Kobalt KMH 1040-03 Brushless Power Head Manual de usuario
- Tipo
- Manual de usuario

SM21438
Questions, problems, missing parts? Before returning to your retailer, call our customer
service department at 1-888-3KOBALT (1-888-356-2258), 8 a.m.- 8 p.m., EST,
Monday - Sunday. You could also contact us at [email protected] or visit
www.lowespartsplus.com.
ATTACH YOUR RECEIPT HERE
Serial Number Purchase Date
ITEM #3809908/3809902/4132849/4665016
BRUSHLESS POWER HEAD
MODEL #KMH 1040-03
Español p. 13
KOBALT and logo design are trademarks or
registered trademarks of LF, LLC. All rights reserved.

2
TABLE OF CONTENTS
Product Specications ......................................................................................2
Packaging Contents ......................................................................................... 3
Safety Information ............................................................................................ 4
Preparation .......................................................................................................7
Assembly Instructions ......................................................................................8
Operating Instructions .................................................................................... 11
Care and Maintenance ...................................................................................12
Troubleshooting.............................................................................................. 12
Warranty ......................................................................................................... 12
PRODUCT SPECIFICATIONS
COMPONENT SPECIFICATIONS
Rated voltage 40V d.c.
Operating temperature 32°F (0°C) - 104°F (40°C)
Storage temperature 32°F (0°C) - 104°F (40°C)

3
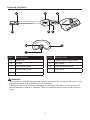
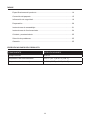
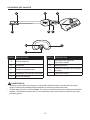
PACKAGE CONTENTS
C
E F
H
B D G
I
A
PART DESCRIPTION PART DESCRIPTION
A Wing knob F Variable-speed trigger switch
B Coupler G Rear handle
C Front-assist handle H Assist-handle lock-lever
D Speed mode switch I Screw knob
E Lock-off button
WARNING:
• Remove the tool from the package and examine it carefully. Do not discard the carton or any
packaging material until all parts have been examined.
• If any part of the tool is missing or damaged, do not attach the battery to use the tool until
the part has been repaired or replaced. Failure to heed this warning could result in serious
injury.

4
SAFETY INFORMATION
Please read and understand this entire manual before attempting to assemble or operate
this product. If you have any questions regarding the product, please call customer service at
1-888-3KOBALT (1-888-356-2258), 8 a.m. - 8 p.m., EST, Monday - Sunday. You could also
contact us at [email protected] or visit www.lowespartsplus.com.
WARNING:
• The operation of any power tool can result in foreign objects being thrown into your eyes,
which can result in severe eye damage. Before beginning power-tool operation, always wear
safety goggles or safety glasses with side shields and a full-face shield, when needed. We
recommend using a wide vision safety mask over eyeglasses or standard safety glasses
with shields. Always use eye protection marked to comply with ANSI Z87.1.
• Some dust created by power sanding, sawing, grinding, drilling, and other construction
activities contains chemicals known to the state of California to cause cancer, birth defects,
or other reproductive harm. Some examples of these chemicals are:
– Lead from lead-based paints
– Crystalline silica from bricks, cement, and other masonry products
– Arsenic and chromium from chemically-treated lumber
• Your risk from these exposures varies, depending upon how often you do this type of work.
To reduce your exposure to these chemicals:
– Work in a well-ventilated area.
– Work with approved safety equipment, such as dust masks that are specially designed to
lter out microscopic particles.
– Avoid prolonged contact with dust from power sanding, sawing, grinding, drilling, and
other construction activities. Wear protective clothing and wash exposed areas with soap
and water. Allowing dust to get into your mouth or eyes or to lie on the skin may promote
absorption of harmful chemicals.
Know the Tool
To operate this tool, carefully read this manual and all labels afxed to the tool before using it.
Keep this manual available for future reference.
Important
This tool should be serviced only by a qualied service technician.
Read All Instructions Thoroughly

5
SAFETY INFORMATION
Some of the following symbols may be used on this tool. Please study them and their meaning.
Proper interpretation of these symbols will allow you to operate the tool better and more safely.
SYMBOL DEFINITION SYMBOL DEFINITION
V Volts n0No-load speed
Direct current RPM Revolutions per Minute
A danger, warning, or caution.
It means ‘Attention! Your
safety is involved.’
To reduce the risk of injury,
user must read instruction
manual.
General Safety Warnings
INSTRUCTIONS PERTAINING TO A RISK OF FIRE, ELECTRIC SHOCK, OR INJURY TO
PERSONS
WARNING!
• When using electric gardening appliances, basic safety precautions should always be
followed to reduce the risk of re, electric shock, and personal injury, including the following:
READ ALL INSTRUCTIONS
DANGER!
• Do not rely on the tool’s insulation against electric shock. To reduce the risk of electrocution,
never operate the tool in the vicinity of any wires or cables which may carry electric current.
CAUTION!
• Wear appropriate personal hearing protection during use. Under some conditions and
durations of use, noise from this product may contribute to hearing loss.
• Avoid Dangerous Environment – Don’t use appliances in damp or wet locations.
• Keep Children Away - All visitors should be kept at a distance away from work area.
• Dress Properly - Do not wear loose clothing or jewelry. They can be caught in moving
parts. Use of rubber gloves and substantial footwear is recommended when working
outdoors. Wear protective hair covering to contain long hair.
• Use Safety Glasses. Always use face or dust mask if operation is dusty.
• Use Right Appliance - Do not use appliance for any job except that for which it is intended.
• Don’t Force Appliance - It will do the job better and with less likelihood of a risk of injury at
the rate for which it was designed.
• Don’t Overreach - Keep proper footing and balance at all times.
• Stay Alert - Watch what you are doing. Use common sense. Do not operate the appliance
when you are tired.
• Store Idle Appliances Indoors - When not in use, appliances should be stored indoors in a
dry and high or locked-up place with the battery pack removed – out of reach of children.
• Maintain Appliance with Care - Keep the appliance clean for best performance and to
reduce the risk of injury. Follow instructions for lubricating and changing accessories. Keep
handles dry, clean, and free from oil and grease.

6
SAFETY INFORMATION
• Check Damaged Parts - Before further use of the appliance, a guard or other part that
is damaged should be carefully checked to determine that it will operate properly and
perform its intended function. Check for alignment of moving parts, binding of moving parts,
breakage of parts, mounting, and any other condition that may affect its operation. A guard
or other part that is damaged should be properly repaired or replaced by an authorized
service center unless indicated elsewhere in this manual.
• Do not charge the battery pack in rain, or in wet locations.
• Disconnect the battery pack from the appliance before making any adjustments,
changing accessories, or storing appliance. Such preventive safety measures reduce
the risk of starting the appliance accidentally.
• Recharge only with the charger specied by the manufacturer. A charger that is suitable
for one type of battery pack may create a risk of re when used with another battery pack.
• Use appliances only with specically designated battery packs. Use of any other
battery packs may create a risk of injury and re.
BATTERY PACK CHARGER
KB 240-03; KB 440-03; KB 640-03; KRC 840-03
• This power head may be used only with the following attachments
ATTACHMENT TYPE MODEL NUMBER
String Trimmer KMS 1040-03
Edger KEG 1040-03
• When battery pack is not in use, keep it away from other metal objects, like paper
clips, coins, keys, nails, screws or other small metal objects, that can make a
connection from one terminal to another. Shorting the battery terminals together may
cause burns or a re.
• Under abusive conditions, liquid may be ejected from the battery; avoid contact. If
contact accidentally occurs, ush with water. If liquid contacts eyes, additionally seek
medical help. Liquid ejected from the battery may cause irritation or burns.
• Do not use a battery pack or appliance that is damaged or modied. Damaged or
modied batteries may exhibit unpredictable behavior resulting in re, explosion or risk of
injury.
• Do not expose a battery pack or tool to re or excessive temperature. Exposure to re
or temperature above 265°F (130°C) may cause explosion.
• Follow all charging instructions and do not charge the battery pack or appliance
outside of the temperature range specied in the instructions. Charging improperly or
at temperatures outside of the specied range may damage the battery and increase the
risk of re.
• Have servicing performed by a qualied repair person using only identical
replacement parts. This will ensure that the safety of the product is maintained.
• Do not modify or attempt to repair the appliance or the battery pack (as applicable)
except as indicated in the instructions for use and care.
• Do not dispose of the battery in a re. The cells may explode. Check with local codes for
possible special disposal instructions.
• Do not open or mutilate the battery. Released electrolyte is corrosive and may cause
damage to the eyes or skin. It may be toxic if swallowed.
• Exercise care in handling batteries in order not to short the battery with conducting
materials such as rings, bracelets, and keys. The battery or conductor may overheat and
cause burns.

7
SAFETY INFORMATION
• When servicing, use only identical replacement parts.
• Use of any other accessory or attachment may increase the risk of injury.
• Battery tools do not have to be plugged into an electrical outlet; therefore, they are
always in operating condition. Be aware of possible hazards even when the tool is not
operating. Take care when performing maintenance or service.
• Do not incinerate the appliance even if it is severely damaged. The batteries can
explode in a re.
• Do not wash the appliance with a hose; avoid getting water in motor and electrical
connections.
• If situations occur that are not covered in this manual, use care and good judgment.
Contact the Service Center for assistance.
• Save these instructions. Refer to them frequently and use them to instruct others who
may use this tool. If you lend this tool to someone else, also lend these instructions
to them to prevent misuse of the product and possible injury.
See operator’s manual for your KOBALT KMS 1040-03 for future use.
See operator’s manual for your KOBALT KEG 1040-03 for future use.
SAVE THESE INSTRUCTIONS
PREPARATION
Know Your Power Head
Before attempting to use the power head, familiarize yourself with all of its operating features
and safety requirements.
WARNING:
• Do not allow familiarity with the tool to cause carelessness. Remember that one careless
moment is enough to cause severe injury. Before attempting to use any tool, be sure to
become familiar with all of the operating features and safety instructions.
• Do not attempt to modify this tool or create accessories not recommended for use with this
tool. Any such alteration or modication is misuse and could result in a hazardous condition
leading to possible serious personal injury.

8
ASSEMBLY INSTRUCTIONS
WARNING
• Read and understand entire Operator’s Manual for each optional attachment used with this
power head and follow all warnings and instructions. Failure to follow all instructions could
result in electric shock, re and/or serious personal injury.
• This 40V power head is designed to be used
only with the attachment models that are
specied in this Operator’s Manual. Use of other,
unauthorized attachments could cause serious
personal injuries or property damage.
• Some accessories have specic requirements
related to safety. Always pay special attention to
such instructions in the manual that accompanies
each accessory.
• Never install, remove, or adjust any attachment
while the power head is running or with the
battery installed. Failure to stop the motor and
remove the battery can cause serious personal
injury. NEVER OPERATE THE POWER HEAD
WITHOUT AN ATTACHMENT.
WARNING
• Always remove the battery pack from the
product when you are assembling parts, making
adjustments, cleaning, or when the product is not
in use.
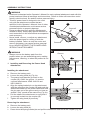
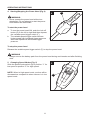
1. Installing and Removing the Power Head
Attachment
Installing the attachment
a. Remove the battery pack.
b. Loosen the wing knob (A) (Fig.1a).
c. The power head has two grooves on the
coupler (B), ONLY the groove 1 is used to
connect attachments: KMS 1040-03 and
KEG 1040-03.
d. Align the spring-loaded pin on the attachment
with the groove on the coupler (B) and push the
attachment shaft into the power head shaft until
the pin pops out of the groove and you hear an
audible “click” sound at the same time (Fig.1b).
e. Pull the shaft of the attachment to verify that it
is securely locked into the coupler (B).
f. Tighten the wing knob (A) securely.
Removing the attachment
a. Remove the battery pack.
b. Loosen the wing knob (A).
c. Press down the spring-loaded pin and pull the attachment shaft out of the coupler (Fig.1c).
B
1b Groove
Pin
1c Pin
1a B
A
Groove1
Groove2

9
ASSEMBLY INSTRUCTIONS
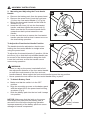
2. Mounting and Adjusting the Front-Assist
Handle
a. Remove the battery pack from the power head.
b. Remove the screw knob (I) and the lock-lever
(H) from the front-assist handle (C) (Fig.2a).
c. Mount the front-assist handle on the shaft as
shown in Fig. 2a.
d. Insert the lock-lever (H) into the front-assist
handle, and then tighten the screw knob (I).
Make sure that the front-assist handle faces
upwards so that it points toward the rear
handle.
e. Lower the lock-lever to secure the front-assist
handle onto the shaft so that it cannot move on
the shaft during operation.
To Adjust the Front-Assist Handle Position
The handle should be adjusted so that the arm
holding the front-assist handle is straight when
using the power head.
To adjust the front-assist handle (C) position, lift the
lock-lever (H) so that the front-assistant handle can
be moved to the desired position along the shaft.
Lower the lock-lever so that the handle cannot
move during operation.
WARNING:
• There is a tag on the power head shaft to limit
the adjustment distance of the front-assist handle
to meet the requirements of the front and rear
handle distance. Never adjust the front-assist handle beyond the tag position.
• Never operate the tool without the front-assist handle rmly in place.
3. To Attach Battery Pack
a. Make sure that the switch is in the OFF
position.
b. Align the mounting grooves on the battery pack
with the raised ribs in the power head housing,
as shown (Fig.3).
c. Slide the battery pack into the tool until it snaps
into position.
NOTICE: Make sure that the latch on the power
head snaps into place and the battery pack is
secured to the tool before beginning operation.
Improper assembly of the battery pack can cause
damage to internal components.
2a H
C
I
2b
3
Battery-release
button

10
ASSEMBLY INSTRUCTIONS
To Remove Battery Pack
a. Make sure that the switch is in the OFF position.
b. Hold the battery pack in the palm of your hand.
c. Press the battery-release button with your thumb. The battery pack will disengage from the
latch.
d. Grasp the battery pack and remove it from the power head.
WARNING:
• Always be aware for the location of your feet, children, or pets when pressing the
battery-release button. NEVER remove the battery pack at a high position. Serious
injury could result if the battery pack falls.
• Battery tools are always in operating condition. Therefore, the ON/OFF switch should always
in OFF position when the tool is not in use or when carrying the tool at your side.

11
OPERATING INSTRUCTIONS
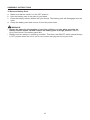
4. Starting/Stopping the Power Head (Fig.4)
WARNING:
• Never operate the power head without an
attachment. Do not attempt to start the power
head without an attachment.
To start the power head
a. To turn the power head ON, push the lock-off
button (E) to the left or right and then depress
the variable-speed trigger switch (F).
b. The variable-speed trigger switch delivers
higher speed with increased trigger pressure
and lower speed with decreased trigger
pressure.
To stop the power head
Release the variable-speed trigger switch (F) to stop the power head.
WARNING
• Always remove the battery pack from the power head during work breaks and after nishing
work.
5. Changing Speed Modes (Fig. 5)
Slide the speed mode switch (D) to position “1” for
low speed or position “2” for high speed.
NOTE: When in high speed mode, runtime will be
decreased as compared to when trimmer is in low
speed mode.
4E
F
5
D

12
CARE AND MAINTENANCE
All maintenance should only be carried out by a qualied service technician.
Cleaning
Before cleaning or performing any maintenance, remove the battery pack. For safe and
proper operation, always keep the tool and its ventilation slots clean.
When work has been completed, clean the tool to allow smooth functioning of the tool over
time.
Always use only a soft, dry cloth to clean your tool; never use detergent or alcohol.
Always wear safety goggles when cleaning tools with compressed air.
TROUBLESHOOTING
WARNING:
• Place the trigger switch (F) in the OFF position and remove the battery pack before
performing troubleshooting procedures.
PROBLEM POSSIBLE CAUSE CORRECTIVE ACTION
Tool does not work.
Low battery pack capacity. Charge the battery pack.
The battery pack is not
inserted properly.
Install the battery pack into the tool
correctly.
Motor overheating Cooling vents are obstructed.
Clean and clear the cooling vents.
Do not cover vents with your hand
during operation
WARRANTY
For 5 years from the date of purchase, the power tool is warranted for the original purchaser
to be free from defects in material and workmanship. This guarantee does not cover damage
due to abuse, normal wear, improper maintenance, neglect, unauthorized repair/alteration, or
expendable parts and accessories expected to become unusable after a reasonable period of
use.
If you think your product meets the above guarantee criteria, please return it to the place of
purchase with valid proof of purchase and the defective product will be repaired or replaced at
no charge. This guarantee gives you specic legal rights, and you may also have other rights
that vary from state to state.
Lowe’s Home Centers LLC.
Mooresville, NC 28117
Printed in China

13
¿Preguntas, problemas, piezas faltantes? Antes de volver a la tienda, llame a nuestro
Departamento de Servicio al Cliente al 1-888-3KOBALT (1-888-356-2258), de lunes a
domingo de 8 a.m. a 8 p.m., hora estándar del Este. También puede ponerse en contacto
con nosotros a través de [email protected] o visitar www.lowespartsplus.com.
ADJUNTE SU RECIBO AQUÍ
Número de serie Fecha de compra
ARTÍCULO #3809908/3809902/4132849/4665016
CABEZAL DE POTENCIA
SIN ESCOBILLAS
MODELO #KMH 1040-03
KOBALT y el diseño del logotipo son marcas
comerciales o marcas registradas de LF, LLC.
Todos los derechos reservados.

14
ÍNDICE
Especicaciones del producto ........................................................................14
Contenido del paquete ................................................................................... 15
Información de seguridad ...............................................................................16
Preparación ....................................................................................................20
Instrucciones de ensamblaje ..........................................................................21
Instrucciones de funcionamiento ....................................................................24
Cuidado y mantenimiento ..............................................................................25
Solución de problemas ...................................................................................25
Garantía .........................................................................................................25
ESPECIFICACIONES DEL PRODUCTO
COMPONENTE ESPECIFICACIONES
Voltaje nominal 40 V CC
Temperatura de funcionamiento De 0° C (32 °F) a 40 °C (104 °F)
Temperatura de almacenaje De 0° C (32 °F) a 40 °C (104 °F)

15
CONTENIDO DEL PAQUETE
C
E F
H
B D G
I
A
PIEZA DESCRIPCIÓN PIEZA DESCRIPCIÓN
A Perilla mariposa F Interruptor tipo gatillo de
velocidad variable
B Acoplador G Manija posterior
C Manija de ayuda frontal H Palanca de bloqueo de la manija
de apoyo
D Interruptor de modo de velocidad I Perilla con tornillo
E Botón de bloqueo
ADVERTENCIA:
• Retire la herramienta del paquete y examínela cuidadosamente. No deseche la caja ni
ningún material de embalaje hasta después de examinar todas las piezas.
• Si falta alguna pieza o si está dañada, no coloque la batería para usar la herramienta hasta
reparar o reemplazar dicha pieza. El incumplimiento de esta advertencia podría provocar
lesiones graves.

16
INFORMACIÓN DE SEGURIDAD
Lea y comprenda completamente este manual antes de intentar ensamblar u operar este
producto. Si tiene preguntas relacionadas con el producto, llame al Departamento de Servicio
al Cliente al 1-888-3KOBALT (1-888-356-2258), de lunes a domingo de 8 a.m. a 8:00 p.m.,
hora estándar del Este. También puede ponerse en contacto con nosotros a través de
[email protected] o visitar www.lowespartsplus.com.
ADVERTENCIA:
• Operar cualquier herramienta eléctrica puede provocar que objetos extraños salten a sus
ojos y que, consecuentemente, le causen graves daños oculares. Use siempre lentes o
gafas de seguridad con protecciones laterales y, cuando sea necesario, una mascarilla que
cubra todo el rostro antes de comenzar a operar una herramienta eléctrica. Recomendamos
usar una máscara de seguridad de visión amplia sobre los lentes o gafas de seguridad
con protecciones estándar. Siempre use lentes de protección que cumplan con la norma
ANSI Z87.1.
• Parte del polvo producido por el lijado, el serruchado, la trituración y el taladrado eléctrico
y otras actividades de construcción contiene productos químicos reconocidos por el estado
de California como causantes de cáncer, defectos congénitos u otros daños en el aparato
reproductivo. Algunos ejemplos de estos productos químicos son los siguientes:
– Plomo de pinturas a base de plomo
– Sílice cristalina de ladrillos, cemento y otros productos de mampostería
– Arsénico y cromo de madera tratada con químicos
• El riesgo que corre debido a la exposición varía según la frecuencia con la que realiza este
tipo de trabajo. Para reducir la exposición a estos productos químicos:
– Trabaje en un área bien ventilada.
– Trabaje con equipo de seguridad aprobado, como las mascarillas antipolvo
especialmente diseñadas para ltrar partículas microscópicas.
– Evite estar en contacto prolongado con el polvo provocado por el lijado, el serruchado,
la trituración, el taladrado y otras actividades de construcción. Use ropa protectora y lave
todas las áreas expuestas del cuerpo con agua y jabón. Si el polvo ingresa a la boca o a
los ojos, o si cae sobre la piel, es posible que se absorban productos químicos dañinos.
Conozca la herramienta
Para operar esta herramienta, lea cuidadosamente este manual y todas las etiquetas jadas a
la herramienta antes de usarla. Guarde este manual para referencia futura.
Importante
Solo un técnico calicado puede reparar esta herramienta.
Lea por completo todas las instrucciones

17
INFORMACIÓN DE SEGURIDAD
Algunos de los siguientes símbolos pueden aplicarse al uso de esta herramienta. Obsérvelos
y aprenda su signicado. La interpretación correcta de estos símbolos le permitirá utilizar la
herramienta de manera ecaz y segura.
SÍMBOLO DEFINICIÓN SÍMBOLO DEFINICIÓN
V Voltios n0Velocidad sin carga
Corriente directa RPM Revoluciones por minuto
Peligro, advertencia o
precaución. Signica
"¡Atención! Su seguridad está
comprometida".
Para reducir el riesgo de
lesiones, el usuario debe leer
el manual de instrucciones.
Advertencias generales de seguridad
INSTRUCCIONES CON RELACIÓN A RIESGOS DE INCENDIO, DESCARGA ELÉCTRICA O
LESIONES EN LAS PERSONAS
¡ADVERTENCIA!
• Cuando utilice electrodomésticos de jardinería, siempre tome las medidas de seguridad
básicas para evitar incendios, descargas eléctricas y lesiones personales, incluidas:
LEA TODAS LAS INSTRUCCIONES
¡PELIGRO!
• No confíe exclusivamente en el aislamiento de la herramienta contra las descargas
eléctricas. Para reducir el riesgo de descarga eléctrica, no utilice la herramienta cerca de
conductores o cables que puedan transportar corriente eléctrica.
¡PRECAUCIÓN!
• Use auriculares de seguridad adecuados mientras utiliza el producto. El ruido que genera
este producto puede contribuir a la pérdida de la audición en algunas condiciones y
períodos de uso.
• Evite los entornos peligrosos: no utilice los electrodomésticos en lugares húmedos.
• Mantenga a los niños alejados: todas las visitas deben mantenerse lejos del área de
trabajo.
• Use ropa adecuada: no use ropa holgada ni joyas. Pueden quedar atrapadas en las piezas
móviles. Se recomienda utilizar guantes de goma y un calzado adecuado si trabaja en el
exterior. Use una malla protectora para contener el cabello largo.
• Use gafas de seguridad. También use siempre una mascarilla antipolvo si se desprende
demasiado polvo.
• Use el electrodoméstico correcto: no use el electrodoméstico en tareas diferentes de
aquellas para las que se lo diseñó.
• No fuerce el electrodoméstico: la unidad hará mejor el trabajo y con menos probabilidad
de riesgos de lesiones si funciona al ritmo para el que se la diseñó.

18
INFORMACIÓN DE SEGURIDAD
• No se extienda demasiado: mantenga una posición y un equilibrio adecuados en todo
momento.
• Manténgase alerta: observe lo que está haciendo. Use el sentido común. No use el
electrodoméstico si está cansado.
• Almacene los electrodomésticos en un lugar cerrado: cuando no estén en uso y luego
de extraer el paquete de baterías, debe almacenar los electrodomésticos en un espacio
interior, seco y cerrado o en altura, fuera del alcance de los niños.
• Mantenga el electrodoméstico en buenas condiciones: mantenga el electrodoméstico
limpio para lograr un mejor rendimiento y reducir el riesgo de lesiones. Siga las
instrucciones para lubricar y reemplazar los accesorios. Mantenga las manijas secas,
limpias y sin aceite ni grasa.
• Verique que no haya piezas dañadas: antes de seguir utilizando el electrodoméstico,
debe vericar detenidamente que los protectores, o cualquier otra pieza dañada, funcionen
de manera correcta y realicen la función deseada. Verique la alineación y el trabamiento
de las piezas móviles, la ruptura de las piezas, la instalación y cualquier otro tipo de
condición que pueda afectar el funcionamiento. Si una cubierta o cualquier otra pieza
están dañadas, deben repararse o reemplazarse de inmediato en un centro de servicio
autorizado, a menos que se indique otro lugar en este manual.
• No cargue el paquete de baterías en una ubicación húmeda o mojada.
• Desconecte el paquete de baterías del electrodoméstico antes de realizarle cualquier
ajuste, cambiar accesorios o almacenarlo. Este tipo de medidas de seguridad
preventivas reduce el riesgo de arranques accidentales del electrodoméstico.
• Use el soplador a batería solo con el paquete de baterías especícamente designado.
El uso de cualquier otra batería puede crear un riesgo de incendio.
• Use solamente los paquetes de baterías y los cargadores que se indican a
continuación.
PAQUETE DE BATERÍAS CARGADOR
KB 240-03; KB 440-03; KB 640-03; KRC 840-03
• Este cabezal de potencia se puede utilizar solo con los siguientes accesorios:
TIPO DE SUJECIÓN NÚMERO DEL MODELO
Orilladora KMS 1040-03
Bordeadora KEG 1040-03
• Cuando no utilice el paquete de baterías, manténgalo lejos de otros objetos
metálicos, como sujetapapeles, monedas, llaves, clavos, tornillos u otros objetos
pequeños que pudieran crear una conexión entre los terminales. Si los terminales de la
batería se conectan entre sí, puede que se produzcan quemaduras o un incendio.
• En condiciones de maltrato, es posible que salga líquido de la batería; evite el
contacto. Si se produce un contacto accidental, enjuáguese con agua. Si el líquido
entra en contacto con los ojos, solicite atención médica. El líquido que sale de la
batería puede provocar irritación o quemaduras.
• No utilice un paquete de baterías o una herramienta que presente daños o
modicaciones. Las baterías dañadas o modicadas podrían provocar consecuencias
impredecibles, como incendios, explosiones o riesgo de lesiones.
• No exponga el paquete de baterías ni la herramienta al fuego o a una temperature
excesiva. La exposición al fuego o a las temperaturas por encima de los 130 °C puede
causar una explosión.

19
INFORMACIÓN DE SEGURIDAD
• Siga todas las instrucciones de carga y no cargue el paquete de baterías ni las
herramientas fuera del rango de temperatura especicado en las instrucciones.
Realizar una carga inadecuada o a temperaturas fuera del rango especicado podría dañar
la batería y aumentar el riesgo de incendio.
• Pida solo a personas capacitadas que reparen el electrodoméstico y que usen
exclusivamente piezas de repuesto idénticas. De esta forma se asegurará de que se
mantenga la seguridad de la herramienta eléctrica.
• No modique ni intente reparar el electrodoméstico o el paquete de baterías, except
como se indica en las instrucciones de uso y cuidado.
• No incinere la batería. Las celdas pueden explotar. Revise los códigos locales para
obtener las instrucciones de eliminación especiales posibles.
• No abra ni mutile la batería. Los electrolitos liberados son corrosivos y pueden causar
daños en los ojos o la piel. Puede ser tóxico si se ingiere.
• Tenga cuidado al manipular las baterías para que la batería no haga cortocircuito con
materiales conductores como anillos, pulseras o llaves. Es posible que la batería o el
conductor se sobrecalienten y produzcan quemaduras.
• Al realizar mantenimiento, utilice solo piezas de repuesto idénticas.
• El uso de cualquier otro accesorio o aditamento incrementará el riesgo de lesiones.
• Las herramientas con batería no se deben enchufar en un tomacorriente; por
lo tanto, siempre están en condiciones de funcionamiento. Tenga en cuenta los
posibles peligros incluso cuando no use la herramienta. Tenga cuidado al realizar la
reparación o el mantenimiento.
• No incinere el electrodoméstico incluso si está gravemente dañado. Las baterías
pueden explotar si se incineran.
• No lave el electrodoméstico con una manguera: evite que ingrese agua al motor y a
las conexiones eléctricas.
• Si se presenta alguna situación que no aparece en este manual, tenga cuidado y
aplique su mejor criterio. Comuníquese con el Departamento de Servicio al Cliente
para obtener ayuda.
• Guarde estas instrucciones. Consúltelas periódicamente y utilícelas para capacitar
a otras personas que puedan utilizar esta herramienta. Si presta la herramienta
a alguien más, préstele también estas instrucciones para prevenir el mal uso del
producto y posibles lesiones.
Consulte el manual del operador del cabezal de potencia KOBALT KMS 1040-03 para
referencia futura.
Consulte el manual del operador del cabezal de potencia KOBALT KEG 1040-03 para
referencia futura.
GUARDE ESTAS INSTRUCCIONES

20
PREPARACIÓN
Conozca su cabezal de potencia
Antes de intentar usar la cabezal de potencia, familiarícese con todas las características de
funcionamiento y los requisitos de seguridad.
ADVERTENCIA:
• Sea cuidadoso, incluso si está familiarizado con la herramienta. Recuerde que un momento
de descuido es suciente para causar lesiones graves. Antes de intentar utilizar cualquier
herramienta, asegúrese de familiarizarse con todas las características de funcionamiento e
instrucciones de seguridad.
• No intente modicar esta herramienta ni crear accesorios que no sean los recomendados
para esta. Cualquier alteración o modicación se considera un uso inadecuado y podría
causar una condición peligrosa que produzca lesiones personales graves.

21
INSTRUCCIONES DE ENSAMBLAJE
ADVERTENCIA
• Lea y comprenda todo el Manual del operador
de cada accesorio opcional utilizado con
este cabezal de potencia y siga todas las
advertencias e instrucciones. No seguir todas
las instrucciones podría resultar en descargas
eléctricas, incendio y/o lesiones personales
graves.
• Este cabezal de potencia de 40 V está diseñado
para usarse solo con los modelos de accesorios
que se especican en este Manual del operador.
El uso de otros accesorios no autorizados podría
causar lesiones personales graves o daños
materiales.
• Algunos accesorios tienen requisitos especícos
relacionados con la seguridad. Siempre preste
especial atención a estas instrucciones en el manual que viene con cada accesorio.
• Nunca instale, quite ni ajuste ningún accesorio si el cabezal de potencia está funcionando
o con la batería instalada. No detener el motor ni retirar la batería puede causar lesiones
personales graves. NUNCA OPERE EL CABEZAL DE POTENCIA SIN UN ACCESORIO.
ADVERTENCIA
Siempre retire el paquete de baterías del producto
cuando no esté en uso o cuando esté ensamblando
las piezas, realizando ajustes o limpiándolo.
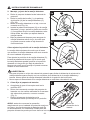
1. Instalación y extracción del accesorio del
cabezal de potencia
Instalación del accesorio
a. Retire el paquete de baterías.
b. Aoje la perilla de mariposa (A) (Fig. 1a).
c. El cabezal de potencia tiene dos ranuras en el
acoplador (B), SOLO se utiliza la ranura 1 para
conectar accesorios: KMS 1040-03 y
KEG 1040-03.
d. Alinee el pasador activado por resorte en el
accesorio con la ranura del acoplador (B)
y empuje el eje del accesorio en el eje del
cabezal de potencia hasta que el pasador
salga de la ranura y escuche un sonido de
“clic” al mismo tiempo (Fig. 1b).
e. Jale el vástago en el accesorio para vericar
que esté rmemente asegurado en el
acoplador (B).
f. Ajuste rmemente la perilla mariposa (A).
Extracción del accesorio
a. Retire el paquete de baterías.
b. Aoje la perilla mariposa (A).
c. Presione hacia abajo el pasador activado por
resorte y extraiga el eje del accesorio del acoplador (Fig. 1c).
B
1b Ranura
Pasador
1c Pasador
1a B
A
Ranura1
Ranura2

22
INSTRUCCIONES DE ENSAMBLAJE
2. Montaje y ajuste de la manija delantera
a. Retire el paquete de baterías del cabezal de
potencia.
b. Retire la perilla del tornillo (I) y la palanca
de bloqueo (H) de la manija delantera (C)
(Fig. 2a).
c. Monte la manija delantera en el eje, como se
muestra en la Fig. 2a.
d. Inserte la palanca de bloqueo (H) en la manija
delantera y, luego, apriete la perilla con tornillo
(I). Asegúrese de que la manija delantera mire
hacia arriba, de modo que apunte hacia la
manija trasera.
e. Baje la palanca de bloqueo para asegurar la
manija delantera sobre el eje, de modo que
no pueda moverse sobre el eje durante el
funcionamiento.
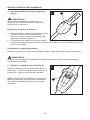
Cómo ajustar la posición de la manija delantera
La manija debe ajustarse de modo que el brazo
que sostiene la manija delantera esté recto cuando
se usa el cabezal de potencia.
Para ajustar la posición de la manija delantera (C),
levante la palanca de bloqueo (H) de modo que
la manija delantera pueda moverse a la posición
deseada a lo largo del eje. Baje la palanca de
bloqueo de modo que la manija no pueda moverse
durante el funcionamiento.
ADVERTENCIA:
• Hay una etiqueta en el eje del cabezal de potencia para limitar la distancia de ajuste de la
manija delantera para cumplir con los requisitos de la distancia de la manija delantera y
trasera. Nunca ajuste la manija delantera más allá de la posición de la etiqueta.
• Nunca opere la herramienta si la manija delantera no está bien colocada en su lugar.
3. Cómo jar el paquete de baterías
a. Asegúrese de que el interruptor esté en la
posición OFF.
b. Alinee las ranuras de montaje del paquete de
baterías con las varillas elevadas de la carcasa
del cabezal de potencia, como se muestra
(Fig. 3).
c. Deslice el paquete de baterías en la
herramienta hasta que encaje en su posición.
AVISO: antes de comenzar la operación,
asegúrese de que el cabezal de potencia encaje en
su lugar y de que el paquete de baterías esté jo
en la herramienta. El ensamblaje inadecuado del
paquete de baterías puede provocar daños a los componentes internos.
2a H
C
I
2b
3
Botón de
liberación de la
batería

23
INSTRUCCIONES DE ENSAMBLAJE
Cómo retirar el paquete de baterías
a. Asegúrese de que el interruptor esté en la posición OFF.
b. Sostenga el paquete de baterías en la palma de la mano.
c. Presione el botón de liberación de la batería con el pulgar. El paquete de baterías se
desenganchará del seguro.
d. Sujete el paquete de baterías y retírelo del cabezal de potencia.
ADVERTENCIA:
• Fíjese siempre en la ubicación de los pies, de los niños o de las mascotas cuando
presione el botón de liberación de la batería. NUNCA retire el paquete de baterías
cuando esté en un lugar alto. Si el paquete de baterías se cae, podría provocar lesiones
graves.
• Las herramientas a batería siempre están en condiciones de funcionamiento. Por lo
tanto, el interruptor ON/OFF (ENCENDIDO/APAGADO) debe estar siempre en la posición
OFF (APAGADO) cuando la herramienta no se encuentre en uso o cuando transporte la
herramienta junto a usted.

24
INSTRUCCIONES DE FUNCIONAMIENTO
4. Arranque/parada del cabezal de potencia
(Fig. 4)
ADVERTENCIA:
Nunca opere el cabezal de potencia sin un
accesorio. No intente encender el cabezal de
potencia sin un accesorio.
Para iniciar el cabezal de potencia
a. Para encender el cabezal de potencia, presione
el botón de bloqueo (E) a la izquierda o
derecha y, luego, presione el interruptor tipo
gatillo de velocidad variable (F).
b. El interruptor tipo gatillo de velocidad variable
proporciona mayor velocidad con mayor presión en el gatillo y menor velocidad con menor
presión en el gatillo.
Para detener el cabezal de potencia
Suelte el interruptor tipo gatillo de velocidad variable (F) para detener el cabezal de potencia.
ADVERTENCIA
Siempre retire el paquete de baterías del cabezal de potencia de altura en los descansos y
tras nalizar los trabajos.
5. Cambio de modos de velocidad (Fig. 5)
Deslice el interruptor del modo de velocidad (D) a
la posición “1” para el modo de baja velocidad o a
la posición “2” para el modo de alta velocidad.
NOTA: cuando está en modo de alta velocidad, el
tiempo de ejecución se reducirá en comparación
con cuando la orilladora está en modo de baja
velocidad.
4E
F
5
D

25
CUIDADO Y MANTENIMIENTO
Todo el mantenimiento debe estar a cargo solo de un técnico de servicio calicado.
Limpieza
Antes de limpiar o realizar cualquier mantenimiento, retire el paquete de baterías. Para
un uso seguro y adecuado, siempre mantenga limpias la herramienta y sus ranuras de
ventilación.
Cuando haya terminado el trabajo, limpie la herramienta para permitir un buen funcionamiento
de la herramienta a lo largo del tiempo.
Siempre use solo un paño suave y seco para limpiar la herramienta; nunca use detergente ni
alcohol.
Siempre use gafas de seguridad al usar herramientas de limpieza con aire comprimido.
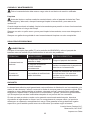
SOLUCIÓN DE PROBLEMAS
ADVERTENCIA:
Coloque el interruptor tipo gatillo (F) en la posición de APAGADO y retire el paquete de
baterías antes de realizar los procedimientos de solución de problemas.
PROBLEMA CAUSA POSIBLE ACCIÓN CORRECTIVA
La herramienta no
funciona.
La capacidad del paquete de
baterías es baja. Cargue el paquete de baterías.
El paquete de baterías
no está insertado
correctamente.
Instale correctamente el paquete de
baterías en la herramienta.
El motor se
sobrecalentó
Las ventilas de enfriamiento
están obstruidas.
Limpie los conductos de ventilación
de enfriamiento. No cubra las
ventilas con la mano durante el
funcionamiento.
GARANTÍA
La herramienta eléctrica está garantizada contra defectos de fabricación en los materiales y la
mano de obra durante 5 años a contar de la fecha de compra para el comprador original. Esta
garantía no cubre daños debidos al maltrato, desgaste normal, mantenimiento inadecuado,
negligencia, reparaciones o alteraciones no autorizadas, o piezas y accesorios prescindibles
que se espera que resulten inutilizables después de un período de uso razonable.
Si cree que este producto cumple con la garantía mencionada anteriormente, devuelva
el producto al lugar donde lo compró con un comprobante de compra válido y el producto
defectuoso se reparará o reemplazará sin cargo. Esta garantía le otorga derechos legales
especícos, pero también podría tener otros derechos que varían según el estado.
Lowe’s Home Centers LLC.
Mooresville, NC 28117
Impreso en China


-
 1
1
-
 2
2
-
 3
3
-
 4
4
-
 5
5
-
 6
6
-
 7
7
-
 8
8
-
 9
9
-
 10
10
-
 11
11
-
 12
12
-
 13
13
-
 14
14
-
 15
15
-
 16
16
-
 17
17
-
 18
18
-
 19
19
-
 20
20
-
 21
21
-
 22
22
-
 23
23
-
 24
24
-
 25
25
-
 26
26
-
 27
27
-
 28
28


Kobalt KMH 1040-03 Brushless Power Head Manual de usuario
- Tipo
- Manual de usuario
en otros idiomas
Artículos relacionados
-
Kobalt KPC 7040-06 Manual de usuario
-
Kobalt SGY-AIR264 Manual de usuario
-
-
-
-
-
-
Kobalt KID 324B-03 Manual de usuario
-
-