
BTX2 PRO S
DUAL CORE INTERCOM SYSTEM
MANUALE D’USO
•
INSTRUCTION GUIDE
•
BEDIENUNGSANLEITUNG
MANUAL DE INSTRUCCIONES
•
GUIDE D’UTILISATION


Sommario
Caratteristiche tecniche Midland BTX2 PRO S ..........................................................................................................................................................................2
Ricarica delle batterie .....................................................................................................................................................................................................................3
Descrizione dispositivo e sistema di fissaggio ................................................................................................................................................................................3
Accensione e spegnimento del Midland BTX2 PRO S ................................................................................................................................................................ 5
Modalità operative ...........................................................................................................................................................................................................................5
Come abbinare un altro dispositivo Midland BTX2 PRO S .........................................................................................................................................................6
Conference ......................................................................................................................................................................................................................................9
Talk 2 All - Abbinamento a dispositivi non Midland ...................................................................................................................................................................10
Compatibilità con i dispositivi BT Midland ...................................................................................................................................................................................11
Abbinare il Midland BTX2 PRO S a dispositivi Bluetooth ......................................................................................................................................................... 11
Utilizzo della funzionalita’ Radio FM ...........................................................................................................................................................................................14
Configurazioni speciali ...................................................................................................................................................................................................................15
Configurazione e aggiornamento firmware ................................................................................................................................................................................. 16
Garanzia .......................................................................................................................................................................................................................................... 16
Certificazioni e Conformità di Sicurezza ..................................................................................................................................................................................... 16

I
2 www.midlandeurope.com
MIDLAND BTX2 PRO S
Dual Core Intercom System
Midland BTX2 PRO S è un sistema intercom con Bluetooth Dual Core (doppio
processore Bluetooth) per comunicazioni Conference e con funzione background
anche in stereo. Estremamente sottile e dal design aerodinamico, BTX2 PRO S è
dotato di molteplici funzioni che si attivano facilmente grazie ai 3 grandi tasti posti
sul frontale del dispositivo. Midland BTX2 PRO S si può fissare al casco in due
modi: tramite basetta adesiva o tramite l’aggancio a morsetto.
Principali caratteristiche:
› Bluetooth Dual Core per background audio anche in stereo
› Intercom Pilota/Passeggero oppure moto a moto fino ad una distanza mas-
sima di 1200 m.
› Conference fino a 8 persone (4 coppie)
› Connessione fino a 6 persone per comunicazioni “one to one”
› MWE Noise Killer
› Funzionalità Universal Intercom per collegare intercom di altre marche
› Radio FM stereo con RDS
› Music share (condivisione musica con passeggero)
› Connessione al telefonino/MP3 player
› Supporto per 2 Telefoni
› Connessione a sistemi di navigazione GPS
› Configurazione ed aggiornamento firmware da PC via USB
Midland BTX2 PRO S è disponibile in due versioni:
› Midland BTX2 PRO S confezione singola con un solo dispositivo
› Midland BTX2 PRO S TWIN confezione doppia con due dispositivi
In base alla versione in vostro possesso nella confezione troverete:
Midland BTX2 PRO S SINGLE
› 1 dispositivo di comunicazione Midland BTX2 PRO S
› 1 kit di montaggio a slitta completo di speaker HI-FI stereo
› 1 microfono a braccetto e 1 microfono a filo
› 1 sistema di fissaggio bi-adesivo
› 1 sistema di fissaggio a morsetto
› 1 kit di ricarica USB-Micro USB
Midland BTX2 PRO S TWIN
› 2 dispositivi di comunicazione Midland BTX2 PRO S
› 2 kit di montaggio a slitta completo di speaker HI-FI stereo
› 2 microfoni a braccetto e 2 microfoni a filo
› 2 sistemi di fissaggio bi-adesivo
› 2 sistemi di fissaggio a morsetto
› 1 kit di ricarica USB-Micro USB con doppio connettore
I dispositivi della confezione TWIN sono già abbinati tra loro sul pulsante “Centrale”
per poter attivare immediatamente la funzione Intercom.
Caratteristiche tecniche Midland BTX2 PRO S
Generali:
› Bluetooth ver. 4.2 stereo (protocollo Headset/Handsfree/A2DP/AVRCP)
› Frequenza 2.4GHz - Max Power 100mW
› Sistema AGC per il controllo automatico del volume in base al rumore di
fondo
› Attivazione della comunicazione intercom vocale (VOX) o manuale
› Comandi manuali per: attivazione telefono, interfono, Radio FM
› Completamente resistente all’acqua
› Batteria al Litio con autonomia fino a 20 ore di conversazione
› Tempo di ricarica: circa 2 ore
Connessioni Bluetooth:
Con un dispositivo dello stesso tipo per comunicazioni intercom Pilota-Pas-
seggero o Moto-Moto fino ad una distanza massima di 1200 m senza ostacoli
o interferenze.
Con dispositivi Bluetooth:
Telefonino con MP3 player Stereo (protocollo A2DP) e GPS

I
www.midlandeurope.com 3
Ricarica delle batterie
Assicuratevi che il dispositivo di comunicazione sia completamente carico pri-
ma di iniziare ad utilizzarlo. La prima volta sono necessarie almeno 3 ore. Suc-
cessivamente il tempo si riduce mediamente a 2 ore per una ricarica completa.
Per ragioni di comodità, il dispositivo può essere rimosso dal casco per essere
ricaricato. Per caricare il dispositivo di comunicazione, sollevate la protezione
in gomma della presa di ricarica e collegate ad essa lo spinotto del caricatore,
quindi innestate la spina CA del caricatore ad una presa di rete elettrica.
Il LED rosso lampeggerà per tutto il tempo della ricarica. Lasciate l’apparec-
chio collegato fino a che il LED rosso si spegne e il LED blu rimane acceso
fisso.
Quando la carica è completa, (LED rosso non più lampeggiante) scollegate il
dispositivo dal caricatore.
Attenzione: Midland BTX2 PRO S è stato progettato per essere resistente alla
pioggia. Verificate sempre che il gommino di protezione della presa di ricarica sia
ben chiuso in caso di pioggia.
Attenzione: ogni volta che viene inserito (o disinserito) il plug di ricarica, il dispo-
sitivo si spegne (per utilizzarlo mentre è in carica è necessario quindi riaccenderlo
con il plug inserito).
Descrizione dispositivo e sistema di fissaggio
Descrizione Midland BTX2 PRO S
Il dispositivo Midland BTX2 PRO S è dotato di 5 pulsanti, tutti nella parte
frontale.
I tre pulsanti principali sono pulsanti multifunzione: pulsante “Avanti” (a sini-
stra), pulsante “Centrale” e pulsante “Indietro” (a destra).
I due pulsanti più piccoli, in alto a destra, sono invece il Volume + ed il volume -.
Presa Ricarica: Permette la ricarica del dispositivo tramite alimentatore mi-
croUSB standard.
Descrizione Kit Audio
Il sistema audio comprende due altoparlanti stereo HI-FI e due microfoni in-
tercambiabili: uno a braccetto e l’altro a filo. Entrambi hanno un mini connet-
tore che vi permette di scegliere il microfono che più si adatta al vostro tipo
di casco.
LED
Centrale
Volume - Volume +
Avanti Indietro
Presa ricarica

I
4 www.midlandeurope.com
Altoparlanti stereo
I due altoparlanti stereo hanno una fascia adesiva/velcro che facilita il loro fis-
saggio all’interno del casco. Raccomandiamo di non tenere il volume troppo
alto, in quanto è importante mantenere l’attenzione in mezzo al traco e du-
rante i vostri spostamenti in moto.
Microfono
Il microfono può essere fissato al casco in due modi, in base alla tipologia di
microfono scelta.
Microfono a braccetto
Posizionate il braccetto del microfono con il velcro/ adesivo tra l’imbottitura e
la parte rigida del casco, in modo che il microfono e il simbolo bianco sul mi-
crofono siano posizionati correttamente di fronte alla bocca. Questa soluzione
è adatta per caschi modulari. Per i caschi aperti (Jet) è disponibile anche un
microfono specifico opzionale (cod. C1253).
Microfono a filo
Posizionate il microfono, grazie al velcro/adesivo, all’interno del casco di fronte
alla bocca. Questo tipo di microfono è l’ideale per i caschi integrali.
Descrizione sistema di fissaggio al casco
Il Midland BTX2 PRO S è fornito con due sistemi di fissaggio al casco, uno
tramite base con biadesivo e l’altro con aggancio a morsetto.
Il dispositivo, grazie al sistema di contatti a slitta, può essere sganciato dal si-
stema di fissaggio scelto ogni volta che si rende necessaria la ricarica o per
custodirlo altrove
Fissaggio con bi-adesivo
Il sistema di fissaggio con bi-adesivo è già montato sulla base con contatti a
slitta. Assicuratevi che la parte del casco dove andrà fissata la base bi adesiva
sia pulita. Piegate le due alette fino ad ottenere la stessa curvatura del casco.
Rimuovete la pellicola dal biadesivo e fissate la base sulla parte sinistra del ca-
sco esercitando una leggera pressione per alcuni secondi.
Fissaggio con morsetto
1. Rimuovere la basetta bi-adesiva dalla slitta utilizzando la chiave presente
nella confezione. Ricordatevi di conservare le due viti.
2. Tramite le due viti in dotazione avvitate la base a morsetto alla slitta.
Microfono a braccetto Microfono a filo
Biadesivo

I
www.midlandeurope.com 5
3. Quando avete trovato il punto esatto dove fissare l’interfono, stringete
maggiormente le due viti per fissare la slitta al morsetto nella parte sinistra
del casco.
Se necessario utilizzate anche la basetta gommata per una maggiore te-
nuta del fissaggio a morsetto.
Grazie alle due viti più corte fissate la basetta
gommata alla slitta e avvitate poi la la base a morsetto.
Inserimento e sgancio del Midland BTX2 PRO S
Il BTX2 PRO S si inserisce facilmente al casco facendolo scorrere verso il bas-
so sull’apposita slitta del kit di fissaggio. Il dispositivo viene mantenuto in sede
grazie alla clip di fissaggio nella parte superiore della slitta (A).
Per rimuoverlo, basta semplicemente premere la clip di fissaggio e spingere il
BTX2 PRO S verso l’alto.
Accensione e spegnimento del Midland BTX2 PRO S
Accensione:
› Tenete premuto il pulsante “Centrale” per circa 3 secondi, fino all’accensio-
ne della luce BLU lampeggiante.
Spegnimento:
› Tenete premuti i pulsanti “Centrale” e “Indietro” insieme per circa 3 secondi,
fino a che la luce ROSSA emette 3 lampeggi. In questo modo non è pos-
sibile spegnere il dispositivo in modo involontario durante l’uso (cosa che
potrebbe succedere, specialmente se si utilizzano i guanti).
Modalità operative
Midland BTX2 PRO S ha tre modalità di funzionamento distinte: Intercom,
Telefono e Radio FM.
In base alla modalità attiva in un dato momento, le funzioni del Midland BTX2
PRO S cambiano e di conseguenza anche i tre pulsanti centrali assumono fun-
zionalità diverse.
› La modalità “Intercom” permette la gestione della funzionalità intercom per
la comunicazione pilota/passeggero o moto a moto. I tre pulsanti permet-
tono di aprire e chiudere la connessione verso gli altri dispositivi collegati .
› La modalità “Telefono” (Phone), permette la gestione del telefono e le fun-
zioni di player musicale del telefono stesso. I tre pulsanti gestiscono le fun-
zionalità del telefono e della musica (play/pausa- avanti e indietro).
A
SgancioAggancio
Base gommata

I
6 www.midlandeurope.com
› La modalità “Radio FM” (FM radio) permette l’ascolto della radio; i tre pul-
santi gestiscono la ricerca e la memorizzazione delle stazioni preferite (6
memorie disponibili)
E’ possibile passare da una modalità all’altra semplicemente premendo per 3
secondi il pulsante “Centrale”. Un annuncio vocale vi indicherà in quale mo-
dalità state entrando.
La sequenza con cui è possibile scorrere le 3 modalità è la seguente:
› Intercom (se è stata abbinata almeno ad un altro dispositivo)
› FM Radio
› Phone (se è stato abbinato un telefono)
Per esempio se siete nella modalità “Intercom” potete utilizzare i tre pulsanti
per aprire e chiudere la comunicazione verso gli altri dispositivi. Se passate,
premendo il pulsante “Centrale”, alla modalità “FM Radio” potete ascoltare la
radio ed i tre pulsanti serviranno per cambiare stazione e memorizzare quelle
preferite.
E’ possibile sapere in quale modalità si trova il dispositivo semplicemente
premendo brevemente insieme i pulsanti “Volume+” e “Volume -” . Un
annuncio vocale vi indicherà in quale modalità vi trovate.
Distanza massima
La modalità intercom è attiva fino ad una distanza massima di 1200 m in con-
dizioni ottimali: questo significa che i piloti devono sempre essere a vista, senza
ostacoli o interferenze.
Come abbinare un altro dispositivo Midland BTX2 PRO S
Per utilizzare la funzionalità Intercom è necessario avere due dispositivi Mi-
dland BTX2 PRO S accesi ed in precedenza abbinati tra loro.
I due dispositivi presenti nella stessa confezione (Midland BTX2 PRO S TWIN)
sono già accoppiati tra loro e pronti all’uso, quindi non è necessario attivare
questa procedura di abbinamento. Se invece i dispositivi non fanno parte del-
la stessa confezione o avete acquistato un altro Midland BTX2 PRO S in un
secondo momento (per esempio per il passeggero), dovete prima eseguire la
procedura di abbinamento.
Abbinamento di un altro dispositivo Midland BTX2 PRO S
1. Attivate la modalità “Setup” su entrambi i dispositivi (Spegnete il Midland
BTX2 PRO S Tenere premuto il pulsante “Centrale” fino a che la luce non
rimane di colore rosso fisso).
2. Tenere premuto il pulsante “Centrale” per 3 sec. sul primo dispositivo, fino a
che la luce lampeggia alternativamente Rossa e Blu.
3. Tenere premuto il pulsante “Centrale” sull’altro dispositivo fino a che la luce
Rossa e Blu lampeggia alternativamente.
4. Ora i due dispositivi si cercano per completare l’abbinamento. Se l’abbina-
mento è avvenuto in modo corretto, su entrambi si accende, per un secon-
do, la luce Blu, per poi tornare in modalità “Setup” con la luce Rossa fissa.
Per utilizzare i due dispositivi è necessario uscire dalla modalità di abbinamento
(setup).
Di seguito un esempio delle principali funzioni dei pulsanti nelle tre modalità:
Modalità Pulsante Avanti (sinistro) Pulsante Centrale Pulsante Indietro (destro)
Intercom Apre/chiude l’intercom al primo
dispositivo collegato
Apre/chiude l’intercom al secondo
dispositivo collegato
Apre/chiude l’intercom al terzo
dispositivo collegato
Phone (telefono) Richiama l’ultimo numero, accetta o
rifiuta la chiamata se abbinato al “Vol+”
Ripeti l’ultimo numero/accetta o rifiuta la
chiamata in entrata sul tasto “Vol-”.
Phone (con musica attiva) Canzone avanti Play/Pausa Canzone indietro
FM Radio Ricerca avanti FM Radio On/o Ricerca indietro

I
www.midlandeurope.com 7
› Fare un doppio click sul pulsante “Centrale” . La luce Rossa si spegne e
al suo posto lampeggia la luce Blu. Ora potete utilizzare il Midland BTX2
PRO S.
Se per qualsiasi ragione si vuole interrompere la ricerca (luce lampeggiante
rossa e blu) e tornare alla fase di setup (luce rossa fissa), è suciente fare due
click sul pulsante “Centrale”.
Attenzione: Durante l’abbinamento devono essere accesi solo i due dispositivi in-
teressati. Spegnete tutti gli altri dispositivi Bluetooth.
Utilizzo della funzionalita’ Intercom con due dispositivi
Per utilizzare la funzionalità intercom, assicuratevi che entrambi i dispositivi
siano accesi e precedentemente abbinati tra loro.
Attivazione manuale
Quando siete in modalità Intercom premendo il pulsante “Centrale”, indie-
rentemente da uno dei due dispositivi, la comunicazione dopo alcuni secondi
si attiva e rimarrà attiva fino a che non verrà premuto nuovamente il pulsante
“Centrale”. Sentirete 1 tono audio a conferma dell’attivazione dell’Intercom e 2
toni audio a conferma della disattivazione.
Attivazione vocale (VOX)
La funzionalità VOX permette di aprire la comunicazione Intercom, senza
dover togliere le mani dal manubrio. Potrebbero essere necessari alcuni se-
condi per l’eettiva apertura della comunicazione intercom (un tono audio vi
avvisa dell’apertura). Se nessuno parla, dopo 40 secondi l’intercom viene au-
tomaticamente chiuso. Per riaprire la comunicazione sarà suciente parlare
nuovamente. Quando l’Intercom è aperto tramite VOX è possibile comunque
chiuderlo senza aspettare il tempo predeterminato, semplicemente premendo
il pulsante “Centrale”.
Attenzione: L’attivazione vocale VOX funziona solo con i dispositivi abbinati tra-
mite il tasto “Centrale”. Se i dispositivi sono stati abbinati con il pulsante “Avanti”
o “Indietro”, l’attivazione può avvenire solo manualmente.
Se necessario, è comunque possibile attivare o disattivare la funzione VOX,
premendo per 7 secondi il pulsante “Indietro”. Un annuncio vocale vi avviserà
dell’avvenuta attivazione/disattivazione. Per riattivarlo è necessario ripetere
la stessa procedura.
Regolazione del volume
Midland BTX2 PRO S è dotato della tecnologia AGC che regola automati-
camente il volume di ascolto in base al rumore di fondo. Potete comunque
regolare manualmente il volume agendo sui pulsanti “Volume+” e “Volume -”.
La regolazione del volume è indipendente per ciascuna sorgente audio: Intercom,
musica, telefono e FM Radio.
Attenzione: la regolazione del volume avviene solo nel momento in cui c’è un audio
attivo.
Impostazione della funzione AGC
Per regolare la sensibilità dell’AGC è necessario utilizzare il software per PC
“BT UPDATER” o l’applicazione per smartphone “BT SET-APP”. È possibile
scegliere diverse impostazioni a seconda del tipo di moto che avete (Touring,
naked o sportiva) o se siete il passeggero. La funzione AGC può essere disa-
bilitata premendo contemporaneamente per 3 secondi i tasti “Volume +” e
“Volume –”.
Come abbinare più di due dispositivi ad un Midland BTX2 PRO S
Un Midland BTX2 PRO S può essere abbinato ad un massimo di 5 dispositivi,
per un totale di 6 unità abbinate (3 dispositivi Midland + 2 Talk2All + voi).
Midland BTX2 PRO S dispone di 3 tasti principali (“Avanti”, “Centrale”, In-
dietro). Potete decidere liberamente quale tasto utilizzare per l’abbinamento,
lo stesso tasto sarà poi utilizzato anche per attivare la comunicazione intercom.
L’abbinamento può anche avvenire “incrociato”, come mostrato nell’immagine
qui sotto. Per esempio potete decidere di abbinare il dispositivo di un pilota al
tasto “Avanti”, il dispositivo del passeggero al pulsante “Centrale” e il disposi-
tivo di un altro pilota al tasto Indietro.
In questo modo avrete 3 dispositivi abbinati tra di loro e potrete parlare con
ognuno di loro, uno alla volta, semplicemente premendo il pulsante corrispon-
dente (lo stesso utilizzato per eseguire l’abbinamento).

I
8 www.midlandeurope.com
Ogni volta che aprite la connessione intercom con un vostro interlocutore la
conversazione precedente verrà chiusa.
Quando due persone stanno comunicando non è possibile interrompere la
conversazione da parte degli altri dispositivi.
1. Attivate la modalità “Setup” (Spegnete il Midland BTX2 PRO S, Tenere
premuto il pulsante “Centrale” fino a che la luce non rimane di colore rosso
fisso).
2. Scegliete il pulsante a voi più congeniale (“Avanti”, “Centrale” o “Indietro”)
e tenetelo premuto per 3 secondi, fino a che la luce lampeggia alternativa-
mente Rossa e Blu. Il pulsante scelto sarà anche lo stesso che verrà usato
per aprire/chiudere l’intercom.
3. Fate la stessa procedura descritta al punto 2 , sull’altro dispositivo che in-
tendete abbinare (non è obbligatorio utilizzare lo stesso pulsante su entram-
be le unit).
4. Ora i due dispositivi si cercano per completare l’abbinamento. Se l’abbina-
mento è avvenuto in modo corretto, su entrambi si accende, per un secon-
do, la luce Blu, per poi tornare in modalità abbinamento con la luce Rossa
fissa.
5. Ora potete procedere ad un secondo e poi ad un terzo abbinamento, basta
ripetere il punto n.2, utilizzando però un pulsante dierente.
Per utilizzare i due dispositivi è necessario uscire dalla modalità di abbinamento
(setup):
› Fare un doppio click sul pulsante “Centrale” . La luce Rossa si spegne e
al suo posto lampeggia la luce Blu. Ora potete utilizzare il Midland BTX2
PRO S.
Utilizzo della funzionalita’ Intercom con più di due dispositivi
Per utilizzare la funzionalità intercom, assicuratevi che tutti i dispositivi siano
accesi e precedentemente abbinati tra loro.
Attivazione manuale:
Premete il pulsante relativo alla persona a cui volete collegarvi, la comunica-
zione dopo alcuni secondi si attiva e rimarrà attiva fino a che non viene premu-
to nuovamente il pulsante. Sentirete 1 tono audio a conferma dell’attivazione
dell’Intercom e 2 toni audio a conferma della disattivazione (vedi tabella A).
Attivazione vocale (VOX):
La funzionalità VOX per l’attivazione vocale dell’Intercom può avvenire solo
verso il dispositivo abbinato tramite il tasto “Centrale”.
Suggerimento: La funzionalità VOX può essere molto utile per comunicare con
la persona a cui si pensa di voler parlare più spesso (per esempio il passeggero).
Pilota 2
Passeggero 1
Pilota 1
Pilota 3
A - Attivazione manuale
Modalità Pulsante “Avanti” Pulsante “Centrale” Pulsante “Indietro”
Intercom Corto: Apre/chiude l’intercom verso l’altro
dispositivo accoppiato
Lungo: Apre/chiude l’intercom verso i
dispositivi non Midland
Corto: Apre/chiude l’intercom verso l’altro
dispositivo accoppiato
Lungo: Cambia modalità
Corto: Apre/chiude l’intercom verso l’altro
dispositivo accoppiato
Lungo: Apre/chiude l’intercom verso i
dispositivi non Midland

I
www.midlandeurope.com 9
Utente già occupato in un’altra conversazione
Se tentate di aprire la comunicazione Intercom verso un utente che sta già
parlando con qualcun altro o che è impegnato al telefono, avrete un segnale
di “occupato” (2 toni audio). Aspettate qualche minuto e riprovate, fino a che
non trovate la “linea” libera! La persona che è stata chiamata verrà avvisata che
qualcuno la sta cercando con un messaggio vocale che indica il numero del
pulsante da cui è giunta la richiesta.
In questo modo appena la conversazione sarà terminata, l’utente potrà contat-
tare la persona che lo cercava, semplicemente aprendo l’intercom utilizzando il
pulsante corrispondente all’avviso ricevuto.
Conference
La modalità “Conference” permette la comunicazione contemporanea di 4
persone oppure fino a 8 persone (4 coppie) se si abbina un dispositivo inter-
com anche sul pulsante VOL-.
Il vostro BTX2 PRO S può funzionare sia in modalità classica, con la comu-
nicazione “uno ad uno”, oppure in modalità “conference” dove tutti parlano
contemporaneamente.
La comunicazione in “Conference” può essere molto interessante ma obbliga che
tutti e quattro i dispositivi siano sempre presenti e tutti con l’intercom aperto!
Per prima cosa è necessario che l’abbinamento dei dispositivi sia fatto seguen-
do una sequenza ben specifica, definita a “catena”, poi su ogni dispositivo deve
essere attiva la modalità “Conference”.
Abbinamento
Per poter utilizzare la funzione “Conference” è necessario abbinare i dispositivi
a “catena”, ovvero il pulsante “Indietro” del primo dispositivo deve essere abbi-
nato al pulsante “Avanti” del secondo. Il pulsante “Indietro” del secondo deve
essere abbinato al pulsante “Avanti” del terzo dispositivo e così via, fino ad un
massimo di 4 . Il primo e l’ultimo dispositivo NON devono essere abbinati tra
loro (la catena non va chiusa).
Attivazione della modalità conference
In qualsiasi modalità senza nessun audio attivo, tenete premuti i tasti “Avanti”
e “Centrale” per 3 secondi. L’annuncio vocale “Conference” confermerà che
ora questa funzione è attiva.
Quando il Conference è attivo i dispositivi Bluetooth abbinati al tasto Vol+
sono scollegati, l’abbinamento al tasto CTRL e l’Universal Intercom non sono
disponibili.
Sono possibili solo l’abbinamento ai tasti “Avanti” e “Indietro”, insieme al di-
spositivo abbinato al tasto “Volume -”. Quando la modalità conference è atti-
va, potete sempre spostarvi su “FM radio” per ascoltare la vostra stazione radio
preferita, oppure su “Phone” per controllare il telefono abbinato al pulsante
VOL-.
Attenzione: in modalità “Conference” anche la funzione “Talk2All-Universal In-
tercom”, per parlare con dispositivi non Midland non è disponibile.
Disabilitare la modalità “Conference”
In qualsiasi modalità e senza audio attivo, tenete premuti i tasti “Avanti” e
“Centrale” per 3 secondi. Un annuncio vocale vi informerà che siete di nuovo
in modalità intercom “One to One” e il dispositivo collegato al tasto “Vol+”, al
tasto “Centrale” CTRL e l’abbinamento Universal Intercom saranno di nuovo
disponibili.
1
2
3
1
2
3
1 2 3 4

I
10 www.midlandeurope.com
Modalità “Conference a 4 persone”
Quando la modalità conference è attiva sarà possibile aprire la comunicazione
intercom premendo sia il pulsante “Avanti” che “Indietro”.
Premendo nuovamente, l’intercom viene chiuso.
Entrambi i dispositivi al centro della catena (dispositivo num. 2 e 3) dovranno
avere l’intercom aperto su entrambi i pulsanti (“Avanti” e “Indietro”) per per-
mettere al dispositivo num. 1 e num. 4 di parlare tutti assieme.
Funzione “One Click Talk”
Quando la modalità “Conference” è attiva, premendo il pulsante “Centrale” si
può aprire la comunicazione a tutti e quattro i dispositivi della catena “in un colpo
solo”. Questa funzione può essere molto utile per aprire la conference veloce-
mente quando per esempio c’è qualche pericolo o avviso da comunicare a tutti.
Modalità Conference con un dispositivo Bluetooth sul “Volume -”.
Quando la modalità Conference è attiva, il dispositivo Bluetooth collegato
al tasto “Volume -” è ancora disponibile: ciò significa che potete ascoltare
le indicazioni stradali dal GPS o rispondere alle chiamate telefoniche senza
interrompere la “catena” della connessione Conference. L’audio proveniente
dalla connessione al tasto “Volume -” può essere “Privato” o “Pubblico” (non
condiviso o condiviso con gli altri utenti in Conference).
Di default l’audio sul “Volume -” è Privato.
Sia in modalità “Private” sia “Public”, se ricevete una chiamata telefonica, siete
momentaneamente scollegati dalla connessione Conference ma non le altre
persone che possono continuare la conversazione tra di loro. Non appena la
telefonata è terminata, automaticamente l’audio ritorna alla modalità Confe-
rence.
› Attivazione modalità Audio Pubblico: tenete premuto il tasto “Volume -”
per 3 sec., sentirete l’annuncio vocale “Public”.
› Attivazione modalità Audio Privato: tenete premuto il tasto “Volume -” per
3 sec., sentirete l’annuncio vocale “Private”.
Attenzione: le telefonate in entrata sono sempre in modalità “Private” anche se
siete in modalità “Public”.
Modalità Conference con 8 persone (4 coppie)
Per avere 8 persone in conference è necessario abbinare un dispositivo inter-
com anche sul tasto “Volume -”.
Attenzione: i dispositivi intercom abbinati sul tasto “Volume -”, devono essere
abbinati in modalità “Universal Intercom”.
Assicuratevi anche di aver selezionato la modalità “Public”.
Di default la modalità è “Private”: questo significa che dovete tenere premuto
il pulsante “Volume -” per 3 sec. , e sentirete l’annuncio vocale “Public”, a
conferma che siete passati all’altra modalità. Nel caso in cui voliate tornare in
modalità “Private” premete ancora il pulsante “Volume -” fino a che sentirete
l’annuncio vocale “Private”.
Come abbinare un dispositivo Intercom al tasto “Volume -”:
› Andate in “Setup mode” (modalità Impostazione) e tenete premuto il pul-
sante “Volume -” per tre secondi. I led blu e rosso iniziano a lampeggiare.
› Sull’altro dispositivo invece seguite la procedura per l’abbinamento come
“Universal Intercom”.
Come aprire il Conference per il dispositivo collegato al tasto “Volume -”.
Per aprire il Conference dal BTX2 PRO S al dispositivo collegato al tasto
“Volume -”, premete, in modalità Telefono, il tasto “Indietro”. Per aprire il
Conference dall’altro dispositivo collegato al pulsante “Volume -”, utiilzzate
il tasto per aprire la connessione Universal Intercom. La distanza massima del
dispositivo collegato al tasto “Volume -” è di 10m, per questo la connessione è
disponibile solo per il passeggero.
Talk 2 All - Abbinamento a dispositivi non Midland
Grazie alla funzione “Talk2 All - Universal Intercom” è possibile abbinare al
BTX2 PRO S fino a due dispositivi intercom di un‘altra marca.
Si possono abbinare al massimo 2 dispositivi Intercom non Midland, uno sul
tasto “Avanti” e l’altro sul pulsante “Indietro”.
› Attivate la modalità “Setup” (spegnete il dispositivo, tenete premuto il pul-
sante “Centrale” fino a che la luce non rimane di colore rosso fisso)
› Tenete premuti per 7 secondi i tasti “Avanti” o “Indietro”: i led rosso e blu
inizieranno a lampeggiare rapidamente; continuate a tenerli premuti e lam-

I
www.midlandeurope.com 11
peggeranno lentamente. Ora lo potete rilasciare.
Sull’intercom non Midland, seguite le istruzione per abbinare un telefo-
no, infatti il Midland BTX2 PRO S verrà abbinato al posto del telefono.
Ad abbinamento concluso (la luce rossa/blu smetterà di lampeggiare e il dispo-
sitivo uscirà automaticamente dalla modalità “Setup”).
Attenzione: Durante l’abbinamento devono essere accesi solo i due dispositivi in-
teressati (spegnete tutti gli altri dispositivi Bluetooth).
Per aprire la comunicazione Universal Intercom sul BTX2 PRO S mentre siete
in modalità Intercom, tenete premuto per 3 secondi il tasto “Avanti” o “Indie-
tro” (in base al tasto che avete utilizzato per l’abbinamento).
Sul dispositivo non Midland invece, potete aprire la comunicazione manual-
mente premendo il tasto per la chiamata telefonica (funzione Voice Dial o
Redial). Potrebbe essere necessario premere il tasto di chiamata due volte ,
dipende dal modello del dispositivo non Midland.
Attenzione: in questa configurazione il dispositivo non Midland non potrà utiliz-
zare il telefono (essendo già stato abbinato il BTX2 PRO S al posto del telefono
stesso).
E’ possibile abbinare anche un dispositivo Midland in modalità “Talk2ALL-Uni-
versal Intercom” a patto che uno dei due dispositivi utilizzi la modalità di abbi-
namento ad un telefono (un dispositivo usa la procedura Talk2All e l’altro quella
per abbinare un telefono).
Compatibilità con i dispositivi BT Midland
BTX2 PRO S è compatibile con i dispositivi Midland BT.
Una volta che i due dispositivi sono abbinati, la massima distanza intercom pos-
sibile è stabilita dal dispositivo con minor potenza. Il BTX2 PRO S è compa-
tibile anche con le precedenti serie Midland BT solo se aggiornate il firmware.
Abbinare il Midland BTX2 PRO S a dispositivi Bluetooth
Il Midland BTX2 PRO S può essere abbinato ad altri dispositivi Bluetooth
come telefoni, navigatori GPS o ricetrasmettitori PMR446 con Bluetooth
integrato o esterno (Dongle).
La procedura di abbinamento si esegue utilizzando i tasti “Volume +” o “Vo-
lume –”.
› Abbinamento al tasto “Volume +”: per telefoni con musica stereo A2DP,
navigatori GPS con audio A2DP o dongle esterni mono/stereo A2DP. Tutti
i dispositivi abbinati al tasto “Volume +” hanno la priorità maggiore e quindi
interromperanno tutte le altre comunicazioni (intercom, musica, radio FM).
› Abbinamento al tasto “Volume –”: per telefoni con musica stereo A2DP,
navigatori GPS con audio A2DP o dongle esterni mono/stereo A2DP. Tutti
i dispositivi abbinati al pulsante “Volume -” sono sempre attivi in background
durante la comunicazione intercom.
Quando un dispositivo è abbinato ai pulsanti Vol+ o “Volume -”, la modalità
“Phone” sarà disponibile.
Funzione Background
Tutti i dispositivi abbinati al pulsante “VOL-” avranno sempre l’audio in sot-
tofondo (background) rispetto alla comunicazione intercom. In questo modo
l’intercom non verrà interrotto per esempio dalle indicazioni del GPS o da altra
sorgente audio.
Potete decidere invece se condividere l’audio della connessione del tasto “Vol
–”quando l’Intercom o il Conference sono aperti (abilitando la modalità “Pu-
blic”), oppure se l’audio deve rimanere privato (modalità Private).
Talk2All-Universal Intercom
Dispositivo no Midland
VOL- (sempre in background)
› Telefono (HFP/A2DP Stereo)
› GPS (HFP/A2DP Stereo)
› Dongle (HFP/A2DP Stereo)
VOL+ (priorità alta)
› Telefono (HFP/A2DP Stereo)
› GPS (HFP/A2DP Stereo)
› Dongle (HFP/A2DP Stereo)

I
12 www.midlandeurope.com
Attenzione: di default è attiva la modalità “Private”.
L’audio dal tasto “Volume -” ha sempre una priorità inferiore rispetto all’inter-
com: questo significa che quando l’intercom è aperto l’audio viene ridotto del
50% per permettere una corretta comprensione della comunicazione Inter-
com. É possibile modificare questa configurazione tramite il software per PC
BT Updater.
Telefono cellulare (abbinamento fino a due telefoni)
Il telefono cellulare può essere abbinato sia al pulsante “Volume +” che al pul-
sante “Volume -”.
Quando il telefono è abbinato, la modalità “Phone” sarà disponibile.
La telefonata entrante avrà sempre la priorità più alta e interromperà le altre
comunicazioni attive (Intercom, Radio FM, Musica). Se arriva una seconda
telefonata sull’altro telefono, durante una telefonata già attiva, riceverete una
segnalazione audio di notifica.
ATTENZIONE!
Per garantire il corretto funzionamento con il vostro telefono è consigliato
riporlo il più vicino possibile al dispositivo BTX2 PRO S, quindi sul lato sinistro
del corpo e possibilmente nelle tasche superiori.
Come abbinare un telefonino
1. Attivate sul vostro telefonino la modalità di ricerca dispositivi Bluetooth.
Questa funzione dipende dalla marca e modello del vostro telefono (fate
riferimento al manuale del telefonino).
2. Attivate la modalità “Setup: spegnete il BTX2 PRO S e tenete premuto il
pulsante “Centrale” fino a che la luce non rimane di colore rosso fisso.
3. Premere il pulsante “Volume+” o “Volume -” fino a quando la luce lampeg-
gia Rosso e Blu.
4. Dopo pochi secondi sul telefonino comparirà il nome “Midland BTX2 PRO
S”, selezionatelo e seguite le istruzioni del vostro telefonino per accettare
l’abbinamento. Quando viene richiesto, immettete il codice di abbinamen-
to: 0000 (quattro zeri). Il telefono confermerà se il processo di abbina-
mento è stato completato con successo.
5. Il Midland BTX2 PRO S uscirà dalla modalità setup (luce rossa fissa) e pas-
serà automaticamente allo stato di funzionalità normale (luce blu lampeg-
giante). Ora il telefono è abbinato correttamente.
Come utilizzare il telefonino
Per utilizzare le funzionalità del telefono è necessario essere in modalità “Pho-
ne”. Tenete premuto per 3 secondi il pulsante “Centrale”. Un annuncio vocale
vi indicherà in quale modalità state entrando, quando sentirete “Phone” potre-
te utilizzare i pulsanti del Midland BTX2 PRO S per gestire il vostro telefono
(vedi tabella B).
Rispondere ad una chiamata
Quando sentite il telefonino squillare, potete rispondere utilizzando 2 modalità:
Risposta vocale:
E’ suciente pronunciare una parola qualunque e quindi iniziare a parlare dopo
il primo squillo del telefono.
Risposta manuale:
Premere brevemente il pulsante “Avanti” o “Indietro” ed iniziare a parlare.
Rifiutare una chiamata
Se non intendete rispondere al telefono potete lasciarlo squillare, oppure te-
nere premuto per 3 secondi il pulsante “Avanti” o “Indietro” (sentirete un tono
audio di conferma).
Chiamare l’ultimo numero:
› Telefono collegato al pulsante “Vol+”: tenete premuto per 3 secondi il
pulsante “Avanti”, l’ultimo numero utilizzato verrà richiamato (sentirete un
tono audio di conferma).
› Telefono collegato al pulsante “Vol-”: tenete premuto per 3 secondi il pul-
sante “Indietro”, l’ultimo numero utilizzato verrà richiamato (sentirete un
tono audio di conferma).
Chiamata vocale:
› Telefono collegato al pulsante “Vol+”: premete brevemente il pulsante
“Avanti”, se il vostro telefonino supporta la chiamata vocale, vi verrà chiesto
di pronunciare il nome del contatto che volete chiamare.
› Telefono collegato al pulsante “Vol-”: premete brevemente il pulsante “In-
dietro”, se il vostro telefonino supporta la chiamata vocale, vi verrà chiesto
di pronunciare il nome del contatto che volete chiamare.

I
www.midlandeurope.com 13
Priorità: La telefonata è prioritaria, quindi tutte le altre comunicazioni vengono
temporaneamente interrotte.
Chiudere una telefonata
Ci sono diversi modi per chiudere una telefonata:
› Aspettare che l’altra parte chiuda la telefonata.
› Premere brevemente il pulsante “Avanti” (sentirete un tono audio di con-
ferma).
› Premere il pulsante “Chiuso” sul telefonino.
Speed dial – Selezione rapida di un numero di telefono
Solo per il telefono abbinato sul Vol+, è possibile memorizzare un numero di
telefono per poterlo utilizzare all’occorrenza. Innanzitutto si deve salvare il nu-
mero tramite il software per PC “BT UPDATER” o l’applicazione per smar-
tphone “BT SET-APP”. Poi quando siete in modalità Telefono, premete sem-
plicemente per 7 secondi il tasto “Avanti”.
Utilizzo della funzionalità MP3 player del telefonino
I telefonini abbinati sia sul Vol+ che sul Vol-, possono essere utilizzati anche
come player musicali Stereo. Il dispositivo Midland BTX2 PRO S supporta
completamente i protocolli A2DP e AVRCP, i quali consentono di ascoltare
musica stereo e di comandare le principali funzioni dell’MP3 player. E’ infatti
possibile utilizzare i pulsanti presenti sul Midland BTX2 PRO S per gestire le
seguenti funzioni: Play, Stop/Pause, “Avanti” ed “Indietro”.
É possibile gestire le funzioni di un solo telefono alla volta, scegliendo quale
telefono controllare:
› Tenete premuto il pulsante “Volume +” per 3 sec. e sentirete l’annuncio vo-
cale “Control ON VOL up” per indicarvi che verrà controllato il telefono
abbinato sul “Volume +”.
› Se premete ancora per tre secondi sentirete l’annuncio vocale “Control on
VOL down” per indicarvi che il controllo è passato ora al telefono abbinato
al tasto Vol-.
Comandi disponibili in modalità “Phone”:
› Play/pausa della musica: fare click sul pulsante “Centrale”.
› Avanti di una canzone: premere il pulsante “Avanti”.
› Indietro di una canzone: premere il pulsante “Indietro”.
Attenzione: Per poter utilizzare le funzionalità del player musicale (Play, Pausa,
Avanti, Indietro) dovete essere in modalità “Phone
Se state ascoltando la musica A2DP e vi spostate su “FM radio” o su “In-
tercom”, potrete continuare ad avere la musica attiva ma non avrete tutti i
comandi di controllo. Solo Play/Pausa è disponibile con un doppio click sul
tasto “Centrale”.
B - Utilizzo pulsanti in modalità Phone
Modalità Pulsante Avanti (Telefono su Vol+) Pulsante Centrale Pulsante Indietro (Telefono su Vol-)
Phone Breve: Chiamata vocale /accetta o termina
chiamata
Lungo: Richiama ultimo numero/ rifiuta chiamata
Lungo: Cambio modalità Breve: Chiamata vocale /accetta o termina
chiamata
Lungo: Richiama ultimo numero/ rifiuta chiamata
Phone (con musica attiva e
Abbinato al pulsante vol+)
Breve: Avanti una canzone Breve: Play/pause
Lungo: Cambio modalità
Breve: Indietro una canzone
Play/PausaAvanti Indietro

I
14 www.midlandeurope.com
Condividere la musica
La condivisione della musica è possibile solo per il telefono abbinato al pulsante
Vol+. Per poter condividere la musica A2DP con il passeggero, il cui dispositivo
è già abbinato con il tasto “Centrale” (distanza massima 10m), tenete premuto
il tasto “Indietro” per 3 secondi mentre state ascoltando la musica.
Il passeggero non può controllare la musica ma può interrompere la condivisio-
ne premendo brevemente il tasto “Centrale”.
Il pilota invece può interrompere la condivisione della musica tenendo premu-
to nuovamente il tasto “Indietro” per 3 secondi. Mentre la condivsione della
musica è attiva non è possibile mantenere la comunicazione Intercom attiva.
Attenzione: per poter azionare la condivisione della musica, assicuratevi di aver
azionato Play dall’interfono.
Attenzione: durante la condivisione della musica, il pilota può aprire l’intercom al
passeggero con un doppio clic sul tasto Centrale.
Navigatore GPS
Il GPS può essere abbinato tramite il pulsante “Volume+” oppure “Volume-”.
› Pulsante “Vol+” (supporto per l’audio stereo A2DP e mono HSP, HFP).
Tutti i dispositivi abbinati al pulsante “VOL+” hanno una priorità più alta e
interromperanno la comunicazione Intercom.
› Pulsante “Vol-” (supporto per l’audio stereo A2DP e mono HSP, HFP).
Potete invece utilizzare l’abbinamento al pulsante “Vol-” per avere sempre
l’audio in sottofondo e non iterrompere la comunicazione intercom.
É possibile inoltre stabilire se l’audio proveniente dal dispositivo abbinato sul
“VOL-” deve essere anche condiviso con le altre persone quando l’intercom
è aperto.
Se la modalità “Public” è attiva, le indicazioni stradali del GPS poptranno esse-
re sentite anche dall’altra persona.
Abbinamento ad un Navigatore GPS
In generale è possibile abbinare qualunque navigatore GPS per moto che ac-
cetti un auricolare Bluetooth.
1. Attivate sul vostro GPS la modalità di ricerca dispositivi auricolari Bluetooth.
Questa funzionalità dipende dalla marca e modello del vostro GPS (fate
riferimento al manuale del GPS).
2. Attivate la modalità “Setup (Spegnete il Midland BTX2 PRO S Tenere pre-
muto il pulsante “Centrale” fino a che la luce non rimane di colore rosso
fisso). Premere il pulsante “Volume + o Volume -” fino a quando la luce
lampeggia Rosso e Blu.
3. Sul GPS comparirà il nome “Midland BTX2 PRO S”, selezionatelo e seguite
le istruzioni per accettare l’abbinamento. Se viene richiesto, immettete il
codice di abbinamento: 0000 (quattro zeri). Il GPS confermerà se il pro-
cesso di abbinamento è stato completato con successo.
4. Il Midland BTX2 PRO S uscirà dalla modalità setup (luce rossa fissa) e pas-
serà automaticamente allo stato di funzionalità normale (luce blu lampeg-
giante). Ora il GPS è abbinato correttamente.
Ricetrasmettitore PMR446 con Bluetooth integrato o esterno
Se possedete un ricetrasmettitore con Bluetooth esterno o integrato potete
abbinarlo al Midland BTX2 PRO S tramite il pulsante “Volume +” o “Volume-”.
Se abbinato al pulsante “Volume -” sarà possibile avere la comunicazione radio
in sottofondo all’intercom.
Abbinamento ed utilizzo
Attivate la modalità “Setup (Spegnete il Midland BTX2 PRO S Tenere pre-
muto il pulsante “Centrale” fino a che la luce non rimane di colore rosso fisso).
› Premere il pulsante “Volume+” o “Volume -” fino a quando la luce lampeg-
gia Rosso e Blu.
› Attivate la modalità di abbinamento sul ricetrasmettitore PMR446, se-
guendo le istruzioni riportate sul manuale del ricetrasmettitore stesso.
Utilizzo della funzionalita’ Radio FM
Il Midland BTX2 PRO S è dotato di un ricevitore radio FM integrato. Per uti-
lizzarlo è suciente passare alla modalità “FM Radio”.
Modalità “ FM Radio”
Tenete premuto per 3 secondi il pulsante “Centrale”.
Un annuncio vocale vi indicherà in quale modalità state entrando, quando sen-
tirete “FM Radio” potrete utilizzare i pulsanti del Midland BTX2 PRO S per
gestire il ricevitore radio (vedi tabella C).

I
www.midlandeurope.com 15
Con un click sul pulsante “Avanti” o “Indietro”potete ricercare una stazione
radio (funzionalità seek), la ricerca si fermerà automaticamente quando in-
contrerà una stazione con un segnale sucientemente forte per garantire una
buona ricezione. Se invece tenete premuto lungo (3 sec.) scorrerete avanti
e indietro le 6 stazioni memorizzate. Ogni volta che passate da una stazione
registrata all’altra un annuncio vocale vi indicherà il numero di memoria in cui
vi trovate. Per registrare una stazione radio tenere premuto per 3 sec contem-
poraneamente i pulsanti “Avanti” e “Indietro”. Sentirete un tono di conferma.
La nuova stazione verrà registrata al posto dell’ultima memoria ascoltata. Gra-
zie al sistema RDS, la radio sceglierà sempre il segnale radio più forte disponi-
bile per la stazione che state ascoltando. Il sistema RDS è spento per default,
potete attivarlo premendo insieme i pulsanti “Volume+” e “Volume-” per 3
sec. Un annuncio vocale vi indicherà lo stato. Per disattivarlo ripetete la stessa
procedura.
Disabilitare/Abilitare la Modalità Radio FM
Per default la radio FM è attiva.
Disattivazione:
› Attivate la modalità “Setup (Spegnete il Midland BTX2 PRO , tenete pre-
muto il pulsante “Centrale” fino a che la luce non rimane di colore rosso
fisso).
› Premete contemporaneamente i pulsanti “Centrale” e “Volume+” per 3 sec.
La luce Blu farà 3 lampeggi per indicare la disattivazione.
› Uscite dalla modalità “Setup” premendo due volte il pulsante “Centrale”.
Attivazione: Fate la stessa procedura; questa volta un lampeggio della luce blu
indicherà l’attivazione.
Uscite dalla modalità “Setup” premendo due volte il pulsante “Centrale”.
Intercom con Radio FM
In modalità FM radio non è possibile attivare l’intercom in modo manuale, ma
può essere utilizzata l’attivazione vocale (VOX) solo verso il dispositivo abbi-
nato sul pulsante “Centrale”. Per attivare l’intercom in modo manuale dovete
uscire dalla modalità “FM Radio” e passare alla modalità “Intercom”.
Radio FM in background
Non è possibile avere la Radio FM in contemporanea con un qualunque altro
audio. Qualsiasi audio attivo come l’intercom o proveniente dalla connessione
del “Volume +” o del VOL-, metterà la radio FM in pausa.
Configurazioni speciali
Reset di tutti i dispositivi accoppiati
Potrebbe essere necessario eliminare tutti i riferimenti di abbinamento regi-
strati nel Midland BTX2 PRO S (reset). Procedete quindi come segue:
› Spegnete il Midland BTX2 PRO S Tenere premuto il pulsante “Centrale”
(“Centrale”) fino a che la luce non rimane di colore rosso fisso.
› Tenete ora premuto contemporaneamente i pulsanti “Volume +” e “Volume
–” per 3 secondi, la luce Blu si accenderà fissa per un secondo e poi tornerà
di colore rosso fisso. Fate doppio click sul tasto “Centrale” per uscire dalla
modalità Set-Up.
Da questo momento il Midland BTX2 PRO S non avrà più nessun dispositivo
Bluetooth in memoria e potrete procedere ad una nuova sessione di accop-
piamento (pairing).
Attenzione: dopo il reset degli abbinamenti, solo la modalità “Radio FM” sarà
disponibile.
C - Modalità con Radio FM
Modalità Pulsante Avanti (sinistro) Pulsante Centrale Pulsante Indietro (destro)
FM Radio Corto: ricerca stazione avanti
Lungo: scansione memorie avanti
Corto: On/o
Lungo: Cambio modalità
Corto : ricerca stazione indietro
Lungo: Scansione memorie indietro

I
16 www.midlandeurope.com
Ritorno alla configurazione di default
Potrebbe essere necessario ritornare alla configurazione “di fabbrica” , in modo
da ottenere un dispositivo “pulito” esattamente come la prima volta che è sta-
to tolto dalla scatola. Spegnete il Midland BTX2 PRO S Tenere premuto il
pulsante “Centrale” fino a che la luce non rimane di colore rosso fisso.
Tenete ora premuto contemporaneamente i tre pulsanti “Avanti”, “Centrale” e
“Indietro” per 3 secondi, la luce Blu si accenderà fissa per un secondo e poi tor-
nerà di colore rosso fisso. Fate doppio click sul pulsante “Centrale” per uscire
dalla modalità Set-Up e per tornare ad utilizzare il Midland BTX2 PRO S.
Attenzione: questa procedura elimina anche i riferimenti ai dispositivi accoppiati.
Queste impostazioni possono essere eettuate tramite il programma “BTPro
Updater” per PC/MAC.
Regolazione/disattivazione della funzione Vox (per Intercom e telefono)
L’apertura della comunicazione Intercom, può avvenire oltre che manualmen-
te, anche tramite attivazione vocale (VOX). Il corretto funzionamento del
VOX dipende dal rumore di fondo, quindi dalla velocità ma anche dal tipo di
casco utilizzato.
Per ottenere il migliore risultato, è possibile decidere la soglia di attivazione,
scegliendo 4 livelli di sensibilità del microfono: alta, media bassa e molto bassa.
In aggiunta, è possibile anche disabilitare completamente la funzione VOX e
quindi attivare l’Intercom e la risposta alla telefonata solo in modalità manuale.
Queste impostazioni possono essere eettuate tramite il programma “BT PRO
Updater” per PC/Mac.
Configurazione e aggiornamento firmware
Midland BTX2 PRO S può essere configurato e aggiornato tramite connessio-
ne USB al vostro PC, per migliorare la compatibilità con i dispositivi Bluetooth,
quali telefoni e GPS o per risolvere problematiche legate alla funzionalità. Il
software per PC insieme agli eventuali aggiornamenti del firmware sono di-
sponibili per il download sul sito www.midlandeurope.com nella pagina del pro-
dotto stesso.
ATTENZIONE: NON COLLEGATE IL DISPOSITIVO AL COMPUTER PRIMA
DI AVER SCARICATO ED INSTALLATO IL SOFTWARE.
Uso e avvertimenti specifici
L’uso assiduo di questi dispositivi può diminuire la vostra capacità di udire suoni
esterni e chi vi sta intorno.
L’uso di questo dispositivo mentre si sta guidando può diventare un pericolo per
voi e per chi vi sta intorno e in alcuni paesi, l’utilizzo del dispositivo potrebbe
non essere consentito.
L’uso ad un volume troppo alto può causare la perdita permanente dell’udito.
Se si avverte un qualsiasi dolore alle orecchie, o fastidio all’udito, diminuite il
volume o spegnete il dispositivo. L’uso continuativo ad alto volume, fa sì che
l’udito si abitui a tale volume, il quale a lungo andare può causare danni per-
manenti.
È fortemente consigliato l’utilizzo di tale apparato ad un volume adeguato.
Garanzia
La durata della garanzia è di 24 mesi per l’apparato e di 6 mesi per gli accessori
(batterie, caricatori, antenne, auricolari e microfoni).
Per maggiori informazioni visitate il sito www.midlandeurope.com
Certificazioni e Conformità di Sicurezza
CE/Informazioni generali
Questo prodotto è conforme alla direttiva 2014/53/UE e può essere liberamen-
te utilizzato nei paesi dell’UE.
Agli utenti non è permesso eettuare variazioni o modifiche di qualsiasi tipo
all’apparecchio. Queste ultime, se non espressamente approvate dal produt-
tore, annullano la possibilità di utilizzo dell’apparecchio ed invalidano la garanzia.
Per ulteriori informazioni, fate riferimento al nostro sito web:
www.midlandeurope.com

UK
www.midlandeurope.com 17
Index
Main features .................................................................................................................................................................................................................................. 18
Technical specifications of Midland BTX2 PRO S ......................................................................................................................................................................18
Charging batteries .......................................................................................................................................................................................................................... 19
Switching ON and OFF your Midland BTX2 PRO S .................................................................................................................................................................21
How to pair two Midland BTX2 PRO S units ............................................................................................................................................................................. 22
Set up of the AGC system ...........................................................................................................................................................................................................23
How to pair the Midland BTX2 PRO S to more than two units ...............................................................................................................................................23
Conference ....................................................................................................................................................................................................................................25
Talk 2 All - Universal Intercom with different brand unit ..........................................................................................................................................................26
Compatibility with Midland BT line units ................................................................................................................................................................................... 27
Pairing the Midland BTX2 PRO S to Bluetooth devices ........................................................................................................................................................... 27
How to listen to the FM Radio .....................................................................................................................................................................................................30
Setup and special configurations ..................................................................................................................................................................................................31
Setup and Firmware update .........................................................................................................................................................................................................32
European CE Notice Certification and Safety Approval Information ..................................................................................................................................... 32

UK
18 www.midlandeurope.com
MIDLAND BTX2 PRO S
Dual core intercom system
Midland BTX2 PRO S is an intercom system solution with Dual Bluetooth Core
(Dual Bluetooth processor) for conference communication and real background
stereo audio. The design is very slim and aerodynamic, all the main functions are
easy to operate thanks to the three big buttons placed on the front of the unit.
Midland BTX2 PRO S is fixed on the helmet using the adhesive plate or the screw
mounting clamp.
Main features
› Dual Bluetooth core system.
› Intercom “one to one” up to 1 .2Km distance.
› Conference up to 8 people (4 couples)
› Connect up to 6 people for “one to one” intercom communication
› MWE Noise Killer
› Universal Intercom feature to connect other brand intercom
› FM Radio Stereo with RDS
› Music Share (Driver and Passenger)
› Connect your phone to receive and place phone call and listen to stereo
music
› Support for 2 phones
› Connect your GPS for voice street indications
› Setup and Firmware update via USB connection to a PC
› Midland BTX2 PRO S is available in two versions:
› Single Midland BTX2 PRO S Intercom kit with one unit only
› Twin Midland BTX2 PRO S Intercom kit with with two units
Depending on the model purchased, the package contains the following parts:
Midland BTX2 PRO S single
› 1 BTX2 PRO S communication unit
› 1 Slide-in mounting kit with two HI-FI stereo speakers
› 1 microphone with boom and 1 wired microphone
› 1 plate with bi-adhesive strip to fix the unit onto the helmet
› 1 plate with screw to fix the unit onto the helmet
› 1 micro USB wall-mounting power supply
Midland BTX2 PRO S Twin
› 2 BTX2 PRO S communication units
› 2 Slide-in mounting kit with two HI-FI stereo speakers
› 2 microphones with boom and 2 wired microphones
› 2 plates with bi-adhesive strip to fix the unit onto the helmet
› 2 plates with screw to fix the unit onto the helmet
› 1 micro USB wall-mounting power supply with double plug
The units included in the TWIN kit are already paired on Middle button and can
therefore be immediately used in Intercom mode.
Technical specifications of Midland BTX2 PRO S
General:
› Bluetooth ver. 4.2 Stereo (Handsfree/A2DP/AVRCP protocol)
› Frequency 2.4GHz - Max power 100 mW
› Dual Bluetooth core for real Stereo Background
› AGC system automatically controls the volume in relation to background
noise
› Voice (VOX) or manual communications activation
› Manual controls to enable: telephone, intercom, FM Radio
› Fully waterproof
› Lithium battery with 20 hours talk time
› Recharge time: app. 2 hours
Bluetooth connections:
With identical device for Rider to Pillion or Bike-to-Bike Intercom mode, up
to a maximum distance range of 1.2 Km without obstructions and interferen-
ces (the riders must be always in sight).

UK
www.midlandeurope.com 19
Bluetooth devices:
Mobile phone with MP3 player Stereo (A2DP protocol) and GPS navigator
Charging batteries
Attention: Make sure that the unit is fully charged before use. Allow at least 3
hours for a full charge before using the unit for the first time.
Charge the unit by inserting the wall-charger into the charging socket (lift the
rubber cover to insert the plug). The red LED on the unit will start flashing
when charging begins.
Allow the headset to charge until the unit stops flashing and the blue LED
turns on.
When the charge is complete (the red LED is not flashing), release the head-
set from the charger. Normally, after the first time, it takes 2 hours for a full
charge.
Attention: Midland BTX2 PRO S is designed to withstand rain and water. Howe-
ver, if it is raining, always verify that the rubber cap protecting the recharging
sockets is fully fitted.
Attention: every time the micro USB recharging plug is inserted (or detached),
the device is automatically turned o. To use it while it is in charge, you should
turn the device on with the plug already inserted.
Unit and fixing system description
BTX2 PRO S description
The BTX2 PRO S has five buttons on the front; the main three big button
are multi functions buttons: the Forward (on the left), the middle button and
the Backward (on the right), the two squared buttons are the Volume + and
Volume -.
On the bottom of the unit you can find the Charger jack that enables to re-
charge the unit using a standard microUSB power supply
Description of the audio kit
The audio system includes two HI-FI stereo speakers and two interchangeable
microphones, which are both supplied with a bracket and wired connection.
The mini connector on the microphone allows you to choose the microphone
that best suits the helmet you are using.
LED
Middle
Volume - Volume +
Forward Backward
Charger plug

UK
20 www.midlandeurope.com
Fixing the stereo speakers
The two stereo speakers have a Velcro/adhesive strip that aids their fixing into
your helmet. Beware not to keep the volume too high, you must always be able
to listen to the trac sound.
Fixing the microphone
Boom Microphone
Place the section with the Velcro/adhesive strip between the padding and the
rigid cover of the helmet, so that the microphone is correctly positioned in
front of your mouth and that the white symbol is facing your mouth. This type
of microphone is suited for Open Faced and Flip Front helmets. For open
helmets it is also available a specific optional microphone cod. C1253.
Wired microphone
Using the Velcro/adhesive strip, place the microphone inside the helmet in
front of your mouth. This type of microphone is more suited for Full Faced
helmets. The mini connector on the microphone allows you choose the mi-
crophone that best suits the helmet you are using.
Description of the Slide-in mounting kit
The Midland BTX2 PRO S can be fixed onto the helmet, installing the slide-in
mounting kit in two dierent ways: By either using the plate with bi-adhesive
strip, or the screw plate. These methods allow you to safely “fix” the BTX2
PRO S unit onto your helmet and to remove it at any time in order to recharge
or store it.
Plate with bi-adhesive strip
The Bi-adhesive plate is already assembled on the slide-in mounting kit.
Clean the application area on the helmet surface, fold the two little wings to
better stick to the curved surface of the helmet, remove the bi-adhesive film
and place the fixing plate on the left side of the helmet by keeping it contact
with the surface for a few seconds.
Screw Clamp
Step 1. remove the bi-adhesive plate from the slide mount using the allen
wrench included in the box. Remember to keep the two screws.
Step 2. Tighten the screw plate to the slide-in mounting kit with the two pro-
vided screws.
Boom microphone Wired microphone
Bi-adhesive

UK
www.midlandeurope.com 21
Step 3.Then, tighten more the two screws in order to firmly fix the clamp in
place on the left side of the helmet.
If necessary, you can use also the rubber plate in order to have more grip for
the screw clamp. Just use the two short screw to fix the rubber plate on the
slide-in mount and tighten the screw plate again.
Fitting and removing your Midland BTX2 PRO S
The BTX2 PRO S can be easily fitted onto the helmet by sliding it downwards
on the sliding mounting kit. BTX2 PRO S is maintained in position thanks to
the fixing clip located on the upper section (A).
To detach the BTX2 PRO S, simply press the fixing clip and push the unit
upwards.
Switching ON and OFF your Midland BTX2 PRO S
Switching the unit on:
Press and hold “Middle” button for approximately 3 seconds until the BLUE
indicator lights.
Switching the unit o:
Press and hold both “Middle” and “Backward” buttons together for approxi-
mately 3 seconds until the RED indicator flashes 3 times, thus lessening the
chances that you might turn o the unit accidentally (especially whilst wearing
gloves).
Operative “mode”
The BTX2 PRO S can operate in three main “mode”: Intercom, Phone and
FM Radio.
The 3 multi function buttons can have dierent functionality depending on
which mode the unit is at that moment.
› In “Intercom mode” the three buttons let you manage the Intercom com-
munications between driver and passenger or bike to bike.
› In “Phone mode” you can manage your Bluetooth mobile phone to place/
answer a phone call or to listen to the music. Please use your phone respon-
sibly and safely.
› In “FM Radio mode” you can listen to your favourite radio station in stereo,
seek for a specific radio station and save it (6 memories are available).
A
UnlockLock
Rubber plate

UK
22 www.midlandeurope.com
› You can switch (toggle) from one mode to the other simply pressing the
Middle button for 3 seconds. A voice announcement will tell in which mode
you are on.
The toggle sequence is the following:
› Intercom mode (if another unit has been paired)
› FM Radio
› Phone mode (if a phone has been paired)
Every time you turn on the unit, the default mode is the last used mode.
The Intercom mode and Phone mode are avalaible only if it was previously pai-
red to another unit or to a phone.
If you need to know in which mode the unit currently is, just press the “Volume
+ “ and “Volume –” button together. A voice announcement will tell you the
current mode.
Maximum Distance
You can reach 1.2 Km intercom distance if you are in line of sight without ob-
structions and interferences (the riders must be always in sight).
How to pair two Midland BTX2 PRO S units
The two units supplied in the same Midland BTX2 PRO S box, are already
paired and ready to use, this means you don’t need to perform this procedure.
The units are already paired using the Middle button.
If the devices are not part of the same kit, or the units has been purchased
separately, you need to first pair them in order to use them.
To pair the Midland BTX2 PRO S to another Midland BTX2 PRO S unit
To pair the Midland BTX2 PRO S to another Midland BTX2 PRO S unit, you
must first enter the setup mode:
1. Turn o the unit.
2. Press and hold down the middle button about 7 sec., until the Red light is
on permanently.
3. Now press the Middle button for 3 seconds. The Blue and Red lights will
flash.
4. Do the same procedure on the other unit. When successfully paired, each
unit will have the Blue light on for one second and then go back to the setup
mode (Red light always on).
5. Now the pairing procedure is complete, you just need to exit the setup
mode before you can use the units.
6. Double click on the Middle button, the Red light will turn o and the Blue
light will start flashing.
You can use now your Midland BTX2 PRO S
Attention: remember to switch o all the other Bluetooth devices that are not
part of the pairing procedure, only the two devices involved in the pairing must
be turned on.
How to use the Intercom with two units
To use the intercom feature, be sure that both units are turned on and cor-
rectly paired together.
Here is an example of the buttons main functionality based on the mode you are on.
Mode Forward (Left button) Middle button Rear (Right button)
Intercom Open/close the intercom to the first rider Open/close the intercom to the second
rider
Open/close the intercom to the Third rider
Phone Redial last number/accept or reject
incoming call on “Vol+”
Redial last number/accept or reject
incoming call on “Vol-”
Phone (while music play) Forward the song Play/pause Backward the song
FM Radio Scan up FM Radio On/o Scan down

UK
www.midlandeurope.com 23
Manual activation
When in “Intercom Mode” press the Middle button on one of the two units
in “Intercom” mode. Communication is enabled and remains active until you
press again the middle button. The intercom need some seconds to activate,
you will hear a beep tone when the intercom is open.
Voice activation (VOX)
Simply say something, after some seconds the communication will be opened
and will remain active for the time you are talking. If there is no conversation
the intercom will be closed after 40 seconds.
If needed you can close the intercom manually without waiting 40 seconds
(just press the middle button).
If needed, you can enable/disable the VOX feature simply by pressing the
Backward button for 7 sec. A voice announcement will advise you when the
VOX is enabled/disabled. To turn the VOX on again, just press the same but-
ton and a voice announcement will advise you that the VOX is now active.
This setting is remembered also if you turn o the unit.
Attention: The Voice activation (VOX) can open the intercom communication
only to the unit that was paired with the Middle button. If you choose to use a
dierent button (Forward or Backward ), you will be able to active the intercom
only manually.
Adjusting the volume
Your Midland BTX2 PRO S uses AGC technology, which automatically adjusts
the listening volume in relation to background noises.
However, it is also possible to manually adjust the volume by means of the
“Volume +” and “Volume -”buttons.
The volume setting is indipendent for each audio source: intercom, stereo mu-
sic, phone call, FM radio.
Attention: volume can be adjusted only when an audio connection is active.
Set up of the AGC system
To adjust the sensitivity of the AGC system you can use the ”BT UPDATER”
Pc Software or the smartphone “BT SET-APP” application. You can choose
dierent set up based on your motorbike type (naked, touring, sport) or if you
are riding as a passenger. You can disable the AGC system pressing “Volume +”
and “Volume -” together for 3 sec.
How to pair the Midland BTX2 PRO S to more than two units
One Midland BTX2 PRO S unit can be paired to maximum five other BT units,
that means six in total (3 Midland unit + 2 Talk2All + yourself).
The Midland BTX2 PRO S has three main buttons (Forward, Middle and Rear).
It is up to you which button to use to pair and activate the intercom, you are
totally free to choose the button you like more. The same button you will use
to pair the unit will be also used to activate the intercom communication.
Remember that each device can always be paired with other 3 units at your
choice; as shown in the picture here below, also ‘crossed’ pairing can be done.
For example you can decide to pair one motorbike rider unit to the Forward
button, your passenger to the Middle button and another rider to the Rear
button.
In this way you can have in total 4 units paired together and talk to each person,
one by one, simply by pressing the corresponding button (the same used for
the pairing). Every time you open the intercom connection to one person, the
Rider 2
Passenger 1
Rider 1
Rider 3

UK
24 www.midlandeurope.com
previous connection will be closed. The connection is not a “chain”, when two
persons are talking it is not possible to break (interrupt) the communication by
one of the other two units.
Pair the Midland BTX2 PRO S to another Midland BTX2 PRO S unit
To pair the Midland BTX2 PRO S to another Midland BTX2 PRO S unit, you
must first enter the setup mode:
1. Turn o the unit
2. Press and hold down the middle button about 7 sec., until the Red light is
on permanently.
3. Now press one of the three buttons (Forward, Middle or Backward) for 3
seconds depending on which button you would like use to open the inter-
com to the other unit. The Blue and Red lights will flash.
4. Repeat the same procedure on the other unit, you don’t need to use the
same button, you can choose one of the three buttons not previously used.
5. When successfully paired, each unit will have the Blue light on for one se-
cond and then go back to the setup mode (Red light always on).
6. Now the unit is ready for another pairing procedure, and you can pair
another Midland BTX2 PRO S unit following the same procedure, but using
a dierent button.
If you don’t have more devices to pair, you must exit the setup mode before
you can use the units:
› Double click on the Middle button, the Red light will turn o and the Blue
light will start flashing. You can use now your Midland BTX2 PRO S
How to use the Intercom with more than two units
To use the intercom feature, be sure that all the units are turned on and cor-
rectly paired together.
Manual activation in Intercom mode
When in “Intercom Mode” press the button corresponding to the unit you
would like to communicate with. After some seconds the intercom commu-
nication will open. The communication remains active until you press again
the same button. To quickly open the intercom to another person, just press
the button corresponding to the other unit, the intercom will be automatically
closed and the new connection will be open (see Table A).
Voice activation (VOX)
The voice activation feature can open the intercom only to the unit paired to
the Middle button.
Hint: this feature is very useful when you have a specific person that you like to
talk to more often (for example your passenger). In this way you don’t need to
press a button to open the communication.
Unit already busy in a conversation
If you try to open an intercom connection to another person that is already
talking with someone else (or is in a middle of a phone conversation), you will
hear a “busy” double beep tone. Just wait sometime and try again, maybe this
time the “line” is not busy.
The person who is called, will be advised that someone is trying to call and will
hear a voice announcement with the number of the button from which the
A- Manual activation
Mode Forward button Middle button Rear button
Intercom Short press: Open/Close intercom to paired
raider
Short press: Open/Close intercom to paired
raider
Long press: Change mode
Short press: Open/Close intercom to paired
raider

UK
www.midlandeurope.com 25
request is coming.
In this way as soon as the first conversation is over, the person can easily con-
tact the caller by opening the intercom of the specific button number (indica-
ted by the voice announcement).
Conference
The “Conference” mode allows the simultaneous communication between 4
people or, if you pair a intercom device also on “Vol-” , up to 8 people (4
couple). You can decide to use the BTX2 PRO S in “one to one” communi-
cation up to 6 people (“classic” Intercom mode) or with 8 people (4 couples)
conference intercom (Conference mode).
How to use the conference mode
First of all you need to pair all the units in a “chain” mode, second the “Confe-
rence” feature must be active on all the units paired.
Pairing
To use the conference mode you need to pair all the units in a “chain” configu-
ration. The BWD button of the first unit must be paired to the FWD button
of the second unit. The BWD button of the second unit must be paired to the
FWD button of the third unit and so on, till the fourth!
The first and the last unit must not be paired together (the chain must stay
open). The unit number 1 can talk to the last unit (number 4) only “through”
the unit number 2 and number 3. That means to have the conference with four
people, all the unit must have the intercom open.
Activate Conference mode
In any mode with no active audio, keep pressed the FWD and Central buttons
for 3 sec. The voice announcement “Conference” will tell you that it is active.
When the Conference mode is active the bluetooth devices paired on “Vol+”
button are disconnected, the paring on CTRL button and the Universal Inter-
com are not available. Now only the paring on FWD and BWD buttons are
available, together with the device paired on the “Vol -” button.
When in Conference mode, you can always move to “FM radio” mode to li-
sten your favorite radio station or to “Phone” mode to control the phone con-
nected on the “Vol-” button.
Disable Conference mode
In any mode with no active audio, keep pressed the FWD and Central buttons
for 3 sec. The voice announcement “Intercom” will tell you that you are back
to the “One to One” Intercom mode and the device connected to the “Vol
+” is available again, together with the Phone, the pairing on CTRL button and
the Universal Intercom.
Conference mode 4 people
When the conference mode is active, it is possible to open the conference
communication pressing both the FWD and BWD buttons. One click on the
button will open the intercom communication, one click on the same button
will close it. The two units that are in the middle of the chain (unit 2 and 3)
must keep the intercom open on both FWD and BWD buttons to allow the
full communication of the four units together.
“One Click Talk” function
When the conference mode is active, is possible to open the conference com-
munication to all the 4 users just in “one click”. Press short the CTRL (mid-
dle) button and you will automatically open the conference to the four units
connected.
1
2
3
1
2
3
1 2 3 4

UK
26 www.midlandeurope.com
Conference mode with one Bluetooth device on “Vol-”
When the conference mode is active the Bluetooth device connected on
“Vol-” is still available, that mean you can listen to GPS street indication or
answer your phone call without “brake” the Conference connection chain.
The audio from the “Vol-” button connection can be “Private” (not shared in
the Conference) or “Public” (the audio is shared with conference).
By default the setting of conference mode is “Private”.
Either in Privat or Public mode, if you receive a phone call, you are temporary
disconnected from the Conference, but the other people can keep on talking
to each other. As soon as the Phone call is over, you are automatically back to
the Conference.
› Activate Public mode: long press the “Vol-” button , you will here the voice
“Public”
› Activate Private mode: long press again the “Vol-” button, the voice will
tell you “Private”.
Attention: the incoming phone call is always “private” even if you are in “public” mode.
Conference mode up to 8 people (4 couples)
To have 8 people conference you need to pair one intercom device also to the
“Vol- “ button and be sure you selected the “Public” option.
Attention: The paring of the intercom device on “Vol-” must be as “Universal
Intercom”.
By default the setting of conference mode is “Private”, that mean the first
time you press long the “Vol-” button, you will hear the voice “Public”. In case
you heare “Private” you need to press again “Vol-” long untill you hear the
voice “Public” mode.
How to pair an Intercom device on the “Vol-” button
› On the BTX2 PRO S go in “Setup mode”, press the “Vol-” button for 3 sec.
The Blue and Red Led lights will start flashing
› On the other device, follow the procedure to pair as an Universal Intercom
How to open the Conference for the “Vol-” unit
› To open the conference from the BTX2 PRO S to the unit connected to the
“Vol-”, press in Phone Mode the “Backward” button
› To open the conference from the other unit connected to the “Vol-”, just
use the command to open the Universal intercom connection.
The maximum distance of the device connected to the “Vol-” button is 10 mt,
this is why is suitable only for Passenger.
Talk 2 All - Universal Intercom with dierent brand unit
Thanks to the “Talk2 All - Universal Intercom” feature it is now possible to
pair your Midland BTX2 PRO S to a dierent brand intercom available on the
market.
You can pair a maximum of two not Midland Intercom devices, one on the
“Forward” button and the other one on the Backward button.
› On the Midland BTX2 PRO S enter the setup mode: (with the unit OFF
press and hold down the Middle button about 7 sec. until the Red light is
on permanently).
› Keep pressed the “Forward” button or “Backward” button for 7 seconds:
the Red and Blu LED lights will start flashing fast, then (while you still keep
the button pressed) the Red and Blu LED lights will change to slow flashing.
Now you can release the button.
On the other intercom (not Midland brand) follow the procedure to pair to a
phone, because the BTX2 PRO S is paired as a Phone.
If successfully paired the red/blue lights will stop flashing and the blu light will
slowly flash instead.
Attention: remember to switch OFF all the other Bluetooth devices during the
pairing procedure, only the two devices involved in the pairing must be turned on.
To open the “Universal Intercom” communication on the Midland BTX2
PRO S while you are in “Intercom Mode”, press long (3 sec) the Forward
Talk2All-Universal Intercom
Not Midland Intercom

UK
www.midlandeurope.com 27
Vol- Always in background
› Phone (HFP/A2DP Stereo)
› GPS (HFP/A2DP Stereo)
› Dongle (HFP/A2DP Stereo)
VOL+ High priority
› Phone (HFP/A2DP Stereo)
› GPS (HFP/A2DP Stereo)
› Dongle (HFP/A2DP Stereo)
button or “Backward” button (depending on wich button you used for pai-
ring) . On the other intercom just press the phone redial or voice dial button.
Maybe it will be necessary to press the redial button two times, depending on
the model of the not Midland intercom.
Attention: In order to use the “Talk2All-Universal Intercom” feature the pairing
on the other unit must be done as a phone. The other intercom (not Midland
brand) will be able to be paired to a phone only if two phones are supported.
You can pair also a Midland unit as Talk2All, that means the pairing must be done
as a phone (one unit use the Talk2All procedure and the other unit use the pairing
to “Phone” procedure).
Compatibility with Midland BT line units
The BTX2 PRO S is compatible with Midland BT devices.
When paired the max distance of the intercom is defined from the lower pos-
sible.
The BTX2 PRO S is compatible with the previous line of Midland BT only if you
update the firmware.
Pairing the Midland BTX2 PRO S to Bluetooth devices
The Midland BTX2 PRO S unit can be paired to other Bluetooth devices, like
Phone, GPS Navigator or PMR446 Radio with built-in or external Bluetooth
(dongle). The pairing procedure must be done using the “Volume +” or the
“Volume -” buttons.
› Pairing to the “Volume +” button: for Phone with music A2DP stereo, GPS
Navigator with A2DP audio or external mono/Stereo A2DP dongle. All de-
vices paired to “Volume +” button has higher priority and will interrupt all
the other communication (like Intercom, FM Radio and Music).
› Pairing to the “Volume -” button: for Phone with music A2DP stereo, GPS
Navigator with A2DP audio or external mono/Stereo A2DP dongle. All de-
vices paired to “Volume -” button are always in active in background during
the Intercom communication.
When a device is paired to the “Vol +” or “Vol –” buttons the “Phone” mode
is activated.
Background feature
The audio connection on any device paired on “Vol-” button, even if it is stereo,
is always in background. In this way the Intercom communication will not be
interrupted, for example, by the GPS’s street indication or other audio source.
You can decide if the audio from the “Vol -” connection is shared with other
people when the intercom is open (public) or if it must be private (private).
Attention: By default the audio is private
The audio from “Vol -” has always lower priority against the Intercom, that
means when the intercom is open the audio is lowered by default to 50%. You
can change this setting using the BTUpdater PC Software
Pairing with one or two phones
The cellular phone can be paired to the “Vol +” or to the “Vol –”.
When a phone is paired to the “Vol +” or “Vol-” the “Phone” mode is activated.
An incoming call has always the higher priority, that means all other commu-
nications will be closed (Intercom, FM Radio, Music).
If another incoming call will arrive on the second phone, an alert sound will
notify it.
WARNING!
In order to have the best performance with your mobile phone, it is suggested
to keep it as close as possible to your BTX2 PRO S unit, on the left side of your
body and in the upper pocket of your jacket if it’s possible.

UK
28 www.midlandeurope.com
How to pair the Midland BTX2 PRO S to a Phone
To pair the Midland BTX2 PRO S to a Phone, you must first enter the setup
mode:
1. Turn o the unit
2. Press and hold down the middle button about 7 sec., until the Red light is
on permanently.
3. Now press for 3 seconds the “Volume +” or “Volume -” button, the Blue
and Red lights will flash.
4. Enable the Bluetooth device search feature on your mobile phone
5. After some seconds, “Midland BTX2 PRO S” will be displayed on your mo-
bile phone. Follow the pairing procedure of your Phone. If a pin code is
requested you must enter “0000” (four time zero).
When successfully paired, the Blue light of the unit will be on for one second
and than the unit will exit the setup mode and switch to the working mode (the
Blue light will start flashing).
You can use now your Midland BTX2 PRO S together with the Phone.
How to use a Phone
After pairing your phone to the Midland BTX2 PRO S unit you must switch
to the “Phone” mode in order to use it. Press the middle button until you hear
“Phone” from the voice announcement. Now all the three main buttons are
dedicated to the phone (see Table B)
Answering a call
When you hear the phone ring, you can answer in two dierent ways:
Vocally:
Simply say one word just after the first ring to answer the call and start talking.
Manually:
Tap the “Forward” or “Backward” button and start talking.
Rejecting a call
If you don’t wish to answer, you can let the mobile phone ring or press the
“Forward” or “Backward” button for 3 seconds (you will hear one audio con-
firmation tone).
Making a call
There are several ways to make a call.
To redial the last number:
› Phone on “Vol+”: Press”Forward”button for 3 seconds in order to redial the
last number (you will hear one audio confirmation tone).
› Phone on “Vol-”: Press”Backward”button for 3 seconds in order to redial
the last number (you will hear one audio confirmation tone).
To make a voice call:
› Phone on “Vol+”: Briefly press”Forward”button. If your mobile phone sup-
ports voice calls, you will be asked to speak the name of the contact you
wish to call.
› Phone on “Vol-”: Briefly press”Backward”button. If your mobile phone sup-
ports voice calls, you will be asked to speak the name of the contact you
wish to call.
Priority: Calls have a high priority, which means that all other communications
are temporarily disabled when a call arrives.
B - Phone mode
Mode Forward button (Phone on “Vol+”) Middle button Backward button (Phone on “Vol-” )
Phone Short press: Voice dial /accept or close if it is
in progress
Long press: redial last number/ or reject
Long press: Change mode Short press: Voice dial /accept or close if it is
in progress
Long press: redial last number/ or reject
Phone (when music is plaing
and paired on “Vol +”)
Short press: Forward the song Short press: Play/pause
Long press: Change mode
Short press: Backward the song

UK
www.midlandeurope.com 29
Ending a call
There are several ways to end a call:
› Wait for the called person to end the call.
› Press the “Forward” button (you will hear an audio confirmation tone).
› Press “End” button on the mobile phone.
Speed dial
Only for the phone paired on “Vol+” is possible to store one phone number in
the unit memory and use it when needed. You must first save the number using
the “BT UPDATER” Pc software or the smartphone “BT SET-APP” applica-
tion. Then when you are in phone mode, just press 7 sec. the “Forward” button.
Using the MP3 player feature of the mobile phone
The mobile phone, when paired on “Volume +” or “Volume -” can be used
as stereo MP3 players. The Midland BTX2 PRO S device fully supports the
A2DP and AVRCP protocols that enable you to listen to stereo music and re-
motely control your mobile phone’s MP3 player. You can even use the buttons
on the Midland BTX2 PRO S unit to control the following play options: Play,
Pause, Forward and Backward the songs.
It is possible to control only one phone at the time. You can choose which
phone to control, pressing 3 sec. the “Vol+” button:
You will hear the voice “Control on volume up” . Now you can control the
phone paired on “Vol+” button. If you want to switch the control to the other
phone just press again for 3 sec. the “Vol+” button and you will hear the voice
“Control on volume down”.
Available controls:
› To play/pause music: click on the “Middle” button.
› To skip forward to the next song: press the “Forward” button.
› To skip backwards to the previous song: press the “Back” button.
Priority: the music listening mode has the lowest priority. Therefore, it will always
be disabled when another audio communication comes in.
To change the priority behaviour you can use the ”BT UPDATER” Pc Software
or the smartphone “BT SET-APP” application
Attention: It is possible to have all the controls (Play/Pause, FWD, BWD) of the
A2DP music only in “Phone mode”.
If you are listening to A2DP music and you move from “Phone” mode to “FM Ra-
dio” or “Intercom” mode, you can still listening to A2DP music but you don’t have
all the controls buttons available. Only Play/Pause is available with double click on
the “Middle” button.
Music Share
Music Share is possible only from the phone paired on the “Vol+” button. To
start sharing your A2DP music with the passenger already paired on the mid-
dle button (maximum distance 10mt), you must press the “Backward” button
long (3 sec.) while the music is playing.
The passenger can only stop the music share pressing short the middle button
(but cannot control the music). The driver can stop the music sharing just
pressing again the “Backward” button for 3 seconds.
With music share active you can not keep open the Intercom communication.
Attention: to enable the Music Share, make sure you sent a play command from
the Intercom device.
Attention: while in Music Share mode, the driver can open the intercom to the
passenger with a double-click on the Central button.
GPS Navigator
The GPS Navigator can be paired using the “Vol +” or the “Vol -” button.
› Volume + button (support for stereo A2DP audio and HFP mono).
All devices paired to “Vol +” button has higher priority and will interrupt all
the other communication (like Intercom, and FM Radio).
Play/PauseForward Backward

UK
30 www.midlandeurope.com
› Volume - button (support for stereo A2DP audio and HFP mono).
All devices paired on “Vol -” button are always active in background during
the Intercom communication. You can decide if the audio from the “Vol -”
connection is shared with other people when the intercom is open (“Public”
feature on) or if it must be private (“Private” feature on). See the “Back-
ground” paragraph above.
GPS Stereo (A2DP) voice announcement
Midland BTX2 PRO S supports Stereo (A2DP) voice announcement from
GPS Navigators or smartphone application on both “Vol+” or “Vol-” con-
nection. When connected on “Volume +” button, the GPS street voice an-
nouncements will interrupt all other communication. Only when connected
on “Vol-” the GPS voice announcements are in backgroud.
How to pair the Midland BTX2 PRO S to a GPS
In general it is possible to pair the Midland BTX2 PRO S to all the GPS for
motorbike that support Bluetooth headset connection.
To pair the Midland BTX2 PRO S to a GPS, you must first enter the setup
mode:
1. Turn o the unit
2. Press and hold down the “Middle” button about 7 sec., until the Red light is
on permanently.
3. Now press firmly (3 sec) the “Volume +” or “Volume -” button, the Blue
and Red lights will flash.
4. Enable the Bluetooth device search feature on your GPS
5. After some seconds, “Midland BTX2 PRO S” will be displayed on your GPS.
6. Follow the pairing procedure of your GPS. If a pin code is requested you
must enter “0000” (four times zero).
When successfully paired, the Blue light of the unit will be on for one second
and then the unit will exit the setup mode and switch to the working mode (the
Blue light will start flashing).
You can now use your Midland BTX2 PRO S with the GPS for street voice
announcement.
Pairing to a PMR446 radio with integrated or external Bluetooth
The PMR446 Radio can be paired to the “Volume +” or “Volume -” button.
If paired on “Volume -”, the PMR446 radio is always in the background even
when you talk on the intercom.
Pairing procedure
› Turn o the unit
› Press and hold down the “Middle” button about 7 sec., until the Red light is
on permanently.
› Now press firmly (3 sec) the “Vol +” or “Vol -” button, the Blue and Red
light will flash.
› Follow now the pairing procedure explained on the manual of the transcei-
ver itself
How to listen to the FM Radio
The FM Radio receiver is integrated inside the unit. You just need to switch to
the “FM Radio” mode in order to use it.
Long press the middle button until you hear “FM radio” from the voice an-
nouncement. Now all the three main buttons are dedicated to the FM Radio
(See Table C).
Press short the “Forward” or the “Backward” button to seek the FM Radio
station. When you press long the Forward or the Backward button, you can
scan up or down the 6 recorded stations.
A voice announcement will tell you the number of which memory you are en-
C-Radio FM mode
Mode Forward button Middle button Rear button
FM Radio Short press: seek station up
Long press: Scan recorded
Short press: On/o
Long press: Change mode
Short press: seek station up
Long press: Scan recorded

UK
www.midlandeurope.com 31
tering.
To save the station you are listening to, press the Forward and Backward but-
tons together for 3 sec. You will hear a beep tone for confirmation.
The station is saved over the last recorded station used.
Thanks to the RDS system, the FM Radio will choose the strongest signal avai-
lable for the radio station you like to listen.
The RDS system is OFF by default, if needed you can toggle on/o the RDS
pressing together the “Volume +” and “Volume –” buttons for 3 sec when the
radio is on. A voice announcement will tell you the RDS status.
How to Disable/Enable the FM Radio
By default the FM radio is on.
Disabling:
› Enter the “Setup” mode: turn o the unit and hold down the “Middle” but-
ton about 7 sec., until the Red light is on permanently.
› Press “Middle” and “Volume+” buttons together for 3 seconds. The blue
LED will flash three times.
› Double click on the “Middle” button to exit the “Setup” mode and use the
Midland BTX2 PRO S.
Enabling:
› Follow the same procedure up described; now the blue LED will flash once.
To exit the “Setup” mode, double click the “Middle” button.
FM Radio with intercom
When you are in “FM Radio” mode it is not possible to manually open the
intercom, you can only open it using VOX feature (just talk) to the unit paired
on the “Middle” button.
To manually activate the intercom you must switch to “Intercom” mode.
FM Radio in background
It is not possible to have the FM radio along with other audio sources.
Any active audio such as Intercom or coming from the “Vol+” or “Vol-” con-
nection, will pause the FM radio.
Setup and special configurations
Resetting all paired devices
Sometimes you may find it necessary to delete all the pairing references sto-
red in the Midland BTX2 PRO S unit (reset operation).
To perform this operation you must first enter the setup mode:
› Turn o the unit.
› Press and hold down the “Middle” button about 7 sec., until the Red light is
on permanently.
› Then simultaneously press and hold down the “Volume +” and “Volume –”
buttons for 3 seconds. The Blue Light will be lit on for 1 sec and then back
to steady RED.
› Double click on the “Middle” button to exit the “Setup” mode and use the
Midland BTX2 PRO S.
This procedure deletes all the paired Bluetooth devices stored in the memory
and it is therefore possible to start a new “clean” pairing session.
Attention: after resetting all the pairting, only the “FM Radio” mode wil be available.
Back to factory setting
Sometimes you may find it necessary to go back to the factory setting, to reset
all the changes/setup already made and have a “clean” unit.
To perform this operation you must first enter the setup mode:
› Turn o the unit.
› Press and hold down the “Middle” button about 7 sec., until the Red light is
on permanently.
› Then simultaneously press and hold down all the three buttons “Forwar-
d”-”Middle”-”Backward” for 3 seconds. The Blue Light will be lit on for 1 sec
and than back to steady RED.
› Double click on the “Middle” button to exit the “Setup” mode and use the
Midland BTX2 PRO S
These adjustements can be set through the program “BTPro Updater” suitable
for PC/MAC
Adjusting/ Disabling the VOX feature (Intercom and telephone)
The Intercom feature can be enabled both manually and vocally (VOX). The

UK
32 www.midlandeurope.com
VOX activation is influenced by the helmet type, the background noise and
therefore by the speed.
For optimum results, it is possible to choose one of the following four mi-
crophone sensitivity levels: high, medium, low and very low. It is also possible
to disable the VOX feature in order to activate the Intercom and phone call
answering features in manual mode only.
These adjustments can be set through the program “BTPro Updater” suitable for
PC/Mac.
Setup and Firmware update
It is possible to configure and update the firmware of your Midland BTX2
PRO S using the USB connection to your PC. On the Midland web site www.
midlandeurope.com in the Midland BTX2 PRO S page you can find the PC
software and the new firmware updates if available.
ATTENTION DO NOT CONNNECT THE UNIT TO THE PC BEFORE YOU
DOWNLOAD AND INSTALL THE SOFTWARE
Use at your own risk
The use of the device will impair your ability to hear other sounds and others
around you.
Listening to music or speaking on a telephone may prevent you from hearing
others around you and distract you from riding safely. The use of such device
while riding may endanger you and others, and its use, in some areas, could
not be allowed.
Using this device at a high volume may result in permanent hearing loss.
If you experience ringing in your ear or any other hearing related pain, reduce
the volume or discontinue using this device. With continued use at high volu-
me, your ears may become accustomed to the sound level, which may result
in permanent damage to your hearing.
Please use this device at a safe volume level.
Warranty
The warranty lasts 24 months for the main device and 6 months for the acces-
sories (batteries, chargers, antennas, headsets, microphones).
For further information about the warranty, please visit:
www.midlandeurope.com.
European CE Notice Certification and Safety Approval
Information
This product is CE marked according to the RED Directive 2014/53/UE and is
free use in all the EU countries. Users are not permitted to make any changes
or modifications to the device. Modifications which are not expressly appro-
ved by the producer invalidate the warranty card. For further information, ple-
ase go to our website: www.midlandeurope.com.

D
www.midlandeurope.com 33
Inhalt
Hauptmerkmale .............................................................................................................................................................................................................................34
Technische Daten des Midland BTX2 PRO S ............................................................................................................................................................................34
Aufladen des Akkus .......................................................................................................................................................................................................................35
Beschreibung des Geräts und Montagehalterung ......................................................................................................................................................................35
Ein-/Ausschalten des Midland BTX2 PRO S ............................................................................................................................................................................. 37
Koppeln (Pairen) von Zwei BTX2 PRO S- Geräten ................................................................................................................................................................... 38
Konferenz ........................................................................................................................................................................................................................................41
Talk 2 All - Universelles Gegensprechen mit einem Gerät einer anderen Marke....................................................................................................................42
Kompatibilität mit Geräten der Midland BT-Produktlinie ........................................................................................................................................................43
Kopplung des Midland BTX2 PRO S mit Bluetooth Geräten...................................................................................................................................................43
Ukw-Radio .....................................................................................................................................................................................................................................47
Setup und spezielle Konfiguration ...............................................................................................................................................................................................48
Gewährleistung .............................................................................................................................................................................................................................. 49

D
34 www.midlandeurope.com
MIDLAND BTX2 PRO S
Dual Core Gegensprechanlage
Midland BTX2 PRO S ist ein Gegensprechsystem mit 2 Bluetooth Chipsätzen
(Dual Bluetooth Processor) für Konferenzkommunikation und echte Stereo Au-
dioübertragung im Hintergrund. Das Design ist extrem flach und aerodynamisch,
alle Hauptfunktionen lassen sich dank der 3 großen Tasten auf der Gerätefront
komfortabel steuern. Midland BTX2 PRO S wird am Helm mittels einer Klebe-
oder Klemmhalterung befestigt.
Hauptmerkmale
› Dual Core Bluetooth System
› “Eins-zu eins”-Gegensprechen mit bis zu 1.2 Km Reichweite.
› Konferenz mit bis zu 8 Teilnehmern (4 Motorräder)
› Verbinden Sie bis zu 6 Personen mittels “Eins-zu-Eins” Kommunikation
› MWE Noise Killer
› Universal Intercom Funktion zum Verbinden mit Freisprecheinrichtungen
verschiedener Hersteller
› Stereo UKW-Radio mit RDS
› Music Share (Fahrer und Beifahrer)
› Anschluss eines Mobiltelefons, um Anrufe anzunehmen und zu tätigen,
sowie für die Wiedergabe von Stereo-Musik
› Kopplung von 2 Telefonen möglich
› Anschluss eines GPS-Navigationsgeräts zur Übertragung von Navigations-
anweisungen
› Setup und Firmware-Update über USB-Verbindung mit einem PC
Das Midland BTX2 PRO S ist in zwei Versionen erhältlich:
› BTX2 PRO S Einzel-Intercom Set mit nur einem Gerät
› BTX2 PRO S Twin-Intercom Set mit zwei Geräten
Je nach gekauftem Modell enthält die Packung folgenden Inhalt:
BTX2 PRO S Einzel-Intercom Set
› 1 BTX2 PRO S-Kommunikationsgerät
› 1 Slide-In Halterungssatz mit zwei HiFi-Stereolautsprechern
› 1 Klapphelmmikrofon und 1 Integralhelmmikrofon
› 1 Platte mit Klebestreifen, um das Gerät am Helm zu befestigen
› 1 Platte mit Schraube, um das Gerät an den Helm zu klemmen
› 1 Micro-USB-Netzteil
BTX2 PRO S Twin- Intercom Set
› 2 BTX2 PRO S Geräte Sets
› 2 Slide-In Halterungssätze mit zwei HiFi-Stereolautsprechern
› 2 Klapphelmmikrofone und 2 Integralhelmmikrofone
› 2 Platten mit Klebestreifen, um das Gerät am Helm zu befestigen
› 2 Platten mit Schrauben, um das Gerät an den Helm zu klemmen
› 1 Micro-USB-Netzteil mit zwei Anschlüssen
Die Gerätesets im TWIN-Kit sind bereits gekoppelt (gepairt) und können daher
sofort als Motorrad-Intercom (Gegensprech- Modus) benutzt werden.
Technische Daten des Midland BTX2 PRO S
Allgemein:
› Bluetooth ver. 4.2 Stereo (Handsfree/A2DP/ AVRCP Protokoll)
› Frequenz 2.4GHz - Max Leistung 100mW
› Bluetooth Dual Core für echte Stereo Hintergrundfunktionnalität
› Das AGC System regelt automatisch die Lautstärke in Abhängigkeit von
den Umgebungs- und Fahrgeräuschen
› Sprachgesteuerte (VOX) oder manuelle Intercom-Aktivierung
› Manuelle Steuerung zum Aktivieren von: Telefon, Intercom (Gegenspre-
chanlage), UKW Radio
› UKW-Stereo-Radio mit RDS
› Vollständig Regenwasserdicht
› Lithium Akku mit 20 Stunden Sprechzeit
› Ladezeit: ca. 2 Stunden

D
www.midlandeurope.com 35
Bluetooth-Verbindungen:
Mit 2 BTX2 PRO S können Sie von Fahrer zu Beifahrer oder von Bike-zu-Bike
gegensprechen, bis zu einer maximalen Reichweite von 1.2 Km ohne Hinder-
nisse oder Interferenzen (Fahrer müssen immer in Sichtweite sein).
Bluetooth-Geräte:
Mobiltelefon mit MP3-Player-Stereo (A2DP-Protokoll), Navigationsgerät
Aufladen des Akkus
Achtung: Stellen Sie sicher, dass das Gerät vor der Benutzung komplett geladen
ist. Laden Sie das Gerät mindestens 3 Stunden bevor es zum ersten Mal genutzt
wird.
Zum Laden das Steckerladegerät in die Ladebuchse stecken (nehmen Sie die
Gummischutzkappe ab, um den Stecker einzustecken).
Die rote LED am Gerät fängt an zu blinken, sobald der Ladevorgang startet.
Laden Sie das Gerät bis die LED von rot-blinkend zu konstant-blau wechselt.
Wenn der Ladevorgang abgeschlossen ist (die rote LED blinkt nicht mehr),
ziehen Sie den Ladestecker vom Headset ab.
Nach dem ersten Laden benötigt eine komplette Ladung normalerweise 2
Stunden.
Achtung: Das Midland BTX2 PRO S ist regen- und wasserfest konzipiert. Stellen
Sie aber dennoch sicher, dass bei Regen die Gummischutzkappen die Anschlüsse
vollständig abdecken.
Achtung: Wenn das Micro-USB-Netzteil angeschlossen oder getrennt wird,
schaltet sich das Gerät automatisch aus. Wenn Sie das Gerät verwenden wollen,
während es aufgeladen wird, sollten Sie es einschalten, nachdem Sie das Netzteil
angeschlossen haben.
Beschreibung des Geräts und Montagehalterung
Das BTX2 PRO S hat fünf Tasten auf der Vorderseite, wobei die drei
großen Tasten Multifunktionstasten sind: Vorwärts (links), die mittlere Taste
und Zurück (rechts); die zwei rechteckigen Tasten sind für Lautstärke+ und
Lautstärke–.
Auf der Unterseite des Gerätes finden Sie die Ladebuchse, welche kompatibel
zu Standard Micro USB Netzteilen ist.
Beschreibung des Audiokits
Das Audiosystem umfasst zwei HI-FI Stereo-Lautsprecher und zwei
austauschbare Mikrofone, eine Klapphelmversion und eine Integralhelmver-
sion. Mit dem Mini-Stecker am Mikrofon können Sie für jeden Helmtyp das
passende Mikrofon auswählen.
LED
Mitte
Lautstärke - Lautstärke +
Vorwärts Zurück
Ladeanschluss

D
36 www.midlandeurope.com
Die Stereo-Lautsprecher befestigen
Die beiden Stereo-Lautsprecher sind mit Klettband/Klebestreifen versehen,
womit sie sich leichter im Helm befestigen lassen. Beachten Sie außerdem die
Lautstärke des Gerätes nicht zu weit zu erhöhen. Sie müssen weiterhin den
Verkehr um Sie herum wahrnehmen können.
Mikrofonbefestigung
Schwanenhalsmikrofon
Befestigen Sie den Bereich mit dem Klettband/Klebestreifen zwischen der
Polsterung und der harten Innenschale des Helms, sodass sich das Mikrofon
in der richtigen Position vor Ihrem Mund befindet und das weiße Symbol in
Richtung Ihres Mundes weist. Dieser Mikrofontyp ist für Jethelme und für
Klapphelme geeignet. Für oene Helme gibt es optional ein längeres Schwa-
nenhalsmikrofon (Art.Nr. C1253).
Kabelgebundenes Mikrofon
Bringen Sie das Mikrofon mithilfe des Klettbandes/Klebestreifens im Helm vor
Ihrem Mund an. Dieser Mikrofontyp ist eher für Integralhelme geeignet.
Slide-In Halterungssatz
Das Midland BTX2 PRO S kann am Helm befestigt werden, indem man die
Slide-In Halterung auf zwei verschiedene Weisen anbaut: entweder mittels
des Klebestreifens oder mittels der Schraubenplatte. Mit beiden Verfahren
können Sie das BTX2 PRO S sicher an Ihrem Helm befestigen und es jederzeit
wieder abnehmen, um es aufzuladen oder zu lagern.
Platte mit Klebestreifen
Die Klebehalterung wird bereits vormontiert mitgeliefert.
Säubern Sie die Klebestelle auf der Helmoberfläche. Biegen Sie die beiden
Flügel so, dass sie perfekt an die Biegung des Helms passen.
Entfernen Sie die Folie vom Klebestreifen und bringen Sie die Befestigung-
splatte auf der linken Seite des Helms an, indem Sie sie einige Sekunden gegen
den Helm drücken.
Schraubklemme
Schritt 1. Entfernen Sie die Klebehalterung von der Slide-In Halterung mit Hil-
fe des mitgelieferten Inbusschlüssels. Bewahren Sie die beiden Schrauben auf.
Schritt 2: Befestigen Sie die Klemmhalterung an der Slide-In Halterung mit-
tels der 2 Schrauben.
Schwanenhalsmikrofon Kabelgebundenes Mikrofon
Klebehalterung

D
www.midlandeurope.com 37
Schritt 3: Schieben Sie die Halterung zwischen Helmschale und Polsterung
und ziehen die beiden Schrauben fest an.
Sofern notwendig können Sie auch auch die gummierte Grundplatte verwen-
den, um die Rutschfestigkeit zu erhöhen. Nutzen Sie einfach die beiden kur-
zen Schrauben, um die Platte an der Slide-In Halterung zu befestigen.
Das Midland BTX2 PRO S anbringen oder abnehmen
Das BTX2 PRO S kann problemlos am Helm befestigt werden, indem es nach
unten auf die Slide-In Halterung geschoben wird. Das BTX2 PRO S wird dur-
ch den Befestigungsclip auf der Oberseite (A) in Position gehalten. Um das
BTX2 PRO S abzunehmen, drücken Sie einfach auf den Befestigungsclip und
drücken das Gerät nach oben.
Ein-/Ausschalten des Midland BTX2 PRO S
Einschalten des Geräts:
› Halten Sie die “mittlere” Taste für ca. 3 Sekunden gedrückt, bis die BLAUE
LED aufleuchtet.
Ausschalten des Geräts:
› Halten Sie die “mittlere” und die “Zurück”-Taste gleichzeitig für ca. 3
Sekunden gedrückt, bis die ROTE LED 3-mal aulinkt. Dadurch wird die
Gefahr des versehentlichen Ausschaltens des Geräts minimiert (vor allem
mit Handschuhen).
Betriebsarten
Das BTX2 PRO S besitzt drei Hauptbetriebsarten: Gegensprechen (Inter-
com), Telefon und UKW- Radio.
Die 3 Multifunktions-Tasten haben unterschiedliche Funktionen und hängen
von der Betriebsart ab, in der sich das Gerät aktuell befindet.
› Im Intercom - Modus können Sie mit den Tasten die Sprechverbindung mit
bis zu 6 Teilnehmern steuern, indem jeweils einer mit einem der anderen
spricht. Drücken Sie einfach auf eine der drei Tasten, um das Intercom zu
aktivieren.
A
LösenBefestigen
Gummierte Grundplatte

D
38 www.midlandeurope.com
› Im Telefon – Modus können Sie mit Ihrem Bluetooth-Mobiltelefon einen
Anruf tätigen/annehmen oder Musik wiedergeben (in Stereo).
› Im UKW-Radio - Modus können Sie Ihren Lieblings-Stereo-Radiosender
wiedergeben. Suchen Sie einen bestimmten Radiosender und speichern Sie
ihn (Es sind 6 Speicherplätze vorhanden).
Sie können von einem Modus in einen anderen umschalten (hin- und her-
schalten), indem Sie einfach die “mittlere” Taste gedrückt halten (3 Sekun-
den). Eine Sprachansage teilt Ihnen den aktuellen Modus mit.
Die Modi schalten in folgender Reihenfolge um:
› Gegensprech- Modus (wenn ein anderes BTX2 PRO S früher schon
gekoppelt wurde)
› UKW-Radio-Modus
› Telefon-Modus (wenn vorher schon ein Mobiltelefon gekoppelt wurde)
Standardmäßig aktiviert das Gerät beim Einschalten die Betriebsart, in der es
zuletzt verwendet wurde.
Der Gegensprechmodus (Intercommodus) und der Telefonmodus (Phone-
modus) sind nur verfügbar, wenn das Gerät vorher mit einem anderen BT-
Gerät oder einem Handy gekoppelt wurde.
Wenn Sie wissen möchten, in welchem Modus sich das Gerät gerade befindet,
drücken Sie einfach gleichzeitig die Tasten “Lautstärke +” und “Lautstärke –”
für 3 Sekunden. Eine Sprachansage teilt Ihnen den aktuellen Modus mit.
Max. Reichweite
Die maximale Reichweite zwischen 2 BTX2 PRO S liegt bei 1.2 Km ohne Hin-
dernisse oder Interferenzen (Fahrer müssen immer in Sichtweite sein).
Koppeln (Pairen) von zwei BTX2 PRO S- Geräten
Die beiden Geräte im BTX2 PRO S - Set sind bereits miteinander gekoppelt
und betriebsbereit. In diesem Fall muss das Verfahren nicht durchführt werden.
Das jeweils andere Gerät wurde bereits mit der “mittleren” Taste gekoppelt.
Wenn die Geräte nicht aus demselben Kit stammen oder eines der Geräte
später zugekauft wurde, müssen Sie die Geräte zuerst koppeln.
Um ein BTX2 PRO S mit einem anderen BTX2 PRO S zu koppeln, müssen Sie
zunächst den Setup-Modus aufrufen:
1. Schalten Sie das Gerät aus.
2. Halten Sie die “mittlere” Taste ca. 7 Sek. gedrückt, bis die rote LED ständig
leuchtet.
3. Jetzt halten Sie die “mittlere” Taste gedrückt (3 Sek.), bis die BLAUE und
die ROTE LED blinken.
4. Führen Sie dasselbe Verfahren auf dem anderen Gerät durch. Nach er-
folgreichem Koppeln leuchtet die blaue LED für eine Sekunde an beiden
Geräten auf und sie gehen anschließend in den Setup-Modus zurück (die
Modus Weiter (linke Taste) Mittlere Taste Zurück (rechte Taste)
Intercom Aktivieren/Deaktivieren der
Intercomverbindung mit dem ersten Fahrer
Aktivieren/Deaktivieren der
Intercomverbindung mit dem zweiten
Fahrer
Aktivieren/Deaktivieren der
Intercomverbindung mit dem dritten
Fahrer
Telefon Wahlwiederholung/Rufannahme bzw.
-ablehnung für Gerät auf “Vol+”
Wahlwiederholung/Rufannahme bzw.
-ablehnung für Gerät auf “Vol-”
Telefon (während der
Musikwiedergabe)
Einen Titel weiter Wiedergabe/Pause Einen Titel zurück
UKW-Radio Sendersuche aufwärts UKW-Radio ein/aus Sendersuchlauf abwärts

D
www.midlandeurope.com 39
rote LED leuchtet ständig). Nun ist die Kopplung abgeschlossen und Sie
müssen nur den Setup-Modus verlassen, bevor Sie die Geräte benutzen
können:
5. Doppelklicken Sie auf die “mittlere” Taste. Die rote LED erlischt und die
blaue LED blinkt.
6. Ihre beiden BTX2 PRO S sind jetzt betriebsbereit.
Achtung: Alle anderen Bluetooth Geräte müssen ausgeschaltet sein. Lediglich die
zwei zu koppelnden Geräte sind angeschaltet.
Intercom zwischen zwei Geräten
Achten Sie darauf, dass beide Geräte eingeschaltet und richtig miteinander
gekoppelt sind.
Manuelle Aktivierung
Im Intercommodus können Sie die Kommunikation starten, indem Sie die
mittlere Taste an einer der beiden Einheiten drücken. Die Intercomanlage
benötigt einige Sekunden zur Aktivierung. Sie hören einen Signalton, wenn die
Intercom-Funktion aktiviert ist.
Sprachsteuerung (VOX)
Fangen Sie einfach an zu reden. Nach einigen Sekunden wird die
Sprechverbindung aktiviert und bleibt eingeschaltet, solange Sie reden. Wenn
nicht mehr geredet wird, wird die Sprechverbindung nach 40 Sekunden
wieder abgeschaltet. Bei Bedarf können Sie die Intercom- Funktion ohne eine
Wartezeit von 40 Sekunden jederzeit manuell abschalten (drücken Sie einfach
die “mittlere” Taste).
Wenn nötig, können Sie die VOX-Funktion aktivieren/deaktivieren, indem
Sie einfach die “Zurück”-Taste für 7 Sek. gedrückt halten. Eine Sprachansage
weist darauf hin, dass die VOX-Funktion aktiviert/deaktiviert wurde. Um die
VOX-Funktion erneut zu aktivieren, drücken Sie einfach die gleiche Taste. Die
Sprachansage weist darauf hin, dass die VOX-Funktion nun aktiviert wurde.
Diese Einstellung bleibt auch nach dem Ausschalten des Gerätes erhalten.
ACHTUNG: Die Sprachsteuerung (VOX) kann die Sprechverbindung nur auf
dem Gerät aktivieren, das mit der “mittleren” Taste gekoppelt wurde. Wenn Sie
eine andere Taste (“Zurück” oder “Weiter”) verwenden möchten, können Sie die
Intercomanlage nur manuell aktivieren.
Anpassen der Lautstärke
Ihr Midland BTX2 PRO S benutzt AGC-Technologie, welche automatisch die
Hörerlautstärke den Hintergrundgeräuschen anpasst.
Sie können aber auch die Lautstärke manuell mit den Tasten “Lautstärke+”
und “Lautstärke-” anpassen. Die gewählte Lautstärke wird für jede Quelle
(Intercom, Stereomusik, Telefonanrufe, UKW Radio) gesondert gespeichert.
Achtung: Die Lautstärke kann nur während einer gerade bestehenden Audiover-
bindung angepasst werden.
Das AGC-System einrichten
Die Empfindlichkeit des AGC-Systems können Sie mit der PC-Software “BT
UPDATER” oder der Smartphone-App “BT SET-APP” einstellen. Sie können
je nachdem, was für ein Motorrad Sie besitzen (Naked-, Touren- oder Sport-
A - Manuelle Aktivierung
Modus Weiter-Taste Mittlere Taste Zurück-Taste
Intercom
(Gegensprechen)
Kurzer Tastendruck: Sprechverbindung
mit dem gekoppelten Fahrer einschalten /
ausschalten
Kurzer Tastendruck: Sprechverbindung mit
dem gekoppelten Fahrer einschalten oder
ausschalten
Langer Tastendruck: Modus wechseln
Kurzer Tastendruck: Sprechverbindung
mit dem gekoppelten Fahrer ein- oder
ausschalten

D
40 www.midlandeurope.com
motorrad) oder ob Sie als Beifahrer mitfahren, unterschiedliche Konfiguratio-
nen wählen. Sie können das AGC-System deaktivieren, indem Sie 3 Sekunden
lang gleichzeitig “Lautstärke+” und “Lautstärke–” drücken.
Kopplung des BTX2 PRO S mit mehr als zwei Geräten
Ein Midland BTX2 PRO S kann mit maximal 5 anderen Intercomgeräten (3
Midland Geräte + 2 Talk2All ) verbunden werden.
Das Midland BTX2 PRO S hat drei Haupttasten (Vorwärts, Mittel und Zurück).
Sie können frei entscheiden, welchen Kommunikationspartner Sie mit welcher
Taste koppeln. Die Taste, welche Sie zum koppeln verwenden dient im Inter-
commodus auch dazu, die Kommunikation zu aktivieren. Beachten Sie bitte,
dass Sie auf diese Weise bis zu 3 Geräte miteinander koppeln können.
Sie können zum Beispiel einen Biker mit der Vorwärts-Taste koppeln, Ihren Bei-
fahrer mit der mittleren Taste und einen weiteren Fahrer mit der Zurück-Taste.
Auf diese Weise können insgesamt 4 Geräte miteinander verbunden werden.
Sie können sich mit jeder Person mittels “Eins-zu-Eins” Gegensprechen ver-
binden, indem Sie einfach nur die jeweilige Taste kurz drücken. Sobald Sie die
Verbindung zu einem Partner auauen, werden etwaige bestehende Verbin-
dungen automatisch geschlossen. Wenn sich 2 Personen unterhalten, ist es
für die anderen beiden Personen nicht möglich diese Verbindung zu unter-
brechen.
Kopplung des Midland BTX2 PRO S mit einer anderen BTX2 PRO S
Um zwei Midland BTX2 PRO S miteinander zu koppeln, müssen diese zuerst
in den Setupmodus gebracht werden:
1. Gerät ausschalten.
2. Die mittlere Taste für etwa 7 Sekunden gedrückt halten, bis die LED kon-
stant rot leuchtet.
3. Nun die Taste (Vorwärts, Mitte oder Zurück) für 3s gedrückt halten, auf
die der Gesprächspartner gespeichert werden soll. Die LED blinkt abwechs-
elnd rot und blau.
4. Schritte 1-3 mit dem zweiten Gerät wiederholen. Sobald die beiden Geräte
erfolgreich gekoppelt wurden blinkt die LED für 1 Sekunde blau und wech-
selt dann zurück in den Setupmodus (LED konstant rot)
5. Nun ist die Kopplung abgeschlossen. Es können nun weitere Geräte gekop-
pelt werden, indem Schritt 3 und 4 wiederholt werden. Um den Setupmo-
dus zu verlassen wird die mittlere Taste schnell doppelt geklickt. Die LED
wechselt von konstant rot auf blau blinkend. Sie können Ihr BTX2 PRO S
nun verwenden.
Auswahlmöglichkeiten beim Intercom mit mehr als 2 Geräten
Um alle Gegensprechfunktionen zu nutzen, müssen alle beteiligten Geräte
auch eingeschaltet und richtig miteinander gekoppelt sein.
Manuelle Aktivierung
Wenn Sie im Intercommodus sind, drücken Sie die jeweilige Taste auf die der
Partner gekoppelt wurde. Nach ca. 4 Sekunden wird die Intercom-Sprech-
verbindung aktiviert.
Die Sprechverbindung bleibt solange eingeschaltet, bis Sie noch einmal die
Taste drücken. Um schnell zu einer anderen Person umzuschalten, drücken
Sie einfach die Taste, die der anderen Person zugeordnet wurde. Die aktuel-
le Verbindung wird dann automatisch beendet und die neue Verbindung wird
gestartet.
Sprachsteuerung (VOX)
Die Sprachaktivierung kann nur genutzt werden, um die Intercomverbindung
zu Ihrem Partner auf der mittleren Taste herzustellen.
Fahrer 2
Beifahrer 1
Fahrer 1
Fahrer 3

D
www.midlandeurope.com 41
Hinweis: diese Funktion ist sehr nützlich, wenn Sie einen Kommunikationspartner
haben, mit dem Sie häufiger sprechen (wie z.B. Ihr Beifahrer). Auf diese Weise
brauchen Sie nicht jedes Mal die Taste zu drücken.
Gerät bereits belegt
Wenn Sie eine Gegensprech-Verbindung mit einer anderen Person herstel-
len möchten, die sich bereits in einem Gespräch befindet (oder telefoniert),
hören Sie zwei “Besetzt”- Signaltöne. Warten Sie einfach einen Moment und
versuchen Sie es erneut.
Die angerufene Person wird über den versuchten Anruf informiert und hört
eine Ansage mit der Nummer der Taste, von der die Anfrage kommt. Sobald
das erste Gespräch beendet ist, kann die Person auf diese Weise einfach
den Anrufer kontaktieren, indem Sie das Intercom mit der entsprechenden
Nummer (per Sprachansage mitgeteilt) aktiviert.
Konferenz
Der Konferenzmodus erlaubt die gleichzeitige Kommunikation zwischen 4
Personen oder, sofern auch Intercomgeräte mittels “Vol-” gekoppelt wurden,
bis zu 8 Personen (4 Motorräder). Sie können das BTX2 PRO S entweder im
“Eins-zu-Eins” Modus mit bis zu 6 Personen (klassisches Intercom) oder mit
bis zu 8 Personen (4 Motorräder) im Konferenzmodus verwenden.
Wie verwende ich den Konferenzmodus
Zuerst müssen alle Einheiten in einer “Kette” gekoppelt werden. Im zweiten
Schritt muss die Konferenz auf jedem der Geräte aktiviert werden
Kopplung
Um den Konferenzmodus zu nutzen, müssen alle Geräte in einer “Kette”
gekoppelt werden. Für die Kopplung von Gerät 1 und 2, nutzt Gerät 1 den
Zurück Knopf und Gerät 2 den Vorwärts Knopf.
Für die Kopplung von Gerät 2 und 3, nutzt Gerät 2 den Zurück Knopf und
Gerät 3 den Vorwärts Knopf. Für die Kopplung von Gerät 3 und 4, nutzt Gerät
3 den Zurück Knopf und Gerät 4 den Vorwärts Knopf. Die Geräte 1 und 4
dürfen nicht miteinander gekoppelt werden.
Nummer 1 und 4 können sich nur durch die Kette unterhalten. Das bedeutet,
dass alle Teilnehmer das Intercom aktivieren und in Reichweite sein müssen.
Konferenzmodus An
Halten Sie die mittlere und Vorwärts Tasten für 3 Sekunden gedrückt. Die
Sprachansage “Conference” zeigt an, dass die Konferenz aktiviert wurde. Nach
der Aktivierung werden Geräte, welche über Vol+ gekoppelt wurden, getrennt.
Das Pairing über die mittlere Taste und Universal Interom sind nicht verfügbar.
Alle Kopplungen über Vorwärts- und Rückwärtstaste, sowie das Gerät auf Vol-
sind weiterhin verfügbar. Während der Konferenz können Sie jederzeit in den
“UKW Radio” Modus wechseln und Ihre Lieblingsstation hören oder in den
“Telefon” Modus, um das Telefon auf Vol- zu steuern.
Konferenzmodus deaktivieren
Halten Sie die Vorwärts- und mittlere Tasten für 3 Sekunden gedrückt. Die
Sprachansage “Intercom” signalisiert, dass sich das Gerät wieder im “Eins-zu-
Eins” Modus befindet. Geräte auf Vol+, das Pairing auf der mittleren Taste,
sowie das Universal Intercom stehen wieder zur Verfügung.
1
2
3
1
2
3
1 2 3 4

D
42 www.midlandeurope.com
Konferenzmodus 4 Personen
Wenn der Konferenzmodus aktiv ist, können Sie die Intercomverbindung auf-
bauen, indem Sie den Vorwärts und den Rückwärts Knopf drücken.
Ein Knopfdruck önet die Verbindung, ein erneuter Knopfdruck schließt
sie wieder. Um die Kommunikation zwischen allen Geräten in der Kette zu
gewährleisten, müssen die Geräte in der Mitte (Nr. 2 und 3) beide Verbin-
dungen aktivieren
“One Click Talk” Funktion
Ist der Konferenzmodus aktiv, ist es möglich die Kommunikation zwischen al-
len 4 Nutzern mit einem “Klick” zu aktivieren. Drücken Sie einfach die mittlere
Taste kurz und die komplette Konferenzkette wird aktiviert.
Konferenzmodus mit Zusatzgerät auf Vol-
Wenn der Konferenzmodus aktiviert ist, dann ist die Kopplung über Vol- wei-
terhin verfügbar. Das bedeutet, dass Sie weiterhin Ihre Navigationsansagen
hören oder Anrufe beantworten können, ohne die Konferenzkette zu unter-
brechen.
Für das Audiosignal von Vol- kann entweder Privat (wird nicht mit Konferenz
geteilt) oder Public (wird mit Konferenz geteilt) gewählt werden. Die Standar-
deinstellung ist Privat.
Ist Privat oder Public gewählt, werden Sie, wenn Sie einen Anruf erhalten,
vorübergehend von der Konferenz getrennt. Alle anderen Konferenzteilneh-
mer können sich weiterhin unterhalten. Ist der Anruf bzw. die Ansage beendet,
wechseln Sie automatisch zurück in die Konferenz.
Wechseln zwischen Public oder Privat: Halten Sie die Vol- gedrückt, bis sie
die Sprachansage “Public” oder “Private” hören, welche den aktuell gewählten
Modus anzeigt.
Achtung: Eingehende Anrufe sind immer Privat, selbst wenn Sie Public gewählt
haben.
Konferenzmodus mit bis zu 8 Personen (4 Motorräder)
Um 8 Personen in die Konferenz einzubinden, müssen weitere Intercomgeräte
mittels der Vol- Taste verbunden werden und die Option Public muss gewählt
werden.
Achtung: Die Kopplung des Gerätes auf Vol- muss als “Universal Intercom”
durchgeführt werden
Wechseln zwischen Public oder Privat: Halten Sie die Vol- gedrückt, bis sie
die Sprachansage “Public” oder “Private” hören, welche den aktuell gewählten
Modus anzeigt.
Verbinden eines Intercomgerätes mittels Vol-:
› Schalten Sie das Gerät aus und halten Sie beim Einschalten die mittlere
Taste solange gedrückt, bis die LED rot leuchtet. Sie befinden sich nun im
Setup Modus. Halten Sie nun die Vol- für 3 Sekunden gedrückt. Die LED
beginnt rot/blau zu blinken.
› Folgen Sie am anderen Gerät den Anweisungen zum Koppeln eines Uni-
versal Intercoms.
Önen der Konferenz für die Vol- Einheit
› Um die Konferenz vom BTX2 PRO S aus zu önen, drücken Sie im Telefon
Modus die Zurück-Taste.
› Um die Konferenz von der anderen Einheit aus zu önen, benutzen Sie ein-
fach das Kommando, um das Universal Intercom zu önen.
Die maximale Intercomreichweite zur Einheit auf Vol- beträgt 10 Meter, de-
shalb eignet sich diese nur für Fahrer-Sozius-Verbindungen.
Talk 2 All - Universelles Gegensprechen mit einem Gerät
einer anderen Marke
Dank der “Talk2 All” Funktion ist es jetzt auch möglich, das BTX2 PRO S mit
Gegensprechanlagen von Fremdherstellern zu koppeln.
Sie können bis zu 2 nicht-Midland Geräte verbinden: eines auf der “Vorwärts”-
und eines auf der “Zurück”-Taste.
› Rufen Sie den Setup-Modus auf. Im ausgeschalteten Zustand halten Sie die
mittlere Taste ca. 7 Sekunden gedrückt, bis die rote LED ständig leuchtet
› Halten Sie jetzt die “Vorwärts” oder “Zurück” für ca. 7 Sekunden gedrückt.
Die rot-blaue LED blinkt zuerst schnell und danach (während Sie weiter die
Taste gedrückt halten) langsam. Sie können die Taste nun loslassen.

D
www.midlandeurope.com 43
Bei der nicht-Midland Gegensprechanlage befolgen Sie bitte die Angaben des
Herstellers um ein Telefon zu verbinden, da das BTX2 PRO S sich nun wie ein
Telefon verhält. Wenn der Verbindungsvorgang erfolgreich war, wird die LED
nur noch langsam in blau blinken.
Achtung: Bitte denken Sie daran, alle anderen Bluetooth Geräte (außer den Bei-
den zu koppelnden) auszuschalten.
Um die Kommunikation zu starten, drücken Sie beim BTX2 PRO S 3Sek. die
“Vorwärts”- oder “Zurück”-Taste (je nachdem, auf welcher Sie das Gerät ver-
bunden haben). Möchten Sie die Verbindung vom Gerät des Fremdherstel-
lers starten, drücken Sie bitte die Telefon Wahlwiederholungstaste. Möglic-
herweise kann es nötig sein, die Wahlwiederholungstaste 2x zu drücken.
Achtung: Um die “Talk2 All” Funktion zu nutzen, muss die Verbindung auf dem
Gerät des Fremdherstellers als Telefon erfolgen. Ein weiteres Telefon kann da-
nach nicht auf dem Fremdgerät gekoppelt werden.
Sie können auch ein Midland Gerät per “Talk2 All” Funktion verbinden. Hierfür
verwenden Sie auf der einen Gegensprechanlage die “Talk2 All” Funktion und
koppeln das andere Midland-Gerät als Telefon.
Kompatibilität mit Geräten der Midland BT-Produktlinie
Das BTX2 PRO S ist mit Midland BT Geräten kompatibel. Wenn sie gekoppelt
sind, hängt die Reichweite der Gegensprechfunktion von dem Gerät ab,
das die geringere Reichweite hat. Das BTX2 PRO S ist mit Geräten der
vorigen Midland BT-Produktlinie nur kompatibel, wenn sie auf die neueste
Firmware-Version.
Kopplung des Midland BTX2 PRO S mit Bluetooth Geräten
Das Midland BTX2 PRO S kann mit anderen Bluetooth Geräten gekoppelt
werden, wie z.B. Telefonen, GPS Navigationsgeräten oder PMR446 Funk-
geräten mit integriertem oder externem Bluetooth (Dongle).
Die Kopplung muss mittels Volume + oder Volume - vorgenommen werden.
› Kopplung über Volume +: alle Geräte, welche über Volume + gekoppelt
wurden, haben die höchste Priorität und unterbrechen jegliche andere
Funktion (wie z.B Intercom, UKW Radio und Musik)
› Kopplung über Volume -: alle Geräte, welche über Volume - gekoppelt
wurden, sind im Hintergrund der Intercomkommunikation und unterbre-
chen diese nicht.
”Hintergrund”-Funktion
Jedes Audiosignal von einem Gerät, welches über Vol- gekoppelt wurde, ist
im Hintergrund hörbar (selbst Stereosignale). Auf diese Weise wird die Inter-
comkommunikation nicht durch Fahranweisungen des Navigationsgerätes o.ä.
unterbrochen. Sie können entscheiden, ob Audiosignale von Vol- Geräten mit
Ihrem Partner geteilt werden, wenn das Intercom geönet ist.
Kopplung mit einem oder zwei Telefonen
Ein Mobiltelefon kann entweder mittels Vol+ oder Vol- gekoppelt werden.
Sobald ein Gerät über die “Vol+” bzw. die “Vol-” Taste gekoppelt wurde, ist der
Telefonmodus während des Betriebs verfügbar.
Ein eingehender Telefonanruf hat immer die höchste Priorität, das heißt, dass
Talk2All-Universal Intercom
Kein Midland Gerät
VOL- Immer im Hintergrund
› Telefon (HFP/A2DP Stereo)
› Navigation(HFP/A2DP Stereo)
› Dongle (HFP/A2DP Stereo)
VOL+ Höhe Priorität
› Telefon (HFP/A2DP Stereo)
› Navigation(HFP/A2DP Stereo)
› Dongle (HFP/A2DP Stereo)

D
44 www.midlandeurope.com
alle anderen Kommunikationen (Intercom, UKW Radio, Musik) unterbrochen
werden. Erhalten Sie währenddessen einen weiteren Anruf auf dem zweiten
Telefon, dann hören Sie einen Piepton
ACHTUNG!
Um eine möglichst gute Performance mit Ihrem Mobiltelefon zu gewährleis-
ten, empfehlen wir es möglichst nah am BTX2 PRO S zu tragen. Idealerweise
auf der linken Seite Ihres Körpers in der Brusttasche.
Das BTX2 PRO S mit einem Mobiltelefon koppeln
Um das BTX2 PRO S mit einem Mobiltelefon zu koppeln, müssen Sie zunächst
den Setup-Modus aufrufen:
› Schalten Sie das Gerät aus.
› Halten Sie die “mittlere” Taste ca. 7 Sek. gedrückt, bis die rote LED ständig
leuchtet.
› Drücken Sie nun die “Volume+” oder die “Volume-” Taste für 3 Sekunden.
Die LED beginnt abwechselnd blau und rot zu blinken
› Halten Sie jetzt die “Lautstärke +” Taste länger gedrückt (3 Sek.), die blaue
und die rote LED blinken. Nach einigen Sekunden sehen Sie im Display des
Telefons “Midland BT NEXT” . Befolgen Sie den Kopplungsvorgang Ihres
Telefons. Wenn ein PIN-Code erforderlich ist, geben “0000” (vier mal
Null) ein.
Wenn der Kopplungsvorgang erfolgreich war, leuchtet die blaue LED des Geräts
für eine Sekunde auf.
Anschließend verlässt das Gerät den Setup-Modus automatisch wieder und
wechselt in den Betriebsmodus (die blaue LED blinkt). Sie können nun Ihr BTX2
PRO S zusammen mit dem Telefon benutzen.
Mobiltelefon über das BTX2 PRO S bedienen
Nachdem Sie Ihr Mobiltelefon mit dem BTX2 PRO S gekoppelt haben, müss-
en Sie in den “Telefon”-Modus wechseln, um es zu verwenden. Wechseln Sie
durch langes Drücken der mittleren Taste durch die Modi, bis Sie die Ansage
“Telefon” hören. Nun bedienen alle drei Tasten das Telefon (siehe die Tabelle B).
Einen Anruf beantworten
Wenn Sie das Telefon klingeln hören, können Sie auf zwei Arten antworten:
Sprachgesteuert:
Sagen Sie einfach ein Wort direkt nach dem ersten Klingeln, um den Anruf
anzunehmen.
Manuell:
Tippen Sie auf die “Vorwärts”-Taste und fangen Sie zu reden.
Anruf ablehnen
Falls Sie den Anruf nicht annehmen wollen, können Sie das Mobiltelefon
klingeln lassen oder halten Sie die “Vorwärts”-Taste für 3 Sekunden gedrückt
(Sie werden einen Bestätigungston hören).
B - Telefon mode
Modus Vorwäts-Taste Mittlere Taste Zurück-Taste
Telefon Kurzer Tastendruck: Sprachwahl/Akzeptieren
oder beenden, solange die Anwahl oder das
Gespräch noch stattfindet
Langer Tastendruck: Wahlwiederholung/ oder
eingehenden Anruf ablehnen
Langer Tastendruck: Modus wechseln Kurz drücken: Sprachwahl / Gespräch
annehmen oder auflegen während eines
Telefonats
Lang drücken: Wahlwiederholung oder
Gespräch ablehnen
Musik vom Telefon
(wenn Musik abgespielt wird und
über “Vol+” gekoppelt wurde)
Kurzer Tastendruck: Einen Titel weiter Kurzer Tastendruck: Wiedergabe/Pause
Langer Tastendruck: Modus wechseln
Kurzer Tastendruck: Einen Titel zurück

D
www.midlandeurope.com 45
Anruf tätigen
Es gibt mehrere Möglichkeiten einen Anruf zu starten.
Mit der Tastatur des Mobiltelefons:
Wählen Sie die Nummer auf der Tastatur des Mobiltelefons:
Drücken Sie “Wählen” auf dem Mobiltelefon.
Wahlwiederholung:
› Telefon über Vol+: Drücken Sie die “Vorwärts”-Taste für 3s, um die
Wahlwiederholung zu starten (Sie erhalten einen Bestätigungston).
› Telefon über Vol-: Drücken Sie die “Zurück”-Taste für 3s, um die Wahlwie-
derholung zu starten (Sie erhalten einen Bestätigungston)
Mit Sprachsteuerung:
› Telefon über Vol+: Drücken Sie kurz auf die “Vorwärts”-Taste. Wenn Ihr Te-
lefon die Spracheingabe unterstützt, werden Sie aufgefordert, den Namen
des gewünschten Kontaktes zu sagen.
› Telefon über Vol-: Drücken Sie kurz auf die “Zurück”-Taste. Wenn Ihr Te-
lefon die Spracheingabe unterstützt, werden Sie aufgefordert, den Namen
des gewünschten Kontaktes zu sagen
Priorität: Anrufe haben eine hohe Priorität, was bedeutet: Wenn ein Anruf ankom-
mt, wird jede andere Verbindung vorübergehend deaktiviert.
Anruf beenden
Es gibt verschiedene Wege, einen Anruf zu beenden:
› Warten Sie, bis die angerufene Person den Anruf beendet.
› Halten Sie die “Vorwärts”-Taste für 3 Sekunden gedrückt (Sie hören einen
Bestätigungston).
› Drücken Sie auf dem Mobiltelefon auf die Taste “Beenden”.
Schnellwahl
Das BTX2 PRO S kann nur eine Nummer für das Telefon, welches über
Vol+ gekoppelt wurde, speichern. Sie müssen die Nummer zuerst über die
PC-Software “BT UPDATER” oder die Smartphone-App “BT SET-APP” auf
dem Gerät speichern. Im Handy-Modus drücken Sie dann einfach 7 Sekunden
lang die “Vorwärts”-Taste.
Die MP3-Player-Funktion des Mobiltelefons benutzen
Ein Mobiltelefon kann, sofern über Vol- oder Vol+ gekoppelt, als Stereo-
MP3-Player verwendet werden. Das BTX2 PRO S unterstützt die A2DP-
und AVRCP-Protokolle, die es Ihnen ermöglichen, Stereo-Musik zu hören
und Ihren MP3 Player im Mobiltelefon fernzusteuern. Sie können die Tasten
am BTX2 PRO S- Gerät nutzen, um die Abspielfunktionen (Wiedergabe,
Pause, Vorspulen und Zurückspulen) zu steuern. Es ist nur möglich ein Telefon
auf diese Weise zu steuern. Sie können ein Telefon auswählen, indem Sie die
Vol+ Taste für 3 Sekunden gedrückt halten.
Sie werden die Sprachansage “Control on volume up” hören. Nun können Sie
die Wiedergabe des Telefons auf Vol+ steuern. Wenn Sie die Steuerung wech-
seln möchten, halten Sie die Vol+ erneut für 3 Sekunden gedrückt. Nun hören
Sie die Sprachansage “Control on volume down”.
Verfügbare Bedienelemente:
› Musik-Wiedergabe/Pause: Klicken Sie auf die “mittlere” Taste.
› Zum nächsten Titel springen: Drücken Sie die “Vorwärts”-Taste.
› Zum vorherigen Titel gehen: Drücken Sie die “Zurück”-Taste.
Priorität: Die Musikwiedergabe hat die niedrigste Priorität. Deshalb wird die Musik
immer deaktiviert, wenn ein anderer Kommunikationstyp aktiviert ist. Das Prio-
risierungsverhalten können Sie mit der PC-Software “BT UPDATER” oder der
Smartphone-App “BT SET-APP” einstellen.
Achtung: Die komplette A2DP Steuerung (Play/Pause, Vorwärts, Zurück) steht
nur im “Telefon” Modus zur Verfügung.
Play/PauseNächster Titel Letzter Titel

D
46 www.midlandeurope.com
Während Sie Musik hören, können Sie den Modus auf “UKW Radio” oder “In-
tercom” wechseln und weiterhin die Musik im Hintergrund hören. Es steht
dann aber nicht mehr die komplette Steuerung zur Verfügung. Lediglich Play/
Pause ist weiterhin über die mittlere Taste verfügbar.
Music Share (Musik weiterleiten)
Music Share kann nur mit dem Telefon, welches über Vol+ gekoppelt wurde,
genutzt werden. Um Musik per A2DP mit Ihrem Beifahrer zu teilen, dessen
Gerät bereits auf der mittleren Taste gekoppelt ist (maximale Distanz 10 m),
müssen Sie während der Musikwiedergabe 3 Sekunden lang die “Zurück”-Tas-
te drücken.
Der Beifahrer kann das Teilen der Musik beenden, indem er kurz die mittlere
Taste drückt, die Musikwiedergabe kann er nicht steuern.
Der Fahrer kann das Teilen der Musik beenden, indem er lange 3 Sekunden
noch einmal auf die “Zurück”-Taste drückt.
Wenn Sie Music Share aktiviert haben, können Sie die Intercom-Verbindung
nicht geönet lassen.
Achtung: Um Music Share zu aktivieren, müssen die Musikwiedergabe vom Inter-
comgerät gestartet werden.
Achtung: wenn man sich im Music Share Modus befindet, kann das Intercom
durch einen Doppelklick auf die Mittlere Taste geönet werden.
Kopplung mit einem GPS Navigationsgerät
Das GPS Navigationsgerät kann entweder über “Volume +” oder “Volume –”
gekoppelt werden.
› Volume + Taste (unterstützt A2DP Audio und HFP Mono) Mit Vol+ gekop-
pelte Geräte haben eine höhere Priorität und unterbrechen jegliche andere
Kommunikation (wie Intercom oder UKW Radio)
› Volume - Taste (unterstützt A2DP Audio und HFP Mono) Mit Vol- gekop-
pelte Geräte sind immer im Hintergrund aktiv und unterbrechen die In-
tercomkommunikation nicht. Sie können außerdem entscheiden, ob das
Audiosignal über das Intercom mit anderen Personen geteilt werden soll
(Option “Public”) oder nicht (Option “Privat”)
Siehe Kapitel Hintergrundfunktion.
Stereo (A2DP)-Routenanweisungen des Navigationsgerätes
Das Midland BTX2 PRO S unterstützt Stereo (A2DP)-Routenanweisungen
von Navigationsgeräten, wenn Sie auf der “Lautstärke+”-Taste gekoppelt sind.
Bei einer Routenanweisung werden Intercom und UKW-Modus unterbro-
chen, und die Routenanweisung hat Priorität. Standardmäßig ist diese Fun-
ktion aktiviert; mittels der PC-Software “BT Updater” oder der Smartpho-
ne-App “BT SET-APP” kann die Priorität jedoch geändert werden.
Das BTX2 PRO S mit einem GPS-Navigationsgerät koppeln
Allgemein ist es möglich, das BTX2 PRO S mit jedem GPS-Navigationsgerät
für Motorräder zu koppeln, das Bluetooth Headsets unterstützt.
Hinweis: Die meisten für PKW angebotenen Bluetooth-Navigationsgeräte sind
auf dem Motorrad nicht brauchbar, da deren Bluetoothmodul nicht headsetfähig
ist!
Um das BTX2 PRO S mit einem GPS-Navigationsgerät zu koppeln, müssen
Sie zunächst den Setup-Modus aufrufen:
› Schalten Sie das Gerät aus.
› Halten Sie die mittlere Taste ca. 7 Sek. gedrückt, bis die rote LED ständig
leuchtet.
› Halten Sie jetzt die Taste “Lautstärke +” oder “Lautstärke -” gedrückt (3
Sek.), bis die blaue und die rote LED anfangen zu blinken. Befolgen Sie
den Kopplungsvorgang für Ihr GPS-Navigationsgerät. Wenn ein PIN-Code
erforderlich ist, geben Sie “0000” (vier mal Null) ein.
Wenn der Kopplungsvorgang erfolgreich war, leuchtet die blaue LED des
BTX2 PRO S für eine Sekunde auf.
Anschließend verlässt das Gerät den Setup-Modus und ist betriebsbereit (die
blaue LED blinkt).
Nun können Sie mit Ihrem Midland BTX2 PRO S die Fahranweisungen Ihres
Navigationsgerätes hören.
Verwenden eines PMR 446 Funkgeräts mit integriertem Bluetooth
Wenn Sie über ein Funkgerät mit integriertem Bluetooth verfügen, dann
koppeln Sie das Funkgerät über die “Lautstärke –” oder “Lautstärke +” Taste.
Wenn es über Volume - gekoppelt wird, ist das PMR446 Gerät immer im
Hintergrund hörbar., selbst wenn Sie sich über das Intercom unterhalten.

D
www.midlandeurope.com 47
› Schalten Sie das Gerät aus.
› Halten Sie die “mittlere” Taste ca. 7 Sek. gedrückt, bis die rote LED ständig
leuchtet.
› Drücken Sie jetzt (3 sec lang) die “Lautstärke – “ Taste. Die blaue und rote
LED blinken.
› Folgen Sie jetzt der Kopplungs- (Pairing) Prozedur, wie Sie im Handbuch
des Funkgeräts beschrieben ist.
Ukw-Radio
Der UKW-Radioempfänger ist in das Gerät integriert. Sie müssen nur in den
“UKW-Radio”-Modus wechseln, um ihn zu benutzen. Drücken Sie die “mittle-
re” Taste, bis Sie die Sprachansage “FM-Radio” hören. Nun bedienen alle drei
Tasten das FM-Radio (siehe die Tabelle C):
› Drücken Sie die “Vorwärts” – oder “Zurück”-Taste kurz, um nach neuen
Radiostationen zu suchen.
Wenn Sie die “Vorwärts” – oder “Zurück”-Taste lange drücken, können Sie die
6 gespeicherten Sender auf- oder abwärts durchschalten.
Eine Sprachansage teilt lhnen die Nummer des Speicherplatzes mit, den Sie
gerade aufgerufen haben. Sie hören zwei Signaltöne, wenn der letzte oder der
erste vorbelegte Sender erreicht wurde.
Um den aktuellen Sender zu speichern,halten Sie für 3 Sekunden gleichzeitig
die “Weiter” - und “Zurück” - Taste gedrückt. Sie hören einen Bestätigungs-
Signalton.
Der Sender überschreibt den vorbelegten Sender, der zuletzt verwendet wur-
de. Dank des RDS-System wählt das UKW-Radio für das aktuelle Radiopro-
gramm das jeweils stärkste Signal.
Das RDS-System ist standardmäßig deaktiviert. Sie können die RDS-Fun-
ktion ein-bzw. auszuschalten, indem Sie bei eingeschaltetem UKW Radio die
Tasten “Lautstärke +” und “Lautstärke -” gleichzeitig für 3 Sekunden gedrückt
halten. Eine Sprachansage teilt Ihnen den RDS-Status mit.
Aktivierung / Deaktivierung des UKW Radios
Standardmäßig ist das UKW Radio aktiviert.
Deaktivierung:
› Gehen Sie in den “Setup”-Modus: schalten Sie das Gerät aus und drücken
Sie die “mittlere”-Taste ca. 7sek. bis die LED rot leuchtet.
› Drücken Sie die “mittlere”- und die “Vol+” Taste für 3sek. Die LED blinkt
zweimal blau.
› Per Doppelklick auf die “mittlere”-Taste verlassen Sie den “Setup”-Modus.
Aktivierung:
› Folgen Sie den Anweisungen wie bei der “Deaktivierung”. Die blaue LED
blinkt nun einmal. Sie verlassen den “Setup”-Modus per Doppelklick auf
die “mittlere”-Taste.
UKW-Radio und Intercom betreiben
Während des Radiohörens können Sie das Intercom nicht manuell starten,
sondern Sie können nur die VOX Funktion benutzen. Das funktioniert durch
einfaches Sprechen, aber nur dann, wenn Sie vorher das jeweils gewünschte
Partnergerät auf die mittlere Taste gekoppelt hatten.
Für eine manuelle Intercomfunktion müssten Sie dann vorher erst in den
Intercom - Mode umschalten.
UKW Radio im Hintergrund
Das UKW Radio kann nicht gleichzeitig mit anderen Audioquellen gehört
werden. Sämtliche Nachrichten über das Intercom oder von den VOL+/VOL-
Verbindungen unterbrechen das UKW Radio kurzfristig.
C-UKW Radio mode
Modus Weiter-Taste Mittlere Taste Zurück-Taste
UKW-Radio Kurzer Tastendruck: Sendersuchlauf hoch
Langer Tastendruck: Gespeicherte Sender aufwärts
Kurzer Tastendruck: Ein- und Ausschalten
Langer Tastendruck: Modus wechseln
Kurzer Tastendruck: Sendersuchlauf runter
Langer Tastendruck: Gespeicherte Sender abwärts

D
48 www.midlandeurope.com
Setup und spezielle Konfiguration
Alle Pairing- (Kopplungs-) Informationen zurücksetzen
Wurde Ihr BT Next bereits öfter mit anderen Geräten gekoppelt, dann kann
die Zahl der gekoppelten Verbindungen irgendwann unübersichtlich werden
und es kann angebracht sein, alle im BTX2 PRO S gespeicherten Kopplung-
sdaten zu löschen (Reset).
Für diese Prozedur rufen Sie zunächst den Setup-Modus auf:
› Schalten Sie das Gerät aus.
› Halten Sie die “mittlere” Taste ca. 7 Sek. gedrückt, bis die rote LED ständig
leuchtet.
› Halten Sie anschließend die “Lautstärke +” und “Lautstärke –” Tasten für
3 Sekunden gedrückt. Die blaue LED leuchtet für 1 Sekunde auf und an-
schließend leuchtet ständig die rote LED.
› Doppelklicken Sie auf die “mittlere” Taste, um den Setup-Modus zu
verlassen und das BTX2 PRO S wieder zu verwenden.
Dieses Vorgehen löscht alle gespeicherten und gekoppelten Bluetooth-Geräte
und ermöglicht einen neuen “sauberen” Kopplungsablauf.
Achtung: nach dem Löschen sämtlicher Pairings steht nur noch der UKW Radio
Modus zur Verfügung.
Auf die Werkseinstellungen zurücksetzen
Manchmal kann es notwendig sein, zu den Werkseinstellungen zurückzu-
kehren, um alle Änderungen oder Setupeinstellungen zurückzusetzen und ein
“sauberes” Gerät zu erhalten.
Zuerst schalten Sie wieder in den Setup-Modus:
› Schalten Sie das Gerät aus.
› Halten Sie die “mittlere” Taste ca. 7 Sek. gedrückt, bis die rote LED ständig
leuchtet.
› Anschließend halten Sie gleichzeitig alle 3 Tasten “Vorwärts” – “mittlere
Taste” – “Zurück” für 3 Sekunden gedrückt. Die blaue LED leuchtet für 1
Sekunde auf und anschließend leuchtet ständig die rote LED.
› Doppelklicken Sie auf die “mittlere” Taste, um den Setup-Modus zu verlas-
sen und das BTX2 PRO S zu verwenden.
Einstellen/Deaktivieren der VOX-Funktion (Gegensprechanlage und
Telefon)
Die Gegensprechfunktion kann manuell oder durch Sprache (VOX) aktiviert
werden. Diese Funktion wird durch die je nach Helmart verursachten
Hintergrundgeräusche beeinflusst und deshalb auch durch die Geschwindigkeit.
Für optimale Resultate kann einer der folgenden vier Mikrofon-Empfin-
dlichkeitspegel gewählt werden: hoch, mittel, niedrig und sehr niedrig. Die
Werkseinstellung des BTX2 PRO S ist “niedrig”. Sie können die VOX Funktion
auch deaktivieren, um die Gegensprech- und Telefon-Antwortfunktion nur im
manuellen Modus zu aktivieren.
Diese Einstellungen können über die Software “BTPro Updater” für PC / MAC
vorgenommen werden.

D
www.midlandeurope.com 49
Setup und Firmware-Aktualisierung
Die Firmware Ihres BTX2 PRO S kann mittels einer USB-Verbindung mit
Ihrem PC konfiguriert und aktualisiert werden. Auf der Website von Midland
www.midlandeurope.com oder unter www.btupdater.de finden Sie auf der
BTX2 PRO S-Seite die PC-Software und die neuen Firmware-Aktualisierun-
gen, falls verfügbar.
ACHTUNG DAS GERÄT NUR AN DEN PC ANSCHLIESSEN, WENN DIE
SOFTWARE HERUNTERGELADEN UND INSTALLIERT WURDE
Benutzung auf eigene Gefahr
Das Benutzen von beidseitigen Audiosets in Helmen kann kann Ihre Fähigkeit,
Geräusche und das Verkehrsgeschehen in Ihrer Umgebung wahrzunehmen,
beeinträchtigen. Benutzen Sie daher das Bluetooth Set nur, wenn die Ver-
kehrssituation es erlaubt.
Beim Motorradfahren kann das Hören von Musik oder das Führen von Telefo-
naten oder das Benutzen des Intercoms Sie von anderen Ereignissen und vom
sicheren Fahren ablenken.
Das Benutzen des Bluetooth Sets beim Führen eines Fahrzeugs oder beim
Fahrradfahren kann ein ernsthaftes Risiko für Sie oder Ihre Mitmenschen be-
deuten und kann, von Land zu Land unterschiedlich, verboten sein.
Das Benutzen eines Headsets mit extremer Lautstärkeeinstellung kann blei-
bende Gehörschäden hervorrufen.
Sollten Sie Klingeln in Ihren Ohren oder andere Hörprobleme feststellen, so
verringern Sie sofort die Lautstärke oder schalten Sie das Gerät aus. Bei ständ-
igem Gebrauch mit hohen Lautstärken kann sich Ihr Gehör and den erhöhten
Lautstärkepegel so gewöhnen, dass die Folge eine permanente Hörschädigung
sein kann. Bitte benutzen Sie dieses Gerät nur mit einer sicheren Lautstärke.
Gewährleistung
Gewährleistungsfrist beträgt 24 Monate ab Kauf-/Lieferdatum (bei Teilen mit
beschränkter Lebensdauer wie, Akkus, Ladegeräte, Headsets, mikrofone und
Antennen 6 Monate). Für allen Informationen über die Garantie der Artikel,
besuchen Sie bitte unsere www.midlandeurope.com
Europäische CE Erklärung und Sicherheitshinweise
Hiermit erklärt Cte International Srl, dass das Produkt die grundlegenden
Anforderungen und anderen relevanten Bestimmungen der Richtlinie
2014/53/UE erfüllt und ist für alle EU Staaten gültig.
Es ist nicht zulässig, nicht mit uns abgesprochene Veränderungen an
den Geräten vorzunehmen. Sie gefährden mit Änderungen nicht nur die
Gewährleistung, sondern auch das Einhalten der gesetzlichen Grenzwerte.
Weitere technische Informationen und die aktuelle Firmware zum Download
finden Kunden aus Deutschland unter www.alan-electronics.de.


E
www.midlandeurope.com 51
Índice
Características principales ............................................................................................................................................................................................................52
Especificaciones técnicas Midland BTX2 PRO S .......................................................................................................................................................................52
Carga de la batería .........................................................................................................................................................................................................................53
Descripción del dispositivo y del sistema de montaje .................................................................................................................................................................53
Encender y apagar el BTX2 PRO S ............................................................................................................................................................................................. 55
Modos Operativos ......................................................................................................................................................................................................................... 55
Cómo emparejar dos unidades de Midland BTX2 PRO S ......................................................................................................................................................... 56
Configuración del sistema AGC .................................................................................................................................................................................................. 57
Cómo emparejar el Midland BTX2 PRO S a más de dos unidades ........................................................................................................................................... 57
Conference ....................................................................................................................................................................................................................................59
Talk 2 All - Universal Intercom: sincronización con Intercomunicadores de otras marcas .....................................................................................................60
Sincronizar BTX2 PRO S a dispositivos Bluetooth .....................................................................................................................................................................61
Uso de la función Radio FM .........................................................................................................................................................................................................64
Configuraciones especiales ...........................................................................................................................................................................................................65
Setup y actualización de Firmware ..............................................................................................................................................................................................65
Garantía Limitada de MIDLAND IBERIA ................................................................................................................................................................................. 66

E
52 www.midlandeurope.com
MIDLAND BTX2 PRO S
Dual Core Intercom System
Midland BTX2 PRO S es un sistema de intercomunicación con Dual Bluetooth
Core (doble processador Bluetooth) para la comunicación Conference y audio
“background” estéreo real. El diseño es muy delgado y aerodinámico, todas las
funciones principales son fáciles de manejar gracias a los tres grandes botones
situados en el frontal de la unidad. Midland BTX2 PRO S se fija al casco mediante
la placa adhesiva o el soporte con mordaza.
Características principales
› Sistema Bluetooth Dual Core
› Intercom piloto/pasajero o moto a moto hasta una distancia máxima de
1.2 Km
› Función “Conference” conversación simultánea hasta 8 personas (4 pa-
rejas)
› Conexión Intercom “uno a uno” hasta seis dispositivos
› Función Universal Intercom para conectar dispositivos de otras marcas
› MWE Noise Killer
› Radio FM Estéreo con RDS
› Music Share (piloto y pasajero)
› Conecte su teléfono para realizar llamadas o escuchar música estéreo
› Soporta 2 teléfonos
› Conexión al Navegador GPS para indicaciones por voz
› Configuración y actualización de Firmware mediante conexión USB al PC
Midland BTX2 PRO S está disponible en dos versiones:
› BTX2 PRO S individual con una unidad Bluetooth
› BTX2 PRO S TWIN con dos unidades Bluetooth sincronizadas
Dependiendo del modelo adquirido, el embalaje contiene lo siguiente:
BTX2 PRO S single
› 1 dispositivo de comunicación BTX2 PRO S
› 1 kit de audio con dos altavoces estéreo, micrófono de varilla regulable y
micrófono de hilo
› 1 lámina con biadhesivo para fijar al casco
› 1 sistema de fijación al casco mediante mordaza
› 1 cargador con conexión USB
BTX2 PRO S TWIN
› 2 dispositivos de comunicación BTX2 PRO S sincronizados
› 2 kit de audio con dos altavoces Estéreo HiFi, micrófonos de varilla regu-
lable y micrófonos de hilo
› 2 láminas con biadhesivo para fijar al casco
› 2 sistemas de fijación al casco mediante mordaza
› 1 cargador doble con conexión USB
Las unidades incluidas en el TWIN ya están sincronizadas en el botón “Central” y,
por tanto, se pueden utilizar inmediatamente en modo Intercom.
Especificaciones técnicas Midland BTX2 PRO S
Generales:
› Bluetooth ver. 4.2 Estéreo (Handsfree/A2DP/protocolo AVRCP)
› Frecuencia 2.4GHz - Potencia max 100mW
› Bluetooth Dual para música de fondo en estéreo
› Sistema AGC de control automático de volumen en función del ruido de
fondo
› Activación de la comunicación por voz (VOX) o manual
› Control manual para activar el teléfono, el Intercom, la radio FM
› Radio FM Estéreo con RDS
› Totalmente resistente al agua
› Batería de Litio con autonomía de hasta 20 horas de conversación
› Tiempo de recarga de batería: 2 horas aproximadamente

E
www.midlandeurope.com 53
Conexiones Bluetooth:
Con otro BTX2 PRO S para modo Intercom Piloto/Pasajero o Moto/Moto
hasta un máximo de 1.2 Km. de distancia sin obstáculos ni interferencias (los
motoristas deben estar siempre en el campo visual).
Con dispositivos Bluetooth:
Teléfono móvil con reproductor Estéreo MP3 (protocolo A2DP) y navegador
GPS.
Carga de la batería
Atención: asegúrese de que las unidades están totalmente cargadas antes de su
uso. Antes de utilizar las unidades por primera vez, efectúe una carga de al menos
3 horas.
Para cargar la unidad, retire la protección de goma del conector de carga
y conecte el cargador. Después enchufe el alimentador a una toma de red
eléctrica. El LED rojo de la unidad empieza a parpadear cuando empieza la
carga. Mantenga la carga hasta que el LED rojo deje de parpadear y se en-
cienda el LED azul. Cuando se completa la carga (LED rojo no parpadea),
desconecte la unidad del cargador. Normalmente, después de la primera vez,
se requieren 2 horas para una carga completa.
Atención: Midland BTX2 PRO S se ha diseñado para resistir la lluvia. Verifique
siempre que las gomas de protección estén bien cerradas.
Atención: cada vez que se conecta o desconecta el USB de carga, la unidad se
apaga automáticamente. Si quiere utilizarla mientras se carga, debe encenderla
después de que haya conectado el cargador.
Descripción del dispositivo y del sistema de montaje
BTX2 PRO S dispone de cinco pulsadores, todos ubicados en la parte frontal:
los tres grandes son multifunción: “Adelante” (izquierda en el dibujo), “Cen-
tral” y “Atrás” (derecha). Los dos botones rectangulares controlan el volumen
(“Vol+” y “Vol-”).
Debajo de la unidad puede encontrar la Toma de Carga, que permite cargar el
dispositivo mediante una conexión microUSB estándar.
Descripción del kit de audio
El sistema de audio incluye dos altavoces estéreo HI-FI y dos micrófonos in-
tercambiables, uno de hilo y otro de varilla regulable. El miniconector en el
micrófono permite escoger el micrófono que mejor convenga al casco que
esté usando.
LED
Central
Volumen - Volumen +
Adelante Atrás
Conector de
alimentación

E
54 www.midlandeurope.com
Montaje de los altavoces estéreo
Los dos altavoces estéreo llevan una tira de velcro adhesiva que permite su
fijación en el interior del casco. Tenga en cuenta no ajustar el volumen dema-
siado alto, siempre debe ser capaz de oír el sonido ambiental y las indicaciones
de tráfico.
Montaje del micrófono
Micrófono de varilla
Coloque la sección con la tira adhesiva de velcro entre el acolchado y la calota
del casco, de forma que el micrófono esté correctamente colocado en frente
de su boca y la marca blanca quede de cara a la misma. Este tipo de micrófono
es adecuado para cascos abiertos y cerrados. Para cascos abiertos también
está disponible un micrófono específico, cód. C1253 (opcional).
Micrófono de hilo
Usando la tira adhesiva de velcro, coloque el micrófono dentro del casco y en
frente de su boca. Este tipo de micrófono es adecuado para cascos Integra-
les. El miniconector en el micrófono permite escoger el micrófono que mejor
convenga al casco que esté usando.
Descripción del sistema de montaje deslizante
El Midland BTX2 PRO S puede fijarse al casco de dos formas: usando la lámina
con biadhesivo o la lámina con mordaza. Estos métodos permiten tanto fijar de
forma segura el BTX2 PRO S al casco como retirarlo en cualquier momento
para cargarlo o guardarlo.
Lámina con tira biadhesiva
El soporte con biadhesivo ya está montado en el kit de montaje deslizante.
Limpie la zona del lado izquierdo del casco donde quiera colocar la unidad, do-
ble las dos alas pequeñas para que se adhiera mejor a la superficie curva del
casco. Retire el protecto del biadhesivo y coloque el soporte en el casco, pre-
sionando durante unos segundos.
Fijación con mordaza
Paso 1. Retire la lámina biadhesiva del soporte mediante la llave allen suminis-
trada. Recuerde conservar los dos tornillos.
Paso 2. Apriete la lámina con mordaza con el soporte de montaje usando los
dos tornillos suministrados.
Micrófono de varilla Micrófono de hilo
Biadhesivo

E
www.midlandeurope.com 55
Paso 3. Apriete más los dos tornillos para fijar firmemente la mordaza en su
sitio, en el lado izquierdo del casco.
Si necesario, utilizar también la base de goma para un mejor sellado de la fija-
ción con mordaza. Utilice los dos tornillos cortos para fijar la base de goma al
soporte deslizante y apriete la lámina de nuevo.
Colocación y extracción del Midland BTX2 PRO S
El BTX2 PRO S se puede fijar al casco fácilmente deslizándolo hacia abajo
en el soporte hasta que encaje en la ranura. El BTX2 PRO S se mantiene en
posición gracias al clip de fijación de la parte superior del soporte (A). Para
retirar el BTX2 PRO S, simplemente presione el clip de fijación y empuje la
unidad hacia arriba.
Encender y apagar el BTX2 PRO S
Encendido:
Mantenga pulsado durante aproximadamente 3 segundos el botón “Central”
hasta que parpadee el LED azul.
Apagado:
Mantenga pulsados durante aproximadamente 3 segundos los botones “Cen-
tral” y “Atrás” hasta que el LED parpadee tres veces en rojo; de ese modo di-
sminuyen las oportunidades de un apagado accidental, especialmente cuando
se llevan puestos los guantes.
Modos Operativos
BTX2 PRO S puede operar de tres modos diferentes: Intercom, Teléfono y
Radio FM.
Los 3 botones del dispositivo tienen diferentes funciones dependiendo del
modo operativo de la unidad.
› En Modo “Intercom” los tres botones permiten gestionar las comunicacio-
nes entre piloto y pasajero y moto a moto.
› En Modo “Teléfono” permiten efectuar o contestar llamadas o activar la
música del teléfono. Por favor, utilice su teléfono de forma segura y re-
sponsable.
› En Modo “Radio FM” puede escuchar en estéreo su emisora favorita,
buscar una emisora concreta y memorizarla (dispone de 6 memorias).
A
DesbloquearBloquear
Base de goma

E
56 www.midlandeurope.com
Puede cambiar de un modo a otro pulsando durante 3 segundos el botón
“Central”. Un mensaje vocal le dirá en qué modo se encuentra. La secuencia
del cambio de modo es la siguiente:
› Intercom (si está sincronizado, al menos, con otra unidad)
› Radio FM
› Teléfono (si se ha sincronizado con un teléfono)
Cada vez que encienda la unidad, el modo por defecto será el último modo
utilizado.
Los modos “Intercom” y “Teléfono” solo están disponibles si la unidad ha sido
previamente emparejada con otra unidad o teléfono. Para saber en qué mo-
dalidad se encuentra el BTX2 PRO S, pulse simultáneamente “Vol+” y “Vol-”
durante 3 segundos: un anuncio vocal le indicará en qué modo se encuentra.
Distancia
Puede alcanzar una distancia de intercomunicador 1.2 Km si los dos disposi-
tivos se encuentran en la línea de visión sin obstáculos ni interferencias (los
pilotos deben poder verse mutuamente).
Cómo emparejar dos unidades de Midland BTX2 PRO S
Las dos unidades suministradas en la caja del BTX2 PRO S Twin están sincro-
nizadas (en el botón “Central”) y listas para su uso, lo que significa que no debe
realizar este proceso. Si las unidades no son del mismo kit o se han comprado
separadamente, necesita sincronizarlas para poder utilizarlas juntas.
Sincronizar BTX2 PRO S con otra unidad de BTX2 PRO S
Para sincronizar el BTX2 PRO S a otro BTX2 PRO S debe entrar en el modo
Setup:
1. Apague ambas unidades.
2. Mantenga pulsado el botón “Central” hasta 7 segundos que el LED rojo se
encienda fijo.
3. Pulse el botón “Central” durante 3 segundos, hasta que el LED parpadee
rojo y azul.
4. Haga el mismo procedimiento en la otra unidad. Cuando se realiza la sincro-
nización, cada unidad tendrá la LED azul fijo durante 1 segundo y después
volverá al modo Setup (LED rojo siempre encendido).
5. Ahora la sincronización está completada. Únicamente debe salir del modo
Setup para poder utilizar las unidades.
6. Haga doble clic en el botón “Central”. El LED rojo se apagará y el azul se
encenderá.
Ahora puede usar su BTX2 PRO S.
Atención: durante la sincronización deben estar encendidos solo los dos dispositi-
vos a sincronizar. Apague el resto de dispositivos.
Cómo usar el modo Intercom con dos dispositivos
Para usar el Intercom, asegúrese que las dos unidades estén encendidas y sin-
cronizadas entre ellas.
Este es un ejemplo de la principal funcionalidad los botones en función del modo en el que se encuentra.
Modo Adelante (Botón Izquierdo) Botón Central Atrás (Botón derecho)
Intercom Abrir/cerrar el intercom para el primer piloto Abrir/cerrar el intercom para el segundo piloto Abrir/cerrar el intercom para el tercer piloto
Teléfono Remarcar el último número aceptar/rechazar
la llamada entrante en “Vol +”
Remarcar el último número aceptar/rechazar
la llamada entrante en “Vol +”
Teléfono
(mientras reproduce música)
Avanzar la canción Reproducir/pausar Retroceder la canción
FM Radio Escanear arriba FM Radio On/o Escanear abajo

E
www.midlandeurope.com 57
Activación manual
En modo Intercom, pulse el botón “Central” en una de las dos unidades. La co-
municación se activa y permanece de este modo hasta que se vuelve a pulsar el
botón “Central”. El Intercom necesita unos segundos para activarse. Cuando
se activa se oye un tono beep de aviso y dos tonos cuando se desactiva.
Activación vocal (VOX):
Bastará con comenzar a hablar sin tocar ningún botón. Después de unos se-
gundos, la comunicación se abrirá y permanecerá activa durante el tiempo que
permanezca hablando. Si no hay ninguna conversación en 40 segundos, el
Intercom se cierra automáticamente. Si quiere cerrar el Intercom antes de los
40 segundos, puede hacerlo manualmente pulsando el botón “Central”.
Se puede activar/desactivar la función VOX presionando el botón “Atrás”
durante 7 segundos. Un anuncio vocal avisará de la desactivación. Para re-
activarlo/desactivarlo deberá repetir el mismo procedimiento. El ajuste se
memorizará incluso si se apaga la unidad.
Atención: la activación por voz (VOX), solo funciona con los dispositivos que se
han sincronizado con el botón “Central”. Si se han sincronizado con otro botón
(“Atrás” o “Adelante”), solo se puede activar el Intercom manualmente.
Ajuste de volumen
Midland BTX2 PRO S utiliza tecnología AGC, la cual ajusta automáticamente
el volumen en función del ruido de fondo. Sin embargo, también se puede
ajustar el volumen manualmente mediante los botones “Volumen +” y “Vo-
lumen -”. El ajuste del volumen es independiente para cada fuente de audio:
Intercom, música estéreo, llamadas telefónicas, radio FM.
Atención: el volumen solo se puede ajustar cuando hay una fuente de audio activa.
Configuración del sistema AGC
Para ajustar la sensibilidad del sistema AGC puede usar el software para PC
“BT UPDATER” o la aplicación para smartphone “BT SET APP”. Puede elegir
diferentes configuraciones en función del tipo de moto (naked, turismo, sport)
o de si viaja como pasajero. Puede desactivar el sistema AGC presionando a la
vez “Volume +” y “Volume -” durante 3 segundos.
Cómo emparejar el Midland BTX2 PRO S a más de dos
unidades
Un Midland BTX2 PRO S puede ser emparejado a un máximo de cinco otras
unidades de BT, es decir, seis en total (3 unidades Midland + 2 Talk2All +
usted). El Midland BTX2 PRO S dispone de tres botones principales (Ade-
lante, “Central” y “Atrás” ). Puede escoger el botón que más le convenga para
emparejar y activar el Intercom.
El botón que utilice para emparejar la unidad será el mismo que use para
activar la comunicación Intercom. Recuerde que cada dispositivo puede
ser emparejado con otras 3 unidades de su elección, como se muestra en la
ilustración más abajo. También es posible un emparejamiento “cruzado”.
Por ejemplo, puede emparejar al pasajero con el botón “Central” y otros pilo-
tos con los botones “Atrás” y “Adelante”. De este modo puede tener en total
4 unidades emparejadas y hablar con cada persona, uno a uno, con solo pre-
sionar el botón correspondiente (el utilizado para el emparejamiento). Cada
vez que abra la conexión Intercom con una persona, la conexión anterior se
cerrará. Cuando dos personas están hablando no es posible interrumpir la co-
municación por parte de las demás unidades.
Piloto 2
Pasajero 1
Piloto 1
Piloto 3

E
58 www.midlandeurope.com
Emparejar Midland BTX2 PRO S a otro Midland BTX2 PRO S
Para emparejar el Midland BTX2 PRO S con otro Midland BTX2 PRO S debe
entrar primero en el modo setup:
1. Apague la unidad.
2. Mantenga presionado el botón “Central” durante 7 segundos, hasta que el
led Rojo permanezca encendido.
3. Ahora presione uno de los botones (Central, “Atrás” o “Adelante”) durante
3 segundos. Las luces Azul y Roja parpadearán.
4. Siga el mismo procedimiento con la otra unidad (no es necesario utilizar el
mismo botón).
5. Cuando se emparejan correctamente, cada unidad mostrará la luz Azul du-
rante un segundo y después volverá al modo configuración (luz Roja siem-
pre encendida).
6. Ahora que el emparejamiento está completado, puede proceder a emparejar
otras unidades en diferentes botones siguiendo el mismo procedimiento.
Si no necesita emparejar más unidades, deberá salir del modo configuración
para empezar a utilizar los dispositivos.
› Doble clic en el botón “Central”, la luz Roja se apagará y la luz Azul empe-
zará a parpadear. Ahora puede utilizar su Midland BTX2 PRO S.
Cómo usar el Intercom con más de dos unidades
Para usar la función “Intercom”, asegúrese de que todas las unidades están
encendidas y correctamente emparejadas.
Activación manual en modo Intercom
En modo Intercom, pulse el botón correspondiente a la unidad con la que
quiere comunicarse. Después de unos 4 segundos el Intercom se activa y per-
manece en este modo hasta que se vuelve a pulsar el mismo botón. Para activar
la comunicación con otra persona de forma rápida, presione el botón corres-
pondiente a su unidad. El Intercom se cerrará automáticamente y la nueva
comunicación estará activa (ver Tabla A).
Activación vocal (VOX):
La función VOX para la activación por voz solo está activa con la unidad sin-
cronizada en el botón central.
Sugerencia: esta función es muy útil cuando hay una persona específica con la que
quiere hablar más a menudo (por ejemplo el pasajero).
Usuario ocupado en otra conversación
Si quiere activar el Intercom con una persona que está hablando con un terce-
ro o por teléfono, oirá un doble pitido indicando que está ocupado. Inténtelo
más tarde hasta que la línea esté libre. La persona llamada será avisada que
alguien ha querido contactar con ella mediante un mensaje vocal que indi-
cará el botón al que está asociado el dispositivo en cuestión. De esta manera,
cuando termine de hablar, el usuario llamado podrá contactar con la persona
que quería hablar con él, simplemente abriendo el Intercom usando el botón
correspondiente al aviso recibido.
A- Activación manual
Modo Botón Adelante Botón Central Botón Atrás
Intercom Pulsación corta: Activar/Desactivar intercom a
piloto enlazado
Pulsación corta: Activar/Desactivar intercom a
piloto enlazado
Pulsación larga: cambiar modo
Pulsación corta: Activar/Desactivar intercom a
piloto enlazado
1
2
3

E
www.midlandeurope.com 59
Conference
El modo “Conference” permite la comunicación simultánea entre cuatro per-
sonas o, si empareja también un intercomunicador en VOL-, hasta 8 personas
(4 parejas).
Puede decidir usar su BTX2 PRO S en modo comunicación “uno a uno” hasta
6 personas (modo clásico), o en modo “Conference” Intercom con 8 personas
(4 parejas) donde todos pueden hablar simultáneamente.
Cómo usar el modo Conference
En primer lugar, debe emparejar todos los dispositivos siguiendo una secuen-
cia específica en cadena. Además, todos los dispositivos deben tener el modo
Conference activo.
Emparejamiento
Para utilizar el modo Conference es necesario configurar todos los dispositivos
en cadena. El botón “Atrás” del primer dispositivo debe ser emparejado con
el botón “Adelante” del segundo dispositivo. Y el botón “Atrás” del segundo
dispositivo debe ser emparejado con el botón “Adelante” del tercer dispositivo.
Y así sucesivamente hasta 4 unidades. Los dispositivos 1 y 4 no deben empa-
rejarse entre ellos (la “cadena” debe permanecer abierta).
El primer dispositivo (nº 1) puede hablar con el último dispositivo (nº 4) solo
a través de la unidad 2 y de la 3. Esto significa que para poder tener una co-
municación entre 4 personas, todos los dispositivos deben tener el Intercom
abierto y estar dentro del rango de cobertura.
Activar el modo Conference
En cualquier modo y sin ningún audio activo, mantenga pulsadas las teclas
“Adelante” y “Central” durante 3 segundos. El aviso vocal “Conference” in-
dicará la activación.
Cuando la función “Conference” está activa, los dispositivos Bluetooth em-
parejados en el botón “Vol+” están desconectados y el emparejamiento en el
botón “Central” y el Intercom Universal no están disponibles.
Ahora solo estarán disponibles los emparejamientos de los botones “Adelante”
y “Atrás” , así como el dispositivo emparejado con el botón “Vol-”.
Desactivar el modo Conference
En cualquier modo, puede ser desactivado en cualquier momento, solo pre-
sionando las teclas “Adelante” y “Central” durante 3 segundos. Automática-
mente, el mensaje vocal “Intercom” le anunciará que el BTNEXT está de nue-
vo en modo Intercom (uno a uno) y el dispositivo enlazado en “Vol+” volverá a
estar operativo, junto con el modo “Teléfono”, el emparejamiento con el botón
“Central” y el “Talk2All-Universal Intercom”.
Modo Conference 4 personas
Cuando el modo “Conference” esté activado, es posible iniciar una comuni-
cación Intercom presionado a la vez los botones “Adelante” y “Atrás” . Un solo
click en el botón “Central” abrirá la comunicación Intercom, y un solo un click
en el mismo botón la cerrará. Las dos unidades en el centro de la cadena (2 y
3) deben mantener la comunicación abierta en ambos botones “Adelante” y
“Atrás” , para permitir la comunicación de las cuatro unidades a la vez.
Función “One Click Talk”
Cuando el modo “Conference” está activo, es posible iniciar una comunica-
ción Conference entre los 4 usuarios con solo un click. Presione brevemente
el botón “Central” y automáticamente se iniciará la conferencia con los cuatro
dispositivos conectados.
Modo Conference con un dispositivo Bluetooth en “Vol-”
Cuando el modo Conferencia está activo, el dispositivo Bluetooth conectado
en “Vol-” está disponible. Es decir que se pueden escuchar las indicaciones del
GPS o responder llamadas de teléfono sin interrumpir la cadena de conexión
Conference.
1
2
3
1 2 3 4

E
60 www.midlandeurope.com
El audio de la conexión en el botón “Vol-” puede ser Privado (no compartido
en la Conferencia) o Público (compartido en la Conferencia).
Por defecto, el modo Conferencia está ajustado en modo Privado.
Cuando está en modo Privado o Publico y, si recibe una llamada telefónica,
se desconectará temporalmente de la Conferencia, pero las otras personas
podrán seguir hablando entre sí.
Tan pronto como termine la llamada de teléfono, se conectará automáticam-
ente a la Conferencia de nuevo.
› Activar modo Público: pulsación larga en el botón “Vol-”, oirá el mensaje
de voz “Público”.
› Activar modo Privado: pulsación larga de nuevo en el botón “Vol-”, oirá el
mensaje de voz “Privado”.
Atención: la llamada telefónica entrante es siempre privada, incluso si se encuen-
tra en modo “Público”.
Modo Conference hasta 8 personas (4 parejas)
Para comunicar con 8 personas en modo Conference debe emparejar también
un intercomunicador al botón “Vol-” y asegurarse de ajustar el modo Público.
Atención: el emparejamiento del intercomunicador en el botón “Vol-” debe ser
como “Universal Intercom”.
Por defecto el modo Conference está ajustado en Privado, es decir que la
primera vez que pulse el botón “Vol-”, oirá el mensaje de voz “Público”. En
caso de oír “Privado” deberá pulsar “Vol-” de nuevo, hasta que oiga “Público”.
Cómo emparejar un Intercom en el botón “Vol-”:
› En el BTX2 PRO S vaya al modo Setup y pulse el botón “Vol-” durante 3
segundos. Los LED azul y rojo empezarán a parpadear.
› En el otro dispositivo, siga el procedimiento de emparejamiento como un
Universal Intercom.
Cómo abrir la Conferencia para la unidad en “Vol-”
Para abrir la conferencia desde el BTX2 PRO S hasta la unidad asignada al
botón “Vol-”, en modo Telefono pulse la tecla Atrás.
Para abrir la conferencia desde la otra unidad asignada al botón “Vol-”, solo use
el sistema para abrir la comunicación Universal Intercom.
La distancia máxima del dispositivo conectado al botón “Vol-” es de 10 metros,
es por eso que solo es adecuada para los pasajeros.
Talk 2 All - Universal Intercom: sincronización con
Intercomunicadores de otras marcas
Gracias a la función “Talk2All-Universal Intercom”, es posible emparejar su
Midland BTX2 PRO S con intercomunicadores de otras marcas.
Puede emparejar un máximo de dos intercomunicadores de otras marcas, uno
en el botón “Adelante” y otro en el botón “Atrás” .
› En el Midland BTX2 PRO S, entre en el modo configuración (con el dispo-
sitivo apagado, presione el botón “Central” durante 7 segundos hasta que la
luz Roja permanezca encendida).
› Mantenga presionado el botón “Adelante” o el botón “Atrás” durante 7
segundos: las luces Roja y Azul parpadearán deprisa, y después (mientras
sigue manteniendo el botón presionado) parpadearán despacio. Ahora pue-
de soltar el botón.
En el dispositivo “no Midland”, siga el procedimiento para emparejar a un
teléfono, ya que el BTX2 PRO S está emparejado como teléfono.
Atención: recuerde apagar todos los dispositivos Bluetooth durante el proceso de
emparejamiento, solo los dos dispositivos a emparejar deben estar encendidos.
Para abrir la comunicación Universal Intercom en el BTX2 PRO S mientras
está en modo Intercom, pulse durante 3 segundos el botón “Adelante” o
“Atrás” (en función del botón que se usó para el emparejamiento). En el otro
intercomunicador, solo pulse el botón de rellamada o de voz.
Quizás sea necesario pulsar el botón de rellamada dos veces, en función del
modelo de intercomunicador “no Midland” que se utilice.
Atención: para usar la función “Talk2All universal Intercom”, el emparejamiento
en la otra unidad debe realizarse como teléfono. El intercomunicador de otra
Talk2All-Universal Intercom
No dispositivo Midland

E
www.midlandeurope.com 61
marca se podrá emparejar a un teléfono solo si el modelo soporta dos teléfonos.
Puede emparejar también un dispositivo Midland como Talk2All, es decir que el
emparejamiento debe realizarse como teléfono (una unidad usa el procedimiento
Talk2All y la otra usa el procedimiento de emparejamiento a un teléfono).
Compatibilidad con unidades de la línea Midland BT
BTX2 PRO S es compatible con todos los dispositivos Midland BT.
BTX2 PRO S solo es compatible con la anterior línea de Midland BT si ésta se
actualiza a la versión de firmware.
Sincronizar BTX2 PRO S a dispositivos Bluetooth
Midland BTX2 PRO S puede sincronizarse con otros dispositivos Bluetooth,
como un smartphone, navegador GPS o radio PMR446 con Bluetooth incor-
porado o externo (dongle).
El procedimiento de sincronización debe efectuarse usando los botones “Vol
+” o “Vol -”.
› Sincronizar con el botón “Vol+”: para teléfonos con música estéreo A2DP,
navegadores GPS con audio A2DP, o conector externo (dongle) mono/
estéreo A2DP. Todos los dispositivos sincronizados con el botón “Vol+” tie-
nen mayor prioridad e interrumpirán las otras comunicaciones (como Inter-
com, radio FM y la música).
› Sincronizar con el botón “Vol-”: para teléfonos con música estéreo A2DP,
navegadores GPS con audio A2DP, o conector externo (dongle) mono/
estéreo A2DP. Todos los dispositivos sincronizados con el botón “Vol-”
están siempre activos de fondo durante la comunicación Intercom.
Cuando un dispositivo se sincroniza con los botones “Vol +” o “Vol -” el modo
“Teléfono” se activa.
Función Background
La conexión de audio en cualquier dispositivo vinculado en el botón “Vol-”, in-
cluso si es estéreo, siempre está de fondo. De esta manera no se interrumpirá
la comunicación, por ejemplo, por indicaciones del GPS u otra fuente de audio.
Puede decidir si el audio de “Vol -” se comparte con otras personas cuando el
intercomunicador está abierto (público) o si debe ser privado (privado).
Atención: por defecto, el audio es privado.
El audio de “Vol -” siempre tiene una prioridad menor que el intercomunicador,
eso significa que cuando el intercomunicador está abierto el audio se reduce
por defecto 50%. Puede cambiar esta configuración mediante el software de
PC BTUpdater.
El emparejamiento con uno o dos teléfonos
El teléfono móvil puede ser emparejado con el “Vol +” o “Vol -”.
Cuando un teléfono está enlazado al botón “Vol +” o “Vol -” el modo “Teléfono”
se activa. Una llamada entrante tiene siempre prioridad, esto significa que
otras comunicaciones se verán interrumpidas (Intercom, Radio FM, Música).
Si otra llamada entrante suena en el segundo teléfono, se notificará a través
de un sonido.
¡ATENCIÓN!
Con el fin de obtener el mejor rendimiento con su teléfono móvil, recomen-
damos mantenerlo lo más cerca posible de su unidad BTX2 PRO S, en el lado
izquierdo de su cuerpo y, si es posible, en el bolsillo superior de la chaqueta.
Cómo sincronizar BTX2 PRO S a un teléfono
Para sincronizar el BTX2 PRO S al teléfono, debe entrar en modo “Setup”:
› Apague la unidad.
› Mantenga pulsado el botón “Central” durante 7 segundos aproximadamen-
te hasta que el LED rojo se mantenga iluminado.
› Ahora presione durante 3 segundos el botón “Vol +” o “Vol -”, el LED par-
padeará en azul y rojo.
› Active el Bluetooth de su teléfono móvil.
VOL- Siempre de fondo
› Teléfono (HFP/A2DP Estéreo)
› GPS (HFP/A2DP Estéreo)
› Dongle (HFP/A2DP Estéreo)
VOL+ Alta prioritad
› Teléfono (HFP/A2DP Estéreo)
› GPS (HFP/A2DP Estéreo)
› Dongle (HFP/A2DP Estéreo)

E
62 www.midlandeurope.com
› Pasados unos segundos, en el teléfono aparecerá “Midland BTX2 PRO S”,
selecciónelo y siga las instrucciones del teléfono para aceptar la sincroniza-
ción. Si el teléfono le pide un pin, teclee el código “0000” (cuatro ceros).
El teléfono confirmará que el proceso de sincronización se ha completado con
éxito. El BTX2 PRO S saldrá del modo Setup y pasará automáticamente al
modo de funcionamiento (LED azul parpadeando). Ahora puede usar el BTX2
PRO S junto con su teléfono.
Cómo usar el teléfono
Después de sincronizar el teléfono al BTX2 PRO S debe entrar en modo
Teléfono para poder utilizarlo. Mantenga pulsado durante unos 3 segundos el
botón “Central” hasta que oiga “Phone”. Ahora los tres botones principales
están dedicados al teléfono (Tabla B).
Responder a una llamada
Cuando el teléfono suena, puede responder de dos maneras:
Respuesta vocal:
Pronuncie una palabra cualquiera después del primer ring y empiece a hablar.
Respuesta manual:
Pulse brevemente el botón “Adelante” o “Atrás” y ya puede habla.
Rechazar una llamada
Si no desea contestar una llamada, puede dejar sonar el teléfono o mantener
pulsado durante 3 segundos el botón “Adelante” o “Atrás” (oirá un tono de
confirmación).
Realizar una llamada
Hay varias maneras de realizar una llamada.
Rellamar al último número:
› Teléfono en “Vol +”: presione el botón “Adelante” durante 3 segundos para
llamar al último teléfono (oirá un tono de confirmación).
› Teléfono en “Vol -”: presione el botón “Atrás” durante 3 segundos para
llamar al último número (oirá un tono de confirmación).
Marcación por voz:
› Teléfono en “Vol +”: presione brevemente el botón “Adelante”. Si su
teléfono tiene la función de marcación por voz, el sistema le pedirá que
pronuncie el nombre de la persona a quien quiera llamar.
› Teléfono en “Vol -”: presione brevemente el botón “Atrás” . Si su teléfono
tiene la función de marcación por voz, el sistema le pedirá que pronuncie el
nombre de la persona a quien quiera llamar.
Prioridad: las llamadas tienen la máxima prioridad, lo que significa que el resto de
comunicaciones se desactivan temporalmente al entrar una llamada.
Terminar una llamada
Hay varias maneras de terminar una llamada:
› Esperar a que la otra persona termine la llamada.
› Pulsar brevemente el botón “Adelante” (oirá un tono de confirmación).
› Pulse el botón de colgar en el teléfono.
B - Modo Teléfono
Modo Tecla “Adelante” Tecla Central Tecla Atrás
Teléfono Pulsación corta: marcación por voz/ aceptar
Pulsación larga: rellamada último número/
rechazar llamada entrante
Pulsación corta: cambio de
modo
Pulsación larga: on/o VOX
Teléfono
(reproduciendo música y sin-
cronizada a “Volumen +”)
Pulsación corta: canción siguiente Pulsación corta: play/pausa
Pulsación larga: cambio de
modo
Pulsación corta: canción anterior

E
www.midlandeurope.com 63
Marcación rápida
Únicamente el teléfono emparejado en “Vol+” puede almacenar un número de
teléfono en la memoria del dispositivo y usarlo cuando sea necesario. Primero
debe guardar el número usando el software para PC “BT UPDATER” o la apli-
cación para smartphone “BT SET APP”. Después, en modo Teléfono presione
el botón “Adelante” durante 7 segundos.
Uso de la función MP3 en el teléfono móvil
El teléfono móvil, cuando está emparejado con “Vol +” o “Vol-”, se puede uti-
lizar como reproductor MP3 estéreo. El Midland BTX2 PRO S soporta com-
pletamente los protocolos A2DP y AVRCP, que permiten escuchar música
estéreo y controlar el reproductor MP3. Incluso es posible utilizar los boto-
nes del BTX2 PRO S para las siguientes funciones: Reproducir, Stop/Pausa,
Avanzar y Retroceder canción.
Es posible controlar un solo teléfono a la vez. Puede escoger qué teléfono
controlar presionando durante 3 segundos en “Vol+”. Oirá la voz “Control on
volume up”. Ahora puede controlar el teléfono emparejado en “Vol+”. Si desea
cambiar el control al otro teléfono, presione de nuevo durante 3 segundos el
botón “Vol+” y oirá la voz “Control on volume down”.
Comandos disponibles:
› Play/pausa de la música: pulse el botón “Central”.
› Avanzar una canción: pulse el botón “Adelante”.
› Retroceder una canción: pulse el botón “Atrás” .
Prioridad: la música tiene la prioridad más baja, siempre se desactivará cuando
otra comunicación entre.
Atención: es posible controlar la música estéreo A2DP solo en modo “Teléfono”.
Si está escuchando música A2DP y cambia a “Radio FM” o “Intercom”, podrá
tener la música activa pero no dispondrá de todos los comandos de control.
Solo Play/Pausa estara disponible con un doble click en el botón “Central”.
Music Share
Music Share (compartir música) solo es posible desde el teléfono emparejado
en el botón “Vol+”. Para empezar a compartir su música A2DP con el pasajero
emparejado en el botón “Central” (distancia máxima 10m), presione el botón
“Atrás” durante 3 segundos mientras la música está sonando. El pasajero solo
puede detener la música compartida presionando una vez el botón “Central”
(pero no puede controlar la música). El piloto puede parar de compartir la
música presionando de nuevo el botón “Atrás” durante 3 segundos. Cuando
esta función está activada, no puede mantener abierta la comunicación In-
tercom.
Atención: para habilitar el Music Share, asegúrese de haber pulsado play desde
el intercomunicador.
Atención: en modo Music Share, el conductor puede abrir el intercomunicador al
pasajero haciendo doble clic en el botón Central.
Navegador GPS
Un navegador GPS puede sincronizarse usando los botones de “Vol +” o “Vol -”
› Botón Vol + (soporta audio estéreo A2DP y mono HFP). Las indicaciones
del navegador tienen alta prioridad e interrumpirán las otras comunicacio-
nes (como Intercom o radio FM) .
› Botón Vol - (soporta audio estéreo A2DP y mono HFP) . Los dispositivos
emparejados en “Vol-” están siempre activos en background y no interrum-
pirán la comunicación Intercom. Puede decidir si el audio de “Vol-” es com-
partido con otras personas cuando el Intercom está abierto (Público) o si
debe ser privado (Privado). Ver párrafo “Función Background”.
Avisos por voz del GPS Estéreo (A2DP)
El BTX2 PRO S soporta avisos por voz estéreo (A2DP) de navegadores GPS
o aplicaciones de smartphone cuando se emparejan en los botones “Vol+” o
“Vol-”. Conectado a “Vol+”, el GPS interrumpirá todas las demás comunica-
ciones. Solo conectado en “Vol-” podrá permanecer en background.
Play/PausaAvanzar Retroceder

E
64 www.midlandeurope.com
Cómo emparejar Midland BTX2 PRO S a un GPS
Se puede sincronizar cualquier navegador GPS para moto que acepte un
auricular Bluetooth. Para emparejarlo debe entrar primero en modo Setup.
› Apague la unidad.
› Active en su GPS la búsqueda de dispositivos auriculares Bluetooth. Esta
función depende de cada GPS (consulte el manual de usuario del mismo).
› Active el modo “Setup” (Apague el BTX2 PRO S, mantenga pulsado el
botón “Central” hasta que el LED rojo fijo). Pulsa el botón “Vol+” o “Vol-”
hasta que el LED parpadee rojo y azul.
› En el GPS aparecerá “Midland BTX2 PRO S”, selecciónelo y siga las
instrucciones para aceptar la sincronización. Si lo pide el GPS, teclee
el código “0000” (cuatro ceros). El GPS confirmará que el proceso de
sincronización se ha completado con éxito.
› El LED azul se encenderá durante un momento. Después, El BTX2
PRO S saldrá del modo Setup y pasará automáticamente al modo de
funcionamiento normal (LED azul intermitente). Ahora, el GPS está
sincronizado correctamente.
Walkie Talkie con Bluetooth
El transceptor PMR446 tiene que emparejarse con el botón “Vol -” o “Vol+”.
Emparejado en el botón “Vol-”, el walkie talkie siempre se oirá en background
incluso cuando esté hablando por el Intercom.
Emparejamiento
› Apague la unidad.
› Mantenga pulsado el botón “Central” unos 7 seg., hasta que la luz roja
quede encendida de forma permanente.
› Ahora presione firmemente (3 seg) los botones “Vol +” o “Vol -”, las luces
azul y roja parpadearán.
› Siga ahora el proceso de emparejamiento descrito en el manual del
transceptor.
Uso de la función Radio FM
El BTX2 PRO S integra un receptor de Radio FM con RDS. Para utilizarlo,
solo tiene que entrar en modo “Radio FM”.
Mantenga pulsado durante 3 segundos el botón “Central” hasta que oiga el
anuncio “FM Radio”. Ahora los tres botones principales están dedicados a la
radio (Tabla C).
Con un click sobre el botón “Adelante” o “Atrás” puede buscar una de las 6
emisoras de radio (función seek), la búsqueda se detendrá automáticamente
cuando encuentre una emisora con una señal suficientemente fuerte para ga-
rantizar una buena recepción.
Si por el contrario mantiene pulsado durante 3 segundos cualquiera de los dos
botones, se desplazará por las 6 emisoras memorizadas. Cada vez que pasa de
una memoria a otra, un anuncio vocal le indicará el número de memoria en el
que se encuentra.
Para memorizar la emisora que está escuchando, pulse simultáneamente los
botones “Adelante” y “Atrás” durante 3 segundos. Escuchará un tono de
confirmación. La emisora se memoriza en la memoria siguiente a la última
escuchada.
Gracias al sistema RDS, la radio seleccionará la señal más fuerte disponible de
la emisora que esté escuchando.
El sistema RDS está desactivado por defecto y para activar/desactivar la
función, pulse al mismo tiempo y durante tres segundos los botones “Vol+” y
“Vol–” mientras la radio está encendida. Un anuncio vocal le indicará el estado.
Para desactivarlo, repita el mismo procedimiento.
C-Modo Radio FM
Modo Tecla Adelante Tecla Central Tecla Atrás
Radio FM Pulsación corta: búsqueda de memoria hacia
adelante
Pulsación larga: buscar emisoras (arriba)
Pulsación corta: on/o
Pulsación larga: cambio de modo
Pulsación corta: búsqueda de memoria hacia atrás
Pulsación larga: buscar emisoras abajo (si la radio
está apagada, activa/desactiva la conexión AUX)

E
www.midlandeurope.com 65
Cómo desactivar/activar la Radio FM
En el BTX2 PRO S la Radio FM viene activada de fábrica.
Desactivar:
› Entre en modo “Setup”: apague la unidad y mantenga pulsado el botón
“Central” durante 7 segundos, hasta que el LED Rojo quede fijo.
› Presione a la vez el botón “Central” y “Vol +” durante 3 segundos. El LED
Azul parpadeará dos veces.
› Haga doble click en el botón “Central” para salir del modo “Setup” y poder
usar el BTX2 PRO S.
Activar:
› Siga el mismo procedimiento descrito, ahora el LED azul parpadeará solo
una vez. Para salir del modo “Setup”,, haga doble click en el botón “Central”.
Intercom con Radio FM
En modo “Radio FM” no se puede activar el Intercom en modo manual pero
puede usar la activación vocal (VOX) solo hacia el dispositivo enlazado en el
pulsador “Central”.
Para activar el Intercom de forma manual deberá salir del modo “Radio FM” y
pasar a modo “Intercom”.
Radio en background
No es posible tener la radio FM en combinación con otra fuente de audio.
Cualquier audio activo, como el Intercomunicador, o procedente de la co-
nexión VOL + o VOL-, pausará la radio FM.
Configuraciones especiales
Reset de todos los dispositivos sincronizados
Alguna vez puede resultar necesario borrar todos los dispositivos sincronizados
al BTX2 PRO S. Para realizar esta operación tiene que entrar en modo Setup:
› Apague la unidad.
› Mantenga pulsado el botón “Central” hasta que el LED rojo quede fijo.
› Pulse al mismo tiempo los botones “Vol+” y “Vol-” durante 3 segundos. El
LED azul se enciende durante 1 segundo y volverá a rojo fijo.
› Haga doble clic en el botón “Central” para salir del modo Setup y usar el
BTX2 PRO S.
Este proceso borra todos los dispositivos Bluetooth sincronizados almacena-
dos en la memoria y por tanto es posible comenzar una nueva sesión de sin-
cronización desde cero.
Atención: tras resetear todos los emparejamientos, únicamente el modo “Radio
FM” estará disponible.
Volver a los ajustes originales
Alguna vez puede ser necesario volver a los ajustes de fábrica, para eliminar
todos los cambios y ajustes realizados y tener la unidad “limpia”. Para realizar
esta operación tiene que entrar en el modo Setup:
› Apague la unidad. Mantenga pulsado el botón “Central” hasta que el LED
rojo quede fijo
› Pulse al mismo tiempo los botones “Vol+” y “Vol-” durante 3 segundos. El
LED azul se enciende durante 1 segundo y volverá a rojo fijo
› Haga doble click en el botón “Central” para salir del modo “Setup” y usar el
BTX2 PRO S.
Ajuste/Desactivación de la función VOX (Intercom y teléfono)
La función Intercom se puede activar de dos formas, manualmente y por voz
(VOX). La correcta activación del VOX depende del ruido de fondo y, por lo
tanto, de la velocidad y del tipo de casco utilizado.
Para un resultado óptimo, se puede seleccionar entre cuatro niveles de sen-
sibilidad del micrófono: alto, medio, bajo y muy bajo. El ajuste por defecto
es “bajo”. También es posible desactivar el VOX para activar el Intercom y la
respuesta de llamadas de teléfono solo en modo manual.
Estos ajustes se pueden configurar a través del programa “BTPro Updater”, dispo-
nible para PC/MAC.
Setup y actualización de Firmware
El BTX2 PRO S permite configurar el dispositivo y actualizar el firmware a
través del PC, conectándolo con un cable USB estándar. En nuestra página
web www.midland.es, encontrará toda la información actualizada sobre
su dispositivo y se podrá descargar gratuitamente tanto el software de
actualización como eventuales nuevas versiones de firmware.

E
66 www.midlandeurope.com
ATENCIÓN: NO CONECTE EL DISPOSITIVO AL PC SIN ANTES HABER
INSTALADO CORRECTAMENTE EL SOFTWARE DE ACTUALIZACIÓN.
Uso y advertencias específicas
El uso de este dispositivo disminuirá la capacidad de oír otros sonidos y a la
gente de su alrededor. El uso de este dispositivo mientras conduce puede si-
gnificar un serio peligro para usted y los de su alrededor y, en algunos países,
existen claras restricciones legales al respecto.
El uso de este dispositivo a un volumen alto, puede producir pérdida permanente
de audición. Si nota algún tipo de dolor alrededor de la oreja o en interior del
oído, reduzca el volumen o interrumpa el uso del dispositivo. El uso continua-
do a volumen alto, puede hacer que sus oídos se acostumbren a ese nivel de
volumen, lo cual puede causar un daño permanente en los mismos. Por favor,
utilice este dispositivo con un nivel de volumen seguro.
Garantía Limitada de MIDLAND IBERIA
Esta garantía no limita los derechos del usuario reconocidos en las normativas
españolas y europeas aplicables en materia de venta de bienes de consumo.
Durante el periodo de garantía se reparará, en un periodo de tiempo razonable,
cualquier avería imputable a defectos en materiales, diseño o fabricación, li-
bre de cualquier cargo por reparación. En el caso de que la reparación no sea
posible, se facilitará al usuario un equipo o accesorio similar o de mejores ca-
racterísticas.
Esta garantía solo es válida en el país donde se ha adquirido el producto.
La garantía comienza en el momento de la compra por parte del primer usuario
final.
La garantía es por un período de:
› 24 meses para el equipo o unidad principal
› 6 meses para accesorios (baterías, cargadores, antenas, auriculares, cables)
› Cualquier reclamación por el producto afectado, debe de comunicarse
dentro de un tiempo razonable desde que se apreció el defecto y, en ningún
caso, después de que expire el periodo de garantía.
La garantía no cubre:
› El deterioro del producto por el uso habitual
› Defectos causados por el uso o conexión del Producto con accesorios y/o
software no original Midland
La garantía quedará invalidada:
› En caso de apertura, modificación o reparación por personas no autorizadas
por Midland o por el uso de recambios no originales
› Si el producto ha sido expuesto a condiciones ambientales para las que no
ha sido diseñado
› En el caso de corrosión, oxidación o derrame de líquido de las baterías
› Si el número de serie ha sido retirado, borrado, alterado o es ilegible
› Nada se deberá al comprador por el tiempo durante el cual, el equipo esté
inactivo, ni podrá solicitar resarcimiento o indemnización por gastos sopor-
tados, así como por daños directos o indirectos derivados del uso impropio
o diferente para el que ha sido diseñado y comercializado.
Para tener acceso a esta garantía, es necesario enviar a nuestro servicio técni-
co (SAT MIDLAND – C/Cobalt, 48 -08940 Cornellà de Llobregat) el pro-
ducto afectado (equipo y/o accesorio) con una nota explicativa de la anomalía
detectada y la factura original de compra, con el nombre, dirección del distri-
buidor y la fecha de compra.
Encontrará información actualizada en www.midland.es
Certificaciones Europeas CE
CTE International SRL. declara, bajo su responsabilidad, que este aparato
cumple con lo dispuesto en la Directiva 2014/53/UE. No se permite a los
usuarios hacer ningún cambio o modificaciones a la unidad. Las modificaciones
que no están aprobadas por el fabricante invalidan la garantía.
© MIDLAND IBERIA. Queda prohibida la reproducción total o parcial sin el
permiso por escrito del titular.
Para más información, visite nuestra web: www.midland.es

F
www.midlandeurope.com 67
Sommaire
Caractéristiques principales..........................................................................................................................................................................................................68
Spécifications techniques du Midland BTX2 PRO S .................................................................................................................................................................68
Rechargement des batteries .........................................................................................................................................................................................................69
Description du module et fixation ..............................................................................................................................................................................................69
Allumer et eteindre votre Midland BTX2 PRO S .......................................................................................................................................................................71
“Mode” de fonctionnement ...........................................................................................................................................................................................................71
Comment coupler deux modules BTX2 PRO S ......................................................................................................................................................................... 72
Comment coupler le BTX2 PRO S a plus de deux modules ..................................................................................................................................................... 73
Conférence .................................................................................................................................................................................................................................... 75
Talk2All – Couplage avec un interphone d”une autre marque .................................................................................................................................................. 76
Compatibilité avec modules de la gamme Midland BT ..............................................................................................................................................................77
Associer le BTX2 PRO S aux périphériques Bluetooth ..............................................................................................................................................................77
Partage de Musique .......................................................................................................................................................................................................................80
Navigateur GPS .............................................................................................................................................................................................................................80
Comment ecouter la radio FM ...................................................................................................................................................................................................... 81
Installation et configuration speciale ...........................................................................................................................................................................................82
Configuration et mise à jour logiciel ............................................................................................................................................................................................ 82
Garantie ..........................................................................................................................................................................................................................................83

F
68 www.midlandeurope.com
Midland BTX2 PRO S
Système intercom Dual Core
Midland BTX2 PRO S est une solution de système d’interphone avec double Blue-
tooth de base (double processor Bluetooth) pour la communication de conférence
et audio stéréo réelle de fond. Le design est très mince et aérodynamique, toutes
les fonctions principales sont faciles à utiliser grâce aux trois gros boutons placés
sur le devant de l’appareil. Midland BTX2 PRO S est fixé sur le casque en utilisant
la plaque adhésive ou la bride de fixation à vis.
Caractéristiques principales
› Système de double cœur Bluetooth
› Intercom “ one to one “ (tète à tète) jusqu’à 1.2 Km de distance.
› Se connecter jusqu’à 6 personnes pour “one to one” communication in-
tercom
› Conférence jusqu’à 8 personnes (4 couples)
› Fonctions Universal Intercom pour connecter des interphones d’autres
marques
› MWE Noise Killer
› Écouter la radio FM stéréo avec RDS
› Connectez votre téléphone pour recevoir, passer des appels et écouter de
la musique en stéréo.
› Partage de musique (conducteur et Passager)
› Support pour 2 téléphones
› Connectez votre GPS pour des indications vocales de navigation.
› Configuration et mise a jour du firmware via une connexion USB à un PC
Le Midland BTX2 PRO S est disponible en deux versions:
› BTX2 PRO S Single Kit Intercom avec un seul module
› BTX2 PRO S Twin Kit Intercom avec deux modules
En fonction du modèle choisi, la bôite contient les éléments suivant:
BTX2 PRO S SINGLE
› 1 Module BTX2 PRO S
› 1 Kit de montage glissière avec deux oreillettes HI-FI stéréo
› 1 micro tige et 1 micro filaire
› 1 plaque avec adhésif double face pour fixer le module sur le casque
› 1 plaque avec vis de serrage pour fixer le module sur le casque
› 1 alimentation secteur micro USB
BTX2 PRO S TWIN
› 2 Modules BTX2 PRO S
› 2 Kit de montage glissière avec deux oreillettes HI-FI stéréo
› 2 micro tige et 2 micro filaire
› 2 plaques avec adhésif double face pour fixer le module sur le casque
› 2 plaques avec vis de serrage pour fixer le module sur le casque
› 1 alimentation secteur micro USB avec double sortie
Les modules qui composent le kit TWIN sont déjà connectés entre eux et
peuvent être utilisé directement en mode Intercom.
Spécifications techniques du Midland BTX2 PRO S
Générale:
› Bluetooth stéréo ver. 4.2 (Protocole Mains-libre/A2DP/AVRCP)
› Fréquence 2.4GHz - Puissance max 100mW
› Double cœur Bluetooth pour de vrai fond stéréo
› Système AGC pour le contrôle automatique du volume en fonction du bruit
de fond.
› Déclenchement à la voix (VOX) ou manuel de la communication
› Touche pour activer: le téléphone, l’Intercom et la radio FM
› Waterproof
› Batterie Lithium avec 20 heures d’autonomie
› Temps de rechargement: env. 2 heures
Connexion Bluetooth:
Avec dispositif identique pour pilote à Passager ou en mode Intercom Bike-

F
www.midlandeurope.com 69
to-Bike, jusqu’à une plage de distance maximale de 1.2 Km sans obstructions
et interférences (les coureurs doivent être toujours en vue).
Périphériques Bluetooth:
Téléphone mobile avec lecteur MP3 stéréo (Protocole A2DP), GPS.
Rechargement des batteries
Attention: Assurez vous que le module soit complètement charger “Avant” la pre-
mière utilisation. Prévoyez au moins 3 heures le module “Avant” de l’utiliser pour
la première fois.
Charger le module en connectant le chargeur mural dans la prise de recharge-
ment (soulevez le capuchon pour insérer la prise). La LED rouge sur le module
clignote pendant le chargement. Laisser le casque à charger jusqu’à ce que
l’appareil cesse de clignoter et la LED bleue se mette en marche. Quand la
charge est complète (La LED rouge ne clignote plus), retirez le module du
chargeur. Normalement, après la première utilisation, Il faut 2 heures pour une
charge complète.
Attention: Le Midland BTX2 PRO S a été conçu pour résister à la pluie et à l’eau.
Cependant, s’il pleut vérifiez que les capuchons en caoutchouc des connecteurs
sont bien en place.
Attention: à chaque fois que le chargeur micro USB est connecté (ou déconnecté),
le module est automatiquement éteint. Pour pouvoir l’utiliser pendant le charge-
ment, il faut allumer le module avec le chargeur déjà connecté.
Description du module et fixation
Description du BTX2 PRO S
Le BTX2 PRO S possède 5 touches sur l’avant. Les trois principaux sont:
Avancé (sur la gauche), la touché “Centrale” et Reculer (sur la droite). Les
deux petites touches sont: Volume + et Volume -.
Sur le fond de l’appareil, vous pouvez trouver la prise du chargeur qui permet
de recharger l’appareil en utilisant une alimentation micro USB standard.
Description du kit audio
Le kit audio comprend deux oreillettes HI-FI stéréo et deux microphones in-
terchangeable, qui sont tous les deux fournit avec support et connexion filaire.
Le mini-connecteur sur le microphone vous permet de choisir le type de mi-
crophone qui convient mieux pour votre casque.
LED
Centrale
Volume - Volume +
Avancé Arriére
Connecteur
de charge

F
70 www.midlandeurope.com
Fixation des oreillettes stéréo
Les deux oreillettes stéréo ont des adhésifs/velcro pour faciliter leur fixation
dans votre casque. Attention à ne pas garder le volume trop élevé, vous devez
toujours être en mesure d’écouter le son de la circulation.
Le microphone peut être fixé dans le casque de deux façons:
Fixer le microphone
Microphone tige
Placez la section avec la bande velcro/adhésive entre l’habillage et la partie rigi-
de extérieur du casque, de manière à ce que le microphone soit correctement
positionné en face de votre bouche et avec le repère blanc vers votre bouche.
Ce type de microphone idéale pour une casque modulable. Pour les casques
ouverts c’est disponible un microphone spécifique en option (cod. C1253).
Microphone filaire
Utilisez la bande Velcro/adhésive et placez le micro dans votre casque en face
de votre bouche. Ce type de microphone est idéal pour les casques intégraux.
Le mini connecteur sur les microphones vous permette de choisir celui qui
convient le mieux au casque que vous utilisez.
Description du kit de montage à glissière
Le Midland BTX2 PRO S peut être fixé sur votre casque en utilisant le kit de
montage à glissière de deux façon diérentes, soit en utilisant la plaque avec
adhésif double face ou alors la plaque avec vis. Ces méthodes vous permette
de fixer en toute sécurité votre module BTX2 PRO S sur votre casque et de le
retirer à n’importe quel moment pour le recharger ou le ranger.
Plaque Bi-adhésif
La plaque Bi-adhésif est déjà monté sur la glissière dans le kit de montage.
Nettoyez la zone d’application sur la surface du casque, plier les deux petites
ailes jusqu’à obtenir la même courbure du casque. Retirez le film bi-adhésif et
placez la plaque de fixation sur le côté gauche du casque en le maintenant en
contact avec la surface pendant quelques secondes.
Plaque à vis
Étape 1. Retirer la plaque bi-adhésif du support en utilisant la clé hexagonale
incluse dans la boîte. N’oubliez pas de garder les deux vis.
Étape 2. Serrer la plaque à vis au support avec les deux vis fournies.
Boom microphone Wired microphone
Bi-adhésif

F
www.midlandeurope.com 71
Étape 3. Ensuite, serrer plus que les deux vis pour fixer fermement la pince en
place sur le côté gauche du casque.
Si nécessaire, vous pouvez utiliser également la plaque de caoutchouc afin d’a-
voir plus d’adhérence pour la vis de serrage. Il sut d’utiliser les deux vis courts
pour fixer la plaque de caoutchouc sur la glissière dans la montagne et serrer à
nouveau la plaque à vis.
Mise en place et retrait de votre Midland BTX2 PRO S
Le BTX2 PRO S peut être facilement mise en place sur le casque en le faisant
glisser vers le bas sur le kit de montage à glissière. BTX2 PRO S est maintenu
en position grâce à l’élément de fixation situé sur la partie supérieure (A). Pour
détacher le BTX2 PRO S, appuyez simplement sur le clip de fixation et pous-
ser le module vers le haut.
Allumer et eteindre votre Midland BTX2 PRO S
Allumage: Appuyez et maintenez la touche “Milieu” enfoncée pendant envi-
ron 3 secondes jusqu’à ce que le voyant soit BLEU.
Extinction: Appuyez et maintenez les touches “Milieu” et “Reculer” enfon-
cées pendant environ 3 secondes jusqu’à ce que le voyant clignote 3 fois. Ceci
évite les erreurs de manipulation (spécialement avec le port de gant).
“Mode” de fonctionnement
Le BTX2 PRO S peut fonctionner de trois façons diérentes: Intercom,
Téléphone et Radio FM. Les 3 touches multi fonctions ont diérentes fon-
ctionnalité qui dépendent du mode dans lequel se trouve le module.
› En “Mode Intercom” les boutons vous permettent de gérer la communica-
tion avec un maximum de 4 personnes, parler un par un. Il sut d’appuyer
l’un des trois boutons pour ouvrir l’interphone.
› En “Mode téléphone” vous pouvez gérez votre téléphone mobile Bluetooth
pour passez/recevoir des appels, écouter de la musique.
› En “Mode radio FM” vous pouvez écouter votre station radio favorite en
stéréo, recherché une station spécifique et la sauvegarder (6 emplacement
mémoire disponible).
Vous pouvez basculer d’un mode à l’autre simplement en appuyant longtemps
sur la touche “Centrale” (appuyez pendant 3 secondes). Une annonce vocale
indique le mode dans lequel vous vous trouvez.
A
DébloquerBloquer
Plaque de caoutchouc

F
72 www.midlandeurope.com
La séquence de basculement est la suivante:
› Intercom (si un autre module a été connecté)
› Radio FM
› Téléphone (si un téléphone a été connecté)
Chaque fois que vous allumez le module, le mode par défaut est le dernier
mode utilisé. Le mode Intercom et le mode de téléphone ne sont disponibles
que si il a déjà été jumelé à un autre module ou un téléphone.
Si vous souhaitez savoir dans quel mode se trouve le module, appuyez sur
“Volume + “ et “Volume –“ ensemble. Une voix annonce le mode en cours
d’utilisation.
Distance maximale
Vous pouvez atteindre 1.2 Km de distance si vous êtes dans la ligne de mire
sans obstructions et interférences (les autres intercom doivent être toujours
en vue).
Comment coupler deux modules BTX2 PRO S
Les deux modules fournis dans la même boîte BTX2 PRO S, sont déjà liés
et prêts à utiliser, ce qui signifie que vous n’avez pas besoin d’eectuer cette
procédure. Les modules sont déjà couplés en utilisant le bouton “Centrale”.
Si les appareils ne font pas partie du même kit ou les unités ont été acheté
séparément, vous devez d’abord les coupler afin de les utiliser.
Pour coupler le BTX2 PRO S à un autre BTX2 PRO S, vous devez tout d’abord
entrer en mode configuration:
1. Éteignez le module.
2. Appuyez sur la touche “Centrale” et maintenez-la pendant 7secondes, ju-
squ’à ce que le voyant soit rouge fixe.
3. Maintenant, appuyez longuement (3 secondes) la touche “Centrale”. La
lumière clignote bleue et rouge.
4. Faites la même chose sur l’autre module, quand l’opération a réussi, sur
chaque unité la lumière est bleue fixe pendant une seconde et retourne en
mode de configuration (la lumière rouge toujours allumé).
5. Maintenant, la procédure de jumelage est terminé, il vous sut de quitter le
mode d’installation “Avant” de pouvoir utiliser les modules.
6. Double-cliquez sur la touche “Centrale”, la lumière rouge s’éteint et le
voyant bleu clignote. Vous pouvez maintenant utiliser votre BTX2 PRO S.
Attention: n’oubliez pas d’éteindre tous les autres appareils Bluetooth, seuls les
deux appareils concernés par le couplage doivent être allumés.
Comment utiliser l’intercom avec deux modules
Pour utiliser la fonction Intercom, assurez-vous que les deux modules sont
correctement couplés ensembles.
Activation manuelle
Lorsque vous êtes dans le mode intercom pressez le touche “Centrale” d’un
des deux modules en mode Intercom. La communication est activée et reste
Ci-dessous un exemple de fonctionnalité des touches en fonction du mode choisi.
Mode Avant (Touche à gauche) Touche centrale Arrière (Touche à droite)
Intercom Ouvrir/fermer l”Intercom vers 1er module Ouvrir/fermer l”Intercom vers 2ème
module
Ouvrir/fermer l”Intercom vers 3ème
module
Téléphone Rappeler le dernier numéro / accepter ou
rejeter un appel entrant sur “vol +”
Rappeler le dernier numéro / accepter ou
rejeter un appel entrant sur “vol -”
Téléphone (pendant
la lecture de musique)
Titre suivant Lecture/pause Titre précédent
Radio FM Recherche vers le haut Radio FM On/o Recherche vers le bas

F
www.midlandeurope.com 73
active jusqu’à ce que vous appuyiez à nouveau sur la touche “Centrale”.
L’interphone à besoin de quelques secondes pour s’activer, vous entendez un
bip sonore lorsque l’Intercom est ouvert.
Activation vocale (VOX)
Il sut de commencer à parler, après quelques secondes la communication
sera ouvert et restera actif pendant le temps ou vous parlerez. S’il n’y a pas de
conversation l’Intercom sera fermé au bout de 40 secondes.
Si nécessaire, vous pouvez fermer manuellement l’interphone sans attendre
40 secondes (il sut de presser la touche “Centrale”).
Si besoin, vous pouvez activer/désactiver la fonction VOX en appuyant sur la
touche “Arrière” pendant 7 secondes. Un message vocal vous avertit que la
fonction VOX est inactive. Pour la réactiver, appuyez sur la même touche et
un message vocal vous indiquera que la fonction VOX est à nouveau active/
désactive. Ce paramètre reste en mémoire même quand vous éteignez le module.
Attention: L’activation vocale (VOX) peut ouvrir la communication Intercom
seulement vers l’unité qui a été jumelé avec la touche centrale. Si vous choisissez
d’utiliser une autre touche (avant ou arrière), vous ne pourrez activer l’Intercom
que manuellement.
Réglage du volume
Votre Midland BTX2 PRO S utilise la technologie AGC, qui ajuste au-
tomatiquement le volume d’écoute par rapport aux bruits de fond.
Toutefois, il est également possible de régler manuellement le volume au
moyen des touches “Volume +” et “Volume -”.
Le réglage de volume est indépendent pour chaque source audio: intercom,
musique stéréo, Appel téléphonique, radio FM.
Attention: Le volume ne peut être réglé que si une connexion audio est active.
Configurer le système AGC
Pour régler la sensibilité AGC vous pouvez utiliser le logiciel PC ”BT UPDA-
TER” ou l’application smartphone “BT SET-APP”.
Vous pouvez choisir diérents réglages en fonction du type de votre moto
(naked, touring, sport) ou si vous êtes passager. Vous pouvez désactiver la fon-
ction AGC en appuyant 3 secondes sur les touches “Volume +” et “Volume
-” simultanément.
Comment coupler le BTX2 PRO S a plus de deux modules
Un appareil Midland BTX2 PRO S peut être couplé à un maximum de cinq au-
tres unités BT, cela signifie six au total (3 unité Midland + 2 Talk2All + vous). Le
Midland BTX2 PRO S dispose de trois boutons principaux (“Avant”, “Centrale”
et arrière). C’est à vous de choisir quel bouton utiliser pour appairer et activer
l’intercom, vous êtes totalement libre de choisir le bouton que vous aimez plus.
Le même bouton que vous allez utiliser pour coupler l’unité sera également
utilisée pour activer la communication intercom. Rappelez-vous que chaque
appareil peut toujours être couplé avec 3 autres unités à votre choix, comme
indiqué dans le tableau ci-dessous, aussi un appairage “croisé” peut être fait.
Par exemple, vous pouvez décider d’associer unité pilote d’une moto sur le
bouton Forward, votre passager au bouton Moyen et un autre conducteur
sur le bouton arrière. De cette façon, vous pouvez avoir un total de 4 uni-
tés appariées ensemble et parler à chaque personne, un par un, en appuyant
simplement sur le bouton correspondant (le même utilisé pour l’appariement).
Chaque fois que vous ouvrez la connexion intercom à une seule personne, la
connexion précédente sera fermée. Lorsque deux personnes parlent, il est im-
possible de rompre (interruption) la communication par une des deux autres
unités.
Conducteur 2
Passager 1
Conducteur 1
Conducteur 3

F
74 www.midlandeurope.com
Associez le Midland BTX2 PRO S à un autre Midland BTX2 PRO S
Pour jumeler le Midland BTX2 PRO S à un autre Midland BTX2 PRO S, vous
devez d’abord entrer dans le mode de configuration:
1. Mettez l’appareil hors tension.
2. Appuyez et maintenez enfoncé le bouton “Centrale” environ 7 sec., Jusqu’à
ce que le voyant rouge soit allumé en permanence.
3. Maintenant, appuyez sur le bouton “Avant” pendant 3 secondes ou “Cen-
trale” ou arrière. La lumière clignote bleue et rouge.
4. Est-ce que la même procédure sur l’autre unité, lorsqu’il est associé avec
succès, chaque unité aura la lumière bleue pendant une seconde et que de
revenir au mode de configuration (lumière rouge toujours).
5. Maintenant, la procédure de couplage est terminée, vous pouvez aller sur
l’appariement autre unité sur le bouton diérent ou tout simplement quitter
le mode de configuration pour commencer à utiliser les unités: Double-cli-
quez sur le bouton du milieu, la lumière rouge s’éteint et la lumière bleue se
met à clignoter.
Vous pouvez maintenant utiliser votre BTX2 PRO S.
Comment utiliser l’Intercom avec plusieurs modules
Pour utiliser la fonction Intercom, assurez-vous que touts les modules sont
sous tension et correctement couplés.
Activation manuelle
Lorsque vous êtes dans le mode intercom pressez le touche correspondant au
module avec lequel vous souhaitez communiquer.
Après environ 4 secondes, l’Intercom s’ouvre. La communication reste active
jusqu’à ce que vous appuyiez à nouveau sur la même touche.
Pour ouvrir rapidement l’Intercom vers une autre personne, il sut d’appuyer
sur le bouton correspondant à l’autre module, l’Intercom actuel sera automa-
tiquement fermé et la nouvelle connexion ouverte.
Activation vocale (VOX)
La fonction d’activation vocale peut ouvrir l’interphone uniquement à l’unité
jumelé au bouton du Milieu.
Astuce: cette fonctionnalité est très utile lorsque vous avez une personne spécifique
avec qui vous voulez parler plus souvent (par exemple votre passager). De cette
façon, vous ne devez appuyer sur un bouton pour ouvrir la communication.
Module déjà occupé
Si vous essayez d’ouvrir une connexion Intercom avec une personne qui est
déjà occupé avec quelqu’un d’autre (ou qui est au milieu d’une conversation
téléphonique), vous entendrez un double bip “occupé”. Attendez un moment
et essayez à nouveau, peut-être cette fois ci la “ligne” n’est pas occupé.
La personne reçoit une demande d’Intercom, est avertie que l’on cherche à le
joindre par une voix qui annonce le bouton correspondent à la demande. De
cette façon dès la fin de la première conversation, elle peut joindre rapidement
la personne qui l’avait demandé (annoncé par la voix).
Talk2All-Universal Intercom
Not Midland Intercom
A – Activation manuelle
Mode Touche avant Touche centrale Touche arrière
Intercom Court: Ouvrir/Fermer l”Intercom vers le mod-
ules connecté
Court: Ouvrir/Fermer l”Intercom vers le modu-
les connecté
Long: Changer de mode
Court: Ouvrir/Fermer l”Intercom vers le modu-
les connecté
1
2
3

F
www.midlandeurope.com 75
Conférence
Le mode “conférence” permet la communication simultanément entre 4 per-
sonnes ou, si vous associez un dispositif d’interphonie également sur le “Vol
-”, jusqu’à 8 personnes (4 couples). Vous pouvez décider d’utiliser le BTX2
PRO S en “ one to one” communication jusqu’à 6 personnes (mode Intercom
“classique”) ou avec 8 personnes (4 couples) conférence d’intercom (mode
Conférence).
Comment utiliser le mode conférence
Vous devez tout d’abord coupler toutes les unités en mode “ chaîne “; en se-
cond lieu, la fonction “ Conférence “ doit être activée sur toutes les unités
couplées.
Couplage
Pour utiliser le mode conférence, vous devez coupler toutes les unités dans
une configuration de “ chaîne “.
Le bouton “Arrière” de la première unité doit être couplé au bouton “Avant”
de la seconde unité. Le bouton “Arrière” de la seconde unité doit être couplé
au bouton “Avant” de la troisième unité et ainsi de suite jusqu’à la quatrième !
La première et la dernière unité ne doivent en aucun cas être couplées ensem-
ble (la chaîne doit rester ouverte).
L’unité numéro 1 ne peut parler à la dernière unité (numéro 4) qu’uniquement
“ à travers “ les unités numéro 2 et numéro 3. Cela signifie que pour pouvoir
communiquer à 4 personnes en mode conférence, il est nécessaire que toutes
les unités aient l’intercom ouvert.
Mode conférence activé
Dans n’importe quel mode et sans audio active, maintenir appuyé les touches
FWD et “Centrale” pendant 3 secondes. L’annonce “Conférence” de la voix
vous dira qu’il est actif. Lorsque le mode de conférence est activé les périp-
hériques Bluetooth appariés sur “Vol +” bouton sont déconnectés, l’appairage
sur le bouton CTRL et l’Intercom Universel ne sont pas disponibles. Mainte-
nant que l’appairage sur les boutons FWD et BWD sont disponibles, ainsi que
l’appareil couplé sur le “Vol -” bouton.
Désactiver le mode conférence
Dans n’importe quel mode et sans audio active, maintenir appuyé les touches
FWD et “Centrale” pendant 3 secondes. L’annonce vocale “Intercom” vous
dira que vous êtes de retour à la “One to One” en mode Intercom et l’appareil
connecté au “Vol +” est à nouveau disponible, ainsi que le téléphone, l’appari-
ement sur le bouton CTRL et Intercom Universel.
Attention: lorsque le mode “ conférence “ est active, la fonction “ Talk2All- Uni-
versal Intercom “ (pour parler avec un interphone n’etant pas de la marque Mi-
dland) n’est pas disponible.
Aussi, si une unité a été jumelé sur le bouton CTRL (milieu), il est temporaire
indisponible, vous devez désactiver le mode “conférence” et revenir à la norme
“one to one” en mode Intercom.
Mode conférence à 4 personnes
Lorsque le mode de conférence est activé, il est possible d’ouvrir la communi-
cation de la conférence aux 4 utilisateurs seulement en “un seul clic”. Appuyez
brièvement sur le bouton CTRL (milieu) et vous allez automatiquement ouvrir
la conférence à quatre unité connectée. Les deux unités se trouvant au milieu
de la chaîne (unités 2 et 3) doivent maintenir l’intercom ouverte sur les bou-
tons “Avant” et “Arrière” pour garantir une bonne communication des quatre
unités à la fois.
La fonction “ One Click Talk “
Lorsque le mode conférence est activé, vous pouvez, en “ un seul clic “, ou-
vrir une communication intercom pour l’ensemble des 4 utilisateurs. Appuyez
brièvement sur le bouton CTRL (“Centrale”) pour ouvrir automatiquement
l’intercom de conférence à l’ensemble des unités connectées.
1
2
3
1 2 3 4

F
76 www.midlandeurope.com
Mode Conférence avec un périphérique Bluetooth sur “Vol -”
Lorsque le mode de conférence est actif, le dispositif Bluetooth connecté sur
“Vol -” est toujours disponible, ce qui signifie que vous pouvez écouter l’indi-
cation de la rue GPS ou répondre à votre appel téléphonique sans “freiner” la
chaîne de connexion de la Conférence.
L’audio de la connexion du bouton “Vol -” peut être “privé” (non partagé dans
la conférence) ou “public” (l’audio est partagé avec la conférence).
Par défaut, le mode de conférence est “Privé”.
Lorsque vous êtes en mode “privé” ou “Public”, si vous recevez un appel
téléphonique, vous êtes temporairement déconnecté de la Conférence, mais
les autres personnes peuvent continuer à se parler. Dès que l’appel est terminé,
vous revenez automatiquement à la conférence.
› Activer le mode Public: appuyez longuement sur le bouton “Vol -”, vous
entendrez “Public”.
› Activer le mode Privé: appuyer à nouveau sur le bouton “Vol -”, la voix vous
indiquera “Privé”.
Attention: l’appel entrant de votre téléphone est toujours “privé” même si vous
êtes en mode “public”.
Mode conférence jusqu’à 8 personnes (4 couples)
Pour avoir une conférence de 8 personnes, vous devez également associer un
périphérique d’intercom au bouton “Vol -” et vous assurer que vous avez sél-
ectionné l’option “Public”.
Attention: Le paramétrage de l’intercom sur “Vol -” doit être comme celui pour
“Intercom Universel”.
Par défaut, le réglage du mode de conférence est “Privé”, c’est-à-dire la pre-
mière fois que vous appuyez longuement sur le bouton “Vol -”, vous entendrez
la voix “Public”. Si vous êtes “Privé”, vous devez appuyer à nouveau sur “Vol -”
tant que vous n’entendrez pas le mode “Public”.
Comment appairé un appareil intercom sur le bouton “Vol -”
› Sur le BTX2 PRO S, passez en mode “Setup”, appuyez sur la touche “Vol -”
pendant 3 sec. Les voyants bleu et rouge se mettent à clignoter.
› Sur l’autre périphérique, suivez la procédure de couplage en tant qu’inter-
com universel.
Comment ouvrir la conférence pour l’unité “Vol -”
› Pour ouvrir la conférence depuis le BTX2 PRO S vers l’appareil raccordé
au “Vol -”, en mode Téléphone, appuyez simplement sur la touche “Arrière”.
› Pour ouvrir la conférence à partir de l’autre appareil connecté au “Vol -”, uti-
lisez simplement la commande pour ouvrir la connexion d’intercom universel.
La distance maximum de connexion des deux appareils sur le bouton “Vol -”
est de 10m, C’est pourquoi il est conseillé de l’utiliser seulement pour le pas-
sager.
Talk2All – Couplage avec un interphone d’une autre marque
Grâce à la fonction “Talk2 All - Universal Intercom’ il est désormais possible de
coupler votre BTX2 PRO S avec un interphone d’une autre marque disponible
dans le commerce. Vous pouvez appairé un maximum de deux intercom Mi-
dland, un sur le bouton “Avant” et un autre sur le bouton “Arrière”. Sur le BTX2
PRO S entrez dans le mode configuration: (avec le module éteint, maintenez
la touche “Centrale” enfoncée pendant 7 secondes environ jusqu’à ce que le
voyant rouge soit allumé de manière fixe).
› Maintenez enfoncée la touche “Avant” ou “Arrière” pendant 7 secondes: la
lumière rouge et bleue clignotera rapidement, puis (alors que vous main-
tenez le bouton enfoncé), les voyants rouge et bleu se mettent à clignoter
lentement. Maintenant, vous pouvez relâcher le bouton.
› Sur l’autre interphone (d’une marque autre que Midland) suivez la procéd-
ure pour coupler un téléphone, car le BTX2 PRO S est couplé comme un
téléphone.
Si le couplage est réussi, le voyant rouge/bleu arrête de clignoter et en revan-
che le voyant bleu se met à clignoter lentement.
Talk2All-Universal Intercom
Interphone d”autre marque

F
www.midlandeurope.com 77
Attention: n’oubliez pas d’éteindre tous les autres appareils Bluetooth, seuls les
deux appareils concernés par le couplage doivent être allumés.
Pour ouvrir la communication “Intercom universel” sur le Midland BTX2 PRO
S pendant que vous êtes en mode Intercom, appuyez longuement (3 secon-
des) sur le bouton “Avant” ou “Arrière” (selon le bouton utilisé pour l’apparie-
ment). Sur l’autre intercom, appuyez simplement sur la touche de recomposi-
tion du téléphone ou de composition vocale.
Attention: pour utiliser la fonction “Talk2All-Universal Intercom” le couplage sur
l’autre module doit être eectué comme pour un téléphone. L’autre interphone
(d’une marque autre que Midland) pourra être couplé comme un téléphone seule-
ment si les 2 Téléphones sont supporté.
Vous pouvez également coupler un module Midland comme Talk2All, ce qui
veut dire que le couplage doit être eectué comme pour un téléphone (un
module utilise la procédure Talk2All et l’autre module utilise le couplage avec
la procédure “Téléphone”).
Compatibilité avec modules de la gamme Midland BT
Le BTX2 PRO S est compatible avec les modules Midland BT. Quand il sont
connectés la distance maximale pour l’Intercom est celui du plus faible. Le
BTX2 PRO S est compatible avec les versions précédentes de la gamme Mi-
dland BT seulement si ces dernier ont leur firmware à jour.
Associer le BTX2 PRO S aux périphériques Bluetooth
Le BTX2 PRO S de Midland peut être jumelée à d’autres appareils Bluetooth,
comme le téléphone, le navigateur GPS ou une radio PMR446 avec Blue-
tooth intégré ou externe (dongle). La procédure d’appariement doit être ef-
fectuée en utilisant les boutons “Volume +” ou “Volume -”.
› Appariement au bouton “Volume +”: pour Téléphone avec musique A2DP
stéréo, Navigateur GPS avec audio A2DP ou dongle A2DP externe mono /
stéréo. Tous les périphériques appariés au bouton “Volume +” ont une prio-
rité plus élevée et interrompent toutes les autres communications (comme
Intercom, Radio FM et Musique).
› Appariement au bouton “Volume -”: pour Téléphone avec musique A2DP
stéréo, Navigateur GPS avec audio A2DP ou dongle A2DP externe mono /
Stereo. Tous les périphériques appariés au bouton “Volume -” sont toujours
actifs en arrière-plan pendant la communication Intercom.
Attention: Les sources audio A2DP ne sont supportées que sur Vol +. Le second
téléphone couplé sur “Vol -” ne peut supporter que de l’audio mono (PML).
Fonction d’arrière-plan
La connexion audio de tout périphérique appairé sur le bouton “Vol -”, même
stéréo, est toujours en arrière-plan. De cette façon, la communication Inter-
com ne sera pas interrompue, par exemple, par l’indication de rue du GPS ou
par une autre source audio. Vous pouvez décider si l’audio de la connexion “Vol
-” est partagé avec d’autres personnes lorsque l’interphone est ouvert (public)
ou s’il doit être privé (privé).
Attention: Par défaut, le son est privé.
L “audio de “Vol -” a toujours une priorité inférieure par rapport à l’ intercom,
ce qui signifie que lorsque l “intercom est ouvert, le son est abaissé par défaut à
50%. Vous pouvez modifier ce paramètre en utilisant logiciel PC: BTUpdater.
Appairer avec un ou deux téléphones
Le téléphone peut être appairé sur le bouton “Vol +” et sur le bouton “Vol -”
Lorsqu’un téléphone est couplé au “Vol +” ou au “Vol -”, le mode “Téléphone”
est activé.
Vol - Always in background
› Téléphone (HFP/A2DP Stéréo)
› GPS (HFP/A2DP Stéréo)
› Dongle (HFP/A2DP Stéréo)
Vol + High priority
› Téléphone (HFP/A2DP Stéréo)
› GPS (HFP/A2DP Stéréo)
› Dongle (HFP/A2DP Stéréo)

F
78 www.midlandeurope.com
Un appel entrant est toujours prioritaire, cela signifie que tous les autres mo-
des de communication seront coupés (Intercom, Radio FM, Musique).
Si un autre appel entrant parvient sur le second téléphone, vous entendrez un
bip qui l’indiquera.
ATTENTION!
Afin d’obtenir les meilleures performances avec votre téléphone mobile, il est
conseillé de le garder aussi près que possible de votre unité BTX2 PRO S, sur
le côté gauche de votre corps et dans la poche supérieure de votre veste, si
c’est possible.
Comment coupler le BTX2 PRO S avec un telephone
Pour coupler le BTX2 PRO S avec un téléphone, il faut d’abord entrez dans le
mode de configuration:
› Éteignez le module.
› Appuyez sur la touche “Centrale” et maintenez-la pendant 7secondes, ju-
squ’à ce que le voyant soit rouge fixe.
› Appuyez maintenant pendant 3 secondes sur les boutons “ Volume + “ ou “
Volume - “, les lumières bleu et rouge s’allumeront. Après quelques secon-
des votre téléphone ache “Midland BTX2 PRO S”. Suivez la procédure de
couplage du téléphone. Si un code PIN est nécessaire il faut entrer “0000”
(quatre fois zéro).
› Lorsque le couplage est réussi, le voyant est bleu fixe pendant une seconde
et sort du mode de configuration et passer en mode de travail (la lumière
bleue se met à clignoter).
› Vous pouvez maintenant utiliser votre BTX2 PRO S avec le téléphone.
Comment utiliser le telephone
Après avoir couplé votre téléphone au BTX2 PRO S vous devez basculer en
mode “téléphone “ afin de pouvoir l’utiliser.
Appuyer longuement sur la touche “Centrale” jusqu’à ce que vous entendiez
“Téléphone” vocalement. Maintenant, toutes les trois touches sont dédiées au
téléphone (voir la table B).
Répondre à un appel
Quand vous entendez la sonnerie, vous pouvez répondre de deux manières:
Vocalement:
Il sut de dire un mot juste après la première sonnerie pour répondre à l’appel
et commencer à parler.
Manuellement:
Appuyez sur la touche “avant” et parlez.
Rejeter un appel
Si vous ne voulez pas répondre vous pouvez laisser sonner le téléphone ou
appuyer sur la touche “Avant” quelques secondes (vous entendrez une tonalité
de confirmation).
Passer un appel
Ils existent plusieur façon de passer un appel.
B - Mode téléphone
Mode Touche avant (Tél. couplé à “Vol +”) Touche centrale Touche arrière (Tél. couplé à “Vol -”)
Téléphone Court: Composition vocale/accepter
Long: rappel du dernier numéro/ ou rejeter
appel
Long: Changement de mode Court: Composition vocale/accepter ou terminer
l”appel si est en cours
Long: Rappel du dernier numéro/ou rejeter l”appel
Téléphone
(pendant la lecture de musique et
couplé au “ Vol + “)
Court: Chanson suivante Court: Lecture/pause
Long: Changement de mode
Court: Chanson précédente

F
www.midlandeurope.com 79
Depuis le clavier du téléphone:
› Composez le numéroe sur le clavier de votre téléphone et appuyez la tou-
che appel.
Rappeler le dernier numéro composé:
› Tèl. couplé à “Vol +”: Appuyez sur la touche “Avant” pendant 3 secondes
de manière à rappeler le dernier numéro (vous entendez une tonalité de
confirmation).
› Tél. couplé à “Vol -”: Appuyez sur la touche “Arrière” pendant 3 secondes
de manière à rappeler le dernier numéro (vous entendez une tonalité de
confirmation).
Par commande vocale:
› Tél. couplé à “Vol +”: Appuyez brièvement sur la touche “Avant”. Si votre
téléphone supporte la reconaissance vocale, vous entendez un message qui
vous invite à prononcer le nom du contact à appeler.
› Tél. couplé à “Vol -”: Appuyez brièvement sur la touche “Arrière”. Si votre
téléphone supporte la reconaissance vocale, vous entendez un message qui
vous invite à prononcer le nom du contact à appeler
Priorité: Les appels ont une priorité haute, ce qui signifie que toutes les communi-
cations sont temporairements interrompues pendant la réception d’un appel.
Terminer un appel
Il y a plusieur façon de terminer un appel:
› Attendez que votre correspondant raccroche.
› Appuyez sur la touche “Avant” pendant 3 secondes (vous entendez une to-
nalité de confirmation).
› Appuyez sur la touche “Fin” de votre téléphone.
Composition rapide
Il est possible de stocker en mémoire un seul numéro de téléphone et de l’uti-
liser lorsque c’est nécessaire que si le téléphone est appairé sur le “Vol +”. Pour
cela il faut d’abord enregistrer le numéro à l’aide du logiciel PC “BT UPDA-
TER” ou de l’application smartphone “BT SET-APP”. Puis lorsque vous êtes
en mode téléphone appuyez sur la touche “Avant” pendant 7 secondes.
Utiliser la fonction MP3 de votre téléphone
Le téléphone mobile couplé au “ Volume + “ peut être utilisé comme un lecteur
MP3 en stéréo. Le BTX2 PRO S est totalement compatible avec les protoco-
les A2DP et AVRCP qui vous permet d’écouter de la musique et de controler
à distance votre lecteur. Vous pouvez même utiliser les touches de votre BTX2
PRO S pour controler les actions suivantes: Lecture, Pause, Avancer et Re-
culer.
Il est possible de contrôler un seul téléphone à la fois. Vous pouvez choisir le
téléphone à contrôler, en appuyant 3 sec sur le bouton “Vol +”.
Vous entendrez la voix “Contrôle sur le volume vers le haut”. Maintenant, vous
pouvez contrôler le téléphone appairé sur le bouton “Vol +”. Si vous souhaitez
basculer le contrôle sur l’autre téléphone, appuyez à nouveau pendant 3 sec
sur le bouton “Vol +” et vous entendrez la voix “Contrôle sur le volume vers
le bas”
Contrôles disponibles:
› Lecture/pause: Appuyez sur la touche “Centrale”.
› Pour avancer les chansons: Appuyez sur la touche “Avant”.
› Pour reculer les chansons: Appuyez sur la touche “Arrière”.
Priorité: Pour changer la priorité vous pouvez utiliser le logiciel PC “BT UPDATER”
ou l’application smartphone “BT SET-APP”
Attention: Il est possible de contrôler la musique stéréo A2DP uniquement en
mode “Téléphone”.
Si vous écoutez de la musique A2DP et vous passez à “Radio FM” ou “Inter-
com”, la musique restera active mais vous n’avrez pas toutes les commandes
disponibles. Seule Play/Pause est disponible avec un double-clique sur la tou-
che “Centrale”.
Play/PauseAvant Arrière

F
80 www.midlandeurope.com
Partage de Musique
La lecture de musique est possible uniquement si le téléphone est appairé sur
le bouton “Vol +”. Pour commencer à partager votre musique A2DP avec le
passager déjà associé sur le bouton du milieu (10m de distance maximum),
vous devez appuyer longtemps sur le bouton “Arrière” (3 sec.), tandis que la
musique joue. Le passager peut arrêter le partage de la musique en appuyant
brièvement sur le bouton du milieu (mais ne peut pas contrôler la musique). Le
conducteur peut arrêter le partage de musique simplement en reproduisant la
même manipulation, un appuie long sur le bouton “Arrière” (3 sec.).
Quand le partage de la musique est actif, vous ne pouvez pas maintenir ouver-
te la communication intercom.
Attention: pour activer le partage de la musique, assurez-vous d’avoir envoyé une
commande Play de le module.
Attention: En modalité partage de la musique, le conducteur peut ouvrir l’inter-
com au passeger avec un double clic sur la touche Central.
Navigateur GPS
Couplage à un Navigateur GPS
Le Navigateur GPS peut être couplé en utilisant les boutons “Volume +” ou
“Volume -”.
› Bouton Volume + (prise en charge audio stéréo A2DP et HFP mono). Tous
les périphériques appariés au bouton “Vol +” ont une priorité plus élevée
et interrompent toutes les autres communications (comme Intercom, et
Radio FM).
› Bouton Volume - (prise en charge de l “audio A2DP stéréo et HFP mono).
Tous les appareils appariés sur le bouton “Vol -” sont toujours actifs en ar-
rière-plan pendant la communication Intercom. Vous pouvez décider si
l’audio de la connexion “Vol -” est partagé avec d’autres personnes lorsque
l’interphone est ouvert (la fonction “Public” est activée) ou si elle doit être
privée (la fonction “Privé” est activée). Voir le paragraphe “Background”
ci-dessus.
Annonce vocale GPS Stéréo (A2DP)
BTX2 PRO S supporte les annonces vocales Stéréo (A2DP) des navigateurs
GPS ou des applications smartphone lorsqu’ils sont connecté à la touche “Vol
+” . Quand une annonce vocale “Se produit”, l’Intercom ou la radio FM s’inter-
rompe pour donner la priorité à l’annonce. Par défaut cette fonction est ON.
Il est possible changer la priorité en utilisant le logiciel PC “BT UPDATER” ou
l’application smartphone “BT SET-APP”.
Connexion à un navigateur GPS avec la fonction lecteur MP3
Si votre GPS possède également la fonction lecteur MP3 et que vous souhai-
tez écouter sa musique, il faut connecter le GPS à la touche “Volume +”. Dans
ce cas les annonces GPS interrompent toutes les autres communications (In-
tercom, Radio FM, Musique).
Quand le GPS est connecté à la touche “Volume +” le mode “Téléphone” est
activé.
Attention: Vous ne pouvez contrôler la musique en stéréo A2DP à partir du GPS
qu’uniquement en “ Mode Téléphone “.
Comment connecter le BTX2 PRO S à un GPS
En général il est possible de connecter le BTX2 PRO S à tous les GPS pour
moto qui supporte le protocole Bluetooth “headset”. Pour connecter le BTX2
PRO S a un GPS, vous devez d’abord entrez en configuration:
1. Éteignez le module.
2. Appuyez sur la touche “Centrale” et maintenez-la pendant 7secondes, ju-
squ’à ce que le voyant soit rouge fixe.
3. Maintenant appuyez sur la touche “Volume +” ou “Volume -” pendant 3
secondes le voyant clignote alors rouge et bleu.
4. Après quelques secondes “MIDLAND BTX2 PRO S” sera aché sur votre
GPS.
5. Suivez la procédure de connexion de votre GPS. Si un code pin est nécess-
aire vous devez saisir “0000” (4 fois zéro).
6. Quand la connexion à réussi, le voyant reste bleu fixe pendant une seconde
puis quitte le mode de configuration. (Le voyant clignote bleu). Vous pouvez
maintenant utilisé votre MIDLAND BTX2 PRO S avec le GPS pour les
annonce de direction.

F
www.midlandeurope.com 81
Connexion à une radio PMR446 avec Bluetooth intégré ou externe
La radio PMR446 doit être connecté au bouton “Vol –“ ou “Vol +”. Si appairé
sur le “ Volume -”, La radio PMR 446 est toujours en arrière plan même quand
vous parlez dans l’intercom.
Procedure
› Éteignez l’appareil.
› Appuyez et maintenez enfoncé la touche “Centrale” environ 7 secondes,
jusqu’à ce que le voyant rouge soit allumé en permanence.
› Maintenant appuyez sur la touche “Volume –“ pendant 3 secondes le
voyant clignote alors rouge et bleu.
› Suivez la procédure de connexion expliquée dans le manuel de la radio.
Comment ecouter la radio FM
Le récepteur radio FM est intégré dans l’appareil. Vous avez juste besoin de ba-
sculer en mode “Radio FM” afin de l’utiliser. Appuyer longuement sur la touche
“Centrale” jusqu’à ce que vous entendiez “radio FM” vocalement. Maintenant,
toutes les trois touches sont dédiées à la Radio FM (voir la table C).
Attention: Appuyez brièvement sur la touche “Avant” ou “Arrière” pour chercher
la station de radio FM.
Lorsque vous appuyez longuement sur la touche “Avant” ou “Arrière”, vous
scannez vers le haut ou le bas les 6 stations enregistrées. Un bip sonore sépare
chaque station enregistrée et un double bip se fait entendre lorsque la dernière
ou la première station enregistrée est atteint.
Pour enregistrer la station que vous écoutez, appuyez sur la touche “Avant”
et “Arrière” en même temps pendant 3 secondes. Vous entendez un bip de
confirmation. La station est enregistrée après la dernière mémoire utilisée.
Grâce au système RDS, la radio FM choisi le signal le plus puissant disponible
pour la station de radio que vous souhaitez écouter.
Le système RDS est désactivée par défaut, si nécessaire, vous pouvez activer/
désactiver le RDS en appuyant sur la touche “Volume +” et “Volume -” pen-
dant 3 secondes lorsque la radio est allumée.
Activer / désactiver la radio FM
Par défaut la radio FM est active.
Désactiver:
› Entrez en configuration: éteignez le module et maintenez appuyé sur la
touche “Centrale” pendant 7 secondes, jusqu’à ce que le voyant soit rouge
fixe.
› Appuyez sur les touches “Centrale” et “Vol +” pendant 3 secondes. Le
voyant bleu clignote deux fois.
› Double cliquez sur la touche “Centrale” pour sortir du mode Configuration
et utiliser le BTX2 PRO S
Activer:
› Suivez la même procédure décrite ci-dessus; le voyant bleu clignotera une
fois.
› Pour sortir du mode Configuration double cliquez sur la touche “Centrale”.
FM radio avec Intercom
Lorsque vous êtes en mode “Radio FM” vous ne pouvez pas ouvrir manuel-
lement l’Intercom, vous pouvez uniquement utiliser la fonction VOX avec le
module connecté par la touche “Centrale”. Pour une activation manuelle vous
devez basculer en mode “Intercom”.
Attention: Après avoir réinitialisé toutes les parties, seul le mode “Radio FM” sera
activé.
C-Mode Radio FM
Mode Touche avant Touche centrale Touche arrière
Radio FM Court: Recherche station avant
Long: enregistrer recherche
Court: On/o radio
Long: Changement de mode
Court: Recherche station avant
Long: Enregistrer recherche

F
82 www.midlandeurope.com
Radio FM en arrière-plan
Il n’est pas possible d’utiliser la radio FM en même temps qu’une autre source
audio. Tout son provenant de l’intercom ou de la connexion “Vol +” ou “Vol -”
met en pause la radio FM.
Installation et configuration speciale
Remise à zéro
Parfois, il peut être nécessaire de supprimer toutes les références de couplage
enregistrées dans le BTX2 PRO S (réinitialisation).
Pour eectuer cette opération vous devez d’abord entrer en mode configu-
ration:
› Éteignez l’appareil.
› Appuyez et maintenez enfoncé la touche “Centrale” environ 7 secondes,
jusqu’à ce que le voyant rouge soit allumé en permanence.
› Appuyez simultanément sur les touches “Volume +” et “Volume -” pendant
3 secondes. La lumière bleue s’allume pendant 1 sec.
› Double cliquez sur la touche “Centrale” pour quitter le mode “Setup” et
utiliser le BTX2 PRO S.
Cette procédure supprime tous les appareils couplés par Bluetooth et
stockées dans la mémoire, il est donc possible de commencer une nouvelle
session “propre” de couplage.
Attention: Après avoir réinitialisé toutes les parties, seul le mode “Radio FM” sera
activé.
Retour en configuration d’usine
Parfois, il peut être nécessaire de revenir aux réglages d’usine, pour remettre
à zéro toutes les modifications et la configuration déjà faite pour avoir un mo-
dule “propre”.
Pour eectuer cette opération vous devez d’abord entrer en mode configu-
ration:
› Éteignez l’appareil.
› Appuyez et maintenez enfoncé la touche “Centrale” environ 7 seconde, ju-
squ’à ce que le voyant rouge soit allumé en permanence.
› Appuyez simultanément en maintenant enfoncée les trois touches “Avant”
- “Centrale” - “Arrière” pendant 3 secondes. La lumière bleue s’allume pen-
dant 1 sec.
› Double cliquez sur la touche “Centrale” pour quitter le mode “Setup” et
utiliser le BTX2 PRO S.
Activer/désactiver la fonction VOX (Intercom et téléphone)
La fonction Intercom peut être activée manuellement ou vocalement (VOX).
L’activation du VOX est influencée par le type de casque, le bruit de fond et
donc par la vitesse.
Pour des résultats optimaux, il est possible de choisir l’un des quatre niveaux
de sensibilité du microphone: haute, moyenne, faible ou très faible.
Le réglage par défaut du BTX2 PRO S est “faible “. Il est également possible
de désactiver la fonction VOX pour activer l’Intercom et appel téléphonique
fonctionnalités répondant uniquement en mode manuel.
Ces réglages peuvent être eectués via le programme “BTPro Updater” compa-
tible avec PC/MAC.
Configuration et mise à jour logiciel
Il est possible de configurer et de mettre à jour le logiciel embarqué du BTX2
PRO S en utilisant la connexion USB vers votre PC. Sur le site web Midland
www.midlandeurope.com à la page BTX2 PRO S vous pouvez trouver le logi-
ciel Pc et le firmware pour la mise à jour.
ATTENTION: NE PAS CONNECTER LE MODULE AU PC “AVANT” D’A
VOIR TELECHARGER ET INSTALLE LE LOGICIEL
Utilisez à vos risques
L’utilisation de cet appareil altère votre capacité à entendre d’autres sons et
d’autres personnes autour de vous.
Écouter de la musique ou parler au téléphone vous empêche d’entendre les
autres autour de vous.
L’utilisation de ces équipements pendant la conduite peut endommager vous
et les autres; dans certains lieux n’est pas autorisé.
L’utilisation à un volume élevé peut entraîner une perte auditive permanente.
Si vous entendez un siement dans l’oreille ou toutes autres écoutes doulou-

F
www.midlandeurope.com 83
reuse associée, réduisez le volume ou cessez d’utiliser cet appareil.
Avec l’utilisation continue à volume élevé, vos oreilles s’habituent au niveau
sonore, ce qui peu causer des dommages permanents à votre audience.
S’il vous plaît utiliser cet appareil à un niveau de volume raisonnable.
Garantie
La garantie s’appliquant à l’appareil principal est d’une durée de 24 mois; elle
est de 6 mois pour les accessoires (batteries, chargeurs, antennes, casques
d’écoute, microphones). Pour davantage d’informations au sujet de la garantie,
veuillez vous rendre sur le site: www.midlandeurope.com
Certification de notice européenne CE et informations
d’agrément aux fins de sécurité
Ce produit porte le marquage CE conformément à la directive RED 2014/53/
UE
et peut être librement utilisé dans tous les pays de l’UE. Il est interdit aux
utilisateurs d’eectuer des changements ou des modifications sur le dispositif.
Les modifications qui ne sont pas expressément approuvées par le producteur
rendent nulle la garantie.
Pour de plus amples informations, veuillez visiter notre site Internet:
www.midlandeurope.com


RED
IT / RSM
Cte International Srl dichiara che il prodotto è conforme ai
requisiti essenziali e alle disposizioni della Direttiva 2014/53/
UE. La Dichiarazione di conformità si può scaricare dal
sito http://www.midlandeurope.com/it/pagina/10090-
certifications
GB / CY / MT
Hereby Cte International Srl declares that this product
is in compliance with the essential requirements and
other relevant provisions of Directive 2014/53/UE. The
declaration of conformity is available on the web site
http://www.midlandeurope.com/it/pagina/10090-
certifications
AT / DE / CH / LI
Hiermit erklärt Cte International Srl, dass das Produkt die
grundlegenden Anforderungen und anderen relevanten
Bestimmungen der Richtlinie 2014/53/UE. Die
Konformitätserklärung ist unter folgendem Link verfügbar:
http://www.midlandeurope.com/it/pagina/10090-
certifications
ES
CTE International SRL. declara, bajo su responsabilidad,
que este aparato cumple con lo dispuesto en la Directiva
2014/53/UE, del Parlamento Europe. La Declaración de
Conformidad está disponible en
http://www.midlandeurope.com/it/pagina/10090-
certifications
FR / LU / CH
Par la présente Cte International Srl déclare que le
modèle est conforme aux exigences essentielles et autres
dispositions pertinentes de la directive 2014/53/UE. La
déclaration de conformité est disponible sur le site internet
http://www.midlandeurope.com/it/pagina/10090-
certifications
PT
A CTE INTERNATIONAL declara que este aparelho
cumpre com o disposto na Directiva 2014/53/UE do
Parlamento Europeu. A Declaração de Conformidade
está disponível no sitio na Internet em http://www.
midlandeurope.com/it/pagina/10090-certifications
GR
Με το παρών, η Cte International Srl δηλώνει οτι το
όνομα του μοντέλου συμμορφώνεται ως προς τις βασικές
απαιτήσεις και άλλες σχετικές διατάξεις του Κανονισμού
2014/53/UE. Η δήλωση συμμόρφωσης είναι διαθέσιμη
στην ιστοσελίδα
http://www.midlandeurope.com/it/pagina/10090-
certifications
NL
Hierbij verklaard CTE International Srl dat dit model voldoet
aan de essentiële eisen en andere relevante bepalingen van
richtlijn 2014/53/UE.
De verklaring van conformiteit is beschikbaar op de website
http://www.midlandeurope.com/it/pagina/10090-
certifications
BE
CTE INTERNATIONAL Srl verklaart dat het product
overeenstemt met de voorschriften en andere bepalingen
van de richtlijn 2014/53/UE. De conformiteitsverklaring is
voorhanden op de website http://www.midlandeurope.com/
it/pagina/10090-certifications
PL
CTE International Srl deklaruje, że ten model jest
zgodny z wymaganiami zasadniczymi i innymi istotnymi
postanowieniami Dyrektywy 2014/53/UE. Deklaracja
Zgodności jest dostepna na stronie http://www.
midlandeurope.com/it/pagina/10090-certifications
RO
Cte International Srl declara ca acest model este in
conformitate cu cerintele esentiale si alte prevederi ale
Directivei 2014/53/UE. Declaratia de confomitate este
disponibila si pe site-ul http://www.midlandeurope.com/it/
pagina/10090-certifications.
BG
С настоящото CTE international Srl декларира, че
продукта е в съответствие с основните изисквания и
съответните модификации на 0Директива 2014/53/UE.
Декларацията за съвместимост е налична на сайта:
http://www.midlandeurope.com/it/pagina/10090-
certifications
NO
CTE INTERNATIONAL Srl erklærer at produktet
er i overensstemmelse med de viktigste kravene og
andre relevante betingelser i Direktivet 2014/53/UE.
Samsvarserklæringen finnes tilgjengelig på nettstedet
http://www.midlandeurope.com/it/pagina/10090-
certifications
DK
Hermed erklærer Cte International Srl , at dette
apperat er i overensstemmelse med kravene og andre
relevante bestemmelser i direktiv 2014/53/UE.
Overensstemmelseserklæringen findes på webstedet
http://www.midlandeurope.com/it/pagina/10090-
certifications
SE
CTE INTERNATIONAL Srl förkunnar att produkten
överensstämmer med de väsentliga kraven och övriga
bestämmelser i direktiv 2014/53/EU. Denna försäkran om
överensstämmelse finns på webbplatsen
http://www.midlandeurope.com/it/pagina/10090-
certifications
FI
CTE INTERNATIONAL Srl vakuuttaa, että tuote täyttää
direktiivin 2014/53/UE. Vaatimuksenmukaisuusvakuutus
on saatavilla
http://www.midlandeurope.com/it/pagina/10090-
certifications –verkkosivuilla.
HR
Cte International Srl ovime izjavljuje da je ime ovog modela
u suglasnosti sa bitnim zahtjevima te ostalim relevantnim
odredbama Propisa 2014/53/EU. Ova Izjava o suglasnosti je
dostupna na web stranici http://www.midlandeurope.com/
it/pagina/10090-certifications.
EE
Käesolevaga kinnitab Cte International Srl selle mudeli
vastavust direktiivi 2014/53/UE. Vastavusdeklaratsioon on
kättesaadav veebilehel
http://www.midlandeurope.com/it/pagina/10090-
certifications

LT
CTE International patvirtina, kad šis modelis atitinka visus
esminius Direktyvos 2014/53 / UE. Atitikties deklaracija yra
pateikiama internetinėje svetainėje
http://www.midlandeurope.com/it/pagina/10090-
certifications
LV
CTE INTERNATIONAL Srl deklarē, ka produkts atbilst
pamatprasībām un citiem ar to saistītajiem Direktīvas
2014/53 / UE. Atbilstības deklarācija ir pieejama mājas lapā:
http://www.midlandeurope.com/it/pagina/10090-
certifications
SK
Týmto Cte International Srl prehlasuje, že tento názov model
je v zhode so základnými požiadavkami a ďalšími príslušnými
ustanoveniami smernice 2014/53 /UE. Vyhlásenie o zhode
je k dispozícii na webových stránkach
http://www.midlandeurope.com/it/pagina/10090-
certifications
SI
Cte International Srl deklarira da je ta model skladen z
bistvenimi zahtevami in drugimi relevantnimi določili EU
direktive 2014/53/UE. Deklaracija o skladnosti je na voljo
na spletni strani http://www.midlandeurope.com/it/
pagina/10090-certifications
CZ
CTE INTERNATIONAL SRL prohlašuje, že výrobek je v
souladu s 2014/53/UE. Prohlášení o shodě je k dispozici na
webových stránkách
http://www.midlandeurope.com/it/pagina/10090-
certifications
H
Mi, a CTE International Srl. saját felelősségre kijelentjük,
hogy ezen elnevezésű termék megfelel az 2014/53 /UE. A
megfelelőségi nyilatkozat elérhető weboldalunkon a
http://www.midlandeurope.com/it/pagina/10090-
certifications címen.

• INFORMAZIONE AGLI UTENTI: i sensi dell’art. 13 del decreto legislativo 25 luglio
2005, n.151 “Attuazione delle Direttive 2002/95/CE, 2002/96/CE e 2003/108/CE,
relative alla riduzione dell’uso di sostanze pericolose nelle apparecchiature elettriche ed
elettroniche, nonché allo smaltimento dei rifiuti”.
Il simbolo del cassonetto barrato riportato sull’apparecchiatura indica che il prodotto alla
fine della propria vita utile deve essere raccolto separatamente dagli altri rifiuti. L’utente
dovrà, pertanto, conferire l’apparecchiatura giunta a fine vita agli idonei centri di raccol-
ta dierenziata dei rifiuti elettronici ed elettrotecnici, oppure riconsegnarla al rivenditore
al momento dell’acquisto di una nuova apparecchiatura di tipo equivalente, in ragione di
uno a uno. L’adeguata raccolta dierenziata per l’avvio successivo dell’apparecchiatura di-
smessa al riciclaggio, al trattamento e allo smaltimento ambientalmente compatibile con-
tribuisce ad evitare possibili eetti negativi sull’ambiente e sulla salute e favorisce il riciclo
dei materiali di cui è composta l’apparecchiatura. Lo smaltimento abusivo del prodotto
da parte dell’utente comporta l’applicazione delle sanzioni amministrative di cui al dlgs.
n.22/1997 (articolo 50 e seguenti del dlgs. n.22/1997).
• All articles displaying this symbol on the body, packaging or instruction manual of same,
must not be thrown away into normal disposal bins but brought to specialised waste di-
sposal centres. Here, the various materials will be divided by characteristics and recycles,
thus making an important contribution to environmental protection.
• Alle Artikel, die auf der Verpackung oder der Gebrauchanweisung dieses Symbol tragen,
dürfen nicht in den normalen Mülltonnen entsorgt werden, sondern müssen an gesonder-
ten Sammelstellen abgegeben werden. Dort werden die Materialien entsprechend ihrer
Eigenschaften getrennt und, um einen Beitrag zum Umweltschutz zu liefern, wieder-
verwertet.
• Todos los artículos que exhiban este símbolo en el cuerpo del producto, en el embalaje o
en el manual de instrucciones del mismo, no deben ser desechados junto a los residuos
urbanos normales sino que deben ser depositados en los centros de recogida especiali-
zados. En estos centros, los materiales se dividirán en base a sus características y serán
reciclados, para así poder contribuir de manera importante a la protección y conservación
del medio ambiente.
• Tous les articles présentant ce symbole sur le corps, l’emballage ou le manuel d’utilisation
de celui-ci ne doivent pas être jetés dans des poubelles normales mais être amenés dans
des centres de traitement spécialisés. Là, les diérents matériaux seront séparés par ca-
ractéristiques et recyclés, permettant ainsi de contribuer à la protection de l’environne-
ment.

SAR
I / RSM
Importante: L’apparato deve essere utilizzato ad una distanza
superiore a 5
cm dal corpo
UK / CY / IRL/ M
Important: The equipment must be used at least 5cm away
from the body of use
A / D / CH / FL
Wichtig: Bei Verwendung des Gerätes muss ein Abstand von
mehr als 5 cm zum Körper eingehalten werden.
BE
Belangrijk: De apparatuur moet gebruikt worden op een af-
stand van het lichaam die groter is dan 5cm
BG
ВАЖНО: Оборудването трябва да се използва на
дистанция не по-малка от 5 см от тялото.
CZ
Důležité: Zařízení nesmí být používáno ve vzdálenosti méně
než 5 cm od těla.
DK
Vigtigt: Udstyret skal skal være mindst 5cm fra kroppen un-
der anvendelse
E
El equipo debe usarse a una distancia superior a 5cm del
cuerpo.
EST
Märkus: Seade tuleb kasutada kaugemal kui 5cm kehast
F / LUX / CH
Important: l’appareil doit être utilisé à une distance supérieure
à 5cm du corps.
FIN
Tärkeää: Laitetta on käytettävä etäisyydellä yli 5cm kehosta
GR
Σημαντικό: Ο εξοπλισμός θα πρέπει να χρησιμοποιείται σε
απόσταση μεγαλύτερη των 5cm από το σώμα σας.
HR
Važno: Oprema se mora koristiti na udaljenosti većoj od 5 cm
od tijela
HU
Fontos! Használat közben győződjön meg arról, hogy az
eszköz legalább 5cm-re a testétől van.
IS
Búnaðurinn verður að nota í arlægð sem er meiri en 5cm
úr líkamanum
LT
SVARBU: Įranga turi būti naudojama ne mažiau kaip 5cm
atstumu nuo kūno.
LV
Aparāts jāizmanto attālumā vairāk nekā 5 cm no organisma
N
Viktig: Apparatet må brukes i en avstand på mer enn 5cm
fra kroppen
NL
Belangrijk: Het apparaat moet op een afstand van minimaal 5
cm van het lichaam gebruikt worden.
P
Importante: O equipamento tem de ser usado a uma di-
stância do corpo superior a 5cm.
PL
Uwaga: Urządzenie podczas pracy nie może znajdować się
bliżej niż 5cm od ciała.
RO
Important: produsul trebuie utilizat la o distanta mai mare de
5cm fata de corp.
SE
Viktigt: Apparaten måste användas på ett avstånd av mer än
5 cm från kroppen
SK
Dôležité: Pri použití prístroja musí byť dodržaná minimálna
vzdialenosť od tela 5 cm!
SL
Pomembno: Napravo se mora uporabljati vsaj 5 cm oddaljeno
od človeškega telesa

Prodotto o importato da:
CTE INTERNATIONAL srl
Via. R.Sevardi 7 42124 Reggio Emilia - Italia.
Prima dell’uso leggere attentamente le istruzioni.
Produced or imported by:
CTE INTERNATIONAL srl
Via. R.Sevardi 7 42124 Reggio Emilia - Italy.
Read the instructions carefully before installation and use.
Vertrieb durch:
ALAN ELECTRONICS GmbH
Daimlerstraße 1K - D-63303 Dreieich Deutschland.
Vor Benutzung Bedienungsanleitung beachten.
Importado por:
MIDLAND IBERIA, SA
C/Cobalt, 48 - 08940 Cornellà de Llobregat, Barcelona - España.
Antes de utilizar, lea atentamente el manual de uso.
Importé par:
ALAN FRANCE S.A.R.L.
5, Rue Ferrie, Zac les Portes du Vexin 95300 Ennery - France
Avant l’utilisation, lire les instructions.

www.midlandeurope.com
Transcripción de documentos
BTX2 PRO S DUAL CORE INTERCOM SYSTEM MANUALE D’USO • INSTRUCTION GUIDE • BEDIENUNGSANLEITUNG MANUAL DE INSTRUCCIONES • GUIDE D’UTILISATION Sommario Caratteristiche tecniche Midland BTX2 PRO S........................................................................................................................................................................... 2 Ricarica delle batterie...................................................................................................................................................................................................................... 3 Descrizione dispositivo e sistema di fissaggio................................................................................................................................................................................. 3 Accensione e spegnimento del Midland BTX2 PRO S................................................................................................................................................................. 5 Modalità operative............................................................................................................................................................................................................................ 5 Come abbinare un altro dispositivo Midland BTX2 PRO S..........................................................................................................................................................6 Conference.......................................................................................................................................................................................................................................9 Talk 2 All - Abbinamento a dispositivi non Midland.................................................................................................................................................................... 10 Compatibilità con i dispositivi BT Midland.................................................................................................................................................................................... 11 Abbinare il Midland BTX2 PRO S a dispositivi Bluetooth.......................................................................................................................................................... 11 Utilizzo della funzionalita’ Radio FM............................................................................................................................................................................................ 14 Configurazioni speciali....................................................................................................................................................................................................................15 Configurazione e aggiornamento firmware.................................................................................................................................................................................. 16 Garanzia........................................................................................................................................................................................................................................... 16 Certificazioni e Conformità di Sicurezza...................................................................................................................................................................................... 16 I MIDLAND BTX2 PRO S Dual Core Intercom System Midland BTX2 PRO S è un sistema intercom con Bluetooth Dual Core (doppio processore Bluetooth) per comunicazioni Conference e con funzione background anche in stereo. Estremamente sottile e dal design aerodinamico, BTX2 PRO S è dotato di molteplici funzioni che si attivano facilmente grazie ai 3 grandi tasti posti sul frontale del dispositivo. Midland BTX2 PRO S si può fissare al casco in due modi: tramite basetta adesiva o tramite l’aggancio a morsetto. Principali caratteristiche: ›› Bluetooth Dual Core per background audio anche in stereo ›› Intercom Pilota/Passeggero oppure moto a moto fino ad una distanza massima di 1200 m. ›› Conference fino a 8 persone (4 coppie) ›› Connessione fino a 6 persone per comunicazioni “one to one” ›› MWE Noise Killer ›› Funzionalità Universal Intercom per collegare intercom di altre marche ›› Radio FM stereo con RDS ›› Music share (condivisione musica con passeggero) ›› Connessione al telefonino/MP3 player ›› Supporto per 2 Telefoni ›› Connessione a sistemi di navigazione GPS ›› Configurazione ed aggiornamento firmware da PC via USB Midland BTX2 PRO S è disponibile in due versioni: ›› Midland BTX2 PRO S confezione singola con un solo dispositivo ›› Midland BTX2 PRO S TWIN confezione doppia con due dispositivi In base alla versione in vostro possesso nella confezione troverete: Midland BTX2 PRO S SINGLE ›› 1 dispositivo di comunicazione Midland BTX2 PRO S 2 ›› ›› ›› ›› ›› 1 kit di montaggio a slitta completo di speaker HI-FI stereo 1 microfono a braccetto e 1 microfono a filo 1 sistema di fissaggio bi-adesivo 1 sistema di fissaggio a morsetto 1 kit di ricarica USB-Micro USB Midland BTX2 PRO S TWIN ›› ›› ›› ›› ›› ›› 2 dispositivi di comunicazione Midland BTX2 PRO S 2 kit di montaggio a slitta completo di speaker HI-FI stereo 2 microfoni a braccetto e 2 microfoni a filo 2 sistemi di fissaggio bi-adesivo 2 sistemi di fissaggio a morsetto 1 kit di ricarica USB-Micro USB con doppio connettore I dispositivi della confezione TWIN sono già abbinati tra loro sul pulsante “Centrale” per poter attivare immediatamente la funzione Intercom. Caratteristiche tecniche Midland BTX2 PRO S Generali: ›› Bluetooth ver. 4.2 stereo (protocollo Headset/Handsfree/A2DP/AVRCP) ›› Frequenza 2.4GHz - Max Power 100mW ›› Sistema AGC per il controllo automatico del volume in base al rumore di fondo ›› Attivazione della comunicazione intercom vocale (VOX) o manuale ›› Comandi manuali per: attivazione telefono, interfono, Radio FM ›› Completamente resistente all’acqua ›› Batteria al Litio con autonomia fino a 20 ore di conversazione ›› Tempo di ricarica: circa 2 ore Connessioni Bluetooth: Con un dispositivo dello stesso tipo per comunicazioni intercom Pilota-Passeggero o Moto-Moto fino ad una distanza massima di 1200 m senza ostacoli o interferenze. Con dispositivi Bluetooth: Telefonino con MP3 player Stereo (protocollo A2DP) e GPS www.midlandeurope.com Assicuratevi che il dispositivo di comunicazione sia completamente carico prima di iniziare ad utilizzarlo. La prima volta sono necessarie almeno 3 ore. Successivamente il tempo si riduce mediamente a 2 ore per una ricarica completa. Per ragioni di comodità, il dispositivo può essere rimosso dal casco per essere ricaricato. Per caricare il dispositivo di comunicazione, sollevate la protezione in gomma della presa di ricarica e collegate ad essa lo spinotto del caricatore, quindi innestate la spina CA del caricatore ad una presa di rete elettrica. Il LED rosso lampeggerà per tutto il tempo della ricarica. Lasciate l’apparecchio collegato fino a che il LED rosso si spegne e il LED blu rimane acceso fisso. Quando la carica è completa, (LED rosso non più lampeggiante) scollegate il dispositivo dal caricatore. Descrizione dispositivo e sistema di fissaggio I Ricarica delle batterie Descrizione Midland BTX2 PRO S Il dispositivo Midland BTX2 PRO S è dotato di 5 pulsanti, tutti nella parte frontale. I tre pulsanti principali sono pulsanti multifunzione: pulsante “Avanti” (a sinistra), pulsante “Centrale” e pulsante “Indietro” (a destra). I due pulsanti più piccoli, in alto a destra, sono invece il Volume + ed il volume -. Volume - Volume + LED Attenzione: Midland BTX2 PRO S è stato progettato per essere resistente alla pioggia. Verificate sempre che il gommino di protezione della presa di ricarica sia ben chiuso in caso di pioggia. Attenzione: ogni volta che viene inserito (o disinserito) il plug di ricarica, il dispositivo si spegne (per utilizzarlo mentre è in carica è necessario quindi riaccenderlo con il plug inserito). Avanti Centrale Indietro Presa Ricarica: Permette la ricarica del dispositivo tramite alimentatore microUSB standard. Presa ricarica Descrizione Kit Audio Il sistema audio comprende due altoparlanti stereo HI-FI e due microfoni intercambiabili: uno a braccetto e l’altro a filo. Entrambi hanno un mini connettore che vi permette di scegliere il microfono che più si adatta al vostro tipo di casco. www.midlandeurope.com 3 I Altoparlanti stereo I due altoparlanti stereo hanno una fascia adesiva/velcro che facilita il loro fissaggio all’interno del casco. Raccomandiamo di non tenere il volume troppo alto, in quanto è importante mantenere l’attenzione in mezzo al traffico e durante i vostri spostamenti in moto. Descrizione sistema di fissaggio al casco Il Midland BTX2 PRO S è fornito con due sistemi di fissaggio al casco, uno tramite base con biadesivo e l’altro con aggancio a morsetto. Il dispositivo, grazie al sistema di contatti a slitta, può essere sganciato dal sistema di fissaggio scelto ogni volta che si rende necessaria la ricarica o per custodirlo altrove Fissaggio con bi-adesivo Il sistema di fissaggio con bi-adesivo è già montato sulla base con contatti a slitta. Assicuratevi che la parte del casco dove andrà fissata la base bi adesiva sia pulita. Piegate le due alette fino ad ottenere la stessa curvatura del casco. Rimuovete la pellicola dal biadesivo e fissate la base sulla parte sinistra del casco esercitando una leggera pressione per alcuni secondi. Microfono Il microfono può essere fissato al casco in due modi, in base alla tipologia di microfono scelta. Microfono a braccetto Posizionate il braccetto del microfono con il velcro/ adesivo tra l’imbottitura e la parte rigida del casco, in modo che il microfono e il simbolo bianco sul microfono siano posizionati correttamente di fronte alla bocca. Questa soluzione è adatta per caschi modulari. Per i caschi aperti (Jet) è disponibile anche un microfono specifico opzionale (cod. C1253). Microfono a filo Posizionate il microfono, grazie al velcro/adesivo, all’interno del casco di fronte alla bocca. Questo tipo di microfono è l’ideale per i caschi integrali. Microfono a braccetto 4 Microfono a filo Biadesivo Fissaggio con morsetto 1. Rimuovere la basetta bi-adesiva dalla slitta utilizzando la chiave presente nella confezione. Ricordatevi di conservare le due viti. 2. Tramite le due viti in dotazione avvitate la base a morsetto alla slitta. www.midlandeurope.com Sgancio A I Aggancio 3. Quando avete trovato il punto esatto dove fissare l’interfono, stringete maggiormente le due viti per fissare la slitta al morsetto nella parte sinistra del casco. Accensione e spegnimento del Midland BTX2 PRO S Accensione: ›› Tenete premuto il pulsante “Centrale” per circa 3 secondi, fino all’accensione della luce BLU lampeggiante. Se necessario utilizzate anche la basetta gommata per una maggiore tenuta del fissaggio a morsetto. Grazie alle due viti più corte fissate la basetta gommata alla slitta e avvitate poi la la base a morsetto. Spegnimento: ›› Tenete premuti i pulsanti “Centrale” e “Indietro” insieme per circa 3 secondi, fino a che la luce ROSSA emette 3 lampeggi. In questo modo non è possibile spegnere il dispositivo in modo involontario durante l’uso (cosa che potrebbe succedere, specialmente se si utilizzano i guanti). Modalità operative Base gommata Inserimento e sgancio del Midland BTX2 PRO S Il BTX2 PRO S si inserisce facilmente al casco facendolo scorrere verso il basso sull’apposita slitta del kit di fissaggio. Il dispositivo viene mantenuto in sede grazie alla clip di fissaggio nella parte superiore della slitta (A). Per rimuoverlo, basta semplicemente premere la clip di fissaggio e spingere il BTX2 PRO S verso l’alto. www.midlandeurope.com Midland BTX2 PRO S ha tre modalità di funzionamento distinte: Intercom, Telefono e Radio FM. In base alla modalità attiva in un dato momento, le funzioni del Midland BTX2 PRO S cambiano e di conseguenza anche i tre pulsanti centrali assumono funzionalità diverse. ›› La modalità “Intercom” permette la gestione della funzionalità intercom per la comunicazione pilota/passeggero o moto a moto. I tre pulsanti permettono di aprire e chiudere la connessione verso gli altri dispositivi collegati . ›› La modalità “Telefono” (Phone), permette la gestione del telefono e le funzioni di player musicale del telefono stesso. I tre pulsanti gestiscono le funzionalità del telefono e della musica (play/pausa- avanti e indietro). 5 I ›› La modalità “Radio FM” (FM radio) permette l’ascolto della radio; i tre pulsanti gestiscono la ricerca e la memorizzazione delle stazioni preferite (6 memorie disponibili) E’ possibile passare da una modalità all’altra semplicemente premendo per 3 secondi il pulsante “Centrale”. Un annuncio vocale vi indicherà in quale modalità state entrando. La sequenza con cui è possibile scorrere le 3 modalità è la seguente: ›› Intercom (se è stata abbinata almeno ad un altro dispositivo) ›› FM Radio ›› Phone (se è stato abbinato un telefono) Per esempio se siete nella modalità “Intercom” potete utilizzare i tre pulsanti per aprire e chiudere la comunicazione verso gli altri dispositivi. Se passate, premendo il pulsante “Centrale”, alla modalità “FM Radio” potete ascoltare la radio ed i tre pulsanti serviranno per cambiare stazione e memorizzare quelle preferite. E’ possibile sapere in quale modalità si trova il dispositivo semplicemente premendo brevemente insieme i pulsanti “Volume+” e “Volume -” . Un annuncio vocale vi indicherà in quale modalità vi trovate. Distanza massima La modalità intercom è attiva fino ad una distanza massima di 1200 m in condizioni ottimali: questo significa che i piloti devono sempre essere a vista, senza ostacoli o interferenze. Come abbinare un altro dispositivo Midland BTX2 PRO S Per utilizzare la funzionalità Intercom è necessario avere due dispositivi Midland BTX2 PRO S accesi ed in precedenza abbinati tra loro. I due dispositivi presenti nella stessa confezione (Midland BTX2 PRO S TWIN) sono già accoppiati tra loro e pronti all’uso, quindi non è necessario attivare questa procedura di abbinamento. Se invece i dispositivi non fanno parte della stessa confezione o avete acquistato un altro Midland BTX2 PRO S in un secondo momento (per esempio per il passeggero), dovete prima eseguire la procedura di abbinamento. Abbinamento di un altro dispositivo Midland BTX2 PRO S 1. Attivate la modalità “Setup” su entrambi i dispositivi (Spegnete il Midland BTX2 PRO S Tenere premuto il pulsante “Centrale” fino a che la luce non rimane di colore rosso fisso). 2. Tenere premuto il pulsante “Centrale” per 3 sec. sul primo dispositivo, fino a che la luce lampeggia alternativamente Rossa e Blu. 3. Tenere premuto il pulsante “Centrale” sull’altro dispositivo fino a che la luce Rossa e Blu lampeggia alternativamente. 4. Ora i due dispositivi si cercano per completare l’abbinamento. Se l’abbinamento è avvenuto in modo corretto, su entrambi si accende, per un secondo, la luce Blu, per poi tornare in modalità “Setup” con la luce Rossa fissa. Per utilizzare i due dispositivi è necessario uscire dalla modalità di abbinamento (setup). Di seguito un esempio delle principali funzioni dei pulsanti nelle tre modalità: Modalità Intercom Phone (telefono) Phone (con musica attiva) FM Radio 6 Pulsante Avanti (sinistro) Apre/chiude l’intercom al primo dispositivo collegato Richiama l’ultimo numero, accetta o rifiuta la chiamata se abbinato al “Vol+” Canzone avanti Ricerca avanti Pulsante Centrale Apre/chiude l’intercom al secondo dispositivo collegato Play/Pausa FM Radio On/off Pulsante Indietro (destro) Apre/chiude l’intercom al terzo dispositivo collegato Ripeti l’ultimo numero/accetta o rifiuta la chiamata in entrata sul tasto “Vol-”. Canzone indietro Ricerca indietro www.midlandeurope.com Attenzione: Durante l’abbinamento devono essere accesi solo i due dispositivi interessati. Spegnete tutti gli altri dispositivi Bluetooth. Utilizzo della funzionalita’ Intercom con due dispositivi Per utilizzare la funzionalità intercom, assicuratevi che entrambi i dispositivi siano accesi e precedentemente abbinati tra loro. Attivazione manuale Quando siete in modalità Intercom premendo il pulsante “Centrale”, indifferentemente da uno dei due dispositivi, la comunicazione dopo alcuni secondi si attiva e rimarrà attiva fino a che non verrà premuto nuovamente il pulsante “Centrale”. Sentirete 1 tono audio a conferma dell’attivazione dell’Intercom e 2 toni audio a conferma della disattivazione. Attivazione vocale (VOX) La funzionalità VOX permette di aprire la comunicazione Intercom, senza dover togliere le mani dal manubrio. Potrebbero essere necessari alcuni secondi per l’effettiva apertura della comunicazione intercom (un tono audio vi avvisa dell’apertura). Se nessuno parla, dopo 40 secondi l’intercom viene automaticamente chiuso. Per riaprire la comunicazione sarà sufficiente parlare nuovamente. Quando l’Intercom è aperto tramite VOX è possibile comunque chiuderlo senza aspettare il tempo predeterminato, semplicemente premendo il pulsante “Centrale”. Attenzione: L’attivazione vocale VOX funziona solo con i dispositivi abbinati tramite il tasto “Centrale”. Se i dispositivi sono stati abbinati con il pulsante “Avanti” o “Indietro”, l’attivazione può avvenire solo manualmente. www.midlandeurope.com Se necessario, è comunque possibile attivare o disattivare la funzione VOX, premendo per 7 secondi il pulsante “Indietro”. Un annuncio vocale vi avviserà dell’avvenuta attivazione/disattivazione. Per riattivarlo è necessario ripetere la stessa procedura. Regolazione del volume Midland BTX2 PRO S è dotato della tecnologia AGC che regola automaticamente il volume di ascolto in base al rumore di fondo. Potete comunque regolare manualmente il volume agendo sui pulsanti “Volume+” e “Volume -”. La regolazione del volume è indipendente per ciascuna sorgente audio: Intercom, musica, telefono e FM Radio. Attenzione: la regolazione del volume avviene solo nel momento in cui c’è un audio attivo. Impostazione della funzione AGC Per regolare la sensibilità dell’AGC è necessario utilizzare il software per PC “BT UPDATER” o l’applicazione per smartphone “BT SET-APP”. È possibile scegliere diverse impostazioni a seconda del tipo di moto che avete (Touring, naked o sportiva) o se siete il passeggero. La funzione AGC può essere disabilitata premendo contemporaneamente per 3 secondi i tasti “Volume +” e “Volume –”. Come abbinare più di due dispositivi ad un Midland BTX2 PRO S Un Midland BTX2 PRO S può essere abbinato ad un massimo di 5 dispositivi, per un totale di 6 unità abbinate (3 dispositivi Midland + 2 Talk2All + voi). Midland BTX2 PRO S dispone di 3 tasti principali (“Avanti”, “Centrale”, Indietro). Potete decidere liberamente quale tasto utilizzare per l’abbinamento, lo stesso tasto sarà poi utilizzato anche per attivare la comunicazione intercom. L’abbinamento può anche avvenire “incrociato”, come mostrato nell’immagine qui sotto. Per esempio potete decidere di abbinare il dispositivo di un pilota al tasto “Avanti”, il dispositivo del passeggero al pulsante “Centrale” e il dispositivo di un altro pilota al tasto Indietro. In questo modo avrete 3 dispositivi abbinati tra di loro e potrete parlare con ognuno di loro, uno alla volta, semplicemente premendo il pulsante corrispondente (lo stesso utilizzato per eseguire l’abbinamento). 7 I ›› Fare un doppio click sul pulsante “Centrale” . La luce Rossa si spegne e al suo posto lampeggia la luce Blu. Ora potete utilizzare il Midland BTX2 PRO S. Se per qualsiasi ragione si vuole interrompere la ricerca (luce lampeggiante rossa e blu) e tornare alla fase di setup (luce rossa fissa), è sufficiente fare due click sul pulsante “Centrale”. I Ogni volta che aprite la connessione intercom con un vostro interlocutore la conversazione precedente verrà chiusa. Quando due persone stanno comunicando non è possibile interrompere la conversazione da parte degli altri dispositivi. Pilota 1 Utilizzo della funzionalita’ Intercom con più di due dispositivi Passeggero 1 Pilota 2 4. Ora i due dispositivi si cercano per completare l’abbinamento. Se l’abbinamento è avvenuto in modo corretto, su entrambi si accende, per un secondo, la luce Blu, per poi tornare in modalità abbinamento con la luce Rossa fissa. 5. Ora potete procedere ad un secondo e poi ad un terzo abbinamento, basta ripetere il punto n.2, utilizzando però un pulsante differente. Per utilizzare i due dispositivi è necessario uscire dalla modalità di abbinamento (setup): ›› Fare un doppio click sul pulsante “Centrale” . La luce Rossa si spegne e al suo posto lampeggia la luce Blu. Ora potete utilizzare il Midland BTX2 PRO S. Pilota 3 1. Attivate la modalità “Setup” (Spegnete il Midland BTX2 PRO S, Tenere premuto il pulsante “Centrale” fino a che la luce non rimane di colore rosso fisso). 2. Scegliete il pulsante a voi più congeniale (“Avanti”, “Centrale” o “Indietro”) e tenetelo premuto per 3 secondi, fino a che la luce lampeggia alternativamente Rossa e Blu. Il pulsante scelto sarà anche lo stesso che verrà usato per aprire/chiudere l’intercom. 3. Fate la stessa procedura descritta al punto 2 , sull’altro dispositivo che intendete abbinare (non è obbligatorio utilizzare lo stesso pulsante su entrambe le unit). Per utilizzare la funzionalità intercom, assicuratevi che tutti i dispositivi siano accesi e precedentemente abbinati tra loro. Attivazione manuale: Premete il pulsante relativo alla persona a cui volete collegarvi, la comunicazione dopo alcuni secondi si attiva e rimarrà attiva fino a che non viene premuto nuovamente il pulsante. Sentirete 1 tono audio a conferma dell’attivazione dell’Intercom e 2 toni audio a conferma della disattivazione (vedi tabella A). Attivazione vocale (VOX): La funzionalità VOX per l’attivazione vocale dell’Intercom può avvenire solo verso il dispositivo abbinato tramite il tasto “Centrale”. Suggerimento: La funzionalità VOX può essere molto utile per comunicare con la persona a cui si pensa di voler parlare più spesso (per esempio il passeggero). A - Attivazione manuale Modalità Intercom 8 Pulsante “Avanti” Corto: Apre/chiude l’intercom verso l’altro dispositivo accoppiato Lungo: Apre/chiude l’intercom verso i dispositivi non Midland Pulsante “Centrale” Corto: Apre/chiude l’intercom verso l’altro dispositivo accoppiato Lungo: Cambia modalità Pulsante “Indietro” Corto: Apre/chiude l’intercom verso l’altro dispositivo accoppiato Lungo: Apre/chiude l’intercom verso i dispositivi non Midland www.midlandeurope.com 1 2 3 In questo modo appena la conversazione sarà terminata, l’utente potrà contattare la persona che lo cercava, semplicemente aprendo l’intercom utilizzando il pulsante corrispondente all’avviso ricevuto. nato al pulsante “Avanti” del secondo. Il pulsante “Indietro” del secondo deve essere abbinato al pulsante “Avanti” del terzo dispositivo e così via, fino ad un massimo di 4 . Il primo e l’ultimo dispositivo NON devono essere abbinati tra loro (la catena non va chiusa). 1 2 3 4 Attivazione della modalità conference La modalità “Conference” permette la comunicazione contemporanea di 4 persone oppure fino a 8 persone (4 coppie) se si abbina un dispositivo intercom anche sul pulsante VOL-. Il vostro BTX2 PRO S può funzionare sia in modalità classica, con la comunicazione “uno ad uno”, oppure in modalità “conference” dove tutti parlano contemporaneamente. In qualsiasi modalità senza nessun audio attivo, tenete premuti i tasti “Avanti” e “Centrale” per 3 secondi. L’annuncio vocale “Conference” confermerà che ora questa funzione è attiva. Quando il Conference è attivo i dispositivi Bluetooth abbinati al tasto Vol+ sono scollegati, l’abbinamento al tasto CTRL e l’Universal Intercom non sono disponibili. Sono possibili solo l’abbinamento ai tasti “Avanti” e “Indietro”, insieme al dispositivo abbinato al tasto “Volume -”. Quando la modalità conference è attiva, potete sempre spostarvi su “FM radio” per ascoltare la vostra stazione radio preferita, oppure su “Phone” per controllare il telefono abbinato al pulsante VOL-. La comunicazione in “Conference” può essere molto interessante ma obbliga che tutti e quattro i dispositivi siano sempre presenti e tutti con l’intercom aperto! Attenzione: in modalità “Conference” anche la funzione “Talk2All-Universal Intercom”, per parlare con dispositivi non Midland non è disponibile. Conference Per prima cosa è necessario che l’abbinamento dei dispositivi sia fatto seguendo una sequenza ben specifica, definita a “catena”, poi su ogni dispositivo deve essere attiva la modalità “Conference”. Abbinamento Per poter utilizzare la funzione “Conference” è necessario abbinare i dispositivi a “catena”, ovvero il pulsante “Indietro” del primo dispositivo deve essere abbi- www.midlandeurope.com Disabilitare la modalità “Conference” In qualsiasi modalità e senza audio attivo, tenete premuti i tasti “Avanti” e “Centrale” per 3 secondi. Un annuncio vocale vi informerà che siete di nuovo in modalità intercom “One to One” e il dispositivo collegato al tasto “Vol+”, al tasto “Centrale” CTRL e l’abbinamento Universal Intercom saranno di nuovo disponibili. 9 I Utente già occupato in un’altra conversazione Se tentate di aprire la comunicazione Intercom verso un utente che sta già parlando con qualcun altro o che è impegnato al telefono, avrete un segnale di “occupato” (2 toni audio). Aspettate qualche minuto e riprovate, fino a che non trovate la “linea” libera! La persona che è stata chiamata verrà avvisata che qualcuno la sta cercando con un messaggio vocale che indica il numero del pulsante da cui è giunta la richiesta. I Modalità “Conference a 4 persone” Quando la modalità conference è attiva sarà possibile aprire la comunicazione intercom premendo sia il pulsante “Avanti” che “Indietro”. Premendo nuovamente, l’intercom viene chiuso. Entrambi i dispositivi al centro della catena (dispositivo num. 2 e 3) dovranno avere l’intercom aperto su entrambi i pulsanti (“Avanti” e “Indietro”) per permettere al dispositivo num. 1 e num. 4 di parlare tutti assieme. Funzione “One Click Talk” Quando la modalità “Conference” è attiva, premendo il pulsante “Centrale” si può aprire la comunicazione a tutti e quattro i dispositivi della catena “in un colpo solo”. Questa funzione può essere molto utile per aprire la conference velocemente quando per esempio c’è qualche pericolo o avviso da comunicare a tutti. Modalità Conference con un dispositivo Bluetooth sul “Volume -”. Quando la modalità Conference è attiva, il dispositivo Bluetooth collegato al tasto “Volume -” è ancora disponibile: ciò significa che potete ascoltare le indicazioni stradali dal GPS o rispondere alle chiamate telefoniche senza interrompere la “catena” della connessione Conference. L’audio proveniente dalla connessione al tasto “Volume -” può essere “Privato” o “Pubblico” (non condiviso o condiviso con gli altri utenti in Conference). Di default l’audio sul “Volume -” è Privato. Sia in modalità “Private” sia “Public”, se ricevete una chiamata telefonica, siete momentaneamente scollegati dalla connessione Conference ma non le altre persone che possono continuare la conversazione tra di loro. Non appena la telefonata è terminata, automaticamente l’audio ritorna alla modalità Conference. ›› Attivazione modalità Audio Pubblico: tenete premuto il tasto “Volume -” per 3 sec., sentirete l’annuncio vocale “Public”. ›› Attivazione modalità Audio Privato: tenete premuto il tasto “Volume -” per 3 sec., sentirete l’annuncio vocale “Private”. Attenzione: le telefonate in entrata sono sempre in modalità “Private” anche se siete in modalità “Public”. 10 Modalità Conference con 8 persone (4 coppie) Per avere 8 persone in conference è necessario abbinare un dispositivo intercom anche sul tasto “Volume -”. Attenzione: i dispositivi intercom abbinati sul tasto “Volume -”, devono essere abbinati in modalità “Universal Intercom”. Assicuratevi anche di aver selezionato la modalità “Public”. Di default la modalità è “Private”: questo significa che dovete tenere premuto il pulsante “Volume -” per 3 sec. , e sentirete l’annuncio vocale “Public”, a conferma che siete passati all’altra modalità. Nel caso in cui voliate tornare in modalità “Private” premete ancora il pulsante “Volume -” fino a che sentirete l’annuncio vocale “Private”. Come abbinare un dispositivo Intercom al tasto “Volume -”: ›› Andate in “Setup mode” (modalità Impostazione) e tenete premuto il pulsante “Volume -” per tre secondi. I led blu e rosso iniziano a lampeggiare. ›› Sull’altro dispositivo invece seguite la procedura per l’abbinamento come “Universal Intercom”. Come aprire il Conference per il dispositivo collegato al tasto “Volume -”. Per aprire il Conference dal BTX2 PRO S al dispositivo collegato al tasto “Volume -”, premete, in modalità Telefono, il tasto “Indietro”. Per aprire il Conference dall’altro dispositivo collegato al pulsante “Volume -”, utiilzzate il tasto per aprire la connessione Universal Intercom. La distanza massima del dispositivo collegato al tasto “Volume -” è di 10m, per questo la connessione è disponibile solo per il passeggero. Talk 2 All - Abbinamento a dispositivi non Midland Grazie alla funzione “Talk2 All - Universal Intercom” è possibile abbinare al BTX2 PRO S fino a due dispositivi intercom di un‘altra marca. Si possono abbinare al massimo 2 dispositivi Intercom non Midland, uno sul tasto “Avanti” e l’altro sul pulsante “Indietro”. ›› Attivate la modalità “Setup” (spegnete il dispositivo, tenete premuto il pulsante “Centrale” fino a che la luce non rimane di colore rosso fisso) ›› Tenete premuti per 7 secondi i tasti “Avanti” o “Indietro”: i led rosso e blu inizieranno a lampeggiare rapidamente; continuate a tenerli premuti e lam- www.midlandeurope.com Attenzione: Durante l’abbinamento devono essere accesi solo i due dispositivi interessati (spegnete tutti gli altri dispositivi Bluetooth). Per aprire la comunicazione Universal Intercom sul BTX2 PRO S mentre siete in modalità Intercom, tenete premuto per 3 secondi il tasto “Avanti” o “Indietro” (in base al tasto che avete utilizzato per l’abbinamento). Abbinare il Midland BTX2 PRO S a dispositivi Bluetooth I peggeranno lentamente. Ora lo potete rilasciare. Sull’intercom non Midland, seguite le istruzione per abbinare un telefono, infatti il Midland BTX2 PRO S verrà abbinato al posto del telefono. Ad abbinamento concluso (la luce rossa/blu smetterà di lampeggiare e il dispositivo uscirà automaticamente dalla modalità “Setup”). Il Midland BTX2 PRO S può essere abbinato ad altri dispositivi Bluetooth come telefoni, navigatori GPS o ricetrasmettitori PMR446 con Bluetooth integrato o esterno (Dongle). VOL- (sempre in background) ›› Telefono (HFP/A2DP Stereo) ›› GPS (HFP/A2DP Stereo) ›› Dongle (HFP/A2DP Stereo) VOL+ (priorità alta) ›› Telefono (HFP/A2DP Stereo) ›› GPS (HFP/A2DP Stereo) ›› Dongle (HFP/A2DP Stereo) Talk2All-Universal Intercom Dispositivo no Midland Sul dispositivo non Midland invece, potete aprire la comunicazione manualmente premendo il tasto per la chiamata telefonica (funzione Voice Dial o Redial). Potrebbe essere necessario premere il tasto di chiamata due volte , dipende dal modello del dispositivo non Midland. Attenzione: in questa configurazione il dispositivo non Midland non potrà utilizzare il telefono (essendo già stato abbinato il BTX2 PRO S al posto del telefono stesso). E’ possibile abbinare anche un dispositivo Midland in modalità “Talk2ALL-Universal Intercom” a patto che uno dei due dispositivi utilizzi la modalità di abbinamento ad un telefono (un dispositivo usa la procedura Talk2All e l’altro quella per abbinare un telefono). Compatibilità con i dispositivi BT Midland BTX2 PRO S è compatibile con i dispositivi Midland BT. Una volta che i due dispositivi sono abbinati, la massima distanza intercom possibile è stabilita dal dispositivo con minor potenza. Il BTX2 PRO S è compatibile anche con le precedenti serie Midland BT solo se aggiornate il firmware. www.midlandeurope.com La procedura di abbinamento si esegue utilizzando i tasti “Volume +” o “Volume –”. ›› Abbinamento al tasto “Volume +”: per telefoni con musica stereo A2DP, navigatori GPS con audio A2DP o dongle esterni mono/stereo A2DP. Tutti i dispositivi abbinati al tasto “Volume +” hanno la priorità maggiore e quindi interromperanno tutte le altre comunicazioni (intercom, musica, radio FM). ›› Abbinamento al tasto “Volume –”: per telefoni con musica stereo A2DP, navigatori GPS con audio A2DP o dongle esterni mono/stereo A2DP. Tutti i dispositivi abbinati al pulsante “Volume -” sono sempre attivi in background durante la comunicazione intercom. Quando un dispositivo è abbinato ai pulsanti Vol+ o “Volume -”, la modalità “Phone” sarà disponibile. Funzione Background Tutti i dispositivi abbinati al pulsante “VOL-” avranno sempre l’audio in sottofondo (background) rispetto alla comunicazione intercom. In questo modo l’intercom non verrà interrotto per esempio dalle indicazioni del GPS o da altra sorgente audio. Potete decidere invece se condividere l’audio della connessione del tasto “Vol –”quando l’Intercom o il Conference sono aperti (abilitando la modalità “Public”), oppure se l’audio deve rimanere privato (modalità Private). 11 I Attenzione: di default è attiva la modalità “Private”. L’audio dal tasto “Volume -” ha sempre una priorità inferiore rispetto all’intercom: questo significa che quando l’intercom è aperto l’audio viene ridotto del 50% per permettere una corretta comprensione della comunicazione Intercom. É possibile modificare questa configurazione tramite il software per PC BT Updater. Telefono cellulare (abbinamento fino a due telefoni) Il telefono cellulare può essere abbinato sia al pulsante “Volume +” che al pulsante “Volume -”. Quando il telefono è abbinato, la modalità “Phone” sarà disponibile. La telefonata entrante avrà sempre la priorità più alta e interromperà le altre comunicazioni attive (Intercom, Radio FM, Musica). Se arriva una seconda telefonata sull’altro telefono, durante una telefonata già attiva, riceverete una segnalazione audio di notifica. ATTENZIONE! Per garantire il corretto funzionamento con il vostro telefono è consigliato riporlo il più vicino possibile al dispositivo BTX2 PRO S, quindi sul lato sinistro del corpo e possibilmente nelle tasche superiori. Come abbinare un telefonino 1. Attivate sul vostro telefonino la modalità di ricerca dispositivi Bluetooth. Questa funzione dipende dalla marca e modello del vostro telefono (fate riferimento al manuale del telefonino). 2. Attivate la modalità “Setup: spegnete il BTX2 PRO S e tenete premuto il pulsante “Centrale” fino a che la luce non rimane di colore rosso fisso. 3. Premere il pulsante “Volume+” o “Volume -” fino a quando la luce lampeggia Rosso e Blu. 4. Dopo pochi secondi sul telefonino comparirà il nome “Midland BTX2 PRO S”, selezionatelo e seguite le istruzioni del vostro telefonino per accettare l’abbinamento. Quando viene richiesto, immettete il codice di abbinamento: 0000 (quattro zeri). Il telefono confermerà se il processo di abbinamento è stato completato con successo. 5. Il Midland BTX2 PRO S uscirà dalla modalità setup (luce rossa fissa) e pas- 12 serà automaticamente allo stato di funzionalità normale (luce blu lampeggiante). Ora il telefono è abbinato correttamente. Come utilizzare il telefonino Per utilizzare le funzionalità del telefono è necessario essere in modalità “Phone”. Tenete premuto per 3 secondi il pulsante “Centrale”. Un annuncio vocale vi indicherà in quale modalità state entrando, quando sentirete “Phone” potrete utilizzare i pulsanti del Midland BTX2 PRO S per gestire il vostro telefono (vedi tabella B). Rispondere ad una chiamata Quando sentite il telefonino squillare, potete rispondere utilizzando 2 modalità: Risposta vocale: E’ sufficiente pronunciare una parola qualunque e quindi iniziare a parlare dopo il primo squillo del telefono. Risposta manuale: Premere brevemente il pulsante “Avanti” o “Indietro” ed iniziare a parlare. Rifiutare una chiamata Se non intendete rispondere al telefono potete lasciarlo squillare, oppure tenere premuto per 3 secondi il pulsante “Avanti” o “Indietro” (sentirete un tono audio di conferma). Chiamare l’ultimo numero: ›› Telefono collegato al pulsante “Vol+”: tenete premuto per 3 secondi il pulsante “Avanti”, l’ultimo numero utilizzato verrà richiamato (sentirete un tono audio di conferma). ›› Telefono collegato al pulsante “Vol-”: tenete premuto per 3 secondi il pulsante “Indietro”, l’ultimo numero utilizzato verrà richiamato (sentirete un tono audio di conferma). Chiamata vocale: ›› Telefono collegato al pulsante “Vol+”: premete brevemente il pulsante “Avanti”, se il vostro telefonino supporta la chiamata vocale, vi verrà chiesto di pronunciare il nome del contatto che volete chiamare. ›› Telefono collegato al pulsante “Vol-”: premete brevemente il pulsante “Indietro”, se il vostro telefonino supporta la chiamata vocale, vi verrà chiesto di pronunciare il nome del contatto che volete chiamare. www.midlandeurope.com Chiudere una telefonata Ci sono diversi modi per chiudere una telefonata: ›› Aspettare che l’altra parte chiuda la telefonata. ›› Premere brevemente il pulsante “Avanti” (sentirete un tono audio di conferma). ›› Premere il pulsante “Chiuso” sul telefonino. cale “Control ON VOL up” per indicarvi che verrà controllato il telefono abbinato sul “Volume +”. ›› Se premete ancora per tre secondi sentirete l’annuncio vocale “Control on VOL down” per indicarvi che il controllo è passato ora al telefono abbinato al tasto Vol-. Speed dial – Selezione rapida di un numero di telefono Solo per il telefono abbinato sul Vol+, è possibile memorizzare un numero di telefono per poterlo utilizzare all’occorrenza. Innanzitutto si deve salvare il numero tramite il software per PC “BT UPDATER” o l’applicazione per smartphone “BT SET-APP”. Poi quando siete in modalità Telefono, premete semplicemente per 7 secondi il tasto “Avanti”. Utilizzo della funzionalità MP3 player del telefonino I telefonini abbinati sia sul Vol+ che sul Vol-, possono essere utilizzati anche come player musicali Stereo. Il dispositivo Midland BTX2 PRO S supporta completamente i protocolli A2DP e AVRCP, i quali consentono di ascoltare musica stereo e di comandare le principali funzioni dell’MP3 player. E’ infatti possibile utilizzare i pulsanti presenti sul Midland BTX2 PRO S per gestire le seguenti funzioni: Play, Stop/Pause, “Avanti” ed “Indietro”. É possibile gestire le funzioni di un solo telefono alla volta, scegliendo quale telefono controllare: ›› Tenete premuto il pulsante “Volume +” per 3 sec. e sentirete l’annuncio vo- Avanti Play/Pausa Indietro Comandi disponibili in modalità “Phone”: ›› Play/pausa della musica: fare click sul pulsante “Centrale”. ›› Avanti di una canzone: premere il pulsante “Avanti”. ›› Indietro di una canzone: premere il pulsante “Indietro”. Attenzione: Per poter utilizzare le funzionalità del player musicale (Play, Pausa, Avanti, Indietro) dovete essere in modalità “Phone Se state ascoltando la musica A2DP e vi spostate su “FM radio” o su “Intercom”, potrete continuare ad avere la musica attiva ma non avrete tutti i comandi di controllo. Solo Play/Pausa è disponibile con un doppio click sul tasto “Centrale”. B - Utilizzo pulsanti in modalità Phone Modalità Phone Phone (con musica attiva e Abbinato al pulsante vol+) www.midlandeurope.com Pulsante Avanti (Telefono su Vol+) Pulsante Centrale Breve: Chiamata vocale /accetta o termina Lungo: Cambio modalità chiamata Lungo: Richiama ultimo numero/ rifiuta chiamata Breve: Avanti una canzone Breve: Play/pause Lungo: Cambio modalità Pulsante Indietro (Telefono su Vol-) Breve: Chiamata vocale /accetta o termina chiamata Lungo: Richiama ultimo numero/ rifiuta chiamata Breve: Indietro una canzone 13 I Priorità: La telefonata è prioritaria, quindi tutte le altre comunicazioni vengono temporaneamente interrotte. I Condividere la musica La condivisione della musica è possibile solo per il telefono abbinato al pulsante Vol+. Per poter condividere la musica A2DP con il passeggero, il cui dispositivo è già abbinato con il tasto “Centrale” (distanza massima 10m), tenete premuto il tasto “Indietro” per 3 secondi mentre state ascoltando la musica. Il passeggero non può controllare la musica ma può interrompere la condivisione premendo brevemente il tasto “Centrale”. Il pilota invece può interrompere la condivisione della musica tenendo premuto nuovamente il tasto “Indietro” per 3 secondi. Mentre la condivsione della musica è attiva non è possibile mantenere la comunicazione Intercom attiva. Attenzione: per poter azionare la condivisione della musica, assicuratevi di aver azionato Play dall’interfono. Attenzione: durante la condivisione della musica, il pilota può aprire l’intercom al passeggero con un doppio clic sul tasto Centrale. Navigatore GPS Il GPS può essere abbinato tramite il pulsante “Volume+” oppure “Volume-”. ›› Pulsante “Vol+” (supporto per l’audio stereo A2DP e mono HSP, HFP). Tutti i dispositivi abbinati al pulsante “VOL+” hanno una priorità più alta e interromperanno la comunicazione Intercom. ›› Pulsante “Vol-” (supporto per l’audio stereo A2DP e mono HSP, HFP). Potete invece utilizzare l’abbinamento al pulsante “Vol-” per avere sempre l’audio in sottofondo e non iterrompere la comunicazione intercom. É possibile inoltre stabilire se l’audio proveniente dal dispositivo abbinato sul “VOL-” deve essere anche condiviso con le altre persone quando l’intercom è aperto. Se la modalità “Public” è attiva, le indicazioni stradali del GPS poptranno essere sentite anche dall’altra persona. Abbinamento ad un Navigatore GPS In generale è possibile abbinare qualunque navigatore GPS per moto che accetti un auricolare Bluetooth. 1. Attivate sul vostro GPS la modalità di ricerca dispositivi auricolari Bluetooth. Questa funzionalità dipende dalla marca e modello del vostro GPS (fate 14 riferimento al manuale del GPS). 2. Attivate la modalità “Setup (Spegnete il Midland BTX2 PRO S Tenere premuto il pulsante “Centrale” fino a che la luce non rimane di colore rosso fisso). Premere il pulsante “Volume + o Volume -” fino a quando la luce lampeggia Rosso e Blu. 3. Sul GPS comparirà il nome “Midland BTX2 PRO S”, selezionatelo e seguite le istruzioni per accettare l’abbinamento. Se viene richiesto, immettete il codice di abbinamento: 0000 (quattro zeri). Il GPS confermerà se il processo di abbinamento è stato completato con successo. 4. Il Midland BTX2 PRO S uscirà dalla modalità setup (luce rossa fissa) e passerà automaticamente allo stato di funzionalità normale (luce blu lampeggiante). Ora il GPS è abbinato correttamente. Ricetrasmettitore PMR446 con Bluetooth integrato o esterno Se possedete un ricetrasmettitore con Bluetooth esterno o integrato potete abbinarlo al Midland BTX2 PRO S tramite il pulsante “Volume +” o “Volume-”. Se abbinato al pulsante “Volume -” sarà possibile avere la comunicazione radio in sottofondo all’intercom. Abbinamento ed utilizzo Attivate la modalità “Setup (Spegnete il Midland BTX2 PRO S Tenere premuto il pulsante “Centrale” fino a che la luce non rimane di colore rosso fisso). ›› Premere il pulsante “Volume+” o “Volume -” fino a quando la luce lampeggia Rosso e Blu. ›› Attivate la modalità di abbinamento sul ricetrasmettitore PMR446, seguendo le istruzioni riportate sul manuale del ricetrasmettitore stesso. Utilizzo della funzionalita’ Radio FM Il Midland BTX2 PRO S è dotato di un ricevitore radio FM integrato. Per utilizzarlo è sufficiente passare alla modalità “FM Radio”. Modalità “ FM Radio” Tenete premuto per 3 secondi il pulsante “Centrale”. Un annuncio vocale vi indicherà in quale modalità state entrando, quando sentirete “FM Radio” potrete utilizzare i pulsanti del Midland BTX2 PRO S per gestire il ricevitore radio (vedi tabella C). www.midlandeurope.com Disabilitare/Abilitare la Modalità Radio FM Per default la radio FM è attiva. Disattivazione: ›› Attivate la modalità “Setup (Spegnete il Midland BTX2 PRO , tenete premuto il pulsante “Centrale” fino a che la luce non rimane di colore rosso fisso). ›› Premete contemporaneamente i pulsanti “Centrale” e “Volume+” per 3 sec. La luce Blu farà 3 lampeggi per indicare la disattivazione. ›› Uscite dalla modalità “Setup” premendo due volte il pulsante “Centrale”. Attivazione: Fate la stessa procedura; questa volta un lampeggio della luce blu indicherà l’attivazione. Uscite dalla modalità “Setup” premendo due volte il pulsante “Centrale”. Intercom con Radio FM I Con un click sul pulsante “Avanti” o “Indietro”potete ricercare una stazione radio (funzionalità seek), la ricerca si fermerà automaticamente quando incontrerà una stazione con un segnale sufficientemente forte per garantire una buona ricezione. Se invece tenete premuto lungo (3 sec.) scorrerete avanti e indietro le 6 stazioni memorizzate. Ogni volta che passate da una stazione registrata all’altra un annuncio vocale vi indicherà il numero di memoria in cui vi trovate. Per registrare una stazione radio tenere premuto per 3 sec contemporaneamente i pulsanti “Avanti” e “Indietro”. Sentirete un tono di conferma. La nuova stazione verrà registrata al posto dell’ultima memoria ascoltata. Grazie al sistema RDS, la radio sceglierà sempre il segnale radio più forte disponibile per la stazione che state ascoltando. Il sistema RDS è spento per default, potete attivarlo premendo insieme i pulsanti “Volume+” e “Volume-” per 3 sec. Un annuncio vocale vi indicherà lo stato. Per disattivarlo ripetete la stessa procedura. In modalità FM radio non è possibile attivare l’intercom in modo manuale, ma può essere utilizzata l’attivazione vocale (VOX) solo verso il dispositivo abbinato sul pulsante “Centrale”. Per attivare l’intercom in modo manuale dovete uscire dalla modalità “FM Radio” e passare alla modalità “Intercom”. Radio FM in background Non è possibile avere la Radio FM in contemporanea con un qualunque altro audio. Qualsiasi audio attivo come l’intercom o proveniente dalla connessione del “Volume +” o del VOL-, metterà la radio FM in pausa. Configurazioni speciali Reset di tutti i dispositivi accoppiati Potrebbe essere necessario eliminare tutti i riferimenti di abbinamento registrati nel Midland BTX2 PRO S (reset). Procedete quindi come segue: ›› Spegnete il Midland BTX2 PRO S Tenere premuto il pulsante “Centrale” (“Centrale”) fino a che la luce non rimane di colore rosso fisso. ›› Tenete ora premuto contemporaneamente i pulsanti “Volume +” e “Volume –” per 3 secondi, la luce Blu si accenderà fissa per un secondo e poi tornerà di colore rosso fisso. Fate doppio click sul tasto “Centrale” per uscire dalla modalità Set-Up. Da questo momento il Midland BTX2 PRO S non avrà più nessun dispositivo Bluetooth in memoria e potrete procedere ad una nuova sessione di accoppiamento (pairing). Attenzione: dopo il reset degli abbinamenti, solo la modalità “Radio FM” sarà disponibile. C - Modalità con Radio FM Modalità FM Radio www.midlandeurope.com Pulsante Avanti (sinistro) Corto: ricerca stazione avanti Lungo: scansione memorie avanti Pulsante Centrale Corto: On/off Lungo: Cambio modalità Pulsante Indietro (destro) Corto : ricerca stazione indietro Lungo: Scansione memorie indietro 15 I Ritorno alla configurazione di default Potrebbe essere necessario ritornare alla configurazione “di fabbrica” , in modo da ottenere un dispositivo “pulito” esattamente come la prima volta che è stato tolto dalla scatola. Spegnete il Midland BTX2 PRO S Tenere premuto il pulsante “Centrale” fino a che la luce non rimane di colore rosso fisso. Tenete ora premuto contemporaneamente i tre pulsanti “Avanti”, “Centrale” e “Indietro” per 3 secondi, la luce Blu si accenderà fissa per un secondo e poi tornerà di colore rosso fisso. Fate doppio click sul pulsante “Centrale” per uscire dalla modalità Set-Up e per tornare ad utilizzare il Midland BTX2 PRO S. Attenzione: questa procedura elimina anche i riferimenti ai dispositivi accoppiati. Queste impostazioni possono essere effettuate tramite il programma “BTPro Updater” per PC/MAC. Regolazione/disattivazione della funzione Vox (per Intercom e telefono) L’apertura della comunicazione Intercom, può avvenire oltre che manualmente, anche tramite attivazione vocale (VOX). Il corretto funzionamento del VOX dipende dal rumore di fondo, quindi dalla velocità ma anche dal tipo di casco utilizzato. Per ottenere il migliore risultato, è possibile decidere la soglia di attivazione, scegliendo 4 livelli di sensibilità del microfono: alta, media bassa e molto bassa. In aggiunta, è possibile anche disabilitare completamente la funzione VOX e quindi attivare l’Intercom e la risposta alla telefonata solo in modalità manuale. Queste impostazioni possono essere effettuate tramite il programma “BT PRO Updater” per PC/Mac. Configurazione e aggiornamento firmware Midland BTX2 PRO S può essere configurato e aggiornato tramite connessione USB al vostro PC, per migliorare la compatibilità con i dispositivi Bluetooth, quali telefoni e GPS o per risolvere problematiche legate alla funzionalità. Il software per PC insieme agli eventuali aggiornamenti del firmware sono disponibili per il download sul sito www.midlandeurope.com nella pagina del prodotto stesso. 16 ATTENZIONE: NON COLLEGATE IL DISPOSITIVO AL COMPUTER PRIMA DI AVER SCARICATO ED INSTALLATO IL SOFTWARE. Uso e avvertimenti specifici L’uso assiduo di questi dispositivi può diminuire la vostra capacità di udire suoni esterni e chi vi sta intorno. L’uso di questo dispositivo mentre si sta guidando può diventare un pericolo per voi e per chi vi sta intorno e in alcuni paesi, l’utilizzo del dispositivo potrebbe non essere consentito. L’uso ad un volume troppo alto può causare la perdita permanente dell’udito. Se si avverte un qualsiasi dolore alle orecchie, o fastidio all’udito, diminuite il volume o spegnete il dispositivo. L’uso continuativo ad alto volume, fa sì che l’udito si abitui a tale volume, il quale a lungo andare può causare danni permanenti. È fortemente consigliato l’utilizzo di tale apparato ad un volume adeguato. Garanzia La durata della garanzia è di 24 mesi per l’apparato e di 6 mesi per gli accessori (batterie, caricatori, antenne, auricolari e microfoni). Per maggiori informazioni visitate il sito www.midlandeurope.com Certificazioni e Conformità di Sicurezza CE/Informazioni generali Questo prodotto è conforme alla direttiva 2014/53/UE e può essere liberamente utilizzato nei paesi dell’UE. Agli utenti non è permesso effettuare variazioni o modifiche di qualsiasi tipo all’apparecchio. Queste ultime, se non espressamente approvate dal produttore, annullano la possibilità di utilizzo dell’apparecchio ed invalidano la garanzia. Per ulteriori informazioni, fate riferimento al nostro sito web: www.midlandeurope.com www.midlandeurope.com Main features...................................................................................................................................................................................................................................18 Technical specifications of Midland BTX2 PRO S.......................................................................................................................................................................18 Charging batteries...........................................................................................................................................................................................................................19 Switching ON and OFF your Midland BTX2 PRO S.................................................................................................................................................................. 21 How to pair two Midland BTX2 PRO S units.............................................................................................................................................................................. 22 Set up of the AGC system............................................................................................................................................................................................................ 23 How to pair the Midland BTX2 PRO S to more than two units................................................................................................................................................ 23 Conference..................................................................................................................................................................................................................................... 25 Talk 2 All - Universal Intercom with different brand unit........................................................................................................................................................... 26 Compatibility with Midland BT line units.................................................................................................................................................................................... 27 Pairing the Midland BTX2 PRO S to Bluetooth devices............................................................................................................................................................ 27 How to listen to the FM Radio......................................................................................................................................................................................................30 Setup and special configurations................................................................................................................................................................................................... 31 Setup and Firmware update.......................................................................................................................................................................................................... 32 European CE Notice Certification and Safety Approval Information...................................................................................................................................... 32 www.midlandeurope.com 17 UK Index MIDLAND BTX2 PRO S UK Dual core intercom system Midland BTX2 PRO S is an intercom system solution with Dual Bluetooth Core (Dual Bluetooth processor) for conference communication and real background stereo audio. The design is very slim and aerodynamic, all the main functions are easy to operate thanks to the three big buttons placed on the front of the unit. Midland BTX2 PRO S is fixed on the helmet using the adhesive plate or the screw mounting clamp. Main features ›› ›› ›› ›› ›› ›› ›› ›› ›› ›› ›› ›› ›› ›› ›› Dual Bluetooth core system. Intercom “one to one” up to 1 .2Km distance. Conference up to 8 people (4 couples) Connect up to 6 people for “one to one” intercom communication MWE Noise Killer Universal Intercom feature to connect other brand intercom FM Radio Stereo with RDS Music Share (Driver and Passenger) Connect your phone to receive and place phone call and listen to stereo music Support for 2 phones Connect your GPS for voice street indications Setup and Firmware update via USB connection to a PC Midland BTX2 PRO S is available in two versions: Single Midland BTX2 PRO S Intercom kit with one unit only Twin Midland BTX2 PRO S Intercom kit with with two units Depending on the model purchased, the package contains the following parts: Midland BTX2 PRO S single ›› 1 BTX2 PRO S communication unit 18 ›› ›› ›› ›› ›› 1 Slide-in mounting kit with two HI-FI stereo speakers 1 microphone with boom and 1 wired microphone 1 plate with bi-adhesive strip to fix the unit onto the helmet 1 plate with screw to fix the unit onto the helmet 1 micro USB wall-mounting power supply Midland BTX2 PRO S Twin ›› ›› ›› ›› ›› ›› 2 BTX2 PRO S communication units 2 Slide-in mounting kit with two HI-FI stereo speakers 2 microphones with boom and 2 wired microphones 2 plates with bi-adhesive strip to fix the unit onto the helmet 2 plates with screw to fix the unit onto the helmet 1 micro USB wall-mounting power supply with double plug The units included in the TWIN kit are already paired on Middle button and can therefore be immediately used in Intercom mode. Technical specifications of Midland BTX2 PRO S General: ›› ›› ›› ›› ›› ›› ›› ›› ›› Bluetooth ver. 4.2 Stereo (Handsfree/A2DP/AVRCP protocol) Frequency 2.4GHz - Max power 100 mW Dual Bluetooth core for real Stereo Background AGC system automatically controls the volume in relation to background noise Voice (VOX) or manual communications activation Manual controls to enable: telephone, intercom, FM Radio Fully waterproof Lithium battery with 20 hours talk time Recharge time: app. 2 hours Bluetooth connections: With identical device for Rider to Pillion or Bike-to-Bike Intercom mode, up to a maximum distance range of 1.2 Km without obstructions and interferences (the riders must be always in sight). www.midlandeurope.com Charging batteries Attention: Make sure that the unit is fully charged before use. Allow at least 3 hours for a full charge before using the unit for the first time. Unit and fixing system description BTX2 PRO S description The BTX2 PRO S has five buttons on the front; the main three big button are multi functions buttons: the Forward (on the left), the middle button and the Backward (on the right), the two squared buttons are the Volume + and Volume -. Volume - Charge the unit by inserting the wall-charger into the charging socket (lift the rubber cover to insert the plug). The red LED on the unit will start flashing when charging begins. Allow the headset to charge until the unit stops flashing and the blue LED turns on. When the charge is complete (the red LED is not flashing), release the headset from the charger. Normally, after the first time, it takes 2 hours for a full charge. Attention: Midland BTX2 PRO S is designed to withstand rain and water. However, if it is raining, always verify that the rubber cap protecting the recharging sockets is fully fitted. Attention: every time the micro USB recharging plug is inserted (or detached), the device is automatically turned off. To use it while it is in charge, you should turn the device on with the plug already inserted. Volume + LED Forward Middle Backward On the bottom of the unit you can find the Charger jack that enables to recharge the unit using a standard microUSB power supply Charger plug Description of the audio kit The audio system includes two HI-FI stereo speakers and two interchangeable microphones, which are both supplied with a bracket and wired connection. The mini connector on the microphone allows you to choose the microphone that best suits the helmet you are using. www.midlandeurope.com 19 UK Bluetooth devices: Mobile phone with MP3 player Stereo (A2DP protocol) and GPS navigator Fixing the stereo speakers UK The two stereo speakers have a Velcro/adhesive strip that aids their fixing into your helmet. Beware not to keep the volume too high, you must always be able to listen to the traffic sound. Description of the Slide-in mounting kit The Midland BTX2 PRO S can be fixed onto the helmet, installing the slide-in mounting kit in two different ways: By either using the plate with bi-adhesive strip, or the screw plate. These methods allow you to safely “fix” the BTX2 PRO S unit onto your helmet and to remove it at any time in order to recharge or store it. Plate with bi-adhesive strip The Bi-adhesive plate is already assembled on the slide-in mounting kit. Fixing the microphone Bi-adhesive Boom Microphone Place the section with the Velcro/adhesive strip between the padding and the rigid cover of the helmet, so that the microphone is correctly positioned in front of your mouth and that the white symbol is facing your mouth. This type of microphone is suited for Open Faced and Flip Front helmets. For open helmets it is also available a specific optional microphone cod. C1253. Wired microphone Using the Velcro/adhesive strip, place the microphone inside the helmet in front of your mouth. This type of microphone is more suited for Full Faced helmets. The mini connector on the microphone allows you choose the microphone that best suits the helmet you are using. Boom microphone 20 Wired microphone Clean the application area on the helmet surface, fold the two little wings to better stick to the curved surface of the helmet, remove the bi-adhesive film and place the fixing plate on the left side of the helmet by keeping it contact with the surface for a few seconds. Screw Clamp Step 1. remove the bi-adhesive plate from the slide mount using the allen wrench included in the box. Remember to keep the two screws. Step 2. Tighten the screw plate to the slide-in mounting kit with the two provided screws. www.midlandeurope.com Unlock A UK Lock Step 3.Then, tighten more the two screws in order to firmly fix the clamp in place on the left side of the helmet. Switching ON and OFF your Midland BTX2 PRO S Switching the unit on: Press and hold “Middle” button for approximately 3 seconds until the BLUE indicator lights. If necessary, you can use also the rubber plate in order to have more grip for the screw clamp. Just use the two short screw to fix the rubber plate on the slide-in mount and tighten the screw plate again. Switching the unit off: Press and hold both “Middle” and “Backward” buttons together for approximately 3 seconds until the RED indicator flashes 3 times, thus lessening the chances that you might turn off the unit accidentally (especially whilst wearing gloves). Operative “mode” Rubber plate Fitting and removing your Midland BTX2 PRO S The BTX2 PRO S can be easily fitted onto the helmet by sliding it downwards on the sliding mounting kit. BTX2 PRO S is maintained in position thanks to the fixing clip located on the upper section (A). To detach the BTX2 PRO S, simply press the fixing clip and push the unit upwards. www.midlandeurope.com The BTX2 PRO S can operate in three main “mode”: Intercom, Phone and FM Radio. The 3 multi function buttons can have different functionality depending on which mode the unit is at that moment. ›› In “Intercom mode” the three buttons let you manage the Intercom communications between driver and passenger or bike to bike. ›› In “Phone mode” you can manage your Bluetooth mobile phone to place/ answer a phone call or to listen to the music. Please use your phone responsibly and safely. ›› In “FM Radio mode” you can listen to your favourite radio station in stereo, seek for a specific radio station and save it (6 memories are available). 21 UK ›› You can switch (toggle) from one mode to the other simply pressing the Middle button for 3 seconds. A voice announcement will tell in which mode you are on. The toggle sequence is the following: ›› Intercom mode (if another unit has been paired) ›› FM Radio ›› Phone mode (if a phone has been paired) Every time you turn on the unit, the default mode is the last used mode. The Intercom mode and Phone mode are avalaible only if it was previously paired to another unit or to a phone. If you need to know in which mode the unit currently is, just press the “Volume + “ and “Volume –” button together. A voice announcement will tell you the current mode. Maximum Distance You can reach 1.2 Km intercom distance if you are in line of sight without obstructions and interferences (the riders must be always in sight). How to pair two Midland BTX2 PRO S units The two units supplied in the same Midland BTX2 PRO S box, are already paired and ready to use, this means you don’t need to perform this procedure. The units are already paired using the Middle button. If the devices are not part of the same kit, or the units has been purchased separately, you need to first pair them in order to use them. To pair the Midland BTX2 PRO S to another Midland BTX2 PRO S unit To pair the Midland BTX2 PRO S to another Midland BTX2 PRO S unit, you must first enter the setup mode: 1. Turn off the unit. 2. Press and hold down the middle button about 7 sec., until the Red light is on permanently. 3. Now press the Middle button for 3 seconds. The Blue and Red lights will flash. 4. Do the same procedure on the other unit. When successfully paired, each unit will have the Blue light on for one second and then go back to the setup mode (Red light always on). 5. Now the pairing procedure is complete, you just need to exit the setup mode before you can use the units. 6. Double click on the Middle button, the Red light will turn off and the Blue light will start flashing. You can use now your Midland BTX2 PRO S Attention: remember to switch off all the other Bluetooth devices that are not part of the pairing procedure, only the two devices involved in the pairing must be turned on. How to use the Intercom with two units To use the intercom feature, be sure that both units are turned on and correctly paired together. Here is an example of the buttons main functionality based on the mode you are on. Mode Intercom Forward (Left button) Open/close the intercom to the first rider Middle button Open/close the intercom to the second rider Phone Redial last number/accept or reject incoming call on “Vol+” Phone (while music play) Forward the song FM Radio Scan up 22 Play/pause FM Radio On/off Rear (Right button) Open/close the intercom to the Third rider Redial last number/accept or reject incoming call on “Vol-” Backward the song Scan down www.midlandeurope.com Set up of the AGC system Voice activation (VOX) To adjust the sensitivity of the AGC system you can use the ”BT UPDATER” Pc Software or the smartphone “BT SET-APP” application. You can choose different set up based on your motorbike type (naked, touring, sport) or if you are riding as a passenger. You can disable the AGC system pressing “Volume +” and “Volume -” together for 3 sec. Simply say something, after some seconds the communication will be opened and will remain active for the time you are talking. If there is no conversation the intercom will be closed after 40 seconds. If needed you can close the intercom manually without waiting 40 seconds (just press the middle button). If needed, you can enable/disable the VOX feature simply by pressing the Backward button for 7 sec. A voice announcement will advise you when the VOX is enabled/disabled. To turn the VOX on again, just press the same button and a voice announcement will advise you that the VOX is now active. This setting is remembered also if you turn off the unit. How to pair the Midland BTX2 PRO S to more than two units One Midland BTX2 PRO S unit can be paired to maximum five other BT units, that means six in total (3 Midland unit + 2 Talk2All + yourself). The Midland BTX2 PRO S has three main buttons (Forward, Middle and Rear). It is up to you which button to use to pair and activate the intercom, you are totally free to choose the button you like more. The same button you will use to pair the unit will be also used to activate the intercom communication. Remember that each device can always be paired with other 3 units at your choice; as shown in the picture here below, also ‘crossed’ pairing can be done. Attention: The Voice activation (VOX) can open the intercom communication only to the unit that was paired with the Middle button. If you choose to use a different button (Forward or Backward ), you will be able to active the intercom only manually. Rider 1 Adjusting the volume Your Midland BTX2 PRO S uses AGC technology, which automatically adjusts the listening volume in relation to background noises. However, it is also possible to manually adjust the volume by means of the “Volume +” and “Volume -”buttons. The volume setting is indipendent for each audio source: intercom, stereo music, phone call, FM radio. Attention: volume can be adjusted only when an audio connection is active. www.midlandeurope.com Passenger 1 Rider 2 Rider 3 For example you can decide to pair one motorbike rider unit to the Forward button, your passenger to the Middle button and another rider to the Rear button. In this way you can have in total 4 units paired together and talk to each person, one by one, simply by pressing the corresponding button (the same used for the pairing). Every time you open the intercom connection to one person, the 23 UK Manual activation When in “Intercom Mode” press the Middle button on one of the two units in “Intercom” mode. Communication is enabled and remains active until you press again the middle button. The intercom need some seconds to activate, you will hear a beep tone when the intercom is open. previous connection will be closed. The connection is not a “chain”, when two persons are talking it is not possible to break (interrupt) the communication by one of the other two units. UK Pair the Midland BTX2 PRO S to another Midland BTX2 PRO S unit To pair the Midland BTX2 PRO S to another Midland BTX2 PRO S unit, you must first enter the setup mode: 1. Turn off the unit 2. Press and hold down the middle button about 7 sec., until the Red light is on permanently. 3. Now press one of the three buttons (Forward, Middle or Backward) for 3 seconds depending on which button you would like use to open the intercom to the other unit. The Blue and Red lights will flash. 4. Repeat the same procedure on the other unit, you don’t need to use the same button, you can choose one of the three buttons not previously used. 5. When successfully paired, each unit will have the Blue light on for one second and then go back to the setup mode (Red light always on). 6. Now the unit is ready for another pairing procedure, and you can pair another Midland BTX2 PRO S unit following the same procedure, but using a different button. If you don’t have more devices to pair, you must exit the setup mode before you can use the units: ›› Double click on the Middle button, the Red light will turn off and the Blue light will start flashing. You can use now your Midland BTX2 PRO S How to use the Intercom with more than two units To use the intercom feature, be sure that all the units are turned on and correctly paired together. Manual activation in Intercom mode When in “Intercom Mode” press the button corresponding to the unit you would like to communicate with. After some seconds the intercom communication will open. The communication remains active until you press again the same button. To quickly open the intercom to another person, just press the button corresponding to the other unit, the intercom will be automatically closed and the new connection will be open (see Table A). Voice activation (VOX) The voice activation feature can open the intercom only to the unit paired to the Middle button. Hint: this feature is very useful when you have a specific person that you like to talk to more often (for example your passenger). In this way you don’t need to press a button to open the communication. Unit already busy in a conversation If you try to open an intercom connection to another person that is already talking with someone else (or is in a middle of a phone conversation), you will hear a “busy” double beep tone. Just wait sometime and try again, maybe this time the “line” is not busy. The person who is called, will be advised that someone is trying to call and will hear a voice announcement with the number of the button from which the A- Manual activation Mode Intercom 24 Forward button Short press: Open/Close intercom to paired raider Middle button Short press: Open/Close intercom to paired raider Long press: Change mode Rear button Short press: Open/Close intercom to paired raider www.midlandeurope.com The first and the last unit must not be paired together (the chain must stay open). The unit number 1 can talk to the last unit (number 4) only “through” the unit number 2 and number 3. That means to have the conference with four people, all the unit must have the intercom open. Activate Conference mode 1 2 3 Conference 3 communication between 4 1 the simultaneous The “Conference” mode allows 2 people or, if you pair a intercom device also on “Vol-” , up to 8 people (4 couple). You can decide to use the BTX2 PRO S in “one to one” communication up to 6 people (“classic” Intercom mode) or with 8 people (4 couples) conference intercom (Conference mode). How to use the conference mode First of all you need to pair all the units in a “chain” mode, second the “Conference” feature must be active on all the units paired. Pairing To use the conference mode you need to pair all the units in a “chain” configuration. The BWD button of the first unit must be paired to the FWD button of the second unit. The BWD button of the second unit must be paired to the FWD button of the third unit and so on, till the fourth! 1 2 www.midlandeurope.com 3 4 In any mode with no active audio, keep pressed the FWD and Central buttons for 3 sec. The voice announcement “Conference” will tell you that it is active. When the Conference mode is active the bluetooth devices paired on “Vol+” button are disconnected, the paring on CTRL button and the Universal Intercom are not available. Now only the paring on FWD and BWD buttons are available, together with the device paired on the “Vol -” button. When in Conference mode, you can always move to “FM radio” mode to listen your favorite radio station or to “Phone” mode to control the phone connected on the “Vol-” button. Disable Conference mode In any mode with no active audio, keep pressed the FWD and Central buttons for 3 sec. The voice announcement “Intercom” will tell you that you are back to the “One to One” Intercom mode and the device connected to the “Vol +” is available again, together with the Phone, the pairing on CTRL button and the Universal Intercom. Conference mode 4 people When the conference mode is active, it is possible to open the conference communication pressing both the FWD and BWD buttons. One click on the button will open the intercom communication, one click on the same button will close it. The two units that are in the middle of the chain (unit 2 and 3) must keep the intercom open on both FWD and BWD buttons to allow the full communication of the four units together. “One Click Talk” function When the conference mode is active, is possible to open the conference communication to all the 4 users just in “one click”. Press short the CTRL (middle) button and you will automatically open the conference to the four units connected. 25 UK request is coming. In this way as soon as the first conversation is over, the person can easily contact the caller by opening the intercom of the specific button number (indicated by the voice announcement). UK Conference mode with one Bluetooth device on “Vol-” When the conference mode is active the Bluetooth device connected on “Vol-” is still available, that mean you can listen to GPS street indication or answer your phone call without “brake” the Conference connection chain. The audio from the “Vol-” button connection can be “Private” (not shared in the Conference) or “Public” (the audio is shared with conference). By default the setting of conference mode is “Private”. Either in Privat or Public mode, if you receive a phone call, you are temporary disconnected from the Conference, but the other people can keep on talking to each other. As soon as the Phone call is over, you are automatically back to the Conference. ›› Activate Public mode: long press the “Vol-” button , you will here the voice “Public” ›› Activate Private mode: long press again the “Vol-” button, the voice will tell you “Private”. Attention: the incoming phone call is always “private” even if you are in “public” mode. Conference mode up to 8 people (4 couples) To have 8 people conference you need to pair one intercom device also to the “Vol- “ button and be sure you selected the “Public” option. Attention: The paring of the intercom device on “Vol-” must be as “Universal Intercom”. By default the setting of conference mode is “Private”, that mean the first time you press long the “Vol-” button, you will hear the voice “Public”. In case you heare “Private” you need to press again “Vol-” long untill you hear the voice “Public” mode. How to pair an Intercom device on the “Vol-” button ›› On the BTX2 PRO S go in “Setup mode”, press the “Vol-” button for 3 sec. The Blue and Red Led lights will start flashing ›› On the other device, follow the procedure to pair as an Universal Intercom How to open the Conference for the “Vol-” unit ›› To open the conference from the BTX2 PRO S to the unit connected to the 26 “Vol-”, press in Phone Mode the “Backward” button ›› To open the conference from the other unit connected to the “Vol-”, just use the command to open the Universal intercom connection. The maximum distance of the device connected to the “Vol-” button is 10 mt, this is why is suitable only for Passenger. Talk 2 All - Universal Intercom with different brand unit Thanks to the “Talk2 All - Universal Intercom” feature it is now possible to pair your Midland BTX2 PRO S to a different brand intercom available on the market. You can pair a maximum of two not Midland Intercom devices, one on the “Forward” button and the other one on the Backward button. ›› On the Midland BTX2 PRO S enter the setup mode: (with the unit OFF press and hold down the Middle button about 7 sec. until the Red light is on permanently). ›› Keep pressed the “Forward” button or “Backward” button for 7 seconds: the Red and Blu LED lights will start flashing fast, then (while you still keep the button pressed) the Red and Blu LED lights will change to slow flashing. Now you can release the button. Talk2All-Universal Intercom Not Midland Intercom On the other intercom (not Midland brand) follow the procedure to pair to a phone, because the BTX2 PRO S is paired as a Phone. If successfully paired the red/blue lights will stop flashing and the blu light will slowly flash instead. Attention: remember to switch OFF all the other Bluetooth devices during the pairing procedure, only the two devices involved in the pairing must be turned on. To open the “Universal Intercom” communication on the Midland BTX2 PRO S while you are in “Intercom Mode”, press long (3 sec) the Forward www.midlandeurope.com Attention: In order to use the “Talk2All-Universal Intercom” feature the pairing on the other unit must be done as a phone. The other intercom (not Midland brand) will be able to be paired to a phone only if two phones are supported. You can pair also a Midland unit as Talk2All, that means the pairing must be done as a phone (one unit use the Talk2All procedure and the other unit use the pairing to “Phone” procedure). Compatibility with Midland BT line units The BTX2 PRO S is compatible with Midland BT devices. When paired the max distance of the intercom is defined from the lower possible. The BTX2 PRO S is compatible with the previous line of Midland BT only if you update the firmware. Pairing the Midland BTX2 PRO S to Bluetooth devices The Midland BTX2 PRO S unit can be paired to other Bluetooth devices, like Phone, GPS Navigator or PMR446 Radio with built-in or external Bluetooth (dongle). The pairing procedure must be done using the “Volume +” or the “Volume -” buttons. Vol- Always in background ›› Phone (HFP/A2DP Stereo) ›› GPS (HFP/A2DP Stereo) ›› Dongle (HFP/A2DP Stereo) VOL+ High priority ›› Phone (HFP/A2DP Stereo) ›› GPS (HFP/A2DP Stereo) ›› Dongle (HFP/A2DP Stereo) ›› Pairing to the “Volume +” button: for Phone with music A2DP stereo, GPS Navigator with A2DP audio or external mono/Stereo A2DP dongle. All devices paired to “Volume +” button has higher priority and will interrupt all the other communication (like Intercom, FM Radio and Music). ›› Pairing to the “Volume -” button: for Phone with music A2DP stereo, GPS Navigator with A2DP audio or external mono/Stereo A2DP dongle. All devices paired to “Volume -” button are always in active in background during the Intercom communication. When a device is paired to the “Vol +” or “Vol –” buttons the “Phone” mode is activated. Background feature The audio connection on any device paired on “Vol-” button, even if it is stereo, is always in background. In this way the Intercom communication will not be interrupted, for example, by the GPS’s street indication or other audio source. You can decide if the audio from the “Vol -” connection is shared with other people when the intercom is open (public) or if it must be private (private). Attention: By default the audio is private The audio from “Vol -” has always lower priority against the Intercom, that means when the intercom is open the audio is lowered by default to 50%. You can change this setting using the BTUpdater PC Software Pairing with one or two phones The cellular phone can be paired to the “Vol +” or to the “Vol –”. When a phone is paired to the “Vol +” or “Vol-” the “Phone” mode is activated. An incoming call has always the higher priority, that means all other communications will be closed (Intercom, FM Radio, Music). If another incoming call will arrive on the second phone, an alert sound will notify it. WARNING! In order to have the best performance with your mobile phone, it is suggested to keep it as close as possible to your BTX2 PRO S unit, on the left side of your body and in the upper pocket of your jacket if it’s possible. www.midlandeurope.com 27 UK button or “Backward” button (depending on wich button you used for pairing) . On the other intercom just press the phone redial or voice dial button. Maybe it will be necessary to press the redial button two times, depending on the model of the not Midland intercom. UK How to pair the Midland BTX2 PRO S to a Phone To pair the Midland BTX2 PRO S to a Phone, you must first enter the setup mode: 1. Turn off the unit 2. Press and hold down the middle button about 7 sec., until the Red light is on permanently. 3. Now press for 3 seconds the “Volume +” or “Volume -” button, the Blue and Red lights will flash. 4. Enable the Bluetooth device search feature on your mobile phone 5. After some seconds, “Midland BTX2 PRO S” will be displayed on your mobile phone. Follow the pairing procedure of your Phone. If a pin code is requested you must enter “0000” (four time zero). When successfully paired, the Blue light of the unit will be on for one second and than the unit will exit the setup mode and switch to the working mode (the Blue light will start flashing). You can use now your Midland BTX2 PRO S together with the Phone. How to use a Phone After pairing your phone to the Midland BTX2 PRO S unit you must switch to the “Phone” mode in order to use it. Press the middle button until you hear “Phone” from the voice announcement. Now all the three main buttons are dedicated to the phone (see Table B) Answering a call When you hear the phone ring, you can answer in two different ways: Vocally: Simply say one word just after the first ring to answer the call and start talking. Manually: Tap the “Forward” or “Backward” button and start talking. Rejecting a call If you don’t wish to answer, you can let the mobile phone ring or press the “Forward” or “Backward” button for 3 seconds (you will hear one audio confirmation tone). Making a call There are several ways to make a call. To redial the last number: ›› Phone on “Vol+”: Press”Forward”button for 3 seconds in order to redial the last number (you will hear one audio confirmation tone). ›› Phone on “Vol-”: Press”Backward”button for 3 seconds in order to redial the last number (you will hear one audio confirmation tone). To make a voice call: ›› Phone on “Vol+”: Briefly press”Forward”button. If your mobile phone supports voice calls, you will be asked to speak the name of the contact you wish to call. ›› Phone on “Vol-”: Briefly press”Backward”button. If your mobile phone supports voice calls, you will be asked to speak the name of the contact you wish to call. Priority: Calls have a high priority, which means that all other communications are temporarily disabled when a call arrives. B - Phone mode Mode Phone Phone (when music is plaing and paired on “Vol +”) 28 Forward button (Phone on “Vol+”) Middle button Short press: Voice dial /accept or close if it is Long press: Change mode in progress Long press: redial last number/ or reject Short press: Forward the song Short press: Play/pause Long press: Change mode Backward button (Phone on “Vol-” ) Short press: Voice dial /accept or close if it is in progress Long press: redial last number/ or reject Short press: Backward the song www.midlandeurope.com Ending a call Speed dial Only for the phone paired on “Vol+” is possible to store one phone number in the unit memory and use it when needed. You must first save the number using the “BT UPDATER” Pc software or the smartphone “BT SET-APP” application. Then when you are in phone mode, just press 7 sec. the “Forward” button. Using the MP3 player feature of the mobile phone The mobile phone, when paired on “Volume +” or “Volume -” can be used as stereo MP3 players. The Midland BTX2 PRO S device fully supports the A2DP and AVRCP protocols that enable you to listen to stereo music and remotely control your mobile phone’s MP3 player. You can even use the buttons on the Midland BTX2 PRO S unit to control the following play options: Play, Pause, Forward and Backward the songs. It is possible to control only one phone at the time. You can choose which phone to control, pressing 3 sec. the “Vol+” button: You will hear the voice “Control on volume up” . Now you can control the phone paired on “Vol+” button. If you want to switch the control to the other phone just press again for 3 sec. the “Vol+” button and you will hear the voice “Control on volume down”. Available controls: ›› To play/pause music: click on the “Middle” button. ›› To skip forward to the next song: press the “Forward” button. ›› To skip backwards to the previous song: press the “Back” button. Priority: the music listening mode has the lowest priority. Therefore, it will always be disabled when another audio communication comes in. To change the priority behaviour you can use the ”BT UPDATER” Pc Software or the smartphone “BT SET-APP” application www.midlandeurope.com Forward Play/Pause UK There are several ways to end a call: ›› Wait for the called person to end the call. ›› Press the “Forward” button (you will hear an audio confirmation tone). ›› Press “End” button on the mobile phone. Backward Attention: It is possible to have all the controls (Play/Pause, FWD, BWD) of the A2DP music only in “Phone mode”. If you are listening to A2DP music and you move from “Phone” mode to “FM Radio” or “Intercom” mode, you can still listening to A2DP music but you don’t have all the controls buttons available. Only Play/Pause is available with double click on the “Middle” button. Music Share Music Share is possible only from the phone paired on the “Vol+” button. To start sharing your A2DP music with the passenger already paired on the middle button (maximum distance 10mt), you must press the “Backward” button long (3 sec.) while the music is playing. The passenger can only stop the music share pressing short the middle button (but cannot control the music). The driver can stop the music sharing just pressing again the “Backward” button for 3 seconds. With music share active you can not keep open the Intercom communication. Attention: to enable the Music Share, make sure you sent a play command from the Intercom device. Attention: while in Music Share mode, the driver can open the intercom to the passenger with a double-click on the Central button. GPS Navigator The GPS Navigator can be paired using the “Vol +” or the “Vol -” button. ›› Volume + button (support for stereo A2DP audio and HFP mono). All devices paired to “Vol +” button has higher priority and will interrupt all the other communication (like Intercom, and FM Radio). 29 UK ›› Volume - button (support for stereo A2DP audio and HFP mono). All devices paired on “Vol -” button are always active in background during the Intercom communication. You can decide if the audio from the “Vol -” connection is shared with other people when the intercom is open (“Public” feature on) or if it must be private (“Private” feature on). See the “Background” paragraph above. GPS Stereo (A2DP) voice announcement Midland BTX2 PRO S supports Stereo (A2DP) voice announcement from GPS Navigators or smartphone application on both “Vol+” or “Vol-” connection. When connected on “Volume +” button, the GPS street voice announcements will interrupt all other communication. Only when connected on “Vol-” the GPS voice announcements are in backgroud. How to pair the Midland BTX2 PRO S to a GPS In general it is possible to pair the Midland BTX2 PRO S to all the GPS for motorbike that support Bluetooth headset connection. To pair the Midland BTX2 PRO S to a GPS, you must first enter the setup mode: 1. Turn off the unit 2. Press and hold down the “Middle” button about 7 sec., until the Red light is on permanently. 3. Now press firmly (3 sec) the “Volume +” or “Volume -” button, the Blue and Red lights will flash. 4. Enable the Bluetooth device search feature on your GPS 5. After some seconds, “Midland BTX2 PRO S” will be displayed on your GPS. 6. Follow the pairing procedure of your GPS. If a pin code is requested you must enter “0000” (four times zero). When successfully paired, the Blue light of the unit will be on for one second and then the unit will exit the setup mode and switch to the working mode (the Blue light will start flashing). You can now use your Midland BTX2 PRO S with the GPS for street voice announcement. Pairing to a PMR446 radio with integrated or external Bluetooth The PMR446 Radio can be paired to the “Volume +” or “Volume -” button. If paired on “Volume -”, the PMR446 radio is always in the background even when you talk on the intercom. Pairing procedure ›› Turn off the unit ›› Press and hold down the “Middle” button about 7 sec., until the Red light is on permanently. ›› Now press firmly (3 sec) the “Vol +” or “Vol -” button, the Blue and Red light will flash. ›› Follow now the pairing procedure explained on the manual of the transceiver itself How to listen to the FM Radio The FM Radio receiver is integrated inside the unit. You just need to switch to the “FM Radio” mode in order to use it. Long press the middle button until you hear “FM radio” from the voice announcement. Now all the three main buttons are dedicated to the FM Radio (See Table C). Press short the “Forward” or the “Backward” button to seek the FM Radio station. When you press long the Forward or the Backward button, you can scan up or down the 6 recorded stations. A voice announcement will tell you the number of which memory you are en- C-Radio FM mode Mode FM Radio 30 Forward button Short press: seek station up Long press: Scan recorded Middle button Short press: On/off Long press: Change mode Rear button Short press: seek station up Long press: Scan recorded www.midlandeurope.com How to Disable/Enable the FM Radio By default the FM radio is on. Disabling: ›› Enter the “Setup” mode: turn off the unit and hold down the “Middle” button about 7 sec., until the Red light is on permanently. ›› Press “Middle” and “Volume+” buttons together for 3 seconds. The blue LED will flash three times. ›› Double click on the “Middle” button to exit the “Setup” mode and use the Midland BTX2 PRO S. Enabling: ›› Follow the same procedure up described; now the blue LED will flash once. To exit the “Setup” mode, double click the “Middle” button. FM Radio with intercom When you are in “FM Radio” mode it is not possible to manually open the intercom, you can only open it using VOX feature (just talk) to the unit paired on the “Middle” button. To manually activate the intercom you must switch to “Intercom” mode. FM Radio in background It is not possible to have the FM radio along with other audio sources. Any active audio such as Intercom or coming from the “Vol+” or “Vol-” connection, will pause the FM radio. Setup and special configurations Resetting all paired devices Sometimes you may find it necessary to delete all the pairing references stored in the Midland BTX2 PRO S unit (reset operation). To perform this operation you must first enter the setup mode: ›› Turn off the unit. ›› Press and hold down the “Middle” button about 7 sec., until the Red light is on permanently. ›› Then simultaneously press and hold down the “Volume +” and “Volume –” buttons for 3 seconds. The Blue Light will be lit on for 1 sec and then back to steady RED. ›› Double click on the “Middle” button to exit the “Setup” mode and use the Midland BTX2 PRO S. This procedure deletes all the paired Bluetooth devices stored in the memory and it is therefore possible to start a new “clean” pairing session. Attention: after resetting all the pairting, only the “FM Radio” mode wil be available. Back to factory setting Sometimes you may find it necessary to go back to the factory setting, to reset all the changes/setup already made and have a “clean” unit. To perform this operation you must first enter the setup mode: ›› Turn off the unit. ›› Press and hold down the “Middle” button about 7 sec., until the Red light is on permanently. ›› Then simultaneously press and hold down all the three buttons “Forward”-”Middle”-”Backward” for 3 seconds. The Blue Light will be lit on for 1 sec and than back to steady RED. ›› Double click on the “Middle” button to exit the “Setup” mode and use the Midland BTX2 PRO S These adjustements can be set through the program “BTPro Updater” suitable for PC/MAC Adjusting/ Disabling the VOX feature (Intercom and telephone) The Intercom feature can be enabled both manually and vocally (VOX). The www.midlandeurope.com 31 UK tering. To save the station you are listening to, press the Forward and Backward buttons together for 3 sec. You will hear a beep tone for confirmation. The station is saved over the last recorded station used. Thanks to the RDS system, the FM Radio will choose the strongest signal available for the radio station you like to listen. The RDS system is OFF by default, if needed you can toggle on/off the RDS pressing together the “Volume +” and “Volume –” buttons for 3 sec when the radio is on. A voice announcement will tell you the RDS status. UK VOX activation is influenced by the helmet type, the background noise and therefore by the speed. For optimum results, it is possible to choose one of the following four microphone sensitivity levels: high, medium, low and very low. It is also possible to disable the VOX feature in order to activate the Intercom and phone call answering features in manual mode only. These adjustments can be set through the program “BTPro Updater” suitable for PC/Mac. Setup and Firmware update It is possible to configure and update the firmware of your Midland BTX2 PRO S using the USB connection to your PC. On the Midland web site www. midlandeurope.com in the Midland BTX2 PRO S page you can find the PC software and the new firmware updates if available. Warranty The warranty lasts 24 months for the main device and 6 months for the accessories (batteries, chargers, antennas, headsets, microphones). For further information about the warranty, please visit: www.midlandeurope.com. European CE Notice Certification and Safety Approval Information This product is CE marked according to the RED Directive 2014/53/UE and is free use in all the EU countries. Users are not permitted to make any changes or modifications to the device. Modifications which are not expressly approved by the producer invalidate the warranty card. For further information, please go to our website: www.midlandeurope.com. ATTENTION DO NOT CONNNECT THE UNIT TO THE PC BEFORE YOU DOWNLOAD AND INSTALL THE SOFTWARE Use at your own risk The use of the device will impair your ability to hear other sounds and others around you. Listening to music or speaking on a telephone may prevent you from hearing others around you and distract you from riding safely. The use of such device while riding may endanger you and others, and its use, in some areas, could not be allowed. Using this device at a high volume may result in permanent hearing loss. If you experience ringing in your ear or any other hearing related pain, reduce the volume or discontinue using this device. With continued use at high volume, your ears may become accustomed to the sound level, which may result in permanent damage to your hearing. Please use this device at a safe volume level. 32 www.midlandeurope.com Inhalt Hauptmerkmale..............................................................................................................................................................................................................................34 Aufladen des Akkus........................................................................................................................................................................................................................ 35 Beschreibung des Geräts und Montagehalterung....................................................................................................................................................................... 35 Ein-/Ausschalten des Midland BTX2 PRO S.............................................................................................................................................................................. 37 Koppeln (Pairen) von Zwei BTX2 PRO S- Geräten.................................................................................................................................................................... 38 Konferenz.........................................................................................................................................................................................................................................41 Talk 2 All - Universelles Gegensprechen mit einem Gerät einer anderen Marke....................................................................................................................42 Kompatibilität mit Geräten der Midland BT-Produktlinie.........................................................................................................................................................43 Kopplung des Midland BTX2 PRO S mit Bluetooth Geräten...................................................................................................................................................43 Ukw-Radio...................................................................................................................................................................................................................................... 47 Setup und spezielle Konfiguration................................................................................................................................................................................................48 Gewährleistung...............................................................................................................................................................................................................................49 www.midlandeurope.com 33 D Technische Daten des Midland BTX2 PRO S.............................................................................................................................................................................34 D MIDLAND BTX2 PRO S Je nach gekauftem Modell enthält die Packung folgenden Inhalt: Dual Core Gegensprechanlage ›› ›› ›› ›› ›› ›› Midland BTX2 PRO S ist ein Gegensprechsystem mit 2 Bluetooth Chipsätzen (Dual Bluetooth Processor) für Konferenzkommunikation und echte Stereo Audioübertragung im Hintergrund. Das Design ist extrem flach und aerodynamisch, alle Hauptfunktionen lassen sich dank der 3 großen Tasten auf der Gerätefront komfortabel steuern. Midland BTX2 PRO S wird am Helm mittels einer Klebeoder Klemmhalterung befestigt. Hauptmerkmale ›› ›› ›› ›› ›› ›› ›› ›› ›› ›› ›› ›› Dual Core Bluetooth System “Eins-zu eins”-Gegensprechen mit bis zu 1.2 Km Reichweite. Konferenz mit bis zu 8 Teilnehmern (4 Motorräder) Verbinden Sie bis zu 6 Personen mittels “Eins-zu-Eins” Kommunikation MWE Noise Killer Universal Intercom Funktion zum Verbinden mit Freisprecheinrichtungen verschiedener Hersteller Stereo UKW-Radio mit RDS Music Share (Fahrer und Beifahrer) Anschluss eines Mobiltelefons, um Anrufe anzunehmen und zu tätigen, sowie für die Wiedergabe von Stereo-Musik Kopplung von 2 Telefonen möglich Anschluss eines GPS-Navigationsgeräts zur Übertragung von Navigationsanweisungen Setup und Firmware-Update über USB-Verbindung mit einem PC Das Midland BTX2 PRO S ist in zwei Versionen erhältlich: ›› BTX2 PRO S Einzel-Intercom Set mit nur einem Gerät ›› BTX2 PRO S Twin-Intercom Set mit zwei Geräten 34 BTX2 PRO S Einzel-Intercom Set 1 BTX2 PRO S-Kommunikationsgerät 1 Slide-In Halterungssatz mit zwei HiFi-Stereolautsprechern 1 Klapphelmmikrofon und 1 Integralhelmmikrofon 1 Platte mit Klebestreifen, um das Gerät am Helm zu befestigen 1 Platte mit Schraube, um das Gerät an den Helm zu klemmen 1 Micro-USB-Netzteil BTX2 PRO S Twin- Intercom Set ›› ›› ›› ›› ›› ›› 2 BTX2 PRO S Geräte Sets 2 Slide-In Halterungssätze mit zwei HiFi-Stereolautsprechern 2 Klapphelmmikrofone und 2 Integralhelmmikrofone 2 Platten mit Klebestreifen, um das Gerät am Helm zu befestigen 2 Platten mit Schrauben, um das Gerät an den Helm zu klemmen 1 Micro-USB-Netzteil mit zwei Anschlüssen Die Gerätesets im TWIN-Kit sind bereits gekoppelt (gepairt) und können daher sofort als Motorrad-Intercom (Gegensprech- Modus) benutzt werden. Technische Daten des Midland BTX2 PRO S Allgemein: ›› ›› ›› ›› ›› ›› ›› ›› ›› ›› Bluetooth ver. 4.2 Stereo (Handsfree/A2DP/ AVRCP Protokoll) Frequenz 2.4GHz - Max Leistung 100mW Bluetooth Dual Core für echte Stereo Hintergrundfunktionnalität Das AGC System regelt automatisch die Lautstärke in Abhängigkeit von den Umgebungs- und Fahrgeräuschen Sprachgesteuerte (VOX) oder manuelle Intercom-Aktivierung Manuelle Steuerung zum Aktivieren von: Telefon, Intercom (Gegensprechanlage), UKW Radio UKW-Stereo-Radio mit RDS Vollständig Regenwasserdicht Lithium Akku mit 20 Stunden Sprechzeit Ladezeit: ca. 2 Stunden www.midlandeurope.com Bluetooth-Verbindungen: Beschreibung des Geräts und Montagehalterung Bluetooth-Geräte: Das BTX2 PRO S hat fünf Tasten auf der Vorderseite, wobei die drei großen Tasten Multifunktionstasten sind: Vorwärts (links), die mittlere Taste und Zurück (rechts); die zwei rechteckigen Tasten sind für Lautstärke+ und Lautstärke–. Mit 2 BTX2 PRO S können Sie von Fahrer zu Beifahrer oder von Bike-zu-Bike gegensprechen, bis zu einer maximalen Reichweite von 1.2 Km ohne Hindernisse oder Interferenzen (Fahrer müssen immer in Sichtweite sein). Mobiltelefon mit MP3-Player-Stereo (A2DP-Protokoll), Navigationsgerät Lautstärke - Lautstärke + Aufladen des Akkus LED Zum Laden das Steckerladegerät in die Ladebuchse stecken (nehmen Sie die Gummischutzkappe ab, um den Stecker einzustecken). Die rote LED am Gerät fängt an zu blinken, sobald der Ladevorgang startet. Laden Sie das Gerät bis die LED von rot-blinkend zu konstant-blau wechselt. Wenn der Ladevorgang abgeschlossen ist (die rote LED blinkt nicht mehr), ziehen Sie den Ladestecker vom Headset ab. Nach dem ersten Laden benötigt eine komplette Ladung normalerweise 2 Stunden. D Achtung: Stellen Sie sicher, dass das Gerät vor der Benutzung komplett geladen ist. Laden Sie das Gerät mindestens 3 Stunden bevor es zum ersten Mal genutzt wird. Vorwärts Mitte Zurück Auf der Unterseite des Gerätes finden Sie die Ladebuchse, welche kompatibel zu Standard Micro USB Netzteilen ist. Achtung: Das Midland BTX2 PRO S ist regen- und wasserfest konzipiert. Stellen Sie aber dennoch sicher, dass bei Regen die Gummischutzkappen die Anschlüsse vollständig abdecken. Achtung: Wenn das Micro-USB-Netzteil angeschlossen oder getrennt wird, schaltet sich das Gerät automatisch aus. Wenn Sie das Gerät verwenden wollen, während es aufgeladen wird, sollten Sie es einschalten, nachdem Sie das Netzteil angeschlossen haben. Ladeanschluss Beschreibung des Audiokits Das Audiosystem umfasst zwei HI-FI Stereo-Lautsprecher und zwei austauschbare Mikrofone, eine Klapphelmversion und eine Integralhelmversion. Mit dem Mini-Stecker am Mikrofon können Sie für jeden Helmtyp das passende Mikrofon auswählen. www.midlandeurope.com 35 Die Stereo-Lautsprecher befestigen Slide-In Halterungssatz Die beiden Stereo-Lautsprecher sind mit Klettband/Klebestreifen versehen, womit sie sich leichter im Helm befestigen lassen. Beachten Sie außerdem die Lautstärke des Gerätes nicht zu weit zu erhöhen. Sie müssen weiterhin den Verkehr um Sie herum wahrnehmen können. Das Midland BTX2 PRO S kann am Helm befestigt werden, indem man die Slide-In Halterung auf zwei verschiedene Weisen anbaut: entweder mittels des Klebestreifens oder mittels der Schraubenplatte. Mit beiden Verfahren können Sie das BTX2 PRO S sicher an Ihrem Helm befestigen und es jederzeit wieder abnehmen, um es aufzuladen oder zu lagern. Platte mit Klebestreifen D Die Klebehalterung wird bereits vormontiert mitgeliefert. Klebehalterung Mikrofonbefestigung Schwanenhalsmikrofon Befestigen Sie den Bereich mit dem Klettband/Klebestreifen zwischen der Polsterung und der harten Innenschale des Helms, sodass sich das Mikrofon in der richtigen Position vor Ihrem Mund befindet und das weiße Symbol in Richtung Ihres Mundes weist. Dieser Mikrofontyp ist für Jethelme und für Klapphelme geeignet. Für offene Helme gibt es optional ein längeres Schwanenhalsmikrofon (Art.Nr. C1253). Kabelgebundenes Mikrofon Bringen Sie das Mikrofon mithilfe des Klettbandes/Klebestreifens im Helm vor Ihrem Mund an. Dieser Mikrofontyp ist eher für Integralhelme geeignet. Schwanenhalsmikrofon 36 Kabelgebundenes Mikrofon Säubern Sie die Klebestelle auf der Helmoberfläche. Biegen Sie die beiden Flügel so, dass sie perfekt an die Biegung des Helms passen. Entfernen Sie die Folie vom Klebestreifen und bringen Sie die Befestigungsplatte auf der linken Seite des Helms an, indem Sie sie einige Sekunden gegen den Helm drücken. Schraubklemme Schritt 1. Entfernen Sie die Klebehalterung von der Slide-In Halterung mit Hilfe des mitgelieferten Inbusschlüssels. Bewahren Sie die beiden Schrauben auf. Schritt 2: Befestigen Sie die Klemmhalterung an der Slide-In Halterung mittels der 2 Schrauben. www.midlandeurope.com Das Midland BTX2 PRO S anbringen oder abnehmen Das BTX2 PRO S kann problemlos am Helm befestigt werden, indem es nach unten auf die Slide-In Halterung geschoben wird. Das BTX2 PRO S wird durch den Befestigungsclip auf der Oberseite (A) in Position gehalten. Um das BTX2 PRO S abzunehmen, drücken Sie einfach auf den Befestigungsclip und drücken das Gerät nach oben. Befestigen Lösen A D Schritt 3: Schieben Sie die Halterung zwischen Helmschale und Polsterung und ziehen die beiden Schrauben fest an. Ein-/Ausschalten des Midland BTX2 PRO S Sofern notwendig können Sie auch auch die gummierte Grundplatte verwenden, um die Rutschfestigkeit zu erhöhen. Nutzen Sie einfach die beiden kurzen Schrauben, um die Platte an der Slide-In Halterung zu befestigen. Einschalten des Geräts: ›› Halten Sie die “mittlere” Taste für ca. 3 Sekunden gedrückt, bis die BLAUE LED aufleuchtet. Ausschalten des Geräts: ›› Halten Sie die “mittlere” und die “Zurück”-Taste gleichzeitig für ca. 3 Sekunden gedrückt, bis die ROTE LED 3-mal aufblinkt. Dadurch wird die Gefahr des versehentlichen Ausschaltens des Geräts minimiert (vor allem mit Handschuhen). Gummierte Grundplatte www.midlandeurope.com Betriebsarten Das BTX2 PRO S besitzt drei Hauptbetriebsarten: Gegensprechen (Intercom), Telefon und UKW- Radio. Die 3 Multifunktions-Tasten haben unterschiedliche Funktionen und hängen von der Betriebsart ab, in der sich das Gerät aktuell befindet. ›› Im Intercom - Modus können Sie mit den Tasten die Sprechverbindung mit bis zu 6 Teilnehmern steuern, indem jeweils einer mit einem der anderen spricht. Drücken Sie einfach auf eine der drei Tasten, um das Intercom zu aktivieren. 37 D ›› Im Telefon – Modus können Sie mit Ihrem Bluetooth-Mobiltelefon einen Anruf tätigen/annehmen oder Musik wiedergeben (in Stereo). ›› Im UKW-Radio - Modus können Sie Ihren Lieblings-Stereo-Radiosender wiedergeben. Suchen Sie einen bestimmten Radiosender und speichern Sie ihn (Es sind 6 Speicherplätze vorhanden). Sie können von einem Modus in einen anderen umschalten (hin- und herschalten), indem Sie einfach die “mittlere” Taste gedrückt halten (3 Sekunden). Eine Sprachansage teilt Ihnen den aktuellen Modus mit. Die Modi schalten in folgender Reihenfolge um: ›› Gegensprech- Modus (wenn ein anderes BTX2 PRO S früher schon gekoppelt wurde) ›› UKW-Radio-Modus ›› Telefon-Modus (wenn vorher schon ein Mobiltelefon gekoppelt wurde) Standardmäßig aktiviert das Gerät beim Einschalten die Betriebsart, in der es zuletzt verwendet wurde. Der Gegensprechmodus (Intercommodus) und der Telefonmodus (Phonemodus) sind nur verfügbar, wenn das Gerät vorher mit einem anderen BTGerät oder einem Handy gekoppelt wurde. Wenn Sie wissen möchten, in welchem Modus sich das Gerät gerade befindet, drücken Sie einfach gleichzeitig die Tasten “Lautstärke +” und “Lautstärke –” für 3 Sekunden. Eine Sprachansage teilt Ihnen den aktuellen Modus mit. Max. Reichweite Die maximale Reichweite zwischen 2 BTX2 PRO S liegt bei 1.2 Km ohne Hindernisse oder Interferenzen (Fahrer müssen immer in Sichtweite sein). Koppeln (Pairen) von zwei BTX2 PRO S- Geräten Die beiden Geräte im BTX2 PRO S - Set sind bereits miteinander gekoppelt und betriebsbereit. In diesem Fall muss das Verfahren nicht durchführt werden. Das jeweils andere Gerät wurde bereits mit der “mittleren” Taste gekoppelt. Wenn die Geräte nicht aus demselben Kit stammen oder eines der Geräte später zugekauft wurde, müssen Sie die Geräte zuerst koppeln. Um ein BTX2 PRO S mit einem anderen BTX2 PRO S zu koppeln, müssen Sie zunächst den Setup-Modus aufrufen: 1. Schalten Sie das Gerät aus. 2. Halten Sie die “mittlere” Taste ca. 7 Sek. gedrückt, bis die rote LED ständig leuchtet. 3. Jetzt halten Sie die “mittlere” Taste gedrückt (3 Sek.), bis die BLAUE und die ROTE LED blinken. 4. Führen Sie dasselbe Verfahren auf dem anderen Gerät durch. Nach erfolgreichem Koppeln leuchtet die blaue LED für eine Sekunde an beiden Geräten auf und sie gehen anschließend in den Setup-Modus zurück (die Modus Weiter (linke Taste) Intercom Aktivieren/Deaktivieren der Aktivieren/Deaktivieren der Intercomverbindung mit dem ersten FahrerIntercomverbindung mit dem zweiten Fahrer Aktivieren/Deaktivieren der Intercomverbindung mit dem dritten Fahrer Telefon Wahlwiederholung/Rufannahme bzw. -ablehnung für Gerät auf “Vol+” Wahlwiederholung/Rufannahme bzw. -ablehnung für Gerät auf “Vol-” Telefon (während der Musikwiedergabe) Einen Titel weiter Wiedergabe/Pause Einen Titel zurück UKW-Radio Sendersuche aufwärts UKW-Radio ein/aus Sendersuchlauf abwärts 38 Mittlere Taste Zurück (rechte Taste) www.midlandeurope.com Achtung: Alle anderen Bluetooth Geräte müssen ausgeschaltet sein. Lediglich die zwei zu koppelnden Geräte sind angeschaltet. Intercom zwischen zwei Geräten Achten Sie darauf, dass beide Geräte eingeschaltet und richtig miteinander gekoppelt sind. Manuelle Aktivierung Im Intercommodus können Sie die Kommunikation starten, indem Sie die mittlere Taste an einer der beiden Einheiten drücken. Die Intercomanlage benötigt einige Sekunden zur Aktivierung. Sie hören einen Signalton, wenn die Intercom-Funktion aktiviert ist. Sprachsteuerung (VOX) Fangen Sie einfach an zu reden. Nach einigen Sekunden wird die Sprechverbindung aktiviert und bleibt eingeschaltet, solange Sie reden. Wenn nicht mehr geredet wird, wird die Sprechverbindung nach 40 Sekunden wieder abgeschaltet. Bei Bedarf können Sie die Intercom- Funktion ohne eine Wartezeit von 40 Sekunden jederzeit manuell abschalten (drücken Sie einfach die “mittlere” Taste). Wenn nötig, können Sie die VOX-Funktion aktivieren/deaktivieren, indem Sie einfach die “Zurück”-Taste für 7 Sek. gedrückt halten. Eine Sprachansage weist darauf hin, dass die VOX-Funktion aktiviert/deaktiviert wurde. Um die VOX-Funktion erneut zu aktivieren, drücken Sie einfach die gleiche Taste. Die Sprachansage weist darauf hin, dass die VOX-Funktion nun aktiviert wurde. Diese Einstellung bleibt auch nach dem Ausschalten des Gerätes erhalten. ACHTUNG: Die Sprachsteuerung (VOX) kann die Sprechverbindung nur auf dem Gerät aktivieren, das mit der “mittleren” Taste gekoppelt wurde. Wenn Sie eine andere Taste (“Zurück” oder “Weiter”) verwenden möchten, können Sie die Intercomanlage nur manuell aktivieren. Anpassen der Lautstärke Ihr Midland BTX2 PRO S benutzt AGC-Technologie, welche automatisch die Hörerlautstärke den Hintergrundgeräuschen anpasst. Sie können aber auch die Lautstärke manuell mit den Tasten “Lautstärke+” und “Lautstärke-” anpassen. Die gewählte Lautstärke wird für jede Quelle (Intercom, Stereomusik, Telefonanrufe, UKW Radio) gesondert gespeichert. Achtung: Die Lautstärke kann nur während einer gerade bestehenden Audioverbindung angepasst werden. Das AGC-System einrichten Die Empfindlichkeit des AGC-Systems können Sie mit der PC-Software “BT UPDATER” oder der Smartphone-App “BT SET-APP” einstellen. Sie können je nachdem, was für ein Motorrad Sie besitzen (Naked-, Touren- oder Sport- A - Manuelle Aktivierung Modus Intercom (Gegensprechen) Weiter-Taste Kurzer Tastendruck: Sprechverbindung mit dem gekoppelten Fahrer einschalten / ausschalten www.midlandeurope.com Mittlere Taste Kurzer Tastendruck: Sprechverbindung mit dem gekoppelten Fahrer einschalten oder ausschalten Langer Tastendruck: Modus wechseln Zurück-Taste Kurzer Tastendruck: Sprechverbindung mit dem gekoppelten Fahrer ein- oder ausschalten 39 D rote LED leuchtet ständig). Nun ist die Kopplung abgeschlossen und Sie müssen nur den Setup-Modus verlassen, bevor Sie die Geräte benutzen können: 5. Doppelklicken Sie auf die “mittlere” Taste. Die rote LED erlischt und die blaue LED blinkt. 6. Ihre beiden BTX2 PRO S sind jetzt betriebsbereit. motorrad) oder ob Sie als Beifahrer mitfahren, unterschiedliche Konfigurationen wählen. Sie können das AGC-System deaktivieren, indem Sie 3 Sekunden lang gleichzeitig “Lautstärke+” und “Lautstärke–” drücken. D Kopplung des BTX2 PRO S mit mehr als zwei Geräten Ein Midland BTX2 PRO S kann mit maximal 5 anderen Intercomgeräten (3 Midland Geräte + 2 Talk2All ) verbunden werden. Das Midland BTX2 PRO S hat drei Haupttasten (Vorwärts, Mittel und Zurück). Sie können frei entscheiden, welchen Kommunikationspartner Sie mit welcher Taste koppeln. Die Taste, welche Sie zum koppeln verwenden dient im Intercommodus auch dazu, die Kommunikation zu aktivieren. Beachten Sie bitte, dass Sie auf diese Weise bis zu 3 Geräte miteinander koppeln können. Fahrer 1 Kopplung des Midland BTX2 PRO S mit einer anderen BTX2 PRO S Um zwei Midland BTX2 PRO S miteinander zu koppeln, müssen diese zuerst in den Setupmodus gebracht werden: 1. Gerät ausschalten. 2. Die mittlere Taste für etwa 7 Sekunden gedrückt halten, bis die LED konstant rot leuchtet. 3. Nun die Taste (Vorwärts, Mitte oder Zurück) für 3s gedrückt halten, auf die der Gesprächspartner gespeichert werden soll. Die LED blinkt abwechselnd rot und blau. 4. Schritte 1-3 mit dem zweiten Gerät wiederholen. Sobald die beiden Geräte erfolgreich gekoppelt wurden blinkt die LED für 1 Sekunde blau und wechselt dann zurück in den Setupmodus (LED konstant rot) 5. Nun ist die Kopplung abgeschlossen. Es können nun weitere Geräte gekoppelt werden, indem Schritt 3 und 4 wiederholt werden. Um den Setupmodus zu verlassen wird die mittlere Taste schnell doppelt geklickt. Die LED wechselt von konstant rot auf blau blinkend. Sie können Ihr BTX2 PRO S nun verwenden. Auswahlmöglichkeiten beim Intercom mit mehr als 2 Geräten Um alle Gegensprechfunktionen zu nutzen, müssen alle beteiligten Geräte auch eingeschaltet und richtig miteinander gekoppelt sein. Beifahrer 1 Fahrer 2 Fahrer 3 Sie können zum Beispiel einen Biker mit der Vorwärts-Taste koppeln, Ihren Beifahrer mit der mittleren Taste und einen weiteren Fahrer mit der Zurück-Taste. Auf diese Weise können insgesamt 4 Geräte miteinander verbunden werden. Sie können sich mit jeder Person mittels “Eins-zu-Eins” Gegensprechen verbinden, indem Sie einfach nur die jeweilige Taste kurz drücken. Sobald Sie die Verbindung zu einem Partner aufbauen, werden etwaige bestehende Verbindungen automatisch geschlossen. Wenn sich 2 Personen unterhalten, ist es für die anderen beiden Personen nicht möglich diese Verbindung zu unterbrechen. 40 Manuelle Aktivierung Wenn Sie im Intercommodus sind, drücken Sie die jeweilige Taste auf die der Partner gekoppelt wurde. Nach ca. 4 Sekunden wird die Intercom-Sprechverbindung aktiviert. Die Sprechverbindung bleibt solange eingeschaltet, bis Sie noch einmal die Taste drücken. Um schnell zu einer anderen Person umzuschalten, drücken Sie einfach die Taste, die der anderen Person zugeordnet wurde. Die aktuelle Verbindung wird dann automatisch beendet und die neue Verbindung wird gestartet. Sprachsteuerung (VOX) Die Sprachaktivierung kann nur genutzt werden, um die Intercomverbindung zu Ihrem Partner auf der mittleren Taste herzustellen. www.midlandeurope.com Gerät bereits belegt Wenn Sie eine Gegensprech-Verbindung mit einer anderen Person herstellen möchten, die sich bereits in einem Gespräch befindet (oder telefoniert), hören Sie zwei “Besetzt”- Signaltöne. Warten Sie einfach einen Moment und versuchen Sie es erneut. Die angerufene Person wird über den versuchten Anruf informiert und hört eine Ansage mit der Nummer der Taste, von der die Anfrage kommt. Sobald das erste Gespräch beendet ist, kann die Person auf diese Weise einfach den Anrufer kontaktieren, indem Sie das Intercom mit der entsprechenden Nummer (per Sprachansage mitgeteilt) aktiviert. 1 2 gekoppelt werden. Für die Kopplung von Gerät 1 und 2, nutzt Gerät 1 den Zurück Knopf und Gerät 2 den Vorwärts Knopf. Für die Kopplung von Gerät 2 und 3, nutzt Gerät 2 den Zurück Knopf und Gerät 3 den Vorwärts Knopf. Für die Kopplung von Gerät 3 und 4, nutzt Gerät 3 den Zurück Knopf und Gerät 4 den Vorwärts Knopf. Die Geräte 1 und 4 dürfen nicht miteinander gekoppelt werden. Nummer 1 und 4 können sich nur durch die Kette unterhalten. Das bedeutet, dass alle Teilnehmer das Intercom aktivieren und in Reichweite sein müssen. D Hinweis: diese Funktion ist sehr nützlich, wenn Sie einen Kommunikationspartner haben, mit dem Sie häufiger sprechen (wie z.B. Ihr Beifahrer). Auf diese Weise brauchen Sie nicht jedes Mal die Taste zu drücken. 1 2 3 4 3 Konferenzmodus An Konferenz Der Konferenzmodus erlaubt die gleichzeitige Kommunikation zwischen 4 Personen oder, sofern auch Intercomgeräte mittels “Vol-” gekoppelt wurden, bis zu 8 Personen (4 Motorräder). Sie können das BTX2 PRO S entweder im “Eins-zu-Eins” Modus mit bis zu 6 Personen (klassisches Intercom) oder mit bis zu 8 Personen (4 Motorräder) im Konferenzmodus verwenden. Wie verwende ich den Konferenzmodus Zuerst müssen alle Einheiten in einer “Kette” gekoppelt werden. Im zweiten Schritt muss die Konferenz auf jedem der Geräte aktiviert werden Kopplung Um den Konferenzmodus zu nutzen, müssen alle Geräte in einer “Kette” www.midlandeurope.com Halten Sie die mittlere und Vorwärts Tasten für 3 Sekunden gedrückt. Die Sprachansage “Conference” zeigt an, dass die Konferenz aktiviert wurde. Nach der Aktivierung werden Geräte, welche über Vol+ gekoppelt wurden, getrennt. Das Pairing über die mittlere Taste und Universal Interom sind nicht verfügbar. Alle Kopplungen über Vorwärts- und Rückwärtstaste, sowie das Gerät auf Volsind weiterhin verfügbar. Während der Konferenz können Sie jederzeit in den “UKW Radio” Modus wechseln und Ihre Lieblingsstation hören oder in den “Telefon” Modus, um das Telefon auf Vol- zu steuern. Konferenzmodus deaktivieren Halten Sie die Vorwärts- und mittlere Tasten für 3 Sekunden gedrückt. Die Sprachansage “Intercom” signalisiert, dass sich das Gerät wieder im “Eins-zuEins” Modus befindet. Geräte auf Vol+, das Pairing auf der mittleren Taste, sowie das Universal Intercom stehen wieder zur Verfügung. 41 Konferenzmodus 4 Personen Wenn der Konferenzmodus aktiv ist, können Sie die Intercomverbindung aufbauen, indem Sie den Vorwärts und den Rückwärts Knopf drücken. Ein Knopfdruck öffnet die Verbindung, ein erneuter Knopfdruck schließt sie wieder. Um die Kommunikation zwischen allen Geräten in der Kette zu gewährleisten, müssen die Geräte in der Mitte (Nr. 2 und 3) beide Verbindungen aktivieren D “One Click Talk” Funktion Ist der Konferenzmodus aktiv, ist es möglich die Kommunikation zwischen allen 4 Nutzern mit einem “Klick” zu aktivieren. Drücken Sie einfach die mittlere Taste kurz und die komplette Konferenzkette wird aktiviert. Konferenzmodus mit Zusatzgerät auf Vol- Wenn der Konferenzmodus aktiviert ist, dann ist die Kopplung über Vol- weiterhin verfügbar. Das bedeutet, dass Sie weiterhin Ihre Navigationsansagen hören oder Anrufe beantworten können, ohne die Konferenzkette zu unterbrechen. Für das Audiosignal von Vol- kann entweder Privat (wird nicht mit Konferenz geteilt) oder Public (wird mit Konferenz geteilt) gewählt werden. Die Standardeinstellung ist Privat. Ist Privat oder Public gewählt, werden Sie, wenn Sie einen Anruf erhalten, vorübergehend von der Konferenz getrennt. Alle anderen Konferenzteilnehmer können sich weiterhin unterhalten. Ist der Anruf bzw. die Ansage beendet, wechseln Sie automatisch zurück in die Konferenz. Wechseln zwischen Public oder Privat: Halten Sie die Vol- gedrückt, bis sie die Sprachansage “Public” oder “Private” hören, welche den aktuell gewählten Modus anzeigt. Achtung: Eingehende Anrufe sind immer Privat, selbst wenn Sie Public gewählt haben. Konferenzmodus mit bis zu 8 Personen (4 Motorräder) Um 8 Personen in die Konferenz einzubinden, müssen weitere Intercomgeräte mittels der Vol- Taste verbunden werden und die Option Public muss gewählt werden. 42 Achtung: Die Kopplung des Gerätes auf Vol- muss als “Universal Intercom” durchgeführt werden Wechseln zwischen Public oder Privat: Halten Sie die Vol- gedrückt, bis sie die Sprachansage “Public” oder “Private” hören, welche den aktuell gewählten Modus anzeigt. Verbinden eines Intercomgerätes mittels Vol-: ›› Schalten Sie das Gerät aus und halten Sie beim Einschalten die mittlere Taste solange gedrückt, bis die LED rot leuchtet. Sie befinden sich nun im Setup Modus. Halten Sie nun die Vol- für 3 Sekunden gedrückt. Die LED beginnt rot/blau zu blinken. ›› Folgen Sie am anderen Gerät den Anweisungen zum Koppeln eines Universal Intercoms. Öffnen der Konferenz für die Vol- Einheit ›› Um die Konferenz vom BTX2 PRO S aus zu öffnen, drücken Sie im Telefon Modus die Zurück-Taste. ›› Um die Konferenz von der anderen Einheit aus zu öffnen, benutzen Sie einfach das Kommando, um das Universal Intercom zu öffnen. Die maximale Intercomreichweite zur Einheit auf Vol- beträgt 10 Meter, deshalb eignet sich diese nur für Fahrer-Sozius-Verbindungen. Talk 2 All - Universelles Gegensprechen mit einem Gerät einer anderen Marke Dank der “Talk2 All” Funktion ist es jetzt auch möglich, das BTX2 PRO S mit Gegensprechanlagen von Fremdherstellern zu koppeln. Sie können bis zu 2 nicht-Midland Geräte verbinden: eines auf der “Vorwärts”und eines auf der “Zurück”-Taste. ›› Rufen Sie den Setup-Modus auf. Im ausgeschalteten Zustand halten Sie die mittlere Taste ca. 7 Sekunden gedrückt, bis die rote LED ständig leuchtet ›› Halten Sie jetzt die “Vorwärts” oder “Zurück” für ca. 7 Sekunden gedrückt. Die rot-blaue LED blinkt zuerst schnell und danach (während Sie weiter die Taste gedrückt halten) langsam. Sie können die Taste nun loslassen. www.midlandeurope.com Talk2All-Universal Intercom Kein Midland Gerät Bei der nicht-Midland Gegensprechanlage befolgen Sie bitte die Angaben des Herstellers um ein Telefon zu verbinden, da das BTX2 PRO S sich nun wie ein Telefon verhält. Wenn der Verbindungsvorgang erfolgreich war, wird die LED nur noch langsam in blau blinken. Achtung: Bitte denken Sie daran, alle anderen Bluetooth Geräte (außer den Beiden zu koppelnden) auszuschalten. Um die Kommunikation zu starten, drücken Sie beim BTX2 PRO S 3Sek. die “Vorwärts”- oder “Zurück”-Taste (je nachdem, auf welcher Sie das Gerät verbunden haben). Möchten Sie die Verbindung vom Gerät des Fremdherstellers starten, drücken Sie bitte die Telefon Wahlwiederholungstaste. Möglicherweise kann es nötig sein, die Wahlwiederholungstaste 2x zu drücken. Achtung: Um die “Talk2 All” Funktion zu nutzen, muss die Verbindung auf dem Gerät des Fremdherstellers als Telefon erfolgen. Ein weiteres Telefon kann danach nicht auf dem Fremdgerät gekoppelt werden. Sie können auch ein Midland Gerät per “Talk2 All” Funktion verbinden. Hierfür verwenden Sie auf der einen Gegensprechanlage die “Talk2 All” Funktion und koppeln das andere Midland-Gerät als Telefon. Das Midland BTX2 PRO S kann mit anderen Bluetooth Geräten gekoppelt werden, wie z.B. Telefonen, GPS Navigationsgeräten oder PMR446 Funkgeräten mit integriertem oder externem Bluetooth (Dongle). Die Kopplung muss mittels Volume + oder Volume - vorgenommen werden. ›› Kopplung über Volume +: alle Geräte, welche über Volume + gekoppelt wurden, haben die höchste Priorität und unterbrechen jegliche andere Funktion (wie z.B Intercom, UKW Radio und Musik) ›› Kopplung über Volume -: alle Geräte, welche über Volume - gekoppelt wurden, sind im Hintergrund der Intercomkommunikation und unterbrechen diese nicht. VOL- Immer im Hintergrund ›› Telefon (HFP/A2DP Stereo) ›› Navigation(HFP/A2DP Stereo) ›› Dongle (HFP/A2DP Stereo) VOL+ Höhe Priorität ›› Telefon (HFP/A2DP Stereo) ›› Navigation(HFP/A2DP Stereo) ›› Dongle (HFP/A2DP Stereo) ”Hintergrund”-Funktion Kompatibilität mit Geräten der Midland BT-Produktlinie Jedes Audiosignal von einem Gerät, welches über Vol- gekoppelt wurde, ist im Hintergrund hörbar (selbst Stereosignale). Auf diese Weise wird die Intercomkommunikation nicht durch Fahranweisungen des Navigationsgerätes o.ä. unterbrochen. Sie können entscheiden, ob Audiosignale von Vol- Geräten mit Ihrem Partner geteilt werden, wenn das Intercom geöffnet ist. Das BTX2 PRO S ist mit Midland BT Geräten kompatibel. Wenn sie gekoppelt sind, hängt die Reichweite der Gegensprechfunktion von dem Gerät ab, das die geringere Reichweite hat. Das BTX2 PRO S ist mit Geräten der vorigen Midland BT-Produktlinie nur kompatibel, wenn sie auf die neueste Firmware-Version. Ein Mobiltelefon kann entweder mittels Vol+ oder Vol- gekoppelt werden. Sobald ein Gerät über die “Vol+” bzw. die “Vol-” Taste gekoppelt wurde, ist der Telefonmodus während des Betriebs verfügbar. Ein eingehender Telefonanruf hat immer die höchste Priorität, das heißt, dass www.midlandeurope.com Kopplung mit einem oder zwei Telefonen 43 D Kopplung des Midland BTX2 PRO S mit Bluetooth Geräten alle anderen Kommunikationen (Intercom, UKW Radio, Musik) unterbrochen werden. Erhalten Sie währenddessen einen weiteren Anruf auf dem zweiten Telefon, dann hören Sie einen Piepton ACHTUNG! Um eine möglichst gute Performance mit Ihrem Mobiltelefon zu gewährleisten, empfehlen wir es möglichst nah am BTX2 PRO S zu tragen. Idealerweise auf der linken Seite Ihres Körpers in der Brusttasche. D Das BTX2 PRO S mit einem Mobiltelefon koppeln für eine Sekunde auf. Anschließend verlässt das Gerät den Setup-Modus automatisch wieder und wechselt in den Betriebsmodus (die blaue LED blinkt). Sie können nun Ihr BTX2 PRO S zusammen mit dem Telefon benutzen. Mobiltelefon über das BTX2 PRO S bedienen Um das BTX2 PRO S mit einem Mobiltelefon zu koppeln, müssen Sie zunächst den Setup-Modus aufrufen: ›› Schalten Sie das Gerät aus. ›› Halten Sie die “mittlere” Taste ca. 7 Sek. gedrückt, bis die rote LED ständig leuchtet. ›› Drücken Sie nun die “Volume+” oder die “Volume-” Taste für 3 Sekunden. Die LED beginnt abwechselnd blau und rot zu blinken ›› Halten Sie jetzt die “Lautstärke +” Taste länger gedrückt (3 Sek.), die blaue und die rote LED blinken. Nach einigen Sekunden sehen Sie im Display des Telefons “Midland BT NEXT” . Befolgen Sie den Kopplungsvorgang Ihres Telefons. Wenn ein PIN-Code erforderlich ist, geben “0000” (vier mal Null) ein. Wenn der Kopplungsvorgang erfolgreich war, leuchtet die blaue LED des Geräts Nachdem Sie Ihr Mobiltelefon mit dem BTX2 PRO S gekoppelt haben, müssen Sie in den “Telefon”-Modus wechseln, um es zu verwenden. Wechseln Sie durch langes Drücken der mittleren Taste durch die Modi, bis Sie die Ansage “Telefon” hören. Nun bedienen alle drei Tasten das Telefon (siehe die Tabelle B). Einen Anruf beantworten Wenn Sie das Telefon klingeln hören, können Sie auf zwei Arten antworten: Sprachgesteuert: Sagen Sie einfach ein Wort direkt nach dem ersten Klingeln, um den Anruf anzunehmen. Manuell: Tippen Sie auf die “Vorwärts”-Taste und fangen Sie zu reden. Anruf ablehnen Falls Sie den Anruf nicht annehmen wollen, können Sie das Mobiltelefon klingeln lassen oder halten Sie die “Vorwärts”-Taste für 3 Sekunden gedrückt (Sie werden einen Bestätigungston hören). B - Telefon mode Modus Telefon Musik vom Telefon (wenn Musik abgespielt wird und über “Vol+” gekoppelt wurde) 44 Vorwäts-Taste Kurzer Tastendruck: Sprachwahl/Akzeptieren oder beenden, solange die Anwahl oder das Gespräch noch stattfindet Langer Tastendruck: Wahlwiederholung/ oder eingehenden Anruf ablehnen Kurzer Tastendruck: Einen Titel weiter Mittlere Taste Zurück-Taste Langer Tastendruck: Modus wechseln Kurz drücken: Sprachwahl / Gespräch annehmen oder auflegen während eines Telefonats Lang drücken: Wahlwiederholung oder Gespräch ablehnen Kurzer Tastendruck: Wiedergabe/Pause Kurzer Tastendruck: Einen Titel zurück Langer Tastendruck: Modus wechseln www.midlandeurope.com Es gibt mehrere Möglichkeiten einen Anruf zu starten. Mit der Tastatur des Mobiltelefons: Wählen Sie die Nummer auf der Tastatur des Mobiltelefons: Drücken Sie “Wählen” auf dem Mobiltelefon. Wahlwiederholung: ›› Telefon über Vol+: Drücken Sie die “Vorwärts”-Taste für 3s, um die Wahlwiederholung zu starten (Sie erhalten einen Bestätigungston). ›› Telefon über Vol-: Drücken Sie die “Zurück”-Taste für 3s, um die Wahlwiederholung zu starten (Sie erhalten einen Bestätigungston) Mit Sprachsteuerung: ›› Telefon über Vol+: Drücken Sie kurz auf die “Vorwärts”-Taste. Wenn Ihr Telefon die Spracheingabe unterstützt, werden Sie aufgefordert, den Namen des gewünschten Kontaktes zu sagen. ›› Telefon über Vol-: Drücken Sie kurz auf die “Zurück”-Taste. Wenn Ihr Telefon die Spracheingabe unterstützt, werden Sie aufgefordert, den Namen des gewünschten Kontaktes zu sagen Die MP3-Player-Funktion des Mobiltelefons benutzen Ein Mobiltelefon kann, sofern über Vol- oder Vol+ gekoppelt, als StereoMP3-Player verwendet werden. Das BTX2 PRO S unterstützt die A2DPund AVRCP-Protokolle, die es Ihnen ermöglichen, Stereo-Musik zu hören und Ihren MP3 Player im Mobiltelefon fernzusteuern. Sie können die Tasten am BTX2 PRO S- Gerät nutzen, um die Abspielfunktionen (Wiedergabe, Pause, Vorspulen und Zurückspulen) zu steuern. Es ist nur möglich ein Telefon auf diese Weise zu steuern. Sie können ein Telefon auswählen, indem Sie die Vol+ Taste für 3 Sekunden gedrückt halten. Sie werden die Sprachansage “Control on volume up” hören. Nun können Sie die Wiedergabe des Telefons auf Vol+ steuern. Wenn Sie die Steuerung wechseln möchten, halten Sie die Vol+ erneut für 3 Sekunden gedrückt. Nun hören Sie die Sprachansage “Control on volume down”. Priorität: Anrufe haben eine hohe Priorität, was bedeutet: Wenn ein Anruf ankommt, wird jede andere Verbindung vorübergehend deaktiviert. Anruf beenden Es gibt verschiedene Wege, einen Anruf zu beenden: ›› Warten Sie, bis die angerufene Person den Anruf beendet. ›› Halten Sie die “Vorwärts”-Taste für 3 Sekunden gedrückt (Sie hören einen Bestätigungston). ›› Drücken Sie auf dem Mobiltelefon auf die Taste “Beenden”. Schnellwahl Das BTX2 PRO S kann nur eine Nummer für das Telefon, welches über Vol+ gekoppelt wurde, speichern. Sie müssen die Nummer zuerst über die PC-Software “BT UPDATER” oder die Smartphone-App “BT SET-APP” auf dem Gerät speichern. Im Handy-Modus drücken Sie dann einfach 7 Sekunden lang die “Vorwärts”-Taste. Nächster Titel Play/Pause Letzter Titel Verfügbare Bedienelemente: ›› Musik-Wiedergabe/Pause: Klicken Sie auf die “mittlere” Taste. ›› Zum nächsten Titel springen: Drücken Sie die “Vorwärts”-Taste. ›› Zum vorherigen Titel gehen: Drücken Sie die “Zurück”-Taste. Priorität: Die Musikwiedergabe hat die niedrigste Priorität. Deshalb wird die Musik immer deaktiviert, wenn ein anderer Kommunikationstyp aktiviert ist. Das Priorisierungsverhalten können Sie mit der PC-Software “BT UPDATER” oder der Smartphone-App “BT SET-APP” einstellen. Achtung: Die komplette A2DP Steuerung (Play/Pause, Vorwärts, Zurück) steht nur im “Telefon” Modus zur Verfügung. www.midlandeurope.com 45 D Anruf tätigen Während Sie Musik hören, können Sie den Modus auf “UKW Radio” oder “Intercom” wechseln und weiterhin die Musik im Hintergrund hören. Es steht dann aber nicht mehr die komplette Steuerung zur Verfügung. Lediglich Play/ Pause ist weiterhin über die mittlere Taste verfügbar. D Music Share (Musik weiterleiten) Music Share kann nur mit dem Telefon, welches über Vol+ gekoppelt wurde, genutzt werden. Um Musik per A2DP mit Ihrem Beifahrer zu teilen, dessen Gerät bereits auf der mittleren Taste gekoppelt ist (maximale Distanz 10 m), müssen Sie während der Musikwiedergabe 3 Sekunden lang die “Zurück”-Taste drücken. Der Beifahrer kann das Teilen der Musik beenden, indem er kurz die mittlere Taste drückt, die Musikwiedergabe kann er nicht steuern. Der Fahrer kann das Teilen der Musik beenden, indem er lange 3 Sekunden noch einmal auf die “Zurück”-Taste drückt. Wenn Sie Music Share aktiviert haben, können Sie die Intercom-Verbindung nicht geöffnet lassen. Achtung: Um Music Share zu aktivieren, müssen die Musikwiedergabe vom Intercomgerät gestartet werden. Achtung: wenn man sich im Music Share Modus befindet, kann das Intercom durch einen Doppelklick auf die Mittlere Taste geöffnet werden. Kopplung mit einem GPS Navigationsgerät Das GPS Navigationsgerät kann entweder über “Volume +” oder “Volume –” gekoppelt werden. ›› Volume + Taste (unterstützt A2DP Audio und HFP Mono) Mit Vol+ gekoppelte Geräte haben eine höhere Priorität und unterbrechen jegliche andere Kommunikation (wie Intercom oder UKW Radio) ›› Volume - Taste (unterstützt A2DP Audio und HFP Mono) Mit Vol- gekoppelte Geräte sind immer im Hintergrund aktiv und unterbrechen die Intercomkommunikation nicht. Sie können außerdem entscheiden, ob das Audiosignal über das Intercom mit anderen Personen geteilt werden soll (Option “Public”) oder nicht (Option “Privat”) Siehe Kapitel Hintergrundfunktion. 46 Stereo (A2DP)-Routenanweisungen des Navigationsgerätes Das Midland BTX2 PRO S unterstützt Stereo (A2DP)-Routenanweisungen von Navigationsgeräten, wenn Sie auf der “Lautstärke+”-Taste gekoppelt sind. Bei einer Routenanweisung werden Intercom und UKW-Modus unterbrochen, und die Routenanweisung hat Priorität. Standardmäßig ist diese Funktion aktiviert; mittels der PC-Software “BT Updater” oder der Smartphone-App “BT SET-APP” kann die Priorität jedoch geändert werden. Das BTX2 PRO S mit einem GPS-Navigationsgerät koppeln Allgemein ist es möglich, das BTX2 PRO S mit jedem GPS-Navigationsgerät für Motorräder zu koppeln, das Bluetooth Headsets unterstützt. Hinweis: Die meisten für PKW angebotenen Bluetooth-Navigationsgeräte sind auf dem Motorrad nicht brauchbar, da deren Bluetoothmodul nicht headsetfähig ist! Um das BTX2 PRO S mit einem GPS-Navigationsgerät zu koppeln, müssen Sie zunächst den Setup-Modus aufrufen: ›› Schalten Sie das Gerät aus. ›› Halten Sie die mittlere Taste ca. 7 Sek. gedrückt, bis die rote LED ständig leuchtet. ›› Halten Sie jetzt die Taste “Lautstärke +” oder “Lautstärke -” gedrückt (3 Sek.), bis die blaue und die rote LED anfangen zu blinken. Befolgen Sie den Kopplungsvorgang für Ihr GPS-Navigationsgerät. Wenn ein PIN-Code erforderlich ist, geben Sie “0000” (vier mal Null) ein. Wenn der Kopplungsvorgang erfolgreich war, leuchtet die blaue LED des BTX2 PRO S für eine Sekunde auf. Anschließend verlässt das Gerät den Setup-Modus und ist betriebsbereit (die blaue LED blinkt). Nun können Sie mit Ihrem Midland BTX2 PRO S die Fahranweisungen Ihres Navigationsgerätes hören. Verwenden eines PMR 446 Funkgeräts mit integriertem Bluetooth Wenn Sie über ein Funkgerät mit integriertem Bluetooth verfügen, dann koppeln Sie das Funkgerät über die “Lautstärke –” oder “Lautstärke +” Taste. Wenn es über Volume - gekoppelt wird, ist das PMR446 Gerät immer im Hintergrund hörbar., selbst wenn Sie sich über das Intercom unterhalten. www.midlandeurope.com Ukw-Radio Der UKW-Radioempfänger ist in das Gerät integriert. Sie müssen nur in den “UKW-Radio”-Modus wechseln, um ihn zu benutzen. Drücken Sie die “mittlere” Taste, bis Sie die Sprachansage “FM-Radio” hören. Nun bedienen alle drei Tasten das FM-Radio (siehe die Tabelle C): ›› Drücken Sie die “Vorwärts” – oder “Zurück”-Taste kurz, um nach neuen Radiostationen zu suchen. Wenn Sie die “Vorwärts” – oder “Zurück”-Taste lange drücken, können Sie die 6 gespeicherten Sender auf- oder abwärts durchschalten. Eine Sprachansage teilt lhnen die Nummer des Speicherplatzes mit, den Sie gerade aufgerufen haben. Sie hören zwei Signaltöne, wenn der letzte oder der erste vorbelegte Sender erreicht wurde. Um den aktuellen Sender zu speichern,halten Sie für 3 Sekunden gleichzeitig die “Weiter” - und “Zurück” - Taste gedrückt. Sie hören einen BestätigungsSignalton. Der Sender überschreibt den vorbelegten Sender, der zuletzt verwendet wurde. Dank des RDS-System wählt das UKW-Radio für das aktuelle Radioprogramm das jeweils stärkste Signal. Das RDS-System ist standardmäßig deaktiviert. Sie können die RDS-Fun- ktion ein-bzw. auszuschalten, indem Sie bei eingeschaltetem UKW Radio die Tasten “Lautstärke +” und “Lautstärke -” gleichzeitig für 3 Sekunden gedrückt halten. Eine Sprachansage teilt Ihnen den RDS-Status mit. Aktivierung / Deaktivierung des UKW Radios Standardmäßig ist das UKW Radio aktiviert. Deaktivierung: ›› Gehen Sie in den “Setup”-Modus: schalten Sie das Gerät aus und drücken Sie die “mittlere”-Taste ca. 7sek. bis die LED rot leuchtet. ›› Drücken Sie die “mittlere”- und die “Vol+” Taste für 3sek. Die LED blinkt zweimal blau. ›› Per Doppelklick auf die “mittlere”-Taste verlassen Sie den “Setup”-Modus. Aktivierung: ›› Folgen Sie den Anweisungen wie bei der “Deaktivierung”. Die blaue LED blinkt nun einmal. Sie verlassen den “Setup”-Modus per Doppelklick auf die “mittlere”-Taste. UKW-Radio und Intercom betreiben Während des Radiohörens können Sie das Intercom nicht manuell starten, sondern Sie können nur die VOX Funktion benutzen. Das funktioniert durch einfaches Sprechen, aber nur dann, wenn Sie vorher das jeweils gewünschte Partnergerät auf die mittlere Taste gekoppelt hatten. Für eine manuelle Intercomfunktion müssten Sie dann vorher erst in den Intercom - Mode umschalten. UKW Radio im Hintergrund Das UKW Radio kann nicht gleichzeitig mit anderen Audioquellen gehört werden. Sämtliche Nachrichten über das Intercom oder von den VOL+/VOLVerbindungen unterbrechen das UKW Radio kurzfristig. C-UKW Radio mode Modus UKW-Radio Weiter-Taste Mittlere Taste Zurück-Taste Kurzer Tastendruck: Sendersuchlauf hoch Kurzer Tastendruck: Ein- und Ausschalten Kurzer Tastendruck: Sendersuchlauf runter Langer Tastendruck: Gespeicherte Sender aufwärts Langer Tastendruck: Modus wechseln Langer Tastendruck: Gespeicherte Sender abwärts www.midlandeurope.com 47 D ›› Schalten Sie das Gerät aus. ›› Halten Sie die “mittlere” Taste ca. 7 Sek. gedrückt, bis die rote LED ständig leuchtet. ›› Drücken Sie jetzt (3 sec lang) die “Lautstärke – “ Taste. Die blaue und rote LED blinken. ›› Folgen Sie jetzt der Kopplungs- (Pairing) Prozedur, wie Sie im Handbuch des Funkgeräts beschrieben ist. Setup und spezielle Konfiguration D Alle Pairing- (Kopplungs-) Informationen zurücksetzen Wurde Ihr BT Next bereits öfter mit anderen Geräten gekoppelt, dann kann die Zahl der gekoppelten Verbindungen irgendwann unübersichtlich werden und es kann angebracht sein, alle im BTX2 PRO S gespeicherten Kopplungsdaten zu löschen (Reset). Für diese Prozedur rufen Sie zunächst den Setup-Modus auf: ›› Schalten Sie das Gerät aus. ›› Halten Sie die “mittlere” Taste ca. 7 Sek. gedrückt, bis die rote LED ständig leuchtet. ›› Halten Sie anschließend die “Lautstärke +” und “Lautstärke –” Tasten für 3 Sekunden gedrückt. Die blaue LED leuchtet für 1 Sekunde auf und anschließend leuchtet ständig die rote LED. ›› Doppelklicken Sie auf die “mittlere” Taste, um den Setup-Modus zu verlassen und das BTX2 PRO S wieder zu verwenden. Dieses Vorgehen löscht alle gespeicherten und gekoppelten Bluetooth-Geräte und ermöglicht einen neuen “sauberen” Kopplungsablauf. Einstellen/Deaktivieren der VOX-Funktion (Gegensprechanlage und Telefon) Die Gegensprechfunktion kann manuell oder durch Sprache (VOX) aktiviert werden. Diese Funktion wird durch die je nach Helmart verursachten Hintergrundgeräusche beeinflusst und deshalb auch durch die Geschwindigkeit. Für optimale Resultate kann einer der folgenden vier Mikrofon-Empfindlichkeitspegel gewählt werden: hoch, mittel, niedrig und sehr niedrig. Die Werkseinstellung des BTX2 PRO S ist “niedrig”. Sie können die VOX Funktion auch deaktivieren, um die Gegensprech- und Telefon-Antwortfunktion nur im manuellen Modus zu aktivieren. Diese Einstellungen können über die Software “BTPro Updater” für PC / MAC vorgenommen werden. Achtung: nach dem Löschen sämtlicher Pairings steht nur noch der UKW Radio Modus zur Verfügung. Auf die Werkseinstellungen zurücksetzen Manchmal kann es notwendig sein, zu den Werkseinstellungen zurückzukehren, um alle Änderungen oder Setupeinstellungen zurückzusetzen und ein “sauberes” Gerät zu erhalten. Zuerst schalten Sie wieder in den Setup-Modus: ›› Schalten Sie das Gerät aus. ›› Halten Sie die “mittlere” Taste ca. 7 Sek. gedrückt, bis die rote LED ständig leuchtet. ›› Anschließend halten Sie gleichzeitig alle 3 Tasten “Vorwärts” – “mittlere Taste” – “Zurück” für 3 Sekunden gedrückt. Die blaue LED leuchtet für 1 Sekunde auf und anschließend leuchtet ständig die rote LED. ›› Doppelklicken Sie auf die “mittlere” Taste, um den Setup-Modus zu verlassen und das BTX2 PRO S zu verwenden. 48 www.midlandeurope.com Die Firmware Ihres BTX2 PRO S kann mittels einer USB-Verbindung mit Ihrem PC konfiguriert und aktualisiert werden. Auf der Website von Midland www.midlandeurope.com oder unter www.btupdater.de finden Sie auf der BTX2 PRO S-Seite die PC-Software und die neuen Firmware-Aktualisierungen, falls verfügbar. ACHTUNG DAS GERÄT NUR AN DEN PC ANSCHLIESSEN, WENN DIE SOFTWARE HERUNTERGELADEN UND INSTALLIERT WURDE Benutzung auf eigene Gefahr Europäische CE Erklärung und Sicherheitshinweise Hiermit erklärt Cte International Srl, dass das Produkt die grundlegenden Anforderungen und anderen relevanten Bestimmungen der Richtlinie 2014/53/UE erfüllt und ist für alle EU Staaten gültig. Es ist nicht zulässig, nicht mit uns abgesprochene Veränderungen an den Geräten vorzunehmen. Sie gefährden mit Änderungen nicht nur die Gewährleistung, sondern auch das Einhalten der gesetzlichen Grenzwerte. Weitere technische Informationen und die aktuelle Firmware zum Download finden Kunden aus Deutschland unter www.alan-electronics.de. D Setup und Firmware-Aktualisierung Das Benutzen von beidseitigen Audiosets in Helmen kann kann Ihre Fähigkeit, Geräusche und das Verkehrsgeschehen in Ihrer Umgebung wahrzunehmen, beeinträchtigen. Benutzen Sie daher das Bluetooth Set nur, wenn die Verkehrssituation es erlaubt. Beim Motorradfahren kann das Hören von Musik oder das Führen von Telefonaten oder das Benutzen des Intercoms Sie von anderen Ereignissen und vom sicheren Fahren ablenken. Das Benutzen des Bluetooth Sets beim Führen eines Fahrzeugs oder beim Fahrradfahren kann ein ernsthaftes Risiko für Sie oder Ihre Mitmenschen bedeuten und kann, von Land zu Land unterschiedlich, verboten sein. Das Benutzen eines Headsets mit extremer Lautstärkeeinstellung kann bleibende Gehörschäden hervorrufen. Sollten Sie Klingeln in Ihren Ohren oder andere Hörprobleme feststellen, so verringern Sie sofort die Lautstärke oder schalten Sie das Gerät aus. Bei ständigem Gebrauch mit hohen Lautstärken kann sich Ihr Gehör and den erhöhten Lautstärkepegel so gewöhnen, dass die Folge eine permanente Hörschädigung sein kann. Bitte benutzen Sie dieses Gerät nur mit einer sicheren Lautstärke. Gewährleistung Gewährleistungsfrist beträgt 24 Monate ab Kauf-/Lieferdatum (bei Teilen mit beschränkter Lebensdauer wie, Akkus, Ladegeräte, Headsets, mikrofone und Antennen 6 Monate). Für allen Informationen über die Garantie der Artikel, besuchen Sie bitte unsere www.midlandeurope.com www.midlandeurope.com 49 Índice Características principales............................................................................................................................................................................................................. 52 Especificaciones técnicas Midland BTX2 PRO S........................................................................................................................................................................ 52 Carga de la batería.......................................................................................................................................................................................................................... 53 Descripción del dispositivo y del sistema de montaje.................................................................................................................................................................. 53 Modos Operativos.......................................................................................................................................................................................................................... 55 Cómo emparejar dos unidades de Midland BTX2 PRO S.......................................................................................................................................................... 56 Configuración del sistema AGC................................................................................................................................................................................................... 57 Cómo emparejar el Midland BTX2 PRO S a más de dos unidades............................................................................................................................................ 57 Conference..................................................................................................................................................................................................................................... 59 Talk 2 All - Universal Intercom: sincronización con Intercomunicadores de otras marcas......................................................................................................60 Sincronizar BTX2 PRO S a dispositivos Bluetooth......................................................................................................................................................................61 Uso de la función Radio FM..........................................................................................................................................................................................................64 Configuraciones especiales............................................................................................................................................................................................................ 65 Setup y actualización de Firmware............................................................................................................................................................................................... 65 Garantía Limitada de MIDLAND IBERIA.................................................................................................................................................................................. 66 www.midlandeurope.com 51 E Encender y apagar el BTX2 PRO S.............................................................................................................................................................................................. 55 MIDLAND BTX2 PRO S Dual Core Intercom System E Midland BTX2 PRO S es un sistema de intercomunicación con Dual Bluetooth Core (doble processador Bluetooth) para la comunicación Conference y audio “background” estéreo real. El diseño es muy delgado y aerodinámico, todas las funciones principales son fáciles de manejar gracias a los tres grandes botones situados en el frontal de la unidad. Midland BTX2 PRO S se fija al casco mediante la placa adhesiva o el soporte con mordaza. Características principales ›› Sistema Bluetooth Dual Core ›› Intercom piloto/pasajero o moto a moto hasta una distancia máxima de 1.2 Km ›› Función “Conference” conversación simultánea hasta 8 personas (4 parejas) ›› Conexión Intercom “uno a uno” hasta seis dispositivos ›› Función Universal Intercom para conectar dispositivos de otras marcas ›› MWE Noise Killer ›› Radio FM Estéreo con RDS ›› Music Share (piloto y pasajero) ›› Conecte su teléfono para realizar llamadas o escuchar música estéreo ›› Soporta 2 teléfonos ›› Conexión al Navegador GPS para indicaciones por voz ›› Configuración y actualización de Firmware mediante conexión USB al PC Midland BTX2 PRO S está disponible en dos versiones: ›› BTX2 PRO S individual con una unidad Bluetooth ›› BTX2 PRO S TWIN con dos unidades Bluetooth sincronizadas 52 Dependiendo del modelo adquirido, el embalaje contiene lo siguiente: BTX2 PRO S single ›› 1 dispositivo de comunicación BTX2 PRO S ›› 1 kit de audio con dos altavoces estéreo, micrófono de varilla regulable y micrófono de hilo ›› 1 lámina con biadhesivo para fijar al casco ›› 1 sistema de fijación al casco mediante mordaza ›› 1 cargador con conexión USB BTX2 PRO S TWIN ›› 2 dispositivos de comunicación BTX2 PRO S sincronizados ›› 2 kit de audio con dos altavoces Estéreo HiFi, micrófonos de varilla regulable y micrófonos de hilo ›› 2 láminas con biadhesivo para fijar al casco ›› 2 sistemas de fijación al casco mediante mordaza ›› 1 cargador doble con conexión USB Las unidades incluidas en el TWIN ya están sincronizadas en el botón “Central” y, por tanto, se pueden utilizar inmediatamente en modo Intercom. Especificaciones técnicas Midland BTX2 PRO S Generales: ›› ›› ›› ›› ›› ›› ›› ›› ›› ›› Bluetooth ver. 4.2 Estéreo (Handsfree/A2DP/protocolo AVRCP) Frecuencia 2.4GHz - Potencia max 100mW Bluetooth Dual para música de fondo en estéreo Sistema AGC de control automático de volumen en función del ruido de fondo Activación de la comunicación por voz (VOX) o manual Control manual para activar el teléfono, el Intercom, la radio FM Radio FM Estéreo con RDS Totalmente resistente al agua Batería de Litio con autonomía de hasta 20 horas de conversación Tiempo de recarga de batería: 2 horas aproximadamente www.midlandeurope.com Conexiones Bluetooth: Descripción del dispositivo y del sistema de montaje Con dispositivos Bluetooth: BTX2 PRO S dispone de cinco pulsadores, todos ubicados en la parte frontal: los tres grandes son multifunción: “Adelante” (izquierda en el dibujo), “Central” y “Atrás” (derecha). Los dos botones rectangulares controlan el volumen (“Vol+” y “Vol-”). Con otro BTX2 PRO S para modo Intercom Piloto/Pasajero o Moto/Moto hasta un máximo de 1.2 Km. de distancia sin obstáculos ni interferencias (los motoristas deben estar siempre en el campo visual). Teléfono móvil con reproductor Estéreo MP3 (protocolo A2DP) y navegador GPS. Volumen - Volumen + LED Carga de la batería Atención: asegúrese de que las unidades están totalmente cargadas antes de su uso. Antes de utilizar las unidades por primera vez, efectúe una carga de al menos 3 horas. Adelante Central Atrás Debajo de la unidad puede encontrar la Toma de Carga, que permite cargar el dispositivo mediante una conexión microUSB estándar. Atención: Midland BTX2 PRO S se ha diseñado para resistir la lluvia. Verifique siempre que las gomas de protección estén bien cerradas. Atención: cada vez que se conecta o desconecta el USB de carga, la unidad se apaga automáticamente. Si quiere utilizarla mientras se carga, debe encenderla después de que haya conectado el cargador. Conector de alimentación Descripción del kit de audio El sistema de audio incluye dos altavoces estéreo HI-FI y dos micrófonos intercambiables, uno de hilo y otro de varilla regulable. El miniconector en el micrófono permite escoger el micrófono que mejor convenga al casco que esté usando. www.midlandeurope.com 53 E Para cargar la unidad, retire la protección de goma del conector de carga y conecte el cargador. Después enchufe el alimentador a una toma de red eléctrica. El LED rojo de la unidad empieza a parpadear cuando empieza la carga. Mantenga la carga hasta que el LED rojo deje de parpadear y se encienda el LED azul. Cuando se completa la carga (LED rojo no parpadea), desconecte la unidad del cargador. Normalmente, después de la primera vez, se requieren 2 horas para una carga completa. Montaje de los altavoces estéreo Los dos altavoces estéreo llevan una tira de velcro adhesiva que permite su fijación en el interior del casco. Tenga en cuenta no ajustar el volumen demasiado alto, siempre debe ser capaz de oír el sonido ambiental y las indicaciones de tráfico. Descripción del sistema de montaje deslizante El Midland BTX2 PRO S puede fijarse al casco de dos formas: usando la lámina con biadhesivo o la lámina con mordaza. Estos métodos permiten tanto fijar de forma segura el BTX2 PRO S al casco como retirarlo en cualquier momento para cargarlo o guardarlo. Lámina con tira biadhesiva El soporte con biadhesivo ya está montado en el kit de montaje deslizante. Biadhesivo Montaje del micrófono E Micrófono de varilla Coloque la sección con la tira adhesiva de velcro entre el acolchado y la calota del casco, de forma que el micrófono esté correctamente colocado en frente de su boca y la marca blanca quede de cara a la misma. Este tipo de micrófono es adecuado para cascos abiertos y cerrados. Para cascos abiertos también está disponible un micrófono específico, cód. C1253 (opcional). Limpie la zona del lado izquierdo del casco donde quiera colocar la unidad, doble las dos alas pequeñas para que se adhiera mejor a la superficie curva del casco. Retire el protecto del biadhesivo y coloque el soporte en el casco, presionando durante unos segundos. Micrófono de hilo Paso 1. Retire la lámina biadhesiva del soporte mediante la llave allen suministrada. Recuerde conservar los dos tornillos. Usando la tira adhesiva de velcro, coloque el micrófono dentro del casco y en frente de su boca. Este tipo de micrófono es adecuado para cascos Integrales. El miniconector en el micrófono permite escoger el micrófono que mejor convenga al casco que esté usando. Micrófono de varilla 54 Micrófono de hilo Fijación con mordaza Paso 2. Apriete la lámina con mordaza con el soporte de montaje usando los dos tornillos suministrados. www.midlandeurope.com Bloquear Desbloquear A Paso 3. Apriete más los dos tornillos para fijar firmemente la mordaza en su sitio, en el lado izquierdo del casco. Encender y apagar el BTX2 PRO S Si necesario, utilizar también la base de goma para un mejor sellado de la fijación con mordaza. Utilice los dos tornillos cortos para fijar la base de goma al soporte deslizante y apriete la lámina de nuevo. Apagado: Mantenga pulsados durante aproximadamente 3 segundos los botones “Central” y “Atrás” hasta que el LED parpadee tres veces en rojo; de ese modo disminuyen las oportunidades de un apagado accidental, especialmente cuando se llevan puestos los guantes. Modos Operativos Base de goma Colocación y extracción del Midland BTX2 PRO S El BTX2 PRO S se puede fijar al casco fácilmente deslizándolo hacia abajo en el soporte hasta que encaje en la ranura. El BTX2 PRO S se mantiene en posición gracias al clip de fijación de la parte superior del soporte (A). Para retirar el BTX2 PRO S, simplemente presione el clip de fijación y empuje la unidad hacia arriba. www.midlandeurope.com BTX2 PRO S puede operar de tres modos diferentes: Intercom, Teléfono y Radio FM. Los 3 botones del dispositivo tienen diferentes funciones dependiendo del modo operativo de la unidad. ›› En Modo “Intercom” los tres botones permiten gestionar las comunicaciones entre piloto y pasajero y moto a moto. ›› En Modo “Teléfono” permiten efectuar o contestar llamadas o activar la música del teléfono. Por favor, utilice su teléfono de forma segura y responsable. ›› En Modo “Radio FM” puede escuchar en estéreo su emisora favorita, buscar una emisora concreta y memorizarla (dispone de 6 memorias). 55 E Encendido: Mantenga pulsado durante aproximadamente 3 segundos el botón “Central” hasta que parpadee el LED azul. Puede cambiar de un modo a otro pulsando durante 3 segundos el botón “Central”. Un mensaje vocal le dirá en qué modo se encuentra. La secuencia del cambio de modo es la siguiente: ›› Intercom (si está sincronizado, al menos, con otra unidad) ›› Radio FM ›› Teléfono (si se ha sincronizado con un teléfono) Cada vez que encienda la unidad, el modo por defecto será el último modo utilizado. Los modos “Intercom” y “Teléfono” solo están disponibles si la unidad ha sido previamente emparejada con otra unidad o teléfono. Para saber en qué modalidad se encuentra el BTX2 PRO S, pulse simultáneamente “Vol+” y “Vol-” durante 3 segundos: un anuncio vocal le indicará en qué modo se encuentra. E Distancia Puede alcanzar una distancia de intercomunicador 1.2 Km si los dos dispositivos se encuentran en la línea de visión sin obstáculos ni interferencias (los pilotos deben poder verse mutuamente). Cómo emparejar dos unidades de Midland BTX2 PRO S Las dos unidades suministradas en la caja del BTX2 PRO S Twin están sincronizadas (en el botón “Central”) y listas para su uso, lo que significa que no debe realizar este proceso. Si las unidades no son del mismo kit o se han comprado separadamente, necesita sincronizarlas para poder utilizarlas juntas. Sincronizar BTX2 PRO S con otra unidad de BTX2 PRO S Para sincronizar el BTX2 PRO S a otro BTX2 PRO S debe entrar en el modo Setup: 1. Apague ambas unidades. 2. Mantenga pulsado el botón “Central” hasta 7 segundos que el LED rojo se encienda fijo. 3. Pulse el botón “Central” durante 3 segundos, hasta que el LED parpadee rojo y azul. 4. Haga el mismo procedimiento en la otra unidad. Cuando se realiza la sincronización, cada unidad tendrá la LED azul fijo durante 1 segundo y después volverá al modo Setup (LED rojo siempre encendido). 5. Ahora la sincronización está completada. Únicamente debe salir del modo Setup para poder utilizar las unidades. 6. Haga doble clic en el botón “Central”. El LED rojo se apagará y el azul se encenderá. Ahora puede usar su BTX2 PRO S. Atención: durante la sincronización deben estar encendidos solo los dos dispositivos a sincronizar. Apague el resto de dispositivos. Cómo usar el modo Intercom con dos dispositivos Para usar el Intercom, asegúrese que las dos unidades estén encendidas y sincronizadas entre ellas. Este es un ejemplo de la principal funcionalidad los botones en función del modo en el que se encuentra. Modo Intercom Teléfono Adelante (Botón Izquierdo) Botón Central Abrir/cerrar el intercom para el primer piloto Abrir/cerrar el intercom para el segundo piloto Remarcar el último número aceptar/rechazar la llamada entrante en “Vol +” Avanzar la canción Reproducir/pausar Teléfono (mientras reproduce música) FM Radio Escanear arriba 56 FM Radio On/off Atrás (Botón derecho) Abrir/cerrar el intercom para el tercer piloto Remarcar el último número aceptar/rechazar la llamada entrante en “Vol +” Retroceder la canción Escanear abajo www.midlandeurope.com En modo Intercom, pulse el botón “Central” en una de las dos unidades. La comunicación se activa y permanece de este modo hasta que se vuelve a pulsar el botón “Central”. El Intercom necesita unos segundos para activarse. Cuando se activa se oye un tono beep de aviso y dos tonos cuando se desactiva. Activación vocal (VOX): Bastará con comenzar a hablar sin tocar ningún botón. Después de unos segundos, la comunicación se abrirá y permanecerá activa durante el tiempo que permanezca hablando. Si no hay ninguna conversación en 40 segundos, el Intercom se cierra automáticamente. Si quiere cerrar el Intercom antes de los 40 segundos, puede hacerlo manualmente pulsando el botón “Central”. Se puede activar/desactivar la función VOX presionando el botón “Atrás” durante 7 segundos. Un anuncio vocal avisará de la desactivación. Para reactivarlo/desactivarlo deberá repetir el mismo procedimiento. El ajuste se memorizará incluso si se apaga la unidad. Cómo emparejar el Midland BTX2 PRO S a más de dos unidades Un Midland BTX2 PRO S puede ser emparejado a un máximo de cinco otras unidades de BT, es decir, seis en total (3 unidades Midland + 2 Talk2All + usted). El Midland BTX2 PRO S dispone de tres botones principales (Adelante, “Central” y “Atrás” ). Puede escoger el botón que más le convenga para emparejar y activar el Intercom. El botón que utilice para emparejar la unidad será el mismo que use para activar la comunicación Intercom. Recuerde que cada dispositivo puede ser emparejado con otras 3 unidades de su elección, como se muestra en la ilustración más abajo. También es posible un emparejamiento “cruzado”. Piloto 1 E Activación manual Atención: la activación por voz (VOX), solo funciona con los dispositivos que se han sincronizado con el botón “Central”. Si se han sincronizado con otro botón (“Atrás” o “Adelante”), solo se puede activar el Intercom manualmente. Ajuste de volumen Midland BTX2 PRO S utiliza tecnología AGC, la cual ajusta automáticamente el volumen en función del ruido de fondo. Sin embargo, también se puede ajustar el volumen manualmente mediante los botones “Volumen +” y “Volumen -”. El ajuste del volumen es independiente para cada fuente de audio: Intercom, música estéreo, llamadas telefónicas, radio FM. Atención: el volumen solo se puede ajustar cuando hay una fuente de audio activa. Configuración del sistema AGC Para ajustar la sensibilidad del sistema AGC puede usar el software para PC “BT UPDATER” o la aplicación para smartphone “BT SET APP”. Puede elegir diferentes configuraciones en función del tipo de moto (naked, turismo, sport) o de si viaja como pasajero. Puede desactivar el sistema AGC presionando a la vez “Volume +” y “Volume -” durante 3 segundos. www.midlandeurope.com Pasajero 1 Piloto 2 Piloto 3 Por ejemplo, puede emparejar al pasajero con el botón “Central” y otros pilotos con los botones “Atrás” y “Adelante”. De este modo puede tener en total 4 unidades emparejadas y hablar con cada persona, uno a uno, con solo presionar el botón correspondiente (el utilizado para el emparejamiento). Cada vez que abra la conexión Intercom con una persona, la conexión anterior se cerrará. Cuando dos personas están hablando no es posible interrumpir la comunicación por parte de las demás unidades. 57 E Emparejar Midland BTX2 PRO S a otro Midland BTX2 PRO S Para emparejar el Midland BTX2 PRO S con otro Midland BTX2 PRO S debe entrar primero en el modo setup: 1. Apague la unidad. 2. Mantenga presionado el botón “Central” durante 7 segundos, hasta que el led Rojo permanezca encendido. 3. Ahora presione uno de los botones (Central, “Atrás” o “Adelante”) durante 3 segundos. Las luces Azul y Roja parpadearán. 4. Siga el mismo procedimiento con la otra unidad (no es necesario utilizar el mismo botón). 5. Cuando se emparejan correctamente, cada unidad mostrará la luz Azul durante un segundo y después volverá al modo configuración (luz Roja siempre encendida). 6. Ahora que el emparejamiento está completado, puede proceder a emparejar otras unidades en diferentes botones siguiendo el mismo procedimiento. Si no necesita emparejar más unidades, deberá salir del modo configuración para empezar a utilizar los dispositivos. ›› Doble clic en el botón “Central”, la luz Roja se apagará y la luz Azul empezará a parpadear. Ahora puede utilizar su Midland BTX2 PRO S. Cómo usar el Intercom con más de dos unidades Para usar la función “Intercom”, asegúrese de que todas las unidades están encendidas y correctamente emparejadas. Activación manual en modo Intercom manece en este modo hasta que se vuelve a pulsar el mismo botón. Para activar la comunicación con otra persona de forma rápida, presione el botón correspondiente a su unidad. El Intercom se cerrará automáticamente y la nueva comunicación estará activa (ver Tabla A). Activación vocal (VOX): La función VOX para la activación por voz solo está activa con la unidad sincronizada en el botón central. Sugerencia: esta función es muy útil cuando hay una persona específica con la que quiere hablar más a menudo (por ejemplo el pasajero). Usuario ocupado en otra conversación Si quiere activar el Intercom con una persona que está hablando con un tercero o por teléfono, oirá un doble pitido indicando que está ocupado. Inténtelo más tarde hasta que la línea esté libre. La persona llamada será avisada que alguien ha querido contactar con ella mediante un mensaje vocal que indicará el botón al que está asociado el dispositivo en cuestión. De esta manera, cuando termine de hablar, el usuario llamado podrá contactar con la persona que quería hablar con él, simplemente abriendo el Intercom usando el botón correspondiente al aviso recibido. 1 2 3 En modo Intercom, pulse el botón correspondiente a la unidad con la que quiere comunicarse. Después de unos 4 segundos el Intercom se activa y per- A- Activación manual Modo Intercom 58 Botón Adelante Botón Central Botón Atrás Pulsación corta: Activar/Desactivar intercom a Pulsación corta: Activar/Desactivar intercom a Pulsación corta: Activar/Desactivar intercom a piloto enlazado piloto enlazado piloto enlazado Pulsación larga: cambiar modo www.midlandeurope.com Conference Activar el modo Conference Cómo usar el modo Conference En primer lugar, debe emparejar todos los dispositivos siguiendo una secuencia específica en cadena. Además, todos los dispositivos deben tener el modo 3 Conference activo. 1 2 Emparejamiento Para utilizar el modo Conference es necesario configurar todos los dispositivos en cadena. El botón “Atrás” del primer dispositivo debe ser emparejado con el botón “Adelante” del segundo dispositivo. Y el botón “Atrás” del segundo dispositivo debe ser emparejado con el botón “Adelante” del tercer dispositivo. Y así sucesivamente hasta 4 unidades. Los dispositivos 1 y 4 no deben emparejarse entre ellos (la “cadena” debe permanecer abierta). El primer dispositivo (nº 1) puede hablar con el último dispositivo (nº 4) solo a través de la unidad 2 y de la 3. Esto significa que para poder tener una comunicación entre 4 personas, todos los dispositivos deben tener el Intercom abierto y estar dentro del rango de cobertura. En cualquier modo y sin ningún audio activo, mantenga pulsadas las teclas “Adelante” y “Central” durante 3 segundos. El aviso vocal “Conference” indicará la activación. Cuando la función “Conference” está activa, los dispositivos Bluetooth emparejados en el botón “Vol+” están desconectados y el emparejamiento en el botón “Central” y el Intercom Universal no están disponibles. Ahora solo estarán disponibles los emparejamientos de los botones “Adelante” y “Atrás” , así como el dispositivo emparejado con el botón “Vol-”. Desactivar el modo Conference En cualquier modo, puede ser desactivado en cualquier momento, solo presionando las teclas “Adelante” y “Central” durante 3 segundos. Automáticamente, el mensaje vocal “Intercom” le anunciará que el BTNEXT está de nuevo en modo Intercom (uno a uno) y el dispositivo enlazado en “Vol+” volverá a estar operativo, junto con el modo “Teléfono”, el emparejamiento con el botón “Central” y el “Talk2All-Universal Intercom”. Modo Conference 4 personas Cuando el modo “Conference” esté activado, es posible iniciar una comunicación Intercom presionado a la vez los botones “Adelante” y “Atrás” . Un solo click en el botón “Central” abrirá la comunicación Intercom, y un solo un click en el mismo botón la cerrará. Las dos unidades en el centro de la cadena (2 y 3) deben mantener la comunicación abierta en ambos botones “Adelante” y “Atrás” , para permitir la comunicación de las cuatro unidades a la vez. Función “One Click Talk” Cuando el modo “Conference” está activo, es posible iniciar una comunicación Conference entre los 4 usuarios con solo un click. Presione brevemente el botón “Central” y automáticamente se iniciará la conferencia con los cuatro dispositivos conectados. 1 2 www.midlandeurope.com 3 4 Modo Conference con un dispositivo Bluetooth en “Vol-” Cuando el modo Conferencia está activo, el dispositivo Bluetooth conectado en “Vol-” está disponible. Es decir que se pueden escuchar las indicaciones del GPS o responder llamadas de teléfono sin interrumpir la cadena de conexión Conference. 59 E El modo “Conference” permite la comunicación simultánea entre cuatro personas o, si empareja también un intercomunicador en VOL-, hasta 8 personas (4 parejas). Puede decidir usar su BTX2 PRO S en modo comunicación “uno a uno” hasta 6 personas (modo clásico), o en modo “Conference” Intercom con 8 personas (4 parejas) donde todos pueden hablar simultáneamente. El audio de la conexión en el botón “Vol-” puede ser Privado (no compartido en la Conferencia) o Público (compartido en la Conferencia). Por defecto, el modo Conferencia está ajustado en modo Privado. Cuando está en modo Privado o Publico y, si recibe una llamada telefónica, se desconectará temporalmente de la Conferencia, pero las otras personas podrán seguir hablando entre sí. Tan pronto como termine la llamada de teléfono, se conectará automáticamente a la Conferencia de nuevo. ›› Activar modo Público: pulsación larga en el botón “Vol-”, oirá el mensaje de voz “Público”. ›› Activar modo Privado: pulsación larga de nuevo en el botón “Vol-”, oirá el mensaje de voz “Privado”. E Atención: la llamada telefónica entrante es siempre privada, incluso si se encuentra en modo “Público”. Modo Conference hasta 8 personas (4 parejas) Para comunicar con 8 personas en modo Conference debe emparejar también un intercomunicador al botón “Vol-” y asegurarse de ajustar el modo Público. Atención: el emparejamiento del intercomunicador en el botón “Vol-” debe ser como “Universal Intercom”. Por defecto el modo Conference está ajustado en Privado, es decir que la primera vez que pulse el botón “Vol-”, oirá el mensaje de voz “Público”. En caso de oír “Privado” deberá pulsar “Vol-” de nuevo, hasta que oiga “Público”. Cómo emparejar un Intercom en el botón “Vol-”: ›› En el BTX2 PRO S vaya al modo Setup y pulse el botón “Vol-” durante 3 segundos. Los LED azul y rojo empezarán a parpadear. ›› En el otro dispositivo, siga el procedimiento de emparejamiento como un Universal Intercom. Cómo abrir la Conferencia para la unidad en “Vol-” Para abrir la conferencia desde el BTX2 PRO S hasta la unidad asignada al botón “Vol-”, en modo Telefono pulse la tecla Atrás. Para abrir la conferencia desde la otra unidad asignada al botón “Vol-”, solo use el sistema para abrir la comunicación Universal Intercom. 60 La distancia máxima del dispositivo conectado al botón “Vol-” es de 10 metros, es por eso que solo es adecuada para los pasajeros. Talk 2 All - Universal Intercom: sincronización con Intercomunicadores de otras marcas Gracias a la función “Talk2All-Universal Intercom”, es posible emparejar su Midland BTX2 PRO S con intercomunicadores de otras marcas. Puede emparejar un máximo de dos intercomunicadores de otras marcas, uno en el botón “Adelante” y otro en el botón “Atrás” . ›› En el Midland BTX2 PRO S, entre en el modo configuración (con el dispositivo apagado, presione el botón “Central” durante 7 segundos hasta que la luz Roja permanezca encendida). ›› Mantenga presionado el botón “Adelante” o el botón “Atrás” durante 7 segundos: las luces Roja y Azul parpadearán deprisa, y después (mientras sigue manteniendo el botón presionado) parpadearán despacio. Ahora puede soltar el botón. Talk2All-Universal Intercom No dispositivo Midland En el dispositivo “no Midland”, siga el procedimiento para emparejar a un teléfono, ya que el BTX2 PRO S está emparejado como teléfono. Atención: recuerde apagar todos los dispositivos Bluetooth durante el proceso de emparejamiento, solo los dos dispositivos a emparejar deben estar encendidos. Para abrir la comunicación Universal Intercom en el BTX2 PRO S mientras está en modo Intercom, pulse durante 3 segundos el botón “Adelante” o “Atrás” (en función del botón que se usó para el emparejamiento). En el otro intercomunicador, solo pulse el botón de rellamada o de voz. Quizás sea necesario pulsar el botón de rellamada dos veces, en función del modelo de intercomunicador “no Midland” que se utilice. Atención: para usar la función “Talk2All universal Intercom”, el emparejamiento en la otra unidad debe realizarse como teléfono. El intercomunicador de otra www.midlandeurope.com Compatibilidad con unidades de la línea Midland BT BTX2 PRO S es compatible con todos los dispositivos Midland BT. BTX2 PRO S solo es compatible con la anterior línea de Midland BT si ésta se actualiza a la versión de firmware. Sincronizar BTX2 PRO S a dispositivos Bluetooth Midland BTX2 PRO S puede sincronizarse con otros dispositivos Bluetooth, como un smartphone, navegador GPS o radio PMR446 con Bluetooth incorporado o externo (dongle). El procedimiento de sincronización debe efectuarse usando los botones “Vol +” o “Vol -”. ›› Sincronizar con el botón “Vol+”: para teléfonos con música estéreo A2DP, navegadores GPS con audio A2DP, o conector externo (dongle) mono/ estéreo A2DP. Todos los dispositivos sincronizados con el botón “Vol+” tienen mayor prioridad e interrumpirán las otras comunicaciones (como Intercom, radio FM y la música). ›› Sincronizar con el botón “Vol-”: para teléfonos con música estéreo A2DP, navegadores GPS con audio A2DP, o conector externo (dongle) mono/ estéreo A2DP. Todos los dispositivos sincronizados con el botón “Vol-” están siempre activos de fondo durante la comunicación Intercom. VOL- Siempre de fondo ›› Teléfono (HFP/A2DP Estéreo) ›› GPS (HFP/A2DP Estéreo) ›› Dongle (HFP/A2DP Estéreo) www.midlandeurope.com VOL+ Alta prioritad ›› Teléfono (HFP/A2DP Estéreo) ›› GPS (HFP/A2DP Estéreo) ›› Dongle (HFP/A2DP Estéreo) Cuando un dispositivo se sincroniza con los botones “Vol +” o “Vol -” el modo “Teléfono” se activa. Función Background La conexión de audio en cualquier dispositivo vinculado en el botón “Vol-”, incluso si es estéreo, siempre está de fondo. De esta manera no se interrumpirá la comunicación, por ejemplo, por indicaciones del GPS u otra fuente de audio. Puede decidir si el audio de “Vol -” se comparte con otras personas cuando el intercomunicador está abierto (público) o si debe ser privado (privado). Atención: por defecto, el audio es privado. El audio de “Vol -” siempre tiene una prioridad menor que el intercomunicador, eso significa que cuando el intercomunicador está abierto el audio se reduce por defecto 50%. Puede cambiar esta configuración mediante el software de PC BTUpdater. El emparejamiento con uno o dos teléfonos El teléfono móvil puede ser emparejado con el “Vol +” o “Vol -”. Cuando un teléfono está enlazado al botón “Vol +” o “Vol -” el modo “Teléfono” se activa. Una llamada entrante tiene siempre prioridad, esto significa que otras comunicaciones se verán interrumpidas (Intercom, Radio FM, Música). Si otra llamada entrante suena en el segundo teléfono, se notificará a través de un sonido. ¡ATENCIÓN! Con el fin de obtener el mejor rendimiento con su teléfono móvil, recomendamos mantenerlo lo más cerca posible de su unidad BTX2 PRO S, en el lado izquierdo de su cuerpo y, si es posible, en el bolsillo superior de la chaqueta. Cómo sincronizar BTX2 PRO S a un teléfono Para sincronizar el BTX2 PRO S al teléfono, debe entrar en modo “Setup”: ›› Apague la unidad. ›› Mantenga pulsado el botón “Central” durante 7 segundos aproximadamente hasta que el LED rojo se mantenga iluminado. ›› Ahora presione durante 3 segundos el botón “Vol +” o “Vol -”, el LED parpadeará en azul y rojo. ›› Active el Bluetooth de su teléfono móvil. 61 E marca se podrá emparejar a un teléfono solo si el modelo soporta dos teléfonos. Puede emparejar también un dispositivo Midland como Talk2All, es decir que el emparejamiento debe realizarse como teléfono (una unidad usa el procedimiento Talk2All y la otra usa el procedimiento de emparejamiento a un teléfono). ›› Pasados unos segundos, en el teléfono aparecerá “Midland BTX2 PRO S”, selecciónelo y siga las instrucciones del teléfono para aceptar la sincronización. Si el teléfono le pide un pin, teclee el código “0000” (cuatro ceros). El teléfono confirmará que el proceso de sincronización se ha completado con éxito. El BTX2 PRO S saldrá del modo Setup y pasará automáticamente al modo de funcionamiento (LED azul parpadeando). Ahora puede usar el BTX2 PRO S junto con su teléfono. Cómo usar el teléfono Después de sincronizar el teléfono al BTX2 PRO S debe entrar en modo Teléfono para poder utilizarlo. Mantenga pulsado durante unos 3 segundos el botón “Central” hasta que oiga “Phone”. Ahora los tres botones principales están dedicados al teléfono (Tabla B). E Responder a una llamada Cuando el teléfono suena, puede responder de dos maneras: Respuesta vocal: Pronuncie una palabra cualquiera después del primer ring y empiece a hablar. Respuesta manual: Pulse brevemente el botón “Adelante” o “Atrás” y ya puede habla. Rechazar una llamada Si no desea contestar una llamada, puede dejar sonar el teléfono o mantener pulsado durante 3 segundos el botón “Adelante” o “Atrás” (oirá un tono de confirmación). Realizar una llamada Hay varias maneras de realizar una llamada. Rellamar al último número: ›› Teléfono en “Vol +”: presione el botón “Adelante” durante 3 segundos para llamar al último teléfono (oirá un tono de confirmación). ›› Teléfono en “Vol -”: presione el botón “Atrás” durante 3 segundos para llamar al último número (oirá un tono de confirmación). Marcación por voz: ›› Teléfono en “Vol +”: presione brevemente el botón “Adelante”. Si su teléfono tiene la función de marcación por voz, el sistema le pedirá que pronuncie el nombre de la persona a quien quiera llamar. ›› Teléfono en “Vol -”: presione brevemente el botón “Atrás” . Si su teléfono tiene la función de marcación por voz, el sistema le pedirá que pronuncie el nombre de la persona a quien quiera llamar. Prioridad: las llamadas tienen la máxima prioridad, lo que significa que el resto de comunicaciones se desactivan temporalmente al entrar una llamada. Terminar una llamada Hay varias maneras de terminar una llamada: ›› Esperar a que la otra persona termine la llamada. ›› Pulsar brevemente el botón “Adelante” (oirá un tono de confirmación). ›› Pulse el botón de colgar en el teléfono. B - Modo Teléfono Modo Teléfono Teléfono (reproduciendo música y sincronizada a “Volumen +”) 62 Tecla “Adelante” Pulsación corta: marcación por voz/ aceptar Pulsación larga: rellamada último número/ rechazar llamada entrante Pulsación corta: canción siguiente Tecla Central Pulsación corta: cambio de modo Tecla Atrás Pulsación larga: on/off VOX Pulsación corta: play/pausa Pulsación larga: cambio de modo Pulsación corta: canción anterior www.midlandeurope.com Uso de la función MP3 en el teléfono móvil El teléfono móvil, cuando está emparejado con “Vol +” o “Vol-”, se puede utilizar como reproductor MP3 estéreo. El Midland BTX2 PRO S soporta completamente los protocolos A2DP y AVRCP, que permiten escuchar música estéreo y controlar el reproductor MP3. Incluso es posible utilizar los botones del BTX2 PRO S para las siguientes funciones: Reproducir, Stop/Pausa, Avanzar y Retroceder canción. Es posible controlar un solo teléfono a la vez. Puede escoger qué teléfono controlar presionando durante 3 segundos en “Vol+”. Oirá la voz “Control on volume up”. Ahora puede controlar el teléfono emparejado en “Vol+”. Si desea cambiar el control al otro teléfono, presione de nuevo durante 3 segundos el botón “Vol+” y oirá la voz “Control on volume down”. Avanzar Play/Pausa Retroceder Comandos disponibles: ›› Play/pausa de la música: pulse el botón “Central”. ›› Avanzar una canción: pulse el botón “Adelante”. ›› Retroceder una canción: pulse el botón “Atrás” . Prioridad: la música tiene la prioridad más baja, siempre se desactivará cuando otra comunicación entre. Atención: es posible controlar la música estéreo A2DP solo en modo “Teléfono”. Si está escuchando música A2DP y cambia a “Radio FM” o “Intercom”, podrá www.midlandeurope.com tener la música activa pero no dispondrá de todos los comandos de control. Solo Play/Pausa estara disponible con un doble click en el botón “Central”. Music Share Music Share (compartir música) solo es posible desde el teléfono emparejado en el botón “Vol+”. Para empezar a compartir su música A2DP con el pasajero emparejado en el botón “Central” (distancia máxima 10m), presione el botón “Atrás” durante 3 segundos mientras la música está sonando. El pasajero solo puede detener la música compartida presionando una vez el botón “Central” (pero no puede controlar la música). El piloto puede parar de compartir la música presionando de nuevo el botón “Atrás” durante 3 segundos. Cuando esta función está activada, no puede mantener abierta la comunicación Intercom. Atención: para habilitar el Music Share, asegúrese de haber pulsado play desde el intercomunicador. Atención: en modo Music Share, el conductor puede abrir el intercomunicador al pasajero haciendo doble clic en el botón Central. Navegador GPS Un navegador GPS puede sincronizarse usando los botones de “Vol +” o “Vol -” ›› Botón Vol + (soporta audio estéreo A2DP y mono HFP). Las indicaciones del navegador tienen alta prioridad e interrumpirán las otras comunicaciones (como Intercom o radio FM) . ›› Botón Vol - (soporta audio estéreo A2DP y mono HFP) . Los dispositivos emparejados en “Vol-” están siempre activos en background y no interrumpirán la comunicación Intercom. Puede decidir si el audio de “Vol-” es compartido con otras personas cuando el Intercom está abierto (Público) o si debe ser privado (Privado). Ver párrafo “Función Background”. Avisos por voz del GPS Estéreo (A2DP) El BTX2 PRO S soporta avisos por voz estéreo (A2DP) de navegadores GPS o aplicaciones de smartphone cuando se emparejan en los botones “Vol+” o “Vol-”. Conectado a “Vol+”, el GPS interrumpirá todas las demás comunicaciones. Solo conectado en “Vol-” podrá permanecer en background. 63 E Marcación rápida Únicamente el teléfono emparejado en “Vol+” puede almacenar un número de teléfono en la memoria del dispositivo y usarlo cuando sea necesario. Primero debe guardar el número usando el software para PC “BT UPDATER” o la aplicación para smartphone “BT SET APP”. Después, en modo Teléfono presione el botón “Adelante” durante 7 segundos. E Cómo emparejar Midland BTX2 PRO S a un GPS Se puede sincronizar cualquier navegador GPS para moto que acepte un auricular Bluetooth. Para emparejarlo debe entrar primero en modo Setup. ›› Apague la unidad. ›› Active en su GPS la búsqueda de dispositivos auriculares Bluetooth. Esta función depende de cada GPS (consulte el manual de usuario del mismo). ›› Active el modo “Setup” (Apague el BTX2 PRO S, mantenga pulsado el botón “Central” hasta que el LED rojo fijo). Pulsa el botón “Vol+” o “Vol-” hasta que el LED parpadee rojo y azul. ›› En el GPS aparecerá “Midland BTX2 PRO S”, selecciónelo y siga las instrucciones para aceptar la sincronización. Si lo pide el GPS, teclee el código “0000” (cuatro ceros). El GPS confirmará que el proceso de sincronización se ha completado con éxito. ›› El LED azul se encenderá durante un momento. Después, El BTX2 PRO S saldrá del modo Setup y pasará automáticamente al modo de funcionamiento normal (LED azul intermitente). Ahora, el GPS está sincronizado correctamente. Walkie Talkie con Bluetooth El transceptor PMR446 tiene que emparejarse con el botón “Vol -” o “Vol+”. Emparejado en el botón “Vol-”, el walkie talkie siempre se oirá en background incluso cuando esté hablando por el Intercom. Emparejamiento ›› Apague la unidad. ›› Mantenga pulsado el botón “Central” unos 7 seg., hasta que la luz roja quede encendida de forma permanente. ›› Ahora presione firmemente (3 seg) los botones “Vol +” o “Vol -”, las luces azul y roja parpadearán. ›› Siga ahora el proceso de emparejamiento descrito en el manual del transceptor. Uso de la función Radio FM El BTX2 PRO S integra un receptor de Radio FM con RDS. Para utilizarlo, solo tiene que entrar en modo “Radio FM”. Mantenga pulsado durante 3 segundos el botón “Central” hasta que oiga el anuncio “FM Radio”. Ahora los tres botones principales están dedicados a la radio (Tabla C). Con un click sobre el botón “Adelante” o “Atrás” puede buscar una de las 6 emisoras de radio (función seek), la búsqueda se detendrá automáticamente cuando encuentre una emisora con una señal suficientemente fuerte para garantizar una buena recepción. Si por el contrario mantiene pulsado durante 3 segundos cualquiera de los dos botones, se desplazará por las 6 emisoras memorizadas. Cada vez que pasa de una memoria a otra, un anuncio vocal le indicará el número de memoria en el que se encuentra. Para memorizar la emisora que está escuchando, pulse simultáneamente los botones “Adelante” y “Atrás” durante 3 segundos. Escuchará un tono de confirmación. La emisora se memoriza en la memoria siguiente a la última escuchada. Gracias al sistema RDS, la radio seleccionará la señal más fuerte disponible de la emisora que esté escuchando. El sistema RDS está desactivado por defecto y para activar/desactivar la función, pulse al mismo tiempo y durante tres segundos los botones “Vol+” y “Vol–” mientras la radio está encendida. Un anuncio vocal le indicará el estado. Para desactivarlo, repita el mismo procedimiento. C-Modo Radio FM Modo Radio FM 64 Tecla Adelante Pulsación corta: búsqueda de memoria hacia adelante Pulsación larga: buscar emisoras (arriba) Tecla Central Pulsación corta: on/off Pulsación larga: cambio de modo Tecla Atrás Pulsación corta: búsqueda de memoria hacia atrás Pulsación larga: buscar emisoras abajo (si la radio está apagada, activa/desactiva la conexión AUX) www.midlandeurope.com Intercom con Radio FM En modo “Radio FM” no se puede activar el Intercom en modo manual pero puede usar la activación vocal (VOX) solo hacia el dispositivo enlazado en el pulsador “Central”. Para activar el Intercom de forma manual deberá salir del modo “Radio FM” y pasar a modo “Intercom”. Radio en background No es posible tener la radio FM en combinación con otra fuente de audio. Cualquier audio activo, como el Intercomunicador, o procedente de la conexión VOL + o VOL-, pausará la radio FM. Configuraciones especiales Reset de todos los dispositivos sincronizados Alguna vez puede resultar necesario borrar todos los dispositivos sincronizados al BTX2 PRO S. Para realizar esta operación tiene que entrar en modo Setup: ›› Apague la unidad. ›› Mantenga pulsado el botón “Central” hasta que el LED rojo quede fijo. ›› Pulse al mismo tiempo los botones “Vol+” y “Vol-” durante 3 segundos. El LED azul se enciende durante 1 segundo y volverá a rojo fijo. ›› Haga doble clic en el botón “Central” para salir del modo Setup y usar el BTX2 PRO S. www.midlandeurope.com Este proceso borra todos los dispositivos Bluetooth sincronizados almacenados en la memoria y por tanto es posible comenzar una nueva sesión de sincronización desde cero. Atención: tras resetear todos los emparejamientos, únicamente el modo “Radio FM” estará disponible. Volver a los ajustes originales Alguna vez puede ser necesario volver a los ajustes de fábrica, para eliminar todos los cambios y ajustes realizados y tener la unidad “limpia”. Para realizar esta operación tiene que entrar en el modo Setup: ›› Apague la unidad. Mantenga pulsado el botón “Central” hasta que el LED rojo quede fijo ›› Pulse al mismo tiempo los botones “Vol+” y “Vol-” durante 3 segundos. El LED azul se enciende durante 1 segundo y volverá a rojo fijo ›› Haga doble click en el botón “Central” para salir del modo “Setup” y usar el BTX2 PRO S. Ajuste/Desactivación de la función VOX (Intercom y teléfono) La función Intercom se puede activar de dos formas, manualmente y por voz (VOX). La correcta activación del VOX depende del ruido de fondo y, por lo tanto, de la velocidad y del tipo de casco utilizado. Para un resultado óptimo, se puede seleccionar entre cuatro niveles de sensibilidad del micrófono: alto, medio, bajo y muy bajo. El ajuste por defecto es “bajo”. También es posible desactivar el VOX para activar el Intercom y la respuesta de llamadas de teléfono solo en modo manual. Estos ajustes se pueden configurar a través del programa “BTPro Updater”, disponible para PC/MAC. Setup y actualización de Firmware El BTX2 PRO S permite configurar el dispositivo y actualizar el firmware a través del PC, conectándolo con un cable USB estándar. En nuestra página web www.midland.es, encontrará toda la información actualizada sobre su dispositivo y se podrá descargar gratuitamente tanto el software de actualización como eventuales nuevas versiones de firmware. 65 E Cómo desactivar/activar la Radio FM En el BTX2 PRO S la Radio FM viene activada de fábrica. Desactivar: ›› Entre en modo “Setup”: apague la unidad y mantenga pulsado el botón “Central” durante 7 segundos, hasta que el LED Rojo quede fijo. ›› Presione a la vez el botón “Central” y “Vol +” durante 3 segundos. El LED Azul parpadeará dos veces. ›› Haga doble click en el botón “Central” para salir del modo “Setup” y poder usar el BTX2 PRO S. Activar: ›› Siga el mismo procedimiento descrito, ahora el LED azul parpadeará solo una vez. Para salir del modo “Setup”,, haga doble click en el botón “Central”. ATENCIÓN: NO CONECTE EL DISPOSITIVO AL PC SIN ANTES HABER INSTALADO CORRECTAMENTE EL SOFTWARE DE ACTUALIZACIÓN. Uso y advertencias específicas E El uso de este dispositivo disminuirá la capacidad de oír otros sonidos y a la gente de su alrededor. El uso de este dispositivo mientras conduce puede significar un serio peligro para usted y los de su alrededor y, en algunos países, existen claras restricciones legales al respecto. El uso de este dispositivo a un volumen alto, puede producir pérdida permanente de audición. Si nota algún tipo de dolor alrededor de la oreja o en interior del oído, reduzca el volumen o interrumpa el uso del dispositivo. El uso continuado a volumen alto, puede hacer que sus oídos se acostumbren a ese nivel de volumen, lo cual puede causar un daño permanente en los mismos. Por favor, utilice este dispositivo con un nivel de volumen seguro. Garantía Limitada de MIDLAND IBERIA Esta garantía no limita los derechos del usuario reconocidos en las normativas españolas y europeas aplicables en materia de venta de bienes de consumo. Durante el periodo de garantía se reparará, en un periodo de tiempo razonable, cualquier avería imputable a defectos en materiales, diseño o fabricación, libre de cualquier cargo por reparación. En el caso de que la reparación no sea posible, se facilitará al usuario un equipo o accesorio similar o de mejores características. Esta garantía solo es válida en el país donde se ha adquirido el producto. La garantía comienza en el momento de la compra por parte del primer usuario final. La garantía es por un período de: ›› 24 meses para el equipo o unidad principal ›› 6 meses para accesorios (baterías, cargadores, antenas, auriculares, cables) ›› Cualquier reclamación por el producto afectado, debe de comunicarse dentro de un tiempo razonable desde que se apreció el defecto y, en ningún caso, después de que expire el periodo de garantía. 66 La garantía no cubre: ›› El deterioro del producto por el uso habitual ›› Defectos causados por el uso o conexión del Producto con accesorios y/o software no original Midland La garantía quedará invalidada: ›› En caso de apertura, modificación o reparación por personas no autorizadas por Midland o por el uso de recambios no originales ›› Si el producto ha sido expuesto a condiciones ambientales para las que no ha sido diseñado ›› En el caso de corrosión, oxidación o derrame de líquido de las baterías ›› Si el número de serie ha sido retirado, borrado, alterado o es ilegible ›› Nada se deberá al comprador por el tiempo durante el cual, el equipo esté inactivo, ni podrá solicitar resarcimiento o indemnización por gastos soportados, así como por daños directos o indirectos derivados del uso impropio o diferente para el que ha sido diseñado y comercializado. Para tener acceso a esta garantía, es necesario enviar a nuestro servicio técnico (SAT MIDLAND – C/Cobalt, 48 -08940 Cornellà de Llobregat) el producto afectado (equipo y/o accesorio) con una nota explicativa de la anomalía detectada y la factura original de compra, con el nombre, dirección del distribuidor y la fecha de compra. Encontrará información actualizada en www.midland.es Certificaciones Europeas CE CTE International SRL. declara, bajo su responsabilidad, que este aparato cumple con lo dispuesto en la Directiva 2014/53/UE. No se permite a los usuarios hacer ningún cambio o modificaciones a la unidad. Las modificaciones que no están aprobadas por el fabricante invalidan la garantía. © MIDLAND IBERIA. Queda prohibida la reproducción total o parcial sin el permiso por escrito del titular. Para más información, visite nuestra web: www.midland.es www.midlandeurope.com Sommaire Caractéristiques principales..........................................................................................................................................................................................................68 Spécifications techniques du Midland BTX2 PRO S..................................................................................................................................................................68 Rechargement des batteries.......................................................................................................................................................................................................... 69 Description du module et fixation ............................................................................................................................................................................................... 69 Allumer et eteindre votre Midland BTX2 PRO S........................................................................................................................................................................ 71 “Mode” de fonctionnement............................................................................................................................................................................................................ 71 Comment coupler deux modules BTX2 PRO S.......................................................................................................................................................................... 72 Comment coupler le BTX2 PRO S a plus de deux modules...................................................................................................................................................... 73 Talk2All – Couplage avec un interphone d”une autre marque................................................................................................................................................... 76 Compatibilité avec modules de la gamme Midland BT ...............................................................................................................................................................77 Associer le BTX2 PRO S aux périphériques Bluetooth...............................................................................................................................................................77 Partage de Musique........................................................................................................................................................................................................................80 Navigateur GPS..............................................................................................................................................................................................................................80 Comment ecouter la radio FM.......................................................................................................................................................................................................81 Installation et configuration speciale............................................................................................................................................................................................ 82 Configuration et mise à jour logiciel............................................................................................................................................................................................. 82 Garantie........................................................................................................................................................................................................................................... 83 www.midlandeurope.com 67 F Conférence..................................................................................................................................................................................................................................... 75 Midland BTX2 PRO S Système intercom Dual Core Midland BTX2 PRO S est une solution de système d’interphone avec double Bluetooth de base (double processor Bluetooth) pour la communication de conférence et audio stéréo réelle de fond. Le design est très mince et aérodynamique, toutes les fonctions principales sont faciles à utiliser grâce aux trois gros boutons placés sur le devant de l’appareil. Midland BTX2 PRO S est fixé sur le casque en utilisant la plaque adhésive ou la bride de fixation à vis. F Caractéristiques principales ›› Système de double cœur Bluetooth ›› Intercom “ one to one “ (tète à tète) jusqu’à 1.2 Km de distance. ›› Se connecter jusqu’à 6 personnes pour “one to one” communication intercom ›› Conférence jusqu’à 8 personnes (4 couples) ›› Fonctions Universal Intercom pour connecter des interphones d’autres marques ›› MWE Noise Killer ›› Écouter la radio FM stéréo avec RDS ›› Connectez votre téléphone pour recevoir, passer des appels et écouter de la musique en stéréo. ›› Partage de musique (conducteur et Passager) ›› Support pour 2 téléphones ›› Connectez votre GPS pour des indications vocales de navigation. ›› Configuration et mise a jour du firmware via une connexion USB à un PC En fonction du modèle choisi, la bôite contient les éléments suivant: BTX2 PRO S SINGLE ›› ›› ›› ›› ›› ›› 1 Module BTX2 PRO S 1 Kit de montage glissière avec deux oreillettes HI-FI stéréo 1 micro tige et 1 micro filaire 1 plaque avec adhésif double face pour fixer le module sur le casque 1 plaque avec vis de serrage pour fixer le module sur le casque 1 alimentation secteur micro USB BTX2 PRO S TWIN ›› 2 Modules BTX2 PRO S ›› 2 Kit de montage glissière avec deux oreillettes HI-FI stéréo ›› 2 micro tige et 2 micro filaire ›› 2 plaques avec adhésif double face pour fixer le module sur le casque ›› 2 plaques avec vis de serrage pour fixer le module sur le casque ›› 1 alimentation secteur micro USB avec double sortie Les modules qui composent le kit TWIN sont déjà connectés entre eux et peuvent être utilisé directement en mode Intercom. Spécifications techniques du Midland BTX2 PRO S Générale: ›› ›› ›› ›› Bluetooth stéréo ver. 4.2 (Protocole Mains-libre/A2DP/AVRCP) Fréquence 2.4GHz - Puissance max 100mW Double cœur Bluetooth pour de vrai fond stéréo Système AGC pour le contrôle automatique du volume en fonction du bruit de fond. Déclenchement à la voix (VOX) ou manuel de la communication Touche pour activer: le téléphone, l’Intercom et la radio FM Waterproof Batterie Lithium avec 20 heures d’autonomie Temps de rechargement: env. 2 heures Le Midland BTX2 PRO S est disponible en deux versions: ›› ›› ›› ›› ›› ›› BTX2 PRO S Single Kit Intercom avec un seul module ›› BTX2 PRO S Twin Kit Intercom avec deux modules Avec dispositif identique pour pilote à Passager ou en mode Intercom Bike- 68 Connexion Bluetooth: www.midlandeurope.com to-Bike, jusqu’à une plage de distance maximale de 1.2 Km sans obstructions et interférences (les coureurs doivent être toujours en vue). Périphériques Bluetooth: Téléphone mobile avec lecteur MP3 stéréo (Protocole A2DP), GPS. Rechargement des batteries Description du module et fixation Description du BTX2 PRO S Le BTX2 PRO S possède 5 touches sur l’avant. Les trois principaux sont: Avancé (sur la gauche), la touché “Centrale” et Reculer (sur la droite). Les deux petites touches sont: Volume + et Volume -. Volume - Attention: Assurez vous que le module soit complètement charger “Avant” la première utilisation. Prévoyez au moins 3 heures le module “Avant” de l’utiliser pour la première fois. Attention: Le Midland BTX2 PRO S a été conçu pour résister à la pluie et à l’eau. Cependant, s’il pleut vérifiez que les capuchons en caoutchouc des connecteurs sont bien en place. LED Avancé Centrale Arriére Sur le fond de l’appareil, vous pouvez trouver la prise du chargeur qui permet de recharger l’appareil en utilisant une alimentation micro USB standard. F Charger le module en connectant le chargeur mural dans la prise de rechargement (soulevez le capuchon pour insérer la prise). La LED rouge sur le module clignote pendant le chargement. Laisser le casque à charger jusqu’à ce que l’appareil cesse de clignoter et la LED bleue se mette en marche. Quand la charge est complète (La LED rouge ne clignote plus), retirez le module du chargeur. Normalement, après la première utilisation, Il faut 2 heures pour une charge complète. Volume + Attention: à chaque fois que le chargeur micro USB est connecté (ou déconnecté), le module est automatiquement éteint. Pour pouvoir l’utiliser pendant le chargement, il faut allumer le module avec le chargeur déjà connecté. Connecteur de charge Description du kit audio Le kit audio comprend deux oreillettes HI-FI stéréo et deux microphones interchangeable, qui sont tous les deux fournit avec support et connexion filaire. Le mini-connecteur sur le microphone vous permet de choisir le type de microphone qui convient mieux pour votre casque. www.midlandeurope.com 69 Fixation des oreillettes stéréo Les deux oreillettes stéréo ont des adhésifs/velcro pour faciliter leur fixation dans votre casque. Attention à ne pas garder le volume trop élevé, vous devez toujours être en mesure d’écouter le son de la circulation. Le microphone peut être fixé dans le casque de deux façons: Description du kit de montage à glissière Le Midland BTX2 PRO S peut être fixé sur votre casque en utilisant le kit de montage à glissière de deux façon différentes, soit en utilisant la plaque avec adhésif double face ou alors la plaque avec vis. Ces méthodes vous permette de fixer en toute sécurité votre module BTX2 PRO S sur votre casque et de le retirer à n’importe quel moment pour le recharger ou le ranger. Plaque Bi-adhésif La plaque Bi-adhésif est déjà monté sur la glissière dans le kit de montage. Fixer le microphone Bi-adhésif Microphone tige F Placez la section avec la bande velcro/adhésive entre l’habillage et la partie rigide extérieur du casque, de manière à ce que le microphone soit correctement positionné en face de votre bouche et avec le repère blanc vers votre bouche. Ce type de microphone idéale pour une casque modulable. Pour les casques ouverts c’est disponible un microphone spécifique en option (cod. C1253). Microphone filaire Utilisez la bande Velcro/adhésive et placez le micro dans votre casque en face de votre bouche. Ce type de microphone est idéal pour les casques intégraux. Le mini connecteur sur les microphones vous permette de choisir celui qui convient le mieux au casque que vous utilisez. Boom microphone 70 Wired microphone Nettoyez la zone d’application sur la surface du casque, plier les deux petites ailes jusqu’à obtenir la même courbure du casque. Retirez le film bi-adhésif et placez la plaque de fixation sur le côté gauche du casque en le maintenant en contact avec la surface pendant quelques secondes. Plaque à vis Étape 1. Retirer la plaque bi-adhésif du support en utilisant la clé hexagonale incluse dans la boîte. N’oubliez pas de garder les deux vis. Étape 2. Serrer la plaque à vis au support avec les deux vis fournies. www.midlandeurope.com Bloquer Débloquer A Étape 3. Ensuite, serrer plus que les deux vis pour fixer fermement la pince en place sur le côté gauche du casque. Allumer et eteindre votre Midland BTX2 PRO S Allumage: Appuyez et maintenez la touche “Milieu” enfoncée pendant environ 3 secondes jusqu’à ce que le voyant soit BLEU. Plaque de caoutchouc Mise en place et retrait de votre Midland BTX2 PRO S Le BTX2 PRO S peut être facilement mise en place sur le casque en le faisant glisser vers le bas sur le kit de montage à glissière. BTX2 PRO S est maintenu en position grâce à l’élément de fixation situé sur la partie supérieure (A). Pour détacher le BTX2 PRO S, appuyez simplement sur le clip de fixation et pousser le module vers le haut. www.midlandeurope.com Extinction: Appuyez et maintenez les touches “Milieu” et “Reculer” enfoncées pendant environ 3 secondes jusqu’à ce que le voyant clignote 3 fois. Ceci évite les erreurs de manipulation (spécialement avec le port de gant). “Mode” de fonctionnement Le BTX2 PRO S peut fonctionner de trois façons différentes: Intercom, Téléphone et Radio FM. Les 3 touches multi fonctions ont différentes fonctionnalité qui dépendent du mode dans lequel se trouve le module. ›› En “Mode Intercom” les boutons vous permettent de gérer la communication avec un maximum de 4 personnes, parler un par un. Il suffit d’appuyer l’un des trois boutons pour ouvrir l’interphone. ›› En “Mode téléphone” vous pouvez gérez votre téléphone mobile Bluetooth pour passez/recevoir des appels, écouter de la musique. ›› En “Mode radio FM” vous pouvez écouter votre station radio favorite en stéréo, recherché une station spécifique et la sauvegarder (6 emplacement mémoire disponible). Vous pouvez basculer d’un mode à l’autre simplement en appuyant longtemps sur la touche “Centrale” (appuyez pendant 3 secondes). Une annonce vocale indique le mode dans lequel vous vous trouvez. 71 F Si nécessaire, vous pouvez utiliser également la plaque de caoutchouc afin d’avoir plus d’adhérence pour la vis de serrage. Il suffit d’utiliser les deux vis courts pour fixer la plaque de caoutchouc sur la glissière dans la montagne et serrer à nouveau la plaque à vis. La séquence de basculement est la suivante: ›› Intercom (si un autre module a été connecté) ›› Radio FM ›› Téléphone (si un téléphone a été connecté) Chaque fois que vous allumez le module, le mode par défaut est le dernier mode utilisé. Le mode Intercom et le mode de téléphone ne sont disponibles que si il a déjà été jumelé à un autre module ou un téléphone. Si vous souhaitez savoir dans quel mode se trouve le module, appuyez sur “Volume + “ et “Volume –“ ensemble. Une voix annonce le mode en cours d’utilisation. Distance maximale Vous pouvez atteindre 1.2 Km de distance si vous êtes dans la ligne de mire sans obstructions et interférences (les autres intercom doivent être toujours en vue). F Comment coupler deux modules BTX2 PRO S Les deux modules fournis dans la même boîte BTX2 PRO S, sont déjà liés et prêts à utiliser, ce qui signifie que vous n’avez pas besoin d’effectuer cette procédure. Les modules sont déjà couplés en utilisant le bouton “Centrale”. Si les appareils ne font pas partie du même kit ou les unités ont été acheté séparément, vous devez d’abord les coupler afin de les utiliser. Pour coupler le BTX2 PRO S à un autre BTX2 PRO S, vous devez tout d’abord entrer en mode configuration: 1. Éteignez le module. 2. Appuyez sur la touche “Centrale” et maintenez-la pendant 7secondes, jusqu’à ce que le voyant soit rouge fixe. 3. Maintenant, appuyez longuement (3 secondes) la touche “Centrale”. La lumière clignote bleue et rouge. 4. Faites la même chose sur l’autre module, quand l’opération a réussi, sur chaque unité la lumière est bleue fixe pendant une seconde et retourne en mode de configuration (la lumière rouge toujours allumé). 5. Maintenant, la procédure de jumelage est terminé, il vous suffit de quitter le mode d’installation “Avant” de pouvoir utiliser les modules. 6. Double-cliquez sur la touche “Centrale”, la lumière rouge s’éteint et le voyant bleu clignote. Vous pouvez maintenant utiliser votre BTX2 PRO S. Attention: n’oubliez pas d’éteindre tous les autres appareils Bluetooth, seuls les deux appareils concernés par le couplage doivent être allumés. Comment utiliser l’intercom avec deux modules Pour utiliser la fonction Intercom, assurez-vous que les deux modules sont correctement couplés ensembles. Activation manuelle Lorsque vous êtes dans le mode intercom pressez le touche “Centrale” d’un des deux modules en mode Intercom. La communication est activée et reste Ci-dessous un exemple de fonctionnalité des touches en fonction du mode choisi. Mode Intercom Téléphone Téléphone (pendant la lecture de musique) Radio FM 72 Avant (Touche à gauche) Touche centrale Ouvrir/fermer l”Intercom vers 1er module Ouvrir/fermer l”Intercom vers 2ème module Rappeler le dernier numéro / accepter ou rejeter un appel entrant sur “vol +” Titre suivant Lecture/pause Arrière (Touche à droite) Ouvrir/fermer l”Intercom vers 3ème module Rappeler le dernier numéro / accepter ou rejeter un appel entrant sur “vol -” Titre précédent Recherche vers le haut Recherche vers le bas Radio FM On/off www.midlandeurope.com active jusqu’à ce que vous appuyiez à nouveau sur la touche “Centrale”. L’interphone à besoin de quelques secondes pour s’activer, vous entendez un bip sonore lorsque l’Intercom est ouvert. Activation vocale (VOX) Il suffit de commencer à parler, après quelques secondes la communication sera ouvert et restera actif pendant le temps ou vous parlerez. S’il n’y a pas de conversation l’Intercom sera fermé au bout de 40 secondes. Si nécessaire, vous pouvez fermer manuellement l’interphone sans attendre 40 secondes (il suffit de presser la touche “Centrale”). Si besoin, vous pouvez activer/désactiver la fonction VOX en appuyant sur la touche “Arrière” pendant 7 secondes. Un message vocal vous avertit que la fonction VOX est inactive. Pour la réactiver, appuyez sur la même touche et un message vocal vous indiquera que la fonction VOX est à nouveau active/ désactive. Ce paramètre reste en mémoire même quand vous éteignez le module. ction AGC en appuyant 3 secondes sur les touches “Volume +” et “Volume -” simultanément. Comment coupler le BTX2 PRO S a plus de deux modules Un appareil Midland BTX2 PRO S peut être couplé à un maximum de cinq autres unités BT, cela signifie six au total (3 unité Midland + 2 Talk2All + vous). Le Midland BTX2 PRO S dispose de trois boutons principaux (“Avant”, “Centrale” et arrière). C’est à vous de choisir quel bouton utiliser pour appairer et activer l’intercom, vous êtes totalement libre de choisir le bouton que vous aimez plus. Le même bouton que vous allez utiliser pour coupler l’unité sera également utilisée pour activer la communication intercom. Rappelez-vous que chaque appareil peut toujours être couplé avec 3 autres unités à votre choix, comme indiqué dans le tableau ci-dessous, aussi un appairage “croisé” peut être fait. Conducteur 1 Attention: L’activation vocale (VOX) peut ouvrir la communication Intercom seulement vers l’unité qui a été jumelé avec la touche centrale. Si vous choisissez d’utiliser une autre touche (avant ou arrière), vous ne pourrez activer l’Intercom que manuellement. Attention: Le volume ne peut être réglé que si une connexion audio est active. Configurer le système AGC Pour régler la sensibilité AGC vous pouvez utiliser le logiciel PC ”BT UPDATER” ou l’application smartphone “BT SET-APP”. Vous pouvez choisir différents réglages en fonction du type de votre moto (naked, touring, sport) ou si vous êtes passager. Vous pouvez désactiver la fon- www.midlandeurope.com F Réglage du volume Votre Midland BTX2 PRO S utilise la technologie AGC, qui ajuste automatiquement le volume d’écoute par rapport aux bruits de fond. Toutefois, il est également possible de régler manuellement le volume au moyen des touches “Volume +” et “Volume -”. Le réglage de volume est indépendent pour chaque source audio: intercom, musique stéréo, Appel téléphonique, radio FM. Passager 1 Conducteur 2 Conducteur 3 Par exemple, vous pouvez décider d’associer unité pilote d’une moto sur le bouton Forward, votre passager au bouton Moyen et un autre conducteur sur le bouton arrière. De cette façon, vous pouvez avoir un total de 4 unités appariées ensemble et parler à chaque personne, un par un, en appuyant simplement sur le bouton correspondant (le même utilisé pour l’appariement). Chaque fois que vous ouvrez la connexion intercom à une seule personne, la connexion précédente sera fermée. Lorsque deux personnes parlent, il est impossible de rompre (interruption) la communication par une des deux autres unités. 73 Associez le Midland BTX2 PRO S à un autre Midland BTX2 PRO S Pour jumeler le Midland BTX2 PRO S à un autre Midland BTX2 PRO S, vous devez d’abord entrer dans le mode de configuration: 1. Mettez l’appareil hors tension. 2. Appuyez et maintenez enfoncé le bouton “Centrale” environ 7 sec., Jusqu’à ce que le voyant rouge soit allumé en permanence. 3. Maintenant, appuyez sur le bouton “Avant” pendant 3 secondes ou “Centrale” ou arrière. La lumière clignote bleue et rouge. 4. Est-ce que la même procédure sur l’autre unité, lorsqu’il est associé avec succès, chaque unité aura la lumière bleue pendant une seconde et que de revenir au mode de configuration (lumière rouge toujours). 5. Maintenant, la procédure de couplage est terminée, vous pouvez aller sur l’appariement autre unité sur le bouton différent ou tout simplement quitter le mode de configuration pour commencer à utiliser les unités: Double-cliquez sur le bouton du milieu, la lumière rouge s’éteint et la lumière bleue se met à clignoter. Vous pouvez maintenant utiliser votre BTX2 PRO S. Comment utiliser l’Intercom avec plusieurs modules F Pour utiliser la fonction Intercom, assurez-vous que touts les modules sont sous tension et correctement couplés. sur le bouton correspondant à l’autre module, l’Intercom actuel sera automatiquement fermé et la nouvelle connexion ouverte. Activation vocale (VOX) La fonction d’activation vocale peut ouvrir l’interphone uniquement à l’unité jumelé au bouton du Milieu. Astuce: cette fonctionnalité est très utile lorsque vous avez une personne spécifique avec qui vous voulez parler plus souvent (par exemple votre passager). De cette façon, vous ne devez appuyer sur un bouton pour ouvrir la communication. Module déjà occupé Si vous essayez d’ouvrir une connexion Intercom avec une personne qui est déjà occupé avec quelqu’un d’autre (ou qui est au milieu d’une conversation téléphonique), vous entendrez un double bip “occupé”. Attendez un moment et essayez à nouveau, peut-être cette fois ci la “ligne” n’est pas occupé. 1 2 3 Activation manuelle Lorsque vous êtes dans le mode intercom pressez le touche correspondant au module avec lequel vous souhaitez communiquer. Après environ 4 secondes, l’Intercom s’ouvre. La communication reste active jusqu’à ce que vous appuyiez à nouveau sur la même touche. Pour ouvrir rapidement l’Intercom vers une autre personne, il suffit d’appuyer La personne reçoit une demande d’Intercom, est avertie que l’on cherche à le joindre par une voix qui annonce le bouton correspondent à la demande. De cette façon dès la fin de la première conversation, elle peut joindre rapidement la personne qui l’avait demandé (annoncé par la voix). A – Activation manuelle Mode Touche avant Touche centrale Touche arrière Talk2All-Universal Intercom Intercom Court: Ouvrir/Fermer l”Intercom vers le mod- Court: Ouvrir/Fermer l”Intercom vers le modul”Intercom vers le moduNotCourt: Midland Ouvrir/Fermer Intercom ules connecté les connecté les connecté Long: Changer de mode 74 www.midlandeurope.com Conférence Mode conférence activé Comment utiliser le mode conférence Vous devez tout d’abord coupler toutes les unités en mode “ chaîne “; en second lieu, la fonction “ Conférence “ doit être activée sur toutes les unités couplées. Couplage Pour utiliser le mode conférence, vous devez coupler toutes les unités dans une configuration de “ chaîne “. Le bouton “Arrière” de la première unité doit être couplé au bouton “Avant” de la seconde unité. Le bouton “Arrière” de la seconde unité doit être couplé au bouton “Avant” de la troisième unité et ainsi de suite jusqu’à la quatrième ! La première et la dernière unité ne doivent en aucun cas être couplées ensemble (la chaîne doit rester ouverte). Désactiver le mode conférence Dans n’importe quel mode et sans audio active, maintenir appuyé les touches FWD et “Centrale” pendant 3 secondes. L’annonce vocale “Intercom” vous dira que vous êtes de retour à la “One to One” en mode Intercom et l’appareil connecté au “Vol +” est à nouveau disponible, ainsi que le téléphone, l’appariement sur le bouton CTRL et Intercom Universel. Attention: lorsque le mode “ conférence “ est active, la fonction “ Talk2All- Universal Intercom “ (pour parler avec un interphone n’etant pas de la marque Midland) n’est pas disponible. Aussi, si une unité a été jumelé sur le bouton CTRL (milieu), il est temporaire indisponible, vous devez désactiver le mode “conférence” et revenir à la norme “one to one” en mode Intercom. Mode conférence à 4 personnes 1 2 3 4 L’unité numéro 1 ne peut parler à la dernière unité (numéro 4) qu’uniquement “ à travers “ les unités numéro 2 et numéro 3. Cela signifie que pour pouvoir communiquer à 4 personnes en mode conférence, il est nécessaire que toutes les unités aient l’intercom ouvert. www.midlandeurope.com Lorsque le mode de conférence est activé, il est possible d’ouvrir la communication de la conférence aux 4 utilisateurs seulement en “un seul clic”. Appuyez brièvement sur le bouton CTRL (milieu) et vous allez automatiquement ouvrir la conférence à quatre unité connectée. Les deux unités se trouvant au milieu de la chaîne (unités 2 et 3) doivent maintenir l’intercom ouverte sur les boutons “Avant” et “Arrière” pour garantir une bonne communication des quatre unités à la fois. La fonction “ One Click Talk “ Lorsque le mode conférence est activé, vous pouvez, en “ un seul clic “, ouvrir une communication intercom pour l’ensemble des 4 utilisateurs. Appuyez brièvement sur le bouton CTRL (“Centrale”) pour ouvrir automatiquement l’intercom de conférence à l’ensemble des unités connectées. 75 F Le mode “conférence” permet la communication simultanément entre 4 personnes ou, si vous associez un dispositif d’interphonie également sur le “Vol -”, jusqu’à 8 personnes (4 couples). Vous pouvez décider d’utiliser le BTX2 PRO S en “ one to one” communication jusqu’à 6 personnes (mode Intercom “classique”) ou avec 8 personnes (4 couples) conférence d’intercom (mode 3 1 Conférence). 2 Dans n’importe quel mode et sans audio active, maintenir appuyé les touches FWD et “Centrale” pendant 3 secondes. L’annonce “Conférence” de la voix vous dira qu’il est actif. Lorsque le mode de conférence est activé les périphériques Bluetooth appariés sur “Vol +” bouton sont déconnectés, l’appairage sur le bouton CTRL et l’Intercom Universel ne sont pas disponibles. Maintenant que l’appairage sur les boutons FWD et BWD sont disponibles, ainsi que l’appareil couplé sur le “Vol -” bouton. Mode Conférence avec un périphérique Bluetooth sur “Vol -” Lorsque le mode de conférence est actif, le dispositif Bluetooth connecté sur “Vol -” est toujours disponible, ce qui signifie que vous pouvez écouter l’indication de la rue GPS ou répondre à votre appel téléphonique sans “freiner” la chaîne de connexion de la Conférence. L’audio de la connexion du bouton “Vol -” peut être “privé” (non partagé dans la conférence) ou “public” (l’audio est partagé avec la conférence). Par défaut, le mode de conférence est “Privé”. Lorsque vous êtes en mode “privé” ou “Public”, si vous recevez un appel téléphonique, vous êtes temporairement déconnecté de la Conférence, mais les autres personnes peuvent continuer à se parler. Dès que l’appel est terminé, vous revenez automatiquement à la conférence. ›› Activer le mode Public: appuyez longuement sur le bouton “Vol -”, vous entendrez “Public”. ›› Activer le mode Privé: appuyer à nouveau sur le bouton “Vol -”, la voix vous indiquera “Privé”. Attention: l’appel entrant de votre téléphone est toujours “privé” même si vous êtes en mode “public”. F Mode conférence jusqu’à 8 personnes (4 couples) Pour avoir une conférence de 8 personnes, vous devez également associer un périphérique d’intercom au bouton “Vol -” et vous assurer que vous avez sélectionné l’option “Public”. Attention: Le paramétrage de l’intercom sur “Vol -” doit être comme celui pour “Intercom Universel”. Par défaut, le réglage du mode de conférence est “Privé”, c’est-à-dire la première fois que vous appuyez longuement sur le bouton “Vol -”, vous entendrez la voix “Public”. Si vous êtes “Privé”, vous devez appuyer à nouveau sur “Vol -” tant que vous n’entendrez pas le mode “Public”. Comment appairé un appareil intercom sur le bouton “Vol -” ›› Sur le BTX2 PRO S, passez en mode “Setup”, appuyez sur la touche “Vol -” pendant 3 sec. Les voyants bleu et rouge se mettent à clignoter. ›› Sur l’autre périphérique, suivez la procédure de couplage en tant qu’intercom universel. 76 Comment ouvrir la conférence pour l’unité “Vol -” ›› Pour ouvrir la conférence depuis le BTX2 PRO S vers l’appareil raccordé au “Vol -”, en mode Téléphone, appuyez simplement sur la touche “Arrière”. ›› Pour ouvrir la conférence à partir de l’autre appareil connecté au “Vol -”, utilisez simplement la commande pour ouvrir la connexion d’intercom universel. La distance maximum de connexion des deux appareils sur le bouton “Vol -” est de 10m, C’est pourquoi il est conseillé de l’utiliser seulement pour le passager. Talk2All – Couplage avec un interphone d’une autre marque Grâce à la fonction “Talk2 All - Universal Intercom’ il est désormais possible de coupler votre BTX2 PRO S avec un interphone d’une autre marque disponible dans le commerce. Vous pouvez appairé un maximum de deux intercom Midland, un sur le bouton “Avant” et un autre sur le bouton “Arrière”. Sur le BTX2 PRO S entrez dans le mode configuration: (avec le module éteint, maintenez la touche “Centrale” enfoncée pendant 7 secondes environ jusqu’à ce que le voyant rouge soit allumé de manière fixe). ›› Maintenez enfoncée la touche “Avant” ou “Arrière” pendant 7 secondes: la lumière rouge et bleue clignotera rapidement, puis (alors que vous maintenez le bouton enfoncé), les voyants rouge et bleu se mettent à clignoter lentement. Maintenant, vous pouvez relâcher le bouton. Talk2All-Universal Intercom Interphone d”autre marque ›› Sur l’autre interphone (d’une marque autre que Midland) suivez la procédure pour coupler un téléphone, car le BTX2 PRO S est couplé comme un téléphone. Si le couplage est réussi, le voyant rouge/bleu arrête de clignoter et en revanche le voyant bleu se met à clignoter lentement. www.midlandeurope.com Attention: n’oubliez pas d’éteindre tous les autres appareils Bluetooth, seuls les deux appareils concernés par le couplage doivent être allumés. Pour ouvrir la communication “Intercom universel” sur le Midland BTX2 PRO S pendant que vous êtes en mode Intercom, appuyez longuement (3 secondes) sur le bouton “Avant” ou “Arrière” (selon le bouton utilisé pour l’appariement). Sur l’autre intercom, appuyez simplement sur la touche de recomposition du téléphone ou de composition vocale. Attention: pour utiliser la fonction “Talk2All-Universal Intercom” le couplage sur l’autre module doit être effectué comme pour un téléphone. L’autre interphone (d’une marque autre que Midland) pourra être couplé comme un téléphone seulement si les 2 Téléphones sont supporté. stéréo, Navigateur GPS avec audio A2DP ou dongle A2DP externe mono / Stereo. Tous les périphériques appariés au bouton “Volume -” sont toujours actifs en arrière-plan pendant la communication Intercom. Attention: Les sources audio A2DP ne sont supportées que sur Vol +. Le second téléphone couplé sur “Vol -” ne peut supporter que de l’audio mono (PML). Vol - Always in background ›› Téléphone (HFP/A2DP Stéréo) ›› GPS (HFP/A2DP Stéréo) ›› Dongle (HFP/A2DP Stéréo) Vol + High priority ›› Téléphone (HFP/A2DP Stéréo) ›› GPS (HFP/A2DP Stéréo) ›› Dongle (HFP/A2DP Stéréo) Vous pouvez également coupler un module Midland comme Talk2All, ce qui veut dire que le couplage doit être effectué comme pour un téléphone (un module utilise la procédure Talk2All et l’autre module utilise le couplage avec la procédure “Téléphone”). Compatibilité avec modules de la gamme Midland BT Associer le BTX2 PRO S aux périphériques Bluetooth Le BTX2 PRO S de Midland peut être jumelée à d’autres appareils Bluetooth, comme le téléphone, le navigateur GPS ou une radio PMR446 avec Bluetooth intégré ou externe (dongle). La procédure d’appariement doit être effectuée en utilisant les boutons “Volume +” ou “Volume -”. ›› Appariement au bouton “Volume +”: pour Téléphone avec musique A2DP stéréo, Navigateur GPS avec audio A2DP ou dongle A2DP externe mono / stéréo. Tous les périphériques appariés au bouton “Volume +” ont une priorité plus élevée et interrompent toutes les autres communications (comme Intercom, Radio FM et Musique). ›› Appariement au bouton “Volume -”: pour Téléphone avec musique A2DP www.midlandeurope.com Fonction d’arrière-plan La connexion audio de tout périphérique appairé sur le bouton “Vol -”, même stéréo, est toujours en arrière-plan. De cette façon, la communication Intercom ne sera pas interrompue, par exemple, par l’indication de rue du GPS ou par une autre source audio. Vous pouvez décider si l’audio de la connexion “Vol -” est partagé avec d’autres personnes lorsque l’interphone est ouvert (public) ou s’il doit être privé (privé). Attention: Par défaut, le son est privé. L “audio de “Vol -” a toujours une priorité inférieure par rapport à l’ intercom, ce qui signifie que lorsque l “intercom est ouvert, le son est abaissé par défaut à 50%. Vous pouvez modifier ce paramètre en utilisant logiciel PC: BTUpdater. Appairer avec un ou deux téléphones Le téléphone peut être appairé sur le bouton “Vol +” et sur le bouton “Vol -” Lorsqu’un téléphone est couplé au “Vol +” ou au “Vol -”, le mode “Téléphone” est activé. 77 F Le BTX2 PRO S est compatible avec les modules Midland BT. Quand il sont connectés la distance maximale pour l’Intercom est celui du plus faible. Le BTX2 PRO S est compatible avec les versions précédentes de la gamme Midland BT seulement si ces dernier ont leur firmware à jour. Un appel entrant est toujours prioritaire, cela signifie que tous les autres modes de communication seront coupés (Intercom, Radio FM, Musique). Si un autre appel entrant parvient sur le second téléphone, vous entendrez un bip qui l’indiquera. ATTENTION! Afin d’obtenir les meilleures performances avec votre téléphone mobile, il est conseillé de le garder aussi près que possible de votre unité BTX2 PRO S, sur le côté gauche de votre corps et dans la poche supérieure de votre veste, si c’est possible. F Comment coupler le BTX2 PRO S avec un telephone Pour coupler le BTX2 PRO S avec un téléphone, il faut d’abord entrez dans le mode de configuration: ›› Éteignez le module. ›› Appuyez sur la touche “Centrale” et maintenez-la pendant 7secondes, jusqu’à ce que le voyant soit rouge fixe. ›› Appuyez maintenant pendant 3 secondes sur les boutons “ Volume + “ ou “ Volume - “, les lumières bleu et rouge s’allumeront. Après quelques secondes votre téléphone affiche “Midland BTX2 PRO S”. Suivez la procédure de couplage du téléphone. Si un code PIN est nécessaire il faut entrer “0000” (quatre fois zéro). ›› Lorsque le couplage est réussi, le voyant est bleu fixe pendant une seconde et sort du mode de configuration et passer en mode de travail (la lumière bleue se met à clignoter). ›› Vous pouvez maintenant utiliser votre BTX2 PRO S avec le téléphone. Comment utiliser le telephone Après avoir couplé votre téléphone au BTX2 PRO S vous devez basculer en mode “téléphone “ afin de pouvoir l’utiliser. Appuyer longuement sur la touche “Centrale” jusqu’à ce que vous entendiez “Téléphone” vocalement. Maintenant, toutes les trois touches sont dédiées au téléphone (voir la table B). Répondre à un appel Quand vous entendez la sonnerie, vous pouvez répondre de deux manières: Vocalement: Il suffit de dire un mot juste après la première sonnerie pour répondre à l’appel et commencer à parler. Manuellement: Appuyez sur la touche “avant” et parlez. Rejeter un appel Si vous ne voulez pas répondre vous pouvez laisser sonner le téléphone ou appuyer sur la touche “Avant” quelques secondes (vous entendrez une tonalité de confirmation). Passer un appel Ils existent plusieur façon de passer un appel. B - Mode téléphone Mode Téléphone Téléphone (pendant la lecture de musique et couplé au “ Vol + “) 78 Touche avant (Tél. couplé à “Vol +”) Court: Composition vocale/accepter Long: rappel du dernier numéro/ ou rejeter appel Court: Chanson suivante Touche centrale Touche arrière (Tél. couplé à “Vol -”) Long: Changement de mode Court: Composition vocale/accepter ou terminer l”appel si est en cours Long: Rappel du dernier numéro/ou rejeter l”appel Court: Lecture/pause Court: Chanson précédente Long: Changement de mode www.midlandeurope.com Priorité: Les appels ont une priorité haute, ce qui signifie que toutes les communications sont temporairements interrompues pendant la réception d’un appel. Terminer un appel Il y a plusieur façon de terminer un appel: ›› Attendez que votre correspondant raccroche. ›› Appuyez sur la touche “Avant” pendant 3 secondes (vous entendez une tonalité de confirmation). ›› Appuyez sur la touche “Fin” de votre téléphone. Composition rapide Il est possible de stocker en mémoire un seul numéro de téléphone et de l’utiliser lorsque c’est nécessaire que si le téléphone est appairé sur le “Vol +”. Pour cela il faut d’abord enregistrer le numéro à l’aide du logiciel PC “BT UPDATER” ou de l’application smartphone “BT SET-APP”. Puis lorsque vous êtes en mode téléphone appuyez sur la touche “Avant” pendant 7 secondes. Utiliser la fonction MP3 de votre téléphone Le téléphone mobile couplé au “ Volume + “ peut être utilisé comme un lecteur www.midlandeurope.com MP3 en stéréo. Le BTX2 PRO S est totalement compatible avec les protocoles A2DP et AVRCP qui vous permet d’écouter de la musique et de controler à distance votre lecteur. Vous pouvez même utiliser les touches de votre BTX2 PRO S pour controler les actions suivantes: Lecture, Pause, Avancer et Reculer. Il est possible de contrôler un seul téléphone à la fois. Vous pouvez choisir le téléphone à contrôler, en appuyant 3 sec sur le bouton “Vol +”. Vous entendrez la voix “Contrôle sur le volume vers le haut”. Maintenant, vous pouvez contrôler le téléphone appairé sur le bouton “Vol +”. Si vous souhaitez basculer le contrôle sur l’autre téléphone, appuyez à nouveau pendant 3 sec sur le bouton “Vol +” et vous entendrez la voix “Contrôle sur le volume vers le bas” Avant Play/Pause Arrière F Depuis le clavier du téléphone: ›› Composez le numéroe sur le clavier de votre téléphone et appuyez la touche appel. Rappeler le dernier numéro composé: ›› Tèl. couplé à “Vol +”: Appuyez sur la touche “Avant” pendant 3 secondes de manière à rappeler le dernier numéro (vous entendez une tonalité de confirmation). ›› Tél. couplé à “Vol -”: Appuyez sur la touche “Arrière” pendant 3 secondes de manière à rappeler le dernier numéro (vous entendez une tonalité de confirmation). Par commande vocale: ›› Tél. couplé à “Vol +”: Appuyez brièvement sur la touche “Avant”. Si votre téléphone supporte la reconaissance vocale, vous entendez un message qui vous invite à prononcer le nom du contact à appeler. ›› Tél. couplé à “Vol -”: Appuyez brièvement sur la touche “Arrière”. Si votre téléphone supporte la reconaissance vocale, vous entendez un message qui vous invite à prononcer le nom du contact à appeler Contrôles disponibles: ›› Lecture/pause: Appuyez sur la touche “Centrale”. ›› Pour avancer les chansons: Appuyez sur la touche “Avant”. ›› Pour reculer les chansons: Appuyez sur la touche “Arrière”. Priorité: Pour changer la priorité vous pouvez utiliser le logiciel PC “BT UPDATER” ou l’application smartphone “BT SET-APP” Attention: Il est possible de contrôler la musique stéréo A2DP uniquement en mode “Téléphone”. Si vous écoutez de la musique A2DP et vous passez à “Radio FM” ou “Intercom”, la musique restera active mais vous n’avrez pas toutes les commandes disponibles. Seule Play/Pause est disponible avec un double-clique sur la touche “Centrale”. 79 Partage de Musique La lecture de musique est possible uniquement si le téléphone est appairé sur le bouton “Vol +”. Pour commencer à partager votre musique A2DP avec le passager déjà associé sur le bouton du milieu (10m de distance maximum), vous devez appuyer longtemps sur le bouton “Arrière” (3 sec.), tandis que la musique joue. Le passager peut arrêter le partage de la musique en appuyant brièvement sur le bouton du milieu (mais ne peut pas contrôler la musique). Le conducteur peut arrêter le partage de musique simplement en reproduisant la même manipulation, un appuie long sur le bouton “Arrière” (3 sec.). Quand le partage de la musique est actif, vous ne pouvez pas maintenir ouverte la communication intercom. Attention: pour activer le partage de la musique, assurez-vous d’avoir envoyé une commande Play de le module. Attention: En modalité partage de la musique, le conducteur peut ouvrir l’intercom au passeger avec un double clic sur la touche Central. Navigateur GPS F Couplage à un Navigateur GPS Le Navigateur GPS peut être couplé en utilisant les boutons “Volume +” ou “Volume -”. ›› Bouton Volume + (prise en charge audio stéréo A2DP et HFP mono). Tous les périphériques appariés au bouton “Vol +” ont une priorité plus élevée et interrompent toutes les autres communications (comme Intercom, et Radio FM). ›› Bouton Volume - (prise en charge de l “audio A2DP stéréo et HFP mono). Tous les appareils appariés sur le bouton “Vol -” sont toujours actifs en arrière-plan pendant la communication Intercom. Vous pouvez décider si l’audio de la connexion “Vol -” est partagé avec d’autres personnes lorsque l’interphone est ouvert (la fonction “Public” est activée) ou si elle doit être privée (la fonction “Privé” est activée). Voir le paragraphe “Background” ci-dessus. 80 Annonce vocale GPS Stéréo (A2DP) BTX2 PRO S supporte les annonces vocales Stéréo (A2DP) des navigateurs GPS ou des applications smartphone lorsqu’ils sont connecté à la touche “Vol +” . Quand une annonce vocale “Se produit”, l’Intercom ou la radio FM s’interrompe pour donner la priorité à l’annonce. Par défaut cette fonction est ON. Il est possible changer la priorité en utilisant le logiciel PC “BT UPDATER” ou l’application smartphone “BT SET-APP”. Connexion à un navigateur GPS avec la fonction lecteur MP3 Si votre GPS possède également la fonction lecteur MP3 et que vous souhaitez écouter sa musique, il faut connecter le GPS à la touche “Volume +”. Dans ce cas les annonces GPS interrompent toutes les autres communications (Intercom, Radio FM, Musique). Quand le GPS est connecté à la touche “Volume +” le mode “Téléphone” est activé. Attention: Vous ne pouvez contrôler la musique en stéréo A2DP à partir du GPS qu’uniquement en “ Mode Téléphone “. Comment connecter le BTX2 PRO S à un GPS En général il est possible de connecter le BTX2 PRO S à tous les GPS pour moto qui supporte le protocole Bluetooth “headset”. Pour connecter le BTX2 PRO S a un GPS, vous devez d’abord entrez en configuration: 1. Éteignez le module. 2. Appuyez sur la touche “Centrale” et maintenez-la pendant 7secondes, jusqu’à ce que le voyant soit rouge fixe. 3. Maintenant appuyez sur la touche “Volume +” ou “Volume -” pendant 3 secondes le voyant clignote alors rouge et bleu. 4. Après quelques secondes “MIDLAND BTX2 PRO S” sera affiché sur votre GPS. 5. Suivez la procédure de connexion de votre GPS. Si un code pin est nécessaire vous devez saisir “0000” (4 fois zéro). 6. Quand la connexion à réussi, le voyant reste bleu fixe pendant une seconde puis quitte le mode de configuration. (Le voyant clignote bleu). Vous pouvez maintenant utilisé votre MIDLAND BTX2 PRO S avec le GPS pour les annonce de direction. www.midlandeurope.com Comment ecouter la radio FM Le récepteur radio FM est intégré dans l’appareil. Vous avez juste besoin de basculer en mode “Radio FM” afin de l’utiliser. Appuyer longuement sur la touche “Centrale” jusqu’à ce que vous entendiez “radio FM” vocalement. Maintenant, toutes les trois touches sont dédiées à la Radio FM (voir la table C). Attention: Appuyez brièvement sur la touche “Avant” ou “Arrière” pour chercher la station de radio FM. Lorsque vous appuyez longuement sur la touche “Avant” ou “Arrière”, vous scannez vers le haut ou le bas les 6 stations enregistrées. Un bip sonore sépare chaque station enregistrée et un double bip se fait entendre lorsque la dernière ou la première station enregistrée est atteint. Pour enregistrer la station que vous écoutez, appuyez sur la touche “Avant” et “Arrière” en même temps pendant 3 secondes. Vous entendez un bip de confirmation. La station est enregistrée après la dernière mémoire utilisée. Grâce au système RDS, la radio FM choisi le signal le plus puissant disponible pour la station de radio que vous souhaitez écouter. Le système RDS est désactivée par défaut, si nécessaire, vous pouvez activer/ désactiver le RDS en appuyant sur la touche “Volume +” et “Volume -” pendant 3 secondes lorsque la radio est allumée. Activer / désactiver la radio FM Par défaut la radio FM est active. Désactiver: ›› Entrez en configuration: éteignez le module et maintenez appuyé sur la touche “Centrale” pendant 7 secondes, jusqu’à ce que le voyant soit rouge fixe. ›› Appuyez sur les touches “Centrale” et “Vol +” pendant 3 secondes. Le voyant bleu clignote deux fois. ›› Double cliquez sur la touche “Centrale” pour sortir du mode Configuration et utiliser le BTX2 PRO S Activer: ›› Suivez la même procédure décrite ci-dessus; le voyant bleu clignotera une fois. ›› Pour sortir du mode Configuration double cliquez sur la touche “Centrale”. FM radio avec Intercom Lorsque vous êtes en mode “Radio FM” vous ne pouvez pas ouvrir manuellement l’Intercom, vous pouvez uniquement utiliser la fonction VOX avec le module connecté par la touche “Centrale”. Pour une activation manuelle vous devez basculer en mode “Intercom”. Attention: Après avoir réinitialisé toutes les parties, seul le mode “Radio FM” sera activé. C-Mode Radio FM Mode Radio FM www.midlandeurope.com Touche avant Court: Recherche station avant Long: enregistrer recherche Touche centrale Court: On/off radio Long: Changement de mode Touche arrière Court: Recherche station avant Long: Enregistrer recherche 81 F Connexion à une radio PMR446 avec Bluetooth intégré ou externe La radio PMR446 doit être connecté au bouton “Vol –“ ou “Vol +”. Si appairé sur le “ Volume -”, La radio PMR 446 est toujours en arrière plan même quand vous parlez dans l’intercom. Procedure ›› Éteignez l’appareil. ›› Appuyez et maintenez enfoncé la touche “Centrale” environ 7 secondes, jusqu’à ce que le voyant rouge soit allumé en permanence. ›› Maintenant appuyez sur la touche “Volume –“ pendant 3 secondes le voyant clignote alors rouge et bleu. ›› Suivez la procédure de connexion expliquée dans le manuel de la radio. Radio FM en arrière-plan - “Centrale” - “Arrière” pendant 3 secondes. La lumière bleue s’allume pendant 1 sec. ›› Double cliquez sur la touche “Centrale” pour quitter le mode “Setup” et utiliser le BTX2 PRO S. Installation et configuration speciale Activer/désactiver la fonction VOX (Intercom et téléphone) Il n’est pas possible d’utiliser la radio FM en même temps qu’une autre source audio. Tout son provenant de l’intercom ou de la connexion “Vol +” ou “Vol -” met en pause la radio FM. F Remise à zéro Parfois, il peut être nécessaire de supprimer toutes les références de couplage enregistrées dans le BTX2 PRO S (réinitialisation). Pour effectuer cette opération vous devez d’abord entrer en mode configuration: ›› Éteignez l’appareil. ›› Appuyez et maintenez enfoncé la touche “Centrale” environ 7 secondes, jusqu’à ce que le voyant rouge soit allumé en permanence. ›› Appuyez simultanément sur les touches “Volume +” et “Volume -” pendant 3 secondes. La lumière bleue s’allume pendant 1 sec. ›› Double cliquez sur la touche “Centrale” pour quitter le mode “Setup” et utiliser le BTX2 PRO S. Cette procédure supprime tous les appareils couplés par Bluetooth et stockées dans la mémoire, il est donc possible de commencer une nouvelle session “propre” de couplage. Attention: Après avoir réinitialisé toutes les parties, seul le mode “Radio FM” sera activé. Retour en configuration d’usine Parfois, il peut être nécessaire de revenir aux réglages d’usine, pour remettre à zéro toutes les modifications et la configuration déjà faite pour avoir un module “propre”. Pour effectuer cette opération vous devez d’abord entrer en mode configuration: ›› Éteignez l’appareil. ›› Appuyez et maintenez enfoncé la touche “Centrale” environ 7 seconde, jusqu’à ce que le voyant rouge soit allumé en permanence. ›› Appuyez simultanément en maintenant enfoncée les trois touches “Avant” 82 La fonction Intercom peut être activée manuellement ou vocalement (VOX). L’activation du VOX est influencée par le type de casque, le bruit de fond et donc par la vitesse. Pour des résultats optimaux, il est possible de choisir l’un des quatre niveaux de sensibilité du microphone: haute, moyenne, faible ou très faible. Le réglage par défaut du BTX2 PRO S est “faible “. Il est également possible de désactiver la fonction VOX pour activer l’Intercom et appel téléphonique fonctionnalités répondant uniquement en mode manuel. Ces réglages peuvent être effectués via le programme “BTPro Updater” compatible avec PC/MAC. Configuration et mise à jour logiciel Il est possible de configurer et de mettre à jour le logiciel embarqué du BTX2 PRO S en utilisant la connexion USB vers votre PC. Sur le site web Midland www.midlandeurope.com à la page BTX2 PRO S vous pouvez trouver le logiciel Pc et le firmware pour la mise à jour. ATTENTION: NE PAS CONNECTER LE MODULE AU PC “AVANT” D’AVOIR TELECHARGER ET INSTALLE LE LOGICIEL Utilisez à vos risques L’utilisation de cet appareil altère votre capacité à entendre d’autres sons et d’autres personnes autour de vous. Écouter de la musique ou parler au téléphone vous empêche d’entendre les autres autour de vous. L’utilisation de ces équipements pendant la conduite peut endommager vous et les autres; dans certains lieux n’est pas autorisé. L’utilisation à un volume élevé peut entraîner une perte auditive permanente. Si vous entendez un sifflement dans l’oreille ou toutes autres écoutes doulou- www.midlandeurope.com reuse associée, réduisez le volume ou cessez d’utiliser cet appareil. Avec l’utilisation continue à volume élevé, vos oreilles s’habituent au niveau sonore, ce qui peu causer des dommages permanents à votre audience. S’il vous plaît utiliser cet appareil à un niveau de volume raisonnable. Garantie La garantie s’appliquant à l’appareil principal est d’une durée de 24 mois; elle est de 6 mois pour les accessoires (batteries, chargeurs, antennes, casques d’écoute, microphones). Pour davantage d’informations au sujet de la garantie, veuillez vous rendre sur le site: www.midlandeurope.com Certification de notice européenne CE et informations d’agrément aux fins de sécurité www.midlandeurope.com F Ce produit porte le marquage CE conformément à la directive RED 2014/53/ UE et peut être librement utilisé dans tous les pays de l’UE. Il est interdit aux utilisateurs d’effectuer des changements ou des modifications sur le dispositif. Les modifications qui ne sont pas expressément approuvées par le producteur rendent nulle la garantie. Pour de plus amples informations, veuillez visiter notre site Internet: www.midlandeurope.com 83 RED IT / RSM Cte International Srl dichiara che il prodotto è conforme ai requisiti essenziali e alle disposizioni della Direttiva 2014/53/ UE. La Dichiarazione di conformità si può scaricare dal sito http://www.midlandeurope.com/it/pagina/10090certifications GB / CY / MT Hereby Cte International Srl declares that this product is in compliance with the essential requirements and other relevant provisions of Directive 2014/53/UE. The declaration of conformity is available on the web site http://www.midlandeurope.com/it/pagina/10090certifications AT / DE / CH / LI Hiermit erklärt Cte International Srl, dass das Produkt die grundlegenden Anforderungen und anderen relevanten Bestimmungen der Richtlinie 2014/53/UE. Die Konformitätserklärung ist unter folgendem Link verfügbar: http://www.midlandeurope.com/it/pagina/10090certifications ES CTE International SRL. declara, bajo su responsabilidad, que este aparato cumple con lo dispuesto en la Directiva 2014/53/UE, del Parlamento Europe. La Declaración de Conformidad está disponible en http://www.midlandeurope.com/it/pagina/10090certifications FR / LU / CH Par la présente Cte International Srl déclare que le modèle est conforme aux exigences essentielles et autres dispositions pertinentes de la directive 2014/53/UE. La déclaration de conformité est disponible sur le site internet http://www.midlandeurope.com/it/pagina/10090certifications PT A CTE INTERNATIONAL declara que este aparelho cumpre com o disposto na Directiva 2014/53/UE do Parlamento Europeu. A Declaração de Conformidade está disponível no sitio na Internet em http://www. midlandeurope.com/it/pagina/10090-certifications GR Με το παρών, η Cte International Srl δηλώνει οτι το όνομα του μοντέλου συμμορφώνεται ως προς τις βασικές απαιτήσεις και άλλες σχετικές διατάξεις του Κανονισμού 2014/53/UE. Η δήλωση συμμόρφωσης είναι διαθέσιμη στην ιστοσελίδα http://www.midlandeurope.com/it/pagina/10090certifications NL Hierbij verklaard CTE International Srl dat dit model voldoet aan de essentiële eisen en andere relevante bepalingen van richtlijn 2014/53/UE. De verklaring van conformiteit is beschikbaar op de website http://www.midlandeurope.com/it/pagina/10090certifications BE CTE INTERNATIONAL Srl verklaart dat het product overeenstemt met de voorschriften en andere bepalingen van de richtlijn 2014/53/UE. De conformiteitsverklaring is voorhanden op de website http://www.midlandeurope.com/ it/pagina/10090-certifications PL CTE International Srl deklaruje, że ten model jest zgodny z wymaganiami zasadniczymi i innymi istotnymi postanowieniami Dyrektywy 2014/53/UE. Deklaracja Zgodności jest dostepna na stronie http://www. midlandeurope.com/it/pagina/10090-certifications RO Cte International Srl declara ca acest model este in conformitate cu cerintele esentiale si alte prevederi ale Directivei 2014/53/UE. Declaratia de confomitate este disponibila si pe site-ul http://www.midlandeurope.com/it/ pagina/10090-certifications. BG С настоящото CTE international Srl декларира, че продукта е в съответствие с основните изисквания и съответните модификации на 0Директива 2014/53/UE. Декларацията за съвместимост е налична на сайта: http://www.midlandeurope.com/it/pagina/10090certifications NO CTE INTERNATIONAL Srl erklærer at produktet er i overensstemmelse med de viktigste kravene og andre relevante betingelser i Direktivet 2014/53/UE. Samsvarserklæringen finnes tilg jengelig på nettstedet http://www.midlandeurope.com/it/pagina/10090certifications DK Hermed erklærer Cte International Srl , at dette apperat er i overensstemmelse med kravene og andre relevante bestemmelser i direktiv 2014/53/UE. Overensstemmelseserklæringen findes på webstedet http://www.midlandeurope.com/it/pagina/10090certifications SE CTE INTERNATIONAL Srl förkunnar att produkten överensstämmer med de väsentliga kraven och övriga bestämmelser i direktiv 2014/53/EU. Denna försäkran om överensstämmelse finns på webbplatsen http://www.midlandeurope.com/it/pagina/10090certifications FI CTE INTERNATIONAL Srl vakuuttaa, että tuote täyttää direktiivin 2014/53/UE. Vaatimuksenmukaisuusvakuutus on saatavilla http://www.midlandeurope.com/it/pagina/10090certifications –verkkosivuilla. HR Cte International Srl ovime izjavljuje da je ime ovog modela u suglasnosti sa bitnim zahtjevima te ostalim relevantnim odredbama Propisa 2014/53/EU. Ova Izjava o suglasnosti je dostupna na web stranici http://www.midlandeurope.com/ it/pagina/10090-certifications. EE Käesolevaga kinnitab Cte International Srl selle mudeli vastavust direktiivi 2014/53/UE. Vastavusdeklaratsioon on kättesaadav veebilehel http://www.midlandeurope.com/it/pagina/10090certifications LT CTE International patvirtina, kad šis modelis atitinka visus esminius Direktyvos 2014/53 / UE. Atitikties deklaracija yra pateikiama internetinėje svetainėje http://www.midlandeurope.com/it/pagina/10090certifications LV CTE INTERNATIONAL Srl deklarē, ka produkts atbilst pamatprasībām un citiem ar to saistītajiem Direktīvas 2014/53 / UE. Atbilstības deklarācija ir pieejama mājas lapā: http://www.midlandeurope.com/it/pagina/10090certifications SK Týmto Cte International Srl prehlasuje, že tento názov model je v zhode so základnými požiadavkami a ďalšími príslušnými ustanoveniami smernice 2014/53 /UE. Vyhlásenie o zhode je k dispozícii na webových stránkach http://www.midlandeurope.com/it/pagina/10090certifications SI Cte International Srl deklarira da je ta model skladen z bistvenimi zahtevami in drugimi relevantnimi določili EU direktive 2014/53/UE. Deklaracija o skladnosti je na voljo na spletni strani http://www.midlandeurope.com/it/ pagina/10090-certifications CZ CTE INTERNATIONAL SRL prohlašuje, že výrobek je v souladu s 2014/53/UE. Prohlášení o shodě je k dispozici na webových stránkách http://www.midlandeurope.com/it/pagina/10090certifications H Mi, a CTE International Srl. saját felelősségre kijelentjük, hogy ezen elnevezésű termék megfelel az 2014/53 /UE. A megfelelőségi nyilatkozat elérhető weboldalunkon a http://www.midlandeurope.com/it/pagina/10090certifications címen. • • INFORMAZIONE AGLI UTENTI: i sensi dell’art. 13 del decreto legislativo 25 luglio 2005, n.151 “Attuazione delle Direttive 2002/95/CE, 2002/96/CE e 2003/108/CE, relative alla riduzione dell’uso di sostanze pericolose nelle apparecchiature elettriche ed elettroniche, nonché allo smaltimento dei rifiuti”. Il simbolo del cassonetto barrato riportato sull’apparecchiatura indica che il prodotto alla fine della propria vita utile deve essere raccolto separatamente dagli altri rifiuti. L’utente dovrà, pertanto, conferire l’apparecchiatura giunta a fine vita agli idonei centri di raccolta differenziata dei rifiuti elettronici ed elettrotecnici, oppure riconsegnarla al rivenditore al momento dell’acquisto di una nuova apparecchiatura di tipo equivalente, in ragione di uno a uno. L’adeguata raccolta differenziata per l’avvio successivo dell’apparecchiatura dismessa al riciclaggio, al trattamento e allo smaltimento ambientalmente compatibile contribuisce ad evitare possibili effetti negativi sull’ambiente e sulla salute e favorisce il riciclo dei materiali di cui è composta l’apparecchiatura. Lo smaltimento abusivo del prodotto da parte dell’utente comporta l’applicazione delle sanzioni amministrative di cui al dlgs. n.22/1997 (articolo 50 e seguenti del dlgs. n.22/1997). All articles displaying this symbol on the body, packaging or instruction manual of same, must not be thrown away into normal disposal bins but brought to specialised waste disposal centres. Here, the various materials will be divided by characteristics and recycles, thus making an important contribution to environmental protection. • • • Alle Artikel, die auf der Verpackung oder der Gebrauchanweisung dieses Symbol tragen, dürfen nicht in den normalen Mülltonnen entsorgt werden, sondern müssen an gesonderten Sammelstellen abgegeben werden. Dort werden die Materialien entsprechend ihrer Eigenschaften getrennt und, um einen Beitrag zum Umweltschutz zu liefern, wiederverwertet. Todos los artículos que exhiban este símbolo en el cuerpo del producto, en el embalaje o en el manual de instrucciones del mismo, no deben ser desechados junto a los residuos urbanos normales sino que deben ser depositados en los centros de recogida especializados. En estos centros, los materiales se dividirán en base a sus características y serán reciclados, para así poder contribuir de manera importante a la protección y conservación del medio ambiente. Tous les articles présentant ce symbole sur le corps, l’emballage ou le manuel d’utilisation de celui-ci ne doivent pas être jetés dans des poubelles normales mais être amenés dans des centres de traitement spécialisés. Là, les différents matériaux seront séparés par caractéristiques et recyclés, permettant ainsi de contribuer à la protection de l’environnement. SAR I / RSM Importante: L’apparato deve essere utilizzato ad una distanza superiore a 5 cm dal corpo UK / CY / IRL/ M Important: The equipment must be used at least 5cm away from the body of use A / D / CH / FL Wichtig: Bei Verwendung des Gerätes muss ein Abstand von mehr als 5 cm zum Körper eingehalten werden. BE Belangrijk: De apparatuur moet gebruikt worden op een afstand van het lichaam die groter is dan 5cm BG ВАЖНО: Оборудването трябва да се използва на дистанция не по-малка от 5 см от тялото. CZ Důležité: Zařízení nesmí být používáno ve vzdálenosti méně než 5 cm od těla. DK Vigtigt: Udstyret skal skal være mindst 5cm fra kroppen under anvendelse E El equipo debe usarse a una distancia superior a 5cm del cuerpo. EST Märkus: Seade tuleb kasutada kaugemal kui 5cm kehast F / LUX / CH Important: l’appareil doit être utilisé à une distance supérieure à 5cm du corps. FIN Tärkeää: Laitetta on käytettävä etäisyydellä yli 5cm kehosta GR Σημαντικό: Ο εξοπλισμός θα πρέπει να χρησιμοποιείται σε απόσταση μεγαλύτερη των 5cm από το σώμα σας. HR Važno: Oprema se mora koristiti na udaljenosti većoj od 5 cm od tijela HU Fontos! Használat közben győződjön meg arról, hogy az eszköz legalább 5cm-re a testétől van. IS Búnaðurinn verður að nota í fjarlægð sem er meiri en 5cm úr líkamanum LT SVARBU: Įranga turi būti naudojama ne mažiau kaip 5cm atstumu nuo kūno. LV Aparāts jāizmanto attālumā vairāk nekā 5 cm no organisma N Viktig: Apparatet må brukes i en avstand på mer enn 5cm fra kroppen NL Belangrijk: Het apparaat moet op een afstand van minimaal 5 cm van het lichaam gebruikt worden. P Importante: O equipamento tem de ser usado a uma distância do corpo superior a 5cm. PL Uwaga: Urządzenie podczas pracy nie może znajdować się bliżej niż 5cm od ciała. RO Important: produsul trebuie utilizat la o distanta mai mare de 5cm fata de corp. SE Viktigt: Apparaten måste användas på ett avstånd av mer än 5 cm från kroppen SK Dôležité: Pri použití prístroja musí byť dodržaná minimálna vzdialenosť od tela 5 cm! SL Pomembno: Napravo se mora uporabljati vsaj 5 cm oddaljeno od človeškega telesa Prodotto o importato da: CTE INTERNATIONAL srl Via. R.Sevardi 7 42124 Reggio Emilia - Italia. Prima dell’uso leggere attentamente le istruzioni. Produced or imported by: CTE INTERNATIONAL srl Via. R.Sevardi 7 42124 Reggio Emilia - Italy. Read the instructions carefully before installation and use. Vertrieb durch: ALAN ELECTRONICS GmbH Daimlerstraße 1K - D-63303 Dreieich Deutschland. Vor Benutzung Bedienungsanleitung beachten. Importado por: MIDLAND IBERIA, SA C/Cobalt, 48 - 08940 Cornellà de Llobregat, Barcelona - España. Antes de utilizar, lea atentamente el manual de uso. Importé par: ALAN FRANCE S.A.R.L. 5, Rue Ferrie, Zac les Portes du Vexin 95300 Ennery - France Avant l’utilisation, lire les instructions. www.midlandeurope.com-
 1
1
-
 2
2
-
 3
3
-
 4
4
-
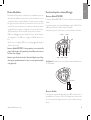 5
5
-
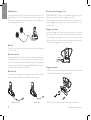 6
6
-
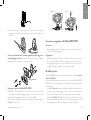 7
7
-
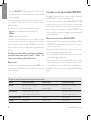 8
8
-
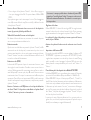 9
9
-
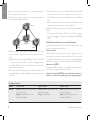 10
10
-
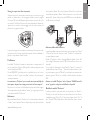 11
11
-
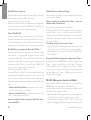 12
12
-
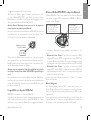 13
13
-
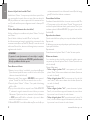 14
14
-
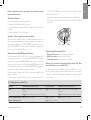 15
15
-
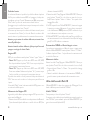 16
16
-
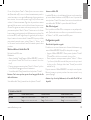 17
17
-
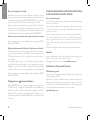 18
18
-
 19
19
-
 20
20
-
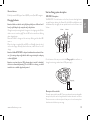 21
21
-
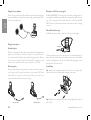 22
22
-
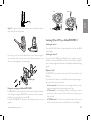 23
23
-
 24
24
-
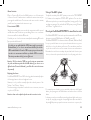 25
25
-
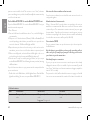 26
26
-
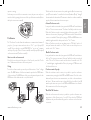 27
27
-
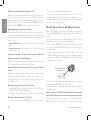 28
28
-
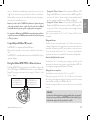 29
29
-
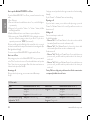 30
30
-
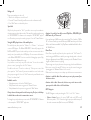 31
31
-
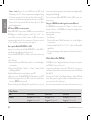 32
32
-
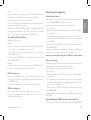 33
33
-
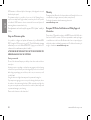 34
34
-
 35
35
-
 36
36
-
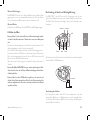 37
37
-
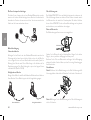 38
38
-
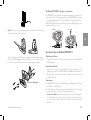 39
39
-
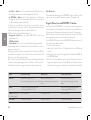 40
40
-
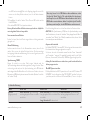 41
41
-
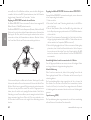 42
42
-
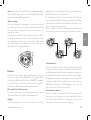 43
43
-
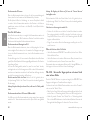 44
44
-
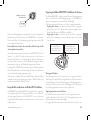 45
45
-
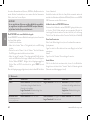 46
46
-
 47
47
-
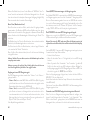 48
48
-
 49
49
-
 50
50
-
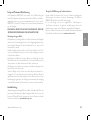 51
51
-
 52
52
-
 53
53
-
 54
54
-
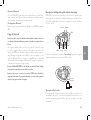 55
55
-
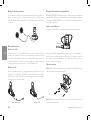 56
56
-
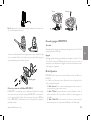 57
57
-
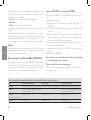 58
58
-
 59
59
-
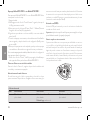 60
60
-
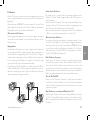 61
61
-
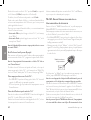 62
62
-
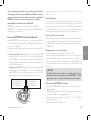 63
63
-
 64
64
-
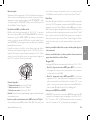 65
65
-
 66
66
-
 67
67
-
 68
68
-
 69
69
-
 70
70
-
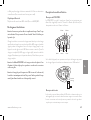 71
71
-
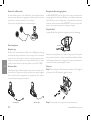 72
72
-
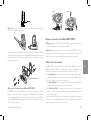 73
73
-
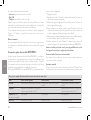 74
74
-
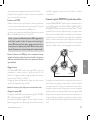 75
75
-
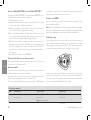 76
76
-
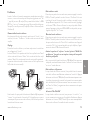 77
77
-
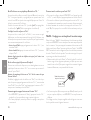 78
78
-
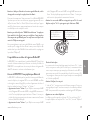 79
79
-
 80
80
-
 81
81
-
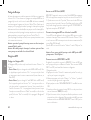 82
82
-
 83
83
-
 84
84
-
 85
85
-
 86
86
-
 87
87
-
 88
88
-
 89
89
-
 90
90
-
 91
91
-
 92
92


Midland BTX2 Pro S-LR Bluetooth Kommunikation, Einzelgerät El manual del propietario
- Tipo
- El manual del propietario
- Este manual también es adecuado para
en otros idiomas
- français: Midland BTX2 Pro S-LR Bluetooth Kommunikation, Einzelgerät Le manuel du propriétaire
- italiano: Midland BTX2 Pro S-LR Bluetooth Kommunikation, Einzelgerät Manuale del proprietario
- English: Midland BTX2 Pro S-LR Bluetooth Kommunikation, Einzelgerät Owner's manual
- Deutsch: Midland BTX2 Pro S-LR Bluetooth Kommunikation, Einzelgerät Bedienungsanleitung
Artículos relacionados
-
Midland BTX2 Pro 2020, Single, HiFi Super Bass Lautsprecher El manual del propietario
-
-
Midland BTX1 Pro S Bluetooth Kommunikation, Doppelset El manual del propietario
-
-
-
-
Midland BTX1 FM Manual de usuario
-
-
Midland Radio BTX1 Manual de usuario
-
Otros documentos
-
 Twiins D3 Manual de usuario
-
Caliber MAC060BT-R El manual del propietario
-
Interphone F5S Manual de usuario
-
Cellular Line INTERPHONEF3EU Manual de usuario
-
Alan MIDLAND BT2 INTERCOM El manual del propietario
-
Cellular Line INTERPHONEF4FFEU Manual de usuario
-
Mpow Bluetooth Music Receiver BH044D Manual de usuario
-
iON Party Float Guía de inicio rápido
-
-
AGPtek G02 Guía de inicio rápido
