Brand HandyStep touch S Multi Dispenser Manual de usuario
- Tipo
- Manual de usuario

HandyStep® touch
HandyStep® touch S
Mehrfachdispenser | Multi Dispenser
Gebrauchsanleitung | Operating manual | Mode
d'emploi | Instrucciones de manejo | 操作手册

2Gebrauchsanleitung HandyStep® touch, HandyStep® touch S 997486
Impressum
BRAND GMBH + CO KG
Otto-Schott-Str. 25
97877 Wertheim (Germany)
More operating manuals and translations?
Please refer to http://www.brand.de/om or use the following
Quick Response Code:
T +49 9342 808 0
F +49 9342 808 98000
www.brand.de
Patents: HandyStep® touch is made in Germany under BRAND patents and patent applications:
CN304548063S
CN305709380S
USD926,224S
EM005796471
DE202017101007U1
DE202017101008U1
DE202017101009U1
EM004517548
US6,841,129B2
USD871,606S
WO2018/153830A1
WO2018/153924A1
WO2018/153986A2
EP3554707B1
EP3554708B1
EP3554709B1
EP3795254B1
US10,870,107B2
The use of dispenser tips with a specific coding on the plunger head is subject to the
BRAND patents US10,870,107B2, EP3795254B1, USD825,750S and CN304542771S as well
as European Design Patents EM003763564 and EM004045847
U.S. Patents: www.brand.de/ip
Link in Quick Response Code: www.brand.de/ip
Operating Manuals
Link in Quick Response Code: www.brand.de/om
Standard Operating Procedures
Link in Quick Response Code: www.brand.de/sop
Technische Änderungen, Irrtum und Druckfehler vorbehalten.


BRAND GMBH + CO KG has made reasonable eorts to ensure that hazardous materials and
substances may not be used in BRAND products.
In order to determine the concentration of hazardous substances in all homogeneous materials of the
subassemblies, a “Product Conformity Assessment” (PCA) procedure was performed. As defined in
GB/T 26572 the “Maximum Concentration Value” limits (MCV) apply to these restricted substances:
Declaration of conformity – China RoHS 2
Environmental Friendly Use Period (EFUP)
EFUP defines the period in years during which the hazardous substances contained
in electrical and electronic products will not leak or mutate under normal operat-
ing conditions. During normal use by the user such electrical and electronic prod-
ucts will not result in serious environmental pollution, cause serious bodily injury or
damage to the user’s assets.
The Environmental Friendly Use Period for BRAND instruments is 40 years.
此表格是按照SJ/T 11364-2014中规定所制定的。
This table is created according to SJ/T 11364-2014.
有毒有害物质或元素
Hazardous substances
部件名称
Part name
铅
Pb
汞
Hg
镉
Cd
六价铬
Cr(+VI)
多溴联苯
PBB
多溴二
苯醚
PBDE
环保期限标识
EFUP
包装 / Packaging O O O O O O
塑料外壳 / 组件
Plastic housing / parts O O O O O O
电池 / Battery O O O O O O
玻璃 / Glass O O O O O O
电子电气组件
Electrical and
electronic parts
X X X O O O
金属外壳 / 组件
Metal housing / parts X O O O O O
电机 / Motor X O O O O O
配件 / Accessories X O O O O O
+ Lead (Pb): 0.1%
+ Mercury (Hg): 0.1%
+ Cadmium (Cd): 0.01%
page 1 of 2
10
+ Hexavalent chromium (Cr(+VI)): 0.1%
+ Polybrominated biphenlys (PBB): 0.1%
+ Polybrominated diphenyl ether (PBDE): 0.1%
Material content declaration for BRAND products

O: 表示该有毒有害物质在该部件所有均质材料中的含量均在GB/T 26572规定的限量要求以下。
O: Indicates that the above mentioned hazardous substance contained in all homogeneous materials of the
part is below the required limit as defined in GB/T 26572.
X: 表示该有毒有害物质至少在该部件某一均质材料中的含量超出GB/T 26572规定的限量要求。
X: Indicates that the above mentioned hazardous substance contained in at least one of the homogeneous
materials of this part is above the required limit as defined in GB/T 26572.
Patrick Ziemeck
(Managing Director
Technology)
Place, date: Wertheim, 17|05|2021
page 2 of 2
注释注释: 此表格适用于所有产品。以上列出的元件或组件不一定都属于所附产品的组成。
Note: Table applies to all products. Some of the components or parts listed above may not be part of the
enclosed product.
除上表所示信息外,还需声明的是,这些部件并非是有意用铅((Pb), 汞 ( (Hg), 铬( (Cd), 六价铬 (Cr(+VI)),
多溴联苯((PBB))或多溴二苯醚((PBDE))来制造的。
Apart from the disclosures in the above table, the subassemblies are not intentionally manufactured or
formulated with lead (Pb), mercury (Hg), cadmium (Cd), hexavalent chromium (Cr+VI), polybrominated
biphenyls (PBB), and polybrominated diphenyl ethers (PBDE).
Products manufactured by BRAND may enter into further devices or can be used together with other appli-
ances. With these third party products and appliances in particular, please note the EFUP labeled on these
products. BRAND will not take responsibility for the EFUP of those products and appliances.
BRAND GMBH + CO KG | Otto-Schott-Str. 25 | 97877 Wertheim | Germany
T +49 9342 808-0 | F +49 9342 808-98000 | info@brand.de | www.brand.de

10 Gebrauchsanleitung HandyStep® touch, HandyStep® touch S 997486
Inhaltsverzeichnis
1 Lieferumfang ...................................... 12
2 Gebrauchsbestimmung........................ 12
2.1 Gefährdungsstufen .......................... 12
2.2 Symbole............................................ 12
2.3 Darstellung ....................................... 12
3 Sicherheitsbestimmungen ................... 13
3.1 Allgemeine Sicherheitsbestimmun-
gen .................................................... 13
3.2 Akku .................................................. 13
3.3 Induktives Laden.............................. 14
3.4 Touch-Display................................... 14
3.5 Einsatzgrenzen................................. 14
3.6 Einsatzausschlüsse .......................... 14
3.7 Verwendete Materialien................... 15
3.8 Transport und Lagerung.................. 15
4 Verwendungszweck............................. 15
5 Funktions- und Bedienelemente ........... 16
5.1 STEP-Taste ....................................... 16
5.2 Power-Taste ..................................... 17
5.3 Akku .................................................. 17
5.4 Bedienelemente............................... 19
5.5 Netzteil und Länderadapter ............ 20
5.6 Gerätehalter ..................................... 20
5.7 Ladeständer (Zubehör).................... 21
5.8 Halteständer (Zubehör) ................... 22
5.9 Aufbau des Touch-Display (Arbeits-
bereich)............................................. 22
5.10 PD-TipsII (Präzisions-Dispenser-
Tips II) ............................................... 23
5.11 Adapter für 25 ml und 50 ml PD-
Tips II................................................. 23
6 Modusübersicht................................... 23
7 Bedienung .......................................... 24
7.1 Gerät einschalten............................. 24
7.2 Gerät ausschalten ............................ 25
7.3 Arbeitsmodus öffnen ....................... 25
7.4 Arbeitsmodus verlassen .................. 25
7.5 Kontexthilfe aufrufen....................... 26
7.6 Spitzen einsetzen............................. 26
7.7 Spitze auswerfen.............................. 27
7.8 Flüssigkeit aufnehmen..................... 27
7.9 Flüssigkeit abgeben ......................... 28
7.10 Volumen einstellen............................ 29
7.11 Aufnahme- und Abgabegeschwin-
digkeit einstellen............................... 29
8 Einstellungen .......................................30
8.1 Sprache.............................................. 30
8.2 Gerät................................................... 30
8.3 Datum / Uhrzeit ................................. 30
8.4 Anzeige............................................... 31
8.5 Ton ..................................................... 31
8.6 Info/Über............................................ 31
8.7 Regulatorische Hinweise................... 31
8.8 Kalibrierung....................................... 31
8.9 Werkseinstellungen........................... 32
8.10 Spitzenerkennung einschalten/aus-
schalten.............................................. 32
8.11 Keypad ............................................... 32
9 Multi-Dispensieren (MULTI-DISP) ...........33
9.1 Flüssigkeit aufnehmen...................... 33
9.2 Flüssigkeitsaufnahme unterbre-
chen und fortsetzen .......................... 33
9.3 Flüssigkeit abgeben .......................... 33
9.4 Umgang mit Restvolumen ................ 34
9.5 STEP-Anzahl vorwählen.................... 34
9.6 Optionen............................................ 34
10 Auto-Dispensieren (AUTO-DISP) ...........35
10.1 Flüssigkeit automatisch abgeben .... 35
10.2 Abgabedauer optimieren.................. 35
10.3 Pausenzeit manuell einstellen.......... 36
10.4 Pausenzeit automatisch einstellen
(Lernfunktion).................................... 36
10.5 Umgang mit Restvolumen ................ 37
10.6 Optionen............................................ 37
11 Pipettieren (PIP)...................................38
11.1 Volumen einstellen............................ 38
11.2 Spitze befüllen................................... 38
11.3 Flüssigkeit abgeben und Flüssig-
keitsabgabe stoppen......................... 38
11.4 Umgang mit Restvolumen ................ 38
11.5 Optionen............................................ 39
12 Sequentielles Dispensieren (SEQ-DISP)...39
12.1 Sequentielles Dispensieren im De-
tail ...................................................... 39
12.2 Aliquotliste anlegen .......................... 40

Deutsch
Inhaltsverzeichnis
HandyStep® touch, HandyStep® touch S 997486 Gebrauchsanleitung 11
12.3 Aliquotliste editieren ....................... 40
12.4 Flüssigkeit abgeben ......................... 41
12.5 Aliquotierung unterbrechen und
beenden............................................ 41
12.6 Optionen........................................... 41
13 Multi-Aspirieren (MULTI-ASP) ............... 41
13.1 Multi-Aspirieren im Detail................ 41
13.2 Flüssigkeitsaufnahme vorbereiten.. 42
13.3 Füllmodi............................................ 42
13.4 Flüssigkeit abgeben ......................... 43
13.5 Aliquotliste zur Flüssigkeitsaufnah-
me anlegen und editieren................ 43
13.6 Arbeitsmodus wechseln................... 43
13.7 Optionen........................................... 43
14 Titrieren ............................................. 43
14.1 Titrieren im Detail ............................ 44
14.2 Titrieren ............................................ 44
14.3 Optionen........................................... 45
15 Favoriten............................................ 46
15.1 Favoriten im Detail........................... 46
15.2 Favoriten anlegen ............................ 46
15.3 Favoriten öffnen............................... 46
15.4 Favoriten löschen............................. 47
16 Reinigung und Desinfektion.................. 47
16.1 Reinigung.......................................... 47
16.2 UV-Entkeimung ................................ 47
17 Störung - Was tun?............................... 48
17.1 Geräteverhalten ............................... 48
17.2 Systemmeldungen........................... 49
17.3 Ereignismeldungen im Display........ 49
18 Volumen überprüfen............................ 50
18.1 Prüfanweisungen (SOP)................... 50
18.2 Dichtheitsprüfung des PD-Tips........ 50
19 Kalibrierung........................................ 50
20 Technische Daten ................................ 50
20.1 Genauigkeitstabelle......................... 50
20.2 Einsatzgrenzen................................. 51
20.3 Verwendete Materialien................... 51
20.4 Akku .................................................. 51
20.5 Ladeständer...................................... 52
20.6 Universalnetzteil .............................. 52
20.7 Kennzeichnungen auf Produkt und
Akku ................................................... 52
21 Bestellinformationen ............................53
21.1 Geräte................................................. 53
21.2 Zubehör ............................................. 54
21.3 Verbrauchsmaterialien...................... 55
22 Reparatur ............................................55
22.1 Zur Reparatur einsenden .................. 55
23 Kalibrierservice ....................................56
24 Informationen zu Ihrem Laborgerät .......58
25 Mängelhaftung .....................................58
26 Entsorgung ..........................................58
26.1 Entsorgung des Akkus....................... 59

12 Gebrauchsanleitung HandyStep® touch, HandyStep® touch S 997486
1 Lieferumfang
Gerät HandyStep® touch
USB-Kabel
Universalnetzteil
Halte-Clips für Regalbefestigung
5 PD-Tips II mit 12,5 ml, 5 ml, 2,5 ml, 1,25 ml und
0,5 ml
Gebrauchsanleitung mit Konformitätserklärung
Qualitätszertifikat
Kurzanleitung
2 Gebrauchsbestimmung
•Lesen Sie die Gebrauchsanleitung vor dem ersten Gebrauch sorgfältig durch.
•Die Gebrauchsanleitung ist Teil des Geräts und muss leicht zugänglich aufbewahrt werden.
•Legen Sie die Gebrauchsanleitung bei, wenn Sie dieses Gerät an Dritte weitergeben.
•Sie finden aktualisierte Versionen der Gebrauchsanleitung auf unserer Homepage
www.brand.de.
2.1 Gefährdungsstufen
Folgende Signalworte kennzeichnen mögliche Gefährdungen:
Signalwort Bedeutung
GEFAHR Führt zu schwerer Verletzung oder Tod.
WARNUNG Kann zu schwerer Verletzung oder Tod führen.
VORSICHT Kann zu leichten oder mittleren Verletzungen führen.
HINWEIS Kann zu einer Sachbeschädigung führen.
2.2 Symbole
Symbol Bedeutung Symbol Bedeutung Symbol Bedeutung
Gefahrenstelle Biogefährdung Warnt vor Sachbe-
schädigung
Elektrische Spannung Explosionsgefährliche
Stoffe
Nicht mit Haus-
müll entsorgen
Heiße Oberfläche Magnetische Felder Stellt eine Display-
Geste dar.
2.3 Darstellung
Darstellung Bedeutung Darstellung Bedeutung
1. Task Kennzeichnet eine Aufgabe. >Kennzeichnet eine Voraus-
setzung.
a., b., c. Kennzeichnet einzelne Schritte der
Aufgabe.
Kennzeichnet ein Ergebnis.

Deutsch
3 Sicherheitsbestimmungen
HandyStep® touch, HandyStep® touch S 997486 Gebrauchsanleitung 13
3 Sicherheitsbestimmungen
3.1 Allgemeine Sicherheitsbestimmungen
Bitte unbedingt sorgfältig durchlesen!
Das Laborgerät HandyStep® touch kann in Kombination mit gefährlichen Materialien, Arbeitsvorgän-
gen und Apparaturen verwendet werden. Die Gebrauchsanleitung kann jedoch nicht alle Sicherheits-
probleme aufzeigen, die hierbei eventuell auftreten. Es liegt in der Verantwortung des Anwenders, die
Einhaltung der Sicherheits- und Gesundheitsvorschriften sicherzustellen und die entsprechenden Ein-
schränkungen vor Gebrauch festzulegen.
1. Jeder Anwender muss diese Gebrauchsanleitung vor Gebrauch des Gerätes gelesen haben und
beachten.
2. Allgemeine Gefahrenhinweise und Sicherheitsvorschriften befolgen, z. B. Schutzkleidung, Au-
genschutz und Schutzhandschuhe tragen.
3. Beim Arbeiten mit infektiösen oder gefährlichen Proben müssen die Standardvorschriften und
Standardvorkehrungen eingehalten werden.
4. Angaben der Reagenzienhersteller beachten.
5. Gerät nicht in explosionsgefährdeter Atmosphäre betreiben.
6. Keine leicht entzündlichen Medien pipettieren.
7. Gerät nur zum Dosieren von Flüssigkeiten und nur im Rahmen der definierten Einsatzgrenzen
und -ausschlüsse einsetzen. Einsatzausschlüsse beachten, siehe Einsatzgrenzen,S.51. Bei
Zweifel unbedingt an den Hersteller oder Händler wenden.
8. Stets so arbeiten, dass weder der Anwender noch andere Personen gefährdet werden. Spritzer
vermeiden. Nur geeignete Gefäße verwenden.
9. Beim Einsetzen einer Spitze wird diese automatisch arretiert. Bei Verwendung einer bereits
benutzten Spitze muss gewährleistet sein, dass sich keine Restflüssigkeit in dieser befindet.
10. Die STEP-Taste des Gerätes nur drücken, wenn gewährleistet ist, dass von der abgegebenen
Flüssigkeit keine Gefahr ausgeht.
11. Die Berührung der Spitzenöffnung ist beim Arbeiten mit aggressiven Medien zu vermeiden.
12. Nie Gewalt anwenden.
13. Nur Original-Zubehör und Original-Ersatzteile verwenden. Keine technischen Veränderungen
vornehmen. Das Gerät darf nicht zerlegt werden.
14. Vor Verwendung stets den ordnungsgemäßen Zustand des Gerätes prüfen. Sollten sich Stö-
rungen des Gerätes ankündigen, sofort aufhören zu dosieren und das Kapitel Störung - Was
tun?,S.48 befolgen. Ggf. an den Hersteller wenden.
3.2 Akku
1. Ausschließlich das im Lieferumfang des Geräts enthaltene USB-Kabel verwenden. Bei der Ver-
wendung von anderen Kabeln kann es zu Schäden am Gerät und Ladeständer kommen.
2. Beim Aufladen können sich Gerät und Netzteil stark erhitzen. Die genannten Geräte nicht ab-
decken.
3. Bei Überhitzung des Gerätes im Bereich der Ladebuchse könnte das USB-Kabel defekt sein,
USB-Kabel durch ein neues Originalkabel ersetzen.
4. Bei Anwendungen, bei denen viel Akkuleistung benötigt wird, kann sich das Gerät zeitweise
stark erwärmen (z. B. beim extremen Arbeiten mit großvolumigen Spitzen). In diesem Fall die
Dosierungen unterbrechen und erst nach Abkühlung fortfahren.

3 Sicherheitsbestimmungen
14 Gebrauchsanleitung HandyStep® touch, HandyStep® touch S 997486
5. Niemals falsche oder beschädigte Netzteile, Ladeständer oder Akkus verwenden. Nicht zuge-
lassene Netzteile oder Kabel können zu einer Explosion des Akkus oder zu Schäden am Gerät
führen.
3.3 Induktives Laden
1. Zum induktiven Laden nur den Originalladeständer verwenden.
2. Beim induktiven Laden keine elektrisch leitfähigen oder magnetischen Gegenstände zwischen
Gerät und Ladeständer platzieren.
3. Während des induktiven Ladens können sich Gerät, Ladeständer und Netzteil erhitzen. Die ge-
nannten Geräte nicht abdecken.
4. Ladeständer nicht im Freien betreiben.
5. Personen mit medizinischen Implantaten müssen vor Verwendung des Ladeständers ärztli-
chen Rat einholen, ob der Ladeständer für sie eine potentielle Gefährdung darstellt. Beachten
Sie außerdem gültige Richtlinien im Umgang mit medizinischen Implantaten und Funkquellen
(hier Ladeständer).
6. Während des induktiven Ladevorgangs können andere Geräte beeinflusst werden, wenn diese
sich in direkter Nähe zum Ladeständer befinden.
7. Beim induktiven Laden können Funkwellen emittiert werden. Wird das Gerät nicht wie in den
Gebrauchsanleitungen beschrieben verwendet, können störende Interferenzen nicht ausge-
schlossen werden.
3.4 Touch-Display
Das Touch-Display kann bei extremer Gewalteinwirkung splittern. Ein dermaßen beschädigtes Gerät
zur Reparatur einsenden und nicht weiterverwenden. Dazu das Display vor dem Einsenden mit Klebe-
band abkleben. Beachten Sie darüber hinaus die Transportbestimmungen, siehe Zur Reparatur ein-
senden,S.55.
3.5 Einsatzgrenzen
Siehe Einsatzgrenzen,S.51.
3.6 Einsatzausschlüsse
•Bei richtiger Handhabung des Gerätes kommt die zu dosierende Flüssigkeit nur mit der Spitze
und nicht mit dem Gerät in Berührung.
•Der Anwender muss die Eignung des Gerätes für den Verwendungszweck selbst überprüfen. Dies
setzt eine ausreichende Qualifikation des Anwenders für die in dieser Anleitung beschriebenen
Tätigkeiten voraus.
•Das Gerät nicht zum Dosieren von Flüssigkeiten einsetzen, die Polypropylen, Polyethylen (Spitze)
oder Polycarbonat (Gehäuse) angreifen.
•Aggressive Dämpfe meiden (Korrosionsgefahr)!
•Das Gerät ist nicht zu verwenden für oxidierende Säuren, da Metallteile und die Elektronik ange-
griffen werden können.

Deutsch
4 Verwendungszweck
HandyStep® touch, HandyStep® touch S 997486 Gebrauchsanleitung 15
•Wird das Gerät durch den Anwender verändert, darf es nicht mehr betrieben werden. Alle Ände-
rungen bedürfen einer ausdrücklichen Genehmigung durch den Hersteller.
USA
Die Geräte sind für die kommerzielle Anwendung ausgelegt und geprüft und entsprechen der Klasse A
Digitale Geräte gemäß Teil 15B (HandyStep® touch und HandyStep® touch S) und Teil 18 (Ladeständer)
der FCC-Vorschriften.
Diese Grenzwerte sollen einen angemessenen Schutz vor schädlichen Störungen bieten, wenn das Ge-
rät in einer gewerblichen Umgebung betrieben wird. Dieses Gerät erzeugt, verwendet und kann Hoch-
frequenzenergie abstrahlen und kann, wenn es nicht gemäß der Bedienungsanleitung installiert und
verwendet wird, schädliche Störungen der Funkkommunikation verursachen.
Der Betrieb dieses Geräts in einem Wohngebiet kann zu schädlichen Störungen führen. In diesem Fall
ist der Benutzer verpflichtet, die Störungen auf eigene Kosten zu beheben.
Änderungen oder Modifikationen an diesem Gerät, die nicht ausdrücklich von der für die Einhaltung
der Vorschriften verantwortlichen Stelle genehmigt wurden, könnten die Befugnis des Benutzers zum
Betrieb des Geräts aufheben.
Kanada
Dieses Gerät entspricht der Norm Industry Canada RSS-216. Der Betrieb unterliegt den folgenden bei-
den Bedingungen:
1. Diese Vorrichtung darf keine Störungen verursachen.
2. Diese Vorrichtung muss alle Störungen aushalten, einschließlich Störungen, die einen uner-
wünschten Betrieb der Vorrichtung verursachen können.
3.7 Verwendete Materialien
Siehe Verwendete Materialien,S.51.
3.8 Transport und Lagerung
Gerät, Akku, Netzteil oder Ladeständer trocken lagern sowie transportieren, dabei vor direkter Son-
neneinstrahlung schützen.
4 Verwendungszweck
Beim HandyStep® touch sowie HandyStep® touch S handelt es sich um mikroprozessorgesteuerte, ak-
kubetriebene Handdispenser mit Touch-Bedienung. Präzisionsdispenser-Spitzen (PD-TipII) von
BRAND mit Typcodierung werden vom Gerät automatisch nach ihrem Nennvolumen erkannt und er-
lauben die schnellstmögliche Volumenselektion. Kompatible Dispenser-Tips anderer Hersteller kön-
nen ebenfalls genutzt werden, nachdem man das entsprechende Volumen manuell ausgewählt hat.

5 Funktions- und Bedienelemente
16 Gebrauchsanleitung HandyStep® touch, HandyStep® touch S 997486
5 Funktions- und Bedienelemente
1
2
3
4
5
6
7
8
9
10
11
12
1Akkufachdeckel 2Power-Taste
3STEP-Taste 4Abdeckung
5Multifunktionsbuchse (USB) 6Griffstück Rückseite
7Kennzeichnungen 8Spitzenaufnahme
9Präzisionsdispenser-Spitze 10 Griffstück Frontseite
11 Griffmulde 12 Touch-Display
5.1 STEP-Taste
Die STEP-Taste löst modusabhängig Flüssigkeitsabgaben und Flüssigkeitsaufnahmen aus. Das Gerät
gibt Meldungen im Touch-Display aus, wie die STEP-Taste zu bedienen ist. Je nachdem welchen Ar-
beitsmodus Sie gewählt haben, kann die STEP-Taste unterschiedlich zu bedienen sein. Die STEP-Taste
kann über die gesamte Fläche betätigt werden. Folgende Bedienarten können unterschieden werden:

Deutsch
5 Funktions- und Bedienelemente
HandyStep® touch, HandyStep® touch S 997486 Gebrauchsanleitung 17
STEP-Taste kurz betätigen ("Klick")
Beispielanwendung:
Flüssigkeit aufnehmen, Flüssigkeit abgeben, Flüssigkeitsauf-
nahme unterbrechen (modusabhängig), Spitze aufnehmen
oder Spitze abwerfen
STEP-Taste 2 x kurz betätigen ("Doppelklick")
Beispielanwendung:
Spitze wieder befüllen.
STEP-Taste gedrückt halten
Beispielanwendung:
Spitze restentleeren, automatische Flüssigkeitsabgabe (im
Modus Auto-Dispensieren), manuelles Titrieren (im Modus Ti-
trieren).
5.2 Power-Taste
Mit der Power-Taste schalten Sie das Gerät ein und aus. Außerdem versetzen Sie das Gerät in den
Stand-by-Modus.
5.3 Akku
WARNUNG
Beschädigter oder falscher Akku
Mögliche Personenschäden
>Nur Originalakku verwenden!
>Nur Originalnetzteil verwenden!
>Akku nicht durchstechen, verbiegen, anzünden, stauchen, kurzschließen oder über-
hitzen!
>Ausgelaufenen Akku nicht mit bloßer Hand berühren, Schutzhandschuhe tragen!
>Beschädigten Akku gemäß gesetzlicher Vorgaben entsorgen!
>Akku nur innerhalb der vorgegebenen Temperaturbereiche betreiben!
>Hinweise auf dem Akku beachten!

5 Funktions- und Bedienelemente
18 Gebrauchsanleitung HandyStep® touch, HandyStep® touch S 997486
HINWEIS
>Laden Sie den Akku vor dem ersten Gebrauch oder wenn Sie das Gerät längere Zeit nicht benutzt
haben. Sie vermeiden damit vorzeitigen Verschleiß des Akkus.
>Den Akku nach Überschreitung der Lebensdauer (~ 3 Jahre), Verformung oder bei extrem kurzen
Ladezyklen und daraus resultierender kurzer Nutzungsdauer austauschen.
>Wenn Sie das Gerät einlagern, ziehen Sie den Akkustecker.
Komponenten
1
2
3
4
1Akku
2Kontakte
3verpolsicherer Stecker
4Kabel
Beschriftung Rückseite
1Akku-Typ und Verwendung
2Teileidentifikation
3Kennzeichen
4Warnhinweis
5.3.1 Akku anschließen
A B C
Abdeckung öffnen und verpolsicheren Stecker des Akkus fest und gerade in die Buchse stecken. Das
Gerät schaltet sich ein, wenn Sie den Akku angeschlossen haben. Dann Abdeckung schließen.
5.3.2 Akku laden
a. Kabel mit Netzteil und HandyStep® touch verbinden.
b. Netzteil in Steckdose stecken.
ðHandyStep® touch wird geladen.

Deutsch
5 Funktions- und Bedienelemente
HandyStep® touch, HandyStep® touch S 997486 Gebrauchsanleitung 19
5.3.3 Anzeigen im Display
Akku ist arbeitsbereit. Akku ist fast entladen. Akku wird geladen.
5.3.4 Stand-by-Modus
Wird die Power-Taste bei eingeschaltetem Gerät kurz gedrückt, wird das Gerät in den Stand-by-Modus
versetzt und das Display ausgeschaltet. Der Stand-by-Modus dient dazu, die Akku-Laufzeit zu verlän-
gern. Um den Stand-by-Modus zu beenden, gibt es folgende Möglichkeiten:
•Power-Taste drücken.
•STEP-Taste drücken.
•Spitze einlegen.
5.3.5 Arbeiten während des Ladevorgangs
Sie können während des Ladevorgangs weiterarbeiten. Dazu stecken Sie das USB-Kabel in die Multi-
funktionsbuchse am Gerät. Der Ladevorgang verlängert sich dadurch. Arbeiten mit eingestecktem
USB-Kabel ist nur möglich, wenn der Akku im Gerät angeschlossen ist.
5.3.6 Akkulaufzeit
Die Akkulaufzeit beschreibt den Zeitraum, während dem mit dem Gerät und einem neuen Akku gear-
beitet werden kann. Diese Akkulaufzeit ist von mehreren Faktoren abhängig, u. a. vom Zustand des
Akkus selbst, der Display-Helligkeit, den verwendeten Geschwindigkeitseinstellungen oder dem ver-
wendeten Medium. Die Akkulaufzeit selbst wurde über einen automatisierten Prozess ermittelt.
Medium (Beispiele) Destilliertes Wasser (gemäß
ISO 3696)*
Rapsöl**
Spitze 10 ml PD-Tip II 25 ml PD-Tip II
Akku Neu und 100 % geladen Neu und 100 % geladen
Einstellungen am Gerät Geschwindigkeitsstufe 6
Mittlere Display-Helligkeit
Geschwindigkeitsstufe 4
Mittlere Display-Helligkeit
Steps 20 Steps á 0,5 ml 10 Steps á 2,5 ml
Akkulaufzeit ca. 5 h ca 2 h
*entspricht normaler Leistungsaufnahme
** entspricht maximaler Leistungsaufnahme
5.4 Bedienelemente
Touch-Display
Das Touch-Display bedienen Sie zur Einstellung der benötigten Werte mit dem Daumen.
STEP-Taste
Die STEP-Taste bedienen Sie mit dem Zeigefinger.

5 Funktions- und Bedienelemente
20 Gebrauchsanleitung HandyStep® touch, HandyStep® touch S 997486
5.5 Netzteil und Länderadapter
WARNUNG
Mögliche Personenschäden durch beschädigtes oder falsches Netzteil
>Nur originales Universalnetzteil und zugehörige Länderadapter verwenden!
>Netzteil während Gebrauch nicht abdecken!
>Beschädigtes Netzteil nicht verwenden!
Netzteil Länderadapter
CN GB US AU/NZ EU
5.5.1 Ladeadapter und Netzteil verbinden
a. Ladeadapter auf Netzteil schieben, bis dieser hörbar
einrastet.
ðNetzteil kann angeschlossen werden.
5.5.2 Ladeadapter von Netzteil lösen
a. Auf Push-Button drücken und Ladeadapter abziehen.
5.6 Gerätehalter
5.6.1 Gerätehalter mit Klebeband befestigen
1
2
1Universalhalter 2Halterrückseite mit Klebestrei-
fen
a. Befestigungsoberfläche mit geeignetem Reinigungsmit-
tel (keine rückfettenden Haushaltsreiniger) und fussel-
freiem Tuch reinigen und gut trocknen lassen.
b. Schutzfolie von Klebestreifen abziehen
c. Halterrückseite fest mit Daumen auf die gereinigte Flä-
che drücken. Bis zur ersten Belastung mit dem Gerät 72
h warten.
d. Universalhalter auf Halterrückseite schieben.

Deutsch
5 Funktions- und Bedienelemente
HandyStep® touch, HandyStep® touch S 997486 Gebrauchsanleitung 21
5.6.2 Gerätehalter im Rondell befestigen
a. Regalhalter ohne Klebeband in das Rondell einsetzen,
bis dieser hörbar einrastet.
5.6.3 Gerätehalter an Regalkante befestigen
1
2
3
1Universalhalter 2Unterseite
3Halterrückseite
a. Befestigungsoberfläche und Halterrückseite mit geeig-
netem Reinigungsmittel (keine rückfettenden Haus-
haltsreiniger) und fusselfreiem Tuch reinigen und gut
trocknen lassen.
b. Schutzfolie einseitig von Klebeband abziehen.
c. Klebeband auf Unterseite kleben und fest andrücken.
d. Dann Schutzfolie der anderen Seite abziehen und Hal-
terrückseite an die gewünschte Befestigungskante kle-
ben.
e. Halterrückseite fest mit Daumen auf die Befestigungso-
berfläche drücken. Bis zur ersten Belastung mit dem Ge-
rät 72 h warten.
f. Universalhalter auf Halterrückseite schieben.
5.7 Ladeständer (Zubehör)
WARNUNG
Mögliche Personenschäden durch Induktion
>Personen mit medizinischen Implantaten (z. B. Herschrittmacher, Medizinpumpen)
müssen einen Sicherheitsabstand einhalten. Die Health Industry Manufacturers Asso-
ciation empfiehlt für Herzschrittmacher einen Abstand von mindestens 15 cm von
der Funkquelle (hier Ladeständer).
>Personen mit medizinischen Implantaten müssen vor Verwendung des Ladeständers
einen Arzt konsultieren.
>Bei Verdacht der Beeinflussung des Implantats Abstand zum Ladeständer erhöhen
und Arzt konsultieren.
HINWEIS
Induktives Laden über den Ladeständer
Der Ladeständer kann induktiv laden, sobald die Stromversorgung hergestellt ist. Keine magnetischen
Datenträger (z. B. Kreditkarten) in die Nähe des Ladeständers legen.

5 Funktions- und Bedienelemente
22 Gebrauchsanleitung HandyStep® touch, HandyStep® touch S 997486
Ladeständer verwenden
Der Ladeständer benötigt das Netzteil und das USB-Kabel
des Geräts HandyStep®touch oder des HandyStep®touchS.
Anzeigen des Ladeständers
•Ladeständer leuchtet blau: Der Akku wird geladen.
•Ladeständer leuchtet nicht: Der Akku ist geladen oder
es befindet sich kein Gerät im Ladeständer.
•Ladeständer leuchtet wechselnd: Der Akku kann nicht
laden. Gerät erneut in den Ladeständer stellen.
5.8 Halteständer (Zubehör)
Der Halteständer dient zur sicheren Aufbewahrung des Geräts. Der Halteständer hat keine Ladefunkti-
on.
5.9 Aufbau des Touch-Display (Arbeitsbereich)
12
3
4
5
6
7
8
9
10
11
12
13 14
1Uhrzeit
2Ladezustand
3Nennvolumen der eingesetzten Spitze
4Füllstand der Spitze
5Spitze abwerfen ( ) oder einsetzen ( ).
6Optionen aufrufen
7Hauptmenü aufrufen (Home)
8Informationsbereich
9Verfügbares Volumen
10 Verfügbare STEPs in Bezug auf das verfügbare Volu-
men
11 STEP-Volumen
12 Aufnahme- und Abgabegeschwindigkeit
13 Modusname
14 Bereich für spezifische Funktionen.

Deutsch
6 Modusübersicht
HandyStep® touch, HandyStep® touch S 997486 Gebrauchsanleitung 23
5.10 PD-TipsII (Präzisions-Dispenser-Tips II)
Die kodierten Spitzen werden vom Gerät automatisch erkannt.
Volumen [ml] Bestell-Nr. Verp.-Einheit
[Stück]
Bestell-Nr.
BIO-CERT® LI-
QUID HANDLING
STERILE
Verp.-Einheit
[Stück]
0,1 705700 100 705730 100
0,5 705702 100 705732 100
1 705704 100 705734 100
1,25 705706 100 705736 100
2,5 705708 100 705738 100
5 705710 100 705740 100
10 705712 100 705742 100
12,5 705714 100 705744 100
25 705716 25+1Adapter 705746 25+1 Adapter
50 705718 50+1 Adapter 705748 25+1 Adapter
Set PD-TipsII
0,5ml ... 12,5ml
705720 je 20 — —
5.11 Adapter für 25 ml und 50 ml PD-Tips II
Volumen [ml] Bestell-Nr. Verpackungseinheit Merkmal
25ml und 50ml 702398 10
25ml und 50ml 702399 5 BIO-CERT® LIQUID
HANDLING STERILE
6 Modusübersicht
Modi HandyStep® touch HandyStep® touch S
Einstellungen + +
Multi-Dispensieren (MULTI-DISP) + +
Auto-Dispensieren (AUTO-DISP) + +
Pipettieren (PIP) + +
Sequentielles Dispensieren (SEQ-DISP) — +
Multi-Aspirieren (MULTI-ASP) — +
Titrieren — +
Favoriten + +

7 Bedienung
24 Gebrauchsanleitung HandyStep® touch, HandyStep® touch S 997486
Modi Beschreibung
Einstellungen Im Modus Einstellungen stellen Sie das Gerät für Ihre Arbeit ein, z. B. Uhr-
zeit, Helligkeit des Displays. Siehe Einstellungen,S.30.
Multi-Dispensieren Im Modus Multi-Dispensieren wird ein aufgenommenes Volumen schritt-
weise wieder abgegeben. Beispielanwendung: Ein aufgenommenes Volu-
men in STEPs unterteilen. Siehe Multi-Dispensieren (MULTI-DISP),S.33.
Auto-Dispensieren Im Modus Auto-Dispensieren wird ein Volumen aufgesaugt und über ein zu-
vor eingestelltes Zeitintervall schrittweise automatisch abgegeben. Bei-
spielanwendung: Ein aufgenommenes Volumen automatisch in viele STEPs
unterteilen. Siehe Auto-Dispensieren (AUTO-DISP) ,S.35.
Pipettieren Im Modus Pipettieren wird ein zuvor ausgewähltes Volumen einmalig auf-
genommen und wieder abgegeben. Siehe Pipettieren (PIP),S.38.
Sequentielles Dispensie-
ren (SEQ-DISP)
Im Modus Sequentielles Dispensieren wird ein aufgenommenes Volumen
über mehrere, zuvor eingestellte und unterschiedlich große STEPs wieder
abgegeben. Beispielanwendung: Verdünnungsreihe. Siehe Sequentielles
Dispensieren (SEQ-DISP),S.39
Multi-Aspirieren (MULTI-
ASP)
Im Modus Multi-Aspirieren werden mehrere STEPs in einer Spitze gesam-
melt und als Gesamtvolumen aufgesaugt und abgegeben. Beispielanwen-
dung: Abnahme von übrig gebliebenen Restvolumen. Siehe Multi-Aspirieren
(MULTI-ASP),S.41.
Titrieren Im Modus Titrieren wird ein Volumen aufgenommen und entweder schnell
oder langsam abgegeben. Die Abgabemenge kann am Display abgelesen
werden. Beispielanwendung: pH-Wert-Bestimmung. Siehe Titrieren,S.43.
Favoriten In Favoriten speichern Sie häufig verwendete Einstellungen ab. Diese Favo-
riten können Sie über dieses Menü wieder abrufen. Siehe Favoriten,S.46.
7 Bedienung
WARNUNG
Mögliche Gesundheitsschäden durch pathogene Flüssigkeiten oder infektiöse Kei-
me.
>Tragen Sie angemessene Schutzausrüstung.
>Beachten Sie beim Umgang mit den genannten Medien die nationalen Bestimmun-
gen, Sicherheitsdatenblätter, die Schutzstufe ihres Labors sowie Maßnahmen zur si-
cheren Arbeit.
HINWEIS
Gerätebeschädigung durch falsche Anwendung.
>Nur Spitze in Flüssigkeit tauchen
>Bei Kontakt mit einer Flüssigkeit, Gerät sofort reinigen.
>Das Gerät aufrecht in der mitgelieferten Halterung einhängen.
7.1 Gerät einschalten
a. Power-Taste drücken.
ðDas Hauptmenü öffnet sich.

Deutsch
7 Bedienung
HandyStep® touch, HandyStep® touch S 997486 Gebrauchsanleitung 25
Start Motor-Init
Verwenden Sie das Gerät nach längerer Zeit wieder, werden Sie nach dem Einschalten aufgefordert,
eine Motor-Initialisierung durchzuführen:
a. Die Meldung "Start Motor Init" bestätigen.
ðDie Motor-Initialisierung wird durchgeführt
ðDas Gerät fährt die Spitzenaufnahme in Arbeitsposition.
ðDas Hauptmenü öffnet sich.
Ladeständer/USB-Kabel
Das Gerät schaltet sich ein, wenn es in den Ladeständer gestellt wird oder das USB-Ladekabel ange-
schlossen wird. Dadurch wird auch der Stand-by-Modus beendet.
7.2 Gerät ausschalten
a. Spitze entleeren und auswerfen, siehe Flüssigkeit abgeben,S.28 bzw. Spitze auswerfen,S.27
b. Power-Taste drücken.
ðEine Abfrage erscheint, ob Sie das Gerät ausschalten möchten. Mit bestätigen. Mit abbre-
chen.
c. Wird die Power-Taste ca. 1s gedrückt, geht das Gerät in Stand-by.
Wird die Power-Taste länger als ca. 2s gedrückt, werden Sie gefragt, ob Sie das Gerät ausschal-
ten möchten.
d. Meldung bestätigen.
e. Das Gerät aufrecht in den mitgelieferten Halterungen einhängen. Wird das Gerät in den Lade-
ständer gestellt, startet der Ladevorgang. Dabei leuchten die LED des Ladeständers.
Reagiert das Touch-Display oder das Gerät nicht mehr, beachten Sie den Abschnitt Störung – Was
tun?, ab Geräteverhalten,S.48.
7.3 Arbeitsmodus öffnen
Sie wählen über das Hauptmenü einen Arbeitsmodus aus. Die eigentliche Tätigkeit (z. B. Dispensieren)
nehmen Sie im Arbeitsmodus vor.
a. b.
a. Arbeitsmodus durch Wischen auswählen.
b. Arbeitsmodus durch einmaliges Antippen öffnen.
ðArbeitsmodus erscheint.
7.4 Arbeitsmodus verlassen
a. Im Arbeitsmodus Schaltfläche antippen.

7 Bedienung
26 Gebrauchsanleitung HandyStep® touch, HandyStep® touch S 997486
ðDas Hauptmenü erscheint.
Befindet sich Flüssigkeit in der Spitze, werden Sie gefragt, ob Sie die Spitze entleeren möchten oder
mit dem verbleibenden Volumen in einem anderen Arbeitsmodus weiterarbeiten möchten.
7.5 Kontexthilfe aufrufen
Die Kontexthilfe hilft Ihnen bei Fragen zur Funktionalität im
jeweiligen Arbeitsmodus oder Menü.
7.6 Spitzen einsetzen
7.6.1 BRAND PD-Tips einsetzen
Voraussetzung:
>Arbeitsmodus wurde gewählt
a. Spitze einsetzen
b. STEP-Taste drücken. Spitze wird mit dem Gerät verbunden und das Volumen eingestellt
ðArbeitsmodus erscheint wieder.
ðFlüssigkeit kann aufgenommen werden.
7.6.2 Kompatible Fremdspitzen (ohne Kodierung) einsetzen
c. d.
Voraussetzung:
>Arbeitsmodus wurde gewählt
a. Spitze einsetzen
b. STEP-Taste drücken.
c. Volumen einstellen.
d. Auswahl mit Schaltfläche bestätigen.
ðArbeitsmodus erscheint wieder.
ðFlüssigkeit kann aufgenommen werden.

Deutsch
7 Bedienung
HandyStep® touch, HandyStep® touch S 997486 Gebrauchsanleitung 27
7.6.3 Kompatible Fremdspitzen (mit Kodierung) einsetzen
Kontrollieren Sie nach dem Einsetzen der Spitze, dass das korrekte Spitzenvolumen übernommen
wurde, siehe Volumen einstellen,S.29.
7.6.4 Spitzen ohne gewählten Arbeitsmodus einsetzen
Sie können eine Spitze auch einsetzen, bevor Sie einen Arbeitsmodus wählen. Um das Volumen einzu-
stellen oder damit die kompatible Spitze automatisch erkannt wird, muss ein Arbeitsmodus gewählt
worden sein.
7.7 Spitze auswerfen
Voraussetzung:
>Sie haben die Spitze entleert.
a. Gerät mit Spitze über Mülleimer halten.
b. Schaltfläche antippen, danach die STEP-Taste drücken.
ðDie Spitze wird abgeworfen.
ðDas Gerät fährt in Spitzenaufnahmeposition.
7.8 Flüssigkeit aufnehmen
HINWEIS
Spitzen vor Gebrauch entlüften
Wir empfehlen eine neue Spitze vor der Verwendung zu entlüften. Dafür die Spitze minimal mit der
Flüssigkeit füllen und wieder entleeren (siehe Spitze befüllen bei leerer Spitze, Spitze befüllen bei lee-
rer Spitze,S.27 und Befüllung der Spitze unterbrechen, Befüllung der Spitze unterbrechen,S.28).
Kleine Luftblasen im Bereich des Kolbens nach dem Entlüften beeinflussen das Ergebnis nicht.
7.8.1 Spitze befüllen bei leerer Spitze
Voraussetzung:
>Ein Arbeitsmodus wurde gewählt.
>Im Touch-Display erscheint die Meldung ‚STEP drücken z. Befüllen‘.
a. Spitze senkrecht in das Gefäß halten.
b. Während des Ansaugens sicherstellen, dass die Spitzenöffnung immer von Flüssigkeit bedeckt
ist, um Luftblasen in der Spitze zu vermeiden.
c. STEP-Taste drücken.
Die Spitze wird befüllt, bis das eingestellte Volumen oder das Nennvolumen erreicht ist.
HINWEIS
Umkehrhub (Spielausgleich)
Das Gerät führt beim Befüllen einen Umkehrhub durch, wodurch die Genauigkeit der STEP-Volumen-
einstellung gewährleistet wird. So muss der erste STEP nicht verworfen werden.

7 Bedienung
28 Gebrauchsanleitung HandyStep® touch, HandyStep® touch S 997486
7.8.2 Befüllung der Spitze unterbrechen
a. Um die Befüllung der Spitze zu unterbrechen, STEP-Taste drücken.
ðDie Befüllung unterbricht sofort. Sie können dann das aufgenommen Volumen mit der STEP-Tas-
te wieder abgeben, die Spitze entleeren oder mit dem Füllvorgang fortfahren.
7.8.3 Spitze befüllen bei teilentleerter Spitze
a.
a. Zum erneuten Befüllen umschalten.
b. Spitze senkrecht in Flüssigkeit halten.
c. STEP-Taste 2 x kurz drücken.
ðFlüssigkeit wird aufgenommen, bis das Nennvolumen
aufgenommen ist.
d. Um die Befüllung zu stoppen, STEP-Taste drücken.
ðArbeitsmodus erscheint wieder. Sie können weiter dis-
pensieren.
HINWEIS
Umkehrhub (Spielausgleich)
Das Gerät führt beim Befüllen einen Umkehrhub durch, wodurch die Genauigkeit der STEP-Volumen-
einstellung gewährleistet wird. So muss der erste STEP nicht verworfen werden.
7.8.3.1 Automatisches Wechseln zur Befüllung
Nach Abgabe aller gewünschten STEPs bleibt in der Spitze Flüssigkeit zurück, deren Volumen kleiner
als 1 STEP ist (das Restvolumen). Das Gerät schaltet automatisch in den Modus um, in dem Sie die
Spitze wieder befüllen können.
a. STEP-Taste 2 x kurz drücken.
ðFlüssigkeit wird aufgenommen, bis die Spitze vollständig befüllt ist.
7.9 Flüssigkeit abgeben
7.9.1 Volumen oder einzelne STEPs abgeben
Voraussetzung:
>Ein Arbeitsmodus wurde gewählt.
>Ein Volumen wurde aufgesaugt.
a. Spitze an Gefäßwand anlegen.
b. Gerät im Winkel von 30 ... 45° zur Gefäßwand halten.
c. STEP-Taste drücken.
ðJe nach gewähltem Arbeitsmodus wird entweder ein STEP oder das gesamte Spitzenvolumen
abgegeben.
Um die Abgabe abzubrechen, Schaltfläche antippen.

Deutsch
7 Bedienung
HandyStep® touch, HandyStep® touch S 997486 Gebrauchsanleitung 29
7.9.2 Zur Entleerung umschalten
a.
a. Zum Entleeren umschalten.
b. Gerät im Winkel von 30 ... 45 ° zur Gefäßwand halten.
c. STEP-Taste gedrückt halten.
ðFlüssigkeit wird abgegeben; die Spitze restentleert.
ðArbeitsmodus erscheint wieder. Sie können neue Flüs-
sigkeit aufnehmen oder Spitze auswerfen.
7.9.3 Restvolumen verwerfen
Nach Abgabe aller verfügbaren STEPs bleibt in der Spitze Flüssigkeit zurück, deren Volumen kleiner
als 1 STEP ist. Das Gerät schaltet automatisch in den Modus um, indem Sie das verbleibende Volumen
verwerfen können.
a. STEP-Taste gedrückt halten.
ðDie Spitze wird restentleert.
7.10 Volumen einstellen
Voraussetzung:
>Ein Arbeitsmodus wurde gewählt.
a. Schaltfläche antippen.
ðDie Volumeneinstellung erscheint.
b. Volumen wählen, in dem Sie aus dem Wertebereich ein Volumen einstellen.
01.00
c. d.
c. Wischen Sie nach links oder rechts, um die Stelle zu än-
dern.
d. Wischen Sie nach oben oder unten, um den Wert einzu-
stellen.
e. Einstellung mit Schaltfläche bestätigen. Einstellung mit
Schaltfläche X verwerfen.
ðDer Arbeitsmodus erscheint.
7.11 Aufnahme- und Abgabegeschwindigkeit einstellen
Passen Sie die Geschwindigkeit auf ihre jeweilige Applikation an.
Voraussetzung:
>Ein Arbeitsmodus wurde gewählt.
a. Schaltfläche antippen.
ðDie Geschwindigkeitseinstellung erscheint.

8 Einstellungen
30 Gebrauchsanleitung HandyStep® touch, HandyStep® touch S 997486
b. Aufnahme- und Abgabegeschwindigkeit einstellen, in dem Sie aus den Wertebereichen 1 ... 8
wählen.
1 = langsam, 4 = mittel, 8 = schnell
c. Sie können für Aufnahme und Abgabe unterschiedliche Geschwindigkeiten einstellen.
d. Auswahl mit Schaltfläche bestätigen. Auswahl mit Schaltfläche verwerfen.
ðDer Arbeitsmodus erscheint wieder.
8 Einstellungen
Stellen Sie das Gerät für die tägliche Benutzung ein. Im Hauptmenü ‚Einstellungen‘ antippen.
8.1 Sprache
Displaysprache und Hilfesprache einstellen. Zur Auswahl stehen die Sprachen Deutsch, Englisch,
Französisch, Spanisch und Chinesisch.
8.2 Gerät
Gerätenamen einstellen. Um Zeichen auszuwählen, diese mit
dem Zeigefinger in den weißen Balken ziehen. Um die Stelle
zu wechseln, nach links oder rechts wischen. Der Gerätena-
me kann aus Ziffern, Sonderzeichen und Schriftzeichen be-
stehen.
Um Großbuchstaben einzufügen, Schaltfläche ABC antippen.
Um Kleinbuchstaben einzufügen, Schaltfläche abc antippen.
Um Zahlen und Sonderzeichen einzufügen, Schaltfläche 123
antippen. Folgende Sonderzeichen stehen zur Verfügung:
Plus, Minus, Unterstrich, Komma, Punkt, Leerzeichen (zwi-
schen der Zahl 9 und Minus).
8.3 Datum / Uhrzeit
Datum, Uhrzeit sowie Uhrzeit- und Datumsformat einstellen.
Um die Funktion zu verlassen, Schaltfläche antippen.
Folgende Abkürzungen beschreiben die Zeit- und Datumsformate (Wertebereich in Klammern):
Stunde hh (00 ... 23) h (0 ... 23)
Minute mm (00 ... 59) m (0 ... 59)
Tag DD (01 ... 31) D (1 ... 31)
Monat MM (01 ... 12) M (1 ... 12)
Jahr YYYY (2019 ... 2050) YY (19 ... 50)

Deutsch
8 Einstellungen
HandyStep® touch, HandyStep® touch S 997486 Gebrauchsanleitung 31
8.4 Anzeige
Helligkeit Helligkeit über den Schiebeschalter einstellen.
Bildschirm-Timeout Zeit einstellen bis das Display zuerst gedimmt und dann, ab-
geschaltet wird.
Auto-Power Off Einstellen, ob sich das Gerät nach 60 min Stand-by-Modus
selbst ausschaltet.
8.5 Ton
HINWEIS
Ereigniston
Bei auftretenden Ereignissen gibt das Gerät Ton wieder. Dieser Ereigniston kann nicht ausgeschaltet
werden.
Hinweistöne Einschalten, ob bei Programmereignissen Töne ausgegeben
werden sollen.
STEP-Tasten Sound Einschalten, ob beim Betätigen der STEP-Taste Töne ausge-
geben werden sollen.
8.6 Info/Über
Version Firmware-Version
Datum Das Datum, an dem die Firmware generiert wurde.
Bootloader Softwaretool
8.7 Regulatorische Hinweise
Informationen über Zulassungen lassen sich über diesen Menüeintrag herausfinden.
8.8 Kalibrierung
1
2
3
4
1Erinnerung aktivieren
2Unlogische Eingaben werden rot dargestellt. In diesem
Fall liegt das letzte Prüfdatum in der Zukunft.
3Stellen Sie das letzte Datum ein, an dem das Gerät ge-
prüft wurde
4Stellen Sie nächste Datum ein, an dem das Gerät ge-
prüft werden soll.

8 Einstellungen
32 Gebrauchsanleitung HandyStep® touch, HandyStep® touch S 997486
Voraussetzung:
>Sie haben das Gerät gerade geprüft und möchten an die nächste Geräteüberprüfung erinnert
werden. Sie stellen damit eine regelmäßige Überprüfung Ihres Gerätes sicher.
a. Datum der letzten Prüfung einstellen. Dieser Zeitpunkt kann vergangen, gegenwärtig oder zu-
künftig sein.
b. Datum der nächsten Prüfung einstellen. Dieser Zeitpunkt muss zukünftig sein.
c. Erinnerung über den Schiebeschalter aktivieren.
ðLief das Prüfintervall ab, werden Sie über eine Meldung im Display an die erneute Überprüfung
des Geräts erinnert.
ðStellen Sie diese Daten am besten direkt nach erfolgter Überprüfung ein.
ðLiegt das Datum der letzten Kalibrierung nach dem aktuellen Datum, erscheint es rot.
ðLiegt das Datum der zukünftigen Kalibrierung vor dem aktuellen Datum, erscheint es rot und die
Erinnerung kann nicht aktiviert werden.
8.9 Werkseinstellungen
Das Gerät lässt sich auf die Werkseinstellungen unter diesem Menüeintrag zurücksetzen.
HINWEIS
Werkseinstellungen
Die Werkseinstellungen überschreiben alle vom Anwender getätigten Einstellungen, sowohl in dem
Einstellungen-Menü als auch in allen verfügbaren Arbeitsmodi. Dieser Vorgang lässt sich nicht wieder
umkehren!
8.10 Spitzenerkennung einschalten/ausschalten
Arbeiten Sie nicht mit BRAND Spitzen oder kompatiblen Spitzen, können Sie die automatische Spitze-
nerkennung ausschalten, um schneller zur Volumeneinstellung zu gelangen.
8.11 Keypad
1
2
3
5
6 4
1Zur Verfügung stehender Wertebereich
2Einheitenwahl
3Eingegebene Zeichen einzeln löschen
4Komma eingeben
5Eingabe verwerfen
6Eingabe übernehmen
Die Werteingabe (z. B. Volumen) über ein Keypad in den ver-
schiedenen Arbeitsmodi vornehmen. Die Werte werden von
links nach rechts zusammen mit dem Komma eingegeben. Es
können abhängig vom zur Verfügung stehenden Wertebe-
reich und des möglichen STEP-Intervalls bis zu 3 Nachkom-
mastellen eingegeben werden, wobei Werte kleiner oder grö-
ßer des angezeigten Wertebereichs nicht übernommen wer-
den können.

Deutsch
9 Multi-Dispensieren (MULTI-DISP)
HandyStep® touch, HandyStep® touch S 997486 Gebrauchsanleitung 33
9 Multi-Dispensieren (MULTI-DISP)
Zur Funktion des Modus siehe Modusübersicht,S.23. Zur Einstellung des Volumens, der Geschwindig-
keit und weiterer in allen Modi gleichbleibender Bedienschritte siehe Bedienung,S.24.
9.1 Flüssigkeit aufnehmen
Voraussetzung:
>Das STEP-Volumen wurde über die Schaltfläche einge-
stellt.
a. Spitze senkrecht in das Gefäß halten.
b. Während des Ansaugens sicherstellen, dass die Spitzen-
öffnung immer von Flüssigkeit bedeckt ist, um Luftbla-
sen in der Spitze zu vermeiden.
c. STEP-Taste drücken.
ðDas Gerät saugt die Flüssigkeit solange an, bis das ein-
gestellte Volumen oder das Nennvolumen erreicht ist.
Das Icon zeigt die Anzahl der möglichen STEPs an.
Das Icon zeigt das zur Verfügung stehende Volumen an.
9.2 Flüssigkeitsaufnahme unterbrechen und fortsetzen
9.2.1 Flüssigkeitsaufnahme unterbrechen
a. Um die Flüssigkeitsaufnahme zu unterbrechen, die STEP-Taste kurz drücken.
9.2.2 Flüssigkeitsaufnahme fortsetzen
a. Schaltfläche antippen.
b. STEP-Taste 2x kurz drücken.
ðDas Gerät saugt Flüssigkeit auf.
9.3 Flüssigkeit abgeben
Voraussetzung:
>Volumen oder einzelne STEPs abgeben, siehe Volumen
oder einzelne STEPs abgeben,S.28.
a. Nachdem Sie die STEP-Taste gedrückt haben, vermin-
dert sich die Anzahl der abzugebenden STEPs( ).

9 Multi-Dispensieren (MULTI-DISP)
34 Gebrauchsanleitung HandyStep® touch, HandyStep® touch S 997486
9.4 Umgang mit Restvolumen
Zum Umgang mit Restvolumen, siehe Zur Entleerung umschalten,S.29 und Flüssigkeit aufneh-
men,S.27.
9.5 STEP-Anzahl vorwählen
1
2
3
1STEP-Vorwahl einschalten/ausschalten.
2STEP-Vorwahl öffnen.
3STEPs vorwählen.
Sie können eine Anzahl von STEPs vorwählen. Die Anzahl der
vorwählbaren STEPs ist abhängig vom eingesetzten Spitzen-
volumen und vom eingestellten Volumen. Vergrößern Sie ein
STEP-Volumen, verringert sich die Anzahl der vorwählbaren
STEPs und umgekehrt.
STEP-Anzahl vorwählen
a. Schaltfläche antippen.
b. Die gewünschte Zahl in das weiße Feld ziehen.
c. Auswahl mit bestätigen.
ðDie STEP-Vorwahl ist aktiv.
Wenn Sie jetzt Flüssigkeit aufnehmen, wird so viel Flüssigkeit
aufgenommen wie für die Vorwahl benötigt. Befindet sich
mehr Flüssigkeit in der Spitze als vorgewählt, können Sie
nach Abgabe der vorgewählten STEPs weiterarbeiten oder
das Volumen verwerfen.
9.6 Optionen
a. Im Arbeitsmodus das Symbol antippen.
ðDas Optionenmenü erscheint.
Option Bedeutung
Zu Favoriten hinzufügen Getätigte Einstellungen zu Favoriten hinzufügen. Sie können diese
über Hauptmenü > Favoriten wieder aufrufen.
Step-Anzahl vorgeben STEP-Anzahl vorwählen.
Gehe zu Auto-Disp Zu Modus Auto-Disp wechseln. Das im Multi-Disp Modus einge-
stellte Volumen wird auch in dem Auto-Disp Modus eingestellt.

Deutsch
10 Auto-Dispensieren (AUTO-DISP)
HandyStep® touch, HandyStep® touch S 997486 Gebrauchsanleitung 35
Option Bedeutung
Arbeitsmodus-Hilfe Blendet die Hilfe zu dem Modus ein.
10 Auto-Dispensieren (AUTO-DISP)
Zur Funktion des Modus siehe Modusübersicht,S.23. Zur Einstellung des Volumens, der Geschwindig-
keit und weiterer in allen Modi gleichbleibender Bedienschritte siehe Bedienung,S.24.
10.1 Flüssigkeit automatisch abgeben
Voraussetzung:
>Sie haben die Pausenzeit (ein Intervall zwischen den Flüssigkeitsabgaben) manuell oder automa-
tisch eingestellt.
>Die Spitze ist mit Flüssigkeit befüllt.
a. STEP-Taste gedrückt halten.
ðFlüssigkeit wird automatisch abgegeben, solange die STEP-Taste gehalten wird oder solange,
wie ausreichend Flüssigkeit in der Spitze vorhanden ist.
ðWährend der Flüssigkeitsabgabe wird die Pausenzeit im Touch-Display heruntergezählt.
ðIm Touch-Display sehen Sie die verbleibenden STEPs.
10.2 Abgabedauer optimieren
Die Dauer der Flüssigkeitsabgabe setzt sich zusammen aus dem von Ihnen definierten Abgabeintervall
und der Abgabegeschwindigkeit. Um die Flüssigkeitsabgabe zu optimieren, passen Sie die beiden Pa-
rameter an.
•Die Abgabegeschwindigkeit, siehe Aufnahme- und Abgabegeschwindigkeit einstellen,S.29.
•Das Abgabeintervall, siehe Pausenzeit manuell einstellen,S.36.

10 Auto-Dispensieren (AUTO-DISP)
36 Gebrauchsanleitung HandyStep® touch, HandyStep® touch S 997486
10.3 Pausenzeit manuell einstellen
a. Schaltfläche antippen.
b. Pausenzeit einstellen.
c. Einstellung mit bestätigen.
ðDie Pausenzeit ist eingestellt. Halten Sie bei der nächs-
ten Flüssigkeitsabgabe die STEP-Taste gedrückt, wird
Flüssigkeit nach dem Ablauf der Pausenzeit abgegeben.
Alternativ können Sie auch die Lernfunktion verwenden.
10.4 Pausenzeit automatisch einstellen (Lernfunktion)
Das Gerät ermittelt mit der Lernfunktion aus den Pausenzeiten zwischen 3 oder mehr Flüssigkeitsab-
gaben einen Mittelwert. Hält der Benutzer nach Beendigung der Lernfunktion die STEP-Taste ge-
drückt, gibt das Gerät Flüssigkeit nach Ablauf der ermittelten Pausenzeit automatisch ab. Somit kön-
nen sich wiederholende Dosieraufgaben vom Benutzer leichter bewältigt werden. Auch das Einstellen
der Pausenzeit gelingt leichter, da die Pausenzeit für die aktuelle Dosieraufgabe ermittelt wird.
10.4.1 Lernfunktion ausführen
a.
c.
Voraussetzung:
>Sie haben die Spitze bereits gefüllt.
a. Taste antippen.
ðDie Lernfunktion ist aktiv. Dies wird durch das Symbol
… angezeigt.
b. Geben Sie mindestens 3 x Flüssigkeit ab, in dem Sie die
STEP-Taste kurz drücken.
ðSie können Flüssigkeit direkt mit gehaltener STEP-Taste
abgeben. Solange die Lernfunktion nicht beendet wird,
ändert sich die eingelernte Pausenzeit.
c. Beenden Sie die Lernfunktion, in dem Sie die Taste …
antippen.
ðDanach erscheint die gemittelte Zeit neben dem Sym-
bol .
Sie können die eingelernte Pausenzeit auch in Favoriten ab-
legen.

Deutsch
10 Auto-Dispensieren (AUTO-DISP)
HandyStep® touch, HandyStep® touch S 997486 Gebrauchsanleitung 37
10.4.2 Alternativer Zugang zur Lernfunktion
a. Optionen über Schaltfläche aufrufen.
b. Den Schiebeschalter nach rechts wischen.
c. Über Schaltfläche zum Arbeitsmenü zurückkehren.
ðDie aktive Lernfunktion wird über das Symbol … angezeigt.
10.4.3 Lernfunktion erneut starten
Stellen Sie beim Arbeiten fest, dass die Pausenzeit zu lang oder zu kurz ist, können Sie die Lernfunkti-
on erneut starten. Alternativ können Sie die Pausenzeit auch manuell anpassen.
10.4.4 Lernfunktion verkürzen oder beenden
Beim ersten Drücken der STEP-Taste beginnt ein 10 s-Countdown. Nach dessen Ablauf wird die Lern-
funktion automatisch beendet.
•Um die Lernfunktion vorher zu beenden, Schaltfläche X antippen.
•Um die Lernfunktion zu beenden, nachdem Sie bei gehaltener STEP-Taste Flüssigkeit abgegeben
haben, Schaltfläche … antippen.
•Um mit der ermittelten Pausenzeit direkt zu arbeiten, STEP-Taste gedrückt halten.
10.5 Umgang mit Restvolumen
Zum Umgang mit Restvolumen, siehe Zur Entleerung umschalten,S.29 und Flüssigkeit aufneh-
men,S.27.
10.6 Optionen
a. Im Arbeitsmodus das Symbol antippen.
ðDas Optionenmenü erscheint.
Option Bedeutung
Zu Favoriten hinzufügen Bearbeiten Sie die Zeit zwischen den einzelnen Abgabeschritten.
Pausezeit einlernen Starten Sie die Lernfunktion.
Gehe zu Multi-Disp In den Multi-Disp Arbeitsmodus wechseln. Das im Auto-Disp-Arbeits-
modus eingestellte Volumen wird auch in dem Multi-Disp-Arbeitsmo-
dus eingestellt.
Arbeitsmodus Hilfe Blendet die Hilfe zu dem Modus ein.

11 Pipettieren (PIP)
38 Gebrauchsanleitung HandyStep® touch, HandyStep® touch S 997486
11 Pipettieren (PIP)
Zur Funktion des Modus siehe Modusübersicht,S.23. Zur Einstellung des Volumens, der Geschwindig-
keit und weiterer in allen Modi gleichbleibender Bedienschritte siehe Bedienung,S.24.
11.1 Volumen einstellen
Voraussetzung:
>Der Arbeitsmodus wurde gewählt.
a. Schaltfläche antippen.
b. Volumen einstellen.
11.2 Spitze befüllen
Voraussetzung:
>Das Volumen ist eingestellt.
>Im Touch-Display erscheint die Meldung ‚STEP zum Be-
füllen‘.
a. Spitze senkrecht in das Gefäß halten. Während des An-
saugens sicherstellen, dass die Spitzenöffnung immer
von Flüssigkeit bedeckt ist, um Luftblasen in der Spitze
zu vermeiden.
b. STEP-Taste drücken.
ðDie Spitze wird befüllt, bis das eingestellte STEP-Volu-
men oder das Nennvolumen der Spitze erreicht ist.
Um die Füllung zu stoppen, STEP-Taste drücken.
11.3 Flüssigkeit abgeben und Flüssigkeitsabgabe stoppen
a. STEP-Taste drücken.
ðDie Spitze wird entleert.
Um die Flüssigkeitsabgabe zu unterbrechen, Schaltfläche X antippen.
11.4 Umgang mit Restvolumen
Zum Umgang mit Restvolumen, siehe Zur Entleerung umschalten,S.29 und Flüssigkeit abge-
ben,S.28.

Deutsch
12 Sequentielles Dispensieren (SEQ-DISP)
HandyStep® touch, HandyStep® touch S 997486 Gebrauchsanleitung 39
11.5 Optionen
a. Im Arbeitsmodus das Symbol antippen.
ðDas Optionenmenü erscheint.
Option Bedeutung
Zu Favoriten hinzufügen. Fügt die gewählten Einstellungen zum Favoritenmenü hinzu. Sie
können die Einstellungen über Hauptmenü > Favoriten wieder
aufrufen.
Arbeitsmodus Blendet die Hilfe zu dem Modus ein.
12 Sequentielles Dispensieren (SEQ-DISP)
Zur Funktion des Modus siehe Modusübersicht,S.23. Zur Einstellung des Volumens, der Geschwindig-
keit und weiterer in allen Modi gleichbleibender Bedienschritte siehe Bedienung,S.24.
12.1 Sequentielles Dispensieren im Detail
2
4
5
6
7
1
3
1Summiertes Volumen der Aliquotliste.
2STEP, der zuvor dispensiert wurde.
3STEP, der jetzt dispensiert wird.
4STEP, der als nächstes dispensiert werden wird.
5Nummer des STEPs, der als nächstes dispensiert wird.
6Anzahl der STEPs, die Sie in der Aliquotliste vorgesehen
haben.
7Vorhandenes Volumen in der Spitze.
Im Arbeitsmodus Sequentielles Dispensieren dispensieren Sie eine definierte Folge verschiedener
oder gleicher Volumen einer Flüssigkeit. Diese Volumen werden Aliquote genannt und werden über
die Aliquotliste (1 ... 10 Aliquote) definiert. Im Arbeitsmodus sehen Sie dann bis zu 3 Einträge der Ali-
quotliste. Diese Einträge werden durch ein Doppelkreuz (#) gekennzeichnet, nämlich der vorherige,
der aktuelle und der nächste Eintrag. Wird ein Aliquot dispensiert, wandert die Anzeige in der Liste
nach unten (1, #2, #1, 2, #3 #2, 3, #4 ... #10). Es kann erst dispensiert werden, wenn ausrei-
chendes Volumen aufgenommen wurde.
Überschreitet die Aliquotsumme das Spitzenvolumen, können Sie erneut Flüssigkeit aufnehmen und
danach weiter dispensieren.
Unterschreitet die Aliquotsumme das Spitzenvolumen, wird so viel Flüssigkeit aufgenommen, wie für
die eingegebene Aliquotliste benötigt wird.
Brechen Sie einen Aliquot ab (Schaltfläche X auf dem Display), wird dieser Aliquot als nicht dispensiert
gezählt. Dabei wird eine Ereignismeldung ausgegeben. Das Programm springt zum nächsten Aliquot
in der Liste. Befindet sich zum Ende der Aliquotierung zu wenig Flüssigkeit in der Spitze, nimmt das
Gerät gerade die benötigte Menge Flüssigkeit auf, um die Aliquotierung zu vervollständigen.

12 Sequentielles Dispensieren (SEQ-DISP)
40 Gebrauchsanleitung HandyStep® touch, HandyStep® touch S 997486
Die Aliquotliste kann nicht mehr verändert werden, sobald das erste Aliquot dispensiert wurde. Erst
nachdem Sie die Abgabe beendet haben, können Sie die Aliquotliste wieder bearbeiten.
12.2 Aliquotliste anlegen
Sie können 1 ... 10 Aliquote anlegen.
Voraussetzung:
>Sie befinden sich im Arbeitsmodus.
a. Schaltfläche antippen.
ðDie Aliquotliste erscheint.
b. '+'-Symbol antippen.
ðEin Aliquot wird zur Liste hinzugefügt.
12.3 Aliquotliste editieren
a. Einen Listeneintrag antippen.
ðDas Kontextmenü erscheint.
Bearbeiten Den gewählten Listeneintrag bearbei-
ten. Bedienung wie bei Volumen ein-
stellen,S.29.
Hinzufügen Einen Listeneintrag ans Ende der Liste
einfügen. Als Aliquotwert wird der Wert
des vorherigen Listeneintrags vorein-
gestellt.
Einfügen Einen Listeneintrag an Stelle des ange-
tippten Listeneintrags einfügen. Der
Listeneintrag wird oberhalb des ange-
tippten Listeneintrags eingefügt. Als
Aliquotwert wird der Wert des ange-
tippten Listeneintrags voreingestellt.
Dieser Wert kann über die ‚Bearbei-
ten‘-Funktion bearbeitet werden.
Löschen Den gewählten Listeneintrag löschen.
Sie können die Liste bis auf einen Ein-
trag löschen.

Deutsch
13 Multi-Aspirieren (MULTI-ASP)
HandyStep® touch, HandyStep® touch S 997486 Gebrauchsanleitung 41
12.4 Flüssigkeit abgeben
Voraussetzung:
>Sie befinden sich im Arbeitsmodus.
a. STEP-Taste drücken.
ðDas Volumen aus dem ersten Aliquotlisteneintrag wird abgegeben.
ðGleichzeitig wird das nächste Volumen aus der Aliquotliste ausgewählt. Dieses Volumen wird dis-
pensiert, wenn Sie die STEP-Taste das nächste Mal drücken.
12.5 Aliquotierung unterbrechen und beenden
a. Schaltfläche oder antippen.
ðDie aktuelle Aliquotierung wird beendet.
12.6 Optionen
a. Im Arbeitsmodus das Symbol antippen.
ðDas Optionenmenü erscheint.
Option Bedeutung
‘Aliquote bearbeiten’ Aliquotliste editieren.
‘Work Mode’ Blendet die Hilfe zu dem Modus ein.
13 Multi-Aspirieren (MULTI-ASP)
Zur Funktion des Modus siehe Modusübersicht,S.23. Zur Einstellung des Volumens, der Geschwindig-
keit und weiterer in allen Modi gleichbleibender Bedienschritte siehe Bedienung,S.24.
13.1 Multi-Aspirieren im Detail
5
1
2
3
4
1Füllmodus umschalten. Der gewählte Füllmodus wird
an dieser Stelle angezeigt.
2Eingestelltes Volumen
3Mögliche STEPs
4Aufgenommenes Volumen
5Zwischen Flüssigkeitsabgabe und -aufnahme umschal-
ten. Sie können zur Flüssigkeitsabgabe auch umschal-
ten, wenn das Nennvolumen nicht erreicht wurde. Ge-
nauso können Sie die Befüllung der Spitze nach einer
Unterbrechung auch fortsetzen.

13 Multi-Aspirieren (MULTI-ASP)
42 Gebrauchsanleitung HandyStep® touch, HandyStep® touch S 997486
13.2 Flüssigkeitsaufnahme vorbereiten
Voraussetzung:
>Spitze ist leer und außerhalb der Flüssigkeit
a. STEP-Taste drücken.
b. Der Kolben der Spitze fährt in die Startposition.
c. Füllmodus wählen.
d. STEP-Taste gedrückt halten.
ðFlüssigkeit wird aufgenommen.
13.3 Füllmodi
Im Arbeitsmodus Multi-Aspirieren nehmen Sie gleiche oder verschiedene Flüssigkeiten mit derselben
Spitze auf. Zur Aufnahme stehen Ihnen 3 Modi zur Verfügung:
Füllmodus ‚Manuell‘
Im Füllmodus ‚Manuell‘ steuern Sie die Flüssigkeitsaufnahme
über die STEP-Taste. Während Sie die STEP-Taste gedrückt
halten, nehmen Sie Flüssigkeit auf. Die Flüssigkeitsaufnahme
stoppt, wenn Sie die STEP-Taste loslassen oder wenn das
Nennvolumen erreicht ist.
Füllmodus ‚Step-Volumen‘
Im Füllmodus ‚Step-Volumen‘ legen Sie das STEP-Volumen
vor der Flüssigkeitsaufnahme fest. Es wird bei jedem Druck
auf die STEP-Taste das eingestellte Volumen aufgenommen,
und zwar solange, bis das Nennvolumen erreicht ist.
Füllmodus ‚Sequentiell‘
Im Füllmodus ‚Sequentiell‘ steuern Sie die Flüssigkeitsauf-
nahme über eine Aliquotliste (1 ... 10 Aliquote). In dieser Ta-
belle können verschiedene Volumen definiert werden, die in
dieser Betriebsart nacheinander aufgenommen werden. Bei
jedem Druck auf die STEP-Taste wird das aktuelle Volumen
aufgenommen. Das Programm wechselt danach zum nächs-
ten Volumen in der Aliquotliste, und zwar solange, bis alle
voreingestellten Aliquote aufgenommen sind. Im Arbeitsmo-
dus sehen Sie dann bis zu 3 Einträge der Aliquotliste. Diese
Einträge werden durch ein Doppelkreuz (#) gekennzeichnet,
nämlich der vorherige, der aktuelle und der nächste Eintrag.
Wird ein Aliquot aufgenommen, wandert die Anzeige in der
Liste nach unten (1, #2, #1, 2, #3 #2, 3, #4 ... #10). Das
Gerät wechselt automatisch zur Flüssigkeitsabgabe, wenn
das gewünschte Volumen oder das Nennvolumen erreicht
ist.

Deutsch
14 Titrieren
HandyStep® touch, HandyStep® touch S 997486 Gebrauchsanleitung 43
13.4 Flüssigkeit abgeben
Sie können zwischen Flüssigkeitsaufnahme und –abgabe über die Schaltfläche und hin- und her-
wechseln.
a. Schaltfläche antippen.
ðDie Meldung ‚STEP halten z. Entleeren‘ erscheint.
b. Um Flüssigkeit abzugeben, halten Sie die STEP-Taste gedrückt.
Um die Flüssigkeitsabgabe abzubrechen, Schaltfläche X drücken. Ist die Spitze entleert, wechselt das
Programm wieder in die Flüssigkeitsaufnahme.
13.5 Aliquotliste zur Flüssigkeitsaufnahme anlegen und editieren
a. Füllmodus ‚Sequentiell‘ wählen.
b. Optionen > ‘Aliquote bearbeiten’ wählen oder #1 ... #10 antippen.
c. Aliquotliste anlegen und editieren wie im Arbeitsmodus Sequentielles Dispensieren unter Ali-
quotliste editieren,S.40 beschrieben.
13.6 Arbeitsmodus wechseln
a. Schaltfläche antippen.
b. Ist die Spitze gefüllt, erscheint eine Meldung ob Sie den Modus mit der gefüllten Spitze wechseln
möchten.
c. Ist nur noch ein Flüssigkeitsrest vorhanden, erscheint danach eine Meldung, ob Sie die Flüssig-
keit verwerfen möchte. Bestätigen Sie die Meldung, wird die Flüssigkeit abgegeben.
13.7 Optionen
a. Im Arbeitsmodus das Symbol antippen.
ðDas Optionenmenü erscheint.
Option Bedeutung
Aliquote bearbeiten Aliquotliste editieren.
Füllmodus wählen Füllmodus auswählen.
Arbeitsmodus Hilfe Blendet die Hilfe zu dem Modus ein.
14 Titrieren
Zur Funktion des Modus siehe Modusübersicht,S.23. Zur Einstellung des Volumens, der Geschwindig-
keit und weiterer in allen Modi gleichbleibender Bedienschritte siehe Bedienung,S.24.

14 Titrieren
44 Gebrauchsanleitung HandyStep® touch, HandyStep® touch S 997486
14.1 Titrieren im Detail
1
2
3
4
5
1Zwischen Titriermodus ‚Manuell‘ und ‚STEP-Volumen‘
umschalten.
2STEP-Volumen einstellen. Das ist im Titriermodus ‚STEP-
Volumen‘ möglich.
3Bereits titriertes Volumen.
4Verbleibende Menge in der Spitze.
5Restmenge verwerfen oder Flüssigkeit aufnehmen.
Im Arbeitsmodus Titrieren dispensieren Sie Flüssigkeit (Maßlösung) in eine andere Flüssigkeit (Probe),
z. B. um einen Farbumschlag zu beobachten. Für diese Tätigkeit stehen Ihnen 2 verschiedene Titrier-
modi zur Verfügung:
Titriermodus ‚Manuell‘
In dem Titriermodus ‚Manuell‘ steuern Sie die Flüssigkeitsabgabe über die STEP-Taste. Während Sie
die STEP-Taste gedrückt halten, geben Sie Flüssigkeit ab. Die Flüssigkeitsabgabe stoppt, wenn Sie die
STEP-Taste loslassen oder wenn das vorhandene Volumen in der Spitze dispensiert wurde. Bei jedem
Loslassen der STEP-Taste wird die Abgabegeschwindigkeit um eine Stufe vermindert (Stufe 8, Stufe 7,
Stufe 6 …. Stufe 1). So können Sie sich z. B. leichter einem Farbumschlagspunkt annähern.
Titriermodus ‚STEP-Volumen‘
In dem Titriermodus STEP legen Sie das STEP-Volumen vor der Flüssigkeitsabgabe fest. Es wird bei je-
dem Druck auf die STEP-Taste das eingestellte Volumen abgegeben. Außerdem reduziert sich die Dis-
pensiergeschwindigkeit bei jedem Druck auf die STEP-Taste.
Volumen speichern
Mit dieser Funktion speichern Sie zuletzt eingestellte Volumina in einer Liste ab. Wenn Sie für gleiche
Titrationen dieselbe Volumeneinstellung verwenden, können Sie sich so schneller einem Farbum-
schlagspunkt annähern. Liste aufrufen, siehe Optionen,S.45.
14.2 Titrieren
Im Folgenden wird die Benutzung des Arbeitsmodus über den Farbumschlag einer pH-Wert-Bestim-
mung beispielhaft erklärt. Sie können den Titriermodus über die Schaltfläche oder umschal-
ten.

Deutsch
14 Titrieren
HandyStep® touch, HandyStep® touch S 997486 Gebrauchsanleitung 45
Voraussetzung:
>Sie benötigen ein durchsichtiges Gefäß, z. B. Erlenmey-
er-Kolben, sowie die für die pH-Wert-Bestimmung not-
wendigen Flüssigkeiten.
a. Modus wählen um zunächst eine größere Flüssig-
keitsmenge zu dispensieren. Über die Schaltfläche
wählen Sie die Dispensiergeschwindigkeit.
b. Flüssigkeit aufnehmen. Gerät senkrecht über den Erlen-
meyer-Kolben halten.
c. Um kontinuierlich Flüssigkeit abzugeben, STEP-Taste
gedrückt halten.
d. Eintauchen der Maßlösung in die Probe beobachten.
Nähern Sie sich dem Farbumschlagspunkt, wechseln
Sie in den Modus .
ðDer Farbumschlagspunkt zeichnet sich durch erste
Farbschlieren in der Probe ab.
e. Schaltfläche antippen. Gewünschtes Volumen ein-
stellen.
f. Durch kurze Betätigung der STEP-Taste Maßlösung
tropfenweise dispensieren, bis der Farbumschlag er-
reicht ist.
14.3 Optionen
a. Im Arbeitsmodus das Symbol antippen.
ðDas Optionenmenü erscheint.
Option Bedeutung
Zu Favoriten hinzufügen Getätigte Einstellungen zu Favoriten hinzufügen. Sie können diese
über Hauptmenü > Favoriten wieder aufrufen.
Manuell/STEP-Volumen Titriermodus umschalten
Letzte Volumen zeigen Die letzten titrierten Volumen anzeigen.
Arbeitsmodus Hilfe Blendet die Hilfe zu dem Modus ein.
Letzte Volumen zeigen
Die Liste zeigt die letzten 5 Volumina an, welche zuletzt von
Ihnen gespeichert wurden. Neu gespeicherte Volumina wer-
den oben angefügt, ältere werden verworfen.

15 Favoriten
46 Gebrauchsanleitung HandyStep® touch, HandyStep® touch S 997486
15 Favoriten
Über die Favoriten speichern Sie Einstellungen ab, um sie später wieder abzurufen, z. B. Volumen-
oder Geschwindigkeitseinstellungen.
15.1 Favoriten im Detail
2
5
4
3
1
1. Das Favoriten-Icon signalisiert den Arbeitsmodus,
aus dem der Favorit abgespeichert wurde.
2. Diese Zeile zeigen den Namen des Favoriten
3. Die Werte zeigen die im Favoriten abgespeicherten
Einstellungen.
4. Spitze abwerfen oder einsetzen.
5. Hilfe anzeigen.
15.2 Favoriten anlegen
Voraussetzung:
>Sie haben einen Arbeitsmodus geöffnet.
a. Schaltfläche antippen.
b. Option „Zu Favoriten hinzufügen“ anwählen.
c. Namen vergeben.
d. Schaltfläche antippen.
ðDer Favorit wird an das Ende der Favoritenliste im Menü Favoriten hinzugefügt. Siehe Favoriten
im Detail,S.46.
15.3 Favoriten öffnen
a. Sie befinden sich im Menü ‚Favoriten‘.
b. Eintrag in der Favoritenliste antippen und ‚Öffnen‘ wählen.
ðDie Einstellungen werden in dem entsprechenden Arbeitsmodus geöffnet.
Favoriteneinstellung und Spitzenvolumen weichen voneinander ab
Jeder Favorit ist gültig für ein Spitzenvolumen. Wenn Sie einen Favorit öffnen und die eingelegte Spit-
ze hat ein anderes Volumen als im Favorit gespeichert, werden Sie aufgefordert, die richtige Spitze
einzulegen. Sie können dann die vorhandene Spitze abwerfen und eine andere Spitze einlegen.

Deutsch
16 Reinigung und Desinfektion
HandyStep® touch, HandyStep® touch S 997486 Gebrauchsanleitung 47
15.4 Favoriten löschen
Einzelnen Favoriten löschen
Voraussetzung:
>Sie befinden sich im Menü ‚Favoriten‘.
a. Eintrag in der Favoritenliste antippen und ‚Löschen‘ wählen.
b. Abfrage bestätigen.
ðDer gewählte Favorit wird gelöscht.
Alle Favoriten löschen
Voraussetzung:
>Sie befinden sich im Menü ‚Favoriten‘.
a. Eintrag in der Favoritenliste antippen und ‚Alle löschen‘ wählen.
b. Abfrage bestätigen.
ðDie Favoritenliste wird gelöscht.
16 Reinigung und Desinfektion
16.1 Reinigung
HINWEIS
Das Gerät ist nicht autoklavierbar
Das Gerät ist werkseitig kalibriert und wartungsfrei.
Bei Verschmutzung das Gerät mit einem feuchten Tuch von außen reinigen. Dazu Wasser oder ver-
dünnter Seifenlösung verwenden. Ätzende oder aggressive Reinigungsmittel vermeiden.
Das Gerät darf nicht auseinandergeschraubt werden.
16.2 UV-Entkeimung
Das Gerät ist gegen die übliche Belastung einer UV-Entkeimungslampe beständig. Infolge der UV-Ein-
wirkung ist eine Farbveränderung möglich.
Empfehlung zur UV-Entkeimung:
Lichtspektrum UV-C
Wellenlänge 220 nm ... 270 nm
Bestrahlungsdauer pro cm2 und beab-
sichtigtem Inaktivierungsgrad
2 s ... 300 s

17 Störung - Was tun?
48 Gebrauchsanleitung HandyStep® touch, HandyStep® touch S 997486
17 Störung - Was tun?
17.1 Geräteverhalten
Störung Mögliche Ursache Was tun?
Der Akkuladezyklus hat
sich extrem verkürzt.
Der Akku ist gealtert oder
beschädigt.
Den Akku tauschen.
Das Gerät lädt nicht. Der Akku kann nicht aufge-
laden werden, wenn dieser
zu kalt oder zu warm ist.
Akkustecker ziehen.
Akku auf Zimmertemperatur aufwärmen
oder abkühlen lassen.
Akkustecker einstecken. Laden erneut versu-
chen.
Die Nutzbarkeitsdauer oh-
ne Stromanschluss hat
sich extrem verkürzt.
Der Akku ist gealtert oder
beschädigt.
Den Akku tauschen.
Das Netzteil wird beim La-
den extrem warm.
Der Akku ist gealtert oder
beschädigt.
Das Netzteil ist beschädigt.
Das USB-Kabel ist beschä-
digt.
Das betroffene Teil austauschen.
Das Gerät lädt nicht. Das Netzteil ist beschädigt.
Das USB-Kabel ist beschä-
digt.
Der Akkustecker wurde ge-
zogen.
Ein Akkukabel ist gebro-
chen.
Der Abstand Gerät zu Lade-
ständer ist zu groß
Das betroffene Teil austauschen.
Den Akkustecker einstecken.
Das Gerät erneut in den Ladeständer einset-
zen,
Das Display ist zu hell oder
zu dunkel.
Die Display-Helligkeit ist ver-
stellt.
Die Helligkeit anpassen, siehe Anzeige,S.31
Das Display wird weiß,
wenn das Gerät in den La-
deständer gestellt wird.
Gerät kann nicht starten.
Der Akkustecker wurde ge-
zogen.
Den Akkustecker einstecken.
Es werden keine Töne
beim Arbeiten mit Gerät
ausgegeben.
Die Tonbenachrichtigung ist
ausgeschaltet.
Die Tonbenachrichtigung einschalten, siehe
Ton,S.31
Das Touch-Display rea-
giert nicht mehr.
Das Programm ist abge-
stürzt.
Das Gerät startet, wenn der Akku nach dem
Programmabsturz wieder gekoppelt wurde
und neu verbunden wurde. Dabei erscheint
eine Hinweismeldung, dass noch eine Spitze
im Gerät vorhanden sein kann. Deswegen
das Gerät in die Halterung einhängen und
ein geeignetes Gefäß unter die Spitze stellen
oder das Gerät über ein geeignetes Gefäß
beim Starten halten.
Zur Abhilfe:
Die Abdeckung öffnen, Akkustecker entkop-
peln, 5 s warten und wieder einstecken. Bei

Deutsch
17 Störung - Was tun?
HandyStep® touch, HandyStep® touch S 997486 Gebrauchsanleitung 49
Störung Mögliche Ursache Was tun?
ausreichendem Akkuladestand startet das
Gerät.
Die Spitze tropft. Die Spitze ist undicht. Die Spitze ersetzen.
Die Spitze wird nicht er-
kannt.
Kodierung beschädigt
Spitze ohne Kodierung ver-
wendet.
Die Spitze auswerfen und erneut einsetzen.
Neue oder kodierte Spitze verwenden.
Es kommt zu Interferen-
zen (EMV) in direkter Nähe
zum Ladeständer.
Diese Störungen sind un-
wahrscheinlich, da die
übertragene Leistung ge-
ring ist.
Ladeständer sendet Interfe-
renzen während des Lade-
vorgangs aus.
Abstand zwischen gestörtem Gerät und La-
deständer vergrößern.
Gerät neu in den Ladeständer stellen.
Darauf achten, dass sich keine Fremdkörper
zwischen Ladeständer und Gerät befinden.
17.2 Systemmeldungen
Beispiel: Das Gerät signalisiert durch Systemmeldungen, dass be-
stimmte Programmfolgen abgekürzt wurden. Die System-
meldungen informieren den Anwender, welche Möglichkei-
ten zur weiteren Bedienung möglich sind.
17.3 Ereignismeldungen im Display
Das Gerät signalisiert durch Ereignismeldungen, dass das Gerät von einem vorgesehenen Zustand ab-
gewichen ist. Die Ereignismeldungen informieren den Anwender, welche Möglichkeiten zur weiteren
Bedienung möglich sind.
Bei der Ereignismeldung ‚Hinweis‘ können Sie mit dem Gerät weiterarbeiten. Diese Ereignismeldun-
gen signalisieren, dass das Gerät eine Aufgabe nicht wie im Programm vorgesehen ausführen konnte.
Beispiel: Akku ist zu schwach.
Bei der Ereignismeldung ‚Fehler‘ ist ein technisches Problem aufgetreten. Tritt diese Ereignismeldung
nach einem Neustart und bei derselben Tätigkeit erneut auf, können Genauigkeit und die richtige
Funktion des Geräts nicht mehr gewährleistet sein. Beispiel: Motor ist blockiert.
Bei wiederholtem Auftreten immer gleicher Ereignismeldungen nehmen Sie Kontakt zu BRAND auf.

18 Volumen überprüfen
50 Gebrauchsanleitung HandyStep® touch, HandyStep® touch S 997486
18 Volumen überprüfen
18.1 Prüfanweisungen (SOP)
https://www.brand.de/sop
Weitere Informationen zur Kalibrierung siehe Kalibrie-
rung,S.50.
18.2 Dichtheitsprüfung des PD-Tips
a. Neuen PD-Tip einlegen.
ðDer PD-Tip wird automatisch erkannt bzw. bei kompatiblen Dispenser-Tips die Volumengröße
auswählen.
b. Verändern des zu dispensierenden Volumens.
c. Füllen des PD-Tips.
d. PD-Tip in die Prüfflüssigkeit eintauchen. Die Flüssigkeit muss gleichmäßig aufgesaugt werden.
Das Gerät ca. 10 s senkrecht nach unten halten: Bildet sich ein Tropfen, dann die Hinweise in
nachfolgender Tabelle beachten.
Spitze wird nicht erkannt keine Kodierung bzw. Kodie-
rung beschädigt oder Spitze
nicht richtig eingelegt
neue Spitze einlegen bzw.
nochmals einlegen, Auswahl
der Volumengröße
Spitze tropft Spitze undicht Neue Spitze einsetzen
19 Kalibrierung
Ist die Dichtheitsprüfung (siehe Volumen überprüfen,S.50) erfolgreich abgeschlossen, kann durch
gravimetrische Messung ermittelt werden, ob das Gerät innerhalb der von der ISO 8655 definierten
Grenzen liegt. Das dazu notwendige Prüfverfahren ist in den Prüfanweisungen (SOP) beschrieben.
20 Technische Daten
20.1 Genauigkeitstabelle
Die Messungen wurden mit PD-Tip II von BRAND durchgeführt.
Als Probenflüssigkeit wurde aqua dest. verwendet.
Das Nennvolumen ist das auf dem PD-Tip aufgedruckte maximale Volumen.

Deutsch
20 Technische Daten
HandyStep® touch, HandyStep® touch S 997486 Gebrauchsanleitung 51
Die in der ISO 8655 festgelegten Toleranzen werden nicht überschritten.
Richtigkeit R* ≤ ± % Variationskoeffizient
VK ≤ %
Nennvolumen Nennvolumen
PD-Tip Volumenbe-
reich
Unterteilung 100% 50% 10
%
1% 100% 50% 10
%
1
%
0,1 ml 1 µl ... 100 µl 0,1 µl 1,0 1,0 1,6 8,0 0,5 1,0 2,0 12,0
0,5 ml 5 µl ... 500 µl 0,1 µl 0,9 0,9 1,0 5,0 0,3 0,6 1,0 5,0
1 ml 10 µl ...1 ml 1,0 µl 0,6 0,9 1,0 5,0 0,3 0,5 0,8 4,0
1,25 ml 12,5 µl ... 1,25 ml 0,5 µl 0,6 0,6 0,9 5,0 0,15 0,5 0,7 4,0
2,5 ml 25 µl ... 2,5 ml 1,0 µl 0,5 0,6 0,7 3,5 0,15 0,3 0,6 3,0
5 ml 50 µl ... 5 ml 1,0 µl 0,5 0,5 0,7 3,5 0,15 0,4 0,7 3,0
10 ml 100 µl ... 10 ml 10 µl 0,4 0,5 0,7 3,5 0,15 0,5 0,8 4,0
12,5 ml 125 µl ... 12,5 ml 5,0 µl 0,5 0,5 0,8 3,5 0,15 0,6 1,4 6,5
25 ml 250 µl ... 25 ml 10 µl 0,5 0,5 0,6 3,0 0,15 0,3 1,0 6,0
50 ml 500 µl ... 50 ml 10 µl 0,5 0,5 0,5 3,0 0,15 0,4 1,2 9,0
20.2 Einsatzgrenzen
Einsatzbereich *) 15 °C ... 40 °C
(59 °F ... 104 °F)
Dampfdruck bis 500 mbar
Viskosität 20 mPa s bei 50 ml PD-Tip
260 mPa s bei 5 ml PD-Tip
977 mPa s bei 1,25 ml PD-Tip
*) Weitere Temperaturen auf Anfrage
20.3 Verwendete Materialien
Gerät PC/PBT, PP, Silikon, Glas, PEEK
Spitzen/Kolben PE/PP (Größe 0,1 mm LCP/PP)
20.4 Akku
Typ Li-Ionen-Akku
Kapazität 1650 mAh
Spannung 3,7 V
Leistung 6,11 Wh
Lagerung 0 °C ... 35 °C
Ladezeit ca. 6 h, abhängig von Ladung durch Netzteil oder Ladeständer.

20 Technische Daten
52 Gebrauchsanleitung HandyStep® touch, HandyStep® touch S 997486
Gewicht 40 g
20.5 Ladeständer
Eingang DC 5,0 V 1,4 A, 7,0 W
Übertragung 3,5 W, 110 kHz ... 205 kHz
20.6 Universalnetzteil
Eingang AC 100 ... 240 V ~ 50 Hz/60 Hz, 0,5 A
Ausgang DC 5,0 V 1,4 A, 7,0 W
20.7 Kennzeichnungen auf Produkt und Akku
Kennzeichnung Bedeutung
Mit diesem Zeichen bestätigen wir, dass das Produkt den in den EG-Richtlinien
festgelegten Anforderungen entspricht und den festgelegten Prüfverfahren
unterzogen wurde.
UKCA: United Kingdom Conformity Assessed
Mit diesem Zeichen bestätigen wir, dass das Produkt den in den UK Designa-
ted Standards festgelegten Anforderungen entspricht.
DE-M 21
Das Gerät ist gemäß deutschem Mess- und Eichgesetz sowie der Mess- und
Eichverordnung gekennzeichnet.
Zeichenfolge DE-M (DE für Deutschland), eingerahmt durch ein Rechteck, so-
wie die beiden letzten Ziffern des Jahres, in dem die Kennzeichnung ange-
bracht wurde.
XXFFFFF Seriennummer
Beachten Sie die gegebenen Hinweise am Gerät, den Zubehörteilen und in der
Gebrauchsanleitung.
Gebrauchsanleitung lesen.
Das Gerät oder der Akku soll fachgerecht entsorgt werden.
(hier: 40 Jahre)
China RoHS (EFUP)
EFUP definiert den Zeitraum in Jahren, in dem die in Elektro- und Elektronik-
geräten enthaltenen gefährlichen Stoffe unter normalen Betriebsbedingungen
nicht auslaufen oder sich verändern. Bei normalem Gebrauch durch den Be-
nutzer führen solche Elektro- und Elektronikprodukte nicht zu einer schweren
Umweltverschmutzung, zu schweren Körperverletzungen oder zur Beschädi-
gung der Sachwerte des Benutzers.

Deutsch
21 Bestellinformationen
HandyStep® touch, HandyStep® touch S 997486 Gebrauchsanleitung 53
Kennzeichnung Bedeutung
Gleichspannung
~ Wechselspannung
Nur für den Innenbereich geeignet
Gerät überall durch doppelte Isolierung oder verstärkte Isolierung geschützt.
Das elektrische Gerät darf nicht mit dem Hausmüll entsorgt werden.
2ATKA-HST7052X0
2ATKA-HSTC705220
Zertifizierungsnummer USA FCC
IC: 25139-
HSTC705220
HVIN: HW_HSTC01.00
Zertifizierungsnummer Kanada ISED
21 Bestellinformationen
https://shop.brand.de/en/
21.1 Geräte
Bezeichnung Abbildung Bestellnummer
HandyStep® touch, Universalhalter, Uni-
versalnetzteil, Länderadapter, Li-Ionen
Akku
705200
HandyStep® touch S, Universalhalter,
Universalnetzteil, Länderadapter, Li-Io-
nen Akku
705210

21 Bestellinformationen
54 Gebrauchsanleitung HandyStep® touch, HandyStep® touch S 997486
21.2 Zubehör
Bezeichnung Abbildung Bestellnummer
Ladeständer (weltweit außer Indien) 705220
Ladeständer (Indien) 705223
Halteständer 705230
Li-Ionen-Akku für HandyStep® touch
und HandyStep® touch S
705225
Universalhalter f. HandyStep® touch
und HandyStep® touch S
705235
Universalnetzteil f. HandyStep® touch
und HandyStep® touch S inkl. Ladekabel
und Länderadapter
705250
Bundle HandyStep® touch mit Lade-
ständer weltweit (außer Indien)
705201
Bundle HandyStep® touch S mit Lade-
ständer weltweit (außer Indien)
705211
Bundle HandyStep® touch mit Lade-
ständer für Indien
705203
Bundle HandyStep® touch S mit Lade-
ständer für Indien
705213

Deutsch
22 Reparatur
HandyStep® touch, HandyStep® touch S 997486 Gebrauchsanleitung 55
21.3 Verbrauchsmaterialien
21.3.1 PD-TipsII (Präzisions-Dispenser-Tips II)
Die kodierten Spitzen werden vom Gerät automatisch erkannt.
Volumen [ml] Bestell-Nr. Verp.-Einheit
[Stück]
Bestell-Nr.
BIO-CERT® LI-
QUID HANDLING
STERILE
Verp.-Einheit
[Stück]
0,1 705700 100 705730 100
0,5 705702 100 705732 100
1 705704 100 705734 100
1,25 705706 100 705736 100
2,5 705708 100 705738 100
5 705710 100 705740 100
10 705712 100 705742 100
12,5 705714 100 705744 100
25 705716 25+1Adapter 705746 25+1 Adapter
50 705718 50+1 Adapter 705748 25+1 Adapter
Set PD-TipsII
0,5ml ... 12,5ml
705720 je 20 — —
21.3.2 Adapter für 25 ml und 50 ml PD-Tips II
Volumen [ml] Bestell-Nr. Verpackungseinheit Merkmal
25ml und 50ml 702398 10
25ml und 50ml 702399 5 BIO-CERT® LIQUID
HANDLING STERILE
22 Reparatur
22.1 Zur Reparatur einsenden
HINWEIS
Der Transport von gefährlichem Material ohne Genehmigung ist gesetzlich verboten.
Gerät gründlich reinigen und dekontaminieren!
•Fügen Sie der Rücksendung von Produkten bitte grundsätzlich eine genaue Beschreibung der Art
der Störung und der verwendeten Medien bei. Bei fehlender Angabe der verwendeten Medien
kann das Gerät nicht repariert werden.
•Senden Sie das Gerät ausschließlich ohne Akku bzw. Batterie.

23 Kalibrierservice
56 Gebrauchsanleitung HandyStep® touch, HandyStep® touch S 997486
•Der Rücktransport geschieht auf Gefahr und Kosten des Einsenders.
Außerhalb der USA und Kanada
"Erklärung zur gesundheitlichen Unbedenklichkeit" ausfüllen und gemeinsam mit dem Gerät an Her-
steller oder Händler senden. Vordrucke können beim Händler oder Hersteller angefordert werden,
bzw. stehen unter www.brand.de zum Download bereit.
Innerhalb der USA und Kanada
Bitte klären Sie mit BrandTech Scientific, Inc. die Voraussetzungen für die Rücksendung bevor Sie das
Gerät zum Service einschicken.
Senden Sie ausschließlich gereinigte und dekontaminierte Geräte an die Adresse, die Sie zusammen
mit der Rücksendenummer erhalten haben. Die Rücksendenummer außen am Paket gut sichtbar an-
bringen.
Kontaktadressen
Deutschland:
BRAND GMBH + CO KG
Otto-Schott-Straße 25
97877 Wertheim (Germany)
T +49 9342 808 0
F +49 9342 808 98000
www.brand.de
USA und Kanada:
BrandTech® Scientific, Inc.
11 Bokum Road
Essex, CT 06426-1506 (USA)
T +1-860-767 2562
F +1-860-767 2563
www.brandtech.com
Indien:
BRAND Scientific Equipment Pvt. Ltd.
303, 3rd Floor, ‘C‘ Wing, Delphi
Hiranandani Business Park,
Powai
Mumbai–400 076 (India)
T +91 22 42957790
F +91 22 42957791
www.brand.co.in
China:
BRAND (Shanghai) Trading Co., Ltd.
Guangqi Culture Plaza
Room 506, Building B
No. 2899, Xietu Road
Shanghai 200030 (P.R. China)
T +86 21 6422 2318
F +86 21 6422 2268
www.brand.cn.com
23 Kalibrierservice
Die ISO 9001 und GLP-Richtlinien fordern die regelmäßige Überprüfung Ihrer Volumenmessgeräte. Wir
empfehlen, alle 3-12 Monate eine Volumenkontrolle vorzunehmen. Der Zyklus ist abhängig von den
individuellen Anforderungen an das Gerät. Bei hoher Gebrauchshäufigkeit oder aggressiven Medien
sollte häufiger geprüft werden.
Die ausführliche Prüfanweisung steht unter www.brand.de bzw. www.brandtech.com zum Download
bereit.

Deutsch
23 Kalibrierservice
HandyStep® touch, HandyStep® touch S 997486 Gebrauchsanleitung 57
BRAND bietet Ihnen darüber hinaus die Möglichkeit, Ihre Geräte durch unseren Werks-Kalibrierservice
oder durch das BRAND-DAkkS-Labor kalibrieren zu lassen. Schicken Sie uns einfach die zu kalibrieren-
den Geräte mit der Angabe, welche Art der Kalibrierung Sie wünschen. Sie erhalten die Geräte nach
wenigen Tagen zusammen mit einem Prüfbericht (Werkskalibrierung) bzw. mit einem DAkkS-Kali-
brierschein zurück. Nähere Informationen erhalten Sie von Ihrem Fachhändler oder direkt von BRAND.
Die Bestellunterlage steht unter www.brand.de zum Download bereit (s. Technische Unterlagen).

24 Informationen zu Ihrem Laborgerät
58 Gebrauchsanleitung HandyStep® touch, HandyStep® touch S 997486
24 Informationen zu Ihrem Laborgerät
Der Online-Service MyProduct (https://www.brand.de/myproduct) bietet Qualitätszertifikate, Zube-
hör und technische Dokumentation für Ihr Laborgerät HandyStep® touch. In dem Sie die Serien- und
Artikelnummer dort eingeben, erhalten Sie die Informationen zu Ihrem individuellen Gerät.
Sie finden weiterhin einen Data Matrix Code auf dem Gerät. Scannen Sie diesen mit einer gebräuchli-
chen Lese-App, um über die URL https://www.brand.de/myproduct die genannten Informationen auf-
zurufen.
25 Mängelhaftung
Wir haften nicht für Folgen unsachgemäßer Behandlung, Verwendung, Wartung, Bedienung oder nicht
autorisierter Reparatur des Gerätes oder für Folgen normaler Abnutzung, insbesondere von Ver-
schleißteilen wie z.B. Kolben, Dichtungen, Ventilen sowie bei Glasbruch. Gleiches gilt für die Nichtbe-
achtung der Gebrauchsanleitung. Insbesondere übernehmen wir keine Haftung für entstandene Schä-
den, wenn das Gerät weiter zerlegt wurde als in der Gebrauchsanleitung beschrieben oder wenn frem-
de Zubehör- bzw. Ersatzteile eingebaut wurden.
USA und Kanada:
Informationen zur Mängelhaftung finden Sie unter www.brandtech.com.
26 Entsorgung
Das nebenstehende Symbol bedeutet, dass Batterien/Akkus
und elektronische Geräte am Ende ihrer Lebensdauer vom
Hausmüll (unsortierter Siedlungsabfall) getrennt entsorgt
werden müssen.
Elektronische Geräte müssen gemäß der Richtlinie 2012/19/EU des europäischen Parlaments und des
Rates vom 04. Juli 2012 über Elektro- und Elektronik-Altgeräte fachgerecht entsprechend den natio-
nalen Entsorgungsvorschriften entsorgt werden.
Batterien und Akkus enthalten Stoffe, die sich schädlich auf die Umwelt und die menschliche Gesund-
heit auswirken können. Sie müssen daher gemäß der Richtlinie 2006/66/EG des europäischen Parla-
ments und des Rates vom 06. September 2006 über Batterien und Akkumulatoren fachgerecht ent-
sprechend den nationalen Entsorgungsvorschriften entsorgt werden. Nur vollständig entladene Bat-
terien und Akkus entsorgen.
Technische Änderungen, Irrtum und Druckfehler vorbehalten.

Deutsch
26 Entsorgung
HandyStep® touch, HandyStep® touch S 997486 Gebrauchsanleitung 59
26.1 Entsorgung des Akkus
WARNUNG
Mögliche Gefahr von Explosion und Feuer durch überhitzten Akku!
Akku zum Entladen nicht kurzschließen.
•Umwickeln Sie den Stecker mit Klebeband, um bei der Entsorgung Kurzschlüsse zu vermeiden.
•Zerlegen Sie niemals den Akku.

60 Operating manual HandyStep® touch, HandyStep® touch S 997486
Table of Contents
1 Scope of supply ................................... 62
2 Terms of use........................................ 62
2.1 Hazard levels .................................... 62
2.2 Symbols ............................................ 62
2.3 Format .............................................. 62
3 Safety regulations ............................... 63
3.1 General safety regulations............... 63
3.2 Battery .............................................. 63
3.3 Inductive charging ........................... 64
3.4 Touchscreen display ........................ 64
3.5 Usage limits ...................................... 64
3.6 Operating Exclusions ....................... 64
3.7 Materials used .................................. 65
3.8 Type plate and marking................... 65
4 Intended use ....................................... 65
5 Functions and controls......................... 66
5.1 STEP button...................................... 66
5.2 Power button.................................... 67
5.3 Battery .............................................. 67
5.4 Controls ............................................ 69
5.5 Power adapter and charging
adapter ............................................. 70
5.6 Device holder.................................... 70
5.7 Charging stand (accessory) ............. 71
5.8 Holding stand (accessory) ............... 72
5.9 Layout of the touchscreen display
(work area) ....................................... 72
5.10 PD-Tips II (precision dispenser tips
II) ....................................................... 73
5.11 Adapter for 25 ml and 50 ml PD tips
II ........................................................ 73
6 Overview of modes .............................. 73
7 Operation ........................................... 74
7.1 Switching on the device................... 74
7.2 Switching off the device................... 75
7.3 Opening an operating mode............ 75
7.4 Exiting an operating mode .............. 75
7.5 Opening Context Help...................... 76
7.6 Inserting tips..................................... 76
7.7 Ejecting the tip ................................. 77
7.8 Aspirating liquid ............................... 77
7.9 Dispensing liquid.............................. 78
7.10 Setting the volume............................ 79
7.11 Setting the aspiration and dispens-
ing speed............................................ 79
8 Settings ...............................................80
8.1 Language ........................................... 80
8.2 Device................................................. 80
8.3 Date / time ......................................... 80
8.4 Display................................................ 81
8.5 Sound................................................. 81
8.6 Info/about.......................................... 81
8.7 Regulatory notes ............................... 81
8.8 Calibration ......................................... 81
8.9 Factory settings ................................. 82
8.10 Switching tip detection on/off.......... 82
8.11 Keypad ............................................... 82
9 Multi-Dispensing (MULTI-DISP) ..............82
9.1 Aspirating liquid ................................ 83
9.2 Interrupting and resuming liquid
aspiration........................................... 83
9.3 Dispensing liquid............................... 83
9.4 Handling residual volumes ............... 84
9.5 Presetting the STEP count ................ 84
9.6 Options............................................... 84
10 Auto-Dispensing (AUTO-DISP) ..............84
10.1 Automatically dispensing liquid....... 85
10.2 Optimizing the dispensing duration. 85
10.3 Setting the pause time manually...... 85
10.4 Setting the pause time automati-
cally (learn function) ......................... 85
10.5 Handling residual volumes ............... 86
10.6 Options............................................... 87
11 Pipetting (PIP)......................................87
11.1 Setting the volume............................ 87
11.2 Filling a tip ......................................... 87
11.3 Dispensing liquid and stopping liq-
uid dispensing ................................... 87
11.4 Handling residual volumes ............... 88
11.5 Options............................................... 88
12 Sequential Dispensing (SEQ-DISP)..........89
12.1 Sequential Dispensing in detail........ 89
12.2 Creating an aliquot list...................... 90
12.3 Editing an aliquot list ........................ 90
12.4 Dispensing liquid............................... 90

English
Table of Contents
HandyStep® touch, HandyStep® touch S 997486 Operating manual 61
12.5 Interrupting and ending aliquoting. 91
12.6 Options ............................................. 91
13 Multi-Aspiration (MULTI-ASP) ............... 91
13.1 Multi-Aspiration in detail ................. 91
13.2 Preparing liquid aspiration.............. 91
13.3 Filling modes .................................... 92
13.4 Dispensing liquid.............................. 92
13.5 Creating and editing an aliquot list
for liquid aspiration.......................... 93
13.6 Switching the operating mode........ 93
13.7 Options ............................................. 93
14 Titration ............................................. 93
14.1 Titration in detail.............................. 93
14.2 Titration............................................ 94
14.3 Options ............................................. 95
15 Favorites ............................................ 95
15.1 Favorites in detail............................. 95
15.2 Creating favorites............................. 96
15.3 Opening favorites............................. 96
15.4 Deleting favorites ............................. 96
16 Cleaning and disinfection..................... 97
16.1 Cleaning............................................ 97
16.2 UV disinfection ................................. 97
17 Troubleshooting.................................. 97
17.1 Device behavior................................ 97
17.2 System messages............................. 99
17.3 Event messages in the display......... 99
18 Monitoring volumes............................. 99
18.1 Testing instructions (SOP)............... 99
18.2 Leak test of the PD tip......................100
19 Calibration..........................................100
20 Technical data.....................................100
20.1 Accuracy table..................................100
20.2 Limitations of use.............................101
20.3 Materials used ..................................101
20.4 Battery ..............................................101
20.5 Charging Stand.................................101
20.6 Universal power adapter .................102
20.7 Markings on the product and the
battery ..............................................102
21 Ordering Information...........................103
21.1 Devices..............................................103
21.2 Accessories ........................................104
21.3 Consumables.....................................105
22 Repairs ................................................106
22.1 Sending for repair..............................106
23 Calibration service................................107
24 Information about your laboratory in-
strument..............................................108
25 Warranty..............................................108
26 Disposal ...............................................108
26.1 Battery disposal.................................108

62 Operating manual HandyStep® touch, HandyStep® touch S 997486
1 Scope of supply
Device HandyStep® touch
USB cable
Universal power adapter
Retaining clips for rack mount
5 PD-Tips II with a volume of 12.5 ml, 5 ml, 2.5 ml,
1.25 ml and 0.5 ml
Operating manual with declaration of conformity
Quality certificate
Quick guide
2 Terms of use
•Carefully read the operating manual before using the device for the first time.
•The operating manual is part of the device and must be kept in an easily accessible place.
•Be sure to include the operating manual if you transfer possession of this device to a third party.
•You can find up-do-date versions of the operating manual on our website: www.brand.de.
2.1 Hazard levels
The following signal words identify possible hazards:
Signal word Meaning
DANGER Will lead to serious injury or death.
WARNING May lead to serious injury or death.
CAUTION May lead to minor or moderate injuries.
NOTICE May lead to property damage.
2.2 Symbols
Symbol Meaning Symbol Meaning Symbol Meaning
Danger area Biohazard Property damage
warning
Electric voltage Explosive materials Do not dispose of
in household
waste
Hot surface Magnetic fields Represents a dis-
play gesture.
2.3 Format
Format Meaning Format Meaning
1. Task Indicates a task. > Indicates a condition.
a., b., c. Indicates the individual steps of a
task.
Indicates a result.

English
3 Safety regulations
HandyStep® touch, HandyStep® touch S 997486 Operating manual 63
3 Safety regulations
3.1 General safety regulations
Please read carefully!
The instrument HandyStep® touch can be used in combination with hazardous materials, work pro-
cesses and equipment. However, the operating manual cannot cover all of the safety issues that may
occur in doing so. It is the user’s responsibility to ensure compliance with the safety and health regu-
lations and to specify the corresponding restrictions before use.
1. Every user must read and observe this operating manual before using the device.
2. Follow the general hazard instructions and safety regulations, e.g. wear protective clothing,
eye protection and protective gloves.
3. When working with infectious or hazardous samples, the standard rules and precautions must
be adhered to.
4. Follow the instructions given by the reagent manufacturer.
5. Do not operate the device in potentially explosive atmospheres.
6. Do not pipette highly flammable media.
7. Use the device only for dosing liquids and only within the defined limits and exclusions of use.
Comply with the operating exclusions; see Limitations of use,p.101. In case of doubt, contact
the manufacturer or dealer.
8. Always perform work in a manner that does not endanger the user or other people. Avoid
splattering. Use only suitable vessels.
9. When a tip is inserted, it is automatically locked in place. When using a previously used tip, en-
sure that it does not contain any residual liquid.
10. Press the STEP button of the device only when it can be ensured that the dispensed liquid
does not pose a risk.
11. Avoid touching the tip opening when working with aggressive media.
12. Never use force.
13. Use only original accessories and original replacement parts. Do not make any technical modi-
fications. Disassembly of the device is not permitted.
14. Always check that the device is in proper working condition before use. If a device fault is sig-
naled, stop dosing immediately and follow the instructions in the chapter Troubleshoot-
ing,p.97. Contact the manufacturer, if necessary.
3.2 Battery
1. Use only the USB cable included in delivery of the device. If other cables are used, damage to
the device and charging stand can occur.
2. The device and power adapter may become very hot when charging. Do not cover these de-
vices.
3. If the device overheats in the area of the charging socket, the USB cable could be defective; re-
place the USB cable with a new OEM cable.
4. In applications that require a lot of battery power, the device can occasionally become very
hot (e.g. when working with high-volume tips). In this case, pause pipetting and only resume
once the device has cooled.
5. Never use non-original or damaged power supplies, charging stands or batteries. Non-ap-
proved power supplies or cables can cause the battery to explode or lead to damage of the de-
vice.

3 Safety regulations
64 Operating manual HandyStep® touch, HandyStep® touch S 997486
3.3 Inductive charging
1. Use only the original charging stand for inductive charging.
2. During inductive charging, do not place electrically conductive or magnetic objects between
the device and the charging stand.
3. The device, charging stand and power adapter may become hot during inductive charging. Do
not cover these devices.
4. Do not operate the charging stand outside.
5. People with medical implants are advised to consult with a doctor before using the charging
stand, in order to determine whether the charging stand poses a potential health risk. Please
also observe the applicable regulations regarding the handling of medical implants and radio
wave sources (charging stand).
6. Other devices can be affected during the inductive charging process if they are in close prox-
imity to the charging stand.
7. Radio waves can be emitted during inductive charging. If the device is not used as described in
the operating manual, harmful interference cannot be excluded.
3.4 Touchscreen display
The touchscreen display can crack if exposed to extreme pressure. Discontinue use of a device with a
cracked display and send it in for repair. Apply tape to the display before sending. Please also observe
the transport regulations, see Sending for repair,p.106.
3.5 Usage limits
See Limitations of use,p.101.
3.6 Operating Exclusions
•When the device is operated properly, the dosed liquid comes in contact only with the tip and
not with the device itself.
•The user is responsible for checking the suitability of the device for the intended use. This pre-
sumes that the user is sufficiently qualified for the tasks described in this instruction manual.
•Do not use the device to dose liquids that corrode polypropylene, polyethylene (tip) or polycar-
bonate (housing).
•Avoid aggressive vapors (risk of corrosion).
•The device must not be used for oxidizing acids since metal parts and the electronics can be cor-
roded.
•If the device is modified by the user, it must no longer be operated. All modifications must be ex-
pressly authorized by the manufacturer.
USA
This equipment has been tested and found to comply with the limits for a Class A digital device, pur-
suant to part 15B (HandyStep® touch and HandyStep® touch S)and part 18 (charging stand) of the FCC
Rules.

English
4 Intended use
HandyStep® touch, HandyStep® touch S 997486 Operating manual 65
These limits are designed to provide reasonable protection against harmful interference when the
equipment is operated in a commercial environment. This equipment generates, uses, and can radi-
ate radio frequency energy and, if not installed and used in accordance with the instruction manual,
may cause harmful interference to radio communications.
Operation of this equipment in a residential area is likely to cause harmful interference in which case
the user will be required to correct the interference at his own expense.
Changes or modifications to this equipment not expressly approved by the party responsible for com-
pliance could void the user's authority to operate the equipment.
Canada
This device complies with the Industry Canada RSS-216 standard and operation is subject to the fol-
lowing two conditions:
1. This device may not cause interference.
2. This device must accept any interference received, including interference that may cause un-
desired operation of the device.
3.7 Materials used
See Materials used,p.101.
3.8 Type plate and marking
The device, battery, power adapter and charging stand must be stored and transported in dry condi-
tions; avoid exposure to direct sunlight.
4 Intended use
The HandyStep® touch and the HandyStep® touch S are microprocessor-controlled, battery-powered
hand dispensers operated by touchscreen. BRAND precision dispenser tips (PD tipsII) with type cod-
ing are automatically recognized by the device according to their nominal volumes and allow quick
volume selection. Compatible dispenser tips from other manufacturers can also be used after manu-
ally selecting the corresponding volume.

5 Functions and controls
66 Operating manual HandyStep® touch, HandyStep® touch S 997486
5 Functions and controls
1
2
3
4
5
6
7
8
9
10
11
12
1Battery compartment cover 2Power button
3STEP button 4Cover
5Multifunction jack 6Handle piece, rear side
7Markings 8Tip adapter
9Precision dispenser tip 10 Handle piece, front side
11 Grip recess 12 Touchscreen display
5.1 STEP button
Depending on the mode, the STEP button initiates liquid dispensing and liquid aspiration. The device
outputs messages to the touchscreen display on how to operate the STEP button. Operation of the
STEP button can vary depending on which operating mode you have chosen. The STEP button can be
pressed across the entire surface. The following actions can be distinguished:

English
5 Functions and controls
HandyStep® touch, HandyStep® touch S 997486 Operating manual 67
Briefly pressing the STEP button (“click”)
Example application:
Aspirating liquid, dispensing liquid, interrupting liquid aspi-
ration (mode-dependent), inserting or ejecting a tip
Briefly pressing the STEP button twice ("double click")
Example application:
Refilling a tip.
Pressing and holding the STEP button
Example application:
Completely emptying a tip, automatically dispensing liquid
(in Auto-Dispensing mode), manual titrating (in Titration
mode).
5.2 Power button
Use the power button to switch the device on and off. It is also used to put the device into standby
mode.
5.3 Battery
WARNING
Damaged or incorrect battery
Possible personal injury
>Use only the original battery.
>Use only the original power adapter.
>Do not puncture, bend, ignite, compress, short circuit or overheat.
>Do not touch a leaking battery with bare hands. Wear safety gloves!
>Dispose of damaged batteries in accordance with legal requirements.
>Operate the battery only within the specified temperature ranges!
>Follow the instructions on the battery!

5 Functions and controls
68 Operating manual HandyStep® touch, HandyStep® touch S 997486
NOTICE
>Charge the battery before the first use or if you have not used the device for an extended time. This
prevents premature wear of the battery.
>Replace the battery after its service life has been exceeded (~ 3 years), in case of deformation or in
the event of extremely short charging cycles and a resulting shorter duration of use.
>When storing the device, disconnect the battery plug.
Components
1
2
3
4
1Battery
2Contacts
3Reverse polarity protected plug
4Cable
Label, rear side
1Battery type and use
2Part identification
3CE marking
4Warning label
5.3.1 Connecting the battery
A B C
Open the cover and connect the battery’s reverse polarity protected plug firmly and straight into the
socket. The device switches on when you have connected the battery. Then close the cover.
5.3.2 Charging the battery
a. Connect the cable to the power adapter and HandyS-
tep® touch.
b. Plug the power adapter into the power outlet.
ðHandyStep® touch is charging.

English
5 Functions and controls
HandyStep® touch, HandyStep® touch S 997486 Operating manual 69
5.3.3 Indicators on the display
Battery is ready for operation. Battery is almost empty. Battery is charging.
5.3.4 Standby mode
If the power button is pressed when the device is switched on, the device goes into standby mode and
the display is turned off. Standby mode is used to extend battery life. To exit Standby mode, perform
one of the following actions:
•Press the power button.
•Press the STEP button.
•Insert a tip.
5.3.5 Working while charging
You can continue to work while the device is charging. To do this, plug the USB cable into the multi-
function jack on the device. The charging time is prolonged as a result. Working with the USB cable
plugged-in is only possible if the battery is connected to the device.
5.3.6 Battery life
The battery life describes the amount of time the device can be used with a new battery. Battery life
depends on several factors, including the condition of the battery itself, the display brightness, the
speed settings or the medium in use. The battery life itself was determined in an automated process.
Medium (examples) Distilled water (in accordance
with ISO 3696)*
Canola oil**
Tip 10 ml PD-Tip II 25 ml PD-Tip II
Battery New and 100% charged New and 100% charged
Device settings Speed level 6
Medium display brightness
Speed level 4
Medium display brightness
Steps 20 steps of 0.5 ml 10 steps of 2.5 ml
Battery life approx. 5 h approx. 2 h
*Corresponds to normal power consumption
**Corresponds to maximum power consumption
5.4 Controls
Touchscreen display
You operate the touchscreen display with your thumb, in order to set the required values.
STEP button
You operate the STEP button with your index finger.

5 Functions and controls
70 Operating manual HandyStep® touch, HandyStep® touch S 997486
5.5 Power adapter and charging adapter
WARNING
Possible personal injury caused by damaged or incorrect power adapter
>Use only an original universal power adapter and the corresponding country
adapter.
>Do not cover the power adapter during use.
>Do not use a damaged power adapter.
Power
adapter
Country adapter
CN GB US AU/NZ EU
5.5.1 Connecting the charging adapter and the power adapter
a. Slide the charging adapter onto the power adapter until
it clicks audibly into place.
ðThe power adapter can be connected.
5.5.2 Detaching the charging adapter from the power adapter
a. Press the push button and remove the charging
adapter.
5.6 Device holder
5.6.1 Mounting the device holder with tape
1
2
1Universal holder 2Mounting support with
adhesive strips
a. Clean the mounting surface with a suitable cleaner (no
moisturizing household cleaners) and a lint-free cloth,
and allow it to dry thoroughly.
b. Remove the protective film from the adhesive strips.
c. Using your thumb, firmly press the mounting support
onto the cleaned surface. Wait 72 h before first use.

English
5 Functions and controls
HandyStep® touch, HandyStep® touch S 997486 Operating manual 71
d. Slide the universal holder onto the mounting support.
5.6.2 Mounting the device holder in the benchtop rack
a. Insert the holder into the benchtop rack without tape
until it clicks audibly into place.
5.6.3 Mounting the device holder to the edge of the racks
1
2
3
1Universal holder 2Bottom
3Mounting support
a. Clean the mounting surface and mounting support with
a suitable cleaner (no moisturizing household cleaners)
and a lint-free cloth, and allow it to dry thoroughly.
b. Remove one side of the protective film from the tape.
c. Apply the tape to the bottom and press firmly.
d. Then peel off the protective film from the other side and
stick the mounting support onto the desired mounting
edge.
e. Using your thumb, firmly press the mounting support
onto the mounting surface. Wait 72 h before first use.
f. Slide the universal holder onto the mounting support.
5.7 Charging stand (accessory)
WARNING
Possible personal injury caused by induction
>People with medical implants (e.g. pacemakers, pump implants) must maintain a
safe distance. The Health Industry Manufacturers Association recommends that
pacemakers maintain a distance of at least 15 cm from the radio wave source (charg-
ing stand).
>People with medical implants must consult a doctor before using the charging sta-
tion.
>If you suspect your implant is affected, increase the distance away from the charging
station and consult a doctor.
NOTICE
Inductive charging via the charging stand
The charging stand can charge inductively as soon as the power adapter is connected. Do not place
any magnetic data media (e.g. credit cards) near the charging stand.

5 Functions and controls
72 Operating manual HandyStep® touch, HandyStep® touch S 997486
Using the charging stand
The charging stand requires the power adapter and the USB
cable of the HandyStep®touch or the HandyStep®touch S.
Charging stand indicators
•Charging stand light is blue: the battery is charging.
•Charging stand light is off: the battery is charged or
there is no device in the charging stand.
•Charging stand lights up intermittently: the battery can-
not charge. Place the device in the charging station
again.
5.8 Holding stand (accessory)
The holding stand is used to safely store the device. The holding stand does not function as a charger.
5.9 Layout of the touchscreen display (work area)
12
3
4
5
6
7
8
9
10
11
12
13 14
1Time
2Charging status
3Nominal volume of the inserted tip
4Fill level of the tip
5Eject ( ) or insert ( ) tip.
6Open options
7Open main menu (Home)
8Information field
9Available volume
10 Available STEPs in relation to the available volume
11 STEP volume
12 Aspiration and dispensing speed
13 Mode name
14 Area for specific functions.

English
6 Overview of modes
HandyStep® touch, HandyStep® touch S 997486 Operating manual 73
5.10 PD-Tips II (precision dispenser tips II)
The device automatically recognizes the coded tips.
Volume [ml] Order No. Packing unit
[pcs.]
Order No.
BIO-CERT® LIQ-
UID HANDLING
STERILE
Packing unit
[pcs.]
0.1 705700 100 705730 100
0.5 705702 100 705732 100
1 705704 100 705734 100
1.25 705706 100 705736 100
2.5 705708 100 705738 100
5 705710 100 705740 100
10 705712 100 705742 100
12.5 705714 100 705744 100
25 705716 25+1Adapter 705746 25+1Adapter
50 705718 50+1Adapter 705748 25+1Adapter
Set PD-TipsII
0,5ml ... 12.5ml
705720 per 20 — —
5.11 Adapter for 25 ml and 50 ml PD tips II
Volume [ml] Order No. Packaging unit Property
25 ml and 50 ml 702398 10
25 ml and 50 ml 702399 5 BIO-CERT® LIQUID HAN-
DLING STERILE
6 Overview of modes
Modes HandyStep® touch HandyStep® touch S
Settings + +
Multi-Dispensing (MULTI-DISP) + +
Auto-Dispensing (AUTO-DISP) + +
Pipetting (PIP) + +
Sequential Dispensing (SEQ-DISP) — +
Multi-Aspiration (MULTI-ASP) — +
Titration — +
Favorites + +

7 Operation
74 Operating manual HandyStep® touch, HandyStep® touch S 997486
Modes Description
Settings In Settings mode, you set the device for your work, e.g. time, display
brightness. See Settings,p.80.
Multi-Dispensing In Multi-Dispensing mode, an aspirated volume is gradually dispensed
again. Example application: dividing an aspirated volume into STEPs.
See Multi-Dispensing (MULTI-DISP),p.82.
Auto-Dispensing In Auto-Dispensing mode, a volume is aspirated and gradually automat-
ically dispensed over a previously set time interval. Example applica-
tion: automatically dividing an aspirated volume into numerous STEPs.
See Auto-Dispensing (AUTO-DISP) ,p.84.
Pipetting In Pipetting mode, a previously selected volume is aspirated once and
dispensed again. See Pipetting (PIP),p.87.
Sequential Dispensing
(SEQ-DISP)
In Sequential Dispensing mode, an aspirated volume is dispensed over
several, preset STEPs of varying size. Example application: dilution se-
ries. See Sequential Dispensing (SEQ-DISP),p.89
Multi-Aspiration (MULTI-
ASP)
In Multi-Aspiration mode, several STEPs are collected in a tip and aspi-
rated and dispensed as a total volume. Example application: removing
residual volumes. See Multi-Aspiration (MULTI-ASP),p.91.
Titration In Titration mode, a volume is aspirated and either quickly or slowly
dispensed. The dispensed volume can be read on the display. Example
application: determining pH values. See Titration,p.93.
Favorites In Favorites, you can save frequently used settings. You can reopen
these favorites using this menu. See Favorites,p.95.
7 Operation
WARNING
Possible damage to health caused by pathogenic liquids or infectious germs.
>Wear appropriate protective gear.
>When handling the above-mentioned media, please observe the national regula-
tions, safety data sheets, the protection level of your laboratory and safe working
measures.
NOTICE
Device damage caused by incorrect use.
>Submerge only the tip into a liquid.
>If the device comes into contact with a liquid, clean it immediately.
>Hang the device upright in the holder provided.
7.1 Switching on the device
a. Press the power button.
ðThe main menu opens.

English
7 Operation
HandyStep® touch, HandyStep® touch S 997486 Operating manual 75
Start Motor Init
If using the device after a long period of non-use, you will be prompted to perform a motor initializa-
tion after switching on the device:
a. Confirm the message "Start Motor Init."
ðMotor initialization is carried out.
ðThe device moves the tip adapter into working position.
ðThe main menu opens.
Charging stand/USB cable
The device switches on when it is placed in the charging stand or when the USB cable is connected.
This also stops standby mode.
7.2 Switching off the device
a. Drain and eject the tip, see Dispensing liquid,p.78 or Ejecting the tip,p.77
b. Press the power button.
ðA message appears asking if you would like to switch off the device. Confirm by tapping . Can-
cel by tapping .
c. If the power button is pressed for approx. 1 s, the device goes into standby.
If the power button is pressed for longer than 2s, you are asked if you would like to switch off the
device.
d. Confirm message.
e. Hang the device upright in the holders provided. If the device is placed in the charging stand,
charging begins. In doing so, the LED of the charging stand lights up.
If the touchscreen display or the device no longer respond, consult the Device behavior,p.97 section
in the chapter Troubleshooting.
7.3 Opening an operating mode
You select an operating mode from the main menu. The actual task (e.g. dispensing) is carried out in
the operating mode.
a. b.
a. Swipe to select the operating mode.
b. Open the operating mode by tapping once.
ðThe operating mode appears.
7.4 Exiting an operating mode
a. In the operating mode, tap the button.

7 Operation
76 Operating manual HandyStep® touch, HandyStep® touch S 997486
ðThe main menu appears.
If there is any liquid left in the tip, you will be asked if you would like to drain the tip or continue work-
ing in another operating mode with the remaining volume.
7.5 Opening Context Help
The Context Help window helps you answer questions about
functionality in the respective operating mode or menu.
7.6 Inserting tips
7.6.1 Inserting BRAND PD tips
Prerequisite:
>The operating mode has been selected
a. Insert the tip.
b. Press the STEP button. The tip is connected to the device and the volume is set.
ðThe operating mode appears again.
ðThe liquid can be aspirated.
7.6.2 Inserting compatible third-party tips (without coding)
c. d.
Prerequisite:
>The operating mode has been selected
a. Insert the tip.
b. Press the STEP button.
c. Set the volume.
d. Confirm the selection by pressing the button.
ðThe operating mode appears again.
ðThe liquid can be aspirated.

English
7 Operation
HandyStep® touch, HandyStep® touch S 997486 Operating manual 77
7.6.3 Inserting compatible third-party tips (with coding)
After inserting the tip, check that the correct tip volume has been applied, see Setting the vol-
ume,p.79.
7.6.4 Inserting tips without an operating mode selected
You can also insert tips before you select an operating mode. In order to set the volume or to have the
compatible tip automatically recognized, an operating mode must be selected.
7.7 Ejecting the tip
Prerequisite:
>You have drained the tip.
a. Hold the device with the tip above the waste bin.
b. Tap on the button, then press the STEP button.
ðThe tip is ejected.
ðThe device moves into tip loading position.
7.8 Aspirating liquid
NOTICE
Priming tips before use
We recommend priming a new tip before use. To do this, fill the tip with a minimal amount of liquid
and empty it (see Filling an empty tip Filling an empty tip,p.77 and Interrupting filling of the tip In-
terrupting filling of the tip,p.78). Small air bubbles in the area of the piston after priming do not af-
fect the results.
7.8.1 Filling an empty tip
Prerequisite:
>An operating mode has been selected.
>On the touchscreen display, the message ‘Press STEP to fill’ appears.
a. Hold the tip vertically in the vessel.
b. During aspiration, make sure that the tip opening is always covered by liquid, in order to prevent
air bubbles in the tip.
c. Press the STEP button.
The tip is filled until the set volume or the nominal volume is reached.
NOTICE
Reverse stroke (play compensation)
During filling, the device performs a reverse stroke, which guarantees accuracy of the STEP volume
setting. This way, the first STEP does not have to be discarded.

7 Operation
78 Operating manual HandyStep® touch, HandyStep® touch S 997486
7.8.2 Interrupting filling of the tip
a. To interrupt filling of the tip, press the STEP button.
ðFilling is suspended immediately. You can dispense the aspirated volume again with the STEP
button, drain the tip or resume the filling process.
7.8.3 Filling a partially drained tip
a.
a. Switch to refill.
b. Hold the tip vertically in the liquid.
c. Press the STEP button 2 times in quick succession.
ðThe liquid is aspirated until the nominal volume has
been reached.
d. To stop filling the tip, press the STEP button.
ðThe operating mode appears again. You can continue
dispensing.
NOTICE
Reverse stroke (play compensation)
During filling, the device performs a reverse stroke, which guarantees accuracy of the STEP volume
setting. This way, the first STEP does not have to be discarded.
7.8.3.1 Automatically switching to filling
After dispensing all of the requested STEPs, liquid with a volume of less than 1 STEP remains in the tip
(residual volume). The device automatically switches into the filling mode that will allow you to refill
the tip.
a. Press the STEP button 2 times in quick succession.
ðLiquid is aspirated until the tip is completely filled.
7.9 Dispensing liquid
7.9.1 Dispensing volumes or individual STEPs
Prerequisite:
>An operating mode has been selected.
>A volume has been aspirated.
a. Place the tip on the vessel wall.
b. Hold the device at an angle of 30 ... 45° to the vessel wall.
c. Press the STEP button.
ðDepending on the operating mode selected, either one STEP or the entire volume is dispensed.
To stop dispensing, tap on the button.

English
7 Operation
HandyStep® touch, HandyStep® touch S 997486 Operating manual 79
7.9.2 Switching to emptying
a.
a. Switch to emptying.
b. Hold the device at an angle of 30 ... 45 ° to the vessel
wall.
c. Press and hold the STEP button.
ðLiquid is dispensed; the tip is drained completely.
ðThe operating mode appears again. Your can aspirate
new liquid or eject the tip.
7.9.3 Discarding the residual volume
After dispensing all of the available STEPs, liquid with a volume of less than 1 STEP remains in the tip.
The device automatically switches into the mode, in which you can discard the remaining volume.
a. Press and hold the STEP button.
ðThe tip is drained completely.
7.10 Setting the volume
Prerequisite:
>An operating mode has been selected.
a. Tap on the button.
ðThe volume setting appears.
b. Select the volume by setting a volume from the range of
values.
01.00
c. d.
c. Swipe to the left or right to change the position.
d. Swipe upward or downward to set the value.
e. Confirm the setting by tapping the button. Discard the
setting by pressing the X button.
ðThe operating mode appears.
7.11 Setting the aspiration and dispensing speed
Adjust the speed to your respective application.
Prerequisite:
>An operating mode has been selected.
a. Tap on the button.
ðThe speed settings appear.
b. Set the aspiration and dispensing speed by selecting a speed from the value range 1 ... 8.
1 = slow, 4 = medium, 8 = fast

8 Settings
80 Operating manual HandyStep® touch, HandyStep® touch S 997486
c. You can set different speeds for aspiration and dispensing.
d. Confirm the selection by pressing the button. Discard the setting by pressing the button.
ðThe operating mode appears again.
8 Settings
Configure your device for daily usage. Tap on ‘Settings’ in the main menu.
8.1 Language
Set the display language and the help language. The available languages are German, English, French,
Spanish and Chinese.
8.2 Device
Set the device name. To select characters, drag these to the
white bar with your index finger. To change position, swipe
to the left or right. The device name can consist of letters,
numbers and special characters.
To add uppercase letters, tap on the ABC button.
To add lowercase letters, tap on the abc button.
To add numbers and special characters, tap on the 123 but-
ton. The following special characters are available: plus, mi-
nus, underscore, comma, period, space (between the num-
ber 9 and minus).
8.3 Date / time
Set the date, time and the time and date format.
To exit this function, tap on the button.
The following abbreviations describe the time and date formats (value range in parentheses):
Hour hh (00 ... 23) h (0 ... 23)
Minute mm (00 ... 59) m (0 ... 59)
Day DD (01 ... 31) D (1 ... 31)
Month MM (01 ... 12) M (1 ... 12)
Year YYYY (2019 ... 2050) YY (19 ... 50)

English
8 Settings
HandyStep® touch, HandyStep® touch S 997486 Operating manual 81
8.4 Display
Brightness Adjust the brightness level via the slide switch.
Display time out Set the amount of time before the display first dims and
then turns off.
Auto power off Set whether the device switches off by itself after 60 min-
utes in standby mode.
8.5 Sound
NOTICE
Event sound
When an event occurs, the device makes a sound. This event sound cannot be switched off.
Notification sound Enable sound alerts for program events.
STEP button sound Enable sounds when the STEP button is pressed.
8.6 Info/about
Version Firmware version
Date The date the firmware was generated.
Bootloader Software tool
8.7 Regulatory notes
Information about approvals can be found via this menu item.
8.8 Calibration
1
2
3
4
1Activate reminder
2Illogical entries are shown in red. In this case, the last
test date lies in the future.
3Set the last date on which the device was tested.
4Set the next date on which the device is to be tested.
Prerequisite:
>You have just tested the device and would like to be reminded of the next device test. This way
you ensure that your device is inspected on a regular basis.
a. Set the date of the last test. This date can be in the past, present or future.

9 Multi-Dispensing (MULTI-DISP)
82 Operating manual HandyStep® touch, HandyStep® touch S 997486
b. Set the date of the next test. This date must be in the future.
c. Activate the reminder via the slide switch.
ðIf the test interval has expired, you will be reminded of the new device inspection via a message
in the display.
ðIt is best to set these dates immediately after an inspection has been completed.
ðIf the date of the last calibration is after the current date, it is shown in red.
ðIf the date of the future calibration is before the current date, it is shown in red and the reminder
cannot be activated.
8.9 Factory settings
The device can be reset to the factory settings in this menu item.
NOTICE
Factory settings
The factory settings overwrite all settings made by the user, both in the settings menu and in all avail-
able operating modes. This action cannot be reversed.
8.10 Switching tip detection on/off
If you are not working with BRAND tips or other compatible tips, you can switch off automatic tip de-
tection, in order to reach the volume setting quicker.
8.11 Keypad
1
2
3
5
6 4
1Available value range
2Unit selection
3Delete entered characters one at a time
4Enter comma
5Discard entry
6Apply entry
Enter values (e.g. volume) via a keypad in the different oper-
ating modes. Values are entered from left to right, together
with the comma. Depending on the available value range
and the possible STEP intervals, up to 3 decimal places can
be entered. Values less than or greater than the value range
shown cannot be applied.
9 Multi-Dispensing (MULTI-DISP)
For information on the function of this mode, see Overview of modes,p.73. For information on setting
the volume, speed, and other steps found in all modes, see Operation,p.74.

English
9 Multi-Dispensing (MULTI-DISP)
HandyStep® touch, HandyStep® touch S 997486 Operating manual 83
9.1 Aspirating liquid
Prerequisite:
>The STEP volume has been set via the button.
a. Hold the tip vertically in the vessel.
b. During aspiration, make sure that the tip opening is al-
ways covered by liquid, in order to prevent air bubbles
in the tip.
c. Press the STEP button.
ðThe device aspirates the liquid until the set volume or
the nominal volume is reached.
The symbol displays the number of possible STEPs.
The symbol displays the available volume.
9.2 Interrupting and resuming liquid aspiration
9.2.1 Interrupting liquid aspiration
a. To stop liquid aspiration, briefly press the STEP button.
9.2.2 Resuming liquid aspiration
a. Tap on the button.
b. Press the STEP button 2 times in quick succession.
ðThe device aspirates liquid.
9.3 Dispensing liquid
Prerequisite:
>Dispensing volumes or individual STEPs, see Dispensing
volumes or individual STEPs,p.78.
a. After pressing the STEP button, the number of STEPs to
be dispensed ( ) decreases.

10 Auto-Dispensing (AUTO-DISP)
84 Operating manual HandyStep® touch, HandyStep® touch S 997486
9.4 Handling residual volumes
For information on handling residual volumes, see Switching to emptying,p.79 and Aspirating liq-
uid,p.77.
9.5 Presetting the STEP count
1
2
3
1Switch the STEP count preset on/off.
2Open the preset STEP count.
3Preset the STEPs.
You can preset a number of STEPs. The number of STEPs that
can be preset depends on the volume of the tips being used
and the set volume. If you increase the STEP volume, the
number of STEPs that can be preset is reduced, and vice
versa.
Presetting the STEP count
a. Tap on the button.
b. Drag the desired count into the white field.
c. Confirm the selection by pressing .
ðThe STEP count preset is active.
If you aspirate liquid now, the device aspirates as much liq-
uid as required for the preset. If there is more liquid in the tip
than preset, you can continue working after dispensing the
preset STEPs or discard the volume.
9.6 Options
a. In the operating mode, tap on the symbol .
ðThe Options menu appears.
Option Meaning
Add to Favorites Adds active settings to Favorites. You can open these again from
the main menu under Favorites.
Preset the STEP count Presets the STEP count.
Go to Auto-Disp Switches to Auto-Disp mode. The volume set in Multi-Disp mode is
also set in Auto-Disp mode.
Operating Mode Help Shows the help text for the mode.
10 Auto-Dispensing (AUTO-DISP)
For information on the function of this mode, see Overview of modes,p.73. For information on setting
the volume, speed, and other steps found in all modes, see Operation,p.74.

English
10 Auto-Dispensing (AUTO-DISP)
HandyStep® touch, HandyStep® touch S 997486 Operating manual 85
10.1 Automatically dispensing liquid
Prerequisite:
>You have set the pause time (an interval between liquid dispensing steps) manually or automati-
cally.
>The tip is filled with liquid.
a. Press and hold the STEP button.
ðLiquid is dispensed automatically, as long as the STEP button is held down or as long as enough
liquid is present in the tip.
ðWhile liquid is being dispensed, the pause time counts down on the touchscreen display.
ðOn the touchscreen display, you see the remaining STEPs.
10.2 Optimizing the dispensing duration
The liquid dispensing duration consists of the dispensing interval that you define and the dispensing
speed. To optimize liquid dispensing, you adjust both parameters.
•For the dispensing speed, see Setting the aspiration and dispensing speed,p.79.
•For the dispensing interval, see Setting the pause time manually,p.85.
10.3 Setting the pause time manually
a. Tap on the button.
b. Set the pause time.
c. Confirm the setting by tapping the button.
ðThe pause time is set. By holding down the STEP button
the next time you dispense a liquid, the liquid will be
dispensed after the pause time has expired.
Alternatively, you can also use the learn function.
10.4 Setting the pause time automatically (learn function)
With the learn function, the device determines the average pause time after dispensing 3 or more
times. When the user holds the STEP button after the learn function has ended, the device automati-
cally dispenses liquid after the determined pause time has expired. This way, repetitive dosing tasks
can be more easily managed by the user. Setting the pause time is also easier since it is calculated for
the current dosing task.

10 Auto-Dispensing (AUTO-DISP)
86 Operating manual HandyStep® touch, HandyStep® touch S 997486
10.4.1 Executing the learn function
a.
c.
Prerequisite:
>You have already filled the tip.
a. Tap on the button.
ðThe learn function is activated. This is indicated by the
…symbol.
b. Dispense liquid at least 3 times, by briefly pressing the
STEP button.
ðYou can immediately dispense liquid by holding down
the STEP button. The learned pause time changes as
long as the learn function is not stopped.
c. Stop the learn function by tapping the … button.
ðAfterwards, the average time appears next to the
symbol.
You can also save the learned pause time in Favorites.
10.4.2 Alternative access to the learn function
a. Open Options via the button.
b. Swipe the switch to the right.
c. Return to the work menu via the button.
ðThe … symbol indicates that the learn function is active.
10.4.3 Restarting the learn function
If while operating the device you notice that the pause time is too long or too short, you can restart
the learn function. Alternatively, you can also adjust the pause time manually.
10.4.4 Stopping or shortening the learn function
The first time the STEP button is pressed, a 10-second countdown begins. When the countdown ex-
pires, the learn function ends automatically.
•To stop the learn function beforehand, tap on the X button.
•To stop the learn function after you have dispensed liquid by holding the STEP button, tap on the
… button.
•To use the calculated pause time immediately, hold down the STEP button.
10.5 Handling residual volumes
For information on handling residual volumes, see Switching to emptying,p.79 and Aspirating liq-
uid,p.77.

English
11 Pipetting (PIP)
HandyStep® touch, HandyStep® touch S 997486 Operating manual 87
10.6 Options
a. In the operating mode, tap on the symbol .
ðThe Options menu appears.
Option Meaning
Add to Favorites Edits the time between the individual dispensing steps.
Learn pause time Starts the learn function.
Go to Multi-Disp Switches to the Multi-Disp operating mode. The volume set in Auto-
Disp mode is also set in the Multi-Disp operating mode.
Operating Mode Help Shows the help text for the mode.
11 Pipetting (PIP)
For information on the function of this mode, see Overview of modes,p.73. For information on setting
the volume, speed, and other steps found in all modes, see Operation,p.74.
11.1 Setting the volume
Prerequisite:
>The operating mode has been selected.
a. Tap on the button.
b. Set the volume.
11.2 Filling a tip
Prerequisite:
>The volume is set.
>On the touchscreen display, the message ‘STEP to fill’
appears.
a. Hold the tip vertically in the vessel. During aspiration,
make sure that the tip opening is always covered by liq-
uid, in order to prevent air bubbles in the tip.
b. Press the STEP button.
ðThe tip is filled until the set STEP volume or the nominal
volume of the tip is reached.
To stop filling the tip, press the STEP button.
11.3 Dispensing liquid and stopping liquid dispensing
a. Press the STEP button.

11 Pipetting (PIP)
88 Operating manual HandyStep® touch, HandyStep® touch S 997486
ðThe tip is drained.
To stop dispensing liquid, tap on the X button.
11.4 Handling residual volumes
For information on handling residual volumes, see Switching to emptying,p.79 and Dispensing liq-
uid,p.78.
11.5 Options
a. In the operating mode, tap on the symbol .
ðThe Options menu appears.
Option Meaning
Add to Favorites Adds the selected settings to the Favorites menu. You can open
the settings again from the main menu under ‘Favorites’.
Operating mode Shows the help text for the mode.

English
12 Sequential Dispensing (SEQ-DISP)
HandyStep® touch, HandyStep® touch S 997486 Operating manual 89
12 Sequential Dispensing (SEQ-DISP)
For information on the function of this mode, see Overview of modes,p.73. For information on setting
the volume, speed, and other steps found in all modes, see Operation,p.74.
12.1 Sequential Dispensing in detail
2
4
5
6
7
1
3
1Accumulated volume of the aliquot list.
2STEP previously dispensed.
3STEP now being dispensed.
4STEP to be dispensed next.
5STEP number to be dispensed next.
6Number of STEPs that you have designated in the
aliquot list.
7Present volume in the tip.
In Sequential Dispensing operating mode, you dispense a defined sequence of different or equal vol-
umes of liquid. These volumes are called aliquots and are defined via the aliquot list (1 ... 10 aliquots).
In the operating mode, you then see up to 3 entries of the aliqout list. These entries – specifically, the
previous, current and next entry – are indicated by a number sign (#). If an aliquot is dispensed, the
display moves down the list (1, #2, #1, 2, #3 #2, 3, #4 ... #10). It can only be dispensed if a suf-
ficient volume has been aspirated.
If the aliquot amount exceeds the tip volume, you can aspirate liquid again and then continue dis-
pensing.
If the aliquot amount is less than the tip volume, enough liquid is aspirated as is needed for the given
aliquot list.
If you cancel an aliquot (X button on the display), this aliquot is counted as not dispensed. In this case,
an event message is output. The program jumps to the next aliquot in the list. If there is not enough
liquid in the tip at the end of aliquoting, the device aspirates exactly the required amount of liquid, in
order to complete aliquoting.
The aliquot list can no longer be changed when the first aliquot has been dispensed. You can edit the
aliquot list again only after you have completed dispensing.

12 Sequential Dispensing (SEQ-DISP)
90 Operating manual HandyStep® touch, HandyStep® touch S 997486
12.2 Creating an aliquot list
You can create 1 ... 10 aliquots.
Prerequisite:
>You are in the operating mode.
a. Tap on the button.
ðThe aliquot list appears.
b. Tap on the '+' symbol.
ðOne aliquot is added to the list.
12.3 Editing an aliquot list
a. Tap on a list entry.
ðThe context menu appears.
Edit Edits the selected list entry. Operation
similar to Setting the volume,p.79.
Add Add a list entry to the end of the list.
The value of the previous list entry is
preset as the aliquot value.
Insert Insert a list entry in place of the se-
lected list entry. The list entry is in-
serted above the selected list entry.
The value of the selected list entry is
preset as the aliquot value. This value
can be added via the ‘Edit’ function.
Delete Deletes the selected list entry. You can
delete all but one of the entries in the
list.
12.4 Dispensing liquid
Prerequisite:
>You are in the operating mode.
a. Press the STEP button.
ðThe volume from the first aliquot list entry is dispensed.
ðSimultaneously, the next volume is selected from the aliquot list. This volume is dispensed the
next time you press the STEP button.

English
13 Multi-Aspiration (MULTI-ASP)
HandyStep® touch, HandyStep® touch S 997486 Operating manual 91
12.5 Interrupting and ending aliquoting
a. Tap on the or the button.
ðThe current aliquoting is ended.
12.6 Options
a. In the operating mode, tap on the symbol .
ðThe Options menu appears.
Option Meaning
‘Edit aliquots’ Edit an aliquot list.
‘Work Mode’ Shows the help text for the mode.
13 Multi-Aspiration (MULTI-ASP)
For information on the function of this mode, see Overview of modes,p.73. For information on setting
the volume, speed, and other steps found in all modes, see Operation,p.74.
13.1 Multi-Aspiration in detail
5
1
2
3
4
1Switch to filling mode. The selected filling mode is dis-
played here.
2Set volume
3Possible STEPs
4Aspirated volume
5Switch between dispensing and aspirating liquid. You
can also switch to dispensing if the nominal volume
has not been reached. In addition, you can also con-
tinue filling the tip after an interruption.
13.2 Preparing liquid aspiration
Prerequisite:
>Tip is empty and outside the liquid.
a. Press the STEP button.
b. The piston of the tip moves to the start position.
c. Select filling mode.
d. Press and hold the STEP button.

13 Multi-Aspiration (MULTI-ASP)
92 Operating manual HandyStep® touch, HandyStep® touch S 997486
ðLiquid is aspirated.
13.3 Filling modes
In Multi-Aspiration operating mode, you can aspirate the same liquid or different liquids with the
same tip. There are 3 modes available for aspiration:
‘Manual’ filling mode
In ‘Manual’ filling mode, you control liquid aspiration using
the STEP button. Liquid is aspirated while you hold down the
STEP button. Liquid aspiration stops when you let go of the
STEP button or when the nominal volume is reached.
‘STEP volume’ filling mode
In ‘STEP volume’ filling mode, you set the STEP volume be-
fore liquid aspiration. Each time the STEP button is pressed,
the set volume is aspirated, and this continues until the nom-
inal volume is reached.
‘Sequential’ filling mode
In ‘Sequential’ filling mode, you control liquid aspiration an
aliquot list (1 ... 10 aliquots). In this table, different volumes
can be defined, which are aspirated successively in this oper-
ating mode. Each time the STEP button is pressed, the cur-
rent volume is aspirated. The program then switches to the
next volume in the aliquot list, and this continues until all
preset aliquots are aspirated. In the operating mode, you
then see up to 3 entries of the aliqout list. These entries –
specifically, the previous, current and next entry – are indi-
cated by a number sign (#). If an aliquot is aspirated, the dis-
play moves down the list (1, #2, #1, 2, #3 #2, 3, #4 #10).
The device automatically switches to liquid dispensing when
the desired volume or the nominal volume is reached.
13.4 Dispensing liquid
You can switch back and forth between liquid aspirating and dispensing using the and buttons.
a. Tap on the button.
ðThe message ‘Hold STEP to empty’ appears.
b. To dispense liquid, hold down the STEP button.
To cancel liquid dispensing, press the X button. If the tip is drained, the program switches back to liq-
uid aspiration.

English
14 Titration
HandyStep® touch, HandyStep® touch S 997486 Operating manual 93
13.5 Creating and editing an aliquot list for liquid aspiration
a. Select ‘Sequential’ filling mode.
b. Select Options > ‘Edit aliquots’ or tap on #1 ... #10.
c. Create and edit the aliquot list as described in the ‘Sequential Dispensing’ operating mode in the
section Editing an aliquot list,p.90.
13.6 Switching the operating mode
a. Tap on the button.
b. If the tip is filled, a message appears asking if you would like to switch modes with the filled tip.
c. If only a residual amount is still present, a message then appears asking if you would like to dis-
card the liquid. Once you confirm the message, the liquid is dispensed.
13.7 Options
a. In the operating mode, tap on the symbol .
ðThe Options menu appears.
Option Meaning
Edit aliquot list Edit an aliquot list.
Select filling mode Select a filling mode.
Operating Mode Help Shows the help text for the mode.
14 Titration
For information on the function of this mode, see Overview of modes,p.73. For information on setting
the volume, speed, and other steps found in all modes, see Operation,p.74.
14.1 Titration in detail
1
2
3
4
5
1Switch between ‘Manual‘ and ‘STEP Volume’ titration
mode.
2Set the STEP volume. This is possible in “STEP volume”
titration mode.
3Volume already titrated.
4Amount remaining in the tip.
5Discard remaining amount or aspirate liquid.

14 Titration
94 Operating manual HandyStep® touch, HandyStep® touch S 997486
In Titration operating mode, you dispense liquid (standard solution) into another liquid (sample), e.g.
to observe the color change. There are 2 different titration modes available for this task:
‘Manual’ titration mode
In ‘Manual’ titration mode, you control liquid dispensing using the STEP button. Liquid is dispensed
while you hold down the STEP button. Liquid dispensing stops when you let go of the STEP button or
when the existing volume in the tip is dispensed. Every time the STEP button is released, the dispens-
ing speed is reduced on level (level 8, level 7, level 6 ... level 1). This makes it easier to achieve a color
change point, for example.
‘STEP volume’ titration mode
In STEP titration mode, you specify the STEP volume before dispensing liquid. Each time the STEP
button is pressed, the set volume is dispensed. The dispensing speed is also reduced each time the
STEP button is pressed.
Saving volumes
This function is used to save the most recently set volumes in a list. If you use the same volume set-
tings for the same titration tasks, you can use this function to achieve a color change point more
quickly. To call up a list, see Options,p.95.
14.2 Titration
This section explains how to use the titration operating mode using the color change of a pH value
measurement as an example. You can switch the titration mode using the or button.
Prerequisite:
>You will need a transparent vessel, e.g. an Erlenmeyer
flask, and the liquids required for the pH measurement.
a. Select the mode, in order to first dispense a large
amount of liquid. Select the dispensing speed using the
button.
b. Aspirate the liquid. Hold the device vertically above the
Erlenmeyer flask.
c. Hold the STEP button to continuously dispense liquid.
d. Observe the immersion of the standard solution in the
sample. As you near the color change point, switch to
the mode.
ðThe color change point is distinguished by the first color
streaks in the sample.
e. Tap on the button. Set the desired volume.
f. Dispense the solution drop by drop by briefly pressing
the STEP button until the color change is achieved.

English
15 Favorites
HandyStep® touch, HandyStep® touch S 997486 Operating manual 95
14.3 Options
a. In the operating mode, tap on the symbol .
ðThe Options menu appears.
Option Meaning
Add to Favorites Adds active settings to Favorites. You can open these again from the
main menu under Favorites.
Manual/STEP volume Switches titration mode
Show last volumes Displays the last volumes titrated.
Operating Mode Help Shows the help text for the mode.
Show last volumes
The list shows the last 5 volumes that were saved by you.
Newly saved volumes are added to the top, while older vol-
umes are discarded.
15 Favorites
You can save settings in Favorites, in order to open them again later, e.g. volume or speed settings.
15.1 Favorites in detail
2
5
4
3
1
1. The Favorites symbol indicates the operating mode
the favorite was saved in.
2. This line displays the name of the favorite.
3. The values show the settings saved in Favorites.
4. Eject or insert tip.
5. Show help.

15 Favorites
96 Operating manual HandyStep® touch, HandyStep® touch S 997486
15.2 Creating favorites
Prerequisite:
>You have opened an operating mode.
a. Tap on the button.
b. Select the option “Add to Favorites”.
c. Assign a name to the favorite.
d. Tap on the button.
ðThe favorite is added to the end of the favorites list in the ‘Favorites’ menu. See Favorites in de-
tail,p.95.
15.3 Opening favorites
a. You are in the ‘Favorites’ menu.
b. Tap on an entry in the favorites list and select ‘Open’.
ðThe settings are opened in the corresponding operating mode.
Favorite setting and tip volume are different
Each favorite is valid for one tip volume. If you open a favorite and the inserted tip has a different vol-
ume than the volume saved in the favorite, you will be prompted to insert the correct tip. You can then
eject the existing tip and insert a different one.
15.4 Deleting favorites
Deleting individual favorites
Prerequisite:
>You are in the ‘Favorites’ menu.
a. Tap on an entry in the favorites list and select ‘Delete’.
b. Confirm the prompt.
ðThe selected favorite is deleted.
Deleting all favorites
Prerequisite:
>You are in the ‘Favorites’ menu.
a. Tap on an entry in the favorites list and select ‘Delete all’.
b. Confirm the prompt.
ðThe favorites list is deleted.

English
16 Cleaning and disinfection
HandyStep® touch, HandyStep® touch S 997486 Operating manual 97
16 Cleaning and disinfection
16.1 Cleaning
NOTICE
The instrument is not autoclavable
The instrument is factory-calibrated and maintenance-free.
When the instrument is dirty, clean the outer surface with a moist cloth. Use water or a mild detergent
solution. Avoid acidic or aggressive cleaners.
Disassembly of the instrument is not permitted.
16.2 UV disinfection
The device is resistant to normal exposure to a UV disinfection lamp. The device may change color due
to the UV exposure.
UV disinfection recommendations:
Light spectrum UV-C
Wave length 220 nm ... 270 nm
Exposure time per cm2 and intended in-
activation rate
2 s ... 300 s
17 Troubleshooting
17.1 Device behavior
Fault Possible cause Corrective action
The battery charging cycle
has been dramatically re-
duced.
The battery is old or damaged. Replace the battery.
The device does not
charge.
The battery cannot be charged
when it is too cold or too warm.
Disconnect the battery plug.
Let the battery warm up or cool down to
room temperature.
Connect the battery plug. Try charging
again.
Duration of use without
power connection has been
dramatically reduced.
The battery is old or damaged. Replace the battery.
The power adapter be-
comes extremely warm
during charging.
The battery is old or damaged.
The power adapter is damaged.
The USB cable is damaged.
Replace the affected part.

17 Troubleshooting
98 Operating manual HandyStep® touch, HandyStep® touch S 997486
Fault Possible cause Corrective action
The device does not
charge.
The power adapter is damaged.
The USB cable is damaged.
The battery plug was discon-
nected.
The battery cable is broken.
The space between the device
and charging stand is too great
Replace the affected part.
Connect the battery plug.
Place the device in the charging station
again.
The display is too bright or
too dark.
The display brightness level has
been adjusted.
Change the brightness level, see Dis-
play,p.81
The display turns white
when the device is placed
in the charging stand.
The device cannot start. The
battery plug was disconnected.
Connect the battery plug.
No sounds are output when
working with the device.
Sound notification is switched
off.
Switch on sound notification, see
Sound,p.81
The touchscreen display no
longer responds.
The program has crashed. The device starts when the battery has
been reconnected after the program
crash. A message appears to warn that a
tip may still be present in the device.
Therefore, hang the device in the holder
and place a suitable vessel under the tip
or hold the device over a suitable vessel
when starting.
Troubleshooting:
Open the cover, disconnect the battery
plug, and wait 5 s before reinserting it.
The device starts when the battery is
sufficiently charged.
The tip drips. The tip has a leak. Replace the tip.
The tip is not recognized. Code is damaged.
Tip without coding used.
Eject the tip and reinsert.
Use a new or coded tip.
There is interference (EMC)
in close proximity to the
charging stand.
This interference unlikely
since the power transmit-
ted is low.
Charging stand emits interfer-
ence during the charging
process.
Increase the distance between the im-
paired device and the charging stand.
Place the device in the charging station
again.
Make sure that there are no foreign ob-
jects between the charging stand and
the device.

English
18 Monitoring volumes
HandyStep® touch, HandyStep® touch S 997486 Operating manual 99
17.2 System messages
Example: The device displays system messages to signal that certain
program sequences were shortened. System messages in-
form the user about which options are available for further
operation.
17.3 Event messages in the display
The device displays event messages to signal that the device has deviated from an intended state.
Event messages inform the user about which options are available for further operation.
When the event message ‘Notice’ is displayed, you can continue working with the device. These event
messages signal that the device was not able to execute a task as intended in the program. Example:
battery is too weak.
When the event message ‘Error’ is displayed, a technical problem has occurred. If this event message
is displayed again after a restart and when performing the same task, the accuracy and proper func-
tion of the device can no longer be guaranteed. Example: motor is blocked.
If the same event messages are repeatedly displayed, please contact BRAND.
18 Monitoring volumes
18.1 Testing instructions (SOP)
https://www.brand.de/sop
For additional information Calibration, see Calibra-
tion,p.100.

19 Calibration
100 Operating manual HandyStep® touch, HandyStep® touch S 997486
18.2 Leak test of the PD tip
a. Insert a new PD tip.
ðThe PD-Tip is recognized automatically or, in the case of compatible dispenser tips, select the
volume size.
b. Change the volume to be dispensed.
c. Fill the PD-Tip.
d. Immerse the PD-Tip into the test liquid. Aspirate liquid at a steady rate. Hold the device down
vertically for approx. 10 s: If a drop forms, then follow the instructions in the following table.
Tip is not recognized No coding or coding dam-
aged or tip not inserted cor-
rectly
Insert a new tip or reinsert,
select the volume size
Tip drips Tip leaky Insert a new tip
19 Calibration
If the leak test (see Monitoring volumes,p.99) has been successfully completed, a gravimetric mea-
surement can determine if the device is within the limits defined by ISO 8655. The test method re-
quired for this is described in the testing instructions (SOP).
20 Technical data
20.1 Accuracy table
The measurements were carried out with BRAND PD-Tips II.
Distilled water was used as the test liquid.
The nominal volume is the maximum volume printed on the PD-Tip.
The tolerances specified in ISO 8655 are not exceeded.
Accuracy A*≤±% Variation coefficient VC ≤
%
Nominal volume Nominal volume
PD-Tip Volume range Volume steps 100 % 50
%
10 % 1
%
100 % 50
%
10
%
1 %
0.1ml 1 µl ... 100 µl 0.1 µl 1.0 1.0 1.6 8.0 0.5 1.0 2.0 12.0
0.5ml 5 µl ... 500 µl 0.1 µl 0.9 0.9 1.0 5.0 0.3 0.6 1.0 5.0
1ml 10 µl ...1 ml 1.0 µl 0.6 0.9 1.0 5.0 0.3 0.5 0.8 4.0
1.25ml 12,5 µl ... 1.25ml 0.5 µl 0.6 0.6 0.9 5.0 0.15 0.5 0.7 4.0
2.5ml 25 µl ... 2.5ml 1.0 µl 0.5 0.6 0.7 3.5 0.15 0.3 0.6 3.0
5ml 50 µl ... 5ml 1.0 µl 0.5 0.5 0.7 3.5 0.15 0.4 0.7 3.0

English
20 Technical data
HandyStep® touch, HandyStep® touch S 997486 Operating manual 101
Accuracy A*≤±% Variation coefficient VC ≤
%
Nominal volume Nominal volume
PD-Tip Volume range Volume steps 100 % 50
%
10 % 1
%
100 % 50
%
10
%
1 %
10ml 100 µl ... 10ml 10 µl 0.4 0.5 0.7 3.5 0.15 0.5 0.8 4.0
12.5ml 125 µl ... 12.5ml 5.0 µl 0.5 0.5 0.8 3.5 0.15 0.6 1.4 6.5
25ml 250 µl ... 25ml 10 µl 0.5 0.5 0.6 3.0 0.15 0.3 1.0 6.0
50ml 500 µl ... 50ml 10 µl 0.5 0.5 0.5 3.0 0.15 0.4 1.2 9.0
20.2 Limitations of use
Operating range *) 15 °C ... 40 °C
(59 °F ... 104 °F)
Vapor pressure Up to 500 mbar
Viscosity 20 mPa s at 50 ml PD-Tip
260 mPa s at 5 ml PD-Tip
977 mPa s at 1.25 ml PD-Tip
*) Additional temperatures upon request
20.3 Materials used
Device PC/PBT, PP, silicone, glass, PEEK
Tips/flasks PE/PP (size 0.1 mm LCP/PP)
20.4 Battery
Type Li-ion battery
Capacity 1650 mAh
Voltage 3.7 V
Power 6.11 Wh
Storage 0 °C ... 35 °C
Charging time Approx. 6 h. depending on whether the device is charged by
the power adapter or the charging stand.
Weight 40 g
20.5 Charging Stand
Input DC 5.0 V 1.4 A, 7.0 W
Transmission 3.5 W, 110 kHz ... 205 kHz

20 Technical data
102 Operating manual HandyStep® touch, HandyStep® touch S 997486
20.6 Universal power adapter
Input AC 100 ... 240 V ~ 50 Hz/60 Hz, 0.5 A
Output DC 5.0 V 1.4 A, 7.0 W
20.7 Markings on the product and the battery
Marking Meaning
With this mark, we confirm that the product complies with the requirements set
out in the EC Directives and has been subjected to the specified testing proce-
dures.
UKCA: United Kingdom Conformity Assessed
With this mark we confirm that the product complies with the requirements
specified in the UK Designated Standards.
DE-M 21
The device is marked in accordance with the German Weights and Measures Act
and the Weights and Measures Ordinance.
Character sequence DE-M (DE for Germany), framed by a rectangle, as well as
the two last digits of the year the marking was added (here: 2021).
XXFFFFF Serial number
Observe the information provided on the device, the accessories and in the op-
erating instructions.
Read the user manual.
The device or the battery should be disposed of properly.
(here: 40 years)
China RoHS (EFUP)
EFUP defines the period in years during which the hazardous substances con-
tained in electrical and electronic equipment do not leak or change under nor-
mal operating conditions. Under normal use by the user, such electrical and
electronic products do not cause severe environmental pollution, serious per-
sonal injury or damage to the user's property.
DC voltage
~ AC voltage
Only suitable for indoor operation
Device is completely protected by double insulation or reinforced insulation.

English
21 Ordering Information
HandyStep® touch, HandyStep® touch S 997486 Operating manual 103
Marking Meaning
The electrical device must not be disposed of with the household waste.
2ATKA-HST7052X0
2ATKA-HSTC705220
Certification number USA FCC
IC: 25139-
HSTC705220
HVIN:
HW_HSTC01.00
Certification number Canada ISED
21 Ordering Information
https://shop.brand.de/en/
21.1 Devices
Description Illustration Order number
HandyStep® touch, universal holder,
universal power adapter, country
adapter, Li-ion battery
705200
HandyStep® touch S, universal holder,
universal power adapter, country
adapter, Li-ion battery
705210

21 Ordering Information
104 Operating manual HandyStep® touch, HandyStep® touch S 997486
21.2 Accessories
Designation Figure Ordering No.
Charging stand (worldwide except In-
dia)
705220
Charging stand (India) 705223
Support stand 705230
Lithium-ion battery for HandyStep®
touch and HandyStep® touch S
705225

English
21 Ordering Information
HandyStep® touch, HandyStep® touch S 997486 Operating manual 105
Designation Figure Ordering No.
Universal holder for HandyStep® touch
HandyStep® touch S
705235
Universal AC Adapter HandyStep® touch
and HandyStep® touch S incl. charging
cable and country adapters
705250
Bundle HandyStep® touch with charging
stand worldwide (except for India)
705201
Bundle HandyStep® touch S with charg-
ing stand worldwide (except for India)
705211
Bundle HandyStep® touch with charging
stand for India
705203
Bundle HandyStep® touch S with charg-
ing stand for India
705213
21.3 Consumables
21.3.1 PD-Tips II (precision dispenser tips II)
The device automatically recognizes the coded tips.
Volume [ml] Order No. Packing unit
[pcs.]
Order No.
BIO-CERT® LIQ-
UID HANDLING
STERILE
Packing unit
[pcs.]
0.1 705700 100 705730 100
0.5 705702 100 705732 100
1 705704 100 705734 100
1.25 705706 100 705736 100
2.5 705708 100 705738 100
5 705710 100 705740 100
10 705712 100 705742 100
12.5 705714 100 705744 100
25 705716 25+1Adapter 705746 25+1Adapter

22 Repairs
106 Operating manual HandyStep® touch, HandyStep® touch S 997486
Volume [ml] Order No. Packing unit
[pcs.]
Order No.
BIO-CERT® LIQ-
UID HANDLING
STERILE
Packing unit
[pcs.]
50 705718 50+1Adapter 705748 25+1Adapter
Set PD-TipsII
0,5ml ... 12.5ml
705720 per 20 — —
21.3.2 Adapter for 25 ml and 50 ml PD tips II
Volume [ml] Order No. Packaging unit Property
25 ml and 50 ml 702398 10
25 ml and 50 ml 702399 5 BIO-CERT® LIQUID HAN-
DLING STERILE
22 Repairs
22.1 Sending for repair
NOTICE
Transporting of hazardous materials without a permit is a violation of federal law.
Clean the instrument thoroughly and decontaminate!
•When returning products, please enclose a general description of the type of malfunction and
the media used. If information regarding media used is missing, the instrument cannot be re-
paired.
•Only send the device without a battery installed.
•Shipment is at the risk and the cost of the sender.
Outside USA and Canada
Complete the “Declaration on Absence of Health Hazards” and send the instrument to the manufac-
turer or supplier. Ask your supplier or manufacturer for the form. The form can also be downloaded
from www.brand.de.
Within USA and Canada
Please clarify the requirements for the return delivery with BrandTech Scientific, Inc before sending
the instrument in for service.
Return only cleaned and decontaminated instruments to the address provided with the Return Autho-
rization Number. Place the Return Authorization number so that it is clearly visible on the outside of
the package.

English
23 Calibration service
HandyStep® touch, HandyStep® touch S 997486 Operating manual 107
Contact addresses
Germany:
BRAND GMBH + CO KG
Otto-Schott-Str. 25
97877 Wertheim (Germany)
T +49 9342 808 0
F +49 9342 808 98000
www.brand.de
USA and Canada:
BrandTech® Scientific, Inc.
11 Bokum Road
Essex, CT 06426-1506 (USA)
T +1-860-767 2562
F +1-860-767 2563
www.brandtech.com
India:
BRAND Scientific Equipment Pvt. Ltd.
303, 3rd Floor, ‘C‘ Wing, Delphi
Hiranandani Business Park,
Powai
Mumbai–400 076 (India)
T +91 22 42957790
F +91 22 42957791
www.brand.co.in
China:
BRAND (Shanghai) Trading Co., Ltd.
Guangqi Culture Plaza
Room 506, Building B
No. 2899, Xietu Road
Shanghai 200030 (P.R. China)
T +86 21 6422 2318
F +86 21 6422 2268
www.brand.cn.com
23 Calibration service
The ISO 9001 and GLP guidelines require regular inspection of your volume measuring devices. We
recommend performing a volume check every 3 to 12 months. The cycle is dependent on the individ-
ual requirements of the device. Checks should be performed more frequently, in case of high fre-
quency of use or the use of aggressive media.
The detailed testing instructions are available for download on www.brand.de or
www.brandtech.com.
BRAND also offers the possibility to have your devices calibrated by our factory calibration service or
by the BRAND DAkkS laboratory. Simply send us the device to be calibrated, accompanied by details
about which type of calibration you would like. The device will be returned to you after a few days to-
gether with a test report (factory calibration) or a DAkkS calibration certificate. More information can
be obtained from your dealer or directly from BRAND. The order document is available for download
on www.brand.de (see Technical Documents).

24 Information about your laboratory instrument
108 Operating manual HandyStep® touch, HandyStep® touch S 997486
24 Information about your laboratory instrument
The MyProduct online service (https://www.brand.de/myproduct) offers quality certificates, acces-
sories and technical documentation for your laboratory instrument HandyStep® touch. By entering
the serial number and item number, you will receive the information on your individual instrument.
You will still find a Data Matrix code on the instrument. Scan this with a common reading app in order
to access the above information via the URL https://www.brand.de/myproduct .
25 Warranty
We shall not be liable for the consequences of improper handling, use, servicing, operating or unau-
thorized repairs of the device or for the consequences of normal wear and tear, especially of wearing
parts such as pistons, seals, valves and the breakage of glass. The same applies for failure to follow
the instructions of the operating manual. We are not liable for damage resulting from disassembly be-
yond that described in the operating manual or if non-original spare parts or components have been
installed.
USA and Canada:
Find more warranty information on www.brandtech.com.
26 Disposal
This symbol means that at the end of their service life, batter-
ies/accumulators and electronic devices must be disposed of
separately from household waste (unsorted municipal
waste).
Electronic devices must be disposed of in accordance with Directive 2012/19/ EU of the European Par-
liament and of the Council from July 04, 2012 on waste from electrical and electronic equipment and
in compliance with national disposal regulations.
Both batteries and accumulators (rechargeable batteries) contain materials that can be damaging to
the environment and human health. Therefore, they must be properly disposed of in accordance with
Directive 2006/66/EC of the European Parliament and of the Council from September 06, 2006 on bat-
teries and accumulators and in compliance with national disposal regulations. Only dispose of fully
discharged batteries and accumulators.
Subject to technical changes, errors, and misprints.
26.1 Battery disposal
WARNING
Possible risk of explosion and fire due to overheated battery.
Do not discharge the battery by short-circuiting.
•Wrap tape around the plug in order to prevent short-circuiting during disposal.
•Never disassemble the battery.

Français
HandyStep® touch, HandyStep® touch S 997486 Mode d'emploi 109
Table des matières
1 Contenu de la livraison.........................111
2 Conditions d'utilisation........................111
2.1 Classes de danger.............................111
2.2 Symboles ..........................................111
2.3 Représentation.................................111
3 Règles de sécurité................................112
3.1 Consignes générales de sécurité.....112
3.2 Accu...................................................112
3.3 Chargement inductif........................113
3.4 Écran tactile......................................113
3.5 Limites d’emploi...............................113
3.6 Interdictions d’emploi .....................113
3.7 Matériaux utilisés .............................114
3.8 Transport et entreposage................114
4 Utilisation...........................................114
5 Éléments fonctionnels et de commande 115
5.1 Touche STEP.....................................115
5.2 Touche de puissance .......................116
5.3 Accu...................................................116
5.4 Éléments de commande..................119
5.5 Bloc d’alimentation et adaptateur
pays...................................................119
5.6 Support de l'appareil .......................120
5.7 Support de chargement (acces-
soire) .................................................121
5.8 Support de maintien (accessoire) ...121
5.9 Configuration de l'écran tactile
(zone de travail)................................122
5.10 Pointes DD II (Präzisions-Dispenser-
Tips II) ...............................................122
5.11 Adaptateur pour pointes DD II 25
ml et 50 ml ........................................122
6 Aperçu des modes................................123
7 Commande .........................................124
7.1 Mise en service de l'appareil............124
7.2 Mise hors service de l'appareil ........124
7.3 Ouverture du mode de travail .........125
7.4 Abandon du mode de travail ...........125
7.5 Appel de l'aide contextuelle ............125
7.6 Utilisation des pointes .....................126
7.7 Éjection de la pointe ........................126
7.8 Aspiration de liquide........................127
7.9 Dosage de liquide.............................128
7.10 Régler le volume................................128
7.11 Réglage de la vitesse d'aspiration
et de dosage ......................................129
8 Réglages ..............................................129
8.1 Langue ...............................................129
8.2 Appareil..............................................130
8.3 Date/Heure ........................................130
8.4 Affichage ............................................130
8.5 Sonnerie.............................................130
8.6 Info/À propos.....................................131
8.7 Remarques règlementaires...............131
8.8 Calibrage............................................131
8.9 Réglages d’usine................................132
8.10 Mise en/hors service de la recon-
naissance de la pointe.......................132
8.11 Clavier ................................................132
9 Multi-dosage (MULTI-DISP)....................132
9.1 Aspiration de liquide .........................133
9.2 Interruption et poursuite de l'aspi-
ration de liquide ................................133
9.3 Dosage de liquide..............................133
9.4 Comportement avec le volume res-
tant.....................................................133
9.5 Présélection du nombre de STEPS...134
9.6 Options...............................................134
10 Auto-dosage (AUTO-DISP) ....................134
10.1 Dosage automatique de liquide .......135
10.2 Optimisation de la durée du dosage135
10.3 Réglage manuel du temps de pause135
10.4 Réglage automatique du temps de
pause (fonction d’apprentissage).....135
10.5 Comportement avec le volume res-
tant.....................................................137
10.6 Options...............................................137
11 Pipetage (PIP) ......................................137
11.1 Régler le volume................................137
11.2 Remplissage de la pointe..................137
11.3 Dosage de liquide et arrêt du do-
sage de liquide...................................138
11.4 Comportement avec le volume res-
tant.....................................................138
11.5 Options...............................................138
12 Dosage séquentiel (SEQ-DISP)................138
12.1 Dosage séquentiel en détails............138

Table des matières
110 Mode d'emploi HandyStep® touch, HandyStep® touch S 997486
12.2 Création de la liste des aliquotes ....139
12.3 Édition de la liste des aliquotes.......139
12.4 Dosage de liquide.............................140
12.5 Interruption et abandon de l'ali-
quotage.............................................140
12.6 Options .............................................140
13 Multi-aspiration (MULTI-ASP) ...............140
13.1 Multi-aspiration en détails...............141
13.2 Préparation de l’aspiration de li-
quide.................................................141
13.3 Modes de remplissage .....................141
13.4 Dosage de liquide.............................142
13.5 Création et édition d'une liste d'ali-
quotes pour l'aspiration de liquide.142
13.6 Changer de mode de travail ............142
13.7 Options .............................................143
14 Titrage................................................143
14.1 Titrage en détails..............................143
14.2 Titrage...............................................144
14.3 Options .............................................144
15 Favoris ...............................................145
15.1 Favoris en détail...............................145
15.2 Créer des favoris...............................145
15.3 Ouvrir les favoris ..............................146
15.4 Supprimer les favoris .......................146
16 Nettoyage et désinfection ....................146
16.1 Nettoyage .........................................146
16.2 Désinfection aux UV .........................147
17 Dérangement - que faire? ....................147
17.1 Comportement de l'appareil...........147
17.2 Messages du système.......................148
17.3 Messages d'événements sur l'écran149
18 Contrôle du volume .............................149
18.1 Instructions de contrôle (SOP) ........149
18.2 Contrôle de l'étanchéité de la
pointe DD..........................................149
19 Calibrage ............................................150
20 Caractéristiques techniques .................150
20.1 Tableau des précisions ....................150
20.2 Limites d’emploi...............................150
20.3 Matériaux utilisés .............................151
20.4 Accu...................................................151
20.5 Support de chargement...................151
20.6 Bloc d’alimentation universel...........151
20.7 Marquages sur le produit et l'accu ...151
21 Informations de commande...................152
21.1 Appareils............................................153
21.2 Accessoires ........................................153
21.3 Consommables..................................154
22 Réparation ...........................................155
22.1 Retour pour réparation.....................155
23 Service de calibrage..............................156
24 Informations sur votre appareil de labo-
ratoire .................................................156
25 Responsabilité pour défauts ..................156
26 Évacuation...........................................157
26.1 Évacuation de l'accu .........................157

Français
HandyStep® touch, HandyStep® touch S 997486 Mode d'emploi 111
1 Contenu de la livraison
Appareil HandyStep® touch
Câble USB
Bloc d’alimentation universel
Clips de maintien pour fixation sur étagère
5 pointes DD II de 12,5 ml, 5 ml, 2,5 ml, 1,25 ml et
0,5 ml
Mode d'emploi avec déclaration de conformité
Certificat de qualité
Instructions succinctes
2 Conditions d'utilisation
•Veuillez lire attentivement le mode d'emploi avant la première utilisation.
•Le mode d'emploi fait partie de l'appareil et doit être conservé de manière à pouvoir y accéder
facilement.
•Veuillez joindre le mode d'emploi lorsque vous remettez cet appareil à des tiers.
•Vous trouverez des versions mises à jour du mode d'emploi sur notre site www.brand.de.
2.1 Classes de danger
Les mots de signalisation suivants caractérisent des dangers potentiels:
Mot de signali-
sation
Signification
DANGER Provoque de graves blessures ou la mort.
AVERTISSEMENT Peut provoquer de graves blessures ou la mort.
PRUDENCE Peut provoquer des blessures légères ou moyennes.
REMARQUE Peut provoquer un dommage matériel.
2.2 Symboles
Symbole Signification Symbole Signification Symbole Signification
Point de danger Biorisque Met en garde
contre un dom-
mage matériel
Tension électrique Substances explosives Ne pas évacuer
avec les déchets
domestiques
Surface chaude Champs magnétiques Représente un
geste à l’écran.
2.3 Représentation
Représenta-
tion
Signification Représenta-
tion
Signification
1. Task Caractérise une tâche. > Caractérise une condition.
a., b., c. Caractérise une étape individuelle
de la tâche.
Caractérise un résultat.

3 Règles de sécurité
112 Mode d'emploi HandyStep® touch, HandyStep® touch S 997486
3 Règles de sécurité
3.1 Consignes générales de sécurité
À lire attentivement!
L’appareil de laboratoire HandyStep® touch peut être utilisé avec des matériaux, des procédés et des
appareillages dangereux. Le mode d'emploi n'a pas pour but d'exposer tous les problèmes de sécurité
susceptibles de se présenter. Il relève donc de la responsabilité de l'utilisateur d'assurer le respect des
consignes de sécurité et de santé et de déterminer les restrictions correspondantes avant l'utilisation
de l'appareil.
1. Tous les utilisateurs doivent avoir lu ce mode d’emploi avant l’utilisation de l’appareil et la
respecter.
2. Tenir compte des consignes générales sur les dangers et des prescriptions de sécurité, par ex.
porter une tenue de protection, une protection des yeux et des gants de protection.
3. Lors de travaux avec des échantillons infectieux ou dangereux, les consignes standard ainsi
que les mesures de précaution standard doivent être observées.
4. Observer les données des fabricants de réactifs.
5. Ne pas faire fonctionner l'appareil dans une atmosphère à risque d'explosion.
6. Ne pas pipeter de milieux facilement inflammables.
7. Employer uniquement l’appareil pour le dosage de liquides en observant les limites et les res-
trictions d'emploi définies. Observer les interdictions d'emploi, voir point Limites d’em-
ploi,p.150. En cas de doute, se renseigner auprès du fabricant et/ou du fournisseur.
8. Toujours travailler de façon à ne mettre en danger ni vous-même ni autrui. Éviter les éclabous-
sures. N’utiliser que des récipients appropriés.
9. Une pointe est automatiquement bloquée lors de sa mise en place. Lors de l'utilisation d'une
pointe qui a déjà servi, s'assurer qu'elle ne contient pas de liquide résiduel.
10. N'actionner la touche STEP de l'appareil que s'il est garanti que le liquide qui est délivré n'est
lié à aucun danger.
11. Éviter tout contact avec les orifices des pointes lors de travaux avec des milieux agressifs.
12. Ne jamais employer la force.
13. Utiliser uniquement les accessoires et pièces de rechange originaux. Ne pas effectuer de modi-
fications techniques. Ne pas démonter l'appareil.
14. Avant l’utilisation, toujours vérifier l’état correct de l’appareil. Si des dérangements se mani-
festent, arrêter immédiatement le dosage et consulter le chapitre Dérangement - que
faire?,p.147. Au besoin, contacter le fabricant.
3.2 Accu
1. Utiliser exclusivement le câble USB fourni avec l'appareil. L'utilisation d'autres câbles peut en-
traîner des dommages sur l'appareil et le support de chargement.
2. L'appareil et le bloc secteur risquent de chauffer de manière excessive lors du chargement. Ne
pas recouvrir les appareils indiqués.
3. En cas de chaleur excessive de l'appareil dans la zone de la douille de chargement, le câble
USB pourrait être défectueux, remplacer le câble USB par un nouveau câble d'origine.
4. En cas d'utilisations qui requièrent beaucoup de puissance de l'accu, l'appareil peut temporai-
rement chauffer fortement (par ex. en cas de travaux extrêmes avec des pointes de grande vo-
lume). Dans ce cas, interrompre les dosages et les poursuivre après le refroidissement.

Français
3 Règles de sécurité
HandyStep® touch, HandyStep® touch S 997486 Mode d'emploi 113
5. Ne jamais utiliser de blocs secteur, supports de charge ou accus inappropriés ou endomma-
gés. Les blocs secteur ou les câbles non autorisés peuvent provoquer une explosion de l'accu
ou des dommages sur l'appareil.
3.3 Chargement inductif
1. N'utiliser que le support de chargement d'origine pour le chargement inductif.
2. En cas de chargement inductif, ne pas placer d'objets conducteurs électriques ou magné-
tiques entre l'appareil et le support de chargement.
3. Pendant le chargement inductif, l'appareil, le support de chargement et le bloc secteur
risquent de chauffer. Ne pas recouvrir les appareils indiqués.
4. Ne pas faire fonctionner les supports de chargement à l'air libre.
5. Les personnes porteuses d'implants médicaux doivent demander conseil à un médecin avant
d'utiliser un support de chargement pour savoir s'il présente un risque pour elles. Respectez
en outre les directives en vigueur concernant les personnes portant des implants médicaux et
concernant les sources d’allumage (ici, le support de chargement).
6. D’autres appareils peuvent être influencés pendant le processus de chargement inductif s’ils
se trouvent à proximité directe du support de chargement.
7. Des ondes radio peuvent être émises pendant le chargement inductif. Si l’appareil n’est pas
utilisé comme décrit dans le mode d’emploi, les interférences ne peuvent pas être exclues.
3.4 Écran tactile
L'écran tactile peut former des éclats en cas de violence extrême. Un appareil ainsi endommagé doit
être envoyé pour être réparé et ne doit plus être utilisé. À cet effet, recouvrir l'écran avec un ruban
adhésif avant l'expédition. Veuillez d'autre part tenir compte des dispositions de transport, voir Re-
tour pour réparation,p.155.
3.5 Limites d’emploi
Voir Limites d’emploi,p.150.
3.6 Interdictions d’emploi
•Lorsque l'appareil est correctement utilisé, le liquide à doser entre uniquement en contact avec
la pointe mais pas avec l'appareil.
•C‘est à l'utilisateur de vérifier si l'appareil est approprié pour l‘usage qu'il veut en faire. Ceci
sous-entend une qualification suffisante de l'utilisateur pour les activités décrites dans le pré-
sent mode d'emploi.
•Ne pas utiliser l'appareil pour le dosage de liquides qui attaquent le polypropylène, le polyéthy-
lène (pointe) ou le polycarbonate (boîtier).
•Éviter les vapeurs agressives (risque de corrosion)!
•L'appareil ne doit pas être utilisé pour les acides oxydants car les pièces métalliques et l'électro-
nique risqueraient d'être attaquées.
•Si l’utilisateur modifie l’appareil, ce dernier ne doit plus être utilisé. Toutes les modifications re-
quièrent l’autorisation explicite du fabricant.

4 Utilisation
114 Mode d'emploi HandyStep® touch, HandyStep® touch S 997486
USA
Les appareils sont conçus et contrôlés pour une application commerciale et satisfont à la classe A Ap-
pareils numériques, conformément à la partie 15B (HandyStep® touch et HandyStep® touch S) et à la
partie 18 (supports de chargement) des prescriptions FCC.
Ces valeurs limites doivent offrir une protection appropriée contre les interférences nuisibles si l’ap-
pareil est utilisé dans un environnement industriel. Cet appareil génère, utilise et peut émettre une
énergie à haute fréquence et peut, s’il n’est pas installé et utilisé conformément au mode d’emploi,
causer des interférences nuisibles de la communication radio.
Le fonctionnement de cet appareil dans une zone résidentielle peut entraîner des interférences nui-
sibles. Dans ce cas, l’utilisateur a l’obligation de supprimer les interférences à ses propres frais.
Les transformations ou modifications de cet appareil, qui n’ont pas été explicitement autorisées par le
bureau responsable du respect des prescriptions, peuvent entraîner l’annulation de l’autorisation
donnée à l’utilisateur concernant l’exploitation de l’appareil.
Canada
Cet appareil est conforme à la norme Industry Canada RSS-216. Son utilisation est soumise aux deux
conditions suivantes:
1. Ce dispositif ne doit causer aucune interférence.
2. Ce dispositif doit résister à toutes les interférences, y compris les interférences peuvent causer
un fonctionnement indésiré du dispositif.
3.7 Matériaux utilisés
Voir Matériaux utilisés,p.151.
3.8 Transport et entreposage
Entreposer et transporter au sec l'appareil, l'accu, le bloc secteur ou le support de chargement en les
protégeant contre les rayons directs du soleil.
4 Utilisation
Le HandyStep® touch et le HandyStep® touch S sont des pipettes manuelles qui fonctionnent sur accu
et qui sont contrôlées par microprocesseur à commande tactile. Les pointes des pipettes de précision
(pointe DD II) de BRAND à codage du type sont automatiquement reconnues par l'appareil en fonction
de leur volume nominal et permettent la sélection de volume la plus rapide possible. Les pointes de
dosage compatibles d'autres fabricants peuvent également être utilisées après avoir sélectionné ma-
nuellement le volume correspondant.

Français
5 Éléments fonctionnels et de commande
HandyStep® touch, HandyStep® touch S 997486 Mode d'emploi 115
5 Éléments fonctionnels et de commande
1
2
3
4
5
6
7
8
9
10
11
12
1Couvercle du compartiment à accu 2Touche de puissance
3Touche STEP 4Recouvrement
5Douille multifonctions (USB) 6Poignée face arrière
7Marquages 8Logement de la pointe
9Pointe de dosage de précision 10 Poignée face avant
11 Évidement poignée 12 Écran tactile
5.1 Touche STEP
La touche STEP déclenche le dosage et l'aspiration de liquides selon le mode. L'appareil génère des
messages sur l'écran tactile sur la façon d'utiliser la touche STEP. La touche STEP peut être utilisée de
différentes manières selon le mode de travail que vous avez choisi. La touche STEP peut être action-
née sur toute la surface. Il est possible de différencier les types de commande suivants:

5 Éléments fonctionnels et de commande
116 Mode d'emploi HandyStep® touch, HandyStep® touch S 997486
Actionnement bref de la touche STEP («Clic»)
Exemples d'utilisation:
Aspiration de liquide, dosage de liquide, interruption de l’as-
piration de liquide (selon le mode), logement de la pointe ou
éjection de la pointe
Actionnement bref de la touche STEP 2 x de suite («double clic»)
Exemples d'utilisation:
Remplir à nouveau la pointe.
Maintenir la touche STEP enfoncée
Exemples d'utilisation:
Vider complètement la pointe, dosage automatique de li-
quide (en mode auto-dosage), titrage manuel (en mode Ti-
trage).
5.2 Touche de puissance
La touche de puissance vous permet d’activer et de désactiver l’appareil. En outre, vous mettez l’ap-
pareil en mode Stand-by.
5.3 Accu
AVERTISSEMENT
Accu endommagé ou inadapté
Dommages corporels possibles
>N'utiliser qu'un accu d'origine!
>N'utiliser qu'un bloc secteur d'origine!
>Ne pas percer, déformer, enflammer, écraser, court-circuiter ou surchauffer un accu!
>Ne pas toucher l’accu présentant une fuite à la main, porter des gants de protection!
>Éliminer un accu endommagé selon les spécifications légales!
>N’utiliser l’accu que dans les plages de température prescrites!
>Tenir compte des indications qui se trouvent sur l’accu!

Français
5 Éléments fonctionnels et de commande
HandyStep® touch, HandyStep® touch S 997486 Mode d'emploi 117
AVIS
>Chargez l'accu avant la première utilisation ou si vous n'avez pas utilisé l'appareil pendant long-
temps. Vous éviterez ainsi l'usure prématurée de l'accu.
>Remplacez l'accu après le dépassement de la durée de vie (~ 3 ans), en cas de déformation ou de
cycles de chargement extrêmement courts et d'une durée d'utilisation courte qui en résulte.
>Lorsque vous entreposez l'appareil, débranchez la fiche de l'accu.
Composants
1
2
3
4
1Accu
2Contacts
3Connecteur à sécurité contre l'inversion de la polarité
4Câble
Inscription sur la face arrière
1Type d'accu et utilisation
2Identification des composants
3Marquages
4Consigne d'avertissement
5.3.1 Raccordement de l'accu
A B C
Ouvrir le recouvrement et emboîter le connecteur de l'accu sécurisé contre une inversion de la polari-
té de manière ferme et droite dans la prise. L'appareil se met en marche lorsque vous avez raccordé
l'accu. Fermer le recouvrement.

5 Éléments fonctionnels et de commande
118 Mode d'emploi HandyStep® touch, HandyStep® touch S 997486
5.3.2 Chargement de l'accu
a. Relier le câble au bloc d’alimentation et au HandyStep®
touch.
b. Brancher le bloc d’alimentation dans la prise.
ðLe HandyStep® touch va être chargé.
5.3.3 Affichage sur l'écran
L'accu est prêt à travailler. L'accu est presque déchargé. L'accu va être chargé.
5.3.4 Mode Stand-by
Si la touche de puissance est appuyée brièvement avec l’appareil activé, celui-ci se met en mode
Stand-by et l’écran s’éteint. Le mode Stand-by sert à prolonger la durée de vie de l’accu. Il est possible
de quitter le mode Stand-by de la manière suivante:
•Appuyer sur la touche Power.
•Appuyer sur la touche STEP.
•Mettre la pointe en place.
5.3.5 Travaux pendant l'opération de chargement
Vous pouvez continuer de travailler pendant le chargement. Enfichez pour cela le câble USB dans la
prise multifonctions sur l'appareil. Le chargement est ainsi prolongé. Il n'est possible de travailler
avec le câble USB branché que lorsque l'accu est raccordé dans l'appareil.
5.3.6 Durée de vie de l’accu
La durée de vie de l’accu est la période pendant laquelle un accu neuf permet de travailler avec l’ap-
pareil. Cette durée de vie dépend de plusieurs facteurs, notamment de l’état de l’accu lui-même, de la
luminosité de l’écran, des réglages de vitesse appliqués ou du liquide utilisé. La durée de vie de l’accu
a été déterminée par un processus automatisé.
Liquide (exemples) Eau distillée (conformément
à l’ISO 3696)*
Huile de colza**
Pointe Pointe DD II 10 ml Pointe DD II 25 ml
Accu Neuf et chargé à 100% Neuf et chargé à 100%
Réglages sur l’appareil Niveau de vitesse 6
Luminosité moyenne de
l’écran
Niveau de vitesse 4
Luminosité moyenne de
l’écran
Steps 20 Steps à 0,5 ml 10 Steps à 2,5 ml

Français
5 Éléments fonctionnels et de commande
HandyStep® touch, HandyStep® touch S 997486 Mode d'emploi 119
Durée de vie de l’accu env. 5 h env. 2 h
*correspond à une puissance absorbée normale
**correspond à une puissance absorbée maximale
5.4 Éléments de commande
Écran tactile
Vous vous servez de l'écran tactile pour régler les valeurs nécessaires à l'aide de votre pouce.
Touche STEP
Vous vous servez de la touche STEP à l'aide de votre index.
5.5 Bloc d’alimentation et adaptateur pays
AVERTISSEMENT
Dommages corporels possibles en raison d'un bloc secteur endommagé ou inadap-
té
>N'utiliser qu'un bloc d’alimentation universel d'origine et que l'adaptateur de pays
correspondant!
>Ne pas recouvrir le bloc secteur pendant l'utilisation!
>Ne pas utiliser un bloc secteur endommagé!
Bloc secteur Adaptateurs pour différents pays
CN GB US AU/NZ UE
5.5.1 Relier l’adaptateur de chargement et le bloc d’alimentation
a. Glisser l’adaptateur de chargement sur le bloc d’alimen-
tation jusqu’à l’enclenchement audible.
ðLe bloc d’alimentation peut être branché.

5 Éléments fonctionnels et de commande
120 Mode d'emploi HandyStep® touch, HandyStep® touch S 997486
5.5.2 Séparation de l'adaptateur de chargement du bloc d’alimentation
a. Appuyer sur le bouton-poussoir et retirer l’adaptateur
de chargement.
5.6 Support de l'appareil
5.6.1 Fixation du support de l'appareil avec un ruban adhésif
1
2
1Support universel 2Appuyer l’arrière du sup-
port avec bandes adhé-
sives
a. Nettoyer la surface de fixation avec un nettoyant adapté
(pas de nettoyants domestiques regraissants) et un chif-
fon non pelucheux et bien la laisser sécher.
b. Retirer le film protecteur des bandes adhésives
c. Enfoncer fermement l’arrière du support avec le pouce
sur la surface nettoyée. Patienter 72 h jusqu'à la pre-
mière charge avec l'appareil.
d. Pousser le support universel sur l’arrière du support.
5.6.2 Fixation du support de l'appareil dans la rondelle
a. Placer le support à étagère sans bande adhésive dans la
rondelle jusqu’à l’enclenchement audible.
5.6.3 Fixation du support de l'appareil sur le bord de l'étagère
1
2
3
1Support universel 2Côté inférieur
3Arrière du support
a. Nettoyer la surface de fixation et l’arrière du support
avec un nettoyant adapté (pas de nettoyants domes-
tiques regraissants) et un chiffon non pelucheux et bien
la laisser sécher.
b. Retirer le film de protection d'un côté du ruban adhésif.
c. Coller le ruban adhésif sur le dessous et appuyer ferme-
ment.

Français
5 Éléments fonctionnels et de commande
HandyStep® touch, HandyStep® touch S 997486 Mode d'emploi 121
d. Puis retirer le film de protection sur l'autre face et coller
l’arrière du support sur l'arête de fixation souhaitée.
e. Enfoncer fermement l’arrière du support avec le pouce
sur la surface de fixation. Patienter 72 h jusqu'à la pre-
mière charge avec l'appareil.
f. Pousser le support universel sur l’arrière du support.
5.7 Support de chargement (accessoire)
AVERTISSEMENT
Dommages corporels possibles en raison de l'induction
>Les personnes porteuses d'implants médicaux (par ex. piles cardiaques, pompes mé-
dicales) doivent respecter une distance de sécurité. La Health Industry Manufactu-
rers Association recommande aux porteurs d'une pile cardiaque de respecter une
distance d'au moins 15 cm par rapport à la source d'allumage (ici, le support de char-
gement).
>Les personnes porteuses d'implants médicaux doivent consulter un médecin avant
d'utiliser le support de chargement.
>Si une influence sur l'implant est soupçonnée, augmenter l'écartement par rapport
au support de chargement et consulter un médecin.
AVIS
Chargement inductif par le support de chargement
Le support de chargement peut charger de manière inductive dès que l'alimentation en courant est
établie. Ne pas placer de supports de données magnétiques (par ex. cartes de crédit) à proximité du
support de chargement.
Utilisation du support de chargement
Le support de chargement a besoin du bloc secteur et du
câble USB de l'appareil HandyStep® touch ou HandyStep®
touch S.
Affichage du support de chargement
•Le support de chargement est éclairé bleu: L'accu va
être chargé.
•Le support de chargement n'est pas éclairé: L'accu est
chargé ou aucun appareil ne se trouve dans le support
de chargement.
•Le support de chargement est éclairéalternativement:
L'accu ne peut pas charger. Placer à nouveau l'appareil
dans le support de chargement.
5.8 Support de maintien (accessoire)
Le support de maintien sert à conserver l'appareil en toute sécurité. Le support de maintien n'a pas de
fonction de chargement.

5 Éléments fonctionnels et de commande
122 Mode d'emploi HandyStep® touch, HandyStep® touch S 997486
5.9 Configuration de l'écran tactile (zone de travail)
12
3
4
5
6
7
8
9
10
11
12
13 14
1Heure
2État de chargement
3Volume nominal de la pointe utilisée
4Niveau de remplissage de la pointe
5Éjecter ( ) ou utiliser ( ) la pointe.
6Appeler les options
7Appeler le menu principal (Home)
8Domaine d'information
9Volume disponible
10 STEPS disponibles par rapport au volume dispo-
nible
11 Volume STEP
12 Vitesse d'aspiration et de dosage
13 Nom du mode
14 Zone pour les fonctions spécifiques.
5.10 Pointes DD II (Präzisions-Dispenser- Tips II)
Les pointes codées sont automatiquement reconnues par l'appareil.
Volume [ml] N° de commande Unité d’emb.
[pièce]
N° de commande
BIO-CERT® LI-
QUID HANDLING
STERILE
Unité d’emb.
[pièce]
0,1 705700 100 705730 100
0,5 705702 100 705732 100
1 705704 100 705734 100
1,25 705706 100 705736 100
2,5 705708 100 705738 100
5 705710 100 705740 100
10 705712 100 705742 100
12,5 705714 100 705744 100
25 705716 25+1Adaptateur 705746 25+1Adaptateur
50 705718 50+1Adaptateur 705748 25+1Adaptateur
Set de pointes DD II
0,5 ml ... 12,5ml
705720 20 — —
5.11 Adaptateur pour pointes DD II 25 ml et 50 ml
Volume [ml] N° de commande Unité d’emballage Caractéristique
25 ml et 50 ml 702398 10

Français
6 Aperçu des modes
HandyStep® touch, HandyStep® touch S 997486 Mode d'emploi 123
Volume [ml] N° de commande Unité d’emballage Caractéristique
25 ml et 50 ml 702399 5 BIO-CERT® LIQUID
HANDLING STERILE
6 Aperçu des modes
Modes HandyStep® touch HandyStep® touch S
Réglages + +
Multi-dosage (MULTI-DISP) + +
Auto-dosage (AUTO-DISP) + +
Pipetage (PIP) + +
Dosage séquentiel (SEQ-DISP) — +
Multi-aspiration (MULTI-ASP) — +
Titrage — +
Favoris + +
Modes Description
Réglages En mode Réglages, vous réglez votre appareil pour votre tra-
vail, par ex. heure, luminosité de l'écran. Voir Ré-
glages,p.129.
Multi-dosage En mode Multi-dosage, un volume aspiré est à nouveau pro-
gressivement dosé. Exemples d'utilisation: Subdiviser un
volume aspiré en STEPs. Voir Multi-dosage (MULTI-
DISP),p.132.
Auto dosage En mode Auto-dosage, un volume est aspiré puis à nouveau
automatiquement dosé de manière progressive par un inter-
valle de temps réglé auparavant. Exemples d'utilisation:
Subdiviser automatiquement un volume aspiré en de nom-
breux STEPs. Voir Auto-dosage (AUTO-DISP) ,p.134.
Pipetage En mode Pipetage, un volume auparavant choisi est aspiré
en une seule fois puis à nouveau dosé. Voir Pipetage
(PIP),p.137.
Dosage séquentiel (SEQ-DISP) En mode Dosage séquentiel, un volume aspiré est à nouveau
dosé par plusieurs STEPS réglés au préalable et de tailles
différentes. Exemples d'utilisation: Série de dilution. Voir
Dosage séquentiel (SEQ-DISP),p.138
Multi-aspiration (MULTI-ASP) En mode Multi-aspiration, plusieurs STEPS sont collectés
dans une pointe puis aspirés et dosés en tant que volume to-
tal. Exemples d'utilisation: Diminution du volume résiduel
restant. Voir Multi-aspiration (MULTI-ASP),p.140.
Titrage En mode Titrage, un volume est aspiré et dosé soit rapide-
ment, soit lentement. La quantité dosée peut être relevée
sur l'écran. Exemple d'utilisation: détermination du pH. Voir
Titrage,p.143.

7 Commande
124 Mode d'emploi HandyStep® touch, HandyStep® touch S 997486
Modes Description
Favoris Les réglages fréquemment utilisés sont enregistrés comme
favoris. Vous pouvez à nouveau appeler ces favoris par l'in-
termédiaire de ce menu. Voir Favoris,p.145.
7 Commande
AVERTISSEMENT
Risques potentiels pour la santé en raison de liquides pathogènes ou de germes in-
fectieux.
>Portez une tenue de protection adéquate.
>Lors de l'utilisation des milieux indiqués, respectez les dispositions nationales, les
fiches de données de sécurité, le niveau de protection de votre laboratoire ainsi que
les mesures pour pouvoir travailler en toute sécurité.
AVIS
Endommagement de l'appareil par une fausse utilisation.
>Ne plonger que la pointe dans le liquide
>En cas de contact avec un liquide, nettoyer aussitôt l'appareil.
>Suspendre l'appareil à la verticale dans les supports fournis.
7.1 Mise en service de l'appareil
a. Appuyer sur la touche Power.
ðLe menu principal s'ouvre.
Start Motor-Init
Si vous réutilisez l’appareil après une longue pause, il vous est demandé d’effectuer une initialisation
du moteur après l’activation:
a. Confirmer le message «Start Motor Init».
ðL’initialisation du moteur est effectuée
ðL'appareil déplace le logement de la pointe dans la position de travail.
ðLe menu principal s'ouvre.
Support de chargement/Câble USB
L’appareil s’allume lorsqu’il est placé dans le support de chargement ou que le câble de chargement
USB est raccordé. Cela quitte également le mode Stand-by.
7.2 Mise hors service de l'appareil
a. Vider et éjecter la pointe, voir Dosage de liquide,p.128 et Éjection de la pointe,p.126
b. Appuyer sur la touche Power.

Français
7 Commande
HandyStep® touch, HandyStep® touch S 997486 Mode d'emploi 125
ðUne question apparaît pour savoir si vous souhaitez mettre l'appareil hors service. Valider avec
. Interrompre avec .
c. Si la touche Power est enfoncée pendant env. 1 s, l'appareil passe en Stand-by.
Si la touche Power est enfoncée pendant plus d’env. 2 s, il vous est demandé si vous souhaitez
mettre l’appareil hors service.
d. Confirmer le message.
e. Suspendre l'appareil à la verticale dans les supports fournis. Le chargement démarre lorsque
l'appareil est mis en place dans le support de chargement. Les LED du support de chargement
sont alors allumées.
Si l’écran tactile ou l’appareil ne répond plus, tenez compte du chapitre Dérangement - que faire?, à
partir de Comportement de l'appareil,p.147.
7.3 Ouverture du mode de travail
Vous sélectionnez un mode travail par le menu principal. Vous procédez à l'activité proprement dite
(par ex. dosage) en mode de travail.
a. b.
a. Sélectionner le mode de travail par effleurement.
b. Ouvrir le mode de travail par un appui une seule fois.
ðLe mode de travail apparaît.
7.4 Abandon du mode de travail
a. En mode de travail, effleurer le bouton .
ðLe menu principal apparaît.
Si du liquide se trouve dans la pointe, il vous est demandé si vous souhaitez vider la pointe ou conti-
nuer de travailler avec le volume restant dans un autre mode de travail.
7.5 Appel de l'aide contextuelle
L'aide contextuelle vous aide en cas de questions sur la fonc-
tionnalité dans le mode de travail respectif ou dans le menu.

7 Commande
126 Mode d'emploi HandyStep® touch, HandyStep® touch S 997486
7.6 Utilisation des pointes
7.6.1 Utilisation des pointes DD BRAND
Prérequis:
>Le mode de travail a été sélectionné
a. Mettre en place la pointe
b. Appuyer sur la touche STEP. La pointe est reliée à l'appareil et le volume est réglé
ðLe mode de travail apparaît à nouveau.
ðLe liquide peut être aspiré.
7.6.2 Utilisation de pointes compatibles d'un autre fabricant (sans codage)
c. d.
Prérequis:
>Le mode de travail a été sélectionné
a. Mettre en place la pointe
b. Appuyer sur la touche STEP.
c. Régler le volume.
d. Confirmer le choix effectué avec le bouton .
ðLe mode de travail apparaît à nouveau.
ðLe liquide peut être aspiré.
7.6.3 Utilisation de pointes compatibles d'un autre fabricant (avec codage)
Après l’installation de la pointe, contrôlez que le soit aspiré, voir Régler le volume,p.128.
7.6.4 Utilisation des pointes sans mode de travail sélectionné
Vous pouvez aussi utiliser une pointe avant d'avoir sélectionné un mode de travail. Un mode de travail
doit avoir été sélectionné pour régler le volume ou pour que la pointe compatible soit automatique-
ment reconnue.
7.7 Éjection de la pointe
Prérequis:
>Vous avez vidé la pointe.
a. Tenir l'appareil avec la pointe au-dessus de la poubelle.
b. Effleurer le bouton , puis appuyer sur la touche STEP.
ðLa pointe est éjectée.
ðL'appareil revient en position d'aspiration de la pointe.

Français
7 Commande
HandyStep® touch, HandyStep® touch S 997486 Mode d'emploi 127
7.8 Aspiration de liquide
AVIS
Purger la pointe avant l’utilisation
Nous recommandons de purger une pointe neuve avant l’utilisation. Pour cela, remplir la pointe d’un
niveau de liquide minimal et la purger à nouveau (voir Remplissage de la pointe lorsqu'elle est vide
Remplissage de la pointe lorsqu'elle est vide,p.127 et Interruption du remplissage de la pointe Inter-
ruption du remplissage de la pointe,p.127). Les petites bulles d’air au niveau du piston après la purge
n’influencent pas le résultat.
7.8.1 Remplissage de la pointe lorsqu'elle est vide
Prérequis:
>Un mode de travail a été sélectionné.
>Le message «Appuyer STEP pour remplir» apparaît à l'écran tactile.
a. Tenir la pointe à la verticale dans le récipient.
b. Pendant l'aspiration, s'assurer que l'ouverture de la pointe soit toujours recouverte de liquide,
pour éviter la formation de bulles d'air dans la pointe.
c. Appuyer sur la touche STEP.
La pointe est remplie jusqu'à ce que le volume réglé ou le volume nominal soit atteint.
AVIS
Course d'inversion (compensation du jeu)
Lors du remplissage, l'appareil effectue une course d'inversion, suite à quoi la précision du réglage du
volume STEP est garantie. Le premier STEP n'a ainsi pas besoin d'être rejeté.
7.8.2 Interruption du remplissage de la pointe
a. Appuyer sur la touche STEP pour interrompre le remplissage de la pointe.
ðLe remplissage est immédiatement interrompu. Vous pouvez ensuite à nouveau doser le volume
aspiré à l'aide de la touche STEP, vider la pointe ou poursuivre le remplissage.
7.8.3 Remplissage de la pointe lorsqu'elle est partiellement vide
a.
a. Commuter pour remplir à nouveau.
b. Tenir la pointe à la verticale dans le liquide.
c. Appuyer 2 x sur la touche STEP.
ðLe liquide est aspiré jusqu'à ce que le volume nominal
le soit également.
d. Appuyer sur la touche STEP pour stopper le remplis-
sage.
ðLe mode de travail apparaît à nouveau. Vous pouvez
poursuivre le dosage.
AVIS
Course d'inversion (compensation du jeu)
Lors du remplissage, l'appareil effectue une course d'inversion, suite à quoi la précision du réglage du
volume STEP est garantie. Le premier STEP n'a ainsi pas besoin d'être rejeté.

7 Commande
128 Mode d'emploi HandyStep® touch, HandyStep® touch S 997486
7.8.3.1 Changement automatique pour le remplissage
Après le dosage de tous les STEPS souhaités, du liquide dont le volume est inférieur à 1 STEP (le vo-
lume résiduel) reste dans la pointe. L'appareil commute automatiquement dans le mode dans lequel
vous pouvez à nouveau remplir la pointe.
a. Appuyer 2 x sur la touche STEP.
ðDu liquide est aspiré jusqu'à ce que la pointe soit complètement remplie.
7.9 Dosage de liquide
7.9.1 Dosage du volume ou des STEPS individuels
Prérequis:
>Un mode de travail a été sélectionné.
>Un volume a été aspiré.
a. Appliquer la pointe sur la paroi du récipient.
b. Tenir l’appareil à un angle de 30 à 45° avec la paroi du récipient.
c. Appuyer sur la touche STEP.
ðSelon le mode de travail choisi, soit un STEP ou le volume complet de la pointe est dosé.
Pour interrompre le dosage, effleurer le bouton .
7.9.2 Commutation pour le vidage
a.
a. Commutation pour le vidage.
b. Tenir l’appareil à un angle de 30 à 45° avec la paroi du
récipient.
c. Maintenir la touche STEP enfoncée.
ðDu liquide est dosé; la pointe est complètement vidée.
ðLe mode de travail apparaît à nouveau. Vous pouvez as-
pirer un nouveau liquide ou éjecter la pointe.
7.9.3 Rejet du volume résiduel
Après le dosage de tous les STEPS souhaités, du liquide dont le volume est inférieur à 1 STEP reste
dans la pointe. L'appareil commute automatiquement dans le mode dans lequel vous pouvez rejeter
le volume restant.
a. Maintenir la touche STEP enfoncée.
ðLa pointe est complètement vidée.
7.10 Régler le volume
Prérequis:

Français
8 Réglages
HandyStep® touch, HandyStep® touch S 997486 Mode d'emploi 129
>Un mode de travail a été sélectionné.
a. Effleurer le bouton .
ðLe réglage du volume apparaît.
b. Sélectionner le volume en réglant un volume à partir de la plage de valeurs.
01.00
c. d.
c. Passez à gauche ou à droite pour modifier l'endroit.
d. Passez vers le haut ou vers le bas pour régler la valeur.
e. Confirmer le choix effectué avec le bouton. Rejeter le ré-
glage avec le bouton X.
ðLe mode de travail apparaît.
7.11 Réglage de la vitesse d'aspiration et de dosage
Adaptez la vitesse à votre application respective.
Prérequis:
>Un mode de travail a été sélectionné.
a. Effleurer le bouton .
ðLe réglage de la vitesse apparaît.
b. Régler la vitesse d'aspiration et de dosage en la sélectionnant dans les plages de valeurs 1 à 8.
1 = lente, 4 = moyenne, 8 = rapide
c. Vous pouvez régler des vitesses différentes pour l'aspiration et le dosage.
d. Confirmer le choix effectué avec le bouton . Rejeter la sélection avec le bouton .
ðLe mode de travail apparaît à nouveau.
8 Réglages
Réglez l'appareil pour l'utilisation quotidienne. Effleurer «Réglages» dans le menu principal.
8.1 Langue
Régler la langue à l'écran et la langue d'aide. L'allemand, l'anglais, le français, l'espagnol et le chinois
sont disponibles comme langues.

8 Réglages
130 Mode d'emploi HandyStep® touch, HandyStep® touch S 997486
8.2 Appareil
Régler le nom de l'appareil. Pour sélectionner des caractères,
les tirer avec l'index dans la barre blanche. Pour changer
d'emplacement, passer sur la gauche ou sur la droite. Le
nom de l'appareil peut consister en des chiffres, des carac-
tères spéciaux et des caractères d'écriture.
Pour insérer des majuscules, effleurer le bouton ABC.
Pour insérer des minuscules, effleurer le bouton abc.
Pour insérer des chiffres et des caractères spéciaux, effleurer
le bouton 123. Les caractères spéciaux suivants sont à dispo-
sition: plus, moins, surlignage, virgule, point, barre d'espa-
cement (entre le chiffre 9 et moins).
8.3 Date/Heure
Régler la date, l'heure ainsi que le format de l'heure et de la date.
Pour quitter la fonction, effleurer le bouton .
Les abréviations suivantes décrivent les formats de l'heure et de la date (plage de valeurs entre paren-
thèses):
Heure hh (00 à 23) h (0 à 23)
Minute mm (00 à 59) m (0 à 59)
Jour DD (01 à 31) D (1 à 31)
Mois MM (01 à 12) M (1 à 12)
Année YYYY (2019 à 2050) YY (19 à 50)
8.4 Affichage
Luminosité Régler la luminosité avec le commutateur coulissant.
Durée de passage à l’écran
de veille
Régler la durée qui s’écoule avant que la luminosité de l’écran soit tout
d’abord atténuée, puis éteint.
Auto-Power Off Régler si l’appareil s’éteint automatiquement après 60 min en mode
Stand-by.
8.5 Sonnerie
AVIS
Sonnerie d’événement
L’appareil fait retentir une sonnerie en cas d’événement. Cette sonnerie d’événement ne peut pas être
désactivée.

Français
8 Réglages
HandyStep® touch, HandyStep® touch S 997486 Mode d'emploi 131
Sonneries d’information Activer ce réglage si des sonneries doivent retentir en cas d’événe-
ments du programme.
Son des touches STEP Activer ce réglage si des sons doivent retentir lors de l’actionnement
de la touche STEP.
8.6 Info/À propos
Version Version du firmware
Date La date correspond à la date à laquelle le firmware a été créé.
Bootloader Outil logiciel
8.7 Remarques règlementaires
Cette entrée du menu vous permet d’obtenir des informations concernant les homologations.
8.8 Calibrage
1
2
3
4
1Activer le rappel
2Les saisies illogiques sont représentées en rouge. Dans
ce cas, la dernière date de contrôle se trouve dans le fu-
tur.
3Réglez la dernière date à laquelle l’appareil a été contrô-
lé
4Réglez la prochaine date à laquelle l’appareil doit être
contrôlé.
Prérequis:
>Vous venez de contrôler l’appareil et souhaitez recevoir un rappel pour le prochain contrôle de
l’appareil. Vous garantissez ainsi un contrôle régulier de votre appareil.
a. Régler la date du dernier contrôle. Cette date peut être dans le passé, le présent ou le futur.
b. Régler la date du prochain contrôle. Cette date doit se trouver dans le futur.
c. Activer le rappel avec le commutateur coulissant.
ðÀ l’écoulement de l’intervalle de contrôle, vous êtes rappelé du nouveau contrôle de l’appareil
par un message à l’écran.
ðRéglez de préférence ces dates immédiatement après un contrôle.
ðSi la date du dernier calibrage se trouve après la date actuelle, elle apparaît en rouge.
ðSi la date du futur calibrage se trouve avant la date actuelle, elle apparaît en rouge et le rappel ne
peut pas être activé.

9 Multi-dosage (MULTI-DISP)
132 Mode d'emploi HandyStep® touch, HandyStep® touch S 997486
8.9 Réglages d’usine
Cette entrée du menu permet de réinitialiser l’appareil aux réglages d’usine.
AVIS
Réglages d’usine
Les réglages d’usine écrasent tous les réglages effectués par l’utilisateur, aussi bien dans le menu des
réglages que dans tous les modes de travail disponibles. Cette opération ne peut pas être annulée!
8.10 Mise en/hors service de la reconnaissance de la pointe
Si vous ne travaillez pas avec des pointes BRAND ou avec des pointes compatibles, vous pouvez
désactiver la reconnaissance automatique de la pointe afin de parvenir plus rapidement au réglage du
volume.
8.11 Clavier
1
2
3
5
6 4
1Plage de valeurs disponibles
2Choix des unités
3Supprimer des caractères saisis individuels
4Saisir une virgule
5Rejeter une saisie
6Prendre en charge une saisie
Effectuer la saisie de valeur (par ex. volume) dans les diffé-
rents modes de travail avec un clavier. Les valeurs sont sai-
sies de gauche à droite, ainsi que la virgule. En fonction de la
plage de valeurs disponibles et de l’intervalle STEP possible,
il est possible de saisir jusqu’à 3 chiffres après la virgule, sa-
chant que des valeurs inférieures ou supérieures à la plage
de valeur indiquée ne pourront pas être prises en charge.
9 Multi-dosage (MULTI-DISP)
Pour le fonctionnement du mode, voir Aperçu des modes,p.123. Pour le réglage du volume, de la vi-
tesse et des autres pas de restants dans tous les modes, voir Commande,p.124.

Français
9 Multi-dosage (MULTI-DISP)
HandyStep® touch, HandyStep® touch S 997486 Mode d'emploi 133
9.1 Aspiration de liquide
Prérequis:
>Le volume STEP a été réglé par le bouton.
a. Tenir la pointe à la verticale dans le récipient.
b. Pendant l'aspiration, s'assurer que l'ouverture de la
pointe soit toujours recouverte de liquide, pour éviter la
formation de bulles d'air dans la pointe.
c. Appuyer sur la touche STEP.
ðL'appareil aspire le liquide jusqu'à ce que le volume ré-
glé ou le volume nominal soit atteint.
L'icône indique le nombre de STEPS possible.
L’icône indique le volume disponible.
9.2 Interruption et poursuite de l'aspiration de liquide
9.2.1 Interrompre l'aspiration de liquide
a. Appuyer brièvement sur la touche STEP pour interrompre l'aspiration de liquide.
9.2.2 Poursuivre l'aspiration de liquide
a. Effleurer le bouton .
b. Appuyer brièvement 2 x sur la touche STEP.
ðL'appareil aspire du liquide.
9.3 Dosage de liquide
Prérequis:
>Dosage du volume ou des STEPS individuels, voir Do-
sage du volume ou des STEPS individuels,p.128.
a. Après avoir appuyé sur la touche STEP, le nombre de
STEPS à doser diminue( ).
9.4 Comportement avec le volume restant
Pour ce qui est du comportement avec le volume restant, voir Commutation pour le vidage,p.128 et
Aspiration de liquide,p.127.

10 Auto-dosage (AUTO-DISP)
134 Mode d'emploi HandyStep® touch, HandyStep® touch S 997486
9.5 Présélection du nombre de STEPS
1
2
3
1Activer/ désactiver la présélection STEP.
2Ouvrir la présélection STEP.
3Présélectionner les STEPS.
Vous pouvez présélectionner un nombre de STEPS. Le
nombre de STEPS présélectionnables dépend du volume de
la pointe utilisée et du volume réglé. Si vous augmentez un
volume STEP, le nombre de STEPS présélectionnables baisse
et inversement.
Présélection du nombre de STEPS
a. Effleurer le bouton .
b. Tirer le nombre souhaité dans le champ blanc.
c. Confirmer le choix effectué avec .
ðLa présélection STEP est active.
Si vous aspirez maintenant du liquide, le volume aspiré cor-
respond à la présélection. Si la pointe contient plus de li-
quide que la présélection, vous pouvez poursuivre le travail
après le dosage des STEPS présélectionnés ou rejeter le vo-
lume.
9.6 Options
a. En mode de travail, effleurer le symbole .
ðLe menu des options apparaît.
Option Signification
Ajouter aux favoris Ajouter les réglages effectués aux favoris. Vous pouvez à nouveau
appeler ceux-ci par le menu principal > Favoris.
Spécification du nombre de
STEPS
Présélection du nombre de STEPS.
Aller à Auto-Disp Passer en mode Auto-Disp. Le volume réglé en mode Multi-Disp
est également réglé en mode Auto-Disp.
Aide pour le mode de travail Insère l'aide pour le mode.
10 Auto-dosage (AUTO-DISP)
Pour le fonctionnement du mode, voir Aperçu des modes,p.123. Pour le réglage du volume, de la vi-
tesse et des autres pas de restants dans tous les modes, voir Commande,p.124.

Français
10 Auto-dosage (AUTO-DISP)
HandyStep® touch, HandyStep® touch S 997486 Mode d'emploi 135
10.1 Dosage automatique de liquide
Prérequis:
>Vous avez réglé le temps de pause (un intervalle entre les dosages de liquide) de façon manuelle
ou automatique.
>La pointe est remplie de liquide.
a. Maintenir la touche STEP enfoncée.
ðDu liquide est dosé aussi longtemps que la touche STEP est maintenue enfoncée ou aussi long-
temps que la pointe contient encore suffisamment de liquide.
ðPendant le dosage de liquide, le temps de pause est compté à rebours sur l'écran tactile.
ðLes STEPS restants sont indiqués sur l'écran tactile.
10.2 Optimisation de la durée du dosage
La durée du dosage de liquide se compose de l'intervalle de dosage que vous avez défini et de la vi-
tesse de dosage. Pour optimiser le dosage de liquide, adaptez les deux paramètres.
•Pour ce qui est de la vitesse de dosage, voir Réglage de la vitesse d'aspiration et de do-
sage,p.129.
•Intervalle de dosage, voir Réglage manuel du temps de pause,p.135.
10.3 Réglage manuel du temps de pause
a. Effleurer le bouton .
b. Régler le temps de pause.
c. Confirmer le réglage avec .
ðLe temps de pause est réglé. Si vous maintenez la
touche STEP enfoncée lors du prochain dosage de li-
quide, le liquide est dosé après expiration du temps de
pause.
En alternative, vous pouvez également utiliser la Fonction
d’apprentissage.
10.4 Réglage automatique du temps de pause (fonction d’apprentissage)
Avec la fonction d’apprentissage, l'appareil détermine à partir des temps de pause une moyenne com-
prise entre 3 ou plus de dosages de liquide. Si l'utilisateur maintien la touche STEP après l'achève-
ment de la fonction d’apprentissage, l'appareil dose automatiquement du liquide après expiration du
temps de pause déterminé. Ainsi, des tâches de dosage répétitives peuvent être facilement maîtrisées
par l'utilisateur. Le réglage du temps de pause se fait aussi plus facilement car le temps de pause est
déterminé pour la tâche de dosage actuelle.

10 Auto-dosage (AUTO-DISP)
136 Mode d'emploi HandyStep® touch, HandyStep® touch S 997486
10.4.1 Exécuter la fonction d’apprentissage
a.
c.
Prérequis:
>Vous avez déjà rempli la pointe.
a. Effleurer le bouton .
ðLa fonction d’apprentissage est active. Cela est affiché
avec le symbole … .
b. Dosez au moins 3 x du liquide en appuyant brièvement
sur la touche STEP.
ðVous pouvez doser du liquide directement avec la
touche STEP maintenue enfoncée. Le temps de pause
change tant que la fonction d’apprentissage n’est pas
quittée.
c. Quittez la fonction d’apprentissage en effleurant le bou-
ton … .
ðLa moyenne de temps apparaît ensuite à côté du sym-
bole .
Vous pouvez également enregistrer le temps de pause pro-
grammé dans les favoris.
10.4.2 Accès alternatif à la fonction d’apprentissage
a. Appeler les options avec le bouton .
b. Faire passer le commutateur coulissant sur la droite.
c. Retourner au menu de travail avec le bouton .
ðLa fonction d’apprentissage active est affichée avec le symbole … .
10.4.3 Redémarrer la fonction d’apprentissage
Si vous constatez pendant le travail que le temps de pause est trop long ou trop court, vous pouvez re-
lancer la fonction d’apprentissage. En alternative, vous pouvez aussi adapter manuellement le temps
de pause.
10.4.4 Raccourcir ou quitter la fonction d’apprentissage
Un compte à rebours de 10 secondes commence lorsque la touche STEP est enfoncée pour la pre-
mière fois. Après son expiration, la Fonction didactique est automatiquement quittée.
•Effleurer le bouton X pour quitter préalablement la fonction d’apprentissage.
•Pour quitter la fonction d’apprentissage après avoir dosé le liquide avec la touche STEP mainte-
nue enfoncée, effleurer le bouton … .
•Pour travailler directement avec le temps de pause déterminé, maintenir la touche STEP enfon-
cée.

Français
11 Pipetage (PIP)
HandyStep® touch, HandyStep® touch S 997486 Mode d'emploi 137
10.5 Comportement avec le volume restant
Pour ce qui est du comportement avec le volume restant, voir Commutation pour le vidage,p.128 et
Aspiration de liquide,p.127.
10.6 Options
a. En mode de travail, effleurer le symbole .
ðLe menu des options apparaît.
Option Signification
Ajouter aux favoris Modifier le temps entre les différents pas de dosage.
Programmer le temps de
pause
Démarrez la fonction d’apprentissage.
Aller à Multi-Disp Passer en mode de travail Multi-Disp. Le volume réglé en mode Auto-
Disp est également réglé en mode Multi-Disp.
Aide pour le mode de travail Insère l'aide pour le mode.
11 Pipetage (PIP)
Pour le fonctionnement du mode, voir Aperçu des modes,p.123. Pour le réglage du volume, de la vi-
tesse et des autres pas de restants dans tous les modes, voir Commande,p.124.
11.1 Régler le volume
Prérequis:
>Le mode de travail a été sélectionné.
a. Effleurer le bouton .
b. Régler le volume.
11.2 Remplissage de la pointe
Prérequis:
>Le volume est réglé.
>Le message «STEP pour remplir» apparaît à l'écran tac-
tile.
a. Tenir la pointe à la verticale dans le récipient. Pendant
l'aspiration, s'assurer que l'ouverture de la pointe soit
toujours recouverte de liquide, pour éviter la formation
de bulles d'air dans la pointe.
b. Appuyer sur la touche STEP.
ðLa pointe est remplie jusqu'à ce que le volume STEP ré-
glé ou le volume nominal de la pointe soit atteint.

12 Dosage séquentiel (SEQ-DISP)
138 Mode d'emploi HandyStep® touch, HandyStep® touch S 997486
Appuyer sur la touche STEP pour stopper le remplissage.
11.3 Dosage de liquide et arrêt du dosage de liquide
a. Appuyer sur la touche STEP.
ðLa pointe est vidée.
Pour interrompre le dosage de liquide, effleurer le bouton X.
11.4 Comportement avec le volume restant
Pour ce qui est du comportement avec le volume restant, voir Commutation pour le vidage,p.128 et
Dosage de liquide,p.128.
11.5 Options
a. En mode de travail, effleurer le symbole .
ðLe menu des options apparaît.
Option Signification
Ajouter aux favoris. Ajoute les réglages sélectionnés au menu des favoris. Vous pouvez
à nouveau appeler les réglages par le menu principal > Favoris.
Mode de travail Insère l'aide pour le mode.
12 Dosage séquentiel (SEQ-DISP)
Pour le fonctionnement du mode, voir Aperçu des modes,p.123. Pour le réglage du volume, de la vi-
tesse et des autres pas de restants dans tous les modes, voir Commande,p.124.
12.1 Dosage séquentiel en détails
2
4
5
6
7
1
3
1Volume totalisé de la liste des aliquotes.
2STEP qui a auparavant été dosé.
3STEP qui est dosé maintenant.
4STEP qui sera dosé ensuite.
5Numéro du prochain STEP qui sera dosé.
6Nombre de STEPS que vous avez prévus dans la liste des
aliquotes.
7Volume se trouvant dans la pointe.

Français
12 Dosage séquentiel (SEQ-DISP)
HandyStep® touch, HandyStep® touch S 997486 Mode d'emploi 139
En mode de travail Dosage séquentiel, vous dosez une succession définie de volumes différents ou
identiques d'un liquide. Ces volumes sont appelés aliquotes et sont définis par la liste d'aliquotes (1 à
10 aliquotes). En mode Travail, vous voyez jusqu'à 3 inscriptions de la liste des aliquotes. Ces inscrip-
tions sont signalées par une double croix (#), à savoir l'inscription précédente, celle qui est actuelle et
la prochaine. Lorsqu'une aliquote est dosée, l'affichage descend dans la liste (1, #2, #1, 2, #3
#2, 3, #4 ... #10). Le dosage peut uniquement avoir lieu si un volume suffisant a été aspiré.
Si le total des aliquotes dépasse le volume de la pointe, vous pouvez à nouveau aspirer du liquide puis
continuer ensuite le dosage.
Si le total des aliquotes dépasse le volume de la pointe, la quantité de liquide aspirée est alors égale à
ce qui est nécessaire pour la liste des aliquotes entrée.
Si vous interrompez une aliquote (bouton X à l'écran), cette aliquote est comptée comme non dosée.
Un message d'événement est alors généré. Le programme passe à la prochaine aliquote dans la liste.
Si la pointe ne contient pas suffisamment de liquide à la fin de l'aliquotage, l'appareil aspire la quanti-
té de liquide nécessaire pour compléter l'aliquotage.
La liste des aliquotes ne peut plus être modifiée dès que la première aliquote a été dosée. Vous pou-
vez traiter à nouveau la liste des aliquotes uniquement lorsque le dosage a été achevée.
12.2 Création de la liste des aliquotes
Vous pouvez créer 1 à 10 aliquotes.
Prérequis:
>Vous vous trouvez en mode de travail.
a. Effleurer le bouton .
ðLa liste des aliquotes apparaît.
b. Effleurer le symbole « +».
ðUne aliquote est ajoutée à la liste.
12.3 Édition de la liste des aliquotes
a. Effleurer une inscription de la liste.
ðLe menu de contexte apparaît.
Traiter Traiter l'inscription de la liste sélectionnée.
Commande comme pour Régler le vo-
lume,p.128.
Ajouter Insérer une inscription à la fin de la liste. La
valeur de l'inscription sur liste précédente est
préréglée comme valeur d'aliquote.
Insérer Insérer une inscription sur liste à la place de
l'inscription sur liste effleurée. L'inscription
sur liste est insérée au-dessus de l'inscription
sur liste effleurée. La valeur de l'inscription

13 Multi-aspiration (MULTI-ASP)
140 Mode d'emploi HandyStep® touch, HandyStep® touch S 997486
sur liste effleurée est préréglée comme valeur
d'aliquote. Cette valeur peut être modifiée
avec la fonction «Modifier».
Supprimer Supprimer l'inscription de la liste sélection-
née. Vous pouvez supprimer la liste jusqu'à
une inscription.
12.4 Dosage de liquide
Prérequis:
>Vous vous trouvez en mode de travail.
a. Appuyer sur la touche STEP.
ðLe volume de la première inscription sur la liste des aliquotes est dosé.
ðParallèlement, le prochain volume est sélectionné à partir de la liste des aliquotes. Ce volume se-
ra dosé lorsque vous actionnerez à nouveau la touche STEP.
12.5 Interruption et abandon de l'aliquotage
a. Effleurer le bouton ou .
ðL'aliquotage actuel est quitté.
12.6 Options
a. En mode de travail, effleurer le symbole .
ðLe menu des options apparaît.
Option Signification
«Modifier l’aliquote» Éditer la liste des aliquotes.
«Mode de travail» Insère l'aide pour le mode.
13 Multi-aspiration (MULTI-ASP)
Pour le fonctionnement du mode, voir Aperçu des modes,p.123. Pour le réglage du volume, de la vi-
tesse et des autres pas de restants dans tous les modes, voir Commande,p.124.

Français
13 Multi-aspiration (MULTI-ASP)
HandyStep® touch, HandyStep® touch S 997486 Mode d'emploi 141
13.1 Multi-aspiration en détails
5
1
2
3
4
1Passer au mode de remplissage. Le mode de remplis-
sage sélectionné est affiché à cet endroit.
2Volume réglé
3STEPS possibles
4Volume aspiré
5Commuter entre le dosage et l'aspiration de liquide.
Vous pouvez également procéder à la commutation
lorsque le volume nominal n'a pas été atteint. Vous
pouvez également poursuivre le remplissage de la
pointe après une interruption.
13.2 Préparation de l’aspiration de liquide
Prérequis:
>La pointe est vide et en dehors du liquide
a. Appuyer sur la touche STEP.
b. Le piston de la pointe se rend à la position de départ.
c. Sélectionner le mode de remplissage
d. Maintenir la touche STEP enfoncée.
ðLe liquide est aspiré.
13.3 Modes de remplissage
En mode de travail Multi-aspiration, vous aspirez le même liquide ou différents liquides avec la même
pointe. Vous disposez de 3 modes pour l’aspiration:
Mode de remplissage «Manuel»
En mode de remplissage «Manuel», vous commandez l'aspi-
ration du liquide par la touche STEP. Pendant que vous
maintenez la touche STEP enfoncée, vous aspirez du liquide.
L'aspiration de liquide s'arrête lorsque vous relâchez la
touche STEP ou lorsque le volume nominal est atteint.
Mode de remplissage «Volume STEP»
En mode de remplissage «Volume STEP», vous définissez le
volume STEP avant l'aspiration du liquide. Le volume réglé
est aspiré à chaque pression sur la touche STEP et ce, jusqu'à
ce que le volume nominal soit atteint.

13 Multi-aspiration (MULTI-ASP)
142 Mode d'emploi HandyStep® touch, HandyStep® touch S 997486
Mode de remplissage «Séquentiel»
En mode de remplissage «Séquentiel», vous commandez
l’aspiration de liquide avec une liste d’aliquotes (1 à 10 ali-
quotes). Plusieurs volumes qui sont aspirés successivement
dans ce mode de service peuvent être définis dans ce ta-
bleau. Le volume actuel est aspiré à chaque pression sur la
touche STEP. Le programme passe ensuite au prochain vo-
lume dans la liste des aliquotes et ce, jusqu'à ce que tous les
aliquotes préréglés aient été aspirés. En mode Travail, vous
voyez jusqu'à 3 inscriptions de la liste des aliquotes. Ces ins-
criptions sont signalées par une double croix (#), à savoir
l'inscription précédente, celle qui est actuelle et la pro-
chaine. Lorsqu'une aliquote est aspirée, l'affichage descend
dans la liste (1, #2, #1, 2, #3 #2, 3, #4 ... #10). L'appareil
passe automatiquement sur le dosage de liquide lorsque le
volume souhaité ou le volume nominal est atteint.
13.4 Dosage de liquide
Vous pouvez aller et venir entre l'aspiration et le dosage de liquide par le bouton et .
a. Effleurer le bouton .
ðLe message «Maintenir STEP pour le vidage» apparaît.
b. Pour doser du liquide, maintenez la touche STEP enfoncée.
Pour interrompre le dosage de liquide, effleurer le bouton X. Si la pointe est vide, le programme passe
à nouveau sur l'aspiration du liquide.
13.5 Création et édition d'une liste d'aliquotes pour l'aspiration de liquide
a. Sélectionner le mode de remplissage «Séquentiel».
b. Options > «Modifier l’aliquote» ou effleurer le #1 ... #10.
c. La création et la modification de la liste des aliquotes comme dans le mode de travail Dosage sé-
quentiel sont décrites dans Édition de la liste des aliquotes,p.139.
13.6 Changer de mode de travail
a. Effleurer le bouton .
b. Si la pointe est remplie, un message apparaît et demande si vous souhaitez changer le mode
avec la pointe remplie.
c. S’il ne reste qu’un fond de liquide, un message apparaît ensuite et demande si vous souhaitez
éjecter le liquide. Si vous confirmez le message, le liquide est rejeté.

Français
14 Titrage
HandyStep® touch, HandyStep® touch S 997486 Mode d'emploi 143
13.7 Options
a. En mode de travail, effleurer le symbole .
ðLe menu des options apparaît.
Option Signification
Modifier l’aliquote Éditer la liste des aliquotes.
Sélectionner le mode de remplissage Sélectionner le mode de remplissage.
Aide pour le mode de travail Insère l'aide pour le mode.
14 Titrage
Pour le fonctionnement du mode, voir Aperçu des modes,p.123. Pour le réglage du volume, de la vi-
tesse et des autres pas de restants dans tous les modes, voir Commande,p.124.
14.1 Titrage en détails
1
2
3
4
5
1Passer entre le mode de titrage «Manuel» et «Volume
STEP».
2Régler le volume STEP. C’est possible en mode de titrage
«Volume STEP».
3Volume déjà titré.
4Quantité restante dans la pointe.
5Rejet de la quantité restante ou aspiration de liquide.
En mode de travail Titrage, vous dosez du liquide (solution mesure) dans un autre liquide (échan-
tillon) par ex. pour observer comment la couleur vire. Pour cette activité, vous disposez de 2 modes de
titrage différents:
Mode de titrage «Manuel»
En mode de titrage «Manuel», vous commandez le dosage du liquide par la touche STEP. Pendant
que vous maintenez la touche STEP enfoncée, vous dosez du liquide. Le dosage de liquide s'arrête
lorsque vous relâchez la touche STEP ou lorsque le volume disponible dans la pointe a été dosé. À
chaque fois que la touche STEP est relâchée, la vitesse de dosage est réduite d’un niveau (niveau 8, ni-
veau 7, niveau 6 … niveau 1). Vous pouvez ainsi vous rapprocher plus facilement, par ex. d’un point de
changement de couleur.

14 Titrage
144 Mode d'emploi HandyStep® touch, HandyStep® touch S 997486
Mode de titrage «Volume STEP»
En mode de titrage STEP, vous définissez le volume STEP avant le dosage de liquide. Le volume réglé
est dosé à chaque fois que vous appuyez sur la touche STEP. Par ailleurs, la vitesse de dosage diminue
à chaque pression de la touche STEP.
Enregistrer le volume
Cette fonction vous permet d’enregistrer les derniers volumes réglés dans une liste. Si vous utilisez le
même réglage de volume pour le même titrage, vous pouvez vous rapprocher plus rapidement d’un
changement de couleur. Appeler la liste, voir Options,p.144.
14.2 Titrage
Ce qui suit explique l'utilisation du mode de travail par le virement de couleur d'une détermination de
pH à titre d'exemple. Vous pouvez commuter le mode de titrage par le bouton ou .
Prérequis:
>Vous avez besoin d'un récipient transparent, par ex. un
Erlenmeyer, ainsi que des liquides nécessaires pour la
détermination du pH.
a. Sélectionner le mode pour doser tout d'abord une
plus grande quantité de liquide. Le bouton vous
permet de sélectionner la vitesse de dosage.
b. Aspiration de liquide Tenir l'appareil à la verticale au-
dessus de l'Erlenmeyer.
c. Pour doser du liquide en continu, maintenir la touche
STEP enfoncée.
d. Observer la plongée de l'échantillon dans la solution
mesure. Si vous vous approchez du point de virement
de la couleur, passez au mode .
ðLe point de virement de couleur se distingue par la pre-
mière traînée de couleur dans l’échantillon.
e. Effleurer le bouton . Régler le volume souhaité.
f. Doser goutte à goutte la solution mesure en actionnant
brièvement la touche STEP jusqu’à atteindre le vire-
ment de couleur.
14.3 Options
a. En mode de travail, effleurer le symbole .
ðLe menu des options apparaît.
Option Signification
Ajouter aux favoris Ajouter les réglages effectués aux favoris. Vous pouvez à nouveau ap-
peler ceux-ci par le menu principal > Favoris.
Manuel/Volume STEP Commuter en mode Titrage
Afficher les derniers volumes Afficher le dernier volume titré.

Français
15 Favoris
HandyStep® touch, HandyStep® touch S 997486 Mode d'emploi 145
Option Signification
Aide pour le mode de travail Insère l'aide pour le mode.
Afficher les derniers volumes
La liste affiche les 5 derniers volumes que vous avez enregis-
trés. Les nouveaux volumes enregistrés sont ajoutés en haut,
les plus anciens sont supprimés.
15 Favoris
Par les favoris, vous enregistrez les réglages pour pouvoir les appeler à nouveau ultérieurement, par
ex. réglages du volume ou de la vitesse.
15.1 Favoris en détail
2
5
4
3
1
1. Le symbole des favoris indique le mode de travail de-
puis lequel le favori a été enregistré.
2. Ces lignes indiquent le nom du favori
3. Les valeurs indiquent les réglages enregistrés dans
les favoris.
4. Éjecter ou utiliser la pointe.
5. Afficher l’aide.
15.2 Créer des favoris
Prérequis:
>Vous avez ouvert un mode de travail.
a. Effleurer le bouton .
b. Sélectionner l’option «Ajouter aux favoris».
c. Attribuer un nom.
d. Effleurer le bouton .
ðLe favori est ajouté à la fin de la liste des favoris, dans le menu Favoris. Voir Favoris en dé-
tail,p.145.

16 Nettoyage et désinfection
146 Mode d'emploi HandyStep® touch, HandyStep® touch S 997486
15.3 Ouvrir les favoris
a. Vous vous trouvez dans le menu «Favoris».
b. Effleurer une entrée dans la liste des favoris et sélectionner «Ouvrir».
ðLes réglages sont ouverts dans le mode de travail correspondant.
Le réglage dans les favoris et le volume de la pointe ne correspondent pas
Chaque favori est valable pour un volume de pointe. Si vous ouvrez un favori et que la pointe installée
a un autre volume que celui enregistré en favori, il vous est demandé d’installer la pointe correcte.
Vous pouvez ensuite rejeter la pointe en place et installer une autre pointe.
15.4 Supprimer les favoris
Supprimer des favoris individuels
Prérequis:
>Vous vous trouvez dans le menu «Favoris».
a. Effleurer une entrée dans la liste des favoris et sélectionner «Supprimer».
b. Confirmer la question.
ðLe favori sélectionné sera supprimé.
Supprimer tous les favoris
Prérequis:
>Vous vous trouvez dans le menu «Favoris».
a. Effleurer une entrée dans la liste des favoris et sélectionner «Supprimer tout».
b. Confirmer la question.
ðLa liste des favoris sera supprimée.
16 Nettoyage et désinfection
16.1 Nettoyage
AVIS
L'appareil n'est pas autoclavable
L'appareil est calibré en nos usines et ne requiert pas d'entretien.
Si l'appareil présente des salissures, nettoyez-le à l'extérieur avec un chiffon humide. Utilisez en plus
de l'eau ou une solution savonneuse diluée. Évitez les nettoyants caustiques ou agressifs.
Ne pas démonter l'appareil.

Français
17 Dérangement - que faire?
HandyStep® touch, HandyStep® touch S 997486 Mode d'emploi 147
16.2 Désinfection aux UV
L'appareil résiste à la sollicitation habituelle que représente une lampe de désinfection aux UV. Un
changement de couleur est possible en raison de l'effet produit par les UV.
Recommandation pour la désinfection aux UV:
Spectre de lumière UV-C
Longueur d'onde 220 nm à 270 nm
Durée d'irradiation par cm2 et degré
d'inactivation envisagé
2 s à 300 s
17 Dérangement - que faire?
17.1 Comportement de l'appareil
Dysfonctionnement Cause possible Que faire?
Le cycle de chargement de
l'accu a considérablement rac-
courci.
L'accu est vieux ou endommagé. Remplacer l'accu.
L'appareil ne charge pas. L'accu ne peut pas être chargé
s'il est trop froid ou trop chaud.
Débrancher le connecteur de l'accu.
Chauffer l'accu à la température am-
biante ou le laisser refroidir.
Brancher le connecteur de l'accu.
Tenter de charger à nouveau l'appa-
reil.
La durée d'utilisation sans
branchement électrique s'est
extrêmement raccourcie.
L'accu est vieux ou endommagé. Remplacer l'accu.
Le bloc secteur devient extrê-
mement chaud lors du charge-
ment.
L'accu est vieux ou endommagé.
Le bloc secteur est endommagé.
Le câble USB est endommagé.
Remplacer l'élément concerné.
L'appareil ne charge pas. Le bloc secteur est endommagé.
Le câble USB est endommagé.
Le connecteur de l’accu a été
débranché.
Un câble de l'accu s'est rompu.
La distance entre l’appareil et le
support de chargement est trop
grande
Remplacer l'élément concerné.
Brancher le connecteur de l'accu.
Placer à nouveau l'appareil dans le
support de chargement.
L'écran est trop clair ou trop
foncé.
La luminosité de l'écran est dé-
réglée.
Adapter la luminosité, voir Affi-
chage,p.130
L’écran devient blanc lorsque
l’appareil est placé dans le
support de chargement.
L’appareil ne peut pas démarrer.
Le connecteur de l’accu a été
débranché.
Brancher le connecteur de l'accu.

17 Dérangement - que faire?
148 Mode d'emploi HandyStep® touch, HandyStep® touch S 997486
Dysfonctionnement Cause possible Que faire?
Aucune tonalité se fait en-
tendre lorsque l'appareil est
utilisé.
La sonnerie est hors service. Mettre la tonalité en service, voir
Sonnerie,p.130
L'écran tactile ne réagit plus. Le programme est tombé en
panne.
L’appareil démarre lorsque l'accu
est à nouveau en service après la
panne du programme et qu’il a été à
nouveau raccordé. Un message ap-
paraît alors comme quoi une pointe
peut encore se trouver dans l'appa-
reil. C'est pourquoi l'appareil doit
être accroché dans le support et un
récipient adéquat doit être mise en
place sous la pointe ou alors l'appa-
reil doit être tenu au-dessus d'un ré-
cipient adéquat lors du démarrage.
Remède:
Ouvrir le recouvrement, débrancher
le connecteur de l'accu, attendre 5 s
et le rebrancher. L'appareil démarre
si l'état de chargement de l'accu est
suffisant.
La pointe forme des gouttes. La pointe n'est pas étanche. Remplacer la pointe.
La pointe n'est pas reconnue. Le codage est endommagé
Pointe sans codage utilisée.
Éjecter la pointe et mettre une
pointe neuve en place.
Utiliser une pointe neuve ou codée.
Des interférences (CEM) se
produisent à proximité directe
du support de chargement.
Ces interférences sont impro-
bables car la puissance trans-
férée est faible.
Le support de chargement émet
des interférences pendant le
chargement.
Augmenter la distance entre l’appa-
reil perturbé et le support de char-
gement.
Placer à nouveau l'appareil dans le
support de chargement.
Veiller à ce qu’aucun corps étranger
ne se trouve entre le support de
chargement et l’appareil.
17.2 Messages du système
Exemple: L'appareil signale par des messages du système que cer-
taines phases du programme ont été raccourcies. Les mes-
sages du système informent l'utilisateur sur les possibilités
qui existent pour poursuivre la commande.

Français
18 Contrôle du volume
HandyStep® touch, HandyStep® touch S 997486 Mode d'emploi 149
17.3 Messages d'événements sur l'écran
L'appareil signale, par des messages d'événements, que l'appareil est passé dans un autre état que
celui qui était prévu. Les messages d'événements informent l'utilisateur sur les possibilités qui
existent pour poursuivre la commande.
En cas de message d'événement «Remarque», vous pouvez continuer à travailler avec l'appareil. Ces
messages d'événements signalent que l'appareil n'a pas pu effectuer une tâche comme prévu dans le
programme. Exemple: L'accu est trop faible.
Dans le cas du message d'événement «Erreur», un problème technique s’est produit. Si ce message
d'événement apparaît après un nouveau démarrage et au cours de la même activité, la précision et le
fonctionnement correct de l'appareil ne peuvent plus être garantis. Exemple: Le moteur est bloqué.
Si les mêmes messages d'événements apparaissent sans cesse, veuillez prendre contact avec BRAND.
18 Contrôle du volume
18.1 Instructions de contrôle (SOP)
https://www.brand.de/sop
Pour de plus amples informations sur calibrages, voir Cali-
brage,p.150.
18.2 Contrôle de l'étanchéité de la pointe DD
a. Mettre en place une nouvelle pointe DD.
ðLa pointe DD est automatiquement reconnue ou, en cas de pointes de dosage compatibles, sé-
lectionnez le volume.
b. Modification du volume à doser.
c. Remplissage de la pointe DD.
d. Plonger la pointe DD dans le liquide à contrôler. Le liquide doit être aspiré de façon régulière. Te-
nir l'appareil pendant env. 10 s à la verticale, dirigé vers le bas: Si une goutte se forme, respecter
alors les remarques du tableau suivant.
La pointe n'est pas reconnue Pas de codage ou codage en-
dommagé ou pointe non cor-
rectement mise en place
Mettre en place une nouvelle
pointe ou remettre la pointe
en place, sélectionner le vo-
lume
La pointe goutte La pointe n'est pas étanche Utiliser une nouvelle pointe.

19 Calibrage
150 Mode d'emploi HandyStep® touch, HandyStep® touch S 997486
19 Calibrage
Si le contrôle de l'étanchéité (voir Contrôle du volume,p.149) a été terminé avec succès, il peut être
déterminé par mesure gravimétrique si l'appareil est dans les limites définies par ISO 8655. Le procé-
dé de contrôle nécessaire à cette fin est décrit dans les instructions de contrôle (SOP).
20 Caractéristiques techniques
20.1 Tableau des précisions
Les mesures ont été effectuées avec une pointe DD II de BRAND.
De l'eau distillée a été utilisée comme liquide.
Le volume nominal est le volume maximal imprimé sur la pointe DD.
Les tolérances définies dans ISO 8655 ne sont pas dépassées.
Exactitude E* ≤ ± % Coefficient de variation CV
≤ %
Volume nominal Volume nominal
Pointe
DD
Plage de vo-
lume
Subdivi-
sion
100% 50% 10
%
1
%
100% 50
%
10
%
1%
0,1ml 1 µl ... 100 µl 0,1 µl 1,0 1,0 1,6 8,0 0,5 1,0 2,0 12,0
0,5ml 5 µl ... 500 µl 0,1 µl 0,9 0,9 1,0 5,0 0,3 0,6 1,0 5,0
1ml 10 µl ...1 ml 1,0 µl 0,6 0,9 1,0 5,0 0,3 0,5 0,8 4,0
1,25ml 12,5 µl ... 1,25ml 0,5 µl 0,6 0,6 0,9 5,0 0,15 0,5 0,7 4,0
2,5ml 25 µl ... 2,5ml 1,0 µl 0,5 0,6 0,7 3,5 0,15 0,3 0,6 3,0
5ml 50 µl ... 5ml 1,0 µl 0,5 0,5 0,7 3,5 0,15 0,4 0,7 3,0
10ml 100 µl ... 10ml 10 µl 0,4 0,5 0,7 3,5 0,15 0,5 0,8 4,0
12,5ml 125 µl ... 12,5ml 5,0 µl 0,5 0,5 0,8 3,5 0,15 0,6 1,4 6,5
25ml 250 µl ... 25ml 10 µl 0,5 0,5 0,6 3,0 0,15 0,3 1,0 6,0
50ml 500 µl ... 50ml 10 µl 0,5 0,5 0,5 3,0 0,15 0,4 1,2 9,0
20.2 Limites d’emploi
Domaine d'utilisation *) 15 °C à 40 °C
(59 °F à 104 °F)
Pression de vapeur jusqu'à 500 mbar
Viscosité 20 mPa s pour pointe DD à 50 ml
260 mPa s pour pointe DD à 5 ml
977 mPa s pour pointe DD à 1,25 ml
*) Autres températures sur demande

Français
20 Caractéristiques techniques
HandyStep® touch, HandyStep® touch S 997486 Mode d'emploi 151
20.3 Matériaux utilisés
Appareil PC/PBT, PP, silicone, verre, PEEK
Pointe/Piston PE/PP (taille 0,1 mm LCP/PP)
20.4 Accu
Type Accu ions-lithium
Capacité 1650 mAh
Tension 3,7 V
Puissance 6,11 Wh
Entreposage 0 °C à 35 °C
Temps de charge-
ment
env. 6 h, en fonction de la charge par le bloc secteur ou le support de charge-
ment.
Poids 40 g
20.5 Support de chargement
Entrée DC 5,0 V 1,4 A, 7,0 W
Transmission 3,5 W, 110 kHz ... 205 kHz
20.6 Bloc d’alimentation universel
Entrée AC 100 à 240 V ~ 50 Hz/60 Hz, 0,5 A
Sortie DC 5,0 V 1,4 A, 7,0 W
20.7 Marquages sur le produit et l'accu
Marquage Signification
Avec ce symbole, nous confirmons que le produit est conforme aux exigences
spécifiées dans les directives CE et a été soumis aux procédures de test spéci-
fiées.Avec ce symbole, nous confirmons que le produit est conforme aux exi-
gences spécifiées dans les directives CE et a été soumis aux procédures de test
spécifiées.
UKCA: United Kingdom Conformity Assessed
Avec cette marque, nous confirmons que le produit est conforme aux exi-
gences définies dans les UK Designated Standards.
DE-M 21
L’appareil est conforme à la loi d’étalonnage et de mesure allemande ainsi que
l’ordonnance d’étalonnage et de mesure.

21 Informations de commande
152 Mode d'emploi HandyStep® touch, HandyStep® touch S 997486
Marquage Signification
Mention DE-M (DE pour Allemagne), encadrée par un rectangle, ainsi que les
deux derniers chiffres de l’année au cours de laquelle le marquage a été appo-
sé (ici : 2021).
XXFFFFF Numéro de série
Respectez les instructions données sur l'appareil, les accessoires et dans le
mode d'emploi.
Lire le mode d’emploi.
L'appareil ou l'accu doit être évacué dans les règles de l'art
(ici : 40 ans)
La directive RoHS chinoise (EFUP)
EFUP définit la période en années pendant laquelle les substances dange-
reuses contenues dans les équipements électriques et électroniques ne fuient
pas ou ne se modifient pas dans des conditions de fonctionnement normales.
Dans des conditions normales d'utilisation par l'utilisateur, ces produits élec-
triques et électroniques ne provoquent pas de pollution grave de l'environne-
ment, de blessures graves ou de dommages aux biens de l'utilisateur
Tension DC
~ Tension alternative
Uniquement adapté aux pièces intérieures
Appareil protégé partout par une double isolation ou une isolation renforcée.
L'appareil électrique ne doit pas être jeté avec les ordures ménagères.
2ATKA-HST7052X0
2ATKA-HSTC705220
Numéro de certification USA FCC
IC: 25139-
HSTC705220
HVIN: HW_HSTC01.00
Numéro de certification Canada ISED
21 Informations de commande

Français
21 Informations de commande
HandyStep® touch, HandyStep® touch S 997486 Mode d'emploi 153
https://shop.brand.de/en/
21.1 Appareils
Désignation Illustration Numéro de commande
HandyStep® touch, support universel,
bloc d’alimentation universel, adapta-
teur pays, accu ions-lithium
705200
HandyStep® touch S, support universel,
bloc d’alimentation universel, adapta-
teur pays, accu ions-lithium
705210
21.2 Accessoires
Désignation Illustration Numéro de commande
Supports de chargement mondial (sauf Inde) 705220
Supports de chargement (Inde) 705223
Support de maintien 705230
Accu aux ions de lithium pour HandyStep®
touch et HandyStep® touch S
705225
Support universel pour HandyStep® touch et
HandyStep® touch S
705235

21 Informations de commande
154 Mode d'emploi HandyStep® touch, HandyStep® touch S 997486
Désignation Illustration Numéro de commande
Bloc d’alimentation universel p. HandyStep®
touch et HandyStep® touch S avec câble de
chargement et adaptateur de pays
705250
Bundle HandyStep® touch avec support de
chargement mondial (sauf Inde)
705201
Bundle HandyStep® touch S avec support de
chargement mondial (sauf Inde)
705211
Bundle HandyStep® touch avec support de
chargement pour l’Inde
705203
Bundle HandyStep® touch S avec support de
chargement pour l’Inde
705213
21.3 Consommables
21.3.1 Pointes DD II (Präzisions-Dispenser- Tips II)
Les pointes codées sont automatiquement reconnues par l'appareil.
Volume [ml] N° de commande Unité d’emb.
[pièce]
N° de commande
BIO-CERT® LI-
QUID HANDLING
STERILE
Unité d’emb.
[pièce]
0,1 705700 100 705730 100
0,5 705702 100 705732 100
1 705704 100 705734 100
1,25 705706 100 705736 100
2,5 705708 100 705738 100
5 705710 100 705740 100
10 705712 100 705742 100
12,5 705714 100 705744 100
25 705716 25+1Adaptateur 705746 25+1Adaptateur
50 705718 50+1Adaptateur 705748 25+1Adaptateur
Set de pointes DD II
0,5 ml ... 12,5ml
705720 20 — —
21.3.2 Adaptateur pour pointes DD II 25 ml et 50 ml
Volume [ml] N° de commande Unité d’emballage Caractéristique
25 ml et 50 ml 702398 10
25 ml et 50 ml 702399 5 BIO-CERT® LIQUID
HANDLING STERILE

Français
22 Réparation
HandyStep® touch, HandyStep® touch S 997486 Mode d'emploi 155
22 Réparation
22.1 Retour pour réparation
AVIS
Transporter des substances dangereuses sans autorisation est interdit par la loi.
Nettoyez et décontaminez soigneusement l’appareil!
•Renvoyer l’appareil, de principe joindre une description précise du type de dysfonctionnement
et des fluides utilisés. Si les liquides utilisés ne sont pas indiqués, l’appareil ne pourra pas être ré-
paré.
•Envoyez l’appareil exclusivement sans accu ou batterie.
•Tout retour est aux périls et aux frais de l’expéditeur.
En dehors des États-Unis et du Canada
Remplir «l’Attestation de Décontamination» et la retourner avec l’appareil au fabricant ou au reven-
deur. Demander le formulaire au fournisseur ou au fabricant ou bien en téléchargement gratuit sous
www.brand.de.
Aux États-Unis et au Canada:
Merci de contacter BrandTech Scientific, Inc. pour demander les conditions de retour de l’appareil
avant de le renvoyer au service après-vente.
Renvoyer uniquement des appareils nettoyés et décontaminés à l’adresse reçue avec le numéro de re-
tour. Le numéro de retour doit être apposé à l’extérieur du colis de façon bien visible.
Adresses de contact
Allemagne:
BRAND GMBH + CO KG
Otto-Schott-Straße 25
97877 Wertheim (Germany)
T +49 9342 808 0
F +49 9342 808 98000
www.brand.de
États-Unis et Canada:
BrandTech® Scientific, Inc.
11 Bokum Road
Essex, CT 06426-1506 (USA)
T +1- 860- 767 2562
F +1- 860- 767 2563
www.brandtech.com
Inde:
BRAND Scientific Equipment Pvt. Ltd.
303, 3rd Floor, ‘C‘ Wing, Delphi
Hiranandani Business Park,
Powai
Chine:
BRAND (Shanghai) Trading Co., Ltd.
Guangqi Culture Plaza
Room 506, Building B
No. 2899, Xietu Road

23 Service de calibrage
156 Mode d'emploi HandyStep® touch, HandyStep® touch S 997486
Mumbai–400 076 (Inde)
T +91 22 42957790
F +91 22 42957791
www.brand.co.in
Shanghai 200030 (P.R. China)
T +86 21 6422 2318
F +86 21 6422 2268
www.brand.cn.com
23 Service de calibrage
Les normes ISO 9001 et les directives BPL exigent des contrôles réguliers de vos appareils de volumé-
trie. Nous recommandons de contrôler les volumes tous les 3 à 12 mois. Les intervalles dépendent des
exigences individuelles de l’appareil. Plus l'appareil est utilisé et plus les produits sont agressifs, plus
les contrôles doivent être fréquents.
Les instructions de contrôle détaillées peuvent être téléchargées sur www.brand.de ou www.brand-
tech.com.
BRAND vous offre également la possibilité de faire calibrer vos instruments par notre service de cali-
bration ou par le laboratoire de calibration BRAND-DAkkS. Envoyez-nous simplement les appareils à
calibrer et indiquez quelle sorte de calibration vous désirez. Vous recevrez vos appareils quelques
jours plus tard avec un rapport de calibration (calibration d'usine) ou avec une attestation de calibra-
tion DAkkS. Pour plus d'informations, veuillez vous renseigner auprès de votre fournisseur ou directe-
ment chez BRAND. Le document de commande peut être téléchargé sur www.brand.de (voir Docu-
ments Techniques).
24 Informations sur votre appareil de laboratoire
Le service en ligne MyProduct(https://www.brand.de/myproduct) propose des certificats de qualité,
des accessoires et de la documentation technique pour votre appareil de laboratoire HandyStep®
touch. En entrant le numéro de série et le numéro d'article, vous obtiendrez des informations sur
votre appareil individuel.
Vous continuez à trouver un code Data Matrix sur l'appareil. Scannez-le avec une application de lec-
ture courante pour accéder aux informations mentionnées via l'URL https://www.brand.de/mypro-
duct.
25 Responsabilité pour défauts
Nous déclinons toute responsabilité en cas de conséquences d'un traitement, d'une utilisation, d'un
entretien et d'une manipulation incorrects, d'une réparation non autorisée de l'appareil ou d'une
usure normale, notamment des pièces d'usure, telles que les pistons, les joints d'étanchéité, les sou-
papes, et de rupture de pièces en verre. Ceci vaut pour le non-respect du mode d'emploi. Nous décli-
nons toute responsabilité en cas de dommages résultant d'actions non décrites dans le mode d'em-
ploi ou si des pièces détachées ou des accessoires autres que ceux d'origine ont été utilisés.
États-Unis et Canada:
Vous trouverez des informations sur la responsabilité en cas de vices sous www.brandtech.com.

Français
26 Évacuation
HandyStep® touch, HandyStep® touch S 997486 Mode d'emploi 157
26 Évacuation
Le symbole ci-contre signifie que les piles/accus ainsi que les
appareils électroniques qui ont atteint la fin de leur durée de
vie doivent être éliminés séparément des déchets domes-
tiques (déchets d'agglomération non triés).
Les appareils électroniques doivent être correctement évacués selon la directive 2012/19/UE du Parle-
ment européen et du Conseil du 04 juillet 2012 sur les appareils électriques et électroniques usés
conformément aux prescriptions d'évacuation nationales.
Les piles et les accus contiennent des substances qui peuvent avoir des répercussions nocives sur
l'environnement et sur la santé des êtres humains. Ils doivent donc être correctement évacués selon
la directive 2006/66/CE du Parlement européen et du Conseil du 6 septembre 2006 sur les batteries et
les accumulateurs conformément aux prescriptions d'évacuation nationales. N'éliminer que des piles
et des accus complètement déchargés.
Sous réserve de modifications, d'erreurs et d'erreurs d'impression.
26.1 Évacuation de l'accu
AVERTISSEMENT
Possible risque d'une explosion et d'un incendie en raison d'un accu surchauffé!
Ne pas court-circuiter un accu pour le décharger.
•Entourez le connecteur d'un ruban adhésif pour éviter des courts-circuits au moment de l'élimi-
nation.
•Ne démontez en aucun cas l'accu.

158 Instrucciones de manejo HandyStep® touch, HandyStep® touch S 997486
Índice
1 Contenido de la entrega .......................160
2 Información general sobre las instruc-
ciones de uso.......................................160
2.1 Niveles de riesgo ..............................160
2.2 Símbolos...........................................160
2.3 Visualización.....................................161
3 Disposiciones de seguridad ..................161
3.1 Disposiciones generales de seguri-
dad ....................................................161
3.2 Batería ..............................................162
3.3 Carga inductiva ................................162
3.4 Pantalla táctil ...................................162
3.5 Límites de empleo............................162
3.6 Condiciones de empleo ...................163
3.7 Materiales utilizados........................163
3.8 Transporte y almacenamiento........163
4 Uso previsto........................................164
5 Elementos de mando y ejecución de fun-
ciones.................................................164
5.1 Botón STEP.......................................165
5.2 Botón de encendido.........................165
5.3 Batería ..............................................166
5.4 Elementos de mando.......................168
5.5 Fuente de alimentación y adapta-
dor para países.................................168
5.6 Soporte del equipo ..........................169
5.7 Soporte de carga (accesorio)...........170
5.8 Soporte (accesorio)..........................171
5.9 Estructura de la pantalla táctil (zo-
na de trabajo) ...................................171
5.10 Puntas PDII (puntas de dosificado-
res de alta precisión II).....................171
5.11 Adaptador para puntas PD II de
25ml y 50ml.....................................172
6 Síntesis de modos operativos ...............172
7 Funcionamiento ..................................173
7.1 Encendido del equipo......................174
7.2 Apagado del equipo.........................174
7.3 Apertura de modo de trabajo ..........174
7.4 Cierre de modo de trabajo...............175
7.5 Acceso al menú de ayuda de la pan-
talla ...................................................175
7.6 Colocación de puntas ......................175
7.7 Eliminación de punta ........................176
7.8 Aspiración de líquido ........................176
7.9 Dosificación de líquido......................178
7.10 Configuración del volumen...............178
7.11 Configuración de velocidad de as-
piración y dosificación ......................179
8 Ajustes.................................................179
8.1 Idioma................................................179
8.2 Equipo................................................179
8.3 Fecha / Hora.......................................180
8.4 Pantalla..............................................180
8.5 Sonido................................................180
8.6 Información .......................................180
8.7 Indicaciones regulatorias..................180
8.8 Calibrado ...........................................181
8.9 Ajustes de fábrica ..............................181
8.10 Encendido/apagado del reconoci-
miento de puntas ..............................181
8.11 Teclado ..............................................182
9 Dosificación múltiple (MULTI-DISP)........182
9.1 Aspiración de líquido ........................182
9.2 Interrupción y continuación de la
aspiración de líquido.........................182
9.3 Dosificación de líquido......................183
9.4 Manejo de volúmenes residuales .....183
9.5 Configuración previa del número
de STEP ..............................................183
9.6 Opciones............................................184
10 Dosificación automática (AUTO-DISP) ...184
10.1 Dosificación automática de líquido..184
10.2 Optimización del tiempo de dosifi-
cación.................................................184
10.3 Configuración manual del tiempo
de espera ...........................................185
10.4 Configuración automática del tiem-
po de espera (función de aprendi-
zaje)....................................................185
10.5 Manejo de volúmenes residuales .....186
10.6 Opciones............................................186
11 Pipeteo (PIP) ........................................186
11.1 Configuración del volumen...............187
11.2 Llenado de punta ..............................187
11.3 Dosificación de líquido y detención
de la dosificación de líquido.............187

Español
Índice
HandyStep® touch, HandyStep® touch S 997486 Instrucciones de manejo 159
11.4 Manejo de volúmenes residuales....187
11.5 Opciones...........................................187
12 Dosificación secuencial (SEQ-DISP) .......188
12.1 Detalles de la dosificación secuen-
cial.....................................................188
12.2 Crear lista de alícuotas ....................189
12.3 Editar lista de alícuotas ...................189
12.4 Dosificación de líquido ....................189
12.5 Interrupción y cierre de alícuotas ...190
12.6 Opciones...........................................190
13 Aspiración múltiple (MULTI-ASP) ..........190
13.1 Detalles de la aspiración múltiple...190
13.2 Preparación de la aspiración de lí-
quido.................................................190
13.3 Modo de llenado...............................191
13.4 Dosificación de líquido ....................191
13.5 Creación y edición de lista de alí-
cuotas para aspirar líquido..............192
13.6 Cambiar modo de trabajo................192
13.7 Opciones...........................................192
14 Valoración ..........................................192
14.1 Detalles de la valoración..................192
14.2 Valoración.........................................193
14.3 Opciones...........................................194
15 Favoritos ............................................194
15.1 Detalles de favoritos ........................194
15.2 Crear favoritos..................................195
15.3 Abrir favoritos...................................195
15.4 Eliminar favoritos.............................195
16 Limpieza y desinfección .......................196
16.1 Limpieza ...........................................196
16.2 Esterilización UV...............................196
17 ¿Qué hacer en caso de averías? .............196
17.1 Funcionamiento del equipo ............196
17.2 Avisos del sistema ............................198
17.3 Avisos en la pantalla ........................198
18 Control de volumen .............................198
18.1 Procedimiento operativo estándar
(POE) .................................................198
18.2 Control de estanqueidad de la pun-
ta PD..................................................198
19 Calibrado............................................199
20 Datos técnicos ......................................199
20.1 Tabla de precisión.............................199
20.2 Límites de empleo.............................200
20.3 Materiales utilizados .........................200
20.4 Batería................................................200
20.5 Soporte de carga ...............................200
20.6 Fuente de alimentación universal....200
20.7 Símbolos informativos en el pro-
ducto y la batería...............................201
21 Información para pedidos......................202
21.1 Equipos ..............................................202
21.2 Accesorios..........................................202
21.3 Consumibles......................................203
22 Reparación...........................................204
22.1 Envíos para reparación .....................204
23 Servicio de calibración ..........................205
24 Información sobre su equipo de labora-
torio ....................................................206
25 Responsabilidad por defectos................206
26 Eliminación ..........................................206
26.1 Eliminación de la batería ..................206

160 Instrucciones de manejo HandyStep® touch, HandyStep® touch S 997486
1 Contenido de la entrega
Equipo HandyStep® touch
Cable USB
Fuente de alimentación universal
Abrazaderas para sujeción de estantes
5 puntas PD II de 12,5ml, 5ml, 2,5ml, 1,25ml y 0,5ml
Manual de instrucciones con declaración de conformidad
Certificado de calidad
Manual de instrucciones breve
2 Información general sobre las instrucciones de uso
•Leer con atención el manual de instrucciones antes de utilizar el producto por primera vez.
•El manual de instrucciones es parte del equipo y debe conservarse en un sitio de fácil acceso.
•Adjuntar el manual de instrucciones cuando se entregue este equipo a un tercero.
•En nuestro sitio web https://www.brand.de/es/, encontrará versiones actualizadas del manual
de instrucciones.
2.1 Niveles de riesgo
Las siguientes palabras de advertencia hacen referencia a posibles riesgos:
Palabra de advertencia Significado
PELIGRO Riesgo de lesiones graves o muerte.
ADVERTENCIA Posible riesgo de lesiones graves o muerte.
PRECAUCIÓN Posible riesgo de lesiones leves o moderadas.
NOTA Posible riesgo de daños materiales.
2.2 Símbolos
Símbolo Significado Símbolo Significado Símbolo Significado
Zona de riesgo Peligro biológico Advertencia por
riesgo de daños
materiales
Tensión eléctrica Materiales explosivos No desechar junto
con los residuos
domésticos
Superficie a alta tem-
peratura
Campos magnéticos Muestra una ac-
ción en la pantalla

Español
3 Disposiciones de seguridad
HandyStep® touch, HandyStep® touch S 997486 Instrucciones de manejo 161
2.3 Visualización
Viñeta Significado Viñeta Significado
1. Tarea Hace referencia a una tarea. > Hace referencia a un requisi-
to.
a., b., c. Hace referencia a cada uno de los
pasos para realizar una tarea.
Hace referencia a un resul-
tado.
3 Disposiciones de seguridad
3.1 Disposiciones generales de seguridad
¡Leer todo el manual con atención por favor!
El equipo de laboratorio HandyStep® touch puede utilizarse en combinación con materiales, procesos
de trabajo y aparatos riesgosos. No obstante, el manual de instrucciones no puede hacer referencia a
todas las cuestiones que, eventualmente, podrían afectar la seguridad. Forma parte de la responsabi-
lidad del usuario asegurar el cumplimiento de las normas de seguridad y sanitarias, y establecer los lí-
mites correspondientes antes de comenzar a utilizar el producto.
1. Todos los usuarios deben haber leído este manual de instrucciones antes de comenzar a utili-
zar el equipo y respetar sus disposiciones.
2. Observar las advertencias de peligro y las reglas de seguridad, como, porej., utilizar vestimen-
ta protectora, protección en los ojos y guantes de protección.
3. Al trabajar con muestras infecciosas o peligrosas, se deben respetar las normativas y precau-
ciones habituales.
4. Contemplar la información brindada por el fabricante de los reactivos utilizados.
5. No utilizar el equipo en atmósferas con riesgo de explosión.
6. No pipetear sustancias de alta inflamabilidad.
7. Utilizar el equipo solo para dosificar líquidos y exclusivamente dentro del marco de los límites
y las condiciones de empleo que se hayan definido. Respetar las condiciones de empleo, ver
Límites de empleo,p.200. En caso de dudas, será imprescindible contactar con el fabricante o
distribuidor.
8. Trabajar siempre de manera que no se generen riesgos para el usuario ni para otras personas.
Evitar salpicar. Utilizar solo recipientes adecuados.
9. Las puntas se bloquean automáticamente al colocarlas. Si se usa una punta que ya ha sido uti-
lizada, se debe asegurar que no contenga restos de líquidos.
10. Presionar el botón STEP del equipo solo cuando se pueda garantizar que el líquido dosificado
no generará riesgos.
11. Se debe evitar entrar en contacto con la abertura de la punta al trabajar con sustancias agresi-
vas.
12. No utilizar nunca la fuerza.
13. Emplear solo accesorios y piezas de repuesto originales. No realizar modificaciones técnicas.
El equipo no puede desarmarse.
14. Comprobar siempre que el equipo esté en buenas condiciones antes de utilizarlo. Si se detec-
tan fallas en el equipo, cesar la dosificación de inmediato y seguir las instrucciones del capítu-
lo ¿Qué hacer en caso de averías?,p.196. Eventualmente, contactar con el fabricante.

3 Disposiciones de seguridad
162 Instrucciones de manejo HandyStep® touch, HandyStep® touch S 997486
3.2 Batería
1. Utilizar exclusivamente el cable USB suministrado con el equipo. Si se usan otros cables, pue-
den ocasionarse daños en el equipo y el soporte de carga.
2. Durante el proceso de carga, el equipo y la fuente de alimentación pueden alcanzar altas tem-
peraturas. No cubrir dichos elementos.
3. El eventual sobrecalentamiento de la toma de carga del equipo podría deberse a una deficien-
cia en el cable USB. En tal caso, cambiar el cable USB por un cable nuevo original.
4. Si se llevan a cabo aplicaciones que requieren un alto nivel de potencia de la batería, por mo-
mentos, el equipo puede alcanzar altas temperaturas (por ejemplo, al realizar trabajos extre-
mos con puntas de amplio volumen). En tal caso, interrumpir las dosificaciones y continuar
una vez que la temperatura haya descendido.
5. Nunca utilizar fuentes de alimentación, soportes de carga o baterías incorrectos o dañados.
Las fuentes de alimentación o los cables no autorizados pueden ocasionar una explosión de la
batería o daños en el equipo.
3.3 Carga inductiva
1. Utilizar solo el soporte de carga original para llevar a cabo la carga inductiva del equipo.
2. No colocar objetos magnéticos o conductores de electricidad entre el equipo y el soporte de
carga durante la carga inductiva.
3. Durante la carga inductiva, el equipo, el soporte de carga y la fuente de alimentación pueden
alcanzar altas temperaturas. No cubrir dichos elementos.
4. No utilizar el soporte de carga al aire libre.
5. Antes de utilizar el soporte de carga, las personas con implantes sanitarios deben consultar
con un médico si el soporte de carga constituye una potencial amenaza para su salud. Asimis-
mo, contemplar las normas vigentes en relación con los implantes sanitarios y las fuentes
energéticas (aquí, el soporte de carga).
6. Durante la carga inductiva, pueden resultar afectados otros aparatos que se encuentren cerca
del soporte de carga.
7. Durante la carga inductiva, se pueden emitir ondas de radio. Si el equipo no se utiliza de la
manera descrita en el manual de instrucciones, pueden producirse interferencias perjudicia-
les.
3.4 Pantalla táctil
La pantalla táctil puede romperse si se ejerce un nivel de fuerza extremo sobre ella. Si el equipo se da-
ña de este modo, cesar en su uso y enviarlo para su reparación. A tal fin, pegar la pantalla con cinta
adhesiva antes del envío. Asimismo, contemplar las disposiciones de transporte del apartado Envíos
para reparación,p.204.
3.5 Límites de empleo
Contemplar el apartado Límites de empleo,p.200.

Español
3 Disposiciones de seguridad
HandyStep® touch, HandyStep® touch S 997486 Instrucciones de manejo 163
3.6 Condiciones de empleo
•Si el equipo se maneja correctamente, el líquido dosificado entra en contacto solo con la punta y
no con el equipo.
•El usuario mismo debe verificar que el equipo sea adecuado para el fin previsto. De este modo,
se presume que el usuario debe disponer de cualificación suficiente para realizar las tareas des-
critas en este manual.
•No utilizar el equipo para dosificar líquidos que puedan corroer el polipropileno, el polietileno
(punta) o el policarbonato (carcasa).
•¡Evitar los vapores agresivos (riesgo de corrosión)!
•El equipo no puede utilizarse con ácidos oxidantes, dado que se pueden corroer las piezas metá-
licas y el sistema electrónico.
•Si el usuario ha modificado el equipo, no se puede volver a poner en funcionamiento. Toda mo-
dificación debe ser expresamente aprobada por el fabricante.
USA
Este equipo ha sido diseñado y probado para su uso comercial y cumple con los dispositivos digitales
de Clase A de acuerdo con la Parte 15B (HandyStep® touch y HandyStep® touch S) y la Parte 18 (sopor-
tes de carga) de las normas de la FCC.
Estos límites están diseñados para proporcionar una protección razonable contra las interferencias
perjudiciales cuando el equipo funciona en un entorno comercial. Este equipo genera, utiliza y puede
irradiar energía de radiofrecuencia y, si no se instala y utiliza de acuerdo con el manual de instruccio-
nes, puede causar interferencias perjudiciales para las comunicaciones de radio.
El funcionamiento de este dispositivo en una zona residencial puede causar interferencias perjudicia-
les. En este caso, el usuario es responsable de corregir la interferencia a su costa.
Los cambios o modificaciones de este equipo que no hayan sido expresamente aprobados por la par-
te responsable de su cumplimiento podrían anular la autoridad del usuario para utilizar el equipo.
Canadá
Este dispositivo cumple con la norma RSS-216 de Industry Canada, y su funcionamiento está sujeto a
las dos condiciones siguientes:
1. Este dispositivo no puede causar interferencias.
2. Este dispositivo debe aceptar cualquier interferencia recibida, incluida la interferencia que
pueda causar un funcionamiento no deseado del dispositivo.
3.7 Materiales utilizados
Contemplar el apartado Materiales utilizados,p.200.
3.8 Transporte y almacenamiento
Almacenar y transportar el equipo, la batería y el soporte de carga en un lugar seco y protegido de la
radiación solar directa.

4 Uso previsto
164 Instrucciones de manejo HandyStep® touch, HandyStep® touch S 997486
4 Uso previsto
El HandyStep® touch y el HandyStep® touch S son dosificadores manuales de batería controlados por
microprocesador y con accionamiento táctil. El equipo reconoce automáticamente las puntas de do-
sificadores de alta precisión (puntas PDII) de BRAND con codificación de modelo según su volumen
nominal y, así, estas puntas permiten la selección más rápida posible del volumen. Las puntas para
dosificadores compatibles de otros fabricantes también pueden utilizarse, una vez que se haya selec-
cionado manualmente el volumen correspondiente.
5 Elementos de mando y ejecución de funciones
1
2
3
4
5
6
7
8
9
10
11
12
1Tapa del compartimiento de la batería 2Botón de encendido
3Botón STEP 4Cubierta
5Toma multifunción (USB) 6Parte trasera del mango
7Símbolos informativos 8Elemento para colocar puntas
9Punta de dosificador de alta precisión 10 Parte delantera del mango
11 Concavidad del mango 12 Pantalla táctil

Español
5 Elementos de mando y ejecución de funciones
HandyStep® touch, HandyStep® touch S 997486 Instrucciones de manejo 165
5.1 Botón STEP
En función del modo seleccionado, el botón STEP permite dosificar o aspirar líquidos. El equipo emite
avisos en la pantalla táctil sobre cómo debe utilizarse el botón STEP. De acuerdo con el modo operati-
vo escogido, el botón STEP puede utilizarse de diversas formas. El botón STEP puede accionarse en
toda su superficie. Se puede distinguir entre las siguientes funciones:
Accionamiento breve del botón STEP («clic»)
Ejemplo:
Aspirar líquido, dosificar líquido, interrumpir la aspiración de
líquido (en función del modo operativo), colocar o quitar la
punta
2 accionamientos breves y consecutivos del botón STEP («doble clic»)
Ejemplo:
Volver a llenar la punta.
Accionamiento prolongado del botón STEP (mantener presionado)
Ejemplo:
Vaciar la punta por completo, dosificación automática de lí-
quido (en el modo de dosificación automática), valoración
manual (en modo de valoración).
5.2 Botón de encendido
Mediante el botón de encendido, se enciende y apaga el equipo. Además, se coloca el equipo en modo
de suspensión.

5 Elementos de mando y ejecución de funciones
166 Instrucciones de manejo HandyStep® touch, HandyStep® touch S 997486
5.3 Batería
ADVERTENCIA
Batería dañada o incorrecta
Riesgo de lesiones
>¡Utilizar solo la batería original!
>¡Utilizar solo la fuente de alimentación original!
>¡No perforar, doblar, prender fuego, recalcar, poner en cortocircuito o calentar exce-
sivamente la batería!
>¡No entrar en contacto directo con la batería si se han producido derrames! ¡Utilizar
guantes de protección!
>¡Eliminar las baterías dañadas de acuerdo con las normativas legales!
>¡Utilizar la batería únicamente dentro del rango de temperaturas indicado!
>¡Contemplar las indicaciones contenidas en la batería!
AVISO
>Cargar la batería antes del primer uso o cuando el equipo no se ha utilizado por un período de
tiempo prolongado. De este modo, se evita que la batería se desgaste de forma prematura.
>Cambiar la batería cuando haya superado su tiempo de vida útil (~ 3 años), se haya deformado o
se haya cargado en ciclos extremadamente cortos y, de este modo, se haya reducido la duración
de su vida útil.
>Retirar el enchufe de la batería al almacenar el equipo.
Componentes
1
2
3
4
1Batería
2Contactos
3Enchufe protegido contra polarización inversa
4Cable
Etiqueta de la parte posterior
1Modelo de batería y uso
2Identificación de piezas
3Símbolos informativos
4Nota de advertencia

Español
5 Elementos de mando y ejecución de funciones
HandyStep® touch, HandyStep® touch S 997486 Instrucciones de manejo 167
5.3.1 Conexión de la batería
A B C
Abrir la cubierta y conectar de manera firme y recta el enchufe protegido contra polarización inversa
de la batería a la toma. El equipo se encenderá, una vez que se haya conectado la batería. A continua-
ción, cerrar la cubierta.
5.3.2 Carga de la batería
a. Conectar el cable a la fuente de alimentación y al
HandyStep® touch.
b. Enchufar la fuente de alimentación a un tomacorriente.
ðHandyStep® touch en proceso de carga.
5.3.3 Símbolos de la pantalla
Batería lista para ser utilizada. Batería prácticamente des-
cargada.
Batería en proceso de carga.
5.3.4 Modo de suspensión
Al presionar brevemente el botón de encendido cuando el equipo está encendido, se activa el modo
de suspensión y la pantalla se apaga. El modo de suspensión se utiliza para prolongar el tiempo de
uso de la batería. Para desactivar el modo de suspensión, se dispone de las siguientes posibilidades:
•Presionar el botón de encendido.
•Presionar el botón STEP.
•Colocar punta.
5.3.5 Trabajos durante el proceso de carga
Durante el proceso de carga, se puede continuar trabajando. A tal fin, conectar el cable USB a la toma
multifunción del equipo. De este modo, el proceso de carga demandará más tiempo. Trabajar con el
cable USB conectado solo es posible cuando la batería está conectada al equipo.

5 Elementos de mando y ejecución de funciones
168 Instrucciones de manejo HandyStep® touch, HandyStep® touch S 997486
5.3.6 Tiempo de uso de la batería
El tiempo de uso de la batería es el período de tiempo durante el cual se puede trabajar con el equipo
y una batería nueva. Este tiempo depende de diferentes factores, como el propio estado de la batería,
el brillo de la pantalla, la configuración de velocidad utilizada o el medio empleado, entre otros. El
tiempo de uso de la batería se ha determinado mediante un proceso automatizado.
Medio (ejemplos) Agua destilada (según ISO
3696)*
Aceite de colza**
Punta Punta PD II de 10ml Punta PD II de 25ml
Batería Nueva y 100% cargada Nueva y 100% cargada
Ajustes del equipo Nivel de velocidad 6
Brillo medio de la pantalla
Nivel de velocidad 4
Brillo medio de la pantalla
Pasos 20 pasos de 0,5ml 10 pasos de 2,5ml
Tiempo de uso de la batería aprox. 5h aprox. 2h
*Se corresponde con un consumo energético normal
**Se corresponde con un consumo energético máximo
5.4 Elementos de mando
Pantalla táctil
Para configurar los valores necesarios en la pantalla táctil, se utiliza el dedo pulgar.
Botón STEP
El botón STEP se acciona con el dedo índice.
5.5 Fuente de alimentación y adaptador para países
ADVERTENCIA
Riesgo de lesiones debido a fuentes de alimentación dañadas o incorrectas
>¡Utilizar solo la fuente de alimentación universal original y el adaptador para países
correspondiente!
>¡No cubrir la fuente de alimentación mientras se está utilizando!
>¡No utilizar la fuente de alimentación cuando esté dañada!
Fuente de ali-
mentación
Adaptador para países
CN GB US AU/NZ EU

Español
5 Elementos de mando y ejecución de funciones
HandyStep® touch, HandyStep® touch S 997486 Instrucciones de manejo 169
5.5.1 Conexión del adaptador de carga y la fuente de alimentación
a. Desplazar el adaptador de carga en la fuente de alimen-
tación hasta oír un clic de encastre.
ðEs posible conectar la fuente de alimentación.
5.5.2 Quitar el adaptador de carga de la fuente de alimentación
a. Presionar el botón pulsador «Push» y retirar el adapta-
dor de carga.
5.6 Soporte del equipo
5.6.1 Fijación del soporte del equipo con cinta adhesiva
1
2
1Soporte universal 2Parte trasera del soporte
con cinta adhesiva
a. Limpiar la superficie de fijación con un agente de lim-
pieza adecuado (no limpiadores domésticos pringosos)
y un paño sin pelusas, y dejar que se seque bien.
b. Retirar la lámina de protección de la tira adhesiva
c. Presionar la parte trasera del soporte con firmeza sobre
la superficie limpia, utilizando los dedos pulgares. Espe-
rar 72h antes de colocar el equipo por primera vez.
d. Desplazar el soporte universal sobre la parte trasera del
soporte.
5.6.2 Fijación del soporte del equipo en el rondel
a. Colocar el soporte sin cinta adhesiva en el rondel hasta
oír un clic de encastre.

5 Elementos de mando y ejecución de funciones
170 Instrucciones de manejo HandyStep® touch, HandyStep® touch S 997486
5.6.3 Fijación del soporte del equipo en el borde de un estante
1
2
3
1Soporte universal 2Parte inferior
3Presionar la parte trasera
del soporte
a. Limpiar la superficie de fijación y la parte trasera del so-
porte con un agente de limpieza adecuado (no limpia-
dores domésticos pringosos) y un paño sin pelusas, y
dejar que se seque bien.
b. Retirar la lámina de protección de un lado de la cinta
adhesiva.
c. Pegar la cinta adhesiva en la parte inferior y presionar
firmemente.
d. A continuación, retirar la lámina de protección del otro
lado y pegar la parte trasera del soporte en el borde de
fijación deseado.
e. Presionar la parte trasera del soporte con firmeza sobre
la superficie de fijación, utilizando los dedos pulgares.
Esperar 72h antes de colocar el equipo por primera vez.
f. Desplazar el soporte universal sobre la parte trasera del
soporte.
5.7 Soporte de carga (accesorio)
ADVERTENCIA
Riesgo de lesiones por inducción
>Las personas con implantes sanitarios (por ejemplo, marcapasos, sistemas de bom-
beo medicinales) deben mantener una distancia de seguridad. La Health Industry
Manufacturers Association (Asociación de fabricantes de la industria sanitaria) reco-
mienda mantener una distancia de 15cm con la fuente energética (aquí, el soporte
de carga) en caso de utilizar marcapasos.
>Las personas con implantes sanitarios deben consultar con un médico antes de utili-
zar el soporte de carga.
>En caso de sospechar que el equipo está afectando un implante, la persona deberá
incrementar su distancia con el soporte de carga y consultar con un médico.
AVISO
Carga inductiva a través del soporte de carga
El soporte de carga puede cargar el equipo de forma inductiva, siempre que se haya establecido el su-
ministro energético. No colocar soportes de datos magnéticos (por ejemplo, tarjetas de crédito) cerca
del soporte de carga.

Español
5 Elementos de mando y ejecución de funciones
HandyStep® touch, HandyStep® touch S 997486 Instrucciones de manejo 171
Uso del soporte de carga
El soporte de carga necesita la fuente de alimentación y el
cable USB del equipo HandyStep®touch o del HandyS-
tep®touchS.
Indicaciones de las luces del soporte de carga
•Luz azul constante en el soporte de carga: batería en
proceso de carga.
•No hay luces encendidas en el soporte de carga: la bate-
ría está totalmente cargada o no hay equipos en el so-
porte de carga.
•La luz del soporte de carga se enciende de forma inter-
mitente: no se puede cargar la batería. Volver a colocar
el equipo en el soporte de carga.
5.8 Soporte (accesorio)
El soporte se utiliza para conservar el equipo de forma segura. Este componente no posee una fun-
ción para cargar el equipo.
5.9 Estructura de la pantalla táctil (zona de trabajo)
12
3
4
5
6
7
8
9
10
11
12
13 14
1Hora
2Nivel de carga
3Volumen nominal en la punta empleada
4Nivel de llenado de la punta
5Soltar punta ( ); colocar punta ( ).
6Menú de opciones
7Menú principal (Inicio)
8Zona informativa
9Volumen disponible
10 STEP disponibles en relación con el volumen dispo-
nible
11 Volumen de STEP
12 Velocidad de aspiración y dosificación
13 Nombre del modo operativo
14 Sector para funciones específicas.
5.10 Puntas PDII (puntas de dosificadores de alta precisión II)
Las puntas codificadas son reconocidas de forma automática por el equipo.

6 Síntesis de modos operativos
172 Instrucciones de manejo HandyStep® touch, HandyStep® touch S 997486
Volumen [ml] N.° de pedido Unidad por em-
balaje [unidades]
N.° de pedido
BIO-CERT® LI-
QUID HANDLING
STERILE
Unidad por em-
balaje [unidades]
0,1 705700 100 705730 100
0,5 705702 100 705732 100
1 705704 100 705734 100
1,25 705706 100 705736 100
2,5 705708 100 705738 100
5 705710 100 705740 100
10 705712 100 705742 100
12,5 705714 100 705744 100
25 705716 25+1 Adaptador 705746 25+1 Adaptador
50 705718 50+1 Adaptador 705748 25+1 Adaptador
Set de puntas PD-
TipsII 0,5ml ...
12,5ml
705720 20 — —
5.11 Adaptador para puntas PD II de 25ml y 50ml
Volumen [ml] N.° de pedido Unidad por embalaje Características
25 ml y 50 ml 702398 10
25 ml y 50 ml 702399 5 BIO-CERT® LIQUID
HANDLING STERILE
6 Síntesis de modos operativos
Modo operativo HandyStep® touch HandyStep® touch S
Ajustes + +
Dosificación múltiple (MULTI-DISP) + +
Dosificación automática (AUTO-DISP) + +
Pipeteo (PIP) + +
Dosificación secuencial (SEQ-DISP) — +
Aspiración múltiple (MULTI-ASP) — +
Valoración — +
Favoritos + +
Modo operativo Descripción
Ajustes En el modo «Ajustes», se realizan los ajustes necesarios para
comenzar a trabajar con el equipo (por ejemplo, hora, brillo
de la pantalla, etc.). Contemplar el apartado Ajustes,p.179.

Español
7 Funcionamiento
HandyStep® touch, HandyStep® touch S 997486 Instrucciones de manejo 173
Modo operativo Descripción
Dosificación múltiple En el modo «Dosificación múltiple», se dosifica un volumen
determinado por pasos. Ejemplo: dividir un volumen deter-
minado en distintos STEP. Contemplar el apartado Dosifica-
ción múltiple (MULTI-DISP),p.182.
Dosificación automática En el modo «Dosificación automática», se aspira un volumen
y se dosifica de forma automática por pasos en el transcurso
de un intervalo temporal predefinido. Ejemplo: dividir un vo-
lumen determinado de forma automática en muchos STEP.
Contemplar el apartado Dosificación automática (AUTO-
DISP) ,p.184.
Pipeteo En el modo «Pipeteo», se aspira una vez un volumen prese-
leccionado y se vuelve a dosificar. Contemplar el apartado
Pipeteo (PIP),p.186.
Dosificación secuencial (SEQ-DISP) En el modo «Dosificación secuencial», se dosifica un volu-
men aspirado a través de varios STEP predefinidos y de dis-
tinto tamaño. Ejemplo: serie de diluciones. Contemplar el
apartado Dosificación secuencial (SEQ-DISP),p.188
Aspiración múltiple (MULTI-ASP) En el modo «Aspiración múltiple», se juntan varios STEP en
una punta y se aspiran y dosifican como un volumen com-
pleto. Ejemplo: aspiración de volúmenes residuales restan-
tes. Contemplar el apartado Aspiración múltiple (MULTI-
ASP),p.190.
Valoración En el modo «Valoración», se aspira un volumen y se dosifica
de forma rápida o lenta. La cantidad dosificada se muestra
en la pantalla. Ejemplo: determinación de pH. Contemplar el
apartado Valoración,p.192.
Favoritos En «Favoritos», se almacenan ajustes utilizados con frecuen-
cia. A través de este menú, se puede volver a acceder a estos
favoritos. Contemplar el apartado Favoritos,p.194.
7 Funcionamiento
ADVERTENCIA
Riesgo de daños a la salud debido a líquidos patógenos o gérmenes infecciosos.
>Utilizar equipo de protección apropiado.
>Al utilizar las sustancias mencionadas, contemplar las disposiciones nacionales, las
fichas de seguridad, el nivel de protección del laboratorio y las medidas respectivas
para garantizar un trabajo seguro.
AVISO
Riesgo de daños en el equipo debido a su aplicación incorrecta.
>Sumergir solo la punta en el líquido
>Limpiar el equipo de inmediato si ha entrado en contacto con un líquido.
>Colocar el equipo correctamente en el soporte suministrado.

7 Funcionamiento
174 Instrucciones de manejo HandyStep® touch, HandyStep® touch S 997486
7.1 Encendido del equipo
a. Presionar el botón de encendido.
ðSe abrirá el menú principal.
Inicialización del motor
Al volver a utilizar el equipo después de un período de tiempo prolongado, se requerirá inicializar el
motor después de encenderlo:
a. Accionar el mensaje «Comenzar inicialización del motor».
ðSe ejecutará la inicialización del motor
ðEl equipo dispondrá el elemento para colocar puntas en posición de trabajo.
ðSe abrirá el menú principal.
Soporte de carga/Cable USB
El equipo se encenderá al colocarlo en el soporte de carga o al conectar el cable de carga USB. De esta
forma, finaliza el modo de suspensión.
7.2 Apagado del equipo
a. Vaciar y desechar punta, contemplar los apartados Dosificación de líquido,p.178 o Eliminación
de punta,p.176
b. Presionar el botón de encendido.
ðAparecerá una ventana en la que se consulta al usuario si desea apagar el equipo. Confirmar con
el botón . Cancelar con el botón .
c. Si el botón de encendido se mantiene presionado durante aprox. 1s, el equipo se coloca en mo-
do de suspensión.
Si el botón de encendido se mantiene presionado durante más de aprox. 2s, se preguntará si se
desea apagar el equipo.
d. Confirmar el mensaje.
e. Colocar el equipo correctamente en los soportes suministrados. Si se coloca el equipo en el so-
porte de carga, comenzará el proceso de carga. De ser así, las luces LED del soporte de carga se
encenderán.
Si la pantalla táctil o el equipo no responden, contemplar el apartado «¿Qué hacer en caso de averí-
as?», a partir del Funcionamiento del equipo,p.196.
7.3 Apertura de modo de trabajo
El modo de trabajo se selecciona a través del menú principal. La tarea en concreto (por ejemplo, dosi-
ficar) se selecciona dentro del modo de trabajo.

Español
7 Funcionamiento
HandyStep® touch, HandyStep® touch S 997486 Instrucciones de manejo 175
a. b.
a. Seleccionar modo de trabajo, desplazando el dedo ha-
cia un lado u otro sobre la pantalla.
b. Abrir modo de trabajo, tocando una vez.
ðEl modo de trabajo seleccionado aparecerá a continua-
ción.
7.4 Cierre de modo de trabajo
a. Tocar el botón en el modo de trabajo.
ðA continuación, aparecerá el menú principal.
Si la punta tiene líquido, se consultará al usuario si desea vaciarla o continuar trabajando en otro mo-
do de trabajo con el volumen restante.
7.5 Acceso al menú de ayuda de la pantalla
El menú de ayuda de la pantalla brinda información sobre las
funciones del modo de trabajo o menú respectivo.
7.6 Colocación de puntas
7.6.1 Colocación de puntas PD de BRAND
Requisito:
>Seleccionar modo de trabajo
a. Colocar punta
b. Presionar el botón STEP. La punta se conectará con el equipo y se configurará el volumen
ðVolverá a aparecer la pantalla del modo de trabajo.
ðSe podrá volver a aspirar líquido.

7 Funcionamiento
176 Instrucciones de manejo HandyStep® touch, HandyStep® touch S 997486
7.6.2 Colocación de puntas compatibles de otros fabricantes (sin codificación)
c. d.
Requisito:
>Seleccionar modo de trabajo
a. Colocar punta
b. Presionar el botón STEP.
c. Configurar volumen.
d. Confirmar la selección con el botón .
ðVolverá a aparecer la pantalla del modo de trabajo.
ðSe podrá volver a aspirar líquido.
7.6.3 Colocación de puntas compatibles de otros fabricantes (con codificación)
Después de colocar la punta, verificar que se haya aceptado el volumen correcto de la punta. Contem-
plar el apartado Configuración del volumen,p.178.
7.6.4 Colocación de puntas sin modo de trabajo seleccionado
También se puede colocar una punta antes de haber seleccionado el modo de trabajo. Para configu-
rar el volumen o que se reconozca la punta compatible de manera automática, se debe haber selec-
cionado un modo de trabajo.
7.7 Eliminación de punta
Requisito:
>Vaciar la punta.
a. Sostener el equipo con la punta sobre el cubo de la basura.
b. Oprimir el botón , seguido del botón STEP.
ðLa punta se desechará.
ðEl equipo se coloca en posición para colocar una punta.
7.8 Aspiración de líquido
AVISO
Purgar puntas antes de utilizarlas
Se recomienda purgar una nueva punta antes de utilizarla. Para ello, llenar mínimamente la punta de
líquido y volver a vaciarla (contemplar los apartados Llenado de punta vacía,p.176 e Interrupción del
llenado de la punta,p.177). Después de la purga, la presencia de pequeñas burbujas de aire en el área
del émbolo no influye en el resultado.
7.8.1 Llenado de punta vacía
Requisito:
>Seleccionar un modo de trabajo.
>En la pantalla táctil, aparecerá el mensaje «Presionar STEP para llenado».
a. Mantener la punta en perpendicular al recipiente.

Español
7 Funcionamiento
HandyStep® touch, HandyStep® touch S 997486 Instrucciones de manejo 177
b. Durante el proceso de aspiración, asegurarse de que la abertura de la punta esté siempre cubier-
ta por líquido, a fin de evitar la formación de burbujas de aire en la punta.
c. Presionar el botón STEP.
La punta se llenará hasta alcanzar el volumen configurado o el volumen nominal.
AVISO
Desplazamiento inverso (compensación del movimiento)
Durante el proceso de llenado, el equipo lleva a cabo un desplazamiento inverso que garantiza la pre-
cisión de la configuración del volumen del STEP. De este modo, resulta innecesario desechar el primer
STEP.
7.8.2 Interrupción del llenado de la punta
a. Presionar el botón STEP para interrumpir el llenado de la punta.
ðEl proceso de llenado se interrumpe de inmediato. De este modo, se puede volver a dosificar el
volumen aspirado con el botón STEP, vaciar la punta o continuar con el proceso de llenado.
7.8.3 Llenado de punta semivacía
a.
a. Accionar reiniciar proceso de rellenado.
b. Mantener la punta en perpendicular al líquido.
c. Presionar 2 veces (brevemente) el botón STEP.
ðEl líquido se aspirará hasta haber alcanzado el volumen
nominal.
d. Presionar el botón STEP para detener el proceso de lle-
nado.
ðVolverá a aparecer la pantalla del modo de trabajo y se
podrá continuar dosificando.
AVISO
Desplazamiento inverso (compensación del movimiento)
Durante el proceso de llenado, el equipo lleva a cabo un desplazamiento inverso que garantiza la pre-
cisión de la configuración del volumen del STEP. De este modo, resulta innecesario desechar el primer
STEP.
7.8.3.1 Activación automática del proceso de llenado
Una vez finalizados todos los STEP deseados, en la punta queda líquido, cuyo volumen es menor a 1
STEP (volumen residual). El equipo activa de forma automática el modo en el que se puede volver a
llenar la punta.
a. Presionar 2 veces (brevemente) el botón STEP.
ðSe aspirará líquido hasta que la punta se haya llenado por completo.

7 Funcionamiento
178 Instrucciones de manejo HandyStep® touch, HandyStep® touch S 997486
7.9 Dosificación de líquido
7.9.1 Dosificación de volúmenes determinados o STEP indivi-
duales
Requisito:
>Seleccionar un modo de trabajo.
>Aspirar un volumen determinado.
a. Colocar la punta sobre la pared del recipiente.
b. Mantener el equipo en un ángulo de entre 30° y 45° contra la pared del recipiente.
c. Presionar el botón STEP.
ðEn función del modo de trabajo seleccionado, se dosificará un STEP o todo el volumen de la pun-
ta.
Para cancelar la dosificación, presionar el botón .
7.9.2 Activación de vaciado
a.
a. Activar vaciado.
b. Mantener el equipo en un ángulo de entre 30° y 45° con-
tra la pared del recipiente.
c. Mantener presionado el botón STEP.
ðEl líquido se liberará y la punta se vaciará por completo.
ðVolverá a aparecer la pantalla del modo de trabajo y se
podrá aspirar otro líquido o desechar la punta.
7.9.3 Eliminación del volumen residual
Una vez finalizados todos los STEP disponibles, en la punta queda líquido, cuyo volumen es menor a 1
STEP. El equipo activa de forma automática el modo en el que se puede eliminar el volumen restante.
a. Mantener presionado el botón STEP.
ðLa punta se vaciará por completo.
7.10 Configuración del volumen
Requisito:
>Seleccionar un modo de trabajo.
a. Oprimir el botón .
ðAparecerá el menú de configuración del volumen.
b. Configurar el volumen a partir del rango de valores sugerido.

Español
8 Ajustes
HandyStep® touch, HandyStep® touch S 997486 Instrucciones de manejo 179
01.00
c. d.
c. Desplazar el dedo sobre la pantalla hacia la izquierda o
la derecha para modificar el dígito.
d. Desplazar el dedo sobre la pantalla hacia arriba o abajo
para ajustar el valor.
e. Confirmar la configuración con el botón. Deshacer los
cambios con el botón X.
ðA continuación, aparecerá el modo de trabajo.
7.11 Configuración de velocidad de aspiración y dosificación
Ajustar la velocidad en función de la aplicación correspondiente.
Requisito:
>Seleccionar un modo de trabajo.
a. Oprimir el botón .
ðA continuación, aparecerá la configuración de la velocidad.
b. Configurar la velocidad de aspiración y dosificación por medio de un rango de valores entre 1 y 8.
1 = lento, 4 = moderado, 8 = rápido
c. Se pueden configurar distintas velocidades para dosificación y aspiración.
d. Confirmar la selección con el botón . Deshacer los cambios con el botón .
ðA continuación, volverá a aparecer el modo de trabajo.
8 Ajustes
Configurar el equipo para el uso diario. Oprimir «Ajustes» en el menú principal.
8.1 Idioma
Configurar el idioma de la pantalla y de los menús de ayuda. Se pueden seleccionar los idiomas ale-
mán, inglés, francés, español y chino.
8.2 Equipo
Configurar el nombre del equipo. Para seleccionar los carac-
teres, desplazarlos con el dedo índice hacia la barra blanca.
Para cambiar la posición, desplazar el dedo sobre la pantalla
hacia la izquierda o la derecha. El nombre del dispositivo
puede estar compuesto por números, y caracteres conven-
cionales y especiales.
Para ingresar letras mayúsculas, presionar el botón ABC.
Para ingresar letras minúsculas, presionar el botón abc.
Para ingresar números y caracteres especiales, presionar el
botón 123. Están disponibles los siguientes caracteres espe-
ciales: más, menos, guion bajo, coma, punto, espacio (entre
el número 9 y menos).

8 Ajustes
180 Instrucciones de manejo HandyStep® touch, HandyStep® touch S 997486
8.3 Fecha / Hora
Configurar la fecha, la hora y el formato de cada uno de estos valores.
Para abandonar este menú, presionar el botón .
Las siguientes letras hacen referencia a los formatos de la hora y la fecha (rango de valores entre pa-
réntesis):
Hora hh (00 a 23) h (0 a 23)
Minutos mm (00 a 59) m (0 a 59)
Día DD (01 a 31) D (1 a 31)
Mes MM (01 a 12) M (1 a 12)
Año YYYY (2019 a 2050) YY (19 a 50)
8.4 Pantalla
Brillo Ajustar el brillo mediante el interruptor.
Tiempo de espera de la pantalla Ajustar el tiempo hasta que la pantalla se atenúe y, a conti-
nuación, se apague.
Apagado automático Establecer si el equipo se debe apagar de manera automáti-
ca tras 60 minutos en modo de suspensión.
8.5 Sonido
AVISO
Sonido de aviso
Al presentarse un aviso, el equipo emite un sonido. Este sonido de aviso no puede desactivarse.
Notificaciones Seleccionar si deben emitirse sonidos en caso de eventos en
los programas.
Sonido del botón STEP Seleccionar si debe emitirse un sonido al accionar el botón
STEP.
8.6 Información
Versión Versión de firmware
Fecha Fecha en la que se ha generado el firmware.
Gestor de arranque Herramienta de software
8.7 Indicaciones regulatorias
Por medio de este menú, se puede acceder a la información acerca de las autorizaciones.

Español
8 Ajustes
HandyStep® touch, HandyStep® touch S 997486 Instrucciones de manejo 181
8.8 Calibrado
1
2
3
4
1Activar recordatorio
2Los datos ilógicos se muestran en rojo. En este caso, la
fecha del último control se encuentra en el futuro.
3Ajustar la fecha en la cual se realizó el último control del
equipo
4Ajustar la fecha en la cual se debe realizar el próximo
control del equipo.
Requisito:
>El equipo ya ha sido controlado y se espera recibir un recordatorio acerca del próximo control
del equipo. De esta forma, se asegura un control regular del equipo.
a. Ajustar fecha del último control. Esta fecha puede ser pasada, actual o futura.
b. Ajustar fecha del próximo control. Esta fecha debe ser futura.
c. Activar recordatorio mediante el interruptor.
ðFinalizado el intervalo de control, aparecerá un aviso en la pantalla indicando que el equipo de-
be volver a ser controlado.
ðSe recomienda ajustar esta fecha directamente tras realizar el control.
ðSi la fecha del último calibrado es posterior a la fecha actual, aparecerá en rojo.
ðSi la fecha del próximo calibrado es anterior a la fecha actual, aparecerá en rojo y no se podrá ac-
tivar el recordatorio.
8.9 Ajustes de fábrica
Por medio de este menú, el equipo se puede restablecer a los ajustes de fábrica.
AVISO
Ajustes de fábrica
Los ajustes de fábrica sobrescriben todos los ajustes realizados por el usuario, tanto en el menú de
ajustes como en todos los modos de trabajo disponibles. ¡Este paso no se puede deshacer!
8.10 Encendido/apagado del reconocimiento de puntas
Si no se trabaja con puntas de BRAND o puntas compatibles, es posible apagar el reconocimiento au-
tomático de puntas para acceder más rápido a la configuración del volumen.

9 Dosificación múltiple (MULTI-DISP)
182 Instrucciones de manejo HandyStep® touch, HandyStep® touch S 997486
8.11 Teclado
1
2
3
5
6 4
1Rango de valores disponible
2Selección de la unidad
3Borrar las cifras ingresadas de a una
4Ingresar una coma
5Desechar los datos ingresados
6Aceptar los datos ingresados
Ingresar los valores (por ejemplo, volumen) mediante el te-
clado en los diferentes modos de trabajo. Los valores se in-
gresan de izquierda a derecha junto con la coma. En función
del rango de valores disponible y del intervalo de STEP posi-
ble, se pueden ingresar hasta 3 decimales, y no se podrán
aceptar valores menores o mayores al rango de valores indi-
cado.
9 Dosificación múltiple (MULTI-DISP)
Para más información sobre el funcionamiento del modo, contemplar el apartado Síntesis de modos
operativos,p.172. Para más información sobre la configuración del volumen, de la velocidad o de
otros pasos operativos idénticos en todos los modos operativos, contemplar el apartado Funciona-
miento,p.173.
9.1 Aspiración de líquido
Requisito:
>Configurar el volumen del STEP a través del botón.
a. Mantener la punta en perpendicular al recipiente.
b. Durante el proceso de aspiración, asegurarse de que la
abertura de la punta esté siempre cubierta por líquido,
a fin de evitar la formación de burbujas de aire en la
punta.
c. Presionar el botón STEP.
ðEl equipo aspirará el líquido hasta haber alcanzado el
volumen configurado o el volumen nominal.
El icono muestra la cantidad de STEP posibles.
El icono muestra el volumen disponible.
9.2 Interrupción y continuación de la aspiración de líquido
9.2.1 Interrupción de la aspiración de líquido
a. Presionar brevemente el botón STEP para interrumpir la aspiración de líquido.

Español
9 Dosificación múltiple (MULTI-DISP)
HandyStep® touch, HandyStep® touch S 997486 Instrucciones de manejo 183
9.2.2 Continuación de la aspiración de líquido
a. Oprimir el botón .
b. Presionar 2 veces (brevemente) el botón STEP.
ðEl equipo aspirará el líquido.
9.3 Dosificación de líquido
Requisito:
>Para más información sobre la dosificación de volúme-
nes determinados o STEP individuales, consultar el
apartado Dosificación de volúmenes determinados o
STEP individuales,p.178.
a. Después de haber oprimido el botón STEP, se reduce la
cantidad de STEP que se dosifican ( ).
9.4 Manejo de volúmenes residuales
Para más información acerca del manejo de volúmenes residuales, contemplar los apartados Activa-
ción de vaciado,p.178 y Aspiración de líquido,p.176.
9.5 Configuración previa del número de STEP
1
2
3
1Encender/apagar la configuración previa de STEP.
2Abrir selección previa de STEP.
3Realizar la selección previa de STEP.
Es posible realizar la configuración previa del número de
STEP. El número de STEP que se puede seleccionar depende
del volumen de las puntas empleadas y del volumen configu-
rado. Al aumentar el volumen de STEP, se reduce el número
de STEP preseleccionados y viceversa.
Configuración previa del número de STEP
a. Oprimir el botón .
b. Desplazar el número deseado a la barra blanca.
c. Confirmar la selección con .
ðLa selección de STEP está activa.
Si se aspira líquido en este momento, se aspirará tanto como
sea necesario para la preselección. Si hay más líquido en la
punta que el preseleccionado, es posible continuar trabajan-
do tras dosificar los STEP preseleccionados o desechar el vo-
lumen.

10 Dosificación automática (AUTO-DISP)
184 Instrucciones de manejo HandyStep® touch, HandyStep® touch S 997486
9.6 Opciones
a. Presionar el símbolo en el modo de trabajo.
ðA continuación, aparecerá el menú de opciones.
Opción Significado
Añadir a favoritos Añadir ajustes realizados a favoritos. Para volver a acceder a ellos,
se debe seleccionar el botón «Favoritos» en el menú principal.
Predefinir el número de STEP Configuración previa del número de STEP.
Ir a Auto-Disp Activar el modo de dosificación automática. El volumen configura-
do en el modo de dosificación múltiple se configura también en el
modo de dosificación automática.
Ayuda sobre el modo de trabajo Abrir el menú de ayuda del modo respectivo.
10 Dosificación automática (AUTO-DISP)
Para más información sobre el funcionamiento del modo, contemplar el apartado Síntesis de modos
operativos,p.172. Para más información sobre la configuración del volumen, de la velocidad o de
otros pasos operativos idénticos en todos los modos operativos, contemplar el apartado Funciona-
miento,p.173.
10.1 Dosificación automática de líquido
Requisito:
>Configurar el tiempo de espera (intervalo entre las dosificaciones de líquido) de forma manual o
automática.
>La punta está llena de líquido.
a. Mantener presionado el botón STEP.
ðEl líquido se dosifica de forma automática mientras se mantenga presionado el botón STEP o
mientras haya líquido suficiente en la punta.
ðDurante el proceso de dosificación del líquido, se puede ver descender el tiempo de la espera en
la pantalla.
ðEn la pantalla táctil, se pueden ver los STEP restantes.
10.2 Optimización del tiempo de dosificación
La duración de la dosificación de líquido depende del intervalo de dosificación definido y de la veloci-
dad de la dosificación. Para optimizar la dosificación de líquido, se deben ajustar ambos parámetros.
•Para más información sobre la velocidad de dosificación, contemplar el apartado Configuración
de velocidad de aspiración y dosificación,p.179.
•Para más información sobre el intervalo de dosificación, contemplar el apartado Configuración
manual del tiempo de espera,p.185.

Español
10 Dosificación automática (AUTO-DISP)
HandyStep® touch, HandyStep® touch S 997486 Instrucciones de manejo 185
10.3 Configuración manual del tiempo de espera
a. Oprimir el botón .
b. Configurar el tiempo de espera.
c. Confirmar la configuración con el botón .
ðTiempo de espera configurado. Si se mantiene presio-
nado el botón STEP en el siguiente proceso de dosifica-
ción de líquido, se liberará líquido una vez que finalice
el tiempo de espera.
Como alternativa, también se puede utilizar la función de
programación.
10.4 Configuración automática del tiempo de espera (función de aprendizaje)
Con la función de aprendizaje, el equipo establece un promedio de los tiempos de espera entre 3 pro-
cesos de dosificación de líquido o más. Si el usuario mantiene presionado el botón STEP una vez fina-
lizada la función de aprendizaje, el equipo liberará líquido de manera automática cuando haya trans-
currido el tiempo de espera establecido. De este modo, el usuario puede llevar a cabo procesos de do-
sificación recurrentes de forma más sencilla. Incluso resulta más sencillo configurar el tiempo de es-
pera, dado que se establece para el proceso de dosificación actual.
10.4.1 Ejecución de la función de aprendizaje
a.
c.
Requisito:
>Llenar la punta.
a. Oprimir el botón .
ðFunción de aprendizaje activa. Esto se indica mediante
el símbolo …
b. Dosificar líquido un mínimo de 3 veces, presionando
brevemente el botón STEP.
ðSe puede liberar líquido directamente manteniendo
apretado el botón STEP. En tanto no finalice la función
de aprendizaje, no se modificará el tiempo de espera
memorizado.
c. Para finalizar la función de aprendizaje, presionar el bo-
tón …
ðA continuación, aparecerá el tiempo promedio al lado
del símbolo .
Es posible determinar el tiempo de espera memorizado co-
mo favorito.
10.4.2 Acceso alternativo a la función de aprendizaje
a. Abrir el menú de opciones mediante el botón .
b. Desplazar el interruptor hacia la derecha.

11 Pipeteo (PIP)
186 Instrucciones de manejo HandyStep® touch, HandyStep® touch S 997486
c. Volver al menú de trabajo mediante el botón .
ðMediante el símbolo …, se muestra la función de aprendizaje activa.
10.4.3 Reinicio de la función de aprendizaje
Si, al trabajar, se determina que el tiempo de espera es demasiado breve o demasiado prolongado, la
función de aprendizaje puede reiniciarse. Como alternativa, también se puede ajustar el tiempo de es-
pera de manera manual.
10.4.4 Reducción o finalización de la función de aprendizaje
Al oprimir una vez el botón STEP, comienza una cuenta regresiva de 10s. Una vez transcurrido este
tiempo, la función de aprendizaje se cierra de forma automática.
•Para finalizar antes la función de aprendizaje oprimir el botón X.
•Para finalizar la función de aprendizaje, tras haber dosificado líquido manteniendo apretado el
botón STEP, oprimir el botón …
•Para trabajar directamente con el tiempo de espera establecido, mantener presionado el botón
STEP.
10.5 Manejo de volúmenes residuales
Para más información acerca del manejo de volúmenes residuales, contemplar los apartados Activa-
ción de vaciado,p.178 y Aspiración de líquido,p.176.
10.6 Opciones
a. Presionar el símbolo en el modo de trabajo.
ðA continuación, aparecerá el menú de opciones.
Opción Significado
Añadir a favoritos Editar el tiempo de espera entre cada proceso de dosificación.
Memorizar tiempo de espera Iniciar la función de aprendizaje.
Ir a Multi-Disp Activar el modo de trabajo de dosificación múltiple. El volumen confi-
gurado en el modo de trabajo de dosificación automática se configu-
ra también en el modo de trabajo de dosificación múltiple.
Ayuda sobre el modo de tra-
bajo
Abrir el menú de ayuda del modo respectivo.
11 Pipeteo (PIP)
Para más información sobre el funcionamiento del modo, contemplar el apartado Síntesis de modos
operativos,p.172. Para más información sobre la configuración del volumen, de la velocidad o de
otros pasos operativos idénticos en todos los modos operativos, contemplar el apartado Funciona-
miento,p.173.

Español
11 Pipeteo (PIP)
HandyStep® touch, HandyStep® touch S 997486 Instrucciones de manejo 187
11.1 Configuración del volumen
Requisito:
>Seleccionar modo de trabajo.
a. Oprimir el botón .
b. Configurar volumen.
11.2 Llenado de punta
Requisito:
>Volumen configurado.
>En la pantalla táctil, aparecerá el mensaje «Presionar
STEP para llenado».
a. Mantener la punta en perpendicular al recipiente. Du-
rante el proceso de aspiración, asegurarse de que la
abertura de la punta esté siempre cubierta por líquido,
a fin de evitar la formación de burbujas de aire en la
punta.
b. Presionar el botón STEP.
ðLa punta se llenará hasta alcanzar el volumen configu-
rado del STEP o el volumen nominal de la punta.
Presionar el botón STEP para detener el proceso de llenado.
11.3 Dosificación de líquido y detención de la dosificación de líquido
a. Presionar el botón STEP.
ðLa punta se vaciará.
Para interrumpir la dosificación de líquido, oprimir el botón X.
11.4 Manejo de volúmenes residuales
Para más información acerca del manejo de volúmenes residuales, contemplar los apartados Activa-
ción de vaciado,p.178 y Dosificación de líquido,p.178.
11.5 Opciones
a. Presionar el símbolo en el modo de trabajo.
ðA continuación, aparecerá el menú de opciones.
Opción Significado
Añadir a favoritos. Añadir los ajustes seleccionados al menú de favoritos. Para volver
a acceder a ellos, se debe seleccionar el botón «Favoritos» en el
menú principal.
Modo de trabajo Abrir el menú de ayuda del modo respectivo.

12 Dosificación secuencial (SEQ-DISP)
188 Instrucciones de manejo HandyStep® touch, HandyStep® touch S 997486
12 Dosificación secuencial (SEQ-DISP)
Para más información sobre el funcionamiento del modo, contemplar el apartado Síntesis de modos
operativos,p.172. Para más información sobre la configuración del volumen, de la velocidad o de
otros pasos operativos idénticos en todos los modos operativos, contemplar el apartado Funciona-
miento,p.173.
12.1 Detalles de la dosificación secuencial
2
4
5
6
7
1
3
1Volumen sumado de la lista de alícuotas.
2STEP dosificado previamente.
3STEP en proceso de dosificación.
4STEP que se dosificará a continuación.
5Número del STEP que se dosificará a continuación.
6Cantidad de STEP previstos en la lista de alícuotas.
7Volumen existente en la punta.
En el modo de trabajo «Dosificación secuencial», se dosifica una serie definida de volúmenes diversos
o iguales de un líquido. Dichos volúmenes se denominan «alícuotas» y se definen a través de la lista de
alícuotas (1 a 10 alícuotas). Así, en el modo de trabajo, pueden observarse hasta 3 entradas de la lista
de alícuotas. Estas entradas están marcadas con una almohadilla (#) y siempre se mostrará la actual,
la anterior y la siguiente. Una vez dosificada una alícuota, el número de la lista asciende (1, #2,
#1, 2, #3 #2, 3, #4 ... #10). Solo se puede dosificar una vez que se ha aspirado un volumen sufi-
ciente.
Si la suma de alícuotas supera el volumen de la punta, se puede volver a aspirar líquido y volver a do-
sificarlo a continuación.
Si la suma de alícuotas no alcanza el volumen de la punta, se aspirará tanto líquido como sea necesa-
rio para la lista de alícuotas ingresada.
Si se interrumpe una alícuota (botón X de la pantalla), dicha alícuota se contabilizará como no dosifi-
cada. Asimismo, se generará un aviso que informa sobre esta situación. El programa saltará hacia la
siguiente alícuota de la lista. Si hay muy poco líquido en la punta al finalizar las alícuotas, el equipo
aspira la cantidad necesaria de líquido para completarlas.
La lista de alícuotas ya no puede modificarse cuando se ha dosificado la primera alícuota. La lista de
alícuotas puede volver a editarse solo una vez que se ha finalizado con la dosificación.

Español
12 Dosificación secuencial (SEQ-DISP)
HandyStep® touch, HandyStep® touch S 997486 Instrucciones de manejo 189
12.2 Crear lista de alícuotas
Es posible crear de 1 a 10 alícuotas.
Requisito:
>Ingresar en el modo de trabajo.
a. Oprimir el botón .
ðAparecerá la lista de alícuotas.
b. Presionar el símbolo '+'.
ðSe añadirá una alícuota a la lista.
12.3 Editar lista de alícuotas
a. Presionar sobre una entrada de la lista.
ðAparecerá el menú de opciones de la entrada.
Editar Editar la entrada seleccionada de la lista. Proce-
der del mismo modo que se especifica en el
apartado Configuración del volumen,p.178.
Añadir Insertar una entrada al final de la lista. Como
valor de la alícuota, se predeterminará el valor
de la entrada anterior en la lista.
Insertar Insertar una entrada en reemplazo de la entra-
da seleccionada de la lista. La entrada se inser-
ta encima de la entrada seleccionada de la lista.
Como valor de la alícuota, se predeterminará el
valor de la entrada seleccionada de la lista. Este
valor puede editarse a través de la función «Edi-
tar».
Borrar Borrar la entrada seleccionada de la lista. Las
entradas de la lista pueden borrarse sin incon-
veniente pero siempre debe quedar, al menos,
una entrada.
12.4 Dosificación de líquido
Requisito:
>Ingresar en el modo de trabajo.
a. Presionar el botón STEP.
ðSe dosifica el volumen de la primera entrada de la lista de alícuotas.
ðAl mismo tiempo, se selecciona el siguiente volumen en la lista de alícuotas. Este volumen se do-
sificará la próxima vez que se presione el botón STEP.

13 Aspiración múltiple (MULTI-ASP)
190 Instrucciones de manejo HandyStep® touch, HandyStep® touch S 997486
12.5 Interrupción y cierre de alícuotas
a. Presionar el botón o .
ðSe cerrarán las alícuotas actuales.
12.6 Opciones
a. Presionar el símbolo en el modo de trabajo.
ðA continuación, aparecerá el menú de opciones.
Opción Significado
«Editar alícuotas» Editar lista de alícuotas.
«Modo de trabajo» Abrir el menú de ayuda del modo respectivo.
13 Aspiración múltiple (MULTI-ASP)
Para más información sobre el funcionamiento del modo, contemplar el apartado Síntesis de modos
operativos,p.172. Para más información sobre la configuración del volumen, de la velocidad o de
otros pasos operativos idénticos en todos los modos operativos, contemplar el apartado Funciona-
miento,p.173.
13.1 Detalles de la aspiración múltiple
5
1
2
3
4
1Activar modo de llenado. El modo de llenado seleccio-
nado se muestra aquí.
2Volumen configurado
3Posibles STEP
4Volumen aspirado
5Cambiar entre el modo de dosificación y el de aspira-
ción de líquido. También se puede acceder al modo de
dosificación de líquido cuando no se ha alcanzado el
volumen nominal. Del mismo modo, también se pue-
de continuar con el llenado de la punta después de
una interrupción.
13.2 Preparación de la aspiración de líquido
Requisito:
>La punta está vacía y fuera del líquido
a. Presionar el botón STEP.
b. El émbolo de la punta se desplaza a la posición de inicio.
c. Seleccionar el modo de llenado.
d. Mantener presionado el botón STEP.

Español
13 Aspiración múltiple (MULTI-ASP)
HandyStep® touch, HandyStep® touch S 997486 Instrucciones de manejo 191
ðSe aspirará líquido.
13.3 Modo de llenado
En el modo de trabajo «Aspiración múltiple», se aspiran líquidos diferentes o iguales con la misma
punta. Para la aspiración, se dispone de 3 modos:
Modo de llenado «manual»
En el modo de llenado «manual», la aspiración de líquido se
maneja a través del botón STEP. El líquido se aspirará mien-
tras se mantenga presionado el botón STEP. La aspiración de
líquido se detiene al soltar el botón STEP o alcanzar el volu-
men nominal.
Modo de llenado «volumen de STEP»
En el modo de llenado «volumen de STEP», se establece el
volumen del STEP antes de aspirar el líquido. Cada vez que
se presione el botón STEP, se aspirará el volumen configura-
do hasta haberse alcanzado el volumen nominal.
Modo de llenado «secuencial»
En el modo de llenado «secuencial», la aspiración de líquido
se maneja a través de una lista de alícuotas (1 a 10 alícuotas).
En esta tabla, se pueden definir diversos volúmenes que, en
este modo operativo, se aspirarán de forma secuencial. Cada
vez que se presiona el botón STEP, se aspira el volumen ac-
tual. A continuación, el programa pasa al siguiente volumen
de la lista de alícuotas hasta que se hayan aspirado todas las
alícuotas predeterminadas. Así, en el modo de trabajo, pue-
den observarse hasta 3 entradas de la lista de alícuotas. Es-
tas entradas están marcadas con una almohadilla (#) y siem-
pre se mostrará la actual, la anterior y la siguiente. Una vez
aspirada una alícuota, el número de la lista asciende (1, #2,
#1, 2, #3 #2, 3, #4 ... #10). El equipo pasará de forma au-
tomática a dosificar líquido cuando se haya alcanzado el vo-
lumen deseado o el volumen nominal.
13.4 Dosificación de líquido
El usuario puede cambiar el modo de aspiración de líquido a dosificación de líquido, y viceversa, por
medio de los botones y .
a. Oprimir el botón .
ðAparecerá el mensaje «Presionar STEP para vaciar».
b. Mantener presionado el botón STEP para dosificar líquido.
Para cancelar la dosificación de líquido, oprimir el botón X. Una vez vaciada la punta, el programa
vuelve al modo de aspiración de líquido.

14 Valoración
192 Instrucciones de manejo HandyStep® touch, HandyStep® touch S 997486
13.5 Creación y edición de lista de alícuotas para aspirar líquido
a. Seleccionar el modo de llenado «secuencial».
b. Seleccionar Opciones > «Editar alícuotas» o presionar #1 a #10.
c. Crear y editar lista de alícuotas como se describe en el modo de trabajo «dosificación secuencial»
en el apartado Editar lista de alícuotas,p.189.
13.6 Cambiar modo de trabajo
a. Oprimir el botón .
b. Si la punta está llena, se preguntará si se desea cambiar el modo con la punta llena.
c. Si solo queda un resto de líquido, se preguntará si se desea desechar el líquido. Una vez confir-
mado el mensaje, se dosificará el líquido.
13.7 Opciones
a. Presionar el símbolo en el modo de trabajo.
ðA continuación, aparecerá el menú de opciones.
Opción Significado
Editar alícuotas Editar lista de alícuotas.
Seleccionar el modo de llenado Seleccionar modo de llenado.
Ayuda sobre el modo de trabajo Abrir el menú de ayuda del modo respectivo.
14 Valoración
Para más información sobre el funcionamiento del modo, contemplar el apartado Síntesis de modos
operativos,p.172. Para más información sobre la configuración del volumen, de la velocidad o de
otros pasos operativos idénticos en todos los modos operativos, contemplar el apartado Funciona-
miento,p.173.
14.1 Detalles de la valoración
1
2
3
4
5
1Cambiar entre el modo de valoración «manual» y «volu-
men de STEP».
2Ajustar el volumen del STEP. Esto es posible en el modo
de valoración «volumen de STEP».
3Volumen ya valorado.
4Cantidad restante en la punta.
5Desechar cantidad restante o aspirar líquido.
En el modo de trabajo «Valoración», se dosifica líquido (solución valorada) en otro líquido (muestra),
por ejemplo, para observar un cambio de color. Para esta tarea, se dispone de 2 modos de valoración
distintos:

Español
14 Valoración
HandyStep® touch, HandyStep® touch S 997486 Instrucciones de manejo 193
Modo de valoración «manual»
En el modo de valoración «manual», la dosificación de líquido se maneja a través del botón STEP. El lí-
quido se dosificará mientras se mantenga presionado el botón STEP. La dosificación de líquido se de-
tiene al soltar el botón STEP o al haber dosificado el volumen disponible en la punta. Cada vez que se
suelta el botón STEP, la velocidad de dosificación se reduce un nivel (nivel 8, nivel 7, nivel 6, hasta ni-
vel 1). De esta forma, es posible, por ejemplo, aproximarse al momento de un cambio de color de ma-
nera más sencilla.
Modo de valoración «volumen de STEP»
En el modo de valoración STEP, se establece el volumen del STEP antes de dosificar el líquido. Cada
vez que se presiona el botón STEP, se dosifica el volumen configurado. Asimismo, la velocidad de do-
sificación se reduce cada vez que se oprime el botón STEP.
Guardar volumen
Por medio de esta función, se guarda el último volumen configurado en una lista. Si se utiliza la mis-
ma configuración de volumen para valoraciones iguales, es posible acercarse más rápido a un mo-
mento de cambio de color. Para acceder a la lista, contemplar el apartado Opciones,p.194.
14.2 Valoración
A continuación, se explica el uso del modo de trabajo por medio del ejemplo del cambio de color en
una prueba de pH. Para activar el modo de valoración, presionar el botón o .
Requisito:
>Para el proceso, se necesita un recipiente transparente,
por ejemplo, un matraz de Erlenmeyer, así como los lí-
quidos necesarios para determinar el pH.
a. Seleccionar el modo para dosificar, en primer lugar,
una cantidad mayor de líquido. Por medio del botón
, se selecciona la velocidad de dosificación.
b. Aspirar líquido. Sostener el equipo en posición vertical
sobre el matraz de Erlenmeyer.
c. Mantener presionado el botón STEP para dosificar líqui-
do de manera continua.
d. Observar el sumergimiento de la muestra en la solución
valorada. Al aproximarse al momento del cambio de co-
lor, cambiar al modo .
ðEl comienzo del momento del cambio de color se reco-
noce por la formación de las primeras líneas de color en
la muestra.
e. Oprimir el botón . Configurar volumen deseado.
f. Al accionar brevemente el botón STEP, se dosifica la so-
lución valorada en forma de gotas hasta alcanzar el
cambio de color.

15 Favoritos
194 Instrucciones de manejo HandyStep® touch, HandyStep® touch S 997486
14.3 Opciones
a. Presionar el símbolo en el modo de trabajo.
ðA continuación, aparecerá el menú de opciones.
Opción Significado
Añadir a favoritos Añadir ajustes realizados a favoritos. Para volver a acceder a ellos, se
debe seleccionar el botón «Favoritos» en el menú principal.
Manual/volumen de STEP Cambio del modo de valoración
Mostrar el último volumen Mostrar el último volumen valorado.
Ayuda sobre el modo de tra-
bajo
Abrir el menú de ayuda del modo respectivo.
Mostrar el último volumen
La lista muestra los últimos 5 volúmenes guardados. Solo se
añaden los últimos volúmenes guardados, los más viejos se
eliminan.
15 Favoritos
A través de la opción «Favoritos», se almacenan ajustes para volver a utilizarse en un momento poste-
rior, por ejemplo, la configuración del volumen o la velocidad.
15.1 Detalles de favoritos
2
5
4
3
1
1. El icono de Favoritos indica el modo de trabajo del
cual se almacenó el favorito.
2. En esta fila se muestra el nombre del favorito
3. Los valores indican los ajustes almacenados en el fa-
vorito.
4. Soltar o colocar punta.
5. Mostrar ayuda.

Español
15 Favoritos
HandyStep® touch, HandyStep® touch S 997486 Instrucciones de manejo 195
15.2 Crear favoritos
Requisito:
>Abrir un modo de trabajo.
a. Oprimir el botón .
b. Seleccionar la opción «Añadir a favoritos».
c. Indicar el nombre.
d. Oprimir el botón .
ðEl favorito se añade al final de la lista de favoritos en el menú Favoritos. Contemplar el apartado
Detalles de favoritos,p.194.
15.3 Abrir favoritos
a. Abrir el menú «Favoritos».
b. Presionar la entrada de la lista de favoritos y seleccionar «abrir».
ðLos ajustes de abren en el modo de trabajo respectivo.
Los ajustes de los favoritos y el volumen de las puntas difieren entre sí
Cada favorito es válido para un volumen de puntas. Si se abre un favorito y la punta colocada tiene un
volumen diferente al del favorito guardado, se requerirá colocar la punta correcta. A continuación, es
posible desechar la punta disponible y colocar otra punta.
15.4 Eliminar favoritos
Eliminar favoritos individuales
Requisito:
>Abrir el menú «Favoritos».
a. Presionar la entrada de la lista de favoritos y seleccionar «eliminar».
b. Confirmar el mensaje.
ðSe elimina el favorito seleccionado.
Eliminar todos los favoritos
Requisito:
>Abrir el menú «Favoritos».
a. Presionar la entrada de la lista de favoritos y seleccionar «eliminar todos».
b. Confirmar el mensaje.
ðSe elimina la lista de favoritos.

16 Limpieza y desinfección
196 Instrucciones de manejo HandyStep® touch, HandyStep® touch S 997486
16 Limpieza y desinfección
16.1 Limpieza
AVISO
El equipo no es esterilizable en autoclave
El equipo se entrega calibrado de fábrica y no necesita mantenimiento.
Limpiar el equipo desde afuera con un paño húmedo cuando se haya ensuciado. A tal fin, utilizar agua
o una solución jabonosa diluida. Evitar el uso de agentes de limpieza corrosivos o agresivos.
El equipo no puede desatornillarse.
16.2 Esterilización UV
El equipo es resistente al efecto habitual de una lámpara UV germicida. Debido a la influencia de la ra-
diación UV, pueden tener lugar cambios de color.
Recomendación para la esterilización UV:
Espectro de luz UVC
Longitud de onda 220nm a 270nm
Duración de la radiación por cm2 y gra-
do de inactivación proyectado
2s a 300 s
17 ¿Qué hacer en caso de averías?
17.1 Funcionamiento del equipo
Avería Posible causa ¿Qué hacer?
El ciclo de carga de la ba-
tería se ha reducido al ex-
tremo.
La batería es antigua o es-
tá dañada.
Cambiar la batería.
El equipo no carga. La batería no puede car-
garse cuando está dema-
siado fría o caliente.
Retirar el enchufe de la batería.
Dejar que la batería se caliente o enfríe con la
temperatura del ambiente.
Conectar el enchufe de la batería. Volver a in-
tentar cargar.
La duración de la autono-
mía sin conexión a la red
energética se ha reducido
al extremo.
La batería es antigua o es-
tá dañada.
Cambiar la batería.

Español
17 ¿Qué hacer en caso de averías?
HandyStep® touch, HandyStep® touch S 997486 Instrucciones de manejo 197
Avería Posible causa ¿Qué hacer?
La fuente de alimenta-
ción se calienta de mane-
ra extrema al cargar.
La batería es antigua o es-
tá dañada.
La fuente de alimentación
está dañada.
El cable USB está dañado.
Cambiar la pieza afectada.
El equipo no carga. La fuente de alimentación
está dañada.
El cable USB está dañado.
Se ha retirado el enchufe
de la batería.
Se ha roto un cable de la
batería.
La distancia entre el equi-
po y el soporte de carga
es muy grande
Cambiar la pieza afectada.
Conectar el enchufe de la batería.
Volver a colocar el equipo en el soporte de car-
ga.
La pantalla está demasia-
do clara o demasiado os-
cura.
Se ha desajustado el brillo
de la pantalla.
Para ajustar el brillo, contemplar el apartado
Pantalla,p.180
La pantalla se vuelve
blanca cuando se coloca
el equipo en el soporte de
carga.
No es posible iniciar el
equipo. Se ha retirado el
enchufe de la batería.
Conectar el enchufe de la batería.
No se oyen sonidos al tra-
bajar con el equipo.
La notificación auditiva se
encuentra desactivada.
Para activar la notificación auditiva, contem-
plar el apartado Sonido,p.180
La pantalla táctil no res-
ponde.
Error en el programa. Reiniciar el equipo al volver a conectar la bate-
ría para restablecer el error del programa. A
continuación, aparecerá un aviso que indica
que aún puede haber una punta en el equipo.
Por tal motivo, colgar el equipo en el soporte y
colocar un recipiente adecuado debajo de la
punta o sostener el equipo sobre un recipiente
apropiado al ponerlo en funcionamiento.
Ayuda:
Abrir la cubierta, retirar el enchufe de la batería,
esperar 5s y volver a conectarlo. Si la batería
tiene carga suficiente, el equipo se encenderá.
Caen gotas de la punta. La punta tiene filtracio-
nes.
Cambiar la punta.
No se reconoce la punta. Codificación dañada
Utilizar la punta sin codifi-
cación.
Retirar la punta y volver a colocarla.
Utilizar una punta nueva o codificada.
Se producen interferen-
cias (CEM) cerca del so-
porte de carga.
Estas interferencias son
poco probables, dado
que la potencia transmiti-
da es baja.
El soporte de carga emite
interferencias durante el
proceso de carga.
Mantener una mayor distancia entre el equipo
defectuoso y el soporte de carga.
Volver a colocar el equipo en el soporte de car-
ga.
Asegurarse de que no haya cuerpos extraños
entre el soporte de carga y el equipo.

18 Control de volumen
198 Instrucciones de manejo HandyStep® touch, HandyStep® touch S 997486
17.2 Avisos del sistema
Ejemplo: Por medio de avisos del sistema, el equipo indica que se han
acortado determinadas secuencias del programa. Los avisos
del sistema informan al usuario acerca de las posibilidades
para continuar utilizando el equipo.
17.3 Avisos en la pantalla
Por medio de los avisos en la pantalla, el equipo indica que el estado del equipo es distinto al previs-
to. Los avisos en la pantalla informan al usuario acerca de las posibilidades para continuar utilizando
el equipo.
Cuando aparece el aviso «Nota», el equipo puede continuar siendo utilizado. Este aviso notifica sim-
plemente que el equipo no ha podido ejecutar una tarea como estaba previsto en el programa. Ejem-
plo: nivel de batería bajo.
El aviso «Error» significa que ha ocurrido un problema técnico. Si este aviso vuelve a aparecer al reini-
ciar el equipo e intentar llevar a cabo la misma tarea, la precisión y el funcionamiento correcto del
equipo ya no podrán garantizarse. Ejemplo: motor bloqueado.
Si vuelve a aparecer el mismo aviso una y otra vez, contactar con la empresa BRAND.
18 Control de volumen
18.1 Procedimiento operativo estándar (POE)
https://www.brand.de/es/servicio-
de-ayuda/base-de-datos-de-la-
aplicacion
Para más información sobre el calibrado, contemplar el
apartado Calibrado,p.199.
18.2 Control de estanqueidad de la punta PD
a. Colocar una nueva punta PD.
ðLa punta PD se reconoce automáticamente, o bien, en caso de puntas compatibles con el dosifi-
cador, seleccionar el volumen.
b. Modificar el volumen que se desea dosificar.

Español
19 Calibrado
HandyStep® touch, HandyStep® touch S 997486 Instrucciones de manejo 199
c. Llenar la punta PD.
d. Sumergir la punta PD en el líquido de ensayo. El líquido debe aspirarse de manera uniforme.
Mantener el equipo en posición vertical aprox. 10 s hacia abajo: si se forma una gota, contemplar
las indicaciones de la siguiente tabla.
No se reconoce la punta No hay codificación, la codificación es-
tá dañada o la punta no se ha colocado
correctamente
Colocar o volver a colocar la
punta nueva, seleccionar el
volumen
La punta gotea Punta con filtraciones Colocar una punta nueva
19 Calibrado
Una vez realizada la prueba de estanqueidad con éxito (contemplar el apartado Control de volu-
men,p.198), por medio de un análisis gravimétrico, se puede determinar si el equipo se encuentra
dentro de los límites definidos por la norma ISO 8655. El procedimiento de control necesario a tal fin,
se encuentra descrito en el procedimiento operativo estándar (POE).
20 Datos técnicos
20.1 Tabla de precisión
Las mediciones se han llevado a cabo con la punta PD II de BRAND.
El líquido utilizado en los ensayos ha sido agua destilada.
El volumen nominal es el volumen máximo impreso en la punta PD.
No se superan los niveles de tolerancia estipulados en la norma ISO 8655.
Exactitud E* ≤ ± % Coeficiente de variación
CV* ≤ %
Volumen nominal Volumen nominal
Punta
PD
Rango de vo-
lumen
Subdi-
visión
100% 50% 10% 1% 100% 50% 10
%
1
%
0,1ml 1 µl ... 100 µm 0,1 µm 1,0 1,0 1,6 8,0 0,5 1,0 2,0 12,
0
0,5ml 5 µl ... 500 µm 0,1 µm 0,9 0,9 1,0 5,0 0,3 0,6 1,0 5,0
1ml 10 µl ... 1 ml 1,0 µm 0,6 0,9 1,0 5,0 0,3 0,5 0,8 4,0
1,25ml 12,5 µl ... 1,25ml 0,5 µl 0,6 0,6 0,9 5,0 0,15 0,5 0,7 4,0
2,5ml 25 µl ... 2,5ml 1,0 µl 0,5 0,6 0,7 3,5 0,15 0,3 0,6 3,0
5ml 50 µl ... 5ml 1,0 µl 0,5 0,5 0,7 3,5 0,15 0,4 0,7 3,0
10ml 100 µl ... 10ml 10 µl 0,4 0,5 0,7 3,5 0,15 0,5 0,8 4,0
12,5ml 125 µl ... 12,5ml 5,0 µl 0,5 0,5 0,8 3,5 0,15 0,6 1,4 6,5
25ml 250 µl ... 25ml 10 µl 0,5 0,5 0,6 3,0 0,15 0,3 1,0 6,0
50ml 500 µl ... 50ml 10 µl 0,5 0,5 0,5 3,0 0,15 0,4 1,2 9,0

20 Datos técnicos
200 Instrucciones de manejo HandyStep® touch, HandyStep® touch S 997486
20.2 Límites de empleo
Ámbito de empleo *) 15°C a 40°C
(59°F a 104°F)
Presión de vapor hasta 500mbares
Viscosidad 20mPas en punta PD de 50ml
260mPas en punta PD de 5ml
977mPas en punta PD de 1,25ml
*) Consultar por otras temperaturas
20.3 Materiales utilizados
Equipo PC/PBT, PP, silicona, vidrio, PEEK
Puntas/émbolos PE/PP (tamaño 0,1mm LCP/PP)
20.4 Batería
Tipo Batería de ion de litio
Capacidad 1650mAh
Voltaje 3,7V
Potencia 6,11Wh
Almacenamiento 0°C a 35°C
Tiempo de carga aprox. 6 h, en función de la potencia de carga de la fuente de alimen-
tación o del soporte de carga.
Peso 40g
20.5 Soporte de carga
Entrada DC 5,0 V 1,4 A, 7,0 W
Transmisión 3,5 W, 110 kHz ... 205 kHz
20.6 Fuente de alimentación universal
Entrada CA 100 a 240V ~ 50Hz/60 Hz, 0,5A
Salida CC 5,0V 1,4A, 7,0W

Español
20 Datos técnicos
HandyStep® touch, HandyStep® touch S 997486 Instrucciones de manejo 201
20.7 Símbolos informativos en el producto y la batería
Marcas Significado
Con este símbolo confirmamos que el producto cumple con los requi-
sitos especificados en las directivas de la CE y ha sido sometido a los
procedimientos de prueba especificados.
UKCA: United Kingdom Conformity Assessed
Con esta marca confirmamos que el producto cumple los requisitos
establecidos en las UK Designated Standards.
DE-M 21
El equipo cuenta con el símbolo que acredita el cumplimiento de la
ley y los reglamentos de medición y calibrado de Alemania.
Cuenta con la secuencia de caracteres DE-M («DE» en referencia a Ale-
mania) enmarcada en un rectángulo, así como las últimas dos cifras
del año en el que se realizó la identificación (en este caso: 2021).
XXFFFFF Número de serie
Observe las instrucciones del aparato, de los accesorios y del manual
de instrucciones.
Leer el instrucciones de manejo.
El equipo y la batería deben desecharse adecuadamente.
(aquí: 40 años)
China RoHS (EFUP)
EFUP define el período en años durante el cual las sustancias peligro-
sas contenidas en los equipos eléctricos y electrónicos no se filtran o
cambian en condiciones normales de funcionamiento. Bajo el uso
normal del usuario, esos productos eléctricos y electrónicos no cau-
san contaminación ambiental grave, lesiones personales graves ni da-
ños a la propiedad del usuario.
Voltaje DC
~ Corriente alterna
Adecuado solo para interiores
Todo el equipo se encuentra protegido mediante aislamiento doble o
reforzado.
El aparato eléctrico no debe ser eliminado con la basura doméstica.
2ATKA-HST7052X0
2ATKA-HSTC705220
Número de certificación EE. UU. FCC
IC: 25139-HSTC705220
HVIN: HW_HSTC01.00
Número de certificación Canadá ISED

21 Información para pedidos
202 Instrucciones de manejo HandyStep® touch, HandyStep® touch S 997486
21 Información para pedidos
https://shop.brand.de/en/
21.1 Equipos
Denominación Imagen Número de pedido
HandyStep® touch, soporte universal,
fuente de alimentación universal, adap-
tador para países, batería de ion de litio
705200
HandyStep® touch S, soporte universal,
fuente de alimentación universal, adap-
tador para países, batería de ion de litio
705210
21.2 Accesorios
Significado Figura Nº de pedido
Soportes de carga (en todo el mundo,
excepto en la India)
705220
Soportes de carga (India) 705223

Español
21 Información para pedidos
HandyStep® touch, HandyStep® touch S 997486 Instrucciones de manejo 203
Significado Figura Nº de pedido
Soporte 705230
Batería de ion de litio para HandyStep®
touch y HandyStep® touch S
705225
Soporte universal para HandyStep®
touch y HandyStep® touch S
705235
Fuente de alimentación universal para
el HandyStep® touch y el HandyStep®
touch S, incluyendo el cable de carga y
el adaptador del país.
705250
Paquete HandyStep® touch con soporte
de carga válido para todo el mundo (ex-
cepto India)
705201
Paquete HandyStep® touch S con so-
porte de carga válido para todo el mun-
do (excepto India)
705211
Paquete HandyStep® touch con soporte
de carga válido para India
705203
Paquete HandyStep® touch S con so-
porte de carga válido para India
705213
21.3 Consumibles
21.3.1 Puntas PDII (puntas de dosificadores de alta precisión II)
Las puntas codificadas son reconocidas de forma automática por el equipo.
Volumen [ml] N.° de pedido Unidad por em-
balaje [unidades]
N.° de pedido
BIO-CERT® LI-
QUID HANDLING
STERILE
Unidad por em-
balaje [unidades]
0,1 705700 100 705730 100
0,5 705702 100 705732 100
1 705704 100 705734 100
1,25 705706 100 705736 100
2,5 705708 100 705738 100
5 705710 100 705740 100

22 Reparación
204 Instrucciones de manejo HandyStep® touch, HandyStep® touch S 997486
Volumen [ml] N.° de pedido Unidad por em-
balaje [unidades]
N.° de pedido
BIO-CERT® LI-
QUID HANDLING
STERILE
Unidad por em-
balaje [unidades]
10 705712 100 705742 100
12,5 705714 100 705744 100
25 705716 25+1 Adaptador 705746 25+1 Adaptador
50 705718 50+1 Adaptador 705748 25+1 Adaptador
Set de puntas PD-
TipsII 0,5ml ...
12,5ml
705720 20 — —
21.3.2 Adaptador para puntas PD II de 25ml y 50ml
Volumen [ml] N.° de pedido Unidad por embalaje Características
25 ml y 50 ml 702398 10
25 ml y 50 ml 702399 5 BIO-CERT® LIQUID
HANDLING STERILE
22 Reparación
22.1 Envíos para reparación
AVISO
Transportar materiales peligrosos sin autorización está prohibido por ley.
¡Limpiar y descontaminar el equipo con cuidado!
•Al enviar productos para reparación, se deberá añadir una descripción precisa del tipo de avería
y de los medios utilizados. En caso de no indicar los medios utilizados, no se podrá reparar el
equipo.
•Enviar el equipo exclusivamente sin las pilas o baterías.
•Los costes y riesgos de la devolución corren a cargo del remitente.
Fuera de EE.UU. y Canadá
Completar la «Declaración sobre la ausencia de riesgos para la salud» y enviarla junto con el equipo al
fabricante o al distribuidor. El formulario se puede pedir al proveedor o al fabricante, o bien, se puede
descargar en el sitio web www.brand.de/es.
Dentro de EE.UU. y Canadá
Contactar con BrandTech Scientific, Inc. para aclarar las condiciones de devolución del equipo antes
de enviarlo al servicio técnico.

Español
23 Servicio de calibración
HandyStep® touch, HandyStep® touch S 997486 Instrucciones de manejo 205
Enviar exclusivamente aparatos limpios y descontaminados a la dirección suministrada junto con el
número de devolución. Colocar el número de devolución en la parte externa del paquete, en una zona
donde pueda verse con claridad.
Direcciones de contacto
Alemania:
BRAND GMBH + CO KG
Otto-Schott-Straße 25
97877 Wertheim (Germany)
Tel.: +49 9342 808 0
Fax: +49 9342 808 98000
www.brand.de
EE.UU. y Canadá:
BrandTech® Scientific, Inc.
11 Bokum Road
Essex, CT 06426-1506 (USA)
Tel.: +1-860-767 2562
Fax: +1-860-767 2563
www.brandtech.com
India:
BRAND Scientific Equipment Pvt. Ltd.
303, 3rd Floor, ‘C‘ Wing, Delphi
Hiranandani Business Park,
Powai
Mumbai–400 076 (India)
Tel.: +91 22 42957790
Fax: +91 22 42957791
www.brand.co.in
China:
BRAND (Shanghai) Trading Co., Ltd.
Guangqi Culture Plaza
Room 506, Building B
No. 2899, Xietu Road
Shanghai 200030 (R.P. China)
Tel.: +86 21 6422 2318
Fax: +86 21 6422 2268
www.brand.cn.com
23 Servicio de calibración
La norma ISO 9001 y los principios de las Buenas Prácticas de Laboratorio (BPL) exigen controlar los
medidores de volumen con regularidad. Recomendamos llevar a cabo un control de volumen cada
3-12 meses. El ciclo depende de las exigencias particulares a las que se somete al equipo. En caso de
una alta frecuencia de uso o utilización de medios operativos agresivos, los controles deberían llevar-
se con mayor continuidad.
Los procedimientos operativos estándar detallados se pueden descargar en los sitios www.brand.de/
es/ y www.brandtech.com.
Asimismo, BRAND ofrece la posibilidad de solicitar el calibrado de los equipos al servicio técnico de
calibrado en fábrica o al laboratorio de BRAND acreditado por el organismo DAkkS de Alemania. A tal
fin, alcanza tan solo con enviar los equipos que se desea calibrar con la indicación de qué tipo de cali-
brado se desea realizar. Después de pocos días, los equipos se retornan junto con un informe de las
pruebas (calibrado en fábrica)o un certificado de calibrado de DAkkS. Para más información, consul-
tar con el distribuidor especializado o directamente con BRAND. La documentación para realizar el
pedido se puede descargar en www.brand.de/es/ (véase la documentación técnica).

24 Información sobre su equipo de laboratorio
206 Instrucciones de manejo HandyStep® touch, HandyStep® touch S 997486
24 Información sobre su equipo de laboratorio
El servicio en línea MyProduct (https://www.brand.de/myproduct) proporciona certificados de cali-
dad, accesorios y documentación técnica para su equipo de laboratorio HandyStep® touch. Al ingre-
sar allí el número de serie y el número de artículo, recibirá información relacionada con su equipo en
particular.
También encontrará un código de matriz de datos en el equipo. Escanee el código con un lector co-
mún para acceder a la información mencionada a través de la URL https://www.brand.de/myproduct.
25 Responsabilidad por defectos
No seremos responsables de las consecuencias derivadas del trato, manejo, mantenimiento, uso in-
correcto o reparación no autorizada del aparato, ni de las consecuencias derivadas del desgaste nor-
mal, en especial de partes susceptibles de abrasión, tales como émbolos, juntas herméticas, válvulas,
ni de la rotura de partes de vidrio o del incumplimiento de las instrucciones de manejo. Tampoco se-
remos responsables de los daños, resultado de acciones no descritas en las instrucciones de manejo o
por el uso de piezas de repuesto o componentes no originales.
EE.UU. y Canadá:
Encontrará informaciones sobre la garantía en el sitio www.brandtech.com.
26 Eliminación
El símbolo que puede verse al costado significa que las pilas/
baterías y los equipos electrónicos deben desecharse por se-
parado de los residuos domésticos (residuos municipales sin
separar) al finalizar su vida útil.
De acuerdo con la directiva 2012/19/UE del Parlamento Europeo y del Consejo de 04 de julio de 2012
sobre residuos de aparatos eléctricos y electrónicos (RAEE), los equipos electrónicos deben desechar-
se de forma apropiada en función de las normas nacionales de eliminación de residuos.
Las pilas y baterías contienen sustancias que pueden tener efectos nocivos en el medio ambiente y la
salud humana. Por tal motivo, de acuerdo con la directiva 2006/66/CE del Parlamento Europeo y del
Consejo de 6 de septiembre de 2006 relativa a las pilas y acumuladores, deben desecharse de forma
apropiada en función de las normas nacionales de eliminación de residuos. Asegurarse de que las pi-
las y baterías estén totalmente descargadas al desecharse.
Todos los derechos reservados en caso de modificaciones técnicas, errores y errores de impresión.
26.1 Eliminación de la batería
ADVERTENCIA
¡Posibles riesgos de explosión y fuego por sobrecalentamiento de la batería!
No poner la batería en cortocircuito para descargarla.
•Enrollar el enchufe con una cinta adhesiva, a fin de evitar cortocircuitos al momento de la elimi-
nación.

Español
26 Eliminación
HandyStep® touch, HandyStep® touch S 997486 Instrucciones de manejo 207
•No desarmar nunca la batería.

208 操作手册 HandyStep® touch, HandyStep® touch S 997486
目录
1 供货范围 .......................... 210
2 使用规定 .......................... 210
2.1 危险等级 .....................210
2.2 图标 .........................210
2.3 图示 .........................210
3 安全规定 .......................... 211
3.1 一般安全规定 .................211
3.2 蓄电池 .......................211
3.3 感应充电 .....................211
3.4 触摸显示屏 ...................212
3.5 使用限制条件 .................212
3.6 使用排除范围 .................212
3.7 所使用的材料 .................213
3.8 运输和存储 ...................213
4 预期用途 .......................... 213
5 功能元件和操作元件 ................ 213
5.1 STEP 按键 ....................214
5.2 电源按键 .....................214
5.3 蓄电池 .......................214
5.4 操作元件 .....................216
5.5 电源和充电适配器 .............217
5.6 设备支架 .....................218
5.7 充电座(配件) ...............218
5.8 固定支架(配件) .............219
5.9 触摸显示屏的结构(工作区域) .219
5.10 PD 吸头 II(精密配液器吸头
II) .........................219
5.11 用于 25 ml 和 50 ml PD 吸头
II 的适配器 ..................220
6 模式概况 .......................... 220
7 操作 .............................. 221
7.1 接通设备 .....................221
7.2 关断设备 .....................222
7.3 打开工作模式 .................222
7.4 退出工作模式 .................222
7.5 调出帮助文档 .................223
7.6 装入吸头 .....................223
7.7 弹出吸头 .....................224
7.8 吸入液体 .....................224
7.9 分配液体 .....................225
7.10 调节体积 .....................226
7.11 设置吸入和分配速度 ...........226
8 设置 ...............................226
8.1 语言 ..........................226
8.2 设备 ..........................227
8.3 日期 / 时间 ...................227
8.4 显示 ..........................227
8.5 声音 ..........................227
8.6 信息 / 关于 ...................228
8.7 监管提示 ......................228
8.8 校准 ..........................228
8.9 出厂设置 ......................228
8.10 开启 / 关闭吸头识别 ...........229
8.11 键盘 ..........................229
9 多次分配 (MULTI-DISP) ..............229
9.1 吸入液体 ......................229
9.2 中断并继续吸入液体 ............229
9.3 分配液体 ......................230
9.4 处理剩余体积 ..................230
9.5 预选 STEP 次数 ................230
9.6 选项 ..........................231
10 自动分配 (AUTO-DISP) ..............231
10.1 自动分配液体 ..................231
10.2 优化分配时长 ..................231
10.3 手动设置暂停时间 ..............232
10.4 自动设置暂停时间(示教功能) ..232
10.5 处理剩余体积 ..................233
10.6 选项 ..........................233
11 吸移 (PIP) .........................233
11.1 调节体积 ......................233
11.2 填充吸头 ......................234
11.3 分配液体和停止分配液体 ........234
11.4 处理剩余体积 ..................234
11.5 选项 ..........................234
12 依次分配 (SEQ-DISP) ................234
12.1 依次分配详情 ..................235
12.2 创建等分试样列表 ..............235
12.3 编辑等分试样列表 ..............236
12.4 分配液体 ......................236
12.5 中断和结束等分试样 ............236
12.6 选项 ..........................236
13 多次吸入 (MULTI-ASP) ...............237
13.1 多次吸入详情 ..................237
13.2 准备液体吸入 ..................237
13.3 填充模式 ......................237

中文
目录
HandyStep® touch, HandyStep® touch S 997486 操作手册 209
13.4 分配液体 .....................238
13.5 创建和编辑用于吸入液体的等分
试样列表 .....................238
13.6 切换工作模式 .................238
13.7 选项 .........................238
14 滴定 .............................. 239
14.1 滴定详情 .....................239
14.2 滴定 .........................239
14.3 选项 .........................240
15 收藏 .............................. 240
15.1 收藏详情 .....................241
15.2 创建收藏 .....................241
15.3 打开收藏 .....................241
15.4 删除收藏 .....................241
16 清洁和消毒 ........................ 242
16.1 清洁 .........................242
16.2 紫外线消毒 ...................242
17 故障 - 如何处理? ................. 242
17.1 设备特性 .....................242
17.2 系统消息 .....................243
17.3 显示屏中的事件消息 ...........244
18 检查体积 .......................... 244
18.1 检查说明 (SOP) ...............244
18.2 PD 吸头密封性检查 ............244
19 校准 .............................. 244
20 技术参数 .......................... 245
20.1 精度表 .......................245
20.2 使用限制条件 .................245
20.3 所使用的材料 .................246
20.4 蓄电池 .......................246
20.5 充电座 .......................246
20.6 通用电源 .....................246
20.7 产品和蓄电池上的标识 .........246
21 订购信息 .......................... 247
21.1 设备 .........................248
21.2 配件 .........................248
21.3 耗材 .........................249
22 维修 .............................. 249
22.1 送修 .........................249
23 校准服务 .......................... 250
24 关于您的实验设备的信息 .............251
25 缺陷责任 ...........................251
26 废弃处理 ...........................251
26.1 处理废弃蓄电池 ................251

210 操作手册 HandyStep® touch, HandyStep® touch S 997486
1 供货范围
设备 HandyStep®触摸
USB 连接线
通用电源
用于固定支架的固定夹
带 12.5 ml、5 ml、2.5 ml、1.25 ml 和 0.5
ml 的 5 PD 吸头s
内附合规声明的使用说明书
质量证书
简要说明
2 使用规定
•在第一次使用前请认真阅读本使用说明书。
•该使用说明书是此设备所包含的部分,必须妥善保存并且易于取阅。
•如果将本设备交予第三方,须随附本使用说明书。
•在我方官网中可查阅更新版的使用说明书:www.brand.de。
2.1 危险等级
下列信号词提示可能存在的危险:
信号词 含义
危险 将导致重伤或死亡。
警告 可能导致重伤或死亡。
小心 可能导致轻伤或中度伤害。
提示 可能导致损失财物。
2.2 图标
图标 意义 图标 意义 图标 意义
危险位置 生物性危害 财物损失的警告
电压 爆炸性物质 不得与生活垃圾
混合
高温表面 磁场 显示手势。
2.3 图示
图示 含义 图示 含义
1.Task 表示一项任务。 > 表示一项前提条件。
a., b., c. 表示任务的单个步骤。 表示结果。

中文
3 安全规定
HandyStep® touch, HandyStep® touch S 997486 操作手册 211
3 安全规定
3.1 一般安全规定
务必请仔细通读!
实验室设备 HandyStep® touch 可与危险材料、工作过程和配件结合使用。本使用说明书未展示
可能出现的安全问题。用户有责任确保遵守安全法规和健康法规,并在使用前确定存在的限制条
件。
1. 在使用设备之前,每个用户都必须阅读并遵循本使用说明书。
2. 遵守一般危险提示和安全法规,例如穿戴防护服、护目镜和防护手套。
3. 使用传染性或危险试样进行工作时,必须遵守标准法规和标准预防措施。
4. 请遵守试剂制造商的信息。
5. 请勿在爆炸性环境中操作本设备。
6. 不得吸移易燃介质。
7. 仅将设备用于液体计量,并且仅在规定的使用限制和使用排除范围内使用。注意使用排除
范围,参见使用限制条件,页245。如有疑问,请联系制造商或经销商。
8. 工作时请始终确保不得危及用户或者其他人员。避免飞溅。仅使用合适的容器。
9. 在插入吸头时会将其自动锁定。在使用已经用过的吸头时,必须确保其表面没有剩余液
体。
10. 如果确保所配液的液体不会造成危险,方可按下设备的 STEP 按键。
11. 使用腐蚀性介质时,应避免接触吸头开口。
12. 切勿使用暴力。
13. 只能使用原装配件和原装备件。不得进行任何技术更改。不得拆卸本设备。
14. 使用前请务必检查设备的状态是否正常。如果设备发生故障,则请立即停止计量并遵照章
节 故障 - 如何处理?,页242 进行操作。必要时请联系制造商。
3.2 蓄电池
1. 仅使用设备随附的 USB 电缆。如果使用其他电缆则可能会损坏设备和充电座。
2. 充电时设备和电源可能会迅速升温。不得覆盖设备。
3. 如果设备的充电插座区域温度过高,则可能会损坏 USB 连接线,需要将 USB 连接线更换
为新的原装连接线。
4. 在需要大功率使用蓄电池的应用中,设备可能会暂时升温(例如使用大容量的吸头进行特
殊工作时)。在此情形下需要中断计量并在冷却后再继续。
5. 切勿使用错误的或者损坏的电源、充电座或蓄电池。未经许可的电源或者电缆可能导致蓄
电池爆炸或设备损坏。
3.3 感应充电
1. 请仅使用原装充电座进行感应充电。
2. 感应充电时请勿在设备和充电座之间放置导电物体或磁性物体。
3. 在感应充电期间,设备、充电座和电源可能会升温。不得覆盖设备。
4. 不得在户外运行充电座。

3 安全规定
212 操作手册 HandyStep® touch, HandyStep® touch S 997486
5. 佩戴医疗植入物的人员在使用充电座之前必须征求医生的意见,以了解充电座是否会对此
人员造成潜在的危险。此外,在处理医疗植入物和射频源(此处为充电座)时,请遵守有
效说明。
6. 感应充电期间,如果其他设备位于充电座附近,则可能影响这些设备。
7. 感应充电时可能会发射无线电波。如果设备未按照使用说明书中使用,则不能排除干扰。
3.4 触摸显示屏
如果使用极大的暴力将导致触摸显示屏破碎。必须停止使用破碎的设备并将其送修。在送修之前
用胶带缠绕显示屏。此外请遵守运输规定,参见 送修,页249。
3.5 使用限制条件
参见 使用限制条件,页245。
3.6 使用排除范围
•在正确处理设备时,待计量的液体仅与吸头接触,不会与设备接触。
•用户必须自行检查设备是否适合预期用途。为做到此点,用户必须有资质执行本说明书中所
说明的工作。
•请勿使用该设备来计量对聚丙烯、聚乙烯(吸头)或聚碳酸酯(外壳)具有腐蚀性的液体。
•避免腐蚀性蒸汽(腐蚀风险)!
•本设备不得用于氧化酸,因为金属部件和电子设备可能会遭到腐蚀。
•如果用户对设备进行了改动,则不得再使用该设备。所有更改都需要得到制造商的明确批
准。
美国
本设备是为商业用途而设计和测试的,符合FCC规则第15B部分(HandyStep® touch和HandyStep®
touch S)和第18部分(充电座)的A类数字设备。
这些限制旨在提供合理的保护,以防止设备在商业环境中运行时受到有害干扰。本设备会产生、
使用并能辐射射频能量,如果不按照说明书的要求安装和使用,可能会对无线电通信造成有害干
扰。
在住宅区操作本设备可能会造成有害干扰。在这种情况下,用户有责任自费纠正干扰。
未经合规责任方明确批准而对本设备进行的变更或修改,可能使用户操作本设备的权力失效。
加拿大
本设备符合加拿大工业部RSS-216标准,其操作需满足以下两个条件。
1. 本设备可能不会造成干扰
2. 本设备必须接受任何接收到的干扰,包括可能导致设备不受欢迎的操作的干扰。

中文
4 预期用途
HandyStep® touch, HandyStep® touch S 997486 操作手册 213
3.7 所使用的材料
参见 所使用的材料,页246。
3.8 运输和存储
将设备、蓄电池、电源或充电座放置于干燥的空间中进行运输,同时需避免阳光直射。
4 预期用途
HandyStep® touch 和 HandyStep® touch S 表示微处理器控制的蓄电池供电手持式配液器(有触
摸操作功能)。设备将在达到额定体积之后自动识别 BRAND 生产的带有型号编码的精准配液器吸
头(PD 吸头),并且能够尽快选择体积。手动选择合适的体积后,也可以使用其他制造商的兼容
配液器吸头。
5 功能元件和操作元件
1
2
3
4
5
6
7
8
9
10
11
12
1蓄电池盒盖 2电源按键
3STEP 按键 4盖板
5多功能插口 (USB) 6背面把手件
7标识 8吸头支座
9精准配液器吸头 10 正面把手件
11 手扣斗 12 触摸显示屏

5 功能元件和操作元件
214 操作手册 HandyStep® touch, HandyStep® touch S 997486
5.1 STEP 按键
STEP 按键根据模块而触发分配液体和吸入液体。设备在触摸显示屏中发出消息,告知如何操作
STEP 按键。根据您选择的工作模式而定,可以不采取同方式操作 STEP 键。可以通过整体表面操
作 STEP 按键。分为如下几种操作方式:
短时操作 STEP 按键(“单击”)。
应用示例:
吸入液体、排出液体、中断液体吸入(取决于模式),吸
头固定或取下
连续短时操作 2 次 STEP 按键(“双击”)
应用示例:
再次填充吸头。
长按 STEP 按键
应用示例:
清空吸头、自动分配液体(在自动分配模式中)、手动滴
定(在配液模式中)。
5.2 电源按键
使用电源按键接通和关断设备。您还可以将设备设置为待机模式。
5.3 蓄电池
警告
损坏或错误的蓄电池
可能造成人身伤害
>仅使用原装蓄电池!
>仅使用原装电源!
>不得刺破、弯曲、点燃、压缩蓄电池或造成其短路或让其温度过高!
>不要裸手触摸有泄漏的蓄电池,戴上防护手套!
>根据法定规定废弃处理损坏的蓄电池!
>仅在规定的温度范围内使用蓄电池!
>遵守针对蓄电池的提示!

中文
5 功能元件和操作元件
HandyStep® touch, HandyStep® touch S 997486 操作手册 215
注意
>在第一次使用前或者长时间未使用时请为蓄电池充电。由此可避免过早损耗蓄电池。
>超过使用寿命(最长约 3 年)、变形或充电周期极短且由此导致使用时长变短时,必须更换
蓄电池。
>存放设备时请抽出蓄电池插头。
组件
1
2
3
4
1蓄电池
2触点
3反极性保护插头
4电缆
背面标签
1蓄电池型号和使用
2部件标识
3标识
4警告提示
5.3.1 连接蓄电池
A B C
打开盒盖并将反极性插头牢固地插入插座中。但您连接蓄电池之后,设备会自动接通。之后关闭
盒盖。
5.3.2 蓄电池充电
a. 将电缆连接到电源和 HandyStep® touch 上。
b. 将电源插入到插座中。
ðHandyStep® touch 蓄电池正在充电。

5 功能元件和操作元件
216 操作手册 HandyStep® touch, HandyStep® touch S 997486
5.3.3 显示屏中的显示
蓄电池工作准备继续。 蓄电池电量几乎耗尽。 蓄电池正在充电。
5.3.4 待机模式
在设备打开时短暂按下电源按键,则设备将进入待机模式,显示屏将关闭。待机模式用于延长蓄
电池使用时间。有如下方法可结束待机模式:
•按下电源按键。
•按下 STEP 按键。
•插入吸头。
5.3.5 在充电过程中工作
您可以在充电过程中继续工作。为便于进行此操作请将 USB 连接线插入设备的多功能插口中。充
电过程会相应延长。在插入 USB 连接线时,只有将蓄电池插入设备中后方可进行工作。
5.3.6 蓄电池使用时间
蓄电池使用时间描述了可以使用设备和新电池的时间段。蓄电池使用时间取决于几个因素,包
括:电池本身的状态、显示屏亮度、使用的速度设置或介质。蓄电池使用时间本身通过自动化过
程确定。
介质(示例) 蒸馏水(符合 ISO 3696 标
准)*
菜籽油 **
吸头 10 ml PD 吸头 II 25 ml PD 吸头 II
蓄电池 新的和 100% 充电 新的和 100% 充电
设备设置 速度等级 6
中等显示亮度
速度等级 4
中等显示亮度
步骤 20 个步骤,á 0.5 ml 10 个步骤,á 2.5 ml
蓄电池使用时间 约 5 小时 约 2 小时
* 正常功耗
** 最大功耗
5.4 操作元件
触摸显示屏
您可用大拇指在触摸显示屏上设置所需的数值。
STEP 按键
您可使用食指操作 STEP 按键。

中文
5 功能元件和操作元件
HandyStep® touch, HandyStep® touch S 997486 操作手册 217
5.5 电源和充电适配器
警告
可能因损坏的或错误的电源造成人身伤害
>仅使用原装通用电源和所属的充电适配器!
>使用期间不得遮盖电源!
>不得使用损坏的电源!
电源 充电适配器
中国 英国 美国 澳大利亚 / 新西
兰
欧盟
5.5.1 连接充电适配器和电源
a. 将充电适配器推到电源上,直到听到卡入声音。
ð可连接电源。
5.5.2 将充电适配器和电源松开
a. 按下按键并拔出充电适配器。

5 功能元件和操作元件
218 操作手册 HandyStep® touch, HandyStep® touch S 997486
5.6 设备支架
5.6.1 使用胶带固定设备支架
1
2
1通用支架 2带胶带的支架背面
a. 使用适当的清洁剂(不得使用渗油的家用洗涤剂)和
无绒布清洁安装表面并等待其干燥。
b. 从胶带上撕下保护膜
c. 用拇指将支架背面紧紧压在清洁表面上。第一次使用
设备时等待 72 h。
d. 将通用支架推到支架背面上。
5.6.2 将设备支架固定在圆形件中
a. 无胶带情况下,将货架夹插入到圆形件上,直到听到
卡入声。
5.6.3 将设备支架固定在支架边缘上
1
2
3
1通用支架 2下侧
3支架背侧
a. 使用适当的清洁剂(不得使用起油家用洗涤剂)和无
绒布清洁安装表面并等待其干燥。
b. 从胶带的一侧撕下保护膜。
c. 将胶带粘在底面并压紧。
d. 撕下另一侧的保护膜并将支架背侧粘贴在所需固定边
缘上。
e. 用拇指将支架背面紧紧压在安装表面上。第一次使用
设备时等待 72 h。
f. 将通用支架推到支架背面上。
5.7 充电座(配件)
警告
可能因电感应造成人身伤害
>有医疗植入物(例如心脏起搏器、医用泵)的人员必须保持安全距离。健康产业
制造商协会建议心脏起搏器距离射频源(本文中所指为充电座)至少 15 厘米。
>带有医疗植入物的人员在使用充电座之前必须咨询医生。
>如果认为医疗植入物受到影响,请增加与充电座的距离并咨询医生。

中文
5 功能元件和操作元件
HandyStep® touch, HandyStep® touch S 997486 操作手册 219
注意
通过充电座进行感应式充电
一旦连接电源后,充电座便可开始感应式充电。不得将磁性数据载体(例如信用卡)放在充电座
附近。
使用充电座
充电座需电源和 HandyStep® touch 或者 HandyStep®
touch S 的 USB 连接线。
充电座的显示
•充电座亮蓝灯:蓄电池正在充电。
•充电座不亮灯:蓄电池正在充电或者在充电座中没有
设备。
•充电座交替亮灯:蓄电池未充电。将设备重新插到充
电座中。
5.8 固定支架(配件)
固定支架用于安全存放设备。固定支架没有充电功能。
5.9 触摸显示屏的结构(工作区域)
12
3
4
5
6
7
8
9
10
11
12
13 14
1时间
2充电状态
3所使用吸头的额定体积
4吸头液位
5弹出 ( ) 或者使用 ( ) 尖端。
6调出选项
7调出主菜单 (Home)
8信息区域
9可使用的体积
10 参照可用体积的可用 STEP
11 STEP 体积
12 吸入和分配速度
13 模式名称
14 特定功能区域。
5.10 PD 吸头 II(精密配液器吸头 II)
设备自动识别带编码的吸头。

6 模式概况
220 操作手册 HandyStep® touch, HandyStep® touch S 997486
体积 [ml] 订购号 包装单位 [件]订购号
BIO-CERT®
LIQUID
HANDLING
STERILE
包装单位 [件]
0.1 705700 100 705730 100
0.5 705702 100 705732 100
1 705704 100 705734 100
1.25 705706 100 705736 100
2.5 705708 100 705738 100
5 705710 100 705740 100
10 705712 100 705742 100
12.5 705714 100 705744 100
25 705716 25+1 适配器 705746 25+1 适配器
50 705718 50+1 适配器 705748 25+1 适配器
PD 吸头套件 II
0.5
ml ...12.5ml
705720 20 — —
5.11 用于 25 ml 和 50 ml PD 吸头 II 的适配器
体积 [ml] 订购号 包装单元 标志
25 ml 和 50 ml 702398 10
25 ml 和 50 ml 702399 5 BIO-CERT® LIQUID
HANDLING STERILE
6 模式概况
模式 HandyStep® touch HandyStep® touch S
设置 + +
多次分配 (MULTI-DISP) + +
自动分配 (AUTO-DISP) + +
吸移 (PIP) + +
依次分配 (SEQ-DISP) — +
多次吸入 (MULTI-ASP) — +
滴定 — +
收藏 + +
模式 描述
设置 在“设置”模式下,可针对您的工作对设备进行设置,例如时间、显示屏亮度。
参见 设置,页226。

中文
7 操作
HandyStep® touch, HandyStep® touch S 997486 操作手册 221
模式 描述
多次分配 在“多次分配”模式中可以分步再次配液吸入的体积。应用示例:将吸入的体积
分配到 STEP 中。参见 多次分配 (MULTI-DISP),页229。
自动分配 在“自动分配”模式中可以抽吸一定体积并在之前设置的时间间隔之后自动分步
分配。应用示例:将吸入的体积自动分配到多个 STEP 中。参见 自动分配 (AUTO-
DISP) ,页231。
吸移 在“吸移”模式中可以一次性吸入之前所选的体积和再次进行配液。参见 吸移
(PIP),页233。
依次分配 (SEQ-DISP) 在“依次分配”模式中可以将吸入体积再次配液给多个此前设置的不同大小
STEPs 中。应用示例:稀释系列。参见 依次分配 (SEQ-DISP),页234
多次吸入 (MULTI-ASP)在“多次吸入”模式中将多个 STEP 汇集到同一个吸头中并且作为总体积进行抽
吸和分配。应用示例:取出剩余的剩余体积。参见 多次吸入 (MULTI-
ASP),页237。
滴定 在“滴定”模式中吸入一定体积并再次快速或慢速分配。可以在显示屏中读取配
液量。应用示例:测定 pH 值。参见 滴定,页239。
收藏 在“收藏”中保存常用设置。您可以通过该菜单再次调出收藏。参见 收
藏,页240。
7 操作
警告
可能因致病液或传染病导致健康损害。
>穿戴适当的防护装备。
>处理所述介质时请遵守国家法规、安全数据表、实验室的防护等级以及安全工作
的措施。
注意
因错误使用导致设备受损。
>仅将吸头浸入液体中
>如接触液体,请立即清洁设备。
>将设备正确竖直悬挂在随附的支架中。
7.1 接通设备
a. 按下电源按键。
ð主菜单自动打开。
开始电机初始化
如果您在很长一段时间后再次使用该设备,系统将提示您在通电后执行电机初始化:
a. 确认消息“start motor init”。
ð正在进行电机初始化
ð该设备将吸头支架移动到工作位置。
ð主菜单自动打开。

7 操作
222 操作手册 HandyStep® touch, HandyStep® touch S 997486
充电座/USB 电缆
当设备插入充电座或插入 USB 充电线时,设备会打开。待机模式结束。
7.2 关断设备
a. 排空和弹出吸头,参见 分配液体,页225 或 弹出吸头,页224
b. 按下电源按键。
ð将会询问您是否要关断设备。使用 确认。使用 取消。
c. 如果按下电源按键大约 1 s,则设备进入 待机模式。
如果按下电源按键时间超过 2 s,则将询问您是否要关闭设备。
d. 确认消息。
e. 将设备正确竖直悬挂在随附的支架中。如果将设备插入充电座中,则启动充电过程。同时充
电座的 LED 灯亮起。
如果触摸显示屏或设备没有响应,参见章节故障 - 如何处理? 从 设备特性,页242 开始。
7.3 打开工作模式
请在主菜单中选择一种工作模式。在工作模式下执行工作(例如分配)。
a. b.
a. 通过滑动选择工作模式。
b. 通过单击打开工作模式。
ð显示工作模式。
7.4 退出工作模式
a. 在工作模式中点击 按键。
ð显示主菜单。
如果吸头中有液体,将询问您是否要清空吸头或在其他工作模式下使用剩余的液体继续进行工
作。

中文
7 操作
HandyStep® touch, HandyStep® touch S 997486 操作手册 223
7.5 调出帮助文档
帮助文档能够帮助您了解工作模式或菜单中的功能相关问
题。
7.6 装入吸头
7.6.1 装入 BRAND PD 吸头
需求:
>已选择工作模式
a. 装入吸头
b. 按下 STEP 按键。吸头已与设备相连并且已设定体积。
ð再次显示工作模式:
ð可以吸入液体。
7.6.2 装入兼容的外部吸头(无编码)
c. d.
需求:
>已选择工作模式
a. 装入吸头
b. 按下 STEP 按键。
c. 设置体积。
d. 使用 按键确认选择。
ð再次显示工作模式:
ð可以吸入液体。
7.6.3 装入兼容的外部吸头(带编码)
装入吸头后,请检查是否采用了正确的吸头体积,参见 调节体积,页226 章节。
7.6.4 装入未选择工作模式的吸头
在选择工作模式之前您也可以装入吸头。设置体积或者自动识别兼容的吸头时,必须选择工作模
式。

7 操作
224 操作手册 HandyStep® touch, HandyStep® touch S 997486
7.7 弹出吸头
需求:
>您已清空吸头。
a. 带吸头的设备固定在垃圾桶上方。
b. 点击按键 ,然后按 STEP 键。
ð已弹出吸头。
ð设备移动到吸头吸入位置中。
7.8 吸入液体
注意
使用前给吸头排气
我们建议在使用前给一个新吸头排气。为此,用液体填充吸头并再次清空吸头(参见在空吸头中
填充,在吸头为空时填充吸头,页224 并中断填充,停止填充吸头,页224)。排气后,活塞区域
内的小气泡不会影响结果。
7.8.1 在吸头为空时填充吸头
需求:
>已选择一种工作模式。
>触摸显示屏显示“按下和填充 STEP”消息。
a. 将吸头垂直放入容器中。
b. 在吸入期间,确保吸头开口始终被液体覆盖,以避免吸头中出现气泡。
c. 按下 STEP 按键。
持续填充吸头,直至达到设定的体积或额定体积。
注意
返回行程(间隙补偿)
设备在填充期间执行反向行程,以便于确保 STEP 体积设置的精度。因此无需丢弃 STEP。
7.8.2 停止填充吸头
a. 请按 STEP 按键以停止填充吸头。
ð将立即停止填充。您可以使用 STEP 按键再次分配吸入液体、清空吸头或继续填充。
7.8.3 在吸头部分为空时填充吸头
a.
a. 切换到重新填充。
b. 将吸头垂直放入液体中。
c. 短按 STEP 按键 2 次。
ð持续吸入液体,直至达到额定体积。
d. 请按 STEP 按键以停止填充。
ð再次显示工作模式:您可以继续配液。

中文
7 操作
HandyStep® touch, HandyStep® touch S 997486 操作手册 225
注意
返回行程(间隙补偿)
设备在填充期间执行反向行程,以便于确保 STEP 体积设置的精度。因此无需丢弃 STEP。
7.8.3.1 自动切换为填充
在配液所有所需的 STEP 之后,将体积小于 1 STEP 的液体保留在吸头中(剩余体积)。设备自
动切换到吸头再次填充的模式中。
a. 短按 STEP 按键 2 次。
ð持续吸入液体,直至完全填充吸头。
7.9 分配液体
7.9.1 分配体积或单个 STEP
需求:
>已选择一种工作模式。
>已抽吸一定体积。
a. 将吸头靠近容器壁。
b. 设备角度为 30 ...保持与血管壁成 45°。
c. 按下 STEP 按键。
ð根据所选工作模式,或者分配 STEP 体积或者整个吸头体积。
点击 按键中断分配。
7.9.2 切换为清空
a.
a. 切换到清空。
b. 设备角度为 30 ...保持与血管壁成 45°。
c. 长按 STEP 按键。
ð将分配液体;清空吸头。
ð再次显示工作模式:可吸入新液体或弹出吸头。
7.9.3 排出剩余体积
在分配所有可用的 STEP 之后,保留在吸头中的液体小于 1 STEP 。该设备将自动切换到该模
式,以便于您排出剩余的体积。
a. 长按 STEP 按键。
ð将清空吸头。

8 设置
226 操作手册 HandyStep® touch, HandyStep® touch S 997486
7.10 调节体积
需求:
>已选择一种工作模式。
a. 点击按键 。
ð出现体积设置。
b. 通过从数值范围中选择一定体积,来选择体积。
01.00
c. d.
c. 向左或向右滑动可更改位置。
d. 向上或向下滑动可设置数值。
e. 使用按键确认设置。使用 X 按键放弃设置。
ð显示工作模式。
7.11 设置吸入和分配速度
根据相应的应用调整速度。
需求:
>已选择一种工作模式。
a. 点击按键 。
ð出现速度设置。
b. 从数值范围 1 ...8 中选择一个吸入和分配速度。
1 = 慢速,4 = 中速,8 = 快速
c. 您设置不同的吸入和分配速度。
d. 使用 按键确认选择。使用 按键放弃选择。
ð再次显示工作模式。
8 设置
将设备用于日常用途。在主菜单中,点击“设置”。
8.1 语言
设置显示屏语言和帮助语言。可供选择的语言有德语、英语、法语、西班牙语和中文。

中文
8 设置
HandyStep® touch, HandyStep® touch S 997486 操作手册 227
8.2 设备
设置设备名称。请使用食指将字母拖放到白色条中,以便
于选择字母。请向左或向右滑动,以便于切换位置。设备
名称可以包含数字、特殊字符和字母。
请点击 ABC 按键,以便于输入大写字母。
请点击 abc 按键,以便于输入小写字母。
插入数字和特殊字符,点击 123 按键。可选择下列特殊字
符:加号、减号、下划线、逗号、句号、空格(位于数字
9 和减号之间)。
8.3 日期 / 时间
设置日期、时间以及时间和日期格式。
请点击按键 以退出该功能。
时间和日期格式的缩写(括号中为数值范围):
小时 hh (00 ...23) h (0 ...23)
分钟 mm (00 ...59) m (0 ...59)
天DD (01 ...31) D (1 ...31)
月MM (01 ...12) M (1 ...12)
年YYYY (2019 ...2050) YY (19 ...50)
8.4 显示
亮度 使用滑动开关调节亮度。
屏幕超时 设置时间,直到显示器首先变暗,然后关闭。
自动断电 设置设备是否在 60 分钟待机后自动关闭。
8.5 声音
注意
事件声
当发生事件时,设备会再次发出声音。无法关闭事件声。
提示音 启用是否在程序事件中发出声音。
STEP 按键声音 如果在按下 STEP 键时发出声音,请启用此选项。

8 设置
228 操作手册 HandyStep® touch, HandyStep® touch S 997486
8.6 信息 / 关于
版本 固件版本
日期 生成固件的日期。
引导装载程序 软件工具
8.7 监管提示
许可证信息可通过此菜单项找到。
8.8 校准
1
2
3
4
1激活提醒
2不合逻辑的输入显示为红色。该情况下,是指未来最
近的检查日期。
3设置最近检查设备的日期
4设置检查设备的下一个日期。
需求:
>刚刚检查了设备,并希望提醒您下一次设备检查日期。您可以确保定期检查您的设备。
a. 设置上次检查的日期。该时间点可以是过去,现在或将来。
b. 设置下次检查日期。该时间点必须是未来的时间。
c. 通过滑动开关激活提醒。
ð当检查间隔到期时,显示器上会显示一条提醒您重新检查设备的信息。
ð最好在检查完成后立即设置此数据。
ð如果上次校准日期在当前日期之后,则显示为红色。
ð如果未来校准日期早于当前日期,则显示为红色,无法激活提醒。
8.9 出厂设置
可以在此菜单项下将设备重置为出厂设置。
注意
出厂设置
出厂设置覆盖用户在“设置”菜单和所有可用工作模式中的所有设置。该过程不能逆转!

中文
9 多次分配 (MULTI-DISP)
HandyStep® touch, HandyStep® touch S 997486 操作手册 229
8.10 开启 / 关闭吸头识别
如果您不使用 BRAND 吸头或兼容吸头,您可关闭自动吸头识别,以便更快地调节体积。
8.11 键盘
1
2
3
5
6 4
1可用数值范围
2单位选择
3逐个删除输入字符
4输入逗号
5放弃输入
6应用输入
在不同的工作模式下通过键盘输入数值(例如,体积)。
从左到右与逗号一起输入数值。根据可用数值范围和可能
的 STEP 时间间隔,最多可以输入至小数点后 3 位,其中
小于或大于显示值范围的数值不能接受。
9 多次分配 (MULTI-DISP)
模式的功能参见 模式概况,页220。体积、速度和所有模式中相同的其他操作步骤的设置参见 操
作,页221。
9.1 吸入液体
需求:
>使用按键设置 STEP 体积。
a. 将吸头垂直放入容器中。
b. 在吸入期间,确保吸头开口始终被液体覆盖,以避免
吸头中出现气泡。
c. 按下 STEP 按键。
ð设备继续抽吸液体,直至达到设置的体积或额定体
积。
图标 显示可用 STEP 的数量。
图标 显示可用体积。
9.2 中断并继续吸入液体
9.2.1 中断吸入液体
a. 请短按 STEP 按键停止吸入液体。

9 多次分配 (MULTI-DISP)
230 操作手册 HandyStep® touch, HandyStep® touch S 997486
9.2.2 继续吸入液体
a. 点击按键 。
b. 短按 STEP 按键 2 次。
ð设备吸入液体。
9.3 分配液体
需求:
>分配体积或单个 STEP,参见 分配体积或单个
STEP,页225。
a. 按下 STEP 按键后,待分配 STEP 的数量减少 (
)。
9.4 处理剩余体积
对剩余体积的处理参见 切换为清空,页225 和 吸入液体,页224。
9.5 预选 STEP 次数
1
2
3
1打开 / 关闭 STEP 预选。
2打开 STEP 预选。
3预选 STEPs。
您可预选 STEPs 数量。预选 STEPs 数量取决于使用的吸
头体积和设置体积。如果增加了一个 STEP 体积,可预选
STEPs 数量会减少,反之亦然。
预选 STEP 次数
a. 点击按键 。
b. 将所需数字拖动到白色单元格中。
c. 通过 确认选择。
ðSTEP 预选激活。
如果现在吸入液体,将吸入初选所需的液体。如果吸头中
有比预选更多的液体,您可以在完成预选 STEPs 后继续工
作或分配体积。

中文
10 自动分配 (AUTO-DISP)
HandyStep® touch, HandyStep® touch S 997486 操作手册 231
9.6 选项
a. 在工作模式中点击图标 。
ð出现选项菜单。
选项 含义
添加到收藏 将执行设置添加到收藏。您可以通过主菜单 > 收藏重新调出这
些设置。
预定 STEP 数量 预选 STEP 数量。
进入到自动分配 切换到自动分配模式。在“多次分配”模式中设置的体积也将
设置到自动分配模式中。
工作模式帮助 出现模式帮助。
10 自动分配 (AUTO-DISP)
模式的功能参见 模式概况,页220。体积、速度和所有模式中相同的其他操作步骤的设置参见 操
作,页221。
10.1 自动分配液体
需求:
>您已手动或自动设置暂停时间(液体配液之间的间隔)。
>吸头充满了液体。
a. 长按 STEP 按键。
ð如果长按 STEP 按键或在吸头上存在足够液体,则将自动分配液体。
ð在液体配液期间,在触摸显示屏中倒计暂停时间。
ð在触摸显示屏中显示剩余的 STEP。
10.2 优化分配时长
分配液体时长由您定义的分配时间间隔和分配速度确定。请调整两个参数,以优化液体配液情
况。
•分配速度,参见 设置吸入和分配速度,页226。
•分配时间间隔,参见 手动设置暂停时间,页232。

10 自动分配 (AUTO-DISP)
232 操作手册 HandyStep® touch, HandyStep® touch S 997486
10.3 手动设置暂停时间
a. 点击按键 。
b. 设置暂停时间。
c. 使用 按键确认设置。
ð设定了暂停时间。如果在下次分配液体时长按 STEP
按键,在暂停时间结束后分配液体。
或者,您也可以使用示教功能。
10.4 自动设置暂停时间(示教功能)
设备使用示教功能计算 3 次或更多液体分配的平均暂停时间。如果用户在完成示教功能后按下
STEP 按键,则设备会在测定暂停时间结束后自动分配液体。因此,用户可以更容易地处理重复的
计量任务。设置暂停时间也更容易,因为确定了当前计量任务的暂停时间。
10.4.1 执行示教功能
a.
c.
需求:
>您已经填充吸头。
a. 按下 按键。
ð已激活示教功能。通过图标 … 显示。
b. 短按 STEP 按键以至少分配 3 次液体。
ð您可以长按 STEP 按键以直接分配液体。只要示教功
能未结束,获得的暂停时间会改变。
c. 点击按键 …终止示教功能。
ð在图标 附近出现测定时间。
你也可将示教的暂停时间放在收藏中。
10.4.2 示教功能的其他通道
a. 通过按键 调用选项。
b. 向右 滑动开关。
c. 使用按键 返回工作菜单。

中文
11 吸移 (PIP)
HandyStep® touch, HandyStep® touch S 997486 操作手册 233
ð通过图标显示示教功能 … 。
10.4.3 重新启动示教功能
如果在工作中确定的暂停时间过长或过短,则您可以重新启动示教功能。您也可以选择手动调整
暂停时间。
10.4.4 缩短或终止示教功能
在第一次按下 STEP 按键时,开始 10 秒倒计时。完成该过程后将自动结束示教功能。
•点击 X 按键以结束示教功能。
•在保持按下 STEP 按键的同时,在排出液体后要停止示教功能,请单击按键 … 。
•请长按 STEP 按键以使用测定的暂停时间直接进行工作。
10.5 处理剩余体积
对剩余体积的处理参见 切换为清空,页225 和 吸入液体,页224。
10.6 选项
a. 在工作模式中点击图标 。
ð出现选项菜单。
选项 含义
添加到收藏 编辑单个分配步骤之间的时间。
获得暂停时间 启动示教功能。
进入到多次分配 切换到多次分配工作模式。在“自动分配”模式中设置的体积也
将设置到多次分配模式中。
工作模式帮助 出现模式帮助。
11 吸移 (PIP)
模式的功能参见 模式概况,页220。体积、速度和所有模式中相同的其他操作步骤的设置参见 操
作,页221。
11.1 调节体积
需求:
>已选择工作模式。
a. 点击按键 。
b. 设置体积。

12 依次分配 (SEQ-DISP)
234 操作手册 HandyStep® touch, HandyStep® touch S 997486
11.2 填充吸头
需求:
>已设置体积。
>触摸显示屏显示“填充步骤”消息。
a. 将吸头垂直放入容器中。在吸入期间,确保吸头开口
始终被液体覆盖,以避免吸头中出现气泡。
b. 按下 STEP 按键。
ð持续填充吸头,直至达到设置的 STEP 体积或吸头的
额定体积。
请按 STEP 按键以停止填充。
11.3 分配液体和停止分配液体
a. 按下 STEP 按键。
ð已清空吸头。
点击按键 X 以中断分配液体。
11.4 处理剩余体积
对剩余体积的处理参见 切换为清空,页225 和 分配液体,页225。
11.5 选项
a. 在工作模式中点击图标 。
ð出现选项菜单。
选项 含义
添加到收藏。 将所选设置添加到“收藏”菜单中。您可以通过主菜单 > 收藏
重新调出这些设置。
工作模式 出现模式帮助。
12 依次分配 (SEQ-DISP)
模式的功能参见 模式概况,页220。体积、速度和所有模式中相同的其他操作步骤的设置参见 操
作,页221。

中文
12 依次分配 (SEQ-DISP)
HandyStep® touch, HandyStep® touch S 997486 操作手册 235
12.1 依次分配详情
2
4
5
6
7
1
3
1等分试样列表的总体积
2之前分配的 STEP。
3当前分配的 STEP。
4将在下一次分配的 STEP。
5将在下一次分配的 STEP 的数量。
6在等分试样列表中规定的 STEP 的数量。
7吸头中存在的体积。
在“依次分配”工作模式中,您可以配液一系列不同或相等体积的液体。将该体积命名为等分试
样并通过等分试样列表定义(1...10 等分试样)。在工作模式中您可查看等分试样列表中的最多
3 个条目。这些条目标识有井号 (#),即前一个、当前和下一个条目。如果配比了一种等分试
样,清单中的示数向下移动 (1, #2, #1, 2, #3 #2, 3, #4 ...#10)。只有在吸入充
足的体积之后,才会进行配液。
如果等分试样量超过吸头体积,您可以重新吸入液体并继续分配。
如果等分试样量低于吸头体积,将吸入所输入等分试样列表中的所需液体量。
如果取消等分试样(显示屏上的按键 X),则将此等分试样计算为未分配。同时将输出一条事件
消息。程序跳转至列表中的下一个等分试样。如果等分试样结束时吸头中没有足够的液体,则设
备当前仅吸入完成等分试样所需的液体量。
配液第一份等分试样后,无法更改等分试样列表。只有在完成分配后,您才能够再次编辑等分试
样列表。
12.2 创建等分试样列表
你可输入 1...10 个等分试样。
需求:
>可以在工作模式中找到该项。
a. 点击按键 。
ð显示等分试样列表。
b. 点击 '+'图标。
ð已将等分试样添加到列表中。

12 依次分配 (SEQ-DISP)
236 操作手册 HandyStep® touch, HandyStep® touch S 997486
12.3 编辑等分试样列表
a. 点击一条列表条目。
ð出现文本菜单。
加工 编辑所选的列表条目。操作方法参见
调节体积,页226。
添加 将列表条目添加到列表末尾。将上一
条列表条目的数值预设为等分试样数
值。
插入 将一个列表条目添加到所点击列表条
目的位置处。列表条目添加到所点击
列表条目的上方。将所点击列表条目
的数值预设为等分试样数值。通
过“编辑”功能编辑该数值。
删除 删除所选的列表条目。您可以将列表
删除至只剩一条条目。
12.4 分配液体
需求:
>可以在工作模式中找到该项。
a. 按下 STEP 按键。
ð将配液第一条等分试样条目中的体积。
ð同时从等分试样列表中选择下一个体积。下次按 STEP 按键时配液该体积。
12.5 中断和结束等分试样
a. 请点击 或 按键。
ð结束当前等分试样。
12.6 选项
a. 在工作模式中点击图标 。
ð出现选项菜单。
选项 含义
“编辑等分试样列表”编辑等分试样列表。
“工作模式”出现模式帮助。

中文
13 多次吸入 (MULTI-ASP)
HandyStep® touch, HandyStep® touch S 997486 操作手册 237
13 多次吸入 (MULTI-ASP)
模式的功能参见 模式概况,页220。体积、速度和所有模式中相同的其他操作步骤的设置参见 操
作,页221。
13.1 多次吸入详情
5
1
2
3
4
1切换填充模式。将在该位置显示所选填充模式。
2设置的体积
3可用 STEP
4吸入的体积
5在分配液体和吸入液体之间进行切换。如果没有达
到额定体积,您也可以切换至分配液体。您也可以
在中断之后继续填充吸头。
13.2 准备液体吸入
需求:
>吸头是空的,在液体外侧
a. 按下 STEP 按键。
b. 吸头活塞移动到起始位置。
c. 选择填充模式 。
d. 长按 STEP 按键。
ð液体被吸入。
13.3 填充模式
在“多次吸入”工作模式中您可以使用同一个吸头吸入不同的液体。有 3 种吸入模式可选:
“手动”填充模式
在填充模式中您可通过 STEP 按键控制液体的吸入情况。
在长按 STEP 按键期间,您可以吸入液体。在松开 STEP
按键或者达到额定体积时,将停止吸入液体。
填充模式“Step 体积”
在“Step 体积”填充模式下,在液体吸入之前设置 STEP
体积。在每次按下 STEP 按键时将设置吸入的体积,并且
持续吸入,直至达到额定体积。

13 多次吸入 (MULTI-ASP)
238 操作手册 HandyStep® touch, HandyStep® touch S 997486
“依次”填充模式
在“依次”填充模式中,您可以通过等分表(1...10 等分
试样)。在表格中可定义该运行模式中依次吸入不同的体
积。在每次按下 STEP 按键时将吸入当前体积。程序切换
到等分试样列表中的下一个体积,并且持续吸入,直至吸
入完所有预设的等分试样。在工作模式中您可查看等分试
样列表中的最多 3 个条目。这些条目标识有井号 (#),即
前一个、当前和下一个条目。如果加入了一种等分试样,
列表中的示数向下移动 (1, #2, #1, 2, #3 #2, 3,
#4 ...#10)。如果达到需要的体积或额定体积,设备自动
切换到分配液体。
13.4 分配液体
您可以通过 和 按键在接收液体和分配液体之间进行来回切换。
a. 点击按键 。
ð持续出现消息‘STEP 排空”。
b. 长按 STEP 按键以分配液体。
请点击 X 按键取消分配液体。如果尖端清空,则程序再次切换到吸收液体。
13.5 创建和编辑用于吸入液体的等分试样列表
a. 选择“依次”填充模式。
b. 选项 > 选择“编辑等分试样”或点击 #1...#10。
c. 创建和编辑等分列表,如在 编辑等分试样列表,页236 下在依次分配工作模式中编辑。
13.6 切换工作模式
a. 点击按键 。
b. 如果吸头已填充,会显示一条消息,表示您是否切换已填充吸头模式。
c. 如果还有剩余液体,会显示一条消息,是否要丢弃液体。确认消息后,液体将被分配。
13.7 选项
a. 在工作模式中点击图标 。
ð出现选项菜单。

中文
14 滴定
HandyStep® touch, HandyStep® touch S 997486 操作手册 239
选项 含义
编辑等分试样 编辑等分试样列表。
选择填充模式 选出填充模式。
工作模式帮助 出现模式帮助。
14 滴定
模式的功能参见 模式概况,页220。体积、速度和所有模式中相同的其他操作步骤的设置参见 操
作,页221。
14.1 滴定详情
1
2
3
4
5
1在滴定模式“手动”和“STEP 体积”之间切换。
2设置 STEP 体积。可能在滴定模式“STEP- 体
积”中。
3已经滴定的体积。
4吸头中剩余的液体量。
5丢弃剩余液体量或者吸入液体。
在滴定工作模式中,将液体(标准溶液)配液到另一种液体(样品)中,以便进行例如观察颜色
变化的操作。该操作可使用 2 种不同的滴定模式:
“手动”滴定模式
在“手动”滴定模式中您可通过 STEP 按键控制分配液体情况。在长按 STEP 按键期间,您可以
分配液体。当您松开 STEP 按键或者在吸头配液了当前的体积时,停止分配液体。每次释放 STEP
按键时,分配速度降低一个等级(等级 8,等级 7,等级 6...等级 1)。您可例如更容易接近颜
色变化点。
“STEP-体积”滴定模式
在滴定模式 STEP 中您可在分配液体之前确定 STEP 体积。在每次按下 STEP 按键时配液设置的
体积。此外,在每次按下 STEP 按键时配液速度都会降低。
保存体积
使用此功能,您可以将上次设置的体积保存到列表中。可使用相同的体积设置进行相同的滴定,
您可以更快地接近颜色变化点。查看列表,参见 选项,页240。
14.2 滴定
在下文中通过 pH 值测定过程颜色变化举例对工作模式用法进行说明。您可以按下按键 或
切换为滴定模式。

15 收藏
240 操作手册 HandyStep® touch, HandyStep® touch S 997486
需求:
>您需要一个透明的容器(例如锥形瓶)以及测定 pH
值所需的液体。
a. 选择模式 ,以便于首先分配较大的液体量。通过
按键 可降低分配速度。
b. 吸入液体。将设备垂直放在锥形瓶上方。
c. 如果要连续分配液体,请按住 STEP 键。
d. 观察溶液浸入到样品中。请靠近颜色变化点,切换到
模式 中。
ð颜色变化点特征在于溶液中的第一个颜色条纹。
e. 点击按键 。设置所需体积。
f. 通过短时间按下 STEP 按键,逐滴配液溶液,直到达
到颜色变化。
14.3 选项
a. 在工作模式中点击图标 。
ð出现选项菜单。
选项 含义
添加到收藏 将执行设置添加到收藏。您可以通过主菜单 > 收藏重新调出这些
设置。
手动 / STEP 体积 切换滴定模式
显示上一个体积 显示最近一次滴定量。
工作模式帮助 出现模式帮助。
显示上一个体积
列表显示您最近保存的最后 5 个体积。新存储体积将添加
到顶部,旧体积将删除。
15 收藏
您可以通过收藏保存设置,以便日后再次调用,例如体积或速度设置。

中文
15 收藏
HandyStep® touch, HandyStep® touch S 997486 操作手册 241
15.1 收藏详情
2
5
4
3
1
1. 收藏图标表示保存收藏的工作模式。
2. 此行显示收藏的名称
3. 该数值显示保存在收藏中的设置。
4. 弹出或放入吸头。
5. 显示帮助。
15.2 创建收藏
需求:
>打开了一个工作模式。
a. 点击按键 。
b. 选择“添加到收藏”选项。
c. 命名。
d. 点击按键 。
ð收藏将添加到“收藏”菜单中“收藏”列表的末尾。参见 收藏详情,页241。
15.3 打开收藏
a. 在“收藏”菜单中。
b. 点击收藏列表中的条目,然后选择“打开”。
ð在相应的工作模式下打开设置。
收藏设置和吸头体积彼此不同
每个收藏适用于一个吸头体积。如果您打开一个收藏,并且放入吸头存储在收藏中的体积不同,
系统将提示您放入正确的吸头。然后,您可以丢弃现有的吸头并装入另一个吸头。
15.4 删除收藏
删除单个收藏
需求:
>在“收藏”菜单中。
a. 点击收藏列表中的条目,然后选择“删除”。
b. 确认查询。
ð所选收藏将被删除。

16 清洁和消毒
242 操作手册 HandyStep® touch, HandyStep® touch S 997486
删除所有收藏
需求:
>在“收藏”菜单中。
a. 点击收藏列表中的条目,然后选择“全部删除”。
b. 确认查询。
ð收藏列表将被删除。
16 清洁和消毒
16.1 清洁
注意
不可对该仪器高压灭菌
仪器出厂前已经过校准且无需维护。
如果脏污,请用湿布从外面清洁仪器。请使用水或稀释的肥皂溶液。避免使用腐蚀性或刺激性清
洁剂。
不得拆卸仪器。
16.2 紫外线消毒
该设备耐受紫外线杀菌灯的常用功率。照射紫外线后颜色可能会变化。
紫外线杀菌建议:
光谱 UV-C
波长 220 nm ...270 nm
每厘米 2 的照射时长和目标灭活度 2 s ...300 s
17 故障 - 如何处理?
17.1 设备特性
故障 可能的原因 如何应对?
蓄电池充电周期严重
缩短。
蓄电池老化或者损坏。 更换蓄电池。
设备无法充电。 如果蓄电池太冷或太
热,则蓄电池无法充
电。
拔出蓄电池插头。
将蓄电池加热或冷却至室温。
插入蓄电池插头。重新尝试充电。

中文
17 故障 - 如何处理?
HandyStep® touch, HandyStep® touch S 997486 操作手册 243
故障 可能的原因 如何应对?
如果不连接电源,可
用时长严重缩短。
蓄电池老化或者损坏。 更换蓄电池。
充电时电源适配器会
迅速升温。
蓄电池老化或者损坏。
电源损坏。
USB 连接线损坏。
更换相关的部件。
设备无法充电。 电源损坏。
USB 连接线损坏。
电池插头已拔掉。
蓄电池电缆破损。
设备到充电座的距离太
大
更换相关的部件。
插入电池插头。
将装置再次放入充电座内,
显示屏亮度过大或过
小。
显示屏亮度设置错误。 调整亮度,参见 显示,页227
当设备放在充电座上
时,显示屏变为白
色。
设备无法启动。电池插
头已拔掉。
插入电池插头。
在使用设备工作时无
法发出提示音。
提示音已关闭。 打开提示音,参见 声音,页227
触摸显示屏没有反
应。
程序中断。 如果电池在程序崩溃后重新配对并重新连接,则
设备将启动。同时出现一条消息,表明设备中可
能仍有一个吸头。因此,将设备悬挂在支架上,
并在吸头下方放置一个合适的容器,或在启动时
将设备固定在适当的容器上方。
补救措施:
打开盖子,拔下蓄电池插头,等待 5 秒钟后再重
新插上蓄电池插头。在蓄电池电量充足后设备将
启动。
吸头滴水。 吸头不密封。 更换吸头。
无法识别吸头。 编码损坏
没有编码的吸头。
弹出吸头并重新装入吸头。
使用新的或编码的吸头。
在充电座附近发生干
扰 (EMC)。
由于传输功率很小,
所以不可能出现干
扰。
充电座在充电过程中出
现干扰。
增加受干扰设备与充电座之间的距离。
将设备重新插到充电座中。
确保充电座和设备之间没有异物。
17.2 系统消息
示例: 设备通过系统消息发出信号,告知已缩短特定的程序序
列。系统消息告知用户,哪些选项可用于下一步操作。

18 检查体积
244 操作手册 HandyStep® touch, HandyStep® touch S 997486
17.3 显示屏中的事件消息
设备通过事件消息发出信号,告知设备与规定的状态不一致。事件消息告知用户,哪些选项可用
于下一步操作。
在出现事件消息时,您可以继续使用设备进行工作。该事件消息发出信号,告知设备无法执行计
划的任务。示例:蓄电池电量过低。
“错误”事件消息表示出现一个技术问题。 如果在重新启动后和相同活动后再次出现此事件消
息,则无法再保证设备的精度和功能是否正常。示例:电机卡止。
如果重复出现相同的事件消息,请联系 BRAND。
18 检查体积
18.1 检查说明 (SOP)
https://www.brand.de/sop
有关校准的更多信息请参见 校准,页244。
18.2 PD 吸头密封性检查
a. 装入新的 PD 吸头。
ð自动识别 PD 吸头 或针对兼容的配液器吸头选择体积大小。
b. 更改待配液的体积。
c. 填充 PD 吸头。
d. 将 PD 吸头浸入测试液体中。必须均匀地抽吸液体。设备垂直朝下约 10 秒:如果产生液
滴,则注意下表中的提示。
无法识别吸头 无编码 / 编码损坏或未正
确装入的吸头
装入新的或再次装入吸头,
选择体积大小
吸头滴液 吸头不密封 装入新的吸头
19 校准
如果密封性检查(参见 检查体积,页244)成功完成,可通过测量重量确定设备是否在 ISO 8655
规定的极限值范围内。为此所需的检查方法参见检查说明 (SOP)。

中文
20 技术参数
HandyStep® touch, HandyStep® touch S 997486 操作手册 245
20 技术参数
20.1 精度表
使用 BRAND 的 PD 吸头 II 进行测量。
使用液体蒸馏水作为样品液体。
额定体积是在 PD 吸头上压印的最大体积。
不得超过在 ISO 8655 中确定的公差。
精度 R*≤±% 变化系数 VK
标称量程 标称量程
PD 吸
头
体积范围 细分 100 % 50 % 10 % 1 % 100 % 50 % 10
%
1
%
0.1ml 1 µl ...100 µl 0.1 µl 1.0 1.0 1.6 8.0 0.5 1.0 2.0 12.0
0.5ml 5 µl ...500 µl 0.1 µl 0.9 0.9 1.0 5.0 0.3 0.6 1.0 5.0
1ml 10 µl ...1 ml 1.0 µl 0.6 0.9 1.0 5.0 0.3 0.5 0.8 4.0
1.25m
l
12.5
µl ...1.25ml
0.5 µl 0.6 0.6 0.9 5.0 0.15 0.5 0.7 4.0
2.5ml 25
µl ...2.5ml
1.0 µl 0.5 0.6 0.7 3.5 0.15 0.3 0.6 3.0
5ml 50 µl ...5ml 1.0 µl 0.5 0.5 0.7 3.5 0.15 0.4 0.7 3.0
10ml 100
µl ...10ml
10 µl 0.4 0.5 0.7 3.5 0.15 0.5 0.8 4.0
12.5m
l
125
µl ...12.5ml
5.0 µl 0.5 0.5 0.8 3.5 0.15 0.6 1.4 6.5
25ml 250
µl ...25ml
10 µl 0.5 0.5 0.6 3.0 0.15 0.3 1.0 6.0
50ml 500
µl ...50ml
10 µl 0.5 0.5 0.5 3.0 0.15 0.4 1.2 9.0
20.2 使用限制条件
使用范围 *) 15 °C ...40°C
(59 °F ...104°F)
蒸汽压力 最大 500 mbar
粘度 50 ml PD 吸头的 20 mPa s
5 ml PD 吸头的 260 mPa s
1.25 ml PD 吸头的 977 mPa s
*) 其他温度可供选择

20 技术参数
246 操作手册 HandyStep® touch, HandyStep® touch S 997486
20.3 所使用的材料
设备 PC/PBT、PP、硅胶、玻璃、PEEK
吸头/活塞 PE/PP(尺寸 0.1 mm LCP/PP)
20.4 蓄电池
型号 锂离子蓄电池
容量 1650 mAh
电压 3.7 V
功率 6.11 Wh
储存 0 °C ...35°C
充电时间 大约 6 小时。充电时间取决于通过电源还是充电座充
电。
重量 40 g
20.5 充电座
入口处 DC 5.0 V 1.4 A, 7.0 W
传动系统 3.5 W, 110 kHz ...205 kHz
20.6 通用电源
输入端 AC 100 ...240 V ~ 50 Hz/60 Hz, 0.5 A
输出端 DC 5.0 V 1.4 A,7.0 W
20.7 产品和蓄电池上的标识
识别 意义
通过这个标志,我们确认产品符合欧共体指令中规定的要求,并经过了规定
的测试程序。
UKCA: United Kingdom Conformity Assessed
通过这个标志,我们确认该产品符合 UK Designated Standards 中规定的要
求。
DE-M 21
该设备已获得德国测量和校准法案以及测量和校准条例的标识。
带一个矩形框的字符串 DE-M(DE 表示德国),以及年份的后两个数字(此
处:2021)。
XXFFFFF 序列号

中文
21 订购信息
HandyStep® touch, HandyStep® touch S 997486 操作手册 247
识别 意义
请遵守设备、附件和使用说明书中的说明。
阅读使用说明书。
必须专业地处理废弃设备或蓄电池。
(此处:40年)
中国RoHS(EFUP)
EFUP定义了电子电气设备所含有害物质在正常工作条件下不泄漏或不变化的
年限。在用户正常使用的情况下,这类电子电器产品不会造成严重的环境污
染、严重的人身伤害或用户财产损失。
直流电压
~ 交流电
仅适用于室内使用
不得将电气设备与生活垃圾一起清理。
电气设备不得与生活垃圾一起处理。
2ATKA-HST7052X0
2ATKA-HSTC705220
美国 FCC 认证编号
IC: 25139-
HSTC705220
HVIN:
HW_HSTC01.00
加拿大 ISED 认证编号
21 订购信息
https://shop.brand.de/en/

21 订购信息
248 操作手册 HandyStep® touch, HandyStep® touch S 997486
21.1 设备
名称 插图 订购号
HandyStep® Touch,通用支架、通用电
源、充电适配器、锂离子电池
705200
HandyStep® Touch S,通用支架、通用
电源、充电适配器、锂离子电池
705210
21.2 配件
订购信息 图片 订单号
充电站(全球范围内,印度除外)。 705220
充电底座(印度)。 705223
支撑架 705230
锂离子电池,用于 HandyStep® touch 和
HandyStep® touch S
705225
通用支架,用于 HandyStep® touch 和
HandyStep® touch S
705235
适用于HandyStep® touch和HandyStep® touch S
的通用电源,包括充电线和国家适配器。
705250
适用全球的通用充电座 HandyStep® touch(印
度除外)
705201

中文
22 维修
HandyStep® touch, HandyStep® touch S 997486 操作手册 249
订购信息 图片 订单号
适用全球的通用充电座 HandyStep® touch(印
度除外 )
705211
带印度充电座的 HandyStep® touch 705203
带印度充电座的 HandyStep® touch S 705213
21.3 耗材
21.3.1 PD 吸头 II(精密配液器吸头 II)
设备自动识别带编码的吸头。
体积 [ml] 订购号 包装单位 [件]订购号
BIO-CERT®
LIQUID
HANDLING
STERILE
包装单位 [件]
0.1 705700 100 705730 100
0.5 705702 100 705732 100
1 705704 100 705734 100
1.25 705706 100 705736 100
2.5 705708 100 705738 100
5 705710 100 705740 100
10 705712 100 705742 100
12.5 705714 100 705744 100
25 705716 25+1 适配器 705746 25+1 适配器
50 705718 50+1 适配器 705748 25+1 适配器
PD 吸头套件 II 0.5
ml ...12.5ml
705720 20 — —
21.3.2 用于 25 ml 和 50 ml PD 吸头 II 的适配器
体积 [ml] 订购号 包装单元 标志
25 ml 和 50 ml 702398 10
25 ml 和 50 ml 702399 5 BIO-CERT® LIQUID
HANDLING STERILE
22 维修
22.1 送修
注意
法律明确禁止在未经许可的情况下运输有害材料。

23 校准服务
250 操作手册 HandyStep® touch, HandyStep® touch S 997486
彻底清洁仪器并清除污染物!
•寄回产品时,原则上须附上故障类型与所使用介质的准确描述。如果缺失所使用介质的相关
信息,仪器将不能得到维修。
•仅发送不含蓄电池的仪器。
•寄回仪器的风险和费用由寄件人承担。
在美国和加拿大之外
将“无健康危害声明”填写完整,并和仪器一同发送给您的经销商或制造商。可以向经销商或制
造商索要表格,也可以从 www.brand.de 主页下载。
在美国和加拿大以内
在返修仪器之前,请联系 BrandTech Scientific, Inc. 确认寄回仪器需满足的各项前提。
只接受已清洁并已去除污染物的仪器,将和返修授权码一同告知您地址。将返修授权码标在包装
外侧的显眼位置。
联系地址
德国:
BRAND GMBH + CO KG
Otto-Schott-Straße 25
97877 Wertheim (Germany)
电话 +49 9342 808 0
传真 +49 9342 808 98000
www.brand.de
美国和加拿大:
BrandTech® Scientific, Inc.
11 Bokum Road
Essex, CT 06426-1506 (USA)
电话 +1-860-767 2562
传真 +1-860-767 2563
www.brandtech.com
印度:
BRAND Scientific Equipment Pvt.Ltd.
303, 3rd Floor, ‘C‘ Wing, Delphi
Hiranandani Business Park,
Powai
Mumbai–400 076 (India)
电话 +91 22 42957790
传真 +91 22 42957791
www.brand.co.in
中国:
普兰德(上海)贸易有限公司
广汽文化广场 B 栋
506 室,
斜土路2899 号光启
上海 200030(中华人民共和国),邮编
200030
电话 +86 21 6422 2318
传真 +86 21 6422 2268
www.brand.cn.com
23 校准服务
ISO 9001 和 GLP 指令要求对您的体积测量设备进行定期检查。我们建议每 3-12 个月进行一次
体积检查。周期取决于设备的个性化要求。对于高频率使用或使用腐蚀性介质的情形,应更频繁
地进行检查。
可从 www.brand.de 或 www.brandtech.com 下载详细的检查说明。

中文
24 关于您的实验设备的信息
HandyStep® touch, HandyStep® touch S 997486 操作手册 251
此外,BRAND 还为您提供下列方案:通过我方工厂校准服务或者由 BRAND-DAkkS 实验室对您的设
备进行校准。您只需向我们寄送需要校准的设备和所需的校准类型在数日后您将收到设备和检查
报告(工厂校准)/DAkkS 校准单有关更多信息请直接联系您的经销商或 BRAND。订购表格可从
www.brand.de 下载(参见技术文档)。
24 关于您的实验设备的信息
在线服务 MyProduct (https://www.brand.de/myproduct) 为您的实验设备 HandyStep® touch.提
供质量证书、附件和技术文档。在此处输入序列号和产品编号,您将收到有关您的个人设备的信
息。
此外,您还会在设备上找到一个数据矩阵代码。请使用一个常用的读取应用程序扫描该代码,从
而通过 URL https://www.brand.de/myproduct 调取所述信息。
25 缺陷责任
我们不承担由于不当拿取,使用,服务,操作或未授权的仪器维修产生的 结果,我们同样不承担
由于正常易损件如活塞,密封垫圈,阀门的磨损或 者玻璃破损而产生的结果。我们也不承担由于
不按照操作手册/使用说明指 导的操作而产生的结果。我们不承担由于进行任何操作手册未描述
的拆卸 或由于非原装配件的使用而产生的结果。
美国和加拿大:
有关保修责任的 信息 请参见 www.brandtech.com。
26 废弃处理
相邻图标表示,必须在电池 / 蓄电池和电子设备使用寿命
结束时将其与生活垃圾(未分类的城市垃圾)分开清理。
根据欧洲议会和理事会 2012.7.04 关于废弃电气和电子设备的 2012/19/EC 指令,必须按照国家
废物处理法规专业处理废弃电子设备。
蓄电池含有可能对环境和人类健康造成危害的物质。根据欧洲议会和理事会 2006.9.6 关于电池
和蓄电池的 2006/66/EC 指令,必须根据国家废弃处理法专业处理废弃电池和蓄电池。废弃处理
时必须将电池和蓄电池完全放电。
保留进行技术变更、出错和打印错误的权利。
26.1 处理废弃蓄电池
警告
因蓄电池过热可能造成爆炸和失火危险!
不得将蓄电池短路以进行放电。
•用胶带包裹插头,以避免在清理时发生短路。
•切勿拆开蓄电池。

997486 | Printed in Germany | 5-0821-3
-
 1
1
-
 2
2
-
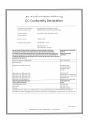 3
3
-
 4
4
-
 5
5
-
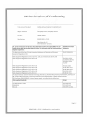 6
6
-
 7
7
-
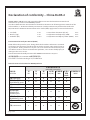 8
8
-
 9
9
-
 10
10
-
 11
11
-
 12
12
-
 13
13
-
 14
14
-
 15
15
-
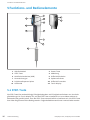 16
16
-
 17
17
-
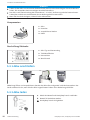 18
18
-
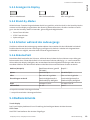 19
19
-
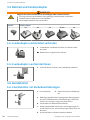 20
20
-
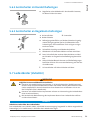 21
21
-
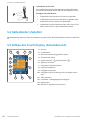 22
22
-
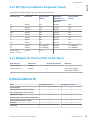 23
23
-
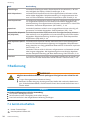 24
24
-
 25
25
-
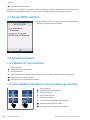 26
26
-
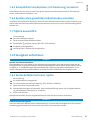 27
27
-
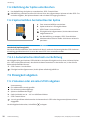 28
28
-
 29
29
-
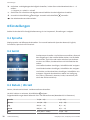 30
30
-
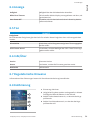 31
31
-
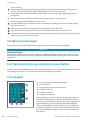 32
32
-
 33
33
-
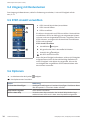 34
34
-
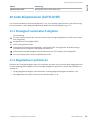 35
35
-
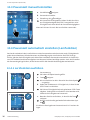 36
36
-
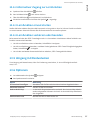 37
37
-
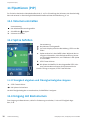 38
38
-
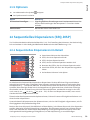 39
39
-
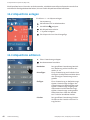 40
40
-
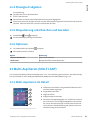 41
41
-
 42
42
-
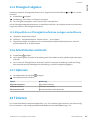 43
43
-
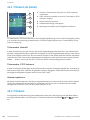 44
44
-
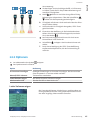 45
45
-
 46
46
-
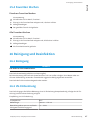 47
47
-
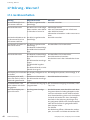 48
48
-
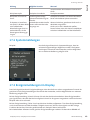 49
49
-
 50
50
-
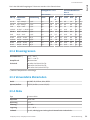 51
51
-
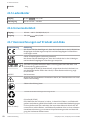 52
52
-
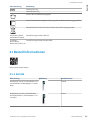 53
53
-
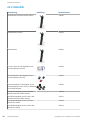 54
54
-
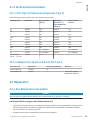 55
55
-
 56
56
-
 57
57
-
 58
58
-
 59
59
-
 60
60
-
 61
61
-
 62
62
-
 63
63
-
 64
64
-
 65
65
-
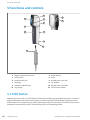 66
66
-
 67
67
-
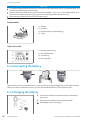 68
68
-
 69
69
-
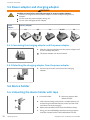 70
70
-
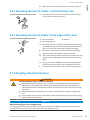 71
71
-
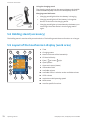 72
72
-
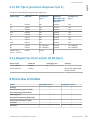 73
73
-
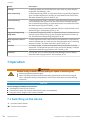 74
74
-
 75
75
-
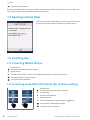 76
76
-
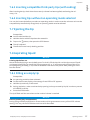 77
77
-
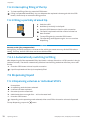 78
78
-
 79
79
-
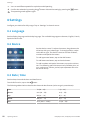 80
80
-
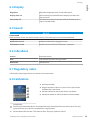 81
81
-
 82
82
-
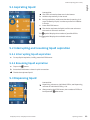 83
83
-
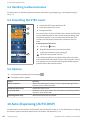 84
84
-
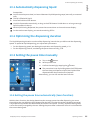 85
85
-
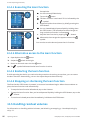 86
86
-
 87
87
-
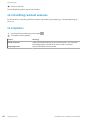 88
88
-
 89
89
-
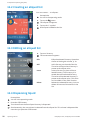 90
90
-
 91
91
-
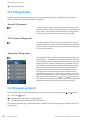 92
92
-
 93
93
-
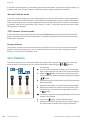 94
94
-
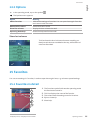 95
95
-
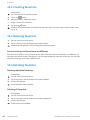 96
96
-
 97
97
-
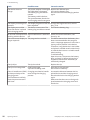 98
98
-
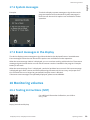 99
99
-
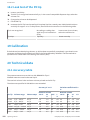 100
100
-
 101
101
-
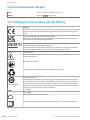 102
102
-
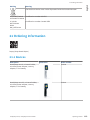 103
103
-
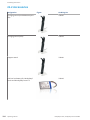 104
104
-
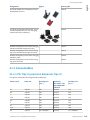 105
105
-
 106
106
-
 107
107
-
 108
108
-
 109
109
-
 110
110
-
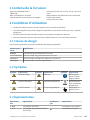 111
111
-
 112
112
-
 113
113
-
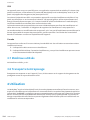 114
114
-
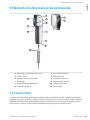 115
115
-
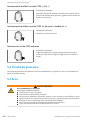 116
116
-
 117
117
-
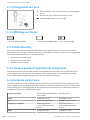 118
118
-
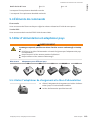 119
119
-
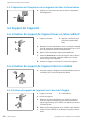 120
120
-
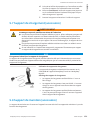 121
121
-
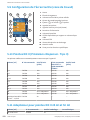 122
122
-
 123
123
-
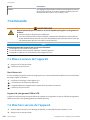 124
124
-
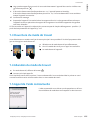 125
125
-
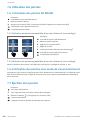 126
126
-
 127
127
-
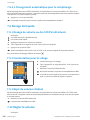 128
128
-
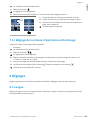 129
129
-
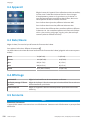 130
130
-
 131
131
-
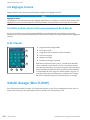 132
132
-
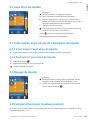 133
133
-
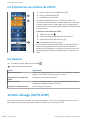 134
134
-
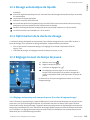 135
135
-
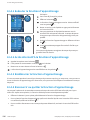 136
136
-
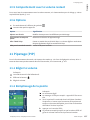 137
137
-
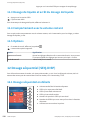 138
138
-
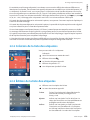 139
139
-
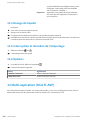 140
140
-
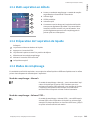 141
141
-
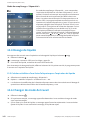 142
142
-
 143
143
-
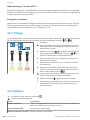 144
144
-
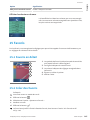 145
145
-
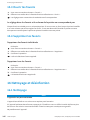 146
146
-
 147
147
-
 148
148
-
 149
149
-
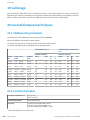 150
150
-
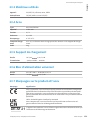 151
151
-
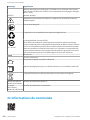 152
152
-
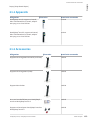 153
153
-
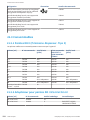 154
154
-
 155
155
-
 156
156
-
 157
157
-
 158
158
-
 159
159
-
 160
160
-
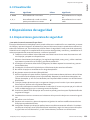 161
161
-
 162
162
-
 163
163
-
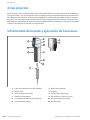 164
164
-
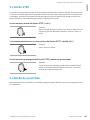 165
165
-
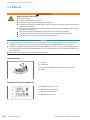 166
166
-
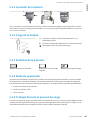 167
167
-
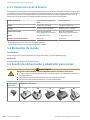 168
168
-
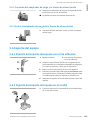 169
169
-
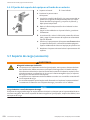 170
170
-
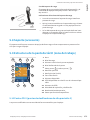 171
171
-
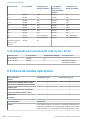 172
172
-
 173
173
-
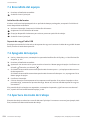 174
174
-
 175
175
-
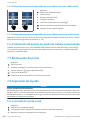 176
176
-
 177
177
-
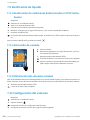 178
178
-
 179
179
-
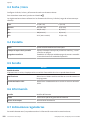 180
180
-
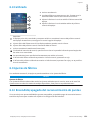 181
181
-
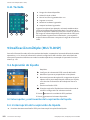 182
182
-
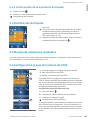 183
183
-
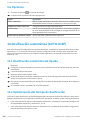 184
184
-
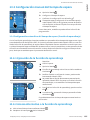 185
185
-
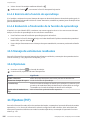 186
186
-
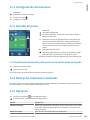 187
187
-
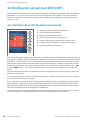 188
188
-
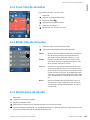 189
189
-
 190
190
-
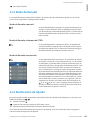 191
191
-
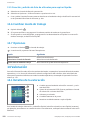 192
192
-
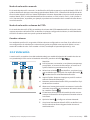 193
193
-
 194
194
-
 195
195
-
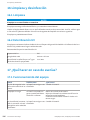 196
196
-
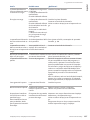 197
197
-
 198
198
-
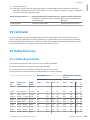 199
199
-
 200
200
-
 201
201
-
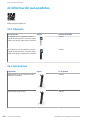 202
202
-
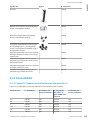 203
203
-
 204
204
-
 205
205
-
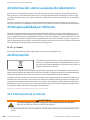 206
206
-
 207
207
-
 208
208
-
 209
209
-
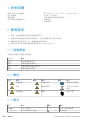 210
210
-
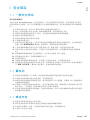 211
211
-
 212
212
-
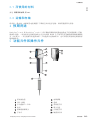 213
213
-
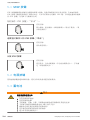 214
214
-
 215
215
-
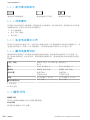 216
216
-
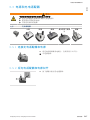 217
217
-
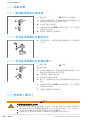 218
218
-
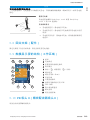 219
219
-
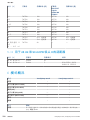 220
220
-
 221
221
-
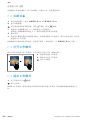 222
222
-
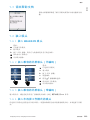 223
223
-
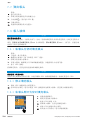 224
224
-
 225
225
-
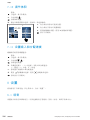 226
226
-
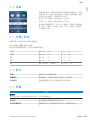 227
227
-
 228
228
-
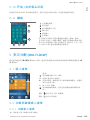 229
229
-
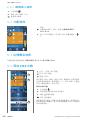 230
230
-
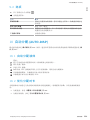 231
231
-
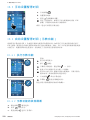 232
232
-
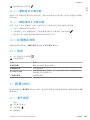 233
233
-
 234
234
-
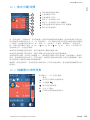 235
235
-
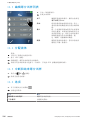 236
236
-
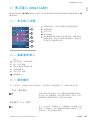 237
237
-
 238
238
-
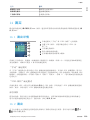 239
239
-
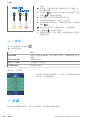 240
240
-
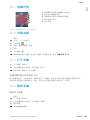 241
241
-
 242
242
-
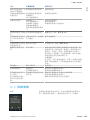 243
243
-
 244
244
-
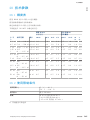 245
245
-
 246
246
-
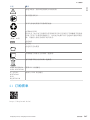 247
247
-
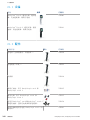 248
248
-
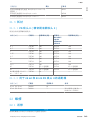 249
249
-
 250
250
-
 251
251
-
 252
252


Brand HandyStep touch S Multi Dispenser Manual de usuario
- Tipo
- Manual de usuario
En otros idiomas
Documentos relacionados
Otros documentos
-
Mettler Toledo AutoRep™ E Repeating Dispenser Instrucciones de operación
-
-
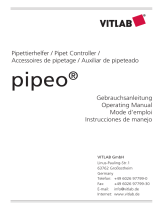 Vitlab pipeo Instrucciones de operación
-
 Rainin AutoRep S Instrucciones de operación
-
Andis 79600 Guía del usuario
-
Panasonic EW1511 Operating Instructions Manual
-
Clatronic BS 1714 A CB El manual del propietario
-
ProfiCare PC-BS 3035 Manual de usuario
-

