La página se está cargando...

User Manual
DEALER: This manual MUST be given to the user of the product.
USER:
BEFORE using this product, read this manual and save for future reference.
For more information regarding
Invacare products, parts, and services,
please visit www.invacare.co.uk
Stand Assist Patient Lift
RPS350-1E
RPS350-1FR
ES Manual del usuario ......................página 25
FR Manuel de l'utilisateur................... page 49
IT Manuale per l'utente....................pagina 73
PT Manual do utilizador...................página 97
DE Anwenderhandbuch....................seite 121

SYMBOL LEGEND
Stand Assist Patient Lift 2 Part No. 1078985
WARNING
DO NOT OPERATE THIS EQUIPMENT WITHOUT FIRST READING AND
UNDERSTANDING THIS MANUAL. IF YOU ARE UNABLE TO UNDERSTAND
THE WARNINGS, CAUTIONS AND INSTRUCTIONS CONTACT A
QUALIFIED DEALER OR INVACARE TECHNICAL SUPPORT BEFORE
ATTEMPTING TO USE THIS EQUIPMENT - OTHERWISE INJURY OR
DAMAGE MAY RESULT.
ACCESSORIES WARNING
Invacare products are specifically designed and manufactured for use in conjunction with Invac-
are accessories. Accessories designed by other manufacturers have not been tested by Invacare
and are not recommended for use with Invacare products.
SYMBOL LEGEND
"ATTENTION, see instructions for use".
WARNING - ALWAYS be aware of the Lift Arm.
Injury to the patient and/or assistant may occur.
2010
"Date of Manufacture"
Device contains Lead Acid
batteries. DO NOT dispose of
batteries in normal household
waste. They MUST be taken
to a proper disposal site.
Contact your local waste
management company for
information.
WARNING - ALWAYS be aware of the Footrest, especially
the patient’s position on the footrest. Injury to the patient
and/or assistant may occur.

TABLE OF CONTENTS
Part No. 1078985 3 Stand Assist Patient Lift
TABLE OF CONTENTS
SYMBOL LEGEND .............................................................................................. 2
SPECIAL NOTES ................................................................................................ 5
PRODUCT PARAMETERS .................................................................................. 6
RPS350-1E and RPS350-1FR Stand Assist Patient Lift ...................................................................................................6
SECTION 1—GENERAL GUIDELINES ................................................................... 7
Weight Limitation ..................................................................................................................................................................7
Assembling the Lift.................................................................................................................................................................7
Using the Sling.........................................................................................................................................................................7
Operating the Lift...................................................................................................................................................................8
Lifting the Patient ...................................................................................................................................................................8
Transferring the Patient........................................................................................................................................................8
Performing Maintenance.......................................................................................................................................................8
SECTION 2—ASSEMBLY ..................................................................................... 9
Unpacking the Patient Lift ....................................................................................................................................................9
Assembling the Patient Lift...................................................................................................................................................9
Assembling the Mast Assembly to the Base................................................................................................................9
Preparing Lift for Use............................................................................................................................................................9
Install the Shifter Handle ......................................................................................................................................................9
Attaching the Battery Charger Mounting Bracket to the Wall................................................................................ 10
SECTION 3— OPERATION ............................................................................... 11
Locking/Unlocking the Rear Casters .............................................................................................................................. 11
Raising/Lowering the Patient Lift ..................................................................................................................................... 11
Closing/Opening the Legs.................................................................................................................................................. 11
Using the Emergency Stop ................................................................................................................................................ 11
Activating a Mechanical Emergency Release................................................................................................................. 12
Primary Emergency Release......................................................................................................................................... 12
Secondary Emergency Release .................................................................................................................................... 12
Charging the Battery .......................................................................................................................................................... 12
Using a Power Cord to Charge the Battery ............................................................................................................ 12
Using the Battery Charger to Charge the Battery ................................................................................................. 13
SECTION 4—LIFTING THE PATIENT ................................................................. 14
Positioning the Stand Assist Lift....................................................................................................................................... 14
Lifting the Patient ................................................................................................................................................................ 15
Moving the Patient .............................................................................................................................................................. 16
SECTION 5—TRANSFERRING THE PATIENT ..................................................... 17
Transferring to a Commode Chair................................................................................................................................. 18
Transferring to a Wheelchair........................................................................................................................................... 19
Transferring to a Bed ......................................................................................................................................................... 19

TABLE OF CONTENTS
Stand Assist Patient Lift 4 Part No. 1078985
TABLE OF CONTENTS
SECTION 6—TROUBLESHOOTING .................................................................... 20
SECTION 7—MAINTENANCE ........................................................................... 21
Maintenance Safety Inspection Checklist....................................................................................................................... 21
Cleaning the Sling and the Lift.......................................................................................................................................... 21
Detecting Wear and Damage........................................................................................................................................... 21
Lubricating the Lift .............................................................................................................................................................. 22
Adjusting the Base............................................................................................................................................................... 22
Adjusting the Knee Pad Height........................................................................................................................................ 22
Replacing the Electric Actuator ....................................................................................................................................... 23
CUSTOMER SALES, SERVICE AND WARRANTY INFORMATION ......................... 24

SPECIAL NOTES
Part No. 1078985 5 Stand Assist Patient Lift
SPECIAL NOTES
Signalwordsareusedinthismanualandapplytohazardsorunsafepracticeswhichcouldresultinpersonalinjuryor
propertydamage.Refertothetablebelowfordefinitionsofthesignalwords.
NOTICE
THE INFORMATION CONTAINED IN THIS DOCUMENT IS SUBJECT TO CHANGE
WITHOUT NOTICE.
RADIO FREQUENCY INTERFERENCE
Most electronic equipment is influenced by Radio Frequency Interference (RFI). CAUTION
should be exercised with regard to the use of portable communication equipment in the area
around such equipment. If RFI causes erratic behavior, PUSH the RED Emergency Stop Button
IMMEDIATELY. DO NOT turn the Red Emergency Stop Button OFF while transmission is in
progress.
MAINTENANCE
Maintenance MUST be performed ONLY by qualified personnel.
SIGNAL WORD MEANING
DANGER
Danger indicates an imminently hazardous situation which, if not avoided, will result in death or seri-
ous injury.
WARNING
Warning indicates a potentially hazardous situation which, if not avoided, could result in death or
serious injury.
CAUTION
Caution indicates a potentially hazardous situation which, if not avoided, may result in property dam-
age or minor injury or both.

PRODUCT PARAMETERS
Stand Assist Patient Lift 6 Part No. 1078985
PRODUCT PARAMETERS
RPS350-1E and RPS350-1FR Stand Assist Patient Lift
*NOTE:Variesdependinguponloadandstroke.
Height at Sling Hook-up - MAX.: 66 inches
Height at Sling Hook-up - MIN.: 40 inches
Base Width OPEN: 37 inches
Base Width CLOSED: 26 inches
Base Height (Clearance): 4.5 inches
Base Length: 35.5 inches
Overall Height: 49 inches
Overall Length: 39 inches
Overall Width: 25.8 inches
Caster Size (FRONT)
Caster Size (REAR)
3.0 inches
5.0 inches
Sling Options: Stand Assist or Transfer Stand Assist
Sling Material: Polyester
Weight Capacity: 350 lbs
Weight Out of Carton: 108 lbs
Battery: 24V DC (RCHBL)
Charger Input: 100-240V AC
Charger Output/Charging Time: 29.5V DC Max 6 hours
Audio/Visual Low Battery Alarm: Yes
Motor Safety Devices: Anti-Entrapment
*Approx. Lifts per Charge: *100-200 Cycles per charge
Limited Warranty Lift/Electronics: 3 Years/2 Years
Emergency Stop Button: Yes

SECTION 1—GENERAL GUIDELINES
Part No. 1078985 7 Stand Assist Patient Lift
SECTION 1—GENERAL GUIDELINES
WARNING
SECTION 1 - GENERAL GUIDELINES contains important information for the safe operation
and use of this product.
Checkallpartsforshippingdamagebeforeusing.Incaseofdamage,DONOTusetheequipment.ContacttheDealerfor
furtherinstructions.
TheInvacarepatientliftisNOTatransportdevice.Itisintendedtotransferanindividualfromoneseatedsurfacetoanother
(suchasabedtoa
wheelchair).
DONOTattemptanytransferwithoutapprovalofthepatient’sphysician,nurseormedicalassistant.Thoroughlyreadthe
instructionsinthisOwner’sManual,observeatrainedteamofexpertsperformtheliftingproceduresandthenperformthe
entireliftprocedureseveraltimeswithpropersupervisionandacapableindividualacting
asapatient.
Usetheslingthatisrecommendedbytheindividual’sdoctor,nurseormedicalassistantforthecomfortandsafetyofthe
individualthatisbeinglifted.
Ifthe patientliftisusedintheareaofashowerorbath,ensurethatthepatientliftiswipedcleanof
anymoistureafteruse. DO
NOTstoretheliftinadampareaorinadampcondition.Periodicallyinspectallc omponents ofthepatientliftforsignsof
corrosion.Replaceallpartsthat arecorr odedordamaged.
TheStandAssistliftmaybeoperatedbyonehealthcareprofessionalforall
liftingpreparation,transferringfromandtransferring
toprocedureswithacooperative,partialweight‐bearingpatient.How ev er,sincemedicalconditionsvary ,Inv acare recommends
thatthehealthcareprofessionalevaluatetheneedforassistanceanddeterminewhethermorethanoneassistantisappropriatein
eachcasetosaf elyperformthetransfer .
Theuse
ofthepatientliftbyoneassistantshouldbebasedontheevaluation ofthehealthcareprofessionalforeachindividualcase.
Weight Limitation
DONOTexceedmaximumweightlimitationofthepatientlift.Theweightlimitationforthepatientliftis25stone(350lbs).
Assembling the Lift
DONOTovertightenmountinghardware.Thiswilldamagemountingbrackets.
Using the Sling
StandAssistSlings:DONOTusethestandassistslingincombinationwiththepatientliftasatransportdevice.Itis
intendedtotransferanindividualfromonerestingsurfacetoanother(suchasabedtoawheelchair).
StandAssistSlings:Beforeliftingthepatient,makesurethebottom
edgeofthestandassistslingispositionedonthelower
backofthepatientandthepatient’sarmsareoutsidethestandassistsling.
StandAssistSlings:ThebeltMUSTbesnug,butcomfortableonthepatient,otherwisethepatientcanslideoutofthesling
duringtransfer,possiblycausing
injury.
TransferSlings:Beforeliftingthepatient,makesurethebottomedgeofthetransferslingisatthebaseofthespineandthe
patient’sarmsareoutsidethetransfersling.
TransferSlings:DONOTraisethepatienttoafullstandingpositionwhileusingthetransfersling,otherwiseinjurymay
occur.
Aftereac hlaun deri ng(inaccordancewithinstructionsonthesling),inspectsling(s)forwear,tears,andloosestitching.
Bleached,torn,cut,frayed,orbrokenslingsareunsafeandcould resultininjury.Discardimmed iately.
DONOTalterslings.
Besuretochecktheslingattachmentseachtimetheslingisremoved
andreplaced,toensurethatitisproperlyattachedbefore
thepatientisremovedfromastationaryobject(bed,chairorcommode).
Ifthe patientisin awheelchair,securethewheel locksinplacetopreventthechairfrommovingforw ardsorbac kw ards.

SECTION 1—GENERAL GUIDELINES
Stand Assist Patient Lift 8 Part No. 1078985
Operating the Lift
Makesurethereisanaudibleclickwhenmountingbatteryonthebatterychargertoconfirmpropermounting.Otherwise,
injuryordamagemayoccur.
Usethehandlestopushorpullthepatientlift.
Lifting the Patient
BeforepositioningthelegsoftheStandAssistliftaroundthepatient,makesurethatthepatient’sfeetareoutofthewayofthefoot
plate,otherwiseinjurymayoccur .
Adjustmentsforsafetyandcomfortshouldbemadebeforemov ingthepatient.Patientʹsarms shouldbeoutsideofthe
sling
straps.
Beforeliftingapatientfromastationaryobjec t(wheelchair ,commodeorbed),slightlyraisethepatientoffthestationaryobject
andchec kthatallslingattachmentsaresecure.Ifany a ttachmentisnotcorr ect,low erthepatientandcorrecttheproblem,then
raisethepatientandcheckagain.
Duringtransfer,
withthepatientsuspendedinaslingattachedtothelift,DONOTrollcasterbaseov e runev ensurfacesthat
wouldcreateanimbalanceofthepatientliftandcouldcausethepatientlifttotipov e r.UsesteeringhandleonthemastatALL
timestopushorpull
thepatientlift.
Inv acarerecommend slockingtherearswivelcastersONLYwhenpositioningorremovingthesling(standassistortransfer)from
aroundthepatient.
Inv acaredoesNO T recommendlockingoftherearcastersof thepatient liftwhenliftinganindividual.Doin gsoco uldcausethe
lifttotipandendanger
thepatientandassistants.InvacareDOESrecommendthattherearcaster sbeleftunlockedduringlifting
procedurestoallowthepatientlifttostabilizeitselfwhe nthepatientisinitiallyliftedfromachair,bed oranystationaryobject.
Transferring the Patient
Beforetransferring,checkthattheproduct’sweightcapacitycanwithstandthepatientʹsweight.
WheelchairwheellocksMUSTbeinalock edpositionbeforelow eringthepatientintothewheelchairfortransport.
Performing Maintenance
Regularmainte nanceofpatientliftsandaccessoriesisnece ssarytoassureproperoperation.
Afterthe first12monthsofoperation,inspectallpivotpointsandfastenersforwear .Ifthemetalisworn,thepartsMUSTbe
replaced.Performthisinspectioneverysixmonthsthereafter.
DONOTov ertightenmountinghardware.Thiswill
da magemountingbrackets.
Castersand axleboltsrequireinspectionseverysixmo nthstoch eckfortightnessandwear .

SECTION 2—ASSEMBLY
Part No. 1078985 9 Stand Assist Patient Lift
SECTION 2—ASSEMBLY
Unpacking the Patient Lift
Unpackthecomponentsfromtheshippingcarton.
Assembling the Patient Lift
WARNING
Use only Invacare parts in the assembly of this
patient lift. The base legs, the mast, boom, pump
assembly and swivel bar are manufactured to
specifications that assure correct alignment of all
parts for safe functional operation.
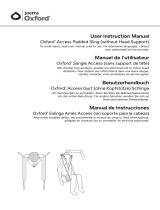
Assembling the Mast Assembly to the Base
NOTE:Themastassemblymayberemovedfr omthebaseforstorage
ortransporting.ThemastassemblyMUSTbeproperlysecuredtothe
baseassemblybefor euse.
NOTE:Forthisprocedure,refertoFIGURE 2.1.
1. Putthebaseonthefloor.
NOTE:Make sureallfourcastersmakecontactwiththefloor.
2. Lockboth
re arcasters.RefertoDetail“A” .
3. Removethehexbolt,washersandnutthatarelocatedin
theU‐shapecut‐outofthebase.
4. Liftthemasttoanuprightposition.
5. Lowerthemastontothemoun tingbracket.
6. Attachthemasttothebasewiththehexbolt,washersand
nut.
Tightensecur ely.
Preparing Lift for Use
CheckandtightenallhardwareBEFOREuse.
Install the Shifter Handle
NOTE:Forthisprocedure,refertoFIGURE 2.2.
1. Removetheshifterhandlefromthepackagingcarton.
2. Threadtheshifterhandleontothemaleadapteronthe
base.
FIGURE 2.1 Assembling the Mast Assembly to the Base
FIGURE 2.2 Install the Shifter Handle
Step Here
to Lock
Step Here
to Unlock
Nut
Washer
Hex Bolt
Mounting Bracket
Locking
Lever
LOCKED
UNLOCKED
DETAIL “A”
Washer
Shifter Handle
Male Adapter
in Base

SECTION 2—ASSEMBLY
Stand Assist Patient Lift 10 Part No. 1078985
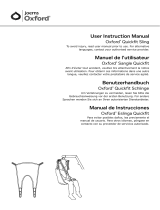
Attaching the Battery Charger Mounting Bracket to the Wall
NOTE:Forthisprocedure,refertoFIGURE 2.3.
NOTE:ThisprocedureonlyappliestoRPS350‐1Emodels.
1. Placethebatterychargermountingbracketonthewall
atthedesiredposition.
2. Withapencil,markthemiddleholeposition.
3. Measuredown6½inchesfromthepencilmarkand
drillonemountinghole.
4. Installthebottom
mountingscrewuntilthereisan
approximate1/8‐inchgapbetweenthescrewheadand
thewall.
5. Putthebatterychargermountingbracketontothebottom
mountingscrew.
6. Drilltheothertwomountingholes.
7. Screwthemountingscrewsthroughthebatterycharger
mountingbracketandintothew all.Tightensecurely.
CAUTION
Make sure there is an audible click when mount-
ing battery on the battery charger to confirm
proper mounting. Otherwise, injury or damage
may occur.
8. Putthebatterychargerinplaceonthemountingbracket.
9. Plugthebatterychargerintoanelectricaloutlet.
NOTE:AnLEDwillilluminatewhenpoweris appliedtobattery
charger.
FIGURE 2.3 Attaching the Battery Charger Mounting Bracket
to the Wall
Mounting Bracket
Mounting
Screws
BOTTOM Mounting Screw

SECTION 3—OPERATION
Part No. 1078985 11 Stand Assist Patient Lift
SECTION 3— OPERATION
WARNING
DO NOT attempt to transfer a patient without approval of a Healthcare Professional. Thoroughly
read the instructions in this owner’s manual, observe a trained team of experts performing the lifting
procedures and then perform the entire lift procedure several times with proper supervision and a
capable individual acting as a patient. Training can be provided. Please contact Invacare UK on 01656
7762222.
The legs of the Stand Assist Lift MUST be in the maximum open position for optimum stability and
safety. If the patient is in a sling and it becomes necessary to move through a narrow passage, close
the legs of the Stand Assist Lift only as long as it takes to move through the passage. When the Stand
Assist Lift is through the passage, return the legs to the maximum open position.
NOTE:Theuseofthepatientlif tbyoneassistantshouldbebasedon
theeva luation ofthehealthcar epr ofessionalforeachindividualcase.
Locking/Unlocking the Rear Casters
•Referto Detail“A” ofFigure 3.1.
Raising/Lowering the Patient Lift
NOTE:Forthisprocedure,refertoDetail “B”.
•ToRaisethePatientLift:
Presstheup() buttononthehandcontrol.
NOTE:Ifthepatientlift isra isedtothehighestlevel,itmay be
necessarytopulldowngentlyontheliftarmsbefo r ethemastwill
begintolower.
Pull downgentlyonbotharmsatthesametimeto
avoidmaki ngtheliftunstable.
•ToLow erthePatientLift:
Pressthedownbutton() onthe handcontrol.
Closing/Opening the Legs
•ToClosethe Legs:
PulltheshifterhandleOUTandawayfromthestand‐uplift
andthentoyourLEFTuntilitLOCKSinthenotchofthe
bracket.
NOTE:Leftisdeterminedbystandingbehindthestand‐uplift
facingtowardsthefrontcasters.
•ToOpentheLegs:
Pulltheshifter
handleOUTandaw ayfromthestand‐uplift
andthento yourRIGHTuntilitLO CKSinthenotchof the
bracket.
NOTE:Rightisdeterminedbystandingbehindthestand‐uplift
facingtowardsthefrontcasters.
Using the Emergency Stop
NOTE:Forthisprocedure,refertoDetail “C”.
•PushtheREDemerge ncybuttonintostoptheliftarms
fromraisingorlowering.
•Toreset,rotatetheemerge ncybuttonclockwise.
FIGURE 3.1 Operating the Patient Lift
DETAIL “B” - HAND
CONTROL DETAILS
DETAIL “C” - EMERGENCY STOP
Down Button
Up Button
Hand Control
Emergency Button
Push in to stop,
turn clockwise
to reset.
Step Here
to Lock
Step Here
to Unlock
Locking
Lever
LOCKED
UNLOCKED
DETAIL “A”
RPS350-1ERPS350-1FR

SECTION 3—OPERATION
Stand Assist Patient Lift 12 Part No. 1078985
Activating a Mechanical Emergency
Release
Primary Emergency Release
NOTE:Forthisprocedure,refertoFIGURE 3.2.
NOTE:Thisprocedurewillbringtheb oomdownifthehandcontr ol
isnotfunctioningpr operly .
Toactiv atetheprimaryemergencyrelease,insertthetipofa
penintotheEmergencyDownhole() inthe controlbox.
Secondary Emergency Release
NOTE:Forthisprocedure,refertoFIGURE 3.3.
NOTE:Allpatientliftactuato rsareequippedwithamechanical
emergencyrelease.Themechanicalreleasewillenabletheactuatorto
retractwithoutpower.
NOTE:Usetheprimaryemer gencyreleasefirstbeforeusingthe
secondaryemer gencyreleaseprocedur e.Thispr ocedur eshouldonly
beusedifthe
primaryemergencyreleaseprocedureisnotfunctioning
orisunreachable.
NOTE:TheliftMUSTbeunderaloadforthemechanicalreleaseto
function.
Toactiv atethesecondaryemergencyrelease,pulluponthe
REDemergencygripandpulldownontheboomatthesame
time.
Charging the Battery
Using a Power Cord to Charge the Battery
NOTE:Forthisprocedure,refertoFIGURE 3.2.
NOTE:ThisprocedureonlyappliestotheRPS350‐1FR.
CAUTION
The emergency stop MUST NOT be activated
- otherwise it will be impossible to charge the
battery. While charging takes place, the
patient lift cannot be used. DO NOT attempt
to move the patient lift without unplugging the
power cord from the wall outlet. DO NOT
attempt to use the patient lift if the battery
housing is damaged. Replace a damaged
battery housing before any further use.
1. Attachthepowercordtothecontrolbox.
2. Plugthepowercordintoasocketoutlet.
NOTE:Thebatterywillchargeinapproximately4hours.
Chargingmustbedoneinaroomwithgoodairventilation.
3. Disconnectthepowercordfromthesocketoutletafterthe
batteryhasbeenfullycharged.
FIGURE 3.2 Primary Emergency Release
FIGURE 3.3 Secondary Emergency Release
Emergency Down
Hole
Control Box
Emergency
Up Hole
Emergency Down
Hole
Control Box
Charger Cable
connects here
RPS350-1E
RPS350-1FR
RED Emergency Grip

SECTION 3—OPERATION
Part No. 1078985 13 Stand Assist Patient Lift
Using the Battery Charger to Charge the
Battery
NOTE:Forthisprocedure,refertoFIGURE 3.4.
NOTE:Thispr ocedur eonlyappliestotheRPS350‐1E.
NOTE:Invacar erecommendsthebatteryberechargeddailyto
prolongbatterylife.
NOTE:Anaudiblealarmwillsoundwhenbatteryislow.
1. LiftUPonthehandleonthebac kofthebattery.
2. Liftthebatteryup
andaw ayfromthecont rolbox.
CAUTION
Make sure there is an audible click when
mounting battery on the battery charger.
Otherwise, injury or damage may occur.
3. Placethebatteryonthebatterycharger.Pushthetopofthe
batteryagainstthemountingbracketuntilthereisan
audibleclick.
NOTE:ThechargeLEDwillilluminate.Whencharged,theLED
willstopilluminating.
NOTE:Itwilltakeapproximatelyfourhourstochargeabatterythat
requiresafullcharge.
4. LiftUPonthehandleonthebac kofthebattery.
5. Liftthebatteryupandawayfromthebatterycharger.
CAUTION
Make sure there is an audible click when
mounting battery on the battery charger.
Otherwise, injury or damage may occur.
6. Placethebatteryonthecontr olbox.Pushthetopofthe
batteryagainstthemountingbracketuntilthereisan
audibleclick.
FIGURE 3.4 Using the Battery Charger to Charge the
Battery
Battery Charger
(STEP 3)
Control Box
(STEP 6)
An audible “click”
will be heard when
properly installed
(STEPS 3 and 6)
Handle
STEPS 1, 2, 4 and 5)
Battery

SECTION 4—LIFTING THE PATIENT
Stand Assist Patient Lift 14 Part No. 1078985
SECTION 4—LIFTING THE PATIENT
WARNING
DO NOT exceed the maximum weight limitation of 25 stone (350 lbs).
DO NOT attempt to any transfer without approval of the a Healthcare Professional.
ALWAYS keep hands and fingers clear of moving parts to avoid injury.
Use the sling that is recommended by the individual’s doctor, nurse or medical assistant for the
comfort and safety of the individual that is being lifted.
Individuals that use the standing patient sling MUST be able to support the majority of their own
weight, otherwise injury may occur.
The legs of the stand assist lift MUST be in the maximum open position and the shifter handle locked
in place for optimum stability and safety. If the patient is in a sling and it becomes necessary to move
through a narrow passage, close the legs of the stand-up lift only as long as it takes to move through
the passage. Once the stand-up lift is through the passage, return the legs of the stand-up lift to the
maximum open position and lock the shifter handle IMMEDIATELY.
DO NOT move the patient if the patient sling is not properly connected to the attachment points on
the patient lift. Check that the patient sling is properly connected to the attachment points BEFORE
lifting the patient.
During transfer, with the patient suspended in the patient sling, DO NOT roll the base of the patient
lift over any uneven surfaces that would cause the patient lift to become unstable.
Use the steering handle on the mast assembly at all times to push or pull the Stand Assist Lift.
Positioning the Stand Assist Lift
NOTE:Forthisprocedure,refertoFIGURE 4.1.
NOTE:Refer toGeneralGuidelines
onpage 7befor epr oceed ingandobserveallwarningsindicated.
NOTE:Befor epositioningthelegsofthepatientliftunderabed,makesur e thatthe ar eaisclearofanyobstructions.
1. EnsurethelegsoftheStandAssistLiftareinthe
maximumopenposition.Ifnot,usetheshifterhandle
toopenthelegs.
2. P osition theStand AssistLiftusingthemasthandle.
3. PresstheDOWNbuttononthehandcontroltolowe rthe
liftarmsforeasyattachmenttothesling.
FIGURE 4.1 Hand Control Buttons
DOWN Button
UP Button
Hand Control

SECTION 4—LIFTING THE PATIENT
Stand Assist Patient Lift 15 Part No. 1078985
Lifting the Patient
WARNING
DO NOT exceed the maximum weight limitation of 25 stone (350 lbs).
Individuals that use the stand assist sling MUST be able to support the majority of their own weight,
otherwise injury may occur.
DO NOT move the patient if the sling is not properly attached to the attachment points on the Stand
Assist Lift. Make sure that the sling is properly attached BEFORE lifting the patient. If any
attachments are not properly in place, correct the problem. When the sling is elevated a few inches
off the stationary surface and before moving the patient, check again to make sure the sling and all
attachments are securely in place. If any problem is found, lower the patient back onto the stationary
surface and correct the problem - otherwise, injury or damage may occur.
Adjustments for safety and comfort should be made before moving the patient.
Use the sling that is recommended by the individual’s doctor, nurse or medical assistant for the
comfort and safety of the individual that is being lifted.
NOTE:Forthisprocedure,refertoFIGURE 4.2onpage16.
NOTE:RefertothepatientslingOwner’sManual,P/N1023891,formoreinformation.
NOTE:ThepatientMUSTbeinaseatedpositionfirst.Use theheadsectionofthebedtogetthepatientuprightthe nmovelegsovertheside
of
thebed.
1. Instructthepatienttoholdontothehan dgripsonbothsidesoftheStandAssistLift(Detail“A ”ofFIGURE 4.2).
2. Instructthepatienttoleanbackintothestandingortransfersling.
WARNING
Stand Assist Slings - Before lifting the patient, make sure the bottom edge of the stand assist sling is
positioned on the lower back of the patient and the patient’s arms are outside the sling.
Standing Slings - Before lifting the patient, make sure the bottom edge of the standing sling is at the
base of the spine and the patient’s arms are outside the sling.
Invacare does not recommend locking the rear casters of the Stand Assist Lift when lifting and trans-
ferring an individual. Doing so could cause the lift to tip and endanger the patient and assistants. Inva-
care recommends that the rear casters be left unlocked during lifting and transferring procedures to
allow the Stand Assist Lift to stabilize itself when the patient is initially lifted from and transferred to
a chair, bed or any stationary object.
3. Ensurethefollowing:
A. Thepatient’skneesare secureagainstthekneepad.
B. Thepatient’sfeetareproperlypositionedonthefootplate.
C. Slings:
• StandAssistSling‐thebottomed geofthestandassistslingispositionedonthe patient’slowerback.
• StandingSling‐thebottomedgeofthestandin gslingisatthe
baseofthepatient’sspine.
•EitherSlingStyle‐thepatient’sarmsareoutsidethesling.
D. Therearcastersareunlocked.
E. Thelegsareinthemaximumopenposition.

SECTION 4—LIFTING THE PATIENT
Part No. 1078985 16 Stand Assist Patient Lift
WARNING
If transferring a patient from a wheelchair, the wheelchair wheel locks MUST be in the locked posi-
tion before lowering the patient into the wheelchair. Otherwise, injury may occur.
4. Iftransferringfromawheelchair ,lockthewheellocksonthewheelchair (Detail“B”of FIGURE 4.2).
5. PresstheUParrowbuttonontheha ndcontroltoraisethepatientabovethesurface(bed,wheelchairorcommode).
NOTE:Thepatient’sweig htwillbesupportedbytheStandAssistLift.
NOTE:Thelowercenter
ofgravityprovidesstabilitymaki ngthepatientfeelmo resecureandthelifteasiertomove.
FIGURE 4.2 Lifting the Patient
Moving the Patient
WARNING
The legs of the Stand Assist Lift MUST be in the maximum open position for optimum stability
and safety. If the patient is in a sling and it becomes necessary to move through a narrow
passage, close the legs of the Stand Assist Lift only as long as it takes to move through the
passage. When the Stand Assist Lift is through the passage, return the legs to the maximum
open position.
DO NOT, during transfer of a patient suspended in the lift sling, roll caster base over uneven sur-
faces that would create an imbalance of the lift. This could cause the lift to tip over. Use the mast
handle at all times to push or pull the lift.
1. EnsurethelegsoftheStandAssistLiftareinthemaximumopenposition.Ifnot,usetheshifterhandletoopenthelegs.
2. MovetheStandAssistLiftawayfromthesurfacetheywereliftedfrom.
3. Slowlymovethepatienttothedesiredsurface.
Handgrip
Casters
Knee Pad
Foot Plate
DETAIL “A” - WHEEL LOCK
Wheel Lock
Mast Handle

SECTION 5—TRANSFERRING THE PATIENT
Stand Assist Patient Lift 17 Part No. 1078985
SECTION 5—TRANSFERRING THE PATIENT
WARNING
DO NOT attempt any transfer of a patient without the approval of a Healthcare Professional.
DO NOT move the patient if the sling is not properly connected to the attachment points of the
Stand Assist Lift. Check that the sling is properly connected to the attachment points prior to
lifting a patient. If any attachments are not properly in place, correct the problem. When the sling is
elevated a few inches off the stationary surface and before moving the patient, check again to make
sure that all sling attachments are secure. If any attachments are not properly in place, lower the
patient back onto the stationary surface and correct this problem - otherwise, injury or damage may
occur.
Adjustments for safety and comfort should be made before moving the patient.
Use the sling that is recommended by the individual’s doctor, nurse or medical assistant for the
comfort and safety of the individual that is being lifted.
Invacare does not recommend locking the rear casters of the Stand Assist Lift when lifting and
transferring an individual. Doing so could cause the lift to tip and endanger the patient and assistants.
Invacare recommends that the rear casters be left unlocked during lifting and transferring
procedures to allow the Stand Assist Lift to stabilize itself when the patient is initially lifted from and
transferred to a chair, bed or any stationary object.
The legs of the Stand Assist Lift MUST be in the maximum open position for optimum stability
and safety. If the patient is in a sling and it becomes necessary to move through a narrow
passage, close the legs of the Stand Assist Lift only as long as it takes to move through the
passage. When the Stand Assist Lift is through the passage, return the legs to the maximum
open position. If it is necessary to close the legs to maneuver the Stand Assist Lift under a bed,
close the legs only as long as it takes to position the Stand Assist Lift over the patient and lift the
patient off the surface of the bed. When the legs of the Stand Assist Lift are no longer under the
bed, return the legs to the maximum open position.
Be sure to check the sling attachments each time the sling is removed and replaced to ensure that it
is properly attached before the patient is removed from a surface.
Theuseofoneassistantisbasedontheevaluationofthehealthcareprofessionalforeachindividualcase.

SECTION 5—TRANSFERRING THE PATIENT
Part No. 1078985 18 Stand Assist Patient Lift
Transferring to a Commode Chair
WARNING
Invacare recommends locking the rear swivel
casters only when positioning or removing the
sling from around the patient.
NOTE:Forthisprocedure,refertoFIGURE 5.1.
1. Liftthepatientfromthesideofthebed.
2. PresstheUPbuttononthehandcontroltoelevatethe
patienthighenoughtoclearthearmsofthecommode
chair.TheirweightwillbesupportedbytheStand
AssistLift.
3. Guidethepatientonto
thecommodechair.Thismay
requiretwoassistants.
4. Pressthedownarrowbuttontolowerthepatientonto
thecommodechair.
5. LocktherearswivelcastersontheStandAssistLift.
6. Performoneofthefollowing:
•StandAssistSling‐unhookthestandassistsling
fromtheattachmentpointsonthelift.
•StandingSling‐
i. Unhookthestandingslingfromthebottom
attachmentpointsonthelift.
ii. Liftuponthepatient’sleg sand removethe
thighsupportsfromunderneaththepatient.
iii. Ifdesired,unhookthestandingslingfromthe
topattachmentpointsonthelift.
NOTE:Thepatientcanremainintheupperportionofthe
transfer
slingwhileusingthecommode.
7. Instructorassistthepatientinliftingtheirfeetoffthe
footplate.
8. Removetheslingfromaroundthepatient.
9. Unlockthecastersandpulltheliftawayfromthe
commode.
FIGURE 5.1 Transferring to a Commode Chair
DETAIL “A”
DETAIL “B”
DETAIL “C”

SECTION 5—TRANSFERRING THE PATIENT
Stand Assist Patient Lift 19 Part No. 1078985
Transferring to a Wheelchair
NOTE:Forthisprocedure,refertoFIGURE 5.2.
1. Ensurethelegsoftheliftwiththepatientintheslingare
intheopenposition.
2. Movethewheelchairintoposition.RefertoDe tail“A ”.
3. Engagetherearwheellocksofthe wheelchairtoprev ent
mov ement ofthewheelchair.RefertoDetail“B”.
WARNING
DO NOT place the patient in the wheelchair if
the locks are not engaged. The wheelchair wheel
locks MUST be in a locked position before lower-
ing the patient into the wheelchair for transport.
Otherwise, injury may result.
4. P osition thepatientoverthewhee lchai r.
5. Lowerthepatientintothewheelchair.
6. Unhooktheslingfromallattachmentpointsonthelift.
RefertoDetail“C”.
7. Instructpatienttolifttheirfeetoffthefootplate.Assistthe
patientifnecessary.
8. Removetheslingfr omaroundthepatient.
9. Pulltheliftawayfromthe
wheelchair.
Transferring to a Bed
NOTE:Forthisprocedure,refertoFIGURE 5.3.
NOTE:Thelowercenterofgravityprovidesstabilitymaki ngthe
patientfeelmoresecureandthelifteasiertomove.
NOTE:Theliftarmswi llstayinpositionuntil theDOWNbutton
onthehandcontr olispres sed.
1. P osition thepatientasfarov erthe
bedaspossible.
NOTE:Ifpatientisbeingtransferredfr omasurfacethatislower
thanthebed,raisethepatientabovethesurfaceofthebed.Thepatient
shouldbeelevatedjusthighenoughtoclearthebedwiththeirweight
fullysuppor tedbythelift.
2. PresstheDOWNbuttonand
lowerthepatientontothebed.
WARNING
Invacare recommends locking the rear swivel
casters ONLY when positioning or removing the
sling from around the patient.
3. Locktherearswivelcaste rsontheStandAssistLift.
4. Unhooktheslingfromallattachmentpointsonthelift.
5. Instructthepatienttolifttheirfeetoffofthefootplate.
Assistthepatientifnecessary.
6. Removethestandingorstandassistslingfromaroundthe
patient.
7. Unlocktherearswiv elcastersand
pulltheliftawayfrom
thebed.
FIGURE 5.2 Transferring to a Wheelchair
FIGURE 5.3 Transferring to a Bed
DETAIL “A”
DETAIL “B”
DETAIL “C”

SECTION 6—TROUBLESHOOTING
Stand Assist Patient Lift 20 Part No. 1078985
SECTION 6—TROUBLESHOOTING
NOTE:Ifproblemsarenotremediedbythesuggestedmeans,pleasecontactyourdealerorInvacare.
SYMPTOMS FAULTS SOLUTION
Noisy or dry sound from pivots. Needs lubrication. Refer to Lubricating the Lift on page 22.
Electric actuator fails to lift when button is
pressed.
Hand-control or actuator
connector loose.
Battery low.
RED emergency stop button
pressed IN.
Battery not connected properly
to control box.
The connecting terminals are
damaged.
Electric actuator in need of ser-
vice or load is too high.
Check the hand control and actuator con-
nections. Re-connect as necessary.
Charge batteries. Refer to Using the Battery
Charger to Charge the Battery on page 13.
Rotate RED emergency stop button
CLOCKWISE until it pops out.
Reconnect the battery to the control box.
Refer to Using the Battery Charger to
Charge the Battery on page 13.
Replace the battery pack. Refer to Using the
Battery Charger to Charge the Battery on
page 13.
Refer to Adjusting the Base
on page 22.
Contact Dealer if service is required.
Unusual noise from actuator. Actuator is worn or damaged
or spindle is bent.
Replace the actuator or contact Dealer.
Refer to Replacing the Electric Actuator
on
page 23.
Lift arms will not lower from the uppermost
position.
Lift arms require a minimum
weight load to lower from the
uppermost position.
Pull down slightly on the lift arms.

SECTION 7—MAINTENANCE
Part No. 1078985 21 Stand Assist Patient Lift
SECTION 7—MAINTENANCE
NOTE:TheUKHealthandSafetyExecutive’s LiftingOperationsandLiftingEquipmentRegulations1998requireanyequipmentthat
isusedintheworkplacetoliftaloadbesubjecttosafetyinspectiononasixmonthbasis.PleaserefertotheHSEwebsiteforguidance
(www.hse.gov.uk).
Maintenance Safety Inspection Checklist
NOTE:Followthemainte na nce pr ocedur es describedinthisma nualtokeepyourpatientliftincontinuousserv ice.
TheInvacare PatientLiftisdesignedtoprovideamaximumofsafe,efficientandsatisfactoryservicewithminimumcareand
maintenance .
AllpartsoftheInvacareLift aremadeofthebestgradesofsteel,
butmetaltome talcontactwillwearafterconsiderableuse.
Thereisnoadjustmentormaintenanceofthecasters,otherthancleaning,lubricationandcheckingaxleandswiv elboltsfor
tightness.Remov ealldebris, etc.fromthewheelandswivelbearings.Ifanypartsareworn,replacethesepartsIMMEDIATELY.
If
youquestionthesaf etyofanypartofthelift,contactyourDealerIMMEDI ATELY.
Cleaning the Sling and the Lift
Theslingshouldbewashedregularlyinwatertemperaturenotexceeding180°F(82°C)andabiologicalsolution.Asoft
cloth,dampenedwithwaterandasmallamountofmilddetergent,isallthatisneededtocleanthepatientlift.Theliftcan
becleanedwithnon‐abrasivecleaners.
Detecting Wear and Damage
Itisimportanttoinspectallstressedparts,suchasslings,liftingarmandanypivotforslingsforsignsofcracking,fraying,
deformationordeterioration.ReplaceanydefectivepartsIMMEDIATELYandensurethattheliftisnotuseduntilrepairs
aremade.
ITEM INITIALLY
INSTITUTIONAL
INSPECT/ADJUST
MONTHLY
IN-HOME INSPECT
EVERY SIX (6)
MONTHS
THE BASE
Inspect for missing hardware.
Legs open/close with ease.
Inspect casters and axle bolts for tightness and wear.
Inspect casters for smooth swivel and roll.
Inspect wheels are clear of debris.
X
X
X
X
X
X
X
X
X
X
X
X
X
X
X
THE MAST
Mast MUST be securely assembled to lift arms.
Inspect for bends or deflections.
X
X
X
X
X
X
THE LIFT ARMS AND LINKAGE
Check all hardware and attachment points.
Inspect for bends or deflections.
Inspect bolted joints of lift arms for wear.
Inspect to ensure that the lift arms are centered
between the base legs.
X
X
X
X
X
X
X
X
X
X
X
X
ELECTRIC ACTUATOR
Check for wear or deterioration.
(IF DAMAGED, CONTACT DEALER)
Cycle to ensure smooth quiet operation.
X
X
X
X
X
X
CLEANING
Whenever necessary. XX X
SLINGS
CHECK ALL SLING ATTACHMENTS each time it is
used to ensure proper connection and patient safety.
Inspect sling material for wear.
Inspect straps for wear.
X
X
X
X
X
X
X
X
X

SECTION 7—MAINTENANCE
Part No. 1078985 22 Stand Assist Patient Lift
Lubricating the Lift
TheInvacareliftisdesignedforminimummaintenance.
However,asixmonthcheckandlubricationshouldensure
continuedsafetyandreliability.
Keepliftandslingscleanand ingoodworkingorder.Any
defectshouldbenotedandreportedtoyourdealerassoon
aspossible.
ThecastersMUSTswivelandrollsmoothly.
Alightgrease
(waterproofautolubricant)maybeappliedtotheball
bearingswivelofthecastersonceayear .Applymore
frequentlyifthecastersareexposedtoextrememoist
conditions.
Adjusting the Base
NOTE:Forthisprocedure,refertoFIGURE 7.1onpage22.
1. CheckthesquarenessofthelegswhenintheCLOSED
position.
2. Placeasquareontheinside ofthelegsandbaseto
determinethe90°alignment.
3. Adjustthelinkagerodsuntil90°alignmentisachieved.
Adjusting the Knee Pad Height
NOTE:Forthisprocedure,refertoFIGURE 7.2.
WARNING
NEVER adjust the knee pad while patient is in
the standing position.
NEVER try to adjust the knee pad while the lift
is moving.
ALWAYS make sure that the adjustment pins
are engaged in corresponding height adjust-
ment holes before use.
1. Pickaheightsettingthatwillbecomfortabletothe
patientandprovidethenecessarysupport.
NOTE:Thekneepadshouldbepositionedsothatthekneeportion
ofthelegisincontactwiththepad.
2. Usingbothhands,pullbothadjustmentpinsoutward
atthesametime.
3. Positiontheknee
padtothedesiredheightandrelease
adjustmentpinsintothecorrespondingalignment
holes.
4. Checktomakesurethatbothpinsareengaged.
FIGURE 7.1 Adjusting the Base
FIGURE 7.2 Adjusting the Knee Pad Height
Square
Linkage Rods
Linkage Rod
Knee Pad
Adjustment Pin
Adjustment Pin

SECTION 7—MAINTENANCE
Stand Assist Patient Lift 23 Part No. 1078985
Replacing the Electric Actuator
1. Removethebottomnut,washerandshoulderboltthatsecuretheelectricactuatortothemastmountingbracket.
2. Resttheliftarmonyourshoulderandremovethetopnut,bolt,bracketandbushing fromtheliftarmmountingbracket.
3. Removetheelectricactuator.
4. ReverseSTEPS1‐3toinstallthenew
electricactuator.
WARNING
DO NOT overtighten mounting hardware. This will damage mounting brackets.
FIGURE 7.3 Replacing the Electric Actuator
Bolt
Washer
Bushing
Washer
Bolt
Bolt
Washer
Bushing
Washer
Bolt
Bracket

CUSTOMER SALES, SERVICE AND WARRANTY INFORMATION
Part No. 1078985 24 Stand Assist Patient Lift
CUSTOMER SALES, SERVICE AND WARRANTY INFORMATION
United Kingdom Invacare Limited, Pencoed Technology Park, Pencoed, Bridgend CF35 5HZ
Tel: (44) (0) 1656 776 222
Fax: (44) (0) 1656 776 220
www.invacare.co.uk, UK@invacare.com
Ireland Invacare Ireland Ltd, Unit 5 Seatown Business Campus, Seatown Road, Swords, County Dublin - Ireland
Tel: (353) 1 810 7084
Fax: (353) 1 810 7085
www.invacare.co.uk, [email protected]m
France Invacare Poirier SAS, Route de Saint Roch, F-37230 Fondettes
Tel: (33) (0) 2 47 62 64 66
Fax: (33) (0) 2 47 42 12 24
www.invacare.fr, contactfr@invacare.com
Belgium & Luxemburg Invacare nv, Autobaan 22, B-8210 Loppem, Brügge
Tel: (32) (0) 50 83 10 10
Fax: (32) (0) 50 83 10 11
www.invacare.be, belgium@invacare.com
Switzerland Invacare AG, Benkenstrasse 260, CH-4108 Witterswil
Tel: (41) (0) 61 487 70 80
Fax: (41) (0) 61 487 70 81
switzerland@invacare.com
Deutschland Invacare Aquatec GmbH, Alemannenstraße 10, D-88316 Isny
Tel: (49) (0) 75 62 7 00 0
Fax: (49) (0) 75 62 7 00 66
www.invacare-aquatec.de, in[email protected]
European Distributor Organisation Invacare, Kleiststraße 49, D-3257 Porta Westfalica
Tel: (49) (0) 57 31 754 540
Tel: (49) (0) 57 31 754 541
Portugal Invacare Lda, Rua Estrada Velha, 949, P-4465-784, Leça do Balio
Tel: (351) (0)225 1059 46/47
Fax: (351) (0)225 1057 39
Norge Invacare AS, Grensesvingen 9, Postboks 6230, Etterstad, N-0603 Oslo
Tel: (47) (0) 22 57 95 00
Fax: (47) (0) 22 57 95 01
Italia Invacare Mecc San s.r.l., Via dei Pini 62, I-3016 Thiene (VI)
Tel: (39) 0445 38 00 59
Fax: (39) 0445 38 00 34
www.invacare.it, italia@invacare.com
España Invacare SA, c/Areny s/n, Poligon Industrial de Celrà, E-17460 Celrà (Girona)
Tel: (34) (0) 972 49 32 00
Fax: (34) (0) 972 49 32 20
www.invacare.es, contactsp@invacare.com

Manual del usuario
DISTRIBUIDOR: Este manual DEBE ser entrgado al usuario del producto.
USUARIO:
ANTES de usar este producto, lea este manual y consérvelo como
referencia para el futuro.
Para obtener más información sobre los
productos, partes y servicios de Invacare,
visite el sitio www.invacare.es
Grúa de bipedestación
RPS350-1E
RPS350-1FR

LEYENDA DE SÍMBOLOS
Grúa de bipedestación 26 No. de parte 1078985
AVERTENCIA
ANTES DE USAR ESTE EQUIPO, LEA Y COMPRENDA CABALMENTE LAS
INSTRUCCIONES DE ESTE MANUAL. SI NO ENTIENDE LAS ADVERTENCIAS,
PRECAUCIONES E INSTRUCCIONES, COMUNÍQUESE CON UN
DISTRIBUIDOR CALIFICADO O PERSONAL DE ASISTENCIA TÉCNICA
ANTES DE INSTALAR EL EQUIPO, YA QUE DE LO CONTRARIO PODRÍAN
PRODUCIRSE LESIONES FÍSICAS O DAÑOS MATERIALES.
ADVERTENCIA SOBRE ACCESORIOS
Los productos Invacare están específicamente diseñados y fabricados para usarse con accesorios
Invacare. Invacare no ha sometido a prueba los accesorios diseñados por otros fabricantes, por lo
que no recomienda usar dichos accesorios con productos Invacare.
LEYENDA DE SÍMBOLOS
"ATENCIÓN, consulte las instrucciones
de utilización".
ADVERTENCIA - SIEMPRE esté consciente del brazo
de la grúa. El paciente y/o asistente podrían sufrir
lesiones.
2010
"Fecha de fabricación"
El dispositivo contiene
baterías de plomo-ácido. NO
deseche las baterías como
desechos comunes. DEBE
llevarlas a un sitio de
eliminación de desechos
adecuado. Para obtener más
información, comuníquese
con la empresa de gestión de
desechos de su localidad.
ADVERTENCIA - SIEMPRE esté consciente del reposapiés,
especialmente la posición del paciente en dicha área. El
paciente y/o asistente podrían sufrir lesiones.

CONTENIDO
No. de parte 1078985 27 Grúa de bipedestación
CONTENIDO
LEYENDA DE SÍMBOLOS .................................................................................. 26
NOTAS ESPECIALES ........................................................................................ 29
PARÁMETROS DEL PRODUCTO ....................................................................... 30
Elevador de paciente con soporte para ponerse de pie RSP350-1E y RPS350-1FR............................................ 30
SECTION 1—PAUTAS GENERALES ................................................................... 31
Límite de peso...................................................................................................................................................................... 31
Montaje de la grúa............................................................................................................................................................... 31
Utilización de la eslinga ...................................................................................................................................................... 31
Operación de la grúa.......................................................................................................................................................... 32
Elevación del paciente ........................................................................................................................................................ 32
Traslado del paciente ......................................................................................................................................................... 32
Tareas de mantenimiento.................................................................................................................................................. 32
SECTION 2—MONTAJE .................................................................................... 33
Desembalaje de la grúa ...................................................................................................................................................... 33
Montaje del elevador de pacientes.................................................................................................................................. 33
Montaje del mástil a la base.......................................................................................................................................... 33
Preparación de la grúa para su utilización ..................................................................................................................... 33
Instalación de la palanca de apertura.............................................................................................................................. 33
Instalación del cargador de pared de las baterías........................................................................................................ 34
SECTION 3—OPERACIÓN ................................................................................ 35
Bloqueo/desbloqueo de las ruedas traseras.................................................................................................................. 35
Elevación/descenso de la grúa .......................................................................................................................................... 35
Cierre/apertura de las patas ............................................................................................................................................. 35
Utilización de la parada de emergencia.......................................................................................................................... 35
Activación de desconexión mecánica de emergencia................................................................................................. 36
Recarga de la batería .......................................................................................................................................................... 36
Uso de un cable de alimentación para cargar la batería ........................................................................................ 36
Utilización del cargador para recargar la batería .................................................................................................... 37
SECTION 4—ELEVACIÓN DEL PACIENTE .......................................................... 38
Posicionamiento de la grúa ............................................................................................................................................... 38
Elevación del paciente ........................................................................................................................................................ 39
Movimiento del paciente ...................................................................................................................................................
40
SECTION 5—TRASLADO DEL PACIENTE ........................................................... 41
Traslado a una silla inodora .............................................................................................................................................. 42
Traslado a una silla de ruedas........................................................................................................................................... 43
Traslado a una cama ........................................................................................................................................................... 43
SECTION 6—SOLUCIÓN DE PROBLEMAS ........................................................... 44

CONTENIDO
Grúa de bipedestación 28 No. de parte 1078985
CONTENIDO
SECTION 7—MANTENIMIENTO ....................................................................... 45
Lista de comprobación para la inspección de mantenimiento de seguridad ......................................................... 45
Limpieza de la eslinga y la grúa......................................................................................................................................... 45
Detección de desgaste y daños........................................................................................................................................ 45
Lubricación de la grúa ........................................................................................................................................................ 46
Ajuste de la base.................................................................................................................................................................. 46
Ajuste de la altura de la rodillera .................................................................................................................................... 46
Reemplazo del pistón eléctrico........................................................................................................................................ 47
SERVICIO DE ATENCION AL CLIENTE, INFORMACIÓN DE SERVICIO Y GARANTÍA
48

NOTAS ESPECIALES
No. de parte 1078985 29 Grúa de bipedestación
NOTAS ESPECIALES
Enestemanualseutilizanpalabrasclavequeindicanprácticaspeligrosasoinsegurasquepodríanprovocarlesiones
personalesodañosalapropiedad.Consultelasiguientetablaparaverlasdefinicionesdelaspalabrasclave.
AVISO
LA INFORMACIÓN CONTENIDA EN ESTE DOCUMENTO ESTÁ SUJETA A CAMBIOS SIN
PREVIO AVISO.
INTERFERENCIA DE RADIOFRECUENCIA
La mayoría de los equipos electrónicos sufren los efectos de la interferencia de radiofrecuencia
(IRF). Se debe tener PRECAUCIÓN respecto a la utilzación de equipo de comunicación portátil
en el área que rodea el equipo. Si la IRF provoca una conducta irregular, PRESION
INMEDIATAMENTE el botón de parada de emergencia ROJO. NO APAGUE el botón de parada
de emergencia rojo si la transmisión está en curso.
MANTENIMIENTO
SÓLO personal calificado DEBE efectuar tareas de mantenimiento.
PALABRA CLAVE SIGNIFICADO
PELIGRO
Indica una situación inminentemente peligrosa que, de no evitarse, provocará lesiones graves o
letales.
ADVERTENCIA
Indica una situación potencialmente peligrosa que, de no evitarse, podría causar lesiones graves or
letales.
PRECAUCIÓN
Indica una situación potencialmente peligrosa que, de no evitarse, puede provocar daños a propiedad
o lesiones leves (o ambos).

PARÁMETROS DEL PRODUCTO
Grúa de bipedestación 30 No. de parte 1078985
PARÁMETROS DEL PRODUCTO
Elevador de paciente con soporte para ponerse de pie RSP350-1E y RPS350-1FR
*NOTA:Varíadependiendodelacargayutilización.
Altura en enganche de eslinga - MÁX.: 167 cm [66 pulgadas]
Altura en enganche de eslinga - MIN.: 102 cm [40 pulgadas]
Ancho de base ABIERTA: 94 cm [37 pulgadas]
Ancho de base CERRADA: 66 cm [26 pulgadas]
Altura de base (espaciado): 11,4 cm [4,5 pulgadas]
Largo de base: 90,2 cm [35,5 pulgadas]
Altura general: 124 cm [49 pulgadas]
Largo general: 99 cm [39 pulgadas]
Ancho general: 65,5 cm [25,8 pulgadas]
Tamaño de ruedas (DELANTERAS):
Tamaño de ruedas (TRASERAS):
7,6 cm [3,0 pulgadas]
12,7 cm [5,0 pulgadas]
Opciones de eslinga: De pie o traslado
Material de eslinga: Poliéster
Capacidad de peso: 158 kg [350 lbs]
Peso fuera de la caja: 49 kg [108 lbs]
Batería: 24V CC (RCHBL)
Entrada del cargador: 100-240V CA
Rendimiento del cargador/tiempo de carga: 29.5V CC Máx 6 horas
Alarma de batería baja audio/visual: Sí
Dispositivos de seguridad del motor: Antiatrapamiento
*Elevaciones por carga aprox.: *100-200 ciclos por carga
Garantía limitada elevador/componentes electrónicos: 3 años/2 años
Botón de parada de emergencia: Sí

SECCIÓN 1—PAUTAS GENERALES
No. de parte 1078985 31 Grúa de bipedestación
SECCIÓN 1—PAUTAS GENERALES
ADVERTENCIA
SECCIÓN 1 - Las PAUTAS GENERALES contienen información importante para operar y usar
este producto de forma segura.
Antede usarelequipo,re visetodaslaspartespo rsisufrierondañosduranteelenvío.Sipresentandaños,NOuselaunidad.
Comuníqueseconsudis tribuid orparaobte nermay oresinstrucciones.
Lagrúa debipedestaciónInvacareNOesundispositiv odetransporte.Estádiseñada paratrasladarunindividuodesde una
superficie
dereposoaotra(porejemplodesdeunacamaaunasilladeruedas).
NOrealiceningúntrasladodepacientessinlaaprobacióndeldo ctor,profesional deenfermeríaoasistentemédico.Lea
completamentelasinstruccionesenestemanualdelusuario,observe aunequipocalificadode expertosefectuarlos
procedimientosde
elevaciónyluegorealicetodoelprocedimientodeelevaciónvariasvecesconlasupervisiónadecuadayun
individuodebidamentedesignadoquesimuleserunpaciente.
Laseslingasde transferenciaytrasladoInv acareestándiseñadasespecíficamenteparausarseenco njuntoconlosgrúasde
pacientesInv acare.Nosedebenutilizareslingasy
accesoriosdiseñadosporotrosfabricantescomocomponentesparaelsistema
deelev aciónInv acare.Uselaeslingare comenda daporeldo ctor,p rofesio naldeenfermeríaoasistentemédicodelpacientepara
lacomodidad yseguridadde lindividuoquevaaserlevantado.
Silagrúadebipedesta ciónseusaeneláreade
unaduc haobaño,cercióresedeeliminartodahume dadconunpañotrasla
utilización.NOguardelagrúaenunáreaoentornoshúmedos.Inspeccioneperiódicamentetodosloscomponen tesdellagr úa
enbuscadeseñasdecorrosión.Reemplacetodaslaspartes quepresentencorrosiónodaños.
Unsoloprofesional
delasaludpuederealizartodaslasmaniobrasdeelev ació n,ylosprocedimientosde trasladodesdeyhacia
unlugarenlagrúaconunpacientequecoopereyqueseacapazdesoportar parcialmente supropiopeso.Sinembargo,debido
aquelascondicionesmédicasvarían,Invacarerecomiendaqueel
pro fesionaldelasaluddetermineencadacasosies necesaria
laayudademásdeunasistentepararealizareltrasladodeformasegura.
Lautilizacióndelagrúaporpartedeunsoloasistentedebebasa rseenlaevaluaciónquerealiceelfacultativ oencadacaso
particular.
Límite de peso
NOexcedaellímitedepesomáximodelagrúadebipedestación.Ellímitedepesodelagrúaesde158kg.[350lbs].
Montaje de la grúa
NOaprieteexcesivamentelosanclajesdemontaje,yaqueellodañarálossoportesdemontaje.
Utilización de la eslinga
Eslingasdetransferen cia:NOuselaeslingadetransferenciaenconjuntoconlagrúacomoundispositivodetransporte.Lagrúa
estádiseñadaparatrasladarunindividuodesdeunasuperfic iedereposoaotra(porejemplodesde unacamaaunasillade
ruedas).
Eslingasdetransferencia:Antesdelev antaral
paciente,cercióresedeque elbordeinferiorde laeslingade transferenciaesté
situadoenlare giónlumbardelpacienteyquelosbrazosdelmismoesténfueradedichaeslinga.
Eslingasdetransferencia:LacorreaDEBEquedarceñida,perocómodaenelpaciente,yaquedeloco ntrariopuederesbalarse
de
laeslingaduranteeltraslado,provocandoposibleslesiones.
Eslingasdetraslado:Antesdelev antaralpaciente,cercióresedequeel bordeinferiordelaeslingade trasladoestéenlabasede
lacolum navertebralde lpacienteyquelosbrazosdelmismoesténfuerade dichaeslinga.
Eslingasdetraslado:
NOlev antealpacienteaunaposicióncompletamentedepiemientrasutilicelaseslingasdetraslado,yaque
podríanproduc irselesiones.
Trascadalav ado(conformealasinstruccionesdelaeslinga),inspec cion equelaolaseslingasnopresentendesgaste ,rasgaduras
ocosturassueltas.
Laseslingasde colorad as, desgastadas,concortes,deshilachadas
orotassoninsegurasypodríanprov o carlesiones.Deserasí,
deséchelasinmediatamente.
NOmodifiquelaseslingas.
Reviseloselemen tosdelaeslingacadavezqueéstaseretireysecoloqueafindegarantizarqueestácorrec tamenteafianzada
antesde retiraralpacientedeunobjetoestacionario (cama,sillao
sillainodora).
Siel pacienteestáenunasilladeruedas,accionesusfrenosparaprev en irquelasillase muevahaciaadelanteoatrás.

SECCIÓN 1—PAUTAS GENERALES
Grúa de bipedestación 32 No. de parte 1078985
Operación de la grúa
Cercióresedeescucharunchasquidoalinstalarlabateríaenelcargadorafindeconfirmarsumontajeadecuado,yaquede
locontrariosepodríanproducirdañosolesiones.
Uselosasiderosparaempujarotirardelagrúa.
Elevación del paciente
Antesdeposicionarlaspatasdelagrúacercadelpaciente,cercióresedequelospiesdelindividuoestén fueradeltrayectodel
reposapiés,yaquedeloco ntrariopodríanproducirselesiones.
Realicelosajustesdeseguridadycomodidadpertin entesantesdemoverelpaciente.Los brazosde lindividuode benestar
fuera
delastirasdelaseslingas.
Antesdelev antaraun pacientedesdeunobj etoestacionario(silladeruedas,sillainodoraocama),eléveloligerame ntedesde
dichoobjetoycompruebequeestáncorrectam entecolocadosloselementosdelaeslinga.Sialgúnelementonoestácolocado
correctamente,bajealpacientey
corrijaelproblema,einténtelonuevamenteyco nfirmequetodoestéenorden.
Duranteeltraslado,conelpacientesuspendidoenunaeslingaconectadaalelevador,NOdeslicelabaseporsuperficies
irregularesquepodríandesequilibrarlagrúayprov ocarquesevuelque.SIEMPREutilicelosasiderosdelmástilparaempujar
o
tirardelagrúa.
Inv acarerecomiendafrenarlasruedastraseras UNICAMENTEalcolocaroretirarlaeslinga(detransferenciaotransferencia
sentado)alpaciente.
InvacareNOrecomiendafrenarlasruedastraserasdelagrúaalincorporaraunapersona,yaqueelloprodríahacerquela
grúavuelque,poniendoenriesgo
alpacienteyasuscuidadores.InvacareSIEMPRErecomiendadejardesbloqueadaslas
ruedastraserasdurantelasaccionesdeincorporaciónparapermitirquelagrúaseestabilicealporellamismaalelevaral
pacientedesdeunasilla,camaocualquierotroobjetoestacionario.
Traslado del paciente
Antesdeefectuareltraslado,compruebequeel productotengalacapacidadsuficienteparasoportarelpesodelpaciente.
Antesdecolocaralpacienteen unasillade ruedasparatransportarlo,losfrenos delasilladeruedasDEBENestaractivados.
Tareas de mantenimiento
Seledebeda rmantenimientoregularalagrúaylosaccesorios paragarantizarunfuncionamientoadecuado.
Despuésdelosprimeros 12mesesdeoperación,revisetodoslospuntosdegi ro ysujetadoresen buscadedesgaste.Sihaypartes
metálicasdeterioradas, reemplácelas INMEDIAT AMENTE.Posteriormen te,realiceestainspeccióncadaseismeses.
NO
aprieteexcesivame ntelosanclaiesdemontaje,yaqueellodañarálosanclajes.
Lasruedasylo spernosdeejedebeninspecc ionarsecadaseismesesparacomprobarqueesténapretadosyquenopresenten
desgaste.

SECCIÓN 2—MONTAJE
No. de parte 1078985 33 Grúa de bipedestación
SECCIÓN 2—MONTAJE
Desembalaje de la grúa
Saqueloscomponentesdelacajadeembalaje.
Montaje del elevador de pacientes
ADVERTENCIA
Utilice sólo partes Invacare para el montaje de
esta grúa. Las patas de la base, el mástil, brazo,
conjunto de la bomba y barra giratoria se han
fabricado según especificaciones que garantizan
la alineación correcta de todas las partes para
una operación segura y adecuada.
Montaje del mástil a la base
NOTA:Esposibleretirarelmástildelabaseparafinesde
almacenamientootransporte.ElmástilDEBEafianzar se
debidamentealabaseantesdeusarlaunidad.
NOTA:Para esteprocedimiento,consultelaFIGURA 2.1.
1. Coloquelabaseenelpiso.
NOTA:Ce r ciór es edequelascuatroruedastengancontactoconel
piso.
2. Bloqueelasdosruedastraseras.Co nsulteelDetalleʺAʺ.
3. Retireelpernohexagonal,arandelasytuercasituadosen
elcaladoconformadeUdelabase.
4. Coloqueelmástilenposiciónvertical.
5. Bajeelmástilhaciaelsoportedemontaje.
6. Instaleelmástilenlabasemedianteelpernohexagonal,
arandelasytuerca.Aprie tefirmementeloscomponen tes.
Preparación de la grúa para su
utilización
ReviseyaprietetodoslosanclajesANTESdeusarla
unidad.
Instalación de la palanca de apertura
NOTA:Para esteprocedimiento,consultelaFIGURA 2.2.
1. Saquelapalancadeaperturadesuembalaje.
2. Alineelaroscadelapalancadeaperturaconel
adaptadormachodelabase.
FIGURA 2.1 Montaje del mástil a la base
FIGURA 2.2 Instalación de la palanca de apertura
Pise aquí
para
bloquear
Pise aquí para
desbloquear
Tuerca
Arandela
Perno hexagonal
Soporte de montaje
Palanca de
bloqueo
BLOQUEO
DESBLOQUEO
DETALLE “A”
Arandela
Palanca de apertura
Adaptador macho
en la base

SECCIÓN 2—MONTAJE
Grúa de bipedestación 34 No. de parte 1078985
Instalación del cargador de pared de las baterías
NOTA:Paraesteprocedimiento,consultelaFIGURA 2.3.
NOTE:EsteprocedimientosoloseaplicaalosmodelosRPS350‐1E.
1. Coloqueenelmuroeldepareddelabateríaenla
posicióndeseada.
2. Marquelaposicióndelorificiointermedioconunlápiz.
3. Mida6½pulgadas(16,5cm)haciaabajodesdelamarca
dellápiz
ytaladreunorificiode montaje.
4. Instaleeltornillodemontajeinferiorhastaquequedeuna
distanciaaproximadade1/8depulgada(0,32cm)entrela
cabezadeltornilloyelmuro.
5. Coloqueelcargadordepareddelasbateríaseneltornillo
demontaje infer ior.
6. Taladrelosotrosdosorificiosde
montaj e.
7. Insertelostornillosdemontajeenelcargadordeparedde
lasbateríasyenelmuro. Apriételos firmemente.
PRECAUCIÓN
Cerciórese de escuchar un chasquido al instalar
la batería en el cargador a fin de confirmar su
montaje adecuado, ya que de lo contrario se
podrían producir daños o lesiones.
8. Coloqueelcargadordelabateríaenelsoportedemontaje.
9. Enchufeelcargadordelabateríaenunatomaeléctrica.
NOTA:SeencenderáunindicadorLEDcuandorecibaalimentación
elcargadordelabatería.
FIGURA 2.3 Instalación del cargador de pared de las baterías
Soporte de montaje
Tornillos de
montaje
Tornillo de montaje INFERIOR

SECCIÓN 3—OPERACIÓN
No. de parte 1078985 35 Grúa de bipedestación
SECCIÓN 3—OPERACIÓN
ADVERTENCIA
NO intente trasladar a un paciente sin la aprobación del doctor, profesional de enfermería o asistente
médico. Lea completamente las instrucciones en este manual del propietario, observe a un equipo
calificado de expertos efectuar los procedimientos de elevación y luego realice todo el procedimiento
de levantado varias veces con la supervisión adecuada y un individuo debidamente designado que
simule ser un paciente.
Las patas de la grúa DEBEN estar en su posición de apertura máxima para brindar estabilidad y segu-
ridad óptimas. Si el paciente está en una eslinga y es preciso trasladarlo por un pasillo estrecho, cierre
las patas de la grúa sólo lo necesario para que quepa por el pasillo. Una vez que el elevador salga del
pasillo, regrese las patas a su posición de apertura máxima. Una vez que la grúa salga del pasillo,
regrese las patas a su posición de apertura máxima.
NOTA:Elusodelagrúaporpartedeunsoloasistentedebebasarse
enlaevaluaciónquerealiceelfacultativoencadacasoparticular.
Bloqueo/desbloqueo de las ruedas
traseras
•ConsulteelDetalleʺAʺdelaFIGURA3.1.
Elevación/descenso de la grúa
NOTA:Para esteprocedimiento,consulteelDetalle“B”.
•Paraelev ació nenlagrúa:
Pulseelbotónascendente() enelmando.
NOTA:Silagrúaselevantahastaelmáximonivel,puede quesea
necesariobajar suavementelosbrazosdelagrúaantesdeque
comienceadescenderelmástil.Ba jesuavemente
ambosbr azosal
mismotiempoparaevitarquelagrúasetorneinestable.
•Paradecenderenlagrúa:
Pulseelbotóndescendente () enelmando.
Cierre/apertura de las patas
•Paracerrarlaspatas:
TiredelapalancahaciaAFUERAretirándoladelagrúay
luegohacialaIZQUIERDAhastaqueENCAJEen el
soporte.
NOTA:Elladoizquierdosedeterminaubicándosedetrásdelagrúa
mirandolasruedasdelanteras.
•Paraabrirlaspatas:
TiredelapalancahaciaAFUERAretirándoladela
grúay
luegohacialaDERECHAhastaqueENCAJEenelsoporte.
NOTA:Elladoderechosedeterminaubicándo sedetrásdelagrúa
mirandolasruedastraseras.
Utilización de la parada de emergencia
NOTA:Para esteprocedimiento,consulteelDetalle“C”.
• Presione elbotóndeemergenciaROJOparaimpedir que
subanobajenlosbrazosdelagrúa.
•Paravolveralajusteinicial,gireel botónde emergenciaen
sentidohorario.
FIGURA 3.1 Operación del grúa de bipedestación
DETALLE “B” -
DETALLES DEL MANDO
DETALLE “C” - PARADA DE EMERGENCIA
Botón
descendente
Botón
ascendente
Control mando
Botón de emergencia
Oprima para detener, gire
en sentido horario para
reajustar
Pise aquí para
bloquear
Pise aquí para
desbloquear
Palanca de
bloqueo
DESBLOQUEO
BLOQUEO
DETALLE “A”
RPS350-1ERPS350-1FR

SECCIÓN 3—OPERACIÓN
Grúa de bipedestación 36 No. de parte 1078985
Activación de desconexión mecánica de
emergencia
Desconexión de emergencia primaria
NOTA:Para esteprocedimiento,consulteelFIGURA 3.2.
NOTA:Estepr ocedimientodescenderáelbrazosielmandonoestá
funcionandodebidamente.
Paraactiv arlade sconexión deemergenciaprimaria,
introduzcalapuntadeunbolígrafoenelorificiorotulado
ʺEm erge ncyʺ() enlacajadecontrol.
Desconexión de emergencia secundaria
NOTA:Para esteprocedimiento,consulteelFIGURA 3.3.
NOTA:Todoslospistonesdegrúasde pacientesestánequipadoscon
unmecanismodeeme r gencia. Lade sconexiónmecánicapermitirá
queelpistónseretraigasinsuministr oeléctrico.
NOTA:Utiliceprimeroladesconexióndeemergenciaprimariaantes
delasecundaria,ya queéstadebeutilizarseúnicamente
siel
procedimiento primario nofuncionaoesinaccesible.
NOTA:LagrúaDEBEtenerunacar gaparaquefuncionela
desconexiónmecánica.
Paraactivarladesconexióndeemergenciasecundaria,subala
piezaROJAdelpistón ysimultáneamentebajeelbrazo.
Recarga de la batería
Uso de un cable de alimentación para cargar la
batería
NOTA:Para esteprocedimiento,consulteelFIGURA 3.2.
NOTA:EsteprocedimientosoloseaplicaalosmodelosRPS350‐1FR.
PRECAUCIÓN
NO DEBE activar la parada de emergencia,
pues en tal caso será imposible cargar la
batería. No es posible usar la grúa mientras se
realiza el procedimiento de carga. NO intente
mover la grúa sin antes desenchufar el cable
de alimentación de la toma de corriente de
pared. NO intente usar la grúa si la cubierta de
la batería está dañada. Reemplace la cubierta
de la batería antes de usar la unidad.
1. Conecteelcabledealimentaciónalacajadecontrol.
2. Enchufeelcabledealimentaciónenlatomade
corriente.
NOTA:Labateríasecargaráapro ximadamenteen4horas.El
procedimiento de car gadebeefectuarseenunlugarconbuena
ventilacióndeaire.
3. Desconecteelcabledealimentacióndelatomade
corrienteunavezquelabateríasehayacargado
completamente.
FIGURA 3.2 Desconexión de emergencia primaria
FIGURA 3.3 Desconexión de emergencia secundaria
Orificio de
emergencia
"Emergency"
Caja de
control
Orificio de
emergencia
ascendente
Orificio de
emergencia
descendente
Caja de control
El cable del cargador
se conecta aquí
RPS350-1FR
RPS350-1E
Pieza de emergencia ROJA

SECCIÓN 3—OPERACIÓN
No. de parte 1078985 37 Grúa de bipedestación
Utilización del cargador para recargar la
batería
NOTA:Para esteprocedimiento,consulteelFIGURA 3.4.
NOTA:Estepr ocedimientosoloseaplicaalosmodel o sRPS350‐1E.
NOTA:Invacar erecomiendaca r ga rdiariamentelabateríapara
prolongarsuvidaútil.
NOTA:Cuandolabateríatengaunabajacar gaseescucharáuna
alarmasonora.
1. SUBAlamanijasituadaenlaparteposteriorde
labatería.
2. Levantelabateríahastaretirarladelacajadecontrol.
PRECAUCIÓN
Cerciórese de escuchar un chasquido al instalar
la batería en el cargador, ya que de lo contrario
se podrían producir daños o lesiones.
3. Coloquelabateríaen elcargador.Empujelaparte
superiordelabateríahaciaelsoportedemontajehasta
escucharunchasquido.
NOTA:SeencenderáelindicadorLEDdecar ga.Unavezquese
carguelabatería,elindicadorLEDdejarádeiluminarse.
NOTA:Tardaráapr oximadamentecuatrohorascar garunabatería
completamente
agotada.
4. SUBAlamanijasituadaenlaparteposteriordelabatería.
5. Lev antelaba teríahastaretirarladelcargador.
PRECAUCIÓN
Cerciórese de escuchar un chasquido al instalar
la batería en el cargador, ya que de lo contrario
se podrían producir daños o lesiones.
6. Coloquelabateríaen lacaj adecontr ol.Empujelaparte
superiordelabateríahaciaelsoportedemontajehasta
escucharunchasquido.
FIGURA 3.4 Recarga de la batería
Cargador de
batería (PASO 3)
Caja de control
(PASO 6)
Se escuchará un
chasquido cuando se
instale correctamente
(PASOS 3 y 6)
Manija (PASOS 1, 2, 4 y 5)
Batería

SECCIÓN 4—ELEVACIÓN DEL PACIENTE
Grúa de bipedestación 38 No. de parte 1078985
SECCIÓN 4—ELEVACIÓN DEL PACIENTE
ADVERTENCIA
NO exceda el límite de peso máximo de 158 kg [350 lbs].
NO realice ningún traslado de pacientes sin la aprobación del doctor, profesional de enfermería o
asistente médico.
SIEMPRE mantenga las manos y dedos lejos de las piezas móviles para evitar lesiones.
Las eslingas marca Invacare están diseñadas para usarse con grúas de pacientes Invacare. Para la
seguridad del paciente, NO utilice conjuntamente eslingas y grúas de fabricantes diferentes.
Los individuos que usan la eslinga de transferencia DEBEN ser capaces de soportar la mayor
parte de su propio peso, de lo contrario se pueden producir lesiones.
Las patas de grúa DEBEN estar en su posición de apertura máxima y la palanca debe estar
bloqueada en su posición para unas óptima estabilidad y seguridad. Si el paciente está en una
eslinga y es preciso trasladarlo por un pasillo estrecho, cierre las patas de la grúa solo lo
necesario para que quepa por el pasillo. Una vez que la grúa salga del pasillo, regrese las patas a
su posición de apertura máxima y bloquee inmediatamente la palanca de apertura.
NO mueva el paciente si la eslinga no está debidamente afianzada a los puntos de conexión de la
grúa de bipedestación. Compruebe que la eslinga esté afianzada correctamente a los puntos de
conexión ANTES de levantar al paciente.
Durante el traslado, con el paciente suspendido en la eslinga, NO deslice la base de la unidad por
superficies disparejas que podrían desequilibrar la grúa.
Siempre utilice los asideros en el mástil para empujar o tirar de la grúa.
Posicionamiento de la grúa
NOTA:Para esteprocedimiento,consultelaFIGURA 4.1.
NOTA:Antesdeproceder,consultelaspautasgeneralesenlapágina8yacatetodaslasadvertenciasindicadas.
NOTA:Antesdeposicionarlaspatasdelagrúadebajodeunacama,compruebequeeláreaestélibredeobstrucciones.
1. Cercióresedequelaspatasde
lagrúaestánensuposición
deaperturamáxima.Denose rasí,utilicelapalanc ade
aperturaparaabrirlaspatas.
2. P osicionelagrúautilizandolosasiderosdelmástil.
3. PulseelbotónDESCENDENTEdelmandoparabajarlos
brazosde lagrúaafindecolocarfácilmentelaeslinga.
FIGURA 4.1 Botones del mando
Botón
DESCENDENTE
Botón
ASCENDENTE
Mando

SECCIÓN 4—ELEVACIÓN DEL PACIENTE
No. de parte 1078985 39 Grúa de bipedestación
Elevación del paciente
ADVERTENCIA
NO exceda el límite de peso máximo de 158 kg [350 lbs].
Los individuos que usan la eslinga de transferencia DEBEN ser capaces de soportar la mayor parte de
su propio peso, de lo contrario se pueden producir lesiones.
NO mueva el paciente si la eslinga no está debidamente afianzada a los puntos de conexión de la
grúa. Cerciórese de que la eslinga esté debidamente afianzada ANTES de levantar al paciente. Si
algún accesorio no está debidamente en su lugar, corrija el problema. Cuando la eslinga se alza unas
cuantas pulgadas respecto a la superficie estacionaria y antes de mover al paciente, vuelva a
comprobar que estén en su lugar todos los elementos de dicha eslinga. Si se detecta cualquier
problema, vuelva a bajar al paciente a la superficie estacionaria y corrija el problema, ya que de lo
contrario se pueden producir daños o lesiones.
Realice los ajustes de seguridad y comodidad pertinentes antes de mover el paciente.
Las eslingas marca Invacare están diseñadas para usarse con grúas Invacare. Para la seguridad del
paciente, NO utilice conjuntamente eslingas y grúas de fabricantes diferentes.
NOTA:Para esteprocedimiento,consultelaFIGURA 4.2enlapágina40.
NOTA:Enelmanualdelpropietario encontraráma yo rinformaciónsobrelaseslingaspara pacientes(N/P1023891).
NOTA:ElpacienteDEBEestarinicialmenteenposiciónsentada.Uselacabeceradelacamaparacolocaralpacienteenposiciónverticalyluego
haga
pasarsuspiernasporencimadelcostadodelaca ma .
1. Indiquealpacientequesujetelosasiderosdelosdosladosdelagrúa.(Detalle“A”deFIGURA4.2).
2. Indiquealpa cientequeseinclinehaci aatrásenlaes linga detransferenciaode traslado.
ADVERTENCIA
Eslingas de transferencia - Antes de levantar al paciente, cerciórese de que el borde inferior de la
eslinga de transferencia esté situado en la región lumbar del paciente y que los brazos del mismo
estén fuera de la eslinga.
Eslingas de traslado - Antes de levantar al paciente, cerciórese de que el borde inferior de la eslinga
de traslado esté en la base de la columna vertebral del paciente y que los brazos del mismo estén
fuera de la eslinga.
Invacare no recomienda bloquear las ruedas traseras de la grúa para elevar y trasladar a una persona,
ya que ello podría volcar la grúa poniendo en riesgo al paciente y a sus cuidadores. Invacare
recomienda dejar desbloqueadas las ruedas traseras durante las acciones de elevación y traslado para
permitir que la grúa se estabilice al levantar en un inicio al paciente desde o hacia una silla, cama o
cualquier lugar estacionario.
3. Compruebelosiguiente:
A. Lasrodillasdelpacienteesténbienaseguradascontralarodillera.
B. Lospiesdelpacienteesténpo sicionadosdebidamenteen elreposapiés.
C. Laseslingas:
•Eslingasdetransferencia‐elbordeinferiordelaeslingade transferenciaestésituadoenlaregió nlumbardel
paciente.
•Eslingasdetraslado‐elbordeinferiordelaeslinga
detrasladoestéenlabasedelacolumna vertebraldelpaciente.
• Cualquierestilodeeslinga‐losbraz osdelpacienteesténfueradelaeslinga.
D. Lasruedastraserasesténdesbloqueadas.
E. Laspatasdelagrúaesténensuposic ióndeaperturamáxima.

SECCIÓN 4—ELEVACIÓN DEL PACIENTE
Grúa de bipedestación 40 No. de parte 1078985
ADVERTENCIA
Si va a trasladar a un paciente desde una silla de ruedas, los seguros de las ruedas de la silla DEBEN
estar activados antes de colocar al paciente en dicho dispositivo, ya que de lo contrario se pueden
producir lesiones.
4. Sivaatrasladaraunpacientedesdeunasilladeruedas,activ elossegurosdelasruedasdelasilla(Detalle“B”de FIGURA
4.2).
5. PulseelbotóndeflechaASCENDE NTEenelmandoparalevantaralpacientesobrelasuperficie(cama,silladeruedasosilla
inodora).
NOTA:La
grúaescapazdesoportarelpesodelpaciente.
NOTA:Elcentrodegravedadinferiorconfiereestabilidadpermitiendoqueelpacientesesientamásseguroyqueseamásfácilmoverla
grúa.
FIGURA 4.2 Elevación del paciente
Movimiento del paciente
ADVERTENCIA
Las patas de la grúa DEBEN estar en su posición de apertura máxima para brindar estabilidad y
seguridad óptimas. Si el paciente está en una eslinga y es preciso trasladarlo por un pasillo
estrecho, cierre las patas del elevador sólo lo necesario para que quepa por el pasillo. Una vez
que la grúa salga del pasillo, regrese las patas a su posición de apertura máxima.
Durante el traslado de un paciente suspendido en la eslinga, NO deslice la base con ruedas por
superficies disparejas que podrían desequilibrar la grúa, ya que ello podría hacer que vuelque la
grúa. Siempre utilice los asideros del mástil para empujar o tirar de la grúa.
1. Compruebequelaspatasdelagrúaesténensuposicióndeaperturamáxima.Denoserasí,uselapalancadeapertura
paraabrirlaspatas.
2. Retirelagrúadelasuperficiedesdedondeselevantóalpaciente.
3. Muevalentamentealpacientealasuperficiedeseada.
Brazos
Ruedas
Rodillera
Reposapiés
DETALLE “A” - FRENO DE LA RUEDA
Freno de la rueda
Asideros del mástil

SECCIÓN 5—TRASLADO DEL PACIENTE
No. de parte 1078985 41 Grúa de bipedestación
SECCIÓN 5—TRASLADO DEL PACIENTE
ADVERTENCIA
NO intente trasladar a ningún paciente sin la aprobación del doctor, profesional de enfermería o
asistente médico.
NO mueva el paciente si la eslinga no está debidamente afianzada a los puntos de conexión de la
grúa. Compruebe que la eslinga esté afianzada correctamente a los puntos de conexión antes de
levantar al paciente. Si algún accesorio no está debidamente en su lugar, corrija el problema.
Cuando la eslinga se alza unas cuantas pulgadas respecto a la superficie estacionaria y antes de
mover al paciente, vuelva a comprobar que estén en su lugar todos los accesorios de dicha
eslinga. Si algún accesorio no está debidamente en su lugar, vuelva a bajar al paciente a la
superficie estacionaria y corrija el problema, ya que de lo contrario se pueden producir daños o
lesiones.
Realice los ajustes de seguridad y comodidad pertinentes antes de mover el paciente.
NO utilice eslingas y grúas de fabricantes diferentes. Las eslingas marca Invacare están diseñadas
para usarse las grúas Invacare. La utilización de otras eslingas podría producir daños o lesiones.
Invacare no recomienda bloquear las ruedas traseras de la grúa al elevar y trasladar a una
persona, ya que ello podría hacer que la grúa se vuelque poniendo en riesgo al paciente y los
asistentes. Invacare recomienda dejar desbloqueadas las ruedas traseras durante los
procedimientos de elevación y traslado para permitir que la grúa se estabilice al levantar
inicialmente al paciente desde o trasladarlo a una silla, cama o cualquier otro objeto
estacionario.
Las patas de la grúa DEBEN estar en su posición de apertura máxima para brindar estabilidad y
seguridad óptimas. Si el paciente está en una eslinga y es preciso trasladarlo por un pasillo
estrecho, cierre las patas del elevador sólo lo necesario para que quepa por el pasillo. Una vez
que la grúa salga del pasillo, regrese las patas a su posición de apertura máxima. Si es preciso
cerrar las patas de la grúa para maniobrarla debajo de la cama, ciérrelas sólo lo necesario para
situarla sobre el paciente y levantar a éste último de la superficie de la cama. Una vez que las
patas de la grúa hayan salido de debajo de la cama, regréselas a su posición de apertura máxima.
Cerciórese de revisar los accesorios de la eslinga cada vez que ésta se retire y vuelva a colocar a
fin de garantizar que esté debidamente afianzada antes de retirar al paciente de una superficie.
Lautilizacióndeunsoloasistentesebasaenlaevaluaciónquerealiceelfacultativodecadacasoenparticular.

SECCIÓN 5—TRASLADO DEL PACIENTE
Grúa de bipedestación 42 No. de parte 1078985
Traslado a una silla inodora
ADVERTENCIA
Invacare recomienda bloquear las ruedas
giratorias traseras únicamente mientras se
coloca o se retira la eslinga del paciente.
NOTA:Paraesteprocedimiento,consultelaFIGURA 5.1.
1. Levantealpacientedesdeelcostadodelacama.
2. PulseelbotónASCENDENTEenelmandopara
levantaralpacientelosuficientecomoparaquedarpor
encimadelosbrazosdelasillainodora.Lagrúaes
capazdesoportarelpesodelpaciente.
3. Guíe
alpacientehacialasillainodora.Ellopuede
requerirlacolaboracióndedosasistentes.
4. Pulseelbotóndeflechadescendenteparabajaral
pacientehastalasillainodora.
5. Bloqueelasruedasgiratoriastraserasdelagrúade
bipedestación.
6. Sigaunodelossiguientesprocedimientos:
•Eslingadetransferencia‐Desconectelaeslingade
transferenciaen
lospuntosdeconexióndelagrúa.
•Eslingadetraslado‐
i. Desconectelaeslingadetrasladoenlospuntos
deconexióninferioresdelagrúa.
ii. Levantelaspiernasdelpacienteyretirelos
apoyosdemuslodesdedebajodelindividuo.
iii. Silodesea,desconectelaeslingadetrasladoen
lospuntosdeconexión
superioresdelagrúa.
NOTA:Elpacientepuedepermanecerenlaporciónsuperiordela
eslingadetrasladomientrasutilicelasillainodora.
7. Indiqueoayudealpacientealevantarsuspiesdel
reposapiés.
8. Retirelaeslingadelpaciente.
9. Desbloqueelasruedasyapartelagrúadelasilla
inodora.
FIGURA 5.1 Traslado a una silla inodora
DETALLE “A”
DETALLE “B”
DETALLE “C”

SECCIÓN 5—TRASLADO DEL PACIENTE
No. de parte 1078985 43 Grúa de bipedestación
Traslado a una silla de ruedas
NOTA:Para esteprocedimiento,consultelaFIGURA 5.2.
1. Compruebequelaspatasdelagrúaconelpaciente
suspendidoenlaeslingaesténensuposic ióndeapertura.
2. Coloquelasilladeruedasenellugaradecuado.Consulte
elDetalleʺAʺ.
3. Accionelosfrenos delasrue dastraserade lasillade
ruedasparaprevenirsudesplazamiento.Consulteel
Detalle“B”.
ADVERTENCIA
NO coloque al paciente en la silla de ruedas sin
antes activar los frenos.
Antes de colocar al paciente en una silla de rue-
das para transportarlo, los frenos de las ruedas
de la silla DEBEN estar activados, ya que de lo
contrario se pueden producir lesiones.
4. Posicionealpacientesobrelasilladeruedas.
5. Bajealpacientehastalasilladeruedas.
6. Desconectelaeslingaentodoslosp untosdeconexiónde
lagrúa.ConsulteelDetalle“C”.
7. Indiquealpa cientequelevantesuspiesdelreposapiés.
Ayúdelosifueranecesario.
8. Retirelaeslingadelpaciente.
9. Retirelagrúa
delasilladeruedas.
Traslado a una cama
NOTA:Para esteprocedimiento,consultelaFIGURA 5.3.
NOTA:Elcentrodegravedadinferiorconfier eestabilidad
permitiendoqueelpacientese sienta mássegur oyqueseamásfácil
moverlagrúa.
NOTA:Losbrazosdelagrúapermaneceránenunaposiciónfijahasta
quesepulseelbotónDESCENDENTEenelmando .
1. Coloquealpacientelomáscentradoposibleenlacama.
NOTA:Sivaatrasladaralpacientedesdeunasuperficiequeseamás
bajaquelacama,levántelopor sobrelasuperficiedelacama.Debe
elevaralpacientesólolonecesarioparaquenotoquelacama yquesu
pesoseasostenidototalmentepor lagrúa.
2. Pulseel botónDESCENDENTEparabajaralpaciente
hastalacama.
ADVERTENCIA
Invacare recomienda bloquear las ruedas
giratorias traseras SÓLO al colocar o retirar la
eslinga del paciente.
3. Bloqueelasruedasgiratoriastraserasdelagrúa.
4. Desconectelaeslingaentodoslosp untosdeconexiónde
lagrúa.
5. Indiquealpacientequelevantesuspiesdelreposapiés.
Ayúdelosifueranecesario.
6. Retirelaeslingadetransferenciaotrasladodel paciente.
7. Desbloqueelasruedasgiratorias traserasyretirelagrúa
dela
cama.
FIGURA 5.2 Traslado a una silla de ruedas
FIGURA 5.3 Traslado a una cama
DETALLE “A”
DETALLE “B”
DETALLE “C”

SECCIÓN 6—SOLUCIÓN DE PROBLEMAS
Grúa de bipedestación 44 No. de parte 1078985
SECCIÓN 6—SOLUCIÓN DE PROBLEMAS
NOTA:Sinosolucionalosproblemasconlosmétodossugeridos,comuníqueseconsudistribuidoroInvacare.
SÍNTOMAS FALLAS SOLUCIÓN
Ruido o sonido de resequedad en los puntos de
giro.
Necesita lubricación. Consulte la sección Lubricación de la grúa en la
página 46.
El pistón eléctrico no sube cuando se pulsa el
botón.
Conector suelto del mando o del
pistón.
Batería baja.
Se ha oprimido el botón de
parada de emergencia ROJO.
La batería no está conectada
debidamente a la caja de
control.
Los terminales de conexión
están dañados.
El pistón eléctrico necesita man-
tenimiento o la carga es
demasiado alta.
Revise las conexiones del mando y acciona-
dor. Vuelva a conectarlas si fuera
necesario.
Cargue las baterías. Consulte la sección
Recarga de la batería
en la página 36.
Gire el botón de parada de emergencia ROJO
en SENTIDO HORARIO hasta que salte.
Vuelva a conectar la batería a la caja de
control. Consulte la sección Recarga de la bat-
ería en la página 36.
Reemplace el paquete de la batería. Consulte la
sección Recarga de la batería
en la página 36.
Consulte la sección Ajuste de la base
en la
página 46. Comuníquese con el distribuidor si
necesita efectuar reparaciones.
Ruido inusual del pistón. El pistón está desgastado o
dañado, o el eje está doblado.
Reemplace el pistón o comuníquese con el dis-
tribuidor. Consulte la sección Reemplazo del
pistón eléctrico en la página 47.
Los brazos de la grúa no descienden desde la
posicíon más alta.
Los brazos de la grúa
requieren una carga mínima de
peso para bajar desde la posicíon
más alta.
Baje a mano levemente los brazos de la
grúa.

SECCIÓN 7—MANTENIMIENTO
No. de parte 1078985 45 Grúa de bipedestación
SECCIÓN 7—MANTENIMIENTO
Lista de comprobación para la inspección de mantenimiento de seguridad
NOTA:Sigalosprocedimientosdemantenimientodescritosenestemanualparamantenerlagrúaenóptimas condiciones.
LagrúaInv a careestádiseñadoparabrindarmáximaseguridad, eficaciayserviciosatisfactoriocon uncuidado ymantenimiento
mínimos.
Sibientodasla spartesdelagrúaInvacareestánfabricadasdeacerodelamejor
calidad,seproducirádesgasteporelcontac tode
metalcontrametaltrasunusoconsiderab le.
Noesnecesariorealizarajustesomantenimientoalasruedas,apartede lalimpieza,lubricaciónyrevisarquelos tornillos
giratoriosyejeesténapretados.Eliminetodasuciedaddelas ruedasycojinetes.Sialgunaparte
estádesgastada,reemplácela
INMEDIATAMENTE.
Sitiene algunainquietudsobrelasegur idaddealgunadelaspartesdelagrúa,comuníqueseINMEDIATAMENTEconsu
distribuidor .
Limpieza de la eslinga y la grúa
Debelavarlaeslingaregularme nteenaguacuy atemperaturanoexceda180°F(82°C),conun productodelimpiezabiológico.
Todoloquenecesitaparalimpiarlagrúadebipedestaciónesunpaño suave,humedecidoconaguayunapequeñacantidadde
detergentesuav e.Esposiblelavarlagr úaconlimpiadoresno
abrasiv os.
Detección de desgaste y daños
Esimportanteinspeccionartodosloscomponentesclave,talescomoeslingas,brazodeelevaciónycualquierpuntogiratorio
delaseslingasenbuscadefisuras,deshilachamiento,deformaciónodeterioro.ReemplaceINMEDIATAMENTEcualquier
partedefectuosaycercióresedenoutilizarlagrúasinantesefectuarlasreparaciones.
ARTÍCULO
INCIALMENTE INSPECCIÓN/
AJUSTE
INSTITUCIONAL
CADA MES
INSPECCIÓN
DOMÉSTICA
CADA DEIS
(6) MESE
BASE
Inspeccione si hay anclajes faltantes.
Patas se abren/cierran con facilidad.
Revise si las ruedas y pernos de eje están apretado y presentan desgaste.
Revise que las ruedas giren y rueden suavemente.
Revise que no haya suciedad en las ruedas.
X
X
X
X
X
X
X
X
X
X
X
X
X
X
X
EL MÁSTIL
DEBE estar instalado firmemente a los brazos de la grúa.
Revise en busca de dobleces o torceduras.
X
X
X
X
X
X
BRAZOS Y UNIONES DE LA GRÚA
Revise todos los anclajes y puntos de conexión.
Revise en busca de doblesces o torceduras.
Revise si hay desgaste en las juntas apernadas de los brazos de la grúa.
Revise que los brazos de la grúa estén centrados entre las patas de la base.
X
X
X
X
X
X
X
X
X
X
X
X
PISTÓN ELÉCTRICO
Revise si hay desgaste o deterioro.
(SI ESTÁ DAÑADO, COMUNÍQUESE CON EL DISTRIBUIDOR)
Acciónelo para confimar que funciona suavemente.
X
X
X
X
X
X
LIMPIEZA
Cada vez que sea necesario. XXX
ESLINGAS
REVISE TODAS LAS CONEXIONES DE LA ESLINGA cada vez que se use
para garantizar una correcta colocación y seguridad del paciente.
Revise si hay desgaste en el material de la eslinga.
Revise si hay desgaste en las correas.
X
X
X
X
X
X
X
X
X

SECCIÓN 7—MANTENIMIENTO
Grúa de bipedestación 46 No. de parte 1078985
Lubricación de la grúa
LagrúaInvacareestádiseñadaparanecesitarunmínimode
mantenimiento.Sinembargo,launidaddebe
inspeccionarseylubricarsecadaseismesesparagarantizar
unfuncionamientoseguroyconfiable.
Mantengalaseslingaslimpiasyenbuenestado.Debe
indicarasudistribuidorcualquierdefectoquedetectetan
prontocomoseaposible.
Las
ruedasDEBENgiraryrodarsuavemente.Sepuede
aplicargrasaliviana(lubricantedeautomóvil
impermeable)unavezalañoaloscojinetesdelasruedas.
Apliquedeformamásfrecuente silasruedasestán
expuestasacondicionesextremasdehumedad.
Ajuste de la base
NOTA:Paraesteprocedimiento,consultelaFIGURA 7.1.
1. Reviselasimetríadelaspatascuandoesténenla
posiciónCERRADA.
2. Coloqueunaescuadraenelinteriordelaspatasyla
baseparadeterminarunaalineaciónde90°.
3. Ajustelasbarrasdeacoplamientohastalograruna
alineaciónde90°.
Ajuste de la altura de la rodillera
NOTA:Paraesteprocedimiento,consultelaFIGURA 7.2.
ADVERTENCIA
NUNCA ajuste el soporte de rodillas mientras
el paciente esté en la posición de pie.
NUNCA intente ajustar el soporte de rodillas
mientras la grúa esté moviéndose.
SIEMPRE compruebe que los pasadores de
ajuste estén colocados en los orificios adecua-
dos de regulación de altura antes de usar la
unidad.
1. Elijaunajustedealturaqueseacómodoparael
pacienteyquesuministreelapoyonecesario.
NOTA:Soportederodillasdebecolocarsedemaneraquela
porcióndelarodilladelapiernacontactelaalmohadilla.
2. Utiliceambasmanospararetirarlospasadoresde
ajustealmismotiempo.
3. Coloquesoportede
rodillasalaalturadeseadaylos
pasadoresdeajustedeliberaciónenlosorificiosde
alineacióncorrespondientes.
4. Compruebequeambospasadoresesténenganchados.
FIGURA 7.1 Ajuste de la base
FIGURA 7.2 Ajuste de la altura de la rodillera
Escuadra
Barras de acoplamiento
Barra de
acoplamiento
Rodillera
Pasador de ajuste
Pasador de ajuste

SECCIÓN 7—MANTENIMIENTO
No. de parte 1078985 47 Grúa de bipedestación
Reemplazo del pistón eléctrico
NOTA:Paraesteprocedimiento,consultelaFIGURA 7.3.
1. Retireelpernoinferior,arandelaypernodetope quesujetanelpistóneléctricoalsoportedemontajedelmástil.
2. Apoyeelbrazodelagrúaensuhombroyretirelatuercasuperior,perno,soporteybujedelsoportedemontajedel
brazode
lagrúa.
3. Retireelpistóneléctrico.
4. InviertalosPASOS1al3parainstalarelnuevopistóneléctrico.
ADVERTENCIA
NO apriete excesivamente los anclajes de montaje, ya que ello dañará los soportes de montaje.
FIGURA 7.3 Reemplazo del pistón eléctrico
Perno
Arandela
Buje
Arandela
Perno
Perno
Arandela
Buje
Arandela
Perno
Soporte

SERVICIO DE ATENCION AL CLIENTE, INFORMACIÓN DE SERVICIO Y GARANTÍA
Grúa de bipedestación 48 No. de parte 1078985
SERVICIO DE ATENCION AL CLIENTE, INFORMACIÓN DE SERVICIO Y GARANTÍA
United Kingdom Invacare Limited, Pencoed Technology Park, Pencoed, Bridgend CF35 5HZ
Tel: (44) (0) 1656 776 222
Fax: (44) (0) 1656 776 220
www.invacare.co.uk, UK@invacare.com
Ireland Invacare Ireland Ltd, Unit 5 Seatown Business Campus, Seatown Road, Swords, County Dublin - Ireland
Tel: (353) 1 810 7084
Fax: (353) 1 810 7085
www.invacare.co.uk, [email protected]m
France Invacare Poirier SAS, Route de Saint Roch, F-37230 Fondettes
Tel: (33) (0) 2 47 62 64 66
Fax: (33) (0) 2 47 42 12 24
www.invacare.fr, contactfr@invacare.com
Belgium & Luxemburg Invacare nv, Autobaan 22, B-8210 Loppem, Brügge
Tel: (32) (0) 50 83 10 10
Fax: (32) (0) 50 83 10 11
www.invacare.be, belgium@invacare.com
Switzerland Invacare AG, Benkenstrasse 260, CH-4108 Witterswil
Tel: (41) (0) 61 487 70 80
Fax: (41) (0) 61 487 70 81
switzerland@invacare.com
Deutschland Invacare Aquatec GmbH, Alemannenstraße 10, D-88316 Isny
Tel: (49) (0) 75 62 7 00 0
Fax: (49) (0) 75 62 7 00 66
www.invacare-aquatec.de, in[email protected]
European Distributor Organisation Invacare, Kleiststraße 49, D-32457 Porta Westfalica
Tel: (49) (0) 57 31 754 540
Tel: (49) (0) 57 31 754 541
Portugal Invacare Lda, Rua Estrada Velha, 949, P-4465-784, Leça do Balio
Tel: (351) (0)225 1059 46/47
Fax: (351) (0)225 1057 39
Norge Invacare AS, Grenesvingen 9, Postboks 6230, Etterstad, N-0603 Oslo
Tel: (47) (0) 22 57 95 00
Fax: (47) (0) 22 57 95 01
Italia Invacare Mecc San s.r.l., Via dei Pini 62, I-3016 Thiene (VI)
Tel: (39) 0445 38 00 59
Fax: (39) 0445 38 00 34
www.invacare.it, italia@invacare.com
España Invacare SA, c/Areny s/n, Poligon Industrial de Celrà, E-17460 Celrà (Girona)
Tel: (34) (0) 972 49 32 00
Fax: (34) (0) 972 49 32 20
www.invacare.es, contactsp@invacare.com

Manuel de l'utilisateur
DISTRIBUTEUR: Ce manuel DOIT être remis à l'utilisateur du produit.
UTILISATEUR:
AVANT d'utiliser ce produit, lisez ce manuel et conservez-le pour le
consulter par la suite.
Pour plus de renseignements concernant les produits, les pièces
et les services Invacare, veuillez visiter www.invacare.fr
Lève-personne verticalisateur
RPS350-1E
RPS350-1FR

LÉGENDE DES SYMBOLES
Lève-personne verticalisateur 50 Part No. 1078985
AVERTISSEMENT
NE PAS UTILISER CET ÉQUIPEMENT SANS AVOIR PRÉALABLEMENT LU ET
COMPRIS CE MANUEL. SI VOUS N'ÊTES PAS EN MESURE DE COMPRENDRE
LES AVERTISSEMENTS, MISES EN GARDE ET INSTRUCTIONS, CONTACTEZ
UN CONCESSIONNAIRE QUALIFIÉ OU L'ASSISTANCE TECHNIQUE
INVACARE AVANT DE TENTER D'UTILISER CET ÉQUIPEMENT.
AUTREMENT, DES BLESSURES OU DES DOMMAGES POURRAIENT EN
DÉCOULER.
AVERTISSEMENT À PROPOS DES ACCESSOIRES
Les produits Invacare sont spécialement conçus et fabriqués pour être employés conjointement
avec les accessoires Invacare. Les accessoires conçus par d'autres fabricants n'ont pas été testés
par Invacare et il n'est pas recommandé qu'ils soient employés avec les produits Invacare..
LÉGENDE DES SYMBOLES
"ATTENTION, voir les consignes
d'utilisation ".
AVERTISSEMENT - Ne JAMAIS oublier l'existence du
bras de levage; autrement, le patient et/ou l'assistant
pourraient se blesser
2010
"Date de fabrication "
Le dispositif contient des batteries
d'accumulateurs au plomb. NE PAS
jeter ces batteries dans la poubelle
où on jette les ordures ménagères.
Elles DOIVENT êtreportées dans
une aire de dépôt appropriée.
Prenez contact avec la société
locale de gestion des déchets pour
plus de renseignements.
AVERTISSEMENT - Ne JAMAIS oublier le
marchepied, surtout la position du patient sur
le marchepied; autrement, le patient et/ou
l'assistant pourraient se blesser

TABLE DES MATIÈRES
Part No. 1078985 51 Lève-personne verticalisateur
TABLE DES MATIÈRES
LÉGENDE DES SYMBOLES ................................................................................ 50
REMARQUES SPÉCIALES ................................................................................. 53
PARAMÈTRES DU PRODUIT ............................................................................ 54
Lève-personne verticalisateur RSP350-1E et RPS350-1FR........................................................................................ 54
SECTION 1—PRINCIPES GÉNÉRAUX ................................................................ 55
Charge maximale de fonctionnement............................................................................................................................. 55
Assemblage du lève-personne.......................................................................................................................................... 55
Usage du sangle.................................................................................................................................................................... 55
Fonctionnement du lève-personne ................................................................................................................................. 56
Levage du patient................................................................................................................................................................. 56
Transfert du patient............................................................................................................................................................ 56
Entretien................................................................................................................................................................................ 56
SECTION 2—ASSEMBLAGE ............................................................................... 57
Déballage du lève-personne.............................................................................................................................................. 57
Assemblage du lève-personne.......................................................................................................................................... 57
Montage de l'ensemble du mât au socle.................................................................................................................... 57
Préparation de l'emploi du lève-personne..................................................................................................................... 57
Installation de la manette de commande ....................................................................................................................... 57
Fixation au mur du support de fixation du chargeur de la batterie....................................................................... 58
SECTION 3—FONCTIONNEMENT ..................................................................... 59
Bloquer/débloquer les roulettes arrière........................................................................................................................ 59
Montée/descente du lève-personne................................................................................................................................ 59
Ouverture/Fermeture des pieds...................................................................................................................................... 59
Utilisation de l'arrêt d'urgence......................................................................................................................................... 59
Déclenchement d'un déverrouillage mécanique de secours..................................................................................... 60
Chargement de la batterie ................................................................................................................................................ 60
Utilisation d'un cordon d'alimentation pour charger la batterie ......................................................................... 60
Emploi du chargeur pour charger la batterie........................................................................................................... 61
SECTION 4—LEVAGE DU PATIENT ................................................................... 62
Mise en position du lève-personne verticalisateur...................................................................................................... 62
Soulever du patient............................................................................................................................................................. 63
Le déménagement du patient ........................................................................................................................................... 64
SECTION 5—TRANSFERT DU PATIENT ............................................................ 65
Transfert vers une chaise d'aisance................................................................................................................................. 66
Transfert vers une chaise roulante ................................................................................................................................. 67
Transfert vers un lit............................................................................................................................................................ 67
SECTION 6—DÉPANNAGE ............................................................................... 68

TABLE DES MATIÈRES
Lève-personne verticalisateur 52 Part No. 1078985
TABLE DES MATIÈRES
SECTION 7—ENTRETIEN ................................................................................. 69
Liste de vérification du contrôle de l'entretien............................................................................................................ 69
Nettoyage du sangle et du lève-personne..................................................................................................................... 69
Détection de l'usure et des dommages.......................................................................................................................... 69
Lubrification du lève-personne......................................................................................................................................... 70
Réglage du socle .................................................................................................................................................................. 70
Ajustement de la hauteur du cale-genou....................................................................................................................... 70
Remplacement de le vérin électrique............................................................................................................................. 71
LES VENTES CLIENTÈLES, LES INFORMATIONS DE SERVICE ET GARANTIE ......... 72

REMARQUES SPÉCIALES
Part No. 1078985 53 Lève-personne verticalisateur
REMARQUES SPÉCIALES
Certainsmots‐indicateurssontutilisésdanscemanuelàlʹégardderisquesetdepratiquesdangereusesquipourraient
entraînerdesblessurescorporellesoudesdégâtsmatériels.Consultezletableauci ‐dessouspourylirelesdéfinitionsdeces
mots.
AVIS
LES INFORMATIONS CONTENUES DANS CE DOCUMENT SONT SUSCEPTIBLES D'ÊTRE
MODIFIÉES SANS PRÉAVIS.
PERTURBATIONS RADIOÉLECTRIQUES
La plupart des appareils électroniques sont influencés par les perturbations radioélectriques
(RFI). Il faut donc agir avec PRUDENCE à l'égard de l'emploi du matériel de communication
portable à proximité de ces appareils. Si les RFI causent un comportement irrégulier, APPUYEZ
IMMÉDIATEMENT sur le bouton ROUGE d'arrêt d'urgence (Stop). NE PAS éteindre le bouton
rouge d'arrêt d'urgence au cours d'une transmission.
ENTRETIEN
L'entretien ne DOIT être effectuée QUE par du personnel qualifié.
MOT-INDICATEUR SIGNIFICATION
DANGER
Danger indique une situation dangereuse imminente qui, à moins qu’elle ne soit évitée, aura pour
conséquence la mort ou des blessures graves.
AVERTISSEMENT
Avertissement indique une situation potentiellement dangereuse, qui, à moins qu’elle ne soit évitée,
pourrait entraîner la mort ou des blessures graves.
MISE EN GARDE
Mise en garde indique une situation potentiellement dangereuse, qui, à moins qu’elle ne soit évitée,
pourrait entraîner des dégâts matériels, des blessures légères ou les deux.

PARAMÈTRES DU PRODUIT
Lève-personne verticalisateur 54 Part No. 1078985
PARAMÈTRES DU PRODUIT
Lève-personne verticalisateur RSP350-1E et RPS350-1FR
*REMARQUE:Selonlechargementetlacourse.
Hauteur au raccordement du sangle - MAXIMUM: 167 cm [66 pouces]
Hauteur au raccordement du sangle - MINIMUM: 102 cm [40 pouces]
Largeur au niveau du socle OUVERT: 94 cm [37 pouces]
Hauteur au niveau du socle FERMÉ: 66 cm [26 pouces]
Hauteur du socle (intervalle): 11,4 cm [4,5 pouces]
Longueur du socle: 90,2 cm [35,5 pouces]
Hauteur totale: 125 cm [49 pouces]
Longueur totale: 99 cm [39 pouces]
Largeur totale 65,5 cm [25,8 pouces]
Dimensions des roulettes (AVANT):
Dimension des roulettes (ARRIÈRE):
7,6 cm [3,0 pouces]
12,7 cm [5,0 pouces]
Options pour le sangle: Position debout ou de transfert
Matère du sangle: Polyester
Capacité pondérale: 158 kg [350 lb]
Poids hors du coneneur d’expédition: 49 kg [108 lb]
Batterie: 24V CC (RCHBL)
Entrée chargeur: 100-240V CA
Sortie chargeur/temps de chargement: 29,5V CC 6 heures Maximum
Avertisseur audio-visuel du niveau faible de la batterie: Oui
Dispositifs de sécurité du moteur: Anti-coincement
*Nombre approximatif de levages par charge: *100-200 cycles par charge
Garantie limitée pour le lève-personne/pour les
composants électroniques: 3 ans/2 ans
Bouton d’arrêt d’urgence: Oui

PARTIE N°1—PRINCIPES GÉNÉRAUX
Part No. 1078985 55 Lève-personne verticalisateur
PARTIE N°1—PRINCIPES GÉNÉRAUX
AVERTISSEMENT
LA PARTIE N°1 - PRINCIPES GÉNÉRAUX contient des informations importantes pour le
fonctionnement et l'utilisation de ce produit entoute sécurité.
Examineztouteslespiècespourvousassurerquʹellesnʹontpasétéendommagéesencoursdʹexpédition.Encasdedommage,NE
PASutiliserlʹéquipement.Contactezleconcessionnairepourdeplusamplesinstructions.
Lelève‐personneInvacarenʹestPASundispositifdetransport.Ilestc onçupourtransférer
unepersonnedʹunesurfaceoùellees t
assiseàunautreendroit (commeunlitouunfauteuilroulante).
NEPAStenterdʹeffect uerdetransfertsanslʹapprobationdumédecin,delʹinfirmièreoudelʹassistantmédical dupatient.Lisez
complètementlesconsignesdecemanueldelʹ
utilisateur ,observezuneéquipedʹexpertseffectuerlesprocéduresdelev age,et
effectuezensuiteplusie ur sfoislʹinterv entiontoutentière,enétantcorrectementsuperviséetavecunepersonnevalidedanslerôle
dupatient.
LessangledʹassistanceInvacarepourlapositiondeboutetletransfertsontspécialementconçuspoursʹ
utiliserconjointementavec
leslèv e‐personneInv acare.Lessangleetlesaccessoiresconçuspardʹautresfabricantsnedoiventpasêtreutiliséscomme
composantsdusystèmedelèv e‐personneInvacare.Utilisezlesangler ecommandéparleméde cin,lʹinfirmièreoulʹassistant
médicaldelapersonnepoursonconfortetsa
sécurité.
Silelève‐pers onneestutilisédanslʹespacedʹunedoucheou dʹunbain,assurez‐vousquʹilsoitnettoyéetnegardeaucunetrace
dʹhumidité.NEPASentreposerlelève‐pe rsonneencoremouilléoudansunendroithumide.Contrôlezpériodiquement tousles
composantsdulèv e‐p ersonne
en recherchantdessigne sdecorr osion.Remplaceztoutesle spiècesrouilléesou endommagées.
Lelève‐personnepeutêtreemployéparunprofessionne ldesantépoureffectuertouteslesprocéduresdepréparationaulev age
etdetransfertav ecunpatientaccommodant,nesʹappuy antquepartiellementsurlʹappareil.Toutefois,dufait
quelesconditions
médicalespeuventvarier,Inv acarerecommandequelesprofessionnelsdesantéév aluentlebesoin dʹassistancepourchaquecas
etdéterminentsi unassistantestsuffisantousʹilenfautplus,afindʹeffectuerletransfertentoutesécurité.
Lʹusagedulève‐pe rsonneparunseulassistant
doitsebasersurlʹévaluationduprofessionneldesantépourchaquecasindividuel.
Charge maximale de fonctionnement
NEPASdépasserlalimitationpondéraledulève‐personne.Lalimitationpondéraledulève‐personneestde158kg[350lb].
Assemblage du lève-personne
NEPAStropserrerlavisseriedemontage.Celaendommageraitlessupportsdemontage.
Usage du sangle
Sangledesécuritépourlamiseenpo sitiondebout:NEPASutilisercesangleconjointementaveclelève‐personnecomme
dispos itif detransport.Ilestprévupourtransférerunepersonnedʹunesurfacedereposàuneautre (commedʹunlitàunechaise
roulante).
Sangledesécuritépour
lamiseenpositiondebout:Avantdeleverlepatient,assurez‐vousquelebordinférieurdusan gleest
placéaubasdesondosetquelesbrasdupatientsontàlʹextérieurdusanglede sécurité.
Sanglede sécuritépourlamiseenpositiondebout:La
ceintur eDOITêtresolidementattachée,toutenétantconfortablepourle
patient;autrement, ilpourraitglisserhorsdusanglependantletransfertetpourraitse blesser.
Sangledetransfert:Avantdeleverlepatient,assurez‐vousquelerebordinférieurdusangledetransfertestplacéaubasdesa
colonnevertébraleetquelesbrasdupatientsontàlʹextérieurdusangledesécurité.
Sanglesanglede transfert:NEPASleverlepatientàlapositiondeboutcomplèteenutilisantle sangledetransfert;autrementdes
blessurespourraient surv enir.
Aprèschaque blanchissage(selon lesconsignesindiquéessurlesangle),
examinezleoulessanglepourvousassurerquʹilnʹya
pasdʹusure,dedéchirure setdecouturesquisedé font.
Lessangledécolorés,déchirés,effilochésoucoupéssontdangereuxetpeuvententraînerdesblessures.Jetez‐lesimmé diatement.
NEPASmodifierles sangle.
Assurez‐vousbiendevérifier
lesaccessoiresdessanglechaquefoisquecederni erestretiréetremplacé,afindegarantir quʹilest
correctementattachéavantdedéplacerlepatientdʹunobjetstationnaire(lit,chaiseouchaisedʹaisance).
Silepatientestsurunecha iseroulante,bloquezlesrouesafindʹemp êcher la
chaisedesedéplacerverslʹavantouverslʹarrière.

PARTIE N°1—PRINCIPES GÉNÉRAUX
Lève-personne verticalisateur 56 Part No. 1078985
Fonctionnement du lève-personne
Assurez‐vousquʹunclicsefaitentendrequandvousmontezlabatteriesurlechargeur,afindeconfirmerquʹelleest
correctementmontée.Autrement,desblessuresoudesdommagespourraientsurvenir.
Utilisezlespoignéespourpousserlelève‐personneouletirer.
Levage du patient
Avantdeplacerlespiedsdulève‐personneverticalisateurautourdupatient,assurez‐vousquesespiedsnesetrouve ntpassurle
repose‐pieds;autrement,desblessurespourraientsurv enir.
Lesréglagesdestinésàlasécuritéetauconfortdoiventêtreeffectuésav antdedéplacerlepatient.Lesbrasdupatient
doiventse
trouveràlʹextérieurdessanglesdusangle.
Avantdelev erlepatientdʹunobj etstationnaire(chaisero ulante,chaisedʹaisanceoulit),soulev ezlégèrementlepatienthors de
lʹobjetetvérifiezquetouteslessanglesdusanglesontbienattachées.Sicenʹestpasle
cas,déposezlepatientpourcorrigerle
problème,puisrelevez‐leàetvérifiezànouv eau.
Pendantletransfert,tandisquelepatientestsuspendudansunsangleattachéaulève‐person ne,NEPASfairecirculerlesroulettes
surdessurfacesirrégulières,cequicréeraitundéséquilibredulèv e‐personneet
pourraitfairebasculerlepatient.Utilisezla
poignéedecommandesurlemâtENTOUTTEMPSpour pousserlelèv e‐personneouletirer.
Inv acarerecommandeleblocagedesroulettespivotantesUNIQUEMENTenplaçantouenretirantlesangle(a id eàlaposition
deboutoutransfert)dupatient.
Inv acarenerecommande
PASdebloquerlesroulettes arrièredu lèv e‐personnelorsquʹonsoulèv e uneperson ne;celapourrait
fairebasculerlelève‐personneetmettreendangerlepatientetsesassistants.Inv acareRECOMMANDEquelesroulettesarrière
nesoientpasbloquéespendantlesprocéduresdelev age,afindepermettreaulève‐personne
desestabiliserquandoncommence
àsouleverlepatientdʹunechaise,dʹunlitoudetoutobjetstationnaire.
Transfert du patient
Avantletransfert,vérifiezquelacapacitépondéraledupro duitpeutsupporterlepoidsdupatient.
Lesroue sdelachaiseroulantedo iventêtrebloquéesavantdʹyinstallerlepatientpourletra nsporter.
Entretien
Lʹentretienrégulierdeslè v e ‐personneetdesaccessoir esestnécessaireafindʹassurerunfonctionnementcorrect.
Aprèsles12premiersmoisdefonctionnement,examinezlʹusure detouslespointsdʹarticulationetlesattaches.Silemétalestusé,
lespiècesDO IVENTêtreremplacées.Effectuezcetteinspectiontousles
sixmoisparlasuite.
NEpasTROPserrerlavisserie dʹassemblage.Celaen dommagerait lessupportsdefixation.
Lesroulettesetlesboulonsdesessieuxdoiv entêtreexaminéstousles sixmoispoursʹassurerquʹilssontbienserrésetquʹil sne
sontpasusés.

PARTIE N°2—ASSEMBLAGE
Part No. 1078985 57 Lève-personne verticalisateur
PARTIE N°2—ASSEMBLAGE
Déballage du lève-personne
Déballezlescomposantsducartondʹexpédition.
Assemblage du lève-personne
AVERTISSEMENT
Utilisez uniquement des pièces d'Invacare pour
l'assemblage de ce lève-personne. Les pieds du
socle, le mât, la perche, l'assemblage de la
pompe et la barre oscillante sont fabriqués selon
les spécifications assurant l'alignement correct
de toutes les pièces pour un fonctionnement effi-
cace en toute sécurité.
Montage de l'ensemble du mât au socle
REMARQUE:Lʹensembledumât peutêtreretirédusoclepour
lʹentreposerouletransporter.LʹensembledumâtDOIT être
correctementfixéàlʹassemblagedusocleavantlʹutilisation.
REMARQUE:Po ur cetteprocédure, consultezlaFIGURE 2.1.
1. Placezlesoclesurlesol.
REMARQUE::Assurez‐vousquelesquatre
roulettessonttoutesen
contactaveclesol.
2. Bloquezlesdeuxroulettesarrière.ConsultezledétailʺAʺ.
3. Retirezleboulondeblocageàsix pans,lesrondelleset
lʹécrousituésdanslapartiedécoupéeenUdusocle.
4. Mettezlemâten positionverticale.
5. Abaissezlemâtsurlesupportde
mo ntage.
6. Fixezlemâtausocleàlʹaide duboulondeblocageàsi x
pans,desrondellesetdelʹécrou.Resserrezsolidement.
Préparation de l'emploi du
lève-personne
ExaminezetresserreztoutelavisserieAVANTlʹutilisation.
Installation de la manette de
commande
REMARQUE:Po ur cetteprocédure, consultezlaFIGURE 2.2.
1. Retirezlamanettedecommandeducarton
dʹemballage.
2. Vissezlapoignéesurlʹadaptateurmâledusocle.
FIGURE 2.1 Montage de l'ensemble du mât au socle
FIGURE 2.2
Installation de la manette de commande
Appuyez ici
pour verrouiller
Appuyez ici pour
déverrouiller
Écrou
Rondelle
Boulon de blocage à six pans
Support de
assemblage
Levier de
blocage
VERROUILLÉ
DÉVERROUILLÉ
DETAIL « A »
Rondelle
Manette de
commande
Adaptateur
mâle en socle

PARTIE N°2—ASSEMBLAGE
Lève-personne verticalisateur 58 Part No. 1078985
Fixation au mur du support de fixation
du chargeur de la batterie
REMARQUE:Po ur cetteprocédure, consultezlaFIGURE 2.3.
REMARQUE:Cette procédurenes’appliquequ’auxmodèles
RPS350‐1E.
1. Placezlesupportdemontageduchargeurdelabatterie
surlemurdanslapositionvoulue.
2. Àlʹaidedʹuncrayon,marquezlʹemplacementde
lʹorificecentral.
3. Mesurez6poucesetdemi(16,5cm)
verslebasàpartir
delamarquedu crayonetpercezunorificedemontage.
4. Installezlavisdemontageinférieurepourquʹilyaitun
intervalledʹunhuitièmedepouce(0,32cm)environ
entrelatêtedelavisetlemur.
5. P osezlesupportdemontage
duchargeurde laba tterie
surlavisdemontageinférieure.
6. P ercezlesdeuxautresorificesdemon tage.
7. Vissezlesvisdemontageàtraverslesupportdemontage
duchargeurdebatterieetdanslemur.Resserrez‐les
solidement.
MISE EN GARDE
Assurez-vous d'entendre un clic quand vous
montez la batterie sur le chargeur, afin de con-
firmer qu'elle est correctement montée. Autre-
ment, des blessures ou des dommages
pourraient survenir.
8. Mettezlechargeurdelabatterieenplacesurlesupportde
montage.
9. Branchezlechargeurdelabatteriedansuneprise
électrique.
REMARQUE:Un voyantDELsʹillumineraquandlecourant
passeradanslechar geurdelabatterie.
FIGURE 2.3 Fixation au mur du support de fixation du
chargeur de la batterie
Support de montage
Vis de
montage
Vis de montage inférieure

PARTIE N° 3—FONCTIONNEMENT
Part No. 1078985 59 Lève-personne verticalisateur
PARTIE N° 3—FONCTIONNEMENT
AVERTISSEMENT
NE PAS tenter d'effectuer de transfert d'un patient sans l'approbation du médecin, de l'infirmière ou
de l'assistant médical du patient. Lisez complètement les consignes de ce manuel de l'utilisateur,
observez une équipe d'experts effectuer les procédures de levage, et effectuez ensuite plusieurs fois
l'intervention tout entière, en étant correctement supervisé et avec une personne valide dans le rôle
du patient.
Les pieds du lève-personne verticalisateur DOIVENT se trouver en position ouverte au maximum
pour une stabilité et sécurité maximale. Si le patient est dans un sangle et qu'il devient nécessaire de
se déplacer dans un passage étroit, fermez les pieds du dispositif le temps qu'il faut pour sortir du pas-
sage. Une fois que le lève-personne verticalisateur est sorti du passage, retournez les pieds à leur
position ouverte au maximum.
REMARQUE:Lʹutilisationdulève‐personneparunseulassistant
doitsebasersurlʹévaluationdupr ofessionneldesantédanschaque
casparticulier.
Bloquer/débloquer les roulettes arrière
REMARQUE:Po ur cetteprocédure, consultezledétail«A».
Montée/descente du lève-personne
REMARQUE:Po ur cetteprocédure, consultezledétail«B».
•Pourmonte rlelève‐personne:
Appuyezsurleboutondemontée() delatélécommande.
REMARQUE:Silelève‐personneestmontéau plushautniveau,il
peutsʹa vérernécessairedetirerdoucementlesbrasdelevageversle
basavantque
lemâtnecommenceàdescendre.Tirezdoucementsur
lesdeuxbrasenmêmetempspouréviterdedéstabiliserle
lève‐personne.
•Pourbaisserlelève‐personne :
Appuyezsurleboutondedescente() dela
télécommande.
Ouverture/Fermeture des pieds
•Pourfermerlespieds:
TirezsurlamanetteverslʹEXTÉRIEUR(OUT)du
lève‐personneverticalisateur,puisversvotreGAUCHE
jusquʹàcequʹelleseBLOQUEdanslʹen coche dusupport.
REMARQUE:La gaucheestdéterminéeensetenantderrièr ele
lève‐personneverticalisateur,verslesr oulettesavant.
•Pourouvrir
lespieds:
Tirezsurlamanettedecom mandeverslʹEXTÉRIEUR
(OUT)dudispositifde verticalisation,puisversvotre
DROITEjusquʹàcequʹelleseBLOQUEdanslʹencochedu
support.
REMARQUE:La droiteestdéterminéeensetenantderrièr ele
lève‐personneverticalisateur,verslesr oulettesavant.
Utilisation de l'arrêt d'urgence
REMARQUE:Po ur cetteprocédure, consultezleDétail«C».
•AppuyezsurleboutonROUGEdʹarrêtdʹurgenceafin
dʹempêcherlesbrasdemonteroudedescendr e.
•Pourremettreàlʹétatinitial,tournezleboutondʹurgence
danslesenshoraire.
FIGURE 3.1 Fonctionnement du lève-personne
DÉTAIL « B » - DU
CONTRÔLE MANUEL
DÉTAIL « C » - ARRÊT D'URGENCE
Bouton de descente
(Down)
Bouton de montée (Up)
Télécommande
Bouton d'urgence
Appuyez pour arrêter
Tournez dans le sens
horaire
pour remettre à l'état
initial
Appuyez ici pour
verrouiller
Appuyez ici pour
déverrouiller
Levier de
blocage
VERROUILLÉ
DÉVERROUILLÉ
DÉTAIL « A »
RPS350-1ERPS350-1FR

PARTIE N° 3—FONCTIONNEMENT
Lève-personne verticalisateur 60 Part No. 1078985
Déclenchement d'un déverrouillage
mécanique de secours
Déverrouillage de secours principal
REMARQUE:Po ur cetteprocédure, consultezleFIGURE 3.2.
REMARQUE:Cette procédureferadescendr elaperchesilecontrôle
manuelnefonctionnepascorrectement.
Pourdéclencherledéverrouillagedesecours principal,insérezla
pointedʹunstylodans lʹorificedesecoursverslebas() du
boîtierdecommande.
Déverrouillage de secours secondaire
REMARQUE:Po ur cetteprocédure, consultezleFIGURE 3.3.
REMARQUE:Touslesactionneursdelève‐personnesontéquipésdʹun
dispositifmécaniquededéverr ouillagedese cours.Lamiseenmar che
mécaniquepermetàlʹactionneurdeseretirersansalimentation.
REMARQUE:Utilisezdʹabordledéverrouillagedesecoursprincipal,
avantdʹemployerledéverr ouillage
desecoursseconda ir e .Cette
procédurenedoitêtreemployéequesiledéverr ouillagedesecours
principalnefonctionnepasounepeut pasêtreatteint.
REMARQUE:Lelève‐personneDOITsupporterunpoidspourquele
déverrouillagemécaniquefonctionne.
Pourdéclencherledéverrouillagedesecourssecondaire,tirezla
poignéedesecours
ROUGEverslehautettirezlapercheversle
basen mêmetemps.
Chargement de la batterie
Utilisation d'un cordon d'alimentation pour
charger la batterie
REMARQUE:Po ur cetteprocédure, consultezlaFIGURE 3.2.
REMARQUE:Cette procédurenes’appliquequ’auxmodèles
RPS350‐1FR
MISE EN GARDE
L'arrêt d'urgence ne DOIT PAS être actionné -
autrement, il sera impossible de charger la
batterie. Pendant le chargement, le lève-personne
ne peut pas être utilisé. NE PAS tenter de
déplacer le lève-personne sans avoir débranché le
cordon d'alimentation de la prise de courant
murale. NE PAS tenter d'utiliser le lève-personne
si le boîtier de la batterie est endommagé.
Remplacer le boîtier endommagé avant d'utiliser
à nouveau la batterie.
1. Connectezlecordondʹalimentationau boîtierde
commande.
2. Branchezlecordondʹalimentationàuneprisedecourant.
REMARQUE:La batteriesechar geen4heuresenviron.Le
chargementdoitêtreeffectuédansunepiècebienventilée.
3. Déconnectezlecordondʹalimentation delaprisedecourant
quandlabatteriees t
complètementchargée.
FIGURE 3.2 Déverrouillage de secours principal
FIGURE 3.3 Déverrouillage de secours secondaire
Orifice de secours
vers le bas
Boîtier de
commande
Orifice de
montée de
secours
Orifice de descente
de secours
Boîtier de
commande
Le câble du chargeur
se raccorde ici
RPS350-1FR
RPS350-1E
Poignée de secours rouge

PARTIE N° 3—FONCTIONNEMENT
Part No. 1078985 61 Lève-personne verticalisateur
Emploi du chargeur pour charger la batterie
REMARQUE:Po ur cetteprocédure, consultezleFIGURE 3.4.
REMARQUE:Cette procédurenes’appliquequ’auxmodèles
RPS350‐1E.
REMARQUE:Invacar er ecommandequelabatteriesoitrechargée
chaquejourafindepr olongersaduréedevieutile.
REMARQUE:Unealarmesonoreretentitquandlabatteriedoitêtre
rechargée
4. Tirezversle HAUTlapoignéeà
lʹarrièredelabatterie.
5. Soulevezlabatterieetretirez‐laduboîtierdecommande.
MISE EN GARDE
Assurez-vous qu'il y ait un clic audible lors de
l'assemblage de la batterie sur le chargeur.
Autrement, des blessures ou des dommages
pourraient survenir.
6. Placezlabatteriesurlechargeur.Poussezlapartie
supérieuredelabatteriecontrelesupportdemontage
jusquʹàcequʹunclicsefasseentendre.
REMARQUE:Le voyantDELindiquantlechar gement
sʹilluminera.Unefoislechar gementeffectué,levoyantDEL
sʹéteindra.
REMARQUE:Ilfautenvironquatreheures
pourcharger
complètementlabatterie.
7. TirezlapoignéeversleHAUTàlʹarrièredelabatterie.
8. Soulevezlabatterieetretirez‐laduchargeur..
MISE EN GARDE
Assurez-vous qu'il y ait un clic audible lors de
l'assemblage de la batterie sur le chargeur.
Autrement, des blessures ou des dommages
pourraient survenir.
9. Placezlabatteriesurleboîtierdecomma nde. Poussezla
partiesupérieuredelabatteriecontrelesupportde
montagejusquʹàcequʹunclicsefasseentendre.
FIGURE 3.4 Chargement de la batterie
Chargeur de la
batterie (étap 3)
Boîtier de
commande
(étap 6)
Un clic se fera entendre
quand l'installation sera
correctement faite
(étapes 3 et 6)
Poignée (étapes 1, 2, 4 et 5)
Batterie

PARTIE N° 4—LEVAGE DU PATIENT
Lève-personne verticalisateur 62 Part No. 1078985
PARTIE N° 4—LEVAGE DU PATIENT
AVERTISSEMENT
NE PAS dépasser la limitation pondérale de 158 kg [350 lb].
NE PAS tenter d'effectuer de transfert sans l'approbation du médecin, de l'infirmière ou de l'assistant
médical du patient.
Gardez TOUJOURS les mains et les doigts éloignés des pièces en mouvement.
Les sangle pour patients Invacare sont conçus spécialement pour s'utiliser conjointement avec les
lève-personne Invacare. Pour la sécurité du patient, NE PAS utiliser des sangle et des lève-personne
provenant de fabricants différents.
Les personnes qui utilisent le sangle de verticalisation DOIVENT pouvoir supporter la plus grande
partie de leur poids; autrement, des blessures pourraient survenir.
Les pieds du lève-personne verticalisateur DOIVENT être dans la position ouverte maximale et le
levier verrouillé pour une stabilité et une sécurité optimales. Si le patient est dans un sangle et qu'il
devient nécessaire de se déplacer dans un passage étroit, fermez les pieds du dispositif le temps qu'il
faut pour sortir du passage. Une fois que le lève-personne verticalisateur est sorti du passage,
retournez les pieds à leur position ouverte maximale et verrouillez IMMÉDIATEMENT la poignée de
commande.
NE PAS déplacer le patient si le sangle n'est pas correctement raccordé aux points d'attache du
lève-personne. Vérifiez que le sangle est bien raccordé aux points d'attache AVANT de lever le
patient.
Au cours du transfert, pendant que le patient est suspendu dans le sangle, NE PAS laisser rouler le
socle du lève-personne sur des surfaces inégales qui pourraient le rendre instable.
Utilisez la poignée de commande sur l'ensemble du mât EN TOUT TEMPS, pour pousser le lève-per-
sonne ou le tirer.
Mise en position du lève-personne verticalisateur
REMARQUE:Po ur cetteprocédure, consultezlaFIGURE 4.1.
REMARQUE:Cons ultezlesPRI NCIPES GÉNÉRAUX
àlapage 55avantdecontinueretr especteztous lesavertissementsindiqués.
REMARQUE:Avantdeplacerlespiedsdulève‐personnesousunlit,assurez‐vousque la zoneestdénuéedetouteobst ruction.
1. Assurez‐vousquelespiedsdulèv e‐p ersonne
verticalisateursetrouventenposition ouverteau
maximum.
Sinon,utilisezlamanettedecomman depour
ouvrirlespieds.
2. Placezlelèv e ‐personneverticalisateurenutilisantla
poignéedumât.
3. Appuyezsurleboutondedescente(DOWN)dela
télécommandeafindʹabaisserlesbrasdelev agepour
quʹilssoientfacilesàattacherausangle.
FIGURE 4.1 Boutons de télécommande
Bouton de descente
Bouton de montée
Télécommande

PARTIE N° 4—LEVAGE DU PATIENT
Part No. 1078985 63 Lève-personne verticalisateur
Soulever du patient
AVERTISSEMENT
NE PAS dépasser la limitation pondérale de 158 kg [350 lb].
Les personnes qui utilisent le sangle de verticalisation DOIVENT pouvoir supporter la plus grande
partie de leur poids; autrement, des blessures pourraient survenir.
NE PAS déplacer le patient si le sangle n'est pas correctement raccordé aux points d'attache du
lève-personne verticalisateur. Vérifiez que le sangle est bien raccordé AVANT de lever le patient. Si
certains des points d'attache ne sont pas bien en place, corrigez le problème. Quand le sangle a été
levé à quelques pouces d'une surface immobile et avant de déplacer le patient, vérifiez à nouveau
pour vous assurer que le sangle et tous les points d'attache sont fermement en place. Si certains
points d'attache ne sont pas bien en place, , redescendez le patient sur la surface immobile et
corrigez le problème - autrement, des blessures ou des dommages pourraient survenir.
Les réglages nécessaires à la sécurité et au confort doivent être effectués avant de déplacer le patient.
Les sangle pour patients Invacare sont prévus spécialement pour s'utiliser conjointement avec les
lève-personne Invacare. Pour la sécurité du patient, NE PAS utiliser des sangle et des lève-personne
de fabricants différents.
REMARQUE:Po ur cetteprocédure, consultezlaFIGURE 4.2onpage64.
REMARQUE:Cons ultezlemanueldelʹutilisateur,P/N1023891pourdeplusamplesinformations.
REMARQUE:Le patientDOITdʹabordsetr ouverenpositionassise.Utilisezlatêtedulitpourmettrelepatienten positionverticale;puis
déplacezsesjambesen
les passantpar‐dessuslecôtédulit.
1. Donnezaupatientlaco nsignedesetenirauxpoignéesdesdeuxcôtésdulève ‐personnev erticalisateur(DétailʺAʺdela
FIGURE4.2).
2. Donnezaupatientlaco nsignedesʹadosserausangledepositiondeboutoudetransfert.
AVERTISSEMENT
sangle en position debout - Avant de lever le patient, assurez-vous que le rebord inférieur du sangle
est placé contre le bas du dos du patient et que ses bras sont à l'extérieur du sangle.
sangle de transfert - Avant de lever le patient, assurez-vous que le rebord inférieur du sangle se
trouve à la base de sa colonne vertébrale et que les bras du patient sont à l'extérieur du sangle.
Invacare ne recommande PAS de bloquer les roulettes arrière du lève-personne verticalisateur pen-
dant le levage et le transfert d'une personne; cela pourrait faire basculer le lève-personne et mettre
en danger le patient et ses assistants. Invacare recommande que les roulettes arrière ne soient pas
bloquées pendant les procédures de levage et de transfert, afin de permettre au lève-personne verti-
calisateur de se stabiliser quand on commence à soulever le patient et à le transférer à une chaise, à
un lit ou à tout objet stationnaire.
3. Assurez‐vousde sactionssuiv antes:
A. Lesge nouxdupatientsontensécuritécontrelecale‐genou.
B. Lespiedsdupatientsontposéscor recteme ntsurlere pose‐pieds.
C. Lessangle:
• ʺSangledev erticalisation‐lerebordinférieurdu sangleenpositiondeboutestplacésurlebasdudosdupatient.
• ʺSanglede
tra nsfert‐lerebo rdinférieurdusangledetransfertestàlabasede lacolonnevertébraledupatient.
• ʺLʹunoulʹautredesstylesdesangle‐lesbrasdupatientsontàlʹextérieurdusangle.
D. Lesroulettesarrièressontdébloquées.
E. Lespiedsso ntenpositionouv erte aumax imum.

PARTIE N° 4—LEVAGE DU PATIENT
Lève-personne verticalisateur 64 Part No. 1078985
AVERTISSEMENT
En transférant un patient d'une chaise roulante, les roues de la chaise doivent être bloquées avant d'y
installer le patient. Autrement, des blessures pourraient survenir.
4. Lorsdʹun transfertdʹunechaiseroulante,bloquezlesrouesdelachaise(détailʺBʺdelafigure4.2).
5. Appuyezsurleboutonde laflèchedemontée(UP)surlaté lécomma ndepourleverlepatientau‐dessusdelasurface(lit,
chaiseroulanteouchaisedʹaisance).
REMARQUE:Le
poidsdupatientestsupportéparlelève‐personneverticalisateur.
REMARQUE:Le centredegravitéplusbasfavoriselastabilité,cequiestsécurisantpourlepatient,rendantlelevageplusfacile.
FIGURE 4.2 Soulever du patient
Le déménagement du patient
AVERTISSEMENT
Les pieds du lève-personne verticalisateur DOIVENT se trouver en position ouverte au maximum
pour une stabilité et sécurité maximale. Si le patient est dans un sangle et qu'il devient nécessaire de
se déplacer dans un passage étroit, fermez les pieds du lève-personne verticalisateur le temps qu'il
faut pour sortir du passage. Une fois que le lève-personne verticalisateur est sorti du passage,
retournez les pieds à leur position ouverte au maximum.
Pendant le transfert, tandis que le patient est suspendu dans le sangle de levage, NE PAS faire circu-
ler les roulettes sur des surfaces irrégulières, ce qui créerait un déséquilibre du dispositif de levage et
pourrait le faire basculer. Utilisez la poignée de commande du mât EN TOUT TEMPS pour pousser
le lève-personne ou le tirer.
1. Assurez‐vousquelespiedsdulève‐personneverticalisateursontenpositiondʹouverturemaximale.Sinon,utilisezla
poignéedulevierpourouvrirlespieds.
2. Éloignezlelève‐personneverticalisateurdelasurfaceoùilssetrouvaient.
3. Déplacezlentementlepatientjusquʹàlasurfacedésirée.
Poignée
Roulettes
Cale-genou
Repose-pieds
DETAIL « A » - BLOCAGE DES ROUES
Blocage des roues
Poignée du

PARTIE N° 5—TRANSFERT DU PATIENT
Part No. 1078985 65 Lève-personne verticalisateur
PARTIE N° 5—TRANSFERT DU PATIENT
AVERTISSEMENT
NE PAS tenter d'effectuer de transfert sans l'approbation du médecin, de l'infirmière ou de
l'assistant médical du patient.
NE PAS déplacer le patient si le sangle n'est pas correctement raccordé aux points d'attache du
lève-personne verticalisateur. Vérifiez que le sangle est bien raccordé AVANT de lever le
patient. Si certains des points d'attache ne sont pas bien en place, corrigez le problème. Quand le
sangle a été levé à quelques pouces d'une surface immobile et avant de déplacer le patient,
vérifiez à nouveau pour vous assurer que le sangle et tous les points d'attache sont fermement en
place. Si certains points d'attache ne sont pas bien en place, redescendez le patient sur la surface
immobile et corrigez le problème - autrement, des blessures ou des dommages pourraient
survenir.
Les réglages nécessaires à la sécurité et au confort doivent être effectués avant de déplacer le
patient.
NE PAS utiliser des sangle et des dispositifs verticalisateurs provenant de fabricants différents.
Les sangle pour patients Invacare sont prévus spécialement pour s'utiliser conjointement avec
les dispositifs verticalisateurs Invacare. Autrement, des blessures ou des dommages pourraient
survenir.
Invacare ne recommande PAS de verrouiller les roulettes arrière du lève-personne
verticalisateur lors du levage et du transfert d'une personne; cela pourrait faire basculer le
lève-personne verticalisateur et mettre en danger le patient et ses assistants. Invacare
recommande que les roulettes arrière ne soient pas verrouillées pendant les procédures de
levage et de transfert, afin de permettre au lève-personne verticalisateur de se stabiliser quand
on commence à soulever le patient d'une chaise, d'un lit ou de tout objet stationnaire.
Les pieds du lève-personne verticalisateur DOIVENT se trouver en position ouverte au
maximum pour une stabilité et sécurité maximale. Si le patient est dans un sangle et qu'il devient
nécessaire de se déplacer dans un passage étroit, fermez les pieds du dispositif le temps qu'il faut
pour sortir du passage. Une fois que le lève-personne verticalisateur est sorti du passage,
retournez les pieds à leur position ouverte au maximum. S'il est nécessaire de fermer les pieds
afin de manœuvrer le lève-personne verticalisateur sous un lit, fermez les pieds le temps
nécessaire à placer le dispositif au-dessus du patient et de le soulever du lit. Une fois que les pieds
du lève-personne verticalisateur ne sont plus sous le lit, remettez-les en position ouverte au
maximum.
Assurez-vous de bien vérifier les points d'attache du sangle chaque fois que ce dernier est retiré
et remplacé, afin de vous assurer qu'il est correctement fixé avant que le patient ne soit levé de
la surface où il se trouve.
Lʹemploiedʹunseulassistantsebasesurlʹévaluationduprofessionneldesantépourchaquecasindividuel.

PARTIE N° 5—TRANSFERT DU PATIENT
Lève-personne verticalisateur 66 Part No. 1078985
Transfert vers une chaise d'aisance
AVERTISSEMENT
Invacare ne recommande le blocage des
roulettes pivotantes que lorsqu'on place ou
retire le sangle du patient.
REMARQUE:Pourcetteprocédure,consultezlaFIGURE 5 .1.
1. Soulevezlepatientdepuislecôtédulit.
2. Appuyezsurleboutondemontée(UP)ducontrôle
manuelafindʹéleverlepatientsuffisammentpour
nʹêtrepasgênéparlesbrasdelachaisedʹaisance.Son
poidsserasupportéparlelève‐personne
verticalisateur.
3. Guidezlepatientverslachaisedʹaisance.Celapeut
demanderdeuxassistants.
4. Appuyezsurleboutondedescentepourdéposerle
patientsurlachaisedʹaisance.
5. Bloquezlesroulettespivotantesarrièresurle
lève‐personneverticalisateur.
6. Effectuezlʹunedesactionssuivantes:
•Sangleenpositiondebout‐décrochezlesangledes
pointsdʹattachedulève‐personne.
•Sangledetransport‐
i. Décrochezlesangledetr ansportdespoints
dʹattacheinférieurssurlelève‐personne.
ii. Levezlesjambesdupatientetretirezles
supportsdescuissesdʹen‐dessouslepatient.
iii. Sicʹestsouhaité,décrochezlesanglede
transportdespointsdʹ
attachesupérieurssurle
lève‐personne.
REMARQUE:Lepatientpeutdemeurerdanslapartiesupérieure
dusanglede transportpendantquʹilsesertdelachaisedʹaisance.
7. Demandezaupatientdʹenleverlespiedsdu
repose‐pied,ouaidez‐leàlefaire.
8. Enlevezlesangleaupatient.
9. Débloquezlesroulettes
etretirezlelève‐personnedela
chaisedʹaisance.
FIGURE 5.1 Transfert vers une chaise d'aisance
DÉTAIL « A »
DÉTAIL « B »
DÉTAIL « C »

PARTIE N° 5—TRANSFERT DU PATIENT
Part No. 1078985 67 Lève-personne verticalisateur
Transfert vers une chaise roulante
REMARQUE:Pourcetteprocédure,consultezlaFIGURE 5 .2.
1. Lepatientétantinstallédanslesangle,assurez‐vousque
lespiedsdulève‐personnesontenpositionouv e rte.
2. Mettezlachaiseroulanteenposition.Consultezledétai l
«A».
3. Bloquezlesrouesarrièredelachaiseroulantepour
lʹempêcherde bouger.Consultez
ledétail «B».
AVERTISSEMENT
Ne pas placer le patient dans la chaise roulante si
les roues ne sont pas bloquées. Les roues
DOIVENT être en position bloquée avant de
déposer le patient sur la chaise roulante pour le
transporter. Autrement des blessures pour-
raient survenir.
4. Placezlepatientau‐dessusdelachaisero ulante.
5. Déposezlepatientdanslachaiseroulante.
6. Décrochezlesangledetouslespointsdʹattachesurle
lève‐personne.Consultezledétai l«C».
7. Demandezaupatientdʹenlev erlespiedsdurepose‐pieds.
Aidez‐lesiné cessaire.
8. Enlevezlesangleenveloppant
lepatient.
9. Retirezlelève‐personnedelachaiseroulante.
Transfert vers un lit
REMARQUE:Pourcetteprocédure,consultezlaFIGURE 5 .3.
REMARQUE:Lecentredegravitéplusbasfavoriselastabilité,
cequiestsécurisantpourlepatient,rendantlelevageplusfacile.
REMARQUE:Lesbrasdelevagerestentenpositionjusquʹàce
queleboutondedescente(DOWN)soitappuyésurla
télécommande.
1. Placez
lepatien taussiprèsdulitquepossible.
REMARQUE:Silepatientesttransférédʹunesurfaceplusbasse
quelelit,levez‐leau‐dessusdelasurfacedulit.Lepatientdoitêtre
levéjusteassezpourêtreau‐dessusdulit,tandisquesonpoidsest
supportéentièrement
parlelève‐personne.
2. Appuyezsurleboutondede scente(DOWN)etdéposezle
patientsurle lit.
AVERTISSEMENT
Invacare recommande de bloquer les roulettes
pivotantes arrière UNIQUEMENT pendant
qu'on place ou qu'on enlève le sangle
enveloppant le patient.
3. Bloquezlesroulettespivotantesarrièresurlelève‐personne
vert icalisat eur.
4. Décrochezlesangledetouslespointsdʹattachesurle
lève‐personnev erticalisateur.
5. Demandezaupatientdʹôtersespiedsdurepose‐pieds.
Aidez‐lesinécessaire.
6. Enlev ezlesangleen positiondeboutoudetransport
enveloppantlepatient.
7. Débloquezlesroulettes
piv otantesarrièreetéloignezle
lève‐personnedulit.
FIGURE 5.2 Transfert vers une chaise roulante
FIGURE 5.3 Transfert vers un lit
DÉTAIL « A »
DÉTAIL « B »
DÉTAIL « C »

PARTIE N° 6—DÉPANNAGE
Lève-personne verticalisateur 68 Part No. 1078985
PARTIE N° 6—DÉPANNAGE
REMARQUE:Silesproblèmesnesontpasrésolusensuivantlessuggestionscidessus,veuillezcontactervotreconcessionnaireou
Invacare.
SYMPTÔMES DÉFAUTS SOLUTIONS
Les pivots produisent des sons bruyants
ou secs
Il faut procéder à la lubrification Consultez Lubrification du lève-personne
page 70.
Le vérin électrique ne répond pas
quand on appuie sur le bouton
La télécommande ou le connecteur
de le vérin est desserré.
La batterie est faible.
Le bouton ROUGE d’arrêt d’urgence
est APPUYÉ.
La batterie n’est pas connectée cor-
rectement au boîtier de commande.
Les bornes de raccordement sont
endommagées.
Le vérin électrique a besoin d’entre-
tien ou la charge est trop élevée.
Vérifiez les connections de la télécommande et
de le vérin. Reconnectez-les s’il le faut.
Chargez les batteries. Consultez Chargement de
la batterie page 60.
Tournez le bouton ROUGE d’arrêt d’urgence
dans le SENS HORAIRE jusqu’à ce qu’il se ferme.
Reconnectez la batterie au boîtier de commande.
Consultez Chargement de la batterie
page 60.
Remplacez la batterie. Consultez Chargement de
la batterie page 60.
Consultez Consultez Réglage du socle
page 70.
Contactez le concessionnaire s’il est nécessaire
de procéder au service.
Bruit inhabituel provenant de
le vérin
Le vérin est usé ou endommagé ou la
tige est pliée.
Remplacez le vérin ou contactez le concession-
naire. Consultez Remplacement de le vérin élect-
rique page 71.
Les bras de levage ne descendent pas
de la position la plus élevée.
Il faut un poids minimum aux bras de
levage pour descendre de la position
la plus élevée.
Tirez légèrement vers le bas sur les bras de
levage.

PARTIE N° 7—ENTRETIEN
Part No. 1078985 69 Lève-personne verticalisateur
PARTIE N° 7—ENTRETIEN
Liste de vérification du contrôle de l'entretien
REMARQUE:Respectezles proc édur esdʹentr etiendécrites dansce manu el afinquevotrelève‐personnecontinueàfo nct ionner sans
interruption.
Lelève‐personne Invacare estconçupouruneprestationdeserviceefficaceetsatisfaisante,entoutesécuritéetavec unminimum
desoinsetdʹentretien.
Touteslespiècesdulève‐personne
Inv acaresontfabriquéesàpartirdesmeilleuresqualitésdʹacier;toutefoislefrottementde s
métauxfinitparlesuseràlasuitedʹun elongueutilisation.
Ilnʹexistepasdʹajustementoudʹentretiendesroulettes, àpartlenettoy age,lalubrificationetle contrôledesboulonsdesessieux
et
despivotspoursʹassurerquʹilssontbienserrés.Enleveztouslesdébris,etc.despartiesencontactaveclesroulettesetlespivots.
Sice rtainespiècessontusées,remplacez‐lesIMMÉDIATEMENT.
Sivousav ezdesdoutessurunedespièc esdecelèv e‐personne, CONTACTEZIMMÉDIATEMENTVOTRE
CONCESSIONNAIRE.
Nettoyage du sangle et du lève-personne
Lesangledoitêtrelavérégulièrementàlʹeau,àunetempératurenedépassantpas180°F(82°C)etdansunesolutionbiologique.
Unchiffo ndoux,humectédʹeauetdʹunpeudedétergen tdilué,cʹesttoutcequʹilfautpournettoy erlelèv e‐personne.Onpeut
nettoyerlelèv e ‐personneavecdesdétergentsnon‐abrasifs.
Détection de l'usure et des dommages
Ilestimportantdʹexaminertoutesles piècessubissantde stensions,commelessangle,lesbrasdelevageetlespivotsdessan gle
etdʹyrechercherdessignesdedéchirures,dʹeffilochage,dedéformationoudedétériora tio n.Remplaceztoutespièces
défectueusesIMMÉDIATEMENTetassurez‐vousquelelève‐pe rsonnen
ʹes tpasutiliséjusquʹàcequelesréparationssoient
effectuées.
ÉLÉMENT
AU
DÉPART
ÉTABLISSEMENTS
CONTRÔLES/
AJUSTEMENTS
MENSUELS
À DOMICILE
CONTRÔLE
TOUS LES SIX
(6) MOIS
LE SOCLE
Contrôle du matériel manquant.
Les pieds s’ouvrent/se ferment facilement.
Contrôle du serrage et de l’usure des roullettes et des boulons d’essieux.
Contrôle des roulettes pour s’assurer qu’elles roulent et pivotent correctement.
Contrôle des roues pour s’assurer qu’elles ne comportent pas de débris.
X
X
X
X
X
X
X
X
X
X
X
X
X
X
X
LE MÂT
Le mât DOIT être solidement assemblé sur les bras de levage.
Contrôle des pliages ou des déflexions.
X
X
X
X
X
X
LES BRAS DE LEVAGE ET LE RACCORDEMENT
Contrôler tout le matériel et les points d’attache.
Contrôle des coudes et des déflexions.
Contrôle des raccords boulonnés des bras de levage pour en vérifier l’user.
Contrôle pour s’assurer que les bras de levage sont bien centrés entre les pieds du socle.
X
X
X
X
X
X
X
X
X
X
X
X
VÉRIN ÉLECTRIQUE
Contrôle de l’usure et de la détérioration.
(SI’IL EST ENDOMMAGÉ, CONTACTER LE CONCESSIONNAIRE)
Effectuez un cycle pour s’assurer d’un fonctionnement silencieux et sans accroc.
X
X
X
X
X
X
NETTOYAGE
Chaque fois que c’est nécessaire. XX X
LES SANGLE
CONTRÔLER TOUS LES POINTS D’ATTACHE des sangle chaque fois qu’ils sont
utilisés afin de s’assurer de raccords corrects et de la sécurité du patient.
Examen de l’usure du matériel des sangle.
Examen de l’usure des sangles.
X
X
X
X
X
X
X
X
X

PARTIE N° 7—ENTRETIEN
Lève-personne verticalisateur 70 Part No. 1078985
Lubrification du lève-personne
Lelève‐personneInvacareestconçupourunentretien
minimum.Toutefois,unevérificationetlubrificationau
boutdesixmoisdevraientassurerunesécuritéetfiabilitéà
longterme.
Gardezlelève‐personneetlessanglepropresetenbonétat.
Toutdéfautdoitêtrenotéetsignaléàvotreconcessionnaire
dèsquepossible.
LesroulettesDOIVENTpivoteretroulerfacilement.Une
graisselégère(unlubrifiantautomobileimperméable)peut
êtreappliquéeaupivotàroulementàbillesdesroulettes
unefoisparan.Appliquez‐laplusfréquemmentsiles
roulettessontexposéesàdesconditionsdʹhumidité
extrêmes.
Réglage du socle
REMARQUE:Pourcetteprocédure,consultezlaFIGURE 7 .1.
1. VérifiezlʹéquerragedespiedsenpositionFERMÉE.
2. Placezuneéquerreàlʹintérieurdespiedsetdusocle
afindedéterminerlʹalignementà90°.
3. Ajustezlestigedeconnexionjusquʹàcequʹun
alignementà90°soitobtenu.
Ajustement de la hauteur du cale-genou
REMARQUE:Pourcetteprocédure,consultezlaFIGURE 7 .2.
AVERTISSEMENT
NE JAMAIS ajuster le cale-genou pendant que
le patient est debout.
NE JAMAIS ajuster le cale-genou pendant que
le lève-personne est en mouvement.
Assurez-vous TOUJOURS que les goupilles
d'ajustement sont enclenchées dans les orifices
de la hauteur correspondante avant l'utilisa-
tion.
1. Choisissezunehauteurquiseraconfortablepourle
patienttoutenluioffrantlesupportnécessaire.
REMARQUE:Lecale‐genoudoitêtreplacéafinquelegenousoit
encontactaveccecoussinetprotecteur.
2. Enutilisantlesdeuxmains,tirezlesdeuxgoupilles
dʹajustementverslʹextérieurenmêmetemps.
3. Placez
lecale‐genouàlahauteurvoulueetinsérezles
goupillesdʹajustementdanslesorificescorrespondants.
4. Vérifiezquelesdeuxgoupillessontbienenclenchées.
FIGURE 7.1 Réglage du socle
FIGURE 7.2 Ajustement de la hauteur du cale-genou
Équerre
Tiges de connexion
Tige de connexion
cale-genou
Goupille
d’ajustement
Goupille
d’ajustement

PARTIE N° 7—ENTRETIEN
Part No. 1078985 71 Lève-personne verticalisateur
Remplacement de le vérin électrique
1. Retirezlʹécrouinférieur,larondelleetleboulonàépaulementfixantlevérinélectriqueausupportdemontage dumât.
2. Posezlebrasdelevagesurvotreépauleetretirezlʹécrousupérieur,leboulon, lesupportetlabaguedusupportde
montagedubrasdelevage.
3. Retirezlevérin
électrique.
4. InversezlesÉTAPES1‐3pourinstaller lenouvelvérinélectrique.
AVERTISSEMENT
NE PAS trop serrer la visserie de montage car cela endommagerait les supports de montage.
FIGURE 7.3 Remplacement de le vérin électrique
Boulon
Rondelle
Bague
Rondelle
Boulon
Boulon
Rondelle
Bague
Rondelle
Boulon
Support

LES VENTES CLIENTÈLES, LES INFORMATIONS DE SERVICE ET GARANTIE
Lève-personne verticalisateur 72 Part No. 1078985
LES VENTES CLIENTÈLES, LES INFORMATIONS DE SERVICE ET GARANTIE
United Kingdom Invacare Limited, Pencoed Technology Park, Pencoed, Bridgend CF35 5HZ
Tel: (44) (0) 1656 776 222
Fax: (44) (0) 1656 776 220
www.invacare.co.uk, UK@invacare.com
Ireland Invacare Ireland Ltd, Unit 5 Seatown Business Campus, Seatown Road, Swords, County Dublin - Ireland
Tel: (353) 1 810 7084
Fax: (353) 1 810 7085
www.invacare.co.uk, [email protected]m
France Invacare Poirier SAS, Route de Saint Roch, F-37230 Fondettes
Tel: (33) (0) 2 47 62 64 66
Fax: (33) (0) 2 47 42 12 24
www.invacare.fr, contactfr@invacare.com
Belgium & Luxemburg Invacare nv, Autobaan 22, B-8210 Loppem, Brügge
Tel: (32) (0) 50 83 10 10
Fax: (32) (0) 50 83 10 11
www.invacare.be, belgium@invacare.com
Switzerland Invacare AG, Benkenstrasse 260, CH-4108 Witterswil
Tel: (41) (0) 61 487 70 80
Fax: (41) (0) 61 487 70 81
switzerland@invacare.com
Deutschland Invacare Aquatec GmbH, Alemannenstraße 10, D-88316 Isny
Tel: (49) (0) 75 62 7 00 0
Fax: (49) (0) 75 62 7 00 66
www.invacare-aquatec.com, info@invacare-aquatec.com
European Distributor Organisation Invacare, Kleiststraße 49, D-32457 Porta Westfalica
Tel: (49) (0) 57 31 754 540
Tel: (49) (0) 57 31 754 541
Portugal Invacare Lda, Rua Estrada Velha, 949, P-4465-784, Leça do Balio
Tel: (351) (0)225 1059 46/47
Fax: (351) (0)225 1057 39
Norge Invacare AS, Grenesvingen 9, Postboks 6230, Etterstad, N-0603 Oslo
Tel: (47) (0) 22 57 95 00
Fax: (47) (0) 22 57 95 01
Italia Invacare Mecc San s.r.l., Via dei Pini 62, I-3016 Thiene (VI)
Tel: (39) 0445 38 00 59
Fax: (39) 0445 38 00 34
www.invacare.it, italia@invacare.com
España Invacare SA, c/Areny s/n, Poligon Industrial de Celrà, E-17460 Celrà (Girona)
Tel: (34) (0) 972 49 32 00
Fax: (34) (0) 972 49 32 20
www.invacare.es, contactsp@invacare.com

Manuale per l'utente
CONCESSIONARIO: questo manuale DEVE essere dato all'utente del prodotto.
UTENTE: PRIMA di usare questo prodotto, leggere questo manuale e conservarlo per
consultazioni future.
Per ulteriori informazioni riguardo prodotti, parti e servizi
Invacare visitare www.invacare.it
Sollevatore Mobile Stand Up
RPS350-1E
RPS350-1FR

LEGENDA DEI SIMBOLI
Sollevatore Mobile Stand Up 74 Parte n.ro 1078985
AVVERTENZA
NON FAR FUNZIONARE QUEST'APPARECCHIATURA SENZA PRIMA AVER
LETTO E CAPITO QUESTO MANUALE. SE NON SI È IN GRADO DI CAPIRE
AVVERTENZE, PRECAUZIONI E ISTRUZIONI, CONTATTARE UN
CONCESSIONARIO QUALIFICATO O L'ASSISTENZA TECNICA INVACARE
PRIMA DI CERCARE DI USARE QUEST'APPARECCHIATURA, ALTRIMENTI
POTREBBERO VERIFICARSI INFORTUNI O DANNI.
AVVERTENZE PER GLI ACCESSORI
I prodotti Invacare sono appositamente progettati e fabbricati per essere usati con gli accessori
Invacare. Gli accessori progettati da altri fabbricanti non sono stati collaudati da Invacare e se ne
sconsiglia l'uso con i prodotti Invacare.
LEGENDA DEI SIMBOLI
"ATTENZIONE, leggere le istruzioni
per l'uso".
AVVERTENZA: fare SEMPRE attenzione al braccio di
sollevamento. Potrebbero verificarsi lesioni al paziente
e/o all'assistente.
2010
"Data di fabbricazione"
Il dispositivo contiene batterie
al piombo acido. NON smaltire
le batterie tra i normali rifiuti
casalinghi. Queste DEVONO
essere collocate in un apposito
sito per lo smaltimento. Per
informazioni, contattare la
propria società locale di
gestione dei rifiuti.
AVVERTENZA: fare SEMPRE attenzione al poggiapiedi,
specialmente alla posizione del paziente sul poggiapiedi.
Potrebbero verificarsi lesioni al paziente e/o all'assistente.

INDICE DEL CONTENUTO
Parte n.ro 1078985 75 Sollevatore Mobile Stand Up
INDICE DEL CONTENUTO
LEGENDA DEI SIMBOLI .................................................................................... 74
ANNOTAZIONI SPECIALI ................................................................................ 77
PARAMETRI DEL PRODOTTO .......................................................................... 78
RSP350-1E e RPS350-1FR Stand Assist Sollevatore paziente ................................................................................... 78
SECTION 1—LINEE GUIDA GENERALI .............................................................. 79
Limite di peso....................................................................................................................................................................... 79
Assemblaggio del sollevatore............................................................................................................................................ 79
Uso dell'imbracatura........................................................................................................................................................... 79
Funzionamento del sollevatore........................................................................................................................................ 79
Sollevamento del paziente................................................................................................................................................. 80
Spostamento del paziente ................................................................................................................................................. 80
Esecuzione della manutenzione........................................................................................................................................ 80
SECTION 2—ASSEMBLAGGIO ........................................................................... 81
Disimballaggio del Sollevatore Mobile Stand Up per pazienti.................................................................................. 81
Assemblaggio del Sollevatore Mobile Stand Up per pazienti................................................................................... 81
Assemblaggio del gruppo montante alla base........................................................................................................... 81
Preparazione del Sollevatore Mobile Stand Up per l'uso ......................................................................................... 81
Installazione della leva di controllo ................................................................................................................................. 81
Collegamento della staffa di montaggio del caricabatterie alla parete.................................................................... 82
SECTION 3—FUNZIONAMENTO ...................................................................... 83
Bloccaggio/sbloccaggio delle ruote posteriori.............................................................................................................. 83
Sollevamento/abbassamento del Sollevatore Mobile Stand Up per pazienti........................................................ 83
Chiusura/apertura dei piedi .............................................................................................................................................. 83
Uso dell'arresto di emergenza ......................................................................................................................................... 83
Attivazione dello sblocco meccanico di emergenza.................................................................................................... 84
Carica della batteria............................................................................................................................................................ 84
Uso di un cavo elettrico per caricare la batteria .................................................................................................... 84
Uso del caricabatteria per caricare la batteria......................................................................................................... 85
SECTION 4—SOLLEVAMENTO DEL PAZIENTE ................................................... 86
Posizionamento del Sollevatore Mobile Stand Up a cavalletto................................................................................. 86
Sollevamento del paziente................................................................................................................................................. 87
Trasporto del paziente....................................................................................................................................................... 88
SECTION 5—SPOSTAMENTO DEL PAZIENTE ..................................................... 89
Spostamento su una sedia WC........................................................................................................................................ 90
Spostamento su una sedia a rotelle ................................................................................................................................ 91
Spostamento su un letto.................................................................................................................................................... 91
SECTION 6—RISOLUZIONE DEI PROBLEMI ....................................................... 92

INDICE DEL CONTENUTO
Sollevatore Mobile Stand Up 76 Parte n.ro 1078985
INDICE DEL CONTENUTO
SECTION 7—MANUTENZIONE ......................................................................... 93
Lista di controllo ispettivo su sicurezza e manutenzione .......................................................................................... 93
Pulizia dell'imbracatura e del sollevatore....................................................................................................................... 93
Rilevamento usura e danni................................................................................................................................................ 93
Lubrificazione del Sollevatore Mobile Stand Up .......................................................................................................... 94
Regolazione della base ....................................................................................................................................................... 94
Regolazione dell'altezza del cuscinetto per le ginocchia ............................................................................................ 94
Sostituzione dell'attuatore elettrico ............................................................................................................................... 95
SERVIZIO CLIENTI E ASSISTENZA .................................................................... 96

ANNOTAZIONI SPECIALI
Parte n.ro 1078985 77 Sollevatore Mobile Stand Up
ANNOTAZIONI SPECIALI
Inquestomanualevengonousateparoledisegnalazionechesiapplicanoaipericolioapratichenonsicurechepotrebbero
causarelesionipersonaliodanniacose.Fareriferimentoallaseguentetabellaperledefinizionidelleparoledisegnalazione.
AVVISO
LE INFORMAZIONI CONTENUTE IN QUESTO DOCUMENTO SONO SOGGETTE A
MODIFICA SENZA PREAVVISO.
INTERFERENZA DI FREQUENZA RADIO
La maggior parte dell'apparecchiatura elettronica è influenzata da Interferenze di Frequenza
Radio (RFI). Occorre prestare ATTENZIONE riguardo all'uso di apparecchiature portatili per
comunicazioni nell'area circostante tale apparecchiatura. Se RFI causa un comportamento
erratico, PREMERE IMMEDIATAMENTE il pulsante ROSSO di Arresto di Emergenza. NON
SPEGNERE [OFF] il pulsante rosso di Arresto di Emergenza mentre la trasmissione è in corso.
MANUTENZIONE
La manutenzione DEVE essere eseguita SOLO da personale qualificato.
PAROLE DI
SEGNALAZIONE
SIGNIFICIATO
PERICOLO
Pericolo indica una situazione di imminente pericolo che, se no evitata, comporterà lesioni gravi o la
morte.
AVVERTENZA
Avvertenza indica una situazione di potenziale pericolo che, se non evitata, potrebbe comportare
lesioni gravi o la morte.
ATTENZIONE
Attenzione indica una situazione di potenziale pericolo che, se non evitata, potrebbe comportare
danni a cose o lesioni non gravi o entrambi.

PARAMETRI DEL PRODOTTO
Sollevatore Mobile Stand Up 78 Parte n.ro 1078985
PARAMETRI DEL PRODOTTO
RSP350-1E e RPS350-1FR Stand Assist Sollevatore paziente
*NOTA:variaasecondadelcaricoedellafase.
Altezza all’aggancio dell’imbracatura - MAX: 167 cm [66 pollici]
Altezza all’aggancio dell’imbracatura - MIN: 102 cm [40 pollici]
Ampiezza base APERTO: 94 cm [37 pollici]
Ampiezza base CHIUSO: 64 cm [26 pollici]
Altezza base (Luce): 11,4 cm [4,5 pollici]
Lunghezza base: 90,2 cm [35,5 pollici]
Altezza complessiva: 124 cm [49 pollici]
Lunghezza complessiva: 99 cm [39 pollici]
Ampiezza complessiva: 65 cm [25,8 pollici]
Dimensioni delle route (ANTERIORI)
Dimensioni dell ruote (POSTERIORI)
7,6 cm [3,0 pollici]
12,6 cm [5,0 pollici]
Opzioni dell’imbracatura: Per tenersi in piedi o per spostamento
Materiale dell’imbracatura: Poliestere
Capacità de peso: 158 kg. [350 librre]
Peso fuori imballaggio: 49 kg. [108 libbre]
Batteria: 24V CC (RCHBL)
Ingresso caricabatterie: 100-240V CA
Uscita caricabatterie/Durata di carica: 29,5V CC Max 6 ore
Allarme batteria scarica audio/visivo: Sì
Dispositivi di sicurezza del motore: Anti-intrappolamento
*Sollevamenti approssimativi per carica: *100-200 cicli per carica
Garanzia limitata di sollevatore/elettronica: 3 anni/2 anni
Pulsante di arresto di emergenza: Sì

SEZIONE 1—LINEE GUIDA GENERALI
Parte n.ro 1078985 79 Sollevatore Mobile Stand Up
SEZIONE 1—LINEE GUIDA GENERALI
AVVERTENZA
SEZIONE 1 - La sezione LINEE GUIDA GENERALI contiene importanti informazioni per il
funzionamento sicuro e l'uso di questo prodotto.
Primadellʹuso verificaretuttelepartipereventualidannidovutiallaspedizione.Incasodidanni,NONusarelʹapparecchiatura.
Contattareilconcessionarioperulterioriistruzioni.
IlsollevatoreperpazientiInvacareNONèundispositivoditrasporto.Ilsuoscopoèquellodispostare unapersonadauna
superficiead
unʹaltra(ades.dallettoallasediaarotelle).
NONcercaredispostareilpazientesenzalʹapprov azionedelsuomedico,infermiereoassistentesanitario. Leggereattentamente
leistruzioniinquestomanualedelproprietario,osservareunteamaddestratodiespertimentreesegueleproceduredi
sollevamentoequindieseguirelʹ
interaproceduradisollev amentonumerosevoltesottoadeguatasorv eglianzaeconlʹassistenza
diunapersonachesi mul iilpaziente.
Seilsollevatoreperpazientiviene usatoinunʹareatipoladocciaolavascadabagno, assicurarsicheilsollev atoresiaripulitoda
qualsiasitracciadiumiditàdopo lʹ
uso.NONconservareilsollev atoreinunʹareaumidaoincondizio nidiumidità.Ispezionare
periodicamentetuttiicomponentidelsollevatoreperpazientipereventualisegnidicorrosione.Sostituiretuttelepartichesono
corroseodanneggiate.
Ilsollevatoreacavallettopuòesserefattofunzionaredaunprofessionistasanitariopertutte
leprocedure dipreparazioneal
sollevamento,spostamentodaeper,diun pazientecollaborativoeingradodiportarealmenounapartedelpropriopeso.
Tuttavia,alvariaredellecondizionimediche,Invacareconsigliacheilprofessionistasanitariovalutilʹesige nzadiassistenzae
stabiliscasesiaappropriatolʹutilizzodiuno
opiùassistentipereseguireinsi cur ez zalospostamento.
Lʹusodelsollevatoreperpazientidapartediunassistentedeveesser ebasatosullav alutazione delprofessionistasanitario per
ciascuncasoindividuale.
Limite di peso
NONeccedereilimitidipesomassimodelsollevatoreperpazienti.Illimitedipesoperilsollevatoreperpazientièdi158kg.[350
libbre].
Assemblaggio del sollevatore
NONserraree ccessivamentelaferramentadimontaggio.Ciòcauserà danniallestaffedimontaggio.
Uso dell'imbracatura
Imbracaturedi assistenzapertenersiin piedi:NONusaretaleimbracaturadiassistenzaconilsollevatoreperpazienticome
dispos itivoditrasporto. Questohaloscopoditrasferireunapersonadaunasuperficiedirip osoadunʹaltra(ades.dal lettoalla
sediaarotelle).
Imbracaturediassistenzapertenersi
inpiedi:primadisollevareilpaziente,assicurarsicheilbordoinferioredellʹimbracaturadi
assistenzapertenersiinpiedisiaposizionatosullabassaschienadelpazienteechelebracciadelpazientesitrovinoallʹesterno
dellʹimbracatura.
Imbracaturediassistenzapertenersiinpiedi:lacinghiaDEVEesserestretta
maconfortevoleperilpaziente,altrimentiilpaziente
potrebbesc ivolarnefuoridurantelospostamento,conconseguentipossibililesioni.
Imbracaturedaspostamento:primadisollevareilpaziente,assicurarsicheilbordoinferioredellʹimbracaturadaspostamentosi
troviallabasedellaspinadorsaleechelebracciadelpazientesitrovinoallʹ
esternodellʹimbracatura.
Imbracaturedaspostamento:NONmettereinpiediilpazientementresiusaintaliimbracature,altrimentipotrebberoverificarsi
lesioni.
Dopociascunlav aggio(attenendosialleistruzio nisullʹimbracatura),ispezionarelʹimbracatura(e)pereventuale usura, strappie
cucitureallentate.
Imbracaturesc olorite, strappate,tagliate,sfilacciateorottenonsonosicureepotrebbero
causarelesioni.Disfarse ne
immediatamente.
NONalterareleimbracature.
Assicurarsidiv erificareimmediatamentegliaccessori dellʹimbracaturaogni voltachequestavien erimossaosostituita,per
assicurarsichesiainstallatacorrettamenteprimadispostareilpazientedaunaposizionestazionaria(letto,sediaogabinetto).
Seilpazientesitrov asuunasediaa
rotelle,bloccareleruoteperevitarechelasediasi spostiin avantioallʹindietro.
Funzionamento del sollevatore
Assicurarsidisentireunoscattoquandosicollocalabatteriasulcaricabatterieaconfermadiunmontaggiocorretto.
Altrimentipotrebberoverificarsilesioniodanni.
Usareimaniciperspingereotirareilsollevatoreperpazienti.

SEZIONE 1—LINEE GUIDA GENERALI
Sollevatore Mobile Stand Up 80 Parte n.ro 1078985
Sollevamento del paziente
Primadiposizionareipiedidelsollevatoreacavallettoattornoalpaziente,assicurarsicheipiedidelpazientesitrovinoallʹesterno
delpoggiapiedi,altrimentipotrebbero verificarsilesioni.
Leregolazioniperlasicurezzaeilcomfor tdev ono esser efatteprimadi spostare ilpaziente. Lebracciadelpazientedev on o
trov arsiallʹ
esternodellecinghiedel lʹimbracatura.
Primadisollevareunpazientedaunaposizionestazionaria(sediaarotelle, gabinettooletto),sollevareleggermenteil paziente
dallaposizionestazionariaeassicurarsichetuttigliaccessoridellʹimbracaturasonofissati.Secosìnonfosse,abbassareilpaziente
ecorreggereilproblema,quindisollev are il
pazienteericontrollare.
Durantelospostamento,conilpazientesospesonellʹimbracaturaattaccataalsollev atore,NONspostareilsollevatoresusuperfici
irregolariche creere bberounosbilanciamentodelsollev atoreeunsuopossibileribaltamento. PermanovrareusareSEMPREil
manicodima novrasulmontanteperspinge reotirareilsollevatoreperpazienti.
Inv acare
consigliadibloccareleruotegirevoliposterio riSOLOquandosiposizionaosi rimuov elʹimbracatura(perlo
spostamentoolʹassistenzapertenersiinpiedi)dalpaziente.
Inv acareSCONSIGLIAdibloccareleruoteposterio ridelsollevatore perpazientiquandosisollev aunapersona .Cosìfacendosi
potrebbecausareilribaltamento
delsollev atore mettendoinpericoloilpazienteegliassistenti.Invaca reCONSIGLIAcheleruote
posteriorisianolasciatesbloccateduranteleproceduredisollev amentoperconsentirelastabilizzazionedelsollev atorequando
ilpazientevieneinizialmentesollev atodaunasedia,dallettoodaunapo sizionestazionaria.
Spostamento del paziente
Primadellospostamento,verificarechelacapacitàdipesodel prodottopossasostenereilpesodelpaziente.
IblocchidelleruotedellasediaarotelleDEVONOtrov arsiinposizionedibloccaggioprimadiabbassareilpazientesullasediaa
rotelleperiltrasporto.
Esecuzione della manutenzione
Lamanutenzion eordinariadeisollevatoriperpazientiedaccessoriènecessariaperassicurareuncorretto funz ioname nto.
Dopoiprimi12mesidifunzionamento,ispezionaretuttiipuntipivotantieidispositividifissaggiopereventualitraccediusura.
Incasodiusuradelmetallo,lepartiDEVONOesseresostituite.Successivamentecontinuare
ades eguirequestaispezioneogni
seimesi.
NONserraree ccessivamentelaferramentadimontaggio.Ciòdan neggerà lestaffedimontaggio.
Leruoteeibullonidell ʹasserichiedonoispezioniognisei mesiperverificarneilserraggioelʹusura.

SEZIONE 2—ASSEMBLAGGIO
Parte n.ro 1078985 81 Sollevatore Mobile Stand Up
SEZIONE 2—ASSEMBLAGGIO
Disimballaggio del Sollevatore Mobile Stand Up per pazienti
Sballareicomponentidallascatoladispedizione.
Assemblaggio del Sollevatore Mobile
Stand Up per pazienti
AVVERTENZA
Usare solo parti Invacare nell'assemblaggio di
questo sollevatore per pazienti. I piedi di base, il
montante, il braccio, il gruppo pompa e la barra
girevole sono fabbricati come da specifiche che
assicurano un allineamento corretto di tutte le
parti per una sicura operatività funzionale.
Assemblaggio del gruppo montante alla base
NOTA:ilgruppomontantepuòesser e rimossodallaba seperla
conservazioneoiltrasporto.IlgruppomontanteDEVEesserefissato
correttamentealgruppobaseprimadellʹuso.
NOTA:perquestaprocedura,fareriferi mentoallaFIGURA 2.1.
1. Metterelabasesulpavimento.
NOTA:as sicura rsichetutteequattroleruotesianoacontatto
col
pavimento.
2. Bloccareentrambeleruoteposteriori. Fareriferimentoal
DettaglioʺAʺ.
3. Rimuovereilbulloneesagonale,lerondelleeildado
ubicatinellasfinestratura aformadi Udellabase.
4. Sollevareilmontanteinposizioneritta.
5. Abbassareilmontantesullastaffadimontaggio.
6. Collegareilmontanteallabaseconilbulloneesagonale,
le
rondelleeildado.Serraresaldamente.
Preparazione del Sollevatore Mobile
Stand Up per l'uso
Verificaree serraretuttalaferramentaPRIMAdellʹuso.
Installazione della leva di controllo
NOTA:perquestaprocedura,fareriferi mentoallaFIGURA 2.2.
1. Rimuoverelalevadicontrollodalcartonedi
imballaggio.
2. Avvitarelalevadicontrollosullʹadattatoremaschio
dellabase.
FIGURA 2.1 Assemblaggio del gruppo montante alla base
FIGURA 2.2 Installazione della leva di controllo
Abbassare col
piede qui per
bloccare
Abbassare col
piede qui per
sbloccare
Dado
Rondella
Bullone esagonale
Staffa del montante
Leva di
bloccaggio
BLOCCATO
SBLOCCATO
DETTAGLIO “A”
Rondella
Leva di controllo
adattatore maschio
nella base

SEZIONE 2—ASSEMBLAGGIO
Sollevatore Mobile Stand Up 82 Parte n.ro 1078985
Collegamento della staffa di montaggio del caricabatterie alla parete
NOTA:perquestaprocedura,farerigerimentoallaFIGURA 2.3.
NOTA:QuestaproceduraèvalidasoloperimodelliRPS350‐1E.
1. Collocarelastaffadimontaggiodelcaricabatteriesulla
paretenellaposizionedesiderata.
2. Conunamatita,contrassegnarelaposizionedelforo
mediano.
3. Misurare16,5cm(6½pollici)inbassodalsegnoa
matitaetrapanare
unforodimontaggio.
4. Installarelavitedimontaggioinferiorefinoaquandosi
ottieneunintervallodicirca3,1mm(1/8dipollice)tra
latestadellaviteelaparete.
5. Metterelastaffadimontaggiodelcaricabatteriesullavite
dimontaggioinferiore.
6. Trapanareglialtridueforidimonta ggio.
7. Avvitare
levitidimontaggioattrav ersolastaffadi
montaggiodel caricabatterieenellaparete.Serrare
saldamente.
ATTENZIONE
Assicurarsi di sentire uno scatto quando si
colloca la batteria sul caricabatterie a
conferma di un montaggio corretto.
Altrimenti potrebbero verificarsi lesioni o danni.
8. Mettereilcaricabatterieinsedesullastaffadimo ntaggio.
9. Inserirelaspinadelcaricabatterieinunapresaelettrica.
NOTA:unLEDsi illumineràquandosiapplicalʹalimentazioneal
caricabatterie.
FIGURA 2.3 Collegamento della staffa di montaggio del
caricabatterie alla parete
Staffa di montaggio
Viti di
montaggio
Vite di montaggio INFERIORE

SEZIONE 3—FUNZIONAMENTO
Parte n.ro 1078985 83 Sollevatore Mobile Stand Up
SEZIONE 3—FUNZIONAMENTO
AVVERTENZA
NON cercare di spostare un paziente senza l'approvazione del suo medico, infermiere o assistente
sanitario. Leggere attentamente le istruzioni di questo manuale, osservare un team addestrato di
esperti mentre esegue le procedure di sollevamento e quindi eseguire l'intera procedura di
sollevamento numerose volte sotto adeguata sorveglianza e con l'assistenza di una persona che
simuli il paziente.
I piedi del sollevatore DEVONO trovarsi nella posizione di massima apertura per una stabilità e sicur-
ezza ottimali. Se il paziente si trova in un'imbracatura e diventa necessario spostarsi attraverso uno
stretto passaggio, chiudere i piedi del sollevatore solo per lo spazio necessario per spostarsi
attraverso il passaggio. Quando il sollevatore ha superato il passaggio, riportare i piedi nella posizione
di massima apertura.
NOTA:lʹusodelsollevatoreperpazientidapartediunsolo
assistentedevebasa rsisullavalutazionedelprofessionistasanitario
perciascuncasoindividuale.
Bloccaggio/sbloccaggio delle ruote
posteriori
•FareriferimentoalDettaglioʺAʺdellaFigura3.1.
Sollevamento/abbassamento del
Sollevatore Mobile Stand Up per pazienti
NOTA:perquestaprocedura,fareriferi mentoalDettaglio“B”.
•Persollevareilsollev atore perpazienti:
PremereilpulsanteSu() sullapulsantiera
NOTA:seilsollevatoreperpazientivienesollevatoalmassimo
livello,potr ebbeesserenecessariotiraredelicatamentesuibraccidel
sollevatoreprimacheilmontante iniziadabbassarsi.Tirareinbasso
delicatamenteecontemporaneamenteentrambiibracciperevitaredi
rendereinstabileilsollevatore.
•Perabba ssareilsollevatoreperpazienti:
PremereilpulsanteSu () sullapulsantiera
Chiusura/apertura dei piedi
•Perch iudere ipiedi:
Tirareilmanicodimanovr aallʹINFUORIeviadal
sollevatore epoisullaSINISTRAdichioperafinoaquando
siBLOCCAnellataccadellastaffa.
NOTA:lasinistravienestabilitamettendosidietroilsollevatore
rivoltiversoleruoteanteriori.
•Peraprire ipiedi:
Tirareilmanicodi
man ovraallʹINFUORIeviadal
sollevatore epoisullaDESTRAdichioperafinoaquando
siBLOCCAnellataccadellastaffa.
NOTA:ladestravienestabilitamettendosidietroilsollevator erivolti
versoleruoteanterior i.
Uso dell'arresto di emergenza
NOTA:perquestaprocedura,fareriferi mentoalDettaglio“C”.
•Spingereilpulsantedi emerge nzaROSSOperarrestareil
sollevamentoolʹabbassamentodeibraccidelso llevatore
•Perresettare,ruotareinsensoorarioilpulsantedi
emergenza.
FIGURA 3.1 Funzionamento del sollevatore per pazienti
DETTAGLIO “B” - DETTAGLI
DELLA PULSANTIERA
DETTAGLIO “C” - ARRESTO DI EMERGENZA
Pulsante Giù
Pulsante Su
Pulsantiera
Pulsante di emergenza
Premere per l'arresto,
ruotare in senso orario
per resettare
Abbassare col
piede qui per
bloccare
Abbassare col piede
qui per sbloccare
Leva di
bloccaggio
BLOCCATO
SBLOCCATO
DETTAGLIO “A”
RPS350-1ERPS350-1FR

SEZIONE 3—FUNZIONAMENTO
Sollevatore Mobile Stand Up 84 Parte n.ro 1078985
Attivazione dello sblocco meccanico di
emergenza
Sblocco di emergenza primario
NOTA:perquestaprocedura,fareriferi mentoallaFIGURA 3.2.
NOTA:questapr oceduraporteràilbraccioinbassose lapulsantiera
nonfunzionacorrettamente.
Perattiv are losblocco diemergenzaprimario,inserire lapunta
diunapennanelforo() GiùdiEmergenzadelpannello
comandi.
Sblocco di emergenza secondario
NOTA:perquestaprocedura,fareriferi mentoallaFIGURA 3.3.
NOTA:tuttigliattuatoridelsollevatoreperpazientisonoequipaggiati
conunaproceduradisbloccomeccanicodiemergenza.Losblocco
meccanicoconsentiràallʹattuatorediritrarsisenzaalimentazione.
NOTA:usar eprimalosbloccodiemer genzaprimarioedopola
proceduradisbloccodiemer genza
secondario.Qu e sta pr oceduradeve
essereusatasoloselaproceduradisbloccodiemer genzaprimarionon
funzionaononèattivabile.
NOTA:ilsollevator eDEVEtrovarsisottocaricoperlo sblocco
meccanico.
Perattiv are losblocco diemergenzasecondario, tirareilgripdi
emergenzaROSSOetirarecontemporaneamenteinbassosul
braccio.
Carica della batteria
Uso di un cavo elettrico per caricare la batteria
NOTA:perquestaprocedura,fareriferi mentoallaFIGURA 3.2.
NOTA:Quest aproceduraèvalidasoloperimodelliRPS350‐1FR.
ATTENZIONE
L’arresto d’emergenza NON DEVE essere atti-
vato; in caso contrario non sarebbe possibile
caricare la batteria. Durante la carica, il solleva-
tore non deve essere usato. NON spostare il sol-
levatore prima di aver staccato la spina dalla
presa di corrente. NON utilizzare il sollevatore
se l’involucro della batteria è danneggiato. Sosti-
tuire un involucro batteria danneggiato prima di
continuare ad usare il sollevatore.
1. Collegareilcavoelettricoallascatoladicomando.
2. Collegareilcavo elettrico allapresadicorrente.
NOTA:Lacaricadellabatteriasaràcompletataincirca4ore.La
ricaricadeveesser eeseguitainunlocalebenventilato.
3. Scollegareilcavo elettricodallapresaunavoltacompletata
lacari cadella batteria.
FIGURA 3.2 Sblocco di emergenza primario
FIGURA 3.3 Sblocco di emergenza secondario
Foro Giù di
Emergenza
Pannello
comandi
Sollevament
o
d’emergenza
Abbassamento
d’emergenza
Scatola di
comando
Collegare qui il
cavo di carica
RPS350-1FR
RPS350-1E
Grip di Emergenza ROSSO

SEZIONE 3—FUNZIONAMENTO
Parte n.ro 1078985 85 Sollevatore Mobile Stand Up
Uso del caricabatteria per caricare la batteria
NOTA:perquestaprocedura,fareriferi mentoallaFIGURA 3.4.
NOTA:Quest aproceduraèvalidasoloperimodelliRPS350‐1E.
NOTA:Invacareconsigliachelabatteriasiaricarica ta tuttiigiorni
perpr olungarneladurata.
NOTA:quandolabatteriastaperscaricar sisiudràunsuono.
4. SollevareINALTOilmanicosulre tro
dellabatteria.
5. Sollevarelabatteriaversolʹalto eviadalpannello
comandi.
ATTENZIONE
Assicurarsi di sentire uno scatto quando si
monta la batteria sul caricabatterie. Altrimenti
potrebbero verificarsi lesioni o danni.
6. Collocarelabatteriasulcaricabatterie.Spingerelaparte
superioredellabatteriacontrolastaffadimontaggiofino
aquandosisenteunoscatto.
NOTA::ilLEDdicaricasiilluminerà.Acaricacompleta,ilLEDsi
spegnerà.
NOTA:occorr er annocir caquattr ooreper caricareunabatteriache
richiedeunacaricacompleta.
7. SollevareINALTOilmanicosulre trodellabatteria.
8. Sollevarelabatteriaversolʹaltoeviadalcaricabatterie.
ATTENZIONE
Assicurarsi di sentire uno scatto quando si
monta la batteria sul caricabatterie. Altrimenti
potrebbero verificarsi lesioni o danni.
9. Collocarelabatteriasulpannellocomandi. Spingerela
partesuperioredellabatteriacontrolastaffadimontaggio
finoaquandosisenteunoscatto.
FIGURA 3.4 Carica della batteria
Caricabatterie
(STEP 3)
Controllare la
Scatola
(STEP 6)
Se installato
correttamente si
udrà uno scatto
(STEP 3 e 6)
Manico
(STEP 1, 2, 4 e 5)
Batteria

SEZIONE 4—SOLLEVAMENTO DEL PAZIENTE
Sollevatore Mobile Stand Up 86 Parte n.ro 1078985
SEZIONE 4—SOLLEVAMENTO DEL PAZIENTE
AVVERTENZA
NON eccedere il limite di peso massimo di 158 kg. [350 libbre].
NON cercare di spostare un paziente senza l'approvazione del suo medico, infermiere e
assistente sanitario.
Tenere SEMPRE le mani e le dita lontano dalle parti mobili per evitare infortuni.
Le persone che usano l'imbracatura per tenersi in piedi DEVONO essere in grado di sostenere la
maggior parte del loro peso, altrimenti potrebbero verificarsi infortuni.
Le gambe del sollevatore Stand Assist DEVONO essere nella posizione di apertura massima e la
manopola di spostamento deve essere bloccata in posizione per la massima stabilità e sicurezza.
Se il paziente si trova in un'imbracatura e diventa necessario spostarsi attraverso uno stretto
passaggio, chiudere i piedi del sollevatore a cavalletto solo per lo spazio necessario per spostarsi
attraverso il passaggio. Una volta che il sollevatore a cavalletto ha attraversato il passaggio,
riportare i piedi del sollevatore nella posizione di massima apertura e bloccare
IMMEDIATAMENTE la leva di controllo.
NON spostare il paziente se l'imbracatura del paziente non è collegata correttamente ai punti di
attacco sul sollevatore per pazienti. Verificare che l'imbracatura del paziente sia correttamente
collegata ai punti di attacco PRIMA di sollevare il paziente.
Durante lo spostamento, con il paziente sospeso nell'imbracatura, NON spostare la base del
sollevatore per pazienti su superfici irregolari in quanto ciò potrebbe rendere instabile il
sollevatore stesso.
Usare sempre il manico di manovra sul gruppo montante per spingere o tirare il sollevatore a
cavalletto.
Posizionamento del Sollevatore Mobile Stand Up a cavalletto
NOTA:perquestaprocedura,fareriferi mentoallaFIGURA 4.1.
NOTA:fareriferimentoallaLINEEGUIDAGENERALI
apagina 79primadiprocedereeosservaretutteleavvertenzeindicate.
NOTA:primadiposizionar eipiedidelsollevator eperpazientisottounletto,assi curarsi chelʹar easialiberadaostruzioni.
1. Assicurarsicheipiedidelsollevatoreperpazientisi
trovinonellaposizionedimassimaapertura.Altrimenti,
usareil manico
dimanovraperaprireipiedi.
2. Posizionareilsollevatoreperpazientiusandoilmanico
delmontante .
3. PremereilpulsanteGIÙdellapulsantieraperabbassarei
braccidelsollev atoreperunagev olecollegamento
allʹimbra catura.
FIGURA 4.1 Pulsanti della pulsantiera
Pulsante GIU
Pulsante SU
Pulsantiera

SEZIONE 4—SOLLEVAMENTO DEL PAZIENTE
Parte n.ro 1078985 87 Sollevatore Mobile Stand Up
Sollevamento del paziente
AVVERTENZA
NON eccedere il limite di peso massimo di 158 kg. [350 libbre].
Le persone che usano l'imbracatura per tenersi in piedi DEVONO essere in grado di sostenere la
maggior parte del loro peso, altrimenti potrebbero verificarsi infortuni.
NON spostare il paziente se l'imbracatura non è collegata correttamente ai punti di attacco sul
sollevatore per pazienti. Assicurarsi che l'imbracatura sia correttamente collegata ai punti di
attacco PRIMA di sollevare il paziente. Se qualche punto di attacco non è sistemato
correttamente, rettificare il problema. Quando l'imbracatura è sollevata di alcuni centimetri
dalla superficie stazionaria e prima di spostare il paziente, verificare nuovamente per assicurarsi
che l'imbracatura e tutti i punti di attacco siano saldamente in sede. Nell'eventualità di problemi,
abbassare il paziente riportandolo sulla superficie stazionaria e correggere il problema;
altrimenti potrebbero verificarsi infortuni.
Le regolazioni per la sicurezza e il comfort devono essere eseguite prima di spostare il paziente.
NOTA:perquestaprocedura,fareriferi mentoallaFIGURA 4.2apagina88.
NOTA:perulterioriinformazioni,far eriferimentoalmanualedelproprietariodellʹimbracaturaperpazienti,P/N1023891.
NOTA:ilpazienteDEVEtr ovarsiprimainposizioneseduta.Usarelasezionedellatestatadellettoperfarseder eilpazienteepoispostar ele
gambedaunlatodelletto.
1. Ordinarealpazientedimantenersiaigripsuentrambiilatidelsollevatoreacavalletto(DettaglioʺAʺdellaFIGURA 4.2).
2. Ordinarealpazientedipoggiarsi sullasc hiena nellʹimbracaturaper tenersiinpiediodaspostamento.
AVVERTENZA
Imbracature di assistenza per tenersi in piedi - prima di sollevare il paziente, assicurarsi che il
bordo inferiore dell'imbracatura sia posizionato sulla bassa schiena del paziente e che le braccia
del paziente si trovino all'esterno dell'imbracatura.
Imbracature da spostamento - Prima di sollevare il paziente, assicurarsi che il bordo inferiore
dell'imbracatura da spostamento sia posizionato alla base della spina dorsale del paziente e che
le braccia del paziente si trovino all'esterno dell'imbracatura.
Invacare sconsiglia si bloccare le ruote posteriori del sollevatore a cavalletto quando si solleva e
si sposta una persona. Così facendo si potrebbe causare il ribaltamento del sollevatore e met-
tere in pericolo il paziente e gli assistenti. Invacare consiglia di lasciare sbloccate le ruote poste-
riori durante le procedure di sollevamento e spostamento per consentire al sollevatore di
stabilizzarsi quando il paziente viene inizialmente sollevato e spostato su una sedia, nel letto o in
qualsiasi posizione stazionaria.
3. Assicurarsiche:
A. Leginocchiadelpazientesianofissatecontrolʹappositocuscinetto.
B. Ipiedidelpazientesianocorrettamen teposizionatisulpoggiapiedi.
C. Imbracature:
• Imbracaturadiassistenzapertenersi inpiedi‐Ilbordoinferioredellʹim bracaturapertenersiinpiedièposizionato
sullabassaschien adelpaziente.
• Imbracaturadasp ostament o‐Ilbordoinferioredellʹimbracatura
daspostamentositrovaallabasedellaspina
dorsaledelpaziente.
•Perqualsiasiimbracatura‐Lebr acciadelpazientesitrov ano all ʹesternodellʹimbracatura.

SEZIONE 4—SOLLEVAMENTO DEL PAZIENTE
Sollevatore Mobile Stand Up 88 Parte n.ro 1078985
D. Leruoteposteriori sonosbloccate.
E. Ipiedisitrovanonellaposizionedimassimaapertura
AVVERTENZA
Se si sposta un paziente da una sedia a rotelle, le ruote della sedia DEVONO trovarsi in posizione
bloccata prima di abbassare il paziente nella sedia a rotelle. Altrimenti potrebbero verificarsi infor-
tuni.
4. Sesispostaunpazientedaunasediaarotelle,bloccareleruotedellasedia(DettaglioʺBʺdellaFIGURA4.2).
5. PremereilpulsanteafrecciaSUsullapulsantierapersollevareilpazientesullasuperficie(let to,sediaarotelleogabinetto).
NOTA:ilpesodelpazientesaràsostenutodalsollevator eacavalletto.
NOTA:
ilcentrodigravitàpiùbassoforniscestabilitàrendendoilpazien tepiùequilibratoeconf er endomaggiorefacilitàdispostamentoal
sollevatore.
FIGURA 4.2 Sollevamento del paziente
Trasporto del paziente
AVVERTENZA
I piedi del sollevatore a cavalletto DEVONO trovarsi nella posizione di massima apertura per
stabilità e sicurezza ottimali. Se il paziente si trova in un'imbracatura e diventa necessario
spostarsi attraverso uno stretto passaggio, chiudere i piedi del sollevatore solo per lo spazio
necessario per spostarsi attraverso il passaggio. Quando il sollevatore ha attraversato il
passaggio, riportare i piedi del sollevatore nella posizione di massima apertura.
Durante lo spostamento di un paziente sospeso nell'imbracatura del sollevatore NON spostare
la base su superfici irregolari in quanto ciò potrebbe causare instabilità o il ribaltamento del soll-
evatore stesso. Usare sempre il manico del montante per spingere o tirare il sollevatore.
1. Assicurarsicheipiedidelsollevatoreacavallettositrovinonellaposizionedimassimaapertura.Altrimenti,usarela
levadicontrolloperaprireipiedi.
2. Allontanareilsollevatoreacavallettodallasuperficiedoveèavvenutoilsollevamento.
3. Spostarelentam enteilpazientenellaposizionedesiderata.
Impugnatura
Ruote
Cuscinetto per le ginocchia
Poggiapiedi
DETTAGLIO “A” - BLOCCO RUOTA
Blocco ruota
Manico del
montante

SEZIONE 5—SPOSTAMENTO DEL PAZIENTE
Parte n.ro 1078985 89 Sollevatore Mobile Stand Up
SEZIONE 5—SPOSTAMENTO DEL PAZIENTE
AVVERTENZA
NON cercare di spostare un paziente senza l'approvazione del suo medico, infermiere o assistente
sanitario.
NON spostare il paziente se l'imbracatura non è collegata correttamente ai punti d'attacco sul
sollevatore per pazienti. Assicurarsi che l'imbracatura sia correttamente collegata ai punti d'attacco
prima di sollevare il paziente. Se qualche punto d'attacco non è sistemato correttamente, rettificare
il problema. Quando l'imbracatura è sollevata di alcuni centimetri dalla superficie stazionaria e
prima di spostare il paziente, verificare nuovamente per assicurarsi che l'imbracatura e tutti i punti
d'attacco siano saldamente in sede. Se qualche punto d'attacco non è sistemato correttamente,
abbassare il paziente riportandolo sulla superficie stazionaria e correggere il problema; altrimenti
potrebbero verificarsi infortuni.
Le regolazioni per la sicurezza e il comfort devono essere eseguite prima di spostare il paziente.
Invacare sconsiglia di bloccare le ruote posteriori del sollevatore a cavalletto quando si solleva e si
sposta una persona. Così facendo il sollevatore si potrebbe ribaltare e mettere in pericolo il paziente
e gli assistenti. Invacare consiglia di lasciare sbloccate le ruote posteriori durante le procedure di
sollevamento e spostamento per consentire al sollevatore di stabilizzarsi quando il paziente viene
inizialmente sollevato e spostato su una sedia, nel letto o in qualsiasi posizione stazionaria.
I piedi del sollevatore DEVONO trovarsi nella posizione di massima apertura per una stabilità e
sicurezza ottimali. Se il paziente si trova in un'imbracatura e diventa necessario spostarsi attraverso
uno stretto passaggio, chiudere i piedi del sollevatore solo per lo spazio necessario per spostarsi
attraverso il passaggio. Quando il sollevatore ha attraversato il passaggio, riportare i piedi del
sollevatore nella posizione di massima apertura. Se è necessario chiudere i piedi per manovrare il
sollevatore sotto un letto, chiudere i piedi solo quanto necessario per posizionare il sollevatore sul
paziente e sollevare il paziente dalla superficie del letto. Quando i piedi del sollevatore non sono più
sotto il letto, riportare i piedi nella posizione di massima apertura.
Assicurarsi di verificare i punti d'attacco ogni volta che l'imbracatura viene rimossa e risistemata per
assicurarsi che sia correttamente collegata prima che il paziente sia rimosso da una superficie.
Lʹusodiunassistentesibasasullav alutazionedelprofessionistasanitarioperciascuncasoindividuale.

SEZIONE 5—SPOSTAMENTO DEL PAZIENTE
Sollevatore Mobile Stand Up 90 Parte n.ro 1078985
Spostamento su una sedia WC
AVVERTENZA
Invacare consiglia di bloccare le ruote girevoli
posteriori solo quando si posiziona o si
rimuove l'imbracatura dal paziente.
NOTA:perquestaprocedura,fareriferimentoallaFIGURA 5.1.
1. Sollevareilpazientedaunlatodelletto.
2. PremereilpulsanteSUsullapulsantieraperelevareil
pazienteabbastanzainaltoperliberareibraccidella
sediaWC.Ilpesosaràsostenutodalsollevatore.
3. GuidareilpazientesullasediaWC.Ciòpotrebbe
richiederedue
assistenti.
4. Premereilpulsanteafrecciagiùperabbassareil
pazientesullasediaWC.
5. Bloccareleruotegirevoliposteriorisulsollevatore.
6. Eseguireunadelleseguentioperazioni:
• Imbracaturadiassistenzapertenersiinpiedi‐
sganciarelʹimbracaturapertenersiinpiedidai
puntidʹattaccosulsollevatore.
• Imbracaturadaspostamento‐
i. Sganciarelʹimbracaturada
spostamentodai
puntidʹattaccoinferiorisulsollevatore.
ii. Sollevarelegambedelpazienteerimuoverei
supportiperlecoscedasottoalpaziente.
iii. Ovenecessario,sganciarelʹimbracaturada
spostamentodaipuntidʹattaccosuperiorisul
sollevatore.
NOTA:ilpazientepuòrestarenellaporzionesuperiore
dellʹimbracaturadaspostamentomentreusa
ilgabinetto.
7. Ordinareoassistereilpazientenelsollevareipiedidal
poggiapiedi.
8. Liberareilpazientedallʹimbracatura.
9. Sbloccareleruoteetirareviailsollevatoredal
gabinetto.
FIGURA 5.1 Spostamento su una sedia WC
DETTAGLIO “A”
DETTAGLIO “B”
DETTAGLIO “C”

SEZIONE 5—SPOSTAMENTO DEL PAZIENTE
Parte n.ro 1078985 91 Sollevatore Mobile Stand Up
Spostamento su una sedia a rotelle
NOTA:perquestaprocedura,fareriferi mentoallaFIGURA 5.2.
1. Assicurarsicheipiedidelsollevatore,conilpaziente
nellʹimbracatura,sitrovinoinposizioneaperta.
2. Spostarelasediaarotelleinposizione.Fareriferimentoal
DettaglioʺAʺ.
3. Bloccareleruoteposterioridellasediaarotelleperevitare
spostamentidellasediamedesima.Fare
riferimentoal
DettaglioʺBʺ.
AVVERTENZA
NON collocare il paziente nella sedia a rotelle
senza aver bloccato le ruote. Le ruote della
sedia a rotelle DEVONO trovarsi in una posiz-
ione bloccata prima di abbassare il paziente nella
sedia a rotelle per lo spostamento. Altrimenti
potrebbero verificarsi infortuni.
4. P osizionareilpazientesullasediaarotelle.
5. Abbassareilpazientenellasediaarotelle.
6. Sganciarelʹimbracaturadatuttiipuntidʹattaccosul
sollevatore.FareriferimentoalDettaglioʺCʺ.
7. Ordinarealpazientedisollev are ipiedidalpo ggiapiedi.
Senecessario,assistereilpaziente.
8. Rimuoverelʹimbracaturadalpaziente.
9. Tirareilsollev atore
dallasediaarotelle.
Spostamento su un letto
NOTA:perquestaprocedura,fareriferi mentoallaFIGURA 5.3.
NOTA:ilcentrodigravitàpiùbassoforniscestabilitàrendendoil
pazientepiùequilibratoeconferendomaggiorefacilitàdispostamento
alsollevator e.
NOTA:ibraccidelsollevatoreresterannoinposizionefinoaquando
ilpulsanteGIÙdellapulsantierarestapremuto.
1. P osizionareilpazienteil
piùpossibilesulletto.
NOTA:seilp azien tevienespostatodaunasuperficiepiùbassadel
letto,sollevar eilpazie ntepiùinaltodellasuperficiedelletto.Il
pazientedeveessereelevatoabbastanzainaltodaesseresostenuto
completamentedalsollevator e.
2. PremereilpulsanteGIÙeabbassareilpazientesul letto.
AVVERTENZA
Invacare consiglia di bloccare le ruote girevoli
posteriori SOLO quando si posiziona o si
rimuove l'imbracatura dal paziente.
3. Bloccareleruotegirevoliposteriori sulsollevatore.
4. Sganciarelʹimbracaturadatuttiipuntidʹattaccosul
sollevatore.
5. Ordinarealpazientedisollev are ipiedidalpo ggiapiedi.
Senecessario,assistereilpaziente.
6. Rimuoverelʹimbracaturadiassistenzapertenersiinpiedi
odaspostamentodalpaziente.
7. Sbloccareleruotegirev oliposteriorietirare
ilsollev atore
viadalletto.
FIGURA 5.2 Spostamento su una sedia a rotelle
FIGURA 5.3 Spostamento su un letto
DETTAGLIO “A”
DETTAGLIO “B”
DETTAGLIO “C”

SEZIONE 6—RISOLUZIONE DEI PROBLEMI
Sollevatore Mobile Stand Up 92 Parte n.ro 1078985
SEZIONE 6—RISOLUZIONE DEI PROBLEMI
NOTA:seiprobleminonsonorisoltidaimetodisuggeriti,contattareilproprioconcessionariooInvacare.
SINTOMI GUASTI SOLUZIONE
Rumore o cigolio dei cardini. Occorre lubrificazione. Fare riferimento a Lubrificazione del Solleva-
tore Mobile Stand Up a pagina 94.
L’attatore elettrico non esegue il
sollevamento all pressione del pulsante.
Connettore dell’attuatore o della
pulsantiera allentato.
Batteria scarica.
Pulsante di arresto di emergenza
ROSSO premuto [IN].
Batteria non collegata correttamente
al pannello commandi.
Terminali di connessione danneggiati.
L’attuatore elettrico deve essere
riparato o carico troppo elevato.
Verificare le connessioni dell’attuatore e
della pulsantiera. Se necessario, ricollegare.
Caricare le batterie. Fare riferimento a Car-
ica della batteria a pagina 84.
Ruotare il pulsante di arresto di emergenza
ROSSO IN SENSO ORARIO fino allo scatto
in fuori.
Ricollegare la batteria con il pannello
comandi. Fare riferimento a Carica della bat-
teria a pagina 84.
Sostituire il pacco batteria. Fare riferimento
a Carica della batteria
a pagina 84.
Fare riferimento a Regolazione della base
a
pagina 94. Contattare il concessionario se
occorrono riparazioni.
Rumore inconsueto dell’attuatore. L’attuatore è usuato o danneggiato o
il mandrion è piegato.
Sostituire l’attuatore o contattare il conces-
sionario. Fare riferimento a Sostituzione
dell'attuatore elettrico a pagina 95.
I bracci del sollevatore non si abbassano
dalla posizone completamente sollevata.
I bracci del sollevatore richiedono un
minimo di carico di peso per
abbassarsi dalla posizione
completamente sollevata.
Tirare leggermente in basso sui bracci del
sollevatore.

SEZIONE 7—MANUTENZIONE
Parte n.ro 1078985 93 Sollevatore Mobile Stand Up
SEZIONE 7—MANUTENZIONE
Lista di controllo ispettivo su sicurezza e manutenzione
NOTA:seguir elepr ocedur edimanutenzionedescritteinquestomanual epertenereilsollevatoreperpazientiinserviziocontinuo.
Ilsollevator eperpazientiInvacareèstatoprogettatoperfornireilmassimodellasicurezza,efficienzaeserviziosoddisfacentecon
curaemanutenzioniminime.
Tutteleparti delsollevatoreInv a caresonostatecostruitecon
imigliorigradidiacciaiomailcontattotrametallileusureràdopo
unusoprolungato.
Nonesistealcunaregolazioneomanutenzionedelleruote,senonlapulizia,lubrificazioneeverificadellasaldezzadibulloni
girevoliedellʹasse.Eliminaredetriti,ecc.dalleruoteedaicuscinettigirev oli.Incasodi
usuradiquesteparti,sostituirle
IMMEDIATAMENTE.Perev entualidubbisullasicurezzadiqualsiasipartedelsollevatore,contattareIMMEDIATAMENTEil
proprioconcessionario.
Pulizia dell'imbracatura e del sollevatore
Lʹimbracaturadev e esserelav a taregolarmenteinacquaatemperaturanonsuperioreagli82gradicentigradiedunasoluzione
biologica.Unpannomorbido,inumiditoconacquaeunapiccolaquantitàdidetergente,ètuttociòdicuisihabisognoperpulire
ilso llevatoreperpazienti.Ilso llevatorepuòesserepulito
condetergentinonabrasivi.
Rilevamento usura e danni
Èimportanteispezionare tuttelepartisottoposteasollecitazioni,comeleimbracature,ilbracciodisollevamentoequalsiasiparte
pivotanteperleimbracature pereventualisegnidispaccatura, sfrangiatura,deformazioneodeterioramento.Sostituire
IMMEDIATAMENTEqualsiasipartedifettosaed assicurarsicheilsollev atoreno nsiausatofinoallʹesecuzionedelleriparazioni.
VOCE
INIZIALE ISPEZIONE
ISTITUZIONALE/
REGOLARE MENSILE
ISPEZIONE
INTERNA OGNI
SEI (6) MESI
LA BASE
Ispezionare la ferramenta mancante.
Agevole apertua/chisura piedi.
Ispezionare saldezza e usura route e bulloni dell’asse.
Ispezionare movimento e scorrimento route.
Ispezionare che le ruote siano libere da detriti.
X
X
X
X
X
X
X
X
X
X
X
X
X
X
X
IL MONTANTE
Il montante DEVE essere assemblato saldamente ai bracci del
sollevatore.
Ispezionare eventuali piegamenti o deforemazioni.
X
X
X
X
X
X
I BRACCI E IL COLLEGAMENTO DE SOLLEVATORE
Verificare tutta la ferramenta e i punti d’attacco.
Ispezionare eventuali piegamenti o deforemazioni.
Ispezionare eventuale usara di giunzioni bullonate dei bracci del sol-
levatore.
Ispezionare per assicurarsi che i bracci del lsollevatore siano cen-
trati tra i piedi della base.
X
X
X
X
X
X
X
X
X
X
X
X
ATTUATORE ELETTRICO
Verificare eventuale usura o deterioramento.
(SE DANNEGGIATO, CONTATTARE IL CONCESSIONARIO)
Ciclizzare per assicurare un funzionamento scorrevole e silenzioso.
X
X
X
X
X
X
PULIZIA
Ove necessario. XX X
IMBRACATURE
VERIFICARE TUTTI CLI ATTACCHI DELL’IMBRACATURA ogni
volta che questa viene usata per assicurare una corretta connes-
sione e sicurezza per il paziente.
Ispezionare eventuale usura del materiale dell’imbracatura.
Ispezionare eventuale usura delle cignhie.
X
X
X
X
X
X
X
X
X

SEZIONE 7—MANUTENZIONE
Sollevatore Mobile Stand Up 94 Parte n.ro 1078985
Lubrificazione del Sollevatore Mobile
Stand Up
IlSollevatoreMobileStandUpInvacareèstatoprogettato
perunamanutenzioneminima.Tuttavia,unaverificae
lubrificazionesemestralepuògarantiresicurezzae
affidabilitàcontinue.
Tenereilsollevatoreeleimbracaturepulitieinbuonordine
difunzionamento.Qualsiasidifettodeveessereannotatoe
riferitoalproprioconcessionariononappenapossibile.
Le
ruoteDEVONOruotareescorrereliberamente.Un
grassoleggero(lubrificanteautoimpermeabile)puòessere
applicatoaicuscinettiasferadelleruoteunavoltaallʹanno.
Applicareconmaggiorefrequenzaseleruote sonoesposte
aestremecondizionidiumidità.
Regolazione della base
NOTA:perquestaprocedura,fareriferimentoallaFIGURA 7.1.
1. Verificarelaquadraturadeipiediquandositrovanoin
posizioneCHIUSO.
2. Collocareunasquadraallʹinternodeipiediedellabase
perstabilirelʹallineamentoa90gradi.
3. Regolareleastedicollegamentofinoadottenereun
allineamentodi90gradi.
Regolazione dell'altezza del cuscinetto
per le ginocchia
NOTA:perquestaprocedura,fareriferimentoallaFIGURA 7.2.
AVVERTENZA
NON regolare MAI il cuscinetto per le
ginocchia mentre il paziente si trova in piedi.
NON cercare MAI di regolare il cuscinetto per
le ginocchia mentre il sollevatore è in
movimento.
Assicurarsi SEMPRE che i perni di regolazione
siano fissati ai corrispettivi fori di regolazione
dell'altezza prima dell'uso.
1. Scegliereunʹimpostazionedellʹaltezzaconfortevoleper
ilpazienteefornireilsupportonecessario.
NOTA:ilcuscinettoperleginocchiadeveessereposizionatoin
modocheleginocchiavenganoacontattoconilcuscinettostesso.
2. Usandoentrambelemani,tirarecontemporaneamente
entrambiipernidiregolazioneversolʹesterno.
3. Posizionareilcuscinetto
perleginocchiaallʹaltezza
desiderataerilasciareipernidiregolazionenei
corrispondentiforidiallineamento.
4. Verificareperassicurarsicheentrambiipernisiano
fissati.
FIGURA 7.1 Regolazione della base
FIGURA 7.2 Regolazione dell'altezza del cuscinetto per
le ginocchia
Squadra
Aste di collegamento
Asta di
collegamento
Cuscinetto per
le ginocchia
Perno di
regolazione
Perno di
regolazione

SEZIONE 7—MANUTENZIONE
Parte n.ro 1078985 95 Sollevatore Mobile Stand Up
Sostituzione dell'attuatore elettrico
NOTA:perquestaprocedura,fareriferimentoallaFIGURA 7.3.
1. Rimuovereildadoinferiore,larondellaeilbulloneapernochefissanolʹattuatoreelettricoallastaffadimontaggiodel
montante.
2. Poggiarsiilbracciosinistrosullaspallaerimuovereildadosu periore,ilbullone,lastaffaelaboccoladallastaffadi
montaggio
delbracciodelsollevatore.
3. Rimuoverelʹattuatoreelettrico.
4. InvertiregliSTEPda1a3perinstallareilnuovoattuatoreelettrico.
AVVERTENZA
NON serrare eccessivamente la ferramenta di montaggio. Ciò danneggerà le staffe di montaggio.
FIGURA 7.3 Sostituzione dell'attuatore elettrico
Bullone
Rondella
Boccola
Rondella
Bullone
Bullone
Rondella
Boccola
Rondella
Bullone
Staffa

SERVIZIO CLIENTI E ASSISTENZA
Sollevatore Mobile Stand Up 96 Parte n.ro 1078985
SERVIZIO CLIENTI E ASSISTENZA
United Kingdom Invacare Limited, Pencoed Technology Park, Pencoed, Bridgend CF35 5HZ
Tel: (44) (0) 1656 776 222
Fax: (44) (0) 1656 776 220
www.invacare.co.uk, UK@invacare.com
Ireland Invacare Ireland Ltd, Unit 5 Seatown Business Campus, Seatown Road, Swords, County Dublin - Ireland
Tel: (353) 1 810 7084
Fax: (353) 1 810 7085
www.invacare.co.uk, [email protected]m
France Invacare Poirier SAS, Route de Saint Roch, F-37230 Fondettes
Tel: (33) (0) 2 47 62 64 66
Fax: (33) (0) 2 47 42 12 24
www.invacare.fr, contactfr@invacare.com
Belgium & Luxemburg Invacare nv, Autobaan 22, B-8210 Loppem, Brügge
Tel: (32) (0) 50 83 10 10
Fax: (32) (0) 50 83 10 11
www.invacare.be, belgium@invacare.com
Switzerland Invacare AG, Benkenstrasse 260, CH-4108 Witterswil
Tel: (41) (0) 61 487 70 80
Fax: (41) (0) 61 487 70 81
switzerland@invacare.com
Deutschland Invacare Aquatec GmbH, Alemannenstraße 10, D-88316 Isny
Tel: (49) (0) 75 62 7 00 0
Fax: (49) (0) 75 62 7 00 66
www.invacare-aquatec.de, in[email protected]
European Distributor Organisation Invacare, Kleiststraße 49, D-32457 Porta Westfalica
Tel: (49) (0) 57 31 754 540
Tel: (49) (0) 57 31 754 541
Portugal Invacare Lda, Rua Estrada Velha, 949, P-4465-784, Leça do Balio
Tel: (351) (0)225 1059 46/47
Fax: (351) (0)225 1057 39
Norge Invacare AS, Grenesvingen 9, Postboks 6230, Etterstad, N-0603 Oslo
Tel: (47) (0) 22 57 95 00
Fax: (47) (0) 22 57 95 01
Italia Invacare Mecc San s.r.l., Via dei Pini 62, I-3016 Thiene (VI)
Tel: (39) 0445 38 00 59
Fax: (39) 0445 38 00 34
www.invacare.it, italia@invacare.com
España Invacare SA, c/Areny s/n, Poligon Industrial de Celrà, E-17460 Celrà (Girona)
Tel: (34) (0) 972 49 32 00
Fax: (34) (0) 972 49 32 20
www.invacare.es, contactsp@invacare.com

Manual Do Utilizador
REVENDEDOR: Este manual DEVE ser dado ao usuário do produto.
USUÁRIO:
ANTES de usar este produto, leia este manual e guarde-o para futura consulta.
Para obter mais informações sobre produtos, peças e
serviços da Invacare, visite www.invacare.pt
Elevador de transferência posição de pé
RPS350-1E
RPS350-1FR

LEGENDA DE SÍMBOLOS
Elevador de transferência posição de pé 98 Parte No. 1078985
ADVERTÊNCIA
NÃO OPERE ESTE EQUIPAMENTO SEM PRIMEIRO LER E COMPREENDER
ESTE MANUAL. SE NÃO TIVER CONDIÇÕES DE COMPREENDER AS
ADVERTÊNCIAS, AVISOS E INSTRUÇÕES CONTATE UM REVENDEDOR
QUALIFICADO OU ASSISTÊNCIA TÉCNICA DA INVACARE ANTES DE
TENTAR USAR ESTE EQUIPAMENTO - CASO CONTRÁRIO PODERÁ SOFRER
LESÃO OU DANO.
ADVERTÊNCIA DOS ACESSÓRIOS
Os produtos Invacare são especificamente projetados e fabricados para usar em conjunto com
acessórios Invacare. Acessórios desenhados por outros fabricantes não foram testados pela Inva-
care e não recomendamos seu uso com Produtos Invacare.
LEGENDA DE SÍMBOLOS
"ATENÇÃO, ver instruções de uso".
ADVERTÊNCIA - SEMPRE preste atenção no Braço do
Elevador. Pode ocasionar lesão no paciente e/ou
assistente.
2010
"Data de Fabricação"
O aparelho contém baterias
de Chumbo Ácido. NÃO
descarte as baterias em lixo
caseiro normal. Estas DEVEM
ser levadas para um local de
descarte adequado.
Contate a sua empresa local
de descarte de resíduos para
obter informações adicionais.
ADVERTÊNCIA - SEMPRE preste atenção do Apoiador
para os Pés, especialmente a posição do paciente no
apoiador para os pés. Pode ocasionar lesão no paciente
e/ou assistente.

ÍNDICE
Parte n.ro 1078985 99 Elevador de transferência posição de pé
ÍNDICE
LEGENDA DE SÍMBOLOS .................................................................................. 98
OBSERVAÇÕES ESPECIAIS ..............................................................................101
PARÂMETROS DO PRODUTO .........................................................................102
Auxiliar de Elevação para o Paciente RSP350-1E e RPS350-1FR...........................................................................102
SECTION 1—DIRETRIZES GERAIS ....................................................................103
Limite de Peso....................................................................................................................................................................103
Montagem do Elevador....................................................................................................................................................103
Uso da cesta .......................................................................................................................................................................103
Operação do Elevador.....................................................................................................................................................104
Suspensão do paciente.....................................................................................................................................................104
Transferência do Paciente...............................................................................................................................................104
Manutenção ........................................................................................................................................................................104
SECTION 2—MONTAGEM ...............................................................................105
Remoção do Elevador de Paciente da Embalagem....................................................................................................105
Montagem do Elevador de Paciente .............................................................................................................................105
Montagem do Mastro na Base...................................................................................................................................105
Prepare o Elevador para Usar........................................................................................................................................105
Instale o Cabo Comutador.............................................................................................................................................105
Fixação do Suporte de Fixação do Carregador de Bateria na Parede..................................................................106
SECTION 3—OPERAÇÃO ................................................................................107
Travamento/Destravamento das rodinhas traseiras.................................................................................................107
Elevação/Abaixamento do Elevador de Paciente .......................................................................................................107
Fechamento/Abertura das pernas .................................................................................................................................107
Uso da Parada de Emergência........................................................................................................................................107
Ativação do Desengate Mecânico de Emergência.....................................................................................................108
Carregamento da Bateria ................................................................................................................................................108
Utilizar um cabo de alimentação para carregar a bateria....................................................................................108
Utilizar o Carregador de Baterias para Carregar a Bateria................................................................................109
SECTION 4—SUSPENSÃO DO PACIENTE ..........................................................110
Posicionamento do Elevador de Paciente....................................................................................................................110
Suspensão do paciente.....................................................................................................................................................111
Locomoção do Paciente ..................................................................................................................................................112
SECTION 5—TRANSFERÊNCIA DO PACIENTE ..................................................113
Transferência para uma Cadeira Higiênica..................................................................................................................114
Transferência para uma Cadeira de Rodas .................................................................................................................115
Transferência para a Cama .............................................................................................................................................115
SECTION 6—DETECÇÃO DE PROBLEMAS .........................................................116

ÍNDICE
Elevador de transferência posição de pé 100 Parte n.ro 1078985
ÍNDICE
SECTION 7—MANUTENÇÃO ...........................................................................117
Checklist de Inspeção de Manutenção e Segurança..................................................................................................117
Limpeza da cesta e do Elevador.....................................................................................................................................117
Detecção de Desgaste e Dano ......................................................................................................................................117
Lubrificação do Elevador .................................................................................................................................................118
Ajuste da Base....................................................................................................................................................................118
Ajuste da Altura da Almofada para o Joelho ..............................................................................................................118
Substituição do Atuador Elétrico ..................................................................................................................................119
AS VENDAS DE CLIENTE, SERVIÇO E INFORMAÇÕES DE GARANTIA ................120

OBSERVAÇÕES ESPECIAIS
Parte No. 1078985 101 Elevador de transferência posição de pé
OBSERVAÇÕES ESPECIAIS
Algunssinaissãousadosnestemanualeaplicadosaperigosoupráticasquepodemocasionarlesãopessoaloudanos
materiais.Consulteatabelaaseguirparaasdefiniçõesdossinais.
NOTIFICAÇÃO
AS INFORMAÇÕES CONTIDASNESTE DOCUMENTO ESTÃO SUJEITAS A MODIFICAÇÃO
SEM COMUNICAÇÃO PRÉVIA.
INTERFERÊNCIA DE FREQUÊNCIA DE RÁDIO
A maioria dos equipamentos eletrônicos é influenciada por Interferência de Frequência de Rádio
(RFI). CUIDADO Tome cuidado ao usar equipamentos portáteis de comunicação em volta de
tais equipamentos. Se RFI causar comportamento instável, APERTE o Botão de Parada de
Emergência Vermelho IMEDIATAMENTE. Não desligue o Botão de Parada de Emergência
Vermelho enquanto a transmissão estiver em andamento.
MANUTENÇÃO
A Manutenção DEVE ser realizada SOMENTE por pessoal qualificado.
SIGNIFICADO DO SINAL
PERIGO
Perigo indica que há uma situação iminentemente periogsa que, se não for evitagda, resultará em
morte ou lesão grave.
ADVERTÊNCIA
Advertência indica que há uma situação potencialmente periogsa que, se não for evitada, pode resul-
tar em morte ou lesão grave.
CUIDADO
Cuidado indica a existência de uma situação potencialmente perigosa que, se não evitada, pode resul-
tar em danos materiais ou lesão leve ou ambos.

PARÂMETROS DO PRODUTO
Elevador de transferência posição de pé 102 Parte No. 1078985
PARÂMETROS DO PRODUTO
Auxiliar de Elevação para o Paciente RSP350-1E e RPS350-1FR
*OBSERVAÇÃO:Variadependendodecargaecurso.
Altura no Engate da Cesta - MAX.: 167 cm [66 polegadas]
Altura no Engage da Cesta - MIN.: 102 cm [40 polegadas]
Largura da Base ABERTA: 94 cm [37 polegadas]
Largura da Base FECHADA: 66 cm [26 polegadas]
Altura da Base (Vão): 11,4 cm [4,5 polegadas]
Comprimento da Base: 90,2 cm [35,5 polegadas]
Altura Total: 124 cm [49 polegadas]
Comprimento Total: 99 cm [39 polegadas]
Largura Total: 65,5 cm [25,8 polegadas]
Tamanho da Rodinha (DIANTEIRA):
Tamanho da Rodinha (TRASEIRA):
7,6 cm [3,0 polegadas]
12,7 cm [5.0 polegadas]
Opçðoes da Cesta: Levantamento ou Transferência
Material da Cesta: Poliéster
Capacidade de Peso: 158 kg [350 lbs]
Peso fora da Vaixa: 49 kg [108 lbs]
Bateria: 24V DC (RCHBL)
Entrada: 100-240V AC
Saida/Tempo de Carregamento: 29,5V DC Max 6 horas
Alarme Áudio/Visual de Bateria Baixa: Sim
Dispositivos de Segurança do Motor: Anti-Prendimento
*Levantamentos Aprox. Por Carga: *100 - 200 Ciclos por carga
Garantia Limitada do Elevador/Eletônica: 3 Anos/2 Anos
Botão de Parada de Emergência: Sim

SEÇÃO 1—DIRETRIZES GERAIS
Parte No. 1078985 103 Elevador de transferência posição de pé
SEÇÃO 1—DIRETRIZES GERAIS
ADVERTÊNCIA
SEÇÃO 1 - DIRETRIZES GERAIS contém informações inportantes para a operaçãoe uso seguro
deste produto.
Verifiquetodasaspeças,eseocorreramdanosduranteotransporte,antesdeusar .Emcasodedano,NÃOuseosequipamentos.
ContateoRevendedorparaobterinstruçõesadicionais.
OElevadordePacienteInv acareNÃOéumaparelhodetransporte.Foiprojetadoparatransferirumindivíduosentadodeuma
superfíciepara
outra(porexemplodeumacamaparaacade iraderodas).
NÃOtentefazerqualquertr ansferên ciasemaaprov açãodomé dico,enfermeiroouassistenteméd icodopaciente.Leia
completamenteasinstruçõescontidasnesteMan ua ldoProprietário,observeumaequipetreinadade especialistasrealizaros
procedimentos delev antamentoeentãorealizeo
procedimentodelev antamentodiversasvezessobsupervisãoadequada,
usandoumindivíduocapazfazendoasvezesdepaciente.
AscestasdeAssistênciadeLev antamentoeTransferênciadaInvacareforamespecificamentedesenhadasparaserusadascomo
ElevadordePacientesInv acare.cestaseacessóriosdesenhadospor outrosfabricantesnãodevemserutilizadoscomo
componentesdosistema deElev adordePacientedaInv acare.Useacestare comendadapelomédic o,enfermeiroouassistente
médicodoindivíduoparagarantiroconfortoesegurançadoindivíduoqueestásendolevantado.
SeoElev adordePacienteforusadana áreado chuveirooubanho,limpeouremovaqualquerumidade
doElev ad ordePaciente
apósusá‐lo.NÃOguardeoelevadornumaáreaúmidaouemcondiçãoúmida.Inspecioneperiodicamentetodososcomponentes
doEle v a dordePaciente,visandodetectarsinai sdecorrosão.Substituatodasaspeçascorroídasoudanif icadas.
Oelev adordepacientepodeseroperadoporumprofissionalmé dico‐hospitalar
duranteopreparodelevantamento,
procedimentos detransferênciade umaorigemoudestinocomumpacientecooperador,quepodesuportarparcialmenteseu
própriopeso.Entretanto,vistoquecondiçõesvariam,aInvacarerecomen daqueoprofissionalmédico‐hospitalaravaliea
necessidadedeprestarassistênciaedetermi neseénecessáriomaisdeum
assistenteemcadacasopararealizaratransferência
comsegurança.
OusodoElev ador dePacienteporsomenteumassistenteserábaseadonaavaliaçãodoprofissionalmédico‐hospitalar,conforme
asituaçãoindividualdecadapaci ente.
Limite de Peso
NÃOexcedaolimitemáximodepesodoElevadordePaciente.OlimitedepesoparaoElevadordePacienteé158kg[350
lbs].
Montagem do Elevador
NÃOaperteexcessivamenteaferragemdemontagem.Istocausarádanosnossuportesdefixação.
Uso da cesta
cestasdeAssistênciaparaPosiçãoLev ant ada:NÃOusarocestadeAssistênciaparaPosiçãoLev antadaemconjuntocomo
ElevadordePacientecomoaparelhodetransporte.Oaparelhofoiprojetadoparatransferirumindivíduodeumasuperfíciede
descansoparaoutra(porexemplo,decamaparaumacadeiraderodas).
Cesta
deAssistênciaparaPosiçãoLev antada:Antesdesuspenderopaciente,certifique‐sedequeaextremidadeinferiordaCesta
deAssistênciaparaPosiçãoLevantadaestáposicionadanaregiãolombardo pacienteeosbraços dopacienteestãoforadoCesta
deAssistênciaparaPosiçãoLevantada.
CestadeAssistênciaparaPosiçãoLev antada:
acintaDEVEestarbemajustadamasconfortáv elnopaciente,casocont rárioo
pacientepodeescapardacestaduranteatransferência, possivelmentecausandolesão.
CestadeTransferência:AntesdeSuspenderoPaciente,certifique‐sedequeaextremidadeinferiordaCestadeTransferênciaestá
nabasedacolunaeosbraços
dopacienteestãofo radaCestadeTransferência.
CestadeTransferência:NÃOlev antaropacientenaposiçãocompletamente verticalaous ar oCestadeTransferência,caso
contráriopodeocasionarlesão.
Apóscadalavagem(deacordocomasinstruçõescontidasnacesta),inspecionesea(s)cesta(s)está(ão)desgastada(s),comrasgos
edescosturada.
Cesta
branqueadas,rasgadas,cortadas,esfregadasouquebradasnãosãosegurasepodemocasionarlesões.
Descarte‐asimediatamente.
NÃOalterarascesta.

SEÇÃO 1—DIRETRIZES GERAIS
Elevador de transferência posição de pé 104 Parte No. 1078985
Verifiqueasfixaçõesdacestatodavezqueestaforremovidaesubstituída,paragarantirqueestáadequadamentefixadaantesdo
pacienteserremovidoda objetoestacionário(cama,cadeiraoucadeirahigiênica).
Seopacienteestivernacadeiraderodas,trav easrodaparapreveniramovimentação dacadeir aparafrente
ouparatrás
Operação do Elevador
Aomontarabaterianocarregadordebateriacertifique‐sedequeouviuumruídoaudível,paraconfirmarqueestá
adequadamentemontada.Casocontrário,podeocasionarlesãooudano.
UseoscabosparaempurraroupuxaroElevadordePaciente
Suspensão do paciente
Antesdepo sicionaraspernasdoelevadoremvoltadopaciente,certifique‐sedequeospésdopacien teestãolongedoapoiodos
pés,casocontráriopodeoc asionarlesão.
Ajustesdesegurançaeconfortodevemserfeitosantesdelocomoveropaciente.Osbraçosdopacientedevemestarforadas
tiras
dacesta.
Antesdesuspenderopacientedoobjetoestacionário(cadeiraderodas,cadeirahigiênicaoucama),levant esuavementeopaciente
doobjetoestacionárioeverifiquesetodasasfixaçõ esdacestaestãoseguras.Sequalquerfixaçãonãoestivercorreta,abaixeo
pacienteecorrijaoproblema,entãosuspendao
pacienteeverifiquenov am ente.
Duranteatransferência,comopacientesuspensonumacestafixadaaoelev ador ,NÃOtransitecomabasederodinhassobre
superfíciesacidentadasquepossamcriarumdesequilíbriodoElev ador dePacienteecausarotombament odoElevadorde
Paciente.Useocabodeesterçament odomastroo
tempotodoparaempurraroupuxaroElevador dePaciente.
AInvacarerecomendatrav arasrodinhasgiratóriastraseirasSOMENTEaopo sicionarouremoveracesta(assistênciade
levantamentooutransferência)emvoltadopaciente.
AInvacarenãorecomendatravarasro dinhastraseirasdoElevadordePacienteaolev antarumindivíduo.Istopode
causaro
tombamentodoelev adorecomprometer aintegridadedo pacienteeassistentes.AInv a careRECOMENDAde ixa asr odinhas
traseirasde stravadasduranteosprocedimentosde levantamentoparapermitirqueoElevador dePacienteseestabilizequando
opacientefor inicialmentelevantadodacadeira,camaouqualquerobjetoestacionário.
Transferência do Paciente
Antesdatransferência,verifiqueseacapacidadedepesodoprodutopodesuportaropesodopaciente.
AstravasdacadeiraderodasDEVEMestarnaposiçãotravadaantesde abaixaropacientenacadeirade rodasparatransporte.
Manutenção
ÉnecessáriofazermanutençãodoElev adordePacienteseacessórios,co mregularidade,paragarantirsuaoperação adequada.
Apósosprimeiros12mesesdeoperação,inspecionarsehádesgasteemtodosospontosdearticulaçãoefechos.Seometalestiver
desgastado,apeçaDEVEse rsubstituída.Daípordiante,realizeesta
inspeçãoacadaseismeses.
NÃOapertarexcessivamenteaferragemdemontagem .Istocausarádano nosuporte defixações.
Asrodinhaseparafusosdoeixo requereminspeçõesacadaseismesesparaverificaratensãoedesgaste.

SEÇÃO 2—MONTAGEM
Parte No. 1078985 105 Elevador de transferência posição de pé
SEÇÃO 2—MONTAGEM
Remoção do Elevador de Paciente da Embalagem
Removaoscomponentesdaembalagem.
Montagem do Elevador de Paciente
ADVERTÊNCIA
Use somente peças Invacare para montar este
Elevador de Paciente. As pernas de suporte, o
mastro, baliza, conjunto de bomba e barra
giratória são fabricados de acordo com especifi-
cações que garantem corrigir o alinhamento de
todas as peças para garantir a operação funcio-
nal.
Montagem do Mastro na Base
OBSERVAÇÃO:Omastropodeserremovido da basepara
armazenamentooutransporte.OmastroDEVEseradequadamente
afixadonabaseantesdeusar.
OBSERVAÇÃO:Pararealizaresteprocedimento,consultea
ILUSTRAÇÃO 2.1.
1. Coloqueabaseno chão.
OBSERVAÇÃO:Certifique‐sedequetodasquatrorodinhasestão
fazendocontatocomochão.
2. Traveambasrodinhas
traseiras. ConsulteoDetalhe ʺAʺ.
3. Remov aoparafusohexagonal,arruelaseporcaestão
situadasnocorteemformadeUnabase.
4. Suspendaomastroparaumaposiçãoereta.
5. Abaixeomastronosuport edefixação.
6. Fixeomastronabasecomoparafusohexagonal,arruelas
eporca.Apertefirmemente.
Prepare o Elevador para Usar
VerifiqueeapertetodasferragensANTESdeusar.
Instale o Cabo Comutador
OBSERVAÇÃO:Pararealizaresteprocedimento,consultea
ILUSTRAÇÃO 2.2.
1. Removaocabocomutadordaembalagem.
2. Rosqueieocabocomutadornoadaptadormachona
base.
ILUSTRAÇÃO 2.1 Montagem do Mastro na Base
ILUSTRAÇÃO 2.2 Instale o Cabo Comutador
Pise aqui
para Travar
Pise aqui para
Destravar
Porca
Arruela
Parafuso hexagonal
Suporte de fixação
Alavanca
de
TRAVADO
DESTRAVADO
DETHALE“A”
Arruela
Cabo comutador
Adaptador
macho na Base

SEÇÃO 2—MONTAGEM
Elevador de transferência posição de pé 106 Parte No. 1078985
Fixação do Suporte de Fixação do Carregador de Bateria na Parede
OBSERVAÇÃO:Pararealizaresteprocedimento,consulteaILUSTRAÇÃO 2.3.
NOTE:EsteprocedimentosóseaplicaaosmodelosRPS350‐1E.
1. Coloqueosuportedefixaçãodocarregadordebateria
naparedenaposiçãodesejada.
2. Comumlápis, marqueaposiçãodo buracocentral.
3. Meça6polegadasemeia(16,5cm),apartirdamarcacom
lápis,eperfureumburacodemontagem.
4. Instaleopara fusodesuporteinferiorm ontagematéficar
umvãoaproximadode1/8depolegada(3,1mm)entrea
cabeçadoparafusoeaparede.
5. Coloqueosuportedefixaçãodocarregadordebateriano
parafusodesuporte inferior.
6. P erfureosoutrosdoisburacos
desuporte.
7. P arafuseosparafusosdesuporteatravésdosuporte de
fixaçãodocarregadordebateriaenaparede.Apertecom
firmeza.
CUIDADO
Ao montar a bateria no carregador de bateria
certifique-se de que ouviu um ruído audível para
confirmar que a montagem foi adequada. Caso
contrário, pode ocasionar lesão ou dano.
8. Coloqueocarregadordebaterianosuportedefixação.
9. Ligueocarregadordebateriaemum atomada.
OBSERVAÇÃO:AumLEDacenderáquandoocarregadordebateria
foralimentado.
ILUSTRAÇÃO 2.3 Fixação do Suporte de Fixação do
Carregador de Bateria na Parede
Suporte de fixação
Parafusos de
suporte
Parafuso de Suporte INFERIOR

SEÇÃO 3—OPERAÇÃO
Parte No. 1078985 107 Elevador de transferência posição de pé
SEÇÃO 3—OPERAÇÃO
ADVERTÊNCIA
NÃO tente fazer qualquer transferência sem a aprovação do médico, enfermeiro ou assistente
médico do paciente. Leia completamente as instruções contidas neste Manual do Proprietário,
observe uma equipe treinada de especialistas realizar os procedimentos de levantamento e então
realize o procedimento de levantamento diversas vezes sob supervisão adequada, usando um
indivíduo capaz fazendo as vezes de paciente.
As pernas do elevador de paciente DEVEM estar na posição aberta máxima para garantir a estabili-
dade e segurança. Se o paciente estiver na cesta e for necessário se locomover através de uma passa-
gem estreita, feche as pernas do elevador de paciente, durante o tempo necessário para se locomover
através da passagem. Após passar o elevador pela passagem, coloque as pernas de volta na posição
aberta máxima.
OBSERVAÇÃO:OusodoElevadordePacienteporsomenteum
assistenteserábaseadonaavaliaçãodopr ofissionalmédico‐hospitalar,
conformeasituaçãoindividualdecadapaciente.
Travamento/Destravamento das rodinhas
traseiras
•ConsulteoDetalheʺAʺdeIlustração3.1.
Elevação/Abaixamento do Elevador de
Paciente
OBSER VAÇÃO:Parar ealizaresteprocedimento,consulteaDetalhe“B”.
•ParaLevantaroElevadordePaciente:
Aperteobotãoup(subida)nocontrolemanual().
OBSERVAÇÃO:SeoElevadordePacienteestiverlevantadononível
maisalto ,podeser
OBSERVAÇÃO:necessáriopuxarsuavementeparabaixoosbraçosdo
elevadorantesdeomastrocomeçar
aabaixar.Puxesuavementepara
baixoambososbraçosaomesmotempoparaqueoelevadornãofique
instável.
•ParaAbai xaroElev ad ordePaciente:
Aperteobotãodown(descida)nocontrolemanual().
Fechamento/Abertura das pernas
•ParaFecharasPernas:
PuxarocabocomutadorPARAFORAenadireçãoopostado
elevadorparapacientesnaposiçãolevant adaeaseguirparaa
ESQUERDAatéTRAVARnoencaixedosuporte.
OBSERVAÇÃO:Paradeterminaroladoesquerdo,fiquedepéatrásdo
elevadornaposiçãolevantada,voltadopara asrodinhas
diante iras.
•ParaAbrir asPernas:
PuxeocabocomutadorPARAFORAenadireçãoopostado
elevadorparapacientesnaposiçãolevant adaeaseguirparaa
DIREITAatéTRAVARnoencaixedosuporte.
OBSERVAÇÃO:Paradeterminaroladodireito, fiquedepéatrá sdo
elevadornaposiçãolevantada,voltadopara as
rodinhasdianteir as.
Uso da Parada de Emergência
OBSERVAÇÃO:Pararealizarestepr ocedimento,consulteaDetalhe“C”.
•EmpurreobotãodeemergênciaVERMELHOpara
interromperasubidaoudescidadosbraçosdoelev ador.
•Parareconfigurar,gireobotãodeemergêncianosentido
horário.
ILUSTRAÇÃO 3.1 Operação do Elevador de Paciente
DETALHE “B” -
DETALHES DO
CONTROLE MANUAL
DETALHE “C” - PARADA DE EMERGÊNCIA
Botão de Descida
Botão de Subida
Controle manual
Botão de emergência
Empurrar para parar,
girar no sentido horário
para reconfigurar
Pise aqui
para Travar
Pise aqui para
Destravar
Alavanca
de
TRAVADO
DESTRAVADO
DETHALE“A”
RPS350-1ERPS350-1FR

SEÇÃO 3—OPERAÇÃO
Elevador de transferência posição de pé 108 Parte No. 1078985
Ativação do Desengate Mecânico de
Emergência
Desengate de emergência principal
OBSERVAÇÃO:Pararealizaresteprocedimento,consultea
ILUSTRAÇÃO 3.2.
OBSERVAÇÃO:Comestepr ocedimentoabalizaéabaixadaseo
controlemanualnãoestiver funcionand oadequadamente.
Paraativ ar odesengatedeemergênciaprincipal,insira uma
pontadecanetanoBuracodeEmergência() nacaixade
controle.
Desengate de Emergência Secundário
OBSERVAÇÃO:Pararealizaresteprocedimento,consultea
ILUSTRAÇÃO 3.3.
OBSERVAÇÃO:Todosatuador esdoElevador dePaciente estão
equipadoscomumdesengatedeemergênciamecânico. Odesengate
mecânicopermitearetraçãodoatuadorsemenergia.
OBSERVAÇÃO:Useodesengatedeemer gênciaprincipalprimeir o
antesdeusaroprocedimentodedesengatedeemergênciasecundário.
Este
pr ocedimentosomentedeveserusadoseopr ocedimentode
desengatedeemergênciaprincipalnãoestiverfuncionand oounãofor
atingível.
OBSERVAÇÃO:OelevadorDEVEestarso bcar ga paraqueo
desengatemecânicofuncione.
Paraativ ar odesengatedeemergênciasecundário,pux ea
alav ancadeemergênciaVERMELHAeaomesmotempo
puxe
abalizaparabaixo.
Carregamento da Bateria
Utilizar um cabo de alimentação para carregar
a bateria
OBSERVAÇÃO:Pararealizaresteprocedimento,consultea
ILUSTRAÇÃO 3.2.
OBSERVAÇÃO:Esteprocedimentosóseaplicaaosmodelos
RPS350‐1FR.
CUIDADO
A paragem de emergência NÃO DEVE ser
activada, uma vez que tal impossibilita o carre-
gamento da bateria. Enquanto decorre o car-
regamento, o auxiliar de elevação não pode
ser utilizado. NÃO tente mover o auxiliar de
elevação sem desligar o cabo de alimentação
da tomada. NÃO tente utilizar o auxiliar de
elevação se o alojamento da bateria estiver
danificado. Substitua o alojamento da bateria
danificado antes de qualquer utilização poste-
rior.
1. Ligueocabodealimentaçãoàcaixadecontrolo.
2. Ligueocabodealimentaçãoàtomada.
OBSERVAÇÃO:Abaterialeva cer cade4horasacarregar.O
carregamentodeveserr ealizadonumasalabem ventilada..
3. Desligueocabodealimentaçãodatomadadepoisdea
bateriaestarcompletamentecarregada..
ILUSTRAÇÃO 3.2 Desengate de emergência principal
ILUSTRAÇÃO 3.3 Desengate de Emergência
Secundário
Buraco de
emergência
Caixa de
controle
Orifício
Ascendente
de
Emergência
Orifício
Descendente de
Emergência
Caixa de
Controlo
Ligar aqui o Cabo de
Carregamento
RPS350-1FR
RPS350-1E
Alavanca de Emergência
VERMELHA

SEÇÃO 3—OPERAÇÃO
Parte No. 1078985 109 Elevador de transferência posição de pé
Utilizar o Carregador de Baterias para
Carregar a Bateria
OBSERVAÇÃO:Pararealizaresteprocedimento,consultea
ILUSTRAÇÃO 3.4.
OBSERVAÇÃO:Esteprocedimentosóseaplicaaosmodelos
RPS350‐1E.
OBSERVAÇÃO:AInvacarerecomendaqueabateriaseja
recarregadadiariamenteparaprolongaravid adabateria .
OBSERVAÇÃO:Umalarmeaudívelsoaráquando abateriaes tiver
baixa.
4. Lev anteocabo natraseiradabateria.
5. Lev antea
bateriaeafastedacaixadecontrole.
CUIDADO
Certifique-se de que ouviu um ruído audível ao
montar a bateria no carregador de bateria. Caso
contrário, pode ocasionar lesão ou dano.
6. Coloqueabaterianocarregadordebateria.Empurreo
topodabateriacontraosupo rtedefixaçãoaté ouvirum
ruídoaudív el
OBSERVAÇÃO:OLEDdecarr ega mentoacenderá.Quandoa
bateriaes tivercarregada,oLEDapagará.
OBSERVAÇÃO:Demora aproximadamentequatrohoraspara
carregarabateriacompletamente.
7. Lev anteocabo natraseirada
bateria.
8. Lev anteabateriaeafastedacaixadeco ntrole.
CUIDADO
Certifique-se de que ouviu um ruído audível ao
montar a bateria no carregador de bateria. Caso
contrário, pode ocasionar lesão ou dano.
9. Coloqueabaterianacaixadecontrole.Empurreotopoda
bateriac ontraosupo rtedefixaçãoaté ouvirumruído
audível.
ILUSTRAÇÃO 3.4 Carregamento da Bateria
Carregador de
bateria
(ETAPA 3)
Caixa de
controle
(ETAPA 6)
Você ouvirá um ruído
audível quando estiver
adequadamente instalado
(ETAPAS 3 e 6)
Cabo
(ETAPAS 1, 2, 4 e 5)
Bateria

SEÇÃO 4—SUSPENSÃO DO PACIENTE
Elevador de transferência posição de pé 110 Parte No. 1078985
SEÇÃO 4—SUSPENSÃO DO PACIENTE
ADVERTÊNCIA
NÃO exceder o limite máximo de peso de 158 kg [350 lbs].
NÃO tente fazer qualquer transferência sem aprovação do médico, enfermeiro ou assistente
médico do paciente.
SEMPRE mantenha as mãos e dedos fora do alcance de peças em movimento para evitar lesão.
As cestas de pacientes da Invacare são feitas especificamente para usar com Elevador de
Pacientes Invacare. Para garantir a segurança do paciente, NÃO misture cestas de pacientes e
Elevador de Pacientes de diferentes fabricantes.
Indivíduos que usam a cesta para pacientes levantados DEVEM ser capazes de apoiar a maioria
do seu próprio peso, caso contrário pode ocasionar lesão.
As pernas do auxiliar de elevação DEVEM estar na posição mais aberta e o manípulo de
deslocação deve estar bloqueado para garantir a máxima estabilidade e segurança. Se o paciente
estiver na cesta e for necessário se locomover através de uma passagem estreita, feche as pernas
do elevador, durante o tempo necessário para se locomover através da passagem. Após passar o
elevador de pacientes pela passagem, coloque as pernas de volta a posição aberta máxima e
trave o cabo comutador IMEDIATAMENTE.
NÃO deslocar o paciente se a cesta do paciente não estiver adequadamente ligada nos pontos de
fixação do Elevador de Paciente. Verifique se a cesta do paciente está adequadamente conectada
aos pontos de fixação ANTES de Levantar o Paciente.
Durante a transferência, com o paciente suspenso no cesta do paciente, NÃO transite com a
base do Elevador de Paciente sobre qualquer superfície acidentada que possa causar a
instabilidade do Elevador de Paciente.
Use o cabo de esterçamento no mastro o tempo todo para empurrar ou puxar o elevador de
paciente.
Posicionamento do Elevador de Paciente
OBSERVAÇÃO:Pararealizaresteprocedimento,consulteaILUSTRAÇÃO 4.1.
OBSERVAÇÃO:ConsulteasDIRET RIZES GERAISdapágina 103antesdepr osseguireobservetodasadvertênciasindicadas.
OBSERVAÇÃO:AntesdeposicionaraspernasdoElevadordePacientesobacama,certifique‐sedequeaáreaestálivredequaisquerobstruções.
1. Certifique‐sedeque as pernasdoelevadordepaciente
estãonaposiçãoabertamáxima.Caso
contrário,useo
cabocomutador paraabriraspernas.
2. P osicioneoelev adordepacienteusandoocabodomastro.
3. AperteoBotãode Descidanocontrolemanualpara
abaixarosbraçosdoelev adorparafacilitarafixaçãoda
cesta.
ILUSTRAÇÃO 4.1 Botões de Comando Manual
Botão de Descida
(DOWN)
Botão de Subida (UP)
Controle manual

SEÇÃO 4—SUSPENSÃO DO PACIENTE
Parte No. 1078985 111 Elevador de transferência posição de pé
Suspensão do paciente
ADVERTÊNCIA
NÃO exceda o limite máximo de peso, 158 kg (350 lbs.)
Indivíduos que usarem a cesta de suspensão do paciente DEVEM ser capazes de apoiar a maioria do
seu próprio peso, caso contrário o uso pode ocasionar lesão.
NÃO deslocar o paciente se a cesta não estiver adequadamente fixada nos pontos de fixação no
elevador. Certifique-se de que a cesta está adequadamente fixada ANTES e Levantar o Paciente. Se
quaisquer fixações não estiverem adequadamente colocadas, corrija o problema. Quando a cesta for
elevada umas poucas polegadas da superfície estacionária e antes de deslocar o paciente, verifique
novamente e certifique-se de que a cesta e todas fixações estão firmemente no lugar. Se for
constatado qualquer problema, abaixe o paciente de volta na superfície estacionária e corrija o
problema - caso contrário, pode ocasionar lesão ou dano.
Ajustes de segurança e conforto devem ser feitos antes de deslocar o paciente.
As cestas de pacientes da Invacare são feitas especificamente para usar com Elevador de Pacientes
Invacare. Para a segurança do paciente, NÃO misture cestas de pacientes e Elevador de Pacientes de
diferentes fabricantes.
OBSERVAÇÃO:Pararealizaresteprocedimento,consulteaILUSTRAÇÃO 4.2napágina1 12.
OBSERVAÇÃO::ConsulteoManualdoPr opr ietáriodecestadopaciente, P/N1023891,paraobtermaisinformações.
OBSERVAÇÃO:OpacienteDEV Eestarprimeiramentenaposiçãosentada.Useacabeceiradacamaparadeixaropacienteereta, eentãomova
aspernas
paraoladodacama.
1. Instruaopacienteasegurarasempunhadurasemambososladosdoelev adordepaci ente(DetalheʺAʺdaILUSTRAÇÃO
4.2).
2. InstruaopacienteaseapoiarnaCestadeSuspensãooudetransferência.
ADVERTÊNCIA
Cestas de Suspensão - Antes de levantar o paciente, certifique-se de que a extremidade inferior da
Cesta de Suspensão está posicionada na região lombar do paciente e os braços do paciente estão fora
da cesta.
Cestas de Transferência - Antes de levantar o paciente, certifique-se de que a extremidade inferior
da cesta de transferência está na base da coluna e os braços do paciente estão fora da cesta.
A Invacare não recomenda travar as rodinhas traseiras do elevador de paciente ao suspender e trans-
ferir um indivíduo. Isto pode causar o tombamento do elevador e comprometer a integridade física
do paciente e assistentes. A Invacare recomenda deixar as rodinhas traseiras destravadas durante os
procedimentos de levantamento e transferência para permitir que o elevador de paciente se estabi-
lize quando o paciente estiver inicialmente levantado e transferido para a cadeira, cama ou qualquer
objeto estacionário.
3. Certifique‐sedoseguinte::
A. Queosjoelhos dopacienteestãoapoiadosnaalmofadaparaojoelho.
B. Ospésdopacienteestãoadequadamenteposicionadosnoapoio dospés.
C. Cestas:
•CestadeSuspensã o‐aextremidadeinferi ordaCestade Suspensãoes táposicionadanaregiãolombardopaciente.
•CestadeTransferên cia‐aextremidadeinferiordaCesta
detransferênciaestánabasedacolunadopaciente.
•QualquerEstilodeCesta‐osbraçosdopacienteestãoforadaCesta.

SEÇÃO 4—SUSPENSÃO DO PACIENTE
Elevador de transferência posição de pé 112 Parte No. 1078985
D. Asrodinhastraseirasestãodes travadas.
E. E.Aspernasestãonaposiçãoabertamáxima.
ADVERTÊNCIA
Se estiver transferindo um paciente de uma cadeira de rodas, as travas desta DEVEM estar na
posição travada antes do paciente ser colocado na cadeira de rodas. Caso contrário, pode ocasionar
lesão.
4. Seestiv ertransferindoopacientedeumacadeiraderodas,trav earo dadacadeiraderodas(DetalheʺBʺdaILUSTRAÇÃO
4.2).
5. AperteobotãocomflechaUP nocontrolemanualparalev antaropacienteacimadasuperfície(cama,cadeir aderodasou
cadeirahigiênica).
OBSERVAÇÃO:Opesodopacienteseráapoiado
peloelevadordepaciente.
OBSERVAÇÃO:Ocentrodegravidademaisbaixopr oporcionaestabilidade,deixandoopacientemai sseguroefacilitandoalocomoçãodo
elevador.
ILUSTRAÇÃO 4.2 Suspensão do paciente
Locomoção do Paciente
ADVERTÊNCIA
As pernas do elevador de paciente DEVEM estar na posição aberta máxima para garantir a
estabilidade e segurança. Se o paciente estiver na cesta e for necessário se locomover através de
uma passagem estreita, feche as pernas do elevador de paciente, durante o tempo necessário
para se locomover através da passagem. Após passar o elevador pela passagem, coloque as
pernas de volta na posição aberta máxima.
Durante a transferência da paciente suspenso na cesta do elevador NÃO transite com a base de
rodinhas sobre superfícies acidentadas que podem criar um desequilíbrio do elevador. Isto pode
fazer o elevador tombar. Use o cabo do mastro o tempo todo para empurrar ou puxar o eleva-
dor.
1. Certifique‐sedequeaspernasdoelevadordepacienteestãonaposiçãoabertamáxima.Casocontrário,useocabo
comutadorparaabriraspernas.
2. Afasteoelevadordepacientedasuperfíciedaqualopacientefoilevantado.
3. Desloqueopacientevagarosamenteparaasuperfí ciedesejada.
Empunhadura
Rodinhas
Almofada para o
joelho
Apoio dos pés
DETALHE “A” - TRAVA DA RODA
Trava da Roda
Cabo do mastro

SEÇÃO 5—TRANSFERÊNCIA DO PACIENTE
Parte No. 1078985 113 Elevador de transferência posição de pé
SEÇÃO 5—TRANSFERÊNCIA DO PACIENTE
ADVERTÊNCIA
NÃO tente fazer qualquer transferência do paciente sem a aprovação do médico, enfermeiro ou
assistente médico do paciente.
NÃO desloque o paciente se a cesta não estiver adequadamente ligada aos pontos de fixação do
elevador de paciente. Verificar se a cesta está adequadamente conectada aos pontos de fixação
antes de elevar o paciente. Se quaisquer fixações não estiverem no lugar adequado, corrija o
problema. Quando a cesta estiver elevada a poucas polegadas da superfície estacionária e antes
de deslocar o paciente, verifique novamente para se certificar que todas fixações da cesta estão
seguras. Se quaisquer fixações não estiverem no lugar adequado, coloque o paciente de volta na
superfície estacionária e corrija este problema - caso contrário, pode ocasionar lesão ou dano.
Ajustes de segurança e conforto devem ser feitos antes de deslocar o paciente.
NÃO usar cestas e elevador de pacientes de fabricantes diferentes. As cestas Invacare são feitas
especificamente para usar com elevador de pacientes Invacare. Caso contrário, pode ocasionar
lesão ou dano.
A Invacare não recomenda travar as rodinhas traseiras do elevador de paciente quando estiver
levantando e transferindo um indivíduo. Isto pode causar o tombamento do elevador e
comprometer a integridade física do paciente e assistentes. A Invacare recomenda que as
rodinhas traseiras fiquem destravadas durante os procedimentos de levantamento e
transferência para permitir que o elevador de paciente se estabilize quando o paciente estiver
sendo inicialmente levantado e transferido para a cadeira, cama ou qualquer objeto estacionário.
As pernas do elevador de paciente DEVEM estar na posição aberta máxima para garantir a
estabilidade e segurança. Se o paciente estiver na cesta e for necessário se locomover através de
uma passagem estreita, feche as pernas do elevador de paciente, durante o tempo necessário
para se locomover através da passagem. Após passar o elevador pela passagem, coloque as
pernas de volta na posição aberta máxima. Se for necessário fechar as pernas para manobrar o
elevador de paciente sob a cama, feche as pernas somente enquanto for necessário posicionar o
elevador de paciente sobre o paciente e levantá-lo da superfície da cama. Quando as pernas do
elevador de paciente não estiverem mais sob a cama, as pernas devem voltar para a posição
aberta máxima.
Verifique as fixações da cesta toda vez que a cesta for removida e substituída, para garantir que está
adequadamente fixada antes do paciente ser removido da superfície.
Ousodesomenteumassistenteserábaseadonaavaliaçãodoprofissionalmédico‐hospitalar,conformeasituação
individualdecadapaciente.

SEÇÃO 5—TRANSFERÊNCIA DO PACIENTE
Elevador de transferência posição de pé 114 Parte No. 1078985
Transferência para uma Cadeira
Higiênica
ADVERTÊNCIA
A Invacare recomenda travar as rodinhas
giratórias traseiras somente ao posicionar ou
remover a cesta em volta do paciente.
OBSERVAÇÃO:Pararealizaresteprocedimento,consultea
ILUSTRAÇÃO 5.1.
1. Levanteopacienteaoladodacama.
2. AperteoBotãodeSubidanocontrolemanualpara
levantarapacientesuficientementeparadeixaros
braçosdacadeirahigiênicalivres.Seupesoserá
apoiadopeloelevador.
3. Conduzaopaciente àcadeirahigiênica.Istopodeexigir
dois
assistentes.
4. Aperteobotão comfl echaparaabaixaropacientena
cadeirahigiênica.
5. Traveasrodinhasgiratóriastraseirasnoelevadorde
paciente.
6. Realizeumadasseguintescoisas:
•cestadeSuspensão‐desengateacestadeSuspensão
dospontosdefixaçãonoelevador.
•cestadetransporte‐
i. Desengateacestadetransportedospontosde
fixação
inferioresnoelevador.
ii. Levanteaspernasdopacienteeremovaos
apoiosdecoxasobopaciente.
iii. Sedesejado,desengateacestadetransporte
dospontosdefixaçãosuperioresnoelevador.
OBSERVAÇÃO:Opacientepodepermanecernaporçãosuperior
dacestadeTransferênciaenquantoestiverusandoacadeira
higiênica.
7. Instruirouajudaro
pacientealevantarseupésdoapoio
paraospés.
8. Removeracestaemvoltadopaciente.
9. Destravarasrodinhaseafastaroelevadordacadeira
higiênica.
ILUSTRAÇÃO 5.1 Transferência para uma Cadeira
Higiênica
DETALHE “A”
DETALHE “B”
DETALHE “C”

SEÇÃO 5—TRANSFERÊNCIA DO PACIENTE
Parte No. 1078985 115 Elevador de transferência posição de pé
Transferência para uma Cadeira de Rodas
OBSERVAÇÃO:Pararealizaresteprocedimento,consultea
ILUSTRAÇÃO5.2
1. Certifique‐sedequeaspernasdoelevadorcomopaciente
nacestaes tãoemnaposiçãoaberta.
2. Mudeacadeiraderodasdeposição.ConsulteoDetalhe
ʺAʺ.
3. Engateatrav adarodatraseiradacadeiraderodaspara
prev eniro
de slocame ntodacadeiraderodas.Consulteo
DetalheʺBʺ.
ADVERTÊNCIA
NÃO colocar o paciente na cadeira de rodas se
as travas não estiverem engatadas. As travas da
cadeira de rodas DEVEM estar na posição
travada antes de colocar o paciente na cadeira
de rodas para deslocamento.
Caso contrário, pode ocasionar lesão.
4. P osicioneopacientesobreacadeiraderodas.
5. Abaixeopacientenacadeiraderodas.
6. Desengateacestadetodosospontosdefixaçãono
elevador.ConsulteoDetalheʺCʺ.
7. Instruaopacientealevantarseuspésdoapoioparaospés.
Ajudeopaciente,senecessário.
8. Remov aacestaqueenvolve
opaciente.
9. Afasteoelev ador dacadeiraderodas.
Transferência para a Cama
OBSERVAÇÃO:Pararealizaresteprocedimento,consultea
ILUSTRAÇÃO5.3
OBSERVAÇÃO:Ocentrodegravidademaisbaixopr oporciona
estabilidade,fazendocomque opacientesesintamaisseguroeo
elevadormaisfácildesedeslocar.
OBSERVAÇÃO:OsbraçosdoelevadorficarãonaposiçãoatéoBotão
deDescidadocontrolemanua lser
aper tado
1. P osicioneopacientemaispertopossível dacabeceirada
cama.
OBSERVAÇÃO:Seopacienteestiversendotransferidodeuma
superfíciemai sbaixadoque aca ma ,levanteopacienteacimada
superfíciedacama.Opacientedeve serlevantadoosuficientepara
livraracama,comseupesocompletamentea poiado
peloelevador.
2. AperteoBotãode Descidaeabaixaropacientenacama.
ADVERTÊNCIA
A Invacare recomenda travar as rodinhas
giratórias traseiras SOMENTE ao posicionar ou
remover a cesta em volta do paciente.
3. Traveasrodinhasgiratóriastraseirasnoelevador.
4. Desengateacestadetodosospontosdefixaçãono
elevador.
5. Instruaopacientealevantarseuspésdoapoioparaospés.
Ajudeopacientesefornecessário.
6. Remov aacestadeSuspensãooudetransportedevoltado
paciente.
7. Destraveasrodinhasgiratóriastraseiras
eafasteo
elevadordacama.
ILUSTRAÇÃO 5.2 Transferência para uma Cadeira de
Rodas
ILUSTRAÇÃO 5.3 Transferência para a Cama
DETALHE “A”
DETALHE “B”
DETALHE “C”

SEÇÃO 6—DETECÇÃO DE PROBLEMAS
Elevador de transferência posição de pé 116 Parte No. 1078985
SEÇÃO 6—DETECÇÃO DE PROBLEMAS
OBSERVAÇÃO:Seosproblemasnãoforemresolvidospelosmeiossugeridos,contateseurevendedorouaInvacare.
SINTOMAS FALHAS SOLUÇÁO
Articulaçðes produzem som ruidoso ou
seco
Precisa de lubrificação Refer to Lubrificação do Elevador na página
118.
Atuador elétrico não levanta quando o
botão é apertado.
Conexão do controle manual ou atuador
está solta.
Bateria baixa.
Botão de parada de emergência
VERMHELHO apertado IN.
A betria não está ligada adequadamente
à caixa de controle.
Os termiais de conexão estão
danificados.
O atuador elétrico precisa de
manutenção ou a carga está muito alta.
Verificar as conexðes do controle manual e
atuador. Re-ligar se for necessário.
Carregue as baterias. Refer to Carrega-
mento da Bateria na página 108.
Gire o botão de emergência VERMHELO no
SENTIDO HORÁRIO até se levantar.
Religar a bateria à caixa de controle. Refer
to Carregamento da Bateria
na página 108.
Substitua o conjunto de bateria. Refer to
Carregamento da Bateria
na página 108.
Substitua o atuador ou contate o Revende-
dor. Refer to Substituição do Atuador Elét-
rico na página 119.
Ruído estranho no atuador O atuador está desgastado ou danificado
ou a haste está dobrada.
Substitua o atuador ou contate o Revende-
dor. Refer to Substituição do Atuador Elét-
rico na página 119.
Os braços do elevador não saem da
posição mais alta.
Os braços do elevador exigem uma
carga de peso mínima para sair da
posição mais alta.
Puxar levemente para baixo os braços do
elevador.

SEÇÃO 7—MANUTENÇÃO
Parte No. 1078985 117 Elevador de transferência posição de pé
SEÇÃO 7—MANUTENÇÃO
Checklist de Inspeção de Manutenção e Segurança
OBSERVAÇÃO:Siga osprocedimentosdemanut enç ão descritosnestema n ual paramanterseuElevadordePaciente emfuncionamento
contínuo.
OElev adordePacienteInvacarefoidesenhadoparaproporcionaromáx imodesegurança,eficiênciaefuncionamento
satisfatóriocomomínimodecuidadoeman utenção.
TodasaspeçasdoElev adorInvacaresãofeitascomaço
damelhorqualidade,masocontatodemetalcommetalcausade sgaste
apósbastanteuso.
Asrodinhasnãosãosujeitasaqualquerajusteoumanutençãoque nãosejalimpeza,lubrificaçãoeverificaçãodetensãodo eixo
eparafusos.Remover todoosdetritos,etc. darodaemancais.Sequaisquer peças estiv erem
de sgastadas, substitua‐as
IMEDIATAMENTE.
Setiv eralgumadúvidasobreasegurançadequalquerpartedoele v a dor,contatesuaRev e ndedorIMEDIATAMENTE.
Limpeza da cesta e do Elevador
Acestadeveserlav adaregularmentecomágua,comtemperaturaquenã oexceda180°F(82°C)eum asoluçãobiológica.Para
limparoElevadordePacientebastaumpanosuave ,umedecidocomáguaeumpo ucodedetergentefraco.Oelevadorpodeser
limpocomprodutosdelimpezanão‐abrasivos.
Detecção de Desgaste e Dano
Éimportanteinspecionartodaspeçassobtensão,comoascestas,braçodelev antamentoequalquerarticulaçãodecestas,
verificandosehásinaisderachadura,fricção, deformaçãooudeterioração.Substituaquaisquerpeçasdefeituos as
IMEDIATAMENTEegarantaqueoelev ad ornãoes tásendousadoatéefetuarconser tos.
ITEM
INCIALMENTE INSPEÇÃO
INSTRITUCIONAL/
AJUSTE
MENSAL
INSPEÇÃO
CASEIRA A
CADA SEIS (6)
MESES
A BASE
Insecionar se está faltando qualquer ferragem.
As pernas abrem/fecham com facilidade.
Inspecionar se há tensão e desgaste nas rodinhas e parafusos do eixo.
Inspecionar se rodinhas giram e rolam suavemente.
Inspecionar se as rodas estão livres de detritos.
X
X
X
X
X
X
X
X
X
X
X
X
X
X
X
O MASTRO
O mastro DEVE estar bem fixado para elevar os braçcos.
Verifique se há dobras ou desviros.
X
X
X
X
X
X
OS BRAÇOS DO ELEVARDOR E ARTICULAÇÃO
Verifique toda ferragem e pontos de fixação.
Inspecione se há dobras ou desvios.
Inspecione se as juntas parafusadas dos braços do elevador estão desgasta-
das.
Verifique se os braços do elevador estão centralizados entre as pernas de
supporte.
X
X
X
X
X
X
X
X
X
X
X
X
ATUADOR ELÉTRICO
Verifique se há desgaste ou deterioração.
(SE ESTIVER DANIFICADO, CONTATE O REVENDEDOR)
Alternar para garantir funcionamento sem ruídos.
X
X
X
X
X
X
LIMPEZA
Sempre que necessário.
XXX
CESTA
VERIFICAR TODAS FIXAÇÕES DA CESTA toda vez que o aparelho for
usada para garantir se está adequadamente conectada, para segurança do
paciente.
Verifique se há desgaste do material da cesta.
Verifique se há desgaste das tiras.
X
X
X
X
X
X
X
X
X

SEÇÃO 7—MANUTENÇÃO
Elevador de transferência posição de pé 118 Parte No. 1078985
Lubrificação do Elevador
OelevadorInv acarefoiprojetadopararequereromínimode
manutenção.
Entretanto,umaverificaçãoelubrificaçãoacadaseismeses
devegarantiraco ntinuidadedasegurançaeconfiabilidade.
Mantenhaoelev ador ecestaslimpaseemboac ondiçãode
funcionamento.Qualquerdefeitode v eseranotadoe
comunicadoaorevendedoromaisrápido
possív el.
AsrodinhasDEVEMgirarerolarsuavemente.Vocêpode
aplicarumagraxalev e(lubrificanteautomotivoaprov a
dʹágua)norolamentodasrodinhas,umavezporano.Ap l ic ar
maisfrequentementeseasrodinhasestiveremexpostasa
condiçõesde umidade extrema.
Ajuste da Base
OBSERVAÇÃO:Pararealizaresteprocedimento,consultea
ILUSTRAÇÃO 7.1.
1. Verifiqueaquadraturadaspernasquandoestiverna
posiçãoFECHADA.
2. Coloqueumquadradonaparteinternadaspernasebase
paradeter minaroalinhamento de90°.
3. Ajusteotirasdeligaçãoatéatingiroalinhamentode90°.
Ajuste da Altura da Almofada para o
Joelho
OBSERVAÇÃO:Pararealizaresteprocedimento,consultea
ILUSTRAÇÃO 7.2.
ADVERTÊNCIA
NUNCA ajuste a almofada para o joelho
enquanto o paciente estiver na posição vertical.
NUNCA tente ajustar a almofada para o joelho
enquanto o elevador estiver em movimento.
SEMPRE se certifique de que o pino de ajustes
está engatado nos buracos de altura correspon-
dentes antes de usar.
1. Escolhaumaconfiguraçãodealturaquesejaconfortável
paraopacienteeproporcioneonecessárioapoio.
OBSERVAÇÃO:Aalmofadaparaojoelhodeveserposicionadade
formaqueapartedojoelhodapernaestejaemcontatocoma
almofada.
2. Usandoambasasmão s,puxeambosospi nosdeajustes
parafora,
aomesmotempo.
3. P osicionaaalmofadaparaojoelhonaalturadesejadae
solteospinosdeajustesnosburacosdealinhamento
correspondentes.
4. Verifiqueseambosospinosestãoengatados.
ILUSTRAÇÃO 7.1 Ajuste da Base
ILUSTRAÇÃO 7.2 Ajuste da Altura da Almofada para
o Joelho
Quadrado
Tira de articulação
Tira de
articulação
Almofada do Joelho
Pino de Ajuste
Pino de Ajuste

SEÇÃO 7—MANUTENÇÃO
Parte No. 1078985 119 Elevador de transferência posição de pé
Substituição do Atuador Elétrico
OBSERVAÇÃO:Pararealizaresteprocedimento,consulteaILUSTRAÇÃO 7.3.
1. Removaaporca,arruelaeparafusoquefixamoatuadorelétriconosuportedefixaçãodomastro.
2. ApoieobraçodoElevadornoseuombroeremovaaporca,parafuso,suporteebuchasuperioresdosuportedefixação
dobraçodoElevador.
3. Removero
atuadorelétrico .
4. InvertaasETAPAS1‐3parainstalaronovoatuadorelétrico.
ADVERTÊNCIA
NÃO aperte excessivamente a ferragem de montagem. Isto danificará o suporte de fixações.
ILUSTRAÇÃO 7.3 Substituição do Atuador Elétrico
Parafuso
Arruela
Bucha
Arruela
Parafuso
Parafuso
Arruela
Bucha
Arruela
Parafuso
Suporte

AS VENDAS DE CLIENTE, SERVIÇO E INFORMAÇÕES DE GARANTIA
Elevador de transferência posição de pé 120 Parte No. 1078985
AS VENDAS DE CLIENTE, SERVIÇO E INFORMAÇÕES DE GARANTIA
United Kingdom Invacare Limited, Pencoed Technology Park, Pencoed, Bridgend CF35 5HZ
Tel: (44) (0) 1656 776 222
Fax: (44) (0) 1656 776 220
www.invacare.co.uk, UK@invacare.com
Ireland Invacare Ireland Ltd, Unit 5 Seatown Business Campus, Seatown Road, Swords, County Dublin - Ireland
Tel: (353) 1 810 7084
Fax: (353) 1 810 7085
www.invacare.co.uk, [email protected]m
France Invacare Poirier SAS, Route de Saint Roch, F-37230 Fondettes
Tel: (33) (0) 2 47 62 64 66
Fax: (33) (0) 2 47 42 12 24
www.invacare.fr, contactfr@invacare.com
Belgium & Luxemburg Invacare nv, Autobaan 22, B-8210 Loppem, Brügge
Tel: (32) (0) 50 83 10 10
Fax: (32) (0) 50 83 10 11
www.invacare.be, belgium@invacare.com
Switzerland Invacare AG, Benkenstrasse 260, CH-4108 Witterswil
Tel: (41) (0) 61 487 70 80
Fax: (41) (0) 61 487 70 81
switzerland@invacare.com
Deutschland Invacare Aquatec GmbH, Alemannenstraße 10, D-88316 Isny
Tel: (49) (0) 75 62 7 00 0
Fax: (49) (0) 75 62 7 00 66
www.invacare-aquatec.de, in[email protected]
European Distributor Organisation Invacare, Kleiststraße 49, D-32457 Porta Westfalica
Tel: (49) (0) 57 31 754 540
Tel: (49) (0) 57 31 754 541
Portugal Invacare Lda, Rua Estrada Velha, 949, P-4465-784, Leça do Balio
Tel: (351) (0)225 1059 46/47
Fax: (351) (0)225 1057 39
Norge Invacare AS, Grenesvingen 9, Postboks 6230, Etterstad, N-0603 Oslo
Tel: (47) (0) 22 57 95 00
Fax: (47) (0) 22 57 95 01
Italia Invacare Mecc San s.r.l., Via dei Pini 62, I-3016 Thiene (VI)
Tel: (39) 0445 38 00 59
Fax: (39) 0445 38 00 34
www.invacare.it, italia@invacare.com
España Invacare SA, c/Areny s/n, Poligon Industrial de Celrà, E-17460 Celrà (Girona)
Tel: (34) (0) 972 49 32 00
Fax: (34) (0) 972 49 32 20
www.invacare.es, contactsp@invacare.com

Gebrauchsanweisung
HÄNDLER:
Diese Gebrauchsanweisung MUSS dem Anwender dieses Produkts
übergeben werden.
ANWENDER: VOR der ersten Verwendung dieses Produkts muss diese
Gebrauchsanweisung sorgfältig durchgelesen werden. Bewahren Sie diese
Gebrauchsanweisung für später auf.
Weitere Informationen zu den Produkten,
Zubehörteilen und Serviceleistungen von
Invacare finden Sie im Internet unter
www.invacare-aquatec.com.
Aufstehlifter
RPS350-1E
RPS350-1FR

ERLÄUTERUNG DER SYMBOLE
Aufstehlifter 122 Part No. 1078985
WARNUNG
VERWENDEN SIE DIESE AUSRÜSTUNG ERST DANN, WENN SIE DIESE
GEBRAUCHSANWEISUNG SORGFÄLTIG GELESEN UND VERSTANDEN
HABEN.
FALLS DIE
WARNUNGEN, SICHERHEITSHINWEISE UND ANWEISUNGEN
UNVERSTÄNDLICH
SIND, WENDEN SIE SICH BITTE AN DEN
ZUSTÄNDIGEN HÄNDLER ODER DIREKT AN DEN TECHNISCHEN
KUNDENDIENST VON INVACARE, BEVOR SIE DIE AUSRÜSTUNG
VERWENDEN. ANDERNFALLS KANN ES ZU VERLETZUNGEN ODER
SACHSCHÄDEN KOMMEN.
WARNUNG ZUM ZUBEHÖR
Die Konstruktion und die Herstellung der Invacare-Produkte sind so speziell, dass ausschließlich
Invacare-Zubehör verwendet werden darf. Zubehörteile von anderen Herstellern sind nicht von
Invacare getestet worden und werden für Invacare-Produkte nicht empfohlen.
ERLÄUTERUNG DER SYMBOLE
„ACHTUNG, Bedienungshinweise
beachten.“
WARNUNG – Achten Sie IMMER auf den Hebearm. Es
kann unter Umständen zu einer Verletzung des
Patienten und/oder des Pflegepersonal kommen.
WARNUNG – STETS auf die Fußplatte, insbesondere auf die
Position der Füße auf der Fußplatte achten. Es kann unter
Umständen zu einer Verletzung des Patienten und/oder des
Pflegepersonal kommen.
2010
„Herstellungsdatum“
In dem Gerät werden Bleibat-
terien verwendet. Entsorgen
Sie die Batterien NICHT über
den normalen Haushaltsmüll.
Batterien müssen zu einer
entsprechenden Entsorgungs-
stelle gebracht werden.
Wenden Sie sich an Ihr
Abfallentsorgungsunterneh-
men, wenn Sie weitere
Informationen wünschen.

INHALTSVERZEICHNIS
Part No. 1078985 123 Aufstehlifter
INHALTSVERZEICHNIS
ERLÄUTERUNG DER SYMBOLE .......................................................................122
WICHTIGE HINWEISE .....................................................................................125
PRODUKTPARAMETER ..................................................................................126
Aufstehlifter RSP350-1E und RPS350-1FR...................................................................................................................126
ABSCHNITT 1 — ALLGEMEINE RICHTLINIEN ..................................................127
Gewichtsbeschränkung ....................................................................................................................................................127
Montage des Pateintenlifters ..........................................................................................................................................127
Verwendung des Gurtes..................................................................................................................................................127
Bedienung des Patientenlifters .......................................................................................................................................128
Anheben des Patienten ....................................................................................................................................................128
Umsetzen des Patienten ..................................................................................................................................................128
Wartungs- und Pflegemaßnahmen.................................................................................................................................128
ABSCHNITT 2 — MONTAGE ...........................................................................129
Auspacken des Patientenlifters ......................................................................................................................................129
Montage des Patientenlifters ..........................................................................................................................................129
Montage der Masteinheit auf der Basis....................................................................................................................129
Vor der Inbetriebnahme des Patientenlifts..................................................................................................................129
Montage des Schalthebels................................................................................................................................................129
Wandmontage der Ladegerät-Halterung.....................................................................................................................130
ABSCHNITT 3 — BEDIENUNG ........................................................................131
Verriegeln und Entriegeln der hinteren Rollen ..........................................................................................................131
Anheben und Absenken des Patientenlifters ..............................................................................................................131
Zusammenklappen und Öffnen der Fußschienen.......................................................................................................131
Verwenden der Notaus-Taste........................................................................................................................................131
Aktivieren einer mechanischen Notentriegelung ......................................................................................................132
Primäre Notentriegelung ............................................................................................................................................132
Sekundäre Notentriegelung........................................................................................................................................133
Aufladen der Batterie.......................................................................................................................................................133
Aufladen der Batterie mithilfe eines Netzkabels...................................................................................................133
Verwendung des Batterieladegeräts zum Laden der Batterie............................................................................134
ABSCHNITT 4 — ANHEBEN DES PATIENTEN ..................................................135
Positionieren des Patientenlifts......................................................................................................................................135
Anheben des Patienten ..........................................................................................................
..........................................136
Bewegen des Patienten ....................................................................................................................................................137
ABSCHNITT 5 — UMSETZEN DES PATIENTEN .................................................138
Umsetzen auf einen Nachtstuhl.....................................................................................................................................139
Umsetzen in einen Rollstuhl ...........................................................................................................................................140

INHALTSVERZEICHNIS
Aufstehlifter 124 Part No. 1078985
INHALTSVERZEICHNIS
Umsetzen auf ein Bett......................................................................................................................................................140
ABSCHNITT 6 — PROBLEMBEHANDLUNG ......................................................141
ABSCHNITT 7 — WARTUNG ...........................................................................142
Übersicht über Wartungs- und Sicherheitsinspektionen.........................................................................................142
Reinigen von Gurt und Patientenlifter..........................................................................................................................142
Feststellen von Verschleiß und Schäden ......................................................................................................................143
Schmieren des Patientenlifters.......................................................................................................................................143
Einstellen der Basis............................................................................................................................................................143
Einstellen der Kniepolster-Höhe ...................................................................................................................................143
Austausch des elektrischen Verstellmotors................................................................................................................144
VERTRIEB, KUNDENDIENST UND GARANTIEINFORMATIONEN ......................145

WICHTIGE HINWEISE
Part No. 1078985 125 Aufstehlifter
WICHTIGE HINWEISE
IndieserGebrauchsanweisungwerdenSignalwörterverwendet,umaufGefahrenoderunsicherePraktikenhinzuweisen,
diezu VerletzungenoderSachschädenführenkönnen.DieDefinitionenderverwendetenSignalwörterfindenSieinder
nachfolgendenTabelle.
HINWEIS
DIE IN DIESER GEBRAUCHSANWEISUNG ENTHALTENEN INFORMATIONEN KÖNNEN
JEDERZEIT OHNE VORHERIGE ANKÜNDIGUNG GEÄNDERT WERDEN.
HOCHFREQUENZSTÖRUNG
Die meisten elektronischen Geräte werden durch Hochfrequenzstörungen (HF-Störung)
beeinträchtigt. Gehen Sie daher bei der Verwendung von tragbaren Kommunikationsgeräten
im Bereich von solchen Geräten MIT UMSICHT vor. Wenn das Gerät aufgrund von
Hochfrequenzstörungen ein unregelmäßiges Verhalten aufweist, DRÜCKEN SIE SOFORT
die ROTE Notaus-Taste. SCHALTEN Sie die rote Notaus-Taste NICHT AUS, solange eine
Übertragung stattfindet.
WARTUNG
Wartungsarbeiten MÜSSEN AUSSCHLIEßLICH von dafür qualifizierten Personen durchgeführt
werden.
SIGNALWORT BEDEUTUNG
GEFAHR
Das Signalwort „Gefahr“ weist auf eine unmittelbar drohende Gefahr hin, die bei Nichtbeachtung
zum Tod oder zu schweren Verletzungen führt.
WARNUNG
Das Signalwort „Warnung“ weist auf eine potentiell gefährliche Situation hin, die bei Nichtbeachtung
zum Tod oder zu schweren Verletzungen führen könnte.
ACHTUNG
Das Signalwort „Achtung“ weist auf eine potentiell gefährliche Situation hin, die bei Nichtbeachtung
unter Umständen zu Sachschäden und/oder leichten Verletzungen führen könnte.

PRODUKTPARAMETER
Aufstehlifter 126 Part No. 1078985
PRODUKTPARAMETER
Aufstehlifter RSP350-1E und RPS350-1FR
*HINWEIS:HängtvonLastundTaktab.
Höhe (Gurt) – Maximale Höhe: ca. 168 cm
Höhe (Gurt) – Minimale Höhe: ca. 100 cm
Breite der Basis (offen): ca. 94 cm
Breite der Basis (zusammengeklappt): ca. 66 cm
Höhe der Basis (Zwischenraum): ca. 11,5 cm
Länge der Basis: ca. 90 cm
Gesamthöhe: ca. 125 cm
Gesamtlänge: ca. 99 cm
Gesamtbreite: ca. 65 cm
Rollengröße (VORNE)
Rollengröße (HINTEN)
ca. 7,6 cm
ca. 12,7 cm
Gurtoptionen: Gurt für die Aufstehhilfte oder Gurt für den Transfer
Gurtmaterial: Polyester
Gewichtskapazität: ca. 158 kg
Nettogewicht: ca. 49 kg
Batterie: 24 V DC (RCHBL)
Eingangsspannung Ladegerät: 100-240 V AC
Ausgangsspannung Ladegerät/Ladedauer: 29,5 V DC/max. 6 Stunden
Akustischer/visueller Alarm bei niedrigem Ladestand: Ja
Motorsicherheitsvorrichtungen: Einschlussschutz
*Anzahl der Hübe pro Ladung (ca.): *100-200 Zyklen pro Ladung
Beschränkte Garantie auf Lifter/Elektronik: 2 Jahre
Notaus-Taste: Ja

ABSCHNITT 1 — ALLGEMEINE RICHTLINIEN
Part No. 1078985 127 Aufstehlifter
ABSCHNITT 1 — ALLGEMEINE RICHTLINIEN
WARNUNG
ABSCHNITT 1 – Die ALLGEMEINEN RICHTLINIEN enthalten wichtige Informationen zum
sicheren Umgang mit diesem Produkt.
ÜberprüfenSiealleTeilevorihrerVerwendungaufTransportschäden.BeiBeschädigungendarfdieAusrüstungNICHT
verwendetwerden.WendenSiesichandenHändler,umInformationenzurweiterenVorgehensweisezuerhalten.
DerPatientenliftervonInvacareistKEINTransportgerät.DerPatientenlifteristdafürgedacht,einePersonvoneiner
SitzflächeaufeineandereSitzfläche
(z.B.voneinemBettineinenRollstuhl)umzusetzen.
EinPatientDARFNURMITGenehmigungdesArztes,derSchwesteroderdesmedizinischenAssistentenumgesetzt
werden.LesenSiedieBedienungshinweiseindieserGebrauchsanweisungsorgfältigdurch,beobachtenSieeingeschultes
TeamvonFachkräftendabei,wiedasVerfahrenzumrichtigenHebendesPatientenkorrekt
durchgeführtwird,undführen
SieanschließenddiegesamteVorgehensweisemehrereMaleunterAufsichtdurch,wobeieinegesundePersonden
Patientendarstellensoll.
VerwendenSiedenGurt,dievomArzt,derSchwesteroderdemmedizinischenAssistentendesPatientenempfohlenwird,
umdenKomfortunddieSicherheitdeszuhebendenPatientenzugewährleisten.
Wenn
derP atientenlifterineinerDuscheodereinemBadverwendetwird,mussderLiftnachjederVerwendungtrockengewischt
werden.Bew ahrenSiedenLiftNICHTineinemfeuchtenRaumoderunterfeuchtenBedingungenauf.ÜberprüfenSiealle
Komponentendes LiftsinregelmäßigenAbständenauf Korrosionsanzeichen.ErsetzenSiealleTeile,diekorrodiert
oder
beschädigtsind.
DerPatientenlifterkannvoneinerPflegepersonfüralleHebev or bere itun gs‐undUmsetzungsmaßnahmenalleinbedientwerden,
vorausgesetztderPatientistkooperativundkannteilweisebelastetwerden.DajedochdiemedizinischenBedingungennicht
immergleichsind,empfiehltInvacare,dassdiePflegepe rson selbsteinschätzt,obimkonkretenFalldieUnterstützungeinesoder
mehrererAssistentenerforderlichistodernicht,umdasUmsetzendesP atientensicher durchführe nzukönnen.
ObderPatientenliftervomPflegepersonalalleinbedientwerdenkann,hängtvonderEinschätzungderPfle gepers onim
konkretenFallab.
Gewichtsbeschränkung
DiemaximaleGewichtsbeschränkungdesPatientenliftsdarfNICHTüberschrittenwerden.Diemax.Belastungfürden
Patientenlifterliegtbei158kg.
Montage des Pateintenlifters
SchraubenundandereMontageverbindungenNICHTZUFESTanziehen.DieBefestigungenkönntendadurchbeschädigt
werden.
Verwendung des Gurtes
GurtfürdieAufstehhilfe:DenGurtfürdieAufstehhilfeNICHTzusammenmitdemPatientenli fteralsTransportgerät
verwenden.DerGurtdientdazu,einePersonvoneinerSitzflächeaufeineandereSitzfläche(z.B.voneinemBettineinen
Rollstuhl)umzusetzen.
GurtfürdieAufstehhilfe:BevorSiedenPati entenanheben,müssenSiedie
untereKantedesGurtesfürdieAufstehhilfeam
unterenRückendesPatientenpositionieren.DieArmedesPatientenmüssensichaußerhalbdesGurtesfürdieAufstehhilfe
befinden.
GurtfürdieAufstehhilfe:DerGurtMUSSfest,aberdennochangenehmamKörperdesPatientenanliegen.Andernfalls
kann espassieren,dassderPatientausdemGurt
rutschtundsichmöglicherweiseverletzt.
GurtfürdenTransfer:BevorSiedenPatientenanheben,müssenSiedieuntereKantedesGurtesfürdenTransferunterdas
untereEndederWirbelsäulebringen.DieArmedesPatientenmüssensichaußerhalbdesGurtesfürdenTransferbefinden.
GurtfürdenTransfer:HebenSiedenPa tienten
NICHTvollständigindenStandhoch,wennSiedenGurtfürdenTransfer
verwenden,sonstkanneszuVerletzungenkommen.
WaschenSiedenGurtgemäßdenWaschanweisungen.ÜberprüfenSiedenGurtnachjederWäscheaufAbnutzung,Risseund
loseNähte.

ABSCHNITT 1 — ALLGEMEINE RICHTLINIEN
Aufstehlifter 128 Part No. 1078985
Ausgeblichene,ve rschlissene,eingeschnittene,ausgefransteoderanderweitigbeschädigteSchlingensindunsicherundkönnen
zuVerletzungenführen.WerfenSiesolcheGurteunverzüglichweg.
NehmenSieKEINEÄNDERUNGENandenGurtenvor .
SiemüssendenGurtjedesMalprüfen,wennSiederGurtentferntundersetzt wird,umsicherzustellen,dassderGurtkorrekt
befestigtist,
bevorderPatientvoneinemstehendenOb jekt(Bett,StuhloderNachtstuhl)hochgehoben wird.
WennsichderPatientineinemRollstuhlbefindet,machenSieunbedingtdieRollstuhlsperrenfest,damitsichderRollstuhlweder
vorwärtsnochrückwärtsbew egenkann.
Bedienung des Patientenlifters
WennSieeineBatterieindasLadegeräteinlegen,müssenSieein deutlichesKlickenhören.Nursoistsichergestellt,dassdie
Batteriekorrekteingelegtwurde.AndernfallskanneszuVerletzungenoderSachschädenkommen.
FassenSiestetsandenGriffenan,umdenPatientenliferzuschiebenbzw.zuziehen.
Anheben des Patienten
BevorSieda sFahrgestelldesAufstehlifterszubeidenSeitendesPatientenschieben,achtenSiedarauf,dassdieFußplatte nicht
andieFüßedesP atienten stößt,sonstkanneszuVerletzungenkommen.
SämtlicheAnpassungenausSicherheits‐oderKomfortgründen müssendurchgeführtwerden,eheSiedenP atientenbewegen.
DieArme desPatientensolltensich
außerhalbde rGurtebefinden.
BevorSieeinenPatientenvoneinemstehendenObjekt(Rollstuhl, Nachtstuhl oderBett)ho chheb en,hebenSiezunächstden
P atienteneinkleinesStückanundüberprüfenSie,oballeGurtbefestigungensicherbefestigtsind.FallseineBefestigungnich t
ordnungsgemäßist,senkenSie denP atientenwiederabundkorrigierenSieden
Fehler.HebenSieanschließenddenPatienten
wiederetw asan undprüfenSiedieBefestigungerneut.
BeimUmsetzendesP atienten, derineinemamPatientenlifterbefestigtenGurtgehaltenwird,dürfendieSchwenkrollen NICHT
überunebeneOberflächengerolltwerden,dadiesezueinemWackelndesP atientenliftersundmöglicherw eisezumUmkippen
desP atientenlifterführen
könnten.FassenSieSTETSdenSchiebegriffamMastenan,umdenPatientenlifterzuschiebenbzw.zu
ziehen.
Inv acareempfiehlt,diehinterenSchwenkrollenNURdannzuverriegeln,wennSiedenGurt(GurtfürdieAufstehhilfeoderGurt
fürdenTransfer)umdenPatientenlegenbzw.dies ewiederentferne n.
Inv acareempfiehlt,diehinterenSchwenkrollen
desPatientenliftersnichtzuverriegeln,wennSieeinePersonhochheben.FallsSie
diesdenno chmachen, kannderPatientenlifterumkippenunddenPatientensowiePfl ege person algefährden.Invacare
EMPFIEHL T,dassdiehinterenSchw enkrollenwährendde sHebeverfahrensnichtve rriegeltwerdensollten,damitder
P atientenliftersichselbststabilisierenkann,wennderPatientvoneinem
Stuhl,einemBettodereinemanderenstehendenObjekt
angehobenwird.
Umsetzen des Patienten
VordemUmsetzendesPatientenmüssenSieüberprüfen,obdasGewichtdesPatientendieGewichtsbeschränkungdesProdukts
nichtüberschreitet.
DieRollstuhlsperrenMÜSSENv erriegeltsein,bev orderPatientindenRollstuhlabgesenktwerdendarf.
Wartungs- und Pflegemaßnahmen
EineregelmäßigeWartungdesPatientenliftersundder Zubehörteileisterforderlich,umeineordnungsmäßigeFunktionzu
gewährleisten.
Nachdenersten12MonatennachInbetriebnahmemüssenalleDrehpunkteundVerbindungselementeaufVerschleißüberprüft
werden.WenndasMetallabgenutztist,MÜSSENdi eT e ileer setztwerden.FührenSiedieseÜberprüfunginderFolgezeitaller
6 Monate
durch.
Schraubenundandere MontageverbindungenNICHTZUFESTanziehen.DieBefe stigungenkönntendadurchbeschädigtwerden.
DieRollenundAchsbolzen müssenaller6Mo nate auffestenSi tz undVerschleißüberprüftwerden.

ABSCHNITT 2 — MONTAGE
Part No. 1078985 129 Aufstehlifter
ABSCHNITT 2 — MONTAGE
Auspacken des Patientenlifters
NehmenSiedieKomponentendesPatientenliftersausderVersandverpackung.
Montage des Patientenlifters
WARNUNG
Für die Montage dieses Patientenlifter dürfen Sie
nur Originalteile von Invacare verwenden. Die
Fußschienen der Basis, der Mast, der Ausleger,
die Pumpeneinheit und die Schwenkstange
werden genau nach den technischen Vorgaben
gefertigt, damit alle Teile korrekt ineinander
passen und ein sicherer Betrieb gewährleistet ist.
Montage der Masteinheit auf der Basis
HINWEIS:DieMasteinheitkannvonderBasisab montiert werden,
wennderPatientenliftgelagertode rtransportiertwerdensoll.Vor
derVerwendungdesPatientenliftsMUSS dieMasteinheit
ordnungsgemäßaufderBasisbefestigtwerden.
HINWEIS:InformationenhierzufindenSieinABBILDUNG 2.1.
1. StellenSiedieBasisaufdenFußboden.
HINWEIS:DabeimüssenallevierSchwenkr ollenden
Fußboden
berühr en.
2. VerriegelnSiediebeidenhinte renRollen.Siehe
Detailzeichnung„A“.
3. EntfernenSiedieSechskantschraubemitsamt
Unterlegscheibenund MutterausderU‐förmigen
ÖffnunganderBasis.
4. BringenSiedenMastenindiesenk rechtePosition.
5. SenkenSienundenMasten aufdieMontagehalterungab.
6. BefestigenSie denMaste nanderBasismitder
Sechskantschraube,denUnterlegscheibenundder
Mutter.ZiehenSiedi eSchraubenfest.
Vor der Inbetriebnahme des
Patientenlifters
VORderVerwendungsindalleKomponentenzu
überprüfenundfestzuziehen.
Montage des Schalthebels
HINWEIS:InformationenhierzufindenSieinABBILDUNG 2.2.
1. NehmenSiedenSchalthebelausdem
Verpackungskartonheraus.
2. SchraubenSiedenSchalthebelaufdasPassstückmit
Außengewinde.DasPassstückbefindetsichaufder
Basis.
ABBILDUNG 2.1 Montage der Masteinheit auf der Basis
ABBILDUNG 2.2
Montage des Schalthebels
Zum Verriegeln
hier auf den
Hebel treten
Zum Entriegeln
hier auf den
Hebel treten
Mutter
Unterlegscheibe
Sechskantschraube
Montagehalterung
Verriege-
lungshebel
VERRIEGELT
NICHT
VERRIEGELT
DETAILZEICHNUNG „A“
Unterlegscheibe
Schalthebel
Passstück mit
Außengewinde

ABSCHNITT 2 — MONTAGE
Aufstehlifter 130 Part No. 1078985
Wandmontage der Ladegerät-Halterung
HINWEIS:InformationenhierzufindenSieinABBILDUNG 2.3.
HINWEIS:DieseVorgehensweisegiltnurfürModellevomTypRPS350‐1E.
1. HaltenSiedieHalterungdesLadegerätsander
gewünschtenStelleanderWandan.
2. Markierenmit einemBleistiftdiePositiondesmittleren
Loches.
3. MessenSievonderBleistiftmarkierung16,5cmnach
untenundbohrenSie
andieserStelleeinLoch.
4. SchraubenSiedieuntereMontageschraubesoweitin
dasBohrlochein,bisderSchraubenkopfetwa3mm
vonderWandabsteht.
5. HängenSiedieHalterungdesLadegeräts anderunteren
Montageschraubeein.
6. BohrenSienundieanderenzwei Bohrlöche r.
7. SteckenSiedieMonta geschrauben durchdie Öffnungen
der
Ladegerät‐HalterunghindurchundschraubenSiedie
SchraubenindieWand.Ziehen SiedieSchraubenfest.
ACHTUNG
Wenn Sie eine Batterie in das Ladegerät
einlegen,
müssen Sie ein deutliches Klicken
hören. Nur so ist sichergestellt, dass die Batterie
korrekt eingelegt wurde. Andernfalls kann es zu
Verletzungen oder Sachschäden kommen.
8. SetzenSiedasLadegerätkorrektin dieHalterungein.
9. SteckenSiedasLadegerätineineSteckdose.
HINWEIS:SolangeStromamLadegerätanliegt,leuchteteineLED
.
ABBILDUNG 2.3 Wandmontage der Ladegerät-Halterung
Montagehalterung
Montage-
schrauben
Untere Montageschraube

ABSCHNITT 3 — BEDIENUNG
Part No. 1078985 131 Aufstehlifter
ABSCHNITT 3 — BEDIENUNG
WARNUNG
Versuchen Sie NICHT, einen Patienten ohne Zustimmung des zuständigen Pflegepersonals
umzusetzen
.
Lesen Sie die Bedienungshinweise in diesem Gebrauchsanweisung sorgfältig durch,
beobachten Sie ein geschultes
Team von Fachkräften dabei, wie das Verfahren zum richtigen Heben des
Patienten korrekt durchgeführt
wird, und führen Sie anschließend die gesamte Vorgehensweise
mehrere Male unter Aufsicht durch, wobei eine gesunde Person den Patienten darstellen soll.
Invacare bietet Schulungen an. Bitte wenden Sie sich an Invacare. Siehe Vertrieb, Kundendienst und
Garantieinformationen auf Seite145.
Das Fahrgestell des Patientenlifters MÜSSEN maximal geöffnet sein, damit optimale Stabilität und
Sicherheit gewährleistet sind. Wenn der Patient in einem Gurt gehalten wird und man mit dem
Patientenlifter durch eine enge Passage hindurch muss, sollten Sie die Fußschienen für den Weg
durch die Passage zusammenklappen. Sobald die enge Stelle passiert ist, müssen die Fußschienen des
Patientenlifts wieder maximal geöffnet werden.
HINWEIS:ObderPatientenliftervoneinemAssistentenalleinbedientwerdenkann,hängtvonderEinschätzungderPflegepersonim
konkretenFallab.
Verriegeln und Entriegeln der hinteren Rollen
•SieheDetailzeichnung„A“inAbbildung3.1.
Anheben und Absenken des Patientenlifters
HINWEIS:InformationenhierzufindenSieinDetailzeichnung„B“.
• AnhebendesPatientenlifters:DrückenSieaufdermanuellenSteuerungaufdieNach‐oben‐Taste().
HINWEIS:WennderPatientenlifteraufdiehöchsteStufeangehobenwurde,istesunterUmständenerforderlich,ganzleichtdie
Hebelarmenachuntenzuziehen,damitderMasteingefahren
wird.Umzuvermeiden,dassderLifterinstabilwird,ziehenSie
gleichzeitigundganzleichtbeideHebelarmenachunten.
•AbsenkendesPatientenlifters:DrückenSieaufdermanuellenSteuerungaufdieNach‐unten‐Taste().
Zusammenklappen und Öffnen der Fußschienen
• ZusammenklappenderFußschienen:
ZiehenSiedenSchalthebelHERAUS,wegvomPatientenlifter
und
anschließendaufIhreLINKESeite,bisdesHebelsindieKerbederHalterungEINRASTET.
HINWEIS:DielinkeSeitebefindetsichlinksvonIhnen,wennSiesichhinterdenPatientenliftermitBlickrichtungzudenvorderen
Rollenstellen.
•ÖffnendesFahrgestelles:ZiehenSiedenSchalthebelHERAUS,wegvomPatientenlifterundanschließendaufIhre
RECHTESeite,bis derHebelindieKerbederHalterungEINRASTET.
HINWEIS:DierechteSeitebefindetsichrechtsvonIhnen,wennSiesichhinterdenPatientenliftmitBlickrichtungzudenvorderen
Rollenstellen.
Verwenden der Notaus-Taste
HINWEIS:InformationenhierzufindenSieinDetailzeichnung„C“.
•DrückenSiedieROTENotaus‐Taste.Dadurchwirdverhindert,dassdieHebelarme angehobenoderabgesenkt
werdenkönnen.
•UmdieNotaus‐Tastewiederzurückzusetzen, drehenSiedieTasteimUhrzeigersinn.

ABSCHNITT 3 — BEDIENUNG
Aufstehlifter 132 Part No. 1078985
ABBILDUNG 3.1 Bedienung des Patientenlifters
Aktivieren einer mechanischen
Notentriegelung
Primäre Notentriegelung
HINWEIS:InformationenhierzufindenSieinABBILDUNG 3.
2.
HINWEIS:MitdiesemVerfahrenkannderAuslegernachunten
gebrachtwerden,fallsdiemanuelleSteuerungnicht
ordnungsgemäßfunktioniert.
UmdieprimäreNotentriegelungzuaktivieren,
führenSiedie
SpitzeeinesStiftesindie
Notfall‐Öffnung
(
)
imSteuerkastenein.
ABBILDUNG 3.2 Primäre Notentriegelung
DETAILZEICHNUNG „B“
– DETAILS ZUR
MANUELLEN
STEUERUNG
DETAILZEICHNUNG „C“ – NOTSTOPP
Nach-unten-Taste
Nach-oben-Taste
Manuelle
Steuerung
Notaus-Taste
Taste eindrücken,
um zu stoppen; zum
Zurücksetzen die Taste
im Uhrzeigersinn
drehen.
Zum Verriegeln
hier auf den
Hebel treten
Zum Entriegeln
hier auf den
Hebel treten
Verriege-
lungshebel
VERRIEGELT
NICHT
VERRIEGELT
DETAILZEICHNUNG „A“
RPS350-1ERPS350-1FR
RPS350-1FR
Notfall-Öffnung
Steuerkasten
Notfall-aufwärts
-Öffnung
Notfall-abwärts-
Öffnung
Steuerungsbox
Ladegerätkabel hier
anschließen
RPS350-1E

ABSCHNITT 3 — BEDIENUNG
Part No. 1078985 133 Aufstehlifter
Sekundäre Notentriegelung
HINWEIS:InformationenhierzufindenSieinABBILDUNG 3.3.
HINWEIS:AlleVerstellmotorensindmiteinermechan isc hen
Notentriegelungausgestattet.Die mechanische Notentriegelung
sorgtdafür,dassderVerstellmotorohneStromzufuhrzurückgezogen
werdenkann.
HINWEIS:VerwendenSieimmerzuerstdieprimäreNotentriegelung,
bevorSiediesekundäreNotentriegelungnutzen.DasVerfahrender
sekundärenNotentriegelungsolltenurdannverwendetwerden,wenn
dasVerfahrenderprimärenNotentriegelungnichtfunktioniertoder
wenndaraufnichtzugegriffenwerdenkann.
HINWEIS:DerPatientenlifterMUSSeineLastaufweisen,damit
dieme cha nis ch eNotentriegelungfunktioniert.
Umdie sekundäreNotentriegelungzuaktivieren,ziehenSie
denROTENNotfallgriffnachobenundgleichzeitigden
Auslegernachunten.
ABBILDUNG 3.3 Sekundäre Notentriegelung
Aufladen der Batterie
Aufladen der Batterie mithilfe eines Netzkabels
HINWEIS:InformationenhierzufindenSieinABBILDUNG 3.2.
HINWEIS:DieseVorgehensweisegiltnurfürModellevomTypRPS350‐1FR.
ACHTUNG
Der Notstopp DARF NICHT aktiviert sein - andernfalls kann die Batterie nicht geladen werden.
Während des Ladevorgangs kann der Patientenlifter nicht verwendet werden. Versuchen Sie
NICHT, den Patientenlifter zu bewegen, ohne vorher den Netzstecker aus der Steckdose zu ziehen.
Versuchen Sie NICHT, den Patientenlifter zu verwenden, wenn das Batteriegehäuse beschädigt ist.
Ersetzen Sie ein beschädigtes Batteriegehäuse vor jedem weiteren Gebrauch.
1. DasNetzkabelanderSteuerungsboxanschließen.
2. DasNetzkabelineineSteckdoseeinstecken.
HINWEIS:DieBatterieladezeitbeträgtetwa4Stunden.DerLadevorgangmussineinemgutbelüftetenRaumstattfinden.
3. DasNetzkabelnachderBeendigungdesLadevorgangsausderSteckdoseziehen.
Roter Notfallgriff

ABSCHNITT 3 — BEDIENUNG
Aufstehlifter 134 Part No. 1078985
Verwendung des Batterieladegeräts zum
Laden der Batterie
HINWEIS:InformationenhierzufindenSieinABBILDUNG 3.4.
HINWEIS:DieseVorgehensweisegiltnurfürModellevomTyp
RPS350‐1E.
HINWEIS:Invacar eempfiehlt,dieBatterietäglichaufzulade n,um
dieBatte rielebensda uerzuverlängern.
HINWEIS:EinakustischerAlarmertönt,wennderLadezustandder
Batterieniedrigist.
1. ZiehenSiedenGriffanderRückseitederBatterienachoben.
2. HebenSiedieBatterie anundwegvomSteuerkasten.
ACHTUNG
Wenn Sie eine Batterie in das Ladegerät einlegen,
müssen Sie ein deutliches Klicken hören. Andernfalls
kann es zu Verletzungen oder Sachschäden
kommen.
3. SetzenSiedieBat ter ieindasLadegerätein.DrückenSie
dieBatterieobengegendieHalterung,bisSieein
deutlichesKlicken hören.
HINWEIS:DieLade‐LEDleuchtet.Wennder Ladevorgang
abgeschlossenist,erlischtdieLE D.
HINWEIS:EsdauertetwavierStun den, biseineBatterie
vollständigwied eraufgeladenist.
4. ZiehenSiedenGriffanderRückseitederBatterienachoben.
5. HebenSiedieBatterie anundwegvomLadegerät.
ACHTUNG
Wenn Sie eine Batterie in das Ladegerät einlegen,
müssen Sie ein deutliches Klicken hören. Andernfalls
kann es zu Verletzungen oder Sachschäden kommen.
6. SetzenSiedieBat ter ieinde nSteuerkastenein.Drücken
SiedieBatterieobengegendieHalterung,bisSieein
deutlichesKlicken hören.
ABBILDUNG 3.4 Aufladen der Batterie
Batterieladegerät
(SCHRITT 3)
Steuerkasten
(SCHRITT 6)
Ein deutliches Klickgeräusch
ist zu hören, wenn die
Batterie korrekt eingelegt
wurde (SCHRITTE 3 und 6).
Griff
(SCHRITTE 1, 2, 4 und 5)
Batterie

ABSCHNITT 4 — ANHEBEN DES PATIENTEN
Part No. 1078985 135 Aufstehlifter
ABSCHNITT 4 — ANHEBEN DES PATIENTEN
WARNUNG
Die maximale Gewichtsbeschränkung von 158 kg darf NICHT überschritten werden.
Versuchen Sie NICHT, einen Patienten ohne Zustimmung des zuständigen Pflegepersonals
umzusetzen.
Um Verletzungen zu vermeiden, Hände und Finger IMMER fern von sich bewegenden Teilen halten.
Verwenden Sie den Gurt, die vom Arzt, der Schwester oder dem medizinischen Assistenten des
Patienten empfohlen wird, um den Komfort und die Sicherheit des zu hebenden Patienten zu
gewährleisten.
Personen, die den Gurt für die Aufstehhilfe verwenden, müssen in der Lage sein, den Hauptteil ihres
eigenen Körpergewichts selbst zu tragen, andernfalls kann es möglicherweise zu Verletzungen
kommen.
Damit optimale Stabilität und Sicherheit gewährleistet sind, MUSS das Fahrgestell der Aufstehhilfe
in maximaler Öffnungsstellung befinden und der Schalthebel muss verriegelt sein. Wenn der Patient
in einem Gurt gehalten wird und man mit dem Patientenlifter durch eine enge Passage hindurch
muss, sollten Sie das Fahrgestell für den Weg durch die Passage zusammenklappen. Sobald die enge
Stelle passiert ist, müssen die Fußschienen des Patientenlifters UNVERZÜGLICH wieder in die
Maximalstellung geöffnet werden und der Schalthebel muss SOFORT wieder verriegelt werden.
Bewegen Sie NICHT den Patienten, wenn der Gurte nicht ordnungsgemäß an den Befestigungspunkten
des Patientenlifters angebracht ist. Überprüfen Sie, dass der Patientengurt ordnungsgemäß an den
Befestigungspunkten angebracht ist, BEVOR Sie den Patienten anheben.
Beim Umsetzen eines Patienten, der in einer am Patientenlifter befestigten Gurt gehalten wird, darf
die Basis des Patientenlifters NICHT über unebene Oberflächen gerollt werden, weil dadurch der
Patientenlift instabil werden könnte.
Fassen Sie STETS den Schiebegriff am Masten an, um den Patientenlifter zu schieben bzw. zu ziehen.
Positionieren des Patientenlifts
HINWEIS:InformationenhierzufindenSieinABBILDUNG 4.1.
HINWEIS:SieheAllgemeineRichtlinien
aufSeite 127.Beachte nSiealleaufgeführtenWarnhinweise.
HINWEIS:BevorSiedasFahr gestelldesPatientenliftersuntereinBettschieben,überprüfenSie,obderBereichfreivonHindernissenist.
1. StellenSiesicher,dasssichdasFahrgestelldesLiftersin
maximalerÖffnungstellungbefinden.Wenndiesnicht
derFallist,öffnenSiedasFahrgestellmit
Hilfedes
Schalthebels.
2. P ositionierenSiedenPatientenlifterandergewünschten
Stelle.FassenSiedazustetsdenGriffamMastenan.
3. DrückenSieaufdermanuellenSteuerungauf die
Nach‐unten‐Taste,umdieHebelarmeabzusenken,
denn solässtsichderGurteinfacherbefestigen.
ABBILDUNG 4.1 Tasten der manuellen Steuerung
Nach-unten-Taste
Nach-oben-Taste
Manuelle
Steuerung

ABSCHNITT 4 — ANHEBEN DES PATIENTEN
Aufstehlifter 136 Part No. 1078985
Anheben des Patienten
WARNUNG
Die maximale Gewichtsbeschränkung von 158 kg darf NICHT überschritten werden.
Personen, die den Gurt für die Aufstehhilfe verwenden, müssen in der Lage sein, den Hauptteil ihres
eigenen Körpergewichts selbst zu tragen, andernfalls kann es zu Verletzungen kommen.
Bewegen Sie NICHT den Patienten, wenn der Gurt nicht ordnungsgemäß an den
Befestigungspunkten des Patientenlifts angebracht ist. Stellen Sie sicher, dass die Schlinge korrekt
befestigt ist, BEVOR Sie den Patienten anheben. Falls eine der Befestigungen nicht ordnungsgemäß
angebracht ist, korrigieren Sie dieses Problem. Wenn der Gurt einige Zentimeter von dem
stehenden Objekt hochgehoben wurde
und bevor Sie den Patienten bewegen, müssen Sie erneut
überprüfen, ob der Gurt und alle Befestigungen
korrekt und sicher angebracht sind. Falls Sie ein
Problem feststellen, senken Sie den Patienten wieder ab und beheben Sie das Problem. Andernfalls
kann es zu Verletzungen oder Sachschäden kommen.
Sämtliche Anpassungen aus Sicherheits- oder Komfortgründen müssen durchgeführt werden, ehe
Sie den Patienten bewegen.
Verwenden Sie die Schlinge, die vom Arzt, der Schwester oder dem medizinischen
Pflegepersonal des Patienten empfohlen wird, um den Komfort und die Sicherheit des zu
hebenden Patienten zu gewährleisten.
HINWEIS:InformationenhierzufindenSieinABBILDUNG 4.2aufSeite137.
HINWEIS:WeitereInformationenfindenSieimAnwenderhandbuchderPatientenschlinge(Produktnummer:1023891).
HINWEIS:DerPatientMUSSzunächstinSitzpositionsitzen.NutzenSiedenGalgenüberdemBett ,umdenPatientenindieSitzposition
aufzurichten.Führ enSiedanndieBeinedesPatien ten seitlichaus
demBett.
1. SagenSiedemPatienten,dassersichandenHandgriffenzubeidenSeitendesPatientenliftsfesthaltensoll(siehe
ABBILDUNG 4.2).
2. SagenSienundemPatienten,dassersichzurückindenGurt(GurtfürdieAufstehhilfeoderGurtfürdenTransfer)
lehnensoll.
WARNUNG
Gurt für die Aufstehhilfe: Bevor Sie den Patienten anheben, müssen Sie die untere Kante des Gurtes
für die Aufstehhilfe am unteren Rücken des Patienten positionieren. Die Arme des Patienten müssen
sich außerhalb des Gurtes für die Aufstehhilfe befinden.
Gurt für den Transfer: Bevor Sie den Patienten anheben, müssen Sie die untere Kante des Gurtes für
den Transfer unter das untere Ende der Wirbelsäule bringen. Die Arme des Patienten müssen sich
außerhalb der Transferschlinge befinden.
Invacare empfiehlt, die hinteren Schwenkrollen des Patientenlifters nicht zu verriegeln, wenn Sie
einen Patienten heben und umsetzen. Falls Sie dies dennoch machen, kann der Patientenlifter
umkippen und den Patienten sowie Pflegepersonal gefährden. Invacare empfiehlt, dass die hinteren
Schwenkrollen während des Hebens und Umsetzens nicht verriegelt werden sollten, damit der
Patientenlifter sich selbst stabilisieren kann, wenn der Patient angehoben und auf einen Stuhl, ein
Bett oder ein anderes stehenden Objekt umgesetzt wird.
3. ÜberprüfenSiediefolgendenPunkte:
A. DieKnie desP atientensollenandemKniepolsterlehnen.
B. DieFüßedesP atientenmüssenaufdi eFußplattekorrektaufgestelltwerden.
C. Gurte:
•GurtfürdieAufstehhilfe:DieuntereKantedesGurtesfürdieAufstehhilfeliegtamunterenRückendesP atientenan.
•GurtfürdenTransfer:DieuntereKantedes
Gurtesfürde nTransferbefindetsichbeimPatientenunterhalbdes
unterenEndesderWirbelsäule.
•BeibeidenGurtenmüssendieArmedesPatientenaußerhalbdesGurtessein.
D. DiehinterenRollensi ndnichtverriegelt.
E. DasFahrgestelldesP atientenlifterssindmax imalgeöffnet.

ABSCHNITT 4 — ANHEBEN DES PATIENTEN
Part No. 1078985 137 Aufstehlifter
WARNUNG
Wird ein Patient von einem Rollstuhl umgesetzt, MÜSSEN die Rollstuhlsperren verriegelt sein,
bevor der Patient in den Rollstuhl abgesenkt werden darf. Andernfalls kann es möglicherweise zu
Verletzungen kommen.
4.
WirdeinPatientvoneinemRollstuhlumgesetzt,verriegelnSiedieRollstuhlsperrendesRollstuhls(siehe
Detailzeichnung„B“
inABBILDUNG 4.2).
5. DrückenSieaufdermanuellenSteuerungaufdieNach‐unten‐Taste,umdenPatientenvonderSitzfläche(Bett,
RollstuhloderNachtstuhl)anzuheben.
HINWEIS:DasGewichtdesPatientenwirdvondemPatientenliftgehalten.
HINWEIS:DaderSchwerpunktrelativweitun te nliegt,istdieStabilitätgewährleistet.Dadur chfühltsichderPatient
sicher erundder
Patientenliftlässtsichleichter bewegen.
ABBILDUNG 4.2 Anheben des Patienten
Bewegen des Patienten
WARNUNG
Das Fahrgestell des Patientenlifters MUSS maximal geöffnet sein, damit optimale Stabilität und
Sicherheit gewährleistet sind. Wenn der Patient im Gurt gehalten wird und man mit dem
Patientenlifter durch eine enge Passage hindurch muss, sollten Sie das Fahrgestell für den Weg durch
die Passage zusammenklappen. Sobald die enge Stelle passiert ist, muss das Fahrgestell des
Patientenlifts wieder maximal geöffnet werden.
Beim Umsetzen eines Patienten, der in einem am Patientenlifter befestigten Gurt gehalten wird,
dürfen die Schwenkrollen NICHT über unebene Oberflächen gerollt werden, da diese zu einem
Wackeln des Patientenlifts führen könnten. Dadurch könnte der Patientenlifter möglicherweise
umkippen.
Fassen Sie STETS den Griff am Masten an, um den Patientenlifter zu schieben bzw. zu
ziehen.
1. StellenSiesicher,dasssichdasFahrgestelldesLiftersinmaximalerÖffnungstellungbefinden.WenndiesnichtderFall
ist,öffnenSiedieFußschienenmitHilfedesSchalthebels.
2. BewegenSiedenAufstehhilfevonderSitzf lächeweg,vonderderPatientangehobenwurde.
3. BewegenSiedenPatientenlangsamzudergewünschtenSitzflächehin.
Handgriff
Rollen
Kniepolster
Fußplatte
DETAILZEICHNUNG „A“
– ROLLSTUHLSPERRE
Rollstuhlsperre
Griff am
Masten

ABSCHNITT 5 — UMSETZEN DES PATIENTEN
Aufstehlifter 138 Part No. 1078985
ABSCHNITT 5 — UMSETZEN DES PATIENTEN
WARNUNG
Versuchen Sie NICHT, einen Patienten ohne Zustimmung des zuständigen Pflegepersonals
umzusetzen.
Bewegen Sie NICHT den Patienten, wenn der Gurt nicht ordnungsgemäß an den
Befestigungspunkten des Patientenlifters angebracht ist. Überprüfen Sie, dass der Gurt
ordnungsgemäß an den Befestigungspunkten angebracht ist, bevor Sie den Patienten anheben.
Falls eine der Befestigungen nicht ordnungsgemäß angebracht ist, korrigieren Sie dieses Problem.
Wenn der Gurt einige Zentimeter von dem stehenden Objekt hochgehoben wurde und bevor Sie den
Patienten bewegen, müssen Sie erneut überprüfen, dass alle Befestigungen des Gurtes korrekt und
sicher angebracht sind. Falls eine der Befestigungen nicht ordnungsgemäß angebracht ist, senken Sie
den Patienten wieder ab und beheben Sie das Problem. Andernfalls kann es zu Verletzungen oder
Sachschäden kommen.
Sämtliche Anpassungen aus Sicherheits- oder Komfortgründen müssen durchgeführt werden,
ehe Sie den Patienten bewegen.
Verwenden Sie den Gurt, die vom Arzt, der Schwester oder dem medizinischen Pflegepersonal
des Patienten empfohlen wird, um den Komfort und die Sicherheit des zu hebenden Patienten zu
gewährleisten.
Invacare empfiehlt, die hinteren Schwenkrollen des Patientenlifters nicht zu verriegeln, wenn Sie
einen Patienten heben und umsetzen. Falls Sie dies dennoch machen, kann der Patientenlift
umkippen und den Patienten sowie Assistenten gefährden. Invacare empfiehlt, dass die hinteren
Schwenkrollen während des Hebens und Umsetzens nicht verriegelt werden sollten, damit der
Patientenlift sich selbst stabilisieren kann, wenn der Patient angehoben und auf einen Stuhl, ein Bett
oder ein anderes stehenden Objekt umgesetzt wird.
Das Fahrgestell des Patientenlifters MÜSSEN maximal geöffnet sein, damit optimale Stabilität
und Sicherheit gewährleistet sind. Wenn der Patient im Gurt gehalten wird und man mit dem
Patientenlifter durch eine enge Passage hindurch muss, sollte das Farhgestell für den Weg durch
die Passage zusammenklappen. Sobald die enge Stelle passiert ist, muss das Fahrgestell des
Patientenlifters wieder maximal geöffnet werden. Falls es erforderlich ist, die Fußschienen
zusammenzuklappen, um den Patientenlifter unter ein Bett zu schieben, lassen Sie die
Fußschienen nur so lange zusammengeklappt, bis Sie den Patientenlifter korrekt über dem
Patienten positioniert und den Patienten vom Bett hochgehoben haben. Sobald das Fahrgestell
des Patientenlifters nicht mehr unter dem Bett sind, das Fahrgestell wieder maximal öffnen.
Sie müssen die Gurtbefestigung jedes Mal prüfen, wenn die Schlinge entfernt und ersetzt wird, um
sicherzustellen, dass die Schlinge korrekt befestigt ist, bevor der Patient von einer Sitzfläche
hochgehoben wird.
ObderPatientenliftvoneinemAssistentenalleinbedientwerdenkann,hängtvonderEinschätzungderPflegepersonim
konkretenFallab.

ABSCHNITT 5 — UMSETZEN DES PATIENTEN
Part No. 1078985 139 Aufstehlifter
Umsetzen auf einen Nachtstuhl
WARNUNG
Invacare empfiehlt, die hinteren
Schwenkrollen nur dann zu verriegeln, wenn
Sie den Gurt um den Patienten legen bzw.
diesen wieder entfernen.
HINWEIS:InformationenhierzufindenSieinABBILDUNG 5.1.
1. HebenSiedenPatientenvonderSeitedesBetteshoch.
2. DrückenSieaufdermanuellenSteuerungauf die
Nach‐oben‐Taste,umdenPatientensoweithochzuheben,
dassdie ArmevomNachtstuhlgenommenwerden.Das
Gewichtde sPatientenwi rdvondemPatientenlift
gehalten.
3. FührenSie
denPatientenaufdenNachtstuhl.Dafür
werdenmöglicherweisezweiAssistentenbenötigt.
4. DrückenSiedanndieNach‐unten‐Taste,umden
P atientenaufdemNachtstuhlabzusetzen.
5. VerriegelnSiediehinterenSchwenkrollendes
P atientenlifters.
6. FührenSiediefolgendenSchrittedurch:
•GurtfürdenAufstehlifter:LösenSiedenGurtfür
denAuftstehliftervondenBefestigungspunkten
am
Patientenlifter.
•GurtfürdenTransfer:
i. LösenSiedenGurtfürdenTransfervonden
unterenBefestigungspunktenam
Patientenlifter.
ii. HebenSiedenGurtaufdieBeinedesPatienten
hochundentfernenSiedieStützenunterden
OberschenkelndesPatienten.
iii. Fallsgewünscht,könnenSiedenGurtauchvon
obenBefestigungspunktenamPatientenlifter
lösen.
HINWEIS:
WennderPatientaufdemNachtstuhlsitzt,kannder
obereBereichdesGurtesfürdenTransferweiterhinangelegt
bleiben.
7. BittenSiedenPatientenoderhelfenSieihm,dieFüßevon
derFußplattezuheben.
8. EntfernenSiedenGurt vomOber körpe rdesPatienten.
9. EntriegelnSiedieRollenwiederundziehenSieden
P atientenlifter
vomNachtstuhlweg.
ABBILDUNG 5.1 Umsetzen auf einen Nachtstuhl
DETAIL „A“
DETAIL „B“
DETAIL „C“

ABSCHNITT 5 — UMSETZEN DES PATIENTEN
Aufstehlifter 140 Part No. 1078985
Umsetzen in einen Rollstuhl
HINWEIS:InformationenhierzufindenSieinABBILDUNG 5.2.
1. StellenSiesicher ,dassdieFußschienendes
P atientenliftersmax imal
geöffnetsind,wennsichder
PatientimGurtbefindet.
2. SchiebenSiedenRollstuhlandenP atientenheran.Siehe
Detailzeichnung„A“.
3. VerriegelnSiediehinterenRollstuhlsperren,damitder
Rollstuhlnich twegrollenkann.SieheDetailzeichnung
„B“.
WARNUNG
Sie dürfen den Patienten NICHT in den Rollstuhl
setzen, solange die Rollstuhlsperren nicht
verriegelt sind. Die Rollstuhlsperren des Rollstuhls
MÜSSEN verriegelt sein, bevor der Patient in den
Rollstuhl abgesenkt werden darf. Andernfalls kann
es möglicherweise zu Verletzungen kommen.
4. P ositionierenSiedenPatientenüberde mRollstuhl.
5. SetzenSiedenPatienteninde nRollstuhl.
6. LösenSiedenGurtvonallenBefestigun gspunkte nam
P atientenlifter.SieheDetailzeich nung„C“.
7. BittenSiedenPatienten,dieFüßevonderFußplattezu
nehmen.HelfenSiedemPatientenggf.dabei .
8. EntfernenSiedieSchlingevomOber körp erdesP atienten.
9. ZiehenSie
denP atientenliftwegvomRollstuhl.
Umsetzen auf ein Bett
HINWEIS:InformationenhierzufindenSieinABBILDUNG 5.3.
HINWEIS:DaderSchwerpunktrelativweitun te nliegt,istdie
Stabilitätgewährleistet.DadurchfühltsichderPatien tsichererund
derPatientenlifterlässtsichleichterbewegen.
HINWEIS:DieHebelarmebleibenso langeinihrerStellung,bisdie
Nach‐unt en‐TasteaufdermanuellenSteuerunggedrücktwird.
1. Bringen
SiedenPatientensoweitwiemöglichüberdas
Bett.
HINWEIS:WenndervoneinertiefergelegenenSitzflächeaufdas
Bettumge setztwird,hebenSiedenPatientenmitdemPatientenlift
überdieOberflächedesBettes.DerPa tien tsolltenursoweit
hochgehobenwerden,dass ervollständiggestütztdurchdenLiftauf
dasBet tgehobenwerdenkann.
2. DrückenSiedieNach‐unten‐TasteundsenkenSieden
P atientenaufdasBettab.
WARNUNG
Invacare empfiehlt, die hinteren Schwenkrollen
NUR zu verriegeln, wenn Sie den Gurt um den
Patienten legen bzw. diese wieder entfernen.
3. VerriegelnSiediehinterenSchwenkrollendes
P atientenlifters.
4. LösenSiedenGurtvonallenBefestigun gspunkte nam
P atientenlift.
5. BittenSiedenPatienten,dieFüßevonderFußplattezu
nehmen.HelfenSiedemPatientenggf.dabei .
6. EntfernenSiedenGurtfürAufstehhilfebzw.denGurtfür
denTransfervomOberkörp erdesPatienten.
7. EntriegelnSiediehint eren
RollenundziehenSieden
P atientenliftervomBett weg.
ABBILDUNG 5.2 Umsetzen in einen Rollstuhl
ABBILDUNG 5.3 Umsetzen auf ein Bett
DETAILZEICHNUNG „A“
DETAILZEICHNUNG „B“
DETAILZEICHNUNG „C“

ABSCHNITT 6 — PROBLEMBEHANDLUNG
Part No. 1078985 141 Aufstehlifter
ABSCHNITT 6 — PROBLEMBEHANDLUNG
HINWEIS:FallsdieProblemedurchdievorgeschlagenenMaßnahmennichtbehobenwerdenkönnen,wendenSiesichbitteanIhren
HändleroderdirektanInvacare.
SYMPTOME FEHLER LÖSUNG
Lautes oder trockenes Geräusch von den
Drehgelenken.
Schmierung ist erforderlich. Siehe Schmieren des Patientenlifters auf
Seite 143.
Elektrischer Verstellmotor beginnt nicht mit
dem Hebevorgang, wenn die Taste gedrückt
wird.
Manuelle Steuerung oder
Verstell-motor sind nicht
korrekt angeschlossen.
Niedriger Ladestand der
Batterie.
ROTE Notaus-Taste wurde
gedrückt.
Batterie nicht korrekt in den
Steuerkasten eingesetzt.
Die Verbindungsklemmen sind
beschädigt.
Der elektrische Verstellmotor
muss gewartet werden oder
die Last ist zu hoch.
Anschluss der manuellen Steuerung so-wie
des Verstellmotors überprüfen. Ggf.
Anschluss erneut herstellen.
Batterien aufladen. Siehe Aufladen der
Batterie auf Seite 133.
Die ROTE Notaus-Taste IM
UHRZEIGERSINN drehen, bis sie
herauskommt.
Die Batterie erneut in den Steuerkasten
einsetzen. Siehe Aufladen der Batterie
auf
Seite 133.
Batteriesatz austauschen. Siehe Aufladen der
Batterie auf Seite 133.
Siehe Einstellen der Basis
auf Seite 143.
Händler kontaktieren, falls Wartungsservice
erforderlich ist.
Ungewöhnliches Geräusch vom Verstellmotor. Verstellmotor ist verbraucht
oder beschädigt oder Welle ist
gekrümmt.
Verstellmotor austauschen oder Händler
kontaktieren. Siehe Austausch des
elektrischen Verstellmotors auf Seite 144.
Hebelarme senken sich aus oberster Position
nicht ab.
Für die Hebelarme ist eine
minimale Gewichtslast
erforderlich, damit sie sich aus
der obersten Position
absenken.
Hebelarme leicht nach unten ziehen.

ABSCHNITT 7 — WARTUNG
Aufstehlifter 142 Part No. 1078985
ABSCHNITT 7 — WARTUNG
HINWEIS:WirweisenSiedaraufhin,dassbeimPatientenlifteralle 6MonateeineSicherheitsinspektiondurchgeführtwedenmuss.
Übersicht über Wartungs- und Sicherheitsinspektionen
HINWEIS:BefolgenSiedieindiesemGebrauchsanweisungbeschriebenenW artung svorschriften,damitderPatientenlifterununterbrochenin
Betriebseinkann.
DerP atientenliftervonInv acare istsokonstruiert,dassereinensicheren,effizientenundzufriedenstellendenBetriebbei
minimalerPflegeundWartung.
AlleTeiledesInvacare‐Lift ersindausbestenStahlsortenhergestellt,allerdingsführtderMetall‐auf‐Me ta l l‐Kontaktnacheiner
beträchtlichenNutzungzumVerschleiß.
DieRollenmüssengereinigtundgeschmiertwerdenunddie
AchseundSchw enkbolzenauffestenSitzüberprüftwerden.
AndereEinstellungs‐oderWartungsmaßnahmensindnichtdurchzuführen. EntfernenSiesämtlichenSchmutzu.a.vomRadund
denLagern.WennTeileverschlissensind,müssendieseUNVERZÜGLICHausgetauschtwerden.
FallsSieZweifelanderSicherheiteinesTeilshaben,wendenSiesichbitteSOFORTanIhrenHändler.
Reinigen von Gurt und Patientenlifter
DerGurtsollteregelmäßigmiteinembiologischabbaubarenWaschmittelundineinerWassertemperaturunter80°C
gewaschenwerden.FürdieReinigungdesPatientenliftersistlediglicheinweiches,feuchtesTucherforderlich,aufdasein
mildesReinigungsmittelgegebenwurde.DerPatientenliftersolltemitnichtscheuerndenReinigungsmittelngesäubert
werden.
Feststellen von Verschleiß und Schäden
Esistwichtig,dassallebeanspruchtenTeile,wiez.B.Schlingen,HebelarmeundsämtlicheDrehpunktefürSchlingen,auf
AnzeichenvonRissen,durchscheuerteStellen,DeformationundVerschlechterungüberprüftwerden.ErsetzenSiedefekte
TeileUNVERZÜGLICH.StellenSieaußerdemsicher,dassderPatientenliftererstdannwiederverwendetwird,wenndie
Reparaturmaßnahmenabgeschlossensind.
KOMPONENTE
ANFÄNGLICH
EXTERNE INSPEKTION/
MONATLICHE
ANPASSUNG
INTERNE INSPEKTION
ALLER SECHS (6)
MONATE
BASIS
Prüfen, ob Teile fehlen.
Fahrgestell müssen sich leicht öffnen/zusammenklappen lassen.
Rollen und Achsbolzen auf festen Sitz und Verschleiß überprüfen.
Rollen auf leichtgängiges Drehen und Rollen überprüfen.
Prüfen, ob Räder frei von Schmutz sind.
X
X
X
X
X
X
X
X
X
X
X
X
X
X
X
MAST
Der Mast MUSS sicher an den Hebearmen montiert sein.
Prüfen, ob Krümmungen oder Biegungen vorhanden sind.
X
X
X
X
X
X
HEBELARME UND VERBINDUNGEN
Sämtliche Teile und Befestigungspunkte überprüfen.
Prüfen, ob Krümmungen oder Biegungen vorhanden sind.
Die Schraubverbindungen der Hebelarme auf Verschleiß überprüfen.
Überprüfen und sicherstellen, dass die Hebelarme zwischen den
Fußschienen zentriert sind.
X
X
X
X
X
X
X
X
X
X
X
X
ELEKTRISCHER VERSTELLMOTOR
Auf Verschleiß und Defekte überprüfen.
(BEI BESCHÄDIGUNG DES VERSTELLMOTORS DEN HÄNDLER
KONTAKTIEREN.)
Verstellmotor zyklisch laufen lassen, um einen gleichmäßigen, laufruhigen
Betrieb zu gewährleisten.
X
X
X
X
X
X
REINIGUNG
Immer, wenn es erforderlich ist. XX X
GURTE
SÄMTLICHE GURTBEFESTIGUNGEN immer dann ÜBERPRÜFEN,
wenn der Gurt verwendet wird, so dass eine korrekte Verbindung und
die Sicherheit des Patienten gewährleistet wird.
Prüfen, ob der Gurt Verschleißspuren aufweist.
Gurte auf Abnutzung überprüfen.
X
X
X
X
X
X
X
X
X

ABSCHNITT 7 — WARTUNG
Part No. 1078985 143 Aufstehlifter
Schmieren des Patientenlifters
DerInvacarePatientenlifteristsokonstruiert,dassernur
eineminimaleWartungerfordert.Jedochsollteder
Patientenlifterregelmäßigaller6Monateüberprüftund
geschmiertwerden,umdieSicherheitundZuverlässigkeit
zugewährleisten.
DerLifterunddieGurtesolltenstetssauberundineinem
gutenZustandsein.JederDefektsolltenotiertunddem
Händlersoschnellwiemöglichmitgeteiltwerden.
DieRollenMÜSSENleichtgängiggedrehtundgerollt
werdenkönnen.EinleichtesSchmiermittel(wasserdichtes
Selbstschmiermittel)sollteeinmalimJahraufdas
KugellagerderRollenaufgetragen
werden.FallsdieRollen
extremfeuchtenBedingungenausgesetztsind,mussdie
Schmierunghäufigererfolgen.
Einstellen der Basis
HINWEIS:InformationenhierzufindenSieinABBILDUNG 7.1
aufSeite143.
1. ÜberprüfenSiedieRechtwinkligkeitderFußschienen
inderzusammengeklapptenPosition.
2. LegenSieeinenrechtenWinkelandieInnenseiteder
FußschienenundderBasisan,umdie90°‐Ausrichtung
zuüberprüfen.
3. StellenSiedieVe rbindungsstangensoein,dassdie
90°‐Ausrichtungerreichtwird.
Einstellen der Kniepolster-Höhe
HINWEIS:InformationenhierzufindenSieinABBILDUNG 7.2.
WARNUNG
Das Kniepolster NIEMALS einstellen, wenn
sich der Patient in der Standposition befindet.
Das Kniepolster NIEMALS einstellen, wenn
der Lift bewegt wird.
IMMER sicherstellen, dass die
Einstellungsstifte in den entsprechenden
Einstellungslöchern fest eingerastet sind.
1. WählenSieeineHöheneinstellung,diefürden
Patientenangenehmistunddieerforderliche
Abstützungbietet.
HINWEIS:DasKniepolstersolltesopositioniertwerden, dassdie
KniedesPatientenaufdemKniepolsteraufliegen.
2. ZiehenSiemitbeidenHändendieEinstellungsstifte
gleichzeitignachaußen.
3. StellenSiedasKniepolsteraufdiegewünschteHöhe
einundlassen
SiedieEinstellungsstifteindie
entsprechendenLöchereinrasten.
4. ÜberprüfenSie,dassbeideStiftefesteingerastetsind.
ABBILDUNG 7.1 Einstellen der Basis
ABBILDUNG 7.2 Einstellen der Kniepolster-Höhe
Rechter Winkel
Verbindungsstangen
Verbindungsstange
Kniepolster
Einstellungsstift
Einstellungsstift

ABSCHNITT 7 — WARTUNG
Aufstehlifter 144 Part No. 1078985
Austausch des elektrischen Verstellmotors
1. EntfernenSiedieuntereMutter,dieUnterlegscheibeunddieAnsatzschraube,mitderderelektrischeVerstellmotoran
derMontagehalterungdesMastenbefestigtist.
2. LehnenSiedenHebelarmgegenIhreSchulterundentfernenSiedieobereMutterundSchraub esowiedieHalterung
undHülsevonderMontagehalterungdesHebelarms.
3. EntfernenSiedenelektrischenVe rstell motor.
4. FührenSiedieSCHRITTE1bis3inumgekehrterReihenfolgeaus,umdenneuenelektrischenVerstellmotorzu
montieren.
WARNUNG
Schrauben und andere Montageverbindungen NICHT ZU FEST anziehen. Die Befestigungen
könnten dadurch beschädigt werden.
ABBILDUNG 7.3 Austausch des elektrischen Verstellmotors
Schraube
Unterlegscheibe
Hülse
Unterleg-
scheibe
Schraube
Schraube
Unterlegscheibe
Hülse
Unterlegscheibe
Schraube
Halterung

VERTRIEB, KUNDENDIENST UND GARANTIEINFORMATIONEN
Part No. 1078985 145 Aufstehlifter
VERTRIEB, KUNDENDIENST UND GARANTIEINFORMATIONEN
Großbritannien und Nordirland Invacare Limited, Pencoed Technology Park, Pencoed, Bridgend CF35 5HZ
Tel: (44) (0) 1656 776 222
Fax: (44) (0) 1656 776 220
www.invacare.co.uk, UK@invacare.com
Irland Invacare Ireland Ltd, Unit 5 Seatown Business Campus, Seatown Road, Swords, County Dublin - Ireland
Tel: (353) 1 810 7084
Fax: (353) 1 810 7085
www.invacare.co.uk, [email protected]m
Frankreich Invacare Poirier SAS, Route de Saint Roch, F-37230 Fondettes
Tel: (33) (0) 2 47 62 64 66
Fax: (33) (0) 2 47 42 12 24
www.invacare.fr, contactfr@invacare.com
Belgien & Luxemburg Invacare nv, Autobaan 22, B-8210 Loppem, Brügge
Tel: (32) (0) 50 83 10 10
Fax: (32) (0) 50 83 10 11
www.invacare.be, belgium@invacare.com
Schweiz Invacare AG, Benkenstrasse 260, CH-4108 Witterswil
Tel: (41) (0) 61 487 70 80
Fax: (41) (0) 61 487 70 81
switzerland@invacare.com
Deutschland Invacare Aquatec GmbH, Alemannenstraße 10, D-88316 Isny
Tel: (49) (0) 75 62 7 00 0
Fax: (49) (0) 75 62 7 00 66
www.invacare-aquatec.de, in[email protected]
European Distributor Organisation Invacare, Kleiststraße 49, D-3257 Porta Westfalica
Tel: (49) (0) 57 31 754 540
Tel: (49) (0) 57 31 754 541
Portugal Invacare Lda, Rua Estrada Velha, 949, P-4465-784, Leça do Balio
Tel: (351) (0)225 1059 46/47
Fax: (351) (0)225 1057 39
Norwegen Invacare AS, Grenesvingen 9, Postboks 6230, Etterstad, N-0603 Oslo
Tel: (47) (0) 22 57 95 00
Fax: (47) (0) 22 57 95 01
Italien Invacare Mecc San s.r.l., Via dei Pini 62, I-3016 Thiene (VI)
Tel: (39) 0445 38 00 59
Fax: (39) 0445 38 00 34
www.invacare.it, italia@invacare.com
Spanien Invacare SA, c/Areny s/n, Poligon Industrial de Celrà, E-17460 Celrà (Girona)
Tel: (34) (0) 972 49 32 00
Fax: (34) (0) 972 49 32 20
www.invacare.es, contactsp@invacare.com


Invacare Corporation
www.invacare.eu.com
USA
One Invacare Way
Elyria, Ohio USA
44036-2125
800-333-6900
France
Invacare France
Opération
Route de Saint Roch
37230 Fondettes
Manufacturer:
Invacare Medical
Equipment
(Suzhou) Co., Ltd.
Unit 2B, Export
Processing Zone
No. 200 Suhong Road SIP
(Suzhou Industrial Park)
Suzhou, Jiangsu, PRC
215021
Tel: 86-512-62586192
Fax: 86-512-62586072
© 2010 Invacare Corporation. All rights
reserved. Republication, duplication or
modification in whole or in part is
prohibited without prior written
permission from Invacare. Trademarks
are identified by ™ and ®. All
trademarks are owned by or licensed to
Invacare Corporation or its subsidiaries
unless otherwise noted.
Part No. 1078985 Rev F - 12/10
/