Phonic AM5GE Manual de usuario
- Categoría
- Mezcladores de audio
- Tipo
- Manual de usuario

AM6GE
AM5GE
AM6GE
User's Manual
Manual del Usuario

English Español
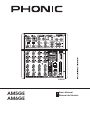
COMPACT MIXERS
MEZCLADORAS COMPACTAS
ENGLISH ......................................I
ESPAÑOL .....................................II
APPENDIX ...................................III
V1.0 10/26/2018
AM5GE AM6GE

AM5GE / AM6GE
English
3
INTRODUCTION
1
FEATURES
1
INSTANT SETUP
1
COMPUTER CONNECTION
2
TF/BT MODULE
2
MAKING CONNECTIONS
4
CONTROLS AND SETTINGS
6
SPECIFCATIONS
8
APPENDIX
APPLICATION
1
CONTENTS
USER'S MANUAL
Phonic reserves the right to improve or alter any information within this
document without prior notice

AM5GE / AM6GE
4
English
RISQUE DE CHOC ELECTRIQUE
NE PAS OUVRIR
1.
Read these instructions.
2.
Keep these instructions.
3.
Heed all warnings.
4.
Follow all instructions.
5.
Do not use this apparatus near water.
6.
Clean only with dry cloth.
7.
Do not block any ventilation openings. Install in
accordance with the manufacture’s instructions.
9.
Do not install near any heat sources such
as radiators, heat registers, stoves, or other
heat.
10.
Do not defeat the safety purpose of the polarized
or grounding plug. A polarized plug has two
blades with one wider than the other. A grounding
plug has two blades and a third grounding prong.
The wide blade or the third prong is provided for
your outlet, consult an electrician for replacement
of the obsolete outlet.
11.
Protect the power cord from being walked on or
pinched particularly at the plugs, convenience
receptacles, and at the point where they exit from
the apparatus.
12.
the manufacturer.
13.
Use only with the cart, stand, tripod,
manufacturer, or sold with the
apparatus. When a cart or rack is
used, use caution when moving the
cart/apparatus combination to avoid
injury from tip-over.
14.
Unplug the apparatus during lightning storms or
when unused for long periods of time.
15.
Servicing is required when the apparatus has
been damaged in any way, such as power supply
cord or plug is damaged, liquid has been spilled
or objects have fallen into the apparatus has been
exposed to rain or moisture, does not operate
normally, or has been dropped.
8.
No naked flame sources, such as lighted candles,
should be placed on the apparatus.
Class 2 Wiring for all other TERMINALS provided
the audio output power exceeds 10 W per channel
under normal operating conditions or the apparatus
is intended to be installed or interconnected in the
field by a SKILLED PERSON.
17.
18.
Use this apparatus in moderate climates.
16.
building-in space such as a book case or similar
unit, and remain a well ventilation conditions at
open site. The ventilation should not be impeded
by covering the ventilation openings with items
such as newspaper, table-cloths, curtains, etc.
19. WARNING: The mains plug/appliance coupler is
used as disconnect device, the disconnect device
shall remain readily operable.
20. This apparatus is for professional use only.
21. WARNING:
shock, do not expose this apparatus to rain or
moisture. The apparatus shall not be exposed to
liquids, such as vases, shall not be placed on
apparatus.
22.
an equilateral triangle is intended to alert
the user to the presence of non-insulated
“dangerous voltage” within the product’s
magnitude to constitute a risk of electric
shock.
Warning: To reduce the risk of electric shock, do
not remove cover (or back) as there are no user-
personnel.
The exclamation point within an equilateral
triangle is intended to alert the user to
the presence of important operating and
maintenance instructions in the literature
accompanying the appliance.
23. Protective earthing terminals. The
apparatus should be connected to a
mains socket outlet with a protective
earthing connection.
ATTENTION
RISK OF ELECTRIC SHOCK
DO NOT OPEN!
TO REDUCE THE RISK OF ELECTRIC SHOCK,
DO NOT REMOVE COVER AS THERE ARE NO
USER-SERVICEABLE PARTS INSIDE. REFER
SERVICING TO QUALIFIED PERSONNEL.
IMPORTANT SAFETY INSTRUCTIONS

AM5GE / AM6GE
English
1
INTRODUCTION
Congratulations on purchasing one of Phonic’s many
quality compact mixers. The AM Gold Edition Mixers
– designed by the ingenious engineers that have
created a variety of mixers fantastic in style and per-
formance in the past – were created to provide a more
elegant mixing experience with more pleasing asthet-
ics than previously available. The AM series features
full gain ranges, amazingly low distortion levels, +22
dBu line signal handling, and incredibly wide dynamic
ranges, just showing the dominance these small ma-
chines will have in the studio or live venues.
We know how eager you are to get started – wanting
to get the mixer out and hook it all up is probably your
number one priority right now – but before you do, we
strongly urge you to take a look through this manual.
Inside, you will nd important facts and gures on the
set up, use and applications of your brand new mixer. If
you do happen to be one of the many people who atly
refuse to read user manuals, then we just urge you to
at least glance at the Instant Setup section. After glanc-
ing at or reading through the manual (we applaud you
if you do read the entire manual), please store it in a
place that is easy for you to nd, because chances are
there’s something you missed the rst time around.
FEATURES
AM5GE
Balanced Mic/Line Neutrik “Combo” input with
compressor and 2-band EQ
2 stereo inputs with balance and level controls
Stereo USB audio interface for connecting to Win-
dows and Mac computers (24-bit, 48 KHz)
Playback of digital media les from TransFlash media
Internal TransFlash module for high quality stereo
recording in WAV or MP3 formats
2.4GHz BT connectivity for streaming digital audio
directly from smartphones and tablets
+48V phantom power for mic input
Peak and VU metering (10 segments)
Peak indicators on mono input channel
2T RTN assignable individually to Main or Headphones
Stereo RCA 2T Return inputs plus mini-stereo
Balanced master output with main rotary control
AM6GE
2 balanced Mic/Line Neutrik “Combo” inputs with
3-band EQ and variable compressor
2 stereo inputs with 3-band EQs
Stereo USB audio interface for connecting to Win-
dows and Mac computers (24-bit, 48 KHz)
Playback of digital media les from TransFlash media
Internal TransFlash module for high quality stereo
recording in WAV or MP3 formats
2.4GHz BT connectivity for streaming digital audio
directly from smartphones and tablets
One stereo AUX return
Post-fader AUX send on every input
Global +48V phantom power for microphone inputs
Peak and VU metering (10 segment)
Peak indicators on both mono input channels
2T RTN assignable individually to Main or Control room
Balanced master output with 60mm fader control
Headset mic and headphone connectors perfect
for livestreaming and web conferencing
INSTANT SETUP
Getting Started
1. Ensure all power is turned o on your mixer. To
totally ensure this, the AC cable should not be
connected to the unit.
2. All faders and level controls should be set at the
lowest level and all channels switched o to en-
sure no sound is inadvertently sent through the
outputs when the device is switched on. All levels
can be altered to acceptable degrees after the
device is turned on.
3. Plug all necessary instruments and equipment
into the device’s various inputs as required.
This may include line signal devices, such as
keyboards and drum machines, as well as micro-
phones and/or guitars, keyboards, etc.
4. Plug any necessary equipment into the device’s
various outputs. This could include ampliers and
speakers, monitors, signal processors, and/or
recording devices.
5. Plug the supplied AC power supply into the inlet
on the rear of the device and then into a power
outlet of a suitable voltage.
6. Turn the power switch on and follow the channel
setup instructions to get the most out of your
equipment.
Channel Setup
1. To ensure the correct audio level of the input
channel is selected, each of the level input con-
trols of the Mixer should be turned counterclock-
wise as far as they will turn (which should be the
-∞ mark).
2. No input other than the one being set should
have any device plugged in. This will ensure the
purest signal is used when setting channels.
3. Ensure the channel has a signal sent to it similar
to the signal that will be sent when in common
use. For example, if the channel is using a mi-
crophone, then you should speak or sing at the
same level the performer normally would during a
performance; if a guitar is plugged into the chan-
nel, then the guitar should also be strummed as
it normally would be (and so on). This ensures
levels are completely accurate and avoids having
to reset them later.
4. Set the gain so the level meter indicates the au-
dio level is around 0 dB.
5. This channel is now ready to be used; you can
stop making the audio signal.
6. You can repeat the same process for other channels.

AM5GE / AM6GE
2
English
COMPUTER CONNECTION
By simply connecting the USB cable provided along
with your AM GE mixer to the device and your personal
computer or laptop, you are able to send DVD quality
(16-bit stereo, with a 48 kHz sampling rate) signal to
and from your mixer. By doing this, you are turning your
mixer into a highly useful plug’n’play soundcard for your
computer.
The USB sends an audio stream of the Main Left and
Right (record out) signal of your mixer to the computer.
You can use almost any dedicated Digital Audio Work-
station (DAW) software to record the signal from the
mixer. You can also set the mixer as your default audio
device.
The USB interface also returns a stereo audio signal
from your computer back to the 2T RTN/USB mix.
Windows
1. Connect the mixer to the computer via the provid-
ed USB cable.
2. Let Windows nd the device and install an appro-
priate driver.
3. Enter the Control Panel and select Sounds and
Audio Devices.
4. When here, go to the Audio tab and select the
“USB Audio Codec” as your default sound record-
ing and playback device.
5. Depending whether you have Windows XP, Vista,
7, 8 or 10, this may dier slightly, but the setting
can always be found within the Control Panel’s
audio menu.
6. If you don’t want to use the mixer as your default
audio device, you can simply enter your DAW or
other audio program and select it as your default
device in the program only.
7. Be sure to set your minimum buer settings to 64
samples as to avoid clicks and pops.
Mac
1. Connect the mixer to the computer via the provided
USB cable.
2. Enter the AUDIO MIDI SETUP menu.
3. Select the “USB Audio Codec” as your input and
output device.
4. The AM mixer is now your default audio device.
5. Alternatively, enter your DAW software (or other
relevant audio program) and select the “USB Au-
dio Codec” in the device preferences.
6. Be sure to set your minimum buer settings to 64
samples as to avoid clicks and pops.
TF/BT MODULE (BLUETOOTH SETUP)
1. Select the Bluetooth function through the TF/BT
module.
2. Enter your smartphone or tablet’s Bluetooth setup
options to nd the “PHONIC” Bluetooth device.
3. If requested, the password for the Bluetooth
function is 0000. Many modern smartphones will
enter this as the default password.
4. Audio signals received through the Bluetooth in-
terface will be routed to the TF/BT channel on the
mixer.
5. To reset the connection, turn your smartphone
or tablet’s Bluetooth connection o and then on
again.
6. When using cell phones and tablets, it may be
an idea to turn “Airplane Mode” or “Flight Mode”
on to stop phone calls or push notications from
interrupting your audio.
Note: Not all modern Bluetooth-enabled devices al-
low for use of external audio playback. In the case of
laptops in particular, Bluetooth may be used for data
transmission only - depending on the model. This is a
limitation of these devices and you will not be able to
use the Bluetooth function with these devices.
TF/BT MODULE (TF PLAYBACK)
1. Insert an appropriately formatted TF card.
2. Select the “Music” option in the main menu and
press PLAY to enter the playback function. The
STOP/MENU button acts as a ‘back’ button when
navigating menus.
3. Select ‘All Songs’, ‘Artists’, ‘Albums’, ‘Genres,’
etc - as applicable.
4. Press the PLAY button to play the current track
through the TF/BT channel, or the << and >> but-
tons to skip forward and backwards between tracks.
The mixer can play MP3, WAV and FLAC les.
5. Push and hold the STOP/MENU button to stop
playback.
6. During playback, quickly press the STOP/MENU
button to access the Shue and Repeat functions.
Repeat Mode – There 4 repeat modes available.
No Repeat – Play each le in the current folder or
root once.
Repeat 1 – Continuously repeat selected song.
Repeat all – Continuously repeat all songs.
Shue – Random playback of les in current folder.

AM5GE / AM6GE
English
3
TF/BT MODULE (TF RECORDING)
1. Insert a FAT-32 formatted TF card (up to 64GB).
2. In the main menu, select ‘Recordings’ and press
the PLAY.
3. Here you have the options: ‘Start voice recording,’
‘Record Settings’, ‘Record Format’ and ‘Recordings
library’ (among others).
4. Adjust the ‘Recording Format’ (MP3 or WAV) and
‘Record Settings’ as necessary (available record-
ing bitrates depends on format).
5. Select “Start voice recording” to begin recording
immediately. The unit will save an audio le to a
‘RECORD’ folder on your inserted TF card.
6. Push the PLAY button to pause recording. Push-
ing the PLAY button again will resume recording
from the position at which it was paused.
7. Press the STOP/MENU button at any time to stop
the recording. The device will then ask if you wish
to save your recording. Select “Yes” or “No”. Your
records can later be found in the “Recordings
library.”
8. Press the STOP/MENU button to exit.

AM5GE / AM6GE
4
English
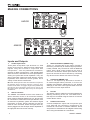
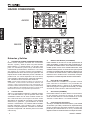
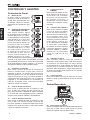
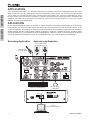
Inputs and Outputs
1. Combo Input Jacks
These jacks accept both 3-pin XLR and 1/4” TRS
phone jack inputs for balanced and unbalanced
signals. They can be used in conjunction with
microphones – such as professional condenser,
dynamic or ribbon microphones – with standard XLR
male connectors, and feature low noise preampliers,
serving for crystal clear sound replication. They can
also be used with various line level devices, such as
keyboards, drum machines, electric guitars, and a
variety of other electric instruments.
NB. When these inputs are used with condenser microphones,
the Phantom Power should be activated. However, when
Phantom Power button is engaged, single ended (unbalanced)
microphones and instruments should not be used on the
Mic inputs unless specifically approved by the microphone
manufacturer.
2. Stereo Channels
The AM5GE and AM6GE mixers each features 2
stereo channels, thrown in for maximum flexibility.
Each of these channels features two 1/4” phone jacks
for connection of various line level input devices, such
as electronic keyboards, guitars and external signal
processors or mixers. Stereo channels can also be
used as mono channels, where the signal from any
device plugged into the left input will be duplicated to
the right (this does not work in reverse).
4
5
6
7
8
9
1
2
3
1
2
7
8
9
5
6
3. Stereo AUX Return (AM6GE only)
These 1/4” TS inputs are for the return of audio to
the mixer, processed by an external signal processor.
If really needed, they can also be used as additional
inputs, with a level control located on the face of
the mixer. Like with the stereo input channels, these
inputs can be used as mono channels by connecting
any device into the Stereo AUX return’s left input.
4. AUX Send (AM6GE only)
This 1/4” TS outputs may be used to connect to
an external digital effect processor, or even to an
amplier and speakers (depending on your desired
settings) to the mixer. The signal is taken from the
AUX control on each input channel.
5. Phones
This stereo output is suited for use with headphones,
allowing monitoring of the mix. The audio level of
this output is controlled using the Phones or Phones/
Control Room control.
6. Headset Connectors
A stereo headphone output and microphone input
(1/8” TRS and TS connectors, respectively) are
included for connection of modern headsets. These
are perfect for livestreamers and digital conferencing
when using the AM Gold as a soundcard.
MAKING CONNECTIONS
AM5GE
AM6GE

AM5GE / AM6GE
English
5
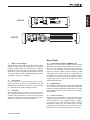
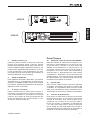
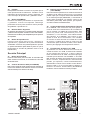
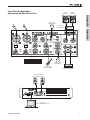
7. Main L and R Output
These two ports will output the nal stereo line level
signal sent from the main mixing bus. The primary
purpose of these jacks is to send the main output to
external devices, which may include power ampliers
(and in-turn, a pair of speakers), other mixers, as well
as a wide range of other possible signal processors
(equalizers, crossovers, etcetera).
8. Record Out
These outputs will accommodate RCA cables,
able to be fed to a variety of recording devices. the
AM5GE also features a mini-stereo output, perfect
for consumer-level digital recording devices.
9. 2T Return
These RCA inputs are used to connect the mixer
with parallel external devices, such as sub mixers or
external eect processors, receiving the processed
signal from another source and feeding it to either
the Main L and R or the Phones mixing bus.
Rear Panel
10. Control Room Outputs (AM6GE only)
These two 1/4” phone jack outputs feed the signal
altered by the Control Room/Phones level control on
the face of the AM6GE. This output has extensive
use, as it can be used to feed the signal from the
mixer to an active monitor, for the monitoring of the
audio signal from within a booth, or, alternatively, for
the addition of external signal processing devices
or mixers, as well as acting as a “side fill” output,
supplying audio to indoor areas that the main
speakers do not reach.
12. USB Interface
This USB-B connector is for connecting the AM Gold
to any modern PC computer. When connected, the
computer should recognize the AM Gold as a sound
card, allowing stereo audio to be sent to and from
the computer.
12. Power Connector
This port is for the addition of the external power
supply, allowing power to be supplied to the mixer.
This accepts 5V of DC voltage through a USB-C
connector. Phonic have included a power adapter
and cable to power the unit. Please be sure of the
voltage before powering the AM Gold mixer. The
power button can be found on the face of the mixer.
AM5GE
AM6GE
12
11
1012 11

AM5GE / AM6GE
6
English
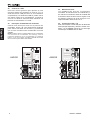
CONTROLS AND SETTINGS
Channel Controls
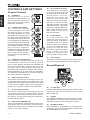
13. Pad Button
The PAD button is used to
attenuate the input signal by 25
dB. This generally will only be
used when using line-level input
devices are connected.
14. Line/Mic Gain Control
This controls the sensitivity
of the inputsignal of the Line/
Microphone input. The gain
should be adjusted to a level
that allows the maximum use of
the audio, while still maintaining
the quality of the feed. This can
be accomplished by adjusting it
to a level that will allow the peak
indicator occasionally illuminate.
The AM5GE features a single
gain control for channel 1,
located on the face of the mixer,
whereas the AM6GE features a
gain controls on both channels 1
and 2, located directly below the
Line inputs.
15. Compressor and Indicator
This controls the onboard compressor function on
mono channels. Turning this control up towards
the 12 o’clock position will adjust the threshold and
ratio of the compressor at varying degrees. Once
you reach the 12 o’clock position, the control will
then adjust the compression settings along with an
onboard expander (or, in other words, a compander).
The LED that accompanies this control will light up
when the compressor is triggered.
16. High Frequency Control
This control is used to give a shelving boost or cut
of ±15 dB to high frequency (12 kHz) sounds. This
will adjust the amount of treble included in the audio
of the channel, adding strength and crispness to
sounds such as guitars, cymbals, and synthesizers.
17. Low Frequency Control
This control is used to give a shelving boost or cut
of ±15 dB to low frequency (80 Hz) sounds. This will
adjust the amount of bass included in the audio of
the channel, and bring more warmth and punch to
drums and bass guitars.
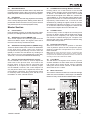
18. AUX Control (AM6GE only)
These controls alter the signal level that is sent to the
AUX Sends, which can be used in conjunction with
external signal processors, or simply as an auxiliary
output for any means required.
19. Pan / Balance Controls
This alternates the degree
or level of audio that the left
and right side of the main mix
should receive. On mono
channels, this control will
adjust the level that the left
and right should receive (pan),
where as on a stereo channel,
adjusting the BAL control will
attenuate the left or right audio
signals accordingly (balance).
Each model features a PAN or
BAL control on every one of
their channel strips.
20. Peak Indicator
This LED indicator will
illuminate when the device
hits high peaks, 6 dB before
overload occurs. It is best to
adjust the gain of the channel
so that the PEAK indicator
lights up on intervals. This
will ensure a greater dynamic
range of audio. The Peak
indicator is featured on the
mono channels of every model.
21. Level Control
This control will alter the signal level that is sent from
the corresponding channel to the main mixing bus.
Record/Playback
22. TF Card Slot
Insert an appropriately formatted (FAT-32) ash card
into this slot. This card can then be used to record
MP3 or WAV les.
23. Display
This display will display the track number currently
being played. It also offers play, pause and record
indicators as well as the current play/record time.
24. Stop/Menu Button
Push this button to stop playback or recording when
applicable. Push and hold the button to access the
TF recorder/player’s main menu.
13
14
15
16
17
19
21
20
13
14
15
16
17
18
19
21
20
22
23
24 26
25

AM5GE / AM6GE
English
7
25. Back/Next Buttons
Pushing these buttons will allow users to skip back and
forwards between tracks. When the menu is activated,
these buttons are used to scroll through on screen options.
26. Play Button
Push this button to start and stop playback and recording
of the currently displayed track. Starting a track after it is
paused will resume the track from the point at which it
was paused (in both record and playback mode).
Master Section
27. Power Button
Push this button to power on the AM Gold mixer. When
powered, an LED light within the button will illuminate.
28. AUX Return Control (AM6GE only)
This control adjusts the incoming signal from the
stereo AUX Return inputs. This signal is then sent to
the mixes selected by the buttons below.
29. AUX Return Routing Buttons (AM6GE only)
These two buttons allow users to select the destination
of the AUX return signal. Users can choose to
incorporate this signal directly into their main mix
(MAIN) or monitor the AUX Return by sending it to
their control room mix and headphones (CTRL RM).
These can, of course, be selected simultaneously.
30. Phones (Control Room/Phones) Control
On the AM5GE, this control is used to adjust the
audio level of the phones feed, to be sent to the
Phones output. It can be used in conjunction with
headphones or, if required, as an auxiliary output.
On the AM6GE, however, this control adjusts not
only the phones level, but the signal level sent to the
Control Room output also. The Control Room output
is commonly used in monitoring, as a side ll, or for
the addition of other, external devices.
31. 2T/USB Return Routing Buttons Controls
Pushing either one of the buttons in the 2T/USB
Return Control Section selects the destination of the
2T Return and USB Return signals. The TO MAIN
button sends the signal to the Main mix, whereas the
“TO PHONES” or “TO CTRL RM” buttons will send the
signal to the Phones or Control Room/Phones mixes,
respectively. These buttons can, of course, be used
simultaneously, feeding the signal to both the Control
Room/Phones and Main L/R mixes. If no “to Phones”
or “to Ctrl Rm” buttons are engaged, the Phones and
Control Room outputs will receive the Main mix.
32. 2T/USB Control
Turn this rotary control to adjust the incoming level
from the 2T Return inputs and the USB return signal
(as sent from the computer). The output of the USB
can further be refined through your computer. The
signal is then sent to the destinations selected using
the 2T/USB routing buttons.
33. Phantom Power Switch
When this switch is in the on position it activates
+48V of phantom power for both microphone inputs,
allowing condenser microphones to be used on
these channels.
NB. Phantom Power should be used in conjunction with
condenser microphones only. However many modern
microphones are unaected by Phantom Power, so it’s best to
consult your mic’s user’s manual for details.
34. Level Meter
The AM Gold’s 10-segment level meters give an
accurate indication of when audio levels of the MAIN
L/R output reach certain levels. Phonic suggests
setting the various levels controls so that the level
sits around the 0 to +3 area.
35. Main L/R Control
This control is nal level control for the main left and right
audio feed, sent to the Main L and R output. The AM5GE
features a rotary control while the AM6GE oers a fader.
27
30
31
33
34
35
32
2728
29
30
31
32
33
34
35
AM5GE
AM6GE

AM5GE / AM6GE
8
English
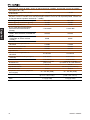
SPECIFICATIONS
AM
5
GE AM
6
GE
Inputs
Total Channels
5 6
Balanced Mono Mic / Line Channel 1 2
Balanced Stereo Mic/Line Channel - -
Balanced Stereo Line Channel 2 2
AUX Return - 1 stereo
2T Input Stereo RCA & mini-stereo Stereo RCA
Headset/Microphone Yes (1/8" TRS + 1/8" TS) Yes (1/8" TRS + 1/8" TS)
Outputs
Main L/R Stereo 1x 1/4" TRS 2x 1/4" TRS
AUX Send - 1
Rec Out Stereo RCA Stereo RCA
CTRL RM L/R - 2 x 1/4" TS
Phones 1 1
Channel Strips 3 4
AUX/EFX Send - 1
Pan/Balance Control Yes Yes
Volume Controls Rotary Rotary
Master Section
Phones Level Control Yes Yes
Main L/R Level Control Rotary VR 60 mm fader
USB Interface
Stereo In/Out Stereo In/Out
Connector Types USB Type-B USB Type-B
Interface Bit Rate 24-bit 24-bit
Interface Sampling Rate 48 kHz 48 kHz
USB Return Button MAIN / PHONES MAIN / CTRL RM
Card Recorder
WAV or MP3 WAV or MP3
Card Compatible Playback Formats WAV, MP3, FLAC WAV, MP3, FLAC
Bluetooth Connectivity
2.4GHz 2.4GHz
Metering
2 x 10 2 x 10
Phantom Power Supply
+48V DC +48V DC
Frequency Response
(Mic input to any output)
20Hz - 60KHz +0/-1 dB +0/-1 dB
20Hz - 100KHz +0/-3 dB +0/-3 dB

AM5GE / AM6GE
English
9
Crosstalk
(1KHz @ 0dBu, 20Hz to 20KHz bandwidth, channel in to main L/R outputs)
Channel fader down, other channels at
unity
<-90 dB <-90 dB
Noise
(20Hz to 20KHz; measured at main output, Channels 1-4 unit gain; EQ at; all channels on main mix;
channels 1/3 as far left as possible, channels 2/4 as far right as possible. Reference=+6dBu)
Master @ unity, channel fader down -86.5 dBu -86.5 dBu
Master @ unity, channel fader @ unity -84 dBu -84 dBu
S/N ratio, ref to +4 >90 dB >90 dB
Microphone Preamp E.I.N.
(150
ohms terminated, max gain)
<-129.5 dBm <-129.5 dBm
THD
(Any output, 1KHz @ +14dBu,
20Hz to 20KHz, channel inputs)
<0.005% <0.005%
CMRR
(1 KHz @ -60dBu, Gain at
max.)
80 dB 80 dB
Maximum Level
Mic Preamp Input +10 dBu +10 dBu
All Other Input +22 dBu +22 dBu
Balanced Output +28 dBu +28 dBu
Impedance
Mic Preamp Input 2 K ohms 2 K ohms
All Other Input (except insert) 10 K ohms 10 K ohms
RCA 2T Output 1.1 K ohms 1.1 K ohms
Equalization
2-band, +/ -15 dB
(mono only)
2-band, +/-15 dB
(3-band on Stereo Ch)
Low EQ 80 Hz 80 Hz
Mid EQ - 2.5 KHz (stereo ch)
Hi EQ 12 KHz 12 KHz
Power Requirement
(depends on
region)
5V - 20V DC (USB) 5V - 20V DC (USB)
Dimensions (W x H x D)
155.6 x 50.5 x 244 mm
(6.12" x 1.99" x 8.82")
190 x 56 x 233 mm
(7.48" x 2.2" x 9.17")
Weight 1.1 kg (2.4 lbs) 1.5 kg (3.3 lbs)

AM5GE / AM6GE
10
English
SERVICE AND REPAIR
For replacement parts, service and repairs please contact the Phonic distributor in your
country. Phonic does not release service manuals to consumers, and advice users to not
attempt any self repairs, as doing so voids all warranties. You can locate a dealer near you at
http://www.phonic.com/where-to-buy/.
WARRANTY INFORMATION
Phonic stands behind every product we make with a no-hassles warranty. Warranty coverage
may be extended, depending on your region. Phonic Corporation warrants this product for a
minimum of one year from the original date of purchase against defects in material and
workmanship under use as instructed by the user’s manual. Phonic, at its option, shall repair
or replace the defective unit covered by this warranty. Please retain the dated sales receipt as
evidence of the date of purchase. You will need it for any warranty service. No returns or repairs
will be accepted without a proper RMA number (return merchandise authorization). In order to
keep this warranty in effect, the product must have been handled and used as prescribed in the
instructions accompanying this warranty. Any tampering of the product or attempts of self repair
voids all warranty. This warranty does not cover any damage due to accident, misuse, abuse,
or negligence. This warranty is valid only if the product was purchased new from an authorized
Phonic dealer/distributor. For complete warranty policy information, please visit
http://www.phonic.com/warranty/.
CUSTOMER SERVICE AND TECHNICAL SUPPORT
We encourage you to visit our online help at http://support.phonic.com/. There you can find
answers to frequently asked questions, tech tips, driver downloads, returns instruction and other
helpful information.
FCC Caution: To assure continued compliance, any changes or modifications not expressly
approved by the party responsible for compliance could void the user's authority to operate this
equipment. (Example - use only shielded interface cables when connecting to computer or
peripheral devices).
THIS DEVICE COMPLIES WITH PART 74 OF THE FCC RULES. This equipment complies with
FCC RF radiation exposure limits set forth for an uncontrolled environment.
http://www.phonic.com

English Español
AM5GE / AM6GE
11
INDICE
Phonic se reserva el derecho de mejorar o alterar cualquier información
provista dentro de este documento sin previo aviso.
INTRODUCCIÓN
1
CARACTERISTICAS
1
CONFIGURACIÓN INSTANTÁNEA
1
CONEXION PARA ORDENADOR
2
HACIENDO CONEXIONES
4
CONTROLES Y CONFIGURACIONES
6
ESPECIFICACIONES
7
APÉNDICE
APLICACIÓN
1
MANUAL DEL USUARIO

English Español
AM5GE / AM6GE
12

English Español
AM5GE / AM6GE
1
INTRODUCCIÓN
Gracias por comprar uno de los mezcladores compac-
tos de alta calidad de Phonic. Los mezcladores AM
Gold Edition han sido diseñados por nuestros talento-
sos ingenieros y son fantásticos mezcladores en estilo
y rendimiento. Estas nuevas series se crearon para
brindar una experiencia de mezcla más elegante con
un diseño estético más agradable que el que había
disponible anteriormente. La serie AM cuenta con
controles de intensidad de señal (GAIN), niveles de
distorsión increíblemente bajos, manejo de señal lineal
de +22 dBu y rangos dinámicos increíblemente am-
plios, estas pequeñas máquinas tendrán una inuencia
increíble en su estudio o lugares en vivo.
Antes de comenzar a conectar su unidad, le recomen-
damos que eche un vistazo a este manual. En el
interior, encontrará datos y cifras importantes sobre la
configuración, el uso y las aplicaciones de su nuevo
mezclador. Si no siente la necesidad de leer este man-
ual, le recomendamos que al menos eche un vistazo
a la sección Configuración instantánea. Después de
haber leído este manual (le aplaudimos si leyó todo el
manual), guárdelo en un lugar que sea fácil de encon-
trar, porque es posible que lo necesite en el futuro.
CARACTERISTICAS
AM5GE
Entrada “Combo” de micro / lineal Neutrik bal-
anceada con compresor y ecualizador de 2 ban-
das
2 entradas estéreo con balance y controles de
nivel
Interfaz de audio USB estéreo para conectarse a
computadoras Windows y Mac (24 bits, 48 KHz)
Reproducción de archivos multimedia digitales
desde medios TransFlash
Módulo interno TransFlash para grabación estéreo
de alta calidad en formatos WAV o MP3
Conectividad BT de 2.4GHz para transmitir audio
digital directamente desde teléfonos inteligentes y
tabletas
Alimentación fantasma de 48V para entrada de
micrófono
Medición de pico y VU (10 segmentos)
Indicadores de picos en el canal de entrada mono
2T RTN asignable individualmente a Principal o
Auriculares
Entradas de retorno estéreo RCA 2T más mini-es-
téreo
Salida maestra balanceada con control rotativo
principal
AM6GE
2 entradas combinadas de micro / lineal Neutrik
“Combo” con ecualizador de 3 bandas y compre-
sor variable
2 entradas estéreo con ecualizadores de 3 bandas
Interfaz de audio USB estéreo para conectarse a
computadoras Windows y Mac (24 bits, 48 KHz)
Reproducción de archivos multimedia digitales
desde medios TransFlash
Módulo interno TransFlash para grabación estéreo
de alta calidad en formatos WAV o MP3
Conectividad BT de 2.4GHz para transmitir audio
digital directamente desde teléfonos inteligentes y
tabletas
Un retorno AUX estéreo
Envío AUX post-fader en cada entrada
Alimentación fantasma global de + 48V para en-
tradas de micrófono
Medición de pico y VU (10 segmentos)
Indicadores de picos en ambos canales de entra-
da mono
2T RTN asignable individualmente a la sala princi-
pal o de control
Salida principal equilibrada con fader de 60 mm.
Conectores de micrófono y auriculares para auric-
ulares, ideales para transmisión en vivo y confer-
encias web
CONFIGURACIÓN RAPIDA
Primeros Pasos
1. Asegúrese que toda la corriente esté apagada en
su mezcladora. Para asegurarse de que toda la
alimentación este desactivada, recomendamos
que nuestros utilizadores desconecten el cable
de alimentación de corriente alterna.
2. Todos los faders y controles de nivel deben ser
posicionados en el nivel más bajo y todos los ca-
nales apagados para asegurarse de que ningún
sonido sea enviado inadvertidamente a través
de las salidas cuando se encienda el dispositivo.
Todos los niveles pueden ser alterados a grados
aceptables después de haber encendido el dis-
positivo.
3. Conecte todos los instrumentos y equipos desea-
dos en las diversas entradas del dispositivo. Esto
puede incluir dispositivos ha señal de lineares,
tales como teclados y cajas de ritmos, micró-
fonos y/o las guitarras, etc.
4. Conecte cualquier equipo necesario en las diver-
sas salidas del dispositivo. Esto podía incluir am-
plicadores, altavoces, monitores, procesadores
de señal y/o dispositivos de grabación.
5. Conecte el cable de alimentación de corriente al-
terna (CA) en el puerto de entrada previsto para
el suministro de energía AC en la parte posterior
del dispositivo, naturalmente asegúrese de ench-
ufar la otra parte del cable de alimentación a un
enchufe adecuado.
6. Active el interruptor de encendido y siga las
“instrucciones de Configuración de Canal” para
obtener lo máximo de su equipo.

English Español
AM5GE / AM6GE
2
CONEXIONES CON UNA
COMPUTADORA
Simplemente conecte el cable USB incluido con su AM
GE a su computadora personal, usted podrá enviar
señales de calidad DVD (16-bit estéreo con una fre-
cuencia de muestreo de 48KHz) a su mezcladora. Con
este proceso usted está convirtiendo su AM GE en una
tarjeta de sonido altamente eciente para conectar y
usar desde su computadora.
El USB envía un flujo de señal de audio al Central
izquierdo y derecho (record out) de su mezcladora a
la computadora. Usted puede emplear cualquier pro-
grama Digital de Audio Workstation (DAW) para grabar
la señal desde su mezcladora AM. Usted también
deberá haber congurado su Mezcladora como su dis-
positivo de audio predeterminado.
El interfase USB también devuelve las señales audio
desde su computadora a la sección de mezcla “2T
RTN/USB”.
Windows
1. Conecte la mezcladora AM a al computadora por
medio del cable USB incluido.
2. Espere que Windows localice la unidad e instale
el driver apropiado.
3. Entre al Panel de Control y seleccione los dis-
positivos de Sonido y Audio.
4. En esta etapa elija el Audio tab y seleccione
“USB Audio Codec” como su sonido de grabación
predeterminado y dispositivo de reproducción.
5. Dependiendo si usted usa Windows XP, Vista, 7,
8.1 o 10, habrá diferencias pero la conguración
siempre se podrá encontrar en el menú del Panel
de Control de audio.
6. Si usted no desea usar su AM como el dispositivo
predeterminado de audio, simplemente entre en
su DAW u otro programa de audio y seleccione
su dispositivo predeterminado en el programa
solamente.
7. Asegúrese de que la configuración minima de
su buer este jada en 64 muestreos (samples)
para evitar ruidos molestos e interferencias.
Mac
1. Conecte la mezcladora AM a la computadora por
medio del cable USB incluido.
2. Entre al menú AUDIO MIDI SETUP.
3. Seleccione el “USB Audio Codec” como su disposi-
tivo de entrada y salida.
4. Ahora el AM es su dispositivo de audio predetermi-
nado.
5. Alternativamente, entre en su programa de DAW (u
otro programa de audio) y seleccione “USB Audio
Codec” en el dispositivo de preferencia.
6. Asegúrese de que la conguración minima de su
buer este jada en 64 muestreos (samples) para
evitar ruidos molestos e interferencias.
Instrucciones de Configuración
de Canal
1. Para garantizar que el correcto nivel de audio del
dicho canal de entrada haya sido configurado,
cada control de nivel de entrada de la Mezcla-
dora debe ser girado a la más izquierda posible
(debe ser -∞).
2. Ninguna otra entrada (aparte de la que se está
configurando) debería tener un dispositivo
conectado alguno, de echo asegurará que la
señal con la cual congura su canal sea la más
pura e inalterada posible.
3. Cuando el usuario configure el canal, debería
asegurarse de que ese dicho canal reciba una
señal con una intensidad similar a la que recibirá
cuando en uso verdadero.
Por ejemplo, si el canal será utilizado con un
micrófono, entonces usted tendrá que hablar o
cantar con la misma intensidad que lo haría el
artista cuando ese haga su actuación; si una
guitarra debe de ser utilizada con el dicho canal,
entonces la guitarra también tendrá que ser
tocada de la misma forma que el protagonista
lo haría durante su verdadera actuación (y así
sucesivamente). Configurando sus canales con
los niveles adecuados siempre le asegurara que
sus canales sean totalmente precisos y de esa
forma le evitara ajustar sus canales durante el
mismo evento.
4. Congure la intensidad de la señal (GAIN) de tal
manera que el medidor de nivel indique que el
nivel de su audio se estabilice alrededor de 0 dB.
5. Este canal está ahora listo para ser utilizado;
usted puede detener la señal audio de congura-
ción.
6. El usuario tendrá que repetir ese mismo proceso
para otros canales.

English Español
AM5GE / AM6GE
3
MÓDULO TF/BT (GRABACIÓN TF)
1. Inserte una tarjeta TF con formato FAT-32 (hasta
64 GB).
2. En el menú principal, seleccione ‘Grabaciones/
Recordings’ y presione PLAY.
3. Aquí tiene las opciones: ‘Iniciar Grabación de
Voz/Start Voice Recording’, ‘Configuración
de Grabación/Record Settings’, ‘Formato de
grabación/Record Format’ y ‘Biblioteca de Graba-
ciones/Recordings Library’ (entre otras).
4. Ajuste el ‘Formato de Grabación’ (MP3 o WAV) y
‘Conguración de Grabación’ según sea necesa-
rio (los bitrates de grabación disponibles depen-
den del formato).
5. Seleccione “Iniciar grabación de voz/Start Voice
Recoding” para comenzar a grabar de inmediato.
La unidad guardará un archivo de audio en una
carpeta ‘RECORD’ en su tarjeta TF insertada.
6. Presione el botón PLAY para pausar la
grabación. Al presionar nuevamente el botón
PLAY se reanudará la grabación desde la
posición en la que se pausó.
7. Presione el botón STOP/MENU en cualquier mo-
mento para detener la grabación. El dispositivo
le preguntará si desea guardar su grabación.
Seleccione “Sí” o “No”. Sus registros se pueden
encontrar más adelante en la “Biblioteca de
grabaciones”.
8. Presione el botón STOP/MENU para salir.
MÓDULO TF / BT (CONFIGURACIÓN
BLUETOOTH)
1. Seleccione la función Bluetooth a través del
módulo TF / BT.
2. Abra las opciones de conguración de Bluetooth
de su teléfono inteligente o tableta para encon-
trar el dispositivo Bluetooth “PHONIC”.
3. Si se solicita, la contraseña para la función Blue-
tooth es 0000. Muchos teléfonos inteligentes
modernos ingresarán automáticamente esta con-
traseña como contraseña predeterminada.
4. Las señales de audio recibidas a través de la in-
terfaz Bluetooth se enrutarán al canal TF / BT en
el mezclador.
5. Para reiniciar la conexión, apague y vuelva a
encender la conexión Bluetooth de su teléfono
inteligente o tableta.
6. Al usar teléfonos celulares y tabletas, puede
ser una buena idea activar el “Modo avión” para
evitar que las llamadas telefónicas o las notica-
ciones interrumpan su audio.
Nota: No todos los dispositivos modernos que incluyen
una función Bluetooth permiten la reproducción de au-
dio externo. En el caso de las computadoras portátiles
en particular, Bluetooth puede usarse solo para trans-
misión de datos, dependiendo del modelo. Esta es
una limitación de estos dispositivos y no podrá usar la
función Bluetooth con estos dispositivos.
MÓDULO TF / BT (REPRODUCCIÓN TF)
1. Inserta una tarjeta TF apropiadamente formateada.
2. Seleccione la opción “Música/Music” en el menú
principal y presione PLAY para ingresar a la
función de reproducción. El botón STOP / MENU
actúa como un botón ‘atrás’ cuando navega por
los menús.
3. Seleccione ‘Todas las canciones’, ‘Artistas’,
‘Álbumes’, ‘Géneros/Genres’, etc., según corre-
sponda.
4. Presione el botón PLAY para reproducir la pista
actual a través del canal TF / BT, o los botones
<< y >> para saltar hacia adelante y hacia atrás
entre las pistas. El mezclador puede reproducir
archivos MP3, WAV y FLAC.
5. Mantenga presionado el botón STOP / MENU
para detener la reproducción.
6. Durante la reproducción, presione rápidamente
el botón STOP / MENU para acceder a las fun-
ciones Shue y Repeat.
Modo de Repetición/ Repeat Mode – hay 4 modos
de repetición disponibles.
No Repetir/No Repeat – Reproduce cada archi-
vo en la carpeta actual o raíz una vez.
Repetir 1/Repeat 1 – Continuamente repetir la
canción seleccionada.
Repita Todo/Repeat all – Continuamente repite
todas las canciones.
Reproducción Aleatoria/Shuffle – Reproducción
aleatoria de archivos en la carpeta actual.

English Español
AM5GE / AM6GE
4
Entradas y Salidas
1. Conectores de “Entrada Combinada/Combo Input”
Estas tomas aceptan entradas de conectores
XLR de 3 pines y TRS de 6,35 mm para señales
balanceadas y no balanceadas. Se pueden usar
junto con micrófonos (esto incluye micrófonos de
condensador profesionales, dinámicos o de cinta)
que poseen un conector macho XLR estándar y
preamplicadores ultra silenciosos que permiten una
replicación de sonido altamente precisa. También se
pueden usar con varios dispositivos de nivel lineal,
como teclados, cajas de ritmos, guitarras eléctricas y
una variedad de otros instrumentos eléctricos.
NOTA: Cuando estas entradas se utilizan con micrófonos de
condensador, se debe activar la alimentación fantasma. Sin
embargo, cuando el botón Phantom Power está activado, los
micrófonos e instrumentos de terminación única (no balanceados)
no deben utilizarse en las entradas de micrófono a menos que el
fabricante del micrófono lo haya aprobado especícamente.
2. Canales Estéreo
Todos los mezcladores AM5GE y AM6GE cuentan
con 2 canales estéreo, que les permite tener más
verastilidad. Cada uno de estos canales cuenta con
dos conectores de 6,35 mm para conectar varios
dispositivos de entrada de nivel lineal, como teclados
electrónicos, guitarras y procesadores de señal
externos o mezcladores. Los canales estéreo también
pueden utilizarse como canales mono, donde la
señal de cualquier dispositivo conectado a la entrada
izquierda se duplicará a la derecha (esto no funciona
a la inversa).
4
5
6
7
8
9
1
2
3
1
2
7
8
9
5
6
3. Retorno AUX Estéreo (solo AM6GE)
Estas entradas TS de 6.35 mm se usan para devolver el
audio al mezclador, un audio que ha sido procesado por un
procesador de señales externo. Si es realmente necesario,
también pueden usarse como entradas adicionales, estas
entradas también poseen un control de nivel que se puede
encontrar en la parte frontal del mezclador. Al igual que con
los canales de entrada estéreo, estas entradas pueden
utilizarse como canales mono conectando cualquier
dispositivo a la entrada izquierda del retorno AUX estéreo.
4. Envío AUX (solo AM6GE)
Estas salidas de 6.35MM TS se pueden utilizar
para conectar el mezclador a un procesador de
efectos digital externo, o incluso a un amplicador y
altavoces (según la conguración deseada). La señal
se toma del control AUX en cada canal de entrada.
5. Auriculares (PHONES)
Esta salida estéreo se debe utilizar con auriculares,
lo que permite controlar la mezcla. El nivel de
audio de esta salida se controla mediante el control
“Phones / Control Room” o el control PHONES.
6. Conectores de auriculares
Se incluye una salida de auriculares estéreo y una entrada
de micrófono (1/8 ”TRS y conectores TS, respectivamente)
para la conexión de auriculares modernos. Estos son
perfectos para transmisiones en vivo y conferencias
digitales cuando se usa la AM Gold como tarjeta de sonido.
HACER CONEXIONES
AM5GE
AM6GE

English Español
AM5GE / AM6GE
5
7. Salida principal L y R
Estos dos puertos emitirán la señal de nivel lineal
estéreo final enviada desde el bus de mezcla
principal. El propósito principal de estos conectores es
enviar la salida principal a dispositivos externos, que
pueden incluir amplicadores de potencia (y, a su vez,
un par de altavoces), otros mezcladores, así como
una amplia gama de otros posibles procesadores de
señal (ecualizadores, cruces, etcétera).
8. Salida de Grabación
Estas salidas acomodarán cables RCA, que pueden
alimentarse a una variedad de dispositivos de
grabación. El AM5GE también cuenta con una salida
mini estéreo, perfecta para dispositivos de grabación
digital de nivel de consumidor.
9. 2T retorno / 2T Return
Estas entradas RCA se utilizan para conectar el
mezclador con dispositivos externos paralelos,
como submezcladores o procesadores de efectos
externos, que reciben la señal procesada de otra
fuente y la alimentan a los conectores Main L y R o
al conector “Phones mixing bus”.
Panel Trasero
10. Salidas de la Sala de Control (solo AM6GE)
Estas dos salidas de conectores de 6.35mm (1/4 ”)
alimentan la señal alterada por el control de nivel
de Control Room / Phones en la parte frontal del
AM6GE. Esta salida tiene un uso extensivo, ya
que puede usarse para enviar la señal desde el
mezclador a un monitor activo, para monitorear la
señal de audio o, alternativamente, para agregar
mezcladores o dispositivos de procesamiento de
señales externos, así como para actuar. como salida
de “relleno lateral”, que suministra audio a áreas que
los altavoces principales no alcanzan.
12. Interfaz USB
Este conector USB-B es para conectar el AM Gold
a cualquier computadora PC moderna. Cuando está
conectado, la computadora debe reconocer el AM
Gold como una tarjeta de sonido, permitiendo que el
audio estéreo se envíe hacia y desde la computadora.
12. Conector de Alimentación
Este puerto se utiliza para conectar una fuente de
alimentación externa, lo que permite suministrar
energía al mezclador. Este puerto acepta 5V de
voltaje de CC a través de un conector USB-C.
Phonic ha incluido un adaptador de alimentación
y un cable para alimentar la unidad. Asegúrese
que el voltaje sea adecuado antes de encender el
mezclador AM Gold. El interruptor de encendido se
encuentra en la parte frontal de la mezcladora.
AM5GE
AM6GE
12
11
1012 11

English Español
AM5GE / AM6GE
6
CONTROLES Y AJUSTES
Controles de Canal
13. Botón de pad
El botón PAD se utiliza para
atenuar la señal de entrada en
25 dB. Esto generalmente solo
se utilizará cuando se conecten
dispositivos de entrada de nivel
lineal.
14. Controles de Intensidad de
Señal (GAIN) “Line / Mic”
Este control rotativo, ajusta
la sensibilidad de la señal de
entrada del puerto “Line/Mic”.
La intensidad de la señal (Gain)
debe ajustarse a un nivel que
permita al usuario obtener un
sonido de máxima calidad, sin
perturbar el flujo de la señal.
Se puede lograr una calidad
de señal más alta y un flujo
de señal óptimo ajustando
la señal de tal manera que
el indicador de pico solo se
ilumine ocasionalmente. El
AM5GE cuenta con un control
de la intensidad de la señal (GAIN) para el canal 1,
ubicado en la parte frontal del mezclador, mientras
que el AM6GE cuenta con el control de la intensidad
de la señal (GAIN) en ambos canales 1 y 2, ubicado
directamente debajo de las entradas lineales.
15. Compresor e Indicador
Este control, controla la función de compresor a
bordo en canales mono. Al girar este control se
ajustarán el umbral y la relación del compresor en
diferentes grados. Una vez que alcanza la posición
superior (12:00 de un reloj), el control ajustará la
conguración de compresión junto con un expansor
integrado (o, en otras palabras, un compander). El
LED que acompaña a este control se encenderá
cuando se active el compresor.
16. Control de Alta Frecuencia
Este control se utiliza para dar un impulso o corte
de ± 15 dB a los sonidos de alta frecuencia (12
kHz). Esto ajustará la cantidad de agudos incluidos
en el audio del canal, agregando fuerza y nitidez a
sonidos como guitarras, platillos y sintetizadores.
17. Control de Baja Frecuencia
Este control se utiliza para dar un impulso o corte
de ± 15 dB a los sonidos de baja frecuencia (80
Hz). Esto ajustará la cantidad de bajas frecuencias
incluidas en el audio del canal, y traerá más calidez
y toque a la batería y los bajos.
18. Control AUX (solo
AM6GE)
Estos controles alteran el nivel
de la señal que se envía a los
envíos AUX, que se pueden
usar junto con procesadores
de señales externos, o
simplemente como una salida
auxiliar para cualquier medio
requerido.
19. Controles Pan / Balance
Este control alterna el grado
o nivel de audio que deben
recibir los lados izquierdo y
derecho de la mezcla principal.
En los canales mono, este
control ajustará el nivel que la
izquierda y la derecha deberían
recibir (paneo), mientras que
en un canal estéreo, al ajustar
el control BAL se atenuarán
las señales de audio izquierda
o derecha (balance). Ambos
modelos AM6GE y AM5GE
cuentan con un control PAN
o BAL en cada uno de sus
canales.
20. Indicador de Picos
Este indicador LED se iluminará cuando el
dispositivo alcance picos altos, 6 dB antes de que
se produzca una sobrecarga. Es mejor ajustar
la intensidad de la señal (GAIN) del canal de tal
manera que el indicador PEAK se ilumine en
intervalos. Esto asegurará un mayor rango dinámico
de audio. El indicador Peak aparece en los canales
mono de cada modelo.
21. Control de Nivel
Este control alterará el nivel de señal que se envía
desde el canal correspondiente al bus de mezcla
principal.
Grabar/Reproducir
22. Ranura para Tarjeta TF
Inserte una tarjeta ash formateada adecuadamente
(FAT-32) en esta ranura. Esta tarjeta se puede
utilizar para grabar archivos MP3 o WAV.
13
14
15
16
17
19
21
20
13
14
15
16
17
18
19
21
20
22
23
24 26
25

English Español
AM5GE / AM6GE
7
23. Pantalla
Esta pantalla mostrará el número de la pista que se
está reproduciendo actualmente. También ofrece
indicadores de reproducción, pausa y grabación, así
como el tiempo de reproducción / grabación actual.
24. Botón STOP/MENU
Presione este botón para detener la reproducción
o grabación cuando corresponda. Mantenga
presionado el botón para acceder al menú principal
del grabador / reproductor TF.
25. Botones Atrás / Siguiente
Al presionar estos botones, los usuarios podrán retroceder
y avanzar entre las pistas. Cuando el menú está activado,
estos botones se utilizan para desplazarse por las opciones
de la pantalla.
26. Botón de Reproducción
Presione este botón para iniciar y detener la
reproducción y grabación de la pista actualmente
visualizada. Comenzar una pista después de que esté
en pausa reanudará la pista desde el punto en que se
pausó (tanto en el modo de grabación como en el de
reproducción).
Sección Principal
27. Botón de Encendido
Presione este botón para encender el mezclador AM
Gold. Cuando se enciende, se encenderá una luz LED
dentro del botón.
28. Control de Retorno AUX (solo AM6GE)
Este control ajusta la señal entrante de las entradas de
retorno AUX estéreo. Esta señal se envía a las mezclas
seleccionadas por los botones de abajo.
29. Botones de Enrutamiento de Retorno AUX
(solo AM6GE)
Estos dos botones permiten a los usuarios seleccionar
el destino de la señal de retorno AUX. Los usuarios
pueden optar por incorporar esta señal directamente
en su mezcla principal (PRINCIPAL) o monitorear el
retorno AUX enviándolo a la sala de control ya los
auriculares (CTRL RM). Estos pueden, por supuesto,
ser seleccionados simultáneamente.
30. Control de Auriculares (Control Room / Phones)
En el AM5GE, este control se usa para ajustar el
nivel de audio de la alimentación de los teléfonos,
que se enviará a la salida de los auriculares. Este
puerto se puede usar naturalmente junto con
auriculares o, si es necesario, como salida auxiliar.
Sin embargo, en el AM6GE, este control no solo
ajusta el nivel de los auriculares, sino también
el nivel de la señal enviada a la salida de la sala
de control. La salida de la sala de control se usa
comúnmente para monitorear la señal, como relleno
lateral o para agregar otros dispositivos externos.
31. Enrutamiento de Retorno 2T / USB
Al presionar uno de los botones en la sección de
control de retorno 2T / USB, se selecciona el destino
de las señales de retorno 2T y retorno USB. El
botón TO MAIN envía la señal a la mezcla principal,
mientras que los botones “TO PHONES” o “TO CTRL
RM” enviarán la señal a las mezclas Phones o Control
Room / Phones, respectivamente. Estos botones
pueden, por supuesto, usarse simultáneamente,
alimentando la señal a las mezclas Control Room /
Phones y Main L / R. Si no se activan los botones “a
Phones” o “a Ctrl Rm”, los auriculares y las salidas de
la sala de control recibirán la mezcla principal.
27
30
31
33
34
35
32
2728
29
30
31
32
33
34
35
AM5GE
AM6GE

English Español
AM5GE / AM6GE
8
32. Control 2T / USB
Gire este control giratorio para ajustar el nivel
entrante desde las entradas de retorno 2T y la
señal de retorno USB (tal como se envía desde la
computadora). La salida del USB se puede refinar
aún más a través de su computadora. La señal se
envía a los destinos seleccionados utilizando los
botones de enrutamiento 2T / USB.
33. Interruptor de Alimentación Fantasma
Cuando este interruptor está en la posición de
encendido, activa +48 V de alimentación fantasma
para ambas entradas de micrófono, permitiendo
que se usen micrófonos de condensador en estos
canales.
NOTA: ”Phantom Power” se debe utilizar solo en combinación
con micrófonos de condensador. Sin embargo, muchos
micrófonos modernos no se ven afectados por “Phantom
Power”, por lo que es mejor consultar el manual del usuario
de su micrófono para obtener más detalles.
34. Medidor de Nivel
Los medidores de nivel de 10 segmentos del
mezclador de AM Gold dan una indicación precisa
de cuándo los niveles de audio de la salida MAIN L /
R alcanzan ciertos niveles. Phonic sugiere congurar
los distintos controles de nivel para que el nivel se
ubique alrededor del área de 0 a +3.
35. Control Principal L / R
Este control ajusta el nivel nal para la alimentación de
audio principal izquierda y derecha, enviado a la salida
Main L y R. El AM5GE cuenta con un control giratorio,
mientras que el AM6GE tiene un fader.
27
30
31
33
34
35
32
2728
29
30
31
32
33
34
35
AM5GE
AM6GE

English Español
AM5GE / AM6GE
9
ESPECIFICACIONES
34. Medidor de Nivel
Los medidores de nivel de 10 segmentos del
mezclador de AM Gold dan una indicación precisa
de cuándo los niveles de audio de la salida MAIN L /
R alcanzan ciertos niveles. Phonic sugiere congurar
los distintos controles de nivel para que el nivel se
ubique alrededor del área de 0 a +3.
35. Control Principal L / R
Este control ajusta el nivel nal para la alimentación de
audio principal izquierda y derecha, enviado a la salida
Main L y R. El AM5GE cuenta con un control giratorio,
mientras que el AM6GE tiene un fader.
AM
5
GE AM
6
GE
Entradas
Total de Canales
5 6
Canal Equilibrado Mono Mic/Linea 1 2
Canal Estéreo Balanceado Mic/Linea - -
Canal Lineal Estéreo Equilibrado 2 2
AUX Return - 1 Estéreo
Entrada 2T Estéreo RCA y mini-estéreo Estéreo RCA
Auricular / Micrófono
Sí (TRS de 3,17 mm (1/8") + TS de
3,17 mm (1/8"))
Sí (TRS de 3,17 mm (1/8") + TS de
3,17 mm (1/8"))
Salidas
Estéreo Principal L / R 1x TRS de 6.35mm (1/4") 2x TRS de 6.35mm (1/4")
AUX Send - 1
Salida Rec (Rec Out) Estéreo RCA Estéreo RCA
CTRL RM L / R - 2 x 1/4" TS
Auriculares (Phones) 1 1
Enrutamiento de Canal 3 4
Envío AUX / EFX - 1
Control Pan / Balance Sí Sí
Controles de Volumen Rotativo Rotativo
Sección Principal (Master)
Control de Nivel para los Auriculares
(Phones)
Sí Sí
Control de Nivel Principal L / R VR Rotativo
Deslizador Potenciómetro
(Fader) de 60mm
Interfaz USB
Entrada/Salida Estéreo Entrada/Salida Estéreo
Tipos de Conectores USB Typo - B USB Typo - B
Velocidad de Bits de la Interfaz 24-bit 24-bit
Frecuencia de Muestreo de Interfaz 48 kHz 48 kHz
Botón de Retorno USB MAIN / PHONES MAIN / CTRL RM
Grabadora de Tarjetas
WAV o MP3 WAV o MP3
Formatos de Reproducción
Compatibles con Tarjetas
WAV, MP3, FLAC WAV, MP3, FLAC
Conectividad Bluetooth
2.4GHz 2.4GHz
Medida
2 x 10 2 x 10
Fuente de Alimentación Fantasma
+48V DC +48V DC
Respuesta de Frecuencia (Entrada de micrófono a cualquier salida)
20Hz - 60KHz +0/-1 dB +0/-1 dB
20Hz - 100KHz +0/-3 dB +0/-3 dB

English Español
AM5GE / AM6GE
10
Interferencia (1KHz @ 0dBu, ancho de banda de 20Hz a 20KHz, entrada del canal a las salidas
principales de L / R)
Fader de canal abajo, otros canales
ensamblados
<-90 dB <-90 dB
Ruido (20Hz a 20KHz; medido en la salida principal, intensidad de la señal de los canales (GAIN) 1-4;
EQ plano; todos los canales en la mezcla principal; canales 1/3 lo más a la izquierda posible, canales 2/4
lo más a la derecha posible. Referencia = + 6dBu)
Master @ unity, fader de canal abajo -86.5 dBu -86.5 dBu
Master @ unity, canal fader @ unity -84 dBu -84 dBu
Relación S / N, ref a +4 >90 dB >90 dB
Preamplicador de micrófono
E.I.N. (150 ohmios terminados,
intensidad de señal máxima
(GAIN))
<-129.5 dBm <-129.5 dBm
THD (cualquier salida, 1KHz @ +
14dBu, 20Hz a 20KHz, entradas de
canal)
<0.005% <0.005%
CMRR (1 KHz @ -60dBu,
intensidad de señal máxima
(GAIN))
80 dB 80 dB
Nivel Maximo
Entrada de Preamplicador de
Micrófono
+10 dBu +10 dBu
Todas las Otras Entradas +22 dBu +22 dBu
Salida Balanceada +28 dBu +28 dBu
Impedancia
Entrada de Preamplicador de
Micrófono
2 K ohmios 2 K ohmios
Todas las Otras Entradas (excepto la
inserción)
10 K ohmios 10 K ohmios
Salida RCA 2T 1.1 K ohmios 1.1 K ohmios
Ecualización
2-bandas, +/ -15 dB
(solo mono)
2-bandas, +/-15 dB
(3 bandas en el Canal Estéreo)
Ecualizador Bajo 80 Hz 80 Hz
Equalizador Medio - 2.5 KHz (Canal Estéreo)
Ecualizador Alto 12 KHz 12 KHz
Requisitos de Potencia (depende
de la región)
5V - 20V DC (USB) 5V - 20V DC (USB)
Dimensiones (AnxAlxP)
155.6 x 50.5 x 244 mm
(6.12" x 1.99" x 8.82")
190 x 56 x 233 mm
(7.48" x 2.2" x 9.17")
Peso 1.1 kg (2.4 lbs) 1.5 kg (3.3 lbs)

English Español
AM5GE / AM6GE
11
SERVICIO Y REPARACIÓN
Para refacciones de reemplazo y reparaciones, por favor póngase en contacto con nuestro
distribuidor de Phonic en su país. Phonic no distribuye manuales de servicio directamente a los
consumidores y, avisa a los usuarios que no intenten hacer cualquier reparación por si mismo,
haciendo ésto invalidará todas las garantías del equipo. Puede encontrar un distribuidor cerca
de usted en http://www.phonic.com/where-to-buy/.
INFORMACIÓN DE LA GARANTIA
Phonic respalda cada producto que hacemos con una garantía sin enredo. La cobertura de
garantía podría ser ampliada dependiendo de su región. Phonic Corporation garantiza este
producto por un mínimo de un año desde la fecha original de su compra, contra defectos en
materiales y mano de obra bajo el uso que se instruya en el manual del usuario. Phonic, a su
propia opinión, reparará o cambiará la unidad defectuosa que se encuentra dentro de esta
garantía. Por favor, guarde los recibos de venta con la fecha de compra como evidencia de la
fecha de compra. Va a necesitar este comprobante para cualquier servicio de garantía. No se
aceptarán reparaciones o devoluciones sin un número RMA apropiado (return merchandise
autorization). En orden de tener esta garantía válida, el producto deberá de haber sido
manejado y utilizado como se describe en las instrucciones que acompañan esta garantía.
Cualquier atentado hacia el producto o cualquier intento de repararlo por usted mismo,
cancelará completamente esta garantía. Esta garantía no cubre daños ocasionados por
accidentes, mal uso, abuso o negligencia. Esta garantía es válida solamente si el producto fue
comprado nuevo de un representante/distribuidor autorizado de Phonic. Para la información
completa acerca de la política de garantía, por favor visite http://www.phonic.com/warranty/.
SERVICIO AL CLIENTE Y SOPORTE TÉCNICO
Le invitamos a que visite nuestro sistema de ayuda en línea en https://support.phonic.com/.
Ahí podrá encontrar respuestas a las preguntas más frecuentes, consejos técnicos, descarga
de drivers, instrucciones de devolución de equipos y más información de mucho interés.
Nosotros haremos todo el esfuerzo para contestar sus preguntas lo antes posible.
FCC Caution: To assure continued compliance, any changes or modifications not expressly
approved by the party responsible for compliance could void the user's authority to operate this
equipment. (Example - use only shielded interface cables when connecting to computer or
peripheral devices).
THIS DEVICE COMPLIES WITH PART 74 OF THE FCC RULES. This equipment complies with
FCC RF radiation exposure limits set forth for an uncontrolled environment.
http://www.phonic.com

Appendix Apéndice
AM5GE / AM6GE
Recording Application Aplicación de Grabación
APPLICATION
On the following few pages you will nd a wide range of possible uses for the AM Gold mixers. Of course
these are far from the only applications that can be attributed to the mixers’ use; however they should give
you an idea of the possible uses that the various inputs and outputs have. The right combination of micro-
phones, guitars, drum machines, keyboards, as well as recording devices, signal processors, ampliers and
speakers, can make for the perfect live performance, home studio recording session or even a basic public
address, to name a few possibilities.
APLICACIÓN
En las siguientes páginas usted encontrará un amplio rango de las posibles aplicaciones para las mezcla-
doras AM GE. Por supuesto éstos están lejos de ser las únicas aplicaciones que se pueden atribuir al uso
de las mezcladoras, sin embargo, le darán una idea de las aplicaciones posibles que las diversas entradas y
salidas podrán ofrecerle. Podrá usted combinar micrófonos, guitarras, unidades de ritmos, teclados, dispo-
sitivos de grabación, procesadores de señal, amplicadores y altavoces para un funcionamiento en directo,
sesión de grabación de estudio o incluso una megafonía básica, por nombrar algunas posibilidades.
KEYBOARD OR SYNETHSIZER
TECLADO O SINTETIZADOR
BASS GUITAR
GUITARRA BASS
HEADPHONES
AUDÍFONOS
ACTIVE MONITORS
MONITORES ACTIVOS
COMPUTADORA PORTÁTIL
LAPTOP
1

Appendix Apéndice
AM5GE / AM6GE
Live Sound Application
Aplicación de Sonido en Vivo
2
TECLADO O SINTETIZADOR
GUITARRA BASS
AUDÍFONOS
REPRODUCT
CD PLAYER
OR DE CD
MIC MIC
BASS GUITAR
HEADPHONES
KEYBOARD OR SYNTHESIZER
COMPUTADORA PORTÁTIL
LAPTOP
ACTIVE MONITORS
MONITORES ACTIVOS
AMPLIFICADOR
AMPLIFIER
AURICULARES
HEADSET
IZQUIERDO
LEFT
DERECHO
RIGHT

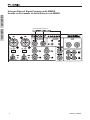
Appendix Apéndice
AM5GE / AM6GE
Usando un Procesador de Señal Externo con AM6GE
Using an External Signal Processor with AM6GE
PROCESADOR DE EFECTO
EFFECTS PROCESSOR
3

Appendix Apéndice
AM5GE / AM6GE
4

-
 1
1
-
 2
2
-
 3
3
-
 4
4
-
 5
5
-
 6
6
-
 7
7
-
 8
8
-
 9
9
-
 10
10
-
 11
11
-
 12
12
-
 13
13
-
 14
14
-
 15
15
-
 16
16
-
 17
17
-
 18
18
-
 19
19
-
 20
20
-
 21
21
-
 22
22
-
 23
23
-
 24
24
-
 25
25
-
 26
26
-
 27
27
-
 28
28
-
 29
29
-
 30
30
-
 31
31
-
 32
32


Phonic AM5GE Manual de usuario
- Categoría
- Mezcladores de audio
- Tipo
- Manual de usuario
en otros idiomas
- English: Phonic AM5GE User manual
Artículos relacionados
-
Phonic AM8GE Manual de usuario
-
Phonic AM 1204FX RW Manual de usuario
-
-
-
Phonic AM642DP Manual de usuario
-
-
-
-
-
Otros documentos
-
NGS NETSTEREO Ficha de datos
-
-
Sony DR-GA500 El manual del propietario
-
Optimus ME-PS2 Manual de usuario
-
GE 98971 Manual de usuario
-
Denver DJ-200 Manual de usuario
-
Bigben Unity Tab El manual del propietario
-
Optimus ME-PS1 Manual de usuario
-
 Audibax HA4000 v2 El manual del propietario
-
Infiniton DJ-M300 El manual del propietario
