Symbol Technologies Barcode Reader LS1900 Manual de usuario
- Categoría
- Lectores de códigos de barras
- Tipo
- Manual de usuario
Este manual también es adecuado para

LS1900
Series
LS 1900 Series.book Page -1 Thursday, May 31, 2001 2:04 PM

LS1900 Series
© 2001 SYMBOL TECHNOLOGIES, INC. All rights
reserved.
Symbol reserves the right to make changes to any product to
improve reliability, function, or design.
Symbol does not assume any product liability arising out of, or in
connection with, the application or use of any product, circuit, or
application described herein.
No license is granted, either expressly or by implication, estoppel, or
otherwise under any patent right or patent, covering or relating to any
combination, system, apparatus, machine, material, method, or
process in which Symbol products might be used. An implied license
only exists for equipment, circuits, and subsystems contained in
Symbol products.
Symbol and the Symbol logo are registered trademarks of Symbol
Technologies, Inc. Other product names mentioned in this manual
may be trademarks or registered trademarks of their respective
companies and are hereby acknowledged.
Symbol Technologies, Inc.
One Symbol Plaza
Holtsville, N.Y. 11742-1300
http://www.symbol.com
Patents
This product is covered by one or more of the following U.S. and foreign Patents:
U.S. Patent No. 4,460,120; 4,496,831; 4,593,186; 4,603,262; 4,607,156;
4,652,750; 4,673,805; 4,736,095; 4,758,717; 4,816,660; 4,845,350; 4,896,026;
4,897,532; 4,923,281; 4,933,538; 4,992,717; 5,015,833; 5,017,765; 5,021,641;
5,029,183; 5,047,617; 5,103,461; 5,113,445; 5,130,520; 5,140,144; 5,142,550;
5,149,950; 5,157,687; 5,168,148; 5,168,149; 5,180,904; 5,216,232; 5,229,591;
5,230,088; 5,235,167; 5,243,655; 5,247,162; 5,250,791; 5,250,792; 5,260,553;
5,262,627; 5,262,628; 5,266,787; 5,278,398; 5,280,162; 5,280,163; 5,280,164;
5,280,498; 5,304,786; 5,304,788; 5,306,900; 5,321,246; 5,324,924; 5,337,361;
5,367,151; 5,373,148; 5,378,882; 5,396,053; 5,396,055; 5,399,846; 5,408,081;
5,410,139; 5,410,140; 5,412,198; 5,418,812; 5,420,411; 5,436,440; 5,444,231;
5,449,891; 5,449,893; 5,468,949; 5,471,042; 5,478,998; 5,479,000; 5,479,002;
5,479,441; 5,504,322; 5,519,577; 5,528,621; 5,532,469; 5,543,610; 5,545,889;
5,552,592; 5,557,093; 5,578,810; 5,581,070; 5,589,679; 5,589,680; 5,608,202;
5,612,531; 5,619,028; 5,627,359; 5,637,852; 5,664,229; 5,668,803; 5,675,139;
5,693,929; 5,698,835; 5,705,800; 5,714,746; 5,723,851; 5,734,152; 5,734,153;
5,742,043; 5,745,794; 5,754,587; 5,762,516; 5,763,863; 5,767,500; 5,789,728;
5,789,731; 5,808,287; 5,811,785; 5,811,787; 5,815,811; 5,821,519; 5,821,520;
5,823,812; 5,828,050; 5,850,078; 5,861,615; 5,874,720; 5,875,415; 5,900,617;
5,902,989; 5,907,146; 5,912,450; 5,914,478; 5,917,173; 5,920,059; 5,923,025;
5,929,420; 5,945,658; 5,945,659; 5,946,194; 5,959,285; 6,002,918; 6,021,947;
6,036,098; 6,047,892; 6,050,491; 6,053,413; 6,056,200; 6,065,678; 6,067,297;
6,068,190; 6,082,621; 6,084,528; 6,088,482; 6,092,725; 6,101,483; 6,102,293;
6,104,620; 6,114,712; 6,115,678; 6,119,944; 6,123,265; 6,131,814; 6,138,180;
6,142,379; 6,172,478; 6,176,428; 6,178,426; 6,186,400; 6,188,681; D305,885;
D341,584; D344,501; D359,483; D362,453; D363,700; D363,918; D370,478;
D383,124; D391,250; D405,077; D406,581; D414,171; D414,172; D418,500;
D419,548; D423,468; D424,035; D430,158; D430,159; D431,562; D436,104.
Invention No. 55,358; 62,539; 69,060; 69,187 (Taiwan); No. 1,601,796; 1,907,875;
1,955,269 (Japan).
European Patent 367,299; 414,281; 367,300; 367,298; UK 2,072,832; France 81/
03938; Italy 1,138,713.
rev. 04/01
LS 1900 Series.book Page 0 Thursday, May 31, 2001 2:04 PM

1
Quick Reference
Introduction
The LS1900 Series scanner combines excellent scanning
performance and advanced ergonomics to provide the best
value in a lightweight laser scanner. Whether used as a
hand-held scanner or in hands-free mode in a stand, the
LS1900 Series ensures comfort and ease of use for
extended periods of time.
Note: Unless otherwise noted, the term LS190xx
refers to all versions of the scanner.
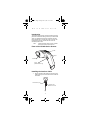
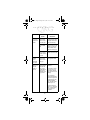
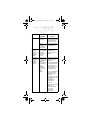
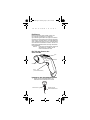
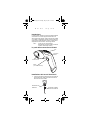
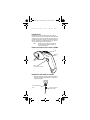
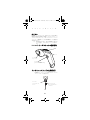
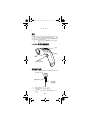
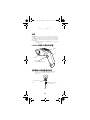
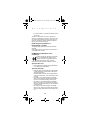
Parts of the LS1900 Series Scanner
Installing the Interface Cable
1. Plug the interface cable modular connector into the
cable interface port on the bottom of the LS1900 Se-
ries handle.
Exit Window
Trigger
(Model LS190xT only)
LED
Beeper
Interface cable
modular connector
Cable interface port
eng.fm Page 1 Friday, June 1, 2001 11:20 AM

2
LS1900 Series
2. Connect the other end of the interface cable to the
host.
3. Connect the power supply to the cable (if neces-
sary).
4. Scan the appropriate bar code(s) beginning on
page 33 to communicate with the host.
Removing the Interface Cable
Unplug the installed cable’s modular connector by
depressing the connector clip with the tip of a screwdriver.
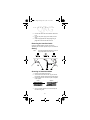
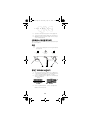
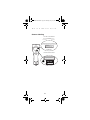
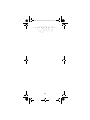
Aiming
Note: The scanner performs best when it is not ex-
actly perpendicular to the bar code.
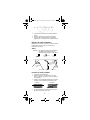
Scanning In Hand-Held Mode
1. Ensure all connections are secure.
2. Aim the scanner at the bar code. (If your scanner
has a trigger, aim the scanner and press the trigger.)
3. Ensure the scan line crosses every bar and space
of the symbol.
4. Upon successful decode, the scanner beeps and
the LED turns green.
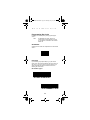
6
6
4
012345 012345
RIGHT
WRONG
eng.fm Page 2 Friday, June 1, 2001 11:20 AM

3
Quick Reference
Scanning in Hands-Free Mode
In the stand, the scanner is in constant-on mode. When you
remove the scanner from the stand it operates in its normal
hand-held mode (e.g., constant-on mode or trigger mode,
depending on the model).
Troubleshooting
Problem Possible
Cause
Possible
Solutions
Nothing hap-
pens when
you follow
the operat-
ing instruc-
tions.
No power to the
scanner.
Check the system
power. Ensure the
power supply is con-
nected if your configu-
ration requires a
power supply.
Interface/pow-
er cables are
loose.
Check for loose cable
connections.
1. Insert scanner in
stand.
2. Present bar code and
ensure the scan line
crosses every bar and
space of the symbol.
3. Upon successful de-
code, the scanner
beeps and the LED
turns green.
eng.fm Page 3 Friday, June 1, 2001 11:20 AM

4
LS1900 Series
Laser comes
on, but sym-
bol does not
decode.
Scanner is not
programmed
for the correct
bar code type.
Be sure the scanner is
programmed to read
the type of bar code
you are scanning.
Bar code sym-
bol is unread-
able.
Check the symbol to
make sure it is not de-
faced. Try scanning
test symbols of the
same bar code type.
Distance be-
tween scanner
and bar code is
incorrect.
Move the scanner
closer to the bar code.
Symbol is
decoded,
but not
transmitted
to the host.
Scanner is not
programmed
for the correct
host type.
Scan the appropriate
host type bar code.
Scanned
data is incor-
rectly dis-
played on
the host.
Scanner is not
programmed to
work with the
host. Check
LS1900 Series
host type pa-
rameters or ed-
iting options.
Be sure proper host is
selected.
For RS-232, ensure
the scanner’s com-
munication parame-
ters match the host’s
settings.
For a keyboard
wedge configuration,
ensure the system is
programmed for the
correct keyboard
type, and the CAPS
LOCK key is off.
Be sure editing op-
tions (e.g., UPC-E to
UPC-A Conversion)
are properly pro-
grammed.
Problem Possible
Cause
Possible
Solutions
eng.fm Page 4 Friday, June 1, 2001 11:20 AM

5
Guide utilisateur
Présentation
Le lecteur de la série LS1900 allie des performances de
lecture excellentes à une ergonomie sophistiquée, ce qui
fait de lui le meilleur lecteur laser léger de sa catégorie.
Qu’il soit utilisé comme lecteur mains-libres ou inséré dans
un support, le LS1900 est synonyme de confort et de
simplicité d’emploi pendant de longues heures d’utilisation.
Remarque : Sauf mention particulière, le terme
LS190xx désigne toutes les versions du
lecteur.
Composants du lecteur de la
série LS1900
Installation du câble d’interface
1. Branchez le connecteur modulaire du câble
d’interface au port correspondant sur la partie
inférieure de la poignée du lecteur de la série LS1900.
Fenêtre de sortie
Gâchette
(modèle LS190xT uniquement)
Témoin
Beeper
Connecteur modulaire
du câble d’interface
Port du câble d’interface
french.fm Page 5 Thursday, May 31, 2001 2:05 PM

6
Série LS1900
2. Connectez l’autre extrémité du câble à l’ordinateur
central.
3. Branchez l’alimentation au câble (si nécessaire).
4. Lisez les codes correspondants qui commencent
page 33
pour communiquer avec l’ordinateur central.
Dépose du câble d’interface
Débranchez le connecteur modulaire du câble d’interface
installé en appuyant sur le clip du connecteur avec
l’extrémité d’un tournevis.
Visée
Remarque : On obtient les meilleures performances de
décodage lorsque le lecteur n’est pas
totalement perpendiculaire au code à barres.
Lecture en mode portable
1. Vérifiez tous les branchements.
2. Pointez le lecteur sur le code à barres. (Si votre
lecteur est muni d’une gâchette, visez, puis appuyez
sur la gâchette.)
3. Assurez-vous que le faisceau de lecture recouvre toutes
les lignes et tous les espaces qui composent le code.
4. Lorsque le décodage est réalisé, le lecteur émet un
bip sonore et le témoin vire au vert.
6
6
4
1. Lecture
réussie
2. Risque de réflexion
spéculaire
3. Lecture
réussie
Faisceau de
lecture
Code à barres
La zone grisée
représente l'angle
mort (± 4°)
Faisceau
de lecture
Code à barres
Code à barres
012345 012345
CORRECT INCORRECT
french.fm Page 6 Thursday, May 31, 2001 2:05 PM

7
Guide utilisateur
Lecture en mode mains-libres
Lorsqu’il est inséré dans son support, le lecteur est activé
en permanence. Lorsque vous l’extrayez de son support, il
se replace en mode portable normal (c’est-à-dire activé en
permanence ou au moyen de la gâchette, selon le modèle).
Dépannage
Problème Cause
probable
Solutions
possibles
Vous avez
suivi les
instructions
d’utilisation,
mais rien ne
se produit.
Le lecteur n’est
pas alimenté.
Vérifiez l'alimentation
du système. Assurez-
vous que l’alimentation
est raccordée si votre
configuration l’utilise.
Les câbles
d’interface/
d’alimentation
sont mal
branchés.
Vérifiez que les câbles
sont correctement
branchés.
Le faisceau
est activé,
mais le code
n’est pas
déchiffré.
Le lecteur n’est
pas programmé
pour le bon type
de code à
barres.
Assurez-vous que le
lecteur est programmé
pour accepter le type
de code à barres que
vous tentez de lire.
1. Insérez le lecteur dans
son support.
2. Présentez le code et
assurez-vous que le
faisceau de lecture
recouvre toutes les lignes
et tous les espaces qui le
composent.
3. Lorsque le décodage est
réalisé, le lecteur émet un
bip sonore et le témoin
vire au vert.
french.fm Page 7 Thursday, May 31, 2001 2:05 PM

8
Série LS1900
(Suite) Le code à barres
est illisible.
Vérifiez que le code à
barres est en bon état.
Essayez de lire des
codes du même type.
Distance
incorrecte entre
le lecteur et le
code à barres.
Rapprochez le lecteur
du code à barres.
Le code est
lu, mais il
n’est pas
transmis à
l’ordinateur
central.
Le lecteur n’est
pas programmé
pour le type
d’ordinateur
central qui
convient.
Lisez le code à barres
correspondant à
l’ordinateur central en
question.
L’affichage
des données
lues sur
l’ordinateur
central est
incorrect.
Le lecteur n’est
pas programmé
pour utiliser cet
ordinateur
central. Vérifiez
les paramètres
du type
d’ordinateur
pour la série
LS1900 ou les
options
d’édition.
Vérifiez que l’ordinateur
central correct est
sélectionné.
Pour le RS-232, vérifiez
que les paramètres de
communication du
lecteur correspondent
aux réglages de
l’ordinateur central.
Pour une configuration
d’émulation clavier,
assurez-vous que le
système est
programmé pour le bon
type de clavier, et que
la touche de
verrouillage des
majuscules est
désactivée.
Vérifiez que les options
d’édition (ex.
conversion UPC-E/
UPC-A) sont
correctement
programmées.
Problème Cause
probable
Solutions
possibles
french.fm Page 8 Friday, June 1, 2001 11:30 AM

9
Kurzübersicht
Einführung
Bei den Scannern der Serie LS1900 vereinen sich
hervorragende Leseleistungen und modernste
ergonomische Eigenschaften. Das Ergebnis: Ein leichter
Laserscanner mit dem besten Preis-Leistungs-Verhältnis
seiner Klasse. Ungeachtet dessen, ob Sie die Modelle der
Serie LS1900 als Handscanner oder im Freihandmodus in
einem stationären Tischständer verwenden: Komfort und
Bedienungsfreundlichkeit sowie eine lange Lebensdauer
sind gewährleistet.
Hinweis: Falls nicht anders angegeben, bezieht sich
die Bezeichnung „LS190xx“ auf alle
Scannermodelle dieser Serie.
Die Teile der Scanner der
Serie LS1900
Installieren des Schnittstellenkabels
1. Stecken Sie das Schnittstellenkabel in den
Kabelanschluss am Griffboden des LS1900.
S
canfenster
Abzug
(nur bei Modell LS190xT)
LED
Piepton
Modularer Stecker
des Schnittstellenkabels
Kabelanschluss
germ.fm Page 9 Thursday, May 31, 2001 2:06 PM

10
Serie LS1900
2. Verbinden Sie das andere Ende des Kabels mit dem
Host.
3. Schließen Sie gegebenenfalls das Netzkabel an.
4. Scannen Sie den bzw. die entsprechenden
Barcode(s), beginnend auf
Seite 33
, um die
Kommunikation mit dem Host zu starten.
Abziehen des Schnittstellenkabels
Drücken Sie zum Herausziehen des modularen Steckers
die Anschlussklemme mit der Klinge eines
Schraubenziehers nach unten.
Zielvorgang
Hinweis: Die besten Scanleistungen werden erzielt,
wenn Sie den Scanner nicht exakt
senkrecht auf den Barcode richten.
Scannen mit dem Handscanner
1. Vergewissern Sie sich, dass alle Anschlüsse festsitzen.
2. Zielen Sie mit dem Scanner auf den Barcode. (Wenn Ihr
Scanner mit einem Abzug ausgestattet ist, zielen Sie
mit dem Scanner, und betätigen Sie dann den Abzug.)
3. Es muss gewährleistet sein, dass die Scanzeile alle
Balken und Zwischenräume des Symbols überstreicht.
4. Nach erfolgreichem Decodieren gibt der Scanner
einen Piepton ab, und die grüne LED wird aktiviert.
6
6
4
1. Erfolgreiches
Scannen
2. Mögliche
Spiegelreflexion
3. Erfolgreiches
Scannen
Scan-Strahl
Der tote Bereich ist
schattiert
dargestellt (±4°)
Scan-
Strahl
Barcode
Barcode
Barcode
012345
012345
FALSCHRICHTIG
germ.fm Page 10 Thursday, May 31, 2001 2:06 PM

11
Kurzübersicht
Scannen im Freihandmodus
Im Tischständer bleibt der Scanner konstant eingeschaltet.
Wenn Sie den Scanner aus dem Ständer nehmen, schaltet
er in den normalen Handbetrieb um (das heißt, je nach
Modell ist er dann konstant eingeschaltet oder er befindet
sich im Auslöser-Betrieb).
Fehlerbehebung
Problem Mögliche
Ursache
Mögliche Lösungen
Sie gehen
exakt nach
der Bedie-
nungsanlei-
tung vor, und
trotzdem
passiert
nichts.
Stromversor-
gung zum
Scanner
unterbrochen.
Überprüfen Sie die Strom-
versorgung des Systems.
Stellen Sie sicher, dass die
Stromversorgung ange-
schlossen ist (sofern Ihr
System über einen
Netzanschluss arbeitet).
Schnittstellen-
oder Strom-
kabel sind lose.
Überprüfen Sie, ob
eventuell Kabelver-
bindungen lose sind.
Der Laser-
strahl wird
aktiviert,
jedoch das
Symbol nicht
decodiert.
Der Scanner ist
für den
betreffenden
Barcode-
Typ nicht
programmiert.
Stellen Sie sicher, dass das
Gerät so programmiert
wurde, dass es den
Barcode-Typ, der gescannt
werden soll, auch lesen
kann.
1. Setzen Sie den Scanner in
den Ständer ein.
2. Halten Sie den Barcode vor
den Scanner. Es muss
gewährleistet sein, dass die
Scanzeile alle Balken und
Zwischenräume des
Symbols überstreicht.
3. Nach einem erfolgreichen
Decodieren gibt der Scanner
einen Piepton ab, und die
grüne LED wird aktiviert.
germ.fm Page 11 Thursday, May 31, 2001 2:06 PM

12
Serie LS1900
(Forts.) Der Barcode ist
unleserlich.
Überprüfen Sie das
Symbol auf Deformie-
rungen. Versuchen Sie,
Testsymbole desselben
Code-Typs zu scannen.
Der Abstand
zwischen
Scanner und
Barcode ist
nicht korrekt.
Bewegen Sie den Scanner
dichter an den Barcode.
Das Symbol
wird decodiert,
jedoch nicht
an den Host
übertragen.
Der Scanner ist
für den betref-
fenden Host-
Typ nicht
programmiert.
Programmieren Sie ggf.
den Scanner auf den
betreffenden Barcode-Typ.
Die gescann-
ten Daten
werden am
Host nicht
korrekt
angezeigt.
Der Scanner ist
für ein Zusam-
menwirken mit
dem Host nicht
programmiert.
Überprüfen Sie
die Hostpara-
meter bzw. die
Bearbeitungso
ptionen für die
Serie LS1900.
Überzeugen Sie sich
davon, dass Sie mit dem
richtigen Host arbeiten.
Stellen Sie bei Verwendung
einer RS-232-Schnittstelle
sicher, dass die Kommuni-
kationsparameter des
Scanners mit den
Hosteinstellungen
übereinstimmen.
Wenn Sie mit einer
Tastaturweiche arbeiten,
muss sichergestellt sein,
dass das System für den
richtigen Tastaturtyp
programmiert und die
Feststelltaste deaktiviert ist
Vergewissern Sie sich
davon, dass die
Bearbeitungsoptionen
(beispielsweise die
Umwandlung von UPC-E in
UPC-A) ordnungsgemäß
programmiert sind.
Problem Mögliche
Ursache
Mögliche Lösungen
germ.fm Page 12 Thursday, May 31, 2001 2:06 PM

13
Guida rapida
Introduzione
Lo scanner Serie LS1900, che riunisce eccellenti prestazioni
di scansione con una linea ergonomica avanzata, è un
ottimo scanner laser leggero. Usato come scanner portatile
o in modalità “a mani libere” mediante l’uso del supporto, lo
scanner Serie LS1900 garantisce confort e minimo sforzo
all’operatore anche nel caso di turni di lunga durata.
Nota : A meno che non sia specificato
diversamente, il termine LS190xx si riferisce
a tutte le versioni dello scanner.
Le parti dello scanner Serie LS1900
Installazione del cavo di interfaccia
1. Inserire il connettore modulare del cavo di interfaccia
nella relativa porta, nella parte inferiore del manico
dello scanner Serie LS1900
Finestra di uscita
Grilletto
(solo modello LS190xT)
LED
Segnalatore
acustico
Connettore modulare
del cavo di interfaccia
Porta del cavo di
interfaccia
ital.fm Page 13 Thursday, May 31, 2001 2:13 PM

14
Serie LS1900
2. Collegare l’altra estremità del cavo di interfaccia
all’host.
3. Collegare il cavo all’alimentazione, se necessario.
4. Eseguire la scansione del codice o dei codici a barre
riportati a
pagina 33
per comunicare con l’host.
Rimozione del cavo di interfaccia
Scollegare il connettore modulare del cavo premendo il
fermaglio del connettore con la punta di un cacciavite.
Mira
Nota : Lo scanner funziona meglio quando non è
esattamente perpendicolare al codice a
barre.
Modalità di scansione portatile
1. Assicurarsi che tutte le connessioni siano siano ben
fatte.
2. Mirare con lo scanner verso il codice a barre. Se lo
scanner ha un grilletto, puntare lo scanner e premere
il grilletto.
3. Assicurarsi che la linea di scansione intersechi
ciascuna barra o spazio del simbolo.
4. Dopo la decodifica con esito positivo, lo scanner
emette un segnale acustico e il LED assume il colore
verde.
6
6
4
1. Scansione con
esito positivo
2. Possibile riflessione
speculare
3. Scansione con
esito positivo
Fascio di
scansione
L'area
ombreggiata
rappresenta
l'area cieca (+4°)
Fascio di
scansione
Codice a barre
Codice a barre
Codice a barre
012345 012345
CORRETTO ERRATO
ital.fm Page 14 Thursday, May 31, 2001 2:13 PM

15
Guida rapida
Modalità di scansione “a mani libere”
Quando è inserito nel supporto, lo scanner si pone
automaticamente in modalità “sempre attiva”. Quando lo
scanner viene tolto dal supporto, torna a funzionare nella
sua modalità di default, ossia, a seconda del modello, in
modalità sempre attiva o “con grilletto”.
Risoluzione dei problemi
Problema Possibile causa Possibile soluzione
Quando si
eseguono le
istruzioni
d’uso, non
accade nulla.
Lo scanner non
riceve
alimentazione.
Controllare
l’alimentazione del
sistema. Verificare il
collegamento
dell'alimentazione se
questa è richiesta dalla
configurazione.
La connessione
dei cavi di
interfaccia/
alimentazione è
difettosa.
Controllare se la
connessione del cavo è
difettosa.
Il laser è
attivo, ma il
simbolo non
viene
decodificato.
Lo scanner non
è programmato
per leggere il
tipo di codice a
barre sottoposto.
Assicurarsi che lo
scanner sia
programmato in modo
da leggere il tipo di
simbologia desiderata.
1. Inserire lo scanner nel
supporto.
2. Presentare il codice a
barre e assicurarsi che la
linea di scansione incroci
ogni barra e ogni spazio
del simbolo.
3. Dopo la decodifica con
esito positivo, lo scanner
emette un segnale
acustico e il LED assume
il colore verde.
ital.fm Page 15 Thursday, May 31, 2001 2:13 PM

16
Serie LS1900
(cont.) Il codice a barre
è illeggibile.
Controllare il simbolo
per assicurarsi che non
sia danneggiato.
Eseguire la lettura di
altri simboli apparte-
nenti alla stessa
simbologia.
La distanza tra lo
scanner e il
codice a barre
non è corretta.
Avvicinare lo scanner al
codice a barre.
Il simbolo
viene
decodificato
ma non viene
trasmesso
all’host.
Lo scanner non
è programmato
per il corretto
tipo di host.
Eseguire la lettura del
codice a barre del tipo
di host corretto.
I dati letti
vengono
visualizzati in
modo errato
sull’host.
Lo scanner non
è programmato
per funzionare
con l’host.
Verificare le
opzioni o i
parametri del
tipo di host dello
scanner Serie
LS1900.
Assicurarsi che sia
selezionato l’host
corretto.
Per RS-232, assicurarsi
che i parametri di
comunicazione dello
scanner corrispondano
alle impostazioni
dell’host.
Per la configurazione
keyboard wedge,
assicurarsi che il
sistema sia
programmato per il tipo
di tastiera corretto e che
il tasto BLOC MAIUSC
non sia inserito.
Assicurarsi che le
opzioni di modifica (ad
esempio la conversione
da UPC-E a UPC-A)
siano programmate
correttamente.
Problema Possibile causa Possibile soluzione
ital.fm Page 16 Friday, June 1, 2001 11:38 AM

17
Referencia rápida
Introducción
El scanner de la serie LS1900 combina un excelente
rendimiento de lectura con una ergonomía avanzada para
ofrecer el mejor valor en un scanner láser ligero. Tanto si
se utiliza como scanner de mano o en modo manos libres
sobre un mostrador, el LS1900 asegura un uso sencillo y
cómodo durante largos períodos de tiempo.
Nota: A menos que se indique lo contrario, el
término LS190xx se refiere a todas las
versiones del scanner.
Partes del scanner de la serie LS1900
Instalación del cable de interfaz
1. Enchufe el conector modular del cable de interfaz al
puerto de interfaz del cable situado en la base del
mango del LS1900.
Ventana de
salida
Gatillo
(Sólo modelo LS190xT)
LED
Emisor de
pitidos
Conector modular del
cable de interfaz
Puerto de interfaz del
cable
span.fm Page 17 Thursday, May 31, 2001 2:09 PM

18
Serie LS1900
2. Conecte el otro extremo del cable de interfaz al host.
3. Conecte la fuente de alimentación al cable (si es
necesario).
4. Realice una lectura del código(s) de barras
apropiados que comienzan en la
página 33
para
establecer la comunicación con el host.
Extracción del cable de interfaz
Desconecte el conector modular del cable instalado
apretando la lengüeta del conector con la punta de un
destornillador.
Apuntado
Nota: El scanner ofrece un mayor rendimiento
cuando no está situado exactamente en
dirección perpendicular al código de barras.
Lectura en modo manual
1. Revise todas las conexiones.
2. Apunte el scanner hacia el código de barras. (Si su
scanner tiene gatillo, apunte el scanner y presione el
gatillo.)
3. Compruebe que la línea de lectura cruce todas las
barras y espacios del símbolo.
4. Si la decodificación es satisfactoria, el scanner emite
un pitido y el LED se ilumina en verde.
6
6
4
1. Lectura
satisfactoria
3. Lectura
satisfactoria
2. Posible reflexión
especular
Haz de lectura
El área sombreada
representa la zona
muerta (±4°)
Haz de
lectura
Código de barras
Código de barras Código de barras
012345 012345
CORRECTO INCORRECTO
span.fm Page 18 Thursday, May 31, 2001 2:09 PM

19
Referencia rápida
Lectura en modo manos libres
El scanner estará continuamente encendido cuando está
colocado en el mostrador. Al retirar el scanner del
mostrador, funcionará en el modo manual normal (por
ejemplo, modo encendido continuo o modo con gatillo,
según el modelo).
Solución de problemas
Problema Causa posible Soluciones posibles
No ocurre nada
al seguir las
instrucciones de
funcionamiento.
El scanner no
recibe
alimentación.
Compruebe la
alimentación del
sistema. Compruebe
que la fuente de
alimentación esté
conectada, si su
configuración necesita
una fuente de
alimentación.
Los cables de
interfaz/
alimentación
están sueltos.
Compruebe que las
conexiones de cables
no estén sueltas.
El láser se
enciende pero
no decodifica.
El scanner no
está programado
para el tipo
adecuado de
código de barras.
Asegúrese de que el
scanner esté
programado para leer el
tipo de código de barras
que está intentando leer.
1. Coloque el scanner en el
mostrador.
2. Exponga el código de
barras y compruebe que
la línea de lectura cruce
todas las barras y
espacios del símbolo.
3. Si la decodificación es
satisfactoria, el scanner
emitirá un pitido y el LED
se iluminará en verde.
span.fm Page 19 Thursday, May 31, 2001 2:09 PM

20
Serie LS1900
(cont.) El código de
barras es ilegible.
Compruebe que el
código no esté
desfigurado. Trate de
leer códigos de barras
de prueba con el mismo
tipo de código.
La distancia
entre el scanner y
el código de
barras es
incorrecta.
Acerque el scanner al
código de barras.
El código de
barras está
decodificado
pero no se
transmite al
host.
El scanner no
está programado
para el tipo de
host adecuado.
Realice una lectura del
código de barras del
tipo de host adecuado.
Los datos
leídos están
mal
presentados en
el host.
El scanner no
está programado
para trabajar con
el host.
Compruebe los
parámetros o las
opciones de
edición del tipo
de host del
LS1900.
Verifique que el host
adecuado esté
seleccionado.
Para RS-232,
compruebe que los
parámetros de
comunicación del
scanner coincidan con
la configuración del
host.
Para la configuración
de la emulación de
teclado, compruebe
que el sistema esté
programado para el tipo
de teclado adecuado, y
que la tecla Bloq Mayús
esté desactivada.
Asegúrese de que las
opciones de edición
estén correctamente
programadas (por
ejemplo, conversión
UPC-E a UPC-A).
Problema Causa posible Soluciones posibles
span.fm Page 20 Friday, June 1, 2001 11:41 AM

21
LS1900
!"# $%&'
()*( +,-.(/0,,'(1
2($-LS1900 34567+,-89:;
</67$=>%&
? : @ABCDEFGHI$ LS190xx JAK
,EALMNOPQ/RS+
>%&
LS1900
1. T.1U VW* 2PXYZ[\.
LS1900 M'(*]^/VW* T
.1U _`/ab+>%&
"#cd
ef(e
`g
( 2h* LS190xT Mi )
LED
jk
T.1U
VW*2PXY
Z[\.
VW*
T.1U
_`

22
LS1900
2. T.1U VW*M-lmno`/ab+
>%&
3. p^qr67%stqrVW*/ab+
>%&
4. 33 uP vwo`xy%zM{|O
Z(+>%&
!
!!
!
(YTO}~nM*$Z[\.\
+iabK,EVW*M2PXYZ[\.p
+>%&
"
""
"
#$
#$#$
#$
? : OZ(M/+,/,
+E$;KE&
%
%%
%&
&&
&'
''
'&
&&
& (
((
(
&)
&)&)
&)
1. VW*}D/abK,E+>
%&
2. O Z(/>% ( D`g
Mst,`g=>% )&
3. YTDOZ(N|l/
+>%&
4. +;hZ($=stvwj
DGLED D/G>%&
6
6
4
1.
2. 3.
( 4)
012345 012345
+E
58

23
%
%%
%&
&&
&
(
((
(&
&&
&)
))
)
.($4$%&.(v
wp%xM'()*( 2(/¡G>%
¢M2h*/,42(-+;`
g2(M/¡G>%&£
¤¥/
¦,-N
;§¨©K
E&
Mqr
Dª,E>
«¬&
®Mqr
+,;KE&qrD
¯°±²Mst
qrD+;abK
,E+
>%&
T.1U
/ qrVW*
MabD³´N
$%&
VW*Dµ¬$E
Ev+,;
KE&
"#cd
KD
OZ(
¶i·w
E&
¶i·O
Z(M¸¹D
+;º»K
,E>«¬&
%OZ
(.T¶i·
l/º»
+,;KE&
1. .(/
¼`+>%&
2. OZ(v½+
YTDO
Z(N|
l/+>%&
3. +;hZ($=
stvw
jDGLED
D/G>%&

24
LS1900
!"
#$%&'
(#)(*+,
-. /
01234 5678
39:6,;;<
=
39:>?
@AB
CDE
FG
HIJ;39:>K
LMNOPMN
,;<=
QN
R/S3
4TU
39:>V
W S34 /
01XY,<
Z[;
J\
CDS34 /01
39:6
,;<=
39:6,N
R/Y,
<S34T
U
39:>V
W S34X
Z[;
J\LS1900
5]^S3
4 /01 _`
&/a$bc
de15f6
*+,;<=
Y,S34gh
;i?*+,
;<=
RS-232 jH39
:>kl_`&/
S34Z[?mn
,;op
Keyboard Wedge qr
E532sY,
97 /01
Z[CAPS
LOCK 9et
Q;Mu
J\
cde15f6 (UPC-
E/UPC-A vw# )
Y,<Z[,;<=

25
LS1900
! "#$
%&'($)*+,-.'
LS1900 /0
1234567489:;<
= >?@ABC
LS190xx D AE
LS1900
1. FGHIJKLGMN LS1900 %OPQ
IJGHRH
2. FGHIJ@RLGSTU
3. FIJGVIW
XAYZ
4. [
33
\]^_`abc dTU
ef
LS190xT
ghijklmnnopqrnstnnuhvwxypz{n|pzn}~{ns~nn}tno|

26
LS1900
7LG MNIJKL
G
= ab4
1. 1 ALG/
2. F^ab
XA\
F^ab
\
3. 1¡¢£E Aa¤¥¦§
4. ¨©ªb
«¬®¯°
±
6
6
4
1. 2. 3.
(±4°)
012345 012345
ghijklmnnopqrnsnnuhvwxypz{n|pzn}~{ns~nn}tno|

27
²)*+,4 ³&´µ' ¶F[*
+,·\
¸Fd¹º%&µ'»c ¼X &´µ'
½\µ'
¾E¿À
XÁÂ
ÃÄBC
«Å
ÆÇ
ÈGe
IW
ÉÊËIW X
Ì)ÍZI
W
`1LG
Î
GH / IWIJ
9Ï
ÉÊIJLG$Ð
9Ï
Ñ£EÈ
ªb
ÒAF
ÓÔ<7
ÕabÖ
×
1FÓ
ÔØÙÚÛa
bÖ
ab£E
0Ù
ÉÊ£Ed1ÜÈ
ÝÞß
àá_
âabÖãà
£E
ab
äåæ<
F·çab
1. FèN*+
2. éab
1
¡¢£E Aa
¤¥¦§
3. ¨©ªb
«¬®¯
°±
ghijklmnnopqrnsênnuhvwxypz{n|pzn}~{ns~nn}tno|

28
LS1900
£Eªb
¨
ÑÈë
VTU
ÒAF
ÓÔ<7
ÕTUÖ
×
_`TUÖ
ab
ìí!
TU,îï
Að
ÒAF
ÓÔT
UñâÄ
×
ÉÊ
S1900 T
UÖòì½
Óóôõ
1ôö¹
TU
^ RS-232 `1
efòì
TU÷)_øÌ
^ùúûüÌ)
`1ÔËÓý
<7ùúÖ
×
þ¯ CAPS
LOCK ù³
1ÔÓóôõ ¼
X
[ UPC-E S
UPC-A
¹
Óý×
ghijklmnnopqrnsnnuhvwxypz{n|pzn}~{ns~nn}tno|

29
LS1900
!"# $%& '(
) . LS1900 *+, -,./0 1234
5 - 6 7234 -,8 9 7: ;< -, 3= >?.
>() .
@ : A B.C D E LS190xx F 7G HI
J 0KL() .
LS1900
1. MN OP 7Q RSM& LS1900
TU V3 W OP MN XY3
Z[() .
\] ^
Y/
( 7_ LS190xT ` ab )
LED
c
MN OP
7Q RSM
OP MN
XY
UGGwGY`GG{SGtGZXSGYWWXGGZa[ZGwt

30
LS1900
2. MN OP# )d eJ fY3 g() .
3. Ih ;%& OP3 g() ( ijE k ).
4. 33 l34 mn op+ qrE st2& .
u fYv wx() .
yz 2{H e| RSM }~J o% OP#
7Q RSM& () .
@ : st23 I | .C D
m() .
!
!!
!
1. 7G g }n WC () .
2. & st23 () . ( 3 Y/$ W
k & . Y/& () .)
3. { st2 # 7G sv uJ w
.= () .
4. st2$ }. , J
LED $ | s() .
6
6
4
1.
2.
3.
( 4 )
012345 012345
s¡
¢£
UGGwGZWGG{SGtGZXSGYWWXGGZa[ZGwt

31
"
""
"
- #
##
#
!
!!
!
123 W ¤" ¥¦ 72 "§¨() . 123
4 & '/. ©ª *+, 72 ( « , 7_3 ¬{ ¤"
¥¦ 720 Y/ 72$ m ) 34 m() .
$
$$
$ %&
%&%&
%&
m ®J
¬{a=
¯° © ©
0C D[
() .
Ih
¥± WC D[
() .
² IhJ .
³´ . Ih ;%
$ ijE µ ¶
k Ih ;%$
gn WC
.³´ .
MN / I
h OP ·¸
() .
·¸E OP g
& .³´ .
1. & 123 ¹º
() .
2. 8 st2& »
() . {
st2 # 7G
sv uJ w.=
() .
3. st2$ }.
, J
LED $ |
s() .
UGGwGZXGG{SGtGZXSGYWWXGGZa[ZGwt

32
LS1900
¥
± WC` s
t2 J
a¼.C ½
() .
$ ab
st2 ¾¿3 À
C D 6 ÁÂ
n W[() .
$ Ã s
t2 ¾¿3 À 6
ÁÂn W
() .
st2 J
J Ä[() .
st2 # Å
T"nC DÆC
.³´ . ©E ¾
¿# st2 J
a c³´ .
v st2
-# /$
sÇC D[
() .
& st23 È
$É +³´ .
st2
F a¼nÊ
C` fY
IËnC
D[() .
$ ab f
Y \Ì3 À
6 ÁÂn W
C D[() .
qrE fY ¾¿#
st2& .³
´ .
E Í
M$ fY
3 sÇ
ÅnC D
[() .
$ fY
v m.= 6
ÁÂn WC
D[() .
LS1900
# fY \Ì
ÎÏÐ Ñ >
Ò ÓÔJ .
³´ .
qrE fY$ ÕÖn
ÊC .³´ .
RS-232 # k ,
# wx ÎÏÐ$
fY# o} ©%
.C .³´ .
×c2 ØC µ#
k ² sd ×
c2 \Ì 6 ÁÂ
nÊ| CAPS LOCK
×$ Ù± WC
.³´ .
>Ò ÓÔ ( Ú : UPC-E
34 UPC-A # ÐÛ )
qr 6 ÁÂn
ÊC .³´ .
UGGwGZYGG{SGtGZXSGYWWXGGZa[ZGwt

33
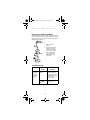
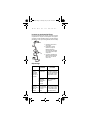
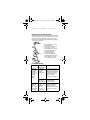
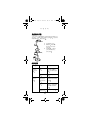
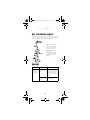
Quick Reference
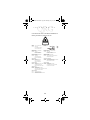
Programming Bar Codes
Following are some frequently used programming bar
codes.
Note: For additional host types, refer to the
LS1900 Series Product Reference Guide,
p/n 72-50930-xx, available on the LS1900
Series CD.
Set Defaults
Scanning this bar code sets all parameters to their default
values.
Host Type
If you are using a Synapse cable (e.g., a part number
STIxx-xxxx), the scanner autodetects the type of host you
are using, so you do not need to scan bar codes. If not,
select an RS-232, Keyboard, or Wand host from the
following bar code menus.
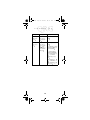
RS-232 Host Types
SET DEFAULTS
STANDARD RS-232C
ICL RS-232C
LS 1900 Series.book Page 33 Thursday, May 31, 2001 2:04 PM

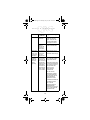
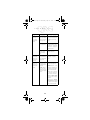
34
LS1900 Series
RS-232 Host Types
NIXDORF RS-232C MODE B
FUJITSU RS-232C
OPOS
NIXDORF RS-232C MODE A
LS 1900 Series.book Page 34 Thursday, May 31, 2001 2:04 PM

35
Quick Reference
Keyboard Host Type
Country Codes
IBM PS/2
AMERICAN
FRENCH
FRENCH INTERNATIONAL
LS 1900 Series.book Page 35 Thursday, May 31, 2001 2:04 PM

36
LS1900 Series
Country Codes
GERMAN
SPANISH
ITALIAN
SWEDISH
LS 1900 Series.book Page 36 Thursday, May 31, 2001 2:04 PM

37
Quick Reference
Country Codes
Wand Host Type
UK ENGLISH
JAPANESE
SYMBOL WAND
LS 1900 Series.book Page 37 Thursday, May 31, 2001 2:04 PM

38
LS1900 Series
Ergonomic Recommendations
Caution: In order to avoid or minimize the potential risk of
ergonomic injury follow the recommendations below.
Consult with your local Health & Safety Manager to ensure
that you are adhering to your company’s safety programs
to prevent employee injury.
• Reduce or eliminate repetitive motion
• Maintain a natural position
• Reduce or eliminate excessive force
• Keep objects that are used frequently within easy
reach
• Perform tasks at correct heights
• Reduce or eliminate vibration
• Reduce or eliminate direct pressure
• Provide adjustable workstations
• Provide adequate clearance
• Provide a suitable working environment
• Improve work procedures.
Regulatory Information
Radio Frequency Interference
Requirements
This device has been tested and found to comply with the
limits for a Class B digital device pursuant to Part 15 of the
Federal Communications Commissions Rules and
Regulation. These limits are designed to provide
reasonable protection against harmful interference when
the equipment is operated in a commercial environment.
This equipment generates, uses, and can radiate radio
frequency energy and, if not installed and used in
accordance with the instruction manual, may cause
harmful interference to radio communications. Operation of
this equipment in a residential area is likely to cause
harmful interference in which case the user will be required
to correct the interference at his own expense.
However, there is no guarantee that interference will not
occur in a particular installation. If the equipment does
cause harmful interference to radio or television reception,
which can be determined by turning the equipment off and
on, the user is encouraged to try to correct the interference
by one or more of the following measures:
• Re-orient or relocate the receiving antenna.
• Increase the separation between the equipment and
receiver.
• Connect the equipment into an outlet on a circuit dif-
ferent from that which the receiver is connected.
LS 1900 Series.book Page 38 Thursday, May 31, 2001 2:04 PM

39
Quick Reference
• Consult the dealer or an experienced radio/TV techni-
cian for help.
This device complies with FCC Part 15. Operation is
subject to the following two conditions: (1) this device may
not cause harmful interference and (2) this device must
accept any interference received, including interference
that may cause undesired operation.
Radio Frequency Interference
Requirements - Canada
This Class B digital apparatus complies with Canadian
ICES-003.
Cet appareil numérique de la classe B est conforme à la
norme NMB-003 du Canada.
CE Marking and European Union
Compliance
Products intended for sale within the European
Union are marked with the CE Mark which
indicates compliance to applicable Directives
and European Normes (EN), as follows.
Amendments to these Directives or ENs are included:
Applicable Directives
• Electromagnetic Compatibility Directive 89/336/EEC
• Low Voltage Directive 73/23/EEC
Applicable Standards
• EN 55022:1998, Limits and Methods of Measurement
of Radio Disturbance Characteristics of Information
Technology Equipment
• EN 55024:1998; Information Technology equipment -
Immunity characteristics - Limits and methods of mea-
surement
• IEC 1000-4-2:1995; Electromagnetic compatibility
(EMC); Part 4:Testing and measurement techniques;
Section 4.2:Electrostatic discharge immunity test
• IEC 1000-4-3:1997; Electromagnetic Compatibility
(EMC); Part 4:Testing and measurement techniques;
Section 3. Radiated, radio frequency, electromagnetic
field immunity test.
• IEC 1000-4-4:1995; Electromagnetic compatibility
(EMC); Part 4: Testing and measurement techniques;
Section 4:Testing electrical fast transient,/Burst immu-
nity.
LS 1900 Series.book Page 39 Thursday, May 31, 2001 2:04 PM

40
LS1900 Series
• IEC1000-4-5:1995; Electromagnetic compatibility
(EMC), Part 4: Testing and measurement techniques;
Section 5: Surge Immunity
• IEC 1000-4-6:1996; Electromagnetic compatibility
(EMC), Part 4:Testing and measurement techniques;
Section 6: Immunity to conducted disturbances,
induced by radio frequency fields.
• IEC 1000-4-11:1994; Electromagnetic compatibility
(EMC), Part 4: Testing and measurement techniques;
Section 11: Voltage Dips, Short Interruptions, and
Voltage Variations.
• EN 60 950 + A1+A2+A3+A4+A11 - Safety of Informa-
tion Technology Equipment Including Electrical Busi-
ness Equipment
• EN 60 825-1 (EN 60 825) - Safety of Devices Con-
taining Lasers
Laser Devices
Symbol products using lasers comply with US
21CFR1040.10, and IEC825-1:1993, EN60825-
1:1994+A11:1996. The laser classification is marked on
one of the labels on the product.
Class 1 Laser devices are not considered to be hazardous
when used for their intended purpose. The following
statement is required to comply with US and international
regulations:
Caution: Use of controls, adjustments or performance of
procedures other than those specified herein may result in
hazardous laser light exposure.
Class 2 laser scanners use a low power, visible light diode.
As with any very bright light source, such as the sun, the
user should avoid staring directly into the light beam.
Momentary exposure to a Class 2 laser is not known to be
harmful.
LS 1900 Series.book Page 40 Thursday, May 31, 2001 2:04 PM

41
Quick Reference
Scanner Labeling
SYMBOL TECHNOLOGIES INC.
HOLTSVILLE , N.Y.
A
V
O
I
D
E
X
P
O
S
U
R
E
-
L
A
S
E
R
L
I
G
H
T
I
S
E
M
I
T
T
E
D
F
R
O
M
T
H
I
S
A
P
E
R
T
U
R
E
É
V
I
T
E
R
T
O
U
T
E
E
X
P
O
S
I
T
I
O
N
-
L
U
M
I
É
R
E
L
A
S
E
R
É
M
I
S
P
A
R
C
E
T
T
E
O
U
V
E
R
T
U
R
E
CLASS 1 LASER PRODUCT
LASER KLASSE 1
APPARIEL À LASER DE CLASSE 1
IEC825-1:1993. EN60825-1:1994+A11:1996
DANGER - LASER LIGHT WHEN OPEN. AVOID DIRECT EYE EXPOSURE.
ATTENTION -LUMIÈRE LASER EN CAS D'OUVERTURE. EXPOSITION DANGEREUSE AU FAISCEAU .
VORSICHT - LASERLICHT, WENN ABDECKUNG GÖEFFNET. NICHT DEM STRAHL AUSSETZEN
C A U T I O N
LASERLICHT - NICHT IN DEN STRAHL BLICKEN. LASER KLASSE 2
LUMIERE LASE-NE PAS REGARDER DANS LE FAISCEAU
APPAREIL A LASER DE CLASSE 2. CAUTION-LASER LIGHT. DO NOT
STARE INTO BEAM. IEC CLASS 2 LASER PRODUCT 630-680 nM, 1.0 mW LASER
630-680nM LASER
1.0 mW MAX OUTPUT
CLASS II LASER PRODUCT
LASER LIGHT -DO NOT
STARE INTO BEAM
SYMBOL TECHNOLOGIES INC.
HOLTSVILLE , N.Y.
For Class 1 Laser Products:
For Class 2 Laser Products:
LS 1900 Series.book Page 41 Thursday, May 31, 2001 2:04 PM

42
LS1900 Series
In accordance with Clause 5, IEC 0825 and EN60825, the
following information is provided to the user:
ENGLISH HEBREW
CLASS 1 CLASS 1 LASER PRODUCT
CLASS 2 LASER LIGHT
DO NOT STARE INTO BEAM
CLASS 2 LASER PRODUCT
DANISH / DANSK ITALIAN / ITALIANO
KLASSE 1 KLASSE 1 LASERPRODUKT CLASSE 1 PRODOTTO AL LASER DI CLASSE 1
KLASSE 2 LASERLYF CLASSE 2 LUCE LASER
SE IKKE IND I STRÅLEN NON FISSARE IL RAGGIOPRODOTTO
KLASSE 2 LASERPRODUKT AL LASER DI CLASSE 2
DUTCH / NEDERLANDS NORWEGIAN / NORSK
KLASSE 1 KLASSE-1 LASERPRODUKT KLASSE 1 LASERPRODUKT, KLASSE 1
KLASSE 2 LASERLICHT KLASSE 2 LASERLYS IKKE STIRR INN I LYSSTRÅLEN
NIET IN STRAAL STAREN LASERPRODUKT, KLASSE 2
KLASSE-2 LASERPRODUKT
FINNISH / SUOMI PORTUGUESE / PORTUGUÊS
LUOKKA 1 LUOKKA 1 LASERTUOTE CLASSE 1 PRODUTO LASER DA CLASSE 1
LUOKKA 2 LASERVALO CLASSE 2 LUZ DE LASER NÃO FIXAR O RAIO LUMINOSO
ÄLÄ TUIJOTA SÄDETTÄ PRODUTO LASER DA CLASSE 2
LUOKKA 2 LASERTUOTE
SPANISH / ESPAÑOL FRENCH / FRANÇAIS
CLASE 1 PRODUCTO LASER DE LA CLASE 1 CLASSE 1 PRODUIT LASER DE CLASSE 1
CLASE 2 LUZ LASER CLASSE 2 LUMIERE LASER
NO MIRE FIJAMENTE EL HAZ NE PAS REGARDER LE RAYON FIXEMENT
PRODUCTO LASER DE LA CLASE 2 PRODUIT LASER DE CLASSE 2
GERMAN / DEUTCH
KLASSE 1 LASERPRODUKT DER KLASSE 1
KLASSE 2 LASERSTRAHLEN
NICHT DIREKT IN DEN LASERSTRAHL SCHAUEN
LASERPRODUKT DER KLASSE 2
SWEDISH / SVENSKA
KLASS 1 LASERPRODUKT KLASS 1
KLASS 2 LASERLJUS STIRRA INTE MOT STRÅLEN
LASERPRODUKT KLASS 2
LS 1900 Series.book Page 42 Thursday, May 31, 2001 2:04 PM

43
Quick Reference
LS 1900 Series.book Page 43 Thursday, May 31, 2001 2:04 PM

44
LS1900 Series
LS 1900 Series.book Page 44 Thursday, May 31, 2001 2:04 PM

45
Quick Reference
Warranty
Symbol Technologies, Inc. (“Symbol”) manufactures its hardware products
in accordance with industry-standard practices. Symbol warrants that for a
period of five (5) years from date of shipment, products will be free from
defects in materials and workmanship.
This warranty is provided to the original owner only and is not transferable
to any third party. It shall not apply to any product (i) which has been
repaired or altered unless done or approved by Symbol, (ii) which has not
been maintained in accordance with any operating or handling instructions
supplied by Symbol, (iii) which has been subjected to unusual physical or
electrical stress, misuse, abuse, power shortage, negligence or accident or
(iv) which has been used other than in accordance with the product
operating and handling instructions. Preventive maintenance is the
responsibility of customer and is not covered under this warranty.
Wear items and accessories having a Symbol serial number will carry a 90-
day limited warranty. Non-serialized items will carry a 30-day limited
warranty.
Warranty Coverage and Procedure
During the warranty period, Symbol will repair or replace defective products
returned to Symbol’s manufacturing plant in the US. For warranty service in
North America, call the Symbol Support Center at 1-800-653-5350.
International customers should contact the local Symbol office or support
center. If warranty service is required, Symbol will issue a Return Material
Authorization Number. Products must be shipped in the original or
comparable packaging, shipping and insurance charges prepaid. Symbol
will ship the repaired or replacement product freight and insurance prepaid
in North America. Shipments from the US or other locations will be made
F.O.B. Symbol’s manufacturing plant.
Symbol will use new or refurbished parts at its discretion and will own all
parts removed from repaired products. Customer will pay for the
replacement product in case it does not return the replaced product to
Symbol within 3 days of receipt of the replacement product. The process for
return and customer’s charges will be in accordance with Symbol’s
Exchange Policy in effect at the time of the exchange.
Customer accepts full responsibility for its software and data including the
appropriate backup thereof.
Repair or replacement of a product during warranty will not extend the
original warranty term.
Symbol’s Customer Service organization offers an array of service plans,
such as on-site, depot, or phone support, that can be implemented to meet
customer’s special operational requirements and are available at a
substantial discount during warranty period.
General
Except for the warranties stated above, Symbol disclaims all warranties,
express or implied, on products furnished hereunder, including without
limitation implied warranties of merchantability and fitness for a particular
purpose. The stated express warranties are in lieu of all obligations or
liabilities on part of Symbol for damages, including without limitation,
special, indirect, or consequential damages arising out of or in connection
with the use or performance of the product.
Seller’s liability for damages to buyer or others resulting from the use of any
product, shall in no way exceed the purchase price of said product, except
in instances of injury to persons or property.
Some states (or jurisdictions) do not allow the exclusion or limitation of
incidental or consequential damages, so the proceeding exclusion or
limitation may not apply to you.
LS 1900 Series.book Page 45 Thursday, May 31, 2001 2:04 PM

72-51366-01
Revision A— June 2001
Symbol Technologies, Inc. One Symbol Plaza
Holtsville, NY 11742-1300
Service Information
Before you use the unit, it must be configured to operate in
your facility’s network and run your applications.
If you have a problem running your unit or using your
equipment, contact your facility’s Technical or Systems
Support. If there is a problem with the equipment, they will
contact the Symbol Support Center:
United States
1
Canada
1-800-653-5350 905-629-7226
1-631-738-2400
United Kingdom Asia/Pacific
0800 328 2424 337-6588
Australia Austria/Österreich
1-800-672-906 1-505-5794
Denmark/Danmark Finland/Suomi
7020-1718 9 5407 580
France Germany/Deutchland
01-40-96-52-21 6074-49020
Italy/Italia Mexico/México
2-484441 5-520-1835
Netherlands/Nederland Norway/Norge
315-271700 66810600
South Africa Spain/España
11-4405668 9-1-320-39-09
Sweden/Sverige Latin America Sales
84452900 Support Operations
1-800-347-0178 Inside US
+1-561-483-1275 Outside US
Europe/Mid-East Distributor Support Operations
Contact local distributor or call
+44 208 945 7360
1
Customer support is available 24 hours a day, 7 days a week.
For the latest version of this guide go to:
http://www.symbol.com/manuals.
LS 1900 Series.book Page 46 Thursday, May 31, 2001 2:04 PM
-
 1
1
-
 2
2
-
 3
3
-
 4
4
-
 5
5
-
 6
6
-
 7
7
-
 8
8
-
 9
9
-
 10
10
-
 11
11
-
 12
12
-
 13
13
-
 14
14
-
 15
15
-
 16
16
-
 17
17
-
 18
18
-
 19
19
-
 20
20
-
 21
21
-
 22
22
-
 23
23
-
 24
24
-
 25
25
-
 26
26
-
 27
27
-
 28
28
-
 29
29
-
 30
30
-
 31
31
-
 32
32
-
 33
33
-
 34
34
-
 35
35
-
 36
36
-
 37
37
-
 38
38
-
 39
39
-
 40
40
-
 41
41
-
 42
42
-
 43
43
-
 44
44
-
 45
45
-
 46
46
-
 47
47
-
 48
48


Symbol Technologies Barcode Reader LS1900 Manual de usuario
- Categoría
- Lectores de códigos de barras
- Tipo
- Manual de usuario
- Este manual también es adecuado para
en otros idiomas
Artículos relacionados
Otros documentos
-
Motorola LS1203 Quick Reference Manual
-
Datalogic QuickScan QS2500 Quick Reference Manual
-
-
König CMP-BARSCAN31 Manual de usuario
-
König CMP-BARSCAN21 Especificación
-
 Inateck BCST-70 Guía del usuario
-
Datalogic Magellan 1100i Quick Reference Manual
-
PSC 2200VS Manual de usuario
-
Zebra LS1203-7AZR0100B Ficha de datos
-
 Hand Held Products HandHeld 3800 Linear Series Guía de inicio rápido

