ForaCare Gluc El manual del propietario
- Categoría
- Medir, probar
- Tipo
- El manual del propietario
Este manual también es adecuado para

Owner’s Manual /
Manual del Propietario
Blood Glucose Monitoring System /
Sistema de Monitoreo de Glucosa
For use in cats and dogs. /
Para uso en gatos y perros.


3
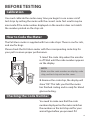
Dear Pet Gluco System Owner:
Thank you for purchasing the Pet Gluco Blood Glucose Monitoring
System. This manual provides important information to help you to use
the system properly. Before using this product, please read the following
contents thoroughly and carefully.
Regular monitoring of your pet’s blood glucose levels can help your pet
and your veterinarian gain better control of your pet’s diabetes. Due to
its compact size and easy operation, you can use the Pet Gluco Blood
Glucose Monitoring System to easily monitor your pet's blood glucose
levels anywhere, any time.
If you have other questions regarding this product, please contact the
place of purchase or call the Customer Care Line.
Version 3.0 2018/02
311-4239300-012
English

4
IMPORTANT SAFTY INSTRUCTIONS READ
BEFORE USE
1. Use this device ONLY for the intended use described in this manual.
2. Do NOT use accessories which are not specied by the manufacturer.
3. Do NOT use the device if it is not working properly or if it is
damaged.
4. This device does NOT serve as a cure for any symptoms or diseases.
The data measured is for reference only.
5. Before using this device to test blood glucose, read all instructions
thoroughly and practice the test. Carry out all the quality control
checks as directed.
6. Keep the device and testing equipment away from young children.
Small items such as the battery cover, batteries, test strips, lancets
and vial caps are choking hazards.
7. Use of this instrument in a dry environment, especially if synthetic
materials are present (synthetic clothing, carpets etc.) may cause
damaging static discharges that may cause erroneous results.
8. Do NOT use this instrument in close proximity to sources of strong
electromagnetic radiation, as these may interfere with the accurate
operation.
KEEP THESE INSTRUCTIONS IN A SAFE PLACE

5
TABLE OF CONTENTS
BEFORE YOU BEGIN 06
Important Information 06
Intended Use 07
Test Principle 07
Meter Overview 08
Display Screen 09
Test Strip 10
Setting the Meter 11
THE MEASURING MODES 14
BEFORE TESTING 15
Calibration 15
How to Code the Meter 15
Checking the Code Number 15
Control Solution Testing 16
Performing a Control Solution Test 17
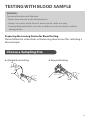
TESTING WITH BLOOD SAMPLE 19
Choose a Sampling Site 19
Performing a Blood Glucose Test 20
METER MEMORY 23
Reviewing Test Results 23
Reviewing Blood Glucose Day Average Results 24
MAINTENANCE 25
Battery 25
Caring for the Meter 26
Caring for the Test Strips 26
Important Control Solution Information 27
SYSTEM TROUBLESHOOTING 28
Result Readings 28
Error Messages 28
Troubleshooting 30
SPECIFICATIONS 31

6
BEFORE YOU BEGIN
Important Information
● Severe dehydration and excessive water loss may cause readings
which are lower than actual values. If you believe your pet is suering
from severe dehydration, consult a veterinarian immediately.
● If your pet’s blood glucose results are lower or higher than usual, and
your pet does not have any symptoms of illness, rst repeat the test.
If your pet has symptoms or continues to get results which are higher or
lower than usual, follow the treatment advice of your veterinarian.
● Use only fresh whole blood samples to test your pet’s blood glucose.
Using other substances will lead to incorrect results.
● If your pet is experiencing symptoms that are inconsistent with your
pet’s blood glucose test results and you have followed all the
instructions given in this owner’s manual, contact your veterinarian.
● We do not recommend using this product on a severely hypotensive pet
or a pet in shock. Readings which are lower than actual values may
occur for a pet experiencing a hyperglycaemic-hyperosmolar state, with
or without ketosis. Please consult the veterinarian before use.
● The measurement unit used for indicating the concentration of blood
or plasma glucose can either have a weight dimension (mg/dL) or a
molarity (mmol/L). The approximate calculation rule for conversion of
mg/dL in mmol/L is:
For example:
1) 120 mg/dL ÷ 18 = 6.6 mmol/L
2) 7.2 mmol/L x 18 = 129 mg/dL approximately.
mg/dL
mmol/L
Divided by 18
Times 18
= mmol/L
= mg/dL

7
Intended Use
This system is intended for use outside the body (in vitro diagnostic use)
by the pet owner at home and by veterinarian professionals in clinical
settings as an aid to monitoring the effectiveness of diabetes control in
cats and dogs. It is intended to be used for the quantitative measurement
of glucose (sugar) in fresh whole blood samples. It should not be used for
the diagnosis of diabetes.
Veterinary professionals may test with capillary and venous blood sample.
Test Principle
This system measures the amount of sugar (glucose) in whole blood.
The glucose testing is based on the measurement of electrical current
generated by the reaction of glucose with the reagent of the strip. The
meter measures the current, calculates the blood glucose level, and
displays the result. The strength of the current produced by the reaction
depends on the amount of glucose in the blood sample.

8
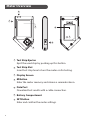
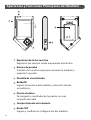
Meter Overview
Test Strip Ejector
Eject the used strip by pushing up this button.
Test Strip Slot
Insert test strip here to turn the meter on for testing.
Display Screen
M Button
Enter the meter memory and silence a reminder alarm.
Data Port
Download test results with a cable connection.
Battery Compartment
SET Button
Enter and conrm the meter settings.
1
2
3
5
4
6
7
1
2
3
4
5
6
7

9
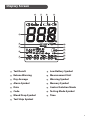
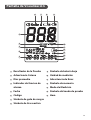
Display Screen
Test Result
Ketone Warning
Day Average
Alarm Symbol
Date
Code
Blood Drop Symbol
Test Strip Symbol
1
2
3
5
4
6
7
8
Low Battery Symbol
Measurement Unit
Warning Symbol
Memory Symbol
Control Solution Mode
Testing Mode Symbol
Time
9
11
10
13
14
15
12
6 7 8 9
1
10
12
13
14
15
11
5
4
2
3

10
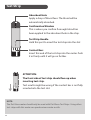
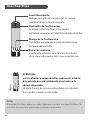
Absorbent Hole
Apply a drop of blood here. The blood will be
automatically absorbed.
Confirmation Window
This is where you confirm if enough blood has
been applied to the absorbent hole in the strip.
Test Strip Handle
Hold this part to insert the test strip into the slot
Contact Bars
Insert this end of the test strip into the meter. Push
it in firmly until it will go no further.
ATTENTION:
The front side of test strip should face up when
inserting test strip.
Test results might be wrong if the contact bar is not fully
inserted into the test slot.
NOTE:
The Pet Gluco meter should only be used with Pet Gluco Test Strips. Using other
test strips with this meter can produce inaccurate results.
Test Strip

11
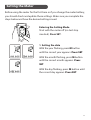
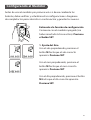
Entering the Setting Mode
Start with the meter off (no test strip
inserted). Press SET.
1. Setting the date
With the year flashing, press M button
until the correct year appears. Press SET.
With the month flashing, press M button
until the correct month appears. Press
SET.
With the day flashing, press M button until
the correct day appears. Press SET.
Setting the Meter
Before using the meter for the first time or if you change the meter battery,
you should check and update these settings. Make sure you complete the
steps below and have the desired settings saved.

12
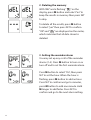
2. Deleting the memory
With “dEL” and a flashing “ ” on the
display, press M button and select “no” to
keep the results in memory then press SET
to skip.
To delete all the results, press M button
to select “yes” then press SET to confirm.
“OK” and “ ” are displayed on the meter,
which indicates that all data stored is
deleted.
3. Setting the reminder alarm
You may set up any or all of the reminder
alarms (1-4). Press M button to turn on or
turn off and to set the first reminder alarm.
Press M button to select “On”, then press
SET to set the hour. When the hour is
flashing, press M button to add an hour.
Press SET to confirm and go to minutes,
press M button to add one minute. Hold
M longer to add faster. Press SET to
confirm and go to the next alarm setting.

13
If you do not want to set an alarm, press SET to skip this step.
If you want to turn off an alarm, find the alarm number by pressing SET in
the setting mode, press M button to change from “ON’ to “OFF”.
At the time of your alarm, the meter will beep and automatically turn on.
You can press M button to silence the alarm and insert a test strip to begin
testing. If you do not press M button, the meter will beep for 2 minutes
then switch off. If you do not want to test at this time, press M button to
switch off the meter.
Congratulations! You have completed all settings!
NOTE:
• TheseparameterscanONLY be changed in the setting mode.
• Ifthemeterisidlefor3minutesduringthesettingmode,itwillswitchoff
automatically.

14
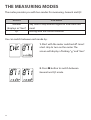
You can switch between each mode by:
1. Start with the meter switched off. Insert
a test strip to turn on the meter. The
screen will display a flashing “ ” and “Gen”.
THE MEASURING MODES
The meter provides you with two modes for measuring, General and QC.
MODES
General
(displays as “Gen”)
QC
USE WHEN
any time of day without regard to time since last
meal
testing with the control solution
2. Press M button to switch between
General and QC mode.

15
1. Insert the code strip when the monitor
is off. Wait until the code number appears
on the display.
2. Remove the code strip, the display will
show “OK”. This tells you that the meter
has finished coding and is ready for blood
glucose testing.
BEFORE TESTING
Calibration
You must calibrate the meter every time you begin to use a new vial of
test strips by setting the meter with the correct code. Test results may be
inaccurate if the code number displayed on the monitor does not match
the number printed on the strip vial.
The Pet Gluco meter is supplied with two code strips. There is one for cats,
and one for dogs.
Please check the Pet Gluco meter with the corresponding code strip for
your pet to ensure proper performance.
How to Code the Meter
NOTE:
Make sure the code number on display, code
strip, and test strip vial are the same.
Checking the Code Number
You need to make sure that the code
number displayed on the meter matches
the number on the test strip vial for your
animal type before you proceed. If it
811
811

16
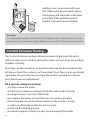
Control Solution Testing
Our Control Solution contains a known amount of glucose that reacts
with test strips and is used to ensure the meter and test strips are working
together correctly.
Test strips, control solutions, or sterile lancets may not be included in the
kit (please check the contents on the product box). They can be purchased
separately. Please make sure you have those items needed to test your
pet's blood glucose beforehand.
Do a control solution test when:
•youfirstreceivethemeter
•atleastonceaweektoroutinelycheckthemeterandteststrips
•youbeginusinganewvialofteststrips
•yoususpectthemeterorteststripsarenotworkingproperly
•thetestresultsarenotconsistentwithhowtheanimalisacting
or when you think the results are not accurate
•practicingthetestingprocess
•youhavedroppedorthinkyoumayhavedamagedthemeter
Warning:
It is important to make sure that the LCD displayed code is the same as the code
on the test strip vial before testing. Failure to do so will result in inaccurate results.
matches, you can proceed with your
test. If the codes do not match, please
stop testing and repeat the calibration
procedure. If the problem persists
contact Customer Service for help.
811

17
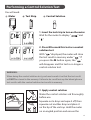
2. Press M to mark this test as a control
solution test
With “
” displayed, the meter will store
the test result in memory under “
”. If
you press the M button again, the “
”
will disappear and this test is no longer a
control solution test.
WARNING:
When doing the control solution test, you have to mark it so that the test result
will NOT be stored in the memory. Failure to do so will mix up the blood glucose
test results with the control solution test results in memory.
1. Insert the test strip to turn on the meter
Wait for the meter to display “ ” and
“
”.
Performing a Control Solution Test
You will need:
Meter
1
Test Strip
2
Control Solution
3
3. Apply control solution
Shake the control solution vial thoroughly
before use.
Squeeze out a drop and wipe it off, then
squeeze out another drop and place it
on the tip of the vial cap. Hold the meter
on an angled position and ensure the

18
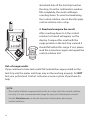
NOTE:
• Thecontrolsolutionrangeprintedontheteststripvialisforcontrolsolution
use only. It is not a recommended range for your pet's blood glucose level.
• SeetheMaintenance section for important information about your
control solutions.
Out-of-range results
If you continue to have test results fall outside the range printed on the
test strip vial, the meter and strips may not be working properly. Do NOT
test your pet's blood. Contact customer service or place of purchase for
help.
4. Read and compare the result
After counting down to 0, the control
solution test result will appear on the
display. Compare this result with the
range printed on the test strip vial and it
should fall within this range. If not, please
read the instructions again and repeat the
control solution test.
109-165
absorbent hole of the test strip touches
the drop. Once the confirmation window
fills completely, the meter will begin
counting down. To avoid contaminating
the control solution, do not directly apply
control solution onto a strip.

19
TESTING WITH BLOOD SAMPLE
Preparing the Lancing Device for Blood Testing
Please follow the instructions in the lancing device insert for collecting a
blood sample.
WARNING:
To reduce the chance of infection:
•Neversharealancetorthelancingdevice.
•Alwaysuseanew,sterilelancet.Lancetsareforsingleuseonly.
•Avoidgettinghandlotion,oils,dirt,ordebrisinoronthelancetsandthe
lancing device.
Choose a Sampling Site
● Marginal ear testing ● Paw pad testing

20
Performing a Blood Glucose Test
You will need:
Meter
1
Test Strip
2
Lancing Device
3
Lancet
4
2. Obtaining a blood sample
a. Select the test site.
b. Wash your hands and the test site
with warm water and soap to ensure
accurate results.
c. Thoroughly dry your hands and test
site.
d. Use the pre-set lancing device to
puncture the desired site.
e. Gently squeeze the punctured area to
obtain a drop of blood.
f. Be careful NOT to smear the blood
sample.
1. Insert the test strip to turn on the meter
Wait for the meter to display “ ” and
“
”.

21
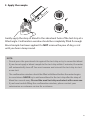
3. Apply the sample
Gently apply the drop of blood to the absorbent hole of the test strip at a
titled angle. Confirmation window should be completely filled if enough
blood sample has been applied. Do NOT remove the paw of dog or cat
until you hear a beep sound.
NOTE:
• Donotpressthepuncturedsiteagainsttheteststriportrytosmeartheblood.
• Ifyoudonotapplyabloodsampletotheteststripwithin3minutes,themeter
will automatically turn off. You must remove and reinsert the test strip to start
a new test.
• Theconfirmationwindowshouldbefilledwithbloodbeforethemeterbegins
to count down. NEVER try to add more blood to the test strip after the drop of
blood has moved away. Discard the used test strip and retest with a new one.
• Ifyouhavetroublefillingtheconfirmationwindow,pleasecontactyour
veterinarian or customer service for assistance.

22
WARNING:
The used lancet and test strip may be biohazardous . Please discard them properly.
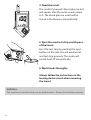
4. Read the result
The result of your pet’s blood glucose test
will appear after the meter counts down
to 0. The blood glucose result will be
stored in the Memory automatically.
5. Eject the used test strip and dispose
of the lancet
Eject the test strip by pushing the eject
button on the side. Discard used lancet
and test strip properly. The meter will
switch itself off automatically.
6. Wash hands throughly
Always follow the instructions in the
lancing device insert when removing
the lancet.

23
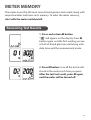
METER MEMORY
The meter stores the 400 most recent blood glucose test results along with
respective dates and times in its memory. To enter the meter memory,
start with the meter switched off.
Reviewing Test Results
1. Press and release M button
“
” will appear on the display. Press M
button again, and the first reading you see
is the last blood glucose result along with
date, time and the measurement mode.
2. Press M button to recall the test results
stored in the meter each time you press.
After the last test result, press M again
and the meter will be turned off.

24
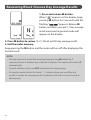
Reviewing Blood Glucose Day Average Results
1. Press and release M button.
When “
” appears on the display, keep
pressing M button for 3 seconds until the
flashing “ ” appears. Release M
button and then your pet’s 7-day average
result measured in general mode will
appear on the display.
2. Press M button to review 14, 21, 28, 60 and 90 day average results.
3. Exit the meter memory.
Keep pressing the M button and the meter will turn off after displaying the
last test result.
NOTE:
• Anytimeyouwishtoexitthememory,keeppressingM button for 5
seconds or leave it without any action for 3 minutes. The meter will switch off
automatically.
• ControlsolutionresultsareNOT included in the day average.
• Ifusingthemeterforthefirsttime,“---”displayswhenyourecallthetest
results or review the average result. It indicates that there is no test result in
the memory.

25
MAINTENANCE
Battery
The meter comes with one 3V lithium battery (CR2032).
Low Battery Signal
The meter will display one of the messages below to alert you when the
meter power is getting low.
The “ ” appears with E-b, Error and low:
The power is not enough to do a test. Please change the
batteries immediately.
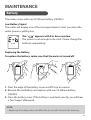
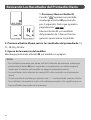
Replacing the Battery
To replace the battery, make sure that the meter is turned off.
NOTE:
• Replacingthebatterydoesnotaffectthetestresultsstoredinthememory.
1. Press the edge of the battery cover and lift it up to remove.
2. Remove the old battery and replace with one 3V lithium battery
(CR2032).
3. Close the battery cover. If the battery is inserted correctly, you will hear
a few “beeps” afterwards.

26
• Aswithallsmallbatteries,thesebatteriesshouldbekeptawayfromchildren.
If swallowed, promptly seek medical assistance.
• Properlydisposeofthebatteryaccordingtoyourlocalenvironmental
regulations.
Caring for the Meter
To avoid the meter and test strips attracting dirt, dust or other
contaminants, please wash and dry your hands thoroughly before use.
Cleaning
•Tocleanthemeterexterior,wipeitwithaclothmoistenedwithtap
water or a mild cleaning agent, then dry the device with a soft dry cloth.
•DoNOT rinse with water.
•DoNOT use organic solvents to clean the meter.
Meter Storage
•Storageconditions:-4°F to 140°F (-20°C to 60°C), below 95% relative
humidity.
•Alwaysstoreortransportthemeterinitsoriginalstoragecase.
•Avoiddroppingandheavyimpact.
•Avoiddirectsunlightandhighhumidity.
Caring for the Test Strips
•Storageconditions:35.6°F to 89.6°F (2°C to 32°C), below 85%
relative humidity. Do NOT freeze.
•Storetheteststripsintheiroriginalvialonly.Donottransferto
another container.
•Storeteststrippackagesinacooldryplace.Keepawayfromdirect
sunlight and heat.

27
•Afterremovingateststripfromthevial,immediatelyclosethevialcap
tightly.
•Touchtheteststripwithcleananddryhands.
•Useeachteststripimmediatelyafterremovingitfromthevial.
•Writetheopeningdateontheviallabelwhenyoufirstopenedit.
•Discardremainingteststripsafter3months.
•Donotuseteststripsbeyondtheexpirydate.Thismaycauseinaccurate
results.
•Donotbend,cut,oralterateststripinanyway.
•Keepthestripvialawayfromchildrensincethecapandtheteststrip
may be a choking hazard. If swallowed, promptly see a doctor for help.
For further information, please refer to the test strip package insert.
Important Control Solution Information
•UseonlyFORAcontrolsolutionswiththemeter.
•Donotusethecontrolsolutionbeyondtheexpirydateor3months
after first opening. Write the opening date on the control solution vial
and discard the remaining solution after 3 months.
•Itisrecommendedthatthecontrolsolutiontestbedoneatroom
temperature 68°F to 77°F (20°C to 25°C). Make sure the control solution,
meter, and test strips are at this specified temperature range before
testing.
•Shakethevialbeforeuse,discardthefirstdropofcontrolsolution,and
wipe off the dispenser tip to ensure a pure sample and an accurate
result.
•Storethecontrolsolutiontightlyclosedattemperaturesbetween36°F
to 86°F (2°C to 30°C). Do NOT freeze.

28
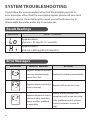
SYSTEM TROUBLESHOOTING
If you follow the recommended action but the problem persists, or
error messages other than the ones below appear, please call your local
customer service. Do not attempt to repair yourself and never try to
disassemble the meter under any circumstances.
Result Readings
MESSAGE WHAT IT MEANS
Appears when
glucose < 20 mg/dL (1.1 mmol/L).
Appears when
glucose > 600 mg/dL(33.3mmol/L).
MESSAGE WHAT IT MEANS? ACTION
Appears when the battery
cannot provide enough
power for a test.
Replace the battery immediately.
Appears when a used test
strip is inserted
Repeat with a new test strip.
Appears when test strip is
removed while counting
down, or other problem
in operation.
Review the instructions and
repeat test with a new test strip.
If the problem persists, please
contact customer service for
help.
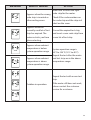
Error Messages

29
MESSAGE WHAT IT MEANS? ACTION
Appears when the wrong
code strip is inserted or
other coding errors.
Make sure to insert the right
code strip for the meter.
Check if the code numbers on
the code strip and the strip vial
label are the same.
Appears when the
currently used lot of test
strip has expired. The
meter restricts you from
glucose testing.
Discard the expired test strip,
and insert a new code strip from
a new lot of test strip.
Appears when ambient
temperature is below
system operation range.
System operation range is
50°F to 104°F (10°C to 40°C).
Repeat the test after the meter
and test strip are in the above
temperature range.
Appears when ambient
temperature is above
system operation range.
Problem in operation.
Repeat the test with a new test
strip.
If the meter still does not work,
please contact the customer
service for assistance.

30
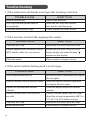
Troubleshooting
1. If the meter does not display a message after inserting a test strip:
POSSIBLE CAUSE
WHAT TO DO
Batteries exhausted.
Test strip inserted upside down or
incompletely.
Defective meter or test strips.
Replace the batteries.
Insert the test strip with contact
bars end first and facing up.
Please contact customer service.
2. If the test does not start after applying the sample:
POSSIBLE CAUSE WHAT TO DO
Defective test strip. Repeat the test with a new test strip.
Sample applied after automatic switch-
off (3 minutes after last user action).
Repeat the test with a new test strip.
Apply sample only when flashing “ ”
appears on the display.
Defective meter. Please contact customer service.
3. If the control solution testing result is out of range:
POSSIBLE CAUSE WHAT TO DO
Error in performing the test.
Control solution vial was poorly shaken.
Expired or contaminated control
solution.
Control solution that is too warm or
too cold.
Defective test strip.
Meter malfunction.
Read instructions thoroughly and repeat
the test again.
Shake the control solution vigorously
and repeat the test again.
Check the expiry date of the control
solution.
Control solution, meter, and test strips
should be at room temperature (68°F to
77°F (20°C to 25°C) before testing.
Repeat the test with a new test strip.
Please contact customer service.

31
SPECIFICATIONS
Model No.: Pet Gluco
Dimension: 96mm (L) x 49mm (W) x 14mm (H)
Weight: 42g
Power Source: one 3V CR2032 battery
Display: LCD
Memory: 400 measurement results with respective date and time
Auto electrode insertion detection
Auto reaction time count-down
Auto switch-off after 3 minutes without action
Temperature Warning
Operating Condition: 50°F to 104°F (10°C to 40°C),
below 85% R.H. (non-condensing)
Storage/Transportation Conditions: -4°F to 140°F (-20°C to 60°C),
below 95% R.H.
Measurement Units: mg/dL
Measurement Range: 20 to 600 mg/dL (1.1 to 33.3 mmol/L)
This device has been tested to meet the electrical and safety requirements of: IEC/
EN 61010-1, IEC/EN 61010-2-101, EN 61326-1, IEC/EN 61326-2-6.

32

33
Estimado usuario del Sistema Pet
Gluco:
Gracias por adquirir el Sistema de Monitoreo de Glucosa Pet Gluco. Este
manual le dará información importante que le ayudará a
utilizar el sistema correctamente. Antes de usar este sistema, lea y siga
las instrucciones del presente Manual del Propietario.
La supervisión periódica de los niveles de glucosa sanguínea de su
mascota pueden ayudarle a usted y a su veterinario a lograr un mejor
control de la diabetes de su mascota. Gracias a su tamaño compacto y
funcionamientos sencillo, puede utilizar el sistema de control de glucosa
sanguínea Pet Gluco para controlar fácilmente los niveles de glucosa
sanguínea en su mascota, en cualquier momento o lugar.
Si tiene otras preguntas sobre este producto, póngase en contacto con
el sitio de compra o llame a nuestra línea de servicio al cliente.
Español

34
IMPORTANTES MEDIDAS DE SEGURIDAD
LEÁSE ANTES DE SER USADO
1. Utilice este sistema SOLAMENTE para el uso previsto.
2. NO utilice accesorios que no hayan sido suministrados por el fabricante.
3. NO utilice este aparato si sospecha que está trabajando erróneamente o
ha sufrido algún daño.
4. Este aparato NO está diseñado para curar ningún síntoma o
enfermedad. Los datos de la medición son SOLO para referencia.
5. Antes de utilizar este equipo para realizar una prueba de glucosa
sanguínea cuidadosamente todas las instrucciones. Lleve a cabo todos
los procedimientos indicados, como se estipula en el manual para
vericar el control de calidad.
6. Mantenga el dispositivo y los equipos de pruebas alejados del alcance
de los niños. Los objetos pequeños como la tapa de las baterías,
baterías, tiras de prueba, lancetas y tapas representan peligros de asxia.
7. Evite utilizar este instrumento en ambientes secos, especialmente si hay
materiales sintéticos (como ropa sintética, alfombras, etc.) ya que podría
causar descargas estáticas y originar resultados erróneos.
8. NO use este instrumento cerca de fuentes de radiación
electromagnéticas, ya que podrían interferir en su operación.
CONSERVE ESTAS INSTRUCCIONES EN UN LUGAR SEGURO

35
TABLA DE CONTENIDO
ANTES DE EMPEZAR 36
Información Importante 36
Uso Previsto 37
Principios de la Prueba 37
Apariencia y Funciones Principales del Medidor 38
Pantalla de Visualización 39
Tiras Reactivas 40
Congurando el Medidor 41
MODALIDADES DE MEDICIÓN 44
ANTES DE HACER LA PRUEBA 44
Calibración 44
Cómo Codicar el Medidor 45
Comprobación del Número de Código 45
Probando con Solución de Control 46
Realizando Una Prueba Con la Solución de Control 47
HACIENDO UNA PRUEBA CON MUESTRA DE SANGRE 49
Preparando el Lugar de Punción 49
Preparar el Dispositivo de Punción para Pruebas de Sangre 50
MEMORIA DEL MEDIDOR 53
Visualización de Los Resultados 53
Revisando Los Resultados del Promedio Diario 54
MANTENIMIENTO 55
Baterías 55
Cuidado de el Medidor 56
Cuidado de las Tiras Reactivas 56
Información Importante sobre la Solución de Control 57
LOCALIZACION Y RESOLUCION DE PROBLEMAS EN EL SISTEMA 58
Lectura de Resultados 58
Mensajes de Error 58
Localización y Resolución de Problemas 60
ESPECIFICACIONES 61

36
ANTES DE EMPEZAR
Información Importante
● Una deshidratación severa y una pérdida de agua excesiva podrían
causar mediciones que sean más bajas que los valores actuales. Si cree
que su mascota está sufriendo una deshidratación severa, consulte a un
veterinario de inmediato.
● Si los resultados de glucosa sanguínea de su mascota son inferiores
o superiores a lo normal, y su mascota no tiene ningún síntoma de
enfermedad, repita la prueba en primer lugar. Si su mascota tiene
síntomas o continúa obteniendo resultados que son más altos o bajos
que lo habitual, siga la recomendación de tratamiento de su veterinario.
● Utilice solo muestras de sangre entera fresca para realizar las pruebas
de glucosa sanguínea de su mascota. La utilización de otras sustancias
provocará resultados incorrectos.
● Si su mascota tiene síntomas que son inconsistentes con los resultados
de las pruebas de glucosa sanguínea y se ha seguido cuidadosamente
todas las instrucciones incluidas en este manual del propietario,
consulte a su veterinario.
● No recomendamos utilizar este producto en una mascota seriamente
hipotensa o en una mascota en shock. Podrían ocurrir mediciones que
sean más bajas que los valores actuales para una mascota con un estado
hiperglicémico-hiperosmolar, con o sin cetosis. Consulte al veterinario
antes del uso.
● La unidad de medición utilizada para indicar la concentración de
glucosa sanguínea o plasma puede tener una dimensión de peso (mg/
dL) o una molaridad (mmol/L). La regla de cálculo aproximada para la
conversión de mg/dL a mmol/L es:
Por ejemplo:
1) 120 mg/dL ÷ 18 = 6,6 mmol/L
2) 7,2 mmol/L x 18 = 129 mg/dL aproximadamente.
mg/dL
mmol/L
Dividido por 18
Multiplicado por 18
= mmol/L
= mg/dL

37
Uso Previsto
Este sistema está diseñado para el uso fuera del cuerpo (uso para
diagnósticos in vitro) por parte del dueño de la mascota en el hogar o
por parte de los profesionales veterinarios en entornos clínicos como
ayuda para supervisar la efectividad del control de la diabetes en perros y
gatos. Está diseñado para su utilización para la medición cuantitativa de la
glucosa (azúcar) en muestras de sangre entera fresca. No se debe utilizar
para el diagnóstico de la diabetes.
Los profesionales veterinarios podrían realizar las pruebas con muestras de
sangre capilar y venosa.
Principios de la Prueba
Este sistema mide la cantidad de azúcar (glucosa) en la sangre. La
prueba de glucosa en la sangre se basa en la medición del fluido
eléctrico generado por la reacción de la glucosa con el agente reactivo
de la tira reactiva. El medidor mide la corriente, calcula el nivel de
glucosa en la sangre y muestra el resultado. La fuerza de la corriente
producida por la reacción depende de la cantidad de glucosa en la
muestra de sangre.

38
Apariencia y Funciones Principales del Medidor
Expulsión de la tira reactiva
Expulse la tira reactiva usada empujando este botón.
Ranura de prueba
Inserte la tira reactiva aquí para encender el medidor y
empezar la prueba.
Pantalla de visualización
Botón M
Ingrese la memoria del medidor y silencie la alarma
recordatoria.
Puerto de datos
Descargue los resultados de la prueba con una
conexión de cable.
Compartimiento de la batería
Botón SET
Ingrese y conrme la conguración del medidor.
1
2
3
5
4
6
7
1
2
3
4
5
6
7

39
Pantalla de Visualización
Resultados de la Prueba
Advertencia Cetona
Días promedio
Indicador de funcion de
alarma
Fecha
Código
Símbolo de gota de sangre
Símbolo de tira reactiva
1
2
3
5
4
6
7
8
Símbolo de batería baja
Unidad de medición
Advertencia de Error
Símbolo de memoria
Modo de Medición
Símbolo del modo de prueba
Hora
9
11
10
13
14
15
12
6 7 8 9
1
10
12
13
14
15
11
5
4
2
3

40
Canal Absorbente
Aplique una gota de sangre aquí. La sangre
será absorbida automáticamente.
Ventanilla de Confirmación
Es donde usted confirma si ha puesto
suficiente sangre en el Canal Absorbente de la tira.
Mango de la Tira Reactiva
Coja la tira por esta parte para introducirla en
la ranura del medidor.
Barras de contacto
Inserte este extremo de la tira reactiva dentro
de la ranura de prueba hasta que no entre mas.
ATENCIÓN:
Los resultados pueden resultar erróneos si la barra
de contacto no está totalmente insertada en la
ranura de prueba.
La parte frontal de la tira reactiva debe ser colocada
hacia arriba cuando es insertada.
NOTA:
El medidor Pet Gluco debe ser usado solamente con tiras reactivas Pet Gluco. Si
usa otras tiras reactivas producirán resultados incorrectos.
Tiras Reactivas

41
Entrando a la función de configuración
Comience con el medidor apagado (sin
haber insertado la tira reactiva). Presione
el botón SET.
1. Ajuste del Año
Con el año parpadeando, presione el
botón M hasta que el año correcto
aparezca. Presione SET.
Con el mes parpadeando, presione el
botón M hasta que el mes correcto
aparezca. Presione SET.
Con el día parpadeando, presione el botón
M hasta que el día correcto aparezca.
Presione SET.
Congurando el Medidor
Antes de usar el medidor por primera vez o si desea cambiarle las
baterías, debe verificar y actualizar estas configuraciones. Asegúrese
de completar los pasos descritos a continuación y guardar los nuevos.

42
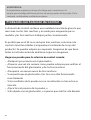
2. Apagar la memoria
Con “dEL” e “ ” parpadeando en
pantalla, presione el botón M
y seleccione “no” para conservar los
resultados en memoria y entonces
presione SET para salir.
Para apagar todos los resultados, presione
el botón M y “yes” para borrar todos los
registros de memoria.
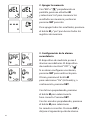
3. Configuración de la alarma
recordatoria
El dispositivo de medición posee 4
alarmas recordatorias. El dispositivo
de medición mostrará "OFF" y " ".
Si no desea configurar una alarma,
presione SET para omitir este paso.
O bien, presione el botón M
para seleccionar "On" (Activado) y, a
continuación, presione SET.
Con la hora parpadeando, presione
el botón M para seleccionar la
hora correcta. Presione SET.
Con los minutos parpadeando, presione
el botón M para seleccionar
los minutos correctos. Presione SET y
diríjase al siguiente ajuste de alarma.

43
Si no desea configurar una alarma, presione SET (Establecer) para omitir
este paso.
Si desea desactivar una alarma, busque el número de alarma presionando
SET (Establecer) en el modo de configuración y presione el botón M para
cambiar de "ON" (Activado) a "OFF" (Desactivado).
Durante la activación de la alarma, el medidor sonará y se encenderá
de forma automática. Puede presionar el botón M para silenciar la
alarma e inserte una tira de prueba para comenzar a realizar la prueba.
Si no presiona el botón M, el medidor sonará durante 2 minutos y, a
continuación, se apagará. Si no desea realizar la prueba en este momento,
presione el botón M para apagar el medidor.
¡Felicitaciones! Ha terminado de programar el medidor
NOTA:
• EstosparámetrospuedensercambiadosSOLOenmododeconfiguracióno
programación.
• Sielmedidorestásinserutilizadoduranteelmododeconfiguraciónpor3
minutos, el medidor se apagará automáticamente.

44
ANTES DE HACER LA PRUEBA
Calibración
Debe calibrar el medidor cada vez que comienze a usar un nuevo
envase de tiras reactivas ajustando el medidor con el código
correcto. Resultados de la prueba pueden ser inexactos si el número de
código que aparece en la pantalla no coincide con el número impreso
en el frasco de tiras.
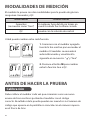
Usted puede cambiar entre cada función:
1. Comience con el medidor apagado.
Inserte la tira reactiva para encender el
medidor. El medidor se encenderá
automáticamente y visualizará lo
siguiente en secuencia: “ ” y “Gen”.
MODALIDADES DE MEDICIÓN
El medidor le provee con dos modalidades para la prueba de glucosa
sanguínea: Generales y QC.
Modalidades Cuándo usarlas
Generales
(se muestra come "Gen")
A cualquier hora del día sin tomar en
cuenta cuándo fue la última comida
QC prueba con la solución de control
2. Presione el botón M para cambiar
entre la función Gen o QC.

45
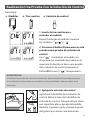
1. Inserte la tira de codificación cuando
el medidor está apagado. Esperar hasta
que el número de código aparezca en la
pantalla.
2. Retire la tira de código, la pantalla
mostrará "OK". Esto indica que el
medidor ha terminado de codificar y está
listo para la prueba de glucosa sanguínea.
El medidor Pet Gluco se suministra con dos tiras de código. Una para gatos
y otra para perros.
Para lograr un rendimiento correcto, utilice el medidor Pet Gluco con la tira
de código correspondiente para su mascota.
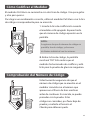
Cómo Codicar el Medidor
NOTA:
Asegúrese de que el número de código en
pantalla, tira de código, y el envase
de lámina individual son los mismos.
Comprobación del Número de Código
Usted necesita asegurarse de que el
número de código que se muestra en el
medidor coincida con el número que
aparece en el frasco de tiras reactivas
antes de continuar. Si coincide, se puede
proceder con la prueba. Si los
códigos no coinciden, por favor deja de
prueba y contacte al Servicio al
Cliente para obtener ayuda.
811
811
811

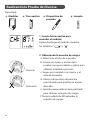
46
Probando con Solución de Control
La Solución de Control contiene una cantidad conocida de glucosa que
reacciona con las tiras reactivas y es usada para asegurarle que su
medidor y las tiras reactivas trabajan juntas correctamente.
Es posible que en el kit no se incluyan tiras reactivas, soluciones de
control o lancetas estériles (compruebe el contenido de la caja del
producto). Se pueden adquirir por separado. Asegúrese de que tiene
todos los artículos antes de analizarse la glucosa sanguínea.
Haga una prueba para la solución de control cuando:
•Aladquirirporprimeravezelglucómetro
•Almenosunavezalasemanacomopruebarutinariaparaverificarel
funcionamiento del glucómetro y de las tiras reactivas
•Alempezarunenvasenuevodetirasreactivas
•Sisospechaqueelglucómetroolastirasnoestánfuncionando
correctamente
•Silosresultadosdelapruebanosonconsistentesacómoactuasu
mascota.
•Alpracticarelprocesodelaprueba,o
•Sihadejadocaerelglucómetro,osipiensaqueéstehasidodañado.
ADVERTENCIA:
Es importante asegurarse de que el código que se muestra es el
mismo que el código del frasco de tiras de ensayo antes de la prueba. De lo
contrario se obtendrán resultados erróneos.

47
2. Presione el botón M para marcar esta
prueba como prueba de solución de
control
Con “
” visualizado, el medidor no
almacenará el resultado de prueba en la
memoria. Si decide no hacer una prueba
de la solución de control, presione el
botón M otra vez y “
” desaparecerá.
ADVERTENCIA:
Al realizar la prueba de solución de control, debe etiquetar la prueba para que
el resultado de la prueba no se mezcle con los resultados almacenados en la
memoria.
1. Inserte la tira reactiva para
encender el medidor
Espere hasta que el medidor muestre
los símbolos “ ” y “
”.
Realizando Una Prueba Con la Solución de Control
Necesitará:
Medidor
1
Tira reactiva
2
Solución de control
3
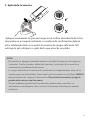
3. Aplique la solución de control
Agite bien la botellita de la solución de
control. Retire la tapa de la botellita de
solución de control. Coloque la tapa sobre
una superficie plana. Apriete la botellita,
deseche la primera gota, y limpie la punta
del gotero para evitar contaminación.

48
NOTA:
• Elrangofijadoenelfrascodelastirasreactivasseaplicasoloenlautilizaciónde
la solución de control. No es un rango recomendado para el nivel de glucosa en
su mascota.
• VerlaseccióndeMANTENIMIENTOparaobtenerinformaciónimportantesobre
las soluciones de control.
Resultados fuera del rango
Si al repetir la prueba el resultado sigue estando fuera de rango, el
sistema podría estar trabajando incorrectamente. NO utilice el sistema
para hacer exámenes de sangre. Contacte a su distribuidor local o bien
al servicio al cliente.
4. Lea y compare los resultados
Después del conteo regresivo hasta 0,
el resultado de la solución de control
aparecerá en la pantalla. Compare este
resultado con el rango impreso en el
envase de las tiras reactivas; el resultado
debe estar dentro del rango.
109-165
Apriete el frasco otra vez para sacar otra gota de solución de control y
aplique esa gota a la cima de la tapa.
Sostenga el medidor con la tira reactiva insertada y toque levemente el
canal absorbente de la tira con la gota. Una vez que la ventanilla de
confirmación esté llena, el medidor empezará el conteo regresivo.

49
HACIENDO UNA PRUEBA CON
MUESTRA DE SANGRE
Preparar el Dispositivo de Punción para Pruebas de Sangre
Por favor, consulte el manual del fabricante para recoger una muestra
de sangre.
ADVERTENCIA:
Para reducir el riesgo de infección:
•Nuncacompartalalancetaoeldispositivodepunción.
•Siempreutiliceunalancetanuevayesterilizada.Laslancetasdebenser
utilizadas SOLO una vez.
•Alutilizarlaslancetasoeldispositivodepuncióneviteelusodecremade
manos, aceite, polvo o cualquier tipo de sustancia contaminante.
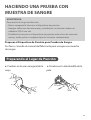
Preparando el Lugar de Punción
● Pruebas en la vena marginal de la
oreja
● Pruebas en la almohadilla de la
pata

50
Realizando la Prueba de Glucosa
Necesitará:
Medidor
1
Tira reactiva
2
Dispositivo de
punción
3
Lanceta
4
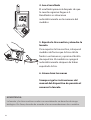
2. Obteniendo la muestra de sangre
a. Seleccione el sitio de la prueba.
b. Lávese las manos y el sitio de la
prueba con agua caliente y jabón para
obtener resultados precisos.
c. Seque por completo sus manos y el
sitio de la prueba.
d. Utilice el dispositivo de punción
precolocado para pinchar en el sitio
deseado.
e. Apriete suavemente el área pinchada
para obtener una gota de sangre.
f. Tenga cuidado de NO extender la
muestra de sangre.
1. Inserte la tira reactiva para
encender el medidor
Espere hasta que el medidor muestre
los símbolos “ ” y “
”.
Correcto
Incorrecto

51
3. Aplicando la muestra
Aplique suavemente la gota de sangre en el orificio absorbente de la tira
de prueba en un ángulo inclinado. La ventana de confirmación deberá
estar totalmente llena si se aplicó la muestra de sangre suficiente. NO
extraiga la pata del perro o gato hasta que escuche un pitido.
NOTA:
• Elmedidorseapagaráautomáticamentesinoaplicalamuestradesangreen
3 minutos. Si esto ocurriera, deberá de remover y reinsertar la tira reactiva y
comenzar el procedimiento de nuevo.
• Lasangredebellenarlaventanadeconfirmacióncompletamenteantesdela
cuenta regresiva del medidor. Si encuentra que la ventana no está llena, NUNCA
trate de añadir más sangre a la tira reactiva. Deseche la tira reactiva y haga la
prueba otra vez con una tira nueva.
• Sitieneproblemasparallenarlaventanadeconfirmación,consulteasu
veterinario o comuníquese con el servicio de atención al cliente para obtener
asistencia.

52
ADVERTENCIA:
La lanceta y las tiras reactivas usadas son consideradas un desecho de riesgo
biológico. Por favor, deseche de acuerdo a las recomendaciones de su médico.
4. Lea el resultado
El resultado aparecerá después de que
la cuenta regresiva llegue a 0.
Resultados se almacenan
automáticamente en la memoria del
medidor.
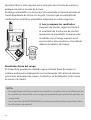
5. Expulse la tira reactiva y deseche la
lanceta
Para expulsar la tira reactiva, coloque el
medidor de forma que la tira esté de
frente a un basurero y oprima el botón
de expulción. El medidor se apagará
automáticamente despues de haber
expulsado la tira.
6. Lávese bien las manos
Siempre siga las instrucciones del
manual del dispositivo de punción al
remover la lanceta.

53
MEMORIA DEL MEDIDOR
Su medidor almacena en la memoria los 400 resultados más
recientes, junto con sus respectivas fechas y horas, para ingresar en la
memoria de su medidor comience con el medidor apagado.
Visualización de Los Resultados
1. Presione y libere el botón M
“
” aparecerá en la pantalla.
Presione el botón M otra vez y la
primera lectura que aparecerá en
pantalla será el resultado de la última
medición con su fecha y hora, así como
el tipo de medición.
2. Presione el botón M para revisar los
resultados guardados en el medidor cada
vez que lo presiona. Presione el botón M
otra vez y el medidor se apagará.

54
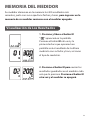
Revisando Los Resultados del Promedio Diario
1. Presione y libere el botón M.
Cuando “
” aparezca en pantalla,
mantenga el botón M presionado
por 3 segundos, hasta que aparezca
parpadeando “ ”.
Libere el botón M y el resultado
del promedio de 7 días en función
general, aparecerá en la pantalla.
2. Presione el botón M para revisar los resultados del promedio de 14,
21, 28, 60 y 90 días.
3. Egreso de la memoria del medidor.
Mantenga presionado el botón M y el medidor se apagará.
NOTA:
• Encualquiermomentoquedeseesalirdelafuncióndememoria,mantenga
presionado el botón M por 5 segundos o simplemente no realice ninguna
acción por 3 minutos y el medidor se apagará automáticamente.
• LosresultadosdelasolucióndecontrolNOestánincluidosenelpromedio
diario.
• Siestáusandoelmedidorporprimeravez,“---”serámostradocuandosolicita
los resultados de prueba o revisa el resultado promedio. Esto significa que no
hay resultados de prueba en la memoria.

55
MANTENIMIENTO
Baterías
Su medidor viene con una batería de litio de 3V (CR2032).
Señal de batería agotada o baja
El medidor mostrará el mensaje siguiente para avisarle cuando se este
agotando la batería.
El símbolo “ ” aparecerá con E-b y low:
Batería no tiene suficiente poder para ejecutar la
prueba. Tiene que cambiarla inmediatamente.
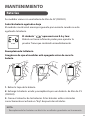
Reemplazando la Batería
Asegúrese de que el medidor está apagado antes de sacar la
batería.
NOTA:
• Reemplazandolasbateríasnoafectalosresultadosguardadosenlamemoria.
1. Retire la tapa de la batería.
2. Extraiga la batería usada y reemplácela por una batería de litio de 3 V
(CR2032).
3. Cierre el cobertor de las baterías. Si las baterías están colocadas
correctamente escuchará un "bip" después de instalarlas.

56
• Comocontodaslasbateríaspequeñas,éstasdebenestarfueradelalcancede
niños pequeños. En caso de que ser ingeridas, por favor busque ayuda médica
lo más pronto posible.
• Desechelasbateríasdeacuerdoconlasregulacionesambientalesdesu
localidad.
Cuidado de el Medidor
Para evitar que el medidor y las tiras reactivas atraigan la suciedad, el
polvo u otros contaminantes, lávese las manos a fondo con agua y
jabón antes y después de su uso.
Limpieza
•Paralimpiarelexteriordelmedidor,límpieloconunpañohumedecido
con agua o agente de limpieza suave y, a continuación, seque el
dispositivo con un paño seco y suave.
•NO enjuague con agua.
•NO utilice solventes orgánicos para limpiar el medidor.
Almacenamiento del medidor
•Condicionesdealmacenamiento:-4°Fa140°F(-20°Ca60°C),bajoun
95% de humedad relativa.
•Siempreguardeotransporteelmedidorensuestucheoriginal.
•Evitequeelmedidorsecaigaoquesufraimpactosfuertes.
•Evitelaluzsolardirectaylaaltahumedad.
Cuidados de las Tiras Reactivas
•Condicionesdealmacenamiento:35.6°Fa89.6°F(2°Ca32°C),bajoun
85% de humedad relativa. NO las congele.
•Almacenelastirasreactivassolamenteensuenvaseoriginal.Nolas
transfiera a otro contenedor.
•Guardeelenvasedelastirasreactivasenunlugarfrescoyseco.
Manténgalo alejado del calor y de la luz solar directa.

57
•Cierrebienelenvaseinmediatamentedespuésderemoverlatira
reactiva.
•Siempremanipulelatirareactivaconlasmanoslimpiasysecas.
•Usecadatirareactivainmediatamentedespuésdesacarladelenvase.
•Escribalafechadeexpiraciónenlaetiquetacuandoabraelfrascopor
primera vez.
•Despuésde3mesesdesechelastirasreactivasrestantes.
•Nuncausetirasreactivasqueesténexpiradasyaquepuedecausar
resultados inexactos.
•Nodoble,corteoalterelatirareactivadeningunamanera.
•Mantengaelenvasedetirasfueradelalcancedeniños,yaquede
ingerirse podría causar asfixia. De ser ingerido, busque atención médica
inmediatamente.
Para mayor información, por favor refierase al inserto en el paquete
de tiras reactivas.
Información Importante sobre la Solución de
Control
•UsesolamentelasolucióndecontrolFORAconelmedidor.
•Nuncausesolucionesdecontrolquefueronabiertaspormásde3
meses o que estén expiradas. Escriba la fecha en la que abrió el envase
de la solución de control en la etiqueta del mismo y deséchela después
de 3 meses.
•Esrecomendablequelapruebaparasolucióndecontrolselleveacabo
a temperatura ambiental de 68°F a 77°F (20°C a 25°C). Asegúrese de que
la solución de control, la medidor y las tiras reactivas estén dentro del
rango especificado antes de realizar la prueba.
•Agitebienelenvaseantesdeusarlo,descartelaprimeragotade
solución de control y limpie la punta del dispensador para asegurarse
de que la muestra esté pura y pueda obtener resultados exactos.
•Lascondicionesdealmacenamientodebenestarentretemperaturasde
35.6°F a 86°F (2°C a 30°C). NO la congele.

58
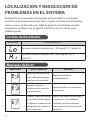
LOCALIZACION Y RESOLUCION DE
PROBLEMAS EN EL SISTEMA
El siguiente es un resumen de mensajes de la pantalla. Si su medidor
muestra un mensaje de error, por favor, siga las acciones para el mensaje
de error como se describe en la tabla de abajo. Si el problema persiste,
póngase en contacto con su agente local de servicio al cliente para
obtener ayuda.
Lectura de Resultados
MENSAJE QUÉ SIGNIFICA
Aparece cuando la glucosa es < 20 mg/dL (1.1 mmol/L).
Aparece cuando la glucosa es > 600 mg/dL (33.3
mmol/L).
MENSAJE QUÉ SIGNIFICA ACCIÓN
Parece que la batería no
tiene suciente energía
para hacer otra prueba.
Remplace la batería
inmediatamente.
Aparece cuando se
inserta una tira reactiva
que está usada.
Haga la prueba con una nueva
tira reactiva.
Aparece cuando se extrae
la tira de prueba durante
el conteo o cuando existe
otro problema durante el
funcionamiento.
Repita la prueba con una nueva
tira reactiva. Si el problema
continua, por favor contacte
con el servicio al cliente para la
asistencia.
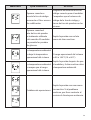
Mensajes de Error

59
MENSAJE QUÉ SIGNIFICA ACCIÓN
Aparece cuando se
inserta la tira de código
incorrecta o Otros errores
de codicación.
Asegúrese de insertar la tira de
código correcta para el medidor.
Comprobar que el número de
código de la tira de código, y
frasco de tiras de prueba son los
mismos.
Aparece cuando el
lote de tiras de prueba
actualmente utilizado
está vencido. El medidor
no permite las pruebas
de glucosa.
Repita la prueba con un lote
nuevo de tiras reactivas.
La temperatura ambiental
es bajo la temperatura
operacional del sistema
El rango operacional del sistema
es 50 a 104°F (10 a 40°C).
Repita la prueba después de que
el medidor y la tira reactiva estén
a temperatura ambiental.
La temperatura ambiental
es mayor que el rango
operacional del sistema.
Problema de operaciones
Repita la prueba con una nueva
tira reactiva. Si el problema
continua, por favor contacte al
servicio al cliente para asistencia.

60
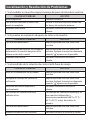
Localización y Resolución de Problemas
1. Si el medidor no muestra ningún mensaje después de introducir una tira:
CAUSAS POSIBLES ACCIÓN
Batería agotada.
Cambiar la batería.
Tira reactiva colocada al revés o de
modo incompleto.
Inserte la tira reactiva hacia arriba con
las barras de contacto primero.
Medidor defectuoso. Por favor contacte con servicio al
cliente.
2. Si la prueba no comienza después de colocar la muestra:
CAUSAS POSIBLES ACCIÓN
Tira reactiva defectuosa. Repita la prueba con una nueva tira
reactiva.
Muestra aplicada después del apagado
automático (3 minutos después de la
última acción del usuario).
Repita la prueba con una nueva tira
reactiva. Apliqué la muestra solamente
cuando “ ” aparece en la pantalla.
Medidor defectuoso. Por favor contacte al servicio al
cliente.
3. Si el resultado de la solución de control está fuera de rango:
CAUSAS POSIBLES ACCIÓN
Error en la realización de la prueba. Repita la prueba con una nueva tira
reactiva.
No agito la solución de control lo
suficiente.
Repita la prueba con una nueva tira
reactiva. Apliqué la muestra solamente
cuando “ ” aparece en la pantalla.
Solución de control expirada o
contaminada.
Por favor contacte al servicio al
cliente.
La solución de control está muy
caliente o fría.
La solución de control, el medidor y las
tiras reactivas debe estar a
temperatura ambiental (68°F a 77°F /
20°C a 25°C), antes de realizar la
prueba.
Tira reactiva defectuosa. Repita la prueba con una nueva tira
reactiva.
Malfuncionamiento del medidor. Por favor contacte al servicio al cliente.

61
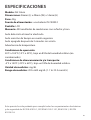
ESPECIFICACIONES
Modelo: Pet Gluco
Dimensiones: 96mm (L) x 49mm (W) x 14mm (H)
Peso: 42g
Fuente de alimentación: una batería 3V CR2032
Pantalla: LCD
Memoria: 400 resultados de mediciones con su fecha y hora
Auto detección al insertar electrodo
Auto reacción de tiempo en cuenta regresiva
Auto apagado después de 3 minutos sin acción
Advertencia de temperatura
Condiciones de operación:
50°F a 104°F (10°C a 40°C), bajo un 85% de humedad relativa (no
condensando)
Condiciones de almacenamiento y/o transporte:
-4°F a 140°F (-20°C a 60°C), bajo un 95% de humedad relativa.
Unidad de medición: mg/dL
Rango de medición: 20 to 600 mg/dL (1.1 to 33.3 mmol/L)
Este aparato ha sido probado para cumplir todos los requerimientos electrónicos
y de seguridad de: IEC/EN 61010-1, IEC/EN 61010-2-101, EN 61326-1, IEC/EN
61326-2-6.

62
MEMO


Distributed by ForaCare, Inc. /
Distribuido por ForaCare, Inc.
893 Patriot Drive Suite D, Moorpark, CA 93021 USA
Products made in Taiwan /
Productos hechos en Taiwán
Toll Free / Número de Teléfono Gratuito :
1-888-307-8188
(8:30 am-5:00 pm PST, Monday to Friday /
8:30 am-5:00 pm PST, Lunes a Viernes)
www.foracare.com
Blood Glucose Monitoring System /
Sistema de Monitoreo de Glucosa
-
 1
1
-
 2
2
-
 3
3
-
 4
4
-
 5
5
-
 6
6
-
 7
7
-
 8
8
-
 9
9
-
 10
10
-
 11
11
-
 12
12
-
 13
13
-
 14
14
-
 15
15
-
 16
16
-
 17
17
-
 18
18
-
 19
19
-
 20
20
-
 21
21
-
 22
22
-
 23
23
-
 24
24
-
 25
25
-
 26
26
-
 27
27
-
 28
28
-
 29
29
-
 30
30
-
 31
31
-
 32
32
-
 33
33
-
 34
34
-
 35
35
-
 36
36
-
 37
37
-
 38
38
-
 39
39
-
 40
40
-
 41
41
-
 42
42
-
 43
43
-
 44
44
-
 45
45
-
 46
46
-
 47
47
-
 48
48
-
 49
49
-
 50
50
-
 51
51
-
 52
52
-
 53
53
-
 54
54
-
 55
55
-
 56
56
-
 57
57
-
 58
58
-
 59
59
-
 60
60
-
 61
61
-
 62
62
-
 63
63
-
 64
64


ForaCare Gluc El manual del propietario
- Categoría
- Medir, probar
- Tipo
- El manual del propietario
- Este manual también es adecuado para
en otros idiomas
- English: ForaCare Gluc Owner's manual
Otros documentos
-
 ACONLABS ON CALL EXPRESS Manual de usuario
-
Prodigy Autocode El manual del propietario
-
 BIONIME Rightest GM300 Manual de usuario
-
iHealth Gluco BG5 Guía de inicio rápido
-
 Trividia TRUEbalance Quick Reference Manual
-
 NIPRO Diagnostics TrueResult El manual del propietario
-
 Fora Diamond GD50 El manual del propietario
-
Accu-Chek Accu-Chek Aviva El manual del propietario
-
ReliOn Confirm Manual de usuario
-
Abbott Freestyle Owner's Booklet


