Sharp XL-B510 El manual del propietario
- Categoría
- Reproductores de CD
- Tipo
- El manual del propietario
Este manual también es adecuado para

XL-B510
User manual
Micro Component System
Product images are for illustration purposes only. Actual product may vary. | Das Bild auf der Verpackung kann vom Inhalt abweichend sein. | Las imágenes del
producto son para fi nes ilustrativos solamente. | Le immagini dei prodotti sono solo ai fi ni illustrativi. | Les images du produit sont présentées à titre d’illustration
uniquement. | Zdjęcie produktu jest tylko w celach ilustracyjnych. Produkt może się różnić.
EN ESDE IT FR PL


EN
Important safety instructions
CAUTION
RISK OF ELECTRIC SHOCK
DO NOT OPEN
Please, read these safety instructions and respect
the following warnings before the appliance is
operated:
The lightning ash with arrowhead symbol, within an
equilateral triangle, is intended to alert the user to the
presence of uninsulated “dangerous voltage” within the
product’s enclosure that may be of su cient magnitude as to
constitute a risk of electric shock to persons.
The exclamation point within an equilateral triangle is
intended to alert the user to the presence of important
operating and maintenance (servicing) instructions in the
literature accompanying the appliance.
This symbol means that the product should be disposed of
in an environmentally friendly manner and not with general
household waste.
AC voltage
DC voltage
Class II equipment
In order to prevent re always
keep candles and other open
ames away from this product.
Warning:
• Always follow basic safety precautions when using this applience, espe-
cially when children are present.
• Children should be supervised to ensure that they do not play with the
appliance.
• Do not damage the power cord, neither do not place any heavy objects
on it, do not strech it or bend it. Also do not attach extension cables.
Damage to the power cord may occur re or electric shock.
• If the supply cord is damaged, it must be replaced by the manufacturer,
a service agent or similarly qualied persons in order to avoid a hazard.
• Ensure that the unit is plugged into an AC 220-240V 50Hz power outlet.
Using higher voltage may cause the unit to malfunction or even re
catching.
• If the power plug does not t into your outlet, do not force the plug into
an electrical socket if it does not t.
• Turn o the unit before unplugging it from power source to completely
switch it o .
• Do not disconnect or connect the power cord with wet hands. It may
cause an electric shock.
• Disconnect the power cord if it is not used for a long time.
• Ensure that the mains plug is always easily accessible.
• This product does not contain any parts that are serviceable by the
user. In case of a fault, contact the manufacturer or authorised service
department. Exposing the internal parts inside the device may endanger
your life. The manufacturers guarantee does not extend to faults caused
by repairs carried out by unauthorised third parties.
• Do not use this product immediately after unpacking. Wait until it warms
up to room temperature before using it.
• Ensure this product is used in moderate climates only (not in tropical/
subtropical climates).
• Place product on a at, stable surface that is not subject to vibrations.
• Ensure the product and its parts is not overhanging the edge of the
supporting furniture.
• To reduce the risk of fire, electric shock or damage to this product, do
not expose it to direct sunlight, dust, rain and moisture. Never expose it
to dripping or splashing and do not place objects filled with liquids on
or near the product.
• Do not place objects lled with liquids, such as vases, on the apparatus.
• Do not install near any heat sources such as radiators, heat registers,
stoves, or other apparatus (including ampli ers) that produce heat.
• Do not place the product where the humidity is high and ventilation is
poor.
• Ensure a minimum distance of 5 cm around the apparatus for su cient
ventilation. Do not block any ventilation openings of this product.
Always ensure that the ventilation openings are not covered with items
such as newspapers, table-cloths, curtains, etc.
• NEVER let anyone, especially children, push anything into holes, slots
or any other openings in the unit’s casing as this could result in a fatal
electric shock.
• Storms are dangerous for all electric appliances. If the mains or aerial
wiring is struck by lightning, the appliance might get damaged, even if it
is turned o . You should disconnect all the cables and connectors of the
appliance before a storm.
• Excessive sound pressure from earphones and headphones can cause
hearing loss.
• Do not move the unit during disc playback. During playback, the disc
rotates at high speed. Do not lift or move the unit during playback, as
doing so may damage the disc or the unit.
• Do not turn up the volume while listening to a section with very low
level inputs or no audio signals. lf you do, the speaker maybe damaged
when a peak level section is suddenly played.
Maintenance
• Unplug the power cable from the power source before cleaning the
appliance.
• Use a soft and clean rag to clean the outside of the unit. Never clean it
with chemicals or detergent.
Batteries
• Observe the correct polarity when inserting the
batteries.
• Do not expose batteries to high temperatures and
do not place them on locations where the tempera-
ture might increase quickly, e.g. near the re or on
the direct sunshine.
• Do not expose batteries to excessive radiant heat,
do not throw them into the re, do not disassemble
them and do not try to recharge un-rechargeable
batteries. They could leak or explode.
• Never use di erent batteries together or mix new and old ones.
• When the Remote Control is not to be used for a long time (more than a
month), remove the battery from the Remote Control to prevent it from
leaking.
• If the batteries leak, wipe away the leakage inside the battery compart-
ment and replace the batteries with new ones.
• Do not use any batteries other than those specied.
Do not ingest battery, chemical burn hazard
• If the battery is swallowed, it can cause severe internal burns in just
2 hours and lead to death. Keep new and used batteries away from
children. If the battery compartment does not close securely, stop
Cd

4
using the product and keep it away from children. If you think batteries
might have been swallowed or placed inside any part of the body, seek
immediate medical attention.
Disposal of this equipment and Batteries
• Do not dispose of this product or its batteries as unsorted
municipal waste. Return it to a designated collection point
for the recycling of WEEE in accordance with local law. By
doing so, you will help to conserve resources and protect
the environment.
• Most of the EU countries regulate the disposal of batteries
by law. Contact your retailer or local authorities for more
information.
• The shown above appears on electrical and electronical
equipment and batteries (or the packaging) to remind
users of this. If "Hg" or 'Pb' appears below the symbol,
this mean that the battery cantains traces of mercury (Hg) or lead (Pb),
respectively.
• Users are requested to use existing return facilities for used equipment
and batteries.
CAUTION:
• Appliances with built in CD player are marked with this caution label
• THIS UNIT IS A CLASS 1 LASER
PRODUCT. THIS UNIT USES A VISIBLE
LASER BEAM WHICH COULD CAUSE
HAZARDOUS RADIATION EXPOSURE IF
DIRECTED. BE SURE TO OPERATE THE
PLAYER CORRECTLY AS INSTRUCTED.WHEN THIS UNIT IS PLUGGED INTO
THE WALL OUTLET, DO NOT PLACE YOUR EYES CLOSE TO THE OPENINGS
TO LOOK INTO THE INSIDE OF THIS UNIT.
• USE OF CONTROLS OR ADJUSTMENTS OR PERFORMANCE OF PROCEDU-
RES OTHER THAN THOSE SPECIFIED HEREIN MAY RESULT IN HAZARDOUS
RADIATION EXPOSURE.
• DO NOT OPEN COVERS AND DO NOT REPAIR YOURSELF. REFER SERVI-
CING TO QUALIFIED PERSONNEL.
CE Statement:
• Hereby, UMC Poland Sp. z o.o. declares that this audio device is in
compliance with the essential requirements and other relevant provi-
sions of RED Directive 2014/53/EU. The full text of the EU declaration of
conformity is available by following the link http://www.sharp.eu/av/
documents-of-con rmity
Trademarks:
The Bluetooth word mark and logos are registered trademarks owned by
Bluetooth SIG,. Inc.
CLASS 1
LASER PRODUCT

EN
What is included in the box
1 x Main unit
2 x Speaker
1 x Remote control
2 x AAA battery
1 x User guide
1 x Quick start guide
1 x EU power cord
Panels & Controls
Front panel
SOURCE
PLAY/PAUSE
EJECT
PREV NEXT
1
2
5
3
4
AUX IN
STANDBY
SOURCE PREV NEXT EJECT
USB
6
7
8
9
12
11
10
PLAY/PAUSE
1. SOURCE button: Press to select the modes.
2. PLAY/PAUSE button: Press to pause or play the music.
3. PREVIOUS button: Press to skip to the previous song/station.
4. NEXT button: Press to skip to the next song/station.
5. EJECT button: Press to pop out the disc drawer.
6. Power Indicator: Indicate the status.
7. STANDBY button: Press to set to standby mode or turn on.
8. Remote Sensor: Point the remote control
to the sensor within 7 meters.
9. Display Screen: Display the station information.
10. VOLUME+/- knob: Turn to adjust the volume level.
11. USB Port: Used to connect with the USB ash disk.
12. Audio Input Socket: Used to connect external audio sources.
Rear panel
14
15
13
13. FM Antenna: To receive the FM signal.
14. Speaker Terminals: Connect the speakers to the main unit.
15. Power socket Connect the power cord to the power supply.
Remote control
1.
EJECT
SHUFFLE
PROGRAM
LOUD
DSP
REPEAT
MO/ST
BASS
FREQ
SAVE
15
13
17
16
10
11
20
19
18
12
14
21
22
1
2
3
4
9
5
6
7
8
_
+
STANDBY: Press this to turn on the unit or enter Standby mode.
2. REPEAT: Press this to repeat the song.
3. PLAY/PAUSE: Start/ Pause playback.
4. FAST REWIND: Press this to fast-rewind the
track that is currently playing.
5. TREBLE: Press this button to adjust the treble, use the
+ or - buttons to increase/decrease the treble.
6. VOLUME- : Press this to decrease volume.
7. PROGRAM: Use this to program the playback order.
8. SHUFFLE: Press this to play music in the random order.
9. NUMBER (0-9): Go to storage location, enter frequency, select track
10. EJECT: Press this to pop out the disc drawer
11. SOURCE: Select mode of operation: CD, FM, USB, Bluetooth® (BT), AUX
12. STOP/ MO/ST: Stop playback, switch between
mono and stereo while in FM mode.
13. PREVIOUS: Press this to skip to the previous track.
14. FAST FORWARD: Press this to fast forward
the track that is currently playing.
15. NEXT: Jump to next track/ station.
16. BASS: Press this button to adjust the bass, use the
+ or - buttons to increase/decrease the bass.
17. VOLUME+: Press this to increase volume.
18. MUTE: Press once to mute the sound, press again to unmute.
You can also unmute by pressing the volume control buttons.
19. DSP: Press this to select the sound equalizer.
20. LOUD: Press LOUD to increase the level of bass at low volume levels.
21. SAVE: Press to save your favourite stations.
22. FREQ: Frequency, in FM mode, press to enter your favourite frequency.
Fitting or replacing the remote control batteries
1. Push the catch on the battery cover in the direction of
the embossed arrow on the rear of the remote.
2. While pushing the catch, open the battery cover.

6
3. Fit two batteries observing polarity +,- as shown.When replacing
the batteries, use only the same type of battery supplied.
4. Re- t the battery cover and clip it in place.
Preparation for use
1.
ANTENNA
1
2
3
AUDIO IN
SOURCE
PLAY/PAUSE
PREV NEXT
EJECT
AUX IN
4
5
6
7
USB
Place a speaker on either side of the main unit, preferably at the same
height and with at least 150mm space between each speaker to the
main unit.
Connect the speaker plugs to the rear of the unit. Take care to match
the speaker placed to the LEFT to the LEFT output on the rear of the
unit. Repeat for the RIGHT speaker.
The LEFT RED cable connects to the LEFT RED terminal, the RIGHT RED
cable to the RIGHT RED terminal. Both BLACK cables connect to the
corresponding BLACK terminals.
2. Please ensure that the voltage marked on the rating label,
located on the rear panel, is the same as the voltage in your
area. Choose a suitable Power Cord, insert the end of the
cord into the Power Socket on the rear panel of the unit. Then
plug the other end of the cable in to the wall socket.
3. Press the STANDBY button on the main unit to turn ON the unit.
Extend the ANTENNA to get the best reception. Press the SOURCE
button to enter the FM mode. To use the radio in FM mode, follow the
instructions in the FM RADIO OPERATION chapter of the User manual.
4. Press the SOURCE button to enter the CD mode. Press the EJECT
button to open the disc drawer and insert a disc. Press the EJECT
button again to close. The CD will begin playing from the rst track.
5. Press the SOURCE button to enter the Aux In (Audio) mode.
Connect your audio device to the AUX IN socket via a 3.5mm aux
in cable. Control playback via your connected audio device.
6. Press the SOURCE button to enter the Bluetooth mode.
Activate the Bluetooth enabled device and select the “SHARP
XL-B510”. Select the song you want and press to play.
7. Press the SOURCE button to enter the USB mode. Plug
the USB device to USB port on the front panel of the unit,
and it will read the USB and play automatically.
BASIC FUNCTIONS
Switching modes
To switch between the modes: CD, FM, Bluetooth, USB and AUX IN. Press
SOURCE button on the unit or the remote control to switch modes.
Volume control
1. Rotate the VOLUME control clockwise or press the
“+” button to increase the volume level.
2. Rotate the VOLUME control anti-clockwise or press
the “ - “ button to decrease the volume level.
DSP e ects
Press the DSP button repeatedly to cyclethrough a set of equalizer presets
to alter the sound. Choose from CLASSIC, ROCK, POP, JAZZ, DANCE, LIVE
and O .
Loudness function
This function will increase the level of bass at low volume levels. Press the
LOUD button on remote to enable the e ect. Press again to disable the
e ect.
Mute function
Press the button at any time to mute the sound output. Press again to
unmute.
Tone controls
Adjust the bass and treble tone controls if required.
Press the BASS or TREBLE button on remote control directly to select bass
or treble, then use the“+”or “ - “ buttons to adjust.
Standby mode
Press the STANDBY button on the unit or the remote to put the system
into standby mode. To resume normal operation, press this button again.
NOTE: This unit is designed to enter STANDBY mode automatically, after about
10 minutes (approximately) of inactivity. Press STANDBY button to wake the
unit.
NOTE: When you power on the unit from standby, the last used mode will
resume.
FM radio operation
1. Press the SOURCE button on the panel or the remote control
to enter the FM mode. (FM frequency: 87.50-108.00MHz)
2. Press the
/ buttons on remote control to decrease
or increase the frequency in 0.05MHz increments.
3. Press and hold the PREV/NEXT buttons on the panel or the
/ buttons on remote control to scan through the frequency
range quickly. The scan will stop once it has found a station.
4. Press and hold the
button to scan through the frequency
range quickly; it will store any stations found automatically.
5. SAVE a station:
You can store up to 40 FM stations in memory.
Press the FREQ button and then, using the number
buttons enter the frequency that you want to store.
Press the SAVE button, it will show " P01" on the display.
Press the
/ button to select through the
station number you want to save.
Press the SAVE button again to con rm.
6. Recall the preset stations:
Press the
/ button to recall your stored stations.

EN
CD operations
1. Press the SOURCE button on the panel or the remote control
to enter the CD mode. Press the EJECT button to pop out the
disc drawer, put a CD on, then press the EJECT button again.
2. Press the
button to pause or play the song.
3. Press the STOP/MO/ST button on remote control to
stop playing, press the
button to re-start.
4. Press the PREV/NEXT button or
/ button on
remote control to skip to the previous or next song.
5. Press the
/ button on remote control to fast forward or fast
rewind the playback, press repeatedly to resume normal speed.
6. To directly select a speci c song press the number buttons 0-9 on
remote control.
Example:
If the track number consists of two digits, for example25, press
button “2“, and then button “5“ to select the 25th track.
If the track number is a one digit number, for example
9, press “0“ rst, then “9“ to skip to the 9th track.
7. REPEAT button:
While in playing mode, press the REPEAT button to set repeat mode.
For CD and CD-R discs, press the REPEAT
button to repeat playing songs.
Press once to repeat current song. Press again to repeat all tracks.
Press a third time to cancel.
8. Press the SHUFFLE button on remote control to play
the disc in random order.Press again to resume.
9. You can set the disc played in a programmed order:
Press the STOP/MO/ST button on remote control to stop playing.
Press the PROGRAM button on remote
control. The screen displays: P01.
Press the number buttons on remote control
to select the tracks to program.
Press the
/ buttons on remote control
to skip between the program tracks.
Press the PROGRAM button on the remote control to con rm.
To begin the programmed order, press the
button.
To cancel the program sequence, press
the STOP/MO/ST button twice.
Notes:
MP3 and WAV formats are supported.
Unsupported le formats are skipped. For example, Word documents
(.doc) or MP3 les with extension .dlf are ignored and not played.
Bluetooth Operation
The Micro system has Bluetooth capability and is able to receive a signal
within 7 meters. To pair the Micro system with a Bluetooth device:
1. Press the SOURCE button repeatedly to enter the Bluetooth
mode, the“bt“ message appear and ash on the display.
2. Activate your Bluetooth device and select the search mode.
3. Select “SHARP XL-B510” from the search list and connect.
4. Enter “0000“ for password if prompted.
5. When the devices are connected to each other, a con rmation
sound will be made. “bt” will stop ashing in the display.
6. Now you can enjoy the music from your device.
7. To turn o the Bluetooth function, switch to another function on the
Micro system, or disable the function on your Bluetooth device.
Connect other audio devices
Audio allows your unit quickly and easily to connect to an MP3 player or
other external sources.
1. Use a 3.5mm audio cable to connect your external audio
device to the AUX IN socket on the front panel.
2. Connect the Micro System mains plug to the power supply.
3. Press the SOURCE button to switch to the AUX IN mode.
4. You may need to operate the external audio
device directly for playback features.
5. For optimum volume levels, adjust the volume
on the external audio device.
USB Operation
It is possible to listen to the music using the USB device interface of the
unit.
Connecting a USB device:
1. Switch the unit on and select USB mode by
pressing the SOURCE button.
2. Connect the USB device to the USB connection
socket on the front panel of the unit.
3. The radio will now play songs which are saved on the USB device.
Notes:
MP3 and WAV formats are supported.
Unsupported le formats are skipped. For example, Word documents
(.doc) or MP3 les with extension .dlf are ignored and not played
Even when the les are in a supported format (MP3), some
may not play or display depending on the compatibility.
In some case, reading may be as long as 60
seconds, this is not a malfunction.
Depending on the amount of data and media speed, it
may take longer for the unit to read the USB device.
The maximum USB memory size is 64GB.
USB memory device must be formatted in FAT, FAT16 or FAT32
Troubleshooting
No Power
Reason
• Power cable not connected to wall socket
• Power socket is not switched on
Solution
• Make sure the plug is connected
• Switch the power on
No Sound CD/AUX/RADIO
No Sound from AUX input
Reason
• Volume is too low
• AUX source volume is too low
Solution
• Increase the volume
• Increase the output volume of the AUX source
Sound is distorted
Sound is distorted from AUX Input
Reason
• Volume is too high
• AUX source volume is too high
Solution
• Reduce the volume
• Reduce the output volume of the AUX source

8
Unable to play CD
Reason
• No disc in the tray
• Disc not loaded properly
• Disc is dirty
Solution
• Insert a compatible disc
• Check the disc loaded
• Clean the disc
Static Sound
Reason
• Poor reception
Solution
• Re-locate the antenna (FM)
Desired station not found
Reason
• Weak signal
• Station not available in your area
Unit switches o after 10 minutes of inactivity
Reason
• Auto standby mode in operation
Solution
• This unit is designed to enter STANDBY mode automatically after 10
minutes of inactivity. Press the STANDBY button to wake up the unit.
Technical speci cation
Model XL-B510
Radio Signal 87.5-108MHz
Power Supply AC 220-240V~ 50Hz
Power Consumption 28 W
Standby Power Consumption <0,5 W
Output Power 2 x 7 W (RMS)
Impedance 2 x 8 Ω
Frequency Response 60Hz - 20KHz
Bluetooth
Version V 2.1 + EDR
Maximum power transmitted <20 dbm
Frequency bands 2402 MHz ~ 2480 MHz
CD player
Disc format CD, CD-R, CD-RW, MP3, WMA
Remote Control
Battery Type 2x AAA / 1.5V
220mm
170mm
150mm
220mm
145mm 177mm
1,75kg
KG
0,95kg
KG

DE
Wichtige Sicherheitsanweisungen
VORSICHT
GEFAHR AUF STROMSCHLAG
NICHT ÖFFNEN
Bitte lesen Sie sich diese Sicherheitsanweisungen
durch und beachten Sie, bevor Sie das Gerät in
Betrieb nehmen, auf die folgenden Warnhinweise:
Das Dreieckszeichen mit Blitzsymbol verweist auf nicht
isolierte „gefährliche Spannungen“ im Gerätegehäuse, die so
hoch sein können, dass sie eine Gefahr von Stromschlägen
bilden.
Das Dreieckszeichen mit Ausrufungszeichen verweist auf
wichtige Funktions - und Wartungshinweise (Reparatur) in
der dem Gerät beigelegten Bedienungsanleitung.
Dieses Symbol bedeutet, dass das Produkt auf
umweltfreundliche Weise und nicht mit dem gewöhnlichen
Haushaltsmüll entsorgt werden sollte.
Wechselspannung
Gleichspannung
Gerät der KlasseII
Halten Sie Kerzen und o enes
Feuer von diesem Produkt fern,
um einen Brand zu vermeiden.
Warnung:
• Halten Sie sich während der Nutzung dieses Geräts immer an die
allgemeinen Sicherheitshinweise, insbesondere, wenn Kinder in der
Nähe sind.
• Kinder sollten beaufsichtigt werden, um sicherzustellen, dass sie nicht
mit dem Gerät spielen.
• Das Stromkabel darf weder beschädigt, noch dürfen schwere Objekte
darauf abgelegt werden, außerdem dürfen Sie es nicht dehnen oder
verbiegen. Schließen Sie auch keine Verlängerungskabel an. Schäden am
Stromkabel können zu einem Feuer oder Stromschlag führen.
• Wenn das Stromversorgungskabel beschädigt ist, muss es vom Her-
steller, einem Servicetechniker oder einer ähnlich quali zierten Person
ausgetauscht werden, um Gefährdungen zu vermeiden.
• Stellen Sie sicher, dass die Einheit an eine AC 220-240V 50Hz Steckdose
angeschlossen wird. Eine höhere Spannung kann zu Fehlfunktionen
oder sogar zu einem Brand führen.
• Wenn der Stecker nicht in die Steckdose passt, dürfen Sie keine Gewalt
anwenden, um einen nicht passenden Stecker in die Steckdose zu
drücken.
• Schalten Sie die Einheit aus, bevor Sie sie von der Stromversorgung
trennen, um sie so vollständig abzuschalten.
• Vermeiden Sie es, das Stromkabel mit nassen Händen anzuschließen
oder zu trennen. Dies könnte andernfalls zu einem Stromschlag führen.
• Trennen Sie das Stromkabel, wenn es längere Zeit nicht verwendet wird.
• Stellen Sie sicher, dass der Hauptstecker immer leicht zugänglich ist.
• Dieses Produkt enthält keine Teile, die vom Benutzer gewartet werden
können. Setzen Sie sich im Fall eines Defekts mit dem Hersteller oder
der autorisierten Kundenabteilung in Verbindung. Teile aus dem Inneren
des Geräts freizulegen kann lebensgefährlich sein. Die Garantie der
Hersteller gilt nicht für Defekte, die durch von nicht autorisierte Dritten
durchgeführte Reparaturen entstehen.
• Benutzen Sie dieses Produkt nicht direkt nach dem Auspacken. Warten
Sie, bis es sich auf Zimmertemperatur erwärmt hat, ehe sie es einschal-
ten.
• Stellen Sie sicher, dass dieses Produkt ausschließlich in Umgebungen
mit mildem Klima verwendet wird (kein tropisches oder subtropisches
Klima).
• Stellen Sie das Produkt auf eine ache, stabile Ober äche, die keinen
Erschütterungen ausgesetzt ist.
• Das Produkt und dessen Teile dürfen nicht über die Kante delelte tragen-
den Möbelstücks hinausragen.
• Um das Risiko eines Feuers, Stromschlags oder Schäden an diesem
Produkt zu reduzieren, sollten Sie es nicht direktem Sonnenlicht, Staub,
Regen oder Feuchtigkeit aussetzen. Setzen Sie es niemals tropfendem
oder spritzendem Wasser aus und positionieren Sie keine mit Flüssigkei-
ten gefüllten Objekte auf oder neben dem Produkt.
• Setzen Sie keine mit Flüssigkeit gefüllten Objekte wie Vasen auf das
Gerät.
• Installieren Sie das Produkt nicht in der Nähe von Heizquellen, wie etwa
Heizungen, Heizregister, Öfen oder anderen Apparaten (einschließlich
Verstärker), die Hitze produzieren.
• Platzieren Sie das Gerät nicht an Orten mit hoher Feuchtigkeit und
mangelhafter Belüftung.
• Sorgen Sie für einen Mindestabstand von 5 cm rund um das Gerät,
um eine ausreichende Belüftung sicherzustellen. Vermeiden Sie es,
Belüftungsö nungen an diesem Produkt zu blockieren. Sorgen Sie
immer dafür, dass die Belüftungsö nungen nicht durch Gegenstände, z.
B. Zeitungen, Tischdecken, Gardinen usw. verdeckt sind.
• Lassen Sie NIEMALS jemanden, ganz besonders nicht Kinder, etwas in
die Löcher, Spalten oder anderen Ö nungen des Gerätegehäuses stop-
fen, da dies zu einem folgenschweren Stromschlag führen kann.
• Gewitter sind für alle elektrischen Geräte gefährlich. Wenn das Strom-
oder Antennenkabel vom Blitz getro en wird, kann das Gerät, auch
wenn es ausgeschaltet ist, beschädigt werden. Bei einem herannahen-
den Gewitter sollten Sie alle Kabel und Stecker des Gerätes ausstecken.
• Ein exzessiver Schalldruck von Kopfhörern kann zu einem Hörverlust
führen.
• Bewegen Sie das Gerät nicht während der Disc-Wiedergabe. Während
der Wiedergabe rotiert die Disc sehr schnell. Heben Sie das Gerät
während der Wiedergabe nicht an und bewegen Sie das Gerät während
der Wiedergabe nicht, denn dies könnte die Disc oder das Gerät
beschädigen.
• Drehen Sie die Lautstärke niemals hoch, während Sie einen sehr leisen
Abschnitt hören oder kein Audiosignal empfangen. Anderenfalls könnte
der Lautsprecher beschädigt werden, wenn plötzlich ein lauter Abschnitt
wiedergegeben wird.
Netzadapter
• Der Netzstecker oder die Merhfachsteckdose wird als Trennvorrichtung
verwendet. Verwenden Sie nur den mitgelieferten Stromversorger.
Andernfalls kann es zu einem Sicherheitsrisiko/einer Beschädigung des
Gerätes kommen.
Wartung
• Trennen Sie vor dem Reinigen des Geräts das Stromkabel von der
Stromquelle.
• Verwenden Sie einen weichen und sauberen Lappen, um die Außen-
ächen der Einheit zu reinigen. Verwenden Sie beim Reinigen niemals
Chemikalien oder Reinigungsmittel.
Batterien
• Achten Sie beim Einlegen der Batterien auf die
richtige Polarität.
• Setzen Sie Batterien keinen hohen Temperaturen
aus und legen Sie sie nicht an Stellen ab, wo sich die
Temperatur schnell erhöht, z. B. neben einem Feuer
oder in die direkte Sonneneinstrahlung.
Cd

10
• Setzten Sie Batterien keiner übermäßigen Strahlungswärme aus, werfen
Sie sie nicht ins Feuer oder bauen sie auseinander und versuchen Sie
nicht, nicht au adbare Batterien aufzuladen. Sie könnten undicht
werden oder explodieren.
• Verwenden Sie niemals unterschiedliche Batterien oder vermischen
neue mit alten.
• Wenn Sie die Fernbedienung für längere Zeit nicht verwenden (länger
als einen Monat), sollten Sie die Batterie aus der Fernbedienung neh-
men, um ein Auslaufen zu verhindern.
• Wenn die Batterien auslaufen, wischen Sie die ausgelaufene Flüssigkeit
im Batteriefach weg und ersetzen die Batterien durch neue.
• Verwenden Sie immer nur die angegebenen Batterien.
• Batterie nicht verschlucken, Gefahr von chemischen Verbrennungen
• Wenn die Batterie verschluckt wird, kann dies zu schweren inneren
Verbrennungen innerhalb von nur 2 Stunden führen und tödlich sein.
Bewahren Sie neue und gebrauchte Batterien für Kinder unzugänglich
auf. Wenn das Batteriefach nicht fest geschlossen werden kann, sollten
Sie das Gerät nicht weiter verwenden und es für Kinder unzugänglich
aufbewahren. Wenn Sie vermuten, dass Batterien verschluckt oder in
irgendein Körperteil eingeführt wurden, müssen Sie sofort medizinische
Hilfe in Anspruch nehmen.
Entsorgung dieses Geräts und von Batterien
• Entsorgen Sie dieses Produkt oder dessen Batterien
niemals über den normalen Hausmüll. Geben Sie es ent-
sprechend den gesetzlichen Regelungen vor Ort bei dem
für das Recycling von WEEE vorgesehenen Sammelpunkt
ab. Damit helfen Sie, Ressourcen einzusparen und die
Umwelt zu schützen.
• In den meisten EU-Ländern gelten für die Entsorgung von
Batterien besondere Gesetze und Vorschriften. Weitere
Informationen erhalten Sie von Ihrem Händler oder den
örtlichen Behörden.
• Der oben aufgeführte Text erscheint auf elektrischen und
elektronischen Geräten und Batterien (oder der Verpack-
ung), um Nutzer entsprechend zu erinnern. Wenn unter dem Symbol
„Hg“ oder „Pb“ erscheint, bedeutet dies, dass die Batterie jeweils Spuren
von Quecksilber (Hg) oder Blei (Pb)enthält.
• Nutzer werden darum gebeten, für gebrauchte Geräte und Batterien
bestehende Rückgabeeinrichtungen zu nutzen.
VORSICHT::
• LASERPRODUKT DER KLASSE1
• Geräte mit eingebautem CD-Player
sind mit diesem Warnetikett geken-
nzeichnet.
• Dieses Warnschild be ndet sich auf der
Rückseite des Geräts
• DIESES GERÄT IST EIN LASERPRODUKT DER KLASSE 1. DIESES GERÄT
NUTZT EINEN SICHTBAREN LASERSTRAHL, BEI DEM ES ZUM AUSTRITT
GEFÄHRLICHER STRAHLUNG KOMMEN KANN, WENN ER GERICHTET
WIRD. BETREIBEN SIE DEN PLAYER NUR ORDNUNGSGEMÄSS ENTSPRECH-
END DER ANLEITUNG.
• WENN DIESES GERÄT IN DIE STECKDOSE EINGESTECKT WIRD, HALTEN
SIE IHRE AUGEN VON DEN ÖFFNUNGEN FERN UND SEHEN SIE NICHT IN
DAS GERÄT.
• EINE NUTZUNG DER STEUERUNG ODER ANPASSUNGEN ODER EINE
DURCHFÜHRUNG VON AKTIONEN AUSSER DENEN, DIE HIER BESCHRIE-
BEN WERDEN, KÖNNEN ZUM AUSTRITT GEFÄHRLICHER STRAHLUNG
FÜHREN.
• ÖFFNEN SIE DIE ABDECKUNGEN NICHT UND NEHMEN SIE SELBST KEINE
REPARATUREN VOR. LASSEN SIE DAS GERÄT NUR VON FACHPERSONAL
REPARIEREN.
CE-Konformitätserklärung:
• Die UMC Poland Sp. z o.o. erklärt hiermit, dass dieses Audiogerät die
wesentlichen Anforderungen und weitere entsprechende Vorschriften
der RED-Verordnung 2014/53/EU einhält. Der vollständige Text der
EU-Konformitätserklärung ist unter folgender Internetadresse erhältlich:
http://www.sharp.eu/av/documents-of-con rmity
Markenzeichen:
Die Bluetooth® Wortmarke und Logos sind geschützte Marken der
Bluetooth SIG Inc.
CLASS 1
LASER PRODUCT

DE
Inhalt der Verpackung
1 x Hauptgerät
2 x Lautsprecher
1x Fernbedienung
2x Batterie vom TypAAA
1x Benutzerhandbuch
1x Schnellstart-Handbuch
1x EU Stromkabel
Panels & Bedienelemente
Vorderseite
SOURCE
PLAY/PAUSE
EJECT
PREV NEXT
1
2
5
3
4
AUX IN
STANDBY
SOURCE PREV NEXT EJECT
USB
6
7
8
9
12
11
10
PLAY/PAUSE
1. Taste SOURCE: Modus auswählen.
2. Taste WIEDERGABE/PAUSE: Musik abspielen oder unterbrechen.
3. Taste ZURÜCK: Zurück zum vorherigen Titel/Sender.
4. Taste WEITER: Weiter zum nächsten Titel/Sender.
5. Taste AUSWERFEN: CD-Fach auswerfen.
6. Betriebsanzeige: Zeigt den Status an.
7. Taste STAND-BY: In den Stand-by-Modus schalten oder einschalten.
8. Fernbedienungssensor: Mit der Fernbedienung in einem
Abstand von bis zu 7Metern auf diesen Sensor zielen.
9. Displayanzeige: Informationen zum Sender anzeigen.
10. Drehknopf LAUTSTÄRKE +/-: Lautstärke durch Drehen regeln.
11. USB-Anschluss: Verbindung mit dem USB-Flash-Laufwerk.
12. Audio-Eingangsbuchse: Verbindung mit externen Audioquellen.
Rückseite
14
15
13
13. FM-Antenne: Empfang des FM-Signals.
14. Lautsprecheranschlüsse: Verbindung der
Lautsprecher mit dem Hauptgerät.
15. Steckdose Stecken Sie das Netzkabel in die Steckdose.
Fernbedienung
1.
EJECT
SHUFFLE
PROGRAM
LOUD
DSP
REPEAT
MO/ST
BASS
FREQ
SAVE
15
13
17
16
10
11
20
19
18
12
14
21
22
1
2
3
4
9
5
6
7
8
_
+
STAND-BY: Gerät einschalten oder in den Stand-by-Modus schalten.
2. REPEAT: Titel wiederholen.
3. WIEDERGABE/PAUSE: Wiedergabe starten/pausieren.
4. SCHNELLER RÜCKLAUF: Derzeit gespielten Titel schnell zurückspulen.
5. HÖHEN: Höhen anpassen; Höhen mit den Tasten + oder - einstellen.
6. LAUTSTÄRKE -: Lautstärke verringern.
7. PROGRAMM: Wiedergabereihenfolge programmieren.
8. ZUFÄLLIGE WIEDERGABE: Musik in einer
zufälligen Reihenfolge wiedergeben.
9. ZAHLEN (0–9): Zum Speicherplatz gehen,
Frequenz eingeben, Titel auswählen
10. AUSWERFEN: CD-Fach auswerfen
11. SOURCE: Betriebsmodus auswählen: CD,
FM, USB, Bluetooth® (BT), AUX
12. STOP/MO/ST: Wiedergabe anhalten, im FM-Modus
zwischen Mono und Stereo umschalten.
13. ZURÜCK: Drücken, um zum vorherigen Titel zurückzuschalten.
14. SCHNELLER VORLAUF: Derzeit gespielten Titel schnell vorspulen.
15. WEITER: Weiter zum nächsten Titel/Sender.
16. BASS: Bass anpassen; Bass mit den Tasten + oder - einstellen.
17. LAUTSTÄRKE +: Lautstärke erhöhen.
18. MUTE: Drücken Sie die Taste einmal, um den Ton auf stumm
zu schalten. Drücken Sie die Taste erneut, um den Ton
erneut einzuschalten. Sie können den Ton auch mit den
Tasten der Lautstärkeregelung erneut einschalten.
19. DSP: Equalizer auswählen.
20. LAUT: Basslevel bei niedriger Lautstärke erhöhen.
21. SAVE: Drücken, um Ihre Lieblingssender abzuspeichern.
22. FREQ: Frequenz, im FM-Modus; drücken, um
Ihre Lieblingsfrequenz einzugeben.
Batterien der fernbedienung einlegen oder ersetzen
1. Drücken Sie die Arretierung auf der Batterieabdeckung auf der
Rückseite der Fernbedienung in Richtung des eingeprägten Pfeils.

12
2. Halten Sie die Arretierung gedrückt und ö nen Sie das Batteriefach.
3. Legen Sie zwei Batterien mit der richtigen Polarität (+/-
) wie angezeigt ein. Verwenden Sie beim Ersetzen der
Batterien nur den gleichen Batterietyp wie mitgeliefert.
4. Setzen Sie die Batterieabdeckung wieder
ein und lassen Sie sie einrasten.
Vorbereitung für die inbetriebnahme
1.
ANTENNA
1
2
3
AUDIO IN
SOURCE
PLAY/PAUSE
PREV NEXT
EJECT
AUX IN
4
5
6
7
USB
Stellen sie die Lautsprecher links und rechts vom Hauptgerät auf,
optimalerweise auf gleicher Höhe und mit einem Abstand von jeweils
zumindest 150mm zum Hauptgerät.
Schließen Sie die Lautsprecherstecker an der Rückseite des Geräts an.
Achten Sie darauf, den LINKEN Lautsprecher an der Rückseite des
Geräts am LINKEN Ausgang anzuschließen. Wiederholen Sie dies für
den RECHTEN Lautsprecher.
Das LINKE ROTE Kabel wird mit dem LINKEN ROTEN Anschluss, das
RECHTE ROTE Kabel mit dem RECHTEN ROTEN Anschluss verbunden.
Beide SCHWARZEN Kabel werden mit dem entsprechenden
SCHWARZEN Anschluss verbunden.
2. Bitte achten Sie darauf, dass die auf dem Typenschild an
der Rückseite angegebene Spannung jener in Ihrer Region
entspricht. Verwenden Sie ein geeignetes Netzkabel und
stecken Sie es in den Anschluss an der Rückseite des Gerätes.
Stecken Sie dann das andere Ende in die Steckdose.
3. Drücken Sie am Hauptgerät auf die Taste STAND-BY, um das Gerät
EINzuschalten.
Ziehen Sie die ANTENNE aus, um den bestmöglichen
Empfang zu gewährleisten. Drücken Sie die Taste SOURCE
(QUELLE), um in den FM-Modus zu gelangen. Um das Radio
im FM-Modus zu verwenden, befolgen Sie die Anleitung im
Kapitel „FM-RADIOBETRIEB“ des Benutzerhandbuchs.
4. Drücken Sie die Taste SOURCE, um in den CD-Modus zu
gelangen. Drücken Sie die Taste AUSWERFEN, um das CD-
Fach zu ö nen, und legen Sie eine CD ein. Drücken Sie
erneut die Taste AUSWERFEN, um das Fach zu schließen.
Die Wiedergabe der CD beginnt mit dem ersten Titel.
5. Drücken Sie die Taste SOURCE, um in den Aux-In (Audio)-
Modus zu gelangen. Schließen Sie ihr Audiogerät mit einem
3,5-mm-Aux-in-Kabel am AUX-IN-Anschluss an. Steuern Sie
die Wiedergabe über Ihr verbundenes Audiogerät.
6. Drücken Sie die Taste SOURCE, um in den Bluetooth-Modus
zu gelangen. Aktivieren Sie das Bluetooth-Gerät und wählen
Sie „SharpXL-B510“ aus. Wählen Sie den Titel aus, den Sie
abspielen möchten, und drücken Sie auf WIEDERGABE.
7. Drücken Sie die Taste SOURCE, um in den USB-Modus zu
gelangen. Stecken Sie das USB-Gerät in den USB-Anschluss
an der Vorderseite des Geräts ein und das USB-Gerät wird
automatisch abgelesen und die Wiedergabe gestartet.
Grundfunktionen
Modus umschalten
Umschalten zwischen den Modi: CD, FM, Bluetooth, USB und AUXIN.
Drücken Sie die Taste SOURCE am Gerät oder der Fernbedienung, um
zwischen den Modi umzuschalten.
Lautstärkeregelung
1. Drehen Sie den Drehknopf LAUTSTÄRKE im Uhrzeigersinn oder
drücken Sie die Taste „+“, um die Lautstärke zu erhöhen.
2. Drehen Sie den Drehknopf LAUTSTÄRKE gegen den Uhrzeigersinn
oder drücken Sie die Taste „-“, um die Lautstärke zu verringern.
DSP-E ekte
Drücken Sie wiederholt die Taste DSP, um zwischen unterschiedlichen
Equalizereinstellungen umzuschalten und den Sound zu verändern.
Wählen Sie aus Klassik, Rock, Pop, Jazz, Dance, Live und O .
Tonstärkefunktion
Diese Funktion erhöht den Basslevel bei niedriger Lautstärke. Drücken
Sie auf der Fernbedienung die Taste LAUT, um den E ekt zu aktivieren.
Drücken Sie die Taste erneut, um den E ekt zu deaktivieren.
Stummschaltfunktion
Drücken Sie jederzeit die Taste , um die Wiedergabe stumm zu schalten.
Drücken Sie die Taste erneut, um die Stummschaltung aufzuheben.
Tonsteuerung
Sie können den Bass und die Höhen bei Bedarf anpassen.
Drücken Sie auf der Fernbedienung die Taste BASS oder HÖHEN, um den
Bass oder die Höhen auszuwählen, und passen Sie die Einstellungen mit
„+“ oder „-“ an.
Stand-by-Modus
Drücken Sie am Gerät oder auf der Fernbedienung die Taste STAND-BY,
um das System in den Stand-by-Modus zu versetzen.
Um den Normalbetrieb wiederaufzunehmen, drücken Sie die Taste erneut.
HINWEIS: Dieses Gerät wurde entwickelt, um nach etwa 10Minuten Inaktivität
automatisch in den STAND-BY-Modus zu wechseln. Drücken Sie die Taste
STAND-BY, um das Gerät einzuschalten.
HINWEIS: Beim Starten des Geräts aus dem Stand-by-Modus wird der zuletzt
verwendete Modus fortgesetzt.
FM-Radiobetrieb
1. Drücken Sie am Bedienfeld oder auf der Fernbedienung
die Taste SOURCE (QUELLE), um in den FM-Modus zu
gelangen. (FM-Frequenz: 87,50 bis 108,00MHz)
2. Drücken Sie auf der Fernbedienung die Tasten
/ , um die
Frequenz in Schritten zu je 0,05MHz zu erhöhen oder zu verringern.

DE
3. Halten Sie die Tasten PREV/NEXT (ZURÜCK/WEITER)
am Panel oder die Tasten
/ auf der Fernbedienung
gedrückt, um den Frequenzbereich schnell abzusuchen.
Die Suche endet, sobald ein Sender gefunden wurde.
4. Halten Sie die Taste
, um den Frequenzbereich schnell zu
durchsuchen– dies speichert automatisch alle gefundenen Sender.
5. Einen Sender ABSPEICHERN:
Sie können bis zu 40FM-Sender im Speicher sichern.
Drücken Sie die Taste FREQ (FREQUENZ) und
geben Sie anschließend mit den Zahlentasten die
Frequenz ein, die Sie abspeichern möchten.
Drücken Sie die Taste SAVE (SPEICHERN)– auf
der Anzeige wird „P01“ angezeigt.
Drücken Sie die Taste
/ , um die Sendernummer
auszuwählen, die Sie abspeichern möchten.
Drücken Sie zur Bestätigung erneut die Taste SAVE (SPEICHERN).
6. Aufrufen des voreingestellten Senders:
Drücken Sie die Taste
/ , um Ihre
abgespeicherten Sender aufzurufen.
CD-Betrieb
1. Drücken Sie am Panel oder auf der Fernbedienung die Taste
SOURCE, um in den CD-Modus zu gelangen. Drücken Sie die
Taste AUSWERFEN, um das CD-Fach zu ö nen, legen Sie eine
CD ein und drücken Sie dann erneut die Taste AUSWERFEN.
2. Drücken Sie die Taste
, um den Titel
abzuspielen oder zu unterbrechen.
3. Drücken Sie auf der Fernbedienung die Taste STOP/
MO/ST, um die Wiedergabe zu beenden, und drücken
Sie die Taste
, um sie wieder zu starten.
4. Drücken Sie die Tasten ZURÜCK/WEITER oder
/ auf der
Fernbedienung, um zum vorigen oder nächsten Titel zu springen.
5. Drücken Sie auf der Fernbedienung die Tasten
/ , um die
Wiedergabe schnell vor- oder zurückzuspulen; drücken Sie
wiederholt, um zur normalen Geschwindigkeit zurückzukehren.
6. Um einen bestimmten Titel direkt aufzurufen, drücken Sie auf der
Fernbedienung die Zahlentasten 0–9.
Beispiel:
Ist der Titel zweistellig, beispielsweise 25, drücken Sie die Taste
„2“ und dann die Taste „5“, um den 25.Titel aufzurufen.
Ist der Titel einstellig, beispielsweise 9, drücken Sie
zuerst „0“ und dann „9“, um den 9.Titel aufzurufen.
7. Taste REPEAT:
Im Wiedergabemodus drücken Sie die Taste REPEAT,
um den Wiederholmodus einzustellen.
Bei CD und CD-R drücken Sie die Taste REPEAT,
um Titel wiederholt abzuspielen.
Drücken Sie einmal, um den aktuellen Titel zu wiederholen.
Drücken Sie erneut, um alle Titel zu wiederholen.
Drücken Sie ein drittes Mal, um dies zu deaktivieren.
8. Drücken Sie auf der Fernbedienung die Taste ZUFÄLLIGE
WIEDERGABE, um die Titel der CD in einer zufälligen Reihenfolge
wiederzugeben. Drücken Sie die Taste erneut, um dies zu deaktivieren.
9. Sie können die Wiedergabe der CD auch programmieren:
Drücken Sie auf der Fernbedienung die Taste STOP/
MO/ST, um die Wiedergabe zu beenden.
Drücken Sie auf der Fernbedienung die Taste
PROGRAMM. Auf dem Display wird angezeigt: P01.
Drücken Sie auf der Fernbedienung die Zahlentasten, um
die Titel auszuwählen, die Sie programmieren möchten.
Drücken Sie auf der Fernbedienung die Tasten
/ um
zwischen den programmierten Titeln weiter zu schalten.
Drücken Sie zur Bestätigung die Taste PROGRAM
(PROGRAMM) auf der Fernbedienung.
Um die programmierte Reihenfolge zu
starten, drücken Sie die Taste
.
Um die Programmsequenz abzubrechen, drücken
Sie zweimal die Taste STOP/MO/ST.
Hinweise:
MP3- und WAV-Formate werden unterstützt.
Nicht unterstützte Dateiformate werden übersprungen.
Word-Dokumente (.doc) oder MP3-Dateien mit der
Endung .dlf werden ignoriert und nicht abgespielt.
Bluetooth-Betrieb
Diese Mikroanlage ist Bluetooth-fähig und empfängt Signale innerhalb von
7Metern. Die Mikroanlage mit einem Bluetooth-Gerät koppeln:
1. Drücken Sie wiederholt die Taste SOURCE, um in den Bluetooth-
Modus zu gelangen; auf dem Display wird blinkend “bt“ angezeigt.
2. Aktivieren Sie Ihr Bluetooth-Gerät und wählen Sie den Suchmodus.
3. Wählen Sie aus der Suchliste „SharpXL-B510“
aus und stellen Sie eine Verbindung her.
4. Geben Sie das Passwort „0000“ ein, wenn
Sie dazu aufgefordert werden.
5. Wenn die Geräte miteinander verbunden sind, ertönt ein
Betätigungston. Auf der Anzeige hört „bt“ zu blinken auf.
6. Nun können Sie die auf Ihrem Gerät gespeicherte Musik genießen.
7. Um die Bluetooth-Funktion auszuschalten, wechseln
Sie auf der Mikroanlage zu einer anderen Funktion oder
deaktivieren Sie die Funktion auf Ihrem Bluetooth-Gerät.
Andere Audiogeräte verbinden
Über „Audio“ können Sie Ihr Gerät rasch und einfach mit einem MP3-Player
oder anderen externen Quellen verbinden.
1. Schließen Sie Ihr externes Audiogerät mit einem 3,5-mm-
Audiokabel am AUX-IN-Anschluss an der Vorderseite an.
2. Stecken Sie den Netzstecker der Mikroanlage in die Steckdose.
3. Drücken Sie die Taste SOURCE, um in den AUX IN-Modus zu gelangen.
4. Es kann sein, dass Sie die Wiedergabe direkt am
externen Audiogerät steuern müssen.
5. Für die optimale Lautstärke passen Sie diese
am externen Audiogerät an.
USB-Betrieb
Sie können auch über die USB-Schnittstelle am Gerät Musik hören.
Ein USB-Gerät anschließen:
1. Schalten Sie das Gerät ein und drücken Sie die Taste
SOURCE, um in den USB-Modus zu gelangen.
2. Stecken Sie das USB-Gerät in den USB-Anschluss
an der Vorderseite des Geräts.
3. Die Anlage spielt nun die auf dem USB-Gerät gespeicherten Titel.
Hinweise:
MP3- und WAV-Formate werden unterstützt.
Nicht unterstützte Dateiformate werden übersprungen.
Word-Dokumente (.doc) oder MP3-Dateien mit der
Endung .dlf werden ignoriert und nicht abgespielt.
Auch wenn die Dateien in einem unterstützten Format (MP3)
vorliegen, kann es vorkommen, dass einige abhängig von der
Kompatibilität nicht abgespielt oder angezeigt werden können.
In manchen Fällen kann dies bis zu 60Sekunden
dauern; dies ist jedoch keine Fehlfunktion.

14
Abhängig von der Datenmenge und Mediengeschwindigkeit
kann es etwas dauern, bis das Gerät das USB-Gerät lesen kann.
USB unterstützt einen maximalen Speicher von 64GB.
USB-Speichergeräte müssen in FAT, FAT16 oder FAT32 formatiert sein
Fehlersuche
Kein Strom
Ursache
• Netzkabel nicht in Steckdose
• Steckdose nicht eingeschaltet
Lösung
• Sicherstellen, dass das Netzkabel angesteckt ist
• Steckdose einschalten
Kein Ton bei CD/AUX/RADIO
Kein Ton bei AUX-Eingang
Ursache
• Lautstärke zu niedrig
• Lautstärke der AUX-Quelle zu niedrig
Lösung
• Erhöhen Sie die Lautstärke
• Erhöhen Sie die Ausgangslautstärke der AUX-Quelle
Ton verzerrt
Ton bei AUX-Eingang verzerrt
Ursache
• Lautstärke zu hoch
• Lautstärke der AUX-Quelle zu hoch
Lösung
• Verringern Sie die Lautstärke
• Verringern Sie die Ausgangslautstärke der AUX-Quelle
CD kann nicht abgespielt werden
Ursache
• Keine CD im Fach
• CD nicht korrekt eingelegt
• CD verschmutzt
Lösung
• Legen Sie eine kompatible CD ein
• Überprüfen Sie die eingelegte CD
• Reinigen Sie die CD
Statisches Geräusch
Ursache
• Schlechter Empfang
Lösung
• Stellen Sie die Antenne (FM) ein
Gewünschter Sender nicht gefunden
Ursache
• Schwaches Signal
• Sender ist in Ihrem Gebiet nicht verfügbar
Gerät schaltet sich nach 10Minuten Inaktivität aus
Ursache
• Automatischer Stand-by-Modus
Lösung
• Dieses Gerät wurde entwickelt, um nach etwa 10Minuten Inaktivität
automatisch in den STAND-BY-Modus zu wechseln. Drücken Sie die Taste
STAND-BY, um das Gerät einzuschalten.
Technische Angaben
Modell XL-B510
Radiosignal 87.5-108MHz
Stromversorgung AC 220-240V~ 50Hz
Stromverbrauch 28 W
Stromverbrauch StandBy <0,5 W
Ausgangsstrom 2 x 7 W (RMS)
Wechselstromwiderstand 2 x 8 Ω
Frequenzabhängigkeit 60Hz - 20KHz
Bluetooth
Version V 2.1 + EDR
Maximaler übertragener Strom <20 dbm
Frequenzbänder 2402 MHz ~ 2480 MHz
CD-Player
Diskformat CD, CD-R, CD-RW, MP3, WMA
Fernbedienung
Batterietyp 2x AAA / 1.5V
220mm
170mm
150mm
220mm
145mm 177mm
1,75kg
KG
0,95kg
KG

ES
Instrucciones de seguridad importantes
ADVERTENCIA
RIESGO DE DESCARGA ELÉCTRICA
NO ABRIR
Lea estas instrucciones de seguridad y respete las
siguientes advertencias antes de utilizar el aparato:
La nalidad del símbolo del rayo con cabeza de echa, dentro
de un triángulo equilátero, es avisar al usuario de la presencia
de "tensión peligrosa" sin aislamiento dentro de la carcasa del
producto, que puede ser de su ciente magnitud como para
provocar descargas eléctricas para las personas.
La nalidad de la marca de admiración dentro de un triángulo
equilátero es avisar al usuario de la presencia de instrucciones
importantes de uso y mantenimiento (servicio) en el manual
que acompaña al aparato.
Este símbolo signi ca que el producto debe eliminarse de
manera respetuosa con el medio ambiente y no con los
residuos domésticos generales.
Tensión de CA
Tensión de CC
Equipo de clase II
Para evitar incendios mantenga
siempre las velas u otras llamas al
descubierto lejos del producto.
Advertencia:
• Respete siempre las precauciones básicas de seguridad cuando utilice
este electrodoméstico, especialmente si hay niños presentes.
• Los niños deben ser supervisados para asegurarse de que no juegan con
el aparato.
• No dañe el cable de alimentación, no coloque objetos pesados encima,
no lo estire ni lo doble. Asimismo, no conecte alargadores. Los daños
en el cable de alimentación pueden ocasionar incendios o descargas
eléctricas.
• Si el cable de alimentación presenta algún daño, deberá ser sustituido
por el fabricante, el servicio técnico o personas con una cuali cación
similar para evitar que se produzcan situaciones de peligro.
• Asegúrese de que la unidad está conectada a una toma de corriente de
CA de 220-240 V y 50 Hz. El uso de una tensión superior puede causar el
mal funcionamiento de la unidad o incluso presentar riesgo de incendio.
• Si el enchufe no encaja en la toma, no lo fuerce.
• Apague la unidad antes de desenchufarla de la corriente para desconec-
tarla por completo.
• No conecte ni desconecte el cable de alimentación con las manos moja-
das, ya que podría producirse una descarga eléctrica.
• Desconecte el cable de alimentación si la unidad no se va a utilizar
durante un periodo prolongado de tiempo.
• Asegúrese de que el enchufe de alimentación resulta fácilmente
accesible.
• Este producto no contiene ninguna pieza que pueda ser reparada por
el usuario. En caso de avería, póngase en contacto con el fabricante o el
servicio técnico autorizado. La exposición a ciertas partes internas del
dispositivo puede poner en peligro su vida. La garantía del fabricante
no cubre las averías resultantes de reparaciones llevadas a cabo por
terceros.
• No utilice este producto inmediatamente tras desembalarlo. Espere a
que se caliente a la temperatura ambiente antes de utilizarlo.
• Asegúrese de utilizar el producto en climas moderados únicamente (no
en climas tropicales o subtropicales).
• Coloque el producto en una super cie plana estable y no expuesta a
vibraciones.
• Asegúrese de que el producto y sus partes no sobresalen de los bordes
del mueble sobre el que se coloca.
• Para reducir el riesgo de incendio, descarga eléctrica o daño en el
producto, no lo exponga directamente a la luz del sol, polvo, lluvia o
humedad. No exponga nunca este producto a gotas o derramamientos y
no coloque objetos llenos de líquido sobre o cerca de este.
• No coloque objetos con líquidos, como jarrones, sobre el aparato.
• No instale el aparato cerca de ninguna fuente de calor, como radiadores,
salidas de aire caliente, estufas u otros aparatos (incluidos ampli cado-
res) que produzcan calor.
• No coloque el producto en espacios húmedos o con ventilación de cien-
te.
• Asegúrese de dejar una distancia mínima de 5 cm en torno al aparato
para garantizar una ventilación adecuada. No obstruya las aberturas de
ventilación de este producto. Evite siempre la obstrucción de las ranuras
de ventilación con objetos como periódicos, manteles, cortinas, etc.
• No permita que nadie, especialmente los niños, introduzca elementos en
los ori cios, ranuras ni en ninguna apertura de la carcasa de la unidad, ya
que podrían dar lugar a descargas eléctricas mortales.
• Las tormentas son peligrosas para todos los aparatos eléctricos. Si el
cable de alimentación o el cableado de la antena es alcanzado por un
rayo, el aparato puede resultar dañado, incluso si no está encendido.
Debe desconectar todos los cables y conectores del aparato antes de
una tormenta.
• La presión acústica excesiva de los auriculares y los cascos puede causar
la pérdida del sentido auditivo.
• No mueva la unidad durante la reproducción de discos. Durante la
reproducción, el disco gira a gran velocidad. No levante ni mueva la
unidad durante la reproducción, ya que de hacerlo podría dañarse el
disco o la unidad.
• No suba el volumen mientras escucha una sección con entradas de muy
bajo nivel o sin señales de audio. De lo contrario, el altavoz podría resul-
tar dañado al reproducir de repente una sección con un nivel máximo.
Mantenimiento
• Desenchufe el cable de alimentación de la toma de corriente antes de
limpiar la unidad.
• Utilice un paño suave y limpio para limpiar la parte exterior de la unidad.
No utilice nunca productos químicos ni detergentes.
Pilas
• Tenga en cuenta la polaridad correcta al insertar
las pilas.
• No exponga las pilas a altas temperaturas y no
las coloque en lugares en los que la temperatura
pueda experimentar cambios bruscos, p. ej., cerca
de un fuente de fuego o en contacto directo con
la luz solar.
• No exponga las pilas a calor radiante excesivo, no
las arroje al fuego, no las desmonte y no intente
recargar pilas no recargables, ya que podrían producirse fugas o
explotar.
• No combine nunca pilas de diferente tipo y no mezcle pilas nuevas y
pilas viejas.
• Si el mando a distancia no se va a utilizar durante un largo periodo de
tiempo (más de un mes), retire la pila para evitar fugas.
• Si las baterías presentan fugas, limpie la parte interior del compartimen-
to y sustitúyalas por pilas nuevas.
• No utilice pilas diferentes a las especi cadas.
No ingiera las pilas, ya que pueden causar quemaduras químicas.
Cd

16
• La ingestión de pilas puede causar quemaduras internas graves en tan
solo 2 horas y producir la muerte. Mantenga las pilas nuevas y usadas
lejos de los niños. Si el compartimiento de la pila no se cierra correc-
tamente, deje de usar el producto y manténgalo alejado de los niños.
Si cree que se pueden haber tragado las pilas o introducido en alguna
parte del cuerpo, busque atención médica inmediatamente.
Eliminación de este equipo y las pilas
• No elimine este producto o sus pilas como residuos
urbanos no clasi cados. Entréguelos en un punto
de recogida designado para el reciclado de aparatos
electrónicos y eléctricos de acuerdo con la ley local. De
esta forma, ayudará a conservar los recursos y a proteger
el medio ambiente.
• La mayor parte de los países de UE regulan la eliminación
de las pilas mediante leyes. Póngase en contacto con su
distribuidor y con las autoridades locales para obtener más
información.
• Se incluye el símbolo anterior en el equipo eléctrico y
electrónico, y las baterías (o el embalaje) para recordar
a los usuarios de esta circunstancia. Si aparece "Hg" o "Pb" debajo del
símbolo, eso signi ca que las pilas contienen trazas de mercurio (Hg) o
plomo (Pb), respectivamente.
• Se solicita a los usuarios que utilicen las instalaciones de devolución
existentes para equipos usados.
ADVERTENCIA::
PRODUCTO DE CLASE 1
• Los aparatos con reproductor de CD
integrado se marcan con esta etiqueta
de precaución.
• Esta etiqueta de advertencia se ubica
en el panel posterior de la unidad
• ESTA UNIDAD ES UN PRODUCTO LÁSER DE CLASE 1. ESTA UNIDAD
UTILIZA UN RAYO LÁSER VISIBLE QUE PODRÍA CAUSAR UNA RADIACIÓN
PELIGROSA EN CASO DE EXPOSICIÓN DIRECTA. ASEGÚRESE DE UTILIZAR
EL REPRODUCTOR DE FORMA CORRECTA, COMO INDICAN LAS INST-
RUCCIONES.
• NO COLOQUE LOS OJOS CERCA DE LA APERTURA PARA MIRAR DENTRO
DE LA UNIDAD CUANDO LA DESENFUCHE DE LA TOMA DE CORRIENTE.
• EL USO DE CONTROLES O AJUSTES O LA APLICACIÓN DE PROCEDI-
MIENTOS DIFERENTES DE LOS ESPECIFICADOS EN ESTE MANUAL PUEDE
OCASIONAR UNA EXPOSICIÓN A RADIACIÓN PELIGROSA.
• NO ABRA LAS TAPAS Y NO REPARE USTED MISMO EL PRODUCTO. CON-
SULTE CON PERSONAL CUALIFICADO DE SERVICIO EN CASO NECESARIO.
Declaración CE:
• Por la presente, UMC Poland Sp. z o.o. declara que este dispositivo
sonoro cumple los requisitos esenciales y otras disposiciones pertinentes
de la Directiva RED 2014/53/UE. El texto completo de la declaración de
conformidad de la UE está disponible en el siguiente enlace http://www.
sharp.eu/av/documents-of-con rmity
Marcas comerciales:
La marca denominativa Bluetooth® y sus logotipos son marcas comerciales
propiedad de Bluetooth SIG, Inc.
CLASS 1
LASER PRODUCT

ES
Contenido de la caja
1 unidad principal
2 altavoces
1 mando a distancia
2 pilas AAA
1 guía del usuario
1 guía de inicio rápido
1 cable de alimentación para la UE
Paneles y controles
Panel frontal
SOURCE
PLAY/PAUSE
EJECT
PREV NEXT
1
2
5
3
4
AUX IN
STANDBY
SOURCE PREV NEXT EJECT
USB
6
7
8
9
12
11
10
PLAY/PAUSE
1. Botón SOURCE: Pulse para seleccionar los modos.
2. Botón PLAY/PAUSE: Pulse para pausar o reproducir la música.
3. Botón PREVIOUS: Pulse para saltar a la canción o emisora anterior.
4. Botón NEXT: Pulse para saltar a la canción o emisora siguiente.
5. Botón EJECT: Pulse para extraer el cajetín del disco.
6. Indicador de encendido: Indica el estado.
7. Botón STANDBY: Pulse para activar el modo
en espera o para encender.
8. Sensor remoto: Apunte con el mando a distancia
al sensor en un radio de 7 metros.
9. Pantalla de visualización: Muestra la información de la emisora.
10. Botón VOLUME+/-: Gírelo para ajustar el nivel de volumen.
11. Puerto USB: Se utiliza para conectar una unidad de memoria USB.
12. Conexión de entrada de audio: Se utiliza para
conectar fuentes de audio externas.
Panel posterior
14
15
13
13. Antena FM: Para recibir la señal de FM.
14. Conectores de altavoces: Conectan los
altavoces con la unidad principal.
15. Toma de alimentación Conecte el cable de
alimentación a la toma de alimentación.
Mando a distancia
1.
EJECT
SHUFFLE
PROGRAM
LOUD
DSP
REPEAT
MO/ST
BASS
FREQ
SAVE
15
13
17
16
10
11
20
19
18
12
14
21
22
1
2
3
4
9
5
6
7
8
_
+
STANDBY: Pulse este botón para encender la unidad o entrar en el
modo en espera.
2. REPEAT: Pulse este botón para repetir la canción.
3. PLAY/PAUSE: Permite detener o poner en pausa la reproducción.
4. FAST REWIND: Pulse este botón para rebobinar en modo
rápido la pista que se esté reproduciendo en ese momento.
5. TREBLE: Pulse este botón para ajustar los agudos; utilice
los botones + o - para aumentar y reducir los agudos.
6. VOLUME -: Pulse este botón para reducir el volumen.
7. PROGRAM: Utilice este botón para programar
el orden de reproducción.
8. SHUFFLE: Pulse este botón para reproducir música en modo aleatorio.
9. NÚMERO (0-9): Ir a la posición guardada, introducir
la frecuencia y seleccionar la pista.
10. EJECT: Pulse este botón para extraer el cajetín del disco.
11. SOURCE: Seleccione el modo de funcionamiento:
CD, FM, USB, Bluetooth® (BT), AUX
12. STOP/MO/ST: permite reproducir, cambiar
entre mono y estéreo en el modo FM.
13. PREVIOUS: permite saltar a la última pista.
14. FAST FORWARD: Pulse este botón para hacer avanzar en modo
rápido la pista que se esté reproduciendo en ese momento.
15. NEXT: Saltar a la siguiente pista o emisora.
16. BASS: Pulse este botón para ajustar los bajos; utilice los
botones + o - para aumentar y reducir los bajos.
17. VOLUME+: Pulse este botón para aumentar el volumen.
18. MUTE: Pulse este botón para silenciar el sonido y vuelva
a pulsarlo para reanudarlo. También puede anular el
sonido pulsando los botones de control del volumen.
19. DSP: Pulse este botón para seleccionar el ecualizador de sonido.
20. LOUD: Pulse LOUD para aumentar el nivel de
bajos con bajos niveles de sonido.
21. SAVE: permite guardar sus emisoras preferidas.
22. FREQ: permite introducir la frecuencia preferida en el modo FM.

18
Instalación o cambio de las pilas del mando a distancia
1. Presione el cierre de la tapa de las pilas en dirección de la echa en
relieve que aparece en la parte posterior del mando a distancia.
2. Mientras presiona el cierre, abra la tapa de las pilas.
3. Introduzca dos pilas jándose en la polaridad +, tal como se indica. Al
cambiar las pilas, utilice solamente el mismo tipo de pila suministrado.
4. Vuelva a colocar la tapa de las pilas y ciérrela.
Preparación para el uso
1.
ANTENNA
1
2
3
AUDIO IN
SOURCE
PLAY/PAUSE
PREV NEXT
EJECT
AUX IN
4
5
6
7
USB
Coloque un altavoz a cada lado de la unidad principal, preferiblemente
a la misma altura y con al menos 150mm de espacio entre cada uno
de ellos y la unidad principal.
Conecte los conectores del altavoz a la parte posterior de la unidad.
Asegúrese de hacer coincidir el altavoz colocado a la IZQUIERDA con la
salida IZQUIERDA de la parte trasera de la unidad. Repita lo mismo con
el altavoz de la DERECHA.
El cable LEFT RED se conecta al terminal LEFT RED y el cable RIGHT
RED al terminal LEFT RED. Ambos cables BLACK se conectan a los
terminales BLACK correspondiente.
2. Asegúrese de que la tensión marcada en la etiqueta de
clasi cación, ubicada en el panel posterior, es la misma que
la tensión en su área. Seleccione un cable de alimentación
adecuado, inserte el extremo del cable en la toma de corriente
situada en el panel posterior de la unidad. A continuación,
enchufe el otro extremo al enchufe de la pared.
3. Pulse el botón STANDBY de la unidad principal para encender la
unidad.
Extienda la ANTENA para conseguir la mejor recepción.
Pulse el botón SOURCE para activar el modo FM. Para utilizar
la radio en modo FM, siga las instrucciones del capítulo
FUNCIONAMIENTO DE LA RADIO FM del manual de uso.
4. Pulse el botón SOURCE para entrar en modo CD. Pulse el
botón EJECT para abrir el cajetín de disco e introduzca
un disco. Pulse de nuevo el botón EJECT para cerrarlo. El
CD empezará a reproducirse en la primera pista.
5. Pulse el botón SOURCE para entrar en modo Aux IN (audio).
Conecte el dispositivo de audio a la toma AUX IN mediante
un cable auxiliar de 3,5mm. Controle la reproducción
mediante el dispositivo de audio conectado.
6. Pulse el botón SOURCE para entrar en modo Bluetooth. Active el
dispositivo habilitado con Bluetooth y seleccione «SHARP XL-B510».
Seleccione la canción correspondiente y pulse para reproducir.
7. Pulse el botón SOURCE para entrar en modo USB. Introduzca el
dispositivo USB en el puerto USB del panel frontal de la unidad.
Se leerá el dispositivo USB y se reproducirá automáticamente.
Funciones básicas
Cambio de modo
Para cambiar entre los modos: CD, FM, Bluetooth, USB y AUX IN. Pulse el
botón SOURCE de la unidad o en el mando a distancia para cambiar de
modo.
Control de volumen
1. Gire el control VOLUME en el sentido de las agujas del
reloj o pulse el botón «+» para aumentar el volumen.
2. Gire el control VOLUME en el sentido contrario a las agujas
del reloj o pulse el botón «-» para reducir el volumen.
Efectos DSP
Pulse el botón DSP repetidamente para desplazarse por un conjunto de
valores predeterminados del ecualizador para modi car el sonido. Elija
entre CLASSIC, ROCK, POP, JAZZ, DANCE, LIVE y O .
Función de intensidad
Esta función aumentará el nivel de bajos con niveles bajos de sonido. Pulse
el botón LOUD del mando a distancia para habilitar el efecto. Pulse de
nuevo para deshabilitar el efecto.
Función silenciar
Pulse el botón en cualquier momento para silenciar la emisión de
sonido. Pulse de nuevo para reanudar el sonido.
Controles de tono
Ajuste los controles de tonos bajos y agudos si resulta necesario.
Pulse directamente el botón BASS o TREBLE del mando a distancia para
seleccionar bajos o agudos y, a continuación, use los botones «+» o «-»
para ajustarlos.
Modo de espera
Pulse el botón STANDBY de la unidad o del mando a distancia para poner
la unidad en modo de espera.
Para reanudar el funcionamiento normal, pulse de nuevo este botón.
NOTA: Esta unidad se ha diseñado para entrar en modo de espera
automáticamente después de 10 minutos (aproximadamente) de inactividad.
Pulse el botón STANDBY para activar la unidad.
NOTA: Al activar la unidad desde el modo en espera, se reanudará el último
modo utilizado.
Funcionamiento de la radio FM
1. Pulse el botón SOURCE del panel o del mando a distancia para
entrar en el modo FM. (Frecuencia FM: 87.50-108.00MHz)
2. Pulse los botones
/ del mando a distancia para reducir
o aumentar la frecuencia en incrementos de 0,05MHz.
3. Mantenga pulsados los botones PREV/NEXT del panel
o los botones
/ del mando a distancia para buscar

ES
el rango de frecuencia rápidamente. La búsqueda
se detendrá cuando encuentre una emisora.
4. Mantenga pulsados el botón
para explorar las
gama de frecuencias rápidamente y almacenar todas
las emisoras encontradas automáticamente.
5. MEMORIZAR una estación:
Puede almacenar hasta 40 emisoras FM en memoria.
Pulse el botón FREQ y utilice los botones de número
para introducir la frecuencia que desea almacenar.
Pulse el botón SAVE; mostrará "P01" en la pantalla.
Pulse el botón
/ para seleccionar el número
de emisora que desea almacenar.
Pulse el botón SAVE de nuevo para con rmar.
6. Recuperar emisoras presintonizadas:
Pulse el botón
/ para recuperar las emisoras almacenadas.
Funcionamiento del CD
1. Pulse el botón SOURCE del panel o del mando a distancia para entrar
en el modo CD. Pulse el botón EJECT para abrir el cajetín del disco,
introduzca un CD y, a continuación, pulse de nuevo el botón EJECT.
2. Pulse el botón
para pausar o reproducir la canción.
3. Pulse el botón STOP/MO/ST del mando a distancia para detener
la reproducción; pulse el botón
para reanudarla.
4. Pulse el botón PREV/NEXT o el botón
/ del mando
a distancia para saltar a la canción anterior o siguiente.
5. Pulse el botón
/ del mando a distancia para avanzar
o rebobinar en modo rápido la reproducción; pulse el
botón varias veces para reanudar la velocidad normal.
6. Para seleccionar directamente una canción especí ca, pulse el botón
de número 0-9 del mando a distancia.
Ejemplo:
Si el número de pista tiene dos dígitos, por ejemplo, 25, pulse
el botón «2» y luego el botón «5» para seleccionar la pista 25.
Si el número de pista es un número de un dígito, por ejemplo,
9, pulse primero «0» y luego «9» para saltar a la pista 9.
7. Botón REPEAT:
En modo de reproducción, pulse el botón REPEAT
para entrar en modo de repetición.
Con discos CD y CD-R, pulse el botón REPEAT para
repetir la reproducción de las canciones.
Pulse una vez para repetir la canción reproducida en ese
momento. Pulse de nuevo para repetir todas las pistas.
Pulse por tercera vez para cancelar.
8. Pulse el botón SHUFFLE del mando a distancia para reproducir
el disco en orden aleatorio. Pulse de nuevo para reanudar.
9. Puede programar un orden para reproducir el disco.
Pulse el botón STOP/MO/ST del mando a
distancia para detener la reproducción.
Pulse el botón PROGRAM del mando a distancia.
En la pantalla se visualizará: P01.
Pulse los botones de número del mando a distancia
para seleccionar las pistas que quiera programar.
Pulse los botones
/ del mando a distancia
para saltar entre las pistas del programa.
Pulse el botón PROGRAM del mando a distancia para con rmar.
Para iniciar el orden programado, pulse el botón
.
Para cancelar la secuencia del programa, pulse
dos veces el botón STOP/MO/ST.
Notas:
El equipo soporta los formatos MP3 y WAV.
Los formatos no admitidos se saltan. Por ejemplo, los
documentos de Word (.doc) o los archivos MP3 con la
extensión .dlf se ignoran o no se reproducen.
Funcionamiento de la función Bluetooth
El microsistema tiene función Bluetooth y puede recibir una señal en un
alcance de 7 metros. Para emparejar el microsistema con un dispositivo
Bluetooth:
1. Pulse varias veces el botón SOURCE para entrar en el modo Bluetooth,
aparecerá el mensaje “bt“ de forma intermitente en la pantalla.
2. Active el dispositivo Bluetooth y seleccione el modo de búsqueda.
3. Seleccione «SHARP XL-B510» en la lista de búsqueda y conecte.
4. Introduzca «0000» como contraseña si se solicita.
5. Cuando los dispositivos se conectan entre sí, se emite un sonido
de con rmación. "bt" dejará de parpadear en la pantalla.
6. A continuación podrá disfrutar de la música desde el dispositivo.
7. Para desactivar la función Bluetooth, cambie a otra función del
microsistema o deshabilite la función en el dispositivo Bluetooth.
Conectar con otros dispositivos de audio
La opción de audio permite que la unidad se conecte rápida y fácilmente
con un reproductor MP3 u otras fuentes externas.
1. Utilice un cable de audio de 3,5mm para conectar un dispositivo
externo de audio con la conexión AUX IN en el panel frontal.
2. Conecte el enchufe del microsistema a la corriente.
3. Pulse el botón SOURCE para cambiar al modo AUX IN.
4. Es posible que tenga que utilizar directamente el dispositivo de
audio externo para utilizar las características de reproducción.
5. Para conseguir unos niveles de volumen óptimos, ajuste
el volumen en el dispositivo de audio externo.
Funcionamiento de la función USB
Se puede escuchar música mediante la interfaz del dispositivo USB de la
unidad. Conexión con un dispositivo USB:
1. Encienda la unidad y seleccione el modo
USB pulsando el botón SOURCE.
2. Conecte el dispositivo USB a la conexión USB
del panel frontal de la unidad.
3. A continuación, la radio reproducirá las canciones
guardadas en el dispositivo USB.
Notas:
El equipo soporta los formatos MP3 y WAV.
Los formatos no admitidos se saltan. Por ejemplo, los
documentos de Word (.doc) o los archivos MP3 con la
extensión .dlf se ignoran o no se reproducen.
Incluso cuando los archivos están en un formato compatible
(MP3), es posible que algunos no se reproduzcan o
visualicen, dependiendo de la compatibilidad.
En algunos casos, la lectura puede tardar hasta 60
segundos; no se trata de un mal funcionamiento.
Dependiendo de la cantidad de datos y la velocidad del medio,
la unidad podría tardar más tiempo en leer el dispositivo USB.
USB admite una memoria máxima de 64GB.
La tarjeta de memoria USB ha de ser formateada en FAT, FAT16 o FAT32
Resolución de problemas
El dispositivo no se enciende.
Motivo
• El cable de alimentación no está conectado a la toma de la pared.
• La toma de corriente no está conectada.
Solución
• Asegúrese de que el enchufe esté conectado.
• Conecte la corriente.

20
No hay sonido de CD/AUX/RADIO.
La entrada AUX no emite sonido.
Motivo
• El volumen está demasiado bajo.
• El volumen de la fuente AUX está demasiado bajo.
Solución
• Aumente el volumen.
• Aumente el volumen de salida de la fuente AUX.
El sonido se oye distorsionado.
El sonido de la entrada AUX se oye distorsionado.
Motivo
• El volumen está demasiado alto.
• El volumen de la fuente AUX está demasiado alto.
Solución
• Reduzca el volumen.
• Reduzca el volumen de salida de la fuente AUX.
No se puede reproducir el CD.
Motivo
• No hay ningún disco en el cajetín.
• El disco no se ha introducido correctamente.
• El disco está sucio.
Solución
• Introduzca un disco compatible.
• Compruebe el disco cargado.
• Limpie el disco.
Sonido estático.
Motivo
• Mala recepción.
Solución
• Reubique la antena (FM).
No se encuentra la emisora deseada.
Motivo
• Señal débil.
• La emisora no está disponible en su zona.
La unidad se apaga después de 10 minutos de inactividad.
Motivo
• Está activado el modo de espera automático.
Solución
• Esta unidad se ha diseñado para entrar en modo de espera automática-
mente después de 10 minutos de inactividad. Pulse el botón STANDBY
para activar la unidad.
Especi cación técnica
Modelo XL-B510
Señal de radio 87.5-108MHz
Fuente de alimentación AC 220-240V~ 50Hz
Consumo de electricidad 28 W
Consumo de electricidad Estado
en espera
<0,5 W
Potencia de salida 2 x 7 W (RMS)
Impedancia 2 x 8 Ω
Respuesta de frecuencia 60Hz - 20KHz
Bluetooth
Versión V 2.1 + EDR
Potencia máxima transmitida <20 dbm
Bandas de frecuencia 2402 MHz ~ 2480 MHz
Del reproductor de CD
Formato de disco CD, CD-R, CD-RW, MP3, WMA
Mando a distancia
Tipo de batería 2x AAA / 1.5V
220mm
170mm
150mm
220mm
145mm 177mm
1,75kg
KG
0,95kg
KG

IT
Importanti istruzioni di sicurezza
ATTENZIONE
RISCHIO DI SCOSSA ELETTRICA
NON APRIRE
Vi preghiamo di leggere queste istruzioni di
sicurezza e di rispettare le seguenti avvertenze
prima di mettere in funzione l'apparecchio:
Il simbolo del fulmine con una punta di freccia in un triangolo
equilatero serve ad avvertire la presenza di un voltaggio
pericoloso non isolato all’interno del prodotto di un livello
su ciente a comportare il rischio di shock elettrico per una
persona.
Il punto esclamativo in un triangolo equilatero serve ad
avvertire la presenza di importanti istruzioni operative e
di manutenzione nella documentazione che accompagna
l’apparecchio.
Questo simbolo signi ca che il prodotto deve essere smaltito
in modo rispettoso dell'ambiente, non insieme ai ri uti
domestici.
Tensione AC
Tensione DC
Apparecchiatura di Classe II
Per evitare incendi, tenete
sempre lontane dall’apparecchio
candele e qualunque
altro tipo di amma.
Avvertenza:
• Seguire sempre le precauzioni di sicurezza basilari quando si utilizza
questo apparecchio, specialmente in presenza di bambini.
• I bambini dovrebbero essere supervisionati per assicurarsi che non
giochino con l’apparecchio.
• Non danneggiare il cavo di alimentazione, né riporvi sopra oggetti
pesanti, tirarlo o piegarlo. Inoltre, non utilizzare prolunghe. Danni al cavo
di alimentazione potrebbero causare incendi o shock elettrici.
• Se il cavo di alimentazione è danneggiato, deve essere sostituito dal
produttore, da un agente di servizio o da persone altrettanto quali cate,
in modo da evitare pericoli.
• Assicurarsi che l’unità sia connessa a una presa di corrente CA 220-240V
50Hz. Usare un voltaggio superiore può provocare un malfunzionamen-
to dell’unità e persino la formazione di amme.
• Non forzare la spina se non si inserisce correttamente nella presa.
• Spegnere completamente l’unità prima di disconnetterla
dall’alimentazione.
• Non disconnettere o connettere il cavo di alimentazione con le mani
bagnate. Può provocare uno shock elettrico.
• Scollegare il cavo di alimentazione se non viene usato per molto tempo.
• Assicurarsi che la presa di corrente sia sempre facilmente accessibile.
• Questo prodotto non ha componenti che possano essere riparate
dall'utente. In caso di guasto, contattate il produttore o l'agente di ser-
vizio autorizzato. Esporre le parti interne al dispositivo può comportare
un pericolo di vita. La garanzia non copre danni causati da riparazioni
e ettuate da terze parti non autorizzate.
• Non utilizzare questo prodotto immediatamente dopo averlo rimosso
dall’imballaggio. Attendere che si riscaldi no a temperatura ambiente
prima di usarlo.
• Assicurarsi di usare questo prodotto soltanto in un clima temperato (non
in ambienti tropicali o subtropicali).
• Collocare il prodotto su una super cie piana e stabile in modo che non
sia sottoposto a vibrazioni.
• Assicurarsi che il prodotto e le sue parti non pendino dal bordo del
mobilio di supporto.
• Per ridurre il rischio di incendi, shock elettrici o danni al prodotto, non
esporlo direttamente a luce del sole, polvere, pioggia o umidità. Non
esporlo mai a gocciolamenti e schizzi d’acqua e non collocare oggetti
contenenti liquidi sopra o vicino a esso.
• Non collocare oggetti pieni di liquidi, come vasi, sull’apparecchio.
• Non installarlo vicino a fonti di calore come termosifoni, griglie di
ventilazione, stufe o altri apparecchi (inclusi ampli catori) che generano
calore.
• Non collocare il prodotto in punti con elevata umidità e scarsa ventilazio-
ne.
• Assicurare una distanza minima di 5 cm attorno all’apparecchio per una
ventilazione su ciente. Non ostruire le aperture per la ventilazione del
prodotto. Assicurarsi che le aperture per la ventilazione siano sgombere
da oggetti come giornali, tovaglie, tendaggi ecc.
• MAI lasciare che qualcuno, specialmente un bambino, inserisca qualcosa
nei fori e nelle aperture dell’involucro dell’unità, in quanto ciò potrebbe
risultare in uno shock elettrico fatale.
• I temporali sono pericolosi per gli apparecchi elettronici. Se i cavi della
rete elettrica o l'antenna vengono colpiti da un fulmine, l'apparecchio
potrebbe risultarne danneggiato, anche se spento. E' opportuno scolle-
gare tutti i cavi e i connettori dell'apparecchio prima di un temporale.
• Un’eccessiva pressione sonora da cu e o auricolari può causare danni
all’udito.
• Non spostare l'unità durante la riproduzione del disco. Durante la ripro-
duzione, il disco ruota ad alta velocità. Non sollevare né spostare l'unità
durante la riproduzione, fare ciò potrebbe danneggiare il disco o l'unità.
• Non aumentare il volume mentre si ascolta una parte con segnale audio
molto basso o assente. Facendo ciò, l'altoparlante potrebbe riportare
danni quando viene riprodotta all'improvviso una parte con livello di
picco.
Manutenzione
• Disconnetti il cavo di alimentazione dalla presa elettrica prima di pulire
l’apparecchio.
• Usare un panno morbido e pulito per pulire l’esterno dell’unità. Non
pulire con agenti chimici e detergenti.
Batterie
• Rispettare la corretta polarità quando inserite le
batterie.
• Non esporre le batterie ad alte temperature e
non riporle in posti in cui la temperatura possa
aumentare velocemente, per esempio vicino a una
amma o alla luce diretta del sole.
• Non esporre le batterie a un eccessivo calore
radiante, non gettarle nel fuoco, non smontarle e
non cercare di ricaricarle se non sono ricaricabili.
Potrebbero avere perdite o esplodere.
• Non usare mai batterie di marche diverse insieme, né mescolare batterie
vecchie con nuove.
• Quando il telecomando non viene usato per lungo tempo (più di un
mese), rimuovere la batteria per prevenire perdite.
• In caso di perdite di batterie, ripulire la perdita all’interno dello scompar-
timento e rimpiazzare le batterie vecchie con quelle nuove.
• Non utilizzare batterie diverse da quelle speci cate.
Non ingerire le batterie: rischio di ustione chimica
• Se la batteria viene ingerita, può causare gravi ustioni interne in appena
due ore e portare alla morte. Tenere batterie nuove e vecchie lontane
dai bambini. Se lo scompartimento della batteria non si chiude perfett-
Cd

22
amente, smettere di usare il prodotto e tenerlo lontano dalla portata dei
bambini. In caso di dubbio di ingerimento di batterie o di inserimento in
qualsiasi parte del corpo, richiedere immediato supporto medico.
Smaltimento dell’apparecchio e delle batterie
• Non smaltire questo prodotto insieme a ri uti non
di erenziati. Riconsegnarlo in un punto di raccolta
apposito per il RAEE (Riciclaggio di Apparecchiature
Elettriche ed Elettroniche). Così facendo, contribuirete
alla conservazione delle risorse e alla protezione
dell'ambiente.
• La maggior parte dei paesi dell'UE regola lo smaltimento delle batterie a
norma di legge. Contattare il fornitore o le autorità locali
per ulteriori informazioni.
• I simboli mostrati in alto appaiono su apparecchi elettrici
ed elettronici e batterie (o sulla relativa confezione) come
promemoria per gli utenti. La presenza di “Hg” o ‘Pb’ sotto
il simbolo indica la presenza di tracce di mercurio (Hg) o
piombo (Pb).
• Gli utenti sono tenuti a utilizzare le strutture adeguate per lo smalti-
mento di apparecchi e batterie.
ATTENZIONE:
• PRODOTTO LASER CLASSE 1
• Gli apparecchi con lettore CD incorpo-
rato sono contrassegnati con questa
etichetta di avvertenza.
• Questa etichetta di avvertenza è situata
sul pannello posteriore dell‘unità.
• QUESTA UNITÀ È UN PRODOTTO LASER CLASSE 1. QUESTA UNITÀ USA
UN RAGGIO LASER VISIBILE CHE POTREBBE CAUSARE RADIAZIONI
PERICOLOSE IN CASO DI ESPOSIZIONE. ACCERTARSI DI UTILIZZARE
CORRETTAMENTE IL LETTORE SECONDO LE ISTRUZIONI.
• QUANDO QUESTA UNITÀ È CONNESSA ALLA PRESA A PARETE, NON
AVVICINIARE GLI OCCHI ALLE APERTURE PER GUARDARE ALL‘INTERNO
DELL‘UNITÀ.
• L‘USO DEI COMANDI O LE REGOLAZIONI O L‘ESECUZIONE DI PROCEDURE
CHE NON SIANO QUELLE SPECIFICATE POTREBBERO CAUSARE ESPOSIZI-
ONE A RADIAZIONI PERICOLOSE.
• NON APRIRE IL COPERCHIO E NON RIPARARE DA SOLI. RICORRERE
ALL‘ASSISTENZA DI PERSONALE QUALIFICATO.
Dichiarazione CE:
• Con la presente, UMC Poland Sp. z o.o. dichiara che questo dispositivo
audio soddisfa i requisiti essenziali e le altre disposizioni rilevanti della
direttiva RED 2014/53/UE. Il testo completo della Dichiarazione di
conformità UE è disponibile al link seguente http://www.sharp.eu/av/
documents-of-con rmity
Imarchi:
La parola e i loghi Bluetooth® simbolo sono marchi registrati di proprietà di
Bluetooth SIG,. Inc.
CLASS 1
LASER PRODUCT

IT
Cosa è compreso nella confezione
1x unità principale
2x altoparlanti
1x telecomando
2x batterie AAA
1x manuale di istruzioni
1x guida di avvio rapido
1x cavo di alimentazione EU
Pannelli e controlli
Pannello anteriore
SOURCE
PLAY/PAUSE
EJECT
PREV NEXT
1
2
5
3
4
AUX IN
STANDBY
SOURCE PREV NEXT EJECT
USB
6
7
8
9
12
11
10
PLAY/PAUSE
1. Pulsante SORGENTE: Premere per selezionare le modalità.
2. Pulsante RIPRODUCI/PAUSA: Premere per
riprodurre o mettere in pausa la musica.
3. Pulsante PRECEDENTE: Premere per passare
alla stazione/canzone precedente.
4. Pulsante SUCCESSIVO: Premere per passare
alla stazione/canzone successiva.
5. Pulsante ESPELLI: Premere per espellere il cassetto del disco.
6. Indicazione di alimentazione: Indica lo stato.
7. Pulsante STANDBY: Premere per impostare
la modalità standby o accendere.
8. Sensore remoto: Puntare il telecomando al sensore entro 7 metri.
9. Schermo del display: Mostra le informazioni sulla stazione.
10. Manopola VOLUME+/-: Girare per regolare il livello del volume.
11. Porta USB: Usato per connettersi al disco ash UB.
12. Presa input audio: Usato per connettere sorgenti audio esterne.
Pannello posteriore
14
15
13
13. Antenna FM: Per ricevere il segnale FM.
14. Connettori altoparlante: Per connettere gli
altoparlanti all‘unità principale.
15. Presa di corrente Collegare il cavo di alimentazione all‘alimentazione.
Telecomando
1.
EJECT
SHUFFLE
PROGRAM
LOUD
DSP
REPEAT
MO/ST
BASS
FREQ
SAVE
15
13
17
16
10
11
20
19
18
12
14
21
22
1
2
3
4
9
5
6
7
8
_
+
STANDBY: Premere per accendere l'unità o passare alla modalità
standby.
2. RIPETERE: Premere per ripetere la canzone.
3. RIPRODUCI/PAUSA: Avvio/pausa riproduzione.
4. RIAVVOLGIMENTO RAPIDO: Premere per riavvolgere
rapidamente la traccia in riproduzione.
5. ALTI: Premere per regolare le frequenze alte, usare
i pulsanti + o - per aumentare/ridurre.
6. VOLUME -: Premere per abbassare il volume.
7. PROGRAMMA: Usare per programmare l'ordine di riproduzione.
8. SHUFFLE: Premere per riprodurre la musica in ordine casuale.
9. NUMERO (0-9): Per passare alla posizione di archiviazione,
inserire la frequenza, selezionare la traccia
10. ESPELLI: Premere per espellere il cassetto del disco.
11. SORGENTE: Selezionare la modalità di funzionamento:
CD, FM, USB, Bluetooth® (BT), AUX
12. STOP/MO/ST: Arresto riproduzione, passare
da mono a stereo in modalità FM.
13. PRECEDENTE: Premere per passare alla traccia precedente.
14. AVANZAMENTO RAPIDO: Premere per fare avanzare
rapidamente la traccia in riproduzione.
15. SUCCESSICO: Per passare alla stazione/traccia successiva.
16. BASSI: Premere per regolare i bassi, usare i
pulsanti + o - per aumentare/ridurre.
17. VOLUME+: Premere per aumentare il volume.
18. MUTE: Premere una volta per azzerare il suono, premere
nuovamente per riavviare. È possibile riavviare il suono
premendo i pulsanti di controllo del volume.
19. DSP: Premere per selezionare l'equalizzatore audio.
20. LOUD: Premere LOUD per aumentare il livello
dei bassi a bassi livelli di volume.
21. SAVE: remere per salvare le tue stazioni preferite.
22. FREQ: Frequenza, in modalità FM, premere per
inserire la tua frequenza preferita.

24
Installazione o sostituzione delle batterie del telecomando
1. Premere il fermo sul coperchio della batteria in direzione della
freccia in rilievo sulla parte posteriore del telecomando.
2. Mentre si preme il fermo, aprire il coperchio della batteria.
3. Inserire due batterie rispettando la polarità +,- come indicato. Quando
si sostituiscono le batterie usare solo lo stesso tipo di batteria fornita.
4. Reinserire il coperchio della batteria e ssarlo al suo posto.
Preparazione per l’uso
1.
ANTENNA
1
2
3
AUDIO IN
SOURCE
PLAY/PAUSE
PREV NEXT
EJECT
AUX IN
4
5
6
7
USB
Collocare un altoparlante su un lato dell‘unità principale,
preferibilmente alla stessa altezza e con almeno 150 mm di spazio tra
ciascun altoparlante sull‘unità principale.
Connettere gli spinotti dell‘altoparlante alla parte posteriore dell‘unità.
Fare attenzione a fare combaciare l‘altoparlante collocato a sinistra con
l‘uscita a sinistra sulla parte posteriore del telecomando. Ripetere per
l‘altoparlante DESTRO.
Il cavo ROSSO SINISTRO si connette al terminale ROSSO SINISTRO, il
cavo ROSSO DESTRO al terminale ROSSO DESTRO. I due cavi NERI si
connettono ai corrispondenti terminali NERI.
2. Assicurarsi che la tensione indicata sull‘etichetta dei valori nominali,
situata sul pannello posteriore, sia la stessa della tensione nella propria
area. Selezionare un cavo di alimentazione adatto, inserire l‘estremità
del cavo nella presa di alimentazione sul pannello posteriore
dell‘unità. Quindi connettere su un altro lato della presa a parete.
3. Premere il pulsante di STANDBY sull‘unità principale per accendere
l‘unità.
Estendere l'ANTENNA per ottenere una migliore ricezione.
Premere il pulsante SORGENTE per passare alla modalità FM.
Per usare la radio in modalità FM, seguire le istruzioni nel
capitolo FUNZIONAMENTO RADIO FM nel manualte utente.
4. Premere il pulsante SORGENTE per passare alla modalità CD.
Premere il pulsante ESPELLERE per aprire il cassetto del disco e
inserire un disco. Premere nuovamente il pulsante ESPELLERE
per chiudere. Il CD inizia la riproduzione dalla prima traccia.
5. Premere il pulsante SORGENTE per passare alla modalità
Aux In (Audio). Connettere il dispositivo audio alla
presa AUX IN tramite cavo aux da 3,5 mm. Regolare la
riproduzione usando il dispositivo audio connesso.
6. Premere il pulsante SORGENTE per passare alla modalità Bluetooth.
Attivare il dispositivo con funzionalità Bluetooth e selezionare “SHARP
XL-B510”. Selezionare la canzone desiderata e premere play.
7. Premere il pulsante SORGENTE per passare alla modalità
USB. Collegare il dispositivo USB alla porta USB sul
pannello anteriore dell‘unità, esso leggerà l‘USB e
avvierà automaticamente la riproduzione.
Funzioni di base
Passaggio tra modalità
Per passare tra le modalità: CD, FM, Bluetooth, USB e AUX IN. Premere
il pulsante SORGENTE sull‘unità o sul telecomando per scorrere tra le
modalità.
Controllo del volume.
1. Ruotare il controllo VOLUME in senso orario o premere
il pulsante „+“ per aumentare il livello del volume.
2. Ruotare il controllo VOLUME in senso antiorario o premere
il pulsante „-“ per ridurre il livello del volume.
E etti DSP
Premere ripetutamente il pulsante DSP per scorrere lungo un set di
preimpostazioni dell‘equalizzatore per alterare il suono. Selezionare tra
CLASSIC, ROCK, POP, JAZZ, DANCE, LIVE e O .
Funzione loudness
Questa funzione aumenta il livello dei bassi a bassi livelli di volume.
Premere il pulsante LOUD per attivare l‘e etto. Premere nuovamente per
disattivare l‘e etto.
Funzione silenziosa
Premere il pulsante in qualsiasi istante per rendere silenzioso il segnale
audio. Premere nuovamente per disattivare.
Controlli dei toni
Regolare i controlli dei toni bassi e alti se richiesto.
Premere il pulsante BASSI o ALTI direttamente sul telecomando per
selezionare i bassi o gli alti, quindi usare i pulsanti „+“ o „-“ per regolare.
Modalità standby
Premere il pulsante STANDBY sull‘unità o sul telecomando per portare il
sistema in modalità standby.
Per riprendere la normale funzione, premere nuovamente questo pulsante.
NOTA: Questa unità è progettata per passare automaticamente alla modalità
STANDBY, dopo circa 10 minuti (circa) di inattività. Premere il pulsante
STANDBY per attivare l‘unità.
NOTA: Quando si attiva l‘unità dallo standby, viene riavviata l‘ultima modalità
utilizzata.
Funzionamento radio FM:
1. Premere il pulsante SOURCE (SORGENTE) sul
pannello o sul telecomando per passare alla modalità
CD. (Frequenza FM: 87.50-108.00MHz)
2. Premere ripetutamente i pulsanti / sul telecomando per
aumentare o ridurre la frequenza in passaggi di 0,05 MHz.
3. Tenere premuto i pulsanti PREV/NEXT (PREC/SUCC) sul pannello o
i pulsanti
/ del telecomando per scansionare l‘intervallo delle
frequenze. La scansione si arresta una volta trovata una stazione.

IT
4. Tenere premuto i pulsanti per scansionare
rapidamente l'intervallo delle frequenze; esso memorizzerà
automaticamente tutte le stazioni trovate.
5. SALVARE una stazione:
Puoi memorizzare no a 40 stazioni FM.
Premi il pulsante FREQ quindi, usando i pulsanti numerici,
inserisci la frequenza che vuoi memorizzare.
Premi il pulsante SAVE (SALVA), sul display verrà visualizzato "P01".
Premi il pulsante
/ per selezionare il
numero della stazione che vuoi salvare.
Premi nuovamente il pulsante SAVE (SALVARE) per confermare.
6. Richiamare una stazione preimpostata:
Premi il pulsante
/ per richiamare
le tue stazioni preimpostate.
Operazioni CD
1. Premere il pulsante SORGENTE sul pannello o sul telecomando
per passare alla modalità CD. Premere il pulsante ESPELLERE
per aprire il cassetto del disco, inserire un disco, quindi
premere nuovamente il pulsante ESPELLERE .
2. Premere il pulsante
per mettere in pausa o riprodurre la canzone.
3. Premere il pulsante STOP/MO/ST sul telecomando per arrestare
la riproduzione, premere il pulsante
per riavviare.
4. Tenere premuto i pulsanti PREC/SUCC sul pannello
o i pulsanti / del telecomando per passare
alla canzone precedente o successiva.
5. Premere ripetutamente il pulsante
/ sul telecomando
per avanzare o riavvolgere rapidamente la riproduzione,
premere ripetutamente per riprendere la normale velocità.
6. Per selezionare direttamente una canzone speci ca, premere i pulsanti
numerici 0-9 sul telecomando.
Esempio:
Se il numero della traccia consiste di due cifre, per
esempio 25, premere il pulsante „2“, quindi il pulsante
„5“ per selezionare la venticinquesima traccia.
Se il numero della traccia è a una cifra, per esempio 9, premere
per primo „0“, quindi „9“ per selezionare la nona traccia.
7. Pulsante RIPETERE:
Mentre si è in modalità riproduzione, premere il pulsante
RIPETERE per selezionare la modalità ripeti.
Per i CD e i CD-R, premere il pulsante RIPETERE per
ripetere le canzoni attualmente riprodotte.
Premere una volta per ripetere la canzone corrente.
Premere nuovamente per ripetere tutte le tracce.
Premere una terza volta per annullare.
8. Premere il pulsante SHUFFLE sul telecomando per riprodurre il
disco in ordine casuale. Premere nuovamente per riprendere.
9. Puoi impostare il disco riprodotto in un ordine programmato:
Premere il pulsante STOP/MO/ST sul telecomando
per arrestare la riproduzione.
Premere il pulsante PROGRAMMA sul
telecomando. Lo schermo mostra: P01.
Premere i pulsanti numerici sul telecomando per
selezionare le tracce da programmare.
Premere i pulsanti
/ sul telecomando
per saltare le tracce del programma.
Premi il pulsante PROGRAMMA sul telecomando per confermare.
Per iniziare l'ordine programmato, premi il pulsante
.
Per annullare la sequenza del programma, premere
due volte il pulsante STOP/MO/ST.
Nota:
I fornati MP3 e WAV sono supportati.
I formati non supportati sono saltati. Per esempio, i documenti Word
(.doc) o le MP3 con estensione .dlf sono ignorati e non sono riprodotti.
Usare il Bluetooth
Il sistema Micro è dotato di funzionalità Bluetooth ed è in grado di ricevere
un segnale entro 7 metri. Per accoppiare il sistema Micro con un dispositivo
Bluetooth:
1. Premere ripetutamente il pulsante SORGENTE per passare
alla modalità Bluetooth, viene visualizzato il messaggio
“bt“ e lampeggia per qualche istante sul display.
2. Attivare il dispositivo Bluetooth e selezionare la modalità di ricerca.
3. Selezionare “SHARP XL-B510” dalla lista di ricerca e connettersi.
4. Digitare “0000” come password, se richiesto.
5. Quando i dispositivi sono connessi, verrà emesso un segnale
di conferma. “bt” smette di lampeggiare nel display.
6. Ora è possibile ascoltare musica dal proprio dispositivo.
7. Per spegnere la funzione Bluetooth, passare a un‘altra
funzione sul sistema Micro, oppure disattivare la
funzione sul proprio dispositivo Bluetooth.
Connettersi ad altri dispositivi audio
L‘audio consente alla tua unità di connettersi facilmente e rapidamente a
un altro lettore MP3 o ad altre sorgenti esterne.
1. Usare un cavo audio da 3,5 mm per connettere il proprio dispositivo
audio esterno alla presa AUX IN nel pannello anteriore.
2. Connettere la spina del sistema Micro all‘alimentazione elettrica.
3. Premere il pulsante SORGENTE per passare alla modalità AUX IN.
4. Potrebbe essere necessario azionare direttamente il dispositivo
audio esterno per le funzionalità di riproduzione.
5. Per volumi di livello ottimale, regolare il volume
sul dispositivo audio esterno.
Azionare l‘USB
È possibile ascoltare la musica utilizzando l‘interfaccia del dispositivo USB
dell‘unità. Connettersi a un dispositivo USB:
1. Attivare l‘unità e selezionare la modalità USB
premendo il pulsante SORGENTE.
2. Connettere il dispositivo USB alla presa di connessione
USB sul pannello anteriore dell‘unità.
3. La radio riprodurre ora canzoni salvate sul dispositivo USB.
Nota:
I fornati MP3 e WAV sono supportati.
I formati non supportati sono saltati. Per esempio, i documenti Word
(.doc) o le MP3 con estensione .dlf sono ignorati e non sono riprodotti.
Anche quando i le sono in un formato supportato
(MP3), alcuni potrebbero non essere visualizzati o
riprodotti a seconda della compatibilità.
In alcuni casi, la lettura potrebbe richiedere no a 60
secondi, ma non si tratta di un malfunzionamento.
A seconda della quantità di dati e della velocità multimediale, l‘unità
potrebbe richiedere più tempo per la lettura del dispositivo USB.
USB supporta una memoria massima di 64 GB.
La memoria USB deve essere formattata in FAT, FAT16 o FAT32.
Risoluzione dei problemi
Nessuna alimentazione
Ragione
• Il cavo dell‘alimentazione non è connesso alla presa su parete.

26
• La presa non è attivata
Soluzione
• Accertarsi che la spina sia connessa
• Attivare l‘alimentazione
Nessun suono da CD/AUX/RADIO
Nessun suono da input AUX
Causa
• Il volume è troppo basso
• Il volume della sorgente AUX è troppo basso
Soluzione
• Aumentare il volume
• Aumentare il volume dell‘output della sorgente AUX
Il suono è distorto
Il suono dall‘input AUX è distorto
Causa
• Il volume è troppo alto
• Il volume della sorgente AUX è troppo alto
Soluzione
• Abbassare il volume
• Abbassare il volume dell‘output della sorgente AUX
Impossibile riprodurre il CD
Causa
• Disco assente nel vassoio
• Disco non correttamente caricato
• Disco sporco
Soluzione
• Inserire un disco compatibile
• Controllare il disco caricato
• Pulire il disco
Suono statico
Causa
• Scarsa ricezione
Soluzione
• Riposizionare l‘antenna (FM)
Stazione desiderata non trovata
Causa
• Segnale debole
• Stazione non disponibile nella propria area
L‘unità si disattiva dopo 10 minuti di inattività.
Causa
• Modalità standby automatico in funzione
Soluzione
• Questa unità è progettata per passare automaticamente alla modalità
STANDBY, dopo circa 10 minuti di inattività. Premere il pulsante STANDBY
per riattivare l‘unità.
Speci che tecniche
Modello XL-B510
Segnale radio 87.5-108MHz
Alimentazione AC 220-240V~ 50Hz
Consumo energetico 28 W
Consumo energetico
StandByEstado en espera
<0,5 W
Corrente in uscita 2 x 7 W (RMS)
Impedenza 2 x 8 Ω
Risposta di frequenza 60Hz - 20KHz
Bluetooth
Versione V 2.1 + EDR
Potenza massima trasmessa <20 dbm
Bande di frequenza 2402 MHz ~ 2480 MHz
Del reproductor de CD
Formato de disco CD, CD-R, CD-RW, MP3, WMA
Telecomando
Tipo di batteria 2x AAA / 1.5V
220mm
170mm
150mm
220mm
145mm 177mm
1,75kg
KG
0,95kg
KG

FR
Importantes consignes de sécurité
ATTENTION
RISQUE D’ÉLECTROCUTION
NE PAS OUVRIR
Svp, lire ces consignes de sécurité et respecter les
avertissements suivants avant que l'appareil ne soit
actionné :
L'éclair contenu dans un triangle équilatéral est un
avertissement à l'attention de l'utilisateur sur la présence, à
l'intérieur du produit, de pièces non isolées soumises à une
« tension dangereuse », su samment élevée pour poser un
risque d'électrocution.
Le point d'exclamation contenu dans un triangle équilatéral
a pour objet d'appeler l'attention de l'utilisateur sur la
présence dans la documentation accompagnant le produit
d'instructions importantes d'utilisation et d'entretien (de
réparation).
Ce symbole signi e que le produit doit être éliminé de
manière écologique et non avec les ordures ménagères.
Tension alternative
Tension continue
Équipement de classe II
A n d’éviter un incendie,
maintenir toujours les bougies
et autres ammes nues
éloignées de ce produit.
Avertissement :
• Suivez toujours les précautions basiques de sécurité durant l'utilisation
de cet appareil, particulièrement lorsque des enfants sont présents.
• Les enfants doivent être supervisés a n de s'assurer qu'ils ne jouent pas
avec l'appareil.
• N'endommagez pas le cordon d'alimentation, ne placez pas d'objets
lourds sur celui-ci, ne l'étirez pas et ne le tordez pas. N'utilisez pas non
plus de rallonge électrique. Un cordon d'alimentation endommagé peut
être source d'incendie ou d'électrocution.
• Si le cordon d'alimentation est endommagé, il doit être remplacé par le
fabricant, un agent du service après-vente ou des personnes similaire-
ment quali ées a n d'éviter tout risque.
• Assurez-vous que l'appareil est bien branché dans une prise électrique
CA 220-240V 50Hz. Utiliser une tension plus élevée peut endommager
l'appareil voir même être cause d'incendie.
• Si votre che électrique ne rentre pas dans votre prise murale, ne forcez
pas pour la faire rentrer.
• Éteignez l'appareil avant de le débrancher de sa source électrique a n de
complètement le désactiver.
• Ne connectez ou ne déconnectez pas le cordon d'alimentation avec des
mains mouillées. Ceci peut causer une électrocution.
• Déconnectez le cordon d'alimentation si l'appareil n'est pas utilisé
pendant une période prolongée.
• Assurez-vous que la prise principale est toujours facilement accessible.
• Ce produit ne contient aucune pièce réparable par l'utilisateur. En cas de
défaut, contactez le fabricant ou le département de service après-vente
autorisé. L'exposition aux pièces internes situées à l'intérieur de l'appareil
peuvent mettre votre vie en danger. La garantie du fabricant ne couvre
pas les défauts provoqués par des réparations e ectuées par des tiers
non autorisés.
• N'utilisez pas ce produit directement après déballage. Attendez qu'il se
réchau e à la température ambiante avant de l'utiliser.
• Assurez-vous que ce produit est utilisé dans des climats modérés uni-
quement (et non tropicaux ou sous-tropicaux).
• Placez le produit sur une surface plane et stable sans vibrations.
• Assurez-vous que le produit ou ses pièces ne dépassent pas du bord du
meuble le supportant.
• Pour réduire les risques d'incendie, d'électrocution ou de dommages
à ce produit, veuillez ne pas l'exposer à la lumière directe du soleil, à la
poussière, à la pluie et à l'humidité. Ne l'exposez jamais aux éclaboussu-
res ou égouttements et ne placez pas d'objets remplis d'eau sur ou près
du produit.
• Ne placez pas d’objets remplis de liquide, comme des vases sur l'appareil.
• N’installez pas l’appareil à proximité de sources de chaleurs telles que
des radiateurs, des chau ages, des cuisinières ou d’autres appareils (y
compris des ampli cateurs) produisant de la chaleur.
• Ne placez pas de produit dans un emplacement à l'humidité élevée et
présentant une mauvaise ventilation.
• Assurez une distance minimum de 5 cm autour de l'appareil a n
d'assurer une ventilation su sante. Ne bloquez pas les entrées de
ventilation de ce produit. Assurez-vous toujours que les ouvertures de
ventilation ne sont pas recouvertes d'articles tels que journaux, nappes
de table, rideaux, etc.
• Ne laissez JAMAIS une personne, et particulièrement un enfant, faire
rentrer un objet dans les trous, fentes ou toute autre ouverture du boitier
de l'appareil, ceci pouvant causer une électrocution fatale.
• Les orages sont dangereux pour tous les appareils électriques. Si le
secteur ou le câblage aérien est frappé par la foudre, l'appareil peut être
endommagé, même s'il était éteint. Vous devez débrancher tous les
câbles et connecteurs de l'appareil avant un orage.
• Un niveau de pression acoustique excessif du casques ou des écouteurs
peut causer une perte auditive.
• Ne déplacez pas l'unité durant la lecture d'un disque. Durant la lecture,
le disque tourne très rapidement. Ne soulevez ou ne de déplacez pas
l'unité durant la lecture, ceci pouvant endommager le disque ou l'unité.
• N'augmentez pas le volume lorsque vous écoutez une section avec de
très faibles niveaux d'entrée ou aucun signal audio. Le haut-parleur
pourrait être endommagé lors de la lecture soudaine d'une section à
signal plus élevé.
Entretien
• Débranchez le câble d'alimentation de la source de courant avant de
nettoyer l'appareil.
• Utilisez un chi on doux et propre pour nettoyer l'extérieur de l'appareil.
Ne nettoyez jamais l'appareil avec des produits chimiques ou détergent.
Piles
• Observez la polarité correcte en insérant les piles.
• Ne pas exposer les piles aux températures élevées
et ne pas les placer dans des endroits où la tempéra-
ture pourrait augmenter rapidement, par exemple
près d'un feu, ou directement à la lumière solaire.
• Ne pas exposer les piles à la chaleur rayonnan-
te excessive, ne pas les jeter au feu, ne pas les
démonter et ne pas essayer de recharger les piles
non-rechargeables. Elles peuvent fuir ou exploser.
• Ne jamais utiliser ensemble des piles di érentes ou mélanger des piles
neuves et les usagées.
• Lorsque la télécommande n'est pas utilisée pendant une période prolon-
gée (plus d'un mois), retirez la pile de la télécommande pour éviter tout
risque de fuite.
• Si les piles fuient, nettoyez les fuites à l'intérieur du compartiment à piles
et remplacez les piles par des piles neuves.
Cd

28
• N'utilisez pas de piles autres que celles spéci ées.
N'ingérez pas la pile, risque de brûlure chimique
• Si la pile est ingérée, elle peut causer de sévères brûlures internes en
moins de 2 heures voire même la mort. Gardez les piles neuves et
usagées hors de la portée des enfants. Si le compartiment de la pile ne
ferme pas bien, arrêtez d'utiliser le produit et gardez-le hors de la portée
des enfants. Si vous pensez que des piles ont pu être avalées ou placées
à l'intérieur d'une partie quelconque du corps, consultez immédiate-
ment un médecin.
Mise au rebut de cet appareil et des piles
• Ne vous débarrassez pas de ce produit ou des piles avec
les déchets ménagers non triés. Renvoyez-la à un point de
ramassage et de recyclage WEEE (déchets d'équipements
électriques et électroniques) selon la législation en
vigueur. Agir ainsi, aide à conserver les ressources et à
• protéger l'environnement.
• La plupart des pays de l'Union Européenne règlent par la loi la mise au
rebut des batteries. Entrer en contact avec le détaillant ou les autorités
locales pour plus d'information.
• Le symbole ci-dessus apparait sur l'équipement électrique
et électronique et les piles (ou l'emballage) pour rappeler
ce fait à l'utilisateur. Si « Hg » ou « Pb » apparait sous le
symbole, ceci indique que la pile contient des traces de
mercure (Hg) ou de plomb (Pb), respectivement.
• Les utilisateur doivent utiliser les centres de ramassage
d'équipements et de piles existants.
ATTENTION:
PRODUIT LASER CLASSE 1
• Les appareils avec lecteur CD intégré
sont marqués avec cette étiquette
d'avertissement.
• Cette étiquette d’avertissement est
située sur le panneau arrière de l’unité.
• CE PRODUIT EST CLASSÉ COMME PRODUIT LASER CLASSE 1. L’UNITÉ
UTILISE UN FAISCEAU LASER VISIBLE QUI PEUT CAUSER UNE EXPOSITION
À DES RADIATIONS DANGEREUSES SI DIRIGÉ. ASSUREZ-VOUS D’UTILISER
LE LECTEUR CORRECTEMENT TEL QU’INDIQUÉ.
• LORSQUE CETTE UNITÉ EST BRANCHÉE À UNE PRISE DE COURANT MU-
RALE, NE PLACEZ PAS VOS YEUX PRÈS DE L’OUVERTURE POUR REGARDER
À L’INTÉRIEUR DE L’UNITÉ.
• L’UTILISATION DE COMMANDES OU DE RÉGLAGES OU L’EXÉCUTION DE
PROCÉDURES AUTRES QUE CELLES STIPULÉES DANS CE DOCUMENT
PEUT EXPOSER L‘UTILISATEUR À DES RADIATIONS DANGEREUSES.
• N’OUVREZ PAS L’UNITÉ ET NE LA RÉPAREZ PAS PAR VOUS-MÊME.
RÉFÉREZ-VOUS À DU PERSONNEL QUALIFIÉ POUR TOUS TRAVAUX
D’ENTRETIEN.
Déclaration CE :
• Par la présente, UMC Poland Sp. z o.o. déclare que cet appareil audio
est conforme aux principales exigences et autres clauses pertinentes
de la Directive RED 2014/53/EU. Le texte intégral de la déclaration de
conformité de l'UE est disponible en cliquant sur le lien suivant: http://
www.sharp.eu/av/documents-of-con rmity
Marques déposées :
La marque et les logos Bluetooth® sont des marques déposées de
Bluetooth SIG., Inc.
CLASS 1
LASER PRODUCT

FR
Contenu de la boîte
1x unité principale
2x haut-parleurs
1x Télécommande
2x piles AA
1x Manuel d‘utilisation
1x Guide de démarrage rapide
1x Cordon d‘alimentation UE
Panneaux et commandes
Panneau avant
SOURCE
PLAY/PAUSE
EJECT
PREV NEXT
1
2
5
3
4
AUX IN
STANDBY
SOURCE PREV NEXT EJECT
USB
6
7
8
9
12
11
10
PLAY/PAUSE
1. Touche SOURCE: Appuyez pour sélectionner les modes.
2. Touche PLAY/PAUSE : Appuyez pour mettre
en pause ou lire la musique.
3. Touche PREVIOUS: Appuyez pour aller au
morceau ou à la station qui précède.
4. Touche NEXT: Appuyez pour aller au morceau ou à la station qui suit.
5. Touche EJECT: Appuyez pour sortir le tiroir du disque.
6. Voyant d‘alimentation: Indique l‘état.
7. Touche STANDBY: Appuyez pour régler le
mode veille ou allumer l‘appareil.
8. Capteur télécommande: Pointez la télécommande
vers le capteur à moins de 7mètres.
9. Écran: A che les informations de la station.
10. Bouton VOLUME+/- : Tournez-le pour régler le volume.
11. Port USB: Permet de connecter une clé USB.
12. Prise d‘entrée audio: Permet de connecter
des sources audio externes.
Panneau arrière
14
15
13
Antenne
13. FM: Pour recevoir le signal FM.
14. Connecteurs de haut-parleur: Connectez
les haut-parleurs à l‘unité principale.
15. Prise d‘alimentation Branchez le cordon
d‘alimentation à l‘alimentation.
Télécommande
1.
EJECT
SHUFFLE
PROGRAM
LOUD
DSP
REPEAT
MO/ST
BASS
FREQ
SAVE
15
13
17
16
10
11
20
19
18
12
14
21
22
1
2
3
4
9
5
6
7
8
_
+
STANDBY: Appuyez pour allumer l'appareil ou le mettre en veille.
2. REPEAT: Appuyez pour répéter le morceau.
3. PLAY/PAUSE : Démarrer / Interrompre la lecture.
4. FAST REWIND: Appuyez pour faire un retour
rapide sur la piste en cours de lecture.
5. TREBLE: Appuyez sur ce bouton pour régler les aigus, ou
les touches + et - pour augmenter/réduire les aigus.
6. VOLUME - : Appuyez pour réduire le volume.
7. PROGRAM: Utilisez pour programmer l'ordre de lecture.
8. SHUFFLE: Appuyez pour lire la musique en ordre aléatoire.
9. NUMÉROS (0-9): Allez à l'emplacement de stockage,
saisissez une fréquence ou sélectionnez une piste
10. EJECT: Appuyez pour sortir le tiroir du disque
11. SOURCE: Sélectionnez le mode de fonctionnement:
CD, FM, USB, Bluetooth® (BT), AUX
12. STOP/MO/ST: Arrêtez la lecture, commutez
entre mono et stéréo en mode FM.
13. PREVIOUS: Appuyez sur cette touche pour
passer à la piste précédente.
14. FAST FORWARD: Appuyez pour faire une avance
rapide sur la piste en cours de lecture.
15. NEXT: Allez à la piste/station suivante.
16. BASS: Appuyez sur ce bouton pour régler les graves, ou
les touches + et - pour augmenter/réduire les graves.
17. VOLUME+: Appuyez pour augmenter le volume.
18. SOURDINE: Appuyez une fois pour couper le son, appuyez de
nouveau pour le rétablir. Vous pouvez également désactiver
le son en appuyant sur les boutons de contrôle du volume.
19. DSP: Appuyez pour sélectionner l'égaliseur sonore.
20. LOUD: Appuyez sur LOUD pour augmenter le
niveau des graves à faible volume.
21. SAVE: Appuyez sur cette touche pour
enregistrer vos stations préférées.

30
22. FREQ: Fréquence, en mode FM, appuyez sur cette
touche pour entrer votre fréquence préférée.
Insérer ou remplacer les piles de la télécommande
1. Appuyez sur le loquet du couvercle des piles dans la direction
de la èche en relief sur la face arrière de la télécommande.
2. Ouvrez le couvercle des piles en poussant le loquet.
3. Placez deux piles en respectant la polarité + -, comme
illustré. Lors du remplacement des piles, utilisez
uniquement le même type que les piles fournies.
4. Replacez le couvercle des piles et xez-le.
Préparation avant utilisation
1.
ANTENNA
1
2
3
AUDIO IN
SOURCE
PLAY/PAUSE
PREV NEXT
EJECT
AUX IN
4
5
6
7
USB
Placez un haut-parleur de chaque côté de l‘unité principale, de
préférence à la même hauteur et avec au moins 150mm d‘espace
entre chaque haut-parleur et l‘unité principale.
Connectez les prises haut-parleur au dos de l‘appareil. Veillez à faire
correspondre le haut-parleur placé sur la GAUCHE à la sortie LEFT au
dos de l‘appareil. Le haut-parleur placé à DROITE est relié à la sortie
RIGHT.
Le câble ROUGE GAUCHE se connecte à la borne GAUCHE ROUGE, et le
câble ROUGE DROIT se connecte à la borne ROUGE DROITE. Les deux
câbles NOIRS se connectent aux bornes NOIRES correspondantes.
2. Assurez-vous que la tension indiquée sur la plaque signalétique,
qui se trouve sur le panneau arrière, est identique à la tension de
votre région. Choisissez un cordon d‘alimentation adapté, et insérez
l‘extrémité du cordon dans une prise d‘alimentation sur le panneau
arrière de l‘appareil. Ensuite, branchez l‘autre côté sur la prise murale.
3. Appuyez sur la touche STANDBYsur l‘appareil pour allumer l‘appareil.
Allongez l'ANTENNE pour obtenir la meilleure réception possible.
Appuyez sur le bouton SOURCE pour accéder au mode FM. Pour
utiliser la radio en mode FM, suivez les instructions du chapitre
FONCTIONNEMENT RADIO FM du Manuel de l'utilisateur.
4. Appuyez sur la touche SOURCE pour entrer en mode CD. Appuyez
sur la touche EJECT pour ouvrir le tiroir du disque et insérez
un disque. Appuyez à nouveau sur EJECT pour le refermer.
La lecture du CD commencera avec la première piste.
5. Appuyez sur la touche SOURCE pour entrer en mode Aux In (audio).
Connectez votre appareil audio à la prise AUX IN via un câble auxiliaire
de 3,5mm. Contrôlez la lecture via votre appareil audio connecté.
6. Appuyez sur la touche SOURCE pour entrer en mode Bluetooth.
Activez l‘appareil compatible Bluetooth et sélectionnez «SHARP
XL-B510». Sélectionnez la piste de votre choix et appuyez pour la lire.
7. Appuyez sur la touche SOURCE pour entrer en mode USB. Branchez
l‘appareil USB sur le port USB sur le panneau avant de l‘appareil,
l‘appareil USB sera lu automatiquement et la lecture commencera.
Fonctions de base
Changement de mode
Pour basculer entre les modes: CD, FM, Bluetooth, USB et AUX IN. Appuyez
sur la touche SOURCE de l‘appareil ou de la télécommande pour changer
de mode.
Contrôle du volume
1. Pivotez le bouton VOLUME dans le sens horaire ou appuyez
sur la touche «+» pour augmenter le volume.
2. Pivotez le bouton VOLUME dans le sens horaire ou
appuyez sur la touche «-» pour réduire le volume.
E ets DSP
Appuyez plusieurs fois sur le bouton DSP pour alterner entre di érents
préréglages d’égaliseur pour modi er le son. Choisissez entre CLASSIC,
ROCK, POP, JAZZ, DANCE, LIVE et O .
Fonction de réglage des basses
Cette fonction augmente le niveau des basses à faible volume. Appuyez
sur la touche LOUD de la télécommande pour activer l’e et. Appuyez à
nouveau pour le désactiver.
Fonction muet
Appuyez sur la touche à tout moment pour couper la sortie audio.
Appuyez à nouveau pour rétablir le son.
Commandes de tonalité
Réglez les commandes de tonalité des graves et des aigus si nécessaire.
Appuyez sur la touche BASS ou TREBLE de la télécommande directement
pour sélectionner les basses ou les aigus, puis utilisez les touches «+» et
«-» pour ajuster.
Mode veille
Appuyez sur la touche STANDBY sur l‘appareil ou la télécommande pour
mettre le système en mode veille.
Pour reprendre le fonctionnement normal, appuyez à nouveau sur ce
bouton.
REMARQUE : Cet appareil est conçu pour entrer en mode veille
automatiquement après 10 minutes (environ) d’inactivité. Appuyez sur la
touche STANDBY pour réveiller l’appareil.
REMARQUE : Lorsque vous sortez l‘appareil de veille, le dernier mode utilisé
reprendra.
Fonctionnement radio FM
1. Appuyez sur la touche SOURCE sur le panneau ou la télécommande
pour entrer en mode FM. (Fréquence FM: 87.50-108.00MHz)
2. Appuyez sur les touches
/ de la télécommande pour réduire
ou augmenter la fréquence par incréments de 0,05MHz.

FR
3. Appuyez de façon prolongée sur les touches PREV/NEXT
du panneau ou les touches
/ de la télécommande pour
parcourir rapidement la bande de fréquences. La recherche
s‘arrêtera une fois qu‘une station aura été trouvée.
4. Appuyez de façon prolongée sur la touche
pour balayer
la gamme de fréquences rapidement; il mémorisera
toutes les stations trouvées automatiquement.
5. ENREGISTRER une station:
Vous pouvez mémoriser jusqu'à 40 stations FM en mémoire.
Appuyez sur la touche FREQ puis, en utilisant les touches
numériques, entrez la fréquence que vous souhaitez mémoriser.
Appuyez sur la touche SAVE, «P01» s'a chera sur l'écran
Appuyez sur la touche
/ pour sélectionner le numéro
de la station que vous souhaitez enregistrer.
Appuyez sur la touche SAVE à nouveau pour con rmer.
6. Rappel d’une station préréglée:
Appuyez sur la touche
/ pour
rappeler vos stations mémorisées.
Opérations CD
1. Appuyez sur la touche SOURCE sur le panneau ou la télécommande
pour entrer en mode CD. Appuyez sur la touche EJECT pour sortir le
tiroir du disque, placez un CD, puis appuyez à nouveau sur EJECT.
2. Appuyez sur la touche
pour mettre en pause ou lire le morceau.
3. Appuyez sur la touche STOP/MO/ST de la télécommande
pour arrêter la lecture, et sur
pour la reprendre.
4. Appuyez sur les touches PREV/NEXT de l‘appareil ou
/ de
la télécommande pour aller à la chanson précédente ou suivante.
5. Appuyez sur les touches
/ de la télécommande pour
une avance rapide ou un retour rapide de la lecture. Appuyez
plusieurs fois pour revenir à la vitesse normale.
6. Pour sélectionner directement un morceau spéci que, utilisez les
touches numériques 0-9 de la télécommande.
Exemple:
Si le numéro de piste se compose de deux chi res, par exemple 25,
appuyez d‘abord sur 2 puis sur 5 pour sélectionner la 25e piste.
Si le numéro de piste est un chi re unique, par exemple 9,
appuyez d‘abord sur 0, puis sur 9 pour aller à la 9e piste.
7. Touche REPEAT:
En mode lecture, appuyez sur le bouton REPEAT
pour régler le mode de répétition.
Pour les CD et CD-R, appuyez sur la touche REPEAT
pour répéter la lecture des morceaux.
Appuyez une fois pour répéter le morceau en cours.
Appuyez à nouveau pour répéter toutes les pistes.
Appuyez une troisième fois pour annuler.
8. Appuyez sur la touche SHUFFLE sur la télécommande pour lire le
disque dans un ordre aléatoire. Appuyez à nouveau pour reprendre.
9. Vous pouvez régler le disque pour être lu dans un ordre programmé:
Appuyez sur la touche STOP/MO/ST de la
télécommande pour arrêter la lecture.
Appuyez sur la touche PROGRAM de la
télécommande. L‘écran a che: P01.
Appuyez sur les touches numériques de la télécommande
pour sélectionner les pistes à programmer.
Appuyez sur les touches
/ de la télécommande
pour sauter entre les pistes du programme.
Pressez la touche PROGRAM sur la télécommande pour con rmer.
Pour commencer l'ordre programmé, appuyez sur la touche
.
Pour annuler la séquence du programme, appuyez
deux fois sur la touche STOP/MO/ST.
Remarques :
Les formats MP3 et WAV sont pris en charge.
La lecture des chiers au format non compatible sera
sautée. Par exemple. les documents Word (.doc) ou
chiers MP3 avec extension .dlf ne seront pas lus.
Fonction Bluetooth
Le microsystème dispose de fonctionnalités Bluetooth et peut recevoir un
signal à moins de 7 mètres. Pour apparier le microsystème avec un appareil
Bluetooth:
1. Appuyez plusieurs fois sur la touche SOURCE pour entrer en mode
Bluetooth. Le message «bt» s‘a che et clignote sur l‘écran.
2. Activez votre appareil Bluetooth et sélectionnez le mode de recherche.
3. Sélectionnez «SHARP XL-B510» dans la liste
de recherche pour vous connecter.
4. Saisissez «0000» si un mot de passe vous est demandé.
5. Lorsque les appareils seront connectés entre eux, un son de
con rmation se fera entendre. «bt» arrêtera de clignoter à l'écran.
6. Vous pouvez maintenant pro ter de la musique de votre appareil.
7. Pour désactiver la fonction Bluetooth, basculez sur
une autre fonction du microsystème, ou désactivez
la fonction sur votre appareil Bluetooth.
Connecter d‘autres appareils audio
Votre appareil vous permet de vous connecter facilement et rapidement à
un lecteur MP3 ou d‘autres sources externes.
1. Utilisez un câble audio 3,5mm pour connecter votre appareil
audio externe à la prise AUX IN du panneau avant.
2. Connectez la che d‘alimentation du microsystème à une prise secteur.
3. Appuyez sur la touche SOURCE pour basculer sur le mode AUX IN.
4. Vous devrez peut-être utiliser l‘appareil audio externe
directement pour les fonctions de lecture.
5. Pour des niveaux de volume optimaux, réglez
le volume sur l‘appareil audio externe.
Fonctionnement USB
Il est possible d‘écouter de la musique avec l‘interface d‘appareil USB de
l‘appareil. Connexion d‘un appareil USB:
1. Allumez l‘appareil et sélectionnez le mode USB
en appuyant sur la touche SOURCE.
2. Connectez l‘appareil USB à la prise de connexion
USB sur le panneau avant de l‘appareil.
3. La radio lit maintenant les morceaux enregistrés sur l‘appareil USB.
Remarques :
Les formats MP3 et WAV sont pris en charge.
La lecture des chiers au format non compatible sera
sautée. Par exemple. les documents Word (.doc) ou
chiers MP3 avec extension .dlf ne seront pas lus.
Même lorsque les chiers sont dans un format pris en
charge (MP3), certains pourraient ne pas être compatibles
et donc ne pas être lus ou a chés correctement.
Dans certains cas, la lecture peut prendre jusqu‘à
60secondes. Ce n‘est pas un dysfonctionnement.
En fonction de la quantité de données et de la vitesse du support,
la lecture de l‘appareil USB peut prendre un certain temps.
La fonction USB n‘est pas compatible avec les supports de plus de 64GB.
Le périphérique de stockage USB doit être
formaté en FAT, FAT16 ou FAT32.

32
Dépannage
Pas d‘alimentation
Cause
• Le câble d‘alimentation n‘est pas branché à une prise murale
• La prise murale n‘est pas active
Solution
• Assurez-vous que la che est branchée
• Allumez l‘appareil
Aucun son en mode CD/AUX/RADIO
Aucun son sur l‘entrée AUX
Cause
• Le volume est trop faible
• Le volume de la source AUX est trop faible
Solution
• Augmentez le volume
• Augmentez le volume de sortie de la source AUX
Le son est déformé
Le son est déformé pour l‘entrée AUX
Cause
• Le volume est trop élevé
• Le volume de la source AUX est trop élevé
Solution
• Réduisez le volume
• Réduisez le volume de sortie de la source AUX
Impossible de lire un CD
Cause
• Aucun disque n‘a été inséré dans le tiroir
• Le disque n‘a pas été chargé correctement
• Le disque est sale
Solution
• Insérez un disque compatible
• Véri ez que le disque a été chargé
• Nettoyez le disque
Son statique
Cause
• Mauvaise réception
Solution
• Placez l‘antenne (FM) ailleurs
Station souhaitée introuvable
Cause
• Signal faible
• Station non disponible dans votre région
L‘appareil s‘éteint après 10 minutes d‘inactivité
Cause
• Le mode veille automatique est activé
Solution
• Cet appareil est conçu pour entrer en mode veille automatiquement
après 10 minutes d’inactivité. Appuyez sur la touche STANDBYpour
réveiller l‘appareil.
Spéci cation technique
Modèle XL-B510
Signal radio 87.5-108MHz
Alimentation électrique AC 220-240V~ 50Hz
Consommation électrique 28 W
Consommation électrique
De veille
<0,5 W
Puissance de sortie 2 x 7 W (RMS)
Impédance 2 x 8 Ω
Réponse en fréquence 60Hz - 20KHz
Bluetooth
Version V 2.1 + EDR
Puissance maximale transmise <20 dbm
Bande de fréquences 2402 MHz ~ 2480 MHz
Lettore CD
Formato disco CD, CD-R, CD-RW, MP3, WMA
Télécommande
Type de pile 2x AAA / 1.5V
220mm
170mm
150mm
220mm
145mm 177mm
1,75kg
KG
0,95kg
KG

PL
Ważne środki ostrożności
UWAGA
RYZYKO PORAŻENIA PRĄDEM
ELEKTRYCZNYM NIE OTWIERAĆ
Proszę zapoznać się zniniejszymi instrukcjami
bezpieczeństwa iwziąć pod uwagę poniższe
ostrzeżenia zanim urządzenie zostanie
uruchomione:
Ikona pioruna z grotem wewnątrz trójkąta równobocznego
ostrzega użytkownika przed nieizolowanym „niebezpiecznym
napięciem” w obudowie produktu, które może być na tyle
wysokie, że stwarza ryzyko porażenia prądem.
Wykrzyknik wewnątrz trójkąta równobocznego powiadamia
użytkownika o ważnych wskazaniach dotyczących obsługi
i konserwacji (serwisowania) zawartych w instrukcji obsługi
urządzenia.
Ten symbol oznacza, że produkt należy usuwać w sposób
przyjazny dla środowiska, a nie z innymi odpadkami
gospodarczymi.
napięcie zmienne
napięcie stałe
urządzenie klasy II
Żeby zapobiec pożarowi,
zawsze trzymaj świece i inne
źródła otwartego ognia z
daleka od urządzenia.
Ostrzeżenie:
• Zawsze zachowuj podstawowe środki ostrożności podczas korzystania z
urządzenia, zwłaszcza w obecności dzieci.
• Nadzoruj dzieci, by nie bawiły się urządzeniem.
• Uważaj, by nie uszkodzić kabla zasilającego: nie stawiaj na nim ciężkich
przedmiotów, nie rozciągaj go ani nie wyginaj. Nie podłączaj urządzenia
do przedłużaczy. Uszkodzenie kabla zasilającego może spowodować
pożar lub porażenie prądem.
• Jeśli przewód zasilający zostanie uszkodzony, należy go wymienić u pro-
ducenta, w serwisie lub u innej wykwali kowanej osoby, żeby ochronić
się przed zagrożeniem.
• Dopilnuj, by urządzenie zostało podłączone do gniazda zasilania 220-
240V~ 50Hz. Używanie wyższego napięcia może powodować awarie, a
nawet zapalenie się urządzenia.
• Jeśli wtyczka nie pasuje do twojego gniazdka, nie wciskaj jej na siłę.
• Wyłącz urządzenie przed odłączeniem go od prądu, by całkowicie je
wyłączyć.
• Nie odłączaj ani nie podłączaj kabla zasilającego mokrymi rękami. Może
to spowodować porażenie prądem.
• Jeśli nie używasz urządzenia przez dłuższy czas, odłącz przewód od
prądu.
• Dopilnuj, by wtyczka była zawsze łatwo dostępna.
• Niniejszy produkt nie posiada żadnych części, które może naprawiać
użytkownik. W przypadku wystąpienia usterki skontaktuj się z producen-
tem lub autoryzowanym serwisem. Odsłanianie wewnętrznych części
urządzenia może stanowić zagrożenie dla życia. Gwarancja nie obejmuje
usterek wywołanych naprawami wykonywanymi przez nieupoważnione
strony trzecie.
• Nie używaj produktu tuż po rozpakowaniu. Przed użyciem należy
odczekać, aż urządzenie nagrzeje się do temperatury pokojowej.
• Urządzenia można używać tylko w umiarkowanym klimacie (nie w
klimacie zwrotnikowym i podzwrotnikowym).
• Umieść urządzenie na płaskiej, stabilnej powierzchni, która nie jest
narażona na wibracje.
• Dopilnuj, by urządzenie nie wystawało za krawędź mebla, na którym stoi.
• Aby zmniejszyć ryzyko pożaru, porażenia prądem i uszkodzenia pro-
duktu, nie wystawiaj go na bezpośrednie działanie światła słonecznego,
kurzu, deszczu czy wilgoci. Nigdy nie narażaj urządzenia na zamoczenie
lub zachlapanie i nie stawiaj na nim ani w jego pobliżu zbiorników
wypełnionych cieczą.
• Nie stawiaj żadnych przedmiotów ani zbiorników z płynami, takich jak
wazony itp., na urządzeniu.
• Nie umieszczaj urządzenia w pobliżu źródeł ciepła, takich jak grzejniki,
nawiewy, piece czy inne urządzenia (w tym wzmacniacze) emitujące
ciepło.
• Nie umieszczaj produktu tam, gdzie wilgotność jest wysoka, a wentylacja
słaba.
• Dopilnuj, by zostawić 5 cm wolnego miejsca wokół urządzenia dla
zapewnienia odpowiedniej wentylacji. Nie zakrywaj otworów wentyla-
cyjnych urządzenia. Upewnij się, że otwory wentylacyjne nie są zakryte
przedmiotami, takimi jak gazety, ścierki, zasłony itp.
• NIGDY nie pozwalaj nikomu, zwłaszcza dzieciom, wpychać czegokolwiek
w otwory, gniazda i inne szczeliny w obudowie urządzenia: może to
skutkować śmiertelnym porażeniem prądem.
• Burze stanowią niebezpieczeństwo dla wszystkich urządzeń elekt-
rycznych. Jeśli przewód zasilający lub przewody antenowe zostaną
tra one piorunem, urządzenie może zostać uszkodzone, nawet gdy
jest wyłączone. Przed nadejściem burzy należy odłączyć od urządzenia
wszystkie przewody i złącza.
• Słuchanie zbyt głośnych dźwięków przez słuchawki douszne i nauszne
może powodować utratę słuchu.
• Nie wolno przesuwać ani przenosić urządzenia podczas odtwarzania
płyt. Podczas odtwarzania płyta obraca się z wysoką prędkością. Nie
należy unosić ani przesuwać urządzenia podczas odtwarzania, ponieważ
mogłoby to doprowadzić do uszkodzenia płyty lub urządzenia.
• Nie zwiększaj głośności podczas słuchania fragmentów z bardzo niskimi
dźwiękami lub bez dźwięku. Jeśli to zrobisz, głośnik może ulec awarii,
gdy nagle zaczną być odtwarzane wysokie dźwięki.
Konserwacja
• Przed czyszczeniem urządzenia odłącz przewód zasilający od prądu.
• Do czyszczenia zewnętrznej części obudowy użyj miękkiej, czystej
ściereczki. Nigdy nie czyść obudowy chemikaliami ani detergentami.
Baterie
• Zachowaj prawidłową polaryzację, gdy montujesz
baterie.
• Nie wystawiaj baterii na działanie wysokich tempe-
ratur i nie umieszczaj ich w miejscach, których tem-
peratura może gwałtownie wzrosnąć, np. w pobliżu
ognia lub w bezpośrednim świetle słonecznym.
• Nie wystawiaj baterii na działanie nadmiernego
ciepła, nie wrzucaj ich do ognia, nie rozmontowuj
i nie próbuj ładować zwykłych baterii. Mogłyby
wyciec lub eksplodować.
• Nigdy nie stosuj jednocześnie różnych baterii i nie łącz baterii nowych
ze starymi.
• Jeśli wiesz, że pilot nie będzie używany przez dłuższy czas (ponad
miesiąc), wyjmij z niego baterie, by nie wyciekły.
• Jeśli baterie wyciekną, wytrzyj komorę baterii i zastąp baterie nowymi.
• Nie używaj innych baterii niż wskazane w instrukcji.
Cd

34
• Nie wkładaj baterii do ust - stwarza to ryzyko poparzenia chemi-
cznego.
• Jeśli bateria zostanie połknięta, może spowodować poważne poparzenia
wewnętrzne w zaledwie dwie godziny, czego rezultatem może być
śmierć. Trzymaj nowe i stare baterie poza zasięgiemi dzieci. Jeśli komora
baterii nie zamyka się prawidłowo, przestań używać pilota i trzymaj
go poza zasięgiem dzieci. Jeśli podejrzewasz połknięcie baterii lub
umieszczenie jej wewnątrz jakiejkolwiek części ciała, natychmiast zgłoś
się do lekarza.
Usuwanie produktu i baterii
• Nie wyrzucaj niniejszego urządzenia do niesortowanych
śmieci z gospodarstwa domowego. Oddaj je do wyznac-
zonego punktu odbioru w celu przetworzenia zgodnie
z przepisami WEEE. W ten sposób oszczędzasz zasoby
naturalne i chronisz środowisko.
• Większość państw UE posiada przepisy regulujące
usuwanie baterii. Więcej informacji możesz uzyskać od
sprzedawcy lub lokalnych władz.
• Powyższy symbol umieszczany jest na urządzeniach
elektrycznych i elektronicznych oraz bateriach (lub na
ich opakowaniach), by przypomnieć użytkownikowi o tej
zasadzie. Jeśli pod symbolem pojawia się oznaczenie „Hg”
lub „Pb”, oznacza to, że baterie zawierają śladowe ilości rtęci (Hg) lub
ołowiu (PB).
• Użytkownicy powinni zgłaszać się do wyznaczonych punktów odbioru
zużytych urządzeń i baterii.
OSTRZEŻENIE:
• PRODUKT LASEROWY KLASY 1 LASER
• Urządzenia z wbudowanym odtwarzac-
zem CD są oznaczone taką etykietą.
• Ta etykieta z ostrzeżeniem jest umieszc-
zona na panelu tylnym urządzenia
• TEN PRODUKT JEST URZĄDZENIEM
LASEROWYM KLASY 1. TO URZĄDZENIE WYKORZYSTUJE WIDZIALNĄ
WIĄZKĘ LASEROWĄ, KTÓRA MOŻE BYĆ NIEBEZPIECZNA W PRZYPADKU
SKIEROWANIA BEZPOŚREDNIEGO. ODTWARZACZ NALEŻY OBSŁUGIWAĆ
PRAWIDŁOWO, ZGODNIE Z INSTRUKCJAMI.
• GDY URZĄDZENIE JEST PODŁĄCZONE DO SIECI ELEKTRYCZNEJ, NIE
NALEŻY ZBLIŻAĆ OCZU DO OTWORÓW W OBUDOWIE, ŻEBY ZAJRZEĆ
DO JEJ WNĘTRZA.
• KORZYSTANIE Z ELEMENTÓW STERUJĄCYCH LUB WYKONYWANIE
CZYNNOŚCI INNYCH NIŻ OPISANO W NINIEJSZEJ INSTRUKCJI MOŻE
NARAZIĆ NA NIEBEZPIECZNE PROMIENIOWANIE.
• NIE WOLNO DEMONTOWAĆ OBUDOWY, ANI SAMODZIELNIE NAPRAWIAĆ
URZĄDZENIA. NAPRAWY NALEŻY ZLECAĆ WYKWALIFIKOWANYM
PRACOWNIKOM SERWISU.
Deklaracja zgodności:
• UMC Poland Sp. z o.o. niniejszym oświadcza, że to urządzenie spełnia
zasadnicze wymagania oraz inne odnośne normy określone w dyrekty-
wie RED 2014/53/UE. Pełen tekst deklaracji zgodności WE jest dostępny
pod następującym linkiem: http://www.sharp.eu/av/documents-of-
con rmity
Znaki handlowe:
Nazwa i logo Bluetooth® są zarejestrowanymi znakami handlowymi rmy
Bluetooth SIG,. Inc.
CLASS 1
LASER PRODUCT

PL
Zawartość opakowania
1x Urządzenie główne
2x głośnik
1x pilot zdalnego sterowania
2x bateria AAA
1x instrukcja obsługi
1x skrócony opis obsługi
1x przewód zasilający dla UE
Panele i przyciski
Przedni panel
SOURCE
PLAY/PAUSE
EJECT
PREV NEXT
1
2
5
3
4
AUX IN
STANDBY
SOURCE PREV NEXT EJECT
USB
6
7
8
9
12
11
10
PLAY/PAUSE
1. Przycisk źródła SOURCE: Naciśnij, by wybrać tryb.
2. Przycisk odtwarzania PLAY/PAUSE: Naciśnij,
by zatrzymać lub włączyć odtwarzanie.
3. Przycisk PREVIOUS: Naciśnij, by przełączyć
na poprzednią piosenkę/stację.
4. Przycisk NEXT: Naciśnij, by przełączyć na następną piosenkę/stację.
5. Przycisk EJECT: Naciśnij, by wysunąć napęd na płyty.
6. Wskaźnik zasilania: Pokazuje status urządzenia.
7. Przycisk STANDBY: Naciśnij, by włączyć tryb
czuwania lub włączyć urządzenie.
8. Czujnik zdalnego sterowania: Skieruj pilot na
czujnik z odległości maksymalnie 7 metrów.
9. Ekran wyświetlacza: Wyświetla informacje o stacji.
10. Pokrętło VOLUME+/-: Kręć, by dostosować poziom głośności.
11. Port USB: Służy do podłączania pendrive‘a.
12. Wejście audio: Służy do podłączania zewnętrznych źródeł audio.
Tylny panel
14
15
13
13. Antena FM: Odbiera sygnał FM.
14. Złącza głośników: Pozwalają podłączyć
głośniki do urządzenia głównego.
15. Gniazdo zasilania Podłącz kabel zasilający.
Pilot zdalnego sterowania
1.
EJECT
SHUFFLE
PROGRAM
LOUD
DSP
REPEAT
MO/ST
BASS
FREQ
SAVE
15
13
17
16
10
11
20
19
18
12
14
21
22
1
2
3
4
9
5
6
7
8
_
+
STANDBY: Naciśnij ten przycisk, by włączyć urządzenie lub przełączyć
je w tryb czuwania.
2. REPEAT: Naciśnij ten przycisk, by powtarzać piosenkę.
3. ODTWARZANIE/PAUZA: rozpoczęcie
odtwarzania/pauza w odtwarzaniu.
4. FAST REWIND: Naciśnij ten przycisk, by szybko
przewinąć odtwarzany utwór.
5. TREBLE: Naciśnij ten przycisk, by dostosować poziom wysokich
tonów. Używaj + lub -, by zwiększyć lub zmniejszyć ich intensywność.
6. VOLUME - : Naciśnij ten przycisk, by zmniejszyć poziom głośności.
7. PROGRAM: Użyj tego przycisku, by ustalić kolejność odtwarzania.
8. SHUFFLE: Naciśnij ten przycisk, by odtwarzać utwory losowo.
9. Przyciski numeryczne (0-9): Przejdź do pamięci,
wprowadź częstotliwość, wybierz piosenkę.
10. EJECT: Naciśnij, by wysunąć napęd na płyty.
11. SOURCE: Wybierz tryb odtwarzania: CD, FM, USB, Bluetooth® (BT), AUX
12. STOP/MO/ST: zatrzymanie odtwarzania, przełączenie
między ustawieniem mono i stereo w trybie FM.
13. PREVIOUS: naciśnij ten przycisk, by wrócić do poprzedniej piosenki.
14. FAST FORWARD: Naciśnij ten przycisk, by
szybko przewinąć odtwarzany utwór.
15. NEXT: Przełączanie na następną piosenkę/stację.
16. BASS: Naciśnij ten przycisk, by dostosować poziom niskich tonów.
Używaj + lub -, by zwiększyć lub zmniejszyć ich głośność.
17. VOLUME+: Naciśnij ten przycisk, by zwiększyć poziom głośności.
18. MUTE: Naciśnij jeden raz, żeby wyciszyć dźwięk, lub dwa
razy, żeby go ponownie włączyć. Możesz również wyłączyć
wyciszenie, naciskając przyciski regulacji głośności.
19. DSP: Naciśnij ten przycisk, by wybrać efekt equalizera.
20. LOUD: Naciśnij ten przycisk, by zwiększyć intensywność
basów na niskich poziomach głośności.
21. SAVE: naciśnij ten przycisk, aby zapamiętać ulubione stacje.

36
22. FREQ: częstotliwość; naciśnij ten przycisk w trybie
FM, aby wybrać ulubioną częstotliwość.
Wkładanie lub wymiana baterii w pilocie zdalnego
sterowania
1. Naciśnij zapadkę osłony komory baterii, znajdującej się z
tyłu pilota, w kierunku wytłoczonej na niej strzałki.
2. Wciskając zapadkę, otwórz komorę baterii.
3. Włóż dwie baterie, zachowując pokazaną polaryzację + i -.
Wymieniaj baterie tylko na takie same jak dostarczone w zestawie.
4. Wsuń na miejsce osłonę baterii tak, by usłyszeć kliknięcie.
Przygotowanie do użycia
1.
ANTENNA
1
2
3
AUDIO IN
SOURCE
PLAY/PAUSE
PREV NEXT
EJECT
AUX IN
4
5
6
7
USB
Ustaw głośniki po obu stronach urządzenia głównego, najlepiej na tej
samej wysokości i w odległości co najmniej 150 mm od urządzenia.
Podłącz kable głośników do wejść z tyłu urządzenia. Dopilnuj, by
głośnik umieszczony z LEWEJ strony urządzenia został podłączony do
LEWEGO wejścia na tylnym panelu. Powtórz czynności dla PRAWEGO
głośnika.
LEWY CZERWONY przewód należy podłączyć do LEWEGO
CZERWONEGO gniazda, a PRAWY CZERWONY do gniazda PRAWEGO
CZERWONEGO. Podłącz oba CZARNE kable do odpowiednich
CZARNYCH gniazd.
2. Upewnij się, że napięcie podane na tabliczce znamionowej na panelu
tylnym urządzenia jest takie samo, jak napięcie zasilające w gniazdku
elektrycznym. Wybierz odpowiedni kabel zasilający, podłącz jego
jeden koniec do gniazda zasilania na panelu tylnym urządzenia.
A następnie podłącz drugi koniec kabla do gniazdka w ścianie.
3. Naciśnij przycisk STANDBY, żeby WŁĄCZYĆ urządzenie.
Wysuń ANTENĘ, by zapewnić najlepszy odbiór. Naciśnij przycisk
SOURCE, by włączyć tryb FM. Żeby słuchać radia w trybie FM,
należy postępować zgodnie z informacjami zamieszczanymi
w rozdziale OBSŁUGA RADIA w instrukcji obsługi.
4. Naciśnij przycisk SOURCE, by włączyć tryb CD. Naciśnij przycisk EJECT,
by wysunąć napęd CD i włożyć płytę. Naciśnij przycisk ponownie, by
wsunąć napęd. Płyta CD zostanie odtworzona od pierwszej piosenki.
5. Naciśnij przycisk SOURCE, by aktywować tryb Aux In (Audio).
Podłącz urządzenie do gniazda AUX IN za pomocą kabla aux 3,5
mm. Steruj odtwarzaniem z podłączonego urządzenia audio.
6. Naciśnij przycisk SOURCE, by włączyć tryb Bluetooth.
Aktywuj urządzenie z funkcją Bluetooth i wybierz „SHARP
XL-B510”. Wybierz piosenkę i włącz odtwarzanie.
7. Naciśnij przycisk SOURCE, by włączyć tryb USB. Podłącz pendrive‘a
do portu USB na przednim panelu urządzenia, a miniwieża
odczyta go i automatycznie rozpocznie odtwarzanie.
Podstawowe funkcje
Przełączanie trybów
By przełączać się między trybami CD, FM, Bluetooth, USB i AUX IN: naciśnij
przycisk SOURCE na urządzeniu lub na pilocie, by przełączać tryby.
Regulacja głośności
1. Kręć pokrętłem głośności VOLUME zgodnie z ruchem wskazówek
zegara lub naciśnij przycisk „+”, by zwiększyć poziom głośności.
2. Kręć pokrętłem głośności VOLUME przeciwnie do ruchu wskazówek
zegara lub naciśnij przycisk „-”, by zmniejszyć poziom głośności.
Efekty DSP
Naciskaj przycisk DSP, by wybierać spośród zestawu zaprogramowanych
efektów zmieniających dźwięk. Dostępne efekty to CLASSIC, ROCK, POP,
JAZZ, DANCE, LIVE i O .
Funkcja głośności
Ta funkcja zwiększa intensywność basów przy niskiej głośności. Naciśnij
przycisk LOUD na pilocie, by włączyć tę funkcję. Naciśnij go ponownie, by
ją wyłączyć..
Funkcja wyciszenia
Naciśnij przycisk w dowolnym momencie, by wyciszyć dźwięki. Naciśnij
go ponownie, by je włączyć.
Regulacja tonów
W razie potrzeby dostosuj głośność tonów niskich i wysokich.
Naciśnij przycisk BASS lub TREBLE na pilocie, by wybrać niskie lub wysokie
tony, a następnie użyj przycisków „+” i „-”, by dostosować poziom ich
głośności.
Tryb czuwania
Naciśnij przycisk STANDBY na urządzeniu lub pilocie, by aktywować tryb
czuwania. By ponownie uaktywnić urządzenie, naciśnij go jeszcze raz.
UWAGA: Urządzenie automatycznie przejdzie w tryb czuwania po około
10 minutach braku aktywności. Naciśnij przycisk STANDBY, by uaktywnić
miniwieżę.
UWAGA: Gdy wyłączasz tryb czuwania, urządzenie wraca do ostatnio
używanego trybu odtwarzania.
Obsługa radia
1. Naciśnij przycisk SOURCE na panelu lub pilocie, by aktywować
tryb FM. (zakres częstotliwości FM: 87,50-108,00 MHz)
2. Naciskaj przyciski
/ na pilocie, by zwiększać
lub zmniejszać częstotliwość co 0.05MHz.
3. Naciśnij i przytrzymaj przycisk PREV/NEXT na panelu
lub przycisk
/ na pilocie, by szybko przeskanować
odbierane częstotliwości. Skanowanie zatrzyma się, gdy
urządzenie natra na częstotliwość stacji radiowej.

PL
4. Naciśnij i przytrzymaj przycisk , aby szybko
przeszukać zakres częstotliwości; automatycznie
wyszukane stacje zostaną zachowane w pamięci.
5. ZAPAMIĘTANIE stacji:
Możesz zapamiętać do 40 stacji FM.
Naciśnij przycisk FREQ, a następnie przy pomocy przycisków
numerycznych wybierz częstotliwość, którą chcesz zapamiętać.
Naciśnij przycisk SAVE, na wyświetlaczu pojawi się wskazanie „P01”.
Naciśnij przycisk
/ , aby wybrać numer
stacji, którą chcesz zapamiętać.
Naciśnij ponownie przycisk SAVE, aby potwierdzić.
6. Przywoływanie stacji z pamięci:
Naciśnij przycisk
/ , aby przywołać stacje zapisane w pamięci.
Odtwarzanie płyt CD
1. Naciśnij przycisk SOURCE na panelu lub pilocie, by aktywować
tryb CD. Naciśnij przycisk EJECT , by wysunąć napęd, włóż
płytę CD, a następie ponownie naciśnij przycisk EJECT.
2. Naciśnij przycisk
, by zatrzymać lub wznowić odtwarzanie.
3. Naciśnij przycisk STOP/MO/ST na pilocie, by zatrzymać
odtwarzanie, lub przycisk , by je wznowić.
4. Naciśnij przycisk PREV/NEXT lub przycisk
/ na
pilocie, by włączyć poprzednię albo następną piosenkę.
5. Naciśnij przycisk
/ na pilocie, by szybko
przewinąć odtwarzanie do przodu lub do tyłu. Naciśnij
ponownie, by wrócić do normalnej prędkości.
6. By od razu wybrać konkretną piosenkę, użyj przycisków
numerycznych na pilocie.
Przykład:
Jeśli numer utworu składa się z dwóch cyfr, na przykład 25,
naciśnij przycisk „2”, a potem przycisk „5”, by wybrać utwór 25.
Jeśli numer utworu zawiera jedną cyfrę, na przykład 9,
naciśnij najpierw „0”, a następnie „9”, by wybrać utwór 9.
7. Przycisk REPEAT:
podczas odtwarzania naciśnij przycisk REPEAT, by aktywować
powtarzanie.
W przypadku odtwarzania płyty CD lub CD-R, naciśnij przycisk REPEAT
, by powtarzać utwory.
Naciśnij przycisk raz, by powtarzać bieżącą piosenkę. Naciśnij
ponownie, by powtarzać wszystkie.
Naciśnij trzeci raz, by anulować powtarzanie.
8. Naciśnij przycisk SHUFFLE na pilocie, by odtwarzać
utwory z płyty w losowej kolejności. Naciśnij go
ponownie, by wrócić do normalnego odtwarzania.
9. Możesz zaprogramować kolejność odtwarzania utworów z płyty:
Naciśnij przycisk STOP/MO/ST na pilocie, by zatrzymać odtwarzanie.
Naciśnij przycisk PROGRAM na pilocie. Na
wyświetlaczu pojawi się komunikat: P01.
Za pomocą przycisków numerycznych wybierz
utwory, które chcesz zaprogramować.
Naciskaj przyciski
/ na pilocie, by
przełączać się między utworami.
Naciśnij przycisk PROGRAM na pilocie, aby potwierdzić.
Żeby rozpocząć zaprogramowaną sekwencję, naciśnij przycisk
.
By anulować zaprogramowaną sekwencję, naciśnij
dwukrotnie przycisk STOP/MO/ST.
Uwagi:
Obsługiwane formaty plików: MP3, WMA.
Nieobsługiwane formaty plików zostaną pominięte. Np.:
dokumenty aplikacji Word (.doc) lub pliki MP3 z rozszerzeniem
.dlf zostaną zignorowane i nie zostaną odtworzone.
Obsługa trybu Bluetooth
Mikrowieża pozwala na odtwarzanie przez Bluetooth. Zasięg sygnału to
7 metrów.
Aby sparować wieżę z urządzeniem Bluetooth:
1. Naciskaj przycisk SOURCE, by wybrać i włączyć tryb
Bluetooth. Na wyświetlacz zacznie migać
komunikat “bt“.
2. Aktywuj urządzenie z łącznością Bluetooth i
rozpocznij wyszukiwanie urządzeń.
3. Wybierz „SHARP XL-B510” z listy wyszukiwania
i połącz miniwieżę z urządzeniem.
4. W razie potrzeby wprowadź hasło „0000”.
5. Jeśli urządzenia zostaną wzajemnie podłączone, zostanie
wyemitowany potwierdzający sygnał dźwiękowy.
Wskazanie „bt” przestanie pulsować na wyświetlaczu.
6. Teraz możesz cieszyć się muzyką odtwarzaną
z urządzenia zewnętrznego.
7. By wyłączyć tryb Bluetooth, zmień tryb na inny na mikrowieży
lub wyłącz funkcję Bluetooth na urządzeniu zewnętrznym.
Podłączanie innych urządzeń audio.
Tryb Audio pozwala szybko i łatwo podłączyć odtwarzacz MP3 lub inne
urządzenie zewnętrzne.
1. Użyj kabla audio 3,5 mm audio, by podłączyć urządzenie
do gniazda AUX IN na przednim panelu miniwieży.
2. Podłącz wtyczkę mikrowieży do gniazdka.
3. Naciśnij przycisk SOURCE, by włączyć tryb AUX IN.
4. By sterować odtwarzaniem, prawdopodobnie będziesz musiał
zmieniać funkcje bezpośrednio na urządzeniu zewnętrznym.
5. By odpowiednio ustawić głośność, zmieniaj jej
poziom na urządzeniu zewnętrznym.
Obsługa trybu USB
Możliwe jest odtwarzanie muzyki za pomocą interfejsu USB urządzenia.
Podłączanie urządzenia USB:
1. Włącz miniwieżę i wybierz tryb USB, naciskając przycisk SOURCE.
2. Podłącz urządzenie USB do gniazda USB
na przednim panelu miniwieży.
3. Miniwieża odtworzy utwory zapisane na dysku USB.
Uwagi:
Obsługiwane formaty plików: MP3, WMA.
Nieobsługiwane formaty plików zostaną pominięte. Np.:
dokumenty aplikacji Word (.doc) lub pliki MP3 z rozszerzeniem
.dlf zostaną zignorowane i nie zostaną odtworzone.
Nawet jeśli pliki mają obsługiwany format (MP3),
niektóre mogą nie zostać odtworzone lub wyświetlone
ze względu na problem ze zgodnością.
W zależności od ilości danych oraz prędkości nośnika odczyt
urządzenia USB może zająć dłuższą chwilę (nawet 60 sekund).
Obsługiwane są pamięci USB o maks. pojemności 64 GB.
Urządzenie USB musi być sformatowane w
systemie FAT, FAT16 lub FAT32.
ROZWIĄZYWANIE PROBLEMÓW
Brak zasilania
Przyczyna
• Zasilacz nie jest podłączony do gniazdka.
• W gniazdku nie ma zasilania.

38
Rozwiązanie
• Upewnij się, że wtyczka jest podłączona.
• Włącz zasilanie.
Nie słychać dźwięku w trybie CD/AUX/RADIO.
Nie słychać dźwięku w trybie AUX.
Przyczyna
• Zbyt niski poziom głośności.
• Zbyt niski poziom głośności źrodła AUX.
Rozwiązanie
• Zwiększ głośność.
• Zwiększ głośność na urządzeniu AUX.
Dźwięk jest zniekształcony.
Zniekształcony dźwięk w trybie AUX.
Przyczyna
• Zbyt wysoki poziom głośności.
• Zbyt wysoki poziom głośności źrodła AUX.
Rozwiązanie
• Zmniejsz głośność.
• Zmniejsz głośność na urządzeniu AUX.
Nie można odtworzyć płyty CD.
Przyczyna
• Brak płyty w napędzie
• Nieodpowiednio włożona płyta
• Zabrudzona płyta
Rozwiązanie
• Włóż obsługiwaną płytę.
• Sprawdź, czy dobrze włożyłeś płytę.
• Wyczyść płytę.
Szum
Przyczyna
• Słaby sygnał
Rozwiązanie
• Zmień pozycję anteny (FM).
Nie odnaleziono żądanej stacji.
Przyczyna
• Słaby sygnał
• Stacja nie jest dostępna w twoim obszarze.
Urządzenie wyłącza się po 10 minutach braku aktywności.
Przyczyna
• Automatyczne przełączanie w tryb czuwania
Rozwiązanie
• Urządzenie automatycznie przejdzie w tryb czuwania po około10
minutach braku aktywności. Naciśnij przycisk STANDBY, by ponownie
aktywować urządzenie.
Dane techniczne
Model XL-B510
Sygnał radiowy 87.5-108MHz
Zasilanie AC 220-240V~ 50Hz
Pobór mocy 28 W
Pobór mocy StandBy <0,5 W
Moc wyjściowa 2 x 7 W (RMS)
Impedancja 2 x 8 Ω
Zakres częstotliwości 60Hz - 20KHz
Bluetooth
Wersja V 2.1 + EDR
Maksymalny poziom
przekazywanej mocy
<20 dbm
Pasma częstotliwości 2402 MHz ~ 2480 MHz
Płyt CD
Odtwarzane formaty CD, CD-R, CD-RW, MP3, WMA
Pilot zdalnego sterowania
Rodzaj baterii 2x AAA / 1.5V
220mm
170mm
150mm
220mm
145mm 177mm
1,75kg
KG
0,95kg
KG


www.sharpconsumer.eu
SAU/MAN/0025
UMC Poland Sp. z o.o.
Ostaszewo 57B, 87-148 Łysomice,
Poland
Made in China
-
 1
1
-
 2
2
-
 3
3
-
 4
4
-
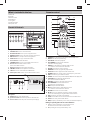 5
5
-
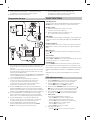 6
6
-
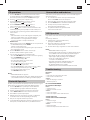 7
7
-
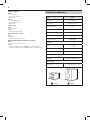 8
8
-
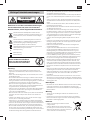 9
9
-
 10
10
-
 11
11
-
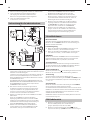 12
12
-
 13
13
-
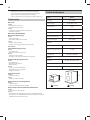 14
14
-
 15
15
-
 16
16
-
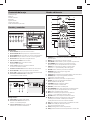 17
17
-
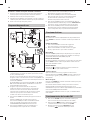 18
18
-
 19
19
-
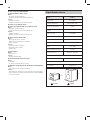 20
20
-
 21
21
-
 22
22
-
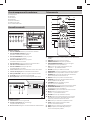 23
23
-
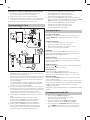 24
24
-
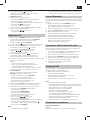 25
25
-
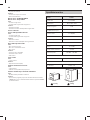 26
26
-
 27
27
-
 28
28
-
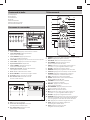 29
29
-
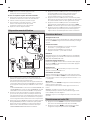 30
30
-
 31
31
-
 32
32
-
 33
33
-
 34
34
-
 35
35
-
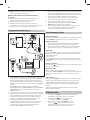 36
36
-
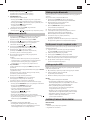 37
37
-
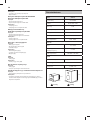 38
38
-
 39
39
-
 40
40


Sharp XL-B510 El manual del propietario
- Categoría
- Reproductores de CD
- Tipo
- El manual del propietario
- Este manual también es adecuado para
en otros idiomas
- français: Sharp XL-B510 Le manuel du propriétaire
- italiano: Sharp XL-B510 Manuale del proprietario
- English: Sharp XL-B510 Owner's manual
- Deutsch: Sharp XL-B510 Bedienungsanleitung
- polski: Sharp XL-B510 Instrukcja obsługi