MasterCool 52233 Instrucciones de operación
- Categoría
- Medición
- Tipo
- Instrucciones de operación

Instruction Manual
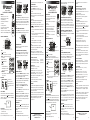
52233 DIGITAL PSYCHROMETER
FEATURES:
• Rotating cap to protect sensor
• External Temp. probe (optional)
• LCD digital display
• Data Hold to capture readings
• Pocket size
• Low battery indicator
• Fast response, Accurate reading
• Max/Min record function
• Microprocessor circuitry for reliability
• Auto Power Off with disabling capability
CONTROLS AND INDICATORS
LCD DISPLAY
RH%
Dry Bulb
Dew Point
Wet Bulb
xternal
emperature
KEYS:
1) - Power on/off
2) ˚C/˚F - Switch between ˚C and ˚F display
3) MODE - Switch between Db (air temp.)
& DP display
4) HOLD - Hold display
+ HOLD - Disable
Auto-off
5) RESET
• Reset Min/Max memory
• Wb and Ex (Ex for external
probe only) mode switch
6) MN/MX Key
HOLD
MX/MN
o o
C/ F
MODE
RESET
• Display minimum or maximum memory value
from power on.
IMPORTANT:
External Probe
OPEN
CLOSE
Open the sensor
protection cap before
starting measurement in
order to achieve accurate
values.
AUTO POWER OFF
Unit will turn itself off after 5 minutes. To override Auto
Power Off function, press + HOLD while the meter is
off. When “n” appears (See Fig. A), release the HOLD key.
Auto-off is now disabled.
Fig. A
MODE OPTIONS
1) Turn the protective sensor cap in a counter
clockwise direction.
2) Turn meter on (See Fig. B)
(3) Press the ˚C/˚F key more than 1 sec. to convert
reading to desired unit.
Fig. B
Fig. D
Fig. B Fig D.
DATA HOLD FUNCTION
Press the HOLD key until (HLD) appears in display. The
current reading is now held and will not change until
Hold function is cancelled. (See Fig.D) Press the HOLD
key again to cancel Hold function. Hold function can be
used on humidity, dew-point, dry bulb, ext. temp., wet
bulb.
DEW POINT/DRY BULB FUNCTION
Press the MODE key until “DP” appears on display. (See
Fig. E) Press MODE key again to display dry bulb “Db.”
Fig. E
WET BULB FUNCTION
Turn the meter on. User will see “Wb” temperature
indicated on the display.
Ex. TEMPERATURE FUNCTION (OPTIONAL)
Plug the external probe (part # 52231) into the meter.
Short press RESET key until “Ex” appears on display.
Unit will now display external probe temperature.
See Fig. F2
Fig. F2
Fig. G
Fig. F2 Fig. G
MIN./MAX. FUNCTION
1) Press and hold MN/MX until (MIN) appears on display.
(See Fig. G) Display now shows minimum humidity
and temperature readings in memory.
2) Press and hold MN/MX key again until (MAX) appears
on display. Display now shows maximum humidity
and temperature readings in memory.
3) To return to current temperature and humidity
readings press and hold MN/MX until Min or Max
disappear from the display.
4) Press the RESET key more than two seconds to clear
current readings from memory.
WARNING: While checking MIN/MAX value for EX do not
replace the probe otherwise an error code will display.
If you don’t plug the probe into socket before turning
the meter on, the error code will also appear when you
check the MIN/MAX value.
LOW-BATTERY
A battery symbol will appear in the top right corner
of the display when the power is low. Failure to replace
batteries will have an effect on the accuracy of the
readings.
1. Open the battery cover.
2. Remove the expired batteries.
3. Insert 2 AAA batteries making sure the batteries are
positioned with the correct polarity. Replace cover.
TROUBLESHOOTING
POWER ON BUT NO DISPLAY
A) Press ON/OFF key for more than 0.1 sec.
B) Check the batteries for correct polarity and secure
contact.
C) Replace with new batteries and try again.
D) Remove the batteries for one minute and put back in
for second try.
NO DISPLAY
A) If the low battery indicator displayed before the
display disappeared, replace the batteries.
B) Check whether auto-off mode is active. If yes, press
+ HOLD or ON/OFF + HOLD key to disable auto-
off function.
Er 1: Circuit error in RH measurement channel, return
for repair.
Er 2: Circuit error in Internal temperature measurement
channel, return for repair.
Er 3: Circuit error in reference resistor channel, return
for repair.
Er 4: Internal temperature is out of the range.
Er 5: External temperature is out of the range.
Note:
a. Dry Bulb temperature means air (internal)
temperature. Dew point & Web Bulb are calculated
from internal temperature.
b. When the meter is on, plugging in an external
probe might cause an error (“ER 5”) in min. or max
mode. Pressing the “RESET” key could solve this error.
OPTIONAL ACCESSORIES
• External Temperature Probe part # 52231
• 33% Salt Solution (for calibration) part # 52733
• 75% Salt Solution (for calibration) part # 52775
SPECIFICATION
•Temp. Range: -20~50˚C (-4~122˚F)
• RH% Range: 0~100% RH
• Wet Bulb Range: -21.6~50.0˚C (-6.88~122˚F)
• Dew Point Range: -78.7~50.0˚C (-109.7~122˚F )
• External Temp. Range: -20~70˚C (-4~158˚F)
• Accuracy: RH% 3% at 25˚C/Temperature: 1˚F (0.6˚C)
• Response Time: 60 seconds
• Pocket Size: 24.7 (h) x 48.4 (w) x 178.5mm (l)
• Power: (2) 1.5V AAA battery
WARRANTY
This product warrants against defects in material and
workmanship for a period of one year. This warranty
does not cover failure due to abuse, improper usage, or
progressive wear and tear.
Warranty becomes valid to the original user, effective on
the purchase date. A copy of an invoice must be sent to
1 Aspen Drive, Randolph, NJ 07869 to validate the
warranty. For further service please contact
(973) 252-9119.
ENGLISH
USA: PH (973) 252-9119
BELGIUM: TEL. + 32 (0) 3 777 28 48
www.mastercool.com
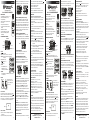
Manual de Instrucción
52233 SICRÓMETRO DIGITAL
CARACTERISTICAS
• Protector rotativo para protección del censor
• Sonda de temperatura externa (opcional)
• Pantalla LCD Digital
• Retención de información para captura de
las lecturas
• Tamaño bolsillo
• Indicador de batería baja (descargada)
• Respuesta rápida. Lectura precisas
• Función de registro Máximo/Mínimo
• Circuito con Microprocesador para mayor
confiabilidad
• Apagado automático con capacidad de
desactivarlo
CONTROLES E INDICADORES
LCD DISPLAY
RH%
Dry Bulb
Dew Point
Wet Bulb
xternal
emperature
TECLADO
1) - Para Encender/Apagar
2) C/F - Cambia entre Celsius a Fahrenheit
3) MODE - Cambia entre Db (Temperatura del aire) 7 Dp
4) HOLD Retiene la información
de pantalla
+ HOLD - Desactiva
Auto-off
5) RESET
• Resetea Memoria Minima/
Máxima
• Wb y Ex (Ex solo para la sonda
externa)
6) MN/MX
HOLD
MX/MN
o o
C/ F
MODE
RESET
• Muestra los valores mínimo/máximo en memoria
cuando esta encendido
IMPORTANTE:
External Probe
OPEN
CLOSE
Abra el protector del
censor para conseguir
valores precisos.
APAGADO AUTOMATICO
La unidad se apagara automáticamente después de 5 minu-
tos sin uso. Para cancelar el apagado automatizo presionar
la techa + HOLD mientras la unidad esta apagada. Deje
de presionar la tecla HOLD cuando aparezca (ver figura A) la
letra “n.” Apagado automático esta desactivado.
Fig. A
MODO DE OPCIONES
1) Gire el protector del censor en la dirección de las
manecillas del reloj.
2) Encienda la unidad (ver figura B.)
3) Presione la tecla C/F mas de 1 segundo para cambiar a la
unidad de medida deseada.
Fig. B
Fig. D
Fig. B Fig D.
FUNCION RETENCION DE DATA (información)
Presione la tecla HOLD hasta que aparezca (HLD) en la
pantalla. La lectura presente será retenida y no cambiara
hasta que la función HOLD es cancelada. (Ver figura D)
Presione nuevamente la tecla HOLD para cancelar la función
HOLD. La función HOLD puede ser usada en Humedad, punto
de condensación, dry bulb, temperatura externa, wet bulb.
FUNCIÓN PUNTO DE CONDENSACIÓN/DRY BULB
Presione la tecla MODE hasta que aparezca “DP” en la
pantalla. (Ver figura E) Presione nuevamente la tecla MODE
para mostrar dry bulb “Db.”
Fig. E
FUNCION WET BULB
Encienda la unidad. El usuario vera la temperatura “Wb” en
la pantalla.
Ex. FUNCION TEMPERATURA (OPCIONAL)
Conecte la sonda externa (parte # 52231) al medidor.
Presione brevemente la tecla RESET hasta que se vea “Ex:”
en la pantalla. La pantalla de la unidad mostrara la
temperatura de la sonda externa. Ver figura 2.
Fig. F2
Fig. G
Fig. F2 Fig. G
FUNCION MIN/MAX.
1) Mantenga presionada la tecla MN/MX hasta que aparezca
MIN en la pantalla. Ahora se podrán ver las lecturas
mínimas en memoria de la humedad y temperatura.
2) Presione nuevamente la tecla MN/MX hasta que (MAX)
aparezca en la pantalla. Ahora se podrán ver las lecturas
máximas en memoria de la humedad y temperatura
3) Para volver a las lecturas presentes de temperatura y
humedad presione la tecla MN/MX hasta que Min o Max
desaparezcan de la pantalla.
4) Presione la tecla RESET más de dos segundos para borrar
las lecturas en memoria.
Advertencia: No reemplace la sonda mientras esté revisando
los valores MIN/MAX de EX ya que aparecerá un código de
error. Si no se conecta la sonda antes de encender el medidor,
también aparecerá un código de error cuando revise los
valores MIN/MAX0 del medidor.
BATERIA BAJA
El símbolo de una batería aparcera en la esquina
superior izquierda de la pantalla cuando la batería este
descargada. El no cambiar la batería causara que las lecturas
no sean precisas.
1) Abra la cubierta de la batería
2) Remueva las baterías descargadas
3) Coloque las (2) dos baterías AAA asegurándose que están
con la polaridad correcta. Cierre la cubierta de las
baterías.
PROBLEMAS / SOLUCIONES
UNIDAD ENCENDIDA; PERO NO HAY PANTALLA
A) Presione la tecla ON/OFF por mas de 0.1 sec.
B) Revise si la polaridad de las baterías es la correcta y si
los contactos están OK.
C) Reemplace la batería y pruebe de nuevo
D) Remueva las baterías por un minuto y póngalas de
vuelta para tratar de nuevo.
NO HAY PANTALLA
A) Si el indicador de batería baja aparece antes que se
apague la unidad, reemplace las baterías.
B) Revise si el modo de auto-off esta activo. Si el auto-off
esta activado, presione la tecla + HOLD o ON/OFF +
HOLD para desactivar la función auto-off.
Er 1: Error circuito en canal de medidas RH, devolver para
reparación.
Er 2: Error circuito en canal de medida de temperatura
Interna, devolver para reparación.
Er 3: Error circuito en canal de resistencia de referencia,
devolver para reparación.
Er 4: Temperatura interna esta fuera de rango.
Er 5: Temperatura externa esta fuera de rango.
Nota:
a. Temperatura Dry Bulb quiere decir temperatura (interna)
del aire. Dew point & Wet Bulb son calculadas desde la
temperatura interna.
b. Si se conecta una sonda externa mientras el medidor
esta encendido, puede causar un error (“ER 5”) en el
modo min. o max. Presionando la tecla “RESET” podría
solucionar el problema.
ACCESORIOS OPCIONALES
• Sonda de Temperatura Externa parte # 52231
• 33% Solución Salina (para calibración) parte # 52733
• 75% Solución Salina (para calibración) parte # 52775
ESPECIFICACIONES
• Rango de Temperatura: -20 a 50˚C (-4 a 122˚F)
• Rango RH%: 0 a 100% RH
• Rango Wet Bulb: -21.6 a 50.0˚C (-6.88 a 122˚F)
• Rango Dew Point: -78.7 a 50.0˚C (-109.7 a 122˚F)
• Rango Temperatura Externa: -20 a 70˚C (-4 a 158˚F)
• Precisión: RH% 3% a 25˚C/Temperatura: 1˚F (0.6˚C)
• Tiempo de respuesta: 60 segundos
• Tamaño bolsillo: 24.7 (h) x 48.4 (w) x 178.5mm (l)
• Potencia: (2) Batería AAA, 1.5V
GARANTIA
Este producto esta garantizado contra defectos de material
y fabricación por un periodo de un año. Esta garantía no
cubre fallas debido a abuso, uso inapropiado o desgaste
progresivo.
La garantía es valida para el comprador original, a partir de
la fecha de compra. Una copia de la factura debe ser
enviada a: 1 Aspen Drive, Randolph, NJ 07869, USA para
validar la garantía. Para asistencia adicional por favor
contactarse al teléfono en los Estados Unidos
1-973-252-9119.
ESPAÑOL
USA: PH (973) 252-9119
BELGIUM: TEL. + 32 (0) 3 777 28 48
www.mastercool.com
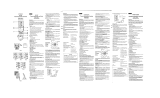
➀
➁
➂
➀
➁
➂
CERRADO ABIERTO
LCD
Temperatura seca
Punto de
condensación
Temperatura
húmeda
Temperatura Externa
Sonda externa
52233-INST
La página se está cargando...
Transcripción de documentos
reading to desired unit. ENGLISH Fig. B Instruction Manual 52233 DIGITAL PSYCHROMETER FEATURES: • Rotating cap to protect sensor • External Temp. probe (optional) • LCD digital display • Data Hold to capture readings • Pocket size • Low battery indicator • Fast response, Accurate reading • Max/Min record function • Microprocessor circuitry for reliability • Auto Power Off with disabling capability Fig. D �� �� � �� ��� � ����� ��� � ��� ��� �������������������� ���� ����� ����� ���� ����� Fig. E � �� � � � � �xternal �emperature Fig. F2 Fig.� G �� ��� Fig. F2 Open the sensor protection cap before starting measurement in order to achieve accurate values. External Probe AUTO POWER OFF Unit will turn itself off after 5 minutes. To override Auto Power Off function, press + HOLD while the meter is off. When “n” appears (See Fig. A), release the HOLD key. Auto-off is now disabled. � � �� ��� MODE OPTIONS 1) Turn the protective sensor cap in a counter clockwise direction. 2) Turn meter on (See Fig. B) (3) Press the ˚C/˚F key more than 1 sec. to convert ➀ TROUBLESHOOTING POWER ON BUT NO DISPLAY A) Press ON/OFF key for more than 0.1 sec. B) Check the batteries for correct polarity and secure contact. C) Replace with new batteries and try again. D) Remove the batteries for one minute and put back in for second try. NO DISPLAY A) If the low battery indicator displayed before the display disappeared, replace the batteries. B) Check whether auto-off mode is active. If yes, press + HOLD or ON/OFF + HOLD key to disable autooff function. Er 1: Circuit error in RH measurement channel, return for repair. Er 2: Circuit error in Internal temperature measurement channel, return for repair. Er 3: Circuit error in reference resistor channel, return for repair. Er 4: Internal temperature is out of the range. Er 5: External temperature is out of the range. OPTIONAL ACCESSORIES • External Temperature Probe • 33% Salt Solution (for calibration) • 75% Salt Solution (for calibration) � Fig. G MIN./MAX. FUNCTION 1) Press and hold MN/MX until (MIN) appears on display. (See Fig. G) Display now shows minimum humidity and temperature readings in memory. 2) Press and hold MN/MX key again until (MAX) appears on display. Display now shows maximum humidity and temperature readings in memory. 3) To return to current temperature and humidity readings press and hold MN/MX until Min or Max disappear from the display. 4) Press the RESET key more than two seconds to clear current readings from memory. WARNING: While checking MIN/MAX value for EX do not replace the probe otherwise an error code will display. If you don’t plug the probe into socket before turning the meter on, the error code will also appear when you check the MIN/MAX value. LOW-BATTERY A battery symbol will appear in the top right corner of the display when the power is low. Failure to replace batteries will have an effect on the accuracy of the readings. 1. Open the battery cover. 2. Remove the expired batteries. 3. Insert 2 AAA batteries making sure the batteries are Fig. A ESPAÑOL Note: a. Dry Bulb temperature means air (internal) temperature. Dew point & Web Bulb are calculated from internal temperature. b. When the meter is on, plugging in an external probe might cause an error (“ER 5”) in min. or max mode. Pressing the “RESET” key could solve this error. Ex. TEMPERATURE FUNCTION (OPTIONAL) Plug the external probe (part # 52231) into the meter. Short press RESET key until “Ex” appears on display. Unit will now display external probe temperature. See Fig. F2 IMPORTANT: OPEN � WET BULB FUNCTION Turn the meter on. User will see “Wb” temperature indicated on the display. Wet Bulb KEYS: 1) - Power on/off 2) ˚C/˚F - Switch between ˚C and ˚F display 3) MODE - Switch between Db (air temp.) & DP display HOLD 4) HOLD - Hold display + HOLD - Disable Auto-off oC/ oF RESET 5) RESET • Reset Min/Max memory • Wb and Ex (Ex for external MX/MN MODE probe only) mode switch 6) MN/MX Key • Display minimum or maximum memory value from power on. CLOSE Fig D. �� �� ��� � DEW POINT/DRY BULB FUNCTION Press the MODE key until “DP” appears on display. (See Fig. E) Press MODE key again to display dry bulb “Db.” RH% �� �� � �� DATA HOLD FUNCTION Press the HOLD key until (HLD) appears in display. The current reading is now held and will not change until Hold function is cancelled. (See Fig.D) Press the HOLD key again to cancel Hold function. Hold function can be used on humidity, dew-point, dry bulb, ext. temp., wet bulb. LCD DISPLAY Dew Point �� � � Fig. B CONTROLS AND INDICATORS Dry Bulb positioned with the correct polarity. Replace cover. ➁ part # 52231 part # 52733 part # 52775 SPECIFICATION •Temp. Range: -20~50˚C (-4~122˚F) • RH% Range: 0~100% RH • Wet Bulb Range: -21.6~50.0˚C (-6.88~122˚F) • Dew Point Range: -78.7~50.0˚C (-109.7~122˚F ) • External Temp. Range: -20~70˚C (-4~158˚F) • Accuracy: RH% 3% at 25˚C/Temperature: 1˚F (0.6˚C) • Response Time: 60 seconds • Pocket Size: 24.7 (h) x 48.4 (w) x 178.5mm (l) • Power: (2) 1.5V AAA battery Manual de Instrucción 52233 SICRÓMETRO DIGITAL CARACTERISTICAS • Protector rotativo para protección del censor • Sonda de temperatura externa (opcional) • Pantalla LCD Digital • Retención de información para captura de las lecturas • Tamaño bolsillo • Indicador de batería baja (descargada) • Respuesta rápida. Lectura precisas • Función de registro Máximo/Mínimo • Circuito con Microprocesador para mayor confiabilidad • Apagado automático con capacidad de desactivarlo Fig. B ����� ��� � ��� ��� �������������������� ���� ����� ����� ���� ����� � �� � � �� � � Fig D. FUNCION RETENCION DE DATA (información) Presione la tecla HOLD hasta que aparezca (HLD) en la pantalla. La lectura presente será retenida y no cambiara hasta que la función HOLD es cancelada. (Ver figura D) Presione nuevamente la tecla HOLD para cancelar la función HOLD. La función HOLD puede ser usada en Humedad, punto de condensación, dry bulb, temperatura externa, wet bulb. FUNCIÓN PUNTO DE CONDENSACIÓN/DRY BULB Presione la tecla MODE hasta que aparezca “DP” en la pantalla. (Ver figura E) Presione nuevamente la tecla MODE para mostrar dry bulb “Db.” Fig. E LCD LCD DISPLAY �� RH% �� Dryseca Bulb Temperatura Punto de Dew Point condensación �� �� �� ��� � � � � Temperatura Wet Bulb húmeda �xternal Temperatura Externa �emperature OPEN ABIERTO � FUNCION WET BULB Encienda la unidad. El usuario vera la temperatura “Wb” en la pantalla. Fig. F2 Fig.� G �� ��� Fig. F2 � � �� ��� � Fig. G FUNCION MIN/MAX. 1) Mantenga presionada la tecla MN/MX hasta que aparezca MIN en la pantalla. Ahora se podrán ver las lecturas mínimas en memoria de la humedad y temperatura. 2) Presione nuevamente la tecla MN/MX hasta que (MAX) aparezca en la pantalla. Ahora se podrán ver las lecturas máximas en memoria de la humedad y temperatura 3) Para volver a las lecturas presentes de temperatura y humedad presione la tecla MN/MX hasta que Min o Max desaparezcan de la pantalla. 4) Presione la tecla RESET más de dos segundos para borrar las lecturas en memoria. Abra el protector del censor para conseguir valores precisos. External Probe Sonda externa APAGADO AUTOMATICO La unidad se apagara automáticamente después de 5 minutos sin uso. Para cancelar el apagado automatizo presionar la techa + HOLD mientras la unidad esta apagada. Deje de presionar la tecla HOLD cuando aparezca (ver figura A) la letra “n.” Apagado automático esta desactivado. MODO DE OPCIONES 1) Gire el protector del censor en la dirección de las manecillas del reloj. 2) Encienda la unidad (ver figura B.) � Ex. FUNCION TEMPERATURA (OPCIONAL) Conecte la sonda externa (parte # 52231) al medidor. Presione brevemente la tecla RESET hasta que se vea “Ex:” en la pantalla. La pantalla de la unidad mostrara la temperatura de la sonda externa. Ver figura 2. TECLADO 1) - Para Encender/Apagar 2) C/F - Cambia entre Celsius a Fahrenheit 3) MODE - Cambia entre Db (Temperatura del aire) 7 Dp 4) HOLD Retiene la información de pantalla HOLD + HOLD - Desactiva Auto-off oC/ oF RESET 5) RESET • Resetea Memoria Minima/ Máxima MX/MN MODE • Wb y Ex (Ex solo para la sonda externa) 6) MN/MX • Muestra los valores mínimo/máximo en memoria cuando esta encendido CLOSE CERRADO ➂ � �� ��� CONTROLES E INDICADORES Fig. A USA: PH (973) 252-9119 BELGIUM: TEL. + 32 (0) 3 777 28 48 www.mastercool.com Fig. D �� �� Fig. B IMPORTANTE: WARRANTY This product warrants against defects in material and workmanship for a period of one year. This warranty does not cover failure due to abuse, improper usage, or progressive wear and tear. Warranty becomes valid to the original user, effective on the purchase date. A copy of an invoice must be sent to 1 Aspen Drive, Randolph, NJ 07869 to validate the warranty. For further service please contact (973) 252-9119. 3) Presione la tecla C/F mas de 1 segundo para cambiar a la unidad de medida deseada. ➀ Advertencia: No reemplace la sonda mientras esté revisando los valores MIN/MAX de EX ya que aparecerá un código de error. Si no se conecta la sonda antes de encender el medidor, también aparecerá un código de error cuando revise los valores MIN/MAX0 del medidor. BATERIA BAJA El símbolo de una batería aparcera en la esquina superior izquierda de la pantalla cuando la batería este descargada. El no cambiar la batería causara que las lecturas no sean precisas. 1) Abra la cubierta de la batería 2) Remueva las baterías descargadas 3) Coloque las (2) dos baterías AAA asegurándose que están ➁ con la polaridad correcta. Cierre la cubierta de las baterías. PROBLEMAS / SOLUCIONES UNIDAD ENCENDIDA; PERO NO HAY PANTALLA A) Presione la tecla ON/OFF por mas de 0.1 sec. B) Revise si la polaridad de las baterías es la correcta y si los contactos están OK. C) Reemplace la batería y pruebe de nuevo D) Remueva las baterías por un minuto y póngalas de vuelta para tratar de nuevo. NO HAY PANTALLA A) Si el indicador de batería baja aparece antes que se apague la unidad, reemplace las baterías. B) Revise si el modo de auto-off esta activo. Si el auto-off esta activado, presione la tecla + HOLD o ON/OFF + HOLD para desactivar la función auto-off. Er 1: Error circuito en canal de medidas RH, devolver para reparación. Er 2: Error circuito en canal de medida de temperatura Interna, devolver para reparación. Er 3: Error circuito en canal de resistencia de referencia, devolver para reparación. Er 4: Temperatura interna esta fuera de rango. Er 5: Temperatura externa esta fuera de rango. Nota: a. Temperatura Dry Bulb quiere decir temperatura (interna) del aire. Dew point & Wet Bulb son calculadas desde la temperatura interna. b. Si se conecta una sonda externa mientras el medidor esta encendido, puede causar un error (“ER 5”) en el modo min. o max. Presionando la tecla “RESET” podría solucionar el problema. ACCESORIOS OPCIONALES • Sonda de Temperatura Externa parte # 52231 • 33% Solución Salina (para calibración) parte # 52733 • 75% Solución Salina (para calibración) parte # 52775 ESPECIFICACIONES • Rango de Temperatura: -20 a 50˚C (-4 a 122˚F) • Rango RH%: 0 a 100% RH • Rango Wet Bulb: -21.6 a 50.0˚C (-6.88 a 122˚F) • Rango Dew Point: -78.7 a 50.0˚C (-109.7 a 122˚F) • Rango Temperatura Externa: -20 a 70˚C (-4 a 158˚F) • Precisión: RH% 3% a 25˚C/Temperatura: 1˚F (0.6˚C) • Tiempo de respuesta: 60 segundos • Tamaño bolsillo: 24.7 (h) x 48.4 (w) x 178.5mm (l) • Potencia: (2) Batería AAA, 1.5V GARANTIA Este producto esta garantizado contra defectos de material y fabricación por un periodo de un año. Esta garantía no cubre fallas debido a abuso, uso inapropiado o desgaste progresivo. La garantía es valida para el comprador original, a partir de la fecha de compra. Una copia de la factura debe ser enviada a: 1 Aspen Drive, Randolph, NJ 07869, USA para validar la garantía. Para asistencia adicional por favor contactarse al teléfono en los Estados Unidos 1-973-252-9119. USA: PH (973) 252-9119 BELGIUM: TEL. + 32 (0) 3 777 28 48 www.mastercool.com 52233-INST ➂-
 1
1
-
 2
2


MasterCool 52233 Instrucciones de operación
- Categoría
- Medición
- Tipo
- Instrucciones de operación
en otros idiomas
- français: MasterCool 52233 Mode d'emploi
- English: MasterCool 52233 Operating instructions
- Deutsch: MasterCool 52233 Bedienungsanleitung
Artículos relacionados
Otros documentos
-
Amprobe TMA5 Mini Vane Anemometer Manual de usuario
-
-
Amprobe TH-1 Manual de usuario
-
-
 MRC 445715_ Manual de usuario
-
 Oregon Scientific THG312 Manual de usuario
-

