Poulan
_1_ Please do not return unit to retailer.
Por favor, no devuelva el aparato al lugar de compra.
Veuillez ne pas retourner I'outil au ddtaillant.
• 1-800-554-6723
www.poulan.com
&
Operator's Manual
Manual del Operador
Manuel de L'utilisateur
For Occasional Use Only
PE3500 !
®
DANGER:
Read and follow all Safety Rules and Operating Instructions before
using this product. Failure to do so can result in serious injury.
ADVERTENClA:
Lea el manual del operador y siga todas las advertencias e instruc-
clones de seguridad. El no hacerio puede resultar en lesiones gra-
ves.
AVERTISSEMENT:
Life le manuel de I'utilisateur et bien respecter tousles avertisse-
ments et toutes les instructions de s6curit6. Tout d6faut de le
!
faire pourrait entraTner des blessures graves.
Electrolux Home Products
North America
Div.of WCI Outdoor Products, Inc.
Augusta, GA 30907
530086382 7/20/01
Copyright 2001 WCI Outdoor Products, Inc.

aWARNING: When using gardening
appliances, basic safety precautions must al-
ways be followed to reduce the dsk of fire and
senous injury. Read and follow all instruc-
tions.
This power unit can be dangerous! Operator
is responsible for following instructions and
warnings on unit and in manual. Read entire
Operator's ManuaI before using unit! Bethor-
oughly familiar with the controls and the prop-
er use of the unit. Restrict the use of this unit
to persons who have read, understand and
will follow the instructions and warnings on
the unit and in the manual. Never allow chil-
dren to operate this unit.
OPERATOR SAFETY
z't
• I_DANGER: RISK OF CUT. KEEP
HANDS AND FEET AWAY FROM BLADE
AND CUTTING AREA. Do not attempt to
clear away cut material or hold material to be
cut when the blade is in motion. Make sure
the engine is stopped and spark plug wire dis-
connected when removing jammed material
from the cutting blade. Do not grab or hold
unit by the cutting blade.
• Dress properly. Always wear safety
glasses or similar eye protection when op-
erating, or performing maintenance on your
unit (safety glasses are available). Eye
protection should be marked ANSI Z87.
• Always wear face or dust mask if operation
is dusty.
• Always wear heavy, long pants, long
sleeves, boots, and gloves.
• Always wear foot protection. Do not go
barefoot or wear sandals.
• Secure hair above shoulder length. Secure
or remove loose clothing and jewelry or
clothing with loosely hanging ties, straps,
tassels, etc. They can be caught in moving
parts.
• Being fully covered also helps protect you
from debris and pieces of toxic plants
thrown by spinning blade.
• Stay Alert. Do not operate unit when you
are tired, ill, upset or under the influence of
alcohol, drugs, ormedication. Watchwhat
you are doing; use common sense.
• Wear hearing protection.
• Never start or run the engine inside a
closed room, building or other unventilated
area. Breathing exhaust fumes can kill.
• Keep handles free ofoil and fuel.
• Always use the handle.
• Never direct discharge of material toward
bystanders or allow anyone near the area
of operation. Use care in directing dis-
charge to avoid glass enclosures, automo-
biles, and the like.
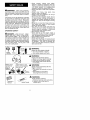
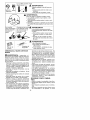
Blades move
momentarily
after the
trigger is
Allow blades to stop ,_
before removing them
from the cut.
_lb WARNING:
Bladescan throwobjectsviolently
• You can be blinded or injured.
• Wear safety glasses and boots.
WARNING:
Hazard zone for thrown objects
• Blades can throw objects violently.
• Others can be blinded or injured.
• Keep people and animals 50 feet
(15 m) away.
WARNING:
Blades move momentarily after the
trigger is released.
• The blades can seriously cut you or
others.
• Allow blades to stop before
removing them from the cut.
Operator's
Manual
_cals
,&WARNING:
Read Operator's Manual
• Follow all warnings and instructions.
• Failure to do so can result in
serious injury.

UNIT/MAINTENANCE SAFETY
_IkWARNING: Disconnect spark plug
before performing maintenance except car-
buretor adjustments.
• Inspect entire unit before each use. Re-
place damaged parts. Check for fuel leaks.
Make sure all fasteners are in place and se-
curely fastened.
• Maintain the unit according to recom-
mended procedures.
• Throw away blades that are bent, warped,
cracked, broken, or damaged in any other
way. Replace parts that are cracked,
chipped, broken, or damaged before using
the unit.
• Use only recommended Poulan replace-
ment parts and accessories. Never use
wire, rope, stdng, flailing devices, etc.
• Be sure blade stops turning when engine
idles (see CARBURETOR ADJUST-
MENTS).
• Remove the blade before making carbure-
toradjustments. Hold the unit by hand. Do
not make carburetor adjustments from the
blade side of the unit.
• Keep others awaywhen making carburetor
adjustments.
• Never start the unit with the clutch housing
removed. The clutch can fly off and cause
sedous injury.
• Have all maintenance and service not ex-
plained in this manual per[ormed by your Au-
thorized Service Dealert
• If product strikes a foreign object follow
these steps: stop unit, disconnect spark
plug lead, inspect for damage, and repair
any damage before resuming operation of
the unit.
EDGING SAFETY
oWARNING: Inspect the area to be
edged before each use. Remove objects
(rocks, broken glass, nails, wire, string, etc.)
which can be thrown by the blade or can wrap
around the shaft.
• Keep others including children, animals
and bystanders, and helpers at least 50 feet
(15 meters) away. Stop the unit immediate-
ly if you are approached.
• Hold the unit firmly with both hands.
• Keep firm footing and balance. Do not over-
reach.
• Always keep the wheels in contact with the
ground.
• Keep all parts of your body away from the
blade and muffler.
• Always push the unit slowly over the
ground. Stay alert for uneven sidewalks,
holes in the terrain, large roots, etc.
• Do not force the unit. Use only for jobs ex-
plained in this manual. USE EDGER-
TRIMMER PROPERLY. Use only for edg-
ing or trimming the type of shrub, growth
and the like described in the operating in-
structions. Do not abuse product. Do not
use product in rain or wet locations. Never
allow children to operate the product. Nev-
er allow adults to operate the product with-
out proper instructions.
• DISCONNECT (UNPLUG) SPARK PLUG
LEAD: when not in use, before servicing,
cleaning and the like, before changing ac-
cessories.
• TOreduce the risk of fire, do not allow ex-
cessive grass, leaves, or grease to accu-
mulate on the unit.
• Objects struck by the cutting blade can
cause serious injuries to persons. The
lawn should always be carefully examined
and cleared of all objects prior to edging or
trimming.
• Never operate the product without guards,
plates, or other protective devices in place.
FUEL SAFETY
• Mix and pour fuel outdoors.
• Keep away from sparks or flames.
• Use a container approved for fuel.
• Do not smoke or allow smoking near fuel or
the unit or while using the unit.
• Make sure the unit is propedy assembled
and in good operating condition.
• Avoid spilling fuel or oil. Wipe up all fuel
spills before starting engine.
• Moveatleast 10feet(3 meters)awayfromfu-
eling site before starting engine.
• Stop engine and allow it to cool before re-
moving fuel cap.
• Do not store the unit with fuel in the fuel
tank. Use up fuel left in the carburetor and
fuel lines by starting the engine and letting it
run until it stops.
• Store unit and fuel in area where rue1vapors
cannot reach sparks or open flames from
water heaters, electric motors or switches,
furnaces, etc.
TRANSPORTING AND STORAGE
• Do not grasp or hold exposed blade.
• Stop unit before leaving work area.
• Allow unit to cool, run fuel out of the fuel
tank, and secure unit before storing or
transporting it in a vehicle.
• Before storing, use up fuel left in the carbu-
retor by starting the unit and letting it run un-
til it stops. Always allow the unit to cool be-
fore storage.
• Store unit and fuel in an area where fuel va-
pors cannot reach sparks or open flames
from water heaters, electric motors or
switches, furnaces, etc.
• Store unit so the blade cannot accidentally
cause injury.
• Store product indoors, out of the reach of
children.
If situations occur which are not covered in
this manual, use care and good judgment. If
you need assistance, contact your nearest
Authorized Service Dealer or call
1-800-554-6723.

SPECIAL NOTICE: Exposure to vibra-
tions through prolonged use of gasoline pow-
ered hand tools could cause blood vessel or
nerve damage in the fingers, hands, and
joints of people prone to circulation disorders
or abnormal swellings. Prolonged use in cold
weather has been linked to blood vessel dam-
age in otherwise healthy people. If symptoms
occur such as numbness, pain, loss of
strength, change in skin color or texture, or
loss of feeling in the fingers, hands, or joints,
discontinue the use of this tool and seek med-
ical attention. An anti-vibration system does
not guarantee the avoidance of these prob-
lems. Users who operate power tools on a
continual and regular basis must monitor
closely their physical condition and the condi-
tion of this unit.
SPECIAL NOTICE: This unit is equipped
with a temperature limiting muffler and spark
arresting screen which meets the require-
ments of California Codes 4442 and 4443. All
U.S. forest land and the states of California,
Idaho, Maine, Minnesota, New Jersey, Ore-
gon, and Washington require by law that
many internal combustion engines be
equipped with asparkarresting screen. If you
operate ina locale where such regulations ex-
ist, you are legally responsible for maintaining
the operating condition of these parts. Failure
to do so is a violation of the law. For normal
homeowner use, the muffler and spark arrest-
ing screen will not require any service. After
50 hours of use, we recommend that your
muffler be serviced or replaced by your Au-
thorized Service Dealer.
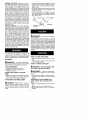
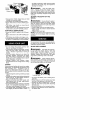
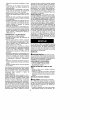
• Locate the decal on the handlebar. This de-
caI includes two arrows. Position the han-
dlebar on the mounting bracket between
these arrows.
• Position the bracket cover over the handle-
bar. Again make sure the handlebar is be-
tween the arrows.
• Insert screws and hand tighten only. Be
sure the handlebar is installed correctly;
then, tighten each screw securely with the
large hex wrench.
Bracket Cover _
Screw
Handlebar
Mountinc
Bracket
d_kWARNING: Remove fuel cap slowly
when refueling.
This engine is certified to operate on unleaded
gasoline. Gasoline must be mixed with a good
quality 2-cycle air-cooled engine oil designed to
be mixed at a ratio of 40:1. Poulan/Weed Eater
brand oiI is recommended. (A 40:1 ratio is ob-
tained by mixing 3.2 ounces of oil with I gallon of
unleaded gasoline). When mixing fuel follow the
instructions printed on the oil container: Always
read and follow the safety rules under FUEL
SAFETY.
It is normal for the fuel filter to rattle in the
empty fuel tank. Finding fuel or oil residue on
muffler is normal due to carburetor adjust-
ments and testing done by the manufacturer.
ASSEMBLY
dCiWAI_NINI3: If received assembled,
repeat all steps to ensure your unit is properly
assembled and all fasteners are secure.
TOOLS REQUIRED:
• 2 hex key wrenches (provided)
• Adjustable wrench or large pliers
• Phillips screwdriver
ATTACH THE TUBE TO THE EN-
GINE
• Slip the tube with drive shaft into the engine.
• Insert and tighten two screws, washers,
and nuts into clamp holes in engine.
ATTACHING THE HANDLEBAR
A
_IL DANGER: RISK OF CUT. To avoid
serious injury, the barrier portion of the han-
dlebar must be installed as shown to provide
a barrier between operator and the spinning
blade.
HOW TO STOP YOUR UNIT
• Move the ON/OFF switch to the OFF posi-
tion.
• if engine does not stop, move choke to the
FULL CHOKE position.
HOW TO START YOUR UNIT
DANGER: The cutting bladewill
turn while starting the engine.
oWARNING: Avoid any contact with
the muffler. A hot muffler can cause serious
burns.
• Rest engine and shield on ground, support-
ing unit, so the blade is not touching the
ground.
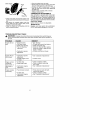
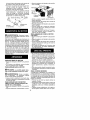
STARTING A COLD ENGINE (or a
warm engine after running out of
fuel)
• Move the ON/OFF switch to the ON posi-
tion.
• Slowly press the primer bulb 6 times.
• Move choke lever to the FULL CHOKE
position.

Choke
Muffler
• Squeezethethrottletriggerfullyandhold
throughall remaining steps,
• Pull starter rope handle sharply 6 times.
• Move choke lever to HALF CHOKE posi-
tion.
• Pull starter rope handle no more than 6
pulls, until engine runs.
• Allow engine to run 10 seconds, then move
choke lever to the OFF CHOKE position.
STARTING A WARM ENGINE
• Move the ON/OFF switch to the ON posi-
tion.
• Move choke lever to the OFF CHOKE posi-
tion.
• Pull starter rope handle until engine runs.
• If engine does not start in 5 pulls, follow in-
structions in STARTING A COLD ENGINE.
• Do not change the engine governor set-
tings or over speed the engine.
• If the product vibrates abnormally, immedi-
ately stop the engine and check for the
cause. Vibration is generally a warning of
trouble.
• Stop the engine whenever you leave the
operating position; disconnect the spark
plug lead before unclogging the cutting
blade guard, when making a repair, adjust-
ment, inspection, or the like.
• Operate product from position where
guards block the line of sight to the cutting
blade.
EDGING
As you become familiar with use of you redger
attachment, you will be able to determine your
own operating pace. Conditions such as
depth of cut and material being cut will regu-
late the speed and time required for your edg-
ing job.
• Allow the engine to warm up before you begin
edging.
• Increase the engine speed before placing the
blade in the cut. For best results, run the en-
gine at full throttle while cutting.
• Always work going away from people and
solid objects such as walls, large stones,
trees, automobiles, etc.
• Be careful when edging near trees orvaluabIe
plants. The high speed metal blade may cut
roots and cause damage to the plants.
• If the blade stalls, immediately move the unit
back slightly to allow the blade to restart. If
the blade continues to stall, stop the engine,
disconnect the spark plug, and inspect for
blockage or damage.
II_WARNING: Keep the blade area
clean. Always release the throttle trigger,
move the ON/OFF switch to the OFF position,
disconnect the spark plug, and make sure the
blade has completely stopped turning before
cleaning.
SETTING THE DEPTH OF THE
WHEEL
iI_WARNING: Neverattempt toadjust
the wheel when the engine is running. Always
stop the engine, wait until the blade stops
turning and disconnect the spark plug before
making adjustments.
• Loosen plastic knob on the blade guard.
• Raise or lower the wheel to obtain desired
edging depth.
• Tighten knob hand tight.
NOTE: If area has not been edged for sever-
al weeks, do not cut deeper than 1/2 inch the
first time.
We recommend all service and adjustments
not listed in this manual be performed by an
Authorized Service Dealer.
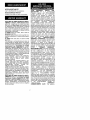
BLADE REPLACEMENT
z*=
iltl WARNING: The blade will continue
to spin after the engine stops or after the
throttle trigger has been released. To avoid
serious injury, make sure the blade has
stopped coasting and disconnect the spark
plug before performing work on the blade.
il_ WARNING: Wear protective gloves
when handling or performing maintenance on
the blade to avoid injury. The blade is sharp and
can cut you even when it is not moving.
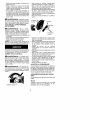
Locking Lever
• To remove the blade, push in locking lever
and hold.
• Rotate blade nut until the locking lever falls
into one of the grooves in the dust cup.
• Continue to hold in locking lever'. This will
keep the shaft from turning while loosening
the blade nut.
• Remove the blade nut by turning clockwise.
• Remove both washers and the blade from
the blade shaft.

Bladeshield._l_l_j B_ade
Blade nut
• Install new blade and the flat washer over
the threaded shaft extending from the gear-
box.
• Now place the cupped washer onto the
shaft. Make sure the cupped side of the
washer is toward the blade.
• Install the blade nut by threading onto the
shaft counterclockwise.
• Push in locking lever and hold.
• Rotate blade nut until the locking lever falls
into one of the grooves in the dust cup.
• Continue to hold in locking lever'. This will
keep the shaft from turning while tightening
the blade nut.
• Tighten blade nut firmly with a wrench.
• Release locking lever.
CARBURETOR ADJUSTMENTS
Your carburetor is equipped with limiter caps.
Damage will occur if you turn the needles be-
yond the limiter caps. Carburetor adjustment is
a complicated task. We recommend that you
take your unit to an Authorized Service Dealer:
IGNITION TIMING
Ignition timing is fixed, non-adjustable.
SPARK PLUG
Replace spark plug yearly with a Champion
RCJ-8Y plug; spark plug gap is 0.025 inch.
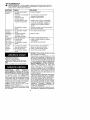
TROUBLESHOOTING TABLE
WARNING: Always stop unit anddisconnect sparkplug before performing any
ofthe recommended remedies below otherthan remedies thatrequire operation of
the unit.
TROUBLE
Engine will not
start.
CAUSE REMEDY
• Engine flooded.
• Fuel tank empty.
• Spark plug not firing.
• Fuel not reaching
carburetor.
• Carburetor requires
adjustment.
Engine will not • Carburetor requires • See "Carburetor Adjustments."
idle properly, adjustment.
• Throttle trigger screw • Loosen screw.
too tight.
Engine wiiI not • Air filter dirty. • Clean or replace air filter.
accelerate, • Spark ptug fouled. • Clean or replace spark plug
lacks power, or and re-gap.
dies under a • Carburetor requires • See "Carburetor Adjustments."
load. adjustment.
Engine smokes • Fuel mixture incorrect. • Empty fuel tank and refill with
excessively, correct fueI mixture.
• Air filter dirty. • Clean or replace air filter.
• Carburetor requires • See "Carburetor Adjustments."
adjustment.
• See "Starting."
• Fill tank with correct fuel mixture.
• Install new spark plug.
• Check for dirty fuel filter; replace.
Check for kinked or split fuel line;
repair or replace.
• Contact your Service Dealer.

NEED ASSISTANCE?
Call 1-800-554-6723 for assistance.
NEED SERVICE PARTS?
Contact your"dealer or place of purchase.
ELECTROLUX HOME PRODUCTS NORTH
AMERICA, Division of WCI Outdoor Prod-
ucts, Inc., warrants to the odginal purchaser
that each new Weed Eater brand gasoline tool
or attachment is free from defects in material
and workmanship and agrees to repair or re-
place under this warranty any defective gaso-
Iine product or attachment as follows from the
odginal date of purohase.
2 YEARS-Pads and Labor, when used for
household purposes.
90 DAYS-Parts and Labor, when used for com-
mercial, professional, or income producing pur-
poses.
30 DAYS-Parts and Labor, if used for rental
purposes.
This warranty is not fi_nsferable and does not
cover damage or liability caused by improper
handling, improper maintenance, or the use of
accessories and/or attachments not specifically
recommended by ELECTROLUX HOME
PRODUCTS NORTH AMERICA for this tool.
Additionally, this warranty does not cover tune-
ups, spark plugs, filters, etc., that will wear and
require replacement with reasonable use during
the warranty pedod. This warranty does not
cover predelivery setup or normal adjustments
explained in the operator's manual.
THIS WARRANTY GIVES YOU SPECIFIC
LEGAL RIGHTS, AND YOU MAY HAVE
OTHER RIGHTS WHICH VARY FROM
STATE TO STATE.
NO CLAIMS FOR CONSEQUENTIAL OR
OTHER DAMAGES WILL BE ALLOWED,
AND THERE ARE NO OTHER EXPRESS
WARRANTIES EXCEPT THOSE EX-
PRESSLY STIPULATED HEREIN.
SOME STATES DO NOT ALLOW LIMITA-
TIONS ON HOW LONG AN IMPLIED WAR-
RANTY LASTS OR THE EXCLUSION OR
LIMITATIONS OF INCIDENTAL OR CONSE-
QUENTIAL DAMAGES, SO THE ABOVE
LIMITATIONS OR EXCLUSION MAY NOT
APPLY TO YOU.
ELECTROLUX HOME PRODUCTS NORTH
AMERICA'S policy is to continuously improve
its products. Therefore, ELECTROLUX HOME
PRODUCTS NORTH AMERICA reserves the
dght to change, modify, or discontinue models,
designs, specifications, and accessories of all
products at any time without notice or obligation
to any purchaser.
YOUR WARRANTY RIGHTS AND
OBLIGATIONS: The U. S. Environmental
Protection Agency and POULAN/WEED
EATER, DIVISION OF WCI OUTDOOR
PRODUCTS are pleased to explain the
emissions control system warranty on your
lawn and garden equipment engine. All new
utility and lawn and garden equipment engines
must be designed, built, and equipped to meet
the stringent anti-smog standards.
POULAN/WEED EATER must warrant the
emission controi system on your lawn and
garden equipment engine for the periods of time
listed below provided there has been no abuse,
neglect, or improper maintenance of your lawn
and garden equipment engine. Your emission
control system includes parts such as the
carburetor and the ignition system. Where a
warrantable condition exits, POULANNVEED
EATER will repair your lawn and garden
equipment engine at no cost to you. Expenses
covered under warranty include diagnosis,
parts and labor. MANUFACTURER'S
WARRANTY COVERAGE: If any emissions
related part on your engine (as listed under
Emissions Control Warranty Parts List) is
defective or a defect in the materials or
workmanship ofthe engine causes the failure of
such an emission related part, the part wiil be
repaired or replaced by POULANNVEED
EATER. OWNER'S WARRANTY
RESPONSIBILITIES: As the lawn and garden
equipment engine owner, you are responsible
for the performance of the required
maintenance listed in your Owner's Manual.
POULAN/WEED EATER recommends that
you retain all receipts covering maintenance on
your lawn and garden equipment engine, but
POULAN/WEED EATER cannot deny
warranty solely for the lack of receipts or for
your failure to ensure the performance of all
scheduled maintenance. As the lawn and
garden equipment engine owner, you should be
aware that POULANNVEED EATER may deny
you warranty coverage if your lawn and garden
equipment engine or a part of it has failed due to
abuse, neglect, improper maintenance,
unapproved modifications, or the use of pads
not made or approved by the original equipment
manufacturer: You are responsible for
presenting your lawn and garden equipment
engine to a POULAN/VVEED EATER
authorized repair center as soon as a problem
exists. Warranty repairs should be completed in
a reasonable amount of time, not to exceed 30
days. If you have any questions regarding your
warranty rights and responsibilities, you should
contact your nearest authorized service center
or call POULANNVEED EATER at
1-800-554-6723. WARRANTY
COMMENCEMENT DATE: The warranty

periedbeginsonthedatethelawnandgarden
equipmentengineispurchased.LENGTHOF
COVERAGE:Thiswarrantyshallbefora
periedoftwoyearsfromtheinitialdateof
purchase.WHATISCOVERED:REPAIROR
REPLACEMENTOFPARTS.Repairor
replacementofanywarrantedpartwillbe
performedatnochargetotheowneratan
approvedPOULAN/WEEDEATERservicing
center:Ifyouhaveanyquestionsregardingyour
warrantyrightsandresponsibilities,youshould
contactyournearestauthorizedservicecenter
or call POULAN/WEEDEATERat
1-800-554-6723WARRANTY PERIOD: Any
warranted part which is not scheduled for
replacement as required maintenance, or which
is scheduled only for regular inspection to the
effect of "repair or replace as necessary" shall
be warranted for 2 years. Any warranted part
which is scheduled for replacement as required
maintenance shall bewarranted for the period of
time up to the first scheduled replacement point
for that part. DIAGNOSIS: The owner shall not
be charged for diagnostic labor which leads to
the determination that a warranted part is
defective if the diagnostic work is performed at
an approved POULAN/WEED EATER
servicing center. CONSEQUENTIAL
DAMAGES: POULAN/WEED EATER may be
liable for damages to other engine components
caused by the failure of a warranted part still
under warranty. WHAT IS NOT COVERED: All
failures caused by abuse, negiect, or improper
maintenance are not covered. ADD-ON OR
MODIFIED PARTS: The use of add-on or
modified parts can be grounds for disallowing a
warranty claim. POULAN/WEED EATER is not
liable to cover failures of warranted parts
caused by the use of add-on or modified parts.
HOW TO FILE A CLAIM: If you have any
questions regarding your warranty dghts and
responsibilities, you should contact your
nearest authorized service center or call
POULAN/WEED EATER at 1-800-554-6723.
WHERE TO GET WARRANTY SERVICE:
Warranty services or repairs shall be provided
at all POULAN/WEED EATER service centers.
call: 1-800-554-6723 MAINTENANCE,
REPLACEMENT AND REPAIR OF
EMISSION RELATED PARTS: Any
POULAN/WEED EATER approved
replacement part used in the performance of
any warranty maintenance or repair on
emission related parts will be provided without
charge tothe owner if the part is under warranty.
EMISSION CONTROL WARRANTY PARTS
LIST: Carburetor, Ignition System: Spark Plug
covered up to maintenance schedule), Ignition
Module. MA NTENANGE STATEMENT: The
owner is responsible for the performance of all
required maintenance as defined in the owner's
manual.

Z_
4_ADVERTENCIA: AI usar cuaIquier
herramienta de fuerza de jardineria, deber_n
observarse precauciones b_sicas de seguri-
dad en todo momento para reducir el riesgo
de incendio y graves heridas. Lea y cumpta
con todas las instrucciones.
iEsta herramienta de fuerza puede ser peli-
grosa! Cabe al usuario la responsabilidad de
cumplir con todas las advertencias e instruc-
clones, iLeas el manual del usuario en su
totalidad antesdeusarelaparato! Est6com-
pletamente familiarizado con los controles y
con el uso correcto del aparato. Limite el uso
de este aparato a aquellas personas que hay-
an leido y comprendido, y que vayan a ob-
edecer, todas las advertencias e instruc-
clones tanto en el aparato como en eImanual.
No permita nunca a los r_i_os que usen este
aparato.
SEGURIDAD DEL USUARIO
_I_ADVERTENCIA: RIESGO DE
CORTADURA - MANTENGA LAS MANOS
Y LOS PIES ALEJADOS DE LAS CUCHILLA
Y DEL AREA DE CORTE. No intente remov-
erel material o sostenga el material a ser cor-
tado mientras las cuchillas se encuentren en
movimiento. AsegQrese que la cuchilla y el
motor se haya detenido antes de remover el
material que se haya atascado en la cuchilIa
de corte. No sostenga ni agarre el aparato
por la cuchilla de corte.
• Vistase apropiadamente. Use siempre ga-
fas de seguridad o protecci6n similar para
ios ojos al usar, o dar mantenimiento a su
aparato. (Galas de seguridad vienen dis-
ponibles). La proteccion para los ojos debe
set marcada con ANSI Z87.
• Siempre use mascarilla para la cara o la na-
riz cuando use su aparato en condiciones
polvorientas.
• Use siempre pantalones largos gruesos,
mangas largas, botas, y guantes.
• Siempre utilize protecci6n para los pies.
No trabaje descalzo ni en sandalias.
• Mantenga el cabello pot encima de los hom-
bros, at_ndolo para tal efecto si es necesario.
No use ropa suelta ni ropa con corbatas, tiras,
borlas, etc. que cuelgan libremente. Pueden
enredarse en las piezas en movimiento.
• Si esta completament tapado, estara mas
protegido de los escombros y pedazos de
plantas t6xicos arrojados por ia cuchilla gi-
rante.
• Mant6ngase alerta. No haga uso del aparato
estando cansado, enfermo, trastornado o
bajo la influencia de! alcohol, de drogas o de
remedios. VigiIe bien Io que esta haciendo;
use del sentido comQn.
• Use protecci6n de oidos.
• Nunca ponga el aparato en marcha ni Io deje
en marcha dentro de un recinto cerrado. Re-
spirar los vapores del combustible Io puede
matar.
• Mantenga las manijas libres de aceite y de
combustible.
• Use Qnicamente el aparato cuando el mango
es instalado.
• Nunca dirija Ia descarga del material hacia
espectadores, ni permita que nadie se en-
cuentre cerca deI area de trabajo. Trabaje
con sumo cuidado al dirigir la descarga de
material para evita cristales, automoviles, y
cosas de tal naturaleza.
SEGURIDAD DEL APARATO
_ADVERTENCIA: Desconecte la
bujia antes de efectuar mantenimiento (ex-
ceptuando los ajustes al carburador).
• Inspeccione el aparato por completo antes
de cada uso. Cambie las piezas daSadas.
Verifique Ios escapes d combustible.
Asegurese de que todos los sujetadores se
encuentren en su Iugar y debidamente
ajustados.
• Mantenga el aparato de acuerdo con los pro-
cedimientos recomendadas.
• Deseche las cuchillas que se encuentren do-
bladas, torcidas, rotas o dafiadas de alguna
otra forma. Cambie las piezas que s encuen-
tren rotas, astilladas o daSadas antes de
comenzar a usar el aparato.
• Use Qnicamente piezas y accesorios de la
marca Poulan. Nunca use alambre, cuerda,
hilo, etc.
• Asegurese de que la cuchilla se detenga
cuando el motor se encuentre en marcha
lenta. Vea la seccion de AJUSTES AL
CARBURADOR.
• Remueva la cuchilla antes de hacer ajustes
al carburador. Sostenga eI aparato con la
mano. No efectue los ajustes al carburador
desde el lado del aparato en donde se en-
cuentra la cuchilla.
• Mantenga o otros alejados al hacer los
ajustes al carburador.
• Nunca ponga en marcha el motor sin antes
tener la caja de cambios en su lugar. El si-
lenciador podria salir disparado al mire y
causar accidentes muy serios.
• Permita que todo el mantenimiento y servi-
cio no explicito en este manual sea efectua-
do por un Agente de Servicio Autorizado.
• Si el aparato choca con un objeto extraSo,
siga el siguiente procedimiento; detenga el
motor, desconecte la bujia, inspeccione los
daSos, y repare cualquier daSo antes de pon-
er en marcha el motor y comenzar a usar el
aparato.

Gafasde
Seguridad
Lascuchillaspuedenarrojar
_!_ objetosalaire _ ADVERTENClA:
H Objetos arrojados al aire de forma vio-
lent&
• Usted puede perder la vista o acci-
s dentarse.
• Use gafas de seguridad y botas.
_lb ADVERTENCIA:
Zona de peligro de objetos arrojados al aire.
• Las cuchillas pueden arrojar objetos al aire
violentamente.
• Otras personas pueden perder la vista o acci-
dentarse.
• Mantenga a personas y animales por Io menos
15 metros (50 pies) alejados de la zona de tra-
bajo.
Las cuchilla Permita que las cuchi!- ,_
ADVERTENClA"
giran momentane- la se detengan antes _'_
amente despu#s de remover las de la Las cuchillas permanecen girando
de soltar e! zona que se est# momentaneamente despu6s de soltar
gati!!o, cortando, el gatillo.
• Las cuchillas pueden causar serias
cortaduras a usted o a otras perso-
nas.
• Permita que las cuchiIIas se deten-
gan antes de removerlas de la zona
t de code.
Manual deJ
Usuario
_s de
Seguridad
,& ADVERTENCIA:
Lea el Manual de Usuario.
• Siga todas las advertencias e
instrucciones.
• De Io contrario, accidentes de gra-
vedad podrian ocurrir.
SEBURIDAD AL HACER CORTES DE
BORDE
_JkADVERTENCIA: Inspeccione el
area que se va a bordear antes de cada uso.
Retire los objetos (rocas, vidrio roto, clavos,
alambre, hilo, etc.) los que pueden set arroja-
dos al aire por la cuchilla o enredarse alrede-
dor del mango.
• Mantenga a otros, incluyendo a los niSos,
animales, espectadores y ayudantes por Io
menos 15 metros (50 pies) alejados de la
zona de trabajo. Detenga el aparato de in-
mediato si alguien se aproxima.
• Sostenga el aparato firmemente con las
dos manos.
• Mantenga el equilibrio y el balance. No se
extienda demasiado.
• Siempre mantenga las ruedas en contacto
con ei suelo.
• Mantenga todas las partes de su cuerpo
alejadas de la cuchilla y del silenciador.
• Siempre empuje el aparato lentamente
sobre el suelo. Mant6ngase alerta en caso
de aceras desiguales, hoyos en el terreno,
raices grandes, etc.
• Use t]nicamente para trabajos especifica-
dos en este manual. USE EL CORTADOR
DE BORDES-CORTADORA APROPIA-
DAMENTE-Use Qnicamente para bordear
o cortar el tipo de arbusto, crecimiento, etc.
descritos en las instrucciones de uso. No
abuse des producto. No usebajo la Iluvia ni
en lugares que se encuentren mojados.
Nunca permita que los niSos usen este pro-
ducto. Nunca permita que ning5n adulto
use este producto sin antes haber leido las
debidas instrucciones.
• DESCONECTE LA BUJIA: cuando no se
encuentre en uso; antes de efectuar servi-
cio; limpieza etc., antes de cambiar acce-
sorios.
• Para reducir el desgo de incendio, no per-
mita la acumuIaci6n excesiva de cc6sped,
hojas o grasa en eI producto.
• Los objetos golpeados pot la cortadora
podrian causar accidentes graves a perso-
nas. Se deber_ examinar cuidadosamente
el c6sped y adarar todos los objetos antes
de comenzar a bordear o cortar.
• Nunca use este producto sin los debidos
protectores, placas u otros dispositivos
protectores en su lugar.
SEGURIBAB CON EL COMBUS-
TIBLE
• Mezcle y vierta el combustible al aire Iibre.
• Mant6ngalo alejado de las chispas y de las
llamas.
• Use recipiente aprobado para el combus-
tible.
• No fume ni permita que otros fumen cerca
del combustible o del aparato; no fume
10

mientrasseencuentremanejandoelapa-
rato.
• Asegt_resequeelaparatoest_correcta-
mentearmadoyenbuenacondici6nde
funcionamiento.
• Evitademarrarelcombustibleoelaceite.
Limpietodolosderramesdecombustible
antesdecomenzarausarelaparato.
• RetireseporIomenos3metros(10pies)
delareadeabastecimientoantesdecom-
enzar.
• Detengaelmotorypermitaqueelaparato
enfrieantesderemoverlatapadeltanque
decombustible.
• Almaceneelaparatoconeltanquedecom-
bustiblevacio;useelcombustiblequeque-
daenelcarburadoryenlaslineasdecom-
bustibledejandoelaparatoenmarcha
hastaquesedetenga.
• Almaceneelaparatoyelcombustibleenun
areaandondelosvaporesdelcombustible
noentrenencontactoconchispasollamas
abiertasprocedentesdecalentadoresde
agua,motoresointerruptoresel_ctricos,
calefactores,etc.
TRANSPORTE Y ALMACENAJE
• No sostenga el cuchilla expuesta.
• Detenga el motor antes de abandonar el
area de trabajo.
• Permita que el motor se enfrie, consuma
todo el combustible que queda en el carbu-
rador y ias lineas de combustible, y ase-
gure el aparato antes de almacenarlo o
transportarlo en un vehiculo.
• Antes de almacenar, use todo el combus-
tible que queda en el carburador poniendo
el motor en marcha y dejandolo en marcha
hasta que el motor se detenga. Permita
siempre que el aparato se enfrie antes de
guardarlo.
• Almacene el aparato y el combustible en un
area donde los vapores del combustible no
entren en contacto con chispas o llamas
abiertas de calentadores de agua, motores
o interruptores el6ctdcos, calefactores,
etc.
• AImacene el aparato de manera que la cu-
chilla no pueda causar heridas accidentaF
mente.
• Guarde el aparato dentro, fuera del alcance
de los ni_os.
Si ocurrieran situaciones las cuales no hayan
sido cubiertas en este manual, sea cuidado-
so y use el sentido comQn. Si necesita ayuda,
entre en contacto con su Agente de Servicio
Autorizado mas cercano o Ilame al
1-800-554-6723.
AVlSO SPECIAL: Estar expuesto a vibra-
clones a tray,s del uso prolongado de herra-
mientas manuales a gasolina puede cuasar
da_o en los vasos sanguineos o los nervios
de dedos, manos y coyunturas a personas
propensas a los trastornos de Ia circulaci6n o
alas hinchazones anormaIes. El uso prolon-
gado en tiempo frio ha sido vinculado a daSos
en los vasos saguineos de personas que pot
otra parte se encuentran en perfecto estado
de salud. Si ocurren sintomas tales como el
entumecimiento, dolor, p6rdida de fuer_a,
cambios de color y textura de la piel, p_rdida
deI tacto en las manos, dedos o coyunturas,
descontinQe el uso de este aparato y busque
ayuda m6dica. Unsistema anti-vibratorio no
garantizara que se eviten tales problemas.
Los usuarios que operan herramientas de
fuerza de manera prolongado y regular, deb-
eran vigilar de cerca su condici6n fisica y la
condici6n de su aparato.
AVISO SPECIAL: Su aparato viene equi-
pada con silenciador limitador de temperatura y
con rejiila antichispa que cumpla los requisitos
de los C6digos de California 4442 y 4443. To-
das las tierras forestadas federales, m_s los es-
tados de California, Idaho, Maine, Minnesota,
Nueva Jersey, Washington y Oreg6n, requieren
por ley que muchos motores de combustion in-
tema est6n equipados con rejilla antichispa. Si
usted el aparato en un estado y otra Iocalidad
donde existen tales reglamentos, usted tiene la
responsabilidad juridica de mantener estas pie-
zas en co[recto estado de funcionamiento. De
Io contrario, estar& en infraccion de la ley. Para
el uso normal del dueSo de la casa, el
silenciador y la rejilla antichispa no requedran
ningQn servicio. Despu_s de 50 horas de uso,
recomendamos que al silenciador se le de
servicio o sea substituido por un Concesionario
de Servicio Autorizado.
Es normal que el filtro de combustible golpetee
dentro del tanque de combustible cuando _ste
se encuentre vacio. El contrar combustible o
residuos de aceite en el silenciador es normal
debido a los ajustes del carburador y a pruebas
efectuadas por el fabdcante.
MONTAJE
,tt
ADVERTENCIA: Si recibe su apa-
rato ya armado, repita todos los pasos para
asegurarse de que se unidad haya sido arma-
da de la manera apropiada y de que todos los
sujetadores se encuentren ajustados.
HERRAMIENTA REQUERIDA:
• 2 Ilaves hesagonales (provistas)
• Llave ajustabie o aIicate grande
• Destomillador phillips
INSTALAClON DEL TUBO AL MO-
TOR
• Encaje el tubo con el mango conductor
dentro del motor.
• Introduzca y ajuste dos tomillos, arandeias
y tuercas dentro de los huecos en la abra-
zadera en el motor como se ilustra a conti-
nuaci6n.
INSTALACTION DEL MANGO
z'x
PELIGRO: RIESGO DE CORTADU-
RA. Para evitar graves heridas, la parte del
mango en forma de barrera debe ser instala-
da como se ilustra con el fin de mantener la
distancia entre el operador y la cuchilla du-
rante el giro de 6sta.
• Localice la etiqueta en la barra del mango.
Esta etiqueta cuenta con dos flechas. Po-
11

sicione Ia barra del mango en el soporte de
la montura entre estas dos flechas.
• Posicione la cubierta del soporte por encF
ma de la barra del mango. Otra vez,
asegt]rese de que la barra del mango se
encuentre entre las dos flechas.
• Introquzca el tornillo ya apri6telo manual-
mente solamente. AsegQrese de que la
barra del mango se encuentre instalada
correctamente; luego, apriete cada tornillo
firmemente con la Ilave hexagonal.
e-_x_ Barra del Mango _11o
de la Montura
d_IAUVI::RII:::NUIA: Remueva la tapa
del tanque de combustible lentamente al rea-
bastecer combustible.
Este motor est& habilitado para funcionar con
gasolina sin plomo. Se deber_ mezclar la gaso-
lina con un aceite de buena calidad para too-
totes de 2 tiempos enfriados a aire designado
para ser mezdado en la proporci6n 40:1. Se re-
comienda ei marca de aceite PoulanANeed Eat-
er. (Se obtiene una proporci6n de 40:1 mezclan-
do 3.2 onzas de aceite con cada galon de
gasolina sin plomo). AI mezclar el combustible
siga las instrucciones impresas en el recipiente.
Siempre lea y siga las instrucciones de seguri-
dad bajo la secci6n de SEGURIDAD CON EL
COMBUSTIBLE.
PARA DETENER EL MOTOR
• Mueva el interruptor ON/OFF a la posici6n
OFF.
• Si el motor no se detiente, mueva el ceba-
dora la posiciSn FULL CHOKE.
PARA ARRANCAR EL MOTOR
,tt
• ll PELIGRO: La cuchilla girar& mien-
tras se est_ intentando arrancar el motor.
Zl
IOI,ADVERTENCIA: Evite el contacto
con el silenciador: Un silenciador caliente
prodria causar serias quemaduras.
• Apoye el motor y el protector en el suelo, sos-
teniendo el aparato, de manera que la cuchilla
no toque el suelo.
PAPA ARPANCAR CON MOTOR
FRIO (o motor caliente despu_s de
quedar sin combustible)
• Mueva el interruptor ON/OFF a la posici6n
ON.
• Oprima lentamente el bombeador 6 veces.
• Mueva la palanca del cebador a ia posiciSn
FULL CHOKE.
Bombeador
de
Cebador
• Apriete y sujete el gatillo durante todos los
pasos siguientes.
• Tire firmemente del mango de la euerda de
arranque de 6 veces.
• Mueva la palanca del cebador a la posici6n
HALF CHOKE.
• Tire del mango de la cuerda de arranque
pero no mas de 6 veces, hasta que el motor
se ponga en march&
• Permita que el motor marche por 10 segun-
dos, para despu_s mover el cebador a la
posiciSn de OFF CHOKE.
PAPA ARPANCAR CON EL MOTOR
CALIENTE
• Mueva el interruptor ON/OFF a la posicion
ON.
• Mueva la palanca del cebador a Ia posici6n
OFF CHOKE.
• Tire firmemente del mango de la cuerda de
arranque firmemente hasta que el motor se
ponga en march&
• Si el motor no arranque en 5 intentos, siga
las instrucciones de PARA ARRANCAR
CON MOTOR FRIO.
• No cambie los reguladores automaticos del
motor o aceIere eI motor sobre los limites.
• Si el producto vibra de forma anormal, de-
tenga el motor de inmediato y verifique la
causa. La vibraci6n es generalmente una
advertencia de que existen problemas.
• Detenga el motor cuando abandone la po-
sici6n de uso; desconecte la bujia antes de
desatascar el protector de la cortadora, al
hacer reparaciones, ajustes, inspeccion,
etc.
• Use este producto desde la posici6n donde
los protectores bloqueen lavista de la pieza
cortadora.
PAPA CORTAR BORDES
A medida que se familiadce con el aparato, ud.
pordd& determina y su propio ritmo de trabajo.
Los factores tales como la profundidad del core
y el matedal que se est& cortando afectaran la
velocidad y el tiempo requeridos para hacer un
trabajo en particular:
• Permita que el motor se caliente Antes de
empezar a cortar.
• Aumente las revoIuciones antes de colocar la
cuchilla en el corte. Para obtener los mejores
resultados, corte con el motor acelerado a
fondo.
• Trabaje siempre alejandose de la gente y
de los abjetos solidos tales como los pare-
12

dones,lasrocasgrandes,losarboIes,los
autom6viles,etc.
• Tengacuidadoal cortarcereadelos
arbolesodeplantasvaliosas.Lacuchilla
metalicadealtavelocidadpuedecortarlas
raicesydaSarlasplantas.
• SiIacuchillasepara,hagaretrocederin-
mediatementeelaparatoparapermitirque
iacuchillavuelvaafirar.Silacuchillasigue
detenida,pareelmotor,desconectelabujia
einspeccioneelaparatoparadetectarb!o-
queoodafio.
,_ADVERTENCIA: Mantenga limpia
area de la cuchilla. Pare el motor, asegurese
de que la cuchilla se haya detenido por com-
pleto y desconecte la bujia antes de limpiar.
FIJAClON DE LA PROFUNDIDAD
DE LA RUEDA
_kADVERTENCIA: Nunca intente
ajustar la rueda mientras el motor se en-
cuentre en marcha. Siempre detenga el mtor,
espere a que la cuchilla pare de girar y desco-
necte la bujia antes de hacer los ajustes.
• Afloje la perilla de plastico enel protector de
la cuchilla.
• Suba o baje la rueda para obtener la profun-
didad de corte de borde deseada.
• Apriete manualmente la perilla.
AVISO: Si no se han hecho bordes en el
area en varias semanas, corte no m&s pro-
fundo de 1 cm (1/2 pulgado) la primera vez.
Recomendamos que todo servicio y ajuste no
explicado en este manual sea efectuado pot
un Concesionario de Servicio Autorizado.
CAMBIO DE LA CUCHILLA
4LtAUVI:I_,II-NL;IA: La cuchilla sigue
girando despu6s de que eI motor para y des-
pu6s de que se suelte el gatillo. Para evitar
graves beridas, asegQrese de que la cuchilla
se baya detenido completamente y desco-
necte la bujia antes de hacer ningQn tragajo
con la cuchilla.
I;tAUVI:KII-NL;IAI Use guantes de
proteccion al tocar o al hacer mantenimiento
a la cuchilla para evitar hendas. La cuchilla
es muy filosa y corta aQn no estando en movi-
miento.
Palance de Cierre
• Para remover la cuchilla, empuje hacia
adentro la palanca de cierre y sostenga.
• Gire la tuerca de la cuchilla hasta que la
palanca de cierre caiga dentro de una de
las ranuras en la taza para el polvo.
• Continue sosteniendo hacia dentro Iapalanca
de cierre. Esto impedira que el eje gire
mientras ajusta la tuerca de la cuchiiia.
• Remueva la tuerca de la cuchilla girandola
hacia la derecha.
• Remueva ambas arandelas y la cuchilla de
la eje.
Protector del
cuchilla 6_/,_ C_chilla
ran e,as
cuchilla
• Coloque la cuchilla nueva y el pIana aran-
dela en el eje roscado que sobresale del
caja de engranajes.
• Ahora coloque la arandela abombada en el
eje. Cerciorese de que el lado mas ancho
de la arandela est& orientado hacia la
cuchilla.
• InstaIe la tuerca de la cuchilIa
enroscandola en el eje dando vuelta a la
izquierda.
• Empuje hacia adentro lapalanca de cierre y
sostenga.
• Gire la tuerca de la cuchilla hasta que la
palanca de cierre caiga dentro de una de
las ranuras en la taza para el poIvo.
• Continue sosteniendo hacia dentro Iapalanca
de cierre. Esto impedira que el eje gire
mientras ajusta la tuerca de la cuchiIIa.
• Apriete la tuerca de la cuchilla firmemente
con una llave.
• Suelte la palanca de cierre.
AJUSTES AL CARBURADOR
Su carburador viene equipado con tapas limi-
tadoras. Dafios podran aeurrir si usted gira
las agujas mas alia de las tapas limitadoras.
Los ajustes al carburador son una tarea com-
plicada. Recomendamos que Ileve su apara-
to a un Agente de Servicio Autorizado.
CRONOMETRIZACION DEL ENCEN-
DIDO
Lacronometrizacion del encendidofijo einalt-
erable.
BUJIA
Cambie la bujia anualmente po]" una bujia
champion RCJ-8Y, La separaclon de los
electrodos es de 0,025 de pulgada.
13

TABLA DIAGNOSTICA
ADVERTENCIA: Siempre apague el aparato ydesconecte la bujia antes de
hacer cualquiera de las reparaciones recomendadas a continuaci6n que no re-
quieran que la unidad est6 en operaci6n.
SINTOMA
El motor no
arranca
CAUSA
• El motor se encuentra
ahogado.
• El tanque de combustible
est& vacio.
• La bujia no esta
haciendo chispa.
• El combustible no esta
Ilegando al carburador.
SOLUCION
• Vea las "Arranque".
• Llene el tanque con la mezcla
correcta de combustible.
• Instale una bujia nueva.
• El carburador requiere
ajuste.
El motor no • El carburador requiere • Vea "Ajustes al Carburador".
mantiene ajuste.
debidamente • El tomillo del gatillo • Afloje el tomillo
Ia marcha acelerador est&
Ienta demasiado ajustado.
El motor no • Filtro de aire sucio. • Limpie o cambie el filtro de aire.
acelera, le • La bujia est& • Limpie o cambie la bujia y recalibre
falta poten- carbonizada, la separaci6n.
cia, o se para • El carburador requiere • Vea "Ajustes al Carburador".
bajo carga ajuste.
El motor • La mezcla de combus- • Vacie el tanque de combustible y
humea tible esta equNocada. 116nelocon la mezcla correcta.
excesiva- • Filtro de aire sucio. • Limpie o cambie el filtro de aire.
mente • El carburador requiere • Vea "Ajustes al Carburador".
ajuste.
• Verifique que el fiItro de combustible
no est6 sucio; cambieIo. Inspeccione
la linea de combustible; reparela o
cambiela si se encuentra partida o
torcida.
• Entre en contacto con su Concesionario
de Servicio Autorizado.
&NECESITA AYUDA?
Lllame al 1-800-554-6723.
&NECESITA PIEZAS DE REPUES-
TO?
Entre en contacto con su concesionario.
ELECTROLUX HOME PRODUCTS
NORTH AMERICA, Divisibn de WCI Out-
door Products, Inc., garantiza al comprador
original que cada herramienta nueva a gasoli-
na y accesorio nuevo marca Weed Eater
ser_ libre de defectos de materiales y de
mano de obra y que se compromete a reparar
o reemplazar, bajo las condiciones de esta
garantia, todo producto y accesodo a gasoli-
na fefectuoso como se detalla a continuaci6n,
a partir de la fecha de compra original:
2 AI_IOS - Piezas y Mano de Obra, cuando
usado para fines dom6sticos.
90 DIAS - Piezas y Mano de Obra, si usado
para fines comerciales o profesionales o para
fines lucrativos.
30 DIAS - Piezas y Mano de Obra, si usado
para prop6sitios de aIquiler.
Esta garantia sno es transferible y no cubre
daSos ni responsabilidad civil debidos a man-
ejo indebido, mantenimiento incorrecto no al
uso de accesorios y/o juejos de piezas adi-
cionales no recomendados especificamente
pot ELECTROLUX HOME PRODUCTS
NORTH AMERICA para esta herramienta.
Asimismo, esta garantia no cubre afina-
ciones, bujias, filtros, sogas de arrangue, re-
sortes de arrangue, etc., que se desgastan y
requieren reemplazo por el uso razonable du-
rante el periodo de vigencia de la garantia.
Esta garantia no cubre preparaci6n de pre-
entrega ni ajustes normales expticados en eI
manual del usuario.
ESTA GARANTIA CONFIERE DERECHQS
JURIDICQS ESPEClFICOS AL COMPRA-
DOR, QUE PUEDE TENER OTROS DERE-
CHOS QUE VARIAN ENTRE ESTADOS.
NO SE ADMITIRAN RECLAMOS POR DA-
NOS CONSECUENTES NI POR OTROS
DANOS NI SE APLICARA NINGUNA OTRA
GARANTIA EXPRESA ADEMAS DE
AQUELLAS EXPRESAMENTE ESPIPULA-
DAS EN LA PRESENTE.
ALGUNOS ESTADOS NO PERMITEN LIMP
TAClONES DEL PERIODO DE VlEGENClA
14

DE GARANTIAS IMPLICITAS, NO LA EX-
CLUSION DE DANOS CONSECUENTES O
INCIDENTALES, NI SU LIMITAClON, DE
MODO QUE LA EXCLUSION Y LAS LIMiTA-
CLONES ANTERIORES PUEDEN NOTEN-
ER VALIDEZ EN SU CASO.
ES norma de ELECTROLUX HOME PROD-
UCTS NORTH AMERICA mejorar sus pro-
ductos continuamente. Pot Io tanto, ELEC-
TROLUX HOME PRODUCTS NORTH
AMERICA se reserva el derecho de cambiar,
modiflcar o descontinuar modelos, dise6os,
especificaciones y accesorios de todos Ios
productos en cualquier momento sin previo
aviso no responsabilidad para con ning_n
comprador.
SUS DERECHOS Y OBLIGACIONES DE
GARANTIA: La Agencia de Proteccion Am-
biental de los Estados Unidos y POULAN/
WEED EATER, DIVISION OF WCI OUT-
DOOR PRODUCTS se complacen en
explicarle Ia garantia del sistema de control
de emisiones en el motor de su equipo de
jardin y c_sped. Todos los motores de equipo
utilitario, de c_sped y jardin nuevos deber_n
serdise_ados, construidos y equipados para
satisfacer las normas rigurosas en contra de
la contaminacion del ambiente. POULAN/
WEED EATER debera garantizar el sistema
de control de emisi6n en el motor del equipo
de cesped yjardin por los periodos de tiempo
enumerados a continuaci6n, estipulando que
no haya habido ningt]n tipo de abuso, negli-
gencia, o mantenimiento no apropiado del
motor de su equipo de c6sped y jardin. Su
sistema de control de emisiOn incluye piezas
tales como el carburador y el sistema de igni-
cion. Cuando existe una condici6n bajo ga-
rantia, POULAN/WEED EATER reparara el
motor de su equipo de c6sped y jardin sin
costo alguno para usted. Los gastos cubier-
tos bajo garantia incluyen diagn6stico, pie-
zas y servicio. CUBIERTA DE GARANTIA
DEL FABRICANTE: Si cualquier pieza rela-
cionada con la emisi6n en su motor (como se
enumeran en la Lista de Piezas de Control de
Emisi6n Bajo Garantia) se encontrara defec-
tuosa o un defecto en los materiales o mano
de obra del motor causara el real funciona-
miento de tal pieza reIacionada con la emi-
sion, esta pieza sera reparada o reemptaza-
da por POULAN/WEED EATER.
GARANTIA DE RESPONSABILIDAD DEL
DUEI_IO: Como due_o deI equipo de c_sped
yjardin, usted es responsable deI mantenimi-
ento requerido indicado en el Manual del
Usuario. POULAN/WEED EATER recomien-
da que guarde to{los los recibos que cubren
el mantenimiento del motor de su equipo de
c_sped yjardin, pero POULAN/WEED EAT-
ER no puede negar Ia garantia t_nicamente
pot la falta de recibos o pot el incumplimiento
de las indicaciones de mantenimiento. Como
dueSo del motor del equipo de cesped y
jardin, usted debe saber que POULAN/
WEED EATER puede negarle la cubierta de
garantia si el motor de su equipo de c6sped y
jardin o una pieza del mismo, ha fallado debi-
do aI abuso, negligencia, mantenimiento no
apropiado, modificaciones sin aprobaci6n, o
el uso de piezas que no han sido hechas o
aprobadas por el fbricante original del equipo.
Usted ser_ el responsable de presentar el
motor deI equipo de c6sped y jardin a un cen-
tro de reparaciones autorizado POULAN/
WEED EATER tan pronto como surja el pro-
blema. Las reparaciones bajo garantia
deber_n ser completadas en una cantidad ra-
zonable de tiempo, no excediendo los 30
dias. Si cuenta con alguna pregunta en refer-
encia a sus derechos y responsabilidades,
usted debera entrar en contacto con su cen-
tro de servicio autorizado mas cercano o Ila-
mar a POULAN/WEED EATER al
1=800-554-6723. FECHA DEL COMIENZO
DE LA GARANTIA: El periodo de garantia
comienza en la fecha en que se compr6 el
motor del equipo de c6sped yjardin. DURA-
CION DE LA GARANTIA: Esta garantia
tiene un periodo de cubierta de dos aSos
desde la fecha inicial de compra. QUE
CUBRE: REPARACIONES O REEMPLA-
ZO DE PIEZAS. Las reparaciones o reem-
plazo de cualquier pieza en garantia ser_n
efectuadas sin cargo alguno para el duefio en
un centro de servicio POULAN/WEED EAT-
ER aprobado. Si tiene alguna pregunta en re-
laci6n con sus derechos y responsabilidades
de garantia, usted debera comunicarse con
su centro de servicio autorizado mas cercano
o Ilamar a POULAN/WEED EATER al
1-800-554-6723. PERIODO DE GARAN-
TIA: Cualquier pieza bajo garantia que no
est6 programada para set reemplazada
como requisito del programa de mantenimi-
ento, o la cual este programada para ser ins-
peccionada de forma regular para efectos de
"reparaciones o reemplazos si es necesalio"
deber_ garantizarse pordosaSos. Cualquier
pieza garantizada que est6 programada para
ser reemplazada como Io es requerido por el
programa de mantenimiento, debera ser ga-
rantizada pot el periodo de tiempo hasta el
primer cambio programado para el reempla-
zo. DIAGNOSTICO: Nosedebera cargar al
due_o ningt_n tipo de recargos por el servicio
de diagn6stico eI cual nos conduce a la deter-
minaci6n de que una pieza bajo garantia est_
defectuosa, si el trabajo de diagn6stico ha
sido Ilevado a cabo en un centro de servicio
POULAN/WEED EATER aprobado. DAI_IOS
POR CONSECUECIA: POULAN/WEED
EATER puede set responsable por da_os a
otros componentes del motor causados pot
el fallo de una pieza garantizada mientras
6sta se encuentre en garantia. QUE NO
CUBRE: Todos los fallos causados por el
abuso, la negligencia, o el mantenimiento no
apropiado no estan cubiertos. PIEZAS
PARA ANADIR O MODIFICADAS: El uso
de piezas a_adidas o modificadas puede ser
15

la base para anular la garantia. POULAN/
WEED EATER no se hace responsable de cu-
brir fallos de piezas garantizadas debido al
uso de piezas afiadidas o modificadas.
COMO ENTABLAR UNA RECLAMACION:
Si cuenta usted con alguna pregunta en refer_
encia a sus derechos y responsabilidades de
garantia, usted deber_ contactar a su centro
de servicio autorizado mas cercano o Ilamar
a POULAN/WEED EATER al
1-800-554-6723. EN DONDE OBTENER
SERVIClO DE GARANTIA: Servicio o repa-
raciones de garantia deber_ set provistas pot
todos los centros de servicio POULAN/WEED
EATER, Ilame al: 1-800-554-6723. MANTEN-
IMIENTO, REEMPLAZO Y REPARAClONES
DE PIEZAS RELACIONADAS CON LA EMI-
StON: Cualquier pieza de reemplazo POU-
LAN/WEED EATER aprobada usada en la
programaci6n de cualquier mantenimiento de
garantia o reparacion de piezas relacionadas
con la emisi6n sera provista al dueSo sin car'-
go alguno si la pieza se encuentra bajo ga-
rantia. LISTADE PIEZAS DE CONTROL DE
EMISlON BAJO GARANTIA: Carburador,
Sistema de Ignici6n: Bujia (cubierta t_nica-
mente hasta el periodo del primer mantenimi-
ento programado), M6dulo de Ignici6n. DE-
CLARAClON DE MANTENIMIENTO: El
duefio es responsa-ble de efectuar todo
mantenimiento programado como Io define el
Manual del Usuario.
16
-
 1
1
-
 2
2
-
 3
3
-
 4
4
-
 5
5
-
 6
6
-
 7
7
-
 8
8
-
 9
9
-
 10
10
-
 11
11
-
 12
12
-
 13
13
-
 14
14
-
 15
15
-
 16
16