AKASO D2000 Manual de usuario
- Categoría
- Grabadoras de disco
- Tipo
- Manual de usuario

Please read this manual before operating your car dash camera,
and keep it for further reference.
23
D2000 CAR DASH CAMERA
USER MANUAL

25-30 31-36
01-06 07-12
19-2413-18

Thank you for choosing AKASO Dash Cam. This FHD 1080P Dash Cam is designed for
recording real time video and audio while driving. To better use it, please read this manual
carefully.
Features
• 170 degree wide angle
• Full HD: 1920*1080@30fps; HD: 1280*720@60fps
• H.264 video compression format
• Automatic file lock triggered by G-sensor
• Motion detection
• WDR (Wide Dynamic Range)
• 3 inches HD LCD display
• Built-in Lithium Polymer battery
• Support microSD/TF card up to 32GB
Introduction
• Insert microSD/TF card to card slot of dash cam
• Select a spot on windshield to locate the suction cup near the rearview mirror
• Attach the cam to the bracket
• Connect the DC power/USB interface of the cam to the car cigarette lighter by the power
cable
• Adjust the cam to the position with best shooting range, then fix the position of bracket
• Once engine starts, the cam will start to work automatically
Attention:
• Please use Class 10 microSD/TF card or above
• Insert the microSD/TF card into the slot in the right direction
• To remove the microSD/TF card, please gently press the card
Product Installment
Once engine starts, the cam will start to record video automatically
• Turn On/Off
Short press Power button to turn on; Long press Power button to turn off
• Video shooting settings
- Please press OK first before entering the video shooting settings
- Press Menu button once to start video shooting mode settings. Press Up and Down
buttons to select each setting, and press OK to confirm.
- Resolution: 1920*1080; 1280*720; 848*480; 640*480; (Default: 1920*1080)
- Loop recording: off/1/3/5 minutes (Default: 3 minutes)
- WDR: off/on (Default: on)
- Exposure:+2;+5/3;+4/3;+1;+2/3;+1/3;+0;-1/3;-2/3;-1;-4/3;-5/3;-2; (Default: +0)
- Motion Detection: off/on (Default: off)
Use your DashCam
• 1 x Dash Cam
• 1 x Car Charger
• 1 x Suction Cup
• 1x 3M Adhesive Mount
• 1x Hardwire Kit
• 1 x USB Cable
• 1 x User Manual
What’s in the box?
Product Overview
1
5 6 7
2
3
4
13
8
9
10
11
12
1415
12
1. TF Card Slot 2. UP 3. Menu 4. Down
5. HD Interface 6. Stand Base 7. DC Power/USB Interface
8. Video/OK 9. Mode 10. Emergency Save
11. Power 12. Lens 13. Display 14. MIC 15. Reset Hole
Buttons:
Up Down
MENU – Press to enter and exit Settings Mode
• Press to navigate UP through options in Settings Mode
• Recording Mode Hot Key: Record(Press to start / stop recording)
2
OK
OK
M
MODE Select – Press to toggle between Recording / Photo / Playback modes
Current video file locked
POWER – Press and hold to turn the device on or off
M
English
1

- Record Audio: off/on (Default: on)
- Date Stamp: off/on (Default: on)
- G Sensor: off/low/medium/high (Default: medium)
- After setting, please press OK again to be back to video shooting mode.
• System settings
- Please press OK first before entering system settings
- Press Menu button twice to start system settings. Press Up and Down buttons to select
each setting, and press OK to confirm.
- Date/Time
- Plate Number: Enable this feature to enter your vehicle plate number for video recording.
The plate number will stamp in the video.
- Auto Power Off: off/1 minute/3 minutes/5 minutes
- Parking Monitoroff/on (default: off)
Enabling this feature will activate the camera if your car is bumped or moved to
automatically record hit-and-runs and automatically lock and save any video file that was
recorded.
- Beep Sound: off/on (default: on)
This setting allows you to turn the device's button sound effect on or off.
- Language
- Frequency
- Backlight: off/1 minute/3 minutes/5 minutes
- Format: to format your Micro SD card
- Default setting
- Version
- After setting, please press OK again to be back to video shooting mode.
• Set Emergency Save
- Press Emergency Save button, and press the button again to quit Emergency Save.
• Picture Taking
- Press Mode button to enter Picture Taking Mode
- Press OK to take pictures
• Video and picture Playback
- Please press OK first before entering video and picture playback
- Press Mode button to enter Playback Mode
- Use Up and Down buttons to browse files, and press OK to watch.
- Press Menu button to lock and unlock current file, and long press Menu button to delete
the files.
- After setting, select video shooting mode and press OK again to be back to video
shooting.
• Data backup and download
- Connect the camera to the computer through USB cable. You can download the files in
removable disk appearing in “My Computer” of your personal computer.
AKASO Dash Cam is not intended to be modified, or calibrated while
operating a vehicle. AKASO is not responsible for any damages resulting from the
user's misuse of the camera.
Use only manufacturer-approved chargers, accessories, and supplies.
AKASO cannot be responsible for the user’s safety when using accessories or supplies that
are not approved by AKASO.
Do not store your device in excessively hot, cold, damp or dry locations.
Doing so may cause the screen to malfunction, result in damage to the device, or cause the
battery to explode. Your device is recommended for use within a temperature range of -4º
to 131º F (-10º to 55º C), and a humidity range of 10% to 80%.
If your device becomes overheated, allow it to cool down before use.
Prolonged exposure of skin to an overheated device may cause low-temperature burn
symptoms, such as red spots or areas of darker pigmentation.
Do not touch the car charger with wet hands or disconnect the charger by pulling the
cord. Doing so may result in electrocution.
Do not use damaged power cords or plugs, or loose electrical sockets.
Faulty connections can cause electric shock or fire.
Do not touch your device with wet hands.
Doing so may cause electric shock.
Do not remove the SD card from the product during data recording,
which may cause an Error.
Always keep the camera lens clean, and ensure that the lens is not blocked by any
object or placed near any reflective material.
If the car’s windshield is tinted with a dark coating, recording quality may be affected.
Precaution
Problem: All buttons are not responding
Solution:
1. Press the RESET button to restart the camera
2. Reformat Micro SD card or replace with a new card
General Troubleshooting
3
4
- You also can insert the Micro SD card into a card reader to download files into your
personal computer.
• Battery Indicator
- The battery indicator is located at the right end corner of the screen. If the red cross sign
comes up, please charge your dash cam immediately.

5
6
3. Press the buttons firmly, or hold them in; it will not always respond to a quick hit.
Problem: The captured image is not stored
Solution:
1. Reformat memory card or replace with a new one
2. Make sure to stop recording before shutting down
Problem: Device will not turn on
Solution: Please make sure Dash Cam is well charged. Make sure unit is off while charging.
Problem: Menu Button Not responding
Solution: Press OK button to stop recording so you can access the menu
Problem: Micro SD card Not Recognized
Solution:
1. Format Micro SD card
2. Use a different Micro SD card
Problem: Screen powers off unexpectedly
Solution:
1. Disable Screen Saver feature
2. Charge the battery
3. Restore to default settings
Problem: Unable to record videos
Solution:
1. Check remaining space on memory card and delete files if necessary
2. Reformat your memory card; if issue persists, replace with a new one
Restore to Default Settings
3. Make sure to hold the OK button in until the red light is blinking
Problem: Stops Recording after 20-40 minutes
Solution: Turn Loop Recording on
Problem: "File error" is encountered when trying to play back pictures or video
Solution: Format Micro SD card
Some content and services accessible through this device belong to third parties and are
protected by copyright, patent, trademark and/or other intellectual property laws. Such
content and services are provided solely for your personal non-commercial use.
You may not use any content or services in a manner that has not been authorized by the
content owner or service provider. Without limiting the foregoing, unless expressly
authorized by the applicable content owner or service provider, you may not modify, copy,
republish, upload, post, transmit, translate, sell, create derivative works, exploit, or distribute
in any manner or medium any content or services displayed through this device.
“THIRD PARTY CONTENT AND SERVICES ARE PROVIDED “AS IS.” AKASO DOES NOT
WARRANT CONTENT OR SERVICES SO PROVIDED, EITHER EXPRESSLY OR IMPLIEDLY, FOR
ANY PURPOSE. AKASO EXPRESSLY DISCLAIMS ANY IMPLIED WARRANTIES, INCLUDING BUT
NOT LIMITED TO, WARRANTIES OF MERCHANTABILITY OR FITNESS FOR A PARTICULAR
PURPOSE. AKASO DOES NOT GUARANTEE THE ACCURACY, VALIDITY, TIMELINESS, LEGALITY,
OR COMPLETENESS OF ANY CONTENT OR SERVICE MADE AVAILABLE THROUGH THIS
DEVICE AND UNDER NO CIRCUMSTANCES, INCLUDING NEGLIGENCE, SHALL AKASO BE
LIABLE, WHETHER IN CONTRACT OR TORT, FOR ANY DIRECT, INDIRECT, INCIDENTAL,
SPECIAL OR CONSEQUENTIAL DAMAGES, ATTORNEY FEES, EXPENSES, OR ANY OTHER
DAMAGES ARISING OUT OF, OR IN CONNECTION WITH, ANY INFORMATION CONTAINED
IN, OR AS A RESULT OF THE USE OF ANY CONTENT OR SERVICE BY YOU OR ANY THIRD
PARTY, EVEN IF ADVISED OF THE POSSIBILITY OF SUCH DAMAGES.”
Disclaimer
For any inquiries, issues or comments concerning our products, please send E-mail to the
address below, and we will respond as soon as possible.
E-mail: [email protected]
US customer service line: (301)670-7335
Contact US
English

Vielen Dank, dass Sie sich für die AKASO Dash Kamera entschieden haben. Diese FHD 1080P
Dash Kamera wurde zur Aufnahme von Echtzeitvideos und Ton während der Autofahrt
entworfen. Für eine optimale Verwendung lesen Sie bitte dieses Handbuch sorgfältig durch.
Produktinformationen
• 170 Grad Weitwinkel(objektiv)
• Volle HD: 1920*1080@30fps; HD: 1280*720@60fps
• H.264 Videokompression
• Automatische Dateisperrung ausgelöst durch G-Sensor.
• Bewegungsmelder
• WDR (Wide Dynamic Range, großer Kontrastumfang)
• 3 Zoll HD LCD Bildschirm
• Integrierter Lithium-Polymer-Akku
• Unterstützt MikroSD/TF-Karte bis zu 32GB
Einleitung
• Setzen Sie eine MikroSD/TF-Karte in den Kartensteckplatz der Armaturen-Kamera ein.
• Wählen Sie eine Stelle auf der Windschutzscheibe in der Nähe des Rückspiegels, um den
Saugnapf zu platzieren.
• Befestigen Sie die Kamera an der Halterung
• Verbinden Sie die DC-Strom/USB-Schnittstelle der Kamera mit dem Auto Zigarettenanzünder
über das Stromkabel.
• Passen Sie die Position der Kamera für einen optimalen Aufnahmewinkel an, dann fixieren Sie
die Position der Halterung.
• Sobald Sie den Motor starten, beginnt die Kamera automatisch zu laufen.
Achtung:
• Bitte verwenden Sie eine MikroSD/TF-Karte der Klasse 10 oder darüber,
• Stellen Sie sicher, dass Sie die MikroSD/TF-Karte in korrekter Richtung in den Kartensteckplatz
einsetzen.
• Um die MikroSD/TF-Karte zu entfernen, drücken Sie bitte leicht auf die Karte.
Produktinstallation
Sobald der Motor gestartet wird, beginnt die Kamera automatische mit der Aufnahme.
• Einschalten/Ausschalten
Drücken Sie die Power-Taste kurz, um das Gerät einzuschalten; Die Power-Taste lange drücken,
um das Gerät auszuschalten.
• Videoaufnahme Einstellungen
- Bitte drücken Sie zuerst OK, bevor Sie die Videoaufnahme Einstellungen öffnen.
- Drücken Sie die Menü-Taste einmal, um die Videoaufnahme Modus Einstellungen zu starten.
Drücken Sie Auf und Ab, um jede Einstellung auszuwählen, und drücken Sie OK, um zu
bestätigen.
- Auflösung: 1920*1080; 1280*720; 848*480; 640*480; (Standard 1920*1080)
- Schlaufen-Aufnahme: aus/1/3/5 Minuten (Standard: 3 Minuten)
- WDR: aus/an (Standard an)
- Belichtung: +2;+5/3;+4/3;+l;+2/3;+l/3;+0;-l/3;-2/3;-l;-4/3;-5/3;-2; (Standard: +0)
- ´Bewegungsmelder: aus/an (Standard: aus)
Verwendung Ihrer Armaturen-Kamera
• 1 × Autoarmaturen-Kamera
• 1 × Autoladegerät
• 1 × Saugnapf
• 1 × 3M Haftungs-Halterung
• 1 × Hardware-Ausstattung
• 1 × USB Kabel
• 1 × Benutzerhandbuch
Lieferumfang
Produktübersicht
1
5 6 7
2
3
4
13
8
9
10
11
12
1415
12
1. TF-Kartensteckplatz 2. Auf 3. Menü 4. Ab
5. HD Schnittstelle 6. Standfuß 7. DC Strom/USB Schnittstelle
8. Video/OK 9. Modus 10. Notfall-Sicherung
11. Power 12. Linse 13. Bildschirm 14. Mikrofon 15. Rücksetz-Öffnung
Tasten:
Auf Ab
MENÜ- Drücken um den Einstellungsmodus zu öffnen und zu verlassen.
• Drücken, um im Einstellungsmodus mit Optionen nach OBEN zu navigieren.
• Aufnahmemodus Hotkey: Aufnahme (Drücken um Aufnahme zu starten/stoppen)
7
8
OK
OK
M
MODUS-Auswahl – Drücken, um zwischen Aufnahme / Foto / Wiedergabe Modi zu
umzuschalten.
Derzeitiges Video-Dokument ist gesperrt
Power – Drücken und halten um das Gerät abzuschalten
M
Deutsch

- Audio-Aufnahme: aus/an (Standard: an)
- Datumsstempel: aus/an (Standard: an)
- G-Sensor: aus/niedrig/mittel/hoch (Standard: mittel)
- Nach der Einstellung, drücken Sie bitte nochmals OK, um in den Videoaufnahmemodus
zurückzukehren.
• Systemeinstellungen
- Drücken Sie bitte zuerst OK, bevor Sie die Systemeinstellungen öffnen.
- Drücken Sie die Menü-Taste zweimal, um die Systemeinstellungen zu öffnen. Drücken Sie die
Auf- und Ab-Tasten, um jede Einstellung auszuwählen und drücken Sie OK, um zu bestätigen.
- Datum/Zeit
- Kennzeichen: Aktivieren Sie diese Funktion, um Ihr Kennzeichen für die Videoaufnahme
einzugeben. Ihr Kennzeichen-Stempel wird im Video angezeigt.
- Auto ausschalten: aus/1 Minute/3 Minuten /5 Minuten
- Parkier-Überwachung: aus/an (Standard: aus)
Wenn diese Funktion aktiviert ist, schaltet sich die Kamera automatisch ein, wenn Ihr Fahrzeug
angestoßen oder bewegt wird, um automatisch Fahrerfluchten aufzuzeichnen und alle
aufgezeichneten Videos zu sperren und zu speichern.
- Piepston: aus/an (Standard: an)
Mit dieser Einstellung lassen sich die Tastentöne des Geräts ein- oder ausschalten.
- Sprache
- Frequenz
- Hintergrundbeleuchtung: aus/1 Minute/3 Minuten/5 Minuten
- Format: Um Ihre Mikro SD-Karte zu formatieren
- Standardeinstellungen
- Version
- Nachdem Sie die Einstellungen vorgenommen haben, drücken Sie bitte nochmals OK, um in
den Videoaufnahmemodus zurückzukehren.
• Notfall-Speicherung aktivieren
- Drücken Sie die Notfall-Speicherungs-Taste, und drücken Sie die Taste erneut, um die Notfall-
Speicherung zu verlassen.
• Foto-Aufnahme
- Drücken Sie die Modus-Taste, um den Foto-Aufnahmemodus zu öffnen.
- Drücken Sie OK, um Fotos zu machen.
• Video- und Foto-Wiedergabe
- Bitte drücken Sie zuerst OK, bevor Sie die Video- und Foto-Wiedergabe öffnen.
- Drücken Sie die Modus-Taste um den Wiedergabemodus zu öffnen.
- Verwenden Sie die Auf- und Ab-Tasten, um die Videos durchzublättern und drücken Sie OK,
um sie wiederzugeben.
- Drücken Sie die Menü-Taste, um das die derzeit ausgewählte Datei zu sperren oder zu
entsperren, und drücken Sie die Menü-Taste lange, um Dateien zu löschen.
• Daten-Sicherung und Übertragung
- Verbinden Sie die Kamera über das USB-Kabel mit Ihrem Computer. Sie können die Dateien
mit dem Wechseldatenträger übertragen, der in „Mein Computer“ auf Ihrem Computer
angezeigt wird.
Die AKASO Armaturen-Kamera ist nicht dazu geändert während der Autofahrt
abgestimmt zu werden. AKASO haftet für keinerlei Schäden, die durch Missbrauch oder
Fehlgebrauch der Kamera entstehen.
Verwenden Sie ausschließlich Ladegeräte, Zubehör und sonstige Zusätze, die vom
Hersteller zugelassen sind.
AKASO kann nicht für die Sicherheit des Benutzers garantieren, wenn Zubehör verwendet
wird, welches nicht von AKASO zugelassen ist.
Lagern Sie Ihr Gerät nicht an übermäßig heißen, kalten, feuchten oder trockenen Orten.
Andernfalls könnten Schäden am Bildschirm oder am Gerät auftreten oder der Akku
explodieren. Es wird empfohlen, dass Sie Ihr Gerät innerhalb von Temperaturen zwischen -10°
bis 55° C (-4° bis 131° F) und einer Luftfeuchtigkeit von 10% bis 80% verwenden.
Wenn sich Ihr Gerät überhitzt, warten Sie, bis es abkühlt, bevor Sie es verwenden.
Bei längerem Hautkontakt mit einem überhitzten Gerät können Niedrig-Temperatur
Verbrennungssymptome wie rote Stellen oder dunklere Pigmentierung auftreten.
Berühren Sie das Autoladegerät nicht mit feuchten Händen und entfernen Sie das
Ladegerät nicht, indem Sie am Kabel ziehen.Andernfalls kann dies zu Stromschlägen führen.
Verwenden Sie keine beschädigten Stromkabel, Stecker oder lose Steckdosen.
Fehlerhafte Anschlüsse können elektrische Schläge oder Feuer verursachen.
Berühren Sie das Gerät nicht mit feuchten oder gar nassen Händen.
Dies kann zu elektrischen Schlägen führen.
Entfernen Sie die SD-Karte nicht während der Aufnahme.
Dies könnte Fehler verursachen.
Halten Sie die Linse stets sauber und stellen Sie sicher, dass die Linse nicht von Objekten
verdeckt oder in der Nähe von reflektierenden Materialien platziert ist.
Wenn die Windschutzscheibe des Fahrzeugs getönt ist, könnte dies die Aufnahmequalität
beeinträchtigen.
Vorsichtsmaßnahmen
Problem: Alle Tasten reagieren nicht
Lösung:
1. Drücken Sie die RÜCKSETZ-Taste, um die Kamera neu zu starten.
2. Formatieren Sie die Mikro SD-Karte neu oder setzen Sie eine neue Karte ein.
3. Drücken Sie die Tasten fest, oder halt Sie sie gedrückt; Die Tasten reagieren nicht immer,
wenn sie nur schnell gedrückt werden.
Allgemeine Fehlerbehebung
9
10
- Sie können Ihre Mikro SD-Karte auch in ein Kartenlesegerät einsetzen, um Dateien auf ihren
Computer zu übertragen.
• Akkustands-Anzeige
- Die Akkustands-Anzeige befindet sich in der rechten unteren Ecke des Bildschirms. Wenn ein
rotes Kreuz aufleuchtet, laden Sie bitte unverzüglich Ihre Armaturen-Kamera auf.

11
12
Problem: Das Aufnahmen werden nicht gespeichert.
Lösung:
1. Formatieren Sie die Speicherkarte neu oder ersetzen Sie sie durch eine neue.
2. Stellen Sie sicher, dass Sie die Aufnahme stoppen, bevor Sie das Gerät ausschalten.
Problem: Das Gerät lässt sich nicht einschalten.
Lösung:
Bitte stellen Sie sicher, dass der Akku der Armaturen-Kamera ausreichend aufgeladen ist.
Stellen Sie sicher, dass das Gerät während dem Ladevorgang ausgeschaltet ist.
Problem: Menü-Taste reagiert nicht.
Lösung:
Drücken Sie die OK-Taste, um die Aufnahme zu stoppen, damit Sie das Menü öffnen können.
Problem: Mikro SD-Karte wird nicht erkannt.
Lösung:
1. Formatieren Sie die Mikro SD-Karte.
2. Verwenden Sie eine andere Mikro SD-Karte.
Problem: Der Bildschirm schaltet sich unerwartet ab.
Lösung:
1. Schalten Sie die Bildschirmschoner Funktion aus.
2. Laden Sie den Akku
3. Stellen Sie die Standardeinstellungen wieder her.
Problem: Es lassen sich keine Videos aufnehmen.
Lösung:
1. Überprüfen Sie ob der Speicherplatz auf der Speicherkarte vorhanden noch genug ist und
löschen sie gegebenenfalls nicht benötigte Dateien.
2. Formatieren Sie die Speicherkarte neu. Wenn das Problem weiterhin besteht, ersetzen Sie die
Speicherkarte. Stellen Sie die Standardeinstellungen wieder her.
3. Halten Sie die OK-Taste, bis das rote Licht blinkt.
Problem: Die Aufnahme stoppt nach 20-40 Minuten.
Lösung: Aktiveren Sie die Schlaufen-Aufnahme
Problem: "File Error" (Datenfehler) erscheint beim Versuch, Fotos oder Videos wiederzugeben.
Lösung: Formatieren Sie die Mikro SD-Karte.
Einige Inhalte und Dienstleistungen, die durch dieses Gerät zugänglich gemacht werden, sind
Eigentum Dritter und durch Urheberrechte, Patente, Warenzeichen und/oder andere Gesetze
für geistiges Eigentum geschützt. Diese Inhalte und Dienstleistungen werden ausschließlich für
private, nicht-kommerzielle Zwecke zur Verfügung gestellt.
Sie sind nicht dazu berechtigt, jegliche Inhalte in einer Art und Weise zu verwenden, die nicht
durch Inhaltseigentümer oder Dienstleister autorisiert sind. Ohne Vorheriges zu beschränken,
sofern nicht ausdrücklich durch Inhaltseigentümer oder Dienstleister gestattet, ist es nicht
gestattet, jegliche Inhalte oder Dienstleistungen, die durch dieses Gerät dargestellt werden, zu
ändern, kopieren, neu veröffentlichen, hochzuladen, veröffentlichen, übermitteln, verkaufen,
nutzen, in ähnlicher Weise anzufertigen oder in jeglicher Weise zu vertreiben.
INHALTE UND DIENSTLEISTUNGEN DRITTER WERDEN IN DER VORLIEGENDEN FORM (AS-IS)
BEREITGESTELLT. AKASO ÜBERNIMMT KEINE GEWÄHR VON BEREITGESTELLTEN INHALTEN
ODER DIENSTLEITUNGEN, AUSDRÜCKLICH ODER IMPLIZIERT. AKASO LEHNT AUSDRÜCKLICH
SÄMTLICHE AUSDRÜCKLICHE ODER STILLSCHWEIGEND ANSPRÜCHE ODER GARANTIEN AB,
DIE IN JEDWEDER ART ERHOBEN ODER AUSGESPROCHEN WERDEN, INKLUSIVE, ABER NICHT
AUSSCHLIEßLICH,, EINER GARANTIE ÜBER HANDELSFÄHIGKEIT, ZULÄSSIGKEIT ODER EINER
EIGNUNG FÜR BESTIMMTE ZWECKE. AKASO ÜBERNIMMT KEINE GEWÄHR FÜR GENAUIGKEIT,
GÜLTIGKEIT, KORREKTE ZEITANGABE, RECHTMÄßIGKEIT ODER VOLLSTÄNDIGKEIT JEDWEDER
INHALTE ODER DIENSTLEISTUNG, DIE DURCH DIESES GERÄT VERFÜGBAR GEMACHT WERDEN.
UNTER KEINEN UMSTÄNDEN, EINSCHLIEßLICH FAHRLÄSSIGKEIT, KANN AKASO HAFTBARE
GEMACHT WERDEN, WEDER DURCH VERTRAG NOCH DURCH UNERLAUBTE HANDLUNG, FÜR
JEDWEDE DIREKTE, INDIREKTE, ZUFÄLLIGE, SPEZIELLE ODER FOLGESCHÄDEN, ANWALTSKOSTEN,
AUSGABEN, ODER SONSTIGE SCHÄDEN, DIE DURCH ODER IN VERBINDUNG MIT JEDWEDER
ENTHALTENEN INFORMATION ENTSTANDEN SIND, ODER ALS FOLGE DER NUTZUNG
JEDWELCHER INHALTE ODER DIENSTLEISTUNG DURCH SIE ODER DRITTER, SELBST, WENN AUF
DIE MÖGLICHKEIT SOLCHER SCHÄDEN HINGEWIESEN WURDE.
Haftungsausschluss
Bei allen Anfragen, Problemen oder Kommentaren bezüglich unserer Produkte, senden Sie uns
ein E-Mail an die unten genannte Adresse, und wir werden uns so schnell wie möglich bei
Ihnen melden.
E-Mail: [email protected]
Kontaktieren Sie uns
Deutsch

Gracias por elegir la cámara de vídeo para coche AKASO. Esta cámara de vídeo FHD 1080P está
diseñada para grabar vídeo y audio en tiempo real mientras conduce. Para sacarle el mayor
provecho, por favor, lea este manual con atención.
Características
• 170 º de ancho de ángulo
• Full HD: 1920*1080@30fps; HD: 1280*720@60fps
• Formato de compresión de vídeo H.264
• Bloqueo de archivos automático activado por el sensor-G
• Detección de movimiento
• WDR (Wide Dynamic Range)
• Pantalla HD LCD de 3 pulgadas
• Batería integrada de polímero de litio
• Tarjeta de hasta 32GB, compatible con microSD/TF
Introducción
• Inserte la tarjeta microSD/TF en la ranura de tarjetas de la cámara
• Seleccione un lugar en el parabrisas para colocar la ventosa, cerca del espejo retrovisor
• Fije la cámara al soporte
• Conecte el interfaz de alimentación DC /USB de la cámara al mechero del coche por medio
del cable de alimentación
• Adapte la cámara a la posición en la que tenga el mejor ángulo para grabar, después fije la
posición en el soporte.
• Una vez arranque el motor, la cámara comenzará a funcionar automáticamente
Atención:
• Por favor, utilice una tarjeta microSD/TF Clase 10 o superior.
• Inserte la tarjeta microSD/TF en la ranura en la dirección correcta.
• Para retirar la tarjeta microSD/TF, por favor, presione suavemente la tarjeta.
Intalación del producto
Una vez arranque el motor, la cámara comenzará a funcionar automáticamente
• Encienda/Apague
Presione una vez el botón de encendido para encender, mantenga apretado el mismo botón
para apagar
• Ajustes de la grabación de vídeo
- Por favor, presione OK antes de entrar en los ajustes de grabación de vídeo
- Presione el botón Menu una vez para iniciar los ajustes del modo de grabación de vídeo.
Presione los botones Arriba y Abajo para seleccionar cada ajuste, y presione OK para confirmar.
- Resolución: 1920*1080; 1280*720; 848*480; 640*480; (Por defecto: 1920*1080)
- Grabación en bucle: apagada/1/3/5 minutos (Por defecto: 3 minutos)
- WDR: apagado/encendido (Por defecto: encendido)
- Exposición:+2;+5/3;+4/3;+1;+2/3;+1/3;+0;-1/3;-2/3;-1;-4/3;-5/3;-2; (Por defecto: +0)
- Detección de movimiento: apagado/encendido (Por defecto: apagado)
Utilice su cámara de vídeo para coche
• 1 cámara de vídeo para coche
• 1 cargador para el coche
• 1 ventosa
• 1 soporte adhesivo 3M
• 1 kit de ferretería
• 1 cable USB
• 1 manual del usuario
¿Qué hay en la caja?
Visión de conjunto del producto
1
5 6 7
2
3
4
13
8
9
10
11
12
1415
12
1. Ranura para tarjeta TF 2. Arriba 3. Menú 4. Abajo
5. Interfaz HD 6. Soporte Base 7. Alimentación Corriente continua/Interfaz USB
8. Video/OK 9. Modo 10. Guardado de emergencia
11. ENCENDIDO 12. Lente 13. Pantalla 14. Micrófono 15. Agujero de reinicio
Botones:
Arriba Abajo
MENU - Presione para entrar y salir del modo de ajustes
• Presione para navegar hacia Arriba por las opciones en el Modo de Ajustes.
• Atajo de teclado para el modo de grabación: Grabar (presione para iniciar / parar de
grabar).
14
OK
OK
M
MODO Seleccionar - Presione para cambiar entre las opciones Grabar / Foto / Modos de
reproducción.
Archivo de vídeo actual bloqueado.
ENCENDIDO - Mantenga apretado para encender o apagar el dispositivo.
M
Español
13

- Grabación de audio: apagado/encendido (Por defecto: encendido)
- Código de tiempo: apagado/encendido (Por defecto: encendido)
- Sensor G: apagado/bajo/medio/alto (Por defecto: medio)
- Después de hacer los cambios, por favor, presione OK de nuevo para regresar al modo de
grabación de vídeo.
• Ajustes del sistema
- Por favor, presione OK antes de entrar en los ajustes del sistema
- Presione el botón Menu dos veces para iniciar los ajustes del sistema. Presione los botones
Arriba y Abajo para seleccionar cada ajuste, y presione OK para confirmar.
- Fecha/Hora
- Número de placa: Habilite esta función para introducir la matrícula de su vehículo para la
grabación de vídeo. El número de matrícula aparecerá en el vídeo.
- Apagado automático: apagado/1 minuto/3 minutos/5 minutos
- Seguimiento de aparcamiento: apagado/encendido (por defecto: apagado)
Habilitar esta función activará la cámara si su coche es golpeado o movido para grabar
automáticamente a los que choquen contra su vehículo y huyan y bloquear y guardar
automáticamente cualquier archivo de vídeo que se haya realizado.
- Sonido de pitido: apagado/encendido (Por defecto: encendido).
Este ajuste le permite encender o apagar el botón de efecto de sonido del dispositivo.
- Idioma
- Frecuencia
- Luz de fondo: apagado/1 minuto/3 minutos/5 minutos
- Formato: para formatear su tarjeta Micro SD
- Ajuste por defecto
- Versión
- Después de hacer los cambios, por favor, presione OK de nuevo para regresar al modo de
grabación de vídeo.
• Establezca el guardado de emergencia
- Presione el botón de Guardado de Emergencia, y presione el botón de nuevo para salir del
Guardado de Emergencia.
• Sacar fotos
- Presione el botón de Modo para entrar en el modo de Sacar Fotos
- Presione OK para sacar fotos
• Reproducción de vídeo y fotos
- Por favor, presione OK antes de entrar en el modo de reproducción de vídeo y fotos
- Presione el botón de Modo para entrar en el modo de Reproducción
- Utilice los botones Arriba Y Abajo para mostrar los archivos, y presione OK para verlos.
- Presione del botón Menu para bloquear y desbloquear el archivo actual, y mantenga
apretado el botón Menu para borrar los archivos.
- Después de hacer los cambios, seleccione el modo de grabación de vídeo y presione OK de
nuevo para regresar al modo de grabación de vídeo.
• Copia de seguridad y descarga de datos
- Conecte la cámara al ordenador por medio del cable USB. Puede descargar los archivos en
el disco extraible que aparece en «Mi PC» de su ordenador.
La cámara de vídeo AKASO no está diseñada para ser modificada, o calibrada mientras
está funcionando el vehículo. AKASO no se hace responsable de cualquier daño como
resultado del mal uso que el usuario pueda hacer de la cámara.
Utilice solo los cargadores, accesorios y repuestos aprobados por el fabricante.
AKASO no puede hacerse responsable de la seguridad del usuario si utiliza accesorios o
repuestos no aprobados por AKASO.
No guarde su dispositivo en lugares excesivamente calientes, fríos, húmedos o secos.
Al hacerlo puede causar que la pantalla funcione mal, se produzcan daños en el dispositivo o
explote la batería.
Se recomienda que utilice su dispositivo dentro de un rango de temperaturas
que va desde -4° a 131° F (-10° to 55° C), y un rango de humedad desde 10% a 80%
Si su dispositivo se sobrerecalienta, deje que se enfríe antes de usarlo.
La exposición prolongada de la piel a un dispositivo sobrecalentado puede causar síntomas de
quemadura a baja temperatura, tales como manchas rojas o zonas de pigmentación más oscura.
No toque el cargador del coche con las manos húmedas ni lo desconecte tirando del
cable. Si lo hace puede producirse una electrocución.
No use cables de alimentación o enchufes dañados, o tomas de corriente sueltas.
Las conexiones defectuosas pueden causar descargas eléctricas o fuego.
No toque su dispositivo con las manos húmedas.
Hacerlo puede provocar una descarga eléctrica.
No retire la tarjeta SD del aparato durante la grabación de datos, lo cual puede causar un
error.
Mantenga siempre limpias las lentes de la cámara, y asegúrese de que la lente no está
bloqueada por ningún objeto o situada cerca de cualquier material reflectante.
Si el parabrisas del coche está tintado con un recubrimiento oscuro, la calidad de la grabación
se puede ver afectada.
Precaución
Problema: Los botones no responden
Solución:
1. Presione el botón RESET para reiniciar la cámara.
2. Reformatee la tarjeta Micro SD o sustitúyala por una nueva.
Solución de problemas generales
15 16
- También puede insertar la tarjeta Micro SD en un lector de tarjetas para descargar los
archivos en su ordenador.
• Indicador de batería
- El indicador de batería está situado en la esquina derecha de la pantalla. Si aparece el
símbolo con forma de cruz roja, por favor cargue su cámara inmediatamente.

17
18
3. Presione los botones firmemente, o mantégalos apretados; no siempre responderán a una
pulsación rápida.
Problema: La imagen capturada no se ha guardado
Solución:
1. Reformatee la tarjeta de memoria o sustitúyala por una nueva
2. Asegúrese de parar de grabar antes de apagar
Problema: El dispositivo no se enciende
Solución: Por favor, asegúrese de que la cámara de vídeo está bien cargada. Asegúrese de que
el aparato está apagado mientras se carga.
Problema: El botón de Menú no responde
Solución:
Presione el botón OK para detener la grabación para que pueda tener acceso al menu
Problema: No reconoce la tarjeta Micro SD
Solución:
1. Formatee la tarjeta Micro SD
2. Utilice una tarjeta Micro SD diferente
Problema: La pantalla se apaga inesperadamente
Solución:
1. Deshabilite la función de Salvapantallas
2. Cargue la batería
3. Restaure los ajustes por defecto
Problema: No se puede grabar vídeos
Solución:
1. Compruebe el espacio que queda en la tarjeta de memoria y borre archivos si es necesario
2. Reformatee su tarjeta de memoria; si el problema persiste, sustitúyala por una nueva y
restaure los ajustes por defecto
3. Asegúrese de que mantiene apretado el botón OK hasta que la luz roja parpadee
Problema: Deja de grabar a los 20-40 minutos
Solución: Active la grabación en bucle
Problema: Se encuentra un <error de archivo> al intentar reproducir fotos o vídeo
Solución: Formatee la tarjeta Micro SD
Algunos contenidos y servicios accesibles a través de este dispositivo, pertenecen a terceros y
están protegidos por copyright, patentes, marcas y/o otras leyes de propiedad intelectual: Tales
contenidos y servicios se proporcionan únicamente para su uso personal y sin propósitos
comerciales.
Puede que no use ningún contenido ni servicio de forma que no haya sido autorizada por el
dueño del contenido o proveedor del servicio. Sin perjuicio de lo anterior, a menos que se esté
expresamente autorizado por el dueño del contenido o el proveedor del servicio, usted no
puede modificar, copiar, republicar, subir, postear, transmitir, traducir, vender, crear trabajos
derivados, explotar o distribuir de cualquier forma o medio ningún contenido o servicios
mostrados a través de este dispositivo.
«CONTENIDO DE TERCEROS Y SERVICIOS PROVISTOS» » AKASO NO GARANTIZA CONTENIDO
O SERVICIOS ASÍ PROVISTOS, YA SEA EXPRESAMENTE O IMPLÍCITAMENTE, PARA CUALQUIER
PROPÓSITO. AKASO RECHAZA EXPRESAMENTE CUALQUIER GARANTÍA IMPLÍCITA,
INCLUYENDO, PERO SIN LIMITARSE, LAS GARANTÍAS DE MERCANTIBILIDAD O FITNESS, PARA
UN PROPÓSITO EN PARTICULAR. AKASO NO GARANTIZA LA PRECISIÓN, VALIDEZ, HORARIO,
LEGALIDAD, O INTEGRIDAD DE CUALQUIER CONTENIDO O SERVICIO PUESTO A DISPOSICIÓN
A TRAVÉS DE ESTE DISPOSITIVO Y BAJO NINGUNA CIRCUNSTANCIA, INCLUYENDO LA
NEGLIGENCIA, AKASO SERÍA RESPONSABLE, YA SEA POR CONTRATO O AGRAVIO, PARA
CUALQUIER DAÑO DIRECTO, INDIRECTO, INCIDENTAL, ESPECIAL O CONSECUENCIAL, DAÑOS,
MINUTA DE ABOGADOS, GASTOS O CUALQUIER OTRO DAÑO QUE PUEDA SURGIR, O EN
CONEXIÓN CON, CUALQUIER INFORMACIÓN CONTENIDA EN, O COMO RESULTADO DEL USO
DE CUALQUIER CONTENIDO O SERVICIO POR SU PARTE O DE CUALQUIER TERCERO, INCLUSO
SI SE LE HA ADVERTIDO DE LA POSIBILIDAD DE TALES DAÑOS.»
Descargo de responsabilidad
Para cualquier pregunta, problema o comentario sobre nuestros productos, por favor, envíe un
e-mail a la siguiente dirección o llámenos.
Correo electrónico: [email protected]
Contacte con nosotros
Español

Merci d'avoir choisi la caméra de bord AKASO. Cette caméra de bord FHD 1080P a été conçue
pour enregistrer en temps réel vidéo et son lorsque vous conduisez. Afin de l'utiliser le mieux
possible, veuillez lire ce manuel avec attention.
Caractéristiques
• Caméra grand angle à 170°
• Full HD: 1920*1080@30ips; HD: 1280*720@60ips
• Format de compression vidéo H.264
• Verrouillage automatique des fichiers amorcé par l'accéléromètre (capteur de gravité)
• Détection de mouvement
• Plage Dynamique Étendue (Wide Dynamic Range)
• Écran LCD de 3 pouces en HD
• Batterie intégrée Lithium Polymère
• Support carte microSD/TF jusqu'à 32GB
Introduction
• Insérez une carte microSD/TF dans la fente de la caméra de bord.
• Choisissez un endroit sur le parbrise près du rétroviseur central afin de fixer la ventouse.
• Fixez la caméra au support ventouse
• Branchez l'interface d'alimentation DC/USB de la caméra à la prise allume-cigare du véhicule
via le cable d'alimentation.
• Ajustez la caméra dans la position avec le meilleur angle de vue, puis fixez le support
d'ajustement.
• Une fois que le véhicule démarre, la caméra débutera sa fonction automatiquement.
Attention:
• Please use Class 10 microSD/TF card or above
• Insert the microSD/TF card into the slot in the right direction
• To remove the microSD/TF card, please gently press the card
ProductFixation du produit
Une fois que le véhicule démarre, la caméra débutera sa fonction automatiquement.
• Allumer/éteindre
Courte pression sur le bouton MARCHE/ARRÊT pour allumer la caméra; Longue pression pour
l'éteindre.
• Réglages enregistrement vidéo
- Veuillez appuyer sur OK avant d'accéder aux réglages de l'enregistrement vidéo.Appuyez
une fois sur le bouton Menu pour rentrer dans les réglages de l'enregistrement vidéo.
Appuyz sur les flèches Haut et Bas afin de choisir un réglage puis appuyer sur OK pour confirmer.
- Résolution: 1920*1080; 1280*720; 848*480; 640*480; (par défaut: 1920*1080)
- Enregistrement par intervalle: OFF/1/3/5 minutes (par défaut: 3 minutes)
- Plage Dynamique Étendue (WDR): OFF/ON (par défaut: marche)
- Exposition:+2;+5/3;+4/3;+1;+2/3;+1/3;+0;-1/3;-2/3;-1;-4/3;-5/3;-2; (par défaut: +0)
- Détecteur de Mouvements: marche/arrêt (par défaut: arrêt)
Use your DashCam
• 1 x Caméra de Bord
• 1 x Chargeur Allume-cigare
• 1 x Ventouse
• 1 x Support Adhésif 3M
• 1 x Kit de Fixation
• 1 x Câble USB
• 1 x Manuel d'Utilisateur
Que contient votre boîte?
Présentation du matériel
1
5 6 7
2
3
4
13
8
9
10
11
12
1415
12
1. Fente carte TF 2. Haute 3. Menu 4. Bas
5. Interface HD 6. Base de Support 7. Interface Alimentation DC /USB
8. Vidéo/OK 9. Mode 10. Sauvegarde d’Urgence
11. MARCHE/ARRÊT 12. Lentille 13. Affichage 14. MIC 15. Trou de réinitialisation
Boutons:
Haut Bas
MENU – Appuyez sur ce bouton pour accéder et sortir du
mode Réglages.
• Appuyez sur ce bouton pour parcourir les différentes options du Mode Réglages
• Raccourci du mode enregistrement: Enregistrer (Appuyer sur Commencer / Arrêter
l'enregistrement)
20
OK
OK
M
Sélection du mode – Appuyez sur ce boutton pour basculer dans les différents modes:
Filmer/Photo/Visionnage
Ce fichier vidéo est verrouillé
MISE EN TENSION MARCHE/ARRÊT – Maintenir une pression afin d'allumer et éteindre la
caméra
M
Français
19

- Enregistrement Audio: marche/arrêt (par défaut: marche)
- Date: marche/arrêt ( par défaut: marche)
- Accéléromètre: arrêt/faible/moyen/élevé (par défaut: moyen)
- Après paramétrage, veuillez APPUYER DE NOUVEAU SUR OK afin de retourner au mode
enregistrement vidéo
• Réglages du système
- Veuillez préalablement appuyer sur OK avant d'accéder aux réglages du système
- Appuyez sur le Bouton Menu Deux Fois pour commencer à paramétrer le système. Appuyer
sur les boutons Haut et Bas afin de sélectionner un réglage spécifique, et confirmez en
appuyant sur OK.
- Date/Heure
- Numéro de Plaque d'Immatriculation : Activez cette option pour renseigner le numéro
d'immatriculation de votre véhicule pour enregistrement vidéo. Le numéro s'affichera alors
sur les vidéos.
- Extinction automatique: arrêt/1 minute/3 minutes/5 minutes
- Surveillance en Parking marche/arrêt (par défaut: arrêt)
L'activation de cette option entraînera un enregistrement si votre véhicule est percuté ou
déplacé pour enregistrer automatiquement les délits de fuite et verrouiller et enregistrer
automatiquement les vidéos faites.
- Son des bips: marche/arrêt (par défaut: marche)
Ce réglage vous permet d'activer ou de désactiver la fonction du bouton pour les effets de
son.
- Langue
- Fréquence
- Rétroéclairage arrêt/1 minute/3 minutes/5 minutes
- Formater: afin de formater la Carte micro SD
- Réglages par Défaut
- Version
- Après réglage, veuillez de nouveau appuyer sur OK pour revenir au mode enregistrement
vidéo.
• Paramétrer l'enregistrement d'urgence
- Appuyez sur le Bouton de Sauvegarde d'Urgence et appuyez de nouveau sur ce bouton
pour quitter le Mode Sauvegarde d’Urgence.
• Prendre une Photo
- Appuyez sur le Bouton Mode pour accéder au Mode Prise de Photo
- Appuyez sur OK pour prendre une photo
• Visionnage de vidéo(s) et de photo(s)
- Appuyez d'abord sur OK avant d'entrer dans le Mode Visionnage de vidéo(s) et de photo(s)
- Appuyez sur le bouton Mode pour accéder au Mode Visionnage
- Utilisez les boutons flèches Haut et Bas pour parcourir les fichiers et appuyer sur OK pour
visionner.
- Appuyez sur le Bouton Menu pour verrouiller ou déverrouiller le fichier choisi, maintenez
une longue pression sur le bouton Meny pour supprimer le fichier.
- Après réglage, choisissez le mode enregistrement vidéo et appuyez de nouveau sur OK
pour retourner au Mode Enregistrement.
• Sauvegarder des fichiers et les télécharger
- Connecter la caméra à l'ordinateur à l'aide du câble USB. Vous pouvez télécharger les
fichiers depuis le disque amovible s'affichant dans “Mon ordinateur”, sur le bureau de votre
ordinateur.
La caméra de bord AKASO n'est faite ni pour être modifiée, ni réglée lors de l'usage d'un
véhicule. AKASO n’est pas résponsable des dommages résultants d'un mauvais usage de
la caméra de la part de l'utilisateur.
Utilisez uniquement les chargeurs, accessoires et fournitures approuvés par le fabricant.
AKASO ne peut être tenu responsablede la sécurité de l'utilisateur lorsque ce dernier utilise
des accessoires ou des fournitures qui n'ont pas été approuvées par AKASO.
Ne laissez pas la caméra à un endroit excessivement chaud, froid, humide ou sec.
Une telle situation peut causer un dysfonctionnement de l'écran, abimer la caméra ou faire
exploser la batterie. Il est recommandé que vous utilisiez la caméra dans unenvironemment avec
une température allant de -4° à 131° F (-10° à 55° C), et avec une humidité entre 10% to 80%.
Si votre appareil surchauffe, attendez alors qu'il refroidisse avant de l'utiliser.
Une exposition prolongée de la peau à un appareil en surchauffe peut laisser apparaître des
symptômes de brûlures artificielles telles que des points rouges ou une pigmentation plus
foncée.
Ne pas toucher au chargeur allume-cigare ni le déconnecter en tirant sur le fil lorsque
vous avez les mains mouillées. En le faisant, vous pouvez être électrocuté.
N'utilisez ni de cable d'alimentation ni interface ou de prise qui soient endommagés.
Un branchement défectueux peut causer une électrocution voire un incendie.
Ne manipulez pas votre caméra avec des mains mouillées
En le faisant vous risquez d'être électrocuté.
Ne retirez pas la carte SD de la caméra pendant qu'elle est en train de filmer , sinon vous
risquez de générer une erreur.
Veuillez vous assurer de maintenir propre la lentille de la caméra ainsi que la lentille ne
soit obstruée par aucun objet ni placée près d'un objet réflechissant.
Si le parebrise du véhicule est teinté, la qualité d'enregistrement peut être affectée.
Précautions
Problème : Aucun bouton ne répond
Solution:
1. Appuyez sur le bouton Réitinialisation afin de redémarrer la caméra.
2. Reformatez la carte Micro-SD ou remplacez la par une nouvelle carte.
Résolution des problèmes
21 22
- Pour télégharger les fichiers de la caméra sur votre ordinateur, vous pouvez également
insérer la carte microSD dans un lecteur de cartes mémoires externe
• Indicateur de Batterie
- L'indicateur de batterie se trouve sur le côté droit de l'écran. Si une croix rouge s'affiche,
veuillez immédiatment charger la caméra de bord.

23
24
3. Appuyez fortement sur les boutons, ou maintenez une plus longue pression;
ils ne produiront pas toujours une réponse instantannée à une pression rapide.
Problème: L'image prise ne peut pas être enregistrée
Solution:
1. Reformatez la Carte Mémoire ou remplacez la par une carte neuve.
2. Assurez-vous d'arrêter l'enregistrement avant l'extinction de la caméra.
Problème: L'appareil ne s'allume pas
Solution: Assurez-vous que la caméra de bord est bien chargée. Assurez-vous que la caméra
est éteinte lorque elle est en charge.
Problème: Le bouton Menu ne répond pas
Solution: Appuyez sur le bouton OK pour arrêter l'enregistrement et ainsi vous accèderez au
menu.
Problème: La carte Micro SD n'est pas reconnue
Solution:
1. Formatez la carte Micro SD
2. Utilisez une autre carte Micro SD
Problème: L'écran s'éteint de manière involontaire
Solution:
1. Désactivez l'option Économie de l'affichage à l'écran
2. Chargez la batterie
3. Rétablir les réglages par défautRestore to default settings
Problème: impossible d’enregistrer une vidéo
Solution:
1. Vérifiez l'espace disponible sur la carte mémoire et si nécessaire, supprimer des fichiers
2. Reformatez votre carte mémoire; si le problème persiste, remplacez-la et rétablissez les
réglages par défaut
3. Assurez-vous de maintenir le bouton OK jusqu'à ce que la lumière rouge clignote
Problème: L'enregistrement s'arrête au bout de 20-40 minutes
Solution: Activez l'Option Enregistrement
En Boucle
Problème: "Erreur fichier" s'affiche lorsqu'il y a tentative de visionnage de vidéo ou de photo
Solution: Formater la carte micro SD
Certains contenus et services accessibles à travers cet appareil appartiennent à des tierces
parties et sont soumis à des droits d'auteur, brevet, droits de marque et/ou à d'autres
protections de la propriété intellectuelle. Ces contenus et services ne sont fournis que pour
votre usage uniquement à des fins non-commerciales.
Vous ne devez utiliser aucun contenu ou service d'une manière qui n'a pas été autorisée par le
propriétaire du contenu ou par le fournisseur de services. Sauf autorisation expresse du
propriétaire du contenu ou du fournisseur de services et en tout état de cause, vous n'êtes pas
autorisé à modifier, copier, republier, télécharger, publier, transmettre, traduire, vendre, créer
des œuvres dérivées, exploiter ou distribuer, de quelque manière ou par quelque moyen que
ce soit les contenus ou services affichés via cet appareil.
"LES CONTENUS ET LES SERVICES DES TIERS SONT FOURNIS "TELS QUELS". AKASO NE
GARANTIT PAS CES CONTENUS OU SERVICES EXPRESSÉMENT OU IMPLICITEMENT FOURNIS,
À QUELQUE FIN QUE CE SOIT. AKASO EXCLUT EXPRESSÉMENT TOUTE GARANTIE IMPLICITE, Y
COMPRIS MAIS SANS LIMITATION AUX GARANTIES DE QUALITÉ MARCHANDE OU DE
CONFORMITÉ À UNE FIN PARTICULIÈRE. AKASO NE GARANTIT PAS L'EXACTITUDE, LA
VALIDITÉ, L'OPPORTUNITÉ, LA LÉGALITÉ OU L'EXHAUSTIVITÉ DE TOUT CONTENU OU SERVICE
DISPONIBLE PAR L'INTERMÉDIAIRE DE CET APPAREIL ET EN AUCUN CAS - Y COMPRIS PAR
NÉGLIGENCE - AKASO NE PEUT ÊTRE TENU RESPONSABLE, CONTRACTUELLEMENT OU
DÉROGATOIRE, DE TOUT DOMMAGE DIRECT, INDIRECT, ACCESSOIRE, SPÉCIAL OU
CONSÉCUTIFS FRAIS DE PROCURATION, DÉPENSES OU TOUT AUTRE DOMMAGE DÉCOULANT,
OU EN RAPPORT AVEC, DE TOUTE INFORMATION CONTENUE, OU RÉSULTANT DE
L'UTILISATION DE TOUT CONTENU OU SERVICE PAR VOUS OU PAR TOUT TIERS, MÊME SI
CONSCIENT DU RISQUE DE TELS DOMMAGES. "
Avertissement
Pour toute question, problème ou avis sur nos produits, veuillez envoyer un email à l'adresse
ci-dessous. Nous vous répondrons aussitôt que possible.
E-mail: [email protected]
Contactez-nous
Français

Grazie per aver scelto la dash-cam AKASO Questa dash-cam FHD 1080P è progettata per
registrare video e audio in tempo reale durante la guida. Per un uso migliore, si prega di
leggere questo manuale con attenzione.
Caratteristiche
• grandangolo di 170 gradi
• Full HD: 1920*1080@30fps; HD: 1280*720@60fps
• Formato di compressione video H.264
• Attivazione automatica del file di lock con sensore-G
• Rilevatore di movimento
• WDR (Wide Dynamic Range)
• display LCD 3 pollici
• Batteria interna in polimero di litio
• MicroSD/TF di supporto fino a 32GB
Introduzione
• Inserire la scheda microSD/TF nell’apposito alloggiamento della dash-cam.
• Scegliere la posizione per attaccare la ventosa sul parabrezza, vicino allo specchietto
retrovisore.
• Attaccare la telecamera al supporto.
• Connettere l’interfaccia di corrente CC/USB della telecamera alla presa accendisigari della
macchina con il cavo.
• Regolare la telecamera nella posizione da cui riprende meglio, e fissare il sostegno.
• Una volta acceso il motore, la telecamera inizierà a funzionare automaticamente.
Attenzione:
• Usare microSD/TF Class 10 o superiore.
• Inserire la microSD/TF Nell’apposito alloggiamento nel giusto verso.
• Per rimuovere la microSD/TF, premere con delicatezza la card.
Installazione Prodotto
Una volta acceso il motore, la telecamera inizierà a funzionare automaticamente
• Accendere con tasto On/Off
Premere il tasto di accensione per accendere; tenere premuto per spegnere.
• Impostazioni di registrazione video
- Premere OK prima di entrare nelle impostazioni di registrazione video - Premere il tasto
menu una volta per entrare nella modalità impostazioni di registrazione video. Premere i
tasti su e giù per selezionare ogni impostazione, e premere OK per confermare.
- Risoluzione: 1920*1080; 1280*720; 848*480; 640*480; (Default: 1920*1080)
- Registrazione Loop: off/1/3/5 minutes (Default: 3 minuti)
- WDR: off/on (Default: on)
- Esposizione:+2;+5/3;+4/3;+1;+2/3;+1/3;+0;-1/3;-2/3;-1;-4/3;-5/3;-2; (Default: +0)
- Rilevatore di movimento: off/on (Default: off)
Usare la Dash-Cam
• 1 x Dash-Cam
• 1 x Caricatore da macchina
• 1 x ventosa
• 1 x 3M Supporto Adesivo
• 1 x Kit Hardware
• 1 x Cavo USB
• 1 x Manuale dell’utente
Cosa c’è nella scatola?
Panoramica Prodotto
1
5 6 7
2
3
4
13
8
9
10
11
12
1415
12
1. Alloggiamento per scheda TF 2. Su 3. Menu 4. Giù
5. Interfaccia HD 6. Base di supporto 7. Interfaccia corrente CC/USB
8. Video/OK 9. Modalità 10. Salvataggio d’emergenza
11. Accensione 12. Lenti 13. Display 14. MIC 15. Foro di reset
Tasti:
Su Giù
MENU - Premere per entrare e uscire dalla modalità impostazioni
• Premere per navigare verso l’alto nella modalità impostazioni
• Modalità registrazione hot key: Registra (premere per iniziare/fermare la registrazione)
26
OK
OK
M
Seleziona modalità - Premere per attivare modalità registrazione / foto / playback
File video corrente bloccato
Accensione - Tenere premuto per accendere o spegnere
M
Italiano
25

- Registrazione Audio: off/on (Default: on)
- Data: off/on (Default: on)
- Sensore G: off/basso/medio/alto (Default: medio)
- Dopo il settaggio, premere OK di nuovo per tornare alla modalità di registrazione.
• Impostazioni del sistema
- Premere OK prima di entrare nelle impostazioni di sistema
- Premere il tasto menu due volte per entrare nelle impostazioni di sistema Premere i tasti
su e giù per selezionare ogni impostazione, e premere OK per confermare.
- Data/Ora
- Numero di targa Abilitare questa funzione per inserire il numero di targa del veicolo per la
registrazione del video. Il numero di targa sarà visibile nel video.
- Auto spegnimento: off/1 minute/3 minuti/5 minuti
- Monitor di parcheggio off/on (default: off)
Abilitando questa funzione si attiverà la telecamera se alla macchina verrà dato un colpo o
Se verrà mossa e automaticamenteSalverà i video degli incidenti registrati.
- Suono (beep): off/on (Default: on)
Questa impostazione permette di attivare o disattivare il suono.
- Lingua
- requenza
- Retroilluminazione: off/1 minuto/3 minuti/5 minuti
- Formatta: per formattare la microSD
- Impostazioni di default:
- Versione
- Dopo il settaggio, premere OK di nuovo per tornare alla modalità di registrazione.
• Impostare il salvataggio d’emergenza
- Premere il tasto di salvataggio d’emergenza, premerlo di nuovo per uscire dal salvataggio
d’emergenza.
• Scatto foto
- Premere il tasto modalità per entrare nella modalità di scatto foto
- Premere OK per scattare
• Playback video e foto
- Premere OK prima di entrare nella modalità playback video e foto
- Premere il tasto modalità per entrare nella modalità di modalità playback
- Premere i tasti su e giù per scorrere fra i file, e premere OK per guardare.
- Premere il tasto menu per bloccare e sbloccare il file corrente, e tenere premuto il tasto
menu per concellare i file.
- Dopo il settaggio, selezionare la modalità di registrazione e premere OK di nuovo per
tornare alla modalità di registrazione.
• Back up dei dati e download
- Connetere la telecamera al computer con cavo USB. I file si possono scaricare nel disco
rimovibile e appariranno su “il mio computer” sul tuo pc.
La Dash-Cam AKASO non è progettata per essere modificata, o calibrata mentre si guida
il veicolo. AKASO non è responsabile di qualunque danno dovuto al cattivo uso della
telecamera.
Usare solo caricatori, accessori e ricambi approvati dal produttore.
AKASO non è responsabile della sicurezza dell’utente che usi accessori o ricambi non
appraovati da AKASO.
Non riporre il dispositivo in luoghi eccessivamente caldi, freddi, umidi o asciutti.
Potrebbe causare malfunzionamenti dello schermo, danni al dispositivo, o far esplodere la
batteria. Si raccomanda di usare il dispositivo in luoghi con temperature che varino dai -10° ai
55°, e con un’umidità fra il 10% e l’80%.
Se il dispositivo si surriscaldasse, farlo raffreddare prima di usarlo.
Un’esposizione prolungata della pelle ad un dispositvo surriscaldato potrebbe causare sintomi
di scottatura, come macchie rosse o di pigmentazione più scura.
Non toccare il caricatore con le mani bagnate o sconnettere il caricatore tirando il filo.
Ciò può esporre a scosse elettriche.
Non usare cavi, trasformatori o prese rovinati.
Connessioni difettose possono causare scosse elettriche o incendi.
Non toccare il dispositivo con le mani bagnate.
Ciò può esporre a scosse elettriche.
Non rimuovere la microSD dal prodotto durante la registrazione dei dati, potrebbe
causare errore.
Mantenere le lenti della telecamera sempre pulite, assicurarsi che le lenti non siano
bloccate da oggetti o che non siano vicine a oggetti riflettenti.
Se il parabrezza fosse di un colore scuro, potrebbe condizionare la qualità della registrazione.
Precauzione
Problema: Nessun tasto funziona
Soluzione:
1. Premere il tasto RESET per riavviare la telecamera.
2. Formattare la microSD o sostituirla con una nuova.
Risoluzione dei problemi generali
27 28
- Si può anche inserire la microSD nel lettore microSD e scaricare i file sul pc.
• Indicatore di batteria
- L’indicatore di batteria è nell’angolo destro dello schermo. Se comparisse la croce rossa,
caricare la dash-cam immediatamente.

29
30
3. Premere i tasti con fermezza, o tenerli premuti; non sempre rispondono a un tocco veloce.
Problema: La foto scattata non risulta salvata .
Soluzione:
1. Formattare la memory card o sostituirla con una nuova.
2. Assicurarsi di interrompere la registrazione prima di spegnere.
Problema: Il dispositivo non si accende.
Soluzione: Assicurarsi che la Dash-Cam sia carica. Assicurarsi che l’unità sia spenta durante la
carica.
Problema: Il tasto menu non risponde.
Soluzione: Premere il tasto OK per interrompere la registrazione così da poter accedere al
menu.
Problema: Non viene riconosciuta la MicroSD.
Soluzione:
1. Formattare la microSD.
2. Usare una microSD diversa.
Problema: Lo schermo si spegne inaspettatamente .
Soluzione:
1. Disabilitare la funzione screen saver.
2. Caricare la batteria.
3. Ripristinare le impostazioni di default.
Problema: Non registra video.
Soluzione:
1. Controllare lo spazio rimanente sulla memory card e cancellare dei file se necessario.
2. Formattare la memory card, se il probema persiste, sostituirla con una nuova. Ripristinare le
impostazioni di default.
3 Assicurarsi di tenere premuto il tasto OK finchè la luce rossa non starà lampeggiando.
Problema: Smette di registrare dopo 20-40 minuti.
Soluzione: Impostare la registrazione in loop.
Problema: Quandosi prova a riprodurre foto o video, appare “file error”.
Soluzione: Formattare la microSD.
Alcuni contenuti e servizi accessibili attraverso questo dispositivo appartengono a terze parti e
sono protette da copyright, brevetti, trademark e/o altre leggi di proprietà intelletuale. Tali
contenuti e servizi sono forniti per il solo uso personale e non commerciale dell’utente.
Non è consentito utilizzare tali contenuti o servizi in maniera non autorizzata dal proprietario
del contenuto o dal fornitore del servizio. Senza limitare il precedente, se non espressamente
autorizzato dal proprietario del contenuto o fornitore del servizio, non si può modificare,
copiare, ripubblicare, caricare, postare, trasmettere, tradurre, vendere, creare lavori derivanti,
sfruttare, o distribuire in qualsiasi maniera o mezzo qualsiasi contenuto o servizio mostrato da
questo dispositivo.
“CONTENUTI E SERVIZI DI TERZE PARTI SONO FORNITE “COSì COME SONO.” AKASO NON
GARANTISCE CONTENUTI O SERVIZI COSì FORNITI, SIA ESPLICITAMENTE CHE IMPLICITAMENTE,
PER QUALSIASI RAGIONE. AKASO ESPLICITAMENTE NEGA QUALSIASI GARANZIA, INCLUSO MA
NON LIMITATO A, GARANZIE DI COMMERCIABILITà O FITNESS PER UNO SCOPO PARTICOLARE.
AKASO NON GARANTISCE L’ACCURATEZZA, VALIDITà, PUNTUALITà, LEGALITà, O COPLETEZZA
DI ALCUN CONTENUTO RESO DISPONIBILE TRAMITE QUESTO DISPOSITIVO E IN NESSUNA
CIRCOSTANZA, INCLUSE NEGLIGENZA, AKASO SARà RESPONSABILE, SIA PER CONTRATTO CHE
ILLECITO, PER QUALSIASI DANNO DIRETTO, INDIRETTO, INCIDENTALE, SPECIALE O
CONSEQUENZIALE, Nè DI SPESE DI AVVOCATO, TASSE O ALTRI DANNI DOVUTI A, O IN
CONNESSIONE CON QUALSIASI INFORMAZIONE CONTENUTA, O RISULTATA DALL’USO DI
CONTENUTO O SERVIZIO DA VOI O TERZE PARTI, ANCHE SE AVVISATI DELLE POSSIBILITà DI
TALI DANNI.”
Dichiarazione di non responsabilità
Per qualsiasi domanda, problemi o commenti riguardo i nostri prodotti, si prega di contattarci
mandando una mail all’indirizzo sottostante o facendo una telefonata.
E-mail: [email protected]
Contatto US
Italiano

AKASO
170
HD 1920 * 1080 @ 30fps; HD 1280*720@60fps
H.264
G
WDR
HD LCD
32GBmicroSD / TF
• microSD / TF
•
•
•
•
•
• Class 10 microSD / TF
• microSD / TF
• microSD / TF
•
•
OK
OK
1920 * 1080; 1280 * 720; 848 * 480; 640 * 480 1920 * 1080
WDR
3M
USB
1
5 6 7
2
3
4
13
8
9
10
11
12
1415
12
1. TF 2. 3. 4.
5. HD 6. 7.
8. / OK 9. 10.
11. 12. 13. 14. 15.
•
•
31
32
OK
OK
M
M

-
-
- G
-
•
- [OK]
-
-
-
-
-
-
-
-
-
-
-
-
- OK
•
-
•
-
- [OK]
•
-
-
•
Micro SD
AKASO
AKASO
AKASO
-10º55ºC
-4º131ºF
Micro SD
33 34
•
-

Transcripción de documentos
USER MANUAL D2000 CAR DASH CAMERA Please read this manual before operating your car dash camera, and keep it for further reference. 23 01-06 07-12 13-18 19-24 25-30 31-36 日本語 English Introduction • Press to navigate UP through options in Settings Mode Thank you for choosing AKASO Dash Cam. This FHD 1080P Dash Cam is designed for recording real time video and audio while driving. To better use it, please read this manual carefully. OK • Recording Mode Hot Key: Record(Press to start / stop recording) M MODE Select – Press to toggle between Recording / Photo / Playback modes Current video file locked POWER – Press and hold to turn the device on or off Features • 170 degree wide angle • Full HD: 1920*1080@30fps; HD: 1280*720@60fps • H.264 video compression format • Automatic file lock triggered by G-sensor • Motion detection • WDR (Wide Dynamic Range) • 3 inches HD LCD display • Built-in Lithium Polymer battery • Support microSD/TF card up to 32GB Product Installment • Insert microSD/TF card to card slot of dash cam • Select a spot on windshield to locate the suction cup near the rearview mirror • Attach the cam to the bracket • Connect the DC power/USB interface of the cam to the car cigarette lighter by the power cable • Adjust the cam to the position with best shooting range, then fix the position of bracket • Once engine starts, the cam will start to work automatically What’s in the box? • 1 x Dash Cam • 1 x Car Charger • 1 x Suction Cup • 1x 3M Adhesive Mount • 1x Hardwire Kit • 1 x USB Cable • 1 x User Manual Product Overview Attention: • Please use Class 10 microSD/TF card or above • Insert the microSD/TF card into the slot in the right direction • To remove the microSD/TF card, please gently press the card 12 5 6 7 1 2 3 4 OK M 8 12 9 10 11 1415 13 1. TF Card Slot 2. UP 3. Menu 4. Down 5. HD Interface 6. Stand Base 7. DC Power/USB Interface 8. Video/OK 9. Mode 10. Emergency Save 11. Power 12. Lens 13. Display 14. MIC 15. Reset Hole Buttons: Up Down MENU – Press to enter and exit Settings Mode 1 Use your DashCam Once engine starts, the cam will start to record video automatically • Turn On/Off Short press Power button to turn on; Long press Power button to turn off • Video shooting settings - Please press OK first before entering the video shooting settings - Press Menu button once to start video shooting mode settings. Press Up and Down buttons to select each setting, and press OK to confirm. - Resolution: 1920*1080; 1280*720; 848*480; 640*480; (Default: 1920*1080) - Loop recording: off/1/3/5 minutes (Default: 3 minutes) - WDR: off/on (Default: on) - Exposure:+2;+5/3;+4/3;+1;+2/3;+1/3;+0;-1/3;-2/3;-1;-4/3;-5/3;-2; (Default: +0) - Motion Detection: off/on (Default: off) 2 - Record Audio: off/on (Default: on) - Date Stamp: off/on (Default: on) - G Sensor: off/low/medium/high (Default: medium) - After setting, please press OK again to be back to video shooting mode. • System settings - Please press OK first before entering system settings - Press Menu button twice to start system settings. Press Up and Down buttons to select each setting, and press OK to confirm. - Date/Time - Plate Number: Enable this feature to enter your vehicle plate number for video recording. The plate number will stamp in the video. - Auto Power Off: off/1 minute/3 minutes/5 minutes - Parking Monitor: off/on (default: off) Enabling this feature will activate the camera if your car is bumped or moved to automatically record hit-and-runs and automatically lock and save any video file that was recorded. - Beep Sound: off/on (default: on) This setting allows you to turn the device's button sound effect on or off. - Language - Frequency - Backlight: off/1 minute/3 minutes/5 minutes - Format: to format your Micro SD card - Default setting - Version - After setting, please press OK again to be back to video shooting mode. • Set Emergency Save - Press Emergency Save button, and press the button again to quit Emergency Save. • Picture Taking - Press Mode button to enter Picture Taking Mode - Press OK to take pictures • Video and picture Playback - Please press OK first before entering video and picture playback - Press Mode button to enter Playback Mode - Use Up and Down buttons to browse files, and press OK to watch. - Press Menu button to lock and unlock current file, and long press Menu button to delete the files. - After setting, select video shooting mode and press OK again to be back to video shooting. • Data backup and download - Connect the camera to the computer through USB cable. You can download the files in removable disk appearing in “My Computer” of your personal computer. 3 - You also can insert the Micro SD card into a card reader to download files into your personal computer. • Battery Indicator - The battery indicator is located at the right end corner of the screen. If the red cross sign comes up, please charge your dash cam immediately. Precaution AKASO Dash Cam is not intended to be modified, or calibrated while operating a vehicle. AKASO is not responsible for any damages resulting from the user's misuse of the camera. Use only manufacturer-approved chargers, accessories, and supplies. AKASO cannot be responsible for the user’s safety when using accessories or supplies that are not approved by AKASO. Do not store your device in excessively hot, cold, damp or dry locations. Doing so may cause the screen to malfunction, result in damage to the device, or cause the battery to explode. Your device is recommended for use within a temperature range of -4º to 131º F (-10º to 55º C), and a humidity range of 10% to 80%. If your device becomes overheated, allow it to cool down before use. Prolonged exposure of skin to an overheated device may cause low-temperature burn symptoms, such as red spots or areas of darker pigmentation. Do not touch the car charger with wet hands or disconnect the charger by pulling the cord. Doing so may result in electrocution. Do not use damaged power cords or plugs, or loose electrical sockets. Faulty connections can cause electric shock or fire. Do not touch your device with wet hands. Doing so may cause electric shock. Do not remove the SD card from the product during data recording, which may cause an Error. Always keep the camera lens clean, and ensure that the lens is not blocked by any object or placed near any reflective material. If the car’s windshield is tinted with a dark coating, recording quality may be affected. General Troubleshooting Problem: All buttons are not responding Solution: 1. Press the RESET button to restart the camera 2. Reformat Micro SD card or replace with a new card 4 English 3. Press the buttons firmly, or hold them in; it will not always respond to a quick hit. Problem: The captured image is not stored Solution: 1. Reformat memory card or replace with a new one 2. Make sure to stop recording before shutting down Problem: Device will not turn on Solution: Please make sure Dash Cam is well charged. Make sure unit is off while charging. Problem: Menu Button Not responding Solution: Press OK button to stop recording so you can access the menu Problem: Micro SD card Not Recognized Solution: 1. Format Micro SD card 2. Use a different Micro SD card Problem: Screen powers off unexpectedly Solution: 1. Disable Screen Saver feature 2. Charge the battery 3. Restore to default settings Problem: Unable to record videos Solution: 1. Check remaining space on memory card and delete files if necessary 2. Reformat your memory card; if issue persists, replace with a new one Restore to Default Settings 3. Make sure to hold the OK button in until the red light is blinking Disclaimer Some content and services accessible through this device belong to third parties and are protected by copyright, patent, trademark and/or other intellectual property laws. Such content and services are provided solely for your personal non-commercial use. You may not use any content or services in a manner that has not been authorized by the content owner or service provider. Without limiting the foregoing, unless expressly authorized by the applicable content owner or service provider, you may not modify, copy, republish, upload, post, transmit, translate, sell, create derivative works, exploit, or distribute in any manner or medium any content or services displayed through this device. “THIRD PARTY CONTENT AND SERVICES ARE PROVIDED “AS IS.” AKASO DOES NOT WARRANT CONTENT OR SERVICES SO PROVIDED, EITHER EXPRESSLY OR IMPLIEDLY, FOR ANY PURPOSE. AKASO EXPRESSLY DISCLAIMS ANY IMPLIED WARRANTIES, INCLUDING BUT NOT LIMITED TO, WARRANTIES OF MERCHANTABILITY OR FITNESS FOR A PARTICULAR PURPOSE. AKASO DOES NOT GUARANTEE THE ACCURACY, VALIDITY, TIMELINESS, LEGALITY, OR COMPLETENESS OF ANY CONTENT OR SERVICE MADE AVAILABLE THROUGH THIS DEVICE AND UNDER NO CIRCUMSTANCES, INCLUDING NEGLIGENCE, SHALL AKASO BE LIABLE, WHETHER IN CONTRACT OR TORT, FOR ANY DIRECT, INDIRECT, INCIDENTAL, SPECIAL OR CONSEQUENTIAL DAMAGES, ATTORNEY FEES, EXPENSES, OR ANY OTHER DAMAGES ARISING OUT OF, OR IN CONNECTION WITH, ANY INFORMATION CONTAINED IN, OR AS A RESULT OF THE USE OF ANY CONTENT OR SERVICE BY YOU OR ANY THIRD PARTY, EVEN IF ADVISED OF THE POSSIBILITY OF SUCH DAMAGES.” Problem: Stops Recording after 20-40 minutes Solution: Turn Loop Recording on Problem: "File error" is encountered when trying to play back pictures or video Solution: Format Micro SD card Contact US For any inquiries, issues or comments concerning our products, please send E-mail to the address below, and we will respond as soon as possible. E-mail: [email protected] US customer service line: (301)670-7335 5 6 Deutsch M Einleitung Vielen Dank, dass Sie sich für die AKASO Dash Kamera entschieden haben. Diese FHD 1080P Dash Kamera wurde zur Aufnahme von Echtzeitvideos und Ton während der Autofahrt entworfen. Für eine optimale Verwendung lesen Sie bitte dieses Handbuch sorgfältig durch. MODUS-Auswahl – Drücken, um zwischen Aufnahme / Foto / Wiedergabe Modi zu umzuschalten. Derzeitiges Video-Dokument ist gesperrt Power – Drücken und halten um das Gerät abzuschalten Produktinstallation Produktinformationen • 170 Grad Weitwinkel(objektiv) • Volle HD: 1920*1080@30fps; HD: 1280*720@60fps • H.264 Videokompression • Automatische Dateisperrung ausgelöst durch G-Sensor. • Bewegungsmelder • WDR (Wide Dynamic Range, großer Kontrastumfang) • 3 Zoll HD LCD Bildschirm • Integrierter Lithium-Polymer-Akku • Unterstützt MikroSD/TF-Karte bis zu 32GB • Setzen Sie eine MikroSD/TF-Karte in den Kartensteckplatz der Armaturen-Kamera ein. • Wählen Sie eine Stelle auf der Windschutzscheibe in der Nähe des Rückspiegels, um den Saugnapf zu platzieren. • Befestigen Sie die Kamera an der Halterung • Verbinden Sie die DC-Strom/USB-Schnittstelle der Kamera mit dem Auto Zigarettenanzünder über das Stromkabel. • Passen Sie die Position der Kamera für einen optimalen Aufnahmewinkel an, dann fixieren Sie die Position der Halterung. • Sobald Sie den Motor starten, beginnt die Kamera automatisch zu laufen. Lieferumfang • 1 × Autoarmaturen-Kamera • 1 × Autoladegerät • 1 × Saugnapf • 1 × 3M Haftungs-Halterung • 1 × Hardware-Ausstattung • 1 × USB Kabel • 1 × Benutzerhandbuch Produktübersicht Achtung: • Bitte verwenden Sie eine MikroSD/TF-Karte der Klasse 10 oder darüber, • Stellen Sie sicher, dass Sie die MikroSD/TF-Karte in korrekter Richtung in den Kartensteckplatz einsetzen. • Um die MikroSD/TF-Karte zu entfernen, drücken Sie bitte leicht auf die Karte. 12 5 6 7 1 2 3 4 OK M 8 12 9 10 11 1415 13 1. TF-Kartensteckplatz 2. Auf 3. Menü 4. Ab 5. HD Schnittstelle 6. Standfuß 7. DC Strom/USB Schnittstelle 8. Video/OK 9. Modus 10. Notfall-Sicherung 11. Power 12. Linse 13. Bildschirm 14. Mikrofon 15. Rücksetz-Öffnung Tasten: Auf OK Ab MENÜ- Drücken um den Einstellungsmodus zu öffnen und zu verlassen. • Drücken, um im Einstellungsmodus mit Optionen nach OBEN zu navigieren. • Aufnahmemodus Hotkey: Aufnahme (Drücken um Aufnahme zu starten/stoppen) 7 Verwendung Ihrer Armaturen-Kamera Sobald der Motor gestartet wird, beginnt die Kamera automatische mit der Aufnahme. • Einschalten/Ausschalten Drücken Sie die Power-Taste kurz, um das Gerät einzuschalten; Die Power-Taste lange drücken, um das Gerät auszuschalten. • Videoaufnahme Einstellungen - Bitte drücken Sie zuerst OK, bevor Sie die Videoaufnahme Einstellungen öffnen. - Drücken Sie die Menü-Taste einmal, um die Videoaufnahme Modus Einstellungen zu starten. Drücken Sie Auf und Ab, um jede Einstellung auszuwählen, und drücken Sie OK, um zu bestätigen. - Auflösung: 1920*1080; 1280*720; 848*480; 640*480; (Standard 1920*1080) - Schlaufen-Aufnahme: aus/1/3/5 Minuten (Standard: 3 Minuten) - WDR: aus/an (Standard an) - Belichtung: +2;+5/3;+4/3;+l;+2/3;+l/3;+0;-l/3;-2/3;-l;-4/3;-5/3;-2; (Standard: +0) - ´Bewegungsmelder: aus/an (Standard: aus) 8 - Audio-Aufnahme: aus/an (Standard: an) - Datumsstempel: aus/an (Standard: an) - G-Sensor: aus/niedrig/mittel/hoch (Standard: mittel) - Nach der Einstellung, drücken Sie bitte nochmals OK, um in den Videoaufnahmemodus zurückzukehren. • Systemeinstellungen - Drücken Sie bitte zuerst OK, bevor Sie die Systemeinstellungen öffnen. - Drücken Sie die Menü-Taste zweimal, um die Systemeinstellungen zu öffnen. Drücken Sie die Auf- und Ab-Tasten, um jede Einstellung auszuwählen und drücken Sie OK, um zu bestätigen. - Datum/Zeit - Kennzeichen: Aktivieren Sie diese Funktion, um Ihr Kennzeichen für die Videoaufnahme einzugeben. Ihr Kennzeichen-Stempel wird im Video angezeigt. - Auto ausschalten: aus/1 Minute/3 Minuten /5 Minuten - Parkier-Überwachung: aus/an (Standard: aus) Wenn diese Funktion aktiviert ist, schaltet sich die Kamera automatisch ein, wenn Ihr Fahrzeug angestoßen oder bewegt wird, um automatisch Fahrerfluchten aufzuzeichnen und alle aufgezeichneten Videos zu sperren und zu speichern. - Piepston: aus/an (Standard: an) Mit dieser Einstellung lassen sich die Tastentöne des Geräts ein- oder ausschalten. - Sprache - Frequenz - Hintergrundbeleuchtung: aus/1 Minute/3 Minuten/5 Minuten - Format: Um Ihre Mikro SD-Karte zu formatieren - Standardeinstellungen - Version - Nachdem Sie die Einstellungen vorgenommen haben, drücken Sie bitte nochmals OK, um in den Videoaufnahmemodus zurückzukehren. • Notfall-Speicherung aktivieren - Drücken Sie die Notfall-Speicherungs-Taste, und drücken Sie die Taste erneut, um die NotfallSpeicherung zu verlassen. • Foto-Aufnahme - Drücken Sie die Modus-Taste, um den Foto-Aufnahmemodus zu öffnen. - Drücken Sie OK, um Fotos zu machen. • Video- und Foto-Wiedergabe - Bitte drücken Sie zuerst OK, bevor Sie die Video- und Foto-Wiedergabe öffnen. - Drücken Sie die Modus-Taste um den Wiedergabemodus zu öffnen. - Verwenden Sie die Auf- und Ab-Tasten, um die Videos durchzublättern und drücken Sie OK, um sie wiederzugeben. - Drücken Sie die Menü-Taste, um das die derzeit ausgewählte Datei zu sperren oder zu entsperren, und drücken Sie die Menü-Taste lange, um Dateien zu löschen. • Daten-Sicherung und Übertragung - Verbinden Sie die Kamera über das USB-Kabel mit Ihrem Computer. Sie können die Dateien mit dem Wechseldatenträger übertragen, der in „Mein Computer“ auf Ihrem Computer angezeigt wird. 9 - Sie können Ihre Mikro SD-Karte auch in ein Kartenlesegerät einsetzen, um Dateien auf ihren Computer zu übertragen. • Akkustands-Anzeige - Die Akkustands-Anzeige befindet sich in der rechten unteren Ecke des Bildschirms. Wenn ein rotes Kreuz aufleuchtet, laden Sie bitte unverzüglich Ihre Armaturen-Kamera auf. Vorsichtsmaßnahmen Die AKASO Armaturen-Kamera ist nicht dazu geändert während der Autofahrt abgestimmt zu werden. AKASO haftet für keinerlei Schäden, die durch Missbrauch oder Fehlgebrauch der Kamera entstehen. Verwenden Sie ausschließlich Ladegeräte, Zubehör und sonstige Zusätze, die vom Hersteller zugelassen sind. AKASO kann nicht für die Sicherheit des Benutzers garantieren, wenn Zubehör verwendet wird, welches nicht von AKASO zugelassen ist. Lagern Sie Ihr Gerät nicht an übermäßig heißen, kalten, feuchten oder trockenen Orten. Andernfalls könnten Schäden am Bildschirm oder am Gerät auftreten oder der Akku explodieren. Es wird empfohlen, dass Sie Ihr Gerät innerhalb von Temperaturen zwischen -10° bis 55° C (-4° bis 131° F) und einer Luftfeuchtigkeit von 10% bis 80% verwenden. Wenn sich Ihr Gerät überhitzt, warten Sie, bis es abkühlt, bevor Sie es verwenden. Bei längerem Hautkontakt mit einem überhitzten Gerät können Niedrig-Temperatur Verbrennungssymptome wie rote Stellen oder dunklere Pigmentierung auftreten. Berühren Sie das Autoladegerät nicht mit feuchten Händen und entfernen Sie das Ladegerät nicht, indem Sie am Kabel ziehen. Andernfalls kann dies zu Stromschlägen führen. Verwenden Sie keine beschädigten Stromkabel, Stecker oder lose Steckdosen. Fehlerhafte Anschlüsse können elektrische Schläge oder Feuer verursachen. Berühren Sie das Gerät nicht mit feuchten oder gar nassen Händen. Dies kann zu elektrischen Schlägen führen. Entfernen Sie die SD-Karte nicht während der Aufnahme. Dies könnte Fehler verursachen. Halten Sie die Linse stets sauber und stellen Sie sicher, dass die Linse nicht von Objekten verdeckt oder in der Nähe von reflektierenden Materialien platziert ist. Wenn die Windschutzscheibe des Fahrzeugs getönt ist, könnte dies die Aufnahmequalität beeinträchtigen. Allgemeine Fehlerbehebung Problem: Alle Tasten reagieren nicht Lösung: 1. Drücken Sie die RÜCKSETZ-Taste, um die Kamera neu zu starten. 2. Formatieren Sie die Mikro SD-Karte neu oder setzen Sie eine neue Karte ein. 3. Drücken Sie die Tasten fest, oder halt Sie sie gedrückt; Die Tasten reagieren nicht immer, wenn sie nur schnell gedrückt werden. 10 Deutsch Problem: Das Aufnahmen werden nicht gespeichert. Lösung: 1. Formatieren Sie die Speicherkarte neu oder ersetzen Sie sie durch eine neue. 2. Stellen Sie sicher, dass Sie die Aufnahme stoppen, bevor Sie das Gerät ausschalten. Problem: Das Gerät lässt sich nicht einschalten. Lösung: Bitte stellen Sie sicher, dass der Akku der Armaturen-Kamera ausreichend aufgeladen ist. Stellen Sie sicher, dass das Gerät während dem Ladevorgang ausgeschaltet ist. Problem: Menü-Taste reagiert nicht. Lösung: Drücken Sie die OK-Taste, um die Aufnahme zu stoppen, damit Sie das Menü öffnen können. Problem: Mikro SD-Karte wird nicht erkannt. Lösung: 1. Formatieren Sie die Mikro SD-Karte. 2. Verwenden Sie eine andere Mikro SD-Karte. Problem: Der Bildschirm schaltet sich unerwartet ab. Lösung: 1. Schalten Sie die Bildschirmschoner Funktion aus. 2. Laden Sie den Akku 3. Stellen Sie die Standardeinstellungen wieder her. Problem: Es lassen sich keine Videos aufnehmen. Lösung: 1. Überprüfen Sie ob der Speicherplatz auf der Speicherkarte vorhanden noch genug ist und löschen sie gegebenenfalls nicht benötigte Dateien. 2. Formatieren Sie die Speicherkarte neu. Wenn das Problem weiterhin besteht, ersetzen Sie die Speicherkarte. Stellen Sie die Standardeinstellungen wieder her. 3. Halten Sie die OK-Taste, bis das rote Licht blinkt. Haftungsausschluss Einige Inhalte und Dienstleistungen, die durch dieses Gerät zugänglich gemacht werden, sind Eigentum Dritter und durch Urheberrechte, Patente, Warenzeichen und/oder andere Gesetze für geistiges Eigentum geschützt. Diese Inhalte und Dienstleistungen werden ausschließlich für private, nicht-kommerzielle Zwecke zur Verfügung gestellt. Sie sind nicht dazu berechtigt, jegliche Inhalte in einer Art und Weise zu verwenden, die nicht durch Inhaltseigentümer oder Dienstleister autorisiert sind. Ohne Vorheriges zu beschränken, sofern nicht ausdrücklich durch Inhaltseigentümer oder Dienstleister gestattet, ist es nicht gestattet, jegliche Inhalte oder Dienstleistungen, die durch dieses Gerät dargestellt werden, zu ändern, kopieren, neu veröffentlichen, hochzuladen, veröffentlichen, übermitteln, verkaufen, nutzen, in ähnlicher Weise anzufertigen oder in jeglicher Weise zu vertreiben. INHALTE UND DIENSTLEISTUNGEN DRITTER WERDEN IN DER VORLIEGENDEN FORM (AS-IS) BEREITGESTELLT. AKASO ÜBERNIMMT KEINE GEWÄHR VON BEREITGESTELLTEN INHALTEN ODER DIENSTLEITUNGEN, AUSDRÜCKLICH ODER IMPLIZIERT. AKASO LEHNT AUSDRÜCKLICH SÄMTLICHE AUSDRÜCKLICHE ODER STILLSCHWEIGEND ANSPRÜCHE ODER GARANTIEN AB, DIE IN JEDWEDER ART ERHOBEN ODER AUSGESPROCHEN WERDEN, INKLUSIVE, ABER NICHT AUSSCHLIEßLICH,, EINER GARANTIE ÜBER HANDELSFÄHIGKEIT, ZULÄSSIGKEIT ODER EINER EIGNUNG FÜR BESTIMMTE ZWECKE. AKASO ÜBERNIMMT KEINE GEWÄHR FÜR GENAUIGKEIT, GÜLTIGKEIT, KORREKTE ZEITANGABE, RECHTMÄßIGKEIT ODER VOLLSTÄNDIGKEIT JEDWEDER INHALTE ODER DIENSTLEISTUNG, DIE DURCH DIESES GERÄT VERFÜGBAR GEMACHT WERDEN. UNTER KEINEN UMSTÄNDEN, EINSCHLIEßLICH FAHRLÄSSIGKEIT, KANN AKASO HAFTBARE GEMACHT WERDEN, WEDER DURCH VERTRAG NOCH DURCH UNERLAUBTE HANDLUNG, FÜR JEDWEDE DIREKTE, INDIREKTE, ZUFÄLLIGE, SPEZIELLE ODER FOLGESCHÄDEN, ANWALTSKOSTEN, AUSGABEN, ODER SONSTIGE SCHÄDEN, DIE DURCH ODER IN VERBINDUNG MIT JEDWEDER ENTHALTENEN INFORMATION ENTSTANDEN SIND, ODER ALS FOLGE DER NUTZUNG JEDWELCHER INHALTE ODER DIENSTLEISTUNG DURCH SIE ODER DRITTER, SELBST, WENN AUF DIE MÖGLICHKEIT SOLCHER SCHÄDEN HINGEWIESEN WURDE. Problem: Die Aufnahme stoppt nach 20-40 Minuten. Lösung: Aktiveren Sie die Schlaufen-Aufnahme Problem: "File Error" (Datenfehler) erscheint beim Versuch, Fotos oder Videos wiederzugeben. Lösung: Formatieren Sie die Mikro SD-Karte. Kontaktieren Sie uns Bei allen Anfragen, Problemen oder Kommentaren bezüglich unserer Produkte, senden Sie uns ein E-Mail an die unten genannte Adresse, und wir werden uns so schnell wie möglich bei Ihnen melden. E-Mail: [email protected] 11 12 Español Introducción • Presione para navegar hacia Arriba por las opciones en el Modo de Ajustes. • Atajo de teclado para el modo de grabación: Grabar (presione para iniciar / parar de grabar). MODO Seleccionar - Presione para cambiar entre las opciones Grabar / Foto / Modos de reproducción. OK Gracias por elegir la cámara de vídeo para coche AKASO. Esta cámara de vídeo FHD 1080P está diseñada para grabar vídeo y audio en tiempo real mientras conduce. Para sacarle el mayor provecho, por favor, lea este manual con atención. M Archivo de vídeo actual bloqueado. Características • 170 º de ancho de ángulo • Full HD: 1920*1080@30fps; HD: 1280*720@60fps • Formato de compresión de vídeo H.264 • Bloqueo de archivos automático activado por el sensor-G • Detección de movimiento • WDR (Wide Dynamic Range) • Pantalla HD LCD de 3 pulgadas • Batería integrada de polímero de litio • Tarjeta de hasta 32GB, compatible con microSD/TF ENCENDIDO - Mantenga apretado para encender o apagar el dispositivo. Intalación del producto • Inserte la tarjeta microSD/TF en la ranura de tarjetas de la cámara • Seleccione un lugar en el parabrisas para colocar la ventosa, cerca del espejo retrovisor • Fije la cámara al soporte • Conecte el interfaz de alimentación DC /USB de la cámara al mechero del coche por medio del cable de alimentación • Adapte la cámara a la posición en la que tenga el mejor ángulo para grabar, después fije la posición en el soporte. • Una vez arranque el motor, la cámara comenzará a funcionar automáticamente ¿Qué hay en la caja? • 1 cámara de vídeo para coche • 1 cargador para el coche • 1 ventosa • 1 soporte adhesivo 3M • 1 kit de ferretería • 1 cable USB • 1 manual del usuario Visión de conjunto del producto 12 5 6 Atención: • Por favor, utilice una tarjeta microSD/TF Clase 10 o superior. • Inserte la tarjeta microSD/TF en la ranura en la dirección correcta. • Para retirar la tarjeta microSD/TF, por favor, presione suavemente la tarjeta. 7 1 2 3 4 OK M 8 12 9 10 11 1415 13 1. Ranura para tarjeta TF 5. Interfaz HD 6. Soporte Base 8. Video/OK 9. Modo 11. ENCENDIDO 12. Lente 2. Arriba 3. Menú 4. Abajo 7. Alimentación Corriente continua/Interfaz USB 10. Guardado de emergencia 13. Pantalla 14. Micrófono 15. Agujero de reinicio Botones: Arriba Abajo MENU - Presione para entrar y salir del modo de ajustes 13 Utilice su cámara de vídeo para coche Una vez arranque el motor, la cámara comenzará a funcionar automáticamente • Encienda/Apague Presione una vez el botón de encendido para encender, mantenga apretado el mismo botón para apagar • Ajustes de la grabación de vídeo - Por favor, presione OK antes de entrar en los ajustes de grabación de vídeo - Presione el botón Menu una vez para iniciar los ajustes del modo de grabación de vídeo. Presione los botones Arriba y Abajo para seleccionar cada ajuste, y presione OK para confirmar. - Resolución: 1920*1080; 1280*720; 848*480; 640*480; (Por defecto: 1920*1080) - Grabación en bucle: apagada/1/3/5 minutos (Por defecto: 3 minutos) - WDR: apagado/encendido (Por defecto: encendido) - Exposición:+2;+5/3;+4/3;+1;+2/3;+1/3;+0;-1/3;-2/3;-1;-4/3;-5/3;-2; (Por defecto: +0) - Detección de movimiento: apagado/encendido (Por defecto: apagado) 14 - Grabación de audio: apagado/encendido (Por defecto: encendido) - Código de tiempo: apagado/encendido (Por defecto: encendido) - Sensor G: apagado/bajo/medio/alto (Por defecto: medio) - Después de hacer los cambios, por favor, presione OK de nuevo para regresar al modo de grabación de vídeo. • Ajustes del sistema - Por favor, presione OK antes de entrar en los ajustes del sistema - Presione el botón Menu dos veces para iniciar los ajustes del sistema. Presione los botones Arriba y Abajo para seleccionar cada ajuste, y presione OK para confirmar. - Fecha/Hora - Número de placa: Habilite esta función para introducir la matrícula de su vehículo para la grabación de vídeo. El número de matrícula aparecerá en el vídeo. - Apagado automático: apagado/1 minuto/3 minutos/5 minutos - Seguimiento de aparcamiento: apagado/encendido (por defecto: apagado) Habilitar esta función activará la cámara si su coche es golpeado o movido para grabar automáticamente a los que choquen contra su vehículo y huyan y bloquear y guardar automáticamente cualquier archivo de vídeo que se haya realizado. - Sonido de pitido: apagado/encendido (Por defecto: encendido). Este ajuste le permite encender o apagar el botón de efecto de sonido del dispositivo. - Idioma - Frecuencia - Luz de fondo: apagado/1 minuto/3 minutos/5 minutos - Formato: para formatear su tarjeta Micro SD - Ajuste por defecto - Versión - Después de hacer los cambios, por favor, presione OK de nuevo para regresar al modo de grabación de vídeo. • Establezca el guardado de emergencia - Presione el botón de Guardado de Emergencia, y presione el botón de nuevo para salir del Guardado de Emergencia. • Sacar fotos - Presione el botón de Modo para entrar en el modo de Sacar Fotos - Presione OK para sacar fotos • Reproducción de vídeo y fotos - Por favor, presione OK antes de entrar en el modo de reproducción de vídeo y fotos - Presione el botón de Modo para entrar en el modo de Reproducción - Utilice los botones Arriba Y Abajo para mostrar los archivos, y presione OK para verlos. - Presione del botón Menu para bloquear y desbloquear el archivo actual, y mantenga apretado el botón Menu para borrar los archivos. - Después de hacer los cambios, seleccione el modo de grabación de vídeo y presione OK de nuevo para regresar al modo de grabación de vídeo. • Copia de seguridad y descarga de datos - Conecte la cámara al ordenador por medio del cable USB. Puede descargar los archivos en el disco extraible que aparece en «Mi PC» de su ordenador. 15 - También puede insertar la tarjeta Micro SD en un lector de tarjetas para descargar los archivos en su ordenador. • Indicador de batería - El indicador de batería está situado en la esquina derecha de la pantalla. Si aparece el símbolo con forma de cruz roja, por favor cargue su cámara inmediatamente. Precaución La cámara de vídeo AKASO no está diseñada para ser modificada, o calibrada mientras está funcionando el vehículo. AKASO no se hace responsable de cualquier daño como resultado del mal uso que el usuario pueda hacer de la cámara. Utilice solo los cargadores, accesorios y repuestos aprobados por el fabricante. AKASO no puede hacerse responsable de la seguridad del usuario si utiliza accesorios o repuestos no aprobados por AKASO. No guarde su dispositivo en lugares excesivamente calientes, fríos, húmedos o secos. Al hacerlo puede causar que la pantalla funcione mal, se produzcan daños en el dispositivo o explote la batería. Se recomienda que utilice su dispositivo dentro de un rango de temperaturas que va desde -4° a 131° F (-10° to 55° C), y un rango de humedad desde 10% a 80% Si su dispositivo se sobrerecalienta, deje que se enfríe antes de usarlo. La exposición prolongada de la piel a un dispositivo sobrecalentado puede causar síntomas de quemadura a baja temperatura, tales como manchas rojas o zonas de pigmentación más oscura. No toque el cargador del coche con las manos húmedas ni lo desconecte tirando del cable. Si lo hace puede producirse una electrocución. No use cables de alimentación o enchufes dañados, o tomas de corriente sueltas. Las conexiones defectuosas pueden causar descargas eléctricas o fuego. No toque su dispositivo con las manos húmedas. Hacerlo puede provocar una descarga eléctrica. No retire la tarjeta SD del aparato durante la grabación de datos, lo cual puede causar un error. Mantenga siempre limpias las lentes de la cámara, y asegúrese de que la lente no está bloqueada por ningún objeto o situada cerca de cualquier material reflectante. Si el parabrisas del coche está tintado con un recubrimiento oscuro, la calidad de la grabación se puede ver afectada. Solución de problemas generales Problema: Los botones no responden Solución: 1. Presione el botón RESET para reiniciar la cámara. 2. Reformatee la tarjeta Micro SD o sustitúyala por una nueva. 16 Español 3. Presione los botones firmemente, o mantégalos apretados; no siempre responderán a una pulsación rápida. Problema: La imagen capturada no se ha guardado Solución: 1. Reformatee la tarjeta de memoria o sustitúyala por una nueva 2. Asegúrese de parar de grabar antes de apagar Problema: El dispositivo no se enciende Solución: Por favor, asegúrese de que la cámara de vídeo está bien cargada. Asegúrese de que el aparato está apagado mientras se carga. Problema: El botón de Menú no responde Solución: Presione el botón OK para detener la grabación para que pueda tener acceso al menu Problema: No reconoce la tarjeta Micro SD Solución: 1. Formatee la tarjeta Micro SD 2. Utilice una tarjeta Micro SD diferente Problema: La pantalla se apaga inesperadamente Solución: 1. Deshabilite la función de Salvapantallas 2. Cargue la batería 3. Restaure los ajustes por defecto Problema: No se puede grabar vídeos Solución: 1. Compruebe el espacio que queda en la tarjeta de memoria y borre archivos si es necesario 2. Reformatee su tarjeta de memoria; si el problema persiste, sustitúyala por una nueva y restaure los ajustes por defecto 3. Asegúrese de que mantiene apretado el botón OK hasta que la luz roja parpadee Descargo de responsabilidad Algunos contenidos y servicios accesibles a través de este dispositivo, pertenecen a terceros y están protegidos por copyright, patentes, marcas y/o otras leyes de propiedad intelectual: Tales contenidos y servicios se proporcionan únicamente para su uso personal y sin propósitos comerciales. Puede que no use ningún contenido ni servicio de forma que no haya sido autorizada por el dueño del contenido o proveedor del servicio. Sin perjuicio de lo anterior, a menos que se esté expresamente autorizado por el dueño del contenido o el proveedor del servicio, usted no puede modificar, copiar, republicar, subir, postear, transmitir, traducir, vender, crear trabajos derivados, explotar o distribuir de cualquier forma o medio ningún contenido o servicios mostrados a través de este dispositivo. «CONTENIDO DE TERCEROS Y SERVICIOS PROVISTOS» » AKASO NO GARANTIZA CONTENIDO O SERVICIOS ASÍ PROVISTOS, YA SEA EXPRESAMENTE O IMPLÍCITAMENTE, PARA CUALQUIER PROPÓSITO. AKASO RECHAZA EXPRESAMENTE CUALQUIER GARANTÍA IMPLÍCITA, INCLUYENDO, PERO SIN LIMITARSE, LAS GARANTÍAS DE MERCANTIBILIDAD O FITNESS, PARA UN PROPÓSITO EN PARTICULAR. AKASO NO GARANTIZA LA PRECISIÓN, VALIDEZ, HORARIO, LEGALIDAD, O INTEGRIDAD DE CUALQUIER CONTENIDO O SERVICIO PUESTO A DISPOSICIÓN A TRAVÉS DE ESTE DISPOSITIVO Y BAJO NINGUNA CIRCUNSTANCIA, INCLUYENDO LA NEGLIGENCIA, AKASO SERÍA RESPONSABLE, YA SEA POR CONTRATO O AGRAVIO, PARA CUALQUIER DAÑO DIRECTO, INDIRECTO, INCIDENTAL, ESPECIAL O CONSECUENCIAL, DAÑOS, MINUTA DE ABOGADOS, GASTOS O CUALQUIER OTRO DAÑO QUE PUEDA SURGIR, O EN CONEXIÓN CON, CUALQUIER INFORMACIÓN CONTENIDA EN, O COMO RESULTADO DEL USO DE CUALQUIER CONTENIDO O SERVICIO POR SU PARTE O DE CUALQUIER TERCERO, INCLUSO SI SE LE HA ADVERTIDO DE LA POSIBILIDAD DE TALES DAÑOS.» Problema: Deja de grabar a los 20-40 minutos Solución: Active la grabación en bucle Problema: Se encuentra un <error de archivo> al intentar reproducir fotos o vídeo Solución: Formatee la tarjeta Micro SD Contacte con nosotros Para cualquier pregunta, problema o comentario sobre nuestros productos, por favor, envíe un e-mail a la siguiente dirección o llámenos. Correo electrónico: [email protected] 17 18 Français Introduction Merci d'avoir choisi la caméra de bord AKASO. Cette caméra de bord FHD 1080P a été conçue pour enregistrer en temps réel vidéo et son lorsque vous conduisez. Afin de l'utiliser le mieux possible, veuillez lire ce manuel avec attention. Caractéristiques • Caméra grand angle à 170° • Full HD: 1920*1080@30ips; HD: 1280*720@60ips • Format de compression vidéo H.264 • Verrouillage automatique des fichiers amorcé par l'accéléromètre (capteur de gravité) • Détection de mouvement • Plage Dynamique Étendue (Wide Dynamic Range) • Écran LCD de 3 pouces en HD • Batterie intégrée Lithium Polymère • Support carte microSD/TF jusqu'à 32GB Que contient votre boîte? • 1 x Caméra de Bord • 1 x Chargeur Allume-cigare • 1 x Ventouse • 1 x Support Adhésif 3M • 1 x Kit de Fixation • 1 x Câble USB • 1 x Manuel d'Utilisateur OK M • Appuyez sur ce bouton pour parcourir les différentes options du Mode Réglages • Raccourci du mode enregistrement: Enregistrer (Appuyer sur Commencer / Arrêter l'enregistrement) Sélection du mode – Appuyez sur ce boutton pour basculer dans les différents modes: Filmer/Photo/Visionnage Ce fichier vidéo est verrouillé MISE EN TENSION MARCHE/ARRÊT – Maintenir une pression afin d'allumer et éteindre la caméra ProductFixation du produit • Insérez une carte microSD/TF dans la fente de la caméra de bord. • Choisissez un endroit sur le parbrise près du rétroviseur central afin de fixer la ventouse. • Fixez la caméra au support ventouse • Branchez l'interface d'alimentation DC/USB de la caméra à la prise allume-cigare du véhicule via le cable d'alimentation. • Ajustez la caméra dans la position avec le meilleur angle de vue, puis fixez le support d'ajustement. • Une fois que le véhicule démarre, la caméra débutera sa fonction automatiquement. Présentation du matériel Attention: • Please use Class 10 microSD/TF card or above • Insert the microSD/TF card into the slot in the right direction • To remove the microSD/TF card, please gently press the card 12 5 6 7 1 2 3 4 OK M 8 12 9 10 11 1415 13 1. Fente carte TF 5. Interface HD 8. Vidéo/OK 11. MARCHE/ARRÊT Boutons: Haut Bas 2. Haute 3. Menu 4. Bas 6. Base de Support 7. Interface Alimentation DC /USB 9. Mode 10. Sauvegarde d’Urgence 12. Lentille 13. Affichage 14. MIC 15. Trou de réinitialisation MENU – Appuyez sur ce bouton pour accéder et sortir du mode Réglages. 19 Use your DashCam Une fois que le véhicule démarre, la caméra débutera sa fonction automatiquement. • Allumer/éteindre Courte pression sur le bouton MARCHE/ARRÊT pour allumer la caméra; Longue pression pour l'éteindre. • Réglages enregistrement vidéo - Veuillez appuyer sur OK avant d'accéder aux réglages de l'enregistrement vidéo.Appuyez une fois sur le bouton Menu pour rentrer dans les réglages de l'enregistrement vidéo. Appuyz sur les flèches Haut et Bas afin de choisir un réglage puis appuyer sur OK pour confirmer. - Résolution: 1920*1080; 1280*720; 848*480; 640*480; (par défaut: 1920*1080) - Enregistrement par intervalle: OFF/1/3/5 minutes (par défaut: 3 minutes) - Plage Dynamique Étendue (WDR): OFF/ON (par défaut: marche) - Exposition:+2;+5/3;+4/3;+1;+2/3;+1/3;+0;-1/3;-2/3;-1;-4/3;-5/3;-2; (par défaut: +0) - Détecteur de Mouvements: marche/arrêt (par défaut: arrêt) 20 - Enregistrement Audio: marche/arrêt (par défaut: marche) - Date: marche/arrêt ( par défaut: marche) - Accéléromètre: arrêt/faible/moyen/élevé (par défaut: moyen) - Après paramétrage, veuillez APPUYER DE NOUVEAU SUR OK afin de retourner au mode enregistrement vidéo • Réglages du système - Veuillez préalablement appuyer sur OK avant d'accéder aux réglages du système - Appuyez sur le Bouton Menu Deux Fois pour commencer à paramétrer le système. Appuyer sur les boutons Haut et Bas afin de sélectionner un réglage spécifique, et confirmez en appuyant sur OK. - Date/Heure - Numéro de Plaque d'Immatriculation : Activez cette option pour renseigner le numéro d'immatriculation de votre véhicule pour enregistrement vidéo. Le numéro s'affichera alors sur les vidéos. - Extinction automatique: arrêt/1 minute/3 minutes/5 minutes - Surveillance en Parking: marche/arrêt (par défaut: arrêt) L'activation de cette option entraînera un enregistrement si votre véhicule est percuté ou déplacé pour enregistrer automatiquement les délits de fuite et verrouiller et enregistrer automatiquement les vidéos faites. - Son des bips: marche/arrêt (par défaut: marche) Ce réglage vous permet d'activer ou de désactiver la fonction du bouton pour les effets de son. - Langue - Fréquence - Rétroéclairage arrêt/1 minute/3 minutes/5 minutes - Formater: afin de formater la Carte micro SD - Réglages par Défaut - Version - Après réglage, veuillez de nouveau appuyer sur OK pour revenir au mode enregistrement vidéo. • Paramétrer l'enregistrement d'urgence - Appuyez sur le Bouton de Sauvegarde d'Urgence et appuyez de nouveau sur ce bouton pour quitter le Mode Sauvegarde d’Urgence. • Prendre une Photo - Appuyez sur le Bouton Mode pour accéder au Mode Prise de Photo - Appuyez sur OK pour prendre une photo • Visionnage de vidéo(s) et de photo(s) - Appuyez d'abord sur OK avant d'entrer dans le Mode Visionnage de vidéo(s) et de photo(s) - Appuyez sur le bouton Mode pour accéder au Mode Visionnage - Utilisez les boutons flèches Haut et Bas pour parcourir les fichiers et appuyer sur OK pour visionner. - Appuyez sur le Bouton Menu pour verrouiller ou déverrouiller le fichier choisi, maintenez une longue pression sur le bouton Meny pour supprimer le fichier. - Après réglage, choisissez le mode enregistrement vidéo et appuyez de nouveau sur OK pour retourner au Mode Enregistrement. • Sauvegarder des fichiers et les télécharger - Connecter la caméra à l'ordinateur à l'aide du câble USB. Vous pouvez télécharger les fichiers depuis le disque amovible s'affichant dans “Mon ordinateur”, sur le bureau de votre ordinateur. 21 - Pour télégharger les fichiers de la caméra sur votre ordinateur, vous pouvez également insérer la carte microSD dans un lecteur de cartes mémoires externe • Indicateur de Batterie - L'indicateur de batterie se trouve sur le côté droit de l'écran. Si une croix rouge s'affiche, veuillez immédiatment charger la caméra de bord. Précautions La caméra de bord AKASO n'est faite ni pour être modifiée, ni réglée lors de l'usage d'un véhicule. AKASO n’est pas résponsable des dommages résultants d'un mauvais usage de la caméra de la part de l'utilisateur. Utilisez uniquement les chargeurs, accessoires et fournitures approuvés par le fabricant. AKASO ne peut être tenu responsablede la sécurité de l'utilisateur lorsque ce dernier utilise des accessoires ou des fournitures qui n'ont pas été approuvées par AKASO. Ne laissez pas la caméra à un endroit excessivement chaud, froid, humide ou sec. Une telle situation peut causer un dysfonctionnement de l'écran, abimer la caméra ou faire exploser la batterie. Il est recommandé que vous utilisiez la caméra dans unenvironemment avec une température allant de -4° à 131° F (-10° à 55° C), et avec une humidité entre 10% to 80%. Si votre appareil surchauffe, attendez alors qu'il refroidisse avant de l'utiliser. Une exposition prolongée de la peau à un appareil en surchauffe peut laisser apparaître des symptômes de brûlures artificielles telles que des points rouges ou une pigmentation plus foncée. Ne pas toucher au chargeur allume-cigare ni le déconnecter en tirant sur le fil lorsque vous avez les mains mouillées. En le faisant, vous pouvez être électrocuté. N'utilisez ni de cable d'alimentation ni interface ou de prise qui soient endommagés. Un branchement défectueux peut causer une électrocution voire un incendie. Ne manipulez pas votre caméra avec des mains mouillées En le faisant vous risquez d'être électrocuté. Ne retirez pas la carte SD de la caméra pendant qu'elle est en train de filmer , sinon vous risquez de générer une erreur. Veuillez vous assurer de maintenir propre la lentille de la caméra ainsi que la lentille ne soit obstruée par aucun objet ni placée près d'un objet réflechissant. Si le parebrise du véhicule est teinté, la qualité d'enregistrement peut être affectée. Résolution des problèmes Problème : Aucun bouton ne répond Solution: 1. Appuyez sur le bouton Réitinialisation afin de redémarrer la caméra. 2. Reformatez la carte Micro-SD ou remplacez la par une nouvelle carte. 22 Français 3. Appuyez fortement sur les boutons, ou maintenez une plus longue pression; ils ne produiront pas toujours une réponse instantannée à une pression rapide. Problème: L'image prise ne peut pas être enregistrée Solution: 1. Reformatez la Carte Mémoire ou remplacez la par une carte neuve. 2. Assurez-vous d'arrêter l'enregistrement avant l'extinction de la caméra. Problème: L'appareil ne s'allume pas Solution: Assurez-vous que la caméra de bord est bien chargée. Assurez-vous que la caméra est éteinte lorque elle est en charge. Problème: Le bouton Menu ne répond pas Solution: Appuyez sur le bouton OK pour arrêter l'enregistrement et ainsi vous accèderez au menu. Problème: La carte Micro SD n'est pas reconnue Solution: 1. Formatez la carte Micro SD 2. Utilisez une autre carte Micro SD Problème: L'écran s'éteint de manière involontaire Solution: 1. Désactivez l'option Économie de l'affichage à l'écran 2. Chargez la batterie 3. Rétablir les réglages par défautRestore to default settings Avertissement Certains contenus et services accessibles à travers cet appareil appartiennent à des tierces parties et sont soumis à des droits d'auteur, brevet, droits de marque et/ou à d'autres protections de la propriété intellectuelle. Ces contenus et services ne sont fournis que pour votre usage uniquement à des fins non-commerciales. Vous ne devez utiliser aucun contenu ou service d'une manière qui n'a pas été autorisée par le propriétaire du contenu ou par le fournisseur de services. Sauf autorisation expresse du propriétaire du contenu ou du fournisseur de services et en tout état de cause, vous n'êtes pas autorisé à modifier, copier, republier, télécharger, publier, transmettre, traduire, vendre, créer des œuvres dérivées, exploiter ou distribuer, de quelque manière ou par quelque moyen que ce soit les contenus ou services affichés via cet appareil. "LES CONTENUS ET LES SERVICES DES TIERS SONT FOURNIS "TELS QUELS". AKASO NE GARANTIT PAS CES CONTENUS OU SERVICES EXPRESSÉMENT OU IMPLICITEMENT FOURNIS, À QUELQUE FIN QUE CE SOIT. AKASO EXCLUT EXPRESSÉMENT TOUTE GARANTIE IMPLICITE, Y COMPRIS MAIS SANS LIMITATION AUX GARANTIES DE QUALITÉ MARCHANDE OU DE CONFORMITÉ À UNE FIN PARTICULIÈRE. AKASO NE GARANTIT PAS L'EXACTITUDE, LA VALIDITÉ, L'OPPORTUNITÉ, LA LÉGALITÉ OU L'EXHAUSTIVITÉ DE TOUT CONTENU OU SERVICE DISPONIBLE PAR L'INTERMÉDIAIRE DE CET APPAREIL ET EN AUCUN CAS - Y COMPRIS PAR NÉGLIGENCE - AKASO NE PEUT ÊTRE TENU RESPONSABLE, CONTRACTUELLEMENT OU DÉROGATOIRE, DE TOUT DOMMAGE DIRECT, INDIRECT, ACCESSOIRE, SPÉCIAL OU CONSÉCUTIFS FRAIS DE PROCURATION, DÉPENSES OU TOUT AUTRE DOMMAGE DÉCOULANT, OU EN RAPPORT AVEC, DE TOUTE INFORMATION CONTENUE, OU RÉSULTANT DE L'UTILISATION DE TOUT CONTENU OU SERVICE PAR VOUS OU PAR TOUT TIERS, MÊME SI CONSCIENT DU RISQUE DE TELS DOMMAGES. " Problème: impossible d’enregistrer une vidéo Solution: 1. Vérifiez l'espace disponible sur la carte mémoire et si nécessaire, supprimer des fichiers 2. Reformatez votre carte mémoire; si le problème persiste, remplacez-la et rétablissez les réglages par défaut 3. Assurez-vous de maintenir le bouton OK jusqu'à ce que la lumière rouge clignote Problème: L'enregistrement s'arrête au bout de 20-40 minutes Solution: Activez l'Option Enregistrement En Boucle Problème: "Erreur fichier" s'affiche lorsqu'il y a tentative de visionnage de vidéo ou de photo Solution: Formater la carte micro SD Contactez-nous Pour toute question, problème ou avis sur nos produits, veuillez envoyer un email à l'adresse ci-dessous. Nous vous répondrons aussitôt que possible. E-mail: [email protected] 23 24 Italiano • Premere per navigare verso l’alto nella modalità impostazioni Introduzione Grazie per aver scelto la dash-cam AKASO Questa dash-cam FHD 1080P è progettata per registrare video e audio in tempo reale durante la guida. Per un uso migliore, si prega di leggere questo manuale con attenzione. OK • Modalità registrazione hot key: Registra (premere per iniziare/fermare la registrazione) M Seleziona modalità - Premere per attivare modalità registrazione / foto / playback File video corrente bloccato Accensione - Tenere premuto per accendere o spegnere Caratteristiche • grandangolo di 170 gradi • Full HD: 1920*1080@30fps; HD: 1280*720@60fps • Formato di compressione video H.264 • Attivazione automatica del file di lock con sensore-G • Rilevatore di movimento • WDR (Wide Dynamic Range) • display LCD 3 pollici • Batteria interna in polimero di litio • MicroSD/TF di supporto fino a 32GB Installazione Prodotto • Inserire la scheda microSD/TF nell’apposito alloggiamento della dash-cam. • Scegliere la posizione per attaccare la ventosa sul parabrezza, vicino allo specchietto retrovisore. • Attaccare la telecamera al supporto. • Connettere l’interfaccia di corrente CC/USB della telecamera alla presa accendisigari della macchina con il cavo. • Regolare la telecamera nella posizione da cui riprende meglio, e fissare il sostegno. • Una volta acceso il motore, la telecamera inizierà a funzionare automaticamente. Cosa c’è nella scatola? • 1 x Dash-Cam • 1 x Caricatore da macchina • 1 x ventosa • 1 x 3M Supporto Adesivo • 1 x Kit Hardware • 1 x Cavo USB • 1 x Manuale dell’utente Panoramica Prodotto Attenzione: • Usare microSD/TF Class 10 o superiore. • Inserire la microSD/TF Nell’apposito alloggiamento nel giusto verso. • Per rimuovere la microSD/TF, premere con delicatezza la card. 12 5 6 7 1 2 3 4 OK M 8 12 9 10 11 1415 13 1. Alloggiamento per scheda TF 5. Interfaccia HD 8. Video/OK 11. Accensione 12. Lenti 2. Su 3. Menu 4. Giù 6. Base di supporto 7. Interfaccia corrente CC/USB 9. Modalità 10. Salvataggio d’emergenza 13. Display 14. MIC 15. Foro di reset Tasti: Su Giù MENU - Premere per entrare e uscire dalla modalità impostazioni 25 Usare la Dash-Cam Una volta acceso il motore, la telecamera inizierà a funzionare automaticamente • Accendere con tasto On/Off Premere il tasto di accensione per accendere; tenere premuto per spegnere. • Impostazioni di registrazione video - Premere OK prima di entrare nelle impostazioni di registrazione video - Premere il tasto menu una volta per entrare nella modalità impostazioni di registrazione video. Premere i tasti su e giù per selezionare ogni impostazione, e premere OK per confermare. - Risoluzione: 1920*1080; 1280*720; 848*480; 640*480; (Default: 1920*1080) - Registrazione Loop: off/1/3/5 minutes (Default: 3 minuti) - WDR: off/on (Default: on) - Esposizione:+2;+5/3;+4/3;+1;+2/3;+1/3;+0;-1/3;-2/3;-1;-4/3;-5/3;-2; (Default: +0) - Rilevatore di movimento: off/on (Default: off) 26 - Registrazione Audio: off/on (Default: on) - Data: off/on (Default: on) - Sensore G: off/basso/medio/alto (Default: medio) - Dopo il settaggio, premere OK di nuovo per tornare alla modalità di registrazione. • Impostazioni del sistema - Premere OK prima di entrare nelle impostazioni di sistema - Premere il tasto menu due volte per entrare nelle impostazioni di sistema Premere i tasti su e giù per selezionare ogni impostazione, e premere OK per confermare. - Data/Ora - Numero di targa Abilitare questa funzione per inserire il numero di targa del veicolo per la registrazione del video. Il numero di targa sarà visibile nel video. - Auto spegnimento: off/1 minute/3 minuti/5 minuti - Monitor di parcheggio: off/on (default: off) Abilitando questa funzione si attiverà la telecamera se alla macchina verrà dato un colpo o Se verrà mossa e automaticamenteSalverà i video degli incidenti registrati. - Suono (beep): off/on (Default: on) Questa impostazione permette di attivare o disattivare il suono. - Lingua - requenza - Retroilluminazione: off/1 minuto/3 minuti/5 minuti - Formatta: per formattare la microSD - Impostazioni di default: - Versione - Dopo il settaggio, premere OK di nuovo per tornare alla modalità di registrazione. • Impostare il salvataggio d’emergenza - Premere il tasto di salvataggio d’emergenza, premerlo di nuovo per uscire dal salvataggio d’emergenza. • Scatto foto - Premere il tasto modalità per entrare nella modalità di scatto foto - Premere OK per scattare • Playback video e foto - Premere OK prima di entrare nella modalità playback video e foto - Premere il tasto modalità per entrare nella modalità di modalità playback - Premere i tasti su e giù per scorrere fra i file, e premere OK per guardare. - Premere il tasto menu per bloccare e sbloccare il file corrente, e tenere premuto il tasto menu per concellare i file. - Dopo il settaggio, selezionare la modalità di registrazione e premere OK di nuovo per tornare alla modalità di registrazione. • Back up dei dati e download - Connetere la telecamera al computer con cavo USB. I file si possono scaricare nel disco rimovibile e appariranno su “il mio computer” sul tuo pc. 27 - Si può anche inserire la microSD nel lettore microSD e scaricare i file sul pc. • Indicatore di batteria - L’indicatore di batteria è nell’angolo destro dello schermo. Se comparisse la croce rossa, caricare la dash-cam immediatamente. Precauzione La Dash-Cam AKASO non è progettata per essere modificata, o calibrata mentre si guida il veicolo. AKASO non è responsabile di qualunque danno dovuto al cattivo uso della telecamera. Usare solo caricatori, accessori e ricambi approvati dal produttore. AKASO non è responsabile della sicurezza dell’utente che usi accessori o ricambi non appraovati da AKASO. Non riporre il dispositivo in luoghi eccessivamente caldi, freddi, umidi o asciutti. Potrebbe causare malfunzionamenti dello schermo, danni al dispositivo, o far esplodere la batteria. Si raccomanda di usare il dispositivo in luoghi con temperature che varino dai -10° ai 55°, e con un’umidità fra il 10% e l’80%. Se il dispositivo si surriscaldasse, farlo raffreddare prima di usarlo. Un’esposizione prolungata della pelle ad un dispositvo surriscaldato potrebbe causare sintomi di scottatura, come macchie rosse o di pigmentazione più scura. Non toccare il caricatore con le mani bagnate o sconnettere il caricatore tirando il filo. Ciò può esporre a scosse elettriche. Non usare cavi, trasformatori o prese rovinati. Connessioni difettose possono causare scosse elettriche o incendi. Non toccare il dispositivo con le mani bagnate. Ciò può esporre a scosse elettriche. Non rimuovere la microSD dal prodotto durante la registrazione dei dati, potrebbe causare errore. Mantenere le lenti della telecamera sempre pulite, assicurarsi che le lenti non siano bloccate da oggetti o che non siano vicine a oggetti riflettenti. Se il parabrezza fosse di un colore scuro, potrebbe condizionare la qualità della registrazione. Risoluzione dei problemi generali Problema: Nessun tasto funziona Soluzione: 1. Premere il tasto RESET per riavviare la telecamera. 2. Formattare la microSD o sostituirla con una nuova. 28 Italiano 3. Premere i tasti con fermezza, o tenerli premuti; non sempre rispondono a un tocco veloce. Problema: La foto scattata non risulta salvata . Soluzione: 1. Formattare la memory card o sostituirla con una nuova. 2. Assicurarsi di interrompere la registrazione prima di spegnere. Problema: Il dispositivo non si accende. Soluzione: Assicurarsi che la Dash-Cam sia carica. Assicurarsi che l’unità sia spenta durante la carica. Problema: Il tasto menu non risponde. Soluzione: Premere il tasto OK per interrompere la registrazione così da poter accedere al menu. Problema: Non viene riconosciuta la MicroSD. Soluzione: 1. Formattare la microSD. 2. Usare una microSD diversa. Problema: Lo schermo si spegne inaspettatamente . Soluzione: 1. Disabilitare la funzione screen saver. 2. Caricare la batteria. 3. Ripristinare le impostazioni di default. Dichiarazione di non responsabilità Alcuni contenuti e servizi accessibili attraverso questo dispositivo appartengono a terze parti e sono protette da copyright, brevetti, trademark e/o altre leggi di proprietà intelletuale. Tali contenuti e servizi sono forniti per il solo uso personale e non commerciale dell’utente. Non è consentito utilizzare tali contenuti o servizi in maniera non autorizzata dal proprietario del contenuto o dal fornitore del servizio. Senza limitare il precedente, se non espressamente autorizzato dal proprietario del contenuto o fornitore del servizio, non si può modificare, copiare, ripubblicare, caricare, postare, trasmettere, tradurre, vendere, creare lavori derivanti, sfruttare, o distribuire in qualsiasi maniera o mezzo qualsiasi contenuto o servizio mostrato da questo dispositivo. “CONTENUTI E SERVIZI DI TERZE PARTI SONO FORNITE “COSì COME SONO.” AKASO NON GARANTISCE CONTENUTI O SERVIZI COSì FORNITI, SIA ESPLICITAMENTE CHE IMPLICITAMENTE, PER QUALSIASI RAGIONE. AKASO ESPLICITAMENTE NEGA QUALSIASI GARANZIA, INCLUSO MA NON LIMITATO A, GARANZIE DI COMMERCIABILITà O FITNESS PER UNO SCOPO PARTICOLARE. AKASO NON GARANTISCE L’ACCURATEZZA, VALIDITà, PUNTUALITà, LEGALITà, O COPLETEZZA DI ALCUN CONTENUTO RESO DISPONIBILE TRAMITE QUESTO DISPOSITIVO E IN NESSUNA CIRCOSTANZA, INCLUSE NEGLIGENZA, AKASO SARà RESPONSABILE, SIA PER CONTRATTO CHE ILLECITO, PER QUALSIASI DANNO DIRETTO, INDIRETTO, INCIDENTALE, SPECIALE O CONSEQUENZIALE, Nè DI SPESE DI AVVOCATO, TASSE O ALTRI DANNI DOVUTI A, O IN CONNESSIONE CON QUALSIASI INFORMAZIONE CONTENUTA, O RISULTATA DALL’USO DI CONTENUTO O SERVIZIO DA VOI O TERZE PARTI, ANCHE SE AVVISATI DELLE POSSIBILITà DI TALI DANNI.” Problema: Non registra video. Soluzione: 1. Controllare lo spazio rimanente sulla memory card e cancellare dei file se necessario. 2. Formattare la memory card, se il probema persiste, sostituirla con una nuova. Ripristinare le impostazioni di default. 3 Assicurarsi di tenere premuto il tasto OK finchè la luce rossa non starà lampeggiando. Problema: Smette di registrare dopo 20-40 minuti. Soluzione: Impostare la registrazione in loop. Problema: Quandosi prova a riprodurre foto o video, appare “file error”. Soluzione: Formattare la microSD. Contatto US Per qualsiasi domanda, problemi o commenti riguardo i nostri prodotti, si prega di contattarci mandando una mail all’indirizzo sottostante o facendo una telefonata. E-mail: [email protected] 29 30 日本語 はじめに • 上ボタンを押し、設定モードでオプション選択 このたびは、AKASOドライブ レコーダーをお買い上げいただき誠にありがとうございます。本機 FHD1080Pドライブ レコーダーは運転中に映像 と音声を記録する機能を搭載。 ご使用の前に、 こ の取扱説明書をよくお読みのうえ、正しくお使い下さい。 OK • 録画モードホットキー:録画(開始/停止) M モード選択 - 録画 / 写真 / 再生モード 現在の動画ファイルがロック 電源 ̶ 電源がオンまたはオフになるまでボタンを押し続けます 特徴 • 170度広角 • フルHD:1920 * 1080 @ 30fps; HD:1280*720@60fps • H.264動画圧縮フォーマット • Gセンサーによる自動ロックファイル • 動体検知 • WDR(ワイドダイナミックレンジ) • 3インチのHD LCDディスプレイ • リチウムポリマー電池内蔵 • 最大32GBmicroSD / TFカードをサポート 取り付け方法 • ドライブレコーダーのカードスロットにmicroSD / TFカードを挿入します。 • フロントガラス上部、吸盤をルームミラーの近くに配置します。 • ブラケットにドライブレコーダーを取り付けます。 • ドライブレコーダーのDC電源/ USBインターフェースを電源ケーブルを使って車のシガーライタ ーソケットに接続します。 • 最大に広角の風景を録画できるようにするため、 ブラケットの位置を調整、固定します。 • エンジンが始動すると、連動して録画を自動的に開始します。 セット内容 • ドライブレコーダーx1 • カーチャージャーx1 • 吸盤x1 • 3M 粘着テープx1 • ハードワイヤキットx1 • USBケーブルx1 • 日本語取扱説明書 x 1 製品の概要 注意: • Class 10 もしくはそれより高度なmicroSD / TFカードを使用してください。 • microSD / TFカードをメモリーカードスロットに、正しい向きでまっすぐ確実に挿入してください。 • microSD / TFカードを取り外すには、 カードを押してください。 12 5 6 7 1 2 3 4 OK M 8 12 9 10 11 1415 13 1. TF カードスロット 2. 上 3. メニュー 4. 下 5. HD インターフェース 6. マウントベース 7. DC電源/ USBインターフェイス 8. ビデオ/ OK 9. 設定モード 10. 緊急保存 11. 電源 12. レンズ 13. 表示ディスプレイ 14. マイク 15. リセット穴 ボタン: 上 下 設定 ̶ モード、終了するときに押します。 31 ドライブレコーダーを使用する エンジンが始動すると、連動して録画を自動的に開始します。 • オン/オフ 電源ボタンを短く押すと電源がオン、長く押すと電源がオフになります。 • 動画撮影の設定 - 動画撮影設定をする前に、最初に[OK]ボタンを押してください - メニューボタンを1度押すと、動画撮影モードの設定が開始します。上下のボタンを押し各設定 を選択しってOKボタンを押します。 - 解像度:1920 * 1080; 1280 * 720; 848 * 480; 640 * 480;(初期設定:1920 * 1080) - ループ録画:オフ/ 1/3/5分(初期設定:3分) - WDR:オフ/オン(初期設定:オン) - 露出:+2; +5/3; +4/3; +1; +2/3; +1/3; +0; -1/3; -2/3; -1; -4/3; -5 / 3; -2;(初期設定:+0) - 動体検知:オフ/オン(初期設定:オフ) 32 - 録音:オフ/オン(初期設定:オン) - 日付スタンプ:オフ/オン(初期設定:オン) - Gセンサー:オフ/低/中/高(初期設定:中) - 設定後、 もう一度OKボタンを押すと動画撮影モードに戻ります。 • システム設定 - システム設定をする前に、最初に[OK]ボタンを押してください - メニューボタンを2回押し、 システム設定を開始します。上下のボタンを押して各設定を選択 し、[OK]ボタンを押します。 - 日付時刻 - プレート番号:この機能を有効にすると、録画にお客様の車両プレート番号を入力できます。 プレート番号はビデオにスタンプされます。 - オートパワーオフ:オフ/ 1分/ 3分/ 5分 - 駐車監視:オフ/オン(初期設定:オフ) この機能を有効にすると、事故や 当て逃げを映像で記録し、録画ファイルは自動的にロック保 存されます。 - ビープ音:オフ/オン(初期設定:オン) この設定では、本機ボタンの効果音をオンまたはオフにすることができます。 - 言語 - 周波数 - バックライト:オフ/ 1分/ 3分/ 5分 - フォーマット:Micro SDカードをフォーマットする - 初期設定 - バージョン - 設定後、 もう一度[OK]ボタンを押すと動画撮影モードに戻ります。 • 緊急保存設定 - 緊急保存ボタンを押し、終了するにはもう一度押します。 • 写真を撮る - モードボタンを押し、撮影モードを選択。 - [OK]ボタンを押して写真を撮ります • 動画と写真の再生 - 動画と写真の再生する前に、最初に[OK]ボタンを押します - モードボタンを押し再生モードにします - 上下のボタンでファイルを閲覧し、[OK]ボタンを押します。 - メニューボタンを押してファイルをロック/ロック解除、ボタンを長く押すとファイルが削除さ れます。 - 設定後、動画撮影モードで、 もう一度OKボタンを押すと録画に戻ります。 • データのバックアップとダウンロード - カメラをUSBケーブルでコンピュータに接続します。パソコンの「マイコンピューター」に表示 されるリムーバブルディスクにファイルをダウンロードできます。 - Micro SDカードをカードリーダーに挿入し、パソコンにファイルをダウンロードすることもでき ます。 33 • バッテリーインジケーター - バッテリーインジケーターは画面の右端にあります。赤い十字記号が表示された場合、すぐに 本機を充電してください。 注意 AKASO ドライブレコーダーは、車両運転中に変更もしくは改造を目的とした製品ではありません。 AKASO は、お客様が取扱説明書に従わず設置および使用された場合のいかなる損害についても 一切責任を負いません。 必ず メーカーが承認した正規品充電器、付属品、および消耗品のみを使用してください。 弊社の承認を受けていないアクセサリーや消耗品を使用し、発生した故障、 又は損傷について はAKASOは一切責任を負いません。 極端に暑い場所や寒い場所、湿気、乾燥した場所に本機を保管しないでください。 画面が誤動作したり、機器が破損、電池が爆発する恐れがあります。、周囲の温度が-10º〜55ºC (-4º〜131ºF) と10%〜80%の湿度範囲での使用を推奨します。 本機が過熱した場合は、使用する前に冷却してください。 過熱した装置に皮膚が触れると、赤い斑点や色素沈着など、低温やけどを引き起こすことがありま す。 濡れた手で車の充電器に触れたり、 コードを引っ張って充電器を外したりしないでください。 感電する恐れがあります。 損傷した電源コードやプラグ、緩んだ電気プラグを使用しないでください。 ショート、感電や火災の原因となります。 濡れた手で本機に触れないでください。 感電する恐れがあります。 データの記録中にSDカードを本機から取り外さないでください。 エラーが発生する可能性があります。 カメラのレンズは常に清潔に保ち、 レンズは塞がれていないこと、 または反射材料の近くに置かれて いないことを確認してください。 車のフロントガラスに暗いフィルムコーティングが施されていると録画品質に影響を与えることが あります。 トラブルシューティング 現象:全てのボタンが応答しません 対処方法: 1. リセットボタンを押してカメラを再起動します。 2. Micro SDカードを再フォーマットする、 または新しいカードに交換します。 34 3. ボタンを強く押すか、長押ししてください。少々時間がかかる場合もあります。 現象:録画した画像が保存されていません。 対処方法: 1. メモリーカードを再フォーマットするか、新しいメモリカードと交換してください。 2. 終了する前に、必ず録画を停止してください。 現象:電源がオンになりません。 対処方法:ドライブレコーダーがのバッテリーがよく充電されているか確認してください。 充電中に電源がオフになっているか確認してください。 現象:メニューボタンが応答しません。 対処方法:OKボタンを押し、録画を停止し、 メニューにアクセス。 現象:Micro SDカードが認識されません 対処方法: 1. Micro SDカードをフォーマットしてください。 2. 他のMicro SDカードを使用してみてください。 現象:画面の電源が予期せず切れます。 対処方法: 1. スクリーンセーバー機能を無効にしてください。 2. バッテリーを充電してください。 3. 初期設定に復元してください。 日本語 免責事項 本機を通じてアクセス可能な一部のコンテンツおよびサービスは、第三者に帰属し、著作権、特許 商標やその他の知的財産権によって保護されています。このようなコンテンツおよびサービスは 非営利目的の使用のみに提供されます。 コンテンツ所有者またはサービスプロバイダーによって許可されていない方法でコンテンツまた はサービスを利用することはできません。上記の一般性を制限することなく、適用されるコンテン ツは該当する所有者もしくはサービスプロバイダーから事前に明示的に許可されてい ない限り、 本機を通じて表示されたコンテンツやサービスを修正、複製、再発行、 アップロード、投稿、送信、 翻訳、販売、派生作品の作成、利用、 または配布することはできないものとし、 「第三者のコンテンツとサービスは、 「現状」のまま提供されます。AKASOは、いかなる目的であって も、明示的であると暗示的であるとにかかわらず、 コンテンツまたはサービスの提供を保証しませ ん。AKASOは、商品性や特定目的への適合性を含め、明示的にも暗示的な保証を否認しますが、 これに限られたものではありません。AKASOは、本機を通じて提供されるコンテンツまたはサービ スの正確性、妥当性、適時性、適法性、完全性を保証せず、いかなる場合においても、契約、不法行 為のいずれかを問わず、過失責任を含む直接的、間接的、偶発的、特別または派生的損害、弁護士 料、損害賠償、本機のご利用に起因したじたお客様の いかなる損害、不利益等に関してもまたは そのような損害が発生する可能性を知らされていた場合においても、お客様または第三者がコン テンツまたはサービス使用の結果で発生したいかなる損害についても責任を負わないものとしま す。」 現象:録画できません。 対処方法: 1. メモリーカードの空き容量を確認し、必要に応じてファイルを削除してください。 2. メモリーカードを再フォーマットしてください。それでも問題が解決しない場合は、新しいメモリ ーカードと交換してください。初期設定に復元してください。 3. 赤いランプが点滅するまで、OKボタンを押し続けてください。 現象:20〜40分後に録音が停止します。 対処方法:ループ録画をオンにしてください。 現象:写真やビデオの再生中に「ファイルエラー」が発生します。 対処方法:Micro SDカードをフォーマットしてください。 お問合せ お取扱いしている商品に関するお問い合わせ. トラブル、 ご意見等ご ざいましたら下記メールア ドレスにお問い合わせください。速やかに対応致します。 Eメ−ルアドレス:[email protected] 35 36-
 1
1
-
 2
2
-
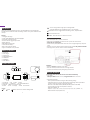 3
3
-
 4
4
-
 5
5
-
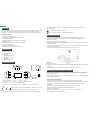 6
6
-
 7
7
-
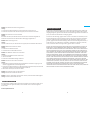 8
8
-
 9
9
-
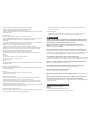 10
10
-
 11
11
-
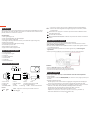 12
12
-
 13
13
-
 14
14
-
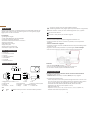 15
15
-
 16
16
-
 17
17
-
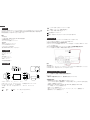 18
18
-
 19
19
-
 20
20


AKASO D2000 Manual de usuario
- Categoría
- Grabadoras de disco
- Tipo
- Manual de usuario
en otros idiomas
- français: AKASO D2000 Manuel utilisateur
- italiano: AKASO D2000 Manuale utente
- English: AKASO D2000 User manual
- Deutsch: AKASO D2000 Benutzerhandbuch
- 日本語: AKASO D2000 ユーザーマニュアル
Artículos relacionados
-
AKASO V1 Manual de usuario
-
-
-
-
-
AKASO P30 Manual de usuario
-
-
-
AKASO Brave 4 Guía del usuario
-
Otros documentos
-
TOGUARD Ultra HD 4K Dash Camera Manual de usuario
-
REXING Rexing V1 Manual de usuario
-
-
Philips ADR81BLX1 Manual de usuario
-
 Boss Audio Systems BCAM70 El manual del propietario
-
REXING V5C Guía de inicio rápido
-
KINGSLIM D1 Manual de usuario
-
Midland h3+ Manual de usuario
-
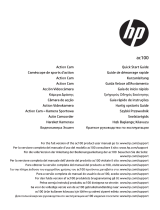 HP AC Series User AC100 Instrucciones de operación
-
REXING V5 Guía del usuario

