NZXT Respire T20 Manual de usuario
- Tipo
- Manual de usuario

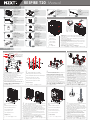
INSTALLATION OF MOUNTING KIT
INTEL SOCKET LGA 2011
1 2 3
4
5
6 7
Fan F
OR
an
INTEL
Install the backplate and secure with pillars.
Installez la plaque arrière et xez-la avec les colonnes.
Setzen Sie die Rückplatte auf, xieren Sie diesen mit den Stangen.
Instale a placa posterior e xe com os pilares.
Установить бэкплейт и зафиксировать опорами.
Instale la placa posterior y fíjela con las columnas.
安装背板并用支柱固定。
バックプレートを挿入し、支柱で固定してください。
INTEL SOCKET LGA 1366/1156/1155/775
Attach the fan to the heatsink.
Attachez le ventilateur au dissipateur.
Bringen Sie den Lüfter am Kühlkörper an.
Encaixe a ventoinha no dissipador.
Установить вентилятор на радиатор.
Acople el ventilador al disipador
将风扇安装到散热器。
ファンをヒートシンクに取り付けて下さい。
LGA 775
LGA 1156/1155
Aligning
LGA 1366
B
A
J
H
H
H
C
L
H
Remove the fan
Retirez le ventilateur
Lüfter ausbauen
Remova a ventoinha
Снять вентилятор.
Quitar el ventilador.
拆下风扇。
ファンを取り外す。
G
G
G
G
J
J
J
F
F
K
D
D
F
F
F
F
D
D
F
F
J
Place the heatsink onto the CPU.
Positionnez le dissipateur sur le processeur.
Setzen Sie den Kühlkörper auf die CPU.
Coloque o dissipador na CPU.
Установить радиатор на ЦП.
Coloque el disipador en la CPU.
将散热器装到 CPU 上。
ヒートシンクをCPU に固定してください。
I
Remove the protective lm on the bottom of the heatsink, then apply a thin layer of
thermal grease.
Retirez le lm de protection sur le bas du radiateur, puis appliquez une ne couche
de graisse thermique.
Entfernen Sie die Schutzfolie am Boden des Kühlkörpers, tragen Sie dann eine
dünne Schicht Wärmeleitpaste auf.
Remova a película de protecção da parte inferior do dissipador e depois aplique
uma camada na de massa térmica.
Снять защитную пленку на нижней части радиатора, а затем нанести тонкий
слой термопасты.
Quite la película protectora de la parte inferior del disipador y, a continuación,
aplique una capa na de compuesto térmico.
揭下散热器底部上的保护膜,然后涂上一层簿簿的散热膏。
注:CPU上の既存の熱
伝導グリスをきれいに
ふき取ってください。
ヒートシンク底部の保護フィルムを取り外し、熱伝導グリスを薄く均一に塗る。
Connect the fan cable onto the motherboard or connect the
speed adapter to lower the fan speed.
Branchez le câble du ventilateur sur la carte mère ou branchez
l'adaptateur de vitesse en vue de réduire la vitesse du ventilateur.
Verbinden Sie das Lüfterkabel mit dem Anschluss am Motherboard;
alternativ schließen Sie den Drehzahladapter an, wenn Sie eine
geringere Lüfterdrehzahl wünschen.
Ligue o cabo da ventoinha à placa principal ou ligue o adaptador
de velocidade para diminuir a velocidade da ventoinha.
Подключить кабель вентилятора к материнской плате или
подключить регулятор скорости, чтобы понизить обороты
вентилятора.
Conecte el cable del ventilador a la placa base o al adaptador
de velocidad para reducir la velocidad de dicho ventilador.
将风扇线缆连接到主板,或连接速度适配器以降低风扇速度。
遅くするためのスピードアダプタに接続し、スピードアダプタのコ
ネクタをマザーボード上のファンコネクタに接続してください。
Install LGA 2011 screws on to the integrated backplate on the
motherboard, then place the Intel clips on the LGA 2011 screws,
using the outer-most hole. Secure the nuts tightly by hand.
Installez les vis LGA 2011 sur la plaque arrière intégrée de la carte
mère, puis placez les attaches Intel sur les vis LGA 2011, en utilisant le
trou le plus à l’extérieur. Fixez les écrous fermement avec la main.
Installieren Sie die LGA 2011-Schrauben an der integrierten
Rückplatte des Motherboards, setzen Sie dann die Intel-Clips auf
die LGA 2011-Schrauben auf, nutzen Sie dazu die Bohrung ganz
außen. Ziehen Sie die Muttern mit der Hand an.
Instale os parafusos LGA 2011 na placa posterior integrada na
placa principal e depois coloque os clips Intel nos parafusos LGA
2011, utilizando o orifício exterior mais distante. Aperte as porcas
rmemente com a mão.
Установить винты LGA 2011 на встроенный бэкплейт материнской
платы, а затем установить крепление для процессоров Intel на
винты LGA 2011, используя самое удаленное от центра отверстие.
Хорошо затянуть гайки рукой.
Instale los tornillos para LGA 2011 de la placa posterior integrada en
la placa base y, a continuación, coloque los broches de Intel en los
tornillos para LGA 2011 utilizando el oricio más externo. Apriete las
tuercas rmemente a mano.
将 LGA 2011 螺丝安装到主板的后板上,然后通过最外侧的孔给
Intel 脚架套上 LGA 2011 螺丝。 用手拧紧螺母。
LGA 2011用ネジをマザーボードに付けてあるバックプレートに
挿入し、インテルクリップのもっとも外側の穴を通してLGA
2011用ネジの上に置き、手でナットを固定してください。
Put the crossbar through the heatsink and lay on the Intel clips. Secure
the cross bar with the crossbar screws.
Mettez la barre transversale au travers du dissipateur et posez-la sur les clips
Intel. Fixez la barre transversale avec les vis de barre transversale.
Führen Sie die Querstrebe so durch den Kühlkörper, dass diese auf den
Intel-Clips auiegt. Fixieren Sie die Querstrebe mit den Querstrebenschrauben.
Coloque a barra transversal no dissipador e coloque os clips Intel. Aperte a
barra transversal com os respectivos parafusos.
Установить матричный переключатель через радиатор и поместить на
крепление для процессоров Intel. Затянуть матричный переключатель
соответствующими винтами.
Coloque la barra transversal a través del disipador y aplique los broches de
Intel. Fije la barra transversal con los tornillos para dicha barra.
使横杆穿过散热器,压在 Intel 脚架上。 用横杆螺丝将横杆拧紧。
クロスバーをヒートシンクを通してインテルクリップ上に置き、クロスバ
ー用ネジで固定してください。
COMPONENTS LIST
Heatsink and Fan
Dissipateur et ventilateur
Kühlkörper und Lüfter
Dissipador e ventoinha
Радиатор и вентилятор
Disipador y ventilador
散热器和风扇
ヒートシンクとファン
x1
A
Backplate
Plaque dorsale
Rückplatte
Placa posterior
Бэкплейт
Placa posterior
背板
バックプレート
x1
B
Crossbar
Barre transversale
Querstrebe
Barra transversal
Матричный переключатель
Barra transversal
横杆
クロスバー
x1
C
AMD Clips
Attaches AMD
AMD-Clips
Clips AMD
Крепление для процессоров AMD
Broches de AMD
AMD 脚架
AMD用クリップ
x2
E
Intel Clips
Attaches Intel
Intel-Clips
Clips Intel
Крепление для процессоров Intel
Broches de Intel
Intel 脚架
インテル用クリップ
x2
D
Nuts
Ecrous
Muttern
Porcas
Гайки
Tuercas
螺母
ナット
x4
F
Pillars
Colonnes
Stangen
Pilares
Опоры
Columnas
支柱
支柱
x4
G
Backplate Screws
Vis Plaque dorsale
Rückplattenschrauben
Parafusos da placa posterior
Винты бэкплейт
Tornillos para la placa posterior
背板螺丝
バックプレート用ネジ
x4
H
Crossbar Screws
Vis barre transversale
Querstrebenschrauben
Parafusos da barra transversal
Винты матричного переключателя
Tornillos para la barra transversal
横杆螺丝
クロスバー用ネジ
x2
I
LGA2011 Screws
Vis LGA2011
LGA2011-Schrauben
Parafusos LGA2011
Винты LGA2011
Tornillos para LGA2011
LGA2011 螺丝
LGA2011 用ネジ
x4
J
Speed Adapter
Adaptateur vitesse
Drehzahladapter
Adaptador de velocidade
Регулятор скорости
Adaptador de velocidad
速度适配器
スピード調整アダプタ
x1
L
Thermal Grease
Graisse thermique
Wärmeleitpaste
Massa térmica
Термопаста
Compuesto térmico
散热膏
熱伝導グリス
x1
K
RESPIRE T20
Manual
NOTE: Towards the head
of the screw, one side is
at, align appropriately
with the backplate.
NOTE: Completely clean
any existing thermal
grease off the CPU.
Insert the backplate screws through the appropriate CPU socket
holes on the backplate.
Insérez les vis de la plaque arrière au travers des trous de prise
appropriés du processeur sur la plaque arrière.
Führen Sie die Rückplattenschrauben durch die passenden
CPU-Sockelaussparungen in der Rückplatte.
Insira os parafusos da placa posterior através dos orifícios para o
socket da CPU na placa posterior.
Вставить винты бэкплейт через соответствующие отверстия в
посадочном месте под ЦП на бэкплейт.
Inserte los tornillos para la placa posterior a través de los oricios del
zócalo de la CPU apropiados que se encuentran en dicha placa.
将背板螺丝通过相应的 CPU 安装孔位插入到背板上。
バックプレート用ネジを、使用されるCPU に適したCPUソケッ
トに穴に挿入してください。
PREPARATION OF INSTALLATION
Install Intel clips with the arrows facing towards the CPU,
then secure the nuts tightly by hand.
Installez les attaches Intel avec les èches tournées vers le
processeur, puis xez les écrous fermement avec la main.
Bringen Sie die Intel-Clips so an, dass die Pfeile zur CPU
zeigen, ziehen Sie die Schrauben dann mit der Hand fest an.
Instale os clips Intel com as setas viradas para a CPU e depois
aperte as porcas rmemente com a mão.
Установить крепление для процессоров Intel стрелками в
сторону ЦП, хорошо затянуть гайки рукой.
Instale los broches de Intel con las echas orientadas hacia la
CPU y, a continuación, je las tuercas rmemente con la mano.
安装 Intel 脚架,使箭头面向 CPU,然后用手拧紧螺母。
インテルクリップを、図のようにCPUに挿入し、ナットを手
でしっかり締め付けてください。

1 2 3
4 5 6 7
AMD
SUPPORT AND SERVICE SECTION
Install the backplate and the secure with pillars.
Installez la plaque arrière et xez-la avec les colonnes
Setzen Sie die Rückplatte auf, xieren Sie diesen mit den Stangen.
Instale a placa posterior e xe com os pilares.
Установить бэкплейт и зафиксировать опорами.
Instale la placa posterior y fíjela con las columnas.
安装背板并用支柱固定。
ファンをヒートシンクに取り付けて下さい。
Attach the fan to the heatsink.
Attachez le ventilateur au dissipateur.
Bringen Sie den Lüfter am Kühlkörper an.
Encaixe a ventoinha no dissipador.
Acople el ventilador al disipador
将风扇安装到散热器。
Установить вентилятор на радиатор.
.
Aligning
G
G
G
G
B
H
H
H
H
Fan F
OR
an
L
F
F
F
F
ヒートシンクをCPU に固定してください。
Place the heatsink onto the CPU.
Positionnez le dissipateur sur le processeur.
Setzen Sie den Kühlkörper auf die CPU.
Coloque o dissipador na CPU.
Coloque el disipador en la CPU.
将散热器装到 CPU 上。
Установить радиатор на ЦП.
E
E
C
I
遅くするためのスピードアダプタに接続し、スピードアダプ
タのコネクタをマザーボード上のファンコネクタに接続して
ください。
www.reddit.com/r/nzxt
www.reddit.com/r/nzxt
www.reddit.com/r/nzxt
www.reddit.com/r/nzxt
www.reddit.com/r/nzxt
www.reddit.com/r/nzxt
www.reddit.com/r/nzxt
Soporte y Servicio
Служба поддержки и обслуживания
Si tiene preguntas o problemas con el producto NZXT que usted compró, no
dure en ponerse en contacto con [email protected] y suministrar una
explicación detallada de su problema así como su prueba de compra. Puede
hacer consultas sobre piezas de repuesto en http://www.nzxt.com/support.
Para comentarios y sugerencias, escriba un mensaje de correo electrónico a
nuestro equipo de diseño: [email protected]. Gracias por comprar un
producto NZXT. Para más información acerca de NZXT, visítenos en línea.
Página web de NZXT: www.nzxt.com Subscríbase a las comunidades NZXT:
www.nzxt.com/forum
www.facebook.com/nzxtcorp
支持和服务
如果有任何疑问或者在使用 NZXT 产品的过程中遇到任何问题,欢迎联络
[email protected],联络时请提供关于问题的详细说明及购买凭证。您可以
向 http://www.nzxt.com/support 查询更换部件。如有任何意见或建议,欢
迎致信我们的设计团队,电子邮件地址是 [email protected]。感谢您购买
NZXT 产品。有关 NZXT 的更多信息,请访问我们的在线网站。NZXT 网
站:www.nzxt.com 加入 NZXT 社区:
www.nzxt.com/forum
www.facebook.com/nzxtcorp
サポートおよびサービス
購入されました
NZXT
の製品に関するご質問または問題は、問題の詳細お
よび購入の証明を添えて、ご遠慮なく[email protected]までご連絡くださ
い。 交換部品はhttp://www.nzxt.com/supportまでお尋ねください。ご意
見およびご提案は弊社設計チーム、[email protected]までメールを送信し
てください。
NZXT
製品をご購入いただきましてありがとうございます。
NZXT
に関する詳細は、インターネット上のウェブサイトをご覧ください
。
NZXT
ウェブサイト: www.nzxt.com NZXTコミュニティへの参加:
www.nzxt.com/forum
www.facebook.com/nzxtcorp
В случае возникновения вопросов или неисправностей в приобретенных
подробным описанием проблемы и подтверждением покупки. О наличии
запчастей можно узнать, обратившись по адресу:
http://www.nzxt.com/support. Замечания и предложения отправляйте в
за покупку продукта NZXT. Более подробная информация о компании
NZXT представлена на наших веб-сайтах. Веб-сайт NZXT: www.nzxt.com.
Для участия в сообществах NZXT посетите веб-сайт:
www.nzxt.com/forum
www.facebook.com/nzxtcorp
Kundendienst und Service
Falls Fragen oder Probleme bezüglich Ihres NZXT-Produktes auftreten, wenden
Sie sich bitte mit einer detaillierten Problembeschreibung und Ihrem
Kaufbeleg an [email protected]. Ersatzteile können Sie unter
http://www.nzxt.com/support anfragen. Kommentare und Anregungen
senden Sie bitte per [email protected] an unser Designteam. Vielen Dank,
dass Sie ein NZXT-Produkt erworben haben. Weitere Informationen über NZXT
erhalten Sie im Internet. NZXT-Webseite: www.nzxt.com Treten Sie unseren
NZXT-Communities bei:
www.nzxt.com/forum
www.facebook.com/nzxtcorp
Support et serviceSupport and Service section
Si vous avez des questions ou des problèmes avec le produit NZXT que vous
avez acheté, n’hésitez pas à contacter [email protected] avec une description
détaillée de votre problème et votre preuve d’achat. Vous pouvez aussi
commander des pièces de remplacement auprès http://www.nzxt.com/support.
Pour les commentaires et les suggestions, envoyez un email à notre équipe de
design, [email protected]. Merci d'avoir acheté ce produit de NZXT. Pour plus
d'informations sur NZXT, visitez notre site Web. Site Web de NZXT :
www.nzxt.com Joignez la communauté de NZXT :
www.nzxt.com/forum
www.facebook.com/nzxtcorp
If you have any questions or problems with the NZXT product you purchased,
please don’t hesitate to contact [email protected] with a detailed explanation
of your problem and your proof of purchase. You may inquire about
replacement parts at http://www.nzxt.com/support. For comments and
suggestions, e-mail our design team, [email protected]. Thank you for
purchasing an NZXT product. For more information about NZXT, please visit
us online. NZXT Website: www.nzxt.com Join the NZXT communities:
www.nzxt.com/forum
www.facebook.com/nzxtcorp
www.reddit.com/r/nzxt
Assistência e manutenção
Caso tenha questões ou problemas com o produto NZXT adquirido, não
hesite em contactar-nos através do endereço [email protected] fornecendo a
explicação detalhada do seu problema e a prova de compra. Poderá solicitar
peças de substituição através do endereço http://www.nzxt.com/support.
Para comentários e sugestões, contacte a nossa equipa de design através do
endereço de e-mail, [email protected]. Obrigado por ter adquirido um
produto NZXT. Para mais informações acerca da NZXT, visite-nos online.
Web site da NZXT: www.nzxt.com Junte-se às comunidades da NZXT:
www.nzxt.com/forum
www.facebook.com/nzxtcorp
Install AMD clips with the arrows facing towards the CPU, then secure the nuts
tightly by hand.
Installez les attaches AMD avec les èches tournées vers le processeur, puis xez les
écrous fermement avec la main.
Bringen Sie die AMD-Clips so an, dass die Pfeile zur CPU zeigen, ziehen Sie die
Schrauben dann mit der Hand fest.
Instale os clips AMD com as setas viradas para a CPU e depois aperte as porcas
rmemente com a mão.
Установить крепление для процессоров AMD стрелками в сторону ЦП, хорошо
затянуть гайки рукой.
Instale los broches de AMD con las echas orientadas hacia la CPU y, a continuación,
je las tuercas rmemente con la mano.
安装 AMD 脚架,使箭头面向 CPU,然后用手拧紧螺母。
AMDクリップを、図のようにCPUに挿入し、ナットを手でしっかり締め付け
てください。
Connect the fan cable onto the motherboard or connect
the speed adapter to lower the fan speed.
Branchez le câble du ventilateur sur la carte mère ou branchez
l'adaptateur de vitesse en vue de réduire la vitesse du ventilateur.
Verbinden Sie das Lüfterkabel mit dem Anschluss am Mother-
board; alternativ schließen Sie den Drehzahladapter an, wenn
Sie eine geringere Lüfterdrehzahl wünschen.
Ligue o cabo da ventoinha à placa principal ou ligue o adapta-
dor de velocidade para diminuir a velocidade da ventoinha.
Conecte el cable del ventilador a la placa base o al adaptador
de velocidad para reducir la velocidad de dicho ventilador.
将风扇线缆连接到主板,或连接速度适配器以降低风扇速度。
Подключить кабель вентилятора к материнской плате или
подключить регулятор скорости, чтобы понизить обороты
вентилятора.
Put the crossbar through the heatsink and lay on the AMD clips.
Secure the crossbar with the crossbar screws.
Mettez la barre transversale au travers du dissipateur et posez-la sur les clips
AMD. Fixez la barre transversale avec les vis de barre transversale.
Führen Sie die Querstrebe so durch den Kühlkörper, dass diese auf den
AMD-Clips auiegt. Fixieren Sie die Querstrebe mit den Querstrebenschrauben.
Coloque a barra transversal no dissipador e coloque os clips AMD. Fixe a
barra transversal com os respectivos parafusos.
Установить матричный переключатель через радиатор и поместить на
крепление для процессоров AMD. Затянуть матричный переключатель
соответствующими винтами.
Coloque la barra transversal a través del disipador y aplique los broches de
AMD. Fije la barra transversal con los tornillos de dicha barra.
使横杆穿过散热器,压在 AMD 脚架上。 用横杆螺丝将横杆拧紧。
クロスバーをヒートシンクを通してAMDクリップ上に置き、クロスバー
用ネジで固定してください。
NOTE: Towards the head
of the screw, one side is
at, align appropriately
with the backplate.
Insert the backplate screws through the appropriate CPU socket holes on the backplate.
Insérez les vis de la plaque arrière au travers des trous de prise appropriés du
processeur sur la plaque arrière.
Führen Sie die Rückplattenschrauben durch die passenden CPU-Sockelaussparungen in
der Rückplatte.
Insira os parafusos da placa posterior através dos orifícios para o socket da CPU na
placa posterior.
Вставить винты бэкплейт через соответствующие отверстия в посадочном месте
под ЦП на бэкплейт.
Inserte los tornillos para la placa posterior a través de los oricios del zócalo de la CPU
apropiados que se encuentran en dicha placa.
将背板螺丝通过相应的 CPU 安装孔位插入到背板上。
バックプレートを挿入し、支柱で固定してください。
バックプレート用ネジを、使用されるCPU に適したCPUソケッ
トに穴に挿入してください。
INSTALLATION OF MOUNTING KIT
Transcripción de documentos
RESPIRE T20 Manual COMPONENTS LIST A x1 E x2 G AMD Clips Attaches AMD AMD-Clips Clips AMD Крепление для процессоров AMD Broches de AMD AMD 脚架 AMD用クリップ x2 K x1 x1 F x4 H Pillars Colonnes Stangen Pilares Опоры Columnas 支柱 支柱 x4 I B Heatsink and Fan Dissipateur et ventilateur Kühlkörper und Lüfter Dissipador e ventoinha Радиатор и вентилятор Disipador y ventilador 散热器和风扇 ヒートシンクとファン Crossbar Screws Vis barre transversale Querstrebenschrauben Parafusos da barra transversal Винты матричного переключателя Tornillos para la barra transversal 横杆螺丝 クロスバー用ネジ x4 J x4 L Thermal Grease Graisse thermique Wärmeleitpaste Massa térmica Термопаста Compuesto térmico 散热膏 熱伝導グリス x1 Backplate Plaque dorsale Rückplatte Placa posterior Бэкплейт Placa posterior 背板 バックプレート Nuts Ecrous Muttern Porcas Гайки Tuercas 螺母 ナット C x1 D Crossbar Barre transversale Querstrebe Barra transversal Матричный переключатель Barra transversal 横杆 クロスバー x2 Intel Clips Attaches Intel Intel-Clips Clips Intel Крепление для процессоров Intel Broches de Intel Intel 脚架 インテル用クリップ PREPARATION OF INSTALLATION A K Backplate Screws Vis Plaque dorsale Rückplattenschrauben Parafusos da placa posterior Винты бэкплейт Tornillos para la placa posterior 背板螺丝 バックプレート用ネジ NOTE: Completely clean any existing thermal grease off the CPU. 注:CPU上の既存の熱 伝導グリスをきれいに ふき取ってください。 LGA2011 Screws Vis LGA2011 LGA2011-Schrauben Parafusos LGA2011 Винты LGA2011 Tornillos para LGA2011 LGA2011 螺丝 LGA2011 用ネジ Remove the protective film on the bottom of the heatsink, then apply a thin layer of thermal grease. Retirez le film de protection sur le bas du radiateur, puis appliquez une fine couche de graisse thermique. Entfernen Sie die Schutzfolie am Boden des Kühlkörpers, tragen Sie dann eine dünne Schicht Wärmeleitpaste auf. Remova a película de protecção da parte inferior do dissipador e depois aplique uma camada fina de massa térmica. Снять защитную пленку на нижней части радиатора, а затем нанести тонкий слой термопасты. Quite la película protectora de la parte inferior del disipador y, a continuación, aplique una capa fina de compuesto térmico. 揭下散热器底部上的保护膜,然后涂上一层簿簿的散热膏。 Remove the fan Retirez le ventilateur Lüfter ausbauen Remova a ventoinha Speed Adapter Adaptateur vitesse Drehzahladapter Adaptador de velocidade Регулятор скорости Adaptador de velocidad 速度适配器 スピード調整アダプタ Снять вентилятор. Quitar el ventilador. 拆下风扇。 ファンを取り外す。 ヒートシンク底部の保護フィルムを取り外し、熱伝導グリスを薄く均一に塗る。 INTEL INTEL SOCKET LGA 1366/1156/1155/775 INSTALLATION OF MOUNTING KIT LGA 1366 INTEL SOCKET LGA 2011 J Aligning NOTE: Towards the head of the screw, one side is flat, align appropriately with the backplate. LGA 1156/1155 LGA 775 F G G F J G B D F F G D D F F J F J F H J D H H Install LGA 2011 screws on to the integrated backplate on the motherboard, then place the Intel clips on the LGA 2011 screws, using the outer-most hole. Secure the nuts tightly by hand. H 1 Insert the backplate screws through the appropriate CPU socket holes on the backplate. 2 Install the backplate and secure with pillars. Installez la plaque arrière et fixez-la avec les colonnes. Insérez les vis de la plaque arrière au travers des trous de prise appropriés du processeur sur la plaque arrière. Setzen Sie die Rückplatte auf, fixieren Sie diesen mit den Stangen. Führen Sie die Rückplattenschrauben durch die passenden CPU-Sockelaussparungen in der Rückplatte. Insira os parafusos da placa posterior através dos orifícios para o socket da CPU na placa posterior. Вставить винты бэкплейт через соответствующие отверстия в посадочном месте под ЦП на бэкплейт. Inserte los tornillos para la placa posterior a través de los orificios del zócalo de la CPU apropiados que se encuentran en dicha placa. 将背板螺丝通过相应的 CPU 安装孔位插入到背板上。 バックプレート用ネジを、使用されるCPU に適したCPUソケッ トに穴に挿入してください。 Instale a placa posterior e fixe com os pilares. Установить бэкплейт и зафиксировать опорами. Instale la placa posterior y fíjela con las columnas. 安装背板并用支柱固定。 バックプレートを挿入し、支柱で固定してください。 3 Install Intel clips with the arrows facing towards the CPU, then secure the nuts tightly by hand. Installez les attaches Intel avec les flèches tournées vers le processeur, puis fixez les écrous fermement avec la main. Bringen Sie die Intel-Clips so an, dass die Pfeile zur CPU zeigen, ziehen Sie die Schrauben dann mit der Hand fest an. Instale os clips Intel com as setas viradas para a CPU e depois aperte as porcas firmemente com a mão. Установить крепление для процессоров Intel стрелками в сторону ЦП, хорошо затянуть гайки рукой. Instale los broches de Intel con las flechas orientadas hacia la CPU y, a continuación, fije las tuercas firmemente con la mano. 安装 Intel 脚架,使箭头面向 CPU,然后用手拧紧螺母。 インテルクリップを、図のようにCPUに挿入し、ナットを手 でしっかり締め付けてください。 Installez les vis LGA 2011 sur la plaque arrière intégrée de la carte mère, puis placez les attaches Intel sur les vis LGA 2011, en utilisant le trou le plus à l’extérieur. Fixez les écrous fermement avec la main. Installieren Sie die LGA 2011-Schrauben an der integrierten Rückplatte des Motherboards, setzen Sie dann die Intel-Clips auf die LGA 2011-Schrauben auf, nutzen Sie dazu die Bohrung ganz außen. Ziehen Sie die Muttern mit der Hand an. Instale os parafusos LGA 2011 na placa posterior integrada na placa principal e depois coloque os clips Intel nos parafusos LGA 2011, utilizando o orifício exterior mais distante. Aperte as porcas firmemente com a mão. Установить винты LGA 2011 на встроенный бэкплейт материнской платы, а затем установить крепление для процессоров Intel на винты LGA 2011, используя самое удаленное от центра отверстие. Хорошо затянуть гайки рукой. Instale los tornillos para LGA 2011 de la placa posterior integrada en la placa base y, a continuación, coloque los broches de Intel en los tornillos para LGA 2011 utilizando el orificio más externo. Apriete las tuercas firmemente a mano. 将 LGA 2011 螺丝安装到主板的后板上,然后通过最外侧的孔给 Intel 脚架套上 LGA 2011 螺丝。 用手拧紧螺母。 LGA 2011用ネジをマザーボードに付けてあるバックプレートに 挿入し、インテルクリップのもっとも外側の穴を通してLGA 2011用ネジの上に置き、手でナットを固定してください。 Fan Fan OR L C 4 Place the heatsink onto the CPU. Positionnez le dissipateur sur le processeur. Setzen Sie den Kühlkörper auf die CPU. Coloque o dissipador na CPU. Установить радиатор на ЦП. Coloque el disipador en la CPU. 5 I Put the crossbar through the heatsink and lay on the Intel clips. Secure the cross bar with the crossbar screws. Mettez la barre transversale au travers du dissipateur et posez-la sur les clips Intel. Fixez la barre transversale avec les vis de barre transversale. Führen Sie die Querstrebe so durch den Kühlkörper, dass diese auf den Intel-Clips aufliegt. Fixieren Sie die Querstrebe mit den Querstrebenschrauben. Coloque a barra transversal no dissipador e coloque os clips Intel. Aperte a barra transversal com os respectivos parafusos. Установить матричный переключатель через радиатор и поместить на крепление для процессоров Intel. Затянуть матричный переключатель соответствующими винтами. 6 Attach the fan to the heatsink. Attachez le ventilateur au dissipateur. Bringen Sie den Lüfter am Kühlkörper an. 7 Connect the fan cable onto the motherboard or connect the speed adapter to lower the fan speed. Branchez le câble du ventilateur sur la carte mère ou branchez l'adaptateur de vitesse en vue de réduire la vitesse du ventilateur. Encaixe a ventoinha no dissipador. Verbinden Sie das Lüfterkabel mit dem Anschluss am Motherboard; alternativ schließen Sie den Drehzahladapter an, wenn Sie eine geringere Lüfterdrehzahl wünschen. Установить вентилятор на радиатор. Ligue o cabo da ventoinha à placa principal ou ligue o adaptador de velocidade para diminuir a velocidade da ventoinha. Acople el ventilador al disipador Подключить кабель вентилятора к материнской плате или подключить регулятор скорости, чтобы понизить обороты вентилятора. 将散热器装到 CPU 上。 Coloque la barra transversal a través del disipador y aplique los broches de Intel. Fije la barra transversal con los tornillos para dicha barra. 将风扇安装到散热器。 Conecte el cable del ventilador a la placa base o al adaptador de velocidad para reducir la velocidad de dicho ventilador. ヒートシンクをCPU に固定してください。 使横杆穿过散热器,压在 Intel 脚架上。 用横杆螺丝将横杆拧紧。 ファンをヒートシンクに取り付けて下さい。 将风扇线缆连接到主板,或连接速度适配器以降低风扇速度。 クロスバーをヒートシンクを通してインテルクリップ上に置き、クロスバ ー用ネジで固定してください。 遅くするためのスピードアダプタに接続し、スピードアダプタのコ ネクタをマザーボード上のファンコネクタに接続してください。 AMD INSTALLATION OF MOUNTING KIT F B Aligning F G G H E G G F F NOTE: Towards the head of the screw, one side is flat, align appropriately with the backplate. H E H 1 H Insert the backplate screws through the appropriate CPU socket holes on the backplate. Insérez les vis de la plaque arrière au travers des trous de prise appropriés du processeur sur la plaque arrière. Führen Sie die Rückplattenschrauben durch die passenden CPU-Sockelaussparungen in der Rückplatte. 2 Install the backplate and the secure with pillars. Installez la plaque arrière et fixez-la avec les colonnes 3 Setzen Sie die Rückplatte auf, fixieren Sie diesen mit den Stangen. Instale a placa posterior e fixe com os pilares. Install AMD clips with the arrows facing towards the CPU, then secure the nuts tightly by hand. Installez les attaches AMD avec les flèches tournées vers le processeur, puis fixez les écrous fermement avec la main. Bringen Sie die AMD-Clips so an, dass die Pfeile zur CPU zeigen, ziehen Sie die Schrauben dann mit der Hand fest. Insira os parafusos da placa posterior através dos orifícios para o socket da CPU na placa posterior. Установить бэкплейт и зафиксировать опорами. Instale os clips AMD com as setas viradas para a CPU e depois aperte as porcas firmemente com a mão. Вставить винты бэкплейт через соответствующие отверстия в посадочном месте под ЦП на бэкплейт. Instale la placa posterior y fíjela con las columnas. Установить крепление для процессоров AMD стрелками в сторону ЦП, хорошо затянуть гайки рукой. Inserte los tornillos para la placa posterior a través de los orificios del zócalo de la CPU apropiados que se encuentran en dicha placa. 安装背板并用支柱固定。 Instale los broches de AMD con las flechas orientadas hacia la CPU y, a continuación, fije las tuercas firmemente con la mano. 将背板螺丝通过相应的 CPU 安装孔位插入到背板上。 バックプレートを挿入し、支柱で固定してください。 安装 AMD 脚架,使箭头面向 CPU,然后用手拧紧螺母。 AMDクリップを、図のようにCPUに挿入し、ナットを手でしっかり締め付け てください。 バックプレート用ネジを、使用されるCPU に適したCPUソケッ トに穴に挿入してください。 Fan Fan OR L C 4 Place the heatsink onto the CPU. Positionnez le dissipateur sur le processeur. Setzen Sie den Kühlkörper auf die CPU. Coloque o dissipador na CPU. Установить радиатор на ЦП. Coloque el disipador en la CPU. 将散热器装到 CPU 上。 ヒートシンクをCPU に固定してください。 5 I 6 Put the crossbar through the heatsink and lay on the AMD clips. Secure the crossbar with the crossbar screws. Führen Sie die Querstrebe so durch den Kühlkörper, dass diese auf den AMD-Clips aufliegt. Fixieren Sie die Querstrebe mit den Querstrebenschrauben. Coloque a barra transversal no dissipador e coloque os clips AMD. Fixe a barra transversal com os respectivos parafusos. Установить матричный переключатель через радиатор и поместить на крепление для процессоров AMD. Затянуть матричный переключатель соответствующими винтами. Coloque la barra transversal a través del disipador y aplique los broches de AMD. Fije la barra transversal con los tornillos de dicha barra. Attach the fan to the heatsink. Attachez le ventilateur au dissipateur. Mettez la barre transversale au travers du dissipateur et posez-la sur les clips AMD. Fixez la barre transversale avec les vis de barre transversale. 7 . Bringen Sie den Lüfter am Kühlkörper an. Encaixe a ventoinha no dissipador. Connect the fan cable onto the motherboard or connect the speed adapter to lower the fan speed. Branchez le câble du ventilateur sur la carte mère ou branchez l'adaptateur de vitesse en vue de réduire la vitesse du ventilateur. Verbinden Sie das Lüfterkabel mit dem Anschluss am Motherboard; alternativ schließen Sie den Drehzahladapter an, wenn Sie eine geringere Lüfterdrehzahl wünschen. Установить вентилятор на радиатор. Ligue o cabo da ventoinha à placa principal ou ligue o adaptador de velocidade para diminuir a velocidade da ventoinha. Acople el ventilador al disipador 将风扇安装到散热器。 Подключить кабель вентилятора к материнской плате или подключить регулятор скорости, чтобы понизить обороты вентилятора. ファンをヒートシンクに取り付けて下さい。 Conecte el cable del ventilador a la placa base o al adaptador de velocidad para reducir la velocidad de dicho ventilador. 使横杆穿过散热器,压在 AMD 脚架上。 用横杆螺丝将横杆拧紧。 将风扇线缆连接到主板,或连接速度适配器以降低风扇速度。 クロスバーをヒートシンクを通してAMDクリップ上に置き、クロスバー 用ネジで固定してください。 遅くするためのスピードアダプタに接続し、スピードアダプ タのコネクタをマザーボード上のファンコネクタに接続して ください。 SUPPORT AND SERVICE SECTION Support and Service section Support et service Kundendienst und Service Служба поддержки и обслуживания If you have any questions or problems with the NZXT product you purchased, Si vous avez des questions ou des problèmes avec le produit NZXT que vous Falls Fragen oder Probleme bezüglich Ihres NZXT-Produktes auftreten, wenden В случае возникновения вопросов или неисправностей в приобретенных please don’t hesitate to contact [email protected] with a detailed explanation avez acheté, n’hésitez pas à contacter [email protected] avec une description Sie sich bitte mit einer detaillierten Problembeschreibung und Ihrem вами продуктах NZXT обращайтесь по адресу: [email protected] с of your problem and your proof of purchase. You may inquire about détaillée de votre problème et votre preuve d’achat. Vous pouvez aussi Kaufbeleg an [email protected]. Ersatzteile können Sie unter подробным описанием проблемы и подтверждением покупки. О наличии replacement parts at http://www.nzxt.com/support. For comments and commander des pièces de remplacement auprès http://www.nzxt.com/support. http://www.nzxt.com/support anfragen. Kommentare und Anregungen запчастей можно узнать, обратившись по адресу: suggestions, e-mail our design team, [email protected]. Thank you for Pour les commentaires et les suggestions, envoyez un email à notre équipe de senden Sie bitte per [email protected] an unser Designteam. Vielen Dank, http://www.nzxt.com/support. Замечания и предложения отправляйте в purchasing an NZXT product. For more information about NZXT, please visit design, [email protected]. Merci d'avoir acheté ce produit de NZXT. Pour plus dass Sie ein NZXT-Produkt erworben haben. Weitere Informationen über NZXT адрес нашей группы разработчиков: [email protected]. Благодарим вас us online. NZXT Website: www.nzxt.com Join the NZXT communities: d'informations sur NZXT, visitez notre site Web. Site Web de NZXT : erhalten Sie im Internet. NZXT-Webseite: www.nzxt.com Treten Sie unseren за покупку продукта NZXT. Более подробная информация о компании www.nzxt.com/forum www.nzxt.com Joignez la communauté de NZXT : NZXT-Communities bei: NZXT представлена на наших веб-сайтах. Веб-сайт NZXT: www.nzxt.com. www.facebook.com/nzxtcorp www.nzxt.com/forum www.nzxt.com/forum Для участия в сообществах NZXT посетите веб-сайт: www.reddit.com/r/nzxt www.facebook.com/nzxtcorp www.facebook.com/nzxtcorp www.nzxt.com/forum www.reddit.com/r/nzxt www.reddit.com/r/nzxt www.facebook.com/nzxtcorp www.reddit.com/r/nzxt Assistência e manutenção Soporte y Servicio 支持和服务 サポートおよびサービス Caso tenha questões ou problemas com o produto NZXT adquirido, não Si tiene preguntas o problemas con el producto NZXT que usted compró, no dure en ponerse en contacto con [email protected] y suministrar una explicación detallada de su problema así como su prueba de compra. Puede hacer consultas sobre piezas de repuesto en http://www.nzxt.com/support. Para comentarios y sugerencias, escriba un mensaje de correo electrónico a nuestro equipo de diseño: [email protected]. Gracias por comprar un producto NZXT. Para más información acerca de NZXT, visítenos en línea. Página web de NZXT: www.nzxt.com Subscríbase a las comunidades NZXT: www.nzxt.com/forum www.facebook.com/nzxtcorp www.reddit.com/r/nzxt 如果有任何疑问或者在使用 NZXT 产品的过程中遇到任何问题,欢迎联络 購入されましたNZXTの製品に関するご質問または問題は、問題の詳細お [email protected],联络时请提供关于问题的详细说明及购买凭证。您可以 よび購入の証明を添えて、ご遠慮なく[email protected]までご連絡くださ 向 http://www.nzxt.com/support 查询更换部件。如有任何意见或建议,欢 い。 交換部品はhttp://www.nzxt.com/supportまでお尋ねください。ご意 迎致信我们的设计团队,电子邮件地址是 [email protected]。感谢您购买 見およびご提案は弊社設計チーム、[email protected]までメールを送信し NZXT 产品。有关 NZXT 的更多信息,请访问我们的在线网站。NZXT 网 てください。NZXT製品をご購入いただきましてありがとうございます。 hesite em contactar-nos através do endereço [email protected] fornecendo a explicação detalhada do seu problema e a prova de compra. Poderá solicitar peças de substituição através do endereço http://www.nzxt.com/support. Para comentários e sugestões, contacte a nossa equipa de design através do endereço de e-mail, [email protected]. Obrigado por ter adquirido um produto NZXT. Para mais informações acerca da NZXT, visite-nos online. Web site da NZXT: www.nzxt.com Junte-se às comunidades da NZXT: www.nzxt.com/forum www.facebook.com/nzxtcorp www.reddit.com/r/nzxt 站:www.nzxt.com 加入 NZXT 社区: NZXTに関する詳細は、インターネット上のウェブサイトをご覧ください www.nzxt.com/forum 。NZXT ウェブサイト: www.nzxt.com NZXTコミュニティへの参加: www.facebook.com/nzxtcorp www.nzxt.com/forum www.reddit.com/r/nzxt www.facebook.com/nzxtcorp www.reddit.com/r/nzxt-
 1
1
-
 2
2


NZXT Respire T20 Manual de usuario
- Tipo
- Manual de usuario
en otros idiomas
- français: NZXT Respire T20 Manuel utilisateur
- English: NZXT Respire T20 User manual
- português: NZXT Respire T20 Manual do usuário
- 日本語: NZXT Respire T20 ユーザーマニュアル
Artículos relacionados
-
NZXT Respire T40 Manual de usuario
-
NZXT Aperture M Manual de usuario
-
-
-
-
-
-
NZXT Avatar S Manual de usuario
-
-
