La página se está cargando...

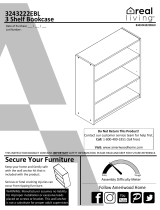
5757337COM
5DrawerDresser
‐Unitcantipovercausingsevereinjuryordeath.
‐Anchorunittostudinwall(ifinstructedto).
‐DoNotallowchildrentoclimbonunit.
‐Putheavyitemsonlowershelvesordrawers.
B345757337COM0
THISINSTRUCTIONBO OKLETCONTAINS
IMPORTANT
SAFETYINFORMATION.PLEASEREADANDKEEPFORFUTUREREFERENCE.
WARNING
FollowAmeriwoodHome
Tube
You
DateofPurchase___/___/___
LotNumber:
DoNotReturnThisProduct!
Contactourcustomerserviceteamforhelpfirst.
Call:1‐800‐489‐3351(tollfree)
Monday‐Friday9am‐5pmCST
Visit:www.ameriwoodhome.com
AssemblyDifficultyMeter
Easy
Tough

ContactUs!
HelpfulHints
2
ameriwoodhome.com
DoNOTreturnthisproduct!
Contactourfriendlycustomerserviceteamfirstforhelp.
Callus!
1‐800‐489‐3351
Monday‐Friday
9am‐5pmCST
Visitameriwoodhome.comtoviewthe
limitedwarrantyvalidintheU.S.andCanada.
AssemblyTips
‐Openyouritemintheareayouplantokeepittoavoidexcessiveheav ylifting.
‐Identify,sortandcountthe partsbeforeattemptingassembly.
‐Compressiondowelsarelightlytappedinwithahammer.
‐Slidesarelabeledwitha
R
(right)and
L
(left)forproperplacement.
‐MakesuretoalwaysfacethepointonthetopoftheCamLock towar d sthe
outeredge.
‐Useallthenailsprovidedforthebackpanelandspreadthemou tequally.
‐Backpanelmustbeusedtomakesureyourunitissturdy.
‐Do
NOTuseharshchemicalsorabrasivecleanersonthisitem.
‐Neverpush,pull,ordragyourfurniture.
Tube
You
Tube
You
PEOPLENEEDEDFORASSEMBLY:1‐2
ESTIMATEDASSEMBLYTIME:1HOUR

3
ameriwoodhome.com
BeforeYouStart
Q
u
i
c
k
T
i
p
A
s
s
e
m
b
l
y
CamLockFasteningSystem
ThisCamLockFasteningSystem willbeusedthroughouttheassemblyprocess.
1
3
2
4
Tube
You
Readthrougheachstepcarefullyandfollowtheproperorder
Separateandcountallyourpartsandhardware
Giveyourselfenoughroomfortheassemblyprocess
Havethefollowingtools:FlatHeadScrewdriver,#2PhillipsHead
ScrewdriverandHammer
Caution:Ifusingapowerdrillorpowerscrewdriverforscr ewing,
pleasebeawaretoslowdownandstopwhenscrewistight.
Failuretodosomayresultinstrippingthescrew.

4
ameriwoodhome.com
BoardIdentification
Notactualsize
LeftPanel
35757337010
Top
35757337030
Support
35757000050
RightPanel
35757337020
Bottom
35757337040
UpperRail
35757337060
LowerRail
35757337070
x2
VerticalMolding
35757337080
x5
DrawerFront
35757337090
x5
DrawerBack
35757331100
x5
DrawerBottom
35757331110
x5
LeftDrawerSide
35781331250
x5
RightDrawerSide
35781331260
A B
C
D
E
F
G
H
I
J
K
Y Z

5
ameriwoodhome.com
BoardIdentification
Notactualsize
BackPanel
K575700000
Thispieceispaperboard
construction.Itisnotmade
fromwood,butisrequiredfor
theassemblyofyourunit.
S
S
A
B
C
D
E
F
G
H
H
I
J
K
Y
Z

6
ameriwoodhome.com
PartList
ActualSize
NotActualSize
5
4
3
2
1
(x12)
#A22570
camlock
(x12)
#A22510
cambolt
(x6)
#A22920
connector
(x6)
#A22910
connectorbolt
(x6)
#A21660
wooddowel
6
7
8
9
(x20)
#A12120
7/16"panhead
(x50)
#A11080
7/16"flathead
(x20)
#A11600
1‐1/4"flathead
(x8)
#A12955
1‐1/8"flathead
(x32)
#A21110
nail
(x10)
#A17100
7/16"bolt
10
11
LeftCabinetMember
RightCabinetMember
LeftDrawerMember
RightDrawerMember
(x5)
#A56770
DrawerSlideKit
13c
13d
13a
13b
13
(x1)
#A84050
SafetyBracketKit
(x10)
#A54223
DrawerBracket
(x5)
#A50515
Handle
14a
14b
14c
14d
16
15

7
ameriwoodhome.com
STEP
1
Proper orientation of CAM LOCK
Tip
Assembly
Quick
(x2)
#A22570
Attachallhardwareasshown.Usingfourscrews(9),
attachtheverticalmolding(H)totheleftpanel(A)as
shown.Pleasenote,therearefourpilotholesinthe
verticalmolding(H)forattachment.
1
2
5
2
(x4)
#A22510
(x1)
#A21660
(x4)
#A12955
5
9
9
1
1
2
2
2
9
9
9
A
endview
H
8
9
(x20)
#A11600
1‐1/4"flathead
(x8)
#A12950
1‐1/8"flathead
Donotgetscrews#8	mixedup.You
willusetheshorterofthetwointhisstep.

8
ameriwoodhome.com
STEP2
(x5)
#A56770
(x15)
#A11080
Attachedfiveleftcabinetmembers(13a)totheleftpanel(A)withscrews(7)asshown.
Marked with a "L".
LeftCabinetMember
13a
7
13a
7
13a
13a
13a
13a
13a
A

9
ameriwoodhome.com
STEP3
Proper orientation of CAM LOCK
Tip
Assembly
Quick
1
2
5
9
(x2)
#A22570
(x4)
#A22510
(x1)
#A21660
(x4)
#A12955
Attachallhardwareasshown.Usingfourscrews(9),attachthe
verticalmolding(H)totherightpanel(B)asshown.Pleasenote,
therearefourpilotholesintheverticalmolding(H)for
attachment.
endview
5
9
2
1
1
2
2
2
9
9
9
B
H
8
9
(x20)
#A11600
1‐1/4"flathead
(x8)
#A12950
1‐1/8"flathead
Donotgetscrews#8	mixedup.You
willusetheshorterofthetwointhisstep.

10
ameriwoodhome.com
STEP
4
7
RightCabinetMember
(x5)
#A56770
(x15)
#A11080
Attachfiverightcabinetmembers(13b)totherightpanel(B)withscrews(7)asshown.
Marked with a "R".
13b
13b
13b
13b
13b
13b
7
13b
B

11
ameriwoodhome.com
STEP
5
14b
14a
2
4
(x4)
#A22510
(x3)
#A22910
(x1)
#A84050
2
4
4
4
2
2
2
14a
14b
C
Donottightenthisscrew.

12
ameriwoodhome.com
STEP
6
3
(x3)
#A22920
Youwillneedtotaptheconnector
(3)withahammertofullyinsert.
Besuretheconnectorispositioned
asshownbeforepushingintohole.
3
3
3
F

13
ameriwoodhome.com
STEP
7
Presstheupperrail(F)ontothetop(C)asshownsotheconnectors(3)engagetheconnector
bolts(4).Turnthescrewinthecenteroftheconnector(3)clockwisetolockinplace.
Turn clockwise to lock in place.
C
F
3

14
ameriwoodhome.com
STEP8
1
3
4
Youwillneedtotaptheconnector
(3)withahammertofullyinsert.
Besuretheconnectorispositioned
asshownbeforepushingintohole.
(x4)
#A22570
(x3)
#A22920
(x3)
#A22910
(x2)
#A21660
5
1
5
1
5
Proper orientation of CAM LOCK
Tip
Assembly
Quick
3
3
3
4
4
4
D
G

15
ameriwoodhome.com
STEP9
endview
D
G
3
Turn clockwise to lock in place.
Pressthelowerrail(G)ontothebottom(D)asshownsotheconnectorbolts(4)engagethe
connectors(3).Turnthescrewinthecenteroftheconnector(3)clockwisetolockinplace.

16
ameriwoodhome.com
STEP10
1
5
(x4)
#A22570
(x2)
#A21660
5
5
1
1
Proper orientation of CAM LOCK
Tip
Assembly
Quick
E

17
ameriwoodhome.com
STEP
11
Attachthebottom(D)andsupport(E)totheleftpanel(A)
asshown.Turnthecamlocksclockwisetolockinplace.
U
N
LO
C
K
L
O
C
K
A
D
E

18
ameriwoodhome.com
STEP12
U
N
L
O
C
K
L
O
C
K
D
E
A
B

19
ameriwoodhome.com
STEP13
U
N
L
O
C
K
L
O
C
K
A
B
C

20
ameriwoodhome.com
STEP
14
11
(x32)
#A21110
IMPORTANT!
THEBACKPANELISASTRUCTURALPARTOFTHISUNITANDMUSTBEINSTALLEDPROPERLY.
Withthehelpofanotherperson,turntheunitoverasshown.Positionthebackpanel(S)as
shown.Flushthebottomedgeofthebackpanelwiththeedgeofthebottom(D).Assurethatthe
unitissquare.Distancefromcornertocornermustbeequalasshown.Nail
straightintoback
edgesasshown.
11
S
D
Makesureedgesareflush
witheachother.
backpanelnotch

21
ameriwoodhome.com
STEP
15
16
(x10)
#A54223
16
16
Y
Z
x5
x5
Laythedrawersidesdownonaflathardsurface.Carefullylineupthedrawerbracketwiththe
holesinthedrawersideasshown.Usingahammer,tapeachdrawerbracketstempartwayinto
thehole.Repeatthisprocessuntilthedrawerbracketisfullyseatedonthedrawer
side.

22
ameriwoodhome.com
STEP
16
(x20)
#A12120
Youwillbeassemblingfivedrawers.Theyallassembleinthesamemanner.
Attachtheleftdrawerside(Y)andrightdrawerside(Z)totheDrawerFront(I)withscrews(6)as
shown.Besurethegrooveinthedrawersidesarecenteredwiththegrooveinthedrawer
front.
x5
6
6
Y
Z
I

23
ameriwoodhome.com
STEP
17
finished surface
Y
I
Z
K
x5
Slidethedrawerbottom(K)intothegrooveofthedrawersides(Y&Z)anddrawerfront(I).

24
ameriwoodhome.com
STEP18
8
(x20)
#A11600
Y
I
Z
J
x5
8
8
7
13c
13d
(x5)
#A56770
DrawerSlideKit
RightDrawerMember
LeftDrawerMember
(x20)
#A11080
7
7
7
7
13c
13d
Marked with a "L".
Marked with a "R".

25
ameriwoodhome.com
STEP19
10
15
(x10)
#A17100
(x5)
#A50515
10
I
Y
Z
15
x5

26
ameriwoodhome.com
STEP20
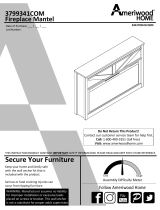
For Masonry, Concrete, or other
wall materials:
Consult your local hardware store
for appropriate anchors to securely
attach the safety bracket.
(x1)
#A84050
IMPORTANT:THISUNITMUSTBESECURETOTHEWALLTOHELPPREVENTTIPOVER.FOLLOW
THESEINSTRUCTIONSTOINSTALLTHEANTI‐TIPPINGSAFETYBRACKETPROVIDEDWITHTHIS
PRODUCT.
WARNING
Seriousorfatalcrushinginjuriescan
occurfromfurnituretipover.
Topreventtipover:
*Installtipoverrestraintprovided
*Placeheaviestitemsin
thelowest
drawers
*Unlessspecificallydesignedto
accommodate,donotsetTVsor
otherheavyobjectsonthetopofthis
product
OPTION1:Attachmentintoawallstud(preferredmethod)
Usingastudfind er,locateastudinthewall.Placeyourunitagainstthewall,withthesafetybracketaligned
inthislocation.Tomakedrivingthescreweasier,youcandrilla1/8"diameterpilothole(3mm)throughthe
safetybracketintothestud.Drivethescrewthroughthe
safetybracketintothewallstud.Tightenthescrew
thatwasnotfullytightenedinstep5.
OPTION2:Attachmentintodrywall
Locateyourunitwheredesiredagainstawallandmarkthewallthroug hthesafetybracket,thenmoveyour
unitaside.Drilla3/16"diameterhole(5mm)intothewallboard.Tapthewallanchorintotheholeuntilitis
flush.Moveyourunitintolocationandfastenthe wallbracket
tothewallanchorwiththescrew.Tighten
thescrewthatwasnotfullytightenedinstep5.
*Neverallowchildrentoclimbor
hangondrawers,door,orshelves
*Neveropenmorethanone
draweratatime
Useoftipoverrestraintsmayonly
reduce,butnoteliminatetherisk
oftipover
stud
wallboard
hole
14d
14c
14c
14d

27
ameriwoodhome.com
STEP21
cabinet member
roller
drawer runner
roller
Note:Thedrawerbracketholesare
slotted.Drawerfrontscanbe
adjustedbylooseningscrews,
makingneededadjustmentsand
retighteningscrews.

28
ameriwoodhome.com
Tube
You
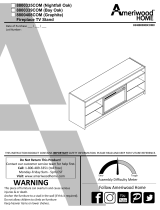
MaximumLoads
Warning:Riskofinjurytopersons‐donotplaceatelevisiononthisfurniture.Thisfurnitureis
notapprovedforusewithatelevision.
50lbs
22.6kg
35lbs
15.8kg
(each drawer)
CertificateofConformity
1.ThiscertificateappliestotheDorelHomeFurnishings,Inc.productidentifiedbythisinstruction manual.
2.ThiscertificateappliestocomplianceofthisproductwiththeCPSCBanonLead‐ContainingPaint(16CFR1303).
3.Thisproductisdistributedby:DorelHomeFurnishings,Inc.
410
EastFirstStreetSouth
WrightCity,MO63390
636‐745‐3351
4.SiteofManufacture:TiffinOH
5.Seefrontpageofinstructionmanualfordateofmanufacture.
Thisunithasbeendesignedtosupportthemaximumloadsshown.Exceedingtheseloadlimits
couldcausesagging,instability,productcollapse,and/orseriousinjury.

29
ameriwoodhome.com
Registeryourproducttoreceivethefollowing:
*Newtrenddetails‐sneakpeekonwhat'snew
*Surveys‐haveavoicewithinourcommunity
*Exclusivedealsanddiscountcodes
*Quickandeasyreplacementpartservice
Toregisteryourproduct,visitameriwoodhome.com
Visityourlocalretailer'swebsite,rateyourpurchased
productandleaveussomefeedback!
Wewouldlike
toextendabig"ThankYou"toallof
ourcustomersfortakingthetimetoassemblethis
AmeriwoodHomeproduct,andtogiveusyour
valuablefeedback.
Tube
You

30
ameriwoodhome.com
Tube
You
CubiertaDelantera
Estelibrodeinstruccionescontieneinformación
IMPORTANTE
deseguridad.Porfavorleaymanténgalo
parareferenciaenelfuturo.
NoRegreseesteproducto!
Comuniqueseconnuestroamistosoequipodeservicioalclienteparaobtener
ayuda.
Llamenosal:1‐800‐489‐3351(Gratis)Lunes‐Viernes9am‐5pmCST
Visitar:
www.ameriwoodhome.com
PRECAUCION
Estemueblepuedevolcarseycausargravesheridasy/omuerte.
Anclarelmuebleaunpostedemaderaenlapared(siestoserequiere).
NoPermitaquelosniñosmontenelmueble.
Mantengalosartículosmáspesadosenloscajonesdeabajo.
ConsejosÚtiles(página2)
‐Abrasuartículoeneláreadondeustedplaneautilizarloparaevitarlevantarymoverlomenos
‐Identificar,ordenarycontarlaspiezasantesdeintentarensamblar
‐Lasclavijasdecompresiónsegolpeanconunmartillo
‐LasdiapositivasestánmarcadasconunaR(derecha)yL(izquierda)paralacolocacióncorrecta
‐
Asegúresedequesiempreesteelpuntolocaizadoenlapartesuperiordebloqueadordeleva
estevolteadohaciabordeexterior
‐Utilizartodoslosclavosparaelpaneldeatrasydistribuirlosporigual
‐Elpaneldeatrasdebeutilizarseparaasegurarsedequelaunidadquedefijayfirme
‐Nouse
quimicasfuertesnilimpiadoresabrasivosenestearticulo
‐Nuncaempuje,tireniarrastrelosmuebles
AntesdeQueEmpieces(página3)
‐Leacuidadosamentecadapasoysigaelordencorrecto
‐Separarycontartodassuspiezasyhardware
‐Désesuficienteespacioparaelprocesodeensamble
‐Tengalassiguientesherramientas:destornilladordecabezaplana,#2cabezaPhillips
Destornilladorymartillo
‐Precaución:Siusauntaladroelectrónicooundestornilladoreléctricoparaatornillar,
porfavorasegúrese
quedejedeatornillarcuandoeltonillosesteapretado.Fallarhacerestopuedecausarbarrereltornillo.
Sistemadefijarelbloqueodeleva(página3)
Estasistemadefijarelbloqueodelevaserausadoentodoelprocesoensamble.
Español

31
ameriwoodhome.com
Español
Tube
You
Página7
Conectetodaslaspartescomosemuestra.Conloscuatrotornillos(9),fijelamoldura vertical(H) alpanel
izquierdo(A)comosemuestra.Noteporfavorquehaycuatroagujerospilotodefijaciónenelmolde
vertical(H).
Vistadelextremo
Nomezclarlostornillos#8y#9.Seusaráel
modelomáscortodelosdosparaestepaso.
Página8
Unalascincopartesdelacabinaizquierda(13a)alpanelizquierdo(A)conlostornillos(7)comoaparece
enlaimagen.
Presionarlacoberturadelacabezadelostornillos(12)eneltornillocomoapareceenlaimagen.Es
posiblequesenecesiteusarunmartilloparaquequeden
bienpuestos.
Marcadoconuna"L".
Página9
Conectetodaslaspartescomosemuestra.Conloscuatrotornillos(9),fijelamoldura vertical(H) alpanel
derecho(B)comosemuestra.Porfavor,notequehaycuatroagujerospilotodefijaciónenlamoldura
vertical(H).
Vistadesdeelextremo
Nomezclarlostorn illos#8y#9.Seusaráelmodelomáscortode losdosparaestepaso.
Página10
Unalascincopartesdelacabinaderecha(13a)alpanelderecho(A)conlostornillos(7)comoapareceen
laimagen.
Presionarlacoberturadelacabezadelostornillos(12)eneltornillocomoapareceenlaimagen.Es
posiblequesenecesiteusarunmartilloparaquequeden
bienpuestos.
Marcadoconuna"R".
Página11
Noaprieteestetornillo.
Página12
Tendráquemartillarelconector(3)conunmartilloparainsertarlocompletamente.Asegúresedequeel
conectorestécolocadocomosemuestraantesdeintroducirloenelorificio.
Página13
Presioneelrielsuperior(F)alapartesuperior(C)talcomosemuestraparaquelosconectores(3)se
acoplenalospernosdeconexión(4).Gireeltornilloenelcentrodelconector(3)ensentidohorariopara
bloquearlo.
Girehacialaderechaparabloquearensulugar.

32
ameriwoodhome.com
Tube
You
Español
Página14
Tendráquetocarelconector(3)conunmartilloparainsertarlocompletamente.Asegúresedequeel
conectorestécolocadocomosemuestraantesdeempujarenelorificio.
Página15
Presioneelrielinferior(G)enlaparteinferior(D)talcomosemuestraparaquelospernosdeconexión
(4)encajenenlosconectores(3).Gireeltornilloenelcentrodelconector(3)ensentidohorariopara
asegurarlo.
Girehacialaderechaparaasegurarloensulugar.
Vistadesdeelextremo
Página17
Fijelaparteinferior(D)yelsoporte(E)alpanelizquierdo(A)comosemuestra.
Girelascerradurasde
levaenelsentidohorarioparaasegurarensulugar.
Página20
¡IMPORTANTE!ELPANELTRASEROESUNAPARTEESTRUCTURALDEESTAUNIDADYDEBEINSTALARSE
CORRECTAMENTE.
Conlaayudadeotrapersona,girelaunidadcomosemuestra.Coloqueelpanelposterior(S)comose
muestra.
Niveleelbordeinferiordelpaneltraseroconelbordedelaparteinferior(D).Asegúrese de
quelaunidadseacuadrada.Ladistanciadeesquinaaesquinadebeserigualacomosemuestra.Clave
directamenteenlosbordestraseroscomosemuestra.
Página21
Coloquecajoneshaciaabajosobreuna
superficieplanaydura.Alineecuidadosamenteelsoportedel
cajónconlosorificiosdelladodelcajón,comosemuestra.Utilizandounmartillo,martillecadaparte
delvástagodelsoportedelcajónhastaelfondodelagujero.Repitaesteprocesohastaqueelsoporte
delcajónestécompletamenteasentadoen
elladodelcajón.
Página22
Vaamontarcincocajones.Todossearmandelamismamanera.Coloqueelladoizquierdodelcajón(Y)
yelladoderechodelcajón(Z)alFrentedelCajón(I)conlostornillos(6)comosemuestra.Asegúresede
quelaranuraenloslados
delcajónestécentradaconlaranuradelfrentedelcajón.
Página23
Desliceelfondodelcajón(K)enlaranuradelosladosdelcajón(YyZ)ydelfrentedelcajón(I).
Superficieterminada

33
ameriwoodhome.com
Español
Página26
Paramaterialesdemampostería,hormigónuotrosmaterialesdepared:
Consulteconsuferreteríalocalparaobteneranclajesadecuadosparafijarfirmementeelsoportede
seguridad.
IMPORTANTE:ESTAUNIDADDEBEESTARASEGURADASOBRELAPAREDPARAAYUDARAPREVENIR
VUELCOS.SIGAESTASINSTRUCCIONESPARAINSTALARELSOPORTEDESEGURIDADANTI‐VUELCO
SUMINISTRADOCONESTEPRODUCTO.
ADVERTENCIA
Puedenocurrirlesionesdeaplastamientograveomortalalvolcarselosmuebles.
Paraevitarlosvuelcos.
*Instaleeldispositivoderetención
devuelco
*Coloquelosartículosmáspesadosenloscajonesmásbajos
*Amenosqueestéespecíficamentediseñadoparaacomodarse,nocoloquetelevisoresuotros
objetospesadosencimadeesteproducto
*Nuncapermitaquelosniñossesubanosecuelguenenloscajones,puertasoestantes
*Nuncaabra
másdeuncajónalavez
Elusodedispositivosdesujeciónsólopuedereducir,peronoeliminarelriesgodevuelco
OPCIÓN1:Colocaciónenunpernodepared(métodopreferido)
Conunbuscadordevigas,ubiqueunpernoenlapared.Coloquelaunidadcontralapared,con
el
soportedeseguridadalineadoenestaubicación.Parafacilitarlaconduccióndeltornillo,puede
perforarunagujeropilotode1/8"dediámetro(3mm)atravésdelsoportedeseguridadenelperno,
introducireltornilloatravésdelsoportedeseguridadenelpernodelaparedyatornille
eltornilloque
noestabatotalmenteapretadoenelpaso5.
OPCIÓN2:Colocaciónenunapareddeyeso
Coloquelaunidadenellugarelegidodelmuroymarqueelmuroatravésdelsoportedeseguridad,
luegomuevasuunidadaunlado.Taladrarunorificiode3/16"de
diámetro(5mm)eneltablerode
pared.Martilleelancladeparedenelagujerohastaqueestéanivel.Muevasuunidadasulugary
sujeteelsoportedemuroalanclajedeparedconeltornilloyatornillebieneltornilloquenoestaba
totalmenteapretadoen
elpaso5.
Página27
Nota:Losorificiosdelossoportesdelcajóntienenranuras.Losfrentesdeloscajonessepueden
ajustaralaflojarlostornillos,realizarlosajustesnecesariosyvolveraapretarlostornillos.

34
ameriwoodhome.com
Página28
CARGAMAXIMA
Estaunidadhasidodiseñadaparasoportarlacargamáximaanotada.Elexcederestoslímitespuede
causarinestabilidad,colapsarsey/ocausarseriaslesiones.
ADVERTENCIA:Riesgodelesionesalaspersonas‐nocoloqueuntelevisorsobremuebles.Estemueble
noestáaprobadoparasuusoconuntelevisor.
Página
29
Registresuproductopararecibirlosiguiente:
*Detallesdenuevastendencias‐Vistazoalonuevo
*Encuestas‐alecsuvozentresucomunidad
*Códigosdeofertasydescuentosexclusivos
*Fácilyrápidoserviciodepartesderemplace
Pararegistrarsuproducto,visiteameriwoodhome.com
Clasificasiónde5estrellas
Visiteelsitio
webdesutiendalocal,califiquesucomprado
ydenossuscomentarios!
Nosgustaríaenviarungran"Agradecimiento"atodosnuestrosclientesportomarseeltiempode
ensamblaresteproductodeAmeriwoodHome,ypordarnossusvaliososcomentarios.
Gracias
Español

35
ameriwoodhome.com
CouvertureAvant
CELIVRETD'INSTRUCTIONCONTIENTDESINFORMATIONS
IMPORTANTES
SURLASÉCURITÉ.VEUILLEZLIRE
ETGARDERPOURUNERÉFÉRENCEFUTURE
Neretournezpasceproduit!
Contacteznotreéquipedeserviceàlaclientèleamicaled'abordpourobtenir
del'aide.
Appelez‐nous:
1‐800‐489‐3351(sansfrais)duLundiauVendredide9hà17hHeureCentrale
Visitez:
www.ameriwoodhome.com
ATTENTION
Lemeublepeutbasculeretcauserdesblessuresgravesoulamort.
Ancrerlemeubleàuneplanchemuraledanslemur(siindiqué).
Nelaissezpaslesenfantsgrimpersurlemeuble.
Placezlesarticleslourdssurlesétagèresoudanslestiroirsinférieurs.
AstucesUtiles(page2)
‐Ouvrezvotrearticledanslazonequevousprévoyezdelegarderpourmoinsdelevagelourd
‐Identifier,trieretcompterlespiècesavantd'essayerd'assembler
‐LesgoujonsdecompressionsonttaraudésavecunMarteau
‐Lesglissièressontmarquéesd'unR(droit)etd'unL(gauche)pourunbonplacement
‐
Assurez‐voustoujoursdefairefacelapointesituésurlehautdelaSerruredeCameverslebordextérieur
‐Utilisertouslesclousfournispourlepanneauarrièreetlesrépartirégalement
‐Lepanneauarrièredoitêtreutilisépourvousassurerquevotreappareilestrobuste
‐N'utilisezpasde
produitschimiquesagressifsoudenettoyantsabrasifssurcetappareil
‐Nejamaispousser,tirer,oufaireglisservotremeuble
AvantdeCommencer(page3)
‐Lisezattentivementchaqueétapeetsuivezlebonordre
‐Séparezetcompteztoutesvospiècesetmatériaux
‐Donnez‐voussuffisammentdeplacepourl'assemblage
‐Avoirlesoutilssuivants:tournevisàtêteplate,#2tournevisPhillips,etMarteau
‐
Attention:Sivousutilisezuneperceuseélectriqueouuntournevisélectriquepourvisser,veillezàralentir
etarrêterlorsquelavisestbienserrée.Lenon‐respectdecetteconsignepeutendommagerlavis.
SystèmedeFixationdeCame(page3)
CeSystèmedeFixationdeCameserautilisétoutaulongdel'assemblage
Tube
You
Français

36
ameriwoodhome.com
Français
Tube
You
Page7
Reliertouteslespartiesdumeubletelqu'illustré.Àl'aidedequatrevis(9),fixerlemoulagevertical(H)
aupanneaugauche(A)commeillustré.Remarque:lemoulagevertical(H)comportequatretrous
pilotesdeguidagepourfixation.
Vuearrière
Nepasmélangerlesvisn°8etn°
9.Vousutiliserezlapluscourtedesdeuxdanscetteétape.
Page8
Joindrelescinqpartiesdegaucherestantesdel'armoire(13a)aupanneaugauche(A)àl'aidedesvis(7)
commeindiqué.
Appuyerlescouverclesdetêtedevis(12)surlesviscommeindiqué.Utiliserunmarteaupourfixer
en
toutesécuritélecasécheant.
Marquésparun"L".
Page9
Reliertouteslespartiesdumeubletelqu'illustré.Àl'aidedequatrevis(9),fixerlemoulagevertical(H)
aupanneaudroit(B)telqu'indiqué.Remarque:lemoulagevertical(H)comportequatretrouspilotes
deguidagepourfixation.
Vue
arrière
Nepasmélangerlesvisn°8etn°9.Vousutiliserezlapluscourtedesdeuxdanscetteétape.
Page10
Fixerlescinqpartiesdedroitedel'armoire(13b)aupanneaudroit(B)àl'aidedevis(7)commeindiqué.
Appuyerlescouverclesdetêtedevis(12)surlesviscommeindiqué.Utiliserunmarteaupourfixeren
toutesécuritélecasécheant.
Marquésparun"R".
Page
11
Nepasserrercettevis.
Page12
Ilestrecommandédetapersurleconnecteur(3)avecunmarteaupourl'insérercomplète
ment.S'assurerqueleconnecteursoitpositionnécommeindiquéavantdel'introduiredansletrou.
Page13
Appuyersurlesdeuxrailssupérieurs(F)delapartiesupérieure(C)comme
indiquéafind'accroche
rlesconnecteurs(3)auxboulonsduconnecteur(4).Tournerlaviscentraleduconnecteur(3)dansle
senshorairepourleverrouiller.
Tournerdanslesenshorairepourverrouiller.

37
ameriwoodhome.com
Français
Tube
You
Page14
Ilestrecommandédetapersurleconnecteur(3)avecunmarteaupourl'insérercomplètement.
S'assurerqueleconnecteursoitpositionnécommeindiquéavantdel'introduiredansletrou.
Page15
Appuyersurlerailinférieur(G)delapartieinférieure(D)telqu'indiquépouraccrocherlesboulonsdu
connecteur
(4)auxconnecteurs(3).Tournerlaviscentraleduconnecteur(3)danslesenshorairepour
leverrouiller.
Tournerdanslesenshorairepourverrouiller.
Vuearrière
Page17
Fixerlefond(D)etlesupport(E)aupanneaudegauche(A)commeillustré.Tournerlesverrousàcame
danslesens
horairepourverrouiller.
Page20
IMPORTANT!LEPANNEAUARRIÈREESTUNEPARTIESTRUCTURELLEDECEMEUBLEQUIDOITÊTRE
INSTALLÉCORRECTEMENT.
Avecl'aided'uneautrepersonne,retournerlemeublecommeindiqué.Disposerlepanneauarrière(S)
commeindiqué.Alignerlebordinférieurdupanneauarrièreavecleborddelapartie
inférieure(D).
S'assurerquelemeubleestcarré.Ladistanced'uncoinàunautredoitêtreégaleàcelleindiquée.
Clouerdirectementdanslesbordsarrièrecommeindiqué.
Page21
Poserlescôtésdutiroirsurunesurfaceplateetdure.Positionnersoigneusementlesupportdutiroir
aveclestrousdu
côtédutiroircommeindiqué. Àl'aided'unmarteau,tapersurchaquetigedesupport
dutiroirafindelesintroduiredans letrou.Répéterceprocessusjusqu'àcequelesupportdutiroirsoit
complètementinstallésurlecôtédutiroir.
Page22
Cinqtiroirsdoiventêtreinstallés.Lesassembler
delamêmefaçon.
Fixerlecôtégauchedutiroir(Y)etlecôtédroitdutiroir(Z)surlafaceavantdutiroir(I)aveclesvis(6)
commeindiqué.S'assurerquelarainuresurlescôtésdutiroircorrespondaveclarainuresurlaface
avantdutiroir.
Page
23
Faireglisserlefonddutiroir(K)danslarainuredescôtésdutiroir(YetZ)ainsiquelafaceavantdu
tiroir(I).
Surfacefinie

38
ameriwoodhome.com
Français
Tube
You
Page26
Pourlamaçonnerie,lebétonoud'autresmatériauxdemur:
Visitervotrequincaillerielocalepourobtenirdesancresappropriéesquipermettrontdefixer
solidementlesupportdesécurité.
IMPORTANT:CEMEUBLEDOITÊTRESÉCURISÉSURLEMURPOURÉVITERQU'ILNEBASCULE.SUIVRE
CESINSTRUCTIONSPOURINSTALLERLE
SUPPORTDESÉCURITÉANTI‐BASCULEMENTFOURNIAVECCE
PRODUIT.
AVERTISSEMENT
Desblessuresgravesoumortellespeuventseproduireencasdebasculementdesmeubles.
Pouréviterlebasculement:
*Installerlapièceanti‐basculementfournie
*Placerlesobjetslespluslourdsdanslestiroirslesplusbas
*Saufsi
spécifiquementconçupouryêtreinstallé,nepasposerdetéléviseuroud'autresobjetslourds
audessusdeceproduit.
*Nejamaislaisserenfantsgrimperous'accrochersurlestiroirs,lesportesoulesétagères.
*Nejamaisouvrirplusd'untiroiràlafois.
L'utilisationdespiècesanti‐basculementpeut
uniquementréduire,maispaséliminerlerisquede
basculement.
OPTION1:ancragesuruncolombage(méthodeprivilégiée)
Localiseruncolombagedanslemuràl'aided'undétecteurdecolombage.Placervotremeublecontrele
murenmaintenantlesupportdesécuritéalignéaumêmeendroit.Pourfaciliterl'insertiondela
vis,il
estrecommandédeperceruntroud'essaide1/8"dediamètre(3mm)àtraverslesupportdesécurité
danslecolombage.Passerlavisàtraverslesupportdesécurit épourl'insérerdanslecolombage.Serrer
lavisquin'apasétécomplètementserréeàl'étape5.
OPTION2:ancragedanslacloisonsèche
Positionnervotremeublesurlazonecibléecontreunmuretfaireunemarquesurlemuràtraversle
supportdesécurité,puisdéplacervotremeubledecôté.Perceruntroude3/16"dediamètre(5mm)
danslepanneaumural.Tapez
surl'ancremuralepourl'introduiredansletroujusqu'àcequ'ilsoit
parfaitementalignéetinstallé.Placervotremeublesursonemplacementetfixerlesupportmuralà
l'ancremuraleaveclavis.Serrerlavisquin'apasétécomplètementserréeàl'étape5.
Page27
Remarque:lestrous
dusupportdetiroirsontencastrés.Lesfacesavantdutiroirpeuventêtreajustées
endesserrantlesvis,eneffectuantlesréglagesnécessairesetenresserrantlesvis.

39
ameriwoodhome.com
Page28
CHARGESMAXIMALES
Cemeubleaétéconçupoursupporterleschargesmaximalesindiquées.Enexcédantceslimitesde
charge,lemeublepourraitdevenirinstable,s'effondrer,et/oucauserdesblessuresgraves.
AVERTISSEMENT:Risquedeblessurecorporelle‐nepasplacerunetélévisionsurcemeuble.Cemeuble
n'estpasapprouvépourune
utilisationavecunetélévision.
Page29
Enregistrezvotreproduitpourrecevoirlesélémentssuivantes:
*Détailssurlesnouvellestendances‐unaperçusurlesnouveautés
*Sondages‐avoirunevoixauseindenotrecommunauté
*Offresexclusivesetcodespromo
*Servicedepiècesderechangerapideetfacile
Pourenregistrervotre
produit,visitezameriwoodhome.com
5Étoiles
VisitezlesiteWebdevotredétaillantlocal,évaluezvotreproduit
achetéetlaissez‐nousquelquescommentaires!
Noustenonsàoffrirungrand"Merci"àtousnosclientspouravoirprisletempsd'assemblerceproduit
"AmeriwoodHome",etdenousdonnervoscommentairesprécieux.
Merci
Français
Tube
You
/