
3799341COM
FireplaceMantel
B343799341COM0
THISINSTRUCTIONBOOKLETCONTAINS
IMPORTANT
SAFETYINFORMATION.PLEASEREADANDKEEPFORFUTUREREFERENCE.
FollowAmeriwoodHome
Tube
You
DateofPurchase___/___/___
LotNumber:
DoNotReturnThisProduct!
Contactourcustomerserviceteamforhelpfirst.
Call:1‐800‐489‐3351(tollfree)
Visit:www.ameriwoodhome.com
AssemblyDifficultyMeter
Easy Tough
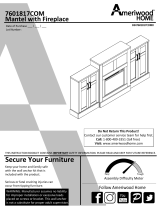
SecureYourFurniture
Keepyourhomeandfamilysafe
withthewallanchorkitthatis
includedwiththeproduct.
Seriousorfatalcrushinginjuriescan
occurfromtippingfurniture.
WARNING:Manufacturerassumesnoliability
forimproperinstallationorexcessiveloads
placedonscrewsorbracket.Thiswallanchor
isnotasubstituteforproperadultsupervision.

ContactUs!
HelpfulHints
2
ameriwoodhome.com
DoNOTreturnthisproduct!
Contactourfriendlycustomerserviceteamfirstforhelp.
Callus!
1‐800‐489‐3351
Monday‐Friday
9am‐5pmCST
Visitameriwoodhome.comtoviewthe
limitedwarrantyvalidintheU.S.andCanada.
AssemblyTips
‐Openyouritemintheareayouplantokeepittoavoidexcessiveheavylifting.
‐Identify,sortandcountthepartsbeforeattemptingassembly.
‐Compressiondowelsarelightlytappedinwithahammer.
‐Slidesarelabeledwitha
R
(right)and
L
(left)forproperplacement.
‐MakesuretoalwaysfacethepointonthetopoftheCamLocktowardsthe
outeredge.
‐Useallthenailsprovidedforthebackpanelandspreadthemoutequally.
‐Backpanelmustbeusedtomakesureyourunitissturdy.
‐DoNOTuseharshchemicalsorabrasivecleanersonthisitem.
‐Neverpush,pull,ordragyourfurniture.
Tube
You
PEOPLENEEDEDFORASSEMBLY:1‐2

3
ameriwoodhome.com
BeforeYouStart
Quick
Tip
Assembly
CamLockFasteningSystem
ThisCamLockFasteningSystemwillbeusedthroughouttheassemblyprocess.
Readthrougheachstepcarefullyandfollowtheproperorder
Separateandcountallyourpartsandhardware
Partsarelabeledonthesurfaceoredgeofthepart
Giveyourselfenoughroomfortheassemblyprocess
Havethefollowingtools:FlatHeadScrewdriver,#2PhillipsHead
ScrewdriverandHammer
Caution:Ifusingapowerdrillorpowerscrewdriverforscrewing,
pleasebeawaretoslowdownandstopwhenscrewistight.
Failuretodosomayresultinstrippingthescrew.
12
34
PresspartstogethersoCAMBOLTinserts
intoedgehole.
PressCAMBOLTintohole. PressCAMLOCKintohole.
Endhole
Usingascrewdriver,turntheCAMLOCKclockwiseto
locktheCAMLOCKandCAMBOLTintotheirholes
andfasteningpartstogether.
Arrowtopointtowardsend
holeinedgeofpart.

4
ameriwoodhome.com
BeforeYouStart
Quick
Assembly
Tip
PleaseNote:
Youmayneedtolightlytapthewooddowelsintotheholesduring
yourassemblyprocess.

5
ameriwoodhome.com
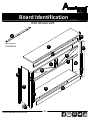
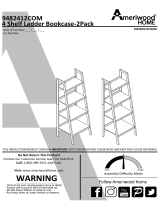
BoardIdentification
Notactualsize
LeftPanel
33799341010
RightPanel
33799341020
Top
33799341030 Bottom
33799341040
ABCD
LeftRail
33799341050
RightRail
33799341060
RearSideRail(x2)
33799341070
Kick
33799341080
FireplaceRail(x2)
33799341090
FireplaceLongRail
33799341100
UpperMolding
33779341110
FrontPanel
33799341120
EFG
H
K
J
I
LCenterMolding
33799341130
M
LeftCenterMolding
33799341140
RightCenterMolding
33799341150
NO

6
ameriwoodhome.com
BoardIdentification
Notactualsize
A
B
C
D
E
F
H
J
K
L
P
RearSupport
33799000160
G
G
I
I
M
N
O
P

7
ameriwoodhome.com
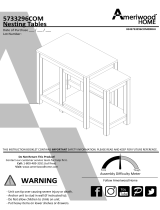
PartList
ActualSize
NotActualSize
(x12)
#A22700
cam lock
(x12)
#A22710
cam bolt
(x4)
#A21670
wood dowel
(x7)
#A12120
7/16" screw
(x1)
#A84000
safety strap kit
1
2
3
9
12
(x14)
#A22761
quickloc
4
12a
(x1)
#A95090
fireplace insert
12e
12d
12c
12b
(x12)
#A12820
1" screw
10
(x3)
#A23030
confirmat
(x6)
#A22790
lock bolt
(x6)
#A22795
lock sleeve
(x6)
#A21960
hidden fastener
(x1)
#A53655
"L" bracket
5
678
11

8
ameriwoodhome.com
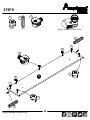
STEP1
(x2)
2
(x3)
2
1
(x2)
3
(x1)
7
1
3
A
Proper orientation of CAM LOCK
Tip
Assembly
Quick
1
7
7
7
2

9
ameriwoodhome.com
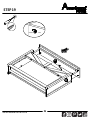
STEP2
123
1
(x2) (x2) (x1) (x3)
2
3
2
7
B
Proper orientation of CAM LOCK
Tip
Assembly
Quick
1
7
7
7

10
ameriwoodhome.com
STEP3
6
28
(x4)
(x6) (x6)
EF
2
2
6
6
6
6
6
6
8
8
88
8
8
2
2

11
ameriwoodhome.com
STEP4
E
A
end view
Besureyourpartsare
positionedasillustrated.
Positionandinsertlockingbolts(6)ofleftrail(E)intoedgeholesofleftpanel(A)asshown.
Besurebothpartsarepositionedasshown.Placethehammerblockontopoflegineachofthe3
lockingboltlocationsandgiveafirmstriketolocktogether.Thelockingbolt(6)willsnapintothe
lockingsleeve(7).
IMPORTANTNOTICE:Oncelockedtogether,partscannotbeseparated.
Note:Arubbermalletcanbeusedinplaceofahammerandhammerblock.

12
ameriwoodhome.com
STEP5
F
B
end view
Positionandinsertlockingbolts(6)ofrightrail(F)intoedgeholesofrightpanel(B)asshown.
Besurebothpartsarepositionedasshown.Placethehammerblockontopoflegineachofthe3
lockingboltlocationsandgiveafirmstriketolocktogether.Thelockingbolt(6)willsnapintothe
lockingsleeve(7).
IMPORTANTNOTICE:Oncelockedtogether,partscannotbeseparated.
Note:Arubbermalletcanbeusedinplaceofahammerandhammerblock.
Besureyourpartsare
positionedasillustrated.

13
ameriwoodhome.com
STEP6
LineduptheholesinbottomofFireplaceRail(I)
withtheHiddenFasteners(8)andpushdown.
10
10
G
A
I
E
PlacetheRearSideRail(G)
undertheLeftPanel(A).
The back edges and top
edges will be flush.
(x3)
10
10

14
ameriwoodhome.com
STEP7
(x3)
I
B
F
G
LineduptheholesinbottomofFireplaceRail(I)
withtheHiddenFasteners(8)andpushdown.
PlacetheRearSideRail(G)
undertheRightPanel(B).
The back edges and top
edges will be flush.
10
10
10
10

15
ameriwoodhome.com
STEP8
4
(x7)
4
H
P
4
4
4
4
4
4

16
ameriwoodhome.com
STEP9
134
1
3
4
3
Proper orientation of CAM LOCK
Tip
Assembly
Quick
1
D
(x4) (x2) (x3)
1
1
4
4

17
ameriwoodhome.com
STEP10
4Turn screw clockwise to
clamp parts together
H
D
end view

18
ameriwoodhome.com
STEP11
4
Turn screw clockwise to
clamp parts together
P
D

19
ameriwoodhome.com
STEP12
5
5
(x3)
J
L
end view
5
5

20
ameriwoodhome.com
STEP13
NL
M
O
10
10
(x6)
10
10
10
10 10

21
ameriwoodhome.com
STEP14
Proper orientation of CAM LOCK
Tip
Assembly
Quick
1
1
1
L
(x4)
1
1

22
ameriwoodhome.com
STEP15
UNLOCKLOCK
A
P
E
L
D
H
4Turn screw
clockwise to clamp
parts together

23
ameriwoodhome.com
STEP16
B
F
L
D
P
H

24
ameriwoodhome.com
STEP17
K
4
4
(x4)
4
4
4

25
ameriwoodhome.com
STEP18
K
C
2
2
4
Turn screw clockwise to
clamp parts together
12a
12b
(x4)
12d
12a
12b
12d
2
2
2

26
ameriwoodhome.com
STEP19
B
C
UNLOCKLOCK

27
ameriwoodhome.com
STEP20
9
9
(x6)
9
9
9
9
9

28
ameriwoodhome.com
STEP21
9
(x1) (x1)
9
11
11

29
ameriwoodhome.com
STEP22
OPTION1:Attachmentintoawallstud(preferredmethod)
Usingastudfinder,locateastudinthewall.Placeyourunitagainstthewall,withthesafetybracketaligned
inthislocation.Tomakedrivingthescreweasier,youcandrilla1/8"diameterpilothole(3mm)throughthe
safetybracketintothestud.Drivethescrewthroughthesafetybracketintothewallstud.
OPTION2:Attachmentintodrywall
Locateyourunitwheredesiredagainstawallandmarkthewallthroughthesafetybracket,thenmoveyour
unitaside.Drilla3/16"diameterhole(5mm)intothewallboard.Tapthewallanchorintotheholeuntilitis
flush.Moveyourunitintolocationandfastenthewallbrackettothewallanchorwiththescrew.
WARNING
Seriousorfatalcrushinginjuriescan
occurfromfurnituretipover.
Topreventtipover:
*Installtipoverrestraintprovided
*Placeheaviestitemsinthelowest
drawers
*Unlessspecificallydesignedto
accommodate,donotsetTVsorother
heavyobjectsonthetopofthisproduct
*Neverallowchildrentoclimborhang
ondrawers,door,orshelves
*Neveropenmorethanonedrawerata
time
Useoftipoverrestraintsmayonly
reduce,butnoteliminatetheriskof
tipover
IMPORTANT:THISUNITMUSTBESECURETOTHEWALLTOHELPPREVENTTIPOVER.FOLLOW
THESEINSTRUCTIONSTOINSTALLTHEANTI‐TIPPINGSAFETYBRACKETPROVIDEDWITHTHIS
PRODUCT.
For Masonry, Concrete, or other
wall materials:
Consult your local hardware store
for appropriate anchors to securely
attach the safety bracket.
stud
wallboard
hole
12c 12d
12e
12e
12d
12c

30
ameriwoodhome.com
MaximumLoads
Warning:Riskofinjurytopersons‐donotplaceatelevisiononthisfurniture.Thisfurnitureis
notapprovedforusewithatelevision.
CertificateofConformity
1.ThiscertificateappliestotheDorelHomeFurnishings,Inc.productidentifiedbythisinstructionmanual.
2.ThiscertificateappliestocomplianceofthisproductwiththeCPSCBanonLead‐ContainingPaint(16CFR1303).
3.Thisproductisdistributedby:DorelHomeFurnishings,Inc.
410EastFirstStreetSouth
WrightCity,MO63390
636‐745‐3351
4.SiteofManufacture:TiffinOH
5.Seefrontpageofinstructionmanualfordateofmanufacture.
10lbs
4.5kg
Thisunithasbeendesignedtosupportthemaximumloadsshown.Exceedingtheseloadlimits
couldcausesagging,instability,productcollapse,and/orseriousinjury.

31
ameriwoodhome.com
Registeryourproducttoreceivethefollowing:
*Newtrenddetails‐sneakpeekonwhat'snew
*Surveys‐haveavoicewithinourcommunity
*Exclusivedealsanddiscountcodes
*Quickandeasyreplacementpartservice
Toregisteryourproduct,visitameriwoodhome.com
Visityourlocalretailer'swebsite,rateyourpurchased
productandleaveussomefeedback!
Wewouldliketoextendabig"ThankYou"toallof
ourcustomersfortakingthetimetoassemblethis
AmeriwoodHomeproduct,andtogiveusyour
valuablefeedback.

32
ameriwoodhome.com
CubiertaDelantera
Estelibrodeinstruccionescontieneinformación
IMPORTANTE
deseguridad.Porfavorleaymanténgalo
parareferenciaenelfuturo.
NoRegreseesteproducto!
Comuniqueseconnuestroamistosoequipodeservicioalclienteparaobtener
ayuda.
Llamenosal:1‐800‐489‐3351(Gratis)Lunes‐Viernes9am‐5pmCST
Visitar:
www.ameriwoodhome.com
PRECAUCION
Estemueblepuedevolcarseycausargravesheridasy/omuerte.
Anclarelmuebleaunpostedemaderaenlapared(siestoserequiere).
NoPermitaquelosniñosmontenelmueble.
Mantengalosartículosmáspesadosenloscajonesdeabajo.
ConsejosÚtiles(página2)
‐Abrasuartículoeneláreadondeustedplaneautilizarloparaevitarlevantarymoverlomenos
‐Identificar,ordenarycontarlaspiezasantesdeintentarensamblar
‐Lasclavijasdecompresiónsegolpeanconunmartillo
‐LasdiapositivasestánmarcadasconunaR(derecha)yL(izquierda)paralacolocacióncorrecta
‐Asegúresedequesiempreesteelpuntolocaizadoenlapartesuperiordebloqueadordeleva
estevolteadohaciabordeexterior
‐Utilizartodoslosclavosparaelpaneldeatrasydistribuirlosporigual
‐Elpaneldeatrasdebeutilizarseparaasegurarsedequelaunidadquedefijayfirme
‐Nousequimicasfuertesnilimpiadoresabrasivosenestearticulo
‐Nuncaempuje,tireniarrastrelosmuebles
AntesdeQueEmpieces(página3)
‐Leacuidadosamentecadapasoysigaelordencorrecto
‐Separarycontartodassuspiezasyhardware
‐Désesuficienteespacioparaelprocesodeensamble
‐Tengalassiguientesherramientas:destornilladordecabezaplana,#2cabezaPhillips
Destornilladorymartillo
‐Precaución:Siusauntaladroelectrónicooundestornilladoreléctricoparaatornillar,porfavorasegúrese
quedejedeatornillarcuandoeltonillosesteapretado.Fallarhacerestopuedecausarbarrereltornillo.
Sistemadefijarelbloqueodeleva(página3)
Estasistemadefijarelbloqueodelevaserausadoentodoelprocesoensamble.
Español

33
ameriwoodhome.com
Página11
Asegúresedequesuspiezasestáncolocadascomoseilustra.
Coloqueeinsertelospernosdebloqueo(6)delraílizquierdo(E)enlosorificiosdelosbordesdelpanel
izquierdo(A)comosemuestra.
Asegúresedequeambaspiezasestáncolocadascomosemuestra.Coloqueelbloquedemartilloenla
partesuperiordelapataencadaunadelas3ubicacionesdelospernosdebloqueoydéungolpe
firmeparabloquearlos.Elpernodebloqueo(6)encajaráenelcasquillodebloqueo(7).
AVISOIMPORTANTE:Unavezbloqueadasjuntas,laspiezasnosepuedenseparar.
Nota:Sepuedeutilizarunmazodegomaenlugardeunmartilloyunbloquedemartillo.
Página12
Asegúresedequesuspiezasestáncolocadascomoseilustra.
Coloqueeinsertelospernosdebloqueo(6)delraílizquierdo(F)enlosorificiosdelosbordesdelpanel
izquierdo(B)comosemuestra.
Asegúresedequeambaspiezasestáncolocadascomosemuestra.Coloqueelbloquedemartilloenla
partesuperiordelapataencadaunadelas3ubicacionesdelospernosdebloqueoydéungolpe
firmeparabloquearlos.Elpernodebloqueo(6)encajaráenelcasquillodebloqueo(7).
AVISOIMPORTANTE:Unavezbloqueadasjuntas,laspiezasnosepuedenseparar.
Nota:Sepuedeutilizarunmazodegomaenlugardeunmartilloyunbloquedemartillo.
Página13
AlineelosorificiosdelaparteinferiordelRieldelaChimenea(I)conlascremallerasocultas(8)y
presionehaciaabajo.
Coloqueelriellateraltrasero(G)debajodelpanelizquierdo(A).
Losbordestraserosysuperioresquedaránenrasados.
Página14
AlineelosorificiosdelaparteinferiordelRieldelaChimenea(I)conlascremallerasocultas(8)y
presionehaciaabajo.
Coloqueelriellateraltrasero(G)debajodelpanelizquierdo(B).
Losbordestraserosysuperioresquedaránenrasados.
Página17/18/22/25
Gireeltornilloenelsentidodelasagujasdelrelojparasujetarlaspiezas.
Español

34
ameriwoodhome.com
Español
Página29
Paramampostería,hormigónuotrosmaterialesdepared:
Consulteensuferreteríadeconfianzalosanclajesapropiadosparafijarfirmementeelsoportede
seguridad.
IMPORTANTE:ESTAUNIDADDEBEESTARBIENSUJETAALAPAREDPARAEVITARVUELCOS.SIGAESTAS
INSTRUCCIONESPARAINSTALARELSOPORTEDESEGURIDADANTIVUELCOSUMINISTRADOCONESTE
PRODUCTO.
ADVERTENCIA
Puedenproducirselesionesgravesofatalesporaplastamientosivuelcaelmueble.
Paraevitarelvuelco:
*Instaleeldispositivoderetencióncontravuelcos
*Coloquelosobjetosmáspesadosenloscajonesmásbajos
*Amenosqueestéespecíficamentediseñadoparaello,nocoloquetelevisoresuotrosobjetospesados
encimadeesteproducto
*Nuncapermitaquelosniñostrepenosecuelguendeloscajones,lapuertaolosestantes
*Nuncaabramásdeuncajónalavez
Elusodedispositivosdesujeciónsolopuedereducir,peronoeliminar,elriesgodevuelco
OPCIÓN1:Fijaciónenunmontanteenlapared(métodopreferido)
Utilizandounlocalizadordemontantes,localiceunmontanteenlapared.Coloquesuunidadcontrala
pared,conelsoportedeseguridadalineadoenestaubicación.Parafacilitarlaintroduccióndeltornillo,
puedetaladrarunorificiopilotode1/8"dediámetro(3mm)atravésdelsoportedeseguridadenel
montante.Introduzcaeltornilloatravésdelsoportedeseguridadenelmontantedelapared.
OPCIÓN2:Fijaciónenlapareddeyeso
Ubiquesuunidaddondedeseecontraunaparedymarquelaparedatravésdelsoportedeseguridad,
luegomuevasuunidadaunlado.Taladreunagujerode3/16"dediámetro(5mm)enelpaneldeyeso.
Golpeeelanclajedeparedenelagujerohastaquequedeenrasado.Muevasuunidadasuubicacióny
fijeelsoportedeparedalanclajedeparedconeltornillo.
Página30
CARGAMAXIMA
Estaunidadhasidodiseñadaparasoportarlascargasmáximasindicadas.Excederestoslímitesdecarga
podríacausarhundimiento,inestabilidad,colapsodelproductoy/olesionesgraves.
Advertencia:Riesgodelesionesalaspersonas:nocoloqueuntelevisorsobreestemueble.Este
mueblenoestáaprobadoparasuusoconuntelevisor.

35
ameriwoodhome.com
Página31
Registresuproductopararecibirlosiguiente:
*Detallesdenuevastendencias‐Vistazoalonuevo
*Encuestas‐alecsuvozentresucomunidad
*Códigosdeofertasydescuentosexclusivos
*Fácilyrápidoserviciodepartesderemplace
Pararegistrarsuproducto,visiteameriwoodhome.com
Clasificasiónde5estrellas
Visiteelsitiowebdesutiendalocal,califiquesucomprado
ydenossuscomentarios!
Nosgustaríaenviarungran"Agradecimiento"atodosnuestrosclientesportomarseeltiempode
ensamblaresteproductodeAmeriwoodHome,ypordarnossusvaliososcomentarios.
Gracias
Español

36
ameriwoodhome.com
CouvertureAvant
CELIVRETD'INSTRUCTIONCONTIENTDESINFORMATIONS
IMPORTANTES
SURLASÉCURITÉ.VEUILLEZLIRE
ETGARDERPOURUNERÉFÉRENCEFUTURE
Neretournezpasceproduit!
Contacteznotreéquipedeserviceàlaclientèleamicaled'abordpourobtenir
del'aide.
Appelez‐nous:
1‐800‐489‐3351(sansfrais)duLundiauVendredide9hà17hHeureCentrale
Visitez:
www.ameriwoodhome.com
ATTENTION
Lemeublepeutbasculeretcauserdesblessuresgravesoulamort.
Ancrerlemeubleàuneplanchemuraledanslemur(siindiqué).
Nelaissezpaslesenfantsgrimpersurlemeuble.
Placezlesarticleslourdssurlesétagèresoudanslestiroirsinférieurs.
AstucesUtiles(page2)
‐Ouvrezvotrearticledanslazonequevousprévoyezdelegarderpourmoinsdelevagelourd
‐Identifier,trieretcompterlespiècesavantd'essayerd'assembler
‐LesgoujonsdecompressionsonttaraudésavecunMarteau
‐Lesglissièressontmarquéesd'unR(droit)etd'unL(gauche)pourunbonplacement
‐Assurez‐voustoujoursdefairefacelapointesituésurlehautdelaSerruredeCameverslebordextérieur
‐Utilisertouslesclousfournispourlepanneauarrièreetlesrépartirégalement
‐Lepanneauarrièredoitêtreutilisépourvousassurerquevotreappareilestrobuste
‐N'utilisezpasdeproduitschimiquesagressifsoudenettoyantsabrasifssurcetappareil
‐Nejamaispousser,tirer,oufaireglisservotremeuble
AvantdeCommencer(page3)
‐Lisezattentivementchaqueétapeetsuivezlebonordre
‐Séparezetcompteztoutesvospiècesetmatériaux
‐Donnez‐voussuffisammentdeplacepourl'assemblage
‐Avoirlesoutilssuivants:tournevisàtêteplate,#2tournevisPhillips,etMarteau
‐
Attention:Sivousutilisezuneperceuseélectriqueouuntournevisélectriquepourvisser,veillezàralentir
etarrêterlorsquelavisestbienserrée.Lenon‐respectdecetteconsignepeutendommagerlavis.
SystèmedeFixationdeCame(page3)
CeSystèmedeFixationdeCameserautilisétoutaulongdel'assemblage
Français

37
ameriwoodhome.com
Page11
Veillezàcequevospiècessoientpositionnéescommeindiquésurl'illustration.
Positionneretinsérerlesboulonsdeverrouillage(6)dusupportgauche(E)danslestrousdupanneau
gauche(A)commeindiqué.
S'assurerquelesdeuxpartiessontpositionnéescommeindiqué.Placerleblocmarteausurledessusdu
piedàchacundes3emplacementsdesboulonsdeverrouillageetdonneruncoupfermepour
verrouillerl'ensemble.Leboulondeverrouillage(6)s'enclenchedansladouilledeverrouillage(7).
AVISIMPORTANT:Unefoisverrouillées,lespiècesnepeuventplusêtreséparées.
Remarque:unmailletencaoutchoucpeutêtreutiliséàlaplaced'unmarteauetd'unblocdemarteau.
Page12
Veillezàcequevospiècessoientpositionnéescommeindiquésurl'illustration.
Positionneretinsérerlesboulonsdeverrouillage(6)dusupportdroit(F)danslestrousdupanneau
droit(B)commeindiqué.
S'assurerquelesdeuxpartiessontpositionnéescommeindiqué.Placerleblocmarteausurledessusde
lajambeàchacundes3emplacementsdesboulonsdeverrouillageetdonneruncoupfermepour
verrouillerl'ensemble.Leboulondeverrouillage(6)s'enclenchedansladouilledeverrouillage(7).
AVISIMPORTANT:Unefoisverrouillées,lespiècesnepeuventplusêtreséparées.
Remarque:unmailletencaoutchoucpeutêtreutiliséàlaplaced'unmarteauetd'unblocdemarteau.
Page13
Alignerlestrousdelapartieinférieuredusupportdecheminée(I)aveclesfixationscachées(8)et
pousserverslebas.
Placezlesupportlatéralarrière(G)souslepanneaugauche(A).
Lesbordsarrièreetsupérieurdoiventêtrealignés.
Page14
Alignerlestrousdelapartieinférieuredusupportdecheminée(I)aveclesfixationscachées(8)et
pousserverslebas.
Placezleraillatéralarrière(G)souslepanneaudroit(B).
Lesbordsarrièreetsupérieurdoiventêtrealignés.
Page17/18/22/25
Tournerlavisdanslesensdesaiguillesd'unemontrepourserrerlespiècesensemble.
Français

38
ameriwoodhome.com
Français
Page29
Pourlamaçonnerie,lebétonoud'autresmatériauxmuraux:
Consultezvotrequincaillerielocalepourobtenirlesancragesappropriésafindefixersolidementle
supportdesécurité.
IMPORTANT:CEMEUBLEDOITÊTREFIXÉAUMURPOURÉVITERQU'ILNEBASCULE.SUIVEZCES
INSTRUCTIONSPOURINSTALLERLESUPPORTDESÉCURITÉANTI‐BASCULEMENTFOURNIAVECCE
PRODUIT.
AVERTISSEMENT
Lebasculementd'unmeublepeutentraînerdesblessuresgravesoumortellesparécrasement.
Pouréviterlebasculement:
*Installerundispositifderetenueencasdebasculement
*Placerlesobjetslespluslourdsdanslestiroirslesplusbas.
*Nepasposerdetéléviseuroud'autresobjetslourdssurledessusdel'appareil,àmoinsqu'ilsne
soientspécifiquementconçusàceteffet.
*Nejamaispermettreauxenfantsdegrimperoudesesuspendreauxtiroirs,portesouétagères.
*Nejamaisouvrirplusd'untiroiràlafois.
L'utilisationdedispositifsderetenueencasdebasculementnepeutqueréduire,maispaséliminer,
lerisquedebasculement.
OPTION1:Fixationdansunmontantmural(méthodepréférée)
Àl'aided'undétecteurdemontants,repérezunmontantdanslemur.Placezvotreappareilcontrele
mur,aveclesupportdesécuritéalignéàcetendroit.Pourfaciliterl'enfoncementdelavis,vous
pouvezpercerunavant‐troude3mmdediamètreàtraverslesupportdesécuritédanslemontant.
Enfoncezlavisàtraverslesupportdesécuritédanslemontantdumur.
OPTION2:Fixationdanslescloisonssèches
Placezvotreappareilàl'endroitsouhaitécontreunmuretmarquezlemuràtraverslesupportde
sécurité,puismettezvotreappareildecôté.Percezuntroude3/16"dediamètre(5mm)dansle
panneaumural.Tapezlachevilledansletroujusqu'àcequ'ellesoitàfleur.Déplacezvotremeubleà
sonemplacementetfixezlesupportmuralàl'ancragemuralàl'aidedelavis.
Page30
CHARGESMAXIMALES
Cemeubleaétéconçupoursupporterleschargesmaximalesindiquées.Ledépassementdeces
limitesdechargepeutentraînerunaffaissement,uneinstabilité,uneffondrementduproduitet/ou
desblessuresgraves.
Avertissement:Risquedeblessurepourlespersonnes‐neplacezpasdetéléviseursurcemeuble.
Cemeublen'estpashomologuépourrecevoiruntéléviseur.

39
ameriwoodhome.com
Français
Page31
Enregistrezvotreproduitpourrecevoirlesélémentssuivantes:
*Détailssurlesnouvellestendances‐unaperçusurlesnouveautés
*Sondages‐avoirunevoixauseindenotrecommunauté
*Offresexclusivesetcodespromo
*Servicedepiècesderechangerapideetfacile
Pourenregistrervotreproduit,visitezameriwoodhome.com
5Étoiles
VisitezlesiteWebdevotredétaillantlocal,évaluezvotreproduit
achetéetlaissez‐nousquelquescommentaires!
Noustenonsàoffrirungrand"Merci"àtousnosclientspouravoirprisletempsd'assemblerce
produit"AmeriwoodHome",etdenousdonnervoscommentairesprécieux.
Merci
-
 1
1
-
 2
2
-
 3
3
-
 4
4
-
 5
5
-
 6
6
-
 7
7
-
 8
8
-
 9
9
-
 10
10
-
 11
11
-
 12
12
-
 13
13
-
 14
14
-
 15
15
-
 16
16
-
 17
17
-
 18
18
-
 19
19
-
 20
20
-
 21
21
-
 22
22
-
 23
23
-
 24
24
-
 25
25
-
 26
26
-
 27
27
-
 28
28
-
 29
29
-
 30
30
-
 31
31
-
 32
32
-
 33
33
-
 34
34
-
 35
35
-
 36
36
-
 37
37
-
 38
38
-
 39
39


en otros idiomas
- français: Dorel Home 3799341COM
- English: Dorel Home 3799341COM
Artículos relacionados
-
 Dorel Home 5308341COM Assembly Manual
-
 Dorel Home 7601817COM Assembly Manual
-
 Dorel Home 5581340COM1 Manual de usuario
-
 Dorel Home 9482412COM Assembly Manual
-
Ameriwood Home 5955222COM1 Instruction Booklet
-
Ameriwood Home 5990196COM Manual de usuario
-
 Dorel Home 5733296COM Assembly Manual
-
 Dorel Home 5047296COM Assembly Manual
-
 Dorel Home 5040900WCOM Assembly Manual
-
 Dorel Home 5040056WCOM Assembly Manual


Otros documentos
-
-
-
-
Ameriwood HD63722 Guía de instalación
-
-
-
Linon Scarsdale Space Saver Manual de usuario