
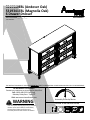
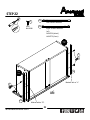
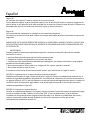
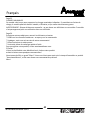
5319341EBL(MagnoliaOak)
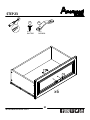
6DrawerDresser
5319340EBL(AndoverOak)
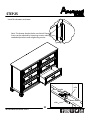
‐Unitcantipovercausingsevereinjuryordeath.
‐Anchorunitto studinwall(ifinstruc te dto).
‐DoNotallowchildrentoclimbonunit.
‐Putheavyitemsonlowershelvesordrawers.
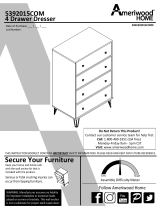
B345319000EBL0
THISINSTRUCTI ONBOOKLETCONTAINS
IMPORTANT
SAFETYINFORM AT ION.PLEASE READANDKEEPFOR FUTUREREFER ENCE.
WARNING
FollowAmeriwoodHome
Tube
You
DateofPurchase___/___/___
LotNumber:
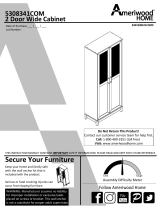
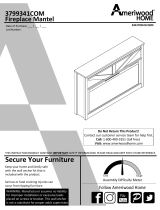
DoNotReturnThisProduct!
Contactourcustomerserviceteamforhelpfirst.
Call:1‐800‐489‐3351(tollfree)
Monday‐Friday9am‐5pmCST
Visit:www.ameriwoodhome.com
AssemblyDifficultyMeter
Easy
Tough

ContactUs!
HelpfulHints
2
ameriwoodhome.com
DoNOTreturnthisproduct!
Contactourfriendlycustomerserviceteamfirstforhelp.
Callus!
1‐800‐489‐3351
Monday‐Friday
9am‐5pmCST
Visitameriwoodhome.com toviewthe
limitedwarrantyvalidintheU.S.andCanada.
AssemblyTips
‐Openyouriteminthe areayo uplantokeepittoavoidexcessiveheavylifting.
‐Identify,sortandcountthepartsbeforeattemptingassembly.
‐Compres sio n dowelsarelight lytappedinwithahammer.
‐Slidesarelab eledwitha
R
(right)and
L
(left)forproperplacement.
‐MakesuretoalwaysfacethepointonthetopoftheCamLocktowardsthe
outeredge.
‐Useallthenailsprovided forthebackpanelandspreadthemoutequally.
‐Backpanelmustbeusedtomakesureyourunitissturdy.
‐Do
NOTuseharshchemicalsorabrasivecleanersonthis item.
‐Neverpush,pull,ordragyourfurniture.
Tube
You
Tube
You
PEOPLENEEDEDFORASSEMBLY:1‐2
ESTIMATEDASSEMBLYTIME:1HOUR

3
ameriwoodhome.com
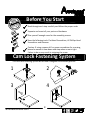
BeforeYouStart
Q
u
i
c
k
T
ip
A
s
s
e
m
b
l
y
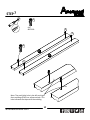
CamLockFasteningSystem
ThisCamLockFasteningSystemwillbeusedthroughouttheassemblyprocess.
1
3
2
4
Tube
You
Readthrougheachstepcarefullyandfollowtheproperorder
Separateand countallyourpartsandhardware
Giveyourselfenoughroomfortheassemblyprocess
Havethefollowingtools:FlatHeadScrewdriver,#2PhillipsHead
ScrewdriverandHammer
Caution:Ifusingapowerdrillorpowerscrewdriverforscrewing,
pleasebeawaretoslowdownandstopwhenscrewistight.
Failuretodosomayresultinstrippingthescrew.

4
ameriwoodhome.com
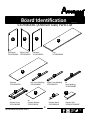
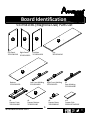
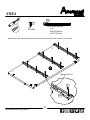
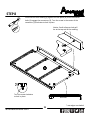
BoardIdentification
5319340EBL(AndoverOak)PartsList
Tube
You
LeftPanel
35319340010
RightPanel
35319340020
Partition
35319340030
Top
35319340040
A
B
C
D
Bottom
35319340050
LeftFrontMolding
35319340060
RightFrontMolding
35319340070
x2
RearMolding
35319340080
x6
DrawerFront
35319340090
x6
DrawerBottom
35319331100
x6
DrawerBrace
35319000110
x12
DrawerSide
39991167346200C
E
F
G
H
I
J
K
DWR
SIDE

5
ameriwoodhome.com
Tube
You
BoardIdentification
5319341EBL(MagnoliaOak)PartsList
B
A
C
D
F
E
G
H
K
J
I
LeftPanel
35319341010
RightPanel
35319341020
Partition
35319341030
Top
35319341040
Bottom
35319341050
LeftFrontMolding
35319341060
RightFrontMolding
35319341070
x2
RearMolding
35319341080
x12
DrawerSide
39991167346200C
x6
DrawerBrace
35319000110
x6
DrawerBottom
35319331100
x6
DrawerFront
35319341090

6
ameriwoodhome.com
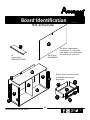
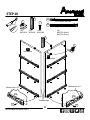
BoardIdentification
Notactualsize
Tube
You
x6
DrawerBack
39991167056150B
BackPanel
K531900000
Thispieceispaperboard
construction.Itisnotmade
fromwood,butisrequiredfor
theassemblyofyourunit.
S
A
B
C
D
E
F
G
H
I
J
K
Drawersides,anddrawerback
arelabeledwiththepart
description.
S
DWR
BACK
DWR
SIDE
DWR
BACK
DWR
SIDE

7
ameriwoodhome.com
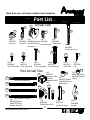
PartList
ActualSize
Tube
You
NotActualSize
1
2
3
4
5
6
7
8
9
11
12
13a
13b
13c
13d
14a
14b
14c
14d
(x18)
#A22620
camlock
(x18)
#A22610
cambolt
(x4)
#A22900(white)
#A22920(black)
connector
(x4)
#A22910
connector bolt
(x3)
#A21660
wood dowel
(x6)
#A23030
confirmatscrew
(x60)
#A11080
7/16"flathead
(x48)
#A12120
7/16"panhead
(x12)
#A12930
1‐1/8"panhead
(x36)
#A21970
drivefastener
(x12)
#A17030
5/16"bolt
(x32)
#A21110
nail
LeftCabinetMember
RightCabinetMember
LeftDrawerMember
RightDrawerMember
(x6)
#A56750(black)
#A56770(linen)
DrawerSlideKit
(x1)
#A84050
SafetyBracketKit
(x12)
#A54520
DrawerBracket
(x6)
#A50408
handle
(x4)
#A44410
(AndoverOak)
#A44420
(MagnoliaOak)
foot
(x1)
#A43105(black)
#A43106(white)
plastic
foot
(x2)
#A43490(black)
#A43495(white)
spacer
17
18
19
15
16
10
Note that your unit may contain extra hardware

8
ameriwoodhome.com
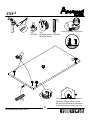
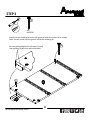
STEP
1
Proper orientation of CAM LOCK
Tip
Assembly
Quick
1
3
5
(x2)
#A22620
(x2)
#A22900(white)
#A22920(black)
(x1)
#A21660
Youwillneedtotaptheconnector
(3)withahammertofullyinsert.
Besuretheconnectorispositioned
asshownbeforepushingintohole.
5
1
3
3
A

9
ameriwoodhome.com
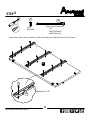
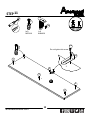
STEP2
7
13a
Attachthreeleftcabinetmembers(13a)totheleftpanel(A)withscrews(7)asshown.
(x9)
#A11080
(x3)
#A56750(black)
#A56770(linen)
LeftCabinetMember
Marked with a "L".
7
13a
A

10
ameriwoodhome.com
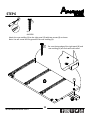
STEP3
9
9
Attachtherearmolding(H)totheleftpanel(A)withtwoscrews(9)asshown.
Note:Youwillscrewintothegrooveoftherearmolding(H).
Besurethetopedgeoftheleftpanel(A)and
rearmolding(H) areflushwitheachother.
9
A
H
(x2)
#A12930

11
ameriwoodhome.com
STEP
4
Proper orientation of CAM LOCK
Tip
Assembly
Quick
1
3
5
(x2)
#A22620
(x2)
#A22900(white)
#A22920(black)
(x1)
#A21660
Youwillneedtotaptheconnector
(3)withahammertofullyinsert.
Besuretheconnectorispositioned
asshownbeforepushingintohole.
3
5
1
3
B

12
ameriwoodhome.com
STEP
5
7
13b
Attachthreerightcabinetmembers(13b)totherightpanel(B)withscrews(7)asshown.
(x9)
#A11080
(x3)
#A56750(black)
#A56770(linen)
RightCabinetMember
Marked with a "R".
B
7
13b

13
ameriwoodhome.com
STEP6
9
9
B
H
(x2)
#A12930
Attachtherearmolding(H)totherightpanel(B)withtwoscrews(9)asshown.
Note:Youwillscrewintothegrooveoftherearmolding(H).
Besurethetopedgeoftherightpanel(B)and
rearmolding(H)areflushwitheachother.
9

14
ameriwoodhome.com
STEP
7
4
4
Note:Thesmallpilotholeintheleftandright
frontmoldings(F&G)isareferencehole.This
holeindicatesthetopendofthemolding.
4
4
4
(x4)
#A22910
F
G

15
ameriwoodhome.com
STEP8
Presstheleftfrontmolding(F)againsttheleftpanel(A)sotheconnector
bolts(4)engagetheconnectors(3).Turnthescrewinthecenterofthe
connector(3)clockwisetolockinplace.
Notice:Smallreferenceholewill
beatthetopendofthemolding.
Turnthescrewclockwise
tolockinplace.
endview
*rawedgesareshaded
A
F
3

16
ameriwoodhome.com
STEP9
*rawedgesareshaded
endview
Turnthescrewclockwise
tolockinplace.
Notice:Smallreferenceholewill
beatthetopendofthemolding.
Presstherightfrontmolding(G)againsttherightpanel(B)sothe
connectorbolts(4)engagetheconnectors(3).Turnthescrewinthe
centeroftheconnector(3)clockwisetolockinplace.
3
B
G

17
ameriwoodhome.com
STEP10
1
5
7
13a
13b
LeftCabinetMember
RightCabinetMember
(x3)
#A56750(black)
#A56770(linen)
(x18)
#A11080
(x2)
#A22620
(x1)
#A21660
5
1
13a
13b
7
7
Marked with a "L".
Marked with a "R".
finished edge
C
C
right surface
left surface

18
ameriwoodhome.com
STEP
11
2
14b
14a
2
Do not tighten this screw
(x6)
#A22610
(x1)
#A84050
14b
14a
2
2
2
2
2
D

19
ameriwoodhome.com
STEP12
18
19
(x1)
#A43105(black)
#A43106(white)
(x2)
#A43490(black)
#A43495(white)
19
19
18
E
Pressthetwospacers(19)andplasticfoot(18)
intothebottom(E)asshown.Youmayneedto
tapeachonewithahammertosecurelyinsert.

20
ameriwoodhome.com
STEP13
6
6
(x6)
#A23030
6
6
6
6
6
A
B
C
E

21
ameriwoodhome.com
STEP
14
U
N
L
O
C
K
L
O
C
K
A
C
B
D

22
ameriwoodhome.com
STEP
15
9
9
Usingtwoscrews(9)perfoot(17),attachthefourfeet(17)tothebottom(E)asshown.
(x8)
#A12930
(x4)
#A44410(Andoveroak)
#A44420(MagnoliaOak)
17
17
17
17
17
E
9
9
9

23
ameriwoodhome.com
STEP16
(x32)
#A21110
IMPORTANT!
THEBACKPANELISASTRUCTURALPARTOFTHISUNITANDMUSTBEINSTALLEDPROPERLY.
Withthehelpofanotherperson,turntheunitoverasshown.Positionthebackpanel(S)as
shown.Flushthebottomedgeofthebackpanelwiththeedgeofthebottom(D).Assurethatthe
unitissquare.Distancefromcornertocornermustbeequalasshown.Attach
thebackpanelby
nailingstraightintobackedgesasshown.
notch in back panel
12
12
S

24
ameriwoodhome.com
STEP
17
T
Fastenthebracketstotheoppositesurfaceofthesmallmetalslideholes.
x6
x6
(x12)
#A54520
15
15
15
DWR
SIDE
DWR
SIDE
(x24)
#A12120
8
8
8
8
8

25
ameriwoodhome.com
STEP18
Proper orientation of CAM LOCK
Tip
Assembly
Quick
1
2
2
1
(x12)
#A22620
(x12)
#A22610
x6
x6
I
K

26
ameriwoodhome.com
STEP19
U
N
L
O
C
K
L
O
C
K
Youwillbeassemblingsixdrawers.Theyallassembleinthesamemanner.
AttachthedrawersidestotheDrawerFront(I)withscrews(8)asshown.Besurethegrooveinthe
drawersidesarecenteredwiththegrooveinthedrawerfront.Attachonedrawerbrace(K)to
eachdrawer
front(I)asshown.
(x24)
#A12120
DWR
SIDE
x6
DWR
SIDE
8
8
8
I
K

27
ameriwoodhome.com
STEP20
DWR
SIDE
DWR
SIDE
I
K
J
unfinishedsurface
x6

28
ameriwoodhome.com
STEP21
10
DWR
BACK
x6
(x36)
#A21970
DWR
SIDE
DWR
SIDE
10
10
10

29
ameriwoodhome.com
STEP22
7
13c
13d
7
7
(x24)
#A11080
(x6)
#A56750(black)
#A56770(linen)
RightDrawerMember
LeftDrawerMember
Marked with a "R".
Marked with a "L".
x6
13c
13d
DWR
SIDE
DWR
SIDE

30
ameriwoodhome.com
STEP23
11
16
(x12)
#A17030
(x6)
#A50408
11
16
x6

31
ameriwoodhome.com
STEP24
For Masonry, Concrete, or other
wall materials:
Consult your local hardware store
for appropriate anchors to securely
attach the safety bracket.
IMPORTANT:THISUNITMUSTBESECURETOTHEWALLTOHELPPREVENTTIPOVER.FOLLOW
THESEINSTRUCTIONSTOINSTALLTHEANTI‐TIPPINGSAFETYBRACKETPROVIDEDWITHTHIS
PRODUCT.
WARNING
Seriousorfatalcrushinginjuriescan
occurfromfurnituretipover.
Topreventtipover:
*Installtipoverrestraintprovided
*Placeheaviestitemsin
thelowest
drawers
*Unlessspecificallydesignedto
accommodate,donotsetTVsor
otherheavyobjectsonthetopofthis
product
*Neverallowchildrentoclimbor
hangondrawers,door,orshelves
*Neveropenmorethanone
draweratatime
Useoftipoverrestraintsmayonly
reduce,
butnoteliminatetherisk
oftipover.
OPTION1:Attachmentintoawallstud(preferredmethod)
Usingastudfinder,locateastudinth e wa ll.Place yourun itagainstthew all,withthesaf e tybracketaligned
inthislocatio n.Tomakedrivingthe screweasier,youcandrilla1/8"diameterpilot hole(3mm)throughthe
safetybracketintothestud.Drivethescrewthr o ughthe
safetybracketintothewallstud.Tightenthescre w
thatwasnotfullytight enedinstep11.
OPTION2:Attachmentintodrywall
Locateyou runitwheredesiredagainstawallandmarkthewallthroughthesafetybracket,thenmoveyour
unitaside.Dr illa3/16"diameterhole(5mm)intothewallboard.Tapthewallanchorint otheholeuntilitis
flush.Moveyourunitinto locationand fastenthewallbracket
to the wallanchorwiththescrew.Tightenthe
screwtha twasnotfully tig ht e nedinstep 11.
14c
14d
stud
wallboard
hole
14d
14c
(x1)
#A84050

32
ameriwoodhome.com
STEP25
cabinet member
roller
drawer runner
roller
Installthedrawersasshown.
Note:Thedrawerbracketholesareslotted.Drawer
frontscanbeadjustedbylooseningscrews,making
neededadjustmentsandretighteningscrews.

33
ameriwoodhome.com
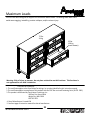
MaximumLoads
Warning:Riskofinjurytopersons‐donotplaceatelevisiononthisfurniture.Thisfurnitureis
notapprovedforusewithatelevision.
75lbs
34kg
CertificateofConformity
1.ThiscertificateappliestotheDor el Home Fur nishings,Inc.productidentifiedbythisinstructionmanual.
2.Thiscertificateappliestocom plian ceofthisproductwiththeCPSCBanonLe ad ‐ContainingPaint(16CFR1303).
3.Thisproductisdistributedby:DorelHomeFurnishings,Inc.
410EastFirst
StreetSouth
WrightCity,MO63390
636‐745‐3351
4.SiteofManufacture:CornwallON
5.Seefrontpag eofinstructionmanualfordateofmanufacture.
Thisunithasbeendesignedtosupportthemaximumloadsshown.Exceedingtheseloadlimits
couldcausesagging,instability,productcollapse,and/orseriousinjury.
35lbs
15.8kg
(eachdrawer)

34
ameriwoodhome.com
Registeryourproducttoreceivethefollowing:
*Newtrenddetails‐sneakpeekonwhat'snew
*Surveys‐haveavoicewithinourcommunity
*Exclusivedealsanddiscountcodes
*Quickandeasyreplacementpartservice
Toregisteryourproduct,visitameriwoodhome.com
Visityourlocalretailer'swebsite,rateyourpurchased
productandleaveussomefeedback!
Wewouldlike
toextendabig"ThankYou"toallof
ourcustomersfortakingthetimetoassemblethis
AmeriwoodHomeproduct,andtogiveusyour
valuablefeedback.

35
ameriwoodhome.com
CubiertaDelantera
Estelibrodeinstruccionescontieneinformación
IMPORTANTE
deseguridad.Porfavorleaymanténgalo
parareferenciaenelfuturo.
NoRegreseesteproducto!
Comuniqueseconnuestroamistosoequipodeservicioalclienteparaobtener
ayuda.
Llamenosal:1‐800‐489‐3351(Gratis)Lunes‐Viernes9am‐5pmCST
Visitar:
www.ameriwoodhome.com
PRECAUCION
Estemueblepuedevolcarseycausargravesheridasy/omuerte.
Anclarelmuebleaunpostedemaderaenlapared(siestoserequiere).
NoPermitaquelosniñosmontenelmueble.
Mantengalosartículosmáspesadosenloscajonesdeabajo.
ConsejosÚtiles(página2)
‐Abrasuartículoeneláreadondeustedplaneautilizarloparaevitarlevantarymoverlomenos
‐Identificar,ordenarycontarlaspiezasantesdeintentarensamblar
‐Lasclavijasdecompresiónsegolpeanconunmartillo
‐LasdiapositivasestánmarcadasconunaR(derecha)yL(izquierda)paralacolocacióncorrecta
‐
Asegúresedequesiempreesteelpuntolocaizadoenlapartesuperiordebloqueadordeleva
estevolteadohaciabordeexterior
‐Utilizartodoslosclavosparaelpaneldeatrasydistribuirlosporigual
‐Elpaneldeatrasdebeu tili zarseparaasegurarsedequelaunidadquedefijayfirme
‐Nouse
quimicasfuertesnilimpiad oresabrasivosenestearticulo
‐Nuncaempuje,tireniarrastrelosmuebles
AntesdeQueEmpieces(página3)
‐Leacuidadosamenteca dapasoysigaelordencorrecto
‐Separarycontartodassuspiezasyhardware
‐Désesuficienteespacioparaelproce sodeensamble
‐Tengalassiguientesherramientas:destornilladordecabezaplana,#2cabezaPhillips
Destornilladorymartillo
‐Precaución:Siusauntaladroelectrónicooundesto rnilladoreléctricoparaatornillar,
porfavorasegúre se
quedejedeatornillarcuandoeltonillosesteapretado.Fallarhacerestopuedecausarbarrereltornillo.
Sistemadefijarelbloqueodeleva(página3)
Estasistemadefijarelbloqueodelevaserausadoentodoelprocesoensamble.
Página7
Tengaencuentaquesuunidadpue decontenerpiezasadicionales
Español

36
ameriwoodhome.com
Español
Página8
Tendráquedarungolpesuavealconector(3)conunmartilloparainsertarlocompletamente.
Asegúresedequeelconectorestécolocadocomosemuestraantesdeempujarlodentrodelorificio.
Página9
Fijelostreselementosdelacajaizquierda(13a)alpanelizquierdo(A)conlostornillos(7)
comose
muestra.
Marcadoconun"L".
Página10
Fijelaparteposteriordelamoldura(H)alpanelizquierdo(A)conlosdostornillos(9)comosemuestra.
Nota:atornillaráenlaranuradelamolduratrasera(H).
Asegúresedequeelbordesuperiordelpanelizquierdo(A)yelde
lapartetrasera(H)esténalineados
entresí.
Página11
Tendráquedarungolpesuavealconector(3)conunmartilloparainsertarlocompletamente.
Asegúresedequeelconectorestécolocadocomosemuestraantesdeempujarlodentrodelorificio.
Página12
Conectelostreselementosdelacajaderecha (13b)
alpanelderecho(B)conlostornillos(7)comose
muestra.
Marcadoconun"R".
Página13
Fijelapartetraseradelamoldura(H)alpanelderecho(B)conlosdostornillos(9)comosemuestra.
Nota:atornillaráenlaranuradelamolduratrasera(H).
Asegúresedequeelborde
superiordelpanelderecho(B)yeldelapartetrasera(H)esténalineados
entresí.
Página14
Nota:Elpequeñoagujeropilotodelosmoldesdelanterosizquierdoyderecho(F&G)esunagujerode
referencia.Esteagujeroindicaelextremosuperiordelamoldura.
Página15
Presionelamolduradelantera
izquierda(F)contraelpanelizquierdo(A)paraquelospernosde
conexión(4)encajenenlosconectores(3).Gireeltornilloenelcentrodelconector(3)ensentido
horarioparabloquearla.

37
ameriwoodhome.com
Español
Aviso:Elpequeñoagujerodereferenciaestaráenelextremosuperiordelamoldura.
Gireeltornilloensentidohorarioparafijarlo.
Vistadesdeunextremo
Página16
Presionelamolduradelanteraderecha(G)contraelpanelderecho(B)paraquelospernosdeconexión
(4)encajenenlosconectores(3).Gire
eltornilloenelcentrodelconector(3)ensentidohorariopara
bloquearla.
Aviso:Elpequeñoagujerodereferenciaestaráenelextremosuperiordelamoldura.
Gireeltornilloensentidohorarioparafijarlo.
Vistadesdeunextremo
Página18
Noaprieteestetornillo.
Página19
Presionelosdosespaciadores(19)y
elpiedeplástico(18)enlaparteinferior(E)comosemuestra.
Puedequetengaquetocarcadaunoconunmartilloparainsertarconseguridad.
Página22
Condostornillos(9)porpie(17),fijeloscuatropies(17)alaparteinferior(E)comosemuestra.
Página23
¡IMPORTANTE!
ELPANELTRASEROESUNAPARTEESTRUCTURALDEESTAUNIDADYDEBEINSTALARSE
CORRECTAMENTE.
Conlaayudadeotrapersona,girelaunidadcomosemuestra.Coloqueelpaneltrasero(S)comose
muestra.Enjuagueelbordeinferiordelpaneltraseroconelbordedelaparteinferior(D).Asegúresede
quelaunidadescuadrada.Ladistanciadeesquinaaesquinadebeserigualalaquesemuestra.Fijeel
paneltraseroclavandodirectamenteenlosbordestraseroscomosemuestra.
Muescaenelpaneltrasero
Página24
Ajustelossoportesalasuperficieopuestadelospequeñosagujerosdedeslizamientodemetal.

38
ameriwoodhome.com
Español
Página26
Vaamontarseiscajones.Todossemontandelamismamanera.
Fijelosladosdelcajónalapartefrontaldelcajón(I)conlostornillos(8)comosemuestra.Asegúresede
quelaranuraenlosladosdelcajónestécentradaconlaranuradelapartefrontal
delcajón.Coloqueuna
abrazaderadecajón(K)encadapartefrontaldelcajón(I)comosemuestra.
Página31
Paramaterialesdemampostería,hormigónuotrosmaterialesdepared:
Consulteconsuferreteríalocalparaconocerlosanclajesadecuadosparafijarfirmementeelsoportede
seguridad.
IMPORTANTE:ESTAUNIDADDEBEESTAR
SEGURAALAPAREDPARAAYUDARAEVITARELVUELCO.SIGA
ESTASINSTRUCCIONESPARAINSTALARELSOPORTEDESEGURIDADANTIVUELCOSUMINISTRADOCON
ESTEPRODUCTO.
ADVERTENCIA
Puedenproducirselesionesporaplastamientogravesomortalesacausadelvuelcodelosmuebles.
Paraevitarelvuelco:
*Instaleeldispositivodeprevencióndelvuelco
proporcionado
*Coloquelosartículosmáspesadosenloscajonesmásbajos
*Amenosqueestéespecíficamentediseñadoparaalbergarlos,nocoloquetelevisoresuotrosobjetos
pesadosencimadeesteproducto
*Nuncapermitaquelosniñossubanosecuelguendeloscajones,puertasoestantes
*Nuncaabramás
deuncajónalavez
Elusodelasrestriccionesdevuelcosolopuedereducir,peronoeliminarelriesgodevuelco.
OPCIÓN1:Acoplamientoenunpernodepared(métodopreferido)
Medianteun buscadordevigas,ubiqueunpernoenlapared.Coloquelaunidadcontralapared,conel
soportedeseguridadalineadoenestaubicación.Parafacilitarlaconduccióndeltornillo, puedeperforar
unagujeropilotode1/8"(3mm)dediámetroatravésdelsoportedeseguridadenelperno,introducirel
tornilloatravésdelsoportedeseguridadenelpernodelaparedyapretarel
tornilloquenoestaba
totalmenteapretadoenelpaso11.
OPCIÓN2:Accesorioenlapareddeyeso
Localicesuunidaddondedeseeenunaparedymarquelaparedatravésdelsoportede seguridad,luego
muevasuunidadaunlado.Taladreunorificiode3/16"(5mm)dediámetroenelpaneldeyeso.
Introduzcaelanclajede
paredenelagujerohastaqueestéaras.Muevasuunidadhastaesepuntoy
sujeteelsoportedeparedalanclajedeparedconeltornillo.Aprieteeltornilloquenoesté
completamenteapretadoenelpaso11.

39
ameriwoodhome.com
Página32
Instaleloscajonescomosemuestra.
Nota:Losorificiosdelossoportesdelcajónestánranurados.Laspartesfrontalesdelcajónse
puedenajustaraflojandolostornillos,haciendolosajustesnecesariosyvolviendoaapretarlos
tornillos.
Página33
CARGAMAXIMA
Estaunidadhasidodiseñadaparasoportarlacargamáximaanotada.Elexcederestoslímitespuede
causarinestabilidad,colapsarsey/ocausarseriaslesiones.
ADVERTENCIA:Riesgodelesionesalaspersonas‐nocoloqueuntelevisorsobremuebles.Este
mueblenoestáaprobadoparasuusoconuntelevisor.
Página34
Registresuproductopararecibirlosiguiente:
*Detallesdenuevastendencias‐Vistazoalonuevo
*Encuestas‐alecsuvozentresucomunidad
*Códigosdeofertasydescuentosexclusivos
*Fácilyrápidoserviciodepartesderemplace
Pararegistrarsuproducto,visiteameriwoodhome.com
Clasificasiónde5estrellas
Visiteel
sitiowebdesutiendalocal,califiquesucomprado
ydenossuscomentarios!
Nosgustaríaenviarungran"Agradecimiento"atodosnuestrosclientesportomarseeltiempode
ensamblaresteproductodeAmeriwoodHome,ypordarnossusvaliososcomentarios.
Gracias
Español

40
ameriwoodhome.com
CouvertureAvant
CELIVRETD'INSTRUCTIONCONTIENTDESINFORMAT IONS
IMPORTANTES
SURLASÉCURITÉ.VEUILLEZLIRE
ETGARDERPOURUNERÉFÉRENCEFUTURE
Neretournezpasceproduit!
Contacteznotreéquipedeserviceàlaclientèleamicaled'abordpourobtenir
del'aide.
Appelez‐nous:
1‐800‐489‐3351(sansfrais)duLundiauVendredi de9hà 17hHeureCentrale
Visitez:
www.ameriwoodhome.com
ATTENTION
Lemeublepeutbascule retcauserdesblessuresgravesoulamort.
Ancrerlemeubleàuneplanchemuraledanslemur(siindiqué).
Nelaissezpaslesenfantsgrimpersurlemeuble.
Placezlesarticleslourdssurlesétagèresoudanslestiroirsinférieurs.
AstucesUtiles(page2)
‐Ouvrezvotrearticledanslazonequevousprévoyezdelegarderpourmoinsdelevagelourd
‐Identifier,trieretcompterlespiècesavantd'essayerd'assembler
‐LesgoujonsdecompressionsonttaraudésavecunMarteau
‐Lesglissièressontmarquéesd'unR(droit)etd'unL(gauche)pourunbonplacement
‐
Assurez‐voustoujoursdefairefacelapointesituésurlehautdelaSerruredeCameverslebordextérieur
‐Utilisertous lesclousfournispourlepanneauarrièreetlesrépartirégalement
‐Lepanneauarrièredo itêtreutilisépourvousassurerquevotreappareilestrobuste
‐N'utilisezpasde
produitschimiquesagressifsoudenettoyantsabrasifssurcetappareil
‐Nejamaispousser,tirer,oufaireglisservotremeuble
AvantdeCommencer(page3)
‐Lisezattentivementchaqueétapeetsuivezlebonordre
‐Séparezetcompteztoutesvospiècesetmatériaux
‐Donnez‐voussuffisammentdeplacepou r l'assemblage
‐Avoirlesoutilssuivants:tournevisà têteplate,#2tournevisPhillips,etMarteau
‐
Attention:Sivousutilisezuneperceuseélectriqueouuntournevisélectriquepourviss er,veillezàralentir
etarrêterlorsquelavisestbienserrée.Lenon‐respectdecetteconsignepeutendomm agerlavis.
SystèmedeFixationdeCame(page3)
CeSystèmedeFixationdeCameserautilisétoutaulongdel'assemblage
Page7
Notezquevotreappareilpeutcontenirdespiècessupplémentaires
Français

41
ameriwoodhome.com
Français
Page8
Vousdevreztapersurleconnecteur(3)avecunmarteaupourl'insérercomplètement.Assurez‐vous
queleconnecteurestpositionnécommeindiquéavantdel'enfoncer.
Page9
Attacheztroispiècesgauches(13a)surlepanneaugauche(A)avecdesvis(7)commeindiqué.
Marquéesavecun"L".
Page10
Attachezla
moulurearrière(H)surlepanneaugauche(A)avecdeuxvis(9)commeindiqué.
Remarque:Vousvisserezdansl'encochedelamoulurearrière(H).
Assurez‐vousquelebordsupérieurdupanneaugauche(A)etdelamoulurearrière(H)sontbien
alignés.
Page11
Vousdevreztapersurle
connecteur(3)avecunmarteaupourl'insérercomplètement.Assurez‐vous
queleconnecteurestpositionnécommeindiquéavantdel'enfoncer.
Page12
Attacheztroispiècesdroites(13b)surlepanneaudroit(B)avecdesvis(7)commeindiqué.
Marquéesavecun"R".
Page13
Attachezlamoulurearrière(H)surle
panneaudroit(B)avecdeuxvis(9)commeindiqué.
Remarque:Vousvisserezdansl'encochedelamoulurearrière(H).
Assurez‐vousquelebordsupérieurdupanneaudroit(B)etdelamoulurearrière(H)sontbienalignés.
Page14
Remarque:Lepetittroudeguidagesurlesmoulures
avantgaucheetdroite(FetG)estuntroude
référence.Cetrouindiquelalimitesupérieuredelam oulure.
Page15
Plaquezlamoulureavantgauche(F)contrelepanneaugauche(A)pourquelesraccordsdeconnexion
(4)engagentlesconnecteurs(3).Tournezlavisaucentredu
connecteur(3)danslesenshorairepour
verrouillerlaposition.
Remarque:Lepetittroudeguidageseraàlalimitesupérieuredelam oulure.
Tournezlavisdanslesenshorairepourverrouillerlaposition.
Vuedubout

42
ameriwoodhome.com
Français
Page16
Plaquezlamoulureavantdroite(G)contrelepanneaudroit(B)pourquelesraccordsdeconnexion(4)
engagentlesconnecteurs(3).Tournezlavisaucentreduconnecteur(3)danslesenshorairepour
verrouillerlaposition.
Remarque:Lepetittroudeguidageseraàlalimite
supérieuredelamoulure.
Tournezlavisdanslesenshorairepourverrouillerlaposition.
Vuefinale
Page18
Nepasserrercettevis.
Page19
Plaquezlesdeuxrondelles(19)etlepiedenplastique(18)surledessous(E),commeindiqué.Vous
aurezpeut‐êtrebesoind'unmarteaupourl'insérercorrectement.
Page22
Avecdeuxvis(9)parpied(17),attachezlesquatrepieds(17)surledessous(E),commeindiqué.
Page23
IMPORTANT !LEPANNEAUARRIÈREESTUNÉLÉMENTSTRUCTURELETDOITÊTREINSTALLÉ
CORRECTEMENT.
Avecl'aided'uneautrepersonne,tournezlemeublecommeindiqué.Positionnezlepanneauarrière(S)
commeindiqué.
Alignezlebordinférieurdupanneauarrièreaveclebordinférieurdumeuble(D).
Assurez‐vousquel'unitésoitcarrée.Ladistanced'unangleàl'autredoitêtreégale,commeindiqué.
Attachezlepanneauarrièreenleclouantsurlesbordsarrière,commeindiqué.
Encochesurlepanneauarrière
Page24
Fixezlessupportsàlasurfaceopposéedespetits trousdeglissièreenmétal.

43
ameriwoodhome.com
Français
Page26
Vousallezassemblersixtiroirs.Ilss'assemblenttousdelamêmemanière.
Attachezlescôtésdutiroiràlafaceavantdutiroir(I)avecdesvis(8)commeindiqué.Assurez‐vousque
lesencochesàl'intérieurdesparoisdutiroirsontalignéesavecl'encochedelafaceavant.Attachez
un
renfortdetiroir(K)àchaquefaceavant(I)commeindiqué.
Page31
Pourlamaçonnerie,lebétonetlesautresmatériauxmuraux:
Consultezvotredistributeurlocalpourobtenirlesfixationsadaptéesafindesécuriservotreinstallation.
IMPORTANT:CEMEUBLEDOITÊTREFIXEAUMURPOURÉVITERLE
BASCULEMENT.SUIVEZCES
INSTRUCTIONSPOURINSTALLERLESYSTÈMEDESÉCURITÉANTIBASCULEMENTFOURNIAVECCE
PRODUIT.
AVERTISSEMENT
Desblessuresgravesoumortellespeuventêtreoccasionnéesparlebasculementd'unmeuble.
Pouréviterlebasculement:
*Installezlesystèmeantibasculementfourni
*Placezlesobjetslespluslourdsdanslestiroirsles
plusbas
*Nepasinstallerdetélévisionouautresobjetslourdssurceproduitsicelui‐cin'estpasprévupourcette
utilisation
*N'autorisezjamaisunenfantàgrimperous'agripperauxtiroirs,portesouétagères
*N'ouvrezjamaisplusd'untiroiràlafois
L'utilisationdusystèmedefixationréduit
maisn'éliminepaslerisquedebasculement.
OPTION1:Fixationàunpoteaumural( méthoderecomm andée)
Avecundétecteurdemontants,localisezunpoteaumural.Placezlemeublecontrelemur,enalignantle
systèmedefixationaveclemontant.Pourfaciliterl'insertiondelavis,vouspouvezperceruntrou
de
guidagede1/8''(3mm)danslemuràtraverslafixation.Insérezlavisdanslafixationetlepoteaumural.
Serrezlavisquin'avaitpasétécomplètementserréeàl'étape11.
OPTION2:Fixationsurunecloisonsèche
Placezvotremeublecontrelemuràl'endroit
souhaitéetmarquezlemuràtraverslafixationdesécurité,
puisdéplacezlemeuble.Percezuntroude3/16''(5mm)danslemur.Insérezl'ancragemuralpour
l'ajuster.Replacezvotremeubleetattachez lafixationàl'ancragemuralaveclavis.Serrezlavisqui
n'avaitpasétécomplètement
serréeàl'étape11.
Page32
Installezlestiroirscommeindiqué.
Remarque:Lestrousdesfixationsdestiroirssontemboîtés.Lesfacesavantdestiroirspeuventêtre
ajustésendesserrantlesvis,ajustantselonlesbesoinsetresserrantlesvis.

44
ameriwoodhome.com
Page33
CHARGESMAXIMALES
Cemeubleaétéconçupoursupporterleschargesmaximalesindiquées.Enexcédantceslimitesde
charge,lemeublepourraitdevenirinstable,s'effondrer,et/oucauserdesblessuresgraves.
AVERTISSEMENT:Risquedeblessurecorporelle‐nepasplacerunetélévisionsurcemeuble.Cemeuble
n'estpasapprouvépourune
utilisationavecunetélévision.
Page34
Enregistrezvotreproduitpourrecevoirlesélémentssuivantes:
*Détailssurlesnouvellestendances‐unaperçusurlesnouveautés
*Sondages‐avoirunevoixauseindenotrecommunauté
*Offresexclusivesetcodespromo
*Servicedepiècesderechangerapideetfacile
Pourenregistrervotre
produit,visitezameriwoodhome.com
5Étoiles
VisitezlesiteWebdevotredétaillantlocal,évaluezvotreproduit
achetéetlaissez‐nousquelquescommentaires!
Noustenonsàoffrirungrand"Merci"àtousnosclientspouravoirprisletempsd'assemblerceproduit
"AmeriwoodHome",etdenousdonnervoscommentairesprécieux.
Merci
Français
Transcripción de documentos
5319340EBL (Andover Oak) 5319341EBL (Magnolia Oak) 6 Drawer Dresser B345319000EBL0 Date of Purchase ___ / ___ / ___ Lot Number: THIS INSTRUCTION BOOKLET CONTAINS IMPORTANT SAFETY INFORMATION. PLEASE READ AND KEEP FOR FUTURE REFERENCE. Do Not Return This Product! Contact our customer service team for help first. Call: 1‐800‐489‐3351 (toll free) Monday‐Friday 9am ‐ 5pm CST Visit: www.ameriwoodhome.com WARNING ‐ Unit can tip over causing severe injury or death. ‐ Anchor unit to stud in wall (if instructed to). ‐ Do Not allow children to climb on unit. ‐ Put heavy items on lower shelves or drawers. Easy Tough Assembly Difficulty Meter Follow Ameriwood Home You Tube Contact Us! Do NOT return this product! Contact our friendly customer service team first for help. Assembly Tips Call us! 1‐800‐489‐3351 Monday‐Friday 9am ‐ 5pm CST Visit ameriwoodhome.com to view the limited warranty valid in the U.S. and Canada. You Tube Helpful Hints PEOPLE NEEDED FOR ASSEMBLY: 1‐2 ESTIMATED ASSEMBLY TIME: 1 HOUR ‐ Open your item in the area you plan to keep it to avoid excessive heavy lifting. ‐ Identify, sort and count the parts before attempting assembly. ‐ Compression dowels are lightly tapped in with a hammer. ‐ Slides are labeled with a R (right) and L (left) for proper placement. ‐ Make sure to always face the point on the top of the Cam Lock towards the outer edge. ‐ Use all the nails provided for the back panel and spread them out equally. ‐ Back panel must be used to make sure your unit is sturdy. ‐ Do NOT use harsh chemicals or abrasive cleaners on this item. ‐ Never push, pull, or drag your furniture. ameriwoodhome.com 2 You Tube k Quic bly m Asse Tip Before You Start Read through each step carefully and follow the proper order Separate and count all your parts and hardware Give yourself enough room for the assembly process Have the following tools: Flat Head Screwdriver, #2 Phillips Head Screwdriver and Hammer Caution: If using a power drill or power screwdriver for screwing, please be aware to slow down and stop when screw is tight. Failure to do so may result in stripping the screw. Cam Lock Fastening System This Cam Lock Fastening System will be used throughout the assembly process. 1 2 3 4 ameriwoodhome.com 3 You Tube Board Identification 5319340EBL (Andover Oak) Parts List C B A Left Panel 35319340010 Right Panel 35319340020 D Top 35319340040 Partition 35319340030 E F Bottom 35319340050 Left Front Molding 35319340060 I x6 Drawer Front 35319340090 J Right Front Molding 35319340070 x2 Rear Molding 35319340080 DWR SIDE K x6 Drawer Brace 35319000110 x6 Drawer Bottom 35319331100 ameriwoodhome.com H G 4 x12 Drawer Side 39991167346200C You Tube Board Identification 5319341EBL (Magnolia Oak) Parts List C A B Left Panel 35319341010 Right Panel 35319341020 D Top 35319341040 Partition 35319341030 E F Bottom 35319341050 Right Front Molding 35319341070 Left Front Molding 35319341060 I x6 Drawer Front 35319341090 G J x2 Rear Molding 35319341080 K x6 Drawer Brace 35319000110 x6 Drawer Bottom 35319331100 ameriwoodhome.com H 5 x12 Drawer Side 39991167346200C You Tube Board Identification Not actual size S DWR BACK x6 Drawer Back 39991167056150B Back Panel K531900000 This piece is paperboard construction. It is not made from wood, but is required for the assembly of your unit. D B S G Drawer sides, and drawer back are labeled with the part description. DWR SIDE DWR BACK C J E I A H DWR SIDE F ameriwoodhome.com K 6 You Tube Note that your unit may contain extra hardware Part List 2 3 Actual Size 1 (x18) #A22620 cam lock 7 5 4 6 (x4) (x3) (x18) (x4) #A21660 #A22610 #A22900 (white) #A22910 #A22920 (black) cam bolt connector bolt wood dowel connector 8 (x60) (x48) #A11080 #A12120 7/16" flat head 7/16" pan head 9 10 (x12) #A12930 1‐1/8" pan head Not Actual Size 13a Left Cabinet Member 13b (x36) #A21970 drive fastener 14c 14a 13c Left Drawer Member 13d Right Drawer Member (x6) #A56750 (black) #A56770 (linen) Drawer Slide Kit ameriwoodhome.com 11 (x4) #A44410 (Andover Oak) #A44420 (Magnolia Oak) foot 17 Right Cabinet Member (x6) #A23030 confirmat screw 14d 14b (x1) #A84050 Safety Bracket Kit 7 (x12) #A17030 5/16" bolt 12 (x32) #A21110 nail 19 (x2) 18 #A43490 (black) #A43495 (white) (x1) #A43105 (black) spacer #A43106 (white) plastic foot 15 (x12) #A54520 Drawer Bracket 16 (x6) #A50408 handle You Tube STEP 1 3 5 Quick Assembly Tip 1 (x2) #A22620 (x2) (x1) #A22900 (white) #A21660 #A22920 (black) Proper orientation of CAM LOCK 1 3 A 3 5 ameriwoodhome.com 8 You will need to tap the connector (3) with a hammer to fully insert. Be sure the connector is positioned as shown before pushing into hole. STEP 2 13a 7 Left Cabinet Member (x3) #A56750 (black) #A56770 (linen) (x9) #A11080 Attach three left cabinet members (13a) to the left panel (A) with screws (7) as shown. A Marked with a "L". 7 13a ameriwoodhome.com 9 STEP 3 9 (x2) #A12930 Attach the rear molding (H) to the left panel (A) with two screws (9) as shown. Note: You will screw into the groove of the rear molding (H). 9 Be sure the top edge of the left panel (A) and rear molding (H) are flush with each other. 9 A H ameriwoodhome.com 10 STEP 4 3 Quick 5 Assembly 1 (x2) #A22620 Tip Proper orientation of CAM LOCK (x2) (x1) #A22900 (white) #A21660 #A22920 (black) 1 3 B 3 You will need to tap the connector (3) with a hammer to fully insert. Be sure the connector is positioned as shown before pushing into hole. ameriwoodhome.com 5 11 STEP 5 7 13b Right Cabinet Member (x3) #A56750 (black) #A56770 (linen) (x9) #A11080 Attach three right cabinet members (13b) to the right panel (B) with screws (7) as shown. B 7 Marked with a "R". 13b ameriwoodhome.com 12 STEP 6 9 (x2) #A12930 Attach the rear molding (H) to the right panel (B) with two screws (9) as shown. Note: You will screw into the groove of the rear molding (H). 9 Be sure the top edge of the right panel (B) and rear molding (H) are flush with each other. 9 B H ameriwoodhome.com 13 STEP 7 4 (x4) #A22910 4 4 4 F G 4 Note: The small pilot hole in the left and right front moldings (F&G) is a reference hole. This hole indicates the top end of the molding. ameriwoodhome.com 14 STEP 8 Press the left front molding (F) against the left panel (A) so the connector bolts (4) engage the connectors (3). Turn the screw in the center of the connector (3) clockwise to lock in place. Notice: Small reference hole will be at the top end of the molding. F A 3 Turn the screw clockwise to lock in place. ameriwoodhome.com end view 15 * raw edges are shaded STEP 9 Press the right front molding (G) against the right panel (B) so the connector bolts (4) engage the connectors (3). Turn the screw in the center of the connector (3) clockwise to lock in place. Notice: Small reference hole will be at the top end of the molding. G B 3 Turn the screw clockwise to lock in place. end view ameriwoodhome.com 16 * raw edges are shaded STEP 10 5 1 13a Left Cabinet Member 7 13b Right Cabinet Member (x2) #A22620 (x1) #A21660 (x3) #A56750 (black) #A56770 (linen) (x18) #A11080 5 1 C left surface C right surface Marked with a "L". Marked with a "R". 13b 13a finished edge 7 ameriwoodhome.com 17 7 STEP 11 14a 2 14b (x6) #A22610 (x1) #A84050 14b 2 Do not tighten this screw 14a 2 2 2 D 2 2 ameriwoodhome.com 18 STEP 12 18 19 (x1) #A43105 (black) #A43106 (white) (x2) #A43490 (black) #A43495 (white) Press the two spacers (19) and plastic foot (18) into the bottom (E) as shown. You may need to tap each one with a hammer to securely insert. 18 19 19 E ameriwoodhome.com 19 STEP 13 6 (x6) #A23030 A 6 C 6 6 B E 6 6 6 ameriwoodhome.com 20 STEP 14 UNLOCK LOCK D A C B ameriwoodhome.com 21 STEP 15 9 (x4) #A44410 (Andover oak) #A44420 (Magnolia Oak) 17 (x8) #A12930 Using two screws (9) per foot (17), attach the four feet (17) to the bottom (E) as shown. 17 9 17 E 9 17 9 17 9 ameriwoodhome.com 22 STEP 16 12 (x32) #A21110 IMPORTANT! THE BACK PANEL IS A STRUCTURAL PART OF THIS UNIT AND MUST BE INSTALLED PROPERLY. With the help of another person, turn the unit over as shown. Position the back panel (S) as shown. Flush the bottom edge of the back panel with the edge of the bottom (D). Assure that the unit is square. Distance from corner to corner must be equal as shown. Attach the back panel by nailing straight into back edges as shown. 12 notch in back panel S ameriwoodhome.com 23 T STEP 17 15 8 (x24) #A12120 (x12) #A54520 DWR SIDE 15 DWR SIDE x6 15 x6 8 8 8 8 Fasten the brackets to the opposite surface of the small metal slide holes. ameriwoodhome.com 24 STEP 18 1 (x12) #A22620 Quick 2 Assembly Tip (x12) #A22610 Proper orientation of CAM LOCK 2 I 1 K x6 ameriwoodhome.com 25 x6 STEP 19 8 UNLOCK (x24) #A12120 LOCK You will be assembling six drawers. They all assemble in the same manner. Attach the drawer sides to the Drawer Front (I) with screws (8) as shown. Be sure the groove in the drawer sides are centered with the groove in the drawer front. Attach one drawer brace (K) to each drawer front (I) as shown. 8 DWR SIDE 8 K DWR SIDE I x6 ameriwoodhome.com 26 STEP 20 unfinished surface J K DWR SIDE I x6 ameriwoodhome.com 27 DWR SIDE STEP 21 10 10 (x36) #A21970 10 10 DWR SIDE DWR BACK DWR SIDE x6 ameriwoodhome.com 28 STEP 22 7 (x24) #A11080 13c Left Drawer Member 13d Right Drawer Member (x6) #A56750 (black) #A56770 (linen) DWR SIDE 7 13c DWR SIDE Marked with a "L". 7 x6 13d ameriwoodhome.com Marked with a "R". 29 STEP 23 11 (x12) #A17030 16 (x6) #A50408 11 16 x6 ameriwoodhome.com 30 STEP 24 For Masonry, Concrete, or other wall materials: Consult your local hardware store for appropriate anchors to securely attach the safety bracket. 14c 14d (x1) #A84050 IMPORTANT: THIS UNIT MUST BE SECURE TO THE WALL TO HELP PREVENT TIPOVER. FOLLOW THESE INSTRUCTIONS TO INSTALL THE ANTI‐TIPPING SAFETY BRACKET PROVIDED WITH THIS PRODUCT. WARNING Serious or fatal crushing injuries can occur from furniture tipover. To prevent tipover: * Install tipover restraint provided * Place heaviest items in the lowest drawers * Unless specifically designed to accommodate, do not set TVs or other heavy objects on the top of this product * Never allow children to climb or hang on drawers, door, or shelves * Never open more than one drawer at a time Use of tipover restraints may only reduce, but not eliminate the risk of tipover. hole stud 14d 14c wallboard OPTION 1: Attachment into a wall stud (preferred method) Using a stud finder, locate a stud in the wall. Place your unit against the wall, with the safety bracket aligned in this location. To make driving the screw easier, you can drill a 1/8" diameter pilot hole (3mm) through the safety bracket into the stud. Drive the screw through the safety bracket into the wall stud. Tighten the screw that was not fully tightened in step 11. OPTION 2: Attachment into drywall Locate your unit where desired against a wall and mark the wall through the safety bracket, then move your unit aside. Drill a 3/16" diameter hole (5mm) into the wallboard. Tap the wall anchor into the hole until it is flush. Move your unit into location and fasten the wall bracket to the wall anchor with the screw. Tighten the screw that was not fully tightened in step 11. ameriwoodhome.com 31 STEP 25 Install the drawers as shown. Note: The drawer bracket holes are slotted. Drawer fronts can be adjusted by loosening screws, making needed adjustments and retightening screws. cabinet member roller ameriwoodhome.com 32 roller drawer runner Maximum Loads This unit has been designed to support the maximum loads shown. Exceeding these load limits could cause sagging, instability, product collapse, and/or serious injury. 75 lbs 34 kg 35 lbs 15.8 kg (each drawer) Warning: Risk of injury to persons ‐ do not place a television on this furniture. This furniture is not approved for use with a television. Certificate of Conformity 1. This certificate applies to the Dorel Home Furnishings, Inc. product identified by this instruction manual. 2. This certificate applies to compliance of this product with the CPSC Ban on Lead‐Containing Paint (16 CFR 1303). 3. This product is distributed by: Dorel Home Furnishings, Inc. 410 East First Street South Wright City, MO 63390 636‐745‐3351 4. Site of Manufacture: Cornwall ON 5. See front page of instruction manual for date of manufacture. ameriwoodhome.com 33 Register your product to receive the following: * New trend details ‐ sneak peek on what's new * Surveys ‐ have a voice within our community * Exclusive deals and discount codes * Quick and easy replacement part service To register your product, visit ameriwoodhome.com Visit your local retailer's website, rate your purchased product and leave us some feedback! We would like to extend a big "Thank You" to all of our customers for taking the time to assemble this Ameriwood Home product, and to give us your valuable feedback. ameriwoodhome.com 34 Español Cubierta Delantera Este libro de instrucciones contiene información IMPORTANTE de seguridad. Por favor lea y manténgalo para referencia en el futuro. No Regrese este producto! Comuniquese con nuestro amistoso equipo de servicio al cliente para obtener ayuda. Llamenos al: 1‐800‐489‐3351 (Gratis) Lunes ‐ Viernes 9am ‐ 5pm CST Visitar: www.ameriwoodhome.com PRECAUCION Este mueble puede volcarse y causar graves heridas y/o muerte. Anclar el mueble a un poste de madera en la pared (si esto se requiere). No Permita que los niños monten el mueble. Mantenga los artículos más pesados en los cajones de abajo. Consejos Útiles (página 2) ‐ Abra su artículo en el área donde usted planea utilizarlo para evitar levantar y moverlo menos ‐ Identificar, ordenar y contar las piezas antes de intentar ensamblar ‐ Las clavijas de compresión se golpean con un martillo ‐ Las diapositivas están marcadas con una R (derecha) y L (izquierda) para la colocación correcta ‐ Asegúrese de que siempre este el punto locaizado en la parte superior de bloqueador de leva este volteadohacia borde exterior ‐ Utilizar todos los clavos para el panel de atras y distribuirlos por igual ‐ El panel de atras debe utilizarse para asegurarse de que la unidad quede fija y firme ‐ No use quimicas fuertes ni limpiadores abrasivos en este articulo ‐ Nunca empuje, tire ni arrastre los muebles Antes de Que Empieces (página 3) ‐Lea cuidadosamente cada paso y siga el orden correcto ‐Separar y contar todas sus piezas y hardware ‐Dése suficiente espacio para el proceso de ensamble ‐Tenga las siguientes herramientas: destornillador de cabeza plana, #2 cabeza Phillips Destornillador y martillo ‐Precaución: Si usa un taladro electrónico o un destornillador eléctrico para atornillar, por favor asegúrese que deje de atornillar cuando el tonillos este apretado. Fallar hacer esto puede causar barrer el tornillo. Sistema de fijar el bloqueo de leva (página 3) Esta sistema de fijar el bloqueo de leva sera usado en todo el proceso ensamble. Página 7 Tenga en cuenta que su unidad puede contener piezas adicionales ameriwoodhome.com 35 Español Página 8 Tendrá que dar un golpe suave al conector (3) con un martillo para insertarlo completamente. Asegúrese de que el conector esté colocado como se muestra antes de empujarlo dentro del orificio. Página 9 Fije los tres elementos de la caja izquierda (13a) al panel izquierdo (A) con los tornillos (7) como se muestra. Marcado con un "L". Página 10 Fije la parte posterior de la moldura (H) al panel izquierdo (A) con los dos tornillos (9) como se muestra. Nota: atornillará en la ranura de la moldura trasera (H). Asegúrese de que el borde superior del panel izquierdo (A) y el de la parte trasera (H) estén alineados entre sí. Página 11 Tendrá que dar un golpe suave al conector (3) con un martillo para insertarlo completamente. Asegúrese de que el conector esté colocado como se muestra antes de empujarlo dentro del orificio. Página 12 Conecte los tres elementos de la caja derecha (13b) al panel derecho (B) con los tornillos (7) como se muestra. Marcado con un "R". Página 13 Fije la parte trasera de la moldura (H) al panel derecho (B) con los dos tornillos (9) como se muestra. Nota: atornillará en la ranura de la moldura trasera (H). Asegúrese de que el borde superior del panel derecho (B) y el de la parte trasera (H) estén alineados entre sí. Página 14 Nota: El pequeño agujero piloto de los moldes delanteros izquierdo y derecho (F&G) es un agujero de referencia. Este agujero indica el extremo superior de la moldura. Página 15 Presione la moldura delantera izquierda (F) contra el panel izquierdo (A) para que los pernos de conexión (4) encajen en los conectores (3). Gire el tornillo en el centro del conector (3) en sentido horario para bloquearla. ameriwoodhome.com 36 Español Aviso: El pequeño agujero de referencia estará en el extremo superior de la moldura. Gire el tornillo en sentido horario para fijarlo. Vista desde un extremo Página 16 Presione la moldura delantera derecha (G) contra el panel derecho (B) para que los pernos de conexión (4) encajen en los conectores (3). Gire el tornillo en el centro del conector (3) en sentido horario para bloquearla. Aviso: El pequeño agujero de referencia estará en el extremo superior de la moldura. Gire el tornillo en sentido horario para fijarlo. Vista desde un extremo Página 18 No apriete este tornillo. Página 19 Presione los dos espaciadores (19) y el pie de plástico (18) en la parte inferior (E) como se muestra. Puede que tenga que tocar cada uno con un martillo para insertar con seguridad. Página 22 Con dos tornillos (9) por pie (17), fije los cuatro pies (17) a la parte inferior (E) como se muestra. Página 23 ¡IMPORTANTE! EL PANEL TRASERO ES UNA PARTE ESTRUCTURAL DE ESTA UNIDAD Y DEBE INSTALARSE CORRECTAMENTE. Con la ayuda de otra persona, gire la unidad como se muestra. Coloque el panel trasero (S) como se muestra. Enjuague el borde inferior del panel trasero con el borde de la parte inferior (D). Asegúrese de que la unidad es cuadrada. La distancia de esquina a esquina debe ser igual a la que se muestra. Fije el panel trasero clavando directamente en los bordes traseros como se muestra. Muesca en el panel trasero Página 24 Ajuste los soportes a la superficie opuesta de los pequeños agujeros de deslizamiento de metal. ameriwoodhome.com 37 Español Página 26 Va a montar seis cajones. Todos se montan de la misma manera. Fije los lados del cajón a la parte frontal del cajón (I) con los tornillos (8) como se muestra. Asegúrese de que la ranura en los lados del cajón esté centrada con la ranura de la parte frontal del cajón. Coloque una abrazadera de cajón (K) en cada parte frontal del cajón (I) como se muestra. Página 31 Para materiales de mampostería, hormigón u otros materiales de pared: Consulte con su ferretería local para conocer los anclajes adecuados para fijar firmemente el soporte de seguridad. IMPORTANTE: ESTA UNIDAD DEBE ESTAR SEGURA A LA PARED PARA AYUDAR A EVITAR EL VUELCO. SIGA ESTAS INSTRUCCIONES PARA INSTALAR EL SOPORTE DE SEGURIDAD ANTIVUELCO SUMINISTRADO CON ESTE PRODUCTO. ADVERTENCIA Pueden producirse lesiones por aplastamiento graves o mortales a causa del vuelco de los muebles. Para evitar el vuelco: * Instale el dispositivo de prevención del vuelco proporcionado * Coloque los artículos más pesados en los cajones más bajos * A menos que esté específicamente diseñado para albergarlos, no coloque televisores u otros objetos pesados encima de este producto * Nunca permita que los niños suban o se cuelguen de los cajones, puertas o estantes * Nunca abra más de un cajón a la vez El uso de las restricciones de vuelco solo puede reducir, pero no eliminar el riesgo de vuelco. OPCIÓN 1: Acoplamiento en un perno de pared (método preferido) Mediante un buscador de vigas, ubique un perno en la pared. Coloque la unidad contra la pared, con el soporte de seguridad alineado en esta ubicación. Para facilitar la conducción del tornillo, puede perforar un agujero piloto de 1/8" (3 mm) de diámetro a través del soporte de seguridad en el perno, introducir el tornillo a través del soporte de seguridad en el perno de la pared y apretar el tornillo que no estaba totalmente apretado en el paso 11. OPCIÓN 2: Accesorio en la pared de yeso Localice su unidad donde desee en una pared y marque la pared a través del soporte de seguridad, luego mueva su unidad a un lado. Taladre un orificio de 3/16" (5 mm) de diámetro en el panel de yeso. Introduzca el anclaje de pared en el agujero hasta que esté a ras. Mueva su unidad hasta ese punto y sujete el soporte de pared al anclaje de pared con el tornillo. Apriete el tornillo que no esté completamente apretado en el paso 11. ameriwoodhome.com 38 Español Página 32 Instale los cajones como se muestra. Nota: Los orificios de los soportes del cajón están ranurados. Las partes frontales del cajón se pueden ajustar aflojando los tornillos, haciendo los ajustes necesarios y volviendo a apretar los tornillos. Página 33 CARGA MAXIMA Esta unidad ha sido diseñada para soportar la carga máxima anotada. El exceder estos límites puede causar inestabilidad, colapsarse y/o causar serias lesiones. ADVERTENCIA: Riesgo de lesiones a las personas ‐ no coloque un televisor sobre muebles. Este mueble no está aprobado para su uso con un televisor. Página 34 Registre su producto para recibir lo siguiente: * Detalles de nuevas tendencias ‐ Vistazo a lo nuevo * Encuestas ‐ alec su voz entre su comunidad * Códigos de ofertas y descuentos exclusivos * Fácil y rápido servicio de partes de remplace Para registrar su producto, visite ameriwoodhome.com Clasificasión de 5 estrellas Visite el sitio web de su tienda local, califique su comprado y denos sus comentarios! Nos gustaría enviar un gran "Agradecimiento" a todos nuestros clientes por tomarse el tiempo de ensamblar este producto de Ameriwood Home, y por darnos sus valiosos comentarios. Gracias ameriwoodhome.com 39 Français Couverture Avant CE LIVRET D'INSTRUCTION CONTIENT DES INFORMATIONS IMPORTANTES SUR LA SÉCURITÉ. VEUILLEZ LIRE ET GARDER POUR UNE RÉFÉRENCE FUTURE Ne retournez pas ce produit! Contactez notre équipe de service à la clientèle amicale d'abord pour obtenir de l'aide. Appelez‐nous: 1‐800‐489‐3351 (sans frais) du Lundi au Vendredi de 9h à 17h Heure Centrale Visitez: www.ameriwoodhome.com ATTENTION Le meuble peut basculer et causer des blessures graves ou la mort. Ancrer le meuble à une planche murale dans le mur (si indiqué). Ne laissez pas les enfants grimper sur le meuble. Placez les articles lourds sur les étagères ou dans les tiroirs inférieurs. Astuces Utiles (page 2) ‐Ouvrez votre article dans la zone que vous prévoyez de le garder pour moins de levage lourd ‐Identifier, trier et compter les pièces avant d'essayer d'assembler ‐Les goujons de compression sont taraudés avec un Marteau ‐Les glissières sont marquées d'un R (droit) et d'un L (gauche) pour un bon placement ‐Assurez‐vous toujours de faire face la pointe situé sur le haut de la Serrure de Came vers le bord extérieur ‐Utiliser tous les clous fournis pour le panneau arrière et les répartir également ‐Le panneau arrière doit être utilisé pour vous assurer que votre appareil est robuste ‐N'utilisez pas de produits chimiques agressifs ou de nettoyants abrasifs sur cet appareil ‐Ne jamais pousser, tirer, ou faire glisser votre meuble Avant de Commencer (page 3) ‐Lisez attentivement chaque étape et suivez le bon ordre ‐Séparez et comptez toutes vos pièces et matériaux ‐Donnez‐vous suffisamment de place pour l'assemblage ‐Avoir les outils suivants: tournevis à tête plate, #2 tournevis Phillips, et Marteau ‐Attention: Si vous utilisez une perceuse électrique ou un tournevis électrique pour visser, veillez à ralentir et arrêter lorsque la vis est bien serrée. Le non‐respect de cette consigne peut endommager la vis. Système de Fixation de Came (page 3) Ce Système de Fixation de Came sera utilisé tout au long de l'assemblage Page 7 Notez que votre appareil peut contenir des pièces supplémentaires ameriwoodhome.com 40 Français Page 8 Vous devrez taper sur le connecteur (3) avec un marteau pour l'insérer complètement. Assurez‐vous que le connecteur est positionné comme indiqué avant de l'enfoncer. Page 9 Attachez trois pièces gauches (13a) sur le panneau gauche (A) avec des vis (7) comme indiqué. Marquées avec un "L". Page 10 Attachez la moulure arrière (H) sur le panneau gauche (A) avec deux vis (9) comme indiqué. Remarque : Vous visserez dans l'encoche de la moulure arrière (H). Assurez‐vous que le bord supérieur du panneau gauche (A) et de la moulure arrière (H) sont bien alignés. Page 11 Vous devrez taper sur le connecteur (3) avec un marteau pour l'insérer complètement. Assurez‐vous que le connecteur est positionné comme indiqué avant de l'enfoncer. Page 12 Attachez trois pièces droites (13 b) sur le panneau droit (B) avec des vis (7) comme indiqué. Marquées avec un "R". Page 13 Attachez la moulure arrière (H) sur le panneau droit (B) avec deux vis (9) comme indiqué. Remarque : Vous visserez dans l'encoche de la moulure arrière (H). Assurez‐vous que le bord supérieur du panneau droit (B) et de la moulure arrière (H) sont bien alignés. Page 14 Remarque : Le petit trou de guidage sur les moulures avant gauche et droite (F et G) est un trou de référence. Ce trou indique la limite supérieure de la moulure. Page 15 Plaquez la moulure avant gauche (F) contre le panneau gauche (A) pour que les raccords de connexion (4) engagent les connecteurs (3). Tournez la vis au centre du connecteur (3) dans le sens horaire pour verrouiller la position. Remarque : Le petit trou de guidage sera à la limite supérieure de la moulure. Tournez la vis dans le sens horaire pour verrouiller la position. Vue du bout ameriwoodhome.com 41 Français Page 16 Plaquez la moulure avant droite (G) contre le panneau droit (B) pour que les raccords de connexion (4) engagent les connecteurs (3). Tournez la vis au centre du connecteur (3) dans le sens horaire pour verrouiller la position. Remarque : Le petit trou de guidage sera à la limite supérieure de la moulure. Tournez la vis dans le sens horaire pour verrouiller la position. Vue finale Page 18 Ne pas serrer cette vis. Page 19 Plaquez les deux rondelles (19) et le pied en plastique (18) sur le dessous (E), comme indiqué. Vous aurez peut‐être besoin d'un marteau pour l'insérer correctement. Page 22 Avec deux vis (9) par pied (17), attachez les quatre pieds (17) sur le dessous (E), comme indiqué. Page 23 IMPORTANT ! LE PANNEAU ARRIÈRE EST UN ÉLÉMENT STRUCTUREL ET DOIT ÊTRE INSTALLÉ CORRECTEMENT. Avec l'aide d'une autre personne, tournez le meuble comme indiqué. Positionnez le panneau arrière (S) comme indiqué. Alignez le bord inférieur du panneau arrière avec le bord inférieur du meuble (D). Assurez‐vous que l'unité soit carrée. La distance d'un angle à l'autre doit être égale, comme indiqué. Attachez le panneau arrière en le clouant sur les bords arrière, comme indiqué. Encoche sur le panneau arrière Page 24 Fixez les supports à la surface opposée des petits trous de glissière en métal. ameriwoodhome.com 42 Français Page 26 Vous allez assembler six tiroirs. Ils s'assemblent tous de la même manière. Attachez les côtés du tiroir à la face avant du tiroir (I) avec des vis (8) comme indiqué. Assurez‐vous que les encoches à l'intérieur des parois du tiroir sont alignées avec l'encoche de la face avant. Attachez un renfort de tiroir (K) à chaque face avant (I) comme indiqué. Page 31 Pour la maçonnerie, le béton et les autres matériaux muraux : Consultez votre distributeur local pour obtenir les fixations adaptées afin de sécuriser votre installation. IMPORTANT : CE MEUBLE DOIT ÊTRE FIXE AU MUR POUR ÉVITER LE BASCULEMENT. SUIVEZ CES INSTRUCTIONS POUR INSTALLER LE SYSTÈME DE SÉCURITÉ ANTI BASCULEMENT FOURNI AVEC CE PRODUIT. AVERTISSEMENT Des blessures graves ou mortelles peuvent être occasionnées par le basculement d'un meuble. Pour éviter le basculement : * Installez le système anti basculement fourni * Placez les objets les plus lourds dans les tiroirs les plus bas * Ne pas installer de télévision ou autres objets lourds sur ce produit si celui‐ci n'est pas prévu pour cette utilisation * N'autorisez jamais un enfant à grimper ou s'agripper aux tiroirs, portes ou étagères * N'ouvrez jamais plus d'un tiroir à la fois L'utilisation du système de fixation réduit mais n'élimine pas le risque de basculement. OPTION 1 : Fixation à un poteau mural (méthode recommandée) Avec un détecteur de montants, localisez un poteau mural. Placez le meuble contre le mur, en alignant le système de fixation avec le montant. Pour faciliter l'insertion de la vis, vous pouvez percer un trou de guidage de 1/8'' (3 mm) dans le mur à travers la fixation. Insérez la vis dans la fixation et le poteau mural. Serrez la vis qui n'avait pas été complètement serrée à l'étape 11. OPTION 2 : Fixation sur une cloison sèche Placez votre meuble contre le mur à l'endroit souhaité et marquez le mur à travers la fixation de sécurité, puis déplacez le meuble. Percez un trou de 3/16'' (5 mm) dans le mur. Insérez l'ancrage mural pour l'ajuster. Replacez votre meuble et attachez la fixation à l'ancrage mural avec la vis. Serrez la vis qui n'avait pas été complètement serrée à l'étape 11. Page 32 Installez les tiroirs comme indiqué. Remarque : Les trous des fixations des tiroirs sont emboîtés. Les faces avant des tiroirs peuvent être ajustés en desserrant les vis, ajustant selon les besoins et resserrant les vis. ameriwoodhome.com 43 Français Page 33 CHARGES MAXIMALES Ce meuble a été conçu pour supporter les charges maximales indiquées. En excédant ces limites de charge, le meuble pourrait devenir instable, s'effondrer, et/ou causer des blessures graves. AVERTISSEMENT : Risque de blessure corporelle ‐ ne pas placer une télévision sur ce meuble. Ce meuble n'est pas approuvé pour une utilisation avec une télévision. Page 34 Enregistrez votre produit pour recevoir les éléments suivantes: * Détails sur les nouvelles tendances ‐ un aperçu sur les nouveautés * Sondages ‐ avoir une voix au sein de notre communauté * Offres exclusives et codes promo * Service de pièces de rechange rapide et facile Pour enregistrer votre produit, visitez ameriwoodhome.com 5 Étoiles Visitez le site Web de votre détaillant local, évaluez votre produit acheté et laissez‐nous quelques commentaires ! Nous tenons à offrir un grand "Merci" à tous nos clients pour avoir pris le temps d'assembler ce produit "Ameriwood Home", et de nous donner vos commentaires précieux. Merci ameriwoodhome.com 44-
 1
1
-
 2
2
-
 3
3
-
 4
4
-
 5
5
-
 6
6
-
 7
7
-
 8
8
-
 9
9
-
 10
10
-
 11
11
-
 12
12
-
 13
13
-
 14
14
-
 15
15
-
 16
16
-
 17
17
-
 18
18
-
 19
19
-
 20
20
-
 21
21
-
 22
22
-
 23
23
-
 24
24
-
 25
25
-
 26
26
-
 27
27
-
 28
28
-
 29
29
-
 30
30
-
 31
31
-
 32
32
-
 33
33
-
 34
34
-
 35
35
-
 36
36
-
 37
37
-
 38
38
-
 39
39
-
 40
40
-
 41
41
-
 42
42
-
 43
43
-
 44
44


Ameriwood Home 5319341EBL Assembly Manual
- Tipo
- Assembly Manual
- Este manual también es adecuado para
en otros idiomas
- français: Ameriwood Home 5319341EBL
- English: Ameriwood Home 5319341EBL
Artículos relacionados
-
Ameriwood Home HD90494 Instrucciones de operación
-
-
-
-
-
-
-
 Dorel Home 5581340COM1 Manual de usuario
-
-

Otros documentos
-
 Novogratz Finley 4 Drawer Dresser Instrucciones de operación
-
 Dorel Home 5308341COM Assembly Manual
-
 Dorel Home 3799341COM Assembly Manual
-
 Novogratz 4545339COM Manual de usuario
-
 Dorel Home 8800408COM Assembly Manual
-
Ameriwood HD84691 Instrucciones de operación
-
 Dorel Home 5581500COM2 Instrucciones de operación
-
 Dorel Home 1795884COM Assembly Manual
-
 Dorel Home HD80037 Guía de instalación
-


