
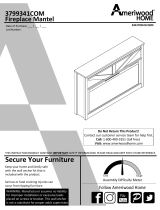
7601817COM
MantelwithFireplace
B347601817COM0
THISINSTRUCTIONBOOKLETCONTAINS
IMPORTANT
SAFETYINFORMATION.PLEASEREADANDKEEPFORFUTUREREFERENCE.
FollowAmeriwoodHome
Tube
You
DateofPurchase___/___/___
LotNumber:
DoNotReturnThisProduct!
Contactourcustomerserviceteamforhelpfirst.
Call:1‐800‐489‐3351(tollfree)
Visit:www.ameriwoodhome.com
AssemblyDifficultyMeter
Easy Tough
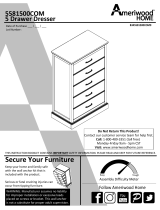
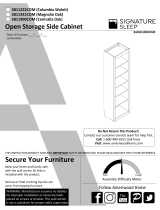
SecureYourFurniture
Keepyourhomeandfamilysafe
withthewallanchorkitthatis
includedwiththeproduct.
Seriousorfatalcrushinginjuriescan
occurfromtippingfurniture.
WARNING:Manufacturerassumesnoliability
forimproperinstallationorexcessiveloads
placedonscrewsorbracket.Thiswallanchor
isnotasubstituteforproperadultsupervision.

ContactUs!
HelpfulHints
2
ameriwoodhome.com
DoNOTreturnthisproduct!
Contactourfriendlycustomerserviceteamfirstforhelp.
Callus!
1‐800‐489‐3351
Monday‐Friday
9am‐5pmCST
Visitameriwoodhome.comtoviewthe
limitedwarrantyvalidintheU.S.andCanada.
AssemblyTips
‐Openyouritemintheareayouplantokeepittoavoidexcessiveheavylifting.
‐Identify,sortandcountthepartsbeforeattemptingassembly.
‐Compressiondowelsarelightlytappedinwithahammer.
‐Slidesarelabeledwitha
R
(right)and
L
(left)forproperplacement.
‐MakesuretoalwaysfacethepointonthetopoftheCamLocktowardsthe
outeredge.
‐Useallthenailsprovidedforthebackpanelandspreadthemoutequally.
‐Backpanelmustbeusedtomakesureyourunitissturdy.
‐DoNOTuseharshchemicalsorabrasivecleanersonthisitem.
‐Neverpush,pull,ordragyourfurniture.
Tube
You
PEOPLENEEDEDFORASSEMBLY:1‐2

3
ameriwoodhome.com
BeforeYouStart
Quick
Tip
Assembly
CamLockFasteningSystem
ThisCamLockFasteningSystemwillbeusedthroughouttheassemblyprocess.
Readthrougheachstepcarefullyandfollowtheproperorder
Separateandcountallyourpartsandhardware
Partsarelabeledonthesurfaceoredgeofthepart
Giveyourselfenoughroomfortheassemblyprocess
Havethefollowingtools:FlatHeadScrewdriver,#2PhillipsHead
ScrewdriverandHammer
Caution:Ifusingapowerdrillorpowerscrewdriverforscrewing,
pleasebeawaretoslowdownandstopwhenscrewistight.
Failuretodosomayresultinstrippingthescrew.
12
34
PresspartstogethersoCAMBOLTinserts
intoedgehole.
PressCAMBOLTintohole. PressCAMLOCKintohole.
Endhole
Usingascrewdriver,turntheCAMLOCKclockwiseto
locktheCAMLOCKandCAMBOLTintotheirholes
andfasteningpartstogether.
Arrowtopointtowardsend
holeinedgeofpart.

4
ameriwoodhome.com
BeforeYouStart
Quick
Assembly
Tip
PleaseNote:
Youmayneedtolightlytapthewooddowelsintotheholesduring
yourassemblyprocess.

5
ameriwoodhome.com
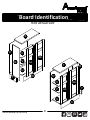
BoardIdentification
Notactualsize
BF
A
C
D
E
GH
LeftPanel
37601015010 RightPanel
37601015020
CenterTop
37601322030
CenterBottom
37601015040
LeftInnerPanel
37601000050
RightInnerPanel
37601000060
CenterKick
37601015070
CenterSupport
37601000080
CenterUpperRail
37601015090
CenterLowerRail
37601015100
CenterVerticalRail
37601015130 LowerFrontPanel
37601015140
LeftInsetRail
37601015150 LeftOuterPanel
37601015170
VerticalRail(x2)
37601015110
P
Q
O
IJ
K
UpperFrontPanel
37601015120
L
M
N
RightInsetRail
37601015160
R
RightOuterPanel
37601015180

6
ameriwoodhome.com
BoardIdentification
Notactualsize
LeftTop
37601322190 RightTop
37601322200 SideBottom(x2)
37601015210
LeftKick
37601015230
AdjustableShelf(x4)
37601015220
Thesepiecesarepaperboardconstruction.
Theyarenotmadefromwood,butare
requiredfortheassemblyofyourunit.
BackPanel(x2)
K760101500
BACK
PNL
STU
X
W
V
RightKick
37601015240
SideKick(x2)
37601015250 LeftDoor(x2)
37601015270
AA
RightDoor(x2)
37601015280
BB

7
ameriwoodhome.com
BoardIdentification
Notactualsize
A
B
C
E
D
F
G
H
I
K
L
M
N
O
P
J
K

8
ameriwoodhome.com
BoardIdentification
Notactualsize
S
T
W
AA
AA
X
Q
R
U
U
V
V
V
V
Y
Y
BB
BB
BACK
PNL
BACK
PNL

9
ameriwoodhome.com
PartList
ActualSize
(x38)
#A22700
camlock
(x38)
#A22710
cambolt
(x22)
#A21670
wooddowel
(x10)
#A22770
quickloc
(x2)
#A12820
1"screw
(x11)
#A12120
screw
(x56)
#A21110
nail
(x16)
#A80250
shelfsupport
12
34
11
8
13
(x4)
#A23030
confirmat
(x8)
#A17250
5/8"bolt
(x4)
#A89020
plasticbumper
(x4)
#A11170
5/8"screw
(x24)
#A21980
hiddenfacefastener
5
67
910
12

10
ameriwoodhome.com
NotActualSize
PartList
17d
17c
17b
17a
17e
(x1)
#A84000
safetystrapkit
(x1)
#A95080
fireplaceinsert
(x4)
#A50875
handle
(x8)
#A65640
hinge
(x2)
#A54270
metalplate
14
15 16
17
18

11
ameriwoodhome.com
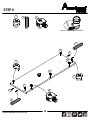
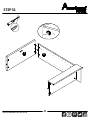
STEP1
(x2) Proper orientation of CAM LOCK
Tip
Assembly
Quick
12
3
(x8) (x1)
1
2
3
A
2
2
2
2
2
2
2
1

12
ameriwoodhome.com
STEP2
Proper orientation of CAM LOCK
Tip
Assembly
Quick
12
3
2
1
3
(x2) (x8) (x1)
B
2
2
2
2
2
2
21

13
ameriwoodhome.com
STEP3
Proper orientation of CAM LOCK
Tip
Assembly
Quick
(x4) (x4)
14
4
M
L
(x1) (x2)
1
1
1
1
3
3
3
3
3
7
7
7

14
ameriwoodhome.com
STEP4
Proper orientation of CAM LOCK
Tip
Assembly
Quick
14
3
4
D
(x4) (x4) (x3)
3
3
3
3
1
1
1
1
4
4

15
ameriwoodhome.com
STEP5
Proper orientation of CAM LOCK
Tip
Assembly
Quick
(x4)
1
1
1
H
1
1

16
ameriwoodhome.com
STEP6
D
H
L
A
UNLOCKLOCK

17
ameriwoodhome.com
STEP7
L
D
H
B
UNLOCKLOCK

18
ameriwoodhome.com
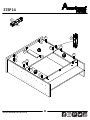
STEP8
Proper orientation of CAM LOCK
Tip
Assembly
Quick
1311
(x4) (x4)
(x2) (x2)
O
P
14
1
1
1
1
11
11
11
11
14
14
3
3

19
ameriwoodhome.com
STEP9
UNLOCKLOCK
11
B
L
P
O
L
A
(x4)
A
11
11
D

20
ameriwoodhome.com
STEP10
13
1
3
1
3E
F
(x2) (x2)
Proper orientation of CAM LOCK
Tip
Assembly
Quick

21
ameriwoodhome.com
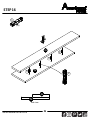
STEP11
E
F
(x4)
Holeoninsideandtothetop.
6
6
6
6
6
D
H

22
ameriwoodhome.com
STEP12
2
2
C
(x6)
2
2
2
2
217a
17b
17d
17a
17d
17b
(x1)

23
ameriwoodhome.com
STEP13
UNLOCKLOCK
C
AE
B
L
Turnscrew
clockwisetolock
partstogether.

24
ameriwoodhome.com
STEP14
(x14)
5
5
5
5
55
5
5
5
5
5
5
5
5
5
L
O
P

25
ameriwoodhome.com
STEP15
K
J
IK
L
O
P

26
ameriwoodhome.com
STEP16
5
5
G
N
5
5
5
N
G
endview
(x4)

27
ameriwoodhome.com
STEP17
(x2)
G
5
5
Turnscrew
clockwisetolock
partstogether.
N
D

28
ameriwoodhome.com
STEP18
2
2
(x8)
2
2
2
2
2
2

29
ameriwoodhome.com
STEP19
(x2)
1
23
Q
2
1
3
Proper orientation of CAM LOCK
Tip
Assembly
Quick
(x2) (x1)
2

30
ameriwoodhome.com
STEP20
134
4
Proper orientation of CAM LOCK
Tip
Assembly
Quick
1
1
1
1
4
4
U
(x4) (x2) (x3)

31
ameriwoodhome.com
STEP21
W
U
Turnscrew
clockwisetolock
partstogether.

32
ameriwoodhome.com
STEP22
UNLOCKLOCK
U
Q

33
ameriwoodhome.com
STEP23
Proper orientation of CAM LOCK
Tip
Assembly
Quick
(x2)
(x2) (x1) (x2)
1
2
1
3
(x2)
S
3
22
1
910
9
10

34
ameriwoodhome.com
STEP24
S
Q
UNLOCKLOCK

35
ameriwoodhome.com
STEP25
S
U
A
UNLOCKLOCK

36
ameriwoodhome.com
STEP26
Proper orientation of CAM LOCK
Tip
Assembly
Quick
3
1
2
1
3
2
(x2) (x2) (x1)
2
1
R

37
ameriwoodhome.com
STEP27
134
4
(x4) (x2) (x3) Proper orientation of CAM LOCK
Tip
Assembly
Quick
1
1
4
4
1
1
U

38
ameriwoodhome.com
STEP28
U
X
Turnscrew
clockwisetolock
partstogether.

39
ameriwoodhome.com
STEP29
UNLOCKLOCK
U
R

40
ameriwoodhome.com
STEP30
1
23
1
Proper orientation of CAM LOCK
Tip
Assembly
Quick
(x2) (x2) (x1) (x2) (x2)
T
2
2
1
3
910
10
9

41
ameriwoodhome.com
STEP31
TR
UNLOCKLOCK

42
ameriwoodhome.com
STEP32
T
U
B

43
ameriwoodhome.com
STEP33
(x56)
IMPORTANT!
THEBACKPANELSAREASTRUCTURALPARTOFTHISUNIT
ANDMUSTBEINSTALLEDPROPERLY.
Flushbottomedgeoftheback
panelswiththebottomedge
ofsidebottom(U).
8
8
BACK
PNL
BACK
PNL
CA
B
U
U
R
Q
unfinished
surface
unfinished
surface
Withthehelpofanotherperson,turntheunitontoit'sfront.
Nailthetwobackpanelsintotherawedges.

44
ameriwoodhome.com
STEP34
Y
Y
(x4)
5
5
5
5

45
ameriwoodhome.com
STEP35
18
18

46
ameriwoodhome.com
STEP36
Fromthebackoftheunit,attachthethreebracketstothebackof
thefireplaceinsert.Usingscrews(11),attachthebracketstothe
bottomandsides.Therewillbeapilotholeforattachment.
11
(x3)
E
FD
11
11
11
18

47
ameriwoodhome.com
STEP37
For Masonry, Concrete, or other
wall materials:
Consult your local hardware store
for appropriate anchors to securely
attach the safety bracket.
IMPORTANT:THISUNITMUSTBESECURETOTHEWALLTOHELPPREVENTTIPOVER.FOLLOW
THESEINSTRUCTIONSTOINSTALLTHEANTI‐TIPPINGSAFETYBRACKETPROVIDEDWITHTHIS
PRODUCT.
WARNING
Seriousorfatalcrushinginjuriescan
occurfromfurnituretipover.
Topreventtipover:
*Installtipoverrestraintprovided
*Placeheaviestitemsinthelowest
drawers
*Unlessspecificallydesignedto
accommodate,donotsetTVsorother
heavyobjectsonthetopofthisproduct
*Neverallowchildrentoclimborhang
ondrawers,door,orshelves
*Neveropenmorethanonedrawerata
time
Useoftipoverrestraintsmayonly
reduce,butnoteliminatetheriskof
tipover
OPTION1:Attachmentintoawallstud(preferredmethod)
Usingastudfinder,locateastudinthewall.Placeyourunitagainstthewall,withthesafetybracketaligned
inthislocation.Tomakedrivingthescreweasier,youcandrilla1/8"diameterpilothole(3mm)throughthe
safetybracketintothestud.Drivethescrewthroughthesafetybracketintothewallstud.
OPTION2:Attachmentintodrywall
Locateyourunitwheredesiredagainstawallandmarkthewallthroughthesafetybracket,thenmoveyour
unitaside.Drilla3/16"diameterhole(5mm)intothewallboard.Tapthewallanchorintotheholeuntilitis
flush.Moveyourunitintolocationandfastenthewallbrackettothewallanchorwiththescrew.
stud
wallboard
hole
17c
17d 17e
17c
17d
17e

48
ameriwoodhome.com
STEP38
x2
x2
AA
BB
(x8)
(x4) (x8)
12
12
12
15 16
15
15
16
16
16
16
12
12

49
ameriwoodhome.com
STEP39
AA
BB
Attachtheother
LeftandRightDoorhere.

50
ameriwoodhome.com
STEP40
V
V
V
V
13
13
(x16)
finishededgesout
13

51
ameriwoodhome.com
MaximumLoads
Warning:Riskofinjurytopersons‐donotplaceatelevisiononthisfurniture.Thisfurnitureis
notapprovedforusewithatelevision.
CertificateofConformity
1.ThiscertificateappliestotheDorelHomeFurnishings,Inc.productidentifiedbythisinstructionmanual.
2.ThiscertificateappliestocomplianceofthisproductwiththeCPSCBanonLead‐ContainingPaint(16CFR1303).
3.Thisproductisdistributedby:DorelHomeFurnishings,Inc.
410EastFirstStreetSouth
WrightCity,MO63390
636‐745‐3351
4.SiteofManufacture:TiffinOH
5.Seefrontpageofinstructionmanualfordateofmanufacture.
Thisunithasbeendesignedtosupportthemaximumloadsshown.Exceedingtheseloadlimits
couldcausesagging,instability,productcollapse,and/orseriousinjury.
20lbs
9.1kg
20lbs
9.1kg
10lbs
4.5kg
10lbs
4.5kg
10lbs
4.5kg
10lbs/4.5kg
adjustable shelf (each)

52
ameriwoodhome.com
Registeryourproducttoreceivethefollowing:
*Newtrenddetails‐sneakpeekonwhat'snew
*Surveys‐haveavoicewithinourcommunity
*Exclusivedealsanddiscountcodes
*Quickandeasyreplacementpartservice
Toregisteryourproduct,visitameriwoodhome.com
Visityourlocalretailer'swebsite,rateyourpurchased
productandleaveussomefeedback!
Wewouldliketoextendabig"ThankYou"toallof
ourcustomersfortakingthetimetoassemblethis
AmeriwoodHomeproduct,andtogiveusyour
valuablefeedback.

53
ameriwoodhome.com
CubiertaDelantera
Estelibrodeinstruccionescontieneinformación
IMPORTANTE
deseguridad.Porfavorleaymanténgalo
parareferenciaenelfuturo.
NoRegreseesteproducto!
Comuniqueseconnuestroamistosoequipodeservicioalclienteparaobtener
ayuda.
Llamenosal:1‐800‐489‐3351(Gratis)Lunes‐Viernes9am‐5pmCST
Visitar:
www.ameriwoodhome.com
PRECAUCION
Estemueblepuedevolcarseycausargravesheridasy/omuerte.
Anclarelmuebleaunpostedemaderaenlapared(siestoserequiere).
NoPermitaquelosniñosmontenelmueble.
Mantengalosartículosmáspesadosenloscajonesdeabajo.
ConsejosÚtiles(página2)
‐Abrasuartículoeneláreadondeustedplaneautilizarloparaevitarlevantarymoverlomenos
‐Identificar,ordenarycontarlaspiezasantesdeintentarensamblar
‐Lasclavijasdecompresiónsegolpeanconunmartillo
‐LasdiapositivasestánmarcadasconunaR(derecha)yL(izquierda)paralacolocacióncorrecta
‐Asegúresedequesiempreesteelpuntolocaizadoenlapartesuperiordebloqueadordeleva
estevolteadohaciabordeexterior
‐Utilizartodoslosclavosparaelpaneldeatrasydistribuirlosporigual
‐Elpaneldeatrasdebeutilizarseparaasegurarsedequelaunidadquedefijayfirme
‐Nousequimicasfuertesnilimpiadoresabrasivosenestearticulo
‐Nuncaempuje,tireniarrastrelosmuebles
AntesdeQueEmpieces(página3)
‐Leacuidadosamentecadapasoysigaelordencorrecto
‐Separarycontartodassuspiezasyhardware
‐Désesuficienteespacioparaelprocesodeensamble
‐Tengalassiguientesherramientas:destornilladordecabezaplana,#2cabezaPhillips
Destornilladorymartillo
‐Precaución:Siusauntaladroelectrónicooundestornilladoreléctricoparaatornillar,porfavorasegúrese
quedejedeatornillarcuandoeltonillosesteapretado.Fallarhacerestopuedecausarbarrereltornillo.
Sistemadefijarelbloqueodeleva(página3)
Estasistemadefijarelbloqueodelevaserausadoentodoelprocesoensamble.
Español

54
ameriwoodhome.com
Página21
Agujeroenelinterioryhaciaarriba.
Página23/27/31/38
Gireeltornilloenelsentidodelasagujasdelrelojparabloquearyfijarlaspiezas.
Página43
¡IMPORTANTE!LOSPANELESTRASEROSSONUNAPARTEESTRUCTURALDEESTAUNIDADYDEBEN
INSTALARSECORRECTAMENTE.
Conlaayudadeotrapersona,girelaunidadsobresupartefrontal.
Clavelosdospanelestraserosenlosbordessinrematar.
Enraseelbordeinferiordelospanelestraserosconelbordeinferiordelfondolateral(U).
Página46
Desdelaparteposteriordelaunidad,fijelostressoportesalaparteposteriordelachimenea.Utilice
tornillos(11)parafijarlossoportesalaparteinferioryaloslaterales.Habráunorificiopilotoparala
fijación.
Página47
Paramampostería,hormigónuotrosmaterialesdepared:
Consulteensuferreteríadeconfianzalosanclajesapropiadosparafijarelsoportedeseguridadde
formasegura.
IMPORTANTE:ESTAUNIDADDEBEESTARFIJADAALAPAREDPARAEVITARQUESEVUELQUE.SIGA
ESTASINSTRUCCIONESPARAINSTALARELSOPORTEDESEGURIDADANTIVUELCOSUMINISTRADOCON
ESTEPRODUCTO.
ADVERTENCIA
Elvuelcodelmueblepuedeprovocarlesionesgravesomortalesporaplastamiento.
Paraevitarelvuelco:
*Instaleelsoporteantivuelcosuministrado
*Coloquelosartículosmáspesadosenloscajonesinferiores
*Amenosqueestédiseñadoespecíficamenteparaello,nocoloquetelevisoresuotrosobjetos
pesadosenlapartesuperiordeesteproducto
*Nopermitanuncaquelosniñostrepenosecuelguendeloscajones,puertasoestantes
*Noabranuncamásdeuncajónalavez
Elusodedispositivosdesujeciónparaelvuelcosolopuedereducir,peronoeliminar,elriesgode
vuelco
Español

55
ameriwoodhome.com
Español
OPCIÓN1:Fijaciónenunmontantedelapared(métodopreferido)
Conunlocalizadordemontantes,localiceunmontanteenlapared.Coloquesuunidadcontralapared,
conelsoportedeseguridadalineadoenestaubicación.Parafacilitarlacolocacióndeltornillo,puede
perforarunagujeropilotode1/8"dediámetro(3mm)atravésdelsoportedeseguridadenel
montante.Introduzcaeltornilloatravésdelsoportedeseguridadenelmontantedelapared.
OPCIÓN2:Fijaciónenunapareddeyesolaminado
Ubiquesuunidadenellugardeseadocontraunaparedymarquelaparedatravésdelsoportede
seguridad,luegomuevasuunidadaunlado.Perforeunagujerode3/16"dediámetro(5mm)enla
pared.Golpeeelanclajedeparedenelagujerohastaqueestéalras.Muevasuunidadasuubicacióny
fijeelsoportedeparedalanclajedeparedconeltornillo.
Página49
Fijeaquílaotrapuertaizquierdayderecha.
Página51
CARGAMAXIMA
Estaunidadhasidodiseñadaparasoportarlascargasmáximasindicadas.Excederestoslímitesdecarga
podríacausarhundimiento,inestabilidad,colapsodelproductoy/olesionesgraves.
Advertencia:Riesgodelesionespersonales‐nocoloqueuntelevisorenestemueble.Elmuebleno
estáaprobadoparasuusoconuntelevisor.
Página52
Registresuproductopararecibirlosiguiente:
*Detallesdenuevastendencias‐Vistazoalonuevo
*Encuestas‐alecsuvozentresucomunidad
*Códigosdeofertasydescuentosexclusivos
*Fácilyrápidoserviciodepartesderemplace
Pararegistrarsuproducto,visiteameriwoodhome.com
Clasificasiónde5estrellas
Visiteelsitiowebdesutiendalocal,califiquesucomprado
ydenossuscomentarios!
Nosgustaríaenviarungran"Agradecimiento"atodosnuestrosclientesportomarseeltiempode
ensamblaresteproductodeAmeriwoodHome,ypordarnossusvaliososcomentarios.
Gracias

56
ameriwoodhome.com
CouvertureAvant
CELIVRETD'INSTRUCTIONCONTIENTDESINFORMATIONS
IMPORTANTES
SURLASÉCURITÉ.VEUILLEZLIRE
ETGARDERPOURUNERÉFÉRENCEFUTURE
Neretournezpasceproduit!
Contacteznotreéquipedeserviceàlaclientèleamicaled'abordpourobtenir
del'aide.
Appelez‐nous:
1‐800‐489‐3351(sansfrais)duLundiauVendredide9hà17hHeureCentrale
Visitez:
www.ameriwoodhome.com
ATTENTION
Lemeublepeutbasculeretcauserdesblessuresgravesoulamort.
Ancrerlemeubleàuneplanchemuraledanslemur(siindiqué).
Nelaissezpaslesenfantsgrimpersurlemeuble.
Placezlesarticleslourdssurlesétagèresoudanslestiroirsinférieurs.
AstucesUtiles(page2)
‐Ouvrezvotrearticledanslazonequevousprévoyezdelegarderpourmoinsdelevagelourd
‐Identifier,trieretcompterlespiècesavantd'essayerd'assembler
‐LesgoujonsdecompressionsonttaraudésavecunMarteau
‐Lesglissièressontmarquéesd'unR(droit)etd'unL(gauche)pourunbonplacement
‐Assurez‐voustoujoursdefairefacelapointesituésurlehautdelaSerruredeCameverslebordextérieur
‐Utilisertouslesclousfournispourlepanneauarrièreetlesrépartirégalement
‐Lepanneauarrièredoitêtreutilisépourvousassurerquevotreappareilestrobuste
‐N'utilisezpasdeproduitschimiquesagressifsoudenettoyantsabrasifssurcetappareil
‐Nejamaispousser,tirer,oufaireglisservotremeuble
AvantdeCommencer(page3)
‐Lisezattentivementchaqueétapeetsuivezlebonordre
‐Séparezetcompteztoutesvospiècesetmatériaux
‐Donnez‐voussuffisammentdeplacepourl'assemblage
‐Avoirlesoutilssuivants:tournevisàtêteplate,#2tournevisPhillips,etMarteau
‐
Attention:Sivousutilisezuneperceuseélectriqueouuntournevisélectriquepourvisser,veillezàralentir
etarrêterlorsquelavisestbienserrée.Lenon‐respectdecetteconsignepeutendommagerlavis.
SystèmedeFixationdeCame(page3)
CeSystèmedeFixationdeCameserautilisétoutaulongdel'assemblage
Français

57
ameriwoodhome.com
Page21
Faitesuntrouàl'intérieuretverslehaut.
Page23/27/31/38
Tournezlavisdanslesensdesaiguillesd'unemontrepourverrouillerlespiècesentièrement.
Page43
IMPORTANT!LESPANNEAUXARRIÈRESONTUNEPARTIESTRUCTURELLEDECEMEUBLEETDOIVENT
ÊTREINSTALLÉSCORRECTEMENT
Avecl'aided'uneautrepersonne,retournezlemeublesursafaceavant.
Clouezlesdeuxpanneauxarrièredanslesbordsbruts.
Alignezlebordinférieurdespanneauxarrièreaveclebordinférieurdubaslatéral(U).
Page46
Àl'arrièredumeuble,fixezlestroissupportsàl'arrièredufoyerencastrable.Àl'aidedesvis(11),fixez
lessupportsaufondetsurlescôtés.Ilyaurauntroupilotepourlafixation.
Page47
Pourlamaçonnerie,lebétonoud'autresmatériauxmuraux:
Consultezvotrequincaillerielocalepourlesancragesappropriéspourfixersolidementlesupportde
sécurité.
IMPORTANT:CEMEUBLEDOITÊTREFIXÉAUMURPOURÉVITERLEBASCULEMENT.SUIVEZCES
INSTRUCTIONSPOURINSTALLERLESUPPORTDESÉCURITÉANTI‐BASCULEMENTFOURNIAVECCE
PRODUIT.
ATTENTION
Desblessuresgravesoumortellesparécrasementpeuventsurvenirencasdebasculementde
meubles.
Pouréviterlebasculement:
*Installezledispositifantibasculementfourni
*Placezlesarticleslespluslourdsdanslestiroirslesplusbas
*Àmoinsqu'ilnesoitspécifiquementconçupourlesrecueillir,neplacezpasdetéléviseursoud'autres
objetslourdssurledessusdeceproduit
*Nelaissezjamaislesenfantsgrimperous'accrocherauxtiroirs,àlaporteouauxétagères
*N'ouvrezjamaisplusd'untiroiràlafois
L'utilisationdedispositifsderetenueencasderenversementpeutseulementréduire,maispas
éliminer,lerisquedebasculement
Français

58
ameriwoodhome.com
Français
OPTION1:Fixationdansunpoteaumural(méthodepréférée)
Àl'aided'undétecteurdemontants,localisezunmontantdanslemur.Placezvotremeublecontrele
muratalignezlesupportdesécuritéàcetendroit.Pourfaciliterl'enfoncementdelavis,vouspouvez
percerunavant‐troude1/8po(3mm)dediamètreàtraverslesupportdesécuritédanslemontant.
Vissezlavisàtraverslesupportdesécuritédanslepoteaumural.
OPTION2:Fixationdansunecloisonsèche
Placezvotremeubleàl'endroitdésirécontreunmuretmarquezlemuràtraverslesupportde
sécurité,puisplacezvotremeubledecôté.Percezuntroude3/16po(5mm)dediamètredansle
panneaumural.Enfoncezl'ancragemuraldansletroujusqu'àcequ'ilsoitaligné.Mettezvotremeuble
enplaceetfixezlesupportmuralàl'ancragemuralaveclavis.
Page49
Fixezl'autreportegaucheetdroiteici.
Page51
CHARGESMAXIMALES
Cetappareilaétéconçupoursupporterleschargesmaximalesindiquées.Ledépassementdeces
limitesdechargepeutentraînerunaffaissement,uneinstabilité,unbasculementduproduitet/oudes
blessuresgraves.
Attention:Risquedeblessurepourlespersonnes‐neplacezpasdetéléviseursurcemeuble.Ce
meublen'estpashomologuépouruneutilisationavecuntéléviseur.
Page52
Enregistrezvotreproduitpourrecevoirlesélémentssuivantes:
*Détailssurlesnouvellestendances‐unaperçusurlesnouveautés
*Sondages‐avoirunevoixauseindenotrecommunauté
*Offresexclusivesetcodespromo
*Servicedepiècesderechangerapideetfacile
Pourenregistrervotreproduit,visitezameriwoodhome.com
5Étoiles
VisitezlesiteWebdevotredétaillantlocal,évaluezvotreproduit
achetéetlaissez‐nousquelquescommentaires!
Noustenonsàoffrirungrand"Merci"àtousnosclientspouravoirprisletempsd'assemblerce
produit"AmeriwoodHome",etdenousdonnervoscommentairesprécieux.
Merci
-
 1
1
-
 2
2
-
 3
3
-
 4
4
-
 5
5
-
 6
6
-
 7
7
-
 8
8
-
 9
9
-
 10
10
-
 11
11
-
 12
12
-
 13
13
-
 14
14
-
 15
15
-
 16
16
-
 17
17
-
 18
18
-
 19
19
-
 20
20
-
 21
21
-
 22
22
-
 23
23
-
 24
24
-
 25
25
-
 26
26
-
 27
27
-
 28
28
-
 29
29
-
 30
30
-
 31
31
-
 32
32
-
 33
33
-
 34
34
-
 35
35
-
 36
36
-
 37
37
-
 38
38
-
 39
39
-
 40
40
-
 41
41
-
 42
42
-
 43
43
-
 44
44
-
 45
45
-
 46
46
-
 47
47
-
 48
48
-
 49
49
-
 50
50
-
 51
51
-
 52
52
-
 53
53
-
 54
54
-
 55
55
-
 56
56
-
 57
57
-
 58
58


Dorel Home 7601817COM Assembly Manual
- Tipo
- Assembly Manual
- Este manual también es adecuado para
en otros idiomas
- français: Dorel Home 7601817COM
- English: Dorel Home 7601817COM
Artículos relacionados
-
 Dorel Home 2636000COM Assembly Manual
-
 Dorel Home 5308341COM Assembly Manual
-
 Dorel Home HD80037 Guía de instalación
-
Ameriwood Home HD71548 Instrucciones de operación
-
-
-
 Dorel Home 3799341COM Assembly Manual
-
 Dorel Home 5581500COM2 Instrucciones de operación
-
 Dorel Home 9482412COM Assembly Manual
-
 Dorel Home 5811341COM Assembly Manual


