
9610222COM
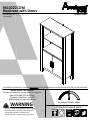
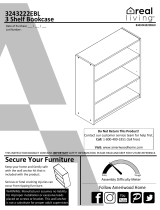
BookcasewithDoors
‐Unitcantipovercausingsevereinjuryordeath.
‐Anchorunittostudinwall(ifinstructedto).
‐DoNotallowchildrentoclimbonunit.
‐Putheavyitemsonlowershelvesordrawers.
B349610222COM0
THISINSTRUCTIONBO OKLETCONTAINS
IMPORTANT
SAFETYINFORMATION.PLEASEREADANDKEEPFORFUTUREREFERENCE.
WARNING
FollowAmeriwoodHome
Tube
You
DateofPurchase___/___/___
LotNumber:
DoNotReturnThisProduct!
Contactourcustomerserviceteamforhelpfirst.
Call:1‐800‐489‐3351(tollfree)
Monday‐Friday9am‐5pmCST
Visit:www.ameriwoodhome.com
AssemblyDifficultyMeter
Easy
Tough

ContactUs!
HelpfulHints
2
ameriwoodhome.com
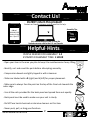
DoNOTreturnthisproduct!
Contactourfriendlycustomerserviceteamfirstforhelp.
Callus!
1‐800‐489‐3351
Monday‐Friday
9am‐5pmCST
Visitameriwoodhome.comtoviewthe
limitedwarrantyvalidintheU.S.andCanada.
AssemblyTips
‐Openyouritemintheareayouplantokeepittoavoidexcessiveheav ylifting.
‐Identify,sortandcountthe partsbeforeattemptingassembly.
‐Compressiondowelsarelightlytappedinwithahammer.
‐Slidesarelabeledwitha
R
(right)and
L
(left)forproperplacement.
‐MakesuretoalwaysfacethepointonthetopoftheCamLock towar d sthe
outeredge.
‐Useallthenailsprovidedforthebackpanelandspreadthemou tequally.
‐Backpanelmustbeusedtomakesureyourunitissturdy.
‐Do
NOTuseharshchemicalsorabrasivecleanersonthisitem.
‐Neverpush,pull,ordragyourfurniture.
Tube
You
Tube
You
PEOPLENEEDEDFORASSEMBLY:1‐2
ESTIMATEDASSEMBLYTIME:1HOUR

3
ameriwoodhome.com
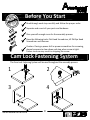
BeforeYouStart
Q
u
i
c
k
T
i
p
A
s
s
e
m
b
l
y
CamLockFasteningSystem
ThisCamLockFasteningSystem willbeusedthroughouttheassemblyprocess.
1
3
2
4
Tube
You
Readthrougheachstepcarefullyandfollowtheproperorder
Separateandcountallyourpartsandhardware
Giveyourselfenoughroomfortheassemblyprocess
Havethefollowingtools:FlatHeadScrewdriver,#2PhillipsHead
ScrewdriverandHammer
Caution:Ifusingapowerdrillorpowerscrewdriverforscr ewing,
pleasebeawaretoslowdownandstopwhenscrewistight.
Failuretodosomayresultinstrippingthescrew.

4
ameriwoodhome.com
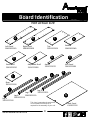
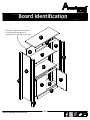
BoardIdentification
Notactualsize
Tube
You
LeftPanel
39610222010
RightPanel
39610222020
Top
39610222030
Bottom
39610222040
FixedShelf
39610222050
AdjustableShelf
39610222060
Apron
39610222070
KickPanel
39610222080
Door
39610222090
LegA
39610222100
LegB
39610222110
LegC
39610222120
LegD
39610222130
This piece is paperboard construction.
It is not made from wood, but is
required for the assembly of your unit.
BackPanel
K961022200
A
B
C
D
E
F
G H
I
J
K
L
M
N

5
ameriwoodhome.com
Tube
You
BoardIdentification
This piece is paperboard construction.
It is not made from wood, but is
required for the assembly of your unit.
A
B
C
D
E
F
G
H
I
I
J
L
K
N

6
ameriwoodhome.com
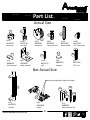
PartList
ActualSize
Tube
You
NotActualSize
1
2
3
5
11
12
(x12)
#A22570
cam lock
(x12)
#A22510
cam bolt
(x12)
#A22920
connector
(x12)
#A21660
wood dowel
(x4)
#A17400
7/8" bolt
(x12)
#A22910
connector bolt
(x2)
#A52925
handle
4
(x34)
#A12210
1/2" pan head
6
(x4)
#A80250
shelf support
(x9)
#A53600
angle bracket
(x12)
#A21110
nail
(x2)
#A89210
bumper
7
8
9
10
(x4)
#A65640
hinge
(x1)
#A84050
safety bracket kit
13
14a
14b
14c
14d
loosen to separate hinge from plate

7
ameriwoodhome.com
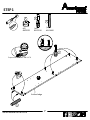
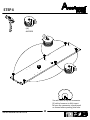
STEP
1
Proper orientation of CAM LOCK
Tip
Assembly
Quick
Tube
You
(x2)
#A22570
1
2
5
(x4)
#A22510
(x2)
#A21660
1
2
5
A
finishededge

8
ameriwoodhome.com
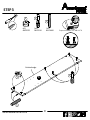
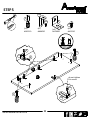
STEP2
Tube
You
Youwillneedtotaptheconnector
(3)withahammertofullyinsert.
Besuretheconnectorispositioned
asshownbeforepushingintohole.
(x6)
#A22920
3
A

9
ameriwoodhome.com
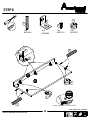
STEP3
Proper orientation of CAM LOCK
Tip
Assembly
Quick
Tube
You
1
2
5
(x2)
#A22570
(x4)
#A22510
(x2)
#A21660
5
1
2
B
finishededge

10
ameriwoodhome.com
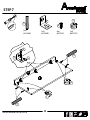
STEP
4
Tube
You
3
(x6)
#A22920
Youwillneedtotaptheconnector
(3)withahammertofullyinsert.
Besuretheconnectorispositioned
asshownbeforepushingintohole.
B
3
3

11
ameriwoodhome.com
STEP
5
Tube
You
2
14b
14a
(x1)
#A84050
(x4)
#A22510
8
6
(x3)
#A53600
(x6)
#A12210
2
14a
14b
2
8
6
6
C
G
donottighten
thisscrew

12
ameriwoodhome.com
STEP
6
Tube
You
8
6
5
(x3)
#A53600
(x6)
#A12210
(x4)
#A21660
1
(x4)
#A22570
5
Proper orientation of CAM LOCK
Tip
Assembly
Quick
*rawedgesareshaded
5
1
1
8
6
6
D
H

13
ameriwoodhome.com
STEP
7
Tube
You
5
8
6
1
(x4)
#A21660
(x3)
#A53600
(x6)
#A12210
(x4)
#A22570
5
5
1
1
8
6
6
E
G

14
ameriwoodhome.com
STEP8
Tube
You
4
(x12)
#A22910
4
4
4
4
4
4
4
4
4
4
4
K
M
J
L

15
ameriwoodhome.com
STEP9
Tube
You
3
turn the screw clockwise
to lock in place
Parts to be flush this end
13
13
13
(x2)
#A65640
Attach hinge plates (13) after legs (J&L) are attached.
A
J
L
end view
A
J
L
Note: For ease of leg attachment, place
a piece of end foam (packaging
material) under both ends of the left
panel (A).
packaging foam from carton

16
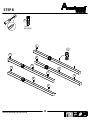
ameriwoodhome.com
STEP10
Tube
You
3
turn the screw clockwise
to lock in place
Parts to be flush this end
13
(x2)
#A65640
Attach hinge plates (13) after legs (K&M) are attached.
end view
Note: For ease of leg attachment, place
a piece of end foam (packaging
material) under both ends of the right
panel (B).
packaging foam from carton
B
K
M
K
M
B
13
13

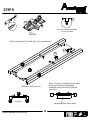
17
ameriwoodhome.com
STEP
11
Tube
You
U
N
L
O
C
K
L
O
C
K
A
B
E
D

18
ameriwoodhome.com
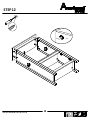
STEP12
Tube
You
U
N
LO
C
K
L
O
C
K
B
A

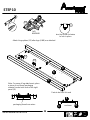
19
ameriwoodhome.com
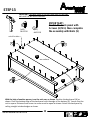
STEP13
Tube
You
6
9
(x16)
#A12210
(x12)
#A21110
N
raw surface
IMPORTANT:
Fasten the back panel with
Screws (6) first, then complete
the assembly with Nails (9)
9
9
6
6
IMPORTANT!
THEBACKPANELISASTRUCTURALPARTOFTHISUNIT
ANDMUSTBEINSTALLEDPROPERLY.
Withthehelpofanotherperson,turntheunitoverasshown.Positionthebackpanel(N)as
shown.Flushthebottomedgeofthebackpanelwiththeedgeofthebottom(D).Assurethatthe
unitissquare.Distancefromcornertocornermustbeequalasshown.
Attachthebackpanelby
nailingstraightintobackedgesasshown.
D
notch location

20
ameriwoodhome.com
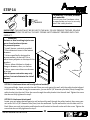
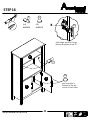
STEP
14
Tube
You
stud
wallboard
hole
OPTION1:Attachmentintoawall stud(preferred method)
Usingastudfinder,locateastudinthewall.Placeyourunitagainstthewall,withthesafetybracketaligned
inthislocation.Tomakedrivingthescreweasier,youcandrilla1/8"diameterpilothole(3mm)throughthe
safetybracketintothestud.Drivethescrewthroughthe
safetybracketintothewallstud.Tightenthescrew
thatwasnotfullytightenedinstep5.
OPTION2:Attachmentintodrywall
Locateyourunitwheredesiredagainstawallandmarkthewallthroughthesafetybracket,thenmoveyou r
unitaside.Drilla3/16"diameterhole(5mm)intothewallboard.Tapthewallanchorintotheholeuntilitis
flush.Moveyourunitintolocationandfastenthewallbracket
tothewallanchorwith thescrew.Tightenthe
screwthatwasnotfullytightenedinstep5.
WARNING
Seriousorfatalcrushinginjuriescan
occurfromfurnituretipover.
Topreventtipover:
*Installtipoverrestraintprovided
*Placeheaviestitemsinthelowest
drawers
*Unlessspecificallydesignedto
accommodate,donotsetTVsor
otherheavyobjectsonthetopofthis
product
*Neverallowchildrentoclimb
or
hangondrawers,door,orshelves
*Neveropenmorethanonedrawer
atatime
Useoftipoverrestraintsmayonly
reduce,but noteliminatetheriskof
tipover.
IMPORTANT:
THISUNITMUSTBESECURETOTHEWALLTOHELPPREVENTTIPOVER.FOLLOW
THESEINSTRUCTIONSTOINSTALLTHEANTI‐TIPPINGSAFETYBRACKETPROVIDEDWITHTHIS
PRODUCT.
For Masonry, Concrete, or other
wall materials:
Consult your local hardware store
for appropriate anchors to securely
attach the safety bracket.
14c
14d
(x1)
#A84050
14c
14d

21
ameriwoodhome.com
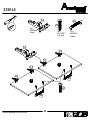
STEP
15
Tube
You
11
(x4)
#A65640
hinge
(x4)
#A17400
7/8" bolt
13
13
13
13
13
13
12
12
11
I
I
12
(x2)
#A52925
handle

22
ameriwoodhome.com
STEP
16
Tube
You
7
10
(x4)
#A80250
(x2)
#A89210
slide hinge arm onto hinge
plate and tighten screw "B"
13
10
7
peel and stick a
bumper to the top
corner of each door
F
I
I
B

23
ameriwoodhome.com
STEP
17
Tube
You
Toadjusttheverticalheight:
Loosenthescrews"A"onbothhinges.They
areusuallyinslottedholeswhichallowsyou
toadjustupordownbyafewmm.Then
tightenbackup.
Toadjustdepth:
Loosenscrew"B"andadjustdoor.If
thedoorcannotbeadjusted,loosen
screw"C",
thentryagain.Tighten
screw"B"and"C".
Toadjustsidetoside:
Turningthescrew"C"onBOTH
hingesoneachdoor.
door
c
a
b
i
n
e
t
c
a
b
i
n
e
t
door
c
a
b
i
n
e
t
door
Door Adjustment
B
A
A
C

24
ameriwoodhome.com
Tube
You
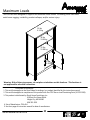
MaximumLoads
Warning:Riskofinjurytopersons‐donotplaceatelevisiononthisfurniture.Thisfurnitureis
notapprovedforusewithatelevision.
CertificateofConformity
1.ThiscertificateappliestotheDorelHomeFurnishings,Inc.productidentifiedbythisinstruction manual.
2.ThiscertificateappliestocomplianceofthisproductwiththeCPSCBanonLead‐ContainingPaint(16CFR1303).
3.Thisproductisdistributedby:DorelHomeFurnishings,Inc.
410
EastFirstStreetSouth
WrightCity,MO63390
636‐745‐3351
4.SiteofManufacture:TiffinOH
5.Seefrontpageofinstructionmanualfordateofmanufacture.
Thisunithasbeendesignedtosupportthemaximumloadsshown.Exceedingtheseloadlimits
couldcausesagging,instability,productcollapse,and/orseriousinjury.
35 lbs
15.88 kg
35 lbs
15.88 kg
35 lbs
15.88 kg
10 lbs
4.54 kg

25
ameriwoodhome.com
Registeryourproducttoreceivethefollowing:
*Newtrenddetails‐sneakpeekonwhat'snew
*Surveys‐haveavoicewithinourcommunity
*Exclusivedealsanddiscountcodes
*Quickandeasyreplacementpartservice
Toregisteryourproduct,visitameriwoodhome.com
Visityourlocalretailer'swebsite,rateyourpurchased
productandleaveussomefeedback!
Wewouldlike
toextendabig"ThankYou"toallof
ourcustomersfortakingthetimetoassemblethis
AmeriwoodHomeproduct,andtogiveusyour
valuablefeedback.
Tube
You

26
ameriwoodhome.com
Tube
You
CubiertaDelantera
Estelibrodeinstruccionescontieneinformación
IMPORTANTE
deseguridad.Porfavorleaymanténgalo
parareferenciaenelfuturo.
NoRegreseesteproducto!
Comuniqueseconnuestroamistosoequipodeservicioalclienteparaobtener
ayuda.
Llamenosal:1‐800‐489‐3351(Gratis)Lunes‐Viernes9am‐5pmCST
Visitar:
www.ameriwoodhome.com
PRECAUCION
Estemueblepuedevolcarseycausargravesheridasy/omuerte.
Anclarelmuebleaunpostedemaderaenlapared(siestoserequiere).
NoPermitaquelosniñosmontenelmueble.
Mantengalosartículosmáspesadosenloscajonesdeabajo.
ConsejosÚtiles(página2)
‐Abrasuartículoeneláreadondeustedplaneautilizarloparaevitarlevantarymoverlomenos
‐Identificar,ordenarycontarlaspiezasantesdeintentarensamblar
‐Lasclavijasdecompresiónsegolpeanconunmartillo
‐LasdiapositivasestánmarcadasconunaR(derecha)yL(izquierda)paralacolocacióncorrecta
‐
Asegúresedequesiempreesteelpuntolocaizadoenlapartesuperiordebloqueadordeleva
estevolteadohaciabordeexterior
‐Utilizartodoslosclavosparaelpaneldeatrasydistribuirlosporigual
‐Elpaneldeatrasdebeutilizarseparaasegurarsedequelaunidadquedefijayfirme
‐Nouse
quimicasfuertesnilimpiadoresabrasivosenestearticulo
‐Nuncaempuje,tireniarrastrelosmuebles
AntesdeQueEmpieces(página3)
‐Leacuidadosamentecadapasoysigaelordencorrecto
‐Separarycontartodassuspiezasyhardware
‐Désesuficienteespacioparaelprocesodeensamble
‐Tengalassiguientesherramientas:destornilladordecabezaplana,#2cabezaPhillips
Destornilladorymartillo
‐Precaución:Siusauntaladroelectrónicooundestornilladoreléctricoparaatornillar,
porfavorasegúrese
quedejedeatornillarcuandoeltonillosesteapretado.Fallarhacerestopuedecausarbarrereltornillo.
Sistemadefijarelbloqueodeleva(página3)
Estasistemadefijarelbloqueodelevaserausadoentodoelprocesoensamble.
Página7
Tendráquetocarelconector(3)conunmartilloparainsertarlocompletamente.Asegúresedequeel
conectorestécolocadocomosemuestraantesdeempujarenelorificio.
Español

27
ameriwoodhome.com
Página9
Tendráquetocarelconector(3)conunmartilloparainsertarlocompletamente.Asegúresedequeel
conectorestécolocadocomosemuestraantesdeempujarenelorificio.
Página10
Noaprieteestetornillo.
Página14
Coloquelasplacasdelabisagra(13)despuésdeunirlaspatas(JyL).
Partesparaseralrasesteextremo
Nota:Parafacilitarlafijaciónde laspiernas,coloqueunapiezadeespumafinal(materialdeembalaje)
debajodeambosextremosdelpanelizquierdo(A).
espumadeembalajedecartón
Página15
Coloquelasplacasdelabisagra(13)despuésdeunirlaspatas(KyM).
Partesparaseralrasesteextremo
Nota:Parafacilitarlafijaciónde laspiernas,coloqueunapiezadeespumafinal(materialdeembalaje)
debajodeambosextremosdelpanelderecho(B).
espumadeembalajedecartón
Página18
¡IMPORTANTE!ELPANELTRASEROESUNAPARTEESTRUCTURALDEESTAUNIDADYDEBEINSTALARSE
CORRECTAMENTE.
IMPORTANTE:PrimeroajusteelpanelposteriorconTornillos(6),luegocompleteelconjuntoconClavos
(9).
ubicacióndemuesca
Conlaayudadeotrapersona,volteelaunidadcomosemuestra.Coloqueelpanelposteriorcomo
se
muestra.enjuagueelbordeinferiordelpanelposteriorconelbordedelaparteinferior.Asegúratede
quelaunidadseacuadrada.Ladistanciadeesquinaaesquinadebeserigualalaquesemuestra.
Coloqueelpanelposteriorclavandodirectamenteenlosbordesposteriorescomosemuestra.
Página19
Paramampostería,concretouotrotipodeparedes:
Acudeatuferreteríalocalparaobtenerlosanclajesadecuadosparafijardeformaseguraelsoportede
seguridad.
IMPORTANTE:ESTAUNIDADDEBEASEGURARSEAUNAPAREDPARAEVITARQUESEVUELQUE.SIGUE
ESTASINSTRUCCIONESPARAINSTALARELSOPORTEDESEGURIDADANTICAÍDAQUE
SEPROPORCIONA
JUNTOCONESTEPRODUCTO.
Español
Tube
You

28
ameriwoodhome.com
Tube
You
Español
ADVERTENCIA
Unmueblealvolcarsepuedeprovocarheridasporaplastamientoquepuedenresultargraveso
mortales.
Paraprevenirqueunmueblesevuelque:
*Instalaeldispositivocontracaídasqueseproporciona
*Colocalosartículosmáspesadosenloscajonesdemásabajo
*Amenosqueestéespecíficamentediseñadoparatal
fin,nocoloquestelevisionesniningúnotro
objetopesadosobreestemueble
*Nuncapermitasquelosniñossesubanocuelguendeloscajones,puertasorepisas.
*Nuncaabrasmásdeuncajónalavez
Elusodelosdispositivoscontracaídaspuedereducir,peronoeliminarpor
completoelriesgodequeel
mueblesevuelque.
OPCIÓN1:acopladoauntravesañodelapared(mé todorecomendado)
Ubicauntravesañoenlaparedutilizandounlocalizadordetravesaños.Colocatuunidadcontrala
pared,conelsoportedeseguridadalineadoeneselugar.Parafacilitarlaentradadeltornillo,puedes
perforarunagujeroguíade1/8"(3
mm)dediámetroatravésdelsoportedeseguridadhastallegaral
travesaño.Introduceeltornilloeneltravesañodelaparedatravésdelsoportedeseguridad.Aprietael
tornilloquenoapretastecompletamenteenelpaso5.
OPCIÓN2:acopladoaunpaneldepared
Colocatuunidaden
ellugardeseadocontraunaparedymarcalaparedatravésdelsoportede
seguridad,luegoretiratuunidadhaciaunlado.Perforaunagujerode3/16"dediámetro(5mm)enel
tablerodelapared.Golpeaelanclajedeparedparaintroducirloenelagujerohastaquequede
aras.
Vuelveacolocartuunidadensulugarysujetaelsoportedeparedalanclajedeparedconeltornillo.
Aprietaeltornilloque noapretastecompletamenteenelpaso5.
Página21
desliceelbrazodelabisagrasobrelaplacadelabisagrayaprieteel
tornillo"B"
pelarypegarunparachoquesa laesquinasuperiordecadapuerta
Página22
Ajustedelapuerta
Paraajustarlaalturavertical:Aflojelostornillos"A"enambasbisagras.Porlogeneral,seencuentran
enagujerosranuradosquelepermitenajustarhaciaarribaohaciaabajoenunospocosmm.Luego
aprietanuevamente.
Paraajustarlaprofundidad:suelteeltornillo"B"yajuste
lapuerta.Silapuertanosepuedeajustar,
aflojeeltornillo"C"yvuelvaaintentarlo.Apreta rlostornillos"B"y"C".
Paraajustardeladoalado:Girandoeltornillo"C"enAMBASbisagrasencadapuerta.

29
ameriwoodhome.com
Español
Tube
You
Página23
CARGAMAXIMA
Estaunidadhasidodiseñadaparasoportarlacargamáximaanotada.Elexcederestoslímitespuede
causarinestabilidad,colapsarsey/ocausarseriaslesiones.
ADVERTENCIA:Riesgodelesionesalaspersonas‐nocoloqueuntelevisorsobremuebles.Estemueble
noestáaprobadoparasuusoconuntelevisor.
Página24
Registresuproductopararecibirlosiguiente:
*Detallesdenuevastendencias‐Vistazoalonuevo
*Encuestas‐alecsuvozentresucomunidad
*Códigosdeofertasydescuentosexclusivos
*Fácilyrápidoserviciodepartesderemplace
Pararegistrarsuproducto,visiteameriwoodhome.com
Clasificasiónde5estrellas
Visiteel
sitiowebdesutiendalocal,califiquesucomprado
ydenossuscomentarios!
Nosgustaríaenviarungran"Agradecimiento"atodosnuestrosclientesportomarseeltiempode
ensamblaresteproductodeAmeriwoodHome,ypordarnossusvaliososcomentarios.
Gracias

30
ameriwoodhome.com
CouvertureAvant
CELIVRETD'INSTRUCTIONCONTIENTDESINFORMATIONS
IMPORTANTES
SURLASÉCURITÉ.VEUILLEZLIRE
ETGARDERPOURUNERÉFÉRENCEFUTURE
Neretournezpasceproduit!
Contacteznotreéquipedeserviceàlaclientèleamicaled'abordpourobtenir
del'aide.
Appelez‐nous:
1‐800‐489‐3351(sansfrais)duLundiauVendredide9hà17hHeureCentrale
Visitez:
www.ameriwoodhome.com
ATTENTION
Lemeublepeutbasculeretcauserdesblessuresgravesoulamort.
Ancrerlemeubleàuneplanchemuraledanslemur(si indiqué).
Nelaissezpaslesenfantsgrimpersurlemeuble.
Placezlesarticleslourdssurlesétagèresoudanslestiroirsinférieurs.
AstucesUtiles(page2)
‐Ouvrezvotrearticledanslazonequevousprévoyezdelegarderpourmoinsdelevagelourd
‐Identifier,trieretcompterlespiècesavantd'essayerd'assembler
‐LesgoujonsdecompressionsonttaraudésavecunMarteau
‐Lesglissièressontmarquéesd'unR(droit)etd'unL(gauche)pourunbonplacement
‐
Assurez‐voustoujoursdefairefacelapointesituésurlehautdelaSerruredeCameverslebordextérieur
‐Utilisertouslesclousfournispourlepanneauarrièreetlesrépartirégalement
‐Lepanneauarrièredoitêtreutilisépourvousassurerquevotreappareilestrobuste
‐N'utilisezpasde
produitschimiquesagressifsoudenettoyantsabrasifssurcetappareil
‐Nejamaispousser,tirer,oufaireglisservotremeuble
AvantdeCommencer(page3)
‐Lisezattentivementchaqueétapeetsuivezlebonordre
‐Séparezetcompteztoutesvospiècesetmatériaux
‐Donnez‐voussuffisammentdeplacepourl'assemblage
‐Avoirlesoutilssuivants:tournevisàtêteplate,#2tournevisPhillips,etMarteau
‐
Attention:Sivousutilisezuneperceuseélectriqueouuntournevisélectriquepourvisser,veillezàralentir
etarrêterlorsquelavisestbienserrée.Lenon‐respectdecetteconsignepeutendommagerlavis.
SystèmedeFixationdeCame(page3)
CeSystèmedeFixationdeCameserautilisétoutaulongdel'assemblage
Page7
Ilestrecommandédetapersurleconnecteur(3)avecunmarteaupourl'insérercomplètement.S'assurer
queleconnecteursoitpositionnételqu'indiquéavant del'introduiredansletrou.
Tube
You
Français

31
ameriwoodhome.com
Page9
Ilestrecommandédetapersurleconnecteur(3)avecunmarteaupourl'insérercomplètement.S'assurer
queleconnecteursoitpositionnételqu'indiquéavantdel'introduiredansletrou.
Page10
Nepasserrercettevis.
Page14
Fixezlesplaquesdecharnière(13)aprèsavoirfixélespattes(J
&L).
Piècesàvidercettefin
Remarque:Pourfaciliterlafixationdelajambe,placezunmorceaudemoussed'extrémité(matériau
d'emballage)souslesdeuxextrémitésdupanneaudegauche(A).
moussed'emballageducarton
Page15
Fixezlesplaquesdecharnière(13)aprèsavoirfixélespattes(J&L).
Piècesà
vidercettefin
Remarque:Pourfaciliterlafixationdelajambe,placezunmorceaudemoussed'extrémité(matériau
d'emballage)souslesdeuxextrémitésdupanneaudedroit(B).
moussed'emballageducarton
Page18
IMPORTANT!LEPANNEAUARRIÈREESTUNEPARTIESTRUCTURELLEDECEMEUBLEQUIDOITETRE
INSTALLÉCORRECTEMENT.
IMPORTANT:Fixezle
panneauarrièreaveclesVis(6)enpremier,etensuitecomplétezl'assemblageavec
lesClous(9).
encochedanslepanneauarrière
Avecl'aided'uneautrepersonne,retournerlemeublecommeindiqué.Disposerlepanneauarrière(N)
commeindiqué.Alignerlebordinférieurdupanneauarrièreavecleborddela
partieinférieure(D).
Assurez‐vousquelemeubleestcarré.Ladistanced'uncoinàunautredoitêtreégaletelqu'indiqué.Fixez
lepanneauarrièreenclouantdirectementdanslesarêtesarrièrecommeindiqué.
Page19
Pourlamaçonnerie,lebétonoud'autresmatériauxdemur:
Visitervotrequincaillerie
localepourobtenirdesancresappropriéesquipermettrontdefixersolidement
lesupportdesécurité.
IMPORTANT:CEMEUBLEDOITETRESÉCURISÉAUMURPOUREVITERQU'ILNEBASCULE.SUIVRECES
INSTRUCTIONSPOURINSTALLERLESUPPORTDESÉCURITÉANTI‐BASCULEMENTFOURNIAVECCE
PRODUIT.
Français
Tube
You

32
ameriwoodhome.com
Français
Tube
You
AVERTISSEMENT
Desblessuresgravesoumortellespeuventseproduireencasdebasculementdesmeubles.
Pouréviterlebasculement:
*Installerlapièceanti‐basculementfournie
*Placerlesobjetslespluslourdsdanslestiroirslesplusbas
*Saufsispécifiquementconçupouryetreinstallé,nepasposer
detéléviseuroud'autresobjetslourds
surdeceproduit
*Nejamaislaisserenfantsgrimperous'accrochersurlestiroirs,lesportesoulesétagères
*Nejamaisouvrirplusd'untiroiràlafois
L'utilisationdespiècesanti‐basculementpeutuniquementréduire,maispaséliminerlerisquede
basculement.
OPTION
1:ancragesuruncolombage(méthodeprivilégiée)
Localisezuncolombagedanslemuràl'aided'undétecteurdecolombage.Placezvotremeublecontrele
murenmaintenantlesupportdesécuritéalignéaumemeendroit.Pourfaciliterl'insertiondelavis,ilest
recommandédeperceruntroud'essaide
1/8"dediamètre(3mm)àtraverslesupportdesécuritédans
lecolombage.Passerlavisà traverslesupportdesécuritépourl'insérerdanslecolombage.Serrerlavis
quin'apasétécomplètementserréeàl'étape5.
OPTION2:ancragedanslacloisonsèche
Positionnezvotremeuble
surlazonecibléecontreunmuretfaitesunemarquesurlemuràtraversle
supportdesécurité,puisdéplacezvotremeubledecôté.Percezuntroude3/16"dediamètre(5mm)
danslepanneaumural.Tapezsurl'ancremuralepourl'introduiredansletroujusqu'àcequ'il
soit
parfaitementalignéetinstallé.Placezvotremeublesursonemplacementetfixerlesupportmuralà
l'ancremuraleaveclavis.Serrezlavisquin'apasétécomplètementserréeàl'étape5.
Page21
faitesglisserlebrasdecharnièresurlaplaquedecharnièreetserrezlavis
"B"
peleretcollerunpare‐chocsdanslecoinsupérieurdechaqueporte
Page22
Ajustement de la Porte
Pourajusterlahauteurverticale:
Desserrezlesvis"A"surlesdeuxcharnières.Ilssontgénéralementdansdestrousfendusquivouspermet
deréglerverslehautouverslebasdequelquesmm.Puisresserrer.
Pourajusterlaprofondeur:
Desserrerlavis"B"etajusterlaporte.Silaportene
peutpasêtreajustée,desserrerlavis"C",puis
réessayer.Serrerlavis"B"et"C".
Pourajusterd'uncôtéàl'autre:
Tournerlavis"C"surlesdeuxcharnièresdechaqueporte.

33
ameriwoodhome.com
Français
Tube
You
Page23
CHARGESMAXIMALES
Cemeubleaétéconçupoursupporterleschargesmaximalesindiquées.Enexcédantceslimitesde
charge,lemeublepourraitdevenirinstable,s'effondrer,et/oucauserdesblessuresgraves.
AVERTISSEMENT:Risquedeblessurecorporelle‐nepasplacerunetélévisionsurcemeuble.Cemeuble
n'estpasapprouvépour
uneutilisationavecunetélévision.
Page24
Enregistrezvotreproduitpourrecevoirlesélémentssuivantes:
*Détailssurlesnouvellestendances‐unaperçusurlesnouveautés
*Sondages‐avoirunevoixauseindenotrecommunauté
*Offresexclusivesetcodespromo
*Servicedepiècesderechangerapideetfacile
Pourenregistrervotre
produit,visitezameriwoodhome.com
5Étoiles
VisitezlesiteWebdevotredétaillantlocal,évaluezvotreproduit
achetéetlaissez‐nousquelquescommentaires!
Noustenonsàoffrirungrand"Merci"àtousnosclientspouravoirprisletempsd'assemblerceproduit
"AmeriwoodHome",etdenousdonnervoscommentairesprécieux.
Merci
-
 1
1
-
 2
2
-
 3
3
-
 4
4
-
 5
5
-
 6
6
-
 7
7
-
 8
8
-
 9
9
-
 10
10
-
 11
11
-
 12
12
-
 13
13
-
 14
14
-
 15
15
-
 16
16
-
 17
17
-
 18
18
-
 19
19
-
 20
20
-
 21
21
-
 22
22
-
 23
23
-
 24
24
-
 25
25
-
 26
26
-
 27
27
-
 28
28
-
 29
29
-
 30
30
-
 31
31
-
 32
32
-
 33
33


en otros idiomas
- français: SystemBuild HD58854 Guide d'installation
- English: SystemBuild HD58854 Installation guide
Otros documentos
-
 Dorel Home 3243222EBL Assembly Manual
-
 Dorel Home 2711222EBL Assembly Manual
-
 Dorel Home 2636000COM Assembly Manual
-
 Dorel Home 1639015EBL Assembly Manual
-
Ameriwood Home 9610407COM Manual de usuario
-
 Dorel Home 5308341COM Assembly Manual
-
 Dorel Home 4950015EBL Assembly Manual
-
 Dorel Home 3074341EBL Assembly Manual
-
-
Ameriwood HD63722 Guía de instalación


