La página se está cargando...

9837222COM
DESK
‐Unitcantipovercausingsevereinjuryordeath.
‐Anchorunittostudinwall(ifinstructedto).
‐DoNotallowchildrentoclimbonunit.
‐Putheavyitemsonlowershelvesordrawers.
B349837222COM0
THISINSTRUCTIONBO OKLETCONTAINS
IMPORTANT
SAFETYINFORMATION.PLEASEREADANDKEEPFORFUTUREREFERENCE.
WARNING
FollowAmeriwoodHome
Tube
You
DateofPurchase___/___/___
LotNumber:
DoNotReturnThisProduct!
Contactourcustomerserviceteamforhelpfirst.
Call:1‐800‐489‐3351(tollfree)
Monday‐Friday9am‐5pmCST
Visit:www.ameriwoodhome.com
AssemblyDifficultyMeter
Easy
Tough

ContactUs!
HelpfulHints
2
ameriwoodhome.com
DoNOTreturnthisproduct!
Contactourfriendlycustomerserviceteamfirstforhelp.
Callus!
1‐800‐489‐3351
Monday‐Friday
9am‐5pmCST
Visitameriwoodhome.comtoviewthe
limitedwarrantyvalidintheU.S.andCanada.
AssemblyTips
‐Openyouritemintheareayouplantokeepittoavoidexcessiveheav ylifting.
‐Identify,sortandcountthe partsbeforeattemptingassembly.
‐Compressiondowelsarelightlytappedinwithahammer.
‐Slidesarelabeledwitha
R
(right)and
L
(left)forproperplacement.
‐MakesuretoalwaysfacethepointonthetopoftheCamLock towar d sthe
outeredge.
‐Useallthenailsprovidedforthebackpanelandspreadthemou tequally.
‐Backpanelmustbeusedtomakesureyourunitissturdy.
‐Do
NOTuseharshchemicalsorabrasivecleanersonthisitem.
‐Neverpush,pull,ordragyourfurniture.
Tube
You
Tube
You
PEOPLENEEDEDFORASSEMBLY:1‐2
ESTIMATEDASSEMBLYTIME:1HOUR

3
ameriwoodhome.com
BeforeYouStart
Q
u
i
c
k
T
i
p
A
s
s
e
m
b
l
y
CamLockFasteningSystem
ThisCamLockFasteningSystem willbeusedthroughouttheassemblyprocess.
1
3
2
4
Tube
You
Readthrougheachstepcarefullyandfollowtheproperorder
Separateandcountallyourpartsandhardware
Giveyourselfenoughroomfortheassemblyprocess
Havethefollowingtools:FlatHeadScrewdriver,#2PhillipsHead
ScrewdriverandHammer
Caution:Ifusingapowerdrillorpowerscrewdriverforscr ewing,
pleasebeawaretoslowdownandstopwhenscrewistight.
Failuretodosomayresultinstrippingthescrew.

4
ameriwoodhome.com
BoardIdentification
Notactualsize
Tube
You
LeftPanel
39837222010
RightPanel
39837222020
LeftPartition
39837222030
RightPartition
39837222040
ModestyPanel
39837222050
LeftFrontPanel
39837222060
RightFrontPanel
39837222070
Top
39837222080
DrawerFront
39837222090
DrawerBack
39991070044400B
x2
FrontLeg
39837222110
x2
RearLeg
39837222120
DrawerBottom
39837331130
A B
C
D
E
F G
H
I
K
L
M
DRW
BACK

5
ameriwoodhome.com
BoardIdentification
Notactualsize
Tube
You
LeftDrawerSide
39991070346010L
RightDrawerSide
39991070346010R
Drawer Sides and Drawer Back are
labeled with part description.
A
B
C
D
E
F
G
H
I
K
K
L
L
M
LEFT
DRW
SIDE
RIGHT
DRW
SIDE
DRW
BACK
LEFT
DRW
SIDE
RIGHT
DRW
SIDE

6
ameriwoodhome.com
PartList
ActualSize
Tube
You
NotActualSize
(x16)
#A22570
cam lock
(x16)
#A22510
cam bolt
(x8)
#A22920
connector
(x8)
#A11600
1-1/4" flat head
(x18)
#A21660
wood dowel
(x8)
#A243222
cam cover
(x8)
#A22910
connector bolt
(x4)
#A12120
7/16" pan head
(x2)
#A54203
drawer bracket
(x10)
#A11080
7/16" flat head
(x2)
#A17400
7/8" bolt
(x1)
#A99040
glue bottle
(x1)
#A56770
drawer slide kit
(x1)
#A52925
handle
LeftCabinetMember
RightCabinetMember
LeftDrawerMember
RightDrawerMember
14a
14b
14c
14d
1
2
3
4
5
6
7
8
9
10
11
12
13

7
ameriwoodhome.com
STEP
1
Proper orientation of CAM LOCK
Tip
Assembly
Quick
Tube
You
(x4)
#A22570
*rawedgesareshaded
Youwillneedtotaptheconnector
(3)withahammertofullyinsert.
Besuretheconnectorispositioned
asshownbeforepushingintohole.
1
1
2
3
A
(x4)
#A22510
(x2)
#A22920
2
2
2
3
1

8
ameriwoodhome.com
STEP2
Proper orientation of CAM LOCK
Tip
Assembly
Quick
Tube
You
*rawedgesareshaded
B
2
1
1
3
Youwillneedtotaptheconnector
(3)withahammertofullyinsert.
Besuretheconnectorispositioned
asshownbeforepushingintohole.
1
2
(x4)
#A22570
(x4)
#A22510
(x2)
#A22920
3
2
2

9
ameriwoodhome.com
STEP3
(x8)
#A21660
A
5
5
Tube
You
13
(x1)
#A99040
Fill each dowel hole approximately 1/3 full with glue. Press the dowels into the holes as shown.
Note: There should be some glue squeeze out as the dowels are inserted. Keep a damp cloth at hand to
wipe this up as you assemble the cabinet.

10
ameriwoodhome.com
STEP
4
5
(x8)
#A21660
5
B
Tube
You
Fill each dowel hole approximately 1/3 full with glue. Press the dowels into the holes as shown.
Note: There should be some glue squeeze out as the dowels are inserted. Keep a damp cloth at hand to
wipe this up as you assemble the cabinet.
13
(x1)
#A99040

11
ameriwoodhome.com
STEP
5
Tube
You
(x4)
#A22510
2
K
L
2
2

12
ameriwoodhome.com
STEP
6
Tube
You
L
K
A
Fill each dowel hole approximately 1/3 full with glue. Press the dowels into the holes as shown.
Note: There should be some glue squeeze out as the dowels are inserted. Keep a damp cloth at hand to
wipe this up as you assemble the cabinet.
13
(x1)
#A99040
Parts to be flush this end
U
N
L
O
C
K
L
O
C
K

13
ameriwoodhome.com
STEP
7
Tube
You
Fill each dowel hole approximately 1/3 full with glue. Press the dowels into the holes as shown.
Note: There should be some glue squeeze out as the dowels are inserted. Keep a damp cloth at hand to
wipe this up as you assemble the cabinet.
2
(x4)
#A22510
K
L
2
2

14
ameriwoodhome.com
STEP8
13
(x1)
#A99040
Fill each dowel hole approximately 1/3 full with glue. Press the dowels into the holes as shown.
Note: There should be some glue squeeze out as the dowels are inserted. Keep a damp cloth at hand to
wipe this up as you assemble the cabinet.
Parts to be flush this end
U
N
L
O
C
K
L
O
C
K
L
K
B
Tube
You

15
ameriwoodhome.com
STEP9
Proper orientation of CAM LOCK
Tip
Assembly
Quick
1
(x6)
#A22570
1
1
E
Tube
You

16
ameriwoodhome.com
STEP10
Youwillneedtotaptheconnector
(3)withahammertofullyinsert.
Besuretheconnectorispositioned
asshownbeforepushingintohole.
Tube
You
3
3
Fill each dowel hole approximately 1/3 full with glue. Press the dowels into the holes as shown.
Note: There should be some glue squeeze out as the dowels are inserted. Keep a damp cloth at hand to
wipe this up as you assemble the cabinet.
(x2)
#A22570
(x2)
#A21660
(x4)
#A22920
1
1
5
5
F
G
C
D
13
(x1)
#A99040

17
ameriwoodhome.com
STEP
11
Tube
You
7
(x8)
#A22910
7
H

18
ameriwoodhome.com
STEP12
Tube
You
4
(x4)
#A11600
4
F
G
C
D
H
3
turn the screw clockwise
to lock in place

19
ameriwoodhome.com
STEP13
Tube
You
turn the screw clockwise
to lock in place
Fill each dowel hole approximately 1/3 full with glue. Press
the dowels into the holes as shown.
Note: There should be some glue squeeze out as the
dowels are inserted. Keep a damp cloth at hand to wipe
this up as you assemble the cabinet.
13
(x1)
#A99040
U
N
L
O
C
K
L
O
C
K
E
H
B
K
L
3

20
ameriwoodhome.com
STEP
14
Tube
You
13
(x1)
#A99040
U
N
L
O
C
K
L
O
C
K
Fill each dowel hole approximately 1/3 full with glue. Press
the dowels into the holes as shown.
Note: There should be some glue squeeze out as the
dowels are inserted. Keep a damp cloth at hand to wipe
this up as you assemble the cabinet.
turn the screw clockwise
to lock in place
3
A
B
E
K
L

21
ameriwoodhome.com
STEP
15
Tube
You
(x6)
#A11080
LeftCabinetMember
RightCabinetMember
14a
14b
8
(x1)
#A56770
8
14a
C
C
D

22
ameriwoodhome.com
STEP
16
Tube
You
(x2)
#A54203
10
10
10
Lay the drawer sides down on a flat hard surface. Carefully line up the drawer bracket with the holes in
the drawer side as shown. Using a hammer, tap each drawer bracket stem part way into each hole.
Repeat this process until the drawer bracket is fully seated on the drawer side.
finished edge
LEFT
DRW
SIDE
RIGHT
DRW
SIDE

23
ameriwoodhome.com
STEP
17
Tube
You
(x4)
#A12120
9
9
9
I
finished edge
f
i
n
i
s
h
e
d
e
d
g
e
finished edge
LEFT
DRW
SIDE
RIGHT
DRW
SIDE

24
ameriwoodhome.com
STEP18
Tube
You
4
(x4)
#A11600
finished edge
r
a
w
s
u
r
f
a
c
e
4
4
Drawer Bottom
raw surface
DRW
BACK

25
ameriwoodhome.com
STEP19
Tube
You
8
12
RightDrawerMember
LeftDrawerMember
(x1)
#A56770
(x4)
#A11080
(x1)
#A52925
11
(x2)
#A17400
8
8
14c
14d
14c
14d
12
11
marked with an "L"
marked with an "R"

26
ameriwoodhome.com
STEP20
Tube
You
6
(x8)
#A243222
6
1
cabinet member
roller
drawer runner
roller

27
ameriwoodhome.com
Tube
You
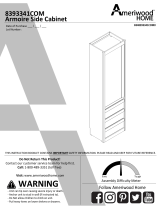
MaximumLoads
Warning:Riskofinjurytopersons‐donotplaceatelevisiononthisfurniture.Thisfurnitureis
notapprovedforusewithatelevision.
CertificateofConformity
1.ThiscertificateappliestotheDorelHomeFurnishings,Inc.productidentifiedbythisinstruction manual.
2.ThiscertificateappliestocomplianceofthisproductwiththeCPSCBanonLead‐ContainingPaint(16CFR1303).
3.Thisproductisdistributedby:DorelHomeFurnishings,Inc.
410
EastFirstStreetSouth
WrightCity,MO63390
636‐745‐3351
4.SiteofManufacture:TiffinOH
5.Seefrontpageofinstructionmanualfordateofmanufacture.
Thisunithasbeendesignedtosupportthemaximumloadsshown.Exceedingtheseloadlimits
couldcausesagging,instability,productcollapse,and/orseriousinjury.
100 lbs
45.1 kg
15 lbs
6.8 kg

28
ameriwoodhome.com
Registeryourproducttoreceivethefollowing:
*Newtrenddetails‐sneakpeekonwhat'snew
*Surveys‐haveavoicewithinourcommunity
*Exclusivedealsanddiscountcodes
*Quickandeasyreplacementpartservice
Toregisteryourproduct,visitameriwoodhome.com
Visityourlocalretailer'swebsite,rateyourpurchased
productandleaveussomefeedback!
Wewouldlike
toextendabig"ThankYou"toallof
ourcustomersfortakingthetimetoassemblethis
AmeriwoodHomeproduct,andtogiveusyour
valuablefeedback.
Tube
You

29
ameriwoodhome.com
Tube
You
CubiertaDelantera
Estelibrodeinstruccionescontieneinformación
IMPORTANTE
deseguridad.Porfavorleaymanténgalo
parareferenciaenelfuturo.
NoRegreseesteproducto!
Comuniqueseconnuestroamistosoequipodeservicioalclienteparaobtener
ayuda.
Llamenosal:1‐800‐489‐3351(Gratis)Lunes‐Viernes9am‐5pmCST
Visitar:
www.ameriwoodhome.com
PRECAUCION
Estemueblepuedevolcarseycausargravesheridasy/omuerte.
Anclarelmuebleaunpostedemaderaenlapared(siestoserequiere).
NoPermitaquelosniñosmontenelmueble.
Mantengalosartículosmáspesadosenloscajonesdeabajo.
ConsejosÚtiles(página2)
‐Abrasuartículoeneláreadondeustedplaneautilizarloparaevitarlevantarymoverlomenos
‐Identificar,ordenarycontarlaspiezasantesdeintentarensamblar
‐Lasclavijasdecompresiónsegolpeanconunmartillo
‐LasdiapositivasestánmarcadasconunaR(derecha)yL(izquierda)paralacolocacióncorrecta
‐
Asegúresedequesiempreesteelpuntolocaizadoenlapartesuperiordebloqueadordeleva
estevolteadohaciabordeexterior
‐Utilizartodoslosclavosparaelpaneldeatrasydistribuirlosporigual
‐Elpaneldeatrasdebeutilizarseparaasegurarsedequelaunidadquedefijayfirme
‐Nouse
quimicasfuertesnilimpiadoresabrasivosenestearticulo
‐Nuncaempuje,tireniarrastrelosmuebles
AntesdeQueEmpieces(página3)
‐Leacuidadosamentecadapasoysigaelordencorrecto
‐Separarycontartodassuspiezasyhardware
‐Désesuficienteespacioparaelprocesodeensamble
‐Tengalassiguientesherramientas:destornilladordecabezaplana,#2cabezaPhillips
Destornilladorymartillo
‐Precaución:Siusauntaladroelectrónicooundestornilladoreléctricoparaatornillar,
porfavorasegúrese
quedejedeatornillarcuandoeltonillosesteapretado.Fallarhacerestopuedecausarbarrereltornillo.
Sistemadefijarelbloqueodeleva(página3)
Estasistemadefijarelbloqueodelevaserausadoentodoelprocesoensamble.
Página7
Tendráquetocarelconector(3)conunmartilloparainsertarlocompletamente.Asegúresedequeel
conectorestécolocadocomosemuestraantesdeempujarenelorificio.
Español

30
ameriwoodhome.com
Página8
Tendráquetocarelconector(3)conunmartilloparainsertarlocompletamente.Asegúresedequeel
conectorestécolocadocomosemuestraantesdeempujarenelorificio.
Página9
Rellenecadaagujerodelaclavijaaproximadamente1/3conpegamento.Presionelospasadoresen
losagujeroscomosemuestra.
Nota:Deberíahaberalgodepegamentoalinsertarlasclavijas.Mantengaunpañohúmedoamano
paralimpiarestomientrasensamblaelgabinete.
Página10
Rellenecadaagujerodelaclavijaaproximadamente1/3conpegamento.Presionelospasadoresen
losagujeroscomosemuestra.
Nota:Deberíahaberalgodepegamentoalinsertarlasclavijas.Mantengaunpañohúmedoamano
paralimpiarestomientrasensamblaelgabinete.
Página12
Partesparaseralrasesteextremo
Rellenecadaagujerodelaclavijaaproximadamente1/3conpegamento.Presionelospasadoresen
losagujeroscomosemuestra.
Nota:Deberíahaberalgodepegamentoalinsertarlasclavijas.Mantengaunpañohúmedoamano
paralimpiarestomientrasensamblaelgabinete.
Página13
Rellenecadaagujerodelaclavijaaproximadamente1/3conpegamento.Presionelospasadoresen
losagujeroscomosemuestra.
Nota:Deberíahaberalgodepegamentoalinsertarlasclavijas.Mantengaunpañohúmedoamano
paralimpiarestomientrasensamblaelgabinete.
Página14
Partesparaseralrasesteextremo
Rellenecadaagujerodelaclavijaaproximadamente1/3conpegamento.Presionelospasadoresen
losagujeroscomosemuestra.
Nota:Deberíahaberalgodepegamentoalinsertarlasclavijas.Mantengaunpañohúmedoamano
paralimpiarestomientrasensamblaelgabinete.
Español
Tube
You

31
ameriwoodhome.com
Tube
You
Español
Página16
Rellenecadaagujerodelaclavijaaproximadamente1/3conpegamento.Presionelospasadoresenlos
agujeroscomosemuestra.
Nota:Deberíahaberalgodepegamentoalinsertarlasclavijas.Mantengaunpañohúmedoamano
paralimpiarestomientrasensamblaelgabinete.
Tendráquetocarelconector(3)conunmartilloparainsertarlocompletamente.Asegúresedequeel
conectorestécolocadocomosemuestraantesdeempujarenelorificio.
Página18
Gireeltornilloenelsentidodelasagujasdelrelojparabloquearloensulugar
Página19
Gireeltornilloenelsentidodelasagujasdelrelojparabloquearloensulugar
Rellenecadaagujerodelaclavijaaproximadamente1/3conpegamento.Presionelospasadoresenlos
agujeroscomosemuestra.
Nota:Deberíahaberalgodepegamentoalinsertarlasclavijas.Mantengaunpañohúmedoamano
paralimpiarestomientrasensamblaelgabinete.
Página20
Gireeltornilloenelsentidodelasagujasdelrelojparabloquearloensulugar
Rellenecadaagujerodelaclavijaaproximadamente1/3conpegamento.Presionelospasadoresenlos
agujeroscomosemuestra.
Nota:Deberíahaberalgodepegamentoalinsertarlasclavijas.Mantengaunpañohúmedoamano
paralimpiarestomientrasensamblaelgabinet
Página22
Coloquelosladosdelcajónsobreunasuperficiedurayplana.Alineecuidadosamenteelsoportedel
cajónconlosorificiosdelladodelcajón,comosemuestra.Usandounmartillo,golpeesuavemente
cadavástagodelsoportedelcajónencadaorificio.Repitaesteprocesohastaqueelsoportedelcajón
esté
completamenteasentadoenelladodelcajón.
Página28
CARGAMAXIMA
Estaunidadhasidodiseñadaparasoportarlacargamáximaanotada.Elexcederestoslímitespuede
causarinestabilidad,colapsarsey/ocausarseriaslesiones.
ADVERTENCIA:Riesgodelesionesalaspersonas‐nocoloqueuntelevisorsobremuebles.Estemueble
noestáaprobadoparasuusoconuntelevisor.

32
ameriwoodhome.com
Español
Tube
You
Página29
Registresuproductopararecibirlosiguiente:
*Detallesdenuevastendencias‐Vistazoalonuevo
*Encuestas‐alecsuvozentresucomunidad
*Códigosdeofertasydescuentosexclusivos
*Fácilyrápidoserviciodepartesderemplace
Pararegistrarsuproducto,visiteameriwoodhome.com
Clasificasiónde5estrellas
Visiteel
sitiowebdesutiendalocal,califiquesucomprado
ydenossuscomentarios!
Nosgustaríaenviarungran"Agradecimiento"atodosnuestrosclientesportomarseeltiempode
ensamblaresteproductodeAmeriwoodHome,ypordarnossusvaliososcomentarios.
Gracias

33
ameriwoodhome.com
CouvertureAvant
CELIVRETD'INSTRUCTIONCONTIENTDESINFORMATIONS
IMPORTANTES
SURLASÉCURITÉ.VEUILLEZLIRE
ETGARDERPOURUNERÉFÉRENCEFUTURE
Neretournezpasceproduit!
Contacteznotreéquipedeserviceàlaclientèleamicaled'abordpourobtenir
del'aide.
Appelez‐nous:
1‐800‐489‐3351(sansfrais)duLundiauVendredide9hà17hHeureCentrale
Visitez:
www.ameriwoodhome.com
ATTENTION
Lemeublepeutbasculeretcauserdesblessuresgravesoulamort.
Ancrerlemeubleàuneplanchemuraledanslemur(si indiqué).
Nelaissezpaslesenfantsgrimpersurlemeuble.
Placezlesarticleslourdssurlesétagèresoudanslestiroirsinférieurs.
AstucesUtiles(page2)
‐Ouvrezvotrearticledanslazonequevousprévoyezdelegarderpourmoinsdelevagelourd
‐Identifier,trieretcompterlespiècesavantd'essayerd'assembler
‐LesgoujonsdecompressionsonttaraudésavecunMarteau
‐Lesglissièressontmarquéesd'unR(droit)etd'unL(gauche)pourunbonplacement
‐
Assurez‐voustoujoursdefairefacelapointesituésurlehautdelaSerruredeCameverslebordextérieur
‐Utilisertouslesclousfournispourlepanneauarrièreetlesrépartirégalement
‐Lepanneauarrièredoitêtreutilisépourvousassurerquevotreappareilestrobuste
‐N'utilisezpasde
produitschimiquesagressifsoudenettoyantsabrasifssurcetappareil
‐Nejamaispousser,tirer,oufaireglisservotremeuble
AvantdeCommencer(page3)
‐Lisezattentivementchaqueétapeetsuivezlebonordre
‐Séparezetcompteztoutesvospiècesetmatériaux
‐Donnez‐voussuffisammentdeplacepourl'assemblage
‐Avoirlesoutilssuivants:tournevisàtêteplate,#2tournevisPhillips,etMarteau
‐
Attention:Sivousutilisezuneperceuseélectriqueouuntournevisélectriquepourvisser,veillezàralentir
etarrêterlorsquelavisestbienserrée.Lenon‐respectdecetteconsignepeutendommagerlavis.
SystèmedeFixationdeCame(page3)
CeSystèmedeFixationdeCameserautilisétoutaulongdel'assemblage
Page7
Ilestrecommandédetapersurleconnecteur(3)avecunmarteaupourl'insérercomplètement.S'assurer
queleconnecteursoitpositionnételqu'indiquéavant del'introduiredansletrou.
Tube
You
Français

34
ameriwoodhome.com
Page8
Ilestrecommandédetapersurleconnecteur(3)avecunmarteaupourl'insérercomplètement.
S'assurerqueleconnecteursoitpositionnételqu'indiquéavantdel'introduiredansletrou.
Page9
Remplissezchaquetroudechevilled'environ1/3avecdelacolle.Enfoncezleschevillesdanslestrous
commeindiqué.
Remarque:Ildevraityavoirunpeudecolleàresserrerlorsqueleschevillessontinsérées.Gardezun
chiffonhumideàportéedemainpourl'essuyerlorsquevousassemblezl'armoire.
Page10
Remplissezchaquetroudechevilled'environ1/3avecdelacolle.Enfoncezleschevillesdanslestrous
commeindiqué.
Remarque:Ildevraityavoirunpeudecolleàresserrerlorsqueleschevillessontinsérées.Gardezun
chiffonhumideàportéedemainpourl'essuyerlorsquevousassemblezl'armoire.
Page12
Lespiècessontgalesàcebout.
Remplissezchaquetroudechevilled'environ1/3avecdelacolle.Enfoncezleschevillesdanslestrous
commeindiqué.
Remarque:Ildevraityavoirunpeudecolleàresserrerlorsqueleschevillessontinsérées.Gardezun
chiffonhumideàportéedemainpour
l'essuyerlorsquevousassemblezl'armoire.
Page13
Remplissezchaquetroudechevilled'environ1/3avecdelacolle.Enfoncezleschevillesdanslestrous
commeindiqué.
Remarque:Ildevraityavoirunpeudecolleàresserrerlorsqueleschevillessontinsérées.Gardezun
chiffonhumideàportéedemainpourl'essuyerlorsquevousassemblezl'armoire.
Page14
Lespiècessontgalesàcebout.
Remplissezchaquetroudechevilled'environ1/3avecdelacolle.Enfoncezleschevillesdanslestrous
commeindiqué.
Remarque:Ildevraityavoirunpeudecolleàresserrerlorsqueleschevillessontinsérées.Gardezun
chiffonhumideàportéedemainpour
l'essuyerlorsquevousassemblezl'armoire.
Français
Tube
You

35
ameriwoodhome.com
Français
Tube
You
Page16
Ilestrecommandédetapersurleconnecteur(3)avecunmarteaupourl'insérercomplètement.
S'assurerqueleconnecteursoitpositionnételqu'indiquéavantdel'introduiredansletrou.
Remplissezchaquetroudechevilled'environ1/3avecdelacolle.Enfoncezleschevillesdansles
trouscommeindiqué.
Remarque:Ildevraityavoirunpeudecolleàresserrerlorsqueleschevillessontinsérées.Gardezun
chiffonhumideàportéedemainpourl'essuyerlorsquevousassemblezl'armoire.
Page18
Tournezlavisdanslesenshorairepourserrerenplace.
Page19
Tournezlavisdanslesenshorairepourserrerenplace.
Remplissezchaquetroudechevilled'environ1/3avecdelacolle.Enfoncezleschevillesdansles
trouscommeindiqué.
Remarque:Ildevraityavoirunpeudecolleàresserrerlorsqueleschevillessontinsérées.Gardezun
chiffonhumideàportéedemainpourl'essuyerlorsquevousassemblezl'armoire.
Page20
Tournezlavisdanslesenshorairepourserrerenplace.
Remplissezchaquetroudechevilled'environ1/3avecdelacolle.Enfoncezleschevillesdansles
trouscommeindiqué.
Remarque:Ildevraityavoirunpeudecolleàresserrerlorsqueleschevillessontinsérées.Gardezun
chiffonhumideàportéedemainpourl'essuyerlorsquevousassemblezl'armoire.
Page22
Posezlescôtésdutiroirsurunesurfacedureetplate.Alignezsoigneusement lesupportdutiroir
aveclestrousducôtédutiroircommeindiqué.Àl'aided'unmarteau,tapezsurchaquetigede
supportdetiroiràmi‐chemindanschaquetrou.Répétezceprocessusjusqu'àcequele
supportdu
tiroirsoitcomplètement installéducôtédu tiroir.
Page28
CHARGESMAXIMALES
Cemeubleaétéconçupoursupporterleschargesmaximalesindiquées.Enexcédantceslimitesde
charge,lemeublepourraitdevenirinstable,s'effondrer,et/oucauserdesblessuresgraves.
AVERTISSEMENT:Risquedeblessurecorporelle‐nepasplacerunetélévisionsurcemeuble.Ce
meublen'estpasapprouvépour
uneutilisationavecunetélévision.

36
ameriwoodhome.com
Français
Tube
You
Page29
Enregistrezvotreproduitpourrecevoirlesélémentssuivantes:
*Détailssurlesnouvellestendances‐unaperçusurlesnouveautés
*Sondages‐avoirunevoixauseindenotrecommunauté
*Offresexclusivesetcodespromo
*Servicedepiècesderechangerapideetfacile
Pourenregistrervotreproduit,visitezameriwoodhome.com
5Étoiles
Visitez
lesiteWebdevotredétaillantlocal,évaluezvotreproduit
achetéetlaissez‐nousquelquescommentaires!
Noustenonsàoffrirungrand"Merci"àtousnosclientspouravoirprisletempsd'assemblerce
produit"AmeriwoodHome",etdenousdonnervoscommentairesprécieux.
Merci
/