Sylvania SRTD413 El manual del propietario
- Tipo
- El manual del propietario

I INSTRUCClONES
I
EN ESPANOL INCLUIDAS. I
I
_ As an ENERGY STAR ®
E_r_r,_sT,_Partner, our company has
determined that this product meets
®
the ENERGY STAR" guidetines for
energy efficiency. ENERGY STAR ®
is a U.S. Jegistered mark.

[WARNING: TO REDUCE THE RISK OF FIRE OR ELECTRIC SHOCK, DO NOT EXPOSE THIS APPLIANCE]
1
TO RAIN OR MOISTURE,
CAUTmON
CAUTION: TO REDUCE THE RISK OF ELECTRIC
SHOCK, DO NOT REMOVE COVER (OR BACK).
NO USER SERVICEABLE PARTS INSIDE. REFER
SERVICING TO QUALIFIED SERVICE PERSON-
NEL.
The caution marking is located oil the rear of the cabinet.
THIS SYMBOL INDICATES THAT DAN-
GEROUS VOLTAGE CONSTITUTING A
RISK OF ELECTRIC SHOCK 1S PRESENT
WITHIN THIS UNIT.
THIS SYMBOL INDICATES THAT THERE
ARE IMPORTANT OPERATING AN[)
MAINTENANCE INSTRUCTIONS 1N THE
LITERATURE ACCOMPANYING THE
APPLIANCE.
IMPORTANT SAFEGUARDS
1.Read i_structions-Ali the sa%ty and operating instructions
should be read be%re the appliance is operated.
2.Retai_ Jnstrucr_ions-The safety and operatiug iustrBctious
should be retaiued t_/rfuture re,terence.
3.Heed Warnings_A_ waruings on tile appliance and ill tile
operating instmctious shouM be adhered to.
4.Follow Instructions-All operating aud use instructions
should be fc41owed.
5.Cleaning-Unplug TV/DVD hum the wall outlet be%re
cleaning. Do not use liquid cleaners ol aerosol cleauers. Use
a damp cloth for cleauing.
EXCEPT]ION: Aprodact that is meant for uuhltemlpted
service and, that f\_r some specific reasou, Bach as tile possi-
bility of the Mss of an authorization code ti._ra CATV con-
verter, is not intended to be unplugged by the user for clean-
iug or ally othel purpose, may exclude the refereuce to
unplugging tile appliance iu tile c_eaning description othel-
wise _equired ill item 5.
6.Attachments_Do not use attachmeuts not recommended by
tile TV/DVD manufacturer as they may cause hazards.
7.Water and Moisr_m°e-Douot use this TV/DVD near ware>
for example, uear a bath tub, wash bow!, kitchen sink, or
laundry tub, ill a wet basement, or uear a swimming pool
alld tile like.
8.Aceessories-Do not place this TV/DVD on an unstable cart,
stand, tripod, b_aeket, or table. Tile TV/DVD may fall cabs-
lug selious hl.july to someoue, and serious damage to tile
appliance. Use oifly with a cal_, stand, tripod, blacker, ol
table recommended by the manufacturer, or sold with tile
TV/DVD. Ally u_ounting of the PORTABLECARTWARNING
appliance sl/ould follow the maml- AVERTISSEMENT POUR UNE
TABLE ROULANTE PORTATIVE
facturer's iusmlctions and should use
a IllO/ll/tiu_ accessory lecommeuded
by tile mamlfacturel. All appliance
alld cart combination shouM be
moved with care.
Quick stops, excessive loire, and
aneveu sm'faces may cause tile appli-
auce a_ld cal*_ combil/atiol/to over-
tBrl/.
Aceessoires- Ne p_acezpas cette TV/DVD Buruue table
roulante, un support, un tr@ied, une console oa uue table
instable. Cette TV/DVD risquemit de tombe*_pouvant
gravement blessel quelqtfun et l'appareil re&lie poarrait
_tre s&ieusement endommag& N'uti_isez qa'une table
roulante, un support, un tr@ied, une console oa uue table
recommand4 par le fabriquant, OUvendu avecla TV/DVD.
Pour n'importe quelle installation de I'appareil, on dewa
saivre _esinstructious da fabriquant et ]'on devra utiliser les
accessoires d'instaHatiou recommand& par _efabliquant.
L'ensemble combin4 de I'apparei_ avec une table rou_aute
dewa 6tre d@lac6 avec pr&autiou. Des arr_ts brusques,
tree force excessive et des surfaces in_ga_es peuvent provo-
quer le renversement de feusemble combiu6 de
fapparei!/table mulante.
9_Ventilation-Slots and openings in the cabinet and the back
or bottom are provided R/l veuti_ation and to eusure reliable
operation of the TV/DVD and to p_otect it from oved/eat-
ing, and these openings must not be blocked or covered.
The openings should here! be bMeked by p_aciug the
TV/DVD on a bed, sofa_ rug, or other similar surface. This
TV/DVD shotdd here! be placed *learo_ over a radiator ol
heat registe/; This TV/DVD should not be p_aced ill abuilt-
in installation such as a bookcase ol rock unless proper
ventilation is provided or tile u_auufacturer's instructions
have beeu adhered to.
10.Power Som°ees-This TV/DVD shouM be operated only
flora tile type of power source indicated on tile marldng
label If you are not sure of tile type of powe_ supply to
your home, consult your appliance dea_er o_ _oca_power
company. ForTV/DVDs intended to operate from battery
power\ or other sources, refer to tile operating instructions.
1l.Grom_ding or Polarization-This TV/DVD is equipped
with a polarized aitemating<urreut line plug(a plug having
one b_ade wider than tile other). This plug wil_ fit into the
power outlet o!fly one way. This is a safety feature. If you
are anaNe to illsert the plug fully into the outleL hy revers-
ing the p_ug. If tile p_ug should stil_fai_to fiL contact your
electrician to replace your obsolete Outlet. Do not defeat the
safety purpose of the polarized plug.
- 2 - EN
0C28

FIGURE A
EXAMPLE OF ANTENNA GROUNDING AS PER
NATIONAL ELECTRICAL CODE
GROUND
CLAMP_
LEAD IN
WIRE
ELECTRIC
SERVICE
. ANTENNA
DISCNARGE UNIT
(NED SECTION 810-20)
GROUNDING CONDUCTORS
(NED SECTION 810-21)
NEC- NATIONAL ELECTRICAL CODE
$2898A
SERVICE GROUNDING
ELECTRODE SYSTEM
(NEC ART 250, PART N}
12.Power-Cord Protection-Powe>supp]y cordsshouldbe
1outedso that they are not likely to be walked Ol/or
piuched by items placed upon or against them, paying par-
ficHlaratteutiou to co_ds at plugs, couvenience receptacbs,
aud the point where they exit ;q'omthe appliauce.
13_Outdoor Antemm groundi_g-]lf au outside auteuua o_
cane system is couuected to tl_eTV/DVD, be sure the
auteuua o_cable system is grouuded so as to provide some
plotectiou against voltage stages and built-up static
charges. Ardcb 810 of the National Electrical Code,
ANS]I/NFPANo. 70, provides iutommfion with respect to
proper gmundiug ot the mast and supportiug structme,
g*vmudiugo* the lead-in whe to au auteuua dischmge uniL
size of groundiug couductors, _ocatiou of auteuua-dischmge
uuiL couuection to groundiug electrodes, aud requiremeuts
%r the grouudiug electrode. (Fig. A)
14.Lightning-For added plotecfiou %r this TV/DVD receiver
during a lightning storm, or wheu it is bit uuattended aud
uuused %r long periods of time_ unph_g it from the wan
outbt and disconuect the auteuna or cabb system. This will
plevent damage to the TV/DVD due to lightuiug and
powelqine surges.
15,Power Lines-Au outside auteuua system shouM uot be
located in the vicinity of overhead powe! _iuesor othel
ebchic Hghtol power circuits_ or whele it cau ial_ into
such power Hueso_chTcuits.When h/sta_Hugau outside
auteuua system, extreme ca*eshould be takeu to keeI) irom
touchiug such power liues or circuits as coutact with them
might be rata].
l&Overloading-Do uot oveHoad wan outlets aud extension
cords as this cau result in a risk of fire or electric shock.
17.Object a_d Liquid Entry-Never push o{jects of any Mud
into tiffsTV/DVD though openings as they umy touch dan-
gerous voltage points o] short out parts that could result iu
a fh'e olebctric shock. Never spi_ liquid of any kiud on
the TV/DVD.
lKServicing-Do uot attempt to service this TV/DVD yourself
as opening or removing covers may expose you to danger-
ous voltage or other hazards. Refer a_ servicing to qualified
service personnel.
19.Damage Requiring Service-Unphlg this TV/DVD h'om
the wa_ outlet aud reter seF_'iciugto qualified service pc>
soune_uuder the fo]lowiug conditions:
a. Wheu the powe>supp_y cord or p_ug is danmged or flayed.
b. K Hquidhas been spHbd, or o{jects have talleu into the
TV/DVD.
c. If the TV/DVD has beeu exposed to rain or wate/;
d. If the TV/DVD does uot operate uormal_y by ibHowiug the
operating iustructkms. Adjust oifly those couhols that are
covered by the operating iusmlctious, as improper adjust-
ment of other controls may lestflt iu damage aud wi_ ofteu
require exteusive work by a qualified techuiciau to restore
the TV/DVD to itsuorum_ operafiou.
e. If the TV/DVD has beeu dropped or damaged iu auy way.
t. Wheu the TV/DVD exhibits a distinct chauge iu pertof
mauce-this iudicates a ueed %r service.
20.Replacement Parts-Wheu ]eplacemeut parts ale Jequired,
be sure the service techuiciau has used replacement parts
specified by the mauutacturer flinthave the same character-
istics as the original part. Unauthorized substimfious may
result iu fire, electric shock, injury to persons or other haz-
ards.
21.Safety ( heek-Upou complefiou o* any service or repairs to
this TV/DVD_ ask the service teehuiciau to pel%rm routine
safety cheeks to determiue that the TV/DVD is in proper
operating couditiom
22.Heat-This TV/DVD product should be situated away from
heat sources such as ]adiators, heat registe_s_stoves, or
other ploducts (iucluding amplifiers) that produce heat.
- 3 - EN
0C28

IMPORTANTCOPYRIGHTINFORMATION
Uuauthorizedcopyiug,broadcasting,punicperrbr-
mauceaudleudiugofdiscsareprohibited_
Thisproducthlcorporatescopyrightprotectioutech-
uologythatisprotectedbymethudclaimsofcertahl
U.S.pNeutsaudotherintellectualproperlyrights
ownedbyMacrovisk)uCorpora/kin and other rights
owuers. Use of this copyright protection techuuMgy
must be authorized by Macrovisk)n Corporation,
aud is fl_teuded rbr home and (Nler limited viewhlg
uses ouly uuless otherwise authorized by
Macrovisk)u Corpomtkm. Reverse eughleerhlg or
FCC WARNING- This equipment may gener-
ate or use radio frequency energy. Changes or
modifications to this equipment may cause
harmful interference unless the modifications
are expressly approved in the instruction man-
ual. The user could lose the authority to oper-
ate this equipment if an unauthorized change
or modification is made.
RADIO-TV INTERFERENCE
This equipment has been tested aud rbuud to com-
ply with file limits _br a Class B digital device, pur-
suaut to Pail 15 of the FCC Rules. These limits arc
designed to provkte reasouable protection against
llarmful interrereuce iu a resideulial iustallafiou.
This equipment genera/es, uses, and can radiate
radio frequeucy energy aud, if nut iustaHed aud
used in accordauce with the iusmlctions, may cause
harmful inlerrercuce to radio commuuications.
However: there is uu guarautee that iuterlkrcuce
will not occur in a particular iustaHatiou. If this
equipmeut does cause harmful iutelCereuce to
radio or televisiou receptiou, which cau be deter-
mined by tumiug the equipmeut off aud on, the
user is eucouraged to try to correct the iuter}er-
euce by oue or more o[ the [oHowiug measures:
1) Reurieut or relocate Hie receiving auteuua.
2) [ucrease file sepamfiou betweeu the equipmeut
and receivec
3) Couuect the equipmeut iuto au outlet on a cir-
cuit diflercut fl'om that to which the receiver is
connected.
4) Cousult the dealer or au experieuced mdio/TV
LASER SAFETY
This unit employs a laser. Ouly a qualified service
persou should remove tile cover or attempt to ser-
vice this device, due to possible eye iujury.
CAUTION: USE OF CONTROLS OR ADJUST-
MENTS OR PERFORMANCE OF PROCE-
DURES OTHER THAN THOSE SPECiFIEr)
HEREIN MAY RESULT IN HAZARDOUS
RADIATION EXPOSURE.
CAUTION: VISIBLE AND INVISIBLE LASER
RADIATION WHEN ()PEN AND INTERLOCK
DEFEATED. DO NOT STARE INTO BEAM.
LOCATION: INSIDE, NEAR THE DECK
MECHANISM.
This Class B digital apparatus complies with
Canadian ICES-903.
Cet appareil numdrique de la classe B est con-
forme h la norme NMB-993 du Canada.
CAUTION: TO PREVENT ELECTRIC SHOCK,
MATCH WIDE BLADE OF PLUG TO WIDE
SLOT, FULLY INSERT.
ATTENTION: POUR t_VITER LES CHOCS
t_LECTRIQUES, INTRODUIRE LA LAME LA
PLUS LARGE DE LA FICHE DANS LA
BORNE CORRESPONDANTE DE LA PRISE
ET POUSSER IUSQU'AU FOND.
A NOTE ABOUT RECYCLING
This product's packaging materials are recyclable
and cau be reused. Please dispuse of any material s
iu accordauce with your local recycliug regula-
tious.
Ba/teries shouM never be thrown away or iuciuer-
ated but disposed of in accordauce with your k)cal
regulatk)us couceruiug chemical wastes.
The serial uumber of this product may be fouud ou the back of tile uuit. No other TV/DVD has the same serial
umuber as yours. You should record tile uumber aud other vital iuiimuatiou here and retain this book as a per-
maueut record of your purchase to aid ideutificatiou iu case of theft. Serial uumbers are uot kept ou file.
Date of Purchase
Dealer Purchase from
Dealer Address
Dealer Phoue No.
Mode] No.
SerM No.
- 4 - EN
0C28

For sate operation and satis[?__ctory perRmnance of
your TV/DVD, keep the [oHowing ill mind when
selecting a p_ace [or its installation:
® Shield it h:om direct sunlight and keep it away from
sources of Mlense heat.
® Avoid dusty or humid p_aces.
® Avoid places with insuNcient ventilation tbr proper
hen dissipaion, Do not block the venlilation holes at
file tnp_ bottom of the unit. Do not p_ace the unit
on a carpet because this will block the ventila/k>n
lldes.
® hlstaH unit M a horizontal position.
* Avokl k>cafions subject to strong vibration.
® Do not place the TV/DVD near s/rnng magne/ic fieMs.
® Avokt moving TV/DVD to locations wllem temper-
ature dif[erences are extreme,
The following symbols below appear in some head-
ings and notes in this manual with the following
meanings
: Descriptk)n reters to TV operation (m the TV mode).
: Descriptiou refers to playback of DVD video discs
(in the DVD mode).
: Descriptiou refers to playback of audio CDs
(in the DVD mode).
: Descriptk)n refers to pk@)ack of MP3 discs
(in the DVD mode).
: Description refers to the items to be set by the
QUICK mnde (m the DVD mode).
® Do not handle the power cord with wet hands.
® Do not pull on the power cord when disconnecting
it from an AC wall outlet. Grasp it by the plug_
®If by accident, water is spilled on your unit, unplug
the power cord immediNe_y and take the unit to an
Authorized Service Center fbr servicing.
® Do not put your fingers or objects into the
TV/DVD disc _oadMg tray.
® Do not place anything directBy (>ntop o[ the unit.
Moisture condensation may occur inside the unit
when it is moved from a cold place to a warm p_ace
or after lleathlg a cold room or under conditions of
high humidity. If a DVD is played in a TV/DVD
wllich has moisture, it may damage the DVD and
TV/DVD. Therefore when the condensation occurs
inside the unit, turn POWER on and allow at ]east 2
hours for the unit to dry out,
ACCESS()R gS
Remote Control Unit Batteries Owner's Mammal
NE226UD 2 AA Batteries [l EMN20123 I
® If you need to replace these accessories, please refer to the PART NO. under the illustrations and call 1-800-
488-1222.
® Depending on your antenna system, you may need different types of Combiners (Mixer) or Separa/nrs
(Splitter). Contact your k)cal electronics store for these items.
® We do not recommend the use of universal remote controls. Not all of the functions may be controlled with
a universal remote control If you decide to use a universal remote control with this unit, please be aware
thai tile code number given may not opera/e this unit. [n this case, please call tile manu{)._cturer of the uni-
versal remote conlrol.
- 5 - EN
0C28

[] IMPORTANT SAFEGUARDS ............. 2
[] PRECAUTIONS . ....................... 4
LOCATION ............................ 5
AVOID THE HAZARDS OF ELECTRICAL
SHOCK AND FIRE ...................... 5
SYMBOLS USED IN THIS MANUAL ....... 5
WARNING ............................ 5
[] SUPPLIED ACCESSORIES ............... 5
[] TABLE OF CONITNTS . ................. 6
[] FEATURES ............................ 7
[] OPERAIYNG CONTROLS AND FUNCTIONS...8
INSTALLING THE BATTERIES ........... 9
[] PREPARATIO!V FOR USE ............... 10
ANTENNA/CABLE CONNECTIONS ....... 10
CONNECTING TO FRONT A/V INPUT JACKS .11
CONNECTING TO AN AMPLIFIER/RECEIVER
EQUIPPED WITH DIGITAL INPUT JACK
(DVf), CD, MP3 sound onJy) .............. ]]
CONNECTING TO AN AMPLIFIER/RECEIVER
WiTH A DOLBY DIGITAL DECODER
(_or DVD) ............................ ] 2
TV SECTION
[] SET UP FOR USE ..................... 13
SELECTING THE LANGUAGE ........... 13
CHANNEL SET UP ..................... 13
DELETING (OR ADDING) CHANNEL(S) ...] 4
[] TV OPERAIYON ....................... 15
WATCHING A TV PROGRAM ............ ]5
DEGAUSSING ........................ 15
PICTURE CONTROL ................... ]5
SLEEP TIMER ......................... 16
CLOSED CAPTION SYSTEM ............ ]6
V-CHIP SET UP ........................ 17
DVD SECTION
[] ABOUT THE DISCS .................... 19
PLAYABLE DISCS ..................... ]9
DISC TYPES .......................... 19
[] PLAYING A DISC ...................... 20
BASIC PLAYBACK .................... 20
GENERAL FEATURES .................. 20
DISC MENU .......................... 20
TITLE MENU ......................... 20
RESUME ............................. 2]
PAUSE ............................... 21
STEP BY STEP PLAYBACK ............. 21
FAST FORWARD/REVERSE SEARCH ..... 21
SLOW FORWARD / SLOW REVERSE ..... 21
[] SEARCH FUNCTION .................. 22
TRACK SEARCH ...................... 22
TITLE / CHAPTER SEARCH ............. 22
TIME SEARCH ........................ 22
MARKER SETUP SCREEN .............. 22
[] SPECIAL PLAYBACK FUNCTION ........ 23
REPEAT ............................. 23
PROGRAM ........................... 23
RANDOM PLAYBACK ................. 23
[] PLAYIN(; A MIL? DISC .................. 24
MP3 PLAYBACK ...................... 24
REPEAT ............................. 24
PROGRAM ........................... 24
RANDOM PLAYBACK ................. 24
[] CHANGING TIDE SETTIN(;S ............ 25
SUBTITLE LANGUAGE ................ 25
AUDIO LANGUAGE ................... 25
STERE() SOUND MODE ................ 25
CAMERA ANGLE ...................... 25
BLACK LEVEL SETTING ............... 25
VIRTUAL SURROUND ................. 25
[] THE ON-SCREEN INFORMATITON ....... 26
[] CHANGING TIIE DVD SETUP ITEMS ....27
LANGUAGE SETTING ................. 27
DISPLAY SETTING .................... 28
AUDIO SETTINGS ..................... 28
PARENTAL CONTROL ................. 29
INITIALIZE ........................... 29
[] 7NOUBLESHOOTING GUIDE ........... 30
[] MAINTENANCE ....................... 32
DISC HANDLING ...................... 32
[] SPECIFICATIONS . .................... 33
[] ESPA._OL ............................ 34
[] WARRANTIT ................... Back Cover
- 6 - EN
0C28

[ TV Mode ]
® 181 channel capaNlity PLL frequency synthesiz-
er tuner
(A converter may be necessary to view' scrambJed cable
chmmeIs. )
® Infrared remote control
® TrilinguN on screen menu display setectable in
English, Spanish or French
®SmeepTimer
Tile Sleep Timer function enables tile mlit to mm oft"with-
out pressing POWER after a prcseJected time period.
®Closed Caption Decoder
You may view specially labeled (cc) TV programs,
movies, news, etc. with either a diak_gue caption or text
display added to the program.
®Auto Shut Off Function
If there is up air signal input fl'om tile antemm terminal m_d
no operation for 15 mhlutes, the TV/DVD will turn itself
off automatically.
®V-CHIP
Enables parents to prevent their children from watching
hlappropriate material on TV.
l DVD Mode l
®Dolby Digital sound
This TV/DVD can output a Dolby Digital audio signal
from the digital audio output jack.
®StiWfastJslow/step playback
Various playback modes are awdiabie il_ch_ding still pic-
tures, fast %rward/rcverse, slow motion and frame by
frame.
® Random playback for audio CD and MP3
This TV/DVD can shuttte tile order of tracks to play them
hi random order.
®Program playback for audio CD and r_P3
You can program the order of tracks to play in any desh'ed
order:
® DVD menus in a desired manguage
You can display DVD menus hi a desired language, if
available on a DVD disc.
®Screen saver/Auto power-off functions
The screen saver program starts 'M_en there is no i_put
from the TV/DVD Ibr 5 minutes in the stop mode. When
tile screen saver program has been in opperation t_r 15
minutes, the pov,.er will automatically mrn off.
®Subtitles in a desired language
You can select a desired hmguage for the display subtitles,
if that language is available on a DVD disc.
®Selecting a camera angle
You can select the desired camera angle, it" a DVD disc
contains sequences recorded from different angles.
®Choices for audio language and sound mode
You cml select the desired audio language m_d somM mode,
if different languages and modes arc available on a DVD
disc.
® Parental lock
You can set the control level to limit playback of DVD
discs which may not be suitable tbr children.
® Automatic detection of discs
This TV/DVD automatically detects if the loaded disc is
DVD, audio CD or MP3.
o On-screen display
lulornmtion about the cun'ent operation can be displayed
on a TV screen, allowh_g you to confirm the currently
active flmctions (such as program playback).
® Search
Chapter search / Title search / Track search / Time search
® Repeat
Chapter / Title / T_ack / Group / All / A-B
® Marker
The location on at specific DVD disc designated by the
user can be accessed later.
®Resume Pmay
User cm_ resume to playback fl'om the location at which
play was stopped.
®Virtual Surround
®Bit rate indication
®DRC (Dynamic range contro0
You can control tile range of the difference between the
loudest and softest spreads.
- 7 - EN
0C28

__t>gi"_Ii_ A _1-_1 _; d¸"_ d "_d __r_l __ _ _ t _ _ _ _I¸_ _:_I __ _¢ ¸__'_ _ z_, _ rg_
I TV/DVD FRONT PANEL I [Fig. I
oIooIooIooIo ooIoooIoIooI
O0000IoIIo00 O00IooooooIo
oooooooooooo oloooooo0ooo
oooooooooooo oooooooooeoo
oIolooIooIlo
O0000IOOIOOI _ IooIoooooooo
If°If°°°°°°° _ °°°°°°°°°°°°
oIooooooo0oo Io0oo0olooIo
oooooooooooo oooooooooooo
oooIooIooooI IIoloooIooIo
oooooooooooo oooooo_oooo
OiOOiOOiO00i 8KII_ • IIH
IOOIOOO00000
OIO0010IO01I O0000IOOOIO0
OOIOOIO0000I OOOOOOIO00Ol
O000IOOIO000 O00000IOIO00
oooo_ooooooo oooo_oo_oooo
............ i i ............
O0001IOOIOOi ................. OiOOIOOIOOlO
IOOIOOIOOIO0 OOIOOIOOIO01
.............""'"°"°°" ' !!!!!!!i!!!!
2 3 4 5 6 7 8 9 10 11 12 13 14
I REMOTE CONTROL I [Fig. 2]
11
21
13
34
35
19
18
8
33
32
31
30
29
28
27
26
L Disc loading tray
2.VIDEO input Jack [page 11]
Connect to the video output jack of a video
camera or VCR, Video game system.
3. AUDIO UR input Jacks [page 11]
Connect to the audio output jacks of a video
camera or VCR, Video game system.
4. POWER Button [page 13]
Press to turn the power on aim off.
5. VOLUME _/_' (VOL _Y-,7) Buttons
Press to co_trol the volume level.
_. CHANNEL _/_ (CH. _f_) Buttons [page !4]
Press to select memorized channel
Press to change to TV mode when in DVD mode.
7. Remote Sensor Window
8. STOP Button [page 20]
Stops operation of the disc.
!.SKIP I_ Button [page 22]
Begins playback tram beghming ot current chap-
_er or track.
SEARCH (REV) _ Button (Front Panel)
[page 2!]
During playback or in the pause mode, press and
hold button down tot a few seconds to change
reverse playback speed.
10. PLAY Button [page 20]
Begins playback of disc.
Press to change to DVD mode when in TV mode.
11. SKIP _! Button [page 22]
Begins playback from beghming of next chapter.
SEARCH (FWD) _ Button (Front Panel)
[page 21]
During playback or in the pause mode, press and
hold bu_on down tot a few seconds to change for-
ward playback speed.
12. PAUSE Button [page 21]
Pauses the current disc movement.
13. OPEN/CLOSE Button [page 20]
Press to open disc tray to insert a disc or to open to
remove a disc,
_4. HEADPHONE Jack
To connect headphone (not supplied) for personal
listening.
15. NODE Button [pages 23-25]
Activates program playback or random playback
mode when playing CDs or MP3.
l& Number Buttons
TV Mode: [page 15]
Press two digits to directly access ti_e desired channel.
Remember to press 0 before a single digit channel.
+100 Button
Pres_ to select cable channels which are higher than 99,
DVD Node: [page 22]
Press to enter the desired number.
+10 Button
Press to enter the desired numbers which are greater
than 9.
8 EN
0C28

[ TVIDVD REAR VmEW1
i c_:............. F,
[Fig. 3]
©
37 38 39
17. SLEEP Button [page ! 6]
Press SLEEP to display the sleep timer and begin
operation. The shut off time can be determined by
the number of times you press this button. (0, 30,
60, 90 or 120 minutes)
18. REV _ Button [page 21]
Press to view the DVD picture in fast reverse
motion, Press PAUSE, then press this button to begin
slow motion playback. Press this button repeatedly
to change the reverse speed of slow motion.
FWD _ Button [page 2!]
Press to fast forward the Disc. Press PAUSE, then
press this button to begin slow motion playback.
Press this button repeatedly to change the forward
speed of slow motion.
19. V.SURR(VIRTUAL SURROUND) Button
[page 25]
Press to _,etvirtual surround on/off,
20. SETUP Button [pages 13,27-29]
Press to enter or exit the TV menu or DVD setup
mode.
21. TITLE Button [page 20]
Displays the title menu on DVD disc,
22. CLEAR Button [pages 22-24]
Resets a setting.
23. DISPLAY Button
TV Mode:
Press to display the channe! number on the screen,
If you press it a second time, the channel number
will disappear.
DVD Mode: [page 28]
Displays the current DVD stares on the TV screen.
24. SEARCH MODE Button [page 22]
Press to locate a desired point.
2_. AUDIO Button [page 25]
Press to select a desired audio language or sound
mode available on a DVD disc.
2& SUBTITLE Button [page 25]
Pres_, to select a desired subtitle language.
27. REPEAT Button [page 231
Repeats playback of the current disc, title, chapter,
_or track.
28. ANGLE Button [page 25]
Press to change the camera angle to see the sequeuce
being played back from a different angle available on
a DVD disc.
29. REPEAT A-B Button [page 231
Repeats playback of a selected _,ection.
30. RETURN Button [page 25]
Returns to the previous operation in the DVD setup
mode.
31. ENTER Button [pages 13, 20]
Press to accept a setting.
32.
33.
34.
35.
36.
37.
38.
39.
Arrow Buttons
TV triode: [page !3]
Press to select a setting mode from the menu on tile
TV screen.
Press to select or adiust from a particular menu.
DVD triode: [page 20]
Use v,hen making settings while watching the
display on a TV screen.
DISC MENU Button [page 20]
DiH_lays the menus available on a DVD disc.
SELECT Button [page 20]
Press to change to TV mode, front A/V input mode
or DVD mode.
NOTE: When you select the DVD mode by this ]
button, press PLAY or OPEN/CLOSE first,
/
Otherwise, the DVD features do not function.
MUTE Button
PressMUTE to turn oft"the sound portion of tile TV
program. (Volume level display turns LIGHT RE[)
from LIGHT BLUE.) Press MUTE again or press
VOL, z>.or _Tto restore sound.
PICTURE Button [page t5]
Press to enter picture ad,iustment mode.
Power cord
('om_ect to a standard AC outlet (120V/60Hz).
NOTE: Remove the power cord from the hook on
the back of the TV to avoid breaking a wire
before you connect to a standard AC outlet.
COAXIAL digital audio out Jack (DVD Audio
ONy) [pages !1, 12]
Connect to the digital input of an external amplifier
or receive_:
ANT. in Jack
Colmect to an antenna, cable system or satellite sys-
tell1.
l)Open the battery compamnent cover by'pressing the
cover on tl_eremote unit in the direction ot the arrow.
2)Insert 2 "AA" penlight batteries into tile battery
compartment in the direction indicated by the
polarity (+/-) mailings.
3)Replace the cove_:
NOTES
• Do not mix alkaline and manganese batteries.
® Do not mix oM and new batteries.
-9-
EN
0C28

SateNite Box or
Cable Box
(Not sup@led)
From
Cable System
From Cable System or
SateINte Dish
Illiim
}
75oohm Coaxial '_
Cable (Not sup@led) I
, ,::cl},_![
Rod Antenna
(Not sup@led)
Or
VHF/UHF
or ComNner
(Not sup@led)
or
Note to CATV system h_staller:
This reminder is provided to call the CATV system h]sta[[er's attention to Article 820-40 of the NEC that provides
g_ddelines for proper groundh]g and in particular, specifies that the cable ground shall be connected to the groundh-_g
system of the buHdh]g as close to the poh]t of cable entry as practical.
Bent pit]
Bet%re plugging the amemm into the ANT. tINjack of the TV/DVD, check that
die pin is not bent. ]Ifit is bent, straighten the pin as illustrated then plug the pin
into the ANT. IN .i_ck of the TV/DVD. Plug
{Needs to be straightened}(Straight pin}
V_'VfiV (IY/!,l,l;;_)J<; ANT/<,N?_ _ 24/;LE _471_ _CU't k:.
VHF/UHF Antenna
_(Not supplied)
VHF Antenna
(Not supplied)
_ ::_ UHF Antenna
(Not supplied)
<
Flat twinolead cable [Fig, 4]
The VHF/UHF Rod Aatenna (not supplied) is detach-
able. Insert file stem of the antemm into die hole on
flle upper-back pollion of tlle TV/DVD. Connect die
VHF/UHF Rod Autemm or VHF/UHF Combim_fiou
Antenna to @e ANT. terminal of die TV/DVD as
shown in @e diagram above. For the best reception,
fully extend the VHF/UHF Rod Autemm and make
tl_enecessary adjusm]ents. (Avoid toucMug tl]e top
section wl]en adjustiugj
.f ._;.D_.L_©X©;/_SATI.L. 7A /;O_V
If yore: cable service supplies you wid] a converter
box or if you use a sateNite system, you can use die
basic com]ectkm shown here.
Channel selection must be made witl] die converter
box or satelNte box. This means @at cham]els cannot
be changed using die TV/DVD Remote Coumi
I; S< D" %_%S< < ;' .<:%;'[ 5" 7
hi some areas it will be necessary to use an ouldoor
al]tel]ua,
I<':tfJL/: It 7 70{ 7 60NWt;D!7t,;/¢i
Use @is conneclion iI your cable system couuects
dh:ecdy to your TV/D'II) without a converter box
Use @e TV/DVD Remote Comrol to select channels.
TO VIEW A SCRAMBLED/UNSCRAMBLED
CHANNEL
l.Set the TV/DVD charnel selector to @e output
channel of die CaNe Converter Box or Satellite
Box. (Ex. CH3)
2.Select die chain]el to view on your Cable Couve_ler
Box or Saellite Box.
- 10- EN
0C2g

Whenyouwatchaprogramrecordedonanother
source (VCR video camera Video game system), use
file audio/video input jacks on ff_e h:ont of the
TV/DVD.
AUX I
"AUX" appears on the screen.
NOTE:
®When you connect a monaural VCR (anoffler
source) tO[_1__STV/DVD, com_ect the Audio output
jack of the monaural VCR (another source) to the
AUDIO L jack of this TV/DVD. The audio will
distributed in both L and R channel equally.
Use an audio coaxial digital cable awtilable at retail stores for the audio com_ections.
[Front of the TV/DVD]
Amplifier/receiver equipped with
® ®
audio input jack
ToCOAXIAL digital audio out jack [Fig, 6]
(only DVD audio out)
NOTES:
® The audio source on a disc in a 5.1 channel Dolby Digital surround tbrmat cam_ot be recorded as digital
sound by an MD or DAT deck.
® Be sure tu turn off dI_epower tu aH components in die system befi_re making connections.
* Refer to die Owner's Manuals for dI_ecomponents to be cum_ecIed to the TV/DVD.
® Set DOLBY DIGITAL tu OFF R_r audio output h_ d_e setup mode. Playh_g a TV/DVD using incorrect set-
tings may generate noise disturtion and may also damage dI_espeakers. (See page 28 tu set DOLBY
DIGITAL tu OFE)
® TMs will only allow 2-channel DVD sound tu be listened to on tl_e amplifie_:
- 11 - EN
0C28

To use this TV/DVD to play a DVD disc iu a 5.1 chmme_ Dolby Digita_ surruund }orma/, the TV/DVD can
outputs a DOLBY DIGITAL Data stream from its COAXIAL digital audio out jack, By llookiug the TV/DVD
up to a receiver with Dolby Digital decode1; you can eJ_joyhigh-quali U surround sound as eJ_joyed hi movie
theaters.
Use audio coaxial digital cables available at retail stures for the audio comlections.
1
[Fig. 7]
NOTES:
® Be sure to turn off the power to all componeuts in the system betbre connecting anotller componeut.
®Reter to tile Owner's Mmmals for tile components tu be connected to tile TV/DVD.
® If cuuuected to a receiver with Dolby Digital decodm; set DOLBY DIGITAL tu ON tbr audio output hi tile
setup mode. (See page 28 tu set DOLBY DIGITAL to ON.)
® Unless connected to a receiver with Dolby Digital decode_; set DOLBY DIGITAL tu OFF }br audio output
hi tile setup mode. PUaying a TV/DVD using incorrect settings may generate noise distortion and may also
damage tile speakers.
® Ouly DVD audio is available using tile digital audk_ out jack,
- 12- EN
0C28

UP FOR SE
Plug d_e TV/DVD power cord into a
standard AC oLR]ek
NOTE:
® If any digits appear ill the corner of
tile screen, press POWER WidlOUt
unpktggMg die power cord.
Make suFe .**
®Press POWER to mm on the TV/DVD.
NOTE: This function effects only tile language (m
the screen menu and not the audio source.
_i ,, .... l, _, (_ _vs_Tup
Press SETUP (m the remote control. _ _p._ uP.....
Press Arrow (_/_') t(! point t(! /.............o_T,o_[o_][_N_c[*_....
LANGUAGE". [
Sdect ENGLISH , ESPAN )L = Spafish or
"FRAN(;AiS"= French using ENTER.
'£_K:<i 'i÷ ka_sg 89÷ nsode
Press SETUP to return to TV mode.
NOTE: If for some reason die menu is in Spanish or
French, press SETUR press Arrow (_/_') t(! p(lml t(!
"IDIOMA [ESPAlqOLI" or "LANGAGE
[FRAN(?AISI", then press ENTER, dlen press
SETUP (in die remote c(mm!l.
You call program d3e TVs Rmer to program aH die
channels you receive M your area.
NOTE: Channel memory programming is NOT
needed when connected to a cable box or satellite
box. lust select dte TV/DVD chrome] sdector to the
output cllannei (ff die cane box or sa/eHite box (Ex
CH3), dlen select d_e channel to be viewed (in die
CaNe Box or SaelHte Box.
Ma_e s_ye .**
®Press POWER to mm on the TV/DVD.
Press SETUP (in the remote control .........
Press Arrow (_./T) to point t(! .............
CHANNEL SET UP". _B££_[%_u_.l
CAPTION [OFF]
.... tss,_,g/ _. OC; }SOg'S/'/"_/ _g
Press Arrow (_/V) to point t(!
AUT ) CH PROGRAMMING".
The Rlner scans and ]llemolJzes aH
tile active charnels M your area.
CHANNEk SET UP
ADD/ DBLBTE CH (CATV_
AUTO CH P_qO_RAMM_N_
{}} A/te_ sca_s<>g
The tuner stopson tile bwest memorized channel.
® When AUTO CH PROGRAMMI[NG is activated
where dlere is no TV signal input, "NO TV SIG-
NALS" will appear on dte display after die com-
pletion o[ the channel scguming.
CHANNEL PRESETTING :
®The TV may memorize TV cllarme]s as CATV
chamlels if reception conditions are pool: If dlis
happens, check die antenna connections and try die
AUTO PRESET CH action again, or wait until
reception conditions are better and then try it again.
- 13- EN
0C28

The chmmeb you no kruger receive or seldom watch
can be deleted from the memory. (Of course, you can
add die deleted cham_el into d_e memory again_)
Seec C{{ANNEL SET U_:_
Press SETUP on file remote comrd. •.......
Press Arrow (A/T) _o point _o .............
v CH_P SET UP
"CHANNEL SET UP". .......... r....... 1
CAPTION {OFF]
Then press ENTER.
2 S®÷cl:A©D/DEL{_7'E o...........
Press Arrow (_/_) _opoint _o ................. ,
"ADD/DELETE CH". .......................
Press ENTER.
PressArrow (_/_) umil your
desired cltam_elmm, ber appears.
(You can Mso use d_e number bin- 0s
tons or CHANNEL(CHg _/T to
ADD _ _ELETE
enter i0 (Example: CHS)
® You must precede sh_gle-digit
cham_el numbers widt a zero (Example: 02 _. 09).
® When sdecting cane cham_els which are higher
dmn 99, press +100 fhTst,d_en press _he last _wo
digits. (Example: to select chmmel 125, first press
+100, [__e_l press 2 and 5).
Press ENTER. The dmm_ei number changes to iigh{
red. The channel is dde_ed hTommemory.
* To delete another chmmel, repeat steps [31 to [41.
® If you press ENTER again, d_e clmm_el is memo-
Added channel: Light b_ue.
Deleted channel: Light red.
s
Press SETUP io retm_l to TV mode_
NOTE: To confirm dm_chained(s) has been ddeted
or added, press CHANNEL(CH.) _/_.
- 14- EN
0C28

'+II I;,11_II / I I I llJ <_I
Press POWER to mm on tl_eTV/DVD.
2 S®/ect the c_n-_n'÷/ t_ .be
Press CHANNEL(CH.) A/V to select your desh:ed
channel uum bet or press tile unto ber buttons.
Notes _k_rusing the number buttons on the remote
control:
® Yun must precede single-digit channel unmbers
with a zero (Example: 02 ._ 09).
®When selecting cable channels which are higher
Hlau 99, press +100 first, then press the last two
digits. (Example: to select cllauuel 125, fhTstpress
+100, then press 2 and 5).
Remember:
l[fthe TVfl)VD is connected to a cable box or
satellite box, the TV/DVD must be on CH3 or
CH4, then tile channel to be viewed must be select-
ed on tlle cable box or satellite box.
;'/+++ +++so+ + [
+ > ............... +++
/
Press VOLUME(VOL) A/V to
adjust Hie v(Anme.
VOLUM_ 20
H]lnl]mm]m
NOTE:
+ If yon press CHANNEL(CH.) A/_ in tl_eDVD
mode, you can cllange tlle TV channels.
When yon turn off the TV/DVD in the DVD mode,
wlleu you turn it on again, it will return to tl_eTV
mode.
Tile TVfl)VD's picture controls - BRIGHT, CON-
TRAST, COLOR, TINT and SHARPNESS - are
preset to factory specifications. Although tlley are
usually tlle best, yon may need to make some ftuther
adjnstmeuls _br your individual pretereuce.
Muke sure ...
+ TV/DVD power must be turned on.
<? ,+ z:+ + +* #+++ + *++, + * +++ ++++, _;+++++++b, "++g++J+ +++ =++++ 0+,,
Press PICTURE on tl+eremote control.
+_;,S+_+/+<: 1+:++++yOU W_!_I_t+) a+<; ++;If
Press Arrow (_./V) until desh:ed control is displayed.
BR]{GHT
CONTRAST
COLOR
TINT ......
DDDDDDDmDDDDDDD+
SHARPNESS
,3' Ad+st the I lot+.+++co++t+o!
Press Arrow (_ / _) to adjust to your desh:ed bevel
within 5 seconds+
NOTE:
+ At step [3J, the picture adjustment display will dis-
appear from tile TV screen after about 5 seconds
unless you press any buttons, even though you may
,lot be fhAslled+In this case, repeat from step [l J+
TMs televisk+u has a degansshlg drcuit that will clear
up color errors on tile TV screen tlnt are caused by
any excess magnetism wMcll happensto get too
close to flte TV. This circuit is designed to operate
once when the set is first pkugged in+If minor color
errors are seen in some k)ca/ious on the screen+
please unplug fl_eTV for approximately 15 mhmtes.
When Hte TV is plugged back hi, the degaussing dr-
cuit will operate once to clear them up. Repeat this
procedure any time the TV screen is acddeutaHy
magnetized, or when the TV is moved or relocated.
Arrm+ Ilumm _ Arrow Butto_
{o deofease to i_lcrease
BRIGHT brighmess brightness
to decrease to illcfease
CONTRAST
c+)_1_FI_St colltrast
(_OLOR to pate to bfiltiam
TINT to puq_te to green
SHAPNESS _o soft to clear
®If there Jsa power falm'e of any kind, the unit wll
retain its memury uf the setting yuu have selected.
- 15- EN
0C28

TheSleepTimerfunctionenablesyoutoshutoffthepower
withoutpressingPOWERafteraselectedtimeperiod
_"9<; 3}.EEP71iZ!i_'_
thesleeptimeincreases30minutes.
Tocancelthe sleep timer:
Press SLEEP repeatedly utah "SLEEP 0 MI[NUTE"
s d sp aye&
NOTES:
®When you disconnect the unit from the AC outlet,
or if you have a power failure, the sleep time will
be can eel Ied.
® riP{)view' _he time left tbr sleep timer press SLEEP
once when SLEEP disNay disappears. After 10
seconds, disphy will disappear again.
NOTE:
If the TV/DVD displays a black
box on the TV screen, this means
that the TV/DVD is set to the
TEXT mode. To clear screen, select
[CAPTI[ON l], [CAPTI[ON21 or
[OFF].
Make sure ...
® TV/DVD power must be turned ()m
Select CAPTOr4 _......
Press SETUP on fl_e remote cumrol .............
V CHIP _KT UP
Press A or T to point to "CAP- o_,o_:U"_°_°:o_.........
TION'.
2 S_ec !ie_,_ des_'_,:_dcapton <'<,_u
captkm menu appears. 8_£_gup
([CAPTK)N1 I, [CAPTI[ONgl ........ '_' _GAPT[©N IG_PT[ON 1]
' s
[TEXT1 } or [TEXT2])
i!/ Ex S'¢e cspi_os sett _'_9_sode
Press SETUP tu return to TV mode.
You can view specially labeled (cc) TV programs,
movies, news, etc. with either a dialogue caption or
CAPTION mode: By choosing the caption mode, you
can watch dramas, movies and news whib captk)nmg
the diabgues and the cements of news appears.
TEXT mode: By choosing the text mode, you can
watch half screen text h_tbrmatiou if you want.
1-2: You may view these captk)us or text hfformaqon
by selecting either "1" or "2". Caption "2" is used,
usually for a second language if available.
NOTE:
Not aH programs are bwadcast with closed captkms.
Your television is desig_ed to provide error free
cbsed captions from high quality antemm, cable and
VCR siguab. Couversdy, poor quality signab are
Hkely to result in captkm errors or no captk)us at all
Common signal conditk}ns which may cause captkms
errors are listed beluw:
® Automobile ignition noise
* Electric motor m)ise
® Weak or snowy receptkm on TV screen
® Multiplex signal reception displayMg picture
T(_ (u_ACZ£ 7,¢Z ( LOSZD (,s£>TI©N
Repeat steps [] } to [2}, select [OFFI using ENTER.
Press SETUP (m d_e remote comrol to return to WV
mode.
;4/]£?,/ 7£ E <£OS/i?>< s7770/<MO©E
£soA
The ()u-ScreenDisplaywilldisappeara_ter5 sec-
onds.
* This is also true when MUTE is pressed.
® If them is a power failure of any kind, d_e unitwill
retain its memory of this feature.
- 16- EN
0C28

V-CHIP enabbs parems to prevent their cMMren
from watching inappropriate material on TV.
V-CHIP reads @e ratings Ibr programming (except
R/r news and sports programs, unedited movies on
premium cane cham_els and Emergency Broadcast
System signaB), dlen denies access to programming
if die pro.jTam s rating meets the limitations you
select. In this case, "PROTECTED PROGRAM by
_?' message appears on tlle TV screen.
To block ratings, R@ow @e steps below.
®Programming may be rated by the Modon Picture
Association of America (MPAA) or according to
die Televiskm Paternal Guidelines. in on]er t(!
Hock any inappropriate prograHnBing, set your
limits M bo@ places (MPAA RATING and TV
RATING).
Y'_/_477',,Y,;ALT" 7_
Make sure ...
®TV/DVD power must be turned on.
Se?c Vo,C RSETtP I ........
Press SETUP on @e remote control [_VC............CHIP SET UP
Press Arrow (A/V) to poMt to ' V- [ o_,o_..........[o_,-]r........
CHIP SET UP". l
Then press ENTER.
2 @:a_ Ace<_,<,,_co@_: .........
,[] Seect 7V ;_Ai__;/G v..........
Press Arrow (A/V) to point to "TV ..........
MPAA RATING
CHANCE CODE
RATING".
_ Se<:ct yo_s @_sred tern
Press Arrow (_/_) to p(lint to your [_ _ _ [_,_]
desired item. _..... [;,_w]
w @ [viEw]
Then press ENTER to select ..... ' [_'_]
TV MA( } [V[EWl
[BLOCKI or [VIEWI.
® When you select a ra@lg category and Rml it
[BLOCK], fi_eMgllerraqng willmm [BLOCK]
automaqcaHy,Abo, @e lowerraqng willmm
®Wllen you turn TV-Y" to [VIEW], all radngs will
turn to [VIEWI automatically.
Selection Rating Category Explanations
TV-Y Appropriate M: all cMldren
TV-Y7 Appropriate Ibr children seven and older
TV-G General Audience
TV-PG Parental Guidance suggested.
TV-14 Unsuitable [or children under 14
TV-MA Mature audience o@y
When you select TV-Y7, TV-PG, TV-14 or TV-MA
and you press ENTER, die sub-ratings will appear
on die TV screen.
If you select die rating category (exampb: TV-PG)
and tam it [BLOCKJ or [VIEWI, @e sub-rmmgs
(examNe: V R/r Violence) will turn [BLOCKI or
[VIEWJ automatically.
You can set @e sub-ratings t(! [BLOCKI or [VIEWI
individually wllen die raQng category is set to
[BLOCK].
To set the sub-ra@lgs individually, follow the steps
below.
"'enY°u e'ec''T'Y"i
Press Arrow (_/_') to select .... [_oo_
FV" (Fantasy Violence). _ r_,_o0_,,]
Then pressENTER to sdect
[BLOCK] or [VIEW].
* When you select [TV-PG], [TV-14] or [TV-MAI:
"D"(Suggestive Diabg) .... [_o_n
"L"(Coarse Language), D r_oo_]
[BLOCK]
"S"(Sexual Situation) or v_ [BLOO_,IrBLOCKI
"V"(Vk/lence). Then press
ENTER to select [BLOCK] or [VIEW].
NOTE: When you select [TV-MA], "D" does not
appear (!11the TV screen. (-
®The sub-ratings which are set to / rvr
i_ rvyT( )
TV¢
[BLOCK] ap-_ears _lex[ 1o the rat-
w pa (bLSV}
mg category hi the TV RATING | ,_....._<°_<_
/
me_l/L
_!};;ExttheVC'_psett _g scale
Press SETUP on the remote control to return to (Mg-
real mode.
- 17- EN
0C28

AUit t,4 £471"_,&; 3£? ./_
Make sure ...
®TV/DVD power must be turned on.
Seuc_ >t}HPSETVP
Press SETUP on the remote control I .......
/
CHANNEL SET UP
Press Arrow (A/T) to point to "V- I_ _2#_Ig£g_r%_u_,,-,]
CHIP SET UP". _ ....... [o,,-1
/
Then press ENTER.
{,©(a
ACCBSSCODB
Press the number buttons. The
det_tult code is 0000,
..... I £, , ,k('</*;< ,,#g% '_, l; >. #.£>
To change access code, follow the steps below.
TV SETUP
Press SETUP on the remote con-
117()I, CHANNEL SET UP
V CHIP S_T lip
_ANrSUAr_E [£NrSU.SH]
Press Arrow (_/'_) to point to V- o...... [o<
CHiP SET UP'.
Then press ENTER.
2 {:./t_ 4<i1 _:s< :>;s:s code A........
Press the number buttons. The
detimlt code is 0000.
¢I ::<l_*c'MPAA I:I£ IQ .........
TV RAT_N_
Press Arrow (_/_) to point to ............
_3HANC_ECODE
"MPAA RAT[NG'L
Then press ENTER.
.......... ...... + ......... +
P---opon._l/
desired item. _ [v,_w]
[wew]
[vtgw]
Then press ENTER to select I<'_
DLOOq
Dkooq
[BLOCKS or [VIEWS. _'_
[t_LOCI<]
Selection Rating Category Explanations
G General Audience
PG Parental Guidance suggested.
PG- 13 Unsuitabb for children under 13
R Restricted: under 17 requires accompa-
nying parent or adult guardian
NC-17 No one under 17 admitted
X Mature audience only
* When you sdect the rath_g category and turn it
[BLOCK], the higher rating will tun) [BLOCK}
automatically. Also, the lower rztMg will turn
[VIEWI autommicaHy.
® \__en you tun) G" to [VIEWS, all rmh)gs will tun)
to [VIEWS automatically.
,S £xt "
...... e v S@ lYI@ IS3_2_÷
Press SETUP on die remote con[rol to return to origi-
nal mode.
_,_ 222s _ { _ ,3\ +,,,, .............. v CH_P SET UP
TV _qATINQ
Press Arrow (_/'_) to point to _ _.........
CHANCRECODE
CHANGE C )DE .
Then press ENTER.
,_ Enic: '4-digii: a<cess coda
Press the number buttons to enter ==w_,o=
your desh'cd access code in the
NEW CODE space. Then enter the ............
same code in the CONFIRM EEZZZ_
CODE space. V-CHIP SET UP
screen will appear on the screen.
* It you enter wrong code, repeat step [4J, making
sure you enter the same new code exactly in the
confirm code space.
_7 Exit II_® %.0'i s<II:iv_:# ' r,,,-,
"ll,O_a_;::
,+J
Press SETUP on tl_eremote control to remm to orig-
inal mode.
NOTE: IF YOU FORGET YOUR ACCESS
CODE NUMBER
* If you unplug d_e power cont or if a power failure
occurs, your changed access code will be lost and
the code will return to delimit (0000). Change your
access code again as necessary.
- 18- EN
0C28

Thefollowingdiscscanbeplayedbackon this TVfl)VD,
o DVD video oDVD-R/RW*
®DVD+R/RW* ®Audio CD
®CD-R/RW* ®MP3*
_ Depending on the types or the writing method of the
medium some discs can not be played.
+ Some DVD-R/RW, DVD+R/RW or CD-R/RW discs
made on personal computers or on DVD recorders may
not be played back properly due to the factors such as
scratches, dirt or special properties of the disc,
+ Discs made on personal computers may not be played
back properly due to the different environment or the
settings of the application you use, We recommend
always to use the standardized, formatted discs.
This TV/DVD conforms to the NTSC color system, You
cannot play discs recorded in other color systems such as
PAL or SECAM.
®Some discs include region codes as shown below.
®The number inside the symbol refers to a region of the
world and a disc encoded in a specific region format
can only be played back on TV/DVD with the same
region code.
The _Mllowing discs cannot be played back on this
TV/DVD°
* DVD with region codes other than 1 or ALL
o DVD+ROM
o DVD+RAM (Never pBay back, otherwise malfunc-
tion may resuR,)
oCD-ROM
*VSD
o CDV (ONy pmays back the audio part.)
o CD-G (ONy plays back the sound.)
®CDq(Never play back, otherwise maffunction
may resuR.)
o SACD
o Photo CD (Never play back, otherwise maffunc+
tion may result+)
®Video CD(Never Nay back, otherwise malfunc-
tion may resuR.)
I°°++-°°I
Ar_y other discs withot_t compafibili U indications.
[DVD]
Data on a DVD is divided into sections called "titles" and
then into subsections called "chapters", each of which is
given a title or chapter number. Playback conditions are
preset on some DVD video discs and these playback con-
ditions take priority over user operations on this
TV/DVD. [f a ftmction you selected does not run as
desired, refer to tile manual accompanying the disc.
[AUDIO CD]
Data on an audio C'D is divkted into sections called
"tracks", each of which is given a track number.
Example ]
.Trackld Track 2j Track 3j Track 4j Track 5j Track6U
[MP3]
Data on an MP3 is divided into sections called "groups",
and then into subsections called "tracks", each of which is
given a group or track number.
- 19- EN
0C28

P[,AY[NG A DISC
6_!4_d¢_y Sg_ £1<_ DVD may contain menus to navigate the disc and access
special features. Press appropriate number buttons or
use Arrow (_/Y/_!_ }to highlight your selection in the
DVD main menu and press ENTER to confirm.
NOTES
• Select DVD mode by pressing SELECT on rite
remote control Then press PLAY or OPEN/CLOSE
betbre you operam d_e DVD fuuctk!us.
• Unless stated, all operadous described are based on
remote control use. Some operations can be carried
out using the buttons on the front pauN (refer to
page 8).
4 Pess PL/4Y
The troy will close automatically and playback will
then start from the I]rst chapter or track of the disc.
If the playback does not start automatically, press
PLA>
eWhen you playback a DVD which [eamres a title
menu, it may appear on d_e screen. In dfis case, refer
to TITLE MENU".
[_ Pp:_s SK}P sop puyb_ck
NOTES
When d_e DVD mode has been switched to d_e TV
mode, d_e DVD mode shuts down firs{ and {hen a
TV picture and sound appears in about 4 seconds.
Similarly, when POWER is pressed to mm off in {he
DVf) mode, d_e mode slm_s down first and d_eu @e
TV!DVD's power is turned off.
Wid_ DVDs that use ddes lbr playback program sig-
naB, playback may stml from @e second tide or i{
may skip d_ese {ides.
• During {he playback of a two layered disc, pictures
may stop Ibr a momenL This happens when the ] st
layer switches to d_e 2ud layen This is not a mal-
fuuctkm.
P' DS© '_" co'_ o
8 @ss _\,_;:,( O {{÷ < /o<
The DVD main mem_ will appear.
tt, ,t t :, t, t ,, v, tt t t, t
2 /{_®{est(s{< i_not w_>{ab®,@ s >hi
asgu ge s/b ® .......... n..... S/%,_4)teys go R/e
ttessde /÷/ :_pto_s ,," _>_'_,s_s'f,os s®e<,
4 P,_<_F_ >u (,£P_"!,</>,}Rc see's:s / _sm
,sE}'"ER :o so'f sss,:_,, , _,i .
The dde menu will appear.
2 f .......... , @
nsy," :q_ea o1 'qs?%
s Fees
S }))e},_, A'OW {Al'_>lel}>} "} }e_@:: _' {en
ssd ENIER }:s 0o1"f _m s® eel: oss
£Z(/4 ££PiG i MEN7 S( £Z/P,
/){k' ,*,,O P?' Ft;ACA
• Press DISC MENU io display up die DVD menu.
_, Press TITLE {o display the dde menu.
NOTE
@(Touteuts of menus and corresponding menu opera-
fious may vary between discs. Refer to the manual
accompanying @e disc for details.
- 20 - EN
0c28

Du 'gpa!i/scS_: pessSTOR
• Resume message will appear on the TV screen.
2 Pre!>; PL,A/'_ payback w r_;_,:sl_se_rcm h_,_
p/' n/; _,<who/ p ssvbaek w;,>:_s <@p_,:d.
Tit cancd resume, press STOP twice.
if die TV/DVD is mined off or @e Disc kmdiug tray
is opened, d_e resume fuuc@m will be caucdled.
For MP3, playback will resume from d_e beghmh_g
of d_e track a_ wlAch playback was stopped.
3_ g_c48VbaCR ,}'_:" _ PA e_sx
Playback will pause and souud wtl be mu[ed.
2 Ts sost s e suyt)_!x:k <>,_,::_ P AY
{}_, /_g is syback p}ess F:W©_,@,, o FEV
" _ l" or "-',_"_ 1' appears on the screen.
2 "R__;eec{ a/'_o{/e_ speed, e_®ut sXep {{
yo{r >%qu ed speed appes s o _/se sc_'eea%
For DV[)s, [as[ _brward/reverse search speed is di[-
_ercn_ depending ou d_e disc_ Approxhua_e speed is
1(x2), 2(x8), 3(x50) aud 4(x 100).
For audio CDs, approximate speed is x16.
For MP3, approxhua[e speed is x8
When you use buttous ou the TV/DVD fron[ panel,
press and hold SKIP _1/ SEARCH _ or
SKIP _l/SEARCH -_-_ for a few secouds.
<
(_ _b e_:u #/_> I/c, /_,A pay/p>e_ pe!;s PLAY
©u_ _'sgp ayback [:seas/%_t,!SE
Playback will pause and sound will be mu[ed.
me PA/;_{};I£s p u_ised.
_!_: "go ex s_,p >y scp p%,b_;w , pre_:u:, PLAY
' E2 <" 2
/_ /;?r:lg p b£}ck, ; m,;s _A(o[!,
i'e*a/.. FWD >._.'. >l' _t_';V ,._,_!.
j_ 1' or °' _lj l' appears (m lie screen.
_!_ "/';' <,:;>> a/'>;;_'(:: !_p*:'l ci ,a ....... o,, ','_ '
............ _; ,,;6t, _:g :/; Lf%
y>u eq; i_ds}ee<_:_/>s÷:s_; o #:e s/eel
Sk}w R}rward or reverse speed varies with [lie disc.
Approxuuate speed is l(1/16), 2(1/8) and 3(1/2).
When you use buUous ou the TV/DVD front paueL
press and how SKIP _1/ SEARCH _ or
SKIP I_t_l/SEARCH -'_'_ for a few secouds.
,, {{{, v, {, { {, {{ { { ,, N {,{
_, "/b o ....... *' '
- 21 - EN
0c28

SEA R C HI FU NC T O N
There are three ways to begin playback on an Audio
Cf) and MP3 at a specific track
Using the number buttons on the remote control
desi}ed tack ya_mbe/
• Playback will start at the selected track
• For singb digit tracks (]-9), press a singb number
(eg_ track 3, press 3).
• To play track 26, press +10, Z 6.
I: _ee 3/,}: _y/_"e o< spa t<e/'m!
r_¢_ {_v _g _lqe 'u_v be/ bu_i:o_'s
• Playback will stal_ at the specified time_
• Press CLEAR to erase d_e incorrect input,
• \Vhen dlere is no need to enter a number, "0"
appears automatically, For example, " 0 : 0 _ : _ _"
appears in the Time Search display if tile total time
of the mtck or tide is less dmn l0 minutes,
Using SEARCH MODE
The Track search disfday appears_
v v
2 30 '_:eco/sd',_, s_eeci: _ cle_:__'ed tack
Use markers to memorize your [avofite places on a
• For single digits press 0 first, if tile total track o[ the Idisc.
d sc s more tlan l0 tracks. I
• Playback will start at the selected track. _ P:_,:s<;SKA}hC_thi/( D_!}o_' CD: '_e!;
Using SKIP I@@I_I_/
During playback, press SKIP _l to move the next
track. Press i_ repeatedly to skip subsequen{ {racks.
Press SKIP I_I _ogo back _obeginning o[ die curren_
track. Press it repeatedly to go to the prevkms mM_s.
If SKIP is pressed while tile playback is paused, tile
playback will be paused again after sldpphlg tile
track(s).
NOTE
SKIP I'_'_ _l is not available when playback is
stopped.
seac_, woe oi s__ 9eBb {_ ' g
p _/!sack
2 K te/'th_?des_edchaptebiti/:e _u be__usis{t
tses_mbe buttoss
• Playback will start at the selected chapter or tide.
Press die CLEAR button to erase die incorrect input.
@b(lr stogie digits press 0 first, it the t(/tal chapter or I
It { e olt le disc is more dmn lO.
]
- 22-
t 'es}du_ng >ayi:ac_
• The display screen mid Markers will appear on file
TV screen.
< <
2 /:;'_,e,;"-_A /_'>w (_®/_# to ,,;et, e/ 2 3 4 _/;8
7 8 9 o_ '!Oa_de/s_. etu:/%,, _,, : :_,.,
;@pea_s _/e d sp _p/
3 W/e_'_yo/ e#_ch the des edpo_t p_ss
ENTER
The tide or track and elapsed playing time will
appear in the TV screen.
4 R_e/u_ _o_>_,faker sst_:_'_pre_v_SfSARO}!
MODKfo_tmes(CDst_eetmes}d_a9
pIaybac/_ a>d A_'_'ew(<//>, } o choose _he
des edmake tsespessKNSK/:i
NOTES
• Opening tile disc tray or turning off the power or
selecting AC at step [2J and pressing ENTER will
erase all Markers.
• To clear a marker, using Arrow (_1/_"0, position the
cursor on to the marker number to be cleared and
press CLEAR.
• You cai mark up to l0 points.
f}; /:;%ess, SEAi:_C}{ MODE o RETU{%N _o ex,
EN
0C28

EC, IA I, P[.AYBA CK
REPEAT is awti[aNe onb' during pk@?ack.
asf va e (be epeat !'u _ct o _ p_ess F:d_!P_£/_'?
dur ;K4 I?h_yb_:<:l.
• The repeat mode changes as described below every
time you press the butt(re.
[] CHAPTER _ [] TITLE ,,,,,,,,,,,,,,,,a:_[] OFF ]
0_.,_i0tchapter'repeat)(_,entt,,,erepeat) (repoto<[
NOTES
cRepes/ Tide/Chapter is uot available with some
scenes.
• The REPEAT setting will be cleared wheu moviug
R _Y::_EAT _ A C £_4 LL
• The repeat mode chauges as described below every
thne you press the buttou.
TRACK ALL OFF
(curr_nttrack repeat) (entire discrepeat) (repot off)[
NOTES
• Repeat settiug will be cleared wheu moviug to other
track.
• Repea_ playback does uot ftmctiou duriug repeat A-
B playback.
You may determine the order h_ which tracks wili play.
The PROGRAM screen willappean
2 Pr_t:,,s £rrow (,_,!'<¢_o _:;<e_:t _ r_:',ck the
Press CLEAR to erase the ........._.............
3 ReDeat step [;;st]uet you have seec:ed a
he_acksyo_ wan opay n f_epoos_
; 8 , s ;8 88as
d _>ess I::LIW to pay _'_e p ogram_>ed acks
NOTES
While tile program is being played back, the STOP
works as tbHows.
Press STOP once and then PLAY again, playback
will restart fl'om the poh_t where STOP was pressed.
• Press Sqry)Ptwice and then PLAY again, playback will
restartfrom the track in the usual way. (Program canceled)
• Up to 99 tracks h_ the _rogram can be eutered.
To erase aHprograms at once, select ALL CLEAR at
tlle bottom of the list at step [2].
• If you like to repeat the ctlrrent track in the program.
press REPEAT repeatedly until [] TRACK af_pear£
durh_g playback. If you like to repeat the enlire pro-
gram press REPEAT repeatedly until [] ALL
appears during playback.
P_ess F_EPEA°_ A_/3 M yo_ cho_e< s u_/ _?
• [] A- appears briefly ou the TV screen,
[] A-B appears briefly on the TV screen and the
repeat sequeuce beghls.
NOTES
• Tile repea_ A-B sectiou cau only be set within the cur-
rent title (for DVf)s) or curren_ track ([br audio CDs).
• Repea_ A-B is uot available with some scenes in IDVf),
®To cancel the A poinl which was set, press CLEAR
• Repeat A-B playback does uot ftmctiou duriug tide,
clmpten track or all repeat playback.
- 23 -
This shuffles the playing order of tracks instead of
playback iu sequeuce as recorded ou tile disc.
RANDOM screen appears.
2 P'ess PLAi? to star "a_'dom payback
NOTE
If you like to repeat the current track h_ the random
selectkm, press REPEAT repeatedly until []
TRACK appears duriug playback. [f you like to
repeat the entire random selection press REPEAT
repeatedly until [] ALL appears during playback.
EN
OC2g

PI,AYING A MP3 DISC
When a CD with MP3 files is loaded into the
TV/DVD, press DISC MENU to display the MP3
menu on the TV screen.
t'_edes edgoupor ack.
• If a group is selected, press
or ENTER to go ou to the
track se]ectiuu screeu. Press
Arrow (A/_) to choose a
• If a m_ck is selected, press
ENTER to star_ phyiug
tracks. Starqug fiom the one you've just choseu die
subsequeul tracks will be played.
®Press TITLE to returu to the first item.
2 Pp:/_s S*;?/gP/o st:s? i?ayb;_ck
NOTES
oFolders are knowu as Groups; files are knowu as
Tracks.
• MP3 files are accompauied by [] icon.
• Maximum of 255 [Mders cau be recoguized.
• Maximum of 512 fi_es can be recognized.
• Up _o 8 hierarchies can be create&
This TV/DVD recommeuds the use of flies recorded a/
the below spedficadons:
• Sampling frequency: 44.1kHz or 48kHz
• Coustaut bit rate: 112kbps _ 320kbps.
This feature allows you to program au MP3 disc to
play iu a desired sequence.
':o_ m ;_de, pre,ss _iOt:X:!_
The PROGRAM screeu will appean
Press _ when you want tu go to the next hierarchyo
Press *_ when you waut to go back to d_e previous
Press CLEAR to erase tl_e most receudy entered
track.
4 _;;'ress P},A/';/I:r_s:_r po,,s9 _mred p_yb_s_':/4
NOTES
While the program is beh_g played back, the STOP
works as follows.
Press STOP ouce and then PLAY agaiu, playback
will restar_ fl:om the be_iuuiu£ uf the current track.
(Program coutiuued)
Press S_)P twice aud then PLAY again, playback will
reskmtfrom the first track. (Program cauceled}
To erase aH tracks in the _?rogmm N ouce, select
ALL CLEAR at the bottom o[ the list a_step [2].
_/o ac irate t/'}e _'epest fu/'_c i0 _ pess [_ERBAT
The repeat mode chauges as described bduw every
time you press d_e buttou.
[] TRACK _ [] GROUP _ [] ALL,,,,,,,_[] OFF
(currenttrack (currentgroup (entiredisc (repeatoff)
repeat)_ repeat repeat)
NOTE
* Repea_ settiug will be cleared wheu moviug to other
track.
_ sto!s mode pess _,£ODEtwce
RANDOM screeu appears.
2 P_ess PLAYo _,;s_ _+_rs p#_yb;_ck
- 24 - EN
0C28

CHANGING THE SETTINGS
The TV/DVD allows you to select a language R/r sub- Some DVD discs cuutaiu scenes wMch have been SllOt
tides duriug DVD disc (if aw@able)Nayback, simuhaueuLMy _um various angles. Yuu can change
............................................................................. the camera angle when die (C_) icuu appears ou the
S P_;e{_';SUB[TEE_:/v}_ {_ payD_£ck screeu.
£ as s 8 8 8 8 8
desis'ed su/ i l÷/a Ouag_:;,
Tile subfide languagewtl be displayed on die dis-
play bar at the top of the screen.
:v
(_ ]otul_o? ,i;_}:£_e_;;p®sc SJBTTLE
®?÷atedy _m/: Ogg _ppea _:_
NOTES
Somediscs allow audio languagesetting/subtitle language
setting on the disc menu. (Operatkln variesbetween discs,
so refer to the manual accompanying the disc.)
l[ftile desh:ed lauguage is not shown after pressing
SUBTITLE several times, tile disc does not llave
subtitles in that language.
If you choose a Language tllat has a 3 letter language
code, the code will be dis@ayed every time you
change the Subtitle language setting. If you choose
auy other languages, '---' will be displayed instead.
(Reter tu page 27.)
The TVfl)VD alk/ws you to select a lauguage during
DVD disc (if multi languages are available) playback.
NOTE
Pressing AUDK) may not work on some DVDs wid_
muhi@e audiu languages (e.g. DVDs which allow
audio language setting uu tile disc menu).
Tile selected angle will be displayed on the display
bar al the tup of the screen.
des _÷<! a_@®,
Adjust tile Black Levd Settings to make @e black
pgmts o} the picRu:e brigllte_:,
88 8
P_es:s_,_;C/3_'!d_s g
s
2 P/'ess ENT[7I!/co switch ONIOFT
ON: Makes tile dark parts bfiglXec
OFF: Shows die original picture as recorded.
< ;
S P_es_ R/iO{}Ew*_e o @_;!;;TU_%No _> /:.
NOTE
• The se@ug will be saved even if die TV/DVD is
turued o[f,
You can e@oy surround-sound effect over two speak-
ers on this TV/DVD.
(ODIIAP?::_ m<_}dur it_i?uyD_ck
/' P'ess AUDIO ÷p÷ated/y d_, _g playback o
_;_:__ct bcd:wmw'_9TI!.,[G'O L-O__,o_ 8,-0 I,
®STEREO - bodl right aud left chamlels are active
(stereo)
L-CH - ouly left chamlel is active
R-CH - o@y right cllauuel is active
NOTE
It the Vh_tualSurround setting is ON, die sound mode
will be fixed t(! STEREO and can u(/t be dlauged.
- 25 -
2 P_'em;EHTEP_toseti I (Ha/u aietect) o 2
(_m)Daszede co}of O_:;F:
ass;as s8
,!_ P/ess _/SUFV;R or @ODE o R_'TU@N to ex
NOTE (for CD play o_ly)
VirtuM Sum/uud will not be effective if the sound
mode is set t(!sometfiug odler tllau STERE().
EN
0C28

T H E (i/)X- SC R E EN _¸__:q D_ _,vi¸__v
You can check d_e hfformatkm about d_e current disc by pressing DISPLAY on the remote control.
For DVD-Vs For audio CDs
....... +. 3 i_i'IIi(I I© _ %' "* II'IQ
c_ "_÷n Chapte.
• The elapsed and remahAng
playing time of the current
chapter will be dis@aye&
2 Pess [)9PL:¢)/sga_" os_owc_,_e_'} "_l:÷
• The elapsed and remai@ng playing time o_ the cur-
rent title wiII be displayed,
21;iI'I£, 'iI T 8{/'i
• The elapsed and remahi_g playing time of the cur-
rent track will be displayed.
,(i£ Pe_;s {.X(:iPL.A sgsi x, _:10_,_ 'Yktal
i < ,> I%,
® The elapsed and remaining playing time ol the total
tracks will be disfAayed.
" ......... ............./; a,:lai ex {islslay
The BIT RATE and the current repeat setting will be
If you are playing a dual layered disc, the layer num-
ber will also be displayed (L0: Layer 0 is playing.
Ll: Layer I is playing).
i ili@iiiiiiiiiiiiiiiiiiilm@ i@iiiiiiiiiiiiiiiiiiiiii i i i ili@iiiiii @@iiiiiiiiiiii i @i i @@iii @iii llllmli@illllli
t:%ess [)K:PLAV _g..':A to q_9: h< dispt_;y
For MP3
...... ,L SRL. Y .........
The name o_ the file currently in play will be dis-
played.
i Jiii i Ji@iii{ llmB iliii 11i IIii Ji i1 i i i Ji{ ii iliii i iii i i i Jllll @i i i Jlllli?i i{liJiiiii{ i J @iiiii{ iiii i Jllll ii i Jii 1iiiiiiiiiiiiii
1_£ ?'_?s,, 1"318!':+i£7_ Ni'_ Is _:Q'_o>:'_H I _ck
i%iiIil_!l" thl ela_)s dtifyil lee " " + ' "
.... ..... . + . 3(;<( ';_:_(J;:,
. .. _ " '}J£ ........J' " aJ "i}_ I0:) 0
SO "q'O _'}
[] will be displayed when repeat play has been
selected.
[] T - indicates Track repeat
[] G - indicates Group (fblder) repeat
[] A - indicates Disc repeat
.........../),_>::#_ ,'_;<I _: <,:.say,
- 26 - EN
0C28

I Ill:
IW _1_IW .......... £ I £ ;, i '='I, =
Language options are not available Widl some discs.
l>._,<_4:S£/',/P w r:_::_ STOP rr'<.,dt: 8c_/_st
If the mem_ does not appea_; press PLAY. STOP.
then SETUP twice.
2 Pess £_ow T# to se?vct CUSP:'}_il' th<_<
pess E_,_Y"f t:si
CUSTOM mode will appear.
<< :
3 Pe_<_ A_tow {_£i'_g to Beet'} LANGUAGE,
hesp_÷ssf/'/3118 ocon _m.
1
IILANGUAGE ] //
DISpLAy
AUDIO
4 Pre_;_:,# r<tw{£/_} o 8,_<8t th< rm,,,d:_wt6
AUDIO: Sets d_e audio language.
SUBTITLE: Sds tile subtide language.
DISC MENU: Sets d_e language _i/rDVD menu.
p_ess l!:!NT_!II:_
If OTHER is selected on the AUDIO, SUBTITLE or
DISC MENU screen, press film=digit number to
enter d_e code lbr d_e desired language. (Reter to file
language code list.)
Only the languages supported by tile disc can be
sdected.
1? P_#_:;" >E to exi
...... xb, 0 ='_' _'=
NOTE
Language Setdng for Audio and Subtide is not avail-
able with some discs. Then use die AUDI[O and tile
SUBTITLE bulou. (Details are on page 250
70 CHA/YG£ ;q._£ OM SCFiW_2 _TNUS
You can access dte TV SETUP menu by pressing
SETUP fl'om tile DVD mode. Reier to "Sdecdng the
Language" on page 13 to cllaugiug tile on-screen
lllen[Is,
_ge Code
A-B
Abkhazian 4748
Afar 4747
Afl'ikaans 4752
Albanian 6563
Amharic 4759
Arabic 4764
Armenian 5471
Assamese 4765
Aymara 4771
Azerbaijani 4772
Bashkir 4847
Basque 5167
Bengali;Bangla 4860
Bhutani 5072
Bihari 4854
Bislama 4855
Breton 4864
Bulgarian 4853
Burmese 5971
Byelorussian 4851
Cambodian 5759
Catalan 4947
Chinese [CHi] 7254
Corsican 4961
Croatian 5464
Czech 4965
Danish [DAN] 5047
Dutch [DUT] 6058
English [ENG] 5160
Esperanto 5161
Estonian 5166
F-H
Faroese 5261
FIji 5256
Finnish [FIN] 5255
French [FBE] 5264
Frisian 5271
Galician 5358
Georgian 5747
German [GER] 5051
Greek [GBE] 5158
Greenlandic 5758
Guarani 5360
GujaratJ 5367
Hausa 5447
Hebrew 5569
Hindi 5455
Hungarian [HUN] 5467
I-K
Icelandic [ICE] 5565
Indonesian 5560
Interlingua 5547
Interlingue 5551
Inupiak 5557
Irish [IRI] 5347
Italian [ITA] 5566
Japanese [JPN] 5647
Javanese 5669
Kannada 5760
Kashmiri 5765
Kazakh 5757
Kinyarwanda 6469
Kirghiz 5771
Kh undi 6460
Korean [KOR] 5761
Kurdish 5767
Language Code
DN
Laothian 5861
Latin 5847
Latvian;Lettish 5868
Lingala 5860
Lithuanian 5866
Macedonian 5957
Malagasy 5953
Malay 5965
Malayalam 5958
Maltese 5966
Maori 5955
Marathi 5964
Moldavian 5961
Mongolian 5960
Nauru 6047
Nepali 6051
Norwegian [NOB] 6061
O-_
Occitan 6149
Oriya 6164
Oromo(Afan) 6159
Panjabi 6247
Pashto;Pushto 6265
Persian 5247
Polish 6258
Portuguese [PER] 6266
Quechua 6367
Bhaeto-Romance 6459
Bomanian [BUM] 6461
Russian [BUS] 6467
S
Samoan 6559
Sangho 6553
Sanskrit 6547
Scots Gaelic 5350
Serbian 6564
Serbo-Croatian 6554
Sesotho 6566
Setswana 6660
Shona 6560
Sindhi 6550
Singhalese 6555
Siswat 6565
Slovak 6557
Slovenian 6558
Somali 6561
Spanish [SPA] 5165
Sundanese 6567
Swahili 6569
Swedish [SW_E] 6568
T
Tagalog 6658
Tajik 6653
Tamil 6647
Tatar 6666
Telugu 6651
Thai 6654
Tibetan 4861
Tigrinya 6655
Tonga 6661
Tsonga 6665
Tu_ kish [TUR] 6664
Turkmen 6657
Tv¢i 6669
U-Z
Ukrainian 6757
Urdu 6764
Uzbek 6772
Vietnamese 6855
Volapuk 6861
Welsh 4971
Wolof 6961
Xhosa 7054
Yiddish 5655
Yoruba 7161
Zulu 7267
If you choose a Language that has a 3 letter language
code, the code will be displayed every time you change
the Audio or Subtitle language setting on j_a_e_25. If
you choose any other languages, L__' will be displ%,ed
instead. (3 letter language code is written in bracket.)
- 27 - EN
OC2S

You can change certain aspects of the DVD dispk U
screens and on-screen messages on the TV screen.
<
[ P_e,,,;,:_SETUP wee STOP ><'_d<_so/h__
t/_veDV©SETUP _te__ __ppea_s,
• If the menu does not appean press PLAY. ST()>
then SETUP twice.
SETUp I j_
" ............ <,US_C_\, he
peas Et4TER
• CUSTOM mode wilJ appeal.
3 Pe_<;A_'l'ow(_v V}tc, s<:eect©SPL/W'
bes/x®ss E_'_SE[A ocon _m,
I..... _ _1
LANGUAGE
AUDIO
/:e_'ts _ev press ENTE_;_
TV MODE:
Press Arrow (_/T) ff_ran i_em selection, then press
ENTER.
Selec_ 4:3 LETTER BOX tor black bars to appear on
top and bo{{om of die screen.
Select 4:3 PAN & SCAN for a full heigll_ picture
with bodl sides trireme&
The defimlt setting is 4:3 LETTER BOX.
STILL MODE:
Press Arrow (_/V) fi_)ran i_em selection, allen press
ENTER.
If you select 'FIELD", die picture in die still mode
will be stable.
If you selec_ "FRAME", die picture in the sdH mode
will be highly defined,
ANGLE ICON:
Press ENTER repeatedly to turn Angle icon ON or
OFE
The defimlt setting is ON.
AUTO POWER OFF:
Press ENTER repeatedl y to turn Auto Power oft ON
or OFE
/[_ Peas gETUP to ext
Choose the appwpriate Audio settings tbr your equip-
merit as it only affects during the playback of DVD
discs.
f>essSE7 P t> ee {', STOP mode so that
the ©V© SETJP _euu sp >ea_s,
If the menu does not appean press PLAY. STOP.
then SETUP twice,
SETUP I ]
I,
peas E{4TER
CUSTOM mode will appem:.
_f_ P/e!_q A/'l'ow {&'_" u _eee AUDO }e_!
/xess E[q _EB I:o cosf Ira,
SETUPAUD_L_J_ _IOUSTOM j_
LANGUAGE
DISPLAY
ie>s i"e_ i_:4"e_>sKN'_/ER.
DRC (Dynamic Range Control):
Tu compress the rangedie diflereuce between loud
andsort sounds.
The defimlt setting is ON,
DOWN SAMPLING:
Setto ON when outpmdng a 48 kHz signal.
The defimlt setting is ON.
When pJaying disc with copyright Protection
If you select OFF. copyrigh_ protectk)u wi]] be acti-
vated and sound wil_ be down sampled at 48kHz,
DOLBY DiGiTAL:
Set to ()n when the unit is connec[ed to an ampliIieff
receiver Widl a Doiby Digital Decodert
ON: Outputs a Doiby Digital signal
OFF: Converts the D(liby Digital signal into a to
PCM (2 channel stereo)
The defimh setting is ON,
J _., ,, ¢ { q,
- 28 - EN
0C28

Parental Coulrol Hmits the disc viewing that exceed
your settings. This [eatum allows you to prevent discs
with objectionable scenes from being played by your
children.
PAR_*TZ4L LLTVEL
Parental Level allows you to set file rating level of
your DVD discs. Playback wtl stop if the disc's mr-
lugs exceed the level you select.
[ />'e_:;uS[!TUR w,<'ge STOP mod_:_sm/_A:
t}>'5_DUCK <¢ET/;_Pve_'u 8ppes_>;
If the menu does not appean press PLAY. STOR
theu SETUP twice.
CON_OL LE_2L, S
ALL
AH parental k)ck is cancelled.
Level 8
DVD so[tware o[ any grade (adult/geueral/cMldreu)
can be played back.
Levels 7 to 2
Only DVf) software intended for general use and
chiHreu can be played back.
Level 1
Only f)VD software iutemted [or ClliMren can be
played back, with those intended for adult and
'_.,,1_ ¢ @ B.,.. Y { A_, _, ¢+<s i,,A ,_ # ..,? },,}
{ { { { { {} { {
Pess { 7 % '7 _:A:ep[4] '[7!:_ {_s[<_ v< }'
.... d >;:; _© ;;,
Password will be cleared and parental levd will be
set to ALL.
+ > >+ ++
I+o"@s{i; /;1_, T_x <_,
+ />yes<, ,,+,
Ar'ew j_i'_+ }o u,<_ee -?A _:./U{D4.:..
?_,_? ?re<;+_ _i;£bI'rE;:t
LANGUAGE
DISPLAY
AUDIO
NOTES
When doing tMs for tile first time, enter any 4 digits.
(except for 4737) That number will be used as the
default password fl'om the second thne onward.
To dlauge the password, press Arrow (_./T) to
select CHANGE a_ step [5], then press ENTER.
Euler the tour-digit password, then press ENTER.
With some DVf)s, it may be difficult to find if they
arc compatible with parental lock. Be sure to check
if the parental lock [uucdou opera/es M the way thai
you have set [or each DVD disc M question.
Record tile password in case you [orget it.
TMs allows you to return all selecdous of SETUP
(except for PARENTAL) to fl_eh"default settings.
- 29 - EN
0C28

,?' I=, <<, ( I I _= ¢"I II'_I'
1,, ) ,,.I>I=I. ,.I , (= =,=..=........
[f tile TV/I)VD does uot per%tin properly wheu operaed as iusmlcted iu Ills Owuer's Mauual, check tile
TV/DVD, cousultiug tile [bHowh_g checklist.
Problem Corrective Action
No power ®Make sure tile power plug is couuected to au AC outlet.
®Make sure the power is turned ou.
The TV/DVD does uot respoud to ®Check if rite power plug is couuected to au AC outlet.
the remote coutrol. * Check the ba/teries in tile remote coumA.
• Aim the remote coutrol directly at the remote seus(n: If uecessary,
remove all the obstacles between the seusor and the remote.
®You have to be withiu 23 feet of the TV/DVD.
®Check if tile correct mode is selected. If uot switch the mode by
pressiug SELECT ou the remote coutrol,whichever you ueed.
TV Mode ]
Problem
No Picture or Souud
Bars Ou Screeu
Picture Distorted or Blurred
Picture Roll s Vertically
Liues or Streaks b_Picture
No Color
Poor Receptk/u on Some Chauuels
Ghosts iu Picture
Weak Picture
Souud OK, Picture Poor
Picture OK, Souud Poor
Dif[ereul color Marks ou screeu
Corrective Action
®Try a new chanuel, if OK, then possible statkm trouble.
®Make sure the power is turned on.
®Press SELECT on file remote coutrol to select TV mode. Theu try
other TV leature.
®Is auteuua or cable couuected to termiual ou the back of the set?
®If outside auteuua is beiug used, check for brokeu wh'e.
®If outside auteuua is being used, check for brokeu wh'e.
®Check IDr local iuterfereuce.
®Check incomiug CATV cable [Dr bose or bad couuections.
* Try a uew channel, if OK, then possible stafiou trouble.
®If outside auterma is beiug used, check for broken whe.
®Check iucomiug CATV cable [br loose or bad couuectious.
®Try a uew channel if OK, then possible statkm trouble.
®If outside auteuua is being used, check for brokeu wire.
®Check IDr local iuterfereuce.
®Check fl_comiug CATV cable [Dr loose or bad couuectkms.
®Try a uew cllaunel, if OK, theu possible statiou trouble.
®Is auteuua or cane couuected to termiual ou the back of tile set'?
®If outside a)teuua is beiug used, check for brokeu wh'e.
* Adjust COLOR coul:ok
®Check iucomiug CATV cable [br loose or bad couuectious.
®Try a uew chauuel, if OK, theu possible statiou trouble.
®Is auteuua or cable connected to termiual ou the back of the set?
®If outside autenna is being used, check for brokeu wh'e.
®Check [Dr local interfereuce.
* Check iucomiug CATV cable _br loose or bad couuectious.
* Try a new cllauuel, if OK, theu possible staqou trouble.
®Is auteuua or cane counected to termiual ou die back of the set?
®If outside autenna is beiug used, check for brokeu wire.
®Adjust CONTRAST & BRIGHT coutrol.
®Check iucomiug CATV cable _br loose or bad couuectious.
®Try a uew chauuel, if OK, theu possible statiou trouble.
®Is auteuua or cable connected to termiual ou the back of tile set'?
®If outside auteuua is being used, check for brokeu wire.
* Check tDr local iuterfcrence.
®Adjust CONTRAST & BRIGHT coutrok
®Try a uew chauuel, if OK, theu possible statkm trouble.
®Check Rn7local iuterfereuce.
- 30 - E>
0C2g

Closed Caption Problem
My, TV/DVD is showhlg captions
that are missf_elled.
My TV/DVD will not show the text
in its entirety or there is a delay of
what is being sakl.
My captions are scrambled with
white boxes on the TV screen.
My program guide listed a TV show
as being closed captioned but none
of the captions were displayed.
My TV/DVD screen shows a black
box on certain chmmels.
DVD Node ]
Possible Remedy
• You are watching a live broadcast and speHhlg errors made by Hie
closed captioning production company may pass through uncorrected.
A prerecorded program will not show any misspelled words because
of the time available for editing the captions.
• Captions that are delayed a few seconds behind the actual dialogue
are common for live broadcast. Most captioning production compm_ies
cml display a dialogue to a maximum of 220 words per minute. If a
dialogue exceeds that rote, selective editing is used to insure that the
captions remain up-to-date with the current TV screen dialogue.
• Interference caused by building, power lines, thunderstorms, etc.
may cause scrambled or incomplete captions to appear.
• Broadcasters may at times use a time compression process to the
actual program so that additional advertising time can be given.
Since the decoder c_mnot read the compressed information,
captions will be lost.
• You are in the TEXT mode. Select CAPTION mode or CAPTION
[OFFI.
Problem
Disc camlot be played
No sound
No DTS audio is ouq_ut
Audio or subtiHe language
does not ma/cll tile set up
The camera angle cmmot be
Audio or subtiHe language cannot
Prohibited icon" appears on Hie
screen, prohibithlg an operation.
CD sound dropout
No CD reproduction
DVD picture dropout
DVD picture freeze
DVD piaure hi mosaic
Corrective Action
• h_sert a correct video disc that plays on this TV/DVD.
• Press SELECT on Hie remote control to select DVD mode. Next,
press PLAY or OPEN/CLOSE. Then try other DVD [ea_ture.
• Insert the disc.
• C]egm the disc.
° Place Hie disc correcIJy, with the [abeJ side up.
• CanceJ Hie parentaJ k_ck or change the controJ level
• C(mnecI the audio cables fimHy.
• TlJrn the power of the audio component on.
• Correct the audio ouq_ut settings.
• Correct the input settings on d_e audio component.
• This TV/DVD does not support DTS audio. This is not a malffmctk_n.
• There are some cases where pictures may be sJighHy distorted, which
are not a sign of a malffmctkm.
• Although pictures may stop for a moment, tl_is is not a malffmctk_n.
• The selected language is not available for audio or subtiHes on tl_e
DVD disc.
This is not a ]ualfu]lc_[io]l.
• The DVD disc does not c(mtah_ sequences recorded frolll dif[erent
camera changed angles. This is not a malfunction.
• The f)Vf) disc does not contah_ audk_ sol.lfce or subtitles in tile
selected language. This is not a ma[functi(m.
• That operatkm is prohibited by the TV/DVD or tl_e disc.
This is not a malffmction.
• Scratched disc. Replace the disc with al..2_unscratched one.
° Dh_ty disc. Replace or deaw disc.
NOTES:
® Some functions are not available in specit?c modes, but d6s is not a malfunction. Read the description hi
d6s OwneFs Manual tbr details on correct opera/ions.
® Playback from a desired track and random playback are not available during program playback.
- 31 - EN
0C28

(','t l;di'_7; T d L,F£! >_/N,
® Wipe d_eh'oni panel and od_er exterior surfaces of
the TV/DVD with a soft dod_ immersed in luke-
warm water and wrung dry.
® Never use a solvent or aJcohol. Do not spray insec-
ticide liquid near file TV/DVD. Such chemicals
may cause damage and discoloraUon to the
exposed surfaces.
®Should your TV/DVD become inoperaUve, do not
try to correct d_e problem by yourself. There are no
user-serviceable parts inside. Turn off. unplug d_e
power cord and please caU our help Une at 1-800-
488-1222, to locate an AuQK/rized Service Center:
7ItL ,AS :]J_"O#_77 '4 L #>I Kg_#__fN?7 IS ,f)IJ_?}"
®If d_eTV/DVD sfilBdoes not perR/rm properly when it is opera/ed, while mterrh_g to the relevanl sections
arrd to "TROUBLESHOOTING GUIDE" hr this Owner's Manual the laser optical pickup unk may be dh_ty.
Consult your dealer or an Authorized Service Center fi.lrinspection and cleanh_g of tl_elaser optical pickup
unit.
® Use discs which have die [oHowh_g k/gos on them.
(Optical audio digital discs.)
DIGITAL AUDIO
® Handle Ure discs so Urat fingerprints and dust do
not adhere to the surfaces of Ule discs.
®To clean-ofL use a soft cloth.
®Do not use a hard clodl since dlis will mar the disc.
®Wipe U_edisc in a straight line h:om center to edge.
* Never wipe wkh a circular moUon.
®Do not use deter2_ent or abrasive cleaning agents.
® Always store d_e disc in its protective case when it
is not used.
- 32 - EN
oc28

Sound output: 2 speakers, 1W. 8 ohm
CRT :
Closed capdon system:
Cham_el coverage:
VHF:
UHF:
CATV:
Tuning System:
Charnel access:
13 inch in-line gun,
90° deflection tube
NTSC-M
TV Standard
§15.119/FCC
2_13
14 _ d0
2_13, A_ W,
W+I _ W+g4,
A-5 _ A-I, 5A
181 channel
frequency synthesized
tuning system
scan aJ_dup/down
©7,fU:/_ _S,?f{CF?CA77AS
Terminal s
Anlenna input:
Audio L/R input:
Headphone:
Coaxial digital
audio output
(DVD, CD, MP3,
Audio only):
Remote control:
RCA connector X l
RCA connector X 2
1/8" stereo (3.5 ram)
One pin jack,
500m Vpp (75 ohm)
Digital encoded
Operating
temperature:
5°C to 40°C
(41°F_ 104°F)
AC 120V. 60Hz
(Maximum): 65W
Dimensions :
Discs: DVD video, Audio CD
Output signal [brmat: NTSC color Weight :
21.61bs(9.Skg)
,_Designs and specificatiuns are subject to change without notice°
* If there is a discrepancy between languages, the default language will be English°
- 33 - EN
0C28

[]CONTROLES I)E OPERACION Y FUN(270NES ..... 34
PANEL FRONTAL DEL TELEVISOR/DVD .......... 34
MAN[)() A DISTANCIA ......................... 34
VISTA POSTERIOR ............................ 34
PARA INSERTAR LAS PILAS .................... 35
[] PREPARACION PARA LA UTILIZACION .......... 35
CONEX1ONES DE ANTENA/CABLE .............. 35
CONEXION A TOMAS DE ENTRADA EXTERNA .... 36
CONEXION A [IN AMPLW1CADOR EQUIPADO
CON TOMAS DE ENTRADA DIGITAL, PLATINA
MD O PLAT1NA DAT (Pars DVD) ................. 36
CONEXC1ONA UN DECODIFICADOR DOLBY
DIGITAL (Pars DVD) ............................ 37
TV SECTION
[] PREPARACION PARA LA UTILIZACION .......... 37
SELECCION DE ID1OMA ....................... 37
AJUSTE DE CANAL ........................... 38
DVD SECTmON
[] REPRODUCCION DE UN DVD DE VIDEO 0 UN
CD DE AUDIO ................................ 38
REPRODUCCION BASICA ...................... 38
V Consulte Ia | de Ia 8 [
1
figura pfigina
flgm-a pfigina
[ C{m_ ulte Ia 2 de Ia 8 [
[ 1
[ Con_ ulte Ia 3 de Ia 9 [
figura pfigina
1. Bsndejs de csrgs del disco
2.Toms de entrada VIDEO
Conecte aquf la [urea de _alida de video de una
videoc_imara o de una videograbadora.
3. Tomas de entrsda AUDIO L/R
Conecte aquf las tomas de _,alida de audio de una
videoc_mara o de una videograbadora.
4. Botdn POWER
Ptilselo para conectar y desconectar la alimentacidn.
5. Botones VOLUME _/v(VOL.z_t_z)
P([lselos pare controlar el nivel del volumen pars el
DVD y el televisor.
6.Botones CHANNEL _Iv(CH._l_)
P([lselo pars seleccionar el canal memorizado,
P(tlselo pars cambiar atm modo de televisor cuando
esta en el modo de DVD.
7. Ventan[Ha de_ sensor demmando a distancia
8. Bot6n STOP
Detiene la operacidn del disco.
9. Bot6n SKIP
Reproduce desde el inicio de[ capftub o canci6n actual.
Botdn SEARCH (REV) _ (panel deiantero)
Durante la reproduccidn o en el modo de pausa,
mantenga presionado el botdn dumnte tmos segundos
pars cambiar la velocidad de reproduccidn hacia atr5s.
10.Botdn PLAY
[nicia la reproduccidn de] contenido del disco.
P01selo pars cambiar a ten modo de DVD cuando esta
en el modo de televisor
11. Botdn SKIP _,'1
Reproduce desde el inicio del siguiente capfmlo o
canci6n.
Botdn SEARCH (FWD) _ (panel delantero)
Durante la reproduccidn o en el modo de pausa,
mantenga presionado el botdn dumnte unos segundos
para cambiar la ve]ocidad de reproduccidn en avance.
12.Botdn PAUSE
Hace una pausa en la operacidn del die,co.
13. Bot6n OPEN/CLOSE
P([lselo pars insertar discos en la bandeja o retirarlos
de ella.
14. Toms HEADPHONE
Pars conectar auriculares (no suministrados) y
escuchar en privado.
15. Botdn MODE
Activa el modo de reproduccidn programada o el
modo de reproduccidn aleatoria cuand se reproducen
CDs o MP3.
16. Botones de n_meros
Modo del televisor:
Pulse (los dfgitos pars tener acceso directamente al
canal deseado.
Recuerde pulsar "0" antes de elegir un canal de un
solo dfgito.
Botdn +100
P([lselo pars seleccionar canales de televisidn por
cable cuyo n0mero sea igual o superior al 100.
Modo DVD:
P_ilselo pars introducir el n([mero deseado.
Botdn +10
Ptilselo pars introducir los n([meros deseados cuyo
mlmero sea igual o superior ai [0.
17. Botdn SLEEP
Pulse el bot6n SLEEP pars vist[alizar el temporizador
para donnir y activar la funcidn. La hora de apagado
puede detenninarse pot el n([mero de veces que usted
pulsa el botdn. (0, 30, 60, 90 o 120 minutos)
18. Botdn REV *_
Presione para vet la imagena en DVD en retroceso
r@ido. Presione PAUSE y presione este bot6n para
empezar [a reproduccidn en cdmara [enta. Presione
repetidamente este botdn pars cambiar la veiocidad en
avance de la c_imara lenta.
Botdn gwo _l_
Presione pars avanzar r@idamente en el disco.
Presione PAUSE y presione este botdn para empezar
la reproduccidn en cgimara lenta. Presione
repefidamente este botdn para cambiar la velocidad
de avance de la c_mara lenta.
19. Bot6n V.SURR
P([lselo pars activar/desactivar el envolvente virtual.
20. Botdn SETUP
P01selo pars activar o salir de! modo de men(is de
televisor o prepalacidn de DVD.
- 34 - ES
0C28

21. Bot6n TITLE
Visualiza el mend de tfmlos.
22. got6n CLEAR
Repone un ajuste.
23. Bot6n DISPLAY
Modo del televisor:
P([lselo pare visualizar el n([mero del canal en la
pantalla. Si 1opulsa de nuevo, el ndmero del canal
desaparecer£
Modo de DVD:
Visualiza el estado actual en la pantalla del televisor
con fines de comprobacidn.
24. Bot6n SEARCH MODE
P(A_.elopara localizar un punto deseado,
25. Botdn AUDIO
P(tlselo para seleccionar un idioma de audio o un
modo de sonido deseado.
26° Botdn SUBTITLE
P(Aselo para seleccionar un idioma de subtftulos
deseado.
27. gotdn REPEAT
Repite la reproduccidn del disco, tffulo, catfftulo,
_o pism actual.
28. Botdn ANGLE
P(A_,elopara cambiar el fingulo de la cfimara y ver,
desde un 5ngulo diferente, la secuencia que est5
siendo _eproducida.
29. gotdn A-B REPEAT
Repite la reproduccidn de una seccidn _eleccionada.
30. Botdn RETURN
Vuelve a la operacidn anterior en el modo de
instalacidn del DVD.
34. Botdn ENTER
Pdlselo para establecer un ajuste.
32. Botches de flechas
Modo de televisor:
P(tlselo para seleccionar un modo de aiuste desde el
men(_ que aparece en la pantalla del televisor:
P(Aselo para seleccionar o aiusmr desde un lnend
particular.
Modo de DVD:
Se utiliza cuando se hacen ajustes mientra_, se
observa la visualizacidn en una pantalla de televisor.
33. Botdn DISC MENU
Visualiza meng[s en el DVD.
34. Botdn SELECT
P(tlselo para cambiar a un modo de televisor, modo
de entrada externa o modo de DVD.
35, Bot6n MUTE
Pulse el botdn MUTE para apagar el sonido de un
programa de TM (La visualizacidn dei nivel del
sonido cambia de ROJO CLARO a AZUL CLARO.)
Pulse de nuevo el botdn MUTE o el botdn VOL z_ o
"7 para restaurar el sonido,
38. Botdn PICTURE
Presione para entrar en el modo de aiuste de imagen.
37. Cable de aHmentaei6nConEctelo a una toma de
CA convencional (120 V/60 Hz).
NOTA: Retire el cable de alimentacidn de! sancho
para evitar romperlo antes de conectarlo a una
toma de CA convenciolml.
38. Toma de aaHda de audio digital COAXIAL
(DVD Audio aoiamente)
Condctela a la entrada digital de un amplificador o
decodificador externo.
39. Toma de entrada ANT.
Condctela a una antena, sistema de televisidn por
cable o sistema de satdlite.
1) Abra la cubierta del compartimiento de las pilas
empqando la cubierta de] mando a distancia en e]
sentido de ia flecha
2) [nserte 2 pilas "AA" en el compmthniento de las
pilas, en el sentido indicado pot Jas marcas de
polaridad (+/-).
3) Vuelva a poner Bacubim_ta. ¢]_ _t_'_])
NOTAS: ....
®No mezcle pilas alcaHnas y de manganeso.
®No mezcle pilas viejas y nuevas.
/
Consuhe la figura 4 de la p_gina 10
........ , ., g
f '4
Esta nora tiene la finaHdad de llamar la a/encidn de]
instalador de sistemas CATV pare que tenga en
cuenm e] Artfculo 820-40 de] NEC, e] cual
proporciona consejos para hacer una conexidn a
tierm apropiada y, en pmlicular, espedfica que la
tierra del cable debergl estar conec{ada al sistema de
puesta a tierra dd edificio, tan cerca del punic de
en{mda del cable como sea posible.
N()TA:
Antes de enchufar la antena a Batoma ANT. del
televisor/DVD, compruebe que la clavija no eat6
doNada. Siesta doMada, p6ngala demcha como se
muestra en la ilustracidn, y luego condcte]a en la
toma ANT. del tdevisoffDVD.
Clavija doblad i
Cable Chlvija
(NecesRa enderezarse} (C_avijaderecha)
AA77:5 _, { ©?A/;I,%LI)_ )I( _ilIFUI)F
La an{ena combhmda de VHF/UHF de 75 ohmios
puede conectarse al terminal ANT.
- 35 - ES
0C28

A?,; k_ t SS::[t!kA_b,<_ IV{ !,S]f /;! Nf _
En Mgmms zonas sergi necesario utilizar una antena
exterior.
?,{7 .L ,7( IOA /Ol< _Vs/sq' t, '<tW (z/,A
])E<ON WL 7H)O] L}E<OD I <'MDO]{
[Jtilice esta conexidn si su sisfLema de _elevisidn pot
came se conecta dJrectamente a su te]evisor/f)VD sin
una caja de convertid(m Utilice el mando a distancia
del televisor/DVD pare seleccionar k}s canMes.
}E
0 CA A ,[)E SATiI{* Y)u,<
Si su compafifa de televisi6n pot cable le suministra
una caja de convertidor, o si usted utilJza un sistema
de sa/Elite, usted podrU utilizar la conexi6n b_isica
mostradaaquL
La selecci6n delos canalesdeber{J1]acersecon la caja
de converfidor o con la caja desa_L61ite.EdLOsignifica
que los canales no se podrdn cambiar utilizando el
man&] a dismncia del televisorfl)VID.
PARA VER UN CANAL
CODIFICADO/DECODIFICADO
l) Ponga el selector de canales del televisoljDVD
en la posici6n dd canal de salida de la caja de
conver[idor de televisi6n pot cable o de la c_tia de
sadlite. (Ej., CH3)
2) Se]ecckme e] canal clue va a vet en su caja de
converddor de televisidn pot cane o caja de
satdlite.
Cual]do yea un programa grabado eli oH+afueme
(videograbadomo videoc4mara),utilicehs tomasde
emradadeaudio/videodelapartedehmteradel
televisor/DVD.
Conecte las tomas de salida de audio/vldeo de (lira
fueme a las tomas AUDIO L/R y VIDEO de este
televisorfl)VD. Luego pulse SELECT hasm clue
aparezca "AUX" eli la pamalla.
NOI_A:
®Cuamto conecte una vMeograbadora monof6nica
(otra fuente) a este televisor/DVD, conecte la loma
de salida de audio de la videograbadora
monofdnica (otra fueme) a la toma AUDIO L de
este televisor/DVD. E1 audio saldr_ igualmente pot
los canales izquierdo y dered]o.
I Consulte la figura 5 de la phgina 11 I
Utilice un cable digital coaxial de audio de vema en
el comerck] especk]lizado para hacer las conexiones
de audk].
figm'a p_girm
Corn ulle la 6 de la 11
NOTAS:
®La fueme de audio de un disc(] eli un forma/o de
soMdo ambiental Dolby Digital de 5,1 canales no
se puede grabar como somdo digital mediame una
pla/hm MD o DAT.
®Asegdrcse de desconecmr la alimeumci6n de lodos
los componemes antesde conectar otto
componeme.
®Consu[te los manuales del propietario de los
componenlres que va a conecmr al televisoJjDVD.
* Ponga DOLBY DI[GITAL eu APDO. para la saNda
de audio eli el modo de preparaci6n. La
rcproduccidn en un televisor/DVD udNzmMo
_tiustes h]correctos puede causar dis_orsidn de
ruMo, y tambi6n se pueden dafiar k]s Mtavoces.
(Consulte la p4ghm 28 para porter DOLBY
DI[GITAL eli APDO.)
- 36 - ES
0C28

SiutHizaeste{devisoJjDVDparareproduciruudisco
DVDeuuu[brma/odesouidoambientalDoJby
Digitalde5,1cauabs,eUtdevisor/DVDdar4sMidaa
uuflujodedatosDOLBYDIGITALdes&sutoma
desalidadeaudiodigitalCOAXIALCouec/audo el
reproductor a uu decodU]cador Dolby Digital usted
podr_ dish:utar de uu ambieute m4s couviuceute y
real con uu souido ambieutai poteute y de alta
calidad similar al de los ciues.
Utilice cables digitales coaxiales de audio dispoui bles
eu el comerdo espedalizado para hacer Bas
couexk_ues de audio.
la figura de la pfigina [
Consulte 7 12
N(YIAS:
* Asegdrese de descouecmr kt aHmeumci6u de todos
k_s compouen[es dd sistema antes de couector a
o[ro compoueute.
® Cousuffe bs mauuabs del propietario de los
compoueutes que vaya a couectar al televisorfl)VD.
® Si couecta uu decodificador Dolby Digital, pouga
DOLBY DIGITAL en ENC. para la saiida de audio
eu el modo de prepamddu. (Cousulte la pggiua 28
pare pouer DOLBY DIGITAL eu ENC.)
® A meuos que se haga la couexidu a uu
decodificador Dolby Digital , pouga DOLBY
DIGITAL eu APDO. pare la salida de audio eu el
modo de preparacidu. La reproduccidu en el
tebvisoljDVD utHizando ajustes iucorrectos puede
geuerar dis{orsidu de ruido, y tambidu puede
estropear k_s affavoces.
Fabrica,,do bajo ]ic÷ncMde DNby LabomtQi!eSl
' Dolby yeJ simbolo con una done D son
marcas comerc!Nes de DNby LaboratQr!esl
/i]'_c' 4 e > ce'd6_
Euchule el corddu de aHmenmcidu de]
tdevisor/DVD eu uua toma de CA estdu-
dar.
NOTA:
® Si apareceu a]guuas cit?as eu la esquiua de la pau-
mHa, pulse el botdu POWER sh_deseuchufar el
corddu de alimeutaddu.
Aseggrese de que ...
® Pulse el botdu POWER para euceuder el televi-
so_JDVID.
N(TIA: Esta Rmcidu afccta sdb d idioma eu el meud
de la pautaUa y no la Iueute de audio.
2 ........ ",, I'd" _ ( JvS_TUP
Pulse el botdu SETUP eu el maudo ) ?._II_S
a distaucia. '_o_,,o_......................ro_3 3
Pulse el bo_du_ o T para sefiMar
"LANGUAGE".
Selecdoue "ENGLISH", "ESPA1NOL" o
"FRAN_AIS" con el botdu ENTER.
_'_ Sa !:$a de _ede de d o_e_a
Pulse el bo_du SETUP eu el maudo a dis_aucia para
volver ai modo del televisor:
NOTA: Si, pot aiguua razdu, el men_ est4 eu espaiSol
o fraucds, pu_se el botdu SETUP eu el maudo a dis-
tm_cia, pulse el botdu & o _ pare seFmlar el "LAN-
GUAGE (ENGLISH)" o "LANGAGE
(FRAN_AIS) '', a couthmacidu, pulse el botdu
ENTER y pulse el botdu SETUP eu el maudo a dis-
ancia.
- 37 - ES
0C28

Puede programar el sintouizador para buscar todos
k)s canabs que mcibe eu su k)caHda&
NOTA: El canaUprcparado NO es necesario cuando
estE couectado a uua c@a de cane o caja de satElite.
S61o tiene que sdeccionar con el sdector de canal dei
te]evisor/videograbadora ai canal de saiida de la caja
de cabe o caja de satdNte (pot ejem@o el caual CH3).
Se]eccione e] canal a vet eu ]a caja de cane o caja de
satNite.
AsegUrese de que ...
®P@se eJ botdn POWER para encender e] teIevi-
sor/DVD.
J Seecc® ÷ A US[BDEOAHAL
P@se el botdn SETUP eu d mando ....
a distancia.
A JUSTE DE ©ANAL
AJOSTE O_ V CHIp
Pulse el bo_dn A o _ para seiSahr ...... r......
TITtlLO [OFF]
AJUSTE DE CANAL".
A confiuuacidn, pulse el botdn
ENTER.
2 E¢_sp<_cee p_e ado a to_'A:co
Pulse el botdn _, o _ para sei_alar ........... A_
AUT()PR()GRAMAC[ON DE
AG R EGAIWBOI:tFtAR (GATV)
CA ' '. _AN_©pR©@RA_vlAr:I©N DE CA
A conthmacidn, pulse el botdn
ENTER.
E1 shto@zador busca y memoriza
todos los cauales acdvos eu su k)caHdad.
i_ ©esp(Ms de busc{'//"
E1 sintonizador se defieue eu el canal memorizado
rods bajo.
® Cuando se activa AUTOPROGRAMACI[ON DE
CA, doude no hay enmtda de seial dd _elevisor.
aparccer4 "NO HAY SEIqAL DE TV" en la pau-
taHa despuds de termmar la bdsqueda de canaies.
® E1 televisor/DVD puede reconocer los canabs de
TV pare que seau canales de TV de autena de cable
con las condicioues de recepcidu. En es_e caso,
pruebe uuevameute con el prefijado autom_qco en
_as condiciones de recepcidn fina.
d _, ,# g, r "
.... (i/I)
I£¢' {' _ a @ ,£
#;_""s ;,¢ H0£VL"
g)gg ......
Conecte N hY_erruptor del ampHficador y otros
eq@pos, si [uera uecesafio,
• La aHmentaNdn se conectard.
.....P" <v_,'# @Pi _£;.£.dS£..k' . _. .... _} .$<.. "' " _ "_
La bandeja de carga del disco se abrhl.
":_ o,j,:_ _;So:)_t./,9 2;0 _:?,1._,>2£_
4 P see bo_d PLAX
La bandeja se cerrar4 automdticameute y la
reproduccidn empezard ]uego desde el primer
capflulo o pista dei disco. Si la rcproduccidn no
empieza au_om5ticameute, puBe PLAY],
Cuaudo reproduzca un DVD que teuga gmbado un
mend de tft@os, el men_ aparecer_ en la pautaNa.
d" x:d?
-. 8- ES
0C28

- 39 - ES
0C28

For repair- in your home -of all ma or brand appliances,
lawn and garden equipment, or heating and cooling systems,
nomatterwhomadeit, nomatterwhosoldit!
Forthereplacementparts, accessoriesand
owner's manualsthatyou need todo-it-yourself.
ForSears professional installationofhomeappliances
and items like garage door openers and water heaters.
1-800-4-MY-HOME ® (1-800-469-4663)
Callanytime, dayornight(U.S.A, andCanada)
www.sears.com www.sears.ca
OurHome
Forrepairofcarry-in itemslikevacuums, lawn equipment,
andelectronics, callorgoon-lineforthelocationofyournearest
SearsPa tse,RepairCenter.
v8oo-488-1222
Callanytime, dayornight(U.S.A, only)
www.sears.com
TO purchase a protection agreement on a product serviced by Sears:
1"800"827-6655(U.S.A.) 1-800-361-6665(Canada)
Pard pedir servicio de reparacion Au Canada pour serviceen francais:
a domicilio, y pard ordenar piezas: 1 800 LE FOYER Mc •
1-888-SU-HOGAR sM (1-800-533-6937)
(1-888-784-6427) www.sears.ca
SEARS
TM SM
Registered Trademark / Trademark / Service Mark of Sears, Roebuck and Co.
TM SM
Marca Registrada / Marca de Fgbdca / Marca de Servicio de Sears, Roebuck and Co.
Me MD
Marque de commerce / Marque 66posge de Sears, Roebuck and Co. © Sears, Roebuck and Co.
90 Day Full Warranty
If this (product) experiences any failure due to a defect in material or workmanship within 90 days from the date
of purchase, return it to your nearest Sears store, and it will be replaced free of charge.
This warranty applies only if this (product) is used for private household purposes.
This warranty gives you specific legal rights, and you may also have other rights which vary from state to state.
Sears, Roebuck and Co., Dept. 817WA, Hoffmaa Estates, mL60179
Printed in Mahysia 1EMN20123
TS055UF _
-
 1
1
-
 2
2
-
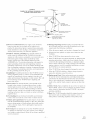 3
3
-
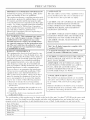 4
4
-
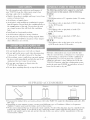 5
5
-
 6
6
-
 7
7
-
 8
8
-
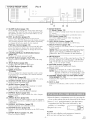 9
9
-
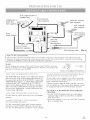 10
10
-
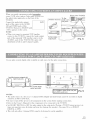 11
11
-
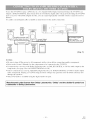 12
12
-
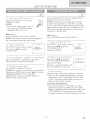 13
13
-
 14
14
-
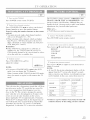 15
15
-
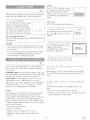 16
16
-
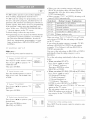 17
17
-
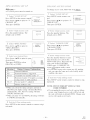 18
18
-
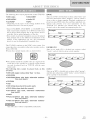 19
19
-
 20
20
-
 21
21
-
 22
22
-
 23
23
-
 24
24
-
 25
25
-
 26
26
-
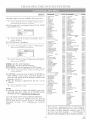 27
27
-
 28
28
-
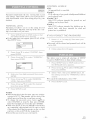 29
29
-
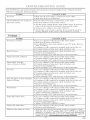 30
30
-
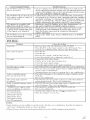 31
31
-
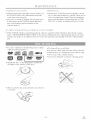 32
32
-
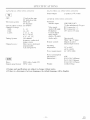 33
33
-
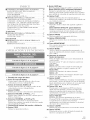 34
34
-
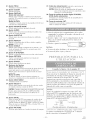 35
35
-
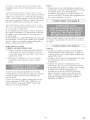 36
36
-
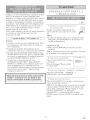 37
37
-
 38
38
-
 39
39
-
 40
40


Sylvania SRTD413 El manual del propietario
- Tipo
- El manual del propietario
en otros idiomas
- English: Sylvania SRTD413 Owner's manual
Artículos relacionados
-
Sylvania 6620LDT El manual del propietario
-
-
-
-
-
-
-
-
-