
Owner's Manual
Manual del Propietario
®
SLIDER/CASEMENTAIRCONDITIONER
HORIZONTAUMARCOACONDICIONADORDEAIRE
Model, Modelo 580. 75063 580. 75123
Sears, Roebuck and Co., Hoffman Estates, IL 60179 U.S.A.
www.sears.com

TABLE OF CONTENTS ........................ 2
WARRANTY .............................................. 2
SAFETY ..................................................... 3
Important Safety Instructions ...................... 3
ELECTRICAL REQUIREMENTS .......4
INSTALLING THE POWER CORD.-..4
INSTALLATION ........................................ 5
Installation Requirements ......................... 5
Installation ................................................ 6
Horizontal Sliding Window Installation "-"6
Casement Window Installation...................... 8
Removal From Window ............................... 8
OPERATION ............................................. 9
How and Why ........................................... 9
Normal Sounds ........................................ 9
Capacity and Running Time ..................... 9
Features ................................................. 10
Using the Air Conditioner ....................... 10
Display ................................................... 11
Air Direction Adjustment ......................... 11
Remote Control ...................................... 12
How To Insert Batteries Into Remote Control ...12
MAINTENANCE .....................................13
Air Filter Cleaning ................................... 13
Air Conditioner Cleaning ........................ 13
How to Remove the Front Grille .................. 13
How to Replace the Front Grille .................. 13
TROUBLESHOOTING .........................14
Before Calling for Service ...................... 14
ESPANOL ................................................16
SERVICE NUMBERS ............Back Cover
FULL ONE YEAR WARRANTY ON
ROOM AIR CONDITIONER
For one year from the date of purchase, when this
air conditioner is operated and maintained for
normal room cooling according to instructions in this
owner's manual, Sears will repair this air
conditioner, free of charge, if defective in material or
workmanship.
FULL FIVE-YEAR WARRANTY ON
SEALED REFRIGERATION SYSTEM
For five years from the date of purchase, when this
air conditioner is operated and maintained for
normal room cooling according to instructions in this
owner's manual, Sears will repair the sealed
refrigeration system (consisting of refrigerant,
connecting tubing, and compressor), free of charge,
if defective in material or workmanship.
WARRANTY SERVICE IS AVAILABLE BY
CONTACTING SEARS SERVICE AT
1-800-4-MY-HOME ®.
Warranty coverage applies only to air conditioners
used for non-commercial, private household
purposes.
This warranty applies only while this product is in
use in the United States.
This warranty gives you specific legal rights, and
you may also have other right which vary from state
to state.
Sears, Roebuck and Co., D/817WA,
Hoffman Estates, IL 60179 U.S.A.
-2-

IMPORTANT SAFETY INSTRUCTIONS
The safety instructions below will tell you how to use your room air conditioner to avoid harm to yourself or
damage to your ROOM AIR CONDITIONER.
FOR YOUR SAFETY
Do not store or use gasoline or other flammable
vapors and liquids in the vicinity of this or any other
appliance. Read product labels for flammability and
other warnings.
PREVENT ACCIDENTS
To reduce the risk of fire, electrical shock, or injury
to persons when using your air conditioner, follow
basic precautions, including the following:
• Be sure the electrical service is adequate for the
model you have chosen.
• If the air conditioner is to be installed in a window,
you will probably want to clean both sides of the
glass first. If the window is a triple4rack type with a
screen panel included, you may want to remove
the screen completely before installation.
• Be sure the air conditioner has been securely and
correctly installed according to the separate
installation instructions provided with this manual.
Save this manual and installation instructions for
possible future use in removing or reinstalling this
unit.
• Use gloves when handling the air conditioner.
Be careful to avoid cuts from sharp metal fins on
front and rear coils.
ELECTRICAL INFORMATION
The complete electrical rating of your new room air
conditioner is stated on the serial plate. Refer to the
rating when checking the electrical requirements.
• Be sure the air conditioner is properly grounded.
To minimize shock and fire hazards, proper
grounding is important. The power cord is
equipped with a three-prong grounding plug for
protection against shock hazards.
• Your air conditioner must be plugged into in a
properly grounded wall receptacle. If the wall
receptacle you intend to use is not adequately
grounded or protected by a time delay fuse or
circuit breaker, have a qualified electrician install
the proper receptacle.
• Do not run air conditioner with a protective
covering. This could result in mechanical damage
within the air conditioner.
• Do not use an extension cord or an adapter
plug.
_ Avoid fire hazard or electric shock.
Do not use an extension cord or an adapter plug.
Do not remove any prong from the power cord.
3-prong
grounding
plug
\\
\
Test \
grounding
type wall
receptacle
Ground
prong
cord
ENERGY SAVING IDEAS
• The capacity of the room air conditioner must fit
the room size for efficient and satisfactory
operation.
• Install the room air conditioner on the shady side
of your home. A window that faces north is best
because it is shaded most of the day.
• Do not block air flow inside with blinds, curtains, or
furniture, or outside with shrubs, enclosures, or
other buildings.
• Close the floor and wall registers and the fireplace
damper so cool air does not escape up the
chimney and into the duct work.
• Keep blinds and drapes in other windows closed
during the sunniest part of the day.
• Clean the air filter as recommended in the
MAINTENANCE section of this manual.
• Proper insulation and weather stripping in your
home will help keep warm air out and cool air in.
• External house shading with trees, plants or
awnings will help reduce the air conditioner's work
load.
• Operate heat producing appliances such as
ranges, washers, dryers, and dishwashers during
/
-3-

OBSERVEALLLOCALCODESANDORDINANCES.
DONOT,UNDERANY CIRCUMSTANCES,REMOVE
THE POWERSUPPLYCORDGROUNDPRONG.
ELECTRICALGROUNDISREQUIREDONTHIS
APPLIANCE.
For230/208volt 60 Hz, AConly,15Afused and
properlygroundedelectricalsupply isrequired.A time
delayfuseor time delaycircuitbreakeris
recommended.Usea dedicatedcircuit,sewing only
this appliance.
DONOTUSEAN EXTENSIONCORD,
115V-
RECOMMENDEDGROUNDINGMETHOD
Foryourpersonalsafety,thisappliancemustbegrounded.
Thisappliancehasa powersupplycordwitha 3-prong
groundingplug.Tominimizepossibleshockhazard,the
cordmustbepluggedintoamatinggroundingtypewall
receptacleandgroundedinaccordancewiththeNational
ElectricalCode(ANSI/NFPA70)latesteditionandalllocal
codesandordinances,if amatingwallreceptacleisnot
available,it isthepersonalresponsibilityandobligationof
thecustomerto havea properlygrounded3-prongwall
receptacleinstalledbyaqualifiedelectrician.
230V-
Power cord may include acurrent interrupter
device. Atest and reset button is providedon the
plug case. The device should be tested on a
periodic basis byfirst pressingthe TEST button
and thenthe RESET button. Ifthe TEST button
does not trip or if the RESET button will not stay
engaged, discontinue use ofthe air conditioner and
contact a qualified servicetechnician.
NOTE: The shape may be different accordingto its model.
Use Wall Receptacle Power Supply
Standard 125V,
3-wire grounding
receptacle rated
15A, t25V AC
Standard 250V,
3-wiregrounding
receptacle rated
15A,250V AC
Use 15 AMP, time
delay fuse or 15 AMP,
circuit breaker.
Standard 250V,
3-wire grounding Use 20 AMP, time
receptacle rated delay fuse or 20 AMP,
20A, 250V AC circuit breaker.
Electrical Shock Hazard
Plug into a grounded 3 prongoutlet.
Do not remove ground prong.
Do not use an adapter.
Do not use an extension cord.
Failure to follow these instructions can result in
death, fire, or electrical shock.
You can choose between the two methods below according to your preference and window sill shape.
USING SLIT "A"
Fasten the stopper using Type A screw, and lead the
power cord out through slit "A'L
Screw(Type A
-4-
USING SLIT "B"
Fasten the stopper using left screw hole, and rotate
properly to lead the power cord out through slit "B'L

INSTALLATION REQUIREMENTS
These instructions are for a horizontal sliding or a
casement window. The electrical outlet must be
within reach of the power cord.
Side louvers and the rear of the air conditioner must
have clear air space to allow enough air flow
through the condenser for heat remove.
The rear of the unit must be outdoors, not inside a
building or garage.
Horizontal sliding window
Casement window
ELECTRICAL SERVICE
Check your available electrical service. The power
supply available must be the same as that shown
on the unit nameplate (found on right side of cabinet).
All models are equipped with a 3-prong service plug
to provide proper service and safe positive
grounding. Do not change plug in any way. Do not
use an adapter plug. If your present wall outlet does
not match your plug, call a qualified electrician to
make the necessary corrections.
SAVE CARTON and this OWNER'S MANUAL for
future reference. The carton is the best way to store
unit during winter or when not in use.
To avoid risk of personalinjury, property damage,
or productdamage due to the weight ofthis
device and sharp edges that may be exposed:
•Air conditioners covered in this manual pose an
excessive weight hazard. Two or morepeople
are neededto move and install the unit.
To prevent injury or strain, use properlifting and
carrying techniques when moving unit.
•Carefully inspect location where air conditioner
will be installed. Be sure itwill support the
weight of the unit over anextended period of
time.
• Handleair conditioner with care. Wear
protective gloves whenever liftingor carrying the
unit. AVOID the sharp metal fins of front and
rear coils.
• Make sure air conditioner does not fall during
installation.
/
NOTE!
Before using the air conditioner
secure the front grille with two screws
enclosed with the owner's manual.
1. Open the inlet grille downward and
remove the air filter.
2. Fasten the front grille with screws.
3. Reinstall the air filter.
4. Close the inlet grille.
Inlet Grille
-5-

INSTALLATION HARDWARE
NO. NAMEOF PARTS Q'TY
1 Curtain 1
2 Curtain Frame 1
3 Upper Guide 1
4 Side Guide 2
5 Support Bracket 1
6 Bracket 1
7 Leveling bolt & nut 1
8 Bolt 2
9 Nut 2
10 Washer 2
11 Side Guide seal 1
12 Foam Seal Strip 1
13 Window Track Seal 1
14 LBracket 1
15 Screw (Type A) 9
16 Screw (Type B) 3
17 Screw (Type C) 8
REQUIRED TOOLS:
• Tight Fitting gloves
• Standard screwdriver
• Phillips screwdriver
• Pliers
• Sharp knife
• 3!8-inch open end wrench or adjustable wrench
• 1/4-inch hex socket and ratchet
• Tape measure
• Electric drill
• 1/4-inch drill bit
INSTALLATION
Pick a location that will allow the air conditioner to
blow the cold air into the area you want. Windows
used for installation must be strong enough to
support the weight of the air conditioner. Good
installation with special attention to the proper
position of the unit will lessen the chance that
service will be needed.
When cooling more than one room, installation
location is very important. To cool your rooms, cold
air must be blown from the air conditioner in a
straight path.
HORIZONTAL SLIDING
WINDOW INSTALLATION
_1 Loosely attach the Support Bracket to the
bottom of Bracket using Bolts, Washer, and Nuts.
Attach the Leveling bolt and nut. (Fig. 1)
Bolt
Bracket
Washer
Support Br ' Bolt & Nut
FIG. 1
_ Remove protective backing from Window Track
Seal and apply seal to window track (Fig.2)
_J Measure and lightly mark a line 8-1/4 inches
from window jamb Center the Support Bracket
assembly on the window track and fasten with
4 Type C screws.(Fig. 2)
WindowJamb
fjj
JWin_owTrack
i" Seal
FIG. 2
-6-

inPut the Support Bracket against the outside
wall and tighten the Bolts on top of the Bracket.
Adjust the Leveling Bolt so that the air conditioner
will be installed with a very slight tilt (about 1/4")
downward toward the outside for proper drainage.
Tighten the nut. (Fig. 3)
NOTE: DO NOT drill a hole in the bottom of the
base pan The air conditioner is designed to
operate with the bottom of the base pan
approximately half-full of water.
FIG, 3
I_1 Fasten Side Guides to the sides of the Air
Conditioner using 3 Type A screws per Guide.
Start with first screw at middle of Guide. (Fig. 4)
Ir_ Fasten Upper Guide on the top of the Air
Conditioner using 3 Type A screws. (Fig. 4)
Fastening Side Guid_
Side Guide
FIG. 4
I_1 Measure height of window opening from top of
Bracket assembly as shown Fig. 5. Subtract 20-3/4
inches. Mark this measurement on Curtain and cut
the Curtain. (Fig. 5)
FIG. 5
Ir_l Slide Curtain into Curtain Frame. Slide Curtain
Frame assembly into side Guides of the Air
Conditioner cabinet. Make sure Curtain is firmly
enclosed on all sides by the Frame. (Fig. 6)
FIG, 6
I_1 Cut side Guide seal into 2 equal lengths.
Remove protective backing and apply it to the rear
side of cabinet Side Guides, starting just below
Curtain Frame assembly. Pinch off excess length so
seal is even with the bottom of side Guide. (Fig. 7)
weather seal
to side guides
just below edge of
Curtain Frame,
FIG. 7
/
-7-

_ti] Place Air Conditioner in window opening. It
should sit on Bracket assembly so that Curtain
Frame and cabinet Side Guides are against top and
side window jambs. Mate front of Bracket with Base
Guide attached to the bottom of base pan.
_1_ Drill 1/8 inch holes in window track through the
existing holes on Base Guide. Screw 4 Type C
screws through the holes. (Fig. 8)
_l_lf this is a casement window installation,
proceed to Casement Window Installation. If not,
slide inner window sash firmly against side of the
cabinet.
_'1 Drill 1/8 inch hole in window jamb to align with
the existing holes in the Curtain Frame. Attach
Curtain Frame to window frame with 2 Type B
screws. (Fig. 8)
NOTE= Check all seals and plug any remaining air
gaps with a suitable weatherproof caulk,
_'L_'l]lfthis is casement window
a
installation,
proceed to Casement Window Installation. If not,
stuff the Foam Seal Strip between the vertical sash
and the window glass, (Fig, 9)
_'_ Attach the L Bracket with a Type B screw. (Fig. 9)
FIG. 9
CASEMENT WINDOW
INSTALLATION
• Installstion procedure isthe ssme as _st descdped in
sIeps 1 through t 1 and step 13 ofthe HorizontalSliding
Window installation.
• Ifthe window openingiswider _an 15-3/4 inchesyou
will need to installa filler panel. Ma_ethis panel from 3/4
inch thick wood and run it the full length ofthe window.
Attach it securely to the window frame and paint it to
proIect it from the weather.
•Since thereis awide variety ofcasement window styles
and sizes, these instructions rosy not be exa_ly suited
to your perticelsr situation. Toensure besI results, have
the work performed by someone skilled in installing
casement window air conditioners.
REMOVAL FROM WINDOW
* Turnoff and unplugthe air conditioner.
* If horizontalslidrngwindow=removethe L Bracket from
window frameand the FoamSeal Strip from betweenthe
windows.
* Remove the Safety Bracket that you installed in Step 12.
* Unscrew the Curtain Frame from the window frame.
* Remove air coadrtionerfrom the window opening.
BECAREFUL NOT TO DROP IT.Once removed,set it
safely out of the way.
* Remove Curtain Frame and Curtain.
* Unscrewthe Side Guidesand UpperGuide.
* Place unitand allassemblyhardware in air cenbit[oaer
shipping carton, and store in a clean, dry place.
*Air conditioners covered in this manual pose an
excessive weight hazard. Two or more people
are needed to moveand install the unit
To prevent injuryor strain, use proper lifting and
carrying techniques when moving unit.
*When handling the air conditioner, be careful to
avoid cuts from sharp metalfins on front and
rear coils.
* Make sure air conditionerdoes notfall during
removal.
-8-

HOW AND WHY
Your room air conditioner provides the following
functions to make hot weather living more
comfortable:
,*Cools and circulates room air.
,*Lowers humidity by removing excess moisture.
,*Filters out summertime dust. dirt. and some
airborne impurities,
The air conditioner performs these functions by
drawing room air through a filter which traps dust
and dirt particles. The air then passes over a
cooling coil which refrigerates the air and removes
excess moisture. The same air is then returned to
the room-cooler, drier, and cleaner, Moisture
removed from the room air is carried to the outside
and evaporated,
Your air conditioner is designed to be easy to
operate and to provide plenty of cooling power,
NORMAL SOUNDS FIG.lO
Aside from the regular fan motor and compressor
sounds coming from your air conditioner, you will
once in a while hear a pinging sound, This is the
result of moisture being picked up from the air inthe
room and thrown against the air conditioner's fan.
This is normal and should not be cause for concern.
Also, do not be alarmed if you hear a slight hissing
or gurgling sound coming from your air conditioner
after it is off. These are normal coolant noises.
CAPACITY AND RUNNING TIME
Proper unit size is important in deciding the desired
comfort for the area you want to cool. An
undersized unit will not have the capability to cool,
leaving the area uncomfortably warm. The proper
size is determined by the number of square feet in
the area to be cooled, indoor and outdoor
temperature and humidity.
Whenever the heat or humidity load is above normal
the air conditioner must run longer and more often
to keep the desired temperature you have selected,
Under heavy heat load conditions the air conditioner
may need to run constantly to keep the temperature
you want,
At times using the MED FAN setting to circulate the
room air may make it comfortable even though the
air is not being cooled, This will decrease your cost
of use.
i ompreasor
The modern high efficiency
compressor may have a h_gh
pitched hum or pulsating
noise that cycles on and off.
Unit Vibration
i Fan The unit may vibrate
You may hear air and make noise
movement from because of poor wall
the fan. or window construction,
Condenael
You may hear drople{s of water hitting
the condenser causing a pinging or
clicking sound,
FIG. 10

FEATURES
4 2
13
12
8
1, Cabin_
2, Air Discharge
3, Vertical Air
Deflector
(Horizontal Louver)
4, Air Intake
(inlet Grille)
5, Air Filter
6, Front Grille
7, Control Panel
8, Power Cord
FIG. 1 1
g. Evaporator Coil
1g. Condenser
11. Compressor
12. Base pan
13. Brace
14. Side Louver
USING THE AIR CONDITIONER
To reduce the risk of fire, electric
shock, or injury to persons, read the important
SAFETY instructions section before operating this
appliance.
To begin operating the air conditioner after
installation, follow these steps:
1. Plug in the air conditioner. (To prevent electrical
hazards, do not use an extension cord or an
adapter plug.)
2. Set the exhaust vent to the CLOSE position.
3. Set the TEMP Control to the coolest setting,
4. Set the MODE control at the highest COOL level,
5. Adjust the louvers for comfortable air flow,
6. Once the room has cooled, adjust the TEMP and
Mode Control to the setting you find most
comfortable.
NOTE : If the air conditioner isturned off, wait 3
minutes before restarting. This allows pressure
inside the compressor to equalize, Failure to wait 3
minutes before restarting may cause inefficient
operation.
If you move the TEMP Control to a warmer, then
immediately back to a cooler setting, the unit will
shut off. Wait 3 minutes before restarting.
VENT CONTROL
The Vent Control allows the air conditioner to
either recimulate inside air (CLOSE) or exhaust
air to the outside (OPEN). (FIG, 12)
* The CLOSE position is used when maximum
cooling is desired. It may also be used for air
recirculation without cooling when the air
conditioner is set in the FAN position.
* The OPEN position removes stale air from the
room and exhausts it to the outside. Fresh air is
drawn into the room through your home's
normal air passages.
* The OPEN or CLOSE position can be used with
any fan selection,
CLOSE-LVENTJLOPEN
FIG. 12
-10-

DISPLAY
- POWER
Toturnthe air cond_ionerON, push thisbutton.To
turnthe airconditioner OFF, pushthe button again.
,,This button _:es priori_ over any other buttons.
,,When you first turn _ on, the uNt is in cool mode,
High 'an speed,Temperature settingat 72"F.
REMOTE CONTROL SIGNAL RE(;
MODE
- Everytime you pushthis button,it will shi"_among
COOL, ENERGY SAVER and FAN.
- ENERGY SAVER
* The'an stops when the compressor stopscooling,
Approximately every3 minutes the fan will turn on and
the unit will checkthe room airto determine ["coolingis
needed.
FAN SPEED
* Everytimeyoupushthisbutton,itadvancesthe
settingasfollows:._HIGH(F3)_.LOW(Ff)_"
MED(F2)_ HIGH(F3)}
TEMPERATURE SETTING
* Usethis button toautomatically controlthe
temperature o"the room,The temperature canbe
setwithina rangeof 60=Fto 86_'Fbyincrementso"
I=F.
When power is restored after an ]
electrical power failure, the unit will begin
to run at its last setting
AIR DIRECTION ADJUSTMENT
HORIZONTAL AIR DIRECTION CONTROL
The horizontal air direction is adjusted by moving
the vertical louvers right and left with your
fingertips. (FIG. 13)
TIMER
- SHUT-OFF TIME
° YOUwillusually use shuI-off time while you sleep.
• With unitrunning,use Timer to set numberof hours until
shuf-off.
• For your sleeping comfort, onceTime is sef, ihe
Ternperature setting will raise2°F sfter 30 rain., and
2°F after snofher 30 rain.
• Every lime you push Timer button, it advances the Timer
settingss follows: 1 Houre 2 Hours _- eft. _- 12 Hours
maximum.
- START TIME
• With unitnor running, use Timer to set numberof hours
before unitsfsrts.
• Every lime you push Timer button, it advances the Timer
setting as follows: 1 Hour _ 2 Hours _ etc. _ 12 Hours
maximum.
VERTICAL AIR DIRECTION CONTROL
The vertical air direction isadjusted by moving the
horizontal louvers up and down with your fingertips.
(FIG, 14)
FIG. 13 FIG. 14
-11

REMOTE CONTROL
Note: The RemoteControl will not operate propedyif
strong light shines on the sensor window of theAir
Conditioner or if there are obstacles be'_een the Remote
Control and _e Air Conditioner.
Every time you push button,you will hear beep sound
from the Air Conditioner.
4 2 5
5
5, TIMER
- SHUT-OFF TIME
* YOUwill usuallyuse shut-off time while you sleep.
,,With unit running, use Timerto set number of hours
until shut-off.
• Foryour sleeping comfort, once Time is set, the
Temperaturesettingwill raise 2"F after 30 rain, and
2°F after aco_er 30 rain.
• Everytime you push Timer burton, it advances _e
Timersorting as follows: 1Hour_' 2 Hours _. etc._'
12 Hoursmaximum.
- START TIME
• With unitnot running,usetimer to set number of
hours before unit starts.
• Everytime you push Timer burton, it advances _e
Timersorting as follows: 1Hour_' 2 Hours _. etc._'
12 Hoursmaximum.
HOW TO INSERT BATTERIES
INTO REMOTE CONTROL
1. Removethe cuverfrsmthe backuf theremotecurltr_ller.
2. Inserttwo batteries.
• Besure that the (-) and (-) direotionsare correct.
• Be sure that both batteries are new.
3. Re-attachthe cover.
REMOTE CONTROL OPERATIONS
FIG. 15
1. POWER
• Toturn theairconditionerON, push thisbutton.
To turn the air conditioner OFF, push the burton
again.
• Thisburton takes priodtyoveranyother burton.
• When you first turn it on,the unit is in ccol mode, High
fan speed, Temperature se_ing at 72'F.
2. TEMPERATURE SE'VI'ING
• Use this buttontoautomatically control the
temperature of the room.
Thetemperature can be set within a range of60°F to
86°F by increments oft°F.
3. MODE
- Everytime you push this burton, it will shift among
COOL, ENERGY SAVER and FAN.
- ENERGY SAVER
• Thefan stops whenthe compressor stops cooling.
Approximately every 3 minutes _e fan will turn on and
the unit will check the room air to determine if ccoling
is needed.
4, FAN SPEED
- Every time you pushthis burton, it advances the setting
asfollows: {High(F3) -_ Low(F1)," Meal(F2)_' High(F3)}
• Do not use rechargeablebatteries. Such batteries
differ from stendard dry cells inshape, dimensions, and
performance.
• Remove the batteriesfrom the remote controller if the air
conditioner is not goingto be usedfor an extended
length of time.
• In order to prevent discharge, remove the batteries from
the remote control ifthe air conditioner is not goingto be
used foran extended pedod oftime. Keep the remote
control away from extremelyhot or humid places.To
maintain optimal operationof the remote control, the
remote sensor should not be exposedto dtteot sunlight.
• The remote control can be mounted ona wall usingthe
mountable holder.
FIG. 17
-12-

AIR FILTER CLEANING
The Air Filter will become dirty as it removes dust
from the inside air, It should be washed at least
every 2 weeks, If the Air Filter remains full of dust,
the air flow will decrease and the cooling capacity
will be reduced, possibly damaging the unit,
• Pull the inlet grille forward, grasping both tabs,
then pull out the air filter. (FIG. 18)
• Wash the Air Filter under the faucet with warm
water. Be sure to shake off all the water before
replacing the filter. (FIO.t g)
FIG. 18
AIR CONDITIONER CLEANING
Clean the front grille and inlet grille by wipingwith a
cloth dampened in a mild detergent solution. (FI0.20)
The cabinet may be washed with mild soap or
detergent and lukewarm water, then polished with
liquid appliance wax.
To ensure continued peak efficiency, the condenser
coils (outside of the unit) should be checked
periodically and cleaned if they become clogged
with soot or dirt from the atmosphere, Brush or
vacuum exterior coils to remove debris from fins.
FIG. 20
HOWTO REMOVETHE FRONTGRILLE
• Open the inlet grille downward.
• Remove the screw securing the Front Grille,
• Push the grille up from the bottom and pull the top
of the grille away from the case to lift the top tabs
out of their slots,
HOW TO REPLACE THE
FRONT GRILLE
Attach the front grille to the cabinet by inserting the
tabs on the grille into the slots on the front of the
cabinet. Push the grille in until it snaps into place.
FIG. 22
-13_

BEFORE CALLING FOR SERVICE
Check the following list to be sure a service cedl is really necessary. A quick reference to this rne_nual may
help you avoid em unneeded service call.
THE AIR CONDITIONER WILL NOT OPERATE
Check if,,, Then...
TheCurrentinterrupterdovioc istripe& PresstheRESETbutton[ooctedonthe peworcord plug
If81eRESETbutton willnot stayengaged,disocntinueuseofthe
airconditianer andcontact aqualifiedservicetochnician.
Wallplugdi_._nnocted. Pushplugfimdyint_._waitoutlot.
HoucoNss blownor ci_u_tbreakert_pped. RoplcooNso_h 5triodelaytypeorr_cot_rouitbreaker.
PowerisOFF. Push#le powerb_n.
Unitwastumodoffandthenontooquickly. Sotunitoffandwait3 minutesbefor_r_starting.
"TEMPCenb'ols_ wannerthanroomtornperaturo. Sot"[EMPCestaroltea lowernumber.
AIR FROM UNIT DOES NOT FEEL COLD ENOUGH,
Check if,,, Then...
FANSPEEDcotatLOW. PushFANSPEEDb_Lt_ntosotatHI.
"TEMPCenb'ols_ toowarm. Sot"[EMPCestaroltea lowerternpcmtore.
Rocrrltemperaturebelow7O_F(21=C). CoolingmaynotoccurunSImorntornperaturerisesabsso70=F(21°C),
Tember_atur_consingtuhoteuchingovape_terocil, StraighLontubea_',_yfromovaperatercoil.
Iocotedbehindfrontg[itle.
THEAIRCONB110NERCOOLING,BUTROOMISTOOWARM- ICEFORMINGONCOOLINGCOILBEHINDINLETGP&LE
Check if,,, Then...
Out&%_rtornpcn._urebelm,_70°F(21°C). Todefrost_; coil,setth_MODEtoFAN,FANspocdtoHigh.
Air_ltermaybedirty. C[oanairfiltor.RoTorto Maii_Lon_ sectionofownor'srrlanocl.
To_fro_ thecoil,ssttheMODEtoCoc],Fanspocdtohigh,and_;
TEMPCost_l s_ toolow. Ternpoanfareltoa highertemper_atur,_.
"file AR CONBIllONB:IO(X)LI_,, BUTROOMISTOOWARM
Check if,,, Then...
Di_yairfilter- airrns_od. C[oanairfiltor.RoTorIo Ma[i_Lon_ soctbnofownor'srrlanocl.
TEMPC_3ntrolcottoowarm. Sot"[EMPCest_roltea lowert_nporature.
Frontcf unitisblockodbydrape&blinds,furniture,otc. C[oarblockageinfrontcf unit.
Ai_"dist4b_onisr_strictod.
Doors,windows,ro'jisters,otc.open.Coldai_"eco_poc. Cle",_odoors,windows,registers,otc.
Unit_n_ turnodon inhotrocrrl. AJb',_additbr_'_,r_to_rnoves_ -cat_ wals,_ling, I_or,an_fuml,_.
THE AIR CONDITIONER TURNS ON AND OFF RAPIDLY,
Check if,,, Then...
Outsidetemperature[soxtrume[yhot. SetFANSPEEDonHItom[nirnizothococlingIocd.
Unitiscottoanorg!/ssvorrrlodo Approx'rretolyc'_ r,t 3 rrlinulss_e fenwillturnonand_e unitv_l[chock
_herooma'rternper,._t_retodetermineifcoelingisneodcd.Thisisnarm_[
energysscorrteds opera,on.
NOISE WHEN UNIT IS COOLING,
Check if,,, Then...
Soul_doffal__-_ing_ator- frorrlthomoisturenercovals,f_el_. This[snarrnsl_e_ httr_)[dityis high.Clocodsors,v_'ndo_,a_qdrogistor&
Wndswvbin€ion- _or nstalaCon. Referto ns_ laton nstrvcConsorchockw_thnstaer.
WATER DRIPPING INSIDE ROOM WHEN UNIT IS COOLING.
Check if,,, Then...
I Tr_eairocndiConerisirnpmberlyinstallod. I 131tairocnditianersligi_tfytetheeutsideteallowwatord_inage.Referteinst_llatianinstructionsorchock_ installer.
WATER DRIPPING OUTSIDE WHEN UNIT IS COOLING,
Check if,,, Then...
Tr]e unitisremovinglargequant_t[nsofr"_oistur_ Thisisnerma[duringe,_'voly humiddays.
f_rn humidmorn.
-14-

-15-

INDICE DE MATERIAS ............................. 16
GARANT_ ................................................ 16
SEGURIDAD .............................................. 17
Importantesinstrucciones deseguridad-,,-,17
REQUERIMIENTOS ELECTRICOS ......... 18
INSTALACION DEL CABLE ELECTRICA -'18
INSTALACION ........................................... 19
Requistios de ventana .......................... 19
Installaci6n ............................................ 20
Montaje en una ventana de cormdera
horizontal ............................................... 20
Instalacion de ventana con marco .........22
La eliminacion de la ventana ................. 22
OPERACION .............................................. 23
C6mo y por qu6 ..................................... 23
Sonidos normales .................................. 23
Capacidad y tiempo do funcionamiento,-23
Caracterieticae ..................................... 24
Uso del equipo de aire acondicionado--24
Caracteristicae del equipo de aire
acondicionado ....................................... 25
MANTENIMIENTO .................................... 26
Limpieza del filtro del aire ...................... 26
Urnpiezadel equipode aireacondidonado -,--26
CSmo eacar la rejilla frontal ................... 26
CSmo a reemplaza el grille anterior ,..,..26
CORRECCION DE FALLAS ...................... 27
Antesde Llarnarpareservicio...................... 27
PARA PEDIR SERVICIO .......Cubierta Trasera
GARANTIA DE UN ANO POR EL
EQUIPO DE AIRE ACONDICIONADO
DE HABITACI()N
Dumnte un a_o complete a partir de la fecha de
compra, si este equipo de aire acondieionado recibe
mantenimiento y se utiliza para el enfriarniento
normal de habitaei6n seg0n las instrucciones
indicadas en este manual del propietario, Sears
reparar_, gratuitamente este equipo de aire
acondicionado, si tiene alg0n defects en rnateriales
o fabricaci6n.
OARANTIA TOTAL DE CINCO A_IOS
POR EL SISTEMA DE REFRIGERACI()N
HERMETICAMENTE SELLADO
Dumnte cinco a_os a partir de la fecha de compra,
sieste equipo de aire acondicionado recibe
mantenimiento y se utiliza para el enfriarniento
normal de habitaei6n seggn las instrucciones
indicadas en este manual del propietario, Sears
reparar_, gratuitamente el sistema de refrigeraci6n
herrn_ticarnente sellado (qua consiste en el agente
refrigerante, los tubas de cone×i6n y el compresor),
si tiene alg0n defeeto en materiales o fabricaci6n.
EL SERVICIO DE GARANTIA ESTA A SU
DISPOSICION CON SOLO PONERSE EN
CONTACTO EL CENTRO DE SEARS AL
1-SO0-4-MY-HOME _
La proteccion de garantfa cubre unicamente a los
equipos de aire acondicionado usados para usa
domestico y no para uso comereial.
Esta garantfa s61o tiene validez mientras el producto
se est_ usando en los Estados Unidos.
Esta garantfa le da derechos legales especfficos y
usted puede tener otros detaches que varfan de
estado en estado.
Sears, Roebuck and Co., D/817WA,
Hoffman Estates, IL 60179 U.S.A.
-16-

IMPORTANTES INSTRUCCIONES DE SEGURIDAD
Las siguientes instrucciones de seguridad le indicar_n c6mo usar su equipo de sire acondioionado de
habitaoi6n papa evitar da_os pars usted mismo y para su EQUIPO DE AIRE ACONDICIONADO,
POR SU SEGURIDAD
No alrnacene ni use gasolina u otros vapores y
Ifquidos inflamables cerea de _ste o cualquier otro
eleotrodom6stico. Lea las etiquetas de los
productos papa vet si contienen advertencias sobre
el car_cter inflamable de los rnismos y otras
advertencias.
PARA PREVENIR ACCIDENTES
Pars reducir el desgo de incendios, descargas
el6otricas o lesiones personales al usar su equipo
de aire acondicionado, tome las precauciones
b_sioas, entre las que est_n las siguientes:
• Asegkirese de qua la alimentaci6n el6ctrica sea la
apropiada pare el rnodelo qua usted ha elegido.
• $i el equipo de sire acondioionado debe instalarse
en una ventana, a usted probablemente le
conviene limpiar primate arnbos lades del vidrio.
$i la ventana es del tipo de tres paneles con un
panel inoluido de pantalla, le conviene sacar la
ventana completarnente antes de la instalaci6n.
• Asegkirese de qua el equipo de aire
acondicionado ha side instalado correctamente y
con seguridad segL_nse sehala en las
instrucoiones separadas de instalaoi6n que vienen
en este manual. Conserve este manual y las
instrucoiones de instalaoi6n para usarlos
posiblemente en el future al saoar o volver a
instalar esta unidad.
• Use guantes al manejar el equipo de aire
acondicionado, tenga ouidado pare evitar oortadas
con las afiladas aletas met_.licas qua se hallan en
nes frontales y posteriores.
INFORMACION ELECTRICA
En la place de eerie del fabrioante se indica ou_] es
la oapacidad el_ctrios nominal complete de su nuevo
equipo de aim aosndidonado pare habitad6n. Consulte
esta place cuandovaya averific_r los requedmientos
el6ctricos.
• Asegfire_sede que elequipo de sire aosndioionado
tangs unacone_6n osrrecta atierra. Para reduoiral
rnmlrnolosdesgosde descargas el_ctrioss e incendio,
es impor_nteconectar el equipo osrrectamente a tierra,
Elosrd,6nde alimerr_oi6n el_'ioa e_ equipade con
un enchufede _es espigascon osne:,d6na _errapare
protegedecon'_adesgos de desc_rgas el_trioss.
" Su equipo de sire acondidonado debe enohuf_ en
unatoms de osrriente de pared quetenga una osneYJ6n
osnecta atierra. Si la toms de corrierrte de paredque
usted piensausar no _ osnec_de osnec_mente a
•_erm o no est_ protegida conun fusible de acci6n
retardapa o conun irTterruptorde circuito, hagsque un
elec_'icistacalificado le instale laterns de osrriente de
pareden forms correct&
• No posg_ a funcionar el equipo de sire aosndioionado
con unacubierta protectors extedor entire& Estopodrfa
oossionar da_os rrec,_niossder'¢¢odel sire
acondidonado.
• No use uncable de extension ni un enchufe
adeptador.
_ Evrtelospeligrosdeinsendiosy
desosrgasel_;_ioss.No useuncable deexlensi6nni un
enchufesdaptador.No elimineningunade lasespigas
delenchufedelcord,6nde slimentad6nel6ctdca,
Temade corriente
de pared con
cone_i6na tierra.
\
\
Pruebs
\
,_C, able de
alimentsci6n
I cosclsvij a
_ I do_adade
conexi6n s
_] tierra de 3
/ , terminsles,
/ Terminalde
osnexi6n a tierra.
_/ BSjOninguna circunstancia
/' corte, quite o evite el use de
la osnexi6n a tierra de esta
clavijs.
IDEAS PARA AHORRAR ENERGJA
• La capaoidad del equipo de sire acondicionado
debe corresponder al tamafio de la habitaoi6n
pare el funcionamiento eficiente y satisfactorio del
equipo.
• Instale el equipo de sire acondicionado de
habitaci6n en el lade sombreado de su hogar. Una
ventana orientada haoia el norte es la major
porque tiene sombre la mayor parte del d/a.
• No bloquee el flujo de sire hacia el interior oon
persianas, cortinas o muebles; o la parte de
afuera con arbustos, parades u otras
construcoiones.
• Cierre el regulador de tire de la chirnenea, las
rejillas de calefacoi6n del piso y la pared, de tel
mode que el sire fr{o no se esoape ni per la
ohirnenea ni per los oonductos.
• Mantenga las persianas y las oortinas de otras
ventanas oerradas durante la parte m_.s soleada
del dfa.
• Limpie el filtro del sire oomo se recomienda en la
seooi6n "MANTENIM lENTO" de este manual.
• El aislamiento correoto y las juntas herm_,ticas en
puertas y ventanas en su hogar le ayudar_n a
mantener el aire caliente afuera y el aire frfo
adentro.
• AI darle sombre externamente a la ease con
_rboles, plantas o toldos ayudar_, a reducir la
carga de trabajo del equipo de sire acondioionado.
• Opere los aparatos qua produoen calor come, per
ejemplo, homes, lavadoras, secadoras y
lavaplatos durante la parte rn_s frfa del dfa,
-17_
/

RESPETETODOSLOSCODIGOSY REGLAMENTO&
BAJONINGUNACIRCUNSTANClAC0RTE,QUITE0
EVITEELUS0DELACONEXIONATERRADEESTA
CLAVIJA.
ESTEAPARAT0NECESITASERCONECTADOATIERRA.
8e requiereureaalirnentaci6nel_ctricaCA,adecaadamer_te
conect_daa tierraconun_usiblede15A,de60Hzyde
230/208V,Serecomiendaunfusiblederetardooun
disyunlordeciR:uitoqua_limenlesol{_Tlenleaesteap_r_to,
NOUSECABLEELECTRIC0DEEXTENSION.
METODORECOMENDADODECONEXIONA"nERRA
Persupro_acogL;rid_d_.__ara_d_b_cco_rs_ a_o_.E_
-:paratovie_eequpadeeo_ancabledealimentad_,nyan-:eavij-:de
1_ teTlinaes Pa'ared_ci_-:lT_xinoelpelcjedec_equeel_chico
elcabledebee_ar¢onectadea_a conexi_,ndep-:recconeo_exiSn
-:tierra,yr_ conexi_,ndebeheco_edeacuercoconatiltima
edie6ndelC6digeEl_ctFcol'Jecon-:l(Ar'4SI_I',_FPA70),e_fcoteco_
losc6digosy_gleTentosIce-:leeSinoexileco-:co_exi_,nee
p_r_ad_:_ad_,e clientetienea _e_s_bilcadylaebligeci_nde
nanee_instaler,co"coeec_ricietac_lifcodo,:_"econexi_,ndep_
_dr_:_ad_det_ te_minaesconconex6n_tierra
115V~ 230V~
F / I
Elcablede_limmtad6npcadeincbir_ndiepcaitive
interrupterdecorriente,L_carcae_de[enchufec_enia
can_nborondepr_eb_yottodereinicio.Eldiepcailivo
debecomprobweeperi_dicamenteprcaionando
primateelboi6nTESTydcap_J_eRESET.
Sie[bo'_onTESTnosedescanectaosielb_l_n
RESETnopermanecaactive,saspsndaelusedsIaira
acandicionadoypbngaseanconl_ctocanuntecnica
des_r4cioeualificado,
NOTA: La forma puede ser diferente segdn su modelo.
Utilice el enchufe de [a pared Consume de Energi_
Standard 125V,
enchufe de 3
L'nea.s de
15A, 125V AO Utilice un fusible de
15AMP, o _n
Standard 125V, Int_rrap|or _Je15AMP.
enchufe de 3
L'nea.s de
15A, 125V AO
Standard 250V,
enchufe de 3 Utilice un f_sible _e
L'nea.$ de 20AMP. o _n
20A, 250V AC Int_rrap|or _Je20AMP.
Peligro be chequeel_rico
Conecte en una conex16nde pared de 3 terminale8
No quite la terminalde conexi6n a tierra
No use abap_bores
No use cable el_ctrico de extension
8i nose siguenest_sinstrucciones,puede ocasionarse
la muerte,un incendio oun chequeel_trico.
Puede escogerentre los dos m_todos abajodescritosde acuerdo ala forma del tabureIe de su ventana y su preferencia.
UTILIZANDO LA RANURA "A"
Aprete el obturador usando hoyo do tornillo, y saque
el cable el_.ctricoa trav_.s do la ranura "A'.
UTILIZANDO LA RANURA "B"
Aprete el obtumdor usando el hoyo izquierdo do
tomillo, y gire apropiadamente pare sacar el cable
el_ctrico a tray,s de la ranura "B".
-18-

REQUISTIOS DE VENTANA
Estas Jnstrucoiones son pars una ventana de
corredera horizontal o un marco de ventana.
La salida el6ctrica debe quedar al alcance del cable
de conexi6n.
Para la instalaci6n en una ventana con marco, la
estructura de la ventana y el lateral del edificio
deben ser los adecuados pars sopoltar el peso del
aparato de airs acondicionado.
Ventana de oorredera horizontal
Ventana con marco
SERVICIO ELECTRICO
Cornpruebe cu_l ee la alirnentaci6n el_ctric_que Ilega a
su dornioilio.L_ slirnentaci6n el_ctdca dispanible debe ser
la rnismaque se rnuestraen Isplata del "fsbdcantede la
unidad (que se hslla en el lads dereoho del gabinete de
corriente alterna).
Todos los rnodelos est&n equipadoe con un enchufe de
treseepigas papasurninisImr un sepsis correctsy una
conexi6n a tierra segum y positive. Nocambie el enchufe
de ninguna forrna. No use un enchufe adsptador. Si eu
toma de corriente de pared actual no puede uearee con el
enohu'fedel equips, Ilamea un electdcista calificsdo pars
queefectde Isscorresoiones necssarias.
CONSERVE LA CAJA y este MANUAL DEL
PROPIETARIO pars que le siwa corns referenois en el
futurc. La cajaes la rnejormanem de conservar Isunidad
durante el inviemo o cuando no est& en uso.
Pare evitsrel riesgode lee[onespersonales,dsnosa
su propiedad,o dance al products debido sl peso de
esteequir)oylosf[Iosa que seran exr)uestos:
• El sire asondicionado del que se bahiaen este
manual sfirma peligro de peso exsesivo.
Dos o ross personas se requiere pars movere
instslar Is unidsd. Pars ev[tar her[dasoagstamlento,
use tecni_s apropiadas pare levntary removerla
unidsd.
• Cu[dadossrnenteinspeoc[oneel lugardondeel airs
asondicionadosere puesto.Asegurese que el lugsr
sostengael pesode Is unidsdsebre un par[odo de
tiempo prolsngads.
• Msntengs su sire scondicionadoson cuidsdo. Use
guantesprotectores cusndo levsnteo muevs Is
unidsd, EVlTE lasaletas 'ilosas de mmetalen el
serpectln delsctero y de atres.
• Asegurese que el sire asondicionado nose ca[ga
durante Is [nstalac[on.
/
NOTE!
Antes de usar el acondicionador de
airs asegure la parrilla delantara con
dos tornillos incluidos con el manual
de owner's.
1. Abra la parrilla de la entrada hacia
abajo y quite el filtro de airs.
2. Sujete la parrilla delantera con los
tornillos.
3. Reinstale el filtro de airs.
4. Oierre la parrilla de la entrada.
Bandejade Entrada
-19_

INSTALACION PIEZAS DE
MONTAJE
NO. r_OBBRELAPARTE CAN'ilDAD
1 Cortina 1
2 Ours superior 1
3 Ours lateral 1
4 Ouide lat_tral 2
5 Soporte de fijaci6n 1
6 Soporte 1
7 Tomille de nivelaci6n y tuerca 1
8 Tomille 2
9 Tuerca 2
10 Amndela 2
11 Junta de gufs lataml 1
12 Burlete de espuma 1
13 Selle del Banda de la ventana 1
14 Soporte de fijaci6n de ventana 1
15 Tomille (ripe A) 9
16 Tomille (ripe B) 3
17 Tomille (ripe C) 8
HERRAMIENTAS REQUERIDAS
,Guantes apmtados
,,Destornillador normal
,,Destornillador Phillips
,,Pinsas
,,Cuchillo filoso
,,Llave inglesa o Ilave abierta de 3/8"
,,Llave hexagonal de cube y trinquete de 1/4
de pulgada
* Cinta para medir
*Taladro electrico
"Broca de taladro de 1/4"
INSTALACION
Escoja un lugar que le permita Ilevar el aire fris al &rea
que desea. Las vestanas que se usen pare la
ins'talaciOndebes tarter la resis'tescia suficiente para
espsrtar el peso del equipsde aire acondicionado. Una
buena instalaci6n con a'tenciOnespecial a la correcta
posici6n de la unidad disminuir& la probabilidad de que
sea necesado efestuar reparaciones.
Cuands se deses enfdar m&s de una habi'taci6n, la
ins'talaciOnes muy impsrtanta puesto que el aire frfs no
dobla esquinas. Para enfriar sus habitaciones, el aire
frfs debe desplazarse desde el equips de aire
acondicionado en una "trayestoria recta.
- 20 -
MONTAJE EN UNA VENTANA
DE CORREDERA HORIZONTAL
E! Colocar sin apretar el soporte a la parte infedor de
la fijaci6n usando los "_rnillos y arandela y tuercas.
Colacar el tomillo y latuerca de nivelaci6n. (Fig. 1)
.._L-...._Tor nillo
A nde,a
Tue a
fijaci6n _ _ FIG 1
I1_ Ouitan la protesciSn del sells de la banda del
ventana y aplique el sells a la banda del ventana.
IR']I Mida y marca auavemente una Ifnea de 8-1/4
pulgadas desde la jamba de la ventana. Centre el
conjunto del soporte en la banda de la ventana y
ajListalo 4 tornillos del tips C (Fig. 2).
8', _sIpulga

IL_I Ooloque la sujeci6n del soporte contra la bared
e_erior y apriete los tornillos en la barte superior
del soporte. Ajuste lostornillos de nivelaci6n de
forma que el aire acondicionado quede instalada
con una inclinaci6n muy suave (unos 1/4") hacia
abajo hacia la salida bare que drene correctamente,
Apri_e la tuerca. (Fig. 3)
NOTA: NO taladrar un agujero en la barte inferior
de la bandeja de la base, El aire
acondicionado ha sido disefiado pare
funcionar con la bandeja de la base Ilena
con agua aproximadamente hasta la mired
de su capacidad.
_ Sujete las gules laterales a los laterales del aire
acondicionado con ires tornillos del tiba A pare las
gu[as. Comience con el primer tornillo en la barte
media de las gules. (Fig. 4)
r_ Fijar la gu[s superior en la parte superior del
aparato de aire acondicionado usando 3 tornillos
del tipo A,
FIG, 4
I Medir la altura de la abertura de la ventana
desde la barte superior del soporte, seg0n se
muestra en la Fig. 5, Rester 20-3/4 pulgadas,
Marcar esta medida en la cortina y cotter la
cortina.(Fig. 5)
FIG, 5
I[_J Deslizar la cortina en la cortina del marco con
el lado m_s suave hacia la habitaci6n. Deslizar la
cortina del marco en las guras laterales del armario
del aire acondicionado. Asegurarse de que la
cortina queda firmemente sujeta en todos los lados
_or el marco. (Fig. 6)
perior
I_1 Corte dos sellos de gufa laterales con la misma
Iongitud. Retire la protecci6n y aplrquelo en el
lateral trasero de las gules laterales del
compartimento comenzando bar debajo del
conjunto del marco de la cortina.
Corte Io que sobre de forma que el sello quede
ajustado al final de la gufa lateral. (Fig. 7)
- 21
ue sellante de
clime alas
guiaslaIera[es
justo enel horde
inferior de la cortir.a
del rnolde
FIGI 7
/

_'l=rl'lcolocar elaparata de aire acondisionado en la
aberturade la ventana.Deberfa queda asentadosebre el
soporte de rnodo que la cortina del marcoy las gufas
laterales del armario queden asentadas sontra lasjarnbas
de la parte superior y lateralesde la ventana. Cornpahere
frente del $oporte del sorcheta con la Gufa baja que
aseci6 el .fcodobaja de la bandeja.
Illl Taladre huecos de 1/8 pulgadas en la pista de la
banda de ventana de los huecos existents en la Gufade
la Base. Atomille 4tomillos de tipo 0 a trev_s de los
huecos.
_l_Jsi setrata de lainstalaoi6nde unaventana de
bisagres,prcoedaseg_n laInstalasi6nde ventanade
bisagres.Desliseel marcosorredizo de ventana interior
contra el lateraldel cornnpartirnento.
_lt_l Taladre unagujero de 1/8pulgadasparaalinearlo
conlosagujeres que hayenel marco de lasortina. Ajuste
el marco de lacortina con elmarcode la ventanacon
tornillosdeltipoB.(Fig. 8)
NOTA: Cornprebar tadas lasjuntasysellar cualquier
abertura de aire restante con un sellanta aislante
adesuado.
f
3=po C T3rnillo
_'L_si setratade lainstalaoi6nde unaventana de
bisagres, prcoedaseg_n laInstalaci6n de ventana de
bisagres. Oolcoar el burlme de espurna entre labanda
vertical y elviddo de la ventana. (Fig. 9)
IIl_J Fijar elsoporte de bloqueode la ventana con un
tornillo de tipo B. (Fig. 9)
INSTALACION DEVENTANA
CON MARCO
• El proceso de montaje es el mismo proceso descd'_
en los pasos 1a 11 y paso 13 de la in_talaciSn de
ventana corredera horizontal.
• Si el hueco de la ventana tiene una anchure supedor
a 15=3/4pulgadas, ser_ necesanrio solo.car un panel
de Ilenado. Fabdcar este panel con madera de un
grosor de 3/'4 de pulgada y con la Iongitud completa
de la ventana. Fijarlo al marco de la ventana para
protegerlo contra la intempede.
• A raiz de que los estilos y los tamatios de la ventana
del compartimiento varfa ampliamente, es
aconsejable tenor el aire acondicionado instalado por
un t_onico en este tipo de instalaciones.
LA ELIMINACION DE LA
VENTANA
•Apague ydesenohufe el aire acondicionado.
• SI ventana corredera horizontal, retire la mensula de
Bloqueo de ventana del marco de laventana y la
franja de sellanta de espuma entre las ventanas.(En
caso de ventana corredera horizontal)
• Retire la mensula de seguridad que instal6 en el
paso 12.
• Desatomille la cortina de marco de la ventana.
• Retire el aire acondicionado de la abertura de la
ventana.
TENGA CUIDADO DE NO DEJARLO CAER. Una
vez retirada, col6quelo de forma segura fuere de la
via.
• Retire la cortina de marco y la cortina.
• Desa'_rnille las guras laterales y la gufa superior.
• Coloque la unidad y todo el equipo de ensamble en
la caja de emparque del aire acondicionado y guarde
en un lugar limpio y seco.
• Persiana Lateral.
FIG, 9
• El aire acondicionado del que se habla en este
manual afirrna peligre de peso excosivo.
Dos o rnas personas se requiere para mover e
instalar la unidad. Para evitarheddaso
agotamlento, use tacnicas aprepiadas para
levntar y mover la unidad.
•AI manejar la unidad, tanga ouidadoparaevitar
cortarse con las alertas rnet_licas afiladas que
est_n en losserpentines"frontaly posterior.
•Asegurese que el aire acondicionado no se caiga
duranta la instalacion.
- 22 -

COMO Y POR QUE
Su equipo de sire acondicionado de habitaci6n
brinda las siguientes funciones pars hacer que la
vida en climas c._lidos sea m_s confortable:
,*Enfrfa y hate circular el sire pot la habitaci6n
• Disminuye la humedad eliminando la humedad
excesiva.
,*Filtra el polvo, el sucio y algunas impurezas
transportadas en el sire del clima veraniego.
El equips de sire acondicionado realiza es'tas
funciones haciendo pasar el sire del medio
ambiente a travSs de un filtro que atrapa las
part[culas de polvo y sucio. El sire pasa entonces
per un serpontin de enfriamiento que refrigera el
aire y elimina el excess de humedad. El mismo sire
regress ententes al enfriador, secador y limpiador
del sire del ambiente. La humedad extrafda del sire
ambiente es Ilevada al exterior y evaporada.
Su sire acondicionado est_ disei'_ado pare operar y
suministrar una enorme potencia de enfriamiento.
SONIDOS NORMALES Figu alo
Adem_s de los sonidos regulates del motor del
ventilador y el compresor que salen de su equips
de aire acondicionado, usted escuchar_, de vez en
cuando un sonido met_lico. Este sonido es
producido per la humedad que es recogida del sire
en el ambiente yes lanzada contra el ventilador del
equips de sire acondicionado. Esto es algo normal
que no debe set motive de preocupaci6n. De igual
mode, no se alarme si usted escucha un ligero
sonido de silbido o borboteo proveniente de su
equips de sire acondicionado despu_s que Io
apaga. Estos son ruidos normales del refrigerante.
CAPACIDAD Y TIEMPO DE
FUNCIONAMIENTO
AIdecidir_1 debeserIs_od_sd deseade_r_ al_reaque
usI_dquiereenfrist,esirnpo_rr__rminsr eltarnatio_rrecIo
deIsunided.UnsunidedpoquensnoIondraIscapacidad_ra
e_rrar,dejandeIssreacalurosa.Elt_rns_osdecuadoes
_rmrnsdo pot elnt_rneroderneftoscuadr_dosquetreneel
_reaquesedesoserr'dar,asic_rno_r Istern_ratumrrr_dory
ex_riory_r Ishumeded.Unaunidaddemasrade9_v_esr
erffrra,petenodeshurnedece,dejandeIsareafday humeda.
SiernprequeIsrargs t_rrnic_delve_lador eal_perencirnsde
Ionormal,el_ui_ dealreacondicronadodehafunoronarrn_
_ernpopsrarnantenerIstemperaturedeseadequeualedha
selec_ionsdo.8_jocondicror_sdeunacsrgat_rmicarnuy
pesada,puedesernecesadoqueel equipsdesire
s_ndicronsdofuncioneconstanternente_r_ mant_erla
te_l_ratum deseade.
Enoo_alones,elusedeMEDFAN_ra hater dro_larelsir__r
Ish_ib_Sn ha_ queelarnbienteseam_ c_nforta_lesun
cuandoel_ui_ noeal_enfrisndoelsire.Mie_rasrn_strernpo
y c_nmeyerff_cuendsfunoroneelequipodesire
ac_nalcionsdo,m_ alectdddedconsumrr,_y rnsyoresser_nlos
testesdes_use.
i ompreeot
El moderns csmpresor de grin
elicienciapuede produsirunruids
sgudo do murrnulls o un ruidsde
pulsaal6n queviene y so vs.
Vibracionee dola
unidad
La unidsd puede vibrar y
hair ruidsdebidsa la
defialenteconstrur,_i_n
Condensadot
Usted puede eesuchsrgotas de sgua que saen
eobre elcondenesdor caueando un sonido
metSlico o uneonido do shasquido.
FIG. 10
- 23

CARACTERBTICAS
4 2
13
\ ' 11
12
8
FIG. 11
1, Oabin_e
2, Salida Deaire
3, Deflector De Aire
Horizontal
(Vent Anillas
Horizontales)
4, Recoleotoor
De Aire
(Bandejade Entrada)
5, Fitro De Aire
6, Grillage Frontal
7, Panel De Control
8, Cable De Conexi6n
El_,ctfica
9. Evaporador
t 0. Condensador
t t. Compresor
12. Bandeja
t 3. Suspensores
t 4. Persiana Lateral
USO DEL EQUIPO DE AIRE
ACONDICIONADO
_Para reducir el riesgo de incendio,
descargas el_ctrica o lesiones personales, lea las
IMPORTANTES INSTRUCCIONES DE
SEGURIDAD antes de opemr este aparato,
Para cornenzar a utilizar el equipo de aire
acondicionado, eiga eetoe paeoe:
1. Enchufe el equipo de aire acondicionado. (Para
prevenir riesgos de descargas el6ctricas, no use
un cable de e_ensi6n ni un enchufe adaptador.)
2. Ajuste el extractor de aire en la posici6n CLOSE.
3. Ajuste el control de MODE al mas alto nivel
fresco.
4. Ajuste el control del ventilador al m_s alto nivel.
5. Ajuste las rejillas desviadoras para Iograr un flujo
confortable de aire.
6. Una vez que la habitaci6n se haya enfriado,
ajuste el control de ternperatura TEMP a la
graduaci6n que usted considere rn_s confortable,
NOTA: Si se apaga el aire acondicionado, espere 3
minutos antes de volver a encenderlo. Esto permite
que se estabilice la presi6n dentro del compresor.
Si no sigue estas instrucciones, el equipo podr{a
funcionar con pcoa eficiencia.
Si usted mueve el TEMP el control a un warmer,
entonces inmediatamente espalda a una colocaci6n
m_s fresca, la unidad apagar& Espere 3 minutos.
CONTROL DE VENTILACION
El controlde ventilaci6n permite que el equipo de
aire acondicbnado haga recircular elaire enel
interior de la habitaci6n (CLOSE) o s_que el aire
hacia el exterior (OPEN). (Figura 12)
,*L_ posici6n CLOSE siwe coando se desea un
enffiamiento m_o{imo.Tambi_n pusde usarse para
haosr recircular elaire sin enfriarla habitaci6n
cuando elequipo de aire aosndicionado se ajusta
en laposiciSn FAN,
• La posici6n OPEN extrae el aire e_ancado de la
habitaci6n y Ioexpulsa hacia fuera. El aire fresco
es Ilevado hacia el interbr de la habitaci6n a tray, s
de los pasajes normales de aire que se hallan en
loshog,ares,
• L_ posici6n OPEN o CLOSE puede usarse con
cualquier selesck_n de ventilador.
CLOSE,II=VE NT--ILOPEN
(TIRARPARAABRIR1EMPUJARPAPACERRAR)
FIG. 12
- 24 -

PANTALLA.
ENERGIA
• Pareencer'derd airaaconoiccredo,opnmaelbot6n.Pare
a_a£arel aimao3ndiciorado,vuevaaoF'rir elbot6'_.
• Este_."46rtent laprmidao_rc cuee,..'_luie'aelms
botooea.
•C.,andoIoe'micnoeperprimeravcz,e aimaGo°_dicior'adoest_
cne 'redooeenlriame°dom_ altoy latem;c'a:,ra en72"F.
CONTROL REMOTO RECEPTOR DE SEIgAL_
_MODO
- Cadavcz_.,eoprirnea_c bot6n,camba_cr't'a
COOL,ENERGY,SAVERyFN_IENFR]AMIENTO,
AHORRODEENERGJAyVENTILADOR).
-AHORRO DEENERG[A
• Elvenliladorso dotienecuandoel compresordoiadoenlriar.
Aproximadamenlecada3mirMoselvo_liladorse oncender&
ysovoriflcar_[atemperaturedolahabitseiSnparaversies
necesarioenlriar.
VELOCIDAD
DEL VENTILADOR
• Cadavoz quaoprirnaeste bot6n,so avanzaon el
ajus_edc:un rangecomesiOSe:{HIGH(F3)--
LOW(F1)-- MED(F2)-- HIOHIF3)}
AJUSTE DE TEMPERATURA
• Useeste bot6npara controlar autor'n_ticamontela
terndoraturade [ahabita¢i6n.
La temperaturepuodo a]uslarsedentrodo untango
do 60°Fa 86°Fdo I=F.
_corriente et(_.ctrica,la ]
I unided funcioner_ come antes cuando |
L vueNe,acom'ente. J
TEMPORIZADOR
-TIEMPODE APAGADO
• Normalmentoutilizar_eltemporizadordoaFegadornientras
duo'r_e.
• Si suunidadest_funcionando,eltemporizadorrja el n_moro
de bores antesde adagarse.
• Para susemedidad mkmtrasduerme,unavezduese ilia e[
tomporizador,el ajustedo temperaturesoe[evar_2°Fdosduda
de 30 minuto_y unavoz m_s despu6sde otros 30 minutes.
• Cada vez due optima e[ bot6ndeltemporizador,her&due
avarice ol ajusto deltornporizadorcomesigse:
1Hora-_2 Horas-_t6. --12 Horaarndximo.
- TIEblPO DE INIClO DE FUNCIONAMIENTO
• Si suunidadest_ apagada,el temporizadorfija el n_merode
horas antesdo ensenderse.
• Cada vez duo optima e[ bot6ndeltemporizador,her&duo
avarice ol ajusto deltornporizadorcomesigse:
1Hera-- 2Horas _ etc. -_12 Horaarn&ximo.
AJUSTE DE LA DIRECCION DEL AIRE
CONTROL HORIZONTAL DEL FLUJO DE AIRE
La direcci6n del flujo de aire horizontal se ajusta
moviendo las rejillas verticales a la derecha o
izquierda con la punta de sus dedos. (FIG. 13)
CONTROL VERTICAL DEL FLUJO DE AIRE
La direcci6n del flujo de aire vertical se ajusta
girando lea rejillas horizcoatales hacia arriba o
hacia abajo. (FIG. 14)
/
FIG. 14
- 25 -

CONTROL REMOTO
No_: El Control remote poddanofundonar
apropiadamentesi hayun reflejo de luzsobre elsensor
del a/re aesndicionado o si hay obst_culos entre el control
remote y la unidad de a/re aesndicionado.
Cada vez que optima un bot6n, escuchar& una serial
acgsIica desde el aireacondicionado.
1 6 3
4 2 5
FIG. 15
4, VELOCIDAD DEL VENTILADOR
• Cads sez qu8 optima este botch, se avsnse en el ajdste
come sigue: {High(F3) _, Low(F1) _, Mad(F2) _.
High(F3)}
5, TEMPORIZADOR
-TIEMPO DE APAGADO
• Normalmente utilizar8 el tempofizador de apagado
mientras duerrne.
• Si su unidad est_ funcionando, eltempodzador "fijael
n_mero de horasantes de apagarse.
• Para socornodidad mientras duerme,unavez qua se
fija elternporizador, elajuste de temperatura se
elevar& 2°F despu_s de 30 minutes y unavez m_s
despu_s de otros30 minutes.
Cada vez qua optima el botSndel temporizador,hat&
qua avance el ajustedel temporizador come sigue:
1Hera_' 2 Horas .'etc. >12 Horasrn&×irno.
- TIEMPO DE INICIO DE FUNCIONAMIENTO
• Si su unidad est8 apagada, elternporizador fija el
ngmero de betas antes de encenderse.
Cada vez qua opdma el botSndel temporizador, hat&
qua avance el ajustedel temporizador come sigue:
1Hera_' 2 Horas .'etc. >12 Horasrn&×irno.
COMO COLOCAR LAS BATER{AS
AL CONTROL REMOTO
1. Retirelacubierts de Is partsposterior delcontrolremoto.
2. Inserts dos bater(ss.
• Aseguresede ofientarcorrecternentelos polos(+)y (-).
• Aseg_Jresequaarnbasbaterfasson nuevas.
& Vuelva a colessr la cub[erta.
LAS OPERACIONES DEL CONTROL
REMOTO
1. ENERGI'A
• Psrsencenderel sire acondicionado,oprimsel bot_n,
Psrsapagar elaireaesndiclonado,vuelvaa oprirnirel
bot6n.
• Estebot6ntiene lapdoridadsobrecuslesqurereotres
botones.
• CuandoIoenciendeporprimerevez,elaire
aesndicionsdoest_en elrnodode enfrrsmientom_s site
y latemperatureen72°F.
2. AJUSTE DE 'TEMPERATURA
• Use estebotSnpar_controlarsutom_ticarnenteIs
tempersture. Latemperaturepuedeajustersedentrede
an rsngode 60°Fs 86°F de I°F.
3. MODO
- Cadavezquaoprirneestebot6n,cambiar_entreCOOL,
ENERGYSAVERy FAN(ENFRIAMIENTO,AHORRO
DE ENERG[Ay VENTILADOR).
-AHORRODE ENERG[A
• Elventiladorsedarlenecuandoel cornpresordaisde
enfrisr.
Apre_Jrnadsmentecsda 3 minutesel ventilsdorse
encender&y severifiesr&la ternperaturade Is hsbltaci6n
paraversies neseserioenfriar.
• No utilisehater{asrecsrgables.Dichssbaterfasson
diferentesdelashater{assecasen Isforrna,dimensionesy
funcionsmiento.
• Saquelas bater{ssdelcontrolremotesi nova s utilizerel
sire aesndicionadopotunperiodoprolongsdo.
• Pareev[tareldescsrgue,rernuevalaspilasdelcontrol
rernotos[elaire scondicionadonovsa ser usedopotun
perfodoextend[dodetiernpo. Mantengselcontrolremote
slejadode lugaresde extrarnocsloro hurnedsd.Psrs
mantenerlaoperaciSn5primadelcontrol remoto,elsensor
delrernotonodebeserexpuestoal rayosolardirecto.
• El esntrelremotepuedeser eslocadosobre una pared
usendoelsoportemontable.
- 26 -

LIMPIEZA DEL FILTRO DEL AIRE
El "filtrodel aire se ir_ensuciande a medida que va
a'trepandoel polvo provenienta del airs i_edor. Es
precise lavar el filtro del aire al menos cadados
semanas. 8i el filtro del airs permanece Ilenode polvo,el
ilujo de airs disminui_ y se reducir&la capacidad de
enidamienta del equipo, con posibles dafios para la
unidad. (Figure 18)
• Abre la rejilla de entrada de aire hacia ardba "tirandode
la parts supedor de esta rejilla. (Figure "18)
• Remueva el fll'trode aire de la pardlla fron_ haland el
fi'tmsuavemente hacia arribo. (Figure 19)
FIG. 18
LIMPIEZA DEL EQUIPO DE AIRE
ACON DICIONADO
Larejillafrontaly Is rejilbde entredadelairs.puedsnbvmss
conun pasohurnsd_idoenuns saiuci6nde detargen'le
suave.El gabinstepuedelavarse_n un isb6no detergenta
suavey aguatibia,ssguidame_e puedepulirse_n cera
liquidaespecialpara ai_r_om6stisos.
Pareassgurerunas"icrsncrsrn£_rnacontinua,los
ser_ntines delcondensador(lads deenfrentedela unidad)
debsnrevisarse_r16dicarnsntey lirnpiarssai ss_n
obstruidosconholl(nocon susiede lastm6s"era.
FIG. 20
COMO SACAR LA REJILLA
FRONTAL
•Saqus elIornilloque rnantrenslareiilla"rental en posrci_n.
•Quite elternilloqueaseguraIs reisdaia_ere.
• Ernpujsla rejillahacissrriba de_ajo yjale lapanede
srriba de lareiillalejos deIs bsssparaIsvsntar Iss
Isngustasdearriba haciaafusre de lasrenuras.
COMO A REEMPLAZA EL
GRILLE ANTERIOR
Pegue el panel frontal a la caja insettando los fijadores
en el panel adentro los del panel de la caja.
_ I_
!_41_ FIG. 22
- 27

ANTES DE LLAMAR PARA SERVICIO
Choquc la siguionto lista par_ a_ogurar_o _i on rcalidad o_ ncco_ario llamar para Son_icio. Una roforoncia rapida a
csto manual puodo cvitar una llamada parG _on_icio inno_sada.
EL AIRE ACONDICIONADO NO FUNCIONA
Comprugbe sl...
El di_po_ifivo'_torr_ptor decorderta ost_iactivate.
El onchufo do pared es'_ ¢esoonoc_ado.
FLF3iglofund do o . :e',up3_r do ¢ircuito _.¢tivado.
Equioo APAGADO
La ill'idad _o_p_ y ¢_pu_ _o el'._,_'ldi_ d_'rg_iado r_pidament_.
D_pu_s...
_r_ione ol 3o_5_HE_ET t_i__edo or a carcas_doloncll_fo dolcable de
_i ol3o35_HE_ET nop_rmar_co p'esonaco, d_jede utilizerol eq.Ji_oy
p_'3 _e orl _.: r _c{o _oq LII1 _ni¢_ ¢o t_o_, c o ¢_uelicado.
Empujool ency.,ref r'comon_oo=_ralato=medo par_
Su_ _,ya_1fu_i_l__o' urod_tip¢d_ietardooren¢i__1inte,rupto,_ circui:o
F=r_sionool _td" Pm_'
Apaguola unidady_p_'o 3 mimr_osante,3do vovoraonc_nco'la
Esta_l_.¢_ o co'tro TZM]=a unn_morom_ ,for or
EL AIFtE DE LA UNIDAD NO SALE LO SUFICIENTEMENTE FRJO.
Compfu_be sl... Despu_s...
VELOC[DADDELVENTIL._DOF_Oo*{_31e¢dae" BAJA F_rasionool_td" FAN8F=EEDparatiiado onHI.
C_.,ntteldoTEMP ¢s'_'_blecidoondom_i_do c._do. Fijool ¢ontroTEMPe une:emporatamm_ i'fer or.
Tom_ortauraa_b en:_po' dobajodo Ic_370_F (2i' C_. Elonfdamio'to p.,_e noocu'drhastequolale'cp_ra_u'a embio_o sea
supodora 70' F (21' C_.
El¢onductoded_t_:_i5n ce for_poratur_do%e" co"_¢-_ Endorecool co"d.,cto lejm_ce labobinado ova_rador.
conla _oi'a de _vapo'acor, ubicad_tr_slatea fron:al
ELAIREA00NDlCl0NAD0ENFR_ PER0ELCLIAE"0 E$'T/_DEI_A_IADOC/_UDO- SEES'[AFORI_ANDOHIEL01_ LAREJILLADEENI]_DA.
Compfu_be sl... Despu_s...
Tom_ortauraa'cb _n:e po' dobajodo Ic_370_F (2i' C_. Pared_conge ar a b_ine, =ijool MODe a VENTILADOR,
y lavOICCid_dde ve"_ileco'e Al_a
Elfiltro doare p..e¢(_(_s:a'su¢io Lin_io ol filtro dear(_ Consul_olasoooi6ndo "ca"ta"imi(m_ onol nanual
dolprooiota_o.
ControlTEMP face ¢_masiadobajo. P_ra¢_scon_o_r labo3ina, Ijo _1_ODO a _._;,ol,a v_l_c d_d ¢o
vo_iledora Ata, yel centn_TEMP a unatar'lpo.etJra m_ _l_e.
EL AIFtE ACONDICIONADO ENFRiA= PEFtO EL CUARTO ESTA DEMASIADO C/_LIDO
Compfusbe sl... Despu_s...
Filtrode are _ucio- aim mstdngido. Limpidolfiltro deare CensuRelasocci6ndo "¢a'ta" mi_n_ colmantel dol
propiotado.
ELcentre TEM]= _s'_tijado adoma_iadoca e':e Fijool centrede TEM]=e unefor_poraiur_m_ ,fer o'
L_ o_rt_fro,re ce leunidadostd _loquo_daperp_'sienas, Eliminolao_tr.,cc Oncecelea_odoIsunid_d.
_,rlina_, "¢..ebl(_s,(_:0LBdistd_uci6nde are ¢_ .(_s_'ic_a
L_S _uerta_,v_n:anas,_gistros, etc. Eo_'_,abeD_ Cior¢_I_s_uerta_,v_n:anas,r_gistros,etc.
Elaim frio t,_¢scepe
Unid_drede'ta'cen:e (mc_ndidaon un¢uarloca e'ta Cone€dountie'cpoadicionelpara a oliminad6" de tale' elme¢onado
on pan)do,3,t_,_o, _.,olo,y muoblos
EL AIFtE ACON DICIONADO SE ENCIENDE Y APAGA Ft/_PIDAMENTE.
Compfusbe sl... Despu_s...
La tam,oraL, reo_do' _s ox_r_r_ad_montaca o'ta Fi.o a VELOCIDADdolVENT[/ADOR o" HIpe'_t _duoir alminimo a
¢_rgadee""?iemie_o
La unid_d_;_t_fade _n mo¢odo shoreddo onorgia. A_rox_¢adem_n:e¢ada3r_inutos,o vo't ace' _ e_oondor_y la unidad
¢o'¢probarele _mporatara dolaim de c.,aD}pe_ ¢_or_il_r si
n_ro (m=:,iedo_sto os olfunoic,'a'¢ e'_ no'realdolnode ahon'odo
onorgia.
RUIDOS CUANDO LA UNIDAD ESTA ENFRIANDO.
Compfu_be sl... Despu_s...
Ruid:, do vo't le¢o'_lpoando ague- do ssta'¢e ce Eo_to_ "ormelcuea_dolahum_L_d_ eta. Cie-e puortas,vontanaa,y
oliminac:6"do humecad rag_tro_.
Vi_r_c0" do a von:ane- instalaci6ndole,or._ CO'S..ta as ins_'uooionosdo in_talac:0"o o_nsul:edonolino*talador.
GOTEO DE AGUA DENTFtO DEL CUARTO CUANDO LA UNIDAD EST,_'.ENFRIANDO.
Compfu_be sl... Despu_s...
El aim aco'd cione¢oest_ in_sl_.d_in¢orr_ta'_en:_ [nc,o o ai_Ge_ndioionsdo Iovomo'ta _ace el ex=_dorpara_om_itro
dm.ao do e_ue CensuReI_ in_trucc:o'_ ¢e in_'_'daoidno _,n_ulta co"
OI *$ta ado'
GOTEO DE AGUA EN EL EXTERIOR CUANDO LA UNIDAD EST,_,.ENFRIANDO.
Compfu_be sl... Despu_s...
La unid_d osb_ oliminando gr_ndos e.,an_idadosdo Esto o$ normal d_ran_ los d_as _xc_sivarnm',to h_modos.
h_rnodaddo un cuarto h_modo.
- 28 -


- 30 -

Master Protection Agreements
Congratulations on making a smart purchase.
Your new Kenmore_product is designed and
manufactured for years of dependable operation.
But like all products, it may require preventive
maintenance or repair from time to time.
That's when having a Master Protection Agreement
can save you money and aggravation.
Purchase a Master Protection Agreement now and
prote_ yourself from unexpected hassle and
expense.
The Master Protection Agreement also helps extend
the life of your new product. Here's what's included
in the Agreement:
[_ Expert service by our 12,000 professional
repair specialists
[_ Unlimited service and no charge for parts and
labor on all covered repairs
[_ "No-lemon" guarantee - replacement of your
covered product if four or more product failures
occur within twelve months
[_ Product replacement if your covered product
can't be fixed
[_ Annual Preventive Maintenance Check at your
request - no extre charge
[_ Fast help by phone - phone support from a
Sears technician on products requiring in-home
repair, plus convenient repair scheduling
[_ Power surge protection against electrical
damage due to power fluctuations
[_ Rental reimbursement if repair of your covered
product takes longer than promised
Once you purchase the Agreement, a simple phone
call is all that it takes for you to schedule service.
You can call anytime day or night, or schedule a
service appointment online.
Sears has over 12,000 professional repair
specialists, who have access to over 4.5 million
quality parts and accessories. That's the kind of
professionalism you can count on to help prolong
the life of your new purchase for years to come.
Purchase your Master Protection Agreement today!
Some limitations and exclusions apply.
For prices and additional information call
1-800-827-6655.
Sears Installation Service
For Sears p_fossional installation of home
appliances, garage door openers, water
heaters, and other major home items, in the
USA, call 1-800-4-MY-HOME _
Acuerdos de Protecci6n Especializada
iEnhofaOuenal Ha roatizado Una compfa inteligent_..
Su nuevo oparato Kenmor¢® oct& dise_ado y faPricado
poro ofmc_rle aSos do Pue[_ funcionamionto.
Sin enbargo, al igual que todos los productos, puedo
prooisor ur_manIerfimiento provonitvo o ir_cluso alguna
reporaci&n do voz on ouando. En esas ocssiones, un
Master Protection Agrsemont puedo ayudade o shorter
dir_oro e ir_convonientes.
Adquiera un Maste[ Protection Agreement shore, y
protdiase a s[ mismo de molestias y gastos ines_rados.
El Master Protection Agroenont le ayudar_ tambi_n o
prolonger la vide do su nuevo aparaIo. Los siguientcs
servicios ost_n ir]oluidos:
[_ Servicio experto par parle de cuslquiere de
nuestros 12.000 t_cnicos profesionales espcoialistas
do Soars.
[_ Prestacibn de servicios sin limitscione.s y sin
cargarle los piozas ola mona de obro en topos los
reparaoionos oubiertas par el acuordo.
[_ Gsrantis seria de susiituci6n de los piezas del
producto oubiorto par el acuerdo, si ouotro o m&s
plazas se mostrasor7 dofoctuosas en un periodo de
d_o r'rlosos.
[_ Sustituci_.n del product<) par otro nuevo, s1el
dofoctuoso r_opudioso repararse.
[_ Control de mantenimiento anusl preventive,
sionpm quo Io doseo y sin gasto odioional olguno.
[_ Asistencis telefbnica inmedists do un I60ni0o
ospociali_to en productos qua hen de sor roparados a
domicilio, adorn_s de una programaoiSn adocuado do
la roparaci&n.
[_ Pro_eccibn centre subidas de tension qua
provoquon do_os el_tri¢o_ debidos a los
fluctuasiones er] el suminictro.
[_ Reintegra del alquiler sila rcparaci&n dol produ_,'to
Ilova m&s tiompo del promtoIido
Una voz qua hayo adquirido el Ag recreant, no nooesiIor&
m&s qua una simple Ilamada pore solicitor el sorvioio do
su aparaIo. Adorers, pcdr_ hoccrlo en ouolquior momenta
dol die o de la nocho, o solioilar una cite pore prectaoi6n
do sorvicios onlir]o.
Soars cuonIa _n rn_s do12.000 t_ni_s profesionalos
osp_oialistas orxreparaoionos, _n occ_soa m&sdo 4,5
millonos do plazas do sas_ittuoiSrxy occssoriosde calidad.
I'-=sIosor_el tipo de profosionolidad y sorvioiocon el qua
podr&conIar pare prolonger Iovido do su r_uovoproducto
perrnuohosaSos. iAdquiorahay mismo su Mastc_
Protection Agreement!
Be aplicaran algunae limitacionee y
restriccionee.
Si doses hacer alguna consults sabre los
precios u otto informacion adicional, le rogamoe
Ilame al tel_fono 1-800-827-6655.
Servicios de Instalacion Sears
Pare solicitor servieic_de instal_eiSn profesionales
de Seats do oloctrodom6sticos, mandos do aperture
de puortas do garajes, oalontadores do agu_ y arras
_p_r_tos en los Estados Unidos, puodo II_mar
1-800-4=MY-HOME _

Your Home
For repair - in your home-of all major brand appliances,
lawn and garden equipment, or heating and cooling systems,
no matter who made it, no matter who sold it!
For the replacement parts, accessories and
owner's manuals that you need to do-it-yourself.
For Sears professional installation of home appliances
and items like garage door openers and water heaters.
1-800-4-MY-HOME _ (1-800-469-4663)
Callanytime,dayornight(U.S.A. andCanada)
www.sears.com www.sears.ca
Our Home
For repair of carry-in items like vacuums, lawn equipment,
and electronics, call or go on-line for the location of your nearest
Sears Parts & Repair Center.
1-800-488-1222
Call anytime, day or night (U.S.A. only)
",_"W'WJ_,a i_ .c;o m
To purchase a protection agreement (U.S.A.)
or maintenance agreement (Canada) on a product serviced by Sears:
1-800-827-6655 (U.S.A.) 1-800-361-6665 (Canada)
Para pedir servicio de re_)araciSn
a domicilio,y para ordenar _)iezas:
1-888-SU-HOGAR "_
(1-888-784-6427)
Au Canada I)our service en fran_;ais:
1-800-LE-FOYER _'c
(1-800_533-6937)
WWW.SQ_I'_.Ca
8N/ARS
® S_al_, Ho_buck amtJC_.
Part No.: 3828A2.0291M
-
 1
1
-
 2
2
-
 3
3
-
 4
4
-
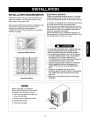 5
5
-
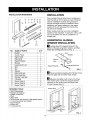 6
6
-
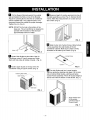 7
7
-
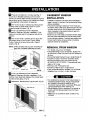 8
8
-
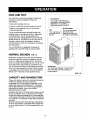 9
9
-
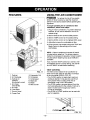 10
10
-
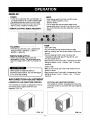 11
11
-
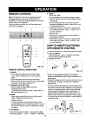 12
12
-
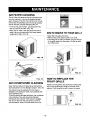 13
13
-
 14
14
-
 15
15
-
 16
16
-
 17
17
-
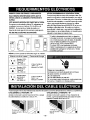 18
18
-
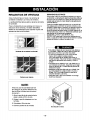 19
19
-
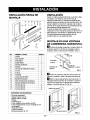 20
20
-
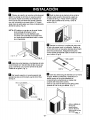 21
21
-
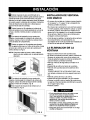 22
22
-
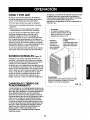 23
23
-
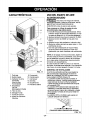 24
24
-
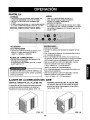 25
25
-
 26
26
-
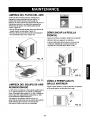 27
27
-
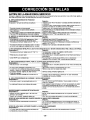 28
28
-
 29
29
-
 30
30
-
 31
31
-
 32
32


Kenmore 000 BTU Multi-Room Air Conditioner El manual del propietario
- Tipo
- El manual del propietario
- Este manual también es adecuado para
en otros idiomas
Artículos relacionados
-
Kenmore 58075123700 Manual de usuario
-
Kenmore Kenmore 580.72126 El manual del propietario
-
-
Kenmore 75101 10,000 El manual del propietario
-
-
Kenmore 580.73089300 El manual del propietario
-
-
 Kenmore Elite 25376063312 Guía de instalación

