

iLl[iNt_n
Owner's Record
The model and serial numbers are located
on tile bottom. Record tile serial tmmber in
the space provided below. Refer to these
immbers whenever you call upon your Sony
dealer regarding this product.
Model No. DSC-W 1501W 17()
Serial No.
To reduce fire or shock hazard, do
not expose the unit to rain or
moisture.
J " JIl'_ I I" " ._
CAUTION¸TO R_D_CETHE RISKOF FLECTRICS_OCK
R_ER S_RVlCI_GTO QUAIIFIEDSERVlCEP_RSO_N_.
This symbol is intended to
alerl lhe user to lhe presence
O] Ullinsuhaed _dangerous
voltage" witlfin the
product's ellclosure that
nlay be of sullicient
nlagnitude to constilute a
risk of electric shock 1o
persolls,
This symbol is intended to
alerl tile user to the presence
of inlportant operating and
maintenance (servicing)
instructions in tile literature
acconlpanying the
appliance,
IMPORTANT
SAFEGUARDS
For your protection, please read these safety
instructions completely belbre operating
the appliance, attd keep this manual for
future reference.
Carefully observe all warnings, precautions
and instructions on the appliance, or the one
described in the operating instructions and
adhere to them.
Power Sources
Tiffs set sllould be operated only from tile type of
power source indicutcd on tile marking lubeh II
you are not sure ol tile type ol electrical power
supplied t() your bonle, consull your de_deror
h)cal power company. For thosesets designed to
operilte lroln battcl-y power, or oilier sources, reler
tOtile operiding instructions.
Polarization
Tiffs set may be equipped with a,polarized ac
power cord plug (g_plug having one blade wider
tllan tile oilier).
Tiffs plug will fit into the power outlet only one
way. This is a salcty lcature. If you arc unable to
insert tile ph/g flflly into the outlet, try reversing
the phlg. If the plug should still lail to fit, contact
your electrician to have a suitable outlet installed.
Do not defimt the salcty purposv of tile polarized
ph/g by lorcing it in.
Overloading
Do not o'_'erload \vail outlets, extcnsioll cords or
convenience mceplacles beyond dleir capacity,
since Ibis call rcsull in fire or eleclric shock,
_Object and Liquid Entry
Never push objects ol any kind into tile set
l]lroLigh openillgs as they lnay touch dangerous
voltage points or short out paris thal could resull
ill a fire or electric shock. Never spill Ikluid ol any
kind on the set.
Attachments
Do nol use auachlllents 11ol recollllnellded by the
l]lanulacturer, as riley l]lay cause hazards,

Cleaning
Unplug the set fi'onl tile wall om]et belore
cleaning or polislling it, Do not use liquid cleaners
or aerosol cleaners. U_ a cloth lightly dampened
"_vilIl"_valerlor cleaning tile exterior of tile set.
Water and Moisture
Do noI /ise power-]hie operilled _ls llear waler
Ior exanlple, near a bathtub, washbowl, kitchen
sink, or laundry tub. in a wet basemenl, or nero a
swimndng pool, etc.
Power-Cord Protection
Ro/lle the power cord so that it is IIOIlikely lo be
walked on or pinched by itelns placed upon or
against thenl, paying particular attention lo file
plugs, receptacles, and file poinl where the cord
exits Irom tile appliance.
Accessories
Do HOt place tile set Oil iLll illlStZlb]e c_lrl, Stalld,
tripod, bracket, or table. The set may l,dl. causing
serious injury to a child or an adult, and serious
danlage to tile set. Use only a carl. stand, lripod.
bracket, or table reconmlended by tile
illanllfilClllrcr.
Ventilation
The slots and openings in tile c+lbinet are pro_ ided
Ior necessary ventilation. To ensure reliable
operation of tile set, and to protect it Ii'oll]
o_,er]lealhlg, I]leSe slots alld opellhlgs ii]/isI never
be blocked or covered.
Never cover the slots and openings wifll a cloth
or other nlaterials.
Never block tile slots and openings by placing
lhe set on a bed. sola. rug. or other similar
surlace.
Never place file _t in a confined space, such as
a bookcase, or built-in cabinet, unless proper
ventilation is provided.
Do nol place tile set near or over a radiator or
heat register, or where il is exposed to direct
sunlight.
Lightning
For +Mdedprotection lor tiffs set during +tlightning
storm, or when it is left unattended and unused 1or
long periods of tinle, unplug it from file wall
duffel and disconnect the antenna or cable '4yslellL
This will prevent danlage 1o lhe sel due to
ligllming and power-line surges.
Damage Requiring Service
Unphlg tile sel I_'olntile w+tll outlet and relcr
servicing to qualified service personnel under tile
tollowing conditions:
When file power cord or phlg is damaged or
h+qed.
If liquid has been spilled or objects ha_e hiIlen
into the set.
If the set has been exposed to rain or water.
If the set llas been subject to excessive shock by
being dropped, or the cabinet has been
dalnaged.
If the set does not operate nornlally when
Iollowing tile operating instructions. A_[iust
only fllose controls that arc specified in file
operating instructions. Improper adjustment of
other controls may result in damage and will
often require extensive work by a quzflified
teclmician to restore tile sel to nornla] operation.
When tile set exllibits a distinct change in
perlornlance this indicales a need fin service.
Servicing
Do nol alIenlpl to service tile sel yotlrsefi as
opellillg or rClllovhlg covers lll_ly expose yell lo
dilllgerous _,oltilge or other hazilrds.
Retcr all selvicing to qualilied serxice personnel.
Replacement parts
When replacement parts are required, be sure tile
service technician Ilas used rcplacelnent parts
specified by the manufi_cmlvr flint have file sanle
characteristics as the original palls.
Unauthorized substitutions nlay result in ilrc,
electric sllock, or other IlazaMs.
Safety Check
Upon completion oI any sel'_ ice or repairs to tile
set. ask tile selwice tccbnickln to perfi)rlll ro/llille
salcty checks (as specified by tile lnanuli_cturcr)
to detcrnline that die set is in salP operating
COlldJlioIl.

Readthis first
Replace the battery with the specified type only.
Otherwise, lire or injmy may result+
Do no[ expose the batteries to excessive heat such
as sunshine, fire or lhe like.
RECYCLING LITHIUM-ION
BATTERIES
Lithium-Ion batteries me
recyclable.
You can ]lelp pre_rve our
envh'Olllnent by returnhlg your
used recllargeable batteries to
the collectkm and recycling
location nearest you.
For lnore inlormatkm regarding recycling of
rechargeable batteries, call toll tiee
I-SfR)-g22-8837, or visit bltp://www,rbrc,org/
Caution: Do not handle damaged or leaking
Lilhium-lon balleries.
This power unil is intended to be correctly
orientaled in a verlicgd or l]oor nloun[ position.
If you have any questions about this product, you
nmy call:
Sony Cuslomer lntormadon Center
1-800-222-SONY (7669)
The number below is Ior file FCC related malters
only.
Regulatory Information
Declaration of Conformity
Trade Name: SONY
Model No.: DSC-W 150
Responsible Party: Sony Electronics Inc.
Address: 16530 Via Esprillo,
San Diego, CA 92127U.S.A.
Telephone No.: 858-942-2230
This device complies with Part 15 of the FCC
Rules. Operatkm is subject lo lhe lbllowing
two condilions: ( 1) This device may nol cause
harmlul interli:rence, and (2) Ibis device inusl
accept any interllrmnce received, including
interlPmnce thal nmy cause undesired
operation.
Declaration of Conformity
Trade Name: SONY
Model No.: DSC-W 170
Responsible Parly: Sony Electronics lnc.
Address: 16530 Via Esprillo,
San Diego, CA 92127U.S.A.
Telephone No.: 858-942-2230
This device complies with Part 15 of the FCC
Rules. Operatkm is subject lo the lbllowing
two conditions: (1) This device may not cause
harlnlul interllrrence, and (2) lhis device inusl
accept any interllrmncc received, including
interlPmnce tllal may cause undesired
operath)n.

CAUTION
You am cautioned that any changes or
modilications not expressly approved in this
manual could void your aulhorily to operate this
equipment.
Note:
This equipment has been tested _tnd lound to
comply wilh lhe lilnils lor a (_'lass B digitM
device, p/irs/lilnI tit Part 15 ol the FCC Rules.
These linfits are designed to provide reasonable
protection againsl harmlul ilvcrlPmnce in a
residential installation. This equipment generates,
uses, and can radiate radio lrequency energy and.
if not installed and used in accordance with the
instructions, may cause harmful interllrmnce tit
radio conltllunications. However, there is no
guaranlee thai inlerl_rence will not occur ill a
parlicular inslallation, lfthis equiplnenl does
cau_ harmflfl interlPrence to radio or television
reception, which can be determined by turning tile
equipment off and on. tile user is encouraged to
try to correcl Ihe interl?rence by (tile or lllOlC of
tile lollowing measures:
Reorienl or relocate the receiving anlenna.
Increase the separation between the
equipmenl and receiver.
Connecl the equipment into gin outlet on a
cite/lit dil]ercnt l]+Olll thai to which the
receiver is connected.
Consull the dealer or all experienced radio/TV
lechnician fin help,
The supplied intcrli_ce cable must be used with the
equipment ill order tit comply with the limits lot a
digilal device pursuanl tit Subpart B of Parl 15 of
FCC Rules.
This product has been tested and ffmnd compliant
with the limits _1 out in lhe EMC Directive lor
using conneclion cables shorter lhan 3 reelers (9,8
lcet),
Attention
Tile electromagnelic lields at tile specilic
hequencies may influence the piclurc and sound
of this uniL
Notice
If static electricity or electrolllagnelism Cil/l_S
data transfer to discontinue midway (l_dl). restart
the application or disconnect and connect the
communicalion cable (USB. elc.) again.
Disposal of Old Electrical &
Electronic Equipment (Applicable
in the European Union and other
European countries with separate
collection systems)
This sylnbol on lhe product or on its packaging
indicates thai lifts product shall not be treated as
household wasle, lnstead il shall be handed over
to the applicable collection point lor the recycling
of electrical and electronic equipmenl. By
ensuring this product is disposed of corlvctly, you
will help prevent polcnlial negative consequences
lor lhe environment and human health, wlfich
could otherwise be caused by inappropriate waste
handling of this product. Tile recycling of
materials will help tit conserve natural resources.
For more detailed inlbrmalion aboul recycling of
this producl, please contact your local Civic
Office. your housetlold waste disposal selvice or
the shop where you purchased lhe product.

Disposal of waste batteries
(applicable in the European Union
and other European countries with
separate collection systems)
This symbol on the battery or on the packaging
indicates that the batte D' provided with this
product shall not be treated as housellold waste.
By ensuring tllese batteries are disposed of
correctly, you will help prevent potentially
negative consequences lor tile en'_'ironnlcnI and
human heallh which could otherwise be caused by
inappropriate waste handling of the ballery. Tile
recycling of the malerials will help to conselve
nalural resources.
In case of products that lor salcty, perfimnance or
data inlegrity reasons rcquirc a permanent
conneclion with an incorporatcd battery, this
battery should be replaced by qualified selwice
staff only, To ensure thai the battcry will be
treated properly, hand over the producl at end-ol:-
lilP to the applicable collectkm poinl fi)r the
recycling of electrical and eleclronic equipmenl.
For all other batteries, please view the sectfim on
bow to renlove file baltery lrolI/ tile product
salcly.
Hand the batlcD' over to the applicable collection
point lor the recycling of waste batteries.
For more detailed inlbrmatkm about recycling of
this product or battery, please contact your local
Civic Olfice, your household waste disposal
sel",ice or the shop where you purchased the
product.
Notice for the customers in the
countries applying EU Directives
The manuhlcmrcr (51 this product is Sony
Corporalion, l -% l Konan Minato-ku Tokyo, 108-
0075 Japan. The Authorized Representative lor
EMC and product sultry is Sony Deutschland
GmbH, Hedellinger Stras_ 61,70327 Stultgart,
Germany. For any service or guarantee matters
please mlcr to the addresses given ill separale
service or guaranlee docunlenls,
A moulded plug complying with BS 1363 is fitted
1(5lhis equipment lor your sali:ly and
convenience.
Should the fllse ill the plug supplied need to be
replaced, a filse of the same rating as the supplied
one and approved by ASTA or BSI to BS 1362,
(i.e., marked with all @ or _ mark) umst be
used.
If the plug supplied with this equipment has a
delachable luse cover, be sure to atlach the fi/se
cover after you change file filse. Never use file
phlg wilhoul the luse cover. If you should lo_ the
I/lse cover, please conlact your nearesl Sony
service station.

Table of contents
IMPORTANT SAFEGUARDS .................................................................... 2
Read this first ............................................................................................ 4
Notes on using the camera ...................................................................... 8
Getting started ................................................................................. 9
Checking the accessories supplied ......................................................... 9
1 Preparing the battery pack .................................................................. 10
2 Inserting the battery pack/a "Memory Stick Duo" (not supplied) ........ 11
3 Turning the camera on/setting the clock ............................................. 13
Shooting images easily ................................................................. 14
Mode dial/Zoom/Flash/Macro/Self-timer/Display ................................... 15
Shooting in Smile Shutter mode ............................................................. 17
Viewing/deleting images ............................................................... 18
Learning the various functions - HOME/Menu ........................... 21
Using the HOME screen ......................................................................... 21
HOME items ............................................................................................ 22
Using menu items ................................................................................... 23
Menu items .............................................................................................. 24
Enjoying your computer ............................................................... 26
Supported Operating Systems for USB connection and application
software (supplied) ................................................................................. 26
Viewing "Cyber-shot Handbook". ........................................................... 27
Indicators on the screen ............................................................... 28
Battery life and memory capacity ................................................ 30
Battery life and number of images you can record/view ........................ 30
Recordable number of still images and recordable time of movies ...... 31
Troubleshooting ............................................................................ 33
Battery pack and power ......................................................................... 33
Shooting still images/movies .................................................................. 34
Viewing images ...................................................................................... 35
Precautions .................................................................................... 36
Specifications ................................................................................ 37

Notes on usingthecamera
Internal memory and "Memory
Stick Duo" back up
Do nol turn olt file calnera, relF_ove file bilttery
pack, or remme tile "Memory Stick Duo while
tile access hunp is lit. Otherwise, the internal
memory data or "Menlory Slick Duo" may be
damaged, Be sure to make a backup COl?yto
protect your data,
Notes on recording/playback
• Betorc you start recording, make a trial
I_cording to makesure that tile camera is
working correctly.
• The camera is neither dustq)rooI, nor splash-
i?rooI, nor water-prool. Read "Precautions"
(page 36) belore operating the camera.
• Aw)id exposing the canlera to water. 11water
milers inside lhe Calllera, a nlalhulctk)n nmy
OCc/Ir. hl Solne ca_s, tile canler+t c_lnnot be
repaired.
• Do not aim tile camera at tile sun or ()tiler brigbl
light. It may cause tile malhmction of tile
conlera.
• Do not u_ the canlera near a Iocatkm that
generates strong radio waves or enlfls radiation.
Otherwise. the camera nlay not properly record
or play back images.
• Using the camera in sandy or dusty locations
nlay cause lnalfilnclions.
• If [noisturc condensation occurs, remo_e il
bek_re using tile camera (page 36).
• Do not shake or strike tile camera. It may cau_
a malflmcflon and you may not be able to lvcord
images. Furthernlolv, the lvcording media may
become unusable or image data may be
danlaged.
• Clean the flash surl,tce belore use. Tile Ileal of
flash emission may cause dirt on the flash
surl;ice to become discolored or to slick to tile
flash surlace, rcsulflng in insulllcient light
ellliSgion,
Notes on the LCD screen and
lens
• The LCD screen is nmnut,tclured using
extremely high-precision technology so mer
99.99% of tile pixels arc operatiollal I_ll"
elJ_:cflve use. However. some tiny black and/or
bright dots (white. rod, blue or green) may
appeal on the LCD screen. These dots am a
normal result of the manulacmring process, and
do not aflect the recording.
• When file battel T level becomes low. the lens
ndgbt stop moving. Insert a charged battel T
pack and turn on the cmnera again,
On image data compatibility
• The camera contorms with DCF (Design rule
lot Camera File sysleln) universal standard
established by JEITA (Japan Electronics and
Intormaflon Tcclmology Industries
Association),
• Sony does not guarantee that tile camera will
play back images recorded or edited with other
equipment, or that other equipment will play
back images recorded with tile camera.
_Warning on copyright
Television programs, Iihns, _ideotapes, and other
nmterials may be copyrighted. Unmlfllorized
recording of such materials may be conmuy to tile
I?ro_isions of tile copyright laws,
No compensation for damaged
content or recording failure
Solly CilllllOt COlllpellSate Ior Ihilul'e to record or
lOSS or dalnage oI recorded C'Olltent due to a
tntdhlnclioll ol lhe canlertt or rccordhlg media,
etc.

Getting started
Checkingtheaccessoriessupplied
• Baltery charger BC-CSGB/BC-('SG(" ( l ) • USB, A/V cable till" muJli-tlse lerminal (l)
• Power cord (mains lead) (1)
(not supplied in the USA and Canada)
• Rcchargeable baltery pack NP-BG 1 ( 1)/
Baltery case (1)
• Wrist strap (1)
• CD-ROM (1)
Cyber-shot application software
"Cyber-shol Handbook"
"Cyber-shol S,cp-up Guide"
• Instruction Manual (this manual) (1)
Attach the strap and place your hand through the loop to prevent the camera from damage by,
being dropped.

1 Preparing the battery pack
OInsert the battery pack into the battery charger.
0 Connect the battery charger to the wall outlet (wall socket).
Tile CHARGE lamp lights up, and charging starts.
When tile CHARGE lamp turns otl, charging is finished (Nornlal charge).
If you continue charging tile ballery pack tot about one nlore hour (unli] it is fully charged), tile charge
will last slightly longer.
Charging time
• The table above shows the time required to charge a flllly depleted battery pack al a temperature of 25 °C
(77 °F). Charging may take longer depending on condilions of u_ and circumslances.
• See page 3(I lor the nulnber of images that can be recorded.
• Connect lhe baltery charger 1o the nearest wall outlel (wall sockel).
• Even if the CHARGE lamp is nol lit, the batlery charger is not disconnected honl tile AC power source
(mains) as hmg as it is connecled to tile wall outlel (wall socket), If some trouble occurs while using the
baltc W charger, imnledkttely shul o1_ the power by disconnecting the plug flonl lhe wall oullet (wall
sockel),
• When charging is finished, disconnect the power cord (nlains lead) tionl lhe wall oullet (wall socket), and
r_2nloYetile batlery pack h'onl tile battery charger,
• Designed lor u_ with compalible Sony balteries.
10

2 Inserting the battery pack/a "Memory Stick Duo"(not
supplied)
_) Open the battery/"Memory Stick Duo" cover.
O Insert the "Memory Stick Duo" (not supplied).
_) Insert the battery pack.
_) Close the battery/"Memory Stick Duo" cover.
When there is no "Memory Stick Duo" inserted
The camera records/plays back images using tile internal memory (approx. 15 MB).
To check the remaining battery charge
Press POWER to turn on and check the relnaining battery charge on the LCD screen.
Remaining , \ i /i
charge _ _ _ _ _ i_-..
indicator -" i \
Status Sufficient Batter_ Batteryhalf Battel 3 1o_, Change thehatte U
power ahnost fully full recording/ with fully charged
remaining charged playback one, or charge the
will stop batte U. (The warning
soon. indicator flashes.)
• If you use the NP-FG1 baltel T pack (nol suppliedh lhe minules also appeal after tile batlery remaining
indicator (_ 60 Min).
• 11takes about one mhlule unlil the correct remaining charge indicator appears.
• The remaining charge indicator may not be conect depending on condilions of use and circumstances.
• The Clock Set screen appears when you turn on lhe camera h_rthe first tinle (page 13).
11

_To remove the battery pack/"Memory Stick Duo"
Open the b_ttery/"Memory Stick Duo" cover.
"Memory Stick Duo" Battery pack
Make sure that the access lamp
is not lit, then push the "Memory
Stick Duo" in once.
Slide the battery eject lever.
Besure not to drop the battery
pack,
• Never remove ll/e baltery pack/"Memory Slick Duo" when lhe access lamp is lit. This may cause damage
to data in the "Memory Slick Duo"/inlernal memory.
12

3 Turningthe camera on/setting the clock
_]_Press POWER.
0 Set the clock with the control button.
1 Select the date display lortzmt "_ ith A/V, then press O.
2 Select each item with 4/P" and set the numeric wllue with A/V. then press O.
3 Select [OKI, then press O.
• Tile can'_era does not have a tcature tllr superimposing dales on images. By using "Picture Motion
Browser" in lhe CD-ROM (supplied). you can prinl or save inlages with the (late.
• Midnight is indicated as 12:00 AM. and noon as 12:00 PM.
To change the date and time
Press HOME. and select [Q Clock Settings] in m_ /Settings) /pages 21, 22).
Notes on when the power is turned on
• Once lhe batlery pack is inserted in lhe camera, it may lake lime belore operatkm becomes possible.
• If the camera is lunning on battery power and you do not operate the camera l_r about three nfinutes, the
canlera turns off automalically to prcxent wearing down tile batlery pack (Auto power-off Lunction).
13

Shootingimageseasily
0 Select the desired function from the mode dial.
When shooting still images (Auto Adjustment nlode): Select L¢_I
When shooting movies: Select H.
0 Hold the camera, with your elbows pressed against your body to steady it.
Position the subject in
the center of thefocus
frame.
/
O Shoot with the shutter button.
"When shooting still images:
1 Press attd hold the shutter button
ball\ray down to focus.
Tile 0 (AE/AF lock) indicator !green)
flashes, a beep sounds, tile indicator stops
flashing and remains lit.
2 Press tbe sbtttter button fully down.
When shooting movies:
Press the shutter button fitly down.
To stop recording, press tbe sbutter button fully down again.
AE/AF lock indicator
• Tile shortest shooting distance is approxinmtely 10 cnl (4 inches) (W)/50 cm (1 loot 7 3/4 inches) (T)
(fronl the front of the lens).
14

Mode dial/Zoom/Flash/Macro/Self-timer/Display
Using the mode dial
Set tile triode dial to tile desired function.
Auto Adjustment
Allows you to shoot wilh tile settings ac[iusted automalically.
EASY Easy Shooting
Allows easy shooting with easy-to-see indicalors.
P Program Auto
Allows you to shool with the exposure adjusted automalically (both tile shutler speed anti tile aperture
value). You can adBlst ot]ler settings using tile nlenu,
H Movie Mode
Allows you 1orecord movies wilh audio,
I_o High Sensitivity
Shools images without a flash even ill low lighling,
@ Smile Shutter
When tile cumera delecls a smile, lhe shutler is released auton]atically. For delails, see page 17.
_,_ Soft Snap
Shools inlages wilh a softer atmosphere R_r portrails ol people, flowers, etc.
[] Landscape
Shools with tile locus on a distant su_!iect.
_' Twilight Portrait
Shoots sharp inlages ol people in a (lark place withoul losing tile nighltime almospherc.
SON* Scene Selection
Selects a setting fi'om tile Scene Seleclion menu.
* SceneSelection in SCNmode
Press MENU illl(l _lect it _ttillg.
.,_ Twilight
Shools nighl scenes withoul losing tile nighttime atmosphere.
"_'_ Beach
Shools seaskle or lakeside scenes with tile blueness of tile water captured more _ividly,
Snow
Shools SllOW scenes ill white t/lOre clearly.
{:}i}Fireworks
Shools fireworks in all their splendor.
Underwater
Shools illlderwaler ill llillural colors ushlg a waler-proo| ho/ishlg,
15

_W/T Using the zoom
Press T to zoom, press W to tlndo zoom.
_ Flash (Selecting a flash mode for still images)
Press )" (,_) on tile control button repeatedly until the desired mode is selected.
_NTO:FlashAuto
Flashes when there is insullicienl light or backlighl(delault setting),
$: Flashforcedon
,_SL:Slowsynchro(Flashforcedon)
The shulrerspeed is slow in adark place to clearly shoot tilebackground thai is outel Ilash light.
{_: Flashforcedoff
_ Macro (Shooting close-up)
Press 411(_e_)on the control button repeatedly until the desired mode is selected.
_UTO:Auto
The camera adjusts filelocus amomatically Itemdislanl subjects 1o close-up.
Normally, pul the camera in this mode.
_: Macro
Tile camera adjusls tilelocus wilh priorily on close-up stH_iects.Set Macro On when shooting close
subjects.
_Using the self-timer
Press • (_,5) on the control button repeatedly tmtil the desired mode is selected.
_&_F:Notusingtheself-timer
_o :SettingthelO-seconddelayself-timer
_2: Settingthe2-seconddelayself-timer
When you press the shutter bt]tton, the self-timer lamp flashes and a beep sounds until the
shutter t)perates.
DISP Changing the screen display
Press • (DISP) on the control button.
Each tithe you press • (DISP), the display and brightness changes as follows:
+ Indicators on
Indicators on*
Histogram on*
$
Indicators off*
LCD screen off
* The brightness of lhe LCD Backlighl is set to up.
16

Shooting in Smile Shutter mode
When tile camera detects a smile, the shtttter is released automatically.
_) Select _ (Smile Shutter) mode from the mode dial.
0 Press the shutter button all the way down to set Smile Detection mode.
Tile Smile Shutter enters standby.
' I
I
Smile Detection mark/Number of images
Smile Detection frame (Orange)
Smile Detection Sensitivity indicator
This indicates the current smile lew:l.
Eacb time the smile level reacbes the set Smile Detection Sensitivity (indicated by 41), the
camera automatically operates tbe shutter and records tip to six images. After recording the
image, tbe Smile Sbutter lamp lights.
0 Press the shutter button all the way down again to exit the Smile Shutter
mode.
• When tile Smile Sbmter is in standby, tile Record lamp (Orange) fl_shes.
• Shooting using tile Smile Slmtter ends automatically when either file "Melnol T Stick Duo" or inlernal
memory becollleS 1/I]] or when six images have been recorded.
• You can select the subjecl lhat has priorily ftlr smile deteclkln wilh [Smile Delection] (page 24).
• If a smile is not detected, _1 the [Snlile Deleclion Sensidvily] (page 24).
• You can have the camera shoot the image automatically when any person displayed in the smile detection
lranlc (Orange) smiles after pressing file shulter button all the way down.
• Tile image may not be in locus if the dislance between the camera and the subjecl is changed after pressing
the shutter button all the way down. The suilable exposure may nol be obtained if the surrounding
brighmess changes.
• Faces may nol be detected correctly when:
It is too dark or too bright.
Faces am partially bidden by sunglasses, masks, bals. elc.
Tile sut_iecls am not ft,cing file camera.
• Smiles may nol be detected correctly depending on tile condilions.
• You cannol use file Digital Zoom hmclion.
• You cannol change the zoom iatio when file Smile Sllulter is in slandby.
17

Viewing/deletingimages
_]_Press [] (Playback).
If you press [] when tim camera is powered off, tim cmnera is turned on automatically und set to
playback mode, To switch to tile shooting mode, press [] again.
OSelect an image with 4/_ on the control button.
I_'lovie:
Press • to play back a movie. (Press • again to stop playback.)
Press • to lz_stIorward, • to rewind. (Prcss• to return to normal playback.)
Press • to display tile volume control screen, then press •/• to at{just tile volume.
• Somctilnes images shot usingearlier Sony models cannot be played back.
Press theHOME button,select [_ Folder ViewI ti'om_ (View hnages), then play back the images.
_ To delete images
1 Display the image _ou 'aant to delete, then press MENU.
2 Select _ [Delete] with A/V and select [This Image] with 4liP,., then press Q.
3 Select [OK] with A, then press O.
_ To view an enlarged image (playback zoom)
Press _ "_hile displaying a still image. To undo the zoom, press _.
Adjust the position with A/V/41/P,..
To cancel the playback zoom, press O.
18

_To view an index screen
Press {_ (Index) to display the index screen while a still image is displayed.
Then, select an image with &/V/4/P".
To return to the single image screen, press 0.
• In the delimll setting, images are displayed in Dale View (when using the "Memory Slick Duo") or in
Folder View (when using llle internal memory).
You can change the View Mode by selecting r_ (View hnages) on lhe HOME screen !page 22).
• Each lime you press [] (Index), lhe number of images on the index screen increases.
To delete images in index mode
1 Press MENIJ 'ahile the index screen is displayed.
2 Select [Delete] with A/V and select [Multiple hnages] with ,,11/_. then press 0.
3 Select the image you want to delete with A/V/',I/_', then press 0.
The N/mark is checked in llle checkbox of the image.
To cancela selection, select an imageyou have selected lot delelkm, thenpress • again.
4 Press MENU and select [OK] with ,it. thm_ press 0.
• To deleteall the images of adate/lolder, select [All Images in Date Range]/[All InThis Folder] in step
2.then press •.
To play back a series of images with effects and music (Slideshow)
1 Press _ (Slideshu'_x) button.
The setupscreen appears.
2 Press _ /Slideshow) button again.
The music will change together with the [Effects]. Yuu can also transfer and change the music
tu your desired music.
Tu transfer and change the music, take the following steps.
(!) Press the HOME button. Then select [J_Music Tool] ---+[Download Music] in _ (Slideshow)
(page 22).
@ Install the software included in the CD-ROM (SUl)plied)to your computer.
@ Connect the camera and a computer with USB cable.
(_) Start up 'Music Transl)r" installed to your computer and change the music.
For details on changing the music, refer to Help in 'Music Transfer".
lg

_To view images on TV
Connect the camera to tile TV with the cable lk_rmulti-use terminal (supplied).
[
Cable for multi-use terminal (supplied)
_ To audio/video
put jacks
To view on HD (High Defioition) TV. att HD Output Adaptor (!able (not supplied) is needed.
• If you set tile inlage size to [16:9]. you can record ilnages ill file size thiH fills file enlire screen of the HD
TV.
• You cannol view movies output ill [HD (1080i)1 signal/ormal. Sel [COMPONENT] to [SD] when
shooting II/ovies.
2O

Learningthe variousfunctions- HOME/Menu
UsingtheHOMEscreen
The HOME screen is tile gateway screen for all tile functions of the camera, and can be called
up regardless of the mode selting (shooting/viewing).
_]_ Press HOME to display the HOME screen.
0 Select a category with 411_ on the control button.
Select an item with A/v, then press O.
When you select the IJm (Manage Memory) or _=_(Settings) category
1 Select the desired setting with A/T. then press 0.
• The HOME screen is displayed bypressing ,.
2 Select a setting with A/T. then press 0.
• The camera is set to lhe shooting or viewing modeby pressing the HOME bull_magain.
21

Fordetailsonthe operation_ page21
22
HOMEitems
Pressing HOME displays tile following items. Only tile available items are displayed on the
screen. Details on each item are displayed in tile guide at the bottom of the screen.
to
Shooting Shooting
I_ View Images Date View
Folder View
Favorites
Slideshow Slidesho_
Music Tool
Download Music Format Music
Print Print
m Manage Memory Memory Tool
Memo U Stick Tool
Format Create REC.Fokler
Change REC.Folder Copy
Internal Memory Tool
Format
=_'_Settings MainSellings
Main Settings I
Beep Function Guide
Initialize Smile demo mode
Main Settings 2
USB Connect COMPONENT
Vide() Out Wide Zoom Display
Shooting Settings
Shooting Settings 1
AF Illuminator Grid Line
AF Mode Digital Zoom
Conversion tells
Shooting Settings 2
Auto Orientation Auto Review
Clock Settings
Language Setting

Usingmenu items
_]_ Press MENU to display the menu.
-- Function Guide
• Tile menu will be displayed only during shooting and playback lnode.
• Different ilems will become visible depending on lhe selected mode.
OSelect a desired menu item with A/V on the control button.
• It the desired item is hidden, keep pressing A/V until tile item appears on the screen.
Select a setting with 41/_.
• If the desired item is hidden, keep pressing _/_ until tile iteln appears on the screen.
• Select an ilem in playback mode, then press 0.
_) Press MENU to turn off the menu.
23

Fordetailsontheoperation_ page23
Menu items
The ave/liable n]cn/i items x_ry depending on tile mode setting (shoeting/vicwing), _lnd the
mode dial pesition in the shoeting mode. Only tile available items are displayed on the screen.
Shooling menu
Scene Selection Selects the settings pre-adjusted to match various scene
conditions.
Image Size Selects the image size.
Flash Selects the flash setting in Easy Shooting mode.
Face Detection Selects the priority subject for adjusting the focus when using
face detection.
Smile Detection Selects the priority subject for the Smile Shutter function.
Smile Detection Sensitivity Sets the level of sensitivity to detect smile.
REC Mode Selects the continuous shooting method.
Scene Recognition Automatically detects the shooting conditions and then takes
the shot.
EV Adjusts Exposure.
ISO Selects a luminous sensitivity.
Metering Mode Selects the metering mode.
Focus Changes the focus method.
White Balance Adjusts the color tones.
Underwater White Balance Adjusts the color tones underwater.
Flash Level Adjusts the amount of flash light.
Red Eye Reduction Sets to reduce the red-eye phenomenon.
DRO Optimizes the brightness and contrast.
Color Mode Changes the vividness of the image or adds special effects.
SteadyShot Selects the anti-blur mode.
_? Shooting Settings Selects the shooting settings.
24

Fordetailsontheoperation _ page23
Viewingmenu
(Delete) Deletes images.
_113'b (View Mode) Switches the View Mode.
(Date List) Selects the playback date.
O_(Filter by Faces) Plays back images filtered to meet cedain conditions.
(_ (Add/Remove Favorites) Registers images to Favorites or removes images from
Favorites.
I_ (Slideshow) Sets and performs the Slideshow (playback of a sedes of
images).
(Retouch) Retouches still images.
(Multi-Purpose Resize) Changes the image size according to usage.
O_ (Protect) Prevents accidental erasure.
OPOF Adds a Print order mark on image that you want to print out.
(Print) Prints images using a PictBridge compliant printer.
(Rotate) Rotates a still image.
P-i (Select Folder) Selects the folder for viewing images.
25

Enjoyingyour computer
You can view images shot wilh Ihe camera on a computer. By using Ilae soflware in Ihe CD-
ROM (supplied). you can enjoy still images and movies frum the camera more than ever. For
details, refer to "Cyber-shot Handbook" in the CD-ROM/supplied).
SupportedOperating SystemsforUSBconnectionand application
software(supplied)
ForWindows users For Macintosh users
USB connection Windows 2{X)OPro fcssional SP4, Mac OS C).l/C).2/Mac OS X/vlO.l
Windows XP* SP2, Windo,.vs to v10.5)
Vista*
Application software Windows 2000 Professional SP4, not compatible
"Picture Motion Windows XP* SP2, Windo_ s
Browser" Vista*
64-bil editions and Starter (Edition) am not supported.
• Your computer nmst be pre-inslalled wilh an OS lisled above. OS upgrades are not supported.
• If your OS does not suppor( USB connections, copy images by inserting the "Memory Slick Duo" into the
Memo W Stick slol on your conlputer, or use a commercially available Menlory Stick Reader/Wriler.
• For flmher details on the operaling environmenl of "Picture Motion Browser" Cyber-sbot applicalion
software, retbr 1o "Cyber-sbol Handbook".
26

_ Viewing "Cyber-shot Handbook"
"(!yber-shot Handbook" in tile CD-ROM
(supplied) explains how to use the camera
in detail. Adobe Reader is required to view
it.
For Windows users
1 Turn on your computer, and insert the CD=
ROM (supplied) into the CD-ROM drive.
The screen below appears.
For Macintosh users
1 Turn on your computer, and insell the CD-
ROM (supplied) into the CD-ROM drive.
2 Select the [Handbook] R)lder and copy
"H mdbook.pdf" stored in the [GB] fokler
to yo/ir comp/iter.
3 After copying is complele, double-click
"Handbook.pdf".
When you click the [Cyber-shot Handbook]
button, the screen t_r copying "Cyber-shot
Handbook" appears.
2 Follow the on-screen instructions to copy.
• When you inst_dl "Cyber-shot Handbook".
lhe '_Cyber-shot Slep-up Guide" will be
installed amomatically.
3 After the installation is complete, double-
click the shortcut created on the desktop.
27

Indicators on the screen
28
Each time you press • (DISP) on the
control button, tile display changes
(page 16).
_When shooting still images
96_
o-is0400gl_ _2s_a.s_ffOEVN
• Tile indicators are limited in Easy Shooting
lllod¢.
When shooting movies
[]
Batlery remaining
Low battery warning
L_M _SM Image size
L_ ['-_A_...2 * L_Mis lbrDSC-W150only.
L_;9+L_I:9 ° L_ is for DSC-WI70 only.
_E _D a_0
_o® -%[] Modedial/Menu_Sc_n_,
p Mode dial (Program Auto)
:_,_"_ _1 _ White balance
_o._ *-Bo._ Burst mode/Bracket mode
_] r;l
Metering mode
Face Detection/Smile
Detection
SteadyShot
DRO
Vibration _ arning
Smile Detection Sensitivity
indicator/Number of
images
Zoom scaling
xl.4
sq_q
V_ S_ Colormo&
_( PictBridge connecting
Vie_ Mode
<P_<P2¢Pa
qP4<PSi6
_q _q Filter by Faces
eq

Q) Favorites
0.,, Protect
DPOF Print order (DPOF) mark
O_X2.0 Zoom scaling
VOL. lilil,,, Volume
_'_ PiclBridge connecting
[]
• AE/AF lock
180400 ISO number
[_ NR slow shutter
125 Shutter speed
F3.5 Aperture value
+2.0E7 Exposure Value
N N _ AF range finder frame
indicator
1.0m Semi manual value
Macro
REC Recording/Standby a movie
Standby
0:12 Recording time (minutes :
seconds)
101-0012 Folder-file number
20001 1 Recorded date/time of the
9:30 AM playback image
• STOP Function guide for playing
• PLAY image
_- BACK/NEXT Selecting im:,gcs
• VOLUME Adjusting vohune
[]
_il Recording folder
• i]_ Playback folder
96 Number of rccordable
images
8/8 12/12 hnage nu mber/Nu tuber of
images recorded in selected
lblder
00:25:05 Recordable time (hours :
minutes : seconds)
1_ [_1 Recording/playback Media
(Memory Slick Duo",
lnlernal memory)
I_ _ I_ Changing folder
i_] i [e'[_+ Scene Rccognilion
+ j,p_a
Ib_oN AF illuminalor
@ Red-eye reduction
[] [] Metering mode
_SL @ Flash mode
Fhtsh charging
_WB "_,__ White balance
.....,,_ _ _
C:32:00 Self-diagnosis display
IS0400 ISO number
+2.0EV Exposure Vahle
500 Shulter speed
F3.5 Aperture value
_T O'_w Conxersion lens
[]
_o 02 Self-limer
C:32:00 Self-diagnosis display
Database full
_FULL
AF range finder frame
+ Spot metering cross hair
Phtyback
i_ i Phtyback bar
Histogram
• [] appears when histogram
display is disabled.
29

Battery life and memorycapacity
Batterylife andnumberof imagesyoucanrecord/view
The numbers shown in the lk_llowiug tables
assume a fully charged battery pack
(supplied) is used at an ambient
temperature of 25 )(? (77 T). The numbers
shown lk)rimages you can recurd/view are
approximations attd allow for changing of
the "Memory Stick Duo" as necessary.
Note that the actual numbers may be less
than those indicated in the table depending
on the conditions of use.
_When shooting still images
DSC-W170
On A1)prox. 195 [ A1)prox. 39(.I
0f[ A1)prox.230 ] A1)prox. 460
DSC-W150
On
Off
A1)prox. 200 [ A1)prox. 400
A1)prox. 240 ] A1)plox. 480
• Shooting in the lbllowing situations:
[REC Mode] is set to [Normal].
[AF Mode] is sel to [Single].
[SteadyShot] is set to [Shooting].
Shooling once every 30 seconds.
The zoom is swilched allernalely belween tbe
W and T ends.
The flash strobes once eveW two times.
Tile power [urns on and oil once evely ten
times.
• The measuremenl method is ba_d on lhe CIPA
slandard.
(CIPA: Camera & hnaging Products
Association)
• Tile battery lilt and the number of images do
no[ change, regardless of image size.
_When viewing still images
• Viewing single images in order at abotu three
second ilUel%'als
Notes on the battery pack
• Bauery capacity decreases over lime and
through repeated ilse.
• Tile battery lile and tile number ol images you
Call record/view gue decreased ullder tile
Io]lowing conditions:
Tile surrounding tenlperatllre is ]o'_v.
The flash is used lbequeluly.
The calllera has been lllrned on all(] olf l/lally
limes.
Tile zoom is used flequently.
Tile brightness of LCD Backligbl is set 1o lip.
[AF Model is set 1o IMonitorl.
[SteadyShot I is set 1o [Continuous].
Tile baltely power is low.
Tile Face Detection hlllction is activated.
3O

Recordablenumberof still imagesand recordabletime of movies
The number of still images and tile length of time lk_rmovies may vary depending on the
shooting conditions.
• Even if lhe capacily of your recording media is lhe same as lhe one in the table below,lhe number ofstill
imagesand timlenglh of time lor movies may be dillcrent.
• You can selectthe imagesize lrom the menu (pages 23,24).
The approximate recordable number o! still images
DSC-W170 (Units: hnages)
10M 3 32 58 120 246 496 982 1973
5M 6 51 92 190 390 786 1556 3127
3M 10 81 148 305 625 1261 2497 5016
VGA 96 782 1420 2932 6000 12102 23956 48138
3:2 (8M) 3 32 58 121 248 500 990 1990
16:9 (7M) 4 34 61 127 261 526 1042 2093
16:9 (2M) 16 132 236 489 1001 2018 3995 8025
DSC-W150 (Units: Images)
8M 4 39 72 149 306 618 1223 2457
5M 6 51 92 190 390 786 1556 3127
3M 10 81 148 305 625 1261 2497 5016
VGA 96 782 1420 2932 6000 12102 23956 48138
3:2 (7M) 4 40 73 151 309 624 1235 2482
16:9 (6M) 5 42 77 159 326 658 1303 2617
16:9 (2M) 16 132 236 489 1001 2018 3995 8025
• The numbers of images listed assume [REC Model is _t to [Normal].
• When the number of remaining shootable images is grealer tllan 9,999, the ">9999" indicator appears.
• When an image was recorded using earlier Sony models and is played back on lhe camera, lhe image may
nol appeal in the actual image size.
31

_The approximate recordable time of movies
The n/lnlbers in the table belo'_x show tile approxinmte maxinmm recordable time obtained by
totaling all movie files. Tile maximum length of time you can shoot continuously is about I0
minutes.
(Units: hour : minute : second)
6401Fine) 1):02:50 0:06:00 0:12:30 0:25:10 0:49:50 1:40:10
6401Standard) 0:00:40 0:05:50 0:10:30 0:22:00 0:45:00 1:30:50 2:59:40 6:01:00
320 0:02:50 0:23:20 0:42:30 1:28:00 3:00:00 6:03:10 11:59:00 24:04:10
• Movies with the size set lo [640(Fine)] can only be recorded on a "Memory Slick PRO Duo".
• Tile camera does not supporl HD recordings or playbacks lot movies.
32

Troubleshooting
If you experience trouble with the camera, try the following solutions.
tl) Checktheitemsbelow,andreferto "Cyber-shotHandbook"(PDF).
If _ code such as "(VE:r-I[]:r-I[]" appears on the screen, refer to "('_her-shot
Handbook".
0 Removethebatterypack, waitforaboutoneminute,re-insertthe battery
pack,thenturnonthepower.
V
O Initializethe settings(page22). ]
[ 0 Censult yeur Sony dealer or lecal autherized Sony service facility" ]
Be aware thai by sending the camera for repair, you give consent that the conlents o1 lhe
internal memory Music files may be checked.
Cannot insert the battery pack.
• Insertthe battery pack correclly Io push Iheballery eiecl lever (page 11).
Cannot turn on the camera.
• Aflcr inserting the batter} p_Jck into the camela_ it may take _Jfc_ moments fi)r the camera to
power up.
•lnsert the battery pack correctly (page 11).
• The battery pack is discharged, lnsert charged hattery pack (page 10).
• The battery pack is dead. Replace it _ ith a new one.
• Use a recommended battery pack.
The power turns off suddenly.
• If you do not operate the c;unel_J for M_out tlnec minutes _bile the po_ er is on, the camera
turns off automatically to prevent wearing down the battery pack. Turn on the camera again
(page 13).
• The batter) pack is dead. Replace it with a new one.
33

The remaining charge indicator is incorrect.
• This phenomenon occurs when you use the camera in an extremely hot or cold location.
• A discrepancy arose between the remaining charge indicator and the actual remaining battel T
charge. Fully discharge the battery pack once, fllen charge it to correct the indication.
• The battery pack is discharged. Insert the charged battery pack (page I 0).
• The battel 3 pack is dead. Replace it with a nex_one.
Cannot charge the battery pack.
• You cannot charge the battery pack using the AC Adaptor (not supplied). Use the barrel3
charger to charge the battery.
Cannot record images.
• Check the free capacity of the internal memol3' or 'Memory Stick Duo" (page 31). If it isfillL
do one of the l_dlowing:
Delete unnecessary images/page 18).
Change the "Memory Stick Duo".
• You cannot record images while charging the flash.
• When shooting a still image, set the mode dial to a position other than _.
• Set the mode did to _ when shooting movies.
• The image size is sel to [640(Fine)] when recording movies. Do one of the follo_ing:
Set the image size to other than [640(Fine)].
Insert a "Memory Stick PRO Duo".
Vertical streaks appear when you are shooting a very bright subject.
• The smear phenomenon is occurring and xdlitc, black, red, purple, or other streaks appear on
Ihe image. This phenomenon is not a malfunction.
34

Cannot play back images.
• Press [] (Playback) (page 18).
• The folder/file name has been changed on your computer.
• Sony does not guarantee playback of image files on the camera if the files have been
processed using a computer or recorded with another camera.
• The camera is in USB mode. Delete the USB connection.
• Playback is impossible if the Smile Shutter is in standby mode. Exit standby mode by
pressing the shutter button all the way down.
• This is caused by copying images on the PC to the Memory Stick Duo" without using the
"Picture Motion Browser". Play such images in FoMer View (page 22).
• Sometimes a Memol T Stick Duo" containing images shot with earlier Sony models cannot
be played back. Play such images in Folder Vie_ (page 22).
35

Precautions
Do not use/store the camera in
the following places
• hi an extremely hot, cold or humid place
In places such as in a car parked in tile sun, the
camera body may become delbrmed and fills
II/_y Cause n m_Jhlnction.
• Under direct sunlight or near a heater
Tile camera body may beconle discolored or
detornled, and this nlay cause a malhlnction.
• hi a location su_iecl to rocking vibration
• Near strong magnetic place
• hi sandy or dusty places
Be era'till] llot to let sluld or dust get into tile
calnera. This may cause tile camera to
malhmctkm, and in some cases this inalfinlction
cannot be repaired.
On carrying
Do not sit down in a chair or other place with lhe
canlera in the back pocket of your trousers or
skirt, *_slhis nlay cause malflmction or danlage tile
camera.
On cleaning
Cleaning the LCD screen
Wipe tile screen surtace witll an LCD cleaning kil
(not supplied) to rcnlove fingelT)rinls, (lust, etc,
Cleaning the lens
Wipe lhe lens with a soil ch)th to rcnlove
lingerprillls, dusl, el(.
Cleaning the camera surface
Clean tile camera surtiice with a soft cloth slightly
u/oislelled with water, then wipe tile S/ll+tltce with
a dry cloth. To prevent danlage to the finish or
casing:
Do not expose tile camera to chenlica] produos
such as thinner, benzine, alcohol, disposable
cloths, insect repellent, suns(men or insecticide.
Do not touch the cmnera with ally (if the above
O11 your hand.
DO not leave tile camera ill contact wilh lubber
or vinyl lOTa long time.
On operating temperatures
Tile camera is designed lbr use under the
temperatures between 0°C and 40°C (32°F and
104°F). Shooting in extremely cold or hot places
thai exceed lifts range is nol recommended.
On moisture condensation
II the camera is broughl directly fi'onl a coM to a
warnl lociltiOll, lnoislurc nlay Colldense inside or
outside the calnera. This lnoisture condellsifliOll
hilly CilU_ _1 Ul_lllUllClh)ll of tile canlera.
If moisture condensation occurs
Turn oll the camera and wait about +ulhour loTtile
/lloist/ire to e_, aporifle, Not( thitt il you shool with
nloismre remaining inside the lens, images will
not be clear.
On the internal rechargeable
backup battery
Tile cmnera has an internnl rechargeable buttery
lot maint+lining tile date and time and other
seltings regardless oI whether tile power is on or
oil.
This rechargeable battery is continually charged
as long as you am using lhe camera. However, if
you use file cmnera lOTonly short periods, it
discharges gradually, and if you do not use the
camera at all lOTabout one nlonth iI beconles
conlpletely discharged. In this case, be sure to
charge this rcchargeable ballery beRaTeusing the
camera.
However, even if this rechargeable battery is not
charged, you can still u_ the canlera, but tile dale
and time will not be indicated.
Charging method of the internal
rechargeable backup battery
Insert charged battery pack in the camera, and
lhen le_o, e lhe Cillllerit lt)r 24 hours or nlore wilh
lhe power off,
36

Specifications
Camera
[System]
Image device:
I)SC-WI70:
7.70 rain (1/2.3 type) color CCD_
Primary color filter
I)SC-WISO:
7.18 mm (1/2.5 type) color CCD_
Primary color filter
Total pixel number of camera:
I)SC-WI70:
Approx. 10.3 Megapixels
I)SC-WISO:
Approx. 8.3 Megapixels
Ellcctive pixel nmnber of camera:
I)SC-WI70:
Approx. 10.1 Megapixels
I)SC-WISO:
Approx. 8.1 Megapixels
Lens:
I)SC-WI70:
Carl Zeiss Vario-Tcssar 5x zoon_ lens
f = 5 - 25 lIlln (28 - 14(I 111111(35 Illln fi]nl
equivalent)) F3.3(W) - 5.2(T)
IISC-WISO:
Carl Zeiss Vario-Tcssar 5x/oom lens
f = 5 - 25 mm (30 - 150 mm (35 mm fihn
equivalent)) F3.3(W) - 5.2(T)
Exposure control: AiltOllltllic exposure, Scene
SelecUon (10 modes)
WhUe balance: AulomaUc, Daylight, Cloudy,
Fluoresccnl 1.2,3, Incandescent. Flash
Underwater Wbde Balance: Auto, Underwaler
1,2. Flash
File R)rmal (DCF compliant):
Still images: Exif Vet. 2.21 JPEG complianL
DPOF compatible
Movies: MPEGI compliant (Monaural)
Recording media: lmernal Memory (approx.
15 MB), "Memory Stick Duo"
Flash:Flash range (ISO sensitivity
(Recommended exposure lndex) sel to Auto):
Approx. 0.2 to 4.2 m 17 7/8 inches to 13 lcet
9 3/8 inches) (W)/approx. 0.5 to 2.7 m (1 R_ot
7 3/4 inches to 8 tcel 10 3/8 inches) (T)
[InputandOutputconnectors]
Multi connector: Video output
Audio outpul (Monaural)
USB communication
USB colnnnmicalion: Hi-Speed USB (USB 2.0
complianl)
[LCDscreen]
LCD panel: 6.7 cm (2.7 type) TFT drive
Total number of dots: 23(I 400 (960 x 240) dots
[Power,general]
Power: Reclmrgeable battery pack
NP-BG l, 3.6 V
NP-FGI (nol supplied), 3.6 V
AC-LS5K AC Adaptor (nol supplied), 4,2 V
Power consumpt km (during shooting, LCD screen
on): 1.0 W
Operaling temperature: 0 to 40°C (32 lo I04°F)
Storage lemperalurc: 20 to +60°C (-4 1_)+I40°F)
Dimensions: 93.7 x 58.0 x 24.0 mm (3 3/4 x
2 318 x 31132 inches) (W/H/D_ excluding
protrusions)
Mass: Approx. 175 g (6.2 oz) (including NP-BG1
baltery pack. strap, etc.)
Microphone: Monaural
Speaker: Monaural
Exif Print: Compatible
PRINT hnage Malching I11:Compatible
PictBridge: Compatible
BC-CSGB/BC-CSGC battery
charger
Power lvquiremenls: AC 100V to 241)V, 51)/611Hz_
2.6 W (BC-CSGB)/2 W (BC-CSGC)
Oulput vollage: DC 4.2 V, 0,25 A
Operating temperature: 0 to 40°C (32 lo I04°F)
Storage temperature: 20 to +60°C ( 4 to +I40°F)
Dimensions: Approx. 62 x 24 × 91 mm 12 112×
31/32 x 3 518 inches) (W/H/D)
Mass: Approx. 75 g (2.7 oz)
Rechargeable battery pack NP-
BG1
Usvd battery: Litlfium-ion battery
Maximum voltage: DC 4.2 V
Nominal _oltage: DC 3.6 V
Capacity: 3.4 Wh/960 mAh)
Design and specifications arc subject to change
witboul notice.
37

Trademarks
• CybEp-_h_, ' Cyber-shof are trademarks
of Sony Corporation.
• "MelnoJy Stick _,g_, "Melnory Stick PRO",
MEM[IR¥5T|[K PRD, "Menlory Stick Duo",
MEMORYST|EK 11Ill3, "Memory Stick PRO
Duo", MEMOR¥STIEKPR0 0UO, "Memory
Stick PRO-HG Duo",
M[MIIR¥SII[RPR0-HI_ DIt0, "Memoly Stick
Micro", "MagicGale", and M£_,G IC G L_.TE
are trademarks of Sony Corporation.
• "PhotoTV HD" is a trademark of Sony
Corporation.
• "Ink_LITHIUM" is a trademark of Sony
Corporation.
• Microsoft, Windows, DirectX and Windows
Vista are eilher l_:gistered trademarks or
trademarks of Microsoll Corporation in the
Uniled Slales and/or Ot]ler countries.
• Macintosh, Mac OS, iMac, iBook, PowerBook,
Power Mac and eMac arc trademarks or
registered trademarks of Apple Inc.
• Intel, MMX, and Pentium am n'ademarks or
registered trademarks of lmel Corporation.
• Adobe and Reader are tradelnarks or registered
trademarks of Adobe Systelns Incorporated in
the United Stales and/or other countries.
• In addition, system and producl nanles u_ed in
lhis lnanual are, in general, m,demarks or
registered tradenmrks of their respective
developers or lnanulaclurcrs. However, the IM
or @ marks are not used in all cases in this
nlanua].
38


IItN I
Nombre del producto: Cgimara Digital
Modelo: DSC-W 1501W 170
POR FAVOR LEA DETALLADAMENTE
ESTE MAN UAL DE INSTRUCCIONES
ANTES DE CONECTAR Y OPERAR
ESTE EQUIPO.
RECUERDE QUE UN MAL USO DE SU
APARATO PODRIA ANULAR LA
GARANTiA.
Para reducir el riesgo de incendio o
descarga el_ctrica, no exponga la
unidad a la Iluvia ni a la humedad.
Suslimya la baterfa t'micamente pot olra del tipo
especificado. De 1o contrario, es posible que se
produzcall illcendios o lesiones.
No exponga las pilas a fllentes de calor excesivo,
con/o la luz solar dirccta, el fllego o similarcs.
Este producto _ ha probado y cumple con la
normativa que establece la Directiva EMC si se
utiliza un cable de conexi6n de menos de 3 metros
de longittld.
Atencion
Los calnpos electrolllilgn_ticos il lrccuellCiits
especfl_cas podr&l inlluir ell la inmgen y el sonklo
de esta unidad.
Aviso
Si la electricidad esl_itica o el electromagnelismo
intcrlumpen la tr+msmisfon de d+dos (lallo),
reinicie la aplicacidn o desconecte el cable de
conmnicacidn (USB, etc.) y vuelva a conectarlo.
_Tratamiento de los equipos
el_ctricos y electronicos al final
de su vida util (aplicable en la
Uni6n Europea y en paises
europeos con sistemas de
recogida selectiva de residuos)
Este sfmbolo en el equipo o el embah@ indica
que el pm_nte producto no puede ser tratado
colIlo rcsiduos domdsticos nornlales, sill() que
debe entmgarse en el com_.spondiente punlo de
rccogida de equipos eldctricos y electrdnicos. AI
a_gurarse de que este prodtlclo se desecba
correctamente, Ud. ayuda a prevenir las
consecuencias negativas para el medio ambiente y
la salud lmmana que podrfan derivarse de la
incorrccta lnanipulacidn ell el t/lOlllellI_l de
deshacer_ de estc producto. El reciclaje de
materiales ayuda a conselwar los reCllrSOS
namrales. Para recibir inR_rmaci6n detallada sobrc
el rcciclaje de este producto, p6ngase en contacto
con el ayuntamiento, el punto de recogida in;is
cercano o el establecimiento donde ha adquirido
el producto.

Tratamiento de las baterias al final
de su vida t_til (aplicable en la
Union Europea y en paises
europeos con sistemas de
recogida selectiva de residuos)
Este sfmbolo en la baterfa o en el embal_tbe indica
que la baterfa proporcionada con este producto no
puede ser tratada colno un rcsidllo doln_slico
normal AI asegurarse de que estas batcrfas se
desechan correctamente, Ud. ayuda a prevenir las
consecuencias negafivas para el medio ambiente y
la salud humana que podrfan derivarse de la
incorrecta tllaniplllaci611 ell el lnonl_n[o de
deshaccrse de la baterfa. El rcciclaje de materiales
ayuda a conservar los rccursos namrales.
En el caso de productos que por razones de
seguridad, rcndimiento o nmntenimiento de dalos,
sea necesaria una conexi6n permanente con la
bater/a incorporada, esta baterfa solo deberfi de ser
reemplazada pot personal l_cnico cualificado para
ello. Para asegurar_ de que la baterfa serfi tratada
correctamentc, entregar el producto al linal de su
vida fitil en un punto de recogida para el reciclado
de aparatos eldctricos y electr6nicos.
Para las demgls baterfas, ver la secci6n donde se
indica como quitar la baterfa del produclo de
Iorlna segura.
Deposite la baterfa en el corrcspondiente punlo de
recogida para el recidado.
Para recibir intormaci6n detallada sobre el
reciclaje de este producto o de la baterfa, p6ngase
en contacto con el ayuntatllienlo, el punto de
recogida i/l_/sccrcano o el establecimienlo donde
ha adquirido el producto,
Aviso para los clientes de paises
en los que se aplican las
directivas de la UE
El l,d_ricunte de esle producto es Sony
Corporation. 1-7-1 Konan Minato-ku Tokyo, 108-
0075, Japdn. El rcpl'eselltal_tC mltorizado ell Io
relcrentc _tlcumplilniento de la dircctiv_t EMC y a
]a seguridad de los productos es Sony
DeutschlmM GmbH, Hedellinger Slrasse 61,
70327 SmHgarL A]mnania. Pm'aresoher
cualqtlJer ilStllltO relilcionado coil el soporte
tdClfiCOo la garantfa, consulte las dirccciones que
se indican ell los documentos de soporte tdcnico y
gmanlfa suminislrados pot sepal'ado.

N0tas s0brela utilizaci6nde la c_mara
Copia de seguridad de la
memoria interna y del "Memory
Stick Duo"
No apague la c_ilnara ni exmdga la baterkl ni el
"Memory Stick Duo" con el indicador tie acceso
encendido, ya que, tie litcontrario, es posible que
Se pl"oduzciln da/lOS en los datos de ]a lllenloria
interna o del "Memol T Stick Duo', Realice
siempre una copk_ tie seguridad de sus &ttos para
pl'ot_gerlos.
Notas sobre la grabacion/
reproduccibn
• AlltCs de COlllcnzar il gritbiff, rca]ice una
grab_cirin de pmeba pm'a asegurm'se tie que la
czlnlara lunciona corrcctamente.
• Esla c_tllara no es resistentc al polvo, a las
salpicaduras ni al agua. Lea "Precauciones"
(pfigina 34) antes de ulilizar la cgimara.
• Tonga cuidado de no dejar que la c&nara se
moie. Si se introduce agua ell la cfimara, es
posible que se produzca un lallo de
Ihncionalniento. Ell algllnos casos. 11o _ podrgl
mparar.
• No enloque la c&nara hacia el sol ni hacia otras
lutes intcnsas. Eslo podrfa producir lallos de
lhncionamienlo en 6sta.
• No utilice la c&nara ccrcz_ de un lugar donde
generen ondas de radio fllertes o se emila
radiaci6n. Es posible que la cfimara no grabe o
rcproduzca las itmlgenes debidamenle.
• La ulili/nci6n de la cfimara en lugares arenosos
o polvorienlos puede ocasionar un tallo de
|hncionamienlo.
• Si se condensa humedz_d, elinffnela allies de
utilizar la cdmara (Digina 34).
• No agile ni golpee la c&nara. Esto podrfa
producir l,dlos de funcionamienlo y provocar
que no pueda grabar imfigenes. Adeln¢is. es
posible que el soporte de grabaci6n quede
inutilizable o que los datos de las imglgenes se
darien.
• Limpie la superficie del flash antes de utilizarlo.
El calor de la endsirin del flash puede hacer que
la superficie del flash se ensucie, que se
descolorc o induso se puede adherir a ella. Io
que ocasionarfa una emisirin de luz insuficienle.
Notas sobre la pantalla LCD y el
objetivo
• La pmmdla LCD estfi labricada lnedial_te
tecnologfa de nmy alta prccisi6n, de lbrma que
m_is del 99,995_ tie los pfxeles son operativos
para uso eli:ctivo. No obstmlte, es posible que se
obsel-venconstal_ten_enteen ]apan|alia L(_'D
pequefios puntos negros y/o brillantes (blancos,
rQios, i/zu]es o verdes), EsIos pllntos SOil
nol'males en el proceso de tabricaddn y no
at_ctan en lnodoa]guno a ]agl'abaci6n.
• CumMo b_@ el nivel de la baterfa, puede que el
objetivo deje de moverse. Insertc una balerfa
cargada y vuelva a encender la c&nara.
_Sobre la compatibilidad de datos
de imagenes
• La c61nara cumple con la norlna universal DCF
(Design rule lbr Camera File system) definida
pot la JEITA (Japan Electronics and
Inlormation Tcdmology Industries
Association).
• Sony no garantiza la reproduccirin ell otros
equipos de im_igenes grabadas con su cfimara y
la rcproduccirin en la cgimara de ilngigenes
grabadas o ediladas con otros equipos.
Aviso sobre los derechos de
autor
Los progl'amas tie televisirin, las pelfculas, l_s
cintas de vkleo y derails materiales pueden estm
protegidos por las leyes de dercchos de autor. La
gl'ab_ci6n no aUtOl'izadade talesmateria]es puede
ir en contra de]o estab]ecido pot ]as]eyes de
der_chos de atltor.
No se ofrecerfi ninguna
compensacion por dafios en los
contenidos o fallos en la
grabacion
Sony no otrccerfi colnpellsacirill alguna pot l,dlos
en la grabacidn o p6rdida o dal-lOS ell el colltellido
grabado debido a algfin Iallo de flmckmalniento
de la cdmala o del medio de grabacidn, etc.

Indice
Notas sobre la utilizacion de la camara ................................................... 4
Introduccion ..................................................................................... 6
Comprobacion de los accesorios suministrados ..................................... 6
1 Preparacion de la bateria ...................................................................... 7
2 Insereion de la bateria o de un "Memory Stick Duo"
(no suministrado) ...................................................................................... 8
3 Encendido de la ea.mara y ajuste del reloj .......................................... 10
Toma sencilla de imagenes .......................................................... 11
Dial de medo/Zoem/Flash/Maero/Autedisparador/Pantalla ................... 12
Toma de imagenes en mede Captador de sonrisas .............................. 14
Visualizacion/borrado de imagenes ............................................ 15
Acerca de las diversas funciones - HOME/Menu ....................... 18
Utilizaci0n de la pantalla HOME ............................................................. 18
HOME Elementos de la pantalla ............................................................. 19
Utilizacion de los elementos del menu ................................................... 20
Elementos del menu ................................................................................ 21
Prestaciones del ordenador ......................................................... 23
Sistemas operativos admitides para la eenexi0n USB y software de
aplicaeion (suministrado) ....................................................................... 23
Visualizacion de la "Guia pra.ctiea de Cyber-shot" ................................ 24
Indicadores de la pantalla ............................................................. 25
Duracion de la bateria y capacidad de la memoria .................... 28
Duraei0n de la bateria y numero de ima.genes que se pueden
grabar/ver ............................................................................................... 28
Numero de ima.genes fijas que se pueden grabar y tiempo de
grabacion de peliculas ........................................................................... 29
Solucion de problemas ................................................................. 31
Bateria y alimentaeion ............................................................................ 31
Toma de ima.genes fijas/peliculas .......................................................... 32
Visualizacion de imagenes ..................................................................... 33
Preeaueiones ................................................................................. 34
Especificaciones ........................................................................... 35

Introducci6n
Comprobaci6nde los accesoriossuministrados
• Cargador de batelfa BC-CSGB/BC-CSGC (1) • Cable USB, A/V para terminal multiuso ( l )
• Cable de alimentaci6n (1)
(no smninistrado en EE. UU. ni Cana&i)
• Baterfa rccargable NP-BG 1 ( 1)/Funda de la
baterfa ( l )
• Correa para la mufieca (l)
• CD-ROM (1)
Soltware de aplicaci6n Cyber-shot
'+Gufa pr_ictica de Cyber-shot +
"Gufa avanzada de Cyber-sllot '+
• Manual de instrucciones (este manual) (1)
]nstale la correa e introduzctt su nlano ell ella pttra evitar qtle se prodllzcan dafios ei/]a
c:imara provocados debido a ca/das.
Gancho

1 Preparaci6n de la bateria
_]J Introduzca la bateria en el cargador.
OConecte el cargador de la bateria a una toma de pared.
El indicador luminoso CHARGE se enciende y la baterfa empieza a cargarse.
Cuando el indicador luminoso CHARGE se apaga, significa que la carga ha finalizndo (Carga normal).
Si sigue cargando la bater/a durante aproximadamente mils de una hora (hasta que est_ totalmentc
curgada), lu curga durarfi un poco reals.
Tiempo de carga
• La Labia anterior lntleslra e] lienlpo necesario para cargar tlna balerfa lotalmenle vacfa a una temperalura
de 25 °C
El tiempo de ci,+ga puede ser mayor en detcrminadas circunstancias o condiciones de uso.
• Consulte en la pfigina 28 el nOmero de imfigenes que se pueden grabar.
• Conecte el cargador de la baterfa a la toma de pared mils cercana.
• Aunque la lfimpara CHARGE no est4 encendida, el cargador de bateria no estarfi desconectado de la
tuente de alimentacidn de cu en tanto que el mismo estd conectado a la toma de corrienlc de la pared. Si
ocurrc algfin problema mientras utiliza el cargador de bater/a, interrumpa inmediatamente la alimentacidn
desconectando la clavija de la toma de coniente de la pared.
• Cuando la baterfa esI+ cargada, desconecte el cable de alimentaci6n de la Iolna de pared y retire la baterfu
del cargador.
• Di_fiado para utilizar_ con bater/as Sony compatibles,

2 Inserci6n de la bateria o de un "Memory Stick Duo"
(no suministrado)
_)Abra la tapa del compartimiento para la bateria/"Memory Stick Duo".
O Inserte el "Memory Stick Duo" (no suministrado).
_)lntroduzca la bateria.
_) Cierre la tapa del compartimiento para la bateria/"Memory Stick Duo".
Cuando no hay insertado un "Memory Stick Duo"
La cfimara graba y reproduce imfigenes con la memoria interna (aprox. 15 MB).
Para comprobar la carga restante de la bateria
Pulse el bot6n POWER para encender y comprobar la carga restante en ]a panta]]a LCD.
Indicador
de carga
restante
Estado
Carga
suficiente
_atelfa casi
tolahilenle
c argada
_atelfa
medio
cargada
Baterfil b_ia;
la grabaci6n o
reproducci6n
se detendrfin
pronto.
\ I /
Cambie la b aerkJ por
otra tota]mente
cargada o cargue la
b aerfa. (El indicador
de advertencia
parpadea.)
• Si utiliza la balerfi_ NP-FG1 (no sunlinistrada), los nlin (minulo) lalnbi&l aparecen despu_Ss del indicador
de baterfa restanle (_ 6(1Min),
• El indicador correcto de ]a carga rcstanle tarda aproxinladanmnte tin illinulo ell aparcccr.
• En deternfinadas circunslancias y condiciones de uso. el indicador de la carga restanle que apamce podr/a
no ser correclo.
• La pamalla de ajuste del reloi aparece cuando se enciende la c&nara pot primera vez (Digina 10).

Para retirar la bateria/"Memory Stick Duo"
Abra la tapa de] conapartimiento lmra ]a balerfn/"Memory Stick Duo".
"Memory Stick Duo" Baterfa
Compruebe que el indicador Deslice la palanca de expulsion
luminoso de acceso no este de la baterfa.
encendido y empuje el "Memory Tenga cuidado de que no se
Stick Duo" hacia dentro una vez. caiga la bateria.
• No retire Iz_baterfa/"Menlol_' Stick Duo" cuando el indicador ]unfinoso de acceso estd encendido, Podrfa
dafiar los (lal_s del "Memo]y Stick Duo"/memoria internm

3 Encendidode la cfimara y ajuste del reloj
_0) Pulse POWER.
OAjuste el reloj con el bot6n de control.
1 Seleccione el lurmato de xisualizaci6n de la fecha con A/V y, a continum.'i6n, pulse O.
2 Seleccione cada elemento mediaute 4/)", a.juste el valor nunvSrico cun A/V y, a
contiuuaci6n, pulse O.
3 Seleccione [OK]y, a continuaci6n, pulse 0.
• La c&nara no dispone de lunci6n para superponer lcchas a las imfigenes. Mediante el software "Picture
Motion Browser" inchfido en el CD-ROM (suministrado), es posible imprimir o ahnacenar imzlgenes con
la tccha.
• La medianoche sv indicg_ como 12:00 AM y el mediodfa como 12:00 PM.
Para eambiar la leeha y la hora
Pulse el bol6n HOME y seleccione [Q Ajustes del reloj en _ /A.justes)/pfiginas 18 y 19).
Rotas sobre euando la alimentaei6n estfi aetivada
• Una vez se II_Linsertado la balcrfa elyla c_hnara, es posible que deba esperar unos rain (lninulo) piffa poder
utilizarla,
• Si no utiliza la c:imara durante unos tres minuto mientras est_ flmcionando con baterfa, la clhnara se apaga
automziticamente para evitar que la baterfa se descargue (flmci6n de apagado automgltico).
10

Tomasencillade im genes
0 Seleccione la funcibn que desee con el dial de modo.
Cuando se est_n toznando im_igenes fijas (modo Ajuste autom_itico): Selecdone _.
Para tillnar peliculas: Selcccione _[_.
_Sujete la eamara sin moverla y mantenga los brazos on los eostados.
Sitt_e el motivo en el
centro del cuadro de
enfoque.
/
O Pulse el boton del disparador para tomar la imagen.
Para tomar im_igenes fijas:
1 Manteuga pulsado el botdu del
disparador hasta la mitad para
realizar el enfoque.
El indicador •/bloqueo AE/AF) (verde)
parpadea, suena un pitido, y el indicador
d_.ia de parpadear y permanece Indicador bloqueo AE/AF
encendido.
2 Pulse el botdn del disparador a fondo.
Para lillnar peliculas:
Pulse el botdn del disparador a foudo.
Para detener la grabaci6n, pulse de nuevo el bot6u del disparador It fondo.
• Ladistancia de tomade imagenmfllimaes de aproximadamente 10cm (W)/50 cm (T) (desde laparte
lrontal del objetivo).
11

Dial de modo/Zoom/Flash/Macro/Autodisparador/Pantalla
Utilizacion del dial de modo
Ajuste el dial de modo en ]a flmcidn deseada.
a Ajuste autom_tico
Pt:l'll/ilc lotllar hn_igenes con ]os ;/i/isles eslab]ecidos a/itOll/_ilicamenle.
EASY Toma facil
Pcrlnilc lomar ilnzlgenes hlcihnentc con indicadores l_ciles de vet,
P Pr0gramaaut0m_tie0
Pcrmile lomar imglgenes con la exposici6n ajustada automtlticamente (la velocidad de obmraci6n y el
valor de la abertura). Es posible configurar otros i_iusles medianle el men6.
Modo pelieula
Pcrn/ite grabar pelfculas con sonido,
I_o Alta sensibilidad
Pcrmite tomar imfigenes sin flash incluso ell condiciones de iluminacidn escw, a.
@ Captador de sonrisas
(_'/la[ldo]a c_hnara detecta una sonrisa, el disparador se acciona automfilicamenle. Para obtener mils
intormacidn, consulte la pfigina 14.
Qo
,_Q Instant_nea suave
Pcrmilc lomar im_igenes con una atnldslcra mils sua'_'e para retratos de personas, tlores, elc.
[] Paisaje
Pcrmite lomar imzlgenes enl_cando ell sttjetos Icjanos.
_a Retrato erep0seulo
Pcrmite lomar in/zlgenes nftidas de personas ell ]ugarcs oscuros Sill perder el ambienle nocturno.
SON* Selecci6n escena
Pcrmite svleccionar un iljuste del men6 de seleccidn de escena.
* Selecci6nde escenaen modoSCN
Pulse MENU y seleccione un ajuste.
Crep0seulo
Pcrlnite lOI/l_lf escellaS llOCtllrnas Sill perder el ambiellle llOClllrllO.
_'_ Playa
Pcrlnite tonlar escenas ell ]a orilla de] mar 0 de ull lago capturando el azu] de] mar con mayor
intensidad.
{_ Nieve
Definite lonlar escenas ell ]a nieve con tin b]zlnco de mayor claridad.
"_:}:.Fuegos artificiales
Permite lomar escenas de lhegos artificiales ell lodo su esplendor.
8ubmarino
Pcrmite lomar imzlgenes bajo el agua en co]ores namrales ufilizando un mceptllculo rcsistenle al agua.
12

W/T Utilizacibn del zoom
Pulse T para actix :u"el zoom y pulse W p:u'a cancelar el zoom.
_, Flash (seleccion de un modo de flash para imzigenes fijas)
Pulse )" (_) del botdn tie control varias veces hasta que se selecciune el mudu que desee.
_,NTO:Flashautomatico
Deslellacuando no hay suficienleluz o luzde/ondo (_iusteprcdeterminado).
$: Flashforzadoactivado
_SL:Sincronizaci6nlenta(flashforzadoactivado)
La _ elocidad de obturaci(m es lenla ell lugares Oscuros para caplar con claridad los londos que se
encuemran filera del alcance de laluz del flash.
(_: Flashforzadodesactivado
_Macro (toma de primeros pianos)
Pulse 411(_'_) del butdn de control varias veces hasta que se selecciune el mudo que desee.
_aUT0:Automatic0
Lacfimaraajusta el enloque aulomfilicamentede motivos Icjanosa primeros pianos.
ajusle nornla]t/lenle ]a cfimara ell este [/lodo.
_: Macro
Lacfimaraajusla el enloque dandoprioridad a los moti_os situadosen primerphmo. Establezca el
_(illSle Macro activado para lonlar inl_igenes de lnotivos cercunos,
__)Utilizacibn del autodisparador
Pulse • /_.._))del but6n decontrol varias veces hastaque se selecciune el mudu que desee.
_(_FF: NO se utiliza el autodisparador
_o :Seajustaelautodisparadorde10s(segundo)deretardo
_2: Seajustaelautodisparadorde2s (segundo)deretardo
Si pulsa el botdu del disparador, el iudicador lumiuosu del autudisparador parpadearfi y souar:i
un pitido hasta que fimciune el disparadur.
DISP Cambio de la visualizacibn en pantalla
Pulse •/DISP) del butdn de control.
Cada vez que pulse el bot6n • (DISP), la pantalla y el brillu cambiar&_ de la siguiente
manera:
* Con indicadures
t
Con indicadures*
t
Con histograma*
t
Sin iudicudores*
t
-Pantalla LCD desactivada
* El bfillo de la luz de kmdo de la pantalla LCD estfi ajustado en un nivel alto.
13

T0made im_genesen m0d0Captad0r des0nrisas
C/lfii]do 1;1 c;/ii]ar;l detecla ulla sonrisa, el disparador se acciona a/llom;]ticarl/onto.
_]_ Seleccione el modo _ (Captador de sonrisas) con el dial de modo.
0 Pulse el bot6n del disparador hasta el fondo para ajustar el modo detecci6n
de sonrisas.
El caxc)tador de sonrisas ¢lltl-al-_i ell lllodo ell espera.
i _ I Marca de detecci6n de sonrisas/nL_mero de imagenes
I
Marco de deteccidn de sonrisas (naranja)
Indicador de sensibilidad de la detecci6n de sonrisas
Esla opci6n indica el grado de sonrisa aclual.
Cada vez que el nivel de sonrisa alcanza la sensibilidad de la deteccidn de sonrisas :tjustada
(indicada medianle 41), la cfimara acciona auiomfiticamente el obmrador 5' toma hasta seis
im:igenes. Despuds tie guardar la imagen, el indicador de] captador tie sonrisas se ihtmina.
Pulse el bot6n del disparador hasta el fondo de nuevo para salir del modo
captador de sonrisas.
• Cuando el caplador de sonrisas estfi en modo de espera, el indicador de grabaci6n (naranja) palt)adea.
• AI tomar im_igenes con el captador de sonrisas, dste se desactiva auton/filicanienle si el <_Memory Stick
Duo" o la memoria inlcrna se llena o si se guardan sets im_igenes.
• Es posible seleccionar el molivo que desea que lenga prioridad en la deteccidn de sonrisas medimlte
[Detecci6n sonrisasl (p_igina 21 ).
• Si la sonrisa no se delecla, i/iusle [Sensib detcccidn sonrisasl (p_lgina 21).
• Es posible ajustar la c*imara pant clue tome imfigenes automilticamenle cuando cualquier persona que
aparece en el marco de deteccidn de sonrisa (nmanja) sonrfe despuds de aprctm el bot6n del disparador
basra el iondo.
• Es posible que la imagen no estd eniocada si la distancia entre la c_imara y el motivo se modifica despuds
de pulsar el bol6n del disparador hasla el Iondo. N0 se oblendrfi la exposici6n adecuada si el brillo de la
luz del enlorno cambia.
• Es posible que no _ delecten bien las caras si:
El cnlorno eslfi hilly Oscuro o hay demasiada luz.
gas caras eslfin parcia]lnenlc escondidas detrgls de gafiis, miiscaras, sombreros, elc.
Los lliotivos no nliran hacia la clhnara.
• Es posible que no _ delectcn corrcctanlente las sonrisas en hmcidn de las condiciones.
• No es posible ulilizar la funcidn Zoom digital.
• No es posible cambiar el porc¢llli/]e de ZOOII/SJel captador de sonrisas eslfi en modo 1211espera.
14

Visualizaci6n/borradode im genes
_]_ Pulse [_ (Reproducci6n).
Si se pulsa _ cuando la c_hnm'a est_i _lpag_ld_l,la c;imara se enciende automiltic_unente en modo tie
rcproducci6n. Pm'a p_tsm"al modo tie toma de im_genes, pulse [] otr_t _ez.
0 Seleccione una imagen mediante 41/_ del bot6n de control.
Pellc.la:
Pulse• pm_ repzoducir pe]fcul_Ls.(Pulse • de nue_o pm'adetener l_trepmducck'm.)
Pulse • para uv_mz_u"r_ipidamenle, • p_,rarebobinar. (Pulse • pm'a rcgresar a la reproducci6n normal,)
Pulse • para visualizar la panlalla de conlrol de volumen y, a conlinuaci6n, pulse •/• para ajuslar el
VO]lll/len,
• En ocasiozles, las imfigenes tomad*ls con nlode]os de Sony anteriores no pueden rcproducirse.
Pulse el bot6n HOME, _leccione [[_ Ver carpelas] en _[_ (Visionado de imfigs.) y, a conlinuaci6n,
reprodu/va las imfigenes.
_ Para borrar imagenes
1Visualice la im:,gen quedesee borr:u"ypulse MENU.
2 Seleccione _ [Borrar] con •/V. seleccione [Esta ima]con "_111,"y, acontilmaci6u pulse @.
3 Seleccione [OK] con • y, a continuaci6n, pulse @.
_@,_ Para visualizar una imagen ampliada (zoom de reproduccibn
Pulse _ mientras se visu:,liz:, un:, inmgen fija. Para cancelar el zoom, pulse (_.
Ajuste la posici6n con •/V/4111_.
Para cancelar el zoom de reproducci6n, pulse 9).
15

_Para visualizar una pantalla de indice
Pulse _1 dudice) para que aparezca la pantalla de [ndice mientras se visu:diza una imagen
t'ij_,.
A cotttinuaci6n, seleccione tma imagen cun •/V/41/P,..
Para volver a la pantalla de una sola imagen, pulse O.
• En la configuraci6n predeternfinada, las imfigenes se nmestran en Vet lccha (si _ utiliza el "Memory
Stick Duo _) o en Ver carpetas (si se utiliza la mcmoria interna).
Es posible cambiar el Modo visualizaci6n mediante la selecci6n de E_ (Visionado de inlzlgs,) en la
pamalla HOME (Ixlgina 19).
• Cada vez que pulse [] !]ndice), aumentarfi el nOmero de imfigenes que apamce en la pantalla de fndicc.
Para borrar imagenes en el modo de indice
1 Pulse MENIJ cu:mdo se muestre la pantalla tie fltdice.
2 Seleccione [Borrar] con •/V. seleccioue [MOltiples itn_igenes] con 4I/P,.y, a coutinuaci6u.
pulse O.
3 Seleccioue la imagen que desee borrar con A/V/41/P.. y, a contiuuaci6u, pulse O.
La marca_' aparccelxlen el cuadro de verificaci6n dela imagen.
Para cancclar la _leccidn de una imagen,seleccione la inlz_genque habfa marcado paraborrar y pulse•
otravez.
4 Pulse MENU. selecckme [OK] cuu • y, a contiuuaci6u, pulse O.
• Para bolTarlodas lasimfigenesde unal_:chz_o carpeta, _leccione [Todas inlgigs de rango lcchal/[Todo
Ell EstaCarpelal enel paso 2 y, a cominuaci6n, pulse•.
Para reproducir una serie de imagenes con efectos y musica
(Diapositivas)
1 Pulse el bot(m _ /Diapositivas).
Aparecer_ilapantalla de configuraci6n.
2 Pulse el but6tt _ (Diapositivas) utra vez.
La mOsica cambiar:i juttto con los [Efectos]. Tambi_Sues posible transfcrir y cambiar la mfisica
put la que usted desee.
Para trausfcrir y cambiar la imisica, lleve a cabu los siguientes pasos.
(_) Pulse el bot6n HOME. A continuaci6n, selecckme [J'J Herramienta m0sica] ---+[Desc mt_sica]
en _ (Diapositivas)(pfigina 19).
(_) lnstale en el equipo el software incluklo en el CD-ROM (suminismldo).
(_) Conecte la c¢imaray un equipo con el cable USB.
(_) lnicie el software "Music Transfer" instalado en su equipo y cambie la m0sica.
Para obtener m¢isinfunnaci6n acerca del cambio de la m0sica, consulte la Ayuda del software
"Music Transfer".
16

Para visualizar imzigenes en el televisor
Conecte la c:inmraal televisor medi:mteelcable par:l terminal multiuso (suministrado).
Cable para terminal multiuso (suministrado)
Para ver imfigenes en un televisor HD/Alta definici6nl, es necesarie disponer de un (?able de
adaptador de salkla HD (no suministrade/.
• si i_iusla el tamafio de la imagen en [16:91, podrfi grabar las imfigenes ell tin tamario que llene toda la
pantalla del lelevisor HD.
• No es posible visualizar pelfculas emitidas en lk_rlnalo de serial [HD( 1080i)1. Ajuste [COMPONENTI en
[SDI cuando fihne pelfculas.
17

Acercadelasdiversasfunciones- HOME/MenG
Utilizaci6nde la pantalla HOME
La panlalla HOME es la paulalla tie acceso a Iodas las funciones tie la cfimara, yes pusible
acceder a ella iudepeucfientemente del _tjusledel modo (tuma/visualizaci6n).
_]} Pulse HOME para visualizar la pantalla HOME.
ioria
Elemento
Guia
OSeleccione una categoria mediante 41/_.del bot6n de control.
OSeleccione un elemento con A/T y, a continuacion, pulse O.
AI seleccionar la categoria _ (Gestion de memoria) o _ (Ajustes)
18
1 Seleccione el a.juste deseado mediaute ,&/V y, a coutinuaci6n, pulse O.
• La pantalla HOME apareceral al pulsar _.
2 Seleccioue un :tjuste con A/V y, a contiuuacidn, pulse O.
• La cfimara se ajusla en el modo de lolna o de visualizaci6n de imfigenes mediante ]a pulsacidn del bol0n
HOME de nuevo.

ParaoMenerm_sinformaci6nacercade la operaciOn<_ p_gina 18
HOMEElementosde la pantalla
Si pulsa el bot6n HOME aparecerfin los siguientes elementos. En la pantalla solamente se
visualizan los elementos disponibles. Los detalles sobre cada elemento aparecerfin en la guia
situada en la parte inferior de la pantalla.
a Toma de imagen Toma de imagen
[] Visionado de im_igs, vet fccha
Vet carpetas
Favoritos
Diapositivas Diapositivas
Herramienta mtlsica
Desc mtisica Format mtisi
Imprimir hnprimir
U Gesti6n de memoria Herrta. Memoria
Her Memo U Stick
Formatear Crea CarpGrabaci6n
Camb. Carp. Grab Copiar
Herr.memoria interna
Fornlatear
Ajustes Ajustes principales
Ajustes principales 1
Pitido Gufa funciones
lnicializar ModoDemoSonrisa
Ajustes principales 2
Conexi6n USB COMPONENT
Salida vide() PantallaZoomAncho
Ajustes de toma
Ajustes toma de imagen 1
lluminador AF Cuadricula
Modo AF Zoom digital
Objetivo conver
Ajustes toma de imagen 2
Orient. aurora. Revisi6n autom
Ajustes del reloj
Language Setting
lg

Utilizaci6nde 10selement0sdel men_
OPulse MENU para visualizar el menU.
Guia funciones
• E] l]len(I SOlo Sg l]ltles[r_[ dtll'_[ll[C c] ll]odo (It? [o11]_1 de hlltlgclleS y reproducci6n,
• En funci6n del modo svleccionado, se har&l visibles dilErentes elelnenlos.
O Seleccione el elemento deseado con _UV del boton de control.
• Si el elelnento deseado estfi oculto, siga pulsando ,Ik/Y hasta que el elelnento aparezca en la pantalla.
I_ Seleccione un ajuste con 411/)),.
• Si el elelnento deseado estfi oculto, siga pulsando _1/1_hasta que el elelnento aparezca en la pantalla.
• S¢]eccione tin elelllenlo ¢n el 111000 de l¢prodtlcci6n y_ a continuaci6n_ pu]se 0.
OPulse MENU para desactivar el menU.
2O

Paraobtenerm_sinformaci6nacercade la operaci6n_ p_gina 20
Elementosdel men_
Los elementos del memi disponibles varfan en funci6n del _{iuste del modo (toma/
visualizaci6n) y de la posici6n del dial de modo en el modo de toma de im:igenes. En la
pantalla solamente se visualizan los elementos disponibles.
Menfldetomade im_igenes
Selecci6n escena Selecciona los ajustes preajustados para adaptarse a varias
condiciones de escena.
Tam imagen Selecciona el tamafio de la imagen.
Flash Selecciona el ajuste del flash en modo Toma f,_cil.
Deteccion de cara Permite seleccionar el motivo prioritario para ajustar el enfoque
cuando se utiliza la funci6n de detecci6n de cara.
Deteccion sonrisas Selecciona el motivo que desea que tenga prioridad para la
funci6n Captador de sonrisas.
Sensib deteccion sonrisas Ajusta el nivel de sensibilidad para detectar una sondsa.
Modo Grabaci6n Selecciona el metodo de toma continua de imagenes.
Reconocimiento de escena Detecta automaticamente las condiciones de disparo y, a
continuaci6n, toma la imagen.
EV Ajusta la exposici6n.
ISO Selecciona la sensibilidad luminosa.
Modo medicion Selecciona el modo de mediciOn.
Enfoque Cambia el metodo de enfoque.
Balance Blanco Ajusta los tonos del color.
Balance Blanco submarino Ajusta los tonos del color bajo el agua.
Nivel flash Permite ajustar la cantidad de luz del flash.
Reduccion ojos rojos Permite reducir el efecto ojos rojos.
DRO Optimiza el brillo y el contraste.
Modo color Cambia la intensidad de la imagen o afiade efectos especiales.
SteadyShot Selecciona el modo de toma estable.
_, Ajustes de toma Selecciona los ajustes de toma de iron,genes.
21

Paraobtenerm_sinformaci6nacercade/a operaci6n_ p_gina 20
Men_ de visualizaci6n
(Borrar) Borra imagenes.
_,a_ (Mode visualizaci6n) Permite cambiar el Mode visualizaci6n.
(Lista Fecha) Selecciona la fecha de reproducci6n.
O_(Filtro per caras) Reproduce imagenes filtradas para que encajen en
determinadas condiciones.
(_ (Agregar/quitar Registra o borra im4_genes de Favorites.
Favorites)
(Diapositivas) Ajusta y realiza la presentaci6n de diapositivas (reproducci6n
de una serie de im41genes).
(Retocar) Retoca las im4_genes fijas.
(M01tiples tamarios) Cambia el tamaflo de la imagen en funci6n de su uso.
o_ (Proteger) Impide el borrado accidental.
DJ_OF Permite afiadir una marca de orden de impresi6n a la imagen
que desea imprimir.
(Imprimir) Imprime im41genes mediante una impresora compatible con
PictBridge.
(Rotar) Gira una imagen fija.
P"I (Seleccionar carpeta) Selecciona la carpeta de visualizaci6n de im4_genes.
22

Prestacionesdel ordenador
Las imdgenes tomadas con la c:imara se pueden ver en el ordenador. Mediante la utilizaci6n
del software incluido en el CD-ROM (suministrado), es posible disfrutar de im_igenes fijas y
peliculas desde la cfimara re:is que nunca. Para obtener informacidn detallada, consulte la
"Gu/a prfictica de Cyber-shot" incluida en el CD-ROM (smninistrado).
Sistemasoperativos admitidospara la conexi6nUSBy softwarede
aplicaci6n (suministrad0)
Para usuarios de Windows Para usuarios deMacintosh
C0nexi6n USB Windows 2000 Pl-oli_,ssional SP4, Mac OS 9,1/9,21 Mac OS X (vl0,1
Windows XP* SP2, Windows a v 10,5)
Vista*
Software de aplicaci6n Windows 2000 Prol_.,ssional SP4, incompatible
"Picture Motion Windows XP* SP2, Windows
Browser" Vista*
* Las ediciones de 64 bits, Starter (Edilion) no son compalibles.
• El ordenador debe conlener uno de los sislenlas operalivos enumerados allterk)rnlenle preinstalados. Las
aclualizaciones de los sislemas operalivos no son compalibles.
• Si su sistema operativo no es compatible con las conexiones USB, copie las imgigenes insertando el
"Memory Stick Duo" en la ranura para Memory Slick del ordenador, o utilice un lector o grabador de
Memory Stick disponible en el mercado.
• Para obtener inzls intormaci6n sobre el entorno operalivo de la aplicaci6n de sol_warc "Picture Molion
Browser" para Cyber-shot, consulte la "Gufa imlctica de Cyber-shol'L
23

_ Visualizaci6ndela "Guia prficticade Cyber-sh0t"
La "Guia prfictica de Cyber-shot" incluida
en el CD-ROM (suministrado) explica
detalladamente c6mo utilizar la cfimara.
Para poder visualizarla, es necesario
disponer de Adobe Reader.
Para usuarios de Windows
1 Encienda el ordenador e inserle cl CD-
ROM (suministrado) en la unidad de CD-
ROM.
Para usuarios de Macintosh
1 Encienda el ordenador e inserte el CD-
ROM (suministrado) en la unidad de CD-
ROM.
2 Seleccione la carpcra [Handbook] y copie
el archivo "Handbook.pdF'ahnacenado en
la carpeta [ES] del ordenador.
3 Una vez finalizada la copia, haga doble
clic en "Handbook.pdf'.
Apamce la pantalla siguiente.
Si hace clic en el bot6n [Cyber-shot
Handbook], aparecerfi la pantalla para copiar
la "Gufa prfictica de Cyber-shol _.
2 Siga las instrucciones de la pantalla para
realizar la copia.
• AI instalar la "Gufa pr;ictica de Cyber-shot',
la "Gufa avanzada de Cyber-shot" se
inslalard aulomiilicgunente.
3 Una vez finalizada la instalaci6n, haga
doble clic en el acceso directo creado en el
escritorio.
24

Indicadoresde la pantalla
Cada vez que pulse • (DISP) del bot6n de
control, la visualizaci6n cambiarfi
/pfigina 13).
Cuando se toman imagenes fijas
_JL÷J _, _.
• Los indicadorcs estfin limilados en el modo
Tonm hlcil.
Cuando se filman peliculas
,L []
Cuando se reproduce
K]- _e_ /l_ E]®,,A
¢,P°_DPDF _ iSO400
__ ÷2.0Ev
N)
[]
Baterfa restanle
Adverlencia de poca baterfa
L_ _ _ Tamafio de imagen
_ _-_IA_"2 °_M ........ ponde
_1:9+L_:9 iinicamcnle al inode]o
_I_Eg-_0_o Dsow]s0
• _ corresponde
finicamenle al mode]o
DSC -W 170.
i¢o@&_[] Di.1d_modo/m_'na
p Dial de nlodo (Programa
automfitico)
_,°_"_ _1 _ Balance dc Blancos
[_ IBRK BRIN
±0,3 -+0.7
rel_
l
Modo r:ifaga/modo
variaci6n de exposicidn
Modo de medici6n
Detecci6n de cara/
Detecci6n sonrisas
SteadyShot
DRO
Avis() de vibraci6n
lndicador de sensibilidad de
detccci6n de sonrisas/
ndmero de im;igenes
Relaci6n del zoom
x1,4
sO_P_
V_ _ Modo de color
_'I( Conexi6n PictBridge
25

Modo visualizaci6n
qPlq)2qPa
_4 _s_6
,_Q _{,_kct Filtro ?or caras
Q) Favoritos
o_ Proteger
IDPOF Marca de orden de
mlpresidn (DPOF)
_X2,0 Relacidn del zoom
VOL. IIIIIIH-_ Volumen
@ Conexidn PictBridge
[]
• Bloquco AE/AF
IS0400 Nthnero ISO
[_ Obturacidn lenta NR
125 Velocidad de obturaci6n
F3,5 Valor de abertu ra
+2,0EV Valor de exposici6n
m _Tt El lndicador del cuadro del
visor de rango AF
1,0 m Valor semimanual
Macro
GRABAR Grabaci6n/modo en espera
Espera de una pelfcula
0:12 Tiempo de grabacidn (m
(minuto) : s (segundo))
101-0012 N/hnero de carpeta-archivo
20081 1 Fecha/hora grabada en la
g:30 AN ]magen en rcproducci6n
• STOP Gufa de funci6n para
• PLAY rcproducirim:igenes
-_- BACK/NEXT Permiten seleccionar
]m_igenes
• VOLUME Permite _0ustar el volumen
[]
96
Carpeta de grabaci6n
Carpeta de reproduccidn
N_mero de iron,genes
grabables
8/8 12/12 N_mero de imagen/Nthnero
de imfigenes grabadas en la
carpeta seleccionada
00:25:05 Tiempo de grabaci6n (h
(hora) : m (minuto) : s
(segundo))
[_ _ Grabacidn/reproducci6n de
soportes ("Memory Stick
Duo", memoria interna)
_1 _ I_ Can/biar caq_cta
i['4'd'_li_ + Reconocimicnto de escenas
+ j ._.,
IN-'
P_ON lhlminador AF
<_ Reducci6n del efccto ojos
rojos
[] [] Modo de medici6n
,_ _SL @ Modo de flash
[_ Carga del flash
AWB _.'- _ Balance de blancos
,_wB
C:32:00 Visualizacidn dc
autodiagndstico
IS0400 N_mero ISO
+2,0EV Valor de exposici6n
500 Velocidad de obturacidn
F3,5 Valor de aberlura
[_T [_w Objetivo de conversidn
26

[]
_.)0 _,32 Autodisparador
C:32:00 Visualizaci6n de
autodiagn6stico
Base de datos llena
_F'ULL
Cuadro del visor de rango
AF
+ Cruz filial de medici6n de
l_)co
_'_ Reproducci6n
_ _Barra de reproducci6n
Histograma
• [] aparcce cuando ]a
visualizaci6ndel
histogrmna eslfi
desaclivada.
27

Duraci6ndela bater{ay capacidaddela
memoria
Duraci6nde la bateriay ntimer0deim;_genesque se puedengrabar/ver
Los mhneros que figuran en las siguientes
tablas corresponden a la utilizaci6n de una
bateria completamente cargada
(suministrada) a una temperamra ambiente
de 25 °(7
Los nt_meros mostrados de im:igenes que
pueden grabarse o verse son
aproximaciones yen ellos se tiene en
cuenta el cambio de "Memory Stick Duo"
segfin sea necesario.
Tenga en cuenta que es posible que el
nfimero real sea menor que el indicado en la
tabla en funci6n de las condiciones de uso.
Cuando se toman imzigenes fijas
DSC-W170
Activar Aprox. 195 Aprox. 390
Apagada Aprox. 23() Aprox. 460
DSC-W150
Activar Aprox. 200 Aprox. 400
Apagada Aprox. 24(} Aprox. 480
• Tomando imdgenes ell las siguienles
siluaciones:
[Modo Grabaci6n] estfi ajuslado ell [N0rmal].
[Modo AFI eslfi ajustado en [Sencillol.
[SleadyShotl estgi @lslado en [Tomandol.
Tomando una imagen cada 30 s (segundo)
Se catllbia el ZOOli]a]lemutivalnenle entre ]os
extrcmos W y T.
El flash destella una de cachl dos veces.
La alimcnlaci6n se activa y desacliva una de
cada diez veces.
• El mtStodo de medici6n esld basado ell el
esl_indar CIPA.
(CIPA: Camera & hnaging Products
Associulion)
• El nfimero de imgigenes y la vida fitil de la
baterfa no cambian, independienlemente del
lalnafio de la imagen,
Cuando se ven imdgenes fijas
• Visualizaci6n de imfigenes individuales en
orden a inlervalos de unos Ires s (_gundo)
Notas sobre la bateria
• La capaci&ld de la baterfa disminuye con el uso
y el paso del tiempo.
• El mhncro de im_igenesque sepueden grabar/
vet y la duracidn de la balerfa disminuyen ell las
condiciones siguienles:
ga tenlperatura del entorno es baja.
El flash _ utiliza liecuenlemenle.
La cfimara ha sido encendida y apagada
[/luchas veces.
El ZOO111 eS utilizado ll'ccuentet/lellle.
El brillo de la luz de londo de la panlalla LCD
esl_ i/iustudo ell un hive] ale().
[Modo AFI estzi ajuslado en [Monitor].
[SteadyShotl estfi ajustado en [Continuol.
La balerfa tiene poca polencia.
La hmcidn de deteccidn de cara estgi activada.
28

N_mer0 de im;_genesfijas que se puedengrabary tiemp0 de grabaci6n
de peliculas
E1ntimero de im:igenes fijas y la duraci6n de las pelfculas pueden variar en funci6n de las
condiciones de toma de imfigenes.
• Aunquela capacidad del soporte de grabaci6n sea la mismaque la cluefigura enla siguienle tabla, es
posible clueel nOmerode im5genes fijasy laduraci6n de las pelfculassea dilcmnle.
• Es posible selecdonar el tamaflode la imagen desdeel menO(p¢iginas20, 21).
Numero aproximado de imagenes fijas que se pueden grabar
DSC-W170
(Unidades: Im:igenes)
10M 3 32 58 120 246 496 982 I 973
5M 6 51 92 190 390 786 I 556 3 127
3M 10 81 148 3()5 625 I 261 2497 5 016
VGA 96 782 I 42(} 2 932 6 000 12 1(}2 23 956 48 138
3:2 (8M) 3 32 58 121 248 5(}(} 99(} I 99(}
16:9 (7M) 4 34 61 127 261 526 I (142 2 093
16:9 (2M) 16 132 236 489 I 001 2018 3995 8025
DSC-W150
(Unidades: Im:igenes)
8M 4 39 72 149 3(}6 618 I 223 2 457
5M 6 51 92 190 39(} 786 I 556 3 127
3M 10 81 148 3(15 625 I 261 2 497 5 016
VGA 96 782 I 42(} 2 932 6 000 12 1(}2 23 956 48 138
3:2 (7M) 4 40 73 151 3(}9 624 I 235 2 482
16:9 (6M) 5 42 77 159 326 658 I 3(}3 2 617
16:9 (2M) 16 132 236 489 I 001 2018 3995 8025
• El nOmero de imfigenes indicado corrcsponde a cuando [Modo Grabaci6n] esl_i ajustado en [Normal].
• Cuando el mhnero de imgigenes restames que pueden lomarse es superior a 9 999_ apamce el indicador
">9999".
2g

• Cuandose reproduzcan en lacfimara imfigenesgrabadasutilizando modelosSony anteriores, es posible
qtle las imglgenes no aparczcan con su lamafio real.
I Tiempo aproximado de grabacion de peliculas
Los nfimeros que uparecen en la siguiente tabla muestran el tiempo mziximo uproximado que
es posible grabar obtenido mediante la suma de todos los archivos de pelfculas. E1 tiempo
m:iximo durante el que es posible grabar de manera continua es de aproximadamente 10
minuto.
(Unidades: h (hora) : ii/ill (ii/in/ito) : S(Segllndo))
640(Fina) 0:02:50 0:06:00 0:12:30 0:25:10 0:49:50 1:40:10
640(Estfindar) 0:00:40 0:05:50 0:10:30 (}:22:(}(} 0:45:00 1:30:50 2:59:4(} 6:01:00
32(} 0:02:50 0:23:20 0:42:30 1:28:(}(} 3:(}(}:(}(}6:(}3:10 I 1:59:00 24:04:10
• Las pelfculas con el tamafio niustado en [640(Fina)] s61o pueden grabar_ en un '<Melnory Stick PRO
Duo ++,
• La c+initu+ano es coniptitible con la grabtici6n ni lit ixzproducci6n de pelfcukis en tormato HD (alttl
deilnici6n).
3O

Soluci6ndeproblemas
Si tiene alg/in problema con la cfimara, intente primero las siguientes soluciones.
0 Comprnebe los elementos siguientes y consnlte la "Gnia pr_icticade Cyher-
shot" (PDF).
Si ap:wece un c6digo como "C/E:D D:DD" en la pantalla, consulte la "Guia pr:ictica
de Cyber-shot".
0 Extraiga la hateria, espere aproximadamente un minnto, vuelva a insertarla y,
a continnaci6n, conecte la alimentaci6n.
O Inicialice los ajustes (p;igina 19).
O Consnlte con el distribuidor de Sony o con la oficina de servicio local
antorizada de Sony.
1
Le rogamos que emienda que usled da su consentimiento a que el contenido de la memoria
interna, inc]uidos los archivos de nlllSiCa, pueda ser comprob0£1o cuando envfa ]a c_inara para
repararla.
No es posible insertar la bateria.
• lnscrte llt bateria corrcctamentc de modo que dsla presione la palanca de expulsi6n dc llt
balerfa (pfigina 8).
No es posible encender la cbmara.
• Dcspuds dc instalar la bateri:l cn la ciln/ala, la c;imala puede tardar cierlo ticmpo cn
encenderse.
• lnserte la baterfa correctamente (p_igina 8).
• La baterfa est:idescargada, lnserle una bater*a cargada (pfigina 7).
• La baterfa ha Ilegado al final de su vida tltil. Reemplficela por una nueva.
• Utilice una de las baterfas rccomendadas.
La alimentaci6n se desconecta de repente.
• Si no utiliza la cfimara durante unos tres minuto mientras cstfi conectada la alimentaci(m, la
c¢imara se apaga automfiticamente para evitar que la baterfa se descargue. Encienda la cfimara
de nuevo (pfigina 10).
• La baterfa ha Ilegado al final de su vida Otil. Reemplficela por una nueva.
31

El indicador de bateria restante es incorrecto.
• Este fen6mcno ocurrc cuando utiliza ]a cfimara cn un lugar muy cfilido o muy frfo.
• La carga de baterfa restante que se indica difiere de la actual. Descargue la baterfa totalmente
y vuelva a cargarla para corrcgir la indicaci6n.
• La baterfa est_i descargada. Inserle la baterfa cargada (pfigina 7).
• La bateria ha llegado al final de su vida fitih Reemplficela por una nucva.
No es posible cargar la bateria.
• No es posible cargar la batcrfa mediantc cl adaptador de alimcntacidn de ca (no suministrado).
Utilice el cargador para cargar la baterfa.
La c;imara no puede grabar im;igenes.
• Compmebc la cupacidad librc de la memoria intcrna o del "Memory Stick Duo" (pfigina29).
Si est_inllenos, tome una de las siguientes medidas:
Borre las imfigenes innecesarias (pfigina 15).
Cambie el "MemoU Stick Duo".
• No es posible grabar imfigenes mientras se carga el flash.
• Cuando tome una imagen fija, _juste el dial de modo en una posici6n distinta de _.
• Ajuste el dial de modo en _ cuando tome peliculas.
• E1tamafio de imagen estfi ajustado en [640(Fina)] cuando est_igrabando peHculas. Realice
uno de los procedimientos siguientes:
Ajuste el tamafio de imagen en uno distinto de [640(Fina)].
lnserle un "MemoU Stick PRO Duo".
Aparece ruido en la imagen cuando ve la pantalla en un lugar oscuro.
• Est_i ocurricndo cl fcndmeno de borrosidad de la imagcn y apareccn en dsta rayas blancas,
negras, rojas, moradas o de otro tip(). No afccta a la imagen grabada.
32

La camara no puede reproducir imagenes.
• Pulse[] (Reproducci6n)(pfigina 15).
• El hombre tie lacarpeta o dcl archi_o ha sido modificado cn cl ordcnador.
• Si se ha procesado un archivo de imagen con un ordenador o si se ha grabado el archivo tie
imagen con un modelo distinto al tie la cfimara, Sony no garantiza la rcproducci6n en esta
cilmar i.
• La cfimara seencuentra ell el modo USB. Elimine la conexi6n USB.
• No es posible efcctuar lareproducci6n si el captador de sonrisas estfiell modo tie espera. Pulse
el bot6n tie disparo hasta el %ndo pare salir del modo de espera.
• Esto se produce al copiar imfigenes del ordenador en el "Memo U Stick Duo" sin utilizar el
"Picture Motion Browser". Reproduzca dichas im¢igenesen Ver carpetas (p:igina 19).
• En ocasiones, un "Memory Stick Duo" que contiene im¢igenes tomadas mediante modelos de
Sony mteriores no pucde reproducirse. Reproduzca dichas im:igenes ell Ver carpclas
(p¢igina 19).
33

Precauciones
No utilice/almacene la camara en
los siguientes lugares
• Ell lltgal'es extlvulad_tnlente C_dltrosoS, fiqos o
Mmedos
Ell lugares tales conlo 1211illl autonl6vil
eslacionado b_l)o el sol, es posible que el cuerpo
de la cgimara se deformc, 1o que podrfa provocar
un hdlo de funcionamiento.
• B_kjo la luz solar dirccta o cerca de una eslula
El cuerpo de la c_imara puede decdorarse o
delornlarse y esto puede ocasionar till Mlo de
l/lllcionanlienIo.
• En tin hlgar expuesto a vibraci6n basculanle
• Cerca de un lugar inagn_lico intenso
• Ell lugares arenosos o polvorientos
Proc/tre que no entre arena o polvo en la cglnlara.
Eslo podrfa ocasklnar un l, dlo de
l/incionamiento en la c_hllara que, en a]gunos
casos, no podrfa repararse,
Transporte
No se siente con l_l c_hnar_l ell el bolsillo posterM"
de los pantalones o de un_ lalda, ya que podrfa
ca/tsar till lltl]o de |/lncionilnliellto O ditfios ell _shl.
Acerca de la limpieza
Limpieza de la pantalla LCD
Limpie la superficie de la pant_dla con un kit de
limpieza p_ra p_atallas L(-'D (no suministrado)
para eliminar huell_Ls dactilarcs, polx o, etc,
Limpieza del objetivo
Limpie el ot_jeli_ o con un pt_fio su_ve para
eliminar huellas dactilarcs, polvo, etc.
Limpieza de la superficie de la camara
Limpie la superficie de I_Lc_hnara con un p_fio
su_ve ligeramente humedecido con agua y, a
conlinuaci6n, pfisele un p_tfio seco. P_u'a evil,u"
dafiar el acabado o la caja:
No exponga la c_imara a productos qtlfnlicos
tales conlo dihlyenle, bencina, alcohol, patios
desechables, repelente de in_ctos, bronceador
con filtro solar, insecticida, elc,
No toque la cfimara con las sustancias
anteriorcs ell la man().
No dcje la cfimara en conlacto con objetos de
gonla o vMIo durallte Ull tienlpo prolongado.
Acerca de la temperatura de
funcionamiento
L_ c_hn_u'a M sido disefiada para utilizarse con
temperauras de entre 0 °C y 40 °C
No se reconlielldil tOlll_ff illlagelleS ell l/tgarcs
extrellladatllenle |lqOS o calurosos que excedan
este rango.
Acerca de la condensacion de
humedad
Si se trasla(h h c_hn_m_ directamente de un lugar
Iiqo a/111o c;ilido, es posible que se condense
humcdad en el interior o el exlerior de la cfimara.
Esta condensz_ci6n de humcdad podrfa ocasionar
un lallo de luncionamienlo en la cfimara.
Si se produce condensacidn de humedad
Ap_gue la c_hnara y espere un_l hora
aproximadamente hasta que la humedad se
evapolv. Tonga en cuenla title si intenta tolnar
imfigenes cuando aOn quede humedad en el
interior del (q_ietivo, no podrfi grabar im_igenes
clart_s.
Acerca de la bateria interna
recargable de reserva
L_ c_hnar_ tiene una batcrfa interna rcc_u'gable
i)artt [lltlnteller ]_1lecha y lit hora, asi conlo otros
ajustcs independientemcnte de si llt alinlentaci6n
est_ co]l¢ctada o descOllectada,
Est_ bateria Ivcargab]e se carga confinuamenle
sienlprc que estfi utili/_mdo la c_l]nlu'_. Sin
embargo, si utiliza l_ c_hnar_ solamente durante
perfodos cortos. _sla se descargarfi graduahnente,
y si no la utiliza ell _tbsoluto durante un rues, se
descargal'i_ colnpleklnle]lle. Ell este caso,
_gth'ese de cargar la baterfa rccargable antes de
utili/ar l_ c_hn_ml.
Sin embargo, aunque h baerfa rechargable no esl_
c_u'gMa, podrfi utiliz_n" la c_hnar_ siempre y
cu_mdo no gr_be ]a t_cha y l_ hor_.
Metodo de carga de la bateria interna
recargable de reserva
Inserte la baterfa carg_d_ en la cfi]nara y, a
conlinu_ci6n, ddjela alx,gad_ durante 24 h (horn)
o nlzls.
34

Especificaciones
Camara
[Sistema]
Dispositivo de imagen:
I)SC-_.VI70:
CCD de color de 7,70 mm (lipo 1/2,3).
filtro de colores primarios
I)SC-WI50:
CCD de color de 7,18 toni (lipo 1/2,5),
filtro de colores primarios
NOmero total de pfxeles de ]a cfinlara:
I)SC-WI70:
Aprox, 10,3 Megapfxeles
I)SC-W150:
Aprox. 8,3 Megapixeles
NOmero elcctivo de pfxeles de la c&nma:
I)SC-WI70:
Aprox. 10,1 Megapfxeles
l)SC-W150:
Aprox. 8,1 Megapixeles
Objetivo:
I)SC-WI70:
Objetivo Carl Zciss Vario-Tessar con zoonl
de 5x
f = 5 - 25 mm (28 - 140 mm (equivalente a
peffcula de 35 ram)) F3,3(W) - 5,2(T)
I)SC-WI50:
Objetivo Carl Zciss Vario-Tessar con zoonl
de 5x
f = 5 - 25 mm (30 - 150 mm (equivalente a
peffcula de 35 ram)) F3,3(W) - 5.2(T)
Control de exposici6n: Exposici6n automailica,
selecci6n de escenas (10 modos)
Balance del 61anco: Automgltico. luz diuma.
nublado, fluorescenle 1.2.3, incandescentc,
flash
Balance del blanco debajo del agua: Automaitico.
submarino 1,2. flash
Formato de archivo (compatible con DCF):
hnfigenes fijas: compatible con Exif Ver. 2.21
JPEG. compatibles con DPOF
Peffculas: Compalible con MPEGI
(monoaural)
Soporles de grabaci6n: Memoria inlerna (aprox,
15 MB), +Memory Stick Duo ++
Flash: Alcance de flash (Sensibilklad ISO (Indice
de exposici6n recomendado) ttiustada en
Auto):
Aprox. de 0.2 a 4.2 m (W)/aprox. de 0,5 a
2.7 m (T)
[Conectoresdeentraday salida]
Conector mfiltiple: Salida de video
Sail&, de audio (monoaural)
Comunicaci6n USB
Conmnicaci6n USB: Hi-Speed USB (compatible
con USB 2,0)
[PantallaLCD]
Panel LCD: Unidad de TFT de 6.7 cnl (tip() 2.7)
Nfimero total de pumos: 230 400 (960 x 240)
ptlnIos
[Alimentaci6n,general]
Alinlcnlaci6n: Balerfa recargable
NP-BG 1, 3,6 V
NP-PGI (no suministrada), 3,6 V
Adaptador de alhnentaci6n de ca de AC-
LS5K (no suministrado), 4,2 V
Consumo de energfa (duranle la toma de
imfigenes, pamalla LCD encendkla): 1,0 W
Tcmperamra de funckmamiento: 0 a 40°C
Tcmperamra de almaccnamienlo: 20 a +60°C
Dimensiones: 93.7 x 58.0 x 24,0 mm (an/al/prf,
sin inchfir las partcs saliemes)
Peso: Aprox. 175 g (incluida la baleria NP-BGI,
la correa, etc.)
Micr61ono: Monoaural
Allavoz: Monoaural
Exif Prinl: Compatible
PRINT hnage Malching Ill: Compalible
PictBridge: Compatible
Cargador de baterias BC-CSGB/
BC-CSGC
Requisitos de alimenmci6n: ca dc I(X)V a 240 V
50160Hz 2,6 W (BC-CSGB)/2 W (BC-CSGC)
Tcnsidn de salida: cc de 4,2 V 0,25 A
Tcmperatura de funcionanfiento: 0 a 40°C
Tcmperanlra de almaccnamiento: 20 a +60°C
Dimensiones: Aprox. 62 x 24 x 91 mm (an/al/prl)
Peso: Aprox. 75 g
Bateria recargable NP-BG1
Baterfa ulilizada: Baler/a de Jones de litio
Tcnsi6n mglxinla: cc de 4,2 V
Tcnsi6n nominal: cc de 3,6 V
Capacidad: 3,4 Wh (960 mAh)
El disefio y las especificaciones est_in s/_ielos a
cat/lbios Sill prcx io aviso,
35

Marcas comerciales
• CybE_ho'_ y "Cyber-shot" son mm'cas
comerciales de Sony Corporalion.
• "MelnoJy Stick", .;_, "Melnory Stick PRO'7
MEMORY5T|EK PRO, "Menlory Stick Duo'7
MEMORY5T|EK 11110,"Menlory Slick PRO
Duo'7 MEMORYSTIEKPRO 0u0, "Memory
Slick PRO-HG Duo",
MEMORY5TIERPRO-HG [JUO,"Memo U Stick
Micro", "MagicGate" y M_GICGZ'_TE son
marcas COnlerciales de Sony Corporation.
• "PhotoTV HE)" es una marca comercial de Sony
Corporation.
• "InIoLITHIUM" es una marca comerckd de
Sony Corporation.
• Microsoft. Windows. DireclX y Windows Visla
son marcas comerciales o marcas conlerciales
rcgistradas de Microsoft Corporalion en los
Eslados Unidos y/o en otros parses.
• Macintosh. Mac OS. iMac. iBook, PowerBook,
Power Mac y emac son nlarcas comerciales o
marcas comerciales registradas de Apple Inc.
• Intel. MMX. y Pentium son nmrcas coinerciales
o malvas coinerciales rcgistradas de Intel
Corporation.
• Adobe y Reader son illglrcas conlerciales o
marcas comerciales regislradas de Adobe
Syslems Incorporaled ell los Estados Unidos y/o
en otros parses.
• Ademfis. los nombms de sislemas y produclos
utilizados ell estc manual son, ell general.
nlarcas comercia]es o marcas comcrciales
rcgistradas de sus respectivos programadores o
labricantes. Sin embargo, las tllarcas IM 0 @ no
ulilizan ell lodos ]os casos en esle manual.
36

-
 1
1
-
 2
2
-
 3
3
-
 4
4
-
 5
5
-
 6
6
-
 7
7
-
 8
8
-
 9
9
-
 10
10
-
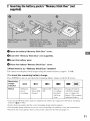 11
11
-
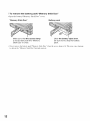 12
12
-
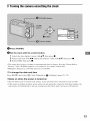 13
13
-
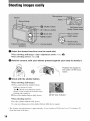 14
14
-
 15
15
-
 16
16
-
 17
17
-
 18
18
-
 19
19
-
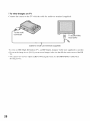 20
20
-
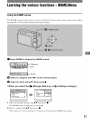 21
21
-
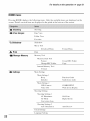 22
22
-
 23
23
-
 24
24
-
 25
25
-
 26
26
-
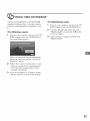 27
27
-
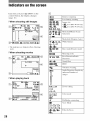 28
28
-
 29
29
-
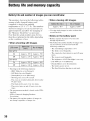 30
30
-
 31
31
-
 32
32
-
 33
33
-
 34
34
-
 35
35
-
 36
36
-
 37
37
-
 38
38
-
 39
39
-
 40
40
-
 41
41
-
 42
42
-
 43
43
-
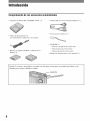 44
44
-
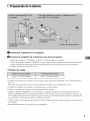 45
45
-
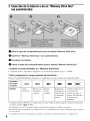 46
46
-
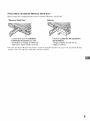 47
47
-
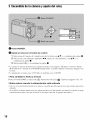 48
48
-
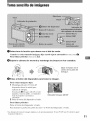 49
49
-
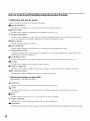 50
50
-
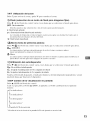 51
51
-
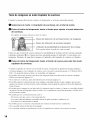 52
52
-
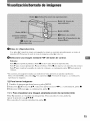 53
53
-
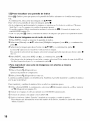 54
54
-
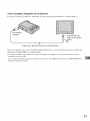 55
55
-
 56
56
-
 57
57
-
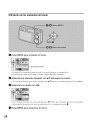 58
58
-
 59
59
-
 60
60
-
 61
61
-
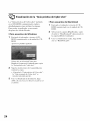 62
62
-
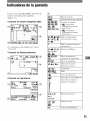 63
63
-
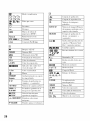 64
64
-
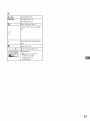 65
65
-
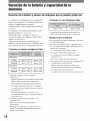 66
66
-
 67
67
-
 68
68
-
 69
69
-
 70
70
-
 71
71
-
 72
72
-
 73
73
-
 74
74
-
 75
75


Sony DSC-W150 El manual del propietario
- Tipo
- El manual del propietario
En otros idiomas
- English: Sony DSC-W150 Owner's manual
Documentos relacionados
-
Sony DSC-W300 El manual del propietario
-
-
-
-
-
-
-
-
-
Sony DSC-HX1 El manual del propietario