Sony DSC-H10 El manual del propietario
- Categoría
- Videocámaras
- Tipo
- El manual del propietario


iL.'_t_n
Owner's Record
The model and serial numbers are located
on tile bottom. Record tile serial tmmber in
the space provided below. Refer to these
immbers whenever you call upon your Sony
dealer regarding this product.
Model No. DSC-H 10
Serial No.
To reduce fire or shock hazard, do
not expose the unit to rain or
moisture.
J " Jil'_ I I" " ._
CAUTION¸TO R_DUCETIqERISKOF FLECTRICS_OCK
R_ER S_RVlCI_GTO QUA1IFIEDSERVlCEP_SO_N_.
This symbol is intended to
alert tile user to lhe presence
OI Ullinsulated _dangerous
voltage" witlfin the
product's ellclosure that
nlay be of sullicient
nlagnitude to constilute a
risk of electric shock 1o
persolls,
This symbol is intended to
alerl tile user to tile presence
of inlportant operating and
maintenance (servicing)
instructions in tile literature
acconlpanying the
appliance,
IMPORTANT
SAFEGUARDS
For your protection, please read these safety
instructions completely beli)re operating
the appliance, attd keep this manual for
future reference.
Carefully observe all warnings, precautions
and instructions on the appliance, or the one
described in the operating instructions and
adhere to them.
Power Sources
Tiffs set sllould be operated only I)'om the type of
power source indicutcd on tile marking lubeh II
you are not sure oI tile type ol electrical power
supplied t(>your bonle, consult }'(>111"de_deror
h)cal power company. For thosesets designed to
operi_te Iroln battcl-y power, or oilier sources, reter
tOtile operiding instructions.
Polarization
Tiffs set may be equipped with a,polarized ac
power cord plug (g_plug having one blade wider
tllan tile oilier).
Tiffs plug will fit into the power outlet only one
way. This is a salcty lcature. If you arc unable to
insert tile ph/g flllly into the outlet, try reversing
the phlg. If the plug should still lail to fit, contact
your electrician to have a suitable outlet installed.
Do not defimt the salcty purposv of tile polarized
plug by lorcing it in.
Overloading
Do not o'_'erload \vail outlets, extcnsioll cords or
convenience receptacles beyond dleir capacity,
since fills call rcsull in fire or eleclric shock,
_Object and Liquid Entry
Never push objects oI any kind into tile set
l]lroLigh openillgs as they lnay touch dangerous
voltage points or short out paris thal could resull
ill a lire or electric shock. Never spill Ikluid ol any
kind on tile set.
Attachments
Do nol use auachlllents 11ol recollllnellded by the
l/lanu|acturer, as riley l/lay cause hazards,

Cleaning
Unplug the set fi'onl tile wall om]et belore
cleaning or polislling it, Do not use liquid cleaners
or aerosol cleaners. U_ a cloth lightly dampened
"_vilIl"_valerlor cleaning tile exterior of tile set.
Water and Moisture
Do noI /ise power-]hie operilled _ls llear waler
Ior exanlple, near a bathtub, washbowl, kitchen
sink, or laundry tub. in a wet basemenl, or nero a
swimndng pool, etc.
+ Power-Cord Protection
Ro/lle the power cord so that it is IIOIlikely lo be
walked on or pinched by itelns placed upon or
against Ihenl. paying particular attention lo file
plugs, reccplacles, and file poinl where the cord
exits Irom tile appliance.
+Accessories
Do HOt place tile set Oil iLll illlStZlb]e c_lrl, Stalld,
tripod, bracket, or table. The set may l,dl. causing
serious injury to a child or an adult, and serious
danlage to tile set. Use only a carl. stand, lripod.
bracket, or table reconmlended by tile
illanllfilClllrcr.
Ventilation
The slots and openings in tile c+lbinet are pro_ ided
Ior necessary ventilation. To ensure reliable
operation of tile set, and to protect it Ii'oll]
o_,er]lealhlg, I]leSe slots alld opellhlgs ii]/isI never
be blocked or covered.
Never cover the slots and openings wifll a cloth
or other nlaterials.
Never block tile slots and openings by placing
lhe set on a bed. sola. rug. or other similar
surlace.
Never place file _t in a confined space, such as
a bookcase, or built-in cabinet, unless proper
ventilation is provided.
Do nol place tile set near or over a radiator or
heat register, or where il is exposed to direct
sunlight.
_{Lightning
For +Mdedprotection lor tiffs set during +tlightning
storm, or when it is left unattended and unused 1or
long periods of tinle, unplug it from file wall
duffel and disconnect the antenna or cable '4yslellL
This will prevent danlage 1o lhe sel due to
ligllming and power-line surges.
Damage Requiring Service
Unphlg tile sel I_'olntile w+tll outlet and relcr
servicing to qualified service personnel under tile
tollowing conditions:
When file power cord or phlg is damaged or
h+qed.
If liquid has been spilled or objects ha_e hiIlen
into the set.
If the set has been exposed to rain or water.
If the set llas been subject to excessive shock by
being dropped, or the cabinet has been
dalnaged.
If the set does not operate nornlally when
Iollowing tile operating instructions. A_[iust
only fllose controls that arc specified in file
operating instructions. Improper adjustment of
other controls may result in damage and will
often require extensive work by a quzflified
teclmician to restore tile sel to nornla] operation.
When tile set exllibits a distinct change in
perlornlance this indicales a need fin service.
Servicing
Do nol alIenlpl to service tile sel yotlrsefi as
opellillg or rClllovhlg covers lll_ly expose yell lo
dilllgerous _,oltilge or other hazilrds.
Retcr all selvicing to qualilied serxice personnel.
_{Replacement parts
When replacement parts are required, be sure tile
service technician Ilas used rcplacelnent parts
specified by the manufi_cmlvr flint have file sanle
characteristics as the original palls.
Unauthorized substitutions nlay result in ilrc,
electric sllock, or other IlazaMs.
Safety Check
Upon completion oI any sel'_ ice or repairs to tile
set. ask tile selwice tccbnickln to perfi)rlll ro/llille
salcty checks (as specified by tile lnanuli_cturcr)
to detcrnline that die set is in salP operating
COlldJlioIl.

Readthis first
Replace the battery with the specified type only.
Otherwise, lire or injmy may result+
Do 11(5[expose the batteries to excessive heat such
as sunshine, fire or the like.
RECYCLING LITHIUM-ION
BATTERIES
Lithium-Ion batteries me
recyclable+
You can ]lelp pl-e_l-ve (5111
e]lvh'Olllllent by relurnlllg your
usedrechargeable batteries to
tile collectkm andrecycling
]ocittiOll llearest you.
For lnore inRn'mation regaMing recycling of
rechargeable batteries, cldl toll ti'ee
1-800-822-8837, or _isit hltp://www.rbrc.org/
Caution: Do not handle damaged or leaking
Lithium-Ion batteries.
-'. • . t"
This power unit is intended to be correctly
orientaled in a verlicgd or floor nloun[ position,
If you have any questions about this product, you
may call:
Sony Customer lnlormation Center
1-800-222-SONY (7669)
Tile number below is lor tile FCC related matters
only.
Regulatory Information
Declaration of Conformity
Trade Name: SONY
Model No.: DSC-H 10
Responsible Party: Sony Electronics Inc.
Address: 16530 Via Esprillo.
San Diego, CA 92127U.S.A.
Telephone No.: 858-942-2230
This device complies with Part 15 of the FCC
Rules. Operation is subject to the lbllowing
two conditions: ( 1) This device may not cause
harmlul interli:rence, and (2) this device inusl
accept any interllrmnce received, including
interlPmnce that may cause undesired
operation.
CAUTION
You arc cautioned tlmt any changes or
moditications not expressly appro_ ed in this
manual could void your autllorily lvloperate this
equipment.

Note:
This equipment has been tested +uldlound to
comply with tile limits lor a Class B digit+d
device, pursuant to Part 15 ol tile FCC Rules.
These limits are designed to provide reasonable
protection against hannlul interlPrcnce in a
residential installation. This equipment generates.
uses, and can radiate radio lrequency energy and.
if not installed and used in accordance with the
inslruclions, may cause harmful interl_rcncc to
radio conltllunica[ions. However, there is no
guarantee that interlhrence will nol occur ill a
particular installation, lftlds equipment does
cau_ harmflfl interlPrence to radio or television
reception, which can be determined by turning the
equipment off and on. the user is encouraged to
try to correcl the interflzrence by one or lnorc of
the lollowing measures:
Reorient or relocate lhe receiving anlenna.
Incl-cilse the separation between the
equipment and receiver.
Connect the equipment into un outlet <ina
circuit dillcrcnt lloln thal 1o whicll the
receiver is connecled.
Consult the dealer or all experienced r_Oio/TV
technician lot help.
Tile supplied intcrli_ce cable must be used with tile
equipment ill order to comply with the limits lot a
digital device pursuant to Subpart 13of Part 15 of
FCC Rules.
Pcrchloratc Material - special handling may
apply, See
www,dtsc.ca.gov/hazardouswaste/perchlorate
Perchloratc Material: Lilhiuln battery conlains
perchlorate.
This product has been tested and kmnd compliam
with the limits _t out in the EMC Directive lot
using connection cables shorter than 3 reelers (9.8
lcet).
+Attention
Tile electromagnetic lields at tile specilic
hequencies may influence tile piclurc and sound
of lids unit.
Notice
If static e]ectricity or electrolnagnetism cml_s
data translcr to discontinue midway (lkdl). restart
the applicatkm or disconnect and connect the
conmmnicadon cable (USB. etc.) again.
Disposal of Old Electrical &
Electronic Equipment (Applicable
in the European Union and other
European countries with separate
collection systems)
This sylnbol on file product or on its packaging
indicates that fills product shall not be treated as
household waste, lnstead it shall be handed over
to the applicable collection point lor the recycling
of electrical and electronic equipmenL By
ensuring this product is disposed of corl_ctly, you
will help prevent polcmial negative consequences
lor file environment and human health, wldch
could otherwise be caused by inappropriate waste
handling of this product. Tile ivcycling of
materials will help to conserve natural resources.
For more detailed inlbrmafion abom lvcycling of
this producL please contact your local Civic
Office, your housetlold waste disposal selvice or
tile shop where you purchased the product.

Disposal of waste batteries
(applicable in the European
Union and other European
countries with separate
collection systems)
This symbol on the battery or on the packaging
indicates that the battel T provided with this
product shall not be treated as household waste.
By ensuring these batteries are disposed of
correctly, you will help prevent potentially
negalive consequences lor the en'_'ironnl_nt and
human health which could otherwise be caused by
inappropriate waste handling of the battery. The
recycling of the materials will help to conserve
natural rcsources.
In case of products that lor salety, periormance or
data integrity reasons require a permanent
connection with an incorporatcd battery, this
battery should be replaced by qualified selvice
staffonly. To ensure that tile battel T will be
treated properly, hand over the product at end-oi:-
liii: to tile applicable collection point Ior the
recycling of electrical mid electronic equipment.
For all other batteries, please view tile sectfim on
how to renlove file battery fioln tile product
salcly.
Hand tile battel T over to the applicable collection
point R)r the recycling of waste batteries.
For more detailed infi)rmation about recycling of
this producl or battery, please contact your local
Civic Olfice, your household waste disposal
sel5 ice or tile shop where you purchased tile
product.
+Notice for the customers in the
countries applying EU Directives
The nl+uml,_cturer of this product is Sony
Corporation, 1-7-I Komul Mim,to-ku Tokyo, 108-
0075 Japan. Tile Authorized Representative 1or
EMC and product salety is Sony Deutschland
GmbH, Hedellinger Strasse 61, 70327 Stuttgm't,
Gernlany. For any selvice or guarantee nlalters
please mli:r to the addresses given in separate
selwice or guarantee docunlenls.
A moulded plug complying with BS 1363 is fitted
to this equipment lor your sali:ty and
convenience.
Should the fuse ill the plug supplied need to be
replaced, a filse of the same rating as the supplied
one and approved by ASTA or BSI to BS 1362,
(i,e., marked with all @ or _ mark) nmst be
used.
If tile plug supplied with this eqtfipment has a
detachable luse cover, be sure to attach the fi/se
cover afier you change the hlse. Never use lhe
phlg without the luse cover. If you should lo_ the
ItlSe cover, please conlact your nearest Sony
service station.

Table of contents
IMPORTANT SAFEGUARDS .................................................................... 2
Read this first ............................................................................................ 4
Notes on using the camera ...................................................................... 8
Getting started ................................................................................. 9
Checking the accessories supplied ......................................................... 9
1 Preparing the battery pack .................................................................. 10
2 Inserting the battery pack/a "Memory Stick Duo" (not supplied) ........ 11
3 Turning the camera on/setting the clock ............................................. 13
Shooting images easily ................................................................. 14
Mode dial/Zoom/Flash/MacrWSelf-timer/Display/Lens hood ................. 15
Viewing/deleting images ............................................................... 17
Learning the various functions - HOME/Menu ........................... 19
Using the HOME screen ......................................................................... 19
HOME items ........................................................................................... 20
Using menu items ................................................................................... 21
Menu items ............................................................................................. 22
Enjoying your computer ............................................................... 23
Supported Operating Systems for USB connection and application
software (supplied) ................................................................................. 23
Viewing "Cyber-shot Handbook". ........................................................... 24
Indicators on the screen ............................................................... 25
Battery life and memory capacity ................................................ 27
Battery life and number of images you can record/view ........................ 27
Recordable number of still images and recordable time of movies ...... 28
Troubleshooting ............................................................................ 30
Battery pack and power ......................................................................... 30
Shooting still images/movies .................................................................. 31
Viewing images ...................................................................................... 31
Precautions .................................................................................... 32
Specifications ................................................................................ 33

Notes on usingthecamera
Internal memory and "Memory
Stick Duo" back up
Do not turn olt file calnera, relF_ove file bilttery
pack, or remme tile "Memory Stick Duo while
tile access hunp is lit. Otherwise, the internal
memory data or "Menlory Slick Duo" may be
damaged, Be sure to make a backup COl?yto
protect your data,
Notes on recording/playback
• Betorc you start recording, make a trial
I_cording to makesure that file camera is
working correctly.
• The camera is neither dustq)rooI, nor splash-
i?rooI, nor water-prool. Read "Precautions"
(page 32) belore operating the camera.
• Aw)id exposing the canlera to water. 11water
milers inside lhe Calllera, a nlalhulctk)n nmy
OCc/Ir. III Solne ca_s, tile canler_L c_lnnot be
repaired.
• Do not aim tile camera at tile sun or ()tiler brigbl
light. It may cause tile malhmction of tile
conlera.
• Do not u_ the canlera near a Iocatkm that
generates strong radio waves or enlfls radiation.
Otherwise, the camera nlay not properly record
or play back images.
• Using the camera in sandy or dusty locations
nlay cause lnalfilnclions.
• If lnoisturc condensation occurs, remoxe il
bek)re using the camera (page 32).
• Do not shake or stflke tile camera. It may cause
a malflmcflon and you may not be able to record
images. Furthermore, the recording media may
become unusable or image data may be
danlaged.
• Clean the flash surl,tce bek)re use. Tile Ileal of
flash emission may cause dirt on the flash
surl;ice to become discolored or to slick to tile
flash surlace, rcsulflng in insullicient light
ellliSgion,
Notes on the LCD screen and
lens
• The LCD screen is nmnut,tclured using
extremely high-precision technology so mer
99.99% of tile pixels arc operatiollal I_ll"
elJPcflve use. However, some tiny black and/or
bright dots (white, rod, blue or green) may
appeal on the LCD screen. These dots am a
normal result of the manulacmring process, and
do not aflect the recording.
• When file battel T level becomes low, the lens
ndgbt stop moving. Insert a charged battel T
pack and turn on the cmnera again,
On image data compatibility
• The camera contorms with DCF (Design rule
lot Camera File sysleln) universal standard
established by JEITA (Japan Electronics and
Intormaflon Tcclmology Industries
Association),
• Sony does not guarantee that tile camera will
play back images recorded or edited with other
equipment, or that other equipment will play
back images recorded with tile camera.
_Warning on copyright
Television programs, Iihns, _ideotapes, and other
nmterials may be copyrighted. Unmlfllorized
recording of such materials may be conmuy to tile
I?ro_isions of tile copyright laws,
No compensation for damaged
content or recording failure
Solly CilllllOt COlllpellSate Ior Ihilul'e to record or
lOSS or dalnage oI recorded C'Olltent due to a
tntdhlnclioll ol lhe canlertL or rccordhlg media,
etc.

Getting started
Checkingtheaccessoriessupplied
• Baltery charger BC-CSGB/BC-CSGC (l)
• Power cord (mains lead) (1)
(not supplied in the USA and Canada)
• Rcchargeable battery pack NP-BG 1 ( 1)/
Battery case (1)
• USB, A/V cable tot mulli-use terminal (l)
• Sboulder strap (1)
• Lens hood (1)/Adaptor ring ( 1)
• Lens cap ( 1)/Lens cap strap ( l )
• CD-ROM (l)
Cyber-shot application software
"Cyber-shol Handbook"
"Cyber-shol Step-up Guide"
• ]nstluction Manual (this manual) (1)
Attachingtheshoulderstrapandthe lenscap
Attachthe strapto preventthe camerafrom damagebybeingdropped,

1 Preparing the battery pack
OInsert the battery pack into the battery charger.
0 Connect the battery charger to the wall outlet (wall socket).
Tile CHARGE lamp lights up, and charging starts.
When tile CHARGE lamp turns otl, charging is finished (Nornlal charge).
If you continue charging tile ballery pack tot about one nlore hour (unli] it is fully charged), tile charge
will last slightly longer.
Charging time
• The table above shows the time required to charge a flllly depleted battery pack al a temperature of 25 °C
(77 °F). Charging may take longer depending on condilions of u_ and circumslances.
• See page 27 lor the nulnber of images that can be recorded.
• Connect lhe baltery charger 1o the nearest wall outlel (wall sockel).
• Even if the CHARGE lamp is nol lit, the batlery charger is not disconnected honl tile AC power source
(mains) as hmg as it is connecled to tile wall outlel (wall socket). If some trouble occurs while using the
halle W charger, imnledkltely shul oil the power by disconnecting the plug flonl lhe wall oullet (wall
sockel).
• When charging is finished, disconnect the power cord (nlains lead) tionl die wall oullet (wall socket), and
r_2nloYetile batlery pack h'onl tile batte W charger.
• Designed lor u_ with compalible Sony balteries.
10

2 Inserting the battery pack/a "Memory Stick Duo"(not
supplied)
O Open the battery/"Memory Stick Duo" cover.
O Insert the "Memory Stick Duo" (not supplied).
Insert the battery pack.
Close the battery/"Memory Stick Duo" cover.
_When there is no "Memory Stick Duo" inserted
The camera records/pla_s back images using the imemal memory (approx. 31 MB).
To check the remaining battery charge
Press; POWER to turn on :rod check the renlaining battery charge on the LCD screen.
Remaining \ i /
indicator / _ \
Status Sufficient Battery Battery half Battel T low, Change the battery
power almost Aflly full recording/ with flflly charged
remaining charged playback one, or charge the
will stop b atery. (The warning
soon. indicator flashes./
• It takes about one minute until the correct remaining charge indicator appears.
• The remaining charge indicator may nol be conect depending on conditions of use and circumstances.
• The Clock Set screen appears when you turn on lhe camera for the first time (page ] 3).
11

_To remove the battery pack/"Memory Stick Duo"
Open the battery/"Memory Stick Duo" cover.
"Memory Stick Duo" Battery pack
Make sure that the access
lamp is not lit, then push the
"Memory Stick Duo" in once.
Slide the battery eject lever.
Be sure not to drop the
battery pack.
• Never rclnove llle ballery pack#'Memory Stick Duo" when the access lamp is lit. This may cause damage
to data in the "MemoJy Stick Duo"/internal memory.
12

3 Turningthe camera on/setting the clock
_]_ Press POWER.
0 Set the clock with the control button.
1 Select tile date display format "_\ith A/V. then press O.
2 Select each item with 4/P" and set the numeric value with A/V. then press O.
3 Select [OK], then press O.
• The camera does not have a lcature lor superimposing dales on images. By using "'Picture Molion
Browser" included on tile CD-ROM (supplied). you can prinl or save inlages wilh the dale.
• Midnight is indicaled as 12:00 AM. and noon as 12:(X)PM.
To change the date and time
Press HOME. and select [(z) Chick Settings] ill _ (Settings) (pages 19, 20).
Notes on when the power is turned on
• Once lhe batlery is inserted in the camera, it may take time belore operation becomes possible.
• If the c_mmra is lunning on battery power and you do not ol?er_llethe camera l_r about three minules, the
camera turns oil automalic_dly to prcxent wearing down tile battery pack (Auto power-oil Lunction).
13

Shootingimageseasily
O Select the desired function from the mode dial.
When shooting still images (Auto Adjustment lno¢te): Select _.
When shooting movies: Select _[_.
O Hold the camera, with your elbows pressed against your body to steady it.
14
Position the subject
in the center of the
focus frame.
f
_) Shoot with the shutter button.
"When shooting still images:
1 Press attd hold the shutter button
h:dl\vay down to focus.
The • (AE/AF lock) indicator (green)
flashes, a beep sounds, the indicator slops
flashing and remains lit.
2 Press the shtttter button fully down.
AE/AF lock indicator
When shooting movies:
Press the shutter button fully duwn.
To stop recording, press file shutter bullou fully down again.

Mode dial/Zoom/Flash/Macro/Self-timer/Display/Lenshood
Using the mode dial
Set tile mode dial to tile desired function.
_'_ Auto Adjustment
Allows easy shooting wilh tile setlings
adBlsled aul<)matically.
P Program Auto
Allows you to shoot with tile exposure
adjusted automatically (both the shutter speed
and the apmlure value). You can adjust other
settings using the nlenu.
M Manual Exposure shooting
Allows you to shoot alter a([iusting tile
exposure manually.
H Moviemode
Allows you 1orecord movies wilh audio.
I_o High Sensitivity
Shoots images wilhout a l]ash e_en ilklow
lighting.
_ Soft Snap
Shoots images with a sotler atmosphere lor
portrails of people, tlowers, etc.
?&] Advanced Sports Shooting
Stlools images by prcdicling tile movement of
lhe su_iect and selling locus.
_'_ Twilight Portrait
Shools sharp images (if people ill a dark ph,ce
without losing lhe nighltinle aln/osl)herc.
[] Landscape
Shoots with the l_)cus on a distanl sur!iect.
SON* Scene Selection
Selects a setting lrom tile Scene Seleclion
nlenll,
* SceneSelection inSCNmode
Press MENU mid select a selling.
j Twilight
Shoots night scenes wit]lout h)sing the
nighllime atmosphere.
_ Beach
Shoots seaside or lakeside sccnes wilh tile
bhleness of lhe waler captured nlore vividly.
Snow
g]lools snow scenes ilkwllile lllOrc clearly.
ii{{>Fireworks
Shools lircworks ilkall lheir splendor.
_W/T Using the zoom
Press T to zoom, press W to tllldo zoon].
Pressing the button slightly zooms slowly
and pressing the button fully down zooms
fast.
_ Flash (Selecting a flash mode
for still images)
Press • If) on tile control button repeated]_
until the desired mode is selected.
_,AUTO: FlashAuto
Flashes when there is insul]]cienl ligla or
backligla (demull setling)
_: Flash forced on
{;SL: Slow synchro (Flash forced on)
Tile shutter speed is slow in a dark place to
clearly shool the background that is out of
flash light.
_: Flash forced off
• Tile flash autonlalically pops up and strobes
when using tile flash. Close the flash by
hand ariel: use.
15

_ Macro (Shooting close-up)
Press 4 (_) on the control button
repeatedly until the desired mode is
selected.
_o_: Macro off
_: Macro on (W side:Approx. 2 cm or farther
(13/16 inches or farther) from the lens, T side:
Approx. 90 cm or farther (2 feet 11 1/2 inches or
farther) from the lens)
_<@Using the self-timer
Press • (<_.)) on the control button
repeatedly until the desired mode is
selected.
_: Not using the self-timer
Go : Setting the 10-second delay self-timer
_2: Setting the 2-second delayself-timer
When yon press the shutter button, the self-
timer lamp flashes and a beep sounds until
the shutter operates.
Attaching the lens hood
1 Attach the adaptor ring 'ahile the po'_xer
is off.
ring
2 Position the lens hood as shown below
and turn the lens hood clockwise until it
clicks.
Lens hood
DISP Changing the screen
display
Press • (DISP) on the control button.
Each time you press • (DISP), the display
and brightness changes as fldlows:
-,-Indicators on
Indicators on*
Histogram on*
$
- Indicators off*
* Tile brightness of the LCD Backliglu up.
Storing the lens hood
Position the lens hood as shown below and
mm the lens hood clockwise until it clicks.
16

Viewing/deletingimages
OPress [] (Playback).
It you press [] when the camera is powered oft, tile camera is mined on mmmlatically and set to
playback Inode. To swilch to tile shooting Inode, press [] again.
OSelect an image with <lib. on the control button.
Movie:
Press • to play back a movie. (Press • again to stop playback.)
Press• to last lorward, • to lvwind. (Press • to returnto normal playback.)
Press• to display tile vohunecontrol screen, thenpress •/• to adjust tilevolume.
_ To delete images
1 Display the image _ou 'aant to delete, then press MENU.
2 Select _ [Delete] with • and select [This hnage] with .,IUP,..then press 0.
3 Select [OK] with •. then press 0.
_ To view an enlarged image (playback zoom)
Press (_ while disphL_ing :, still itn:,ge. To undo the zoom, press (_.
At/iust the position with •/V/41/P,..
To cancel the playback zoom. press 0.
17

_To view an index screen
Press [] (Index) to display the index screen while a still image is displayed.
Then. select an image with ,&IV/4/)".
To return to the single image screen, press 0.
• Each time you press [] (Index). the mnnber of inmgeson the index screen increases.
_To delete images in index mode
1 Press MENU while the index screen is displa>ed.
2 Select [Delete] with •attd select [Multiple Images] with <11_'.then press 0.
3 Select the image you want to delete with •/V/411_.. then press 0.
The_ nmrk is checked in tilecheckbox of lhe image.
Tocancel a selection, select allimage you have selecled lor delelion, then press • again.
4 Press MENU and select [OK] with •. then press 0.
•To deleteall the images ill a/older, select [All InThis Polder]. then press • in slep 2,
_To play back a series of images (Slide Show)
1 Select I_ Slide Sho'_ I in D (View hnages) on the HOME screen.
2 Select [Start] with •, then press 0.
The music will change together with the [Effects]. You can also transfer and change the music
to your desired music. For details on changing the music, refer to Help of "Music Transfer"
included on the CD-ROM/supplied).
_To view images on TV
Connect the camera to the TV with the cable lk_rmulti-use terminal (supplied).
connector
To audio/video input
acks
Cable for multi-use terminal (supplied)
To view on HD (High Definition) TV. an HD Output Adaptor (!able (not supplied) is needed.
• Ifyou set the imagesize to [16:9].you can recordimages illlhe sizethat fills lhe entirescreen of the HD
TV.
• You cannol view movies otltptltill [HD(1080i)1signal lornlal. Sel [COMPONENT]to [SD] when
shooling movies.
18

Learningthe variousfunctions- HOME/Menu
UsingtheHOMEscreen
The HOME screen isthe gateway screen for all Ihe functions o1'Ihe camera, and can be called
up regardless of lhe mode setting (shooting/viewing).
_0) Press HOME to display the HOME screen.
0 Select a category with 41111,,.on the control button.
Select an item with A/v, then press 0.
When you select the g (Manage Memory) or _= (Settings) category
1 Select the desired item with A/V.
• This is lunctional only whenyou selecl _ (Setlings).
2 Press P" and select the desired setting with A/V. then press O.
3 Select a setting with A/V. then press O.
• The camera is set to the shooting or viewing mode bypressing HOME again.
19

Fordetailsonthe operation(_ page lg
HONE items
Pressing HOME displays tile following items. Details on tile items are displayed on tile screen
by tile guide.
to
Shooting Shooting
D View Images
,t, Printing, Other
Ul ManageMemory
==g_Settings
Single Image
Index Display
Slide Show
Print
Music Tool
Download Music Format Music
Memory Tool
Memo U Stick Tool
Format Create REC. Folder
Change REC. Folder Copy
Internal Memory Tool
Format
Main Settings
Main Settings I
Beep Function Guide
Initialize
Main Settings 2
USB Connect COMPONENT
Video Out
Shooting Settings
Shooting Settings 1
AF Illuminator Grid Line
AF Mode Digital Zoom
Conversion Lens
Shooting Settings 2
Auto Orientation Auto Review
Clock Settings
Language Setting
2O

Using menuitems
_]_ Press MENU to display the menu.
- Function Guide
• Tile menu will be displayed only during shooling and playback mode.
• Different ilems will become visible depending on lhe selected mode.
OSelect a desired menu item with A/V on the control button.
• It lhe desired ilem is hidden, keep pressing A/V until lhe ileln appears on the screen.
_) Select a setting with 41/_.
• ff the desired item is hidden, keep plessing _/_ until tile iteln appears on the screen.
• Select an ilem in playback mode, and press 0.
_) Press MENU to turn off the menu.
21

Fordetailsonthe operation_ page21
Menu items
The ave/liable n]cn/i items x_ry depending on tile mode setting (shoeting/vicwing), _lnd the
mode dial pesition in the shoeting mode. Only tile available items are displayed on the screen.
Shooling menu
Scene Selection Selects the settings pre-adjusted to match various scene
conditions.
Image Size Selects the still image size.
Face Detection Detects the faces of your subjects and adjusts focus, etc.
REC Mode Selects the continuous shooting method.
Color Mode Changes the vividness of the image or adds special effects.
ISO Selects a luminous sensitivity.
EV Adjusts Exposure.
Metering Mode Selects the metering mode.
Focus Changes the focus method.
White Bal Adjusts the color tones.
Flash Level Adjusts the amount of flash light.
Red Eye Reduction Sets to reduce the red-eye phenomenon.
Contrast Adjusts the contrast of the image.
Sharpness Adjusts the sharpness of the image.
SteadyShot Selects the anti-blur mode.
SETUP Selects shooting settings.
Viewingmenu
(Delete) Deletes irrlages.
(Slide Show) Plays back a series of images.
E[I_ (Retouch) Retouches images.
O_ (Protect) Prevents accidental erasure.
BPBF Adds a Print order mark on image that you want to print out.
(Print) Prints images using a PictBridge compliant printer.
(Rotate) Rotates a still image.
P"I (Select Folder) Selects the folder for viewing images.
22

Enjoyingyour computer
You can view images shol with Ihe camera on a computer. By using Ilae sofl'ware in Ihe (.7[)-
ROM (supplied), you can enjoy still images and movies from the c,_tmera_ more than ever. For
details, refer to "Cyber-shol Handbook" in II'_eCD-ROM/supplied).
SupportedOperating Systemsfor USBconnectionand application
software(supplied)
ForWindows users ForMacintosh users
USB connection Windows 2000 Proli_,ssional SP4, Mac OS 9.1/92/Mac OS XlvlO. 1
Windows XP* SP2, Windows to vlO.5)
Vista*
Application software Windows 2000 Profl_+ssional SP4+ not compatible
"Picture Motion Windows XP* SP2, Windows
Browser" Vista*
* 64-bil editions and Startcr (Edilion) are not supported.
• Your computer must be prc-inslalled with an OS lisled above. OS upgrades are not supported.
• If your OS does nol support USB connections, copy inlages by inserting file "Memo W Slick Duo" into file
Memory Slick slot on your computer, or use a commercially available Memory Slick ReadelqWriter.
• For hlrther details on the operaling environmem of "Picture Motion Brow_r" Cyber-shol applicalion
sol}warc_ rclbr to "Cyber-shot Handbook".
23

_ Viewing "Cyber-shot Handbook"
"Cyber-shot Handbook" in tile CD-ROM
(supplied) explains how to use the camera
in detail. Adobe Reader is required to view
it.
For Windows users
1 Turn on your computer, and insert the CD-
ROM (supplied) into the CD-ROM drive.
The screen below appears.
/ For Macintosh users
1 Turn on yoLIr computer, mid insert the CD-
ROM (supplied) into the CD-ROM drive.
2 Select the [Handbook] folder and copy
Handbook.pdl _' stored in the IGBI tMder
to your computer.
3 After copying is complete, double-click
Handbook.pdFL
When you click the [Cyber-shot Handbook]
button, the screen lor copying "Cyber-shoi
Handbook" appears.
2 Follow the on-screen instructions to copy.
• When you install ' Cyber-shot Handbook."
tile _Cyber-shoi Step-up Guide" will be
installed automatically.
3 Afler the installation is complete, double-
click the shortcut created on the desktop.
24

Indicators onthe screen
Each time you press • (DISP) on the
conlrol bullon, the display changes
(page 16).
_When shooting still images
m RETURN € 4_ L_
I _0409 _[_ 125 F3,5 +2,0EV _#a
When shooting movies
[]
When playing back
o_DPOF I[m r_®_
aXi.a _ is_oo
_# +2.oEv
101-0012 2000 1 1 _;30 AM
,__BACK/NEXT v VOLUME
=_
[]
Bauery remaining
Lm_ batte W warning
_...2_ hnage size
1_0_'_ Z_ mJ Mode dial/Menu (Scene
[] j __ {_ Sel_.cti,,n)
_!:{:)
P M Mode dial
";},°,'-"_ _, _a White balance
[_ _ _oP_7 Burst mode/Bracket mode
BRK
-+'l,0
[] [] Metering mode
_] Face Detection
((_o_1((_ SteadyShot
((_ Vibration warning
Zoom scaling
X1.3 sO, PO,
V_ _ Colo_mode,
t_4" PictBridge connecting
0.,t Protect
VOL.|illi-, Volume
DPOF Print order (DPOF) mark
Q.N1,3 Zoom scaling
_{> PictBridge connecting
_- !_+Ni1 Cont_a_t
_= rr¥ Sharpness
25

[]
_. -,,I_ Manual exposure setting
mode
• RETURN Function guide R)r Manual
• SET exposure
1.0hi Focus preset distance
• AE/AF lock
IS0400 ISO number
NR slo_ shutter
125 Shutter speed
F3.5 Aperture value
+2.0EV Exposure Value
N N I_ AF range finder frame
indicator
Macro
Playback
,_ ,Playback bar
Standby Standby/Recording a movie
REC
0:12 Recording time (minutes :
seconds)
Histogram
• [] appears when hislograt/l
display is disabled.
101-0012 Folder-file number
20081 1 Recorded date/time of the
g:30AN _layback image
• STOP Function guide for playing
• PLAY image
_ BACK/NEXTSelecting images
• VOLUME A([justing vohlme
[]
[_ _t Recording/phL,,'back Media
("Memo U Stick Duo',
Internal memo U)
_ Recording folder
_RI, Playback folder
g6 Number of recordable
images
12/'[2 hnage number/Number of
images recorded in selected
folder
08:25:05 Recordahle time (hours :
ndnutes : seconds)
_ _ Changing folder
_ON AF illuminator
<_ Red-eye reduction
[] [] Metering mode
_SL (_t_ Flash mode
_[_ Flash charging
AWB ";}_{-*-_ White balance
,_ws
C:32:00 Self-diagnosis display
IS0400 ISO number
+2.0EV Exposure Value
500 Shutter speed
F3.5 Apemlre value
[_c [_r [_w Conversion Ions
[]
C:32:00 Self-diagnosis display
'_-_0_ Self-timer
AF range finder frame
+ Spot metering cross hair
Histogram
26

Batterylife andmemorycapacity
Batterylife andnumberof imagesyoucanrecord/view
The numbers shown in the following tables
assume a fully charged battery pack
(supplied) is used at an ambient
temperature of 25 _C (77 'E). The numbers
shown lk_rimages you can record/view are
approximations and allow for changing of
the "Memory Stick Duo" as necessary.
Note that the actual numbers may be less
than those indicated in the table depending
on the conditions of use.
_When shooting still images
• Shooting in tile lollowing situations:
[REC Model is set to [Normall
[AF Model is set to [Singlel.
[SteadyShot] is _t to [Sllooting].
Shooting once every 30 seconds.
Tile zoom is swilclled alternately between tile
W and T ends.
Tile flash strobes once every two tinles.
Tile power turns on and ol] once every ten
times.
• The measurement nleltlod is based on the CIPA
standard.
/CIPA: Canlera & hnaging Products
Association)
• Tile baucl T lilb and tile nunlber of images do
not cllange, regardless of image size.
Notes on the battery pack
• Battely capacity decreases o_er tinle and
tllrougll lvpeated use.
• Tile battery lilt and tile nunlber of im_ges you
Call record/view i_re decreased ullder tile
lollowing conditions:
The surroundhlg temperature is k_w.
The l'l_sh is u_d fiequenlly.
The camera has been turned on and oil lnany
tinles.
The zoonl is used lrequently.
The briglltness of LCD Backlighl is set to up.
[AF Model is set to [Monitor],
[SteadyShot] is set to [Continuous].
Tile battery power is low.
[Face Detectionl is set to toni,
_When viewing still images
• Viewing single inlages in order at about three
second intelvals
27

Re¢ordablenumberof still imagesandre¢ordabletime of movies
The number of still images and tile length of time for movies may vary depending on tile
shooting conditions.
• Even if tile capacity of your recording media is tile sanle as tile one in the table below, the number of still
im_ges and tile lengtll of tinle lot movies may be different.
• You can select the image size from the menu (pages 21.22).
_The approximate reeordable number of still images
(Units: Images)
8M 10 40 72 150 306 618 1223 2457
3:2 10 40 72 150 306 618 1223 2457
5M 13 51 92 191 390 787 1557 3127
3M 21 82 148 306 626 1262 2498 5017
VGA 202 790 1428 2941 6013 12120 23980 48160
16:9 33 133 238 490 1002 2020 3997 8027
• Tile numbers of inlages listed assunle [REC Mode] is _t to [Normal].
• When the number of rcnlaining sboolable images is greater fllan 9,999. the ">9999" indicator appears.
• When an image was recorded using an earlier Sony model and is pl_lyed back on the camera, the image
may not appear in tile actual image size,
28

The approximate recordable time of movies
The mmlbers in the table below show the approxinlate maxinmnl recordable time obtained by
totaling all movie files. Tile maxinmm length of time you can shoot continuously is about 10
minutes.
(Units: hour : minute : second)
640(Fine) 0:02:50 0:06:00 0:12:30 0:25:10 0:49:50 1:40:20
640(Standard) 0:01:30 0:05:50 0:10:40 0:22:00 0:45:00 1:30:50 2:59:50 6:01:10
320 0:06:00 0:23:40 0:42:50 1:28:10 3:00:20 6:03:30 11:59:30 24:04:50
• Movies with the size set to [640(Fine)] can only be recorded on a "Memory Stick PRO Duo'L
• Tile camera does not support HD recordings or playbacks for movies,
2g

Troubleshooting
If you experience lrouble with Ihe camera. Iry Ihe following sohnions.
0 Check the items below, and refer to "Cyber-shot Handbook" (PDF).
If a code such as "C/E:f-lf-I:f-lUl" appears on the screen, refer to "Cyber-shol
Handbook".
0
O
V
Removethebattery pack,waitfor aboutoneminute,re-insertthebattery
pack,thenturnonthe power.
Initialize the settings (page 20).
v
V
O Consnlt your Sony dealer or local authorized Sony service facility.
Be aware that by sending the camera for repair, you give consent that the contents of the
internal memory, Music files may be checked.
Cannot insert the battery pack.
• Inserl the batlel T pack correctly Io push the battery eject h:ver (page I I ).
Cannot turn on the camera.
• After inserling the battery pack into the camera, it may take a le_ moments for the camera to
power up.
• Insert the battel 3' pack correctly (page 11).
• The battery pack is discharged. Insert charged batte U pack (page I0).
• The batte U pack is dead. Replace it x_ith a ne_ one.
• Use a recommended battery pack.
The power turns off suddenly.
• It"you do not operate the camera for about three minutes while the pox_c'r is on, the camera
turns off automatically to prevent wearing down the batte Wpack. Ttlrn on the camera again
(page 13).
• The batte U pack is dead. Replace it with a new one.
3O

The remaining charge indicator is incorrect.
• This phenomenon occurs when you use the camera in an extremely hot or cold location.
• A discrepancy arose bet_seen the remaining charge indicator and the actual remaining barrel3'
charge. Fully discharge the batte U pack once, then charge it to correct the indication.
• The battery pack is discharged. Insert the charged batteU pack (page I0).
• The batte U pack is dead. Replace it with a new one.
Cannot charge the battery pack.
• You cannot charge the battel.'s pack using the AC Adaptl:r (not supplil:d).
Cannot record images.
• Check the free capacity of the internal memory or "Mvmor.'_Stick Duo" (page 28). Ifit is full
do one of the R)llowing:
Delete unnecessa U images (page 17).
Change the "Memory Stick Duo".
• You cannot record images while ch irging the flash.
• When shooting a still image, set the mode dial to a position other than _.
• Set the mode dial to _ when shooting movies.
• The image size is set to [640(Fine)] when recording movies. Do one of the following:
Set the image size to other than [640(Fine)].
Insert a "Memory Stick PRO Duo".
Vertical streaks appear when you are shooting a very bright subject.
• The smear phenomenon is occurring and white, black, reel, purple, or other streaks appear on
the image. This phenomenon is not a malfunction.
Cannot play back images.
• Press [] lPlayback) (page 17).
• The folder/file name has been changed on your computer.
• Sony does not guarantee playback of image files on the camera if the files have been
processed using a computer or recorded with another camera.
• The camera is in USB mode. Delete the USB connectkm.
31

Precautions
Do not use/store the camera in
the following places
• hi an extremely hot, cold or humid place
In places such as in a car parked in tile sun, the
camera body may become delormed and fills
in_ly cause n [ll_/]l/inction.
• Under direct sunlight or near a heater
Tile camera body may beconle discolored or
detornled, and this may cause a mallunction.
• hi a location su_iecl to rocking vibration
• Near strong magnetic place
• hi sandy or dusty places
Be ciJrcI/l] llot to let sand or dust get into tile
calnera. This may cause tile camera to
mallunction, and in some cases this malfimction
cannot be repaired.
On cleaning
Cleaning the LeD screen
Wipe the sclven surt,,ce with an LCD cleaning kil
(not supplied) lo rcnlove fingelT)rinls, dust, etc,
Cleaning the lens
Wipe tile lens with a soil cloth to rcnlove
lingerprints, dusl, elc.
Cleaning the camera surface
Clean the camera surti_ce with a sol_ cloth slightly
u/oislened wilh water, then wipe tile s/irt_/ce wilb
a dry cloth. To prevent danlage 1o the finish or
casing:
Do not expose tile camera to chenlica] producls
such as thinner, benzine, alcohol, disposable
cloths, insect repellent, sunscrcen or insecticide.
Do nol touch tile camera with ally of lhe above
oll your hand.
Do nol leave lhe camera ill contact wilh rubber
or vinyl lOTa long time.
On operating temperatures
Tile cumera is designed Ior use under the
temperatures between 0°C and 40°C (32°F mid
104°F). Shooting ill extremely cokl or hot places
thal exceed this range is not recommended.
On moisture condensation
II the camera is broughl directly fi'om a coM to a
warnl IOCiltiOlL lnoistHrc nlay Colldense inside or
oulside l]le calnera. This lnoisture condellsaliOll
hilly CilU_ [1 Ill_ll]UllCliOll of tile canlera.
If moisture condensation occurs
Turn oil the camera and wait about +ulhour Ior tile
tlloist/ire to e_,aporitte, Note thitt it you shool with
nloismre remaining inside the lens, images will
not be clear.
+On the internal rechargeable
backup battery
Tile cmnera has an internnl rcchargeable buttery
lot maint+fining the date and time andother
seaings regardless ol whether the power is on or
oil.
This rechargeable battery is continually charged
as long as you am using the camera. However, if
you use file cmnera lOTonly short periods, it
discharges gradually, and if you do not use the
camera at all loT about one nlonth iI beconles
conlpletely discharged. In this case, be sure to
charge tills rcchargeable baaery bek)re using the
camera.
However, even if this rechargeable battery is not
charged, you can still u_ the canlera, but tile dale
and time will not be indicated.
Charging method of the internal
rechargeable backup battery
Insert charged battery pack in tile canlera, and
lhen le_o, e lhe Cillllera lt)r 24 bouTs or nlore wilb
lhe power oil
32

Specifications
Camera
[System]
Image de_ ice: 7,18 lnln (1/2.5 type) color CCD,
Prima D' color filter
Total pixel number of camera:
Approx, 8 286/11111pixels
Ellcctive pixel number of calnera:
Approx, 8 083/XX} pixels
Lens: Carl Zeiss Vario-Tcssar 10x zoom lens f =
6.3 63 nun (38 380 mm (35 mm film
equivalent)) F3,5 (W) 4.4 (T)
Exposure control: Al/tOlllalic expostlrc, Scene
Selection (9 modes)
While balance: Aulomatic. Daylight, Cloudy,
Fluorescenl 1,2,3, Incandescent. Flash
File li)rmal (DCF compliant):
Still imz_ges: Exif Vet. 2.21 JPEG compliant.
DPOF compatible
Movies: MPEG1 compliant (Monaural)
Recording media: Internal Memory (approx,
31 MB), "Melnory Stick Duo"
Flash: Flash range (ISO sensitivity
(Recommended exposure Index) sel to Auto):
approx. 0.2 to %0 m (7 7/8 inches to 22 lPet
11 5/8 inches) (W)/approx, 0.9 to 5.6 m
(2 icel I 1 1/2 inches to 18 icel 4 I/2 inches)
(T)
[InputandOutputconnectors]
Multi connector: Video output
Audio otltptlt (Mon_l/ll'id)
USB conmlunicaUon
USB comnmnication: Hi-Speed USB (USB 2.1)
complian0
[LCDscreen]
LCD p_ulel: 7.5 cm (3,0 type) TFT drive
Total number of dots: 230 41X1(960 × 240) dots
[Power,general]
Power: Rechargeable battery pack NP-BGI. 3.6 V
AC-LS5K AC Adaptor (nol supplied), 4,2 V
Power consumption (during shooting): 11.97W
Operating temperature: 0 to 41)°C 132 to I04°F)
Storage temperature: 20 to +60°C ( 4 to +I40°F)
Dimensions: 106.0 x 68.5 x 48.9 mm (4 1/4 x
2 3/4 x 1 15/16 inches) (W/H/D, excluding
protrusions)
Mass: Approx. 381 g (13.4 oz) (including NP-
BG 1 battery pack. strap, adaptor ring, lens
hood and lens cap, etc,)
Microphone: Monaural
Speaker: Monaural
Exif Prinl: Compatible
PRINT hnage Matclfing I11:Compatible
PictBridge: Compatible
BC-CSGB/BC-CSGC battery
charger
Power requirements: AC 100 V to 240 V, 5t.I/
60 Hz, 2.6 W (BC-CSGB)/2 W (BC-CSGC)
Oulput voltage: DC 4,2 V, 0,25 A
Operating temperature: 0 to 40°C (32 to 104°F)
Slorage lemperalum: 2111o+60°C ( 4 1o +I40°F)
Dimensions: Approx. 62 x 24 × 91 mm (2 1/2 ×
31/32 x 3 5/8 inches) (W/H/D)
Mass: Approx. 75 g 12.7 oz)
Rechargeable battery pack NP-
BG1
U_d battery: Litlfiunl-ion battery
Maximum xollage: DC 4,2 V
NominM xollage: DC 3.6 V
C_tpacity: 3,4 Wh/960 mAb)
Design and specifications arc subject to cbange
without notice,
33

Trademarks
• CubEr-Shot, 'Cyber-sbot"_,r_m_demarks
(If Sony Corporatioll.
• "Memory Stick", _,, "Memory Stick PRO",
MEMORY 5TIEK P_D, "Memol3' Stick Duo",
MEMDRY 5TIEK nOEl, "Menlory Stick PRO
Duo", MemoRY STicK PRO DUo, "Memory
Stick PRO-HG Duo",
MEM0r_YSTI[_ PR0-Hfi 0uo, "Memol)' Stick
Micro", "MagicGate', and MZkGIC _{_Z_,TE
arc tradenlarks of Sony Corporation.
• Microsoft, Windows. DirectX and Windows
Vista are either registered trademarks or
tradenlarks of Microsoft Corporation in the
United States and/or other countries,
• Macintosh, Mac OS, iMac, iBook, PowerBook,
Power Mac and eMac arc lradelnarks or
registered trademarks of Apple Inc.
• Intel, MMX, and Pentium are n'ademarks or
rcgistertrd trademarks of lntt:l Corporatkm.
• Adobe and Reader are either registered
n'ademarks or tradenlarks of Adobe Systenls
Incorporated ill tile United States and/or other
countries.
• In addition, systenl and product nanles used in
tiffs manual are, ill general, trademarks or
ivgistercd trademarks of their respective
developers or nlanulactllrers. However, tile IM
or (_3 marks arc not used in all cases ill fills
nlanllal,
34

IL.'IN I
Nombre del producto: Cfimara Digital
Modelo: DSC-H 10
POR FAVOR LEA DETALLADAMENTE
ESTE MANUAL DE INSTRUCCIONES
ANTES DE CONECTAR Y OPERAR ESTE
EQUIPO.
RECUERDE QUE UN MAL USO DE SU
APARATO PODR[A ANULAR LA
GARANT[A.
Para reducir el riesgo de incendio o
descarga el_ctrica, no exponga la
unidad a la Iluvia ni a la humedad.
Sustituya la baterfa/hficamente por otra del
tipo especificado. De lo contrario, es
posible que se produzcan incendios o
lesiones.
No exponga las pilas a fuentes de calor
excesivo, como la luz solar directa, el fuego
o similares.
+, , I • • • +I,
Este producto _e ha probado y cumple con la
nornmtiva que establece la Directiva EMC si se
utiliza un cable de conexidn de menos de 3 metros
de Iongitud.
Atencion
Los calnpos elecll+omilgn_ticos il [l+cCUellCiits
especificas podrfin influir ell l+timagen y el sonido
de esta unidad.
+Aviso
Si la electricidad estfiticu o el electromagnetismo
intcrrumpen la transmisi6n de datos (lallo),
reinicie la aplicaci6n o desconecte el cable de
comunicucidn (USB, etc.) y vuelva a conectarlo.
+Tratamiento de los equipos
el_ctricos y electronicos al final
de su vida t_til(aplicable en la
Uni6n Europea y en paises
europeos con sistemas de
recogida selectiva de residuos)
Este sfinbolo en el equipo o el embalaje indica
que el prc'_nte producto no puede ser tratado
COIllO l+csiduos dolndsticos llormales, sin() que
debe entregarse en el corlvspondiente punto de
rccogida de equipos eldctricos y electrdnicos. AI
a_egurarse de que este producto se desecha
correctamente, Ud. ayuda a prevenir las
consecuencias negativas para el medio ambiente y
la salud lmmana que podrian derivarse de la
incorrccta manipulaci6n en el momento de
deshacer_ de este product(). El reciclaje de
materiales ayuda a conservar los rccursos
namrales. Para recibir inlormacidn detallada sobm
el mcicla.ie de esle producto, pdngase en conlaclo
con el ayuntamiento, el punto de mcogida mils
cercuno o el establecimiento donde Im adquirido
el produclo,

+Tratamiento de las baterias al
final de su vida t_til (aplicable en
la Unibn Europea y en paises
europeos con sistemas de
recogida selectiva de residuos)
Este simbolo en la bateria o en el embal+tie indica
que la baterfa proporcionada con este producto no
puede set tratada colno un rcsiduo domEstico
normal. AI asegurarse de que estas bat_rfas se
desechan correctamente, Ud. ayuda a prevenir las
consecuencias negativas para el medio ambiente y
la salud humana que podrfan derivarse de la
incorrecta nlanipulaci6n ell el molllcnto de
deshaccrse de la baterfa. El reciclaje de materiales
ayuda a conservar los rccursos naturales. En el
caso de productos que por razones de _guridad.
rendilniento o t/lantenitllienl_l de datos, sea
necesaria una conexi6n permanente con la baterfa
incorporada, esta baterfa solo deber5 ser
reemplazada por personal t_cnico cualificado para
ello. Para asegurar_ de que la bateria serfi tratada
correctalnenle, enlregue el producto al final de su
vida fitil en un punto de recogida para el reciclado
de aparatos elEctricos y electrdnicos. Para las
derails baterfas, yea la seccidn donde se indica
c6mo quitar la baterfa del producto de tbrma
segura. Deposite la bater_a en el correspondiente
punto de lvcogida para el recidado. Para rccibir
inlbrmacidn detallada sobre el Ivciclaje de est_
producto o de la baterfa, pdngase en contacto con
el ayuntamiento, el punto de recogida mils
cercano o el establecimiento donde ha adquirido
el producto.
Aviso para los clientes de paises
en los que se aplican las
directivas de la UE
El t, tbricante de esle producto es Sony
Corporation. 1-% 1 Konan Minato-ku Tokyo, 1(18-
0075, .lap(re. El repl'esentante +tutorizado en lo
relclenle +tlcumplilniento de la directiva EMC y +t
I+t _gul'id+td de los pi'oductos es Sony
Deutschlmld GlnbH. Hedeltinger Stri,sse 61.
70327 Stuttgart. Alemania. Para resolver
cualquier asunlo rclacionado con e] soporte
tt_cnico o la garantfa, consultc las direcciones que
se indican en los documentos de soporte t_cnico y
garantia suministrados pot separado.

N0tas s0brela utilizaci6nde la c_mara
Copia de seguridad de la
memoria interna y del "Memory
Stick Duo"
No apague la Cfilnara ni extraig_ la bateria ni el
"Memory Stick Duo" con la lfimpm'a de acceso
encendida, ya que, de lo conmuio, es posible que
los datos de ]a lnelnoriaimm'na o de] "Memory
Stick Duo" se destruyan. Realicc sielnple una
copia de seguridad desus datos parerprotegelk_s.
Notas sobre la grabacion/
reproduccibn
• AlltCs de COlllcnzilr il gritbiff, rca]ice unil
grabacidn de pmeba pm'a asegurmse de que la
Calll_ll'_lluncioml corl'_ctanlentc.
• EMa CaHliffi1110¢S resistentc id polvo, a las
salpicaduras ni al agua. Lea "Precauciones"
(pfigina 29) allies de utilizar la cfimara.
• Tonga cuidado de no deiar que la cfimara se
moie. Si entra agua en la Cfilnara puede
ocasionar un l,dlo de flmcionamienlo y, ell
algunos casos, no se podrfi rcp_lrar,
• No enloque la cfimara hack, el sol ni hacia otras
luces intcnsas, ya que podrian producirse tallos
de flmcionamiento ell 6sta.
• No utilice la cfimara ccrct_ de un lugar donde
generen ondas de radio fllertes o se emila
rz_diaci6n. Es posible que la cfimara no grabe o
rcproduzca las imfigenes debidamente.
• La utilizacidn de la cfimara en lugares arenosos
o polvoriemos puede ocasionar un Iallo de
|hncionamienlo.
• Si se condensa humedad, eliminela allies de
utilizar la cfimara (pfigina 29).
• No agite ni golpee la cfimara. Ademfis de
producirse un Iallo de flmcionamiento y de no
poder grabar imfigenes, es posible que el soporle
de grabaci6n quede inutilizable o que los datos
de las illlfigenes s¢ eslropeen, se darien o se
pierdan.
• Limpie la superficie del flash antes de utilizarlo.
El calor de la enlisi6n del flash puede hacer que
la superficie del flash se ensucie, que se
descolorc o incluso se puede adherir a ella, 1o
que ocasionarfa una emisi6n de luz insuficienle.
Notas sobre la pantalla LCD y el
objetivo
• Ln pmmdla LCD estll labricada lnediante
tecnologfa de nmy alia prccisi6n, de lbrma que
mils del 99,9WA de los pixeles son operativos
para uso el_:ctivo. No obstmlte, es posible que se
obsel-venconstantmnente ell ]apantaHa LCD
pequefios puntos negros y/o brillantes (bkmcos,
rQios, i/ZU]eS o Vel'des), EsIos pllntos SOll
nol'males en el proceso de tabricaci6n y no
at_ctan ell lnodoa]guno a ]agrabaci6n.
• CumMo b_@ el nivel de la bateria, puede que el
objetivo dcje de moverse. Insertc una balerfa
cargada y vuelva a encender la c&nara.
_Sobre la compatibilidad de datos
de imagenes
• La Cfilnara cumple con la norlna universal DCF
(Design rule 1orCamera File system) definida
pot la JEITA (Japan Electronics and
Information Technology Industries
Associalion).
• Sony no garantiza la reproduccidn ell otros
equipos de imfigenes grabadas con su cfimara y
la rcproducci6n en la cfimara de imfigenes
grabadas o editadas con otros equipos.
Aviso sobre los derechos de
autor
Los progl'amas de televisidn, las peliculas, las
cintas de vkleo y derails materinles pueden estm
protegidos por las leyes de dercchos de autor. La
grabaci6n no aUtOl'izadade tales materia]es puede
ir ell contra de ]o estab]ecido pot ]as]eyes de
dercchos de atltor.
No se ofrecera ninguna
compensacion por dafios en los
contenidos o fallos en la
grabacion
Sony no otrccerfi colnpensacidn alguna pot l,dlos
en la gl'ilbilcidn o p61"dida o dafios ell el COlltellido
grabado debido a algfin tallo de flmckmalniento
de la cfimala o del medio de grabacidn, etc.

indice
Notas sobre la utilizacion de la camara ................................................... 4
Introduccion ..................................................................................... 6
Comprobaci0n de los accesorios suministrados ..................................... 6
1 Preparaci0n de la bateria ...................................................................... 7
2 Insercion de la bateria o de un "Memory Stick Duo"
(no suministrado) ...................................................................................... 8
3 Encendido de la camara y ajuste del reloj .......................................... 10
Toma sencilla de imagenes .......................................................... 11
Dial de modo/Zoom/Flash/Macro/Autodisparador/Pantalla/Cubierta del
objetivo ................................................................................................... 12
Visual izacion/borrado de imagenes ............................................ 14
Acerca de las diversas funciones - HOME/Ment_ ....................... 16
Utilizaci0n de la pantalla HOME ............................................................. 16
Elementos de la pantalla HOME ............................................................ 17
Utilizacion de los elementos del menu ................................................... 18
Elementos del menu ............................................................................... 19
Prestaciones del ordenador ......................................................... 20
Sistemas operativos admitidos para la conexi0n USB y software de
aplicacion (suministrado) ....................................................................... 20
Visualizacion de la "Guia practica de Cyber-shot" ................................ 21
Indicadores de la pantalla ............................................................. 22
Duracion de la bateria y capacidad de la memoria .................... 24
Duracion de la bateria y numero de ima.genes que se pueden
grabar/ver ............................................................................................... 24
Numero de imagenes fijas grabables y tiempo de grabacion de pel[culas
................................................................................................................. 25
Solucion de problemas ................................................................. 27
Bateria y alimentaci0n ............................................................................ 27
Toma de ima.genes fijas/peliculas .......................................................... 28
Visualizacion de imP.genes ..................................................................... 28
Precauciones ................................................................................. 29
Especificaciones ........................................................................... 30

Introducci6n
Comprobaci6nde los accesoriossuministrados
• Cargador de bateria BC-CSGB/BC-CSGC (l) • Bandolera (1)
• Cubierta del objetivo (1)/Anillo adaplador (1)
• Cable de alimenlaci6n (1)
(no suministrado en EE. UU. ni Canadfi)
• Bater_a rccargable NP-BG 1 (1)/
Funda de la bater_a ( 1)
• Tapa del ot_ietivo (1)/Correa de la lapa del
ob.ietivo ( 1)
• Cable USB, A/V para terminal multiuso (1)
• CD-ROM (1)
Software de aplicaci6n Cyber-shot
"Gufa prfctica de Cyber-sbol _
"Gufa avanzada de Cyber-shot"
• Manual de instrucciones (este manual) (1)
Colocaci6n de la handolera y de la tapa del objetivo
Coloque la correa para evitar que la camara caiga y sufra dafios,

1 Preparaci6n de la bateria
0 Introduzca la bateria en el cargador.
OConecte el cargador de la bateria a una toma de pared.
El indicador luminoso CHARGE se enciende y la balerfa empieza a cargarse.
Cuando el indicador luminoso CHARGE se apaga, la carga ha finalizado (Carga normal).
Si sigue cargando la bater_a durante aproximadamenle mils de una hora (hasla que esl_ totalmentc
c_,rgada), bJ c_,rga durarfi un poco ]ntis.
Tiempo de carga
• La tabla anterior lntleslra e] lienlpo necesario para cargar ilna balerfa l£)talmenle vacfa a una te[llperalura
de 25 °C
El tJelI/po de cilrga ptlede set mayor en detcrminadas circunslancias o condJciones de iis(i.
• Consulle en la pfigina 24 el n0]nero de imfigenes que se pueden grabar.
• Conecte el cargador de la batcrfa a la toma de pared mils cercana.
• Aunque la lfimpara CHARGE no estd encendido, el cargador de batcrfa no estarfi desconectado de la
hlenle de alimentaci6n de ca, en tanto que el mismo estd conectado a la toma de corrienlc de la pared. Si
ocurrc algfin problema mientras ulJlJza el cargador de baleria, Jnlerrumpa Jnmedialanlente la alimenlacidn
desconectando la clav0a de la loma de coniente de la pared.
• Cuando la baleria esl_ cargada, desconecle el cable de alimentaci6n de la lwlna de pared y retire la baterfa
del cargador.
• Disefiado para utilizarse con balerias Sony compatibles.

2 Inserci6n de la bateria o de un "Memory Stick Duo"
(no suministrado)
_)Abra la tapa de la bateria/"Memory Stick Duo".
O Inserte el "Memory Stick Duo" (no suministrado).
_)lntroduzca la bateria.
_) Cierre la tapa del compartimiento para la bateria/"Memory Stick Duo".
Cuando no hay insertado un "Memory Stick Duo"
La c:imara graba y reproduce imfigenes con la nlemoria interna (aprox. 31 MB)
+Para comprobar la carga restante de la bateria
Pulse el botdn POWER para encender y comprobar la carga restante en ]a pantalla LCD.
Indicador
de carga
restante
Estado
Carga
suficiente
B at el-_{icasi
[o[{l][nenle
c argada
Batel-_a
medio
cargada
Baterfa baja;
lagrabacidn o
reproducci6n
se detendrfin
pronto.
N I /
/ I \
Cambie la bateria por
otra totalmente
cargada o cargue la
baterfa. (El indicador
de advertencia
parpadea).
• El indicador correcto de ]a carga rcstanle tarda apr()xitlladalllellte un nlilluto ell aparcccr.
• En detcrminadas circunstancias y condiciones de us(). el indicador de ]a carga restante que aparcce podrfa
no ser correcto.
• La pantalla de ajuste del reloi aparece cuando sv enciende la cfimara pot primera vez (pfigina 10).

Para retirar la bateria/"Memory Stick Duo"
Abra 1:1t:q:)_ldel l.'enlpartimiento para ]_Jb_Jtel'fa/"Memory Stick Duo".
"Memory Stick Duo" Bateria
Compruebe que el
indicador luminoso de
acceso no este encendido y
empuje el "Memory Stick
Duo" hacia dentro una vez.
Deslice la palanca de
expulsibn de la bateria.
Tenga cuidado de que no se
caiga la bateria.
• No retire la bateritd"Menloly Stick Duo _cuando el indicador luminoso de acceso est,5 encendido, Podrfa
dafiar los datos del "Mel/_i_J_' Stick Duo'/melnoria interna.

3 Encendidode la c_mara y ajuste del reloj
_]) Pulse POWER.
OAjuste el reloj con el bot6n de control.
1 Seleccione el formato de visualizacidn de ]a leclm con A/V _, a continu:_ci6n, pulse 0.
2 Seleccione cada elemento mediaute 41P", ajuste el valor numdrico con A/V y, a
contiuuacidn, pulse 0.
3 Seleccione [OK]y, a continuaci6n, pulse @.
• La cfimara no dispone de funcidn para superponer lcchas a las imfigenes. AI utilizar "Picture Motion
Browser", incluido en el CD-ROM (suministrado), puede imprimir o guardar imfigenes con la I)cha.
• La medianoche aparece indicada como 12:00 AM y el mediodfa como 12:00 PM.
Para cambiar la fecha y la hora
Pulse el boldn HOME y seleccione [(_) Aiustes del reloj en _ /Ajusles//pfiginas 16 y 17).
Notas sobre cuando la alimentacidn esta activada
• Una vez que se ha instalado la bateria en la cfimara, es posible que debit esperar unos minuIo unles de
poderla utilizar.
• Si no utiliza la cfimara durante unos tres minuto nlientras esI_ fimcionando con baterfa, la cfimara se apaga
uuton/fiticamenle para exitur que la baterfa se descmgue (fimcidn de upagado mUomfitico).
10

Tomasencilladeim genes
_]_ Seleccione la funci6n que desee con el dial de modo.
Para tonlar iln6genes lijas (modo de ajuste autoln_tico): seleccione _1
Para filmar imageries: seleccione _.
OSujete la camara sin moverla y mantenga los brazos en los costados.
SitL_e el motivo en el
centro del cuadro de
enfoque.
f
0 Pulse el bot6n del disparador para tomar la imagen.
Para tonlar iln_genes fijas:
1 Manleuga pulsado el but6n del
disparador hasla la mitad para
realizar el enfuque.
El indicador • (bloqueo AE/AF) (verde)
parpadea, suena un pilido, y el indicador
deja de parpadear y permanece
encendido.
2 Pulse el bol(Sn del disparador a rondo. Indicador bloqueo AE/AF
Para lihnar pellculas:
Pulse el but6n de] disparador a rondo.
Para delener ]a grabaci6u, pulse de nuevo el bot6n del disparador a rondo.
11

Dial de modoFLoom/Flash/Macro/Autodisparador/Pantalla/Cubiertadel
objetivo
+Utilizacion del dial de modo
Ajuste el dial tie modo en la l)mcidn
deseada.
a Ajuste automdtieo
Pcrlnite lonlar inl_genes l_cilnlenle con los
a.iusles establecidos aulomllticamenle.
P Programa automatieo
Pcrmitc lomar im+igenescon laexposici6n
a.iuslada autonl_ticalllentc (la velocidad de
obmraci6n y el wdor de la abermra). Es
posible configurar otros ajustes mediame el
illen(L
M Toma con exposiei6n manual
Pcrmite lomar imfigenes despu_s de @lstar ]a
exposici6n manuahnenle.
Modo pelieula
Pcrlnite grabar pelfculas con sonido,
I_o Alta sensibilidad
Pcrmite lomar inlfigenes sin flash inc]uso ell
condiciones de ihnninaci6n escasa.
@o
,_s Instantanea suave
Pcrmite lomar inlfigenes con unaatm6slcra
lngis suave para retralos de personas, tlores,
etc.
?K_T0madep0rtivaavanzada
Pcrmitc tomar imfigenes medianle la
predicci6n del movinlienlo del motivo y el
ajuste del enffNue.
_'_ Retrato crep0sculo
Pcrmitc lomar imfigenes nflidas de personas
en hlgarcs osctlros Sill perder el ambienle
nocturno.
[] Paisaje
Pcl'lnJte tolnar i[/l_genes elllocando ell Slljetos
lejanos,
SCN* Seleeei6n eseena
Pcrmitc _leccionar un ajuste del mend de
selecci6n de escena.
* Sele¢¢i6nde escenaenmodoSCN
Pulse MENU y seleccione un ajuste.
J Crep0eeulo
Permite lolnar escenas nocturnas sill perder el
alnbielltc llOC[llrno.
___ Playa
Permite tomar escenas en la orilla del mar o
de un lago capmrando el azul d¢l agua con
mayor imensidad.
Nieve
Pernfite tOlil_lr escenas ell ]a niexe COil till
blanco de mayor claridad.
@ Fuegos artificiales
Permite tonlar escenas de megos artiliciales
ell Iodo su esplendor.
+W/T Utilizaci6n del zoom
Pulse T para activar el zoom _ pulse W para
cancelar el zoom. Si pulsa el botdn
ligeramente se amplfa la imagen
lentamente, y si lo pulsa hasta el fondo, se
amplfa rfipidamente.
_ Flash (seleccidn de un modo de
flash para imzigenes fijas)
Pulse P" (_) del botdn tie control varias
veces hasta que se seleccione el modo que
desee.
{NI0 : Flash aut0m_tic0
Dcstclla cuando no hay suficieme luz o luz de
flmdo (ajusle pmdeterminado)
,_: Flash I0rzad0 aetivad0
f_sL:Sincronizaci6n lenta (flash forzado activado)
La xe]ocidad de obturaci6n es lentaell lugares
osctlros para captar con claridad los londos
que se cncllcnlran luera de] alcance de la hlz
del flash.
(_: Flash forzado desactivado
• Ctlando se utiliza el Ilash, este se levanla
automfilicamentc y destclla. Cierre el flash
con la inano despuds de utilizarlo.
12

_Macro (toma de primeros
pianos)
Pulse 4 (_,_) del botdn de control wwias
veces hasta que se seleccioue el modo que
desee.
_o_:: Macrodesactivado
_: Macroactivado(ladoW:aprox.2cm om_s
lejosdesdeelobjetivo,ladoT:aprox.90cmom_s
lejosdesdeelobjetivo)
__)Utilizacibn del autodisparador
Pulse •/_V)) del botdn tie control varias
veces hasta que se seleccioue el modo que
desee.
_(_FF:noseutilizael autodisparador
Go: seajustaelautodisparadorde10s (segundo)
deretardo
_2: seajustaelautodisparadorde2s (segundo)
deretardo
Si pulsa el botdn del disp:wador, el
iudicador lumiuoso del autodisparador
parpadearfi y sonarfi un pitido hasta que
funcione el disparador.
Colocacion de la cubierta del
objetivo
1Coloque el :millo adaptador con ]a
alimentaci6u desactiwtda.
Anillo adaptador
2 Coloque 1:,cubierta del objetivo tal y
como se muestra a contiuuaci6u y gfrela
hacia la derecha hasta que euc;tie.
Cubierta del objetivo
DISP Cambio de la visualizacibn
en pantalla
Pulse •/DISP) de] botdn de control.
Cada vez que pulse el bot6n • (DISP), la
pautalla y el brillo cambiarfin de la
siguieute mauera:
*-Con indicadores
Con indicadores*
Con histograma*
-Sin iudicadores*
* Aumento del brillo de la luz de flmdo de la
pantalla LCD.
Almacenamiento de la cubierta del
objetivo
Coloque la cubierta del objetivo tal y como
se muestra a contiuuaci6n y gfrela hacia la
derecha hasta que enca.je.
13

Visualizaci6n/borradodeim genes
0 Pulse [_ (Reproducci6n).
Si se pulsa [_ cuando la c&l;ara est_ apagada+ la c_m+u'a se enciende automfiticamente en modo de
reproducci6n. Para pasar al modo de toma de imzigenes, pulse [_ otra vez.
0 Seleccione una imagen mediante 41/_ del bot6n de control.
Pelicula:
Pulse • para reproducir peliculas. (Pulse • de nue_o para detcner la rcpmducci(m).
Pulse • para avanzar rfipidamente, • para mbobinar. (Pulse • para regresar a la reproduccidn normal).
Pulse • para visualizar la panlalla de control de volumen y. a conlinuaci6n, pul_ •/• para ajustar el
VO] Ulllen.
_ Para borrar imfigenes
1 Visualice la im:,genque desee borrar y pulse MENU.
2 Seleccione _ [Borrar] con•. seleccione [Esta ima] con41/_.y, a continuaci6n pulse @.
3 Seleccione [OK]con • y, a continuaci6n, pulse @.
_+_ Para visualizar una imagen ampliada (zoom de reproduccion)
Pulse _ mientr:,s sevisu:,liza un:, im:,genfija. Para cancel:u"el zoom. pulse(_.
Ajuste la posici6ncon •/V/4U),..
Para cancelar elzoom de reproducci6n, pulse 9).
14

_Para visualizar una pantalla de indice
Pulse [] (]udice) para que aparezca la pantalla de fi_dice mientras se visualiza una imagen
fija.
A coutinuaci6n, seleccione una imagen cun •/V/41_'.
Para velvet a la pantalla de una sola imagen, pulse O.
• Cada vezque pulse [] (Jndice),aumenlarfiel nfimerode imfigenesqueaparece en lapamalla de fndice.
Para borrar imagenes en el modo de indice
1 Pulse MENU cu:mde se muestre la pantnlla de fndice.
2 Seleccione [Borrar] con • y seleccione [Mfiltiples imfigenes] cun ,,ll/_,, a continuaci6n,
pulse @.
3 Seleccione la imagen que desee borrar cun •lVl41_ y, a centinuaci6n, pulse 0.
La marca _/" aparcccrfien el cuadrode verificaci6n de la imagen.
Para cancelar la selecci6n de una imagen, seleccione laimagen que habfa marcadopara borrary pulse •
otra vex.
4 Pulse MENU, seleccione [OKI con • y, a continuaci6n, pulse 0.
• Paraborrarlodas las imfigenesde una carpeta,_leccione [TodoEnEsla Carpetal y pulse • en el paso 2.
+Para reproducir una serie de imagenes (Diapositivas)
1 Seleccioee 1_ Diapositivas] ee 113/Visienadu tie imfigs.) en la pantalla HOME.
2 Selecciene [Inicio] cun• y, a centinuaci6n, pulse 0.
La mfisica cambiarfi junto con [Efcctes]. Tambidn puede transfcrir y cambiar la mfisica para
seleccionar la que prefiera. Para obteuer mils informaci6n sobre c6mo cambiar la mfisica.
consulte la Ayuda de "Music Transfer" incluida en el CD-ROM (suministrado/.
+Para visualizar imagenes en el televisor
Cunecte la cfimara al televisor mediante el cable para terminal multiusu/suministradu/.
AI conector mOItiple
A las tomas de entrada
de audio/vfdeo
Cable para terminal multiuso (suministrado)
Para ver imfigenes en un televisor HD (Alta definicidn), es necesario disponer de un (:able de
adaptador de salida HD/nu suministrade).
• Si i_iusla el tamafio de ]a imagen en [16:91, podrfi grabar las imfigenes en un tanmrio que llene toda ]a
pantalla del lelevisor HD.
• No es posible visualizar pelfculas emilklas en lk>rlnalo de serial [HD! 1080i)]. Aiuste [COMPONENT] en
[SDI al fihnar pelfculas.
15

Acercadelasdiversasfunciones- HOME/MenG
Utilizaci6nde la pantalla HOME
La panlalla HOME es la panlalla tie acceso a Iodas las funciones tie la cfimara, yes posible
acceder a ella independientenlente del _jusle del modo (toma/visualizaci6n).
_]} Pulse HOME para visualizar la pantalla HOME.
ioria
Elemento
Guia
O Seleccione una categoria mediante 41/_.del bot6n de control.
Seleccione un elemento con A/T y, a continuaci6n, pulse O.
_{AI seleccionar la categoria _ (Gestion de memoria) o _- (Ajustes)
16
1 Seleccione el elemento deseado con A/V.
• Esto solo lullcionargiorlandoseleccione _,_ (Ajusles).
2 Pulse P"y seleccione el ajuste deseado con A/V y, a continuaci6n, pulse @.
3 Seleccione un :tjuste con A/V y, a continuaci6n, pulse O.
• La cfimarase ajustaen el modo de lomao de visualizaci6n de imzigenespulsando HOME de nuevo.

Para obtenerm_sinformaci6nacercade/[uncionamiento_ p_gina 16
Elementosdela pantalla HOME
Si pulsa el bot(m HOME aparecerfin los siguientes elementos. La gufa mostrarfi en p:mtalla
detalles sobre los elementos.
a Tomade imagen
z'_ Visionadode im_gs.
,b, Impresi6n,Otros
Gesti6nde memoria
_=_Ajustes
Toma de hIl_lgen
hnagen sencilla
Visualizaci6n indice
Diapositivas
hnprimir
Hevramienta mfisica
Desc mt_sica Format mt_si
Herramienta ii/etil()ria
Her Memo U Stick
Formatear CrearCarp. Grabaci6n
Camb. Carp. Grab Copiar
Herr.lnelnori t intema
Sormatear
Ajustes principales
Ajustes principales 1
Pitido Gu/a funciones
lnicializar
Ajustes principales 2
Conexi6n USB COMPONENT
Salida vfdeo
Ajustes de toma imag.
Ajustes de toma de imagen 1
lluminador AF Cuadricula
Modo AF Zoom digital
Objetivo conver
Ajustes de toma de imagen 2
Orient. aurora. Revisi6n autom
Ajustes del reloj
Language Setting
17

Utilizaci6nde 10selement0sdel men_
OPulse MENU para visualizar el mena.
Guia funci6n
• E] l/lel]t_l S()]() Sg llltles[r_[ d[ll'_[ll[e C] ll]odo de [o11]_[ de Jl]fltl_CllCS y reprodtlcci6n.
• En funci6n del modo svleccionado, se hal'fill visibles dilErentes elementos.
O Seleccione el elemento deseado con _hJV del bot6n de control.
• Si el elemento deseado estfi oculto, siga pulsando &/Y hasta que el elemento aparezca en la pantalla.
_) Seleccione un ajuste con <1/_.
• Si el elemento deseado estfi oculto, siga pulsando _/1_ hasta que el elemento aparezca en la pantalla.
• Seleccione un elemento en el modo de reproducci6n y pul_ O.
_) Pulse MENU para desactivar el menU.
18

Para obtenerm_si/#ormaci6nacercade/[m_donamiento(_ p_gina 18
Elementosdel men_
Los elementos del memi disponibles varfan en funci6n del _{justedel modo (toma/
visualizaci6n) y de la posici6n del dial de modo en el modo de toma de im:igenes. En la
pantalla solamente se visualizan los elementos disponibles.
Men_detomade im_genes
Selecci6n escena Permite seleccionar los ajustes preajustados para adaptarse a
varias condiciones de escena.
Tam imagen Selecciona el tamafio de la imagen fija.
Deteccion de cara Detecta las caras de los sujetos y ajusta el enfoque, etc.
Modo Grabaci6n Selecciona el metodo de toma continua de imagenes.
Modo color Cambia la intensidad de la imagen o afiade efectos especiales.
ISO Selecciona la sensibilidad luminosa.
EV Ajusta la exposici6n.
Modo medicion Selecciona el modo de medici6n.
Enfoque Cambia el metodo de enfoque.
Balance Blanco Ajusta los tonos del color.
Nivel flash Permite ajustar la cantidad de luz del flash.
Reducci6n ojos rojos Permite reducir el efecto ojos rojos.
Contraste Ajusta el contraste de la imagen.
Nitidez Ajusta la nitidez de la imagen.
SteadyShot Selecciona el modo de toma estable.
SETUP Selecciona los ajustes de toma de iron,genes.
Men_devisualizaci6n
(Borrar) Borra im_genes.
(Diapositivas) Reproduce una serie de imagenes.
E_ (Retocar) Retoca img._genes.
oa" (Proteger) Impide el borrado accidental.
DPOF Permite afiadir una marca de orden de impresi6n a la imagen
que desea imprimir.
_t, (Imprimir) Imprime img_genes mediante una impresora corr_patible con
PictBridge.
(Rotar) Gira una imagen fija.
(Seleccionar carpeta) Selecciona la carpeta de visualizaci6n de imagenes.
lg

Prestacionesdel ordenador
Las imfigenes tomadas con la cfimara se pueden ver en el ordenador. Mediante la milizaci6n
del software incluido en el CD-ROM (suministrado), es posible disfrutar de imfigenes fijas y
pelfculas desde la c_imara mils que nunca. Para obtener informacidn detallada, consulte la
"Gufa prfictica de Cyber-shot" incluida en el CD-ROM (suministrado).
Sistemasoperativos admitidospara la conexi6nUSBy softwarede
aplicaci6n(suministrado)
Conexi6nUSB
Software de aplicaci6n
"Picture Motion
Browser"
Para usuarios deWindows
Windo_ s 2000 Professional SP4+
Windows XP* SPZ Windows
Vista*
Windows 2000 Professional SP4,
Windows XP* SPZ Windm_ s
Vista*
ParausuariosdeMacintosh
Mac OS 9.1/9.2/Mac OS X (vlO. l
a x 10.5)
incompalible
Las ediciones de 64 bits y Starter (Editkm) no son compatibles.
• El ordenador debe contener illlOde los sislenlas operativos enumerados alltel+iornlente preinstalados, gas
actualizaciones de los sislemas operativos no son compatibles.
• Si el sistema operativo no admite conexiones USB, copie las imfigenes introduciendo el "Memory Stick
Duo" en la ranura para Memol y Stick del ordenador o bien utilice un lector de Memoly Stick disponible
en el mercudo+
• Para obtcner mils inlormacidn sobre el entorno operativo de la aplicaci6n de soltware "Picture Motkm
Browser" para Cyber-shot, consulte la "Oufa prfictica de Cyber-shoU.
2O

_ Visualizaci6nde la "Guia pr_cticadeCyber-sh0t"
La "Gu/a prfictica de Cyber-shot" incluida
en el CD-ROM (suministrado) explica
detalladamente c6mo utilizar la cfimara.
Para poder visualizarla, es necesario
disponer de Adobe Reader.
_{Para usuarios de Windows
1 Encienda el ordenador einserte el CD-
ROM (suministrado) en la unidad de CD-
ROM.
_{Para usuarios de Macintosh
1 Encienda el ordenador e inserte el CD-
ROM (suministrado) en la unidad de CD-
ROM.
2 Seleccione la carpeta [Handbook] y copie
el archivo "Handbook.pdf' ahnacenado en
la carpeta [ESI de su ordenador.
3 Una vez finalizada la copia, haga doble
clic en "Handbook.pdf'.
Aparece la pantalla siguiente.
Si hace clic ell el bot6n [Cyber-shol
Handbook], aparecerfi la pantalla para copiar
la "Gufa prfictica de Cyber-shol '.
2 Siga las instrucciones de la pantalla para
rcalizar la copia.
• AI inslalar la "Guia pr_ictica de Cyber-shot',
la "Gufa avan/ada de Cyber-shot" se
instalarfi automfilicamente,
3 Una vez finalizada la instalaci6m haga
doble clic en el acceso dirccto creado en el
escritorio.
21

Indicadoresdela pantalla
Cada vez que pulse • (DISP) del botdn de
coulrol, la visualizacidn cambiarfi
/pfigina 13).
Cuando se toman imfigenes fijas
Xb
• Is_a_o Rgl 12sF3.S+2.0EV_
_{Cuando se filman peliculas
Cuando se reproduce
101-0012 2008 1 1 9:30 AM
4) BACK/NEXT _ VOLUME
[]
Bateria restame
Advertencia de poca bateria
_'.'2 _5_ Tamafio de imagen
I_'O I_ ?_; _ Did de modo/mcnti
_!:ii:
P M Dial de modo
÷}i-"_ _1 _ Balance dcl blanco
[_ _oP_ _,s_.7 Modo RMaga/modo
_._ Bracket
[] [] Modo de medicidn
[_1 Delecci6n de cara
((_, ((_o;_ SteadyShot
((_ Avis() de vibracidn
Relaci6n del zoom
x1,3 sq pq
V_ N_ Modo dc color
_d( Conexi6n PictBridge
0.,, Protecci6n
VOL. ll|ll|lb- Volumen
DPOF Marca de ordcn de
impresi6n (DPOF)
0_X1,3 Relacidn del zoom
@ Conexi6n PictBridge
[_= [_,4, Nitidez
22

[]
,_ _1_- Modo de ajuste de la
exposicidn manual
• RETURN Gufa de fimci6n para la
• SET exposicidn manual
1,0m Distancia de enfoque
predcfinida
• Bloqueo AE/AF
180400 N0mero ISO
[_ Obmraci6n lenta NR
125 Velocidad de obturacidn
F3,5 Valor de abertura
+2,0E7 Valor de exposicidn
M M _ Indicador del cuadro del
visor de rango AF
_ Macro
Reproducci6n
i _ i Barra de reproducci6n
Espera Modo en espera/grabaci6n
GRABAR de una pelfcula
0:12 Tiempo de grabaci6n
(rain (minuto) : s (segundo))
Histograma
• [] apamce cuando la
visualizacidn del
histogrmna eslfi
desaclivada.
101-0012 Nfimero de carpeta-archivo
2008 1 1 Fecha/hora grabada en la
9:30 AM imagen en rcproduccidn
• STOP Gufa de funcidn para
• PLAY rcproducir imfigenes
-_ BACKNE×TPermitenseleccionar
imfigenes
• VOLUME Permite :tjustar d vohunen
[]
1_] _ Grabacidn/reproduccidn de
soportes ("Memo U Stick
Duo", memoria interna)
_il Carpeta de grabaci6n
_ Carpeta de rcproducci6n
g6 Nthnero de imSgenes
grabables
12/12 NOmero deimagen/Nfimero
de imfigenes grabadas en la
carpeta seleccionada
00:25:05 Tiempo de grabacidn
Ih (hora) : rain (minuto) :
s (segundo))
_ [_ Cambiar carpeta
)5oN lluminador AF
(_ Reduccidn del efccto ojos
rqios
[] [] Modo de medici6n
_SL @ Modo de flash
Carga del flash
_WB "i_" _ Balance del blanc()
SwB
C:32:00 Visualizacidn de
autodiagn6stico
IS0400 Nthnero ISO
+2,0EV Valor de exposici6n
500 Velocidad de obturacidn
F3,5 Valor de aberlura
[_C _ [_W Objctivo de convcrsidn
[]
C:32:00 Visualizacidn de
autodiagn6stico
_o <'_-)2 Autodisparador
Cuadro del visor de rango
AF
i i
+ Cruz filial de medici6n de
foco
Histograma
23

Duraci6ndela bateriay capacidadde la
memoria
Duraci6nde la bateriay n_merodeim;igenesque se puedengrabar/ver
Los mimeros que figuran en las siguientes
tablas corresponden a la utilizaci6n de una
bater/a completamente cargada
(suministrada) a una temperamra ambiente
de 25 °(7
Los mimeros mostrados de im:igenes que
pueden grabarse o verse son
aproximaciones y en ellos se tiene en
cuenta el cambio de "Memory Stick Duo"
segfin sea necesario.
Tenga en cuenta que es posible que el
nfimero real sea menor que el indicado en la
tabla en funci6n de las condiciones de uso.
Cuando se toman imagenes fijas
Notas sobre la bater(a
• La capacidad de la baterfa disminuye con el uso
y el paso del tienlpo.
• El mhnmo de iron,genes que se pueden grabar/
vet y la duraci(m de la baleria disminuyen en las
condiciones siguienles:
La temperatura del entorno es b_ia.
El flash _ utiliza fiecuenlemenle.
La c_imara ha sido encendida y apagada
i/luchas veces.
El zoom es ulilizado ffccuentemenle.
El brillo de la luz de londo de la pantalla LCD
eslll i{iustado en un hive] alto.
[Modo AFI estfi ajuslado en [Monitor].
[SteadyShotl estfi ajustado en [Continuo].
La baterfa liene poca polencfiL
[Detecci6n de caral estfi ujustado ell [Activarl.
24
• Tomando imdgenes en las siguienles
siluaciones:
[Modo Grabaci6n] eslfi ajustado en [Normal]
[Modo AF] eslfi ajustado en [Sencillo].
[SleadyShot] estfi @lslado en [Tomando].
Tomando una imagen cada 30 s (segundo)
Se cambia el ZOOll/allernativamenle entre los
extrcnlos W y T.
El flash destella una de cuda dos veces.
La alinlcnlaci6n se activa y desacliva una de
cada diez veces.
• El mdtodo de medici6n eslfi basado en el
eslfindar CIPA.
(CIPA: Camera & Imaging Products
Associalion)
• El nfimero de im5genes y la vida fitil de la
balerfa no cambian, independienlemenlc del
tamafio de la imagen.
Cuando se ven imagenes fijas
1
• Visualizaci6n de imfigenes individuales en
orden a inlervalos de unos trcs s (segundo)

N_mer0 de im;_genesfijas grabablesy tiemp0 de graba¢i6ndepeliculas
E1mhnero de im:igenes fijas y la duraci6n de las pelfculas pueden variar en funci6n de las
condiciones de toma de imfigenes.
• Aunque la capacidad del soporte de grabaci6n sea la misma que la que figura en la siguiente tabla, es
posible que el nOmero de imfigenes fijas y la duraci6n de las pelfculas sea dilcrcnte.
• Es posible seleccionar el tamafio de la imagen desde el menli (pfiginas 18, 19).
Nt_mero aproximado de imagenes fijas grabables
(Unidades: im:igenes)
8M I0 40 72 15(} 306 618 1223 2457
3:2 I0 40 72 15(} 306 618 1223 2457
5M 13 51 92 191 39(1 787 1557 3127
3M 21 82 148 306 626 1262 2498 5017
VGA 202 790 1428 2941 6013 12120 2398(} 48160
16:9 33 133 238 49(} 1002 2020 3997 8(}27
• El nOmero de imligenes indicado corlx:sponde a cuando [Modo Grabaci6n] estfi ajustado en [Normal].
• Cuando el mhnero de imfigenes restantes que pueden tomarse es superior a 9 999. aparcce el indicador
">9999".
• Cuando _ mproduzcan en esta cfimara imfigenes grabadas utilizando modelos Sony anteriores, es posible
que ]as inl_genes no aparezc_m con su tanlafio real.
25

_Tiempo de grabacibn aproximado de las peliculas
Los nfimeros que aparecen en la siguiente tabla muestmn el tiempo mfiximo aproxinmdo que
es posible grabar obtenido mediante la suma de todos los archivos de pelfculas. E1 tiempo
mfiximo durante el que es posible grabar de manera continua es de aproximadamente 10
minlltO
(Unidades: h (hora) : rain (minuto) : s (segundo))
640(Fina) 0:02:50 0:06:00 0:12:30 0:25:10 0:49:50 1:40:20
640(Estfindar) 0:01:30 0:05:50 0:10:40 (t:22:(t(t 0:45:00 1:30:50 2:59:5(t 6:01:10
32(1 0:06:00 0:23:40 0:42:50 1:28:10 3:(t(t:2(t 6:03:30 11:59:30 24:04:50
• Las pelfculas con el tamafio ajustado en [640(Fina)] solo pueden grabar_ en un "Memory Slick PRO
Duo ++,
• La cgit/lal+ano es compatible con la grabaci6n ni la rcproducci6n de pelfculas en fornlato HD (alta
deflnici6n).
26

Soluci6ndeproblemas
Si tiene algfin problema con la cfimara, intente primero las siguientes soluciones.
O ComprnebeInselementossiguientesy consnltela"Gnia pr_cticade Cyher-
shot"(PDF).
Si ap:wece un c6digo como "C/E:DD:DD" en la pantalla, consulte la "Gufa prfictica
de Cyber-shot".
O Extraigala bateria,espereaproximadamenteunminnto
vuelvaa insertarlay, acontinuaci6n,¢onectelaalimentaci6n.
O InicialiceInsajustes(p_gina17).
O Consnlteconel distrihnidorde Sonyocon laoficinadeserviciolocal
antorizadadeSony.
1
Le rogamos que emienda que usted da su consentimiento a que el contenido de la memoria
interna, incluidos los archivos de mfisica, pueda set comprobado cuando envfa la cfimara para
repararla.
No es posible insertar la bateria.
• lnscrte la bateria corrcctamentc de modo que 6sla presione la palanca deexpulsi6n dc la
balerfa (pfigina 8).
No es posible encender la c_mara.
• Dcspuds dc instalar la bateria cn la ciln/ala, la c;imala puede tardar cierlo ticmpo cn
cnCcllderse.
• lnserte la bateria correctamente (p_igina 8).
• La bateria est:i descargada, lnserie una bateria cargada (p_igina 7).
• La baterfa ha Ilegado al final de su vkla fitil. Reemplficela por una nueva.
• Utilice una de las baterfas rccomendadas.
La alimentaci6n se desconecta de repente.
• Si no utiliza la cfimara durante unos tres minuto mientras cstfi conectada la alimentacidn, la
cfimara se apaga automfiticamente para evitar que la baterfa se descargue. Encienda la cfimara
de nuevo (pfigina 10).
• La baterfa ha Ilegado al final de su vida fitil. Reemplficela por una nueva.
27

El indicador de bateria restante es incorrecto.
• Este fen6mcno ocurrc cuando utiliza ]a cfimara cn un lugar muy cfilido o tony frio.
• La carga de baterfa restante que se indica difiere de la actual. Descargue la baterfa totalmente
y vuelva a cargarla para corrcgir la indicaci6n.
• La bateria est_ descargada. Inserle la baterfa cargada (pfigina 7).
• La bateria ha llegado al final tie su vida fitih Reemplficela por una nue':a.
No es posible cargar la bateria.
• No cs posiblc cargar la batcria mediantc el adaptador dc alimcntacidn tic ca (no suministrado).
La c_mara no puede grabar imfigenes.
• Compruebc Ii capacidad libre tic la memoria intcrna o el "Memor? Stick Duo' (p_igina25). Si
est_n llenos, tome una tie las siguientes medidas:
Borre las imfigenes innecesarias (pfigina 14).
Cambie el "Memory Stick Duo".
• No es posible grabar imfigenes mientras se carga el flash.
• Cuando tome una imagen fija, _(justeel dial de modo en una poslci6n distinta tie _.
• Ajuste el dial de modo en _ cuando tome peliculas.
• E1tamano de imagen estfi ajustado en [640(Fina)] cuando est_igrabando peliculas. Realice
uno tie los procedimientos siguientes:
Ajuste el tamafio de imagen en uno distinto tie [640(Fina)].
lnserte un "Memo U Stick PRO Duo".
Aparece ruido en la imagen cuando ve la pantalla en un lugar oscuro.
• Est_iocurriendo el fcn6meno de borrosidad de la imagen y apareccn en dsta rayas blancas,
negras, rojas, moradas o tie otro tipo. No afccta a la imagen grabada.
La cfimara no puede reproducir imagenes.
• Pulse [] (Reproducci6n) (p_igina 14).
• El nombrc de la carpela o del archivo ha sido modificado en el ordenador.
• Si se ha procesado un archivo de imagen con un ordenador o si seha grabado el archivo de
imagen con un modelo distinto al de la cfimara, Sony no garantiza lareproducci6n en esta
ci_mara.
• La cfimara se encuentra en el modo USB. Elimine la conexidn USB.
28

Precauciones
No utilice/almacene la camara en
los siguientes lugares
• Ell hlgaB:s extrcnladalnente caJ/irosos, fl'fos o
hdnledos
En hlgares tales colno ell un autoln6vil
estacionado bajo el sol, es posible que el cure,x)
de la cfimara se delbrme, 1o que podrfa provocar
un hdlo de funcionamienlo.
• Bajo la luz solar directa o cerca de una estula
El cuerpo de la cfimara puede decolorarse o
delormar_ y esto puede ocasionar un IMIo de
fllllcionanliento.
• En un lugar expueslo a vibraci6n basculanle
• Cerca de un lugar magn_tico intenso
• Ell lugarcs arcnosos o polvorientos
Procure que no entre arena o polvo ell la c_mara,
Esto podria ocasionar un lallo de
fllncionanfienlo ell la Cfilllara que, ell algunos
casos, no podrfa rcparar_.
Acerca de la limpieza
Limpieza de la pantalla LCD
Limpie la superficie de ]a pantalla con un kit de
limpieza para pamallas LCD (no suministrado)
para elinfinar huellas dactilares, polx o, etc,
Limpieza del objetivo
Limpie el objeli_ o con un patio suave para
eliminar huellas dactilares, polvo, etc.
Limpieza de la superficie de la camara
Limpie hi superlicie de la c&nara con un patio
suave ligeramente humedecMo con agua y, a
continuacidn, pfisele un patio seco. Para evitar
dafiar el acabado o la c@,:
No exponga la cfimara a productos quimicos
lales como diluyenle, bencina, alcohol, patios
desechables, repelentc de insectos, bronceador
con filtro solar, insecticida, etc.
No toque la c_tllara con ]_ls sustancias
anleriores ell la nlano,
No dcje la cfimara en conlaOo con objetos de
gonla o Villi]() dtlranle un liell/po prolongado,
Acerca de la temperatura de
funcionamiento
La cfimara ha sido disetiada Dira utilizarse con
temperamras de entrc 0 °C y 40 _'C
No _ l'econlienda tonlar hlli_gelleS ell hlg_lrcs
extrelnad_llnente lr_os o calurosos que excedall
este rango.
Acerca de la condensacion de
humedad
Si _ traslada la cfimara directamentc de un lugar
trio a uno cfilido, es posible que se condense
hunledad en el interior o el exterior de la cfimara,
Esla condensaci6n de humedad podrfa ocaskmar
un lallo de funcionanfienlo en la cfimara.
Si se produce condensacion de humedad
Apague la cfimara y esperc urn, him,
aproximadamcnle hasla que la humedad se
evapore. Wenga ell cuenta que si intema tonlar
imfigenes cuando afln quede humedad en el
interior del objetivo, no podrfi grabar imfigenes
claras.
Acerca de la bateria interna
recargable de reserva
Lit Cfilnara tiene una balel"/a intel"na recargable
[Xll'a nlantener la l_ctla y lit hora. ils_ colno otros
ajusles independientemente de si la alimenlacidn
est_ COllect;Ida o desconeckldm
Esta bateffa recargable se carga continuamente
sienlpre que estfi utilizando la c&nara. Sin
embargo, si utiliza hi cfinlara solamente durante
perk_dos cortos, _sta se descargarfi gradua]nlcme,
y si no ]a ufiliza en absohno durante un rues, se
descargal'_ COlllplel,,inlentc. Ell esle caso,
asegfire_ de cm'gar ]a baterh_ recargab]e antes de
utili/ar la cfimara,
Sin embargo, aunque ]a baterfa recto'gable no est_
cargada, podrfi utilizar ]Zlcfinlara siemprc y
cllallldO llO grabe la lecha y la hora.
Metodo de carga de la bateria interna
recargable de reserva
hlsertc la baterfa cargada ell la cfimara y, a
conlinuaci6n, d_jela apagada duranle 24 h (hora)
o liltS.
29

Especificaciones
C_imara
[Sistema]
Dispositi_o de ilnagen: CCD de color de 7,18 mm
(tipo 1/2,5), liltro de color prinmrio
Nfimero totld de pixeles de la cfimlu'a:
Aprox. 8 286 (,_,_1pixeles
Nfimero elcctivo de pixeles de la cfimarz_:
Aprox. 8 083 (,_,_1pixeles
Obietivo: ,&ietivo zoom Carl Zeiss Vario-Tcssar
de 10× f = 6,3 63 mm (38 380 mm
(equivaleme a pelfcula de 35 ram))
F3,5 (W) 4,4 (T)
Control de exposici6n: exposici6n automdtica,
selecci6n de escenas (9 modos)
Balance del blanco: autoznfitico, luz diurna,
nuboso, fluorcscente 1,2,3, incandesceme,
flash
Pormalo de archivo (cumple con el eslfindar
DCF):
llnfigenes fijas: Exif versi6n 2,21 cumple con
el estfindar JPEG y es compatible con DPOF
Pcliculas: cumple con el estfindar MPEGI
(monoaun,l)
Soportes de grabaci6n: memoria inlerna (aprox.
31 MB)
"Memory Stick Duo"
Flash: alcance del fl_sh (Sensibilklad ISO (Indice
de exposici6n recomendado) ajustado en
automfitico): aprox, de 0,2 a 7,0 m (W)/aprox.
de 0,9 a 5,6 m (T)
[Conectoresdeentraday salida]
Conector mfilliple: S_,lida de vkleo
Salida de audio (nKinoatlrid)
Conmnicacidn USB
Conmnicaci6n USB: Hi-Speed USB (cumple con
el eslfindar USB 2.0)
[PantallaLCD]
Panel LCD: unidad de TFT de 7,5 cm (lipo 3,0)
NOmero tolal de punlos: 230 400 (960 x 240)
pUlllOS
[Alimentaci6n,general]
Alimenlaci6n: balel'ia lvcargable NP-BGI, 3Z_ V
Adaptz_dor de alimemaci6n de ca
AC-LS5K (no suzninistrado), 4,2 V
Consulno de energkl (duranle la toma de
imfigenes): 0,97 W
Tclnperamra de fimcionamiento: de 0 a 40 °C
Tclllperalura de ahllacenallliento:
de 20 °C a +60 °C
Dimenskmes: 106,0 x 68,5 x 48,9 rain
(an/al/prf, sin induir partes saliemes)
Peso: aprox. 381 g (inchfida la baterfa NP-BG1, la
corlva, el anillo adaptador, la cubierta del
objetivo y la tapa del objetivo, etc.)
Micr6lono:/llonoaural
A]ta'voz: monoaural
Exif Print: compatible
PRINT linage Matching III: compatible
PictBridge: compatible
Cargador de bateria BC-CSGB/BC-
CSGC
Requisitos de alimenlaci6n: ca de ltlO V _1240 V
50160 Hz
2,6 W (BC-CSGB)/2 W (BC-CSGC)
Tcnsi6n de salida: cc de 4,2 V
0,25 A
Tcmperatura de flmcionamienlo: de 0 a 40 °C
Tcmperzltura de ahllacenamiento:
de 20 °C a +60 °C
Dimensiones: aprox. 62 × 24 x 91 mm
(an/al/prl)
Peso: apmx. 75 g
Bateria recargable NP-BG1
Batcrfa utili,'ada: balerfa de iones de litio
Tcnsi6n mfixima: cc de 4,2 V
Tcnsi6n nonlinal: cc de 3,6 V
Capacidad: 3,4 Wh (960 mAh)
El di_fio y las especificaciones estfin sujetos a
canlbios sill previo aviso.
3O

Marcas comerciales
• CM_sh_ y "Cyber-sh,_t" son marc_s
comerci_des de Sony Corpormion.
• "Menloly Slick _, _,_, "Melnol)' Stick PRO",
MEMORY STIEK PRO,"Melno_5'Stick Duo",
MEMORY STICK DUO, "Melnory Stick PRO
Duo", MEMORY STI[K PRO 0U[1, "Memory
Stick PRO-HG Duo",
MEMORYSTIll( PRO -Hi] nUO, "Memory Slick
Micro". "MagicGate" y _lz_,G ICIGA_.TE son
illarc_l _, conlcrciales de Sony Corporatk)n.
• MicrosoLk Windows, DirectX y Windows Vista
son n/arcas conlerciales o marcas comerciales
regislradas de Microsoll Corporalion en los
Estados Unidos y/o en otros panes.
• Macintosh, Mac OS. iMac, iBook, PowerBook.
Power Mac y eMac son marcas comerciales o
marcas comerciales registradas de Apple lnc,
• lntel, MMX y Pentium son marcas comerciales
o marcas comerciales registradas de lnlel
Corporalion,
• Adobe y Reader son lnarcas comerciales o
marcas comerciales registradas de Adobe
Syslems lncorporaled en los Estados Unidos o
en otros paf_s.
• Ademfis, los nombres de sislemas y productos
ulilizados en este nlanua] son, en general.
inarcCN comerckdes o marcas conlerciales
registradas de siis respectivos programadores o
hlbricanles, Sill embargo. ]as lnarcas IM O @ I]O
se ulilizan en Iv)dos los casos en este manllal.
31

-
 1
1
-
 2
2
-
 3
3
-
 4
4
-
 5
5
-
 6
6
-
 7
7
-
 8
8
-
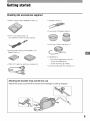 9
9
-
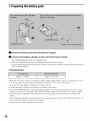 10
10
-
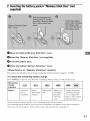 11
11
-
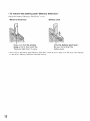 12
12
-
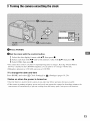 13
13
-
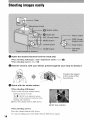 14
14
-
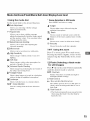 15
15
-
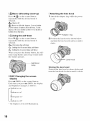 16
16
-
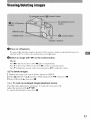 17
17
-
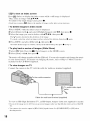 18
18
-
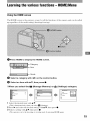 19
19
-
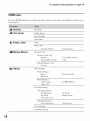 20
20
-
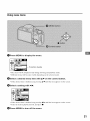 21
21
-
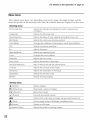 22
22
-
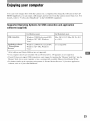 23
23
-
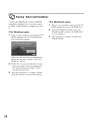 24
24
-
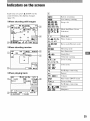 25
25
-
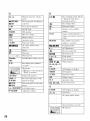 26
26
-
 27
27
-
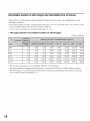 28
28
-
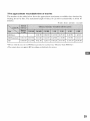 29
29
-
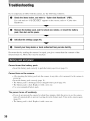 30
30
-
 31
31
-
 32
32
-
 33
33
-
 34
34
-
 35
35
-
 36
36
-
 37
37
-
 38
38
-
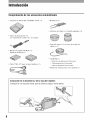 39
39
-
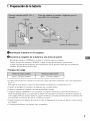 40
40
-
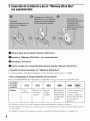 41
41
-
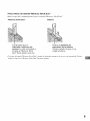 42
42
-
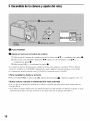 43
43
-
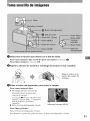 44
44
-
 45
45
-
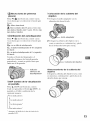 46
46
-
 47
47
-
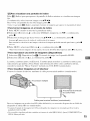 48
48
-
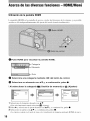 49
49
-
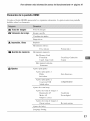 50
50
-
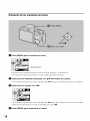 51
51
-
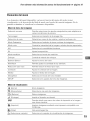 52
52
-
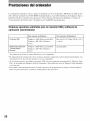 53
53
-
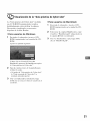 54
54
-
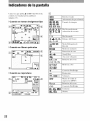 55
55
-
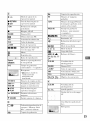 56
56
-
 57
57
-
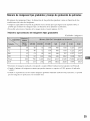 58
58
-
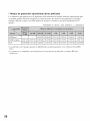 59
59
-
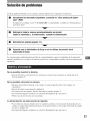 60
60
-
 61
61
-
 62
62
-
 63
63
-
 64
64
-
 65
65


Sony DSC-H10 El manual del propietario
- Categoría
- Videocámaras
- Tipo
- El manual del propietario
en otros idiomas
- English: Sony DSC-H10 Owner's manual
Artículos relacionados
-
Sony Cyber Shot DSC-H3 Instrucciones de operación
-
-
-
-
-
-
-
Sony DSC-HX1 El manual del propietario
-
-