Craftsman 917.387260 El manual del propietario
- Categoría
- Cortadoras de césped
- Tipo
- El manual del propietario
Este manual también es adecuado para

Owner's ManuaH
®
4.5 HOR EPOWER
20" REAR ARGE
ROTARY LAWN MOWER
Model No.
917.387260
O
O
e
G
o
Safety
Assembly
Operation
Maintenance
EspaSol
Repair Parts
CAUTION'.
Read and follow all
Safety Rules and Instructions
before operating this equipment
Sears, Roebuck and Co., Hoffman Estates, IL 60179

Warranty 2 Product Specifications 11
Safety Rules 2 Service and Adjustments 13
Assembly 4 Storage t4
Operation 6 Troubleshooting 15
Maintenance Schedule 10 Repair Parts 32
Maintenance 10 Parts Ordering Back Cover
LIMITED TWO YEAR WARRANTY ON CRAFTSMAN POWER MOWER
For two years from date of purchase, when this Craftsman Lawn Mower is maintained,
lubricated, and tuned up according to the operating and maintenance instructions in the
owner's manual, Sears will repair free of charge any defect in material or workmanship.
if this Craftsman Lawn Mower is used for commercial or rental purposes, this warranty
applies for only 90 days from the date of purchase.
This Warranty does not cover:
° Expendable items which become worn during normal use, such as rotary mower
blades, blade adapters, belts, air cleaners and spark plugo
o Repairs necessary because of operator abuse or negligence, including bent crank-
shafts and the failure to maintain the equipment according to the instructions con-
tained in the owner's manual.
Warranty service is available by returning the Craftsman power mower to the nearest
Sears Service Center/Department in the United States. This warranty applies only while
this product is in use in the United States°
ThisWarranty gives you specific legal rights, and you may also have other rights which
vary from state to state.
SEARS, ROEBUCKAND CO., D/817 WA, HOFFMAN ESTATES, ILLINOIS 60179
TRAINING:
° Read this operator's manual carefully.
Become familiar with the controlsand
know how to operate your mower
properly. Learn how to quicklystop
mower.
o Do not allow children to use your mower.
Never allow adults to use mower without
proper instructions.
Keep the area of operation clear of all
persons, especially small children and
pets.
o Use mower only as the manufacturer
intended and as described in this manual.
° Do not operate mower if it has been
dropped or damaged in any manner.
Always have damage repaired before
using your mower.
= Do not use accessory attachments that
are not recommended by the manufac_
turer. Use of such attachments may be
hazardous.
The blade turns when the engine is
nmning.
2
PREPARATION:
• Always thoroughly check the area to be
mowed and clear it of all stones, sticks,
wires, bones, and other foreign objects°
These objects will be thrownby the blade
and can cause severe injury.
o Always wear safety glasses or eye
shields when starting and while using
your mower.
o Dress properly. Do not operate mower
when barefoot or wearing open sandals.
Wear only solid shoes with good traction
when mowing.
o Check fuel tank before starting engine.
Do not fill gas tank indoors, when the
engine is runningorwhen the engineis

hot°Allowtheenginetocootforseveral
minutesbeforefillingthegastank.Clean
offanyspilledgasolinebeforestartingthe
engine.
Alwaysmakewheelheightadjustments
beforestartingyourmower.Never
attempttodothiswhiletheengineis
running.
Mowonlyin daylightorgoodartificial
light.
OPERATION:
o Keepyour eyesandmindonyourmower
andtheareabeingcut.Donotletother
interestsdistractyou.
Donotmowwetorslipperygrass.Never
runwhileoperatingyourmower.Always
besureofyourfooting-- keepafirm
holdonthehandlesandwalk.
o Donotputhandsorfeetnearorunder
rotatingparts°Keepclearofthedischarge
openingatalltimes.
o Alwaysstoptheenginewheneveryou
leaveorarenotusingyourmower,or
beforecrossingdriveways,walks,roads,
andanygravel--coveredareas.
o Neverdirectdischargeof materialtoward
bystandersnorallowanyonenearthe
mowerwhileyouareoperatingit.
° Beforecleaning,inspecting,orrepairing
yourmower,stoptheengineandmake
absolutelysurethebladeandallmoving
partshavestopped.Thendisconnectthe
sparkplugwireandkeepitawa_ffi_bmthe
sparkplugtopreventaccidentalstarting.
o Donotcontinuetorunyourmowerif you
hitaforeignobject.Followtheprocedure
outlinedabove,thenrepairanydamage
beforerestartingandoperatingyou
mower.
• Donotchangethegovernorsettingsor
overspeedtheengine.Enginedamageor
personalinjurymayresult.
o Donotoperateyourmowerif itvibrates
abnormally.Excessivevibrationisan
indicationofdamage;stoptheengine,
safelycheckforthecauseofvibration
andrepairasrequired°
• Donotruntheengineindoors.Exhaust
fumesaredangerous.
o Nevercutgrassbypullingthemower
towardsyou°Mowacrossthefaceof
slopes,neverupanddownoryoumight
loseyourfooting.Donotmowexces-
sivelysteepslopes.Usecautionwhen
operatingthemoweronuneventerrain
orwhenchangingdirections-- maintain
goodfooting.
o Neveroperateyourmowerwithout
properguards,plates,grasscatcheror
othersafetydevicesinplace.
MAINTENANCE AND STORAGE:
o Check the blade and the engine mount-
ing bolts often to be sure they are
tightened properly.
o Check all bolts, nuts and screws at
frequent intervals for proper tightness to
be sure mower is in safe working
condition.
o Keep al! safety devices in place and
working.
° To reduce fire hazard, keep the engine
free of grass, leaves or excessive grease
and oil.
• Check grass catcher often for deteriora-
tion and wear and replace worn bags.
Use only replacement bags that are
recommended by and comply with
specifications of the manufacturer of your
mower°
o Always keep a sharp blade on your
mower.
• Allow engine to cool before storing in any
enclosure.
o Never store mower with fuel in the tank
inside a building where fumes may reach
an open flame or an ignition source such
as a hot water heater, space heater,
clothes dryer, etc.
CAUTION: Always disconnect spark
plug wire and place wire where it
cannot contact spark plug in order to
prevent accidental starting when
setting up, transporting, adjusting or
making repair&
WARNING
The engine exhaust from this product
contains chemicals known to the State
of California to cause cancer, birth
defects, or other reproductive harm_
3

These accessories were available when this lawn mower was produced, They are also
availabte at most Sears retail outlets and sewice centers, Most Sears stores can also order
repair parts for you, when you provide the model number ofyour lawn mower. Some of these
accessories may not apply to your lawn mower.
LAWN MOWER PERFORMANCE
CLIPPINGDER.ECTO.
FOR. REAR D!SC,H,ARG E LAWN MOWERS
GRASS CATCHERS
FOR
REARDISCHARGE
LAWN MOWERS
LAWN MOWER MAINTENANCE
MULCHER KITS
GRASSCATCHERS
FOR
SIDEDISCHARGE
LAWNMOWERS
STABILIZER
GAS CANS
MUFFLERS
............._,,,,,,,,_...................,,,
BELTS
BLADES
AIR FILTERS
BLADE ADAPTERS WHEELS
SPARK PLUGS
ENGINE OIL
Read these instructions and this manual in its
entirety before youattempt to assemble or
operate your new lawn mower. Your new lawn
mower hasbeen assembled atthe factor,]with
the exception ofthose parts left unassembled
for shipping purposes. All parts such as nuts,
washers, bolts, etc.,necessary to complete [he
assembly have been placed in the parts bag.
To ensure safe and proper operation ofyour
lawn mower, atl parts and hardware you
assemble must be tightened securely. Use the
correct toots as necessary to ensure proper
tightness,
TO REMOVE LAWN MOWER FROM
CARTON
= Remove looseparts included with mower°
o Cut down two end comers of carton and lay
end panel down flato
o Remove all packing materials except
padding between upper and lower handie
and padding holding operator presence
control bar to upper handle.
= Roll lav_nmower outof carton and check
carton thoroughly for additional loose parts_
HOW TO SET UP YOUR LAWN
MOWER
TO UNFOLD HANDLE
IMPORTANT: Un fold handlescarefutfyso as
notto pinchor damage controlcables,
° Raise handles untillower handle section
locksintoplace in mowingposition.
o Remove protective padding, raise upper
handle section into place on lower handle
and tighten both handle knobs.
o Remove handle padding holding operator
presence control bar to upper handle.
o Your lawn mower handle can be adjusted
for yourmowing comfort, Refer to "Adjust
Handle" in the Service and Adjustment
section ofthis manual,

Operator resence control bar
YMowioo
/_ position
Lower handle
CAUTION: Do not run your lawn mower
without mulcher plug in place or approved
clipping deflector or grass catcher in place.
Never attempt to operate the lawn mower
with the rear door removed or propped
open.
TO INSTALL ATTACHMENTS
Your lawn mower was shipped ready to be
used as a mulcher_To convert to bagging or
discharging:
o Open rear door and remove mulcher plug.
Store mulcher plug in a safe place.
o You can now installcatcher or optional
clipping deflector.
o To returnto mulching operation, install
mulcher plug into discharge opening of
mower.
Mulcher plug

KNOW YOUR LAWN MOWER
READ THIS OWNER'S MANUALAND SAFETY RULES BEFORE OPERATING YOUR
LAWN MOWER. Compare the illustrations with your lawn mower to familiarize yourself with the
location ofvarious controls and adjustments. Save this manual for future reference,
These symbols may appear on your lawn mower orin literature supplied with the product.
Learn and understand their meaning,
CAUTION ENGINE ENGINE FAST
OR WARNING ON OFF
SLOW CHOKE FUEL OiL DANGER, KEEP HANDS
AND FEET AWAY
Operator presence control bar
Starter handle \.
ine zone control cable
Handle
Grass
Gasoline filler cap
Primer
Air filter
Housing
Mulcher plug
Wheel adjuster
(on each wheel)
MEETS CPSC SAFETY REQUIREMENTS
Sears rotary walk-behind power lawn mowers conform tothe safety standards ofthe American
National Standards Institute and the U,SoConsumer Product Safety Commission, The blade
_turns when the engine isrunn]ng. ............................................................................................................................................
Operator presence control bar- must be
helddown to the handle to start the engine.
Release to stop the engine.
Primer- pumps additional fuel from the
carburetor to thecylinder for use when
starting a cold engine.
Starter Handle - used for starting the
engine.
Mulcher Plug - located at the discharge
opening must be removed when convert-
ing to bagging or discharging operation.

Theoperationofanylawnmowercan
resultin foreignobjectsthrownintothe
eyes,whichcanresultinsevereeye
damage. Alwayswearsafetyglassesor
eye shieldswhileoperatingyourlawn
mowerorperforminganyadjustmentsor
repairs°We recommendawidevision
safetymaskoverthespectaclesor
standardsafetyglasses.
HOWTO USE YOUR LAWN iVlOWER
ENGINE SPEED
The engine speed was set at thefactor.,/for
optimum performance. Speed is not adjust-
able.
ENGINE ZONE CONTROL
CAUTION= Federal regulations require an
engine control to be installed on this lawn
mower in order to minimize the riskof blade
contact injury. Do not under any circumstances
attempt to defeat the function of the operator
control. The blade turns when the engine is
nJnning_
= Your lawn mower isequippedwith an
operator presence control bar which
requires the operatorto be positioned
behind the lawn mower handle to start and
operate the lawn mower.
TO ADJUST CU_ING HEIGHT
o Raise wheels for low cut and lower wheels
for high cut.
- Adjust cutting height to suit your reguire-
ments_ Medium position is bestfor rhost
lawns.
. To change cutting height, squeeze adjuster
tevertoward wheel. Move wheel upor
down to suit your requirements. Be sure all
wheels are in the same setting.
NOTE: Adjuster is properly positioned when
plate tab inserts intohole in lever. Also, 9-
position adjusters (if so equipped) allow lever
to be positioned between the plate tabs.
Lower wheels for Plate tab
high cut
Lever
Raise wheels for low cut
TO ATTACH GRASS CATCHER
. Lift the rear door of the lawn mower and
place the grass catcher frame side
hooks onto the handle bracket hooks°
• The grass catcher is secured to the lawn
mower housing when the rear door is
lowered onto the grass catcher frame.
CAUTION: Do not run your lawn mower
without clipping deflector or approved
grass catcher in place_ Never attempt to
operate the lawn mower with the rear door
removed or propped open.
Rear door
Hinge
bracket Grass catcher
Formed
tabs
TO EMPTY GRASS CATCHER
= Lift up on grass catcher using the frame
handle.
o Remove grass catcher with clippings
from under lawn mower handle.
° Empty clippings from bag using both
frame handle and bag handle.
NOTE: Do not drag the bag when
emptying; it will cause unnecessary wear°
BEFORE STARTING ENGINE
OIL
Your lawn mower isshipped without oil in the
engine.
= Be sure mower is level and area around oil
fill is clean°
= Remove engine oilcap w/dipstick and fill to
the full line on the dipstick.
° Use 20 ozs. of oil. For type and grade of oil
to use, see "ENGINE" in Customer
Responsibilities section of this manual.
= Pour oil slowiy. Do not over fill.
• Check oillevel before each use. Add oil if
needed. Fill to full line on dipstick.
° To read proper level, tighten engine oil cap
each t_me.
° Reinstall engine oil cap and tighten.
• Change the oil after every 25 hours of
operation or each season. You may need
to change the oil more often under dusty,
dirty conditions_
7

GAS
o Fillfueltank. Usefresh,clean,regular
unleadedgasolinewith aminimumof8"7
octane. Do notmixoilwithgasoline,
Purchasefuel inquantitiesthatcanbe
usedwithin30daystoassurefuel
freshness.
WARNING: Experienceindicatesthat
alcoholblendedfuels(calledgasoholor
usingethanolor methanol)canattract
moisturewhichleadsto separationand
formationofacidsduringstorage.Acidic
gascandamagethefuelsystemof an
enginewhilein storage. Toavoidengine
problems,thefuelsystemshouldbe
emptiedbeforestorageof30daysor
tonger. Drainthefueltank,startthe
engineandletit rununtilfuellinesand
carburetorareempty. Usefreshfuel next
season. SeeStorageInstructionsfor
additionalinformation.Neveruseengine
or carburetorcleanerproductsinfueltank
orpermanentdamagemayoccur.
Gasoline filler
cap
Engine oil cap
w/dipstick
TO START ENGINE
o To start a cold engine, push primer five
(5) times before trying to start. Use a
firm push° This step is not usually
necessary when starting an engine
which has already run for a few
minutes.
o Hotd operator presence control bar
down to the handle and pull starter
handle quickly. Do not allow starter
rope to snap back°
o To stop engine, release operator
presence control bar°
NOTE: In cooler weather it may be
necessary to repeat priming steps. In
warmer weather over priming may cause
flooding and engine will not start. If you
do flood engine, wait a few minutes
before attempting to start and do not
repeat priming steps_
MOWING TIPS
° Under certain conditions, such as very
tall grass, it may be necessary to raise
the height of cut to reduce pushing
effort and to keep from overloading the
engine and leaving clumps of grass
clippings.
° For extremely heavy cutting, reduce the
width of cut and raise the rear of the
lawn mower housing one (1) wheel
adjuster setting higher than the front for
better discharge of grass,
° When using a rear discharge lawn
mower in moist, heavy grass, clumps of
cut grass may not enter the grass
catcher. Reduce ground speed
(pushing speed) and/or run the lawn
mower over the area a second time.
o If a trail of grass clippings is left on the
right side of a rear discharge lawn
mower, mow in a clockwise direction
with a small overlap to collect the
clippings on the next pass_
o Keep top of engine around starter clear
and clean of grass clippings and chafL
This will help engine air flow and extend
engine life.
° Pores in cloth grass catchers can
become filled with dirt and dust with use
and catchers will collect less grass. To
prevent this, regularly hose catchers off
with water and let dry before using.
MULCHING MOWING TIPS
IMPORTANT: For best performance,
keep mower housing free of built-up grass
and trash_ Clean UNDERSIDE OF
MOWER HOUSING after each use. See
"Cleaning" in CUSTOMER
RESPONSIBILITIES section of this
manual.
• The special mulching blade will recut
the grass clippings many times and
reduce them in size so that as they fall
onto the lawn they will disperse into the
grass and not be noticed. Also, the
mulched grass will biodegrade quickly
to provide nutrients for the lawn_
Always mulch with your highest engine
(blade) speed as this will provide the
best recutting action of the blades,
8

Avoid cutting your lawn when it is wet.
Wet grass tends to form clumps and
interferes with the mulching action. The
best time to mow your lawn is the early
afternoon, At this time the grass has
dried and the newly cut area will not be
exposed to the direct sun.
For best results, adjust the lawn mower
cutting height so that the lawn mower
cuts off only the top one-third of the
grass blades. If the lawn is overgrown it
will be necessary to raise the height of
cut to reduce pushing effort and to keep
from overloading the engine and
leaving clumps of mulched grass. For
extremely heavy mulching, reduce your
width of cut, mow slowly and raise
the rear of the lawn mower one wheel
adjuster setting higher than the front.
o Certain types of grass and grass
conditions may require that an area be
mulched a second time to completely
hide the clippings. When doing a
second cut, mow across or perpendicu-
lar to the first cut path.
• Change your cutting pattern from week
to week, Mow north to south one week
then change to east to west the next
week. This will help prevent matting
and graining of the lawn,
Max 1/3
9

AS "YOU COMPLETE 0__--_/*__,._,__/,.',__ O_
_ _._ _'4_ _ SERVICE DATES
REGULAR SERVICE
Check for Loose Fasteners _
cleanSinspeCte_a'ssCatcher
(If Equipped)
a Clean Lawn Mower ....
_f_ Clean Under Drive Cover,(Power-P[oPelled Mowers)
Check drive bett/pufleys
E (Power-Propelled Mowers)
R ChectdSharperffReplace Blade
Lubrication Chart
V';v' .............. IV' ............
e,'
_J#3
Clean BatterytRecharge ..........
(Electric Start Mowers) _ i/'4
E. i.eo"&V;i......................................................................................................................................................
Nc, n oE,,g °e0, , i i l i
G Ctean Air Hirer .................. . , ,_............ _ ............................................................
I Inspect Muffler
N Clean or Replace Spark Plug
E Replace Air Filter Paper Cartridge 6/2
1 - Change more often when operating under _ heavy load or In high embien! temperatu,res
2 - Service more often when operating in dirty or dusty conditions,
3 - Replace blades more often when mowing In sandy soil
4 - Charge 4B hours at end el season
GENERAL RECOMMENDATIONS
The warranty on this lawn mower does not
cover itemsthat have been subjected to
operator abuse or negligence,. To receivefull
vaiuefrom the warranty, operator must
maintain mower as instructed inthis manual
Some adjustments wilt need to be made
periodicallyto properly maintain your unit
Alladjustments inthe Service and Adjust-
ments section of this manual should be
checked at least once each season,
. Once a year, replace the spark plug,
replace airfilter element and check blade for
wear. A new spark plug and clean/new air
filter element assures proper air-fuel mixture
and helps your engine run better and last
longer,
. Follow the maintenance schedule inthis
manual
BEFORE EACH USE
- Check engine oil level
- Check for loose fasteners°
LUBRICATION
Keep unit well lubricated (See "LUBRICATION
CHART")°
LUBRICATION CHART
(_ Wheel (_) Engine oil
adjuster
1_ Handle bracket
mounting pin
(_ Spray lubricant
(_ Brake spring
bracket
(_) Rear
door
hinge
('_ SAE 30 MOTOR OIL, Refer to
engine- CUSTOMER RESPONSIBILITIES
section,
IMPORTANT: Do not oil or grease plastic
wheel bearings. Viscous lubricants will
attract dust and dirt that will shorten the life
of the self lubricating bearings. If you feel
they must be lubricated, use only a dry,
powdered graphite type lubricant sparingly.
10

=RODUCT SPECIIFUCATIONS
MODEL NUMBER 917.387260
SERIAL NUMBER
DATE OF PURCHASE
HORSEPOWER: 4_5
DISPLACEMENT: 11.5 CU. IN.
GASOLINE CAPACITY/TYPE: 1.5 QUARTS
UNLEADED REGULAR
OIL TYPE (API-SF/SG/SH): SAE 30 (ABOVE 32°F)
SAE 5W-30 (BELOW 32°F)
OIL CAPACITY: 20 OZS.
SPARK PLUG(GAP: °030") CHAMPION RJ19LM OR J19LM
VALVECLEARANCE: INTAKE: °004 _ .008
EXHAUST: .004 - .008
SOLID STATE IGNITION
AIR GAP: .0125 IN.
BLADE BOLT TORQUE: 35-40 FT. LBS.
o The model and serial numbers will be found on a decal attached to the rear of the
lawn mower housingoRecord both serial number and date of purchase in space
= provided above.
LAWN MOWER
Always observe safety nJleswhen performing
any maintenance°
TIRES
o Keep tires free of gasoline, oil, or insect
control chemicals which can harm rubber.
o Avoid stumps, stones, deep ruts,sharp
o Remove blade and attaching hardware
(bolt, lock washer and hardened washer).
NOTE: Remove the blade adapter and check
the key inside hub of blade adapter_ The key
must be in good condition to work properly.
Replace adapter ifdamaged.
TO REPLACE BLADE
objects and otherhazards that may cause
tiredamage.
BLADE CARE
For best results, mower blade must be kept
sharp. Replace bent or damaged blades.
TO REMOVE BLADE
o Disconnect spark plug wirefrom spark plug
and place wire where it cannot come in
contact with spark plug.
= Turn lawn mower on its side. Make sure air
filterand carburetor are up.
o Use a wood block between blade and
mower housing to prevent blade from
turning when removing blade bolto
• Protect your hands with gloves and/or wrap
blade with heavy cloth.
o Remove blade boltby turning counter-
clockwise. Usea 9/16" box or open-end
wrench°
o Position the blade adapter onthe engine
crankshaft. Be sure key in adapter and
keyway in crankshaft are aligned.
o Position blade onthe blade adapter aligning
the two (2) holes in the blade with the raised
lugs onthe adapter.
o Be sure the trailing edge isup toward the
engine,
o Installthe blade bolt with the lock washer
and hardened washer intoblade adapter
and crankshaft.
o Use block of wood between blade and lawn
mower housing and tighten the blade bolt,
turning clockwise°
° The recommended tightening torque is 354
40 fL Ibs.
IMPORTANT: Blade bolt is grade 8 heat
treated.
11

Blade
adaptor _
Key
Crankshaft
Blade
Crank-
shaft
Blade
bolt Blade
adaptor
Hardened Trailing
washer Lock edge
washer
NOTE: We do notrecommend sharpening
blade -.but if you do, be sure the blade is
balanced.
TO SHARPEN BLADE
Care should be taken to keep the blade
balanced. An unbalanced blade will cause
eventual damage to lawn mower or engine.
o The blade can be sharpened with a file or
on a grinding wheel. Do not attempt to
sharpen while on the mower.
° To check blade balance, drive a nail into a
beam or wall. Leave about one inch of the
straight nail exposed. Place center hole of
blade over the head of the nail. If blade is
balanced, it should remain in a horizontal
position. If either end of the blade moves
downward, sharpen the heavy end until the
blade is balanced.
GRASS CATCHER
° The grass catcher may be hosed with
water, but must be dry when used_
- Check your grass catcher often for damage
ordeterioration. Through normal use itwill
wear. If catcher needs replacing, replace
only with a manufacturer approved
replacement catcher. Give the lawn mower
model number when ordering.
ENGINE
LUBRICATION
Use only high quality detergent oil ratedwith
API service classification SF, SG or SH.
Select the oil's SAE viscosity grade according
)erature.
3'EMPERA'_RE RANGE ANTIC|PA'I'E'DBEFORE I,IEXT O|L CHANGE
NOTE: Although multi-viscosity oils (5W30,
10W30 etc.) improve starting in cold weather,
these multi-viscosity oils will result in increased
oi!consumption when used above 32°F.
12
Check yourengine oil level more frequentlyto
avoid possible engine damage from running
low on oil.
Change the oil after ever,/25 hours of
operation or each season. You may need to
change the oil more often under dusty, dirty
conditions.
Check the crankcase oil level before starting
the engine and after each five (5) hours of
continuous use. Tighten oil plug securely each
time you check the oil level
TO CHANGE ENGINE OiL
NOTE: Before tipping lawn mower to drain oil,
drain fuel tank by running engine until fuel tank
is empty.
° Disconnect spark plug 'wire from spark plug
and place wire where it cannot come in
contact with spark plug.
= Remove engine oil cap; lay aside on a clean
surface.
° Tip lawn mower on its side as shown and
drain oil into a suitable container. Rock lawn
mower back and forth to remove any oil
trapped inside of engine.
o Wipe off any spilled oil on lawn mower and
on side of engine.
o Fill engine with oil, Fill only to the "FULL"
line on the dipstick. DO NOT OVER FILL.
o Replace engine oil cap.
. Reconnect spark plug wire to spark plug,
CoT
AIR FILTER
Your engine will not run propedy and may be
damaged by using a dirty air filter,
Replace the airfilterevery year, more often if
you mow in very dusty, dirty conditions. Do not
wash air filter.
TO CHANGE AIR FILTER
,, Remove the airfilter cover by turning
counterclockwise to the stop and pull away
from collar°
- Remove filter from inside of cover.
, Clean the inside ofthe cover and the cotlar
to remove any dirt accumulation.
= Insert new filter intocover.
- Put airfilter cover and tilterinto collar
aligning the tab with the slot.
o Push in on cover and turn clockwise to
tighten.

Tum
counter-
clockwise
to remove
Air filter
Tab Turn
Air filter cov_,r clockwise to
tighten
MUFFLER
inspect and replace corroded muffler as it
could create a firehazard and!or damage.
SPARK PLUG
Change your spark plug each year to make
your engine start easier and runbetter. Set
spark plug gap at _030inch.
CLEANING
IMPORTANT," Foi"best performance, keep
mower housing free of built-upgrass and
trash°Clean underside of mower housing after
each use°
CAUTION: Disconnect spark plug wire from
spark plug and place wire where it cannot
come in contact with the spark plugo
• Turn lawn mower on its side. Make sure air
filterand carburetor are up. Clean the
underside ofyour lawn mower by scraping
to remove build-up of grass and trash_
o Clean engine often to keep trash from
accumulating. A clogged engine runs
hotter and shortens engine life.
, Keep finished surfaces and wheels free of
all gasoline, oil, etc.
o We DO NOT recommend using a garden
hose to clean lawn mower unless the
electrical system, muffler, airfilter and
carburetor are covered to keep water out.
Water in engine can result in shortened
engine life.
CAUTION: BEFORE PERFORMING ANY
SERVICE OR ADJUSTMENTS:
Release control bar.
= Make sure the blade and al! moving
parts have completely stopped.
o Disconnect spark plug wire from spark
plug and place where it cannot come in
contact with plug.
LAWN MOWER
TO ADJUST CUTTING HEIGHT
See "TOADJUST CUTTING HEIGHT" in the
Operation section of this manual.
REAR DEFLECTOR
The rear deflector, attached between the rear
wheels of your lawn mower, isprovided to
minimize the possibility thatobjects will be
thrown out the rear ofthe lawn mower intothe
operator's mowing position.
If the rear deflector becomes damaged, it
should be replaced.
TO ADJUST HANDLE
"(ourlawn mower handle can be raised or
lowered for your mowing comfort, Four (4)
positions are available: high, medium high,
medium low and low. Handles are shipped
mounted in the medium low position.
° To change from medium low to medium
high position, the upper and lower handle
sections wilt have to be turned ove.
o Remove the cableclips.
° Remove the controlsand operator presence
control bar from the upper handle.
13
• Remove the starter rope guide from the
lower handle.
o Remove hairpincotters.
• Disconnect the lower handle from the
handle brackets.
° Tum the handle over and reassemble the
hairpin cotters that have been removed.
,, Reassemble the starter rope guide.
o Reassemble the controls and the operator
presence control bar to the upper handle.
CAUTION= The operator presence control bar
must pivot freely to permit blade brake
engagement when control bar is released. Do
not overtighten the fasteners holding the
controls to the upper handle_
o To change from medium low to high
position only the upper handle section will
have to be turned over.
• To change from medium low to low position,
only the lower handle section will have to be
turned over,
Shipping position
Medium
low
Medium

High _
Squeeze to
remove
Hairpin
Low
Lower handle
Handle
bracket
ENGINE
CARBURETOR
Yourcarburetor has a non-adjustable fixed
main jet for mixture control. Ifyour engine
does not operate properly due to suspected
carburetor problems, take your fawn mower to
an authorized service center for repair or
adjustment.
ENGINE SPEED
Your engine speed has been factory set,
Do not attempt to increase engine speed
or it may result in personal injury. If you
believe that the engine is running too fast
or too slow, take your lawn mower to an
authorized service center for repair and
adjustment.
Immediately prepare your lawn mower for
storage at the end of the season or ifthe unit
will notbe used for 30 days or more.
LAWN MOWER
When lawn mower isto be stored for a period
of time, clean itthoroughly, remove all dirt,
grease, leaves, etc. Store in a clean, dry area_
= Clean entire lawn mower (See "CLEANING"
in the Customer Responsibilities section of
this manual).
° Lubricate as shown in the Customer
Responsibilities s'_cttonof this manual.
• Be sure that al! nuts, bolts, screws, and pins
are securely fastened_ Inspect moving
parts for damage, breakage and wear.
Replace if necessary.
o Touch up all rusted or chipped paint
surfaces; sand lightly before painting.
HANDLE
You canfold yourlawn mowerhandle for
storage.
= Squeeze the bottom ends of the lower
handle toward each other until the lower
handle clears the handle bracket, then
move handleforward.
° Loosen upper handle mounting bolts
enough to allow upper handle to befolded
back.
IMPORTANT: When folding the handle for
storage or transportation, be sure to fold the
handle as shown or you may damage the
control cables
When setting upyourhandle from the
storage position, the lowerhandle will
automatically lock into the mowing position.
Operator resence control bar
Upper handle
Lift up
Mowing
position
Lower handle
Lower handle
/
Squeeze _ die
"__ Hairpin cotter
ENGINE
FUEL SYSTEM
IMPORTANT: It isimportant to prevent gum
deposits from forming in essential fuel system
parts such as carburetor, fuel filter,fue! hose,
ortank during storage. Also, experience
indicates that alcohol blended fuels (called
gasohol or using ethanol or methanol) can
attract moisture which leads to separation and
14

formationofacidsduringstorage.Acidicgas
candamagethefuelsystemofanengine
whileinstorage.
o Drainthefue!tank.
° Starttheengineandletitrununtilthe fuel
lines and carburetor are empty_
Never use engine or carburetor cleaner
products inthe fuel tank or permanent
damage may occur.
o Use fresh fuel next season.
NOTE: Fuel stabilizer isan acceptable
altemative in minimizing theformation of fuel
gum deposits during storage. Add stabilizer to
gasoline in fuel tank or storage container.
Always follow the mix ratio found on stabilizer
container. Run engine at least 10 minutes
after adding stabilizer to allow the stabilizer to
reachthe carburetor. Do notdrain the gas
tank and carburetor ifusing fuel stabilizer.
ENGINE OIL
Drain oil (with engine warm) and replace with
clean engine oi!. (See "ENGINE" in the
Customer Responsibilities section of this
manual).
CYUNDER
o Remove spark plug.
o Pour one ounce (29 ml)of oil through spark
plug hole into cylinder.
• Pull starter handle slowly a few times to
distribute oil.
o Replace with new spark plug.
OTHER
o Donot store gasoline from one season to
another,
,, Replace your gasoline can ifyour can starts
to rust. Rust and/or dirt inyour gasoline will
cause problems.
o If possible, storeyour unit indoors and cover
itto give protection from dust and dirt.
o Cover your unitwith a suitable protective
cover that does not retain moisture. Do not
use plastic. Plasticcannot breathe which
allows condensation to form and will cause
your unit to rust.
IMPORTANT: Never cover mower while
engine and exhaust areas are stillwarm.
CAUTION: Never store the lawn mower
with gasoline in the tank inside a building
where fumes may reach an open flame or
spark. Allow the engine to cool before
storing in any enclosure.
TROUBLESHOOTING CHART
PROBLEM
Does not start
CAUSE
° Dirty air _ter.
° OUt of fuel.
o Stale fuelo
° Water in fuel.
o Spark plug wire is
disconnected.
, Bad spark plug.
o Loose blade or broken blade
adapter.
• Control bar in released
position.
° Control bardefectiveo
CORRECTION
= CleapJreplace air filter.
° Fillfuel tank.
• Drain tank and refillwith
fresh clean fuel.
° Drain fuel tank and
carburetor and refilltank
with fresh gasoline.
o Connect wire to plug.
° Replace spark plug.
= Tighten blade bolt or
replace blade adapter.
o Depresscontrol bar to
handle.
o Replace control bar.
15

TROUBLESHOOTING CHART
PROBLEM .............. CAUSE .................. CORRECTION
LOSSof power o Rearoflawnmower housing = Set to=HigherC_ ..............
Poor cut- uneven
or cutting blade dragging
in heavy grass.
Cutting too much grass.
• Dirty airfiiter.
• Buildupof grass, leaves,
and trash under mower.
=Too much oil in engine.
pos_on.
o Setto"Higher Cut"
position.
° CleapJreplaceairfilter.
- Clean underside of mower
housing.
o Check oillevel.
-Zxcessive
Jibration
3tarter rope hard
:opull
Grass catcher
not filling (if so
_uipped)
Walkingspeed toofast. oCut at stower walking
...................... speed.
Wom, bent or loose blade. ° Replace blade.Tighten
= Wheel heights uneven.
° Buildup of grass, leaves
and trash under mower.
° Worn, bent or loose blade.
• Bentengine crankshaft.
J, ,,j : .............. ::: ..................
, Engine flywheel brake is on
when control bar is released.
= Bent engine crankshaft.
° Blade adapter broken.
• Blade dragging in grass.
blade boll
o Set allwheels at same
height
° Clean underside of
mower housing.
,, Replace blade. Tighten
blade bolt.
° Contact an authorized
service center.
° Depress control bar to
upper handle before
pulling starter rope.
° Contact an authorized
service center.
° Replace blade adapter.
o Move lawn mower to cut
grass orto hard surface
to start engine°
= Raise cutting height.
° Replace btade.
° Clean grass catcher.
oCutting height too low.
= Uft on blade worn off.
° Catcher not ventingair.
_lardto push o Grass is too high orwheel
height is too low.
° Rear of lawn mower
housing or blade dragging
in grass.
o Grass catcher too futlo
= Handle height position not
right foryou.
Raise cutting height.
- Raise rear of lawn mower
housing one (t) setting
higher.
° Empty grass catcher.
° Adjust handle height to
suit.
16

Garantfa 17 Especificaciones del Producto 25
Reglas de Seguridad 17 Ser,,,icio y Adjustes 27
Montaje 19 Almacenamiento 28
Operaci6n 20 IdentificaciSn de problemas 30
Mantenimiento 24 Partes de repuesto Vea el manual
Programa de Mantenimiento 24 ingles del dueSo
Orden de Partes Contratapa
GARANT[A LIMtTADA DE DOS A[_IOSPARA LA SEGADORAA MOTOR CRAFTSMAN
Por dos (2) aSos, a partir de la fecha de compra, cuando esta Segadora Craftsman se mantenga, lubdque
y aline segt_nlas instrucciones para taoperaciSn y el mantenimiento en el manual del dueSo, Sears
reparar& gratis rode defecto en e!material y lamano de obra.
Si la Segadora Craftsman se usa para finescomerciales o de arriendo, esta garantfa sSlose aplica FOr
noventa (90) dfasa partir de lafecha de comprao
Esta Garantfa no cubre:
o A.,lfculosque se desgastan durante el uso normal tales como las cuchillas segadoras rotatorias, los
adaptadores do tacuchitla, las correas, los filtrosde airey las bujfaso
• Reparaciones necesarias debido al abuso oa la negligenc{a del operador, incluy6ndose a los
cig_Jefialesdoblados y a lafatta de mantenimiento del equiFoseg_n las instrucciones que se incluyen
en elmanual del duefio.
EL SERVICtO DE GARANT[A ESTA DISPONIBLE al devolver la segadpra a motor Craftsman al centro/
deparlmento de se_cio Sears mas cercano en los Estados Unidos. Esta garantia se aplica solamente
mientras el producto este en uso en los Estados Unidos°
Esta Garantfa le otorga derechos legates especificos, y puede que tambi_n tenga otros derechos que
varfan de estado a estado°
Soars, Roebuckand Co., D!817WA, Hoffman Estates, IL 60179 USA
Los estandrares de seguridad exigen tapresencia
del operator en los controles para reducir a un
minimo el riesgo de tesionarse. Su unidad,,4ene
equipada con dichos controles. Por ningun motivo
trate de! eliminar lafunciSn de los controles que
exJgenla presencia del operador.
ENTRENAMIENTO:
o Lea este manual del operador
cuidadosamente. Familiarfcese con los
controles y aprenda a operar su segadora en
forma adecuada. Aprenda a parar su segadora
r_,_4oidamente.
° No permita que los niSosusen su segadora.
Nunca permita que los adultos operen la
segadora sin contar con las instrucciones
adecuadas°
Mantenga el_rea de operaciSn despejada
de genre, especialmente de niSos pequeSos
y de animates dom_sticos.
o Use lasegadora sotamente para los fines
propuestos FOrelfabricante y segt_nfas
explicaciones descritas en este manual.
,, No opere la segadora si se ha cafdo o daSado en
cualquiera forma. Siempre repare losdaSos
antes de usarla.
o No use accesorios que no hayan sido
recomendados For el fabricanteoEl usode dichos
accesorios puede ser peligroso.
o La cuchilla gim cuando el motor est&
funcionando.
PREPARACION:
o Siempre revise cuidadosarnente el _rea que se
va a segar y desp_jela de todas las piedras,
palos, alambres, huesos y otros objetos
extrados. Estos objetos ser'_nlanzados con la
cuchilIay pueden producir lesiones graves.
o Siempre use anteojos de seguridad o protectores
de ojoscuando arranque y durante el tiempo
que use la segadora.
17

o Vistase en fonna adecuada. No opere la
segadora sin zapatos ocon sandalias
mientras que et motor est& funcionando.
o Siegue siempre durante el d{a o con buena
luz artificial=
OPERAOION:
- Mantenga sus ojos y su mente an la
segadora yen el _rea que se est,. cortando.
No permita que otros intereses Io distraigan.
o No corte c_sped mojado o resbatoso. Nunca
corra mientras est_ operando su segadora.
Siempre asegt]rese de mantener el equilibdo
- mantenga el mango agarrado firmemente y
camine,
° No ponga los manos o los pies cerca odebajo
de los partes rotatofias. Mant6ngase
alejado de la abertura de descarga en todo
momento..
• Siempre pare el motor cuando se vaya
ocuando no est_ usando su segadora, o
antes de atravesar los entradas para autos,
los senderos, caminos y _reas cubiertas de
ripio.
- Nunca didja la descarga del material hacia
los espectadores ni permita a nadie cerca de
la segadora mientras la est6 operando.
° Antes de limpiar, inspeccionar o de reparar I
a segadora, pare et motor y est6
completamente seguro de que la cuchitla y
que todas fas partes que se mueven se
hayan detenido, Luego, desconecte el
alambre de la buj_ay mant6ngalo alejado de
6sta para evitar el arranque por accidente°
° No continde haciendo funcionar su segadora
site pega a un objeto extraSo. Siga el
procedimiento descrito anteriormente, luego
repare cualquier daSo antes de volver a
arrancar y de operar su segadora.
• No cambie los ajustes del regulador o
hagaque el motor ande a una ve!ocidad
excesiva. Se pueden producir dar_osen el
motor y t esiones personates.
° No opere su segadora si vibra fuera de io
normal. La vibraci6n excesiva es una
indicaci6n de dafio; pare el motor, revise en
forma segura la causa de ta vibraci6n y haga
las reparaciones seg_in sea necesario°
o No haga funcionar el motor en
recintoscerrados. Los gases de escape son
peligrosos.
° Nunca corte el c6sped tirando la segadora
hacia usted. Siegue a tray, s de la cara de
las pendientes, nunca hacia arriba o hacia
abajo pues puede perder el equilibrio. No
siegue pendientes demasiado empinadas.
Tenga cuidado cuando opere la segadora en
terreno disparejo o cuando cambie de
direcci6n - mantenga un buen equilibrio,.
o Nunca opere la segadora sin los
protecciones adecuadas, las planchas, el
recogedor de c6sped y otros dispositivos de
seguridad en su lugar.
MANTENIMIENTO Y
ALMACENAfVIIEN-TO:
o Revise la cuchillay los pemos de montaje
det motora menudo, para asegurarse que
est_n apretados en la forma adecuada.
o Revise todos los pernos, tuercas y tomillosa
intercalos trecuentes, para vefificar si est&n
apretados en forma adecuada, y
asegurarseque ia segadora se encuentra en
condicionesde funcionamiento seguro.
° Mantenga todos los dispositivosde seguridad
en su fugar y listos para funcionar.
, Para reducirel peligro de incendio,
mantenga el motorsin c_sped, hojas y grasa
o aceite en exceso.
o Revise el recogedor de c_sped a menudo
para verificar si hay deterioro y desgaste y
cambie las bolsas desgastadaso Use
solamente las bolsas de repuesto
recomendadas por el fabdcante de su
segadora o que cumplen con tas
especificaciones de _steo
° Siempre mantenga una cuchilla afilada en su
segadora.
• Siempre permita que el motor se enfrie
antes de guardada en cua|quier recinto
cerrado.
o Nunca guarde la segadora con combustible
en el estanque dentro de un edificio endonde
los gases pueden alcanzar una llama
expuesta o una fuente de ignici6n, tal como el
catentador de agua, la estufa de
calefacci6n, la secadora de ropa, etc.
PRECAUCI6N: Siempre desconecte el
alambre de la bujfa y p6ngalo donde no pueda
entrar en contacto con la bujfa, para evitar el
arranque por accidente, durante la preparaci6n,
el transporte, el ajuste o cuando se hacen
reparaciones.
PRECAUCION; Es conocido pot et Estado de
California que los gases de escape del motor de
este productor contienen qufmicos loscuates a
ciertos niveles, pueden ocasionar, c_ncer,
defectos de nacimiento, y otros dafios al sistema
reproductivo.
18

Estos accesofios estabandisponibles cuandose produjo la segadora. Tambi_n est_n disponib_esenlas
tiendas de Sears yen loscentros de servicio. La mayorfa de las tiendas Sears tambi6n pueden mandar a
pedir partes de repuesto para usted, si les proporciona el n_mero del modelo de su segadoraoAlgunos de
estos accesodos tat vez no se apliquen a su segadora.
RENDiiVIIENTO DE LA SEGADORA
DESV|ADOR DE RECORTES
PARA SEGADORAS CON DESCARGA TRASERA
RECOREDOR
PAPA
SEGADORAS
CON DESCARGA
TRASERA
MANTENIMIENTO DE LA SEGADORA
SILENCIADORES j
CORREAS
JUEGOS PARA LA ACOLCHADORA
RECOREDOR
PARA
SEGADORAS
CON DESCARGA
LATERAL
CUCHILLAS
A
ESTABILIZADORES
ENVASES
DE GASOLINA
FILTROS DE AIRE BUJI'AS
ADAPTADORES
DE CUCHILLA RUEDAS
ACEITE
DEL MOTO R.....................
Lea estas instruccionesy este manual
completamente antes de tratar de montar u operar
su segadora nueva. Su segadora nueva ha sido
montada en la f_ibricacon la excepci6n de aquetlas
parles que se dejaron sin montar por razones de
envfo. Todas las partes como lastuercas, las
arandelas, los pemos, etc., que son necesarias
para completar el montaje han side colocadas en la
bolsa de partes..Para asegurarse que su segadora
funcione en forma segura y adecuada, todas las
partes y los articulos de ferreteria que se monten
tienen que ser apretados seguramente. Use tas
herramientas correclas, comosea necesario, para
asegurar que se aprieten adecuadamente.
PARA REMOVER LA SEGADORA
DE LA CAJA DE CARTON
,, Remueva las partes sueltas que se incluyencon
la segadora.
. Corte las dos esquinas de los extremos de la
caja de cart6n y tienda el panel del extremo
piano.
, Remueva todo el material de empaque, excepto
la cuSa entre el mango superior y _1inferior,y la
cuSa que sujeta la barra de los control que exige
la presenciadel operadorjuntocon elmango
superior.
Haga rodar la segadora hacia afuera de la caja
de cartSny revfselacuidadosamente para
verificarsi todavfa quedan partes sueltas
adicionales.
COMO PREPARAR SU
SEGADOPJ
PARA DESDOBLAR EL MANGO
IMPORTANTE: Despliegue elmango con mucho
cuidado para no pellizcar o dafiar los cables de
control
= Levante los mangos hasta que la secci6n del
mango inferior se asegure en su lugar, en ]a
posici6npara segar. ;_;.,
• Remueva la cufa protectora, levante la secci6n
del mango superior hasta su lugar en el mango
inferiory apriete ambas manillas del mango.
- Remueva la cufa del mango que sujeta la barra
de los control que exige la presenda del
operador junto con el mango superior.
° El mango de la segadora puede ajustarse,segSn
Ie acomode para segaroRefi6rase a "AJUSTE
19

DEL MANGO" en la Secci6n de Servicio y
Ajustes de este manual.
Barra de controlque exige la
presencia del operador
Mango superior
Mango
inferior
€1_7
/7 Postci6n
//" para segar
PARA INSTALAR LOS ACCESORIOS
Su segadora rue enviada lista para usarse como
una acolchadora de capa vegetal, Para converlJrla
de modo que pueda ensacar o descargar:
• Abra la puerta tmsera y remueva la tapon
acotchadora. Gu_trdelaenun lugar seguro.
• Ahora puede instalar el recogedor o el desviador
de recortes opcionaL
• Para volver a la operaci6n de acolchamiento con
capa vegetal, instale la tapon acolchadora en la
abertura de descarga de la segadora.
PRECAUCION: No haga funcionarsu
segadora sin la tapon acolchadom aprobadaen su
lugar,o s(netdesviador de recorles, o sin el
recogedor de cdsped, aprobados, en su lugar.
Nunca trate de operar la segadom cuandose ha
removido la puerta tmsera o cuando est_iun poco
abierta.
Tapon alcotchadora
2O

IA
LEA ESTE MANUAL DEL DUE_O Y LAS REGLAS DE SEGURIDAD ANTES DE OPERAR SU
SEGADORAo Compare las ilustraciones con su segadora para familiarizarse con la ubicaci6n de
los diversos controles y ajusteso Guarde este manual para referencia en el futuroo
Estos simbolos pueden apareser sobre su segadora o en ia literatura proporcionada con el
producto. Aprenda y comprenda sus significados.
ATTENCI6N O MOTOR MOTOR F_PIDO LENTO ESTRANGU COM- ACE1TE PELIGRO, GUARDE LAS
ADVERTENCIA ENCEND|DO APAGADO LACI6N BUSTIEtLE MANOS Y LO_ PIES LEJOS
Cable de control de la velocidad del
motor Barra de control que
exige la presencia del
operador
Cord6n arrancador
Manilla del mango
Recogedor del c_sped
Tapa de1relleno de la
gasolina
Cebador
Filtro del aire
Tapon de ia
acolchadera
Tapa del deposito de aceit_
motor con varilla tndicadora de
nfvel
Ajustador de la rueda (en
cada rueda)
CUMPLE CON LOS REQUISITOS DE SEGUR|DAD DE LA CPSC ._
I.as segadoras a motor,que se conducendesde lapartede atrds, rSta'torias,Seam, cumplencon{os
est_ndaresde seguridad del American NationalStandards Institutey de la U.SoConsumer ProductSafety
Commission. Lacuchillagira cuandoelmotorest_ funcionando.
BARRA DE CONTROL QUE EXIGE LA
PRESENCIA DEL OPERADOR - tieneque
sujetarse abajo, juntoconel mango, parahacer
arrancar el motor,.Su_ltelaparapararel motor.
CEBADOR- bombeacombustible adicional desde
elcarburadoralcilindropard usocuandose
necesitahacer arrancar un motorfifo.
CORDON ARRANCADOR - se usa para hacer
arrancarelmotor.
TAPON DE LAACOLCHADORA-permite la
conversi6n para la operaci6n de descargao
ensacaclo.
2'1

La operaci6n de cualquier segadora puede hacer
que salten objetos extranos dentro de sus ojos, 1o
que puede producir dafios graves en _stoso
Siempre use anteojos de seguridad o protecci6n
para losojos mientras opere su segadora o cuando
haga ajustes o reparacioneso Recomendamos una
mascara de seguridad de visiSnamptia, para uso
esp_ejueloso anteojos de seguridad estandarte.
COMO USAR SU SEGADORA
VELOCIDAD DEL MOTOR
La veloddad del motor se estableci6 en la f_rica
para unrendimiento 6ptimo,.La velocidad no se
puedeajustac
CONTROL DE ZONA DEL MOTOR
PRECAUCION: Las regulaciones federales exigen
que se instale un contro! para el motor en esta
segadora para reducir a un mfnimo el riesgo de
lesionarse debido al contacto con la cuchilla. For
ning_n motivotrate de eliminar la funci6n del control
del operador..La cuchilla gira cuando el motor est,.
funcionandoo
o Su segadora viene equipada con una barra de
control que exige la presencia detoperador, Io
que requiem que el operador est6 detr_s del
mango de la segadora para hacerla arrancar y
operartao
PARA AJUSTAR LA ALTURA DE
CORTE
= Levante las ruedas para elcorte bajo y baje las
ruedas para e!corte alto.
• Ajuste la altura de corte para que se acomode a
sus requisitos. La posici6n del medio es la mejor
para lamayorfa de los c_spedes,
° Para cambiar laaltura de corte, empuje la
palanca del ajustador hacia larueda. Mueva ta
rueda hada amba o hacia abajo de modo que se
acomode a sus requisitos. Asegurese que todas
las ruedas queden igualmente ajustadas.
ATENOION: El ajustador esta correctamente
colocado cuando las orejas de la placa est_J_
insertadas en elagujero del mango. Tambi_n, los
ajustes de 9 posiciones (si equipado) permiten que
el mango pueda ser movido entre las orejas de la
placao
Para un cortealto, baje las
ruedas
Mando
_]as de
v--_-- laplaca
Para uncortebajo,levantelasruedas
PARA ADJUNTAR EL RECOGEDOR
DE ClaSPED
Aviso: Si lossujetadores de vinilio est_ muy
duros, m_talos en agua caliente.
° Cierre tatapa soltable. Latapa soltable debe
estar cerrada cuando se esta operando la
segado_
o Levantela puerta trasera de la caja de ]a
segadora y ponga elbastidor del recogedor de
c6sped en lasorejas formadas en el puntal de
bisagra de la pueP.atrasera.
° Etrecogedor de c_sped esta asegurado en la
caja de la segadora cuando se baja la puerta
trasera para descansar en el bastidor del
recogedor de c_sped
PRECAUCION: No haga funcionar su segadora
sin el desviador de recortes o sin el recogedor de
c_sped, aprobados, en su lugar.Nunca trate de
operar la segadora cuando se ha removido la
puertatrasera o cuando est,. un poco abierl_
PARA VAClAR EL RECOGEDOR DE
ClaSPED
• Levante el recogedor de c_sped usando el
mango del bastJdor.
° Remueva el recogedor de c6sped, con los
recortes, de debajo del mango de la segadora.
• Vacfe los recortes de la bolsa usando tanto el
mango del bastidor como _1de la bolsa.
AVISO-"No arrastre fabolsa cuando la vacie; se
producir_ un desgaste innecesario.
Puede necesitar cambiar el aceite m_s a menudo
cuandolas condiciones son polvorosas o sucias,
ANTES DE HACEFI ARRANCAR EL
MOTOR
ACEITE
Su segadora rue enviada sin aceite en el motor.
° Asegt_reseque la segadora est6 nivelada y que
el &rea alrededor del dep6sito de aceite est_
limpia_
° Remueva la tapa deldep6sito de aceite del
motor con la varilla indicadora de nively rellene
hasta la Ifnea de lleno en _sta.
° Use 0,61(20 oz.) de aceite. Para el tipoy la
calidad vea "MOTOR" en la secci6n de fas
"Responsabilidadesdel Cliente" en este manual.
o Vacfe el aceite lentamente. No IoIlene
demasiado.
° Reviseel n_veldel aceite antes de cada usoo
Agregue aceite si es necesario. Uene hasta la
Ifnea de Uenoen la varilla indicadora de nivel°
22

• Para leer el nivel adecuado, apriete ta tapa det
dep6sito de aceite del motor cada vez.
Vuetva a instalar la tapa del dep6sito det aceite y
apri_tela.
o Cambie el aceite despu6s de 25 horas de
operaci6n o una vez per temporada.
Tapadel depositode Tapadel
acetteconvarilfa /f reffenadof
indicadorade nivel"_-..L_._.,_e,/ gasolina
GASOLINA
• Uene elestanquede combustible. Use gasolina
regular, sin plomo, nueva y limpia con el mfnimo
de 87 octanes. No mezcle el aceite con la
gasolina. Para asegurar que la gasolina utilizada
sea fresca compre estanques los cuales puedan
ser utilizados durante los primeros 30 dfas.
ADVERTENOIA: La experiencia ha indicado que
los combustibles mezclados con alcohol (conocidos
come gasohol, o el use de etanol o metanol)
pueden atraer la humedad, la que conduce a la
separaci6n y formaci6n de &cidosdurante el
almacenarniento. La gasotina acfdica puede daSar
el sistema del combustible de un motor dur,_nteel
almacenamiento. Para evitar los problemas con el
motor, se debe vaciar el sistema del combustible
antes de guardario per un perfodo de 30 dfas o
m#,soVacfe el estanque del combustible, haga
arrancar el motor y h#,galofuncionar hasta que fas
lfneas del combustible y el carburador queden
vacfos. La prSximatemporada use combustible
nuevo. Vea las Instrucciones Para El
Almacenamiento para rn&sinformaci6n. Nunca use
productos de limpieza para et motor o para el
carburador en el estanque del combustible pues se
pueden producir dafios permanentes.
PARA HACER ARRANCAR EL MO-
TOR
o Para hacer arrancar un motorfr[o, empuje el
cebador cineo (5)veces antes de tratario_
Empuje firmemente_ Este paso normalmente no
es necesario cuando se hace arrancar un motor
que ya ha estado funcionando per unos cuantos
minutes.
, Sujete la barra de controles que exigen la
presencia del operador abajo en el mango y tire
e! mango del arrancador r_pidamente. No
permita que el cord6n arrancador se devuelva
abruptarnente.
o Para parar el motor, suelte la barra de controles
que exigen lapresencia del operador.
AVISO: En climas m_s frfos puede que sea
necesario repetir los pasos del cebado. En climas
m_s caturosos elcebar demasiado puede producir
el ahogo y el motor no va a arrancar. Si se ahoga el
motor espere unos cuantos minutes antes de tratar
de hacerlo arrancar y no repita los pasos del
cebado.
CONSEJOS PARA SEGAR
, Bajo ciertascondiciones, taJcome c6sped muy
alto, puede ser necesario el elevar la altura del
corte para reducirel esfuer-zonecesado para
empujar la segadora y para evitar sobrecargar el
motor, dejando montones de recortes de c6sped.
• Para un corte muy pesado, reduzca el ancho del
corte pasando pardalmente per encima del lugar
anteriormente corlado y siegue lentarnenteo
o Cuando use una segadora con descarga trasera
en c_sped h0medo y pesado, los montones de1
c6sped cortado puede que no entren en el
recogedor de c_sped. Reduzca la velocidad del
recorrido (velocidad de empuje) y/o haga
funcionar la segadora sobre el _rea per segunda
vez.
o Si queda una huella de cortes en el lade derecho
de una segadora con descarga trasera, siegue
en la direcciSnen que giran las manillas det reloj,
solapando un poco pare recaudar los recortes en
la prSxima pasada.
o Los pores en los recogedores de c_.spedde tela
pueden llenarsecon mugre y peevecon el use y
los recogedores recaudar&n menos c_spedo
Pare evitar 6sto, rocfe el recogedor con la
manguera de agua regularmente y d_jelo
secarse antes de usario,.
, Mantenga la parte superior del motor, alrededor
del arrancador, despejada y sin recortes de
c_sped y paja. Esto ayudar'&elflujo del aire del
motor y extender'&la duraci6n 6steo
CONSEJOS PARA SEGAR Y
ACOLOHAR
IMPORTANTE: Para obtener el meier rendimiento
mantenga la cajade la segadora sinacumulaci6n
de scesped y basura.Vea "LIMPIEZA" en la seccion
de "RESPONSABIUDADES DEL CLIENTE" de
este manual.
= La cuchilla acolchadore especial va a volver a
cortar los recortesde c_sped muchas veces, y
los reduceen tamaSo,de mode que si se caen
en etc_sped se van a dispesar entre este y no
se van a notar.Tambi6n, el c6sped acolchado se
va a deshacer r_pidamente entregando
substancias nutritivas para el c_sped_Siempre
acolche con la velocidad del motor (cuchilla) m_s
alta, pues as[ se obtendr_ la meier acci6n de
recorte de las cuchillas.
• Evite cortar elc_sped cu&ndo est_ mojado. E1
c_ispedmojado tiende a formar montones e
inteffierecon la acci6n de acolchado, La rnejor
here para segar elc_spedes tempranoen la
tardeoA esa hera _ste se ha secado y el_rea
reci6ncortadano quedar_expuestaalsot
directo.
• Pareobtener los mejores resuttados,ajuste la
alturadel corte de la segadora de mode clue6sta
corte solamente el tercio SUl_eriorde las hojas de
c_spedoEn el case de que el c_sped haya
crecido demasiado, puede ser necesario el
elevar la altura del code para reducir el esfuerzo
23

necesario para empujar la segadora y para evitar
sobrecargar el motor, dejando montones de
recortes de c_sped. Para un acolchamiento muy
pesado, reduzca el ancho del corte pasando por
encima del lugar anteriormente cortado y siegue
tentamente,
Ciertos tJposde c_sped y sus condiciones
pueden exigir que un &reatenga que ser
acolchada por segunda vez para esconder
completamente los recortes, Cuando se haga el
segundo corte, siegue atravesado o en forma
perpendicular a la pasada del primer corte°
Cambie su patr6nde corte de semana a
semana. Siegue de notre a sur una semana y
tuego cambie de este a oeste la pr6xima
semana. Esto ev'_ar_que el c6sped se enrede y
cambie de direcci6n.
MAX. 1/3
24

PROGRA_A DJ_ _ANTr_ E J_'TO ,,__ _=l_ _-_ /_f
_._ ................. I __/_'J" FECHASOESERVJCJO
i Revisar sthay sujetadores sueltos ....._
Umpiar/inspeccionar el racogedor de
c_sped(slvieneequipado) ._ .__ .....
El Ump!a,=._gadora . :.... _ V' .............................
G Umpiar deb_jo de la cubierla de la tmns-
misi6n (segadoras con poder pmpulsor) $/
sadas (segad°_ COnP0tier Pr°Puls°r)-- ! I............ ....... JJ ! l
Ri m.v_..r l.s co._as y 1_ po,ea,impul- i.....i ......V il _j J ....... J..... : :: .............
A labia de lubricacl6n j i _ '"'J _ JJ l I - _
Umpt_r i_ baie ri'aimc'_,rg_r ................... =........... ' _........... _ =- ...........
Revisar el niveldel acelte $/ , I
................................................ I I I I I
,._po=oion_,,II,,n_do,! 1 ' V' j I I I I I 1----........
Umplar o/cambiar labu._fa j _ .........
Cambiar el cartucho de pape_det filt_"_ "_ _-'_ _ '
de a_re v.-
1 - Cambi_ m_s a monudo cuando so oporo bajo carga pas_da o on ambiontes con aires temporaturas_
2 - Dar sBrvictom_s a menudo cua_do se opare en condiciortes suci_s o polvorosas
3 _C_mbie las cuchilias ross a menudo cuando si_gue an tBr_enoarenoso.
4 _CBrgar por 4B horas a| fin de la tomporada
RECOMENDACIONES TABLA DE LUBRICACION
GENERALES O Aju_t_or_e=aru_da
Lagarantt'ade esta segadora no cubre los art[culos
que ban estado sujetos al abuso o a la negligencia
del operador, Para recibir todo elvalor de la
garantfa, el operadortiene que mantener la
segadora segSn tasinstrucciones descfilas en este
manual.
Hay algunos ajustes que se tienen que hater en
forrna peri6dica para poder mantener su unidad
adecuadamente,
Todos los ajustes en lasecci6n de Sewicio y Ajustes
de este manual tienen que ser revisados por to
menos un vez pot cada temporada.
o Una vez al aSo, cambie la bujia, limpie o cambie
el elemento del filtm de aim y revise si la cuchilla
estd desgastada. Una bujla nueva y un elemento
del filtro de aim limpiolnuevo aseguran la mezcta
de aire-combustible adecuada y ayudan a que su
motor funcionemejor y que dure m_s,
• Siga el programa de mantenimiento en este
manual,
ANTES DE CADA USO
• Revise eln'rveldel aceite delmotor.
,, Revise sihay sujetadores sueltos.
LUBRIOACION
Mantenga laun=dadb_enubncada (yea ta TABLA
DE LUBRICACION").
Aceite de motor
de montaje del
(_ puntal det mango
(_) Punta| de
resorte
del freno
(_ Btsagra de la
puerta trasera
(D Rocie ellubricante
Aceite de motor de SAE 30. Refierasea la
(_)secci6n deRESPONSABILIDADES DEL
CLfENTE en "MOTOR"
IMPORTANTE: No aceite o engrase los
rodamientos de la ruedade plastico_Los
lubricantesviscosos atraeran potvo y mugre, Io que
acortam la duraciSn de tos rodamientos
autolubricantesoSi cree que tienen que lubricarse,
use solamente un lubricante tipografito, de polvo
seco, enfarina moderada.
25

ESPECJRCACIlONES DEL PRODUCTO
NOMERO DE MODELO 917.387260
NOMERO DE SERIE
FECHA DE COMPRA
CABALLOS DE FUERZA: 4.5
DESPLAZAMIENTO: 11.5 CUo IN.
CAPAClDAD Y TIPO
DE GASOLINA:
1.5 Cuartos
REGULAR SIN PLOMO
TIPO DE ACEITE:
(API-SF/SG)
CAPACIDAD DE ACEITE: 20 oz. de capacidad
BUJ[A (ABERTURA: .030") CHAMPION RJ19LM O J19LM
TOLERANCIA DE VALVULA: ADMISION: .004 - .008
DESCARGA: .004 - .008
SENCENDIDO DE ESTADO
SOLIDO ABERTURA DE AIRE: .0125 IN.
TORSION DEL PERNO
DE LA CUCHILLA: 35-40 FT, LBS.
• El num6ro del nodelo y el de serie se encuentran en ta calcomania adjunta a la parte
trasera de la caja de la segadora. Debe registrar tanto el num_ro de serie come ta
fecha de compra y mantengalos en un lugar seguro para refencia en el futuro.
SEGADORA sent/do contrario en que giran las manillas del
SAE 30 (sobre 32°F)
SAE 5W-30 (debajo 32°F)
Siempre observe las reglasde seguridad cuando
haga el mantenimiento.
LLANTAS
. Mantenga las llantas singasolina, aceite o
substar_ciasqu[micas para controlde insectos
que pueden daffarla goma.
• Evite lostocones, laspiedras,las grietas
profundas, los objetos afilados y otros peligms
que pueden d_ara tas tlantas.
CUIDADO DE LA CUCHILLA
reloj.
= Remueva la cuchilta y los artfculos de ferreterfa
adjuntadores (el pemo, la arandela de seguridad
y la arandela endurecida).
AVISO: Remueva e[adaptador de ta cuchilla y
revise el cubo interior de la ranura del adaptador de
la cuchilla. La ranura tiene que estar en buenas
condiciones para que funcione en forTnaadecuada.
Cambie el adaptador si est_ daSado.
Para obtener los mejores resultados,la cuchi[lade
la segadora tiene que mantenerse afitada.Cambie
la cuchilla doblada o daSada.
PARA REMOVER LA CUCHILLA
o Desconecte el alambre de la bujfa y p6ngalo en
donde no pueda entrar encontacto con _sta.
- Haga descansarla segadora en su lado.
AsegSrese que el filtro de aire y que el
carburador queden mirando hacia ardba.
= Use un bloque de madera entre lacuchillay ia
caja de la segadora para evitarque la cuchilla
gire cuando se le quite elpemo.
o Proteja sus rnanos con guantes y/o envuelva la
cuchiIlacon una tela gruesa.
o Remueva el perno de lacuchilla gir&ndolo en el
PAPA CAMBIAR LA CUCHILLA
= Ponga el adaptador de la cuchilla en el cigueffal
del motor. Aseg_rese que la ranura del
adaptador y que e! chavetero del ciguefiat est_n
alineados.
= Ponga la cuchilla en etadaptador de _sta
alineando tos dos (2) agujeros en la cuchilla con
las salientes elevadasen el adaptador.
° Asegfirese de que el borde de safidade la
cuchilla (opuesto al borde afilado) est6 hacia
arriba hacia el motor.
° Instaleel pemo de la cuchilla con la arandela de
seguridad y la arandela endurecida en el
adaptador de la cuchilla y el cigueRaL
= Use un bloque de madera entre la cuchitlay la
caja de la segadora y apriete etpemo de la
cuchilia gir_ndoto en el sentido en que giran las
manillas del reloj.
26

• La torsi6n para apretar recomendada es de 35 -
40 pies libras,
IMPORTANTE: El pemo de Iacuchilla es clase 8
tratado acalor.
AVISO: No recomendamos el afllar la cuchilla-
pero si Iohace, asegOrese de que quede
balanceada.
PARAAFILAR LACUCHILLA
Se tiene que tenet cuidado de mantenerta
balanceada, Una cuchilta que no est& balanceada
va a proctucireventualmente dario en la segadora o
en e!motor°
• La cuchilla puede afilarse con una lima o en una
rueda rectificadoraoNo trate de afilarlamientras
se encuentra en tasegadora.
o Para revisar e!balance de la cuchilla, clave un
clavo en una _ga o en ta pared. Deje alrededor
de una pulgada de un clavo recto expuesto.
Ponga el agujero central de la cuchilla sobre la
cabeza del clavooSi la cuchilla est,. balanceada
debe permanecer en la posici6n horizontal,.Si
cualquiera de losextremos de la cuchilla se
mueve hacia abajo, afile el extremo pesado
hasta que _sta quede balanceada,
Adaptadorde la
Chaveterodel
cuchilla \.,, ciguenal
Flan__
Arandela de Arandela
seguridad endurecida Borde de
salida
FtECOGEDOR DE OF'SPED
• El recogedor de c_sped puede ser mciado con
etagua de la manguera pero tiene que estar
seco cuando se vaya a usar.
• Revise su recogedor dec_sped a menudo para
vefificar si est_ daSado o detefioradooSe va a
desgastar con el uso normal. Si se necesita
cambiar el recogedor, cAmbielo solamente por
uno cluesea aprobado por elfabficante. D6 el
nfimero del modeto de la segadora cuando Io
ordene.
MOTOR
LUBRIOAClON
Use solamente aceite de detergente de alta cafidad
clasificado con la clasificaci6n SF,SG o SH de
servicio AP1.Seleccione tacalidadde viscosidad
SAE segSnsu temperatura de operaciOnesperada.
' " £,,DAD SDEVlSoOS!D#DDE,,sA
°cj' -=" 40, _" ;0. _0" _' _o'=
GAMA DE TEMpERATURA ANTICIPADA ANTES DEf. PROXIMO CAM{_tO DE ACEITE_
AVISO: A pesar deque los aceites de
multiviscosidad (5W30, 10W30, etc.)mejoran el
arranque en climafrio, estos aceites de
muttiviscosidadvan a aumentar el consumo de
aceite cuando se usan en temperaturas sobre 32"
F. Reviseel nivel del aceite del motor m_s a
menudo, para evitar un posible dafio en el motor,
debido a que no tiene suficiente aceite..
Cambie e!aceite despu_s de 25 horas de
operaciSn o una vez por temporada., Puede
necesitar cambiar el aceite m&s a menudo cuando
Ias condiciones son polvorosas o suciaso
Revise el nivel det aceite del c_rter antes de
arrancar el motor y despu_s de cada cinco (5) horas
de uso continuadooApriete ettapSn del aceite en
forma segura cada vez que revise el niveldel
aceite_
PARA CAMBtAR ELACEITE DEL MOTOR
AVISO: Antes de indinar la segadora para drenar
el aceite, drene ettanquede combustible haciendo
correr el motor hasta que el tanqueest6 vacio.
o Desconecte el alambre de labuj{a y p6ngalo de
modo que no pueda entrar en contacto con _sta.
° Remueva la tapa deldep6sito del aceite;d6jela a
un lado en una supedicie limpia.
• incline la segadora y h&gala descansar en su
lado y drene e!aceite en un envase adecuado,
Mueva la segadora de atr_s para adelante para
remover todo el aceite que se haya quedado
atrapado dentro del motor°
° Umpie todo el aceite derramado en la segadora
yen el lado del motor.
o Uene el motor con aceite. LI6nelo solamente
hasta la l{nea de "LLENO" (FULL) en la varilla
indicadora de niveLNO LO LLENE
DEMASIADO°
o Vuelva a poner la tapa en el dep6sito del aceite.
• Vuelva a conectar el alambre de la bujia a _sta,
Envase
FILTRO DE AIRE
Su motor no funcionar_,en forma adecuada y
puede sufrir daSos si se usa un filtro de aire sucio.
Cambie elfiltro de aire cada afio, y m_.sa menudo
si siega en condiciones mu-ypolvorosas o suciaso
No lave elfiltm de aire..
27

o
o
o
o
o
Collar
Abra-
zadera
PARA CAMBIAR EL FILTRO DE AIRE
* Remueva el filtrode aire gir-&ndoloen el sentido
contrario en que giran tasmanillas det reloj,hasta
ettope, y retfrelo del collar.
Remueva el fiitrode la parte interiorde la
cubierta.
Umpie la parte interior de la cubierla y el collar
para remover toda acumulaciSn de mugre.
tnserte el filtro nuevo en la cubierta.
Ponga la cubierta del filtro de aire dentro del
collar aJineandotaoreja con la ranura.
Empuje la cubierta hacia adentro ygirela an el
sentido de las maniUasdel reloj para apretarlao
Gire en el
sentido
contrarioa
lasmanillas
detreloj
para
Ranura remover
Fittrode aire Gire en el
sentido de
Oreia lasmanillas
Cubiertadetfiltro
del reloj
de aire
para
apretar
SILENCIADOR
Inspeccione y cambie el silenciador si est#,
corrofdo pues producir un peligro de incendio y/
o da5o.
BUJfA
Cambie su bujfa cada afio para hacer que su
motor arranque m&s f&cilmente y funcione
mejoroAjuste la abertura de la bujfa en 0,030
pulgada,
LIMPIEZA
IMPORTANTE: Para obtener el mejor rendi-
miento, mantenga la caja de la segadora sin
acumulacion de cesped y basura. Limpie la
parte de abajo de su segadora despues de
cada uso.
PRECAUCION: Desconecte el alambre de la
bujfa y p6ngalo en donde no pueda entrar en
contacto con 6sta.
* Haga descansar la segadora en su lado.
AsegQrese que el filtro de aire y que el
carburador queden mirando hacia arriba.
Limpie la parte inferior de su segadora
rasp_mdola para remover la acumulaciOn de
c_sped y basura.
° Limpie el motor a menudo para evitar que se
acumule la basura. Un motor tapado funciona
m__scaliente y se acorta su duraciOn.
. Mantenga las superficies acabadas y las
ruedas sin gasolina, aceite, etc,
. No recomendamos el uso de una manguera
de jardfn para limpiar la segadora a menos
que e! sistema el_ctrico, el silenciador, el
filtro de aire y el carburador est#n tapados
para evitar que les entre el agua. El agua en
el motor puede acortar fa duraciOn de _ste_
PRECAUCION: ANTES DE DAR CUALQUtER
SERVtClO O DE HACER AJUSTES:
o Suelte la barra de control y pare el motor.
. Asegr3rese que la cuchilla y que todas las
partes movibtes se hayan detenido
completamente.
. Desconecte el alambre de la bujia y pOngalo
en donde no pueda entrar en contacto con
_stao
SEGADORA
PARA AJUSTAR LA ALTURA DE
CORTE
Vea"PARAAJUSTAR I.AALTURA DE CORTE" en
la secci6n de Operaci6n de este manual.
DESVIADOR TRASERO
Se proporciona undesviador trasero, adjunto entre
lasruedastraserasde su segadora, para reducir a
un mfnimo la posibilidad que objetos sean lanzados
hacia aluera de la parte trasera de la segadora, en
la posiciOnen donde se encuentra el operador. Si
se dafa el desviador debe cambiarse.
PAPUAAJUSTAR EL MANGO
Se puedelevantar o bajarelmango de su segadora
seg6n le quede c6modo.Hay cuatro (4) posiciones
disponibles:alta, media.haalta, mediana baja, baja.
Los mangosse en:¢fanmontados en la posici6n
mediana baja.
= Para cambiar de la posici6n mediana baja a
mediana alta, la secci6n superior y la inferior del
mango tendr'&nque darse vuelta.
• Remueva lasabrazaderas del cable.
. Remueva loscontroles y la barra de control que
exJgela presencia det operador del mango
superior.
= Remueva la guia del corcl6n arrancador del
mango inferior.
• Remueva lasclavijas de horqui!la,
• Desconecte el mango inferior de los puntales del
mango.
• Devuelta el mango yvuelva a montar ]as davijas
de horquilla que se habfan removido.
. Vuelva a montar la guia del cord6n arrancador.
° Vuelva a montar los controles y la barra de
controles que exige la presencia del operador en
el mango superior.
PRECAUGION: La barra de control que exige la
presencia del operador tiene que pivotear
libremente para permitir el enganche de la cuchilla/
freno cuando se suetta la barra de control. No
apriete demasiado los sujetadores que sujetan a los
controles al mango superior.
28

- Para cambiar de la posici6n de mediana baja a
alta solamente se tendr_ que dar vuelta la
secci6n del mango superior.
o Para cambiar de la posici6n mediana baja a baja,
solamente se tendr_ que dar,_elta la secci6n
del mango inferior.
postci6n de envio
Mediana baja
edianaatta
)'
Alia
Mangoinferior
Aprietepara....-J'1>_ _Clavija de
Clavija de horquilla
MOTOR
CARBURADOR
Su carburador tiene un chorro principalfijo no
ajustable para controlar la mezcla. Si su motor no
est_ funcionando en forma adecuada debido a
problemas que sesospecha vienen del carburador,
Ileve su segadora a un centro de servicio autorizado
para repararla y/o ajustada
VELOOIDAD DEL MOTOR
La velocidad del motor ha sido ajustada en la
f&bfica. No trate de aumentar la velocidad de1motor
pues se pueden producir lesiones personalesoSi
cree que elmotor est& funcionando demasiado
r_pidoo demasiado lento, Ileve su segadora a un
centro de servicio autorizado para repararla o
ajustafla.
Inmediatamente prepare su segadora para el
almacenamiento al final de cada temporada o sila
unidad no seva a usar por 30 dfas o m_s.
SEGADOFIA
Cuando se va a guardar la segadora por cierto
periodo de tiempo, limpiela cuidadosamente,
remueva toda la mugre, la grasa, las hojas, etc.
Gu&rdela en un _rea limpia y seca.
• Limpie toda la segadora (Vea "LIMPIEZA" en la
secci6n de Responsabilidades del Cliente de
este manual).
, Lubriquela segQnse muestra en la secci6n de
ResponsabHidadesdel Cliente de este manual
° AsegQresede que todas tas tuem.,asy clavijas y
todos los pemos y tomil!os est6n apretados en
foma segura. Inspeccione las partes que se
mueven para verificar si est&n dafiadas,
quebradas o desgastadas. C&mbielas si es
necesarioo
• Retoque todas las superficies que est6n
oxidadas o con la pintura picada; use una lija
antes de pintar.
MANGO
Puede doblar el mango de su segadora para
almacenada.
° Apriete los extremos inferiores del mango inferior
entre s[ hasta que el mango inferior quede
separado del puntal del mango, luego mu6valo
hacia adelante.
• Suelte los pemos de montaje del mango superior
Io suficiente como para permitirque el mango
superior se puedadoblar hacia atr_s.
IMPORTANTE: Cuando doble el mango para el
almacenamianto o el transporte, asegurese que Io
doble segun se muestra o puede danar los cables
de control.
° Cuando prepare sus mangos a partir de la
posici6n de almacenamiento, etmango inferior
autom&ticamente se asegurar_ en la posici6n
para segar. Puntatdel
Mangoinferior •
Barra de controlque exige ta
presencia del operador
Mango superior
Levantar
Mango
inferior
Posici6n
para segar
29

MOTOR
S|STEMA DE COMBUSTIBLE
IMPORTANTE: Es importante evitar que se
formen depositos de goma em partes
fundamentales del sistemade combustible tales
como el carburador,el filtro del combustible, la
manguera del combustible o en el estanque
durante el almacenamiento° La experiencea
tanbien indica que los combustibles mezclados
con alcohol (conocido como gasohol o que
tienen etanot o metanot) pueden atraer
humedad, Io que conduce a la separacion y a la
formacion de acidos durante el
almacenamientoo La gasolina acidica puede
danar el sistema de combustible de yn motor
durante el periodo de almacenamiento.
. Drene el estanque de combustible.
° Haga arrancar el motor y d_jelo funcionar
hasta que las Ifneas del combustible y el
carburador est_n vacfos.
° Nunca use los productos para limpieza del
carburador o del motor en el estanque de
combustible pues se pueden producir daSos
permanentes.
° Use combustible nuevo la pr6xima
temporada.
AVISO: El estabilizador de combustible es una
altemativa aceptable para reducir a un mfnimo
la formaci6n de dep6sitos de goma en el
combustible durante el pefiodo de
almacenamiento, Agregue estabilizador a ta
gasolina en et estanque de combustible o en el
envase para el almacenamiento. Siempre siga
ia proporci6n de mezcla que se encuentra en el
envase del estabilizador. Haga funcionar el
motor por Io menos 10 minutos despu_s de
agregar el estabilizador, para permitir que este
Ilegue al carburador_ No drene la gasolina del
estanque de gasolina y el carburador si se est,1
usando estabilizador de combustible°
ACEiTE DEL MOTOR
Drene el aceite (con el motor catiente) y
c&mbielo con aceite de motor limpio° (Vea
"MOTOR" en la secci6n de Responsabilidades
del Cliente de este manuaL)
CILINDRO
,, Remueva la bujfao
• Vacfe una onza (29 mf) de aceite a trav6s det
agujero de la buji'a en el cilindroo
o Tire la manilla de arranque lentamente unas
cuantas veces para distribuir et aceite.
° Vuelva a montar la nueva bujfa.
OTROS
° No guarde la gasolina de una temporada a la
otra.
o Cambie el envase de la gasolina si se
empieza a oxidar. La oxidaci6n y/o la mugre
en su gasolina producir_n problemas.
= Si es posibte,guarde su unidad en un recinto
cerrado y cubrala para protegeda contra el
polvo y la mugre.
o Cubra su unidad con un forro protector
adecuado que no retenga la humedad. No
use pldstico. El pidstico no puede respirar, Io
que permite la formaci6n de condensaci6n, Io
que producir_ la oxidaci6n de su unidad.
IMPORTANTE: Nunca cubra la segadora
mientras el motor y las areas de escape todavia
estan catientes.
PRECAUCI6N: Nunca almacene la segadora
con gasolina en el estanque dentro de un
edificio en donde los gases pueden alcanzar
una llama expuesta o una chispao Permita que
se enfrfe el motor antes de almacenada en
alg0n recinto cerradoo
3O

PROBLEMA
No arranca
IDENTIFICACION DE PROBLEMAS
CAUSA
=Fi_tro de aire sucioo
° Sin combustible,,
oCombustible rancio.
Falta de fuerza
° Agua en el combustible.
oAlambre de la bujia
desconectado.
°Bujfamala,
=Cuchilla suelta o adaptador
de la cuchilla quebrado.
° Barra de control en la posici6n
suelta.
° Barra de control defectuosa.
° Parte trasera de la cajacuchilla
de la segadora arrastr_,ndose
en el c6sped pesadoo
° Est_ cortando mucho c6sped.
• Filtro de aire sucio,
• AcumulaciSn de c_sped, hojas
y basura debajo de la sega-
dora.
° Demasiado aceite en el motor.
CORRECCION
° Limpie/caml0ie el fiiiro de airel
° Llene el estanque de combustible.
• Drene el estanque y wJelva a
Ilenado con combustible limpio y
Ruevoo
° Drene el estanque de combustible y
el carburador y vue{va a ilenar el
estanque con gasolina nueva_
° Conecte et alambre a la bujfa.
• Cambie la bujia.
= Apriete e! perno de la cuchilla o
cambie el adaptador de la cuchilia.
o Presione la barra de control hacia el
mango.
° Cambie ta barra de control.
Ajuste a la posici6n de "Corte m_.s
alto."
Ajuste a la posici6n de "Corte m&s
a_to."
o Limpie/cambie el filtro de aire.
• Limpie la parte infedor de la caja de
la segadora.
° Revise et nivel del aceite.
° Corte a una velocidad de recorrido
m&s lenta.
31

PROBLEIVIA
,, ,,,,
Jlal corte -disparejo o
o
o
Cuchilla desgastada, doblada o
suelta.
Attura de las rdedas dispareja.
AcumutaciSn de c_sped, hojas o!
basura debajo de la segadora.
CAUSA .................. CORRECCiON
o Cambie la cuchilla, Apriete el
pemo de la cuchilla.
° Ajuste todas tas ruedas a la
misma alturao
° Limpie [a parte inferior de la caja
de la segadora.
VibraciSn excesiva = Cambie la cuchilla. Apdete el
pemo de ta cuchillao
• P6ngase en contacto con su
centro de servicio autodzado
m_s cercano.
CordSn arrancador
dif[cil de tirar
Recogedor de c_sped
no se Iiena (si viene
equipado)
Diffcil de empujar
• Cuchilla desgastada, doblada o
sueltao
• Ciguefial del motor doblado.
° El freno del volante del motor
est6,aplicado cuando se suelta
ta barra de control.
° Ciguefial del motor doblado_
° Adaptador de la cuchilla
quebradoo
• La cuchilla se arrastra en el
c_sped.
• Altura de corte demasiado
baja_
• Levantamiento de la cuchilla
desgastado.
• Recogedor sin ventilaci6n de
aim.
° El c_sped est,. demasiado alto
o la attura de la rueda dema-
siado baja.
o Parte trasera de la caja/cuchilla
de la segadora arrastr_ndose
en el c6sped.
° Recogedor de c_sped dema-
siado Ileno.
° Posici6n de la altura del mango
no adecuada para usted.
° Presione la barra de control
hacia el mango superior antes de
tirar el cordSn arrancadoro
• PSngase en contacto con su
centre de sewicio autodzado
mds cemano.
° Cambie el adaptador de la
cuchilla.
° Mueva la segadora a un iugar en
donde el cdsped ha sido cortado
o a una supefficie firme para
hacer arrancar el motor.
° Eteve la altura de corte.
• Cambie la cuchillas.
° Limpie el recogedor de c_spedo
° Eleve la altura de corte.
• Eleve la parte trasera de la caja dE
la segadora (1) un lugar m&s alto.
° Vact'e el recogedor de c_sped.
° Ajuste la altura del mango de
modo que le acomode.
32

33

CRAFTSMAN 20" ROTARY LAWN MOWER - - MODEL NO. 917.387260
58
35
43
42
43
03
32 33
44
32
37
37
36 38
4O
43
39
4O
43
38
3g
37
t

KEY PART
NO. NO.
CRAFTSMAN 20" ROTARY LAWN MOWER - - MODEL NO. 917.387260
DESCRIPTION KEY PART DESCRIPTION
NO. NO.
O3
O1
! 86902
2 145646x479
3 150424
4 132001
5 157081X479
7 131959
8 66426
9 51793
!0 136376
11 156577
13 750097
14 850733X004
15 63601
17 147613
18 700357)(479
19 150050
21 54583
22 700063X479
23 88652
24 700363X479
25 144875X479
26 140657
28 151512X479
29 151511X479
31 150078
32 700325X007
33 146630
34 128415
35 87877
36 700331X004
Control Bar 37 145935){004
Upper Handle 38 62335
Mulcher Plug 39 142748
Rope Guide 40 151157
Lower Handle 42 83923
Handle Bolt 43 77400
Wire Tie 44 85463
Hairpin Cotter 45 150406
Handle Knob 46 161857
Engine Zone Control Cable
Hex Washer Head Screw 10-24 x 1/2 47 751592
Up-Stop Bracket 50 700938X479
Keps Locknut 1/4-20 51 851084
Rear Door Assembly Kit 52 850263
Back Plate 53 851074
Self Tapping Screw 10-24 x 5/8 54 145106
Hex Head Tapping Screw !/4-20 x 1/2 55 850977
Rear Baffle 56 144748
Hinge Screw 1/4-20 x 1-1/4 57 154870
Side Baffle 58 ......
Discharge Baffle
Rear Deflector 59 t44747
Handle Bracket Assembly (Left) - - 161882
Handle Bracket Assembly (Right}
Screw 5/t6-18 x 3/4
Wheel Adjusting Bracket
Spacer
Pop Rivet
Selector Knob
Selector Spring
Axle Arm Assembly
8elfeville Washer
Shoulder Bolt
Wheel and Tire Assembly
He× Flange Locknut
Hubcap
Danger Decal
Hex Head Thread Rolling Screw 318-16 x I
Lawn Mower Housing (Incl. Key #18, 22, 24, 44,
50)
Locknut 3/8-16
FrontBaffle
Hex Head Machine Screw 3/8-24 × 1-3/8 (Grd. 8)
Helical Lockwasher 3/8
Washer
Blade 20"
Blade Adapter
Tube Frame
Grass Bag
Engine - (See Breakdown) Craftsman
Modei 143.984500
Throat Frame
Owner's Manual
Available accessories not included with lawn mower:
Z.t 33723 Hi-Wheel Kit
71 33623 Gas Can (2.5 gaL)
71 33500 Fuel Stabilizer
71 33300 SAE 30W Oil (20 oz.)
71 33417 Dust Shield
7./33316 Mower Cover

9O0
..........................................MODEL NUMBER !,43_984500'
0--370K
130
120
4-16
119
125
101
126
/287
298
36

CRAFTSMAN 4-CYCLE ENGINE MODEL NUMBER 143.984500
KEY PART KEY PART
NO.NO DESCRIPTION NO. NO. DESCRIPTION
1
2
6
7
12
12A
128
14
15
16
17
i8
19
2O
30
4O
4O
4O
41
41
41
42
42
42
43
45
46
48
5O
52
69
70
72
75
80
81
82
83
86
B9
9O
92
93
100
101
103
110
1t9
120
t25
125
126
126
37O27
26727
33734
36557
36775
36558
36694
28277
3O589
34839A
31335
651018
36281
326OO
36793
35544A
35545A
35546
35541
35542
35543
35547A
35548A
35549
2O381
36777
326!0A
27241
37032
29914
35261
36995
3608-3
27897
30574A
3059OA
30591
30588A
65O488
611004
611112
650815
65O816
344438
610118
651007
37047
37O28
36788
36779
36780
36781
36782
Cylinder (Incl,2 & 20) 130 602tA Screw,5/16-t8 x t-112"
Dowel Hn 135 35395 ResistorSpark Plug
Breather Element (J19LM)
Breather Assy.(Incl. 6 & 150 35991 Valve Spring
12A) 151 31673 Valve Spring Cap
BreatherTube 151A 40017 IntakeValve Seal
Breather Cover & Tube 169 36783 "Valve Cover Gasket
(lncLt2B) 172 36784 Valve Cover
Breather Tube Elbow 174 30200 Screw, 10-24 x 9/16"
Washer 178 29752 Nut& LockWasher, 1/4-28
Governor Rod (lncL14) 182 6201 Screw, t/4-28 x 7/8"
Governor Lever 184 26756 "CarburetorTo Intake Pipe
Governor Lever Clamp Gasket
Screw,Torx'l"-t 5,8-32 x 185 36785 IntakePipe
19/64" I86 32653 GovernorLink
Extension Spring 189 650839 Screw, 11,$-20x 3/8"
OilSeat I9I 36559 S.E.Brake Bracket (incL
Crankshaft 195)
Piston,Pin & Ring Set 195 610973 Terminal
(Std.) 207 34336 Throttle Link
Piston,Pin & Ring Set 216 33086 RoPoM,Adjusting Lever
(.010" OS) 223 650451 Screw, 1/4-20 x 1"
Piston,Pin & Ring Set 224 36786 * Intake Pipe Gasket
(.020"OS) 238 650932 Screw,10-32x 49164"
Piston & PinAssty. (Std.) 239 34338 "Air Cleaner Gasket
(Inc!.4-3) 241 35797 AirCleaner Collar
Piston & PinAss'y. 245 35066 Air CleanerFilter
(,010" OS)(incl. 43) 250 35065 Air Cleaner Cover
Piston & PinAss'y. 260 36980 Blower Housing
(.020 OS) (IncL43) 261 30200 Screw,10"24x 9/16"
RingSet (Std.) 262 650831 Screw, 1/4-20x 1/2"
RingSet (.010"OS) 275 36790 Muffler
RingSet (.020 OS) 277 650988 Screw, 1/4-20 x 2-5/16"
Piston PinRetaining Ring 285 35000A StarterCup
ConnectingRod Assty. 287 650926 Screw,8-32 x 21/64"
(tncL46) 290 29774 FuelLine
ConnectingRod Bolt 292 26460 FuelLine Clamp
Valve Lifter 298 28763 Screw, 10-32 x 35164"
Camshaft (NCR) 300 36916 FuelTank (Incl.292 & 301)
Oil PumpAss'y. 30t 36246 FuelCap
Mounting FlangeGasket 305 35647 0_1RltTube
MountingFlange(Incl.72 306 36996 ""O"-Rtng
thru83) 307 35499 "O"-Ring
Oil DrainPtug 309 650562 Screw, 10-32x 1/2"
Oil Seal 310 35648 Dipstick
GovernorShaft 313 34080 Spacer
Washer 370A 36261 Lubfica_n Decal
GovemorGear Ass'y. (Inel. 370C 36861 PrimerDecal
81) 370K 36695 Starter Decal
GovernorSpool 380 640124 Carburetor (lnclo184)
Screw,1/4-20x 1-114" 390 590694 Rewind Starter
FlywheelKey 400 37029A Gasket Set
Flywheel (incLItems Marked" in
BeIlevitleWasher Notes)
FlywheelNut 416 36085 Spark Arrestor Kit
SolidStateIgnition (IncL417)(Optional)
Spark PlugCover 417 650760 Screw,832 x 3/8"
Screw,Torx T-15, 10-24x (Optional)
15/16" 900 Replacement Engine
GroundWire 750830,
CylinderHead Gasket orderfrom 71-999
CylinderHead 900 ---- Replacement S/B 750806,
ExhaustValve (Std.) (Inclo orderfrom71-999
151) RPM High2900 to 3200
ExhaustValve
(1/32"OS) (Incl, 151) NOTE: This engine could havebeenbuiltwilh590737
IntakeValve (Std) starter.
(Inclo151)
IntakeValve (1/32"OS) NOTE: All component dimensions givenin U& Inches
(IncL151) t inch = 2&4 mm
37

CRAFTSMAN 4-CYCLE ENGINE MODEL NUMBER 143.984500
2S i_
KEY
NO.
1
2
4
5
6
7
16
25
27
28
29
3O
31
35
36
37
40
44
48
PART
NO,,
640124
631615
631767
631184
631183
632504
650506
631807
631867
631024
632019
631028
631021
631022
36045A
640080
632547
640062
27110
631027
DESCRIPTION
Carburetor
(Incl° 184 of Engine Parts List)
Throttle Shaft & Lever Assembly
Throttle Return Spring
Dust Seal Washer
Dust Seal (Throttle)
Throttle Shutter
Shutter Screw
Fuel Fitting
Float Bowl
Float Shaft
Float
Float Bowl "O" Ring
inlet Needle, Seat, & Clip (incl, 31)
Spring CIip
Primer Bulb/Retainer Ring
Matn Nozzle Tube
"O" Ring, Main Nozzle Tube
High Speed Bowl Nut
Bowl Nut Washer
Welch Plug, Atmospheric Vent
38

CRAFTSMAN 4-CYCLE ENGINE MODEL NUMBER 143.984500
O_z
KEY PART
NO. NO. DESCRIPTION
-_ 590694 Recoil Starter
1 590599A Spring Pin (incl. 4)
2 590600 Washer
3 590696 Retainer
4 590601 Washer
5 590697 Brake Spring
6 590698 Starter Dog
7 690699 Dog Spring
8 590700 Pulley & Rewind Spring
Assy,,
11 590695 Starter Housing Assyo
(40 degree grommet)
12 590535 Starter Rope ( 98" X 9/
64" dia,)
13 590701 Starter Handle
18 _--7
_8
KEY PART
NO, NO, DESCRIPTION
_ 590737 Rewind Starter
3 590740 Retainer
6 590616 Starter Dog
7 590617 Dog Spring
B 590618A Pulley & Rewind Spring
Assy
11 590687A Starter Housing Ass'y
(40 degree grommet)
12 590535 Starter Rope
(Length 98" x 9f64" alia.)
13 590701 Starter Handle
14 590741 Locking Tab
39

Fortherepairorreplacementpartsyouneed
delivereddirectlytoyourhome
Call7am -7pm, 7daysaweek
1=800=366-PART
(1-800-366-7278)
Para ordenar piezas con entrega a
domicilio - 1-800-659-7084
For in-house major brand repair service
Call 24 hours a day, 7 days a week
1-800=4=REPAIR
(1-800-473-7274)
Para pedir servicio de reparaci6n a
domicilio - 1-800-676-5811
For the location of a Sears Parts and
Repair Center in your area
Call 24 hours a day, 7 days a week
1=800=488-1222
For information on purchasing a Sears
Maintenance Agreement or to inquire
about an existing Agreement
Call 9 am - 5 pm, Monday-Saturday
1-800=827=6655
When requesting service or ordering
parts, always provide the following
information:
- Product Type oPart Number
° Model Number ° Part Description
Arnenca's Repazr Speciattsts
161882 REV.1 03.09.98 VB Printed in U.S.A.
-
 1
1
-
 2
2
-
 3
3
-
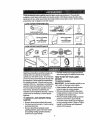 4
4
-
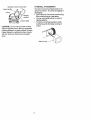 5
5
-
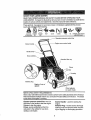 6
6
-
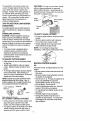 7
7
-
 8
8
-
 9
9
-
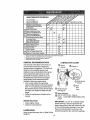 10
10
-
 11
11
-
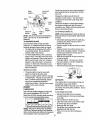 12
12
-
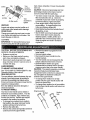 13
13
-
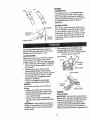 14
14
-
 15
15
-
 16
16
-
 17
17
-
 18
18
-
 19
19
-
 20
20
-
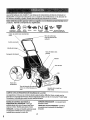 21
21
-
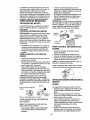 22
22
-
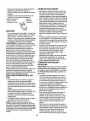 23
23
-
 24
24
-
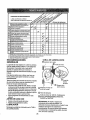 25
25
-
 26
26
-
 27
27
-
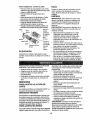 28
28
-
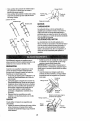 29
29
-
 30
30
-
 31
31
-
 32
32
-
 33
33
-
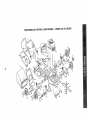 34
34
-
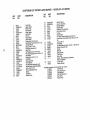 35
35
-
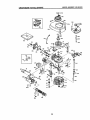 36
36
-
 37
37
-
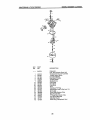 38
38
-
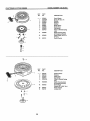 39
39
-
 40
40


Craftsman 917.387260 El manual del propietario
- Categoría
- Cortadoras de césped
- Tipo
- El manual del propietario
- Este manual también es adecuado para
en otros idiomas
- English: Craftsman 917.387260 Owner's manual
Artículos relacionados
-
Craftsman 917.389151 El manual del propietario
-
-
-
-
-
-
-
-
-