Electrolux EOG68C2IUX Manual de usuario
- Categoría
- Microondas
- Tipo
- Manual de usuario


CONTENTS
1. SAFETY INFORMATION....................................................................................3
2. SAFETY INSTRUCTIONS..................................................................................4
3. INSTALLATION.................................................................................................. 7
4. PRODUCT DESCRIPTION.............................................................................. 11
5. BEFORE FIRST USE....................................................................................... 11
6. DAILY USE....................................................................................................... 12
7. CLOCK FUNCTIONS....................................................................................... 13
8. USING THE ACCESSORIES........................................................................... 13
9. ADDITIONAL FUNCTIONS.............................................................................. 15
10. HINTS AND TIPS........................................................................................... 15
11. CARE AND CLEANING..................................................................................20
12. TROUBLESHOOTING....................................................................................23
13. TECHNICAL DATA.........................................................................................25
14. ENERGY EFFICIENCY.................................................................................. 25
WE’RE THINKING OF YOU
Thank you for purchasing an Electrolux appliance. You’ve chosen a product that
brings with it decades of professional experience and innovation. Ingenious and
stylish, it has been designed with you in mind. So whenever you use it, you can
be safe in the knowledge that you’ll get great results every time.
Welcome to Electrolux.
Visit our website to:
Get usage advice, brochures, trouble shooter, service and repair information:
www.electrolux.com/support
Register your product for better service:
www.registerelectrolux.com
Buy Accessories, Consumables and Original spare parts for your appliance:
www.electrolux.com/shop
CUSTOMER CARE AND SERVICE
Always use original spare parts.
When contacting our Authorised Service Centre, ensure that you have the
following data available: Model, PNC, Serial Number.
The information can be found on the rating plate.
Warning / Caution-Safety information
General information and tips
Environmental information
Subject to change without notice.
www.electrolux.com2

1. SAFETY INFORMATION
Before the installation and use of the appliance, carefully
read the supplied instructions. The manufacturer is not
responsible for any injuries or damage that are the result
of incorrect installation or usage. Always keep the
instructions in a safe and accessible location for future
reference.
1.1 Children and vulnerable people safety
• This appliance is not intended for use by persons
(including children) with reduced physical, sensory or
mental capabilities, or lack of experience and
knowledge, unless they have been given supervision
or instruction concerning use of the appliance by a
person responsible for their safety.
• Do not let children play with the appliance.
• Keep all packaging away from children and dispose of
it appropriately.
• WARNING: Keep children and pets away from the
appliance when it operates or when it cools down.
Accessible parts become hot during use.
• If the appliance has a child safety device, it should be
activated.
• Children shall not carry out cleaning and user
maintenance of the appliance without supervision.
1.2 General Safety
• Only a qualified person must install this appliance and
replace the cable.
• WARNING: The appliance and its accessible parts
become hot during use. Care should be taken to avoid
touching heating elements.
• Always use oven gloves to remove or put in
accessories or ovenware.
• Before carrying out any maintenance, disconnect the
appliance from the power supply.
ENGLISH 3

• WARNING: Ensure that the appliance is switched off
before replacing the lamp to avoid the possibility of
electric shock.
• Do not use the appliance before installing it in the
built-in structure.
• Do not use a steam cleaner to clean the appliance.
• Do not use harsh abrasive cleaners or sharp metal
scrapers to clean the glass door since they can
scratch the surface, which may result in shattering of
the glass.
• If the mains power supply cable is damaged, it must
be replaced by the manufacturer, its Authorised
Service Centre or similarly qualified persons to avoid
an electrical hazard.
• To remove the shelf supports first pull the front of the
shelf support and then the rear end away from the
side walls. Install the shelf supports in the opposite
sequence.
2. SAFETY INSTRUCTIONS
This appliance is suitable for the
following markets: MX
2.1 Installation
WARNING!
Only a qualified person must
install this appliance.
• Remove all the packaging.
• Do not install or use a damaged
appliance.
• Follow the installation instructions
supplied with the appliance.
• Always take care when moving the
appliance as it is heavy. Always use
safety gloves and enclosed footwear.
• Do not pull the appliance by the
handle.
• Install the appliance in a safe and
suitable place that meets installation
requirements.
• Keep the minimum distance from
other appliances and units.
• Before mounting the appliance, check
if the oven door opens without
restraint.
• Do not operate the appliance without
the cavity bottom cover. It is a
functional safety component.
• The appliance is equipped with an
electric cooling system. It must be
operated with the electric power
supply.
Cabinet minimum
height (Cabinet un‐
der the worktop
minimum height)
590 (600) mm
Cabinet width 560 mm
Cabinet depth 550 (550) mm
Height of the front of
the appliance
594 mm
Height of the back
of the appliance
576 mm
www.electrolux.com4

Width of the front of
the appliance
595 mm
Width of the back of
the appliance
559 mm
Depth of the appli‐
ance
569 mm
Built in depth of the
appliance
548 mm
Depth with open
door
1022 mm
Ventilation opening
minimum size.
Opening placed on
the bottom rear side
560x110 mm
Ventilation opening
minimum size.
Opening placed on
the upper rear side
560x50 mm
Mains supply cable
length. Cable is
placed in the right
corner of the back
side
1500 mm
Mounting screws 4x25 mm
2.2 Electrical connection
WARNING!
Risk of fire and electric
shock.
• All electrical connections should be
made by a qualified electrician.
• The appliance must be earthed.
• Make sure that the parameters on the
rating plate are compatible with the
electrical ratings of the mains power
supply.
• Always use a correctly installed
shockproof socket.
• Do not use multi-plug adapters and
extension cables.
• Make sure not to cause damage to
the mains plug and to the mains
cable. Should the mains cable need to
be replaced, this must be carried out
by our Authorised Service Centre.
• Do not let mains cables touch or
come near the appliance door or the
niche below the appliance, especially
when it operates or the door is hot.
• The shock protection of live and
insulated parts must be fastened in
such a way that it cannot be removed
without tools.
• Connect the mains plug to the mains
socket only at the end of the
installation. Make sure that there is
access to the mains plug after the
installation.
• If the mains socket is loose, do not
connect the mains plug.
• Do not pull the mains cable to
disconnect the appliance. Always pull
the mains plug.
• Use only correct isolation devices: line
protecting cut-outs, fuses (screw type
fuses removed from the holder), earth
leakage trips and contactors.
• The electrical installation must have
an isolation device which lets you
disconnect the appliance from the
mains at all poles. The isolation
device must have a contact opening
width of minimum 3 mm.
• This appliance is supplied only with a
main cable.
2.3 Gas connection
• All gas connections must be made by
a qualified person.
• Before installation, make sure that the
local distribution conditions (nature of
the gas and gas pressure) and the
adjustment of the appliance are
compatible.
• Make sure that there is air circulation
around the appliance.
• The information about the gas supply
is on the rating plate.
• This appliance is not connected to a
device, which evacuates the products
of combustion. Make sure to connect
the appliance according to current
installation regulations. Follow the
requirements for adequate ventilation.
2.4 Use
WARNING!
Risk of injury, burns and
electric shock or explosion.
• This appliance is for household use
only.
ENGLISH 5

• Do not change the specification of this
appliance.
• Make sure that the ventilation
openings are not blocked.
• Do not let the appliance stay
unattended during operation.
• Deactivate the appliance after each
use.
• Be careful when you open the
appliance door while the appliance is
in operation. Hot air can release.
• Do not operate the appliance with wet
hands or when it has contact with
water.
• Do not apply pressure on the open
door.
• Do not use the appliance as a work
surface or as a storage surface.
• Open the appliance door carefully.
The use of ingredients with alcohol
can cause a mixture of alcohol and
air.
• Do not let sparks or open flames to
come in contact with the appliance
when you open the door.
• Do not put flammable products or
items that are wet with flammable
products in, near or on the appliance.
WARNING!
Risk of damage to the
appliance.
• To prevent damage or discoloration to
the enamel:
– do not put aluminium foil directly
on the bottom of cavity of the
appliance.
– do not put water directly into the
hot appliance.
– do not keep moist dishes and
food in the appliance after you
finish the cooking.
– be careful when you remove or
install the accessories.
• Discoloration of the enamel or
stainless steel has no effect on the
performance of the appliance.
• Use a deep pan for moist cakes. Fruit
juices cause stains that can be
permanent.
• This appliance is for cooking
purposes only. It must not be used for
other purposes, for example room
heating.
• Always cook with the oven door
closed.
• If the appliance is installed behind a
furniture panel (e.g. a door) make
sure the door is never closed when
the appliance operates. Heat and
moisture can build up behind a closed
furniture panel and cause subsequent
damage to the appliance, the housing
unit or the floor. Do not close the
furniture panel until the appliance has
cooled down completely after use.
2.5 Care and cleaning
WARNING!
Risk of injury, fire, or
damage to the appliance.
• Before maintenance, deactivate the
appliance and disconnect the mains
plug from the mains socket.
• Make sure the appliance is cold.
There is the risk that the glass panels
can break.
• Replace immediately the door glass
panels when they are damaged.
Contact the Authorised Service
Centre.
• Be careful when you remove the door
from the appliance. The door is
heavy!
• Clean regularly the appliance to
prevent the deterioration of the
surface material.
• Clean the appliance with a moist soft
cloth. Use only neutral detergents. Do
not use abrasive products, abrasive
cleaning pads, solvents or metal
objects.
• If you use an oven spray, follow the
safety instructions on its packaging.
2.6 Internal lighting
WARNING!
Risk of electric shock.
• Concerning the lamp(s) inside this
product and spare part lamps sold
separately: These lamps are intended
to withstand extreme physical
conditions in household appliances,
such as temperature, vibration,
humidity, or are intended to signal
information about the operational
status of the appliance. They are not
intended to be used in other
www.electrolux.com6

applications and are not suitable for
household room illumination.
• Use only lamps with the same
specifications.
2.7 Service
• To repair the appliance contact the
Authorised Service Centre.
• Use original spare parts only.
2.8 Disposal
WARNING!
Risk of injury or suffocation.
• Contact your municipal authority for
information on how to discard the
appliance correctly.
• Disconnect the appliance from the
mains supply.
• Cut off the mains electrical cable
close to the appliance and dispose of
it.
• Flat the external gas pipes.
3. INSTALLATION
WARNING!
Refer to Safety chapters.
3.1 Gas connection
The gas supply ramp is on the back of
the oven.
Do not use rubber flexible pipes.
1. Before the gas connection,
disconnect the oven from the mains.
2. Close the primary valve of the gas
supply.
3. Do not fully put the oven into the
built-in cabinet, leave approximately
30 cm gap.
4. Connect gas supply.
A B C
A. Gas supply ramp, end of shaft
with ramp
B. Washer
C. Elbow
5. Put the supplied gasket between the
pipe and the gas supply ramp. Turn
the pipe to the 1/2" gas supply ramp.
6. Use a 22 mm spanner to tighten the
nuts. Keep the gas supply ramp in
the correct position. Gently handle
the gas supply circuit.
WARNING!
Do not use flame to check
for leaks.
7. Fully move the oven into the built-in
cabinet.
WARNING!
Do not squeeze the gas
supply ramp and the pipe
when you move the oven
into the built-in cabinet.
8. Seal the connection correctly. Use a
leak detection to control it.
3.2 Adjustment to different
types of gas
Only a qualified technician is authorized
to handle adjustment of different types of
gas.
The oven is set for different types of gas,
you can switch between liquid gas and
natural gas with the correct injectors.
The gas rate is adjusted to suit.
WARNING!
Before you replace the
injectors, make sure that the
gas knobs are in the off
position. Disconnect the
oven from the mains. Wait
until the oven is cold. There
is a risk of injury.
ENGLISH 7

3.3 Oven injector replacement
1. Remove the bottom plate of the oven
cavity (A) to get access to the oven
burner (B).
AB
2. Release the screw (C), which keeps
the burner in position.
C
3. Carefully move the burner off the
injector support (D).
D
E
F
4. Slowly move it to the left side. Do not
apply force to the wire of the spark
plug connector (F) and to the
thermocouple conductor (E).
5. Release the burner injector (D) with a
7 mm socket spanner and replace it
with a different one, which is
necessary for the type of gas you
use.
Refer to “Technical data” chapter.
6. Assemble the burner in a reverse
sequence.
Replace the gas type sticker near the
gas supply ramp with the one related to
the new gas type.
The gas oven burner does not need any
primary gas regulation.
Make sure that the gas
supply pressure of the
appliance is in line with the
recommended values.
If the supply gas pressure is
changeable or different than
the necessary pressure, you
must fit an applicable
pressure adjuster on the gas
supply pipe.
3.4 Minimum level adjustment
of the oven burner
1. Disconnect the oven from the mains.
2. Turn the knob for the gas control to
the minimum position and remove it.
3. Adjust the adjustment screw (A) with
a thin-bladed screwdriver.
A
Change of
the type of
gas
Adjustment
of the ad‐
justment
screw
From natural
gas to liquid
gas
Fully tighten
the adjust‐
ment screw
in.
www.electrolux.com8

From liquid
gas to natu‐
ral gas
Release the
adjustment
screw ap‐
proximately
1/3 of a turn.
4. Attach the knob for the gas control.
5. Connect the oven to the mains.
WARNING!
Only put the mains plug into
the mains socket when all
parts are back into their
initial position. There is a risk
of injury.
6. Light the gas oven burner.
Refer to "Daily use" chapter.
7. Set the knob for the gas control to
the maximum position and let the
oven heat for at least 10 minutes.
8. Turn the knob for the gas control
from the maximum to the minimum
position.
Control the flame. If the flame goes out,
do the procedure again. There must be a
small regular flame on the oven burner
crown.
The manufacturer objects liability if
you do not obey to this safety
measures.
3.5 Building In
Only set up the appliance in a kitchen or
in a kitchen-dining room. Do not set up
the appliance in a bathroom or a
bedroom.
You can install the appliance "built-in" or
"built-under". The dimensions of the built-
in cabinet must agree with the related
illustrations.
80
520
60
60
110
min. 550
110
600
min. 560
130cm²
min. 4mm
114
18
595
±1
21548
198
523
3
5
589
594
65cm²
ENGLISH 9

130cm²
110
50
min. 550
110
114
18
590
min. 560
595
±1
21548
70
60
520
60
110
198
523
589
594
3
5
65cm²
There must be a clearance of minimum 4
mm between the top surface of the
appliance and the inner top of the
cabinet.
When you install the appliance "built-
under" (below a hob), install the hob
before the oven unit.
The materials must be resistant to a
temperature increase of minimum 60 °C
above the ambient temperature.
There must be a continuous air supply
around the oven in order to not have the
oven become too hot.
For correct operation, the oven cabinet
must have a minimum opening of 130
cm² in the front or on the sides (a
minimum of 65 cm² for each side). The
manufacturer recommends a 130 cm²
opening in the front for a brick cabinet
and a 65 cm² opening for each side for a
wooden cabinet.
When you install a hob above the oven,
make different electrical connections for
the hob and for the oven.
Only make connections with correct
cables for the power supplied.
Make sure that after the
installation there is easy
access to the appliance if
repairs or maintenance are
necessary.
3.6 Securing the oven to the
cabinet
www.electrolux.com10

4. PRODUCT DESCRIPTION
4.1 General overview
1
2 63
13
54
1
14
7
8
9
11
12
5
4
3
2
1
10
1
Control panel
2
Grill indicator
3
Knob for the heating functions
4
Knob for the Minute Minder
5
Knob for the gas control
6
Power indicator
7
Air vents for the cooling fan
8
Heating element
9
Lamp
10
Turnspit hole
11
Fan
12
Oven cavity bottom plate
13
Shelf support, removable
14
Shelf positions
4.2 Accessories
• Wire shelf
For cookware, cake tins, roasts.
• Baking tray
For cakes and biscuits.
• Turnspit
For roasting larger joints of meat and
poultry.
5. BEFORE FIRST USE
WARNING!
Refer to Safety chapters.
5.1 Oven cavity bottom plate
When you buy the oven, at first the oven
cavity bottom plate is together with the
accessories. Before you use the oven for
the first time, put the bottom plate with
the hole on its front part in the burner
area, as shown in "Product description"
chapter.
5.2 Initial Cleaning
Remove all accessories and removable
shelf supports from the oven.
Refer to "Care and cleaning" chapter.
Clean the oven and the accessories
before the first use.
Put the accessories and the removable
shelf supports back to their initial
position.
5.3 Preheating
Preheat the empty oven before first use.
1. Set the function . Set the
maximum temperature.
2. Let the oven operate for 1 hour.
3. Set the function
. Set the
maximum temperature.
4. Let the oven operate for 15 minutes.
5. Turn off the oven and let it cool
down.
Accessories can become hotter than
usual. The oven can emit an odour and
smoke. Make sure that the airflow in the
room is sufficient.
ENGLISH 11

6. DAILY USE
WARNING!
Refer to Safety chapters.
6.1 Ignition of oven gas burner
Oven safety device:
The gas oven has a
thermocouple. It stops the
gas flow if the flame goes
out.
1. Press the knob for the gas control
and turn it to .
2. Keep the knob for the gas control
pushed for 15 seconds or less to let
the thermocouple warm up. Do not
release the knob until the flame
ignites, otherwise the gas flow is
interrupted.
Do not keep the knob for the gas control
pushed for more than 15 seconds. If the
oven burner does not ignite after 15
seconds, release the knob for the gas
control, turn it into off position, open the
oven door. Wait minimum 1 minute, close
the oven door and try to ignite the oven
burner again.
6.2 After igniting the oven gas
burner
1. Release the knob for the gas control.
2. Turn the knob for the gas control to
set the temperature.
Control the flame through the holes in
the cavity bottom plate.
The power indicator turns on when you
turn the knob for the oven functions.
6.3 Knob for the gas control
Symbol Function
Off posi‐
tion
The oven burner is off.
150 °C -
250 °C
Range of temperature ad‐
justment.
6.4 Oven functions
Oven func‐
tion
Application
Off position
The oven is off.
Light
To turn on the lamp.
Grill + Turn‐
spit
To grill meat, including
kebabs and small pieces
of meat.
To roast large pieces of
meat on the turnspit.
Range of
Temperature
Adjustment
To adjust the tempera‐
ture for the electric grill
in the cavity centre, from
a minimum of about
50 °C to a maximum of
about 200 °C.
Fan Cook‐
ing /Defrost
To bake and to dry food.
You can use the fan in
combination with the gas
oven burner.
To defrost food (vegeta‐
bles and fruit). The de‐
frosting time depends on
the amount and size of
the frozen food.
You cannot use the gas
oven and the function Grill +
Turnspit at the same time.
6.5 Using the fan
The gas burner heats up the
air inside the oven. The fan
moves the hot air to keep
the equal temperature.
1. Light the oven gas burner.
2. After ignition, turn the knob for the
oven functions to .
www.electrolux.com12

6.6 Using the grill
1. Turn the knob for the oven functions
clockwise to
and set the
maximum temperature.
2. Adjust the grill and the deep pan
runner position to fit in different
portions of food.
Refer to "Hints and Tips" chapter,
Grilling.
6.7 Grill indicator
The grill indicator turns on when the grill
cooking function is selected. It turns off
when the oven reaches the correct
temperature. It then cycles on and off to
show the temperature changes.
7. CLOCK FUNCTIONS
7.1 How to set: Minute minder
To set the countdown.
Step 1 Step 2
Turn the knob for the timer to its full
range.
Turn the knob for the timer to set the
countdown.
When the set time ends, the signal sounds. This function has no effect on the opera‐
tion of the oven.
8. USING THE ACCESSORIES
WARNING!
Refer to Safety chapters.
8.1 Using the turnspit
WARNING!
Be careful when you use the
turnspit. The forks and the
spit are sharp. There is a
risk of injury.
WARNING!
Use oven gloves when you
remove the turnspit. The
turnspit and the grill are hot.
There is a risk of burns.
A B
D
C
A. Turnspit frame
B. Forks
C. Spit
D. Handle
1. Put the turnspit handle into the spit.
2. Put the deep pan on the lowest shelf
position.
3. Put the spit frame on the third shelf
position from the bottom.
4. Install the first fork on the spit, then
put the meat on the turnspit and
install the second fork.
ENGLISH 13

5. Use the screws to tighten the forks.
6. Put the tip of the spit into the turnspit
hole.
7. Lay the back side of the spit on the
turnspit frame.
Refer to "Product description"
chapter.
8. Remove the turnspit handle.
9. Select a function with the turnspit
position. The turnspit rotates.
10. Set the necessary temperature.
Refer to the cooking tables.
8.2 Inserting accessories
A small indentation at the top increases
safety. The indentations are also anti-tip
devices. The high rim around the shelf
prevents cookware from slipping of the
shelf.
Wire shelf:
Push the shelf between the guide
bars of the shelf support and make
sure that the feet point down.
Baking tray:
Push the tray between the guide bars
of the shelf support.
Wire shelf, Baking tray:
Push the tray between the guide bars
of the shelf support and the wire shelf
on the guide bars above.
www.electrolux.com14

9. ADDITIONAL FUNCTIONS
9.1 Cooling fan
When the oven operates, the cooling fan
turns on automatically to keep the
surfaces of the oven cool. If you turn off
the oven, the cooling fan can continue to
operate until the oven cools down.
10. HINTS AND TIPS
Refer to Safety chapters.
10.1 Cooking recommendations
The oven has five shelf positions.
Count the shelf positions from the bottom
of the oven floor.
Your oven may bake or roast differently
to the oven you had before. The below
tables provide you with the standard
settings for temperature, cooking time
and shelf position.
If you cannot find the settings for a
special recipe, look for the similar one.
The oven has a special system which
circulates the air and constantly recycles
the steam. With this system you can
cook in a steamy environment and keep
the food soft inside and crusty outside. It
decreases the cooking time and energy
consumption.
Baking cakes
Do not open the oven door before 3/4 of
the set cooking time is up.
Grilling
Put the food close to the top heating
element for faster cooking and further
away for more gentle cooking.
To minimise splashing, you should dry
food before grilling. Apply a little oil or
melted butter on lean meats and fish to
keep them moist during cooking.
You can place accompaniments such as
tomatoes and mushrooms underneath
the grid when grilling meats.
You should turn over the food during
cooking, as you require.
Cooking meat and fish
Leave the meat for approximately 15
minutes before carving so that the juice
does not seep out.
To prevent too much smoke in the oven
during roasting, add some water into the
deep pan. To prevent the smoke
condensation, add water each time after
it dries up.
Cooking times
Cooking times depend on the type of
food, its consistency, and volume.
Initially, monitor the performance when
you cook. Find the best settings (heat
setting, cooking time, etc.) for your
cookware, recipes and quantities when
you use this appliance.
10.2 Baking and roasting table
Cakes
Preheat the empty oven for 10 minutes
before cooking.
Use the cake mould if no other cookware
specified below.
Use the third shelf position.
Use the function: Fan Cooking.
Food Tem‐
pera‐
ture
(°C )
Time
(min)
Whisked recipes 160 45 - 60
Shortbread
dough
160 20 - 30
Buttermilk
cheesecake, on a
wire shelf
160 70 - 80
ENGLISH 15

Food Tem‐
pera‐
ture
(°C )
Time
(min)
Apple pie, 20 cm
cake mould on a
wire shelf
160 80 - 100
Strudel, baking
tray
min. 60 - 80
Jam tart 165 30 - 40
Sponge cake 160 50 - 60
Christmas cake /
Rich fruit cake,
20 cm cake
mould
min. 90 - 120
Plum cake, bread
tin
160 50 - 60
Small cakes -
one level, baking
tray
min. -
160
25 - 35
Biscuits/ Pastry
strips - one level,
baking tray
min. 30 - 35
Buns, baking tray 180 15 - 20
Eclairs, baking
tray
170 25 - 35
Plate tarts, 20 cm
cake mould
170 45 - 70
Rich fruit cake,
24 cm cake
mould
min. 110 - 120
Victoria sand‐
wich, 20 cm cake
mould
160 50 - 60
Bread and pizza
Preheat the empty oven for 10 minutes
before cooking.
Use the third shelf position.
Use the function: Fan Cooking.
Food Tem‐
pera‐
ture
(°C )
Time
(min)
Com‐
ments
White
bread
190 60 - 70 1 - 2
pieces,
0,5 kg per
piece
Rye
bread
180 30 - 45 In a bread
tin
Bread
rolls
230 -
250
10 - 20 6 - 8 rolls
in a bak‐
ing tray
Pizza 190 10 - 20 In a bak‐
ing tray or
a deep
pan
Scones 190 10 - 20 In a bak‐
ing tray
Flans
Preheat the empty oven for 10 minutes
before cooking.
Use the cake mould.
Use the fourth shelf position.
Use the function: Fan Cooking.
Food Tempera‐
ture (°C )
Time (min)
Pasta flan 180 45 - 50
Vegetable
flan
175 45 - 60
Quiches 180 50 - 60
Fish
Preheat the empty oven for 10 minutes
before cooking.
Use the third shelf position.
Use the function: Fan Cooking.
Food Temper‐
ature
(°C )
Time
(min)
Com‐
ments
Trout /
Sea
bream
175 40 -
55
3 - 4
fish
www.electrolux.com16

Food Temper‐
ature
(°C )
Time
(min)
Com‐
ments
Tuna /
Salmon
175 35 -
60
4 - 6 fil‐
lets
10.3 Gas oven cooking
Meat & Poultry
Preheat the empty oven for 10 minutes
before cooking.
Use the wire shelf.
Put a deep pan on the second shelf
position.
Use the third shelf position.
Food Tempera‐
ture (°C)
Time
(min)
Bone-in beef,
1.0 kg
min. 40 - 50
Boneless beef,
1.0 kg
190 50
Lamb, 1.0 kg min. 40 - 50
Pork, 1.0 kg 180 - 190 75 - 85
Chicken / Rab‐
bit, 1.2 kg
220 - 230 75 - 85
Duck, 1.0 kg 190 80 - 90
English roast
beef - rare
220 44 - 50
English roast
beef - medium
220 51 - 55
English roast
beef - well done
220 56 - 60
Turkey
Preheat the empty oven for 10 minutes
before cooking.
Use the deep pan.
Use the second shelf position.
Food Tem‐
pera‐
ture
(°C)
Time (min)
Turkey, 4.5 -
5.5 kg
160 210 - 240
Pastry
Preheat the empty oven for 10 minutes
before cooking.
Use the aluminium baking tray if no other
cookware specified below.
Use the fourth shelf position.
Food Temper‐
ature
(°C)
Time
(min)
Fruit tart in a 26 cm
round cake mould
on the wire shelf
165 40 - 50
Fruit pie in a 26 cm
round cake mould
on the wire shelf
min. 40 - 50
Sausage rolls 180 20 - 30
Choux pastry 190 25 - 30
Vol-au-vent 170 15 - 20
Jam tart in a 30 cm
round cake mould
on the wire shelf
165 40 - 50
Pudding
Preheat the empty oven for 10 minutes
before cooking.
Use 9 ceramic ramekins.
Pour 2 cm of water into the deep pan.
Use the third shelf position.
Food Temper‐
ature
(°C)
Time
(min)
Egg custard in a
bain-marie
min. 60 - 75
Cakes
Preheat the empty oven for 10 minutes
before cooking.
ENGLISH 17

Use the aluminium baking tray if no other
cookware specified below.
Use the fourth shelf position.
Food Temper‐
ature
(°C)
Time
(min)
Rich fruit cake in a
20 cm cake mould
on the wire shelf
min. 150 -
170
Rich fruit cake in a
20 cm cake mould
on the wire shelf
min. 150
Madeira cake in a
20 cm cake mould
on the wire shelf
min. 105 -
120
Small cakes min. -
170
35 - 50
Ginger bread min. 35 - 45
Bread
Preheat the empty oven for 10 minutes
before cooking.
Use the aluminium baking tray.
Use the fourth shelf position.
Food Tempera‐
ture (°C)
Time
(min)
Bread loaves,
0.5 kg
180 - 190 40 - 50
Bread loaves,
1.0 kg
180 - 190 50 - 60
Rolls and buns 180 - 190 15 - 20
10.4 Grilling
Preheat the empty oven for 3 minutes
before cooking.
Use the fourth shelf position.
Maximum temperature is the default
value for all types of food.
Food Piec
es
Time (min)
1st
side
2nd side
Fillet
steaks, 0.8
kg
4 12 - 15 12 - 14
Beef steak,
0.6 kg
4 10 - 12 6 - 8
Sausages 8 12 - 15 10 - 12
Pork chops,
0.6 kg
4 12 - 16 12 - 14
Chicken
(cut in 2),
1.0 kg
2 30 - 35 25 - 30
Kebabs 4 10 - 15 10 - 12
Chicken
breast, 0.4
kg
4 12 - 15 12 - 14
Hamburger,
0.6 kg
6 13 - 15 12 - 14
Fish fillet,
0.4 kg
4 12 - 14 10 - 12
Toasted
sandwiches
4 - 6 5 - 7 -
Toast 4 - 6 2 - 4 2 - 3
10.5 Turnspit
Preheat the empty oven for 3 minutes
before cooking.
Use the third shelf position.
Food Tem‐
pera‐
ture
(°C)
Time
(min)
Poultry, 1.0 - 1.2
kg
max. 75 - 85
Roast, 0.8 - 1.0 kg max. 75 - 85
www.electrolux.com18

10.6 Defrost
(kg)
Defrosting
time (min)
Further defrost‐
ing time (min)
Chicken 1 100 - 140 20 - 30 Place chicken on
an upturned saucer
placed on a large
plate. Turn halfway
through.
Meat 1 100 - 140 20 - 30 Turn halfway
through.
0.5 90 - 120
Cream 2 x 0.2 80 - 100 10 - 15 Cream can also be
whipped when still
slightly frozen in
places.
Trout 0.15 25 - 35 10 - 15 -
Strawberries 0.3 30 - 40 10 - 20 -
Butter 0.25 30 - 40 10 - 15 -
Gateau 1.4 60 60 -
10.7 Information for test
institutes
Tests according to IEC 60350-1.
(°C) (min)
Small
cakes,
20 per
tray
Fan Cooking Alumi‐
nized
baking
tray
4 160 -
170
25 - 35 Preheat the oven
for 10 minutes.
Apple
pie, 2
tins Ø20
cm
Fan Cooking Wire
shelf
4 160 80 - 100 Preheat the oven
for 10 minutes.
Sponge
cake,
cake
mould
Ø26 cm
Fan Cooking Wire
shelf
4 160 -
170
45 - 55 Preheat the oven
for 10 minutes.
ENGLISH 19

(°C) (min)
Short
bread
Fan Cooking Alumi‐
nized
baking
tray
4 150 -
160
30 - 40 Preheat the oven
for 10 minutes.
Toast, 4
- 6
pieces
Grill Wire
shelf
4 max. 2 - 3 minutes
first side; 2 - 3
minutes sec‐
ond side
Preheat the oven
for 3 minutes.
Beef bur‐
ger, 6
pieces,
0.6 kg
Grill Wire
shelf
and
drip‐
ping
pan
4 max. 20 - 30 Put the wire shelf
on the fourth lev‐
el and the drip‐
ping pan on the
third level of the
oven. Turn the
food halfway
through the cook‐
ing time.
Preheat the oven
for 3 minutes.
11. CARE AND CLEANING
WARNING!
Refer to Safety chapters.
11.1 Notes on cleaning
Cleaning
Agents
Clean the front of the oven with a soft cloth with warm water and a
mild detergent. Clean and check the door gasket around the frame of
the cavity.
Use a cleaning solution to clean metal surfaces.
Clean stains with a mild detergent.
Everyday
Use
Clean the cavity after each use. Fat accumulation or other residue
may cause fire.
Moisture can condense in the oven or on the door glass panels. To
decrease the condensation, let the oven work for 10 minutes before
cooking. Do not store the food in the oven for longer than 20 minutes.
Dry the cavity with a soft cloth after each use.
www.electrolux.com20

Accessories
Clean all accessories after each use and let them dry. Use a soft
cloth with warm water and a mild detergent. Do not clean the acces‐
sories in a dishwasher.
Do not clean the non-stick accessories using abrasive cleaner or
sharp-edged objects.
11.2 How to remove: Shelf
supports
Remove the shelf supports to clean the
oven.
Step 1 Turn off the oven and wait
until it is cold.
Step 2 Pull the front of the shelf
support away from the side
wall.
Step 3 Pull the rear end of the shelf
support away from the side
wall and remove it.
2
1
Step 4 Install the shelf supports in
the opposite sequence.
11.3 How to remove and install: Door
The oven door has two glass panels. You can remove the oven door and the internal
glass panel to clean it. Read the whole "Removing and installing door" instruction
before you remove the glass panels.
CAUTION!
Do not use the oven without the glass panels.
Step 1 Open the door fully and hold
both hinges.
Step 2 Lift and turn the levers fully on
both hinges.
ENGLISH 21

Step 3 Close the oven door halfway to
the first opening position. Then
lift and pull forward and remove
the door from its seat.
Step 4 Put the door on a soft cloth on a
stable surface.
Step 5 Hold the door trim (B) on the top
edge of the door at the two sides
and push inwards to release the
clip seal.
Step 6 Pull the door trim to the front to
remove it.
1
2
B
Step 7 Hold the door glass panel by its
top edge and carefully pull it out.
Make sure the glass slides out of
the supports completely.
Step 8 Clean the glass panels with wa‐
ter and soap. Dry the glass pan‐
els carefully. Do not clean the
glass panels in the dishwasher.
Step 9 After cleaning, install the glass
panel and the oven door.
The screen-printing zone must face the
inner side of the door. Make sure that
after the installation the surface of the
glass panel frame on the screen-printing
zones is not rough when you touch it.
When installed correctly the door trim
clicks.
Make sure that you install the internal
glass panel in the seats correctly.
A
www.electrolux.com22

11.4 How to replace: Lamp
WARNING!
Risk of electric shock.
The lamp can be hot.
Always hold the halogen lamp with a
cloth to prevent grease residue from
burning on the lamp.
Before you replace the lamp:
Step 1 Step 2 Step 3
Turn off the oven. Wait un‐
til the oven is cold.
Disconnect the oven from
the mains.
Put a cloth on the bottom
of the cavity.
Back lamp
Step 1 Turn the glass cover to remove it.
Step 2 Clean the glass cover.
Step 3 Replace the lamp with a suitable 300 °C heat-resistant lamp.
Step 4 Install the glass cover.
12. TROUBLESHOOTING
WARNING!
Refer to Safety chapters.
12.1 What to do if...
Problem Possible cause Remedy
The oven does not heat
up.
The oven is off. Turn on the oven.
The oven does not heat
up.
The fuse is blown. Make sure that the fuse is
the cause of the malfunc‐
tion. If the fuse problem re‐
curs, contact a qualified
electrician.
ENGLISH 23

Problem Possible cause Remedy
The oven does not work. The automatic ignition
does not work.
Light the burner with a long
match. Hold the flame near
the hole in the bottom of
the oven cavity. At the
same time push the knob
for the gas control and turn
it counterclockwise to the
maximum temperature.
When the flame lights,
keep the knob for the gas
control pushed for 15 sec‐
onds or less to warm up
the thermocouple. Other‐
wise the gas flow is inter‐
rupted.
The lamp does not work. The lamp is broken. Replace the lamp.
Steam and condensation
settle on the food and in
the oven cavity.
A dish was left in the oven
for too long.
Food should not be left in
the oven for longer than
15-20 minutes after cook‐
ing.
The flame extinguishes im‐
mediately after ignition.
The thermocouple is not
heated up.
After the flame lights, keep
the knob for the gas con‐
trol pushed for 15 seconds
or less.
The turnspit does not ro‐
tate.
The turnspit is not correctly
installed into the turnspit
hole.
Refer to "Using the acces‐
sories" chapter, Using the
turnspit.
The door gasket is dam‐
aged.
- Do not use the oven. Con‐
tact an Authorised Service
Centre.
12.2 Service data
If you cannot find a solution to the
problem yourself, contact your dealer or
an Authorised Service Centre.
The necessary data for the service
centre is on the rating plate. The rating
plate is on the front frame of the oven
cavity. Do not remove the rating plate
from the oven cavity.
We recommend that you write the data here:
Model (MOD.) .........................................
Product number (PNC) .........................................
Serial number (S.N.) .........................................
www.electrolux.com24

13. TECHNICAL DATA
13.1 Technical data
TOTAL POWER: Electric: 1.77 kW
Gas original: Natural gas 1.76 kPa = 8640 kJ/h
G20 (2H) 18 mbar = 8640 kJ/h
Gas replacement: Gas LP 2.75 kPa = 7920 kJ/h
Electric supply: 220 - 240 V ~ 50 - 60 Hz
Appliance category: II 2,3
Gas connection: G 1/2"
Appliance class: 3
13.2 Gas oven burner
Gas type NOMINAL
GAS POWER
(kW)
Reduced gas
power (kW)
BY-PASS
NEEDLE
(1/100 mm)
INJECTOR
MARK (1/100
mm)
G20 (2H) 18 mbar 2.4 0.7 Regulated
Natural gas 1.76 kPa 2.5 0.7 Regulated
Gas LP 2.75 kPa 2.5 0.7 43 80
14. ENERGY EFFICIENCY
14.1 Energy saving
The oven has features which
help you save energy during
everyday cooking.
Make sure that the oven door is closed
when the oven operates. Do not open
the oven door too often during cooking.
Keep the door gasket clean and make
sure it is well fixed in its position.
Use metal cookware to improve energy
saving.
When possible, do not preheat the oven
before cooking.
Keep breaks between baking as short as
possible when you prepare a few dishes
at one time.
Cooking with fan
When possible, use the cooking
functions with fan to save energy.
Residual heat
When the cooking duration is longer than
30 min, reduce the oven temperature to
minimum 3 - 10 min before the end of
cooking. The residual heat inside the
oven will continue to cook.
Use the residual heat to warm up other
dishes.
Keep food warm
Choose the lowest possible temperature
setting to use residual heat and keep a
meal warm.
ENGLISH 25

15. ENVIRONMENTAL CONCERNS
Recycle materials with the symbol .
Put the packaging in relevant containers
to recycle it. Help protect the
environment and human health by
recycling waste of electrical and
electronic appliances. Do not dispose of
appliances marked with the symbol
with the household waste. Return the
product to your local recycling facility or
contact your municipal office.
www.electrolux.com26

CONTENIDO
1. INFORMACIÓN SOBRE SEGURIDAD............................................................ 28
2. INSTRUCCIONES DE SEGURIDAD................................................................29
3. INSTALACIÓN..................................................................................................32
4. DESCRIPCIÓN DEL PRODUCTO................................................................... 36
5. ANTES DEL PRIMER USO.............................................................................. 37
6. USO DIARIO.....................................................................................................37
7. FUNCIONES DEL RELOJ................................................................................ 39
8. USO DE LOS ACCESORIOS...........................................................................39
9. FUNCIONES ADICIONALES........................................................................... 40
10. CONSEJOS.................................................................................................... 41
11. MANTENIMIENTO Y LIMPIEZA.....................................................................46
12. SOLUCIÓN DE PROBLEMAS........................................................................49
13. DATOS TÉCNICOS........................................................................................51
14. EFICACIA ENERGÉTICA...............................................................................51
PENSAMOS EN USTED
Gracias por adquirir un aparato Electrolux. Ha escogido un producto que contiene
décadas de experiencia e innovación profesionales. Ingenioso y elegante, se ha
diseñado pensando en usted. Así pues, siempre que lo utilice, puede tener la
seguridad de que conseguirá excelentes resultados.
Bienvenido a Electrolux.
Visite nuestro sitio web para:
Obtener consejos, folletos, soluciones a problemas e información de servicio y
reparación:
www.electrolux.com/support
Registrar su producto para recibir un mejor servicio:
www.registerelectrolux.com
Adquirir accesorios, artículos de consumo y recambios originales para su
aparato:
www.electrolux.com/shop
ATENCIÓN Y SERVICIO AL CLIENTE
Le recomendamos que utilice recambios originales.
Al contactar con nuestro centro autorizado de servicio técnico, cerciórese de
tener la siguiente información a mano: Modelo, PNC, Número de serie.
La información se puede encontrar en la placa de características.
Advertencia / Precaución-Información sobre seguridad
Información general y consejos
Información sobre el medio ambiente
Salvo modificaciones.
ESPAÑOL 27

1. INFORMACIÓN SOBRE SEGURIDAD
Antes de instalar y utilizar el aparato, lea atentamente
las instrucciones facilitadas. El fabricante no se hace
responsable de lesiones o daños producidos como
resultado de una instalación o un uso incorrectos.
Conserve siempre estas instrucciones en lugar seguro y
accesible para futuras consultas.
1.1 Seguridad de niños y personas vulnerables
• Este aparato no debe ser utilizado por personas
(incluidos niños) con capacidades físicas, sensoriales
o mentales reducidas o por personas que carezcan de
la experiencia y conocimientos suficientes para
manejarlo, a menos que cuenten con las instrucciones
o la supervisión de una persona responsable de su
seguridad.
• No deje que los niños jueguen con el aparato.
• Mantenga todo el material de embalaje fuera del
alcance de los niños y deséchelo de forma adecuada.
• ADVERTENCIA: Mantenga a los niños y mascotas
alejados del aparato cuando esté funcionando o
enfriándose. Las partes accesibles se calientan
durante el uso.
• Si este aparato tiene un bloqueo de seguridad para
niños, debe activarlo.
• La limpieza y mantenimiento de usuario del aparato
no podrán ser realizados por niños sin supervisión.
1.2 Seguridad general
• Solo un electricista cualificado puede instalar este
aparato y sustituir el cable.
• ADVERTENCIA: El aparato y las piezas accesibles se
calientan mucho durante el funcionamiento. Preste
mucha atención para no tocar las resistencias.
• Utilice siempre guantes de horno cuando introduzca o
retire accesorios o utensilios refractarios.
www.electrolux.com28

• Antes de realizar tareas de mantenimiento,
desenchufe el aparato de la red eléctrica.
• ADVERTENCIA: Asegúrese de que el aparato está
desconectado antes de reemplazar la lámpara con el
fin de impedir que se produzca una descarga
eléctrica.
• No utilice el aparato antes de instalarlo en la
estructura empotrada.
• No utilice un limpiador a vapor para limpiar el aparato.
• No utilice limpiadores abrasivos ásperos ni rascadores
de metal afilado para limpiar la puerta de cristal si no
quiere arañar su superficie, lo que podría hacer que el
cristal se hiciese añicos.
• Si el cable de alimentación eléctrica sufre algún daño,
el fabricante, su servicio técnico autorizado o un
profesional cualificado tendrán que cambiarlo para
evitar riesgos eléctricos.
• Para quitar los carriles laterales, tire primero del
frontal del carril y luego separe el extremo trasero de
las paredes. Coloque los carriles laterales en el orden
inverso.
2. INSTRUCCIONES DE SEGURIDAD
Este aparato es adecuado para los
siguientes mercados: MX
2.1 Instalación
ADVERTENCIA!
Sólo un técnico cualificado
puede instalar el aparato.
• Retire todo el embalaje.
• No instale ni utilice un aparato
dañado.
• Siga las instrucciones de instalación
suministradas con el aparato.
• Tenga cuidado al mover el aparato,
porque es pesado. Utilice siempre
guantes de protección y calzado
cerrado.
• No tire nunca del aparato sujetando el
asa.
• Instale el aparato en un lugar seguro
y adecuado que cumpla los requisitos
de instalación.
• Respete siempre la distancia mínima
entre el aparato y los demás
electrodomésticos y mobiliario.
• Antes de montar el aparato,
compruebe si la puerta del horno se
abre sin limitaciones.
• No utilice el aparato sin la cubierta
inferior de la cavidad. Es un
componente funcional de seguridad.
• El aparato dispone de un sistema de
enfriamiento eléctrico. Debe utilizarse
con alimentación eléctrica.
ESPAÑOL 29

Altura mínima del
armario (Altura mí‐
nima del armario
debajo de la enci‐
mera)
590 (600) mm
Ancho del armario 560 mm
Profundidad del ar‐
mario
550 (550) mm
Altura de la parte
frontal del aparato
594 mm
Altura de la parte
trasera del aparato
576 mm
Anchura de la parte
frontal del aparato
595 mm
Anchura de la parte
trasera del aparato
559 mm
Fondo del aparato 569 mm
Fondo empotrado
del aparato
548 mm
Fondo con la puerta
abierta
1022 mm
Tamaño mínimo de
la abertura de venti‐
lación. Abertura si‐
tuada en la parte
trasera inferior
560x110 mm
Tamaño mínimo de
la abertura de venti‐
lación. Abertura si‐
tuada en la parte
superior trasera
560x50 mm
Longitud del cable
de alimentación. El
cable está en la es‐
quina derecha de la
parte trasera
1500 mm
Tornillos de montaje 4x25 mm
2.2 Conexión eléctrica
ADVERTENCIA!
Riesgo de incendios y
descargas eléctricas.
• Todas las conexiones eléctricas
deben realizarlas electricistas
cualificados.
• El aparato debe conectarse a tierra.
• Asegúrese de que los parámetros de
la placa de características son
compatibles con los valores eléctricos
del suministro eléctrico.
• Utilice siempre una toma con
aislamiento de conexión a tierra
correctamente instalada.
• No utilice adaptadores de enchufes
múltiples ni cables prolongadores.
• Asegúrese de no provocar daños en
el enchufe ni en el cable de red. Si es
necesario cambiar el cable de
alimentación del aparato, debe
hacerlo el centro de servicio técnico
autorizado.
• Evite que el cable de red toque o
entre en contacto con la puerta del
aparato o con el hueco por debajo del
aparato, especialmente mientras
funciona o si la puerta está caliente.
• Los mecanismos de protección contra
descargas eléctricas de componentes
con corriente y aislados deben fijarse
de forma que no puedan aflojarse sin
utilizar herramientas.
• Conecte el enchufe a la toma de
corriente únicamente cuando haya
terminado la instalación. Asegúrese
de tener acceso al enchufe del
suministro de red una vez finalizada
la instalación.
• Si la toma de corriente está floja, no
conecte el enchufe.
• No desconecte el aparato tirando del
cable de conexión a la red. Tire
siempre del enchufe.
• Use únicamente dispositivos de
aislamiento apropiados: línea con
protección contra los cortocircuitos,
fusibles (tipo tornillo que puedan
retirarse del soporte), dispositivos de
fuga a tierra y contactores.
• La instalación eléctrica debe tener un
dispositivo de aislamiento que permita
desconectar el aparato de todos los
polos de la red. El dispositivo de
aislamiento debe tener una apertura
de contacto con una anchura mínima
de 3 mm.
• El aparato solo se suministra con un
cable de alimentación.
www.electrolux.com30

2.3 Conexión del gas
• Todas las conexiones de gas tienen
que realizarlas personal cualificado.
• Antes de realizar la instalación,
asegúrese de que las condiciones de
distribución locales (tipo y presión del
gas) son compatibles con los
requisitos del aparato.
• Compruebe que el aire circula
libremente alrededor del aparato.
• La placa de características contiene
información sobre el suministro de
gas.
• Este aparato no está conectado a un
dispositivo que evacua los productos
de combustión. Asegúrese de
conectar el aparato según la
normativa de instalación vigente. Siga
los requisitos para una ventilación
adecuada.
2.4 Uso
ADVERTENCIA!
Riesgo de lesiones,
quemaduras y descargas
eléctricas o explosiones.
• Este aparato está diseñado
exclusivamente para uso doméstico.
• No cambie las especificaciones de
este aparato.
• Cerciórese de que los orificios de
ventilación no están obstruidos.
• No deje nunca el aparato desatendido
mientras está en funcionamiento.
• Desactive el aparato después de
cada uso.
• Tenga cuidado al abrir la puerta del
aparato cuando éste esté en
funcionamiento. Pueden liberarse
vapores calientes.
• No utilice el aparato con las manos
mojadas ni cuando entre en contacto
con el agua.
• No ejerza presión sobre la puerta
abierta.
• No utilice el aparato como superficie
de trabajo ni de almacenamiento.
• Abra la puerta del aparato con
cuidado. El uso de ingredientes con
alcohol puede generar una mezcla de
alcohol y aire.
• Procure que no haya chispas ni fuego
encendido cerca cuando se abra la
puerta del aparato.
• No coloque productos inflamables ni
objetos mojados con productos
inflamables dentro, cerca o encima
del aparato.
ADVERTENCIA!
Podría dañar el aparato.
• Para evitar daños o decoloraciones
en el esmalte:
– no coloque papel de aluminio
directamente en la parte inferior
del interior del aparato.
– No ponga agua directamente en
el aparato caliente.
– No deje platos húmedos ni
comida en el aparato una vez
finalizada la cocción.
– Preste especial atención al
desmontar o instalar los
accesorios.
• La pérdida de color del esmalte o el
acero inoxidable no afecta al
rendimiento del aparato.
• Utilice una bandeja honda para
pasteles húmedos. Los jugos de las
frutas podrían ocasionar manchas
permanentes.
• Este aparato está diseñado
exclusivamente para cocinar. No
debe utilizarse para otros fines, por
ejemplo, como calefacción.
• Cocine siempre con la puerta del
horno cerrada.
• Si el aparato se instala detrás de un
panel de un mueble (por ejemplo una
puerta) asegúrese de que la puerta
nunca esté cerrada mientras funciona
el aparato. El calor y la humedad
pueden acumularse detrás de un
panel del armario cerrado y provocar
daños al aparato, el alojamiento o el
suelo. No cierre del panel del armario
hasta que el aparato se haya enfriado
completamente después de su uso.
2.5 Mantenimiento y limpieza
ADVERTENCIA!
Existe riesgo de lesiones,
incendios o daños al
aparato.
ESPAÑOL 31

• Antes de proceder con el
mantenimiento, apague el aparato y
desconecte el enchufe de la red.
• Asegúrese de que el aparato esté
frío. Los paneles de cristal pueden
romperse.
• Cambie inmediatamente los paneles
de cristal de la puerta que estén
dañados. Póngase en contacto con el
servicio técnico autorizado.
• Tenga cuidado al desmontar la puerta
del aparato. ¡La puerta es muy
pesada!
• Limpie periódicamente el aparato
para evitar el deterioro del material de
la superficie.
• Limpie el aparato con un paño suave
humedecido. Utilice solo detergentes
neutros. No utilice productos
abrasivos, estropajos duros,
disolventes ni objetos metálicos.
• Si utiliza aerosoles de limpieza para
hornos, siga las instrucciones de
seguridad del envase.
2.6 Luces interiores
ADVERTENCIA!
Riesgo de descarga
eléctrica.
• En cuanto a la(s) bombilla(s) de este
producto y las de repuesto vendidas
por separado: Estas bombillas están
destinadas a soportar condiciones
físicas extremas en los aparatos
domésticos, como la temperatura, la
vibración, la humedad, o están
destinadas a señalar información
sobre el estado de funcionamiento del
aparato. No están destinadas a
utilizarse en otras aplicaciones y no
son adecuadas para la iluminación de
estancias domésticas.
• Utilice solo bombillas de las mismas
características .
2.7 Asistencia
• Para reparar el aparato, póngase en
contacto con el centro de servicio
autorizado.
• Utilice solamente piezas de recambio
originales.
2.8 Eliminación
ADVERTENCIA!
Existe riesgo de lesiones o
asfixia.
• Póngase en contacto con las
autoridades locales para saber cómo
desechar correctamente el aparato.
• Desconecte el aparato de la red.
• Corte el cable eléctrico cerca del
aparato y deséchelo.
• Aplaste los tubos de gas externos.
3. INSTALACIÓN
ADVERTENCIA!
Consulte los capítulos sobre
seguridad.
3.1 Conexión del gas
La rampa de suministro de gas se
encuentra en la parte posterior del
horno.
No utilice tubos de goma flexibles.
1. Antes de la conexión de gas,
desconecte el horno de la red
eléctrica.
2. Cierre la válvula principal del
suministro de gas.
3. No introduzca completamente el
horno en el armario integrado, deje
aproximadamente 30 cm.
4. Conecte el suministro de gas.
A B C
A. Rampa de suministro de gas,
extremo del eje con rampa
B. Arandela
C. Codo
5. Coloque la junta suministrada entre
el tubo y la rampa de suministro de
gas. Gire el tubo a la rampa de
suministro de gas de 1/2".
www.electrolux.com32

6. Use una llave de 22 mm para apretar
las tuercas. Mantenga la rampa de
suministro de gas en la posición
correcta. Maneje con cuidado el
circuito de suministro de gas.
ADVERTENCIA!
No utilice una llama para
verificar fugas.
7. Introduzca el horno totalmente en el
armario empotrado.
ADVERTENCIA!
No apriete la rampa de
suministro de gas ni el tubo
cuando mueva el horno al
armario empotrado.
8. Selle la conexión correctamente.
Utilice un detector de fugas para
controlarlo.
3.2 Adaptación a otros tipos de
gas
Solo un técnico cualificado está
autorizado a realizar el ajuste a los
diferentes tipos de gas.
El horno está configurado para
diferentes tipos de gas, se puede
cambiar entre gas líquido y gas natural
con los inyectores adecuados.
El caudal de gas se ajusta para
adaptarse.
ADVERTENCIA!
Antes de cambiar los
inyectores, asegúrese de
que los mandos del gas
están en la posición de
apagado. Desconecte el
horno de la red. Espere
hasta que el horno esté frío.
Existe riesgo de lesiones.
3.3 Sustitución del inyector del
horno
1. Retire la placa inferior del interior del
horno (A) para acceder al quemador
(B).
AB
2. Afloje el tornillo (C) que sujeta el
quemador.
C
3. Extraiga con cuidado el quemador
del soporte del inyector (D).
D
E
F
4. Desplácelo suavemente hacia la
izquierda. No aplique fuerza en el
cable del conector de la bujía (F) ni
en el conductor del termopar (E).
5. Afloje el inyector del quemador (D)
con una llave tubular de 7 mm y
cámbielo por otro diferente necesario
para el tipo de gas que use.
ESPAÑOL 33

Consulte el capítulo “Datos técnicos”.
6. Monte el quemador en el orden
inverso.
Cambie la etiqueta del tipo de gas
situada al lado de la rampa del
suministro de gas por la correspondiente
al tipo nuevo.
El quemador de gas del horno no
necesita regulación de gas principal.
Asegúrese de que la presión
del suministro de gas del
aparato cumple los valores
recomendados.
Si la presión del suministro
de gas se puede cambiar o
es diferente de la necesaria,
debe instalar un regulador
de presión adecuado en el
tubo del suministro de gas.
3.4 Nivel de ajuste mínimo del
quemador del horno
1. Desconecte el horno de la red.
2. Gire el mando del control de gas a la
posición mínima y quítelo.
3. Ajuste el tornillo de sujeción (A) con
un destornillador plano.
A
Cambio del
tipo de gas
Ajuste del
tornillo de
sujeción
De gas natu‐
ral a gas líq‐
uido
Apriete hasta
el tope el tor‐
nillo de suje‐
ción.
De gas líq‐
uido a gas
natural
Afloje el tor‐
nillo de suje‐
ción unos 1/3
de vuelta.
4. Acople el mando del control de gas.
5. Conecte el horno a la red eléctrica.
ADVERTENCIA!
Enchúfelo únicamente
cuando todas las piezas
estén en su posición
original. Existe riesgo de
lesiones.
6. Encienda el quemador.
Consulte "Uso diario".
7. Ajuste al máximo el control de gas y
deje que el horno se caliente durante
al menos 10 minutos.
8. Gire el mando del gas del máximo al
mínimo.
Controle la llama. Si la llama se apaga,
vuelva a realizar el procedimiento. Debe
haber una llama pequeña regular en la
corona del quemador del horno.
El fabricante declina toda
responsabilidad si no se cumplen
estas medidas de seguridad.
3.5 Empotrado
Coloque el aparato únicamente en una
cocina o comedor. No instale el aparato
en baños ni dormitorios.
Puede instalar el aparato "empotrado" o
"bajo encimera". Las medidas del
armario empotrado deben coincidir con
las de las ilustraciones correspondientes.
www.electrolux.com34

80
520
60
60
110
min. 550
110
600
min. 560
130cm²
min. 4mm
114
18
595
±1
21548
198
523
3
5
589
594
65cm²
130cm²
110
50
min. 550
110
114
18
590
min. 560
595
±1
21548
70
60
520
60
110
198
523
589
594
3
5
65cm²
Debe dejar un espacio mínimo de 4 mm
entre la superficie superior del aparato y
la superficie interior del armario.
Cuando instale el aparato "bajo
encimera" (debajo de una placa), instale
la placa antes que el horno.
Los materiales deben ser resistentes a
subidas de temperatura de un mínimo de
60 °C sobre la temperatura ambiente.
Debe haber un suministro de aire
continuo alrededor del horno para que
éste no se caliente demasiado.
ESPAÑOL 35

Para un funcionamiento correcto, el
armario del horno debe tener una
abertura mínima de 130 cm² en la parte
frontal o en los lados (un mínimo de 65
cm² en cada lado). El fabricante
recomienda dejar una abertura de 130
cm² en la parte frontal para un armario
de ladrillo y 65 cm² para cada lado en un
armario de madera.
Cuando instale una placa encima del
horno, realice conexiones eléctricas
diferentes para la placa y para el horno.
Realice las conexiones únicamente con
los cables correctos para la potencia
suministrada.
Asegúrese de que después
de la instalación, se pueda
tener acceso al aparato
fácilmente, en caso de que
sea necesario realizar
reparaciones o tareas de
mantenimiento.
3.6 Fijación del horno al
mueble
4. DESCRIPCIÓN DEL PRODUCTO
4.1 Descripción general
1
2 63
13
54
1
14
7
8
9
11
12
5
4
3
2
1
10
1
Panel de control
2
Indicador de grill
3
Mando de las funciones de cocción
4
Mando del Avisador
5
Mando de control del gas
6
Indicador del suministro eléctrico
7
Salidas de aire del ventilador de
refrigeración
8
Resistencia
9
Bombilla
10
Orificio del asador rotativo
11
Ventilador
12
Placa inferior del interior del horno
13
Carril lateral, extraíble
14
Posiciones de los estantes
4.2 Accesorios
• Parrilla
Para bandejas de horno, pastel en
molde, asados.
• Bandeja
Para bizcochos y galletas.
• Asador rotativo
Para asar grandes trozos de carne y
aves.
www.electrolux.com36

5. ANTES DEL PRIMER USO
ADVERTENCIA!
Consulte los capítulos sobre
seguridad.
5.1 Placa inferior del interior del
horno
Cuando se compra el horno, la placa
inferior del interior del horno está junto
con los accesorios. Antes de usar el
horno por primera vez, coloque la placa
inferior con el orificio de la parte
delantera en la zona de quemadores,
como se muestra en el capítulo
"Descripción del producto".
5.2 Limpieza inicial
Retire todos los accesorios y carriles de
apoyo extraíbles del horno.
Consulte el capítulo "Mantenimiento y
limpieza".
Limpie el horno y los accesorios antes
del primer uso.
Coloque los accesorios y soportes
telescópicos extraíbles en su posición
inicial.
5.3 Precalentamiento
Precaliente el horno vacío antes de
utilizarlo por primera vez.
1. Ajuste la función . Ajuste la
temperatura máxima.
2. Deje funcionar el horno 1 hora.
3. Ajuste la función
. Ajuste la
temperatura máxima.
4. Deje funcionar el horno 15 minutos.
5. Apague el horno y deje que se
enfríe.
Los accesorios se pueden calentar más
de lo habitual. El horno puede emitir
olores y humos. Asegúrese de que haya
una buena ventilación en la habitación.
6. USO DIARIO
ADVERTENCIA!
Consulte los capítulos sobre
seguridad.
6.1 Encendido del quemador a
gas del horno
Dispositivo de seguridad
del horno:
El horno de gas incorpora un
termopar. Si la llama se
apaga, interrumpe el
suministro de gas.
1. Presione el mando del gas y gírelo
hacia
.
2. Mantenga presionado el mando del
gas durante unos 15 segundos como
máximo; de esta forma el termopar
se calentará. No suelte el mando
hasta que se encienda la llama, de lo
contrario se corta el gas.
No mantenga presionado al mando del
gas durante más de 15 segundos. Si el
quemador del horno no se enciende al
cabo de 15 segundos, suelte el mando
de las funciones del horno, gírelo hasta
la posición de apagado, abra la puerta
del horno. Espere al menos 1 minuto
antes de cerrar la puerta del horno y
volver a intentar encender el quemador.
6.2 Después de encender el
quemador de gas del horno
1. Suelte el mando del control del gas.
2. Gire el mando del control de gas
para ajustar la temperatura.
Controle la llama por los agujeros de la
placa inferior del interior.
El indicador de energía se enciende
cuando se gira el mando de las
funciones del horno.
ESPAÑOL 37

6.3 Mando de control del gas
Símbolo Función
Posición
de apa‐
gado
El quemador del horno está
apagado.
150 °C -
250 °C
Intervalo de ajuste de tem‐
peratura.
6.4 Funciones del horno
Función del
horno
Aplicación
Posición de
apagado
El horno está apagado.
Luz
Para encender la luz.
Grill + rusti‐
dor
Para cocinar al grill car‐
ne, por ejemplo broche‐
tas y trozos pequeños.
Para asar trozos gran‐
des de carne en el asa‐
dor.
Intervalo de
ajuste de
temperatura
Para ajustar la tempera‐
tura del grill eléctrico en
el centro de la cavidad,
desde un mínimo de
aprox. 50°C hasta un
máximo de unos 200°C.
Cocción ven‐
til. /Descon‐
gelar
Para hornear y secar ali‐
mentos. Puede usar el
ventilador en combina‐
ción con el quemador de
horno de gas.
Para descongelar ali‐
mentos (verdura y fruta).
El tiempo de desconge‐
lación depende de la
cantidad y tamaño de los
alimentos congelados.
No puede usar el horno de
gas y la función Grill +
Asador rotativo al mismo
tiempo.
6.5 Uso del ventilador
El quemador de gas calienta
el aire en el interior del
horno. El ventilador
desplaza el aire caliente
para mantener una
temperatura uniforme.
1. Encienda el quemador de gas del
horno.
2. Después de encenderlo, gire el
mando del horno a la función
.
6.6 Cómo utilizar el grill
1. Gire el mando de funciones del
horno hacia la derecha hasta y
ajuste la temperatura máxima.
2. Ajuste el grill y la posición de la
bandeja honda para permitir
diferentes grosores de los alimentos.
Consulte el capítulo "Consejos", Grill.
6.7 Indicador de grill
El indicador de grill se enciende cuando
se ha seleccionado una función de
cocción del grill. Se apaga cuando el
horno alcanza la temperatura correcta A
partir de ese momento, se enciende y
apaga para indicar los cambios de la
temperatura
www.electrolux.com38

7. FUNCIONES DEL RELOJ
7.1 Cómo configurar: Minutero
Para configurar una cuenta atrás.
Paso 1 Paso 2
Gire el mando del temporizador hasta el
máximo.
Gire el mando del temporizador para
configurar la cuenta atrás.
Al finalizar el tiempo ajustado suena una señal. Esta función no influye en el funcio‐
namiento del horno.
8. USO DE LOS ACCESORIOS
ADVERTENCIA!
Consulte los capítulos sobre
seguridad.
8.1 Uso del asador rotativo
ADVERTENCIA!
Tome las debidas
precauciones cuando utilice
el asador rotativo. Las
horquillas y el espadín son
afilados. Existe riesgo de
lesiones.
ADVERTENCIA!
Póngase guantes para
retirar el asador rotativo. El
asador rotativo y el grill
están calientes. Corre el
riesgo de quemarse.
A B
D
C
A. Soporte del asador
B. Horquillas
C. Espadín
D. Asa
1. Coloque el asa del asador rotativo en
el espadín.
2. Coloque la bandeja honda en la
posición más baja.
3. Coloque el soporte del asador
rotativo en la tercera posición desde
abajo.
4. Coloque la primera horquilla en el
espadín, ponga luego la carne en el
asador rotativo y, finalmente, coloque
la segunda horquilla.
5. Use los tornillos para apretar las
horquillas.
6. Coloque la punta del espadín en el
orificio del asador rotativo.
7. Coloque la parte trasera del espadín
en el soporte del asador rotativo.
Consulte el capítulo "Descripción del
producto".
ESPAÑOL 39

8. Retire el mango del asador rotativo.
9. Seleccione una función con la
posición del asador. El asador
rotativo gira.
10. Defina la temperatura apropiada.
Consulte las tablas de cocción.
8.2 Inserción de accesorios
Una pequeña muesca en la parte
superior aumenta la seguridad. Las
hendiduras también son dispositivos
anti-vuelco. El borde elevado que rodea
la bandeja evita que los utensilios de
cocina resbalen de la parrilla.
Parrilla:
Inserte la parrilla entre las guías del
carril y asegúrese de que las hendi‐
duras apuntan hacia abajo.
Bandeja:
Introduzca la bandeja entre las guías
del carril de apoyo.
Parrilla, Bandeja:
Posicione la bandeja entre las guías
del carril de apoyo y la parrilla en las
guías de encima.
9. FUNCIONES ADICIONALES
9.1 Ventilador de enfriamiento
Cuando el horno funciona, el ventilador
de enfriamiento se pone en marcha
automáticamente para mantener frías las
superficies del horno. Una vez apagado
el horno, el ventilador sigue funcionando
hasta enfriarlo totalmente.
www.electrolux.com40

10. CONSEJOS
Consulte los capítulos sobre
seguridad.
10.1 Recomendaciones de
cocción
El horno tiene cinco niveles.
Cuente los niveles de las parrillas desde
abajo hacia arriba.
El comportamiento de su horno puede
ser diferente al del que tenía
anteriormente. Las tablas siguientes le
proporcionan los ajustes estándares de
temperatura, tiempo de cocción y
posición de la parrilla.
Si no encuentra los ajustes para una
receta especial, busque otra similar.
El horno está dotado con un sistema
especial que hace circular el aire y
recicla constantemente el vapor. Gracias
a este sistema puede cocinar con un
entorno de vapor y mantener los
alimentos blandos en su interior y
crujientes en su exterior. Reduce el
tiempo de cocción y el consumo de
energía.
Repostería
No abra la puerta del horno antes de que
transcurran 3/4 partes del tiempo de
cocción establecido.
Grill
Coloque los alimentos cerca de la
resistencia superior para que se cocinen
antes, o más alejados para una cocción
más suave.
Para reducir al mínimo las salpicaduras,
debe secar los alimentos antes de usar
el grill. Aplique un poco de aceite o
mantequilla fundida a las carnes y
pescados magros para que se
mantengan jugosos durante la cocción.
Los acompañamientos como tomates y
setas se pueden colocar debajo de la
rejilla al hacer la carne.
Se debe dar la vuelta a los alimentos
durante la cocción según sea necesario.
Carnes y pescados
Antes de trinchar la carne, déjela reposar
unos 15 minutos, como mínimo, para
que retenga los jugos.
Para evitar que se forme mucho humo
en el horno, vierta un poco de agua en la
bandeja honda. Para evitar la
condensación de humos, añada agua
después de cada vez que se seque.
Tiempos de cocción
Los tiempos de cocción dependen del
tipo de alimento, de su consistencia y del
volumen.
Inicialmente, supervise el rendimiento
cuando cocine. Busque los ajustes
óptimos (de calor, tiempo de cocción,
etc.) para sus recipientes, recetas y
cantidades cuando utilice este horno.
10.2 Cuadro de
especificaciones para hornear y
asar
Repostería
Precaliente el horno vacío durante 10
minutos antes de cocinar.
Utilice el molde de repostería si no se
especifica otro utensilio a continuación.
Use el tercer nivel.
Use la función: Cocción ventil..
Alimento Tempe‐
ratura
(°C)
Tiempo
(min)
Masas batidas 160 45 - 60
Masa con mante‐
quilla
160 20 - 30
Tarta de queso
(con suero), en
un estante de re‐
jilla
160 70 - 80
Pastel de manza‐
na, molde de re‐
postería de 20
cm en una parri‐
lla
160 80 - 100
ESPAÑOL 41

Alimento Tempe‐
ratura
(°C)
Tiempo
(min)
Strudel, bandeja mín. 60 - 80
Tarta de merme‐
lada
165 30 - 40
Bizcocho 160 50 - 60
Tronco de Navi‐
dad / Pastel de
fruta, molde de
repostería de 20
cm
mín. 90 - 120
Pastel de cirue‐
las, molde de
pan
160 50 - 60
Pastelillos - un
nivel, bandeja
min. -
160
25 - 35
Galletas/ Masa
quebrada - un ni‐
vel, bandeja
mín. 30 - 35
Bollos, bandeja 180 15 - 20
Bollos rellenos
de crema, bande‐
ja
170 25 - 35
Tartaletas, molde
de repostería de
20 cm
170 45 - 70
Pastel de fruta,
molde de repos‐
tería de 24 cm
mín. 110 - 120
Tarta Victoria,
molde de repos‐
tería de 20 cm
160 50 - 60
Pan y pizza
Precaliente el horno vacío durante 10
minutos antes de cocinar.
Use el tercer nivel.
Use la función: Cocción ventil..
Alimen‐
to
Tem‐
peratu‐
ra (°C)
Tiem‐
po
(min)
Comenta‐
rios
Pan
blanco
190 60 - 70 1 - 2 pie‐
zas, 0,5
kg cada
pieza
Pan de
centeno
180 30 - 45 En molde
para pan
Pan/
Rollitos
230 -
250
10 - 20 6 - 8 pa‐
necillos en
una ban‐
deja de
repostería
Pizza 190 10 - 20 En una
bandeja o
bandeja
honda
Bollitos 190 10 - 20 En bande‐
ja
Flanes
Precaliente el horno vacío durante 10
minutos antes de cocinar.
Use el molde de repostería.
Use el cuarto nivel.
Use la función: Cocción ventil..
Alimento Temperatu‐
ra (°C)
Tiempo
(min)
Pudin de
pasta
180 45 - 50
Pudin de
verduras
175 45 - 60
Quiches 180 50 - 60
Pescado
Precaliente el horno vacío durante 10
minutos antes de cocinar.
Use el tercer nivel.
Use la función: Cocción ventil..
www.electrolux.com42

Alimento Tempe‐
ratura
(°C)
Tiem‐
po
(min)
Comen‐
tarios
Trucha /
Pargo
175 40 -
55
3 - 4
pesca‐
dos
Atún / Sal‐
món
175 35 -
60
4 - 6 fi‐
letes
10.3 Cocción en el horno a gas
Carne y aves
Precaliente el horno vacío durante 10
minutos antes de cocinar.
Utilice la parrilla.
Coloque una bandeja honda en la
segunda posición.
Use el tercer nivel.
Alimento Tempera‐
tura (°C)
Tiempo
(min)
Vacuno sin des‐
huesar, 1,0 kg
mín. 40 - 50
Vacuno deshue‐
sado, 1,0 kg
190 50
Cordero, 1,0 kg mín. 40 - 50
Cerdo, 1,0 kg 180 - 190 75 - 85
Pollo / Conejo,
1,2 kg
220 - 230 75 - 85
Pato, 1,0 kg 190 80 - 90
Rosbif inglés -
poco hecha
220 44 - 50
Rosbif inglés - al
punto
220 51 - 55
Rosbif inglés -
muy hecha
220 56 - 60
Pavo
Precaliente el horno vacío durante 10
minutos antes de cocinar.
Utilice la bandeja honda.
Use el segundo nivel.
Alimento Tempe‐
ratura
(°C)
Tiempo
(min)
Pavo, 4,5 - 5,5
kg
160 210 - 240
Hojaldres
Precaliente el horno vacío durante 10
minutos antes de cocinar.
Utilice la bandeja de repostería de
aluminio si no se especifica otro utensilio
a continuación.
Use el cuarto nivel.
Alimento Tempe‐
ratura
(°C)
Tiempo
(min)
Tarta de fruta en
molde redondo de
26 cm en la parrilla
165 40 - 50
Pastel de fruta en
molde redondo de
26 cm en la parrilla
mín. 40 - 50
Pasteles de carne 180 20 - 30
Hojaldre para relle‐
nar
190 25 - 30
Volovanes 170 15 - 20
Tarta de mermela‐
da en molde redon‐
do de 30 cm en la
parrilla
165 40 - 50
Flan
Precaliente el horno vacío durante 10
minutos antes de cocinar.
Use 9 ramekines de cerámica.
Vierta 2 cm de agua en la bandeja
honda.
Use el tercer nivel.
Alimento Tempe‐
ratura
(°C)
Tiempo
(min)
Pudding de huevo
in un baño maría
mín. 60 - 75
ESPAÑOL 43

Repostería
Precaliente el horno vacío durante 10
minutos antes de cocinar.
Utilice la bandeja de repostería de
aluminio si no se especifica otro utensilio
a continuación.
Use el cuarto nivel.
Alimento Tempe‐
ratura
(°C)
Tiempo
(min)
Pastel de fruta en
molde de 20 cm
en la parrilla
mín. 150 -
170
Pastel de fruta en
molde de 20 cm
en la parrilla
mín. 150
Tarta de Madeira
en molde de 20
cm en la parrilla
mín. 105 -
120
Pastelillos min. -
170
35 - 50
Pan de jengibre mín. 35 - 45
Pan
Precaliente el horno vacío durante 10
minutos antes de cocinar.
Utilice la bandeja de repostería de
aluminio.
Use el cuarto nivel.
Alimento Tempera‐
tura (°C)
Tiempo
(min)
Hogazas de
pan, 0,5 kg
180 - 190 40 - 50
Hogazas de
pan, 1,0 kg
180 - 190 50 - 60
Rollitos y pane‐
cillos
180 - 190 15 - 20
10.4 Grill
Precaliente el horno vacío durante 3
minutos antes de cocinar.
Use el cuarto nivel.
La temperatura máxima es el valor
predeterminado para todos los tipos de
alimento.
Alimento Pie‐
zas
Tiempo (min)
1ª cara 2ª cara
Filetes de
solomillo,
0,8 kg
4 12 - 15 12 - 14
Bistec de
vaca, 0,6
kg
4 10 - 12 6 - 8
Salchichas 8 12 - 15 10 - 12
Chuletas
de cerdo,
0,6 kg
4 12 - 16 12 - 14
Pollo (cor‐
tado en 2),
1,0 kg
2 30 - 35 25 - 30
Brochetas 4 10 - 15 10 - 12
Pechuga
de pollo,
0,4 kg
4 12 - 15 12 - 14
Hambur‐
guesa, 0,6
kg
6 13 - 15 12 - 14
Filete de
pescado,
0,4 kg
4 12 - 14 10 - 12
Sándwi‐
ches tosta‐
dos
4 - 6 5 - 7 -
Tostadas 4 - 6 2 - 4 2 - 3
10.5 Asador rotativo
Precaliente el horno vacío durante 3
minutos antes de cocinar.
Use el tercer nivel.
Alimento Tempe‐
ratura
(°C)
Tiempo
(min)
Aves, 1,0 - 1,2 kg Máx. 75 - 85
Asado, 0,8 - 1,0
kg
Máx. 75 - 85
www.electrolux.com44

10.6 Descongelar
(kg)
Tiempo de
descongela‐
ción (min)
Tiempo de des‐
congelación pos‐
terior (minutos)
Pollo 1 100 - 140 20 - 30 Coloque el pollo so‐
bre un plato puesto
del revés sobre otro
mayor. Dele la vuel‐
ta a media cocción.
Carne 1 100 - 140 20 - 30 Dele la vuelta a me‐
dia cocción.
0.5 90 - 120
Nata 2 x 0,2 80 - 100 10 - 15 La nata se puede
montar perfecta‐
mente incluso aun‐
que queden puntos
ligeramente conge‐
lados.
Trucha 0.15 25 - 35 10 - 15 -
Fresas 0.3 30 - 40 10 - 20 -
Mantequilla 0.25 30 - 40 10 - 15 -
Pasteles 1.4 60 60 -
10.7 Información para los
institutos de pruebas
Pruebas conforme a IEC 60350-1.
(°C) (min)
Pasteli‐
llos, 20
unidades
por ban‐
deja
Cocción ven‐
til.
Bande‐
ja de
repos‐
tería
de alu‐
minio
4 160 -
170
25 - 35 Precaliente el
horno 10 minu‐
tos.
Tarta de
manza‐
na, 2
moldes,
Ø 20 cm
Cocción ven‐
til.
Parrilla 4 160 80 - 100 Precaliente el
horno 10 minu‐
tos.
ESPAÑOL 45

(°C) (min)
Bizco‐
cho, mol‐
de de re‐
postería
Ø26 cm
Cocción ven‐
til.
Parrilla 4 160 -
170
45 - 55 Precaliente el
horno 10 minu‐
tos.
Manteca‐
dos
Cocción ven‐
til.
Bande‐
ja de
repos‐
tería
de alu‐
minio
4 150 -
160
30 - 40 Precaliente el
horno 10 minu‐
tos.
Tosta‐
das, 4 - 6
trozos
Grill Parrilla 4 máx. 2 - 3 minutos
el primer la‐
do; 2 - 3 mi‐
nutos el se‐
gundo
Precaliente el
horno 3 minutos.
Hambur‐
guesa de
vacuno,
6 trozos,
0,6 kg
Grill Parrilla
y gra‐
sera
4 máx. 20 - 30 Coloque la parri‐
lla en el cuarto
nivel y la grasera
en el tercer nivel
del horno. Dele la
vuelta a la mitad
del tiempo.
Precaliente el
horno 3 minutos.
11. MANTENIMIENTO Y LIMPIEZA
ADVERTENCIA!
Consulte los capítulos sobre
seguridad.
11.1 Notas sobre la limpieza
Agentes lim‐
piadores
Limpie la parte delantera del horno con un paño suave humedecido
en agua templada y jabón suave. Limpie y compruebe la junta de la
puerta alrededor del interior.
Utilice un producto de limpieza para limpiar las superficies metálicas.
Limpie las manchas con un detergente suave.
www.electrolux.com46

Uso diario
Limpie el interior después de cada uso. La acumulación de grasa u
otros residuos puede provocar un incendio.
La humedad puede llegar a condensarse en el horno o en los pane‐
les de cristal. Para reducir la condensación, ponga en funcionamien‐
to el horno 10 minutos antes de cocinar. No guarde la comida en el
horno más de 20 minutos. Seque el interior con un paño suave des‐
pués de cada uso.
Accesorios
Limpie todos los accesorios después de cada uso y déjelos secar.
Use un paño suave humedecido en agua caliente y detergente sua‐
ve. No lave los accesorios en el lavavajillas
No limpie los accesorios no adherentes utilizando un limpiador abra‐
sivo ni objetos afilados.
11.2 Cómo quitar: Apoyos de
baldas
Para limpiar el horno, retire los carriles
de apoyo.
Paso 1 Apague el horno y espere a
que esté frío.
Paso 2 Tire de la parte delantera
del carril de apoyo para se‐
pararlo de la pared lateral.
Paso 3 Tire del extremo trasero del
carril de apoyo para despe‐
garlo de la pared lateral y
sáquelo.
2
1
Paso 4 Coloque los carriles apoyo
en el orden inverso.
11.3 Cómo quitar e instalar: Puerta
La puerta del horno tiene dos paneles de cristal. Es posible retirar la puerta del horno
y el panel de cristal interior para limpiarlos. Lea las instrucciones completas de
"Extracción e instalación de la puerta" antes de retirar los paneles de cristal.
PRECAUCIÓN!
No utilice el aparato sin los paneles de cristal.
ESPAÑOL 47

Paso 1 Abra completamente la puerta y
sujete las dos bisagras.
Paso 2 Levante y gire completamente
las palancas de ambas bisagras.
Paso 3 Cierre la puerta del horno a me‐
dio camino hasta la primera posi‐
ción de apertura. A continuación
levante la puerta y tire hacia
adelante para desencajarla.
Paso 4 Coloque la puerta sobre una su‐
perficie estable y protegida por
un paño suave.
Paso 5 Sujete por ambos lados el aca‐
bado de la puerta (B), situado en
el borde superior de ésta, y em‐
puje hacia dentro para soltar el
sello de resorte.
Paso 6 Tire del borde de la puerta hacia
delante para desengancharla.
1
2
B
Paso 7 Sujete el panel de la puerta de
cristal por el borde superior y ex‐
tráigalo con cuidado. Asegúrese
de que el cristal se desliza com‐
pletamente fuera de los sopor‐
tes.
Paso 8 Limpie los paneles de cristal con
agua y jabón. Seque los paneles
de cristal con cuidado. No limpie
los paneles de cristal en el lava‐
vajillas.
Paso 9 Después de la limpieza, instale
el panel de vidrio y la puerta del
horno.
www.electrolux.com48

La cara impresa debe mirar hacia el in‐
terior de la puerta. Después de la insta‐
lación, asegúrese de que la superficie
del marco del panel de cristal de las ca‐
ras impresas no esté áspera cuando la
toque.
Al instalarlo correctamente, el acabado
de la puerta hace clic.
Asegúrese de que coloca el panel de
cristal interno en los soportes correctos.
A
11.4 Cómo cambiar: Bombilla
ADVERTENCIA!
Riesgo de descarga
eléctrica.
La lámpara puede estar
caliente.
Coja siempre la bombilla halógena con
un paño para evitar quemar los residuos
de grasa.
Antes de reemplazar la bombilla:
Paso 1 Paso 2 Paso 3
Apague el horno. Espere
hasta que el horno esté
frío.
Desconecte el horno de la
red.
Coloque un paño en el fon‐
do de la cavidad.
Bombilla trasera
Paso 1 Gire la tapa de cristal para extraerla.
Paso 2 Limpie la tapa de cristal.
Paso 3 Cambie la bombilla por otra apropiada termorresistente hasta 300 °C.
Paso 4 Coloque la tapa de cristal.
12. SOLUCIÓN DE PROBLEMAS
ADVERTENCIA!
Consulte los capítulos sobre
seguridad.
12.1 Qué hacer si...
Problema Posible causa Solución
El horno no calienta. El horno está apagado. Encienda el horno.
ESPAÑOL 49

Problema Posible causa Solución
El horno no calienta. Ha saltado el fusible. Compruebe si el fusible es
la causa del fallo de fun‐
cionamiento. Si el proble‐
ma del fusible se repite,
póngase en contacto con
un técnico cualificado.
El horno no funciona. El encendido automático
no funciona.
Encienda el quemador con
una cerilla larga. Coloque
la llama cerca del agujero,
en la parte inferior del inte‐
rior del horno. Al mismo
tiempo, presione el mando
del control del gas y gírelo
hacia la izquierda hasta la
temperatura máxima.
Cuando se encienda la lla‐
ma, mantenga presionado
el mando del control de
gas durante unos 15 se‐
gundos como máximo para
calentar el termopar. De lo
contrario, el suministro de
gas se interrumpe.
La bombilla no funciona. La bombilla está rota. Sustituya la bombilla.
Se acumula vapor y con‐
densación en los alimentos
y en el interior del horno.
Un plato ha permanecido
en el horno demasiado
tiempo.
Una vez cocinado un ali‐
mento, no lo deje más de
15 o 20 minutos en el hor‐
no.
La llama se apaga justo
después de encenderse.
El termopar no se ha ca‐
lentado.
Después de encender la
llama, mantenga pulsado
el mando del control de
gas durante 15 segundos
como máximo.
El asador rotativo no gira. El asador rotativo no se ha
introducido correctamente
en su orificio.
Consulte el capítulo “Uso
de los accesorios”, Uso del
asador rotativo.
La junta de la puerta está
dañada.
- No utilice el horno. Pónga‐
se en contacto con un ser‐
vicio técnico autorizado.
12.2 Datos de servicio
Si no logra subsanar el problema,
póngase en contacto con su distribuidor
o el centro de servicio técnico.
Los datos que necesita para el centro de
servicio técnico se encuentran en la
placa de características. La placa de
régimen se encuentra en el marco
delantero de la cavidad del horno. No
retire la placa de características de la
cavidad del horno.
www.electrolux.com50

Es conveniente que anote los datos aquí:
Modelo (MOD.) .........................................
Número de producto (PNC) .........................................
Número de serie (S.N.) .........................................
13. DATOS TÉCNICOS
13.1 Datos técnicos
ENERGÍA TOTAL: Eléctrico: 1.77 Kw
Gas original: Gas natural 1,76 Kpa = 8640 kJ/h
G20 (2H) 18 mbar = 8640 kJ/h
Sustitución de gas: Gas LP 2,75 Kpa = 7920 kJ/h
Suministro eléctrico: 220 - 240 V ~ 50 - 60 Hz
Categoría de aparato: II 2,3
Conexión de gas: G 1/2"
Clase de aparato: 3
13.2 Quemador de horno de gas
Tipo de gas POTENCIA
NOMINAL
DE GAS
(Kw)
Potencia re‐
ducida de
gas (Kw)
AGUJA DE
DERIVA‐
CIÓN (1/100
mm)
Marca de in‐
yector (1/100
mm)
G20 (2H) 18 mbares 2.4 0.7 Regulado
GAS NATURAL 1,76
kPa
2.5 0.7 Regulado
Gas LP 2,75 Kpa 2.5 0.7 43 80
14. EFICACIA ENERGÉTICA
14.1 Ahorro de energía
El horno tiene
características que le
ayudan a ahorrar energía
durante la cocina de cada
día.
Asegúrese de que la puerta del horno
está cerrada cuando el horno funciona.
No abra la puerta del horno muchas
veces durante la cocción. Mantenga
limpia la junta de la puerta y asegúrese
de que está bien fijada en su posición.
Utilice utensilios de cocina de metal para
mejorar el ahorro energético.
En la medida de lo posible, no
precaliente el horno antes de cocinar.
Reduzca al máximo el tiempo entre
horneados cuando prepare varios platos
de una vez.
ESPAÑOL 51

Cocción con ventilador
En la medida de lo posible, utilice las
funciones de cocción con ventilador para
ahorrar energía.
Calor residual
Para una duración de la cocción superior
a 30 minutos, reduzca la temperatura del
horno un mínimo de 3 - 10 minutos antes
de que transcurra el tiempo de cocción.
El calor residual dentro del horno seguirá
cocinando.
Utilice el calor residual para calentar
otros platos.
Mantener calor
Si desea utilizar el calor residual para
mantener calientes los alimentos,
seleccione el ajuste de temperatura más
bajo posible.
15. ASPECTOS MEDIOAMBIENTALES
Recicle los materiales con el símbolo .
Coloque el material de embalaje en los
contenedores adecuados para su
reciclaje. Ayude a proteger el medio
ambiente y la salud pública, así como a
reciclar residuos de aparatos eléctricos y
electrónicos. No deseche los aparatos
marcados con el símbolo junto con los
residuos domésticos. Lleve el producto a
su centro de reciclaje local o póngase en
contacto con su oficina municipal.
*
www.electrolux.com52


www.electrolux.com/shop
867359478-A-302020
-
 1
1
-
 2
2
-
 3
3
-
 4
4
-
 5
5
-
 6
6
-
 7
7
-
 8
8
-
 9
9
-
 10
10
-
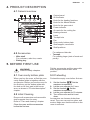 11
11
-
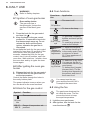 12
12
-
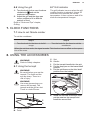 13
13
-
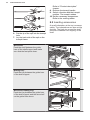 14
14
-
 15
15
-
 16
16
-
 17
17
-
 18
18
-
 19
19
-
 20
20
-
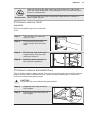 21
21
-
 22
22
-
 23
23
-
 24
24
-
 25
25
-
 26
26
-
 27
27
-
 28
28
-
 29
29
-
 30
30
-
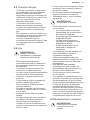 31
31
-
 32
32
-
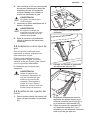 33
33
-
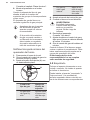 34
34
-
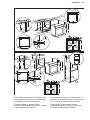 35
35
-
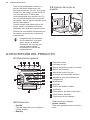 36
36
-
 37
37
-
 38
38
-
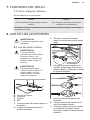 39
39
-
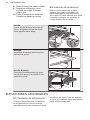 40
40
-
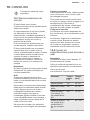 41
41
-
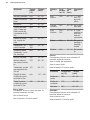 42
42
-
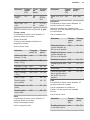 43
43
-
 44
44
-
 45
45
-
 46
46
-
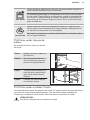 47
47
-
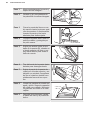 48
48
-
 49
49
-
 50
50
-
 51
51
-
 52
52
-
 53
53
-
 54
54
-
 55
55
-
 56
56


Electrolux EOG68C2IUX Manual de usuario
- Categoría
- Microondas
- Tipo
- Manual de usuario
en otros idiomas
- English: Electrolux EOG68C2IUX User manual
Artículos relacionados
-
Electrolux FR13GG Manual de usuario
-
Electrolux F13GN Manual de usuario
-
-
-
-
-
Electrolux GHL246SW Manual de usuario
-
-
-
Otros documentos
-
Frigidaire FOG68C2IUX Manual de usuario
-
AEG BE300300IM Manual de usuario
-
ELECTROLUX-REX FG13N Manual de usuario
-
Zanussi ZOB582XS Manual de usuario
-
-
Groupe Brandt 4CF-631LMDBU El manual del propietario
-
-
Aspes SHM4700EX El manual del propietario
-
Beko FSE62110DW El manual del propietario
-
Svan SHM4700X El manual del propietario