Yamaha POCKETRAK C24 Manual de usuario
- Categoría
- Dictáfonos
- Tipo
- Manual de usuario
Este manual también es adecuado para

EN
POCKET RECORDER
POCKETRAK W24
Reference Manual

Table of Contents
POCKETRAK W24 Reference Manual
2
Table of Contents
1 Starting Up.................................. 4
Part names and functions ................................. 4
Front, side and back panels.................................... 4
Remote control ...................................................... 7
LCD screen ............................................................ 8
2 Recording .................................... 9
Recording with an external microphone.......... 9
Recording from an external audio device
(such as a CD player) ................................... 10
3 Recording Settings.................... 12
Using a preset or custom recording scene ..... 12
Selecting a recording scene.................................. 12
R
ecording with the selected recording scene
.. 13
Modifying the recording scene settings......... 13
Changing the Recording mode
(Selecting a sound quality) .......................... 16
Changing Recording mode .................................. 16
Turning the ALC (Auto Level Control)
on and off..................................................... 17
Setting the microphone sensitivity
(MIC SENS)................................................... 17
Setting the recording EQ (equalizer) ............. 18
About recording EQ options................................. 18
Selecting a recording EQ option........................... 19
Customizing the recording EQ ............................. 20
Setting the recording peak limiter ................. 21
Setting the High Pass Filter (HPF) .................. 21
Setting the recording peak hold indication ... 21
VAS (Voice Activated System) recording ....... 22
Setting the voice sensing level (VAS value) ........... 22
Setting the Auto Divide function
(AUTO DIVIDE)............................................. 23
Recording with the self timer ......................... 24
Changing the LED setting............................... 25
4 Playback .................................... 26
Playing files ..................................................... 26
Playing back tracks from the Playlist .............. 27
Indicators displayed during playback.................... 27
Fast forwarding and fast reversing................. 28
Using headphones .......................................... 28
5 Playback Settings.......................29
Changing the playback speed ........................ 29
Playing back specific sections of a track......... 30
Using the Skip playback function.......................... 30
Using the A-B Repeat playback function ............... 31
Using the Phrase playback function ...................... 31
Playing back the same track repeatedly......... 32
Locating a playback position by time
(Time Search function) ................................ 33
Setting the sound EQ (equalizer) ................... 34
About the sound EQ options ................................ 34
Selecting a sound EQ option ................................ 35
Customizing the sound EQ option........................ 36
6 Using the Tuner Function ..........37
Tuning your musical instrument..................... 37
Calibrating the standard pitch ....................... 37
7
Using the Metronome Function
..38
Using the metronome..................................... 38
Setting the metronome tempo (speed) ......... 38
Setting the metronome beats ........................ 39
Playing the metronome during recording ..... 39
8 Editing Files................................40
Dividing files.................................................... 40
Using the fade in and fade out effects ........... 42
Applying the fade in effect ................................... 42
Applying the fade out effect ................................. 43
Inserting and deleting index marks................ 43
Inserting index marks ........................................... 43
Deleting index marks............................................ 43
Using the Playlist function
(available only for the MUSIC folder).......... 44
Assigning the folder and files to a Playlist (P1–5)... 44
Changing the playback sequence in a Playlist
(P1–5)............................................................... 45
Removing a file from a Playlist (P1–5)............ 45
Removing all files from a Playlist (P1–5) ........ 46

Table of Contents
POCKETRAK W24 Reference Manual
3
9 Deleting..................................... 47
Managing the Recycle Bin .............................. 47
Activating the Recycle Bin function ...................... 47
Displaying the Recycle Bin folder.......................... 48
Playing back a file in the Recycle Bin folder .......... 48
Restoring a file from the Recycle Bin folder........... 49
Emptying the Recycle Bin folder........................... 50
Deleting a selected file.................................... 51
Deleting all files from a folder........................ 52
Formatting the internal memory/
a microSD card (Deleting all data) .............. 53
10 Using the Timer Function ....... 54
Programming a timer ..................................... 54
11 Preference Settings................. 58
Setting the current date and time.................. 58
Setting the beep sound .................................. 59
Settings related to remote control operation
.. 59
Activating the Auto Power Off function......... 60
Setting the Backlight function........................ 61
Adjusting the LCD contrast............................. 61
Initializing the menu settings......................... 62
Checking the firmware version....................... 62
12 Using the Recorder with a
Computer.................................63
Computer system requirements ..................... 63
Connecting the recorder to your computer... 63
Disconnecting the recorder from your
computer ...................................................... 64
Troubleshooting (Windows Vista/XP)............ 64
About files and folders.................................... 65
About the file naming rules .................................. 70
Transferring audio files from the recorder
to a computer............................................... 71
Copying audio files to a CD-R......................... 72
13 Using the Recorder as a Music
Player.......................................73
Ripping CDs (Creating compatible music files
from music CDs)........................................... 73
Transferring music files to the Recorder
(Sync function)............................................. 75
Playing back tracks in a specific sequence...... 77
Creating a Playlist................................................. 77
14 Installing Cubase AI.................78
15 Appendix .................................79
Error messages ................................................ 79
Troubleshooting.............................................. 81
FAQ .................................................................. 86
Specifications .................................................. 87
Index................................................................ 89
Copyrights
• Copying of the commercially available musical data is strictly prohibited except for your personal use.
• This Reference Manual is the exclusive copyrights of Yamaha Corporation.
• Windows is a registered trademark of Microsoft
®
Corporation in the United States and other countries.
• Apple, Mac and Macintosh are trademarks of Apple Inc., registered in the U.S. and other countries.
• The microSD and microSDHC logos are trademarks.
• The company names and product names in this manual are the trademarks or registered trademarks of
their respective companies.
• The illustrations and LCD screens shown in this manual are for instructional purposes only and may
appear somewhat different from those on your instrument.
About the manuals
The operation of the POCKETRAK W24 is explained in this Reference Manual (this file) and also in the
Owner’s Manual (printed version).
Owner’s Manual (printed version): The Owner’s Manual includes information about precautions,
setup and basic operation that will get you started as easily as possible.
Reference Manual (this file): The Reference Manual includes part names and functions, detailed
descriptions and procedures that will help you take full advantage of the POCKETRAK W24,
and troubleshooting information.

1 Starting Up
POCKETRAK W24 Reference Manual
4
1 Starting Up
Part names and functions
Front, side and back panels
1 LCD screen
2 [REC/PAUSE ] button
Starts or pauses recording.
3 [STOP/ESC ] button
Stops recording or playback. Press this button during the menu setting operation to
return to the previous screen or setting.
4 [VOL +] button
Increases the output volume of the speaker or headphones. Also, it moves the
cursor upward during menu operation or file selection.
5 [VOL –] button
Decreases the output volume of the speaker or headphones. Also, it moves the
cursor downward during menu operation or file selection.
6 [] button
Locates the beginning of the previous file, or fast reverses a file. Also, use this button
to return to the previous screen during the menu setting operation or while the list
screen is displayed, move the cursor to the left, or set the recording level.
7 [] button
Locates the beginning of the next file, or fast forwards a file. Also, use this button to
proceed to the next screen during the menu setting operation or while the list
screen is displayed, move the cursor to the right, or set the recording level.
8 [MENU/ENTER] button
While the main screen is displayed, press and hold down this button for at least two
(2) seconds to display the menu screen. During the menu setting operation or while
the list screen is displayed, press this button once to confirm the item selection or
the operation.
VOL
MENU
ENTER
SPEEDP
AUSE ESC
PLAY
STOP
REC
9
K
L
M
N
O
P
Q
0
A
B
C
D
E
F
G
H
I
J
1
2
3
4
5
6
7
8

1 Starting Up
POCKETRAK W24 Reference Manual
5
9 Built-in stereo microphone
The recorder features a high-performance X-Y stereo microphone.
0 LED indicator
Lights up or flashes red during recording and lights up green during playback.
☞ Changing the LED setting (page 25)
A [PLAY/SPEED ] button
Starts playback or changes the playback speed in stages.
☞ Playback (page 26)
☞ Changing the playback speed (page 29)
B MIC/LINE socket
External stereo microphone/line level input socket.
☞ Recording with an external microphone (page 9)
☞ Recording from an external audio device (such as a CD player) (page 10)
C [POWER] button
Turns the power to the recorder on or off. Press the button once briefly to turn the
power on. Press and hold down the button for at least two (2) seconds to turn the
power off.
D [FOLDER/A-B REPEAT] button
Displays the folder select screen, or executes A-B repeat playback.
E [LIST/INDEX] button
To display a list of files in the selected folder, press this button while the recorder is
stopped.
Press this button during recording or playback to insert index marks (playback
position locators).
☞ Inserting and deleting index marks (page 43)
F [SCENE/PHRASE] button
Recalls a recording scene while the unit is stopped. Alternatively, use this button to
perform Phrase playback (the playback point will be moved back by the specified
number of seconds).
☞ Using a preset or custom recording scene (page 12)
☞ Using the Phrase playback function (page 31)
VOL
MENU
ENTER
SPEED
PAUSEESC
PLAY
STOP
REC
9
K
L
M
N
O
P
Q
0
A
B
C
D
E
F
G
H
I
J
1
2
3
4
5
6
7
8

1 Starting Up
POCKETRAK W24 Reference Manual
6
G [DELETE] button
Deletes files, folders, or index marks. It also recalls the Recycle Bin menu while the
Recycle Bin folder is selected.
☞ Deleting (page 47)
H microSD card slot
Insert a microSD card here.
I USB terminal
Connect this terminal to a computer using the included USB cable.
J Remote sensor
Receives remote control signals.
K [HOLD] switch
To engage the Hold function (to avoid accidental operation), slide the switch in the
direction of the arrow.
L Headphones socket
Connect inner-ear headphones or other types of headphones here.
M [ALC ON/OFF] switch
Set this switch to ON to automatically adjust the recording level in accordance with
the source level to optimize the dynamics of the resulting recording.
☞ Turning the ALC (Auto Level Control) on and off (page 17)
N [MIC SENS HIGH/LOW] switch
Switches the microphone sensitivity to high or low in accordance with the
recording environment.
O Speaker
P Battery cover
Q Threaded socket for attaching a tripod or a microphone stand adapter
Use this socket to attach a tripod or a microphone stand adapter.
☞ Refer to the Owner’s Manual
VOL
MENU
ENTER
SPEEDPAUSE ESC
PLA
Y
STOP
REC
9
K
L
M
N
O
P
Q
0
A
B
C
D
E
F
G
H
I
J
1
2
3
4
5
6
7
8

1 Starting Up
POCKETRAK W24 Reference Manual
7
Remote control
Pressing any remote control button will cause the recorder to emit a beep (unless other recorder
settings override this function).
1 [W] button
Starts playback.
2 [] button
Locates the beginning of a file, or fast reverses a file. Alternatively, this button
enables you to lower the REC LEVEL.
3 [REC] button
Starts recording.
4 [] button
Locates the beginning of a file, or fast forwards a file. Alternatively, this button
enables you to raise the REC LEVEL.
5 [A] button
Stops recording or playback.
6 VOLUME button (+)
Raises the playback volume level.
7 VOLUME button (–)
Lowers the playback volume level.
1
2
4
5
6
7
3

1 Starting Up
POCKETRAK W24 Reference Manual
8
LCD screen
The unit will not display all the following indicators and items at the same time.
Hint:
· What is Linear PCM (Pulse Code Modulation) recording?
Linear PCM (LPCM) recording is a digital recording method that samples analog audio
signals at a certain frequency and saves them as digital signals without compression.
Music CDs (CD-DA–CD digital Audio) use PCM recording (sampling rate of 44.1kHz, bit
depth of 16-bit samples, bit rate of 1,411kbps, and frequency response from 20 to
20kHz).
PCM recordings are digitally-recorded unprocessed audio, and are supposed to be of the
highest sound quality. “WAVE” format is used to import these PCM recording files into a
computer. The WAVE file extension is “.WAV”. MP3 and WMA format files are created
by compressing the LPCM data.
· Recording margin indicator
Recording margin: space or margin (expressed in dB) between 0dB and the input peak
levels.
–10dB
5:2 8
090503
_
1256.MP3
1:08:30
88.2KPCM 24bit
H
L
R
199/199
A
SD
30
S
A.D HPF
E
SD
Recording level (with ALC off)
Microphone sensitivity
High Pass Filter
File number/
Total number of files
microSD indicator
Bit rate
(for recording and playing
back MP3 files and playing
back WMA files)
Frequency (for PCM
recording and playback)
Remaining battery power
Folder name
File format
Level meters, Information
indicators
(track name, file name,
artist name, total playback
time, operation status, file
type, current time and
date, etc.)
Recording scene
Bit rate (for PCM recording
and playback)
Auto Divide
microSD card
Remaining recording time
(hour : minute)
Recording margin,
playback position indicator
Elapsed recording time
(hour : minute : second)
Level meters
EQ (equalizer)
File name
Recording/Playback
indicators (S/W)

2 Recording
POCKETRAK W24 Reference Manual
9
2 Recording
For information on recording preparation and how to record musical performances or conference
meetings using the built-in microphone, please refer to the Owner’s Manual (printed version).
Recording with an external microphone
You can use an external microphone for recording (instead of using the built-in stereo
microphone). For an external microphone, you can use a stereo or monaural powered
microphone, or a stereo or monaural dynamic microphone. To set up the recorder for your type
of external microphone, follow the steps below:
1. Press the [MENU/ENTER] button for at least two (2) seconds while the main screen
is displayed, press the [VOL +/–] buttons to select [REC MENU] → [REC SELECT],
then press the [MENU/ENTER] button.
2. Press the [VOL +/–] buttons to select [EXTERNAL MIC], then press the [MENU/
ENTER] button.
3. Press the [VOL +/–] buttons repeatedly to select [POWERED ST],
[POWERED MONO], [DYNAMIC ST] or [DYNAMIC MONO]
depending on the microphone type, then press the [MENU/
ENTER] button.
Press the [STOP/ESC ] button twice to display the main screen.
4. Connect the microphone to the recorder’s [MIC/LINE] socket located on the right
side panel, then point the microphone toward the sound source.
5. Press the [REC/PAUSE ] button on the recorder.
Recording starts.
Yamaha recommends that you use a microphone with the following specifications as an
external microphone.
If you use an external microphone with the following specifications, select [POWERED
ST] or [POWERED MONO] as the microphone type in Step 3.
Type Electret condenser microphone that features plug-in power operation
Impedance 2k ohms
Power supply Guaranteed operation at 1.3V
Plug Mini plug (
∅
3.5mm)
VOL
MENU
ENTER
EXTERNAL MIC
LINE IN
REC SELECT
40
POWERED ST
POWERED MONO
DYNAMIC ST
DYNAMIC MONO
EXTERNAL MIC
40

2 Recording
POCKETRAK W24 Reference Manual
10
Recording from an external audio device (such as a CD
player)
You can record line input sources from an external audio device (such as a CD player or MD
player).
1. Press the [MENU/ENTER] button for at least two (2) seconds while the main screen
is displayed, press the [VOL +/–] buttons to select [REC MENU] → [REC SELECT],
then press the [MENU/ENTER] button.
2. Press the [VOL +/–] buttons to select [LINE IN], then press the [MENU/ENTER]
button.
Press the [STOP/ESC ] button twice to display the main screen.
Note:
· For information on how to change the recording mode, see page 16.
· During an MP3 recording, you can use the Auto Divide function (see page 23).
3. Connect the recorder’s [MIC/LINE] socket to the audio output connector on the
external device.
Use a commercially-available audio cable (stereo mini plug, 3.5mm, with no resistance).
4. Adjust the volume level of the external audio device while playing the recording
source.
Hint:
· Try a test recording to find an appropriate recording level.
VOL
MENU
ENTER
EXTERNAL MIC
LINE IN
REC SELECT
40
VOL
MENU
ENTER
SPEEDP
A
USE ESC
PLAY
S
T
OP
REC
To the external
input socket
Audio device
or LINE OUT
(Recording) socket
To audio output
headphones socket

2 Recording
POCKETRAK W24 Reference Manual
11
5. Play the recording source on the external audio device and press the
[REC/PAUSE ] button.
Recording starts.
Note:
· Recordings are automatically stored in the LINE (L) folder.
· While you are recording audio through the line input from the connected external
device, no audio will be heard from the speaker. Use the headphones to listen to the
audio being recorded.
6. Press the [STOP/ESC ] button to stop recording.
Stop playback on the external device.

3 Recording Settings
POCKETRAK W24 Reference Manual
12
3 Recording Settings
Using a preset or custom recording scene
The recorder features preset and custom recording scenes. Each preset scene is a snapshot of the
recording menu settings that would work well in a certain recording environment and
application. You can also create your own customized recording scenes.
Selecting a recording scene
The recorder offers four preset recording scenes ([Practice], [Studio], [Outdoor] and [Live])
and three custom recording scenes ([User 1-3]) that enable you to create your own custom
scenes by combining different menu settings.
1. While the main screen is displayed, press the [SCENE/PHRASE]
button located on the side panel.
The unit displays the [SCENE SELECT] screen.
2. Press the [VOL +/–], [ ]/[ ] buttons to select a preferred
recording scene, then press the [MENU/ENTER] button.
The unit confirms your selection of a recording scene, and then
displays the main screen.
“ ” will appear in the upper right corner of the LCD.
Scene
Menu
settings
OFF Practice Studio Outdoor Live User1-3
REC MODE
PCM
44.1kHz
16bit
MP3
128kbps
MP3
192kbps
PCM
96kHz
24bit
PCM
44.1kHz
16bit
MP3
192kbps
INPUT 20 20 20 20 20 20
MIC ALC OFF/ON ON OFF OFF OFF OFF
MIC SENS HIGH/LOW HIGH LOW HIGH LOW HIGH
HPF OFF OFF OFF ON OFF OFF
LIMITER OFF ON ON OFF ON OFF
PEAK HOLD 3 sec 3 sec 3 sec 3 sec 3 sec 3 sec
SELECT
P-ST
*1
*1. P-ST is an abbreviation of POWERED ST.
P-ST P-ST P-ST P-ST P-ST
AUTO DIVIDE OFF OFF OFF OFF OFF OFF
TIMER OFF OFF OFF OFF OFF OFF
VAS OFFONOFFOFFOFFOFF
VAS LEVEL 333333
REC EQ
RECOMM
*2
*2. RECOMM is an abbreviation of RECOMMEND.
RECOMM RECOMM FLAT RECOMM RECOMM
OFF
Practice
Studio
Outdoor
Live
User1
User2
User3
SCENE SELECT
AUTO
44.1KPCM 16bit
H
192KMP3
L
20
S
1:0 2
091101
_
0025.WAV
0:00:00
L
R
1/53
A
E
Recording scene

3 Recording Settings
POCKETRAK W24 Reference Manual
13
Recording with the selected recording scene
1. After selecting a recording scene, while the main screen is displayed, press the
[FOLDER/A-B REPEAT] button located on the side panel, then press the [VOL +/–],
[ ]/[ ] buttons to select a folder into which to record a file, then press the
[MENU/ENTER] button.
2. Press the [REC/PAUSE ] button.
If you have selected the [Practice] recording scene, recording starts immediately.
3. If you have selected any scene other than [Practice], the unit enters recording
STANDBY mode. Press the [REC/PAUSE ] button again.
Note:
· If you wish to change the INPUT (recording level), press the [
t
]/[
Y
] buttons to
adjust the level while the unit remains in recording STANDBY mode.
Modifying the recording scene settings
You can modify the recording scene settings and store the edits.
1. While the main screen is displayed, press the [SCENE/PHRASE] button located on
the side panel.
2. Press the [VOL +/–], [ ]/[ ] buttons to highlight the
recording scene that you wish to modify.
You cannot modify the settings for the [OFF] scene.
3. While the recording scene is highlighted, press the [SCENE/
PHRASE] button again.
The unit displays the scene edit screen.
4. Press the [VOL +/–] buttons to select a setting item that you wish to modify, then
press the [MENU/ENTER] button.
The unit displays the setting edit screen for the selected item.
5. Modify the setting or value.
• For [INPUT] (recording level), press the [VOL +/–] buttons to select
a value from 0 to 40, then press the [MENU/ENTER] button.
OFF
Practice
Studio
Outdoor
Live
User1
User2
User3
SCENE SELECT
192KMP3
L
20
S
REC MODE :MP3
192kbps
INPUT :20
MIC ALC :OFF
MIC SENS :LOW
Studio
20
S
1/3
INPUT
25
25
S

3 Recording Settings
POCKETRAK W24 Reference Manual
14
• For [MIC ALC], press the [VOL +/–] buttons to select [ON] or [OFF],
then press the [MENU/ENTER] button.
• For [MIC SENS], press the [VOL +/–] buttons to select [HIGH] or
[LOW], then press the [MENU/ENTER] button.
For information on how to set other menu items, refer to the following pages:
☞ [REC MODE] (See page 16.)
☞ [HPF] (See page 21.)
☞ [LIMITER] (See page 21.)
☞ [PEAK HOLD] (See page 21.)
☞ [SELECT] (Line in) (See page 9.)
☞ [AUTO DIVIDE] (See page 23.)
☞ [TIMER] (See page 24.)
☞ [VAS] (See page 22.)
☞ [VAS LEVEL] (See page 22.)
☞ [REC EQ] (See page 18.)
To modify other settings, repeat Steps 4 and 5.
6. Press the [VOL +/–] buttons to select [STORE], then press the [MENU/ENTER]
button.
The modified recording scene overwrites the existing scene, and the unit displays the
[SCENE SELECT] screen.
Note:
· To cancel overwriting the settings, select [CANCEL] instead of [STORE].
· If you try to abort the operation in the middle of the procedure before you select
[STORE] or [CANCEL], the message [CANCEL UPDATE ?] will appear on the display.
To abort the operation, select [CANCEL], then press the [MENU/ENTER] button.
7. Press the [STOP/ESC ] button to return to the main screen.
MIC ALC
OFF
ON
27
S
MIC SENS
HIGH
LOW
27
S

3 Recording Settings
POCKETRAK W24 Reference Manual
15
■ Notes regarding modifying the [MIC ALC] and [MIC SENS] settings
If you change the [ALC] or [MIC SENS] switch setting after selecting a recording scene, the
switch setting will be stored in the current scene by overwriting the corresponding setting
status. In this case, if you turn off the power to the unit, then turn it on again, the status of
the switches on the side panel will be used for the recording settings.
Examples
■ Initializing the recording scene settings
1. While the main screen is displayed, press and hold down the [SCENE/PHRASE]
button located on the side panel for at least two (2) seconds.
2. Press the [VOL +/–], [ ]/[ ] buttons to select a recording
scene that you wish to initialize, then press the [MENU/ENTER]
button.
If you wish to initialize all recording scenes, select [ALL].
3. Press the [ ]/[ ] buttons to highlight [YES], then press the
[MENU/ENTER] button.
The unit initializes the selected recording scene, and then displays
the main screen.
When a recording
scene is selected
When the [ALC]
switch is turned
[OFF]
When the power
is turned off, then
back on
Effective settings
Recording scene USER 1 OFF OFF
MIC ALC ON OFF OFF
MIC SENS HIGH HIGH LOW
Status of switches
on the side panel
ALC switch ON OFF OFF
MIC SENS switch LOW LOW LOW
INITIALIZE
40
ALL
Practice
Studio
Outdoor
Live
User1
User2
User3
INITIALIZE
40
INITIALIZE
ALL ?
CANCEL YES

3 Recording Settings
POCKETRAK W24 Reference Manual
16
Changing the Recording mode (Selecting a sound quality)
The recorder enables you to record audio in MP3 or PCM (WAV) format. In PCM mode, non-
compressed audio data will be recorded. In MP3 mode, compressed audio data will be recorded.
With the better sound quality, the data size will be larger and available recording time will be
shorter.
Changing Recording mode
1. Press the [MENU/ENTER] button for at least two (2) seconds while the main screen
is displayed, press the [VOL +/–] buttons to select [REC MENU] → [REC MODE],
then press the [MENU/ENTER] button.
2. Press the [VOL +/–] , [ ]/[ ] buttons to select the desired Recording format
from [PCM 24bit],[PCM 16bit],[MP3], then press the [MENU/ENTER] button.
3. Press the [VOL +/–] buttons to select the desired frequency or bit
rate, then press the [MENU/ENTER] button.
4. Press the [STOP/ESC ] button twice.
The recorder displays the main screen.
REC MODE
PCM
24bit
PCM
16bit
MP3
320kbps
192kbps
128kbps
64kbps
32kbps
AUTO
ESC
STOP

3 Recording Settings
POCKETRAK W24 Reference Manual
17
Turning the ALC (Auto Level Control) on and off
Note:
· You can turn the ALC function on or off when recording audio to folders A–D.
• Turning the ALC function on
Slide the [ALC] switch located on the side panel of the
unit to “ON.”
The recording level will automatically be adjusted in
response to the input level.
• Turning the ALC function off
Slide the [ALC] switch (located on the side panel of the
unit) to “OFF.”
You can change the recording level in increments (Refer
to the Owner’s Manual).
Note:
· You cannot adjust the recording level when you are recording audio from a connected
external device (see page 10).
Setting the microphone sensitivity (MIC SENS)
You can set the microphone sensitivity level to high or low to accommodate the recording
environment.
• If the volume level of the recording source is too low:
Slide the [MIC SENS] switch (located on the side panel) to [HIGH].
• If the volume level of the recording source is too high:
Slide the [MIC SENS] switch (located on the side panel) to [LOW].
The indicator displayed in the upper right of the LCD:
When the [MIC SENS] switch is set to [HIGH]:
When the [MIC SENS] switch is set to [LOW]:
7/7
AUTO
44.1KPCM
A
16bit
L
0:0 3
091101_1746.WAV
0:00:00
L
R
ALC ON
7/7
44.1KPCM
A
16bit
L
40
0:0 3
091101_1746.WAV
0:00:00
L
R
ALC OFF
(The recording level
will be displayed.)
H
L

3 Recording Settings
POCKETRAK W24 Reference Manual
18
Setting the recording EQ (equalizer)
Setting the recording EQ enables to record the audio of the desired tonal quality by boosting the
lower or higher frequency ranges.
You can use the recording EQ only when recording audio to folders A–D and when the ALC
function is turned off.
About recording EQ options
The recorder offers eight recording EQ presets and one USER recording EQ option (that
enables you to customize by cutting and boosting five EQ bands individually). The
recording EQ presets include RECOMMEND, FLAT, SUPER BASS, BASS, MIDDLE,
BASS&TREBLE, TREBLE, and SUPER TREBLE.
Features of each recording EQ preset
Note:
· You cannot change the parameters of these eight recording EQ presets. Select the USER
recording EQ option if you wish to customize the recording EQ.
RECOMMEND FLAT SUPER BASS BASS
This preset is
recommended for
recording via the built-in
microphone.
No EQ is used for
recording.
This preset significantly
boosts the lower
frequency range.
This preset mildly boosts
the lower frequency
range.
MIDDLE BASS&TREBLE TREBLE SUPER TREBLE
This preset boosts the
mid frequency range.
This preset mildly boosts
the lower and higher
frequency ranges.
This preset mildly boosts
the higher frequency
range.
This preset significantly
boosts the higher
frequency range.
40
40
40
40
40
40
40
40

3 Recording Settings
POCKETRAK W24 Reference Manual
19
Selecting a recording EQ option
1. Set the [ALC] switch to “OFF.”
2. Press the [FOLDER/A-B REPEAT] button → the [VOL +/–], [ ]/[ ] buttons to
select a folder into which to record, then press the [MENU/ENTER] button.
Select a folder from folders A–D.
3. Press the [REC/PAUSE ] button.
The unit displays the [STANDBY] indicator.
4. Press and hold down the [MENU/ENTER] button for at least two (2) seconds while
the [STANDBY] indicator is displayed.
The unit displays the REC MENU screen.
5. Press the [VOL +/–] buttons to select [RECORDING EQ], then
press the [MENU/ENTER] button.
The unit displays the recording EQ screen.
6. Press the [ ]/[ ] buttons to select the desired recording EQ option.
You can select from eight recording EQ presets and one USER recording EQ (which
enables you to customize the EQ settings).
Hint:
· For information on how to customize the USER recording EQ option, refer to
“Customizing the recording EQ” on page 20.
7. Press the [MENU/ENTER] button.
The selection of the recording EQ is confirmed. Press the [STOP/ESC ] button to
display the [STANDBY] indicator. Adjust the recording level, then press the [REC/PAUSE
] button again to start recording.
Note:
· To cancel the operation, press the [STOP/ESC ] button.
–30dB
3:0 2
091101
_
1712.WAV
STANDBY
0:00:00
20
44.1KPCM
A
16bit
L
L
R
REC MENU
HPF
PEAK HOLD
RECORDING EQ
20

3 Recording Settings
POCKETRAK W24 Reference Manual
20
Customizing the recording EQ
The USER recording EQ enables you to customize the level of five EQ bands.
1. Select “USER” while the recording EQ screen is displayed.
Refer to steps 1–5 in the “Selecting a recording EQ option” section
on page 19.
2. Press the [VOL –] button.
The 150Hz band will be selected and displayed as a black bar.
3. Press the [ ]/[ ] buttons to select a frequency band that you wish to cut or
boost.
The selected frequency band will be displayed as a black bar.
4. Press the [VOL +/–] buttons to boost or cut the level of the selected frequency
band.
You can boost the level by as much as +12dB or cut the level by as much as –12dB in
1dB steps. The larger value will raise the recording level and boost the frequency band.
Note:
· To adjust the level of other frequency bands, repeat steps 3 and 4.
· To cancel the operation, press the [STOP/ESC ] button.
5. Press the [MENU/ENTER] button.
The USER recording EQ is now customized. Adjust the recording level, then press the
[REC/PAUSE ] button again to start recording.
Note:
· The recording EQ setting is retained when you turn the power off or change the battery.
However, the setting will be lost if you change the battery without first turning the
power off.
USER
40
40
USER

3 Recording Settings
POCKETRAK W24 Reference Manual
21
Setting the recording peak limiter
When the recording peak limiter is set to ON, the recorder reduces sound distortion by
automatically adjusting excessive peaks. It is recommended that you set the limiter to ON when
you are recording audio. The peak limiter is available only when the ALC is set to OFF.
Procedure:
Press the [MENU/ENTER] button for at least two (2) seconds while the
main screen is displayed, select [REC MENU] → [REC LIMITER] → [ON],
then press the [MENU/ENTER] button.
To cancel the recording peak limiter, select [OFF].
Setting the High Pass Filter (HPF)
You can cut the low frequency range by switching the High Pass Filter on. The filter reduces the
level of chatting voices, wind and other noise in the recording environment and enables you to
record clearer audio.
Procedure:
Press the [MENU/ENTER] button for at least two (2) seconds while the
main screen is displayed, select [REC MENU] → [HPF (High Pass Filter)]
→ [ON], then press the [MENU/ENTER] button.
The indicator will appear on the main screen.
To cancel the High Pass Filter, select [OFF].
Setting the recording peak hold indication
You can set the duration of the recording peak hold indication displayed on the LCD. This setting
is useful when you want to record live with the recording level set to maximum.
Procedure:
1. Press and hold down the [MENU/ENTER] button for at least two
(2) seconds while the main screen is displayed, select [REC
MENU] → [PEAK HOLD], then press the [MENU/ENTER] button.
2. Press the [VOL +/–] buttons to set the peak hold time to [INF]
(infinity) or a value from 0 to 10 seconds, then press the [MENU/
ENTER] button.
3. Press the [STOP/ESC ] button twice.
The unit displays the main screen.
REC LIMITER
40
OFF
ON
*
DISABLED WHEN
ALC IS ON
HPF
40
OFF
ON
HPF
High Pass Filter
REC MENU
REC MODE
HPF
REC LIMITER
PEAK HOLD
REC SELECT
40
PEAK HOLD
40
3 sec

3 Recording Settings
POCKETRAK W24 Reference Manual
22
VAS (Voice Activated System) recording
When the VAS recording function is turned on, if the unit is in recording pause mode, the unit
will automatically start to record as soon as it detects audio at a level above a certain threshold.
The unit will pause recording when the detected audio level falls below the threshold. VAS
recording is available only when ALC is set to ON.
Note:
· Audio at a level below a certain threshold will be undetected and will not be recorded. If
you are planning to record important audio, set the VAS recording to OFF.
1. Press the [MENU/ENTER] button for at least two (2) seconds
while the main screen is displayed, select [REC MENU] → [VAS] →
[ON], then press the [MENU/ENTER] button.
2. Press the [STOP/ESC ] button twice.
The indicator will appear on the main screen.
3. Press the [REC/PAUSE ] button.
As soon as the unit detects audio, recording begins.
If the unit does not detect any audio, the elapsed recording time
indicator, the remaining recording time indicator and the VAS
indicator will flash, and the unit will enter Recording Pause mode.
Note:
· If the recorder does not detect any audio or does not pause recording, adjust the
threshold by following the procedure in the “Setting the voice sensing level (VAS value)”
section below.
· If you start recording while the VAS function is turned on, the first two seconds or so will
be recorded with no exception.
Setting the voice sensing level (VAS value)
You can adjust the voice sensing level in five steps (1–5) to accommodate the source
volume level. A larger value will increase the voice activation sensitivity so recording will be
triggered by lower-level audio. If the value is too small, the recorder may not detect audio.
Set the microphone sensitivity (see page 17) in accordance with the source input level so
that the VAS function can work more effectively.
Procedure:
To adjust the voice sensing level, press the [ ]/[ ] buttons
while recording with the VAS function turned on.
Note:
· If the High Pass Filter is turned on, the filter will cut the low range,
and recording may not start. In this case, set the VAS function to Off.
VAS
40
OFF
ON
*
ALC MUST BE ON
TO USE VAS
0/0
VAS
44.1KPCM
B
16bit
L
0:0 3
091101_1746.WAV
0:00:00
L
R
VAS indicator
VAS
–40dB
3:0 1
091101
_
1746.WAV
0:00:18
44.1KPCM 16bit
L
L
R
VAS 3
VAS
VAS value

3 Recording Settings
POCKETRAK W24 Reference Manual
23
Setting the Auto Divide function (AUTO DIVIDE)
If you turn the Auto Divide function on when recording a line source, such as tracks from a CD
player, the unit automatically detects a silent pause between tracks and records each track as an
individual file. More specifically, when the recorder detects a silent pause of two seconds or
longer, it pauses recording, thus storing the audio data up to the silent pause as one file. In this
way, the unit will record the first track as file 1, the second track as file 2, and so on.
This function is available only for MP3 files recorded via Line In. You cannot use this function
for PCM line recordings, or PCM or MP3 recordings made by using the built-in or external
microphone.
1. Press the [MENU/ENTER] button for at least two (2) seconds
while the main screen is displayed, select [REC MENU] → [AUTO
DIVIDE] → [ON], then press the [MENU/ENTER] button.
2. Press the [STOP/ESC ] button twice.
The unit displays the main screen, including the (Auto Divide)
indicator.
To cancel the Auto Divide function, select [OFF] in step 1.
Note:
· The function will not work if the recorder does not detect a silence of two seconds
between tracks on a live CD or similar source. In this case, use the Divide File function
(see page 40) to manually divide the files.
· If the unit detects silence for 15 seconds or more, recording stops automatically.
AUTO DIVIDE
OFF
ON
*
LINE+MP3 ONLY
VAS
A.D
1/1
VAS
192KMP3
B
L
A.D
0:0 3
091101_1746.WAV
0:00:00
L
R
Auto Divide indicator

3 Recording Settings
POCKETRAK W24 Reference Manual
24
Recording with the self timer
You can specify the time duration from the press of the [REC/PAUSE ] button until the start of
recording. This function is useful when you need some time to prepare. For example, you may
wish to practice your musical instrument until the actual recording starts.
1. Press the [MENU/ENTER] button for at least two (2) seconds
while the main screen is displayed, select [REC MENU] → [SELF
TIMER], then press the [MENU/ENTER] button.
2. Press the [VOL +/–] buttons to select a self timer value of 5, 10 or
30 seconds, then press the [MENU/ENTER] button.
3. Press the [STOP/ESC ] button twice.
The recorder displays the main screen.
4. Press the [FOLDER/A-B REPEAT] button → the [VOL +/–], [ ]/[ ] buttons to
select a folder into which to record, then press the [MENU/ENTER] button.
5. Press the [REC/PAUSE ] button.
The recorder displays the self timer standby screen, then starts counting down for the
duration specified in step 2. (The LED indicator flashes.)
Note:
· If the [ALC] switch is set to OFF, the unit enters recording standby mode. Adjust the
recording level, then press the [REC/PAUSE ] button again.
6. After the time specified in step 2 expires, recording begins.
Note:
· Once self timer recording begins, the self timer recording setting will be stored until you
turn the self timer off or initialize the menu settings.
Hint:
· To cancel self timer recording, press the [STOP/ESC ] button during countdown.
REC MENU
AUTO DIVIDE
SELF TIMER
VAS
VAS
A.D
SELF TIMER
OFF
5 sec
10 sec
30 sec
VAS
A.D

3 Recording Settings
POCKETRAK W24 Reference Manual
25
Changing the LED setting
You can set the LED indicator so that it will light up during recording or playback (the REC/PLAY
option), or NOT light up during recording or playback (the OFF option). Alternatively, you can
set the indicator so that it will function as a recording peak LED indicator (the PEAK/PLAY option),
in which case the LED indicator will flash only at recording peaks, and otherwise turn off during
recording.
1. Press and hold down the [MENU/ENTER] button for at least two
(2) seconds while the main screen is displayed, select [COMMON
MENU] → [REC/PLAY LED], then press the [MENU/ENTER]
button.
2. Press the [VOL +/–] buttons to select [OFF], [REC/PLAY] or [PEAK/
PLAY], then press the [MENU/ENTER] button.
3. Press the [STOP/ESC ] button twice.
The unit displays the main screen.
[OFF]
The LED indicator remains off during recording, recording
standby mode, recording pause mode, and playback.
[REC/PLAY]
The LED indicator lights up red during recording and green
during playback.
The LED indicator flashes red rapidly during excessive
recording peaks. The LED indicator flashes red slowly
during recording standby mode or recording pause mode.
[PEAK/PLAY]
The LED indicator flashes red rapidly during excessive
recording peaks. The LED indicator remains off during
recording, recording standby mode, and recording pause
mode. The LED indicator lights up green during playback.
COMMON MENU
BEEP SOUND
REC/PLAY LED
DATE & TIME
REMOTE
TIMER & ALARM
VAS
A.D
REC/PLAY LED
OFF
REC/PLAY
PEAK/PLAY
VAS
A.D

4 Playback
POCKETRAK W24 Reference Manual
26
4 Playback
Playing files
The recorder plays MP3 and WMA format files in addition to WAV format files recorded on the
unit. To play back a file recorded on the unit, select a folder from the MIC (A–D) folders or the
LINE (L) folder. To play back a file transferred from a computer, select the MUSIC (M) folder.
1. While the main screen is displayed, press the [FOLDER/
A-B REPEAT] button located on the side panel.
2. Press the [VOL +/–], [ ]/[ ] buttons to select a folder from
which to play back a file.
A–D: Files recorded via a microphone
L: Files recorded via the line connection
M: Files transferred from your computer
P1–P5: Playlists (You can assign tracks in the M folder to Playlists.)
(See page 44.)
(): Recycle Bin
3. Press the [ ]/[ ] buttons to select
the desired file number.
4. Press the [PLAY/SPEED ] button.
The recorder starts playing back the file.
5. Press the [VOL +/–] buttons to set the proper playback volume level.
The level can be set in 21 steps (0–20).
6. Press the [STOP/ESC ] button to stop playback.
Press the [PLAY/SPEED ] button again to resume playback.
Hint:
· You can play the files in each folder from the list screen (Refer to the Owner’s Manual).
MENU
ENTER
SPEEDPAUSE ESC
PLAY
STOP
REC
FOLDER
SELECT FOLDER
INT. S D
A B C D L
M
P1 P2 P3 P4 P5
AUTO
SD
2/8
44.1KPCM
A
16bit
L
40
0:0 3
091101
_
1746.WAV
0:00:00
L
R
File number
Total number of files
0:0 1
091101
_
0024.WAV
0:00:09
44.1KPCM 16bit
L
R
2/8
A
Remaining playback time
(minute : second)
Elapsed playback time

4 Playback
POCKETRAK W24 Reference Manual
27
Playing back tracks from the Playlist
The recorder offers five Playlist files P1–5 (see page 44). You can also create a Playlist using the
computer (see page 77).
This section explains how to play back a Playlist you created on the computer.
1. While the main screen is displayed, press the [FOLDER/A-B REPEAT] button located
on the side panel.
2. Press the [VOL +/–], [ ]/[ ] buttons to select the [M] folder, then press the
[MENU/ENTER] button.
3. Press the [VOL +/–] buttons to select the desired Playlist, then press the [MENU/
ENTER] button.
4. Press the [PLAY/SPEED ] button.
The recorder starts playing the tracks in the sequence specified in the Playlist.
Note:
· The unit will not play the tracks from a Playlist if the Playlist contains an error in the
drive name, folder name, file name, etc.
Indicators displayed during playback
Note:
· With some files, the indicated elapsed playback time may not match the actual elapsed
time. Also, the names of certain artists or tracks stored in the unit may not be displayed.
0:0 2
091101
_
1757.MP3
0:00:10
128KMP3
120%
L
R
9/9
A
FAST
Bit rate (MP3, WMA),
frequency (PCM)
File number/Total number of files
File format
Playback speed
Elapsed playback time
(hour : minute : second)
Level meters
File name, track name
Playback indicator
Playback progress bar
Remaining playback
time (minute : second)
(Indicates up to 99 min
59 sec)

4 Playback
POCKETRAK W24 Reference Manual
28
Fast forwarding and fast reversing
■ Fast forwarding and fast reversing
Press and hold down the [ ] button for more than one (1) second during playback to
fast forward the currently-playing file. Press and hold down the [ ] button for more than
one (1) second during playback to fast reverse the currently-playing file. Once the unit
starts to fast forward or reverse, it will continue doing so even if you release the button.
To resume normal playback, press the [PLAY/SPEED ] button.
■ Locating the file to play back
Press the [ ] button once briefly while the unit is playing or stopped to locate the
beginning of the next file.
Press the [ ] button once briefly to locate the beginning of the previous file.
■ Locating the index
While the unit is playing back a file that contains index marks, press the [ ] button once
briefly to skip to the next index mark.
Press the [ ] button once briefly to locate the previous index mark.
Hint:
· For information on inserting index marks, refer to page 43.
Using headphones
Use headphones if you do not want sound to be output from the speaker or if the sound from the
speaker is difficult to hear. Connect the headphones to the headphones socket located on the
side panel of the unit.
You can listen to music through the headphones and achieve your preferred tonal balance by
setting the Sound EQ function (see page 34).
Note:
· The Sound EQ function is effective only for playback through headphones.

5 Playback Settings
POCKETRAK W24 Reference Manual
29
5 Playback Settings
Changing the playback speed
You can decrease or increase the playback speed, if necessary. This is useful if you want to listen
carefully to complex musical parts or to skip quickly through unimportant parts of a recorded
meeting.
1. During playback, press the [PLAY/SPEED ] button.
2. The speed indicator flashes. Press the [ ]/[ ] buttons to
select your preferred speed, then press the [MENU/ENTER]
button.
Note:
· If you stop the playback or press the [PLAY/SPEED ] button while
the speed indicator is flashing, the modified playback speed will be
reset to the original setting.
With the [SLOW] option, you can change the speed in 5% steps.
With the [FAST] option, you can change the speed in 10% steps.
The playback speed varies with the file format as follows:
The recorder remembers the changed playback speed after the playback is stopped,
and will use that speed for the next playback operation. However, the playback speed
will be reset to “normal” when the power is turned off.
Note:
· You can change the speed only for playback of MP3 and WMA files. You cannot change
the speed for playback of PCM (WAV) files.
· Some files may not play correctly when the playback speed is changed.
PLAY (normal) SLOW FAST
MP3 100%
50%–100%
(in 5% steps)
100%–200%
(in 10% steps)
WMA 100%
50%–100%
(in 5% steps)
100%–200%
(in 10% steps)
PCM (WAV) 100% Playback speed cannot be changed.
0:0 2
091101
_
1757.MP3
0:00:10
128KMP3
120%
L
R
9/9
A
FAST
Playback speed (FAST)

5 Playback Settings
POCKETRAK W24 Reference Manual
30
Playing back specific sections of a track
You can specify and quickly locate a desired section of a track in three ways. This can be useful if
you want to skip unimportant parts during playback or to repeat playback of a particular portion
of the file. The recorder features three special playback functions: Skip playback (locating the
playback point immediately), A-B Repeat playback (playing a specified part repeatedly), and
Phrase playback (moving the playback point back by a specified number of seconds).
Using the Skip playback function
You can skip forward or back by a specific amount of time. This function is useful when you
want to locate a desired playback point immediately.
1. During playback, press the [ ]/[ ] buttons.
Playback will skip ahead or back by the specified amount of time.
Note:
· The playback point will not skip to the next or previous folder. The function is effective
only within one folder.
· If the distance between the current point and an index mark or the beginning of the
next file is shorter than the distance between the current point and the skip point, the
recorder will locate the index mark or the beginning of the next file.
■ Setting the amount of time for Skip playback
1. Press the [MENU/ENTER] button for at least two (2) seconds
while the main screen is displayed, select [PLAY MENU] → [SKIP
PLAY], then press the [MENU/ENTER] button.
2. Press the [VOL +/–], [ ]/[ ] buttons to select a skip time
value of “10 sec,” “30 sec,” “1 min,” “5 min” or “15 min,” then
press the [MENU/ENTER] button.
3. Press the [STOP/ESC ] button twice.
The unit displays the main screen.
Hint:
· You can set the skip time value by displaying the menu screen during playback.
PLAY MENU
TIME SEARCH
REPEAT
PHRASE PLAY
SKIP PLAY
SOUND EQ
AUTO
SKIP PLAY
OFF 1 min
10 sec 5 min
30 sec 15 min
AUTO

5 Playback Settings
POCKETRAK W24 Reference Manual
31
Using the A-B Repeat playback function
During playback, you can specify a part of a file that you want to play repeatedly (from
point A to point B).
1. During playback, press the [FOLDER/A-B REPEAT] button
at the desired start point (A) for A-B Repeat playback.
The start point indicator lights up.
2. Press the [FOLDER/A-B REPEAT] button at the desired
end point (B) for A-B Repeat playback.
The end point is set, and the unit starts playing back the
part between A and B repeatedly until you cancel the A-B
Repeat function.
To cancel A-B Repeat playback, do one of the following
operations during A-B Repeat playback:
• Press the [FOLDER/A-B REPEAT] button again.
• Press the [STOP/ESC ] button.
• Press the [ ]/[ ] buttons.
Note:
· If the duration between point A and B is too short, you will be unable to set up A-B
Repeat playback.
· If you set point A, but not point B, the end of the file will automatically become point B.
· The unit will not perform A-B Repeat playback across files.
Using the Phrase playback function
You can move back the playback point in the currently-playing file by a specified number of
seconds. This function is useful if you want to listen again to a short phrase in a piece of
music or an important piece of audio.
1. During playback, press the [SCENE/PHRASE] button.
The playback point will move back by the specified number of seconds and playback
will resume.
Note:
· During A-B Repeat playback, the Phrase playback function remains effective between
points A and B.
· If the specified number of seconds exceeds the time between the current playback point
and the beginning of the file, the unit will play back from the beginning of the file.
· The playback point can be moved back to the beginning of the file, but no further. It
cannot jump into the previous file.
0:5 0
091101
_
0025.WAV
0:00:12
44.1K 16bit
L
R
4/9
A
A
PCM
Start point indicator
0:5 2
091101
_
0025.WAV
0:00:10
44.1K 16bit
L
R
4/9
A
AB
PCM
A-B Repeat indicator

5 Playback Settings
POCKETRAK W24 Reference Manual
32
■ Setting the amount of time for Phrase playback.
1. Press the [MENU/ENTER] button for at least two (2) seconds
while the main screen is displayed, select [PLAY MENU] →
[PHRASE PLAY], then press the [MENU/ENTER] button.
2. Press the [VOL +/–] buttons to select the amount of time to move
back the playback point in a range of 1 sec to 5 sec, in
1 sec(second) steps, then press the [MENU/ENTER] button.
3. Press the [STOP/ESC ] button twice.
The recorder displays the main screen.
Hint:
· You can specify the amount of time for Phrase playback by displaying the menu screen
during playback.
Playing back the same track repeatedly
You can play back the same track repeatedly (Repeat playback). The Repeat playback function
features various Repeat playback modes, such as playing back the same file repeatedly, playing
files in a folder in normal or random sequence, etc.
■ Setting the Repeat playback mode
1. Press the [MENU/ENTER] button for at least two (2) seconds
while the main screen is displayed, select [PLAY MENU] →
[REPEAT], then press the [MENU/ENTER] button.
2. Press the [VOL +/–] buttons to select a Repeat playback mode
from [OFF], [ONE], [ALL] or [RANDOM], then press the [MENU/
ENTER] button.
3. Press the [STOP/ESC ] button twice.
The unit displays the main screen.
[OFF] No repeat
[ONE] Repeats only the currently-selected file.
[ALL]
Repeats all files in the current folder. (The unit
will not perform Repeat playback across folders.)
[RANDOM]
Repeats all files in the current folder in random
sequence. (The unit will not perform Random
playback across folders.)
PLAY MENU
TIME SEARCH
REPEAT
PHRASE PLAY
SKIP PLAY
SOUND EQ
AUTO
PHRASE PLAY
3 sec
AUTO
PLAY MENU
TIME SEARCH
REPEAT
PHRASE PLAY
SKIP PLAY
SOUND EQ
AUTO
REPEAT
OFF
ONE
ALL
RANDOM
AUTO

5 Playback Settings
POCKETRAK W24 Reference Manual
33
During playback, the Repeat mode indicator will appear in the lower right corner of the
screen.
4. Press the [PLAY/SPEED ] button.
The unit will perform the selected Repeat playback.
To cancel Repeat playback, select [OFF] as the Repeat playback mode.
Hint:
· You can select a Repeat playback mode by displaying the menu screen during playback.
Locating a playback position by time (Time Search
function)
You can play back a file from a point specified by the time position.
1. Press the [MENU/ENTER] button for at least two (2) seconds while the main screen
is displayed, select [PLAY MENU] → [TIME SEARCH], then press the [MENU/ENTER]
button.
2. Press the [ ]/[ ] buttons to select each digit of hour (h),
minute (m), or second (s).
Press the [VOL +/–] buttons repeatedly to set the value.
POS: Time position
TOTAL: Duration of the entire file
3. Press the [MENU/ENTER] button.
The file will play from the specified time position.
Note:
· You can use the Time Search function only for the currently-selected file.
ONE
ALL
RANDOM
TIME SEARCH
POS :00h00m17s
TOTAL:00h01m02s
AUTO

5 Playback Settings
POCKETRAK W24 Reference Manual
34
Setting the sound EQ (equalizer)
You can set the sound EQ to adjust the overall tone of music. The function is available only when
you play back files through the headphones.
About the sound EQ options
The recorder offers six sound EQ presets and one USER EQ option (which enables you to cut
and boost five bands individually to suit your preference). The sound EQ presets include
FLAT, BASS1, BASS2, POP, ROCK and JAZZ.
Features of each sound EQ preset
Note:
· You cannot change the parameters of the six sound EQ presets. Use the USER EQ option
if you wish to adjust the sound EQ to suit your preference.
FLAT BASS1 BASS2
No EQ is used. The original
sound will be played as is.
This preset mildly boosts the
lower frequency range.
This preset significantly boosts
the lower frequency range.
POP ROCK JAZZ
This preset significantly boosts
the higher frequency range.
This preset mildly boosts the
lower and higher frequency
ranges.
This preset boosts the mid
frequency range.

5 Playback Settings
POCKETRAK W24 Reference Manual
35
Selecting a sound EQ option
1. Press the [MENU/ENTER] button for at least two (2) seconds
while the main screen is displayed, select [PLAY MENU] →
[SOUND EQ], then press the [MENU/ENTER] button.
2. Press the [ ]/[ ] buttons to select the desired sound EQ
option.
Select from six sound EQ presets and one USER EQ option (which
enables you to customize the EQ settings).
Hint:
· For information on how to customize the USER EQ option, refer to “Customizing the
sound EQ option” on page 36.
3. Press the [MENU/ENTER] button.
The selection of the sound EQ option is confirmed.
4. Press the [STOP/ESC ] button twice.
The recorder displays the main screen, including the indicator.
Hint:
· You can select a sound EQ option by displaying the menu screen during playback.
PLAY MENU
TIME SEARCH
REPEAT
PHRASE PLAY
SKIP PLAY
SOUND EQ
AUTO

5 Playback Settings
POCKETRAK W24 Reference Manual
36
Customizing the sound EQ option
The USER sound EQ option enables you to adjust the level of five EQ bands.
1. Select “USER” as the sound EQ.
Refer to steps 1 and 2 in the “Selecting a sound EQ option” section
on page 35.
2. Press the [VOL –] button.
The 150Hz band will be selected and displayed as a black bar.
3. Press the [ ]/[ ] buttons to select the frequency band to cut or boost.
The selected frequency band will be displayed as a black bar.
4. Press the [VOL +/–] buttons to boost or cut the level of the selected frequency
band.
You can boost the level by as much as +6dB or cut the level by as much as –6dB in 1dB
steps. The larger value will raise the playback level and boost the frequency band.
Note:
· To adjust the level of other frequency bands, repeat steps 3 and 4.
· To cancel the operation, press the [STOP/ESC ] button.
5. Press the [MENU/ENTER] button.
The USER sound EQ option is now customized.
6. Press the [STOP/ESC ] button twice.
The recorder displays the main screen, including the indicator.

6 Using the Tuner Function
POCKETRAK W24 Reference Manual
37
6 Using the Tuner Function
The recorder features a Tuner function that enables you to tune your musical instruments and
calibrate the standard pitch (frequency).
Tuning your musical instrument
1.
Point the built-in stereo microphone toward the musical instrument you want to tune.
Note:
· To tune an electric guitar or synthesizer, connect the instrument to the recorder’s [MIC/
LINE] socket.
☞ For information on how to use the [MIC/LINE] socket, please refer to “Recording
from an external audio device (such as a CD player)” on page 10.
2. Press and hold down the [MENU/ENTER] button for at least two
(2) seconds while the main screen is displayed, select [TUNER] →
[START], then press the [MENU/ENTER] button.
The unit starts analyzing the pitch.
3. The name of the closest note appears in the center of the LCD (in
this example, “A”). Tune your musical instrument so that the
large black dot (
●) appears in the center.
If the pitch is low, “
●”appears on the left side. If the pitch is high, “●” appears on the
right side.
When the instrument is tuned correctly, a white triangle indicator ( ) on each side of
the screen turns black ( ) and the LED indicator lights up green.
4. Press the [STOP/ESC ] button to stop tuning.
Note:
· After you start using the Tuning function, if you do not operate the recorder for a
duration specified via the Auto Power Off function (see page 60), the Tuning function
will automatically stop and power to the unit will turn off.
· While you use the Tuning function, the backlight remains on (unless the backlight
setting is “off”).
Calibrating the standard pitch
You can calibrate the standard pitch in the range of 430 Hz to 450 Hz in 1 Hz steps. When you
purchase the recorder, the standard pitch is set to 440 Hz.
1. Press and hold down the [MENU/ENTER] button for at least two
(2) seconds while the main screen is displayed, select [TUNER] →
[CALIBRATE], then press the [MENU/ENTER] button.
2. Press the [VOL +/–] buttons repeatedly to set the standard pitch
in the range of 430 Hz to 450 Hz, then press the [MENU/ENTER]
button.
3. Press the [STOP/ESC ] button twice.
The unit displays the main screen.
TUNER
440Hz
A
+20–20
AUTO
CALIB
33
440 Hz

7 Using the Metronome Function
POCKETRAK W24 Reference Manual
38
7 Using the Metronome Function
The recorder features a built-in metronome. The Metronome function enables you to play the
metronome, change its tempo and/or beat, and set the metronome so that it will play during
recording.
Using the metronome
1. Press and hold down the [MENU/ENTER] button for at least two
(2) seconds while the main screen is displayed, select
[METRONOME] → [START], then press the [MENU/ENTER]
button.
The metronome sound will be output from the speaker and
headphones.
2. Press the [STOP/ESC ] button to stop the metronome.
3. Press the [STOP/ESC ] button twice.
The unit displays the main screen.
Setting the metronome tempo (speed)
1. Press and hold down the [MENU/ENTER] button for at least two
(2) seconds while the main screen is displayed, select
[METRONOME] → [TEMPO], then press the [MENU/ENTER]
button.
2. Press the [VOL +/–] buttons repeatedly to set the tempo in the
range of 30 to 250 bpm, then press the [MENU/ENTER] button.
3. Press the [STOP/ESC ] button twice.
The unit displays the main screen.
Note:
· You can also adjust the metronome tempo by pressing the [
t
]/[
Y
] buttons while
playing the metronome.
METRONOME
33
BEAT4/4 TEMPO120
METRONOME
START
TEMPO
BEAT
RECORD
24
TEMPO
33
120

7 Using the Metronome Function
POCKETRAK W24 Reference Manual
39
Setting the metronome beats
1. Press and hold down the [MENU/ENTER] button for at least two
(2) seconds while the main screen is displayed, select
[METRONOME] → [BEAT], then press the [MENU/ENTER] button.
2. Press the [VOL +/–] buttons repeatedly to set the beat in the
range of 0/4 to 8/4, then press the [MENU/ENTER] button.
3. Press the [STOP/ESC ] button twice.
The unit displays the main screen.
Playing the metronome during recording
You can record your performance while listening to the metronome via the headphones (the
metronome sound will not be output from the speaker). This feature is useful when you are
practicing your musical instrument.
1. Press and hold down the [MENU/ENTER] button for at least two
(2) seconds while the main screen is displayed, select
[METRONOME] → [RECORD], then press the [MENU/ENTER]
button.
2. Press the [VOL +/–] buttons to select [ON], then press the
[MENU/ENTER] button.
3. Press the [STOP/ESC ] button twice.
The unit displays the main screen. You can now listen to the metronome through the
headphones during recording. The metronome sound will not be recorded.
METRONOME
START
TEMPO
BEAT
RECORD
33
BEAT
24
2/4
METRONOME
START
TEMPO
BEAT
RECORD
33
RECORD
OFF
ON
33

8 Editing Files
POCKETRAK W24 Reference Manual
40
8 Editing Files
Dividing files
You can divide any file recorded and stored in the MIC (A–D) folders or LINE (L) folder into two
pieces. This feature enables you to remove an unwanted part of a recording while retaining the
part you wish to keep.
IMPORTANT
Once a file is divided in two, the pieces cannot be rejoined. Be sure to backup important files on a
computer or other device before you divide any file.
1. While the main screen is displayed, press the [FOLDER/A-B REPEAT] button located
on the side panel.
2. Press the [VOL +/–], [ ]/[ ] buttons to select a folder that contains the file
you want to divide, then press the [MENU/ENTER] button.
3. Press the [ ]/[ ] buttons to select the desired file number, then press the
[PLAY/SPEED ] button.
The recorder starts playing back the file.
4. Press the [STOP/ESC ] button at the point at which you wish to divide the file.
The recorder stops playback.
5. Press the [MENU/ENTER] button for at least two (2) seconds
while the main screen is displayed, press the [VOL +/–] buttons to
select [EDIT MENU] → [DIVIDE], then press the [MENU/ENTER]
button.
6. Press the [ ]/[ ] buttons to select [YES], then press the
[MENU/ENTER] button.
The recorder displays the message “DIVIDING…,” then “DIVIDE
COMPLETED!” and the file division operation is complete.
When a file is divided, the number of files in the folder increases by
one.
Note:
· You can divide only MP3 or WAV files recorded on the unit.
· If the file length is too short, the unit displays the message “CANNOT DIVIDE! REC
TIME TOO SHORT!” and the file will not be divided. This function is not effective on files
in the MUSIC (M) and Recycle Bin folders.
· If you divide a file that contains index marks (see page 43), the index marks will be
deleted.
EDIT MENU
DIVIDE
FADE IN
FADE OUT
33
DIVIDE
DIVIDE AT
THIS POINT
CANCEL YES
33

8 Editing Files
POCKETRAK W24 Reference Manual
41
■ File names after division
For example, if you divide a file named “001A_090911_1200.MP3”, a new file named
“002A_090911_1200.MP3” will be created. If the new file has the same name as a file that
already exists in the folder, the new file will keep the name, and the existing file will be
renamed automatically.
Note:
· The recorder does not display the file number or the folder type (see page 70). You can
view them only via a connected computer.
■ Overlap time and minimum file length required for division
The two pieces created by a file division overlap each other at the division point as shown in
the table below. To be divided successfully, a file must be twice the overlap time or longer
in duration.
Recording mode Overlap time Required length
MP3
32kbps About 8 seconds About 16 seconds or longer
64kbps About 4 seconds About 8 seconds or longer
128kbps About 2 seconds About 4 seconds or longer
192kbps
About 1 second or shorter About 2 seconds or longer
320kbps
PCM
44.1kHz
48kHz
88.2kHz
96kHz
Before division
After division
Dividing a file
The file name is
automatically
changed.

8 Editing Files
POCKETRAK W24 Reference Manual
42
Using the fade in and fade out effects
The recorder enables you to apply fade in and fade out effects to the files recorded in PCM (WAV)
format. The fade in effect raises gradually the volume level of the beginning of the file. The fade
out effect reduces gradually the volume level of the end of the file.
IMPORTANT
Once you apply the fade in/fade out effects, you cannot remove the effect. Be sure to backup
important files on a computer or other external device before applying effects.
Applying the fade in effect
1. While the main screen is displayed, press the [FOLDER/A-B REPEAT] button located
on the side panel.
2. Press the [VOL +/–], [ ]/[ ] buttons to select a folder that contains the file
you want to apply the fade in effect, then press the [MENU/ENTER] button.
3. Press the [ ]/[ ] buttons to select the desired file number.
4. Press the [MENU/ENTER] button for at least two (2) seconds
while the main screen is displayed, press the [VOL +/–] buttons to
select [EDIT MENU] → [FADE IN], then press the [MENU/ENTER]
button.
5. Press the [VOL +/–] buttons to select the amount of time to apply
fade in effect, then press the [MENU/ENTER] button.
You can specify the amount of time in a range of 1 sec to 8 sec
(second).
The unit displays the message “FADE IN EXECUTING…”.
Note:
· If you have selected any file other than a PCM file recorded on the unit, or if you have
selected a file of four seconds or less, the unit will display the message “CANNOT FADE
IN! FILE TOO SHORT!”.
6. When the unit displays “COMPLETED”, press the [VOL +/–]
buttons to select [AUDITION], then press the [MENU/ENTER]
button.
The unit will play back the file with the fade in effect.
[AUDITION]
You can audition up to about 10 seconds at the beginning of
the file with the fade in effect.
[SAVE]
(Overwrite)
The file with the fade in effect will be saved. You cannot
revert the file to its original status. (That is, you cannot undo
the fade in effect.)
[CANCEL] The fade in effect will not be applied.
EDIT MENU
DIVIDE
FADE IN
FADE OUT
33
FADE IN
33
4 sec
AUDITION
SAVE
CANCEL
COMPLETED
33

8 Editing Files
POCKETRAK W24 Reference Manual
43
7. If you are satisfied with the file after auditioning and wish to save it, press the
[VOL +/–] buttons to select [SAVE], then press the [MENU/ENTER] button.
The file with the fade in effect will overwrite the original file.
If you do not wish to overwrite the original file, select [CANCEL], then press the [MENU/
ENTER] button.
Note:
· If the internal memory (or a microSD card) does not have sufficient free space, you will
be unable to apply the fade in and out effects to the file.
Applying the fade out effect
The basic procedure is the same as that for the fade in effect. Please refer
to the “Applying the fade in effect” section on page 42. Please note
that you must select [FADE OUT] instead of [FADE IN] in step 4 to
apply the fade out effect.
Inserting and deleting index marks
Inserting index marks in a file enables you to locate the playback point immediately during the
playback operation. You can insert index marks only in the files in the MIC (A–D) folders.
Inserting index marks
1. During recording or playback, press the [LIST/INDEX] button (located on the side
panel) at the point where you want to insert an index mark.
The unit displays the message “INDEX SETTING…” and the index mark is inserted.
Note:
· Recording or playback continues after you insert an index mark. Repeat the same steps
to continue inserting more index marks in the file, if necessary.
· You can insert up to 36 index marks in each file. If you try to insert more than 36 index
marks, the unit displays “INDEX FULL!” and no more index marks will be recorded.
· If you divide a file that contains index marks, the index marks will be deleted.
Deleting index marks
1. While the main screen is displayed, press the [FOLDER/A-B REPEAT] button located
on the side panel.
2. Press the [VOL +/–], [ ]/[ ] buttons to select a folder that contains a file from
which you want to delete index marks, then press the [MENU/ENTER] button.
3. Press the [ ]/[ ] buttons to select the file from
which you want to delete index marks.
4. Press the [DELETE] button located on the side panel.
EDIT MENU
DIVIDE
FADE IN
FADE OUT
33
1/5
AUTO
44.1KPCM
A
16bit
H
0:0 3
091101_1746.WAV
0:00:00
L
R
File number

8 Editing Files
POCKETRAK W24 Reference Manual
44
5. Press the [VOL +/–] buttons to select [INDEX], then press the
[MENU/ENTER] button.
6. Press the [ ]/[ ] buttons to select [DELETE], then press the
[MENU/ENTER] button.
The unit displays the message “DELETING…” and the index marks
are deleted.
Note:
· Deleting index marks will not delete the audio recording.
· You cannot delete index marks individually. All index marks in a file will be deleted.
Using the Playlist function (available only for the MUSIC
folder)
The recorder offers five Playlist files P1–5 (PLIST1-5.M3U). You can play back your favorite songs
(that are stored in the MUSIC (M) folder) in a preferred sequence by assigning the songs to a
Playlist.
Before using the Playlist function, you must transfer audio (track) files to the
MUSIC (M) folder using the computer.
☞ Connecting the recorder to your computer (page 63)
☞ About files and folders (page 65)
Assigning the folder and files to a Playlist (P1–5)
1. While the main screen is displayed, press the [FOLDER/A-B REPEAT] button located
on the side panel, press the [VOL +/–], [ ]/[ ] buttons to select the [M]
folder, then press the [MENU/ENTER] button.
2. Press the [VOL +/–], [ ]/[ ] buttons to highlight the file or folder which you
wish to assign to a Playlist, then press the [SCENE/PHRASE] button located on the
side panel of the recorder.
3. Press the [ ]/[ ] buttons to select a target Playlist
(PLAYLIST1–5), then press the [MENU/ENTER] button.
The folder or the files will be assigned to the selected Playlist.
Note:
· You can assign up to 99 files to each Playlist.
· You cannot delete Playlists (P1–5).
· Do not edit Playlists (P1–5) using the computer. For information on creating a Playlist
that you can edit using the computer, please refer to “Playing back tracks in a specific
sequence” on page 77.
FILE
FOLDER
INDEX
RECYCLE BIN
DELETE MENU
33
CANCEL DELETE
DELETE INDEX
33
091101
_
1712.WAV
DELETE ALL
INDEX
ADD ITEM TO
PLAYLIST #
1 2 3 4 5
ADD TO
33

8 Editing Files
POCKETRAK W24 Reference Manual
45
Changing the playback sequence in a Playlist (P1–5)
1. While the main screen is displayed, press the [FOLDER/A-B
REPEAT] button located on the side panel, then press the
[VOL +/–], [ ]/[ ] buttons to select one of the folders
[P1]–[P5], then press the [MENU/ENTER] button.
The unit displays the track list of the selected Playlist.
2. Press the [VOL +/–] buttons to select a file whose list position you want to change,
then press the [SCENE/PHRASE] button located on the side panel.
3. Press the [VOL +/–] buttons to select [ORDER], then press the
[MENU/ENTER] button.
4. Press the [VOL +/–] buttons to move the selected file to the
preferred position in the playback list.
The indicator of the selected file changes to “ ”.
5. Press the [MENU/ENTER] button.
The order of the files in the Playlist is changed.
Removing a file from a Playlist (P1–5)
You can remove a file from a Playlist. Removing a file from a Playlist will not delete the original
file.
1. While the main screen is displayed, press the [FOLDER/A-B
REPEAT] button located on the side panel, then press the
[VOL +/–], [ ]/[ ] buttons to select one of the folders
[P1]–[P5], then press the [MENU/ENTER] button.
The unit displays the track list of the selected Playlist.
2. Press the [VOL +/–] buttons to highlight a file you wish to remove from the Playlist,
then press the [SCENE/PHRASE] button located on the side panel.
3. Press the [VOL +/–] buttons to select [DELETE], then press the
[MENU/ENTER] button.
4. Press the [ ]/[ ] buttons to select [DELETE], then press the [MENU/ENTER]
button.
The selected file will be removed from the Playlist.
IN
33
PLIST1.M3U
02 MUSIC1
04 MUSIC2
06 MUSIC3
ORDER
DELETE
DELETE PLAYLIST
EDIT PLAYLIST
33
IN
33
PLIST1.M3U
04 MUSIC1
02 MUSIC2
06 MUSIC3
IN
33
PLIST1.M3U
02 MUSIC1
04 MUSIC2
06 MUSIC3
ORDER
DELETE
DELETE PLAYLIST
EDIT PLAYLIST
33

8 Editing Files
POCKETRAK W24 Reference Manual
46
Removing all files from a Playlist (P1–5)
You can remove all files from a Playlist. Removing all files from a Playlist will not delete the original
files.
1. While the main screen is displayed, press the [FOLDER/A-B REPEAT] button located
on the side panel, then press the [VOL +/–], [ ]/[ ] buttons to select one of
the folders [P1]–[P5], then press the [MENU/ENTER] button.
The unit displays the track list of the selected Playlist.
2. Press the [SCENE/PHRASE] button located on the side panel.
3. Press the [VOL +/–] buttons to select [DELETE PLAYLIST], then
press the [MENU/ENTER] button.
4. Press the [ ]/[ ] buttons to select [DELETE], then press the
[MENU/ENTER] button.
All files are removed from the Playlist, and the unit displays “No File”
on the LCD.
ORDER
DELETE
DELETE PLAYLIST
EDIT PLAYLIST
33
CANCEL DELETE
DELETE ALL
33
PLIST1.M3U
DELETE ENTIRE
PLAYLIST

9 Deleting
POCKETRAK W24 Reference Manual
47
9 Deleting
Managing the Recycle Bin
If you delete a file on the recorder while the Recycle Bin function is active, the file will be moved
to the Recycle Bin ( ) folder temporarily so that you can restore it later if necessary. If you
delete a file or folder on the recorder while the Recycle Bin function is turned off, the file will be
deleted completely and you will be unable to restore it. It is recommended that you turn the
Recycle Bin function on to avoid accidental erasure.
When the Recycle Bin is full, you must empty it to increase the remaining recording time.
Otherwise, you may be unable to record. Empty the Recycle Bin regularly.
Note:
· The Recycle Bin folder can accommodate up to 199 files. If the Recycle Bin folder is full
and you cannot move any more files to the Recycle Bin, move some files from the
Recycle Bin folder to the original folder (see page 49) or empty the Recycle Bin folder
(see page 50).
Activating the Recycle Bin function
1. Press the [MENU/ENTER] button for at least two (2) seconds
while the main screen is displayed, press the [VOL +/–] buttons to
select [COMMON MENU] → [RECYCLE BIN] → [ON], then press
the [MENU/ENTER] button.
The Recycle Bin function is turned on.
2. Press the [STOP/ESC ] button twice to go back to the main screen.
Note:
· You can move files to the Recycle Bin folder only from the MIC (A–D) folders and LINE
(L) folder. You cannot move files from the MUSIC (M) folder to the Recycle Bin folder,
regardless of whether the Recycle Bin function is on or off. These files will be deleted
completely by the delete operation.
· If you initialize the internal memory or a microSD card, all files on the internal memory
or microSD card, respectively, will be deleted (and will not be moved to the Recycle Bin
folder). All files previously moved from the card to the Recycle Bin folder will also be
deleted.
· If the Recycle Bin function is active, deleting the files will not increase the available
recording time.
RECYCLE BIN
OFF
ON
33

9 Deleting
POCKETRAK W24 Reference Manual
48
Displaying the Recycle Bin folder
While the main screen is displayed, press the [FOLDER/A-B REPEAT] button located on the
side panel,then press the [VOL +/–], [ ]/[ ] buttons to select the Recycle Bin ( )
folder, and then press the [MENU/ENTER] button.
The files moved into the Recycle Bin will be renamed automatically (see page 70).
Playing back a file in the Recycle Bin folder
1. While the main screen is displayed, press the [FOLDER/A-B REPEAT] button located
on the side panel.
2. Press the [VOL +/–], [ ]/[ ] buttons to select the Recycle Bin ( ), then press
the [MENU/ENTER] button.
3. Press the [ ]/[ ] buttons to select the desired file to play,
then press the [PLAY/SPEED ] button.
The selected file will play.
1/3
128KPCM
H
33
E
ORIGINAL:
A
FILE NO :001
001A_091101_002
0/0
128KPCM
H
33
E
NO DATA!
File number/Total number of files
in the Recycle Bin folder
Original folder that contained the
file prior to deletion
File number prior to deletion
• The Recycle Bin folder
contains no files.
• The Recycle Bin folder
contains files.
E
1/3
0:0 0
001A
_
091101
_
002
0:00:13
L
R
44.1KPCM 16bit

9 Deleting
POCKETRAK W24 Reference Manual
49
Restoring a file from the Recycle Bin folder
1. While the main screen is displayed, press the [FOLDER/A-B REPEAT] button located
on the side panel.
2. Press the [VOL +/–], [ ]/[ ] buttons to select the Recycle Bin ( ), then press
the [MENU/ENTER] button.
3. Press the [ ]/[ ] buttons to select the desired file to
restore, then press the [DELETE] button located on the side
panel.
4. Press the [VOL +/–] buttons to select [RESTORE 1 FILE], then
press the [MENU/ENTER] button.
5. Press the [ ]/[ ] buttons to select [RESTORE], then press
the [MENU/ENTER] button.
The recorder will display the message “RESTORING…”, then
“RESTORED TO THE BOTTOM OF ” (if the file previously belonged
to folder A), and the file will move back to its original folder.
Note:
· A file restored from the Recycle Bin will be renamed automatically and added to the end
of the file list in the original folder (see page 70).
· If the recorder displays the message “FOLDER FULL!,” the original folder contains the
maximum number of files allowed. In this case, delete some files to clear some space.
6. Press the [MENU/ENTER] button again.
The recorder displays the main screen.
1/3
128KPCM
L
33
E
ORIGINAL:
A
FILE NO :001
001A
_
091101
_
002
RECYCLE BIN
RESTORE 1 FILE
EMPTY
33
RESTORED TO
THE BOTTOM
OF
A
OK
33

9 Deleting
POCKETRAK W24 Reference Manual
50
Emptying the Recycle Bin folder
1. While the main screen is displayed, press the [FOLDER/A-B REPEAT] button located
on the side panel.
2. Press the [VOL +/–], [ ]/[ ] buttons to select the Recycle Bin ( ), then press
the [MENU/ENTER] button.
3. Press the [DELETE] button located on the side panel.
4. Press the [VOL +/–] buttons to select [EMPTY], then press the
[MENU/ENTER] button.
Caution
· Emptying the Recycle Bin will permanently delete all files in the Recycle Bin and the
same files from the internal memory or the microSD card. You will be unable to
restore those files. Be sure to backup important files on a computer or other external
device before emptying the Recycle Bin.
5. Press the [ ]/[ ] buttons to select [EMPTY], then press the
[MENU/ENTER] button.
The recorder displays the message “EMPTYING…”, then “NO
DATA!”, and the Recycle Bin is emptied.
• If the Recycle Bin folder contains many files, the recorder’s operation may slow down.
Empty the Recycle Bin regularly.
RECYCLE BIN
RESTORE 1 FILE
EMPTY
33
RECYCLE BIN
EMPTY
RECYCLE BIN
33
CANCEL EMPTY
0/0
128KPCM
H
33
E
NO DATA!
IMPORTANT

9 Deleting
POCKETRAK W24 Reference Manual
51
Deleting a selected file
You can delete a single file from a folder.
Caution
• If you delete a file while the Recycle Bin function is turned off (see page 47), you will
be unable to restore it. Be sure to check the content of a file before you delete it.
• Before you proceed, make sure that the battery power is sufficient.
1. While the main screen is displayed, press the [FOLDER/A-B REPEAT] button located
on the side panel.
2. Press the [VOL +/–], [ ]/[ ] buttons to select a folder from which to delete a
file, then press the [MENU/ENTER] button.
3. Press the [ ]/[ ] buttons to select a file to delete, then press the [DELETE]
button located on the side panel.
4. Press the [VOL +/–] buttons to select [FILE], then press the
[MENU/ENTER] button.
5. When the [DELETE FILE] screen is displayed, press the [ ]/
[ ] buttons to select [DELETE], then press the [MENU/ENTER]
button.
The unit displays the message “DELETING…” and the file is deleted.
Note:
· If you decide not to execute the delete operation, select [CANCEL], then press the
[MENU/ENTER] button.
· You cannot cancel the delete operation if the recorder has already started the operation.
If the Recycle Bin function is active, the file will move to the Recycle
Bin. When the recorder displays “MOVED TO RECYCLE BIN,” select
[OK], then press the [MENU/ENTER] button.
Note:
· If the recorder displays the message “RECYCLE BIN FULL!,” the Recycle Bin folder is full.
Empty the Recycle Bin, then delete the file.
FILE
FOLDER
INDEX
RECYCLE BIN
DELETE MENU
33
CANCEL DELETE
DELETE FILE
33
091101
_
0001.WAV
MOVED TO
RECYCLE BIN
OK
33

9 Deleting
POCKETRAK W24 Reference Manual
52
Deleting all files from a folder
You can delete all files from a selected folder.
Caution
• If you delete all files from the selected folder while the Recycle Bin function is turned
off (see page 47), you will be unable to restore them. Be sure to check the contents of
a folder before you delete the files.
• Before you proceed, make sure that the battery power is sufficient.
The procedure is similar to that for deleting a file. Please refer to the “Deleting a selected
file” section on page 51. Please note that you must select [FOLDER] instead of [FILE] in
step 4 to delete all files from the folder.
Note:
· You cannot delete any sub-folders in the MUSIC (M) folder (see pages 67 and 69) by
using this function. To delete these sub-folders, connect the recorder to a computer and
delete the sub-folders by using the computer.

9 Deleting
POCKETRAK W24 Reference Manual
53
Formatting the internal memory/a microSD card
(Deleting all data)
Formatting the internal memory or a microSD card will delete all files on the internal memory or
microSD card, respectively, regardless of whether the Recycle Bin function is turned on or off.
You must also format a commercially available microSD card before you use the card for the first
time.
Caution
• If you delete files from the internal memory or the microSD card, you will be unable
to restore those files. Be sure to check the file contents before you delete a file.
• Be sure to backup important files on a computer or other external device.
• Before you proceed, make sure that the battery power is sufficient.
1. Press the [MENU/ENTER] button for at least two (2) seconds
while the main screen is displayed, press the [VOL +/–] buttons to
select [COMMON MENU] → [FORMAT], then press the [MENU/
ENTER] button.
2. Press the [VOL +/–] buttons to select [INTERNAL MEMORY] or
[microSD CARD], then press the [MENU/ENTER] button.
3. Press the [ ]/[ ] buttons to select [FORMAT], then press the [MENU/ENTER]
button.
The unit displays the message “FORMATTING…”, then “FORMAT COMPLETED!”, and
all data is deleted from the internal memory (or the microSD card).
Note:
· If you decide not to execute the operation, select [CANCEL], then press the [MENU/
ENTER] button.
· You cannot cancel the formatting operation if the recorder has already started the
operation.
4. Press the [STOP/ESC ] button twice.
The recorder displays the main screen.
COMMON MENU
AUTO OFF
BACKLIGHT
CONTRAST
RECYCLE BIN
FORMAT
33
INTERNAL MEMORY
microSD CARD
FORMAT
33

10 Using the Timer Function
POCKETRAK W24 Reference Manual
54
10 Using the Timer Function
Programming a timer
The Timer function enables you to set the recorder so that it will start a microphone recording or
play a file or an alarm at a specified time. Before you program a timer, make sure that the date
and time on the unit have been set correctly (see page 58).
1. Press and hold down the [MENU/ENTER] button for at least two
(2) seconds while the main screen is displayed, press the
[VOL +/–] buttons to select [COMMON MENU] → [TIMER &
ALARM], then press the [MENU/ENTER] button.
2. Press the [VOL +/–] buttons to select a setting item, then press
the [MENU/ENTER] button.
The unit displays the setting screen for the selected item. For details
about each setting item, see pages 54–57.
■ SET
Press the [VOL +/–] buttons to highlight [ON] or [OFF], then press the
[MENU/ENTER] button.
OFF: The Timer function is disabled.
ON: The Timer function is enabled.
■ REPEAT
Press the [VOL +/–] buttons to highlight [ONCE], [DAILY] or [WEEKLY],
then press the [MENU/ENTER] button.
ONCE: The recorder will automatically record or play back once at
the programmed time.
DAILY: The recorder will automatically record or play back every
day at the programmed time.
WEEKLY: The recorder will automatically record or play back at the
programmed time on the programmed day of the week.
COMMON MENU
BEEP SOUND
REC/PLAY LED
DATE & TIME
REMOTE
TIMER & ALARM
33
SET :OFF
REPEAT:ONCE
START : 0:00
END : 0:00
ACTION:RECORD
TIMER
33
1/2
SET
OFF
ON
AUTO
24
REPEAT
ONCE
DAILY
WEEKLY

10 Using the Timer Function
POCKETRAK W24 Reference Manual
55
■ Setting the WEEKLY timer (Available only when [WEEKLY] REPEAT is
selected)
1. Press the [VOL +/–], [ ]/[ ] buttons to highlight a day of
the week, then press the [MENU/ENTER] button to check the
corresponding box.
SUN: Sunday; MON: Monday; TUE: Tuesday; WED: Wednesday;
THU: Thursday; FRI: Friday; SAT: Saturday; STORE: Confirm
Note:
· You can select multiple days of the week.
2. Press the [VOL +/–], [ ]/[ ] buttons to highlight [STORE] (Confirm), then
press the [MENU/ENTER] button.
■ Setting the START time
Press the [ ]/[ ] buttons to highlight the hour or minute digit, use
the [VOL +/–] button to set the value, then press the [MENU/ENTER]
button.
■ Setting the END time
Press the [ ]/[ ] buttons to highlight the hour or minute digit, use
the [VOL +/–] button to set the value, then press the [MENU/ENTER]
button.
Note:
· You can set up to 12 hours for the programmed time duration from start
to end time.
■ Setting the ACTION
Press the [VOL +/–] buttons to select [PLAY] or [RECORD], then press the
[MENU/ENTER] button.
PLAY: The unit starts playback at the programmed time.
RECORD: The unit starts recording at the programmed time.
WEEKLY
SUN
MON
TUE
WED
24
THU
FRI
SAT
STORE
START TIME
13:55
AUTO
END TIME
14:03
AUTO
24
ACTION
PLAY
RECORD

10 Using the Timer Function
POCKETRAK W24 Reference Manual
56
■ Setting the playback SOURCE (Available only when [PLAY] is selected for
ACTION)
1. Press the [VOL +/–] buttons to select [BEEP] (to play a beep
sound) or [FILE] (to play a file).
BEEP: The unit plays a beep sound.
FILE: The selected file will play.
When you select “FILE,” the unit displays the list screen. Select a file
to play (excluding files in Playlists or in the Recycle Bin).
Note:
· To toggle between the internal memory and a microSD card, press and hold down the
[FOLDER/A-B REPEAT] button for at least two (2) seconds while the list screen is
displayed.
2. Press the [VOL +/–], [ ]/[ ] buttons to select [STORE] (Confirm), then press
the [MENU/ENTER] button.
■ Setting the REC MODE (sound quality) (Available only
when [RECORD] is selected for ACTION)
Press the [VOL +/–], [ ]/[ ] buttons to select a Recording mode
option, then press the [MENU/ENTER] button.
■ Setting the recording destination FOLDER (Available only
when [RECORD] is selected for ACTION)
Press the [VOL +/–], [ ]/[ ] buttons to select a folder to which to
record a file, then press the [MENU/ENTER] button.
If you wish to record to the card folder MIC_A_SD–MIC_D_SD, you must
first insert a microSD card in the recorder.
PLAY SOURCE
BEEP
FILE
AUTO
REC MODE
PCM
24bit
PCM
16bit
MP3
96 kHz
88.2kHz
48 kHz
44.1kHz
33
REC FOLDER
MIC
_
A MIC
_
A
_
SD
MIC
_
B MIC
_
B
_
SD
MIC
_
C MIC
_
C
_
SD
MIC
_
D MIC
_
D
_
SD
33

10 Using the Timer Function
POCKETRAK W24 Reference Manual
57
■ Completing the timer settings
1. Press the [VOL +/–] buttons to select [STORE], then press the
[MENU/ENTER] button.
The programmed timer settings are confirmed, and the unit displays
the [COMMON MENU] screen.
2. Press the [STOP/ESC ] button twice.
The unit displays the main screen.
Note:
· Initializing the calendar (date and time) will reset all timer settings to “OFF.”
· The timer recording (or playback) may fail under the following circumstances:
- The internal memory (or microSD card) does not have sufficient memory space for
the specified duration of the timer recording.
- The file (for playback) or the folder (for recording) in the microSD card has been
specified, but the microSD card has not been inserted in the recorder.
- You attempted to program a timer recording that would cause the maximum
number of recordable files (199) to be exceeded.
- The recorder is connected to the computer, and is unable to start the timer
operation at the programmed time.
- The battery is exhausted or the power to the unit turned off during the timer
recording (or playback).
· If the timer fails for some reason, one of the following will occur:
If a REPEAT [ONCE] timer recording fails, the timer will be turned off.
If a REPEAT [DAILY] or [WEEKLY] timer recording fails, the timer will remain on.
REC MODE:PCM
44.1kHz 16bit
FOLDER:MIC
_
A
TIMER
33
2/2
STORE CANCEL

11 Preference Settings
POCKETRAK W24 Reference Manual
58
11 Preference Settings
You can set the preference settings to make it easier to use the recorder in various environments
and circumstances.
Setting the current date and time
After you set the date and time, the recorder will automatically record the time and date of
recording with each file. Since the name of recorded files includes the recording date and time,
Yamaha recommends that you set the date and time accurately.
1. Press the [MENU/ENTER] button for at least two (2) seconds while the main screen
is displayed, press the [VOL +/–] buttons to select [COMMON MENU], then press
the [MENU/ENTER] button.
2. Press the [VOL +/–] buttons to select [DATE & TIME], then press the [MENU/
ENTER] button.
3. Press the [VOL +/–] buttons to select the year, then press the [ ] button.
4. In the same way, select the month, day, 24/12-hour indication (24H or AM/PM),
hour and minute, then press the [MENU/ENTER] button.
5. Press the [STOP/ESC ] button twice.
The recorder displays the main screen.
MENU
ENTER
VOL
MENU
TUNER
METRONOME
REC MENU
PLAY MENU
COMMON MENU
33
at least two (2)
seconds
MENU
ENTER
VOL
MENU
ENTER
COMMON MENU
BEEP SOUND
REC/PLAY LED
DATE & TIME
REMOTE
TIMER & ALARM
33
VOL
2009.NOV. 1
24H 20
:
29
DATE & TIME
33
DATE & TIME
2009.NOV. 1
24H 20:29
33

11 Preference Settings
POCKETRAK W24 Reference Manual
59
Setting the beep sound
You can set the recorder so that it will make a beep sound when you operate the buttons or if you
make an operational error.
1. Press the [MENU/ENTER] button for at least two (2) seconds
while the main screen is displayed, press the [VOL +/–] buttons to
select [COMMON MENU] → [BEEP SOUND], then press the
[MENU/ENTER] button.
2. Press the [VOL +/–] buttons to select [ON], then press the
[MENU/ENTER] button.
3. Press the [VOL +/–] buttons to select the desired volume option ,
then press the [MENU/ENTER] button.
To cancel the beep sound, select [OFF] in step 2.
HIGH: High volume
MIDDLE: Medium volume
LOW: Low volume
Settings related to remote control operation
You can set the recorder so that the supplied remote control will be locked (disabled). You can
also set the recorder so that the LED indicator will flash green when the recorder receives a signal
from the remote control.
1. Press the [MENU/ENTER] button for at least two (2) seconds
while the main screen is displayed, press the [VOL +/–] buttons to
select [COMMON MENU] → [REMOTE], then press the [MENU/
ENTER] button.
Locking (disabling) remote control operation:
2. Press the [VOL +/–] buttons to select [REMOTE LOCK], then press the [MENU/
ENTER] button.
3. Press the [VOL +/–] buttons to select [LOCK], then press the
[MENU/ENTER] button.
To unlock (enable) the remote control, select [REMOTE ON].
COMMON MENU
BEEP SOUND
REC/PLAY LED
DATE & TIME
REMOTE
TIMER & ALARM
33
S
BEEP SOUND
OFF
ON
33
BEEP VOLUME
HIGH
MIDDLE
LOW
33
COMMON MENU
BEEP SOUND
REC/PLAY LED
DATE & TIME
REMOTE
TIMER & ALARM
33
REMOTE LOCK
LOCK
REMOTE ON
33
S

11 Preference Settings
POCKETRAK W24 Reference Manual
60
Flashing the recorder’s LED indicator:
You can set the recorder so that its recording/playback LED indicator (located in the upper
part of the recorder) will flash green when the recorder receives a signal from the remote
control.
After flashing green for a few seconds, the LED indicator will light up steadily or turn off,
depending on the [REC/PLAY LED] setting, as explained in the “Changing the LED setting”
on page 25.
2. Press the [VOL +/–] buttons to select [LED], then press the [MENU/ENTER] button.
3. Press the [VOL +/–] buttons to select [ON], then press the
[MENU/ENTER] button.
To make the LED indicator not flash green, select [OFF].
Activating the Auto Power Off function
If this function is turned on, and you leave the recorder turned on but unused for a specified
duration, the recorder will automatically turn off (except during recording, VAS recording
standby mode, playback or metronome operation).
1. Press the [MENU/ENTER] button for at least two (2) seconds
while the main screen is displayed, press the [VOL +/–] buttons to
select [COMMON MENU] → [AUTO OFF], then press the [MENU/
ENTER] button.
2. Press the [ ]/[ ] buttons to select the desired time to
function the Auto Power Off, then press the [MENU/ENTER]
button.
0 (OFF)–15 (15 min.)
You can specify the time in 1 minute steps.
To cancel the Auto Power Off function, specify [0](OFF).
LED
OFF
ON
33
COMMON MENU
AUTO OFF
BACKLIGHT
CONTRAST
RECYCLE BIN
FORMAT
33
15 min
AUTO OFF
33
150

11 Preference Settings
POCKETRAK W24 Reference Manual
61
Setting the Backlight function
When the Backlight function is turned on, the LCD backlight lights up each time you press a
button or switch on the unit.
1. Press the [MENU/ENTER] button for at least two (2) seconds
while the main screen is displayed, press the [VOL +/–] buttons to
select [COMMON MENU] → [BACKLIGHT], then press the
[MENU/ENTER] button.
2. Press the [VOL +/–] buttons to select the desired time to light up
the backlight, then press the [MENU/ENTER] button.
OFF: The backlight will not light up.
5 sec: The backlight lights up for five seconds.
15 sec: The backlight lights up for 15 seconds.
ALWAYS ON: The backlight remains lit all the time.
Note:
· If the battery power is insufficient, the backlight will not light up.
Adjusting the LCD contrast
You can adjust the LCD contrast on a scale of ten (10).
1. Press the [MENU/ENTER] button for at least two (2) seconds
while the main screen is displayed, press the [VOL +/–] buttons to
select [COMMON MENU] → [CONTRAST], then press the
[MENU/ENTER] button.
2. Press the [ ]/[ ] buttons to adjust the contrast, then press
the [MENU/ENTER] button.
L (low): 1–H (high): 10
COMMON MENU
AUTO OFF
BACKLIGHT
CONTRAST
RECYCLE BIN
FORMAT
33
BACKLIGHT
OFF
5 sec
15 sec
ALWAYS ON
33
COMMON MENU
AUTO OFF
BACKLIGHT
CONTRAST
RECYCLE BIN
FORMAT
33
CONTRAST 5
CONTRAST
33
HL

11 Preference Settings
POCKETRAK W24 Reference Manual
62
Initializing the menu settings
Initializing the recorder settings will restore all menu settings (excluding the date and time
setting) to the factory default.
Note:
· Initializing the recorder settings will not delete any data on the internal memory or
microSD card. For information on initializing the internal memory or a microSD card,
refer to page 53.
Procedure:
Press the [MENU/ENTER] button for at least two (2) seconds while the
main screen is displayed, press the [VOL +/–] buttons to select
[COMMON MENU] → [MENU RESET] → [YES], then press the [MENU/
ENTER] button.
If you decide not to initialize the settings, select [CANCEL].
Checking the firmware version
You can check the version number of the recorder’s firmware by following the procedure below.
Procedure:
Press the [MENU/ENTER] button for at least two (2) seconds while the
main screen is displayed, press the [VOL +/–] buttons to select
[COMMON MENU] → [VERSION], then press the [MENU/ENTER]
button.
The firmware version will be displayed.
MENU RESET
CANCEL
YES
33
VERSION
Ver 1.00
33

12 Using the Recorder with a Computer
POCKETRAK W24 Reference Manual
63
12 Using the Recorder with a
Computer
You can transfer audio files stored on the internal memory or microSD card to a computer by
connecting the recorder to the computer via an included USB cable. Transferred files are
compatible for playback with Windows Media Player and iTunes, and can be edited using the
included “Cubase AI” DAW software. You can also transfer audio files from a computer to the
recorder for playback.
Computer system requirements
■ Windows
Computer: Windows-based computer with built-in USB interface
OS: Windows 7, Vista, XP Professional/Home Edition
■ Macintosh
Computer: Macintosh computer with built-in USB interface
OS: Mac OS X 10.4, 10.5, 10.6
Note:
· Please visit the website below for the latest information on included software and
system requirements.
http://www.yamahasynth.com/
· The menu items and buttons displayed on your computer may not exactly match those
shown in this manual, depending on the OS version of your computer. This manual uses
Windows XP and Widows Media Player 11 as examples.
Connecting the recorder to your computer
1. Start the computer.
2. Make sure that the recorder is turned off, and then connect the included USB
cable.
IMPORTANT
Use only the USB cable included with the recorder. The use of an improper cable may damage the
terminal and result in a malfunction.

12 Using the Recorder with a Computer
POCKETRAK W24 Reference Manual
64
Disconnecting the recorder from your computer
■ Windows:
1. Click on the taskbar at the bottom
right of the Windows screen, then
click [Safely remove USB Mass Storage
Device].
2. After the computer displays the
message shown on the right, remove
the USB cable.
■ Macintosh:
1. Drag and drop the drive icon [PRW24] or [PRW24SD] of the recorder on the
desktop to the Trash Can.
2. After the drive icon [PRW24] or [PRW24SD] disappears from the desktop, remove
the USB cable.
Troubleshooting (Windows Vista/XP)
If the recorder is not recognized by the computer, refer to the information below:
■ Windows Vista
While the recorder remains connected to the computer, follow the steps below:
1. From the [Start] menu, right-click [Computer] to display the pop-up menu, then
select [Properties] to open the “System” window.
2. Click [Device Manager] to open the user account control window. In this window,
click [Continue] to open the “Device Manager” window.
3. Expand “Disk drives” and “Universal Serial Bus controllers.” “Disk drives” must
include “Yamaha Pocketrak USB Device”, “Yamaha Pocketrak SD USB Device”, and
“Universal Serial Bus controllers” must include the device name for the USB Mass
Storage Device.
■ Windows XP
While the recorder remains connected to the computer, follow the steps below:
1. From the [Start] menu or on the desktop, right-click [My Computer] to display the
pop-up menu, then select [Properties] to open the “System Property” window.
2. Click the [Hardware] tab, then click [Device Manager] to open the “Device
Manager” window.
3. Expand “Disk drives” and “Universal Serial Bus controllers.” “Disk drives” must
include “Yamaha Pocketrak USB Device”, “Yamaha Pocketrak SD USB Device”, and
the “Universal Serial Bus controllers” must include the device name for the USB
Mass Storage Device.

12 Using the Recorder with a Computer
POCKETRAK W24 Reference Manual
65
About files and folders
From a connected computer, you can manage the recorder’s files that are stored in folders.
You can also transfer audio files from the recorder to a computer to save them, or from a
computer to the recorder for playback.
1. Connect the recorder to the computer.
2. Click to open [My Computer] from the [start] menu.
• The unit displays [PRW24] as the drive name of the recorder’s internal memory.
• If you have formatted a microSD card on the recorder, the drive name of the card
inserted in the unit appears as [PRW24SD]. If the microSD card inserted in the unit
was not formatted on the recorder, or if a microSD card has not been inserted in the
unit, the unit displays [Removable Disk] as the drive name.
If the “Device Manager” window does not display the correct items:
Follow the steps below.
1. Exit (quit) all running applications.
2. Disconnect all external USB devices (excluding a properly working mouse and
keyboard), then connect only the recorder.
3. If the computer features multiple USB terminals, use a different USB terminal to
connect the recorder.
4. If the recorder is connected via a bus-powered USB hub, remove the hub, then use
the included USB cable to connect the recorder directly to the computer’s USB
terminal.

12 Using the Recorder with a Computer
POCKETRAK W24 Reference Manual
66
3. Double-click to open [PRW24] or [PRW24SD].
The system displays the recorder’s folders.
Note:
· If the system displays the “What do you want
Windows to do?” panel, click to select [Open
folder to view files], then click [OK]. The
system will display the recorder’s folders.
1 Select
2 Click

12 Using the Recorder with a Computer
POCKETRAK W24 Reference Manual
67
■ Files are stored in the following folders on the internal memory or
microSD card.
• MIC(A–D) / MIC_(A–D)_SD
These folders store audio files (in MP3 or WAV format) recorded by the unit.
Note:
· Do not move the files to a different folder. For example, do not move a file in the A folder
to the B folder. Otherwise, you will be unable to play the file.
· Also, please note that if you change the name of an MP3 or WAV file (originally
recorded on the unit) on the computer, then move the file back to the MIC (A–D) folder,
you will be unable to play the file on the unit. To play the file, first rename the file
following the file naming rules, or move the file to the MUSIC (M) folder (see page 70).
•MUSIC
This folder stores music and other audio files transferred from a connected computer.
To play the transferred files, the files must be in MP3 or WMA format or WAV files that
were recorded on the unit. There are no naming rules that apply to these files.
The recorder offers five Playlist files (PLIST1–5.M3U). You can play your favorite songs in
your preferred order by creating Playlists using the files stored in the MUSIC folder (see
page 44).
Note:
· Files in each folder are automatically sorted numerically in ascending order based on
the number that appears at the start of each file name.
If the number of digits varies (e.g., “001xxxxx”, “01xxxxxx”, and “1xxxxxxx”), files will
be sorted in the following order: “001xxxxx”, “01xxxxxx”, then “1xxxxxxx”.
· You can create sub-folders (in up to two hierarchies) inside the MUSIC folder to
organize the music files by albums or musicians (see page 69).
· Please note that if the MUSIC (M) folder contains a file with the same name as that of
the audio file you are transferring from a computer, the file in the MUSIC folder will be
overwritten by the one transferred from the computer.
1 Track1.wma
2 Track2.wma
001 Track1.wma
002 Track2.wma
003 Track3.wma
01 Track1.wma
02 Track2.wma
03 Track3.wma
1 Track1.wma
2 Track2.wma
002 Track2.wma
001 Track1.wma
003 Track3.wma
01 Track1.wma
02 Track2.wma
03 Track3.wma
M Folder
Sorted numerically based
on the numbers that start
each file name

12 Using the Recorder with a Computer
POCKETRAK W24 Reference Manual
68
•DATA
This folder stores data files (of MS Excel, MS Word, etc.) and enables you to use the
recorder as a USB flash drive or a microSD card reader/writer (removable disk).
Note:
· The recorder will not play any audio or music files that are placed in this folder.
· This folder will be recognized only by a connected computer. The recorder will not
display this folder on its screen.
• LINE(L) / LINE(L)_SD
This folder stores files recorded from external devices via the line connection.
Please note that if you change the name of an MP3 file (originally recorded on the unit)
on the computer, then move the file back to the LINE (L) folder, you will be unable to
play the file on the unit. To play the file, first rename the file following the file naming
rules, or move the file to the MUSIC (M) folder (see page 70).
•RECYCLE
This is the Recycle Bin folder. While the Recycle Bin function is active, files deleted on the
recorder will move to this folder. You can restore files from the Recycle Bin folder, which
can be a life saver if you delete a file accidentally.
•MANUAL
This folder stores the Owner’s Manual and Reference Manual in PDF format. These
manuals are organized into the sub-folders by language.
If you initialize the recorder’s internal memory, the MANUAL folder will also be erased. If
necessary, you can download the manuals from the following website:
http://www.yamahasynth.com/
Note:
· This folder will be recognized only by a connected computer. The recorder will not
display this folder on its screen.

12 Using the Recorder with a Computer
POCKETRAK W24 Reference Manual
69
■ POCKETRAK W24 folder structure
PLIST1.M3U
PLIST2.M3U
PLIST3.M3U
PLIST5.M3U
PLIST4.M3U
: Folder
: File
MIC (A-D) folders:
These folders store audio files recorded via
the recorder’s microphone, such as
conference meetings, lectures, and musical
performances.
Each folder accommodates up to 199 files.
LINE (L) folders:
These folders store audio files recorded from
external devices via the line connection.
Each folder accommodates up to 199 files.
MUSIC (M) folder:
This folder stores music files
for playback.
You can assign up to 99 files
to each Playlist (PLIST). Each
sub-folder accommodates
up to 199 files (or folders).
The recorder can recognize
up to two levels of folders
inside the MUSIC folder.
* If you are using a microSD card, the
names in parentheses will be displayed.
POCKETRAK W24
(microSD)
First layer Second layer

12 Using the Recorder with a Computer
POCKETRAK W24 Reference Manual
70
About the file naming rules
The recorder automatically names the recorded files, following the file naming rules as shown
below. The recorder does not display the file number and the folder type. You can view them only
via a connected computer.
1 File number (001–199)
2 Folder type (A–D: MIC folders A–D, L: LINE folder)
3 Recording date (Year, Month, Day: Date of the file recording)
4 Recording time (Hour, Minute: Start time of the file recording)
5 Extension (File format: MP3 for an MP3 recording file, and WAV for a PCM recording file)
Files moved into the Recycle Bin will be renamed as follows:
Example: Moving file “001A_091121_1200.MP3” in the MIC_A folder into the Recycle Bin
1 File number used in the Recycle Bin (Each file will be numbered sequentially based on
when the file was moved to the Recycle Bin [e.g., 001, 002, 003, etc.])
The recorder will not display these file numbers on its screen. You can view them only via
a connected computer.
2 File number (The original file number used before the file was moved to the Recycle Bin)
3 Original folder name (The folder that originally contained the file before it was moved to
the Recycle Bin)
4 Recording date (Year, Month, Day: Date of the file recording)
5 Recording time (Hour, Minute: Start time of the file recording)
6 Extension (File format: MP3 for an MP3 recording file, and WAV for a PCM recording file)
001A_091121_1200.MP3
1342 5
001_001A_091121_1200.MP3
2453 61

12 Using the Recorder with a Computer
POCKETRAK W24 Reference Manual
71
Transferring audio files from the recorder to a computer
■ Windows:
1. Connect the recorder to a computer.
2. Open [My Computer] from the [Start] menu.
3. Double-click the [PRW24] or [PRW24SD] folder.
4. Double-click the folder (MIC_A–MIC_D) that contains the file that you wish to load
to your computer.
5. Copy the file to the desired location.
■ Macintosh:
1. Connect the recorder to a computer.
2. Double-click the drive icon [PRW24] or [PRW24SD] of the recorder on the desktop.
3. Double-click the folder (MIC_A–MIC_D) that contains the file that you wish to load
to your computer.
4. Copy the file to the desired location.
Hint:
· Transferring audio files from the computer to the recorder
In Step 4 (for Windows) or Step 3 (for Macintosh), drag and drop the audio files that
you wish to transfer (such as MP3 files or WMA files) into the [MUSIC] folder. The
MUSIC (M) folder stores music and other audio files transferred from a connected
computer.
Before transferring audio files to the MIC(A–D) folders or LINE (L) folder, rename the
files following the file naming rules (see page 70). The unit will not play files that do not
comply with the file naming rules, unless they are in the MUSIC (M) folder.

12 Using the Recorder with a Computer
POCKETRAK W24 Reference Manual
72
Copying audio files to a CD-R
You can copy audio files (that were recorded on the recorder) to a CD-R disc by using Windows
Media Player.
Please visit the Microsoft website for information on how to obtain Windows Media Player.
http://www.microsoft.com/windows/windowsmedia/
Note:
· This section uses Windows XP and Widows Media Player 11 as examples.
· To copy audio files to a CD-R disc, you must have a CD writer, such as a CD-R/RW drive.
1. From the [Start] menu, select [All Programs], then click [Windows Media Player] to
start Windows Media Player.
2. Right-click [Burn] in the menu bar, then select [Audio CD] or [Data CD].
3. Insert a new CD-R/RW disc into the CD-R/RW drive.
4. Drag and drop the audio files you wish to copy to the Burn List pane in the
Windows Media Player panel.
5. Click [Start Burn] to start copying the files to the CD-R/RW disc.
[Audio CD]
Audio files are converted to CD-DA format and copied to a CD-R/RW disc. You
can play the disc on a CD-R compatible CD player in your home or car.
[Data CD]
Audio files (MP3 or PCM) are copied to a CD-R/RW disc without conversion.
You can play the disc on a computer, but not on an audio CD player.
Right-click
Burn List
Click

13 Using the Recorder as a Music Player
POCKETRAK W24 Reference Manual
73
13 Using the Recorder as a Music
Player
If you install Windows Media Player or iTunes on your computer and transfer music files to the
connected recorder, you can use the unit as a music player.
Please visit the Microsoft website for information on how to obtain Windows Media Player.
http://www.microsoft.com/windows/windowsmedia/
Note:
· This section uses Windows XP and Widows Media Player 11 as examples.
· Copying commercially-available music data is strictly prohibited except for your
personal use.
· Yamaha makes no representations or warranties with regard to the content of files, and
cannot be held responsible for the failure of transfers or downloads, or for damage or
erasure of music files due to malfunction of the unit or your computer.
Ripping CDs (Creating compatible music files from music
CDs)
You can import music files from music CDs into your computer and convert them to MP3 or
WMA files so that they can be played on the recorder.
1. From the [Start] menu, select [All Programs], then click [Windows Media Player] to
start Windows Media Player.
2. Right-click [Rip] in the menu bar, then select [Format] → [mp3].
Right-click

13 Using the Recorder as a Music Player
POCKETRAK W24 Reference Manual
74
3. Click [Rip] in the menu bar.
4. Insert a music CD into the computer’s CD-ROM drive.
Note:
· If your computer has access to the Internet, the system will automatically obtain and
display music information related to the CD.
5. Check the box for each song that you wish to rip to your computer, then click
[Start Rip].
The system starts ripping the CD.
Note:
· You can also set Windows Media Player so that inserting a music CD will automatically
start ripping.
Click
Click
Check

13 Using the Recorder as a Music Player
POCKETRAK W24 Reference Manual
75
Transferring music files to the Recorder (Sync function)
You can transfer audio files (ripped from a music CD to a computer) to the recorder for playback.
For information on how to rip a music CD, refer to the “Ripping CDs (Creating compatible music
files from music CDs)” on page 73.
1. From the [Start] menu, select [All Programs], then click [Windows Media Player] to
start Windows Media Player.
2. Click [Sync] in the menu bar.
3. Connect the recorder to the computer.
Note:
· If the system displays the “Device Setup” window, click [Finish].
4. Right-click [Sync] in the menu bar, then select [Pocketrak] or [Pocketrak SD] →
[Advanced Options…].
5. Check the box for “Create folder hierarchy on device” on the [Sync] tab, then click
[OK].
Note:
· If the box has already been checked by default, the folder may not be created. Remove
the check from the box, then check the box again, and then click [OK].
Check

13 Using the Recorder as a Music Player
POCKETRAK W24 Reference Manual
76
6. Drag and drop the desired music files from the Library pane in the left column of
the window to the Sync List pane in the right column of the window.
7. Click [Start Sync].
The files will be transferred to the recorder.
Click

13 Using the Recorder as a Music Player
POCKETRAK W24 Reference Manual
77
Playing back tracks in a specific sequence
The recorder features the Playlist function, offering five Playlist files PLIST 1–5.M3U (see page 44).
You can also create a Playlist using the computer to play back tracks in the desired sequence.
☞ Using the Playlist function (available only for the MUSIC folder) (page 44)
Creating a Playlist
You can create a Playlist to play back tracks in a desired sequence.
The recorder supports playlist files that are in M3U format with the extension “.m3u”. An
M3U format file stores multimedia playlists that specify the location of media files (such as
MP3 files).
1. From the [Start] menu, select [All Programs] → [Accessories], then click to open
[Notepad].
2. Enter the file names included in the MUSIC (M) folder into the Playlist in the
desired sequence.
Enter the file names into the Playlist in the following format: “Drive name:\Folder
name\File name”. See the example below.
Note:
· To make sure that you enter each file name correctly, check the properties of the music
file that you wish to include in the Playlist, copy the displayed file name, then paste the
name into a Playlist you create using Notepad.
3. From the [File] menu, select [Save As…], then name the file “xxx(file name).m3u”
to save the Playlist.
4. Transfer the saved Playlist file to the MUSIC (M) folder on the recorder
(see page 71).
Be sure to transfer the Playlist file directly to the root level of the MUSIC (M) folder.
Note:
· You must place the Playlist file at the root level of the MUSIC (M) folder, NOT in any
sub-folder inside the MUSIC folder.
· You can assign up to 99 tracks to each Playlist.
5. Disconnect the recorder from the computer (see page 64).
Hint:
· For information on how to play tracks from the Playlist, refer to page 27.
Drive name Folder name File name

14 Installing Cubase AI
POCKETRAK W24 Reference Manual
78
14 Installing Cubase AI
The recorder ships with a DVD disc that contains the DAW software “Cubase AI.” You can use this
software to edit and mix audio files. This section explains how to install Cubase AI. Refer to the
PDF documentation supplied with Cubase AI (Getting Started and Operation Manual, opened
from the “Help” menu).
Note:
· You can not copy audio files to a CD-R disc by using Cubase AI. To copy audio files to a
CD-R disc, refer to page 72.
Since the End-User Software License Agreement (EUSLA) displayed on your computer when
you install the DAW software is superseded by the agreement in the included Owner’s Manual
(printed version), you should disregard the EUSLA. Please read the Software License Agree-
ment in the included Owner’s Manual carefully, and install the software if you agree to it.
1. Start the computer and log on to the Administrator account.
2. Insert the Cubase AI DVD-ROM into the DVD-ROM drive.
3. When the “WELCOME TO CUBASE AI” window appears, choose your preferred
language by clicking on the corresponding national flag icon.
4. Click “Install CUBASE AI.”
5. Follow the onscreen instructions to install the software.
Note:
· In order to have continuous use of Cubase AI, including support and other benefits, you
will need to register the software and activate your software license by starting it while
the computer is connected to the Internet. Click the “Register Now” button shown
when the software is started, then fill in all required fields for registration. If you do not
register the software, you will be unable to use it after a limited period of time expires.
IMPORTANT

15 Appendix
POCKETRAK W24 Reference Manual
79
15 Appendix
Error messages
The following table explains the error messages that you may see during operation of the
recorder.
Unit status or
function
Error message Description
Low battery
LOW BATTERY!
REPLACE BATTERY
The battery is exhausted. Replace the battery
with a new one.
Recording
MEMORY FULL!
The internal memory or the microSD card
does not have sufficient free space for
recording.
FILE FULL!
You attempted to record more files than the
maximum number of files allowed for the
selected folder.
Playback
NO DATA!
You pressed the [PLAY/SPEED ] button but
the selected folder contains no files.
CANNOT CHANGE
PLAYBACK SPEED!
You attempted to change the playback
speed while playing back a PCM recording.
You cannot change the playback speed of
PCM (WAV) files.
Editing (Index) INDEX FULL!
You attempted to insert more index marks
than the maximum number (36) of index
marks allowed per file. No more index marks
will be recorded.
Editing
(File division)
CANNOT DIVIDE!
FOLDER FULL!
You attempted to divide a file when the
corresponding folder contains the maximum
number of files allowed.
CANNOT DIVIDE!
MEMORY FULL!
The internal memory or the microSD card
does not have sufficient free space to divide
a file.
CANNOT DIVIDE!
REC TIME
TOO SHORT !
The recording is too short in duration to
divide.
CANNOT DIVIDE!
AT THIS POINT
You cannot divide the file at the current
point.

15 Appendix
POCKETRAK W24 Reference Manual
80
Editing
(Fade in/fade out)
CANNOT FADE IN!
FILE TOO SHORT!
The file is too short in duration (ten seconds
or less) to apply the fade in effect.
CANNOT
FADE OUT!
FILE TOO SHORT!
The file is too short in duration (ten seconds
or less) to apply the fade out effect.
CANNOT FADE IN!
READ-ONLY FILE!
You attempted to apply the fade in effect to
a file other than a PCM (WAV) file. You
cannot apply the fade in effect to any files
other than PCM (WAV) files.
CANNOT
FADE OUT!
READ-ONLY FILE!
You attempted to apply the fade out effect
to a file other than a PCM (WAV) file. You
cannot apply the fade out effect to any files
other than PCM (WAV) files.
MEMORY FULL!
The internal memory or the microSD card
does not have sufficient free space for
applying the fade in or out effect.
Editing (General)
CANNOT EDIT!
READ-ONLY MODE!
You attempted to edit a file in the MUSIC
folder using the [EDIT MENU].
List screen NO FILE
The selected folder does not contain any files
that can be played on the unit.
Recycle Bin
CANNOT EDIT!
READ-ONLY MODE!
You attempted to edit a file in the Recycle
bin folder using the [EDIT MENU].
FOLDER FULL!
You cannot move the file from the Recycle
Bin to its original folder because the folder
contains the maximum number of files
allowed.
RECYCLE BIN FULL!
You attempted to delete a file while the
Recycle Bin function was turned on and the
Recycle Bin folder contained the maximum
number of files allowed (199 files).
PLEASE EMPTY
THE RECYCLE
BIN FIRST!
The internal memory or microSD card does
not have sufficient free space, and files or
folders cannot be deleted. Empty the Recycle
Bin folder.
microSD card
NO MEDIA!
You attempted to record or play back a file
with no microSD card inserted inserted.
Insert a microSD card.
SD CARD
ACCESS ERROR!
INSERT AGAIN!
The recorder did not recognize the inserted
microSD card, or the card is broken. Try
inserting the card again.
SD CARD
WRITE SPEED
TOO SLOW!
PCM recording was incomplete or the data
was not written correctly.
Unit status or
function
Error message Description

15 Appendix
POCKETRAK W24 Reference Manual
81
Troubleshooting
Playlists
NO MORE FILE
FOR THIS
PLAYLIST!
You attempted to assign a 100th file to one
of the Playlists (PLIST).
PLAYLIST CAN BE
EDITED ONLY IN
MUSIC FOLDER
You attempted to select a file in a folder
other than the MUSIC (M) folder and assign
it to one of the Playlist (PLIST).
TOO MANY FILES
FOR
A PLAYLIST!
You attempted to assign more than 100 files
to one of the Playlists (PLIST).
NO FILE IN
PLAYLIST!
The original file of the track assigned to one
of the Playlist (PLIST) has been deleted.
PLAYLIST FILE
CANNOT
BE SELECTED
You selected a Playlist (PLIST) while the list
screen is displayed and pressed the [SCENE/
PHRASE] button.
The unit does not operate.
Possible cause
Battery is not inserted properly or is exhausted.
Corrective action
Reinsert the battery correctly or replace it with a new battery (refer to the
Owner’s Manual).
Buttons do not work.
Possible cause
The Hold function is set.
Corrective action
Set the [HOLD] switch (located on the rear panel of the unit) to its original
position to cancel the Hold function.
Possible cause
The USB terminal is still connected to the computer.
Corrective action
Disconnect the unit from the computer (see page 64).
The unit does not recognize the inserted microSD card.
Possible cause
The microSD card is not inserted correctly.
Corrective action
Turn off the power to the unit, then insert the microSD card correctly.
Possible cause
The microSD card was formatted on a computer or device other than the
recorder.
Corrective action
Use the recorder to format the microSD card (see page 53).
Unit status or
function
Error message Description

15 Appendix
POCKETRAK W24 Reference Manual
82
No sound.
Possible cause
The volume is turned down too low.
Corrective action
Use the [VOL +/–] button to adjust the volume level.
Files in the MIC (A–D), LINE or Recycle Bin ( ) folders cannot be played.
Possible cause
The file name is wrong.
Corrective action
If you change the file name on a computer, then move the file back to the
MIC (A–D) folder, you cannot play the file on the unit. Transfer the file to
the MUSIC (M) folder to play it.
Possible cause
The audio file is not in the type of WAV format that is supported by the
unit.
Corrective action
The unit will not play back a WAV file that was not recorded on the unit.
Files in the MUSIC (M) folder cannot be played (correctly or at all).
Possible cause
The file is not in a playable format.
Corrective action
Use MP3 or WMA files.
Possible cause
The audio file is not in the type of PCM (WAV) format that is supported by
the unit.
Corrective action
The unit will not play back a WAV file that was not recorded on the unit.
Possible cause
The file was transferred to an incorrect destination.
Corrective action
The unit will not play files that were transferred from a computer to a
folder other than the MUSIC (M) folder. Be sure to transfer the file to the
MUSIC (M) folder in the [PRW24] or [PRW24SD].
Possible cause
The file is not compatible with the unit.
Corrective action
Create a file using different MP3/WMA encoder software.
Possible cause
The files listed in the Playlist are missing from the MUSIC (M) folder.
Corrective action
Delete the file names from the Playlist. Alternatively, transfer the missing
files to the MUSIC (M) folder.
Possible cause
The maximum number of playable files has been exceeded.
Corrective action
The unit can play back up to 199 files per folder. If the folder contains sub-
folders, the maximum number of playable files will be reduced by the
number of sub-folders. Store extra files in another folder.

15 Appendix
POCKETRAK W24 Reference Manual
83
A file cannot be divided.
Possible cause
The internal memory or the microSD card may have insufficient free
space.
Corrective action
Erase unnecessary files (see page 51).
Possible cause
The file is too short to divide.
Corrective action
The minimum file length required for the file division operation varies with
the recording mode (see page 41).
A file cannot be erased.
Possible cause
The attribute of the file is set to “read only.”
Corrective action
Connect the unit to a computer and change the file attribute or erase the
file using the computer. Alternatively, format the microSD card (see
page 53).
[PRW24] or [PRW24SD] icon does not appear when you connect the unit to the
computer.
Possible cause
The unit is not connected to the computer correctly.
Corrective action
Make sure that the USB cable is securely and correctly connected to the
unit and to the computer (see page 63).
Possible cause
Power supplied from the computer to the unit is insufficient.
Corrective action
If the recorder is connected via a bus-powered USB hub, remove the hub,
then use the included USB cable to connect the recorder directly to the
computer’s USB terminal. Alternatively, use a self-powered USB hub (with
the power adaptor). If the computer features multiple USB terminals, use a
different USB terminal to connect the recorder (see page 63).
Possible cause
A network drive has been assigned.
Corrective action
If a network drive has been assigned, the drive letter (an alphabet letter
used as the drive name) is already taken. In this case, [PRW24] or
[PRW24SD] icon may not be created. Change the network drive
assignment, then reconnect the unit.
Consult your network administrator regarding how to reassign the
network drive.
Possible cause
The connected computer does not recognize the recorder.
Corrective action
If the computer does not recognize the unit, try connecting it again. If you
connect the unit to any computer other than those supported by the unit,
Yamaha will not guarantee the operation of the unit (see page 63).

15 Appendix
POCKETRAK W24 Reference Manual
84
The file transfer speed (from the computer to the unit) is slow.
Possible cause
The unit is connected to a USB1.1 terminal on the computer.
Corrective action
Connect the unit to a USB2.0 High Speed terminal.
When the unit is connected to the computer, the unit does not display the
“Connected” icon.
Possible cause
The unit is not connected to the computer correctly.
Corrective action
In some cases, the unit may not display the “Connected” icon or may not
be recognized when it is connected to a computer. Disconnect the unit
from the computer, then reconnect it.
The recorded audio sounds noisy.
Possible cause
Wind noise has been recorded.
Corrective action
The built-in stereo microphone is highly sensitive. Therefore, a slight
breeze or breath — even a weak air conditioning breeze that hits the
microphones directly — will be recorded as noise. To reduce the level of
wind and other environmental noise:
• Use the recorder with the wind screen (protection against wind and
sibilance) attached to the built-in stereo microphones.
• Turn on the High Pass Filter via menu item [HPF] (see page 21).
• Set the [MIC SENS] (microphone sensitivity) switch to [LOW].
The recorded sound is distorted.
Possible cause
The microphone sensitivity level may not be appropriately set.
Corrective action
• Set the [MIC SENS] (microphone sensitivity) switch to [LOW]. If you still
hear distortion, set the High Pass Filter to ON and attach the
windscreen to the recorder (see page 21).
• If the ALC function is turned off, set the recording peak limiter to ON
(see page 21).
The recorded sound skips.
Possible cause
• The microSD card was formatted not on the recorder, but on a
computer or other device.
• The microSD card may be fragmented significantly.
Corrective action
Use the recorder to format the microSD card (see page 53).
Possible cause
You are using a microSD card that is not recommended by Yamaha.
Corrective action
Use a microSD card that is recommended by Yamaha (refer to the Owner’s
Manual).

15 Appendix
POCKETRAK W24 Reference Manual
85
The date and time are displayed incorrectly.
Corrective action
Set the correct date and time (see page 58).
Deleting files does not increase the amount of free space.
Possible cause
The Recycle Bin function is turned on.
Corrective action
Empty the Recycle Bin (see page 50).
The timer does not work properly. (The timer recording failed.)
Possible cause
The calendar was initialized.
Corrective action
Set the calendar (date and time) (see page 58).
Possible cause
The folder to which to record is full.
Corrective action
• Delete unnecessary files (see page 51).
• Select a different folder to which to record.
Possible cause
The battery is exhausted.
Corrective action
Replace the battery (refer to the Owner’s Manual).
Possible cause
The internal memory or microSD card may not have sufficient free space.
Corrective action
Delete unnecessary files (see page 51).
Possible cause
The microSD card has been selected as the recording destination, but the
card has not been inserted in the recorder.
Corrective action
Insert a microSD card in the recorder.
The recorder does not respond to remote control operation.
Possible cause
You attempted to operate the remote control from beyond its effective
range.
Corrective action
For more information about the effective range of the remote control,
refer to the Owner’s Manual.
Possible cause
Direct sunlight or electric light is striking the remote sensor on the
recorder.
Corrective action
Change the position of the lighting fixture or the recorder.
Possible cause
The battery is exhausted.
Corrective action
Replace the battery.
Possible cause
An object is positioned between the remote control and the remote sensor
on the recorder.
Corrective action
Remove the object.

15 Appendix
POCKETRAK W24 Reference Manual
86
FAQ
Q: Why do I hear a rustling noise in the recordings?
A: A rustling noise may be recorded if you move the unit during recording, or even if you move
your fingers while holding the unit when recording. If possible, try not to move the unit
during recording.
Q: How can I transfer the recordings onto tapes or MDs?
A: Use a standard audio cable (with 3.5mm mini plugs) to connect the unit to your tape
recorder or MD recorder, then dub the recordings to a tape or MD.
Compatible audio cable
* Use a stereo audio cable.
* Before dubbing the recordings, adjust the dubbing level on the unit.
* You can also dub the recordings from your tape player or MD player to the unit (see
page 10).
Q: Are there any tips to making a good recording?
A: Try a test recording to set the optimum recording mode and sensitivity, since the recording
condition varies with the location and circumstances.
Q: I cannot play a recorded file that was stored on the computer and transferred back to
the unit.
A: You may have changed the file name on the computer. If you change the file name, the file
will not play, even if it is transferred back into the MIC(A–D) or LINE folder. However, you will
be able to play the file if you transfer it into the MUSIC folder.
Socket on the external recorder Audio cable
Microphone input 3.5-mm mini plug, with resistance
Line input 3.5-mm mini plug, without resistance
Stereo
headphone
socket
Microphone/
Line input
socket
External recorder
Standard audio cable

15 Appendix
POCKETRAK W24 Reference Manual
87
Specifications
Supported OS
Windows 7, Vista, XP Professional/Home Edition
Mac OS X 10.4, 10.5, 10.6
Supported media microSD/SDHC card
Recording mode and estimated
available recording time
(with the internal 2GB memory)
PCM
24bit
96kHz Approx. 55min.
88.2kHz Approx. 1hr.
48kHz Approx. 1hr.50min.
44.1kHz Approx. 2hr.
16bit
96kHz Approx. 1hr.25min.
88.2kHz Approx. 1hr.30min.
48kHz Approx. 2hr.50min.
44.1kHz Approx. 3hr.
MP3
320kbps Approx. 13hr.30min.
192kbps Approx. 22hr.30min.
128kbps Approx. 34hr.
64kbps Approx. 68hr.
32kbps Approx. 136hr.
Recording format MP3, PCM (WAV)
Playback format
MP3 (MPEG1 LAYER3, MPEG2 LAYER3), WMA
PCM (Only files recorded on this unit are supported.)
Frequency response (recording with
an external microphone)
PCM
96kHz/24, 16bit 40Hz–47kHz
88.2kHz/24, 16bit 40Hz–43kHz
48kHz/24, 16bit 40Hz–23kHz
44.1kHz/24, 16bit 40Hz–21.7kHz
MP3
320kbps 40Hz–21kHz
192kbps 40Hz–20kHz
128kbps 40Hz–17kHz
64kbps 40Hz–7.6kHz
32kbps 40Hz–6.7kHz
Frequency response (recording with
the built-in microphone)
60–20,000Hz (PCM recording)
* The high end frequency response varies with the recording mode
that was selected for recording with an external microphone.
The low end response is 60Hz in all MP3 recording modes.
Frequency response (playback) 20–23,000Hz
Sampling frequency 16kHz–96kHz
Bit rate (playback)
16–320kbps (MP3)
32–192kbps (WMA)
* Some files may not be played back correctly.
Connectors
USB mini, Stereo headphones 3.5-mm mini, Stereo
microphone (line input)
3.5-mm mini, microSD card slot

15 Appendix
POCKETRAK W24 Reference Manual
88
• Battery life varies depending on the type and manufacturer of the battery, storage
conditions, usage, ambient temperature, etc. The battery life values listed above are
estimates and are not guaranteed.
• The battery life of a nickel-metal hydride battery is about 70% of that of an alkaline
battery. Also, the voltage of a nickel-metal hydride battery is different from that of an
alkaline battery. Therefore, the remaining battery power for a nickel-metal hydride
battery may not be displayed correctly. You cannot charge a nickel-metal hydride
battery using the unit.
• The available recording time refers to the optimal total recording time available for all
folders, and assumes that no recorded data exists in the internal memory and that
one continuous recording is made without changing the recording mode.
• The largest available recording space (for continuous recording) in one file is 2GB. If
the largest available recording space (2GB) is reached, recording in the next file will
automatically start in about two seconds (when using a microSDHC card). However,
you will be unable to record continuously beyond the battery life.
• When you purchase the recorder, the manuals are stored in PDF format in the internal
memory. Therefore, the actual available recording time is less than the above time.
• Specifications and descriptions in this owner’s manual are for information purposes
only. Yamaha Corp. reserves the right to change or modify products or specifications
at any time without prior notice. Since specifications, equipment or options may not
be the same in every locale, please check with your Yamaha dealer.
Operating temperature +5°C – +35°C (+41°F – +95°F)
Output (headphones) 10mW + 10mW (at 16Ω load)
Power supply
“AA/LR6” alkaline battery (1) or “AA” nickel-metal hydride
battery (1)
Battery life for recording
Alkaline battery: MP3 64kbps Approx. 56 hours,
PCM 44.1kHz 16bit Approx. 38 hours
(Recording condition: Recording LED off, backlight off, no
recording monitoring, ALC on)
Battery life for playback through
headphones
Alkaline battery: MP3 64kbps Approx. 70 hours,
PCM 44.1kHz 16bit Approx. 45 hours
(Playback condition: Playback LED off, backlight off, FLAT
sound EQ)
Battery life for playback through the
speaker
Alkaline battery: MP3 64kbps Approx. 43 hours,
PCM 44.1kHz 16bit Approx. 36 hours
(Playback condition: Playback LED off, backlight off, FLAT
sound EQ)
Dimensions
Approx. 46.5 (W) x 129.5 (H) x 17.5 (D) mm
1-13/16 (W) x 5-1/8 (H) x 11/16 (D) inch
Weight Approx. 92 g (3.2 oz) (including an alkaline battery)
Included accessories
AA/LR6 alkaline battery (1)
Wireless remote control (1)
Lithium battery(CR2025) (1)
Microphone stand adapter (1)
Windscreen (1)
DVD-ROM (1)
USB cable (1)
Owner’s Manual (1)

Appendix
POCKETRAK W24 Reference Manual
89
Index
Symbols
button ................................................ 4
button ................................................ 4
A
A-B Repeat playback ................................ 31
Alarm....................................................... 54
ALC (Auto Level Control) ......................... 17
ALC ON/OFF switch................................... 6
Audio cable........................................ 10, 86
Audio files................................................ 71
Auto Divide.............................................. 23
Auto Power Off ........................................ 60
Available recording time .......................... 87
B
Backlight.................................................. 61
Battery cover.............................................. 6
Beat ......................................................... 39
Beep sound.............................................. 59
Bit rate....................................................... 8
Built-in stereo microphone......................... 5
C
Calibrating............................................... 37
CD..................................................... 72, 73
CD player ................................................ 10
Computer ................................................ 63
Contrast................................................... 61
Cubase AI ................................................ 78
D
Date ........................................................ 58
DELETE button........................................... 6
Deleting
Deleting a selected file......................... 51
Deleting all data.................................. 53
Deleting all files from a folder.............. 52
Dividing files............................................ 40
E
EDIT MENU ............................................. 40
Editing Files ............................................. 40
EQ (equalizer).................................... 18, 34
Error messages......................................... 79
External audio device............................... 10
External microphone.................................. 9
F
Fade in ..................................................... 42
Fade out ................................................... 42
FAQ .......................................................... 86
Fast forwarding......................................... 28
Fast reversing............................................ 28
File............................................................ 65
File names .......................................... 41, 70
Folder ....................................................... 65
Folder structure ........................................ 69
FOLDER/A-B REPEAT button........................ 5
Formatting the internal memory/
a microSD card ...................................... 53
Frequency........................................... 18, 34
H
Headphones ............................................. 28
Headphones socket..................................... 6
High Pass Filter (HPF)................................ 21
HOLD switch .............................................. 6
I
Index marks.............................................. 43
Indicators displayed during playback ........ 27
Initializing................................................. 62
Formatting the internal memory/
a microSD card.................................. 53
Initializing the menu settings................ 62
Input (recording level) .............................. 13
L
LCD screen ............................................. 4, 8
LED................................................. 5, 25, 60
Level meter........................................... 8, 27
Linear PCM................................................. 8
LIST/INDEX button ..................................... 5
Locating the file to play back .................... 28
Locating the index.................................... 28

Appendix
POCKETRAK W24 Reference Manual
90
M
Manual ...................................................... 3
MD.......................................................... 86
MENU RESET ........................................... 62
MENU/ENTER button................................. 4
Metronome ............................................. 38
MIC SENS HIGH/LOW switch............... 6, 17
MIC/LINE socket .................................. 5
Microphone............................................... 9
Microphone sensitivity ............................. 17
Microphone stand (adapter) ...................... 6
microSD card....................................... 6, 53
MP3..................................................... 8, 16
Music....................................................... 73
P
PCM (WAV) ......................................... 8, 16
Pitch ........................................................ 37
PLAY/SPEED button .............................. 5
Playback .................................................. 26
Playing back files ................................. 26
Playing back tracks from the Playlist .... 27
Repeat playback .................................. 32
Using the A-B Repeat playback
function............................................ 31
Using the Phrase playback function ..... 31
Using the Skip playback function......... 30
Playback speed ........................................ 29
Playlist ............................................... 44, 77
POWER button........................................... 5
Preference settings................................... 58
Preset
Recording EQ ...................................... 18
Recording scene .................................. 12
R
REC/PAUSE button ............................... 4
Recording
Recording from an external audio device
(such as a CD player)........................ 10
Recording EQ (equalizer) ......................... 18
Recording mode ...................................... 16
Recording peak limiter ............................. 21
Recording scene....................................... 12
Recycle Bin .............................................. 47
Remote control.................................... 7, 59
Repeat playback................................. 31, 32
Ripping CDs............................................. 73
S
SCENE/PHRASE button ............................... 5
Self timer .................................................. 24
Skip playback............................................ 30
Sound EQ (equalizer)................................ 34
Sound quality ........................................... 16
Speaker....................................................... 6
Specifications............................................ 87
Speed
Changing the playback speed .............. 29
Setting the metronome tempo
(speed).............................................. 38
STANDBY mode........................................ 13
Stereo mini plug ....................................... 10
STOP/ESC button.................................. 4
Storing ............................................... 65, 69
Sync ......................................................... 75
T
Tempo...................................................... 38
Threaded socket for attaching a tripod ....... 6
Time ......................................................... 58
TIME SEARCH ........................................... 33
Timer........................................................ 54
Transferring files ....................................... 71
tripod ......................................................... 6
Troubleshooting ................................. 64, 81
Tuner........................................................ 37
U
USB terminal............................................... 6
USER................................................... 20, 36
V
VAS (Voice Activated System).................... 22
Version ..................................................... 62
Voice sensing level (VAS value) ................. 22
VOL + / – button ........................................ 4
Volume....................................................... 4
W
Windows Media Player.............................. 72
U.R.G., Pro Audio & Digital Musical Instrument Division, Yamaha Corporation
© 2009 Yamaha Corporation
004IP-B0
Transcripción de documentos
POCKET RECORDER POCKETRAK W24 Reference Manual EN Table of Contents Table of Contents 1 Starting Up.................................. 4 5 Playback Settings.......................29 Part names and functions ................................. 4 Changing the playback speed ........................ 29 Front, side and back panels .................................... 4 Remote control ...................................................... 7 LCD screen ............................................................ 8 Playing back specific sections of a track ......... 30 2 Recording .................................... 9 Recording with an external microphone.......... 9 Recording from an external audio device (such as a CD player) ................................... 10 3 Recording Settings .................... 12 Using a preset or custom recording scene ..... 12 Selecting a recording scene.................................. 12 Using the Skip playback function.......................... 30 Using the A-B Repeat playback function ............... 31 Using the Phrase playback function ...................... 31 Playing back the same track repeatedly ......... 32 Locating a playback position by time (Time Search function) ................................ 33 Setting the sound EQ (equalizer) ................... 34 About the sound EQ options ................................ 34 Selecting a sound EQ option ................................ 35 Customizing the sound EQ option........................ 36 Recording with the selected recording scene.. 13 6 Using the Tuner Function ..........37 Modifying the recording scene settings......... 13 Tuning your musical instrument..................... 37 Changing the Recording mode (Selecting a sound quality) .......................... 16 Calibrating the standard pitch ....................... 37 Changing Recording mode .................................. 16 7 Using the Metronome Function ..38 Turning the ALC (Auto Level Control) on and off..................................................... 17 Using the metronome..................................... 38 Setting the microphone sensitivity (MIC SENS)................................................... 17 Setting the metronome beats ........................ 39 Setting the recording EQ (equalizer) ............. 18 Setting the metronome tempo (speed) ......... 38 Playing the metronome during recording ..... 39 About recording EQ options................................. 18 Selecting a recording EQ option........................... 19 Customizing the recording EQ ............................. 20 8 Editing Files................................40 Setting the recording peak limiter ................. 21 Using the fade in and fade out effects ........... 42 Setting the High Pass Filter (HPF) .................. 21 Applying the fade in effect ................................... 42 Applying the fade out effect ................................. 43 Setting the recording peak hold indication ... 21 VAS (Voice Activated System) recording ....... 22 Setting the voice sensing level (VAS value) ........... 22 Setting the Auto Divide function (AUTO DIVIDE)............................................. 23 Recording with the self timer ......................... 24 Changing the LED setting............................... 25 Dividing files.................................................... 40 Inserting and deleting index marks................ 43 Inserting index marks ........................................... 43 Deleting index marks............................................ 43 Using the Playlist function (available only for the MUSIC folder).......... 44 Assigning the folder and files to a Playlist (P1–5)... 44 Changing the playback sequence in a Playlist (P1–5) ............................................................... 45 4 Playback .................................... 26 Removing a file from a Playlist (P1–5)............ 45 Playing files ..................................................... 26 Removing all files from a Playlist (P1–5) ........ 46 Playing back tracks from the Playlist .............. 27 Indicators displayed during playback.................... 27 Fast forwarding and fast reversing................. 28 Using headphones .......................................... 28 POCKETRAK W24 Reference Manual 2 Table of Contents 9 Deleting..................................... 47 12 Using the Recorder with a Managing the Recycle Bin .............................. 47 Computer.................................63 Activating the Recycle Bin function ...................... 47 Displaying the Recycle Bin folder.......................... 48 Playing back a file in the Recycle Bin folder .......... 48 Restoring a file from the Recycle Bin folder........... 49 Emptying the Recycle Bin folder ........................... 50 Computer system requirements ..................... 63 Deleting a selected file.................................... 51 Deleting all files from a folder ........................ 52 Connecting the recorder to your computer... 63 Disconnecting the recorder from your computer ...................................................... 64 Troubleshooting (Windows Vista/XP)............ 64 About files and folders.................................... 65 About the file naming rules .................................. 70 Formatting the internal memory/ a microSD card (Deleting all data) .............. 53 Transferring audio files from the recorder to a computer............................................... 71 10 Using the Timer Function ....... 54 Copying audio files to a CD-R ......................... 72 Programming a timer ..................................... 54 13 Using the Recorder as a Music 11 Preference Settings................. 58 Setting the current date and time.................. 58 Setting the beep sound .................................. 59 Player.......................................73 Ripping CDs (Creating compatible music files from music CDs)........................................... 73 Settings related to remote control operation .. 59 Transferring music files to the Recorder (Sync function)............................................. 75 Activating the Auto Power Off function......... 60 Playing back tracks in a specific sequence...... 77 Setting the Backlight function........................ 61 Creating a Playlist ................................................. 77 Adjusting the LCD contrast............................. 61 14 Installing Cubase AI.................78 Initializing the menu settings ......................... 62 Checking the firmware version....................... 62 15 Appendix .................................79 Error messages ................................................ 79 Troubleshooting.............................................. 81 FAQ .................................................................. 86 Specifications .................................................. 87 Index................................................................ 89 About the manuals The operation of the POCKETRAK W24 is explained in this Reference Manual (this file) and also in the Owner’s Manual (printed version). Owner’s Manual (printed version): The Owner’s Manual includes information about precautions, setup and basic operation that will get you started as easily as possible. Reference Manual (this file): The Reference Manual includes part names and functions, detailed descriptions and procedures that will help you take full advantage of the POCKETRAK W24, and troubleshooting information. Copyrights • • • • • • Copying of the commercially available musical data is strictly prohibited except for your personal use. This Reference Manual is the exclusive copyrights of Yamaha Corporation. Windows is a registered trademark of Microsoft® Corporation in the United States and other countries. Apple, Mac and Macintosh are trademarks of Apple Inc., registered in the U.S. and other countries. The microSD and microSDHC logos are trademarks. The company names and product names in this manual are the trademarks or registered trademarks of their respective companies. • The illustrations and LCD screens shown in this manual are for instructional purposes only and may appear somewhat different from those on your instrument. POCKETRAK W24 Reference Manual 3 1 Starting Up 1 Starting Up Part names and functions Front, side and back panels 9 1 0 K A B L C M PA US E 2 3 4 5 6 7 8 RE C ES ST C OP SP E PL ED AY ME EN NU TE R VO L D E F G H I J N O P Q 1 LCD screen 2 [REC/PAUSE 3 4 5 6 7 8 ] button Starts or pauses recording. [STOP/ESC ] button Stops recording or playback. Press this button during the menu setting operation to return to the previous screen or setting. [VOL +] button Increases the output volume of the speaker or headphones. Also, it moves the cursor upward during menu operation or file selection. [VOL –] button Decreases the output volume of the speaker or headphones. Also, it moves the cursor downward during menu operation or file selection. [ ] button Locates the beginning of the previous file, or fast reverses a file. Also, use this button to return to the previous screen during the menu setting operation or while the list screen is displayed, move the cursor to the left, or set the recording level. [ ] button Locates the beginning of the next file, or fast forwards a file. Also, use this button to proceed to the next screen during the menu setting operation or while the list screen is displayed, move the cursor to the right, or set the recording level. [MENU/ENTER] button While the main screen is displayed, press and hold down this button for at least two (2) seconds to display the menu screen. During the menu setting operation or while the list screen is displayed, press this button once to confirm the item selection or the operation. POCKETRAK W24 Reference Manual 4 1 Starting Up 9 1 PA U R SE EC 2 3 4 5 6 7 8 ES C ST OP SP E PL ED AY ME EN NU TE R VO L 0 K A B L C M D E F G H I J N O P Q 9 Built-in stereo microphone The recorder features a high-performance X-Y stereo microphone. 0 LED indicator Lights up or flashes red during recording and lights up green during playback. ☞ Changing the LED setting (page 25) A [PLAY/SPEED ] button Starts playback or changes the playback speed in stages. ☞ ☞ Playback (page 26) Changing the playback speed (page 29) B MIC/LINE socket External stereo microphone/line level input socket. ☞ ☞ Recording with an external microphone (page 9) Recording from an external audio device (such as a CD player) (page 10) C [POWER] button Turns the power to the recorder on or off. Press the button once briefly to turn the power on. Press and hold down the button for at least two (2) seconds to turn the power off. D [FOLDER/A-B REPEAT] button Displays the folder select screen, or executes A-B repeat playback. E [LIST/INDEX] button To display a list of files in the selected folder, press this button while the recorder is stopped. Press this button during recording or playback to insert index marks (playback position locators). ☞ Inserting and deleting index marks (page 43) F [SCENE/PHRASE] button Recalls a recording scene while the unit is stopped. Alternatively, use this button to perform Phrase playback (the playback point will be moved back by the specified number of seconds). ☞ ☞ Using a preset or custom recording scene (page 12) Using the Phrase playback function (page 31) POCKETRAK W24 Reference Manual 5 1 Starting Up 9 1 PA U R SE EC 2 3 4 5 6 7 8 ES ST C OP SP E PL ED AY ME EN NU TE R VO L 0 K A B L C M D E F G H I J N O P Q G [DELETE] button Deletes files, folders, or index marks. It also recalls the Recycle Bin menu while the Recycle Bin folder is selected. ☞ Deleting (page 47) H microSD card slot I J K L M Insert a microSD card here. USB terminal Connect this terminal to a computer using the included USB cable. Remote sensor Receives remote control signals. [HOLD] switch To engage the Hold function (to avoid accidental operation), slide the switch in the direction of the arrow. Headphones socket Connect inner-ear headphones or other types of headphones here. [ALC ON/OFF] switch Set this switch to ON to automatically adjust the recording level in accordance with the source level to optimize the dynamics of the resulting recording. ☞ Turning the ALC (Auto Level Control) on and off (page 17) N [MIC SENS HIGH/LOW] switch Switches the microphone sensitivity to high or low in accordance with the recording environment. O Speaker P Battery cover Q Threaded socket for attaching a tripod or a microphone stand adapter Use this socket to attach a tripod or a microphone stand adapter. ☞ Refer to the Owner’s Manual POCKETRAK W24 Reference Manual 6 1 Starting Up Remote control Pressing any remote control button will cause the recorder to emit a beep (unless other recorder settings override this function). 1 2 4 3 5 6 7 1 [W] button 2 3 4 5 6 7 Starts playback. [ ] button Locates the beginning of a file, or fast reverses a file. Alternatively, this button enables you to lower the REC LEVEL. [REC] button Starts recording. [ ] button Locates the beginning of a file, or fast forwards a file. Alternatively, this button enables you to raise the REC LEVEL. [A] button Stops recording or playback. VOLUME button (+) Raises the playback volume level. VOLUME button (–) Lowers the playback volume level. POCKETRAK W24 Reference Manual 7 1 Starting Up LCD screen The unit will not display all the following indicators and items at the same time. High Pass Filter Bit rate (for recording and playing back MP3 files and playing back WMA files) Frequency (for PCM recording and playback) Auto Divide Recording scene microSD card Remaining battery power File format Folder name microSD indicator Level meters, Information indicators (track name, file name, artist name, total playback time, operation status, file type, current time and date, etc.) Bit rate (for PCM recording and playback) Recording level (with ALC off) SD A.D HPF S PCM 88.2K 24bit SD 30 H A 199/199 E 090503_1256.MP3 L R 1:08:30 –10dB 5:28 Microphone sensitivity File number/ Total number of files EQ (equalizer) File name Level meters Recording/Playback indicators (S/W) Remaining recording time (hour : minute) Elapsed recording time (hour : minute : second) Recording margin, playback position indicator Hint: · What is Linear PCM (Pulse Code Modulation) recording? Linear PCM (LPCM) recording is a digital recording method that samples analog audio signals at a certain frequency and saves them as digital signals without compression. Music CDs (CD-DA–CD digital Audio) use PCM recording (sampling rate of 44.1kHz, bit depth of 16-bit samples, bit rate of 1,411kbps, and frequency response from 20 to 20kHz). PCM recordings are digitally-recorded unprocessed audio, and are supposed to be of the highest sound quality. “WAVE” format is used to import these PCM recording files into a computer. The WAVE file extension is “.WAV”. MP3 and WMA format files are created by compressing the LPCM data. · Recording margin indicator Recording margin: space or margin (expressed in dB) between 0dB and the input peak levels. POCKETRAK W24 Reference Manual 8 2 Recording 2 Recording For information on recording preparation and how to record musical performances or conference meetings using the built-in microphone, please refer to the Owner’s Manual (printed version). Recording with an external microphone You can use an external microphone for recording (instead of using the built-in stereo microphone). For an external microphone, you can use a stereo or monaural powered microphone, or a stereo or monaural dynamic microphone. To set up the recorder for your type of external microphone, follow the steps below: 1. Press the [MENU/ENTER] button for at least two (2) seconds while the main screen is displayed, press the [VOL +/–] buttons to select [REC MENU] → [REC SELECT], then press the [MENU/ENTER] button. 2. Press the [VOL +/–] buttons to select [EXTERNAL MIC], then press the [MENU/ ENTER] button. 40 REC SELECT EXTERNAL MIC LINE IN VOL 3. MENU ENTER Press the [VOL +/–] buttons repeatedly to select [POWERED ST], [POWERED MONO], [DYNAMIC ST] or [DYNAMIC MONO] depending on the microphone type, then press the [MENU/ ENTER] button. Press the [STOP/ESC ] button twice to display the main screen. 40 EXTERNAL MIC POWERED ST POWERED MONO DYNAMIC ST DYNAMIC MONO 4. Connect the microphone to the recorder’s [MIC/LINE] socket located on the right side panel, then point the microphone toward the sound source. 5. Press the [REC/PAUSE Recording starts. ] button on the recorder. Yamaha recommends that you use a microphone with the following specifications as an external microphone. If you use an external microphone with the following specifications, select [POWERED ST] or [POWERED MONO] as the microphone type in Step 3. Type Electret condenser microphone that features plug-in power operation Impedance 2k ohms Power supply Guaranteed operation at 1.3V Plug Mini plug (∅3.5mm) POCKETRAK W24 Reference Manual 9 2 Recording Recording from an external audio device (such as a CD player) You can record line input sources from an external audio device (such as a CD player or MD player). 1. Press the [MENU/ENTER] button for at least two (2) seconds while the main screen is displayed, press the [VOL +/–] buttons to select [REC MENU] → [REC SELECT], then press the [MENU/ENTER] button. 2. Press the [VOL +/–] buttons to select [LINE IN], then press the [MENU/ENTER] button. 40 REC SELECT EXTERNAL MIC LINE IN VOL Press the [STOP/ESC MENU ENTER ] button twice to display the main screen. Note: · For information on how to change the recording mode, see page 16. · During an MP3 recording, you can use the Auto Divide function (see page 23). 3. Connect the recorder’s [MIC/LINE] socket to the audio output connector on the external device. Use a commercially-available audio cable (stereo mini plug, 3.5mm, with no resistance). To the external input socket PA U R SE EC Audio device ES ST C OP SP E PL ED AY ME EN NU TE R VO L 4. To audio output headphones socket or LINE OUT (Recording) socket Adjust the volume level of the external audio device while playing the recording source. Hint: · Try a test recording to find an appropriate recording level. POCKETRAK W24 Reference Manual 10 2 Recording 5. Play the recording source on the external audio device and press the [REC/PAUSE ] button. Recording starts. Note: · Recordings are automatically stored in the LINE (L) folder. · While you are recording audio through the line input from the connected external device, no audio will be heard from the speaker. Use the headphones to listen to the audio being recorded. 6. Press the [STOP/ESC ] button to stop recording. Stop playback on the external device. POCKETRAK W24 Reference Manual 11 3 Recording Settings 3 Recording Settings Using a preset or custom recording scene The recorder features preset and custom recording scenes. Each preset scene is a snapshot of the recording menu settings that would work well in a certain recording environment and application. You can also create your own customized recording scenes. Selecting a recording scene The recorder offers four preset recording scenes ([Practice], [Studio], [Outdoor] and [Live]) and three custom recording scenes ([User 1-3]) that enable you to create your own custom scenes by combining different menu settings. Scene OFF Practice Studio Outdoor Live User1-3 PCM 44.1kHz 16bit MP3 128kbps MP3 192kbps PCM 96kHz 24bit PCM 44.1kHz 16bit MP3 192kbps 20 20 20 20 20 20 MIC ALC OFF/ON ON OFF OFF OFF OFF MIC SENS HIGH/LOW HIGH LOW HIGH LOW HIGH HPF OFF OFF OFF ON OFF OFF LIMITER OFF ON ON OFF ON OFF PEAK HOLD 3 sec 3 sec 3 sec 3 sec 3 sec 3 sec SELECT P-ST*1 P-ST P-ST P-ST P-ST P-ST AUTO DIVIDE OFF OFF OFF OFF OFF OFF TIMER OFF OFF OFF OFF OFF OFF VAS OFF ON OFF OFF OFF OFF 3 3 3 3 3 3 RECOMM*2 RECOMM RECOMM FLAT RECOMM RECOMM Menu settings REC MODE INPUT VAS LEVEL REC EQ *1. P-ST is an abbreviation of POWERED ST. *2. RECOMM is an abbreviation of RECOMMEND. 1. 2. While the main screen is displayed, press the [SCENE/PHRASE] button located on the side panel. The unit displays the [SCENE SELECT] screen. Press the [VOL +/–], [ ]/[ ] buttons to select a preferred recording scene, then press the [MENU/ENTER] button. The unit confirms your selection of a recording scene, and then displays the main screen. “ ” will appear in the upper right corner of the LCD. AUTO PCM 44.1K 16bit SCENE SELECT Live OFF Practice User1 Studio User2 Outdoor User3 Recording scene 20 S MP3 192K A 1/53 L E 091101_0025.WAV L R POCKETRAK W24 Reference Manual H 0:00:00 1:02 12 3 Recording Settings Recording with the selected recording scene 1. After selecting a recording scene, while the main screen is displayed, press the [FOLDER/A-B REPEAT] button located on the side panel, then press the [VOL +/–], [ ]/[ ] buttons to select a folder into which to record a file, then press the [MENU/ENTER] button. 2. Press the [REC/PAUSE ] button. If you have selected the [Practice] recording scene, recording starts immediately. 3. If you have selected any scene other than [Practice], the unit enters recording STANDBY mode. Press the [REC/PAUSE ] button again. Note: · If you wish to change the INPUT (recording level), press the [t]/[Y] buttons to adjust the level while the unit remains in recording STANDBY mode. Modifying the recording scene settings You can modify the recording scene settings and store the edits. 1. While the main screen is displayed, press the [SCENE/PHRASE] button located on the side panel. 2. Press the [VOL +/–], [ ]/[ ] buttons to highlight the recording scene that you wish to modify. You cannot modify the settings for the [OFF] scene. 3. While the recording scene is highlighted, press the [SCENE/ PHRASE] button again. The unit displays the scene edit screen. S MP3 192K 20 SCENE SELECT Live OFF Practice User1 Studio User2 Outdoor User3 S L 20 Studio 1/3 REC MODE :MP3 192kbps INPUT :20 MIC ALC :OFF MIC SENS :LOW 4. Press the [VOL +/–] buttons to select a setting item that you wish to modify, then press the [MENU/ENTER] button. The unit displays the setting edit screen for the selected item. 5. Modify the setting or value. • For [INPUT] (recording level), press the [VOL +/–] buttons to select a value from 0 to 40, then press the [MENU/ENTER] button. S 25 INPUT 25 POCKETRAK W24 Reference Manual 13 3 Recording Settings • For [MIC ALC], press the [VOL +/–] buttons to select [ON] or [OFF], then press the [MENU/ENTER] button. S OFF ON 27 MIC ALC • For [MIC SENS], press the [VOL +/–] buttons to select [HIGH] or [LOW], then press the [MENU/ENTER] button. S 27 MIC SENS HIGH LOW For information on how to set other menu items, refer to the following pages: ☞ ☞ ☞ ☞ ☞ ☞ ☞ ☞ ☞ ☞ [REC MODE] (See page 16.) [HPF] (See page 21.) [LIMITER] (See page 21.) [PEAK HOLD] (See page 21.) [SELECT] (Line in) (See page 9.) [AUTO DIVIDE] (See page 23.) [TIMER] (See page 24.) [VAS] (See page 22.) [VAS LEVEL] (See page 22.) [REC EQ] (See page 18.) To modify other settings, repeat Steps 4 and 5. 6. Press the [VOL +/–] buttons to select [STORE], then press the [MENU/ENTER] button. The modified recording scene overwrites the existing scene, and the unit displays the [SCENE SELECT] screen. Note: · To cancel overwriting the settings, select [CANCEL] instead of [STORE]. · If you try to abort the operation in the middle of the procedure before you select [STORE] or [CANCEL], the message [CANCEL UPDATE ?] will appear on the display. To abort the operation, select [CANCEL], then press the [MENU/ENTER] button. 7. Press the [STOP/ESC POCKETRAK W24 Reference Manual ] button to return to the main screen. 14 3 Recording Settings ■ Notes regarding modifying the [MIC ALC] and [MIC SENS] settings If you change the [ALC] or [MIC SENS] switch setting after selecting a recording scene, the switch setting will be stored in the current scene by overwriting the corresponding setting status. In this case, if you turn off the power to the unit, then turn it on again, the status of the switches on the side panel will be used for the recording settings. Examples When a recording scene is selected When the [ALC] switch is turned [OFF] When the power is turned off, then back on USER 1 OFF OFF MIC ALC ON OFF OFF MIC SENS HIGH HIGH LOW ALC switch ON OFF OFF LOW LOW LOW Recording scene Effective settings Status of switches on the side panel MIC SENS switch ■ Initializing the recording scene settings 1. While the main screen is displayed, press and hold down the [SCENE/PHRASE] button located on the side panel for at least two (2) seconds. 2. Press the [VOL +/–], [ ]/[ ] buttons to select a recording scene that you wish to initialize, then press the [MENU/ENTER] button. If you wish to initialize all recording scenes, select [ALL]. 3. Press the [ ]/[ ] buttons to highlight [YES], then press the [MENU/ENTER] button. The unit initializes the selected recording scene, and then displays the main screen. POCKETRAK W24 Reference Manual 40 INITIALIZE Live ALL Practice User1 Studio User2 Outdoor User3 40 INITIALIZE INITIALIZE ALL ? CANCEL YES 15 3 Recording Settings Changing the Recording mode (Selecting a sound quality) The recorder enables you to record audio in MP3 or PCM (WAV) format. In PCM mode, noncompressed audio data will be recorded. In MP3 mode, compressed audio data will be recorded. With the better sound quality, the data size will be larger and available recording time will be shorter. Changing Recording mode 1. Press the [MENU/ENTER] button for at least two (2) seconds while the main screen is displayed, press the [VOL +/–] buttons to select [REC MENU] → [REC MODE], then press the [MENU/ENTER] button. 2. Press the [VOL +/–] , [ ]/[ ] buttons to select the desired Recording format from [PCM 24bit],[PCM 16bit],[MP3], then press the [MENU/ENTER] button. 3. Press the [VOL +/–] buttons to select the desired frequency or bit rate, then press the [MENU/ENTER] button. 4. Press the [STOP/ESC ] button twice. The recorder displays the main screen. AUTO REC MODE PCM 320kbps 24bit 192kbps PCM 128kbps 16bit 64kbps MP3 32kbps ESC STOP POCKETRAK W24 Reference Manual 16 3 Recording Settings Turning the ALC (Auto Level Control) on and off Note: · You can turn the ALC function on or off when recording audio to folders A–D. • Turning the ALC function on Slide the [ALC] switch located on the side panel of the unit to “ON.” The recording level will automatically be adjusted in response to the input level. ALC ON AUTO PCM 44.1K 16bit A L R • Turning the ALC function off Slide the [ALC] switch (located on the side panel of the unit) to “OFF.” You can change the recording level in increments (Refer to the Owner’s Manual). L 7/7 091101_1746.WAV 0:00:00 0:03 ALC OFF (The recording level will be displayed.) PCM 44.1K 16bit A 40 L 7/7 091101_1746.WAV L R 0:00:00 0:03 Note: · You cannot adjust the recording level when you are recording audio from a connected external device (see page 10). Setting the microphone sensitivity (MIC SENS) You can set the microphone sensitivity level to high or low to accommodate the recording environment. • If the volume level of the recording source is too low: Slide the [MIC SENS] switch (located on the side panel) to [HIGH]. • If the volume level of the recording source is too high: Slide the [MIC SENS] switch (located on the side panel) to [LOW]. The indicator displayed in the upper right of the LCD: When the [MIC SENS] switch is set to [HIGH]: H When the [MIC SENS] switch is set to [LOW]: L POCKETRAK W24 Reference Manual 17 3 Recording Settings Setting the recording EQ (equalizer) Setting the recording EQ enables to record the audio of the desired tonal quality by boosting the lower or higher frequency ranges. You can use the recording EQ only when recording audio to folders A–D and when the ALC function is turned off. About recording EQ options The recorder offers eight recording EQ presets and one USER recording EQ option (that enables you to customize by cutting and boosting five EQ bands individually). The recording EQ presets include RECOMMEND, FLAT, SUPER BASS, BASS, MIDDLE, BASS&TREBLE, TREBLE, and SUPER TREBLE. Features of each recording EQ preset RECOMMEND FLAT 40 This preset is recommended for recording via the built-in microphone. SUPER BASS 40 MIDDLE BASS&TREBLE 40 40 This preset boosts the mid frequency range. 40 This preset significantly boosts the lower frequency range. No EQ is used for recording. This preset mildly boosts the lower and higher frequency ranges. BASS TREBLE 40 This preset mildly boosts the lower frequency range. SUPER TREBLE 40 This preset mildly boosts the higher frequency range. 40 This preset significantly boosts the higher frequency range. Note: · You cannot change the parameters of these eight recording EQ presets. Select the USER recording EQ option if you wish to customize the recording EQ. POCKETRAK W24 Reference Manual 18 3 Recording Settings Selecting a recording EQ option 1. Set the [ALC] switch to “OFF.” 2. Press the [FOLDER/A-B REPEAT] button → the [VOL +/–], [ ]/[ ] buttons to select a folder into which to record, then press the [MENU/ENTER] button. Select a folder from folders A–D. 3. Press the [REC/PAUSE ] button. The unit displays the [STANDBY] indicator. PCM 44.1K 16bit 20 A STANDBY L 091101_1712.WAV L R 3:02 0:00:00 –30dB 4. Press and hold down the [MENU/ENTER] button for at least two (2) seconds while the [STANDBY] indicator is displayed. The unit displays the REC MENU screen. 5. Press the [VOL +/–] buttons to select [RECORDING EQ], then press the [MENU/ENTER] button. The unit displays the recording EQ screen. 6. 20 REC MENU HPF PEAK HOLD RECORDING EQ Press the [ ]/[ ] buttons to select the desired recording EQ option. You can select from eight recording EQ presets and one USER recording EQ (which enables you to customize the EQ settings). Hint: · For information on how to customize the USER recording EQ option, refer to “Customizing the recording EQ” on page 20. 7. Press the [MENU/ENTER] button. The selection of the recording EQ is confirmed. Press the [STOP/ESC ] button to display the [STANDBY] indicator. Adjust the recording level, then press the [REC/PAUSE ] button again to start recording. Note: · To cancel the operation, press the [STOP/ESC POCKETRAK W24 Reference Manual ] button. 19 3 Recording Settings Customizing the recording EQ The USER recording EQ enables you to customize the level of five EQ bands. 1. 2. Select “USER” while the recording EQ screen is displayed. Refer to steps 1–5 in the “Selecting a recording EQ option” section on page 19. Press the [VOL –] button. The 150Hz band will be selected and displayed as a black bar. 40 USER 40 USER 3. Press the [ ]/[ ] buttons to select a frequency band that you wish to cut or boost. The selected frequency band will be displayed as a black bar. 4. Press the [VOL +/–] buttons to boost or cut the level of the selected frequency band. You can boost the level by as much as +12dB or cut the level by as much as –12dB in 1dB steps. The larger value will raise the recording level and boost the frequency band. Note: · To adjust the level of other frequency bands, repeat steps 3 and 4. · To cancel the operation, press the [STOP/ESC ] button. 5. Press the [MENU/ENTER] button. The USER recording EQ is now customized. Adjust the recording level, then press the [REC/PAUSE ] button again to start recording. Note: · The recording EQ setting is retained when you turn the power off or change the battery. However, the setting will be lost if you change the battery without first turning the power off. POCKETRAK W24 Reference Manual 20 3 Recording Settings Setting the recording peak limiter When the recording peak limiter is set to ON, the recorder reduces sound distortion by automatically adjusting excessive peaks. It is recommended that you set the limiter to ON when you are recording audio. The peak limiter is available only when the ALC is set to OFF. Procedure: Press the [MENU/ENTER] button for at least two (2) seconds while the main screen is displayed, select [REC MENU] → [REC LIMITER] → [ON], then press the [MENU/ENTER] button. To cancel the recording peak limiter, select [OFF]. 40 REC LIMITER OFF ON WHEN *DISABLED ALC IS ON Setting the High Pass Filter (HPF) You can cut the low frequency range by switching the High Pass Filter on. The filter reduces the level of chatting voices, wind and other noise in the recording environment and enables you to record clearer audio. Procedure: Press the [MENU/ENTER] button for at least two (2) seconds while the main screen is displayed, select [REC MENU] → [HPF (High Pass Filter)] → [ON], then press the [MENU/ENTER] button. The indicator will appear on the main screen. High Pass Filter HPF OFF ON 40 HPF To cancel the High Pass Filter, select [OFF]. Setting the recording peak hold indication You can set the duration of the recording peak hold indication displayed on the LCD. This setting is useful when you want to record live with the recording level set to maximum. Procedure: 1. 2. Press and hold down the [MENU/ENTER] button for at least two (2) seconds while the main screen is displayed, select [REC MENU] → [PEAK HOLD], then press the [MENU/ENTER] button. Press the [VOL +/–] buttons to set the peak hold time to [INF] (infinity) or a value from 0 to 10 seconds, then press the [MENU/ ENTER] button. 40 REC MENU REC MODE HPF REC LIMITER PEAK HOLD REC SELECT 40 PEAK HOLD 3 sec 3. Press the [STOP/ESC ] button twice. The unit displays the main screen. POCKETRAK W24 Reference Manual 21 3 Recording Settings VAS (Voice Activated System) recording When the VAS recording function is turned on, if the unit is in recording pause mode, the unit will automatically start to record as soon as it detects audio at a level above a certain threshold. The unit will pause recording when the detected audio level falls below the threshold. VAS recording is available only when ALC is set to ON. Note: · Audio at a level below a certain threshold will be undetected and will not be recorded. If you are planning to record important audio, set the VAS recording to OFF. 1. Press the [MENU/ENTER] button for at least two (2) seconds while the main screen is displayed, select [REC MENU] → [VAS] → [ON], then press the [MENU/ENTER] button. 2. Press the [STOP/ESC ] button twice. VAS The indicator will appear on the main screen. 3. Press the [REC/PAUSE ] button. As soon as the unit detects audio, recording begins. If the unit does not detect any audio, the elapsed recording time indicator, the remaining recording time indicator and the VAS indicator will flash, and the unit will enter Recording Pause mode. 40 VAS OFF ON MUST BE ON *ALC TO USE VAS VAS indicator VAS PCM 44.1K 16bit B L 0/0 091101_1746.WAV L R 0:00:00 0:03 Note: · If the recorder does not detect any audio or does not pause recording, adjust the threshold by following the procedure in the “Setting the voice sensing level (VAS value)” section below. · If you start recording while the VAS function is turned on, the first two seconds or so will be recorded with no exception. Setting the voice sensing level (VAS value) You can adjust the voice sensing level in five steps (1–5) to accommodate the source volume level. A larger value will increase the voice activation sensitivity so recording will be triggered by lower-level audio. If the value is too small, the recorder may not detect audio. Set the microphone sensitivity (see page 17) in accordance with the source input level so that the VAS function can work more effectively. Procedure: To adjust the voice sensing level, press the [ ]/[ while recording with the VAS function turned on. ] buttons VAS value VAS PCM 44.1K 16bit Note: · If the High Pass Filter is turned on, the filter will cut the low range, and recording may not start. In this case, set the VAS function to Off. POCKETRAK W24 Reference Manual L VAS 3 091101_1746.WAV L R 3:01 0:00:18 –40dB 22 3 Recording Settings Setting the Auto Divide function (AUTO DIVIDE) If you turn the Auto Divide function on when recording a line source, such as tracks from a CD player, the unit automatically detects a silent pause between tracks and records each track as an individual file. More specifically, when the recorder detects a silent pause of two seconds or longer, it pauses recording, thus storing the audio data up to the silent pause as one file. In this way, the unit will record the first track as file 1, the second track as file 2, and so on. This function is available only for MP3 files recorded via Line In. You cannot use this function for PCM line recordings, or PCM or MP3 recordings made by using the built-in or external microphone. 1. 2. Press the [MENU/ENTER] button for at least two (2) seconds while the main screen is displayed, select [REC MENU] → [AUTO DIVIDE] → [ON], then press the [MENU/ENTER] button. Press the [STOP/ESC ] button twice. The unit displays the main screen, including the (Auto Divide) indicator. To cancel the Auto Divide function, select [OFF] in step 1. A.D VAS AUTO DIVIDE OFF ON *LINE+MP3 ONLY Auto Divide indicator A.D MP3 192K B VAS L 1/1 091101_1746.WAV L R 0:00:00 0:03 Note: · The function will not work if the recorder does not detect a silence of two seconds between tracks on a live CD or similar source. In this case, use the Divide File function (see page 40) to manually divide the files. · If the unit detects silence for 15 seconds or more, recording stops automatically. POCKETRAK W24 Reference Manual 23 3 Recording Settings Recording with the self timer You can specify the time duration from the press of the [REC/PAUSE ] button until the start of recording. This function is useful when you need some time to prepare. For example, you may wish to practice your musical instrument until the actual recording starts. 1. 2. Press the [MENU/ENTER] button for at least two (2) seconds while the main screen is displayed, select [REC MENU] → [SELF TIMER], then press the [MENU/ENTER] button. Press the [VOL +/–] buttons to select a self timer value of 5, 10 or 30 seconds, then press the [MENU/ENTER] button. A.D VAS REC MENU AUTO DIVIDE SELF TIMER VAS A.D VAS SELF TIMER OFF 5 sec 10 sec 30 sec 3. Press the [STOP/ESC ] button twice. The recorder displays the main screen. 4. Press the [FOLDER/A-B REPEAT] button → the [VOL +/–], [ ]/[ ] buttons to select a folder into which to record, then press the [MENU/ENTER] button. 5. Press the [REC/PAUSE ] button. The recorder displays the self timer standby screen, then starts counting down for the duration specified in step 2. (The LED indicator flashes.) Note: · If the [ALC] switch is set to OFF, the unit enters recording standby mode. Adjust the recording level, then press the [REC/PAUSE ] button again. 6. After the time specified in step 2 expires, recording begins. Note: · Once self timer recording begins, the self timer recording setting will be stored until you turn the self timer off or initialize the menu settings. Hint: · To cancel self timer recording, press the [STOP/ESC POCKETRAK W24 Reference Manual ] button during countdown. 24 3 Recording Settings Changing the LED setting You can set the LED indicator so that it will light up during recording or playback (the REC/PLAY option), or NOT light up during recording or playback (the OFF option). Alternatively, you can set the indicator so that it will function as a recording peak LED indicator (the PEAK/PLAY option), in which case the LED indicator will flash only at recording peaks, and otherwise turn off during recording. 1. 2. 3. Press and hold down the [MENU/ENTER] button for at least two (2) seconds while the main screen is displayed, select [COMMON MENU] → [REC/PLAY LED], then press the [MENU/ENTER] button. Press the [VOL +/–] buttons to select [OFF], [REC/PLAY] or [PEAK/ PLAY], then press the [MENU/ENTER] button. [OFF] The LED indicator remains off during recording, recording standby mode, recording pause mode, and playback. [REC/PLAY] The LED indicator lights up red during recording and green during playback. The LED indicator flashes red rapidly during excessive recording peaks. The LED indicator flashes red slowly during recording standby mode or recording pause mode. [PEAK/PLAY] The LED indicator flashes red rapidly during excessive recording peaks. The LED indicator remains off during recording, recording standby mode, and recording pause mode. The LED indicator lights up green during playback. A.D VAS COMMON MENU BEEP SOUND REC/PLAY LED DATE & TIME REMOTE TIMER & ALARM A.D VAS REC/PLAY LED OFF REC/PLAY PEAK/PLAY Press the [STOP/ESC ] button twice. The unit displays the main screen. POCKETRAK W24 Reference Manual 25 4 Playback 4 Playback Playing files The recorder plays MP3 and WMA format files in addition to WAV format files recorded on the unit. To play back a file recorded on the unit, select a folder from the MIC (A–D) folders or the LINE (L) folder. To play back a file transferred from a computer, select the MUSIC (M) folder. While the main screen is displayed, press the [FOLDER/ A-B REPEAT] button located on the side panel. PAUSE ESC REC STOP FOLDER 1. SPEED PLAY MENU ENTER 2. 3. Press the [VOL +/–], [ ]/[ ] buttons to select a folder from which to play back a file. A–D: Files recorded via a microphone L: Files recorded via the line connection M: Files transferred from your computer P1–P5: Playlists (You can assign tracks in the M folder to Playlists.) (See page 44.) ( ): Recycle Bin Press the [ ]/[ ] buttons to select the desired file number. PCM 44.1K 16bit SD AUTO SELECT FOLDER INT. SD AB C D L M P1 P2 P3 P4 P5 40 L A 2/8 091101_1746.WAV File number Total number of files L R 4. Press the [PLAY/SPEED ] button. The recorder starts playing back the file. 0:00:00 0:03 PCM 44.1K 16bit A 2/8 091101_0024.WAV L R 0:00:09 0:01 Remaining playback time (minute : second) Elapsed playback time 5. Press the [VOL +/–] buttons to set the proper playback volume level. The level can be set in 21 steps (0–20). 6. Press the [STOP/ESC Press the [PLAY/SPEED ] button to stop playback. ] button again to resume playback. Hint: · You can play the files in each folder from the list screen (Refer to the Owner’s Manual). POCKETRAK W24 Reference Manual 26 4 Playback Playing back tracks from the Playlist The recorder offers five Playlist files P1–5 (see page 44). You can also create a Playlist using the computer (see page 77). This section explains how to play back a Playlist you created on the computer. 1. While the main screen is displayed, press the [FOLDER/A-B REPEAT] button located on the side panel. 2. Press the [VOL +/–], [ ]/[ [MENU/ENTER] button. 3. Press the [VOL +/–] buttons to select the desired Playlist, then press the [MENU/ ENTER] button. 4. Press the [PLAY/SPEED ] button. The recorder starts playing the tracks in the sequence specified in the Playlist. ] buttons to select the [M] folder, then press the Note: · The unit will not play the tracks from a Playlist if the Playlist contains an error in the drive name, folder name, file name, etc. Indicators displayed during playback Bit rate (MP3, WMA), frequency (PCM) File number/Total number of files File format File name, track name Level meters Elapsed playback time (hour : minute : second) MP3 128K A FAST 120% 9/9 091101_1757.MP3 Playback speed Playback indicator L R 0:00:10 Playback progress bar 0:02 Remaining playback time (minute : second) (Indicates up to 99 min 59 sec) Note: · With some files, the indicated elapsed playback time may not match the actual elapsed time. Also, the names of certain artists or tracks stored in the unit may not be displayed. POCKETRAK W24 Reference Manual 27 4 Playback Fast forwarding and fast reversing ■ Fast forwarding and fast reversing Press and hold down the [ ] button for more than one (1) second during playback to fast forward the currently-playing file. Press and hold down the [ ] button for more than one (1) second during playback to fast reverse the currently-playing file. Once the unit starts to fast forward or reverse, it will continue doing so even if you release the button. To resume normal playback, press the [PLAY/SPEED ] button. ■ Locating the file to play back Press the [ ] button once briefly while the unit is playing or stopped to locate the beginning of the next file. Press the [ ] button once briefly to locate the beginning of the previous file. ■ Locating the index While the unit is playing back a file that contains index marks, press the [ briefly to skip to the next index mark. Press the [ ] button once briefly to locate the previous index mark. ] button once Hint: · For information on inserting index marks, refer to page 43. Using headphones Use headphones if you do not want sound to be output from the speaker or if the sound from the speaker is difficult to hear. Connect the headphones to the headphones socket located on the side panel of the unit. You can listen to music through the headphones and achieve your preferred tonal balance by setting the Sound EQ function (see page 34). Note: · The Sound EQ function is effective only for playback through headphones. POCKETRAK W24 Reference Manual 28 5 Playback Settings 5 Playback Settings Changing the playback speed You can decrease or increase the playback speed, if necessary. This is useful if you want to listen carefully to complex musical parts or to skip quickly through unimportant parts of a recorded meeting. 1. During playback, press the [PLAY/SPEED 2. The speed indicator flashes. Press the [ ]/[ ] buttons to select your preferred speed, then press the [MENU/ENTER] button. ] button. Note: · If you stop the playback or press the [PLAY/SPEED ] button while the speed indicator is flashing, the modified playback speed will be reset to the original setting. Playback speed (FAST) MP3 128K FAST 120% A 9/9 091101_1757.MP3 L R 0:00:10 0:02 With the [SLOW] option, you can change the speed in 5% steps. With the [FAST] option, you can change the speed in 10% steps. The playback speed varies with the file format as follows: PLAY (normal) SLOW FAST MP3 100% 50%–100% (in 5% steps) 100%–200% (in 10% steps) WMA 100% 50%–100% (in 5% steps) 100%–200% (in 10% steps) PCM (WAV) 100% Playback speed cannot be changed. The recorder remembers the changed playback speed after the playback is stopped, and will use that speed for the next playback operation. However, the playback speed will be reset to “normal” when the power is turned off. Note: · You can change the speed only for playback of MP3 and WMA files. You cannot change the speed for playback of PCM (WAV) files. · Some files may not play correctly when the playback speed is changed. POCKETRAK W24 Reference Manual 29 5 Playback Settings Playing back specific sections of a track You can specify and quickly locate a desired section of a track in three ways. This can be useful if you want to skip unimportant parts during playback or to repeat playback of a particular portion of the file. The recorder features three special playback functions: Skip playback (locating the playback point immediately), A-B Repeat playback (playing a specified part repeatedly), and Phrase playback (moving the playback point back by a specified number of seconds). Using the Skip playback function You can skip forward or back by a specific amount of time. This function is useful when you want to locate a desired playback point immediately. 1. During playback, press the [ ]/[ ] buttons. Playback will skip ahead or back by the specified amount of time. Note: · The playback point will not skip to the next or previous folder. The function is effective only within one folder. · If the distance between the current point and an index mark or the beginning of the next file is shorter than the distance between the current point and the skip point, the recorder will locate the index mark or the beginning of the next file. ■ Setting the amount of time for Skip playback 1. 2. 3. Press the [MENU/ENTER] button for at least two (2) seconds while the main screen is displayed, select [PLAY MENU] → [SKIP PLAY], then press the [MENU/ENTER] button. Press the [VOL +/–], [ ]/[ ] buttons to select a skip time value of “10 sec,” “30 sec,” “1 min,” “5 min” or “15 min,” then press the [MENU/ENTER] button. AUTO PLAY MENU TIME SEARCH REPEAT PHRASE PLAY SKIP PLAY SOUND EQ AUTO SKIP OFF 10 sec 30 sec PLAY 1 min 5 min 15 min Press the [STOP/ESC ] button twice. The unit displays the main screen. Hint: · You can set the skip time value by displaying the menu screen during playback. POCKETRAK W24 Reference Manual 30 5 Playback Settings Using the A-B Repeat playback function During playback, you can specify a part of a file that you want to play repeatedly (from point A to point B). 1. During playback, press the [FOLDER/A-B REPEAT] button at the desired start point (A) for A-B Repeat playback. The start point indicator lights up. PCM 44.1K 16bit A 4/9 091101_0025.WAV L R 0:00:12 A 0:50 Start point indicator 2. Press the [FOLDER/A-B REPEAT] button at the desired end point (B) for A-B Repeat playback. The end point is set, and the unit starts playing back the part between A and B repeatedly until you cancel the A-B Repeat function. To cancel A-B Repeat playback, do one of the following operations during A-B Repeat playback: • Press the [FOLDER/A-B REPEAT] button again. • Press the [STOP/ESC • Press the [ ]/[ PCM 44.1K 16bit A 4/9 091101_0025.WAV L R 0:00:10 A B 0:52 A-B Repeat indicator ] button. ] buttons. Note: · If the duration between point A and B is too short, you will be unable to set up A-B Repeat playback. · If you set point A, but not point B, the end of the file will automatically become point B. · The unit will not perform A-B Repeat playback across files. Using the Phrase playback function You can move back the playback point in the currently-playing file by a specified number of seconds. This function is useful if you want to listen again to a short phrase in a piece of music or an important piece of audio. 1. During playback, press the [SCENE/PHRASE] button. The playback point will move back by the specified number of seconds and playback will resume. Note: · During A-B Repeat playback, the Phrase playback function remains effective between points A and B. · If the specified number of seconds exceeds the time between the current playback point and the beginning of the file, the unit will play back from the beginning of the file. · The playback point can be moved back to the beginning of the file, but no further. It cannot jump into the previous file. POCKETRAK W24 Reference Manual 31 5 Playback Settings ■ Setting the amount of time for Phrase playback. 1. 2. 3. Press the [MENU/ENTER] button for at least two (2) seconds while the main screen is displayed, select [PLAY MENU] → [PHRASE PLAY], then press the [MENU/ENTER] button. Press the [VOL +/–] buttons to select the amount of time to move back the playback point in a range of 1 sec to 5 sec, in 1 sec(second) steps, then press the [MENU/ENTER] button. Press the [STOP/ESC ] button twice. The recorder displays the main screen. AUTO PLAY MENU TIME SEARCH REPEAT PHRASE PLAY SKIP PLAY SOUND EQ AUTO PHRASE PLAY 3 sec Hint: · You can specify the amount of time for Phrase playback by displaying the menu screen during playback. Playing back the same track repeatedly You can play back the same track repeatedly (Repeat playback). The Repeat playback function features various Repeat playback modes, such as playing back the same file repeatedly, playing files in a folder in normal or random sequence, etc. ■ Setting the Repeat playback mode 1. 2. Press the [MENU/ENTER] button for at least two (2) seconds while the main screen is displayed, select [PLAY MENU] → [REPEAT], then press the [MENU/ENTER] button. Press the [VOL +/–] buttons to select a Repeat playback mode from [OFF], [ONE], [ALL] or [RANDOM], then press the [MENU/ ENTER] button. [OFF] No repeat [ONE] Repeats only the currently-selected file. [ALL] Repeats all files in the current folder. (The unit will not perform Repeat playback across folders.) [RANDOM] 3. AUTO PLAY MENU TIME SEARCH REPEAT PHRASE PLAY SKIP PLAY SOUND EQ AUTO REPEAT OFF ONE ALL RANDOM Repeats all files in the current folder in random sequence. (The unit will not perform Random playback across folders.) Press the [STOP/ESC ] button twice. The unit displays the main screen. POCKETRAK W24 Reference Manual 32 5 Playback Settings During playback, the Repeat mode indicator will appear in the lower right corner of the screen. ONE ALL RANDOM 4. Press the [PLAY/SPEED ] button. The unit will perform the selected Repeat playback. To cancel Repeat playback, select [OFF] as the Repeat playback mode. Hint: · You can select a Repeat playback mode by displaying the menu screen during playback. Locating a playback position by time (Time Search function) You can play back a file from a point specified by the time position. 1. Press the [MENU/ENTER] button for at least two (2) seconds while the main screen is displayed, select [PLAY MENU] → [TIME SEARCH], then press the [MENU/ENTER] button. 2. Press the [ ]/[ ] buttons to select each digit of hour (h), minute (m), or second (s). Press the [VOL +/–] buttons repeatedly to set the value. POS: Time position TOTAL: Duration of the entire file 3. AUTO TIME SEARCH POS :00h00m17s TOTAL:00h01m02s Press the [MENU/ENTER] button. The file will play from the specified time position. Note: · You can use the Time Search function only for the currently-selected file. POCKETRAK W24 Reference Manual 33 5 Playback Settings Setting the sound EQ (equalizer) You can set the sound EQ to adjust the overall tone of music. The function is available only when you play back files through the headphones. About the sound EQ options The recorder offers six sound EQ presets and one USER EQ option (which enables you to cut and boost five bands individually to suit your preference). The sound EQ presets include FLAT, BASS1, BASS2, POP, ROCK and JAZZ. Features of each sound EQ preset FLAT No EQ is used. The original sound will be played as is. POP This preset significantly boosts the higher frequency range. BASS1 This preset mildly boosts the lower frequency range. ROCK This preset mildly boosts the lower and higher frequency ranges. BASS2 This preset significantly boosts the lower frequency range. JAZZ This preset boosts the mid frequency range. Note: · You cannot change the parameters of the six sound EQ presets. Use the USER EQ option if you wish to adjust the sound EQ to suit your preference. POCKETRAK W24 Reference Manual 34 5 Playback Settings Selecting a sound EQ option 1. 2. Press the [MENU/ENTER] button for at least two (2) seconds while the main screen is displayed, select [PLAY MENU] → [SOUND EQ], then press the [MENU/ENTER] button. AUTO PLAY MENU TIME SEARCH REPEAT PHRASE PLAY SKIP PLAY SOUND EQ Press the [ ]/[ ] buttons to select the desired sound EQ option. Select from six sound EQ presets and one USER EQ option (which enables you to customize the EQ settings). Hint: · For information on how to customize the USER EQ option, refer to “Customizing the sound EQ option” on page 36. 3. Press the [MENU/ENTER] button. The selection of the sound EQ option is confirmed. 4. Press the [STOP/ESC ] button twice. The recorder displays the main screen, including the indicator. Hint: · You can select a sound EQ option by displaying the menu screen during playback. POCKETRAK W24 Reference Manual 35 5 Playback Settings Customizing the sound EQ option The USER sound EQ option enables you to adjust the level of five EQ bands. 1. Select “USER” as the sound EQ. Refer to steps 1 and 2 in the “Selecting a sound EQ option” section on page 35. 2. Press the [VOL –] button. The 150Hz band will be selected and displayed as a black bar. 3. Press the [ ]/[ ] buttons to select the frequency band to cut or boost. The selected frequency band will be displayed as a black bar. 4. Press the [VOL +/–] buttons to boost or cut the level of the selected frequency band. You can boost the level by as much as +6dB or cut the level by as much as –6dB in 1dB steps. The larger value will raise the playback level and boost the frequency band. Note: · To adjust the level of other frequency bands, repeat steps 3 and 4. · To cancel the operation, press the [STOP/ESC ] button. 5. Press the [MENU/ENTER] button. The USER sound EQ option is now customized. 6. Press the [STOP/ESC ] button twice. The recorder displays the main screen, including the POCKETRAK W24 Reference Manual indicator. 36 6 Using the Tuner Function 6 Using the Tuner Function The recorder features a Tuner function that enables you to tune your musical instruments and calibrate the standard pitch (frequency). Tuning your musical instrument 1. Point the built-in stereo microphone toward the musical instrument you want to tune. Note: · To tune an electric guitar or synthesizer, connect the instrument to the recorder’s [MIC/ LINE] socket. ☞ 2. 3. For information on how to use the [MIC/LINE] socket, please refer to “Recording from an external audio device (such as a CD player)” on page 10. Press and hold down the [MENU/ENTER] button for at least two (2) seconds while the main screen is displayed, select [TUNER] → [START], then press the [MENU/ENTER] button. The unit starts analyzing the pitch. TUNER –20 +20 The name of the closest note appears in the center of the LCD (in A 440Hz this example, “A”). Tune your musical instrument so that the large black dot (●) appears in the center. If the pitch is low, “●”appears on the left side. If the pitch is high, “●” appears on the right side. When the instrument is tuned correctly, a white triangle indicator ( the screen turns black ( ) and the LED indicator lights up green. 4. AUTO Press the [STOP/ESC ) on each side of ] button to stop tuning. Note: · After you start using the Tuning function, if you do not operate the recorder for a duration specified via the Auto Power Off function (see page 60), the Tuning function will automatically stop and power to the unit will turn off. · While you use the Tuning function, the backlight remains on (unless the backlight setting is “off”). Calibrating the standard pitch You can calibrate the standard pitch in the range of 430 Hz to 450 Hz in 1 Hz steps. When you purchase the recorder, the standard pitch is set to 440 Hz. 1. Press and hold down the [MENU/ENTER] button for at least two (2) seconds while the main screen is displayed, select [TUNER] → [CALIBRATE], then press the [MENU/ENTER] button. 2. Press the [VOL +/–] buttons repeatedly to set the standard pitch in the range of 430 Hz to 450 Hz, then press the [MENU/ENTER] button. 3. Press the [STOP/ESC ] button twice. The unit displays the main screen. POCKETRAK W24 Reference Manual 33 CALIB 440 Hz 37 7 Using the Metronome Function 7 Using the Metronome Function The recorder features a built-in metronome. The Metronome function enables you to play the metronome, change its tempo and/or beat, and set the metronome so that it will play during recording. Using the metronome 1. Press and hold down the [MENU/ENTER] button for at least two (2) seconds while the main screen is displayed, select [METRONOME] → [START], then press the [MENU/ENTER] button. The metronome sound will be output from the speaker and headphones. 2. Press the [STOP/ESC 3. Press the [STOP/ESC ] button twice. The unit displays the main screen. 33 METRONOME BEAT4/4 TEMPO120 ] button to stop the metronome. Setting the metronome tempo (speed) 1. 2. Press and hold down the [MENU/ENTER] button for at least two (2) seconds while the main screen is displayed, select [METRONOME] → [TEMPO], then press the [MENU/ENTER] button. 24 METRONOME START TEMPO BEAT RECORD Press the [VOL +/–] buttons repeatedly to set the tempo in the range of 30 to 250 bpm, then press the [MENU/ENTER] button. 33 TEMPO 120 3. Press the [STOP/ESC ] button twice. The unit displays the main screen. Note: · You can also adjust the metronome tempo by pressing the [t]/[Y] buttons while playing the metronome. POCKETRAK W24 Reference Manual 38 7 Using the Metronome Function Setting the metronome beats 1. 2. Press and hold down the [MENU/ENTER] button for at least two (2) seconds while the main screen is displayed, select [METRONOME] → [BEAT], then press the [MENU/ENTER] button. 33 METRONOME START TEMPO BEAT RECORD Press the [VOL +/–] buttons repeatedly to set the beat in the range of 0/4 to 8/4, then press the [MENU/ENTER] button. 24 BEAT 2/4 3. Press the [STOP/ESC ] button twice. The unit displays the main screen. Playing the metronome during recording You can record your performance while listening to the metronome via the headphones (the metronome sound will not be output from the speaker). This feature is useful when you are practicing your musical instrument. 1. 2. Press and hold down the [MENU/ENTER] button for at least two (2) seconds while the main screen is displayed, select [METRONOME] → [RECORD], then press the [MENU/ENTER] button. 33 METRONOME START TEMPO BEAT RECORD Press the [VOL +/–] buttons to select [ON], then press the [MENU/ENTER] button. 33 OFF ON 3. RECORD Press the [STOP/ESC ] button twice. The unit displays the main screen. You can now listen to the metronome through the headphones during recording. The metronome sound will not be recorded. POCKETRAK W24 Reference Manual 39 8 Editing Files 8 Editing Files Dividing files You can divide any file recorded and stored in the MIC (A–D) folders or LINE (L) folder into two pieces. This feature enables you to remove an unwanted part of a recording while retaining the part you wish to keep. IMPORTANT Once a file is divided in two, the pieces cannot be rejoined. Be sure to backup important files on a computer or other device before you divide any file. 1. While the main screen is displayed, press the [FOLDER/A-B REPEAT] button located on the side panel. 2. Press the [VOL +/–], [ ]/[ ] buttons to select a folder that contains the file you want to divide, then press the [MENU/ENTER] button. 3. Press the [ ]/[ ] buttons to select the desired file number, then press the [PLAY/SPEED ] button. The recorder starts playing back the file. 4. Press the [STOP/ESC ] button at the point at which you wish to divide the file. The recorder stops playback. 5. Press the [MENU/ENTER] button for at least two (2) seconds while the main screen is displayed, press the [VOL +/–] buttons to select [EDIT MENU] → [DIVIDE], then press the [MENU/ENTER] button. 6. Press the [ ]/[ ] buttons to select [YES], then press the [MENU/ENTER] button. The recorder displays the message “DIVIDING…,” then “DIVIDE COMPLETED!” and the file division operation is complete. When a file is divided, the number of files in the folder increases by one. 33 EDIT MENU DIVIDE FADE IN FADE OUT 33 DIVIDE DIVIDE AT THIS POINT CANCEL YES Note: · You can divide only MP3 or WAV files recorded on the unit. · If the file length is too short, the unit displays the message “CANNOT DIVIDE! REC TIME TOO SHORT!” and the file will not be divided. This function is not effective on files in the MUSIC (M) and Recycle Bin folders. · If you divide a file that contains index marks (see page 43), the index marks will be deleted. POCKETRAK W24 Reference Manual 40 8 Editing Files ■ File names after division Before division The file name is automatically changed. Dividing a file After division For example, if you divide a file named “001A_090911_1200.MP3”, a new file named “002A_090911_1200.MP3” will be created. If the new file has the same name as a file that already exists in the folder, the new file will keep the name, and the existing file will be renamed automatically. Note: · The recorder does not display the file number or the folder type (see page 70). You can view them only via a connected computer. ■ Overlap time and minimum file length required for division The two pieces created by a file division overlap each other at the division point as shown in the table below. To be divided successfully, a file must be twice the overlap time or longer in duration. Recording mode MP3 Overlap time Required length 32kbps About 8 seconds About 16 seconds or longer 64kbps About 4 seconds About 8 seconds or longer 128kbps About 2 seconds About 4 seconds or longer About 1 second or shorter About 2 seconds or longer 192kbps 320kbps 44.1kHz 48kHz PCM 88.2kHz 96kHz POCKETRAK W24 Reference Manual 41 8 Editing Files Using the fade in and fade out effects The recorder enables you to apply fade in and fade out effects to the files recorded in PCM (WAV) format. The fade in effect raises gradually the volume level of the beginning of the file. The fade out effect reduces gradually the volume level of the end of the file. IMPORTANT Once you apply the fade in/fade out effects, you cannot remove the effect. Be sure to backup important files on a computer or other external device before applying effects. Applying the fade in effect 1. While the main screen is displayed, press the [FOLDER/A-B REPEAT] button located on the side panel. 2. Press the [VOL +/–], [ ]/[ ] buttons to select a folder that contains the file you want to apply the fade in effect, then press the [MENU/ENTER] button. 3. Press the [ 4. Press the [MENU/ENTER] button for at least two (2) seconds while the main screen is displayed, press the [VOL +/–] buttons to select [EDIT MENU] → [FADE IN], then press the [MENU/ENTER] button. 5. ]/[ ] buttons to select the desired file number. Press the [VOL +/–] buttons to select the amount of time to apply fade in effect, then press the [MENU/ENTER] button. You can specify the amount of time in a range of 1 sec to 8 sec (second). The unit displays the message “FADE IN EXECUTING…”. 33 EDIT MENU DIVIDE FADE IN FADE OUT 33 FADE IN 4 sec Note: · If you have selected any file other than a PCM file recorded on the unit, or if you have selected a file of four seconds or less, the unit will display the message “CANNOT FADE IN! FILE TOO SHORT!”. 6. When the unit displays “COMPLETED”, press the [VOL +/–] buttons to select [AUDITION], then press the [MENU/ENTER] button. The unit will play back the file with the fade in effect. [AUDITION] You can audition up to about 10 seconds at the beginning of the file with the fade in effect. [SAVE] (Overwrite) The file with the fade in effect will be saved. You cannot revert the file to its original status. (That is, you cannot undo the fade in effect.) [CANCEL] 33 COMPLETED AUDITION SAVE CANCEL The fade in effect will not be applied. POCKETRAK W24 Reference Manual 42 8 Editing Files 7. If you are satisfied with the file after auditioning and wish to save it, press the [VOL +/–] buttons to select [SAVE], then press the [MENU/ENTER] button. The file with the fade in effect will overwrite the original file. If you do not wish to overwrite the original file, select [CANCEL], then press the [MENU/ ENTER] button. Note: · If the internal memory (or a microSD card) does not have sufficient free space, you will be unable to apply the fade in and out effects to the file. Applying the fade out effect The basic procedure is the same as that for the fade in effect. Please refer to the “Applying the fade in effect” section on page 42. Please note that you must select [FADE OUT] instead of [FADE IN] in step 4 to apply the fade out effect. 33 EDIT MENU DIVIDE FADE IN FADE OUT Inserting and deleting index marks Inserting index marks in a file enables you to locate the playback point immediately during the playback operation. You can insert index marks only in the files in the MIC (A–D) folders. Inserting index marks 1. During recording or playback, press the [LIST/INDEX] button (located on the side panel) at the point where you want to insert an index mark. The unit displays the message “INDEX SETTING…” and the index mark is inserted. Note: · Recording or playback continues after you insert an index mark. Repeat the same steps to continue inserting more index marks in the file, if necessary. · You can insert up to 36 index marks in each file. If you try to insert more than 36 index marks, the unit displays “INDEX FULL!” and no more index marks will be recorded. · If you divide a file that contains index marks, the index marks will be deleted. Deleting index marks 1. While the main screen is displayed, press the [FOLDER/A-B REPEAT] button located on the side panel. 2. Press the [VOL +/–], [ ]/[ ] buttons to select a folder that contains a file from which you want to delete index marks, then press the [MENU/ENTER] button. 3. Press the [ ]/[ ] buttons to select the file from which you want to delete index marks. AUTO PCM 44.1K 16bit H A File number 1/5 091101_1746.WAV L R 4. 0:00:00 0:03 Press the [DELETE] button located on the side panel. POCKETRAK W24 Reference Manual 43 8 Editing Files 5. Press the [VOL +/–] buttons to select [INDEX], then press the [MENU/ENTER] button. 33 DELETE MENU FILE FOLDER INDEX RECYCLE BIN 6. Press the [ ]/[ ] buttons to select [DELETE], then press the [MENU/ENTER] button. The unit displays the message “DELETING…” and the index marks are deleted. 33 DELETE INDEX 091101_1712.WAV DELETE ALL INDEX CANCEL DELETE Note: · Deleting index marks will not delete the audio recording. · You cannot delete index marks individually. All index marks in a file will be deleted. Using the Playlist function (available only for the MUSIC folder) The recorder offers five Playlist files P1–5 (PLIST1-5.M3U). You can play back your favorite songs (that are stored in the MUSIC (M) folder) in a preferred sequence by assigning the songs to a Playlist. Before using the Playlist function, you must transfer audio (track) files to the MUSIC (M) folder using the computer. ☞ ☞ Connecting the recorder to your computer (page 63) About files and folders (page 65) Assigning the folder and files to a Playlist (P1–5) 1. While the main screen is displayed, press the [FOLDER/A-B REPEAT] button located on the side panel, press the [VOL +/–], [ ]/[ ] buttons to select the [M] folder, then press the [MENU/ENTER] button. 2. Press the [VOL +/–], [ ]/[ ] buttons to highlight the file or folder which you wish to assign to a Playlist, then press the [SCENE/PHRASE] button located on the side panel of the recorder. 3. Press the [ ]/[ ] buttons to select a target Playlist (PLAYLIST1–5), then press the [MENU/ENTER] button. The folder or the files will be assigned to the selected Playlist. 33 ADD TO ADD ITEM TO PLAYLIST # 1 2 3 4 5 Note: · You can assign up to 99 files to each Playlist. · You cannot delete Playlists (P1–5). · Do not edit Playlists (P1–5) using the computer. For information on creating a Playlist that you can edit using the computer, please refer to “Playing back tracks in a specific sequence” on page 77. POCKETRAK W24 Reference Manual 44 8 Editing Files Changing the playback sequence in a Playlist (P1–5) 1. While the main screen is displayed, press the [FOLDER/A-B REPEAT] button located on the side panel, then press the [VOL +/–], [ ]/[ ] buttons to select one of the folders [P1]–[P5], then press the [MENU/ENTER] button. The unit displays the track list of the selected Playlist. 33 PLIST1.M3U 02 MUSIC1 04 MUSIC2 06 MUSIC3 IN 2. Press the [VOL +/–] buttons to select a file whose list position you want to change, then press the [SCENE/PHRASE] button located on the side panel. 3. Press the [VOL +/–] buttons to select [ORDER], then press the [MENU/ENTER] button. 33 EDIT PLAYLIST ORDER DELETE DELETE PLAYLIST 4. 5. Press the [VOL +/–] buttons to move the selected file to the preferred position in the playback list. The indicator of the selected file changes to “ ”. 33 PLIST1.M3U 04 MUSIC1 02 MUSIC2 06 MUSIC3 IN Press the [MENU/ENTER] button. The order of the files in the Playlist is changed. Removing a file from a Playlist (P1–5) You can remove a file from a Playlist. Removing a file from a Playlist will not delete the original file. 1. While the main screen is displayed, press the [FOLDER/A-B REPEAT] button located on the side panel, then press the [VOL +/–], [ ]/[ ] buttons to select one of the folders [P1]–[P5], then press the [MENU/ENTER] button. The unit displays the track list of the selected Playlist. 33 PLIST1.M3U 02 MUSIC1 04 MUSIC2 06 MUSIC3 IN 2. Press the [VOL +/–] buttons to highlight a file you wish to remove from the Playlist, then press the [SCENE/PHRASE] button located on the side panel. 3. Press the [VOL +/–] buttons to select [DELETE], then press the [MENU/ENTER] button. 33 EDIT PLAYLIST ORDER DELETE DELETE PLAYLIST 4. Press the [ ]/[ ] buttons to select [DELETE], then press the [MENU/ENTER] button. The selected file will be removed from the Playlist. POCKETRAK W24 Reference Manual 45 8 Editing Files Removing all files from a Playlist (P1–5) You can remove all files from a Playlist. Removing all files from a Playlist will not delete the original files. 1. While the main screen is displayed, press the [FOLDER/A-B REPEAT] button located on the side panel, then press the [VOL +/–], [ ]/[ ] buttons to select one of the folders [P1]–[P5], then press the [MENU/ENTER] button. The unit displays the track list of the selected Playlist. 2. Press the [SCENE/PHRASE] button located on the side panel. 3. Press the [VOL +/–] buttons to select [DELETE PLAYLIST], then press the [MENU/ENTER] button. 33 EDIT PLAYLIST ORDER DELETE DELETE PLAYLIST 4. Press the [ ]/[ ] buttons to select [DELETE], then press the [MENU/ENTER] button. All files are removed from the Playlist, and the unit displays “No File” on the LCD. POCKETRAK W24 Reference Manual 33 DELETE ALL PLIST1.M3U DELETE ENTIRE PLAYLIST CANCEL DELETE 46 9 Deleting 9 Deleting Managing the Recycle Bin If you delete a file on the recorder while the Recycle Bin function is active, the file will be moved to the Recycle Bin ( ) folder temporarily so that you can restore it later if necessary. If you delete a file or folder on the recorder while the Recycle Bin function is turned off, the file will be deleted completely and you will be unable to restore it. It is recommended that you turn the Recycle Bin function on to avoid accidental erasure. When the Recycle Bin is full, you must empty it to increase the remaining recording time. Otherwise, you may be unable to record. Empty the Recycle Bin regularly. Note: · The Recycle Bin folder can accommodate up to 199 files. If the Recycle Bin folder is full and you cannot move any more files to the Recycle Bin, move some files from the Recycle Bin folder to the original folder (see page 49) or empty the Recycle Bin folder (see page 50). Activating the Recycle Bin function 1. 2. Press the [MENU/ENTER] button for at least two (2) seconds while the main screen is displayed, press the [VOL +/–] buttons to select [COMMON MENU] → [RECYCLE BIN] → [ON], then press the [MENU/ENTER] button. The Recycle Bin function is turned on. Press the [STOP/ESC 33 RECYCLE BIN OFF ON ] button twice to go back to the main screen. Note: · You can move files to the Recycle Bin folder only from the MIC (A–D) folders and LINE (L) folder. You cannot move files from the MUSIC (M) folder to the Recycle Bin folder, regardless of whether the Recycle Bin function is on or off. These files will be deleted completely by the delete operation. · If you initialize the internal memory or a microSD card, all files on the internal memory or microSD card, respectively, will be deleted (and will not be moved to the Recycle Bin folder). All files previously moved from the card to the Recycle Bin folder will also be deleted. · If the Recycle Bin function is active, deleting the files will not increase the available recording time. POCKETRAK W24 Reference Manual 47 9 Deleting Displaying the Recycle Bin folder While the main screen is displayed, press the [FOLDER/A-B REPEAT] button located on the side panel,then press the [VOL +/–], [ ]/[ ] buttons to select the Recycle Bin ( ) folder, and then press the [MENU/ENTER] button. • The Recycle Bin folder contains no files. 33 PCM 128K H 0/0 E NO DATA! • The Recycle Bin folder contains files. 33 PCM 128K File number/Total number of files in the Recycle Bin folder H 1/3 E ORIGINAL:A FILE NO :001 001A_091101_002 Original folder that contained the file prior to deletion File number prior to deletion The files moved into the Recycle Bin will be renamed automatically (see page 70). Playing back a file in the Recycle Bin folder 1. While the main screen is displayed, press the [FOLDER/A-B REPEAT] button located on the side panel. 2. Press the [VOL +/–], [ ]/[ the [MENU/ENTER] button. 3. Press the [ ]/[ ] buttons to select the desired file to play, then press the [PLAY/SPEED ] button. The selected file will play. ] buttons to select the Recycle Bin ( ), then press PCM 44.1K 16bit 1/3 E 001A_091101_002 L R POCKETRAK W24 Reference Manual 0:00:13 0:00 48 9 Deleting Restoring a file from the Recycle Bin folder 1. While the main screen is displayed, press the [FOLDER/A-B REPEAT] button located on the side panel. 2. Press the [VOL +/–], [ ]/[ the [MENU/ENTER] button. 3. Press the [ ]/[ ] buttons to select the desired file to restore, then press the [DELETE] button located on the side panel. ] buttons to select the Recycle Bin ( ), then press 33 PCM 128K L 1/3 E ORIGINAL:A FILE NO :001 001A_091101_002 4. Press the [VOL +/–] buttons to select [RESTORE 1 FILE], then press the [MENU/ENTER] button. 33 RECYCLE BIN RESTORE 1 FILE EMPTY 5. Press the [ ]/[ ] buttons to select [RESTORE], then press the [MENU/ENTER] button. The recorder will display the message “RESTORING…”, then “RESTORED TO THE BOTTOM OF ” (if the file previously belonged to folder A), and the file will move back to its original folder. 33 RESTORED TO THE BOTTOM OF A OK Note: · A file restored from the Recycle Bin will be renamed automatically and added to the end of the file list in the original folder (see page 70). · If the recorder displays the message “FOLDER FULL!,” the original folder contains the maximum number of files allowed. In this case, delete some files to clear some space. 6. Press the [MENU/ENTER] button again. The recorder displays the main screen. POCKETRAK W24 Reference Manual 49 9 Deleting Emptying the Recycle Bin folder 1. While the main screen is displayed, press the [FOLDER/A-B REPEAT] button located on the side panel. 2. Press the [VOL +/–], [ ]/[ the [MENU/ENTER] button. 3. Press the [DELETE] button located on the side panel. 4. Press the [VOL +/–] buttons to select [EMPTY], then press the [MENU/ENTER] button. ] buttons to select the Recycle Bin ( ), then press 33 RECYCLE BIN RESTORE 1 FILE EMPTY Caution · Emptying the Recycle Bin will permanently delete all files in the Recycle Bin and the same files from the internal memory or the microSD card. You will be unable to restore those files. Be sure to backup important files on a computer or other external device before emptying the Recycle Bin. 5. Press the [ ]/[ ] buttons to select [EMPTY], then press the [MENU/ENTER] button. 33 RECYCLE BIN EMPTY RECYCLE BIN CANCEL EMPTY The recorder displays the message “EMPTYING…”, then “NO DATA!”, and the Recycle Bin is emptied. 33 PCM 128K H 0/0 E NO DATA! IMPORTANT • If the Recycle Bin folder contains many files, the recorder’s operation may slow down. Empty the Recycle Bin regularly. POCKETRAK W24 Reference Manual 50 9 Deleting Deleting a selected file You can delete a single file from a folder. Caution • If you delete a file while the Recycle Bin function is turned off (see page 47), you will be unable to restore it. Be sure to check the content of a file before you delete it. • Before you proceed, make sure that the battery power is sufficient. 1. While the main screen is displayed, press the [FOLDER/A-B REPEAT] button located on the side panel. 2. Press the [VOL +/–], [ ]/[ ] buttons to select a folder from which to delete a file, then press the [MENU/ENTER] button. 3. Press the [ ]/[ ] buttons to select a file to delete, then press the [DELETE] button located on the side panel. 4. Press the [VOL +/–] buttons to select [FILE], then press the [MENU/ENTER] button. 33 DELETE MENU FILE FOLDER INDEX RECYCLE BIN 5. When the [DELETE FILE] screen is displayed, press the [ ]/ [ ] buttons to select [DELETE], then press the [MENU/ENTER] button. The unit displays the message “DELETING…” and the file is deleted. 33 DELETE FILE 091101_0001.WAV CANCEL DELETE Note: · If you decide not to execute the delete operation, select [CANCEL], then press the [MENU/ENTER] button. · You cannot cancel the delete operation if the recorder has already started the operation. If the Recycle Bin function is active, the file will move to the Recycle Bin. When the recorder displays “MOVED TO RECYCLE BIN,” select [OK], then press the [MENU/ENTER] button. 33 MOVED TO RECYCLE BIN OK Note: · If the recorder displays the message “RECYCLE BIN FULL!,” the Recycle Bin folder is full. Empty the Recycle Bin, then delete the file. POCKETRAK W24 Reference Manual 51 9 Deleting Deleting all files from a folder You can delete all files from a selected folder. Caution • If you delete all files from the selected folder while the Recycle Bin function is turned off (see page 47), you will be unable to restore them. Be sure to check the contents of a folder before you delete the files. • Before you proceed, make sure that the battery power is sufficient. The procedure is similar to that for deleting a file. Please refer to the “Deleting a selected file” section on page 51. Please note that you must select [FOLDER] instead of [FILE] in step 4 to delete all files from the folder. Note: · You cannot delete any sub-folders in the MUSIC (M) folder (see pages 67 and 69) by using this function. To delete these sub-folders, connect the recorder to a computer and delete the sub-folders by using the computer. POCKETRAK W24 Reference Manual 52 9 Deleting Formatting the internal memory/a microSD card (Deleting all data) Formatting the internal memory or a microSD card will delete all files on the internal memory or microSD card, respectively, regardless of whether the Recycle Bin function is turned on or off. You must also format a commercially available microSD card before you use the card for the first time. Caution • If you delete files from the internal memory or the microSD card, you will be unable to restore those files. Be sure to check the file contents before you delete a file. • Be sure to backup important files on a computer or other external device. • Before you proceed, make sure that the battery power is sufficient. 1. 2. Press the [MENU/ENTER] button for at least two (2) seconds while the main screen is displayed, press the [VOL +/–] buttons to select [COMMON MENU] → [FORMAT], then press the [MENU/ ENTER] button. 33 COMMON MENU AUTO OFF BACKLIGHT CONTRAST RECYCLE BIN FORMAT Press the [VOL +/–] buttons to select [INTERNAL MEMORY] or [microSD CARD], then press the [MENU/ENTER] button. 33 FORMAT INTERNAL MEMORY microSD CARD 3. Press the [ ]/[ ] buttons to select [FORMAT], then press the [MENU/ENTER] button. The unit displays the message “FORMATTING…”, then “FORMAT COMPLETED!”, and all data is deleted from the internal memory (or the microSD card). Note: · If you decide not to execute the operation, select [CANCEL], then press the [MENU/ ENTER] button. · You cannot cancel the formatting operation if the recorder has already started the operation. 4. Press the [STOP/ESC ] button twice. The recorder displays the main screen. POCKETRAK W24 Reference Manual 53 10 Using the Timer Function 10 Using the Timer Function Programming a timer The Timer function enables you to set the recorder so that it will start a microphone recording or play a file or an alarm at a specified time. Before you program a timer, make sure that the date and time on the unit have been set correctly (see page 58). 1. 2. Press and hold down the [MENU/ENTER] button for at least two (2) seconds while the main screen is displayed, press the [VOL +/–] buttons to select [COMMON MENU] → [TIMER & ALARM], then press the [MENU/ENTER] button. Press the [VOL +/–] buttons to select a setting item, then press the [MENU/ENTER] button. The unit displays the setting screen for the selected item. For details about each setting item, see pages 54–57. 33 COMMON MENU BEEP SOUND REC/PLAY LED DATE & TIME REMOTE TIMER & ALARM 33 1/2 TIMER SET :OFF REPEAT:ONCE START : 0:00 END : 0:00 ACTION:RECORD ■ SET Press the [VOL +/–] buttons to highlight [ON] or [OFF], then press the [MENU/ENTER] button. OFF: The Timer function is disabled. ON: The Timer function is enabled. AUTO OFF ON SET ■ REPEAT Press the [VOL +/–] buttons to highlight [ONCE], [DAILY] or [WEEKLY], then press the [MENU/ENTER] button. ONCE: The recorder will automatically record or play back once at the programmed time. DAILY: The recorder will automatically record or play back every day at the programmed time. WEEKLY: The recorder will automatically record or play back at the programmed time on the programmed day of the week. POCKETRAK W24 Reference Manual 24 REPEAT ONCE DAILY WEEKLY 54 10 Using the Timer Function ■ Setting the WEEKLY timer (Available only when [WEEKLY] REPEAT is selected) 1. Press the [VOL +/–], [ ]/[ ] buttons to highlight a day of the week, then press the [MENU/ENTER] button to check the corresponding box. SUN: Sunday; MON: Monday; TUE: Tuesday; WED: Wednesday; THU: Thursday; FRI: Friday; SAT: Saturday; STORE: Confirm 24 WEEKLY SUN THU MON FRI TUE SAT WED STORE Note: · You can select multiple days of the week. 2. Press the [VOL +/–], [ ]/[ ] buttons to highlight [STORE] (Confirm), then press the [MENU/ENTER] button. ■ Setting the START time Press the [ ]/[ ] buttons to highlight the hour or minute digit, use the [VOL +/–] button to set the value, then press the [MENU/ENTER] button. AUTO START TIME 13:55 ■ Setting the END time Press the [ ]/[ ] buttons to highlight the hour or minute digit, use the [VOL +/–] button to set the value, then press the [MENU/ENTER] button. AUTO END TIME 14:03 Note: · You can set up to 12 hours for the programmed time duration from start to end time. ■ Setting the ACTION Press the [VOL +/–] buttons to select [PLAY] or [RECORD], then press the [MENU/ENTER] button. PLAY: The unit starts playback at the programmed time. RECORD: The unit starts recording at the programmed time. POCKETRAK W24 Reference Manual 24 ACTION PLAY RECORD 55 10 Using the Timer Function ■ Setting the playback SOURCE (Available only when [PLAY] is selected for ACTION) 1. Press the [VOL +/–] buttons to select [BEEP] (to play a beep sound) or [FILE] (to play a file). BEEP: The unit plays a beep sound. FILE: The selected file will play. When you select “FILE,” the unit displays the list screen. Select a file to play (excluding files in Playlists or in the Recycle Bin). AUTO PLAY SOURCE BEEP FILE Note: · To toggle between the internal memory and a microSD card, press and hold down the [FOLDER/A-B REPEAT] button for at least two (2) seconds while the list screen is displayed. 2. Press the [VOL +/–], [ ]/[ the [MENU/ENTER] button. ] buttons to select [STORE] (Confirm), then press ■ Setting the REC MODE (sound quality) (Available only when [RECORD] is selected for ACTION) Press the [VOL +/–], [ ]/[ ] buttons to select a Recording mode option, then press the [MENU/ENTER] button. 33 REC MODE PCM 96 kHz 24bit 88.2kHz PCM 48 kHz 16bit 44.1kHz MP3 ■ Setting the recording destination FOLDER (Available only when [RECORD] is selected for ACTION) Press the [VOL +/–], [ ]/[ ] buttons to select a folder to which to record a file, then press the [MENU/ENTER] button. If you wish to record to the card folder MIC_A_SD–MIC_D_SD, you must first insert a microSD card in the recorder. POCKETRAK W24 Reference Manual 33 REC MIC_A MIC_B MIC_C MIC_D FOLDER MIC_A_SD MIC_B_SD MIC_C_SD MIC_D_SD 56 10 Using the Timer Function ■ Completing the timer settings 1. 2. Press the [VOL +/–] buttons to select [STORE], then press the [MENU/ENTER] button. The programmed timer settings are confirmed, and the unit displays the [COMMON MENU] screen. Press the [STOP/ESC ] button twice. The unit displays the main screen. 33 2/2 TIMER REC MODE:PCM 44.1kHz 16bit FOLDER:MIC_A STORE CANCEL Note: · Initializing the calendar (date and time) will reset all timer settings to “OFF.” · The timer recording (or playback) may fail under the following circumstances: - The internal memory (or microSD card) does not have sufficient memory space for the specified duration of the timer recording. - The file (for playback) or the folder (for recording) in the microSD card has been specified, but the microSD card has not been inserted in the recorder. - You attempted to program a timer recording that would cause the maximum number of recordable files (199) to be exceeded. - The recorder is connected to the computer, and is unable to start the timer operation at the programmed time. - The battery is exhausted or the power to the unit turned off during the timer recording (or playback). · If the timer fails for some reason, one of the following will occur: If a REPEAT [ONCE] timer recording fails, the timer will be turned off. If a REPEAT [DAILY] or [WEEKLY] timer recording fails, the timer will remain on. POCKETRAK W24 Reference Manual 57 11 Preference Settings 11 Preference Settings You can set the preference settings to make it easier to use the recorder in various environments and circumstances. Setting the current date and time After you set the date and time, the recorder will automatically record the time and date of recording with each file. Since the name of recorded files includes the recording date and time, Yamaha recommends that you set the date and time accurately. 1. Press the [MENU/ENTER] button for at least two (2) seconds while the main screen is displayed, press the [VOL +/–] buttons to select [COMMON MENU], then press the [MENU/ENTER] button. 33 MENU MENU VOL at least two (2) seconds 2. MENU TUNER METRONOME REC MENU PLAY MENU COMMON MENU ENTER ENTER Press the [VOL +/–] buttons to select [DATE & TIME], then press the [MENU/ ENTER] button. 33 VOL 3. COMMON MENU BEEP SOUND REC/PLAY LED DATE & TIME REMOTE TIMER & ALARM MENU ENTER Press the [VOL +/–] buttons to select the year, then press the [ 33 VOL DATE & TIME 2009.NOV. 1 24H 20:29 ] button. 33 DATE & TIME 2009.NOV. 1 24H 20:29 4. In the same way, select the month, day, 24/12-hour indication (24H or AM/PM), hour and minute, then press the [MENU/ENTER] button. 5. Press the [STOP/ESC ] button twice. The recorder displays the main screen. POCKETRAK W24 Reference Manual 58 11 Preference Settings Setting the beep sound You can set the recorder so that it will make a beep sound when you operate the buttons or if you make an operational error. 1. 2. Press the [MENU/ENTER] button for at least two (2) seconds while the main screen is displayed, press the [VOL +/–] buttons to select [COMMON MENU] → [BEEP SOUND], then press the [MENU/ENTER] button. S 33 COMMON MENU BEEP SOUND REC/PLAY LED DATE & TIME REMOTE TIMER & ALARM Press the [VOL +/–] buttons to select [ON], then press the [MENU/ENTER] button. 33 BEEP SOUND OFF ON 3. Press the [VOL +/–] buttons to select the desired volume option , then press the [MENU/ENTER] button. To cancel the beep sound, select [OFF] in step 2. HIGH: High volume MIDDLE: Medium volume LOW: Low volume 33 BEEP VOLUME HIGH MIDDLE LOW Settings related to remote control operation You can set the recorder so that the supplied remote control will be locked (disabled). You can also set the recorder so that the LED indicator will flash green when the recorder receives a signal from the remote control. 1. Press the [MENU/ENTER] button for at least two (2) seconds while the main screen is displayed, press the [VOL +/–] buttons to select [COMMON MENU] → [REMOTE], then press the [MENU/ ENTER] button. 33 COMMON MENU BEEP SOUND REC/PLAY LED DATE & TIME REMOTE TIMER & ALARM Locking (disabling) remote control operation: 2. Press the [VOL +/–] buttons to select [REMOTE LOCK], then press the [MENU/ ENTER] button. 3. Press the [VOL +/–] buttons to select [LOCK], then press the [MENU/ENTER] button. To unlock (enable) the remote control, select [REMOTE ON]. POCKETRAK W24 Reference Manual S 33 REMOTE LOCK LOCK REMOTE ON 59 11 Preference Settings Flashing the recorder’s LED indicator: You can set the recorder so that its recording/playback LED indicator (located in the upper part of the recorder) will flash green when the recorder receives a signal from the remote control. After flashing green for a few seconds, the LED indicator will light up steadily or turn off, depending on the [REC/PLAY LED] setting, as explained in the “Changing the LED setting” on page 25. 2. Press the [VOL +/–] buttons to select [LED], then press the [MENU/ENTER] button. 3. Press the [VOL +/–] buttons to select [ON], then press the 33 [MENU/ENTER] button. To make the LED indicator not flash green, select [OFF]. OFF ON LED Activating the Auto Power Off function If this function is turned on, and you leave the recorder turned on but unused for a specified duration, the recorder will automatically turn off (except during recording, VAS recording standby mode, playback or metronome operation). 1. 2. Press the [MENU/ENTER] button for at least two (2) seconds while the main screen is displayed, press the [VOL +/–] buttons to select [COMMON MENU] → [AUTO OFF], then press the [MENU/ ENTER] button. Press the [ ]/[ ] buttons to select the desired time to function the Auto Power Off, then press the [MENU/ENTER] button. 0 (OFF)–15 (15 min.) 33 COMMON MENU AUTO OFF BACKLIGHT CONTRAST RECYCLE BIN FORMAT 33 0 AUTO OFF 15 min 15 You can specify the time in 1 minute steps. To cancel the Auto Power Off function, specify [0](OFF). POCKETRAK W24 Reference Manual 60 11 Preference Settings Setting the Backlight function When the Backlight function is turned on, the LCD backlight lights up each time you press a button or switch on the unit. 1. 2. Press the [MENU/ENTER] button for at least two (2) seconds while the main screen is displayed, press the [VOL +/–] buttons to select [COMMON MENU] → [BACKLIGHT], then press the [MENU/ENTER] button. Press the [VOL +/–] buttons to select the desired time to light up the backlight, then press the [MENU/ENTER] button. OFF: The backlight will not light up. 5 sec: The backlight lights up for five seconds. 15 sec: The backlight lights up for 15 seconds. ALWAYS ON: The backlight remains lit all the time. 33 COMMON MENU AUTO OFF BACKLIGHT CONTRAST RECYCLE BIN FORMAT 33 BACKLIGHT OFF 5 sec 15 sec ALWAYS ON Note: · If the battery power is insufficient, the backlight will not light up. Adjusting the LCD contrast You can adjust the LCD contrast on a scale of ten (10). 1. 2. Press the [MENU/ENTER] button for at least two (2) seconds while the main screen is displayed, press the [VOL +/–] buttons to select [COMMON MENU] → [CONTRAST], then press the [MENU/ENTER] button. Press the [ ]/[ ] buttons to adjust the contrast, then press the [MENU/ENTER] button. L (low): 1–H (high): 10 POCKETRAK W24 Reference Manual 33 COMMON MENU AUTO OFF BACKLIGHT CONTRAST RECYCLE BIN FORMAT 33 CONTRAST CONTRAST 5 L H 61 11 Preference Settings Initializing the menu settings Initializing the recorder settings will restore all menu settings (excluding the date and time setting) to the factory default. Note: · Initializing the recorder settings will not delete any data on the internal memory or microSD card. For information on initializing the internal memory or a microSD card, refer to page 53. Procedure: Press the [MENU/ENTER] button for at least two (2) seconds while the main screen is displayed, press the [VOL +/–] buttons to select [COMMON MENU] → [MENU RESET] → [YES], then press the [MENU/ ENTER] button. If you decide not to initialize the settings, select [CANCEL]. 33 MENU RESET CANCEL YES Checking the firmware version You can check the version number of the recorder’s firmware by following the procedure below. Procedure: Press the [MENU/ENTER] button for at least two (2) seconds while the main screen is displayed, press the [VOL +/–] buttons to select [COMMON MENU] → [VERSION], then press the [MENU/ENTER] button. The firmware version will be displayed. POCKETRAK W24 Reference Manual 33 VERSION Ver 1.00 62 12 Using the Recorder with a Computer 12 Using the Recorder with a Computer You can transfer audio files stored on the internal memory or microSD card to a computer by connecting the recorder to the computer via an included USB cable. Transferred files are compatible for playback with Windows Media Player and iTunes, and can be edited using the included “Cubase AI” DAW software. You can also transfer audio files from a computer to the recorder for playback. Computer system requirements ■ Windows Computer: Windows-based computer with built-in USB interface OS: Windows 7, Vista, XP Professional/Home Edition ■ Macintosh Computer: Macintosh computer with built-in USB interface OS: Mac OS X 10.4, 10.5, 10.6 Note: · Please visit the website below for the latest information on included software and system requirements. http://www.yamahasynth.com/ · The menu items and buttons displayed on your computer may not exactly match those shown in this manual, depending on the OS version of your computer. This manual uses Windows XP and Widows Media Player 11 as examples. Connecting the recorder to your computer 1. Start the computer. 2. Make sure that the recorder is turned off, and then connect the included USB cable. IMPORTANT Use only the USB cable included with the recorder. The use of an improper cable may damage the terminal and result in a malfunction. POCKETRAK W24 Reference Manual 63 12 Using the Recorder with a Computer Disconnecting the recorder from your computer ■ Windows: 1. Click on the taskbar at the bottom right of the Windows screen, then click [Safely remove USB Mass Storage Device]. 2. After the computer displays the message shown on the right, remove the USB cable. ■ Macintosh: 1. Drag and drop the drive icon [PRW24] or [PRW24SD] of the recorder on the desktop to the Trash Can. 2. After the drive icon [PRW24] or [PRW24SD] disappears from the desktop, remove the USB cable. Troubleshooting (Windows Vista/XP) If the recorder is not recognized by the computer, refer to the information below: ■ Windows Vista While the recorder remains connected to the computer, follow the steps below: 1. From the [Start] menu, right-click [Computer] to display the pop-up menu, then select [Properties] to open the “System” window. 2. Click [Device Manager] to open the user account control window. In this window, click [Continue] to open the “Device Manager” window. 3. Expand “Disk drives” and “Universal Serial Bus controllers.” “Disk drives” must include “Yamaha Pocketrak USB Device”, “Yamaha Pocketrak SD USB Device”, and “Universal Serial Bus controllers” must include the device name for the USB Mass Storage Device. ■ Windows XP While the recorder remains connected to the computer, follow the steps below: 1. From the [Start] menu or on the desktop, right-click [My Computer] to display the pop-up menu, then select [Properties] to open the “System Property” window. 2. Click the [Hardware] tab, then click [Device Manager] to open the “Device Manager” window. 3. Expand “Disk drives” and “Universal Serial Bus controllers.” “Disk drives” must include “Yamaha Pocketrak USB Device”, “Yamaha Pocketrak SD USB Device”, and the “Universal Serial Bus controllers” must include the device name for the USB Mass Storage Device. POCKETRAK W24 Reference Manual 64 12 Using the Recorder with a Computer If the “Device Manager” window does not display the correct items: Follow the steps below. 1. Exit (quit) all running applications. 2. Disconnect all external USB devices (excluding a properly working mouse and keyboard), then connect only the recorder. 3. If the computer features multiple USB terminals, use a different USB terminal to connect the recorder. 4. If the recorder is connected via a bus-powered USB hub, remove the hub, then use the included USB cable to connect the recorder directly to the computer’s USB terminal. About files and folders From a connected computer, you can manage the recorder’s files that are stored in folders. You can also transfer audio files from the recorder to a computer to save them, or from a computer to the recorder for playback. 1. Connect the recorder to the computer. 2. Click to open [My Computer] from the [start] menu. • The unit displays [PRW24] as the drive name of the recorder’s internal memory. • If you have formatted a microSD card on the recorder, the drive name of the card inserted in the unit appears as [PRW24SD]. If the microSD card inserted in the unit was not formatted on the recorder, or if a microSD card has not been inserted in the unit, the unit displays [Removable Disk] as the drive name. POCKETRAK W24 Reference Manual 65 12 Using the Recorder with a Computer 3. Double-click to open [PRW24] or [PRW24SD]. The system displays the recorder’s folders. Note: · If the system displays the “What do you want Windows to do?” panel, click to select [Open folder to view files], then click [OK]. The system will display the recorder’s folders. 1 Select 2 Click POCKETRAK W24 Reference Manual 66 12 Using the Recorder with a Computer ■ Files are stored in the following folders on the internal memory or microSD card. • MIC(A–D) / MIC_(A–D)_SD These folders store audio files (in MP3 or WAV format) recorded by the unit. Note: · Do not move the files to a different folder. For example, do not move a file in the A folder to the B folder. Otherwise, you will be unable to play the file. · Also, please note that if you change the name of an MP3 or WAV file (originally recorded on the unit) on the computer, then move the file back to the MIC (A–D) folder, you will be unable to play the file on the unit. To play the file, first rename the file following the file naming rules, or move the file to the MUSIC (M) folder (see page 70). • MUSIC This folder stores music and other audio files transferred from a connected computer. To play the transferred files, the files must be in MP3 or WMA format or WAV files that were recorded on the unit. There are no naming rules that apply to these files. The recorder offers five Playlist files (PLIST1–5.M3U). You can play your favorite songs in your preferred order by creating Playlists using the files stored in the MUSIC folder (see page 44). Note: · Files in each folder are automatically sorted numerically in ascending order based on the number that appears at the start of each file name. If the number of digits varies (e.g., “001xxxxx”, “01xxxxxx”, and “1xxxxxxx”), files will be sorted in the following order: “001xxxxx”, “01xxxxxx”, then “1xxxxxxx”. 1 Track1.wma 2 Track2.wma 001 Track1.wma 002 Track2.wma 001 Track1.wma 003 Track3.wma 002 Track2.wma 01 Track1.wma 003 Track3.wma 02 Track2.wma 01 Track1.wma 02 Track2.wma 03 Track3.wma 03 Track3.wma 1 Track1.wma Sorted numerically based on the numbers that start each file name M Folder 2 Track2.wma · You can create sub-folders (in up to two hierarchies) inside the MUSIC folder to organize the music files by albums or musicians (see page 69). · Please note that if the MUSIC (M) folder contains a file with the same name as that of the audio file you are transferring from a computer, the file in the MUSIC folder will be overwritten by the one transferred from the computer. POCKETRAK W24 Reference Manual 67 12 Using the Recorder with a Computer • DATA This folder stores data files (of MS Excel, MS Word, etc.) and enables you to use the recorder as a USB flash drive or a microSD card reader/writer (removable disk). Note: · The recorder will not play any audio or music files that are placed in this folder. · This folder will be recognized only by a connected computer. The recorder will not display this folder on its screen. • LINE(L) / LINE(L)_SD This folder stores files recorded from external devices via the line connection. Please note that if you change the name of an MP3 file (originally recorded on the unit) on the computer, then move the file back to the LINE (L) folder, you will be unable to play the file on the unit. To play the file, first rename the file following the file naming rules, or move the file to the MUSIC (M) folder (see page 70). • RECYCLE This is the Recycle Bin folder. While the Recycle Bin function is active, files deleted on the recorder will move to this folder. You can restore files from the Recycle Bin folder, which can be a life saver if you delete a file accidentally. • MANUAL This folder stores the Owner’s Manual and Reference Manual in PDF format. These manuals are organized into the sub-folders by language. If you initialize the recorder’s internal memory, the MANUAL folder will also be erased. If necessary, you can download the manuals from the following website: http://www.yamahasynth.com/ Note: · This folder will be recognized only by a connected computer. The recorder will not display this folder on its screen. POCKETRAK W24 Reference Manual 68 12 Using the Recorder with a Computer ■ POCKETRAK W24 folder structure POCKETRAK W24 (microSD) MIC (A-D) folders: These folders store audio files recorded via the recorder’s microphone, such as conference meetings, lectures, and musical performances. Each folder accommodates up to 199 files. LINE (L) folders: These folders store audio files recorded from external devices via the line connection. Each folder accommodates up to 199 files. First layer Second layer PLIST1.M3U PLIST2.M3U MUSIC (M) folder: This folder stores music files for playback. You can assign up to 99 files to each Playlist (PLIST). Each sub-folder accommodates up to 199 files (or folders). The recorder can recognize up to two levels of folders inside the MUSIC folder. PLIST3.M3U PLIST4.M3U PLIST5.M3U : Folder : File * If you are using a microSD card, the names in parentheses will be displayed. POCKETRAK W24 Reference Manual 69 12 Using the Recorder with a Computer About the file naming rules The recorder automatically names the recorded files, following the file naming rules as shown below. The recorder does not display the file number and the folder type. You can view them only via a connected computer. 001A_091121_1200.MP3 1 2 3 4 5 1 File number (001–199) 2 Folder type (A–D: MIC folders A–D, L: LINE folder) 3 Recording date (Year, Month, Day: Date of the file recording) 4 Recording time (Hour, Minute: Start time of the file recording) 5 Extension (File format: MP3 for an MP3 recording file, and WAV for a PCM recording file) Files moved into the Recycle Bin will be renamed as follows: Example: Moving file “001A_091121_1200.MP3” in the MIC_A folder into the Recycle Bin 001_001A_091121_1200.MP3 1 2 3 4 5 6 1 File number used in the Recycle Bin (Each file will be numbered sequentially based on when the file was moved to the Recycle Bin [e.g., 001, 002, 003, etc.]) The recorder will not display these file numbers on its screen. You can view them only via a connected computer. 2 File number (The original file number used before the file was moved to the Recycle Bin) 3 Original folder name (The folder that originally contained the file before it was moved to the Recycle Bin) 4 Recording date (Year, Month, Day: Date of the file recording) 5 Recording time (Hour, Minute: Start time of the file recording) 6 Extension (File format: MP3 for an MP3 recording file, and WAV for a PCM recording file) POCKETRAK W24 Reference Manual 70 12 Using the Recorder with a Computer Transferring audio files from the recorder to a computer ■ Windows: 1. Connect the recorder to a computer. 2. Open [My Computer] from the [Start] menu. 3. Double-click the [PRW24] or [PRW24SD] folder. 4. Double-click the folder (MIC_A–MIC_D) that contains the file that you wish to load to your computer. 5. Copy the file to the desired location. ■ Macintosh: 1. Connect the recorder to a computer. 2. Double-click the drive icon [PRW24] or [PRW24SD] of the recorder on the desktop. 3. Double-click the folder (MIC_A–MIC_D) that contains the file that you wish to load to your computer. 4. Copy the file to the desired location. Hint: · Transferring audio files from the computer to the recorder In Step 4 (for Windows) or Step 3 (for Macintosh), drag and drop the audio files that you wish to transfer (such as MP3 files or WMA files) into the [MUSIC] folder. The MUSIC (M) folder stores music and other audio files transferred from a connected computer. Before transferring audio files to the MIC(A–D) folders or LINE (L) folder, rename the files following the file naming rules (see page 70). The unit will not play files that do not comply with the file naming rules, unless they are in the MUSIC (M) folder. POCKETRAK W24 Reference Manual 71 12 Using the Recorder with a Computer Copying audio files to a CD-R You can copy audio files (that were recorded on the recorder) to a CD-R disc by using Windows Media Player. Please visit the Microsoft website for information on how to obtain Windows Media Player. http://www.microsoft.com/windows/windowsmedia/ Note: · This section uses Windows XP and Widows Media Player 11 as examples. · To copy audio files to a CD-R disc, you must have a CD writer, such as a CD-R/RW drive. 1. From the [Start] menu, select [All Programs], then click [Windows Media Player] to start Windows Media Player. 2. Right-click [Burn] in the menu bar, then select [Audio CD] or [Data CD]. [Audio CD] Audio files are converted to CD-DA format and copied to a CD-R/RW disc. You can play the disc on a CD-R compatible CD player in your home or car. [Data CD] Audio files (MP3 or PCM) are copied to a CD-R/RW disc without conversion. You can play the disc on a computer, but not on an audio CD player. Right-click Burn List Click 3. Insert a new CD-R/RW disc into the CD-R/RW drive. 4. Drag and drop the audio files you wish to copy to the Burn List pane in the Windows Media Player panel. 5. Click [Start Burn] to start copying the files to the CD-R/RW disc. POCKETRAK W24 Reference Manual 72 13 Using the Recorder as a Music Player 13 Using the Recorder as a Music Player If you install Windows Media Player or iTunes on your computer and transfer music files to the connected recorder, you can use the unit as a music player. Please visit the Microsoft website for information on how to obtain Windows Media Player. http://www.microsoft.com/windows/windowsmedia/ Note: · This section uses Windows XP and Widows Media Player 11 as examples. · Copying commercially-available music data is strictly prohibited except for your personal use. · Yamaha makes no representations or warranties with regard to the content of files, and cannot be held responsible for the failure of transfers or downloads, or for damage or erasure of music files due to malfunction of the unit or your computer. Ripping CDs (Creating compatible music files from music CDs) You can import music files from music CDs into your computer and convert them to MP3 or WMA files so that they can be played on the recorder. 1. From the [Start] menu, select [All Programs], then click [Windows Media Player] to start Windows Media Player. 2. Right-click [Rip] in the menu bar, then select [Format] → [mp3]. Right-click POCKETRAK W24 Reference Manual 73 13 Using the Recorder as a Music Player 3. Click [Rip] in the menu bar. Click Check Click 4. Insert a music CD into the computer’s CD-ROM drive. Note: · If your computer has access to the Internet, the system will automatically obtain and display music information related to the CD. 5. Check the box for each song that you wish to rip to your computer, then click [Start Rip]. The system starts ripping the CD. Note: · You can also set Windows Media Player so that inserting a music CD will automatically start ripping. POCKETRAK W24 Reference Manual 74 13 Using the Recorder as a Music Player Transferring music files to the Recorder (Sync function) You can transfer audio files (ripped from a music CD to a computer) to the recorder for playback. For information on how to rip a music CD, refer to the “Ripping CDs (Creating compatible music files from music CDs)” on page 73. 1. From the [Start] menu, select [All Programs], then click [Windows Media Player] to start Windows Media Player. 2. Click [Sync] in the menu bar. 3. Connect the recorder to the computer. Note: · If the system displays the “Device Setup” window, click [Finish]. 4. Right-click [Sync] in the menu bar, then select [Pocketrak] or [Pocketrak SD] → [Advanced Options…]. 5. Check the box for “Create folder hierarchy on device” on the [Sync] tab, then click [OK]. Check Note: · If the box has already been checked by default, the folder may not be created. Remove the check from the box, then check the box again, and then click [OK]. POCKETRAK W24 Reference Manual 75 13 Using the Recorder as a Music Player 6. Drag and drop the desired music files from the Library pane in the left column of the window to the Sync List pane in the right column of the window. Click 7. Click [Start Sync]. The files will be transferred to the recorder. POCKETRAK W24 Reference Manual 76 13 Using the Recorder as a Music Player Playing back tracks in a specific sequence The recorder features the Playlist function, offering five Playlist files PLIST 1–5.M3U (see page 44). You can also create a Playlist using the computer to play back tracks in the desired sequence. ☞ Using the Playlist function (available only for the MUSIC folder) (page 44) Creating a Playlist You can create a Playlist to play back tracks in a desired sequence. The recorder supports playlist files that are in M3U format with the extension “.m3u”. An M3U format file stores multimedia playlists that specify the location of media files (such as MP3 files). 1. From the [Start] menu, select [All Programs] → [Accessories], then click to open [Notepad]. 2. Enter the file names included in the MUSIC (M) folder into the Playlist in the desired sequence. Enter the file names into the Playlist in the following format: “Drive name:\Folder name\File name”. See the example below. Note: · To make sure that you enter each file name correctly, check the properties of the music file that you wish to include in the Playlist, copy the displayed file name, then paste the name into a Playlist you create using Notepad. Drive name Folder name File name 3. From the [File] menu, select [Save As…], then name the file “xxx(file name).m3u” to save the Playlist. 4. Transfer the saved Playlist file to the MUSIC (M) folder on the recorder (see page 71). Be sure to transfer the Playlist file directly to the root level of the MUSIC (M) folder. Note: · You must place the Playlist file at the root level of the MUSIC (M) folder, NOT in any sub-folder inside the MUSIC folder. · You can assign up to 99 tracks to each Playlist. 5. Disconnect the recorder from the computer (see page 64). Hint: · For information on how to play tracks from the Playlist, refer to page 27. POCKETRAK W24 Reference Manual 77 14 Installing Cubase AI 14 Installing Cubase AI The recorder ships with a DVD disc that contains the DAW software “Cubase AI.” You can use this software to edit and mix audio files. This section explains how to install Cubase AI. Refer to the PDF documentation supplied with Cubase AI (Getting Started and Operation Manual, opened from the “Help” menu). Note: · You can not copy audio files to a CD-R disc by using Cubase AI. To copy audio files to a CD-R disc, refer to page 72. IMPORTANT Since the End-User Software License Agreement (EUSLA) displayed on your computer when you install the DAW software is superseded by the agreement in the included Owner’s Manual (printed version), you should disregard the EUSLA. Please read the Software License Agreement in the included Owner’s Manual carefully, and install the software if you agree to it. 1. Start the computer and log on to the Administrator account. 2. Insert the Cubase AI DVD-ROM into the DVD-ROM drive. 3. When the “WELCOME TO CUBASE AI” window appears, choose your preferred language by clicking on the corresponding national flag icon. 4. Click “Install CUBASE AI.” 5. Follow the onscreen instructions to install the software. Note: · In order to have continuous use of Cubase AI, including support and other benefits, you will need to register the software and activate your software license by starting it while the computer is connected to the Internet. Click the “Register Now” button shown when the software is started, then fill in all required fields for registration. If you do not register the software, you will be unable to use it after a limited period of time expires. POCKETRAK W24 Reference Manual 78 15 Appendix 15 Appendix Error messages The following table explains the error messages that you may see during operation of the recorder. Unit status or function Low battery Error message LOW BATTERY! REPLACE BATTERY The battery is exhausted. Replace the battery with a new one. MEMORY FULL! The internal memory or the microSD card does not have sufficient free space for recording. FILE FULL! You attempted to record more files than the maximum number of files allowed for the selected folder. NO DATA! You pressed the [PLAY/SPEED ] button but the selected folder contains no files. CANNOT CHANGE PLAYBACK SPEED! You attempted to change the playback speed while playing back a PCM recording. You cannot change the playback speed of PCM (WAV) files. INDEX FULL! You attempted to insert more index marks than the maximum number (36) of index marks allowed per file. No more index marks will be recorded. CANNOT DIVIDE! FOLDER FULL! You attempted to divide a file when the corresponding folder contains the maximum number of files allowed. CANNOT DIVIDE! MEMORY FULL! The internal memory or the microSD card does not have sufficient free space to divide a file. CANNOT DIVIDE! REC TIME TOO SHORT ! The recording is too short in duration to divide. CANNOT DIVIDE! AT THIS POINT You cannot divide the file at the current point. Recording Playback Editing (Index) Editing (File division) Description POCKETRAK W24 Reference Manual 79 15 Appendix Unit status or function Error message Description CANNOT FADE IN! FILE TOO SHORT! The file is too short in duration (ten seconds or less) to apply the fade in effect. CANNOT FADE OUT! FILE TOO SHORT! The file is too short in duration (ten seconds or less) to apply the fade out effect. CANNOT FADE IN! READ-ONLY FILE! You attempted to apply the fade in effect to a file other than a PCM (WAV) file. You cannot apply the fade in effect to any files other than PCM (WAV) files. CANNOT FADE OUT! READ-ONLY FILE! You attempted to apply the fade out effect to a file other than a PCM (WAV) file. You cannot apply the fade out effect to any files other than PCM (WAV) files. MEMORY FULL! The internal memory or the microSD card does not have sufficient free space for applying the fade in or out effect. Editing (General) CANNOT EDIT! READ-ONLY MODE! You attempted to edit a file in the MUSIC folder using the [EDIT MENU]. List screen NO FILE The selected folder does not contain any files that can be played on the unit. CANNOT EDIT! READ-ONLY MODE! You attempted to edit a file in the Recycle bin folder using the [EDIT MENU]. FOLDER FULL! You cannot move the file from the Recycle Bin to its original folder because the folder contains the maximum number of files allowed. RECYCLE BIN FULL! You attempted to delete a file while the Recycle Bin function was turned on and the Recycle Bin folder contained the maximum number of files allowed (199 files). PLEASE EMPTY THE RECYCLE BIN FIRST! The internal memory or microSD card does not have sufficient free space, and files or folders cannot be deleted. Empty the Recycle Bin folder. NO MEDIA! You attempted to record or play back a file with no microSD card inserted inserted. Insert a microSD card. SD CARD ACCESS ERROR! INSERT AGAIN! The recorder did not recognize the inserted microSD card, or the card is broken. Try inserting the card again. SD CARD WRITE SPEED TOO SLOW! PCM recording was incomplete or the data was not written correctly. Editing (Fade in/fade out) Recycle Bin microSD card POCKETRAK W24 Reference Manual 80 15 Appendix Unit status or function Playlists Error message Description NO MORE FILE FOR THIS PLAYLIST! You attempted to assign a 100th file to one of the Playlists (PLIST). PLAYLIST CAN BE EDITED ONLY IN MUSIC FOLDER You attempted to select a file in a folder other than the MUSIC (M) folder and assign it to one of the Playlist (PLIST). TOO MANY FILES FOR A PLAYLIST! You attempted to assign more than 100 files to one of the Playlists (PLIST). NO FILE IN PLAYLIST! The original file of the track assigned to one of the Playlist (PLIST) has been deleted. PLAYLIST FILE CANNOT BE SELECTED You selected a Playlist (PLIST) while the list screen is displayed and pressed the [SCENE/ PHRASE] button. Troubleshooting The unit does not operate. Possible cause Battery is not inserted properly or is exhausted. Corrective action Reinsert the battery correctly or replace it with a new battery (refer to the Owner’s Manual). Buttons do not work. Possible cause The Hold function is set. Corrective action Set the [HOLD] switch (located on the rear panel of the unit) to its original position to cancel the Hold function. Possible cause The USB terminal is still connected to the computer. Corrective action Disconnect the unit from the computer (see page 64). The unit does not recognize the inserted microSD card. Possible cause The microSD card is not inserted correctly. Corrective action Turn off the power to the unit, then insert the microSD card correctly. Possible cause The microSD card was formatted on a computer or device other than the recorder. Corrective action Use the recorder to format the microSD card (see page 53). POCKETRAK W24 Reference Manual 81 15 Appendix No sound. Possible cause The volume is turned down too low. Corrective action Use the [VOL +/–] button to adjust the volume level. Files in the MIC (A–D), LINE or Recycle Bin ( ) folders cannot be played. Possible cause The file name is wrong. Corrective action If you change the file name on a computer, then move the file back to the MIC (A–D) folder, you cannot play the file on the unit. Transfer the file to the MUSIC (M) folder to play it. Possible cause The audio file is not in the type of WAV format that is supported by the unit. Corrective action The unit will not play back a WAV file that was not recorded on the unit. Files in the MUSIC (M) folder cannot be played (correctly or at all). Possible cause The file is not in a playable format. Corrective action Use MP3 or WMA files. Possible cause The audio file is not in the type of PCM (WAV) format that is supported by the unit. Corrective action The unit will not play back a WAV file that was not recorded on the unit. Possible cause The file was transferred to an incorrect destination. Corrective action The unit will not play files that were transferred from a computer to a folder other than the MUSIC (M) folder. Be sure to transfer the file to the MUSIC (M) folder in the [PRW24] or [PRW24SD]. Possible cause The file is not compatible with the unit. Corrective action Create a file using different MP3/WMA encoder software. Possible cause The files listed in the Playlist are missing from the MUSIC (M) folder. Corrective action Delete the file names from the Playlist. Alternatively, transfer the missing files to the MUSIC (M) folder. Possible cause The maximum number of playable files has been exceeded. Corrective action The unit can play back up to 199 files per folder. If the folder contains subfolders, the maximum number of playable files will be reduced by the number of sub-folders. Store extra files in another folder. POCKETRAK W24 Reference Manual 82 15 Appendix A file cannot be divided. Possible cause The internal memory or the microSD card may have insufficient free space. Corrective action Erase unnecessary files (see page 51). Possible cause The file is too short to divide. Corrective action The minimum file length required for the file division operation varies with the recording mode (see page 41). A file cannot be erased. Possible cause The attribute of the file is set to “read only.” Corrective action Connect the unit to a computer and change the file attribute or erase the file using the computer. Alternatively, format the microSD card (see page 53). [PRW24] or [PRW24SD] icon does not appear when you connect the unit to the computer. Possible cause The unit is not connected to the computer correctly. Corrective action Make sure that the USB cable is securely and correctly connected to the unit and to the computer (see page 63). Possible cause Power supplied from the computer to the unit is insufficient. Corrective action If the recorder is connected via a bus-powered USB hub, remove the hub, then use the included USB cable to connect the recorder directly to the computer’s USB terminal. Alternatively, use a self-powered USB hub (with the power adaptor). If the computer features multiple USB terminals, use a different USB terminal to connect the recorder (see page 63). Possible cause A network drive has been assigned. Corrective action If a network drive has been assigned, the drive letter (an alphabet letter used as the drive name) is already taken. In this case, [PRW24] or [PRW24SD] icon may not be created. Change the network drive assignment, then reconnect the unit. Consult your network administrator regarding how to reassign the network drive. Possible cause The connected computer does not recognize the recorder. Corrective action If the computer does not recognize the unit, try connecting it again. If you connect the unit to any computer other than those supported by the unit, Yamaha will not guarantee the operation of the unit (see page 63). POCKETRAK W24 Reference Manual 83 15 Appendix The file transfer speed (from the computer to the unit) is slow. Possible cause The unit is connected to a USB1.1 terminal on the computer. Corrective action Connect the unit to a USB2.0 High Speed terminal. When the unit is connected to the computer, the unit does not display the “Connected” icon. Possible cause The unit is not connected to the computer correctly. Corrective action In some cases, the unit may not display the “Connected” icon or may not be recognized when it is connected to a computer. Disconnect the unit from the computer, then reconnect it. The recorded audio sounds noisy. Possible cause Wind noise has been recorded. Corrective action The built-in stereo microphone is highly sensitive. Therefore, a slight breeze or breath — even a weak air conditioning breeze that hits the microphones directly — will be recorded as noise. To reduce the level of wind and other environmental noise: • Use the recorder with the wind screen (protection against wind and sibilance) attached to the built-in stereo microphones. • Turn on the High Pass Filter via menu item [HPF] (see page 21). • Set the [MIC SENS] (microphone sensitivity) switch to [LOW]. The recorded sound is distorted. Possible cause The microphone sensitivity level may not be appropriately set. Corrective action • Set the [MIC SENS] (microphone sensitivity) switch to [LOW]. If you still hear distortion, set the High Pass Filter to ON and attach the windscreen to the recorder (see page 21). • If the ALC function is turned off, set the recording peak limiter to ON (see page 21). The recorded sound skips. Possible cause • The microSD card was formatted not on the recorder, but on a computer or other device. • The microSD card may be fragmented significantly. Corrective action Use the recorder to format the microSD card (see page 53). Possible cause You are using a microSD card that is not recommended by Yamaha. Corrective action Use a microSD card that is recommended by Yamaha (refer to the Owner’s Manual). POCKETRAK W24 Reference Manual 84 15 Appendix The date and time are displayed incorrectly. Corrective action Set the correct date and time (see page 58). Deleting files does not increase the amount of free space. Possible cause The Recycle Bin function is turned on. Corrective action Empty the Recycle Bin (see page 50). The timer does not work properly. (The timer recording failed.) Possible cause The calendar was initialized. Corrective action Set the calendar (date and time) (see page 58). Possible cause The folder to which to record is full. Corrective action • Delete unnecessary files (see page 51). • Select a different folder to which to record. Possible cause The battery is exhausted. Corrective action Replace the battery (refer to the Owner’s Manual). Possible cause The internal memory or microSD card may not have sufficient free space. Corrective action Delete unnecessary files (see page 51). Possible cause The microSD card has been selected as the recording destination, but the card has not been inserted in the recorder. Corrective action Insert a microSD card in the recorder. The recorder does not respond to remote control operation. Possible cause You attempted to operate the remote control from beyond its effective range. Corrective action For more information about the effective range of the remote control, refer to the Owner’s Manual. Possible cause Direct sunlight or electric light is striking the remote sensor on the recorder. Corrective action Change the position of the lighting fixture or the recorder. Possible cause The battery is exhausted. Corrective action Replace the battery. Possible cause An object is positioned between the remote control and the remote sensor on the recorder. Corrective action Remove the object. POCKETRAK W24 Reference Manual 85 15 Appendix FAQ Q: Why do I hear a rustling noise in the recordings? A: A rustling noise may be recorded if you move the unit during recording, or even if you move your fingers while holding the unit when recording. If possible, try not to move the unit during recording. Q: How can I transfer the recordings onto tapes or MDs? A: Use a standard audio cable (with 3.5mm mini plugs) to connect the unit to your tape recorder or MD recorder, then dub the recordings to a tape or MD. Stereo headphone socket Microphone/ Line input socket Standard audio cable External recorder Compatible audio cable Socket on the external recorder Audio cable Microphone input 3.5-mm mini plug, with resistance Line input 3.5-mm mini plug, without resistance * Use a stereo audio cable. * Before dubbing the recordings, adjust the dubbing level on the unit. * You can also dub the recordings from your tape player or MD player to the unit (see page 10). Q: Are there any tips to making a good recording? A: Try a test recording to set the optimum recording mode and sensitivity, since the recording condition varies with the location and circumstances. Q: I cannot play a recorded file that was stored on the computer and transferred back to the unit. A: You may have changed the file name on the computer. If you change the file name, the file will not play, even if it is transferred back into the MIC(A–D) or LINE folder. However, you will be able to play the file if you transfer it into the MUSIC folder. POCKETRAK W24 Reference Manual 86 15 Appendix Specifications Supported OS Supported media Windows 7, Vista, XP Professional/Home Edition Mac OS X 10.4, 10.5, 10.6 microSD/SDHC card 96kHz 24bit 16bit Playback format Approx. 1hr. Approx. 1hr.50min. Approx. 2hr. 96kHz Approx. 1hr.25min. 88.2kHz Approx. 1hr.30min. 48kHz Approx. 2hr.50min. 44.1kHz MP3 Recording format 48kHz 44.1kHz PCM Recording mode and estimated available recording time (with the internal 2GB memory) 88.2kHz Approx. 55min. Approx. 3hr. 320kbps Approx. 13hr.30min. 192kbps Approx. 22hr.30min. 128kbps Approx. 34hr. 64kbps Approx. 68hr. 32kbps Approx. 136hr. MP3, PCM (WAV) MP3 (MPEG1 LAYER3, MPEG2 LAYER3), WMA PCM (Only files recorded on this unit are supported.) PCM Frequency response (recording with an external microphone) MP3 96kHz/24, 16bit 40Hz–47kHz 88.2kHz/24, 16bit 40Hz–43kHz 48kHz/24, 16bit 40Hz–23kHz 44.1kHz/24, 16bit 40Hz–21.7kHz 320kbps 40Hz–21kHz 192kbps 40Hz–20kHz 128kbps 40Hz–17kHz 64kbps 40Hz–7.6kHz 32kbps 40Hz–6.7kHz 60–20,000Hz (PCM recording) Frequency response (recording with the built-in microphone) * The high end frequency response varies with the recording mode that was selected for recording with an external microphone. The low end response is 60Hz in all MP3 recording modes. Frequency response (playback) 20–23,000Hz Sampling frequency 16kHz–96kHz 16–320kbps (MP3) Bit rate (playback) 32–192kbps (WMA) * Some files may not be played back correctly. Connectors POCKETRAK W24 Reference Manual USB mini, Stereo headphones 3.5-mm mini, Stereo microphone (line input) 3.5-mm mini, microSD card slot 87 15 Appendix Operating temperature +5°C – +35°C (+41°F – +95°F) Output (headphones) 10mW + 10mW (at 16Ω load) Power supply “AA/LR6” alkaline battery (1) or “AA” nickel-metal hydride battery (1) Alkaline battery: Battery life for recording MP3 64kbps Approx. 56 hours, PCM 44.1kHz 16bit Approx. 38 hours (Recording condition: Recording LED off, backlight off, no recording monitoring, ALC on) Alkaline battery: Battery life for playback through headphones MP3 64kbps Approx. 70 hours, PCM 44.1kHz 16bit Approx. 45 hours (Playback condition: Playback LED off, backlight off, FLAT sound EQ) Battery life for playback through the speaker Alkaline battery: MP3 64kbps Approx. 43 hours, PCM 44.1kHz 16bit Approx. 36 hours (Playback condition: Playback LED off, backlight off, FLAT sound EQ) Dimensions Approx. 46.5 (W) x 129.5 (H) x 17.5 (D) mm 1-13/16 (W) x 5-1/8 (H) x 11/16 (D) inch Weight Approx. 92 g (3.2 oz) (including an alkaline battery) Included accessories AA/LR6 alkaline battery (1) Wireless remote control (1) Lithium battery(CR2025) (1) Microphone stand adapter (1) Windscreen (1) DVD-ROM (1) USB cable (1) Owner’s Manual (1) • Battery life varies depending on the type and manufacturer of the battery, storage conditions, usage, ambient temperature, etc. The battery life values listed above are estimates and are not guaranteed. • The battery life of a nickel-metal hydride battery is about 70% of that of an alkaline battery. Also, the voltage of a nickel-metal hydride battery is different from that of an alkaline battery. Therefore, the remaining battery power for a nickel-metal hydride battery may not be displayed correctly. You cannot charge a nickel-metal hydride battery using the unit. • The available recording time refers to the optimal total recording time available for all folders, and assumes that no recorded data exists in the internal memory and that one continuous recording is made without changing the recording mode. • The largest available recording space (for continuous recording) in one file is 2GB. If the largest available recording space (2GB) is reached, recording in the next file will automatically start in about two seconds (when using a microSDHC card). However, you will be unable to record continuously beyond the battery life. • When you purchase the recorder, the manuals are stored in PDF format in the internal memory. Therefore, the actual available recording time is less than the above time. • Specifications and descriptions in this owner’s manual are for information purposes only. Yamaha Corp. reserves the right to change or modify products or specifications at any time without prior notice. Since specifications, equipment or options may not be the same in every locale, please check with your Yamaha dealer. POCKETRAK W24 Reference Manual 88 Appendix Index Symbols button ................................................ 4 button ................................................ 4 F A-B Repeat playback ................................ 31 Alarm....................................................... 54 ALC (Auto Level Control) ......................... 17 ALC ON/OFF switch................................... 6 Audio cable........................................ 10, 86 Audio files ................................................ 71 Auto Divide.............................................. 23 Auto Power Off ........................................ 60 Available recording time .......................... 87 Fade in ..................................................... 42 Fade out ................................................... 42 FAQ .......................................................... 86 Fast forwarding......................................... 28 Fast reversing............................................ 28 File............................................................ 65 File names .......................................... 41, 70 Folder ....................................................... 65 Folder structure ........................................ 69 FOLDER/A-B REPEAT button........................ 5 Formatting the internal memory/ a microSD card ...................................... 53 Frequency........................................... 18, 34 B H A Backlight.................................................. 61 Battery cover.............................................. 6 Beat ......................................................... 39 Beep sound.............................................. 59 Bit rate....................................................... 8 Built-in stereo microphone......................... 5 C Calibrating............................................... 37 CD..................................................... 72, 73 CD player ................................................ 10 Computer ................................................ 63 Contrast................................................... 61 Cubase AI ................................................ 78 D Date ........................................................ 58 DELETE button........................................... 6 Deleting Deleting a selected file......................... 51 Deleting all data .................................. 53 Deleting all files from a folder .............. 52 Dividing files ............................................ 40 Headphones ............................................. 28 Headphones socket..................................... 6 High Pass Filter (HPF) ................................ 21 HOLD switch .............................................. 6 I Index marks .............................................. 43 Indicators displayed during playback ........ 27 Initializing ................................................. 62 Formatting the internal memory/ a microSD card.................................. 53 Initializing the menu settings................ 62 Input (recording level) .............................. 13 L LCD screen ............................................. 4, 8 LED................................................. 5, 25, 60 Level meter........................................... 8, 27 Linear PCM ................................................. 8 LIST/INDEX button ..................................... 5 Locating the file to play back .................... 28 Locating the index .................................... 28 E EDIT MENU ............................................. 40 Editing Files ............................................. 40 EQ (equalizer) .................................... 18, 34 Error messages......................................... 79 External audio device ............................... 10 External microphone.................................. 9 POCKETRAK W24 Reference Manual 89 Appendix M S Manual ...................................................... 3 MD .......................................................... 86 MENU RESET ........................................... 62 MENU/ENTER button................................. 4 Metronome ............................................. 38 MIC SENS HIGH/LOW switch............... 6, 17 MIC/LINE socket .................................. 5 Microphone............................................... 9 Microphone sensitivity ............................. 17 Microphone stand (adapter) ...................... 6 microSD card....................................... 6, 53 MP3..................................................... 8, 16 Music....................................................... 73 SCENE/PHRASE button ............................... 5 Self timer .................................................. 24 Skip playback............................................ 30 Sound EQ (equalizer) ................................ 34 Sound quality ........................................... 16 Speaker....................................................... 6 Specifications............................................ 87 Speed Changing the playback speed .............. 29 Setting the metronome tempo (speed) .............................................. 38 STANDBY mode........................................ 13 Stereo mini plug ....................................... 10 STOP/ESC button .................................. 4 Storing ............................................... 65, 69 Sync ......................................................... 75 P PCM (WAV) ......................................... 8, 16 Pitch ........................................................ 37 PLAY/SPEED button .............................. 5 Playback .................................................. 26 Playing back files ................................. 26 Playing back tracks from the Playlist .... 27 Repeat playback .................................. 32 Using the A-B Repeat playback function............................................ 31 Using the Phrase playback function ..... 31 Using the Skip playback function......... 30 Playback speed ........................................ 29 Playlist ............................................... 44, 77 POWER button........................................... 5 Preference settings................................... 58 Preset Recording EQ ...................................... 18 Recording scene .................................. 12 R REC/PAUSE button ............................... 4 Recording Recording from an external audio device (such as a CD player) ........................ 10 Recording EQ (equalizer) ......................... 18 Recording mode ...................................... 16 Recording peak limiter ............................. 21 Recording scene....................................... 12 Recycle Bin .............................................. 47 Remote control .................................... 7, 59 Repeat playback................................. 31, 32 Ripping CDs............................................. 73 POCKETRAK W24 Reference Manual T Tempo...................................................... 38 Threaded socket for attaching a tripod ....... 6 Time ......................................................... 58 TIME SEARCH ........................................... 33 Timer........................................................ 54 Transferring files ....................................... 71 tripod ......................................................... 6 Troubleshooting ................................. 64, 81 Tuner........................................................ 37 U USB terminal............................................... 6 USER................................................... 20, 36 V VAS (Voice Activated System).................... 22 Version ..................................................... 62 Voice sensing level (VAS value) ................. 22 VOL + / – button ........................................ 4 Volume ....................................................... 4 W Windows Media Player.............................. 72 U.R.G., Pro Audio & Digital Musical Instrument Division, Yamaha Corporation © 2009 Yamaha Corporation 004IP-B0 90-
 1
1
-
 2
2
-
 3
3
-
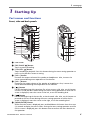 4
4
-
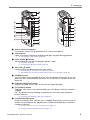 5
5
-
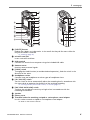 6
6
-
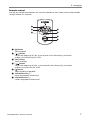 7
7
-
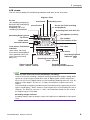 8
8
-
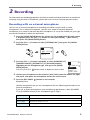 9
9
-
 10
10
-
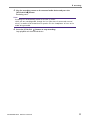 11
11
-
 12
12
-
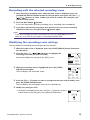 13
13
-
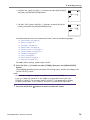 14
14
-
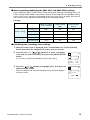 15
15
-
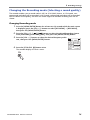 16
16
-
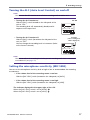 17
17
-
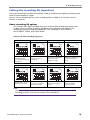 18
18
-
 19
19
-
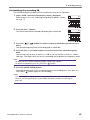 20
20
-
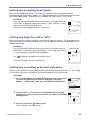 21
21
-
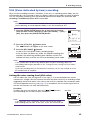 22
22
-
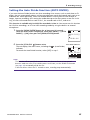 23
23
-
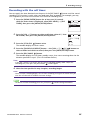 24
24
-
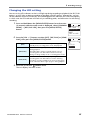 25
25
-
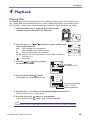 26
26
-
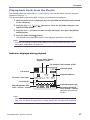 27
27
-
 28
28
-
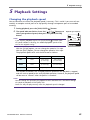 29
29
-
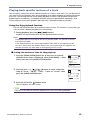 30
30
-
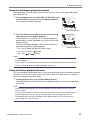 31
31
-
 32
32
-
 33
33
-
 34
34
-
 35
35
-
 36
36
-
 37
37
-
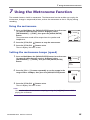 38
38
-
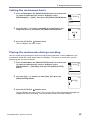 39
39
-
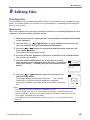 40
40
-
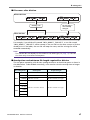 41
41
-
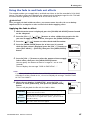 42
42
-
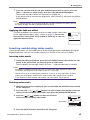 43
43
-
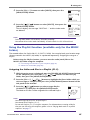 44
44
-
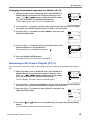 45
45
-
 46
46
-
 47
47
-
 48
48
-
 49
49
-
 50
50
-
 51
51
-
 52
52
-
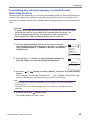 53
53
-
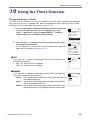 54
54
-
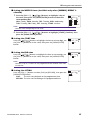 55
55
-
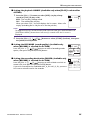 56
56
-
 57
57
-
 58
58
-
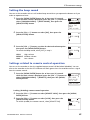 59
59
-
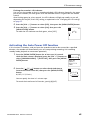 60
60
-
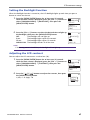 61
61
-
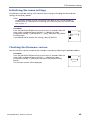 62
62
-
 63
63
-
 64
64
-
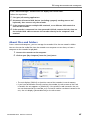 65
65
-
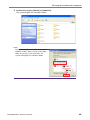 66
66
-
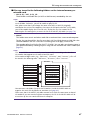 67
67
-
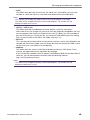 68
68
-
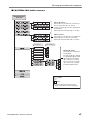 69
69
-
 70
70
-
 71
71
-
 72
72
-
 73
73
-
 74
74
-
 75
75
-
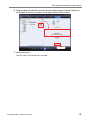 76
76
-
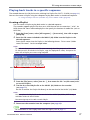 77
77
-
 78
78
-
 79
79
-
 80
80
-
 81
81
-
 82
82
-
 83
83
-
 84
84
-
 85
85
-
 86
86
-
 87
87
-
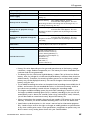 88
88
-
 89
89
-
 90
90


Yamaha POCKETRAK C24 Manual de usuario
- Categoría
- Dictáfonos
- Tipo
- Manual de usuario
- Este manual también es adecuado para
en otros idiomas
- français: Yamaha POCKETRAK C24 Manuel utilisateur
- italiano: Yamaha POCKETRAK C24 Manuale utente
- English: Yamaha POCKETRAK C24 User manual
- Deutsch: Yamaha POCKETRAK C24 Benutzerhandbuch
- русский: Yamaha POCKETRAK C24 Руководство пользователя
- Nederlands: Yamaha POCKETRAK C24 Handleiding
- português: Yamaha POCKETRAK C24 Manual do usuário
- dansk: Yamaha POCKETRAK C24 Brugermanual
- polski: Yamaha POCKETRAK C24 Instrukcja obsługi
- čeština: Yamaha POCKETRAK C24 Uživatelský manuál
- svenska: Yamaha POCKETRAK C24 Användarmanual
- Türkçe: Yamaha POCKETRAK C24 Kullanım kılavuzu
- suomi: Yamaha POCKETRAK C24 Ohjekirja
- română: Yamaha POCKETRAK C24 Manual de utilizare
Artículos relacionados
Otros documentos
-
Panasonic RR-XS350 El manual del propietario
-
Sony PCM-M10 Manual de usuario
-
Panasonic RR-US300 El manual del propietario
-
-
Sharp PA-VR10E Guía del usuario
-
Panasonic RR-XS410 El manual del propietario
-
-
Panasonic RRUS310E Instrucciones de operación
-
Aiwa MUSIC TRANSFER El manual del propietario
-