
1
Comfort Zone Digital Monitor
08302
User Guide
ADVERTENCIA:
POR FAVOR LEA DETENIDAMENTE LAS SIGUIENTES
ADVERTENCIAS Y TODAS LAS INSTRUCCIONES DE
MONTAJE ANTES DE UTILIZAR EL MONITOR “COMFORT
ZONE DIGITAL”. GUARDE ESTAS INSTRUCCIONES PARA
SU USO FUTURO.
TÉRMINOS USADOS EN LAS ADVERTENCIAS: El término
“Receptor” corresponde a la “Unidad del padre” y el término
“Transmisor” corresponde a la “Unidad del bebé” en el resto
de este folleto de instrucciones.
s¬¬%L¬
Monitor “Comfort Zone Digital”
no está pensado para
reemplazar la supervisión responsable y adecuada por parte
de los padres.
s¬¬#OMPRUEBE¬LA¬ACTIVIDAD¬DE¬SU¬HIJOA¬A¬INTERVALOS¬REGULARES¬
ya que este monitor no alertará a los padres de las
actividades silenciosas de un niño.
s¬
Antes de utilizar el Monitor “Comfort Zone Digital”:
-
Lea y siga cuidadosamente todas las instrucciones.
-
Lea y observe todas las advertencias en el producto y
en este folleto de instrucciones.
s¬¬0ARA¬EVITAR¬ENREDOS¬CON¬EL¬CABLE¬DEL¬ADAPTADOR¬NUNCA
#/,/15%¬%,¬#!",%¬$%.42/¬$%¬5.!¬#5.!¬/¬#/22!,¬/¬
CERCA DE ELLOS. NO coloque el receptor en ningún lugar
donde el cable del adaptador de CA quede al alcance de los
niños.
s¬¬0ARA¬EVITAR¬ESTRANGULAMIENTO¬MANTENGA¬EL¬TRANSMISOR¬A¬NO¬
menos de 6 pies (1.8 m) de distancia de la cuna.
s¬¬SIEMPRE MANTENGA EL TRANSMISOR Y EL RECEPTOR Y
LOS ADAPTADORES DE CA FUERA DEL ALCANCE DE LOS
NIÑOS.
s¬¬
Este producto no está pensado para utilizarse como
monitor médico y su uso no debe reemplazar la
supervisión por parte de adultos.
s¬¬
Es esencial comprobar con regularidad la recepción.
0OR¬FAVOR¬CONSULTE¬LA¬SECCIØN¬h)NSTALACIØNv¬PARA¬OBTENER¬
instrucciones completas.
s¬¬%L¬
Monitor “Comfort Zone Digital” está indicado
solamente para usarse en ambientes interiores.
s¬¬NUNCA use el transmisor o receptor cerca del agua.
0OR¬EJEMPLO¬NO¬LOS¬USE¬CERCA¬DE¬UNA¬BA×ERA¬UN¬LAVABO¬
FREGADERO¬DE¬LA¬LAVANDERÓA¬O¬DE¬LA¬COCINA¬EN¬UN¬SØTANO¬CON¬
HUMEDAD¬ETC
s¬¬3IEMPRE¬DESENCHUFE¬LOS¬ADAPTADORES¬DE¬#!¬DE¬LOS¬
tomacorrientes de la pared cuando no se vayan a usarse
durante periodos prolongados.
s¬¬#OLOQUE¬EL¬TRANSMISOR¬EL¬RECEPTOR¬Y¬LOS¬ADAPTADORES¬DE¬#!¬
DE¬MANERA¬QUE¬TENGAN¬VENTILACIØN¬ADECUADA¬PARA¬EVITAR¬QUE¬
estos componentes se recalienten.
Monitor “Comfort Zone Digital”
08302
Guía del Usuario
WARNING:
PLEASE READ THE FOLLOWING WARNINGS AND ALL
ASSEMBLY INSTRUCTIONS CAREFULLY BEFORE USING
THE COMFORT ZONE DIGITAL MONITOR. KEEP THESE
INSTRUCTIONS FOR FUTURE REFERENCE.
TERMS USED IN WARNINGS: 4HE¬TERM¬h2ECEIVERv¬
CORRESPONDS¬TO¬h0ARENT¬5NITv¬AND¬THE¬TERM¬h4RANSMITTERv¬
CORRESPONDS¬TO¬h"ABY¬5NITv¬IN¬THE¬REST¬OF¬THIS¬instruction
booklet.
s¬¬4HE¬#OMFORT¬:ONE¬$IGITAL¬-ONITOR¬IS¬NOT¬INTENDED¬TO¬
replace responsible and proper parental supervision.
s¬¬#HECK¬YOUR¬CHILDS¬ACTIVITY¬AT¬REGULAR¬INTERVALS¬AS¬THIS¬
MONITOR¬WILL¬NOT¬ALERT¬PARENTS¬TO¬THE¬SILENT¬ACTIVITIES¬OF¬A¬
CHILD
s¬Before using your Comfort Zone Digital Monitor:
- Read and follow all instructions carefully.
¬ ¬2EAD¬AND¬OBSERVE¬ALL¬WARNINGS¬ON¬THE¬PRODUCT¬AND¬IN¬
¬ ¬¬THIS¬INSTRUCTION¬BOOKLET
s¬¬4O¬PREVENT¬ENTANGLEMENT¬WITH¬THE¬ADAPTER¬CORD¬NEVER
PLACE THE CORD IN OR NEAR A CRIB OR PLAYPEN.
DO NOT¬PLACE¬THE¬2ECEIVER¬ANYWHERE¬THAT¬ITS¬!#¬ADAPTER¬
CORD¬IS¬WITHIN¬REACH¬OF¬CHILDREN
s¬¬4O¬PREVENT¬STRANGULATION¬KEEP¬4RANSMITTER¬AT¬LEAST¬¬FEET¬
away from crib.
s¬¬ALWAYS¬+%%0¬4(%¬42!.3-)44%2¬2%#%)6%2¬!.$¬!#¬
ADAPTERS OUT OF REACH OF CHILDREN.
s¬¬4HIS¬PRODUCT¬IS¬NOT¬INTENDED¬TO¬BE¬USED¬AS¬A¬MEDICAL¬
MONITOR¬AND¬ITS¬USE¬SHOULD¬NOT¬REPLACE¬ADULT¬SUPERVISION¬
s¬¬)T¬IS¬ESSENTIAL¬TO¬CHECK¬RECEPTION¬REGULARLY¬0LEASE¬SEE¬
THE¬h3ET5Pv¬SECTION¬FOR¬COMPLETE¬INSTRUCTIONS
s¬¬4HE¬#OMFORT¬:ONE¬$IGITAL¬-ONITOR¬IS¬INTENDED¬FOR¬INDOOR¬
use only.
s¬¬NEVER¬USE¬THE¬4RANSMITTER¬OR¬2ECEIVER¬NEAR¬WATER¬&OR¬
EXAMPLE¬DO¬NOT¬USE¬NEAR¬A¬BATHTUB¬BATHROOM¬SINK¬
LAUNDRY¬TUB¬KITCHEN¬SINK¬IN¬A¬WET¬BASEMENT¬ETC
s¬¬!LWAYS¬UNPLUG¬THE¬!#¬ADAPTERS¬FROM¬WALL¬OUTLETS¬DURING¬
long periods of non-use.
s¬¬0OSITION¬THE¬4RANSMITTER¬2ECEIVER¬AND¬!#¬ADAPTERS¬TO¬
ALLOW¬ADEQUATE¬VENTILATION¬AND¬PREVENT¬THESE¬COMPONENTS¬
FROM¬OVERHEATING
©2009 Dorel Juvenile Group. All Rights Reserved. Todos
derechos reservados.
www.djgusa.com (800) 544-1108 www.safety1st.com
Made in CHINA. Hecho en CHINA.
Styles and colors may vary. Los estilos y los colores pueden variar.
Distributed by (distribuido por) Dorel Juvenile Group, Inc.,
2525 State St., Columbus, IN 47201-7494
Dorel Distribution Canada, 873 Hodge, St. Laurent, QC H4N 2B1
08/14/09 4358-4636


3
Set-Up Instalación
Test Reception Guidelines:
This monitor uses digital monitoring technology and is designed to
automatically connect you to provide clear sound with no static, no
interference and a private channel.
To Choose Locations:
IMPORTANT: When choosing locations to set up the Baby Unit and
Parent Unit, follow these guidelines:
đŏŏ+.ŏ!/0ŏ/+1* ŏ-1(%05Čŏ,(!ŏ5ŏ*%0ŏąŏġŏćŏ"!!0ŏĨāċĆŏġŏĂŏ)!0!./ĩŏ
away from the baby.
đŏŏ/!ŏ0$!ŏ.!*0ŏ*%0ŏ".ŏ!*+1#$ŏ35ŏ".+)ŏ0$!ŏ5ŏ*%0ŏ/+ŏ/ŏ*+0ŏ0+ŏ
get feedback.
đŏŏ1.%*#ŏ1/!ŏ+"ŏ0$!ŏ)+*%0+.Čŏ/+1* ŏ-1(%05ŏ !0!.%+.0!/ŏ/ŏ5+1ŏ.!$ŏ
the limits of the monitor’s range. If this happens, you will need to
move the Parent Unit in closer proximity to the Baby Unit.
đŏŏ &1/0ŏ0$!ŏ2+(1)!ŏ0+ŏŏ+)"+.0(!ŏ(!2!(ŏ"+.ŏ5+1.ŏ!*2%.+*)!*0ċ
Pautas de prueba de recepción:
Este monitor utiliza tecnología de monitoreo digital y está diseñado
para conectar el sistema automáticamente y proporcionar un sonido claro
y sin estática o interferencias, mediante un canal privado.
Cómo elegir las ubicaciones:
IMPORTANTE: Al elegir un lugar para instalar la unidad del bebé y la unidad
de los padres, siga estas pautas:
đŏŏ.ŏ1*ŏ)!&+.ŏ(% ŏ !ŏ/+*% +Čŏ+(+-1!ŏ(ŏ1*% ŏ !(ŏ!hŏŏ1*ŏ
distancia de 4 a 6 pies (1.5 a 2 metros) del bebé.
đŏŏ0%(%!ŏ ŏ1*% ŏ !ŏ(+/ŏ, .!/ŏ/1"%%!*0!)!*0!ŏ(!&+/ŏ !(ŏ1*% ŏ !(ŏ
!hČŏ,.ŏ-1!ŏ*+ŏ$5ŏ.!0.+(%)!*0%¨*ŏ/+*+.ċ
đŏŏ1.*0!ŏ!(ŏ1/+ŏ !(ŏ)+*%0+.Čŏ(ŏ(% ŏ !(ŏ/+*% +ŏ/!ŏ.! 1!ŏŏ)! % ŏ
-1!ŏ/!ŏ((!#ŏ(ŏ()%0!ŏ !(ŏ(*!ŏ !(ŏ)+*%0+.ċŏ%ŏ+1..!ŏ!/0+Čŏ0!* .8ŏ-1!ŏ
acercar la unidad de los padres a la unidad del bebé.
đŏŏ&1/0!ŏ!(ŏ2+(1)!*ŏŏ1*ŏ*%2!(ŏ+*"+.0(!ŏ,.ŏ/1ŏ!*0+.*+ċ
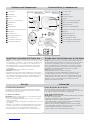
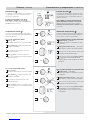
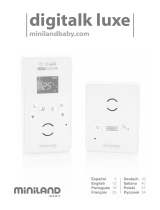
Features and Components Características y componentes
Sound Lights
LCD Display
Volume Control
Speaker
AC Ports (on back and side)
On/Off Button
Belt Clip
On/Off Button
Power On & Link Indicator (green)
Microphone
AC Adapters (2)
Rechargeable Batteries (3)
Link Indicator Icon
Low Battery Indicator Icon
Temperature Alarm Icon
Luces de sonido
Pantalla LCD
Control de volumen
Altavoz
Puerto de CA (posterior y lateral)
+0¨*ŏ !ŏ!*!* % +ĥ,# +
(%,ŏ,.ŏ%*01.¨*
+0¨*ŏ !ŏ!*!* % +ĥ,# +
Indicador de encendido y enlace (verde)
%.¨"+*+
Adaptadores de CA (2)
Baterías recargables (3)
Icono indicador de enlace
Icono de indicador de batería baja
Icono de alarma de temperatura
AA
BB
CC
DD
EE
FF
H
I
GG
HH
II
JJ
Parent Unit Unidad del padre Baby Unit Unidad de bebé
A
B
D
K
G
đŏŏNOTE: This monitor features a thermometer to help assure you that
the temperature of your baby’s room is within the comfortable and
recommended range of 61 to 68 degrees. The number shown on
the LCD display may not correspond with what’s shown on your
home thermostat due to differences in location of temperature
measurement.
đŏŏTool needed: Phillips head screwdriver (not included).
DO NOT use power tools.
đŏŏ"ŏ*5ŏ,.0/ŏ.!ŏ)%//%*#Čŏ!)%(ŏ+*/1)!.Į /ċ+)Čŏ((ŏ+*/1)!.ŏ
Relations at (800) 544-1108, or fax at (800) 207-8182. You can also visit
our website at www.safety1st.com. Have the model number (08302)
ready and date code (manufacture date) located inside battery
compartment of Parent Unit.
C
J
KK
LL
đŏŏ
NOTA:ŏ/0!ŏ)+*%0+.ŏ1!*0ŏ+*ŏ1*ŏ0!.)¨)!0.+ŏ,.ŏ51 .(!ŏŏ/!#1../!ŏ
!ŏ-1!ŏ(ŏ0!),!.01.ŏ !ŏ(ŏ$%0%¨*ŏ !ŏ/1ŏ!hŏ/!ŏ¨)+ ŏ5ŏ!/0hŏ !*0.+ŏ
!ŏ(+/ŏ()%0!/ŏ.!+)!* +/ŏĨćāŏŏćĉŏłĩċŏ/ŏ,+/%(!ŏ-1!ŏ!(ŏ*Ò)!.+ŏ-1!ŏ
,.!!ŏ!*ŏ(ŏ,*0((ŏŏ*+ŏ+..!/,+* ŏ+*ŏ(+ŏ-1!ŏ%* %ŏ!(ŏ0!.)+/00+ŏ
de su hogar debido a la diferencia de ubicaciones al medir la temperatura.
đŏŏ!..)%!*0ŏ*!!/.%čŏ!/0+.*%(( +.ŏ0%,+ŏ$%((%,/ŏĨ*+ŏ%*(1% ĩċŏ
NO utilice herramientas eléctricas.
đŏŏ%ŏ"(0ŏ(#1*ŏ,%!6Čŏ!*2!ŏ1*ŏ+..!+ŏ!(!0.¨*%+ŏŏ
+*/1)!.Į /ċ+)Čŏ(()!ŏ(ŏ!,.0)!*0+ŏ !ŏ!(%+*!/ŏ+*ŏ!(ŏ
Consumidor al (800) 544-1108, o envíe un fax al (800) 207-8182.
También puede visitar nuestro sitio web en www.safety1st.com. Tenga
ŏ)*+ŏ!(ŏ*Ò)!.+ŏ !ŏ)+ !(+ŏĨĀĉăĀĂĩŏ5ŏ!(ŏ¨ %#+ŏ !ŏ"!$ŏĨ"!$ŏ !ŏ
".%%¨*ĩČŏ-1!ŏ/!ŏŏ!*1!*0.ŏ !*0.+ŏ !(ŏ+),.0%)!*0+ŏ !ŏ(/ŏ
baterías de la unidad de los padres.
L
MM
E
F
M
N
O
N
O
N
O
Keep These Instructions For Future Use Guarde estas instrucciones para su uso futuro

ab
4
Screw
Tornillo
c
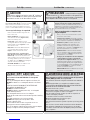
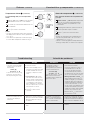
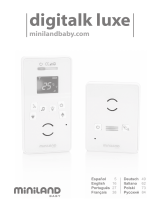
NOTE:
For initial charge, plug in Parent Unit
for 10 hours to fully charge. The Parent Unit and
Baby Unit may be used with AC power while
Parent Unit is charging. The Baby Unit uses AC
power or 3 AAA alkaline batteries (not included).
To set up, full charge is required.
Remove and discard static clings from the
front of each unit.
Battery Installation: Unscrew the screw
at the back of each Unit
(Figures a & b)
.
Remove the battery doors.
Parent Unit: Confirm that the 3 AAA
rechargeable batteries are properly installed.
Match polarity shown in Figure b. Secure
door with the screw.
Baby Unit: Install 3 AAA alkaline batteries
(not included). Match polarity shown in
Figure a. Secure door with the screw.
Recharge and AC Use: It is important to
fully charge the Parent Unit as a part of your
initial set up. You can use the Parent Unit
3$%(!ŏ.!$.#%*#Čŏ+.ŏ"+.ŏŏ-1%'!.ŏ$.#!Čŏ5+1ŏ
can charge with the power off. Connect an
AC adapter into each
(Figure c)
and plug the
opposite ends into power outlets
.
CAUTION: DO NOT use an adapter that
did not come with this product.
s¬¬#HECK¬BATTERIES¬REGULARLY¬,OW¬BATTERIES¬SYMBOL¬¬¬¬¬¬¬¬¬INDICATES¬THE¬
batteries are low. DO NOT use monitor system in portable mode
WHEN¬BATTERIES¬ARE¬LOW¬5SE¬!#¬WHEN¬BATTERIES¬ARE¬LOW
CAUTION
Para la carga inicial, enchufe la unidad de los padres
durante 10 horas para cargarla completamente.
La
unidad de los padres y la unidad del bebé pueden ser
utilizadas con CA mientras se carga la unidad de los
, .!/ċŏŏ1*% ŏ !(ŏ!hŏ10%(%6ŏ(%)!*0%¨*ŏ !ŏŏ+ŏ
tres baterías alcalinas AAA (no incluidas).
Para la configuración se requiere una
carga completa.
Retire y deseche la película adherida a la parte
delantera de cada unidad.
Instalación de la batería: Desatornille el tornillo
en la parte trasera de cada unidad (Figuras a y b).
Retire la tapa del compartimiento de baterías.
Unidad de los padres:ŏ+*"%.)!ŏ-1!ŏ(/ŏ0.!/ŏ
baterías recargables AAA (incluidas) estén
instaladas correctamente. Haga coincidir la
polaridad como se muestra en la Figura bċŏ%&!ŏ(ŏ
tapa del compartimiento con el tornillo.
Unidad del bebé: Instale tres baterías alcalinas
AAA (no incluidas). Haga coincidir la polaridad
como se muestra en la Figura aċŏ%&!ŏ(ŏ0,ŏ !(ŏ
compartimiento con el tornillo.
Recargar y uso del adaptador de CA: Es importante
cargar la unidad de los padres completamente
como parte de la configuración inicial. Puede usar la
unidad de los padres mientras se está recargando o,
para una carga más rápida, puede cargarla mientras
se encuentra apagada. Conecte un adaptador de CA
a cada unidad (Figura c) y enchufe los extremos
opuestos en tomas de corriente.
PRECAUCIÓN: NOŏ10%(%!ŏ1*ŏ ,0 +.ŏ-1!ŏ*+ŏ$5ŏ
sido provisto con este producto.
PRECAUCIÓN s¬6ERIFIQUE¬LAS¬BATERÓAS¬CON¬REGULARIDAD¬
%L¬SÓMBOLO¬DE¬BATERÓA¬BAJA¬¬¬¬¬¬¬¬¬INDICA¬QUE¬LAS¬BATERÓAS¬SE¬ESTÉN¬AGOTANDO¬3I¬LAS¬
BATERÓAS¬TIENEN¬POCA¬CARGA¬NO utilice el sistema de monitor en el modo portátil.
Utilice el adaptador de CA cuando las baterías se estén agotando.
s¬¬'UARDE¬ESTAS¬INSTRUCCIONES¬YA¬QUE¬CONTIENEN¬INFORMACIØN¬IMPORTANTE
s¬¬Utilice únicamente las baterías recargables incluidas de níquel-hidruro
metálico (NiMH) tipo “AAA” de 1.2 V y 600 mAh.
s¬¬Utilice únicamente las baterías recargables suministradas en la unidad de los
padres.
s¬NO utilice baterías alcalinas o no recargables en la unidad de los padres.
s¬¬SI LAS BATERÍAS SON REEMPLAZADAS POR UN TIPO DE BATERÍAS
).#/22%#4/¬%8)34%¬2)%3'/¬$%¬%80,/3)¼.
s¬NO¬MEZCLE¬BATERÓAS¬VIEJAS¬Y¬NUEVAS
s¬¬NO¬MEZCLE¬BATERÓAS¬ALCALINAS¬ESTÉNDAR¬CARBØNZINC¬O¬RECARGABLES¬NÓQUELCADMIO
s¬¬Las baterías no recargables no deben ser recargadas.
s¬¬!NTES¬DE¬INSTALAR¬LAS¬BATERÓAS¬VERIFIQUE¬QUE¬TODAS¬LAS¬SUPERFICIES¬DE¬
contacto estén limpias y brillantes.
s¬¬Los terminales eléctricos no deben cortocircuitarse.
s¬¬NO¬SUMERJA¬NINGUNA¬PARTE¬DEL¬PRODUCTO¬EN¬AGUA
s¬¬$ESECHE¬LAS¬BATERÓAS¬EN¬FORMA¬SEGURA
s¬¬Retire las baterías cuando desee guardar el producto por un largo período
sin uso.
s¬¬!NTES¬DE¬VOLVER¬A¬COLOCAR¬LAS¬BATERÓAS¬DESENCHUFE¬EL¬CABLE¬DE¬ALIMENTACIØN
s¬¬Utilice únicamente el adaptador de corriente provisto con este producto.
La polaridad o la tensión incorrectas del adaptador pueden provocar daños
severos al producto.
ADVERTENCIA SOBRE LAS BATERÍAS:
s¬¬+EEP¬THESE¬INSTRUCTIONS¬AS¬THEY¬CONTAIN¬IMPORTANT¬INFORMATION
s¬¬Use included 1.2V 600 mAH NiMH AAA size rechargeable
batteries only.
s¬¬5SE¬ONLY¬THE¬RECHARGEABLE¬BATTERIES¬SUPPLIED¬IN¬THE¬0ARENT¬5NIT¬
s¬¬DO NOT¬USE¬ALKALINE¬OR¬NON¬RECHARGEABLE¬BATTERIES¬IN¬THE¬0ARENT¬
Unit.
s¬¬4(%2%¬)3¬!¬2)3+¬/&¬%80,/3)/.¬)&¬4(%¬"!44%2)%3¬!2%¬
REPLACED BY AN INCORRECT TYPE.
s¬DO NOT mix old and new batteries.
s¬¬DO NOT¬MIX¬ALKALINE¬STANDARD¬CARBON¬ZINC¬OR¬RECHARGEABLE¬
(nickel-cadmium) batteries.
s¬¬.ON¬RECHARGEABLE¬BATTERIES¬ARE¬NOT¬TO¬BE¬RECHARGED
s¬¬#HECK¬THAT¬ALL¬CONTACT¬SURFACES¬ARE¬CLEAN¬AND¬BRIGHT¬BEFORE¬INSTALLING¬
batteries.
s¬¬4HE¬SUPPLY¬TERMINALS¬ARE¬NOT¬TO¬BE¬SHORTCIRCUITED
s¬¬DO NOT¬SUBMERGE¬ANY¬PART¬OF¬THE¬PRODUCT¬IN¬WATER¬
s¬¬Dispose of batteries safely.
s¬¬2EMOVE¬BATTERIES¬WHEN¬STORED¬FOR¬LONG¬PERIODS¬OF¬NONUSE
s¬¬Unplug power cord before replacing batteries.
s¬¬5SE¬ONLY¬THE¬ADAPTERS¬SUPPLIED¬WITH¬THIS¬PRODUCT¬)NCORRECT¬ADAPTER¬
POLARITY¬OR¬VOLTAGE¬CAN¬SERIOUSLY¬DAMAGE¬THE¬PRODUCT
BATTERY CAUTION:
Screw
Tornillo
Set-Up (continued) Instalación (continuación)

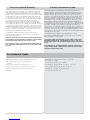
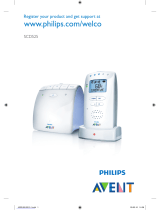
Power :
To power up both the Parent and Baby Unit,
press and hold each On/Off button
for 3 seconds, then release. The Parent Unit
will display all segments followed by two
dashes and the blue backlight will illuminate.
The Baby Unit LED will illuminate green
when powered on.
Volume Control :
There are five volume levels plus a silent level
(L0). Press the volume up or down button
repeatedly to adjust volume. More sound
LEDs will illuminate and beeping occurs as
volume increases. The LCD will display
L0 - L5. All five sound LEDs illuminate to
indicate maximum volume level is reached.
Sound Lights :
The five sound LEDs on the Parent Unit
indicate the sound levels of the baby. As
baby’s sound level increases, the sound
LEDs will illuminate upward.
TIP: You can turn the volume all the way
down to silent (L0) and monitor the sound
visually by using the sound LEDs.
Low Batteries :
When the Baby Unit or Parent Unit batteries
are low, the word “PARENT” or “BABY”: will
flash and beeping occurs once every minute
for five minutes. The Baby Unit LED will turn
red and flash.
When the batteries of both
Parent and Baby Units are low, the low battery
symbol and the words “PARENT” and “BABY”
will display under the battery symbol .
To Recharge Parent Unit Batteries:
Plug AC adapter into Parent Unit and into
a power outlet. You cannot overcharge.
While charging, the symbol segments
will scroll. Once fully charged, low battery
symbol will disappear.
NOTE: If Baby Unit AC adapter is plugged
in, the word “BABY” will not display though
its batteries are low.
Linked Indicator :
While linking, the symbol flashes in the
"+((+3%*#ŏ/!-1!*!čŏ
(đ), ((đ)), (((đ))).
When
the symbol appears solid , this indicates
that the Baby Unit and Parent Unit are in
close enough range and are connected.
M
N
HF
C
A
5
Features Características y componentes
F
. . .
. . .
H
. . . . . .
. . . . . . . . . . . .
M
N
. . . . . .
C
Encendido :
Para encender la unidad de los padres y la
unidad del bebé mantenga oprimidoŏ!(ŏ+0¨*ŏ
de encendido/apagado durante 3 segundos y
suéltelo. La pantalla de la unidad de los padres
mostrará todos los segmentos, seguidos
de dos guiones, y se encenderá la luz de
fondo azul. Cuando la unidad del bebé esté
encendida, el LED se verá de color verde.
Control de volumen :
Hay cinco niveles de volumen, más un nivel
de silencio (L0). Si desea ajustar el volumen,
oprima los botones para subirlo o bajarlo.
ŏ)! % ŏ-1!ŏ1)!*0!ŏ!(ŏ2+(1)!*Čŏ/!ŏ
encenderán más LED de sonido y se oirán
“bips” . La pantalla LCD mostrará los niveles L0
a L5. Los cinco LED de sonido se encenderán
,.ŏ%* %.ŏ-1!ŏ/!ŏ$ŏ(*6 +ŏ!(ŏ*%2!(ŏ !ŏ
volumen máximo.
Luces de sonido :
Los cinco LED de sonido de la unidad de los
padres indican el nivel de sonido del bebé. A
)! % ŏ-1!ŏ(+/ŏ/+*% +/ŏ !(ŏ!hŏ1)!*0!*Čŏ(+/ŏ
LED de sonido se irán iluminando hacia arriba.
CONSEJO: Puede bajar el volumen hasta el
nivel de silencio (L0) y monitorear el sonido
visualmente utilizando los LED de sonido.
Batería baja :
Cuando las baterías de la unidad de los padres
o de la unidad del bebé se estén agotando, las
palabras “PARENT” (padres) o “BABY” (bebé)
aparecerán en la pantalla y se oirán “bips” una
vez por minuto o cada cinco minutos. El LED
de la unidad del bebé se mostrará de color rojo
y parpadeará. Cuando las baterías de ambas
unidades se estén agotando, el símbolo de
batería baja y las palabras “PARENT” o “BABY”
aparecerán debajo del símbolo de la batería
.
Para recargar las baterías de la unidad de
los padres:
Enchufe el adaptador de CA en
la unidad de los padres y en una toma de
corriente. Las baterías no pueden sobrecargarse.
Mientras las baterías se estén cargando, los
segmentos del símbolo de batería se
!*!* !.8*ŏ/1!/%2)!*0!ċŏ*ŏ2!6ŏ-1!ŏ(ŏ
unidad esté completamente cargada, el símbolo
de batería baja desaparecerá.
NOTA: Si el adaptador de CA de la unidad del
bebé está enchufado, la palabra “BABY” no
,.!!.8ŏ!*ŏ(ŏ,*0((ŏ1*-1!ŏ/1/ŏ0!./ŏ/!ŏ
estén agotando..
Indicador de enlace :
Cuando las unidades estén estableciendo
el enlace, el símbolo parpadeará en la
/%#1%!*0!ŏ/!1!*%čŏĨđĩČŏĨĨđĩĩČŏĨĨĨđĩĩĩċŏ1* +ŏ
!(ŏ/)+(+ŏ-1! ŏ!/0(!ŏŏŏŏŏŏČŏ%* %ŏ-1!ŏ(ŏ
unidad del bebé y la unidad de los padres están
suficientemente cerca y conectadas.
M
N
HF
C
A

LCD Display
B
:
The LCD will constantly display the temperature
of your baby’s room. The temperature scale is
"0+.5ŏ/!0ŏ0+ŏ$.!*$!%0ċŏ
To Change Temperature Scale From
Fahrenheit to Celsius (or vice versa):
Press volume up or down button and hold for 3
seconds until there is a beep.
Temperature Alarm O:
You can
set a desired temperature that triggers
high and/or low temperature alarm (rapid beeping
and symbol flashing).
To Set “HI” Temperature Alarm:
Press once.
The alarm symbol with the word “HI” will flash.
Press and hold until the temperature and
the alarm symbol flash.
Use volume up or down button to set the
desired temperature.
Press twice to return to normal view.
When “HI” stops flashing, the high temperature
alarm has been set.
To Set “LO” Temperature Alarm:
Press twice.
The alarm symbol with the word “LO” will flash.
Press and hold until the temperature and
the alarm symbol flash.
Use volume up or down button to set the
desired temperature.
Press twice to return to normal view. When
“LO” stops flashing, the low temperature alarm
has been set.
Features (continued) Características y componentes (continuación)
. . .
3 seg.
3 Sec.
1 x
2 x
. . . . . .
B
2 x
2 x
. . . . . .
b
c
a
d
b
c
a
d
b
c
a
d
b
c
a
d
6
Pantalla de LCD
B
:
La pantalla de LCD mostrará constantemente la
0!),!.01.ŏ!*ŏ(ŏ$%0%¨*ŏ !(ŏ!hċŏŏ!/(ŏ
de temperatura viene configurada de fábrica en
#. +/ŏ$.!*$!%0ċ
Para cambiar la escala de temperatura de
grados Fahrenheit a Celsius (o viceversa):
,.%)ŏ!(ŏ+0¨*ŏ,.ŏ/1%.ŏ+ŏ&.ŏ!(ŏ2+(1)!*ŏ5ŏ
manténgalo presionado durante 3 segundos hasta
oír un “bip”.
Alarma de temperatura O:
Puede programar la temperatura deseada para
-1!ŏ0%2!ŏ(ŏ(.)ŏ !ŏ0!),!.01.ŏ(0ĥ&ŏ
(tonos rápidos y símbolo parpadeante).
Para programar la alarma de temperatura alta:
Oprima el botón una vez.
El símbolo de alarma con la palabra “HI” (alta)
parpadeará.
Mantenga presionado el botón ŏ$/0ŏ-1!ŏ(ŏ
temperatura y el símbolo de alarma parpadeen.
0%(%!ŏ!(ŏ+0¨*ŏ !ŏ/1%.ŏ5ŏ&.ŏ!(ŏ2+(1)!*ŏ,.ŏ
programar la temperatura deseada.
Para volver a la vista normal, presione el botón
dos veces.ŏŏ0!),!.01.ŏ(0ŏ-1! ŏ
,.+#.) ŏ1*ŏ2!6ŏ-1!ŏ!(ŏ/)+(+ŏėĘŏ !&ŏ !ŏ
parpadear.
Para programar la alarma de temperatura baja:
Oprima el botón dos veces.
El símbolo de alarma con la palabra “LO” (baja)
parpadeará.
Mantenga presionado el botón ŏ$/0ŏ-1!ŏ(ŏ
temperatura y el símbolo de alarma parpadeen.
0%(%!ŏ!(ŏ+0¨*ŏ !ŏ/1%.ŏ5ŏ&.ŏ!(ŏ2+(1)!*ŏ,.ŏ
programar la temperatura deseada.
Para volver a la vista normal, presione el botón
dos veces. ŏ0!),!.01.ŏ&ŏ-1! ŏ
,.+#.) ŏ1*ŏ2!6ŏ-1!ŏ!(ŏ/)+(+ŏėĘŏ !&ŏ
de parpadear.
b
c
a
d
b
c
a
d
. . . . . .
O
O

7
Features (continued) Características y componentes (continuación)
Troubleshooting Solución de problemas
Meaning Action
đŏŏThe Parent Unit and the Baby
Unit are preset to be linked
automatically.
Linked:
Not linked:
In case the link is lost by strong
interference, the units can be
linked by following these steps:
đŏŏParent Unit or Baby Unit does
not turn on. No display on
Parent Unit.
đŏŏ!! 'ŏ+1./ċ
a. Turn both units On.
b. Place Parent and Baby Units no
more than 1 foot apart. There may
be audio feedback due to close
proximity, so adjust the volume
down.
c. Press and hold the of both
units at the same time. The units
will turn off and on again within 6
seconds with P1 (or P2 if pressing
+/-) displayed on LCD when the
(%*'ŏ%/ŏ!/0(%/$! ċŏĨ+.ŏĀĉĂĈĊČŏ/ŏ
there are 2 parent units, set one as
P1 and another one as P2).
d. Press to return normal
operation.
đŏŏBatteries are exhausted. Recharge
batteries in Parent Unit and replace
batteries in Baby Unit or plug in
AC adapters.
đŏŏIncrease the distance between the
units.
Problem Action Problema Acción
Temperature Alarm O(continued):
To Turn Off High and/or Low Temperature
Alarm:
Press once for HI or twice for LO. The alarm
symbol with the word “HI” or “LO” will flash.
Use volume up or down button once to turn off
the notification.
Press to return to normal view.
NOTES:
đŏŏThe range of temperature which can be detected
* ŏ %/,(5! ŏ+*ŏŏ%/ŏāąłŏġāĂĂłŏĨ!-1%2(!*0ŏ0+ŏ
-10°C- 50°C).
đŏŏThere will be two rapid beep sounds when trying
to set the alarm temperature outside the range.
b
c
a
b
c
a
1 x
2 x
. . . . . .
Alarma de temperatura O(continuación):
Para desactivar la alarma de temperatura alta
y/o baja:
Oprima el botón una vez para la temperatura
alta o dos veces para la temperatura baja. El
símbolo de alarma con la palabra “HI” o “LO”
parpadeará.
ŏ .ŏ,#.ŏ(ŏ*+0%"%%¨*Čŏ+,.%)ŏ1*ŏ/+(ŏ2!6ŏ
!(ŏ+0¨*ŏ,.ŏ/1%.ŏ+ŏ&.ŏ!(ŏ2+(1)!*ċŏŏ
Oprima para volver a la vista normal.
NOTAS:
đŏŏ(ŏ.*#+ŏ !ŏ0!),!.01.ŏ-1!ŏ(ŏ1*% ŏ !0!0ŏ5ŏ
)1!/0.ŏ!*ŏ(ŏ,*0((ŏŏ!/ŏ !ŏāąŏłŏŏāĂĂŏłŏ
Ĩ!-1%2(!*0!/ŏŏġāĀŏłŏ5ŏĆĀŏłĩċ
đŏŏCuando se intenta programar la temperatura fuera
del rango de disponible, se oirán dos tonos rápidos.
b
c
a
đŏŏLa unidad de los padres y
la unidad del bebé están
preprogramadas para establecer
el enlace automáticamente.
Con enlace:
Sin enlace:
*ŏ/+ŏ !ŏ-1!ŏ!(ŏ!*(!ŏ/!ŏ,%!. ŏ
debido a fuertes interferencias,
las unidades pueden restablecerlo
siguiendo estos pasos:
đŏŏLa pantalla de la unidad de los
padres o de la unidad del bebé
no se enciende. La unidad de los
padres no muestra datos.
đŏŏ5ŏ.!0.+(%)!*0%¨*ċ
a. Encienda ambas unidades.
b. +(+-1!ŏ(ŏ1*% ŏ !ŏ(+/ŏ, .!/ŏ5ŏ
la unidad del bebé a no más de 1
pie (30 cm) de distancia. Debido
a la proximidad, puede producirse
.!0.+(%)!*0%¨*ŏ !ŏ/+*% +Čŏ !ŏ)+ +ŏ
-1!ŏ!/ŏ+*2!*%!*0!ŏ&.ŏ!(ŏ2+(1)!*ċ
c. Mantenga presionado el botón en
ambas unidades al mismo tiempo. Las
unidades se apagarán y se encenderán
nuevamente dentro de los siguientes 6
segundos; la pantalla LCD mostrará “P1”
(o “P2” si está presionando “+/-”) una
2!6ŏ-1!ŏ!(ŏ!*(!ŏ!/0hŏ!/0(!% +ċŏĨ.ŏ
!(ŏ)+ !(+ŏĀĉĂĈĊČŏ !% +ŏŏ-1!ŏ$5ŏ +/ŏ
unidades de los padres, debe programar
una como “P1” y la otra como “P2”).
d. ,.%)ŏ!(ŏ+0¨* para volver al
funcionamiento normal.
đŏŏLas baterías están agotadas. Recargue
las baterías de la unidad de los padres y
reemplace las baterías de la unidad del
bebé, o enchufe los adaptadores de CA.
đŏŏAumente la distancia entre las
unidades.

Dorel Juvenile Group, Inc. warrants to the original purchaser that
this product (Comfort Zone Digital Monitor), is free from material
and workmanship defects when used under normal conditions for a
period of one (1) year from the date of purchase. Should the product
contain defects in material or workmanship Dorel Juvenile Group,
Inc., will repair or replace the product, at our option, free of charge.
Purchaser will be responsible for all costs associated with packaging
and shipping the product to Dorel Juvenile Group Consumer
Relations Department at the address noted on front page and all
other freight or insurance costs associated with the return. Dorel
Juvenile Group will bear the cost of shipping the repaired or replaced
product to the purchaser. Product should be returned in its original
package accompanied by a proof of purchase, either a sales receipt
or other proof that the product is within the warranty period. This
warranty is void if the owner repairs or modifies the product or the
product has been damaged as a result of misuse.
This warranty excludes any liability other than that expressly
stated previously, including but not limited to, any incidental or
%*+*/!-1!*0%(ŏ )#!/ċ
SOME STATES DO NOT ALLOW THE EXCLUSION OR LIMITATION
OF INCIDENTAL OR CONSEQUENTIAL DAMAGES, SO THE ABOVE
LIMITATION OR EXCLUSION MAY NOT APPLY TO YOU.
THIS WARRANTY GIVES YOU SPECIFIC LEGAL RIGHTS, AND YOU
MAY ALSO HAVE OTHER RIGHTS THAT MAY VARY FROM STATE
TO STATE.
+.!(ŏ12!*%(!ŏ.+1,Čŏ*ċŏ#.*0%6ŏ(ŏ+),. +.ŏ+.%#%*(ŏ-1!ŏ!/0!ŏ
producto (Monitor “Comfort Zone Digital”) estará libre de defectos de
material y mano de obra cuando se utilice bajo condiciones normales
durante un periodo de un (1) año a partir de la fecha de compra. Si el
producto tuviese defectos de material o mano de obra, Dorel Juvenile
.+1,Čŏ*ċŏ.!,..8ŏ+ŏ.!!),(6.8ŏ!(ŏ,.+ 10+Čŏŏ*1!/0.ŏ+,%¨*Čŏ/%*ŏ
cargo. El comprador será responsable de todos los costos asociados
con embalar y enviar el producto al Departamento de Relaciones con
!(ŏ+*/1)% +.ŏ !ŏ+.!(ŏ12!*%(!ŏ.+1,ŏŏ(ŏ %.!%¨*ŏ%* % ŏ!*ŏ(ŏ
primera página y de todos los otros costos de envío o seguro asociados
+*ŏ(ŏ !2+(1%¨*ċŏ+.!(ŏ12!*%(!ŏ.+1,ŏ+..!.8ŏ+*ŏ(+/ŏ#/0+/ŏ !ŏ!*2%.ŏ
el producto reparado o reemplazado al comprador. El producto se
debe devolver en su embalaje original acompañado de la constancia de
+),.Čŏ5ŏ/!ŏ1*ŏ.!%+ŏ !ŏ+),.ŏ1ŏ+0.ŏ,.1!ŏ-1!ŏ !)1!/0.!ŏ-1!ŏ
el producto está dentro del periodo de garantía. Esta garantía es nula si
!(ŏ,.+,%!0.%+ŏ.!,.ŏ+ŏ)+ %"%ŏ!(ŏ,.+ 10+ŏ+ŏ/%ŏh/0!ŏ/1".%¨ŏ ¦+ŏ+)+ŏ
resultado de uso incorrecto.
/0ŏ#.*0ŏ!4(15!ŏ1(-1%!.ŏ.!/,+*/%(% ŏ-1!ŏ*+ŏ/!ŏ(ŏ
expresamente indicada anteriormente, incluyendo pero sin limitarse a
daños incidentales o consecuentes.
ALGUNOS ESTADOS NO PERMITEN LA EXCLUSIÓN O LIMITACIÓN
DE DAÑOS INCIDENTALES O CONSECUENTES, POR LO TANTO LA
LIMITACIÓN O EXCLUSIÓN ANTERIOR PODRÍA NO APLICARSE EN SU
CASO.
ESTA GARANTÍA LE OTORGA DERECHOS LEGALES ESPECÍFICOS Y
USTED PODRÍA TENER TAMBIÉN OTROS DERECHOS QUE PUEDEN
VARIAR DE UN ESTADO A OTRO.
One-Year Limited Warranty Garantía limitada de un año
8
F
or Customers in Canada
ç
-
 1
1
-
 2
2
-
 3
3
-
 4
4
-
 5
5
-
 6
6
-
 7
7
-
 8
8


Safety 1st 08302 Manual de usuario
- Categoría
- Babyphones
- Tipo
- Manual de usuario
en otros idiomas
- English: Safety 1st 08302 User manual
Artículos relacionados
Otros documentos
-
Anglecare AC1100 El manual del propietario
-
Philips SCD570/10 Manual de usuario
-
Philips AVENT SCD713/26 Manual de usuario
-
Avent SCD525/00 Manual de usuario
-
 Miniland digitalk luxe Manual de usuario
-
Angelcare AC701 El manual del propietario
-
 Miniland Baby digitalk luxe Manual de usuario
-
-
 Philips AVENT AVENT SCD525 Manual de usuario
-
Dorel Juvenile IH552TX Guía del usuario


