Bticino 361511 Instrucciones de operación
- Categoría
- Altavoces de la barra de sonido
- Tipo
- Instrucciones de operación
La página se está cargando ...
La página se está cargando ...

Audio - Kit
3
346040
PRI 110 - 240 V 50 - 60 Hz 370 mA - 225 mA
BUS 26.0 V 600 mA
BUS
PRI
PRI
BUS
230 Vac 12 V
230 Vac
346040
PRI 110 - 240 V 50 - 60 Hz 370 mA - 225 mA
BUS 26.0 V 600 mA
BUS
PRI
PRI
BUS
230 Vac 12 V
230 Vac
*
• Vecchio impianto a campanello
Impianto esistente con 3 fili e sola chiamata.
• Old system with bell
Existing system with 3 wires and just call.
• Ancienne installation a sonnette
Installation existante à 3 fils et un seul appel.
• Alte klingelanlage
Vorhandene 3-Leiter Anlage nur mit Ruffunktion.
• Vieja instalación con timbre
Instalación existente con 3 hilos y una llamada.
• Oude deurbelinstallatie
Bestaande 3-aderige installatie met alleen een
oproepfunctie.
• Antiga instalação em campaínha
Instalação existente com 3 fios e somente
chamada.
* Acquistabile separatamente
* Can be purchased separately
* Vendu séparément
* Auf Anfrage getrennt erhältlich
* A la venta por separado
* Apart verkrijgbaar
* Adquirível separadamente
• Nuovo impianto citofonico
Impianto realizzato senza modifiche ai 2 fili
esistenti: chiamata, citofono e serratura.
• New door entry system
System made without modifications to the 2 existing
wires; call, handset and electric door lock.
• Nouvelle installation phonique
Installation réalisée sans modifications sur les 2 fils
existants: appel, phone, et serrure électrique.
• Neue haustelefonanlage
Anlage ohne Änderungen an den vorhandenen
2 Leiter: Ruffunktion, Gegensprechanlage und
elektrisches Schloss.
• Nueva instalación interfónica
Instalación realizada sin las modificaciones a los
2 hilos existentes: llamada, portero y cerradura
eléctrica.
• Nieuwe deurtelefooninstallatie
Installatie aangelegd zonder wijzigingen aan de
2 bestaande aders: oproep, intercom en elektrisch
deurslot.
• Nova instalação do intercomunicador
Instalação realizada sem modificar os 2 fios
existentes: chamada, intercomunicador e
fechadura eléctrica.

4
• Cavi e distanze (mm
2
)
• Cables and distances (mm
2
)
• Câbles et distances (mm
2
)
• Kabeln und Abstände (mm
2
)
• Cables y distancias (mm
2
)
• Kabels en afstanden (mm
2
)
• Cabos e distâncias (mm
2
)
B C
A
D
346040
PRI 110 - 240 V 50 - 60 Hz 370 mA - 225 mA
BUS 26.0 V 600 mA
BUS
PRI
PRI
BUS
0,28 mm
2
BTicino
336904
BTicino
L4669
0,35 mm
2
1 mm
2
A 380 m 610 m 400 m 1000 m
B 200 m 290 m 210 m 580 m
C 180 m 320 m 190 m 560 m
D 30 m 50 m 30 m 100 m
• Installazione no a 3 PI
• Installation of up to 3 handsets
• Montage jusqu’à 3 PI
• Installation von bis zu 3 Türstationen
• Instalación con un máximo de 3 PI
• Installatie tot 3 PI
• Instalação até 3 UI
La página se está cargando ...

6
• Schema bifamiliare
• Two-family diagram
• Schéma bi-familiale
• Schema Zweifamilienhaus
• Esquema bifamiliar
• Schema tweegezins
• Esquema bifamiliar
346040
PRI 110 - 240 V 50 - 60 Hz 370 mA - 225 mA
BUS 26.0 V 600 mA
BUS
PRI
PRI
BUS
ON
OFF
ON
OFF
BUS
BUS
PL S+
S-
N
= –
= –
T = –
S = –
P
= –
–
=
2
1
B
BUS
B
A
P
= –
= –
= –
M
N
= –
= –
P
= –
= –
= –
M
N
= –
= *1
*
Bifamiliare - Two family
Monofamiliare - One family
* • Il secondo posto interno ed il configuratore 3501/1 devono essere acquistati separatemente.
• The second internal unit and the 3501/1 configurator must be purchased separately.
• Le deuxième poste interne et le configurateur 3501/1 doivent être achetés séparément.
• Die zweite Hausstation und der Konfigurator 3501/1 werden getrennt verkauft.
• La segunda unidad interior y el configurador 3501/1 se han de comprar por separado.
• De tweede binnenpost en de configurator 3501/1 moeten apart worden gekocht.
• A segunda unidade interna e o configurador 3501/1 devem ser adquiridos separadamente.
• A Pulsante locale apertura serratura.
B Chiamata al piano.
S+ S- 18 V; 4 A impulsivi. 250 mA mantenimento (30 Ω max).
• A Door lock release local pushbutton.
B Floor call.
S+ S- 18 V; 4 A impulsive. 250 mA holding current (30 Ω max).
• A Bouton local ouverture serrure.
B Appel à l’étage.
S+ S- 18 V; 4 A impulsifs. 250 mA entretien (30 Ω max).
• A Lokale Schlossöffnungstaste.
B Etagenruf.
S+ S- 18 V; 4 A impulsstrom. 250 mA Haltestrom (30 Ω max).
• A Pulsador local apertura cerradura.
B Llamada al piso.
S+ S- 18 V; 4 A por impulsos. 250 mA mantenimiento (30 Ω max).
• A Lokale knop opening slot.
B Oproep aan verdieping.
S+ S- 18 V; 4 A impulsief; 250 mA onderhoud (30 Ω max).
• A Botão local de abertura da fechadura.
B Chamada ao piso.
S+ S- 18 V; 4 A instantâneos. 250 mA continuos (30 Ω max).

Audio - Kit
7
• Schema bifamiliare 2
• Two-family diagram 2
• Schéma bi-familiale 2
•
Schema Zweifamilienhaus 2
• Esquema bifamiliar 2
• Schema tweegezins 2
• Esquema bifamiliar 2
Bifamiliare - Two family
Monofamiliare - One family
346040
PRI 110 - 240 V 50 - 60 Hz 370 mA - 225 mA
BUS 26.0 V 600 mA
BUS
PRI
PRI
BUS
BUS
PL S+
S-
ON
OFF
ON
OFF
BUS
BUS
N
= –
= –
T = –
S = –
P
= –
–
=
2
1
B
B
A
P
= –
= –
= –
M
N
= –
=
*1
P
= –
= –
= –
M
N
= –
= –
*
* • Il secondo posto interno ed il configuratore 3501/1 devono essere acquistati
separatemente.
• The second internal unit and the 3501/1 configurator must be purchased separately.
• Le deuxième poste interne et le configurateur 3501/1 doivent être achetés
séparément.
• Die zweite Hausstation und der Konfigurator 3501/1 werden getrennt verkauft.
• La segunda unidad interior y el configurador 3501/1 se han de comprar por separado.
• De tweede binnenpost en de configurator 3501/1 moeten apart worden gekocht.
• A segunda unidade interna e o configurador 3501/1 devem ser adquiridos
separadamente.

8
• Opzione serratura a relè
• Relay door lock option
• Option serrure à relais
• Option Relais-Schloss
• Opción cerradura de relé
• Optie relaisslot
• Opção trinco de relê
BUSPL S+
S-
N
= –
= –
T = –
S = –
P
= –
–
=
8 A cosφ = 1
4 A cosφ = 0,7
3 A cosφ = 0,4
24 Vdc; 24 Vac
24 Vac
24 Vac
NO
NC
C
346250 (*)
S-
S+
C
NC
NO
A
* Acquistabile separatamente
* Can be purchased separately
* Vendu séparément
* Auf Anfrage getrennt erhältlich
* A la venta por separado
* Apart verkrijgbaar
* Adquirível separadamente
• A Pulsante locale apertura serratura.
S+ S- 18 V; 4 A impulsivi. 250 mA mantenimento (30 Ω max).
• A Door lock release local pushbutton.
S+ S- 18 V; 4 A impulsive. 250 mA holding current (30 Ω max).
• A Bouton local ouverture serrure.
S+ S- 18 V; 4 A impulsifs. 250 mA entretien (30 Ω max).
• A Lokale Schlossöffnungstaste.
S+ S- 18 V; 4 A impulsstrom. 250 mA Haltestrom (30 Ω max).
• A Pulsador local apertura cerradura.
S+ S- 18 V; 4 A por impulsos. 250 mA mantenimiento (30 Ω max).
• A Lokale knop opening slot.
S+ S- 18 V; 4 A impulsief; 250 mA onderhoud (30 Ω max).
• A Botão local de abertura da fechadura.
S+ S- 18 V; 4 A instantâneos. 250 mA continuos (30 Ω max).
La página se está cargando ...

10
• Posto esterno
• Entrance panel
• Poste extérieur
• Türstation
• Placa exterior
• Externe plaats
• Unidade externa
1
2
3
4
12
11
10
9
8
7
6
5
1 - Morsetti di collegamento
2 - Pulsanti di chiamata
3 - LED connessione attiva
4 - LED indicazione porta aperta
5 - Microfono
6 - Regolazione microfono
7 - Regolazione altoparlante
8 - Switch mono/bifamiliare
9 - Pannello LED per illuminazione
pulsante di chiamata
10 - Sede dei configuratori
11 - Sensore di luminosità per
retroilluminazione notturna
12 - Altoparlante
1 - Bornes de branchement
2 - Boutons d’appel
3 - Voyant connexion active
4 - Voyant indication porte
ouverte
5 - Micro
6 - Réglage micro
7 - Réglage haut-parleur
8 - Commutateur mono/bi-familial
9 - Panneau Voyant d’éclairage
bouton d’appel
10 - Logement des configurateurs
11 - Capteur de luminosité pour
rétro-éclairage nocturne
12 - Haut-parleur
1 - Connection clamp
2 - Call pushbuttons
3 - Active connection LED
4 - Open door notification LED
5 - Microphone
6 - Microphone adjustment
7 - Loudspeaker adjustment
8 - One-family/two-family switch
9 - LED panel for call pushbutton
lighting
10 - Configurator socket
11 - Brightness sensor for night
backlighting
12 - Loudspeaker
1 - Aansluitklemmen
2 - Oproepknoppen
3 - Led verbinding geactiveerd
4 - Led aanduiding deur geopend
5 - Microfoon
6 - Regeling microfoon
7 - Regeling luidspreker
8 - Schakelaar een-/tweegezins
9 - Led paneel voor verlichting
oproepknop
10 - Plaats van de configuratoren
11 - Lichtsensor voor achtergrond-
verlichting ‘s nachts
12 - Luidspreker
1 - Anschlussklemmen
2 - Ruftasten
3 - LED Verbindung aktiv
4 - LED Anzeige Tür offen
5 - Mikrophon
6 - Einstellung des Mikrophons
7 - Einstellung des Lautsprechers
8 - Switch Ein-/Zweifamilienhaus
9 - LED-Tafel zur Beleuchtung
der Ruftaste
10 - Sitz der Konfiguratoren
11 - Helligkeitssensor zur
nächtlichen Rückbeleuchtung
12 - Lautsprecher
1 - Bornes de conexão
2 - Botões de chamada
3 - LED de conexão ativa
4 - LED indicação de porta aberta
5 - Microfone
6 - Regulação do microfone
7 - Regulação do altifalante
8 - Interruptor mono/bifamiliar
9 - Painel LED para iluminação
do botão de chamada
10 - Sede dos configuradores
11 - Sensor de luminosidade para
retroiluminação noturna
12 - Altifalante
1 - Bornes de conexión
2 - Pulsadores de llamada
3 - LED conexión activada
4 - LED indicación puerta abierta
5 - Micrófono
6 - Regulación del micrófono
7 - Regulación del altavoz
8 - Switch mono/bifamiliar
9 - Panel LED para iluminación
pulsador de llamada
10 - Alojamiento de los
configuradores
11 - Sensor de luminosidad para
retroiluminación nocturna
12 - Altavoz
La página se está cargando ...

12
1 - Rode LED signalering uitsluiting oproep.
2 - Volumeregeling beltoon / uitsluiting oproep.
3 - Fonische volumeregeling ontvangt.
4 -
Rode LED signalering activering slot en/of status
deur.
5 - Bedieningstoets slot.
6 - Toets activering / deactivering communicatie.
7 - Tweekleurige LED rood / groen signalering
functioneringsstatus.
8 - Microfoon.
9 - Toets activering deurstation / cyclische weergave.
10 - Bedieningstoets inschakeling traplicht.
11 - Luidspreker.
12 - Aansluitklem voor een externe oproepknop op
de verdieping.
13 - Aansluitklemmen 2-dradige BUS SCS.
14 - Microschakelaar ON / OFF einde lijn.
15 - Plaats configuratoren.
1 -
LED vermelho de sinalização exclusão de chamada.
2 - Regulação do volume da campainha / exclusão
de chamada.
3 - Regulação do volume fónico em recepção.
4 - LED vermelho de sinalização para a activação da
fechadura e/ou o estado da porta.
5 - Tecla de comando da fechadura.
6 - Tecla de activação / desactivação da comunicação.
7 - LED bicolor vermelho / verde de sinalização do
estado de funcionamento.
8 - Microfone.
9 - Tecla de activação da unidade externa /
ciclamento.
10 - Tecla comando acendimento luzes das escadas.
11 - Altifalante.
12 - Bornes para a conexão de um botão externo de
chamada no piso.
13 - Bornes para a conexão ao BUS SCS bus de 2 fios.
14 -
Microinterruptor ON / OFF de terminação de trecho.
15 - 4. Alojamento dos configuradores.
1 - VOYANT rouge de signal d’exclusion appel.
2 - Réglage volume sonnerie / exclusion appel.
3 - Réglage volume phonique en réception.
4 - VOYANT rouge de signal d’activation serrure et/
ou état porte.
5 - Touche commande serrure.
6 - Touche activation / désactivation communication.
7 - VOYANT bicolore rouge / vert de signal de l’état
de fonctionnement.
8 - Micro.
9 - Touche activation poste externe / cyclage.
10 - Touche commande allumage lumière escaliers.
11 - Haut-parleur.
12 - Bornes de branchement d’un bouton externe
d’appel à l’étage.
13 - Bornes de branchement au BUS SCS 2 fils.
14 - Micro-interrupteur ON / OFF de fin de ligne.
15 - Logement des configurateurs.
1 - Rote Meldeleuchte für Anruf ausgeschlossen.
2 - Regelung des Ruftonlautstärke / Anruf
ausgeschlossen.
3 - Regelung Audiolautstärke bei Empfang.
4 - Rote Meldeleuchte zur Aktivierung des
Schlosses und/oder des Türzustands.
5 - Taste Schlosssteuerung.
6 - Taste Kommunikation aktivieren/deaktivieren.
7 - Zweifarbige Meldeleuchte (rot/grün) zur
Meldung des Betriebszustands.
8 - Mikrophon.
9 - Taste für Türstation aktivieren und Taktierung.
10 - Taste Treppenlicht einschalten.
11 - Lautsprecher.
12 - Anschlussklemmen einer äußeren Taste für
Etagenruf.
13 - Klemme für Anschluss an BUS/SCS 2-Draht.
14 - Mikroschalter ON/OFF für den
Streckenabschluss.
15 - Sitz der Konfiguratoren.
1 - LED rojo de señalización y exclusión de llamada.
2 - Regulación volumen timbre/exclusión de llamada.
3 - Regulación volumen fónico en recepción.
4 - LED rojo de señalización para activar la cerradura y/o el
estado de la puerta.
5 - Tecla mando cerradura.
6 - Tecla de activación/desactivación comunicación.
7 - LED bicolor rojo/verde de señalización del estado de
funcionamiento.
8 - Micrófono.
9 - Tecla de activación placa exterior/visualización cíclica.
10 - Tecla de mando encendido luces escaleras.
11 - Altoparlante.
12 - Bornes para la conexión de un pulsador exterior de llamada
a la planta.
13 - Bornes para la conexión al BUS SCS 2 hilos.
14 - Microinterruptor de ON/OFF de terminación de tramo.
15 - Alojamiento de los configuradores.

Audio - Kit
13
• Installazione posto esterno
• Entrance panel installation
•
Installation du poste extérieur
• Installation der Türstation
•
Instalación de la placa exterior
• Installatie externe plaats
•
Instalação da unidade externa
** Prima dell’installazione assicurarsi che la vite sia completamente avvitata.
** Before installing make sure that the screw is completely tightened.
** Avant l’installation, s’assurer que la vis soit complètement vissée.
** Vor der Installation sicherstellen, dass die Schraube richtig festgeschraubt ist.
** Antes de la instalación, compruebe que el tornillo esté completamente
enroscado.
** Vóór de installatie controleren of de schroef volledig vastgedraaid is.
** Antes da instalação vericar se o parafuso está completamente atarraxado.
* Per garantire l’impermeabilità montare le guarnizioni a corredo.
* To guarantee water tightness make sure to t the seals supplied.
* Pour garantir l’imperméabilité, monter les joints fournis à cet eet.
* Um die Abdichtung sicherzustellen, montieren Sie die mitgelieferten Dichtungen.
* Montar las juntas de la dotación para garantizar la impermeabilidad.
* Monteer de geleverde pakkingen om de waterdichtheid te waarborgen.
* Para garantir a impermeabilidade, montar as vedações fornecidas juntamente.
*
*
1
**
2
3
4
5
La página se está cargando ...

Audio - Kit
15
• Se si manifestasse il disturbo del fischio, (effetto Larsen), ridurre prima la potenza del microfono , agen-
do con un cacciavite sul potenziometro corrispondente, fino ad un livello accettabile. Qualora il fenomeno
persista, agire sul potenziometro dell’altoparlante in modo da eliminare l’inconveniente. Se il volume è
troppo basso, aumentare prima il volume dell’altoparlante ed eventualmente anche quello del microfono,
tenendo presente che è preferibile una trasmissione chiara e priva di disturbi, che una al limite dell’innesco
(Larsen).
• In case of a whistle (Larsen effect), first reduce the microphones
power, adjusting the corresponding potenti-
ometers with a screw driver, until an acceptable level is reached. Should the whistle persist, adjust the loudspeakers
volume in order to eliminate the trouble. If the volume is too low level then, increase first the potentiometer of
the loudspeaker and secondly the one for the microphone, bearing in mind that a clear and noise free reception is
preferable than one just before whistling (Larsen).
• Lors de sifflement (effet de Larsen), reduire d’abord la puissance du micro sur le potentiomètre corres-
pondant, à l’aide d’un tournevis, jusqu’à l’obtention d’un niveau satisfaisant. Si le sifflement persiste, régler
le potentiomètre du hautparleur
jusqu’à l’élimination de celui-ci. Si le volume est trop bas, augmenter
d’abord la puissance du haut-parleur et éventuellement celle du micro, en considérant qu’une réception
claire et sans parasite est préférable à une communication à la limite de l’accrochage (effet de Larsen).
• Beim etwaigen Auftreten eines Pfeiftones (Larsen-Effekt), zuerst die Lautstärke des Mikrophones bis auf einen
annehmbaren Wert herabsetzen, indem man das entsprechende Potentiometer mit einem Schraubendreher ein-
stellt. Sollte die Störung weiterhin bestehen, dann das Potentiometer des Lautsprechers
bis zur Beseitigung des
Pfeiftones einstellen. Ist die Lautstärke nun zu niedrig, dann zuerst die des Lautsprechers und erst danach evtl. auch
die des Mikrophones erhohen, wobei ein deutlicher und störungsfreier Empfang einem an der Störungsgrenze lie-
gendem (Larsen-Effekt) vorzuziehen ist.
• Si se manifesta el silbido de acoplamiento, (efecto Larsen), reducir primero la potencia del micrófono
, girando con un destornillador el potenciómetro correspondiente, hasta obtener un nivel aceptable. Si el
fenómeno persistiera, regular el potenciómetro del altavoz
hasta eliminar la interferencia. Si el volumen
es demasiado bajo, aumentar primero el volumen del altavoz y eventualmente también el del micrófono,
teniendo en cuenta que es preferible una transmissión clara y limpia de interferencias, que una al limite del
acoplo (Larsen).
• Als er een fluittoon hoorbaar is (effect van Larsen): verminder eerst het vermogen van de microfoon met behulp
van een schroevendraaier zijn stroomregelaar zo te regelen dat de geluidssterkte van het gefluit aanvaardbaar
is. Als het verschijnsel niet verdwijnt, dan moet u ook de stroomregelaar van de luidspreker
bijstellen. Als de
geluidssterkte nu te klein is, verhoog dan eerst de geluidssterkte van de luidspreker en daarna eventueel ook die
van de microfoon, en denk er bij het bijstellen aan dat een duidelijk hoorbaar en ongestoord geluid beter is dan een
harder geluid op de grens van het Larsen effect.
• Se se manifestar uma interferência no som (efeito de Larsen), começar por diminuir a potência do microfone
, rodando o potenciómetro correspondente com uma chave de parafusos, até obter um nível aceitável.
Se o fenómeno persistir, regular o potenciómetro do altifalante
de modo a eliminar o problema. Se o
volume estiver demasiado baixo, começar por aumentar o volume do altifalante e depois, se necessário,
o do microfone, tendo presente que é melhor ter uma transmissão clara e sem interferências, que uma no
limiar de início de efeitos Larsen.

16
• Configurazione posto esterno
• Entrance panel configuration
• Configuration poste extérieur
• Konfiguration Türstation
• Configuración placa exterior
• Configuratie externe plaats
•
Configuração unidade externa
P T S N
P
- Possono non essere configurati.
- They do not need to be configured.
- Ils peuvent ne pas être configurés
- Brauchen nicht konfiguriert zu werden.
- Pueden no precisar configuración.
- Kunnen niet worden geconfigureerd.
- Podem não serconfigurados.
N
S
T
- Temporizzatore serratura (vedi tabella).
- Door lock timer relay (see table).
- Temporisation serrure (voir tableau).
- Zeitgeber schlossrelaiscerradura (siehe Tabelle).
- Temporizador relé cerradura (véase la tabla).
- Timer deurslotrelais (zie de tabel).
- Temporizador do relé da fechadura (veja a tabela).
– 1 2 3 4 5 6 7
4 s 1 s 2 s 3 s
*
6 s 8 s 10 s
* Funzionamento come pulsante per max. 10 sec. dopodichè entra in stand-by.
Per estendere tale funzionamento oltre i 10 sec. utilizzare l’attuatore 346210 configurato con MOD=5.
* Operation as pushbutton for 10 sec. max after which it goes in stand-by.
In order to extend this type of operation over 10 seconds, use the actuator, item 346210 configured with MOD=5.
* Fonctionnement comme bouton pendant 10 sec. max., ensuite passe en stand-by.
Pour étendre ce fonctionnement au-delà de 10 sec., utiliser l’actionneur 346210 configuré sur MOD=5.
* Die Tastenfunktion dauert max. 10 sec.; danach schaltet sie auf Standby. Um diese Funktion zu verlängern und mehr als 10 sec. dauern zu lassen, den Aktor 346210
verwenden und mit MOD=5 konfigurieren.
* Funcionamiento como pulsador durante al máx.10 s. después se pone en standby.
Para ampliar dicho funcionamiento a más de 10 s., use el actuador art. 346210 configurado con MOD = 5.
* 10 sec. lange werking als knop, vervolgens vindt de overschakeling naar stand-by plaats.
Laat deze functie langer dan 10 sec. duren met behulp van de actuator 346210 die als MOD=5 is geconfigureerd.
* Funcionamento como botão por um máximo de 10 segundos, depois disto dispõe-se em standby. Para prolongar este funcionamento por mais de 10 segundos,
utilizar o atuador 346210 configurado com MOD=5.
• Tutte le volte che si modifica la configurazione è necessario togliere e ridare l’alimentazione all’impianto, attendendo circa 1 minuto.
• Every time the configuration is altered the system must be switched off and back on again, waiting for about 1 minute.
• Chaque fois que l’on modifie la configuration, il faut retirer, puis redonner l’alimentation à l’installation, après avoir attendu environ 1 minute.
• Jedes Mal, wenn die Konfiguration geändert wird, den Strom abschalten, etwa 1 Minute warten und dann wieder einschalten.
• Cada vez que modifica la configuración, es necesario cortar y volver a dar alimentación a la instalación, después de esperar aproximadamente 1 minuto.
• Na iedere wijziging in de configuratie moet de installatie ongeveer 1 minuut van het elektriciteitsnet worden afgesloten.
• Todas as vezes que se modificar a configuração é necessário ligar e desligar a instalação da energia eléctrica, esperando cerca de 1 minuto.

Audio - Kit
17
• Installazione del posto interno
• Handset installation
• Installation du poste interne
• Installation der Hausstation
• Instalación de la unidad interior
• Installatie van het intern punt
• Instalação da unidade interna
2
1
3
4

18
• Selezione suoneria
• Bell selection
• Sélection sonnerie
• Läutwerk wählen
• Selección del timbre
• Beltoon kiezen
• Selecção toques
• Selezione suoneria chiamata intercom.
• Selection call intercom bell.
• Sélection sonnerie appel intercom.
• Änderung interner Rufton.
• Selección del timbre de llamada intercom.
• Kies belgeluid intercom oproep gebouw.
• Selecção do toque para chamada
intercomomunicador.
> 3s
1
2
16
• Selezione suoneria da posto esterno principale (S=0).
• Selection call from main outdoor station (S=0) bell.
• Sélection sonnerie appel d’un poste extérieur
principal (S=0).
• Änderung Rufton der Haupttürstation (S=0).
• Selección timbre llamada desde el puesto exterior
principal (S=0).
• Kies belgeluid oproep vanuit eerste externe post (S=0).
• Selecção do toque para chamada da unidade externa
principal (S=0).
> 3s
1
2
16
> 3s
1
2
16
• Selezione suoneria chiamata al piano.
• Selection call to the floor bell.
• Sélection sonnerie appel à l’étage.
• Änderung Rufton Etagentaster.
• Selección del timbre de llamada al piso.
• Kies belgeluid oproep aan verdieping.
• Selecção do toque para chamada ao andar.

Audio - Kit
19
M = 0 M = 1 M = 2 M = 3 M = 4
P
+1
MOD=5
P
+1
P
+1
P
+1
MOD=9
P
+1
P
+2
MOD=9
P
+2
P
+3
MOD=9
P
+3
MOD=5
P
+2
P
+2
P
+3
MOD=5
P
+3
P
+3
P
+4
MOD=5
P
+4
P
+4
P
P
2
3
1 32
346210
1
2
3
1 32
346210
1
2
3
1 32
346210
1
2
3
1 32
346210
1
2
3
1 32
346210
1
2
3
1 32
346210
1
2
3
1 32
346210
1
2
3
1 32
346210
1
P
+1
MOD=5
P
+1
P
+1
P
+1
MOD=9
P
+1
P
+2
MOD=9
P
+2
P
+3
MOD=9
P
+3
MOD=5
P
+2
P
+2
P
+3
MOD=5
P
+3
P
+3
P
+4
MOD=5
P
+4
P
+4
P
P
2
3
1 32
346210
1
2
3
1 32
346210
1
2
3
1 32
346210
1
2
3
1 32
346210
1
2
3
1 32
346210
1
2
3
1 32
346210
1
2
3
1 32
346210
1
2
3
1 32
346210
1
P
+1
MOD=5
P
+1
P
+1
P
+1
MOD=9
P
+1
P
+2
MOD=9
P
+2
P
+3
MOD=9
P
+3
MOD=5
P
+2
P
+2
P
+3
MOD=5
P
+3
P
+3
P
+4
MOD=5
P
+4
P
+4
P
P
2
3
1 32
346210
1
2
3
1 32
346210
1
2
3
1 32
346210
1
2
3
1 32
346210
1
2
3
1 32
346210
1
2
3
1 32
346210
1
2
3
1 32
346210
1
2
3
1 32
346210
1
P
+1
MOD=5
P
+1
P
+1
P
+1
MOD=9
P
+1
P
+2
MOD=9
P
+2
P
+3
MOD=9
P
+3
MOD=5
P
+2
P
+2
P
+3
MOD=5
P
+3
P
+3
P
+4
MOD=5
P
+4
P
+4
P
P
2
3
1 32
346210
1
2
3
1 32
346210
1
2
3
1 32
346210
1
2
3
1 32
346210
1
2
3
1 32
346210
1
2
3
1 32
346210
1
2
3
1 32
346210
1
2
3
1 32
346210
1
P
+1
MOD=5
P
+1
P
+1
P
+1
MOD=9
P
+1
P
+2
MOD=9
P
+2
P
+3
MOD=9
P
+3
MOD=5
P
+2
P
+2
P
+3
MOD=5
P
+3
P
+3
P
+4
MOD=5
P
+4
P
+4
P
P
2
3
1 32
346210
1
2
3
1 32
346210
1
2
3
1 32
346210
1
2
3
1 32
346210
1
2
3
1 32
346210
1
2
3
1 32
346210
1
2
3
1 32
346210
1
2
3
1 32
346210
1
P
+1
MOD=5
P
+1
P
+1
P
+1
MOD=9
P
+1
P
+2
MOD=9
P
+2
P
+3
MOD=9
P
+3
MOD=5
P
+2
P
+2
P
+3
MOD=5
P
+3
P
+3
P
+4
MOD=5
P
+4
P
+4
P
P
2
3
1 32
346210
1
2
3
1 32
346210
1
2
3
1 32
346210
1
2
3
1 32
346210
1
2
3
1 32
346210
1
2
3
1 32
346210
1
2
3
1 32
346210
1
2
3
1 32
346210
1
P
+1
MOD=5
P
+1
P
+1
P
+1
MOD=9
P
+1
P
+2
MOD=9
P
+2
P
+3
MOD=9
P
+3
MOD=5
P
+2
P
+2
P
+3
MOD=5
P
+3
P
+3
P
+4
MOD=5
P
+4
P
+4
P
P
2
3
1 32
346210
1
2
3
1 32
346210
1
2
3
1 32
346210
1
2
3
1 32
346210
1
2
3
1 32
346210
1
2
3
1 32
346210
1
2
3
1 32
346210
1
2
3
1 32
346210
1
P
+1
MOD=5
P
+1
P
+1
P
+1
MOD=9
P
+1
P
+2
MOD=9
P
+2
P
+3
MOD=9
P
+3
MOD=5
P
+2
P
+2
P
+3
MOD=5
P
+3
P
+3
P
+4
MOD=5
P
+4
P
+4
P
P
2
3
1 32
346210
1
2
3
1 32
346210
1
2
3
1 32
346210
1
2
3
1 32
346210
1
2
3
1 32
346210
1
2
3
1 32
346210
1
2
3
1 32
346210
1
2
3
1 32
346210
1
MOD=5
P
+1
P
+1
P
+1
MOD=9
P
+1
P
+2
MOD=9
P
+2
P
+3
MOD=9
P
+3
P
+2
MOD=5
P
+2
P
+2
P
+3
MOD=5
P
+3
P
+3
P
+4
MOD=5
P
+4
P
+4
P
P
+1
N=1N=1–99
P
+1
MOD=5
P
+1
P
+1
P
+1
MOD=9
P
+1
P
+2
MOD=9
P
+2
P
+3
MOD=9
P
+3
MOD=5
P
+2
P
+2
P
+3
MOD=5
P
+3
P
+3
P
+4
MOD=5
P
+4
P
+4
P
P
2
3
1 32
346210
1
2
3
1 32
346210
1
2
3
1 32
346210
1
2
3
1 32
346210
1
2
3
1 32
346210
1
2
3
1 32
346210
1
2
3
1 32
346210
1
2
3
1 32
346210
1
P
+1
MOD=5
P
+1
P
+1
P
+1
MOD=9
P
+1
P
+2
MOD=9
P
+2
P
+3
MOD=9
P
+3
MOD=5
P
+2
P
+2
P
+3
MOD=5
P
+3
P
+3
P
+4
MOD=5
P
+4
P
+4
P
P
2
3
1 32
346210
1
2
3
1 32
346210
1
2
3
1 32
346210
1
2
3
1 32
346210
1
2
3
1 32
346210
1
2
3
1 32
346210
1
2
3
1 32
346210
1
2
3
1 32
346210
1
P
+1
MOD=5
P
+1
P
+1
P
+1
MOD=9
P
+1
P
+2
MOD=9
P
+2
P
+3
MOD=9
P
+3
MOD=5
P
+2
P
+2
P
+3
MOD=5
P
+3
P
+3
P
+4
MOD=5
P
+4
P
+4
P
P
2
3
1 32
346210
1
2
3
1 32
346210
1
2
3
1 32
346210
1
2
3
1 32
346210
1
2
3
1 32
346210
1
2
3
1 32
346210
1
2
3
1 32
346210
1
2
3
1 32
346210
1
P
+1
MOD=5
P
+1
P
+1
P
+1
MOD=9
P
+1
P
+2
MOD=9
P
+2
P
+3
MOD=9
P
+3
MOD=5
P
+2
P
+2
P
+3
MOD=5
P
+3
P
+3
P
+4
MOD=5
P
+4
P
+4
P
P
2
3
1 32
346210
1
2
3
1 32
346210
1
2
3
1 32
346210
1
2
3
1 32
346210
1
2
3
1 32
346210
1
2
3
1 32
346210
1
2
3
1 32
346210
1
2
3
1 32
346210
1
M = 5 come M = 0 con tono tasti disabilitato
M = 6 come M = 1 con tono tasti disabilitato
M = 7 come M = 2 con tono tasti disabilitato
M = 8 come M = 3 con tono tasti disabilitato
M = 9 come M = 4 con tono tasti disabilitato
M = 5 como M = 0 con tono de teclas deshabilitado
M = 6 como M = 1 con tono de teclas deshabilitado
M = 7 como M = 2 con tono de teclas deshabilitado
M = 8 como M = 3 con tono de teclas deshabilitado
M = 9 como M = 4 con tono de teclas deshabilitado
M = 5 wie M = 0 mit deaktiviertem Tastenton
M = 6 wie M = 1 mit deaktiviertem Tastenton
M = 7 wie M = 2 mit deaktiviertem Tastenton
M = 8 wie M = 3 mit deaktiviertem Tastenton
M = 9 wie M = 4 mit deaktiviertem Tastenton
M = 5 als M = 0 met tonen toetsen gedeactiveerd
M = 6 als M = 1 met tonen toetsen gedeactiveerd
M = 7 als M = 2 met tonen toetsen gedeactiveerd
M = 8 als M = 3 met tonen toetsen gedeactiveerd
M = 9 als M = 4 met tonen toetsen gedeactiveerd
M = 5 comme M = 0 avec tonalité touches désactivée
M = 6 comme M = 1 avec tonalité touches désactivée
M = 7 comme M = 2 avec tonalité touches désactivée
M = 8 comme M = 3 avec tonalité touches désactivée
M = 9 comme M = 4 avec tonalité touches désactivée
M = 5 como M = 0 com tom das teclas desligado
M = 6 como M = 1 com tom das teclas desligado
M = 7 como M = 2 com tom das teclas desligado
M = 8 como M = 3 com tom das teclas desligado
M = 9 como M = 4 com tom das teclas desligado
M = 5 like M = 0 with key tone disabled
M = 6 like M = 1 with key tone disabled
M = 7 like M = 2 with key tone disabled
M = 8 like M = 3 with key tone disabled
M = 9 like M = 4 with key tone disabled
• Funzionamento dei pulsanti programmabili
• Pushbutton operating mode
• Fonctionnement des touches programmables
• Betriebsmodus der programmierbaren Tasten
• Funcionamiento de los pulsadores programables
• Werkmodus van de programmeerbare
drukknoppen
• Modalidade de funcionamento dos botões
programáveis
La página se está cargando ...

Audio - Kit
21
ES NL PT
P
+1
MOD=5
P
+1
P
+1
P
+1
MOD=9
P
+1
P
+2
MOD=9
P
+2
P
+3
MOD=9
P
+3
MOD=5
P
+2
P
+2
P
+3
MOD=5
P
+3
P
+3
P
+4
MOD=5
P
+4
P
+4
P
P
2
3
1 32
346210
1
2
3
1 32
346210
1
2
3
1 32
346210
1
2
3
1 32
346210
1
2
3
1 32
346210
1
2
3
1 32
346210
1
2
3
1 32
346210
1
2
3
1 32
346210
1
Activación de la placa exterior (configurada
con P) en el modo directo sin llamada.
Visualización cíclica de las placas exteriores
y telecámaras presentes en el sistema.
Llamada directa a la centralita de conserjería
si está presente en el sistema
Activering DS (geconfigureerd met P) in
directe modus zonder oproep.
Cyclische weergave DS en camera’s in
installatie. Oproep naar portierscentrale
als de installatie daarvan is voorzien
Activação do UE (configurado com P)
em Modo directo sem chamada.
Ciclamento UE e câmaras presentes na
instalação. Chamada directa à central
de portaria, se estiver presente na
instalação
Activación/Desactivación de la fónica Audio activeren/deactiveren Activação/Desactivação da fónica
P
+1
MOD=5
P
+1
P
+1
P
+1
MOD=9
P
+1
P
+2
MOD=9
P
+2
P
+3
MOD=9
P
+3
MOD=5
P
+2
P
+2
P
+3
MOD=5
P
+3
P
+3
P
+4
MOD=5
P
+4
P
+4
P
P
2
3
1 32
346210
1
2
3
1 32
346210
1
2
3
1 32
346210
1
2
3
1 32
346210
1
2
3
1 32
346210
1
2
3
1 32
346210
1
2
3
1 32
346210
1
2
3
1 32
346210
1
Apertura de la cerradura de la placa
exterior (configurada con P) de mane-
ra directa sin la llamada o de la placa
exterior en conexión
Direct openen slot Deurstation
(geconfigureerd met P) zonder oproep
of Deurstation verbonden
Abertura da fechadura da UE (configu-
rada com U) em modo directo sem a
chamada ou então de UE em conexão
P
+1
MOD=5
P
+1
P
+1
P
+1
MOD=9
P
+1
P
+2
MOD=9
P
+2
P
+3
MOD=9
P
+3
MOD=5
P
+2
P
+2
P
+3
MOD=5
P
+3
P
+3
P
+4
MOD=5
P
+4
P
+4
P
P
2
3
1 32
346210
1
2
3
1 32
346210
1
2
3
1 32
346210
1
2
3
1 32
346210
1
2
3
1 32
346210
1
2
3
1 32
346210
1
2
3
1 32
346210
1
2
3
1 32
346210
1
Mando luces escalera con actuador
346210
Bediening traphuisverlichting met
actuator 346210
Comando da luz das escadas com
actuador 346210
P
+1
MOD=5
P
+1
P
+1
P
+1
MOD=9
P
+1
P
+2
MOD=9
P
+2
P
+3
MOD=9
P
+3
MOD=5
P
+2
P
+2
P
+3
MOD=5
P
+3
P
+3
P
+4
MOD=5
P
+4
P
+4
P
P
2
3
1 32
346210
1
2
3
1 32
346210
1
2
3
1 32
346210
1
2
3
1 32
346210
1
2
3
1 32
346210
1
2
3
1 32
346210
1
2
3
1 32
346210
1
2
3
1 32
346210
1
Apertura cerradura del PE (con-
figurado con P+1) en modo di recto
sin llamada o activación del actuador
346210 (con fi gurado con P+1 y
MOD=5) o ac ti vación del actuador
346230 (con fi gu rado con P+1)
Echtstreekse opening van het deurslot
van het als P+1 ge con figureerde deur-
station, zonder oproep of activering van
het to e stel 346210 (ge con fi gu re erd
als P+1 en MOD=5) of ac ti ve ring van
het toestel 346230 (ge con figureerd
als P+1)
Abertura da fechadura da UE (confi-
gurada com P+1) de ma nei ra directa
sem a chamada ou então ligação do
actuador 346210 (configurado com
P+1 e MOD=5) ou então ligação do
actuador 346230 (con fi gu ra do com
P+1)
MOD=5
P
+1
P
+1
P
+1
MOD=9
P
+1
P
+2
MOD=9
P
+2
P
+3
MOD=9
P
+3
P
+2
MOD=5
P
+2
P
+2
P
+3
MOD=5
P
+3
P
+3
P
+4
MOD=5
P
+4
P
+4
P
P
+1
N=1N=1–99
Intercomunicador a todas las unidades
internas configuradas N = 1
Intercom op alle binnenposten
geconfigureerd met N=1
Intercom a todas as unidades internas
configuradas N=1
Intercomunicación hacia los aparatos
iguales, envía la llamada a todos los
aparatos con igual dirección
Intercom op zichzelf, verstuurt de
oproep naar alle toestellen met
hetzelfde adres
Intercomunicador sobre si mesmo,
envia a chamada a todos os aparelhos
com endereço igual

22
• Modalità Push to Talk
• Push to Talk mode
• Modalité Push to Talk
• Modus Push toTalk
• Función Push to Talk
• Push to Talk functie
• Função Push to Talk
• Se il posto esterno si trova in un ambiente particolarmente rumoroso è possibile, durante la conversazione,
attivare la funzione Push to Talk al fine di ottenere una comunicazione meno disturbata. Durante la conver-
sazione è possibile attivare la funzione Push to Talk nel seguente modo.
- Premere il tasto Connessione per almeno 2 secondi per parlare con il posto esterno. Il Led rimane verde.
- Rilasciare il tasto per poter ascoltare dal posto esterno. Il Led diventa rosso.
- Per terminare la connessione premere brevemente il tasto Connessione. Il Led si spegne.
• If the entrance panel is in a particularly noisy place, during the conversation the Push to Talk function can be
activated for a less disturbed call. During the conversation the Push to Talk function can be activated as follows.
- Press the Connection key for at least 2 seconds to talk to the entrance panel. The LED remains green.
- Release the key to hear from the entrance panel. The LED becomes red.
- To end the connection press the connection key briefly. The LED goes out.
• Si le poste externe se trouve dans un environnement particulièrement bruyant, il est possible d’activer du-
rant la conversation la fonction Push to Talk pour obtenir une meilleure communication. Durant la conversa-
tion, il est possible d’activer la fonction Push to Talk en procédant comme suit. Appuyer sur la touche.
- Connexion pendant au moins 2 secondes pour parler avec le poste externe. Le voyant reste vert.
- Relâcher la touche pour pouvoir écouter depuis le poste externe. Le voyant devient rouge.
- Pour mettre fin à la connexion, appuyer brièvement sur la touche connexion. Le voyant s’éteint.
• Wenn die Türstation in einem besonders geräuschvollen Bereich installiert ist, kann man während des Gesprächs
die Funktion Push to Talk drücken, um diese Geräusche zu überwinden. Während des Gesprächs kann die Funkti-
on Push to Talk folgendermaßen aktiviert werden.
- Die Verbindungstaste mindestens 2 Sekunden lang drücken, um mit der Türstation zu sprechen.
Die grüne Meldeleuchte leuchtet immer noch.
- Taste loslassen, um die Türstation hören zu können. Die Meldeleuchte leuchtet rot auf
- Um die Verbindung abzubrechen, die Verbindungstaste kurz drücken. Die Meldeleuchte erlischt.
• Si la placa exterior se encuentra en un ambiente con un alto nivel de ruido, durante la conversación es
posible activar la función Push to Talk para obtener una comunicación con menor interferencias. Durante la
conversación es posible activar la función Push to Talk en el modo siguiente.
- Presione la tecla de conexión almenos 2 segundos para conversar con la placa exterior. El led permanece verde.
- Suelte la tecla para poder escuchar desde la placa exterior. El led se vuelve rojo.
- Para terminar la conexión, presione brevemente la tecla de conexión. El led se apaga.
• Indien het extern punt zich op een bijzonder lawaaierige plaats bevindt, is het mogelijk, tijdens het gesprek, de
functie Push to Talk te activeren teneinde een minder gestoorde communicatie te verkrijgen. Tijdens het gesprek
is het mogelijk de functie Push to Talk te activeren op de volgende manier.
- De drukknop van Verbinding gedurende minstens 2 seconden indrukken om met het externe punt te communiceren.
De led blijft groen.
- De toets loslaten om vanuit het externe punt te kunnen luisteren. De led wordt rood.
- Om de verbinding te beëindigen, eventjes de toets. van verbinding indrukken. De led gaat uit.
• Esta função permite difundir uma mensagem vocal, ditada ao microfone do dispositivo, por meio de altifalantes
do sistema de Difusão sonora. A activação realiza-se premindo brevemente a tecla “Conexão” com o dispositivo
em espera, o indicador luminoso verde aceso indica que a função está activada. Para cessar a função pressionar
novamente a tecla “Conexão”.
- Pressionar a tecla de conexão por pelo menos 2 segundos para falar com a unidade externa.
O indicador luminoso continua verde
- Soltar a tecla para poder escutar a unidade externa. O indicador luminoso fica vermelho
- Para desligar pressionar ligeiramente a tecla da conexão. O indicador luminoso apaga.

Audio - Kit
23
• Questa funzione segnala lo stato della serratura (solo se l’impianto è predisposto mediante apposito
attuatore). Se è aperta il “led serratura” lampeggia, se è chiusa rimane spento. La funzione non è attivabile
contemporaneamente alla funzione Studio Professionale.
• This function indicates the status of the door lock (only for systems preset with appropriate actuator). If open the
„door lock LED“ flashes, and if closed, the LED stays off. The function cannot be activated together with the Office
function.
• Cette fonction signale l’état de la serrure (uniquement si l’installation est prévue à cet effet avec actionneur).
Si elle est ouverte, le “Voyant serrure” clignote, si elle est fermée, il reste éteint. La fonction ne peut pas être
activée conjointement à la fonction Bureau.
• Diese Funktion meldet den Status des Schlosses (nur wenn die Anlage mit entsprechendem Aktor versehen ist).
Wenn geöffnet, blinkt die „Led Schloss“; wenn geschlossen bleibt die Led ausgeschaltet. Die Funktion kann nicht
gleichzeitig mit der Büro-Funktion aktiviert werden.
• Esta función indica el estado de la cerradura (solamente con el sistema predispuesto mediante el actuador
correspondiente). Si está abierta, el “led cerradura” parpadea y si está cerrada permanece apagado. La
función no se puede activar al mismo tiempo que la función Oficina Profesional.
• Deze functie geeft de status van het slot (uitsluitend als de installatie daarvoor is voorbereid met de specifieke
actuator). De „led slot“ knippert als het slot ontgrendeld is. De led is uit als het slot vergrendeld is. Deze functie en
de functie Professionele studio kunnen niet tegelijkertijd worden geactiveerd.
• Esta função indica o estado da fechadura (apenas se a instalação estiver predisposta mediante expresso
atuador). Se estiver aberta o “led fechadura” resulta intermitente, se estiver fechada, permanece desligado.
A função não pode ser ativada simultaneamente à função Estúdio profissional.
• Funzione Stato porta
• Door state function
• Fonction État porte
• Funktion Türzustand
• Función Estado
puerta
• Staat deur
• Função Estado porta
• La funzione Studio Professionale ti permette di impostare l’apertura automatica della serratura in caso di
chiamata dal Posto Esterno, non puoi attivarla contemporaneamente alla funzione Stato Porta. Il lampeggio
del tasto serratura (
) indica che la funzione è attivata.
• The Office function gives the possibility of setting the automatic opening of the door lock in case of call from the
Entrance Panel. It cannot be activated at the same time as the Door Status function. The door lock key flashing
(
) indicates that the functions is active.
• La fonction Bureau permet de programmer l’ouverture automatique de la serrure en cas d’appel depuis le
Poste Externe ; elle n’est pas activable conjointement à la fonction État Porte. Le clignotement de la touche
serrure (
) indique que la fonction est activée.
• Mit der Büro-Funktion kann das Schloss nach einem Ruf von der Türstation automatisch geöffnet werden; diese
Funktion kann nicht gleichzeitig mit der Funktion Tür-Status aktiviert werden. Das Blinken der Schlosstaste
(
) meldet, dass die Funktion aktiv ist.
• La función Oficina Profesional le permite configurar la apertura automática de la cerradura al recibir una
llamada de la PE pero no la puede activar al mismo tiempo que la función Estado Puerta. El parpadeo de la
tecla cerradura (
) indica la activación de la función.
• Met de functie Professionele studio kunt u de automatische ontgrendeling van het slot bij een oproep vanaf de
buitenpost instellen. Deze functie en de functie Status deur kunnen niet tegelijkertijd worden geactiveerd. De
toets slot (
) knippert om aan te geven dat de functie geactiveerd is.
• A função Estúdio profissional permite-lhe definir a abertura automática da fechadura em caso de chamada
da Unidade Externa, não pode ativá-la simultaneamente à função Estado da Porta. A intermitência do botão
da fechadura (
) indica que a função está ativada.
• Funzione Studio
Professionale
• Office function
• Fonction Bureau
• Funktion Büro
• Función Oficina Profesional
• Functie professionele studio
• Função Escritório profissional

24
346210
BUSBUS
MP
N
1
MP
N
2
3
1 32
346210
1
C
NO
NC
230V
2A
cos =0,5
6A
M
230 Vac
346040
PRI 110 - 240 V 50 - 60 Hz 370 mA - 225 mA
BUS 26.0 V 600 mA BUS
PRI
PRI
BUS
T SN
P
BUS
PL S+
S-
A
• Comando luci scale
• Staircase light control
• Commande lumières escaliers
· Treppenlichtsteuerung
• Mando luces escaleras
• Bediening lichten trapzaal
• Comando das luzes da escada
* • Il secondo posto interno ed il configuratore 3501/1 devono essere acquistati separatemente.
• The second internal unit and the 3501/1 configurator must be purchased separately.
• Le deuxième poste interne et le configurateur 3501/1 doivent être achetés séparément.
• Die zweite Hausstation und der Konfigurator 3501/1 werden getrennt verkauft.
• La segunda unidad interior y el configurador 3501/1 se han de comprar por separado.
• De tweede binnenpost en de configurator 3501/1 moeten apart worden gekocht.
• A segunda unidade interna e o configurador 3501/1 devem ser adquiridos separadamente.
*
*
La página se está cargando ...

26
Lea detenidamente antes del uso y conserve la documentación para
consultas futuras
Se prohíbe tocar las unidades con las manos mojadas
Se prohíbe el uso de limpiadores líquidos o aerosoles
Se prohíbe tapar las aperturas de ventilación
Se prohíbe modicar los dispositivos
Se prohíbe desmontar las partes de protección de los dispositivos
Se prohíbe instalar las unidades cerca de líquidos y polvo
Se prohíbe instalar las unidades cerca de fuentes de calor
Se prohíbe instalar las unidades cerca de gases nocivos, polvo metálico
o productos similares
Se prohíbe jar las unidades en supercies no aptas
Peligro de descarga eléctrica
Riesgo de caída de los dispositivos por hundimiento de la supercie de
montaje o instalación inadecuada
Corte la alimentación antes de intervenir en el sistema
Atención: Las operaciones de instalación, conguración, puesta en
servicio y mantenimiento han de ser efectuadas exclusivamente por
personal cualicado. Asegúrese de que la instalación se haya efectuado
correctamente.
La colocación de los cables ha de cumplir las normativas vigentes
Conecte los cables de alimentación según las indicaciones
Para posibles expansiones del sistema, use solamente los artículos indi-
cados en las especicaciones técnicas
Vóór het gebruik doorlezen en voor naslag bewaren
Het is verboden het apparaat met natte handen aan te raken
Het is verboden vloeibare reinigers of verstuivers te gebruiken
Het is verboden de ventilatie-openingen af te sluiten
Het is verboden het apparaat te wijzigen
Het is verboden om beschermende onderdelen van het apparaat te
verwijderen
Het is verboden de apparaten te installeren in de buurt van vloei-
stoffen en stof
Het is verboden de apparaten te installeren in de buurt van warmtebronnen
Het is verboden de apparaten te installeren in de buurt van schadelijke
gassen, metaalstof of soortgelijke materialen
Het is verboden de units te bevestigen aan ongeschikte oppervlakken
Gevaar voor elektrische schokken
Gevaar voor vallen van de apparaten als het oppervlak waarop ze geïn-
stalleerd zijn instort of wegens een verkeerde installatie
Verwijder de spanning alvorens werkzaamheden aan de installatie te
verrichten
Opgelet: laat de installatie, de conguratie, de inbedrijfstelling en het
onderhoud uitsluitend verrichten door gekwaliceerd personeel.
Controleer of de installatie aan de muur correct is verricht
Breng de kabels aan volgens de toepasselijke normen
Sluit de voedingskabels aan volgens de aanwijzingen
Gebruik uitsluitend de artikelen die in de technische specicaties zijn
gegeven voor de eventuele uitbreiding van de installatie
Ler atentamente antes do uso e guardar para qualquer futura referência
Proibição de tocar as unidades com as mãos molhadas
Proibição da utilização de produtos de limpeza líquidos ou aerossóis
Proibição de obstruir as aberturas de ventilação
Proibição de alterar os dispositivos
Proibição de remover peças de proteção dos dispositivos
Proibição de instalar as unidades em proximidade de líquidos e pós
Proibição de instalar as unidades em proximidade de fontes de calor
Proibição de instalar as unidades em proximidade de gases nocivos, pós
metálicos ou similares
Proibição de xação das unidades sobre superfícies não adequadas
Perigo de choque eléctrico
Risco de queda dos dispositivos, devido a desabamento da superfície em
que estão instalados ou instalação inadequada
Tirar a alimentação elétrica antes de qualquer intervenção sobre a instalação
Atenção: as operações de instalação, conguração, colocação em serviço e
manutenção devem ser realizadas exclusivamente por pessoal qualicado.
Certicar-se de que a instalação de parede seja realizada corretamente
Proceder à colocação dos cabos atendo-se escrupulosamente às normas
vigentes.
Conectar os cabos de alimentação de acordo com as prescrições
Face a eventuais extensões de instalações utilizar exclusivamente os
artigos listados nas especicações técnicas
• Puoi scaricare i manuali completi dei dispositivi dal sito
www.homesystems-legrandgroup.com
• The complete manuals of the devices can be downloaded
from the website www.homesystems-legrandgroup.com
• Vous pouvez télécharger le manuel complet des disposi-
tifs sur le site www.homesystems-legrandgroup.com
• Sie können die vollständigen Handbücher von der Website
www.homesystems-legrandgroup.com herunterladen.
• Puede bajarse los manuales completos de los dispositi-
vos en la web de www.homesystems-legrandgroup.com
• Puede bajarse los manuales completos de los dispositivos
en la web de www.homesystems-legrandgroup.com
• É possível baixar os manuais completos do sítio
www.homesystems-legrandgroup.com
La página se está cargando ...
La página se está cargando ...
Transcripción de documentos
Audio - Kit * 230 Vac 230 Vac PRI 230 Vac 12230 V Vac 12 V • Vecchio impianto a campanello Impianto esistente con 3 fili e sola chiamata. • Old system with bell Existing system with 3 wires and just call. • Ancienne installation a sonnette Installation existante à 3 fils et un seul appel. • Alte klingelanlage Vorhandene 3-Leiter Anlage nur mit Ruffunktion. • Vieja instalación con timbre Instalación existente con 3 hilos y una llamada. • Oude deurbelinstallatie Bestaande 3-aderige installatie met alleen een oproepfunctie. • Antiga instalação em campaínha Instalação existente com 3 fios e somente chamada. * Acquistabile separatamente * Can be purchased separately * Vendu séparément * Auf Anfrage getrennt erhältlich * A la venta por separado * Apart verkrijgbaar * Adquirível separadamente PRI PRI BUS PRI BUS 346040 PRI 110 - 240 V 50 - 60 Hz 370 mA - 225 mA BUS 26.0 V 600 mA 346040 BUS PRI 110 - 240 V 50 - 60 Hz 370 mA - 225 mA BUS 26.0 V 600 mA BUS • Nuovo impianto citofonico Impianto realizzato senza modifiche ai 2 fili esistenti: chiamata, citofono e serratura. • New door entry system System made without modifications to the 2 existing wires; call, handset and electric door lock. • Nouvelle installation phonique Installation réalisée sans modifications sur les 2 fils existants: appel, phone, et serrure électrique. • Neue haustelefonanlage Anlage ohne Änderungen an den vorhandenen 2 Leiter: Ruffunktion, Gegensprechanlage und elektrisches Schloss. • Nueva instalación interfónica Instalación realizada sin las modificaciones a los 2 hilos existentes: llamada, portero y cerradura eléctrica. • Nieuwe deurtelefooninstallatie Installatie aangelegd zonder wijzigingen aan de 2 bestaande aders: oproep, intercom en elektrisch deurslot. • Nova instalação do intercomunicador Instalação realizada sem modificar os 2 fios existentes: chamada, intercomunicador e fechadura eléctrica. 3 • Cavi e distanze (mm2) • Cables and distances (mm2) • Câbles et distances (mm2) • Kabeln und Abstände (mm2) • Cables y distancias (mm2) • Kabels en afstanden (mm2) • Cabos e distâncias (mm2) D A PRI PRI BUS B 346040 PRI 110 - 240 V 50 - 60 Hz 370 mA - 225 mA BUS 26.0 V 600 mA • Instalación con un máximo de 3 PI • Installatie tot 3 PI • Instalação até 3 UI • Installazione fino a 3 PI • Installation of up to 3 handsets • Montage jusqu’à 3 PI • Installation von bis zu 3 Türstationen BTicino 336904 0,28 mm2 4 C BUS BTicino L4669 0,35 mm2 1 mm2 A 380 m 610 m 400 m 1000 m B 200 m 290 m 210 m 580 m C 180 m 320 m 190 m 560 m D 30 m 50 m 30 m 100 m • Schema bifamiliare • Two-family diagram • Schéma bi-familiale • Schema Zweifamilienhaus * ON OFF B BUS = = = P = M = N • Esquema bifamiliar • Schema tweegezins • Esquema bifamiliar – *1 – – – ON OFF B = = = P = M = N – – – – – PRI BUS PRI BUS 346040 PRI 110 - 240 V 50 - 60 Hz 370 mA - 225 mA BUS 26.0 V 600 mA * • Il secondo posto interno ed il configuratore 3501/1 devono essere acquistati separatemente. • The second internal unit and the 3501/1 configurator must be purchased separately. • Le deuxième poste interne et le configurateur 3501/1 doivent être achetés séparément. • Die zweite Hausstation und der Konfigurator 3501/1 werden getrennt verkauft. • La segunda unidad interior y el configurador 3501/1 se han de comprar por separado. • De tweede binnenpost en de configurator 3501/1 moeten apart worden gekocht. • A segunda unidade interna e o configurador 3501/1 devem ser adquiridos separadamente. PL BUS S+SBUS A P = = N = = T = S = – – – – – – Bifamiliare - Two family 2 Monofamiliare - One family 1 • A B S+ S• A B S+ S• A B S+ S• A B S+ S6 Pulsante locale apertura serratura. Chiamata al piano. 18 V; 4 A impulsivi. 250 mA mantenimento (30 Ω max). Door lock release local pushbutton. Floor call. 18 V; 4 A impulsive. 250 mA holding current (30 Ω max). Bouton local ouverture serrure. Appel à l’étage. 18 V; 4 A impulsifs. 250 mA entretien (30 Ω max). Lokale Schlossöffnungstaste. Etagenruf. 18 V; 4 A impulsstrom. 250 mA Haltestrom (30 Ω max). • A B S+ S• A B S+ S• A B S+ S- Pulsador local apertura cerradura. Llamada al piso. 18 V; 4 A por impulsos. 250 mA mantenimiento (30 Ω max). Lokale knop opening slot. Oproep aan verdieping. 18 V; 4 A impulsief; 250 mA onderhoud (30 Ω max). Botão local de abertura da fechadura. Chamada ao piso. 18 V; 4 A instantâneos. 250 mA continuos (30 Ω max). Audio - Kit • Schema bifamiliare 2 • Two-family diagram 2 • Schéma bi-familiale 2 • Schema Zweifamilienhaus 2 * ON OFF • Esquema bifamiliar 2 • Schema tweegezins 2 • Esquema bifamiliar 2 = = = P = M = – *1 – – – = = = P = M = – – – – – N * • Il secondo posto interno ed il configuratore 3501/1 devono essere acquistati separatemente. • The second internal unit and the 3501/1 configurator must be purchased separately. • Le deuxième poste interne et le configurateur 3501/1 doivent être achetés séparément. • Die zweite Hausstation und der Konfigurator 3501/1 werden getrennt verkauft. • La segunda unidad interior y el configurador 3501/1 se han de comprar por separado. • De tweede binnenpost en de configurator 3501/1 moeten apart worden gekocht. • A segunda unidade interna e o configurador 3501/1 devem ser adquiridos separadamente. BUS B N ON OFF PRI PRI BUS BUS 346040 B PRI 110 - 240 V 50 - 60 Hz 370 mA - 225 mA BUS 26.0 V 600 mA PL BUS S+SBUS A Bifamiliare - Two family Monofamiliare - One family P = = N = = T = S = – – – – – – 2 1 7 • Opzione serratura a relè • Relay door lock option • Option serrure à relais • Option Relais-Schloss P = = = N = T = S = – – – – – – • Opción cerradura de relé • Optie relaisslot • Opção trinco de relê PL BUS S+SA 346250 (*) S- S+ C NC NO * Acquistabile separatamente * Can be purchased separately * Vendu séparément * Auf Anfrage getrennt erhältlich * A la venta por separado * Apart verkrijgbaar * Adquirível separadamente • A S+ S• A S+ S• A S+ S• A S+ S- 8 Pulsante locale apertura serratura. 18 V; 4 A impulsivi. 250 mA mantenimento (30 Ω max). Door lock release local pushbutton. 18 V; 4 A impulsive. 250 mA holding current (30 Ω max). Bouton local ouverture serrure. 18 V; 4 A impulsifs. 250 mA entretien (30 Ω max). Lokale Schlossöffnungstaste. 18 V; 4 A impulsstrom. 250 mA Haltestrom (30 Ω max). 8 A cosφ = 1 24 Vdc; 24 Vac 4 A cosφ = 0,7 24 Vac 3 A cosφ = 0,4 24 Vac NO NC C • A S+ S• A S+ S• A S+ S- Pulsador local apertura cerradura. 18 V; 4 A por impulsos. 250 mA mantenimiento (30 Ω max). Lokale knop opening slot. 18 V; 4 A impulsief; 250 mA onderhoud (30 Ω max). Botão local de abertura da fechadura. 18 V; 4 A instantâneos. 250 mA continuos (30 Ω max). • Posto esterno • Entrance panel • Poste extérieur • Türstation 12 11 10 1 9 8 7 6 5 2 3 4 1234- Bornes de branchement Boutons d’appel Voyant connexion active Voyant indication porte ouverte 5 - Micro 6 - Réglage micro 7 - Réglage haut-parleur 8 - Commutateur mono/bi-familial 9 - Panneau Voyant d’éclairage bouton d’appel 10 - Logement des configurateurs 11 - Capteur de luminosité pour rétro-éclairage nocturne 12 - Haut-parleur 123456789- Aansluitklemmen Oproepknoppen Led verbinding geactiveerd Led aanduiding deur geopend Microfoon Regeling microfoon Regeling luidspreker Schakelaar een-/tweegezins Led paneel voor verlichting oproepknop 10 - Plaats van de configuratoren 11 - Lichtsensor voor achtergrondverlichting ‘s nachts 12 - Luidspreker 10 • Placa exterior • Externe plaats • Unidade externa 123456789- Morsetti di collegamento Pulsanti di chiamata LED connessione attiva LED indicazione porta aperta Microfono Regolazione microfono Regolazione altoparlante Switch mono/bifamiliare Pannello LED per illuminazione pulsante di chiamata 10 - Sede dei configuratori 11 - Sensore di luminosità per retroilluminazione notturna 12 - Altoparlante 123456789- 123456789- 123456789- Anschlussklemmen Ruftasten LED Verbindung aktiv LED Anzeige Tür offen Mikrophon Einstellung des Mikrophons Einstellung des Lautsprechers Switch Ein-/Zweifamilienhaus LED-Tafel zur Beleuchtung der Ruftaste 10 - Sitz der Konfiguratoren 11 - Helligkeitssensor zur nächtlichen Rückbeleuchtung 12 - Lautsprecher 123456789- Bornes de conexão Botões de chamada LED de conexão ativa LED indicação de porta aberta Microfone Regulação do microfone Regulação do altifalante Interruptor mono/bifamiliar Painel LED para iluminação do botão de chamada 10 - Sede dos configuradores 11 - Sensor de luminosidade para retroiluminação noturna 12 - Altifalante Connection clamp Call pushbuttons Active connection LED Open door notification LED Microphone Microphone adjustment Loudspeaker adjustment One-family/two-family switch LED panel for call pushbutton lighting 10 - Configurator socket 11 - Brightness sensor for night backlighting 12 - Loudspeaker Bornes de conexión Pulsadores de llamada LED conexión activada LED indicación puerta abierta Micrófono Regulación del micrófono Regulación del altavoz Switch mono/bifamiliar Panel LED para iluminación pulsador de llamada 10 - Alojamiento de los configuradores 11 - Sensor de luminosidad para retroiluminación nocturna 12 - Altavoz 1234- VOYANT rouge de signal d’exclusion appel. Réglage volume sonnerie / exclusion appel. Réglage volume phonique en réception. VOYANT rouge de signal d’activation serrure et/ ou état porte. 5 - Touche commande serrure. 6 - Touche activation / désactivation communication. 7 - VOYANT bicolore rouge / vert de signal de l’état de fonctionnement. 8 - Micro. 9 - Touche activation poste externe / cyclage. 10 - Touche commande allumage lumière escaliers. 11 - Haut-parleur. 12 - Bornes de branchement d’un bouton externe d’appel à l’étage. 13 - Bornes de branchement au BUS SCS 2 fils. 14 - Micro-interrupteur ON / OFF de fin de ligne. 15 - Logement des configurateurs. 1234- 1 - Rote Meldeleuchte für Anruf ausgeschlossen. 2 - Regelung des Ruftonlautstärke / Anruf ausgeschlossen. 3 - Regelung Audiolautstärke bei Empfang. 4 - Rote Meldeleuchte zur Aktivierung des Schlosses und/oder des Türzustands. 5 - Taste Schlosssteuerung. 6 - Taste Kommunikation aktivieren/deaktivieren. 7 - Zweifarbige Meldeleuchte (rot/grün) zur Meldung des Betriebszustands. 8 - Mikrophon. 9 - Taste für Türstation aktivieren und Taktierung. 10 - Taste Treppenlicht einschalten. 11 - Lautsprecher. 12 - Anschlussklemmen einer äußeren Taste für Etagenruf. 13 - Klemme für Anschluss an BUS/SCS 2-Draht. 14 - Mikroschalter ON/OFF für den Streckenabschluss. 15 - Sitz der Konfiguratoren. 1 - LED vermelho de sinalização exclusão de chamada. 2 - Regulação do volume da campainha / exclusão de chamada. 3 - Regulação do volume fónico em recepção. 4 - LED vermelho de sinalização para a activação da fechadura e/ou o estado da porta. 5 - Tecla de comando da fechadura. 6 - Tecla de activação / desactivação da comunicação. 7 - LED bicolor vermelho / verde de sinalização do estado de funcionamento. 8 - Microfone. 9 - Tecla de activação da unidade externa / ciclamento. 10 - Tecla comando acendimento luzes das escadas. 11 - Altifalante. 12 - Bornes para a conexão de um botão externo de chamada no piso. 13 - Bornes para a conexão ao BUS SCS bus de 2 fios. 14 - Microinterruptor ON / OFF de terminação de trecho. 15 - 4. Alojamento dos configuradores. 1234- Rode LED signalering uitsluiting oproep. Volumeregeling beltoon / uitsluiting oproep. Fonische volumeregeling ontvangt. Rode LED signalering activering slot en/of status deur. 5 - Bedieningstoets slot. 6 - Toets activering / deactivering communicatie. 7 - Tweekleurige LED rood / groen signalering functioneringsstatus. 8 - Microfoon. 9 - Toets activering deurstation / cyclische weergave. 10 - Bedieningstoets inschakeling traplicht. 11 - Luidspreker. 12 - Aansluitklem voor een externe oproepknop op de verdieping. 13 - Aansluitklemmen 2-dradige BUS SCS. 14 - Microschakelaar ON / OFF einde lijn. 15 - Plaats configuratoren. LED rojo de señalización y exclusión de llamada. Regulación volumen timbre/exclusión de llamada. Regulación volumen fónico en recepción. LED rojo de señalización para activar la cerradura y/o el estado de la puerta. 5 - Tecla mando cerradura. 6 - Tecla de activación/desactivación comunicación. 7 - LED bicolor rojo/verde de señalización del estado de funcionamiento. 8 - Micrófono. 9 - Tecla de activación placa exterior/visualización cíclica. 10 - Tecla de mando encendido luces escaleras. 11 - Altoparlante. 12 - Bornes para la conexión de un pulsador exterior de llamada a la planta. 13 - Bornes para la conexión al BUS SCS 2 hilos. 14 - Microinterruptor de ON/OFF de terminación de tramo. 15 - Alojamiento de los configuradores. 12 Audio - Kit • Installazione posto esterno • Entrance panel installation • Installation du poste extérieur • Installation der Türstation • Instalación de la placa exterior • Installatie externe plaats • Instalação da unidade externa 3 * ** 2 1 * 4 * Per garantire l’impermeabilità montare le guarnizioni a corredo. * To guarantee water tightness make sure to fit the seals supplied. * Pour garantir l’imperméabilité, monter les joints fournis à cet effet. * Um die Abdichtung sicherzustellen, montieren Sie die mitgelieferten Dichtungen. * Montar las juntas de la dotación para garantizar la impermeabilidad. * Monteer de geleverde pakkingen om de waterdichtheid te waarborgen. * Para garantir a impermeabilidade, montar as vedações fornecidas juntamente. 5 ** Prima dell’installazione assicurarsi che la vite sia completamente avvitata. ** Before installing make sure that the screw is completely tightened. ** Avant l’installation, s’assurer que la vis soit complètement vissée. ** Vor der Installation sicherstellen, dass die Schraube richtig festgeschraubt ist. ** Antes de la instalación, compruebe que el tornillo esté completamente enroscado. ** Vóór de installatie controleren of de schroef volledig vastgedraaid is. ** Antes da instalação verificar se o parafuso está completamente atarraxado. 13 Audio - Kit • Se si manifestasse il disturbo del fischio, (effetto Larsen), ridurre prima la potenza del microfono , agendo con un cacciavite sul potenziometro corrispondente, fino ad un livello accettabile. Qualora il fenomeno persista, agire sul potenziometro dell’altoparlante in modo da eliminare l’inconveniente. Se il volume è troppo basso, aumentare prima il volume dell’altoparlante ed eventualmente anche quello del microfono, tenendo presente che è preferibile una trasmissione chiara e priva di disturbi, che una al limite dell’innesco (Larsen). power, adjusting the corresponding potenti• In case of a whistle (Larsen effect), first reduce the microphones ometers with a screw driver, until an acceptable level is reached. Should the whistle persist, adjust the loudspeakers volume in order to eliminate the trouble. If the volume is too low level then, increase first the potentiometer of the loudspeaker and secondly the one for the microphone, bearing in mind that a clear and noise free reception is preferable than one just before whistling (Larsen). sur le potentiomètre corres• Lors de sifflement (effet de Larsen), reduire d’abord la puissance du micro pondant, à l’aide d’un tournevis, jusqu’à l’obtention d’un niveau satisfaisant. Si le sifflement persiste, régler jusqu’à l’élimination de celui-ci. Si le volume est trop bas, augmenter le potentiomètre du hautparleur d’abord la puissance du haut-parleur et éventuellement celle du micro, en considérant qu’une réception claire et sans parasite est préférable à une communication à la limite de l’accrochage (effet de Larsen). • Beim etwaigen Auftreten eines Pfeiftones (Larsen-Effekt), zuerst die Lautstärke des Mikrophones bis auf einen annehmbaren Wert herabsetzen, indem man das entsprechende Potentiometer mit einem Schraubendreher einbis zur Beseitigung des stellt. Sollte die Störung weiterhin bestehen, dann das Potentiometer des Lautsprechers Pfeiftones einstellen. Ist die Lautstärke nun zu niedrig, dann zuerst die des Lautsprechers und erst danach evtl. auch die des Mikrophones erhohen, wobei ein deutlicher und störungsfreier Empfang einem an der Störungsgrenze liegendem (Larsen-Effekt) vorzuziehen ist. • Si se manifesta el silbido de acoplamiento, (efecto Larsen), reducir primero la potencia del micrófono , girando con un destornillador el potenciómetro correspondiente, hasta obtener un nivel aceptable. Si el hasta eliminar la interferencia. Si el volumen fenómeno persistiera, regular el potenciómetro del altavoz es demasiado bajo, aumentar primero el volumen del altavoz y eventualmente también el del micrófono, teniendo en cuenta que es preferible una transmissión clara y limpia de interferencias, que una al limite del acoplo (Larsen). met behulp • Als er een fluittoon hoorbaar is (effect van Larsen): verminder eerst het vermogen van de microfoon van een schroevendraaier zijn stroomregelaar zo te regelen dat de geluidssterkte van het gefluit aanvaardbaar bijstellen. Als de is. Als het verschijnsel niet verdwijnt, dan moet u ook de stroomregelaar van de luidspreker geluidssterkte nu te klein is, verhoog dan eerst de geluidssterkte van de luidspreker en daarna eventueel ook die van de microfoon, en denk er bij het bijstellen aan dat een duidelijk hoorbaar en ongestoord geluid beter is dan een harder geluid op de grens van het Larsen effect. • Se se manifestar uma interferência no som (efeito de Larsen), começar por diminuir a potência do microfone , rodando o potenciómetro correspondente com uma chave de parafusos, até obter um nível aceitável. de modo a eliminar o problema. Se o Se o fenómeno persistir, regular o potenciómetro do altifalante volume estiver demasiado baixo, começar por aumentar o volume do altifalante e depois, se necessário, o do microfone, tendo presente que é melhor ter uma transmissão clara e sem interferências, que uma no limiar de início de efeitos Larsen. 15 • Configurazione posto esterno • Entrance panel configuration • Configuration poste extérieur • Konfiguration Türstation • Configuración placa exterior • Configuratie externe plaats • Configuração unidade externa P P N S N - Possono non essere configurati. - They do not need to be configured. - Ils peuvent ne pas être configurés - Brauchen nicht konfiguriert zu werden. T S - Pueden no precisar configuración. - Kunnen niet worden geconfigureerd. - Podem não ser configurados. - Temporizzatore serratura (vedi tabella). - Door lock timer relay (see table). T - Temporisation serrure (voir tableau). - Zeitgeber schlossrelaiscerradura (siehe Tabelle). - Temporizador relé cerradura (véase la tabla). - Timer deurslotrelais (zie de tabel). - Temporizador do relé da fechadura (veja a tabela). – 1 2 3 4 5 6 7 4s 1s 2s 3s * 6s 8s 10 s * Funzionamento come pulsante per max. 10 sec. dopodichè entra in stand-by. Per estendere tale funzionamento oltre i 10 sec. utilizzare l’attuatore 346210 configurato con MOD=5. * Operation as pushbutton for 10 sec. max after which it goes in stand-by. In order to extend this type of operation over 10 seconds, use the actuator, item 346210 configured with MOD=5. * Fonctionnement comme bouton pendant 10 sec. max., ensuite passe en stand-by. Pour étendre ce fonctionnement au-delà de 10 sec., utiliser l’actionneur 346210 configuré sur MOD=5. * Die Tastenfunktion dauert max. 10 sec.; danach schaltet sie auf Standby. Um diese Funktion zu verlängern und mehr als 10 sec. dauern zu lassen, den Aktor 346210 verwenden und mit MOD=5 konfigurieren. * Funcionamiento como pulsador durante al máx.10 s. después se pone en standby. Para ampliar dicho funcionamiento a más de 10 s., use el actuador art. 346210 configurado con MOD = 5. * 10 sec. lange werking als knop, vervolgens vindt de overschakeling naar stand-by plaats. Laat deze functie langer dan 10 sec. duren met behulp van de actuator 346210 die als MOD=5 is geconfigureerd. * Funcionamento como botão por um máximo de 10 segundos, depois disto dispõe-se em standby. Para prolongar este funcionamento por mais de 10 segundos, utilizar o atuador 346210 configurado com MOD=5. • Tutte le volte che si modifica la configurazione è necessario togliere e ridare l’alimentazione all’impianto, attendendo circa 1 minuto. • Every time the configuration is altered the system must be switched off and back on again, waiting for about 1 minute. • Chaque fois que l’on modifie la configuration, il faut retirer, puis redonner l’alimentation à l’installation, après avoir attendu environ 1 minute. • Jedes Mal, wenn die Konfiguration geändert wird, den Strom abschalten, etwa 1 Minute warten und dann wieder einschalten. • Cada vez que modifica la configuración, es necesario cortar y volver a dar alimentación a la instalación, después de esperar aproximadamente 1 minuto. • Na iedere wijziging in de configuratie moet de installatie ongeveer 1 minuut van het elektriciteitsnet worden afgesloten. • Todas as vezes que se modificar a configuração é necessário ligar e desligar a instalação da energia eléctrica, esperando cerca de 1 minuto. 16 Audio - Kit • • • • Installazione del posto interno Handset installation Installation du poste interne Installation der Hausstation • Instalación de la unidad interior • Installatie van het intern punt • Instalação da unidade interna 2 1 3 4 17 • Selezione suoneria • Bell selection • Sélection sonnerie • Läutwerk wählen • Selezione suoneria da posto esterno principale (S=0). • Selection call from main outdoor station (S=0) bell. • Sélection sonnerie appel d’un poste extérieur principal (S=0). • Änderung Rufton der Haupttürstation (S=0). • Selección timbre llamada desde el puesto exterior principal (S=0). • Kies belgeluid oproep vanuit eerste externe post (S=0). • Selecção do toque para chamada da unidade externa principal (S=0). • • • • • • • Selezione suoneria chiamata intercom. Selection call intercom bell. Sélection sonnerie appel intercom. Änderung interner Rufton. Selección del timbre de llamada intercom. Kies belgeluid intercom oproep gebouw. Selecção do toque para chamada intercomomunicador. • Selezione suoneria chiamata al piano. • Selection call to the floor bell. • Sélection sonnerie appel à l’étage. • Änderung Rufton Etagentaster. • Selección del timbre de llamada al piso. • Kies belgeluid oproep aan verdieping. • Selecção do toque para chamada ao andar. 18 • Selección del timbre • Selecção toques • Beltoon kiezen 1 2 > 3s 16 1 2 > 3s 16 1 2 > 3s 16 3 2 1 1 2 1 3 2 1 3 2 1 3 2 1 3 2 3 346210 346210 P+1 P+1 P+1 MOD=9 3 2 1 1 P+1 2 1 2 1 2 3 2 3 346210 P+1 P+1 MOD=5 3 2 1 1 346210 3 2 1 3 346210 P+1 P+1 MOD=5 P+2 P+2 MOD=9 3 2 1 3 346210 346210 P+1 P+1 P+1 MOD=5 3 2 1 1 2 3 P+1 2 P+2 P+2 MOD=9 3 2 1 1 P+1 3 2 1 Audio - Kit 3 1 346210 2 3 346210 P+1 P+1 MOD=5 P+1 P+1 MOD=5 P+2 MOD=9 P+2 2 P+3 MOD=9 3 2 1 1 2 2 3 1 346210 3 2 1 1 3 2 1 3 2 3 346210 2 3 346210 P+3 3 2 1 1 346210 3 2 1 1 346210 P+3 P+3 MOD=9 3 2 1 1 2 3 2 1 3 1 346210 2 3 346210 3 346210 • Funzionamento dei pulsanti programmabili • Werkmodus van de programmeerbare P+3 P+3 MOD=9 • Pushbutton operating mode drukknoppen P+1 P+3 P+3 P+3 P+3 • Fonctionnement des touches programmables • P+3 Modalidade de funcionamento P+1 dos botões • Betriebsmodus der programmierbaren Tasten programáveis P+1 P+1 P+1 P+1 P+1 • Funcionamiento de los pulsadores programables MOD=5 MOD=5 P+2 P+2 MOD=5 2 1 2 1 P+2 P+2 MOD=5 3 2 2 3 3 2 1 3 2 1 3 346210 346210 2 1 2 1 3 2 3 346210 346210 P+3 P+3 MOD=5 2 1 3 3 346210 P+3 P+3 MOD=5 3 2 1 3 2 1 1 346210 P+3 P+3 MOD=5 P+2 P+2 MOD=5 P+3 P+3 MOD=5 3 2 1 3 2 1 3 346210 P+3 P+3 MOD=5 1 P+2 P+2 MOD=5 1 3 2 1 1 P+2 P+2 MOD=5 2 3 346210 P+4 P+4 P+1 P+1 M =0 MOD=5 2 P 1 2 2 1 P+4 P+4 MOD=5 P 3 P+4 P+4 MOD=5 1 2 P+4 P+4 M=3 M=4 3 2 1 1 2 1 3 346210 P+2 P+2 MOD=5 P 3 2 1 3 346210 3 2 1 P 2 3 346210 P+4 P+4 MOD=5 P+4 P+4 MOD=5 1 3 2 1 2 3 346210 P+2 P+2 MOD=5 P P P+2 P+2 MOD=5 P P+3 3 2 1 1 2 1 P+2 MOD=9 3 2 1 2 3 1 2 P+3 3 2 1 3 1 2 2 2 1 3 346210 1 346210 2 3 346210 P+3 P+3 MOD=5 3 P+1 P+1 MOD=9 P+3 P+3 MOD=5 P+3 2 P+3 P+3 MOD=5 3 2 1 1 P+3 MOD=9 3 N=1–99 346210 P+4 P+2 P+2 MOD=9 P+4 3 2 1 1 2 P+4 1 346210 N=1 3 2 1 3 2 3 346210 3 2 1 2 3 2 346210 3 3 346210 346210 1 3 2 1 3 1 346210 1 3 2 1 1 3 2 1 2 3 2 1 346210 P+3 1 3 2 1 3 346210 P+2 2 346210 3 346210 3 2 1 3 346210 3 2 1 1 P+1 M=2 3 2 1 3 P+4 P+4 MOD=5 P+1 MOD=9 P+4 M=1 3 2 1 1 346210 2 3 346210 P+1 P+1 P+1 MOD=5 P+2 2 P+4 P+4 MOD=5 3 2 1 1 3 346210 P+4 P+4 MOD=5 P P P+3 P+3 MOD=9 P 3 2 1 1 2 1 3 2 1 3 346210 2 P P 1 P+1 P+1 MOD=9 3 2 1 2 P 3 P+1 P+1 MOD=9 1 2 346210 P+1 P+1 3 2 1 3 346210 P+1 MOD=9 P+4 P+4 MOD=5 3 346210 1 2 1 3 346210 2 P+2 P+2 MOD=5 2 3 346210 P+2 P+2 MOD=9 P+1 P+1 MOD=5 2 1 1 346210 P+2 M = 5 come M = 0 con tono tasti disabilitato M = 6 come M = 1 con tono tasti disabilitato P+2 P+2 P+3 M = 7 come M =P+3 2 con tono tasti disabilitatoMOD=5 MOD=5 M = 8 come M = 3 con tono tasti disabilitato M = 9 come M = 4 con tono tastiP+3 disabilitato P+3 P+3 MOD=9 P+3 MOD=9 P+4 P+3 M = 5 like M = 0 with key tone disabled M = 6 like M = 1 with key tone disabled M = 7 like M = 2P+4 with key tone disabled P+4 P+3 P+3 MOD=5 M = 8 like M = 3 with key tone disabled MOD=5 M = 9 like M = 4 with key tone disabled 2 3 346210 3 2 1 1 2 1 3 2 1 3 346210 2 3 346210 3 2 1 1 2 3 346210 P+1 P+1 M = 5 comme M = 0 avec tonalité touches désactivée P+4 M = 6 comme M = 1 avec tonalité touches désactivée M = 7 comme M = 2 avec tonalité touches désactivée M = 8 comme M = 3 avec tonalité touches désactivée P+1 P+1 P+1 P+1 M = 9 comme M = 4 avec tonalité touches désactivée P+4 P+4 3 2 1 1 2 1 346210 3 2 1 3 2 3 346210 3 2 1 1 2 3 346210 MOD=5 MOD=5 MOD=5 M = 5 wie M = 0 mit deaktiviertem Tastenton M = 6 wie M = 1 mit deaktiviertem Tastenton M = 7 wie M = 2 mit deaktiviertem Tastenton P M = 8 wie M = 3 mit deaktiviertem Tastenton M = 9 wie M = 4 mit deaktiviertem Tastenton 3 2 1 1 2 1 P+2 P+2 MOD=5 3 2 1 3 346210 2 3 346210 3 2 1 1 2 346210 3 2 3 346210 3 2 1 3 3 3 2 1 3 P+2 MOD=9 1 2 346210 3 2 1 1 2 1 3 346210 1 3 2 1 P+3 3 2 1 3 2 1 P+2 P+2 MOD=5 P+2 P+2 MOD=9 M = 5 como M = 0 con tono de teclas deshabilitado M = 6 como M = 1 con tono de teclas deshabilitado M = 7 como M = 2 con tono de teclas deshabilitado M = 8 como M = 3 con tono de teclas deshabilitado M = 9 como M = 4 con tono de teclas deshabilitado P+3 P+3 MOD=9 M = 5 als M = 0 met tonen toetsen gedeactiveerd M = 6 als M = 1 met tonen toetsen gedeactiveerd M = 7 als M = 2 met tonen toetsen gedeactiveerd M = 8 als M = 3 met tonen toetsen gedeactiveerd M = 9 als M = 4 met tonen toetsen gedeactiveerd 3 2 1 1 2 3 346210 P+1 M = 5 como M = 0 com tom das teclas desligado M = 6 como M = 1 com tom das teclas desligado M = 7 como M = 2 com tom das teclas desligado M = 8 como M = 3 com tom das teclas desligado M = 9 como M =P+1 4 comP+1 tom das teclas desligado 3 2 1 1 2 3 346210 MOD=5 3 2 1 1 2 3 346210 P+2 P+2 MOD=5 19 P+2 MOD=9 P+1 3 2 1 1 2 3 346210 3 2 1 1 2 3 346210 Audio - Kit P+3 P+3 MOD=9 P+1 P+1 MOD=5 P+1 3 2 1 1 2 3 3 2 1 346210 1 2 3 346210 P+1 P+1 MOD=5 P+2 P+2 MOD=5 3 2 1 1 P+3 2 3 346210 P+2 P+2 MOD=5 3 2 1 1 2 3 346210 P+3 P P+3 MOD=5 P+3 2 1 2 Activación de la placa exterior (configurada con P) en el modo directo sin llamada. Visualización cíclica de las placas exteriores y telecámaras presentes en el sistema. Llamada directa a la centralita de conserjería si está presente en el sistema Activering DS (geconfigureerd met P) in directe modus zonder oproep. Cyclische weergave DS en camera’s in installatie. Oproep naar portierscentrale als de installatie daarvan is voorzien Activação do UE (configurado com P) em Modo directo sem chamada. Ciclamento UE e câmaras presentes na instalação. Chamada directa à central de portaria, se estiver presente na instalação Activación/Desactivación de la fónica Audio activeren/deactiveren Activação/Desactivação da fónica 3 346210 P+4 P+3 P+3 P+1 MOD=5 P+1 MOD=9 3 2 1 PT 3 346210 1 NL 3 2 1 3 2 1 1 ES 2 3 346210 P P+4 P+4P+4 MOD=5 3 2 1 1 2 3 346210 2 3 2 1 1 3 2 1 1 2 3 3 346210 346210 P+2 PP+1 +2 MOD=9 P+4 P+4 P+1 MOD=9 MOD=5 P 3 2 1 1 2 Abertura da fechadura da UE (configurada com U) em modo directo sem a chamada ou então de UE em conexão Mando luces escalera con actuador 346210 Bediening traphuisverlichting met actuator 346210 Comando da luz das escadas com actuador 346210 Apertura cerradura del PE (con figurado con P+1) en modo directo sin llamada o activación del actuador 346210 (configurado con P+1 y MOD=5) o activación del actuador 346230 (configurado con P+1) Echtstreekse opening van het deurslot van het als P+1 geconfigureerde deurstation, zonder oproep of activering van het toestel 346210 (geconfigureerd als P+1 en MOD=5) of activering van het toestel 346230 (geconfigureerd als P+1) Abertura da fechadura da UE (configurada com P+1) de maneira directa sem a chamada ou então ligação do actuador 346210 (configurado com P+1 e MOD=5) ou então ligação do actuador 346230 (configurado com P+1) 3 2 1 Apertura de la cerradura de la placa openen slot Deurstation exterior (configurada con P) de mane- Direct met P) zonder oproep ra directa sin la llamada o de la placa (geconfigureerd of Deurstation verbonden exterior en conexión 3 1 2 3 346210 P 346210 P+2 P+2 MOD=9P+3 P+3 MOD=9 3 2 1 1 2 3 3 2 1 1 2 3 346210 346210 3 2 1 1 2 346210 3 P+3 P+3 MOD=9 P+1 3 2 1 1 2 3 346210 P+1 P+1 P+1 MOD=5 3 2 1 1 2 3 346210 P+1 P+1 MOD=5 N=1–99 N=1 3 2 1 1 2 3 3 2 1 1 2 3 346210 346210 P+2P+2 P+2 P+2 MOD=5 MOD=5 Intercomunicador a todas las unidades Intercom op alle binnenposten internas configuradas N = 1 geconfigureerd met N=1 Intercom a todas as unidades internas configuradas N=1 Intercomunicación hacia los aparatos iguales, envía la llamada a todos los aparatos con igual dirección Intercomunicador sobre si mesmo, envia a chamada a todos os aparelhos com endereço igual P+3 2 P+3 3 2 1 1 3 346210 3 2 1 1 2 3 P+3 P+3 MOD=5 346210 P+3 P+3 MOD=5 P+4 3 2 1 1 2 Intercom op zichzelf, verstuurt de oproep naar alle toestellen met hetzelfde adres 3 346210 P+4 P+4 P+4 MOD=5 3 2 1 1 2 3 346210 PP+4 P+4 MOD=5 21 • Modalità Push to Talk • Modalité Push to Talk • Función Push to Talk • Função Push to Talk • Push to Talk mode • Modus Push toTalk • Push to Talk functie • Se il posto esterno si trova in un ambiente particolarmente rumoroso è possibile, durante la conversazione, attivare la funzione Push to Talk al fine di ottenere una comunicazione meno disturbata. Durante la conversazione è possibile attivare la funzione Push to Talk nel seguente modo. - Premere il tasto Connessione per almeno 2 secondi per parlare con il posto esterno. Il Led rimane verde. - Rilasciare il tasto per poter ascoltare dal posto esterno. Il Led diventa rosso. - Per terminare la connessione premere brevemente il tasto Connessione. Il Led si spegne. • If the entrance panel is in a particularly noisy place, during the conversation the Push to Talk function can be activated for a less disturbed call. During the conversation the Push to Talk function can be activated as follows. - Press the Connection key for at least 2 seconds to talk to the entrance panel. The LED remains green. - Release the key to hear from the entrance panel. The LED becomes red. - To end the connection press the connection key briefly. The LED goes out. • Si le poste externe se trouve dans un environnement particulièrement bruyant, il est possible d’activer durant la conversation la fonction Push to Talk pour obtenir une meilleure communication. Durant la conversation, il est possible d’activer la fonction Push to Talk en procédant comme suit. Appuyer sur la touche. - Connexion pendant au moins 2 secondes pour parler avec le poste externe. Le voyant reste vert. - Relâcher la touche pour pouvoir écouter depuis le poste externe. Le voyant devient rouge. - Pour mettre fin à la connexion, appuyer brièvement sur la touche connexion. Le voyant s’éteint. • Wenn die Türstation in einem besonders geräuschvollen Bereich installiert ist, kann man während des Gesprächs die Funktion Push to Talk drücken, um diese Geräusche zu überwinden. Während des Gesprächs kann die Funktion Push to Talk folgendermaßen aktiviert werden. - Die Verbindungstaste mindestens 2 Sekunden lang drücken, um mit der Türstation zu sprechen. Die grüne Meldeleuchte leuchtet immer noch. - Taste loslassen, um die Türstation hören zu können. Die Meldeleuchte leuchtet rot auf - Um die Verbindung abzubrechen, die Verbindungstaste kurz drücken. Die Meldeleuchte erlischt. • Si la placa exterior se encuentra en un ambiente con un alto nivel de ruido, durante la conversación es posible activar la función Push to Talk para obtener una comunicación con menor interferencias. Durante la conversación es posible activar la función Push to Talk en el modo siguiente. - Presione la tecla de conexión almenos 2 segundos para conversar con la placa exterior. El led permanece verde. - Suelte la tecla para poder escuchar desde la placa exterior. El led se vuelve rojo. - Para terminar la conexión, presione brevemente la tecla de conexión. El led se apaga. • Indien het extern punt zich op een bijzonder lawaaierige plaats bevindt, is het mogelijk, tijdens het gesprek, de functie Push to Talk te activeren teneinde een minder gestoorde communicatie te verkrijgen. Tijdens het gesprek is het mogelijk de functie Push to Talk te activeren op de volgende manier. - De drukknop van Verbinding gedurende minstens 2 seconden indrukken om met het externe punt te communiceren. De led blijft groen. - De toets loslaten om vanuit het externe punt te kunnen luisteren. De led wordt rood. - Om de verbinding te beëindigen, eventjes de toets. van verbinding indrukken. De led gaat uit. • Esta função permite difundir uma mensagem vocal, ditada ao microfone do dispositivo, por meio de altifalantes do sistema de Difusão sonora. A activação realiza-se premindo brevemente a tecla “Conexão” com o dispositivo em espera, o indicador luminoso verde aceso indica que a função está activada. Para cessar a função pressionar novamente a tecla “Conexão”. - Pressionar a tecla de conexão por pelo menos 2 segundos para falar com a unidade externa. O indicador luminoso continua verde - Soltar a tecla para poder escutar a unidade externa. O indicador luminoso fica vermelho - Para desligar pressionar ligeiramente a tecla da conexão. O indicador luminoso apaga. 22 Audio - Kit • Funzione Stato porta • Fonction État porte • Door state function • Funktion Türzustand • Función Estado puerta • Staat deur • Função Estado porta • Questa funzione segnala lo stato della serratura (solo se l’impianto è predisposto mediante apposito attuatore). Se è aperta il “led serratura” lampeggia, se è chiusa rimane spento. La funzione non è attivabile contemporaneamente alla funzione Studio Professionale. • This function indicates the status of the door lock (only for systems preset with appropriate actuator). If open the „door lock LED“ flashes, and if closed, the LED stays off. The function cannot be activated together with the Office function. • Cette fonction signale l’état de la serrure (uniquement si l’installation est prévue à cet effet avec actionneur). Si elle est ouverte, le “Voyant serrure” clignote, si elle est fermée, il reste éteint. La fonction ne peut pas être activée conjointement à la fonction Bureau. • Diese Funktion meldet den Status des Schlosses (nur wenn die Anlage mit entsprechendem Aktor versehen ist). Wenn geöffnet, blinkt die „Led Schloss“; wenn geschlossen bleibt die Led ausgeschaltet. Die Funktion kann nicht gleichzeitig mit der Büro-Funktion aktiviert werden. • Esta función indica el estado de la cerradura (solamente con el sistema predispuesto mediante el actuador correspondiente). Si está abierta, el “led cerradura” parpadea y si está cerrada permanece apagado. La función no se puede activar al mismo tiempo que la función Oficina Profesional. • Deze functie geeft de status van het slot (uitsluitend als de installatie daarvoor is voorbereid met de specifieke actuator). De „led slot“ knippert als het slot ontgrendeld is. De led is uit als het slot vergrendeld is. Deze functie en de functie Professionele studio kunnen niet tegelijkertijd worden geactiveerd. • Esta função indica o estado da fechadura (apenas se a instalação estiver predisposta mediante expresso atuador). Se estiver aberta o “led fechadura” resulta intermitente, se estiver fechada, permanece desligado. A função não pode ser ativada simultaneamente à função Estúdio profissional. • Funzione Studio Professionale • Office function • Fonction Bureau • Funktion Büro • Función Oficina Profesional • Functie professionele studio • Função Escritório profissional • La funzione Studio Professionale ti permette di impostare l’apertura automatica della serratura in caso di chiamata dal Posto Esterno, non puoi attivarla contemporaneamente alla funzione Stato Porta. Il lampeggio ) indica che la funzione è attivata. del tasto serratura ( • The Office function gives the possibility of setting the automatic opening of the door lock in case of call from the Entrance Panel. It cannot be activated at the same time as the Door Status function. The door lock key flashing ) indicates that the functions is active. ( • La fonction Bureau permet de programmer l’ouverture automatique de la serrure en cas d’appel depuis le Poste Externe ; elle n’est pas activable conjointement à la fonction État Porte. Le clignotement de la touche ) indique que la fonction est activée. serrure ( • Mit der Büro-Funktion kann das Schloss nach einem Ruf von der Türstation automatisch geöffnet werden; diese Funktion kann nicht gleichzeitig mit der Funktion Tür-Status aktiviert werden. Das Blinken der Schlosstaste ) meldet, dass die Funktion aktiv ist. ( • La función Oficina Profesional le permite configurar la apertura automática de la cerradura al recibir una llamada de la PE pero no la puede activar al mismo tiempo que la función Estado Puerta. El parpadeo de la ) indica la activación de la función. tecla cerradura ( • Met de functie Professionele studio kunt u de automatische ontgrendeling van het slot bij een oproep vanaf de buitenpost instellen. Deze functie en de functie Status deur kunnen niet tegelijkertijd worden geactiveerd. De ) knippert om aan te geven dat de functie geactiveerd is. toets slot ( • A função Estúdio profissional permite-lhe definir a abertura automática da fechadura em caso de chamada da Unidade Externa, não pode ativá-la simultaneamente à função Estado da Porta. A intermitência do botão ) indica que a função está ativada. da fechadura ( 23 • • • · Comando luci scale Staircase light control Commande lumières escaliers Treppenlichtsteuerung • Mando luces escaleras • Bediening lichten trapzaal • Comando das luzes da escada * * N 1 BUS P BUS M 230 Vac N P NO C NC 6A M 230V 2A M cos =0,5 346210 3 2 1 1 PRI 2 3 PRI BUS 346210 346040 PRI 110 - 240 V 50 - 60 Hz 370 mA - 225 mA BUS 26.0 V 600 mA P N BUS PL T S S+SBUS A * • Il secondo posto interno ed il configuratore 3501/1 devono essere acquistati separatemente. • The second internal unit and the 3501/1 configurator must be purchased separately. • Le deuxième poste interne et le configurateur 3501/1 doivent être achetés séparément. • Die zweite Hausstation und der Konfigurator 3501/1 werden getrennt verkauft. • La segunda unidad interior y el configurador 3501/1 se han de comprar por separado. • De tweede binnenpost en de configurator 3501/1 moeten apart worden gekocht. • A segunda unidade interna e o configurador 3501/1 devem ser adquiridos separadamente. 24 Lea detenidamente antes del uso y conserve la documentación para consultas futuras Se prohíbe tocar las unidades con las manos mojadas Se prohíbe el uso de limpiadores líquidos o aerosoles Se prohíbe tapar las aperturas de ventilación Se prohíbe modificar los dispositivos Se prohíbe desmontar las partes de protección de los dispositivos Se prohíbe instalar las unidades cerca de líquidos y polvo Se prohíbe instalar las unidades cerca de fuentes de calor Se prohíbe instalar las unidades cerca de gases nocivos, polvo metálico o productos similares Se prohíbe fijar las unidades en superficies no aptas Vóór het gebruik doorlezen en voor naslag bewaren Het is verboden het apparaat met natte handen aan te raken Het is verboden vloeibare reinigers of verstuivers te gebruiken Het is verboden de ventilatie-openingen af te sluiten Het is verboden het apparaat te wijzigen Het is verboden om beschermende onderdelen van het apparaat te verwijderen Het is verboden de apparaten te installeren in de buurt van vloeistoffen en stof Het is verboden de apparaten te installeren in de buurt van warmtebronnen Het is verboden de apparaten te installeren in de buurt van schadelijke gassen, metaalstof of soortgelijke materialen Het is verboden de units te bevestigen aan ongeschikte oppervlakken Peligro de descarga eléctrica Gevaar voor elektrische schokken Riesgo de caída de los dispositivos por hundimiento de la superficie de montaje o instalación inadecuada Corte la alimentación antes de intervenir en el sistema Gevaar voor vallen van de apparaten als het oppervlak waarop ze geïnstalleerd zijn instort of wegens een verkeerde installatie Verwijder de spanning alvorens werkzaamheden aan de installatie te verrichten Atención: Las operaciones de instalación, configuración, puesta en servicio y mantenimiento han de ser efectuadas exclusivamente por personal cualificado. Asegúrese de que la instalación se haya efectuado correctamente. La colocación de los cables ha de cumplir las normativas vigentes Conecte los cables de alimentación según las indicaciones Para posibles expansiones del sistema, use solamente los artículos indicados en las especificaciones técnicas Opgelet: laat de installatie, de configuratie, de inbedrijfstelling en het onderhoud uitsluitend verrichten door gekwalificeerd personeel. Controleer of de installatie aan de muur correct is verricht Breng de kabels aan volgens de toepasselijke normen Sluit de voedingskabels aan volgens de aanwijzingen Gebruik uitsluitend de artikelen die in de technische specificaties zijn gegeven voor de eventuele uitbreiding van de installatie Ler atentamente antes do uso e guardar para qualquer futura referência Proibição de tocar as unidades com as mãos molhadas Proibição da utilização de produtos de limpeza líquidos ou aerossóis Proibição de obstruir as aberturas de ventilação Proibição de alterar os dispositivos Proibição de remover peças de proteção dos dispositivos Proibição de instalar as unidades em proximidade de líquidos e pós Proibição de instalar as unidades em proximidade de fontes de calor Proibição de instalar as unidades em proximidade de gases nocivos, pós metálicos ou similares Proibição de fixação das unidades sobre superfícies não adequadas Perigo de choque eléctrico Risco de queda dos dispositivos, devido a desabamento da superfície em que estão instalados ou instalação inadequada Tirar a alimentação elétrica antes de qualquer intervenção sobre a instalação Atenção: as operações de instalação, configuração, colocação em serviço e manutenção devem ser realizadas exclusivamente por pessoal qualificado. Certificar-se de que a instalação de parede seja realizada corretamente Proceder à colocação dos cabos atendo-se escrupulosamente às normas vigentes. Conectar os cabos de alimentação de acordo com as prescrições Face a eventuais extensões de instalações utilizar exclusivamente os artigos listados nas especificações técnicas 26 • Puoi scaricare i manuali completi dei dispositivi dal sito www.homesystems-legrandgroup.com • The complete manuals of the devices can be downloaded from the website www.homesystems-legrandgroup.com • Vous pouvez télécharger le manuel complet des dispositifs sur le site www.homesystems-legrandgroup.com • Sie können die vollständigen Handbücher von der Website www.homesystems-legrandgroup.com herunterladen. • Puede bajarse los manuales completos de los dispositivos en la web de www.homesystems-legrandgroup.com • Puede bajarse los manuales completos de los dispositivos en la web de www.homesystems-legrandgroup.com • É possível baixar os manuais completos do sítio www.homesystems-legrandgroup.com-
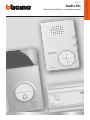 1
1
-
 2
2
-
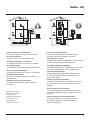 3
3
-
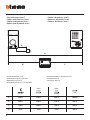 4
4
-
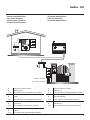 5
5
-
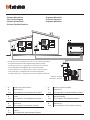 6
6
-
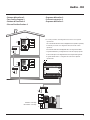 7
7
-
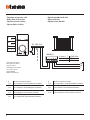 8
8
-
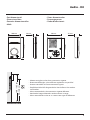 9
9
-
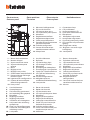 10
10
-
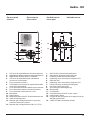 11
11
-
 12
12
-
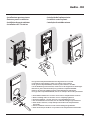 13
13
-
 14
14
-
 15
15
-
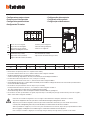 16
16
-
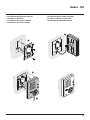 17
17
-
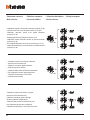 18
18
-
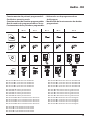 19
19
-
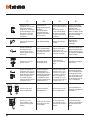 20
20
-
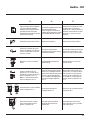 21
21
-
 22
22
-
 23
23
-
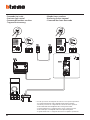 24
24
-
 25
25
-
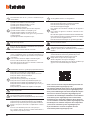 26
26
-
 27
27
-
 28
28


Bticino 361511 Instrucciones de operación
- Categoría
- Altavoces de la barra de sonido
- Tipo
- Instrucciones de operación
En otros idiomas
- français: Bticino 361511 Mode d'emploi
- italiano: Bticino 361511 Istruzioni per l'uso
- English: Bticino 361511 Operating instructions
- Deutsch: Bticino 361511 Bedienungsanleitung
- Nederlands: Bticino 361511 Handleiding
- português: Bticino 361511 Instruções de operação
Documentos relacionados
-
Bticino 361311 Instrucciones de operación
-
-
-
-
-
-
-
-
-