La página se está cargando...
La página se está cargando...

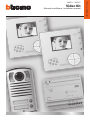
Video Kit
3
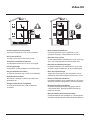
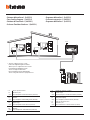
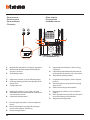
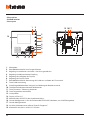
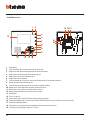
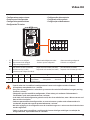
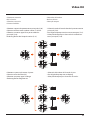
• Vecchio impianto a campanello
Impianto esistente con 3 fili e sola chiamata.
• Old system with bell
Existing system with 3 wires and just call.
• Ancienne installation a sonnette
Installation existante à 3 fils et un seul appel.
• Alte klingelanlage
Vorhandene 3-Leiter Anlage nur mit Ruffunktion.
• Vieja instalación con timbre
Instalación existente con 3 hilos y una llamada.
• Oude deurbelinstallatie
Bestaande 3-aderige installatie met alleen een
oproepfunctie.
• Antiga instalação em campaínha
Instalação existente com 3 fios e somente
chamada.
230 Vac
230 Vac 12 V
230 Vac
}
346 0 0 0
0322 06
IP30
PRI 230V~ 50 - 60Hz 260mA
BUS
2-1
27V 1,2A
PRI
PS
BUS TK
BUS PI
346830
230 Vac 12 V
1– + 2 3 4
230 Vac
230 Vac 12 V
230 Vac
}
346 0 0 0
0322 06
IP30
PRI 230V~ 50 - 60Hz 260mA
BUS
2-1
27V 1,2A
PRI
PS
BUS TK
BUS PI
346830
230 Vac 12 V
1– + 2 3 4
• Nuovo impianto citofonico
Impianto realizzato senza modifiche ai 2 fili
esistenti: chiamata, videocitofono e serratura.
• New door entry system
System made without modifications to the 2 existing
wires; call, video handset and electric door lock.
• Nouvelle installation phonique
Installation réalisée sans modifications sur les 2 fils
existants: appel, vidéophone, et serrure électrique.
• Neue haustelefonanlage
Anlage ohne Änderungen an den vorhandenen 2 Leiter:
Ruffunktion, Gegensprechanlage und elektrisches Schloss.
• Nueva instalación interfónica
Instalación realizada sin las modificaciones a los 2 hilos
existentes: llamada, videoportero y cerradura eléctrica.
• Nieuwe deurtelefooninstallatie
Installatie aangelegd zonder wijzigingen aan de
2 bestaande aders: oproep, beeldhuistelefoon en
elektrisch deurslot.
• Nova instalação do intercomunicador
Instalação realizada sem modificar os 2 fios existentes:
chamada, intercomunicador vídeo e fechadura eléctrica.

4
D
B C
A
>0,2 mm
2
BTicino
L4669
0,35 mm
2
0,28 mm
2
BTicino
C9881U/5E
AWG24 UTP5
BTicino
336904
One PTT
278 TP
0,28 mm
2
OneSYT
+ Digital
TP
5/10
OneSYT
+ Num TP
5/10
GIGA TW
CAT5E
AWG24
One SYT
+ Num TP
8/10
Cable
ARB.6060-1
6/10
Cable
EV6R
6/10
1
mm
2
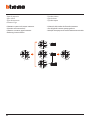
A 50 m 140 m 150 m 200 m 200 m 150 m 200 m 50 m –
B 50 m 115 m 80 m 200 m 115 m 80 m 200 m 50 m –
C 50 m 130 m 80 m 200 m 100 m 80 m 200 m 50 m –
D 30 m 30 m – 50 m 30 m – – – 100 m
• Cavi e distanze (mm
2
)
• Cables and distances (mm
2
)
• Câbles et distances (mm
2
)
• Kabeln und Abstände (mm
2
)
• Cables y distancias (mm
2
)
• Kabels en afstanden (mm
2
)
• Cabos e distâncias (mm
2
)
La página se está cargando...
La página se está cargando...
La página se está cargando...

8
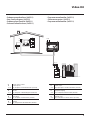
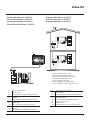
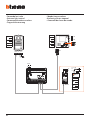
• Opzione serratura a relè
• Relay door lock option
• Option serrure à relais
• Option Relais-Schloss
• Opción cerradura de relé
• Optie relaisslot
• Opção trinco de relê
BUS
PL S+
S-
A
N
= –
= –
T = –
S = –
P
= –
–
=
8 A cosφ = 1
4 A cosφ = 0,7
3 A cosφ = 0,4
24 Vdc; 24 Vac
24 Vac
24 Vac
NO
NC
C
346250 (*)
S-
S+
C
NC
NO
* • Fornito a corredo.
• Supplied.
• Fourni.
• Wird mitgeliefert.
• En dotación.
• Standaard meegeleverd.
• Fornecido no equipamento base.
La página se está cargando...

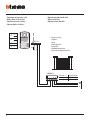
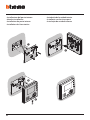
10
ON OFF
ON OFF
1 - Regulação do volume
(*veja as próxima
página).
2 - Activação/desactivação do sinal de confir-
mação da abertura da fechadura.
3 - Alojamento configurador.
• Posto esterno
• Entrance panel
• Poste extérieur
• Türstation
• Placa exterior
• Externe plaats
• Unidade externa
1 -
Regulación del volumen (*véase la pág.
siguiente).
2 - Habilitación/deshabilitación del tono de
confirmación de apertura de la cerradura.
3 - Alojamiento configuradores.
1 - Adjustment volume (*see the following page).
2 - Enabling/disabling of door lock opening confir-
mation tone.
3 - Configurator seat.
1 - Regolazione del volume (*vedi pag. seguente).
2 - Abilitazione/disabilitazione tono conferma
apertura serratura.
3 - Sede configuratori.
1 -
Einstellung der Lautstärke (*siehe nachfolgende
Seiten).
2 - Aktivierung/Deaktivierung des Bestätigungs-
signals nach erfolgter Türöffnung.
3 - Sitz der Konfiguratoren.
1 - Réglage du volume (* voir page suivante).
2 - Activation/désactivation tonalité de confirma-
tion ouverture serrure.
3 - Logement configurateurs.
1 - De geluidssterkte regelen
(*zie de volgende
pagina’s).
2 - Activering/desactivering toon bevestiging
opening slot.
3 - Plaats van de configuratiemodules.
2
3
1

Video Kit
11
(*)
• Se si manifestasse il disturbo del fischio, (effetto Larsen), ridurre prima la potenza del microfono
, agen-
do con un cacciavite sul potenziometro corrispondente, fino ad un livello accettabile. Qualora il fenomeno
persista, agire sul potenziometro dell’altoparlante in modo da eliminare l’inconveniente. Se il volume è
troppo basso, aumentare prima il volume dell’altoparlante ed eventualmente anche quello del microfono,
tenendo presente che è preferibile una trasmissione chiara e priva di disturbi, che una al limite dell’innesco
(Larsen).
• In case of a whistle (Larsen effect), first reduce the microphones power, adjusting the corresponding
potentiometers with a screw driver, until an acceptable level is reached. Should the whistle persist, adjust the
loudspeakers volume in order to eliminate the trouble. If the volume is too low level then, increase first the
potentiometer of the loudspeaker and secondly the one for the microphone, bearing in mind that a clear and
noise free reception is preferable than one just before whistling (Larsen).
• Lors de sifflement (effet de Larsen), reduire d’abord la puissance du micro
sur le potentiomètre corres-
pondant, à l’aide d’un tournevis, jusqu’à l’obtention d’un niveau satisfaisant. Si le sifflement persiste, régler
le potentiomètre du hautparleur jusqu’à l’élimination de celui-ci. Si le volume est trop bas, augmenter
d’abord la puissance du haut-parleur et éventuellement celle du micro, en considérant qu’une réception
claire et sans parasite est préférable à une communication à la limite de l’accrochage (effet de Larsen).
• Beim etwaigen Auftreten eines Pfeiftones (Larsen-Effekt), zuerst die Lautstärke des Mikrophones
bis auf einen
annehmbaren Wert herabsetzen, indem man das entsprechende Potentiometer mit einem Schraubendreher
einstellt. Sollte die Störung weiterhin bestehen, dann das Potentiometer des Lautsprechers bis zur Beseitigung
des Pfeiftones einstellen. Ist die Lautstärke nun zu niedrig, dann zuerst die des Lautsprechers und erst danach
evtl. auch die des Mikrophones erhohen, wobei ein deutlicher und störungsfreier Empfang einem an der
Störungsgrenze liegendem (Larsen-Effekt) vorzuziehen ist.
• Si se manifesta el silbido de acoplamiento, (efecto Larsen), reducir primero la potencia del micrófono
, girando con un destornillador el potenciómetro correspondiente, hasta obtener un nivel aceptable. Si el
fenómeno persistiera, regular el potenciómetro del altavoz hasta eliminar la interferencia. Si el volumen
es demasiado bajo, aumentar primero el volumen del altavoz y eventualmente también el del micrófono,
teniendo en cuenta que es preferible una transmissión clara y limpia de interferencias, que una al limite del
acoplo (Larsen).
• Als er een fluittoon hoorbaar is (effect van Larsen): verminder eerst het vermogen van de microfoon
met behulp van een schroevendraaier zijn stroomregelaar zo te regelen dat de geluidssterkte van het gefluit
aanvaardbaar is. Als het verschijnsel niet verdwijnt, dan moet u ook de stroomregelaar van de luidspreker
bijstellen. Als de geluidssterkte nu te klein is, verhoog dan eerst de geluidssterkte van de luidspreker en daarna
eventueel ook die van de microfoon, en denk er bij het bijstellen aan dat een duidelijk hoorbaar en ongestoord
geluid beter is dan een harder geluid op de grens van het Larsen effect.
• Se se manifestar uma interferência no som (efeito de Larsen), começar por diminuir a potência do microfone
, rodando o potenciómetro correspondente com uma chave de parafusos, até obter um nível aceitável.
Se o fenómeno persistir, regular o potenciómetro do altifalante de modo a eliminar o problema. Se o
volume estiver demasiado baixo, começar por aumentar o volume do altifalante e depois, se necessário,
o do microfone, tendo presente que é melhor ter uma transmissão clara e sem interferências, que uma no
limiar de início de efeitos Larsen.
La página se está cargando...
La página se está cargando...
La página se está cargando...

Video Kit
15
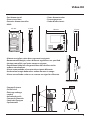
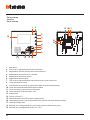
1. Micrófono
2. LED rojo de señalización exclusión llamada
3. Regulación volumen timbre/exclusión llamada
4. Regulación volumen módulo fónico en recepción
5. Regulación luminosidad pantalla
6. Regulación color pantalla
7. LED rojo de señalización para activación cerradura y/o estado puerta
8. Tecla accionamiento cerradura
9. LED bicolor rojo/verde de señalización del estado de funcionamiento
10. Tecla activación/desactivación comunicación
11. Tecla activación placa exterior / visualización cíclica
12. Tecla accionamiento encendido luz escaleras
13. Altavoz
14. Pantalla LCD de 3,5 “
15. Microinterruptor ON/OFF final de tramo
16. Alojamiento configurador J1 para función MASTER/SLAVE (extraer para habilitar SLAVE)
17. Alojamiento de los configuradores
18. Bornes para la conexión de un pulsador externo de llamada a la planta
19. Bornes para la conexión al BUS SCS 2 HILOS
1. Microfoon
2. Rode led signalering uitsluiting oproep
3. Regeling volume beltoon/uitsluiting oproep
4. Regeling volume ontvangen geluid
5. Regeling helderheid display
6. Regeling kleur display
7. Rode led signalering voor de activering van het slot en/of de status van de deur
8. Bedieningstoets slot
9. Tweekleurig led rood/groen signalering status van de functionering
10. Toets activering/deactivering communicatie
11. Toets activering buitenpost/cyclische weergave
12. Bedieningstoets inschakeling traphuisverlichting
13. Luidspreker
14. Lcd-display 3,5“
15. Micro-schakelaar ON/OFF eindafsluiting deel
16. Plaats configurator J1 voor de MASTER/SLAVE-functie (verwijderen om SLAVE te activeren)
17. Plaats configuratoren
18. Klemmen voor de aansluiting van een externe oproepknop op de verdieping
19. Klemmen voor de aansluiting op de 2-DRAADSE BUS SCS
La página se está cargando...

Video Kit
17
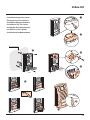
• Installazione posto esterno
• Entrance panel installation
•
Installation du poste extérieur
• Installation der Türstation
•
Instalación de la placa exterior
• Installatie externe plaats
•
Instalação da unidade externa
1
2
°
°
°
°
CLAC
CLAC
CLAC
CLAC
CLAC
6
7
8
Ø 5 mm (max)
3
4
5
La página se está cargando...

Video Kit
19
• Configurazione posto esterno
• Entrance panel configuration
• Configuration poste extérieur
• Konfiguration Türstation
• Configuración placa exterior
• Configuratie externe plaats
•
Configuração unidade externa
P T S N
– 1 2 3 4 5 6 7
4 s 1 s 2 s 3 s
- Come pulsante.
- As pushbutton.
- Comme poussoir.
- Wie taste.
- Come pulsador.
- Als de drukknop.
- Como botão. 6 s 8 s 10 s
• P - Possono non essere configurati.
- They do not need to be configured.
- Composants principaux des KITS.
- Brauchen nicht konfiguriert zu werden.
- Pueden no precisar configuración.
- Kunnen niet worden geconfigureerd.
- Podem não serconfigurados.
N
S
T
- Temporizzatore serratura (vedi tabella).
- Door lock timer relay (see table).
-
Ils peuvent ne pas être configurés (voir tableau).
-
Zeitgeber schlossrelaiscerradura (siehe Tabelle)
.
- Temporizador relé cerradura
(véase la tabla)
.
- Timer deurslotrelais
(zie de tabel).
-
Tem
porizador do relé da fechadura (veja a tabela).
- Tutte le volte che si modifica la configurazione è necessario togliere e ridare l’tazione
all’impianto, attendendo circa 1 minuto.
- Every time the configuration is altered the system must be switched off and back on again, waiting
for about 1 minute.
- Chaque fois que l’on modifie la configuration, il faut retirer, puis redonner l’alimentation à
l’installation, après avoir attendu environ 1 minute.
- Jedes Mal, wenn die Konfiguration geändert wird, den Strom abschalten, etwa 1 Minute warten und
dann wieder einschalten.
- Cada vez que modifica la configuración, es necesario cortar y volver a dar alimentación a la
instalación, después de esperar aproximadamente 1 minuto.
- Na iedere wijziging in de configuratie moet de installatie ongeveer 1 minuut van het elektriciteitsnet
worden afgesloten.
- Todas as vezes que se modificar a configuração é necessário ligar e desligar a instalação da
energia eléctrica, esperando cerca de 1 minuto.

20
• Installazione del posto interno
• Handset installation
• Installation du poste interne
• Installation der Hausstation
• Instalación de la unidad interior
• Installatie van het intern punt
• Instalação da unidade interna
1
2
3
4
La página se está cargando...

22
• La suoneria di chiamata del citofono è selezionabile tra 16 differenti tipi di melodie.
Si possono differenziare le seguenti tipologie di chiamata:
Chiamata da posto esterno principale; Chiamata intercom interno; Chiamata al piano.
• The door entry unit call bells can be selected from 16 different types of tune.
The following types of call can be differentiated:
Call from the main entrance panel; Intercom internal call; Call to the floor.
• La sonnerie d’appel du phone peut être sélectionnée parmi 16 différents types de mélodies.
On peut différencier les typologies d’appel suivantes:
Appel depuis poste externe principal; Appel intercom interne; Appel à l’étage.
• Für das Läutwerk der Rufe des haustelefons stehen 16 verschiedene Melodien zur Verfügung.
Die Rufe können folgendermaßen differenziert werden:
Ruf von der Haupttürstation; Intercom intern Ruf; Etagenruf.
• El timbre del llamada del interno fono se puede seleccionar entre 16 melodías diferentes.
Es posible diferenciar las siguientes tipologías de llamadas:
Llamada desde placa exterior principal; Llamada intercomunicación interna; Llamada a la planta.
• De oproepbeltoon van de telefoon biedt de keus uit 16 melodiën.
Het is mogelijk om de volgende types oproepen te kenmerken:
Oproep van primaire buitenpost; Oproep Interne intercom; Oproep op etage.
• Os toques de chamada do intercomunicador podem ser seleccionados em 16 tipos de melodias diferentes.
Podem ser diferenciados os seguintes tipos de chamada:
Chamada a partir de unidade externa principal; Chamada Intercom interno; Chamada até o andar.
• Selezione suoneria
• Bell selection
• Sélection sonnerie
• Läutwerk wählen
• Selección del timbre
• Beltoon kiezen
• Selecção toques

Video Kit
23
• Selezione suoneria
• Bell selection
• Sélection sonnerie
• Läutwerk wählen
• Selección del timbre
• Beltoon kiezen
• Selecção toques
• Selezione suoneria chiamata al piano.
• Selection call to the floor bell.
• Sélection sonnerie appel à l’étage.
• Änderung Rufton Etagentaster.
• Selección del timbre de llamada al piso.
• Kies belgeluid oproep aan verdieping.
• Selecção do toque para chamada ao andar.
> 3s
1
2
16
> 3s
1
2
16
• Selezione suoneria da posto esterno principale (S=0).
• Selection call from main outdoor station (S=0) bell.
• Sélection sonnerie appel d’un poste extérieur
principal (S=0).
• Änderung Rufton der Haupttürstation (S=0).
• Selección timbre llamada desde el puesto exterior
principal (S=0).
• Kies belgeluid oproep vanuit eerste externe post (S=0).
• Selecção do toque para chamada da unidade ex-
terna principal (S=0).

24
• Tipo di suoneria
• Type of bell
• Type de sonnerie
• Läutwerk -Typ
• Tipo de timbre
• Type beltoon
• Tipo de toque
• Selezione suoneria chiamata intercom.
• Selection call intercom bell.
• Sélection sonnerie appel intercom.
• Änderung interner Rufton.
•
Selección del timbre de llamada intercom
.
• Kies belgeluid intercom oproep gebouw.
• Selecção do toque para chamada intercomomunicador.
> 3s
1
2
16

Video Kit
25
• Modalità Push to Talk
• Push to Talk mode
• Modalité Push to Talk
• Modus Push toTalk
• Función Push to Talk
• Push to Talk functie
• Função Push to Talk
• Se il posto esterno si trova in un ambiente particolarmente rumoroso è possibile, durante la conversazione,
attivare la funzione Push to Talk al fine di ottenere una comunicazione meno disturbata. Durante la conversa-
zione è possibile attivare la funzione Push to Talk nel seguente modo.
- Premere il tasto Connessione per almeno 2 secondi per parlare con il posto esterno. Il Led rimane verde.
- Rilasciare il tasto per poter ascoltare dal posto esterno. Il Led diventa rosso.
- Per terminare la connessione premere brevemente il tasto Connessione. Il Led si spegne.
• If the entrance panel is in a particularly noisy place, during the conversation the Push to Talk function can be
activated for a less disturbed call. During the conversation the Push to Talk function can be activated as follows.
- Press the Connection key for at least 2 seconds to talk to the entrance panel. The LED remains green.
- Release the key to ear from the entrance panel. The LED becomes red.
- To end the connection press the connection key briefly. The LED goes out
• Si le poste externe se trouve dans un environnement particulièrement bruyant, il est possible d’activer durant
la conversation la fonction Push to Talk pour obtenir une meilleure communication. Durant la conversation, il
est possible d’activer la fonction Push to Talk en procédant comme suit.
- Appuyer sur la touche Connexion pendant au moins 2 secondes pour parler avec le poste externe. Le voyant reste vert.
- Relâcher la touche pour pouvoir écouter depuis le poste externe. Le voyant devient rouge.
- Pour mettre fin à la connexion, appuyer brièvement sur la touche connexion. Le voyant s’éteint.
• Wenn die Türstation in einem besonders geräuschvollen Bereich installiert ist, kann man während des Gesprächs
die Funktion Push to Talk drücken, um diese Geräusche zu überwinden. Während des Gesprächs kann die
Funktion Push to Talk folgendermaßen aktiviert werden.
- Die Verbindungstaste mindestens 2 Sekunden lang drücken, um mit der Türstation zu sprechen. Die grüne
Meldeleuchte leuchtet immer noch.
- Taste loslassen, um die Türstation hören zu können. Die Meldeleuchte leuchtet rot auf.
- Um die Verbindung abzubrechen, die Verbindungstaste kurz drücken. Die Meldeleuchte erlischt
• Si la placa exterior se encuentra en un ambiente con un alto nivel de ruido, durante la conversación es posible
activar la función Push to Talk para obtener una comunicación con menor interferencias. Durante la conver-
sación es posible activar la función Push to Talk en el modo siguiente.
- Presione la tecla de conexión almenos 2 segundos para conversar con la placa exterior. El led permanece verde.
- Suelte la tecla para poder escuchar desde la placa exterior. El led se vuelve rojo.
- Para terminar la conexión, presione brevemente la tecla de conexión. El led se apaga.
• Indien het extern punt zich op een bijzonder lawaaierige plaats bevindt, is het mogelijk, tijdens het gesprek, de
functie Push to Talk te activeren teneinde een minder gestoorde communicatie te verkrijgen. Tijdens het gesprek is
het mogelijk de functie Push to Talk te activeren op de volgende manier.
- De drukknop van Verbinding gedurende minstens 2 seconden indrukken om met het externe punt te
communiceren. De led blijft groen.
- De toets loslaten om vanuit het externe punt te kunnen luisteren. De led wordt rood.
- Om de verbinding te beëindigen, eventjes de toets. van verbinding indrukken. De led gaat uit.
• Esta função permite difundir uma mensagem vocal, ditada ao microfone do dispositivo, por meio de alti-
falantes do sistema de Difusão sonora. A activação realiza-se premindo brevemente a tecla “Conexão” com
o dispositivo em espera, o indicador luminoso verde aceso indica que a função está activada. Para cessar a
função pressionar novamente a tecla “Conexão”.
- Pressionar a tecla de conexão por pelo menos 2 segundos para falar com a unidade externa. O indicador
luminoso continua verde
- Soltar a tecla para poder escutar a unidade externa. O indicador luminoso fica vermelho
- Para desligar pressionar ligeiramente a tecla da conexão. O indicador luminoso apaga.

26
• Comando luci scale
• Staircase light control
• Commande lumières escaliers
• Treppenlichtsteuerung
• Mando luces escaleras
• Bediening lichten trapzaal
• Comando das luzes da escada
230 Vac
BUS
PL S+
S-
ON = 1”
ON
OFF
BUS
2
3
1 32
346210
1
C
NO
NC
230V
2A
cos =0,5
6A
M
MOD
= –
M
= –
= –
N/P
= –
= –
T = 5
346210
P
= –
= –
N
= –
= –
T = –
S = –
P
= –
= –
J1
N
= –
= –
M
= –
= –
La página se está cargando...
La página se está cargando...
Transcripción de documentos
Video Kit 230 Vac 230 Vac 12 230VVac 230 Vac 12 V • Vecchio impianto a campanello Impianto esistente con 3 fili e sola chiamata. • Old system with bell Existing system with 3 wires and just call. • Ancienne installation a sonnette Installation existante à 3 fils et un seul appel. • Alte klingelanlage Vorhandene 3-Leiter Anlage nur mit Ruffunktion. • Vieja instalación con timbre Instalación existente con 3 hilos y una llamada. • Oude deurbelinstallatie Bestaande 3-aderige installatie met alleen een oproepfunctie. • Antiga instalação em campaínha Instalação existente com 3 fios e somente chamada. • Nuovo impianto citofonico Impianto realizzato senza modifiche ai 2 fili esistenti: chiamata, videocitofono e serratura. • New door entry system System made without modifications to the 2 existing wires; call, video handset and electric door lock. • Nouvelle installation phonique Installation réalisée sans modifications sur les 2 fils existants: appel, vidéophone, et serrure électrique. • Neue haustelefonanlage Anlage ohne Änderungen an den vorhandenen 2 Leiter: Ruffunktion, Gegensprechanlage und elektrisches Schloss. • Nueva instalación interfónica Instalación realizada sin las modificaciones a los 2 hilos existentes: llamada, videoportero y cerradura eléctrica. • Nieuwe deurtelefooninstallatie Installatie aangelegd zonder wijzigingen aan de 2 bestaande aders: oproep, beeldhuistelefoon en elektrisch deurslot. • Nova instalação do intercomunicador Instalação realizada sem modificar os 2 fios existentes: chamada, intercomunicador vídeo e fechadura eléctrica. 3 • Cavi e distanze (mm2) • Cables and distances (mm2) • Câbles et distances (mm2) • Kabeln und Abstände (mm2) • Cables y distancias (mm2) • Kabels en afstanden (mm2) • Cabos e distâncias (mm2) D A B BTicino L4669 C BTicino C9881U/5E BTicino 336904 >0,2 mm2 0,35 mm2 0,28 mm2 AWG24 UTP5 One PTT 278 TP OneSYT OneSYT GIGA TW One SYT Cable + Digital + Num TP CAT5E + Num TP ARB.6060-1 TP 0,28 mm2 5/10 6/10 5/10 AWG24 8/10 Cable EV6R 1 mm2 6/10 A 50 m 140 m 150 m 200 m 200 m 150 m 200 m 50 m – B 50 m 115 m 80 m 200 m 115 m 80 m 200 m 50 m – C 50 m 130 m 80 m 200 m 100 m 80 m 200 m 50 m – D 30 m 30 m – 50 m 30 m – – – 100 m 4 • Opzione serratura a relè • Relay door lock option • Option serrure à relais • Option Relais-Schloss P = = N = = T = S = – – – – – – • Opción cerradura de relé • Optie relaisslot • Opção trinco de relê PL S+SBUS A * • Fornito a corredo. • Supplied. • Fourni. • Wird mitgeliefert. • En dotación. • Standaard meegeleverd. • Fornecido no equipamento base. 346250 (*) S- S+ C NC NO 8 A cosφ = 1 24 Vdc; 24 Vac 4 A cosφ = 0,7 24 Vac 3 A cosφ = 0,4 24 Vac NO NC C 8 • Posto esterno • Entrance panel • Poste extérieur • Türstation • Placa exterior • Externe plaats • Unidade externa 3 1 2 ON ON OFF OFF 1 - Regolazione del volume (*vedi pag. seguente). 2 - Abilitazione/disabilitazione tono conferma 1 - Regulación del volumen (*véase la pág. siguiente). apertura serratura. 3 - Sede configuratori. 2 - Habilitación/deshabilitación del tono de 1 - Adjustment volume (*see the following page). 2 - Enabling/disabling of door lock opening confir- 1 - De geluidssterkte regelen (*zie de volgende confirmación de apertura de la cerradura. 3 - Alojamiento configuradores. pagina’s). mation tone. 3 - Configurator seat. 2 - Activering/desactivering toon bevestiging 1 - Réglage du volume (* voir page suivante). 2 - Activation/désactivation tonalité de confirma- 1 - Regulação do volume (*veja as próxima tion ouverture serrure. 3 - Logement configurateurs. 1 - Einstellung der Lautstärke (*siehe nachfolgende Seiten). 2 - Aktivierung/Deaktivierung des Bestätigungssignals nach erfolgter Türöffnung. 3 - Sitz der Konfiguratoren. 10 opening slot. 3 - Plaats van de configuratiemodules. página). 2 - Activação/desactivação do sinal de confirmação da abertura da fechadura. 3 - Alojamento configurador. Video Kit (*) • Se si manifestasse il disturbo del fischio, (effetto Larsen), ridurre prima la potenza del microfono , agendo con un cacciavite sul potenziometro corrispondente, fino ad un livello accettabile. Qualora il fenomeno persista, agire sul potenziometro dell’altoparlante in modo da eliminare l’inconveniente. Se il volume è troppo basso, aumentare prima il volume dell’altoparlante ed eventualmente anche quello del microfono, tenendo presente che è preferibile una trasmissione chiara e priva di disturbi, che una al limite dell’innesco (Larsen). • In case of a whistle (Larsen effect), first reduce the microphones power, adjusting the corresponding potentiometers with a screw driver, until an acceptable level is reached. Should the whistle persist, adjust the loudspeakers volume in order to eliminate the trouble. If the volume is too low level then, increase first the potentiometer of the loudspeaker and secondly the one for the microphone, bearing in mind that a clear and noise free reception is preferable than one just before whistling (Larsen). sur le potentiomètre corres• Lors de sifflement (effet de Larsen), reduire d’abord la puissance du micro pondant, à l’aide d’un tournevis, jusqu’à l’obtention d’un niveau satisfaisant. Si le sifflement persiste, régler le potentiomètre du hautparleur jusqu’à l’élimination de celui-ci. Si le volume est trop bas, augmenter d’abord la puissance du haut-parleur et éventuellement celle du micro, en considérant qu’une réception claire et sans parasite est préférable à une communication à la limite de l’accrochage (effet de Larsen). bis auf einen • Beim etwaigen Auftreten eines Pfeiftones (Larsen-Effekt), zuerst die Lautstärke des Mikrophones annehmbaren Wert herabsetzen, indem man das entsprechende Potentiometer mit einem Schraubendreher einstellt. Sollte die Störung weiterhin bestehen, dann das Potentiometer des Lautsprechers bis zur Beseitigung des Pfeiftones einstellen. Ist die Lautstärke nun zu niedrig, dann zuerst die des Lautsprechers und erst danach evtl. auch die des Mikrophones erhohen, wobei ein deutlicher und störungsfreier Empfang einem an der Störungsgrenze liegendem (Larsen-Effekt) vorzuziehen ist. • Si se manifesta el silbido de acoplamiento, (efecto Larsen), reducir primero la potencia del micrófono , girando con un destornillador el potenciómetro correspondiente, hasta obtener un nivel aceptable. Si el fenómeno persistiera, regular el potenciómetro del altavoz hasta eliminar la interferencia. Si el volumen es demasiado bajo, aumentar primero el volumen del altavoz y eventualmente también el del micrófono, teniendo en cuenta que es preferible una transmissión clara y limpia de interferencias, que una al limite del acoplo (Larsen). • Als er een fluittoon hoorbaar is (effect van Larsen): verminder eerst het vermogen van de microfoon met behulp van een schroevendraaier zijn stroomregelaar zo te regelen dat de geluidssterkte van het gefluit aanvaardbaar is. Als het verschijnsel niet verdwijnt, dan moet u ook de stroomregelaar van de luidspreker bijstellen. Als de geluidssterkte nu te klein is, verhoog dan eerst de geluidssterkte van de luidspreker en daarna eventueel ook die van de microfoon, en denk er bij het bijstellen aan dat een duidelijk hoorbaar en ongestoord geluid beter is dan een harder geluid op de grens van het Larsen effect. • Se se manifestar uma interferência no som (efeito de Larsen), começar por diminuir a potência do microfone , rodando o potenciómetro correspondente com uma chave de parafusos, até obter um nível aceitável. Se o fenómeno persistir, regular o potenciómetro do altifalante de modo a eliminar o problema. Se o volume estiver demasiado baixo, começar por aumentar o volume do altifalante e depois, se necessário, o do microfone, tendo presente que é melhor ter uma transmissão clara e sem interferências, que uma no limiar de início de efeitos Larsen. 11 Video Kit 1. 2. 3. 4. 5. 6. 7. 8. 9. 10. 11. 12. 13. 14. 15. 16. 17. 18. 19. Micrófono LED rojo de señalización exclusión llamada Regulación volumen timbre/exclusión llamada Regulación volumen módulo fónico en recepción Regulación luminosidad pantalla Regulación color pantalla LED rojo de señalización para activación cerradura y/o estado puerta Tecla accionamiento cerradura LED bicolor rojo/verde de señalización del estado de funcionamiento Tecla activación/desactivación comunicación Tecla activación placa exterior / visualización cíclica Tecla accionamiento encendido luz escaleras Altavoz Pantalla LCD de 3,5 “ Microinterruptor ON/OFF final de tramo Alojamiento configurador J1 para función MASTER/SLAVE (extraer para habilitar SLAVE) Alojamiento de los configuradores Bornes para la conexión de un pulsador externo de llamada a la planta Bornes para la conexión al BUS SCS 2 HILOS 1. 2. 3. 4. 5. 6. 7. 8. 9. 10. 11. 12. 13. 14. 15. 16. 17. 18. 19. Microfoon Rode led signalering uitsluiting oproep Regeling volume beltoon/uitsluiting oproep Regeling volume ontvangen geluid Regeling helderheid display Regeling kleur display Rode led signalering voor de activering van het slot en/of de status van de deur Bedieningstoets slot Tweekleurig led rood/groen signalering status van de functionering Toets activering/deactivering communicatie Toets activering buitenpost/cyclische weergave Bedieningstoets inschakeling traphuisverlichting Luidspreker Lcd-display 3,5“ Micro-schakelaar ON/OFF eindafsluiting deel Plaats configurator J1 voor de MASTER/SLAVE-functie (verwijderen om SLAVE te activeren) Plaats configuratoren Klemmen voor de aansluiting van een externe oproepknop op de verdieping Klemmen voor de aansluiting op de 2-DRAADSE BUS SCS 15 Video Kit 1 • Installazione posto esterno • Entrance panel installation • Installation du poste extérieur • Installation der Türstation • Instalación de la placa exterior • Installatie externe plaats • Instalação da unidade externa 2 Ø 5 mm (max) 3 ° ° ° 5 ° 4 6 CLAC CLAC CLAC 8 CLAC CLAC 7 17 Video Kit • Configurazione posto esterno • Entrance panel configuration • Configuration poste extérieur • Konfiguration Türstation • Configuración placa exterior • Configuratie externe plaats • Configuração unidade externa P • N P - Possono non essere configurati. - Brauchen nicht konfiguriert zu werden. - Pueden no precisar configuración. N - They do not need to be configured. S - Composants principaux des KITS. - Zeitgeber schlossrelaiscerradura (siehe Tabelle). - Temporizzatore serratura (vedi tabella). - Temporizador relé cerradura (véase la tabla). T - Door lock timer relay (see table). - Ils peuvent ne pas être configurés (voir tableau). – 4s 1 1s 2 2s 3 3s - Come pulsante. - As pushbutton. - Comme poussoir. 4 - Wie taste. - Come pulsador. T S - Kunnen niet worden geconfigureerd. - Podem não ser configurados. - Timer deurslotrelais (zie de tabel). - Temporizador do relé da fechadura (veja a tabela). - Als de drukknop. - Como botão. 5 6 7 6s 8s 10 s - Tutte le volte che si modifica la configurazione è necessario togliere e ridare l’tazione all’impianto, attendendo circa 1 minuto. - Every time the configuration is altered the system must be switched off and back on again, waiting for about 1 minute. - Chaque fois que l’on modifie la configuration, il faut retirer, puis redonner l’alimentation à l’installation, après avoir attendu environ 1 minute. - Jedes Mal, wenn die Konfiguration geändert wird, den Strom abschalten, etwa 1 Minute warten und dann wieder einschalten. - Cada vez que modifica la configuración, es necesario cortar y volver a dar alimentación a la instalación, después de esperar aproximadamente 1 minuto. - Na iedere wijziging in de configuratie moet de installatie ongeveer 1 minuut van het elektriciteitsnet worden afgesloten. - Todas as vezes que se modificar a configuração é necessário ligar e desligar a instalação da energia eléctrica, esperando cerca de 1 minuto. 19 • Installazione del posto interno • Handset installation • Installation du poste interne • Installation der Hausstation • Instalación de la unidad interior • Installatie van het intern punt • Instalação da unidade interna 1 2 3 4 20 • Selezione suoneria • Bell selection • Sélection sonnerie • Läutwerk wählen • Selección del timbre • Beltoon kiezen • Selecção toques • La suoneria di chiamata del citofono è selezionabile tra 16 differenti tipi di melodie. Si possono differenziare le seguenti tipologie di chiamata: Chiamata da posto esterno principale; Chiamata intercom interno; Chiamata al piano. • The door entry unit call bells can be selected from 16 different types of tune. The following types of call can be differentiated: Call from the main entrance panel; Intercom internal call; Call to the floor. • La sonnerie d’appel du phone peut être sélectionnée parmi 16 différents types de mélodies. On peut différencier les typologies d’appel suivantes: Appel depuis poste externe principal; Appel intercom interne; Appel à l’étage. • Für das Läutwerk der Rufe des haustelefons stehen 16 verschiedene Melodien zur Verfügung. Die Rufe können folgendermaßen differenziert werden: Ruf von der Haupttürstation; Intercom intern Ruf; Etagenruf. • El timbre del llamada del interno fono se puede seleccionar entre 16 melodías diferentes. Es posible diferenciar las siguientes tipologías de llamadas: Llamada desde placa exterior principal; Llamada intercomunicación interna; Llamada a la planta. • De oproepbeltoon van de telefoon biedt de keus uit 16 melodiën. Het is mogelijk om de volgende types oproepen te kenmerken: Oproep van primaire buitenpost; Oproep Interne intercom; Oproep op etage. • Os toques de chamada do intercomunicador podem ser seleccionados em 16 tipos de melodias diferentes. Podem ser diferenciados os seguintes tipos de chamada: Chamada a partir de unidade externa principal; Chamada Intercom interno; Chamada até o andar. 22 Video Kit • Selezione suoneria • Bell selection • Sélection sonnerie • Läutwerk wählen • Selección del timbre • Beltoon kiezen • Selecção toques • Selezione suoneria da posto esterno principale (S=0). • Selection call from main outdoor station (S=0) bell. • Sélection sonnerie appel d’un poste extérieur principal (S=0). • Änderung Rufton der Haupttürstation (S=0). • Selección timbre llamada desde el puesto exterior principal (S=0). • Kies belgeluid oproep vanuit eerste externe post (S=0). • Selecção do toque para chamada da unidade externa principal (S=0). 1 2 > 3s 16 • Selezione suoneria chiamata al piano. • Selection call to the floor bell. • Sélection sonnerie appel à l’étage. • Änderung Rufton Etagentaster. • Selección del timbre de llamada al piso. • Kies belgeluid oproep aan verdieping. • Selecção do toque para chamada ao andar. 1 2 > 3s 16 23 • Tipo di suoneria • Type of bell • Type de sonnerie • Läutwerk -Typ • Tipo de timbre • Type beltoon • Tipo de toque • Selezione suoneria chiamata intercom. • Selection call intercom bell. • Sélection sonnerie appel intercom. • Änderung interner Rufton. • Selección del timbre de llamada intercom. • Kies belgeluid intercom oproep gebouw. • Selecção do toque para chamada intercomomunicador. 1 2 > 3s 16 24 Video Kit • Modalità Push to Talk • Push to Talk mode • Modalité Push to Talk • Modus Push toTalk • Función Push to Talk • Push to Talk functie • Função Push to Talk • Se il posto esterno si trova in un ambiente particolarmente rumoroso è possibile, durante la conversazione, attivare la funzione Push to Talk al fine di ottenere una comunicazione meno disturbata. Durante la conversazione è possibile attivare la funzione Push to Talk nel seguente modo. - Premere il tasto Connessione per almeno 2 secondi per parlare con il posto esterno. Il Led rimane verde. - Rilasciare il tasto per poter ascoltare dal posto esterno. Il Led diventa rosso. - Per terminare la connessione premere brevemente il tasto Connessione. Il Led si spegne. • If the entrance panel is in a particularly noisy place, during the conversation the Push to Talk function can be activated for a less disturbed call. During the conversation the Push to Talk function can be activated as follows. - Press the Connection key for at least 2 seconds to talk to the entrance panel. The LED remains green. - Release the key to ear from the entrance panel. The LED becomes red. - To end the connection press the connection key briefly. The LED goes out • Si le poste externe se trouve dans un environnement particulièrement bruyant, il est possible d’activer durant la conversation la fonction Push to Talk pour obtenir une meilleure communication. Durant la conversation, il est possible d’activer la fonction Push to Talk en procédant comme suit. - Appuyer sur la touche Connexion pendant au moins 2 secondes pour parler avec le poste externe. Le voyant reste vert. - Relâcher la touche pour pouvoir écouter depuis le poste externe. Le voyant devient rouge. - Pour mettre fin à la connexion, appuyer brièvement sur la touche connexion. Le voyant s’éteint. • Wenn die Türstation in einem besonders geräuschvollen Bereich installiert ist, kann man während des Gesprächs die Funktion Push to Talk drücken, um diese Geräusche zu überwinden. Während des Gesprächs kann die Funktion Push to Talk folgendermaßen aktiviert werden. - Die Verbindungstaste mindestens 2 Sekunden lang drücken, um mit der Türstation zu sprechen. Die grüne Meldeleuchte leuchtet immer noch. - Taste loslassen, um die Türstation hören zu können. Die Meldeleuchte leuchtet rot auf. - Um die Verbindung abzubrechen, die Verbindungstaste kurz drücken. Die Meldeleuchte erlischt • Si la placa exterior se encuentra en un ambiente con un alto nivel de ruido, durante la conversación es posible activar la función Push to Talk para obtener una comunicación con menor interferencias. Durante la conversación es posible activar la función Push to Talk en el modo siguiente. - Presione la tecla de conexión almenos 2 segundos para conversar con la placa exterior. El led permanece verde. - Suelte la tecla para poder escuchar desde la placa exterior. El led se vuelve rojo. - Para terminar la conexión, presione brevemente la tecla de conexión. El led se apaga. • Indien het extern punt zich op een bijzonder lawaaierige plaats bevindt, is het mogelijk, tijdens het gesprek, de functie Push to Talk te activeren teneinde een minder gestoorde communicatie te verkrijgen. Tijdens het gesprek is het mogelijk de functie Push to Talk te activeren op de volgende manier. - De drukknop van Verbinding gedurende minstens 2 seconden indrukken om met het externe punt te communiceren. De led blijft groen. - De toets loslaten om vanuit het externe punt te kunnen luisteren. De led wordt rood. - Om de verbinding te beëindigen, eventjes de toets. van verbinding indrukken. De led gaat uit. • Esta função permite difundir uma mensagem vocal, ditada ao microfone do dispositivo, por meio de altifalantes do sistema de Difusão sonora. A activação realiza-se premindo brevemente a tecla “Conexão” com o dispositivo em espera, o indicador luminoso verde aceso indica que a função está activada. Para cessar a função pressionar novamente a tecla “Conexão”. - Pressionar a tecla de conexão por pelo menos 2 segundos para falar com a unidade externa. O indicador luminoso continua verde - Soltar a tecla para poder escutar a unidade externa. O indicador luminoso fica vermelho - Para desligar pressionar ligeiramente a tecla da conexão. O indicador luminoso apaga. 25 • Comando luci scale • Staircase light control • Commande lumières escaliers • Treppenlichtsteuerung P N T S = = = = = = • Mando luces escaleras • Bediening lichten trapzaal • Comando das luzes da escada J1 = = = P = = M = – – – – – – N OFF – – – – – – ON BUS BUS PL S+ S- 230 Vac NO C NC 3 2 1 1 2 2A M cos =0,5 ON = 1” 3 346210 346210 26 230V 6A MOD = – =– M =– =– N/P =– T =5-
 1
1
-
 2
2
-
 3
3
-
 4
4
-
 5
5
-
 6
6
-
 7
7
-
 8
8
-
 9
9
-
 10
10
-
 11
11
-
 12
12
-
 13
13
-
 14
14
-
 15
15
-
 16
16
-
 17
17
-
 18
18
-
 19
19
-
 20
20
-
 21
21
-
 22
22
-
 23
23
-
 24
24
-
 25
25
-
 26
26
-
 27
27
-
 28
28


Bticino 365521 Instrucciones de operación
- Tipo
- Instrucciones de operación
- Este manual también es adecuado para
en otros idiomas
- français: Bticino 365521 Mode d'emploi
- italiano: Bticino 365521 Istruzioni per l'uso
- English: Bticino 365521 Operating instructions
- Nederlands: Bticino 365521 Handleiding
- português: Bticino 365521 Instruções de operação
Artículos relacionados
-
Bticino 365711 Instrucciones de operación
-
-
-
-
-
-
-
-
-