Moulinex LM6208FR El manual del propietario
- Categoría
- Batidoras
- Tipo
- El manual del propietario
Este manual también es adecuado para

notice blender2:Mise en page 1 26/02/08 14:54 Page a1

notice blender2:Mise en page 1 26/02/08 14:54 Page a2

notice blender2:Mise en page 1 26/02/08 14:54 Page a3

notice blender2:Mise en page 1 26/02/08 14:54 Page a4

1
CONSEILS DE SECURITE
- Lisez attentivement le mode d'emploi avant
la première utilisation de votre blender et
suivez attentivement les instructions
d’utilisation. Une utilisation non conforme au
mode d'emploi dégagerait le fabricant de
toute responsabilité.
- Vérifiez que la tension d’alimentation de votre
blender correspond bien à celle de votre
installation électrique. Toute erreur de
branchement annule la garantie.
- N’utilisez votre blender que pour un usage
culinaire à l'intérieur de la maison.
- Débranchez toujours votre blender dès que
vous cessez de l'utiliser, lorsque vous le nettoyez
ou en cas de coupure d’électricité.
- Utilisez votre blender sur une surface plane,
propre et sèche.
- Ne mettez jamais vos doigts ou tout autre
objet dans le bol mixeur pendant le
fonctionnement de l’appareil.
- Manipulez les lames avec précaution elles
peuvent vous blesser.
- Ne mettez pas l'appareil, le câble
d'alimentation ou la fiche dans l'eau ou tout
autre liquide.
- Ne laissez pas le câble d'alimentation à portée
de mains des enfants, à proximité ou en
contact avec les parties chaudes de votre
appareil, près d'une source de chaleur ou sur
un angle vif, ou au contact des lames.
- Ne passez pas les accessoires dans un four à
micro-ondes.
- Ne faites jamais fonctionner le bol mixeur sans
ingrédients ou avec des produits secs
uniquement, et n’y versez pas de liquides
bouillants.
- Ne laissez pas pendre les cheveux longs, les
écharpes, les cravates, etc… au dessus du bol
et des accessoires en fonctionnement.
- Cet appareil ainsi que ses accessoires ne sont
pas prévus pour être utilisés par des personnes
(y compris les enfants), dont les capacités
physiques, sensorielles ou mentales sont
réduites, ou des personnes dénuées
d'expérience ou de connaissance, sauf si elles
ont pu bénéficier, par l'intermédiaire d'une
personne responsable de leur sécurité, d'une
surveillance ou d'instructions préalables
concernant l'utilisation de l'appareil. Il convient
de surveiller les enfants pour s’assurer qu’ils ne
jouent pas avec l’appareil.
- Toute intervention autre que le nettoyage et
l'entretien usuel par le client doit être
effectuée par un centre agréé.
- Pour votre sécurité, n'utilisez que des
accessoires et des pièces détachées adaptés
à votre blender, vendus en centre agréé.
- N'utilisez pas l'appareil plus de 3 minutes en
marche continue. Attendez quelques minutes
avant de le remettre en marche après
3 minutes de fonctionnement ininterrompu.
- Lorsque vous videz l’accessoire, manipulez les
lames avec précautions : elles peuvent vous
blesser.
F
Les accessoires contenus dans le modèle que vous venez d'acheter sont représentés sur
l
'étiquette située sur le dessus de l'emballage.
* selon modèle
MISE EN SERVICE
- Avant une première utilisation, nettoyez tous les
accessoires à l'eau chaude savonneuse (sauf
le bloc moteur
(
D)
: voir § nettoyage). Rincez-
les et séchez-les soigneusement.
-
A
SSUREZ VOUS QUE TOUT EMBALLAGE SOIT
RETIRÉ AVANT LE FONCTIONNEMENT
.
UTILISATION DU BOL MIXEUR (E)
Schéma
❶
:
- Positionnez le joint d’étanchéité
(
E2)
sur la
base du porte lames amovible
(
E1)
.
- Verrouillez le porte lames sur le bol mixer en
tournant d’un quart de tour.
- Insérez le joint
(
E3)
dans la sortie du bol.
- Posez le bol sur le bloc moteur
(
D)
.
ASSEMBLAGE DU ROBINET (F) SUR LE
BOL
S
chéma
❷
:
- Insérez le joint
(
E3)
dans la sortie du bol.
- Verrouillez le robinet d'un quart de tour sur la
sortie du bol, en le tenant par le corps
(
F2)
(trou de sortie vers le bas.)
N
B:
La pédale peut être tournée librement tout
autour du corps du robinet.
- Introduisez les aliments à mixer dans le bol
(
E4)
en commençant par les ingrédients
liquides, sans dépasser le niveau maximal
indiqué (1,25 l).
notice blender2:Mise en page 1 26/02/08 14:54 Page 1

2
Schéma
❸
:
- Mettez le joint de couvercle
(E5)
autour du
couvercle
(E6)
, verrouillez l'ensemble sur le bol
(E4)
et placez le bouchon
(E7)
sur le couvercle.
- Posez la grille
(A2)
sur sa coupelle
(A1)
.
- Glissez l’ensemble
(
A)
dans le bloc moteur
(D)
, dans le logement prévu à cet effet
(B)
.
- Branchez l’appareil , mettez en marche en
choisissant la vitesse la plus adaptée à votre
préparation, grâce au sélecteur de vitesse
(C)
.
Pour arrêter l’appareil, mettez le sélecteur de
vitesse
(C)
sur 0.
Le couvercle et son bouchon doivent
toujours être en place lorsque l’appareil est
en fonctionnement. Toujours maintenir son
verre posé sur la grille avec la main.
Pour
ajouter des ingrédients au cours du mélange,
insérez les par l’orifice de remplissage du
couvercle
(E6)
.
Après utilisation, si nécessaire, jetez le contenu
de la coupelle
(A1)
et lavez l'ensemble
(A)
soigneusement.
SERVICE PAR LE ROBINET (F)
Schéma
❹
:
Deux positions sont possibles pour se servir en
faisant pivoter la pédale
(F1)
:
- La pédale en position basse permet de se
servir en appuyant directement avec le verre.
- La pédale en position haute permet de se
servir en tirant dessus avec la main et d'avoir
un débit plus important.
NB:
La vitesse 1 peut faciliter l’écoulement des
préparations assez épaisses (type milkshakes
ou smoothies). Arrêter l'appareil dès la fin du
service.
Nettoyez votre robinet après chaque utilisation
(voir § Nettoyage).
Si vous n'avez pas besoin du robinet, vous
pouvez le remplacer par le capuchon
(J)
(voir
Schéma
❻), équipé du joint
(E3)
.
UTILISATION DE L' ICE STICK* (H)
Cet accessoire vous permet de rafraîchir des
préparations, ou bien de les maintenir au frais.
- Remplissez de
g
ros sel
la partie carrée de la
poignée
(
H2)
jusqu'à ras bord
(
Schéma
❺
)
puis versez le sel dans le réservoir
(
H1)
.
- Remplissez d'eau le réservoir
(
H1)
.
- Vissez fortement la poignée sur le réservoir et
secouez pour faire fondre le sel.
- Placez l'ensemble au congélateur (-18°C au
minimum), de préférence debout, jusqu'à ce
que le mélange soit bien gelé (12h au
minimum).
- Faites votre préparation, puis introduisez l'Ice
stick
(
H)
gelé au travers de l'orifice du
couvercle
(
E6)
, à la place du bouchon
(
E7)
.
Votre préparation sera ainsi rafraîchie.
- vous pouvez utiliser l’ice stick comme pilon
pour mélanger vos préparations, en
l'introduisant obligatoirement par l'orifice de
remplissage du couvercle
(
E6)
.
U
TILISATION DES ACCESSOIRES (K & L*)
MOULIN A EPICES (K)
:
cet accessoire vous permet :
- de moudre jusqu’à 40g de café en 30 secondes
au maximum
- de moudre en quelques secondes différents
épices et fruits secs tels que noisettes, noix,
amandes, dattes, ... Ex: 50g de dattes en 4 s.
R
ÂPE (L)
:
cet accessoire réduit en poudre la noix de
muscade, la noix de coco, les fromages durs
(ex 60g de parmesan), préalablement coupés
en dés, en 30 secondes au maximum.
* Ces accessoires sont équipés d’un
couvercle
(
M)
de sécurité qui interdit
l’accès aux lames pendant le
fonctionnement
- Introduisez les ingrédients dans le e bol
(
K
ou
L
)
. Positionnez le couvercle
(
M)
sur le bol de
l’accessoire (une seule position possible),
tournez le couvercle dans le sens des aiguilles
d’une montre pour le verrouiller (sens cadenas
fermé), puis posez l’ensemble sur le corps du
blender
(
D) (voir Schéma
❾
)
.
* Branchez le blender et mettez le sélecteur
de vitesse
(
C)
sur la position «2» ou donnez
quelques impulsions sur « pulse ». Tenir le
couvercle
(
M)
pendant le fonctionnement.
* Pour arrêter le blender, ramenez-le sélecteur
de vitesse
(
C)
sur la position“0”, et ne retirez
l’accessoire que lorsque l’appareil est
complètement arrêté.
Retournez l’ensemble de l’accessoire sur le
plan de travail avant de déverrouiller le
couvercle de l’accessoire
(
K
ou
L) (voir
Schéma
➓
)
Vous pouvez alors récupérer la préparation
directement dans le couvercle qui sert de
récipient.
notice blender2:Mise en page 1 26/02/08 14:54 Page 2

3
- Débranchez le blender et enlevez les
accessoires.
- Nettoyez le bloc moteur (D) avec un chiffon
humide. Séchez-le soigneusement.
-
N
e plongez jamais le bloc moteur (D) dans
l’eau courante.
- Rincez le bol mixeur
(
E)
sous l’eau courante
ainsi que ses accessoires.
- Pour faciliter l’entretien du bol mixer
(
E)
,
déverrouillez le porte-lames
(
E1)
, retirez le joint
d’étanchéité
(
E2)
, enlevez l'ensemble robinet
(
F)
avant de tout nettoyer.
NETTOYAGE
SI VOTRE BLENDER NE FONCTIONNE PAS QUE FAIRE ?
Vérifiez tout d'abord le branchement, puis:
- que le bol est correctement positionné sur le
bloc moteur.
- que le bouton de commande est bien
positionné.
Votre bol fuit, vérifiez:
- que les joints sont tous présents et bien
positionnés.
Votre appareil ne fonctionne toujours pas?
Adressez-vous à un centre de service agréé
(voir liste dans le livret service).
Vous pouvez personnaliser votre appareil et
vous procurer auprès de votre revendeur
habituel, ou d’un centre agréé, les accessoires
suivants :
- accessoire moulin à épices
- accessoire râpe
- ice stick
RECYCLAGE
Participons à la protection de l’environnement !
Votre appareil contient de nombreux matériaux valorisables ou
recyclables.
Confiez celui-ci dans un point de collecte pour que son traitement soit
effectué.
ÉLIMINATION DES MATÉRIAUX D’EMBALLAGE DE L’APPAREIL
L’emballage comprend exclusivement des matériaux sans danger pour
l’environnement, pouvant être jetés conformément aux dispositions de
recyclage en vigueur.
Pour la mise au rebut de l’appareil, se renseigner auprès du service
approprié de votre commune.
Schéma
❼:
Démontage du robinet
(
F)
pour un nettoyage
aisé:
- Dévissez le corps
(
F2)
de la pédale
(
F1)
, en
tenant bien l'écrou
(
F3)
de la pédale.
Pour le remonter, procédez dans le sens inverse,
en faisant attention au bon positionnement du
joint
(
F4)
.
-
Manipulez les lames avec précaution, elles
sont très coupantes.
- Tous les accessoires vont au lave-vaisselle.
notice blender2:Mise en page 1 26/02/08 14:54 Page 3

4
RECETTES
MILK-SHAKES
Milk-shake au chocolat :
Pour 2 verres : 75 cl de lait bien froid
- 3 cuillères à soupe de cacao en poudre
- 2 cuillères à soupe de sucre - 3 boules de
glace au chocolat.
Versez le lait dans le bol mixer avec le cacao et
le sucre. Mixez 20s. Ajoutez les boules de glace
et mixez 10s.
Milk-shake à la fraise :
Pour 2 verres : 200 g de fraises - 40 cl de lait
bien froid - 2 cuillères à café de sucre de
canne.
Equeutez les fraises et coupez-les en morceaux.
Mettez tous les ingrédients dans le bol mixer et
mixez 30s. Servez bien frais.
Variante: Vous pouvez aussi remplacer les
fraises par 200 g de framboises ou par une
banane.
Lait meringué à la framboise :
Pour 4 verres : 400 g de lait concentré sucré
(1 boite) - 25 cl de lait - 300 g de framboises
- 10 glaçons - 4 petites meringues.
Mettez le lait, le lait concentré, les framboises et
les glaçons dans le bol mixer. Actionnez le pulse
10 fois, puis mixer 1 min 30. Ecrasez grossièrement
les meringues. Versez le lait dans les verres et
décorez avec les meringues en morceaux.
Servez sans attendre.
Douceur d'été aux fraises :
Pour 2 verres : 250 g de fraises équeutées
- 25 cl de yaourt à boire parfumé aux fruits rouges
- 4 boules de yaourt à la fraise surgelé - 1 cuillère
à soupe de coulis de fraises - quelques gouttes
d'extrait naturel de vanille - glaçons.
Placez le yaourt à la fraise au congélateur au
moins 3 heures avant la préparation. Dans le bol
mixer, mettez les fraises, le yaourt à boire, le
yaourt surgelé, le coulis de fraises et la vanille.
Mixer jusqu'à obtention d'un mélange épais et
lisse. Versez la préparation sur des glaçons.
Café frappé :
Pour 2 verres : 1/2l de lait - 6 cuillères à café de
café soluble - 6 cuillères à soupe de sucre
- 6 glaçons.
Introduisez tous les ingrédients dans le bol mixez
20s. Servez rapidement.
SMOOTHIES / COCKTAILS VITAMINES
Cocktail vitaminé :
Pour 4 verres : 2 tranches d'ananas - 6 fraises
- 1 banane - 4 oranges pressées - 15 cl d'eau
gazeuse bien fraîche - 1 sachet de sucre vanillé
- 2 glaçons.
Mettez l'ananas, les fraises, la banane, le jus
d'orange et le sachet de sucre vanillé dans le
bol mixer. Mixez pendant 15s. Ajoutez l'eau
gazeuse et les glaçons. Mixer 15s.
Cocktail énergie :
Pour 6 verres : 3 oranges pressées - 1 citron
pressé - 6 cuillères à soupe de miel liquide
- 2 jaunes d'oeufs - 4 cuillères à soupe de
crème liquide - 4 glaçons.
Mettez tous les ingrédients dans le bol mixer et
mixez 30s. Servez très frais.
Jus de tomates épicé :
Pour 2 verres : 500g de tomates bien mûres
- ½ citron pressé - 4 feuilles de basilic - 2 brins
de persil - ½ cuillère à café de cumin en
poudre - 2 gouttes de Tabasco - sel de céleri
- 4 glaçons.
Pelez, épépinez et coupez les tomates en 4.
Mettez tous les ingrédients dans le bol mixer.
Mixer pendant 1min. Servez très frais.
Délice au kiwi :
Pour 4 petits verres: 3 kiwis pelés et coupés en
tranches - 80 g d'ananas coupés en morceaux
- 1 banane coupée en tronçons - 25 cl de jus
de fruits tropicaux - 2 glaçons.
Dans le bol mixer, mettez tous les ingrédients et
mixez jusqu'à obtention d'un mélange
onctueux.
Coco citron glacé :
Pour 2 grands verres : 40 cl de lait de coco
- le jus de 4 citrons verts - 2 cuillères à café
d'extrait naturel de vanille - 80 g de sucre en
poudre - 7 g de menthe fraîche (facultatif)
- 8 gros glaçons.
Mettez tous les ingrédients dans le bol mixer et
mixez jusqu'à obtention d'un mélange onctueux.
notice blender2:Mise en page 1 26/02/08 14:54 Page 4

5
Gaspacho:
Pour 6 verres: ½ concombre - ½ poivron doux
- 500g de tomates - 1 petit oignon - 1 gousse
d'ail - 20g de mie de pain - 2 cuillères à café
de vinaigre de vin - 2 cuillères à soupe d'huile
d'olive - 1 cuillère à café de concentré de
tomates - 50cl de bouillon froid - sel - poivre
- 1 pincée de piment de Cayenne.
Epluchez le concombre, l'ail et l'oignon. Otez les
graines du poivron. Pelez et épépinez les
tomates. Mettez tous les ingrédients en
morceaux dans le bol mixer et mixez 1 minute.
Laissez 1 heure au réfrigérateur (ou bien utilisez
l'ice stick) avant de servir avec des croûtons
frottés d'ail.
C
OCKTAILS
(à consommer avec modération)
Margarita :
Pour 4 verres : 16 cl de Tequila - 8 cl de
Cointreau - 4 cl de citron vert - 1 cuillère à café
de sel - 5 glaçons.
Introduisez dans le bol mixer la Tequila, le
Cointreau et le citron. Mixer 10s. Ajoutez les
glaçons et mixer. Mouillez le bord des verres et
passez-les dans le sel. Versez et décorez les
verres avec une rondelle de citron.
Piña Colada :
Pour 4 verres : 50 cl de jus d'ananas - 20 cl de
crème de noix de coco - 10 cl de rhum blanc
- 1 cuillère à soupe de sucre de canne
- 1 pincée de cannelle - quelques gouttes de
vanille - 6 glaçons.
Introduisez les ingrédients dans le bol mixer,
ajoutez les glaçons et mixez 30s.
Irish Cocktail :
Pour 4 verres : 16 cl de whisky irlandais
- 4 cuillères à café de crème de menthe verte
- 4 boules de glace à la vanille.
Introduisez les ingrédients dans le bol mixer, et
mettez en marche à vitesse 1 quelques
secondes. Servez immédiatement
notice blender2:Mise en page 1 26/02/08 14:54 Page 5

6
SAFETY INSTRUCTIONS
- Read the instructions for use carefully before
using your blender for the first time, and
follow them closely. The manufacturer
cannot be held responsible for any use that
does not comply with the instructions.
- Check that the power voltage of your blender
is the same as that of your mains installation.
Any incorrect connection invalidates the
warranty.
- This product has been designed for domestic
use only. Any commercial use, inappropriate
use or failure to comply with the instructions,
the manufacturer accepts no responsibility
and the guarantee will not apply.
- Always unplug your blender from the mains as
soon as you have finished using it, when you
are cleaning it, or whenever there is a power
cut.
- Use your blender on a work surface that is flat,
clean and dry.
- Never place your fingers or any other object in
the blender jug while the appliance is
operating.
- Handle the blades with extreme care, they
may injure you.
- Do not immerse the appliance, the power cord
or the plug in water or any other liquid.
- Do not leave the power cord within the reach
of children, close to or in contact with the hot
parts of your appliance, close to a heat source
or a sharp edge, or in contact with the blades.
GB
The accessories that come with the model that you have bought are shown on the label
located on the top of the packaging.
* according to model.
- Do not place the accessories in a microwave
oven.
- Do not use the blender jug without any
ingredients or with only dry ingredients, and do
not pour boiling liquids into it.
- Do not leave long hair, scarves, ties, etc.
dangling over the jug and the accessories
when they are working.
- This appliance is not intended for use by
persons (including children) with impaired
physical, sensory or mental capabilities, or lack
of experience and knowledge, unless they
have been given supervision or instruction
concerning use of the appliance by a person
responsible for their safety. Children should be
supervised to ensure that they do not play with
the appliance.
- All repair work other than cleaning and basic
maintenance by the customer must be carried
out by an approved centre.
- For your safety, only use accessories and spare
parts designed for your appliance, sold by an
approved centre.
- Do not use the appliance for more than 3
minutes continuously. Wait for a few minutes
before using it again if it has been used for
3 minutes non-stop.
- When emptying the appliance, be careful with
the blades: they may injure you.
USING FOR THE FIRST TIME
- Before using the appliance for the first time,
clean all of the accessories in hot soapy water
(except for the motor unit
(
D)
: see cleaning §).
Rinse and dry them carefully.
-
E
NSURE THAT ALL PACKAGING HAS BEEN
REMOVED BEFORE USE
.
USING THE BLENDER (E)
Diagram
❶ :
- Place the seal
(
E2)
on to the removable blade
holder
(
E1)
.
- Lock the blade holder on to the blender by
giving it a quarter turn.
- Insert the joint
(
E3)
into the blender outlet.
- Place the blender on the motor unit
(
D)
.
F
ITTING THE TAP (F) ON TO THE
BLENDER
Diagram
❷ :
- Hold the tap by its body
(
F2)
(with the lever
facing downwards) and lock the tap on to the
blender outlet by giving it a quarter turn
clockwise.
NB: The pedal can be turned freely all the way
round the body of the tap.
- Place the food to be blended into the jug
(
E4)
,
starting with the liquid ingredients first, never
exceed the maximum level (1.25 litre).
notice blender2:Mise en page 1 26/02/08 14:54 Page 6

7
hole in the lid
(
E6)
, instead of the cap
(
E7)
. The
mixture will then be cooled.
- You can use the ice stick as a mixing stick to
help mix up your drinks, by introducing it
through the feeder hole in the lid
(
E6)
.
U
SE OF THE ACCESSORIES (K & L)
*
(according to model)
SPICE GRINDER ACCESSORY (K):
this accessory allows you:
- to grind up to 40 g of coffee in 30 seconds
maximum operating time;
- to grind or chop various spices, dried fruits and
nuts such as hazelnuts, walnuts, almonds or
dates in a matter of seconds. E.g. 50 g of dates
in 4 seconds.
G
RATER ACCESSORY (L):
this accessory can reduce to powder nutmeg
and grate coconut, hard cheeses (eg 60g of
Parmesan) cut into small cubed pieces with a
30 second maximum operating time.
- These accessories are fitted with a safety lid
(
M)
which prevents access to the blades
during operation.
- Introduce the ingredients into the container
(
K
or L).
Fit the lid
(M)
to the container of the
accessory (only one position is possible) and
turn it in a clockwise direction to lock it
(towards the closed padlock symbol), then fit
this assembly onto the blender body
(
D) (see
diagram
➒
)
.
- Plug in the blender and set the speed selector
(C)
to "pulse". Hold the lid during operation.
- To stop the blender, turn the speed selector
(
C)
to the "0" position and only remove the
accessory when the appliance has completely
stopped.
Turn the assembly upside down on the work
surface before unlocking the lid of the accessory
(
K or L) (see diagram
❿
)
.
The preparation may then be taken directly
from the lid, which acts as a bowl
.
Diagram
❸ :
Fit the lid seal
(
E5)
around the lid
(
E6)
, lock the
lid on to the blender by turning anti-clockwise
(
E4)
and place the cap
(
E7)
in the lid.
- Place the grid
(
A2)
on the drip tray
(
A1)
.
- Slide the drip tray unit
(
A)
into the motor unit
(
D)
, into its housing
(B)
.
- Plug the appliance in, turn it on and choose
the speed most suitable for your preparation
using the speed selection switch
(C)
.
To stop the appliance, turn the speed switch
(C)
to 0.
The lid and its cap must always be properly
fitted when the appliance is working.
Always hold your glass firmly on the grid.
To add ingredients while the blender is
operating , insert them through the feeder hole
in the lid
(E6)
.
After use, if necessary, throw away the contents
of the drip tray
(A1)
and wash the drip tray unit
(A)
carefully.
DISPENSING THROUGH THE TAP (F)
D
iagram
❹
Two positions are possible, by pivoting the tap
(
F1)
:
- When the lever faces downwards, you can
serve yourself by pressing it directly with a
glass.
- When the lever is facing upwards you can
serve yourself by pulling it with your hand and
the liquid will flow faster.
NB:
To make thicker mixtures (such as
milkshakes or smoothies) flow better, set the
blender to speed 1 and then pull the pedal
forward). Turn the appliance off when you
have finished serving.
Clean the tap after each use (see Cleaning §)
If you do not need the tap, you can replace it
with the cap
(
J)
(
s
ee diagram
), fitted on to
the sealing joint
(E3)
.
U
SE OF THE ICE STICK (H)*
(according to model)
This accessory enables you to cool mixtures
down, or keep them cool.
- Fill the square part of the handle
(
H2)
with
c
rystal salt
right up to the brim (
diagram
)
and then pour the salt into the container
(
H1)
.
- Fill the container
(
H1)
with cold water.
- Screw the handle of the container on very
tightly and shake until the salt dissolves.
- Place the handle in the deep freezer (at least -
18°C), preferably in an upright position, until the
salt water mixture has frozen (12 hours
minimum).
- Make your preparation in the blender, and then
introduce the frozen ice stick
(
H)
through the
notice blender2:Mise en page 1 26/02/08 14:54 Page 7

8
- Unplug the blender and remove the accessories.
- Wipe the motor unit
(
D)
down with a damp
cloth. Dry carefully.
- Never plunge the motor unit
(
D)
into running
water.
- Rinse the jug
(
E)
under running water, along
with its accessories.
- To make the blender easier to clean
(
E)
, unlock
the blade holder
(
E1), remove the seal (E2),
remove the tap unit
(
F)
before cleaning
everything.
Diagram
:
Dismantling the tap
(
F)
to make cleaning easier:
- Unscrew the body
(
F2)
of the lever
(
F1)
,
holding the bolt tightly
(
F3)
.
To reassemble it, do the same operations in
reverse, making sure that the seal
(
F4)
is fully
tightened.
-
H
andle the blades with extreme care, they
are very sharp.
- All the accessories are dishwasher-safe.
CLEANING
WHAT TO DO IF MY BLENDER DOESN'T WORK?
Start by checking the power cord and plug,
then check:
- that the blender is properly set on the motor
unit.
- that the speed selection switch is in the right
position.
Your blender is leaking, check:
- that all the seals are properly positioned.
- the jug has not been overfilled above the
maximum level (1.25 litre)
Your appliance still does not work?
Call our Customer Relations Helpline:
0845 602 1454 or
(01) 677 4003 - Ireland
or consult our website - www.moulinex.co.uk
You can customise your blender and obtain the
following accessories from your usual
retailer or an approved centre:
- Grinder accessory
- Ice stick
- cap
(
J)
RECYCLING
Play your part in protecting the environment!
Your appliance contains a lot of recoverable or recyclable material.
Leave it at a local civic waste collection point so that it can be recycled.
DISPOSAL OF THE PACKAGING OF THE APPLIANCE
The packaging does not contain any materials that are harmful to the
environment, they may all be disposed of in compliance with the
recycling rules in force.
For disposal of your appliance, please contact the appropriate municipal
department.
notice blender2:Mise en page 1 26/02/08 14:54 Page 8

9
RECIPES
MILKSHAKES
Chocolate milkshake:
For 2 glasses: 750 ml very cold milk
- 3 tablespoons drinking chocolate
- 2 tablespoons caster sugar - 3 scoops of
chocolate ice cream.
Pour the milk into the blender with the drinking
chocolate and the sugar. Blend for 20 sec. Add
the scoops of ice cream and blend for another
10 sec. Serve immediately.
Strawberry milkshake:
For 2 glasses: 200 g fresh strawberries - 400 ml
very cold milk -2 teaspoons caster sugar.
Hull the strawberries and cut them in half. Place
all the ingredients in the blender and blend for
30 sec. Serve cold.
Variation: You can also replace the strawberries
by 200 g of fresh raspberries or a banana.
Raspberry Meringue Heaven :
For 4 glasses: 400 g sweetened condensed milk
(1 tin) - 250 ml cold milk - 300 g fresh raspberries
- 10 ice cubes - 4 small meringues.
Place the milk, condensed milk, raspberries and
ice cubes in the blender. Use the pulse button 10
times, then blend for 1 minute 30 seconds. Crush
the meringues. Pour the mixture into the glasses
and decorate with the pieces of meringue.
Serve straight away.
Summer strawberry delight:
For 2 glasses: 250 g hulled strawberries - 250 ml
red berry drinking yoghurt - 4 scoops frozen
strawberry yoghurt - 1 tablespoon of strawberry
coulis - a few drops of natural vanilla extract
- ice cubes.
Place the strawberry yoghurt in the freezer for at
least three hours before you make the recipe.
Place the strawberries, drinking yoghurt, frozen
yoghurt, strawberry coulis and vanilla extract
into the blender. Blend until the mixture
becomes thick and smooth. Pour the mixture
over the ice cubes. Serve straight away.
Café frappé:
For 2 glasses: ½ litre cold milk - 6 teaspoons of
instant coffee - 4 - 6 tablespoons caster sugar
- 6 ice cubes
Place all the ingredients in the blender and
blend 20 secs. Adjust sweetness according to
your personal taste. Serve immediately.
SMOOTHIES / VITAMIN COCKTAILS
Vitamin cocktail:
For 4 glasses: 2 slices pineapple - 6 fresh
strawberries - 1 sliced banana - juice of
4 oranges - 150 ml very cold sparkling water
- 1 sachet vanilla sugar (optional) - 2 ice
cubes.
Place the pineapple, strawberries, banana,
orange juice and vanilla sugar into the blender.
Blend for 15 sec. Add the sparkling water and
the ice cubes. Blend 15 sec. Serve
immediatlely.
Energy cocktail:
For 6 glasses: juice of 3 oranges - juice of
1 lemon - 6 tablespoons clear honey - 2 egg
yolks - 4 tablespoons single cream
- 4 ice cubes.
Place all the ingredients in the blender and
blend 30 sec. Serve very cold.
Spicy tomato juice:
For 2 glasses: 500 g very ripe tomatoes - juice of
½ lemon - 4 basil leaves - 3 sprigs parsley
- ½ teaspoon ground cumin - 2 drops Tabasco
sauce - pinch of celery salt - 4 ice cubes.
Peel the tomatoes, remove the pips and cut into
quarters. Place all the ingredients in the blender.
Blend for 1 min. Serve very cold.
Kiwi delight:
For 4 small glasses: 3 kiwi fruit peeled and
sliced - 80 g fresh pineapple cut into chunks
- 1 sliced banana - 250 ml tropical fruit juice
- 2 ice cubes.
Place all the ingredients into the blender and
blend until creamy.
Iced lime coconut:
For 2 large glasses: 400 ml chilled coconut milk -
juice of 4 limes - 2 teaspoons natural vanilla
extract - 80 g caster sugar - 7 g fresh mint
(optional) - 8 large ice cubes.
Place all the ingredients into the blender and
blend until creamy. Serve straight away.
notice blender2:Mise en page 1 26/02/08 14:54 Page 9

10
Gaspacho:
For 6 glasses: ½ cucumber - ½ sweet red
pepper - 500g tomatoes - 1 small onion
- 1 clove of garlic - 20g fresh breadcrumbs
- 2 teaspoons wine vinegar - 2 tablespoons
olive oil - 1 teaspoon tomato puree - 500 ml
cold stock - salt - pepper - 1 pinch of Cayenne
pepper.
Peel the cucumber, garlic and onion. Remove
the seeds from the pepper. Peel the tomatoes,
remove the pips. Place all of the ingredients into
the blender and blend for one minute. Leave for
1 hour in the refrigerator (or use the ice stick)
before serving with garlic croutons.
C
OCKTAILS
(to be consumed in moderation)
Margarita :
For 4 glasses: 160 mlf Tequila - 80 ml Cointreau
- 40 ml lime - 1 teaspoon salt - 5 ice cubes.
In the blender, put the Tequila, the Cointreau
and the lime. Blend 10 sec. Add the ice cubes
and blend. Wet the edges of the glasses and
dip them in the salt. Pour in the mixture and
decorate the glasses with a slice of lemon.
Piña Colada :
For 4 glasses: 500 ml pineapple juice - 200 ml
coconut liqueur - 100 ml white rum
- 1 tablespoon caster sugar - 1 pinch ground
cinnamon - a few drops of vanilla extract
- 6 ice cubes.
Place all the ingredients in the blender, add the
ice cubes and blend 30 sed.
Irish Cocktail :
For 4 glasses: 160 ml Irish whisky - 4 teaspoons
crème de menthe - 4 scoops of vanilla ice
cream.
Place all the ingredients in the blender and turn
to speed 1 for a few seconds. Serve immediately
notice blender2:Mise en page 1 26/02/08 14:54 Page 10

11
SICHERHEITSHINWEISE
- Lesen Sie die Bedienungsanleitung vor der
ersten Inbetriebnahme Ihres Standmixer
aufmerksam durch. Bei unsachgemäßem,
nicht der Bedienungsanleitung
entsprechendem Gebrauch übernimmt der
Hersteller keinerlei Haftung.
- Überprüfen Sie, dass die Betriebsspannung
Ihres Standmixers mit der Spannung Ihrer
Elektroinstallation übereinstimmt.
Bei falschem Anschluss erlischt die Garantie.
- Benutzen Sie Ihren Standmixer ausschließlich
zur Zubereitung von Speisen in geschlossenen
Räumen.
- Stecken Sie Ihren Standmixer nach dem
Gebrauch, bei der Reinigung und bei
Stromausfällen aus.
- Stellen Sie Ihren Standmixer auf eine ebene,
saubere und trockene Fläche.
- Stellen Sie Ihr Gerät niemals auf eine heiße
Oberfläche (z. B. Herdplatte) oder in die Nähe
einer offenen Flamme.
- Stecken Sie nie Ihre Finger oder irgendwelche
Objekte in den Mixaufsatz, wenn sich das
Gerät in Betrieb befindet.
- Gehen Sie vorsichtig mit dem Messer um, da
Sie sich andernfalls verletzen könnten.
- Tauchen Sie das Gerät, das Netzkabel und
den Stecker niemals in Wasser oder andere
Flüssigkeiten.
Ziehen Sie den Stecker nicht am Kabel aus der
Steckdose.
- Lassen Sie das Netzkabel nicht in Reichweite
von Kindern. Das Netzkabel darf nicht in
Kontakt mit oder in die Nähe von den sich
drehenden Teilen des Gerätes, einer
Wärmequelle, scharfen Kanten oder des
Messers gebracht werden.
- Nehmen Sie den Mixaufsatz nicht ohne
Zutaten oder nur mit Trockenprodukten gefüllt
in Betrieb und füllen Sie keine kochenden
Flüssigkeiten in den Mixaufsatz. Geben Sie
keine zu großen Stücke in das Gerät
(max. 2 cm groß), um ein Blockieren des
Messers und dadurch eine Überhitzung des
Gerätes zu vermeiden.
- Vorsicht im Umgang mit heißen Speisen.
- Die Zubehörteile sind nicht mikrowellenfest.
- Lassen Sie lange Haare, Schals, Krawatten usw.
nicht über den Mixaufsatz und in Betrieb
befindliche Zubehörteile hängen.
Vermeiden Sie jeden Kontakt mit sich
bewegenden Teilen.
- Dieses Gerät darf nicht von Personen
(inbegriffen Kindern) mit eingeschränkten
körperlichen, sensorischen oder geistigen
Fähigkeiten benutzt werden. Das Gleiche gilt
für Personen, die keine Erfahrung mit dem
Gerät besitzen oder sich mit ihm nicht
auskennen, außer wenn sie von einer für ihre
Sicherheit verantwortlichen Person
beaufsichtigt werden oder von dieser mit dem
Gebrauch des Gerätes vertraut gemacht
wurden. Kinder müssen beaufsichtigt werden,
damit sie nicht mit dem Gerät spielen.
- Das Gerät niemals ohne Aufsicht laufen lassen.
- Benutzen Sie Ihren Standmixer nicht, wenn er
nicht richtig funktioniert oder beschädigt
wurde oder wenn das Netzkabel oder der
Stecker beschädigt sind. Lassen Sie sie zu Ihrer
eigenen Sicherheit unbedingt von einem
Kundendienstcenter austauschen (siehe Liste
im Serviceheft).
- Alle Arbeiten, die über die üblichen durch den
Kunden ausgeführten Reinigungs- und
Pflegemaßnahmen hinausgehen, dürfen nur
von zugelassenen Kundendienstcentern
ausgeführt werden. Verwenden Sie das Gerät
niemals ohne Deckel.
- Verwenden Sie zu Ihrer eigenen Sicherheit nur
zu Ihrem Standmixer passende, in einem
zugelassenen Kundendienstcenter erworbene
Originalzubehör- und Ersatzteile.
- Benutzen Sie das Gerät nicht länger als
3 Minuten in Dauerbetrieb. Schalten Sie es
nach 3 Minuten Dauerbetrieb aus und lassen
Sie es ein paar Minuten lang abkühlen.
- Vorsicht beim Leeren und Reinigen des
Mixbechers, die Messer sind sehr scharf.
- Das Gerät ist nur für den Hausgebrauch.
- Das Gerät niemals ohne Aufsicht laufen lassen.
- Vorsicht im Umgang mit heißen Speisen.
- Verwenden Sie nur Verlängerungskabel in
Ordnungsgemässem Zustand.
D
Die dem von Ihnen erworbenen Modell beiliegenden Zubehörteile sind auf dem Etikett auf
der Oberseite der Verpackung aufgeführt.
* je nach Modell.
notice blender2:Mise en page 1 26/02/08 14:54 Page 11

12
- Reinigen Sie vor der ersten Benutzung alle
Zubehörteile mit heißem Seifenwasser
(ausgenommen den Motorblock
(
D)
: siehe
Absatz Reinigung). Spülen und trocknen Sie sie
ab.
-
E
NTFERNEN SIE VOR DER INBETRIEBNAHME
ALLE VERPACKUNGSTEILE.
GEBRAUCH DES MIXAUFSATZES (E)
Bild
❶:
- Legen Sie den Dichtungsring
(
E2)
auf die Basis
des abnehmbaren Messerträgers
(
E1)
.
- Verriegeln Sie den Messerträger mit einer
Vierteldrehung auf dem Mixaufsatz.
- Stecken Sie das Zwischenstück
(
E3)
in die
Öffnung des Mixaufsatzes.
- Stellen Sie den Mixaufsatz auf den Motorblock
(
D)
.
MONTAGE DES ZAPFHAHNS (F) AM
MIXAUFSATZ
Bild
❷:
- Verriegeln Sie den Zapfhahns mit einer
Vierteldrehung an der Öffnung des
Mixaufsatzes. Halten Sie ihn dabei am
Gehäuse
(
F2)
fest (Ausgießöffnung nach unten.)
BITTE BEACHTEN: Der Zapfhahn lässt sich ganz
um sich selbst drehen.
- Geben Sie die Zutaten, die gemixt werden
sollen, in den Mixaufsatz
(
E4)
, beginnen Sie mit
den flüssigen Zutaten. Achten Sie darauf, die
angegebene Höchsteinfüllmenge (1,25 l)
nicht zu übertreten.
B
ild
❸:
Legen Sie den Dichtungsring
(
E5)
um den
Deckel
(
E6)
, setzen Sie die beiden Teile auf dem
Mixaufsatz
(
E4)
und schließen den Deckel mit
Hilfe des Dosierverschlusses
(
E7)
.
- Legen Sie das Sieb
(
A2)
auf das Schälchen
(
A1)
.
- Setzen Sie die beiden Teile
(
A)
an den dafür
vorgesehenen Platz
(
B)
in den Motorblock
(
D)
ein.
- Schließen Sie das Gerät an, stellen Sie am
Geschwindigkeitswahlschalter
(
C)
die am
besten für Ihre Zubereitung geeigneten
Geschwindigkeit ein und setzen Sie das Gerät
in Betrieb.
Stellen Sie zum Abschalten des Gerätes den
Geschwindigkeitswahlschalter
(
C)
auf 0.
D
er Deckel sowie der Dosierverschluss
müssen stets aufgesetzt sein, wenn das Gerät
in Betrieb ist.
Während der Zubereitung können
weitere Zutaten durch die Einfüllöffnung im
Deckel
(
E6)
beigegeben werden.
Leeren Sie den Inhalt des Schälchens
(
A1)
nach der Reinigung gegebenenfalls aus und
reinigen Sie die beiden Teile
(
A)
sorgfältig.
MIT DEM ZAPFHAHN (F) SERVIEREN
Bild
❹:
Zum Servieren kann der Zapfhahn
(
F1)
wahlweise auf zwei Positionen gestellt werden:
- Wenn der Zapfhahn nach unten gerichtet
steht, braucht das Glas zum Servieren nur
direkt an die Taste gedrückt zu werden.
- Wenn der Zapfhahn nach oben gerichtet
steht, muss man zum Servieren mit der Hand
daran ziehen und die Flüssigkeit läuft schneller
ab.
BITTE BEACHTEN: Bei Geschwindigkeit 1 laufen
dickflüssige Zubereitungen (z.B. Milchshake
oder Smoothies) besser ab. Schalten Sie das
Gerät nach dem Servieren aus.
Achtung je nach Flüssigkeit ist es möglich das
der Zapfhahn nachtropft. Lassen Sie Ihr Glas
nach dem Einfüllen noch einen Augenblick
unter dem Auslauf stehen. Reinigen Sie den
Zapfhahn nach jeder Benutzung (siehe Absatz
Reinigung). Wenn Sie den Zapfhahn nicht
verwenden wollen, können Sie ihn durch die
Kappe
(
J)
ersetzen
(
siehe Bild
❻
)
, in die das
Zwischenstück
(
E3)
eingesetzt werden muss.
BENUTZUNG DES ICE STICKS*(H)
Der Ice Stick dient zum Kühlen oder Kühlhalten
der Zubereitungen. Je nach Modell vorhanden.
- Füllen Sie den eckigen Teil des Ice Sticks
(
H2)
bis oben mit
g
robem Salz
(Bild ❺) und füllen
Sie das Salz anschließend in den Ice Stick-
Behälter
(
H1)
.
- Füllen Sie den Ice Stick-Behälter
(
H1)
mit Wasser.
- Schrauben Sie den Deckel des Ice Sticks fest
auf den Behälter und schütteln Sie ihn, um das
Salz aufzulösen.
- Stellen Sie den Stick möglichst aufrecht in den
Eisschrank (mindestens -18°C) und lassen Sie
die Mischung gut durchfrieren (mindestens
12 Stunden).
- Bereiten Sie die Zutaten zu und führen Sie
dann den gefrorenen Ice Stick
(
H)
anstelle des
Dosierverschlusses
(
E7)
durch die Öffnung im
Deckel
(
E6)
ein. Ihre Zubereitung wird gekühlt.
- Der Ice Stick kann auch zum Durchmischen
während der Zubereitungen verwendet
werden. Dazu muss er unbedingt durch die
Einfüllöffnung im Deckel
(
E6)
eingeführt
werden.
BENUTZUNG DER ZUBEHÖRTEILE (K und L)
GEWÜRZMÜHLE (K)
:
Mit diesem Zubehörteil lassen sich
- bis zu 40 g Kaffee in höchstens 30 Sekunden
mahlen
- in ein paar Sekunden verschiedene Gewürze
und Trockenfrüchte wie Haselnüsse, Walnüsse,
Mandeln, Datteln usw. mahlen, zum Beispiel:
50 g Datteln in 4 Sek.
INBETRIEBNAHME
notice blender2:Mise en page 1 26/02/08 14:54 Page 12

13
- Stecken Sie den Standmixer aus und nehmen
Sie das Zubehör ab.
- Reinigen Sie den Motorblock
(
D)
mit einem
feuchten Tuch und trocknen Sie ihn sorgfältig ab.
-
Halten Sie den Motorblock (D) nie unter
fließendes Wasser.
- Spülen Sie den Mixaufsatz
(
E)
sowie die
Zubehörteile unter fließendem Wasser ab.
- Entriegeln Sie zur einfacheren Reinigung des
Mixaufsatz
(
E)
vor der Reinigung den
Messerträger
(
E1)
, entnehmen Sie den
Dichtungsring
(
E2)
und nehmen Sie den
zusammengesetzten Zapfhahn
(
F)
ab.
Bild
❼
:
Abnehmen des
(
F)
zur leichteren
Reinigung:
- Schrauben Sie das Gehäuse
(
F2)
vom
Zapfhahn
(
F1)
ab und halten Sie dabei die
Mutter
(
F3)
des Zapfhahns gut fest.
Schrauben Sie zum erneuten Anbringen des
Gehäuses das Teil wieder an und achten Sie
dabei darauf, dass das Zwischenstück
(
F4)
richtig herum eingesetzt ist.
-
G
ehen Sie vorsichtig mit den Messern um,
vor allem beim Leeren und Reinigen. Sie
sind äußerst scharf
.
- Alle Zubehörteile sind spülmaschinengeeignet.
REINIGUNG
WAS TUN, WENN IHR STANDMIXER NICHT FUNKTIONIERT?
Überprüfen Sie zunächst den Anschluss des
Geräts und anschließend:
- ob der Mixaufsatz richtig auf dem Motorblock
sitzt,
- ob die Wahltaste richtig eingestellt ist, Wenn
Flüssigkeit aus dem Mixaufsatz austritt,
überprüfen Sie:
- ob alle Dichtungsringe und Teile richtig
eingesetzt sind.
Das Gerät funktioniert immer noch nicht?
Wenden Sie sich an ein zugelassenes
Kundendienstcenter (siehe Liste im Serviceheft).
Sie können Ihr Gerät Ihren persönlichen
Bedürfnissen anpassen und bei Ihrem
Fachgeschäft oder bei einem zugelassenen
Kundendienstcenter folgende Zubehörteile
erwerben:
- Mahlwerk
- Ice Stick
- Kappe zum Schließen der Öffnung des
Zapfhahns
RECYCLING
Denken Sie an den Schutz der Umwelt!
Ihr Gerät enthält zahlreiche wieder verwertbare oder recycelbare Materialien.
Bringen Sie es zur Entsorgung zu einer Sammelstelle Ihrer Stadt oder Gemeinde.
E
NTSORGUNG DER VERPACKUNGSMATERIALIEN DES GERÄTS
Die Verpackung des Geräts besteht ausschließlich aus umweltfreundlichen
Materialien, die unter Beachtung der gültigen Recycling-Vorschriften entsorgt
werden können.
Erkundigen Sie sich bei der zuständigen Dienststelle Ihrer Gemeinde über die
Entsorgung des Geräts.
REIBE (L):
Mit diesem Zubehörteil lassen sich in
ein paar Sekunden Muskatnüsse, Kokosnüsse
und harte, zuvor gewürfelte Käsesorten (zum
Beispiel 60 g Parmesan) in höchstens
30 Sekunden zermahlen. Diese Zubehörteile sind
mit einem Sicherheitsdeckel
(
M)
ausgestattet,
der den Zugriff zu den Schneiden während des
Betriebs verhindert.
- Füllen Sie die Zutaten in den Behälter
(
K oder
L)
. Setzen Sie den Deckel
(
M)
auf den Behälter
des jeweiligen Zubehörteils (nur eine Position
möglich), verriegeln Sie den Deckeln, indem
Sie ihn im Uhrzeigersinn drehen (in Richtung
zugemachtes Schloss) und setzen Sie diese
Einheit auf den Standmixer
(
D) (siehe
Zeichnung
❾
)
.
- Schließen Sie den Standmixer an, stellen Sie
die Geschwindigkeitseinstellung
(
C)
auf
Position 2 oder betätigen Sie mehrmals den
Impulsbetrieb. Halten Sie den Deckel
(
M)
während des Betriebs fest.
- das Gerät an und setzen Sie es in Betrieb.
Halten Sie das Zubehörteil dabei mit der Hand
fest.
- Stellen Sie zum Abschalten des Standmixers
die Geschwindigkeitseinstellung
(
C)
auf
Position 0 und nehmen Sie das Zubehörteil erst
nach vollständigem Stillstand des Geräts ab.
- Stellen Sie das zusammengesetzte Zubehörteil
kopfüber auf eine Arbeitsfläche und nehmen
Sie den Deckel von dem jeweiligen Zubehörteil
(
K
oder
L
) ab
(
siehe Zeichnung
❿
)
.
- Jetzt können Sie die Zubereitung direkt aus
dem Deckel entnehmen, der als Behälter dient.
notice blender2:Mise en page 1 26/02/08 14:54 Page 13

14
REZEPTE
MILCHSHAKES
Schokoladenmilchshake:
Für 2 Gläser:
75 cl sehr kalte Milch - 3 Esslöffel
Kakaopulver - 2 Esslöffel Zucker - 3 Kugeln
Schokoladeneis
.
Giessen Sie die Milch mit dem Kakao und dem
Zucker in den Mixaufsatz und mixen Sie
20 Sekunden lang. Geben Sie die Eiskugeln
dazu und mixen Sie weitere 10 Sekunden.
Erdbeermilchshake:
Für 2 Gläser:
200 g Erdbeeren - 40 cl sehr kalte
Milch - 2 Teelöffel Rohrzucker.
Entstielen Sie die Erdbeeren und schneiden Sie
sie in Stücke. Geben Sie alle Zutaten in den
Mixaufsatz und mixen Sie 30 Sekunden lang.
Sehr kalt servieren.
Tipp: Sie können die Erdbeeren durch 200 g
Himbeeren oder eine Banane ersetzen.
Baiser-Milch mit Himbeeren:
Für 4 Gläser:
400 g gezuckerte Kondensmilch
(
1 Dose) - 25 cl Milch - 300 g Himbeeren -
1
0 Eiswürfel - 4 kleine Baisers
.
Geben Sie die Milch, die Kondensmilch, die
Himbeeren und die Eiswürfel in den Mixaufsatz.
Drücken Sie 10 Mal auf Pulse und mixen Sie
anschließend 1 Minute 30 lang. Zerdrücken Sie
die Baisers grob. Geben Sie die Milch in die
Gläser und dekorieren Sie diese mit den
zerdrückten Baisers. Sofort servieren.
Sommernascherei mit Erdbeeren:
Für 2 Gläser:
250 g entstielte Erdbeeren - 25 cl
Trinkjoghurt mit Beerengeschmack - 4 Kugeln
gefrorener Erdbeerjoghurt - 1 Esslöffel
Erdbeersoße (Dessertsoße) - ein paar Tropfen
natürlicher Vanilleextrakt - Eiswürfel.
Stellen Sie den Erdbeerjoghurt mindestens
3 Stunden vor der Zubereitung in den
Eisschrank. Geben Sie die Erdbeeren, den
Trinkjoghurt, den gefrorenen Joghurt, die
Erdbeersoße und den Vanilleextrakt in den
Mixaufsatz und mixen Sie alles durch, bis eine
dickflüssige, glatte Mischung entsteht. Gießen
Sie die Zubereitung auf die Eiswürfel.
Café Frappé:
Für 2 Gläser:
1/2l Milch - 6 Teelöffel
Instantkaffee - 6 Esslöffel Zucker - 6 Eiswürfel.
Geben Sie alle Zutaten in den Mixaufsatz und
mixen Sie sie 20 Sekunden lang. Sofort servieren.
SMOOTHIES / VITAMIN-COCKTAILS
Vitamin-Cocktail:
Für 4 Gläser:
2 Scheiben Ananas - 6 Erdbeeren
- 1 Banane - 4 ausgepresste Orangen-
1
5 cl sehr kaltes Mineralwasser mit
Kohlensäure - 1 Päckchen Vanillezucker -
2
Eiswürfel.
Geben Sie die Ananas, die Erdbeeren, die
Banane, den Orangensaft und das Päckchen
Vanillezucker in den Mixaufsatz.
Mixen Sie 15 Sekunden lang. Geben Sie das
Mineralwasser und die Eiswürfel dazu.
Mixen Sie 15 Sekunden lang.
Energie-Cocktail:
Für 6 Gläser:
3 ausgepresste Orangen -
1 ausgepresste Zitrone - 6 Esslöffel flüssiger
Honig - 2 Eigelb - 4 Esslöffel flüssige Sahne -
4
Eiswürfel.
Geben Sie alle Zutaten in den Mixaufsatz und
mixen Sie sie 30 Sekunden lang. Sehr kalt
servieren.
Scharfer Tomatensaft:
Für 2 Gläser:
500g schön reife Tomaten -
½
ausgepresste Zitrone - 4 Blätter Basilikum -
2
Stängel Petersilie- ½ Teelöffel Kümmelpulver
- 2 Tropfen Tabasco - Selleriesalz - 4 Eiswürfel
Schälen Sie die Tomaten, entfernen Sie die
Kerne und schneiden Sie sie in 4 Viertel. Geben
Sie alle Zutaten in den Mixaufsatz und mixen Sie
sie 1 Minute lang. Sehr kalt servieren.
Kiwi-Köstlichkeit:
Für 4 kleine Gläser:
3 geschälte und in
Scheiben geschnittene Kiwis - 80 g in Stücke
geschnittene Ananas - 1 in Scheiben
geschnittene Banane
- 25 cl Saft tropischer Früchte - 2 Eiswürfel.
Geben Sie alle Zutaten in den Mixaufsatz und
mixen Sie sie durch, bis eine sämige Mischung
entsteht.
Gekühlte Kokosmilch mit Zitrone
Für 2 große Gläser:
40 cl Kokosmilch - Saft von
4 Limetten - 2 Teelöffel natürlicher
Vanilleextrakt - 80 g Puderzucker - 7 g frische
Minze, ca. - 8 große Eiswürfel.
Geben Sie alle Zutaten in den Mixaufsatz und
mixen Sie sie durch, bis eine sämige Mischung
entsteht.
notice blender2:Mise en page 1 26/02/08 14:54 Page 14

15
Gaspacho:
Für 6 Gläser:
½ Gurke - ½ Gemüsepaprika
-
500g Tomaten - 1 kleine Zwiebel
-
1 Knoblauchzehe - 20g frisches Weißbrot
ohne Rinde - 2 Teelöffel Weinessig - 2 Esslöffel
Olivenöl - 1 Teelöffel Tomatenmark - 50cl kalte
Bouillon - Salz - Pfeffer - 1 Prise
Cayennepfeffer.
Schälen Sie die Gurke, den Knoblauch und die
Zwiebel. Entfernen Sie die Kerne aus dem
Gemüsepaprika. Schälen Sie die Tomaten und
entfernen Sie die Kerne. Schneiden Sie alle
Zutaten in Stücke, geben Sie diese in den
Mixaufsatz und mixen Sie 1 Minute. Lassen Sie
die Zubereitung 1 Stunde im Kühlschrank ruhen
(oder benutzen Sie den Ice Stick) und servieren
Sie die Gaspacho mit Knoblauch und
Brotstückchen.
C
OCKTAILS
(mit Vorsicht zu genießen)
Margarita:
Für 4 Gläser:
16 cl Tequila - 8 cl Cointreau -
4 cl Limettensaft - 1 Teelöffel Salz - 5 Eiswürfel.
Geben Sie den Tequila, den Cointreau und den
Limettensaft in den Mixaufsatz und mixen Sie
10 Sekunden lang. Geben Sie die Eiswürfel dazu
und mixen Sie weiter. Feuchten Sie den
Gläserrand an und stecken Sie ihn in das Salz.
Gießen Sie die Margarita in die Gläser und
verzieren Sie diese mit einer Zitronenscheibe.
Piña Colada :
Für 4 Gläser:
50 cl Ananassaft
-
20 cl Kokosnusscreme - 10 cl Weißer Rum
-
1 Esslöffel Rohrzucker - 1 Prise Zimt - ein paar
Tropfen Vanilleextrakt - 6 Eiswürfel.
Geben Sie die Zutaten in den Mixaufsatz,
geben Sie die Eiswürfel dazu und mixen Sie
30 Sekunden lang.
Irish Cocktail :
Für 4 Gläser:
16 cl irischer Whisky - 4 Teelöffel
grüne Minzcreme - 4 Kugeln Vanilleeis.
Geben Sie die Zutaten in den Mixaufsatz und
setzen Sie ihn ein paar Sekunden lang auf
Geschwindigkeit 1 in Betrieb. Sofort servieren.
notice blender2:Mise en page 1 26/02/08 14:54 Page 15

16
VEILIGHEIDSADVIEZEN
- Lees de gebruiksaanwijzing aandachtig
door voordat u uw blender voor de eerste
keer gaat gebruiken en volg de
gebruiksinstructies zorgvuldig op. Indien het
apparaat niet overeenkomstig de
handleiding gebruikt wordt, kan de
fabrikant geen enkele aansprakelijkheid
aanvaarden.
- Controleer of de netspanning, aangegeven op
uw blender, overeenkomt met de netspanning
bij u thuis. Bij een verkeerde aansluiting is de
garantie niet geldig.
- Gebruik uw blender uitsluitend voor
keukentoepassingen binnenshuis.
- Trek de stekker uit het stopcontact bij
langdurige afwezigheid, als u de blender
schoonmaakt en in geval van een
stroomonderbreking.
- Gebruik uw blender op een vlakke, schone en
droge ondergrond.
- Nooit uw vingers of enig ander voorwerp in de
mengbeker stoppen tijdens de werking van
het apparaat.
- Wees voorzichtig met de messen, deze kunnen
u verwonden.
- Zet het apparaat, het netsnoer of de stekker
niet in water of enige andere vloeistof.
- Laat de voedingskabel niet in binnen
handbereik van kinderen, in de buurt van, of in
contact met de warme delen van het
apparaat, in de buurt van een warmtebron of
op scherpe randen komen of in contact
komen met de messen.
- Doe de accessoires niet in de magnetron.
- Laat de mengbeker nooit werken zonder
ingrediënten of met uitsluitend droge
producten en schenk hier geen kokend hete
vloeistoffen in.
- Laat lang haar, sjaals, dassen, enz. nooit los
boven de mengkom en de werkende
accessoires hangen.
- Dit apparaat is niet bedoeld om zonder hulp of
toezicht gebruikt te worden door kinderen of
andere personen, indien hun fysieke, zintuiglijke
of mentale vermogen hen niet in staat stellen
dit apparaat op een veilige wijze te gebruiken,
tenzij zij van tevoren instructies hebben
ontvangen betreffende het gebruik van dit
apparaat door een verantwoordelijke persoon.
Er moet toezicht zijn op kinderen zodat zij niet
met het apparaat kunnen spelen.
- Elke handeling anders dan schoonmaken en
het gewone onderhoud dient door een door
erkende servicedienst te gebeuren.
- Voor uw eigen veiligheid, dient u uitsluitend
gebruik te maken van de op de blender afge-
stemde accessoires en onderdelen die bij de
afdeling onderdelen verkocht worden.
- Laat het apparaat niet langer dan 3 minuten
achter elkaar functioneren. Wacht enkele
minuten voordat u hem weer aanzet.
- Wees tijdens het legen van het accessoire
voorzichtig met de messen: deze kunnen
snijwonden veroorzaken.
NL
De accessoires van het model dat u zojuist aangeschaft heeft, staan op het etiket op de
bovenzijde van de verpakking.
* afhankelijk van het model.
EERSTE GEBRUIK
- Reinig voor het eerste gebruik alle accessoires
met warm water en afwasmiddel (m.u.v. het
motorblok
(
D)
: zie § reiniging). Zorgvuldig
afspoelen en afdrogen.
-
Z
ORG DAT VOOR HET FUNCTIONEREN ALLE
VERPAKKINGSMATERIAAL VERWIJDERD IS
.
GEBRUIK VAN DE MENGBEKER (E)
Schema
➊:
- Zet de afdichtingspakking
(
E2)
op het
voetstuk van de afneembare meshouder
(
E1).
- Vergrendel de meshouder op de mengbeker
door hem een kwartslag te draaien.
- Steek de pakking
(
E3)
in de uitlaat van de
mengkom.
- Plaats de mengkom op het motorblok
(
D)
.
A
SSEMBLAGE VAN DE KRAAN (F) OP
DE MENGKOM
Schema
❷ :
- Vergrendel de kraan door hem een kwartslag
op de uitgang van de mengkom te draaien en
hem daarbij vast te houden
(
F2)
(uitgangsgat naar beneden.)
notice blender2:Mise en page 1 26/02/08 14:54 Page 16

17
NB: De hendel kan vrij rond het kraanhuis
draaien.
- Plaats de te mixen voedingsmiddelen in de
mengkom
(
E4)
),
t
e beginnen met de
vloeibare ingrediënten, zonder het
aangegeven maximum niveau te
overschrijden (1,25 l).
Schema
❸ :
Plaats de pakking van het deksel
(
E5)
rond het
deksel
(
E6)
, vergrendel het geheel op de
mengkom
(
E4)
en plaats de dop
(
E7)
op het
deksel.
- Plaats het rooster
(
A2)
op het lekbakje
(
A1)
.
- schuif het geheel
(
A)
in het motorblok
(
D)
, in
de hiervoor bedoelde zitting
(
B)
.
- Steek de stekker in het stopcontact, zet het
apparaat aan en kies de juiste snelheid voor
uw bereiding met de keuzeknop voor de
snelheid
(
C)
.
Om het apparaat uit te schakelen zet u de
keuzeknop voor de snelheid
(
C) op 0.
Het deksel en zijn dop moeten altijd op hun
plaats zitten wanneer het apparaat werkt.
Het op het rooster geplaatste glas steeds met
de hand vasthouden.
Voer de tijdens het
mengen toe te voegen ingrediënten in via de
vulschacht in het deksel
(
E6)
.
Gooi, indien nodig, na gebruik de inhoud van
het lekbakje
(
A1)
weg en was het geheel
(
A)
zorgvuldig af.
G
EBRUIK VAN DE HENDEL (F)
Schema
❹
Er zijn twee standen mogelijk voor de service
door de hendel te laten draaien
(
F1)
:
- Met de hendel in de lage stand kunt u serveren
door rechtstreeks met het glas te drukken.
- Met de hendel in de hoge stand kunt u
serveren door hier met de hand aan te
trekken, voor een grotere straal.
NB: Met de snelheid 1 kunnen nogal dikke
bereidingen beter stromen (zoals milkshakes
of smoothies). Schakel het apparaat aan het
einde van het gebruik uit.
Reinig de kraan na ieder gebruik (zie § Reiniging).
Indien u de kraan niet nodig heeft, kunt u deze
vervangen door de dop
(
J)
(
z
ie Schema
➏), samen met de pakking
(E3)
.
G
EBRUIK VAN DE ICE STICK* (H)
Met dit accessoire kunt u de bereidingen
koelen of koel houden.
- Vul het vierkante gedeelte van de handgreep
(
H2)
tot de rand met
g
rof zout (H2)
(
S
chema
❺) en schenk het zout in het reservoir
(
H1)
.
- Vul het reservoir
(
H1)
met water.
- Schroef de handgreep stevig op het reservoir
en schud om het zout te laten smelten.
- Zet het geheel in de diepvriezer (minstens -
18°C), bij voorkeur rechtop, totdat het geheel
diep bevroren is (minstens 12u).
- Maak uw bereiding en plaats de bevroren Ice
stick
(
H)
door de opening van het deksel
(
E6)
,
in de plaats van de dop
(
E7)
.
Uw bereiding wordt zo gekoeld.
- U kunt de ice stick gebruiken als stamper voor het
mengen van uw bereidingen, door deze altijd via
de vulopening in het deksel te steken
(
E6)
.
G
EBRUIK VAN DE ACCESSOIRES
(K & L)
SPECERIJMOLEN (K)
:
Met dit accessoire kunt u:
- tot 40 g koffie in maximaal 30 seconden malen
- in enkele seconden diverse kruiden en droge
vruchten, zoals hazelnoten, walnoten,
amandelen, dadels, enz. malen, ...
Voorbeeld: 50 g dadels in 4 seconden.
RASP (L)
:
Dit accessoire maalt nootmuskaat, kokosnoot, in
blokjes gesneden harde kazen (bijvoorbeeld
60 g Parmezaanse kaas) in maximaal 30 sec.
* Deze accessoires zijn voorzien van een
veiligheidsdeksel
(
M)
dat voorkomt dat men
tijdens de werking bij de messen kan komen
- Doe de ingrediënten in de kom
(
K of L)
. Plaats
het deksel
(
M)
op de kom van het accessoire
(één stand mogelijk), draai het deksel met de
klok mee om het te vergrendelen (in de
richting van het gesloten hangslot) en plaats
vervolgens het geheel op de romp van de
blender
(
D)
(zie schema ➒).
* Steek de stekker van de blender in het
stopcontact en zet de keuzeknop voor de
snelheid
(
C)
op stand “2” of druk enkele
malen op “pulse”. Houd tijdens de werking
het deksel
(
M)
vast.
* Zet voor het uitschakelen van de blender de
keuzeknop voor de snelheid
(
C)
terug op
stand “0” en haal het accessoire pas weg
wanneer het apparaat volledig tot stilstand is
gekomen.
Draai het complete accessoire om op het
werkblad voordat u het deksel van het
accessoire ontgrendeld
(
K of L)
(zie schema ❿).
U kunt nu de bereiding rechtstreeks uit het als
bakje dienende deksel halen.
notice blender2:Mise en page 1 26/02/08 14:54 Page 17

18
- Haal de stekker van de blender uit het
stopcontact en verwijder de accessoires.
- Reinig het motorblok
(
D)
met een vochtige
doek. Goed afdrogen.
- Dompel het motorblok
(
D)
nooit onder in
water.
- Spoel de mengbeker
(
E)
en de accessoires af
onder de kraan.
- Om het onderhoud van de mengbeker
(
E)
te
vereenvoudigen, ontgrendelt u de meshouder
(
E1)
, verwijdert u de afdichtpakking
(
E2)
en
verwijdert u de complete kraan
(
F)
, voordat u
met reinigen begint.
S
chema
:
Demontage van de kraan
(
F)
voor eenvoudige
reiniging:
- Schroef de romp
(
F2)
van de hendel
(
F1)
los
en houd daarbij de moer
(
F3)
van de hendel
vast.
Ga voor het monteren in de omgekeerde
volgorde te werk en let daarbij op de goede
plaatsing van de pakking
(
F4)
.
-
Wees voorzichtig met de messen, deze zijn
vlijmscherp.
- Alle accessoires kunnen in de vaatwasser.
REINIGING
WAT TE DOEN INDIEN UW BLENDER NIET WERKT?
Controleer allereerst of de stekker goed in het stop-
contact zit en vervolgens of:
- de kom goed op het motorblok staat.
- de bedieningsknop op de juiste stand staat.
Uw kom lekt, controleer:
- of de pakkingen aanwezig zijn en goed op hun
plaats zitten.
RECYCLING
Wees vriendelijk voor het milieu!
Uw apparaat bevat talrijke materialen die geschikt zijn voor hergebruik of
recycling.
Lever het in bij het milieustation in uw gemeente.
V
ERWIJDERING VAN HET VERPAKKINGSMATERIAAL VAN HET APPARAAT
De verpakking bestaat uitsluitend uit materiaal dat ongevaarlijk voor het
milieu is en overeenkomstig de geldende bepalingen betreffende
recycling weggeworpen kan worden.
Vraag voor het wegwerpen van het apparaat inlichtingen bij de
betreffende afdeling op uw gemeentehuis.
Werkt uw apparaat nog steeds niet?
Neem contact op met een erkende servicedienst
(zie de lijst in het serviceboekje).
U kunt uw apparaat aanvullen met onderstaande
accessoires die te koop zijn bij uw leverancier of bij
een erkende servicedienst:
- breekaccessoire
- ice stick
- dop
notice blender2:Mise en page 1 26/02/08 14:54 Page 18

19
RECEPTEN
MILK-SHAKES
Chocolade Milkshake:
Voor 2 glazen: 75 cl goed koude melk
- 3 eetlepels cacaopoeder - 2 eetlepels suiker
- 3 bolletjes chocolade-ijs.
Schenk de melk in de mengbeker, samen met
de cacao en de suiker. Mix 20 sec. Voeg de
ijsbolletjes toe en mix 10 sec.
Aardbeien Milkshake:
Voor 2 glazen: 200 g aardbeien - 40 cl goed
koude melk - 2 theelepels rietsuiker.
Verwijder het kroontje van de aardbeien en
snijd ze in stukjes. Doe alle ingrediënten in de
mengkom en mix 30 sec. Goed koel serveren.
Variant: U kunt ook de aardbeien vervangen
door 200 g frambozen of door een banaan.
Schuimende frambozenmelk:
Voor 4 glazen: 400 g zoete geconcentreerde
melk (1 blikje) - 25 cl melk - 300 g frambozen
- 10 ijsblokjes - 4 kleine schuimkoekjes.
Doe de melk, de geconcentreerde melk, de
frambozen en de ijsblokjes in de mengbeker.
Druk de pulseknop 10 keer in en mix vervolgens
1.30 min. Stamp de schuimkoekjes enigszins fijn.
Schenk de melk in de glazen en versier deze
met de stukjes schuimkoek. Onmiddellijk
opdienen.
Zomerse aardbeienlekkernij:
Voor 2 glazen: 250 g aardbeien zonder kroontje
- 25 cl drinkyoghurt met rode vruchtensmaak
- 4 diepgevroren bolletjes aardbeienyoghurt
- 1 eetlepel aardbeiensaus - enkele druppels
natuurlijk vanille-extract - ijsblokjes.
Zet de aardbeienyoghurt minstens 3 uur voor
het bereiden in de diepvriezer. Doe de
aardbeien, de drinkyoghurt, de diepgevroren
yoghurt, de aardbeiensaus en de vanille in de
mengbeker. Mix tot u een dik, glad mengsel
verkregen heeft. Schenk de bereiding over de
ijsblokjes.
IJskoffie:
Voor 2 glazen: 1/2l melk - 6 theelepels
oploskoffie - 6 eetlepels suiker - 6 ijsblokjes.
Doe alle ingrediënten in de mengkom en mix
20 sec. Snel serveren.
SMOOTHIES / VITAMINECOCKTAILS
Vitaminecocktail:
Voor 4 glazen: 2 plakjes ananas - 6 aardbeien
- 1 banaan - 4 uitgeperste sinaasappels - 15 cl
goed gekoeld koolzuurhoudend water - 1 zakje
vanillesuiker - 2 ijsblokjes.
Doe de ananas, de aardbeien, de banaan, het
sinaasappelsap en het zakje vanillesuiker in de
mengbeker. Mix 15 sec. Voeg het
koolzuurhoudende water en de ijsblokjes toe.
Mix 15 sec.
Energiecocktail:
Voor 6 glazen: 3 uitgeperste sinaasappels
- 1 uitgeperste citroen - 6 eetlepels vloeibare
honing - 2 eidooiers - 4 eetlepels vloeibare
room - 4 ijsblokjes.
Doe alle ingrediënten in de mengkom en mix
30 sec. Zeer koel serveren.
Pittig tomatensap:
Voor 2 glazen: 500g rijpe tomaten
- ½ uitgeperste citroen - 4 blaadjes basilicum
- 2 takjes peterselie - ½ theelepel
komijnpoeder - 2 druppels Tabasco
- selderijzout - 4 ijsblokjes.
Ontvel de tomaten, verwijder de zaadjes en
snijd ze in vieren. Doe alle ingrediënten in de
mengbeker. Mix 1 min. Zeer koel serveren.
Kiwidrank:
Voor 4 glaasjes: 3 gepelde en in plakjes
gesneden kiwi’s - 80 g in stukjes gesneden
ananas - 1 in stukken gesneden banaan
- 25 cl tropische vruchtensap - 2 ijsblokjes
Doe alle ingrediënten in de mengbeker en mix
tot u een romige melange verkregen heeft.
IJsdrank met kokos en citroen:
Voor 2 grote glazen: 40 cl kokosmelk - het sap
van 4 limoenen - 2 theelepels natuurlijk
vanille-extract - 80 g poedersuiker - 7 g verse
munt (facultatief) - 8 grote ijsblokjes.
Doe alle ingrediënten in de mengbeker en mix tot
u een romige melange verkregen heeft.
notice blender2:Mise en page 1 26/02/08 14:54 Page 19

20
Gazpacho:
Voor 6 glazen: ½ komkommer - ½ zoete paprika
- 500 g tomaten - 1 uitje
- 1 knoflookteentje - 20 g broodkruim
- 2 theelepels wijnazijn - 2 eetlepels olijfolie
- 1 theelepel geconcentreerde tomatenpuree
- 50 cl koude bouillon - zout - peper - 1 snufje
Cayennepeper.
Schil de komkommer, de knoflook en de ui.
Verwijder de zaadlijsten van de paprika. Ontvel
de tomaten en verwijder de zaadjes. Doe alle in
stukjes gesneden ingrediënten in de mengkom
en mix 1 minuut. Zet de bereiding 1 uur in de
koelkast (of gebruik de ice stick) en serveer hem
met knoflookcroutons.
C
OCKTAILS
(geniet, maar drink met mate)
Margarita :
Voor 4 glazen: 16 cl Tequila - 8 cl Cointreau
- 4 cl limoen - 1 theelepel zout - 5 ijsblokjes
Schenk de Tequila, de Cointreau en de limoen
in de mengbeker. Mix 10 sec. Voeg de ijsblokjes
toe en mix. Maak de randen van de glazen nat
en steek ze in het zout. Schenk de drank in de
glazen en versier deze met een schijfje citroen.
Piña Colada :
Voor 4 glazen: 50 cl ananassap - 20 cl romige
kokosmelk - 10 cl witte rum - 1 eetlepel
rietsuiker - 1 snufje kaneel - enkele druppels
vanille - 6 ijsblokjes.
Doe alle ingrediënten in de mengbeker, voeg
de ijsblokjes toe en mix 30 sec.
Irish Cocktail :
Voor 4 glazen: 16 cl Ierse whisky - 4 theelepels
groene muntlikeur - 4 bolletjes vanille-ijs.
Doe de ingrediënten in de mengbeker en zet
hem enkele seconden op stand 1. Onmiddellijk
serveren.
notice blender2:Mise en page 1 26/02/08 14:54 Page 20

21
CONSIGLI DI SICUREZZA
- Leggere attentamente il libretto di istruzioni
prima di usare per la prima volta il frullatore
e seguite attentamente le indicazioni d’uso.
Un utilizzo non conforme alle istruzioni per
l’uso solleverebbe il fabbricante da ogni
responsabilità.
- Verificare che la tensione d’alimentazione del
vostro frullatore corrisponda a quella del vostro
impianto elettrico.
Ogni errore di collegamento annulla la
garanzia.
- Utilizzate il frullatore solo per un uso culinario
all’interno della casa.
- Scollegate sempre il frullatore dalla corrente
non appena smettete di utilizzarlo, quando lo
pulite o in caso di interruzione della corrente
elettrica.
- Utilizzate il frullatore su una superficie piana,
pulita e asciutta.
- Non mettete mai le dita o qualsiasi altro
oggetto nel bicchiere frullatore durante il
funzionamento dell’apparecchio.
- Maneggiate le lame con cautela perché
possono ferirvi.
- Non mettete l’apparecchio, il cavo
d'alimentazione o la spina nell’acqua né in
qualsiasi altro liquido.
- Non lasciate il cavo di alimentazione a portata
di mano dei bambini, vicino o a contatto con
le parti calde dell’apparecchio, vicino a una
fonte di calore o su un angolo vivo, o a
contatto con le lame.
- Non mettete gli accessori in un forno a
microonde.
- Non fate mai funzionare il bicchiere frullatore
senza ingredienti o soltanto con prodotti
secchi, e non versatevi liquidi bollenti.
- Non lasciate penzolare i capelli lunghi, sciarpe,
cravatte, ecc… sopra il bicchiere e gli
accessori in funzione.
- Questo apparecchio e i suoi accessori non
devono essere utilizzati da persone (compresi i
bambini), con capacità fisiche, sensoriali o
mentali ridotte, o persone prive di esperienza o
di conoscenza, salvo se hanno potuto
beneficiare, tramite una persona responsabile
della loro sicurezza, di una sorveglianza o di
istruzioni preventive relative all’utilizzo
dell’apparecchio. È opportuno sorvegliare i
bambini per accertarsi che non giochino con
l’apparecchio.
- Ogni intervento diverso dalla pulizia e dalla
normale manutenzione da parte del cliente
deve essere effettuato da un centro
autorizzato.
- Per la vostra sicurezza, utilizzate solo accessori
e pezzi di ricambio adatti al vostro frullatore,
venduti in un centro autorizzato.
- Non utilizzate l’apparecchio per più di 3 minuti
in funzionamento continuo. Aspettate alcuni
minuti prima di rimetterlo in funzione dopo
3 minuti di funzionamento ininterrotto.
- Quando svuotate l’accessorio, maneggiate le
lame con cautela perché possono ferirvi.
I
Gli accessori contenuti nel modello che avete comprato sono rappresentati sull’etichetta si-
tuata sulla parte superiore della confezione.
* secondo il modello.
MESSA IN FUNZIONE
- Prima di utilizzare l’apparecchio per la prima
volta, pulite tutti gli accessori con acqua e
sapone calda (tranne il blocco motore
(
D)
:
vedere § pulizia). Sciacquateli e asciugateli
accuratamente.
-
A
SSICURATEVI DI AVERE TOLTO OGNI PARTE DI
IMBALLAGGIO PRIMA DEL FUNZIONAMENTO
.
UTILIZZO DEL BICCHERE FRULLATORE (E)
Schema ❶ :
- Posizionate la guarnizione di tenuta
(
E2)
sulla
base del porta lame amovibile
(
E1)
.
- Bloccate il porta lame sul bicchiere frullatore
girandolo di un quarto di giro.
- Inserite la guarnizione (
E3) nell’uscita del
bicchiere.
- Posate il bicchiere sul blocco motore
(
D)
.
ASSEMBLAGGIO DEL RUBINETTO (F)
SUL BICCHIERE
Schema
❷ :
- Bloccate il rubinetto di un quarto di giro
sull’uscita del bicchiere, tenendolo per il corpo
(
F2)
(foro di uscita verso il basso.)
NB: La leva può essere girata liberamente
attorno a tutto il corpo del rubinetto.
- Introducete gli alimenti da frullare nel bicchiere
(
E4)
cominciando con gli ingredienti liquidi, senza
superare il livello massimo indicato (1,25 l).
S
chema
❸ :
- Mettete la guarnizione del coperchio
(
E5)
attorno al coperchio
(
E6)
, bloccate l’insieme
sul bicchiere
(
E4)
e posate il tappo
(
E7)
sul
coperchio.
notice blender2:Mise en page 1 26/02/08 14:54 Page 21

22
- Posate la griglia
(A2)
sulla sua calotta
(A1)
.
- infilate l’insieme
(
A)
nel blocco motore
(
D)
,
nell’apposito alloggiamento
(
B).
- Collegate l’apparecchio alla corrente,
accendete scegliendo la velocità più adatta
alla vostra preparazione, usando il selettore di
velocità
(
C).
Per fermare l’apparecchio, mettete il selettore
di velocità
(
C)
su 0.
I
l coperchio e il suo tappo devono essere
sempre al loro posto quando l’apparecchio
è in funzione. Tenere il bicchiere con la mano
quando è appoggiato sulla griglia.
Per
aggiungere degli ingredienti nel corso della
miscelazione, inseriteli attraverso l’apertura di
riempimento del coperchio
(
E6)
.
Dopo l’utilizzo, se necessario, buttate il
contenuto della calotta
(
A1)
e lavate l'insieme
(
A)
accuratamente.
S
ERVIZIO DAL RUBINETTO (F)
Schema
❹
Sono possibili due posizioni per servirsi facendo
ruotare la leva
(
F1)
:
- Con la leva posizionata in basso ci si può
servire premendo direttamente con il
bicchiere.
- Con la leva posizionata in alto ci si può servire
tirando con la mano ed erogando così una
quantità maggiore.
NB: La velocità 1 può facilitare il deflusso delle
preparazioni molto dense (tipo frullati o
smoothies). Spegnere l’apparecchio alla fine
dell’utilizzo.
Pulite il rubinetto dopo ogni utilizzo (vedere §
Pulizia).
Se non avete bisogno del rubinetto, potete
sostituirlo con il cappuccio
(
J)
(
vedere Schema
❻), provvisto di guarnizione
(E3)
.
U
TILIZZO DELL’ICE STICK* (H)
Questo accessorio vi permette di rinfrescare
delle preparazioni, oppure di mantenerle al
fresco.
- Riempite con
s
ale grosso
la parte quadrata
dell’impugnatura
(
H2)
fino all’orlo (
Schema
❺)
poi versate il sale nel serbatoio
(
H1)
.
- Riempite d’acqua il serbatoio
(
H1)
.
- Avvitate fortemente la maniglia sul serbatoio e
scuotete per fare sciogliere il sale.
- Mettete l’insieme nel congelatore (-18°C
minimo), preferibilmente in piedi, finché la
miscela si è ben congelata (12 ore minimo).
- Fate la vostra preparazione, poi introducete
l'Ice stick
(
H)
gelato nell’apertura del
coperchio (E6), al posto del tappo
(
E7)
.
La vostra preparazione sarà così raffreddata.
- potete utilizzare l’ice stick come pestello per
mescolare le vostre preparazioni,
introducendolo obbligatoriamente attraverso
l’apertura di riempimento del coperchio
(
E6)
.
UTILIZZO DEGLI ACCESSORI * (K & L)
MACINATUTTO (K):
Questo accessorio vi permette:
- di macinare fino a 40g di caffè in 30 secondi al
massimo
- di macinare in pochi secondi varie spezie e
frutta secca come nocciole, noci, mandorle,
datteri, ... Es: 50 g di datteri in 4 s.
GRATTUGIA (L):
Questo accessorio riduce in polvere la noce
moscata, la noce di cocco, i formaggi duri (es.
60g di parmigiano) precedentemente tagliato
a dadini, in 30 secondi al massimo.
*Questi accessori sono dotati di un coperchio
(
M)
di sicurezza che impedisce l’accesso alle
lame durante il funzionamento
Introducete gli ingredienti nel bicchiere
(
K o L).
Posizionate il coperchio
(
M)
sul bicchiere
dell’accessorio (una sola posizione possibile),
girate il coperchio in senso orario per bloccarlo
(senso lucchetto chiuso), poi ponete l’insieme
sul corpo del frullatore
(
D)
(vedere Schema ➒).
* Collegate l’apparecchio alla corrente e
mettete il selettore di velocità
(
C)
sulla
posizione «2» o date qualche impulso su
«pulse». Tenere il coperchio
(
M)
durante il
funzionamento.
* Per fermare il frullatore, riportate il selettore di
velocità
(
C)
sulla posizione “0”, e togliete
l’accessorio solo quando l’apparecchio è
completamente fermo.
Rigirare l'insieme dell’accessorio sul piano di
lavoro prima di sbloccare il coperchio
dell’accessorio
(
K o L)
(vedere Schema ➓)
Adesso potete recuperare la preparazione
direttamente nel coperchio che serve da
recipiente.
notice blender2:Mise en page 1 26/02/08 14:54 Page 22

23
- Staccate il frullatore dalla corrente e togliete
gli accessori
- Pulite il blocco motore
(
D)
con uno straccio
umido. Asciugatelo accuratamente.
-
Non immergete mai il blocco motore (D)
nell’acqua corrente.
- Sciacquate il bicchiere frullatore
(
E)
e i suoi
accessori sotto l’acqua corrente.
- Per facilitare la manutenzione del bicchiere
frullatore
(
E)
, sbloccate il porta-lame
(
E1)
,
togliete la guarnizione di tenuta (E2), togliete il
gruppo rubinetto
(
F)
prima di pulire tutto.
Schema
:
Smontaggio del rubinetto
(
F)
per una facile pulizia:
- Svitate il corpo
(
F2)
dalla leva
(
F1)
, tenendo
bene il dado
(
F3)
della leva.
Per rimontarlo, procedete in senso contrario,
facendo attenzione al corretto posizionamento
della guarnizione
(
F4)
.
-
Maneggiate le lame con cautela perché
sono molto taglienti.
- Tutti gli accessori possono essere lavati in
lavastoviglie.
PULIZIA
COSA FARE SE IL FRULLATORE NON FUNZIONA?
Verificate innanzitutto il collegamento alla
corrente, poi:
- che il bicchiere sia posizionato correttamente
sul blocco motore.
- che il pulsante di comando sia ben
posizionato.
Il bicchiere perde, verificate:
- che le guarnizioni sono tutte presenti e ben
posizionate.
Il vostro apparecchio non funziona ancora?
Rivolgetevi a un centro assistenza autorizzato
(vedere elenco nel libretto di assistenza).
Potete personalizzare il vostro apparecchio e
procurarvi presso il vostro rivenditore abituale, o
un centro autorizzato, i seguenti accessori:
- accessorio macinatutto
- ice stick
- cappuccio
RICICLAGGIO
Partecipiamo alla protezione dell’ambiente!
Il vostro apparecchio è composto da diversi materiali che possono essere
riciclati.
Lasciatelo in un punto di raccolta o presso un Centro Assistenza Autorizzato.
S
MALTIMENTO DEI MATERIALI D’IMBALLAGGIO DELL’APPARECCHIO
L'imballaggio comprende esclusivamente materiali senza pericolo per
l’ambiente, che possono essere smaltiti conformemente alle disposizioni di
riciclaggio in vigore.
Per lo smaltimento dell’apparecchio, informatevi presso il servizio
appropriato del vostro comune.
notice blender2:Mise en page 1 26/02/08 14:54 Page 23

24
RICETTE
FRULLATI
Frullato al cioccolato:
Per 2 bicchieri: 75 cl di latte ben freddo
- 3 cucchiai di cacao in polvere- 2 cucchiai di
zucchero - 3 palline di gelato al cioccolato.
Versate il latte nel bicchiere frullatore con il cacao
e lo zucchero. Frullate per 20s. Aggiungete le
palline di gelato e frullate per 10s.
Frullato alla fragola:
Per 2 bicchieri: 200 g di fragole - 40 cl di latte
ben freddo - 2 cucchiaini di zucchero di canna.
Lavate e togliete il picciolo dalle fragole e
tagliatele a pezzetti. Mettete tutti gli ingredienti
nel bicchiere frullatore e frullate per 30s. Servite
ben fresco.
Variante: Potete sostituire le fragole con 200 g
di lamponi o una banana.
Latte meringato al lampone:
Per 4 bicchieri: 400 g di latte concentrato
zuccherato (1 scatola) - 25 cl di latte - 300 g di
lamponi - 10 cubetti di ghiaccio - 4 piccole
meringhe.
Mettete il latte, il latte concentrato, i lamponi e i
cubetti di ghiaccio nel bicchiere frullatore.
Azionate la funzione “pulse” 10 volte, poi frullare
per 1 min 30. Schiacciate grossolanamente le
meringhe. Versate il latte nei bicchieri e
decorate con le meringhe a pezzetti. Servite
immediatamente.
Dolcezza d’estate alle fragole:
Per 2 bicchieri: 250 g di fragole senza picciolo
- 25 cl di yogurt da bere al gusto frutti rossi
- 4 palline di yogurt alla fragole surgelato
- 1 cucchiaio di coulis di fragole - alcune gocce di
estratto naturale di vaniglia - cubetti di ghiaccio.
Mettete lo yogurt alla fragole nel congelatore
per almeno 3 ore prima della preparazione. Nel
bicchiere frullatore, mettete le fragole, lo yogurt
da bere, lo yogurt surgelato, il coulis di fragole e
la vaniglia. Frullare fino a ottenere una
miscela densa e liscia. Versate la preparazione
su dei cubetti di ghiaccio.
Caffè shakerato:
Per 2 bicchieri: 1/2l di latte - 6 cucchiaini di
caffè solubile - 6 cucchiai di zucchero
- 6 cubetti di ghiaccio.
Introducete tutti gli ingredienti nel bicchiere
frullatore e frullate per 20s. Servite rapidamente.
S
MOOTHIES / COCKTAILS
VITAMINIZZATI
Cocktail vitaminizzato:
Per 4 bicchieri: 2 fette di ananas - 6 fragole
- 1 banana - 4 arance spremute - 15 cl di
acqua gassata molto fredda - 1 bustina di
zucchero vanigliato - 2 cubetti di ghiaccio.
Mettete l'ananas, le fragole, la banana, il succo
d’arancia e la bustina di zucchero vanigliato
nel bicchiere frullatore. Frullate per 15s.
Aggiungete l’acqua gassata e i cubetti di
ghiaccio. Frullare per 15s.
Cocktail energetico:
Per 6 bicchieri: 3 arance spremute - 1 limone
spremuto - 6 cucchiai di miele liquido - 2 tuorli
d’uovo - 4 cucchiai di panna liquida - 4 cubetti
di ghiaccio.
Mettete tutti gli ingredienti nel bicchiere
frullatore e frullate per 30s. Servite molto fresco.
Succo di pomodoro speziato:
Per 2 bicchieri: 500g di pomodori ben maturi
- ½ limone spremuto - 4 foglie di basilico
- 2 ciuffi di prezzemolo - ½ cucchiaino di
cumino in polvere - 2 gocce di Tabasco - sale
di sedano - 4 cubetti di ghiaccio.
Pelate, togliete i semi e tagliate i pomodori in 4.
Mettete tutti gli ingredienti nel bicchiere
frullatore. Frullare per 1min. Servite molto fresco.
Delizia al kiwi:
Per 4 bicchierini: 3 kiwi pelati e tagliati a fette
- 80 g di ananas tagliati a pezzetti - 1 banana
tagliata a pezzi - 25 cl di succo di frutti tropicali
- 2 cubetti di ghiaccio.
Nel bicchiere frullatore, mettete tutti gli ingredienti
e frullate fino a ottenere una miscela cremosa.
Cocco limone ghiacciato:
Per 2 bicchieri grandi: 40 cl di latte di cocco
- il succo di 4 limoni verdi - 2 cucchiaini di
estratto naturale di vaniglia - 80 g di zucchero
in polvere - 7 g di menta fresca (facoltativa)
- 8 grossi cubetti di ghiaccio.
Mettete tutti gli ingredienti nel bicchiere
frullatore e frullate fino a ottenere una miscela
cremosa.
notice blender2:Mise en page 1 26/02/08 14:54 Page 24

25
Gaspacho:
Per 6 bicchieri: ½ cetriolo - ½ peperone dolce
- 500g di pomodori - 1 piccola cipolla
- 1 spicchio d’aglio - 20g di mollica di pane
- 2 cucchiaini di aceto di vino - 2 cucchiai di
olio d’oliva - 1 cucchiaio di concentrato di
pomodoro - 50cl di brodo freddo - sale - pepe -
1 pizzico di peperoncino di Cayenna.
Sbucciate il cetriolo, l’aglio e la cipolla. Togliete i
semi dal peperone. Pelate e togliete i semi dai
pomodori. Mettete tutti gli ingredienti a pezzetti
nel bicchiere frullatore e frullate per 1 minuto.
Lasciate 1 ora in frigorifero (oppure utilizzate
l'ice stick) prima di servire con crostini sfregati
con aglio.
C
OCKTAILS
(da consumare con moderazione)
Margarita :
Per 4 bicchieri: 16 cl di Tequila - 8 cl di
Cointreau - 4 cl di lime - 1 cucchiaino di sale
- 5 cubetti di ghiaccio.
Introducete nel bicchiere frullatore la Tequila, il
Cointreau e il limone. Frullare per 10s.
Aggiungete i cubetti di ghiaccio e frullare.
Bagnare il bordo dei bicchieri e passarli nel sale.
Versate e decorate i bicchieri con una rondella
di limone.
Piña Colada :
Per 4 bicchieri: 50 cl di succo di ananas
- 20 cl di crema di noce di cocco - 10 cl di
rhum bianco - 1 cucchiaio di zucchero di
canna - 1 pizzico di cannella - alcune gocce di
vaniglia - 6 cubetti di ghiaccio.
Introducete gli ingredienti nel bicchiere
frullatore, aggiungete i cubetti di ghiaccio e
frullate per 30s.
Irish Cocktail :
Per 4 bicchieri: 16 cl di whisky irlandese
- 4 cucchiaini di crema di menta verde
- 4 palline di gelato alla vaniglia.
Introducete gli ingredienti nel bicchiere
frullatore, e accendete alla velocità 1 per
qualche secondo. Servite immediatamente.
notice blender2:Mise en page 1 26/02/08 14:54 Page 25

26
CONSEJOS DE SEGURIDAD
- Lea atentamente el modo de empleo antes
de utilizar su batidora por primera vez y siga
atentamente las instrucciones de uso. Una
utilización no conforme liberaría al
fabricante de cualquier responsabilidad.
- Compruebe que la corriente de alimentación
que aparece en la placa indicadora del
aparato corresponde a la de la instalación
eléctrica. Cualquier error de conexión anularía
la garantía.
- Su aparato está únicamente destinado a un
uso culinario y en el interior de la casa.
- Desconecte siempre su aparato tan pronto
como deja de utilizarlo, cuando lo limpia o en
caso de corte de electricidad.
- Utilice la batidora sobre una superficie plana,
limpia y seca.
- Nunca ponga sus dedos o ningún otro objeto
en el bol de batidora durante el
funcionamiento del aparato.
- Manipule siempre las cuchillas con
precaución, pueden herirlo.
- No introduzca el aparato, el cable de
alimentación o el enchufe dentro del agua o
cualquier otro líquido.
- No deje el cable de alimentación al alcance
de las manos de los niños, a proximidad o en
contacto con las partes calientes de su
aparato, cerca de una fuente de calor o
sobre un ángulo agudo o en contacto con las
cuchillas.
- No coloque los accesorios en un horno
microondas.
- Nunca haga funcionar el recipiente de
batidora sin ingredientes o únicamente con
productos secos y no vierta en ella líquidos
hirvientes.
- No deje colgar cabellos largos, bufandas,
corbatas, etc… encima de los accesorios en
funcionamiento.
- Este aparato y sus accesorios no están
previstos para ser utilizados por personas
(incluido los niños) cuyas capacidades físicas,
sensoriales o mentales son reducidas, o por
personas privadas de experiencia o de
conocimiento, excepto si pudieron
beneficiarse, por medio de otra persona
responsable de su seguridad, de una
vigilancia o de instrucciones previas
concernientes a la utilización del aparato.
Conviene vigilar a los niños para segurarse que
no juegan con el aparato.
- Toda intervención que no sea la limpieza y el
mantenimiento usual por parte del cliente
debe ser efectuada por un centro
homologado.
- Por su seguridad, utilice solamente accesorios
y piezas de recambio adaptadas a su
aparato, vendidas en centros concertados.
- No utilice su aparato durante más de
3 minutos en marcha continua. Espere unos
instantes antes de volver a ponerlo en
funcionamiento después de 3 minutos de
funcionamiento ininterrumpido
- Cuando vacíe el accesorio, manipule las
cuchillas con precaución: pueden herirlo.
E
Los accesorios en el modelo que acaba de comprar están representados sobre la etiqueta
en la parte de arriba del embalaje.
* Según modelo.
PUESTA EN SERVICIO
- Antes de la primera utilización, limpie todos los
accesorios con agua jabonosa caliente
(excepto el bloque motor
(
D)
: ver § limpieza).
Enjuáguelos y séquelos cuidadosamente.
-
A
SEGÚRESE DE QUE TODOS LOS EMBALAJES SON
RETIRADOS ANTES DE SU FUNCIONAMIENTO
.
UTILIZACIÓN DEL RECIPIENTE PARA
MEZCLA (E)
Esquema
❶
- Posicione la juntura de impermeabilidad
(E2)
sobre la base del porta hojas desmontable
(
E1).
- Enrosque el porta-hojas sobre el recipiente de
mezcla girándolo un cuarto de vuelta.
- Introduzca la juntura
(
E3)
en la salida del
recipiente.
P
ONGA EL RECIPIENTE SOBRE EL
BLOQUE MOTOR (D).
Esquema
❷ :
- Enroscado del grifo
(
F)
sobre el recipiente
- Enrosque el grifo un cuarto de vuelta en la
salida del recipiente, sujetándolo por el cuerpo
(
F2)
(agujero de salida hacia abajo.)
notice blender2:Mise en page 1 26/02/08 14:54 Page 26

27
NB: El pedal puede girarse libremente
alrededor del cuerpo del grifo.
- Introduzca los alimentos a mezclar dentro del
recipiente
(
E4)
empezando por los ingredientes
líquidos, sin sobrepasar el nivel máximo
indicado (1,25 l).
E
squema
❸ :
- Ponga la junta de la tapadera
(
E5)
alrededor
de la tapadera
(
E6)
, enrosque el conjunto
sobre el recipiente
(
E4)
y coloque el tapón
(
E7)
sobre la tapadera.
- Ponga la rejilla
(
A2)
sobre su crisol
(
A1)
.
- Deslice el conjunto
(
A)
en el bloque motor
(
D)
,
en el lugar previsto a este fin
(
B)
.
- Conecte el aparato, póngalo en marcha
escogiendo la velocidad más adaptada a su
preparación, gracias al selector de velocidad
(
C)
. Para detener el aparato, ponga el
selector de velocidad
(
C)
en 0.
L
a tapadera y su tapón deben estar siempre
colocados cuando el aparato esté en
funcionamiento. Mantenga siempre el vaso
apoyado sobre la rejilla con la mano.
Para
añadir ingredientes en el curso de la mezcla,
insértelos por el orificio de relleno de la
tapadera
(
E6)
.
Después de la utilización, si es necesario, tire el
contenido del crisol
(
A1)
y lave el conjunto
(
A)
cuidadosamente.
S
ERVICIO POR EL GRIFO (F)
Esquema
❹
Dos posiciones son posibles para servirse
haciendo pivotar el pedal
(
F1)
:
- El pedal en posición baja permite servirse
apretando con el vaso directamente.
- El pedal en posición alta permite servirse
tirando hacia adelante con la mano y obtener
mayor cantidad.
NB: la velocidad 1 puede facilitar el fluido de
las preparaciones bastante espesas (tipo
batido de leche o smoothies). Detener el
aparato al final del servicio.
Limpie el grifo después de cada utilización
(ver § Limpieza).
Si usted no necesita el grifo, puede reemplazarlo
por la capucha
(
J)
(
v
er esquema
❻), equipado
con la junta
(E3)
.
U
TILIZACIÓN DEL ICE STICK* (H)
Este accesorio le permite refrescar
preparaciones, o bien mantenerlas al fresco.
- Rellene de
s
al gorda
la parte cuadrada del
mango
(H2)
hasta el borde (
e
squema
❺)
luego vierta la sal en el depósito
(
H1)
.
- Rellene de agua el depósito
(
H1)
.
- Atornille fuertemente el mango sobre el
depósito y sacuda para disolver la sal.
- Coloque el conjunto en el congelador (-18°C
mínimo), preferentemente levantado, hasta
que la mezcla esté bien congelada (12 horas
mínimo).
- Haga su preparación, luego introduzca el Ice
Stick
(
H)
helado a través del orificio de la
tapadera (E6), en el lugar del tapón
(
E7)
. Su
preparación será así refrescada.
- Usted puede utilizar el Ice Stick como mortero
para mezclar sus preparaciones,
introduciéndolo obligatoriamente por el orificio
de relleno de la tapadera
(
E6)
.
UTILIZACIÓN DE LOS ACCESORIOS
(K & L*)
MOLINO PARA ESPECIAS (K):
Este accesorio le permite:
- Moler hasta 40g de café en 30 segundos como
máximo
- Moler en algunos segundos diferentes especias y
frutos secos como avellanas, nueces, almendras,
dátiles... Ex: 50g de dátiles en 4s.
RALLAR (L):
Este accesorio reduce a polvo la nuez moscada,
el coco, los quesos duros (ex 60g de queso
parmesano) previamente cortados en dados,
en 30 segundos como máximo.
* Estos accesorios están equipados de una
tapa
(
M)
de seguridad que prohíbe el
acceso a las láminas durante el
funcionamiento
- Introduzca los ingredientes en el recipiente
(K o
L)
.
- Sitúe la tapadera
(
M)
sobre el recipiente del
accesorio (una sola posición posible)
- Gire la tapadera en el sentido de las agujas
del reloj para bloquearlo (cerrojo cerrado),
luego ponga el conjunto sobre el cuerpo de la
licuadora
(D)
(ver esquema ➒).
* Enchufe la licuadora y el selector de
velocidad
(C)
en la posición «2» o presione
varias veces sobre « pulse ». Sujete la
tapadera
(M)
durante el funcionamiento.
* Para detener la licuadora, lleve el selector de
velocidad
(
C)
a la posición " 0 ", y retire los
accesorios sólo cuando el aparato esté
completamente parado.
Devuelva el conjunto del accesorio a su
encimera antes de bloquear la tapadera del
accesorio
(
K o L)
(ver esquema ❿).
Usted puede entonces recuperar la preparación
directamente en la tapadera que sirve de
recipiente.
notice blender2:Mise en page 1 26/02/08 14:55 Page 27

28
- Desenchufe la licuadora y retire los accesorios.
- Limpie el bloque motor
(
D)
con un paño
húmedo. Séquelo con cuidado.
- No sumerja nunca el bloque motor
(
D)
bajo el
agua corriente
- Enjuague el recipiente para mezclas
(
E)
y los
accesorios bajo el agua corriente.
- Para facilitar el mantenimiento del recipiente
para las mezclas
(
E)
, desenrosque el porta-
hojas
(
E1)
, retire la junta de impermeabilidad
(
E2)
, retire el conjunto del grifo
(
F)
antes de
limpiarlo todo.
E
squema
:
Desmontaje del grifo
(
F)
para una limpieza más
fácil:
- Desatornille el cuerpo
(
F2)
del pedal
(
F1),
sujetando bien la tuerca
(
F3)
del pedal.
Para volver a montarlo, proceda en el sentido
inverso, poniendo atención al buen
posicionamiento de la junta
(
F4)
.
-
Manipule las hojas con precaución, están
muy afiladas.
- Todos los accesorios pueden ir al lavavajillas
LIMPIEZA
SI SU LICUADORA NO FUNCIONA ¿QUÉ HACER?
Verifique primero la conexión, después:
- que el recipiente esté correctamente
posicionado sobre el bloque motor.
- que el botón de comando está bien
posicionado.
Su recipiente tiene una fuga, verifique:
- que las juntas están presentes y bien
colocadas.
¿Todavía no funciona su aparato?
Vaya a un centro de servicio concertado (ver
lista en el libreto servicio)
Usted puede personalizar su aparato y
procurarse con los siguientes accesorios, a
través de su vendedor habitual o en un centro
concertado:
- Accesorio Triturador
- Ice Stick
- Capucha
RECICLAJE
¡¡Participe en la conservación del medio ambiente!!
Su electrodoméstico contiene materiales recuperables y/o reciclables.
Entréguelo al final de su vida útil, en un Centro de Recogida Específico
donde será tratado de forma adecuada.
E
LIMINACIÓN DE MATERIALES DE EMBALAJE DEL APARATO
El embalaje comprende exclusivamente materiales sin peligro para el
medio ambiente, pudiendo desecharlos conforme a las disposiciones del
reciclaje en vigor.
Para deshacerse del aparato, infórmese en los servicios apropiados de su
comunidad.
notice blender2:Mise en page 1 26/02/08 14:55 Page 28

29
RECETAS
BATIDOS
Batido de chocolate:
Para 2 vasos: 75 cl de leche bien fría
- 3 cucharadas soperas de cacao en polvo
- 2 cucharadas soperas de azúcar - 3 bolas de
helado de chocolate.
Vierta la leche en el recipiente para mezclas
con el cacao y el azúcar. Mezcle 20s. Añada las
bolas de helado y mezcle 10s.
Batido de fresa:
Para 2 vasos: 200 g de fresas - 40 cl de leche
bien fría - 2 cucharillas de café de azúcar de
caña.
Quite las hojas a las fresas y córtelas en trozos.
Introduzca todos los ingredientes en el
recipiente para mezclas y mezcle 30s. Sirva bien
frío.
Variante: También puede reemplazar las
fresas por 200 g de frambuesa o por un
plátano.
Leche merengada con frambuesa:
Para 4 vasos: 400 g de leche concentrada
azucarada (1 bote) - 25 cl de leche - 300 g de
frambuesas - 10 hielos - 4 merengues.
Introduzca la leche, le leche concentrada, las
frambuesas y los hielos en el recipiente para
mezclas. Accione el botón pulse 10 veces,
después mézclelo 1 min 30. Aplaste los
merengues. Vierta la leche en los vasos y
decórelos con los merengues en trozos. Sirva sin
esperar.
Dulce de verano con fresas:
Para 2 vasos: 250 g de fresas sin hojas
- 25 cl de yogur líquido con frutas del bosque
- 4 bolas de yogur de fresas congeladas
- 1 cucharada sopera jugo de fresas - algunas
gotas de extracto natural de vainilla - hielos.
Ponga el yogur de fresa en el congelador por lo
menos 3 horas antes de la preparación. En el
recipiente para mezclas, ponga las fresas, el
yogur líquido, el yogur congelado, el jugo de
fresas y la vainilla. Mezcle hasta que obtenga
una pasta espesa y lisa. Vierta la preparación
sobre los hielos.
Café frappé :
Para 2 vasos: 1/2l de leche - 6 cucharillas de
café soluble - 6 cucharadas soperas de azúcar
- 6hielos.
Introduzca todos los ingredientes en el recipiente
para mezclas 20s. Sirva rápidamente.
S
MOOTHIES / COCKTAILS VITAMINAS
Cocktail vitaminado:
Para 4 vasos: 2 rodajas de piña - 6 fresas
- 1 plátano - 4 naranjas exprimidas - 15 cl de
agua con gas bien fresca - 1 sobrecito de
vainilla azucarada - 2 hielos.
Introduzca la piña, las fresas, el plátano, el zumo
de naranja en el recipiente para mezclar.
Mezcle durante 15s. Añada el agua con gas y
los hielos. Mezcle 15s.
Cocktail énergia :
Para 6 vasos: 3 naranjas exprimidas - 1 limón
exprimido - 6 cucharadas soperas de miel
líquida - 2 yemas de huevo - 4 cucharadas
soperas de crema líquida - 4 hielos.
Introduzca todos los ingredientes en el
recipiente para mezclas y mezcle 30s. Sirva bien
frío.
Zumo de tomate especiado:
Para 2 vasos: 500g de tomates bien maduros
- ½ limón exprimido - 4 hojas de albahaca
- 2 ramitas de perejil - ½ cucharilla de comino
en polvo - 2 gotas de Tabasco - sal de apio
- 4 hielos.
Pele, quite las pepitas y corte los tomates en 4.
Introduzca todos los ingredientes en el
recipiente para mezclas. Mezcle durante 1 min.
Sirva fresco.
Delicias al kiwi:
Para 4 vasitos: 3 kiwis pelados y cortados en
rodajas - 80 g de piña en trozos - 1 plátano
cortado en trozos - 25 cl de zumo de frutas
tropicales - 2 hielos.
Introduzca todos los ingredientes en el
recipiente para mezclas y mezcle hasta la
obtención de una pasta untuosa.
Coco limón helado:
Para 2 grandes vasos: 40 cl de leche de coco
- el zumo de 4 limones verdes - 2 cucharillas de
extracto natural de vainilla - 80 g de azúcar en
polvo - 7 g de menta fresca (facultativo)
- 8 hielos grandes.
Introduzca todos los ingredientes en el recipiente
para mezclas. Mezcle hasta la obtención de una
pasta untuosa.
notice blender2:Mise en page 1 26/02/08 14:55 Page 29

30
Gaspacho:
Para 6 vasos: ½ pepino - ½ pimiento - 500g de
tomates - 1 cebolla pequeña - 1 diente de ajo -
20g de miga de pan - 2 cucharillas de
vinagre de vino - 2 cucharadas soperas de
aceite de oliva - 1 cucharilla de concentrado
de tomate - 50cl de caldo frío - sal - pimienta -
1 pizca de pimienta de Cayena.
Monde el pepino, el ajo y la cebolla. Quítele los
granos al pimiento. Pele y quite los granos al
tomate. Introduzca todos los ingredientes en
pedazos en el recipiente para mezclas y
mezcle 1 minuto. Déjelo en el frigorífico una
hora (o bien utilice el Ice stick) antes de servir
con panecitos al ajo.
C
OCKTAILS
(a consumir con moderación)
Margarita :
Para 4 vasos: 16 cl de Tequila - 8 cl de
Cointreau - 4 cl de lima verde - 1 cucharita de
sal - 5 hielos.
Introduzca en el recipiente para mezclas el
Tequila, el Cointreau y la lima. Mezcle 10s.
Añada los hielos y mezcle. Moje el borde de los
vasos y páselos por la sal. Vierta y decore los
vasos con una rodaja de limón.
Piña Colada:
Para 4 vasos: 50 cl de zumo de piña - 20 cl de
crema de nuez de coco - 10 cl de ron blanco
- 1 cucharada sopera de azúcar de caña
- 1 pizca de canela - algunas gotas de vainilla
- 6 hielos.
Introduzca los ingredientes en el recipiente para
mezclas, añada los hielos y mezcle 30 s.
Cocktail Irlandés:
Para 4 vasos: 16 cl de whisky irlandés
- 4 cucharillas de crema de menta verde
- 4 bolas de helado de vainilla.
Introduzca todos los ingredientes en el
recipiente para mezclas y póngala en marcha
a velocidad 1 algunos segundos. Sirva
inmediatamente.
notice blender2:Mise en page 1 26/02/08 14:55 Page 30

31
CONSELHOS DE SEGURANÇA
- Leia atentamente o manual de instruções
antes da primeira utilização da sua
liquidificadora e siga atentamente as
instruções. Uma utilização não conforme ao
manual de instruções liberta o fabricante
de qualquer responsabilidade e anula a
garantia.
- Verifique se a tensão de alimentação da
liquidificadora corresponde à da sua
instalação eléctrica. Qualquer erro de ligação
anula a garantia.
- A liquidificadora destina-se exclusivamente a
utilização doméstica e dentro de casa.
- Desligue sempre a liquidificadora da tomada
após cada utilização, durante o processo de
limpeza ou em caso de falha de corrente
eléctrica.
- Utilize a liquidificadora sobre uma superfície
plana, limpa e seca.
- Nunca introduza os dedos ou qualquer
objecto no copo liquidificador enquanto o
aparelho estiver em funcionamento.
- Manipule as lâminas com precaução, por
forma a evitar qualquer ferimento.
- Não coloque o aparelho, o cabo de
alimentação ou a ficha dentro de água ou de
qualquer outro líquido.
- Não deixe o cabo de alimentação ao
alcance das crianças, próximo ou em
contacto com as partes quentes do aparelho,
perto de uma fonte de calor ou sobre uma
aresta cortante ou em contacto com as
lâminas.
- Não coloque os acessórios no micro-ondas.
- Nunca coloque o copo liquidificador a
funcionar sem ingredientes ou com produtos
secos apenas e não deite líquidos a ferver.
- Tenha cuidado para que cabelos compridos,
écharpes, gravatas, etc., não fiquem
pendurados por cima do copo ou dos seus
acessórios, quando em funcionamento.
- Este aparelho não foi concebido para ser
utilizado por pessoas (incluindo crianças) cujas
capacidades físicas, sensoriais ou mentais se
encontram reduzidas, ou por pessoas com
falta de experiência ou conhecimento, a não
ser que tenham sido devidamente
acompanhadas e instruídas sobre a correcta
utilização do aparelho, pela pessoa
responsável pela sua segurança.
É importante vigiar as crianças por forma a
garantir que as mesmas não brinquem com o
aparelho.
- Qualquer intervenção para além da limpeza e
manutenção habitual pelo cliente deverá ser
efectuada por um Serviço de Assistência
Técnica autorizado.
- Para sua segurança, utilize apenas acessórios
e peças sobresselentes adaptadas à sua
liquidificadora. Poderá adquirir estes acessórios
num Serviço de Assistência Técnica autorizado.
- O aparelho não deve ser utilizado mais do que
3 minutos em funcionamento contínuo.
Aguarde alguns minutos antes de voltar a ligá-
lo, após 3 minutos de funcionamento
ininterrupto.
- Quando esvaziar o copo, manuseie as lâminas
com cuidado: elas podem feri-lo.
P
Os acessórios que compõem o aparelho que acaba de adquirir encontram-se reproduzidos
na etiqueta colocada na parte superior da embalagem.
* consoante o modelo.
PREPARAÇÃO
- Antes da primeira utilização, lave todos os
acessórios com água quente e detergente
(excepto o bloco motor
(
D)
: ver § limpeza).
Passe-os por água limpa e seque-os
cuidadosamente.
-
VERIFIQUE SE RETIROU TODOS OS
COMPONENTES DA EMBALAGEM, ANTES DE
COMEÇAR A UTILIZAR O APARELHO
UTILIZAÇÃO DO COPO LIQUIDIFICADOR
(E)
Esquema
❶ :
- Posicione a junta de vedação
(
E2)
sobre a
base do porta-lâminas amovível
(
E1)
.
- Fixe o porta-lâminas sobre o copo
liquidificador, rodando-o um quarto de volta.
- Insira a junta
(
E3)
na saída do copo.
- Coloque o copo sobre o bloco motor
(
D)
.
MONTAGEM DA TORNEIRA (F) SOBRE
O COPO
Esquema
❷ :
- Coloque a junta
(
E3)
na saída do copo
liquidificador.
- Aperte a torneira um quarto de volta sobre a
saída do copo, segurando-o pelo corpo
(
F2)
(orifício de saída virado para baixo.)
notice blender2:Mise en page 1 26/02/08 14:55 Page 31

32
Nota: A alavanca pode ser rodada livremente
em volta do corpo da torneira.
- Introduza os alimentos dentro do copo
(
E4)
,
deitando primeiro os ingredientes líquidos, sem
exceder o nível máximo indicado (1,25 l).
Esquema
❸ :
- Coloque a junta da tampa
(
E5)
em volta da
tampa
(
E6)
aperte o conjunto sobre o copo
(
E4)
e coloque a tampa pequena
(
E7)
sobre a
tampa.
- Coloque a grelha
(
A2)
sobre a gaveta de
recolha de pingos
(
A1)
.
- Faça deslizar todo o conjunto
(
A)
sobre o
bloco motor
(D)
, no espaço previsto para o
efeito
(
B)
.
- Ligue e coloque o aparelho em
funcionamento seleccionando a velocidade
mais adaptada à sua preparação, com a
ajuda do selector de velocidade
(
C)
.
Para desligar o aparelho, coloque o selector
de velocidade
(
C)
no 0.
A
tampa e a respectiva tampa pequena
devem estar sempre colocadas quando o
aparelho está em funcionamento. Segure
sempre no copo que se encontra colocado
sobre a grelha.
Para adicionar ingredientes
durante a preparação, introduza-os através do
orifício de enchimento da tampa
(
E6)
.
Após utilização, se necessário, deite fora o
conteúdo da gaveta de recolha de pingos
(
A1)
e lave cuidadosamente todo o conjunto
(
A)
.
S
ERVIÇO DIRECTO PELA TORNEIRA (F)
Esquema
❹
Alavanca de dupla posição
(
F1)
:
- A alavanca em posição baixa permite servir
pressionando directamente com o copo.
- A alavanca em posição alta permite servir
pressionando com a mão, para obter um
débito maior.
Nota: A velocidade 1 pode facilitar a
extracção de preparações mais espessas
(tipo batidos). Desligue o aparelho logo que
acabe de se servir.
Lave a torneira após cada utilização
(ver § Limpeza).
Se não precisar de usar a torneira, pode
substitui-la pela tampa (J) (
v
er esquema
➏),
equipada com a junta (E3).
U
TILIZAÇÃO DO "ICE STICK"* (H)
Este acessório permite refrescar as preparações
ou mantê-las frias.
- Encha com
s
al grosso
a parte quadrada da
pega
(
H2)
até ao máximo (
E
squema
➎) em
seguida deite o sal no reservatório
(
H1)
.
- Encha o reservatório
(
H1)
com água.
- Aperte a pega sobre o reservatório e agite
para fazer derreter o sal.
- Coloque o conjunto no congelador (-18°C no
mínimo), de preferência em pé, até que a
mistura fique bem gelada (12h no mínimo).
- Faça a sua preparação e em seguida
introduza o "Ice Stick"
(
H)
gelado através do
orifício da tampa
(
E6)
, em vez da rolha
(
E7)
. A
sua preparação manter-se-á assim fresca.
- Também pode usar o "Ice stick" como calcador
para misturar as preparações, introduzindo-o
obrigatoriamente pelo orifício de enchimento
da tampa
(
E6)
.
UTILIZAÇÃO DOS ACESSÓRIOS
(K e L)
MOINHO DE ESPECIARIAS (K):
Este acessório permite:
– moer até 40 g de café em 30 segundos no
máximo
– moer em apenas alguns segundos diferentes
especiarias e frutos secos como avelãs, nozes,
amêndoas, tâmaras… Ex.: 50 g de tâmaras em
4 segundos.
RALADOR (L):
Este acessório reduz em pó a noz-moscada, o
coco, os queijos rijos (ex., 60 g de parmesão)
previamente cortados em cubos, em
30 segundos no máximo.
– Estes acessórios estão equipados com uma
tampa
(
M)
de segurança que impede o
acesso às lâminas durante o funcionamento.
– Introduza os ingredientes na taça
(
K ou L)
.
Posicione a tampa
(
M)
na taça do acessório
(uma única posição possível), rode a tampa
no sentido dos ponteiros do relógio para
bloqueá-la (sentido cadeado fechado) e
coloque o conjunto no corpo da
liquidificadora
(
D)
(ver esquema ❾).
– Ligue a liquidificadora e coloque o selector de
velocidade
(
C)
na posição “2” ou carregue
algumas vezes em “pulse”. Segure a tampa
(
M)
durante o funcionamento.
– Para parar a liquidificadora, coloque o selector
de velocidade
(
C)
na posição “0” e retire o
acessório apenas quando o aparelho está
completamente parado.
Vire o conjunto do acessório sobre a bancada
de trabalho antes de desbloquear a tampa do
acessório
(
K ou L)
(ver esquema ❿)
.
Pode, então, retirar a preparação directamente
na tampa que funciona como recipiente.
notice blender2:Mise en page 1 26/02/08 14:55 Page 32

33
- Desligue a liquidificadora e retire os acessórios.
- Limpe o bloco motor
(
D)
com um pano
húmido. Seque-o cuidadosamente.
-
Nunca mergulhe o bloco motor (D) dentro
de água ou qualquer outro tipo de líquido.
- Lave o copo liquidificador
(
E)
com água, bem
como os respectivos acessórios.
- Para facilitar a manutenção do copo
liquidificador
(
E)
, desaperte o porta-lâminas
(
E1)
, retire a junta de vedação
(
E2)
, retire a
torneira
(
F)
antes de proceder à limpeza.
Esquema
:
Desmontagem da torneira
(
F)
para facilitar a
limpeza:
- Desaperte o corpo
(
F2)
da alavanca
(
F1)
,
segurando bem a porca
(
F3)
da alavanca.
Para o voltar a montar, proceda no sentido
inverso, tendo atenção ao posicionamento
correcto da junta. (F4).
-
As lâminas devem ser manipuladas com
precaução, já que são muito cortantes.
- Todos os acessórios podem ser lavados na
máquina.
LIMPEZA
O QUE FAZER SE A LIQUIDIFICADORA NÃO FUNCIONAR?
Em primeiro lugar, verifique a ligação, e depois
confirme se:
- o copo está correctamente posicionado
sobre o bloco motor.
- o botão de comando está bem posicionado.
Se o copo desliza, verifique se:
- as juntas estão todas devidamente
posicionadas.
O seu aparelho continua a não funcionar?
Dirija-se a um Serviço de Assistência Técnica
autorizado (ver lista no folheto de Assistência).
Pode personalizar o seu aparelho, adquirindo,
junto do seu revendedor habitual ou de um
Serviço de Assistência Técnica autorizado, os
acessórios seguintes:
- acessório triturador
- "ice stick"
- tampa pequena
RECICLAGEM
Protecção do ambiente em primeiro lugar!
O seu produto contém materiais que podem ser recuperados ou
reciclados.
Entregue-o num ponto de recolha para possibilitar o seu tratamento.
E
LIMINAÇÃO DOS MATERIAIS DE EMBALAGEM DO APARELHO
A embalagem é composta exclusivamente por materiais sem perigo para
o meio ambiente, que podem ser eliminados em conformidade com as
disposições de reciclagem em vigor.
Para a eliminação do aparelho, informe-se junto do serviço apropriado do
seu município.
notice blender2:Mise en page 1 26/02/08 14:55 Page 33

34
RECEITAS
BATIDOS
Batido de chocolate:
Para 2 copos: 75 cl de leite bem frio
- 3 colheres de sopa de cacau em pó
- 2 colheres de sopa de açúcar - 3 bolas de
gelado de chocolate.
Deite o leite no copo liquidificador, seguido do
cacau e do açúcar. Misture durante 20 seg.
Adicione as bolas de gelado e misture durante
10 seg.
Batido de morango:
Para 2 copos: 200 g de morangos - 40 cl de
leite bem frio - 2 colheres de café de açúcar
de cana.
Retire os pés aos morangos e corte-os em
pedaços. Deite todos os ingredientes no copo
liquidificador e misture durante 30 seg. Sirva
bem fresco.
Variante: Também pode substituir os
morangos por 200 g de framboesas ou por
uma banana.
Merengue de leite com framboesa:
Para 4 copos: 400 g de leite condensado doce
(1 lata) - 25 cl de leite - 300 g de framboesas
- 10 cubos de gelo - 4 merengues pequenos.
Deite o leite, o leite condensado, as framboesas
e os cubos de gelo no copo liquidificador.
Accione a função pulse 10 vezes, depois misture
durante 1 min 30. Corte grosseiramente os
merengues. Deite o leite nos copos e decore com
os merengues em pedaços. Sirva imediatamente.
Suavidade de Verão com morangos:
Para 2 copos: 250 g de morangos sem o pé
- 25 cl de iogurte líquido com sabor a frutos
silvestres - 4 bolas de iogurte de morango
gelado - 1 colher de sopa de calda de
morango - umas gotas de extracto natural de
baunilha - cubos de gelo.
Coloque o iogurte de morango no congelador
pelo menos 3 horas antes da preparação. No
copo liquidificador, deite os morangos, o iogurte
líquido, o iogurte congelado, a calda de
morango e a baunilha. Misture até obter uma
preparação espessa e cremosa. Deite o
preparado sobre os cubos de gelo.
Café gelado (frappé) :
Para 2 copos: ½ l de leite - 6 colheres
pequenas de café solúvel - 6 colheres de sopa
de açúcar - 6 cubos de gelo.
Introduza todos os ingredientes no copo
liquidificador e misture durante 20 seg.
Sirva imediatamente.
BATIDOS / COCKTAILS DE VITAMINAS
Cocktail vitaminado:
Para 4 copos: 2 fatias de ananás - 6 morangos -
1 banana - sumo de 4 laranjas - 15 cl de água
com gás bem fresca - 1 saqueta de açúcar
baunilhado - 2 cubos de gelo.
Introduza o ananás, os morangos, a banana, o
sumo de laranja e a saqueta de açúcar
baunilhado dentro do copo liquidificador.
Misture durante 15 seg. Adicione a água com
gás e os cubos de gelo. Misturar durante 15 seg.
Cocktail energia:
Para 6 copos: sumo de 3 laranjas - sumo de
1 limão - 6 colheres de sopa de mel líquido
- 2 gemas de ovos - 4 colheres de sopa de
natas líquidas - 4 cubos de gelo.
Deite todos os ingredientes no copo
liquidificador e misture durante 30 seg.
Sirva muito frio.
Sumo de tomate com especiarias:
Para 2 copos: 500 g de tomate bem maduro
- sumo de ½ limão - 4 folhas de manjericão
- 2 ramos de salsa - ½ colher de café de
cominhos em pó - 2 gotas de Tabasco
- sal de aipo - 4 cubos de gelo.
Descasque, retire as grainhas e corte o tomate
em 4. Deite todos os ingredientes no copo
liquidificador. Misture durante 1 minuto.
Sirva muito fresco.
Delícia de kiwi:
Para 4 copos pequenos: 3 kiwis descascados e
cortados em pedaços - 80 g de ananás
cortado em pedaços - 1 banana cortada
- 25 cl de sumo de frutos tropicais - 2 cubos de
gelo.
No copo liquidificador, deite todos os
ingredientes e misture até obter uma
preparação cremosa.
Gelado de Coco e limão:
Para 2 copos grandes: 40 cl de leite de coco
- sumo de 4 limas - 2 colheres de café de
extracto natural de baunilha - 80 g de açúcar
em pó - 7 g de menta fresca (facultativo) -
8 cubos grandes de gelo.
Deite todos os ingredientes no copo
liquidificador e misture até obter uma
preparação cremosa.
notice blender2:Mise en page 1 26/02/08 14:55 Page 34

35
Gaspacho:
Para 6 copos: ½ pepino - ½ pimento doce
- 500 g de tomate - 1 pequena cebola
- 1 dente de alho - 20 g de migas de pão
- 2 colheres de café de vinagre de vinho
- 2 colheres de sopa de azeite - 1 colher de
café de concentrado de tomate - 50 cl de
caldo frio - sal - pimenta - 1 pitada de pimenta
Caiena.
Descasque o pepino, o alho e a cebola. Retire as
grainhas do pimento. Descasque e retire as
grainhas do tomate. Deite todos os ingredientes
em pedaços no copo liquidificador e misture
durante 1 minuto. Reserve 1 hora no frigorífico (ou
utilize o "ice stick") antes de servir com pão de
alho.
C
OCKTAILS
(para consumir com moderação)
Margarita:
Para 4 copos: 16 cl de Tequilla - 8 cl de
Cointreau - 4 cl de lima - 1 colher de café de
sal - 5 cubos de gelo.
Deite no copo liquidificador a Tequilla, o
Cointreau e a lima. Misture durante 10 seg.
Adicione os cubos de gelo e misture. Molhe o
bordo dos copos e passe-os pelo sal. Deite nos
copos e decore com uma rodela de limão.
Piña Colada:
Para 4 copos: 50 cl de sumo de ananás
- 20 cl de creme de coco - 10 cl de rum branco
- 1 colher de sopa de açúcar de cana -
1 pitada de canela - umas gotas de baunilha -
6 cubos de gelo.
Introduza os ingredientes no copo liquidificador,
adicione os cubos de gelo e misture durante
30 seg.
Irish Cocktail:
Para 4 copos: 16 cl de whisky irlandês -
4 colheres de café de creme de menta verde
- 4 bolas de gelado de baunilha.
Introduza os ingredientes no copo liquidificador
e misture à velocidade 1 durante alguns
segundos. Sirva imediatamente.
notice blender2:Mise en page 1 26/02/08 14:55 Page 35
-
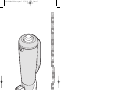 1
1
-
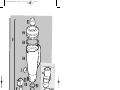 2
2
-
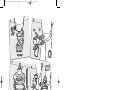 3
3
-
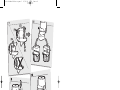 4
4
-
 5
5
-
 6
6
-
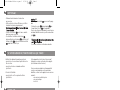 7
7
-
 8
8
-
 9
9
-
 10
10
-
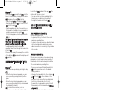 11
11
-
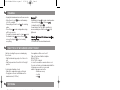 12
12
-
 13
13
-
 14
14
-
 15
15
-
 16
16
-
 17
17
-
 18
18
-
 19
19
-
 20
20
-
 21
21
-
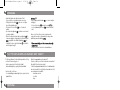 22
22
-
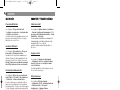 23
23
-
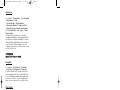 24
24
-
 25
25
-
 26
26
-
 27
27
-
 28
28
-
 29
29
-
 30
30
-
 31
31
-
 32
32
-
 33
33
-
 34
34
-
 35
35
-
 36
36
-
 37
37
-
 38
38
-
 39
39


Moulinex LM6208FR El manual del propietario
- Categoría
- Batidoras
- Tipo
- El manual del propietario
- Este manual también es adecuado para
en otros idiomas
- français: Moulinex LM6208FR Le manuel du propriétaire
- italiano: Moulinex LM6208FR Manuale del proprietario
- Deutsch: Moulinex LM6208FR Bedienungsanleitung
- Nederlands: Moulinex LM6208FR de handleiding
- português: Moulinex LM6208FR Manual do proprietário
Artículos relacionados
-
Moulinex LM600E El manual del propietario
-
-
Tefal BL100041 El manual del propietario
-
-
Tefal BL523D3E El manual del propietario
-
-
-
-
-
Otros documentos
-
-
LAGRANGE Blender et moulin à grains Manual de usuario
-
LAGRANGE 609001 El manual del propietario
-
Philips HR3653/00 Recipe Booklet
-
Breville BBL550XL /A Manual de usuario
-
-
-
Tribest PB-410-RD Guía del usuario
-
Krups Freshmix KB710D Manual de usuario
-