DieHard DH-6M Manual de usuario
- Categoría
- Cargadores de batería de coche
- Tipo
- Manual de usuario

00-99-001049/0510
Manual Battery Charger
Cargador de Batería Manual
Model / Modelo: DH-6M
Sears Brands Management Corporation, Hoffman Estates, IL 60179 U.S.A.
OPERATOR’S MANUAL • MANUAL DEL USUARIO
Read all Safety Rules and Operating Instructions,
and follow them with each use of this product.
ATENCIÓN
Lea todas las Instrucciones de Operación y Reglas de Seguridad,
así mismo aplíquelas a cada uso del producto.


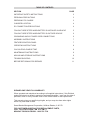
TABLE OF CONTENTS
SECTION PAGE
IMPORTANT SAFETY INSTRUCTIONS 2
PERSONAL PRECAUTIONS 3
PREPARING TO CHARGE 3
CHARGER LOCATION 4
DC CONNECTION PRECAUTIONS 4
FOLLOW THESE STEPS WHEN BATTERY IS INSTALLED IN VEHICLE 5
FOLLOW THESE STEPS WHEN BATTERY IS OUTSIDE VEHICLE 6
GROUNDING AND AC POWER CORD CONNECTIONS 6
ASSEMBLY INSTRUCTIONS 7
FEATURES/CONTROL PANEL 7
OPERATING INSTRUCTIONS 8
CALCULATING CHARGE TIME 8
MAINTENANCE INSTRUCTIONS 9
MOVING AND STORAGE INSTRUCTIONS 9
TROUBLESHOOTING 10
BEFORE RETURNING FOR REPAIRS 11
DIEHARD ONE-YEAR FULL WARRANTY
When operated and maintained according to all supplied instructions, if this DieHard
product fails due to a defect in material or workmanship within 1 year from the date of
purchase, return it to any DieHard outlet in the United States for free replacement.
This warranty gives you specic legal rights, and you may also have other rights
which vary from state to state.
Sears Brands Management Corporation, Hoffman Estates, IL 60179
FOR CUSTOMER ASSISTANCE OR REPLACEMENT PARTS,
CALL TOLL-FREE FROM 7 AM TO 5 PM CT
MONDAY THROUGH FRIDAY: 1-800-732-7764

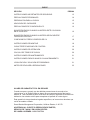
ÍNDICE
SECCIÓN PÀGINA
INSTRUCCIONES IMPORTANTES DE SEGURIDAD 13
PRECAUCIONES PERSONALES 14
PREPARACIÓN PARA LA CARGA 15
UBICACIÓN DEL CARGADOR 16
PRECAUCIONES DE CONEXIÓN EN CC 16
SIGA ESTOS PASOS CUANDO LA BATERÍA ESTÉ COLOCADA
EN EL VEHÍCULO 16
SIGA ESTOS PASOS CUANDO LA BATERÍA SE ENCUENTRE
FUERA DEL VEHÍCULO 17
CONEXIONES A TIERRA Y ENERGÍA DE CA 18
INSTRUCCIONES DE MONTAJE 18
CARACTERÍSTICAS/PANEL DE CONTROL 19
INSTRUCCIONES DE OPERACIÓN 20
CÁLCULO DE TIEMPO DE CARGA 20
INSTRUCCIONES DE MANTENIMIENTO 21
INSTRUCCIONES PARA EL MANEJO Y ALMACENAMIENTO 21
LOCALIZACIÓN Y SOLUCIÓN DE PROBLEMAS 21
ANTES DE DEVOLVER A REPARACIONES 23
UN AÑO DE GARANTÍA TOTAL EN DIEHARD
Cuando se opere o maneje con las debidas precauciones de acuerdo a las
instrucciones, si el DieHard falla en alguno de sus componentes de fabricación
durante el 1 año contados a partir de la fecha de compra, regresarlo al autoservicio
diehard en los estados unidos para reemplazar el aparato sin costo alguno.
Esta garantía le otorga derechos legales especícos, así como otros derechos que
varían de estado a estado.
Sears Brands Management Corporation, Hoffman Estates, IL 60179
ASISTENCIA AL CLIENTE O REPOSICIÓN DE PARTES,
SERVICIO DE 7 AM A 5 PM, HORA CENTRO
DE LUNES A VIERNES: 1-800-732-7764

• 1 •
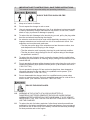
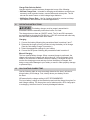
IMPORTANT: READ AND SAVE THIS SAFETY AND INSTRUCTION MANUAL.
SAVE THESE INSTRUCTIONS – The DH-6M charger offers a wide range of
features to accommodate your needs. This manual will show you how to use
your charger safely and effectively. Please read, understand and follow these
instructions and precautions carefully, as this manual contains important safety
and operating instructions. The safety messages used throughout this manual
contain a signal word, a message and an icon.
The signal word indicates the level of the hazard in a situation.
Indicates an imminently hazardous situation which, if not avoided,
will result in death or serious injury to the operator or bystanders.
Indicates a potentially hazardous situation which, if not avoided,
could result in death or serious injury to the operator or bystanders.
Indicates a potentially hazardous situation which, if not avoided,
could result in moderate or minor injury to the operator
or bystanders.
Indicates a potentially hazardous situation which, if not avoided,
could result in damage to the equipment or vehicle or
property damage.
Safety messages in this manual contain two different type styles.
Unnumbered type states the hazard.•
Numbered type states how to avoid the hazard.•
The icon gives a graphical description of the potential hazard.
Pursuant to California Proposition 65, this product contains chemicals
known to the State of California to cause cancer and birth defects or
other reproductive harm.

• 2 •
IMPORTANT SAFETY INSTRUCTIONS - SAVE THESE INSTRUCTIONS - 1.
This manual contains important safety and operating instructions
RISK OF ELECTRIC SHOCK OR FIRE.
Keep out of reach of children.1.1
Do not expose the charger to rain or snow.1.2
Use only recommended attachments. Use of an attachment not recommended 1.3
or sold by the battery charger manufacturer may result in a risk of re, electric
shock or injury to persons or damage to property.
To reduce the risk of damage to the electric plug or cord, pull by the plug rather 1.4
than the cord when disconnecting the charger.
An extension cord should not be used unless absolutely necessary. Use of an 1.5
improper extension cord could result in a risk of re and electric shock. If an
extension cord must be used, make sure:
That the pins on the plug of the extension cord are the same number, size •
and shape as those of the plug on the charger.
That the extension cord is properly wired and in good electrical condition.•
That the wire size is large enough for the AC ampere rating of the charger •
as specied in section 8.
To reduce the risk of electric shock, unplug the charger from the outlet before 1.6
attempting any maintenance or cleaning. Simply turning off the controls will not
reduce this risk.
Do not operate the charger with a damaged cord or plug; have the cord or plug 1.7
replaced immediately by a qualied service person. (Call customer service at:
1-800-732-7764.)
Do not operate the charger if it has received a sharp blow, been dropped or 1.8
otherwise damaged in any way; take it to a qualied service person. (Call
customer service at: 1-800-732-7764.)
Do not disassemble the charger; take it to a qualied service person when 1.9
service or repair is required. Incorrect reassembly may result in a risk of re or
electric shock. (Call customer service at: 1-800-732-7764.)
RISK OF EXPLOSIVE GASES.
WORKING IN THE VICINITY OF A LEAD-ACID BATTERY IS 1.10
DANGEROUS. BATTERIES GENERATE EXPLOSIVE GASES DURING
NORMAL BATTERY OPERATION. FOR THIS REASON, IT IS OF UTMOST
IMPORTANCE THAT YOU FOLLOW THE INSTRUCTIONS EACH TIME YOU
USE THE CHARGER.
To reduce the risk of a battery explosion, follow these instructions and those 1.11
published by the battery manufacturer and the manufacturer of any equipment
you intend to use in the vicinity of the battery. Review the cautionary markings
on these products and on the engine.

• 3 •
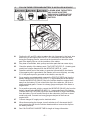
This charger employs parts, such as switches and circuit breakers, that tend to 1.12
produce arcs and sparks. If used in a garage, locate this charger 18 inches or
more above oor level.
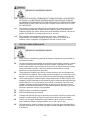
PERSONAL PRECAUTIONS2.
RISK OF EXPLOSIVE GASES.
NEVER smoke or allow a spark or ame in the vicinity of a battery or engine.2.1
Remove personal metal items such as rings, bracelets, necklaces and watches 2.2
when working with a lead-acid battery. A lead-acid battery can produce a short-
circuit current high enough to weld a ring or the like to metal, causing a
severe burn.
Be extra cautious to reduce the risk of dropping a metal tool onto the battery. 2.3
It might spark or short-circuit the battery or other electrical part that may cause
an explosion.
Use this charger for charging LEAD-ACID batteries only. It is not intended to 2.4
supply power to a low voltage electrical system other than in a starter-motor
application. Do not use this battery charger for charging dry-cell batteries that
are commonly used with home appliances. These batteries may burst and
cause injury to persons and damage to property.
NEVER charge a frozen battery.2.5
NEVER overcharge a battery.2.6
Consider having someone close enough by to come to your aid when you work 2.7
near a lead-acid battery.
Have plenty of fresh water and soap nearby in case battery acid contacts your 2.8
skin, clothing or eyes.
Wear complete eye and body protection, including safety goggles and 2.9
protective clothing. Avoid touching your eyes while working near the battery.
If battery acid contacts your skin or clothing, immediately wash the area with 2.10
soap and water. If acid enters your eye, immediately ood the eye with cold
running water for at least 10 minutes and get medical attention right away.
If battery acid is accidentally swallowed, drink milk, the whites of eggs or water. 2.11
DO NOT induce vomiting. Seek medical attention immediately.
PREPARING TO CHARGE3.
RISK OF CONTACT WITH BATTERY ACID.
BATTERY ACID IS A HIGHLY CORROSIVE
SULFURIC ACID.
If it is necessary to remove the battery from the vehicle to charge it, always 3.1
remove the grounded terminal rst. Make sure all of the accessories in the
vehicle are off to prevent arcing.
Be sure the area around the battery is well ventilated while the battery is 3.2
being charged.

• 4 •
Clean the battery terminals before charging the battery. During cleaning, keep 3.3
airborne corrosion from coming into contact with your eyes, nose and mouth.
Use baking soda and water to neutralize the battery acid and help eliminate
airborne corrosion. Do not touch your eyes, nose or mouth.
Add distilled water to each cell until the battery acid reaches the level specied 3.4
by the battery manufacturer. Do not overll. For a battery without removable
cell caps, such as valve regulated lead acid batteries (VRLA), carefully follow
the manufacturer’s recharging instructions.
Read, understand and follow all instructions for the charger, battery, vehicle 3.5
and any equipment used near the battery and charger. Study all of the battery
manufacturer’s specic precautions while charging and recommended rates
of charge.
Determine the voltage of the battery by referring to the vehicle owner’s manual 3.6
and make sure that the output voltage selector switch is set to the correct
voltage. If the charger has an adjustable charge rate, charge the battery in the
lowest rate rst.
Make sure that the charger cable clips make tight connections.3.7
CHARGER LOCATION4.
RISK OF EXPLOSION AND
CONTACT WITH BATTERY ACID.
Locate the charger as far away from the battery as the DC cables permit.4.1
Never place the charger directly above the battery being charged; gases from 4.2
the battery will corrode and damage the charger.
Do not set the battery on top of the charger.4.3
Never allow battery acid to drip onto the charger when reading the electrolyte 4.4
specic gravity or lling the battery.
Do not operate the charger in a closed-in area or restrict the ventilation in 4.5
any way.
DC CONNECTION PRECAUTIONS5.
Connect and disconnect the DC output clips only after setting all of the charger 5.1
switches to the “off” position (if applicable) and removing the AC plug from the
electrical outlet. Never allow the clips to touch each other.
Attach the clips to the battery and chassis, as indicated in sections 6 and 7.5.2

• 5 •
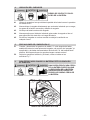
FOLLOW THESE STEPS WHEN BATTERY IS INSTALLED IN VEHICLE6.
A SPARK NEAR THE BATTERY
MAY CAUSE A BATTERY
EXPLOSION. TO REDUCE THE
RISK OF A SPARK NEAR THE
BATTERY:
NEGATIVE GROUNDED SYSTEM
Position the AC and DC cables to reduce the risk of damage by the hood, door 6.1
and moving or hot engine parts. NOTE: If it is necessary to close the hood
during the charging process, ensure that the hood does not touch the metal
part of the battery clips or cut the insulation of the cables.
Stay clear of fan blades, belts, pulleys and other parts that can cause injury.6.2
Check the polarity of the battery posts. The POSITIVE (POS, P, +) battery post 6.3
usually has a larger diameter then the NEGATIVE (NEG, N, -) post.
Determine which post of the battery is grounded (connected) to the chassis. 6.4
If the negative post is grounded to the chassis (as in most vehicles), see step
6.5. If the positive post is grounded to the chassis, see step 6.6.
For a negative-grounded vehicle, connect the POSITIVE (RED) clip from the 6.5
battery charger to the POSITIVE (POS, P, +) ungrounded post of the battery.
Connect the NEGATIVE (BLACK) clip to the vehicle chassis or engine block
away from the battery. Do not connect the clip to the carburetor, fuel lines or
sheet-metal body parts. Connect to a heavy gauge metal part of the frame or
engine block.
For a positive-grounded vehicle, connect the NEGATIVE (BLACK) clip from the 6.6
battery charger to the NEGATIVE (NEG, N, -) ungrounded post of the battery.
Connect the POSITIVE (RED) clip to the vehicle chassis or engine block away
from the battery. Do not connect the clip to the carburetor, fuel lines or sheet-
metal body parts. Connect to a heavy gauge metal part of the frame or
engine block.
Connect charger AC supply cord to electrical outlet.6.7
When disconnecting the charger, turn all switches to off, disconnect the AC 6.8
cord, remove the clip from the vehicle chassis and then remove the clip from
the battery terminal.
See CALCULATING CHARGE TIME for length of charge information.6.9

• 6 •
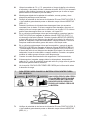
FOLLOW THESE STEPS WHEN BATTERY IS OUTSIDE VEHICLE7.
A SPARK NEAR THE BATTERY
MAY CAUSE A BATTERY
EXPLOSION. TO REDUCE THE
RISK OF A SPARK NEAR THE
BATTERY:
Check the polarity of the battery posts. The POSITIVE (POS, P, +) battery post 7.1
usually has a larger diameter than the NEGATIVE (NEG, N, -) post.
Attach at least a 24-inch (61 cm) long 6-gauge (AWG) insulated battery cable 7.2
to the NEGATIVE (NEG, N, -) battery post.
Connect the POSITIVE (RED) charger clip to the POSITIVE (POS, P, +) post 7.3
of the battery.
Position yourself and the free end of the cable you previously attached to the 7.4
NEGATIVE (NEG, N, -) battery post as far away from the battery as possible –
then connect the NEGATIVE (BLACK) charger clip to the free end of the cable.
Do not face the battery when making the nal connection.7.5
Connect charger AC supply cord to electrical outlet.7.6
When disconnecting the charger, always do so in the reverse order of the 7.7
connecting procedure and break the rst connection while as far away from the
battery as practical.
A marine (boat) battery must be removed and charged on shore. To charge it 7.8
onboard requires equipment specially designed for marine use.
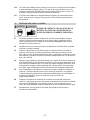
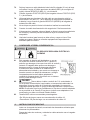
GROUNDING AND AC POWER CORD CONNECTIONS8.
RISK OF ELECTRIC SHOCK OR FIRE.
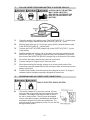
This battery charger is for use on a nominal 120-volt 8.1
circuit and has a grounded plug that looks like the plug
illustrated. The charger must be grounded to reduce
the risk of electric shock. The plug must be plugged
into an outlet that is properly installed and grounded in
accordance with all local codes and ordinances. The
plug pins must t the receptacle (outlet). Do not use with
an ungrounded system.

• 7 •
8.2 Never alter the AC cord or plug provided – if it does not t
the outlet, have a proper grounded outlet installed by a qualied electrician. An
improper connection can result in a risk of an electric shock or electrocution.
NOTE: Pursuant to Canadian Regulations, use of an adapter plug is not
allowed in Canada. Use of an adapter plug in the United States is not
recommended and should not be used.
Recommended minimum AWG size for extension cord:8.3
100 feet long or less - use an 18 gauge extension cord.•
Over 100 feet long - use a 16 gauge extension cord.•
ASSEMBLY INSTRUCTIONS9.
Included with your battery charger are two cord wrap cleats for storage of the
battery cables.
Remove all cord wraps and uncoil the cables prior to using the battery charger.
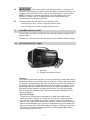
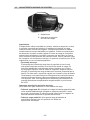
FEATURES/CONTROL PANEL10.
1 2
Ammeter1.
Charge Rate Selector Switch2.
Ammeter
The Ammeter indicates the amount of current, measured in amps, that is being
drawn by the battery. As a battery takes on a charge, it draws less current from
the charger. Correspondingly, the meter will show less current being drawn by
the battery. When the current stops decreasing, the battery is charged. The 2
amp charge rate may indicate some activity on the meter, although the meter
does not have the resolution to display this low rate. For the 2 amp charge
rate, a triangle has been provided. Its accuracy has been calibrated for use
with small batteries.
Percent of Charge•
The percent of charge scale is intended as a visual aid to help simplify
reading the state of charge. It is scaled for use with the 6 amp charge rate
only. For the 2 amp charge rate, use the triangle. The percent of charge is
based on the current drawn by the battery. For this reason, accuracy will vary
with the size and battery type. Typically a 28 ampere hour gel cell battery will
draw less current at the end of the charge cycle than a 140 ampere hour wet
cell battery. This means that the indication for a fully charged large battery
may be slightly less than 100%.

• 8 •
Charge Rate Selector Switch
Use this switch to set the maximum charge rate to one of the following.
2A Slow Charge Rate• – Intended for charging small batteries such as those
commonly used in garden tractors, snow mobiles and motorcycles. The 2A
rate can be used to warm or trickle charge larger batteries.
6A Medium Charge Rate• – Use for charging automotive, marine and deep-
cycle batteries. Not intended for industrial applications.
OPERATING INSTRUCTIONS11.
This battery charger must be properly assembled in
accordance with the assembly instructions before it is used.
The charger does not have an ON/OFF switch. The On and Off commands
are controlled by plugging the DH-6M into a 120V AC electrical wall outlet only
after the battery connections have been made.
Charging
Connect the battery following the precautions listed in sections 6 and 7.1.
Determine the length of time it will take to bring the battery to full charge. 2.
(See the Calculating Charge Time section.)
Select the appropriate settings for your battery.3.
Connect the AC power following the precautions listed in section 8.4.
Manual Charging
This is a manual battery charger. When a manual charge is performed, the
charger will continue to charge and will not shut off. You must keep a visual
check on the ammeter to determine when the battery is charged. Be sure to
monitor the charging process and stop it when the battery is charged. Not
doing so may cause damage to your battery or result in other property damage
or personal injury.
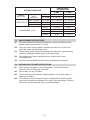
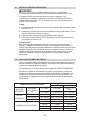
CALCULATING CHARGE TIME12.
Use the following table to more accurately determine the time it will take to
bring a battery to full charge. First, identify where your battery ts into
the chart.
NR means that the charger setting is NOT RECOMMENDED.
Find your battery’s rating on the chart below and note the charge time given for
each charger setting. The times given are for batteries with a 50% charge prior
to recharging. Add more time for severely discharged batteries.

• 9 •
BATTERY SIZE/RATING
CHARGE RATE/
CHARGING TIME
2 AMP 6 AMP
SMALL
BATTERIES
Motorcycle,
garden,
tractor, etc.
6 - 12 AH 2 - 4 hrs 45 min - 1 ¼ hrs
12 - 32 AH 4 - 10 hrs 1¼ – 3½ hrs
CARS/TRUCKS
200 - 315 CCA 40 - 60 RC 11 ¼ - 14 ½ hrs 3¾ – 4¾ hrs
315 - 550 CCA 60 - 85 RC 14 ½ - 18 ¼ hrs 4¾ – 6 hrs
550 - 1000 CCA 80 - 190 RC 18 ¼ - 34 ¾ hrs 6 – 11½ hrs
MARINE/DEEP CYCLE
80 RC 17½ hrs 6 hrs
140 RC 27 hrs 9 hrs
160 RC 30 hrs 10 hrs
180 RC 33 hrs 11 hrs
MAINTENANCE INSTRUCTIONS13.
After use and before performing maintenance, unplug and disconnect the 13.1
battery charger (see sections 6, 7 and 8).
Use a dry cloth to wipe all battery corrosion and other dirt or oil from the 13.2
terminals, cords, and the charger case.
Ensure that all of the charger components are in place and in good working 13.3
condition, including the plastic boots on the battery clips.
Servicing does not require opening the unit, as there are no user- 13.4
serviceable parts.
All other servicing should be performed by qualied service personal.13.5
MOVING AND STORAGE INSTRUCTIONS14.
Store charger unplugged, in an upright position. Cord will still conduct 14.1
electricity until it is unplugged from outlet.
Store inside, in a dry, cool place.14.2
Do not store clips on the handle, clipped together, on or around metal, or 14.3
clipped to the cables.
If the charger is moved around the shop or transported to another location, 14.4
take care to avoid/prevent damage to the cords, clips and charger. Failure to
do so could result in personal injury or property damage.

• 10 •
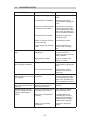
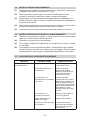
TROUBLESHOOTING15.
PROBLEM POSSIBLE CAUSE REASON/SOLUTION
No reading on the ammeter. Charger is not plugged in.
No power at the receptacle.
Clips are not making a good
connection to the battery.
Connections are reversed.
Battery is defective (will not
accept a charge).
2 amp charge rate is being
used.
Plug the charger into an AC
outlet.
Check for open fuse or
circuit breaker supplying AC
outlet.
Check for poor connection
to battery and frame. Make
sure connection points are
clean. Rock clips back and
forth for a better connection.
Unplug the charger and
reverse the clips.
Have battery checked.
Ammeter may show no
activity at the 2A charge
rate.
Ammeter reading stays
high.
Battery is severely
discharged.
Wrong battery voltage.
Continue charging battery
for two more hours. If
problem continues have the
battery checked.
Verify the voltage of the
battery is 12 volts.
Charger will not turn on
when properly connected.
AC outlet is dead.
Poor electrical connection.
Check for open fuse or
circuit breaker supplying AC
outlet.
Check power cord and
extension cord for loose
tting plug.
The battery is connected
and the charger is on, but is
not charging.
Clips are not making a good
connection.
Check for poor connection
at battery and frame. Make
sure connecting points are
clean. Rock clips back and
forth for a better connection.
The measured current is
much lower than what was
selected.
The charger reached the
maximum voltage and is
reducing the current.
No problem, this is a normal
condition.
Ammeter reads less than
selected charge rate when
charging a discharged
battery
Extension cord is too long or
wire gauge is too small.
Weak cell or sulfated plate
in battery.
Battery is only partially
discharged.
Use a shorter or heavier
gauge extension cord.
A sulfated battery will
eventually take a normal
charge if left connected. If
the battery will not take a
charge, have it checked.
Continue to charge the
battery.

• 11 •
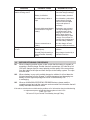
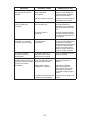
PROBLEM POSSIBLE CAUSE REASON/SOLUTION
The charger is making an
audible clicking sound.
Circuit breaker is cycling.
Battery is defective.
Shorted battery cables or
clips.
Severely discharged battery,
but otherwise it is a good
battery.
Reverse connections at
battery.
The settings may be wrong.
Check the charger settings.
Have the battery checked.
Circuit breaker cycles when
current draw is too high.
Check for shorted cables
or clips and replace if
necessary.
The battery may not want
to accept a charge due to
a run-down state. Allow
charging to continue until
battery has a chance to
recover sufciently to take
a charge. If more than 20
minutes, stop charging and
have the battery checked.
Shut the charger off and
correct the lead connections.
Charger makes a loud buzz
or hum.
Transformer laminations
vibrate (buzz).
Shorted Diode Assembly or
Output Rectier Assembly
(hum).
No problem, this is a normal
condition.
Have charger checked by a
qualied technician.
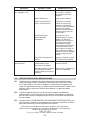
BEFORE RETURNING FOR REPAIRS16.
When a charging problem arises, make certain that the battery is capable of 16.1
accepting a normal charge. Double check all connections, AC outlet for a full
120-volts, charger clips for correct polarity and the quality of the connections
from the cables to the clips and from the clips to the battery system. The clips
must be clean.
When a battery is very cold, partially charged or sulfated, it will not draw the 16.2
full rated amperes from the charger. It is both dangerous and damaging to a
battery to force higher amperage into it than it can effectively use
in recharging.
When an UNKNOWN OPERATING PROBLEM arises, please read the 16.3
complete manual and call the customer service number for information that will
usually eliminate the need for return.
If the above solutions do not eliminate the problem or for information about troubleshooting
or replacement parts, call toll-free from anywhere in the U.S.A.
1-800-732-7764
7:00 am to 5:00 pm Central Time Monday through Friday

• 12 •
IMPORTANTE: LEA Y GUARDE ESTE MANUAL DE INSTRUCCIONES Y
SEGURIDAD.
GUARDE ESTAS INSTRUCCIONES: El DH-6M cargador ofrece una amplia
gama de características para satisfacer sus necesidades. Este manual le
mostrará cómo utilizar su cargador en forma segura y efectiva. Por favor, lea,
comprenda y siga estas instrucciones y precauciones cuidadosamente, ya que
este manual contiene instrucciones operativas y de seguridad de importancia.
Los mensajes de seguridad representados en este manual contienen palabras
guía, un mensaje y una gura.
La palabra guía indica el nivel de peligro en determinada situación.
Indica una inminente situación de riesgo que, si no se evita,
resultaría mortal o de serios perjuicios al operador o
personas alrededor.
Indica una situación potencialmente riesgoso que, si no se evita,
podría resultar o de serios perjuicios al operador o
personas alrededor.
Indica una situación potencialmente peligrosa que, de no evitarse,
podría resultar en menores o serio daños al usuario y
terceras personas.
Indica una situación potencialmente peligrosa que, de no evitarse,
podría causar daño al equipo, al vehículo y propiedades alrededor.
Los mensajes estipulados en este manual se describen dos tipos de estilo.
Los que aparecen sin número indican el riesgo.•
Aquellos que aparecen numerados, indican cómo evitar los riesgos.•
La gura muestra una descripción gráca del potencial de riesgo.
Conforme a la propuesta 65 de California, este producto contiene
químicos de los cuales en el Estado de California se tiene
conocimiento que provocan cáncer y malformaciones congénitas u
otras lesiones reproductivas.
PELIGRO
ADVERTENCIA
ATENCIÓN
IMPORTANTE
ADVERTENCIA

• 13 •
INSTRUCCIONES IMPORTANTES DE SEGURIDAD - GUARDE ESTAS 1.
INSTRUCCIONES - Este manual contiene instrucciones operativas y de
seguridad de importancia
EL RIESGO DE DESCARGA ELÉCTRICA O
INCENDIO
Manténgase alejado de los niños.1.1
No exponga el cargador a la lluvia o a la nieve.1.2
Utilice solamente accesorios recomendados. El uso de un accesorio no 1.3
recomendado o suministrado por el fabricante del cargador de baterías puede
provocar riesgo de incendio, descarga eléctrica o lesiones a personas o daño
a la propiedad.
Para reducir el riesgo de daños al enchufe o cable eléctrico, jale del enchufe 1.4
en lugar de jalar del cable al desconectar el cargador.
No se debe utilizar un alargador a menos que resulte absolutamente 1.5
necesario. El uso de un alargador inadecuado puede provocar riesgo de
incendio o descarga eléctrica. En caso de que deba utilizarse un alargador,
asegúrese de que:
Los pasadores en el enchufe del alargador posean el mismo número, •
tamaño y forma que aquellos presentes en el enchufe del cargador.
El alargador se encuentre correctamente conectado y en buenas •
condiciones eléctricas.
El tamaño del cable sea lo sucientemente extenso para el amperaje en •
C.A. del cargador como se especica en la sección 8.
Para reducir el riesgo de descarga eléctrica, desenchufe el cargador 1.6
del tomacorriente antes de intentar llevar a cabo cualquier actividad de
mantenimiento o limpieza. El simple apagado de los controles no reducirá
este riesgo.
No utilice el cargador si el mismo posee un enchufe o cable dañado; 1.7
substituya el cable o el enchufe inmediatamente por una persona calicada en
el ramo. (Comuníquese con el servicio al cliente al: 1-800-732-7764.)
No utilice el cargador si el mismo recibió un golpe fuerte, si se cayó o si sufrió 1.8
daños de cualquier otra forma; hágalo revisar por una persona capacitada que
efectúe reparaciones. (Comuníquese con el servicio al cliente al:
1-800-732-7764.)
No desarme el cargador; hágalo revisar por una persona capacitada que 1.9
efectúe reparaciones cuando necesite servicio de mantenimiento o una
reparación. Volver a ensamblar el cargador en forma incorrecta puede
provocar riesgo de incendio o descarga eléctrica. (Comuníquese con el
servicio al cliente al: 1-800-732-7764.)

• 14 •
RIESGO DE GASES EXPLOSIVOS.
RESULTA PELIGROSO TRABAJAR EN FORMA CERCANA A UNA BATERÍA 1.10
DE PLOMO. LAS BATERÍAS GENERAN GASES EXPLOSIVOS DURANTE
SU NORMAL FUNCIONAMIENTO. POR ESTE MOTIVO, RESULTA DE SUMA
IMPORTANCIA QUE SIGA LAS INSTRUCCIONES CADA VEZ QUE UTILIZA
EL CARGADOR.
Para reducir el riesgo de explosión de una batería, siga estas instrucciones 1.11
y aquellas publicadas por el fabricante de la batería y por el fabricante de
cualquier equipo que intente utilizar en la proximidad de la batería. Revise las
pautas de precaución en estos productos y en el motor.
Este cargador está equipado con partes, tales como, interruptores y 1.12
cortacircuitos, que tienden a originar chispas y cortos. Si se utiliza en la
cochera, utilice el cargador 18 pulgadas o más del nivel del suelo.
PRECAUCIONES PERSONALES2.
RIESGO DE GASES EXPLOSIVOS.
NUNCA fume o permita la presencia de chispas o llamas en la proximidad de 2.1
una batería o motor.
No utilice elementos personales de metal tales como anillos, pulseras, collares 2.2
y relojes al trabajar con una batería de plomo-ácido. Una batería de plomo-
ácido puede producir una corriente de cortocircuito lo sucientemente elevada
como para soldar un anillo o provocar efectos similares sobre el metal,
causando una quemadura de gravedad.
Tenga especial cuidado para reducir el riesgo de dejar caer una herramienta 2.3
de metal sobre la batería. Esto podría provocar chispas o un cortocircuito en la
batería o en cualquier otra pieza eléctrica que podría provocar una explosión.
Utilice este cargador solamente para cargar baterías de PLOMO-ÁCIDO. Este 2.4
cargador no está destinado a suministrar energía a sistemas eléctricos de baja
tensión más que en una aplicación de un motor de arranque. No utilice este
cargador de batería para cargar baterías de pila seca que por lo general se
utilizan con artefactos domésticos. Estas baterías podrían explotar y provocar
lesiones a personas o daño a la propiedad.
NUNCA cargue una batería congelada.2.5
NUNCA sobrecargue una batería.2.6
Considere la idea de que alguna persona se encuentre cerca suyo para poder 2.7
ayudarlo cuando trabaje en forma cercana a una batería de plomo-ácido.
Cuente con una gran cantidad de agua potable y jabón a mano en caso de 2.8
que el ácido de la batería tenga contacto con su piel, ropa u ojos.
Utilice protección visual y corporal completa, incluyendo gafas de seguridad y 2.9
prendas de protección. Evite tocar sus ojos mientras trabaje en forma cercana
a la batería.

• 15 •
Si el ácido de la batería tiene contacto con su piel o su ropa, lave de inmediato 2.10
el área afectada con agua y jabón. En caso de que ingrese ácido en un ojo,
sumerja el mismo de inmediato bajo agua potable corriente por al menos 10
minutos y obtenga atención médica en forma inmediata.
Si el ácido de la batería es accidentalmente ingerido, se recomienda beber 2.11
leche, clara de huevo o agua. NO provoque vómito. Busque ayuda médica
de inmediato.
PREPARACIÓN PARA LA CARGA 3.
RIESGO DE CONTACTO CON EL ÁCIDO DE LA
BATERÍA. EL ÁCIDO DE LA BATERÍA ES UN
ÁCIDO SULFÚRICO ALTAMENTE CORROSIVO.
Si resulta necesario extraer la batería del vehículo para cargarla, siempre 3.1
retire el terminal con descarga a tierra en primer lugar. Asegúrese de que
todos los accesorios en el vehículo se encuentren apagados para evitar la
formación de arcos eléctricos.
Asegúrese de que el área que rodea a la batería se encuentre bien ventilada 3.2
mientras se carga la batería.
Limpie los terminales de la batería antes de cargar la batería. Durante la 3.3
limpieza, evite que la corrosión producida por aire tenga contacto con sus
ojos, nariz y boca. Utilice bicarbonato de sodio y agua para neutralizar el ácido
de la batería y ayudar a eliminar la corrosión producida por aire. No toque sus
ojos, nariz o boca.
Agregue agua destilada a cada pila hasta que el ácido de la batería alcance el 3.4
nivel especicado por el fabricante de la batería. No provoque derrames. En lo
que concierne a baterías que no cuentan con tapas extraíbles para pilas, tales
como baterías de plomo-ácido reguladas por válvulas (VRLA, por sus siglas
en inglés), siga cuidadosamente las instrucciones de recarga del fabricante.
Lea, comprenda y siga todas las instrucciones para el cargador, la batería, el 3.5
vehículo y cualquier equipo que se utilice cerca de la batería y el cargador.
Controle todas las precauciones especícas establecidas por el fabricante de
la batería al realizar la carga, así también como los índices de
carga recomendados.
Determine la tensión de la batería al consultar el manual del usuario del 3.6
vehículo y asegúrese de que el interruptor de selección de la tensión de salida
se encuentre establecido en la tensión correcta. Si el cargador posee un
índice de carga ajustable, cargue la batería en el menor índice en primer lugar.
Asegúrese de que los ganchos del cable del cargador se encuentren 3.7
fuertemente conectados.

• 16 •
UBICACIÓN DEL CARGADOR4.
RIESGO DE CONTACTO CON EL
ÁCIDO DE LA BATERÍA.
Ubique el cargador a la mayor distancia posible de la batería como lo permitan 4.1
los cables de CC.
Nunca ubique el cargador directamente por encima de la batería que se carga; 4.2
los gases de la batería corroerán y dañarán el cargador.
No ubique la batería encima del cargador.4.3
Nunca permita que el ácido de la batería gotee sobre el cargador al leer el 4.4
peso especíco del electrolito o al cargar la batería.
No utilice el cargador en un área cerrada o restrinja la ventilación en 4.5
cualquier forma.
PRECAUCIONES DE CONEXIÓN EN CC5.
Conecte y desconecte los ganchos de salida C.C. sólo después de haber 5.1
establecido todos los interruptores del cargador a la posición de “apagado” (si
es aplicable) y de haber desconectado el enchufe de C.A. del tomacorriente
eléctrico. Nunca permita que los ganchos tengan contacto entre sí.
Sujete los ganchos a la batería y al chasis, como se indica en las 5.2
secciónes 6 y 7.
SIGA ESTOS PASOS CUANDO LA BATERÍA ESTÉ COLOCADA EN 6.
EL VEHÍCULO
UNA CHISPA PROVOCADA CERCA
DE LA BATERÍA PUEDE CAUSAR
LA EXPLOSIÓN DE LA BATERÍA.
PARA REDUCIR EL RIESGO DE
PROVOCAR CHISPAS CERCA DE
LA BATERÍA:
NEGATIVE GROUNDED SYSTEM

• 17 •
Ubique los cables de C.A. y C.C. para reducir el riesgo de daños a la cubierta, 6.1
a la puerta y a las piezas móviles o calientes del motor. NOTA: Si es necesario
cerrar el cofre durante el proceso de carga, asegúrese que el cofre no toque
parte metálica de la batería o pele los cables.
Manténgase alejado de las paletas del ventilador, correas, poleas y otras 6.2
piezas que podrían provocar lesiones.
Verique la polaridad de los bornes de la batería. El borne POSITIVO (POS, P, 6.3
+) de la batería generalmente posee un diámetro mayor al borne NEGATIVO
(NEG, N, -).
Determine qué borne de la batería hace descarga a tierra (se encuentra 6.4
conectado) con el chasis. Si el borne negativo hace descarga a tierra con el
chasis (como en la mayor parte de los vehículos), ver el paso 6.5. Si el borne
positivo hace descarga a tierra con el chasis, ver el paso 6.6.
En un vehículo con descarga a tierra por borne negativo, conecte el gancho 6.5
POSITIVO (ROJO) del cargador de batería al borne POSITIVO (POS, P, +)
sin descarga a tierra de la batería. Conecte el gancho NEGATIVO (NEGRO)
al chasis del vehículo o al bloque motor alejado de la batería. No conecte el
gancho al carburador, líneas de combustible o cuerpos metálicos. Conecte a
una pieza metálica de calibre grueso del marco o del bloque motor.
En un vehículo con descarga a tierra por borne positivo, conecte el gancho 6.6
NEGATIVO (NEGRO) del cargador de batería al borne NEGATIVO (NEG, N,
-) sin descarga a tierra de la batería. Conecte el gancho POSITIVO (ROJO)
al chasis del vehículo o al bloque motor alejado de la batería. No conecte al
carburador, líneas de combustible o cuerpos metálicos. Conecte a una pieza
metálica de calibre grueso del marco o del bloque motor.
Conecte el condón de alimentación del cargador de CA al tomacorriente.6.7
Al desconectar el cargador, apague todos los interruptores, desconecte el 6.8
cable de C.A., retire el gancho del chasis del vehículo y luego retire el gancho
del terminal perteneciente a la batería.
Ver la sección CÁLCULO DEL TIEMPO DE CARGA por la información sobre 6.9
la duración de carga.
SIGA ESTOS PASOS CUANDO LA BATERÍA SE ENCUENTRE FUERA 7.
DEL VEHÍCULO
UNA CHISPA PROVOCADA CERCA
DE LA BATERÍA PUEDE CAUSAR
LA EXPLOSIÓN DE LA BATERÍA.
PARA REDUCIR EL RIESGO DE
PROVOCAR CHISPAS CERCA DE
LA BATERÍA:
Verique la polaridad de los bornes de la batería. El borne POSITIVO (POS, P, 7.1
+) de la batería generalmente posee un diámetro mayor al borne NEGATIVO
(NEG, N, -).

• 18 •
Sujete al menos un cable aislado de batería de 24 pulgadas (61 cm) de largo 7.2
con calibre 6 según el Calibre americano de cables (AWG, por sus siglas en
inglés) al borne NEGATIVO (NEG, N, -) de la batería.
Conecte el gancho POSITIVO (ROJO) del cargador al borne POSITIVO (POS, 7.3
P, +) de la batería.
Ubíquese junto con el extremo libre del cable que previamente sujetó al 7.4
borne NEGATIVO (NEG, N, -) de la batería a la mayor distancia posible de
la batería. Luego conecte el gancho NEGATIVO (NEGRO) del cargador al
extremo libre del cable.
No se ubique en posición frontal a la batería al realizar la conexión nal.7.5
Conecte el condón de alimentación del cargador de CA al tomacorriente.7.6
Al desconectar el cargador, siempre hágalo en forma inversa al procedimiento 7.7
de conexión y realice la primera conexión tan lejos de la batería como
sea posible.
Una batería marina (para barcos) se debe retirar y cargar en tierra. Para 7.8
realizar una carga a bordo se necesitan equipamientos especialmente
diseñados para uso marino.
CONEXIONES A TIERRA Y ENERGÍA DE CA8.
EL RIESGO DE DESCARGA ELÉCTRICA O
INCENDIO
Este cargador de batería está destinado a un uso en 8.1
un circuito con tensión nominal de 120 V y posee un
enchufe con descarga a tierra que luce como el enchufe
ilustrado. El cargador debe poseer una descarga a
tierra para reducir el riesgo de descargas eléctricas.
El enchufe se debe conectar a un tomacorriente
adecuadamente instalado y que cuente con descarga a
tierra de acuerdo con todas las ordenanzas y códigos.
Los pasadores del enchufe deben adaptarse al
receptáculo (tomacorriente). No utilizar con un sistema
que no posea descarga a tierra.
PELIGRO
8.2 Nunca altere el cable o enchufe de C.A. suministrado, si
no se ajusta al tomacorriente, haga instalar un tomacorriente adecuado con
descarga a tierra por medio de un electricista capacitado. Una conexión
inadecuada puede provocar un riesgo de descarga eléctrica o electrocución.
NOTA: De acuerdo a las Leyes Canadienses, el uso de un enchufe adaptador
no es permitido en el Canada. El uso de un enchufe como adaptador no se
recomienda y no debe ser utilizado Estados Unidos.
Tamaño AWG mínimo recomendado para alargadore:8.3
De 100 pies de largo o menos-use una extensión de calibre 18.•
Para más de 100 pies de largo- use una extensión de calibre 16.•
INSTRUCCIONES DE MONTAJE9.
Junto con el cargador de batería, encontrará dos abrazaderas cubiertas para
almacenar los prensacables.
Desenrede todos los cordones y extienda los cables antes de usar el cargador
de baterías.

• 19 •
CARACTERÍSTICAS/PANEL DE CONTROL10.
Amperímetro1.
Interruptor de selección 2.
del índice de cargah
1 2
Amperímetro
El amperímetro indica la cantidad de corriente, medida en amperios, es decir
la corriente consumida por la batería. A medida que la batería se carga,
consume menos corriente del cargador. Correspondientemente el medidor
mostrará menos corriente absorbida por la batería. Cuando la corriente para
de descender, la batería ya está cargada. El índice de carga de 2 amperios
podría indicar actividad en el medidor a pesar de que este último no cuente
con la resolución para presentar este reducido índice. Para el índice de carga
de 2 amperios, se suministra un triángulo. Su precisión se calibró con el n de
implementar un uso con baterías pequeñas.
Porcentaje de carga•
El porcentaje de la escala de carga tiene el propósito de servir como
una ayuda visual para contribuir en la lectura del estado de carga. Se
encuentra establecido en escala para utilizar solamente con el índice
de carga de 6 amperios. Para el índice de carga de 2 amperios utilice el
triángulo. El porcentaje de carga se basa en la corriente consumida por la
batería. Por esta razón, la precisión variará con el tamaño y tipo de batería.
Generalmente, una batería de gel de 28 amperios-hora consumirá menos
corriente al nal del ciclo de carga que una batería de celda húmeda de
140 amperios- hora. Esto signica que la indicación para una batería de
grandes dimensiones completamente cargada será de un poco menos
del 100%.
Interruptor de selección del índice de carga
Utilice este botón para establecer el índice máximo de carga.
Índice de carga lenta 2A• : destinado a la carga de baterías pequeñas tales
como aquellas habitualmente utilizadas en tractores para jardín, motos
de nieves y motocicletas. El índice 2A puede utiliza como un cargador de
baterías destinado a baterías de grandes dimensiones.
Índice de carga media 6A• : utilice para la carga de baterías de
automóviles, marinas y de ciclo profundo. No utilizar en
aplicaciones industriales.

• 20 •
INSTRUCCIONES DE OPERACIÓN11.
ADVERTENCIA
Este cargador de baterías debe ser ensamblado
correctamente de acuerdo a las instrucciones de ensamble antes de usar.
El cargador carece de interruptor para encendido y apagado. Los
controles para encendido y apagado se controlan conectando DH-6M en
el tomacorriente de 120V C.C. y sólo después de que las conexiones de la
batería se han realizado.
Carga
Conectar la batería teniendo en cuenta las precauciones que guran en las 1.
secciones 6 y 7.
Determinar el tiempo que le llevará completar la carga de la batería. (Ver la 2.
sección Cálculo del Tiempo de Carga.)
Seleccione las conguraciones apropiadas para la batería.3.
Conecte la energía eléctrica de CA teniendo en cuenta las precauciones 4.
que guran en la sección 8.
Carga manual
Este es un cargador de baterías manual. Cuando se realiza una carga
manual, el cargador continuará la carga y no se apagará. Debe realizar un
control visual del amperímetro para determinar cuando la batería se encuentra
cargada. Asegúrese de controlar el proceso de carga y detenerlo cuando la
batería se encuentre cargada. Dejar de llevar esto a cabo podría provocar
daños en la batería u ocasionar otros daños en la propiedad o lesiones
personales.
CÁLCULO DE TIEMPO DE CARGA12.
Utilice la siguiente tabla para determinar con mayor exactitud el tiempo que le
llevará completar la carga de la batería. En primer lugar, identique dónde se
encuentra su batería dentro del gráco.
NR signica que las conguraciones del cargador NO SE RECOMIENDAN.
Encuentre el índice de su batería en el gráco a continuación y observe el
tiempo de carga que corresponde por cada conguración del cargador. Los
tiempos que se informan son para baterías con un 50% de carga antes de
volver a cargar. Agregue más tiempo para las baterías que se descargaron
varias veces.
TAMAÑO/ÍNDICE DE LA BATERÍA
ÍNDICE/TIEMPO DE CARGA
2 AMP 6 AMP
BATERÍAS
PEQUEÑAS
Motocicleta,
tractor de jardín,
etc.
6 - 12 AH 2 - 4 horas
45 min - 1¼
horas
12 - 32 AH 4 - 10 horas 1¼ - 3½ horas
AUTOS/
CAMIONES
200 - 315 CCA 40 - 60 RC 11¼ - 14½ horas 3¾ - 4¾ horas
315 - 550 CCA 60 - 85 RC 14½ - 18¼ horas 4¾ - 6 horas
550 - 1000 CCA 80 - 190 RC 18¼ - 34¾ horas 6 - 11½ horas
MARINA/CICLO PROFUNDO
80 RC 17½ horas 6 horas
140 RC 27 horas 9 horas
160 RC 30 horas 10 horas
180 RC 33 horas 11 horas

• 21 •
INSTRUCCIONES DE MANTENIMIENTO13.
Después de usar y antes de realizar mantenimiento, desenchufe y desconecte 13.1
el cargador de la batería (ver secciones 6, 7 y 8).
Utilice un paño seco para limpiar la corrosión de toda la batería y otra 13.2
suciedad o aceite de los terminales, cables y carcasa del cargador.
Asegúrese de que todas las piezas del cargador estén bien instaladas y en 13.3
buenas condiciones para su función, incluyendo los protectores de plástico de
las pinzas de la batería.
Para realizar mantenimiento no es necesario abrir la unidad, ya que no existen 13.4
piezas a las cuales puede realizarle mantenimiento el usuario.
Cualquier otro servicio debe realizarse por personal calicado en el ramo.13.5
INSTRUCCIONES PARA EL MANEJO Y ALMACENAMIENTO14.
Guárdese desconectado el cargador en forma vertical. El cable conduce carga 14.1
hasta que es desconectado del tomacorriente.
Guárdese en un lugar seco y recomendable.14.2
No se sujeten las pinzas a la agarradera, ni las sujete una con otra, ni al metal 14.3
o a los cables.
Si el cargador se mueve alrededor del taller o se transporta a otra localidad, 14.4
trate de evitar/prevenir daño a los cables,pinzas y al cargador. El ignorar estas
recomendaciones, podría llegar a causarle daños personales o de inmueble.
LOCALIZACIÓN Y SOLUCIÓN DE PROBLEMAS15.
PROBLEM POSSIBLE CAUSE REASON/SOLUTION
No se maniesta la lectura
en el amperímetro.
Cargador desenchufado.
No hay electricidad en el
tomacorriente.
Los ganchos no se
encuentran bien conectados
a la batería.
Las conexiones se
encuentran invertidas.
Batería defectuosa (no
acepta una carga).
Se utiliza un índice de carga
de 2 amperios.
Enchufe el cargador a un
tomacorriente de CA.
Verique la posible
presencia de fusibles
abiertos o disyuntores que
suministren energía al
tomacorriente de CA.
Verique la posible
presencia de una conexión
defectuosa a la batería o al
bastidor. Asegúrese de que
los puntos de conexión estén
limpios. Mueva los ganchos
hacia adelante y hacia
atrás para lograr una mejor
conexión.
Desenchufe el cargador e
invierta los ganchos.
Haga revisar la batería.
El amperímetro podría
dejar de mostrar actividad
en el índice de carga de
mantenimiento.

• 22 •
PROBLEM POSSIBLE CAUSE REASON/SOLUTION
La lectura en el
amperímetro permanece
elevada.
La batería se encuentra
extremadamente
descargada.
Tensión de batería errónea.
Continúe con la carga de la
batería por dos horas más.
Si persiste algún problema,
haga revisar la batería.
Verique que esté utilizando
una batería de 12-voltios.
El cargador no se enciende
incluso al estar bien
conectado.
Tomacorriente de CA fuera
de funcionamiento.
Conexión eléctrica
deciente.
Controle la posible presencia
de fusibles abiertos o
disyuntores que suministren
energía al tomacorriente de
CA.
Controle la posible pérdida
del enchufe perteneciente a
los cables de alimentación o
al alargador.
La batería se encuentra
conectada y el cargador
encendido, pero no carga.
Los ganchos no se
encuentran bien
conectados.
Controle la posible presencia
de una conexión defectuosa
a la batería o al bastidor.
Asegúrese de que los puntos
de conexión estén limpios.
Mueva los ganchos hacia
adelante y hacia atrás para
lograr una mejor conexión
La corriente medida
es mucho menor a la
seleccionada.
El cargador alcanzó su
máxima tensión y está
reduciendo la corriente.
No es un problema, es una
situación habitual.
El amperímetro lee una
cantidad menor al índice de
carga seleccionado cuando
se carga una batería
descargada
El alargador es demasiado
largo o el calibre del cable
es demasiado pequeño.
Batería débil o placa
sulfatada en la batería.
La batería se encuentra sólo
parcialmente descargada.
Utilice un alargador de
calibre más pequeño o
pesado.
Una batería sulfatada
nalmente acepta una
carga normal si se la deja
conectada. Si la batería
no acepta la carga, hágala
revisar.
Continúe con la carga de la
batería.

• 23 •
PROBLEM POSSIBLE CAUSE REASON/SOLUTION
Se escucha un sonido seco
en el cargador (“clic”).
El disyuntor se resetea.
Batería defectuosa.
Cables o ganchos de la
batería en cortocircuito.
Buena batería pero
extremadamente
descargada.
Conexiones inversas en la
batería.
Las conguraciones podrían
ser erróneas. Verique
las conguraciones del
cargador.
Haga revisar la batería.
El disyuntor se resetea
cuando el consumo de
corriente es demasiado
elevado. Controle la posible
presencia de cables o
ganchos cortocircuitados y
reemplace los mismos de
ser necesario.
La batería tal vez no
decida aceptar una carga
debido a un estado de
agotamiento. Permita que
la carga continúe hasta
que la batería tenga la
oportunidad de recuperarse
lo sucientemente como
para aceptar una carga. Si
este período se extiende a
más de 20 minutos, detenga
la carga y haga revisar la
batería.
Apague el cargador y corrija
las conexiones principales.
El cargador realiza un
fuerte zumbido.
Las láminas del
transformador vibran
(provocan un zumbido).
Montaje del diodo o montaje
del recticador de salida
cortocircuitado (provocan un
zumbido).
No es un problema, es una
situación habitual.
Haga revisar el cargador por
un técnico capacitado.
ANTES DE DEVOLVER A REPARACIONES16.
Cuando surja un problema de carga, asegúrese de que la batería puede 16.1
recibir una carga normal. Verica dos veces todas las conexiones, el toma
de CA para obtener 120-voltios completos, los ganchos del cargador para
lograr una polaridad correcta y la calidad de las conexiones de los cables a los
ganchos y de los ganchos al sistema de la batería. Los ganchos deben
estar limpios.
Cuando la batería está muy fría, parcialmente cargada o sulfatada no 16.2
obtendrá todo el índice de amperios del cargador. Es peligroso y perjudicial
para la batería forzar un amperaje mayor al que puede utilizar efectivamente
en una recarga.
Cuando surja un PROBLEMA DE FUNCIONAMIENTO DESCONOCIDO, por 16.3
favor lea todo el manual y comuníquese con el número de atención al cliente
para más información que no haga falta la devolución.
Si las soluciones descriptas no eliminan el problema o por información
sobre la solución de problemas o repuestos, puede llamar a la línea gratuita
desde cualquier lugar de los EE.UU.
1-800-732-7764
7:00 a. m. a 5:00 p. m. hora central de lunes a viernes
-
 1
1
-
 2
2
-
 3
3
-
 4
4
-
 5
5
-
 6
6
-
 7
7
-
 8
8
-
 9
9
-
 10
10
-
 11
11
-
 12
12
-
 13
13
-
 14
14
-
 15
15
-
 16
16
-
 17
17
-
 18
18
-
 19
19
-
 20
20
-
 21
21
-
 22
22
-
 23
23
-
 24
24
-
 25
25
-
 26
26
-
 27
27


DieHard DH-6M Manual de usuario
- Categoría
- Cargadores de batería de coche
- Tipo
- Manual de usuario
en otros idiomas
- English: DieHard DH-6M User manual
Artículos relacionados
Otros documentos
-
Schumacher DH6L 12V Battery Charger El manual del propietario
-
Schumacher Electric SE-1052 Manual de usuario
-
Schumacher Electric SE-4225 Manual de usuario
-
-
-
-