LG VR6480MS El manual del propietario
- Categoría
- Aspiradoras roboticas
- Tipo
- El manual del propietario
Este manual también es adecuado para

5
4
3
2
1
DWG.
No.
TRIG.
DR COMPLETED
도면 DR 완료
완료일 :
LG 전자 (주)
LG Electronics Inc.
UNIT SCALE
1
1
mm
REVIEWEDDESIGNED
RELATED DWG.
CHECKED APPROVED
김 상 목 이 갑 선 김 남 철
18.06.19 18.06.19 18.06.19
MODELING
I
T
L
E
T
APPROVED
승인자
PREPARED
시방자
DATE
년/월/일
REF. NO.
시방 번호
REV. NO.
기호
REVISION DESCRIPTION
변경 사항
RELEASING THIS DRAWING
WITHOUT PERMISSION LG
Electronics SHOULD BE
ACCUSED ACCORDING TO THE
LAWS AND COMPANY RULES.
이 도면은 LG전자의 자산으로 불법
유출시 관계법과 회사규정에 의해 처벌됨.
PDF
ILLUSTRATOR
MFL67680096
Manual,Owners
HIT-N 중남미향
1/1
MFL67680096
<< 주기 >>
1. 재질, 인쇄방법, 인쇄도수, 외곽치수등은 작업표에 준한다.
2. 인쇄내용, 문자크기 및 형상, 선의 굵기 등은 설계에서 제시된 FILM에 준함.
3. 외곽치수는 절단후 치수임.
4. 양산전에 설계 한도를 득할 것.
5. 본 부품에 금지물질이 포함되지 않도록 하고,
상세 내용은 LG(63)-A-5501-34를 만족할 것.
<< NOTES >>
1. Material, printing and exterier size are refer to work tables.
2. Printing, text size and line are based on LG design film.
3. Exterier size on the drawing is cutting line.
4. Before product controlled by criteria sample.
5. The part should not contain prohibited substances(Pb,Cd,Hg,Cr+6,PBB,PBDE)
and details should comply with LG standard of LG(63)-A-5501-34.
가
P/NO. 다
<FRONT>
<BACK>
나
WORK
가
BRAND
LG
-
VR648*****.****GSP
1
나
MODEL
MFL67680072
다
P/NO.
모조지 80g OFFSET 인쇄
MATERIAL AND PRINTING DESCRIPTION
1 1
PRINTING DEGREE
EXTERIER INTERIER
LG MODEL 명
LANGUAGE
PAGE
A5 용지
REMARK
SEC.
140
영어+스페인어
148
148
210

www.lg.com
Copyright © 2018 LG Electronics Inc. All Rights Reserved.
MFL67680096
Before using, please carefully read the Safety Precautions pages to allow for safe operation of
the product. After reading the operation manual, please keep it in an easily accessible location.
Be sure to charge the battery fully before using the product for the first time after purchase.
OWNER’S MANUAL
HOM-BOT
VR6480**

FEATURES
Corner Master
By having adopted a brand new concept design that is appropriate for walls,
the Robot Cleaner's cleaning performance is incredibly efficient.
Learning Mode
The Robot Cleaner is capable of memorizing the cleaning environment via its
Smart Operation feature for smarter cleaning.
Turbo Mode
In the Turbo mode, the Robot Cleaner operates the suction motor and the
brushes at a greater speed giving cleaner results.
When selected, the "Turbo" mode is automatically activated on carpets,
which enables the Robot Cleaner to run more efficiently.
Drawer Mop Plate (Option)
The "Drawer mop plate" makes it much easier for users to fit and remove the
mop without having to turn over the device.
My Space Mode
By commanding it to clean a particular area, the Robot Cleaner quickly
cleans that desired area.
Repeat Cleaning
The Robot Cleaner will continuously clean.
Location Search Function
If the Robot Cleaner is moved from a spot while operating, the device will
automatically search for the previous location and return to the spot from
where it was interrupted.
Zigzag
Cleaning
Cl
l
le
e
e
e
e
LG Smart ThinQ Smartphone Application
You can control the Robot Cleaner from your smartphone.

CONTENTS
1
BEFORE USING
2~6 Safety precautions
7 Included with product
8~9 Parts description - robot cleaner
10~11 Button functions – robot cleaner
12 Display status information
13 Before you start
14 Overview
2
METHOD OF USE
15 How to install the home station
16 How to turn the robot cleaner power
supply on & off
17 How to start and stop cleaning
18~20 How to charge the battery
21 Using Magnetic Wall Strips
22~23 Cleaning modes
24~25 Auxiliary cleaning modes
26 Time setting
27 Scheduled cleaning
28 Mop cleaning (option)
29 Location search function
30~31 Smart diagnosis
32~51 Smart application function
52 Product info initialization
3
HANDLING METHOD AFTER USE
53 Cleaning the dust bin
54 Cleaningthedustbinlter
55 Cleaning the brush
56 Cleaning the sensors/charging
terminals
57 Cleaning the side brush
58 Cleaningtheultramicrobermop
(option)
4
ADDITIONAL INFORMATION
59~61 Troubleshooting
62 Before you call for service
5
REFERENCE
63~64 ProductSpecications
65 Reference items
66 [IEC 62929 Standard] Setting for
Cleaning Performance Test

2
SAFETY PRECAUTIONS
The purpose of the safety precautions described below is for the user to use the product safely and
correctly to prevent any unexpected risk of injury or damage.
WARNING
1. This appliance is not intended for use by persons
(including children) with reduced physical, sensory
or mental capabilities, or lack of experience and
knowledge, unless they have been given supervision or
instruction concerning use of the appliance by a person
responsible for their safety.
2. Children should be supervised to ensure that they do
not play with the appliance.
3. If the supply cord is damaged, it must be replaced by
LG Electronics Service Agent in order to avoid a hazard
4. This appliance can be used by children aged from 8
years and above and persons with reduced physical,
sensory or mental capabilities or lack of experience
and knowledge if they have been given supervision or
instruction concerning use of the appliance in a safe
way and understand the hazards involved. Children
shall not play with the appliance. Cleaning and user
maintenance must not be made by children without
supervision.
Basic safety precautions
After reading this manual, please keep it in an easily accessible location.
This is the safety alert symbol. This symbol alerts you to potential hazards that can
result in property damage and/or serious bodily harm or death.
Indicates a hazardous situation which, if not avoided, could result in death or
serious injury.
Indicates a hazardous situation which, if not avoided, could result in minor or
moderate injury.
WARNING
CAUTION

3
SAFETY PRECAUTIONS
WARNING
For your safety, do not
remove the battery from the
Robot Cleaner. If you need to
replace the battery of the
Robot Cleaner, take it to the
nearest authorized LG
Electronics service center or
dealer for assistance.
Failure to follow this warning
cancausereorproductfailure.
Never use the Robot Cleaner
with a battery and/or home
station from any other
product than the Robot
Cleaner.
Doingsocancausereor
product failure.
Make sure the power cord of
the home station is not
crushed under a heavy object
or damaged by contact with
sharp objects.
Failure to follow this warning
cancauseelectricshock,reor
product failure. If the power
cord is broken, do not plug it in.
Take the product to an LG
Electronics Authorised service
repairer.
Do not place the home station
and the Robot Cleaner near a
heating device.
Doing so can cause product
deformation,re,orproduct
failure.
Do not use the Robot Cleaner
when candles or fragile
objects are placed on the
oor.
Doingsocancausereor
product failure.
Always use a dedicated
power outlet with a 10 amp
rating.
If multiple appliances are
connected to an outlet
simultaneously, they can
generate enough heat to cause
are.
Do not force the power plug
to bend. Do not use the
power plug when it has been
damaged or loosened.
Doingsocancausereor
product failure.
When pulling out the home
station power plug, always
pull it out by grabbing the
plug, not the cord. When
pulling out the power plug,
do not to touch the prongs
with your ngers.
Doing so can cause an electric
shock.
Do not touch the power plug
with wet hands.
Doing so can cause electric
shock.
Do not allow children or pets
to play with or rest upon the
Robot Cleaner at any time. Do
not use the Robot Cleaner
while an object is hanging
from it.
Doing so can cause injury or
product damage.

4
SAFETY PRECAUTIONS
Do not insert any part of the
body, such as a hand or foot,
below the brush or wheels of
the Robot Cleaner while in
use.
Doing so can cause injury or
product damage.
Do not operate the Robot
Cleaner on narrow and high
furniture such as a wardrobe,
refrigerator, desk, table, etc.
Doing so can cause injury,
product failure or damage which
is not covered by the warranty.
Do not operate the Robot
Cleaner in a room where a
child is sleeping.
Doing so can cause injury or
product damage.
Do not leave Children or pets
near the Robot Cleaner
unsupervised.
Doing so can cause injury or
product damage.
This product is intended for indoor domestic
home use and should not be used in mobile
applications. it should not be used in commercial
applications such as workshops or garages or
around indoor swimming pools, etc.
Do not activate the device on
a oor that has more than a
10 degree incline.
The device may not work
properly.
WARNING
Gasoline
Detergent
Do not spray or use
inammable materials,
surfactants, or drinking water
in the vicinity of the Robot
Cleaner.
Doingsocancausereor
product failure.
*Inammablematerials:
gasoline, thinner, etc.
*Surfactant:detergent,articles
for bath, etc.
Turn the power supply off
immediately if any abnormal
sound, odor, or smoke is
generated from the Robot
Cleaner by removing it from
the home station and turning
off the main switch on the
rear side of the unit.
Failuretodosocancausere
or product failure.

5
SAFETY PRECAUTIONS
CAUTION
Frequently empty the dust bin
and maintain its cleanliness.
The dust collected in the dust
bin can trigger allergies and
may contain harmful insects. it
should be cleaned after each
use.
Use the Robot Cleaner
indoors only.
Using it outdoors can cause
product failure and irreparable
damage to the unit.
Close the cover of the dust
bin on the main unit before
starting cleaning.
If the cover is not closed, it can
cause injury or product damage.
DO NOT use the Robot
Cleaner around a banister,
staircase or any other
dangerous place.
Doing so could cause injury or
damage to the unit.
Do not drop the Robot
Cleaner or subject it to strong
impacts.
Doing so can cause injury or
product failure not covered by
the warranty.
Do not expose the Robot
Cleaner to cold temperatures
(less than -5 ˚C) for a long
period of time.
Doing so can cause product
failure.
Remove any cables or string
from the oor before starting.
Cable or string can get tangled
in the wheels of Robot Cleaner
and cause product failure or the
cord of an appliance can be
disconnected.
Make sure the Robot Cleaner
is not put on a table or desk,
with the power ON.
It may result in an injury or
damage to the product.
In rare cases, the Robot
Cleaner’s brush can damage
carpet. If this happens,
immediately stop the cleaning
operation.
When a carpet has long tassels,
the tassels can be damaged.
Do not let the main unit and
charging terminal of the
home station come into
contact with metallic objects.
Doing so can cause product
failure.
Do not allow the Robot
Cleaner to sweep up liquids,
blades, thumb tacks, sharp
objects or ashes, hot or cold.
etc.
These items can cause product
failure or damage.
Do not put sharp objects into
the opening of the Robot
Cleaner’s ultrasonic sensors.
Doing so can cause product
failure.
Do not put water, detergent,
etc. into or onto the Robot
Cleaner.
Doing so can cause product
failure. Do not put any water or
detergent on the Robot Cleaner.
If liquids get inside of the Robot
Cleaner, turn off the power
supply and contact an LG
Electronics sales agent or
customer care center.
Do not use the Robot Cleaner
when the dust bin is
completely full.
Doing so can cause product
failure.

6
SAFETY PRECAUTIONS
Checkthefollowingitemsbeforeuse:
•Empty the dust bin after each operation or prior to it filling up.
•Remove any cables or long strings from the floor.
•Remove any moisture from the floor before cleaning.
•Close the cover of the dust bin before cleaning.
•Remove fragile or unnecessary objects from the room to be cleaned.
For example, remove expensive ceramics and valuables from the floor.
•Confirm whether the battery has sufficient power, and if it is low, recharge it.
•Close the doors of any room that you do not want the Robot Cleaner to enter.
During cleaning, the Robot Cleaner may enter another room and continue cleaning.
•Do not use this product in the room where a child is sleeping alone. The child can be hurt or
woken.
•Remove towels, foot towel or any other thin cloth from the floor as they can get caught by the
brush.
•Before starting the device, it's better to remove carpets that are thicker than 20 mm as they
may cause it to malfunction.
•Please close any balcony doors as the wheels may get stuck while cleaning.
Tip
CAUTION
If the oor is wet or has wet
spots, wipe them up before
using the Robot Cleaner. Do
not use the Robot Cleaner on
a wet surface.
Doing so can cause product
failure.
When attaching the mop,
ensure that it is tted
correctly so that it does not
block the lower camera
sensor.
Blocking the bottom camera
sensor may not allow the
product to work correctly.
When the robot cleaner is
operating, it may hit the chair
leg, desk leg, table leg or
other narrow pieces of
furniture.
For quicker and better cleaning,
place the dining chairs on top of
the dining table.
NOTE: Very low thresholds
will allow the Robot cleaner
to go over them and perhaps
into an undesirable location.
Make sure that all the doors
of the rooms that are not to
be cleaned are closed.
To save energy when the
Roboking is not in use for
longer periods, turn off the
power switch, and turn on the
power switch again just prior
to using the Robot cleaner
again.

7
INCLUDED WITH PRODUCT
►Appearance and accessories may vary depending on model.
*Available on some models.
Dust bin filter* (spare) Manual Magnetic Wall strip*
(3.2 ft / 2 m)
Cleaning Tool
Cleaning brush
(on dust bin cover)
Mop plate*
for cleaning
sensors
for cleaning
the filter
Ultra microfiber mop*
(2 pieces)
Batteries for remote controller
(2 units of AAA size)
Home station
Robot Cleaner
Remote controller
Side brush*
(2 pieces)
Pet Brush*
Adapter
Manual

8
PARTS DESCRIPTION - ROBOT CLEANER
►Figures can be different from actual objects.
Plan view
Front view
Rear view
Bottom view
Upper camera sensor
Dust bin cover
Display & function buttons
Dust bin compartment release button
Ultrasonic sensors
Front camera
LED
Obstacle detecting sensor window Detecting
sensors of home station & Receiving sensors of
remote controller
Main Power switch
Ventilation port
Cliff detection sensors
Side brush
Charging terminals
Brush
Wheel
Battery housing
Lower camera sensor

9
PART DESCRIPTION – HOME STATION / DUST BIN
►Figures can be different from actual objects.
Home station
Dust bin
Remote controller holder
Charging terminal
Adapter jack
Sponge filter
Dust bin handle
Cleaning brush
Dust bin cover
Suction port flap
EPA filter
Filter cover
Dust bin lid opening
button
Power cord fixing hook

10
BUTTON FUNCTIONS – ROBOT CLEANER
•If the button is pressed, ‘Turbo Mode’ will be set with a voice confirmation.
•If the button is pressed whilst in ‘Turbo Mode’, it will be canceled.
•Used to change the clean mode setting.
•If the machine is at the Home Station, ‘Spot Clean’ option is not available.
•The 'My Space' mode can only be selected by remote control (when the Robot
Cleaner is not on the home station).
•Used to return the Robot Cleaner back to the home station for charging.
•If cleaning is finished or the battery is low, the Robot Cleaner will return to the
Home Station by itself to recharge its battery.
•Pressing the ‘Turbo' and 'Mode' button for 3 seconds will activate or deactivate
the Lock function.
•If 'Lock' is ON, a voice announcement "Key lock has already been set" will be
heard each time a button is pressed.
•Used to turn the power on from Standby, start or stop cleaning.
•If the button is pressed whilst the unit is powered ON, it will start cleaning.
•If button is pressed during the cleaning, it will stop the cleaning.
•If the button is pressed for about 2 sec. whilst the power is ON, the power will be
returned to Standby.
•If the button is pressed in 'Smart Diagnosis' mode, it will end the diagnosis.
TURBO
MODE
HOME
BUTTON LOCK
On/Off
START/STOP
•Pressing the ‘HOME’ button for 3 seconds will change the language for the voice
message. (English, Spanish, Italian, French, German, Danish, Czech, Hungarian)
•You cannot use this function with the button on the remote controller.
•Press and hold down the Turbo button for 3 seconds to activate the registration
mode with a voice message.
•This mode is for registering the product to Robot Cleaner over Wi-Fi.
Language
Change
Product
registration
(Wi-Fi)
•Press and hold down the MODE and CHARGE buttons for 3 seconds to activate
or deactivate the front camera.
•Home Guard and Home View will not be available with the front camera disabled.
Front camera
On/OFF

11
BUTTON FUNCTIONS – REMOTE CONTROLLER
•With the machine's power OFF, the Remote Controller will not work.
•To turn the power ON/OFF, use the 'START/STOP' button on the upper section of the Robot
Cleaner or 'Power' button on the Remote Controller.
•The 'Mode', 'My Space' or 'Clock' button can only be used after stopping the Robot Cleaner or
whilst it is charging on the Home station.
Tip
Power
Pressing this button will turn
the power on from Standby
or the power will be returned
to Standby while the power is
ON. (p17)
Home
Used to recharge the Robot
Cleaner by making it return to
the Home Station. (p18)
Turbo
Used to activate or deactivate
'Turbo' mode. (p25)
Start/Stop button
Pressing the button will Start
or Stop the Robot Cleaner, or
confirm a cleaning schedule or
time setting.
My Space
Used to put the Robot Cleaner in
'My Space clean' mode. (p23)
Mute
Used to activate or deactivate
'Mute' mode. (p12)
Diagnosis
Used to run Smart Diagnosis.
Available only when Robot
Cleaner is recharging. (p30)
Mode
Changes the cleaning mode.
(p22)
Directional button
This button enables Manual
Operation and selection of an
area in 'My Space cleaning'
mode.
Repeat
This button allows activating or
deactivating 'Repeat Cleaning'
mode. (p25)
Clock
Used to set the current
time indicated on the Robot
Cleaner. (p26)
Schedule
Used to start cleaning at a
scheduled time.
Pressing the button for 3 sec. will
cancel the scheduled cleaning.
※
Schedule Setting/Cancel
options are available only in
'Charge' mode. (p27)
※
Option

12
DISPLAY STATUS INFORMATION
•Once the clean mode is selected (Zigzag or Cell by Cell) it will be remembered even if the
power is OFF.
•To cancel the reservation, please press the 'Schedule' button on the remote for 3 seconds
while the Robot Cleaner is recharging.
Tip
Mute icon
This icon indicates
whether the Mute is ON
or OFF.
Battery icon
This icon indicates the
residual battery level,
it flashes if the battery
needs recharging.
AM/PM icon
This indicates a.m. or
p.m. according to the
clock setting.
Turbo icon
This display illuminates if
Turbo Mode is activated.
Homing icon
This icon is displayed
if Robot Cleaner is in
'Homing' mode.
My Space cleaning
Is displayed when the
Robot Cleaner runs
My Space cleaning
mode.
Spot cleaning
This icon appears
when Spot cleaning is
selected.
Time display
This indicates the current
and scheduled time.
Repeat cleaning
Displayed if the
machine is in 'Repeat
Cleaning' mode.
Zigzag cleaning
This icon is displayed to
indicate Robot Cleaner is
working in a Zigzag Clean.
Cell by Cell cleaning
This icon is displayed to
indicate Robot Cleaner is
working in a Cell by Cell
cleaning mode.
Schedule icon
Indicates the status
of Schedule/'Once
reservation', or
'Daily reservation'
setting.
Lock icon
Indicates whether
'Lock‘ is activated
or not.
Remote
connection Icon
Is Displayed when the
smartphone connect to
Robot Cleaner.

13
BEFORE YOU START
•Do not use this device in a room where a child is left alone. The child could be injured.
•Remove fragile or unnecessary objects from the room to be cleaned.
Especially, remove expensive ceramics and valuables from the floor.
•Close the cover of the dust bin compartment before cleaning.
•Remove any moisture that might be on the floor.
•Remove cables, strips, towels, mats etc. from the floor so they will not get tangled in the brushes.
•Confirm whether the battery charge is sufficient, and if it is low, recharge it.
•Empty the dust bin before or after each clean, or before it becomes full.
•Close the doors of any room that you do not want the Robot Cleaner to enter. During cleaning,
the Robot Cleaner may enter another room and continue cleaning.
•When the mop is attached, Robot Cleaner will not be able to go over thresholds of 5 mm or higher.
If you are not planning to use the mop for cleaning, remove the mop before using Robot Cleaner.
•Before starting the device, it's better to remove carpets that are thicker than 20 mm as they may cause it
to malfunction.
•Please close any balcony doors as the wheels may get stuck while cleaning.
1. Open the battery cover by lifting the rear hook of the remote controller.
2. Insert two AAA batteries, checking for +, - nodes while loading.
3. Close the battery cover completely so that the batteries will not fall out.
•Only press one button at a time.
•Do not drop or subject it to any impact.
•Do not store it near devices that give off heat, fire or hot air.
•Certain fluorescent lamps, such as the three band radiation lamp, can interfere with the activation of the
remote control. Therefore, use it as far away as possible from such lamps.
•If the remote control is far from the Robot Cleaner when activated, it may fail to operate properly. Use the
remote within 3 m of the Robot Cleaner if possible.
Check these items before cleaning
Loading the remote controller battery
Precautions while using the remote control
–
+
+
–
–
+
+
–
–
+
+
–

14
OVERVIEW
1.5
1.5
2
< Warning > When the Robot Cleaner is operated with the dust bin compartment lid left
open, it can cause an injury or serious damage to the product.
1
Install the home station. (p15)
Insert the power cord plug into an outlet and locate the
station against a wall. If power is not supplied to the
home station, the Robot Cleaner will not charge.
2
Turn on the power supply of the Robot
Cleaner. (p16)
Turn ON the power switch on the rear-left of
Robot Cleaner, and press the ‘START/STOP’
button on the top or press the ‘Power’ button on
the Remote controller.
※
If the power supply is not turned on, refer to
page 16.
3
Check the dust bin.
Check the cleanness of the dust bin before starting
cleaning and close the dust bin compartment cover on
the main unit.
4
Start cleaning. (p17)
Press the ‘START/STOP’ button (or ‘ ’ button on the
Remote Controller) once again while the Robot Cleaner
is turned on. You will hear an announcement of the
cleaning mode and cleaning will begin once the Robot
Cleaner has reversed and turned around.
5
6
Automatic charge. (p18~20)
Use the cleaning mode and auxiliary
functions. (p22~28)
The Robot Cleaner will self-diagnose and automatically
return to the home station to recharge before
the complete discharge of the battery. It takes
approximately three hours to charge the battery.
Use the buttons on Robot cleaner and Remote
Controller to use each cleaning mode and supporting
features Cleaning modes include ZigZag, Cell by Cell,
Spot, My space, and Repeat cleaning; supporting
features include Manual, Scheduled and Microfiber Mop
cleaning.

15
HOW TO INSTALL THE HOME STATION
•Always keep the home station plugged in when in use. If the home station is not plugged in,
the Robot Cleaner will not return to the station to charge automatically.
How to Install the Home Station
< Warning > Do not operate the Robot Cleaner if the Home Station has a damaged cord or
plug, if it is not working properly, or if it has been damaged or dropped. To
avoid electrical hazards, the cord must be replaced by LG Electronics, Inc. or a
qualified service person.
Tip
1. Position the home station against a wall on hard, level flooring to
prevent sliding during docking.
Installing the home station on carpet is not recommended. The
robot cleaner may have difficulty docking.
Remove objects within 1.5 m to the right and left side and within
2 m to the front.
2. Plug the jack into the home station.
3. Plug the power cord into an outlet.
Wrap the remaining power cord around the fixed hook on the back
side of the home station or along the wall surface so that the travel
path of the Robot Cleaner will not be obstructed.
4. Fix the home station against the wall so that it does not move.
Then turn on the power switch.
5. When the remote controller is not used, store it in the remote
controller holder on the home station.
power cord keeper
1.5
1.5
2

16
HOW TO TURN THE ROBOT CLEANER POWER SUPPLY ON & OFF
Make sure the Power Switch is on at the rear-left of the Robot
Cleaner.
If the power is OFF, turn the switch ON.
※
When turning on the power switch, do not press or touch any
button located on the upper section of the Robot Cleaner.
Button operations can be delayed.
※
Turn off the power switch if the Robot Cleaner is not used for a
long period of time in order to protect the battery. The Robotic
Cleaner cannot charge if the main switch is in the "OFF"
position.
With the Standby power of the Robot Cleaner OFF, press 'START/
STOP' button for 1 second until a "Ting" sound is heard or press
'Power' button on the remote controller. In about 10 seconds, the
power will be on and a melody will sound.
※
If 10 minutes elapse without the Robot Cleaner having being
given an active command after being turned on, the power will
automatically return to Standby again.
Press and hold the START/STOP button for two seconds or
Power button on the remote controller while the Robot Cleaner
is turned on. A melody will sound when the power is turned off.
•If the power cannot be turned on, do the following.
- Turn the main power switch OFF, wait 5 seconds then ON again.
- Press the ‘START/STOP’ button or press 'Power' button on the remote controller after the
main power switch has been turned on again
- If the power is not turned on or if there is no display but only the “Ting” sound, put the Robot
Cleaner manually on to the home station as the battery may be flat.
Turning on the main power supply
Turning on from Stand By power.
Turning off the power supply
Tip

17
HOW TO START AND STOP CLEANING
Forbestresults:
•Briefly scan the area to be cleaned for big and small objects that will cause difficulty for the
Robot Cleaner.
•If cleaning is started when the Robot Cleaner is at the home station, the device can rapidly be
returned to the home station as the current home position has been accurately read.
•When the mop plate is installed, to prevent a 2
nd
contamination from the contaminated mop, it
will not go over door sills of 5 mm or higher.
Tip
After the Robot Cleaner main power switch is turned on, press the
START/STOP button to begin cleaning. A melody will sound and
cleaning will begin.
Press the START/STOP button during the cleaning cycle to stop
cleaning.
※
When the ‘START/STOP’ button is pressed while the power supply
of the Robot Cleaner is in Standby, the power will be turned on.
Press the ‘START/STOP’ button one more time to start cleaning.
After the Robot Cleaner is turned on press the ‘
’ button on the
remote controller. A melody will sound and cleaning will begin.
Press the
button during the cleaning cycle to stop cleaning.
※
When the power is off, press the ‘Power’ button on the remote
controller to turn the power on.
※
During cleaning, collisions can happen when the sensor cannot detect objects because of their shape
(Thin chairs and table legs, furniture corner). When this happens, the internal impact detecting sensor will
react by using a backward motion.
※
If the Robot Cleaner is set to start cleaning at a location away from the home station, put the Robot
Cleaner on a flat floor in order to prevent a malfunction of the obstacle detecting sensor. In addition, start
cleaning from a location where there are no obstacles . For example, curtains or walls must be 30 cm
from the Robot Cleaner.
Using the buttons on the Robot Cleaner
Using the remote controller

18
HOW TO CHARGE THE BATTERY
The Robot Cleaner returns to the home station at the end of a
cleaning cycle or when its battery is running low.
※
If 10 minutes elapse without the Robot Cleaner moving or the
battery is too low, the power will be automatically turned OFF.
※
Do NOT turn OFF the Main Power Switch as the battery will
not be recharged. If the machine is returned manually with the
Main Power Switch OFF, it announces an error message, "Main
power switch on the back of the Roboking is turned off. Please
turn the switch on."
※
In the event that the unit returns to the Home Station due to a low
battery during the cleaning, cleaning will be started, after recharging, from the nearest place of the area
which has not been cleaned before. (Page 19)
※
If Robot Cleaner is unable to dock to the home station on its first attempt, it will try again until it docks
successfully.
※
When Robot Cleaner has completed all areas that it can clean, it will return to the home station even
when the battery level is not low.
Method 1. Attach the Robot Cleaner to the home
station by aligning to the front side of the
home station. A melody sound will be
generated along with an audio message to
start charging.
※
If a voice message, "Main power switch
on the back of the Roboking is turned
off. Please turn the switch on." is
announced repeatedly, then turn on the
Main Power Switch.
Method 2. When the 'HOME' button of the remote
control or the Robot Cleaner is pressed,
charging will be prompted by automatically
generating a searching signal and returning
the Robot Cleaner to the home station.
Automatic charging
Manual charging
Takethefollowingprecautionswhenusingthehomestation:
•If foreign material is caught on the charging terminal, charging may not be activated. Wipe the
terminal from time to time with a dry cloth after the power plug is disconnected.(p56)
•To prevent electric shock or damage to the home station, do not touch the charging terminal
with any metallic objects.
•To avoid fire or electric shock, never disassemble or modify the home station.
•Do not to place the Robot cleaner, the home station or power plug near a heating source.
Tip
You can manually charge the battery prior to using the Robot Cleaner for the first time or to charge the
battery during cleaning.
※
If the Robot Cleaner did not start cleaning from the home station or if the Robot Cleaner is manually
charged by pressing the Home button, it may take slightly longer to nd the home station.
※
If the Robot Cleaner is within 10 cm of the front of the charging terminal while the power is turned on from
Standby, it will automatically be returned to the home station and charging will begin.

19
HOW TO CHARGE THE BATTERY
The Battery level is indicated on the Status Display, as follows.
•If recharging is in progress, the Battery Level indicator flashes showing the battery charge status level.
•If recharging is complete, only the 'Battery' and 'Clean Mode' icons are displayed to save the energy.
•Upon the need for recharging, only the first level of the Battery charge level indicator will be on and flashing.
The status indicators show the
different pending conditions
during charging mode.
※
If Robot Cleaner goes back to the Home Station, in need of a charge during
the cleaning mode, the Cleaning mode indicator will continue to flash during
charging to indicate that cleaning was disrupted as the battery required
charging.
- When the 'Clean Mode' lamp continues to flash after recharging is
complete, Robot Cleaner will then resume cleaning the areas which were
not previously completed.
- Pressing the 'Start' button on the Remote Controller or 'Start/Stop' button
on main unit whilst it is recharging, with the 'Clean Mode' lamp flashing,
will also manually force the Robot Cleaner to find and clean the uncovered
areas.
- Pressing the "Start" button on the remote control or the "Start/Stop" button
on the Robot Cleaner after the Charging has completed will make the Robot
Cleaner start to clean from the beginning again.
Remaining Battery Charge Indicator
Flickering
In the case of no existing area
to be cleaned after charging.
In the case of an existing area that the
Robot Cleaner will resume cleaning
when charging has completed.
(ashingCleaningindicator)
Charging is required
Middle
Low
High

20
HOW TO CHARGE THE BATTERY
Check 1:
If the battery is not charging even when the Robot Cleaner is
attached to the home station, check the following items.
- Turn the power switch on the rear-left of the Robot Cleaner
off once and then on again.
- Check the power lamp of the home station.
- Wipe the terminals on the home station with a dry cloth.
(p56)
If the Battery is Not Charging
Power lamp
Charge terminal
Step 1. Press the Power button on the remote. All functions of the
Robot Cleaner are turned off except the recharging mode.
※
After recharging is complete, press the Power button
on the remote to use the Robot Cleaner.
Energy Saving Charging Mode
You can recharge the battery with the Energy Saving mode, if you don't use the Robot Cleaner for a long
period of time or overnight.

21
USING MAGNETIC WALL STRIPS
Use a Magnetic Wall strip to block off areas the robot cleaner should not enter. The Magnetic Wall strip is
only included with some models. To purchase a strip for use with a model that did not include one, or to
purchase additional strips, visit the LG website at www.lg.com.
1. Use a Magnetic Wall strip to block off areas the robot cleaner should not enter.
Magnetic
Wall strip
Magnetic
Wall
Bathroom
Living room
2. Use the Magnetic Wall in areas where the robot cleaner could be damaged or could cause damage to
objects.
※
Place the Magnetic Wall strip at least 6 inches (15 cm) away from the object.
※
Place the Magnetic Wall strips underneath the edges of carpets or mats you don't want cleaned.
※
Do not overlap the ends of the Magnetic Wall strips.
Use the strips:
- Around stairs where the robot cleaner could fall
- Around lamps, plants, or other fragile items
- Around sofas, tables, chairs, or pet bowls to avoid scuffs and impacts
- Around tables, or thick carpets where the robot cleaner wheels could get stuck
6 inches
(15 cm)
6 inches
(15 cm)
Tip
•You can cut the Magnetic Wall strip into shorter lengths. Make sure the Magnetic Wall strips
form a continuous shape when surrounding an object. If the strips do not form a continuous
line, the robot cleaner may have difficulty recognizing them.
•Only use the Magnetic Wall strip provided with the product. Third-party magnetic strips may
not be recognized by the robot cleaner.
•If necessary, use removable tape such as gaffer's tape or painter's tape to keep the Magnetic
Wall strip in place.
• Do not install Magnetic Wall strips near products which are susceptible to magnetic fields,
such as speakers, desktop computers or hard drives, laptops, and some electronics
including CRT TVs.

22
CLEANING MODES
•Once set up, the cleaning mode(Zigzag, Cell by Cell) setting will be maintained even after the
power supply is turned off.
•During operation, if a mode change is required, press the button and then select the mode.
Cleaning will then start from the beginning.
Tip
In ‘Zigzag’ mode, Robot Cleaner repeats a zigzag
operation to clean each and every spot in the
cleaning area.
If you need to quickly clean an area choose ‘Zigzag’
mode.
Press ‘Mode’ button on Remote Controller or main
unit to select ‘Zigzag’ mode and press ‘ ’ button.
※
Factory release default setting is 'Zigzag'.
In 'Cell by Cell' mode, Robot Cleaner cleans the
area by dividing it into rectangular spaces.
For meticulous cleaning, select this mode.
Press ‘Mode’ button on Remote Controller to select
'Cell by Cell' mode and press ‘ ’ button.
The 1st stage:
The maximum outline of 3 m x 3 m of cleaning
area will be cleaned. (The size of the outline may
vary in accordance with the shape of the area to
be cleaned.)
The 2nd stage:
The 2nd stage of Cell by Cell cleaning engages a
Zigzag mode automatically.
When the 1st, and 2nd stages are completed, the
cleaned area will be cleaned again through the
repetition of the above cleaning method as the
device advances to the next part of cleaning area.
Zigzag Cleaning
Cell by Cell Cleaning

23
Pressing 'My Space' on the Remote Controller will set
the My Space cleaning mode with a voice message.
For cleaning of particular spaces, select this mode.
The 1st stage:
Use the Remote Controller to manually set the
parameters of each cleaning block.
※
This cleaning mode will be accepted when the distance of the start and end position is less than 1 m in
area.
CLEANING MODES
•While recharging, you cannot activate ‘My Space’ mode.
•To change the cleaning mode while the Robot Cleaner is in operation, press button first
then select a cleaning mode. The cleaning will then start from the begining.
Tip
My Space
The 2nd stage:
Pressing the ‘ ’ button will then make the Robot Cleaner clean the manually outlined area by itself.
※
Upon failure to correctly outline a zone, a voice will announce, which says "Area does not meet the
specified conditions. Please continue to make specified area for cleaning process."
Use the Remote Controller to assign a zone, again.
※
Upon completion of cleaning for all selected areas, the Robot Cleaner will resume the cleaning mode
(Zigzag or Cell by Cell) which it was last set to.
My Space Cleaning

24
AUXILIARY CLEANING MODES
By pressing a direction key on the Remote Controller, you can move the Robot Cleaner manually.
Robot Cleaner will clean the area, by pressing the forward/backward/left/right buttons accordingly on the
keypad of the remote control.
While in 'Manual' mode, the robot cleaner will run into obstacles placed behind it if the backward key on the
remote is pressed or held down.
Is best used to clean certain parts of the house.
Press 'Mode’ button on the Remote Controller to select 'Spot' mode, which will then indicate on the Status
Display, then press the
button, then Robot Cleaner will start Spot cleaning an area of
1.5 m in diameter around it.
※
While recharging, 'Spot' cannot be selected.
Manual Cleaning
Spot Cleaning
It stops at the started position after
completing the cleaning(takes 4~5 min.).

25
AUXILIARY CLEANING MODES
•Precautions with Smart Operation
- This Learning mode enables memorizing locations with obstacles to help bypass them.
Robot Cleaner memorizes every aspect of the environment it was subjected to from when it
started cleaning from the Home Station to the moment it finishes its course.
- Robot Cleaner learns new conditions again when the location of Home Station has been
changed.
- If the learning mode is accepted, a voice message will say "Environment has been studied
by learning process."
Tip
Pressing the 'Turbo' button on the Remote Controller
or main unit will activate 'Turbo' mode, with a voice
message.
While in 'Turbo' mode, pressing the same button will
cancel 'Turbo' mode, with a voice message.
In 'Turbo' mode, Robot Cleaner runs more intensely
for a powerful clean. Turbo mode will reduce the
battery duration.
※
<Turbo Mode (Floor Master Function)>
‘Turbo mode’ will automatically operate when the
Robot Cleaner cleans carpets.
Pressing 'Repeat' button on Remote Controller will activate 'Repeat'
mode, with a voice message.
While in 'Repeat' mode, pressing the same button will cancel 'Repeat'
mode, with a voice message.
In 'Repeat' mode, Robot Cleaner repeats the cleaning in progress.
The Robot Cleaner is capable of memorising the
cleaning environment through its Learning mode for
an intelligent cleaning operation.
※
'Learning Mode' is available only when the
machine starts cleaning from the Home Station.
Turbo Mode
Repeat Mode
Learning Mode

26
TIME SETTING
You can set or change the current time on the Robot Cleaner.
Pressing ‘Clock' button on the Remote Controller, when the Robot Cleaner is in standby mode,
will start the clock setting mode.
•Any scheduled cleaning will be activated based on the time on the Robot Cleaner. You must
set the clock before setting scheduled cleaning.
•If there is no input for 10 seconds, the clock setting is canceled.
Tip
Selectbyusing‘◄►’buttons
on the Remote Controller.
The function can be heard
through the voice guide.
Flickering
Setthehourbyusing‘▲▼’buttonson
Remote Controller.
Flickering
Settheminutesusing‘▲▼’buttonson
Remote Controller.
Flickering
SettheAM/PMusing‘▲▼’buttonson
Remote Controller.
Pressing ‘Clock’ or ‘ ’ button on
Remote Controller will complete the
time setting process.

27
SCHEDULED CLEANING
You can schedule cleaning so that the Robot Cleaner starts cleaning at a scheduled time.
Pressing 'Schedule' button on Remote Controller, only when the Robot Cleaner is recharging,
will start the scheduled cleaning setting.
•When the scheduled time comes up, Robot Cleaner will start cleaning by itself.
•Scheduled cleaning can only be set when the Robot Cleaner is recharging.
•While recharging, by pressing the 'Schedule' button on the Remote Controller for
3 seconds will cancel the set schedule.
•If there is no input when setting the schedule time within 10 seconds, the setting is canceled.
Tip
Setting/Cancelling the schedule cleaning is only possible when the unit is recharging on the home station
Select a setting by using
'◄►'buttonsonRemote
Controller.
‘Once reservation’
‘Daily reservation’
Flickering
Select ‘Once reservation’ or ‘Daily
reservation’optionbyusing‘▲▼’
buttons on Remote Controller.
A voice message will confirm the
schedule.
Flickering
Setthehourbyusingthe‘▲▼’buttons
on Remote Controller.
Flickering
Settheminutesbyusingthe‘▲▼’
buttons on Remote Controller.
Flickering
SettheAM/PMusingthe‘▲▼’buttons
on Remote Controller.
Pressing ‘Schedule’ or ‘ ’ button on
Remote Controller will then complete
the scheduling process.

28
MOP CLEANING (OPTION)
•To avoid odors, wash any foreign material or dust off the mop after cleaning is completed.
•To avoid staining floors, do not use the ultra microfiber mop to clean when dirt is contaminated
with liquids such as coffee or ink.
•To avoid damage to carpets from the Velcro or dirt transfer from the mop, do not attempt to
clean the carpet while the mop plate or mop is attached.
•Keep the ultra microfiber mop dry. Do not use it on wet surfaces.
If there is moisture on the floor, it can interfere with the navigation and damage the unit.
•Smart Diagnosis feature is not available, when the Mop Plate is attached.
Tip
1. Attach the ultra microfiber mop to the Velcro
of the mop plate as shown in the figure.
2. Firmly slide the Mop Plate into the furrows
until you hear a 'click' sound.
※
Note that, if the Mop Plate is not secured
correctly, it may separate during the
cleaning.
3. It is essential that the fixing hooks on the
Mop Plate align correctly on to the fixing
grooves on the underside of the cleaner.
Formopcleaning,mountthemopandmopplatetotheRobotCleaneraccordingtothefollowinginstructions:
By attaching the ultra microfiber mop, you can
effectively use the Robot Cleaner to remove dust on
hard floor surfaces.
When the mop plate is attached, the Robot Cleaner
will not climb on to carpets or over thresholds, in
order to prevent transferring dirt from the mop.
Fixing hook
Fixing groove
“Click!”
Caution
Do not cover the bottom camera
sensor by mop.
Mounting the Mop and Mop Plate

29
LOCATION SEARCH FUNCTION
•If the power is turned off after the location search function is set, the location search function
will be canceled.
•Location search will be more effective when the Robot Cleaner is closer to the location where
it was moved from.
Tip
※
The navigating function will be activated after
the Robot Cleaner adequately recognizes the
cleaning environment.
Manual Relocation.
1. With the power off, locate the Robot Cleaner near
the location where it was originally moved from.
※
The location search is more effective when the
Robot Cleaner is closer to the location where it
was moved from.
※
If it is moved from its original cleaning position
by more than 1 m, it becomes difficult for
the Robot Cleaner to search for it's previous
location.
2. Press the START/STOP button on the Robot Cleaner or
button on the remote controller.
Robot Cleaner will then start the location search function along with an audio guide.
※
When the location search is successfully completed, it will continue cleaning from where it was moved.
If the location search fails, it will start again from the beginning.
The Robot Cleaner remembers its location while cleaning.
If the user moves the Robot Cleaner while it is operating, it will search for the location it was
moved from by using its navigational location search function before continuing to clean.
Zigzag Zigzag
Zigzag Zigzag
Change location
Location of incident
Location of incident
1
m
1
m
When the location search
function is activated, the
cleaning mode of the status
indicatorwillash
To find exact location,
please step away from the
Roboking.

30
SMART DIAGNOSIS
•Be careful not to touch the Robot Cleaner or disturb its operation before Smart Diagnosis
is complete. If it is accidently interrupted, turn the main power switch OFF then ON again to
resume the diagnosis.
•Smart Diagnosis will not be activated in each of the following cases. In each case, check the
problem and try again.
- Robot Cleaner is detached from Home Station
- Battery level is insufficient
- No Dust Bin Filter is fitted.
- Mop Plate is attached
Tip
1. Smart Diagnosis will operate when the main power switch
of the Robot cleaner and the Home station are turned on,
and the unit docked on the Home station.
※
Smart Diagnosis is only possible when the Robot
Cleaner is attached to the Home Station.
2. Press 'Diagnosis' button on the Remote Controller, then
the process will start with a voice message which says
"Roboking smart diagnosis will be started. Please step
away and clear around 1 meter around the home station."
※
If the Mop Plate is attached, the process will not be
activated.
3. When the Smart Diagnosis has successfully
finished, Robot Cleaner will return back to the
Home Station and inform the result through
a voice message. After the voice message,
pressing the 'HOME' button on the Remote
Controller or main unit will allow the voice
message to be repeated. To terminate the
diagnosing process, press the ‘
’ button on the
Remote Controller or main unit.
※
After the Smart Diagnosis voice message,
the Robot Cleaner will start recharging after
1 minute.
※
If an error is detected with any of the
Sensors whilst in Smart Diagnosis, a voice
message will announce, and the unit will not
return to the home station.
Robot Cleaner uses this Smart Diagnosis feature to run a self-diagnosis.
If any irregularity is found from the diagnosis, please contact the local LG Electronics service
center.
※
During Smart Diagnosis, the Robot Cleaner will move about within a 50 cm radius. So, make sure
no objects are in the way within a 1 m radius around the Home Station, before starting Smart
Diagnosis.

31
SMART DIAGNOSIS
If a voice message is announced after Smart Diagnosis, refer to the following table to take proper actions.
Voice message Measures (for reference)
Roboking smart diagnosis will be started. Please
step away and clear around 1 meter around the home
station.
Clear any object within a 1 m radius around Home
Station, and stay back until the diagnosis is complete.
Smart diagnosis can start when it is being charged.
Please dock Roboking to the home station to charge.
Move Robot cleaner to the Home Station to recharge it.
No defect found during diagnosis.
Diagnosis mode cannot be operated due to a low
battery. Please try again after the battery is charged.
Try the Smart Diagnosis again after recharging the
battery.
Please check if the dust bin is installed with the lter. Open the Dust Bin Cover and examine the bin.
Charging cannot be done due to a problem in infrared
sensor.
Run Smart Diagnosis again and, if the same message is
announced, contact an LG Electronics service center.
Charging cannot be done due to a problem in
ultrasonic sensor.
Run Smart Diagnosis again and, if the same message is
announced, contact an LG Electronics service center.
Charging cannot be done due to a problem in the cliff
detection sensors on the bottom. Please clean the
sensors.
Clean the three Cliff Sensors on the bottom at the front
of the unit.
Please wipe the lower camera sensor on the right
bottom of the Roboking.
Clean the lens of Camera Sensor on the bottom-right.
Please wipe the obstacle detecting sensor window on
the left and right side of the Roboking.
Clean the lens of the Obstacle Sensors on both the left
and right hand sides.
A problem has been found on the Gyro Sensor. Run Smart Diagnosis again and, if the same message is
announced, contact an LG Electronics service center.
Please check for dirt on the left wheel. Check for foreign materials on the left wheel.
Please check for dirt on the right wheel. Check for foreign materials on the right wheel.
A problem has been found on the left wheel sensor. Run Smart Diagnosis again and, if the same message is
announced, contact an LG Electronics service center.
A problem has been found on the right wheel sensor. Run Smart Diagnosis again and, if the same message is
announced, contact an LG Electronics service center.
Please check the brushes for obstructions. Check for any foreign material stuck in the Brush.
A problem has been found in the suction motor. Run Smart Diagnosis again and, if the same message is
announced, contact an LG Electronics service center.
A problem has been found in the acceleration sensor. Run Smart Diagnosis again and, if the same message is
announced, contact an LG Electronics service center.
In order to listen to the smart diagnosis result again,
please press the charging button. To stop, please press
the stop button.
If you need to repeat the diagnosis result, press
the 'Home' button, or press ‘
’ button to finish the
diagnosis.
Smart diagnosis mode will be turned off. Please try smart diagnosis again after turning the main
power switch off and on from the back of Roboking. If
the problem continues, please contact LG Electronics
customer care.
Smart Diagnosis mode cannot be operated with mop
plate being attached. Please try again after removing it.
Run Smart Diagnosis again after removing the Mop
Plate.
Smart diagnosis has failed to operate. Please try it
again after turning off and on the main power switch on
the back of the Roboking.
Turn the main power switch OFF and then ON again
to resume the diagnosis. Do NOT touch the robot or
disturb its operation until the diagnosis is complete.

32
SMART APPLICATION FUNCTION
AP with Internet access
Robot Cleaner with network access
Smartphone (Android or iOS)
Some models and OS versions may restrict the use, or render the application inoperable from the
smartphone.
Special characters in the ID of the router may hamper product connection or registration.
Recommended specication
•Android:Higherthan4.1.2(JellyBean)
•iOS:HigherthaniOS8(iPhone5)
•Screenresolution:1920x1080
※
Connecting to the Wireless Access Point without proper security setup may cause security issues.
※
If security is set up internally for your organization, it may affect connection therein.
※
To improve the quality of the application in use, modifications may be proceeded without notice to
customers.
1. Search "Smart ThinQ" in Google Play Store or App Store.
2. Download and install the "Smart ThinQ" application.
What to check before using the product
Installing SmartThinQ App
Smart ThinQ
[Roboking application]
•The recommended specifications are necessary for running the smart control function.
•The application is not compatible with tablets or with desktop or laptop computers.
•For successful product registration, the name of your Wi-Fi access point (SSID) must include
only English letters and numbers.
•The robot cleaner supports 2.4 GHz Wi-Fi networks only.
Tip
You can control the Robot Cleaner from your smartphone.
The"LGRoboking"applicationprovidesthefollowingfunctions:
•HomeView, HomeGuard, Cleaning Diary, Schedule Cleaning, Smart Diagnosis

33
SMART APPLICATION FUNCTION
[Startup screen] [Sign in screen]
You need to subscribe your personal login ID on the server to control the Robot Cleaner from your
smartphone.
1. The [Startup Screen] opens when you run the "Smart ThinQ" application. Select “nation / Language” and
click “LG Account Login”.
2. You can sign up with the [Create account] button on the "sign in screen" page.
Fill the Blanks on [create account screen] page to create account.
3. If you have successfully created an account, try to sign in on the “Sign in” page after receiving an
authentication sign in e-mail.
※
Don’t change ‘Nation/Language’ in the [Startup Screen] page. If you change it, you will not be able to
register your robot cleaner that you purchased in nation. If it is set to another country, change it to Nation/
Language.
※
You can also sign in with google and facebook at the [Log in screen] page.
Signing up for membership

34
SMART APPLICATION FUNCTION
[Start-up screen] [Select Product screen]
You will need to register the product on the application to control the Robot Cleaner from your smartphone.
Add your Robot Cleaner to the app with the Wi-Fi feature to use the Smart function.
1. The [Startup Screen] opens when you run the "Smart ThinQ" application. Click the “+t” Button.
2. Select Robot cleaner on [Select Product Screen].
How to register the product
•The distance between the Robot Cleaner and the router should be within 5m; there should
be no obstacle between the router and the Robot Cleaner to help reduce problems during
registration.
•Replacing the router, changing its security settings, or changing the router settings on the
app, will require the Robot cleaner to be reregistered. You can change the router information
in the product network on the setting page.
•Wait for approximately 5 minutes after replacing the router or changing its security settings,
as it may take some time for the changed setting to be recognized.
Tip

35
SMART APPLICATION FUNCTION
Product network / Register product (Android)
•With the network function enabled on the Robot Cleaner, press “Access" to connect to the
Robot Cleaner.
•Use a 2.4 GHz bandwidth.
•Special characters in the ID of the router may hamper product connection or registration.
Tip
1. Long-press the "TURBO(Register/3sec)" button on Roboking for 3 seconds. The [Select AP(Wi-Fi)] screen
will open soon.
2. By selecting your AP on the "Wi-Fi network" list, you will automatically be directed to the product
registration mode.
3. After registration is complete, the [Dashboard] screen will open.
4. With the network function enabled on the Robot Cleaner, press “Robot cleaner image" to connect to Robot
Cleaner.
[Select AP(Wi-Fi)][Press the ‘TURBO’ button] [Register product]
[Registered user list] [Product selection screen]

36
SMART APPLICATION FUNCTION
Product network / Register product (iOS)
•With the network function enabled on the Robot Cleaner, press “Access" to connect to the
Robot Cleaner.
•Use a 2.4GHz bandwidth.
•Special characters in the ID of the router may hamper product connection or registration.
Tip
1. Please long-press the “Turbo” button for 3 seconds while the Robot cleaner is turned on.
The [Select ‘LG_HOMBOT_REG~’ Wi-Fi] screen will open soon.
2. Please turn on the “Wi-Fi connection” function in iPhone “Settings.”
3. Please press the “Check connection” button on the App screen after connecting to “LG_HOMBOT_REG~”
in the Wi-Fi list.
4. After checking the network, please enter the network ID and password to connect to the product.
[Network setting]
[Press ‘TURBO’ button] [Select ‘LG_HOMBOT_REG~’ Wi-Fi]
[Product registration]
[Select network]
[Product selection screen]

37
SMART APPLICATION FUNCTION
The following screen will open when you connect to the Robot Cleaner for the first time from the "Smart
ThinQ"application:
Startup screen of application
Displays the product's
nickname.
The home icon selects
the product list page.
(Dashboard)
Displays the status of
robot cleaner.
Displays setting status of
HomeGuard reservation
and Schedule Cleaning.
Start Cleaning
immediately.
Start searching for the
Home station.
Mode Menu
You can set serveral modes
of the robot cleaner.
Menu
HomeGuard, Schedule
Cleaning, Cleaning Diary,
Smart Diagnosis, Setting.
HomeView
You can use the
remotecontrol function,
and monitor the
surrounding environment
around the robot cleaner
through the front camera.
Displays Cleaning mode,
working status of camera,
status of battery.
Start HomeGuard
immediately.

38
SMART APPLICATION FUNCTION
Startup screen of application
Menu
HomeGuard, Schedule
Cleaning, Cleaning Diary,
Smart Diagnosis, Setting.
Mode Menu
Cleaning mode, Repeat
mode, Turbo mode.
HomeView
You can use the
remotecontrol function, and
monitor the surrounding
environment around the
robot cleaner through the
front camera.

39
SMART APPLICATION FUNCTION
OpenHomeView;thefollowingcontrolscreeniconswillappear:
HomeView (interface conguration)
HomeView main menu
Each button provides the corresponding function.
Status icons
Wi-Fi, battery, Reserve
Cleaning, cleaning mode,
Turbo mode, repeat mode,
lighting mode, and cleaning
time are displayed here.
Mode setting
Click each icon to toggle
Cleaning modes, Repeat
mode, Turbo mode, and
Lighting.

40
SMART APPLICATION FUNCTION
You can change to the cleaning mode during HomeView and have the Robot Cleaner start cleaning by
clicking “Start cleaning."
HomeView (Cleaning)
Click “Start cleaning” to engage the cleaning mode. You can select another cleaning mode by
clicking the “Mode setting” button before pressing the “Start cleaning” button.
While the Robot Cleaner is cleaning, the "Stop cleaning" button is displayed. Click it to stop the
Robot Cleaner.
Click "Mode setting" to turn on or off the Repetition Mode, Turbo Mode, or Lighting on and off
(Lighting is active at maximum power when turned on and at low power when turned off).
[Waiting to clean]
[During Cleaning]
•Spiral Spot mode is not available whilst the cleaner is on the charging station.
•Click any blank area to make the buttons disappear; click again to show the buttons again.
Tip

41
SMART APPLICATION FUNCTION
Click “Start Charging” when the Robot Cleaner is not charging to have the Robot Cleaner start searching for
the Home station. Click "Stop" to have the Robot Cleaner stop searching.
HomeView (Redock for charging)
HomeView (Manual control)
[Moving to Home station]
[Manual Control]
[Charging]
Press the "Manual Control" button to have the Robot Cleaner operate by manual control.
Move the Robot Cleaner with the rotation button on the lower left corner and the forward button on the lower
right corner. Unlike the remote control or Simple Control, you can press both buttons simultaneously.
•There may be a delay in the video on the Manual control screen and the Robot Cleaner's
responsiveness when using the manual control due to the WiFi and Router network
conditions.
Tip

42
SMART APPLICATION FUNCTION
HomeGuard lets you monitor the house through the Robot Cleaner's camera at its designated location while
you are away from home. The Robot Cleaner will take pictures of any activity it detects and sends them to
you as Alerts. (You can choose whether to receive such pictures or not in "Setting").
If you go to work regularly or have to leave the house on a regular basis, you can Reserve the Home Guard
function to activate at the desired time.
Menu - HomeGuard (Main screen)
Menu - HomeGuard (HomeGuard reservation)
[HomeGuard is inactive]
[Home Guard not scheduled]
[HomeGuard is active]
[Home Guard scheduled]
•Scheduling or activating HomeGuard is only available when the Robot Cleaner is charging.
• When ambient lighting is lower than 20 lux, the HomeGuard function may be inefficient, and
detection may not work well.
•Movement may be constantly detected for households with indoor pets and sudden lighting
condition changes.
• If you do not want to receive the alerts and notification, you can change the alert setting in "Setting.“
Tip
Tip

43
SMART APPLICATION FUNCTION
To start HomeGuard, first, you have to set the location where the Robot Cleaner will remain during the
HomeGuard mode. Select the location on the virtual map.
1. Click the target location on the map or drag the Robot Cleaner to the desired location within the
designated area. The monitoring location can be continuously changed before it is saved.
Menu - HomeGuard (Location setting)
2. Use the two arrows on both sides of the video feed to set the desired direction.
[Location setting1][Location setting] [Location setting2]
•The Home Guard monitoring location can only be within 1.5m to the right and left side and
within 3m from the front of the home station. If the Home Station is relocated, the Home
Guard position will always use the Home station as the starting point, and so the Home
Guard position will need to be set again.
•f the Home Guard mode has been terminated, or the mode is stopped due to low battery
level, the Robot Cleaner exits Home Guard mode and returns to the Home station where it
will remain on charge until further command.
Tip
Tip
[Location Setting]

44
SMART APPLICATION FUNCTION
3. Check if the location is satisfactory from the video feed and click "Save" to complete location setup.
Menu - HomeGuard (Location setting)
Menu - HomeGuard (Check photos)
You can view the pictures taken in Home
Guard mode that have been sent by the
Robot Cleaner and can save them on
your Smartphone.
Up to 20 pictures are stored on the
Robot Cleaner. Click "Save in Gallery"
if you want to save the pictures on your
smartphone. If they are not saved to your
smartphone, then they will be deleted and
overridden with any ongoing new photos.
[Saving Location setting]
[HomeGuard Photos][HomeGuard Photos list]
•The Robot Cleaner searches for the saved location with the Home station as the starting
point, so you will have to set up the location again if the station has been moved.
•Upon detecting movement, The Robot Cleaner takes 5 consecutive pictures.
Tip
Tip

45
SMART APPLICATION FUNCTION
Upon detecting any movement while in HomeGuard mode, the Robot Cleaner takes pictures and sends
an alert to your smartphone. Press "Confirm" on the alert pop-up to view the picture or use the "Call" "View
home". "Call" switches the screen to the phone interface; "View home" opens the Home View mode.
You can change the alert setting in "setting."
Menu - HomeGuard (Alert)
[HomeGuard alert window][setting screen - Alert enabled][Menu-Setting]
[HomeGuard picture
checking screen]
[HomeView screen]

46
SMART APPLICATION FUNCTION
You can schedule the time you want the Robot Cleaner to start cleaning.
To set up Schedule cleaning, toggle across the Schedule cleaning key to turn it on or off in the Schedule
cleaning menu. After enabling Schedule cleaning, set up the time and repetition, and then click "Save" to
complete scheduling.
Menu – Schedule Cleaning
•The Schedule cleaning menu on the application has the same function as that of the remote
control. Refer to Schedule cleaning on page 27.
•Setting up or starting Schedule cleaning can only be done whilst the Robot Cleaner is
charging.
Tip
[With Schedule cleaning on] [With Schedule cleaning off]

47
SMART APPLICATION FUNCTION
You can view the diary to find out when the Robot Cleaner did the
cleaning.
Cleaning Diary records information such as date, mode, and the
start and completion times of each cleaning.
Click Play button on the right of the completed cleaning list; an
active cleaning map of that particular cleaning event will appear.
Menu – Cleaning Diary
[Cleaning Diary]
The cleaning map shows an animated map of the Robot Cleaner's course whilst it was in the cleaning
mode; you can control the playback speed or rotate the map.
[Cleaning map]
Map
Map drawn by Robot
Cleaner while cleaning
the area. Colors show the
areas it could not reach
because of obstacles or
walls as well as where it
completed cleaning.
Playback / Stop button
of cleaning animation
This starts or stops the
recorded animation of the
selected cleaning event. It
changes to a Stop button while
the animation is being played.
Time of starting/
cleaning completion.
Robot Cleaner location
Location of the Robot
Cleaner when it started
cleaning
Controlling the playback
speed
You can control the
playback speed of the
cleaning animation.
Each click of the triangle
button will accelerate the
playback speed from X1 to
X2, X4, X8 and X16.
Rotate Map
Each click of this button will
rotate the map 90 degrees
clockwise.
•The Cleaning Diary list shows the 20 most recent cleaning sessions.
•If charging was required during a session, the charging time is included in the completed
cleaning time. The displayed message will indicate the sequence that occurred.
(Eg.) After recharging, Zigzag finished
•If cleaning was interrupted by pressing the "Charge" button, only a map up to that exact point
will be drawn.
(Eg.) Zigzag Stopped
•A cleaning diary list entry may say "Stopped" if the cleaning was interrupted and the Robot
Cleaner did not return back to the Home Station within 10 minutes after cleaning stopped, or
if the power turns off due to an error.
•If power is turned off manually, or any button on the Roboking is pressed during cleaning, the
session may not be logged in the list.
Tip

48
SMART APPLICATION FUNCTION
The Robot Cleaner can self-diagnose with the Smart Diagnosis function.
Click "Start Smart Diagnosis" whilst the Robot Cleaner is charging.
Be sure to resolve any issue identified in the diagnosis by taking a corresponding measure. If the symptom
persists, contact the customer service center of LG Electronics.
Menu – Smart Diagnosis
•Smart Diagnosis on the application provides the same function as that of the remote control.
Refer to pages 30 and 31 for details on Smart Diagnosis.
•Smart Diagnosis can only be activated whilst the Robot Cleaner is charging.
Tip
[Smart Diagnosis] [Smart Diagnosis result]

49
SMART APPLICATION FUNCTION
You can check or change the current information set up on Robot Cleaner.
Click Voice gender to change the voice of the Robot Cleaner to male or female.
Click Product nickname to change the current nickname of the Robot Cleaner; a pop-up where you can
enter a new nickname opens (up to 10 characters allowed including English, Spanish and numeric).
You can check the current software version of the Robot Cleaner and the latest version. If the current
software is not the latest, please update it. Refer to the details on "Software Update."
Basic Information shows the current version of the application and open source license information.
Menu – Setting
[Setting 2][Setting 1] [Edit nickname]

50
SMART APPLICATION FUNCTION
[Softwareledownloadwindow] [Updating Roboking]
The network-enabled model of the Robot Cleaner can update the software automatically via the application.
1. Make sure that the "Smart ThinQ" application is up to date on the Play Store.(Unless you update the app
to the latest version, software update will not be available.)
2. If a new version is available upon connecting to the Roboking, an update will start.
3. A new software file is downloaded to the Roboking when the updating starts.
4. When download is completed, the update will be started after tansmitting files to the Roboking.
5. The Roboking will turn off and on again automatically in the process, and updating will resume.
6. A voice message saying that update is completed will be announced when the update is done. The
Roboking will turn off and on again to apply the updated software.
Misc. 1 - Software update
•Software update can only be done whilst the Roboking
is charging.
•Software updates will only be done if there is sufficient
battery level. Ensure that the battery is fully charged
before engaging any software update.
Tip

51
SMART APPLICATION FUNCTION
Misc. 2 - Mode
You can order to robot cleaner simply without connection with robot cleaner through Mode function.
Mode function has total 5 functions. If you push ‘Applied’ button, Robot cleaner will act according to Mode
like below.
Homemode:startsearchinghomestation
Vacationmode:startHomeGuard
Awaymode:startcleaning
Sleepmode:startsearchinghomestation
Pleasantmode:NotSupport
※
If more than one Robot cleaner is registered, only one of them can be set by the mode function.
In the event that there are 2 registered Robot cleaners, the first Registered one will be the one set by the
mode function.
You can change which of the Robot Cleaners will be set by the mode function by editing them. [Edit
mode] (You can enter Edit mode by pressing the pencil image.)
[Away mode][Mode] [Edit mode]

52
PRODUCT INFO INITIALIZATION
If you happen to sell a used Robot Cleaner, or if would like to initialize information set up on the product, run
Initialization.
※
Any dispute between seller and buyer is an issue between the two parties. LG Electronics provides a
product initialization function for smooth transaction.
1. Press and hold down the "Turbo" and "Charge" buttons for 3
seconds with the power on; all displays will then be lit with a
"ding" sound.
2. Press "Start/Stop" to initialize the product; power will be turned
off.
3. Pressing "Start/Stop" again will turn Robot Cleaner on with a
melody.
Product info initialization
•Initialization returns the following information as factory default setting.
- Home Guard image - Cleaning Diary
- Home Guard location - Smart Diagnosis record
- Front camera (Back to on) - Nickname
- Learned cleaning information
Tip

53
CLEANING THE DUST BIN
•Operating the unit without Filters fitted to the dust bin can cause a motor malfunction not
covered by warranty.
•After cleaning the Dust Bin, make sure to assemble the filter and fit it to the Dust Bin.
If you initiate cleaning, with no filters fitted to the dust bin or Filter Cover not assembled,
a voice message will be announced which says "Please check if the dust bin is installed with
the filter."
•Always ensure that the dust bin lid is refitted correctly after
cleaning the dust bin so that it closes easily and accurately.
Tip
1. Open the dust bin compartment cover by pressing
the PUSH button on the Robot Cleaner.
2. Grab the handle of the dust bin and pull it upward.
3. Pull the hook on the left of Filter Cover on the rear
of Dust Bin to separate the filter and the sponge.
※
Note that separating the filter may result in dust
dropping.
※
Refer to p.54 when cleaning the Dust Bin Filter.
4. Lift the dust bin lid upward while pressing the
separation button on the dust bin.
5. Empty the dust bin and clean it with a cleaning
brush or under running water.
6. After cleaning with water, completely dry the
dust bin in a well-ventilated area out of the direct
sunlight.
7. When reassembling or fitting the cleaned Dust
Bin, close the lid and put in the Sponge and EPA
Filter.
※
Refer to p.54 for detailed assembly guides.
8. Put the dust bin into the Robot Cleaner and close
the dust bin compartment cover.
If the dust bin is full, suction power can be reduced. Clean the dust bin before or after each cleaning
session.Cleanthedustbinusingthefollowingsequence:

54
CLEANING THE DUST BIN FILTER
The Dust Bin Filter consists of a EPA Filter and Sponge Filter.
Clean both the EPA and Sponge filters as per the following sequence.
3. Use a cleaning brush to clean the Sponge Filter.
If using water to clean it, allow it to dry completely in
the shade before refitting.
4. Assemble the EPA and Sponge filters back onto
the Filter housing as per the following sequence.
※
Fit the rectangular locator on the EPA Filter into
the locating slot of the filter body.
※
Be careful not to incorrectly assemble EPA and
Sponge Filter onto the Filter housing.
2. Thoroughly clean out the fine dust particles on the
EPA Filter, with a vacuum cleaner or cleaning brush.
※
Do NOT wash the EPA Filter with water.
Its suction power will be reduced.
•To preserve the performance of the Robot Cleaner, clean the EPA Filter at least once a week,
with a brush or vacuum cleaner.
•The EPA and sponge filters must be fitted to the filter housing before refitting the filter to
the dust bin. Operating the Robot cleaner without the EPA and sponge filters will cause the
suction motor to malfunction.
Tip
1. Pull the hook on the left of the EPA Filter module
on the rear side of Dust Bin to separate the EPA
Filter and the sponge.

55
CLEANING THE BRUSH
Fit the Fixing Hook
(rectangular shape) on
the side of the Brush into
the slots, with the colors
matching.
While pushing the Brush to the
arrow direction, fit the Fixing
Hook (rectangular shape) on
the opposite side into the slot.
Press down and close the
Cover until a 'crack' sound
is heard from both sides of
Fixing Hook.
※
Be careful not to trap the
side brush bristles under the
cover when closing it.
Push the Brush all the way
into the yellow protrusion.
While pushing the Brush, lift
the white protrusion part up to
separate it from the main unit.
Carefully clean the Brush with
a vacuum cleaner or scissors.
Turn the Main Power Switch
OFF before starting the clean.
Put the Robot Cleaner upside
down on a soft cloth.
After checking for foreign
materials, press down the
Fixing Hook and pull it up to
separate the brush Cover.
By using the cleaning tool,
clear hairs and other debris
and foreign materials on the
Brush and from the 2 smaller
jockey wheels.
The rotating Brush, located on the bottom of Robot Cleaner, helps collect the dust. Clean the Brush as per
the following sequence.
※
Before turning over the main unit, lay a soft cloth on the oor and remove the Dust Bin.
Otherwise, the main unit can get scratched and dust will fall from the Dust Bin.

56
CLEANING THE SENSORS/CHARGING TERMINALS
Upper camera
sensor
•Do not clean the Robot Cleaner by directly spraying it with water, thinners, solvents, benzene,
or any other liquids.
•Call the service center if the sensor or charging terminal is damaged. Sensor and terminal
damage can cause the product to malfunction.
•To clean the sensor/charging terminals, use the cleaning brush.
There are sensors on the Robot Cleaner that detect obstacles,
stairways and the home station for charging the battery. In order to
maintain the performance of the Robot Cleaner, regularly clean the
sensorsandchargingterminalsasfollows:
1. Turn off the power switch on the rear side of the Robot Cleaner.
Injury can be caused by the activation of the Robot Cleaner if the
main power is not turned off.
2. Lay a smooth cloth on the floor, turn over the Robot Cleaner and
put it on the cloth.
※
Please make sure to remove the dust bin before rotating the
main body. Otherwise, the dust in the dust bin may fall out.
3. Use a smooth cloth or cleaning brush to wipe the dust off each of the 3 cliff sensors, camera sensors and
ultrasonic sensors and the charging terminal as described below.
Charging terminals
Ultrasonic sensors
Obstacle detecting
sensor window
Detecting sensors
of home station &
Receiving sensors of
remote controller
Cliff detection
sensors
Charging terminals
Bottom camera
sensor
Lens
Tip

57
Charging terminals
CLEANING THE SIDE BRUSH
Foreign objects/materials such as hair can easily adhere to the side
brush. Remove such materials at least once a week.
If excessive amounts of foreign materials are stuck to the brush,
there is the risk of damage to the brushes.
If the floor is rough or frequently cleaned, the side brushes may bend or become deformed. In this case,
use the following method to straighten the side brush.
1. The following procedure is helpful in restoring
deformed brushes.
2. Turn off the power by switching the main switch
off on the rear off the unit.
3. Place the Robot Cleaner at the end of a table to
make cleaning the side brush easier. Make sure
that the Robot Cleaner is not in danger of falling.
4. Soak the side brush in warm to hot water.
5. Press down on the side brush for about ten
seconds so that it is completely submerged in the
water.
6. Slowly wipe the side brush by sliding it through
your hand.
7. Rotate the side brush and repeat steps 4-6 for
each section of the brush.
8. Use the side brush only after it has completely
dried.
1. Remove the screws by using a suitable screw driver
and separate the Side Brush from the main unit.
2. Remove any hair after the separation.
3. Assemble the Side Brush by replacing it onto the
bottom of the Robot Cleaner, with the 'R' and 'L'
marking of the Brush matching the counterparts on
Robot Cleaner.
Side Brush management

58
CLEANING THE ULTRA MICROFIBER MOP (OPTION)
1. Separate the ultra microfiber mop from the mop plate.
2. Carefully clean it with warm water.
3. Use the Mop after completely drying it in direct sunlight.
※
If the Mop is used in a damp or wet state, it will cause the
Robot Cleaner to malfunction.
To avoid odors, dirt and dust should be washed off the mop after it is used for cleaning. Follow these
directionstowashtheultramicrofibermop:
•To avoid product malfunction, only use the ultra microfiber mop provided with the Robot
Cleaner.
•Additional microfiber mops can be purchased by visiting a nearby LG Electronics service
center.
Tip
210 mm

59
TROUBLESHOOTING
A warning message will be given if a wheel does not contact the floor surface for any reason.
•Is a wheel trapped in the front door, balcony, stairway, etc?
►MovetheRobotCleanerontotheatoor.
•Is any foreign material wound around the wheel?
►Turn off the main power switch on the rear side of the Robot cleaner. Then lay a soft cloth on the
oor,turnovertheRobotCleaner,andputitonthecloth.
Remove foreign material after observing the wheels.
※
Please make sure to remove the dust bin before turning over the main body.
Otherwise, the dust in the dust bin may fall out.
A warning message will be given if Robot Cleaner cannot go on cleaning due to any unfavourable condition.
•Is the Robot Cleaner stuck?
►Afterremovingitfromtheobstacle,placetheRobotCleanerbackontotheatoor.
Upon a voice message, "The wheels are not touching the oor.
Please move Roboking onto at oor."
Upon a voice message, "Please remove foreign material on the
left/right wheel."
Upon a voice message, "Roboking cannot continue cleaning.
Please check the area around Roboking."

60
TROUBLESHOOTING
A warning message will be given if there is no Dust Bin or Filter housing fitted.
•Is the Dust Bin fitted to the Robot Cleaner?
►Open the Dust Bin compartment cover and check to ensure the Dust Bin is in place.
►Do NOT leave the Dust Bin Cover open.
When the remaining amount of battery power is almost nil, the voice, “Battery is low”, is generated.
•Initiate battery charging of the Robot Cleaner by moving it to the home station.
►When the Robot Cleaner is attached to the docking station successfully, it will start the recharging
with the recharging start melody.
Upon a voice message, "Please check if the dust bin is installed
with the lter."
Upon a voice message, "Battery is low. Please move Roboking
onto the home station to charge."
•Make sure the Filter housing is assembled onto the Dust Bin.

61
TROUBLESHOOTING
※
For a more detailed description of this process, refer to the instructions on page 55, 57.
A warning message will be given if foreign materials restrict the Brush's rotation.
Turn off the main power switch on the rear of the Robot Cleaner. Lay a soft cloth on the floor and put the
Robot Cleaner upside down on it.
※
Before turning over the main unit, remove the Dust Bin.
Otherwise, it will cause dust to fall from the Dust Bin.
•The brush is making a loud, abnormal sound.
►Conrmthecorrectassemblyofthebrushbycheckingtheseparationgrooveofthebrush
►Remove the lower rotating brush from the Robot Cleaner and remove any foreign material from
the brush.
•The lower rotating brush or side brush is stuck.
►Remove any foreign materials such as cables, thread of hair caught in the side brushes or the
lower rotating brush.
Upon a voice message, "Please remove foreign material from the
brushes on the bottom."
1 2 3
45

62
BEFORE YOU CALL FOR SERVICE
Confirm before reporting the failure of Robot Cleaner.
Problem Solutions (Reference page)
The power supply cannot be
turned on.
Check that the power switch is turned on. (Page 16)
The power supply
automatically turns off.
This is not a failure. Robot Cleaner has its own power saving function.
If it is not used for ten minutes after the power supply is turned on,
the power will automatically turn off. (Page 18)
The Robot Cleaner will not
charge.
►Check whether the main power switch is turned on.
►Remove objects around the home station. (Page 16)
►Conrmthatthepowersupplyisconnectedtothehomestation.
(Page 15)
►Wipe the charging terminals with a dry cloth.
Suction power becomes weak.
►Check whether there is foreign material blocking the suction port.
(Page 55)
►Empty the dust bin. (Page 53)
►Cleanthedustbinlter.(Page54)
Noise becomes louder.
►Conrmthatthedustbinhasbeenmountedproperly.
►Conrmthatthedustbinlterhasbeenmountedproperly.
(Page 54)
►Check whether foreign material is caught in the brush. (Page 55)
The Robot Cleaner will not
activate.
►Conrmthatthepowerswitchisturnedon.(Page16)
►Conrmthatthebatteryhasbeencharged.(Page19)
The lower brush does not
rotate.
►Clean the brush. (Page 55)
►Conrmthatthebrushhasbeenmountedproperly.(Page55)
Movements or travel path are
abnormal.
►Carefully wipe the sensors with a dry soft cloth. (Page 56)
►Iftheultramicrobermopisattached,conrmthatitismounted
properly. (Page 28)
►Turn the main power switch off and on.
The Robot Cleaner cannot
be activated with the remote
control.
►Replace the remote control batteries. (Page 13)
►Conrmthatthecontroliswithinthecoverageareaofthemain
unit, which is less than 3 m. (Page 13)
►Check whether the main power switch is turned on. (Page 16)

63
PRODUCT SPECIFICATIONS
Item/Model Battery
Type Lithium Battery
Rating DC 14.4 V / 2330 mAh
Charging temperature Standard charge at
73.4±9˚F(23±5˚C)
Number of Batteries 1 EA
Item/Model LG Robot Cleaner
External Dimensions 340 mm × 340 mm × 89 mm
Power Consumption 58 W
Weight 3 kg
Battery (When Charging) DC 16.8 V
Traveling Velocity 350 mm/s (Maximum)
Use Time Up to 100 minutes
(Based on general wooden floor)
Charging Time 3 hours
Main Functions
Turbo Mode
Learning Mode
Obstacle Sensing
Anti-Plunge function
Scheduled Cleaning
Error Displaying
Navigation
Auto/Manual Recharging
Dry Mopping (cleaning)
Corner Clean
Voice Messaging
Map Drawing
Spot Cleaning
Repeat Cleaning
My Space Cleaning
Cell by Cell cleaning
Zigzag Cleaning
Smart Application function

64
PRODUCT SPECIFICATIONS
Item/Model Home Station
(VR650)
EPS : ADS-30FSA-17
17030EPCU
External
Dimensions
236 mm × 181 mm
× 128 mm
95 mm × 43 mm
× 30.7 mm
Rating 17.1 VDC AC 100–240 V~
50/60 Hz
Output Voltage/
Current
17.1 VDC / 1.7 A DC 17.1 V / 1.7 A
Current
Consumption
1.7 A 0.8 A
Wireless LAN module Specications
Model TWFM-L302D
Frequency Range 2412 - 2462 MHz
Output Power (Max) IEEE802.11b:21.89dBm
IEEE802.11g:21.64dBm
IEEE802.11n(20MHz):21.31dBm
IEEE802.11n(40MHz):21.43dBm

65
REFERENCE ITEMS
Open source software notice
To obtain the source code under GPL, LGPL, MPL and other open source licenses, that is contained in this
product,pleasevisithttp://opensource.lge.com.
In addition to the source code, all referred license terms, warranty disclaimers and copyright notices are
available for download.
Removing / Retting the battery pack
1 3
456
Turn off the main power switch
on the back-left side of the
Robot Cleaner.
Refit the battery in the
reverse order.
Place a soft cloth on the floor,
remove the dust bin, and flip the
Robot Cleaner over.
Press the connector release
lug on the connecting plug to
disconnect the battery wiring.
Remove the screws by using a
Phillips head screwdriver.
Remove the battery from the
device.
2
WARNING
Please be careful of fire, explosion, electric shock, or breakdown.
•Do not charge this Battery Pack with any other type of charger other than the one originally provided
with the Robot Cleaner.
•Do not damage the battery pack in such ways as dropping, crushing, cutting, or shorting extemal
contacts.
•Do not attempt to disassembly the battery pack In any case. When the battery pack is damaged or
malfunctioning, bring it and the Robot cleaner and Home station to an authorised service center.
•Do not place the battery pack near a heat source or do not dispose of in fire or water.
•Please keep the battery pack away from any damp or wet environment when the pack is charged.
•Please keep away from children, infants or pets.

66
[IEC 62929 STANDARD] SETTING FOR CLEANING PERFORMANCE TEST
1. Put fully charged Robot Cleaner down on start point and turn on.
2. Push ‘TURBO’ button on the Robot Cleaner or ‘Turbo’ button on the Remote Controller and Robot
Cleaner will be set Turbo Mode.
3. Push ‘Repeat’ button on the Remote Controller and Robot Cleaner will be set Repeat Mode.
4. Push ‘START/STOP’ button on the Robot Cleaner or ‘
’ button on the Remote Controller and Robot
Cleaner will be operated.
1. Put fully charged Robot Cleaner down on start point and turn on.
2. Push both ‘Schedule’ button and ‘Mode’ button for 3 seconds to access Test
Mode(Straight).
3.(1)IncaseoftestingonHardFloor,LEDexpression:T-H.
(2)IncaseoftestingonCarpet,LEDexpression:T-C.
※
Change LED expression by pushing ‘Mode’ button on the Remote
Controller or ‘MODE’ button on the Robot Cleaner.
4. Push ‘START/STOP’ button on the Robot Cleaner or ‘
’ button on the
Remote Controller and Robot Cleaner will be operated.
1. Put fully charged Robot Cleaner down on start point and turn on.
2. Push ‘Repeat’ button on the Remote Controller and Robot Cleaner will be set Repeat Mode.
3. Push ‘START/STOP’ button on the Robot Cleaner or ‘
’ button on the Remote Controller and Robot
Cleaner will be operated.
※
Use this mode only when organizations test cleaning performance or driving performance according to
IEC62929
Dust Removal Test - Box(Hard Floor & Carpet)
Dust Removal Test - Straight Line(Hard Floor & Carpet)
Autonomous navigation/coverage test
[Hard Floor Test mode] [Carpet Test mode]

www.lg.com
Copyright © 2018 LG Electronics Inc. Todos los derechos reservados
Antes de usar el producto por primera vez, lea atentamente la sección de
Precauciones de seguridad para asegurar el funcionamiento seguro del producto.
Después de leer el manual de instrucciones, consérvelo en un lugar accesible.
MANUAL DEL PROPIETARIO
HOM-BOT
VR6480**

CARACTERÍSTICAS
Experto en esquinas
Gracias a su nuevo diseño, más adecuado, el rendimiento del robot es
increíblemente eficaz.
El aprendizaje de conducción
El robot de limpieza puede memorizar el entorno de limpieza mediante su
función de «Funcionamiento inteligente» para así realizar una limpieza más
inteligente.
El modo Turbo
En el modo «Turbo», el robot de limpieza funciona con mayor potencia, y la
limpieza es más intensa.
El modo «Turbo» se activa automáticamente en alfombras, así el robot de
limpieza puede funcionar de forma más eficaz.
Bandeja para mopa
La «Bandeja extraíble para la bayeta» permite que los usuarios cambien la
bayeta fácilmente y sin tener que dar la vuelta al aparato.
Mi espacio
Si desea limpiar rápidamente una zona sucia, solo tiene que programar el
robot de limpieza para que limpie esa zona en particular.
Repita la limpieza
El robot limpiador limpiará continuamente.
Lugar de búsqueda
Si mueve el robot de limpieza cuando este está limpiando una zona en
particular, el aparato buscará automáticamente esa ubicación, volverá a
dicha zona y continuará la limpieza.
Descripción de la aplicación para Smartphone
Usted puede controlar Aspirador Robot desde su teléfono inteligente.
Zigzag
Cleaning
Cl
l
le
e
e
e
e

ÍNDICE
1
PREPARACIÓN DEL DISPOSITIVO
2~6 Precauciones de seguridad
7 Elementos incluidos en el producto
8~9 Descripción de las piezas: Robot de
limpieza
10~11 Funciones de los botones: Robot de
limpieza
12 Pantalla de información de estado
13 Antes de usar
14 Vista general
2
FORMA DE USO
15 Instalación de la base
16 Encendido y apagado de la fuente de
alimentación
17 Inicio e interrupción de la limpieza
18~20 Carga de la batería
21 Uso de Tira Magnética de Pared
22~23 Modos de limpieza
24~25 Modos de limpieza auxiliares
26 Conguracióndelahora
27 Limpieza programada
28 Limpieza con bayeta (Opcional)
29 Función de búsqueda de ubicación
30~31 Diagnóstico inteligente
32~51 Función aplicación inteligente
52 Inicialización de la información del
producto
3
MANEJO DESPUÉS DEL USO
53 Limpieza del depósito de polvo
54 Limpiezadelltrodeldepósitodepolvo
55 Limpieza del cepillo
56 Limpieza del sensor/terminal de carga
57 Limpieza de los cepillos laterales
58 Limpiezadelabayetaultramicrobras
(Opcional)
4
INFORMACIÓN ADICIONAL
59~61 Resolución de problemas
62 Antes de solicitar asistencia técnica
5
REFERENCIAS
63~64 Especicacionesdelproducto
65 Referencias
66 [NormaIEC62929]Conguraciónpara
la prueba de rendimiento de limpieza

2
PRECAUCIONES DE SEGURIDAD
La finalidad de las precauciones de seguridad descritas a continuación es asegurar el uso seguro y
correcto del producto por parte del usuario para así prevenir posibles daños o lesiones.
ADVERTENCIA
1. Este electrodoméstico no está destinado para ser utilizado
por personas (incluyendo niños) cuyas capacidades físicas,
sensoriales o mentales sean reducidas, ni por aquellas que
no tengan experiencia y conocimientos, a menos que hayan
recibido supervisión o instrucción relacionadas con el uso del
electrodoméstico por parte de una persona responsable por su
seguridad.
2. Los niños deben ser supervisados para asegurarse de que no
jueguen con el electrodoméstico.
3. Si el cable de alimentación está dañado, debe ser sustituido por
un Agente de Servicios de LG Electronics para evitar riesgos.
4.
Este electrodoméstico puede ser utilizado por niños de 8 años de
edad y mayores, así como por personas cuyas capacidades físicas,
sensoriales o mentales sean reducidas, siempre y cuando reciban
supervisión o instrucción relacionadas con el uso seguro del
electrodoméstico y comprendan los riesgos involucrados. Los niños
no jugarán con el electrodoméstico. La limpieza y el mantenimiento
del usuario no las realizarán niños sin la debida supervisión.
Precauciones de seguridad básicas
Después de leer este manual, consérvelo en un lugar accesible.
Este es el símbolo de alerta de seguridad. Este símbolo le advierte de
aquellos riesgos que pueden provocar daños a la propiedad, lesiones
corporales graves o la muerte.
Indica una situación peligrosa que, de no evitarse, puede provocar la muerte o
una lesión grave.
Indica una situación peligrosa que, de no evitarse, puede provocar una lesión
leve o moderada.
ADVERTENCIA
PRECAUCIÓN

3
PRECAUCIONES DE SEGURIDAD
ADVERTENCIA
Por motivos de seguridad, no
extraiga la batería del robot de
limpieza. Si necesita
reemplazar la batería o el robot
de limpieza, llévelo al
distribuidor o al centro de
servicio técnico autorizado de
LG Electronics más cercano.
De no seguir esta advertencia,
podría provocar un incendio o
un fallo en el producto.
Nunca use el robot de
limpieza con una batería o
con una base que no esté
diseñada para este producto.
Al hacerlo, podría provocar un
incendio o un fallo en el
producto.
Asegúrese de que el cable de
alimentación de la base no
queda atrapado bajo un
objeto pesado o dañado por
entrar en contacto con
De no seguir esta advertencia,
podría provocar una descarga
eléctrica, un incendio o un fallo
en el producto. Si el cable de
alimentación está dañado, no lo
enchufe. Lleve el producto a un
centro de reparación autorizado
de LG Electronics.
No coloque la base o el robot
de limpieza cerca de una
fuente de calor.
Al hacerlo, podría provocar la
deformación del producto, un
incendio o un fallo en el
producto.
No use el robot de limpieza
cuando haya velas u objetos
frágiles en el suelo.
Al hacerlo, podría provocar un
incendio o un fallo en el
producto.
Use siempre una toma de
corriente independiente de al
menos 5 A.
Si se conectan varios dispositivos
simultáneamente a una toma de
corriente, estos pueden generar
sucientecalorcomopara
provocar una incendio.
No doble el enchufe de
alimentación. No use el
enchufe de alimentación
cuando este esté dañado o
Al hacerlo, podría provocar un
incendio o un fallo en el
producto.
Cuando desenchufe el
enchufe de alimentación,
hágalo siempre agarrando el
enchufe, y no el cable.
Cuando desenchufe el
enchufe de alimentación, no
toque las clavijas.
Al hacerlo, podría provocar una
descarga eléctrica.
No toque el enchufe de
alimentación con las manos
húmedas.
Al hacerlo, podría provocar una
descarga eléctrica.
No permita en ningún
momento que los niños o los
animales de compañía
jueguen con el robot de
limpieza o se apoyen en el
mismo. No use el robot de
limpieza mientras un objeto
cuelgue del mismo.
Al hacerlo, podría provocar una
lesión o dañar el producto.

4
PRECAUCIONES DE SEGURIDAD
No introduzca ningún
miembro del cuerpo, como,
por ejemplo, la mano o el pie,
bajo el cepillo o bajo las
ruedas del robot de limpieza
mientras este esté en uso.
Al hacerlo, podría provocar una
lesión o dañar el producto.
No use el robot de limpieza
en mobiliario estrecho y alto
como, por ejemplo, armarios,
mesas.
Al hacerlo, podría provocar
lesiones o daños y fallos en el
producto que no están cubiertos
por la garantía.
No use el robot de limpieza
en una habitación donde
haya un niño durmiendo.
Al hacerlo, podría provocar una
lesión o dañar el producto.
No deje que los niños o los
animales de compañía
permanezcan cerca del robot
de limpieza sin vigilancia.
Al hacerlo, podría provocar una
lesión o dañar el producto.
No active el aparato sobre
aquellos suelos que tengan
más de diez grados de
inclinación.
El aparato no funcionará
correctamente.
ADVERTENCIA
Gasoline
Detergent
No pulverice o aspire
surfactantes o agua potable
cerca del robot de limpieza.
Al hacerlo, podría provocar un
incendio o un fallo en el
producto.
*Materialesinamables:
gasolina, disolvente, etc.
* Surfactantes: detergente,
artículos para el baño, etc.
Apague la fuente de
alimentación inmediatamente
si el robot de limpieza
produce cualquier sonido u
olor anómalo, o si sale humo
del mismo.
De no hacerlo, podría provocar
un incendio o un fallo en el
producto.

5
PRECAUCIONES DE SEGURIDAD
PRECAUCIÓN
Vacíe frecuentemente el
depósito de polvo y
manténgalo limpio.
El polvo recogido en el depósito
de polvo puede provocar
alergias y contener insectos
dañinos.
Use el robot de limpieza
únicamente en espacios interiores.
Si lo usa en espacios
exteriores, puede provocar un
fallo en el producto y daños
irreparables en la unidad.
Cierre la tapa del depósito de
polvo de la unidad principal
antes del inicio de la limpieza.
Si la tapa no está cerrada,
podría provocar lesiones o
daños en el producto.
NO use el robot de limpieza
cerca de barandillas, escaleras
o cualquier otro lugar peligroso.
De lo contrario, el usuario o el
producto podrían estar
expuestos a cualquier daño.
No deje caer el robot de
limpieza ni lo someta a
impactos fuertes.
Al hacerlo, podría provocar
lesiones o fallos en el producto
que no están cubiertos por la
garantía.
No exponga el robot de
limpieza a bajas temperaturas
un largo periodo.
Al hacerlo, podría provocar un
fallo en el producto.
Retire cualquier cable o
cuerda de gran longitud que
haya en el suelo.
Los cables o las cuerdas pueden
quedar enredados en las ruedas del
robot de limpieza y provocar un fallo en
el producto o la desconexión del cable.
Nunca coloque el robot de
limpieza sobre una mesa o
sobre un escritorio cuando
esté encendido.
Podría provocar una lesión en el
usuario o daños en el producto.
En casos excepcionales, el
cepillo del robot de limpieza
puede dañar las alfombras. En
este caso, detenga la operación
de limpieza inmediatamente.
Losecoslargosdelasalfombras
pueden resultar dañados.
No permita que la unidad
principal y el terminal de carga
de la base entren en contacto
con objetos metálicos.
Al hacerlo, podría provocar un
fallo en el producto.
No permita que el robot de
limpieza aspire líquidos,
cuchillas, chinchetas,
combustibles, etc.
Estos elementos podrían
provocar un fallo en el producto.
en la abertura del sensor
supersónico del robot de
limpieza.
Al hacerlo, podría provocar un
fallo en el producto.
No introduzca agua,
detergente, etc., en el robot
de limpieza.
Al hacerlo, podría provocar un fallo
en el producto. No introduzca agua
o detergente en el robot de
limpieza. Si algún líquido penetra
en el robot de limpieza, apague la
fuente de alimentación y póngase
en contacto con el centro de
atención al cliente o el agente de
ventas de LG Electronics.
No use el robot de limpieza
cuando el depósito de polvo
está completamente lleno.
Al hacerlo, podría provocar un
fallo en el producto.

6
PRECAUCIONES DE SEGURIDAD
Consejos
Compruebe los siguientes consejos antes de usar el robot de limpieza:
•Vacíe el depósito de polvo una vez que esté lleno.
•Retire cualquier cable o cuerda de gran longitud que haya en el suelo.
•Seque cualquier superficie húmeda que haya en el suelo antes del inicio de la limpieza.
•Cierre la tapa del depósito de polvo antes del inicio de la limpieza.
•Retire cualquier objeto frágil o innecesario que haya en la habitación que desea limpiar.
Por ejemplo, retire del suelo artículos de cerámica valiosos u otros objetos de valor.
•Compruebe si la batería tiene potencia suficiente y recárguela si es necesario.
•Cierre la puerta de cualquier habitación en la que no quiere que entre el robot de limpieza. Durante
la limpieza, es posible que el robot de limpieza entre en otra habitación y continúe limpiando.
•No use este producto en una habitación donde haya un niño durmiendo. El niño puede resultar
herido.
•Retire las toallas o cualquier otro tipo de tela fina del suelo, ya que pueden quedar atrapados en el
cepillo.
•La limpieza puede presentar problemas en alfombras con borlas o con un grosor de mas de 20 mm.
Por lo tanto, se recomienda que las prepare o las retire antes de usar el producto.
•Cierre todas las puertas de los balcones. Las ruedas pueden atascarse durante la limpieza.
•Por favor, instale el porta mopas , ya que subir pequeñas alturas - como la parte inferior de un
ventilador eléctrico de pie - puede causarle daños al Aspirador Robot.
•Conectar a un router inalámbrico sin configuración de seguridad adecuada puede causar problemas
de seguridad.
•Si tiene configurada internamente la seguridad, esto puede afectar la conexión en la misma.
CAUTION
Si el suelo está mojado o hay
séquelos antes de usar el
robot de limpieza. No use el
robot de limpieza en
De hacerlo, podría provocar un
fallo en el producto.
Cuando acople la bayeta, no
bloquee el sensor de la
cámara inferior.
Si bloquea el sensor de la
cámara inferior, es posible que
el producto no funcione
adecuadamente.
Cuando el robot de limpieza
está en funcionamiento, es
posible que golpee las patas
de las sillas, de los
escritorios, de las mesas, o
cualquier otro mueble
estrecho.
Para conseguir una limpieza
mejor y más rápida, coloque las
sillas sobre la mesa.
Antes de comenzar la
limpieza, asegúrese de que el
umbral de la puerta sobresale
3 cm del suelo.
Si el umbral es bajo, el robot de
limpieza puede pasar por
encima de él y atravesar la
puerta principal.
Para ahorrar energía, apague
el interruptor mientras no lo
esté usando, y enciéndalo
para la limpieza y la carga.

7
ELEMENTOS INCLUIDOS EN EL PRODUCTO
►Las ilustraciones pueden ser diferentes de la apariencia real de los objetos.
Filtro del deposito de
polvo (de recambio)
(opcional)
Herramienta de
limpieza
Cepillo de limpieza
(situado en la tapa del depósito de polvo)
Bandeja para la bayeta
(opcional)
Para limpiar
los sensores
Para limpiar el
filtro
Bayeta ultramicrofibras
(2 unidades) (opcional)
Pilas secas para el mando a distancia
(2 unidades de tamaño AAA)
Base Adaptador
Robot de limpieza
Mando a distancia
Cepillo lateral
(2 piezas) (opcional)
Cepillo alfombra
(opcional)
Tira Magnética de Pared*
(3.2 ft / 2 m)
Manual
Manual
*Disponible para algunos modelos.

8
DESCRIPCIÓN DE LAS PIEZAS: Robot de limpieza
►Las ilustraciones pueden ser diferentes de la apariencia real de los objetos.
Vista superior
Vista frontal
Vista trasera
Vista inferior
Sensor de la cámara superior
Tapa del depósito de polvo
Pantalla y botón de manipulación
Botón de la tapa del depósito de polvo
Sensores ultrasónicos
Cámara delantera
LED
Ventana del sensor de detección de obstáculos
Sensores de detección de la base y sensores de
recepción del mando a distancia
Interruptor de alimentación
Puerto de ventilación
Sensor de detección de alturas
Cepillo lateral
Terminal de carga
Cepillo
Rueda
Batería
Sensor de la cámara inferior

9
DESCRIPCIÓN DE LAS PIEZAS: Base / Depósito de polvo
►Las ilustraciones pueden ser diferentes de la apariencia real de los objetos.
Base
Depósito de polvo
Soporte para el mando a distancia
Terminal de carga
Filtro de esponja
Asa del depósito
de polvo
Cepillo de limpieza
Tapa del depósito de polvo
Tapa del puerto de
succión
Filtro EPA
Tapa del filtro
Botón de apertura de la
tapa del depósito de polvo
Lengüetas de fijación del cable de alimentación
Adaptador

10
FUNCIONES DE LOS BOTONES: Robot de limpieza
• Si pulsa este botón, se activará el modo «Turbo» y se emitirá un mensaje de voz de
confirmación.
• Si pulsa este botón en el modo «Turbo», se cancelará dicho modo.
•Este botón se usa para cambiar la configuración del modo de limpieza.
•Si el aparato está acoplado a la base, los modos «Spot (Limpieza focalizada)»
no están disponibles.
•El modo de «My Space(Limpieza Mi espacio)» solo se puede seleccionar a
través del mando a distancia (cuando el aparato no está cargando).
• Este botón hace que el robot de limpieza vaya a la base para cargar la batería.
• Si la limpieza ha finalizado o si la batería no es suficiente, El robot de limpieza irá a
la base automáticamente para cargar la batería.
• Si pulsa los botones «TURBO» y «MODE» durante al menos 3 segundos, se activará
o se desactivará la función de bloqueo de botones.
• Si pulsa cualquier botón cuando el bloqueo de botones está activado, el icono del bloqueo
de botones parpadeará, y el aparato emitirá el mensaje: «El panel está bloqueado».
• Este botón se usa para encender el aparato y para iniciar o interrumpir la limpieza.
• Si pulsa este botón cuando el aparato está encendido, se iniciará la limpieza.
• Si pulsa este botón durante limpieza automática, la limpieza se parará.
• Si pulsa este botón durante aproximadamente 2 segundos cuando el aparato está
encendido, se apagará el aparato.
• Si pulsa este botón cuando la función de «Diagnóstico inteligente» está activada, se
finalizará el diagnóstico.
TURBO
MODE
HOME
BLOQUEO
DE BOTONES
activado/
desactivado
START/STOP
• Al pulsar el botón "HOME" durante 3 segundos cambiará el idioma de los mensajes
de voz. (Inglés, español, italiano, francés, alemán, danés, checo, húngaro)
• No es posible utilizar esta función desde el botón del mando a distancia.
• Presione y mantenga pulsado el botón Turbo durante 3 segundos para activar el
modo de registro con un mensaje de voz.
• Este modo se utiliza para registrar el producto al Aspirador Robot a través de Wi-Fi.
Cambio de
Idioma
Registro del
producto
• Presione y mantenga pulsado los botones 'MODE' y 'HOME' durante 3 segundos
para activar o desactivar la cámara frontal.
• HomeGuard y HomeView no estarán disponibles con la cámara frontal desactivada.
Cámara delantera
Encendido/
Apagado

11
FUNCIONES DE LOS BOTONES: Mando a distancia
Consejos
•Si el aparato está apagado, el mando a distancia no funciona.
•Para el ENCENDIDO/APAGADO utilice el botón 'START/STOP' situado en la parte superior del
Robot de Limpieza o el botón 'Power' del Mando a Distancia.
•Use los botones «Mode», «My Space» o «Clock» después de detener el robot de limpieza.
Power
Pulsar este botón encenderá
el aparato en modo de espera
o hará que el aparato vuelva
al modo de espera mientras el
aparato está encendido.
Home
Este botón hace que el robot
de limpieza vaya a la base para
cargar la batería. (p18)
Turbo
Este botón se usa para activar o
desactivar el modo «Turbo». (p25)
Start/Stop
Pulsar el botón enciende y apaga
el Robot de Limpieza o confirma
un programa de limpieza o un
ajuste de tiempo.
My Space
Este botón se usa para poner
al robot de limpieza en el modo
de «Limpieza intensiva en una
zona». (p23)
Mute
Este botón se usa para activar o
desactivar el modo «Mudo». (p12)
Diagnosis
Este botón se usa para realizar
un diagnóstico inteligente. Solo
está disponible cuando el robot de
limpieza está limpiando. (p30)
Mode
Si pulsa este botón, cambiará el
modo de limpieza.(p22)
Botón direccional
Este botón se usa para operar
el producto manualmente y para
seleccionar una zona en el modo de
«Limpieza intensiva en una zona».
Repeat
Este botón permite activar
o desactivar el modo de
«Repetición de limpieza». (p25)
Clock
Este botón se usa para
configurar la hora indicada en
el robot de limpieza. (p26)
Schedule
Este botón se usa para iniciar la
limpieza a una hora programada.
Si pulsa este botón durante al
menos 3 segundos, se cancelará
la limpieza programada.
※
Las opciones de configuración
/cancelación de la limpieza
programada solo están disponibles
en el modo de «Carga». (p27)
※
Opcional

12
PANTALLA DE INFORMACIÓN DE ESTADO
Consejos
•Una vez seleccionado, el modo de limpieza (en zigzag o Celda por celda) continuará activado
incluso si el aparato está apagado.
•Para cancelar la reserva, pulse el botón «Schedule» durante tres segundos mientras el aparato está
cargando.
Pantalla de la hora
Indica la hora actual y la
programada.
Icono del bloqueo
de botones
Este icono indica si el
bloqueo de botones está
o no activado.
Repetición de limpieza
Este icono se muestra en
pantalla si el aparato está
en modo de «Repetición de
limpieza».
Limpieza en zigzag
Este icono se muestra en
pantalla para indicar que el
robot de limpieza está en modo
de «Limpieza en zigzag».
Limpieza Celda por celda
Este icono se muestra en pantalla para
indicar que el robot de limpieza está en
modo de «Limpieza Celda por celda(Cell
by Cell)».
Icono de
programación
Este icono indica
el estado de la
configuración de
limpieza
programada puntual/
diaria.
Icono de conexión
remota
Se muestra cuando el
teléfono inteligente se
conecta al Aspirador Robot.
Icono del modo mudo
Este icono indica si el
sonido está encendido o
apagado.
Icono de la batería
Este icono indica el nivel
de batería restante y
parpadea si es necesario
cargar la batería.
Icono AM/PM
Este icono indica si la
hora es a. m. o p. m..
Icono turbo
Este icono se muestra en
pantalla cuando el modo
«Turbo» está activado.
Icono de regreso a la
base
Este icono se muestra en
pantalla cuando el robot
de limpieza está en modo
de «Regreso a la base».
My Space(Limpieza Mi
Este icono se muestra
en pantalla cuando el
aparato está en modo de
«Limpieza Mi espacio(My
Space)».
Limpieza focalizada
Este icono se muestra
en pantalla cuando el
robot de limpieza inicia la
limpieza.

13
ANTES DE USAR
•No use este aparato en una habitación donde haya un niño sin vigilancia. El niño puede resultar herido.
•Retire cualquier objeto frágil o innecesario que haya en la habitación que desea limpiar.
En especial, retire del suelo artículos de cerámica valiosos u otros objetos de valor.
•Cierre la tapa del depósito de polvo antes del inicio de la limpieza.
•Seque cualquier superficie húmeda que haya en el suelo.
•Retire cualquier cable, cuerda, toalla, felpudo, etc., del suelo de modo que no quede atrapado por el
cepillo.
•Compruebe si la batería tiene potencia suficiente y recárguela si es necesario.
•Vacíe el depósito de polvo una vez que esté lleno.
•Cierre la puerta de cualquier habitación en la que no quiere que entre el robot de limpieza. Durante la
limpieza, es posible que el robot de limpieza entre en otra habitación y continúe limpiando.
•Cuando la bayeta está acoplada, el robot de limpieza no puede pasar umbrales de altura igual o superior
a 5 mm.
Si no desea usar la bayeta durante la limpieza, sepárela del aparato antes de usar el robot de limpieza.
•La limpieza puede presentar problemas en alfombras con borlas o con un grosor de mas de 20 mm. Por
lo tanto, se recomienda que las prepare o las retire antes de usar el producto.
•Cierre todas las puertas de los balcones. Las ruedas pueden atascarse durante la limpieza.
1. Abra la tapa del compartimento de las pilas levantando la pestaña de la parte posterior del mando a
distancia.
2. Introduzca dos pilas AAA y compruebe que los polos positivo (+) y negativo (-) están en la posición
correcta.
3. Cierre la tapa del compartimento de las pilas completamente para que estas no se caigan.
•Nunca pulse más de un botón al mismo tiempo.
•No lo deje caer ni lo someta a impactos fuertes.
•No lo guarde en un lugar cercano a fuentes de calor, fuego o aire caliente.
•Ciertas lámparas fluorescentes, como, por ejemplo, tres bandas de radiación de la lámpara, pueden
interferir en la activación del mando a distancia. Por tanto, procure usarlo lo más alejado posible de
dichas lámparas.
•Si el mando a distancia se activa lejos del robot de limpieza, es posible que no funcione de la forma
adecuada. Si es posible, use el mando a una distancia máxima de 3 m del robot de limpieza.
Compruebe los siguientes consejos antes de usar el robot de limpieza:
Instalación de las pilas del mando a distancia
Medidas de precaución durante el uso del mando a distancia
–
+
+
–
–
+
+
–
–
+
+
–

14
VISTA GENERAL
< Advertencia > Si pone en funcionamiento el robot de limpieza con la tapa del depósito de
polvo abierta, podría provocar una lesión o daños graves en el producto.
1
Introduzca el enchufe del cable de alimentación en
una toma de corriente y coloque la base apoyada en
la pared. Si la base no recibe electricidad, el robot de
limpieza no se cargará.
2
Encienda la fuente de alimentación del
Coloque en la posición «ON» el interruptor de
alimentación de la parte posterior izquierda del
robot de limpieza y pulse el botón «START/
STOP» de la parte superior.
※
Si la fuente de alimentación no está
encendida, consulte la página 16.
3
Compruebe el depósito de polvo.
Compruebe que el depósito de polvo está limpio antes
de iniciar la limpieza y cierre la tapa del depósito de
polvo en la unidad principal.
4
Pulse de nuevo el botón 'START/STOP' (o el botón
' ' del Mando a Distancia) cuando el robot de
limpieza está encendido. Al iniciar la limpieza, oirá el
sonido de indicación de inicio de la limpieza.
5
6
Use los modos de limpieza y las funciones
El robot de limpieza autoevaluará el estado de la
batería y volverá automáticamente a la base para
cargar la batería antes de que esta se vacíe por
completo. La batería tarda aproximadamente tres horas
en cargarse.
Use los botones del robot de limpieza y del mando
a distancia para usar cada modo de limpieza y cada
complemento.
Hay varios modos de limpieza, entre ellos: Zigzag;
Celda por celda; Limpieza focalizada; Mi sitio;
Repetir; los complementos incluyen limpieza manual,
programada y con bayeta ultramicrofibras.
1.5
1.5
2

15
INSTALACIÓN DE LA BASE
1. Coloque la base sobre suelo liso y apoyada a la pared para así evitar
deslizamientos durante el acoplamiento.
Instalar la estación de carga sobre alfombra, no es recomendado. La
aspiradora podrá presentar problemas a la hora de conectarse a la estación.
Retire cualquier objeto que se encuentre a menos de 1,5 m de los laterales y
a menos de 2 m del frontal.
2. Conecte el cable a la estación de carga.
3. Enchufe el cable de alimentación a una toma de corriente.
Enrolle el cable de alimentación alrededor de las lengüetas de
fijación de la parte posterior de la base o colóquelo pegado a la
pared de modo que el recorrido del robot de limpieza no quede
obstruido.
4. Fije la base colocándola pegada a la pared para que no se mueva.
5. Cuando el mando a distancia no esté en uso, colóquelo en el soporte
adecuado de la base.
Lengüetasdejacióndel
cable de alimentación
Instalación de la base
< Advertencia > No ponga en funcionamiento el robot de limpieza si este no funciona
adecuadamente, si está dañado o se ha caído, o si el enchufe o el cable
están dañados. Para evitar peligros, solamente LG Electronics, Inc. o un
técnico de servicio cualificado deben reemplazar el cable.
Consejos
•Debe mantener la base enchufada en todo momento. Si la base no
está enchufada, el robot de limpieza no volverá a ella para cargarse
automáticamente.
1.5
1.5
2

16
ENCENDIDO Y APAGADO DE LA FUENTE DE ALIMENTACIÓN
Asegúrese de que el interruptor de alimentación principal de la
parte posterior izquierda del aparato está en la posición «ON». Si
está en la posición «OFF», póngalo en la posición «ON».
※
Cuando encienda el interruptor de alimentación, no pulse el
botón situado en la parte superior del robot de limpieza. La
acción del botón puede verse retrasada.
※
Con el fin de proteger la batería, ponga el interruptor de
alimentación en la posición «OFF» si no va a usar el robot de
limpieza durante un largo periodo.
Con el robot de limpieza apagado, pulse «START/STOP» durante
al menos 1 segundo, hasta que se oiga un «tin». En unos
10 segundos, el aparato se encenderá, y sonará una melodía.
※
El robot de limpieza se apagará si no se ha movido en 10
minutos y la batería no está cargada.
Pulse el botón «START/STOP» durante 2 segundos cuando el
robot de limpieza está encendido. Sonará una melodía cuando se
apague.
Encendido de la fuente de alimentación principal
Encendido desde el modo en espera.
Apagado de la fuente de alimentación
Consejos
•Si no puede encender el aparato, haga lo siguiente:
- Ponga el interruptor de alimentación en la posición «ON» y espere durante más de 3 segundos.
- Pulse el botón «START/STOP» cuando el interruptor de alimentación está encendido.
- Si el aparato no se enciende o si no aparece nada en la pantalla y solo se emite un «tin», coloque
el robot de limpieza en la base.

17
INICIO E INTERRUPCIÓN DE LA LIMPIEZA
Consejos
Para obtener mejores resultados:
•Examine rápidamente la zona a limpiar y retire cualquier objeto, ya sea grande o pequeño, que
pueda dificultar el paso del robot de limpieza.
•Si la limpieza se inicia cuando el robot de limpieza está en la base, el aparato puede volver
rápidamente a ella, ya que habrá leído con precisión la posición actual de la base.
•Cuando la bandeja para la bayeta está instalada, para prevenir una segunda contaminación por la
bayeta contaminada, el aparato no puede atravesar umbrales de altura igual o superior a 5 mm.
Cuando el robot de limpieza está encendido, pulse el botón «START/
STOP» para iniciar la limpieza. Sonará una melodía y se iniciará la
limpieza.
Pulse el botón «START/STOP» durante el ciclo de limpieza para
interrumpir la limpieza.
※
Si pulsa el botón «START/STOP» cuando la fuente de
alimentación del robot de limpieza está apagada, el aparato se
encenderá. Pulse de nuevo el botón «START/STOP» para iniciar
la limpieza.
Cuando el robot de limpieza está encendido, pulse el botón «
» en
el mando a distancia. Sonará una melodía y se iniciará la limpieza.
Pulse el botón «
» durante el ciclo de limpieza para interrumpir la
limpieza.
※
Cuando el aparato está apagado, pulse el botón «START/STOP»
en la parte superior del robot de limpieza para encenderlo y así o
pulse el botón 'Power' del mando a distancia.
※
Durante la limpieza, se pueden producir colisiones si el sensor no detecta objetos a causa de sus
características físicas (patas finas de mesas y sillas, esquinas de los muebles, etc.). Cuando esto
sucede, el sensor de detección de impactos del interior del aparato evitará los obstáculos mediante un
movimiento de retroceso.
※
Si el robot de limpieza está configurado para iniciar la limpieza en una ubicación distinta de la base,
coloque el aparato en un suelo liso para prevenir el mal funcionamiento del sensor de detección de
obstáculos. Además, deberá iniciar la limpieza desde una ubicación en la que no haya ningún obstáculo,
como, por ejemplo, cortinas o paredes, en un radio de 30 cm alrededor del robot de limpieza.
Mediante los botones del robot de limpieza
Mediante el mando a distancia

18
CARGA DE LA BATERÍA
El robot de limpieza vuelve a la base al finalizar el ciclo de limpieza o
cuando le queda poca batería.
※
El robot de limpieza se apagará si no se ha movido en 10 minutos y
la batería no está cargada.
※
NO ponga el interruptor de alimentación principal en la posición «OFF»,
ya que no se cargará la batería. Si el aparato intenta cargar la batería
con el interruptor de alimentación principal en la posición «OFF»,
se muestra el mensaje de error: "El interruptor principal en la parte
posterior del HomBot está apagado. Por favor, encienda el interruptor."
※
Si el aparato vuelve a la base porque necesita cargar la batería, la limpieza se reanudará, después de la
carga, desde el lugar más cercano a la zona que aún no se había limpiado. (Página 19)
※
Si el robot de limpieza no consigue acoplarse a la base al primer intento, lo intentará de nuevo hasta que
consiga acoplarse correctamente.
※
Cuando el robot de limpieza haya finalizado la limpieza de todas las zonas que puede limpiar, volverá a la
base incluso si no tiene un nivel bajo de batería.
Método 1. Acople el robot de limpieza a la base, para
ello, alinéelo con el lado frontal de la base.
Sonará una melodía y un mensaje de audio
que confirmará el inicio de la carga.
※
Si se repite el mensaje de voz "El
interruptor principal en la parte
posterior del HomBot está apagado.
Por favor, encienda el interruptor.",
asegúrese de que el interruptor de
alimentación principal está en la
posición «ON».
Método 2. Si pulsa el botón «Home» del mando a
distancia o del robot de limpieza, se emitirá
automáticamente un sonido de búsqueda y
el robot de limpieza volverá a la base para
iniciar la carga.
Carga automática
Carga manual
Consejos
Tome las precauciones siguientes cuando use la base:
•Si hay sustancias extrañas en el terminal de carga, es posible que la carga no se realice
adecuadamente. Limpie el terminal periódicamente con un paño seco después de desconectar el
enchufe de alimentación.(p56)
•Para evitar una descarga eléctrica, no toque el terminal de carga con objetos metálicos.
•Para evitar un incendio o una descarga eléctrica, nunca desensamble o modifique la base.
•No coloque la base o el enchufe de alimentación cerca de un aparato de calefacción.
Si usa el robot de limpieza por primera vez o si carga la batería durante la limpieza, puede cargar la batería
manualmente.
※
Si el robot de limpieza no inicia la limpieza desde la base o si se carga manualmente mediante el botón
de carga, es posible que necesite algo más de tiempo para localizar la base.
※
Si el robot de limpieza se encuentra a menos de 10 cm del frontal del terminal de carga cuando la fuente
de alimentación está encendida, el aparato volverá automáticamente a la base y se iniciará la carga.

19
CARGA DE LA BATERÍA
El nivel de la batería se indica en la pantalla de estado, como se muestra a continuación.
•Si el aparato está cargando la batería, la luz del nivel de la batería parpadea.
•Si la carga de la batería se ha completado, solo se muestran los iconos de la batería y del modo de
limpieza, para ahorrar energía.
•Cuando es necesario cargar la batería, solo el primer nivel de la luz del nivel de la batería está encendido
y parpadeando.
Luz de indicación de estado
cuando el robot está cargando
(modo de limpieza en zigzag)
※
Si el robot de limpieza vuelve a la base con un nivel bajo de batería, la luz
del modo de limpieza comienza a parpadear.
- Cuando se ha completado la carga y si la luz del modo de limpieza
parpadea, el robot de limpieza buscará y limpiará aquellas zonas por las
que no pasó.
- Si pulsa el botón «Start» en el mando a distancia o el botón «START/
STOP» en la unidad principal mientras la luz del modo de limpieza
parpadea, el robot de limpieza buscará y limpiará aquellas zonas por las
que no pasó.
- Si pulsa el botón «Start» en el mando a distancia o el botón «START/
STOP» en el aparato después de cambiar el modo, el robot de limpieza
reiniciará la limpieza desde el principio.
Indicador de la cantidad de batería restante
arpadeando
En caso de que no exista una
zona a limpiar
En caso de que exista una zona
a limpiar (parpadea)
Carga necesaria
Nivel medio
Nivel bajo
Nivel alto

20
CARGA DE LA BATERÍA
Comprobación:
Si la batería no está cargando incluso cuando el robot de
limpieza está acoplado a la base, compruebe lo siguiente:
- Ponga el interruptor de alimentación de la parte inferior del
robot de limpieza en la posición «OFF» y, después, vuelva
a ponerlo en la posición «ON».
- Compruebe la luz de encendido de la base. Si la luz está
en posición OFF, vuelva a ponerlo en la posición ON al lado
izquierdo del terminal de la base.
- Limpie el terminal de la base con un paño seco. (p56)
Si la batería no está cargando
Luz de encendido
Terminal de carga
Paso 1. Presione el botón de Power (encendido) en el control
remoto. Todas las funciones de la aspiradora se
apagaran, excepto el modo de recarga.
※
Después de recargar por completo, presione el botón
utilizar la aspiradora.
Modo de carga de ahorro de energía
Usted puede recargar la batería con el modo de carga de ahorro de energía, si usted no utiliza la
aspiradora por un periodo de tiempo prolongado o en la noche.

21
USO DE TIRA MAGNÉTICA DE PARED
Utilize la tira Magnética de Pared para bloquear áreas donde la aspiradora no debe entrar. La tira
Magnética de Pared está incluida en algunos modelos. Para comprar la tira para utilizar con algunos
modelos que no la tiene, o comprar tiras adicionales, puede entrar a www.lg.com.
1. Utilice la Tira Magnética de pared para bloquear áreas que no quiere que su aspiradora limpie.
Tira Magnética
de Pared
Pared
Magnética
Baño
Sala de estar
2. Utilice la pared magnética en áreas donde la aspiradora podría dañarse o podría dañar objetos.
※
Coloque la tira magnética de pared al menos a 6 pulgadas (15 cm) del objeto.
※
Coloque la tira magnética de pared debajo de los bordes de las alfombras que no desea limpiar.
※
No superponga los extremos de las tiras magnéticas de pared.
Use las tiras:
- Alrededor de las escaleras donde podría caer la aspiradora.
- Alrededor de lámparas, plantas u otros artículos frágiles.
- Alrededor de sofás, mesas, sillas o cuencos para mascotas para evitar roces e impactos.
- Alrededor de mesas o alfombras gruesas donde las ruedas del robot podrían quedar atrapadas.
6 pulgadas
(15 cm)
6 pulgadas
(15 cm)
Consejos
•Puede cortar la tira magnética de pared en longitudes más cortas. Asegúrese que las tiras
magnéticas de pared esté de forma continua cuando se rodea un objeto. Si las tiras no forman una
línea continua, la aspiradora puede tener dificultades para reconocerlos.
•Utilice únicamente la tira magnética de pared provista con el producto. Las bandas magnéticas de
terceros pueden no ser reconocido por la aspiradora.
•Si es necesario, use cinta extraíble como cinta adhesiva o cinta de pintor para mantener la tira
magnética de pared en su lugar.
•No instale tiras magnéticas de pared cerca de productos que sean susceptibles a campos
magnéticos, como altavoces, computadoras de escritorio o discos duros, computadoras
portátiles y algunos productos electrónicos incluyendo televisores CRT.

22
MODOS DE LIMPIEZA
Consejos
•Una vez configurado, el modo de limpieza se mantendrá seleccionado incluso si se apaga la fuente
de alimentación.
•Si necesita cambiar el modo de limpieza cuando el aparato está en funcionamiento, pulse el botón
« » y, a continuación, seleccione el modo.
En el modo de «Limpieza en zigzag», el robot de
limpieza repite un patrón en zigzag para limpiar
todos y cada uno de los rincones del hogar.
Si necesita terminar la limpieza rápidamente, elija el
modo de «Limpieza en zigzag».
Pulse el botón «Mode» en el mando a distancia o
en la unidad principal para seleccionar el modo de
«Limpieza en zigzag» y, a continuación, pulse el
botón «
».
※
La configuración de fábrica predeterminada es el
modo de «Limpieza en zigzag».
En el modo de «Celda por Celda(Cell by Cell)», el
robot de limpieza limpia el hogar mediante la división
del espacio en zonas rectangulares. Si necesita una
limpieza exhaustiva, seleccione este modo.
Pulse el botón «Mode» en el mando a distancia para
seleccionar el modo de «Celda por Celda(Cell by
Cell)» y, a continuación, pulse el botón «
».
1.ª etapa:
Se limpia el contorno de la zona de limpieza, cuyas
dimensiones máximas son 3 m × 3 m. (El tamaño
del contorno varía según la forma del interior del
hogar).
2.ª etapa:
Se limpia el interior del contorno siguiendo un
recorrido en zigzag.
Cuando hayan finalizado la 1.ª y la 2.ª etapa, el
aparato se moverá a la siguiente zona de limpieza y
limpiará el interior del hogar mediante la repetición
del modo de limpieza indicado anteriormente.
Limpieza en zigzag

23
Al pulsar el botón «My Space» en el mando a distancia,
se emitirá un mensaje de voz y el modo de limpieza
pasará a «Selectivo».
Si desea limpiar una zona determinada, seleccione
este modo.
1.ª etapa:
Use el mando a distancia para realizar manualmente
la limpieza del contorno de cada zona de limpieza.
※
Para que el aparato pueda reconocer el contorno, la distancia entre el punto inicial y el final debe ser
menor de 1 m.
MODOS DE LIMPIEZA
Consejos
•Cuando el aparato está cargando, no es posible activar el modo de «My Space(Mi espacio)».
•Para cambiar el modo de limpieza cuando el robot de limpieza está en funcionamiento, pulse el
botón « » y, a continuación, seleccione el modo.
My Space
2.ª etapa:
Al pulsar el botón « », el robot de limpieza limpiará intensivamente las zonas seleccionadas.
※
Si se produce un fallo durante la selección de una zona, se emitirá el siguiente mensaje de voz:"La zona
no cumple las condiciones especificadas. Delimite la zona especificada para el proceso de limpieza."
Por tanto, debe usar el mando a distancia para volver a asignar una zona.
※
Una vez completada la limpieza de todas las zonas seleccionadas, el aparato pasará a estar en el modo
de limpieza automática (‘zigzag’ o ‘Celda por Celda’) que estaba activo anteriormente.

24
MODOS DE LIMPIEZA AUXILIARES
Al pulsar una tecla de dirección en el mando a distancia, puede mover el robot de limpieza en el modo
«Manual».
El robot de limpieza limpiará el hogar siguiendo la trayectoria que usted defina mediante la tecla de
dirección: adelante/atrás/izquierda/derecha. En el modo «Manual», el robot de limpieza retrocederá si
colisiona con un obstáculo.
Este modo está pensado para limpiar una parte determinada del hogar.
Pulse el botón «Mode» en el mando a distancia para seleccionar el modo de «Limpieza focalizada», que
se indica en la pantalla de estado, y, a continuación, pulse el botón «
», el robot de limpieza comenzará
entonces una limpieza focalizada en un espacio de 1,5 m de diámetro.
※
Cuando el aparato está cargando, no es posible activar el modo de «Limpieza focalizada(Spot)».
Limpieza manual
Se detiene en la posición inicial
tras completar la limpieza

25
MODOS DE LIMPIEZA AUXILIARES
Consejos
•Precauciones con la función de «Funcionamiento inteligente»
- Esta función de limpieza inteligente permite memorizar la ubicación de los obstáculos para así
eludirlos. El robot de limpieza memoriza cada aspecto del entorno en el que se encuentra desde
que comienza la limpieza en la base hasta el momento en que finaliza su trabajo.
- El robot de limpieza memoriza las nuevas condiciones del entorno cuando se cambia la ubicación
de la base.
- Si la función de “Funcionamiento inteligente” ha sido reconocida, se emite el mensaje de voz:
«EL proceso de aprendizaje de limpieza ha finalizado.»
Al pulsar el botón «Turbo» en el mando a distancia o
en la unidad principal, se emitirá un mensaje de voz
y se activará el modo «Turbo».
Si pulsa el mismo botón cuando el modo «Turbo»
está activado, se emitirá un mensaje de voz y se
cancelará dicho modo.
En el modo «Turbo», el robot de limpieza funciona
con mayor potencia y la limpieza es más intensa.
※
<Modo «Turbo» inteligente>
El modo «Turbo» se pone en funcionamiento
automáticamente cuando el robot de limpieza
limpia alfombras.
Al pulsar el botón «Repeat» en el mando a distancia, se emitirá
un mensaje de voz y se activará el modo de «Repeticion de
limpieza(Repeat)».
Si pulsa el mismo botón cuando el modo de «Repeticion de
limpieza(Repeat)» está activado, se emitirá un mensaje de voz y se
cancelará dicho modo.
En el modo "repetir", el robot limpiador repite la limpieza en curso.
El robot de limpieza puede memorizar el entorno de
limpieza mediante su función de «Funcionamiento
inteligente» para así realizar una limpieza
inteligente.
※
La función de «Funcionamiento inteligente»
solo está disponible cuando el aparato inicia la
limpieza desde la base.
Modo Turbo
Modo de Memorización

26
CONFIGURACIÓN DE LA HORA
Puede configurar la hora indicada en el robot de limpieza.
Al pulsar el botón «Clock» en el mando a distancia, el robot de limpieza iniciará la
configuración de la hora.
Consejos
•La limpieza programada se activa en función de la hora actual del robot de limpieza.
•Si no realiza ninguna acción durante 10 segundos, se cancelará el proceso de configuración.
Seleccione una categoría
usandolosbotones«◄►»
del mando a distancia.
La función se puede encontrar
mediante un mensaje de voz.
Parpadeando
Ajuste la hora usando los botones
«▲▼»delmandoadistancia.
Parpadeando
Ajuste los minutos usando los botones
«▲▼»delmandoadistancia.
Parpadeando
Ajuste si la hora es AM/PM usando
losbotones«▲▼»delmandoa
distancia.
Al pulsar el botón «Clock» o « » en
el mando a distancia, se completará el
proceso de configuración de hora.

27
LIMPIEZA PROGRAMADA
Con la función de limpieza programada, puede hacer que el robot de limpieza inicie la limpieza
a una hora determinada.
Al pulsar el botón «Schedule» en el mando a distancia, y si la batería está cargada, el robot de
limpieza iniciará la configuración de la limpieza programada.
Consejos
•Cuando llegue la hora programada, el robot de limpieza iniciará la limpieza automáticamente.
•La función de limpieza programada solo está disponible cuando el robot de limpieza está cargando.
•Si, cuando el aparato está cargando, pulsa el botón «Schedule» del mando a distancia durante al
menos 3 segundos, se cancelará la programación.
•La función de limpieza programada solo está disponible cuando el robot de limpieza está cargando y
preparado para el uso.
Setting/Cancelling the schedule cleaning is only possible when the unit is recharging on the home station
Seleccione una categoría
usandolosbotones«◄►»
del mando a distancia.
‘Once reservation’
‘Daily reservation’
Parpadeando
Seleccione la opción «Programación
diaria» o «Salida programada» usando
losbotones«▲▼»delmandoa
distancia.
Un mensaje de voz confirmará la
programación.
Parpadeando
Ajuste la hora usando los botones
«▲▼»delmandoadistancia.
Parpadeando
Ajuste los minutos usando los botones
«▲▼»delmandoadistancia.
Parpadeando
Ajuste si la hora es AM/PM usando los
botones«▲▼»delmandoadistancia.
Al pulsar el botón «Schedule» o « »
en el mando a distancia, se completará
el proceso de configuración.

28
Consejos
•Para evitar olores, lave cualquier sustancia extraña o desempolve la bayeta una vez completada la
limpieza.
•Para evitar extender manchas por el suelo, no use la bayeta ultramicrofibras para limpiar cuando en el
suelo haya suciedad mezclada con líquidos, como, por ejemplo, café o tinta.
•Para evitar dañar las alfombras con el velcro o con la transferencia de suciedad de la bayeta, no
limpie las alfombras cuando la bayeta o la bandeja para la bayeta estén acopladas.
•Mantenga la bayeta ultramicrofibras seca. No la use en superficies húmedas.
Si hay humedad, esta puede interferir con la navegación.
• La función de «Diagnóstico inteligente» no está disponible cuando la bandeja para la bayeta está acoplada.
1. Acople la bayeta ultramicrofibras al velcro
de la bandeja para la bayeta como muestra
la ilustración.
2. Empuje suavemente la bandeja para la
bayeta en las ranuras hasta oír un clic.
※
Tenga en cuenta que la bandeja para la
bayeta se puede desacoplar durante la
limpieza si no se ha colocado de la forma
correcta.
3. En este modo, es preciso ajustar
firmemente las lengüetas de la bandeja para
la bayeta en las ranuras de fijación ubicadas
bajo el aparato.
Para realizar la limpieza con bayeta, acople la bayeta y la bandeja para la bayeta al robot de limpieza según
las instrucciones siguientes:
Si acopla la bayeta ultramicrofibras, puede usar el robot
de limpieza para eliminar el polvo de forma eficaz.
Cuando la bandeja para la bayeta está acoplada, el
robot de limpieza no pasará por encima de las alfombras
o de los umbrales de las puertas para prevenir así la
transferencia de suciedad desde la bayeta.
Lajacióndelgancho
Ranura
Clic
Precaución
No cubra el sensor de la cámara.
Montaje de escobillas y la placa de la escobilla

29
FUNCIÓN DE BÚSQUEDA DE UBICACIÓN
Consejos
•Si apaga el aparato cuando la función de búsqueda de ubicación está activada, dicha función
resultará cancelada.
•La búsqueda de ubicación es más eficaz cuando el robot de limpieza está cerca de la ubicación
desde la que fue movido.
•Si el robot está cargando, se cancelará la anterior programación de la “Función de navegación”.
※
La función de navegación se activará después
de que el robot de limpieza reconozca
adecuadamente las condiciones de limpieza.
1. Coloque el robot de limpieza cerca de la
ubicación desde la que fue movido.
※
La búsqueda de ubicación es más eficaz
cuando el robot de limpieza está cerca de la
ubicación desde la que fue movido.
※
Si está fuera de un diámetro de 1 m de la
posición desde la que fue movido, el aparato
tiene dificultades para buscar la posición.
2. Pulse el botón «START/STOP» en el robot de limpieza o el botón «
» en el mando a distancia. El
robot de limpieza iniciará la función de búsqueda de ubicación y emitirá un mensaje de audio.
※
Cuando la búsqueda de ubicación se ha completado correctamente, el aparato continuará la limpieza
desde el lugar donde fue movido.
Si se produce un fallo en la búsqueda de ubicación, el aparato iniciará la limpieza desde el principio.
El robot de limpieza recuerda su ubicación durante la limpieza.
Si mueve el robot de limpieza cuando está en funcionamiento, este buscará su ubicación con la
función de búsqueda de ubicación para continuar la limpieza desde la última ubicación.
Zigzag Zigzag
Zigzag Zigzag
Cambio de ubicación
Ubicación de la colisión
Ubicación de la colisión
Cuando la función de
búsqueda de ubicación está
activada, el modo de limpieza
del indicador de estado
parpadea
Para encontrar la posición
exacta, por favor, apártese
del HomBot.
1
m
1
m

30
DIAGNÓSTICO INTELIGENTE
Consejos
•Asegúrese de no tocar el robot de limpieza o de alterar su funcionamiento antes de que el
diagnóstico inteligente haya finalizado. De lo contrario, deberá poner el interruptor de alimentación
principal primero en la posición «OFF» y después en la posición «ON» para reanudar el diagnóstico.
•El diagnóstico inteligente no se activará en cualquiera de los casos siguientes. En cada caso,
compruebe el problema e inténtelo de nuevo.
- El robot de limpieza no está acoplado a la base
- No hay suficiente batería
- El filtro del depósito de polvo no está en su posición
- La bandeja para la bayeta está acoplada
1. Ponga el interruptor de alimentación principal de la parte
trasera en la posición «ON» y asegúrese de que el robot
de limpieza está acoplado a la base.
※
La función de «Diagnóstico inteligente» solo
está disponible cuando el robot de limpieza está
acoplado a la base.
2. Pulse el botón «Diagnosis» en el mando a distancia,
a continuación, el proceso se iniciará con el siguiente
mensaje: "Iniciando diagnóstico inteligente de HomBot.
Por favor apártese y quite cualquier objeto a una
distancia de 1 metro o 3 pies aproximadamente."
※
Si la bandeja para la bayeta está acoplada, el
proceso no se activará.
3. Si el diagnóstico inteligente se completa con
normalidad, el robot de limpieza volverá a la base
e informará del resultado mediante un mensaje de
voz. Una vez emitido el mensaje de voz, si pulsa
el botón «Recharge» en el mando a distancia o en
la unidad principal, el mensaje se volverá a emitir.
Para finalizar el proceso de diagnóstico, pulse
el botón «
» en el mando a distancia o en la
unidad principal.
※
Si, pasado 1 minuto desde el mensaje de
voz, no ha realizado ninguna acción, el robot
se pondrá en modo de «Carga».
※
Si se produce un error en el sensor de obstáculos, en el sensor ultrasónico o en el sensor de
con el mensaje de voz correspondiente.
El robot de limpieza usa la función de «Diagnóstico inteligente» para realizar un autodiagnóstico.
Si el diagnóstico detecta cualquier irregularidad, póngase en contacto con el centro de servicio
técnico de LG Electronics más cercano.
※
Durante el diagnóstico inteligente, es posible que el robot de limpieza se mueva dentro de un
radio de 50 cm. Por tanto, antes de iniciar el diagnóstico inteligente, asegúrese de que no haya
ningún objeto dentro de un radio de 1 m alrededor de la base.

31
DIAGNÓSTICO INTELIGENTE
Si se emite un mensaje de voz después del diagnóstico inteligente, consulte la tabla siguiente y actúe en consecuencia.
Mensaje de voz
Iniciando diagnóstico inteligente de HomBot. Por favor
apártese y quite cualquier objeto a una distancia de
1 metro o 3 pies aproximadamente.
Clear any object within a 1 m radius around Home Station, and
stay back until the diagnosis is complete.
Hombot tiene que estar cargandose para poder iniciar el diagnóstico
inteligente. Por favor acople el HomBot a la base de carga.
Move Robot cleaner to the Home Station to recharge it.
No se encontró ningún defecto durante el diagnóstico.
Imposible iniciar el diagnóstico inteligente debido al bajo nivel
de batería. Por favor, vuelva a intentarlo después de cargar
la batería.
Try the Smart Diagnosis again after recharging the battery.
correctamente instalados.
Open the Dust Bin Cover and examine the bin.
HomBot no se cargará debido a un error del sensor infrarrojo. Run Smart Diagnosis again and, if the same message is
announced, contact an LG Electronics service center.
HomBot no se cargará debido a un error del sensor
ultrasónico.
Run Smart Diagnosis again and, if the same message is
announced, contact an LG Electronics service center.
HomBot no se cargará debido a un problema con los sensores de
inclinación inferiores. Por favor, limpie los sensores.
Clean the three Cliff Sensors on the bottom at the front of the
unit.
Por favor, limpie el sensor de la cámara situado en la parte
inferior del lado derecho.
Clean the lens of Camera Sensor on the bottom-right.
Por favor, limpie las ventanas del sensor de detección de
obstáculos en ambos lados del HomBot.
Clean the lens of the Obstacle Sensors on both the left and
right hand sides.
Se ha encontrado un problema en el sensor de giro. Run Smart Diagnosis again and, if the same message is
announced, contact an LG Electronics service center.
Por favor, compruebe que no hay materiales extraños en la
rueda izquierda.
Check for foreign materials on the left wheel.
Por favor, compruebe que no hay materiales extraños en la
rueda derecha.
Check for foreign materials on the right wheel.
Se ha encontrado un problema en el sensor de la rueda
izquierda.
Run Smart Diagnosis again and, if the same message is
announced, contact an LG Electronics service center.
Se ha encontrado un problema en el sensor de la rueda
derecha.
Run Smart Diagnosis again and, if the same message is
announced, contact an LG Electronics service center.
Se ha encontrado un problema con el cepillo. Por favor,
compruebe que no hay materiales extraños.
Check for any foreign material stuck in the Brush.
Se ha encontrado un problema en el motor de succión. Run Smart Diagnosis again and, if the same message is
announced, contact an LG Electronics service center.
Se ha encontrado un problema en el sensor de aceleración. Run Smart Diagnosis again and, if the same message is
announced, contact an LG Electronics service center.
Para volver a escuchar el resultado del diagnóstico
inteligente, por favor pulse el botón de carga. Para parar, por
favor, pulse el botón de parada.
If you need to repeat the diagnosis result, press the 'Home'
button, or press ‘
’ button to finish the diagnosis.
Por favor, intente de nuevo el diagnóstico inteligente tras apagar
el interruptor principal situado en la parte trasera del HomBot y
encenderlo de nuevo. Si el problema persiste, por favor, contacte
con atención al cliente de LG Electronics.
Please try smart diagnosis again after turning the main power
switch off and on from the back of Roboking. If the problem
continues, please contact LG Electronics customer care.
El modo diagnóstico inteligente se apagará. Run Smart Diagnosis again after removing the Mop Plate.
El modo diagnóstico inteligente no funcionará con la mopa
acoplada. Por favor, vuelva a intentarlo tras quitarla.
Turn the main power switch OFF and then ON again to resume
the diagnosis. Do NOT touch the robot or disturb its operation
until the diagnosis is complete.
El diagnóstico inteligente no ha podido completar el
diagnóstico. Por favor, vuelva a intentarlo de nuevo tras
haber apagado el interruptor principal situado en la parte
posterior del HomBot y encenderlo de nuevo.
Ponga el interruptor de alimentación principal primero en la
posición «OFF» y después en la posición «ON» para reanudar
el diagnóstico. NO toque el robot o altere su funcionamiento
hasta que el diagnóstico haya finalizado.

32
FUNCIÓN APLICACIÓN INTELIGENTE
Usted puede controlar Aspirador Robot desde su teléfono inteligente.
La aplicación "Smart ThinQ" ofrece las siguientes funciones:
•HomeView, HomeGuard, Limpieza diaria, Limpieza Programada Smart Diagnosis
AP con acceso a Internet
El Aspirador Robot con función de red
Smartphone (Android o iOS)
El uso de la aplicación para smartphones podría estar restringida para algunos modelos y versiones de OS.
Los caracteres especiales o caracteres coreanos en el ID del router pueden obstaculizar la conexión del
producto o el registro.
•Android: Superior a 4.1.2 (Jelly Bean)
•iOS: Superior a iOS 8 (iPhone 5)
•Resolución de la pantalla : 1920x1080
※
Conectarse al router inalámbrico sin una configuración de seguridad adecuada puede causar problemas
de seguridad.
※
Si su organización tiene configurada internamente la seguridad, esto puede afectar la conexión en la
misma.
1. Buscar "Smart ThinQ" en Google Play Store o App Store.
2. Descargue e instale la aplicación "Smart ThinQ".
Lo que hay que comprobar antes de utilizar el producto
Instalando SmartThinQ App
Smart ThinQ
[Aspirador Robot aplicación]
Consejos
•Las especificaciones recomendadas son necesarias para ejecutar la función de control inteligente.
•La aplicación no es compatible con tabletas o computadoras de escritorio o portátiles.
•Para el registro exitoso del producto, el nombre de su punto de acceso Wi-Fi (SSID) debe incluir solo
letras y números en inglés.
•La aspiradora solo admite redes Wi-Fi de 2,4 GHz.

33
FUNCIÓN APLICACIÓN INTELIGENTE
Necesita registrar su identificación personal del inicio de sesión en el servidor para controlar el Aspirador
Robot desde su teléfono inteligente.
1. La [Pantalla de Inicio] se abre al ejecutar la aplicación "Smart ThinQ". Seleccione "Nación/Idioma" y
haga clic en "Inicio de sesión en la cuenta de LG".
2. Usted puede iniciar la sesión con el botón [Crear cuenta] en la página "pantalla de inicio".
Llene los espacios en blanco en la página [crear la pantalla de la cuenta] para crear la cuenta.
3. Si ha creado correctamente una cuenta, intente iniciar sesión en la página "Inicio de sesión" después de
recibir un aviso de autenticación por correo electrónico.
※
No cambie 'Nación/Idioma' en la página [Pantalla de inicio]. Si lo cambia, usted no podrá registrar su
Aspirador Robot que haya adquirido en su país.
※
También puede iniciar sesión con Google y Facebook en la página [Pantalla de Acceso].
Inscripción para la membresía
[Pantalla de inicio] [Pantalla de registro]

34
FUNCIÓN APLICACIÓN INTELIGENTE
Usted debe registrar el producto en la aplicación para controlar el Aspirador Robot desde su teléfono
inteligente. Agregue su Aspirador Robot a la aplicación con la Wi-Fi para utilizar la función Smart.
1. La [Pantalla de Inicio] se abre al ejecutar la aplicación "Smart ThinQ". Haga clic en el botón "+".
2. Elija un Robot aspirador en [Pantalla de Seleccione un producto].
Cómo registrar el producto
Consejos
•La distancia entre el Aspirador Robot y el router no debe exceder los 5 metros; no debería haber
ningún obstáculo entre el router y el Aspirador Robot para ayudar a reducir los problemas durante el
registro.
•Para el reemplazo del router, cambio de configuración de seguridad, o cambio de configuración del
router en la aplicación, se necesita que el Aspirador Robot se vuelva a registrar. Puede cambiar la
información del router en la red del producto en la página de configuración.
•Espere durante aproximadamente 5 minutos después de cambiar el router o modificar la
configuración de seguridad, ya que el cambio puede tomar algún tiempo para ser reconocido.
[Pantalla de inicio] [Pantalla de Selección del
Producto]

35
FUNCIÓN APLICACIÓN INTELIGENTE
Consejos
•Con la función de red habilitada en el Aspirador Robot, pulse "Acceder" para conectar con el
Aspirador Robot.
•Utilice un ancho de banda de 2,4 GHz.
• Los caracteres especiales en el ID del router pueden obstaculizar la conexión del producto o el registro.
1. Mantenga presionado el botón "TURBO(Register/3sec)" en Roboking durante 3 segundos.
La pantalla [Seleccione AP (Wi-Fi)] se abrirá pronto.
2. Al seleccionar su AP en la lista de "Wi-Fi network" automáticamente se lo dirigirá al modo de registro del
producto.
3. Después de que el registro se ha completado, la pantalla [Tablero] se abrirá.
4. Con la función de red habilitada en el Aspirador Robot, pulse "Imagen del Aspirador Robot" para
conectarse al Aspirador Robot.
[Seleccione AP (Wi-Fi)][Pulsar el botón ‘TURBO’] [Registro del producto]
[Lista de usuarios registrados] [Pantalla de selección del producto]

36
FUNCIÓN APLICACIÓN INTELIGENTE
1. Mantenga presionado el botón "TURBO(Register/3sec)" en Roboking durante 3 segundos.
La pantalla [Seleccione AP (Wi-Fi)] se abrirá pronto.
2. Al seleccionar su AP en la lista de "Wi-Fi network" automáticamente se lo dirigirá al modo de registro del
producto.
3. Después de que el registro se ha completado, la pantalla [Tablero] se abrirá.
4. Con la función de red habilitada en el Aspirador Robot, pulse "Imagen del Aspirador Robot" para
conectarse al Aspirador Robot.
Consejos
•Con la función de red habilitada en el Aspirador Robot, pulse "Acceder" para conectar con el Aspirador
Robot.
•Utilice un ancho de banda de 2,4G Hz.
• Los caracteres especiales en el ID del router pueden obstaculizar la conexión del producto o el registro.
[Ajustes de red]
[Pulsar el botón ‘TURBO’]
[Seleccionar “LG_HOMBOT_REG~”
Wi-Fi]
[Registro del producto]
[Seleccionar red]
[Pantalla de selección de producto]

37
FUNCIÓN APLICACIÓN INTELIGENTE
La siguiente pantalla se abrirá cuando usted se conecte al Aspirador Robot por primera vez desde la
aplicación "Smart ThinQ":
Pantalla de inicio de la aplicación
Muestra el apodo del
producto.
El icono de inicio
selecciona la página de
la lista de productos.
(Tablero)
Muestra el estado del
Aspirador Robot.
Muestra el estado de
configuración de la
reserva de HomeGuard y
Schedule Cleaning.
Iniciar Cleaning
inmediatamente.
Inicie la búsqueda de la
estación Home.
Modo menú
Puede establecer los
distintos modos del
Aspirador Robot.
Menú
HomeGuard, Schedule
Cleaning, Cleaning
Diary, Smart Diagnosis,
Configuración.
Homeview
Puede utilizar la función
de control remoto, y
controlar el ambiente que
rodea al Aspirador Robot
a través de la cámara
frontal.
Muestra el modo
Cleaning, el estado de
funcionamiento de la
cámara, el estado de la
batería.
Iniciar HomeGuard
inmediatamente.

38
FUNCIÓN APLICACIÓN INTELIGENTE
Pantalla de inicio de la aplicación
Menú
HomeGuard, Schedule Cleaning,
Cleaning Diary, Smart Diagnosis,
Configuración.
Modo menú
Modo de limpieza, modo
Repeat, modo Turbo.
HomeView
Puede utilizar la función de
control remoto, y controlar
el ambiente que rodea al
Aspirador Robot a través de
la cámara frontal.

39
FUNCIÓN APLICACIÓN INTELIGENTE
Abra Homeview; aparecerán los siguientes iconos de la pantalla de control:
Menú principal Homeview
Cada botón proporciona la función correspondiente.
Iconos de estado
Aquí se muestran la Wi-Fi,
la batería, elprogramación
de limpieza, el modo de
limpieza, el modo Turbo, el
modo de repetición, el modo
de iluminación, y el horario de
limpieza.
Haga clic en cada icono
para alternar los modos de
Cleaning, el de repetición, el
modo Turbo, y la iluminación.

40
FUNCIÓN APLICACIÓN INTELIGENTE
Puede cambiar al modo de limpieza durante HomeView y hacer que el Aspirador Robot comience a limpiar
haciendo clic en "Iniciar la limpieza".
Haga clic en "Iniciar la limpieza" para activar el modo de limpieza. Puede seleccionar otro modo de limpieza
haciendo clic en el botón "Mode Setting" antes de pulsar el botón "Iniciar la limpieza".
Mientras el Aspirador Robot está limpiando, se muestra el botón de "Detener Limpieza". Haga clic en él
para detener el Aspirador Robot.
Haga clic en "Configuración de modo" para activar o desactivar el modo Repetición, modo Turbo, o
encender y apagar la Iluminación (Iluminación está activo a la máxima potencia cuando está encendido y a
baja potencia cuando está apagado).
[Esperando para limpiar]
[Durante la Limpieza.]
Consejos
•El modo Spiral Spot no está disponible mientras el limpiador se encuentre en la estación de carga.
•Haga clic en cualquier área libre para hacer que los botones desaparezcan; vuelva a hacer clic para
volver a mostrar los botones.

41
FUNCIÓN APLICACIÓN INTELIGENTE
Haga clic en "Iniciar la Carga" cuando el Aspirador Robot no está cargando para hacer que el Aspirador
Robot inicie la búsqueda de la estación Home. Haga clic en "Detener" para que el Aspirador Robot detenga
la búsqueda.
Pulse el botón "Control Manual" para hacer que el Aspirador Robot funcione con control manual.
Mueva el Aspirador Robot con el botón de rotación en la esquina inferior izquierda y el botón de avance
en la esquina inferior derecha. A diferencia del control remoto o el Control Simple, puede pulsar ambos
botones simultáneamente.
Consejos
•Puede haber un retraso del vídeo en la pantalla de control Manual y en la respuesta del Aspirador
Robot al utilizar el control manual, debido a las condiciones de WiFi y la red del Router.
[Yendo a la estación Home]
[Control Manual]
[Cargando]

42
FUNCIÓN APLICACIÓN INTELIGENTE
HomeGuard le permite controlar la casa a través de la cámara del Aspirador Robot en su ubicación asignada
mientras usted está lejos. El Aspirador Robot tomará imágenes de cualquier actividad que detecte y se las
enviará a usted como Alertas. (Puede elegir si desea recibir este tipo de imágenes o no en "Configuración").
Si usted sale a trabajar habitualmente o tienen que salir de la casa de manera habitual, puede programar la
función HomeGuard para que se active en el momento deseado.
[HomeGuard está inactivo]
[HomeGuard no programado]
[HomeGuard está activo]
[HomeGuard programado]
Consejos
•Programar o activar HomeGuard sólo está disponible cuando el Aspirador Robot se está cargando.
Consejos
•Cuando la luz ambiental sea inferior a 20 lux, la función HomeGuard puede ser ineficiente, y la
detección puede no funcionar bien.
•El movimiento puede ser detectado en forma constante en el interior para animales domésticos y
repentinos cambios en las condiciones de luz.
•Si no desea recibir las alertas y notificaciones, puede cambiar la configuración de alerta en "Ajustes".

43
Consejos
•Programar o activar HomeGuard sólo está disponible cuando el Aspirador Robot se está cargando.
FUNCIÓN APLICACIÓN INTELIGENTE
Para iniciar HomeGuard, en primer lugar, usted tiene que establecer la ubicación donde el Aspirador Robot se
quedará durante el modo de HomeGuard. Seleccione la ubicación en el mapa virtual.
1. Haga clic en la ubicación de destino en el mapa o arrastre el Aspirador Robot a la ubicación deseada dentro
del área designada. La ubicación de monitoreo puede modificarse de forma continua antes de guardarla.
2. Utilice las dos flechas en ambos lados del vídeo para ajustar la dirección deseada.
[Conguracióndelaubicación1][Conguracióndelaubicación] [Conguracióndelaubicación2]
Consejos
••ElpuntodemonitoreodeHomeGuardsólopuedeestardentrode1,5metrosaladerechayla
izquierda y dentro de los 3 metros al frente de la estación Home. La posición de Guardia siempre
utilizará la estación Home como punto de partida, por lo que la posición HomeGuard tendrá que ser
ajustado de nuevo.
Consejos
•"Si el modo HomeGuard se ha completado, o el modo está detenido debido al bajo nivel de la
batería, el Aspirador Robot sale del modo HomeGuard y regresa a la estación Home donde continua
cargando hasta nueva orden."
[Conguracióndelaubicación]

44
FUNCIÓN APLICACIÓN INTELIGENTE
3. Compruebe si la ubicación es satisfactoria en el vídeo y haga clic en "Guardar" para completar la
configuración de ubicación.
Puede ver las imágenes tomadas en
el modo HomeGuard y enviadas por el
Aspirador Robot, y puede guardarlas en
su teléfono inteligente.
Se almacenan hasta 20 imágenes en el
Aspirador Robot. Haga clic en "Guardar
en la Galería" si desea guardar las
imágenes en su teléfono inteligente.
Si no se guardan en su teléfono
inteligente, entonces se borrarán y serán
reemplazadas con nuevas fotos en curso.
[GuardandolaConguracióndeLocalización]
Consejos
•El Aspirador Robot busca la ubicación guardada con la estación Home como punto de partida, por lo
que tendrá que configurar la ubicación de nuevo si la estación se ha movido.
[Fotos Homeguard][Lista de Fotos HomeGuard]
Consejos
•Tras la detección de movimiento, el Aspirador Robot toma 5 imágenes consecutivas.

45
FUNCIÓN APLICACIÓN INTELIGENTE
Al detectar cualquier movimiento mientras está en el modo HomeGuard, el Aspirador Robot toma
fotografías y envía una alerta a su teléfono inteligente. Pulse el botón "Confirmar" en en la ventana
emergente de alerta para ver la imagen, o utilice el "Call" "View home". "Call" cambia la pantalla a la
interfaz del teléfono; "View home" se abre el modo Vista de la Casa.
Puede cambiar la configuración de alerta en "Ajustes".
[Ventana de alerta HomeGuard][pantalla de ajuste - Alerta habilitado][Ajuste de Menú]
[pantalla de comprobación de
imágenes HomeGuard]
[Pantalla Homeview]

46
FUNCIÓN APLICACIÓN INTELIGENTE
Usted puede programar el horario en que desea que el Aspirador Robot inicie la limpieza.
Para configurar el Programa de limpieza, accione su tecla para activarlo o desactivarlo en el menú del
Programa de limpieza. Después de habilitar el Programa de limpieza, fije el horario y la repetición, y
después haga clic en "Guardar" para completar la programación.
Menú - Limpieza Programada
Consejos
•El menú de Programa de limpieza en la aplicación tiene la misma función que la del control remoto.
Consulte el Programa de limpieza en la página 27.
•El ajuste o el inicio del Programa de limpieza sólo puede hacerse mientras el Aspirador Robot está
cargando.
[Programa de limpieza activado] [Programa de limpieza
desactivado]

47
FUNCIÓN APLICACIÓN INTELIGENTE
Puede ver la agenda del Aspirador Robot para saber cuando hizo
la limpieza.
Cleaning Diary registra información tal como la fecha, el modo y el
horario de inicio y finalización de cada limpieza.
Haga clic en el botón Reproducir a la derecha de la lista de
limpieza realizada; aparecerá un mapa activo de la limpieza de ese
evento particular.
[Diario de Limpieza]
El mapa de limpieza muestra un mapa animado del Aspirador Robot en el modo de limpieza; usted puede
controlar la velocidad de reproducción o rotar el mapa.
[Mapa de limpieza]
Mapa
Mapa dibujado por el
Aspirador Robot durante
la limpieza de la zona. Los
colores muestran las áreas
que no pudieron accederse
debido a obstáculos o las
paredes, así como donde
si se ha completado la
limpieza.
Botón de Reproducción/
Detención de la animación de
la limpieza
Este inicia o detiene la
animación del Aspirador
Robot en el modo de limpieza.
Cambia al botón de Detención
mientras la animación se esté
reproduciendo.
Hora de inicio/
finalización de la
limpieza.
Ubicación del Aspirador Robot
Ubicación del Aspirador Robot al
comenzar la limpieza
Control de la velocidad de
reproducción
Usted puede controlar la
velocidad de reproducción de
la animación de limpieza.
Cada clic en el botón
triangular acelerará la
velocidad de reproducción de
1X a 2X, 4X, 8X, y 16X.
Rotar mapa
Cada clic en este botón hará
girar el mapa 90 grados en
sentido horario.
Consejos
•La lista Cleaning Diary muestra las 20 sesiones de limpieza más recientes.
•Si se requiere cargar durante una sesión, el tiempo de carga se incluye en el tiempo de limpieza
completo. El mensaje presentado indicará la secuencia que ha ocurrido.
•Si la limpieza se interrumpe pulsando el botón "Carga", solamente se elaborará un mapa hasta ese
punto exacto.
•Una entrada en la lista de la agenda de limpieza puede decir "Detenido" si la limpieza se interrumpió
y el Aspirador Robot no volvió a la estación Home dentro de los 10 minutos posteriores a que la
limpieza se detuvo, o si se apaga la alimentación debido a un error.
•Si se apaga manualmente, o cuando se pulsa cualquier botón en el Aspirador Robot durante la
limpieza, la sesión puede no quedar registrada en la lista.

48
FUNCIÓN APLICACIÓN INTELIGENTE
El Aspirador Robot puede auto-diagnosticarse con la función Smart Diagnosis.
Haga clic en "Start Smart Diagnosis" mientras que el Aspirador Robot se esté cargando.
Asegúrese de resolver cualquier problema identificado en el diagnóstico adoptando las medidas
correspondientes. Si el síntoma persiste, póngase en contacto con el centro de servicio al cliente de LG
Electronics.
Menú – Smart Diagnosis
Consejos
•El Smart Diagnosis en la aplicación proporciona la misma función que la del control remoto.
Consulte las páginas 30 y 31 para obtener detalles sobre Smart Diagnosis.
•Smart Diagnosis sólo se puede activar mientras que el Aspirador Robot se está cargando.
[Smart Diagnosis] [Resultados de Smart Diagnosis]

49
FUNCIÓN APLICACIÓN INTELIGENTE
Puede revisar o cambiar la información actual establecida en el Aspirador Robot.
Haga clic en tipo de Voz para cambiar la voz del Aspirador Robot a hombre o mujer.
Haga clic en el apodo del Producto para cambiar el apodo actual del Aspirador Robot; se abre una ventana
emergente donde se puede introducir un nuevo apodo (hasta 10 caracteres, incluyendo inglés, español y
numérico).
Puede comprobar la versión actual del software del Aspirador Robot y la última versión. Si el software
actual no es el más reciente, por favor actualícelo. Consulte los detalles en "Software Update".
Información Básica muestra la versión actual de la aplicación y la información de la licencia de código
abierto.
[Conguración2][Conguración1] [Editar apodo]

50
FUNCIÓN APLICACIÓN INTELIGENTE
[Ventana de descarga de archivos
de software ]
[Actualizando Aspirador Robot]
El modelo del Aspirador Robot con acceso a red puede actualizar automáticamente el software a través de
la aplicación.
1. Asegúrese de que la aplicación "Smart ThinQ" está actualizada en el Play Store. (A menos que usted
actualice la app a la última versión, la actualización de software no estará disponible.)
2. Si una nueva versión está disponible al conectarse a Aspirador Robot, comenzará una actualización.
3. Un nuevo archivo de software se descarga en Aspirador Robot cuando comienza la actualización.
4. Cuando se haya completado la descarga, la actualización se iniciará después de transmitir los archivos a
Aspirador Robot.
5. Aspirador Robot se apagará y encenderá automáticamente en el proceso, y la actualización se
reanudará.
6. Escuchara un mensaje de voz, diciendo que la actualización se ha completado, cuando la actualización
finalice. El Aspirador Robot se apagará y encenderá para aplicar el software actualizado.
Misc. 1 - Actualización del software
Consejos
•La actualización del software sólo se puede hacer mientras que
Aspirador Robot se está cargando.
•Las actualizaciones de software pueden ser hechas sólo si hay
suficiente carga en la batería. Asegúrese de que la batería está
completamente cargada antes de realizar cualquier actualización
de software.

51
FUNCIÓN APLICACIÓN INTELIGENTE
Misc. 2 - Modo
Puede ordenarle al Aspirador Robot simplemente, sin conexión con el mismo, a través de la función Modo.
La función Modo tiene un total de 5 funciones. Si se pulsa el botón 'Aplicado', el Aspirador Robot actuará de
acuerdo con el Modo, según lo siguiente.
Modo Hogar: inicia la búsqueda de la estación Home
Modo Vacaciones: inicia HomeGuard
Modo Viaje: comienza a limpiar
Modo Dormir: inicia la búsqueda de la estación Home
Modo Agradable : No apoyo
※
Si se ha registrado más de un Aspirador Robot, sólo uno de ellos se puede configurar mediante la función
de modo.
En el caso de que haya 2 Aspirador Robot registrados, el primero será el configurado con la función de
modo.
Usted puede cambiar cuál Aspirador Robot será configurado con la función de modo, editándola. [Modo
Editar] (Usted puede ingresar al modo Edición pulsando la imagen del lápiz.)
[Modo Ausente][Modo] [Editar el Modo]

52
INICIALIZACIÓN DE LA INFORMACIÓN DEL PRODUCTO
Si desea vender un Aspirador Robot usado, o si quisiera inicializar la información establecida en el
producto, ejecute Inicialización.
※
Toda controversia entre el vendedor y el comprador es un problema entre las dos partes. LG Electronics
proporciona una función de inicialización del producto para una transacción fluida.
1. Pulse y mantenga presionado los botones "Turbo" y "Carga"
durante 3 segundos con la alimentación encendida; entonces,
todas las pantallas se iluminarán escuchándose un sonido similar
a "ding".
2. Pulse el botón "Start/Stop" para inicializar el producto; la
alimentación se apagará.
3. Al pulsar "Start/Stop" nuevamente,se encenderá Aspirador Robot
con una melodía.
Inicialización de la información del producto
Consejos
•La inicialización devuelve la siguiente información como valores predeterminados de fábrica.
- Imagen de HomeGuard - Diario de Limpieza
- Ubicación de HomeGuard - Registro de Smart Diagnosis
- Cámara frontal (Volver a encender) - Apodo
- Información de limpieza aprendida

53
LIMPIEZA DEL DEPÓSITO DE POLVO
Consejos
•Si cierra la tapa del filtro del depósito de polvo sin colocar ningún filtro, el polvo que llega al interior
puede provocar fallos en el aparato.
•Asegúrese de ensamblar el filtro en el depósito de polvo después de limpiarlo.
Si pone el robot de limpieza en funcionamiento sin haber colocado los filtros o sin haber ensamblado
la tapa del filtro, se emitirá el mensaje de voz siguiente: «Por favor,
compruebe que la bolsa de polvo y el filtro están correctamente
instalados.»
•Si la cubierta del aparato se desacopla durante la limpieza, acóplela
verticalmente en la ranura del depósito de polvo.
1. Pulse el botón «PUSH» en el robot de limpieza
para abrir la tapa del depósito de polvo.
2. Agarre el asa del depósito de polvo y tire de ella
hacia arriba.
3. Tire de la lengüeta del lateral izquierdo del
módulo del filtro EPA situado en la parte trasera
del depósito de polvo para así separar el filtro
EPA y la esponja.
※
Tenga en cuenta que al separar el filtro se
puede caer algo de polvo.
※
Consulte la página 54 antes de limpiar el filtro
del depósito de polvo.
4. Levante la tapa hacia arriba mientras mantiene
pulsado el botón de separación del depósito de
polvo.
5. Vacíe el depósito de polvo y límpielo con un
cepillo de limpieza o bajo un chorro de agua.
6. Después de limpiar el depósito de polvo con
agua, séquelo completamente en una zona bien
ventilada y a la sombra.
7. Cuando haya finalizado la limpieza del depósito
de polvo, cierre la tapa y coloque la esponja y el
filtro EPA.
※
En la página 54 encontrará guías de
ensamblaje detalladas.
8. Coloque el depósito de polvo en el robot de
limpieza y cierre la tapa del depósito de polvo.
Si el depósito de polvo está lleno, la potencia de succión disminuirá. Limpie el depósito de polvo antes y
después de cada sesión de limpieza. Limpie el depósito de polvo siguiendo la secuencia que se indica a
continuación:

54
LIMPIEZA DEL FILTRO DEL DEPÓSITO DE POLVO
El filtro del depósito de polvo está compuesto de un filtro EPA y de un filtro de esponja.
Limpie el filtro EPA y el filtro de esponja siguiendo la secuencia que se indica a continuación:
3. Use un cepillo para limpiar el filtro de esponja.
Si lo ha lavado con agua, séquelo completamente a
la sombra.
4. Ensamble el filtro EPA y el filtro de esponja en
la tapa siguiendo la secuencia que se indica a
continuación:
※
Encaje el saliente rectangular del lateral del
filtro EPA en la ranura de la tapa.
※
Asegúrese de ensamblar correctamente el filtro
EPA y el filtro de esponja en la tapa.
2. Limpie a fondo las pequeñas partículas del filtro EPA
con una aspiradora o con un cepillo.
※
NO lave el filtro EPA con agua. Su potencia de
succión podría disminuir.
Consejos
•Para mantener el rendimiento del robot de limpieza, limpie el filtro EPA al menos una vez a la
semana con un cepillo o con una aspiradora.
•Si pone el robot de limpieza en funcionamiento con la tapa del filtro ensamblada en el depósito
de polvo sin haber colocado ningún filtro, el polvo que llega al interior puede provocar fallos en el
aparato.
1. Tire de la lengüeta del lateral izquierdo del
módulo del filtro EPA situado en la parte trasera
del depósito de polvo para así separar el filtro
EPA y la esponja.

55
LIMPIEZA DEL CEPILLO
Encaje la lengüeta de fijación
(de forma rectangular) del
lateral del cepillo en las
ranuras del mismo color.
Mientras empuja el cepillo en
la dirección de la flecha, encaje
la lengüeta de fijación (de
forma rectangular) del lateral
opuesto en las ranuras.
Presione el cepillo y cierre la
tapa hasta oír un chasquido
en ambos lados de la
lengüeta de fijación.
※
Asegúrese de no atascar
los cepillos laterales en la
tapa.
Póngase unos guantes y
empuje el cepillo hasta una
protuberancia amarilla.
Al empujar el cepillo, levante
la protuberancia amarilla para
separarla de la unidad principal.
Limpie el cepillo con una
aspiradora o con unas tijeras.
Ponga el interruptor de
alimentación principal en la
posición «OFF» antes de
empezar la limpieza. Coloque
el robot de limpieza boca abajo
sobre un paño suave.
Use una herramienta de
limpieza para limpiar los
pelos y otras sustancias
extrañas que haya en el
cepillo.
El cepillo, situado en la parte inferior del robot de limpieza, ayuda a absorber el polvo. Limpie el cepillo
siguiendo la secuencia que se indica a continuación:
※
Antes de dar la vuelta a la unidad principal, extienda un paño suave en el suelo y extraiga el
depósito de polvo.
De lo contrario, la unidad principal se puede rayar o se puede llenar de polvo procedente del depósito.
Después de comprobar si hay
sustancias extrañas, pulse la
lengüeta de fijación y tire de
ella hacia arriba para separar
la tapa.

56
LIMPIEZA DEL SENSOR/TERMINAL DE CARGA
Sensor de
la cámara
superior
El robot de limpieza tiene sensores que le permiten detectar obstáculos y
escaleras, así como la ubicación de la base para cargar la batería. Para
mantener el rendimiento del robot de limpieza, limpie con frecuencia los
sensores y el terminal de carga como se indica a continuación:
1. Ponga el interruptor de alimentación de la parte inferior del robot de
limpieza en la posición «OFF». Si el interruptor no está en la posición
«OFF», la activación del robot de limpieza puede provocar lesiones.
2. Extienda un paño suave en el suelo, dé la vuelta al robot de limpieza y
colóquelo sobre el paño.
※
Asegúrese de extraer el depósito de polvo antes de dar la vuelta a
la unidad principal. De lo contrario, el polvo del depósito de polvo se puede caer.
3. Use un paño suave o un cepillo de limpieza para limpiar el polvo de cada sensor y del terminal de carga
como se describe a continuación:
Terminal de carga
Sensores
ultrasónicos
Ventana del sensor
de detección de
obstáculos Sensores
de detección de la
base y sensores de
recepción del mando
a distancia
Sensor de detección
de alturas
Terminal de carga
Sensor de la
cámara inferior
Lente
Consejos
•Cuando limpie el robot de limpieza, nunca pulverice agua, disolvente, benceno, etc., directamente
sobre él.
•Llame al centro de servicio técnico si el sensor o el terminal de carga están dañados. Los daños en
el sensor y en el terminal pueden provocar un mal funcionamiento del aparato.
•Para limpiar el filtro/sensor, use un paño suave o un cepillo de limpieza.

57
LIMPIEZA DE LOS CEPILLOS LATERALES
Sustancias u objetos extraños, como, por ejemplo, pelos, pueden
quedar adheridos fácilmente a los cepillos laterales. Elimine esas
sustancias al menos una vez a la semana.
Si hay una gran cantidad de sustancias extrañas en los cepillos, es
posible que estos resulten dañados.
Si el suelo es áspero o si se limpian las paredes con frecuencia, los cepillos laterales se pueden doblar o
dañar. En ese caso, siga el método siguiente para alisar los cepillos laterales:
1. El procedimiento siguiente ayuda a restaurar los
cepillos deformados.
2. Pulse el botón «START/STOP» en el robot de
limpieza durante 2 segundos para apagar la
fuente de alimentación.
3. Coloque el robot de limpieza en el extremo de
una mesa para facilitar la limpieza de los cepillos
laterales. Asegúrese de que el robot de limpieza
no se puede caer.
4. Sumerja el cepillo lateral en agua caliente.
5. Presione el cepillo lateral durante
aproximadamente 10 segundos para que esté
completamente sumergido en el agua.
6. Frote suavemente el cepillo lateral deslizándolo
en la mano.
7. Gire el cepillo lateral y repita los pasos 4 a 6 para
cada sección del cepillo.
8. Antes de usar el cepillo lateral, espere a que se
haya secado por completo.
1. Use un destornillador para extraer los tornillos y así
separar el cepillo lateral de la unidad principal.
2. Elimine cualquier cabello que pueda haber tras la
separación.
3. Ensamble el cepillo lateral a reemplazar en la parte
inferior del robot de limpieza, colocando las marcas
«R» y «L» del cepillo en sus homólogos del robot
de limpieza.
Reemplazo de los cepillos laterales

58
1. Separe la bayeta ultramicrofibras de la bandeja para la
bayeta.
2. Lávela cuidadosamente con agua.
3. Antes de usar la bayeta, séquela a la luz del sol en un lugar
bien ventilado.
※
Si usa la bayeta cuando aún está húmeda, puede
provocar un mal funcionamiento del robot de limpieza.
Para evitar olores, lave la suciedad y el polvo de la bayeta una vez finalizada la limpieza. Siga estas
indicaciones para lavar la bayeta ultramicrofibras:
Consejos
•Para evitar un mal funcionamiento del aparato, use solamente la bayeta ultramicrofibras
proporcionada con el robot de limpieza.
•Puede comprar bayetas ultramicrofibras adicionales en el centro de servicio técnico de LG
Electronics más cercano.
8.3 in
(210 mm)

59
RESOLUCIÓN DE PROBLEMAS
Se emite un mensaje de advertencia cuando una rueda no está en contacto con el suelo o cuando se ha
caído por cualquier motivo.
•¿Una de las ruedas ha quedado atrapada en la puerta principal, en el balcón, en la escalera, etc.?
►Coloqueelrobotdelimpiezaenunasupercieplana.
•¿Hay alguna sustancia extraña enrollada en la rueda?
►Extienda un paño suave en el suelo, dé la vuelta al robot de limpieza y colóquelo sobre el paño.
Elimine las sustancias extrañas de la rueda.
※
Asegúrese de extraer el depósito de polvo antes de dar la vuelta a la unidad principal.
De lo contrario, el polvo del depósito de polvo se puede caer.
Se emite un mensaje de advertencia cuando el robot de limpieza no puede continuar la limpieza por la
presencia de un obstáculo.
•¿El robot de limpieza está atascado?
►Despuésderetirarlapiezaqueestáatascada,coloqueelrobotdelimpiezasobreunasupercieplana.
Si se emite el mensaje de voz: «Las ruedas no están en contacto con
Si se emite el mensaje de voz: «Por favor, retire cualquier material
extraño de la rueda izquierda/derecha.»
Si se emite el mensaje de voz: «HomBot no puede seguir limpiando.
Por favor, compruebe el área a su alrededor»

60
RESOLUCIÓN DE PROBLEMAS
Se emite un mensaje de advertencia cuando no hay un depósito de polvo o una tapa del filtro instalados.
•¿El depósito de polvo está instalado en el robot de limpieza?
►Abra la tapa del depósito de polvo y si falta el depósito de polvo, colóquelo.
►NO deje abierta la rendija de la tapa del depósito de polvo.
Cuando la batería está prácticamente agotada, se emite el mensaje de voz: «Bateria baja»
•Lleve el robot de limpieza a la base para que se inicie la carga de la batería.
►Si el robot de limpieza está acoplado a la base, se iniciará la carga y se emitirá la melodía de inicio de
carga.
Si se emite el mensaje de voz: «Por favor, compruebe que la bolsa de
Si se emite el mensaje de voz: «Batería baja. Por favor, sitúe el
HomBot en la estación de inicio para cargar.»
•Asegúrese de que la tapa del filtro está ensamblada en el depósito de polvo.

61
※
En las instrucciones de la página 55, 57 encontrará una descripción más detallada de este proceso.
RESOLUCIÓN DE PROBLEMAS
Se emite un mensaje de advertencia cuando hay una sustancia extraña en el cepillo.
Extienda un paño suave en el suelo, dé la vuelta al robot de limpieza y colóquelo sobre el paño.
※
Antes de dar la vuelta a la unidad principal, extraiga el depósito de polvo.
De lo contrario, la unidad principal se puede llenar de polvo procedente del depósito.
•El cepillo hace un sonido fuerte y anómalo.
►Compruebelaranuradeseparacióndelcepilloparavericarqueesteestáensambladocorrectamente.
►Extraiga el cepillo del robot de limpieza y elimine cualquier sustancia extraña del mismo.
•El cepillo o los cepillos laterales están atascados.
►Elimine cualquier sustancia extraña, como, por ejemplo, cables o pelos, que se encuentre en el cepillo
o en los cepillos laterales.
Si se emite el mensaje de voz: «Por favor, retire cualquier material
extraño del cepillo de la parte inferior del HomBot.»
1 2 3
45

62
ANTES DE SOLICITAR ASISTENCIA TÉCNICA
Compruebe lo siguiente antes de informar del fallo del robot de limpieza.
Problema
La fuente de alimentación no
se puede encender.
Compruebe que el interruptor de alimentación está en la posición
«ON». (Página 16)
La fuente de alimentación se
apaga automáticamente.
Esto no es un fallo. El robot de limpieza tiene su propia función de
ahorro de energía.
Si, después de encender la fuente de alimentación, no usa el aparato
en 10 minutos, la fuente de alimentación se apagará. (Página 18)
El robot de limpieza no carga
la batería.
►Retire los objetos que haya alrededor de la base. (Página 16)
►Compruebe que la fuente de alimentación está conectada a la base.
(Página 15)
►Limpie el terminal de carga con un paño seco.
La potencia de succión ha
disminuido.
►Compruebe si hay alguna sustancia extraña bloqueando el puerto
de succión. (Página 55)
►Vacíe el depósito de polvo. (Página 53)
►Limpieelltrodeldepósitodepolvo.(Página54)
El aparato hace más ruido de
lo normal.
►Compruebe que el depósito de polvo está ensamblado
correctamente.
►Compruebequeelltrodeldepósitodepolvoestáensamblado
correctamente. (Página 54)
►Compruebe si hay alguna sustancia extraña atascada en el cepillo.
(Página 55)
El robot de limpieza no se
enciende.
►Compruebe que el interruptor de alimentación está en la posición
«ON». (Página 16)
►Compruebe que la batería está cargada. (Página 19)
El cepillo no gira. ►Limpie el cepillo. (Página 55)
►Compruebe que el cepillo está ensamblado correctamente.
(Página 55)
Los movimientos o el
recorrido son anómalos.
►Limpie el sensor cuidadosamente con un paño suave. (Página 56)
►Silabayetaultramicrobrasestáacoplada,compruebequeestá
ensamblada correctamente. (Página 28)
►Ponga el interruptor de alimentación primero en la posición «OFF»
y después en la posición «ON».
No es posible encender el
robot de limpieza con el
mando a distancia.
►Reemplace las pilas del mando a distancia. (Página 13)
►Compruebe que el mando a distancia está dentro del área de
cobertura de la unidad principal, que tiene un radio de 3 m.
(Página 13)
►Compruebe si el interruptor de alimentación principal de la parte
inferior está en la posición «ON». (Página 16)

63
ESPECIFICACIONES DEL PRODUCTO
Elemento Batería
Tipo Batería de litio
DC 14.4 V / 2330 mAh
Temperatura de Carga Carga estándar
73.4±9 °F(23±5 °C)
Número de Baterías 1 EA
Elemento/Modelo Robot de limpieza LG
Dimensiones externas 340 mm × 340 mm × 89 mm
Peso 3 kg
Consumo de energía 58 W
DC 16.8 V
Velocidad de
desplazamiento
350 mm/s (Máximo)
Tiempo de uso Aprox. 100 minutos
(en suelo de madera ordinario)
Tiempo de carga 3 horas
Funciones principales
Modo turbo
Modo de memorización
Detección de obstáculos
Función anticaídas
Limpieza programada
Visualización de errores
Navegación
Carga automática/manual
Pulido en seco (limpieza)
Limpieza de rincones
Mensajes de voz
Trazado de mapas
Limpieza focalizada(Spot)
Repetición de limpieza
Limpieza Mi espacio(My Space)
Limpieza Celda por Celda(Cell by Cell)
Limpieza en zigzag
Función aplicación inteligente

64
ESPECIFICACIONES DEL PRODUCTO
Elemento/
Modelo
Home Station
EPS : ADS-30FSA-17
17030EPCU
Dimensiones
externas
236 mm × 181 mm
× 128 mm
95 mm × 43 mm
× 30.7 mm
Tensión
nominal
17.1 VDC AC 100–240 V~
50/60 Hz
Tensión/
corriente de
salida
17.1 VDC / 1.7 A DC 17.1 V / 1.7 A
Consumo
actual
1.7 A 0.8 A
Modelo TWFM-L302D
Rango de frecuencia 2412 - 2462 MHz
IEEE 802.11b: 21.89 dBm
IEEE 802.11g: 21.64 dBm
IEEE 802.11n (20 MHz): 21.31 dBm
IEEE 802.11n (40 MHz): 21.43 dBm

65
REFERENCIAS
Aviso sobre el software de código abierto
Para obtener, bajo licencias de código abierto GPL, LGPL y MPL entre otras, el código fuente contenido en
este producto, entre en http://opensource.lge.com.
Además del código fuente, también podrá descargar todos los términos de la licencia y todas las
exenciones de responsabilidad sobre la garantía a los que se hace referencia.
Ensamblado y desensamblado de la batería
1 3
456
Ponga el interruptor de
alimentación principal de la parte
inferior izquierda del robot de
limpieza en la posición «OFF».
Coloque la batería.
Ponga el interruptor de
alimentación principal de la parte
inferior izquierda del robot de
limpieza en la posición «OFF».
Separe el cable de la batería
mientras presiona el gancho
conector.
Extraiga el tornillo con un
destornillador y retire la
batería del aparato.
2
ADVERTENCIA
Precauciones en caso de incendio, explosión, descarga eléctrica, o avería.
•No cargue este Paquete de Baterías (Paquete en lo adelante) con otro cargador que no sea el
suministrado originalmente.
•No dañe la batería como por ejemplo, corte, pinche, aplaste, acorte o corte los contactos externos.
•No intente desarmar la batería en ningún caso. Cuando el envase esté dañado o no funcione
correctamente, llévelo al servicio técnico.
•No coloque la batería cerca de una fuente de calor ni la arroje al fuego o al agua.
•Cuando la batería esté cargada, por favor, manténgala fuera de un ambiente húmedo o mojado.
•Por favor, mantenga la batería alejada de niños, bebés o mascotas.

66
[NORMA IEC 62929] CONFIGURACIÓN PARA LA PRUEBA DE RENDIMIENTO DE LIMPIEZA
1. Ponga la aspiradora completamente cargada en el punto de inicio y enciéndala.
2. Presione el botón 'TURBO' en la aspiradora o el botón 'Turbo' en el control remoto y la aspiradora.
Se configurará en modo Turbo.
3. Presione el botón 'Repetir' en el control remoto y la aspiradora se configurará en el modo de repetición.
4. Presione el botón "START / STOP" en la aspiradora o el botón "
" en el control remoto y la aspiradora
será operado.
1. Ponga la aspiradora completamente cargado en el punto de inicio y enciéndalo.
2. Presione el botón "Programar" y el botón "Modo" durante 3 segundos para
acceder a Prueba Modo (Derecho).
3. (1) En caso de realizar pruebas en piso, expresión LED: T-H.
(2) En caso de prueba en la alfombra, expresión del LED: T-C.
※
Cambie la expresión del LED presionando el botón 'Mode' en el control
remoto Controlador o el botón 'MODE' en la aspiradora.
4. Presione el botón 'START / STOP' en la aspiradora o el botón '
' en el
control remoto y la aspiradora serán operados.
1. Ponga la aspiradora completamente cargado en el punto de inicio y enciéndalo.
2. Presione el botón 'Repetir' en el control remoto y la aspiradora se ajustará en el modo de repetición.
3. Presione el botón "START / STOP" en la aspiradora o el botón "
" en el control remoto y la aspiradora
será operada.
※
Utilice este modo solo cuando las organizaciones prueben el rendimiento de limpieza o el rendimiento de
conducción de acuerdo con IEC62929
Prueba de navegación / cobertura autónoma
[Modo de Prueba de piso] [Modo de Prueba de alfombra]

67
MEMO

68
MEMO

69
MEMO

Made in Korea
-
 1
1
-
 2
2
-
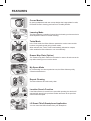 3
3
-
 4
4
-
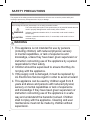 5
5
-
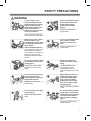 6
6
-
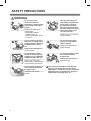 7
7
-
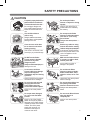 8
8
-
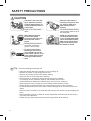 9
9
-
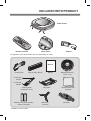 10
10
-
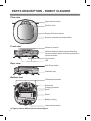 11
11
-
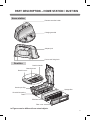 12
12
-
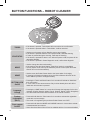 13
13
-
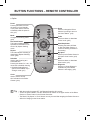 14
14
-
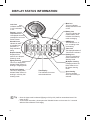 15
15
-
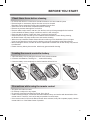 16
16
-
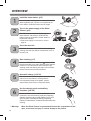 17
17
-
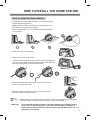 18
18
-
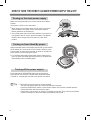 19
19
-
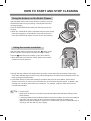 20
20
-
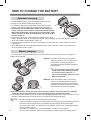 21
21
-
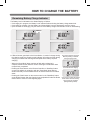 22
22
-
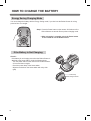 23
23
-
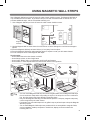 24
24
-
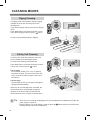 25
25
-
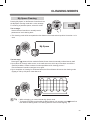 26
26
-
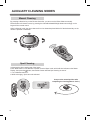 27
27
-
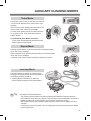 28
28
-
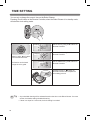 29
29
-
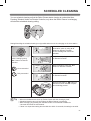 30
30
-
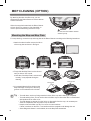 31
31
-
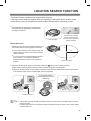 32
32
-
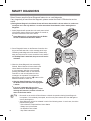 33
33
-
 34
34
-
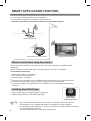 35
35
-
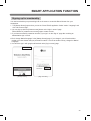 36
36
-
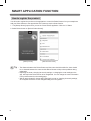 37
37
-
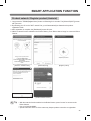 38
38
-
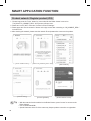 39
39
-
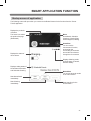 40
40
-
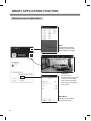 41
41
-
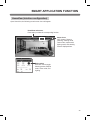 42
42
-
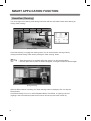 43
43
-
 44
44
-
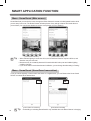 45
45
-
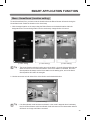 46
46
-
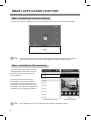 47
47
-
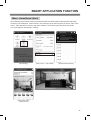 48
48
-
 49
49
-
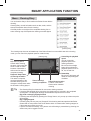 50
50
-
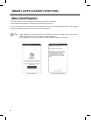 51
51
-
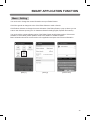 52
52
-
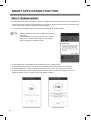 53
53
-
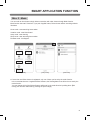 54
54
-
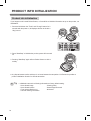 55
55
-
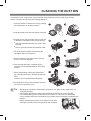 56
56
-
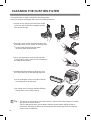 57
57
-
 58
58
-
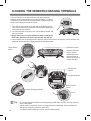 59
59
-
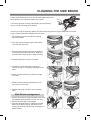 60
60
-
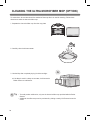 61
61
-
 62
62
-
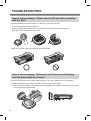 63
63
-
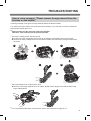 64
64
-
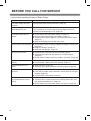 65
65
-
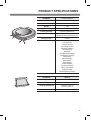 66
66
-
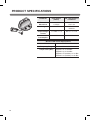 67
67
-
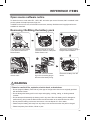 68
68
-
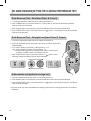 69
69
-
 70
70
-
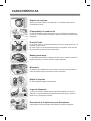 71
71
-
 72
72
-
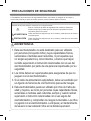 73
73
-
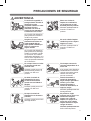 74
74
-
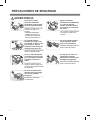 75
75
-
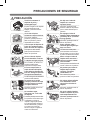 76
76
-
 77
77
-
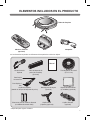 78
78
-
 79
79
-
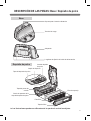 80
80
-
 81
81
-
 82
82
-
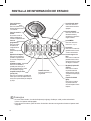 83
83
-
 84
84
-
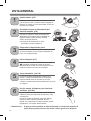 85
85
-
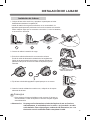 86
86
-
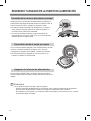 87
87
-
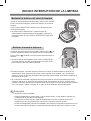 88
88
-
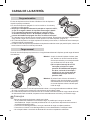 89
89
-
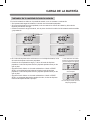 90
90
-
 91
91
-
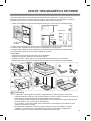 92
92
-
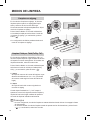 93
93
-
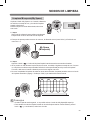 94
94
-
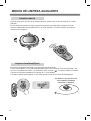 95
95
-
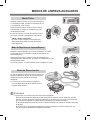 96
96
-
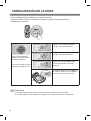 97
97
-
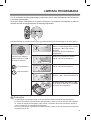 98
98
-
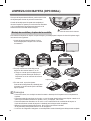 99
99
-
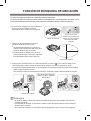 100
100
-
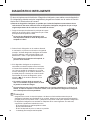 101
101
-
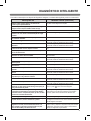 102
102
-
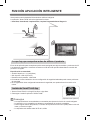 103
103
-
 104
104
-
 105
105
-
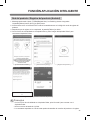 106
106
-
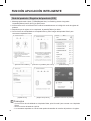 107
107
-
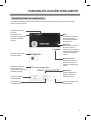 108
108
-
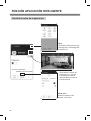 109
109
-
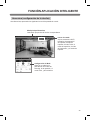 110
110
-
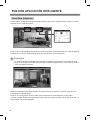 111
111
-
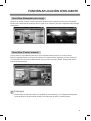 112
112
-
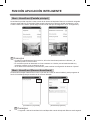 113
113
-
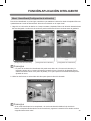 114
114
-
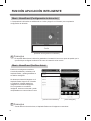 115
115
-
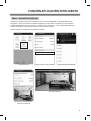 116
116
-
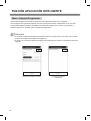 117
117
-
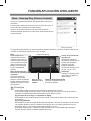 118
118
-
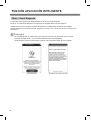 119
119
-
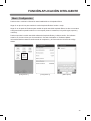 120
120
-
 121
121
-
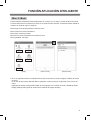 122
122
-
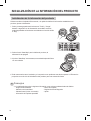 123
123
-
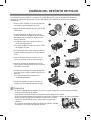 124
124
-
 125
125
-
 126
126
-
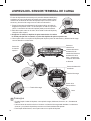 127
127
-
 128
128
-
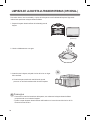 129
129
-
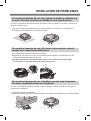 130
130
-
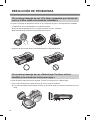 131
131
-
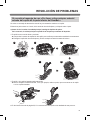 132
132
-
 133
133
-
 134
134
-
 135
135
-
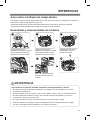 136
136
-
 137
137
-
 138
138
-
 139
139
-
 140
140
-
 141
141


LG VR6480MS El manual del propietario
- Categoría
- Aspiradoras roboticas
- Tipo
- El manual del propietario
- Este manual también es adecuado para
en otros idiomas
- English: LG VR6480MS Owner's manual
Artículos relacionados
-
LG VR9647PS Manual de usuario
-
LG VR9627PG Manual de usuario
-
-
-
LG VR6270LVMB Manual de usuario
-
LG VR65710LVMP Manual de usuario
-
-
LG VR5943L Manual de usuario
-
-
LG VR5942L Manual de usuario
Otros documentos
-
Hoover HGO310 011 Guía de inicio rápido
-
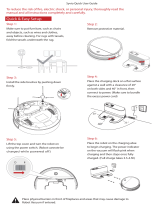 SYVIO 2500Pa Guía del usuario
-
Silvercrest SSRA1 Manual de usuario
-
-
Sharper Image Self-Emptying Robot Vacuum with HEPA Filter El manual del propietario
-
Samsung SR8730 Manual de usuario
-
Miele SCOUT RX2 HOME VIEW El manual del propietario
-
Palson Diábolo Plus 30596 Operating Instructions Manual
-
-
Mi Robot Vacuum-Mop P White (SKV4110GL) Manual de usuario
