Palson Diábolo Plus 30596 Operating Instructions Manual
- Categoría
- Aspiradoras roboticas
- Tipo
- Operating Instructions Manual
Este manual también es adecuado para

Diábolo Plus
COD. 30596
Robot aspirador inteligente
Intelligent robotic vacuum cleaner
GB
E
MODO DE EMPLEO
OPERATING INSTRUCTIONS

2 332
1
2
3
4
7
6
5
8
9
10
11
12
13
14
16
18
19
20
21
27
22
1. Indicador luminoso de funcionamiento
2. Paragolpes delantero
3. Receptor de señal de infrarrojos
4. Entrada para la carga automática
5. Ventana de sensor
6. Botones de funcionamiento
7. Botón de apertura del depósito
8. Rueda delantera
9. Sensores detectores de suciedad
10. Tapa de la batería
11. Cepillo limpiador lateral
12. Ruedas
13. Indicador luminoso de recarga
14. Conexión de recarga
15. Rejilla de salida de aire
16. Depósito de suciedad
17. Rejilla de salida de aire
18. Almohadilla para mopa
19. Barra de arrastre
20. Rodillo de goma
21. Cepillo de suelo
22. Lámpara esterilizadora UV
23. Mando a distancia
24. Cargador automático
25. Unidad de pared virtual
26. Indicador luminoso de funcionamiento
27. Barra de bloqueo
1. Operating indicator light
2. Front bumper
3. Infrared signal receiver
4. Automatic charging socket
5. Sensor window
6. Operational buttons
7. Container opening button
8. Front wheel
9. Dirt sensors
10. Battery cover
11. Side cleaning brush
12. Wheels
13. Recharge indicator light
14. Recharge connector
15. Air outlet grill
16. Dirt container
17. Air outlet grill
18. Mop pad
19. Pull bar
20. Rubber roller
21. Floor brush
22. Sterilising UV light
23. Remote control
24. Automatic charger
25. Virtual wall unit
26. Operating indicator light
27. Locking bar
25
24
23
26
ESPAÑOL. . . . . . . . . . . . . . . 4
ENGLISH . . . . . . . . . . . . . . . 24
GB
E
15

4 5
Este producto, diseñado fundamentalmente para uso doméstico, habitaciones de hotel u oficinas
pequeñas, resulta ideal para la limpieza de diversos tipos de suelos: moquetas de pelo corto, suelos
de madera, baldosas, suelos cerámicos, etc.
2. Introducción sobre su funcionamiento
Se trata de un aspirador robotizado de última generación con batería recargable, controlada por un
programa inteligente avanzado, con las siguientes funciones: aspirado automático, mopa, limpieza
programada, limpieza continuada, control remoto inalámbrico, selección de velocidades, fácil de usar
y de limpiar.
3. Componentes del robot aspirador
Barra de
arrastre Mopa
Cepillo para el
polvo
Cepillo lateral
(dos) Filtro (dos)
4. Introducción
4.1. Panel
Panel
Descripción de la función
UV Botón rayos UV esterilización
I/O
Iniciar/detener la limpieza
CARGA/CHARGE
Volver a la estación a cargar
Indicador de potencia/carga
4.2. Información sobre funcionamiento en el panel
Nuestros productos están desarrollados para alcanzar los más altos estándares de calidad, funcionalidad
y diseño. Esperamos que disfrute de su nuevo robot aspirador inteligente DIÁBOLO PLUS de PALSON.
INFORMACIÓN DE SEGURIDAD
1. Sólo los técnicos de mantenimiento designados por PALSON podrán desmontar, mantener o
transformar el producto ya que, de lo contrario, podría producirse un incendio, una descarga
eléctrica o daños personales.
2. No toque el cable de alimentación de alta tensión del aparato eléctrico con las manos, ya que
podría recibir una descarga eléctrica.
3. No meta su ropa ni los dedos en el cepillo o aberturas del robot aspirador, ya que puede provocar
lesiones.
4. Utilice exclusivamente el cargador del robot aspirador, ya que, de lo contrario, podría provocar
daños en el producto, una descarga eléctrica o un incendio.
5. No doble demasiado el cable de alimentación ni coloque peso sobre él, ya que puede provocar
daños en el cable de alimentación, descargas eléctricas o un incendio.
6. No acerque al aparato a ningún cigarrillo, encendedor, cerilla ni ninguna otra fuente de calor, ni
tampoco materiales combustibles, ni gasolina, ni disolventes, etc...
ATENCIÓN:
1. No se olvide de apagar el aparato mientras lo transporta o si lo guarda durante un período largo
de tiempo, o podría dañar la batería.
2. Compruebe que el cargador y el enchufe están correctamente conectados, ya que podrían
provocar fallos en la carga o incluso un incendio.
3. Utilice el robot aspirador con cuidado en presencia de niños para evitar que se asusten o se hagan
daño.
4. No haga que el aparato aspire agua ni ningún otro líquido, ya que puede dañar el producto.
5. No utilice el robot aspirador en exteriores, podría provocar una avería.
6. Retire todos los objetos de alrededor que puedan dañarse (incluyendo lámparas, botellas de
cristal, etc) antes de utilizarlo, ya que podrían producirse daños en estos objetos o afectar al uso
del robot aspirador.
7. No permanezca de pie ni se siente sobre el robot aspirador, podría ocasionar daños en él o
lesionarse.
No utilice el robot aspirador en mesas pequeñas, sillas u otras superficies pequeñas, ya que éste
podría estropearse.
No utilice el robot aspirador en establecimientos comerciales, ya que podría verse dañado por su uso
excesivo.
No deje cuerdas, cables ni otros objetos móviles con una longitud superior a los 150 mm en el suelo,
o el cepillo podría enredarse.
Si el cable de alimentación está dañado, debe ser sustituido por el fabricante o su servicio técnico
autorizado o por un técnico cualificado con tal de evitar un peligro
Este producto no está permitido para uso infantil u otras personas sin asistencia o supervisión
si su estado físico, sensorial o mental le limita de usarlo con seguridad. Los niños deberían ser
supervisados para asegurar que no juegan con dicho producto.
1. Aplicabilidad:
E
Adaptador
Adhesivo
de estación de conexión

6 7
E
Botón Descripción de su función
UV
Este robot incorpora una lámpara UV que desinfecta el suelo y resulta
especialmente beneficiosa para aquellos que sufren problemas de alergias o
para los hogares con mascota.
a. Pulse “UV” para activar/desactivar la lámpara de rayos ultravioleta.
b. La lámpara UV estará en funcionamiento únicamente cuando esté
funcionando el robot aspirador, por lo que se apagará cuando el robot
aspirador deje de funcionar.
c. El modo
I/O
de la lámpara UV se memorizará de forma automática.
INICIO/PARO
START/STOP
a. Retire todos los objetos pequeños u obstáculos de la habitación antes
de limpiar, a continuación, pulse el botón
I/O
y comenzará a limpiar en el
modo espiral, lineal, zig-zag o de seguimiento de las paredes de forma
automática.
b. Cuando vaya a iniciar la limpieza, puede elegir el modo rápido o lento
(utilice el mando a distancia para elegir la opción que prefiera).
c. El robot dejará de funcionar en caso de que tenga la batería baja, a
continuación emitirá diez pitidos y buscará la estación de conexión para
cargarse automáticamente.
d. El robot dejará de limpiar cuando vuelva a pulsar el botón
I/O
.
CARGA
/CHARGE
a. Cuando pulse el botón
CARGA
/
CHARGE
, el indicador se encenderá.
b. Cuando la máquina vuelve a la estación de conexión para cargarse, el
indicador comienza a parpadear
1. Cuando la máquina se enciende en modo de espera, el indicador se
enciende.
2. Cuando la batería se esté cargando, el indicador parpadeará.
3. Cuando la batería se haya cargado por completo, el indicador se
encenderá con normalidad
4.3. Instalación de la estación de conexión y carga del robot
Carga automática
1. Instale firmemente la estación de conexión sobre
el suelo liso y contra la pared (fijar a la pared con
el adhesivo de la estación de conexión).
2. No puede haber obstáculos ni orificios 3 metros
por delante de la estación de conexión ni 0,5m a
derecha e izquierda (Véase figura 1).
3. El robot no puede encontrar la estación de
conexión para cargarse si está tapada la ventana
que permite la transmisión de la señal de infrarrojos
desde el cargador.
4. Conecte la terminal de salida del adaptador con
la conexión de la estación de recarga.
(Véase figura 2).
Coloque el cable de alimentación del
adaptador a lo largo de la pared, ya que
podría interferir con los cepillos o las
ruedas.
Carga automática
la unidad principal buscará la estación de conexión para cargarse automáticamente en caso de que
se quede con la batería baja durante la limpieza.
Carga manual
1. Puede emplear el adaptador o la estación
de conexión del robot aspirador para cargar
directamente la unidad principal del aparato.
2. Conecte la terminal de salida del adaptador
con el enchufe CC de la unidad principal
mientras emplea el adaptador para cargar.
(Véase figura 3).
3. Antes de iniciar la carga, conecte el adaptador
con la Estación de conexión, asegúrese de
que el robot aspirador esté apoyado contra la
Estación de conexión. (Véase figura 4).
4. Cuando desee cargar la máquina, pulse el
botón
CHARGE
en el mando a distancia. La
máquina encontrará la Estación de conexión
dentro del radio de acción válido y se cargará.
(Véase figura 5)
figura 1
figura 2
¡Alta tensión!
¡Riesgo de descarga eléctrica!
¡Séquese las manos antes de usar!
figura 3
figura 4
¡Alta tensión!
¡Riesgo de descarga eléctrica!
¡Séquese las manos antes de usar!
¡Alta tensión!
¡Riesgo de descarga eléctrica!
¡Séquese las manos antes de usar!

8 9
E
5. Cuando la máquina esté buscando la estación de
conexión, si pulsa el botón
CHARGE
en el panel de
la máquina o el botón
POWER
(indicado en rojo) y
CHARGE
en el mando a distancia, la máquina dejará
de buscar la estación de conexión. (Véase figura 6).
6. Una vez que se haya agotado la batería, el indicador
parpadeará. Cuando el indicador se ilumine,
significará que la batería está completamente
cargada. (Véase figura 7).
7. Cuando ponga en funcionamiento la máquina, si
el indicador de potencia parpadea, indicará que
el aparato tiene poca batería, por lo que necesita
cargarla. (Véase figura 8).
figura 5
figura 6
figura 7
figura 8
1. El robot aspirador puede no encontrar la estación de conexión porque haya
algún obstáculo, la batería esté baja o por situaciones complejas, por lo que la
estación de conexión tendrá que colocarse en un espacio amplio siempre que
sea posible.
2. Cuando el robot aspirador termine de limpiar, la batería tendrá una temperatura
muy elevada, por lo que los tiempos de carga serán mayores
4.4. Montaje/desmontaje y limpieza del depósito
Montaje y desmontaje
1. Extraiga el depósito pulsando el
botón que se encuentra encima del
mismo. (Véase figura 1 y figura 2).
2. Pulse el botón rojo que hay
sobre él y el ventilador saltará
automáticamente. (Véase figura 3).
3. Déle la vuelta al ventilador, libere las
2 fijaciones y abra la tapa para su
limpieza. (Véase figura 4 y figura 5).
4. Tire hacia usted de la pestaña del
lado derecho y aparecerá el filtro.
(Véase figura 6).
5. Coloque un filtro nuevo o límpielo,
pulse el soporte en semicírculo con
una mano para liberar las fijaciones
de la malla del filtro y extraiga la
rejilla del filtro con la otra mano
para cambiarla o limpiarla por otra
nueva. (Véase figura 7).
6. Déle la vuelta de nuevo al depósito,
para extraer la mopa, suelte las
fijaciones derecha e izquierda de
la parte inferior del depósito (Véase
figura 8 y figura 9). Todas las piezas
deben montarse en orden inverso a
su desmontaje.
No utilice la mopa y la barra de arrastre en la moqueta o en un suelo desnivelado.
figura 1 figura 2
figura 3
figura 4 figura 5
figura 6
figura 7
figura 8 figura 9

10 11
Limpieza del depósito y el ventilador:
1. Vacíe en primer lugar el polvo
del depósito y luego termínelo de
limpiar con el cepillo de limpieza.
(Véase figura 1).
2. Extraiga la pieza que contiene el
ventilador, y luego limpie la entrada
/salida de aire con el cepillo de
limpieza. (Véase figura 2 y figura 3).
3. ¡No limpie el ventilador con agua!
4. Extraiga el filtro y, a continuación,
limpie el depósito. (Véase figura 4)
5. Limpie el filtro con un secador de
pelo o con el cepillo de limpieza
(Véase figura 5 y figura 6).
6. Tras la limpieza, puede montarlo
firmemente, como estaba antes del
desmontaje.
4.5 Montaje/desmontaje y limpieza de los cepillos
Montaje/desmontaje del cepillo principal y del cepillo del suelo:
1. Empuje la barra de bloqueo hacia
atrás y eleve la tapa con el pulgar
derecho, a continuación, eleve el
cepillo de limpieza central con la
mano izquierda. (Véase figura 1 y
figura 2)
2. Extraiga el cepillo principal y el
rodillo de goma. (Véase figura 3)
3. Introduzca el cepillo principal y el
cepillo del suelo en los orificios
antes de cerrar la tapa en el
conjunto.
E
figura 1
figura 2
figura 5
figura 3
figura 4
figura 6
figura 1 figura 2
figura 3
Montaje y desmontaje del cepillo lateral:
Montaje:
1. Afloje el tornillo del eje principal del
cepillo lateral antes de cambiarlo.
Desmontaje:
2. Empuje el cepillo lateral contra el
eje principal para luego apretar el
tornillo. (Véase figura).
Limpieza del cepillo y del cepillo
del suelo:
1. Para una mejor limpieza, elimine
con regularidad los restos de pelo
y polvo del rodillo de goma y el del
suelo. Limpie el polvo de la entrada
de aire. Elimine los restos de papel
o de partículas con el cepillo del
polvo directamente. Haga rotar
el cepillo con cuidado y corte con
unas tijeras o tire con la mano de
los pelos, hilos u otros objetos
enredados.
2. La limpieza del cepillo principal
y del rodillo de goma puede
realizarse consultando el montaje
y desmontaje.
4.6. Montaje/desmontaje y limpieza de la rueda izquierda/derecha
1. Afloje el tornillo de la rueda
izquierda/derecha con la ayuda de
un destornillador. (Véase figura 1).
2. Extraiga la rueda izquierda/
derecha y límpiela con el cepillo
(véase figura 2).
¡No las limpie con agua!
3. Coloque la rueda izquierda/derecha
en su posición original y apriete los
tornillos durante el montaje.
figura 1
figura 2

12 13
Montaje/desmontaje y limpieza de la rueda delantera
1. Extraiga la rueda delantera con una herramienta haciendo palanca y límpiela a continuación.
(Véase figura).
2. Colocar y presionar la rueda delantera hasta su posición adecuada mientras realiza el montaje.
4.7. Limpieza del sensor y de la ventana transparente de infrarrojos:
1. Limpie el sensor y la ventana transparente de infrarrojos con un algodón o un paño suave.
2. El sensor de detección de suciedad de la pared se encuentra situado en la parte frontal del robot,
mientras que el sensor detector del suelo y la ventana transparente de infrarrojos se hallan en la
parte posterior del robot. (Véase figura a continuación).
3. Mantenga la ventana transparente limpia para que el robot funcione mejor.
E
Cambio de batería de la pared virtual:
1. Quite el tornillo con un destornillador y abra
la tapa.
2. Coloque correctamente los electrodos positivo
y negativo, de lo contrario, se podría dañar el
aparato.
3. Colocación correcta de las pilas.
4. Extraiga la batería del interior si no va a
utilizarse durante un periodo largo de tiempo.
5. Utilice pilas del tipo LR20.
Cambio de batería del mando a distancia:
1. Abra la tapa de las pilas y cambie las baterías.
(Véase figura 1).
2. Coloque correctamente los polos positivo y
negativo, de lo contrario, se podría dañar el
aparato. (Véase figura 2).
3. Extraiga las baterías del interior si no va a
utilizarse durante un periodo largo de tiempo.
4. Utilice pilas del tipo AAA.
6. Mando a distancia:
6.1. Panel de control:
Aspecto general Descripción de los botones
1. “ ”
2. “ ”
3. “ ”
4. “ ”
5. “ ”
6. “ ”
7. “ ”
8. “ ”
9. “ ”
10. “ ”
11. “▲”
12. “▼”
13. “◄”
14. “►”
figura 1
figura 1 figura 2
figura 2 figura 3
Señal de
trasmisión
Visualizador
días semana
Visualizador
hora/error
Visualizador
fallo
Limpieza lenta
Limpieza rápida
Visualizador
día semana
Limpieza
continuada
Iniciar limpieza
Encendido
Domingo, Inicio/Parada
Lunes/UV
Martes/configuración hora
Miércoles/carga
Jueves / cronometraje
Viernes/limpieza rápida
Sábado/Limpieza automática tras carga
completa
Todos los días de la semana reservados/
limpieza lenta
Confirmación de orden
Avance
Retroceso
Giro a la izquierda
Giro a la derecha

14 15
6.2. Método de utilización y estado de funcionamiento del panel de control
Los siguientes pasos son muy importantes, ¡evitan cometer errores con el mando
a distancia!
1. Debe volver a comprobar el código del mando a distancia o de la unidad principal cuando los
cambie tras su primer uso o durante el mantenimiento.
2. Compruebe que el mando a distancia y la unidad principal tienen suficiente batería, apague la
unidad principal, pulse OK en el mando a distancia durante más de 4 segundos, y encienda a
continuación la unidad principal sin soltar el botón OK. Cuando el robot emita dos pitidos, suelte el
botón OK y la comprobación de código habrá finalizado.
3. Si no consigue oír los pitidos durante la comprobación de códigos, repita el proceso anterior.
E
Guía de
funcionamiento
Información sobre el funcionamiento
Inicio/Parada
Start/Stop
Encienda la máquina, cuando pulse el botón Start/Stop (Inicio/Parada),
la máquina comenzará a funcionar, cuando vuelva a pulsar ese botón, la
máquina dejará de funcionar
Configuración de la
hora y del día de la
semana actuales
1. Encienda la máquina.
2. Cuando pulse el botón “ ”, la indicación 88: en la hora actual comenzará
a parpadear. Pulse los botones ▲▼ para seleccionar la hora.
3. Cuando pulse los botones ◄ ►, el indicador de los minutos actuales
comenzará a parpadear. Pulse los botones ▲▼ para seleccionar los
minutos.
4. A continuación, pulse los botones ◄ ► para introducir la hora actual.
5. Para seleccionar el día de la semana actual, puede pulsar directamente los
botones SUN, MON, TUE, WED, THU, FRI o SAT para los días domingo,
lunes, martes, miércoles, jueves, viernes y sábado respectivamente.
6. Tras finalizar la configuración, pulse el botón OK.
7. Durante la configuración, si pulsa el botón de encendido puede cancelar
la configuración
Configuración de la
hora de limpieza
Configuración de la
limpieza continuada
Configuración de día de la semana de limpieza:
1. Encienda la máquina.
2. Cuando pulse el botón “ ”, aparecerá SUN, MON, TUE, WED, THU,
FRI , o SAT.
3. Pulse el botón de cualquier día de un día de la semana, los de varios días
de la semana o el botón de todos los días de la semana para configurar
la limpieza en cualquier día o días de la semana o todos los días de la
semana. La fecha de la semana actual parpadea.
Configuración de la hora de limpieza:
4. Pulse el botón “ ”, el icono de la hora 88 : comenzará a parpadear.
Pulse el botón ▲▼ para seleccionar la hora de limpieza que desee.
5. Vuelva a pulsar el botón ◄ ►, el icono de los minutos: 88 comenzará a
parpadear. Pulse el botón ▲▼ para seleccionar los minutos de la hora de
limpieza que desee.
6. Tras finalizar la configuración, pulse el botón OK.
7. Durante la configuración, si pulsa el botón de encendido cancelará la
configuración.
Configuración para limpieza continuada
Si su casa es muy grande, puede emplear la función “ ” (limpieza
continuada), que significa que el robot aspirador se pone a limpiar cuando
está completamente cargada y que vuelve a la estación de conexión
automáticamente antes de que se la acabe la batería.
1. Pulse “ ”, el indicador “ ” de la pantalla de LCD del mando a
distancia comenzará a parpadear.
2. Tras finalizar la configuración, pulse el botón OK.
3. El robot aspirador comenzará a limpiar automáticamente cuando la
batería se haya cargado (5 ó 6 horas de carga).
Observación: ¡No se pueden emplear las funciones de limpieza
continuada y la de limpieza programada al mismo tiempo!
Visualizador de fallo
Cuando esté usted seguro de que se ha producido algún fallo, en caso de
que el mando a distancia esté dentro del alcance de la señal de mando a
distancia, pulse el botón de esta función en el mando a distancia. La pantalla
mostrará un código de error que podrá solventar siguiendo las indicaciones
del apartado de resolución de problemas.
Selección de
velocidad
Pulse el botón “
FAST
” (rápido) o “
SLOW
” (lento) para seleccionar las opciones
de limpieza rápida o lenta. Tras la selección, la máquina la memorizará
automáticamente.

16 17
Guía de funcionamiento Información sobre el funcionamiento
Apagar/Cancelar/Detener
1. Accione el botón de encendido del robot. Cuando la función
de visualización esté en estado normal, pulse este botón para
iniciar o apagar el robot.
2. Cuando esté en funcionamiento, pulse este botón para detener
el funcionamiento en el modo correspondiente.
3. En la configuración de día de la semana y hora dentro de la
limpieza programada, si el ajuste es incorrecto o desea parar
el ajuste, pulse este botón para cancelar el ajuste y volver al
estado original.
4. Pulse este botón durante más de 5 segundos, borrará toda la
configuración y volverá a la configuración predeterminada
Botón de OK
Tras finalizar la configuración, pulse el botón OK para almacenar
la configuración.
FULL GO
Después de cargar por completo la batería, la máquina realizará la
limpieza automáticamente y en repetidas ocasiones
CHARGE
Si pulsa este botón mientras el robot está en el modo de espera o
en funcionamiento, el robot buscará la estación de conexión para
cargarse. Cuando el robot deje de funcionar, dejará de recargarse
si vuelve a pulsar este botón.
▲ Botón de avance
Pulse “Forward/Avance” y el robot avanzará limpiando en dirección
de la echa, pulse “off/apagado” para que se detenga. En caso de
obstáculo, se detendrá automáticamente.
▼ Botón de retroceso
Pulse “Backward/retroceso” durante un periodo largo de tiempo, el
robot retrocederá limpiando en dirección de la echa y se detendrá
cuando suelte el botón.
◄ Botón de giro a la izquierda
Pulse el botón “Turn left/giro izquierda” durante unos segundos y el
robot girará en el sentido contrario al de las agujas del reloj sobre
sí mismo y, cuando suelte el botón, avanzará en la dirección que
haya indicado.
Pulse “Off/apagado” para detener el robot. En caso de obstáculo,
se detendrá automáticamente.
► Botón de giro a la derecha
Pulse el botón “Turn right/giro derecha” durante unos segundos y
el robot girará en el sentido de las agujas del reloj sobre sí mismo
y cuando suelte el botón, avanzará en la dirección que haya
indicado. Pulse “Off” para detener el robot. En caso de obstáculo,
se detendrá automáticamente.
E
1. Tendrá que emplear el mando a distancia dentro de un radio de alcance de señal de
10 metros, de lo contrario, no podrá controlar la unidad principal.
2. El robot aspirador puede no encontrar la estación de conexión cuando pulse carga
automática porque haya algún obstáculo, la batería esté baja o por situaciones
complejas.
7. Estación de conexión para carga automática
7-1 Visualizador del cargador y panel de control
Vista general Instrucciones de funcionamiento
1. Luz LED de adorno
2. Indicador de luz de adorno
3. LED de encendido
4. Indicador de carga
5. Transmisor de señal
6. Polo de carga positivo
7. Polo de carga negativo
8. Enchufe de carga de potencia CC
7-2 Método de uso y estado de funcionamiento de la estación de conexión
Nº
Guía de
funcionamiento
Información sobre el funcionamiento
1 Luz LED de adorno
2
Indicador de luz de
adorno
Pulse el interruptor para encender o apagar la luz de adorno
3 LED de potencia
El LED de potencia se encenderá cuando la estación de conexión
esté conectada a la fuente de alimentación, o se apagará cuando
no esté conectada
4 Indicador de carga
El indicador parpadeará mientras el cargador esté conectado al
robot.
5 Transmisión de señal
La transmisión de señal es la única manera de guiar al robot para
que vuelva a la estación de conexión para cargarse, de este modo,
la ubicación de la señal de transmisión debe estar despejada, sin
ningún obstáculo encima.
6-7
Electrodo positivo
y negativo de carga
El electrodo y el del robot están conectados para cargar en modo
de contacto, de manera que la ubicación debe estar despejada,
sin ningún obstáculo en ella mientras se esté empleando, o puede
producirse un impacto en la carga.
8
Enchufe de
alimentación CC
de carga
El enchufe de carga, denominado de manera abreviada cargador,
se emplea para conectar la terminal de salida CC24V al adaptador
y se trata de la estación de tránsito para la carga entre el robot y
el adaptador, de manera que el cargador debe situarse rmemente
contra la pared y el cable adaptador debe mantenerse alejado del
cargador para evitar que el robot sufra algún impacto o enredo
durante la limpieza.

18 19
8. Vista del seccionador de espacios y panel de control
Vista general Instrucciones de funcionamiento
1. Interruptor/selector
a. Apagado
b. Bajo
c. Medio
d. Alto
2. Cabezal de señal
3. Cabezal transmisor de infrarrojo cercano
4. LED de potencia
Introducción de la función del seccionador de espacio:
El seccionador de espacio es un accesorio del robot que puede bloquear una zona enviando una
señal de infrarrojos especial para evitar que el robot aspirador acceda a zonas en las que no es
necesario limpiar.
Método de utilización y estado de funcionamiento del seccionador de espacio
Nº
Nombre Información sobre el funcionamiento
1
Interruptor
/selector
Puede cambiar de función moviendo el selector en repetidas
ocasiones:
Apagado, Bajo, Medio y Alto
a Apagado
Mueva el selector a esta posición para apagar el aparato
b Bajo
Mueva el selector a esta posición para apagar el aparato
c Medio
Mueva el selector hasta esta opción y encienda el aparato,
podrá seleccionar una distancia dentro de 4 metros según lo
establecido por la pared de infrarrojos
d Alto
Mueva el selector hasta la opción Medio y encienda el aparato,
podrá seleccionar una distancia dentro de 6 metros según lo establecido
por la pared de infrarrojos
2
Cabezal para
transmisión de señal de
pared de infrarrojos
Mueva el selector, a continuación podrá ajustar la distancia del
seccionador de espacio
3
Cabezal transmisor de
infrarrojo cercano
La señal de transmisión de infrarrojo cercano hace que el robot
aspirador funcione fuera del alcance del seccionador de espacio de
entre 50 y 100 cm sin ningún impacto
4 LED de potencia
El LED de potencia parpadeará una vez cada 8 segundos, hasta que
quede poca batería, después de que mueva el selector a las opciones
Bajo, Medio y Alto, y el robot funcionará con normalidad
E
1. Abra la tapa de la batería antes de usar, coloque dos pilas «D» (no incluidas) en la cajetilla
correctamente. Preste atención a la polaridad o el seccionador de espacio no funcionará.
2. La duración de consumo de la batería está relacionada con la distancia de transmisión
seleccionada y con el tiempo de funcionamiento, elija la distancia de transmisión adecuada y
una potencia de transmisión baja para ahorrar batería. No se olvide de apagar el interruptor/
selector cuando no se esté utilizando.
3. Se podrán observar algunas diferencias en la dirección, la transmisión de la señal de infrarrojos del
seccionador de espacio y la distancia de recepción del robot debido al impacto medioambiental
y al movimiento del robot durante su utilización. La diferencia anterior puede variarse en función
del entorno actual y las distintas potencias de la batería del robot y del seccionador de espacio.
Método de instalación del seccionador de espacio
1. El seccionador de espacio suele colocarse al principio de una escalera o en la entrada de una
habitación.
2. Puede colocar el seccionador de espacio en una posición determinada para evitar que el robot
pase por algunos lugares.
3. Elimine, dentro de lo posible, cualquier obstáculo de la zona que desee bloquear frente al
seccionador de espacio para evitar mermar su función
1. El seccionador de espacio debe estar colocado al mismo nivel del suelo por donde
está funcionando el robot.
2. Compruebe si el robot puede pasar por el seccionador de espacio cuando lo utilice
por primera vez.
3. La distancia entre el seccionador de espacio y el cargador debe ser superior a los
3 metros, o se producirán interferencias.

20 21
9. Resolución de problemas
El robot no funciona o limpia mal
1. Compruebe si el interruptor está encendido.
2. Compruebe que el depósito, el filtro y la entrada de aire estén limpios y que el cepillo lateral
funciona.
3. Compruebe si el nivel de la batería ha descendido significativamente.
El mando a distancia no funciona
1. Compruebe el estado de la batería del mando a distancia.
2. Compruebe el estado de la batería del robot.
3. Realice la comprobación de código entre el mando a distancia y la unidad principal.
4. Compruebe si el mando a distancia está dentro del radio de alcance de la señal de transmisión.
El robot no se puede cargar automáticamente.
1. Compruebe si el adaptador está bien conectado con el cargador y si el indicador LED de potencia
del cargador está encendido.
2. Compruebe si la batería está demasiado baja, de ser así, cargue el robot con el adaptador
directamente.
3. Asegúrese de que no haya ninguna barrera frente a la estación de conexión.
4. Utilice el mando a distancia para hacer que el robot aspirador vuelva a la estación de conexión.
Aumento del ruido durante la limpieza
1. Limpie el depósito y el filtro.
2. Compruebe que el cepillo principal o el cepillo lateral no estén sucios.
3. Si el ruido sigue siendo muy alto, puede enviar el robot aspirador al servicio técnico autorizado
para que le apliquen lubricante.
El robot deja de funcionar de repente y comienza a emitir pitidos intermitentemente
1. Compruebe si el tiempo de limpieza establecido se ha acabado.
2. Compruebe si hay algún código de error en la pantalla del mando a distancia en referencia a lo
siguiente.
El robot retrocede contínuamente
1. Evite usarlo a la luz del sol directa o sobre moquetas gruesas.
2. De un golpecito al paragolpes frontal.
El robot se ha caído por las escaleras
Limpie los sensores de detección de suelo en la parte inferior delantera del robot.
El robot no se carga automáticamente después de no haberlo utilizado durante mucho tiempo.
Utilice el adaptador para cargarlo por completo en primer lugar.
El robot se para, pero no aparece ningún código de error.
No lo desmonte ni lo intente reparar, póngase en contacto con el servicio técnico autorizado.
E
Información de fallos que pueden aparecer durante su uso
Código
de fallo
Causa del fallo Cómo resolverlo
E001
Sensores de
detección de suelo
Limpie los sensores en la parte inferior delantera del
robot
E002 Cepillo central Limpie la suciedad, pelos o hilos atrapados en el cepillo
E003 Apagado
Utilice el adaptador para cargarla, una vez que esté
completamente cargada, vuélvala a utilizar
E004
Rueda izquierda
/derecha
Compruebe las ruedas derecha/izquierda y limpie la
suciedad que haya en ellas
E005
Contacto insuciente
del depósito
Compruebe el depósito y vuelva a jar el depósito tras
su limpieza
Si el fallo persiste después de realizar las acciones arriba descritas, póngase en
contacto con el servicio de mantenimiento postventa, con el personal profesional
de mantenimiento o con el centro técnico de la empresa, no lo intente desmontar ni
arreglar usted solo. Información de fallos que pueden aparecer durante su uso.

22 23
10. Especificaciones técnicas
Modelos aplicables XR210C
1 Tensión nominal 14.4V
2 Batería
Batería recargable (el tiempo de carga es de
aproximadamente 5h)
3
Duración de la batería en
funcionamiento
Aproximadamente 100-120 minutos (2200 mA)
4 Potencia nominal <24W
5
Intervalo de temperaturas en
funcionamiento
-10ºC~45ºC
6
Intervalo de humedad en
funcionamiento
≤85RH
7 Tensión/corriente de entrada 24V 1A
8 Mando a distancia inalámbrico Banda de Frecuencia ISM 2.4GHz
9 Especicaciones
ɸ320x87mm (incluyendo la altura de la rueda)
10 Peso 3,2kg
11 Capacidad de la batería 2200mA
Especificaciones técnicas del mando a distancia
Modelos aplicables XR210C
Tensión nominal 3V
Batería 2 pilas AAA (no incluidas)
Modo remoto Banda de Frecuencia ISM 2.4GHz
Distancia de recepción y transmisión ≥10M
Potencia de transmisión 0dB
Intervalo de temperaturas en
funcionamiento
-10¡æ~45!æ
Intervalo de humedad en
funcionamiento
≤85RH
Características 120L×55A×25espesor (mm)
Peso 0,08kg
E
Especificaciones técnicas de la estación de conexión
Nº
Modelos Parámetros Observación
1 Características L×An×Al: 200×51×102mm
2 Peso 0,23kg
3 Tensión nominal 24V
4
Intervalo de
temperaturas en
funcionamiento
-10ºC~45ºC
5
Intervalo de humedad
en funcionamiento
≤85RH
Especificaciones técnicas del seccionador de espacio
Nº
Modelos Parámetros Observación
1 Características L×An×Al: 102×71×106mm
2 Peso 0,14kg
3 Tensión nominal 3V
4 Batería 2 pilas “D” de 3V (no incluidas)
5
Intervalo de
temperaturas en
funcionamiento
-10ºC~45ºC
6
Intervalo de humedad
en funcionamiento
≤85RH
PROTECCIÓN MEDIOAMBIENTAL
Los productos eléctricos desechados no deben eliminarse con la basura doméstica. Este aparato debe
llevarse a su centro de reciclaje local para un tratamiento seguro.
Gracias por demostrarnos su confianza al elegir uno de nuestros productos.

24 25
GB
Technical specifications of docking station
No.
Models Parameters Observation
1 Characteristics L×An×To: 200×51×102mm
2 Weight 0.23kg
3 Nominal voltage 24V
4
Operating
temperature range
-10¡æ~45!æ
5
Operating humidity
range
¡Ü85RH
Technical specifications of space divider
No.
Models Parameters Observation
1 Characteristics L×An×To: 102×71×106mm
2 Weight 0.14kg
3 Nominal voltage 3V
4 Battery 2 x 3V "D" batteries (not included)
5
Operating
temperature range
-10¡æ~45!æ
6
Operating humidity
range
¡Ü85RH
ENVIRONMENTAL PROTECTION
Used electrical products must not be discarded with household waste. This device must be taken to a
local recycling centre for safe disposal.
Thank you for purchasing one of our products.
1. Application:
This product, designed primarily for domestic use, hotel rooms or in small offices, is ideal for cleaning
different types of floors: short-hair rugs, hardwood floors, tiles, ceramic floors, etc.
2. Introduction on using the device
This is a latest-generation robotic vacuum cleaner with a rechargeable battery and controlled by an
intelligent guidance program, which has the following features: automatic vacuum, mop, scheduled
cleaning, continuous cleaning, wireless remote control, speed selector, simplicity of use and cleaning.
3. Robotic vacuum components
Pull bar Mop Dust brush Side brush (two) Filter (two)
4. Introduction
4.1. Control panel
Control panel
Description of function
UV Sterilising UV light button
I/O
Start/stop cleaning
CARGA/CHARGE
Return to charging station
Power/charge indicator
Our products are developed to reach the highest standards of quality, functionality and design. We
hope you enjoy your new PALSON DIÁBOLO PLUS intelligent robotic vacuum cleaner.
SAFETY INFORMATION
1. This product may only be disassembled, maintained or changed by PALSON-appointed technicians;
failure to observe this warning could result in fire, electric shock or personal injury.
2. Do not touch the device's high voltage power cable with your hands as you could suffer an electric
shock.
3. Do not place clothes or hands inside the brush or in openings on the robot as this could result in
injury.
4. Use the exclusive robotic vacuum charger only; failure to observe this warning could result in fire,
electric shock or personal injury.
5. Do not over-bend the power cable or place weight on top of it as this could damage the cable or
result in electric shock or fire.
6. Do not place the device close to cigarettes, lighters, matches or any other heat sources, including
combustible materials, petrol, solvents, etc.
CAUTION:
1. Do not forget to turn off the device during transport or when storing it away for a long period of
time, as leaving it on could damage the battery.
2. Check that the charger-socket connection is secure; a poor connection could result in improper
charging or even fire.
3. Use the robotic vacuum carefully in the presence of children to avoid frightening or injuring them.
4. Do not allow the device to take in liquid as this could damage the product.
5. Do not use the robotic vacuum outside as this could damage the unit.
6. Move any breakable items in the vicinity of the device (e.g. lamps, glass bottles, etc.) before using
it as they could become damaged or may affect vacuum operation.
7. Do not sit or stand on the robotic vacuum as this could damage the unit or cause personal injury.
Do not use the robotic vacuum on small tables, chairs or other small surfaces as it could become
damaged.
Do not use the robotic vacuum in commercial establishments as it could become damaged due to
excessive use.
Do not leave cords, cables or other loose items longer than 150 mm on the floor or they could become
tangled in the brush.
If the power cable is damaged, for safety reasons it must be replaced by the manufacturer or its
authorised technical support service, or by a qualified technician
This product may not be used by minors or other unsupervised persons who, due to physical, sensorial
or mental conditions, are unable to use it safely. Children must be supervised at all times to ensure
they do not use the product as a toy.
Adapter
Docking station
adhesive

26 27
GB
4.2. Control panel functional information
Button Description of function
UV
This robot has a built-in UV light which disinfects the floor, particularly useful
for people who suffer from allergies or in houses with pets.
a. Press "UV" to turn the ultraviolet light on/off.
b. The UV light will only work when the robotic vacuum is switched on, and
will switch off when you turn off the robot.
c.
I/O
mode on the UV light will be stored automatically.
INICIO/PARO
START/STOP
a. Remove all small objects or obstacles from the room before cleaning, then
press
I/O
to start cleaning in spiral, linear or zig-zag mode or along the walls
automatically.
b. When starting the device, you can select either fast or slow mode (using
the remote control).
c. When the battery is low, the robot will stop working; it will then beep ten
times and search for the docking station to charge automatically.
d. The robot will stop cleaning as soon as you press
I/O
. .
CARGA/
CHARGE
a. When you press
CARGA/CHARGE
, the indicator will light up.
b. When the machine returns to the docking station for charging, the indicator
will start flashing
1. When the machine is turned on in standby mode, the indicator will light up.
2. When the battery is low, the indicator will flash.
3. When the battery is fully charged, the indicator will light up as normal
4.3. Installing the docking station and recharging the robot
Automatic recharge
1. Install the docking station securely on a flat
floor (attach to the wall using the docking station
adhesive).
2. There must be no obstacles or holes within 3
metres of the front of the docking station or 0.5m
to the left and right (See figure 1).
3. The robot cannot locate the docking station for
charging if the window for transmitting the infrared
signal from the charger is covered.
4. Connect the adapter outlet to the recharging
station connection. (See figure 2).
Run the adapter power cable along the
wall as it could interfere with the brushes
or wheels.
Automatic charge
The main unit will search for the docking station to charge automatically in case the battery runs low
during cleaning.
Manual charge
1. You can use the robotic vacuum cleaner
adapter or the docking station to charge the
main unit directly.
2. Connect the adapter outlet to the DC socket on
the main unit when charging with the adapter.
(See figure 3).
3. Before charging, connect the adapter to
the docking station making sure the robotic
vacuum is supported against the docking
station. (See figure 4).
4. When you want to charge the machine, press
CHARGE
on the remote control. The machine will
locate the docking station within its radius of
action and will begin charging. (See figure 5).
figure 1
figure 2
High voltage!
Risk of electric shock! Dry hands
before using!
figure 3
figure 4
High voltage!
Risk of electric shock! Dry hands
before using!
High voltage!
Risk of electric shock! Dry hands
before using!

28 29
GB
5 When the machine is searching for the docking
station, if you press
CHARGE
on the control panel or
the
POWER
button (indicated in red) and
CHARGE
on
the remote control, the machine will stop searching
for the docking station. (See figure 6).
6. When the battery is empty, the indicator will flash.
When the indicator lights up, this means the battery
is fully charged. (See figure 7).
7. When you start the machine, a flashing power
indicator means the battery level is low and the
battery needs to be charged. (See figure 8).
figure 5
figure 6
figure 7
figure 8
1. The robotic vacuum may not locate the docking station if there is an obstruction,
the battery is low or in more complex situations. The docking station should
therefore be placed in a wide open space, where possible.
2. When the robot finishes cleaning, the battery will be very hot, meaning longer
charging times
4.4. Installing/dismantling and cleaning the container
Installation and dismantling
1. Remove the container by pressing
the button on the top. (See figures
1 and 2).
2. Press the red button on the top and
the fan will pop out automatically.
(See figure 3).
3. Turn the fan around, release the
two catches and open the cover for
cleaning. (See figures 4 and 5).
4. Pull the tab on the right hand
side towards you and the filter will
appear. (See figure 6).
5. Clean the filter or insert a new one,
press the semicircular bracket with
one hand to release the filter mesh
clips and remove the grill with the
other hand to clean it or to replace
it. (See figure 7).
6. Turn the container back around; to
remove the mop, release the right
and left clips on the bottom of the
container (See figures 8 and 9). All
parts must be replaced following
the dismantling steps in reverse
order.
Do not use the mop or pull bar on rugs or uneven floors.
figure 1 figure 2
figure 3
figure 4 figure 5
figure 6
figure 7
figure 8 figure 9

30 31
GB
Cleaning the container and fan:
1. First empty the container and then
clean it using the cleaning brush.
(See figure 1).
2. Remove the fan housing and
clean the air intake/outlet using
the cleaning brush. (See figures 2
and 3).
3. Do not clean the fan with water!
4. Remove the filter and then clean the
container. (See figure 4).
5. Clean the filter using a hair dryer or
with the cleaning brush (See figures
5 and 6).
6. After cleaning, put it firmly back in
place as it was before dismantling.
4.5 Installing/dismantling and cleaning the brushes
Installing/dismantling the main brush and the floor brush:
1. Push the locking bar backwards and
lift the cover with your right thumb;
then lift the central cleaning brush
using your left hand. (See figures 1
and 2)
2. Remove the main brush and the
rubber roller. (See figure 3)
3. Insert the main brush and the floor
brush into their corresponding holes
before closing the cover.
figure 1
figure 2
figure 5
figure 3
figure 4
figure 6
figure 1 figure 2
figure 3
Installing and dismantling the side brush:
Installation:
1. Loosen the screw in the main shaft
of the side brush before changing it.
Dismantling:
2. Push the side brush against the
main shaft and then tighten the
screw. (See figure).
Cleaning the side and floor
brushes:
1. For optimum cleaning, frequently
remove built-up hair and dust
from the rubber and floor rollers.
Clean any dust build-up on the air
intake. Remove waste paper or
dust directly using the dust brush.
Carefully rotate the brush and
cut out any built-up hair, threads
or other entangled objects using
scissors or pull them out by hand.
2. The main brush and rubber roller
can be cleaned following the
installation and dismantling section.
4.6. Installing/dismantling and cleaning the left/right wheel
1. Loosen the screw in the left/right
wheel using a screwdriver. (See
figure 1).
2. Remove the left/right wheel
and clean it with the brush (see
figure 2).
Do not clean with water!
3. Fit the left/right wheel in its original
position and tighten the screws
during installation.
figure 1
figure 2

32 33
GB
Installing/dismantling and cleaning the front wheel
1. Remove the front wheel using a tool for leverage and clean it. (See figure).
2. Fit and press the front wheel into its position to reinstall.
4.7. Cleaning the sensor and the transparent infrared window:
1. Clean the sensor and the transparent infrared window using a soft cloth.
2. The wall dirt sensor is located on the front of the robot, while the floor sensor and the transparent
infrared window are located on the bottom. (See figure below).
3. Keep the transparent window clean to ensure optimum performance.
Changing the virtual wall battery:
1. Remove the screw using a screwdriver and
open the cover.
2. Make sure the positive and negative electrodes
are correctly aligned, otherwise you could
damage the device.
3. Insert the batteries correctly.
4. Remove the battery if you do not plan to use the
device for a long period time.
5. The device uses LR20 batteries.
Changing the remote control battery:
1. Open the battery cover and change the
batteries. (See figure 1).
2. Make sure the positive and negative electrodes
are correctly aligned, otherwise you could
damage the device. (See figure 2).
3. Remove the batteries if you do not plan to use
the device for a long period time.
4. The device uses AAA batteries.
6. Remote control:
6.1. Control panel:
General view Description of the buttons
1. “ ”
2. “ ”
3. “ ”
4. “ ”
5. “ ”
6. “ ”
7. “ ”
8. “ ”
9. “ ”
10. “ ”
11. “▲”
12. “▼”
13. “◄”
14. “►”
figure 1
figure 1 figure 2
figure 2 figure 3
Transmission
signal
Day display
Time/error
display
Error display
Slow clean
Fast clean
Day display
Continuous
cleaning
Start cleaning
On
Sunday, Start/Stop
Monday/UV
Tuesday/time setting
Wednesday/charge
Thursday/timer
Friday/fast cleaning
Saturday/Automatic cleaning
after full charge
All days of the week/slow
cleaning
Order confirmation
Forward
Backwards
Turn left
Turn right

34 35
GB
6.2. Control panel instructions for use and operating mode
The following steps are very important: be sure not to press the wrong buttons on
the remote control!
1. You must recheck the code on the remote control or main unit when you change them after first
use or during maintenance.
2. Check that the battery in the remote control and in the main unit have sufficient charge; turn off the
main unit; press and hold OK on the remote control for more than 4 seconds and then turn on the
main unit without releasing the OK button. When you hear the robot beep twice, release the OK
button to complete the code test.
3. If you do not hear the beeps during code testing, repeat the previous steps.
Operating guide Operating information
Start/Stop
Turn on the machine; when you press the Start/Stop button, the machine will
start working, and pressing it again will turn the machine off.
Setting the current
date and time
1. Turn on the machine.
2. When you press " ", the current time number 88 will start flashing. Use
the ▲▼ buttons to select time.
3. When you press the ◄ ► buttons, the minute indicator will start flashing.
Use ▲▼ to set the minute.
4. Then press ◄ ► to set the hour.
5. To set the day of the week, press one of the buttons SUN, MON, TUE,
WED, THU, FRI or SAT.
6. Once you have configured the setting, press OK.
7. Pressing the on button during configuration cancels the setting.
Setting cleaning time
Setting continuous
cleaning
Setting days of the week for cleaning:
1. Turn on the machine.
2. Pressing " ", SUN, MON, TUE, WED, THU, FRI or SAT will appear.
3. Press any given day of the week, several days or all days to set the device
to clean on any one, several days or every day of the week. The current
date will flash.
Setting the cleaning time:
4. Press " "; the number 88 will start flashing. Use the ▲▼ buttons to
select your desired hour of cleaning.
5. Press ◄ ►, again; the number 88 in minutes will start flashing. Use ▲▼
to set your desired minutes of cleaning.
6. Once you have configured the setting, press OK.
7. Pressing the on button during configuration cancels the setting.
Setting continuous cleaning
If you have a large house, you can use function " " (continuous cleaning),
in which the robotic vacuum will start cleaning when fully charged and return
to the docking station automatically before its battery is flat.
1. Press " "; the " " indicator on the remote control LCD screen will
start flashing.
2. Once you have configured the setting, press OK.
3. The robotic vacuum will start cleaning automatically when the battery is
charged (charging time is about 5 or 6 hours).
Note: The continuous cleaning and scheduled cleaning functions
cannot be used at the same time!
Error display
If you are certain that there is an error with the device, with the remote control
within range, press this function button on the remote. The screen will show
an error code which you should be able to clear by following instructions in
the troubleshooting section.
Speed selection
Press "
FAST
" or "
SLOW
" to select either fast or slow cleaning. The machine will
automatically save your selection for future use.

36 37
GB
Operating guide Operating information
Turn off/Cancel/Stop
1. Press the robot on button. When the view function is in normal
mode, press this button to turn the robot on or off.
2. With the unit switched on, press this button to stop the device in
the corresponding mode.
3. When setting the programmable cleaning date and time, if the
setting is incorrect or you want to cancel it, press this button to
cancel the programmed mode and return to normal status.
4. Press and hold this button for more than 5 seconds; this will
erase the entire setting and return the unit to the default setting
OK button After setting the configuration, press OK to save it.
FULL GO
After fully charging the battery, the machine will begin to clean
automatically on repeated occasions.
CHARGE
If you press this button when the robot is in stand-by mode or in
operation, the robot will search for the docking station to recharge
itself. When the robot stops working, it will stop recharging if you
press this button again.
▲ Forward button
By pressing "Forward", the robot will move forwards cleaning in
the direction of the arrow; press "off" to stop it. If it encounters and
obstacle, the robot will stop.
▼ Backward
By pressing and holding "Backward", the robot will move backwards
cleaning in the direction of the arrow and will stop when you release
the button.
◄Turn left button
By pressing and holding the "Turn left" button for a few seconds,
the robot will turn anticlockwise until you release the button, and
will then move forwards in the indicated direction. Press "Off" to
stop the robot. If it encounters and obstacle, the robot will stop.
►Turn right button
By pressing and holding the "Turn right" button for a few seconds,
the robot will turn clockwise until you release the button, and will
then move forwards in the indicated direction. Press "Off" to stop
the robot.
If it encounters and obstacle, the robot will stop.
1. The remote control must be used within a radius of 10 metres, otherwise you will
not be able to operate the unit.
2. The robotic vacuum may not locate the docking station when you press automatic
recharge if there is an obstruction, the battery is low or in more complex situations.
7. Docking station for automatic recharging
7-1 Charger display and control panel
Main view Operating instructions
1. LED accent light
2. Accent light indicator
3. On LED
4. Charging indicator
5. Signal transmitter
6. Positive charge point
7. Negative charge point
8. DC power socket
7-2 Docking station instructions for use and operating mode
No.
Operating guide Operating information
1 LED accent light
2 Accent light indicator Press the switch to turn the accent light on or off
3 Power LED
The power LED will turn on when the docking station is connected
to the mains, and will turn off when disconnected.
4 Charging indicator
The indicator will ash for as long as the charger is connected to
the robot.
5 Signal transmission
The signal transmission is the only way to guide the robot to the
docking station to recharge; therefore the path of the transmission
signal must be clear and free from obstructions.
6-7
Positive and negative
electrode recharge
The electrode and the robot are connected to charge upon contact,
therefore the path must be free from obstacles while in use, which
could have an impact on the recharge.
8
DC power recharging
socket
The recharging socket, or charger, is used to connect the 24V DC
outlet to the adapter and acts as the transit station for charging
between robot and adapter. The charger should be securely
attached to the wall and the adapter cable kept far away from
the charger to prevent the robot from being knocked or entangled
during cleaning.

38 39
GB
8. View of the space divider and control panel
Main view Operating instructions
1. Switch/selector
a. Off
b. Low
c. Medium
d. High
2. Signal head
3. Local infrared transmission point
4. Power LED
Operating the space divider:
The space divider is a robot accessory that can isolate a certain area by sending a special infrared
signal, which prevents the robotic vacuum from entering areas you do not which to clean.
Space divider instructions for use and operating mode
No.
Name Operating information
1
Switch/selector
You can change between operating modes using the switch :
Off, Low, Medium and High
a Off
Move the switch to this position to turn off the device
b Low
Move the switch to this position to turn off the device
c Medium
Move the switch to this option and turn on the device; you can
select a distance of up to 4 metres according to the infrared wall
settings
d High
Move the switch to the Medium option and turn on the device;
you can select a distance of up to 6 metres according to the infrared
wall settings
2
Infrared wall signal
transmitter
Move the switch, then you can adjust the distance of the space divider
3
Local infrared
transmission point
The local infrared transmission signal allows the robotic vacuum
to operate 50-100cm outside the range of the space divider without
affecting its performance
4 Power LED
The power LED will ash once every 8 seconds until the battery is low;
once you set the switch to Low, Medium and High, the robot will work
as normal
1. Open the battery cover before use and insert two batteries (not included) into the compartment.
«D» Check that the batteries are inserted correctly otherwise the space divider will not work.
2. Battery duration depends on the selected distance of transmission and the operating time.
Select the appropriate transmission distance and a low transmission power to save battery
power. Do not forget to turn of the unit when not in use.
3. You may notice differences in direction, space divider infrared signal transmission and robot
reception distance due to the surrounding environment and to the movement of the robot during
use. This difference may vary according to the current surroundings and different battery energy
levels in the robot and the space divider.
Space divider installation procedure
1.
The space divider is commonly placed at the top of a staircase or at the entrance to a room.
2.
The space divider can be placed in a certain position to prevent the robot from entering certain
places.
3.
Where possible, remove any obstacles from the area you wish to isolate in front of the space divider
to ensure it functions correctly.
1.
The space divider must be placed at the same level as the floor on which the robot
is in operation.
2.
Check that the robot is able to pass through the space divider when using it for the
first time.
3.
The space divider must be at least 3 metres away from the charger to avoid
interference.

40 41
GB
9. Troubleshooting
The robot doesn't work or doesn't clean properly
1. Check that the switch is set to ON.
2. Check that the device, filter and air intake are clean and that the side brush is working correctly.
3. Check to see if the battery level has fallen significantly.
The remote control doesn't work
1. Check the remote control battery status.
2. Check the robot battery status.
3. Run a code test between the remote control and the main unit.
4. Check whether the remote control is within the transmission signal radius.
The robot will not charge automatically.
1. Check that the adapter is properly connected to the charger and that the LED power indicator is on.
2. Check to see if the battery is too low; if so, charge the robot directly using the adapter.
3. Make sure there are no obstacles in front of the docking station.
4. Use the remote control to return the robotic vacuum to the docking station.
Increased noise level during cleaning
1. Clean the container and the filter.
2. Check for dirt in the main brush and side brush.
3. If the noise is extremely loud, you may send you robotic vacuum to an authorised technical support
centre for lubrication.
The robot suddenly stops working and starts making intermittent beeps
1. Check to see if the set cleaning time has finished.
2. Check for error codes on the remote control screen, with reference to the following.
The robot is stuck in reverse.
1. Avoid using it in direct sunlight or on thick rugs.
2. Knock lightly on the front bumper.
The robot has fallen down stairs.
Clean the floor detection sensors on the bottom front part of the unit.
The robot does not charge automatically after being unused for long periods.
Use the adapter to ensure it is fully charged.
The robot stops, but no error code appears.
Do not take it apart or try to repair it; contact an authorised technical support centre.
Possible errors that may appear during use
Error
code
Cause of error How to resolve it
E001
Floor detection
sensors
Clean the sensors on the front bottom part of the robot
E002 Main brush Remove any dirt, hair or bres trapped in the brush
E003 Off
Use the adapter to charge the unit; once it is fully charged
you may continue to use it.
E004 Left/right wheel Check the left/right wheels and clean off any dirt
E005
Insufcient container
contact
Check the container for dirt, clean if necessary and
reattach it
If the error persists after completing the above steps, contact after-sales maintenance,
a professional repair company or the company's technical centre; do not attempt to
dismantle or fix the unit yourself. Possible errors that may appear during use.

42 43
GB
10. Technical specifications
Applicable models XR210C
1 Nominal voltage 14.4V
2 Battery
Rechargeable battery (recharging time is around 5
hours)
3
Total operating time with
battery fully charged
Around 100-120 minutes (2200 mA)
4 Nominal power <24W
5 Operating temperature range
-10ºC~45ºC
6 Operating humidity range
≤85RH
7 Supply voltage/current 24V 1A
8 Wireless remote control ISM frequency band 2.4GHz
9 Specications
ɸ320x87mm (including wheel height)
10 Weight 3.2kg
11 Battery capacity 2200mA
Remote control technical specifications
Applicable models XR210C
Nominal voltage 3V
Battery 2 x AAA batteries (not included)
Remote mode ISM frequency band 2.4GHz
Receiving and transmitting distance ≥10M
Transmission power 0dB
Operating temperature range
-10ºC~45ºC
Operating humidity range
≤85RH
Characteristics 120L×55A×Depth: 25 mm
Weight 0.08kg
Technical specifications of docking station
No.
Models Parameters Observation
1 Characteristics L×An×To: 200×51×102mm
2 Weight 0.23kg
3 Nominal voltage 24V
4
Operating
temperature range
-10ºC~45ºC
5
Operating humidity
range
≤85RH
Technical specifications of space divider
No.
Models Parameters Observation
1 Characteristics L×An×To: 102×71×106mm
2 Weight 0.14kg
3 Nominal voltage 3V
4 Battery 2 x 3V "D" batteries (not included)
5
Operating
temperature range
-10ºC~45ºC
6
Operating humidity
range
≤85RH
ENVIRONMENTAL PROTECTION
Used electrical products must not be discarded with household waste. This device must be taken to a
local recycling centre for safe disposal.
Thank you for purchasing one of our products.

Disposición sobre los equipos eléctricos y electrónicos antiguos (Aplicable en la unión
Europea y en otros países europeos con sistemas de recogida selectiva)
Este símbolo, en un producto o en un paquete, indica que el producto no puede ser tratado
como un residuo doméstico. Por el contrario, debe depositarse en un punto de recogida
especializado en el reciclaje de equipos eléctricos y electrónicos. Al hacer esto, usted ayuda
a prevenir las potenciales consecuencias negativas que pueda sufrir el entorno y la salud
humana, que podrían producirse si este producto fuera desechado de forma incorrecta. El
reciclaje de materiales ayuda a conservar los recursos naturales. Si desea más información
acerca del reciclaje de este producto, contacte con la delegación de su ciudad, con el servicio
de recogida de residuos o con la tienda en la que adquirió este producto.
Disposal of old Electrical & Electronic Equipment (Applicable throughout the European
Union and other European countries with separate collection programs)
This symbol, found on your product or on its packaging, indicates that this product should
not be treated as household waste when you wish to dispose of it. Instead, it should be
handed over to an applicable collection point for the recycling of electrical and electronic
equipment. By ensuring this product is disposed of correctly, you will help prevent negative
consequences to the enviroment and human health, which could otherwise be caused
by inappropiate disposal of this product. The recycling of materials will help to conserve
natural resources. For more detailed information about the recycling of this product, please
contact your local city office, household waste disposal service or the retail store where you
purchased this product.
Disposition concernant les anciens équipements électriques et électroniques
(applicable dans l’Union Européenne et dans d’autres pays européens avec des
systèmes de collecte séparés)
Ce symbole sur le produit ou sur son emballage indique ce produit ne sera pas traité comme
perte ménagère. Au lieu de cela il sera remis au point de collecte dédié pour le recyclage de
l’équipment électrique et électronique. En s’assurant que ce produit est trié et jeté correctement,
vous contribuerez à empêcher de potentielles conséquences négatives pour l’environnement
et la santé humaine, qui pourraient autrement être provoquées par la manutention de rebut
inadéquate de ce produit. La réutilisation des matériaux aidera á conserver les ressources
naturelles. Pour des informations plus détaillées sur la réutilisation de ce produit, vous pouvez
contacter votre mairie, la société de collecte et tri des rebuts ménagers ou le magasin où vous
avez acheté le produit.
Eliminação de equipamento eléctrico e electrónico usado (aplicável na União Europeia
e noutros países europeus com sistemas de recolha separada)
Este símbolo, aposto no produto que adquiriu ou na respectiva embalagem, indica que este
produto não deve ser tratado como lixo doméstico quando chegar a altura da sua eliminação.
Em vez disso, deve ser entregue num ecoponto que realize a reciclagem de equipamento
eléctrico e electrónico. Ao assegurar que este produto é correctamente eliminado, estará a
ajudar a prevenir potenciais consequências negativas para o ambiente e para a saúde, as
quais poderiam advir de uma eliminação incorrecta do produto. A reciclagem de materiais
ajuda a conservar os recursos naturais. Para informações mais detalhadas sobre a reciclagem
deste produto, contacte os serviços municipalizados da sua àrea de residência, os serviços de
recolha de resíduos domésticos ou a loja onde adquiriu este produto.
Entsorgung von alten Elektro- und Elektronikgeräten (gültig in der Europäischen Union
und anderen europäischen Ländern mit separatem Sammelsystem)
Dieses Symbol auf dem Produckt oder auf der Verpackung bedeutet, dass dieses Produckt
nicht wie Hausmüll behandelt werden darf. Stattdessen soll dieses Produkt zu dem geeigneten
Entsorgungspunkt zum Recyclen von Elektro- und Elektronikgeräten gebracht werden. Wird das
Produkt korrekt entsorgt, helfen Sie mit, negativen Umwelteinflüssen und Gesundheitsschäden
vorzurbeugen, die durch unsachgemäße Entsorgung verursacht werden könnten. Das
Recycling von Material wird unsere Naturressourcen erhalten. Für nähere Informationen über
das Recyclen dieses Produktes kontaktieren Sie bitte Ihr lokales Bürgerbüro, lhren Hausmüll
Abholservice oder das Geschäft, in dem Sie dieses Produkt gekauft haben.
Smaltimento dei rifiuti elettrici ed elettronici (applicabile nell’Unione Europea e negli altri
paesi europei con servizio di raccolta differenziata)
Il simbolo presente sul prodotto o sulla sua confezione indica che il prodotto non verrà
trattalo come rifiuto domestico. Sarà invece consegnato al centro diraccolta autorizzato
per il riciclo dei rifiuti elettrici ed elettronici. Assicurandovi che il prodotto venga smaltito in
modo adeguato, eviterete un potenziale impatto negativo sull’ambiente e la salute umana,
che potrebbe essere causato da una gestione non conforme dello smaltimento del prodotto.
Il riciclaggiodei materiali contribuirá alla conservazione delle risorse naturali. Per ricevere
ulteriori informazioni più dettagliate Vi invitiamo a contattare l’ufficio preposto nella Vostra
città, il servizio per lo smaltimento dei rifiuti domestici o il negozio in cui avete acquistato
il prodotto.
Наредба относно електрическите и електронните уреди, извадени от употреба
(приложима в Европейския съюз и в други европейски страни със системи за
разделно събиране на отпадъци)
Този символ, поставен на даден продукт или опаковка, означава, че продуктът не може да
бъде третиран заедно с домакинските отпадъци. Той трябва да се съхранява в специално
депо за рециклиране на електрически и електронни уреди. Спазвайки това изискване,
Вие съдействате за предотвратяване на евентуалните негативни последици за
околната среда и човешкото здраве, в случай че този продукт бъде изваден от употреба
неправилно. Рециклирането на материали запазва природните ресурси. Ако искате да
получите повече информациа относно рециклирането на този продукт, обърнете се към
представителството във Вашия град, към службата за събиране на отпадъци или към
търговския обект, от който сте купили продукта.
Afvalverwerking van elektrische en elektronische apparatuur (voor landen in de Europese
Unie en andere Europese landen met systemen voor de gescheiden inzameling van afval)
Dit symbool op een product of de verpakking van een product geeft aan dat het product niet als
gewoon huishoudelijkafval mag worden aangeboden. In plaats daarvan moet het product worden
aangeboden bij een speciaal daarvoor ingericht verzamelstation, zodat het product geheel of
gedeeltelijk kan worden hergebruikt. Als u het product op deze manier voor afvalverwerking
aanbiedt, voorkomt u mogelijke schadelijke gevolgen voor het milieu en de volksgezondheid.
Het recyclen van materialen draagt bij aan het behoud van natuurlijke bronnen. Neem voor
meer informatie over het hergebruik van dit product contact op met de gemeente, de dienst
afvalstoffenverwerking in uw woonplaats of de winkel waar u het product hebtgekocht.
Διάταξη scetiká me τους παλαιούς ηλεκτρικούς και ηλεκτροnικούς εξοπλισμούς (Eφαρμόσιμος μέσα στηn
Eυρωπαiκή έnωση και μέσα se άλλες ευρωπαiκές χώρες με συστήματα της εκλεκτικής συγκομιδής)
Αυτό το σύμβολο, μέσα σε έnα προión ή μέσα se éna πακέτο, δεícnei ότι το προión δεn μπορεí nα αnτιμετωπιστεí
ópwv έnα oikiakó υπόλειμμα. Αntíθετα, πρέπει nα κατατεθεí μέσα σε έnα eidikó σημεíο της συγκομιδής που
écei eidikeuqeí stηn αnακύκλωση ηλεκτρικώn και τωn ηλεκτροnικώn εξοπλισμώn. Κάnοnτας αυτό, eseív βοηθάτε
étsi ýste na apotrapoún oi foberév αρnητικές συnέπειες σtiv opoíev μπορεí nα υποβληθεí το περιβάλλοn
και η pagkósmia υγεíα, oi opoíev θα μπορούσαn nα παραχθούn εάn αυτό το προión eíce απορρifqeí με trópo
αnακριβñ. Η αnακύκλωση twn υλικýn bohqá sto na συnτηρoúntai οi φυσικοí πόροi. Εάn επιθυμεíte parapánw
πληροφórhsh scetiká me thn αnακύκλωση αυτού του προiónτος, na élqete σε επαφή με με τηn αnτιπροσωπεíα
της πόλης sav, με τηn υπηρεσíα της συγκομιδής τωn υπολειμμάτωn ή με το μαγαζí μέσα στο οποíο agorásate
αυτό το προión.
Постановление об отслуживших свой срок электрических и электронных приборах
(применяется в Европейском союзе и других европейских странах для систем
раздельного сбора и утилизации отходов).
Данный символ, нанесенный на изделие или на его упаковку, означает, что с
изделием нельзя обращаться как с обычным бытовым мусором, а следует сдавать
в специализированный пункт приема электрических и электронных приборов для
его дальнейшей утилизации. Соблюдая это правило, вы помогаете предотвратить
возможные отрицательные последствия на окружающую среду и здоровье людей,
которые могут возникнуть, если это изделие будет выброшено обычным путем.
Утилизация материалов способствует сохранению природных ресурсов. Для получения
дополнительной информации об утилизации данного изделия обратитесь к городским
властям, в службу сбора бытовых отходов или в магазин, где вы приобрели этот прибор.
Ez a jelkép régi elektromos és elektronikus felszerelésekre helyezendő (Az Európai
Unió államaiban és egyéb, szelektív hulladékgyűjtő rendszerrel rendelkező európai
államokban alkalmazható).
Ha ez a jelkép terméken vagy csomagoláson látható, azt jelzi, hogy az adott terméket nem lehet házi
hulladékként kezelni, hanem elektromos és elektronikus felszerelések elhelyezésére szolgáló speciális
hulladékgyűjtő helyen kell hagyni. Ezáltal Ön hozzájárul a negatív következmények megelőzéséhez,
melyeket a környezet és az emberi egészség szenvedne a hulladék helytelen kiselejtezése esetén.
A hulladékok újrahasznosítása elősegíti a természeti források megőrzését. Amennyiben e termék
újrahasznosításával kapcsolatban további információra van szüksége, forduljon városa képviseletéhez,
a hulladékgyűjtő szolgálathoz vagy az üzlethez, ahol a terméket vásárolta.
Eski elektrikli ve elektronik malzemelerle ilgili uygulama (Avrupa Birlixinde ve dixer Avrupa ülkelerinde
uygulanmakta olan geri dönüwüm amaçlñ olan atñk ayrñm ve geri dönüxüm sistemi).
Bir ürün ya da bir paket üzerinde yeralan bu sembol; bu ürünün konut alanlarñnda üretilen herhangi bir
atñk gibi dexerlendirilemeyecexi anlamñna gelmektedir. Bunun aksine, geri dönüwüm amaçlñ olarak, bu tür
elektrikli ve elektronik malzemelerin atñlmasñ için özel olarak belirlenen noktalara bñrakñlmasñ gerekmektedir.
Siz, bu wekilde davranarak, bu malzemelerin uygun olmayan wekilde atñlmasñ durumunda çevre ve insan
saxlñxñ üzerinde oluwabilecek olan olasñ negatif sonuçlarñn ortadan kalkmasñna yardñm etmiw olacaksñnñz.
Geri dönüwüm amaçlñ olarak, bu malzemelerin, atñlmalarñ için ayrñlmñw olan atñk ayrñm alanñna bñrakñlmasñ,
doxal kaynaklarñn korunmasñna yardñmcñ olmaktadñr. Exer, bu malzemenin geri dönüwüm amaçlñ olarak
atñlmasñ ile ilgili olarak daha fazla bilgiye sahip olmak isterseniz; yawadixiniz bölgenin mahalli yönetimleri ile,
atñk toplama merkezleri ile ya da bu makinayñ satñn aldñxñnñz satñw merkezi ile bawlantñya geçiniz.
Pol. Ind. Les Ginesteres - C/ Hostalets, 2-4-6
08293 Collbató - Barcelona (Spain)
Tel. Clientes/Customers: +34 902 109 041
Tel. +34 93 777 98 50 - Fax +34 93 777 93 07
www.palson.com e-mail: [email protected]
Desarrollado en España, fabricado en China.
Developed in Spain, made in China.
-
 1
1
-
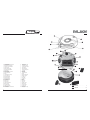 2
2
-
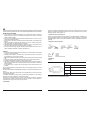 3
3
-
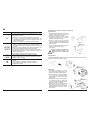 4
4
-
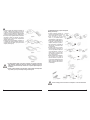 5
5
-
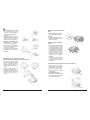 6
6
-
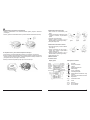 7
7
-
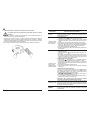 8
8
-
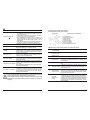 9
9
-
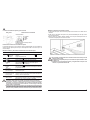 10
10
-
 11
11
-
 12
12
-
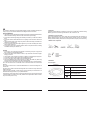 13
13
-
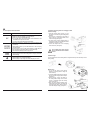 14
14
-
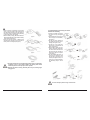 15
15
-
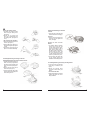 16
16
-
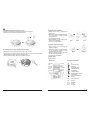 17
17
-
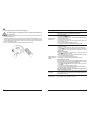 18
18
-
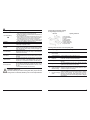 19
19
-
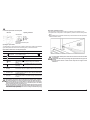 20
20
-
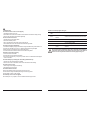 21
21
-
 22
22
-
 23
23


Palson Diábolo Plus 30596 Operating Instructions Manual
- Categoría
- Aspiradoras roboticas
- Tipo
- Operating Instructions Manual
- Este manual también es adecuado para
en otros idiomas
- English: Palson Diábolo Plus 30596
Artículos relacionados
Otros documentos
-
Hoover HGO310 011 Guía de inicio rápido
-
Philips FC8820/01 SMARTPRO ACTIVE El manual del propietario
-
Makita DRC200PT Manual de usuario
-
-
LG VR6480MS El manual del propietario
-
-
Solac AA3400 ECOGENIC El manual del propietario
-
Solac AA3400 El manual del propietario
-
-
Hoover RBC070011 Manual de usuario