Craftsman 247.290000 Manual de usuario
- Categoría
- Cortadoras de césped
- Tipo
- Manual de usuario

perator's
I:RnFrSMRN°
REAR ENGINE RiDiNG MOWER
6 Speed, Shift-on=the=Go
30" Deck
Model No. 247.290000
• Espanol, P. 70
This product has a low emission engine which operates differently
from previously built engines. Before you start the engine, read and
understand this Operator's Manual.
Before using this equipment,
read this manual and follow
all safety rules and operating
instructions.
For answers to your questions about
this product, Call:
1-800=659=5917
CraftsmanTractorHelpLine
7 am =7 pm CT, Mort. =Sun.
Sears Brands Management Corporation, Hoffman Estates, IL 60179 U.S.A.
Visit our website: www.craftsman.com FormNo.769-07597C
(December11,2012)

Warranty Statement ................................... 2
Safety Instructions .................................... 3
Slope Guide .......................................... 8
Assembly ............................................. 9
Operation ........................................... 15
Service and Maintenance ............................ 21
Off-Season Storage ................................... 32
Troubleshooting ..................................... 33
Parts List ............................................. 34
Espaffo[ .............................................. 69
Service Numbers ............................ Back Cover
CRAFTSMANFULLWARRANTY
FORTWOYEARSfromthedateofpurchase,allnon-expendablepartsofthisridingequipmentarewarrantedagainstanydefectsinmaterialorworkmanship.
Adefectivenon-expendablepartwill receivefreein-homerepairorreplacementifrepairisunavailable.
BATTERYLIMITEDWARRANTY
FOR90DAYSfromthedateofpurchase,thebattery(anexpendablepart)ofthisridingequipmentiswarrantedagainstanydefectsinmaterialor
workmanship.Anewbatterywillbesuppliedfreeofcharge.Youareresponsibleforthelaborcostofbatteryinstallation.
ADDITIONALLIMITEDWARRANTIES
Inthefollowingadditionalwarranties,youareresponsibleforthelaborcostofpartinstallationafterthesecondyearfromthedateofpurchase.
FORFIVEYEARSfromthedateofpurchase,theframeofthisridingequipmentiswarrantedagainstanydefectsinmaterialorworkmanship.Anewframewill
besuppliedfreeofcharge.
FORTENYEARSfromthedateofpurchase,thefrontaxleofthisridingequipmentiswarrantedagainstanydefectsin materialorworkmanship.Anewfront
axlewillbesuppliedfreeofcharge.
FORASLONGASITISUSEDbytheoriginalownerafterthetenthyearfromthedateofpurchase,thecastironfrontaxle(ifequipped)ofthisridingequipment
iswarrantedagainstanydefectsin materialorworkmanship.Withproofofpurchase,anewcastironfrontaxlewill besuppliedfreeofcharge.
WARRANTYSERVICE
Forwarrantycoveragedetailstoobtainfreerepairorreplacement,call1-800-659-5917orvisitthewebsite:www.craftsman.com
Inallcasesabove,ifpartrepairorreplacementisimpossible,theridingequipmentwill bereplacedfreeofchargewith thesameoranequivalentmodel.
Alloftheabovewarrantycoverageisvoidifthisridingequipmentiseverusedwhileprovidingcommercialservicesorifrentedtoanotherperson.
ThiswarrantycoversONLYdefectsinmaterialandworkmanship.WarrantycoveragedoesNOTinclude:
• Expendableparts(exceptbattery)thatcanwearoutfromnormalusewithinthewarrantyperiod,includingbutnotlimitedtoblades,sparkplugs,air
cleaners,belts,andoilfilters.
• Standardmaintenanceservicing,oilchanges,ortune-ups.
• Tirereplacementorrepaircausedbypuncturesfromoutsideobjects,suchasnails,thorns,stumps,orglass.
• Tireorwheelreplacementorrepairresultingfromnormalwear,accident,orimproperoperationormaintenance.
• Repairsnecessarybecauseofoperatorabuse,includingbutnotlimitedtodamagecausedbytowingobjectsbeyondthecapabilityoftheriding
equipment,impactingobjectsthatbendtheframe,axleassemblyorcrankshaft,orover-speedingtheengine.
• Repairsnecessarybecauseofoperatornegligence,includingbutnotlimitedto,electricalandmechanicaldamagecausedbyimproperstorage,failureto
usethepropergradeandamountofengineoff,failuretokeepthedeckclearofflammabledebris,orfailuretomaintaintheridingequipmentaccording
totheinstructionscontainedintheoperator'smanual.
• Engine(fuelsystem)cleaningorrepairscausedbyfueldeterminedtobecontaminatedoroxidized(stale).Ingeneral,fuelshouldbeusedwithin30days
ofitspurchasedate.
• Normaldeteriorationandwearoftheexteriorfinishes,orproductlabelreplacement.
Thiswarrantygivesyouspecificlegalrights,andyoumayalsohaveotherrightswhichvaryfromstatetostate.
SearsBrandsManagementCorporation,HoffmanEstates,IL60179
Engine Oil: SAE30
Fuel: Unleaded Gasoline
Spark Plug: F6RTC (951-10292)
© Sears Brands, LLC
2
Model Number
Serial Number
Date of Purchase
Record the model number, serial number,
and date of purchase above.

Thissymbolpointsout importantsafetyinstructionswhich,ifnot
followed,couldendangerthe personalsafetyand/orpropertyof
yourselfandothers.Readandfollow all instructionsinthismanual
beforeattempting tooperatethismachine.Failuretocomplywith these
instructionsmayresultinpersonalinjury.Whenyouseethissymbol,HEED
ITSWARNING!
CALIFORNIA PROPOSITION 65
EngineExhaust,someof itsconstituents,andcertainvehiclecomponents
containoremit chemicalsknowntoStateofCaliforniatocausecancerand
birth defectsor other reproductiveharm.
Batteryposts,terminals,andrelatedaccessoriescontainleadandlead
compounds,chemicalsknownto theStateof Californiatocausecancerand
reproductiveharm.Washhandsafter handling.
Thismachinewasbuilt to beoperatedaccordingto the safeoperation
practicesinthismanual.Aswith anytype ofpowerequipment,
carelessnessorerroronthe part oftheoperatorcanresultinseriousinjury.
Thismachineiscapableof amputatingfingers,hands,toesandfeet and
throwing debris.Failureto observethefollowing safety instructionscould
resultin seriousinjury or death.
Your ResponsibilityiRestrict theuseofthispowermachineto
personswho read,understandandfollow thewarningsand instructionsin
thismanualandonthe machine.
SAVETHESEINSTRUCTIONS!
GENERAL OPERATION
Read,understand,andfollowall instructionsonthemachineandinthe
manual(s)beforeattemptingtoassembleandoperate.Keepthismanualin
asafeplaceforfutureandregularreferenceandfororderingreplacement
parts.
Befamiliarwith allcontrolsandtheirproperoperation.Knowhowtostop
themachineanddisengagethemquickly.
Neverallowchildrenunder14yearsoldtooperatethismachine.Children14
yearsoldandovershouldreadandunderstandtheoperationinstructions
andsafetyrulesinthismanualandshouldbetrainedandsupervisedbya
parent.
Neverallowadultstooperatethismachinewithout properinstruction.
Tohelpavoidbladecontactorathrownobjectinjury,keepbystanders,
helpers,childrenandpetsatleast75feetfromthemachinewhileitisin
operation.Stopmachineifanyoneentersthearea.
Thoroughlyinspecttheareawheretheequipmentistobeused.Remove
allstones,sticks,wire,bones,toys,andotherforeignobjectswhichcould
bepickedupandthrownbytheblade(s).Thrownobjectscancauseserious
personalinjury.
Planyourmowingpatterntoavoiddischargeofmaterialtowardroads,
sidewalks,bystandersandthelike.Also,avoiddischargingmaterialagainst
awallorobstructionwhichmaycausedischargedmaterialto ricochetback
towardtheoperator.
Alwayswearsafetyglassesorsafetygogglesduringoperationandwhile
performinganadjustmentor repairtoprotectyoureyes.Thrownobjects
whichricochetcancauseseriousinjurytotheeyes.
Wearsturdy,rough-soledworkshoesandclose-fittingslacksandshirts.
Loosefitting clothesandjewelrycanbecaughtinmovableparts.Never
operatethis machineinbarefeetorsandals.
Beawareofthemowerandattachmentdischargedirectionanddonotpoint
it atanyone.Donotoperatethemowerwithoutthedischargecoverorentire
grasscatcherin itsproperplace.
Donotput handsorfeetnearrotatingpartsor underthecuttingdeck.
Contactwiththe blade(s)canamputatehandsandfeet.
Amissingordamageddischargecovercancausebladecontactorthrown
objectinjuries.
Stoptheblade(s)whencrossinggraveldrives,walks,orroadsandwhilenot
cuttinggrass.
Watchfortrafficwhenoperatingnearorcrossingroadways.Thismachineis
not intendedforuseonanypublicroadway.
Donotoperatethemachinewhileunderthe influenceofalcoholordrugs.
Mowonlyindaylightorgoodartificiallight.
Nevercarrypassengers.
Disengageblade(s)beforeshiftingintoreverse.Backupslowly.Alwayslook
clownandbehindbeforeandwhilebackingtoavoidaback-overaccident.
Slowdownbeforeturning.Operatethemachinesmoothly.Avoiderratic
operationandexcessivespeed.
Disengageblade(s),setparkingbrake,stopengineandwaituntilthe
blade(s)cometoacompletestopbeforeremovinggrasscatcher,emptying
grass,uncloggingchute,removinganygrassordebris,ormakingany
adjustments.
Neverleavearunningmachineunattended.Alwaysturnoffblade(s),set
parkingbrake,stopengineandremovekeybeforedismounting.
Useextracarewhenloadingor unloadingthemachineintoatrailerortruck.
Thismachineshouldnotbedrivenupordownramp(s),becausethemachine
couldtipover,causingseriouspersonalinjury.Themachinemustbepushed
manuallyonramp(s)toloadorunloadproperly.
Mufflerandenginebecomehotandcancauseaburn.Donottouch.

Checkoverheadclearancescarefullybeforedrivingunderlowhangingtree
branches,wires,dooropeningsetc.,wheretheoperatormaybestruckor
pulledfromthemachine,whichcouldresultinseriousinjury.
Disengageallattachmentclutchesanddepressthebrakepedalcompletely
beforeattemptingtostartengine.
Yourmachineisdesignedtocutnormalresidentialgrassofaheightnomore
than10".Donotattempttomowthroughunusuallytall,drygrass(e.g.,
pasture)orpliesofdryleaves.Drygrassorleavesmaycontacttheengine
exhaustand/orbuilduponthemowerdeckpresentingapotentialfire
hazard.
Useonlyaccessoriesandattachmentsapprovedforthismachinebythe
machinemanufacturer.Read,understandandfollowallinstructions
providedwiththeapprovedaccessoryorattachment.Foralistofapproved
accessoriesandattachments,call1-800-659-5917.
Dataindicatesthatoperators,age60yearsandabove,areinvolvedina
largepercentageofridingmower-relatedinjuries.Theseoperatorsshould
evaluatetheirabilitytooperatetheridingmowersafelyenoughtoprotect
themselvesandothersfromseriousinjury.
Ifsituationsoccurwhicharenotcoveredinthismanual,usecareandgood
judgment.
SLOPE OPERATION
Slopesareamajorfactorrelatedtolossofcontrolandtip-overaccidentswhichcan
resultinsevereinjuryordeath.Allslopesrequireextracaution.Ifyoucannotback
uptheslopeorif youfeeluneasyonit, donotmowit.
Foryoursafety,usetheSlopeGuideincludedaspartofthismanualtomeasure
slopesbeforeoperatingthismachineonaslopedorhillyarea.Iftheslopeisgreater
than12degreesasshownontheSlopeGuide,donotoperatethismachineonthat
areaorseriousinjurycouldresult.
Do;
Mowupanddownslopes,notacross.Exerciseextremecautionwhen
changingdirectiononslopes.
Watchforholes,ruts,bumps,rocks,orotherhiddenobjects.Uneventerrain
couldoverturnthemachine.Tallgrasscanhideobstacles.
Useslowspeed.Choosealowenoughspeedsettingsothat youwill nothave
tostoporshiftwhileontheslope.Tiresmaylosetractiononslopeseven
thoughthebrakesarefunctioningproperly.Alwayskeepmachineingear
whengoingdownslopestotakeadvantageofenginebrakingaction.
Followthemanufacturer'srecommendationsfor wheelweightsor
counterweightstoimprovestability.
Useextracarewith grasscatchersor otherattachments.Thesecanchange
thestabilityofthemachine.
Keepallmovementontheslopesslowandgradual.Donotmakesudden
changesinspeedordirection.Rapidengagementorbrakingcouldcause
thefrontofthemachineto lift andrapidlyflip overbackwardswhichcould
causeseriousinjury.
Avoidstartingorstoppingonaslope.Iftireslosetraction,disengagethe
blade(s)andproceedslowlystraightdowntheslope.
Do Not:
Donotturnonslopesunlessnecessary;then,turnslowlyandgradually
downhill,if possible.
Donotmowneardrop-offs,ditchesorembankments.Themowercould
suddenlyturnoverira wheelisovertheedgeofacliff,ditch,orifanedge
cavesin.
Donottry tostabilizethemachinebyputtingyourfootontheground.
Donotuseagrasscatcheronsteepslopes.
Donotmowonwetgrass.Reducedtractioncouldcausesliding.
Donotattempttocoastdownhill.Over-speedingmaycausetheoperatorto
losecontrolofthe machineresultinginseriousinjuryordeath.
Donottow heavypullbehindattachments(e.g.loadeddumpcart,lawn
roller,etc.)onslopesgreaterthan5 degrees.Whengoingdownhill,the
extraweighttendstopushthetractorandmaycauseyoutoloosecontrol
(e.g.tractormayspeedup,brakingandsteeringabilityarereduced,
attachmentmayjack-knifeandcausetractortooverturn).
CHILDREN
Tragicaccidentscanoccurif theoperatorisnotalertto thepresenceofchildren.
Childrenareoftenattractedtothemachineandthemowingactivity.Theydonot
understandthedangers.Neverassumethatchildrenwill remainwhereyoulastsaw
them.
Keepchildrenoutofthemowingareaandinwatchfulcareofaresponsible
adultotherthantheoperator.
Bealertandturnmachineoff ifachildentersthearea.
Beforeandwhilebacking,lookbehindanddownforsmallchildren.
Nevercarrychildren,evenwith theblade(s)shutoff.Theymayfall offandbe
seriouslyinjuredorinterferewith safemachineoperation.
Useextremecarewhenapproachingblindcorners,doorways,shrubs,trees
orotherobjectsthat mayblockyourvisionofachildwhomayrunintothe
machine.
Toavoidback-overaccidents,alwaysdisengagethecuttingblade(s)before
shiftingintoReverse.Ifequipped,the"ReverseCautionMode"(blades
operatewhilemachineridesinreverse)shouldnotbeusedwhenchildrenor
othersarearound.
Keepchildrenawayfromhotorrunningengines.Theycansufferburnsfrom
ahotmuffler.
Removekeywhenmachineisunattendedtopreventunauthorized
operation.
Neverallowchildrenunder14yearsofagetooperatethismachine.Children14and
overshouldreadandunderstandtheinstructionsandsafeoperationpracticesin
thismanualandonthemachineandshouldbetrainedandsupervisedbyanadult.
TOWING
Towonlywith amachinethathasahitchdesignedfor towing.Donotattach
towedequipmentexceptatthehitchpoint.
Followthe manufacturersrecommendationforweightlimitsfortowed
equipmentandtowingonslopes.
Neverallowchildrenorothersinorontowedequipment.
4

Onslopes,theweightofthetowedequipmentmaycauselossoftractionand
lossofcontrol.
Alwaysuseextracautionwhentowingwith amachinecapableofmaking
tight turns(e.g."zero-turn"ride-onmower).Makewideturnstoavoid
jack-knifing.
Travelslowlyandallowextradistancetostop.
Donotcoastdownhill.
SERVICE
Safe Handling of Gasoline:
Toavoidpersonalinjury orproperty damageuseextremecarein handling
gasoline.Gasolineisextremelyflammableand thevaporsareexplosive.
Seriouspersonalinjury canoccurwhen gasolineisspilledonyourselforyour
clotheswhichcanignite. Washyourskinand changeclothesimmediately.
Useonlyanapprovedgasolinecontainer.
Neverfill containersinsideavehicleoronatruckortrailerbedwith aplastic
liner.AIwaysplacecontainersonthegroundawayfromyourvehiclebefore
filling.
Whenpractical,removegas-poweredequipmentfromthetruckor
trailerandrefuelit ontheground.Ifthisisnotpossible,thenrefuelsuch
equipmentonatrailerwitha portablecontainer,ratherthanfromagasoline
dispensernozzle.
Keepthenozzlein contactwith therimofthefueltankorcontaineropening
atalltimesuntilfuelingiscomplete.Donotuseanozzlelock-opendevice.
Extinguishallcigarettes,cigars,pipesandothersourcesofignition.
Neverfuelmachineindoors.
Neverremovegascaporaddfuelwhiletheengineishotor running.Allow
enginetocoolatleasttwominutesbeforerefueling.
Neveroverfill fueltank.Filltanktonomorethan1/2inchbelowbottomof
fillernecktoallowspaceforfuelexpansion.
Replacegasolinecapandtightensecurely.
Ifgasolineisspilled,wipeit off theengineandequipment.Movemachineto
anotherarea.Wait5 minutesbeforestartingtheengine.
Toreducefirehazards,keepmachinefreeofgrass,leaves,orotherdebris
build-up.Cleanupoilorfuelspillageandremoveanyfuelsoakeddebris.
Neverstorethe machineorfuelcontainerinsidewherethereisanopen
flame,sparkorpilotlightasonawaterheater,spaceheater,furnace,clothes
dryerorothergasappliances.
Allowamachinetocoolatleastfiveminutesbeforestoring.
General Service
Neverrunanengineindoorsorinapoorlyventilatedarea.Engineexhaust
containscarbonmonoxide,anodorless,anddeadlygas.
Beforecleaning,repairing,orinspecting,makecertaintheblade(s)andall
movingpartshavestopped.Disconnectthesparkplugwireandgroundagainst
theenginetopreventunintendedstarting.
Periodicallychecktomakesurethebladescometocompletestopwithin
approximately(5)fivesecondsafteroperatingthe bladedisengagement
control.Ifthebladesdonotstopwithinthethistimeframe,yourmachine
shouldbeservicedprofessionallybyaSearsorotherqualifiedservicedealer.
Checkbrakeoperationfrequentlyasit issubjectedtowearduringnormal
operation.Adjustandserviceasrequired.
Checktheblade(s)andenginemountingboltsatfrequentintervalsfor
propertightness.Also,visuallyinspectblade(s)for damage(e.g.,excessive
wear,bent,cracked).Replacetheblade(s)with theoriginalequipment
manufacturer's(O.E.M.)blade(s)only,listedinthismanual.Useofparts
whichdonotmeettheoriginalequipmentspedficationsmayleadto
improperperformanceandcompromisesafety!
Mowerbladesaresharp.Wrapthebladeorweargloves,anduseextra
cautionwhenservicingthem.
Keepallnuts,bolts,andscrewstight tobesuretheequipmentisinsafe
workingcondition.
Nevertamperwith thesafetyinterlocksystemorothersafetydevices.Check
theirproperoperationregularly.
Afterstrikingaforeignobject,stoptheengine,disconnectthesparkplug
wire(s)andgroundagainsttheengine.Thoroughlyinspectthemachinefor
anydamage.Repairthedamagebeforestartingandoperating.
Neverattempttomakeadjustmentsorrepairstothe machinewhilethe
engineisrunning.
Grasscatchercomponentsandthedischargecoveraresubjecttowear
anddamagewhichcouldexposemovingpartsorallowobjectstobe
thrown.Forsafetyprotection,frequentlycheckcomponentsandreplace
immediatelywithoriginalequipmentmanufacturer's(O.E.M.)partsonly,
listedinthismanual.Useofpartswhichdonotmeettheoriginalequipment
specificationsmayleadtoimproperperformanceandcompromisesafety!
Donotchangetheenginegovernorsettingsorover-speedtheengine.The
governorcontrolsthemaximumsafeoperatingspeedoftheengine.
Maintainorreplacesafetyandinstructionlabels,asnecessary.
Observeproperdisposallawsandregulationsforgas,off,etc.toprotectthe
environment.
AccordingtotheConsumerProductsSafetyCommission(CPSC)andtheU.S.
EnvironmentalProtectionAgency(EPA),thisproducthasanAverageUseful
Lifeofseven(7)years,or 270hoursofoperation.AttheendoftheAverage
UsefulLife,buya newmachineorhavethemachineinspectedannuallyby
aSearsorotherqualifiedservicedealertoensurethatallmechanicaland
safetysystemsareworkingproperlyandnotwornexcessively.Failuretodo
socanresultinaccidents,injuriesordeath.
DO NOT MODIFY ENGINE
Toavoidseriousinjuryordeath,donot modifyengineinanyway.Tampering
with thegovernorsettingcanleadto arunawayengineandcauseitto
operateat unsafespeeds.Nevertamperwith factory settingof engine
governor.

NOTICE REGARDING EMiSSiONS
Engineswhicharecertified to complywithCaliforniaandfederalEPA
emissionregulationsfor SORE(SmallOffRoadEquipment)arecertified
tooperateonregularunleadedgasoline,andmayincludethefollowing
emissioncontrolsystems:EngineModification (EM),OxidizingCatalyst(0C),
SecondaryAirInjection(SAI)andThreeWayCatalyst(TWC)ifsoequipped.
SPARK ARRESTOR
Thismachineisequippedwith aninternal combustionengineand should
not beusedonor nearanyunimprovedforest-covered,brusbcoveredor
grass-coveredland unlessthe engine'sexhaustsystemisequippedwith a
sparkarrestormeetingapplicablelocalorstatelaws(ifany).
Ira sparkarrestorisused,it shouldbemaintainedin effectiveworkingorder
bythe operator.Inthe StateofCaliforniatheaboveisrequiredbylaw (Section
4442ofthe CaliforniaPublicResourcesCode).Otherstatesmayhavesimilar
laws.Federallawsapplyonfederal lands.
Asparkarrestorforthe muffler isavailablethroughyournearestSearsParts
andRepairServiceCenter.
SAFETY SYMBOLS
Thispagedepictsanddescribessafetysymbolsthatmayappearonthisproduct. Read,understand,andfollow all instructionsonthemachinebefore
attempting toassembleandoperate.
" "i READTHEOPERATOR'SMANUAL(S)
i Read,understand, and follow all instructions in the manual(s) before attempting to assemble and
i
' operate
I
DANGER-- ROTATINGBLADES
Never carry passengers. Never carry children, even with the blades off.
O_, DANGER-- ROTATINGBLADES
Toavoid a back-over accident, keep children awayfrom the machine while it isin operation.
_j WARNING-- ROTATINGBLADES
Do not put hands or feet near rotating parts or under the cutting deck. Contact with the blade(s)canamputate hands and feet.
DANGER-- ROTATINGBLADES
Always look down and behind before and while backing to avoid aback-over accident.
..........._ •
JJ .
,,,/_ WARNING--THROWN OBJECTS
ii_;iil._',_....... This machine may pick up and throw and objects which can causeserious personal injury.
/ WARN,NG--T.ROWNOBJECTS
Thismachinemaypickupandthrowandobjectswhichcancauseseriouspersona,injury
_f
6

®
O
BYSTANDERS
Keep bystanders, helpers, children and pets at least 75 feet from the machine while it is in operation.
WARNING-- SLOPE OPERATION
Do not operate this machine on a slope greater than 12 degrees.
WARNING-- HOT SURFACE
Engine parts, especially the muffler, become extremely hot during operation. Allow engine and
muffler to cool before touching.
DANGER- ROTATING BLADES
To reduce the risk of injury, keep hands and feet away. Do not operate unless discharge cover or grass
catcher is in its proper place. If damaged, replace immediately.
WARNING-- CARBON MONOXIDE
Never run an engine indoors or in a poorly ventilated area. Engine exhaust contains carbon
monoxide, an odorless and deadly gas.
DANGER-- ROTATING BLADES
Do not step on the cutting deck.
WARNING: Your Responsibility--Restrict the use of this power machine to persons who read, understand and follow
the warnings and instructions in this manual and on the machine.
SAVETHESEINSTRUCTIONS!

,/
(OK)
"'- 12° Slope
X
(TOO STEEP)
- 12° Slope
Figure1
USETHiSSLOPEGAUGE TO DETERMINE
iFA SLOPEiSTOO STEEPFOB SAFEOPERATION!
Tochecktheslope,proceedasfollows:
1. Removethis pageandfoldalongthe dashedline.
2. Locatea verticalobjecton orbehindtheslope(e.g.a pole,building,fence, tree,etc.)
3. Aligneithersideoftheslopegaugewith theobject(SeeFigure1andFigure2).
4. Adjustgaugeupor downuntiltheleftcornertouchestheslope(SeeFigure1 andFigure2).
5.
Ifthereisagapbelowthegauge,theslopeistoosteepfor safeoperation(SeeFigure2 above).
Figure2
Slopes are a major factor related to tip-over and roll-over accidents which can result in severe injury or death. Do not operate machine
on slopes in excess of 12 degrees. All slopes require extra caution. If you cannot back up the slope or if you feel uneasy on it, do not
mow it. Always mow up and down the face of slopes, never mow across the face of slopes.

Contents of Crate
OneRidingMower
OneSteeringWheel/ShaftAssembly
OneRearHitchPlate
OneRidingMowerOperator'sManual
OneSeatAssembly
OneRearEngineCover
OneOilDrainSleeve
OneEngineOperator'sManual
OneSteeringPedestalCap
OneDischargeChuteAssembly
OneHardwarePack
OneProductRegistrationCard
Contents of Hardware Pack
Beforebeginninginstallation,removeallthecontentsfromthecrateandallthe
hardwarefromthepackfromto makesureeverythingispresent.Hardwareislisted
below.Partnumbersareshowninparentheses.
HitchPlate
SeatMountingBracket(withtwoshoulderbolts&locknutsinstalled)
Lowerthesteeringwheelassemblyontothelowersteeringshaft(1)and
securewith boltandlocknut(2)previouslyremoved.SeeFigure2.
EecommendedToolsfor Assembly
3/8"Wrench(orsocket) 9/16"Socket
1/2"Wrench(orsocket) 7/16"wrench
5/8"Wrench(orsocket) PhillipsScrewDriver
1/4"DriveRatchet
InstallingTheSteeringWheelAssembly
Ifthesteeringwheelassemblyforyourtractordidnotcomealreadyinstalled,
followthestepsbelow:
1. Slidethe pedestalcapontothesteeringshaftsothatwhenthesteering
shaftisinstalledonthetractor,thepedestalcapwill beuprightasshownin
Figure1.
Figure1
Removetheshoulderboltandlocknutfromthesteeringshaftonthetractor
andretainforlatersteps.
Withthesteeringwheelassemblyuprightandpositionedoverthelower
steeringshaftonthetractor,alignthesteeringwheelsothatwith the
tractorwheelsstraight,thelargeopeningonthesteeringwheelisfacing
forward.
Figure2
Tightentheshoulderboltandlocknutusinga9/16"wrenchand
7/16"wrenchorsocket.
6. Removethepedestalcapmountscrewfactoryinstalledandlocatedonthe
tractor'ssteeringconsole.Retainthescrewfor laterinstructions.
7. SlidethePedestalcapdownontothetractor(1)andslightlyrotatetothe
righttoclipintoplace.Securethepedestalwith thescrew(2)previously
removed.SeeFigure3.
9 Figure3

AttachingTheSeat
Iftheseatforyourtractorwasnotattachedatthefactory,followtheapplicable
instructionsbelowtoattachit.
2. Removetheshoulderboltsandlocknutsfromtheseatmountingbracket
includedinyourhardwarepack.SeeFigure4.
f
Figure4
2. Removethetwoself-tappingscrewsfactoryinstalledonthetractor.See
Figure5.
Usinga1/4-inchdriveratchetwith a%" socket,securetheseatbracketwith
theself-tappingscrewsremovedin Step2.SeeFigure6.
Figure6
i_ll CAUTIO N: Donot useanytypeofpowertool(e.g.impactgun
orelectricdrillwith nutdriverattached)whentighteningtheself-
tappingboltstoattachtheseatbracket.
5. Positiontheseatassemblyovertheseatmountingbracket,aligningthe
holesprovided.
6. Installthetwo shoulderboltsandlocknutsremovedfromtheseatmounting
bracketin Step1.SeeFigure7.
Donotuseanytype ofpowertool (e.g.impactgunor electricdrill with nut
driverattached)whentightening theself-tapping boltsto attachthe seat
bracket°
3.
Figure5
Aligntheseatbracketinplaceovertheholesfromwheretheself-tapping
screwswereremoved,asshowninFigure6.
I0
Figure7

InstallingTheDeckChuteSeatAdjustment
1. Toadjustthepositionoftheseat,removetheadjustmentknobonthe
bottomoftheseat.Slidetheseatforwardorbackwardasdesired.Reinstall
theadjustmentknob.RefertoFigure8.
f
s j_
Figure8
Steering wheel height adjustment
NEVERoperatethistractor without either the mulchplugordeckchute
installed.
Removethewingknobsinstalledonthemowingdeckandretainforlater
installation.
2. Installthedeckchuteintothedeckdischargeopeningonthedeck.Thestuds
onthedecksurfacewill fit throughtheholesontheupperportionofthe
deckchute.Thesmalltabonthedecklip areawill fitthroughthesquare
cutoutonthe lowerportionofthedeckchute.SeeinsetofFigure10.
Note:Makecertainthat theupper-rearportionofdeckchuteisdepressing
thesafetyswitchlocatedonthedecksurface.Theenginewill notstart
withoutthedeckchuteproperlyinplace.
3. Securethedeckchutebytighteningthewingknobsremovedearlier.See
Figure10.
Toadjusttheheightofthesteeringwheel,thisunitisequippedwith atelescoping
steeringcolumn.Toadjusttheheightofthesteeringwheel:
1. Sitintheoperator'sseatandplaceyourhandsonthesteeringwheel.
2. Pushthebutton(a)onthesteeringcolumnandraiseorlowerthesteering
wheel(b)tothedesiredposition.SeeFigure9.
flete:Oncethedesiredpositionisachieved,lift upanddownonthesteeringwheel
tomakesureit locksintoplaceandthebutton(a)onthesteeringcolumnreleases
intoalockedposition.Donotoperatethisunitunlessthesteeringcolumnisina
lockedposition.
Figure10
Figure9
11

InstallTheRearEngineCover
1. Removethetwofactoryinstalledhexscrewslocatedontherearengine
covermountingbracket.Retainthescrewsforlaterinstructions.See
Figure11.
2. Installtherearenginecoverbypositioningit inplaceasshowninFigure11.
Tiptheenginecoverforwardtofit it intotheslotsprovided,thenrotateit
backwardstoalignthemountingholes.
F
3.
Figure11
Securethecoverwith thetwohexscrewspreviouslyremoved.Donot to
over-tighten.
Installingthe Bumper
1. Removethetwoscrewsasshownin Figure12.
2. Positionthebumperoverthemountingholesandsecureusingthehardware
removedinStep1,asshownin Figure12.
Installingthe HitchPlate
Removethefactoryinstalledhitchplatemountinghardwarelocatedonthe
rearofthetractor.
Positionthehitchplate,packedwiththe looseparts,with theflat sideup
asshownin Figure13.Secureusingthetwoboltsandhexnutspreviously
removed.
Figure13
Connecting the Battery Cables
CALIFORNIA PROPOSITION 65
Batteryposts,terminals,andrelatedaccessoriescontainleadandlead
compounds,chemicalsknownto theStateof Californiato causecancerand
reproductiveharm.Washhandsafter handling.
Figure12
\
12
Whenattachingbatterycables,alwaysconnectthe POSITIVE(Red)wire to
itsterminal first, followed bythe NEGATIVE(Black)wire.
Forshippingreasons,bothbatterycablesonyourequipmentmayhavebeenleft
disconnectedfromtheterminalsatthefactory.Toconnectthebatterycables,
proceedasfollows:
NOTE:ThepositivebatteryterminalismarkedPos.(+).Thenegativebattery
terminalismarkedNeg.(-).
1. Removethefactoryinstalledhexboltsandhexnutslocatedontheendof
thewiringharness.Retainthehardwarefor laterinstructions.
Removetheplasticcover,if present,fromthepositivebatteryterminaland
attachtheredcabletothepositivebatteryterminal(+)withoneofthehex
boltandhexnuts,usinga7/16inchwrenchandsocketwrench.SeeFigure11.
Removetheplasticcover,if present,fromthenegativebatteryterminal
andattachtheblackcabletothenegativebatteryterminal(-) with the
remaininghexboltandhexnut,usinga 7/16inchwrenchandsocket
wrench.SeeFigure14.

4. Positiontheredrubberbootoverthepositivebatteryterminaltohelp
protectitfromcorrosion.
NOTE:Ifthe batteryisput intoserviceafterthedateshownontop/sideofbattery,
chargethe batteryasinstructedintheMaintenancesectionofthisOperator's
Manualpriortooperatingthetractor.
Figure14
m///=lllb
v
v
mm mm
(°C)-30 ° -20° -10° 0° 10° 200 300
(°F)-20 ° 0° 150 300 50o 70o 85o 105o
CheckingThe Oil Level
NOTE:Besuretochecktheoilwhileonalevelsurfacewith theenginestopped.
1. Removetheoilfillercap/dipstickandwipethedipstickclean.
2. Insertthedipstickintotheoilfiller neck.Turnthedipstick1/4turnintothe
lockedpositiontofullyseat.SeeFigure15.
3. Removedipsticktochecktheoil level.
4. Ifthelevelislow,slowlyaddoiluntilthereadingisattheupperlevelonthe
dipstick.SeeFigure15inset.
5. Reinsertthedipstickandturntolockedpositionbeforestartingtheengine.
Gas&Oil
NOTE:Theengineisshippedwithoutgasolineandwithmotoroil intheengine.
However,youMUSTchecktheoil levelbeforeoperating.Becarefulnottooverfill.
Runningtheenginewith insufficientoilcancauseseriousenginedamageandvoid
theenginewarranty.
Alwayskeephandsand feet clearofequipment movingparts. Donot usea
pressurizedstarting fluid. Vaporsareflammable.
Oil Recommendations
Beforestartingengine,checkoillevel;capacityis1700ml/57.5ft.oz.Referto
viscositychartfor oilrecommendations.Donotover-fill.Useasyntheticornon-
synthetic4-stroke,oranequivalenthighdetergent,premiumqualitymotoroil
certifiedtomeetorexceedU.S.automobilemanufacturer'srequirementsforservice
classificationSG,SEMotoroilsclassifiedSG,SFwill showthisdesignationonthe
container.
SAE10W-30isrecommendedfor general,alltemperatureuse.Ifsingleviscosity
oilisused,selecttheappropriateviscosityonthenextpagefortheaverage
temperatureinyourareafromthechartbelow.
Donotusenon-detergentoil or2-strokeengineoil. It couldshortenthe
engine'sservicelife.
NOTE:A5w30syntheticoilmaybeusedtoimprovestartabilityforcoldweather
(temperaturesbelow40F).
Oil Fill
Cap/Dipstick-==_
Level
Figure15
NOTE:Donotoverfill.Overfillingwithoil maycausesmoking,hardstarting,
sparkplugfouling,oroilsaturationofaircleaner.
FuelRequirements
Operatingthe enginewith ESSfuel, anoil/gasolinemixture, dirty gasoline,
or gasoline over 30 days old without fuel stabilizingadditivemayresult
[indamagetoyourengine'-scarburetor.Subsequentdamagewouldnot be
coveredunderthe Craftsmanwarranty.
13

Useautomotivegasoline(unleadedorlowleadedtominimizecombustionchamber
deposits)witha minimumof87octane.Gasolinewith upto10%ethanolor15%
MTBE(MethylTertiaryButylEther)canbeused.Neveruseanoil/gasolinemixture
ordirtygasoline.Avoidgettingdirt,dust,orwaterinthefueltank.DONOTuseE85
gasoline.
Useextremecarewhen handling gasoline.Gasolineisextremelyflammable
andthe vaporsareexplosive.Neverfuel machineindoorsor while the
engineishot or running.Extinguishcigarettes,cigars,pipes,andother
sourcesofignition.
NOTE:Purchasegasolineinsmallquantities.Donotusegasolineleftoverfromthe
previousseason,to minimizegumdepositsinthefuelsystem.
Thisengineiscertifiedtooperateonunleadedgasoline.Forbestresults,fill
thefueltankwith onlyclean,fresh,unleadedgasolinewith apumpsticker 1.
octaneratingof87orhigher.
Gasohol(upto10%ethylalcohol,90%unleadedgasolinebyvolume)isan
approvedfuel.Othergasoline/alcoholblends,suchasE85,arenotapproved.
2.
MethylTertiaryButylEther(MTBE)andunleadedgasolineblends(uptoa
o
maximumof15_ MTBEbyvolume)areapprovedfuels.Othergasoline/ether 3.
blendsarenotapproved.
Fillfueltankoutdoorsorinwell-ventilatedarea. f
Donotoverfillfueltank.Filltankto nomorethan1/2inchbelowbottomof
fillernecktoallowspaceforfuelexpansion.
Neverremovegascaporaddfuelwhiletheengineishotor running.Allow
enginetocoolatleasttwominutesbeforerefueling.
Ifgasolineisspilled,wipeit offtheengineandequipment.Movemachineto
anotherarea.Wait5minutesbeforestartingtheengine.
ToAddGasoline
NOTE:Thetractorisfitted with a tethered,ratchetingfuelcap.STOPfillingthetank
oncethefuelisseeninsidethefillerneck.Thisensuresthata properexpansion
volumeiscreated,otherwisethefuelcanoverflowcreatingahazardoussituation.
DoNOTtopoffthe fueltank.
Refuelin awell-ventilatedareawith theenginestopped.Donotsmokeor
allowflamesorsparksintheareawheretheengineisrefueledorwhere
gasolineisstored.
Donotoverfillthefueltank.Afterrefueling,makesurethetankcapisclosed
properlyandsecurely.
Becarefulnottospillfuelwhenrefueling.Spilledfuelorfuelvapormay
ignite.Ifanyfuelisspilled,makesuretheareaisdrybeforestartingthe
engine.
Avoidrepeatedorprolongedcontactwithskinorbreathingofvapor.
AddingFuel
Anadult shouldfuel thisengine.NEVERallow childrentorefuel itsengine.
Gasoline(fuel)vaporsarehighlyflammable andcanexplode.Fuelvapors
canspreadandbeignitedbyasparkor flamemanyfeetawayfrom engine.
Topreventinjuryor deathfrom fuelfires, follow theseinstructions:
DONOTuseleadedfuel.
Fuelmustbefreshandclean.NEVERusefuelleftoverfromlastseasonor
storedforlongperiods.
NEVERmixoilwith fuel.
DONOTusefuelcontainingMethanol(WoodAlcohol)
NOTE:Beforerefueling,allowenginetocooltwominutes.
Turntheengineoffandlet enginecoolatleast2minutesbeforeremoving
thefuelcap.Thegasolinetankislocatedundertheseat.Thefuelcapis
tetheredtothetractortopreventitsloss.Donotattempttoremovethecap
fromthetractor.
Cleanaroundfuelfill beforeremovingcaptofuel.
Filltankuntilfuelreaches1/2inchbelowthebottomofthefillerneckto
allowspaceforfuelexpansion.Becarefulnottooverfill.SeeFigure16.
,. j
Figure16
4. Replacethegasolinecapandtightensecurely.Wipeupspilledfuelbefore
startingengine.IffuelisspilledDONOTstartengine.Movemachineaway
fromareaofspillage.Avoidcreatinganysourceofignitionuntilfuelvapors
aregone.
TirePressure
Equaltire pressureshouldbemaintainedat alltimes. Neverexceedthe
maximuminflation pressureshownonthe sidewallofthe tire.
Therecommendedoperatingtirepressureis:
Approximately10psiforthereartires
Approximately14psiforthefronttires
IMPORTANT:Refertothetiresidewallforexacttire manufacturer'srecommended
ormaximumpsi.Donotoverinflate.Uneventirepressurecouldcausethecutting
decktomowunevenly.
14

Clutch/BrakePedal
SpeedControl&Parking
BrakeLever
FuelLevelindicator
IgnitionSwitch
Shift Lever
Throttle/ChokeLever
FuelFillCap
CupHolder
DeckLift Lever
OilFillCap
PTO(BladeEngage)Lever
Figure17
NOTE:AnyreferenceinthismanualtotheRIGHTorLEFTsideofthetractorisobservedfromoperator'sseatpositionfacingforwardtowardsthefrontoftractor.
MeetsANSiSafetyStandards
CraftsmanTractorsconformtothesafetystandardoftheAmericanNationalStandardsInstitute(ANSI).
15

Throttle/ ChokeControl
Thethrottlecontrolleverislocatedontheleftfenderofthetractorasseenfromthe
operator'sposition,seeFigure17.Thislevercontrolsthespeedoftheengine,aswell
asthechokewhenit ispushedallthewayforward.Whensetinagivenposition,
thethrottlewill maintainauniformenginespeed.
IMPORTAfl#Whenoperatingthetractorwith thecuttingdeckengaged,becertain
thatthethrottleleverisalwaysintheFAST(rabbit)position.
Movingthethrottleleverallthewayforwardactivatestheengine'schokecontrol.
Activatingthechokecontrolclosesthechokeplateonthecarburetorandaidsin
startingtheengine.
RefertoStartingTheEnginein theOperationsectionofthismanualfordetailed
startinginstructions.
ignitionSwitch
Theignitionswitchislocatedontheleftfenderofthetractorasseenfromthe
operator'sposition,adjacenttotheThrottle/ChokeControl.Activatethe Ignition
Switchtostarttheenginebyinsertingthekeyintothe ignitionswitchandturn
clockwisetotheSTARTposition.Releasethe keyintotheONpositiononceengine
hasfired.SeeFigure18.
On
off
Start
Figure18
Clutch-BrakePedal
Thedutch-brakepedalislocatedonthe leftsideofthe lawntractor,alongthe
runningboard.Depressthedutch-brakepedalpartwaydownwhenslowingthe
tractorbychangingspeeds(RefertoSpeedControlLever).Depressthepedalallthe
wayclowntoengagethediscbrakeandbringthetractortoacompletestop.
NOTE:Thedutch-brakepedalmustbecompletelydepressedtostarttheengine.
RefertoSafetyInterlockSwitchesintheOperationsectionofthismanual.
ShiftLever
Theshiftleverislocatedonthecontrolpaneljustbelowtheseat,inthecenterof
thetractor.It hasthreepositions,FORWARD,NEUTRALandREVERSE.Thebrake
pedalmustbe completely depressedandthetractormustnotbeinmotion
whenmovingtheshiftlever.SeeFigure19.
IMPORTANT:Neverforcetheshiftlever.Doingsomayresultin seriousdamageto
thetractor'stransmission.
f
Figure19
SpeedControl Lever
Thespeedcontrollever,locatedontherightsideofthetractor'ssteeringconsole,
allowsyoutoregulatethegroundspeedofthelawntractor.
Touse,depressthedutch-brakepedalandmovetheleveroutoftheparkingbrake
notchandforwardtoincreasethetractor'sgroundspeed.Whenadesiredspeedhas
beenreached,releasetheleverintoanappropriatenotchtomaintainthat speed.
Toslowthetractor'sgroundspeed,depressthedutch-brakepedalandmovethe
speedcontrolleverrearwardandreleaseit intoanotch.
ParkingBrake
Tosettheparkingbrake,fullydepresstheclutch-brakepedal.Movethespeed
controlleverallthewaydownandintotheparkingbrakeposition.Releasethe
clutch-brakepedaltoallowtheparkingbraketoengage.
Toreleasethe parkingbrake,depresstheclutch-brakepedalandmovethespeed
controlleveroutoftheparkingbrakepositionintothedesiredposition.Releasethe
clutch-brakepedal.
NOTE:Theparkingbrakemustbesetiftheoperatorleavestheseatwith theengine
runningortheenginewill automaticallyshutoff.
FuelLeverIndicator
TheFuelLeverIndicatorislocatedbelowtheseatontheleft handsidefromthe
operator'spositioninthecontrolpanel.Usethiswindowtoidentifythetractor's
fuelneeds.SeeFigure20.
16

©
Safety Interlock Switches
Thesafetyinterlocksystemisdesignedfor safeoperationofthetractor.Ifthis
systemshouldevermalfunction,donotoperatethetractor.
Immediatelycontact1-800-4-MY-HOMEtohavethesystemserviced.
Thesafetyinterlocksystempreventstheenginefromstartingunless
theparkingbrakeisengagedandthePTO(BladeEngage)leverisinthe
disengaged(OFF)position.
Thesafetyinterlocksystemwill automaticallyshutofftheengineifthe
operatorleavestheseatbeforeengagingtheparkingbrake.
Thesafetyinterlocksystemwill automaticallyshutofftheengineifthe
operatorleavesthetractor'sseatwiththe PTO(BladeEngage)leverengaged,
regardlessofwhethertheparkingbrakeisengaged.
Theenginewill automaticallyshutoff ifthe PTO(BladeEngage)leveris
movedintotheengaged(ON)positionwiththeshiftleverinReverse.
Figure20
DeckLiftLever
Foundonyourtractor'srightfender,thedecklift leverisusedtochangetheheight
ofthecuttingdeck.Touse,movethelevertotheleft,thenplaceinthenotchbest
suitedfor yourapplication.
PTO(BladeEngage)Lever
Foundonthetractor'srightfender,the PTO(blade engage) leverisusedto
engagepowertothecuttingdeck.Tooperate,movetheleverallthewayforward.
Movingtheleverallthewayrearwardintothe PTOOFFpositiondisengagespower
tothecuttingdeck.
NOTE:ThePTO(bladeengage)levermustbeinthedisengaged(PTOOFF)position
whenstartingtheengine.
FuelFillCap
TheFuelFillCapislocatedbelowtheseat.RefertotheAssemblysectioninthis
manualforinstructionsonfuelingthistractor.
OilFill Cap
TheOilFillCapislocatedbelowtheseat.RefertotheAssemblysectioninthis
manualforinstructionsoncheckingandaddingoiltothistractor.
FuelFill Cap
Thegasolinetankislocatedundertheseat.Donotoverfill.
Useextremecarewhen handlinggasoline.Gasolineisextremelyflammable
andthe vaporsareexplosive.Neverfuel machineindoorsorwhile the
engineishotorrunning. Extinguishcigarettes,cigars,pipes,andother
sourcesof ignition.
Fordetailedinformationonaddingfuel,referto FuelRequirementsintheAssembly
sectionofthismanual.
Donotoperatethetractor if the interlocksystemismalfunctioning. This
systemwasdesignedforyoursafetyand protection.
IgnitionSwitch
Theignitionswitchisactivatedtostarttheengine.Insertkeyintotheignition
switchandturnclockwisetotheSTARTposition.ReleasethekeyintotheON
positiononceenginehasfired.SeeFigure21.
Tostoptheengine,turntheignitionkeycounterclockwisetotheOFFposition.See
Figure21.
Neverleavearunningmachineunattended.AlwaysdisengagePTO,move
shift leverinto neutralposition,setparkingbrake,stopengineandremove
keyto preventunintendedstarting.
off
On
Start
Figure21
17

AvoidSeriousinjuryor Death
Knowlocationandfunctionofallcontrols.
Removeobjectswhichcouldbethrownbytheblades.
Goupanddownslopes,notacross.
Useextracautiononslopes.Donotmowslopesgreaterthan12degrees.
Avoidsuddenturns.Uselowspeed.
Donotoperatemachinewhereitcouldtiporslip.
Ifmachinestopsgoinguphill,stopbladesandbackdownslowly.
Beforeleavingoperator'sposition,disengageblades,engageparking
brake,shutoff andremovekey.
Besurebladesandenginearestoppedbeforeplacinghandsorfeetnear
blades.
Keepsafetydevices(guards,shields,switches,etc.)inplaceandworking.
Keepbystandersaway.
Allowmachinetocoolbeforefuelingorstoring.
Keepmachinefreeofdebris.
ReadOperator'sManual
Engagingthe ParkingBrake
Toengagethe parking brake:
I. Fullydepressthe brakepedalandholdit downwith yourfoot.
2. Movetheparkingbrakeleverdownintotheparkingbrakeposition.
3. Releasethebrakepedaltoallowtheparkingbraketoengage.
Toreleasethe parking brake:
1. Depressthebrakepedalandmovethespeedcontrolleveroutoftheparking
brakeposition.
Setting the Cuttingfreight
Selecttheheightpositionofthecuttingdeckby placingthedecklift leverinanyof
thedifferentcuttingheightnotchesontherightsideofthefender.
Starting the Engine
Donotoperatethetractor ifthe interlocksystemismalfunctioning. This
systemwasdesignedforyoursafetyand protection.
NOTE:RefertotheAssemblysectionofthismanualforgasolineandoilfill-up
instructions.
1. Insertthetractorkeyintotheignitionswitch.
2. PlacethePTO(Blade Engage) leverin thedisengaged(OFF)position.
3. Engagethetractor'sparkingbrake.
4. Activatethechokecontrol.
5. TurntheignitionkeyclockwisetotheSTARTposition.Aftertheenginestarts,
releasethekey.Itwill returntotheONposition.
IMPORTANT:DoNOTholdthe keyinthe STARTpositionfor longerthanten
secondsatatime. Doingsomaycausedamagetoyourengine'selectric
starter.
6. Aftertheenginestarts,deactivatethechokecontrolbyplacingthethrottle
controlintotheFASTposition.
NOTE:DoNOTleavethechokecontrolonwhileoperatingthetractor.Doingsowill
resultina"rich"fuelmixtureandcausetheenginetorunpoorly.
Stopping the Engine
Ifyoustrikeaforeign object,stoptheengine,disconnectthesparkplug
wire(s)andgroundagainsttheengine.Thoroughlyinspectthemachinefor
anydamage.Repairthe damagebeforerestarting andoperating.
1. Ifthebladesareengaged,placethePTO(BladeEngage)leverin the
disengaged(OFF)position.
2. TurntheignitionkeycounterclockwisetotheSTOPposition.
3. Removethekeyfromtheignitionswitchtopreventunintendedstarting.
Keephandsandfeet awayfrom the dischargeopeningof thecutting deck.
18

Driving TheTractor
Avoidsuddenstarts,excessivespeedandsuddenstops.
Donot leavethe seatofthe tractorwithout first placingthe PTO(Blade
Engage)leverinthe disengaged(OFF)position,depressingthe brakepedal
andengagingthe parkingbrake.Ifleavingthetractor unattended,also
turn the ignitionkeyoff andremovethe key.
Alwayslookdownandbehindbeforeandwhile backingupto avoidaback-
overaccident.
1. Depressthebrakepedalandmovethespeedcontrolleveroutoftheparking
brakeposition,thenletthepedalrelease.
2. Movethethrottleleverintothe FAST(rabbit)position.
3. PlacetheshiftleverineithertheFORWARDorREVERSEposition.
IMPORTA#_DoNOTusetheshiftlevertochangethedirectionoftravelwhenthe
tractorisinmotion.Alwaysusethebrakepedaltobringthetractortoacomplete
stopbeforeshifting.
4. Releasetheparkingbrakebydepressingtheclutch-brakepedaland
positioningthespeedcontrolleverindesiredposition.
IMPOR@N_First-timeoperatorsshouldusespeedpositions1or2.Become
completelyfamiliarwith thetractor'soperationandcontrolsbeforeoperatingthe
tractorinhigherspeedpositions.
5. Releaseclutch-brakepedalslowlytoputunitintomotion.
6. Thelawntractorisbroughttoastopbydepressingtheclutch-brakepedal.
NOTE:Whenoperatingthe unitinitially,therewill belittledifferencebetweenthe
highesttwo speedsuntilafterthebeltshaveseatedthemselvesintothepulleys
duringthebreak-inperiod.
Beforeleavingtheoperator'spositionforanyreason,disengagetheblades,place
theshiftleverinneutral,engagetheparkingbrake,shutengineoffand remove
thekey.
5. Depressclutch-brakepedal.
6. Placespeedcontrolleverindesiredposition.
7. PlaceshiftleverineitherFORWARDorREVERSE,andfollownormaloperating
procedures.
Driving OnSlopes
RefertotheSLOPEGAUGEin theSafetyInstructionssectionofthemanualtohelp
determineslopeswhereyoumayoperatethistractorsafely.
Donotmowoninclineswith aslopein excessof 12degrees(ariseof
approximately2feetevery10feet). Thetractorcouldoverturn andcause
seriousinjury.
Mowupanddownslopes,NEVERacross.
Exerciseextremecautionwhenchangingdirectiononslopes.
Watchforholes,ruts,bumps,rocks,orotherhiddenobjects.Uneventerrain
couldoverturnthemachine.Tallgrasscanhideobstacles.
Avoidturnswhendrivingonaslope.Ifaturnmustbemade,turndownthe
slope.Turningupaslopegreatlyincreasesthechanceofarollover.
Avoidstoppingwhendrivingupaslope.Ifit isnecessarytostopwhile
drivingupaslope,startupsmoothlyandcarefullyto reducethepossibility
offlippingthetractoroverbackward.
IMPORTAN_Whenstoppingthetractorfor anyreasonwhileonagrasssurface,
always:
1. Placetheshiftleverinneutral,
2. Engagetheparkingbrake,
3. Shutengineoffandremovethekey.Doingsowill minimizethe possibility
ofhavingyourlawn"browned"byhotexhaustfromyourtractor'srunning
engine.
Ifunitstallswith speedcontrolinhighspeed,or ifunitwill notoperatewith speed
controlleverina lowspeedposition,proceedasfollows:
1. PlaceshiftleverinNEUTRAL.
2. Restartengine.
3. Placespeedcontrolleverinhighestspeedposition.
4. Releaseclutch-brakepedalfully.
19

Engagingthe Blades
Engagingthe PTO(BladeEngage)transferspowertothecuttingdeck.Toengage
theblades,proceedasfollows:
1. Movethethrottle/chokecontrollevertotheFAST(rabbit)position.
2. GraspthePTO(BladeEngage)leverandpivotit allthewayforwardintothe
engaged(ON)position.
3. Keepthethrottleleverinthe FAST(rabbit)positionforthemostefficientuse
ofthecuttingdeck.
NOTE:Theenginewill automaticallyshutoff ifthe PTO(BladeEngage)leveris
movedintotheengaged(ON)positionwith theshiftleverinReverse.
Mulching
Amulchkitisavailableasanattachment.Mulchingisaprocessofredrculating
grassclippingsrepeatedlybeneaththecuttingdeck.Theultra-fineclippingsare
thenforcedbackintothe lawnwheretheyactasanaturalfertilizer.Contactthe
nearestParts& RepairServiceCenterto purchaseamulchkit forthisunit.
TolocatethenearestParts&RepairServiceCenter,contact1-800-4-MY-HOME®.
Using the Deck Lift Lever
Toraisethecuttingdeck,movethedecklift levertothe left,thenplaceit inthe
notchbestsuitedforyourapplication.RefertoSettingTheCuttingHeightearlierin
thissection.
Mowing
Tohelpavoidbladecontactor athrown object injury,keepbystanders,
helpers,childrenandpetsat least75feet from themachinewhile it isin
operation.Stopmachineif anyoneentersthearea.
Thefollowinginformationwill behelpfulwhenusingthecuttingdeckwith your
tractor:
Planyourmowingpattern toavoiddischargeof materialstowardroads,
sidewalks,bystandersandthe like.Also,avoiddischargingmaterialagainst
awall or obstructionwhichmaycausedischargedmaterial to ricochetback
towardthe operator.
Donotmowat highgroundspeed,especiallyifa mulchkitorgrasscollector
isinstalled.
Forbestresultsit isrecommendedthatthefirsttwo lapsbecutwiththe
dischargethrowntowardsthecenter.Afterthefirst twolaps,reversethe
directiontothrowthedischargetotheoutsideforthebalanceofcutting.
Thiswill giveabetterappearancetothelawn.
Donotcutthegrasstooshort.Shortgrassinvitesweedgrowthandyellows
quicklyindryweather.
Mowingshouldalwaysbedonewith theengineatfullthrottle.
Underheavierconditionsit maybenecessarytogobackoverthecutareaa
secondtimetogetacleancut.
DoNOTattemptto mowheavybrushandweedsandextremelytallgrass.
Yourtractorisdesignedtomowlawns,NOTclearbrush.
Keepthebladesharpandreplacethebladewhenworn.RefertoCutting
BladeintheMaintenancesectionofthismanualfor properbladesharpening
instructions.
Thelampsturn OFFwhentheignitionkeyismovedtotheSTOPposition.
2O

MAINTENANCESCHEDULE
Beforeperforminganytypeofmaintenance/service,disengageall controls
andstoptheengine.Waituntilallmovingpartshavecometoacomplete
stop.Disconnectsparkplugwireandgrounditagainsttheengineto prevent
unintendedstarting.AlwayswearsafetyglassesduringoperationorwhUe
performinganyadjustmentsor repairs.
BeforeEachUse
Inthe FirstFiveHours
Every10Hours
Every25hours
Every50hours
Annually
BeforeStorage
1. Engineoil level
2. AirFilter
3. Mufflerareaandcontrols
1. EngineOil
1. Hood/Dashairvents
2. Batteryterminals
3. Deckspindleandidlerbracket
1. Airfilter'sprecleaner*
2. Airfilter*
3. Mid-steeringarms,pivotshafts,
rackandaxles
4. Frontwheelbearings
1. Engineoil/Oil filter
2. Muffler
1. Airfilter
2. Airfilter'spre-cleaner
3. Sparkplug
4. Aircoolingsystem*
5. Fuelfilter
6. SteeringGears
Z RearWheels
1. Hood/Dashairvents
2. Batteryterminals
3. Midsteeringarms,pivotshafts,
andaxles
4. Frontwheelbearings
5. Deckspindleandidlerbracket
6. Pedalpivotpoints
*Servicemorefrequentlyunderdustyconditions.
Followthe maintenanceschedulegivenbelow.Thischartdescribesservice
guidelinesonly.UsetheServiceLogcolumnto keeptrackofcompleted
maintenancetasks.
Tolocate the nearestParts&RepairServiceCenteror toscheduleservice,
simply call(800)659-5917.
1. Check
2. Clean/Replace
3. Clean
1. Change
1. Clean
2. Clean
3. Lubricate
1. Clean
2. Clean
3. Lubricate
4. Lubricate
1. Change/Replace
2. Check
1. Replace
2. Replace
3. Replace
4. Clean
5. Replace
6. Clean
7. Removeandgreaseaxles
1. Clean
2. Clean
3. Lubricate
4. Lubricate
5. Lubricate
6. Lubricate
Beforeperforminganymaintenanceor repairs,disengagethe PTO(Blade
EngageLever),engagethe parkingbrake,stopthe engineandremovethe
keyto preventunintendedstarting.
21
Ifthe enginehasbeenrecentlyrun,the engine,muffler andsurrounding
metalsurfaceswill behot andcancauseburnsto the skin.Exercisecaution
to avoidburns.

Engine Maintenance
Shutoff the enginebeforeperforming anymaintenance.Toprevent
accidentalstart-up,disconnectthesparkplug boot.
IMPORTAIV#Ifenginemustbetippedtotransportequipmentor toinspector
removegrass,keepsparkplugsideofengineup.Transportingortippingengine
sparkplugdownmaycausesmoking,hardstarting,sparkplugfouling,oroil
saturationofaircleaner.
Periodicinspectionandadjustmentoftheengineisessentialifhighlevel
performanceistobemaintained.Regularmaintenancewill alsoensurealong
servicelife.Therequiredserviceintervalsandthekindof maintenancetobe
performedaredescribedinthetableonthepreviouspage.Followthehourlyor
calendarintervals,whicheveroccurfirst.Morefrequentserviceisrequiredwhen
operatinginadverseconditions.
Ifthe enginehasbeenrunning,the muffler will bevery hot.Becarefulnot
totouchthe muffler.
Servicingthe EngineOil
Checkthe oillevelregularly.
Besurecorrectoillevelismaintained.Checktheoiieveryfivetotenhoursof
operation,beforestartingtheengine.SeeCheckingOilLevelintheAssembly
section.
Onlyusehighqualitydetergentoilratedwith APIserviceclassificationSIC,SG,
SH,or SJ.Selecttheoil'sSAEviscositygradeaccordingtotheexpectedoperating
temperature.RefertoGas&Oilin theAssemblysectionofthismanual.
Oil Drain
IMPORTIIfl#Besuretocheckengineonalevelsurfacewiththeenginestopped.
Draintheoilwhiletheengineisstillwarmtoassurerapidandcompletedraining.
Fordrainingoiifromtheengine'scrankcaseofselectmodeltractors,aplasticoil
drainsleeveispackedwith thisOperator'sManual.Todraintheoil, proceedas
follows:
1. Unscrewtheoilfill capandremovethedipstickfromtheoil filltube.
2. Snapthesmallendofoildrainsleeveontotheoilsump.SeeFigure22.
3. Removedrainpluganddrainoil intoasuitablecontainerwith acapacityof
nolessthan64oz.
4.
Tipthetractorslightlyinthedirectionofthesuitablecontainertoaidinfully
drainingall oftheoilfromtheengine.
Beforetipping engineor equipmentto drainoil, drainfuelfrom tank by
runningengineuntil fuel tank isempty.
5. Servicetheoilfilter asinstructedlaterinthissection.
6. Servicethe 0il Filterifdesired,aspertheinstructionslaterinthissection.
7. Reinstallthedrainplugandtightenitsecurely,12-14Nm(106.2-123.9in-lb).
8. Removetheoildrainsleevefromtheoilsump.Returnthedipsticktotheoilfill
tubeandscrewtheoilfill capbackintoplace.
9. Refilltheenginewith thenewmotoroil.RefertoGas&OilintheAssembly
sectionofthismanualforinformationregardingtheapprovedoiltype.
IMPORTAIV#Usedmotoroilmaycauseskincancerifrepeatedlyleft incontactwith
theskinforprolongedperiods.Althoughthisisunlikelyunlessyouhandleusedoil
onadallybasis,itisstilladvisabletothoroughlywashyourhandswith soapand
waterassoonaspossibleafterhandlingusedoil.
flOTE:Pleasedisposeofusedmotoroilin amannerthatiscompatiblewith the
environment.Wesuggestyoutakeitinasealedcontainertoyourlocalservice
stationfor reclamation.Donotthrowitinthetrash,pouritdownadrainoronthe
ground.
22
,, j
Figure22
ReplacingTheOil Filter
Thisengineisequippedwithaspin-onoilfilter thatshouldbereplacedeachtime
anoilchangeisperformed,everyseasonor50hours.Referto Figure23.
Toreplacethe Oil Filter:
1. Draintheoil asinstructionpreviouslyinthissection.
2. Removetheoilfilter. Disposeoftheoldoilfilter properly.
3. Lubegasketofnewoil filterwith cleanoil.
4. Installandturnoilfilter byhanduntilthegasketcomesincontactwiththe
sealingsurfaceofthecrankcasecover,thentightentheoilfilter, 10-12Nm
(88.5-106.2in-lb),1/2-3/4turn.
5. Addoilaspreviouslyinstructed.
6. Makesuredipstickisinstalled.
7. Startandrunengine.Checkfor leaks.
8. Stopengine.Waitafewminutesandchecktheoillevel.SeeCheckingThe
0il LevelintheAssemblysectionofthismanual.

Air Filter Service
Paperfilterscannotbecleanedandshouldbereplacedevery100operatinghours;
moreoftenif usedinextremelydustyconditions.
OilFilter
Neverusegasolineorlowflashpointsolventsforcleaningtheairfilter
element.Afire orexplosioncouldresult.
Donotusepressurizedair orsolventsto cleantheaircleaner
cartridge.
Iffilters, orcoversarenot installedcorrectly seriousinjuryordeath
could resultfrom backfire. Donot attempt to start the enginewith them
removed.
Figure23
Adding Oil
IMPORTANT:Besuretocheckengineonalevelsurfacewiththeenginestopped.
I. Wipearounddipstickcapandtubewithacleanclothto removeanydebris.
SeeFigure24.
f
IMPORTANT:Neverruntheenginewithouttheairfilter.Rapidenginewearwill
result.
1. Unscrewthethumbscrewsandremovetheairfiltercover.SeeFigure25.
AirFilter Cover
\
Figure25
Figure24
2. Removedipstickandwipecleanwith acloth.
3. Pouroilintothedipsticktube. Donotoverfill. Withanoilfilterchangethe
highlevelamountofoilfor thisengineis1700ml(57.48fl-oz.).
4. Installdipstickandturnto lockedpositionbeforestartingengine.
5. Startengine.Allowto runforafewsecondsandthenshutdowntheengine.
6. Checktheoil level.SeeCheckingOilLevelintheAssemblysectionofthis
manual.
23

2.
f
Removetheairfilter.SeeFigure26.
/
._ j
Figure26
Removethefoampre-filterfromaroundthepaperairfilter. SeeFigure
27.Replacepaperelementwhendirtyordamaged.Cleanfoamelementor
replacewhendamaged.
AirFilter
Pre-Filter
Figure27
4. Tocleanfoamelement,washin amildliquiddetergentandwater.Squeeze
orpressthefoamelementto rinseoutdirt andwater.Donottwist; this
coulddamageortearthefoamelement.Allowtodrythoroughlybefore
using.DONOToilthefoamelement.
5. Attachthenewairfilter withfoamelement,aligningtheholeintheairfilter
with theintakemanifold.SeeFigure28.
Manifold
Figure28
Attachtheairfilter cover,makingsuretoalignplasticribfeaturesonthe
shroudtotheplasticfeaturesontheairfiltercover.SeeFigure29.Turn
thumbscrewsclockwiseuntilsnug.Checkforanymisalignment.
Air Filter
Plastic
Feature
Shroud
PI,
Feature
Figure29
SparkPlugService
DONOTcheckfor sparkwith sparkplugremoved.DONOTcrankenginewith
sparkplug removed.
Toensureproperengineoperation,thesparkplugmustbeproperlygappedand
freeofdeposits.
1. Removethesparkplugbootanduseasparkplugwrenchtoremovethe
plug.SeeFigure30.
24

ifthe enginehasbeenrunning,the muffler wii[ beveryhot.Becareful not
to touchthe muffler.
FuelFilter Service
Gasolineanditsvaporsareextremelyflammable andexplosive.Fireor
explosioncancausesevereburnsor death.
2.
3.
f
SparkPlugBoot
SparkPlug
Figure30
Visuallyinspectthesparkplug.Discardthesparkplugif thereisapparent
wear,orif theinsulatoriscrackedorchipped.Cleanthesparkplugwitha
wirebrushifit istobereused.
Measurethepluggapwith afeelergauge.Correctasnecessaryby
bendingsideelectrode.SeeFigure31.Thegapshouldbesettobetween
0.024-0.031in.
Electrode
Figure31
4. Checkthatthesparkplugwasherisingoodconditionandthreadthespark
pluginbyhandtopreventcross-threading.
5. Afterthesparkplugisseated,tightenwith asparkplugwrenchtocompress
thewasher.
NOTE:Wheninstallinga newsparkplug,tighten1/2turnafterthespark
plugseatstocompressthewasher.Whenreinstallingausedsparkplug,
tighten1/8-1/4turnafterthesparkplugseatstocompressthewasher.
IMPORTANT:Thesparkplugmustbesecurelytightened.Animproperly
tightenedsparkplugcanbecomeveryhotandmaydamagetheengine.
Keepgasolineawayfromsparks,openflames,pilotlights,heat,andother
ignitionsources.
Checkfuellines,tank,cap,andfittingsfrequentlyforcracksorleaks.Replace
if necessary.
Beforereplacingthefuelfilter,drainthefueltankasin ToDrainthe Fuel.
Donotdrainfuelwhentheengineishot.Allowtheengineadequatetimeto
cool.Drainfuelintoanapprovedcontaineroutdoors,awayfromopenflame.
Drainanylargevolumeoffuelfromthetankbydisconnectingthefuelline
fromthein-linefuelfilter neartheengine.
RemovethefuellinefromtheIn-lineside(sidetowardsthefueltank)ofthe
fuelfilter.
Replacementpartsmustbethesameandinstalledinthesamepositionas
theoriginalparts.
Iffuelspills,waituntilit evaporatesbeforestartingengine.
Beforereplacingthefuelfilter,drainthefueltank.Otherwise,fuelcanleak
outandcauseafireorexplosion.
ToDrainTheFuel:
Locatethefuelfilter,whichisroutedontheleftsideoftheenginebetween
thefueltankandthecarburetor,andmaybeattachedtotheenginewithatie
strap.Cutthetiestrap,ifpresent,thenpinchthein-lineclamponthefuelfilter
with apairofpliers,slidetheclampupthefuelline.Pullthefuellinefreefrom
thefilterandplacetheopenendofthelineintoanapprovedcontainertodrain
thefuel.
ToChangeTheFuelFilter:
I. Useplierstosqueezethetabsontheotherclamp(theout-linesideofthe
fuelfilter),andslidetheclampawayfromthefuelfilter.Twistandpullthe
fuellineoffofthefuelfilter. SeeFigure32.
2. Checkthefuellinesforcracksorleaks.Replaceifnecessary.
3. Replacethefuelfilter withanoriginalequipmentreplacementfilter.
Call1-800-4-MY-HOME_to purchasethe original equipment
replacementfilter.
4. Securethefuellineswiththeclamps.
Thefuelfilter cannotbecleanedandshouldbereplacedevery100operatinghours;
moreoftenifrunwith oldgasoline.
25

F
FuelLine
Figure32
CleanEngine
Iftheenginehasbeenrunning,allowittocoolfor atleasthalfanhourbefore
cleaning.Periodicallyremovedirt build-upfromengine.Cleantheenginecooling
finsevery25hours.Cleanwith abrushorcompressedair.
IMPORTANT:Donotsprayenginewith watertocleanbecausewatercould
contaminatefuel.Usingagardenhoseorpressurewashingequipmentcanalso
forcewaterintotheaircleanerormuffleropening.Waterintheaircleanerwill soak
thepaperelement,andwaterthat passesthroughtheelementormufflercanenter
thecylinder,causingdamage.
Figure33
Removethebow-tiecotterpinandflatwasherfromthedecklift assembly,
andretainforreinstallationlater.SeeFigure34.
Accumulationofdebrisaroundmuffler couldcausea fire. Inspectandclean
beforeeveryuse.
Cutting DeckRemoval
Toremovethe cutting deck,proceedasfollows:
1. PlacethePTO(BladeEngage)leverinthedisengaged(OFF)positionand
engagethe parkingbrake.
2. Lowerthedeckbymovingthedecklift leverintothe bottomnotchonthe
rightfender.
3. Removethebeltfromaroundthetractor'sPTOpulley.SeeFigure33.
Figure34
Avoidpinchinginjuries.Neverplaceyourfingersonthe idler springor
betweenthe belt andapulleywNle removingthe belt.
26

5.
Removetheremainingbow-tiecotterpinssecuringthedeckto theunit,as
shownin Figure35.
k. j
Figure35
NOTE:Thebow-tieclipsshouldbere-installedfromthetopdown.
6. Movethedeckliftleverintothetopnotchontherightfendertoraisethe
deckliftarmsupandoutoftheway.
7. Unplugthewiringpigtailfromthedecksafetyswitch.
8. CarefullyremovethePTOcablefromtherearofthecuttingdeckby
removingthebow-tiecotterpinwhichsecuresit. Removethespringfrom
thedeckidlerbracket.SeeFigure36.
f
Figure36
9. Gentlyslidethecuttingdeck(fromtheleft side)outfromunderneaththe
tractor.
Changingthe DeckBelt
NOTE:Itispossibletochangethedeckbeltwiththecuttingdeckstillinstalledon
thetractor,howeveritismucheasiertoremovethedeckfirst,changethedeckbelt,
thenreinstallthecuttingdeck.
Tochangethecuttingdeckbelt,proceedasfollows:
1. Itiseasiesttochangethedeckbeltbyfirst removingthecuttingdeckas
instructedearlierinthissection.Skipthisstepifderidingtochangethedeck
beltwith themowingdeckstillinstalledontheunit.Otherwise,removethe
cuttingdecknow.
2. Ifchangingthedeckbeltwith thecuttingdeckstillinstalledontheunit,
lowerthecuttingdecktothelowestcuttingposition.
3. Removethedeckbeltfromaroundtheunit'sPTOdrivepulleyasshownin
Figure33.Simplyrollonesideofthebeltoffof the pulleyandthenwork
itoffthe pulleybycontinuingaroundthepulleyuntilthe beltisoffof the
pulley.
4. Pullthebelttowardsthefrontoftheunit,pullingitthroughandoutofthe
beltkeeperbracket,showninFigure33.
5. Removethedeckbeltcoverbyremovingthethreehexboltsthat secureit.
SeeFigure37.
Figure37
Removethebeltkeepingspacerbyremovingthe hexboltthatsecuresit. See
Figure38.
BeltKeeperI-lexbolt
Figure38
Changethebelt,thenreinstalltheallthecomponentsremovedinthe
reverseorderbeginningwiththeidlerpulley,andlastlythebeltcover.
27

8.
Feedthedeckbeltthroughthebeltkeeperbracketandworkit aroundand
ontothePTOdrivepulleyasshownin Figure33.
Tires
Neverexceedthe maximuminflationpressureshownonthe sidewallof tire.
Therecommendedoperatingtire pressureis:
Approximately10psiforthereartires
Approximately14psiforthefronttires
IMPORTANT:Refertothetiresidewallforexacttiremanufacturer'srecommended
ormaximumpsi.Donotovednflate.Uneventire pressurecouldcausethecutting
decktomowunevenly.
CuttingBlade
Shutthe engineoffand removeignitionkeybeforeremovingthe cutting
bladeforsharpeningorreplacement.Protectyourhandsbyusingheavy
[g oveswhengraspngthe bade.
Periodicallyinspectthe bladeand/orspindlefor cracksor damage,
[especiallyafter you'vestruckaforeign object.Donot operatethe machine
[until damagedcomponentsarereplaced.
Toremovetheblade,proceedasfollows.
NOTE:Itmaybeeasierto changethebladebyfirst removingthedeckfrom
beneaththetractor,(refertoCuttingDeckRemovalearlierinthissection)
thengentlyflipthedeckovertoexposeitsunderside.It ispossibletochange
theblade,however,withthedeckstillattachedtothetractor.Ifattempting
tochangethebladewith thedeckstillinstalledonthetractor,firstmovethe
decklift levertoitshighestcuttingposition.
1. Removethemulchplug,deckchuteor baggingchute,ifequipped,exposing
thedeckchuteopening.
2. Usingablockofwoodor2x4,insertit intothedeckopeningandrotatethe
bladearounduntilitwedgesthewoodbetweenthedeckopeningandthe
cuttingblade,asshownin Figure39.
3. Removethehexflangenutthatsecuresthe bladetothespindleassembly,
andremovetheblade.SeetheInsetofFigure39.
NOTE:Thedeckspindlehasanormalthread.Toloosen,rotatetheflangelock
nutcounterclockwise.
Figure39
Toproperlysharpenthecuttingblades,removeequalamountsofmetal
frombothendsofthebladesalongthecuttingedges,paralleltothetrailing
edge,ata25°-to30°angle.Alwaysgrindeachcuttingbladeedgeequallyto
maintainproperbladebalance.SeeFigure40.
Figure40
Ifthe cuttingedgeofthe bladehaspreviouslybeensharpened,orifany
metalseparationispresent,replacethe bladeswith newones.
Apoorlybalancedbladewill causeexcessivevibration, maycausedamageto
the tractor and/orresultin personalinjury.
Testtheblade'sbalanceusingabladebalancer.Grindmetalfromthe
heavysideuntilit balancesevenly.
NOTE:Whenreplacingthe blade,besuretoinstallthe bladewith thesideof
the blademarked"Bottom" (orwith a partnumberstampedinit)facingthe
groundwhenthemowerisintheoperatingposition.
Useatorquewrenchtotighten the bladespindlehexflange nut to between
70Ibs-ftand90Ibs4t.
28

Adjustments
Neverattempt to makeanyadjustmentswhiletheengineisrunning,except
wherespecifiedinthe operator'smanual.
Levelingthe Deck
NOTE:Checkthetractor'stire pressurebeforeperforminganydeckleveling
adjustments.RefertoTires,inthisServiceAndMaintenancesectionformore
informationregardingtire pressure.
Front ToRear
Itispossibletoadjustthepitchofthecuttingdeck.Thefrontofthedeckshouldbe
between0" (level)and1_,,lowerthanthe rearofthedeck.Adjustif necessaryas
follows:
2.
3.
Withthetractorparkedonafirm,levelsurface,placetheleverforliftingthe
cuttingdeckintothemiddleposition(3)androtatethebladesothat it is
alignedwith thefrontandrearofthetractor.
Measurethedistancefromthefrontofthe bladetiptothegroundandthe
rearofthe bladetip totheground.Thefirstmeasurementtakenshouldbe
between0" (level)and1_,,lessthanthesecondmeasurement.Determine
theapproximatedistancenecessaryforproperadjustmentandproceed,if
necessary,tothenextstep.
LocatetheflangelocknutonthefrontendofthePTOLiftRod.SeeFigure41.
Tightentheflangelocknuttoraisethefrontofthedeck;
Loosentheflangelocknuttolowerthefrontofthedeck.
/ ....
/ /
/ /
....................... / /
/ / /
, /
Figure41
SeatAdjustment
RefertotheAssemblysectionofthismanualforseatadjustmentinstructions.
ParkingBrakeAdjustment
Neverattempt to adjustthe brakeswhile the engineisrunning.Always
disengagePTO(BladeEngageLever),moveshift leverinto neutralposition,
stopengineand removekeyto preventunintendedstarting.
Ifthetractordoesnotcometoacompletestopwhentheclutch-brakepedalis
completelydepressed,or ifthetractor'srearwheelscanrollwiththe parkingbrake
applied,thebrakeisinneedofadjustment.ContactthenearestParts&Repair
ServiceCentertohaveyourbrakesserviced.
Tolocate the nearestParts&RepairServiceCenteror toscheduleservice,
contact 1-800-4-MY-HOME_.
Changingthe TransmissionDrive Belt
NOTE:Severalcomponentsmustberemovedandspecialtools(i.e.air/impact
wrench)inordertochangethetractor'sdrivebelt.ContactthenearestParts&
RepairServiceCentertohaveyourtransmissiondrivebeltserviced.
TolocatethenearestParts&RepairServiceCenterorto scheduleservice,call
(800)659-5917.
Muffler
Temperatureofmuffler and nearbyengineareasmayexceed150° F(65°C).
Avoidcontactwith theseareas.
Inspectmufflerperiodically,andreplaceifnecessary.Replacementparts
forthe mufflermustbethesameandinstalledinthesamepositionasthe
originalparts.
Clean Engine
Dailyorbeforeeveryuse,cleangrass,chafforaccumulateddebrisfrom
engine.Keeplinkage,spring,andcontrolsclean.
Keepareaaroundandbehindmufflerfreeofanycombustibledebris.
Keepingenginecleanallowsairmovementaroundengine.
Enginepartsshouldbekeptcleantoreducetheriskofoverheatingand
ignitionofaccumulateddebris.
Donotusewater tocleanengineparts.Watercouldcontaminatefuel
system.Useabrushor drycloth.
CarburetorAdjustment
Thecarburetoronthisengineisnotadjustable.
Battery
CaliforniaProposition65WARNING!Batteryposts,terminals,andrelated
accessoriescontainleadandleadcompounds,chemicalsknowntotheStateof
Californiatocausecancerandreproductiveharm.Washhandsafterhandling.
Ifremovingthebattery, disconnectthe NEGATIVE(Black)wire from its
terminalfirst, followed bythe POSITIVE(Red)wire. Whenre-installing
the battery,alwaysconnectthe POSITIVE(Red)wire to itsterminal first,
followedbythe NEGATIVE(Black)wire.
29

Thebatteryissealedandismaintenance-free.Acidlevelscannotbechecked.
Alwayskeepthebatterycablesandterminalscleanandfreeof
corrosivebuild-up.
Aftercleaningthe batteryandterminals,applyalightcoatof
petroleumjellyorgreasetobothterminals.
Alwayskeeptherubberbootpositionedoverthepositiveterminalto
preventshorting.
IMPORTAIV_Ifremovingthe batteryforanyreason,disconnecttheNEGATIVE
(Black)wirefromitsterminalfirst, followedbythe POSITIVE(Red)wire.When
re-installingthebattery,alwaysconnectthePOSITIVE(Red)wiretoitsterminal
first, followedbythe NEGATIVE(Black)wire.Becertainthat thewiresareconnected
tothecorrectterminals;reversingthemcouldchangethepolarityandresultin
damagetoyourengine'salternatingsystem.
CleaningBattery
Cleanthebatterybyremovingit fromthetractorandwashingwith abakingsoda
andwatersolution.Ifnecessary,scrapethebatteryterminalswith awirebrushto
removedeposits.Coatterminalsandexposedwiringwith greaseorpetroleumjelly
topreventcorrosion.
Battery Failures
Somecommoncausesforbatteryfailureare:
Incorrectinitialactivation
Overcharging
Freezing
Undercharging
Corrodedconnections
ThesefailuresareNOTcoveredbyyourtractor'swarranty.
Jump Starting
Neverjump start adamagedor frozen battery. Becertain the vehicles
do not touch, and ignitions areoff. Donot allow cable clampsto
touch.
1. Connectpositive(+) cabletopositivepost(+)ofyourtractor'sdischarged
battery.
2. Connecttheotherendofthecabletothepositive(+) postofthejumper
battery.
3. Connectthesecondcablenegative(-) tothenegativepost(-) ofthejumper
battery.
4. Connecttheotherendofthenegativecabletotheengineblockofthe
tractor,awayfromthebattery.Attachtoanunpaintedparttoassureagood
connection.
Ifthejumper battery isinstalledona vehicle(i.e.car,truck),doNOTstart
the vehicle'senginewhenjump starting yourtractor.
5. Startthetractor(asinstructedintheOperationsectionofthismanual).
6. Setthetractor'sparkingbrakebeforeremovingthejumpercables,inreverse
orderofconnection.
Charging
Batteriesgiveoff anexplosivegaswhile charging.Chargethe battery in
awell ventilated areaand keepawayfrom anopenflame or pilot light
ason awater heater,spaceheater,furnace,clothesdryer or othergas
appliances.
Whenchargingyourtractor'sbattery, useonlyachargerdesignedfor 12V
lead-addbatteries.Readyourbattery charger'sOwner'sManualpriorto
chargingyourtractor'sbattery. Alwaysfollow itsinstructionsandheedits
warnings.
Ifyourtractorhasnotbeenputintouseforanextendedperiodoftime,chargethe
batteryasfollows:
1. Setyourbatterychargertodelivera maxof 10amperes.
Ifyourbatterychargerisautomatic,chargethebatteryuntilthechargerindicates
thatchargingiscomplete.Ifthechargerisnotautomatic,chargefornofewerthan
eighthours.
Fuse
One15AMPfuseisinstalledinyourtractor'swiringharnessto protectthetractor's
electricalsystemfromdamagecausedbyexcessiveamperage.
Iftheelectricalsystemdoesnotfunction,oryourtractor'senginewill notcrank;
first checkto becertainthat thefusehasnot blown.Itcanbefoundunderthe
fenderontheleftsideoftheunit,onthewiringharnessjustabovethebattery.
Alwaysuseafusewith thesameamperagecapacityfor replacement.
Lubrication
Beforelubricating, repairing,or inspecting,alwaysdisengagePTO(Blade
EngageLever),moveshift leverinto neutralposition,setparkingbrake,stop
engneandremovekeyto preventun ntendedstart ng.
Pivot Points& Linkage
Lubricateallthepivotpointsonthedrivesystem,parkingbrakeandlift linkageat
leastonceaseasonwith lightoil.
RearWheels
Therearwheelsshouldberemovedfromtheaxlesonceaseason.Lubricatethe
axlesandtherimswellwithanall-purposegreasebeforere-installingthem.
FrontAxles
Eachendofthetractor'sfront pivotbarmaybeequippedwithagreasefitting.
Lubricatewith agreasegunafterevery25hoursoftractoroperation.
Steering Rack& Pinion
Onceperseason,orevery25hoursofoperation,it will benecessarytolubricatethe
steeringrackandpiniongearlocatedunderthefrontoftheunit.Usingstandard
automotivegrease,applygreasetothefrontsideandrearsideofthesteeringrack,
asindicatedin Figure42.
3O

............................................................... , ff .................................
Figure42
Cleaningthe EngineAndDeck
Anyfueloroilspilledonthemachineshouldbewipedoffpromptly.DoNOTallow
debristoaccumulatearoundtheenginecoolingfinsoftheengineoronanyother
partofthemachine.
iMPORTANT:TheuseofapressurewashertocleanyourtractorisNOT
recommended.Itmaycausedamagetoelectricalcomponents,spindles,pulleys,
bearingsortheengine.
Deck Wash System
Yourtractor'sdeckisequippedwitha waterportonitssurfaceaspartofitsdeck
washsystem.
Usethedeckwashtorinsegrassclippingsfromthedeck'sundersideandprevent
thebuildupofcorrosivechemicals.CompletethefollowingstepsAFTEREACH
MOWING:
Drivethetractortoalevel,clearspotonyourlawn,nearenoughforyour
gardenhosetoreach.
J
Figure43
5. Turnthewateron.
6. Whilesittingintheoperator'spositiononthetractor,starttheengineand
placethethrottleleverintheFAST(rabbit)position.
7. Movethetractor'sPTO(BladeEngage)intothe ONposition.
8. Remainintheoperator'spositionwith thecuttingdeckengagedfora
minimumoftwo minutes,allowingtheundersideofthecuttingdeckto
thoroughlyrinse.
9. Movethetractor'sPTO(BladeEngage)intothe OFFposition.
10. Turntheignitionkeytothe STOPpositiontoturnthetractor'sengineoff.
11. Turnthewateroff anddetachthehosecouplerfromthewaterportonyour
deck'ssurface.
Aftercleaningyourdeck,returntotheoperator'spositionandengagethe PTO.Keep
thecuttingdeckrunningforaminimumoftwominutes,allowingtheundersideof
thecuttingdecktothoroughlydry.
Makecertainthe tractor'sdischargechuteisdirectedAWAYfrom yourhouse,
garage,parkedcars,etc.
2. DisengagethePTO(BladeEngage),settheparkingbrakeandstopthe
engine.
3. Threadthehosecoupler(packagedwith yourtractor'sOperator'sManual)
ontotheendofyourgardenhose.
4. Attachthehosecouplertothewaterportonyourdeck'ssurface.SeeFigure
43.
31

Neverstorelawntractorwithfuelin tankindoorsorin poorly
ventilatedareaswherefuelfumesmayreachanopenflame,spark,
or pilotlightasona furnace,waterheater,clothesdryer,orgas
appliance.
PREPARING THE ENGINE
iMPORTANT:Fuelleft inthefueltankduringwarmweatherdeterio-
ratesandwillcauseseriousstartingproblems.
Gasolineisa toxicsubstance.Disposeofgasolineproperly.Contact
yourlocalauthoritiesforapproveddisposalmethods.
Failureto usea fuelstabilizingadditiveorcompletelyruntheengine
untilit'soutoffuelbeforeoff-seasonstoragemayresultindamageto
yourengine'scarburetor.Subsequentdamagewouldnet becovered
underthe manufacturer'swarranty.
Enginesstoredbetween30 and90 daysneedtobetreatedwitha
gasolinestabilizerandenginesstoredover90 daysneedtobedrained
offuelto preventdeteriorationandgumfromformingin fuelsystemor
onessentialcarburetorparts.Ifthegasolinein yourenginedeterio-
ratesduringstorage,youmayneedto havethecarburetor,andother
fuelsystemcomponents,servicedor replaced.
Topreventgumdepositsfromforminginsidetheengine'scarburetor
andcausingpossiblemalfunctionoftheengine,thefuelsystemmust
beeithercompletelyemptied,or thegasolinemustbetreatedwitha
stabilizertopreventdeterioration.
1. If usingafuelstabilizer:
a. Readtheproductmanufacturer'sinstructionsandrecom-
mendations.
b. Addtoclean,freshgasolinethecorrectamountof stabilizer
forthecapacityofthefuelsystem.
c. Fillthefueltankwithtreatedfueland runtheenginefor2-3
minutestogetstabilizedfuelintothecarburetor.
2. If emptyingthefuelsystem:
a. Donotdrainfuelwhentheengineishot.Allowtheengine
adequatetimetocool. Drainfuelintoan approvedcontainer
outdoors,awayfromopenflame.
b. Drainanylargevolumeoffuelfromthetankbydisconnect-
ingthefuellinefromthein-linefuelfilterneartheengine.
SeethecompleteinstructionsforDrainingThe Fuellaterin
thissection.
Gasolineisextremelyflammableandcanbeexplosiveundercertain
conditions.Draingasolinebeforestoringtheequipmentforextended
periods.Drainfuelonlyintoan approvedcontaineroutdoors,away
fromanopenflame.Allowenginetocool.Extinguishcigarettes,
cigars,pipes,andothersourcesofignitionpriortodrainingfuel.
Storegasolinein anapprovedcontainerin safelocation.
c. Reconnectthefuellineand runtheengineuntilit startsto
falter,thenusethechoketokeeptheenginerunninguntilall
fuelinthecarburetorhasbeenexhausted.
d. Disconnectthefuellineanddrainanyremaininggasoline
fromthe system.
32
3. Removethesparkplugandpourone(1)ounceof engineoil
throughthesparkplugholeintothecylinder.Cranktheengine
severaltimestodistributetheoil. Replacethesparkplug.
4. Cleandebrisfromaroundengine,underfingerguard,andunder,
aroundandbehindmuffler.Touchupanydamagedpaint,and
coatotherareasthatmayrustwitha lightfilmofoil.
5. Storeina clean,dryandwellventilatedareaawayfromanyap-
pliancethatoperateswitha flameor pilotlight,suchasafurnace,
waterheater,or clothesdryer.Alsoavoidanyareawitha spark
producingelectricmotor,or wherepowertoolsareoperated.
6. If possible,alsoavoidstorageareaswith highhumidity,because
thatpromotesrustandcorrosion.
7. Keeptheenginelevelin storage.Tiltingcancausefueloroil
leakage.
DRAINING THE FUEL
1. Locatethefuelfilter,whichislocatedon theleftsideofthe
engine,andmaybeattachedto theenginewitha tie strap.
2. Cutthetiestrap,ifpresent,thenpinchthein-lineclampon the
fuelfilterwitha pairofpliers,slidetheclampup thefuelline.
3. Pullthefuellinefreefromthefilterandplacetheopenendofthe
lineintoan approvedcontainertodrainthefuel.
PREPARING THE LAWN TRACTOR
1. Cleanandlubricatetheunitthoroughlyasdescribedinthe
LubricationinstructionsintheServiceandMaintenancesection.
2. Donotusea pressurewasherorgardenhosetocleanyourunit.
3. Storemowerina dry,cleanarea.Donotstorenexttocorrosive
materials,suchasfertilizer.
Removing From Storage
1. ChecktheoillevelasdescribedintheAssemblysectionofthis
manual.
2. If thefuelwasdrainedduringstoragepreparation,fillthetankwith
freshgasoline.If youkeepa containerofgasolineforrefueling,
makecertainitcontainsonlyfreshfuel.Gasolineoxidizesand
deterioratesovertime,causinghardstarting.
3. If thecylinderwascoatedwithoil duringstoragepreparation,the
enginewillsmokebrieflyat startup.Thisisnormal.

Enginefailstostart
Enginerunserratically
1. PTO/BladeEngageleverengaged.
2. Parkingbrakenotengaged.
3. Sparkplugwire(s)disconnected.
4. Throttle/ChokecontroJlevernotincorrect
startingposition.
5. Chokenotactivated
6. Fueltankempty,orstalefuel.
7. Blockedfuelline.
8. Faultysparkplug(s).
9. Engineflooded.
10.BlownFuse(s).
1. Placeleverindisengaged(OFF)position.
2. Engageparkingbrake.
3. Connectwire(s)tosparkplug(s).
4. PlaceThrottle/ChokeleverintotheFASTposition.
11.Safetyswitch(s)notproperlyengaged.
1. UnitrunningwithCHOKEactivated.
2. Sparkplugwire(s)loose.
3. Blockedfuellineorstalefuel.
5. MovetheThrottle/ChokeleverintotheChoke
position.
6. Filltankwithclean,fresh(lessthan30daysold)gas.
7. Replacethefuellineandreplacefuelfilter.
8. Clean,adjustgaporreplaceplug(s).
9. CrankenginewiththrottleinFASTposition.
10.ReplaceFuse(s)
4. Ventingascapplugged.
5. Waterordirtinfuelsystem.
6. Dirtyaircleaner.
Engineoverheats 1. Engineoillevellow. 1.
2. Airflowrestricted. 2.
EnginehesitatesathighRPM 1. Sparkpluggaptooclose. 1.
Engineidlesrough 1. Sparkplugfouled,faultyorgaptoowide. 1.
2. Dirtyaircleaner. 2.
Excessivevibration
Mowerwillnotmulchgrass
Unevencut
1. Cuttingbladelooseorunbalanced.
2. Damagedorbentcuttingblade.
1. Enginespeedtoolow.
2. Wetgrass.
3. Excessivelyhighgrass.
4. Dullblade.
1. Decknotleveledproperly.
2. Dullblade.
3. Uneventirepressure.
11.Ensureseatisintheproperoperatingposition,and/
ordeckchute,tubeormulchplugproperlyinstalled.
1. DeactivatetheCHOKE.
2. Connectsparkplugwire(s).
3. Replacethefuelline;filltankwithclean,fresh
gasolineandreplacefuelfilter.
4. Clearventorreplacecapifdamaged.
5. Drainfueltank.Refillwithclean,freshgasoline.
6. Replaceaircleanerpaperelementorcleanfoam
pre-cleaner,ifequipped.
Fillcrankcasewithproperamountandweightofoil.
Cleangrassclippingsanddebrisfromaroundthe
engine'scoolingfinsandhousing.
Removesparkplugandresetthegap.
Replacesparkplug.Setpluggap.
Replaceaircleanerelementand/orcleanpre-
cleaner.
1. Tightenbladeandspindle.
2. Replaceblade.
1. PlacethrottleinFAST(rabbit)position.
2. Donotmulchwhengrassiswet.
3. Mowonceatahighcuttingheight,thenmowagain
atdesiredheightormakeanarrowercuttingswath.
4. Sharpenorreplaceblade.
1. Performside-to-sidedeckadjustment.
2. Sharpenorreplaceblade.
3. Checktirepressureinallfourtires.
Find this and a{[ your other product manuals online.
6et answers from our team of home experts,
Get a personalized maintenance ptan for your home,
Find information and tools to help with home projects.
bzo_#_tteye_ #y S_s_
33

777123784
TOP VIEW
777D17060
777D16808
777D17041
777D17040
777D18493
777S34201
777S34202
777D18492
REF. 777S34102
34

This page intentionally left blank. Use this page to make any notes regarding your tractor.
35

Craftsman Model 247.290000
24
15
22_
\
2O
3G

Craftsman Model 247.290000
Ref, [
No,
1 710-0924
2 710-1241
3 710-3008
4 710-3015
5 712-04063
6 712-04064
7 712-04092
8 731-08813
9 731-08814
10 731-08815
II 731-08816
12 738-04184A
13 749-04932-0637
14 783-07208-0637
15 710-1652
16 731-08528
17 731-08753
18 936-0463
19 683-04751-0637
20 783-07125
21 783-07162-0637
22 783-07168-0637
23 783-07215-0637
24 783-07302
25 683-04767-0637
Part No, Description
Machine Screw, 1/4-20, 0.750
Hex Screw, 1/4-15, 1.000
Hex Head Screw, 5/16-18, .75
Hex Head Screw, 1/4-20, .75
Flange Locknut, 5/16-18
Flange Locknut, 1/4-20
U-type Speed Nut, 1/4-20
Column Cover
Steering Column Cap
Fender
Rear Cover
Shoulder Screw, .368 X.113:1/4-20
Rear Cover Support Tube
Hitch Plate
Tap Screw, 1/4-20, .625
Running Board
Running Board Plug
Flat Washer, .250 x .630 x .052
Frame Assembly
Deck Lift Index Bracket
Seat Pan
Seat Pivot Bracket
Battery Tray
Top Rear Drive Cover
Bumper
37

Craftsman IViodel 247.290000
33
39
_\g27
52
54
38

Craftsman Model 247.290000
Ref, [
No,
1 918-05056
2 647-04262
3 683-04768-0637
4 683-04779
5 710-04484
6 710-05378
7 710-05415A
8 710-0599
9 710-0623
I0 710-0757
II 710-0809
12 710-1007
13 710-1325
14 710-1652
15 711-0736
16 712-04065
17 712-0700
18 914-0209
19 714-04040
20 718-04407
21 720-04028
22 732-0459C
23 732-04934
24 936-0171
25 736-0322
26 736-3010
27 738-0372B
Part No, Description
Transmission Assembly
Shift Handle Assembly
Drive Assembly Idler
Variable Bracket Assembly
Tap Screw, 5/16-18, .750
Tap Screw, 5/16-18, 2.50
Hex Head Scew, 3/8-16, 1.62
Tap Scew, 1/4-20, 0.500
Tap Screw, 3/8-16, 0.750
Hex Head Screw, 7/16-20, 1.50
Tap Screw, 1/4-20, 1.250
SEMS Tap Screw, 3/8-16, 1.500
Tap Screw, 1/4-20, 1.625
Tap Screw, 1/4-20 x .625
Adjustable Ferrule, 1/4-20 X 1.00
Flange Lock Nut, 3/8-16
Flange Nut, 9/16-18
Internal Cotter Pin, .125 Dia.
Bow-Tie Cotter Pin
Pulley Hub, 5/8 Spline
Shift Knob
Extension Spring, .94 Dia. X 6.74 Lg.
Extension Spring, .97 OD X 6.18
Split Lock Washer, 7/16
Flat Washer, .450X1.250X.164
Flat Washer, .407X.812X.135
Shoulder Spacer, 1.00 X .38 X .38
Ref, I
No,
28 738-0930
29 747-05593
30 747-05617A
31 950-04099
32 750-04456
33 750-3119
34 954-0241A
35 954-04331
36 756-04224
37 756-04325
38 756-04464
39 756-04479
40 783-07207
41 783-07248
42 956-04015A
43 N/A
44 710-0627
45 710-0778
46 718-04261
47 736-0362
48 941-0600
49 634-0139-0961
50 734-04641
51 634-04319-4042
52 934-0255
53 710-0627
54
Part No, Description
Shoulder Spacer, .560x.165, 5/16-18
Shift Rod
Deck Belt Keeper, 30"
Stepped Spacer, .265 ID X .750
Spacer, .260 X .372 X 1.420
Spacer, .406 ID X 1.00 OD X .38
V-Belt, 5L:35.25
V-Belt, 5L:35.28
Flat Idler Pulley, 2.75 OD
V-Type Idler Pulley, 3.06
V-Type Pulley, 6.56
Engine Pulley, 4.46 / 3.39
Front Support Shift Bracket
Rear Idler Arm Bracket
Variable Speed Pulley Assembly
Variable Bracket (order 683-04779)
Hex Head Lock Screw, 5/16-24:.750
Tap Screw, 1/4-20:1.500
Bearing Cup
Flat Washer, .330x1.250x.060
Ball Bearing, 17 X 40 X 12
Complete Wheel Assembly
Tire, 16 x 6.5 x 8 Sq. Shldr.
Rim Assembly, 8.0 x 5.38
Air Valve
Hex Head Screw, 5/16-24, 7.50
39

Craftsman IViodel 247.290000
6
J
11
33
22
34
34
\31
40

Craftsman IViodel 247.290000
Ref, I
NO,
1 710-0607
2 712-04063
3 720-04009A
4 732-04905
5 735-0271A
6 938-0140
7 757-04158
8 783-07213-0637
9 683-04754-0637
10 712-04065
11 720-04049A
12 725-0157
13 732-04956
14 738-04554
15 946-04802
16 735-04081
17 751-12118
18 951-04366
19 951-12179A
20 925-1707D
21 710-0227
22 710-1652
23 712-04064
24 725-04363
25 725-04439
26 925-04659
27 925-05013
28 725-1643
29 925-1745A
30 926-0320
31 738-04237A
32 783-07384-0637
33 738-1132
34 712-0271
-- 925-05359
Part No, Description
TapScrew,5/16-18,0.500
FlangeLockNut,5/16-18
Knob,3/8-16,.875
SeatSpring
Bumper,.62DIAX .3
ShoulderSpacer,.435X .178-5/16X .56
Seat
SeatPivotBracket
PTOHandleAssembly
FlangeLockNut,3/8-16
HandleGrip,3/8
CableTie,3/16X .05X 7.4
ExtensionSpring,.50ODX 4.646LG
ShoulderBolt,.500X .270:3/8-16
PTOCable
RubberGrommet
RolloverValve
FuelTank,1-3Gal.
FuelCap
Battery,155CCA
Screw,#8
TapScrew,1/4-20,.625
FlangeLockNut,1/4-20
InterlockSwitch
Solienoid,12v
Three-WayKeySwitch
SeatSwitch
SwitchSpring
Key
InsulatorPlate
ShoulderScrew,#10-32,.500
BatteryHold-DownBracket
Screw,Shoulder,.250x .150
Nut,Sems,1/4-20
WiringHarness(NotShown)
41

Craftsman Model 247.290000
\24
42

Craftsman Model 247.290000
Ref, I
No,
1 683-04699-0637
2 910-0224
3 710-0376
4 710-04484
5 710-3008
6 911-04075A
7 711-0736
8 712-04063
9 914-0111
10 714-04040
11 726-0214
12 731-08656
13 731-08743
14 732-04937
15 732-0716D
16 735-04279
17 936-0264
18 736-3072
19 738-04184A
20 741-0356A
21 747-05506
22 747-05508
23 747-05616
24 748-0234
25 783-05940
26 783-07050-0637
27 783-07287
28 717-0772B
Part No, Description
Brake Pedal Assembly
Screw, #10-16:0.500
Hex Head Scerw, 5/16-18:1.00
Tap Screw, 5/16-18:.750
Hex Head Screw, 5/16-18:.75
Ferrule 3/8-24 X .375 Dia.
Adjustable Ferrule, 1/4-20 X 1.00
Flange Lock Nut, 5/16-18
Cotter Pin, 3/32X1.0
Bow-Tie Cotter Pin, 72
Push Cap, 5/8
Speed Control Cover
Speed Lever, 6-SPEED
Shift Spring
Extension Spring, .59 OD X 4.00 LG
Foot Pad, 2.5" LG.
Flat Washer, .330x.630x.064
Flat Washer, .380X.930X.110
Shoulder Screw, .368 X.113, 1/4-20
Steering Col. Bearing, .880 ID X 1.36
Variable Speed Control Rod
Brake Rod
Speed Selector Control Rod
Shoulder Spacer
Pedal Strap Support Bracket, 5/8
Speed Latch Bracket
Brake Cam Bracket
Brake lever Bracket
43

Craftsman Model 247.290000
28-_
7 _j18
..15
29
9
"_32 \31
\29
44

Craftsman IViodel 247.290000
I
Ref.
I Part No.
1 683-04726-0637
2 683-04727-0637
3 683-04761
4 683-04762
5 710-05046
6 710-05386
7 710-0643
8 710-0703
9 711-04448
10 712-04064
II 712-04065
12 714-04040
13 717-1554
14 726-0341
15 726-04127
16 731-08690
17 731-08691
18 736-0242
19 738-04537
20 741-04542
21 741-0660A
22 747-05514
23 747-05585
24 747-05686
25 783-06988
26 783-07239
27 631-04008A
28 731-06825
29 634-04726
30 736-04228A
31 714-0162
32 931-0484A
Description
Front Axle Assembly, RH
Front Axle Assembly, LH
Upper Tube Assembly
Lower Tube Assembly
Allen Wrench, 3/16
Screw, 1/4-20 X 1.25
Hex Head Screw, 5/16-18:1.00
Carriage Screw, 1/4-20, .75
Ferrule, 5/16-24 X .312 Dia.
Flange Lock Nut, 1/4-20
Flange Lock Nut, 3/8-16
Bow-Tie Cotter Pin, 72
Steering Pinion Gear
Push Cap, 3/4
Snap Butt
Lower Steering Collar
Upper Steering Collar
Bevel Washer, .340X.872X.060
Steering Shaft, .625 OD X 18.03
Hex Flange Bearing, 5/8
Flange Bearing, .760 X .941 X 1.0
Steering Rod, LH
Steering Rod, RH
Front Tie Rod
Steering Rack Plate
Lower Steering Bearing
Steering Wheel
Steering Cap
Complete Wheel Assembly
Washer, .781 x 1.59
Cotter Pin, 5/32 x 1.25
Hub Cap
45

Craftsman IViodel 247.290000
1
11
18
46

Craftsman Model 247.290000
I
Ref.
I Part No.
1 683-04706-0637
2 683-04757-0637
3 710-04484
4 710-0514
5 710-0642
6 710-0809
7 710-1652
8 711-05690
9 712-04065
10 712-04243
II 714-04040
12 714-04043
13 720-0311
14 732-04692
15 936-0300
16 938-0347
17 747-05511
18 747-05576-0637
19 750-0566A
20 783-07129-0637
Description
Lift Assembly Shaft
Front Hanger Bracket Assembly
Tap Screw,5/16-18, .750
Hex Head Screw,3/8-16, 1.00
Tap Screw,1/4-20, 0.750
Tap Screw,1/4-20, 1.250
Tap Screw,1/4-20 X .625
Ferrule, .50 X.50
Flange Lock Nut, 3/8-16
Flex Lock Nut, 1/2-13
Bow-Tie Cotter Pin,72
Bow-Tie Cotter Pin,91
Grip Handle, 1/2
Extension Spring, .85 OD X 5.915 LG
Flat Washer, .406 X .875 X .059
Shoulder Spacer, .625 ID X .169
Lift Link Rod
Deck Lift Rod
Spacer, .260 x .375 x 1.030 LG
Front Deck Mounting Bracket
47

Craftsman IViodel 247.290000
i 1
\6
i 2
LJ
48

Craftsman Model 247.290000
I
Ref.
I Part No.
1 710-04483
2 710-04683
3 710-05446
4 726-0205
5 731-1682A
6 946-04829
7 751-10349
8 751-3013
N_
Description
Tap Screw, 1/4-20, 0.500
Tap Screw, 3/8-16, 1.000
Tap Screw, 3/8-16, 2.250
Hose Clamp, .490 DIA.
Oil Drain Sleeve
Throttle/Choke Cable 31 Lg.
Low Permeation Fuel Line, 1/4
Fuel Filter, 1/4"
Engine (See breakdown)
Craftsman Model No. 4Pg0JUA
49

Craftsman Model 247.290000
22 'i ,lo
18
20 4
_\38
10
5O

Craftsman Model 247.290000
Ref, I
No,
1 918-04822A
2 683-04734
3 683-04782-0637
4 710-04484
5 710-04998
6 710-0514
7 710-0778
8 710-I026
9 710-1315
10 710-1652
II 712-04065
12 712-0417A
13 714-04040
14 720-04122
15 726-0201
16 731-07487
17 732-04948A
18 732-0814
19 936-0289
20 736-0362
21 736-0518
22 783-07342-0637
23 938-0347
Part No, Description
Spindle Pulley Assembly, 6.3 DIA
PTO Brake Assembly Bracket
Rear Deck Assembly Bracket
Tap Screw, 5/16-18, .750
Carriage Screw, 5/16-18, 1.00
Hex Head Screw, 3/8-16, 1.00
Tap Screw, 1/4-20, 1.500
Tap Screw, 1/4-20, 1.750
Tap Screw, 3/8-16, 1.250
Tap Screw, 1/4-20 X .625
Flange Lock Nut, 3/8-16
Flange Nut, 5/8-18
Bow-Tie Cotter Pin, 72
Wing Knob, 5/16-18
Speed Nut, .3125 ID
Deck Wash Nozzle
Ext. Spring, .708 X 7.357 X .094
Ext. Spring, .56 OD X 5.52 LG
Shoulder Bushing, .320 ID X .135
Flat Washer, .330x1.250x.060
Thrust Washer, .445X.1.920X.060
Deck Belt Cover
Shoulder Spacer, .625 ID X .169
Ref, I
No,
24 738-04162A
25 738-04278
26 942-04385
27 750-04456
28 750-0566A
29 954-04318
30 756-04224
31 783-07004
32 783-07146-0637
33 783-07184-0637
34 783-07204-0637
35 783-07304
36 783-07306
37 631-04633
38 738-04519
39 712-0417A
40 936-0351
41 738-1186A
42 941-0919A
43 750-04936
44 956-1227
45 946-04802
Part No, Description
Shoulder Spacer, .8840 X .190
Shoulder Spacer, 1/4-20, 0.50
Cutting Blade, 30.00" 3-1N-1
Spacer, .260 X .372 X 1.420 LG
Spacer, .260 x .375 x 1.030 LG
V-Type Belt, 5L, 45.15 LG
Flat Idler Pulley, 2.75 OD
Front Deck Bracket
Deck, 30" w/Nozzle
RR Deck Bracket, LH
Release Brake Bracket
Lower Floating Idler Bracket
Upper Floating Idler Bracket
Chute Deflector
Shoulder Screw, 1/4-15 x .750
Flange Nut, 5/8-18
Shim Washer, .760X1.500X.030
Spindle Shaft, 6.11 LG.
Ball Bearing, .7871D X 1.85 ODX.551
Spacer, .792 X 1.060 X 1.860 LG
Deck Pulley, 6.3 DIA
PTO Cable
51

Craftsman Engine Model 4P90JUA For Model 247.290000
120
]
0
1 126
127-_o_ 01128
130 _1 127
129
m
120
121
122
124
126
127
128
129
130
951-12255
712-04291
951-12255
951-12256
951-12260
712-04212
951-12328
951-12257
951-12258
D = " O
Air FilterCoverAssembly
Air FilterLockNut
Air FilterCover
SpongeFilter
Air FilterAssembly
NutM6
RubberCap
Manifold
ManifoldGasket
52

Craftsman Engine IViodel 4P90JUA For IViodel 247.290000
7
_2
m
1
2
3
4
5
6
7
192
751-12205
712-04290
750-05320
710-05304
951-11622
710-05305
951-12206
710-05303
D = O O
DebrisShield
Nut
EngineShroudSpacer
Starter/ShroudStudM6xlO0
FlexibleClamp
HookBolt
Air Shield
Self-TappingBolt5.5x25
53

Craftsman Engine IViodel 4P90JUA For IViodel 247.290000
197-GasketI{it-Complete
198-GasketI{it-External
199-CompleteEagiae
51--_
°__53
_47
I
178
189
1_5-U
_183
55
67
I
7O
54

Craftsman Engine IViodel 4P90JUA For IViodel 247.290000
m
47
48
49
5O
51
52
53
54
55
56
57
58
59
6O
62
63
64
65
66
67
68
951-11499
710-04916
751-12770
951-12226
951-12685
951-12227
951-12686
951-12228
951-12229
736-04558
714-04074
951-11574
951-12230
951-12231
951-12232
710-04908
712-04212
951-12233
710-04979
710-05310
951-12234
D = 0
UpperCrankshaftSeal
BoltM6x14
BreatherCoverPlate
BreatherGasket
UmbrellaValve
MeshScreen
UmbrellaValveSeat
ChokeLinkage
GovernorArmShaft
GovernorWasher
GovernorCotterPin
GovernorSeal
ThrottleLinkage
ThrottleLinkageSpring
GovernorArm
GovernorArmBolt
GovernorArmNutM6
GovernorSpring
BoltM6x18
BoltM6x38
ThrottleControlBracket
m
69
7O
72
73
m
74
178
183
184
185
186
189
197
198
199
750-05530
951-12235
951-12236
751-12200A
951-12237
951-12275
951-11953
951-12276
951-11954
951-12277
710-05319
951-12204
951-12201
952Z4P90JUA
m = 0
ComponentBracketSpacer
BreatherHoseAssembly
BreatherHoseClamp
ShortBlockAssembly
(Incl.37,47-53,55-58,73-77,84,
86-89,91-93,98-104,112,113,
115-119,137,138,144,160,172,
173,175-178,183-186)
CrankcaseCoverGasket
PistonRingSet
PistonPinSnapRing
Piston
PistonPin
ConnectingRodAssembly
ConnectingRodBolt
GasketKit- Complete
(Incl.47,50,58,74,113,118,
130,136-138,144,160,166)
GasketKit- External
(Inc1.113,130,136-138,144,160)
CompleteEngine(4PgOJUA)
55

Craftsman Engine Model 4P90JUA For Model 247.290000
151-_O
151-_O
197-GasketKit- Complete
198-GasketKit- External
199-CompleteEngine
152
1A_ 147 148 149
147 148 149
154 157
153 155 _
155 16_i_
163
150
142
142
145
163
@--142
173
175
174
175
174
162 (_
173
193--_)
I
194
I
OPTIONAL
140
141
I,--14o
_140
56

Craftsman Engine IViodel 4P90JUA For IViodel 247.290000
m
140
141
142
143
144
145
146
147
148
149
150
151
152
153
154
155
157
162
163
164
165
710-05315
951-12265
710-05316
951-12266
951-12267
951-11981
751-11124
751-11123
951-11966
710-04962
951-12268
951-12081
951-12080
951-12078
951-11964
951-12077
951-11337
951-10292
710-05317
710-05318
751-12778
D = O 0
BoltM5xlO
Cowl
ValveCoverBolt
ValveCover
ValveCoverRingGasket
RockerArmAssembly
Jam Nut
FulcrumNut
RockerArm
RockerArmStud
PushRodGuide
ExhaustValveAdjuster
ExhaustValveSpringRetainer
ValveSpring
intakeValveSeal
ValveSpringRetainer
ValveKit
SparkPlug/F6Rtc
BoltM10x1.25x85
Bolt/M10x1.25x65
CylinderHeadAsm
(Incl.137-139,144,146-157,
160,161,163-172)
m
165
166
167
168
169
170
171
172
173
174
175
176
177
193
194
196
197
198
199
951-12202
751-12774
751-12775
751-12776
751-12777
736-04629
710-05450
951-12273
715-04122
951-11335
951-11962
736-04561
951-12274
951-12329
710-05344
951-12197
951-12204
951-12201
952Z4P90JU
D = W O
CylinderHeadKit
(Inc1.144,156,163,164,166)
Air ValveCore
StrainerClip
Strainer
TheAirValveBonnet
Washer
ScrewM5x12
CylinderHeadGasket
CylinderHeadDowel12x16
PushRodKit
Tappet
CamshaftThrustWasher
CamshaftAssembly
SparkArrestor
SparkArrestorScrew
ValveCoverKit
GasketKit- Complete
(Incl.47,50,58,74,113,118,
130,136-138,144,160,166)
GasketKit- External
(Inc1.113,130,136-138,144,160)
CompleteEngine
57

Craftsman Engine Model 4P90JUA For Model 247.290000
79_ -8{
82_ 3
76--_
--75
_----91
_---93
104
84--_
116
117
114
58

Craftsman Engine IViodel 4P90JUA For IViodel 247.290000
m
5
75
76
77
79
8O
81
82
83
84
85
86
87
88
89
9O
91
92
93
951-11622
951-12238
951-11969
951-10307
951-12239
951-12241
951-12363
951-12240
710-04980
710-05311
951-12242
715-04121
951-12243
951-12244
710-05312
736-04557
951-12245
751-12246
736-04559
D = O O
FlexibleClamp
CrankshaftAssembly
MainBearing
WoodruffKey
DipstickAssembly
UpperO-Ring
LowerO-Ring
Oil FillTubeAssembly
BoltM6x35
Oil DrainPlug
Regulator
DowelPin8x14
Ball6.35
Spring
Bolt
CrankshaftThrustWasher
BalanceableShaftBearing
BalanceableShaftAssembly
BalanceableThrustWasher
m
98
99
1CO
101
102
103
104
112
113
114
115
116
117
118
119
195
951-12248
951-12247
951-12249
951-12250
951-12251
951-12252
951-11956
710-05313
736-04560
951-12690
951-12253
951-12254
951-12318
710-04982
951-11375
710-05314
951-12194
D = O O
OilPumpAssembly
O-Ring10x2.65
Filter
FilterSpring
O-Ring35.5x2.65
FilterCover
GovernorGear/ShaftAssembly
BoltM8x15
OilDrainPlugWasher
Oil Filter
ScrewJoint
CrankcaseCover
CrankcaseCoverAsm
(Incl.87-89,100-104,112,113,115,116)
BoltM8x54
LowerCrankshaftSeal
BoltM8x43
OilDrainPlugAssembly
59

Craftsman Engine Model 4P90JUA For Model 247.290000
134
134
137
139139 138
200-CarburetorI(it- Major
--133
F A
o _ __
BB
CC
6O

Craftsman Engine Model 4P90JUA For Model 247.290000
m
131
132
133
134
136
137
138
139
200
A
B
C
D
E
F
G
H
I
J
K
951-12823
951-11731
951-11336
723-04071
951-12261
951-12262
951-12263
951-12264
751-12779
m = I! O
CarburetorAssembly
FuelHoseClamp
FuelLineKit
PlasticSupportClamp
CarburetorGasket
CarburetorInsulator
CarburetorInsulatorGasket
CarbStud
CarburetorKit- Major
n/a
n/a
n/a
n/a
n/a
n/a
n/a
n/a
n/a
n/a
n/a
(Inck130,136,B,BB,CC,DD,G,
M,N,U,W,Y,Z)
ChokeShaft
FiberO-Ring
ChokeReturnSpring
FlatSteelWasher
ChokePlate
Idle,JetAssembly
IdleJet O-Ring
SheetmetalHousing
ThrottleShaft
ThrottlePlate
ScrewM3x5
L
M
N
0
P
Q
R
S
T
U
V
W
X
Y
Z
AA
BB
CC
DD
EE
GG
HH
n/a
n/a
n/a
n/a
n/a
n/a
n/a
n/a
n/a
n/a
n/a
n/a
n/a
951-12304
751-12772
751-12773
n/a
951-11349
710-04938
710-05449
736-04554
710-05337
D = I! O
LockWasher
Nylon/PlasticO-Ring
FiberO-Ring
IdleSpeedAdjustingScrew
IdleMixtureScrew
CarburetorBody
FuelInlet
FloatPin
EmulsionTube
NeedleValve
MainJet
NeedleValveSpring
Float
FuelBowlO-Ring
Seat/FuelBowlBoltO-Ring
SolenoidValveAssembly
FuelBowl
FuelDrainPlugGasket
FuelDrainPlug
Seat!FuelBowlBolt
Washer
ScrewM5x12
61

Craftsman Engine Model 4P90JUA For Model 247.290000
190--
48
161
161
m
48
158
159
160
161
161
190
191
710-04916
712-04219
951-12270
951-12271
951-12272
951-12196
951-12278
710-05051
D = O O
BoltM6x14
NutM8
MufflerAssembly
ExhaustPipeGasket
MuffStudM8x47
MufflerStudAssembly
WireMeshShield
BoltM6x12
62

Craftsman Engine Model 4P90JUA For Model 247.290000
8
9
I
23
24--W \_
25---+
24
I
25
10
11--o | o--ll
--16
_--17
37
37
m
8
9
10
11
12
13
14
15
16
17
18
19
21
710-05306
951-12207
710-05307
736-04554
736-04556
I = O
BoltM8x40
StarterAssembly
ScrewM5x25
LockWasher5
PlainWasher6
951-12208
951-12211
951-12210
951-12312
951-12209
951-12212
951-12214
951-12216
ElectricalStarterFrontCover
Bearing
Pinion/ClutchAssembly
Gear
Bearing
PinionCover
Bearing6001Zz
Bearing
m
23
24
25
28
29
30
31
33
34
35
36
37
951-12528
951-12217
736-04554
951-12529
951-12219
710-05308
951-12324
736-04555
736-04556
736-04477
712-04212
715-04120
m = O O
StarterHousingAssembly
Screw
LockWasher
Brush Assembly
ElectricalStarterBackCover
BoltM6xl00
BoltM6x30Assembly
InsulationWasher
PlainWasher6
LockWasher6
NutM6
DowelPin 10x14
G3

Craftsman Engine IViodel 4P90JUA For IViodel 247.290000
38
m43
38-
45
m
38
39
4O
41
42
43
44
45
46
710-04920
951-12220
712-04220
951-12221
751-12222A
951-12223
951-12224
710-04940
951-12279
D = O O
BoltM6x28
IgnitionCoilAssembly
FlywheelNutM16x1.5
FanMountingPlate
CoolingFan
Flywheel
CoilAssy.Charge
BoltM6xlO
Cowl
64

Look For Relevant Emissions Durability Period and
Air index information On Your Engine Emissions Label
Engines that are certified to meet the California Air Resources Board (CARB) Tier 2 Emission Standards must
display information regarding the Emissions Durability Period and the Air Index. Sears Brands Management
Corporation makes this information available to the consumer on our emission labels.
The Emissions Durability Period describes the number of hours of actual running time for which the engine is
certified to be emissions compliant, assuming proper maintenance in accordance with the Operating & Mainte-
nance Instructions. The following categories are used:
Moderate: Engine is certified to be emission compliant for 125 hours of actual engine running time.
Intermediate: Engine is certified to be emission compliant for 250 hours of actual engine running time.
Extended: Engine is certified to be emission compliant for 500 hours of actual engine running time.
For example, a typical walk-behind lawn mower is used 20 to 25 hours per year. Therefore, the Emissions
Durability Period of an engine with an intermediate rating would equate to 10 to 12 years.
The Air index is a calculated number describing the relative level of emissions for a specific engine family. The
lower the Air Index, the cleaner the engine. This information is displayed in graphical form on the emissions label.
After July 1,2000, Look For Emissions Compliance Period
On Engine Emissions Compliance Label
After July 1, 2000 certain Sears Brands Management Corporation engines will be certified to meet the United
States Environmental Protection Agency (USEPA) Phase 2 emission standards. For Phase 2 certified engines, the
Emissions Compliance Period referred to on the Emissions Compliance label indicates the number of operating
hours for which the engine has been shown to meet Federal emission requirements.
For engines less than 225 cc displacement, Category C = 125 hours, B = 250 hours and A = 500 hours.
For engines of 225 cc or more, Category C = 250 hours, B = 500 hours and A = 1000 hours.
This isa generic representation of the emission label typically found on a certified engine.
FAMILYYBSXS.3192VA 274812
GDOC-100182Rev.B
56

(Thispageapplicableinthe U.S.A.and Canadaonly.)
Sears Brands Management Corporation (Sears), the California Air Resources Board (CARD)
and the United States Environmental Protection Agency (U.S. EPA)
Emission Control System Warranty Statement (Owner's Defect Warranty Rights and Obligations)
EMISSIONCONTROLWARRANTYCOVERAGEISAPPLICABLETOCERTI-
FIEDENGINESPURCHASEDINCALIFORNIAIN1995ANDTHEREAF-
TER,WHICHAREUSEDINCALIFORNIA,ANDTOCERTIFIEDMODEL
California and United States Emission
TheCaliforniaAirResourcesBoard(CARD),U.S.EPAand Searsarepleased
toexplainthe EmissionControlSystemWarrantyonyourmodelyear2000and
latersmalloff-roadengine(SORE).InCalifornia,newsmalloff-roadengines
mustbedesigned,builtand equippedto meettheState'sstringentanti-smog
standards.Elsewherein theUnitedStates,newnon-road,spark-ignition
enginescertifiedformodelyear1997and latermustmeetsimilarstandardsset
forthbythe U.S.EPA.Searsmustwarranttheemissioncontrolsystemonyour
YEAR1997ANDLATERENGINESWHICHAREPURCHASEDANDUSED
ELSEWHEREINTHEUNITEDSTATES(ANDAFTERJANUARY1,2001 IN
CANADA).
Control Defects Warranty Statement
enginefortheperiodsoftime listedbelow,providedtherehasbeennoabuse,
neglector impropermaintenanceofyoursmalloff-roadengine.Youremis-
sioncontrolsystemincludespartssuchasthecarburetor,aircleaner,ignition
system,mufflerandcatalyticconverter.Alsoincludedmaybeconnectorsand
otheremissionrelatedassemblies.Whereawarrantableconditionexists,Sears
will repairyoursmalloff-roadengineatnocostto youincludingdiagnosis,parts
andlabor.
Sears Emission Control Defects Warranty Coverage
Smalloff-roadenginesarewarrantedrelativeto emissioncontrolpartsdefects
fora periodofone year,subjecttoprovisionssetforthbelow.Ifanycovered
Owner's Warranty
Asthe smalloff-roadengineowner,youareresponsiblefor theperformanceof
therequiredmaintenancelistedinyourOperatingand MaintenanceInstruc-
tions.Searsrecommendsthatyouretainallyourreceiptscoveringmaintenance
onyoursmalloff-roadengine,butSearscannotdenywarrantysolelyforthe
lackofreceiptsorfor yourfailuretoensuretheperformanceof allscheduled
maintenance.As the smalloff-roadengineowner,youshouldhoweverbe
awarethat Searsmaydenyyouwarrantycoverageifyoursmalloff-roadengine
ora parthasfaileddueto abuse,neglect,impropermaintenanceor unap-
parton yourengineis defective,the partwillbe repairedorreplacedbySears.
Responsibilities
provedmodifications.Youareresponsibleforpresentingyoursmalloff-road
engineto anAuthorizedSearsServiceDealerassoonas aproblemexists.The
undisputedwarrantyrepairsshouldbecompletedinareasonableamountof
time,notto exceed30days.Ifyouhaveanyquestionsregardingyourwarranty
rightsand responsibilities,youshouldcontactaSearsServiceRepresentative
at 1-800-469-4663.Theemissionwarrantyisa defectswarranty.Defectsare
judgedonnormalengineperformance.Thewarrantyis notrelatedtoan in-use
emissiontest.
Sears Emission Control Defects Warranty Provisions
ThefollowingarespecificprovisionsrelativetoyourEmissionControlDefectsWarrantyCoverage.ItisinadditiontotheSearsenginewarrantyfornon-regulated
enginesfoundin theOperatingand MaintenanceInstructions.
1. WarrantedParts
Coverageunderthiswarrantyextendsonlytothe partslistedbelow(the
emissioncontrolsystemsparts)tothe extentthesepartswerepresenton
theenginepurchased.
a. FuelMeteringSystem
• Coldstartenrichmentsystem
• Carburetorandinternalparts
• FuelPump
b. AirlnductionSystem
• Aircleaner
• Intakemanifold
c. IgnitionSystem
• Sparkplug(s)
• Magnetoignitionsystem
d. CatalystSystem
• Catalyticconverter
• Exhaustmanifold
• Air injectionsystemor pulsevalve
e. MiscellaneousItemsUsedin AboveSystems
• Vacuum,temperature,position,timesensitivevalves
andswitches
• Connectorsandassemblies
2. LengthofCoverage
Searswarrantstothe initialownerandeachsubsequentpurchaserthat
theWarrantedPartsshallbefreefromdefectsin materialsandworkman-
shipwhichcausedthefailureofthe WarrantedPartsfor aperiodofone
yearfromthe datetheengineis deliveredtoa retailpurchaser.
3. NoCharge
Repairor replacementof anyWarrantedPartwill beperformedat no
chargetothe owner,includingdiagnosticlaborwhichleadstothe
determinationthataWarrantedPartisdefective,ifthe diagnosticworkis
performedatanAuthorizedSearsServiceDealer.Foremissionswarranty
servicecontactyournearestAuthorizedSearsServiceDealeraslistedin
the "YellowPages"under"Engines,Gasoline,""GasolineEngines,""Lawn
Mowers,"orsimilarcategory.
4. Claimsand CoverageExclusions
Warrantyclaimsshallbefiledin accordancewiththe provisionsofthe
SearsEngineWarrantyPolicy.Warrantycoverageshallbeexcludedfor
failuresof WarrantedPartswhicharenotoriginalSearspartsorbecause
ofabuse,neglector impropermaintenanceassetforth inthe Sears
EngineWarrantyPolicy.Searsisnotliableto coverfailuresof Warranted
Partscausedbytheuseof add-on,non-original,or modifiedparts.
5. Maintenance
AnyWarrantedPartwhichis notscheduledforreplacementas required
maintenanceor whichis scheduledonlyfor regularinspectiontothe effect
of"repairor replaceasnecessary"shallbe warrantedastodefectsfor the
warrantyperiod.AnyWarrantedPartwhichisscheduledfor replacement
asrequiredmaintenanceshallbewarrantedas todefectsonlyforthe
periodoftime uptothe firstscheduledreplacementfor that part.Any
replacementpartthat isequivalentinperformanceand durabilitymay
beusedin the performanceofanymaintenanceor repairs.Theowneris
responsibleforthe performanceof all requiredmaintenance,as definedin
the SearsOperatingandMaintenanceInstructions.
6. ConsequentialCoverage
Coveragehereundershallextendtothefailureofanyenginecomponents
causedbythe failureofanyWarrantedPartstillunderwarranty.
Inthe USAandCanada,a 24hourhotline,1-800-469-4663,hasamenuofpre-recordedmessagesofferingyouenginemaintenanceinformation.
GDOC-100188Rev.B
57

FEDERALand/or CALIFORNIAEMISSIONCONTROLWARRANTYSTATEMENT
YOURWARRANTYRIGHTSANDOBLIGATIONS
MTD Consumer Group Inc, the United States Environmental Protection Agency (EPA), and, for those products certified for sale in the state of
California, the California Air Resources Board (CARB) are pleased to explain the emission (evaporative and/or exhaust) control system (ECS)
warranty on your outdoor 2006 and later small off-road spark-ignited engine and equipment (outdoor equipment engine) In California, new
outdoor equipment engines must be designed, built and equipped to meet the State's stringent anti-smog standards (in other states, 1997 and
later model year equipment must be designed, built, and equipped to meet the U.S. EPAsmall off-road, spark ignition engine regulations. MTD
Consumer Group Inc must warrant the ECSon your outdoor equipment engine for the period of time listed below provided there has been no
abuse, neglect or improper maintenance of outdoor equipment engine.
Your ECS may include parts such as the carburetor, fuel-injection system, the ignition system, catalytic converter, fuel tanks, fuel lines, fuel caps,
valves, canisters, filters, vapor hoses, clamps, connectors, and other associated emission-related components.
Where a warrantable condition exists, MTD Consumer Group Inc will repair your outdoor equipment engine at no cost to you including
diagnosis, parts and labor.
MANUFACTURER'SWARRANTYCOVERAGE:
This emission control system is warranted for two years. If any emission-related part on your outdoor equipment engine is defective, the part
will be repaired or replaced by MTD CONSUMER GROUP INC.
OWNER'SWARRANTYRESPONSIBILITIES:
As the outdoor equipment engine owner, you are responsible for performance of the required maintenance listed in your owner's manual. MTD
Consumer Group Inc recommends that you retain all receipts covering maintenance on your outdoor equipment engine, but MTD Consumer
Group Inc cannot deny warranty solely for the lack of receipts.
As the outdoor equipment engine owner, you should however be aware that MTD Consumer Group Inc may deny you warranty coverage if
your outdoor equipment engine or a part has failed due to abuse, neglect, or improper maintenance or unapproved modifications.
You are responsible for presenting your outdoor equipment engine to MTD Consumer Group Inc's distribution center or service center as soon
as the problem exists. The warranty repairs should be completed in a reasonable amount of time, not to exceed 30 days. If you have a question
regarding your warranty coverage, you should contact the MTD Consumer Group Inc Service Department at 1-800-800-7310 or via email at
http://su pport.mtd prod ucts.com
GENERALEMISSIONSWARRANTYCOVERAGE:
MTD Consumer Group Inc warrants to the ultimate purchaser and each subsequent purchaser that the outdoor equipment engine is: Designed,
built and equipped so as to conform with all applicable regulations; and free from defects in materials and workmanship that cause the failure
of a warranted part to be identical in all material respects to that part as described in MTD Consumer Group Inc's application for certification.
The warranty period begins on the date the outdoor equipment engine is delivered to an ultimate purchaser or first placed into service. The
warranty period is two years.
Subject to certain conditions and exclusions as stated below, the warranty on emission-related parts is as follows:
1. Any warranted part that is not scheduled for replacement as required maintenance in the written instructions supplied, is warranted for
the warranty period stated above. If the part fails during the period of warranty coverage, the part will be repaired or replaced by MTD
Consumer Group Inc according to subsection (4) below. Any such part repaired or replaced under warranty will be warranted for the
remainder of the period.
2. Any warranted part that is scheduled only for regular inspection in the written instructions supplied is warranted for the warranty period
stated above. Any such part repaired or replaced under warranty will be warranted for the remaining warranty period.
3. Any warranted part that is scheduled for replacement as required maintenance in the written instructions supplied is warranted for the
period of time before the first scheduled replacement date for that part. If the part fails before the first scheduled replacement, the part
will be repaired or replaced by MTD Consumer Group Inc according to subsection (4) below. Any such part repaired or replaced under
warranty will be warranted for the remainder of the period prior to the first scheduled replacement point for the part.
Repair or replacement of any warranted part under the warranty provisions herein must be performed at a warranty station at no charge
to the owner.
4.
5. Notwithstanding the provisions herein, warranty services or repairs will be provided at all of our distribution centers that are franchised to
service the subject engines or equipment.
6. The outdoor equipment engine owner will not be charged for diagnostic labor that is directly associated with diagnosis of a defective,
emission-related warranted part, provided that such diagnostic work is performed at a warranty station.
7. MTD Consumer Group Inc is liable for damages to other engine or equipment components proximately caused by a failure under
warranty of any warranted part.
8. Throughout the off-road engine and equipment warranty period stated above, MTD Consumer Group Inc will maintain a supply of
warranted parts sufficient to meet the expected demand for such parts.
9. Any replacement part may be used in the performance of any warranty maintenance or repairs and must be provided without charge to
the owner. Such use will not reduce the warranty obligations of MTD Consumer Group Inc.

10. Add-onormodifiedpartsthatarenotexemptedbytheAirResourcesBoardmaynotbeused.Theuseofanynon-exemptedadd-onor
modifiedpartsbytheultimatepurchaserwillbegroundsfordisallowingawarrantyclaims.MTDConsumerGroupIncwillnotbeliableto
warrantfailuresofwarrantedpartscausedbytheuseofanon-exemptedadd-onormodifiedpart.
WARRANTEDPARTS:
The repair or replacement of any warra nted part otherwise eligible for warranty coverage may be excluded from such warranty coverage if
MTD Consumer Group Inc demonstrates that the outdoor equipment engine has been abused, neglected, or improperly maintained, and that
such abuse, neglect, or improper maintenance was the direct cause of the need for repair or replacement of the part. That notwithstanding,
any adjustment of a component that has a factory installed, and properly operating, adjustment limiting device is still eligible for wa rranty
coverage. Further, the coverage under this warranty extends only to parts that were present on the off-road engine and equipment purchased.
The following emission warranty parts are covered (if applicable):
1. Fuel Metering System
Cold start enrichment system (soft choke)
Carburetor and internal parts (or fuel injection system)
Fuel pump
Fuel tank
2. Air Induction System
Air cleaner
Intake manifold
3. Ignition System
Spark plug(s)
Magneto ignition system
4. Exhaust System
Catalytic converter
SAI (Reed valve)
5. Miscellaneous Items Used in Above System
Vacuum, temperature, position, time sensitive valves and switches
Connectors and assemblies
6. Evaporative Control
Fuel hose
Fuel hose clamps
Tethered fuel cap
Carbon canister
• Vapor lines
GDOG100223Rev.A

Congratulations on making a smart purchase. Your new Craftsman® product is designed and
manufactured for years of dependable operation. But like all products, it may require repair
from time to time. That's when having a Repair Protection Agreement can save you money and
aggravation.
Here's what the Repair Protection Agreement* includes:
[] Expert service by our 10,000 professional repair specialists
[] Unlimited service and no charge for parts and labor on all covered repairs
[] Product replacement up to $1500 if your covered product can't be fixed
[] Discount of 25% from regular price of service and related installed parts not covered by the
agreement; also, 25% off regular price of preventive maintenance check
[] Fast help by phone - we call it Rapid Resolution - phone support from a Sears representative.
Think of us as a "talking owner's manual."
Once you purchase the Repair Protection Agreement, a simple phone call is all that it takes for you
to schedule service. You can call anytime day or night, or schedule a service appointment online.
The Repair Protection Agreement is a risk-free purchase. If you cancel for any reason during the
product warranty period, we will provide a full refund. Or, a prorated refund anytime after the
product warranty period expires. Purchase your Repair Protection Agreement today!
Some limitations and exclusions apply. For prices and additional information in the U.S.A.
call 1=800=827=6655.
*Coverage in Canada varies on some items. For full details call Sears Canada at 1=800=361=
6665.
Sears Installation Service
For Sears professional installation of home appliances, garage door openers, water heaters, and
other major home items, in the U.S.A. or Canada call 1=800=4=MY=HOME®.
60

Operaci6n segura Pr,_cticas .......... Paginas 71
Asamblea ........................... Page 78
Operaci6n de ...................... Paginas 84
De Servicio y Mantenimiento de ....... Paginas 90
Fuera de temporada de almacenamiento . Page 101
Soluci6n de problemas ............... Page 102
Lista de piezas ..................... Paginas 36
Reparaci6n de Acuerdo de Protecci6n ... Page 107
Servicio de nOmeros ............ atrasados Page
CRAFTSMAN GARANTiA TOTAL
PORDOSANOSdesdelafechadecornpra,todaslaspartesdenofungiblesdeesteequipodeequitaci6nestangarantizadascontracualquierdefectode
materialornanodeobra.Unapartenofungiblesdefectuosarecibir_a dornicilioreparacbno lasustituci6nsilareparaci6nnoest_disponible.
GARANT{ALIMITADAADIClONAL
Entodaslasgarantiasadicionales,noseincluyeelcostodemanodeobraparainstalarlapiezaderecambiolibredespuesdelsegundoa_odesdelafechadecompra.
DURANTEcincoa_osdesdelafechadecompra,elmarcodeesteequipodeconducci6nest_garantizadocontracualquierdefectodematerialomanodeobra.Un
marcodefectuosorecibir_reemplazoadomiciliogratuito.
DURANTEdieza_osdesdelafechadecompra,elejedelanterodeesteequipodeconducci6nest_garantizadocontracualquierdefectodematerialomanodeobra.
Unejedelanterodefectuosorecibir_reemplazoadomiciliogratuito.
POR90diasdesdelafechadecompra,labateria(unapiezaconsumible)deesteequipodeconducci6nest_garantizadacontracualquierdefectodematerialomano
deobra(nuestrapruebademuestraquenopresentar_unacarga).Unabateriadefectuosarecibir_reemplazoadomiciliogratuito.
PARAmientrasesutilizadopotelpropietariooriginaldespuesdeldecimoa_odelafechadecompra,elejehierrofundidofrontal(siest_equipado)deesteequipo
deconducci6nest_garantizadocontracualquierdefectodematerialomanodeobra.Concomprobantedecompra,unejedelanterodefundici6ndefectuosarecibir_
reemplazoadomiciliogratuito. GARANT{ADESERVlClO
Paradetallesdelacoberturadegaranfiaobtenerlareparaci6no reernplazo,Ilarneal1-800-659-5917o visiteelsitioweb:www.Craftsman.corn
Entodosloscasos,sisepartedelareparacbno reernplazoesirnposible,elequipodeequitaci6nsereernplazar_gratuitarnenteconelrnisrnooequivalente.
Todoslosdelaanteriorgarantiaesnulasiseutilizaesteequipodeconducci6nrnientrasqueproporcionaservicioscornercialesoSialquilaaotrapersona.
EstagarantiacubrelosdefectosSOLOde materialesy fabricaci6n.Lagarantfanoincluye:
• Piezasfungibles(exceptola bateria)quepuedengastarseporel usonormaldentrodelperiododegaranfia,incluyendoperonolirnitadoa
cuchillas,bujias,filtrosdeaire,correasy filtrosdeaceite.
• Serviciode rnantenirniento,carnbiosde aceiteo puestasapunto.
• Neurn_.ticoreernplazoo reparaci6ncausadasporpinchazosde objetosexternos,talescornoclavos,espinas,toconeso vidrio.
• Neurn_.ticoo ruedade repuestoo reparaci6nresultantesdeldesgastenormal,accidente,o funcionarnientoincorrectoo mantenirniento.
• Reparacionesnecesariasdebidoa abusodeloperador,incluyendoperonolirnitadoada_oscausadosporobjetosrn_.sall_.de la capacidad
de losequiposdeconducci6nde rernolque,afectarobjetosquedoblanelmarco,eleje o elcig(Je_alo over-speedingelmotor.
• Reparacionesnecesariasdebidoa la negligenciadeloperador,incluyendoperono lirnitadoa, el_ctricasy rnec_nicasda_oscausados
porel alrnacenarnientoinadecuado,no usarelgradoadecuadoyla cantidadde aceitede motor,nornantenerla cubiertalibrede residuos
infiarnables,ofaltade rnantenirnientodelequipode equitaci6nsegQnlasinstruccionescontenidasenel manualdeloperador.
• Lirnpiezadel motor(sisternadecombustible)o reparacionescausadosporcombustibledeterrninadoestarcontarninadosuoxidan(obsole-
tos).Engeneral,elcombustibledebeutilizarsedentrode30 dfasde lafechadecornpra.
• Normaldeterioroydesgastedelosacabadosexteriores,o productode reernplazola etiqueta.
• deterioroydesgastenormaldelosacabadosexteriores,o reernplazodela etiquetadel producto.
Estagaranfialeotorgaderechoslegalesespecificos,yustedtarnbi_npuedetenetotrosderechosquevariandeestadoaestado.
SearsBrandsManagementCorporation,HoffmanEstates,IL60179
Aceitedel motor: SAE30
Combustible: Gasolinasinplorno
Bujia: F6RTC(951-10292)
N_mero de rnodelo ..........................................................
N_mero de sede..............................................................
Fechade compra .............................................................
RegistrearribaelnQmerodelmodelo,elnQmerodeserieylafechadecompra
©SearsBrands,LLC
70

Lapresenciadeeste sirnboloindicaquesetratade instrucciones
irnportantesde seguridadquesedebenrespetarparaevitar
ponerenpeligrosuseguridadpersonaly/o materialy lade otras
personas.Leaysigatodaslasinstruccionesdeestemanualantes
de poneren funcionarnientoestarn_.quina.Si no respetaestas
instruccionespodriaprovocarlesionespersonales.Cuandoveaeste
sirnbolo,ipresteatenci6na la advertencia!
PROPOSICION 65 DE CALIFORNIA
Elescapedel motordeesteproducto,algunosde suscornponentes
y algunoscornponentesdelvehiculocontieneno liberansustancias
quirnicasqueelestadodeCaliforniaconsideraque puedenproducir
c_.ncer,defectosde nacirnientouotrosproblernasreproductivos.
Losbornesdela bateriay losaccesoriosalinescontienenplornoy
cornpuestosde plorno,sustanciasquirnicasque seg_nIoestableci-
do porel Estadode Californiacausanc_.ncery da_osenel sisterna
reproductivo.Ldveselasmanos despu_sde estaren contacto
con estoscomponentes.
Estarn_.quinarueconstruidaparaseroperadadeacuerdocon
lasreglasdeseguridadcontenidasenestemanual.AIigualque
concualquiertipodeequipornotorizado,undescuidoo errorpor
partedeloperadorpuedeproducirlesionesgraves.Estarn_.quina
escapazde arnputarrnanosy piesy dearrojarobjetoscongran
fuerza.Deno respetarlasinstruccionesde seguridadsiguientesse
puedenproducirlesionesgraveso larnuerte.
Su responsabilidad--Restrinja el usode estarn_.quina
rnotorizadaalas personasque lean,cornprendany respetenlas
advertenciase instruccionesqueaparecenenestemanualyen la
rn_.quina.
iGUARDEESTASINSTRUCCIONES!
FUNCIONAMIENTO GENERAL
• Lea,entiendaycurnplatodaslasinstruccionesincluidasen
la rn_.quinayen losrnanualesantesdernontarlay utilizarla.
Guardeestemanualenun lugarseguroparaconsultasfuturasy
peri6dicas,asi cornoparasolicitarrepuestos.
• Farniliaricesecontodosloscontrolesyconel usoadecuado
delosrnisrnos.Sepac6rnodetenerlarn_.quinaydesactivarlos
controlesr_.pidarnente.
• Noperrnitanuncaque losni_osrnenoresde 14a_osutilicen
estarn_.quina.Losni_osde 14a_osen adelantedebenleery
entenderlasinstruccionesdeoperaci6ny norrnasdeseguridad
contenidaseneste manual,yen la rn_.quinay debenser
entrenadosy supervisadospor unadulto.
• Nuncaperrnitaquelosadultosoperenestarn_.quinasinrecibir
antesla instrucci6napropiada.
• Paraayudaraevitarel contactoconlascuchillaso unalesi6npor
algQnobjetoqueseaarrojado,rnantengaa losobservadores,a
losayudantes,ni_osy rnascotasalejadosal rnenos25 metrosde
la rn_.quinarnientrasest,.en funcionarniento.Detengala rn_.quina
sialguienentraen lazona.
• Inspeccionerninuciosarnenteel Areadondeutilizar_,el equipo.
Retiretodaslaspiedras,palos,cables,huesos,juguetesy otros
objetosextra_osquepodrianserrecogidosyarrojadospor la
acci6nde lascuchillas.Losobjetosarrojadosporlarn_.quina
puedenproducirlesionesgraves.
• Planifiqueel patr6ndecortedelc_spedque hade seguirpara
evitarla descargade materialhacialoscarninos,lasveredas,los
observadores,etc.Eviteadern_.sdescargarmaterialcontralas
paredesyobstruccionesquepodrianprovocarqueel material
descargadorebotecontrael operador.
• Paraprotegerselosojosutilicesiernpreanteojoso antiparras
deseguridadrnientrasoperalarn_.quinao rnientraslaajusta
o repara.Losobjetosarrojadosque rebotanpuedenproducir
lesionesocularesgraves.
• Utilicezapatosde trabajoresistentes,desuelafuerte,asicorno
pantalonesycarnisasajustados.Lasprendassueltaso las
alhajaspuedenquedaratrapadasenlaspiezasrnovibles.Nunca
operela rn_.quinadescalzooconsandalias.
• Est_atentoa lacortadoraya la direcci6nde la descargade
losaditarnentosy noapuntea nadie.Nuncaoperelacortadora
de c_spedsinqueest_nen sulugarapropiadolacubiertade
descargao elcolectorde recortesdecesped.
• Nopongalasrnanoso lospiescercade laspiezasrotatoriaso
debajode la plataforrnadecorte.Elcontactoconlascuchillas
puedeproducirla arnputaci6ndernanosy pies.
• Unacubiertade descargafaltanteo da_adapuedeprovocarel
contactoconlacuchillao lesionespotobjetosarrojados.
• Detengala(s)cuchilla(s)cuandoatraviesesenderos,sendaso
carninosde gravaycuandonoest_cortandoel cesped.
• Vigileel tr_.nsitovehicularcuandoest_operandocercadeo en
crucesde carninos.Estarn_.quinanodebeutilizarseen lavia
pQblica.
• Noopereestarn_.quinabajolosefectosdelalcoholode drogas.
• Corteel cespedsolarnenteconluzdediao conunabuenaluz
artificial.
• Nuncatransportepasajeros.
• Desenganchela(s)cuchilla(s)antesdecolocarlarnarchaatr_.s.
Retrocedalentarnente.Siernpremirehaciaabajoy haciaatr_.santes
y rnientrasretrocede,paraevitaraccidentes.
• Reduzcala velocidadantesdedarlavuelta.Operelarn_.quina
suavernente.Evitelaoperaci6nerr_.ticayla velocidadexcesiva.
• Desenganchela(s)cuchilla(s),coloqueelfrenodeestaciona-
rniento,detengaelmotoryesperehastaquela(s)cuchilla(s)se
detenga(n)porcornpletoantesderetirarelcolectordec_sped,
vaciarlosrecortes,destaparelcanal,retirarrestosde cespedo
desechos,o hacercualquierajuste.
71

• Nuncadejelarn_.quinaen funcionarnientosinvigilancia.Apague
siernprelascuchillas,coloqueelfrenodernano,detengaelmotory
retirelaIlaveantesdebajarsedelvehiculo.
• Tengasurnocuidadoalcargarodescargarlarn_.quinaen un
rernolqueocarni6n.Estaunidadnodebeconducirseenascensoo
descensoderarnpas,porquepodrialadearseyprovocarlesiones
personalesgraves.Enlasrarnpaslarn_.quinasedebeernpujar
rnanualrnenteparacargarlao descargarlacorrectarnente.
• Elsilenciadoryel motorsecalientanypuedencausarquernaduras.
Nolostoque.
• Reviseel espaciolibrepotencirnade lacabezaantesdeconducir
bajolasrarnasbajasde_.rboles,cables,cerrarnientosde puertas,
etc.enloscualeseloperadorpodriaatorarseo serernpujadofuera
dela rn_.quina,Ioquepodriaresultaren lesionesgraves.
• Desenganchetodoslosernbraguesdelosaccesoriosy presione
totalrnenteel pedaldelfrenoantesdeintentararrancarel motor.
• Larn_.quinaest,.diseSadaparacortarc_spedresidencialnormal,
conunaalturanomayora 10".Nointentecortarcespeddernasiado
crecido,seco(porej.,pastura)nipilasdehojassecas.Elc_sped
ylashojassecaspuedenentraren contactoconel escapedel
motory/o acurnularseenla plataforrnade lacortadoradecesped,
convirti_ndoseen unpeligrodeincendio
• Utilicesolarnenteaccesoriosyaditarnentosaprobadosparaesta
rn_.quinapotelfabricantedelarnisrna.Lea,cornprendaysiga
todaslasinstruccionesproporcionadasconlosaccesorioso
aditarnentosaprobados.Paraobtenerunalistadelosaccesorios
aprobadosy losarchivosadjuntos,Ilarne1-800-659-5917.
• Losdatosestadsticosrnuestranquelosoperadoresde60 aSos
yrnayoresseven involucradosenunaltoporcentajedelesiones
relacionadascontractorescortacesped.Estosoperadoresdeben
evaluarsucapacidadparaoperarel tractorcortac_spedenforrna
suficienternenteseguraparaprotegersea ellosrnisrnosy alos
dern_.scontralesionesgraves.
Si sepresentansituacionesqueno est_.nprevistasen este
manualseacuidadosoyuseel sentidocornOn.
FUNCIONAiVIIENTO EN PENDIENTES
Laspendientessonunfactorirnportanterelacionadoconaccidentes
porderrapeyvuelcosquepuedenproducirlesionesgravese incluso
la rnuerte.Laoperaci6nen pendientesrequieremayorprecauci6n.
Si nopuederetrocederen la pendienteo sino sesienteseguro,no
realiceningunaoperaci6ndecorte.
Parasuseguridad,useel indicadordependientesqueseincluye
cornopartede estemanualpararnedirla pendienteantesdeoperarla
rn_.quinaenunazonainclinada.Sila pendientees mayorde 12grados
segOnel rnedidor,noopereestarn_.quinaenesesector,puespodria
causarlesionesgraves.
HagaIosiguiente:
• Podehaciaarribayabajodelaspendientes,nodeforrnatrans-
versal.Tengacuidadocuandocarnbiededirecci6nal operaren
pendiente.
• Est_atentoa loshoyos,surcos,baches,rocas,uotrosobjetos
ocultos.Elterrenodesniveladopuedevoltearla rn_.quina.Elcesped
altopuedeocultarobst_.culos.
• Vayaabajavelocidad.ElijaunavelocidadIosuficienternentebaja,
dernodoquenotengaquedetenerseo hacercarnbiosrnientras
est,.sobrelapendiente.Losneurn_.ticospodrianperdertracci6n
sobrelaspendientesaQncuandolosfrenosfuncionaranapro-
piadarnente.Siernprernantengalarn_.quinaencarnbiornientras
desciendelaspendientes,parapoderfrenarconelmotor.
• Sigalasrecornendacionesdelfabricanteparalospesosocontra-
pesosdelasruedas,pararnejorarlaestabilidadde larn_.quina.
Tengaespecialcuidadoconloscolectoresdecespeduotros
aditarnentos.Losrnisrnospuedenrnodificarlaestabilidaddela
rn_.quina.
Hagaquetodoslosrnovirnientosen laspendientesseanlentosy
graduales.Nocarnbierepentinarnentelavelocidadniladirecci6n.
Unfrenadoo carnbiodevelocidadrepentinospuedencausarque
el frentede larn_.quinaselevantey d_unavolteretahaciaatr_.s,Io
quepodriaproducirlesionesgraves.
Evitearrancaro detenerseenunapendiente.Silosneurn_.ticos
pierdenlatracci6n,desenganchelascuchillasydescienda
lentarnentela pendiente.
No hagaIo siguiente:
• Nogiresobrelaspendientesarnenosqueseanecesario.Sies
posible,girelentarnenteygradualrnenteduranteeldescenso.
• Nocorteelc_spedcercade pozos,hundirnientosoterraplenes.La
cortadoradec_spedpuedevolcarserepentinarnentesiunadelas
ruedasestersobreelhordede unacantilado,zanjao siunhordese
desrnorona.
• Nointenteestabilizarlarn_.quinaponiendoelpieenel suelo.
• Noutiliceuncolectordec_speden pendientesernpinadas.
• NopodeelcespedhOrnedo.Unarnenortracci6npodriacausar
derrapes.
• Noparadescender.Elexcesodevelocidadpuedehacerqueel
operadorpierdaelcontroldelarn_.quina,ocasionandolesiones
graveseinclusolarnuerte.
• Norernolquecargaspesadasdetr_.sdelosaditarnentos(carritode
basuracargado,podadoraderodillos,etc)en pendientesrnayores
de5grados.Cuandosedesplazapendienteabajo,el pesoadicional
tiendeaernpujareltractorypuedehacerquesepierdaelcontrol
delrnisrno(porejernplo,eltractorsepuedeacelerar,sereducela
capacidadparafrenary rnaniobrar,losaccesoriospuedenplegarse
cornouncortaplurnasyhacerqueeltractorvuelque).
NINOS
Puedenocurriraccidentestr_.gicossiel operadornoest,.atentoa la
presenciade ni_os.PotIogeneral,losni_ossesientenatraidospor
estetipode rn_.quinasy sufuncionarniento.Noentiendenlosriesgos
ni lospeligros.Nuncaasurnaquelosni_osperrnanecer_.nen el rnisrno
lugardondelosviopotQltirnavez.
Mantengaa losni_osfueradel_.readetrabajoybajoestricta
vigilanciadeunadultoresponsableadern_.sdelpropiooperador.
Est_alertayapaguelarn_.quinasiunni_oingresaal_.rea.
Antesy rnientrasest,.retrocediendo,mirehaciaatr_.sycuidequeno
hayani_os.
Nuncatransporteni_os,aQnconlacuchillaapagada.Podriancaerse
y resultarseverarnenteheridosointerferirconlaoperaci6nsegurade
larn_.quina.
• Tengaextrernaprecauci6ncuandoseaproxirneaesquinasciegas,
portales,arbustos,_.rbolesuotrosobjetosquepuedanirnpedirlever
a unni_oquesecruceenel recorridode larn_.quina.
• Paraevitaraccidentesal operarenrnarchaatr_.s,siernpredesengan-
chelascuchillasantesdecolocarrnarchaatr_.s.Siest,.instalado,
el"ModoPrecauci6nMarchaAtr_.s"(hojasde operarla rn_.quina,
rnientrasquelospaseosa lainversa)nodebeutilizarsecuandohay
ni_osu otraspersonaspresentes.
• Mantengaa losni_osalejadosdelosrnotoresen rnarchaocalientes.
Puedensufrirquernadurasconunsilenciadorcaliente.
• RetirelaIlavecuandodejelarn_.quinasinvigilancia,evitequeuna
personasinautorizaci6nlarnaneje.
72

Noperrnitanuncaque losniSosrnenoresde14aSosutilicenesta
rn&quina.LosniSosde14aSosen adelantedebenleeryentenderlas
instruccionesdeoperaci6nynorrnasde seguridadcontenidaseneste
manual,yen la rn&quinaydebenserentrenadosysupervisadospor
unadulto.
REIVIOLQUE
• RernolqueL_nicarnenteconunarn_quinaquecuenteconun
enganchediseSadopararernolcar.Noacopleequiporernolcado
exceptoenelpuntodeenganche.
• SigalasrecornendacionesdelfabricanteenIoquerespectaalos
lirnitesdepesodelosequiposa rernolcaryalrernolqueenpendien-
tes.
• Nuncaperrnitalapresenciade niSosuotraspersonasdentroosobre
losequiposrernolcados.
• Enlaspendientes,elpesodelequiporernolcadopuedecausar
p_rdidadetracci6nyp_rdidadecontrolde larn_quina.
• Siernpreuseextralaprecauci6nrernolcandoconunarnaquina
capazdehacervueltasapretadas(p.ejpaseo"devueltacero"-enel
cortacesped).Hagaarnpliasvueltasparaevitaralgato-knifing.
• Desplaceselentarnenteydejedistanciaadicionalparafrenado.
• Noparadescender.
SERVIClO
Manejoseguro de lagasolina
Paraevitarlesionespersonaleso daSosrnaterialesseasurnarnente
cuidadosoal rnanipularla gasolina.Lagasolinaessurnarnente
inflarnableysusvaporespuedencausarexplosiones.Se puede
lesionargravernentesiderrarnagasolinasobreustedosobrelaropa,
yaque_stasepuedeincendiar.L&veselapiely c&rnbiesede ropade
inrnediato.
• Utilices61olosrecipientesparagasolinaautorizados.
• NuncaIlenelosrecipientesenel interiordeunvehiculoo carni6n
o cajade rernolqueconrecubrirnientopl&stico.Coloquesiernpre
losrecipientesenel pisoylejosdel vehiculoantesde realizarla
carga.
• Cuandoseafactible,retireel equipoa gasolinadel carni6no
rernolqueyII_neloen elsuelo.Siestonoes posible,Ileneel
equipoen unrernolqueconun contenedorport&til,envezde
hacerloconunaboquilladispensadoradegasolina.
• Mantengalaboquillade Ilenadoencontactoconel hordedel
dep6sitode combustibleoconla aberturadelrecipienteen todo
rnornento,hastaterrninarlacarga.1/outiliceundispositivode
boquilladeapertura/cierre.
• Apaguetodosloscigarrillos,cigarros,pipasyotrasfuentesde
cornbusti6n.
• Nuncacarguecombustibleen larn&quinaen unespaciocerrado.
• Nuncasaquelatapadelcornbustibleni agreguecombustible
rnientrasel motorest&calienteo en rnarcha.Dejequeel motor
seenfrieporIornenosdosrninutosantesde volveracargar
combustible.
• Nuncalleneenexcesoeldep6sitodecombustible.Lleneel
tanqueno rn&sde1/2pulgadapordebajode la basedelcuello
deltap6nde carga,paradejarespacioparalaexpansi6ndel
combustible.
• Vuelvaa colocarlatapadelagasolinayajL_stelabien.
• Lirnpieel combustiblequese hayaderrarnadosobreel motory el
equipo.Trasladelarn&quinaa otrazona.Espere5 rninutosantes
de encenderelmotor.
• Parareducirel riesgode incendio,rnantengalarn&quinalirnpia
de pasto,hojasy deacurnulaci6ndeotros residuos.Lirnpielos
derrarnesdeaceiteo combustibleysaquetodoslosresiduos
ernbebidosde combustible.
• Nuncaguardelarn&quinao el recipientedecombustibleen un
espaciocerradodondehayafuego,chispaso luzpiloto,corno
potejernplodecalentadoresdeagua,calefactoresde arnbientes,
hornos,secadoresde ropau otrosaparatosa gas.
• Dejequelarn&quinaseenfriecincorninutospor Iornenosantes
de guardarla.
Servicio general
• Nuncaenciendael motoren espacioscerradosoen unazona
conpocaventilaci6n.Elescapedel motorcontienernon6xidode
carbono,ungasinodoroyletal.
• Antesdelirnpiar,repararo inspeccionarla rn&quina,cornpruebe
que la(s)cuchilla(s)ytodaslaspartesenrnovirnientosehayan
detenido.Desconecteelcablede labujfay p6ngalohaciendo
rnasacontrael motorparaevitarqueseenciendaaccidental-
rnente.
• Reviseperi6dicarnenteparaasegurarsequelascuchillasse
detenganpotcornpletoenaproxirnadarnentecinco(5) segundos
despu_sdeaccionarel controldedesenganchede la(s)
cuchilla(s).Si lascuchillasnosedetienendentrodeeste lapso
de tiernpo,suunidaddeber&ser reparadaporsudistribuidorde
servicioautorizadoMTD.
• Reviseconfrecuenciaelfuncionarnientodelsisternadefrenos
yaqueest,.sujetoa desgasteporlaoperaci6nnormal.Ajustey
efectL_ernantenirnientosegL_nserequiera.
• Reviselospernosdernontajede la(s)cuchilla(s)ydel motora
intervalosfrecuentesparaverificarqueest_nbienapretados.
Adern&s,inspeccionevisualrnentela(s)cuchilla(s)en buscade
daSos(porejernplo,desgasteexcesivo,abolladuras,rajaduras,
etc.). Reernplacela(s)cuchilla(s)L_nicarnenteconlascuchillas
de fabricantesdeequiposoriginales(O.E.M.)listadaseneste
manual.El usode piezasque nocurnplenconlasespecifi-
cacionesdel equipooriginalpodrfatenercornoresultadoun
rendirnientoincorrectoy adern&sponerenriesgolaseguridad.
• Lascuchillasde laspodadorassonrnuyafiladas.Envuelvala
cuchillao utiliceguantesy extremelasprecaucionescuando
efectL_ernantenirniento.
• Mantengatodoslospernos,tuercasytornillosbienajustados
paraasegurarsedequelarn&quinaseencuentraencondiciones
segurasde operaci6n.
• Nuncaaltereel sisternadeenclavarnientodeseguridadni
otrosmecanisrnosdeseguridad.Controleperi6dicarnenteque
funcionencorrectarnente.
73

• Despu_sdegolpearconalgOnobjetoextra_o,detengael motor,
desconecteel cablede la bujfay conecteel motora rnasa.
Inspeccionerninuciosarnentela rn_.quinaparaversiest,.da_ada.
Repareel da_oantesdearrancary utilizarla rn_.quina.
Nuncatratedehacerajusteso reparacionesa la rn_.quina
rnientrasel motorest,.enrnarcha.
Loscornponentesdelcolectordecespedy la cubiertade
descarga,est_.nsujetosadesgasteyda_osque podriandejar
expuestaspartesen rnovirnientoo perrnitirque searrojenobjetos.
Paraprotegersuseguridad,verifiquefrecuenternentetodoslos
cornponentesy reernpl_.celosinrnediatarnentes61oconpiezasde
losfabricantesdel equipooriginal,listadosen estemanual.Eluso
de piezasque nocurnplenconlasespecificacionesdel equipo
originalpodriatenercornoresultadoun rendirnientoincorrectoy
adern_.sponeren riesgolaseguridad.
Nocarnbielaconfiguraci6ndel reguladordel motorni Ioopere
a sobrevelocidad.El reguladordel motorcontrolala velocidad
rn_.xirnaseguradefuncionarnientodel motor.
Mantengao reernplacelasetiquetasdeseguridade instrucciones
segOnseanecesario.
Respetelasnorrnasreferentesa ladisposici6ncorrectay las
reglarnentacionessobregasolina,aceite,etc.paraprotegerel
medicarnbiente.
SegOnla Cornisi6ndeSeguridadde Productosparael Consurni-
dorde losEstadosUnidos(CPSC)y laAgenciade Protecci6n
Arnbientalde losEstadosUnidos(EPA),esteproductotieneuna
vidaQtilmediade siete(7)a_os,6 270horasdefuncionarniento.
AIfinalizarla vida[3tilmedia,adquieraunarn_.quinanuevao haga
inspeccionaranualrnente_staSearsporunou otrodistribuidorde
serviciosparacerciorarsedequetodoslossisternasrnec_.nicos
yde seguridadfuncionancorrectarnenteyno tienenexcesivo
desgaste.Si noIohace,puedenproducirseaccidentes,lesiones
o rnuerte.
NO MODIFIQUE EL MOTOR
Paraevitarlesionesgraveso larnuerte,nornodifiqueel motorbajo
ningunacircunstancia.Si carnbialaconfiguraci6ndel reguladordel
motorel motorpuededescontrolarsey operara velocidadesinsegu-
ras.Nuncacarnbielaconfiguraci6ndef_.bricadel reguladordel motor.
AVISO REFERIDO A EMISIONES
Losrnotoresqueest&ncertificadosycurnplenconlasregulaciones
de ernisionesfederalesEPAyde CaliforniaparaSORE(Equipos
peque_ostodoterreno)est_.ncertificadosparaoperarcongasolina
cornQnsinplornoy puedenincluirlossiguientessisternasdecontrol
de ernisiones:Modificaci6nde motor(EM)ycatalizadorde tresvias
(TWO)siest_.nequipadosde esarnanera.
GUARDACHISPAS
Si seutilizaunarnortiguadorde chispasel operadorIodebernantener
en condicionesde usoadecuadas.EnelEstadode Californialas
rnedidasanteriorrnenternencionadassonexigidasporIcy(Arficulo
4442del C6digode RecursosPOblicosde California).Esposible
queexistanleyessirnilaresenotrosestados.Lasleyesfederalesse
aplicanenterritoriosfederales.
Puedeconseguirelarnortiguadordechispasparael silenciadora
travesdesudistribuidorautorizadode rnotoreso poni_ndoseen
contactoconel centrode servicioSears.
Estarn_.quinaest,.equipadaconunmotorde cornbusti6ninternay
no debeserutilizadaeno cercade unterrenoagrestecubiertopor
bosque,rnalezaso hierbaexceptosiel sisternade escapedelmotor
est,.equipadoconunarnortiguadordechispasquecurnplaconlas
leyeslocaleso estatalescorrespondientes,encasode haberlas.
74

SilVIBOLOSDE SEGURIDAD
Estap&ginarepresentay describelaseguridadlossimbolosquepuedenpareceren esteproducto.Lea,comprenda,y sigatodasinstrucciones
enla m_quinaantesprocurarparareuniry operar.
0
LEA EL MANUAL(S) DEL OPERADOR
leido, entienda, y siga todas las instrucciones en el manual(s) antes de procurar montar y funcionar
PELIGRO-- DE ELCORTE DE PIE
Nunca transporte pasajeros. Nunca transporte ni_os, aun con la cuchilla apagada.
PELIGRO-- DIe ELCORTEDEPIE
Paraevitar accidentes, mantener a los niffos lejosde lam_iquinamientras est,1en funcionamiento..
PELIGRO-- DIeEL CORTE DE PIE
Guarde manos y pies lejos de hacer girar partes.
PELIGRO-- DIeEL CORTE DE PIE
Retroceda lentamente. Siempre mire hacia abajo y hacia atr_is antes y mientras retrocede, para evitar
accidentes.
PELIGRO-- ESCOMBROS LANZADOS
Quite objetos que pueden ser lanzados pot la I_imina en cualquier direcci6n. Lleve gafas de
seguridad..
PELIGRO-- ESCOMBROS LANZADOS
Quite objetos que pueden ser lanzados pot la I_imina en cualquier direcci6n. Lleve gafas de
seguridad.
ERSONAS PRESENTES
Guarde alas personas presentes, a los ayudantes y a ni_os pot Io menos 75 pies lejos.
PELIGRO-- CUESTAS
Use extra la precauci6n en cuestas. No siegue cuestas mayores que 12.
ADVERTENCIA -- SUPERFICIE CALIENTE
Las partes del motor, especialmente el silenciador, Ilega a set muy caliente durante la operaci6n.
Permita motor y silenciador para ponerse frio antes de tocar.
75

PELIGRO-- GIRANDO HOJAS
Para reducir el riesgo de herida, guarde manos y pies lejos. No funcione a menos que la tapa
de descarga o el receptor de hierba est6n en su lugar apropiado. De ser dahado, sustituya
inmediatamente.
GASOLINA DE ADVERTENClA ESINFLAMABLE
Permita que el motor se enfrie al menos dos minutos antes del reabastecimiento de combustible.
ADVERTENCIA -- MONOXIDO DE CARBONO
Nunca dirijas un motor dentro o en un _rea real ventilada. Los gases de combusti6n de motor
contienen el mon6xido de carbono, un gas inodoro y mortal.
PELIGRO-- DE ELCORTE DE PIE
No se pare sobre la plataforma de corte.
76

(ACEPTAR)
- 12° Pendiente
-'12 ° Pendiente
(DEMASIADO ESCARPADO)
Rgura1 Rgura2
_ 120 P
"" //rle#
-- -- SCORtiRUa
USO DEESTEPENDIENTEBE CALIBREPARADETERMINAR _=
SI UNAPENDIENTEESDEMASIADOESCARPADOPARAUNA OPERACIONSEGURA!
Paracomprobar la pendiente, haga Io siguiente:
1. Borrar esta p_.ginay doble a Iolargo de la linea discontinua.
2. Localizar un objeto vertical sobre o detr_.sde la pendiente (un poste, un edificio, unavalla, un _.rbol,etc.)
3. Alinee cada lado de pendiente de calibre con el objeto vertical (consultar Figura 1 and Figura 2 ).
4. Ajuste el pendiente de calibre arriba o hacia abajo hasta los toques esquina izquierda el pendiente
(consultar Figura1 and Figura 2).
5. Si hay un espacio por debajo de la pendiente de calibre, el pendiente es demasiado escarpa pot operaci6n
segura (consultar Figura2 above).
Las pendientesson un factorimportante relacionadocon unvuelco y renovaci6ndelos accidentesque puedenprovocar lesionesgraveso la muerte.
No utilicela ma.quinaenpendientesde m_tsde 15grados.Todos pendientesrequiere mayorprecauci6n.Si nopuede retrocederen la pendienteo si se
siente inseguroenella, no la recorte. Siemprecorteel cespedarriba y abajo laspendientes, nuncaentoda la superficiede la cuesta.
I",,.
I",,.

Contenido deicaj6n
Untractorcortac_sped
Unconjuntoderueda/ejededirecd6n
Unaplacadeenganchetrasera
Unmanualdeloperadordeltractorcortac(_sped
Unconjuntodeasiento
Unatapatraseradelmotor
Unamangaparadrenadodeaceite
Unmanualdeoperad6ndelmotor
Unatapadepedestaldedirecd6n
Unconjuntodecanaldedescarga
Unpaquetedeelementosdeferreteria
Unatarjetapararegistrarelproducto
Contenidodel paquete deelementosdeferreteria
Antesdecomenzarlainstalad6n,extraigatodoelcontenidodelacajay todos
loselementosdeferreteriadelpaqueteparacomprobarquenofaltenada.
Loselementosdeferreteriasedetallanacontinuaci6n.Losmimerosdepieza
seindicanentrepar_ntesis.
Placadeenganche
Soportedemontajedelasiento(condospernosconrebordeytuercas
desujed6ninstalados)
tterramientas re¢omendadasparaelmontaje
Llavede3/8"(odecubo) Llavedecubode9"y 16"
LlavedeI/2" (odecubo) Llavede7/16"
Llavede5/8"(odecubo) DestornilladorPhillips
LlavedetrinquetedeI/4"
Instalaci6n delconjuntodelvolante
Sielconjuntodelvolantedeltractornovinoyainstalado,sigalospasosa
continuaci6n:
I. Deslicelatapadelpedestalsobreel_rboldeladirecci6ndemaneraque
dichoejeseinstaleeneltractor,latapadelpedestalquedar_verticalcomo
seindicaenlaFiguraI.
2.
3.
Figura1
Extraigael pernoconrebordey latuercadeseguridaddel_rboldela
direcd6ndeltractorygu_rdelosparalospasosposteriores.
Conelconjuntodelvolanteverticalyubkadodemaneraquequedesobreel
_rbolinferiordeladirecd6ndeltractor,sedebealinearelvolantedemanera
queconlasruedasdeltractorderechas,laaberturagrandedelvolanteest_
orientadahadaadelante.
5.
6.
Bajeelconjuntodelvolantesobreel_rbolinferiordeladirecd6n(1)
ysuj_teloconelpernoy latuercadeseguridad(2)queextrajopreviamente.
Yeala Figura2
/
/
Figura2
Ajusteelpernoconrebordeylatuercadeseguridadusandolallavede
9/16"y lallavede7/16"odecubo.
Extraigaeltornillodemonturadelatapadelpedestalinstaladoen
f_bricayubicadoenlaconsoladedirecci6ndeltractor.Guardeeltornillo
parausoposterior.
Deslicelatapadelpedestalsobreeltractor(1)yr6telaligeramenteala
derechaparacalzarlaensulugar.Sujeteelpedestalconeltornillo(2)
queextrajoantes.Veala Figura3.
\
78
Figura3
J

InstMaci6n dei asiento
Sisutractornotraiaelasientoinstaladodef_brica,sigalasinstrucciones
correspondientesquese[ncluyenacontinuad6npara[nstalarlo.
I. Extraigalosdospernosconrebordey lastuercasdeseguridaddelsoporte
demontajedelasiento[ncluidoenelpaquetedeelementosdeferreteria.
VealaFlgura4.
2.
f
Figura4
Extraigalosdostornillosautorroscantesinstaladosenf_bricaeneltractor.
VealaFlgura5.
3.
Figura5
Alineeelsoportedelasientoensulugarsobrelosorifidosdelostornillos
autorroscantesqueextrajo,comoseindkaenlaFigura6.
J
ConunallavedetrinquetedeI/4 depulgaday unallavedecubode3/8",
sujeteel soportedelasientoconlostornillosautorroscantesqueextrajo
enelPaso2.Vealafigura6.
Figura6
PRECAUCION: Nouseningunaherramientael_ctrica
(porejemplo,pistoladeimpactootaladroel(ktrkoconelextractor
detuercascolocado)paraapretarlospemosautorroscantespara
sujetarelsoportedelaslento.
5.
6.
Ubiqueelconjuntodelaslentosobreelsoportedemontajedelasiento,
alineandolosorifidossuministrados.
Instalelosdospernosconrebordey lastuercasdeseguridadqueextrajodel
soportedemontajedelasientoenelPaso1.Yeala Flgura7.
Nouseningunaherramientael_ctrica(potejemplo,pistoladeimpacto
otaladroel_ctricoconel extractordetuercascolocado)paraapretar los
pernosautorroscantesparasujetarel soportedelasiento.
Figura7
79

Ajuste dei asiento
1. Paraajustar[aposid6nde[asiento,retirelasdosperJllasdeajusteque
est_nubicadasen[aparteinferiorde[asiento.Des[icee[asientohada
ade[anteohadaarras,secjuntodesee.Vue[vaaco[ocar[aperi[[adeajuste.
Consu[te[aFicjura8.
Figura8
Ajustede iaaitura deivolante
Paraajustarlaalturadelvolante,estaunidadest_equipadaconunacolumnade
volantetelesc6pica.Paraajustarlaalturadelvolante:
1. Si(!nteseenel asientodeloperadorycoloquelasmanosenelvolante.
2. Pulseelbot6ndelacolumnadeladirecddnyeleveobajeelvolante(b)hasta
laposiddndeseada.VealaFigura9.
Nora:Despu(_sdeIograrlaposid6ndeseada,[evanteybajeelvolantepara
comprobarquesetrabeensu[ugaryqueelbotdn(a)delacolumnadeladirecd6n
sesuelteparaquedartrabado.Noopereestaunidadamenosquelacolumnadela
direcd6nest_enlaposid6nenquequedatrabada.
Instaiaci6n dei canal de ia piataforma
NUNCAopereestetractorsinotiene colocadosel tap6ndeabonooelcanal
dela plataforma.
I,
2.
Extraigalasperillasdealetasqueinstal6enlaplataformadecortey
gu_rdelasparacolocarlasposteriormente.
Coloqueelcanaldelaplataformaenlaaberturadedescargasobrela
plataforma.Losprisionerosenlasuperfidedelaplataformacalzar_nenlos
orifidosdelapartesuperiordelcanaldelaplataforma.LapequeffalengiJeta
delbordedelaplataformacalzar_enelrecortecuadradodelaparteinferior
delcanaldelaplataforma.VeaelrecuadrodelaFigura10.
Nora:Compruebequelapord6nsuperiortraseradelcanaldelaplataforma
est_oprimiendoelinterruptordeseguridadubicadoenlasuperfidede
laplataforma.Elmotornoarrancar_sielcanaldelaplataformanoest_
correctamenteubicado.
Sujeteelcanaldelaplataformaajustandolasperillasdealetaqueextrajo
antes.VealaFigura10.
Figura10
Figura9
80

Coloqueiatapa trasera deimotor
2.
Extraigalosdostornilloshexagonalesinstaladosenf_bricaubicadosenla
m_nsulademontajedelatapatraseradelmotor.Guardelostornillospara
usoposterior.Veala Figura11.
Coloquelatapatraseradelmotorubic_ndolaensulugarcomoseindica
enla Figura11.Inclinelatapadelmotorhadaadelanteparaquecake
dentrodelasranurasprovistas,luegor6telahadaatr_sparaalinearlos
orifidosdemontaje.
f
3.
\
Figura11
Sujetelatapaconlosdostronilloshexagonalesqueextrajoantes.
Noajustedemasiado.
Instalaci6ndei paragoipes
1. ExtraigalosdostornilloscomoseindicaenlaFigura12.
2. Ubiqueel paragolpessobrelosorificiosdemontajeysujeteconloselementos
deferreteffaqueextrajoenelPaso1,comoseindicaenlaFigura12.
Instalaci6nde iaplacadeenganche
1. Extraigaloselementosdemontajeinstaladosenf_bricadelaplatade
enganchedelapartetraseradelmotor.
2. Ubiquelaplatadeenganche,embaladaconsuspiezassueltas,conellado
pianohadaarribacomoseindicaenlaFigura13.Suj_telaconlosdospernos
ylastuercashexagonalesqueextrajoantes.
Figura13
Conexi6ndeloscablesde iabateria
PROPOSICION 65 DE CALIFORNIA
Losbornesdela bateriaylosaccesoriosafinescontienenplomoy
compuestosdeplomo,sustanciasquimicasquesegunIoestabiecidopor
el EstadodeCaliforniacausanc_ncery daffosenelsistemareproductivo.
L_veselasmanosdespu_sdeestarencontactoconestoscomponentes.
Figura12
81
Cuandocoloqueloscablesdelabateria,conectesiempreprimeroel cable
POSITIVO(rojo)asuborne,y acontinuaci6nelcableNEGATIVO(negro).
Porrazonesreladonadasconelembarque,losdoscablesdelabateriadesuequipo
puedenhabersidodesconectadosdelosbornesenf_brica.Paraconectarloscables
delabater[a,procedadelasiguientemanera:
NO@:Elbornepositivodelabateffaest_marcadocomoPos(+). Elbornenegativo
delabater[aest_marcadocomoNeg(-).
1. Extraigalospernosy lastuercashexagonalesinstaladosenf_bricaubicados
enelextremodelmazodecables.Guardelaspiezasparausoposterior.
2. Retirelacubiertapl_stica,siesqueest_presente,delbornepositivodela
bateffayunaelcablerojoalbornepositivodelabateria(+) conunpernoy
sutuercahexagonalusandounaIlavede7/16pulgadasy unaIlavedecubo.
YealaFigura11.
3. Retirelacubiertapl_stica,siesqueest_presente,delbornenegativodela
bateriayunaelcablenegroalbornenegativodelabateria(-) conelotro
pernoytuercahexagonalusandolaIlavede7/16pulgadasylaIlavedecubo.
Yeala Figura14.

4. Coloqueelcapuch6ndegomarojoporendmadelbornepositivodelabater[a
paraprotegerlocontralacorrosi6n.
NOTA:SIlabater[aseponeenservkiodespu6sdelafechaindicadaensuparte
superioroalcostadodelamisma,c_irguelasigulendolasinstrucdonesdelasecd6n
MantenimientodeestemanualdeloperadorantesdehaterfuncJonareltractor.
r
....... iii........................
Figura14
J
Gasolinayaceite
NOTA:Elmotorseenv[asingasolinayconaceiteparamotorensuinterior.Sin
embargo,ustedDEBEcontrolarel niveldeaceiteantesdehacedofundonar.Tenga
cuidadodenoIlenarenexceso.Sisehacefundonarel motorsinsufidenteaceite
puededa_arsegravementeyseanulalagarantia.
Siempremantengalasmanosylospiesalejadosdelaspiezasm6vilesdel
equipo.Noutilke fluidos comprimidosparaarrancar.Losvaporesson
inflamables.
Recomendadonessobreel aceite
Antesdeponerenmarchael motor,controleelniveldeaceite,lacapaddad
esde1700ml/57.5onzasliquidas.Consulteenelcuadrodeviscosidadlas
recomendadonessobreel aceite.NoIleneexcesivamente.Useunaceitepara
motordecuatrotiempossint_ticoonosint_tico,ounaceitedetergentedecalidad
premiumequivalenteconcertificadoquecubraoexcedalasexigendasdelos
fabdcantesdeautom6vilesamedcanosrespectodelaclasificad6ndeservkioSG
ySF.Losaceitesparamotorconlaclasificad6nSG,SFtienenest_idesignad6nen
elenvase.
SerecomiendaSAElOW-30parausogeneral,atodaslastemperaturas.Siutiliza
aceiteconviscosidadmonogrado,seleccioneenlatabladelap_iginasiguientela
viscosidadadecuadaparalatemperaturamediadesuzona.
Noutiliceaceitessindetergenteni aceiteparamotordedostiempos.
[Podriareducrse av daut de motor.
NOTA:Sepuedeusarunaceitesint_tico5w30paramejorarelencendidocuandoel
climaest_ifrio(temperaturasinfedoresalos40°F).
v
mm_mmm
mmmllb
(oC)-300 -200 -I0o 0o I0o 200 300 400
(°F)-200 0o 150 300 500 700 850 1050
Controldel nivel deaceite
NOTA:Aseguresedecomprobarelaceitesobreunasuperficieniveladayconel
motorapagado.
1. Retireeltap6ndeIlenado/varillademedid6ndeaceiteylimpiebienlavadlla.
2. Insertelavarillademedici6ndeniveldentrodelcuellodeIlenadodeaceite.
GirelavarHlademedid6n1/4degirohastala posid6nenlaquequeda
trabadaparaqueseasienteporcompleto.YealaFigura15.
3. Retirelavadllademedid6ndenivelparacontrolarelniveldeaceite.
4. SIel nivelest_ibajo,agregueaceitelentamentehastaquelamedid6nest_i
enel limitesuperiordelavadllademedid6n.YeaelrecuadrodelaFigura15.
5. Vuelvaacolocarlavadllademedid6nygirelahastalaposid6nenque
quedatrabadaantesdearrancarel motor.
Tap6nde Ilenado deaceite/
varilla demedici6n del
nivel de aceite
superior
Figura15
NOTA:NoIoIleneenexceso.Elexcesodeaceitepuedecausarahumado,
problemasdearranque,sudedadenlabujiaysaturad6ndeaceiteenel
pudficadordeaire.
Requisitosde combustible
Siseoperael motorconcombustibleE85,unamezcladeaceite/gasolina,
gasolinasuciaogasolinaconrodsde30aliasdeusoquenosehaya
lestabilizadoconunaditivo decombustible,sepuededaffarel carburadordel
[motor.A losdaffossubsiguientesnoloscubrelagarantiadeCraftsman.
82

Utilicegasolinaparaautomdviles(sinplomoobajocontenidodeplomopara
minimizarlosdep6sitosenlac_maradecombusti6n)conunminimode87octanos.
Sepuedeusargasolinaconhastaun10%deetanoloun15%deMTBE(_termetilico
terdario-butilico).Nuncauseunamezcladeaceiteygasolinanigasolinasuda.Evite
queseintroduzcasudedad,polvooaguaeneldep6sitodecombustible.NOutilice
gasolinaE85.
Tengamuchocuidadoaltrabajarcongasolina.Lacjasolinaessumamente
inflamableysusvaporespuedencausarexplosiones.Nuncacarcjuecombustible
enla m_quinaenunespadocerradoocuandoel motorest_calienteoeu
marcha.Apaguedgarrillos,dgarros,pipasyotrasfuentesdecombusti6n.
NOT,4:Compregasolinaenpeque_ascantidades.Nousegasolinaquehayaquedado
delatemporadaanterior,paraminimizarlaformaddndedepdsitosdegomaenel
sistemadecombustible.
Estemotorest_habilitadoparafundonarcongasolinasinplomo.Para
obtenerelmejorresultado,lleneeldep6sitodecombustibleOnicamentecon
gasolinasinplomolimpiayfresca,enunsurtidorqueindiqueunoctanaje
iguala87om_s.
Elgasohol(hasta10%dealcoholetilico,90%degasolinasinplomopor
volumen)esuncombustibleaprobado.Noseapruebaelusodeotras
mezclasdegasolina/alcohol,comola E85.
El_termetilicoterciario-butilico(MTBE)ylasmezclasdegasolinasin
plomo(hastaunm_ximode15%deMTBEpotvolumen)soncombustibles
aprobados.Noseapruebael usodeotrasmezclasdegasolina/_ter.
Lleneeldep6sitodecombustiblealairefibreoenun_reabienventilada.
Nolleneenexcesoeldep6sitodecombustible.Lleneeldep6sitonom_sde
I/2 pulgadapordebajodelabasedelcuellodellenadoparadejarespado
paralaexpansi6ndelcombustible.
Nuncasaquelatapadelcombustibleniagreguecombustiblemientrasel
motorest_calienteoenmarcha.DejequeelmotorseenfrieporIomenos
dosminutosantesdevolveracargarcombustible.
Limpieelcombustiblequesehayaderramadosobreelmotoryelequipo.
Trasladelam_quinaaotrazona.Espere5minutosantesdeencenderelmotor.
Procedimientoparaagregar gasolina
NOTA:Eltractorsesujetaconunatapadecombustiblequeest_amarradaytiene
unallavedetrinquete.PAREdecargardespu_sdequeseveacombustibledentro
delcuellodellenado.Estoaseguraquehayunvolumendeexpansidnadecuado,de
Iocontrarioelcombustiblepuederebalsargenerandounasituad6ndepeligro.
NOlleneal m_ximoeldep6sitodecombustible.
Carguecombustibleenun_reabienventiladayconelmotorapagado.
Nofumenipermitallamasochispasenellugardondesecarga
combustibleosealmacenalagasolina.
Nolleneenexcesoeldep6sitodecombustible.Despu_sdecargar
combustible,asegOresedequeeltap6ndeldepdsitoest_biencerradoy
asegurado.
Tengacuidadodenoderramarcombustibleal realizarlarecarga.
Elcombustiblederramadoosusvaporessepuedenincendiar.Sisederrama
combustible,asegOresedequeel_reaest_secaantesdearrancarel motor.
Eviteelcontactorepetidoo prolongadoconlapielyla inhalad6n
delosvapores.
Cargade combustible
Elcombustibledebecargarlounadulto. NUNCApermitaqueun niffo
recarguecombustibleenelmotor. Losvaporesdela gasolina(el
combustible)sonsumamenteinflamablesy puedenexplotar.Losvapores
delcombustiblesepuedenesparciryencenderseporunachispao llama
queest_amuchadistanciadelmotor. Paraevitarlesioneso muertespor
incendiosdecombustible,sigaestasinstrucciones:
NOusecombustibleconplomo.
Elcombustibledebesernuevoyestarlimpio.NUNCAuseelcombustibleque
quedadesdelaOltimatemporadaoquequed6almacenadoduranteperiodos
prolongados.
NUNCAmezcleaceiteconcombustible.
NOusecombustiblequecontengametanol(alcoholdemadera).
#01,4:Antesderecargarcombustible,dejequeelmotorseenfriedosminutos.
I. Apagueelmotoryd_jeloenfriaral menosdosminutosantesdequitarla
tapadellenadodecombustible.Eldep6sitodegasolinaest_ubkadodebajo
delasiento.Eltap6ndelcombustibleest_amarradoaltractorparaimpedir
quesepierda.Nointenteretkareltapdndeltractor.
2. Antesdesacareltap6nparacargarcombustible,limpiealrededor.
3. Cargueel dep6sitohastaqueelcombustiblellegueaI/2 pulgadapotdebajo
delabasedelcuellodellenadoparadejarespadoparalaexpansi6ndel
combustible.Tengacuidadodenollenarenexceso.Veala Figura16.
,J
Figura16
VuelvaacolocarlatapadelagasolinayajOstelabien.Antesdeporteren
marchaelmotor,debelimpiarelcombustiblequesehayaderramado.Sise
derramacombustibleNOpongaenmarchaelmotor.Muevalam_quinapara
alejarladelazonadelderrame.Evitegenerarunafuentedeencendidohasta
quelosvaporesdelcombustiblehayandesapareddo.
Presi6ndelosneum ticos
Sedebemanteneruna presi6nuniformeparatodoslosneum_ticosentodo
momento.Nuncaexcedalapresi6nm_ximadeinfladoqueseindka enlos
lateralesdelosneum_tkos.
Lapresi6noperativarecomendadaparalosneum_ticoses:
Aproximadamente10psiparalosneum_tkostraseros
Aproximadamente14psiparalosneum_tkosdelanteros
IMPORTAglTE:Consulteloslateralesdelasruedasparaconocerconexactitudla
presi6nm_ximaenpsirecomendadaporelfabrkante.Nolosinfleenexceso.
Unapresi6ndeneum_ticosdesparejapodriahacerquelaplataformanocorte
elc_spedparejo.
83

Pedaldefreno/embrague
Palancadecontrolde
veloddadyfrenodemano
Indicadordenivelde
combustible
Interruptordeencendido
Palancadecambios
Palancadeacelerador/
estranguJador
Tap6ndeIlenado
decombustible
Portacubeta
PatancadeeLevaci6n
de/a platatorma
Tap6ndellenadodeaceite
Palancadelatomadefuerza(PTO)
(enganchedecuchUla)
Figura15
NOt"A:CualquierreferenciahechaenestemanualalladoDERECNOoIZQUIERDOdeltractordebeentendersetal comoseobservadesdelaposicibndeloperador
cuandoest_sentadohaciaadelanteorientadoalfrentedeltractor.
Cumpleconiasnormasdeseguridad deANSi
LostractoresCraftsmancumplenconlasnormasdeseguridaddelInstitutoNacionalAmericanodeNormalizacibn(ANSI).
84

Controldei acelerador/estrangulador
Lapalancadecontroldelaceleradorest_ubicadaenelguardabarrosizquierdodel
tractorsisesientaenlaposici6ndeloperador,yealaFig.15.Estapalancacontrolala
velocidaddelmotor,asicomoelcebadorcuandoseIoempujacompletamentehacia
adelante.CuandoseIocolocaenunaposici6ndeterminada,elaceleradormantiene
unavelocidaddemotoruniforme.
IMPORTANTE:Cuandoopereeltractorconlaplataformadetortecolocada,
asegtiresedequelapalancadelaceleradorest_siempreenlaposid6nFAST
(r_pida;representadaporunaliebre).
Sisemuevelapalancadelaceleradortotalmentehaciaadelante,seactivaelcontrol
delestranguladordelmotor.AIactivarelcontroldelestranguladorsecierralaplaca
delestranguladordelcarburadoryestoayudaaponerenmarchaelmotor.
ConsulteArranquedelmotorenlasecd6nFundonamientodeestemanualparaver
instrucdonesdearranquedetalladas.
Interruptorde encendido
Elinterruptordeencendidoest_ubicadoenelguardabarrosizquierdodeltractorsi
sesientaenlaposici6ndeloperador,adyacentealcontroldelacelerador/cebador.
Paraencenderelmotor,activelaIlaveenelinterruptordeencendidoinsertandola
Ilaveenel interruptordeencendidoygirelaenelsentidodelasagujasdelrelojhasta
laposici6nSTART(encendido).SueltelaIlaveenlaposici6nON(encendido)unavez
quehayaarrancadoelmotor.VealaFig.16.
Encendido
Apagado
Arranque
,J
Figura16
Pedaldefreno-embrague
Elpedaldelembrague-frenoest_ubicadodelladoizquierdodeltractorcortac_sped,
aIolargodelestribo.Presioneel pedaldelembrague-frenopardalmentehacia
abajocuandodisminuyalaveloddaddeltractorcambiandodemarchas(Consultela
secci6nPalancadecontroldevelocidad).Presioneelpedaltotalmentehaciaabajo
paracolocarelfrenodediscoyhacerqueeltractorsedetengaporcompleto.
NO@:Sedebeoprimircompletamenteelpedaldelembrague-frenoparaponer
enmarchaelmotor.ConsulteInterruptoresdeBloqueodeSeguridadenlasecci6n
Funcionamientodeestemanual.
Palancadecambios
Lapalancadecambiosest_ubicadaenelpaneldecontroljustodebajodelasiento,
enel centrodeltractor.Tieneiresposidones,ADELANTE,PUNTOMUERTOyATRAS.
Cuandomuevalapalancadecambios,el pedaldel freno debeestar presionado
afondo yeltractornodebeestarenmovimiento.VealaFig.17.
IMPORTANTE:Nuncafuercelapalancadecambios.Dehacerlo,puededaffarse
seriamentelatransmisi6ndeltractor.
N
J
Figura17
Palancadecontrol deveioddad
Lapalancadecontroldevelocidad,ubicadadelladoderechodelaconsolade
direcci6ndeltractor,lepermiteregularlaveloddaddepisodeltractorcortac_sped.
Parautilizarla,presioneelpedaldelembrague-freno,saquelapalancadelamuesca
delfrenodeestacionamientoyll_velahaciaadelanteparaaumentarlavelocidadde
pisodeltractor.Cuandohayaalcanzadolavelocidaddeseada,sueltelapalancaenla
muescaadecuadaparamanteneresavelocidad.
Pararedudrlavelocidaddepisodeltractor,presioneelpedaldelembrague-freno,
llevelapalancadecontroldevelocidadhaciaatr_sysu(_Iteladentrodeunamuesca.
Frenodemano
Paracolocarelfrenodemano,presionearondoelpedaldelembrague-freno
Muevalapalancadecontroldevelocidadtotalmentehadaabajoenlaposid6nde
frenodemano.Suelteel pedaldelembrague-frenoparapermitirqueelfrenode
manoengrane.
Parasoltarel frenodemano,presioneelpedaldelembrague-freno,saquelapalanca
decontroldevelocidaddelaposid6ndefrenodemanoy ll(_velaa laposici6n
deseada.Suelteelpedaldeembrague-freno.
NOTA:Siel operadorabandonaelasientoydejael motorenfuncionamiento,
deber_colocarel frenodemano,oel motorseapagar_deformaautom_tica.
Indicador denivelde combustible
Elindicadordeniveldecombustibleest_ubicadodebajodelasientoalaizquierda
delaposid6ndeloperadorenel paneldecontrol.Useestaventanaparaidentificar
losrequerimientosdecombustibledeltractor.Yeala Fig.18.
85

©
Interruptoresde bloqueo deseguridad
Figura18
J
Palancadeelevaci6nde iaplataforma
Ubicadaenelguardabarrosderechodeltractor,lapalancadeelevaci6ndela
plataformaseutilizaparacambiarlaalturadelaplataformadetorte.Parautilizarla,
muevalapalancahacialaizquierda,luegocol6quelaenlamuescaquemejorse
adaptealaaplicaci6ndeseada.
Palancadeiatoma defuerza (PTO)
(enganchedecuchUla)
Ubicadaenelguardabarrosderechodeltractor,lapalancadetomadefuerza(PTO)
(enganchedecuchilla)seusaparadarenergiaalaplataformadecorte.Parahacerla
fundonar,muevalapalancatotalmentehaciaadelante.Moviendolapalanca
totalmentehaciaatr_s,enlaposici6nPTOOFF(tomadefuerzadesconectada),se
cortalaenergiaalaplataformadecorte.
NO@:AIencenderel motor,lapalancaPTO(enganchedecuchilla)debeencontrarse
enposici6ndesconectada(PTOOFF).
Tap6ndeiienadodecombustible
Eltap6ndeIlenadodecombustibleest_ubicadodebajodelasiento.Consulte
lasecd6nMontajedeestemanualparaobtenerinstrucdonessobrelacargade
combustibledeltractor.
Tap6nde ilenado de aceite
Eltap6ndeIlenadodeaceiteest_ubkadodebajodelasiento.Consultelasecd6n
Montajedeestemanualparaobtenerinstrucdonesparacontrolaryagregar
combustiblealtractor.
Tap6ndeilenado de combustible
Eldep6sitodegasolinaest_ubicadodebajodelasiento.NoIoIleneenexceso.
Tengamucbocuidadoaltrabajar congasolina.Lagasolinaessumamente
inflamableysusvaporespuedencausarexpiosiones.Nuncacargue
combustibleenla m_quinaenunespaciocerradoocuandoelmotorest_
calienteoenmarcha.Apaguecigarrillos,cigarros,pipasyotrasfuentes
decombusti6n.
Paraobtenerinformaci6ndetalladasobrec6moagregarcombustible,consulte
Requisitosdecombustibleenlasecd6nMontajedeestemanual.
Elsistemadebloqueodesegufidadest_diseffadoparaqueeltractorfundonecon
segufidad.Sidichosistemafundonamal,nosedebehacerfundonareltractor.
Comun[quesede[nmediatoal 1-800-4-MY-HOMEparasolidtarel servkiode
mantenimientoyreparad6ndelsistema.
Elsistemadebloqueodesegufidadimpidequeelmotorarranqueamenos
queest(_colocadoelfrenodemano,ylapalancadetomadefuerza(PTO)
(enganchedecuchilla)est_enposid6ndesconectada(OFF).
Sieloperadorabandonasuasientoantesdecolocarel frenodemano,el
sistemadebloqueodesegufidadapagaautom_ticamenteelmotor.
SieloperadorabandonasuasientoconlapalancadelaPTO(enganche
decuchilla)conectada,elsistemadebloqueodesegufidadapaga
autom_ticamenteelmotor,independientementedequeelfrenode
manoest_puestoo no.
Elmotorseapagar_autom_ticamentesilapalancadela PTO(enganchede
cuchilla)secolocaenposid6nenganchada(ON)conla palancadecambios
enposid6nmarchaarras.
Noopereeltractorsiel sistemadebloqueofuncionareal.Elsistemarue
diseffadoparabrindarleseguridady protecci6n.
Intermptordeencendido
Elinterruptordeencendidoseactlvaparaarrancarelmotor.InsertelaIlaveenel
interruptordeencendidoygireenelsentidodelasagujasdelrelojalaposici6n
START(arranque).Sueltela Ilaveenlaposid6nON(encendido)unavezquehaya
arrancadoelmotor.Yeala Fig.19.
Paradetenerelmotor,girelaIlavedeencendidoensent[docontrafioalasagujasdel
relojhastalaposid6nOFF(apagado).Yeala Fig.19.
Nuncadejela m_quinaenfuncionamientosinvigilancia.Cortesiemprela
PTO,muevala palancadecambiosalaposici6nNeutral(puntomuerto),
pongaelfrenode mano,pareel motor yretire la Ilave,paraevitarque
alguienenciendaaccidentalmenteel motor.
f
Encendido
Apagado
Arranque
Figura19
86

Evite iesionesgraveso ia muerte
Conozcala ubicad6nyfund6ndetodosloscontroles.
Extraigalosobjetosquepodrianserarrojadosporlascuchillas.
Recorralaspendienteshadaarribay haciaabajo,nodemaneratransversal.
Tengasumocuidadoenlaspendientes.Nocorteel c_spedenpendientes
dem_sde12°. Eviterealizargirosabruptos.Conduzcaabajavelocidad.
Noutilicelaunidadenlugaresdondepodriaresbalarovolcar.
Silam_quinaseparamientrassubelapendiente,parelascuchillasy
retrocedalentamenteparaabajo.
Antesdeabandonarlaposid6ndeloperador,desconectelascuchillas,
pongaelfrenodemano,apagueel motorysaquelallave.
Asegt#esequelascuchillasyelmotorsedetenganantesdecolocarlas
manosolospiescercadelascuchillas.
Mantengalosdispositivosdeseguridad(guardas,protectores,
interruptores,etc.)ensulugaryenfundonamiento.
Mantengaalejadosalosobservadores.
Dejequeseenfrieel motorantesdealmacenarotransportarlaunidad.
Mantengalam_quinafibrederesiduos.
Leael Manual del operador
Colocaci6ndel freno de mano
Paracolocarelffeno de mano:
I. Presionetotalmenteelpedaldelfrenoymant_ngalohaciaabajoconel pie.
2. Muevalapalancadelfrenodemanohaciaabajohastalaposici6n
defrenodemano.
3. Suelteelpedaldelfrenoparapermit#queelfrenodemanoquedepuesto.
Parasacarelfreno demano:
I. Oprimaelpedaldel#enoymuevalapalancadecontroldevelocidadhasta
quequedefueradelaposici6ndefrenodemano.
Fijaci6nde iaaltura de torte
Seleccionelaposici6ndealturadelaplataformadecortecolocandolapalancade
elevad6ndelaplataformaencualquieradelasmuescasdediferentealturadecorte,
delladoderechodelguardabarros.
Encendidodei motor
Noopereeltractorsiel sistemadebloqueofuncionareal.Elsistemafue
disehadoparabrindarleseguridady protecd6n.
NOTA:Consultelasecd6nMontajedeestemanualparaobtenerinstruccionessobre
el Ilenadodeaceiteygasolina.
1. InsertelaIlavedeltractorenelinterruptordeencendido.
2. ColoquelapalancadelaPTO(enganchedecuchilla)enlaposici6nOFF
(desconectada).
3. Coloqueelfrenodemanodeltractor.
4. Activeelcontroldelestrangulador.
5. GirelaIlavedeencendidoenelsentidodelasagujasdelrelojhastala
posici6nSTART(arranque).Unavezquearranqueel motor,sueltelaIlave.
Volver_alaposid6nON.
IMPORTANTE:NOmantengala flareenlaposici6nSTART(arranque)
durantem_sdediezsegundosporvez.SiIohace,puedeocasionardaffosal
arrancadorel_ctricodelmotor.
6. Despu_sdequearranqueelmotor,desactiveelcontroldelcebador
colocandoelcontroldelaceleradorenlaposid6nFAST(r_pida).
flO@:NOdejeel controldelcebadoractivadomientrasoperaeltractor.SiIohate,
segenerar_unamezcladecombustible"rica",Iocualhar_queelmotorno
fundonebien.
l)etend6n dei motor
Sigolpeacontraalgunobjetoextraffo,detengael motor,desconecteel(los)
cable(s)dela bujiay conecteel motoramasa.Inspeccioneminudosamente
la m_quinaparavet siest_daffada.Repareel daffoantesdevolvera
[encendere motoryoperar am_quna.
1. Silascuchillasest_nenganchadas,coloquelapalancadela PTO
(enganchedecuchilla)enlaposici6nOFF(desconectada).
2. Girela Ilavedeencendidoensentidocontrarioalasagujasdelreloj
alaposici6nSTOP(parar).
3. Retirela Ilavedelinterruptordeencendidoparaevitarquealguien
enciendaaccidentalmenteelmotor.
Mantengalasmanosypiesalejadosdela aberturadedescargadela
plataformadecorte.
87

Conducci6ndeitractor
Evitearrancarsubitamente,desarrollare×cesivavelocidadydetenerse
derepente.
Noabandoneelasientodeltractor sincolocarprimero laPTO(enganchede
cuchilla)enla posici6nOFF(desconectada),presionarelpedaldelfrenoy
colocarelfreno demano.Sidejaeltractorsinvigilancia,apagueel motory
retirelallavedeencendido.
Siempremirehaciaabajoy haciaatr_santesymientrassedesplazamarcha
atr_s,paraevitarunaccidente.
Oprimaelpedaldelfrenoymuevala palancadecontroldeveloddad
hastaquequedefueradelaposid6ndefrenodemano,luegodejeque
sesuelteelfreno.
2. Muevalapalancadelaceleradora laposid6nFAST(RAPIDA,
representadaporunaliebre).
3. Coloquela palancadecambiosenposid6nFORWARD
(marchaadelante)oREVERSE(marchaatr_s).
IMPORI'ANTE:NOuselapalancadecambiosparacambiarladirecci6nde
desplazamientomientraseltractorest_enmovimiento.Siempreuseel
pedaldefrenoparadetenerel tractorporcompletoantesdehacerelcambio.
4. Suelteelfrenodemanopresionandoelpedaldelembrague-freno
ycolocandolapalancadecontroldeveloddadenlaposid6ndeseada.
IMPORTAIVTE:Quienesutiiicenlam_quinaporprimeravezdebenusar
lasposicionesdeveloddad162.Familiarkeseporcompletoconel
fundonamientoyloscontrolesdeltractorantesdeoperarlam_quina
enposidonesdemayorveloddad.
5. Suelteelpedaldelembrague-frenolentamenteparaponerlaunidad
enmovimiento.
6. Eltractorcortac_spedsedetienepresionandoel pedaldelembrague-freno.
NO@:AIoperarlaunidad[nkialmente,habr_pocadiferendaentrelasdos
veloddadesm_saltashastaquelascorreassehayanasentadoenlaspoleas
duranteelperiododeablande.
Antesdeabandonarlaposici6ndeloperador,desenganchelascuchillas,coloque
lapalancaenneutral,coloqueelfrenodeestadonamiento,apagueel motory
retirelaIlavedeencendido.
Silaunidadsedetieneconelcontroldeveloddadenlaposid6ndealtaveloddad,
osilaunidadnofundonaconlapalancadecontroldeveloddadenlaposid6nde
bajaveloddad,realiceIosiguiente:
1. Coloquelapalancadecambiosenposici6nNEUTRAL(puntomuerto).
2. Vuelvaaencenderelmotor.
3. Coloquelapalancadecontroldeveloddadenlaposici6nde
veloddadm_salta.
4. Sueltecompletamenteelpedaldelembrague-freno.
5. Presioneel pedaldelembrague-freno.
6. Coloquelapalancadecontroldeveloddadenlaposici6ndeseada.
7. Coloquelapalancadecambiosenlaposid6nFORWARD(marchaadelante)
o REVERSE(marchaatr_s),ysigaelprocedimientonormaldeoperad6n.
Operaci6nenpendiente
ConsulteelINDICADORDEPENDIENTESenlasecci6nInstruccionesdeseguridad
delmanualparacontribuiradeterminarenqu6pendientespuedeoperareltractor
conseguridad.
Nocorteenpendientesconunainclinaci6ndem_sde12°(elevaci6n
aproximadade2piesporcada10pies).Eltractorpodriavoltearseycausar
lesionesseveras.
Enlaspendientescortehadaarribayhadaabajo,NUNCAen
formatransversal.
Tengamuchocuidadoalcambiardedirecd6nenunapendiente.
Est_atentoaloshoyos,surcos,baches,rocasuotrosobjetosocultos.
Elterrenodesniveladopuedevoltearlam_quina.Elc_spedaltopuede
ocultarobst_culos.
Eviterealizargiroscuandoopereenunapendiente.S[deberealizarungiro,
h_galopendienteabajo.Subirunapendienteaumentaenormementelas
posibilidadesdequeelvehkulod(_unavueltadecampana.
Evitedetenersecuandosubaunapendiente.Sifuesenecesariodetenerse
mientrassubeunapendiente,arranquesuaveycuidadosamenteparareducir
laposibilidaddequeeltractorseddvueltahaciaarras.
/MPORTANTE:Siemprequedetengaeltractorporcualquierraz6nenun_reade
c(_sped,hagaIosiguiente:
1. Coloquela palancadecambiosenpuntomuerto,
2. Coloqueelfrenodemano,
3. Apagueelmotory retirelaIlave.Esopermitir_redudralminimola
posibilidaddequesuc_spedresulte"quemado"porelescapecalientedel
motorenfundonamiento.
88

Enganchede iascuchUlas
AIconectarlaPTO(enganchedecuchilla)sesuministraalimentaddnalaplataforma
decorte.Paraconectarlascuchillas,hagaIosiguiente:
I. Muevalapalancadecontroldelacelerador/cebadora laposiddnFAST
(RAPIDA,representadaporunaliebre).
2. TomelapalancadelaPTO(enganchedecuchilla)ygirelatotalmentehada
adelantealaposid6nON(enganchada).
3. MantengalapalancadelaceleradorenlaposiddnFAST(r_pido;representada
porunaliebre),paraunusom_seflcazdela plataformadecorte.
NOT/!:Elmotorseapagar_autom_ticamentesilapalancadelaPTO(enganche
decuchilla)secolocaenposiddnenganchada(ON)conlapalancadecambiosen
posiddnmarchaatr_s.
Abono
Seencuentradisponiblecomoaccesoriounkitdeabono.Elabonoesunproceso
porelcualserecirculanlosrecortesdec_speddemanerarepetidadebajodela
plataformadecorte.Losrecortesmuyfinosluegosondespedidoshadaatr_spara
quesedepositenenelc_spedyactuencomofertilizantenatural.ComuNquesecon
elCentrodeserviciodereparadonesy piezasm_scercanoparacomprarunkitde
abonoparaestaunidad.
ParaubicarelCentrodeservidodereparadonesypiezasm_scercano,comuNquese
al1-800-4-MY-HOME®.
Usode la palancade elevaci6nde laplataforma
Paraelevarlaplataformadecorte,muevalapalancadeelevad6ndelaplataforma
hadalaizquierdaycol6quelaenlamuescaquemejorseadaptea[aaplicad6n
deseada.ConsulteAjustedelaalturadecorteanterlormenteenestamlsmasecd6n.
Cortede c sped
Paratratar deevitarelcontactoconlascuchillasounaiesi6npotalgt_n
objetoqueseaarrojado,mantengaalosobservadores,a losayudantes,
niffosymascotasalejadosal menos25metrosdela m_quinamientrasest_
enfundonamiento. Detengala m_quinasialguienseacerca.
LasiguienteJnformad6nser_deutilidadcuandouselaplataformadecorte
consutractor:
Planifiqueeipatrdndetorte, paraevitarqueladescargadematerialesse
realicehacialoscaminos,iasveredas,losobservadores,etc.Eviteadem_s
descargarmaterialcontraunaparedu obstrucci6n,yaqueestopodriahacer
queel materialdescargadorebotecontraeloperador.
Nocorteaaltaveloddaddeplso,espedalmentesitienelnstaladounkit de
abonoouncolectordec_sped.
Paraobtenerlosmejoresresultados,serecomlendarealizarlosdosprlmeros
cortesdec_spedarrojandoladescargahadaelcentro.Despu_sdelasdos
primerasvueltas,cambieladlrecd6nparaarrojarladescargahadaafuera,
paraequlllbrarel corte.Estootorgar_unmejoraspectoalc_sped.
Nocorteelc_speddemasiadocorto.Elc_spedcortoespropldopara
elcredmientodemalezasyseponeamarillor_pidamentecuando
escasealaIluvia.
Elcortedelc(gpedsiempredeberealizarseconelaceleradordel
motoralm_ximo.
Enterrenosdifkiles,puederesultarnecesarlopasarporsegundavez
eltractorcortac#spedsobreel_reayacortada,paraobteneruncorte
m_sprolijo.
NOintentecortarmalezasfrondosasoc_spedextremadamentealto.
Eltractorfuediseffadoparacortarelc_sped,NOparapodarmalezas.
Mantengalacuchillaafiladay c_mbielacuandosegasten.Consulte
Cuchilladecorteenlasecci6nMantenimientodeestemanualparaobtener
instruccionessobrec6moafilarcorrectamentelascuchillas.
Losfarosseapagan(OFF)cuandosecolocala llavedeencendido
enlaposid6nSTOP.
89

PROGRAMADEMANTENIMIENTO
Antesderealizarcualquiertipo demantenimientooservicio,desenganche
todosloscontrolesy detengael motor.Esperea quesedetengancomple-
tamentetodaslaspiezasm6viles.Desconecteelcabledelabujiayp6ngalo
haciendomasacontraelmotor paraevitarqueseenciendaaccidentalmente.
Otilicesiempreanteo]osdeseguridadduranteelfuncionamientoomientras
ajustaoreparaesteequipo.
Antesdecadauso 1. Niveldeaceitedelmotor
2. Filtrodeaire
3. Areadelsilendadorycontroles
Durantelasprimeras 1. Aceitedelmotor
dncohoras
Cada10horas
Cada25horas
4.
Cada50horas I.
Anualmente
Antesdealmacenar
1. Respiraderosdelcap6/tablerodeinstrumentos
2. Bornesdelasbater[as
3. Husilloym_nsula[ntermediadelaplataforma
1. Prefiltrodelfiltrodeaire*
2. Filtrodeaire*
3. Brazosdemando[ntermedios,ejesdepivote,
cremallerayejes
Cojinetesdelasruedasdelanteras
Aceitedelmotor/filtrodeaceite
2. S[lendador
1. Filtrodeaire
2. Prefiltrodelfiltrodeaire
3. Bujiadeencendido
4. Sistemadeenfriamiento*
5. Filtrodecombustible
6. Engranajesdeladirecd6n
7. Ruedastraseras
1. Respiraderosdelcap6/tablerodeinstrumentos
2. Bornesdelasbater[as
3. Brazosdemando[ntermedios,ejesdelpivoteyejes
4. Cojinetesdelasruedasdelanteras
5. Husilloym_nsula[ntermediadelaplataforma
6. Puntosdepivotedelpedal
*Realkeelservic[om_sfrecuentementecuandohayam_spolvo.
Antesderealizartareasdemantenimientooreparadones,desconectela PTO
(palancadeengancbedecucbillas),pongaelfrenode mano,apagueel motor
retirelallaveparaevitarelencendidoaccidentaldelmotor.
Sigaelcronogramademantenimientoquesepresentaacontinuad6n.Estatabla
s61odescribepautasdeservido.UtilicelacolumnaRegistrodeServidoparahacerel
seguimientodelastareasdemantenimientocompletadas.
Paraubkarel Centrodeserviciodereparadonesy piezasm_scercano,
simplemente flameal (800)659-5917.
1. Verificar
2. Limpieza/Reemplazo
3. Lim)lar
1. Cambiar
1. Lim)lar
2. Lim)lar
3. Lubrkar
1. Lim)lar
2. Lim)lar
3. Lubricar
4. Lubrkar
1. Cambiar/Reemplazar
2. Verificar
1. Reem)lazar
2. Reem)lazar
3. Reem)lazar
4. Lim_ar
5. Reem)lazar
6. Lim_ar
7. Sacarlosejesyengrasarlos
1. Lim_ar
2. Lim_ar
3. Lubricar
4. Lubricar
5. Lubricar
6. Lubricar
Sielmotorhaestadoenfundonamiento recientemente,el motor,el silencia-
dory lassuperficiesmet_licascircundantesestar_ncalientesy puedencausar
[quemadurasen ap e. Tengacudadoparaev tar quemaduras.
9O

MANTENIMIENTODELMOTOR
Apagueel motorantesderealizareJmantenimiento.Paraevitar unapuesta
en marchaaccidental,desconecteJafundadeJabujia.
IMPORTANTE:Siel motordebeinclinarseparatransportarequipooparainspec-
cionaro extraerpaste,mantengaelladedelabujiadelmotorhadaarriba.Silabujia
delmotorsetransportaoseinclinahaciaabajopuedecausarhumo,problemasde
arranque,suciedadenlabujiaosaturaci6nconaceitedeldepuradordeaire.
Lainspecci6nylosajustesperi6dicosdelmotorsonesendalessisedeseamantener
unaltoniveldedesempeho.Elmantenimientoregulartambi_ngarantizarauna
prolongadavidatitil delmotor.Losintervalosdemantenimientorequeridosyelripe
demantenimientoasetrealizadosedescribenenlatabladelapaginaprecedente.
Sigalosintervalosperheraocalendarios,Ioqueocurraprimero.Cuandoseoperaen
condicionesadversasesnecesarioIlevaracabounmantenimientomasfrecuente.
Siel motorhaestadofuncionando,el silenciadorestar_muycaliente.Tonga
cuidadoparanotocarel silenciador.
Serviciodel aceite del meter
6. SiIodesea,realiceelserviciodelfiltro deaceitecomeseindicaposteriormente
enestasecci6n.
7. Vuelvaainstalarel tap6ndedrenadoyajtistelofirmemente,12-14Nm
(106.2-123.9pulgada-libra).
8. Extraigalamangadedrenadodeaceitedelcarterdeaceite.Vuelvaacolocar
lavarilladeniveleneltubedeIlenadodeaceiteyenrosqueeltap6nde
Ilenadoensulugar.
9. VuelvaaIlenarelmotorconaceiteparamotornuevo.ConsulteGasolina
yaceiteenlasecd6nMontajedeestemanualparaobtenerinformad6n
reladonadaconelripedeaceiteaprobado.
IMPORTIINTE:Elaceiteusadodelmotorpuedecausarcancerdepielsientraen
contactoconlapieldemanerareiteradayperperiodosprolongados.Sibienesto
esimprobableamenosquemanipuleaceiteusadoredeslosdfas,sinembargoes
recomendablelavarsebienlasmanesconaguayjab6ninmediatamentedespu_s
dehabermanipuladoaceiteusado.
flOTA:Elimineelaceitedelmotorusadodelamaneraqueseacompatibleconel
medioambiente.SugerimosqueIocoloqueenunrecipienteselladoyIoIleveala
estad6ndeservidolocalparasurecuperad6n.NoIotirealabasuraniIoviertaen
eldrenajeoenelsuelo.
Inspeccioneel niveldeaceiteregularmente.
Asegtiresedequesemantengaelnlveldeaceltecorrecto.Controleelaceite
cadadncoadiezhorasdefuncionamiento,antesdeponerenmarchaelmotor.
ConsulteControldelniveldeaceiteenlasecd6nMontaje.
Usesolamenteunaceitedetergentedealtacalidadcuyaclasificad6ndeservido
APIseaSF,%, SHoSJ.SeleccioneelgradedeviscosldadSAEdelaceitesegtin
latemperaturadeoperad6nesperada.ConsulteGasolinayaceiteenlasecd6n
Ensambladodeestemanual.
Drenajedelaceite
IMPORTANTE:Asegt_resedeinspeccionarelmotorsobreunasuperficienivelada
yconel motorapagado.Droneelaceitemientraselmotorest_calientepara
asegurarundrenajerapidoycomplete.
Paradrenarelaceitedelcarterdemotordeciertosmodelosdetractores,seadjunta
unamangadeplasticoparadrenadodeaceitejuntoconesteManualdelOperador.
Paradrenarelaceite,procedadelasiguientemanera:
1. Desenrosqueeltap6ndeIlenadodeaceiteyextraigalavarilladenivelde
aceitedeltubedeIlenado.
2. Coloqueelextremepeque_odelamangadedrenadoenelcarterdeaceite.
Yeala Figura20.
3. Extraigaeltapbndedrenadoyvadeelaceiteenuncontenedorapropiado,
conunacapacidadnomenora64oz.
4. Inclineeltractorligeramenteendirecdbndeunredpienteadecuadopara
ayudaradrenarpercompleterodeelaceitedelmotor.
Antesdeindinarel motor oequipo paradrenarelaceite,droneel
combustibledeldep6sitohaciendofuncionar el motor hastaqueel
dep6sitodecombustibleest_ vado.
5. Realiceelserviciodelfiltrodeaceitecomeseindicaposteriormente
enestasecd6n.
Figura20
geemplaze del filtre de aceite
Estemotorestaequipadoconunfiltrodeaceitearosenquedebereemplazarse
cadavezqueserealizauncambiodeaceite,encadaestaci6nocada50horns.
ConsultelaFigura21.
Parareemplazarel filtro de aceite:
1. Dreneelaceitecomeseindk6precedentementeenestasecd6n.
2. Extraigaelfiltrodeaire.Desecheelfiltroviejodemaneraadecuada.
3. Lubriquelajuntadelfiltro nuevoconaceiteIimpio.
4. Coloqueygireelfiltro deaceitemanualmentehastaquelajuntaentreen
contactoconlasupefficiedeselladodelacubiertadelcarter,luegoajusteel
filtro deaceite,10-12Nm(88.5-106.2pulgada-Iibra),1/2-3/4degiro.
5. Agregueaceitecomoseindic6precedentemente.
6. Asegt_resedequelavarillademedici6nest_instalada.
7. Enciendayhagafuncionarel motor.Compruebesihayfugas.
91

8. Detengael motor.Espereunosminutosycontroleelniveldeaceite.Consulte
Controldelniveldeaceiteenlasecci6nMontajedelpresentemanual.
Filtro de aceite
J
Figura21
Procedimiento para agregar aceite
li@ORTANTE:Asegtiresedeinspecdonarel motorsobreunasuperfidenivelada
yconel motorapagado.
1. Limpiealrededordelatapayeltubodelavafillademedici6nconunatela
limpiaparaeliminarlosresiduos.VealaFigura22.
Figura22
2. Saquelavafillademedki6ndelniveldelaceiteylimpielaconunatela.
3. Viertaaceitedentrodeltubodelavafillademedid6n.Nollene
excesivamente.Conuncambiodefiltrodeaceitelacantidaddeaceitedealto
nivelparaestemotoresde1700ml(57.48onzasliquidas).
4. Coloquelavafillademedici6nygirelahastalaposid6nenquequedatrabada
antesdearrancarel motor.
5. Arranqueelmotor.D_jeloenmarchaduranteunossegundosy luego
apagueel motor.
6. Controleel niveldeaceite.ConsulteControldelniveldeaceiteenlasecd6n
Montajedelpresentemanual.
Mantenimiento delfiltro deaire
Losfiltrosdepapelnosepuedenlimpiarysedebenreemplazarcada100horas
defuncionamiento;conmayorfrecuenciasiseutilizanenlugaresdondeabunda
el polvo.
Nuncausegasolinaosolventesdepuntodeencendidobajoparalimpiarel
elementodelfUtrodeaire.Podriaproducirseunincendiooexplosi6n.
Nouseairepresurizadonidisoiventeparalimpiarel¢artuchopurificador
deaire.
Sinoseinstalancorrectamentelosfiltros olascubiertas,lasexplosiones
[del carburadorpuedencausarlesionesgravesola muerte. Nointente
[haterarrancarelmotor cuandonoest_ncolocados.
IMPORTANTE:Nuncaopereel motorsinelfiltrodeaire.Resultakiendesgaste
r_ipidodelmotor.
1. Desenrosquelostornillosdeorejetasyquitelacubiertadelfiltro deaire.
VealaFigura23.
f
Tornillo de
orejetas
Tapa del filtro
deai
/
Figura23
92

2.
f
3.
Extraigaelfiltrodeaire.Veala Figura24.
/'i
/// i
........Y
J
Figura24
Retireelpreflltrodeespumadealrededordelfiltrodeairedepapel.Veala
Figura25.Reemplaceelelementodepapelsiest_sudoodafiado.Limpieel
elementodeespumaoreempl_celosJest_dafiado.
Figura25;
4. Afindelimpiarelelementodeespuma,I_velocondetergenteliquidosuave
yagua.Apdeteuopdmaelelementodeespumaparaenjuagarlasudedad
yelagua.NoIoretuerza;siIohate,podriadafiaro rasgarel elementode
espuma.Permitaquesesequebienantesdeusarlo.NOlubdqueelelemento
deespuma.
5. Sujeteelfiltrodeairenuevoconel elementodeespuma,paraIocualdebe
alinearel orificiodelfiltro deaireconelcolectordeadmisi6n.YealaFigura26.
admisi6n
Figura26
Sujetelacubiertadelfiltrodeairecomprobandoquequedenalineadas
lasnervaduraspl_sticasdelacubiertaconlosdispositivospl_sticosdela
cubiertadelfiltro deaire.YealaFig.27.Girelostornillosdeorejetasenel
sentidodelasagujasdelrelojhastaquequedenajustados.Controlesihay
problemasdealineaci6n.
Tapa del filtro
deaire
Dispositivo
Cubierta
Mantenimientodebujia
Figura27
NOpruebelachispasinoest_la buj[adeencendido.NOd_arranqueal motorsino
est_labuj[adeencendido.
Paraasegurarsedequeelmotorfundonebien,labuj[adebetenerunaseparaci6n
correctay debeestarlibrededep6sitos.
1. Retirelafundadebuj[ayutiliceunaIlaveparabuj[asparaextraerlabuj[a.Vea
laFigura28.
93

Siel motor haestadofuncionando, elsilendadorestar_muy caEente.
Tengacuidadoparanotocarelsilendador.
Funda de bujia j
Figura28
Inspeccionevisualmentelabujia.Eliminela bujiasipresentamuchodesgaste,
osielaislanteest_agrietadooastillado.Limpielabujiaconuncepillode
alambresisevaareutilizar.
Midalaseparaci6ndebujiaconuncalibrador.Corrijadesetnecesariotorden-
doelelectrodolateral.Yeala Figura29.Laseparaci6ndebeestablecersepara
quequedeentre0.024-0.031pulg.
f Electrodo
Figura29
4. Verifiquequelaarandeladelabujiaest_enbuenascondidonesyenrosquela
bujiahadaadentromanualmenteparaevitarelenrosquecruzado.
5. Unavezquelabujiaest_asentadaensulugar,ajusteconunaIlaveparabuj[a
paracomprimirlaarandela.
NOTA:Cuandoinstaleunabujianueva,apriete1/2devueltaunavezquela
bujiaseencuentracolocadaensulugarparacomprimirlaarandela.Cuando
vuelvaa colocarunabujiausada,apriete1/8- 1/4degirodespu(_sdequela
bujiaseasientaparacomprimirlaarandela.
IMPORTANTE:Labujiadebeestarfirmementeasegurada.Silabuj[anoest_
bienaseguradapuedecalentarsemuchoydaffarelmotor.
Mantenimientodelfiltro decombustible
la gasolinayelvapordegasolinasonsumamenteinflamablesy
Iexpiosivos.Elfuegoylasexpiosionespuedencausarquemadurasgraves
tambi_nlamuerte.
Mantengalagasolinaalejadadechispas,llamasexpuestas,llamaspiloto,
calor,yotrasfuentesdeignici6n.
Verifiquefrecuentementelaslineasdecombustible,eltanque,eltap6n,ylos
accesoriosbuscandorajadurasop6rdidas.Reemplacedesetnecesario.
Antesdereemplazarelfiltrodecombustible,dreneeldep6sitodecombustible
comoseindicaenParadrenarelcombustible.
Nodreneelcombustiblecuandoel motorest_caliente.Permitaqueelmotor
seenfriebien.Dreneelcombustibledentrodeunredpienteaprobadoyalaire
libre,lejosdecualquierllamaexpuesta.
Dreneunvolumendecombustiblegrandedesdeeldep6sito,desconectando
la I[neadecombustibledelfiltrodecombustibleenI[neaqueseencuentra
cercadelmotor.
Retirelalineadecombustibledelladoenlinea(ladoorientadoaldep6sito
decombustible)delfiltrodecombustible.
Losrepuestosdebenserlosmismosysedebeninstalarenlamismaposid6n
quelaspiezasoriginales.
Sisederramacombustible,esperehastaqueseevaporeantesdeencender
el motor.
Antesdereemplazarelfiltrodecombustible,dreneeldep6sitodecombusti-
ble.DeIocontrario,el combustiblepuedegotearycausarunincendio
ounaexplosi6n.
Paradrenarelcombustible:
Ubiqueelfiltrodecombustible,quepasadelladoizquierdodelmotor,entre
eltanquedecombustibleyelcarburador,ypuedeestarsujetoal motorcon
unatira deuni6n.Cortelatira,sila hay,luegosujetelaabrazaderaenlinea
delfiltro decombustibleconunpardepinzas,deslkelaabrazaderahada
arribapotlaI[neadecombustible.Saquelalineadecombustibledelfiltroy
coloqueelextremoabiertodela I[neaenunredpienteaprobadoparadrenar
elcombustible.
Paracambiarelfiltro decombustible:
2. UtilicepinzasparaapretarlaslengiJetasdelaotraabrazadera(elladofuera
delineadelfiltro decombustible),luegodeslicelaabrazaderaalej_ndoladel
filtro decombustible.Gireytiredelalineadecombustibledelfiltro.
YealaFigura30.
3. VerifiquequelasI[neasdecombustiblenotienenrajaduraso p_rdidas.
Reemplacedesetnecesario.
4. Reemplaceel filtrodecombustibleporunfiltro derecambiodeequipo
original.Llamea1-800-4-MY-HOME®paracomprarelfiltroderepuestodel
equipooriginal.
5. SujetelasI[neasdecombustibleconlasabrazaderas.
Elfiltro decombustiblenosepuedelimpiarysedebereemplazarcada100horasde
fundonamiento;conmayorfrecuendasiseutilizacongasolinavieja.
94

Filtro de
combustible
\
Leng_3eta
Linea de
Abrazadera
j/
%=
Figura30
I.impieelmotor
Sielmotorhaestadofundonando,d_jeloenfriardurantepotIomenosmediahora
antesdelimpiarlo.Retireperi6dicamentelasuciedadacumuladaenelmotor.
Limpielasaletasderefrigeraci6ndelmotorcada25horas.Limpieconuncepillo
oairecomprimido.
IMPORTANTE:Norodeel motorconaguaparalimpiarloporqueelaguapodr[acon-
taminarelcombustible.Conunamangueradejard[noequipodelavadoapresi6n
tambi_npuedeforzaraguadentrodelfiltro deaireolaaberturadelsilenciador.El
aguaenelfiltrodeaireembeber_elelementodepapel,yel aguaquepasaatrav_s
delelementoosilenciadorpuedeingresarenelcilindro,causandodaSo.
la acumulad6nderesiduosalrededordelsilendadorpodriaprodudrun
incendio.Inspecci6neloylimpieloantesdecadauso.
EXTRACCIONDELAPLMAFORMADECOETE
Para extraer la plataforma decorte, procedade la siguiente manera:
1. Coloquela palancadelatomadefuerza(PTO)(enganchedecuchilla)enla
posici6nOFF(desconectada)ypongaelfrenodemano.
2. Bajela plataformacolocandolapalancadeelevad6ndela plataforma
dentrodela muescainferiordelguardabarrosderecho.
3. ExtraigalacorreadealrededordelapoleadelaPTOdeltractor.
Yeala Figura31.
Figura31
Extraigaelpasadordechavetaconuni6ncurvaylaarandelaplanadel
conjuntodeelevaci6ndelaplataformaygu_rdeloparavolveracolocarlo
posteriormente.YealaFigura32.
Figura32
Evitelaslesionesporcompresi6n.AIextraerla correa,nocoloquenunca
losdedosen elresorteintermediooentrela correay unapolea.
95

5.
Extraigalospasadoresdechavetaconuni6ncurvaqueatinest_nsujetando
launidad,comoseindicaenlaFigura33.
.. J
Figura33
NOTA:Lospasadoresdechavetaconuni6ncurvasedebenvolveracolocarde
arribahaciaabajo.
6. Muevalapalancadeelevad6ndelaplataformadentrodelamuesca
superiordelguardabarrosderechoparalevantarlosbrazosdeelevad6ndela
plataformaysacarlosdelcamino.
7. Desconecteelcableadoenespiraldelinterruptordeseguridaddelaplataforma.
8. ExtraigaconcuidadoelcabledelaPTOdelaparteposteriordelaplataforma
decorteretirandoelpasadordechavetaconuni6ncurvaqueIosujeta.Retire
elresortedelsoportedepoleaIotadelaplataforma.VealaFigura34.
9.
Figura34
Deslicesuavementelaplataformadecorte(desdeel ladoizquierdo)hacia
afueradesdelaparteinferiordeltractor.
Cambiodelacorreadelaplataforma
J
NOTA:5epuedecambiarlacorreadelaplataformasindesinstalarlaplataformade
cortedeltractor;sinembargo,resultamuchom_sf_cilextraerprimerolaplatafor-
ma,cambiarlelacorreayluegovolverainstalarlaplataformadecorte.
Paracambiarlacorreadelaplataformadecorte,procedadelasiguientemanera:
I. Lom_sf_cilescambiar[acorreadelaplataformaextrayendoprimerola
plataformadecortecomoseindicapreviamenteenestasecci6n.Omitaeste
pasosidecidecambiarlacorreadelaplataformasinextraerlaplataformade
cortedelaunldad.DeIocontrario,extraigalaplataformadecorteahora.
2. Sivaacambiarlacorreadelaplataformaconlaplataformadecorteinstalada
enlaunidad,bajelaplataformadecortea laposici6ndecortem_sbaja.
3. Extraigalacorreadealrededordela poleadetransmisibndelaPTOdela
unidadcomoseindicaenla Figura31.Simplementedejerodarunladodela
correaparaquesalgadelapoleayluegodebeseguirsac_ndolatodoalrededor
delapoleahastaquesesueltadela polea.
4. Llevelacorreahaciaelfrentedelaunidad,jal_ndolaatrav(_syhadaafuerade
la m_nsuladelguardacorrea,comoseindicaenlaFigura31.
5. Extraigalacubiertadelacorreadelaplataforma,paraIocualdeber_retirarlos
trespernoshexagonalesquelasujetan.VealaFigura35.
Figura35
Extraigaelespaciadordelguardacorreaextrayendolospernoshexagonales
quelasujetan.VealaFigura36.
Perno hexagonal del guardacorrea
J
Figura36
Cambielacorrea,luegovuelvaainstalartodosloscomponentesqueextrajo
siguiendoelordeninverso,comenzandoporlapoleaIocayterminandoporla
cubiertadelacorrea.
96

8. Paselacorreadelaplataformaatrav(_sdelam_nsuladelguardacorreay
col6quelaalrededorysobrelapoleadetransmisi6ndelaPTO,comoseindica
enla Figura31.
NEUM_,TICOS
Nuncaexcedalapresi6nm_ximadeinfladoqueseindicaenloslateralesde
losneum_ticos.
Lapresibnoperativarecomendadaparalosneumaticoses:
• Aproximadamente10psiparalosneum_ticostraseros
• Aproximadamente14psiparalosneum_ticosdelanteros
IMPORTANTE"Consulteloslateralesdelasruedasparaconocerconexactitud
lapresi6nm_ximaenpsirecomendadaporelfabricante.Nolosinfleenexceso.
Unapresi6ndeneum_ticosdesparejapodriahacerquelaplataformanocorteel
cdspedparejo.
CUCHILLADECOETE
Apagueelmotor yextraigala IlavedecontactoantesderetirarlascuchiF
lasdetorte paraafllarlas oreemplazarlas.Protejasusmanosutiiizando
guantesreforzadoscuandosujetelascuchiiias.
Inspeccioneperi6dicamentelacuchiilay/oelhusilloenbuscade
rajadurasodafios,especialmentedespu_sdegoipearunobjetoextrafio.
Nooperelam_quinabasradespu_sdehaberreemplazadoloscomponen-
tesda_ados.
Pararetirarlacuchilla,hagaIosiguiente.
2.
3.
NOTA:Puederesultarm_sf_cilcambiarlacuchillaempezandoprimeropor
extraerla plataformadelaparteinferiordeltractor,(consultelasecci6n
Extracci6ndelaplataformadecorteenpartesanterioresdeestasecci6n);
luegovolteecondelicadezalaplataformaparadejaraldescubiertosuparte
inferior.Sinembargo,esposiblecambiarlacuchillasinsacarlaplataforma
deltractor.Siseintentacambiarlacuchillasinsacarlaplataformadeltractor,
primerosedebemoverlapalancadeelevaci6ndelaplataformahastasu
posici6ndecortem_selevada.
Extraigalaclavijadeabono,elcanaldelaplataformaoelcanaldela
embolsadora,sivieneequipado,dejandoalavistalaaberturadelcanal
delaplataforma.
Useunbloquedemaderaoun2x4,ins(_rtelodentrodelaaberturadela
plataformay hagagirarlacuchillahastaquelamaderahagacuffaentrela
aberturadelaplataformaylacuchilladecorte,comoseindicaenlaFigura37.
Extraigalatuercadebridahexagonalqueaseguralacuchillaalmontajedel
husilloyretirelacuchilla.Yeaelrecuadrodela Figura37.
NOTA:Elhusillodelaplataformatieneunaroscanormal.Paraaflojarlo,rote
latuercadeseguridadconbridaensentidocontrarioalasagujasdelreloj.
Figura37
Paraafilarlascuchillasdecortedeformaadecuada,extraigacantidades
igualesdemetaldeambosextremosdelascuchillasaIolargodelosbordes
cortantes,paraleloalbordedeca[dayaun_ngulode25°a 30°. Afilesiempre
cadabordedelascuchillasdecortedeformaparejaparamantenerun
equilibrioadecuadoentrelasmismas.YealaFigura38.
Sielhordedetortedelacuchillahasidoafiladopreviamenteosiexiste
unaseparad6ndemetal,reempiacelascuchiiiaspototrasnuevas.
Unacuchillarealequilibradacausaraexcesodevibraci6nypuededafiar
eltractory/ocausarlesionespersonales.
Pruebeelequilibr[odelacuchillausandouncompensadordecuchillas.
Afileelmetaldelladopesadohastaquequedebienequilibrada.
NOTA:Cuandoreemplacelacuchilla,asegtiresedeinstalarlaconel lado
marcado"Bottom"(inferior)(oconelladoqueposeeunntimerodepieza
estampado)mirandoalpisocuandolacortadoradec_spedest_enposici6n
deoperaci6n.
97

Utiliceunallavedetorsi6n paraajustarlatuercade bridahexagonaldel
husillodelacuchillaentre70y 90pies-libras.
AJUSTES
Nuncaintentehaterajustesmientraselmotorest_enmarcha,excepto
cuandoasiloespedficaelmanualdeloperador.
AJLISTI:I)ELASIENTO
Consulteenlasecd6nMontajedeestemanuallasinstrucdonesparaelajuste
delasiento.
AJUSTEDELFEENODEMANO
Nuncaintenteajustarlosfrenosconelmotorenmarcha.Desenganchesiempre
laPTO(palancadeenganchedecuchilla),muevalapalancadecambiosala
posid6nneutral,pareelmotoryretirelaIlave,paraevitarquealguienencienda
acddentalmenteel motor.
Nivelaci6ndela plataforma
NOTA:Controlelapresi6ndeneum_ticosdeltractorantesderealizarcualquiernive-
laci6ndelaplataforma.ConsulteNeum_ticosenlasecci6nServidoymantenimiento
deestemanualparaobtenerm_sinformad6nsobrelapresi6ndelosneum_ticos.
Nivelaci6n frontal-posterior
EsposJbleajustarlainclinaci6ndelaplataformadetorte. Elfrentedelaplataforma
debeestarentre0"(alras)y1/4"m_sbajoquelaparteposteriordelaplataforma.
Desetnecesario,realkeunajustedelasiguientemanera:
1. Coneltractorestadonadosobreunasuperficiefirmeynivelada,ubiquela
palancadeelevaci6ndelaplataformaenla posid6nmedia(3)yrotelacuchilla
demaneraquequedealineadaconel frenteylaparteposteriordeltractor.
2. Midaladistandadesdelapartedelanteradelapuntadelacuchillahasta
elpiso,ydesdelaparteposteriordelapuntadelacuchillahastaelpiso.La
primeramedki6ndebesetentre0"(alras)y 1/4"menorquelasegunda.
Determineladistandaaproximadanecesariaparaunajusteadecuadoy,deset
necesario,sigaconelpasosiguiente.
3. Ubiquelatuercadeseguridadconbridaenelextremofrontaldelavarilla
deelevad6ndelaPTO.YealaFigura39.
Aprietelatuercadeseguridadconbridaparalevantarla partedelantera
delaplataforma;
Aflojelatuercadeseguridadconbridaparabajarlapartedelantera
delaplataforma.
J
/ /
/ //
/ /
//
/
J
Sieltractornosedetieneporcompletocuandosepresionatotalmenteelpedalde
embrague-freno,osilasruedastraserasdeltractorpuedenrodarconelfrenode
manocolocado,elfrenonecesitaunajuste.Comuniqueseconel Centrodeservkiode
reparacionesm_scercanoparaquelehaganunservkioalosfrenos.
ParaubkarelCentrodeservido dereparadonesy piezasmascercano
oparaprogramarel servidode mantenimiento o reparad6n,comuniquese
altel_fono 1-800-4-MY-HOME_.
CAMBIODELACORREADETRANSMISION
NOTA:Paracambiarlacorreadetransmisi6ndeltractor,sedebenretirarvarios
componentesyserequierenherramientasespedales(esdecir,Ilavedeimpacto/aire).
ComuniqueseconelCentrodeservkiodereparacionesypiezasm_scercanoparaque
lehaganunservkioalacorreadetransmisi6n.
ParaubicarelCentrodeservkiodereparadonesypiezasm_scercano,Ilameal
(800)659-5917.
SILENCIAi)OR
Latemperaturadelsilenciadorydelas_reascercanasdelmotorpuedesuperarlos
150°F(65°C).Eviteelcontactoconestas_reas.
Inspeccioneperi6dkamenteelsilenciadoryreempl_celosiesnecesario.Los
repuestosdelsilendadordebensetlosmismosysedebeninstalarenlamisma
posid6nquelaspiezasoriginales.
LIMPIE ELMOTOR
Diariamenteoantesdecadauso,limpieelcdsped,lagrasaolosresiduosacumu-
ladosenelmotor.Mantengalimpioselvarillaje,losresortesy loscontroles.
Mantengael_reaquerodeaalsilenciadoryqueest_detr_sdelmismolibre
decualquierresiduocombustible.
Mantengaelmotorlimpioparapermitirelmovimientodeairealrededor
delmismo.
Laspiezasdelmotorsedebenmantenerlimpiaspararedudrelriesgode
sobrecalentamientoycombusti6ndelosresiduosacumulados.
Nouseaguaparalimpiarlaspiezasdelmotor.Elaguapuedecontaminar
elsistemadecombustible.Useuncepilloounpasoseco.
AJLISTEi)ELCAI_BLIRAI)OE
Elcarburadordeestemotornoesregulable.
Figura39
98

BATERIA
iADVERTENCIAProposid6n65deCalifornia!Losbornesdelabatefiay losaccesofios
afinescontienenplomoycompuestosdeplomo,sustandasquimlcasquesegunIo
estableddoporelEstadodeCaliforniacausanc_ncerydaffosenelsistemareproduc-
tivo.L_veselasmanosdespu(_sdeestarencontactoconestoscomponentes.
Siextraela batefia, desconecteprimeroel cableNEGATIVO(negro)desu
borney a continuad6n elcablePOSmVO(rojo).Cuandovue[vaainstalar
la bateria, conectesiempreprimeroelcablePosmvo (rojo)asuborne,
jya cont nuac 6ne cabeNEGATVO(negro).
Labatefiaest_selladaynonecesitamantenlmlento.Losnlvelesde_ddonose
puedencontrolar.
SiempremantengaIimpiosyIibresdeacumulad6ndeelementoscorrosivoslos
cablesylosbornesdelabatefia.
Despu_sdeIlmpiarlabatefiay losbornes,apllqueunacapadelgadade
vasellnaograsaaambosbornes.
Slempremantengaloscapuchonesdegomacolocadossobreelbornepositivo
parapreveniruncortodrcuito.
IMPORTANTE:Siquitalabatefiaporcuaiquierraz6n,desconectepfimeroelcable
NEGATIVO(negro)desuterminalyacontinuad6nelcablePOSITIVO(rojo).Cuando
vuelvaa[nstalarlabatefia,conectesiemprepfimeroelcablePOSITIVO(rojo)asu
borne,yacontinuad6nelcableNEGATIVO(negro).Aseguresequeloscablesest_n
conectadosalosbornescorrectos,yaques[loscambiasepodfia[nvertirlapolafidad
yprovocarundaffoalsistemaalternadordelmotor.
Limpieza de la bateria
LimpJelabatefiaretir_ndoladeltractorylav_ndolaconbicarbonatodesod[oy
solud6ndeagua.Siesnecesafio,raspelosbornesdelabatefiaconunceplllode
alambreparaquitarlosdep6sitos.Cubralosbornesyloscablesexpuestoscongrasa
ovasellnaparaprevenirlacorrosi6n.
4. Conecteelotroextremodelcablenegativoal bloquedelmotordeltractor,
alejadodelabatefia.Acopleaunapartesinpinturaparaasegurarsedeque
hayaunabuenaconexi6n.
Sila batefiaconcargaest_iinstaladaenelvehkulo(esdedrautom6vil,
cami6n)NOpongaen marchaelmotordelvehkulocuandoarranque su
tractor conconexionesenpuente.
5. Arranqueel tractor(segunlasinstruccionesdelasecci6nFuncionamiento
deestemanual).
6. Coloqueelfrenodemanodeltractorantesdesacarloscablesdeconexi6nen
puente,enordeninversodeconexi6n.
DURACI6N
AIcargarse,lasbatefiasemiten ungasquepuedecausarexplosiones.
Carguela batefiaenunfirea bienventiiaday mant_ngaJaalejadade una
llama expuestaopiloto,comolosde loscaientadoresde agua,calefacto-
resde ambiente, hornos,secadoresderopayotrosaparatos agas.
Cuandocarguelabatefiadesu tractor, utiliceunicarnenteuncargador
disefiadoparabatefiasdeplomo-ficidode 12V.Leaelmanual del
joperadordelcargadordela bateriaantesdecargarla batefiadesu
[tractor. Siempresigalas instruccionesytenga en cuentalasadvertencias.
Sisutractornosehautilizadoduranteunpefiododetiempoprolongado,carguela
batefiadelasiguientemanera:
1. Ajusteelcargadordebatefiaparaqueproduzcaunm_ximode10amperios.
Sisucargadordebatefiaesautom_tico,carguelabatefiahastaqueelcargador
indiquequesehacompletadolacarga.Sielcargadornoesautom_tico,cargue
duranteochohorascomom[nlmo.
Desperfectosde la bateria
Algunascausascomunesdefalladelabatefiason:
Activaci6ninicialincorrecta
Sobrecarga
Congelamiento
Cargalnsufidente
Corrosl6nenlasconexiones
EstasfallasNOest_ncubiertasporlagarantiadesutractor.
FUSIBLE
Enel mazodecablesdesutractorest_instaladounfusiblede15ampefios,
paraprotegerelsistemael(ktficodeltractordelosdaffoscausadosporexceso
deamperaje.
S[elsistemael_ctriconofunciona,oel motordesutractornoarranca,verifique
pfimeroqueelfusiblenosehayaquemado.Sepuedeencontrardebajodel
guardabarrosenellado[zquierdodelaunidad,enelmazodecablesjustoendma
delabatefia.
ARRANQUECONCABLESDEPUENTE
Huncaarranque unabatefiadafiada ocongeladaconconexionesen
puente.Aseguresedequelosvehkulosnosetoqueny losmotoresestzin
apagados.Nopermitaquelaspinzasdeloscablessetoquen.
Conecteelcablepositivo(+) albornepositivo(+) delabatefiadescargada
desutractor.
2. Conecteelotroextremodelcablealborneposltivo(+) delabatefiaconcarga.
3. Conecteelsegundocablenegativo(-) al borne(-) delabatefiacargada.
Paraelreemplazoutilicesiempreunfusibleconlamismacapacidadde
amperaje.
LUBFIICACION
Antesderealizartareasdelubricaci6n,reparaci6noinspecci6n,siempre
desconectela PTO(pa[ancadeenganchedecuchilla),muevala palanca
deeatablesala posici6nneutral,pongael freno demano, pareel motory
retirela Ilave,paraevitar quealguienenciendaaccidentalmenteel motor.
99

Puntosdepivoteyvarillaje
Lubdquetodoslospuntosdepivotedelsistemadeimpulsi6n,elfrenodemano
yelvadllajedeelevad6nalmenosunavezportemporadaconaceiteligero.
Ruedastraseras
Lasruedastraserassedebensacardelosejesunavezportemporada.Lubdquebien
losejesylasIlantasconunagrasamultiusosantesdereinstalarlos.
Ejesdelanteros
Cadaextremodelabarradepivotedelanteradeltractorpuedeestarequipado
conunaccesododeengrasado.Lubdqueconpistoladegrasacada25horasde
fundonamlentodeltractor.
Cremallera y pi_6n de direcd6n
Unavezportemporada,ocada25horasdefundonamlento,ser_necesar[olubdcar
elmecanismodecremalleraypiff6ndedirecd6nqueest_ublcadodebajodelfrente
delaunldad.Medianteelusodegrasaparaautom6vilesest_ndar,engraseelfrente
ylaparteposteriordelacremalleradedirecd6n,comoseindicaenlaFigura40.
©
Figura40
LiMPiEZADELMOTORYDELAPLATAFORMA
Sisederramacombustibleoaceitesobrelam_quina,debeI[mp[arsedeinmediato.
NOpermitaqueseacumulendesechosalrededordelasaletasderefrlgerad6ndel
motornienningunaotrapartedela m_quina.
IMPORTANTE:NOserecomiendaelusodeunalavadoradepresi6nparalimpiar
eltractor.Puededaffarloscomponentesel(ktrlcos,loshusillos,laspoleas,los
rodamientosoelmotor.
Sistema de lavado de plataforma
Laplataformadesutractorest_equipadaconunpuertodeaguasobresusuperfide
comopartedelsistemadelavadodelaplataforma.
Utiliceelsistemadelavadodeplataformaparalavarlaparteinferiordelaplataforma
e[mpedirlaacumulad6ndesustandascorrosivas.Realkelossiguientespasos
DESPUESDECADACORTEDEClaSPED:
1. Drivethetractortoa level,clearspotonyourlawn,nearenoughforyour
gardenhosetoreach.
Aseguresede quee[canaldedescargade[tractor NOESTEORiENTADO
ENLADiRECCI6Nenqueseencuentranlacasa,elgaraje,losvehkuios
estacionados,etc.
2. Desconectelatomadefuerza(enganchedecucHIla),pongaelfrenodemano
ypareelmotor.
3. Enrosqueelacopledemanguera(embaladoconelManualdelOperador
desutractor)enelextremodelamangueradejard[n.
4. Unaelacopledelamangueraal puertodeaguaqueseencuentraenla
superfidedelaplataforma.YealaFigura41.
J
Figura41
5. Abraelsuministrodeagua.
6. Mientrasest_sentadoenlaposki6ndeloperadordeltractor,vuelvaaarrancar
el motorycoloquelapalancadelreguladorenlaposici6nVELOCIDADRAPIDA
(FAST,representadoporunaliebre).
7. Muevalapotendadearranque(enganchedecucHIla)deltractora laposici6n
ON(encendido).
8. Permanezcaenlaposki6ndeloperadorconlaplataformadecorteengancha-
dadurantedosminutoscomominimo,permitiendoquelaparteinferiordela
plataformadecorteselaveafondo.
9. Muevalapotendadearranque(enganchedecuchilla)deltractora laposid6n
OFF(apagado).
10. Girela Ilavedeencendidoalaposid6nSTOP(parar)paraapagarelmotor
deltractor.
11. Desconecteel aguay retireelacopladordelamangueradesdeelpuertode
aguaqueseencuentraenlasuperfidedelaplataforma.
Despu(_sdelimpiar[aplataforma,regresealaposid6ndeloperadoryenganchela
PTO.Mantengalaplataformadecorteenfundonamientodurantedosminutospor
Iomenosparapermitirquesesequetotalmentelaparteinferiordelamisma.
100

Nuncaalrnacenetractordec_spedconcombustibleen eltanqueen unespaciocerradooen_.reasconpocaventilad6n,dondelosgasesdel
combustiblepuedanalcanzarel fuego,chispaso unaluzpilotocornolaquefienenalgunoshornos,calentadoresde agua,secadoresde ropa
oalgOnotrodispositivoa gas.
PREPARACION DEL MOTOR
IMPORTANTE:Elcombustiblequequedaen el tanquecuandohace
calorsedeteriorayocasionagravesproblernasdeencendido.
La noutilizaci6ndeun aditivodecombustibledeestabilizaci6no
totalrnenteenrnarchaelmotorhastaque sequedansincombustible
antesde sualrnacenarnientofueradeternporadapuederesultar
enda_osal carburadordel motor.Da_osposterioresnoestarian
cubiertospor lagaranfiadel fabricante.
Motoressealrnacenaentre30y 90diasdebensertratadosconun
estabilizadordegasolinay losrnotoresalrnacenadosrn_.sde90 dias
esnecesariodrenarel combustibleparaevitareldeterioroy lagorna
de laforrnaci6nenel sisternade combustibleoen laspartesesen-
cialesdel carburador.Si lagasolinaen el motorsedeterioradurante
elalrnacenarniento,puedesernecesariotenetelcarburador,yotros
cornponentesdelsisternadecombustible,la reparaci6no sustituci6n.
Paraevitarqueseforrnendep6sitosdegornaenel interiordel
carburadordel motorycausarun posiblernalfuncionarnientodel mo-
tor,el sisternadecombustibledebeservaciadocornpletarnente,o la
gasolinadebesertratadoconunestabilizadorparaevitarsudeterioro.
1. Si utilizaunestabilizadordecombustible:
a. Lealasinstruccionesy recornendacionesdelfabricantedel
producto.
b. Agreguela cantidadcorrectadeestabilizadorparala
capacidaddel sisternade combustiblea gasolinalirnpiay
nueva.
c. Lleneel dep6sitodecombustibleconcombustibletratado
yhagafuncionarel motor2-3rninutosparaestabilizarel
combustibledentrodelcarburador.
2. Cuandovacieel sisternadecombustible:
a. Nodreneel combustiblecuandoel motorest,.caliente.
Perrnitaqueel motorseenfriebien.Dreneel combustible
dentrode un recipienteaprobadoyal airelibre,lejosde
cualquierllamaexpuesta.
b. Dreneungranvolurnende combustibledesdeel dep6sito,
desconectandolaIfneade combustibledel filtrode combus-
tibleen lineaqueseencuentracercadel motor.
Lagasolinaessumamenteinflamabley puedesetexplosivaenciertas
condiciones.Vacielaantesdeaimacenarei equipoduranteperiodos
prolongados.DreneelcombustibleOnicarnentedentrodeun
recipienteaprobadoy al airelibre,lejosdecualquierllamaexpuesta.
Dejequeel motorseenfrie.Antesdedrenarel combustible,apague
cigarrillos,cigarros,pipasyotrasfuentesde cornbusti6n.Vaciela
gasolinaenuna.reabienventilada,lejosdecualquierfuentedellama
o chispas,incluidocuaiquierartefactoconluzpiloto.AImacenela
gasolinaenunrecipienteaprobado,en unlugarseguro.
Vuelvaa contectarla Ifneadecombustibleyhagafuncionar
el motorhastaquecorniencea fallar,useentoncesel
cebadorpararnantenerel motorenrnarchahastaagotar
todoel combustibledel carburador.
101
d. Vuelvaa desconectarla lineadecombustibleydrenela
gasolinarestanteenel sisterna.
La gasolinaes unasustancia t6xica. Elimine ia gasolina
adecuadamente.Comuniquesecon lasautoridadeslocales para
averiguarcua.iesson los metodosadecuados para eliminar la gasolina.
3. Extraigalabujiay viertauna(1)onzade aceiteparamotorpotel
orificiode labujiaenel cilindro.Hagagirarelmotorvariasveces
paradistribuirel aceite.Vuelvaa colocarla bujia.
4. Lirnpielos residuosdetodomotor,conprotecci6nparalosdedos,
y debajo,alrededory detr_.sdel silenciador.Retocarlapintura
da_ada,ylas_.reasotropelajequepuedenoxidarseconuna
peliculadelgadadeaceite.
5. Conservaren unlugarlirnpio,secoy bienventiladolejosde
cualquieraparatoque funcionaconunallamao luzpiloto,corno
unhomo,calentadorde aguao secadorade ropa.Tarnbi_nevitar
cualquier_.reaconun motorel_ctricoqueproduzcachispas,o
dondelasherrarnientasel_ctricassonoperados.
6. Siesposible,evitarlaszonasde almacenarnientoconalta
hurnedad,yaque prornuevelaoxidaci6ny lacorrosi6n.
7. Mantenerel nivelde motorde alrnacenarniento.Inclinaci6npuede
provocarfugasde aceiteo combustible.
EL DRENAJE DE LOS COMBUSTIBLES
1. Localiceel filtrodecombustible,que seencuentraen el lado
izquierdodel motor,ypuedeserconectadoal motorconuna
correade ernpate.
2. Cortarlacorreade la corbata,siest,.presente,entonceserner-
genteen la abrazaderaenlineaen elfiltrode combustibleconun
pardealicates,deslicelaabrazaderadela lineadecombustible.
3. QuitelaIfneade combustibleen la lineay lafugadecombustible
en un recipienteaprobado.
PREPARACION DE LA TRACTOR DE CI=SPED
1. Lirnpiey lubriquela tractorcornosedescribeen lasinstrucciones
de lubricaci6n.
2. Noutiliceunalavadoraa presi6nniunarnangueradejardinpara
lirnpiarsuunidad.
3. Alrnacenelatractoren unazonalirnpiay seca.Nola alrnacene
cercade rnaterialescorrosivoscornoporejernplofertilizantes.
ELIMINACION DE ALMACENAMIENTO
1. Revisesumotorcornosedescribeen la secci6nde laAsarnblea
de estemanual.
2. Siel combustibleruedrenadodurantelapreparaci6ndealrnace-
narniento,Ileneeltanquecongasolinafresca.Siustedrnantiene
uncontenedordegaso%apararepostar,asegQresede que
contienes61ocombustiblefresco.Lagasolinaseoxidaydeteriora
conel tiernpo,causandoproblernasdearranque.
3. Siel cilindrorue recubiertaconaceitedurantela preparaci6nde
alrnacenarniento,el motorde hurnoal arrancar.Estoesnormal.

Elmotornoarranca
Elmotorfuncionade manera
err_tica
1. Perilladepotenciade arranque(PTO)conectada.
2. Noest&colocadoelfreno demano.
3. Sehadesconectadoel cablede lasbujias.
4. Lapalancade controldel reguladornoest_en
la posici6nde arranquecorrecta.
5. Nose haactivadoelcebador
6. Eldep6sitodecombustibleest_vaciooel
combustiblesehaechadoaperder.
7. Lalineadelcombustibleest&bloqueada.
8. Lasbujiasnofuncionancorrectamente.
9. Motorahogado.
10. Fusiblefundido(s)
11. Interruptor de seguridad (s) no est,.
debidarnente enganchado.
1. Launidadest_funcionandoconel CEBADOR
activado.
2. Sehanaflojadoloscablesde labujia.
3. Lalineadelcombustibleest_tapadaoel
combustiblesehaechadoaperder.
4. Laventilaci6nenla tapadel combustibleest_
obstruida.
5. Aguaosuciedaden el sistemadelcombustible.
6. EIfiltrode aireest_ sucio.
1. Coloquela perillaenla posici6ndedesconexi6n(OFF).
2. Coloqueelfreno demano.
3. Conecteelcable alas bujias.
4. Muevala palancadelreguladora la posici6nFAST
(r@ido).
5. Tire elcontroldelCEBADORhaciaafuera.
6. Lleneel dep6sitocongasolinalimpiay nueva(de menos
de 30dias).
7. Limpielalineadecombustibley reemplaceelfiltrodecombustible.
8. Limpieo cambielasbujiasoajustela separaci6n.
9. Arranqueelmotorconelreguladorenposici6nFAST(r&pido).
10. Reemplaceelfusible(s)
11. Asegurarse de asiento est,. en la posici6n de func-
ionarniento adecuada, y / o de la cubierta canaleta,
tubo o clavija de abono instalado correctamente.
1. PresioneelcontroldelCEBADOR.
2,
3.
4,
5.
6,
Elmotorrecalienta 1. Elniveldeaceitedelmotorest_ bajo. 1.
2.
2. Flujodeairerestringido.
Elmotorvacilaa altas 1. Laseparaci6nde lasbujiasesmuypequeSa. 1.
revoluciones
Elmotorfuncionacondificultad 1. Bujiaatorada,averiadaoexcesode separaci6n. 1.
en ralenti 2. Elfiltrode aireest_ sucio. 2.
Demasiadavibraci6n 1. Cuchillade cortefloja o descentrada. 1.
2. CuchilladaSadaocurvada 2.
1. Lavelocidaddelmotoresdemasiadolenta. 1.
2. CespedhQmedo.
Lacortadorade cespedno
regresael recortedecesped
comoabono
Cortedesigual
3. Cespeddemasiadoalto.
Lacuchillade lacortadoranoest_afilada.
Laplataformanoest&correctamentenivelada.
Lacuchillade lacortadoranoest_afilada.
Presi6nde neum_ticosdesigual.
4,
1.
2.
3.
Conecteloscablesde la bujia.
Limpiela lineadecombustible;Ileneeltanquecon gaso-
linalimpiay nuevay reemplaceelfiltro decombustible.
Destapelaventilaci6noreemplacelatapasiest_da_ada.
Vacieel tanquede combustible.Lleneel tanquecon
gasolinalimpiay nueva.
Reemplaceelelementode papeldelfiltrode aireo limpie
el depuradordeespuma.
Lleneel c&rtercon laadecuadacantidady pesodeaceite.
Limpielos recortesdepastoy la suciedadacumulados
alrededorde lasaletasde refrigeraci6ndelmotory del
alojamientodelsoplador.
Retirelasbujiasy reajustelaseparaci6n
Reemplacelasbujias.Configurela separaci6nde la bujia.
Reemplaceelelementodelfiltro deairey/o limpieel
depurador.
Aprietelacuchillay el husillo.
Reemplacelacuchilla.
Coloqueel controldel reguladorenla posici6nFAST
(velocidadr@ida,representadapotuna liebre).
2. Norealiceabonocuandoel cespedest&hQmedo.
3. Corteunavezauna alturade corteelevaday luego
vuelvaacortarel cespedala alturadeseada,ohagauna
pasadade cortem_sangosta.
4. Afileocambie la cuchilla.
1. Realiceunajustede laplataformaladoa lado.
2. Afileocambie la cuchilla.
3. Verifiquela presi6nde loscuatroneum_ticos.
102

Busque el periodo de duraci6n de emisiones importantes yla informaci6n de clasificaci6n de aire en
la etiqueta de emisiones de su motor
Los motores cuyo cumpiimiento con los estAndares de emisi6n Tier 2 de laComisi6n de Recursos Ambientales de California (CARB)
est6 certificado deben exhibir la informaci6n relacionada con el periodo de duraci6n de ias emisiones y la clasificaci6n de aire. Sears
Brands Management Corporation ponen esta informaci6n a disposici6n del consumidor en nuestras etiquetas de emisiones.
Ei Periodo de Duraci6n de las Emisiones describe el nQmero de horas de tiempo real de funcionamiento para el cuai se certifica que
el motor cumpie con ias reglas de emisi6n, descontando el mantenimiento adecuado del mismo segQn las instrucciones de oper-
aci6n y mantenimiento. Se utilizan las siguientes categonas:
Moderado:Se certifica que el motor cumpie con las reglas de emisi6n durante 125 horas de tiempo real de funcionamiento del motor.
Inmediato:Se certifica que el motor cumpie con las reglas de emisi6n durante 250 horas de tiempo real de funcionamiento del motor.
Extendido:Se certifica que el motor cumpie con las reglas de emisi6n durante 500 horas de tiempo real de funcionamiento del motor.
Por ejemplo, una cortadora de c6sped tJpica que se empuja desde arras se usa entre 20 y 25 horas por aSo. Por Io tanto, el Periodo
de Duraci6n de Emisiones de un motor con una clasificaci6n intermedia sena equivaiente aentre 10 y 12 aSos.
Laciasificaci6n de aire es un nQmero calculado para describir el nivel relativo de emisiones para un grupo de motores en particular.
Cuanto menor sea la clasificaci6n de aire, mayor es la limpieza del motor. La informaci6n se presenta de forma grAfica en la etiqueta
de emisiones.
Despu_s del 1 de julio de 2000, busque el periodo de cumplimiento de las reglas de
emisiones en la etiqueta de cumplimiento de las reglas de emisiones del motor
Despu6s del 1 de julio de 2000 se certificarA que determinados motores Sears Brands Management Corporation cumplen
con los estAndares de emisiones de la fase 2 de la Agencia de Protecci6n Ambientai de los Estados Unidos (USEPA). Para
los motores certificados para la etapa 2, el periodo de cumplimiento con ias reglas de emisiones al cual se hace referencia
en la etiqueta de cumplimiento con las reglas de emisiones indica el nQmero de horas de funcionamiento para el cual se ha
demostrado que el motor cumple con los requerimientos federales de emisi6n.
Para los motores con desplazamiento inferior a 225 cc, Categoria C = 125 horas, B = 250 horas y A = 500 horas.
Para los motores con desplazamiento de 225 cc o mAs, Categoria C = 250 horas, B = 500 horas y A = 1000 horas.
El desplazamiento de los motores de la serie modelo 150112 es 249 cc.
La presente es una representaci6n gen_ricade laetiqueta de emisi6n que se encuentra generaimente en un
motor certificado.
FAMILYYBSXS.3192VA 274812
GDOC-100182Rev.A

(Estap_.ginaseaplicas61oenEE.UU.yCanada.).
SearsBrandsManagement Corporation, el Consejo de Recursos Ambientales de California (CARB)
y la Agencia de Protecci6n Ambiental de los Estados Unidos (EPA)
Declaraci6n de garantia del sistema de control de emisiones (derechos y obligaciones de la garanfia de defectos del propi=
etario)
LACOBERTURADE LAGARANTJADECONTROLDEEMISIONESES Y PARALOSMODELOSCERTIFICADOSDELANO1997YPOSTERIORES,
APLIOABLEALOSMOTORESCERTIFICADOSCOMPRADOSENCALIFOR- QUESECOMPRENY UTILICENENCUALQUIERPARTEDE LOSESTADOS
NIAEN1995Y POSTERIORMENTE,QUESE UTILIZANENCALIFORNIA, UNIDOS(Y APARTIRDEL1 DE ENERODE2001ENCANADA).
Declaraci6n de garanfia sobre defectos en el control de emisiones para California y los Estados Unidos
ElConsejode RecursosAmbientalesdeCalifornia(CARB),laEPA(Agencia
de Protecci6nAmbientaldelos EE.UU.)y Searstienenel gustodeexplicarla
garantiadelsistemadecontroldeemisionesparamotoresdela_o 2000y para
elfuturoconrelaci6na motorespeque_ostodoterreno(SORE).EnCalifornia,
los nuevosmotorespeque_ostodoterrenodebenestardise_ados,construidos
y equipadosparacumplirconlas rigurosasnormasanti-smogdelestado.En
el restodelos EstadosUnidos,losmotoresnuevostodoterrenodeencendido
porchispacertificadosparaela_o1997debencumplirest_ndaressimilares
establecidospot laEPA.Searsdebegarantizarel sistemadecontroldeemis-
ionesdesu motorparalosperiodosdetiempoenumeradosacontinuaci6n,
siemprequenohayaabuso,negligenciao mantenimientoindebidode su
motortodoterrenopeque_o.Susistemade controldeemisionespuedeincluir
piezastalescomoel carburador,el filtrodeaire,elsistemadeencendido,el
silenciadoryel conversorcatalitico.Tambienpuedeincluirconectoresyotras
unidadesrelacionadasconlasemisiones.Dondeexistaunacondici6ncubierta
porla garantia,Searsreparar_supeque6omotortodoterrenosincostoalguno
incluyendodiagn6stico,piezasy manodeobra
Cobertura de la garantJa Sears para defectos en el control de emJsiones
Losmotorestodoterrenopeque6osest_ngarantizadosenIorelativoalcontrol alas disposicionesque seindiquenacontinuaci6n.Si una partedesumotor
deemisionesparadefectosenpiezasduranteunperiododedosa_os,sujeto cubiertapot lagaranfiaesdefectuosa,Searsreparar_o sustituir_dichaparte.
Responsabilidades del propietario en relacibn con la garantia
Comopropietariodelmotortodoterrenopeque_o,Ud.esresponsabledela
realizaci6ndelmantenimientorequeridoquese incluyeenlas instrucciones
deoperaci6ny mantenimiento.Searsrecomiendaquese conserventodoslos
recibosrelativosal mantenimientodesu motortodoterrenopeque_o,pero
nopudedenegarlagarantiasimplementeporla faltade losmismos,oporsu
incumplimientodelmantenimientoprogramatic.Comopropietariodelmotor
peque_otodoterrenodebesaberque,sinembargo,Searslepuedenegar
lacoberturade lagarantiasi su motortodoterrenopeque6oouna piezadel
mismohanfalladodebidoaabuso,negligencia,mantenimientoindebidoo
a modificacionesnoaprobadas.Ud.esresponsabledepresentarsumotor
todoterrenopeque6oaundistribuidorde serviciosSearsautorizadotan pronto
comoaparezcaunproblema.Lasreparacionesdela garantiasinconfiicto
debencompletarseen unplazodetiemporazonable,nosuperiora30dias.Si
tienealgunapreguntarespectoa susderechosy responsabilidadesreferen-
tesala garantia,debecontactarconunrepresentantedeserviciosSearsal
1--800--469--4663.Lagarantiadeemisionesesunagarantiapordefectos.Los
defectossejuzgandeacuerdoconelfuncionamientonormalde unmotor.La
garantiano est_relacionadaconunapruebade emisionesenuso.
Disposiciones de la garantJa Sears para defectos en el control de emJsiones
Lassiguientessondisposicionesespecificasrelacionadasconla coberturade lagarantiaparadefectosenel controldeemisiones.Esuna_adidoa lagarantiade
motorSearsparamotoresnoreguladosqueseencuentraen lasinstruccionesdefuncionamientoy mantenimiento.
1. Piezascongarantia
Lacoberturadeesta garantiaseextiendeL]nicamentealas piezas
queaparecenacontinuaci6n(las partesde lossistemasdecontrolde
emisiones),siemprequedichaspiezasestuvieranyaenel motoren el
momentodesucompra.
a. Sistemademedici6ndecombustible
•Sistemadeenriquecimientoparaarranqueenfrio
•Carburadory partesinternas
• Bombade combustible
b. Sistemadeinducci6nde aire
• Filtrodeaire
•Colectordeadmisi6n
c. Sistemadeencendido
• Bujia(s)deencendido
•Sistemadeencendidomagneto
d. Sistemadelcatalizador
•Convertidorcatalitico
•Colectordeescape
•Sistemadeinyecci6nde aireov_lvulade impulsos
e. Elementosvariadosusadosenlossistemasanteriores
•Wlvulas devacio,sensiblesa temperatura,posici6ny tiempo
einterruptores
•Conectoresy montajes
2. AIcancedela cobertura
Searsgarantizaal poseedorinicialy a loscompradoressubsiguientes
quelas piezascongarantianotendr_ndefectosen materialesni mano
deobraque provoquenla falladelas mismasduranteun periodode
dosaSosa partirdela fechaen queel motorse entregaa uncomprador
particular.
3. Sincargo
Lareparaci6noreemplazodecualquierpartecongarantiaserealizar_
sin cargoalgunoparael poseedor,incluyendotareasdediagn6sticoque
permitandeterminarsi una partecongarantiaesdefectuosa,siempreque
dichodiagn6sticose realiceenundistribuidordeserviciosSearsautoriza-
do. Paraelserviciode lagarantiadeemisiones,contactealdistribuidorde
serviciosSearsautorizadom_scercanoincluidoen las"P_ginasamarillas"
en lascategorias"Motores,gasolina","Motoresdegasolina","Podadoras
de cesped",osimilares.
4. Reclamacionesyexclusionesala cobertura
Las reclamacionesde lagarantiadebenenviarsedeacuerdocon las
disposicionesdela politicadegarantiaparamotoresSears.Lacobertura
de lagarantiaexcluir_defectosen piezascongarantiaquenoscan partes
originalesSears,o abuso,negligenciao mantenimientoincorrecto,taly
comoseestableceen lapoliticadegarantiaparamotoresSears.Searsno
es responsablede lasfallasenpiezascongarantiaprovocadasporel uso
de partesa6adidas,que noscanoriginalesoquesehayanmodificado.
5. Mantenimiento
Cualquierpartecongarantiaque noesteprogramadaparaser reem-
plazadacomomantenimientorequerido,oque s61odebainspeccionarse
regularmentealefectode"inspeccioneoreemplacesegL]nsea necesario",
estar_garantizadacontradefectosduranteelperiodode la garantia.Todas
las piezasgarantizadasqueestenprogramadasparasureemplazopara
cumplirconlos requisitosdemantenimientoestar_ngarantizadass61o
porel periodoanterioral primerreemplazoprogramaticparadicha pieza.
Cualquierpiezade recambioqueseaequivalenteenfuncionamientoy
durabilidadpuedeusarsepararealizarmantenimientoo reparaciones.El
propietarioes responsablederealizartodoel mantenimientorequerido,tal
y comose defineenlas instruccionesdefuncionamientoy mantenimiento
Sears
6. Coberturaindirecta
Porla presente,lacoberturaseextiendeala falladecualquiercomponente
de motorprovocadapot lafallade unapiezacongarantiaque estetodavia
en periododegarantia.
Enlos EstadosUnidosy Canad_hayunalineadeatenci6nde24 horas,1-800-469--4GG3,quecuentacon unmenL]conmensajespre-grabadosque contienen
informaci6nparael mantenimientodemotores.

DECLARACIONFEDERALy/oDECALIFORNIASOBRE GARANTJAS EN EL CONTROL DE EIVIISIONES
SUS DERECHOS Y OBLIGACIONES EN CUANTO A LA GARANTJA
MTDConsumerGroupInc,laAgenciadeProtecci6nMedioambientaldelos EstadosUnidos(EPA),y paraaquellosproductoscertificadosparasuventaen el es-
tadode California,elDepartamentode los RecursosdelAire deCalifornia(CARB)secomplacenenexplicarla garanfiaquecubreal sistemade control(ECS)de
emisiones(evaporativasy/ode escape)de suequipoy motor(motordeequiposdeexteriores)deencendidopot chispaparatodoterreno,peque_o,deexteriores
dela_o2006y a_osposterioresEnCalifornia,losnuevosmotoresdeequiposdeexterioresdebenestardise_ados,construidosyequipadosparacumplircon las
estrictasnormasantipoluci6ndel Estado(enotrosestados,losequiposdela_o 1997y modelosposterioresdebenserestardise_ados,construidosy equipados
paracumplirconlas regulacionesdemotoresdeencendidoporchispaparatodoterrenopeque_osde laAgenciade Protecci6nMedioambientaldelos Estados
Unidos,(EPA).MTDConsumerGroupInc.debegarantizarelsistemadecontroldeemisiones(ECS)desu motordeequiposdeexteriorespotel periodode
tiempoindicadom_sabajo,siempreycuando noexistausoincorrecto,negligenciaomantenimientoinadecuadodedicho motor.
SuECSpuedeincluirpiezastalescomoel carburador,el sistemade inyecci6ndecombustible,elsistemadeencendido,el convertidorcatalitico,losdep6sitos
decombustible,laslineasdecombustible,lostaponesdecombustible,lasv_lvulas,contenedores,filtros, manguerasdevapor,abrazaderas,conectoresyotros
componentesafinesrelacionadosconlasemisiones.
Dondeexistaunacondici6ncubiertaporla garantia,MTDConsumerGroupInc.reparar_su motorde equiposde exterioressincostoalgunoincluyendoel
diagn6stico,las piezasy lamanodeobra.
COBERTURA DE LA GARANTJA DEL FABRICANTE:
Estesistemadecontroldeemisionessegarantizaporel t@minode dosaSos.Si algunapiezarelacionadacon lasemisionesdesu motorde equiposde
exterioresesdefectuosa,MTDCONSUMERGROUPINC.reparar_osustituir_dichapieza.
RESPONSABILIDADES DEL PROPIETARIO SEGUN LA GARANTJA:
Ensu car_cterdepropietariodelmotordeequiposdeexteriores,ustedesresponsabledel mantenimientorequeridoqueseespecificaenel manualdel propieta-
rio.MTDConsumerGroupIncle recomiendaque conservetodoslosrecibosquecubrenel mantenimientode sumotor,noobstanteIocualMTDConsumerGroup
Incnopodr_denegarel cumplimientode lagarantiaQnicamenteporlafaltade los recibos.
Comopropietariodel motordeequiposde exteriores,usteddebesaberqueMTDConsumerGroupInc.puededenegarlacoberturade lagarantiasisu motoro
unapiezadel mismofallandebidoauso incorrecto,negligencia,mantenimientoindebidoo amodificacionesnoaprobadas.
Ustedesresponsablede presentarsumotoral centrodedistribuci6noserviciotecnicodeMTDConsumerGroupInc.tan prontocomoaparezcael problema.Las
reparacionescubiertasporla garantiasedebenIlevara caboen unlapsorazonablequenoexcedade30 dias.Sitienealgunapreguntarespectode lacobertura
dela garantia,p6ngaseen contactoconel DepartamentodelServicioT@nicode MTDConsumerGroupInc.al telefono1-800-800-7310o pot correoelectr6nico
enhttp://support.mtdproducts.com
COBERTURA DE LA GARANTJA DE EMISIONES GENERALES:
MTDConsumerGroupIncgarantizaal compradorfinaly acadacompradorsubsiguienteque el motordeequiposde exteriores:est_ dise_ado,construidoy
equipadodemododecumplircontodaslas regulacionesaplicablesy quese encuentralibrededefectosdematerialesyde fabricaci6nquepudierencausarla
falladeuna piezagarantizadaidentica,entodoslosaspectosmaterialesala piezadescriptaenla solicitudde certificaci6ndeMTDConsumerGroupInc.
El periododegarantiacomienzaenla fechade entregadelmotoral compradorfinalo en lafechaenque la m_quinaseponeenfuncionamientopot primeravez.
El periododegarantiaesde dosaSos.
Sujetoaciertascondicionesyexclusionesqueseindicanacontinuaci6n,lagarantiadelas piezasrelacionadascon lasemisionesesla siguiente:
1. Cualquierpiezagarantizadaque noesteprogramadaparaserreemplazadacomopartedelmantenimientorequeridoen lasinstruccionesescritassuminis-
tradassegarantizaporel periododegarantiaarribamencionado.Sila piezafalladuranteel periododecoberturade lagarantia,la mismaser_reparada
oreemplazadaporMTDConsumerGroupInc.deacuerdoconel parrafo(4)acontinuaci6n.Cualquierpiezareparadao reemplazadasegQnlagaranfiase
garantizar_potel restodelperiodode garantia.
2. Cualquierpiezagarantizadaqueeste programadasolamenteparainspecci6nregularenlas instruccionesescritassuministradassegarantizapotel periodo
degarantiaarribamencionado.CualquierpiezareparadaoreemplazadasegQnla garantiasegarantizar_pot elrestodelperiodo.
3. Cualquierpiezagarantizadaqueeste programadaparareemplazosegQnel mantenimientorequeridode conformidadcon lasinstruccionesescritassuminis-
tradas,segarantizaporel periododetiempoanteriora laprimerafechade reemplazoprogramadaparaesapieza.Si lapiezafallaantesdelprimerreemplazo
programatic,lamismaser&reparadaoreemplazadapot MTDConsumerGroupInc.deacuerdoconelparrafo(4)acontinuaci6n.Cualquierpiezareparadao
reemplazadabajogarantiasegarantizar_potel restodelperiodoanterioral primerreemplazoprogramaticpuntualparaesapieza.
4. Lareparaci6noel reemplazodecualquierpiezagarantizadadeconformidadconlasdisposicionesde lagarantiaqueaquise estipulasedeben realizarenun
centrodegarantiasin costoalgunoparael propietario.
5. Noobstantelasdisposicionesqueaquiseestipulan,losservicioso reparacionesbajo garantiasesuministrar_nentodosnuestroscentrosdedistribuci6nbajo
franquiciademantenimientoparalos motoresoequiposencuesti6n.
6. El propietariodelmotorde equiposdeexterioresno deber_pagarel trabajodediagn6sticodirectamenteasociadocon unapiezagarantizadadefectuosaen
relaci6nconlas emisiones,siempreycuandodichotrabajode diagn6sticoserealiceen uncentrocubiertopot lagarantia.
7. MTDConsumerGroupInces responsablepotdaSoscausadosaotroscomponentesdemotoresoequiposderivadosde lafallabajo garantiadecualquier
piezagarantizada.

8.Durantelatotalidaddelperiododegarantiadelmotoryequipoparatodoterrenoarribamencionado,MTDConsumerGroupIncmantendr_unsuministro
depiezasbajogarantiasuficienteparasatisfacerlademandaesperadadetalespiezas.
9.Cualquierpiezadereemplazosepodr_usarparaelcumplimientodelmantenimientoolasreparacionesbajogarantiaysesuministrar_nsincargopara
elpropietario.Dichousonoreducir_lasobligacionesdegarantiadeMTDConsumerGroupInc.
10.Nosepodr_nusarpiezasadicionalesnimodificadasquenoestenexentasdeacuerdoconelDepartamentodelosRecursosdelAire(AirResourcesBoard).
Elusodecualquierpiezaadicionalomodificadanoexentaporelcompradorfinalser_causaldeinvalidezdelosreclamosbajogaranfia.MTDConsumer
GroupIncnotendr_responsabilidadpotlagarantiadefallasdepiezasgarantizadasquefuerencausadaspotelusodeunapiezaadicionalnoexenta
omodificada.
PIEZAS GARANTIZADAS:
Lareparaci6noel reemplazodecualquierpiezagarantizadaquede otto modopudieseestarcubiertaporlagarantiapodr_set excluidadetal coberturade
garantiasi MTDConsumerGroupIncdemuestraqueel motoresobjetodeusoincorrecto,negligenciao mantenimientoinadecuado,y quetal usoincorrecto,
negligenciaomantenimientoinadecuadofuecausa directade la necesidadde reparaci6noreemplazode dichapieza.NoobstanteIoantedicho,cualquierajuste
deuncomponenteconundispositivodelimitaci6nde ajusteinstaladoenf_bricay quefuncioneadecuadamente,podr_setcubiertopot lagarantia.Adem_s,
la coberturabajoestagarantiase extiendesoloapiezasqueestuvieronpresentesenel motory equipotodoterrenoadquiridos.
Est_ncubiertaslas siguientespiezascongaranfiaparaemisiones(decorresponder):
(1)Sistemademedici6nde combustible
• Sistemade mejoraparainicioenfrio (cebadosuave)
• Carburadory piezasinternas(osistemade inyecci6npotcombustible)
• Bombadecombustible
• Dep6sitodecombustible
(2)Sistemade inducci6ndeaire
• Purificadordeaire
• Colectordeadmisi6n
(3) Sistemadeencendido
• Bujia(s) deencendido
• Sistemade encendidopot magneto
(4)Sistemade encendido
• Convertidorcatalitico
,, SAI(v_lvulaReed)
(5)Componentesvariosutilizadosen el sistemaanterior
• Wlvulas e interruptoresdevacio,temperatura,posici6nsensiblesaltiempo
• Conectoresy montajes
(6) Controlevaporativo
• Manguerade combustible
• Abrazaderasde lamangueradecombustible
• Tap6ndelcombustibleatadopot correa
• Cajadecarbono
• Lineas de vapor
GDOC-100223

Felicitaciones por haber realizado una adquisici6n inteligente. El producto Craftsman® que ha
adquirido esta diseSado y fabricado para brindar muchos aSos de funcionamiento confiable. Pero
como todos los productos a veces puede requerir de reparaciones. Es en ese momento cuando el
disponer de un Acuerdo de protecci6n para reparaciones le puede ahorrar dinero y problemas.
A continuaci6nse detallanlos puntosincluidosen el Acuerdo:
[] Servicio experto prestadopor nuestros10,000especialistasen reparacionesprofesionales
[] Servicio ilirnitado sin cargo para las piezasy la manode obraentodas las reparacionescubiertas
[] Reernplazo del producto hasta 1500d61aressi no es posible repararel productocubierto
[] Descuento de 25% del precionormal delservicio y de las piezas relacionadascon el mismo que no estencubiertas
por elacuerdo;ademas,25% del precionormal de laverificaci6nde mantenimientopreventivo
[] Ayuda r_pida pot tel_fono - Io IlamamosResoluci6n RApida- el apoyotelef6nico de unChamusca al representante.
Pienseennosotroscomo el manual "de un dueSohablador."
Una vezadquiridoel Acuerdo,puede programarel serviciocon tan s61orealizaruna Ilamadatelef6nica. PuedeIlamaren
cualquier momentodeldia o de la nocheo programarunservicio en linea.
ElAcuerdode Protecci6nde Reparaci6nes unacompra sin riesgo.Si ustedanulapor alguna raz6nduranteel periodode
garantiade producto,proporcionaremosunreembolso Ileno.O, un reembolsoprorrateadoencualquier momentodespues
del periodode garantiade productoexpira,iAdquiera hoysu acuerdode protecci6nparareparaciones!
Se aplican determinadas limitaciones y exclusiones. Paraobtener informaciTnadicional y precios en los Estados
Unidos Ilame al 1-800-827-6655.
El *Coverage en Canad_ivaria en algunos articulos. Para detalles Ilenos la Ilamada Chamusca Canad_ien 1-800-
361-8885.
Servicio de instalaci6nde Sears
Sidesea solicitar la instalaci6nprofesionalde Searsde aparatosdomesticos,dispositivos paraabrir portones,calentado-
resde aguay otrosarticulos domesticosimportantes,en los EstadosUnidoso Canada flameal 1-800-4-MY-HOME®.

Riding Equipment
questions or problems?
Satisfaction with your purchase
is our number one concern!
To troubleshoot problems,
get answers to questions, order parts,
or schedule repair service for your
Riding Equipment, call the number below.
Para respuestas a preguntas o problemas,
y ordenar piezas o pedir servicio para la
reparacibn de su equipo, Ilame el nt_mero abajo.
1-800-659-5917
Craftsman Help Line
www.craftsman.com
TM
® Registered Trademark / Trademark of KCD IP, LLC in the United States, or Sears Brands, LLC in other countries
® Marca Registrada / TMMarca de Fabrica de KCD IP, LLC en Estados Unidos, o Sears Brands, LLC in otros paises

perator's
I:RnFrSMRN°
REAR ENGINE RiDiNG MOWER
6 Speed, Shift-on=the=Go
30" Deck
Model No. 247.290000
• Espanol, P. 70
This product has a low emission engine which operates differently
from previously built engines. Before you start the engine, read and
understand this Operator's Manual.
Before using this equipment,
read this manual and follow
all safety rules and operating
instructions.
For answers to your questions about
this product, Call:
1-800=659=5917
CraftsmanTractorHelpLine
7 am = 7 pm CT, Mort. =Sun.
Sears Brands Management Corporation, Hoffman Estates, IL 60179 U.S.A.
Visit our website: www.craftsman.com FormNo.769-07597C
(December11,2012)

Warranty Statement ................................... 2
Safety Instructions .................................... 3
Slope Guide .......................................... 8
Assembly ............................................. 9
Operation ........................................... 15
Service and Maintenance ............................ 21
Off-Season Storage ................................... 32
Troubleshooting ..................................... 33
Parts List ............................................. 34
Espaffo[ .............................................. 69
Service Numbers ............................ Back Cover
CRAFTSMANFULLWARRANTY
FORTWOYEARSfromthedateofpurchase,allnon-expendablepartsofthisridingequipmentarewarrantedagainstanydefectsinmaterialorworkmanship.
Adefectivenon-expendablepartwill receivefreein-homerepairorreplacementifrepairisunavailable.
BATTERYLIMITEDWARRANTY
FOR90DAYSfromthedateofpurchase,thebattery(anexpendablepart)ofthisridingequipmentiswarrantedagainstanydefectsinmaterialor
workmanship.Anewbatterywillbesuppliedfreeofcharge.Youareresponsibleforthelaborcostofbatteryinstallation.
ADDITIONALLIMITEDWARRANTIES
Inthefollowingadditionalwarranties,youareresponsibleforthelaborcostofpartinstallationafterthesecondyearfromthedateofpurchase.
FORFIVEYEARSfromthedateofpurchase,theframeofthisridingequipmentiswarrantedagainstanydefectsinmaterialorworkmanship.Anewframewill
besuppliedfreeofcharge.
FORTENYEARSfromthedateofpurchase,thefrontaxleofthisridingequipmentiswarrantedagainstanydefectsin materialorworkmanship.Anewfront
axlewillbesuppliedfreeofcharge.
FORASLONGASITISUSEDbytheoriginalownerafterthetenthyearfromthedateofpurchase,thecastironfrontaxle(ifequipped)ofthisridingequipment
iswarrantedagainstanydefectsin materialorworkmanship.Withproofofpurchase,anewcastironfrontaxlewill besuppliedfreeofcharge.
WARRANTYSERVICE
Forwarrantycoveragedetailstoobtainfreerepairorreplacement,call1-800-659-5917orvisitthewebsite:www.craftsman.com
Inallcasesabove,ifpartrepairorreplacementisimpossible,theridingequipmentwill bereplacedfreeofchargewith thesameoranequivalentmodel.
Alloftheabovewarrantycoverageisvoidifthisridingequipmentiseverusedwhileprovidingcommercialservicesorifrentedtoanotherperson.
ThiswarrantycoversONLYdefectsinmaterialandworkmanship.WarrantycoveragedoesNOTinclude:
• Expendableparts(exceptbattery)thatcanwearoutfromnormalusewithinthewarrantyperiod,includingbutnotlimitedtoblades,sparkplugs,air
cleaners,belts,andoilfilters.
• Standardmaintenanceservicing,oilchanges,ortune-ups.
• Tirereplacementorrepaircausedbypuncturesfromoutsideobjects,suchasnails,thorns,stumps,orglass.
• Tireorwheelreplacementorrepairresultingfromnormalwear,accident,orimproperoperationormaintenance.
• Repairsnecessarybecauseofoperatorabuse,includingbutnotlimitedtodamagecausedbytowingobjectsbeyondthecapabilityoftheriding
equipment,impactingobjectsthatbendtheframe,axleassemblyorcrankshaft,orover-speedingtheengine.
• Repairsnecessarybecauseofoperatornegligence,includingbutnotlimitedto,electricalandmechanicaldamagecausedbyimproperstorage,failureto
usethepropergradeandamountofengineoff,failuretokeepthedeckclearofflammabledebris,orfailuretomaintaintheridingequipmentaccording
totheinstructionscontainedintheoperator'smanual.
• Engine(fuelsystem)cleaningorrepairscausedbyfueldeterminedtobecontaminatedoroxidized(stale).Ingeneral,fuelshouldbeusedwithin30days
ofitspurchasedate.
• Normaldeteriorationandwearoftheexteriorfinishes,orproductlabelreplacement.
Thiswarrantygivesyouspecificlegalrights,andyoumayalsohaveotherrightswhichvaryfromstatetostate.
SearsBrandsManagementCorporation,HoffmanEstates,IL60179
Engine Oil: SAE30
Fuel: Unleaded Gasoline
Spark Plug: F6RTC (951-10292)
© Sears Brands, LLC
2
Model Number
Serial Number
Date of Purchase
Record the model number, serial number,
and date of purchase above.

Thissymbolpointsout importantsafetyinstructionswhich,ifnot
followed,couldendangerthe personalsafetyand/orpropertyof
yourselfandothers.Readandfollow all instructionsinthismanual
beforeattempting tooperatethismachine.Failuretocomplywith these
instructionsmayresultinpersonalinjury.Whenyouseethissymbol,HEED
ITSWARNING!
CALIFORNIA PROPOSITION 65
EngineExhaust,someof itsconstituents,andcertainvehiclecomponents
containoremit chemicalsknowntoStateofCaliforniatocausecancerand
birth defectsor other reproductiveharm.
Batteryposts,terminals,andrelatedaccessoriescontainleadandlead
compounds,chemicalsknownto theStateof Californiatocausecancerand
reproductiveharm.Washhandsafter handling.
Thismachinewasbuilt to beoperatedaccordingto the safeoperation
practicesinthismanual.Aswith anytype ofpowerequipment,
carelessnessorerroronthe part oftheoperatorcanresultinseriousinjury.
Thismachineiscapableof amputatingfingers, hands,toesandfeet and
throwing debris.Failureto observethefollowing safety instructionscould
resultin seriousinjury or death.
Your ResponsibilityiRestrict theuseofthispowermachineto
personswho read,understandandfollow thewarningsand instructionsin
thismanualandonthe machine.
SAVETHESEINSTRUCTIONS!
GENERAL OPERATION
Read,understand,andfollowall instructionsonthemachineandinthe
manual(s)beforeattemptingtoassembleandoperate.Keepthismanualin
asafeplaceforfutureandregularreferenceandfororderingreplacement
parts.
Befamiliarwith allcontrolsandtheirproperoperation.Knowhowtostop
themachineanddisengagethemquickly.
Neverallowchildrenunder14yearsoldtooperatethismachine.Children14
yearsoldandovershouldreadandunderstandtheoperationinstructions
andsafetyrulesinthismanualandshouldbetrainedandsupervisedbya
parent.
Neverallowadultstooperatethismachinewithout properinstruction.
Tohelpavoidbladecontactorathrownobjectinjury,keepbystanders,
helpers,childrenandpetsatleast75feetfromthemachinewhileitisin
operation.Stopmachineifanyoneentersthearea.
Thoroughlyinspecttheareawheretheequipmentistobeused.Remove
allstones,sticks,wire,bones,toys,andotherforeignobjectswhichcould
bepickedupandthrownbytheblade(s).Thrownobjectscancauseserious
personalinjury.
Planyourmowingpatterntoavoiddischargeofmaterialtowardroads,
sidewalks,bystandersandthelike.Also,avoiddischargingmaterialagainst
awallorobstructionwhichmaycausedischargedmaterialto ricochetback
towardtheoperator.
Alwayswearsafetyglassesorsafetygogglesduringoperationandwhile
performinganadjustmentor repairtoprotectyoureyes.Thrownobjects
whichricochetcancauseseriousinjurytotheeyes.
Wearsturdy,rough-soledworkshoesandclose-fittingslacksandshirts.
Loosefitting clothesandjewelrycanbecaughtinmovableparts.Never
operatethis machineinbarefeetorsandals.
Beawareofthemowerandattachmentdischargedirectionanddonotpoint
it atanyone.Donotoperatethemowerwithoutthedischargecoverorentire
grasscatcherin itsproperplace.
Donotput handsorfeetnearrotatingpartsor underthecuttingdeck.
Contactwiththe blade(s)canamputatehandsandfeet.
Amissingordamageddischargecovercancausebladecontactorthrown
objectinjuries.
Stoptheblade(s)whencrossinggraveldrives,walks,orroadsandwhilenot
cuttinggrass.
Watchfortrafficwhenoperatingnearorcrossingroadways.Thismachineis
not intendedforuseonanypublicroadway.
Donotoperatethemachinewhileunderthe influenceofalcoholordrugs.
Mowonlyindaylightorgoodartificiallight.
Nevercarrypassengers.
Disengageblade(s)beforeshiftingintoreverse.Backupslowly.Alwayslook
clownandbehindbeforeandwhilebackingtoavoidaback-overaccident.
Slowdownbeforeturning.Operatethemachinesmoothly.Avoiderratic
operationandexcessivespeed.
Disengageblade(s),setparkingbrake,stopengineandwaituntilthe
blade(s)cometoacompletestopbeforeremovinggrasscatcher,emptying
grass,uncloggingchute,removinganygrassordebris,ormakingany
adjustments.
Neverleavearunningmachineunattended.Alwaysturnoffblade(s),set
parkingbrake,stopengineandremovekeybeforedismounting.
Useextracarewhenloadingor unloadingthemachineintoatrailerortruck.
Thismachineshouldnotbedrivenupordownramp(s),becausethemachine
couldtipover,causingseriouspersonalinjury.Themachinemustbepushed
manuallyonramp(s)toloadorunloadproperly.
Mufflerandenginebecomehotandcancauseaburn.Donottouch.

Checkoverheadclearancescarefullybeforedrivingunderlowhangingtree
branches,wires,dooropeningsetc.,wheretheoperatormaybestruckor
pulledfromthemachine,whichcouldresultinseriousinjury.
Disengageallattachmentclutchesanddepressthebrakepedalcompletely
beforeattemptingtostartengine.
Yourmachineisdesignedtocutnormalresidentialgrassofaheightnomore
than10".Donotattempttomowthroughunusuallytall,drygrass(e.g.,
pasture)orpliesofdryleaves.Drygrassorleavesmaycontacttheengine
exhaustand/orbuilduponthemowerdeckpresentingapotentialfire
hazard.
Useonlyaccessoriesandattachmentsapprovedforthismachinebythe
machinemanufacturer.Read,understandandfollowallinstructions
providedwiththeapprovedaccessoryorattachment.Foralistofapproved
accessoriesandattachments,call1-800-659-5917.
Dataindicatesthatoperators,age60yearsandabove,areinvolvedina
largepercentageofridingmower-relatedinjuries.Theseoperatorsshould
evaluatetheirabilitytooperatetheridingmowersafelyenoughtoprotect
themselvesandothersfromseriousinjury.
Ifsituationsoccurwhicharenotcoveredinthismanual,usecareandgood
judgment.
SLOPE OPERATION
Slopesareamajorfactorrelatedtolossofcontrolandtip-overaccidentswhichcan
resultinsevereinjuryordeath.Allslopesrequireextracaution.Ifyoucannotback
uptheslopeorif youfeeluneasyonit, donotmowit.
Foryoursafety,usetheSlopeGuideincludedaspartofthismanualtomeasure
slopesbeforeoperatingthismachineonaslopedorhillyarea.Iftheslopeisgreater
than12degreesasshownontheSlopeGuide,donotoperatethismachineonthat
areaorseriousinjurycouldresult.
Do;
Mowupanddownslopes,notacross.Exerciseextremecautionwhen
changingdirectiononslopes.
Watchforholes,ruts,bumps,rocks,orotherhiddenobjects.Uneventerrain
couldoverturnthemachine.Tallgrasscanhideobstacles.
Useslowspeed.Choosealowenoughspeedsettingsothat youwill nothave
tostoporshiftwhileontheslope.Tiresmaylosetractiononslopeseven
thoughthebrakesarefunctioningproperly.Alwayskeepmachineingear
whengoingdownslopestotakeadvantageofenginebrakingaction.
Followthemanufacturer'srecommendationsfor wheelweightsor
counterweightstoimprovestability.
Useextracarewith grasscatchersor otherattachments.Thesecanchange
thestabilityofthemachine.
Keepallmovementontheslopesslowandgradual.Donotmakesudden
changesinspeedordirection.Rapidengagementorbrakingcouldcause
thefrontofthemachineto lift andrapidlyflip overbackwardswhichcould
causeseriousinjury.
Avoidstartingorstoppingonaslope.Iftireslosetraction,disengagethe
blade(s)andproceedslowlystraightdowntheslope.
Do Not:
Donotturnonslopesunlessnecessary;then,turnslowlyandgradually
downhill,if possible.
Donotmowneardrop-offs,ditchesorembankments.Themowercould
suddenlyturnoverira wheelisovertheedgeofacliff,ditch,orifanedge
cavesin.
Donottry tostabilizethemachinebyputtingyourfootontheground.
Donotuseagrasscatcheronsteepslopes.
Donotmowonwetgrass.Reducedtractioncouldcausesliding.
Donotattempttocoastdownhill.Over-speedingmaycausetheoperatorto
losecontrolofthe machineresultinginseriousinjuryordeath.
Donottow heavypullbehindattachments(e.g.loadeddumpcart,lawn
roller,etc.)onslopesgreaterthan5 degrees.Whengoingdownhill,the
extraweighttendstopushthetractorandmaycauseyoutoloosecontrol
(e.g.tractormayspeedup,brakingandsteeringabilityarereduced,
attachmentmayjack-knifeandcausetractortooverturn).
CHILDREN
Tragicaccidentscanoccurif theoperatorisnotalertto thepresenceofchildren.
Childrenareoftenattractedtothemachineandthemowingactivity.Theydonot
understandthedangers.Neverassumethatchildrenwill remainwhereyoulastsaw
them.
Keepchildrenoutofthemowingareaandinwatchfulcareofaresponsible
adultotherthantheoperator.
Bealertandturnmachineoff ifachildentersthearea.
Beforeandwhilebacking,lookbehindanddownforsmallchildren.
Nevercarrychildren,evenwith theblade(s)shutoff.Theymayfall offandbe
seriouslyinjuredorinterferewith safemachineoperation.
Useextremecarewhenapproachingblindcorners,doorways,shrubs,trees
orotherobjectsthat mayblockyourvisionofachildwhomayrunintothe
machine.
Toavoidback-overaccidents,alwaysdisengagethecuttingblade(s)before
shiftingintoReverse.Ifequipped,the"ReverseCautionMode"(blades
operatewhilemachineridesinreverse)shouldnotbeusedwhenchildrenor
othersarearound.
Keepchildrenawayfromhotorrunningengines.Theycansufferburnsfrom
ahotmuffler.
Removekeywhenmachineisunattendedtopreventunauthorized
operation.
Neverallowchildrenunder14yearsofagetooperatethismachine.Children14and
overshouldreadandunderstandtheinstructionsandsafeoperationpracticesin
thismanualandonthemachineandshouldbetrainedandsupervisedbyanadult.
TOWING
Towonlywith amachinethathasahitchdesignedfor towing.Donotattach
towedequipmentexceptatthehitchpoint.
Followthe manufacturersrecommendationforweightlimitsfortowed
equipmentandtowingonslopes.
Neverallowchildrenorothersinorontowedequipment.
4

Onslopes,theweightofthetowedequipmentmaycauselossoftractionand
lossofcontrol.
Alwaysuseextracautionwhentowingwith amachinecapableofmaking
tight turns(e.g."zero-turn"ride-onmower).Makewideturnstoavoid
jack-knifing.
Travelslowlyandallowextradistancetostop.
Donotcoastdownhill.
SERVICE
Safe Handling of Gasoline:
Toavoidpersonalinjury orproperty damageuseextremecarein handling
gasoline.Gasolineisextremelyflammableand thevaporsareexplosive.
Seriouspersonalinjury canoccurwhen gasolineisspilledonyourselforyour
clotheswhichcanignite. Washyourskinand changeclothesimmediately.
Useonlyanapprovedgasolinecontainer.
Neverfill containersinsideavehicleoronatruckortrailerbedwith aplastic
liner.AIwaysplacecontainersonthegroundawayfromyourvehiclebefore
filling.
Whenpractical,removegas-poweredequipmentfromthetruckor
trailerandrefuelit ontheground.Ifthisisnotpossible,thenrefuelsuch
equipmentonatrailerwitha portablecontainer,ratherthanfromagasoline
dispensernozzle.
Keepthenozzlein contactwith therimofthefueltankorcontaineropening
atalltimesuntilfuelingiscomplete.Donotuseanozzlelock-opendevice.
Extinguishallcigarettes,cigars,pipesandothersourcesofignition.
Neverfuelmachineindoors.
Neverremovegascaporaddfuelwhiletheengineishotor running.Allow
enginetocoolatleasttwominutesbeforerefueling.
Neveroverfill fueltank.Filltanktonomorethan1/2inchbelowbottomof
fillernecktoallowspaceforfuelexpansion.
Replacegasolinecapandtightensecurely.
Ifgasolineisspilled,wipeit off theengineandequipment.Movemachineto
anotherarea.Wait5 minutesbeforestartingtheengine.
Toreducefirehazards,keepmachinefreeofgrass,leaves,orotherdebris
build-up.Cleanupoilorfuelspillageandremoveanyfuelsoakeddebris.
Neverstorethe machineorfuelcontainerinsidewherethereisanopen
flame,sparkorpilotlightasonawaterheater,spaceheater,furnace,clothes
dryerorothergasappliances.
Allowamachinetocoolatleastfiveminutesbeforestoring.
General Service
Neverrunanengineindoorsorinapoorlyventilatedarea.Engineexhaust
containscarbonmonoxide,anodorless,anddeadlygas.
Beforecleaning,repairing,orinspecting,makecertaintheblade(s)andall
movingpartshavestopped.Disconnectthesparkplugwireandgroundagainst
theenginetopreventunintendedstarting.
Periodicallychecktomakesurethebladescometocompletestopwithin
approximately(5)fivesecondsafteroperatingthe bladedisengagement
control.Ifthebladesdonotstopwithinthethistimeframe,yourmachine
shouldbeservicedprofessionallybyaSearsorotherqualifiedservicedealer.
Checkbrakeoperationfrequentlyasit issubjectedtowearduringnormal
operation.Adjustandserviceasrequired.
Checktheblade(s)andenginemountingboltsatfrequentintervalsfor
propertightness.Also,visuallyinspectblade(s)for damage(e.g.,excessive
wear,bent,cracked).Replacetheblade(s)with theoriginalequipment
manufacturer's(O.E.M.)blade(s)only,listedinthismanual.Useofparts
whichdonotmeettheoriginalequipmentspedficationsmayleadto
improperperformanceandcompromisesafety!
Mowerbladesaresharp.Wrapthebladeorweargloves,anduseextra
cautionwhenservicingthem.
Keepallnuts,bolts,andscrewstight tobesuretheequipmentisinsafe
workingcondition.
Nevertamperwith thesafetyinterlocksystemorothersafetydevices.Check
theirproperoperationregularly.
Afterstrikingaforeignobject,stoptheengine,disconnectthesparkplug
wire(s)andgroundagainsttheengine.Thoroughlyinspectthemachinefor
anydamage.Repairthedamagebeforestartingandoperating.
Neverattempttomakeadjustmentsorrepairstothe machinewhilethe
engineisrunning.
Grasscatchercomponentsandthedischargecoveraresubjecttowear
anddamagewhichcouldexposemovingpartsorallowobjectstobe
thrown.Forsafetyprotection,frequentlycheckcomponentsandreplace
immediatelywithoriginalequipmentmanufacturer's(O.E.M.)partsonly,
listedinthismanual.Useofpartswhichdonotmeettheoriginalequipment
specificationsmayleadtoimproperperformanceandcompromisesafety!
Donotchangetheenginegovernorsettingsorover-speedtheengine.The
governorcontrolsthemaximumsafeoperatingspeedoftheengine.
Maintainorreplacesafetyandinstructionlabels,asnecessary.
Observeproperdisposallawsandregulationsforgas,off,etc.toprotectthe
environment.
AccordingtotheConsumerProductsSafetyCommission(CPSC)andtheU.S.
EnvironmentalProtectionAgency(EPA),thisproducthasanAverageUseful
Lifeofseven(7)years,or 270hoursofoperation.AttheendoftheAverage
UsefulLife,buya newmachineorhavethemachineinspectedannuallyby
aSearsorotherqualifiedservicedealertoensurethatallmechanicaland
safetysystemsareworkingproperlyandnotwornexcessively.Failuretodo
socanresultinaccidents,injuriesordeath.
DO NOT MODIFY ENGINE
Toavoidseriousinjuryordeath,donot modifyengineinanyway.Tampering
with thegovernorsettingcanleadto arunawayengineandcauseitto
operateat unsafespeeds.Nevertamperwith factory settingof engine
governor.

NOTICE REGARDING EMiSSiONS
Engineswhicharecertified to complywithCaliforniaandfederalEPA
emissionregulationsfor SORE(SmallOffRoadEquipment)arecertified
tooperateonregularunleadedgasoline,andmayincludethefollowing
emissioncontrolsystems:EngineModification (EM),OxidizingCatalyst(0C),
SecondaryAirInjection(SAI)andThreeWayCatalyst(TWC)ifsoequipped.
SPARK ARRESTOR
Thismachineisequippedwith aninternal combustionengineand should
not beusedonor nearanyunimprovedforest-covered,brusbcoveredor
grass-coveredland unlessthe engine'sexhaustsystemisequippedwith a
sparkarrestormeetingapplicablelocalorstatelaws(ifany).
Ira sparkarrestorisused,it shouldbemaintainedin effectiveworkingorder
bythe operator.Inthe StateofCaliforniatheaboveisrequiredbylaw (Section
4442ofthe CaliforniaPublicResourcesCode).Otherstatesmayhavesimilar
laws.Federallawsapplyonfederal lands.
Asparkarrestorforthe muffler isavailablethroughyournearestSearsParts
andRepairServiceCenter.
SAFETY SYMBOLS
Thispagedepictsanddescribessafetysymbolsthatmayappearonthisproduct. Read,understand,andfollow all instructionsonthemachinebefore
attempting toassembleandoperate.
" "i READTHEOPERATOR'SMANUAL(S)
i Read,understand, and follow all instructions in the manual(s) before attempting to assemble and
i
' operate
I
DANGER-- ROTATINGBLADES
Never carry passengers. Never carry children, even with the blades off.
O_, DANGER-- ROTATINGBLADES
Toavoid a back-over accident, keep children awayfrom the machine while it isin operation.
_j WARNING-- ROTATINGBLADES
Do not put hands or feet near rotating parts or under the cutting deck. Contact with the blade(s)canamputate hands and feet.
DANGER-- ROTATINGBLADES
Always look down and behind before and while backing to avoid aback-over accident.
..........._ •
JJ .
,,,/_ WARNING--THROWN OBJECTS
ii_;iil._',_....... This machine may pick up and throw and objects which can causeserious personal injury.
/ WARN,NG--T.ROWNOBJECTS
Thismachinemaypickupandthrowandobjectswhichcancauseseriouspersona,injury
_f
6

®
O
BYSTANDERS
Keep bystanders, helpers, children and pets at least 75 feet from the machine while it is in operation.
WARNING-- SLOPE OPERATION
Do not operate this machine on a slope greater than 12 degrees.
WARNING-- HOT SURFACE
Engine parts, especially the muffler, become extremely hot during operation. Allow engine and
muffler to cool before touching.
DANGER- ROTATING BLADES
To reduce the risk of injury, keep hands and feet away. Do not operate unless discharge cover or grass
catcher is in its proper place. If damaged, replace immediately.
WARNING-- CARBON MONOXIDE
Never run an engine indoors or in a poorly ventilated area. Engine exhaust contains carbon
monoxide, an odorless and deadly gas.
DANGER-- ROTATING BLADES
Do not step on the cutting deck.
WARNING: Your Responsibility--Restrict the use of this power machine to persons who read, understand and follow
the warnings and instructions in this manual and on the machine.
SAVETHESEINSTRUCTIONS!

,/
(OK)
"'- 12° Slope
X
(TOO STEEP)
- 12° Slope
Figure1
USETHiSSLOPEGAUGE TO DETERMINE
iFA SLOPEiSTOO STEEPFOB SAFEOPERATION!
Tochecktheslope,proceedasfollows:
1. Removethis pageandfoldalongthe dashedline.
2. Locatea verticalobjecton orbehindtheslope(e.g.a pole,building,fence, tree,etc.)
3. Aligneithersideoftheslopegaugewith theobject(SeeFigure1andFigure2).
4. Adjustgaugeupor downuntiltheleftcornertouchestheslope(SeeFigure1 andFigure2).
5.
Ifthereisagapbelowthegauge,theslopeistoosteepfor safeoperation(SeeFigure2 above).
Figure2
Slopes are a major factor related to tip-over and roll-over accidents which can result in severe injury or death. Do not operate machine
on slopes in excess of 12 degrees. All slopes require extra caution. If you cannot back up the slope or if you feel uneasy on it, do not
mow it. Always mow up and down the face of slopes, never mow across the face of slopes.

Contents of Crate
OneRidingMower
OneSteeringWheel/ShaftAssembly
OneRearHitchPlate
OneRidingMowerOperator'sManual
OneSeatAssembly
OneRearEngineCover
OneOilDrainSleeve
OneEngineOperator'sManual
OneSteeringPedestalCap
OneDischargeChuteAssembly
OneHardwarePack
OneProductRegistrationCard
Contents of Hardware Pack
Beforebeginninginstallation,removeallthecontentsfromthecrateandallthe
hardwarefromthepackfromto makesureeverythingispresent.Hardwareislisted
below.Partnumbersareshowninparentheses.
HitchPlate
SeatMountingBracket(withtwoshoulderbolts&locknutsinstalled)
Lowerthesteeringwheelassemblyontothelowersteeringshaft(1)and
securewith boltandlocknut(2)previouslyremoved.SeeFigure2.
EecommendedToolsfor Assembly
3/8"Wrench(orsocket) 9/16"Socket
1/2"Wrench(orsocket) 7/16"wrench
5/8"Wrench(orsocket) PhillipsScrewDriver
1/4"DriveRatchet
InstallingTheSteeringWheelAssembly
Ifthesteeringwheelassemblyforyourtractordidnotcomealreadyinstalled,
followthestepsbelow:
1. Slidethe pedestalcapontothesteeringshaftsothatwhenthesteering
shaftisinstalledonthetractor,thepedestalcapwill beuprightasshownin
Figure1.
Figure1
Removetheshoulderboltandlocknutfromthesteeringshaftonthetractor
andretainforlatersteps.
Withthesteeringwheelassemblyuprightandpositionedoverthelower
steeringshaftonthetractor,alignthesteeringwheelsothatwith the
tractorwheelsstraight,thelargeopeningonthesteeringwheelisfacing
forward.
Figure2
Tightentheshoulderboltandlocknutusinga9/16"wrenchand
7/16"wrenchorsocket.
6. Removethepedestalcapmountscrewfactoryinstalledandlocatedonthe
tractor'ssteeringconsole.Retainthescrewfor laterinstructions.
7. SlidethePedestalcapdownontothetractor(1)andslightlyrotatetothe
righttoclipintoplace.Securethepedestalwith thescrew(2)previously
removed.SeeFigure3.
9 Figure3

AttachingTheSeat
Iftheseatforyourtractorwasnotattachedatthefactory,followtheapplicable
instructionsbelowtoattachit.
2. Removetheshoulderboltsandlocknutsfromtheseatmountingbracket
includedinyourhardwarepack.SeeFigure4.
f
Figure4
2. Removethetwoself-tappingscrewsfactoryinstalledonthetractor.See
Figure5.
Usinga1/4-inchdriveratchetwith a%" socket,securetheseatbracketwith
theself-tappingscrewsremovedin Step2.SeeFigure6.
Figure6
i_ll CAUTIO N: Donot useanytypeofpowertool(e.g.impactgun
orelectricdrillwith nutdriverattached)whentighteningtheself-
tappingboltstoattachtheseatbracket.
5. Positiontheseatassemblyovertheseatmountingbracket,aligningthe
holesprovided.
6. Installthetwo shoulderboltsandlocknutsremovedfromtheseatmounting
bracketin Step1.SeeFigure7.
Donotuseanytype ofpowertool (e.g.impactgunor electricdrill with nut
driverattached)whentightening theself-tapping boltsto attachthe seat
bracket°
3.
Figure5
Aligntheseatbracketinplaceovertheholesfromwheretheself-tapping
screwswereremoved,asshowninFigure6.
I0
Figure7

InstallingTheDeckChuteSeatAdjustment
1. Toadjustthepositionoftheseat,removetheadjustmentknobonthe
bottomoftheseat.Slidetheseatforwardorbackwardasdesired.Reinstall
theadjustmentknob.RefertoFigure8.
f
s j_
Figure8
Steering wheel height adjustment
NEVERoperatethistractor without either the mulchplugordeckchute
installed.
Removethewingknobsinstalledonthemowingdeckandretainforlater
installation.
2. Installthedeckchuteintothedeckdischargeopeningonthedeck.Thestuds
onthedecksurfacewill fit throughtheholesontheupperportionofthe
deckchute.Thesmalltabonthedecklip areawill fitthroughthesquare
cutoutonthe lowerportionofthedeckchute.SeeinsetofFigure10.
Note:Makecertainthat theupper-rearportionofdeckchuteisdepressing
thesafetyswitchlocatedonthedecksurface.Theenginewill notstart
withoutthedeckchuteproperlyinplace.
3. Securethedeckchutebytighteningthewingknobsremovedearlier.See
Figure10.
Toadjusttheheightofthesteeringwheel,thisunitisequippedwith atelescoping
steeringcolumn.Toadjusttheheightofthesteeringwheel:
1. Sitintheoperator'sseatandplaceyourhandsonthesteeringwheel.
2. Pushthebutton(a)onthesteeringcolumnandraiseorlowerthesteering
wheel(b)tothedesiredposition.SeeFigure9.
flete:Oncethedesiredpositionisachieved,lift upanddownonthesteeringwheel
tomakesureit locksintoplaceandthebutton(a)onthesteeringcolumnreleases
intoalockedposition.Donotoperatethisunitunlessthesteeringcolumnisina
lockedposition.
Figure10
Figure9
11

InstallTheRearEngineCover
1. Removethetwofactoryinstalledhexscrewslocatedontherearengine
covermountingbracket.Retainthescrewsforlaterinstructions.See
Figure11.
2. Installtherearenginecoverbypositioningit inplaceasshowninFigure11.
Tiptheenginecoverforwardtofit it intotheslotsprovided,thenrotateit
backwardstoalignthemountingholes.
F
3.
Figure11
Securethecoverwith thetwohexscrewspreviouslyremoved.Donot to
over-tighten.
Installingthe Bumper
1. Removethetwoscrewsasshownin Figure12.
2. Positionthebumperoverthemountingholesandsecureusingthehardware
removedinStep1,asshownin Figure12.
Installingthe HitchPlate
Removethefactoryinstalledhitchplatemountinghardwarelocatedonthe
rearofthetractor.
Positionthehitchplate,packedwiththe looseparts,with theflat sideup
asshownin Figure13.Secureusingthetwoboltsandhexnutspreviously
removed.
Figure13
Connecting the Battery Cables
CALIFORNIA PROPOSITION 65
Batteryposts,terminals,andrelatedaccessoriescontainleadandlead
compounds,chemicalsknownto theStateof Californiato causecancerand
reproductiveharm.Washhandsafter handling.
Figure12
\
12
Whenattachingbatterycables,alwaysconnectthe POSITIVE(Red)wire to
itsterminal first, followed bythe NEGATIVE(Black)wire.
Forshippingreasons,bothbatterycablesonyourequipmentmayhavebeenleft
disconnectedfromtheterminalsatthefactory.Toconnectthebatterycables,
proceedasfollows:
NOTE:ThepositivebatteryterminalismarkedPos.(+).Thenegativebattery
terminalismarkedNeg.(-).
1. Removethefactoryinstalledhexboltsandhexnutslocatedontheendof
thewiringharness.Retainthehardwarefor laterinstructions.
Removetheplasticcover,if present,fromthepositivebatteryterminaland
attachtheredcabletothepositivebatteryterminal(+)withoneofthehex
boltandhexnuts,usinga7/16inchwrenchandsocketwrench.SeeFigure11.
Removetheplasticcover,if present,fromthenegativebatteryterminal
andattachtheblackcabletothenegativebatteryterminal(-) with the
remaininghexboltandhexnut,usinga 7/16inchwrenchandsocket
wrench.SeeFigure14.

4. Positiontheredrubberbootoverthepositivebatteryterminaltohelp
protectitfromcorrosion.
NOTE:Ifthe batteryisput intoserviceafterthedateshownontop/sideofbattery,
chargethe batteryasinstructedintheMaintenancesectionofthisOperator's
Manualpriortooperatingthetractor.
Figure14
m///=lllb
v
v
mm mm
(°C)-30 ° -20° -10° 0° 10° 200 300
(°F)-20 ° 0° 150 300 50o 70o 85o 105o
CheckingThe Oil Level
NOTE:Besuretochecktheoilwhileonalevelsurfacewith theenginestopped.
1. Removetheoilfillercap/dipstickandwipethedipstickclean.
2. Insertthedipstickintotheoilfiller neck.Turnthedipstick1/4turnintothe
lockedpositiontofullyseat.SeeFigure15.
3. Removedipsticktochecktheoil level.
4. Ifthelevelislow,slowlyaddoiluntilthereadingisattheupperlevelonthe
dipstick.SeeFigure15inset.
5. Reinsertthedipstickandturntolockedpositionbeforestartingtheengine.
Gas&Oil
NOTE:Theengineisshippedwithoutgasolineandwithmotoroil intheengine.
However,youMUSTchecktheoil levelbeforeoperating.Becarefulnottooverfill.
Runningtheenginewith insufficientoilcancauseseriousenginedamageandvoid
theenginewarranty.
Alwayskeephandsand feet clearofequipment movingparts. Donot usea
pressurizedstarting fluid. Vaporsareflammable.
Oil Recommendations
Beforestartingengine,checkoillevel;capacityis1700ml/57.5ft.oz.Referto
viscositychartfor oilrecommendations.Donotover-fill.Useasyntheticornon-
synthetic4-stroke,oranequivalenthighdetergent,premiumqualitymotoroil
certifiedtomeetorexceedU.S.automobilemanufacturer'srequirementsforservice
classificationSG,SEMotoroilsclassifiedSG,SFwill showthisdesignationonthe
container.
SAE10W-30isrecommendedfor general,alltemperatureuse.Ifsingleviscosity
oilisused,selecttheappropriateviscosityonthenextpagefortheaverage
temperatureinyourareafromthechartbelow.
Donotusenon-detergentoil or2-strokeengineoil. It couldshortenthe
engine'sservicelife.
NOTE:A5w30syntheticoilmaybeusedtoimprovestartabilityforcoldweather
(temperaturesbelow40F).
Oil Fill
Cap/Dipstick-==_
Level
Figure15
NOTE:Donotoverfill.Overfillingwithoil maycausesmoking,hardstarting,
sparkplugfouling,oroilsaturationofaircleaner.
FuelRequirements
Operatingthe enginewith ESSfuel, anoil/gasolinemixture, dirty gasoline,
or gasoline over 30 days old without fuel stabilizingadditivemayresult
[indamagetoyourengine'-scarburetor.Subsequentdamagewouldnot be
coveredunderthe Craftsmanwarranty.
13

Useautomotivegasoline(unleadedorlowleadedtominimizecombustionchamber
deposits)witha minimumof87octane.Gasolinewith upto10%ethanolor15%
MTBE(MethylTertiaryButylEther)canbeused.Neveruseanoil/gasolinemixture
ordirtygasoline.Avoidgettingdirt,dust,orwaterinthefueltank.DONOTuseE85
gasoline.
Useextremecarewhen handling gasoline.Gasolineisextremelyflammable
andthe vaporsareexplosive.Neverfuel machineindoorsor while the
engineishot or running.Extinguishcigarettes,cigars,pipes,andother
sourcesofignition.
NOTE:Purchasegasolineinsmallquantities.Donotusegasolineleftoverfromthe
previousseason,to minimizegumdepositsinthefuelsystem.
Thisengineiscertifiedtooperateonunleadedgasoline.Forbestresults,fill
thefueltankwith onlyclean,fresh,unleadedgasolinewith apumpsticker 1.
octaneratingof87orhigher.
Gasohol(upto10%ethylalcohol,90%unleadedgasolinebyvolume)isan
approvedfuel.Othergasoline/alcoholblends,suchasE85,arenotapproved.
2.
MethylTertiaryButylEther(MTBE)andunleadedgasolineblends(uptoa
o
maximumof15_ MTBEbyvolume)areapprovedfuels.Othergasoline/ether 3.
blendsarenotapproved.
Fillfueltankoutdoorsorinwell-ventilatedarea. f
Donotoverfillfueltank.Filltankto nomorethan1/2inchbelowbottomof
fillernecktoallowspaceforfuelexpansion.
Neverremovegascaporaddfuelwhiletheengineishotor running.Allow
enginetocoolatleasttwominutesbeforerefueling.
Ifgasolineisspilled,wipeit offtheengineandequipment.Movemachineto
anotherarea.Wait5minutesbeforestartingtheengine.
ToAddGasoline
NOTE:Thetractorisfitted with a tethered,ratchetingfuelcap.STOPfillingthetank
oncethefuelisseeninsidethefillerneck.Thisensuresthata properexpansion
volumeiscreated,otherwisethefuelcanoverflowcreatingahazardoussituation.
DoNOTtopoffthe fueltank.
Refuelin awell-ventilatedareawith theenginestopped.Donotsmokeor
allowflamesorsparksintheareawheretheengineisrefueledorwhere
gasolineisstored.
Donotoverfillthefueltank.Afterrefueling,makesurethetankcapisclosed
properlyandsecurely.
Becarefulnottospillfuelwhenrefueling.Spilledfuelorfuelvapormay
ignite.Ifanyfuelisspilled,makesuretheareaisdrybeforestartingthe
engine.
Avoidrepeatedorprolongedcontactwithskinorbreathingofvapor.
AddingFuel
Anadult shouldfuel thisengine.NEVERallow childrentorefuel itsengine.
Gasoline(fuel)vaporsarehighlyflammable andcanexplode.Fuelvapors
canspreadandbeignitedbyasparkor flamemanyfeetawayfrom engine.
Topreventinjuryor deathfrom fuelfires, follow theseinstructions:
DONOTuseleadedfuel.
Fuelmustbefreshandclean.NEVERusefuelleftoverfromlastseasonor
storedforlongperiods.
NEVERmixoilwith fuel.
DONOTusefuelcontainingMethanol(WoodAlcohol)
NOTE:Beforerefueling,allowenginetocooltwominutes.
Turntheengineoffandlet enginecoolatleast2minutesbeforeremoving
thefuelcap.Thegasolinetankislocatedundertheseat.Thefuelcapis
tetheredtothetractortopreventitsloss.Donotattempttoremovethecap
fromthetractor.
Cleanaroundfuelfill beforeremovingcaptofuel.
Filltankuntilfuelreaches1/2inchbelowthebottomofthefillerneckto
allowspaceforfuelexpansion.Becarefulnottooverfill.SeeFigure16.
,. j
Figure16
4. Replacethegasolinecapandtightensecurely.Wipeupspilledfuelbefore
startingengine.IffuelisspilledDONOTstartengine.Movemachineaway
fromareaofspillage.Avoidcreatinganysourceofignitionuntilfuelvapors
aregone.
TirePressure
Equaltire pressureshouldbemaintainedat alltimes. Neverexceedthe
maximuminflation pressureshownonthe sidewallofthe tire.
Therecommendedoperatingtirepressureis:
Approximately10psiforthereartires
Approximately14psiforthefronttires
IMPORTANT:Refertothetiresidewallforexacttire manufacturer'srecommended
ormaximumpsi.Donotoverinflate.Uneventirepressurecouldcausethecutting
decktomowunevenly.
14

Clutch/BrakePedal
SpeedControl&Parking
BrakeLever
FuelLevelindicator
IgnitionSwitch
Shift Lever
Throttle/ChokeLever
FuelFillCap
CupHolder
DeckLift Lever
OilFillCap
PTO(BladeEngage)Lever
Figure17
NOTE:AnyreferenceinthismanualtotheRIGHTorLEFTsideofthetractorisobservedfromoperator'sseatpositionfacingforwardtowardsthefrontoftractor.
MeetsANSiSafetyStandards
CraftsmanTractorsconformtothesafetystandardoftheAmericanNationalStandardsInstitute(ANSI).
15

Throttle/ ChokeControl
Thethrottlecontrolleverislocatedontheleftfenderofthetractorasseenfromthe
operator'sposition,seeFigure17.Thislevercontrolsthespeedoftheengine,aswell
asthechokewhenit ispushedallthewayforward.Whensetinagivenposition,
thethrottlewill maintainauniformenginespeed.
IMPORTAfl#Whenoperatingthetractorwith thecuttingdeckengaged,becertain
thatthethrottleleverisalwaysintheFAST(rabbit)position.
Movingthethrottleleverallthewayforwardactivatestheengine'schokecontrol.
Activatingthechokecontrolclosesthechokeplateonthecarburetorandaidsin
startingtheengine.
RefertoStartingTheEnginein theOperationsectionofthismanualfordetailed
startinginstructions.
ignitionSwitch
Theignitionswitchislocatedontheleftfenderofthetractorasseenfromthe
operator'sposition,adjacenttotheThrottle/ChokeControl.Activatethe Ignition
Switchtostarttheenginebyinsertingthekeyintothe ignitionswitchandturn
clockwisetotheSTARTposition.Releasethe keyintotheONpositiononceengine
hasfired.SeeFigure18.
On
off
Start
Figure18
Clutch-BrakePedal
Thedutch-brakepedalislocatedonthe leftsideofthe lawntractor,alongthe
runningboard.Depressthedutch-brakepedalpartwaydownwhenslowingthe
tractorbychangingspeeds(RefertoSpeedControlLever).Depressthepedalallthe
wayclowntoengagethediscbrakeandbringthetractortoacompletestop.
NOTE:Thedutch-brakepedalmustbecompletelydepressedtostarttheengine.
RefertoSafetyInterlockSwitchesintheOperationsectionofthismanual.
ShiftLever
Theshiftleverislocatedonthecontrolpaneljustbelowtheseat,inthecenterof
thetractor.It hasthreepositions,FORWARD,NEUTRALandREVERSE.Thebrake
pedalmustbe completely depressedandthetractormustnotbeinmotion
whenmovingtheshiftlever.SeeFigure19.
IMPORTANT:Neverforcetheshiftlever.Doingsomayresultin seriousdamageto
thetractor'stransmission.
f
Figure19
SpeedControl Lever
Thespeedcontrollever,locatedontherightsideofthetractor'ssteeringconsole,
allowsyoutoregulatethegroundspeedofthelawntractor.
Touse,depressthedutch-brakepedalandmovetheleveroutoftheparkingbrake
notchandforwardtoincreasethetractor'sgroundspeed.Whenadesiredspeedhas
beenreached,releasetheleverintoanappropriatenotchtomaintainthat speed.
Toslowthetractor'sgroundspeed,depressthedutch-brakepedalandmovethe
speedcontrolleverrearwardandreleaseit intoanotch.
ParkingBrake
Tosettheparkingbrake,fullydepresstheclutch-brakepedal.Movethespeed
controlleverallthewaydownandintotheparkingbrakeposition.Releasethe
clutch-brakepedaltoallowtheparkingbraketoengage.
Toreleasethe parkingbrake,depresstheclutch-brakepedalandmovethespeed
controlleveroutoftheparkingbrakepositionintothedesiredposition.Releasethe
clutch-brakepedal.
NOTE:Theparkingbrakemustbesetiftheoperatorleavestheseatwith theengine
runningortheenginewill automaticallyshutoff.
FuelLeverIndicator
TheFuelLeverIndicatorislocatedbelowtheseatontheleft handsidefromthe
operator'spositioninthecontrolpanel.Usethiswindowtoidentifythetractor's
fuelneeds.SeeFigure20.
16

©
Safety Interlock Switches
Thesafetyinterlocksystemisdesignedfor safeoperationofthetractor.Ifthis
systemshouldevermalfunction,donotoperatethetractor.
Immediatelycontact1-800-4-MY-HOMEtohavethesystemserviced.
Thesafetyinterlocksystempreventstheenginefromstartingunless
theparkingbrakeisengagedandthePTO(BladeEngage)leverisinthe
disengaged(OFF)position.
Thesafetyinterlocksystemwill automaticallyshutofftheengineifthe
operatorleavestheseatbeforeengagingtheparkingbrake.
Thesafetyinterlocksystemwill automaticallyshutofftheengineifthe
operatorleavesthetractor'sseatwiththe PTO(BladeEngage)leverengaged,
regardlessofwhethertheparkingbrakeisengaged.
Theenginewill automaticallyshutoff ifthe PTO(BladeEngage)leveris
movedintotheengaged(ON)positionwiththeshiftleverinReverse.
Figure20
DeckLiftLever
Foundonyourtractor'srightfender,thedecklift leverisusedtochangetheheight
ofthecuttingdeck.Touse,movethelevertotheleft,thenplaceinthenotchbest
suitedfor yourapplication.
PTO(BladeEngage)Lever
Foundonthetractor'srightfender,the PTO(blade engage) leverisusedto
engagepowertothecuttingdeck.Tooperate,movetheleverallthewayforward.
Movingtheleverallthewayrearwardintothe PTOOFFpositiondisengagespower
tothecuttingdeck.
NOTE:ThePTO(bladeengage)levermustbeinthedisengaged(PTOOFF)position
whenstartingtheengine.
FuelFillCap
TheFuelFillCapislocatedbelowtheseat.RefertotheAssemblysectioninthis
manualforinstructionsonfuelingthistractor.
OilFill Cap
TheOilFillCapislocatedbelowtheseat.RefertotheAssemblysectioninthis
manualforinstructionsoncheckingandaddingoiltothistractor.
FuelFill Cap
Thegasolinetankislocatedundertheseat.Donotoverfill.
Useextremecarewhen handlinggasoline.Gasolineisextremelyflammable
andthe vaporsareexplosive.Neverfuel machineindoorsorwhile the
engineishotorrunning. Extinguishcigarettes,cigars,pipes,andother
sourcesof ignition.
Fordetailedinformationonaddingfuel,referto FuelRequirementsintheAssembly
sectionofthismanual.
Donotoperatethetractor if the interlocksystemismalfunctioning. This
systemwasdesignedforyoursafetyand protection.
IgnitionSwitch
Theignitionswitchisactivatedtostarttheengine.Insertkeyintotheignition
switchandturnclockwisetotheSTARTposition.ReleasethekeyintotheON
positiononceenginehasfired.SeeFigure21.
Tostoptheengine,turntheignitionkeycounterclockwisetotheOFFposition.See
Figure21.
Neverleavearunningmachineunattended.AlwaysdisengagePTO,move
shift leverinto neutralposition,setparkingbrake,stopengineandremove
keyto preventunintendedstarting.
off
On
Start
Figure21
17

AvoidSeriousinjuryor Death
Knowlocationandfunctionofallcontrols.
Removeobjectswhichcouldbethrownbytheblades.
Goupanddownslopes,notacross.
Useextracautiononslopes.Donotmowslopesgreaterthan12degrees.
Avoidsuddenturns.Uselowspeed.
Donotoperatemachinewhereitcouldtiporslip.
Ifmachinestopsgoinguphill,stopbladesandbackdownslowly.
Beforeleavingoperator'sposition,disengageblades,engageparking
brake,shutoff andremovekey.
Besurebladesandenginearestoppedbeforeplacinghandsorfeetnear
blades.
Keepsafetydevices(guards,shields,switches,etc.)inplaceandworking.
Keepbystandersaway.
Allowmachinetocoolbeforefuelingorstoring.
Keepmachinefreeofdebris.
ReadOperator'sManual
Engagingthe ParkingBrake
Toengagethe parking brake:
I. Fullydepressthe brakepedalandholdit downwith yourfoot.
2. Movetheparkingbrakeleverdownintotheparkingbrakeposition.
3. Releasethebrakepedaltoallowtheparkingbraketoengage.
Toreleasethe parking brake:
1. Depressthebrakepedalandmovethespeedcontrolleveroutoftheparking
brakeposition.
Setting the Cuttingfreight
Selecttheheightpositionofthecuttingdeckby placingthedecklift leverinanyof
thedifferentcuttingheightnotchesontherightsideofthefender.
Starting the Engine
Donotoperatethetractor ifthe interlocksystemismalfunctioning. This
systemwasdesignedforyoursafetyand protection.
NOTE:RefertotheAssemblysectionofthismanualforgasolineandoilfill-up
instructions.
1. Insertthetractorkeyintotheignitionswitch.
2. PlacethePTO(Blade Engage) leverin thedisengaged(OFF)position.
3. Engagethetractor'sparkingbrake.
4. Activatethechokecontrol.
5. TurntheignitionkeyclockwisetotheSTARTposition.Aftertheenginestarts,
releasethekey.Itwill returntotheONposition.
IMPORTANT:DoNOTholdthe keyinthe STARTpositionfor longerthanten
secondsatatime. Doingsomaycausedamagetoyourengine'selectric
starter.
6. Aftertheenginestarts,deactivatethechokecontrolbyplacingthethrottle
controlintotheFASTposition.
NOTE:DoNOTleavethechokecontrolonwhileoperatingthetractor.Doingsowill
resultina"rich"fuelmixtureandcausetheenginetorunpoorly.
Stopping the Engine
Ifyoustrikeaforeign object,stoptheengine,disconnectthesparkplug
wire(s)andgroundagainsttheengine.Thoroughlyinspectthemachinefor
anydamage.Repairthe damagebeforerestarting andoperating.
1. Ifthebladesareengaged,placethePTO(BladeEngage)leverin the
disengaged(OFF)position.
2. TurntheignitionkeycounterclockwisetotheSTOPposition.
3. Removethekeyfromtheignitionswitchtopreventunintendedstarting.
Keephandsandfeet awayfrom the dischargeopeningof thecutting deck.
18

Driving TheTractor
Avoidsuddenstarts,excessivespeedandsuddenstops.
Donot leavethe seatofthe tractorwithout first placingthe PTO(Blade
Engage)leverinthe disengaged(OFF)position,depressingthe brakepedal
andengagingthe parkingbrake.Ifleavingthetractor unattended,also
turn the ignitionkeyoff andremovethe key.
Alwayslookdownandbehindbeforeandwhile backingupto avoidaback-
overaccident.
1. Depressthebrakepedalandmovethespeedcontrolleveroutoftheparking
brakeposition,thenletthepedalrelease.
2. Movethethrottleleverintothe FAST(rabbit)position.
3. PlacetheshiftleverineithertheFORWARDorREVERSEposition.
IMPORTA#_DoNOTusetheshiftlevertochangethedirectionoftravelwhenthe
tractorisinmotion.Alwaysusethebrakepedaltobringthetractortoacomplete
stopbeforeshifting.
4. Releasetheparkingbrakebydepressingtheclutch-brakepedaland
positioningthespeedcontrolleverindesiredposition.
IMPOR@N_First-timeoperatorsshouldusespeedpositions1or2.Become
completelyfamiliarwith thetractor'soperationandcontrolsbeforeoperatingthe
tractorinhigherspeedpositions.
5. Releaseclutch-brakepedalslowlytoputunitintomotion.
6. Thelawntractorisbroughttoastopbydepressingtheclutch-brakepedal.
NOTE:Whenoperatingthe unitinitially,therewill belittledifferencebetweenthe
highesttwo speedsuntilafterthebeltshaveseatedthemselvesintothepulleys
duringthebreak-inperiod.
Beforeleavingtheoperator'spositionforanyreason,disengagetheblades,place
theshiftleverinneutral,engagetheparkingbrake,shutengineoffand remove
thekey.
5. Depressclutch-brakepedal.
6. Placespeedcontrolleverindesiredposition.
7. PlaceshiftleverineitherFORWARDorREVERSE,andfollownormaloperating
procedures.
Driving OnSlopes
RefertotheSLOPEGAUGEin theSafetyInstructionssectionofthemanualtohelp
determineslopeswhereyoumayoperatethistractorsafely.
Donotmowoninclineswith aslopein excessof 12degrees(ariseof
approximately2feetevery10feet). Thetractorcouldoverturn andcause
seriousinjury.
Mowupanddownslopes,NEVERacross.
Exerciseextremecautionwhenchangingdirectiononslopes.
Watchforholes,ruts,bumps,rocks,orotherhiddenobjects.Uneventerrain
couldoverturnthemachine.Tallgrasscanhideobstacles.
Avoidturnswhendrivingonaslope.Ifaturnmustbemade,turndownthe
slope.Turningupaslopegreatlyincreasesthechanceofarollover.
Avoidstoppingwhendrivingupaslope.Ifit isnecessarytostopwhile
drivingupaslope,startupsmoothlyandcarefullyto reducethepossibility
offlippingthetractoroverbackward.
IMPORTAN_Whenstoppingthetractorfor anyreasonwhileonagrasssurface,
always:
1. Placetheshiftleverinneutral,
2. Engagetheparkingbrake,
3. Shutengineoffandremovethekey.Doingsowill minimizethe possibility
ofhavingyourlawn"browned"byhotexhaustfromyourtractor'srunning
engine.
Ifunitstallswith speedcontrolinhighspeed,or ifunitwill notoperatewith speed
controlleverina lowspeedposition,proceedasfollows:
1. PlaceshiftleverinNEUTRAL.
2. Restartengine.
3. Placespeedcontrolleverinhighestspeedposition.
4. Releaseclutch-brakepedalfully.
19

Engagingthe Blades
Engagingthe PTO(BladeEngage)transferspowertothecuttingdeck.Toengage
theblades,proceedasfollows:
1. Movethethrottle/chokecontrollevertotheFAST(rabbit)position.
2. GraspthePTO(BladeEngage)leverandpivotit allthewayforwardintothe
engaged(ON)position.
3. Keepthethrottleleverinthe FAST(rabbit)positionforthemostefficientuse
ofthecuttingdeck.
NOTE:Theenginewill automaticallyshutoff ifthe PTO(BladeEngage)leveris
movedintotheengaged(ON)positionwith theshiftleverinReverse.
Mulching
Amulchkitisavailableasanattachment.Mulchingisaprocessofredrculating
grassclippingsrepeatedlybeneaththecuttingdeck.Theultra-fineclippingsare
thenforcedbackintothe lawnwheretheyactasanaturalfertilizer.Contactthe
nearestParts& RepairServiceCenterto purchaseamulchkit forthisunit.
TolocatethenearestParts&RepairServiceCenter,contact1-800-4-MY-HOME®.
Using the Deck Lift Lever
Toraisethecuttingdeck,movethedecklift levertothe left,thenplaceit inthe
notchbestsuitedforyourapplication.RefertoSettingTheCuttingHeightearlierin
thissection.
Mowing
Tohelpavoidbladecontactor athrown object injury,keepbystanders,
helpers,childrenandpetsat least75feet from themachinewhile it isin
operation.Stopmachineif anyoneentersthearea.
Thefollowinginformationwill behelpfulwhenusingthecuttingdeckwith your
tractor:
Planyourmowingpattern toavoiddischargeof materialstowardroads,
sidewalks,bystandersandthe like.Also,avoiddischargingmaterialagainst
awall or obstructionwhichmaycausedischargedmaterial to ricochetback
towardthe operator.
Donotmowat highgroundspeed,especiallyifa mulchkitorgrasscollector
isinstalled.
Forbestresultsit isrecommendedthatthefirsttwo lapsbecutwiththe
dischargethrowntowardsthecenter.Afterthefirst twolaps,reversethe
directiontothrowthedischargetotheoutsideforthebalanceofcutting.
Thiswill giveabetterappearancetothelawn.
Donotcutthegrasstooshort.Shortgrassinvitesweedgrowthandyellows
quicklyindryweather.
Mowingshouldalwaysbedonewith theengineatfullthrottle.
Underheavierconditionsit maybenecessarytogobackoverthecutareaa
secondtimetogetacleancut.
DoNOTattemptto mowheavybrushandweedsandextremelytallgrass.
Yourtractorisdesignedtomowlawns,NOTclearbrush.
Keepthebladesharpandreplacethebladewhenworn.RefertoCutting
BladeintheMaintenancesectionofthismanualfor properbladesharpening
instructions.
Thelampsturn OFFwhentheignitionkeyismovedtotheSTOPposition.
2O

MAINTENANCESCHEDULE
Beforeperforminganytypeofmaintenance/service,disengageall controls
andstoptheengine.Waituntilallmovingpartshavecometoacomplete
stop.Disconnectsparkplugwireandgrounditagainsttheengineto prevent
unintendedstarting.AlwayswearsafetyglassesduringoperationorwhUe
performinganyadjustmentsor repairs.
BeforeEachUse
Inthe FirstFiveHours
Every10Hours
Every25hours
Every50hours
Annually
BeforeStorage
1. Engineoil level
2. AirFilter
3. Mufflerareaandcontrols
1. EngineOil
1. Hood/Dashairvents
2. Batteryterminals
3. Deckspindleandidlerbracket
1. Airfilter'sprecleaner*
2. Airfilter*
3. Mid-steeringarms,pivotshafts,
rackandaxles
4. Frontwheelbearings
1. Engineoil/Oil filter
2. Muffler
1. Airfilter
2. Airfilter'spre-cleaner
3. Sparkplug
4. Aircoolingsystem*
5. Fuelfilter
6. SteeringGears
Z RearWheels
1. Hood/Dashairvents
2. Batteryterminals
3. Midsteeringarms,pivotshafts,
andaxles
4. Frontwheelbearings
5. Deckspindleandidlerbracket
6. Pedalpivotpoints
*Servicemorefrequentlyunderdustyconditions.
Followthe maintenanceschedulegivenbelow.Thischartdescribesservice
guidelinesonly.UsetheServiceLogcolumnto keeptrackofcompleted
maintenancetasks.
Tolocate the nearestParts&RepairServiceCenteror toscheduleservice,
simply call(800)659-5917.
1. Check
2. Clean/Replace
3. Clean
1. Change
1. Clean
2. Clean
3. Lubricate
1. Clean
2. Clean
3. Lubricate
4. Lubricate
1. Change/Replace
2. Check
1. Replace
2. Replace
3. Replace
4. Clean
5. Replace
6. Clean
7. Removeandgreaseaxles
1. Clean
2. Clean
3. Lubricate
4. Lubricate
5. Lubricate
6. Lubricate
Beforeperforminganymaintenanceor repairs,disengagethe PTO(Blade
EngageLever),engagethe parkingbrake,stopthe engineandremovethe
keyto preventunintendedstarting.
21
Ifthe enginehasbeenrecentlyrun,the engine,muffler andsurrounding
metalsurfaceswill behot andcancauseburnsto the skin.Exercisecaution
to avoidburns.

Engine Maintenance
Shutoff the enginebeforeperforming anymaintenance.Toprevent
accidentalstart-up,disconnectthesparkplug boot.
IMPORTAIV#Ifenginemustbetippedtotransportequipmentor toinspector
removegrass,keepsparkplugsideofengineup.Transportingortippingengine
sparkplugdownmaycausesmoking,hardstarting,sparkplugfouling,oroil
saturationofaircleaner.
Periodicinspectionandadjustmentoftheengineisessentialifhighlevel
performanceistobemaintained.Regularmaintenancewill alsoensurealong
servicelife.Therequiredserviceintervalsandthekindof maintenancetobe
performedaredescribedinthetableonthepreviouspage.Followthehourlyor
calendarintervals,whicheveroccurfirst.Morefrequentserviceisrequiredwhen
operatinginadverseconditions.
Ifthe enginehasbeenrunning,the muffler will bevery hot.Becarefulnot
totouchthe muffler.
Servicingthe EngineOil
Checkthe oillevelregularly.
Besurecorrectoillevelismaintained.Checktheoiieveryfivetotenhoursof
operation,beforestartingtheengine.SeeCheckingOilLevelintheAssembly
section.
Onlyusehighqualitydetergentoilratedwith APIserviceclassificationSIC,SG,
SH,or SJ.Selecttheoil'sSAEviscositygradeaccordingtotheexpectedoperating
temperature.RefertoGas&Oilin theAssemblysectionofthismanual.
Oil Drain
IMPORTIIfl#Besuretocheckengineonalevelsurfacewiththeenginestopped.
Draintheoilwhiletheengineisstillwarmtoassurerapidandcompletedraining.
Fordrainingoiifromtheengine'scrankcaseofselectmodeltractors,aplasticoil
drainsleeveispackedwith thisOperator'sManual.Todraintheoil, proceedas
follows:
1. Unscrewtheoilfill capandremovethedipstickfromtheoil filltube.
2. Snapthesmallendofoildrainsleeveontotheoilsump.SeeFigure22.
3. Removedrainpluganddrainoil intoasuitablecontainerwith acapacityof
nolessthan64oz.
4.
Tipthetractorslightlyinthedirectionofthesuitablecontainertoaidinfully
drainingall oftheoilfromtheengine.
Beforetipping engineor equipmentto drainoil, drainfuelfrom tank by
runningengineuntil fuel tank isempty.
5. Servicetheoilfilter asinstructedlaterinthissection.
6. Servicethe 0il Filterifdesired,aspertheinstructionslaterinthissection.
7. Reinstallthedrainplugandtightenitsecurely,12-14Nm(106.2-123.9in-lb).
8. Removetheoildrainsleevefromtheoilsump.Returnthedipsticktotheoilfill
tubeandscrewtheoilfill capbackintoplace.
9. Refilltheenginewith thenewmotoroil.RefertoGas&OilintheAssembly
sectionofthismanualforinformationregardingtheapprovedoiltype.
IMPORTAIV#Usedmotoroilmaycauseskincancerifrepeatedlyleft incontactwith
theskinforprolongedperiods.Althoughthisisunlikelyunlessyouhandleusedoil
onadallybasis,itisstilladvisabletothoroughlywashyourhandswith soapand
waterassoonaspossibleafterhandlingusedoil.
flOTE:Pleasedisposeofusedmotoroilin amannerthatiscompatiblewith the
environment.Wesuggestyoutakeitinasealedcontainertoyourlocalservice
stationfor reclamation.Donotthrowitinthetrash,pouritdownadrainoronthe
ground.
22
,, j
Figure22
ReplacingTheOil Filter
Thisengineisequippedwithaspin-onoilfilter thatshouldbereplacedeachtime
anoilchangeisperformed,everyseasonor50hours.Referto Figure23.
Toreplacethe Oil Filter:
1. Draintheoil asinstructionpreviouslyinthissection.
2. Removetheoilfilter. Disposeoftheoldoilfilter properly.
3. Lubegasketofnewoil filterwith cleanoil.
4. Installandturnoilfilter byhanduntilthegasketcomesincontactwiththe
sealingsurfaceofthecrankcasecover,thentightentheoilfilter, 10-12Nm
(88.5-106.2in-lb),1/2-3/4turn.
5. Addoilaspreviouslyinstructed.
6. Makesuredipstickisinstalled.
7. Startandrunengine.Checkfor leaks.
8. Stopengine.Waitafewminutesandchecktheoillevel.SeeCheckingThe
0il LevelintheAssemblysectionofthismanual.

Air Filter Service
Paperfilterscannotbecleanedandshouldbereplacedevery100operatinghours;
moreoftenif usedinextremelydustyconditions.
OilFilter
Neverusegasolineorlowflashpointsolventsforcleaningtheairfilter
element.Afire orexplosioncouldresult.
Donotusepressurizedair orsolventsto cleantheaircleaner
cartridge.
Iffilters, orcoversarenot installedcorrectly seriousinjuryordeath
could resultfrom backfire. Donot attempt to start the enginewith them
removed.
Figure23
Adding Oil
IMPORTANT:Besuretocheckengineonalevelsurfacewiththeenginestopped.
I. Wipearounddipstickcapandtubewithacleanclothto removeanydebris.
SeeFigure24.
f
IMPORTANT:Neverruntheenginewithouttheairfilter.Rapidenginewearwill
result.
1. Unscrewthethumbscrewsandremovetheairfiltercover.SeeFigure25.
AirFilter Cover
\
Figure25
Figure24
2. Removedipstickandwipecleanwith acloth.
3. Pouroilintothedipsticktube. Donotoverfill. Withanoilfilterchangethe
highlevelamountofoilfor thisengineis1700ml(57.48fl-oz.).
4. Installdipstickandturnto lockedpositionbeforestartingengine.
5. Startengine.Allowto runforafewsecondsandthenshutdowntheengine.
6. Checktheoil level.SeeCheckingOilLevelintheAssemblysectionofthis
manual.
23

2.
f
Removetheairfilter.SeeFigure26.
/
._ j
Figure26
Removethefoampre-filterfromaroundthepaperairfilter. SeeFigure
27.Replacepaperelementwhendirtyordamaged.Cleanfoamelementor
replacewhendamaged.
AirFilter
Pre-Filter
Figure27
4. Tocleanfoamelement,washin amildliquiddetergentandwater.Squeeze
orpressthefoamelementto rinseoutdirt andwater.Donottwist; this
coulddamageortearthefoamelement.Allowtodrythoroughlybefore
using.DONOToilthefoamelement.
5. Attachthenewairfilter withfoamelement,aligningtheholeintheairfilter
with theintakemanifold.SeeFigure28.
Manifold
Figure28
Attachtheairfilter cover,makingsuretoalignplasticribfeaturesonthe
shroudtotheplasticfeaturesontheairfiltercover.SeeFigure29.Turn
thumbscrewsclockwiseuntilsnug.Checkforanymisalignment.
Air Filter
Plastic
Feature
Shroud
PI,
Feature
Figure29
SparkPlugService
DONOTcheckfor sparkwith sparkplugremoved.DONOTcrankenginewith
sparkplug removed.
Toensureproperengineoperation,thesparkplugmustbeproperlygappedand
freeofdeposits.
1. Removethesparkplugbootanduseasparkplugwrenchtoremovethe
plug.SeeFigure30.
24

ifthe enginehasbeenrunning,the muffler wii[ beveryhot.Becareful not
to touchthe muffler.
FuelFilter Service
Gasolineanditsvaporsareextremelyflammable andexplosive.Fireor
explosioncancausesevereburnsor death.
2.
3.
f
SparkPlugBoot
SparkPlug
Figure30
Visuallyinspectthesparkplug.Discardthesparkplugif thereisapparent
wear,orif theinsulatoriscrackedorchipped.Cleanthesparkplugwitha
wirebrushifit istobereused.
Measurethepluggapwith afeelergauge.Correctasnecessaryby
bendingsideelectrode.SeeFigure31.Thegapshouldbesettobetween
0.024-0.031in.
Electrode
Figure31
4. Checkthatthesparkplugwasherisingoodconditionandthreadthespark
pluginbyhandtopreventcross-threading.
5. Afterthesparkplugisseated,tightenwith asparkplugwrenchtocompress
thewasher.
NOTE:Wheninstallinga newsparkplug,tighten1/2turnafterthespark
plugseatstocompressthewasher.Whenreinstallingausedsparkplug,
tighten1/8-1/4turnafterthesparkplugseatstocompressthewasher.
IMPORTANT:Thesparkplugmustbesecurelytightened.Animproperly
tightenedsparkplugcanbecomeveryhotandmaydamagetheengine.
Keepgasolineawayfromsparks,openflames,pilotlights,heat,andother
ignitionsources.
Checkfuellines,tank,cap,andfittingsfrequentlyforcracksorleaks.Replace
if necessary.
Beforereplacingthefuelfilter,drainthefueltankasin ToDrainthe Fuel.
Donotdrainfuelwhentheengineishot.Allowtheengineadequatetimeto
cool.Drainfuelintoanapprovedcontaineroutdoors,awayfromopenflame.
Drainanylargevolumeoffuelfromthetankbydisconnectingthefuelline
fromthein-linefuelfilter neartheengine.
RemovethefuellinefromtheIn-lineside(sidetowardsthefueltank)ofthe
fuelfilter.
Replacementpartsmustbethesameandinstalledinthesamepositionas
theoriginalparts.
Iffuelspills,waituntilit evaporatesbeforestartingengine.
Beforereplacingthefuelfilter,drainthefueltank.Otherwise,fuelcanleak
outandcauseafireorexplosion.
ToDrainTheFuel:
Locatethefuelfilter,whichisroutedontheleftsideoftheenginebetween
thefueltankandthecarburetor,andmaybeattachedtotheenginewithatie
strap.Cutthetiestrap,ifpresent,thenpinchthein-lineclamponthefuelfilter
with apairofpliers,slidetheclampupthefuelline.Pullthefuellinefreefrom
thefilterandplacetheopenendofthelineintoanapprovedcontainertodrain
thefuel.
ToChangeTheFuelFilter:
I. Useplierstosqueezethetabsontheotherclamp(theout-linesideofthe
fuelfilter),andslidetheclampawayfromthefuelfilter.Twistandpullthe
fuellineoffofthefuelfilter. SeeFigure32.
2. Checkthefuellinesforcracksorleaks.Replaceifnecessary.
3. Replacethefuelfilter withanoriginalequipmentreplacementfilter.
Call1-800-4-MY-HOME_to purchasethe original equipment
replacementfilter.
4. Securethefuellineswiththeclamps.
Thefuelfilter cannotbecleanedandshouldbereplacedevery100operatinghours;
moreoftenifrunwith oldgasoline.
25

F
FuelLine
Figure32
CleanEngine
Iftheenginehasbeenrunning,allowittocoolfor atleasthalfanhourbefore
cleaning.Periodicallyremovedirt build-upfromengine.Cleantheenginecooling
finsevery25hours.Cleanwith abrushorcompressedair.
IMPORTANT:Donotsprayenginewith watertocleanbecausewatercould
contaminatefuel.Usingagardenhoseorpressurewashingequipmentcanalso
forcewaterintotheaircleanerormuffleropening.Waterintheaircleanerwill soak
thepaperelement,andwaterthat passesthroughtheelementormufflercanenter
thecylinder,causingdamage.
Figure33
Removethebow-tiecotterpinandflatwasherfromthedecklift assembly,
andretainforreinstallationlater.SeeFigure34.
Accumulationofdebrisaroundmuffler couldcausea fire. Inspectandclean
beforeeveryuse.
Cutting DeckRemoval
Toremovethe cutting deck,proceedasfollows:
1. PlacethePTO(BladeEngage)leverinthedisengaged(OFF)positionand
engagethe parkingbrake.
2. Lowerthedeckbymovingthedecklift leverintothe bottomnotchonthe
rightfender.
3. Removethebeltfromaroundthetractor'sPTOpulley.SeeFigure33.
Figure34
Avoidpinchinginjuries.Neverplaceyourfingersonthe idler springor
betweenthe belt andapulleywNle removingthe belt.
26

5.
Removetheremainingbow-tiecotterpinssecuringthedeckto theunit,as
shownin Figure35.
k. j
Figure35
NOTE:Thebow-tieclipsshouldbere-installedfromthetopdown.
6. Movethedeckliftleverintothetopnotchontherightfendertoraisethe
deckliftarmsupandoutoftheway.
7. Unplugthewiringpigtailfromthedecksafetyswitch.
8. CarefullyremovethePTOcablefromtherearofthecuttingdeckby
removingthebow-tiecotterpinwhichsecuresit. Removethespringfrom
thedeckidlerbracket.SeeFigure36.
f
Figure36
9. Gentlyslidethecuttingdeck(fromtheleft side)outfromunderneaththe
tractor.
Changingthe DeckBelt
NOTE:Itispossibletochangethedeckbeltwiththecuttingdeckstillinstalledon
thetractor,howeveritismucheasiertoremovethedeckfirst,changethedeckbelt,
thenreinstallthecuttingdeck.
Tochangethecuttingdeckbelt,proceedasfollows:
1. Itiseasiesttochangethedeckbeltbyfirst removingthecuttingdeckas
instructedearlierinthissection.Skipthisstepifderidingtochangethedeck
beltwith themowingdeckstillinstalledontheunit.Otherwise,removethe
cuttingdecknow.
2. Ifchangingthedeckbeltwith thecuttingdeckstillinstalledontheunit,
lowerthecuttingdecktothelowestcuttingposition.
3. Removethedeckbeltfromaroundtheunit'sPTOdrivepulleyasshownin
Figure33.Simplyrollonesideofthebeltoffof the pulleyandthenwork
itoffthe pulleybycontinuingaroundthepulleyuntilthe beltisoffof the
pulley.
4. Pullthebelttowardsthefrontoftheunit,pullingitthroughandoutofthe
beltkeeperbracket,showninFigure33.
5. Removethedeckbeltcoverbyremovingthethreehexboltsthat secureit.
SeeFigure37.
Figure37
Removethebeltkeepingspacerbyremovingthe hexboltthatsecuresit. See
Figure38.
BeltKeeperI-lexbolt
Figure38
Changethebelt,thenreinstalltheallthecomponentsremovedinthe
reverseorderbeginningwiththeidlerpulley,andlastlythebeltcover.
27

8.
Feedthedeckbeltthroughthebeltkeeperbracketandworkit aroundand
ontothePTOdrivepulleyasshownin Figure33.
Tires
Neverexceedthe maximuminflationpressureshownonthe sidewallof tire.
Therecommendedoperatingtire pressureis:
Approximately10psiforthereartires
Approximately14psiforthefronttires
IMPORTANT:Refertothetiresidewallforexacttiremanufacturer'srecommended
ormaximumpsi.Donotovednflate.Uneventire pressurecouldcausethecutting
decktomowunevenly.
CuttingBlade
Shutthe engineoffand removeignitionkeybeforeremovingthe cutting
bladeforsharpeningorreplacement.Protectyourhandsbyusingheavy
[g oveswhengraspngthe bade.
Periodicallyinspectthe bladeand/orspindlefor cracksor damage,
[especiallyafter you'vestruckaforeign object.Donot operatethe machine
[until damagedcomponentsarereplaced.
Toremovetheblade,proceedasfollows.
NOTE:Itmaybeeasierto changethebladebyfirst removingthedeckfrom
beneaththetractor,(refertoCuttingDeckRemovalearlierinthissection)
thengentlyflipthedeckovertoexposeitsunderside.It ispossibletochange
theblade,however,withthedeckstillattachedtothetractor.Ifattempting
tochangethebladewith thedeckstillinstalledonthetractor,firstmovethe
decklift levertoitshighestcuttingposition.
1. Removethemulchplug,deckchuteor baggingchute,ifequipped,exposing
thedeckchuteopening.
2. Usingablockofwoodor2x4,insertit intothedeckopeningandrotatethe
bladearounduntilitwedgesthewoodbetweenthedeckopeningandthe
cuttingblade,asshownin Figure39.
3. Removethehexflangenutthatsecuresthe bladetothespindleassembly,
andremovetheblade.SeetheInsetofFigure39.
NOTE:Thedeckspindlehasanormalthread.Toloosen,rotatetheflangelock
nutcounterclockwise.
Figure39
Toproperlysharpenthecuttingblades,removeequalamountsofmetal
frombothendsofthebladesalongthecuttingedges,paralleltothetrailing
edge,ata25°-to30°angle.Alwaysgrindeachcuttingbladeedgeequallyto
maintainproperbladebalance.SeeFigure40.
Figure40
Ifthe cuttingedgeofthe bladehaspreviouslybeensharpened,orifany
metalseparationispresent,replacethe bladeswith newones.
Apoorlybalancedbladewill causeexcessivevibration, maycausedamageto
the tractor and/orresultin personalinjury.
Testtheblade'sbalanceusingabladebalancer.Grindmetalfromthe
heavysideuntilit balancesevenly.
NOTE:Whenreplacingthe blade,besuretoinstallthe bladewith thesideof
the blademarked"Bottom" (orwith a partnumberstampedinit)facingthe
groundwhenthemowerisintheoperatingposition.
Useatorquewrenchtotighten the bladespindlehexflange nut to between
70Ibs-ftand90Ibs4t.
28

Adjustments
Neverattempt to makeanyadjustmentswhiletheengineisrunning,except
wherespecifiedinthe operator'smanual.
Levelingthe Deck
NOTE:Checkthetractor'stire pressurebeforeperforminganydeckleveling
adjustments.RefertoTires,inthisServiceAndMaintenancesectionformore
informationregardingtire pressure.
Front ToRear
Itispossibletoadjustthepitchofthecuttingdeck.Thefrontofthedeckshouldbe
between0" (level)and1_,,lowerthanthe rearofthedeck.Adjustif necessaryas
follows:
2.
3.
Withthetractorparkedonafirm,levelsurface,placetheleverforliftingthe
cuttingdeckintothemiddleposition(3)androtatethebladesothat it is
alignedwith thefrontandrearofthetractor.
Measurethedistancefromthefrontofthe bladetiptothegroundandthe
rearofthe bladetip totheground.Thefirstmeasurementtakenshouldbe
between0" (level)and1_,,lessthanthesecondmeasurement.Determine
theapproximatedistancenecessaryforproperadjustmentandproceed,if
necessary,tothenextstep.
LocatetheflangelocknutonthefrontendofthePTOLiftRod.SeeFigure41.
Tightentheflangelocknuttoraisethefrontofthedeck;
Loosentheflangelocknuttolowerthefrontofthedeck.
/ ....
/ /
/ /
....................... / /
/ / /
, /
Figure41
SeatAdjustment
RefertotheAssemblysectionofthismanualforseatadjustmentinstructions.
ParkingBrakeAdjustment
Neverattempt to adjustthe brakeswhile the engineisrunning.Always
disengagePTO(BladeEngageLever),moveshift leverinto neutralposition,
stopengineand removekeyto preventunintendedstarting.
Ifthetractordoesnotcometoacompletestopwhentheclutch-brakepedalis
completelydepressed,or ifthetractor'srearwheelscanrollwiththe parkingbrake
applied,thebrakeisinneedofadjustment.ContactthenearestParts&Repair
ServiceCentertohaveyourbrakesserviced.
Tolocate the nearestParts&RepairServiceCenteror toscheduleservice,
contact 1-800-4-MY-HOME_.
Changingthe TransmissionDrive Belt
NOTE:Severalcomponentsmustberemovedandspecialtools(i.e.air/impact
wrench)inordertochangethetractor'sdrivebelt.ContactthenearestParts&
RepairServiceCentertohaveyourtransmissiondrivebeltserviced.
TolocatethenearestParts&RepairServiceCenterorto scheduleservice,call
(800)659-5917.
Muffler
Temperatureofmuffler and nearbyengineareasmayexceed150° F(65°C).
Avoidcontactwith theseareas.
Inspectmufflerperiodically,andreplaceifnecessary.Replacementparts
forthe mufflermustbethesameandinstalledinthesamepositionasthe
originalparts.
Clean Engine
Dailyorbeforeeveryuse,cleangrass,chafforaccumulateddebrisfrom
engine.Keeplinkage,spring,andcontrolsclean.
Keepareaaroundandbehindmufflerfreeofanycombustibledebris.
Keepingenginecleanallowsairmovementaroundengine.
Enginepartsshouldbekeptcleantoreducetheriskofoverheatingand
ignitionofaccumulateddebris.
Donotusewater tocleanengineparts.Watercouldcontaminatefuel
system.Useabrushor drycloth.
CarburetorAdjustment
Thecarburetoronthisengineisnotadjustable.
Battery
CaliforniaProposition65WARNING!Batteryposts,terminals,andrelated
accessoriescontainleadandleadcompounds,chemicalsknowntotheStateof
Californiatocausecancerandreproductiveharm.Washhandsafterhandling.
Ifremovingthebattery, disconnectthe NEGATIVE(Black)wire from its
terminalfirst, followed bythe POSITIVE(Red)wire. Whenre-installing
the battery,alwaysconnectthe POSITIVE(Red)wire to itsterminal first,
followedbythe NEGATIVE(Black)wire.
29

Thebatteryissealedandismaintenance-free.Acidlevelscannotbechecked.
Alwayskeepthebatterycablesandterminalscleanandfreeof
corrosivebuild-up.
Aftercleaningthe batteryandterminals,applyalightcoatof
petroleumjellyorgreasetobothterminals.
Alwayskeeptherubberbootpositionedoverthepositiveterminalto
preventshorting.
IMPORTAIV_Ifremovingthe batteryforanyreason,disconnecttheNEGATIVE
(Black)wirefromitsterminalfirst, followedbythe POSITIVE(Red)wire.When
re-installingthebattery,alwaysconnectthePOSITIVE(Red)wiretoitsterminal
first, followedbythe NEGATIVE(Black)wire.Becertainthat thewiresareconnected
tothecorrectterminals;reversingthemcouldchangethepolarityandresultin
damagetoyourengine'salternatingsystem.
CleaningBattery
Cleanthebatterybyremovingit fromthetractorandwashingwith abakingsoda
andwatersolution.Ifnecessary,scrapethebatteryterminalswith awirebrushto
removedeposits.Coatterminalsandexposedwiringwith greaseorpetroleumjelly
topreventcorrosion.
Battery Failures
Somecommoncausesforbatteryfailureare:
Incorrectinitialactivation
Overcharging
Freezing
Undercharging
Corrodedconnections
ThesefailuresareNOTcoveredbyyourtractor'swarranty.
Jump Starting
Neverjump start adamagedor frozen battery. Becertain the vehicles
do not touch, and ignitions areoff. Donot allow cable clampsto
touch.
1. Connectpositive(+) cabletopositivepost(+)ofyourtractor'sdischarged
battery.
2. Connecttheotherendofthecabletothepositive(+) postofthejumper
battery.
3. Connectthesecondcablenegative(-) tothenegativepost(-) ofthejumper
battery.
4. Connecttheotherendofthenegativecabletotheengineblockofthe
tractor,awayfromthebattery.Attachtoanunpaintedparttoassureagood
connection.
Ifthejumper battery isinstalledona vehicle(i.e.car,truck),doNOTstart
the vehicle'senginewhenjump starting yourtractor.
5. Startthetractor(asinstructedintheOperationsectionofthismanual).
6. Setthetractor'sparkingbrakebeforeremovingthejumpercables,inreverse
orderofconnection.
Charging
Batteriesgiveoff anexplosivegaswhile charging.Chargethe battery in
awell ventilated areaand keepawayfrom anopenflame or pilot light
ason awater heater,spaceheater,furnace,clothesdryer or othergas
appliances.
Whenchargingyourtractor'sbattery, useonlyachargerdesignedfor 12V
lead-addbatteries.Readyourbattery charger'sOwner'sManualpriorto
chargingyourtractor'sbattery. Alwaysfollow itsinstructionsandheedits
warnings.
Ifyourtractorhasnotbeenputintouseforanextendedperiodoftime,chargethe
batteryasfollows:
1. Setyourbatterychargertodelivera maxof 10amperes.
Ifyourbatterychargerisautomatic,chargethebatteryuntilthechargerindicates
thatchargingiscomplete.Ifthechargerisnotautomatic,chargefornofewerthan
eighthours.
Fuse
One15AMPfuseisinstalledinyourtractor'swiringharnessto protectthetractor's
electricalsystemfromdamagecausedbyexcessiveamperage.
Iftheelectricalsystemdoesnotfunction,oryourtractor'senginewill notcrank;
first checkto becertainthat thefusehasnot blown.Itcanbefoundunderthe
fenderontheleftsideoftheunit,onthewiringharnessjustabovethebattery.
Alwaysuseafusewith thesameamperagecapacityfor replacement.
Lubrication
Beforelubricating, repairing,or inspecting,alwaysdisengagePTO(Blade
EngageLever),moveshift leverinto neutralposition,setparkingbrake,stop
engneandremovekeyto preventun ntendedstart ng.
Pivot Points& Linkage
Lubricateallthepivotpointsonthedrivesystem,parkingbrakeandlift linkageat
leastonceaseasonwith lightoil.
RearWheels
Therearwheelsshouldberemovedfromtheaxlesonceaseason.Lubricatethe
axlesandtherimswellwithanall-purposegreasebeforere-installingthem.
FrontAxles
Eachendofthetractor'sfront pivotbarmaybeequippedwithagreasefitting.
Lubricatewith agreasegunafterevery25hoursoftractoroperation.
Steering Rack& Pinion
Onceperseason,orevery25hoursofoperation,it will benecessarytolubricatethe
steeringrackandpiniongearlocatedunderthefrontoftheunit.Usingstandard
automotivegrease,applygreasetothefrontsideandrearsideofthesteeringrack,
asindicatedin Figure42.
3O

............................................................... , ff .................................
Figure42
Cleaningthe EngineAndDeck
Anyfueloroilspilledonthemachineshouldbewipedoffpromptly.DoNOTallow
debristoaccumulatearoundtheenginecoolingfinsoftheengineoronanyother
partofthemachine.
iMPORTANT:TheuseofapressurewashertocleanyourtractorisNOT
recommended.Itmaycausedamagetoelectricalcomponents,spindles,pulleys,
bearingsortheengine.
Deck Wash System
Yourtractor'sdeckisequippedwitha waterportonitssurfaceaspartofitsdeck
washsystem.
Usethedeckwashtorinsegrassclippingsfromthedeck'sundersideandprevent
thebuildupofcorrosivechemicals.CompletethefollowingstepsAFTEREACH
MOWING:
Drivethetractortoalevel,clearspotonyourlawn,nearenoughforyour
gardenhosetoreach.
J
Figure43
5. Turnthewateron.
6. Whilesittingintheoperator'spositiononthetractor,starttheengineand
placethethrottleleverintheFAST(rabbit)position.
7. Movethetractor'sPTO(BladeEngage)intothe ONposition.
8. Remainintheoperator'spositionwith thecuttingdeckengagedfora
minimumoftwo minutes,allowingtheundersideofthecuttingdeckto
thoroughlyrinse.
9. Movethetractor'sPTO(BladeEngage)intothe OFFposition.
10. Turntheignitionkeytothe STOPpositiontoturnthetractor'sengineoff.
11. Turnthewateroff anddetachthehosecouplerfromthewaterportonyour
deck'ssurface.
Aftercleaningyourdeck,returntotheoperator'spositionandengagethe PTO.Keep
thecuttingdeckrunningforaminimumoftwominutes,allowingtheundersideof
thecuttingdecktothoroughlydry.
Makecertainthe tractor'sdischargechuteisdirectedAWAYfrom yourhouse,
garage,parkedcars,etc.
2. DisengagethePTO(BladeEngage),settheparkingbrakeandstopthe
engine.
3. Threadthehosecoupler(packagedwith yourtractor'sOperator'sManual)
ontotheendofyourgardenhose.
4. Attachthehosecouplertothewaterportonyourdeck'ssurface.SeeFigure
43.
31

Neverstorelawntractorwithfuelin tankindoorsorin poorly
ventilatedareaswherefuelfumesmayreachanopenflame,spark,
or pilotlightasona furnace,waterheater,clothesdryer,orgas
appliance.
PREPARING THE ENGINE
iMPORTANT:Fuelleft inthefueltankduringwarmweatherdeterio-
ratesandwillcauseseriousstartingproblems.
Gasolineisa toxicsubstance.Disposeofgasolineproperly.Contact
yourlocalauthoritiesforapproveddisposalmethods.
Failureto usea fuelstabilizingadditiveorcompletelyruntheengine
untilit'soutoffuelbeforeoff-seasonstoragemayresultindamageto
yourengine'scarburetor.Subsequentdamagewouldnet becovered
underthe manufacturer'swarranty.
Enginesstoredbetween30 and90 daysneedtobetreatedwitha
gasolinestabilizerandenginesstoredover90 daysneedtobedrained
offuelto preventdeteriorationandgumfromformingin fuelsystemor
onessentialcarburetorparts.Ifthegasolinein yourenginedeterio-
ratesduringstorage,youmayneedto havethecarburetor,andother
fuelsystemcomponents,servicedor replaced.
Topreventgumdepositsfromforminginsidetheengine'scarburetor
andcausingpossiblemalfunctionoftheengine,thefuelsystemmust
beeithercompletelyemptied,or thegasolinemustbetreatedwitha
stabilizertopreventdeterioration.
1. If usingafuelstabilizer:
a. Readtheproductmanufacturer'sinstructionsandrecom-
mendations.
b. Addtoclean,freshgasolinethecorrectamountof stabilizer
forthecapacityofthefuelsystem.
c. Fillthefueltankwithtreatedfueland runtheenginefor2-3
minutestogetstabilizedfuelintothecarburetor.
2. If emptyingthefuelsystem:
a. Donotdrainfuelwhentheengineishot.Allowtheengine
adequatetimetocool. Drainfuelintoan approvedcontainer
outdoors,awayfromopenflame.
b. Drainanylargevolumeoffuelfromthetankbydisconnect-
ingthefuellinefromthein-linefuelfilterneartheengine.
SeethecompleteinstructionsforDrainingThe Fuellaterin
thissection.
Gasolineisextremelyflammableandcanbeexplosiveundercertain
conditions.Draingasolinebeforestoringtheequipmentforextended
periods.Drainfuelonlyintoan approvedcontaineroutdoors,away
fromanopenflame.Allowenginetocool.Extinguishcigarettes,
cigars,pipes,andothersourcesofignitionpriortodrainingfuel.
Storegasolinein anapprovedcontainerin safelocation.
c. Reconnectthefuellineand runtheengineuntilit startsto
falter,thenusethechoketokeeptheenginerunninguntilall
fuelinthecarburetorhasbeenexhausted.
d. Disconnectthefuellineanddrainanyremaininggasoline
fromthe system.
32
3. Removethesparkplugandpourone(1)ounceof engineoil
throughthesparkplugholeintothecylinder.Cranktheengine
severaltimestodistributetheoil. Replacethesparkplug.
4. Cleandebrisfromaroundengine,underfingerguard,andunder,
aroundandbehindmuffler.Touchupanydamagedpaint,and
coatotherareasthatmayrustwitha lightfilmofoil.
5. Storeina clean,dryandwellventilatedareaawayfromanyap-
pliancethatoperateswitha flameor pilotlight,suchasafurnace,
waterheater,or clothesdryer.Alsoavoidanyareawitha spark
producingelectricmotor,or wherepowertoolsareoperated.
6. If possible,alsoavoidstorageareaswith highhumidity,because
thatpromotesrustandcorrosion.
7. Keeptheenginelevelin storage.Tiltingcancausefueloroil
leakage.
DRAINING THE FUEL
1. Locatethefuelfilter,whichislocatedon theleftsideofthe
engine,andmaybeattachedto theenginewitha tie strap.
2. Cutthetiestrap,ifpresent,thenpinchthein-lineclampon the
fuelfilterwitha pairofpliers,slidetheclampup thefuelline.
3. Pullthefuellinefreefromthefilterandplacetheopenendofthe
lineintoan approvedcontainertodrainthefuel.
PREPARING THE LAWN TRACTOR
1. Cleanandlubricatetheunitthoroughlyasdescribedinthe
LubricationinstructionsintheServiceandMaintenancesection.
2. Donotusea pressurewasherorgardenhosetocleanyourunit.
3. Storemowerina dry,cleanarea.Donotstorenexttocorrosive
materials,suchasfertilizer.
Removing From Storage
1. Checktheoil levelasdescribedintheAssemblysectionofthis
manual.
2. If thefuelwasdrainedduringstoragepreparation,fillthetankwith
freshgasoline.If youkeepa containerofgasolineforrefueling,
makecertainitcontainsonlyfreshfuel.Gasolineoxidizesand
deterioratesovertime,causinghardstarting.
3. If thecylinderwascoatedwithoil duringstoragepreparation,the
enginewillsmokebrieflyat startup.Thisisnormal.

Enginefailstostart
Enginerunserratically
1. PTO/BladeEngageleverengaged.
2. Parkingbrakenotengaged.
3. Sparkplugwire(s)disconnected.
4. Throttle/ChokecontroJlevernotincorrect
startingposition.
5. Chokenotactivated
6. Fueltankempty,orstalefuel.
7. Blockedfuelline.
8. Faultysparkplug(s).
9. Engineflooded.
10.BlownFuse(s).
1. Placeleverindisengaged(OFF)position.
2. Engageparkingbrake.
3. Connectwire(s)tosparkplug(s).
4. PlaceThrottle/ChokeleverintotheFASTposition.
11.Safetyswitch(s)notproperlyengaged.
1. UnitrunningwithCHOKEactivated.
2. Sparkplugwire(s)loose.
3. Blockedfuellineorstalefuel.
5. MovetheThrottle/ChokeleverintotheChoke
position.
6. Filltankwithclean,fresh(lessthan30daysold)gas.
7. Replacethefuellineandreplacefuelfilter.
8. Clean,adjustgaporreplaceplug(s).
9. CrankenginewiththrottleinFASTposition.
10.ReplaceFuse(s)
4. Ventingascapplugged.
5. Waterordirtinfuelsystem.
6. Dirtyaircleaner.
Engineoverheats 1. Engineoillevellow. 1.
2. Airflowrestricted. 2.
EnginehesitatesathighRPM 1. Sparkpluggaptooclose. 1.
Engineidlesrough 1. Sparkplugfouled,faultyorgaptoowide. 1.
2. Dirtyaircleaner. 2.
Excessivevibration
Mowerwillnotmulchgrass
Unevencut
1. Cuttingbladelooseorunbalanced.
2. Damagedorbentcuttingblade.
1. Enginespeedtoolow.
2. Wetgrass.
3. Excessivelyhighgrass.
4. Dullblade.
1. Decknotleveledproperly.
2. Dullblade.
3. Uneventirepressure.
11.Ensureseatisintheproperoperatingposition,and/
ordeckchute,tubeormulchplugproperlyinstalled.
1. DeactivatetheCHOKE.
2. Connectsparkplugwire(s).
3. Replacethefuelline;filltankwithclean,fresh
gasolineandreplacefuelfilter.
4. Clearventorreplacecapifdamaged.
5. Drainfueltank.Refillwithclean,freshgasoline.
6. Replaceaircleanerpaperelementorcleanfoam
pre-cleaner,ifequipped.
Fillcrankcasewithproperamountandweightofoil.
Cleangrassclippingsanddebrisfromaroundthe
engine'scoolingfinsandhousing.
Removesparkplugandresetthegap.
Replacesparkplug.Setpluggap.
Replaceaircleanerelementand/orcleanpre-
cleaner.
1. Tightenbladeandspindle.
2. Replaceblade.
1. PlacethrottleinFAST(rabbit)position.
2. Donotmulchwhengrassiswet.
3. Mowonceatahighcuttingheight,thenmowagain
atdesiredheightormakeanarrowercuttingswath.
4. Sharpenorreplaceblade.
1. Performside-to-sidedeckadjustment.
2. Sharpenorreplaceblade.
3. Checktirepressureinallfourtires.
Find this and a{[ your other product manuals online.
6et answers from our team of home experts,
Get a personalized maintenance ptan for your home,
Find information and tools to help with home projects.
bzo_#_tteye_ #y S_s_
33

777123784
TOP VIEW
777D17060
777D16808
777D17041
777D17040
777D18493
777S34201
777S34202
777D18492
REF. 777S34102
34

This page intentionally left blank. Use this page to make any notes regarding your tractor.
35

Craftsman Model 247.290000
24
15
22_
\
2O
3G

Craftsman Model 247.290000
Ref, [
No,
1 710-0924
2 710-1241
3 710-3008
4 710-3015
5 712-04063
6 712-04064
7 712-04092
8 731-08813
9 731-08814
10 731-08815
II 731-08816
12 738-04184A
13 749-04932-0637
14 783-07208-0637
15 710-1652
16 731-08528
17 731-08753
18 936-0463
19 683-04751-0637
20 783-07125
21 783-07162-0637
22 783-07168-0637
23 783-07215-0637
24 783-07302
25 683-04767-0637
Part No, Description
Machine Screw, 1/4-20, 0.750
Hex Screw, 1/4-15, 1.000
Hex Head Screw, 5/16-18, .75
Hex Head Screw, 1/4-20, .75
Flange Locknut, 5/16-18
Flange Locknut, 1/4-20
U-type Speed Nut, 1/4-20
Column Cover
Steering Column Cap
Fender
Rear Cover
Shoulder Screw, .368 X.113:1/4-20
Rear Cover Support Tube
Hitch Plate
Tap Screw, 1/4-20, .625
Running Board
Running Board Plug
Flat Washer, .250 x .630 x .052
Frame Assembly
Deck Lift Index Bracket
Seat Pan
Seat Pivot Bracket
Battery Tray
Top Rear Drive Cover
Bumper
37

Craftsman IViodel 247.290000
33
39
_\g27
52
54
38

Craftsman Model 247.290000
Ref, [
No,
1 918-05056
2 647-04262
3 683-04768-0637
4 683-04779
5 710-04484
6 710-05378
7 710-05415A
8 710-0599
9 710-0623
I0 710-0757
II 710-0809
12 710-1007
13 710-1325
14 710-1652
15 711-0736
16 712-04065
17 712-0700
18 914-0209
19 714-04040
20 718-04407
21 720-04028
22 732-0459C
23 732-04934
24 936-0171
25 736-0322
26 736-3010
27 738-0372B
Part No, Description
Transmission Assembly
Shift Handle Assembly
Drive Assembly Idler
Variable Bracket Assembly
Tap Screw, 5/16-18, .750
Tap Screw, 5/16-18, 2.50
Hex Head Scew, 3/8-16, 1.62
Tap Scew, 1/4-20, 0.500
Tap Screw, 3/8-16, 0.750
Hex Head Screw, 7/16-20, 1.50
Tap Screw, 1/4-20, 1.250
SEMS Tap Screw, 3/8-16, 1.500
Tap Screw, 1/4-20, 1.625
Tap Screw, 1/4-20 x .625
Adjustable Ferrule, 1/4-20 X 1.00
Flange Lock Nut, 3/8-16
Flange Nut, 9/16-18
Internal Cotter Pin, .125 Dia.
Bow-Tie Cotter Pin
Pulley Hub, 5/8 Spline
Shift Knob
Extension Spring, .94 Dia. X 6.74 Lg.
Extension Spring, .97 OD X 6.18
Split Lock Washer, 7/16
Flat Washer, .450X1.250X.164
Flat Washer, .407X.812X.135
Shoulder Spacer, 1.00 X .38 X .38
Ref, I
No,
28 738-0930
29 747-05593
30 747-05617A
31 950-04099
32 750-04456
33 750-3119
34 954-0241A
35 954-04331
36 756-04224
37 756-04325
38 756-04464
39 756-04479
40 783-07207
41 783-07248
42 956-04015A
43 N/A
44 710-0627
45 710-0778
46 718-04261
47 736-0362
48 941-0600
49 634-0139-0961
50 734-04641
51 634-04319-4042
52 934-0255
53 710-0627
54
Part No, Description
Shoulder Spacer, .560x.165, 5/16-18
Shift Rod
Deck Belt Keeper, 30"
Stepped Spacer, .265 ID X .750
Spacer, .260 X .372 X 1.420
Spacer, .406 ID X 1.00 OD X .38
V-Belt, 5L:35.25
V-Belt, 5L:35.28
Flat Idler Pulley, 2.75 OD
V-Type Idler Pulley, 3.06
V-Type Pulley, 6.56
Engine Pulley, 4.46 / 3.39
Front Support Shift Bracket
Rear Idler Arm Bracket
Variable Speed Pulley Assembly
Variable Bracket (order 683-04779)
Hex Head Lock Screw, 5/16-24:.750
Tap Screw, 1/4-20:1.500
Bearing Cup
Flat Washer, .330x1.250x.060
Ball Bearing, 17 X 40 X 12
Complete Wheel Assembly
Tire, 16 x 6.5 x 8 Sq. Shldr.
Rim Assembly, 8.0 x 5.38
Air Valve
Hex Head Screw, 5/16-24, 7.50
39

Craftsman IViodel 247.290000
6
J
11
33
22
34
34
\31
40

Craftsman IViodel 247.290000
Ref, I
NO,
1 710-0607
2 712-04063
3 720-04009A
4 732-04905
5 735-0271A
6 938-0140
7 757-04158
8 783-07213-0637
9 683-04754-0637
10 712-04065
11 720-04049A
12 725-0157
13 732-04956
14 738-04554
15 946-04802
16 735-04081
17 751-12118
18 951-04366
19 951-12179A
20 925-1707D
21 710-0227
22 710-1652
23 712-04064
24 725-04363
25 725-04439
26 925-04659
27 925-05013
28 725-1643
29 925-1745A
30 926-0320
31 738-04237A
32 783-07384-0637
33 738-1132
34 712-0271
-- 925-05359
Part No, Description
TapScrew,5/16-18,0.500
FlangeLockNut,5/16-18
Knob,3/8-16,.875
SeatSpring
Bumper,.62DIAX .3
ShoulderSpacer,.435X .178-5/16X .56
Seat
SeatPivotBracket
PTOHandleAssembly
FlangeLockNut,3/8-16
HandleGrip,3/8
CableTie,3/16X .05X 7.4
ExtensionSpring,.50ODX 4.646LG
ShoulderBolt,.500X .270:3/8-16
PTOCable
RubberGrommet
RolloverValve
FuelTank,1-3Gal.
FuelCap
Battery,155CCA
Screw,#8
TapScrew,1/4-20,.625
FlangeLockNut,1/4-20
InterlockSwitch
Solienoid,12v
Three-WayKeySwitch
SeatSwitch
SwitchSpring
Key
InsulatorPlate
ShoulderScrew,#10-32,.500
BatteryHold-DownBracket
Screw,Shoulder,.250x .150
Nut,Sems,1/4-20
WiringHarness(NotShown)
41

Craftsman Model 247.290000
\24
42

Craftsman Model 247.290000
Ref, I
No,
1 683-04699-0637
2 910-0224
3 710-0376
4 710-04484
5 710-3008
6 911-04075A
7 711-0736
8 712-04063
9 914-0111
10 714-04040
11 726-0214
12 731-08656
13 731-08743
14 732-04937
15 732-0716D
16 735-04279
17 936-0264
18 736-3072
19 738-04184A
20 741-0356A
21 747-05506
22 747-05508
23 747-05616
24 748-0234
25 783-05940
26 783-07050-0637
27 783-07287
28 717-0772B
Part No, Description
Brake Pedal Assembly
Screw, #10-16:0.500
Hex Head Scerw, 5/16-18:1.00
Tap Screw, 5/16-18:.750
Hex Head Screw, 5/16-18:.75
Ferrule 3/8-24 X .375 Dia.
Adjustable Ferrule, 1/4-20 X 1.00
Flange Lock Nut, 5/16-18
Cotter Pin, 3/32X1.0
Bow-Tie Cotter Pin, 72
Push Cap, 5/8
Speed Control Cover
Speed Lever, 6-SPEED
Shift Spring
Extension Spring, .59 OD X 4.00 LG
Foot Pad, 2.5" LG.
Flat Washer, .330x.630x.064
Flat Washer, .380X.930X.110
Shoulder Screw, .368 X.113, 1/4-20
Steering Col. Bearing, .880 ID X 1.36
Variable Speed Control Rod
Brake Rod
Speed Selector Control Rod
Shoulder Spacer
Pedal Strap Support Bracket, 5/8
Speed Latch Bracket
Brake Cam Bracket
Brake lever Bracket
43

Craftsman Model 247.290000
28-_
7 _j18
..15
29
9
"_32 \31
\29
44

Craftsman IViodel 247.290000
I
Ref.
I Part No.
1 683-04726-0637
2 683-04727-0637
3 683-04761
4 683-04762
5 710-05046
6 710-05386
7 710-0643
8 710-0703
9 711-04448
10 712-04064
II 712-04065
12 714-04040
13 717-1554
14 726-0341
15 726-04127
16 731-08690
17 731-08691
18 736-0242
19 738-04537
20 741-04542
21 741-0660A
22 747-05514
23 747-05585
24 747-05686
25 783-06988
26 783-07239
27 631-04008A
28 731-06825
29 634-04726
30 736-04228A
31 714-0162
32 931-0484A
Description
Front Axle Assembly, RH
Front Axle Assembly, LH
Upper Tube Assembly
Lower Tube Assembly
Allen Wrench, 3/16
Screw, 1/4-20 X 1.25
Hex Head Screw, 5/16-18:1.00
Carriage Screw, 1/4-20, .75
Ferrule, 5/16-24 X .312 Dia.
Flange Lock Nut, 1/4-20
Flange Lock Nut, 3/8-16
Bow-Tie Cotter Pin, 72
Steering Pinion Gear
Push Cap, 3/4
Snap Butt
Lower Steering Collar
Upper Steering Collar
Bevel Washer, .340X.872X.060
Steering Shaft, .625 OD X 18.03
Hex Flange Bearing, 5/8
Flange Bearing, .760 X .941 X 1.0
Steering Rod, LH
Steering Rod, RH
Front Tie Rod
Steering Rack Plate
Lower Steering Bearing
Steering Wheel
Steering Cap
Complete Wheel Assembly
Washer, .781 x 1.59
Cotter Pin, 5/32 x 1.25
Hub Cap
45

Craftsman IViodel 247.290000
1
11
18
46

Craftsman Model 247.290000
I
Ref.
I Part No.
1 683-04706-0637
2 683-04757-0637
3 710-04484
4 710-0514
5 710-0642
6 710-0809
7 710-1652
8 711-05690
9 712-04065
10 712-04243
II 714-04040
12 714-04043
13 720-0311
14 732-04692
15 936-0300
16 938-0347
17 747-05511
18 747-05576-0637
19 750-0566A
20 783-07129-0637
Description
Lift Assembly Shaft
Front Hanger Bracket Assembly
Tap Screw,5/16-18, .750
Hex Head Screw,3/8-16, 1.00
Tap Screw,1/4-20, 0.750
Tap Screw,1/4-20, 1.250
Tap Screw,1/4-20 X .625
Ferrule, .50 X.50
Flange Lock Nut, 3/8-16
Flex Lock Nut, 1/2-13
Bow-Tie Cotter Pin,72
Bow-Tie Cotter Pin,91
Grip Handle, 1/2
Extension Spring, .85 OD X 5.915 LG
Flat Washer, .406 X .875 X .059
Shoulder Spacer, .625 ID X .169
Lift Link Rod
Deck Lift Rod
Spacer, .260 x .375 x 1.030 LG
Front Deck Mounting Bracket
47

Craftsman IViodel 247.290000
i 1
\6
i 2
LJ
48

Craftsman Model 247.290000
I
Ref.
I Part No.
1 710-04483
2 710-04683
3 710-05446
4 726-0205
5 731-1682A
6 946-04829
7 751-10349
8 751-3013
N_
Description
Tap Screw, 1/4-20, 0.500
Tap Screw, 3/8-16, 1.000
Tap Screw, 3/8-16, 2.250
Hose Clamp, .490 DIA.
Oil Drain Sleeve
Throttle/Choke Cable 31 Lg.
Low Permeation Fuel Line, 1/4
Fuel Filter, 1/4"
Engine (See breakdown)
Craftsman Model No. 4Pg0JUA
49

Craftsman Model 247.290000
22 'i ,lo
18
20 4
_\38
10
5O

Craftsman Model 247.290000
Ref, I
No,
1 918-04822A
2 683-04734
3 683-04782-0637
4 710-04484
5 710-04998
6 710-0514
7 710-0778
8 710-I026
9 710-1315
10 710-1652
II 712-04065
12 712-0417A
13 714-04040
14 720-04122
15 726-0201
16 731-07487
17 732-04948A
18 732-0814
19 936-0289
20 736-0362
21 736-0518
22 783-07342-0637
23 938-0347
Part No, Description
Spindle Pulley Assembly, 6.3 DIA
PTO Brake Assembly Bracket
Rear Deck Assembly Bracket
Tap Screw, 5/16-18, .750
Carriage Screw, 5/16-18, 1.00
Hex Head Screw, 3/8-16, 1.00
Tap Screw, 1/4-20, 1.500
Tap Screw, 1/4-20, 1.750
Tap Screw, 3/8-16, 1.250
Tap Screw, 1/4-20 X .625
Flange Lock Nut, 3/8-16
Flange Nut, 5/8-18
Bow-Tie Cotter Pin, 72
Wing Knob, 5/16-18
Speed Nut, .3125 ID
Deck Wash Nozzle
Ext. Spring, .708 X 7.357 X .094
Ext. Spring, .56 OD X 5.52 LG
Shoulder Bushing, .320 ID X .135
Flat Washer, .330x1.250x.060
Thrust Washer, .445X.1.920X.060
Deck Belt Cover
Shoulder Spacer, .625 ID X .169
Ref, I
No,
24 738-04162A
25 738-04278
26 942-04385
27 750-04456
28 750-0566A
29 954-04318
30 756-04224
31 783-07004
32 783-07146-0637
33 783-07184-0637
34 783-07204-0637
35 783-07304
36 783-07306
37 631-04633
38 738-04519
39 712-0417A
40 936-0351
41 738-1186A
42 941-0919A
43 750-04936
44 956-1227
45 946-04802
Part No, Description
Shoulder Spacer, .8840 X .190
Shoulder Spacer, 1/4-20, 0.50
Cutting Blade, 30.00" 3-1N-1
Spacer, .260 X .372 X 1.420 LG
Spacer, .260 x .375 x 1.030 LG
V-Type Belt, 5L, 45.15 LG
Flat Idler Pulley, 2.75 OD
Front Deck Bracket
Deck, 30" w/Nozzle
RR Deck Bracket, LH
Release Brake Bracket
Lower Floating Idler Bracket
Upper Floating Idler Bracket
Chute Deflector
Shoulder Screw, 1/4-15 x .750
Flange Nut, 5/8-18
Shim Washer, .760X1.500X.030
Spindle Shaft, 6.11 LG.
Ball Bearing, .7871D X 1.85 ODX.551
Spacer, .792 X 1.060 X 1.860 LG
Deck Pulley, 6.3 DIA
PTO Cable
51

Craftsman Engine Model 4P90JUA For Model 247.290000
120
]
0
1 126
127-_o_ 01128
130 _1 127
129
m
120
121
122
124
126
127
128
129
130
951-12255
712-04291
951-12255
951-12256
951-12260
712-04212
951-12328
951-12257
951-12258
D = " O
Air FilterCoverAssembly
Air FilterLockNut
Air FilterCover
SpongeFilter
Air FilterAssembly
NutM6
RubberCap
Manifold
ManifoldGasket
52

Craftsman Engine IViodel 4P90JUA For IViodel 247.290000
7
_2
m
1
2
3
4
5
6
7
192
751-12205
712-04290
750-05320
710-05304
951-11622
710-05305
951-12206
710-05303
D = O O
DebrisShield
Nut
EngineShroudSpacer
Starter/ShroudStudM6xlO0
FlexibleClamp
HookBolt
Air Shield
Self-TappingBolt5.5x25
53

Craftsman Engine IViodel 4P90JUA For IViodel 247.290000
197-GasketI{it-Complete
198-GasketI{it-External
199-CompleteEagiae
51--_
°__53
_47
I
178
189
1_5-U
_183
55
67
I
7O
54

Craftsman Engine IViodel 4P90JUA For IViodel 247.290000
m
47
48
49
5O
51
52
53
54
55
56
57
58
59
6O
62
63
64
65
66
67
68
951-11499
710-04916
751-12770
951-12226
951-12685
951-12227
951-12686
951-12228
951-12229
736-04558
714-04074
951-11574
951-12230
951-12231
951-12232
710-04908
712-04212
951-12233
710-04979
710-05310
951-12234
D = 0
UpperCrankshaftSeal
BoltM6x14
BreatherCoverPlate
BreatherGasket
UmbrellaValve
MeshScreen
UmbrellaValveSeat
ChokeLinkage
GovernorArmShaft
GovernorWasher
GovernorCotterPin
GovernorSeal
ThrottleLinkage
ThrottleLinkageSpring
GovernorArm
GovernorArmBolt
GovernorArmNutM6
GovernorSpring
BoltM6x18
BoltM6x38
ThrottleControlBracket
m
69
7O
72
73
m
74
178
183
184
185
186
189
197
198
199
750-05530
951-12235
951-12236
751-12200A
951-12237
951-12275
951-11953
951-12276
951-11954
951-12277
710-05319
951-12204
951-12201
952Z4P90JUA
m = 0
ComponentBracketSpacer
BreatherHoseAssembly
BreatherHoseClamp
ShortBlockAssembly
(Incl.37,47-53,55-58,73-77,84,
86-89,91-93,98-104,112,113,
115-119,137,138,144,160,172,
173,175-178,183-186)
CrankcaseCoverGasket
PistonRingSet
PistonPinSnapRing
Piston
PistonPin
ConnectingRodAssembly
ConnectingRodBolt
GasketKit- Complete
(Incl.47,50,58,74,113,118,
130,136-138,144,160,166)
GasketKit- External
(Inc1.113,130,136-138,144,160)
CompleteEngine(4PgOJUA)
55

Craftsman Engine Model 4P90JUA For Model 247.290000
151-_O
151-_O
197-GasketKit- Complete
198-GasketKit- External
199-CompleteEngine
152
1A_ 147 148 149
147 148 149
154 157
153 155 _
155 16_i_
163
150
142
142
145
163
@--142
173
175
174
175
174
162 (_
173
193--_)
I
194
I
OPTIONAL
140
141
I,--14o
_140
56

Craftsman Engine IViodel 4P90JUA For IViodel 247.290000
m
140
141
142
143
144
145
146
147
148
149
150
151
152
153
154
155
157
162
163
164
165
710-05315
951-12265
710-05316
951-12266
951-12267
951-11981
751-11124
751-11123
951-11966
710-04962
951-12268
951-12081
951-12080
951-12078
951-11964
951-12077
951-11337
951-10292
710-05317
710-05318
751-12778
D = O 0
BoltM5xlO
Cowl
ValveCoverBolt
ValveCover
ValveCoverRingGasket
RockerArmAssembly
Jam Nut
FulcrumNut
RockerArm
RockerArmStud
PushRodGuide
ExhaustValveAdjuster
ExhaustValveSpringRetainer
ValveSpring
intakeValveSeal
ValveSpringRetainer
ValveKit
SparkPlug/F6Rtc
BoltM10x1.25x85
Bolt/M10x1.25x65
CylinderHeadAsm
(Incl.137-139,144,146-157,
160,161,163-172)
m
165
166
167
168
169
170
171
172
173
174
175
176
177
193
194
196
197
198
199
951-12202
751-12774
751-12775
751-12776
751-12777
736-04629
710-05450
951-12273
715-04122
951-11335
951-11962
736-04561
951-12274
951-12329
710-05344
951-12197
951-12204
951-12201
952Z4P90JU
D = W O
CylinderHeadKit
(Inc1.144,156,163,164,166)
Air ValveCore
StrainerClip
Strainer
TheAirValveBonnet
Washer
ScrewM5x12
CylinderHeadGasket
CylinderHeadDowel12x16
PushRodKit
Tappet
CamshaftThrustWasher
CamshaftAssembly
SparkArrestor
SparkArrestorScrew
ValveCoverKit
GasketKit- Complete
(Incl.47,50,58,74,113,118,
130,136-138,144,160,166)
GasketKit- External
(Inc1.113,130,136-138,144,160)
CompleteEngine
57

Craftsman Engine Model 4P90JUA For Model 247.290000
79_ -8{
82_ 3
76--_
--75
_----91
_---93
104
84--_
116
117
114
58

Craftsman Engine IViodel 4P90JUA For IViodel 247.290000
m
5
75
76
77
79
8O
81
82
83
84
85
86
87
88
89
9O
91
92
93
951-11622
951-12238
951-11969
951-10307
951-12239
951-12241
951-12363
951-12240
710-04980
710-05311
951-12242
715-04121
951-12243
951-12244
710-05312
736-04557
951-12245
751-12246
736-04559
D = O O
FlexibleClamp
CrankshaftAssembly
MainBearing
WoodruffKey
DipstickAssembly
UpperO-Ring
LowerO-Ring
Oil FillTubeAssembly
BoltM6x35
Oil DrainPlug
Regulator
DowelPin8x14
Ball6.35
Spring
Bolt
CrankshaftThrustWasher
BalanceableShaftBearing
BalanceableShaftAssembly
BalanceableThrustWasher
m
98
99
1CO
101
102
103
104
112
113
114
115
116
117
118
119
195
951-12248
951-12247
951-12249
951-12250
951-12251
951-12252
951-11956
710-05313
736-04560
951-12690
951-12253
951-12254
951-12318
710-04982
951-11375
710-05314
951-12194
D = O O
OilPumpAssembly
O-Ring10x2.65
Filter
FilterSpring
O-Ring35.5x2.65
FilterCover
GovernorGear/ShaftAssembly
BoltM8x15
OilDrainPlugWasher
Oil Filter
ScrewJoint
CrankcaseCover
CrankcaseCoverAsm
(Incl.87-89,100-104,112,113,115,116)
BoltM8x54
LowerCrankshaftSeal
BoltM8x43
OilDrainPlugAssembly
59

Craftsman Engine Model 4P90JUA For Model 247.290000
134
134
137
139139 138
200-CarburetorI(it- Major
--133
F A
o _ __
BB
CC
6O

Craftsman Engine Model 4P90JUA For Model 247.290000
m
131
132
133
134
136
137
138
139
200
A
B
C
D
E
F
G
H
I
J
K
951-12823
951-11731
951-11336
723-04071
951-12261
951-12262
951-12263
951-12264
751-12779
m = I! O
CarburetorAssembly
FuelHoseClamp
FuelLineKit
PlasticSupportClamp
CarburetorGasket
CarburetorInsulator
CarburetorInsulatorGasket
CarbStud
CarburetorKit- Major
n/a
n/a
n/a
n/a
n/a
n/a
n/a
n/a
n/a
n/a
n/a
(Inck130,136,B,BB,CC,DD,G,
M,N,U,W,Y,Z)
ChokeShaft
FiberO-Ring
ChokeReturnSpring
FlatSteelWasher
ChokePlate
Idle,JetAssembly
IdleJet O-Ring
SheetmetalHousing
ThrottleShaft
ThrottlePlate
ScrewM3x5
L
M
N
0
P
Q
R
S
T
U
V
W
X
Y
Z
AA
BB
CC
DD
EE
GG
HH
n/a
n/a
n/a
n/a
n/a
n/a
n/a
n/a
n/a
n/a
n/a
n/a
n/a
951-12304
751-12772
751-12773
n/a
951-11349
710-04938
710-05449
736-04554
710-05337
D = I! O
LockWasher
Nylon/PlasticO-Ring
FiberO-Ring
IdleSpeedAdjustingScrew
IdleMixtureScrew
CarburetorBody
FuelInlet
FloatPin
EmulsionTube
NeedleValve
MainJet
NeedleValveSpring
Float
FuelBowlO-Ring
Seat/FuelBowlBoltO-Ring
SolenoidValveAssembly
FuelBowl
FuelDrainPlugGasket
FuelDrainPlug
Seat!FuelBowlBolt
Washer
ScrewM5x12
61

Craftsman Engine Model 4P90JUA For Model 247.290000
190--
48
161
161
m
48
158
159
160
161
161
190
191
710-04916
712-04219
951-12270
951-12271
951-12272
951-12196
951-12278
710-05051
D = O O
BoltM6x14
NutM8
MufflerAssembly
ExhaustPipeGasket
MuffStudM8x47
MufflerStudAssembly
WireMeshShield
BoltM6x12
62

Craftsman Engine Model 4P90JUA For Model 247.290000
8
9
I
23
24--W \_
25---+
24
I
25
10
11--o | o--ll
--16
_--17
37
37
m
8
9
10
11
12
13
14
15
16
17
18
19
21
710-05306
951-12207
710-05307
736-04554
736-04556
I = O
BoltM8x40
StarterAssembly
ScrewM5x25
LockWasher5
PlainWasher6
951-12208
951-12211
951-12210
951-12312
951-12209
951-12212
951-12214
951-12216
ElectricalStarterFrontCover
Bearing
Pinion/ClutchAssembly
Gear
Bearing
PinionCover
Bearing6001Zz
Bearing
m
23
24
25
28
29
30
31
33
34
35
36
37
951-12528
951-12217
736-04554
951-12529
951-12219
710-05308
951-12324
736-04555
736-04556
736-04477
712-04212
715-04120
m = O O
StarterHousingAssembly
Screw
LockWasher
Brush Assembly
ElectricalStarterBackCover
BoltM6xl00
BoltM6x30Assembly
InsulationWasher
PlainWasher6
LockWasher6
NutM6
DowelPin 10x14
G3

Craftsman Engine IViodel 4P90JUA For IViodel 247.290000
38
m43
38-
45
m
38
39
4O
41
42
43
44
45
46
710-04920
951-12220
712-04220
951-12221
751-12222A
951-12223
951-12224
710-04940
951-12279
D = O O
BoltM6x28
IgnitionCoilAssembly
FlywheelNutM16x1.5
FanMountingPlate
CoolingFan
Flywheel
CoilAssy.Charge
BoltM6xlO
Cowl
64

Look For Relevant Emissions Durability Period and
Air index information On Your Engine Emissions Label
Engines that are certified to meet the California Air Resources Board (CARB) Tier 2 Emission Standards must
display information regarding the Emissions Durability Period and the Air Index. Sears Brands Management
Corporation makes this information available to the consumer on our emission labels.
The Emissions Durability Period describes the number of hours of actual running time for which the engine is
certified to be emissions compliant, assuming proper maintenance in accordance with the Operating & Mainte-
nance Instructions. The following categories are used:
Moderate: Engine is certified to be emission compliant for 125 hours of actual engine running time.
Intermediate: Engine is certified to be emission compliant for 250 hours of actual engine running time.
Extended: Engine is certified to be emission compliant for 500 hours of actual engine running time.
For example, a typical walk-behind lawn mower is used 20 to 25 hours per year. Therefore, the Emissions
Durability Period of an engine with an intermediate rating would equate to 10 to 12 years.
The Air index is a calculated number describing the relative level of emissions for a specific engine family. The
lower the Air Index, the cleaner the engine. This information is displayed in graphical form on the emissions label.
After July 1,2000, Look For Emissions Compliance Period
On Engine Emissions Compliance Label
After July 1, 2000 certain Sears Brands Management Corporation engines will be certified to meet the United
States Environmental Protection Agency (USEPA) Phase 2 emission standards. For Phase 2 certified engines, the
Emissions Compliance Period referred to on the Emissions Compliance label indicates the number of operating
hours for which the engine has been shown to meet Federal emission requirements.
For engines less than 225 cc displacement, Category C = 125 hours, B = 250 hours and A = 500 hours.
For engines of 225 cc or more, Category C = 250 hours, B = 500 hours and A = 1000 hours.
This isa generic representation of the emission label typically found on a certified engine.
FAMILYYBSXS.3192VA 274812
GDOC-100182Rev.B
56

(Thispageapplicableinthe U.S.A.and Canadaonly.)
Sears Brands Management Corporation (Sears), the California Air Resources Board (CARD)
and the United States Environmental Protection Agency (U.S. EPA)
Emission Control System Warranty Statement (Owner's Defect Warranty Rights and Obligations)
EMISSIONCONTROLWARRANTYCOVERAGEISAPPLICABLETOCERTI-
FIEDENGINESPURCHASEDINCALIFORNIAIN1995ANDTHEREAF-
TER,WHICHAREUSEDINCALIFORNIA,ANDTOCERTIFIEDMODEL
California and United States Emission
TheCaliforniaAirResourcesBoard(CARD),U.S.EPAand Searsarepleased
toexplainthe EmissionControlSystemWarrantyonyourmodelyear2000and
latersmalloff-roadengine(SORE).InCalifornia,newsmalloff-roadengines
mustbedesigned,builtand equippedto meettheState'sstringentanti-smog
standards.Elsewherein theUnitedStates,newnon-road,spark-ignition
enginescertifiedformodelyear1997and latermustmeetsimilarstandardsset
forthbythe U.S.EPA.Searsmustwarranttheemissioncontrolsystemonyour
YEAR1997ANDLATERENGINESWHICHAREPURCHASEDANDUSED
ELSEWHEREINTHEUNITEDSTATES(ANDAFTERJANUARY1,2001 IN
CANADA).
Control Defects Warranty Statement
enginefortheperiodsoftime listedbelow,providedtherehasbeennoabuse,
neglector impropermaintenanceofyoursmalloff-roadengine.Youremis-
sioncontrolsystemincludespartssuchasthecarburetor,aircleaner,ignition
system,mufflerandcatalyticconverter.Alsoincludedmaybeconnectorsand
otheremissionrelatedassemblies.Whereawarrantableconditionexists,Sears
will repairyoursmalloff-roadengineatnocostto youincludingdiagnosis,parts
andlabor.
Sears Emission Control Defects Warranty Coverage
Smalloff-roadenginesarewarrantedrelativeto emissioncontrolpartsdefects
fora periodofone year,subjecttoprovisionssetforthbelow.Ifanycovered
Owner's Warranty
Asthe smalloff-roadengineowner,youareresponsiblefor theperformanceof
therequiredmaintenancelistedinyourOperatingand MaintenanceInstruc-
tions.Searsrecommendsthatyouretainallyourreceiptscoveringmaintenance
onyoursmalloff-roadengine,butSearscannotdenywarrantysolelyforthe
lackofreceiptsorfor yourfailuretoensuretheperformanceof allscheduled
maintenance.As the smalloff-roadengineowner,youshouldhoweverbe
awarethat Searsmaydenyyouwarrantycoverageifyoursmalloff-roadengine
ora parthasfaileddueto abuse,neglect,impropermaintenanceor unap-
parton yourengineis defective,the partwillbe repairedorreplacedbySears.
Responsibilities
provedmodifications.Youareresponsibleforpresentingyoursmalloff-road
engineto anAuthorizedSearsServiceDealerassoonas aproblemexists.The
undisputedwarrantyrepairsshouldbecompletedinareasonableamountof
time,notto exceed30days.Ifyouhaveanyquestionsregardingyourwarranty
rightsand responsibilities,youshouldcontactaSearsServiceRepresentative
at 1-800-469-4663.Theemissionwarrantyisa defectswarranty.Defectsare
judgedonnormalengineperformance.Thewarrantyis notrelatedtoan in-use
emissiontest.
Sears Emission Control Defects Warranty Provisions
ThefollowingarespecificprovisionsrelativetoyourEmissionControlDefectsWarrantyCoverage.ItisinadditiontotheSearsenginewarrantyfornon-regulated
enginesfoundin theOperatingand MaintenanceInstructions.
1. WarrantedParts
Coverageunderthiswarrantyextendsonlytothe partslistedbelow(the
emissioncontrolsystemsparts)tothe extentthesepartswerepresenton
theenginepurchased.
a. FuelMeteringSystem
• Coldstartenrichmentsystem
• Carburetorandinternalparts
• FuelPump
b. AirlnductionSystem
• Aircleaner
• Intakemanifold
c. IgnitionSystem
• Sparkplug(s)
• Magnetoignitionsystem
d. CatalystSystem
• Catalyticconverter
• Exhaustmanifold
• Air injectionsystemor pulsevalve
e. MiscellaneousItemsUsedin AboveSystems
• Vacuum,temperature,position,timesensitivevalves
andswitches
• Connectorsandassemblies
2. LengthofCoverage
Searswarrantstothe initialownerandeachsubsequentpurchaserthat
theWarrantedPartsshallbefreefromdefectsin materialsandworkman-
shipwhichcausedthefailureofthe WarrantedPartsfor aperiodofone
yearfromthe datetheengineis deliveredtoa retailpurchaser.
3. NoCharge
Repairor replacementof anyWarrantedPartwill beperformedat no
chargetothe owner,includingdiagnosticlaborwhichleadstothe
determinationthataWarrantedPartisdefective,ifthe diagnosticworkis
performedatanAuthorizedSearsServiceDealer.Foremissionswarranty
servicecontactyournearestAuthorizedSearsServiceDealeraslistedin
the "YellowPages"under"Engines,Gasoline,""GasolineEngines,""Lawn
Mowers,"orsimilarcategory.
4. Claimsand CoverageExclusions
Warrantyclaimsshallbefiledin accordancewiththe provisionsofthe
SearsEngineWarrantyPolicy.Warrantycoverageshallbeexcludedfor
failuresof WarrantedPartswhicharenotoriginalSearspartsorbecause
ofabuse,neglector impropermaintenanceassetforth inthe Sears
EngineWarrantyPolicy.Searsisnotliableto coverfailuresof Warranted
Partscausedbytheuseof add-on,non-original,or modifiedparts.
5. Maintenance
AnyWarrantedPartwhichis notscheduledforreplacementas required
maintenanceor whichis scheduledonlyfor regularinspectiontothe effect
of"repairor replaceasnecessary"shallbe warrantedastodefectsfor the
warrantyperiod.AnyWarrantedPartwhichisscheduledfor replacement
asrequiredmaintenanceshallbewarrantedas todefectsonlyforthe
periodoftime uptothe firstscheduledreplacementfor that part.Any
replacementpartthat isequivalentinperformanceand durabilitymay
beusedin the performanceofanymaintenanceor repairs.Theowneris
responsibleforthe performanceof all requiredmaintenance,as definedin
the SearsOperatingandMaintenanceInstructions.
6. ConsequentialCoverage
Coveragehereundershallextendtothefailureofanyenginecomponents
causedbythe failureofanyWarrantedPartstillunderwarranty.
Inthe USAandCanada,a 24hourhotline,1-800-469-4663,hasamenuofpre-recordedmessagesofferingyouenginemaintenanceinformation.
GDOC-100188Rev.B
57

FEDERALand/or CALIFORNIAEMISSIONCONTROLWARRANTYSTATEMENT
YOURWARRANTYRIGHTSANDOBLIGATIONS
MTD Consumer Group Inc, the United States Environmental Protection Agency (EPA), and, for those products certified for sale in the state of
California, the California Air Resources Board (CARB) are pleased to explain the emission (evaporative and/or exhaust) control system (ECS)
warranty on your outdoor 2006 and later small off-road spark-ignited engine and equipment (outdoor equipment engine) In California, new
outdoor equipment engines must be designed, built and equipped to meet the State's stringent anti-smog standards (in other states, 1997 and
later model year equipment must be designed, built, and equipped to meet the U.S. EPAsmall off-road, spark ignition engine regulations. MTD
Consumer Group Inc must warrant the ECSon your outdoor equipment engine for the period of time listed below provided there has been no
abuse, neglect or improper maintenance of outdoor equipment engine.
Your ECS may include parts such as the carburetor, fuel-injection system, the ignition system, catalytic converter, fuel tanks, fuel lines, fuel caps,
valves, canisters, filters, vapor hoses, clamps, connectors, and other associated emission-related components.
Where a warrantable condition exists, MTD Consumer Group Inc will repair your outdoor equipment engine at no cost to you including
diagnosis, parts and labor.
MANUFACTURER'SWARRANTYCOVERAGE:
This emission control system is warranted for two years. If any emission-related part on your outdoor equipment engine is defective, the part
will be repaired or replaced by MTD CONSUMER GROUP INC.
OWNER'SWARRANTYRESPONSIBILITIES:
As the outdoor equipment engine owner, you are responsible for performance of the required maintenance listed in your owner's manual. MTD
Consumer Group Inc recommends that you retain all receipts covering maintenance on your outdoor equipment engine, but MTD Consumer
Group Inc cannot deny warranty solely for the lack of receipts.
As the outdoor equipment engine owner, you should however be aware that MTD Consumer Group Inc may deny you warranty coverage if
your outdoor equipment engine or a part has failed due to abuse, neglect, or improper maintenance or unapproved modifications.
You are responsible for presenting your outdoor equipment engine to MTD Consumer Group Inc's distribution center or service center as soon
as the problem exists. The warranty repairs should be completed in a reasonable amount of time, not to exceed 30 days. If you have a question
regarding your warranty coverage, you should contact the MTD Consumer Group Inc Service Department at 1-800-800-7310 or via email at
http://su pport.mtd prod ucts.com
GENERALEMISSIONSWARRANTYCOVERAGE:
MTD Consumer Group Inc warrants to the ultimate purchaser and each subsequent purchaser that the outdoor equipment engine is: Designed,
built and equipped so as to conform with all applicable regulations; and free from defects in materials and workmanship that cause the failure
of a warranted part to be identical in all material respects to that part as described in MTD Consumer Group Inc's application for certification.
The warranty period begins on the date the outdoor equipment engine is delivered to an ultimate purchaser or first placed into service. The
warranty period is two years.
Subject to certain conditions and exclusions as stated below, the warranty on emission-related parts is as follows:
1. Any warranted part that is not scheduled for replacement as required maintenance in the written instructions supplied, is warranted for
the warranty period stated above. If the part fails during the period of warranty coverage, the part will be repaired or replaced by MTD
Consumer Group Inc according to subsection (4) below. Any such part repaired or replaced under warranty will be warranted for the
remainder of the period.
2. Any warranted part that is scheduled only for regular inspection in the written instructions supplied is warranted for the warranty period
stated above. Any such part repaired or replaced under warranty will be warranted for the remaining warranty period.
3. Any warranted part that is scheduled for replacement as required maintenance in the written instructions supplied is warranted for the
period of time before the first scheduled replacement date for that part. If the part fails before the first scheduled replacement, the part
will be repaired or replaced by MTD Consumer Group Inc according to subsection (4) below. Any such part repaired or replaced under
warranty will be warranted for the remainder of the period prior to the first scheduled replacement point for the part.
Repair or replacement of any warranted part under the warranty provisions herein must be performed at a warranty station at no charge
to the owner.
4.
5. Notwithstanding the provisions herein, warranty services or repairs will be provided at all of our distribution centers that are franchised to
service the subject engines or equipment.
6. The outdoor equipment engine owner will not be charged for diagnostic labor that is directly associated with diagnosis of a defective,
emission-related warranted part, provided that such diagnostic work is performed at a warranty station.
7. MTD Consumer Group Inc is liable for damages to other engine or equipment components proximately caused by a failure under
warranty of any warranted part.
8. Throughout the off-road engine and equipment warranty period stated above, MTD Consumer Group Inc will maintain a supply of
warranted parts sufficient to meet the expected demand for such parts.
9. Any replacement part may be used in the performance of any warranty maintenance or repairs and must be provided without charge to
the owner. Such use will not reduce the warranty obligations of MTD Consumer Group Inc.

10. Add-onormodifiedpartsthatarenotexemptedbytheAirResourcesBoardmaynotbeused.Theuseofanynon-exemptedadd-onor
modifiedpartsbytheultimatepurchaserwillbegroundsfordisallowingawarrantyclaims.MTDConsumerGroupIncwillnotbeliableto
warrantfailuresofwarrantedpartscausedbytheuseofanon-exemptedadd-onormodifiedpart.
WARRANTEDPARTS:
The repair or replacement of any warra nted part otherwise eligible for warranty coverage may be excluded from such warranty coverage if
MTD Consumer Group Inc demonstrates that the outdoor equipment engine has been abused, neglected, or improperly maintained, and that
such abuse, neglect, or improper maintenance was the direct cause of the need for repair or replacement of the part. That notwithstanding,
any adjustment of a component that has a factory installed, and properly operating, adjustment limiting device is still eligible for wa rranty
coverage. Further, the coverage under this warranty extends only to parts that were present on the off-road engine and equipment purchased.
The following emission warranty parts are covered (if applicable):
1. Fuel Metering System
Cold start enrichment system (soft choke)
Carburetor and internal parts (or fuel injection system)
Fuel pump
Fuel tank
2. Air Induction System
Air cleaner
Intake manifold
3. Ignition System
Spark plug(s)
Magneto ignition system
4. Exhaust System
Catalytic converter
SAI (Reed valve)
5. Miscellaneous Items Used in Above System
Vacuum, temperature, position, time sensitive valves and switches
Connectors and assemblies
6. Evaporative Control
Fuel hose
Fuel hose clamps
Tethered fuel cap
Carbon canister
• Vapor lines
GDOG100223Rev.A

Congratulations on making a smart purchase. Your new Craftsman® product is designed and
manufactured for years of dependable operation. But like all products, it may require repair
from time to time. That's when having a Repair Protection Agreement can save you money and
aggravation.
Here's what the Repair Protection Agreement* includes:
[] Expert service by our 10,000 professional repair specialists
[] Unlimited service and no charge for parts and labor on all covered repairs
[] Product replacement up to $1500 if your covered product can't be fixed
[] Discount of 25% from regular price of service and related installed parts not covered by the
agreement; also, 25% off regular price of preventive maintenance check
[] Fast help by phone - we call it Rapid Resolution - phone support from a Sears representative.
Think of us as a "talking owner's manual."
Once you purchase the Repair Protection Agreement, a simple phone call is all that it takes for you
to schedule service. You can call anytime day or night, or schedule a service appointment online.
The Repair Protection Agreement is a risk-free purchase. If you cancel for any reason during the
product warranty period, we will provide a full refund. Or, a prorated refund anytime after the
product warranty period expires. Purchase your Repair Protection Agreement today!
Some limitations and exclusions apply. For prices and additional information in the U.S.A.
call 1=800=827=6655.
*Coverage in Canada varies on some items. For full details call Sears Canada at 1=800=361=
6665.
Sears Installation Service
For Sears professional installation of home appliances, garage door openers, water heaters, and
other major home items, in the U.S.A. or Canada call 1=800=4=MY=HOME®.
60

Operaci6n segura Pr,_cticas .......... Paginas 71
Asamblea ........................... Page 78
Operaci6n de ...................... Paginas 84
De Servicio y Mantenimiento de ....... Paginas 90
Fuera de temporada de almacenamiento . Page 101
Soluci6n de problemas ............... Page 102
Lista de piezas ..................... Paginas 36
Reparaci6n de Acuerdo de Protecci6n ... Page 107
Servicio de nOmeros ............ atrasados Page
CRAFTSMAN GARANTiA TOTAL
PORDOSANOSdesdelafechadecornpra,todaslaspartesdenofungiblesdeesteequipodeequitaci6nestangarantizadascontracualquierdefectode
materialornanodeobra.Unapartenofungiblesdefectuosarecibir_a dornicilioreparacbno lasustituci6nsilareparaci6nnoest_disponible.
GARANT{ALIMITADAADIClONAL
Entodaslasgarantiasadicionales,noseincluyeelcostodemanodeobraparainstalarlapiezaderecambiolibredespuesdelsegundoa_odesdelafechadecompra.
DURANTEcincoa_osdesdelafechadecompra,elmarcodeesteequipodeconducci6nest_garantizadocontracualquierdefectodematerialomanodeobra.Un
marcodefectuosorecibir_reemplazoadomiciliogratuito.
DURANTEdieza_osdesdelafechadecompra,elejedelanterodeesteequipodeconducci6nest_garantizadocontracualquierdefectodematerialomanodeobra.
Unejedelanterodefectuosorecibir_reemplazoadomiciliogratuito.
POR90diasdesdelafechadecompra,labateria(unapiezaconsumible)deesteequipodeconducci6nest_garantizadacontracualquierdefectodematerialomano
deobra(nuestrapruebademuestraquenopresentar_unacarga).Unabateriadefectuosarecibir_reemplazoadomiciliogratuito.
PARAmientrasesutilizadopotelpropietariooriginaldespuesdeldecimoa_odelafechadecompra,elejehierrofundidofrontal(siest_equipado)deesteequipo
deconducci6nest_garantizadocontracualquierdefectodematerialomanodeobra.Concomprobantedecompra,unejedelanterodefundici6ndefectuosarecibir_
reemplazoadomiciliogratuito. GARANT{ADESERVlClO
Paradetallesdelacoberturadegaranfiaobtenerlareparaci6no reernplazo,Ilarneal1-800-659-5917o visiteelsitioweb:www.Craftsman.corn
Entodosloscasos,sisepartedelareparacbno reernplazoesirnposible,elequipodeequitaci6nsereernplazar_gratuitarnenteconelrnisrnooequivalente.
Todoslosdelaanteriorgarantiaesnulasiseutilizaesteequipodeconducci6nrnientrasqueproporcionaservicioscornercialesoSialquilaaotrapersona.
EstagarantiacubrelosdefectosSOLOde materialesy fabricaci6n.Lagarantfanoincluye:
• Piezasfungibles(exceptola bateria)quepuedengastarseporel usonormaldentrodelperiododegaranfia,incluyendoperonolirnitadoa
cuchillas,bujias,filtrosdeaire,correasy filtrosdeaceite.
• Serviciode rnantenirniento,carnbiosde aceiteo puestasapunto.
• Neurn_.ticoreernplazoo reparaci6ncausadasporpinchazosde objetosexternos,talescornoclavos,espinas,toconeso vidrio.
• Neurn_.ticoo ruedade repuestoo reparaci6nresultantesdeldesgastenormal,accidente,o funcionarnientoincorrectoo mantenirniento.
• Reparacionesnecesariasdebidoa abusodeloperador,incluyendoperonolirnitadoada_oscausadosporobjetosrn_.sall_.de la capacidad
de losequiposdeconducci6nde rernolque,afectarobjetosquedoblanelmarco,eleje o elcig(Je_alo over-speedingelmotor.
• Reparacionesnecesariasdebidoa la negligenciadeloperador,incluyendoperono lirnitadoa, el_ctricasy rnec_nicasda_oscausados
porel alrnacenarnientoinadecuado,no usarelgradoadecuadoyla cantidadde aceitede motor,nornantenerla cubiertalibrede residuos
infiarnables,ofaltade rnantenirnientodelequipode equitaci6nsegQnlasinstruccionescontenidasenel manualdeloperador.
• Lirnpiezadel motor(sisternadecombustible)o reparacionescausadosporcombustibledeterrninadoestarcontarninadosuoxidan(obsole-
tos).Engeneral,elcombustibledebeutilizarsedentrode30 dfasde lafechadecornpra.
• Normaldeterioroydesgastedelosacabadosexteriores,o productode reernplazola etiqueta.
• deterioroydesgastenormaldelosacabadosexteriores,o reernplazodela etiquetadel producto.
Estagaranfialeotorgaderechoslegalesespecificos,yustedtarnbi_npuedetenetotrosderechosquevariandeestadoaestado.
SearsBrandsManagementCorporation,HoffmanEstates,IL60179
Aceitedel motor: SAE30
Combustible: Gasolinasinplorno
Bujia: F6RTC(951-10292)
N_mero de rnodelo ..........................................................
N_mero de sede..............................................................
Fechade compra .............................................................
RegistrearribaelnQmerodelmodelo,elnQmerodeserieylafechadecompra
©SearsBrands,LLC
70

Lapresenciadeeste sirnboloindicaquesetratade instrucciones
irnportantesde seguridadquesedebenrespetarparaevitar
ponerenpeligrosuseguridadpersonaly/o materialy lade otras
personas.Leaysigatodaslasinstruccionesdeestemanualantes
de poneren funcionarnientoestarn_.quina.Si no respetaestas
instruccionespodriaprovocarlesionespersonales.Cuandoveaeste
sirnbolo,ipresteatenci6na la advertencia!
PROPOSICION 65 DE CALIFORNIA
Elescapedel motordeesteproducto,algunosde suscornponentes
y algunoscornponentesdelvehiculocontieneno liberansustancias
quirnicasqueelestadodeCaliforniaconsideraque puedenproducir
c_.ncer,defectosde nacirnientouotrosproblernasreproductivos.
Losbornesdela bateriay losaccesoriosalinescontienenplornoy
cornpuestosde plorno,sustanciasquirnicasque seg_nIoestableci-
do porel Estadode Californiacausanc_.ncery da_osenel sisterna
reproductivo.Ldveselasmanos despu_sde estaren contacto
con estoscomponentes.
Estarn_.quinarueconstruidaparaseroperadadeacuerdocon
lasreglasdeseguridadcontenidasenestemanual.AIigualque
concualquiertipodeequipornotorizado,undescuidoo errorpor
partedeloperadorpuedeproducirlesionesgraves.Estarn_.quina
escapazde arnputarrnanosy piesy dearrojarobjetoscongran
fuerza.Deno respetarlasinstruccionesde seguridadsiguientesse
puedenproducirlesionesgraveso larnuerte.
Su responsabilidad--Restrinja el usode estarn_.quina
rnotorizadaalas personasque lean,cornprendany respetenlas
advertenciase instruccionesqueaparecenenestemanualyen la
rn_.quina.
iGUARDEESTASINSTRUCCIONES!
FUNCIONAMIENTO GENERAL
• Lea,entiendaycurnplatodaslasinstruccionesincluidasen
la rn_.quinayen losrnanualesantesdernontarlay utilizarla.
Guardeestemanualenun lugarseguroparaconsultasfuturasy
peri6dicas,asi cornoparasolicitarrepuestos.
• Farniliaricesecontodosloscontrolesyconel usoadecuado
delosrnisrnos.Sepac6rnodetenerlarn_.quinaydesactivarlos
controlesr_.pidarnente.
• Noperrnitanuncaque losni_osrnenoresde 14a_osutilicen
estarn_.quina.Losni_osde 14a_osen adelantedebenleery
entenderlasinstruccionesdeoperaci6ny norrnasdeseguridad
contenidaseneste manual,yen la rn_.quinay debenser
entrenadosy supervisadospor unadulto.
• Nuncaperrnitaquelosadultosoperenestarn_.quinasinrecibir
antesla instrucci6napropiada.
• Paraayudaraevitarel contactoconlascuchillaso unalesi6npor
algQnobjetoqueseaarrojado,rnantengaa losobservadores,a
losayudantes,ni_osy rnascotasalejadosal rnenos25 metrosde
la rn_.quinarnientrasest,.en funcionarniento.Detengala rn_.quina
sialguienentraen lazona.
• Inspeccionerninuciosarnenteel Areadondeutilizar_,el equipo.
Retiretodaslaspiedras,palos,cables,huesos,juguetesy otros
objetosextra_osquepodrianserrecogidosyarrojadospor la
acci6nde lascuchillas.Losobjetosarrojadosporlarn_.quina
puedenproducirlesionesgraves.
• Planifiqueel patr6ndecortedelc_spedque hade seguirpara
evitarla descargade materialhacialoscarninos,lasveredas,los
observadores,etc.Eviteadern_.sdescargarmaterialcontralas
paredesyobstruccionesquepodrianprovocarqueel material
descargadorebotecontrael operador.
• Paraprotegerselosojosutilicesiernpreanteojoso antiparras
deseguridadrnientrasoperalarn_.quinao rnientraslaajusta
o repara.Losobjetosarrojadosque rebotanpuedenproducir
lesionesocularesgraves.
• Utilicezapatosde trabajoresistentes,desuelafuerte,asicorno
pantalonesycarnisasajustados.Lasprendassueltaso las
alhajaspuedenquedaratrapadasenlaspiezasrnovibles.Nunca
operela rn_.quinadescalzooconsandalias.
• Est_atentoa lacortadoraya la direcci6nde la descargade
losaditarnentosy noapuntea nadie.Nuncaoperelacortadora
de c_spedsinqueest_nen sulugarapropiadolacubiertade
descargao elcolectorde recortesdecesped.
• Nopongalasrnanoso lospiescercade laspiezasrotatoriaso
debajode la plataforrnadecorte.Elcontactoconlascuchillas
puedeproducirla arnputaci6ndernanosy pies.
• Unacubiertade descargafaltanteo da_adapuedeprovocarel
contactoconlacuchillao lesionespotobjetosarrojados.
• Detengala(s)cuchilla(s)cuandoatraviesesenderos,sendaso
carninosde gravaycuandonoest_cortandoel cesped.
• Vigileel tr_.nsitovehicularcuandoest_operandocercadeo en
crucesde carninos.Estarn_.quinanodebeutilizarseen lavia
pQblica.
• Noopereestarn_.quinabajolosefectosdelalcoholode drogas.
• Corteel cespedsolarnenteconluzdediao conunabuenaluz
artificial.
• Nuncatransportepasajeros.
• Desenganchela(s)cuchilla(s)antesdecolocarlarnarchaatr_.s.
Retrocedalentarnente.Siernpremirehaciaabajoy haciaatr_.santes
y rnientrasretrocede,paraevitaraccidentes.
• Reduzcala velocidadantesdedarlavuelta.Operelarn_.quina
suavernente.Evitelaoperaci6nerr_.ticayla velocidadexcesiva.
• Desenganchela(s)cuchilla(s),coloqueelfrenodeestaciona-
rniento,detengaelmotoryesperehastaquela(s)cuchilla(s)se
detenga(n)porcornpletoantesderetirarelcolectordec_sped,
vaciarlosrecortes,destaparelcanal,retirarrestosde cespedo
desechos,o hacercualquierajuste.
71

• Nuncadejelarn_.quinaen funcionarnientosinvigilancia.Apague
siernprelascuchillas,coloqueelfrenodernano,detengaelmotory
retirelaIlaveantesdebajarsedelvehiculo.
• Tengasurnocuidadoalcargarodescargarlarn_.quinaen un
rernolqueocarni6n.Estaunidadnodebeconducirseenascensoo
descensoderarnpas,porquepodrialadearseyprovocarlesiones
personalesgraves.Enlasrarnpaslarn_.quinasedebeernpujar
rnanualrnenteparacargarlao descargarlacorrectarnente.
• Elsilenciadoryel motorsecalientanypuedencausarquernaduras.
Nolostoque.
• Reviseel espaciolibrepotencirnade lacabezaantesdeconducir
bajolasrarnasbajasde_.rboles,cables,cerrarnientosde puertas,
etc.enloscualeseloperadorpodriaatorarseo serernpujadofuera
dela rn_.quina,Ioquepodriaresultaren lesionesgraves.
• Desenganchetodoslosernbraguesdelosaccesoriosy presione
totalrnenteel pedaldelfrenoantesdeintentararrancarel motor.
• Larn_.quinaest,.diseSadaparacortarc_spedresidencialnormal,
conunaalturanomayora 10".Nointentecortarcespeddernasiado
crecido,seco(porej.,pastura)nipilasdehojassecas.Elc_sped
ylashojassecaspuedenentraren contactoconel escapedel
motory/o acurnularseenla plataforrnade lacortadoradecesped,
convirti_ndoseen unpeligrodeincendio
• Utilicesolarnenteaccesoriosyaditarnentosaprobadosparaesta
rn_.quinapotelfabricantedelarnisrna.Lea,cornprendaysiga
todaslasinstruccionesproporcionadasconlosaccesorioso
aditarnentosaprobados.Paraobtenerunalistadelosaccesorios
aprobadosy losarchivosadjuntos,Ilarne1-800-659-5917.
• Losdatosestadsticosrnuestranquelosoperadoresde60 aSos
yrnayoresseven involucradosenunaltoporcentajedelesiones
relacionadascontractorescortacesped.Estosoperadoresdeben
evaluarsucapacidadparaoperarel tractorcortac_spedenforrna
suficienternenteseguraparaprotegersea ellosrnisrnosy alos
dern_.scontralesionesgraves.
Si sepresentansituacionesqueno est_.nprevistasen este
manualseacuidadosoyuseel sentidocornOn.
FUNCIONAiVIIENTO EN PENDIENTES
Laspendientessonunfactorirnportanterelacionadoconaccidentes
porderrapeyvuelcosquepuedenproducirlesionesgravese incluso
la rnuerte.Laoperaci6nen pendientesrequieremayorprecauci6n.
Si nopuederetrocederen la pendienteo sino sesienteseguro,no
realiceningunaoperaci6ndecorte.
Parasuseguridad,useel indicadordependientesqueseincluye
cornopartede estemanualpararnedirla pendienteantesdeoperarla
rn_.quinaenunazonainclinada.Sila pendientees mayorde 12grados
segOnel rnedidor,noopereestarn_.quinaenesesector,puespodria
causarlesionesgraves.
HagaIosiguiente:
• Podehaciaarribayabajodelaspendientes,nodeforrnatrans-
versal.Tengacuidadocuandocarnbiededirecci6nal operaren
pendiente.
• Est_atentoa loshoyos,surcos,baches,rocas,uotrosobjetos
ocultos.Elterrenodesniveladopuedevoltearla rn_.quina.Elcesped
altopuedeocultarobst_.culos.
• Vayaabajavelocidad.ElijaunavelocidadIosuficienternentebaja,
dernodoquenotengaquedetenerseo hacercarnbiosrnientras
est,.sobrelapendiente.Losneurn_.ticospodrianperdertracci6n
sobrelaspendientesaQncuandolosfrenosfuncionaranapro-
piadarnente.Siernprernantengalarn_.quinaencarnbiornientras
desciendelaspendientes,parapoderfrenarconelmotor.
• Sigalasrecornendacionesdelfabricanteparalospesosocontra-
pesosdelasruedas,pararnejorarlaestabilidadde larn_.quina.
Tengaespecialcuidadoconloscolectoresdecespeduotros
aditarnentos.Losrnisrnospuedenrnodificarlaestabilidaddela
rn_.quina.
Hagaquetodoslosrnovirnientosen laspendientesseanlentosy
graduales.Nocarnbierepentinarnentelavelocidadniladirecci6n.
Unfrenadoo carnbiodevelocidadrepentinospuedencausarque
el frentede larn_.quinaselevantey d_unavolteretahaciaatr_.s,Io
quepodriaproducirlesionesgraves.
Evitearrancaro detenerseenunapendiente.Silosneurn_.ticos
pierdenlatracci6n,desenganchelascuchillasydescienda
lentarnentela pendiente.
No hagaIo siguiente:
• Nogiresobrelaspendientesarnenosqueseanecesario.Sies
posible,girelentarnenteygradualrnenteduranteeldescenso.
• Nocorteelc_spedcercade pozos,hundirnientosoterraplenes.La
cortadoradec_spedpuedevolcarserepentinarnentesiunadelas
ruedasestersobreelhordede unacantilado,zanjao siunhordese
desrnorona.
• Nointenteestabilizarlarn_.quinaponiendoelpieenel suelo.
• Noutiliceuncolectordec_speden pendientesernpinadas.
• NopodeelcespedhOrnedo.Unarnenortracci6npodriacausar
derrapes.
• Noparadescender.Elexcesodevelocidadpuedehacerqueel
operadorpierdaelcontroldelarn_.quina,ocasionandolesiones
graveseinclusolarnuerte.
• Norernolquecargaspesadasdetr_.sdelosaditarnentos(carritode
basuracargado,podadoraderodillos,etc)en pendientesrnayores
de5grados.Cuandosedesplazapendienteabajo,el pesoadicional
tiendeaernpujareltractorypuedehacerquesepierdaelcontrol
delrnisrno(porejernplo,eltractorsepuedeacelerar,sereducela
capacidadparafrenary rnaniobrar,losaccesoriospuedenplegarse
cornouncortaplurnasyhacerqueeltractorvuelque).
NINOS
Puedenocurriraccidentestr_.gicossiel operadornoest,.atentoa la
presenciade ni_os.PotIogeneral,losni_ossesientenatraidospor
estetipode rn_.quinasy sufuncionarniento.Noentiendenlosriesgos
ni lospeligros.Nuncaasurnaquelosni_osperrnanecer_.nen el rnisrno
lugardondelosviopotQltirnavez.
Mantengaa losni_osfueradel_.readetrabajoybajoestricta
vigilanciadeunadultoresponsableadern_.sdelpropiooperador.
Est_alertayapaguelarn_.quinasiunni_oingresaal_.rea.
Antesy rnientrasest,.retrocediendo,mirehaciaatr_.sycuidequeno
hayani_os.
Nuncatransporteni_os,aQnconlacuchillaapagada.Podriancaerse
y resultarseverarnenteheridosointerferirconlaoperaci6nsegurade
larn_.quina.
• Tengaextrernaprecauci6ncuandoseaproxirneaesquinasciegas,
portales,arbustos,_.rbolesuotrosobjetosquepuedanirnpedirlever
a unni_oquesecruceenel recorridode larn_.quina.
• Paraevitaraccidentesal operarenrnarchaatr_.s,siernpredesengan-
chelascuchillasantesdecolocarrnarchaatr_.s.Siest,.instalado,
el"ModoPrecauci6nMarchaAtr_.s"(hojasde operarla rn_.quina,
rnientrasquelospaseosa lainversa)nodebeutilizarsecuandohay
ni_osu otraspersonaspresentes.
• Mantengaa losni_osalejadosdelosrnotoresen rnarchaocalientes.
Puedensufrirquernadurasconunsilenciadorcaliente.
• RetirelaIlavecuandodejelarn_.quinasinvigilancia,evitequeuna
personasinautorizaci6nlarnaneje.
72

Noperrnitanuncaque losniSosrnenoresde14aSosutilicenesta
rn&quina.LosniSosde14aSosen adelantedebenleeryentenderlas
instruccionesdeoperaci6nynorrnasde seguridadcontenidaseneste
manual,yen la rn&quinaydebenserentrenadosysupervisadospor
unadulto.
REIVIOLQUE
• RernolqueL_nicarnenteconunarn_quinaquecuenteconun
enganchediseSadopararernolcar.Noacopleequiporernolcado
exceptoenelpuntodeenganche.
• SigalasrecornendacionesdelfabricanteenIoquerespectaalos
lirnitesdepesodelosequiposa rernolcaryalrernolqueenpendien-
tes.
• Nuncaperrnitalapresenciade niSosuotraspersonasdentroosobre
losequiposrernolcados.
• Enlaspendientes,elpesodelequiporernolcadopuedecausar
p_rdidadetracci6nyp_rdidadecontrolde larn_quina.
• Siernpreuseextralaprecauci6nrernolcandoconunarnaquina
capazdehacervueltasapretadas(p.ejpaseo"devueltacero"-enel
cortacesped).Hagaarnpliasvueltasparaevitaralgato-knifing.
• Desplaceselentarnenteydejedistanciaadicionalparafrenado.
• Noparadescender.
SERVIClO
Manejoseguro de lagasolina
Paraevitarlesionespersonaleso daSosrnaterialesseasurnarnente
cuidadosoal rnanipularla gasolina.Lagasolinaessurnarnente
inflarnableysusvaporespuedencausarexplosiones.Se puede
lesionargravernentesiderrarnagasolinasobreustedosobrelaropa,
yaque_stasepuedeincendiar.L&veselapiely c&rnbiesede ropade
inrnediato.
• Utilices61olosrecipientesparagasolinaautorizados.
• NuncaIlenelosrecipientesenel interiordeunvehiculoo carni6n
o cajade rernolqueconrecubrirnientopl&stico.Coloquesiernpre
losrecipientesenel pisoylejosdel vehiculoantesde realizarla
carga.
• Cuandoseafactible,retireel equipoa gasolinadel carni6no
rernolqueyII_neloen elsuelo.Siestonoes posible,Ileneel
equipoen unrernolqueconun contenedorport&til,envezde
hacerloconunaboquilladispensadoradegasolina.
• Mantengalaboquillade Ilenadoencontactoconel hordedel
dep6sitode combustibleoconla aberturadelrecipienteen todo
rnornento,hastaterrninarlacarga.1/outiliceundispositivode
boquilladeapertura/cierre.
• Apaguetodosloscigarrillos,cigarros,pipasyotrasfuentesde
cornbusti6n.
• Nuncacarguecombustibleen larn&quinaen unespaciocerrado.
• Nuncasaquelatapadelcornbustibleni agreguecombustible
rnientrasel motorest&calienteo en rnarcha.Dejequeel motor
seenfrieporIornenosdosrninutosantesde volveracargar
combustible.
• Nuncalleneenexcesoeldep6sitodecombustible.Lleneel
tanqueno rn&sde1/2pulgadapordebajode la basedelcuello
deltap6nde carga,paradejarespacioparalaexpansi6ndel
combustible.
• Vuelvaa colocarlatapadelagasolinayajL_stelabien.
• Lirnpieel combustiblequese hayaderrarnadosobreel motory el
equipo.Trasladelarn&quinaa otrazona.Espere5 rninutosantes
de encenderelmotor.
• Parareducirel riesgode incendio,rnantengalarn&quinalirnpia
de pasto,hojasy deacurnulaci6ndeotros residuos.Lirnpielos
derrarnesdeaceiteo combustibleysaquetodoslosresiduos
ernbebidosde combustible.
• Nuncaguardelarn&quinao el recipientedecombustibleen un
espaciocerradodondehayafuego,chispaso luzpiloto,corno
potejernplodecalentadoresdeagua,calefactoresde arnbientes,
hornos,secadoresde ropau otrosaparatosa gas.
• Dejequelarn&quinaseenfriecincorninutospor Iornenosantes
de guardarla.
Servicio general
• Nuncaenciendael motoren espacioscerradosoen unazona
conpocaventilaci6n.Elescapedel motorcontienernon6xidode
carbono,ungasinodoroyletal.
• Antesdelirnpiar,repararo inspeccionarla rn&quina,cornpruebe
que la(s)cuchilla(s)ytodaslaspartesenrnovirnientosehayan
detenido.Desconecteelcablede labujfay p6ngalohaciendo
rnasacontrael motorparaevitarqueseenciendaaccidental-
rnente.
• Reviseperi6dicarnenteparaasegurarsequelascuchillasse
detenganpotcornpletoenaproxirnadarnentecinco(5) segundos
despu_sdeaccionarel controldedesenganchede la(s)
cuchilla(s).Si lascuchillasnosedetienendentrodeeste lapso
de tiernpo,suunidaddeber&ser reparadaporsudistribuidorde
servicioautorizadoMTD.
• Reviseconfrecuenciaelfuncionarnientodelsisternadefrenos
yaqueest,.sujetoa desgasteporlaoperaci6nnormal.Ajustey
efectL_ernantenirnientosegL_nserequiera.
• Reviselospernosdernontajede la(s)cuchilla(s)ydel motora
intervalosfrecuentesparaverificarqueest_nbienapretados.
Adern&s,inspeccionevisualrnentela(s)cuchilla(s)en buscade
daSos(porejernplo,desgasteexcesivo,abolladuras,rajaduras,
etc.). Reernplacela(s)cuchilla(s)L_nicarnenteconlascuchillas
de fabricantesdeequiposoriginales(O.E.M.)listadaseneste
manual.El usode piezasque nocurnplenconlasespecifi-
cacionesdel equipooriginalpodrfatenercornoresultadoun
rendirnientoincorrectoy adern&sponerenriesgolaseguridad.
• Lascuchillasde laspodadorassonrnuyafiladas.Envuelvala
cuchillao utiliceguantesy extremelasprecaucionescuando
efectL_ernantenirniento.
• Mantengatodoslospernos,tuercasytornillosbienajustados
paraasegurarsedequelarn&quinaseencuentraencondiciones
segurasde operaci6n.
• Nuncaaltereel sisternadeenclavarnientodeseguridadni
otrosmecanisrnosdeseguridad.Controleperi6dicarnenteque
funcionencorrectarnente.
73

• Despu_sdegolpearconalgOnobjetoextra_o,detengael motor,
desconecteel cablede la bujfay conecteel motora rnasa.
Inspeccionerninuciosarnentela rn_.quinaparaversiest,.da_ada.
Repareel da_oantesdearrancary utilizarla rn_.quina.
Nuncatratedehacerajusteso reparacionesa la rn_.quina
rnientrasel motorest,.enrnarcha.
Loscornponentesdelcolectordecespedy la cubiertade
descarga,est_.nsujetosadesgasteyda_osque podriandejar
expuestaspartesen rnovirnientoo perrnitirque searrojenobjetos.
Paraprotegersuseguridad,verifiquefrecuenternentetodoslos
cornponentesy reernpl_.celosinrnediatarnentes61oconpiezasde
losfabricantesdel equipooriginal,listadosen estemanual.Eluso
de piezasque nocurnplenconlasespecificacionesdel equipo
originalpodriatenercornoresultadoun rendirnientoincorrectoy
adern_.sponeren riesgolaseguridad.
Nocarnbielaconfiguraci6ndel reguladordel motorni Ioopere
a sobrevelocidad.El reguladordel motorcontrolala velocidad
rn_.xirnaseguradefuncionarnientodel motor.
Mantengao reernplacelasetiquetasdeseguridade instrucciones
segOnseanecesario.
Respetelasnorrnasreferentesa ladisposici6ncorrectay las
reglarnentacionessobregasolina,aceite,etc.paraprotegerel
medicarnbiente.
SegOnla Cornisi6ndeSeguridadde Productosparael Consurni-
dorde losEstadosUnidos(CPSC)y laAgenciade Protecci6n
Arnbientalde losEstadosUnidos(EPA),esteproductotieneuna
vidaQtilmediade siete(7)a_os,6 270horasdefuncionarniento.
AIfinalizarla vida[3tilmedia,adquieraunarn_.quinanuevao haga
inspeccionaranualrnente_staSearsporunou otrodistribuidorde
serviciosparacerciorarsedequetodoslossisternasrnec_.nicos
yde seguridadfuncionancorrectarnenteyno tienenexcesivo
desgaste.Si noIohace,puedenproducirseaccidentes,lesiones
o rnuerte.
NO MODIFIQUE EL MOTOR
Paraevitarlesionesgraveso larnuerte,nornodifiqueel motorbajo
ningunacircunstancia.Si carnbialaconfiguraci6ndel reguladordel
motorel motorpuededescontrolarsey operara velocidadesinsegu-
ras.Nuncacarnbielaconfiguraci6ndef_.bricadel reguladordel motor.
AVISO REFERIDO A EMISIONES
Losrnotoresqueest&ncertificadosycurnplenconlasregulaciones
de ernisionesfederalesEPAyde CaliforniaparaSORE(Equipos
peque_ostodoterreno)est_.ncertificadosparaoperarcongasolina
cornQnsinplornoy puedenincluirlossiguientessisternasdecontrol
de ernisiones:Modificaci6nde motor(EM)ycatalizadorde tresvias
(TWO)siest_.nequipadosde esarnanera.
GUARDACHISPAS
Si seutilizaunarnortiguadorde chispasel operadorIodebernantener
en condicionesde usoadecuadas.EnelEstadode Californialas
rnedidasanteriorrnenternencionadassonexigidasporIcy(Arficulo
4442del C6digode RecursosPOblicosde California).Esposible
queexistanleyessirnilaresenotrosestados.Lasleyesfederalesse
aplicanenterritoriosfederales.
Puedeconseguirelarnortiguadordechispasparael silenciadora
travesdesudistribuidorautorizadode rnotoreso poni_ndoseen
contactoconel centrode servicioSears.
Estarn_.quinaest,.equipadaconunmotorde cornbusti6ninternay
no debeserutilizadaeno cercade unterrenoagrestecubiertopor
bosque,rnalezaso hierbaexceptosiel sisternade escapedelmotor
est,.equipadoconunarnortiguadordechispasquecurnplaconlas
leyeslocaleso estatalescorrespondientes,encasode haberlas.
74

SilVIBOLOSDE SEGURIDAD
Estap&ginarepresentay describelaseguridadlossimbolosquepuedenpareceren esteproducto.Lea,comprenda,y sigatodasinstrucciones
enla m_quinaantesprocurarparareuniry operar.
0
LEA EL MANUAL(S) DEL OPERADOR
leido, entienda, y siga todas las instrucciones en el manual(s) antes de procurar montar y funcionar
PELIGRO-- DE ELCORTE DE PIE
Nunca transporte pasajeros. Nunca transporte ni_os, aun con la cuchilla apagada.
PELIGRO-- DIe ELCORTEDEPIE
Paraevitar accidentes, mantener a los niffos lejosde lam_iquinamientras est,1en funcionamiento..
PELIGRO-- DIeEL CORTE DE PIE
Guarde manos y pies lejos de hacer girar partes.
PELIGRO-- DIeEL CORTE DE PIE
Retroceda lentamente. Siempre mire hacia abajo y hacia atr_is antes y mientras retrocede, para evitar
accidentes.
PELIGRO-- ESCOMBROS LANZADOS
Quite objetos que pueden ser lanzados pot la I_imina en cualquier direcci6n. Lleve gafas de
seguridad..
PELIGRO-- ESCOMBROS LANZADOS
Quite objetos que pueden ser lanzados pot la I_imina en cualquier direcci6n. Lleve gafas de
seguridad.
ERSONAS PRESENTES
Guarde alas personas presentes, a los ayudantes y a ni_os pot Io menos 75 pies lejos.
PELIGRO-- CUESTAS
Use extra la precauci6n en cuestas. No siegue cuestas mayores que 12.
ADVERTENCIA -- SUPERFICIE CALIENTE
Las partes del motor, especialmente el silenciador, Ilega a set muy caliente durante la operaci6n.
Permita motor y silenciador para ponerse frio antes de tocar.
75

PELIGRO-- GIRANDO HOJAS
Para reducir el riesgo de herida, guarde manos y pies lejos. No funcione a menos que la tapa
de descarga o el receptor de hierba est6n en su lugar apropiado. De ser dahado, sustituya
inmediatamente.
GASOLINA DE ADVERTENClA ESINFLAMABLE
Permita que el motor se enfrie al menos dos minutos antes del reabastecimiento de combustible.
ADVERTENCIA -- MONOXIDO DE CARBONO
Nunca dirijas un motor dentro o en un _rea real ventilada. Los gases de combusti6n de motor
contienen el mon6xido de carbono, un gas inodoro y mortal.
PELIGRO-- DE ELCORTE DE PIE
No se pare sobre la plataforma de corte.
76

(ACEPTAR)
- 12° Pendiente
-'12 ° Pendiente
(DEMASIADO ESCARPADO)
Rgura1 Rgura2
_ 120 P
"" //rle#
-- -- SCORtiRUa
USO DEESTEPENDIENTEBE CALIBREPARADETERMINAR _=
SI UNAPENDIENTEESDEMASIADOESCARPADOPARAUNA OPERACIONSEGURA!
Paracomprobar la pendiente, haga Io siguiente:
1. Borrar esta p_.ginay doble a Iolargo de la linea discontinua.
2. Localizar un objeto vertical sobre o detr_.sde la pendiente (un poste, un edificio, unavalla, un _.rbol,etc.)
3. Alinee cada lado de pendiente de calibre con el objeto vertical (consultar Figura 1 and Figura 2 ).
4. Ajuste el pendiente de calibre arriba o hacia abajo hasta los toques esquina izquierda el pendiente
(consultar Figura1 and Figura 2).
5. Si hay un espacio por debajo de la pendiente de calibre, el pendiente es demasiado escarpa pot operaci6n
segura (consultar Figura2 above).
Las pendientesson un factorimportante relacionadocon unvuelco y renovaci6ndelos accidentesque puedenprovocar lesionesgraveso la muerte.
No utilicela ma.quinaenpendientesde m_tsde 15grados.Todos pendientesrequiere mayorprecauci6n.Si nopuede retrocederen la pendienteo si se
siente inseguroenella, no la recorte. Siemprecorteel cespedarriba y abajo laspendientes, nuncaentoda la superficiede la cuesta.
I",,.
I",,.

Contenido deicaj6n
Untractorcortac_sped
Unconjuntoderueda/ejededirecd6n
Unaplacadeenganchetrasera
Unmanualdeloperadordeltractorcortac(_sped
Unconjuntodeasiento
Unatapatraseradelmotor
Unamangaparadrenadodeaceite
Unmanualdeoperad6ndelmotor
Unatapadepedestaldedirecd6n
Unconjuntodecanaldedescarga
Unpaquetedeelementosdeferreteria
Unatarjetapararegistrarelproducto
Contenidodel paquete deelementosdeferreteria
Antesdecomenzarlainstalad6n,extraigatodoelcontenidodelacajay todos
loselementosdeferreteriadelpaqueteparacomprobarquenofaltenada.
Loselementosdeferreteriasedetallanacontinuaci6n.Losmimerosdepieza
seindicanentrepar_ntesis.
Placadeenganche
Soportedemontajedelasiento(condospernosconrebordeytuercas
desujed6ninstalados)
tterramientas re¢omendadasparaelmontaje
Llavede3/8"(odecubo) Llavedecubode9"y 16"
LlavedeI/2" (odecubo) Llavede7/16"
Llavede5/8"(odecubo) DestornilladorPhillips
LlavedetrinquetedeI/4"
Instalaci6n delconjuntodelvolante
Sielconjuntodelvolantedeltractornovinoyainstalado,sigalospasosa
continuaci6n:
I. Deslicelatapadelpedestalsobreel_rboldeladirecci6ndemaneraque
dichoejeseinstaleeneltractor,latapadelpedestalquedar_verticalcomo
seindicaenlaFiguraI.
2.
3.
Figura1
Extraigael pernoconrebordey latuercadeseguridaddel_rboldela
direcd6ndeltractorygu_rdelosparalospasosposteriores.
Conelconjuntodelvolanteverticalyubkadodemaneraquequedesobreel
_rbolinferiordeladirecd6ndeltractor,sedebealinearelvolantedemanera
queconlasruedasdeltractorderechas,laaberturagrandedelvolanteest_
orientadahadaadelante.
5.
6.
Bajeelconjuntodelvolantesobreel_rbolinferiordeladirecd6n(1)
ysuj_teloconelpernoy latuercadeseguridad(2)queextrajopreviamente.
Yeala Figura2
/
/
Figura2
Ajusteelpernoconrebordeylatuercadeseguridadusandolallavede
9/16"y lallavede7/16"odecubo.
Extraigaeltornillodemonturadelatapadelpedestalinstaladoen
f_bricayubicadoenlaconsoladedirecci6ndeltractor.Guardeeltornillo
parausoposterior.
Deslicelatapadelpedestalsobreeltractor(1)yr6telaligeramenteala
derechaparacalzarlaensulugar.Sujeteelpedestalconeltornillo(2)
queextrajoantes.Veala Figura3.
\
78
Figura3
J

InstMaci6n dei asiento
Sisutractornotraiaelasientoinstaladodef_brica,sigalasinstrucciones
correspondientesquese[ncluyenacontinuad6npara[nstalarlo.
I. Extraigalosdospernosconrebordey lastuercasdeseguridaddelsoporte
demontajedelasiento[ncluidoenelpaquetedeelementosdeferreteria.
VealaFlgura4.
2.
f
Figura4
Extraigalosdostornillosautorroscantesinstaladosenf_bricaeneltractor.
VealaFlgura5.
3.
Figura5
Alineeelsoportedelasientoensulugarsobrelosorifidosdelostornillos
autorroscantesqueextrajo,comoseindkaenlaFigura6.
J
ConunallavedetrinquetedeI/4 depulgaday unallavedecubode3/8",
sujeteel soportedelasientoconlostornillosautorroscantesqueextrajo
enelPaso2.Vealafigura6.
Figura6
PRECAUCION: Nouseningunaherramientael_ctrica
(porejemplo,pistoladeimpactootaladroel(ktrkoconelextractor
detuercascolocado)paraapretarlospemosautorroscantespara
sujetarelsoportedelaslento.
5.
6.
Ubiqueelconjuntodelaslentosobreelsoportedemontajedelasiento,
alineandolosorifidossuministrados.
Instalelosdospernosconrebordey lastuercasdeseguridadqueextrajodel
soportedemontajedelasientoenelPaso1.Yeala Flgura7.
Nouseningunaherramientael_ctrica(potejemplo,pistoladeimpacto
otaladroel_ctricoconel extractordetuercascolocado)paraapretar los
pernosautorroscantesparasujetarel soportedelasiento.
Figura7
79

Ajuste dei asiento
1. Paraajustar[aposid6nde[asiento,retirelasdosperJllasdeajusteque
est_nubicadasen[aparteinferiorde[asiento.Des[icee[asientohada
ade[anteohadaarras,secjuntodesee.Vue[vaaco[ocar[aperi[[adeajuste.
Consu[te[aFicjura8.
Figura8
Ajustede iaaitura deivolante
Paraajustarlaalturadelvolante,estaunidadest_equipadaconunacolumnade
volantetelesc6pica.Paraajustarlaalturadelvolante:
1. Si(!nteseenel asientodeloperadorycoloquelasmanosenelvolante.
2. Pulseelbot6ndelacolumnadeladirecddnyeleveobajeelvolante(b)hasta
laposiddndeseada.VealaFigura9.
Nora:Despu(_sdeIograrlaposid6ndeseada,[evanteybajeelvolantepara
comprobarquesetrabeensu[ugaryqueelbotdn(a)delacolumnadeladirecd6n
sesuelteparaquedartrabado.Noopereestaunidadamenosquelacolumnadela
direcd6nest_enlaposid6nenquequedatrabada.
Instaiaci6n dei canal de ia piataforma
NUNCAopereestetractorsinotiene colocadosel tap6ndeabonooelcanal
dela plataforma.
I,
2.
Extraigalasperillasdealetasqueinstal6enlaplataformadecortey
gu_rdelasparacolocarlasposteriormente.
Coloqueelcanaldelaplataformaenlaaberturadedescargasobrela
plataforma.Losprisionerosenlasuperfidedelaplataformacalzar_nenlos
orifidosdelapartesuperiordelcanaldelaplataforma.LapequeffalengiJeta
delbordedelaplataformacalzar_enelrecortecuadradodelaparteinferior
delcanaldelaplataforma.VeaelrecuadrodelaFigura10.
Nora:Compruebequelapord6nsuperiortraseradelcanaldelaplataforma
est_oprimiendoelinterruptordeseguridadubicadoenlasuperfidede
laplataforma.Elmotornoarrancar_sielcanaldelaplataformanoest_
correctamenteubicado.
Sujeteelcanaldelaplataformaajustandolasperillasdealetaqueextrajo
antes.VealaFigura10.
Figura10
Figura9
80

Coloqueiatapa trasera deimotor
2.
Extraigalosdostornilloshexagonalesinstaladosenf_bricaubicadosenla
m_nsulademontajedelatapatraseradelmotor.Guardelostornillospara
usoposterior.Veala Figura11.
Coloquelatapatraseradelmotorubic_ndolaensulugarcomoseindica
enla Figura11.Inclinelatapadelmotorhadaadelanteparaquecake
dentrodelasranurasprovistas,luegor6telahadaatr_sparaalinearlos
orifidosdemontaje.
f
3.
\
Figura11
Sujetelatapaconlosdostronilloshexagonalesqueextrajoantes.
Noajustedemasiado.
Instalaci6ndei paragoipes
1. ExtraigalosdostornilloscomoseindicaenlaFigura12.
2. Ubiqueel paragolpessobrelosorificiosdemontajeysujeteconloselementos
deferreteffaqueextrajoenelPaso1,comoseindicaenlaFigura12.
Instalaci6nde iaplacadeenganche
1. Extraigaloselementosdemontajeinstaladosenf_bricadelaplatade
enganchedelapartetraseradelmotor.
2. Ubiquelaplatadeenganche,embaladaconsuspiezassueltas,conellado
pianohadaarribacomoseindicaenlaFigura13.Suj_telaconlosdospernos
ylastuercashexagonalesqueextrajoantes.
Figura13
Conexi6ndeloscablesde iabateria
PROPOSICION 65 DE CALIFORNIA
Losbornesdela bateriaylosaccesoriosafinescontienenplomoy
compuestosdeplomo,sustanciasquimicasquesegunIoestabiecidopor
el EstadodeCaliforniacausanc_ncery daffosenelsistemareproductivo.
L_veselasmanosdespu_sdeestarencontactoconestoscomponentes.
Figura12
81
Cuandocoloqueloscablesdelabateria,conectesiempreprimeroel cable
POSITIVO(rojo)asuborne,y acontinuaci6nelcableNEGATIVO(negro).
Porrazonesreladonadasconelembarque,losdoscablesdelabateriadesuequipo
puedenhabersidodesconectadosdelosbornesenf_brica.Paraconectarloscables
delabater[a,procedadelasiguientemanera:
NO@:Elbornepositivodelabateffaest_marcadocomoPos(+). Elbornenegativo
delabater[aest_marcadocomoNeg(-).
1. Extraigalospernosy lastuercashexagonalesinstaladosenf_bricaubicados
enelextremodelmazodecables.Guardelaspiezasparausoposterior.
2. Retirelacubiertapl_stica,siesqueest_presente,delbornepositivodela
bateffayunaelcablerojoalbornepositivodelabateria(+) conunpernoy
sutuercahexagonalusandounaIlavede7/16pulgadasy unaIlavedecubo.
YealaFigura11.
3. Retirelacubiertapl_stica,siesqueest_presente,delbornenegativodela
bateriayunaelcablenegroalbornenegativodelabateria(-) conelotro
pernoytuercahexagonalusandolaIlavede7/16pulgadasylaIlavedecubo.
Yeala Figura14.

4. Coloqueelcapuch6ndegomarojoporendmadelbornepositivodelabater[a
paraprotegerlocontralacorrosi6n.
NOTA:SIlabater[aseponeenservkiodespu6sdelafechaindicadaensuparte
superioroalcostadodelamisma,c_irguelasigulendolasinstrucdonesdelasecd6n
MantenimientodeestemanualdeloperadorantesdehaterfuncJonareltractor.
r
....... iii........................
Figura14
J
Gasolinayaceite
NOTA:Elmotorseenv[asingasolinayconaceiteparamotorensuinterior.Sin
embargo,ustedDEBEcontrolarel niveldeaceiteantesdehacedofundonar.Tenga
cuidadodenoIlenarenexceso.Sisehacefundonarel motorsinsufidenteaceite
puededa_arsegravementeyseanulalagarantia.
Siempremantengalasmanosylospiesalejadosdelaspiezasm6vilesdel
equipo.Noutilke fluidos comprimidosparaarrancar.Losvaporesson
inflamables.
Recomendadonessobreel aceite
Antesdeponerenmarchael motor,controleelniveldeaceite,lacapaddad
esde1700ml/57.5onzasliquidas.Consulteenelcuadrodeviscosidadlas
recomendadonessobreel aceite.NoIleneexcesivamente.Useunaceitepara
motordecuatrotiempossint_ticoonosint_tico,ounaceitedetergentedecalidad
premiumequivalenteconcertificadoquecubraoexcedalasexigendasdelos
fabdcantesdeautom6vilesamedcanosrespectodelaclasificad6ndeservkioSG
ySF.Losaceitesparamotorconlaclasificad6nSG,SFtienenest_idesignad6nen
elenvase.
SerecomiendaSAElOW-30parausogeneral,atodaslastemperaturas.Siutiliza
aceiteconviscosidadmonogrado,seleccioneenlatabladelap_iginasiguientela
viscosidadadecuadaparalatemperaturamediadesuzona.
Noutiliceaceitessindetergenteni aceiteparamotordedostiempos.
[Podriareducrse av daut de motor.
NOTA:Sepuedeusarunaceitesint_tico5w30paramejorarelencendidocuandoel
climaest_ifrio(temperaturasinfedoresalos40°F).
v
mm_mmm
mmmllb
(oC)-300 -200 -I0o 0o I0o 200 300 400
(°F)-200 0o 150 300 500 700 850 1050
Controldel nivel deaceite
NOTA:Aseguresedecomprobarelaceitesobreunasuperficieniveladayconel
motorapagado.
1. Retireeltap6ndeIlenado/varillademedid6ndeaceiteylimpiebienlavadlla.
2. Insertelavarillademedici6ndeniveldentrodelcuellodeIlenadodeaceite.
GirelavarHlademedid6n1/4degirohastala posid6nenlaquequeda
trabadaparaqueseasienteporcompleto.YealaFigura15.
3. Retirelavadllademedid6ndenivelparacontrolarelniveldeaceite.
4. SIel nivelest_ibajo,agregueaceitelentamentehastaquelamedid6nest_i
enel limitesuperiordelavadllademedid6n.YeaelrecuadrodelaFigura15.
5. Vuelvaacolocarlavadllademedid6nygirelahastalaposid6nenque
quedatrabadaantesdearrancarel motor.
Tap6nde Ilenado deaceite/
varilla demedici6n del
nivel de aceite
superior
Figura15
NOTA:NoIoIleneenexceso.Elexcesodeaceitepuedecausarahumado,
problemasdearranque,sudedadenlabujiaysaturad6ndeaceiteenel
pudficadordeaire.
Requisitosde combustible
Siseoperael motorconcombustibleE85,unamezcladeaceite/gasolina,
gasolinasuciaogasolinaconrodsde30aliasdeusoquenosehaya
lestabilizadoconunaditivo decombustible,sepuededaffarel carburadordel
[motor.A losdaffossubsiguientesnoloscubrelagarantiadeCraftsman.
82

Utilicegasolinaparaautomdviles(sinplomoobajocontenidodeplomopara
minimizarlosdep6sitosenlac_maradecombusti6n)conunminimode87octanos.
Sepuedeusargasolinaconhastaun10%deetanoloun15%deMTBE(_termetilico
terdario-butilico).Nuncauseunamezcladeaceiteygasolinanigasolinasuda.Evite
queseintroduzcasudedad,polvooaguaeneldep6sitodecombustible.NOutilice
gasolinaE85.
Tengamuchocuidadoaltrabajarcongasolina.Lacjasolinaessumamente
inflamableysusvaporespuedencausarexplosiones.Nuncacarcjuecombustible
enla m_quinaenunespadocerradoocuandoel motorest_calienteoeu
marcha.Apaguedgarrillos,dgarros,pipasyotrasfuentesdecombusti6n.
NOT,4:Compregasolinaenpeque_ascantidades.Nousegasolinaquehayaquedado
delatemporadaanterior,paraminimizarlaformaddndedepdsitosdegomaenel
sistemadecombustible.
Estemotorest_habilitadoparafundonarcongasolinasinplomo.Para
obtenerelmejorresultado,lleneeldep6sitodecombustibleOnicamentecon
gasolinasinplomolimpiayfresca,enunsurtidorqueindiqueunoctanaje
iguala87om_s.
Elgasohol(hasta10%dealcoholetilico,90%degasolinasinplomopor
volumen)esuncombustibleaprobado.Noseapruebaelusodeotras
mezclasdegasolina/alcohol,comola E85.
El_termetilicoterciario-butilico(MTBE)ylasmezclasdegasolinasin
plomo(hastaunm_ximode15%deMTBEpotvolumen)soncombustibles
aprobados.Noseapruebael usodeotrasmezclasdegasolina/_ter.
Lleneeldep6sitodecombustiblealairefibreoenun_reabienventilada.
Nolleneenexcesoeldep6sitodecombustible.Lleneeldep6sitonom_sde
I/2 pulgadapordebajodelabasedelcuellodellenadoparadejarespado
paralaexpansi6ndelcombustible.
Nuncasaquelatapadelcombustibleniagreguecombustiblemientrasel
motorest_calienteoenmarcha.DejequeelmotorseenfrieporIomenos
dosminutosantesdevolveracargarcombustible.
Limpieelcombustiblequesehayaderramadosobreelmotoryelequipo.
Trasladelam_quinaaotrazona.Espere5minutosantesdeencenderelmotor.
Procedimientoparaagregar gasolina
NOTA:Eltractorsesujetaconunatapadecombustiblequeest_amarradaytiene
unallavedetrinquete.PAREdecargardespu_sdequeseveacombustibledentro
delcuellodellenado.Estoaseguraquehayunvolumendeexpansidnadecuado,de
Iocontrarioelcombustiblepuederebalsargenerandounasituad6ndepeligro.
NOlleneal m_ximoeldep6sitodecombustible.
Carguecombustibleenun_reabienventiladayconelmotorapagado.
Nofumenipermitallamasochispasenellugardondesecarga
combustibleosealmacenalagasolina.
Nolleneenexcesoeldep6sitodecombustible.Despu_sdecargar
combustible,asegOresedequeeltap6ndeldepdsitoest_biencerradoy
asegurado.
Tengacuidadodenoderramarcombustibleal realizarlarecarga.
Elcombustiblederramadoosusvaporessepuedenincendiar.Sisederrama
combustible,asegOresedequeel_reaest_secaantesdearrancarel motor.
Eviteelcontactorepetidoo prolongadoconlapielyla inhalad6n
delosvapores.
Cargade combustible
Elcombustibledebecargarlounadulto. NUNCApermitaqueun niffo
recarguecombustibleenelmotor. Losvaporesdela gasolina(el
combustible)sonsumamenteinflamablesy puedenexplotar.Losvapores
delcombustiblesepuedenesparciryencenderseporunachispao llama
queest_amuchadistanciadelmotor. Paraevitarlesioneso muertespor
incendiosdecombustible,sigaestasinstrucciones:
NOusecombustibleconplomo.
Elcombustibledebesernuevoyestarlimpio.NUNCAuseelcombustibleque
quedadesdelaOltimatemporadaoquequed6almacenadoduranteperiodos
prolongados.
NUNCAmezcleaceiteconcombustible.
NOusecombustiblequecontengametanol(alcoholdemadera).
#01,4:Antesderecargarcombustible,dejequeelmotorseenfriedosminutos.
I. Apagueelmotoryd_jeloenfriaral menosdosminutosantesdequitarla
tapadellenadodecombustible.Eldep6sitodegasolinaest_ubkadodebajo
delasiento.Eltap6ndelcombustibleest_amarradoaltractorparaimpedir
quesepierda.Nointenteretkareltapdndeltractor.
2. Antesdesacareltap6nparacargarcombustible,limpiealrededor.
3. Cargueel dep6sitohastaqueelcombustiblellegueaI/2 pulgadapotdebajo
delabasedelcuellodellenadoparadejarespadoparalaexpansi6ndel
combustible.Tengacuidadodenollenarenexceso.Veala Figura16.
,J
Figura16
VuelvaacolocarlatapadelagasolinayajOstelabien.Antesdeporteren
marchaelmotor,debelimpiarelcombustiblequesehayaderramado.Sise
derramacombustibleNOpongaenmarchaelmotor.Muevalam_quinapara
alejarladelazonadelderrame.Evitegenerarunafuentedeencendidohasta
quelosvaporesdelcombustiblehayandesapareddo.
Presi6ndelosneum ticos
Sedebemanteneruna presi6nuniformeparatodoslosneum_ticosentodo
momento.Nuncaexcedalapresi6nm_ximadeinfladoqueseindka enlos
lateralesdelosneum_tkos.
Lapresi6noperativarecomendadaparalosneum_ticoses:
Aproximadamente10psiparalosneum_tkostraseros
Aproximadamente14psiparalosneum_tkosdelanteros
IMPORTAglTE:Consulteloslateralesdelasruedasparaconocerconexactitudla
presi6nm_ximaenpsirecomendadaporelfabrkante.Nolosinfleenexceso.
Unapresi6ndeneum_ticosdesparejapodriahacerquelaplataformanocorte
elc_spedparejo.
83

Pedaldefreno/embrague
Palancadecontrolde
veloddadyfrenodemano
Indicadordenivelde
combustible
Interruptordeencendido
Palancadecambios
Palancadeacelerador/
estranguJador
Tap6ndeIlenado
decombustible
Portacubeta
PatancadeeLevaci6n
de/a platatorma
Tap6ndellenadodeaceite
Palancadelatomadefuerza(PTO)
(enganchedecuchUla)
Figura15
NOt"A:CualquierreferenciahechaenestemanualalladoDERECNOo IZQUIERDOdeltractordebeentendersetal comoseobservadesdelaposicibndeloperador
cuandoest_sentadohaciaadelanteorientadoalfrentedeltractor.
Cumpleconiasnormasdeseguridad deANSi
LostractoresCraftsmancumplenconlasnormasdeseguridaddelInstitutoNacionalAmericanodeNormalizacibn(ANSI).
84

Controldei acelerador/estrangulador
Lapalancadecontroldelaceleradorest_ubicadaenelguardabarrosizquierdodel
tractorsisesientaenlaposici6ndeloperador,yealaFig.15.Estapalancacontrolala
velocidaddelmotor,asicomoelcebadorcuandoseIoempujacompletamentehacia
adelante.CuandoseIocolocaenunaposici6ndeterminada,elaceleradormantiene
unavelocidaddemotoruniforme.
IMPORTANTE:Cuandoopereeltractorconlaplataformadetortecolocada,
asegtiresedequelapalancadelaceleradorest_siempreenlaposid6nFAST
(r_pida;representadaporunaliebre).
Sisemuevelapalancadelaceleradortotalmentehaciaadelante,seactivaelcontrol
delestranguladordelmotor.AIactivarelcontroldelestranguladorsecierralaplaca
delestranguladordelcarburadoryestoayudaaponerenmarchaelmotor.
ConsulteArranquedelmotorenlasecd6nFundonamientodeestemanualparaver
instrucdonesdearranquedetalladas.
Interruptorde encendido
Elinterruptordeencendidoest_ubicadoenelguardabarrosizquierdodeltractorsi
sesientaenlaposici6ndeloperador,adyacentealcontroldelacelerador/cebador.
Paraencenderelmotor,activelaIlaveenelinterruptordeencendidoinsertandola
Ilaveenel interruptordeencendidoygirelaenelsentidodelasagujasdelrelojhasta
laposici6nSTART(encendido).SueltelaIlaveenlaposici6nON(encendido)unavez
quehayaarrancadoelmotor.VealaFig.16.
Encendido
Apagado
Arranque
,J
Figura16
Pedaldefreno-embrague
Elpedaldelembrague-frenoest_ubicadodelladoizquierdodeltractorcortac_sped,
aIolargodelestribo.Presioneel pedaldelembrague-frenopardalmentehacia
abajocuandodisminuyalaveloddaddeltractorcambiandodemarchas(Consultela
secci6nPalancadecontroldevelocidad).Presioneelpedaltotalmentehaciaabajo
paracolocarelfrenodediscoyhacerqueeltractorsedetengaporcompleto.
NO@:Sedebeoprimircompletamenteelpedaldelembrague-frenoparaponer
enmarchaelmotor.ConsulteInterruptoresdeBloqueodeSeguridadenlasecci6n
Funcionamientodeestemanual.
Palancadecambios
Lapalancadecambiosest_ubicadaenelpaneldecontroljustodebajodelasiento,
enel centrodeltractor.Tieneiresposidones,ADELANTE,PUNTOMUERTOyATRAS.
Cuandomuevalapalancadecambios,el pedaldel freno debeestar presionado
afondo yeltractornodebeestarenmovimiento.VealaFig.17.
IMPORTANTE:Nuncafuercelapalancadecambios.Dehacerlo,puededaffarse
seriamentelatransmisi6ndeltractor.
N
J
Figura17
Palancadecontrol deveioddad
Lapalancadecontroldevelocidad,ubicadadelladoderechodelaconsolade
direcci6ndeltractor,lepermiteregularlaveloddaddepisodeltractorcortac_sped.
Parautilizarla,presioneelpedaldelembrague-freno,saquelapalancadelamuesca
delfrenodeestacionamientoyll_velahaciaadelanteparaaumentarlavelocidadde
pisodeltractor.Cuandohayaalcanzadolavelocidaddeseada,sueltelapalancaenla
muescaadecuadaparamanteneresavelocidad.
Pararedudrlavelocidaddepisodeltractor,presioneelpedaldelembrague-freno,
llevelapalancadecontroldevelocidadhaciaatr_sysu(_Iteladentrodeunamuesca.
Frenodemano
Paracolocarelfrenodemano,presionearondoelpedaldelembrague-freno
Muevalapalancadecontroldevelocidadtotalmentehadaabajoenlaposid6nde
frenodemano.Suelteel pedaldelembrague-frenoparapermitirqueelfrenode
manoengrane.
Parasoltarel frenodemano,presioneelpedaldelembrague-freno,saquelapalanca
decontroldevelocidaddelaposid6ndefrenodemanoy ll(_velaa laposici6n
deseada.Suelteelpedaldeembrague-freno.
NOTA:Siel operadorabandonaelasientoydejael motorenfuncionamiento,
deber_colocarel frenodemano,oel motorseapagar_deformaautom_tica.
Indicador denivelde combustible
Elindicadordeniveldecombustibleest_ubicadodebajodelasientoalaizquierda
delaposid6ndeloperadorenel paneldecontrol.Useestaventanaparaidentificar
losrequerimientosdecombustibledeltractor.Yeala Fig.18.
85

©
Interruptoresde bloqueo deseguridad
Figura18
J
Palancadeelevaci6nde iaplataforma
Ubicadaenelguardabarrosderechodeltractor,lapalancadeelevaci6ndela
plataformaseutilizaparacambiarlaalturadelaplataformadetorte.Parautilizarla,
muevalapalancahacialaizquierda,luegocol6quelaenlamuescaquemejorse
adaptealaaplicaci6ndeseada.
Palancadeiatoma defuerza (PTO)
(enganchedecuchUla)
Ubicadaenelguardabarrosderechodeltractor,lapalancadetomadefuerza(PTO)
(enganchedecuchilla)seusaparadarenergiaalaplataformadecorte.Parahacerla
fundonar,muevalapalancatotalmentehaciaadelante.Moviendolapalanca
totalmentehaciaatr_s,enlaposici6nPTOOFF(tomadefuerzadesconectada),se
cortalaenergiaalaplataformadecorte.
NO@:AIencenderel motor,lapalancaPTO(enganchedecuchilla)debeencontrarse
enposici6ndesconectada(PTOOFF).
Tap6ndeiienadodecombustible
Eltap6ndeIlenadodecombustibleest_ubicadodebajodelasiento.Consulte
lasecd6nMontajedeestemanualparaobtenerinstrucdonessobrelacargade
combustibledeltractor.
Tap6nde ilenado de aceite
Eltap6ndeIlenadodeaceiteest_ubkadodebajodelasiento.Consultelasecd6n
Montajedeestemanualparaobtenerinstrucdonesparacontrolaryagregar
combustiblealtractor.
Tap6ndeilenado de combustible
Eldep6sitodegasolinaest_ubicadodebajodelasiento.NoIoIleneenexceso.
Tengamucbocuidadoaltrabajar congasolina.Lagasolinaessumamente
inflamableysusvaporespuedencausarexpiosiones.Nuncacargue
combustibleenla m_quinaenunespaciocerradoocuandoelmotorest_
calienteoenmarcha.Apaguecigarrillos,cigarros,pipasyotrasfuentes
decombusti6n.
Paraobtenerinformaci6ndetalladasobrec6moagregarcombustible,consulte
Requisitosdecombustibleenlasecd6nMontajedeestemanual.
Elsistemadebloqueodesegufidadest_diseffadoparaqueeltractorfundonecon
segufidad.Sidichosistemafundonamal,nosedebehacerfundonareltractor.
Comun[quesede[nmediatoal 1-800-4-MY-HOMEparasolidtarel servkiode
mantenimientoyreparad6ndelsistema.
Elsistemadebloqueodesegufidadimpidequeelmotorarranqueamenos
queest(_colocadoelfrenodemano,ylapalancadetomadefuerza(PTO)
(enganchedecuchilla)est_enposid6ndesconectada(OFF).
Sieloperadorabandonasuasientoantesdecolocarel frenodemano,el
sistemadebloqueodesegufidadapagaautom_ticamenteelmotor.
SieloperadorabandonasuasientoconlapalancadelaPTO(enganche
decuchilla)conectada,elsistemadebloqueodesegufidadapaga
autom_ticamenteelmotor,independientementedequeelfrenode
manoest_puestoo no.
Elmotorseapagar_autom_ticamentesilapalancadela PTO(enganchede
cuchilla)secolocaenposid6nenganchada(ON)conla palancadecambios
enposid6nmarchaarras.
Noopereeltractorsiel sistemadebloqueofuncionareal.Elsistemarue
diseffadoparabrindarleseguridady protecci6n.
Intermptordeencendido
Elinterruptordeencendidoseactlvaparaarrancarelmotor.InsertelaIlaveenel
interruptordeencendidoygireenelsentidodelasagujasdelrelojalaposici6n
START(arranque).Sueltela Ilaveenlaposid6nON(encendido)unavezquehaya
arrancadoelmotor.Yeala Fig.19.
Paradetenerelmotor,girelaIlavedeencendidoensent[docontrafioalasagujasdel
relojhastalaposid6nOFF(apagado).Yeala Fig.19.
Nuncadejela m_quinaenfuncionamientosinvigilancia.Cortesiemprela
PTO,muevala palancadecambiosalaposici6nNeutral(puntomuerto),
pongaelfrenode mano,pareel motor yretire la Ilave,paraevitarque
alguienenciendaaccidentalmenteel motor.
f
Encendido
Apagado
Arranque
Figura19
86

Evite iesionesgraveso ia muerte
Conozcala ubicad6nyfund6ndetodosloscontroles.
Extraigalosobjetosquepodrianserarrojadosporlascuchillas.
Recorralaspendienteshadaarribay haciaabajo,nodemaneratransversal.
Tengasumocuidadoenlaspendientes.Nocorteel c_spedenpendientes
dem_sde12°. Eviterealizargirosabruptos.Conduzcaabajavelocidad.
Noutilicelaunidadenlugaresdondepodriaresbalarovolcar.
Silam_quinaseparamientrassubelapendiente,parelascuchillasy
retrocedalentamenteparaabajo.
Antesdeabandonarlaposid6ndeloperador,desconectelascuchillas,
pongaelfrenodemano,apagueel motorysaquelallave.
Asegt#esequelascuchillasyelmotorsedetenganantesdecolocarlas
manosolospiescercadelascuchillas.
Mantengalosdispositivosdeseguridad(guardas,protectores,
interruptores,etc.)ensulugaryenfundonamiento.
Mantengaalejadosalosobservadores.
Dejequeseenfrieel motorantesdealmacenarotransportarlaunidad.
Mantengalam_quinafibrederesiduos.
Leael Manual del operador
Colocaci6ndel freno de mano
Paracolocarelffeno de mano:
I. Presionetotalmenteelpedaldelfrenoymant_ngalohaciaabajoconel pie.
2. Muevalapalancadelfrenodemanohaciaabajohastalaposici6n
defrenodemano.
3. Suelteelpedaldelfrenoparapermit#queelfrenodemanoquedepuesto.
Parasacarelfreno demano:
I. Oprimaelpedaldel#enoymuevalapalancadecontroldevelocidadhasta
quequedefueradelaposici6ndefrenodemano.
Fijaci6nde iaaltura de torte
Seleccionelaposici6ndealturadelaplataformadecortecolocandolapalancade
elevad6ndelaplataformaencualquieradelasmuescasdediferentealturadecorte,
delladoderechodelguardabarros.
Encendidodei motor
Noopereeltractorsiel sistemadebloqueofuncionareal.Elsistemafue
disehadoparabrindarleseguridady protecd6n.
NOTA:Consultelasecd6nMontajedeestemanualparaobtenerinstruccionessobre
el Ilenadodeaceiteygasolina.
1. InsertelaIlavedeltractorenelinterruptordeencendido.
2. ColoquelapalancadelaPTO(enganchedecuchilla)enlaposici6nOFF
(desconectada).
3. Coloqueelfrenodemanodeltractor.
4. Activeelcontroldelestrangulador.
5. GirelaIlavedeencendidoenelsentidodelasagujasdelrelojhastala
posici6nSTART(arranque).Unavezquearranqueel motor,sueltelaIlave.
Volver_alaposid6nON.
IMPORTANTE:NOmantengala flareenlaposici6nSTART(arranque)
durantem_sdediezsegundosporvez.SiIohace,puedeocasionardaffosal
arrancadorel_ctricodelmotor.
6. Despu_sdequearranqueelmotor,desactiveelcontroldelcebador
colocandoelcontroldelaceleradorenlaposid6nFAST(r_pida).
flO@:NOdejeel controldelcebadoractivadomientrasoperaeltractor.SiIohate,
segenerar_unamezcladecombustible"rica",Iocualhar_queelmotorno
fundonebien.
l)etend6n dei motor
Sigolpeacontraalgunobjetoextraffo,detengael motor,desconecteel(los)
cable(s)dela bujiay conecteel motoramasa.Inspeccioneminudosamente
la m_quinaparavet siest_daffada.Repareel daffoantesdevolvera
[encendere motoryoperar am_quna.
1. Silascuchillasest_nenganchadas,coloquelapalancadela PTO
(enganchedecuchilla)enlaposici6nOFF(desconectada).
2. Girela Ilavedeencendidoensentidocontrarioalasagujasdelreloj
alaposici6nSTOP(parar).
3. Retirela Ilavedelinterruptordeencendidoparaevitarquealguien
enciendaaccidentalmenteelmotor.
Mantengalasmanosypiesalejadosdela aberturadedescargadela
plataformadecorte.
87

Conducci6ndeitractor
Evitearrancarsubitamente,desarrollare×cesivavelocidadydetenerse
derepente.
Noabandoneelasientodeltractor sincolocarprimero laPTO(enganchede
cuchilla)enla posici6nOFF(desconectada),presionarelpedaldelfrenoy
colocarelfreno demano.Sidejaeltractorsinvigilancia,apagueel motory
retirelallavedeencendido.
Siempremirehaciaabajoy haciaatr_santesymientrassedesplazamarcha
atr_s,paraevitarunaccidente.
Oprimaelpedaldelfrenoymuevala palancadecontroldeveloddad
hastaquequedefueradelaposid6ndefrenodemano,luegodejeque
sesuelteelfreno.
2. Muevalapalancadelaceleradora laposid6nFAST(RAPIDA,
representadaporunaliebre).
3. Coloquela palancadecambiosenposid6nFORWARD
(marchaadelante)oREVERSE(marchaatr_s).
IMPORI'ANTE:NOuselapalancadecambiosparacambiarladirecci6nde
desplazamientomientraseltractorest_enmovimiento.Siempreuseel
pedaldefrenoparadetenerel tractorporcompletoantesdehacerelcambio.
4. Suelteelfrenodemanopresionandoelpedaldelembrague-freno
ycolocandolapalancadecontroldeveloddadenlaposid6ndeseada.
IMPORTAIVTE:Quienesutiiicenlam_quinaporprimeravezdebenusar
lasposicionesdeveloddad162.Familiarkeseporcompletoconel
fundonamientoyloscontrolesdeltractorantesdeoperarlam_quina
enposidonesdemayorveloddad.
5. Suelteelpedaldelembrague-frenolentamenteparaponerlaunidad
enmovimiento.
6. Eltractorcortac_spedsedetienepresionandoel pedaldelembrague-freno.
NO@:AIoperarlaunidad[nkialmente,habr_pocadiferendaentrelasdos
veloddadesm_saltashastaquelascorreassehayanasentadoenlaspoleas
duranteelperiododeablande.
Antesdeabandonarlaposici6ndeloperador,desenganchelascuchillas,coloque
lapalancaenneutral,coloqueelfrenodeestadonamiento,apagueel motory
retirelaIlavedeencendido.
Silaunidadsedetieneconelcontroldeveloddadenlaposid6ndealtaveloddad,
osilaunidadnofundonaconlapalancadecontroldeveloddadenlaposid6nde
bajaveloddad,realiceIosiguiente:
1. Coloquelapalancadecambiosenposici6nNEUTRAL(puntomuerto).
2. Vuelvaaencenderelmotor.
3. Coloquelapalancadecontroldeveloddadenlaposici6nde
veloddadm_salta.
4. Sueltecompletamenteelpedaldelembrague-freno.
5. Presioneel pedaldelembrague-freno.
6. Coloquelapalancadecontroldeveloddadenlaposici6ndeseada.
7. Coloquelapalancadecambiosenlaposid6nFORWARD(marchaadelante)
o REVERSE(marchaatr_s),ysigaelprocedimientonormaldeoperad6n.
Operaci6nenpendiente
ConsulteelINDICADORDEPENDIENTESenlasecci6nInstruccionesdeseguridad
delmanualparacontribuiradeterminarenqu6pendientespuedeoperareltractor
conseguridad.
Nocorteenpendientesconunainclinaci6ndem_sde12°(elevaci6n
aproximadade2piesporcada10pies).Eltractorpodriavoltearseycausar
lesionesseveras.
Enlaspendientescortehadaarribayhadaabajo,NUNCAen
formatransversal.
Tengamuchocuidadoalcambiardedirecd6nenunapendiente.
Est_atentoaloshoyos,surcos,baches,rocasuotrosobjetosocultos.
Elterrenodesniveladopuedevoltearlam_quina.Elc_spedaltopuede
ocultarobst_culos.
Eviterealizargiroscuandoopereenunapendiente.S[deberealizarungiro,
h_galopendienteabajo.Subirunapendienteaumentaenormementelas
posibilidadesdequeelvehkulod(_unavueltadecampana.
Evitedetenersecuandosubaunapendiente.Sifuesenecesariodetenerse
mientrassubeunapendiente,arranquesuaveycuidadosamenteparareducir
laposibilidaddequeeltractorseddvueltahaciaarras.
/MPORTANTE:Siemprequedetengaeltractorporcualquierraz6nenun_reade
c(_sped,hagaIosiguiente:
1. Coloquela palancadecambiosenpuntomuerto,
2. Coloqueelfrenodemano,
3. Apagueelmotory retirelaIlave.Esopermitir_redudralminimola
posibilidaddequesuc_spedresulte"quemado"porelescapecalientedel
motorenfundonamiento.
88

Enganchede iascuchUlas
AIconectarlaPTO(enganchedecuchilla)sesuministraalimentaddnalaplataforma
decorte.Paraconectarlascuchillas,hagaIosiguiente:
I. Muevalapalancadecontroldelacelerador/cebadora laposiddnFAST
(RAPIDA,representadaporunaliebre).
2. TomelapalancadelaPTO(enganchedecuchilla)ygirelatotalmentehada
adelantealaposid6nON(enganchada).
3. MantengalapalancadelaceleradorenlaposiddnFAST(r_pido;representada
porunaliebre),paraunusom_seflcazdela plataformadecorte.
NOT/!:Elmotorseapagar_autom_ticamentesilapalancadelaPTO(enganche
decuchilla)secolocaenposiddnenganchada(ON)conlapalancadecambiosen
posiddnmarchaatr_s.
Abono
Seencuentradisponiblecomoaccesoriounkitdeabono.Elabonoesunproceso
porelcualserecirculanlosrecortesdec_speddemanerarepetidadebajodela
plataformadecorte.Losrecortesmuyfinosluegosondespedidoshadaatr_spara
quesedepositenenelc_spedyactuencomofertilizantenatural.ComuNquesecon
elCentrodeserviciodereparadonesy piezasm_scercanoparacomprarunkitde
abonoparaestaunidad.
ParaubicarelCentrodeservidodereparadonesypiezasm_scercano,comuNquese
al1-800-4-MY-HOME®.
Usode la palancade elevaci6nde laplataforma
Paraelevarlaplataformadecorte,muevalapalancadeelevad6ndelaplataforma
hadalaizquierdaycol6quelaenlamuescaquemejorseadaptea[aaplicad6n
deseada.ConsulteAjustedelaalturadecorteanterlormenteenestamlsmasecd6n.
Cortede c sped
Paratratar deevitarelcontactoconlascuchillasounaiesi6npotalgt_n
objetoqueseaarrojado,mantengaalosobservadores,a losayudantes,
niffosymascotasalejadosal menos25metrosdela m_quinamientrasest_
enfundonamiento. Detengala m_quinasialguienseacerca.
LasiguienteJnformad6nser_deutilidadcuandouselaplataformadecorte
consutractor:
Planifiqueeipatrdndetorte, paraevitarqueladescargadematerialesse
realicehacialoscaminos,iasveredas,losobservadores,etc.Eviteadem_s
descargarmaterialcontraunaparedu obstrucci6n,yaqueestopodriahacer
queel materialdescargadorebotecontraeloperador.
Nocorteaaltaveloddaddeplso,espedalmentesitienelnstaladounkit de
abonoouncolectordec_sped.
Paraobtenerlosmejoresresultados,serecomlendarealizarlosdosprlmeros
cortesdec_spedarrojandoladescargahadaelcentro.Despu_sdelasdos
primerasvueltas,cambieladlrecd6nparaarrojarladescargahadaafuera,
paraequlllbrarel corte.Estootorgar_unmejoraspectoalc_sped.
Nocorteelc_speddemasiadocorto.Elc_spedcortoespropldopara
elcredmientodemalezasyseponeamarillor_pidamentecuando
escasealaIluvia.
Elcortedelc(gpedsiempredeberealizarseconelaceleradordel
motoralm_ximo.
Enterrenosdifkiles,puederesultarnecesarlopasarporsegundavez
eltractorcortac#spedsobreel_reayacortada,paraobteneruncorte
m_sprolijo.
NOintentecortarmalezasfrondosasoc_spedextremadamentealto.
Eltractorfuediseffadoparacortarelc_sped,NOparapodarmalezas.
Mantengalacuchillaafiladay c_mbielacuandosegasten.Consulte
Cuchilladecorteenlasecci6nMantenimientodeestemanualparaobtener
instruccionessobrec6moafilarcorrectamentelascuchillas.
Losfarosseapagan(OFF)cuandosecolocala llavedeencendido
enlaposid6nSTOP.
89

PROGRAMADEMANTENIMIENTO
Antesderealizarcualquiertipo demantenimientooservicio,desenganche
todosloscontrolesy detengael motor.Esperea quesedetengancomple-
tamentetodaslaspiezasm6viles.Desconecteelcabledelabujiayp6ngalo
haciendomasacontraelmotor paraevitarqueseenciendaaccidentalmente.
Otilicesiempreanteo]osdeseguridadduranteelfuncionamientoomientras
ajustaoreparaesteequipo.
Antesdecadauso 1. Niveldeaceitedelmotor
2. Filtrodeaire
3. Areadelsilendadorycontroles
Durantelasprimeras 1. Aceitedelmotor
dncohoras
Cada10horas
Cada25horas
4.
Cada50horas I.
Anualmente
Antesdealmacenar
1. Respiraderosdelcap6/tablerodeinstrumentos
2. Bornesdelasbater[as
3. Husilloym_nsula[ntermediadelaplataforma
1. Prefiltrodelfiltrodeaire*
2. Filtrodeaire*
3. Brazosdemando[ntermedios,ejesdepivote,
cremallerayejes
Cojinetesdelasruedasdelanteras
Aceitedelmotor/filtrodeaceite
2. S[lendador
1. Filtrodeaire
2. Prefiltrodelfiltrodeaire
3. Bujiadeencendido
4. Sistemadeenfriamiento*
5. Filtrodecombustible
6. Engranajesdeladirecd6n
7. Ruedastraseras
1. Respiraderosdelcap6/tablerodeinstrumentos
2. Bornesdelasbater[as
3. Brazosdemando[ntermedios,ejesdelpivoteyejes
4. Cojinetesdelasruedasdelanteras
5. Husilloym_nsula[ntermediadelaplataforma
6. Puntosdepivotedelpedal
*Realkeelservic[om_sfrecuentementecuandohayam_spolvo.
Antesderealizartareasdemantenimientooreparadones,desconectela PTO
(palancadeengancbedecucbillas),pongaelfrenode mano,apagueel motor
retirelallaveparaevitarelencendidoaccidentaldelmotor.
Sigaelcronogramademantenimientoquesepresentaacontinuad6n.Estatabla
s61odescribepautasdeservido.UtilicelacolumnaRegistrodeServidoparahacerel
seguimientodelastareasdemantenimientocompletadas.
Paraubkarel Centrodeserviciodereparadonesy piezasm_scercano,
simplemente flameal (800)659-5917.
1. Verificar
2. Limpieza/Reemplazo
3. Lim)lar
1. Cambiar
1. Lim)lar
2. Lim)lar
3. Lubrkar
1. Lim)lar
2. Lim)lar
3. Lubricar
4. Lubrkar
1. Cambiar/Reemplazar
2. Verificar
1. Reem)lazar
2. Reem)lazar
3. Reem)lazar
4. Lim_ar
5. Reem)lazar
6. Lim_ar
7. Sacarlosejesyengrasarlos
1. Lim_ar
2. Lim_ar
3. Lubricar
4. Lubricar
5. Lubricar
6. Lubricar
Sielmotorhaestadoenfundonamiento recientemente,el motor,el silencia-
dory lassuperficiesmet_licascircundantesestar_ncalientesy puedencausar
[quemadurasen ap e. Tengacudadoparaev tar quemaduras.
9O

MANTENIMIENTODELMOTOR
Apagueel motorantesderealizareJmantenimiento.Paraevitar unapuesta
en marchaaccidental,desconecteJafundadeJabujia.
IMPORTANTE:Siel motordebeinclinarseparatransportarequipooparainspec-
cionaro extraerpaste,mantengaelladedelabujiadelmotorhadaarriba.Silabujia
delmotorsetransportaoseinclinahaciaabajopuedecausarhumo,problemasde
arranque,suciedadenlabujiaosaturaci6nconaceitedeldepuradordeaire.
Lainspecci6nylosajustesperi6dicosdelmotorsonesendalessisedeseamantener
unaltoniveldedesempeho.Elmantenimientoregulartambi_ngarantizarauna
prolongadavidatitil delmotor.Losintervalosdemantenimientorequeridosyelripe
demantenimientoasetrealizadosedescribenenlatabladelapaginaprecedente.
Sigalosintervalosperheraocalendarios,Ioqueocurraprimero.Cuandoseoperaen
condicionesadversasesnecesarioIlevaracabounmantenimientomasfrecuente.
Siel motorhaestadofuncionando,el silenciadorestar_muycaliente.Tonga
cuidadoparanotocarel silenciador.
Serviciodel aceite del meter
6. SiIodesea,realiceelserviciodelfiltro deaceitecomeseindicaposteriormente
enestasecci6n.
7. Vuelvaainstalarel tap6ndedrenadoyajtistelofirmemente,12-14Nm
(106.2-123.9pulgada-libra).
8. Extraigalamangadedrenadodeaceitedelcarterdeaceite.Vuelvaacolocar
lavarilladeniveleneltubedeIlenadodeaceiteyenrosqueeltap6nde
Ilenadoensulugar.
9. VuelvaaIlenarelmotorconaceiteparamotornuevo.ConsulteGasolina
yaceiteenlasecd6nMontajedeestemanualparaobtenerinformad6n
reladonadaconelripedeaceiteaprobado.
IMPORTIINTE:Elaceiteusadodelmotorpuedecausarcancerdepielsientraen
contactoconlapieldemanerareiteradayperperiodosprolongados.Sibienesto
esimprobableamenosquemanipuleaceiteusadoredeslosdfas,sinembargoes
recomendablelavarsebienlasmanesconaguayjab6ninmediatamentedespu_s
dehabermanipuladoaceiteusado.
flOTA:Elimineelaceitedelmotorusadodelamaneraqueseacompatibleconel
medioambiente.SugerimosqueIocoloqueenunrecipienteselladoyIoIleveala
estad6ndeservidolocalparasurecuperad6n.NoIotirealabasuraniIoviertaen
eldrenajeoenelsuelo.
Inspeccioneel niveldeaceiteregularmente.
Asegtiresedequesemantengaelnlveldeaceltecorrecto.Controleelaceite
cadadncoadiezhorasdefuncionamiento,antesdeponerenmarchaelmotor.
ConsulteControldelniveldeaceiteenlasecd6nMontaje.
Usesolamenteunaceitedetergentedealtacalidadcuyaclasificad6ndeservido
APIseaSF,%, SHoSJ.SeleccioneelgradedeviscosldadSAEdelaceitesegtin
latemperaturadeoperad6nesperada.ConsulteGasolinayaceiteenlasecd6n
Ensambladodeestemanual.
Drenajedelaceite
IMPORTANTE:Asegt_resedeinspeccionarelmotorsobreunasuperficienivelada
yconel motorapagado.Droneelaceitemientraselmotorest_calientepara
asegurarundrenajerapidoycomplete.
Paradrenarelaceitedelcarterdemotordeciertosmodelosdetractores,seadjunta
unamangadeplasticoparadrenadodeaceitejuntoconesteManualdelOperador.
Paradrenarelaceite,procedadelasiguientemanera:
1. Desenrosqueeltap6ndeIlenadodeaceiteyextraigalavarilladenivelde
aceitedeltubedeIlenado.
2. Coloqueelextremepeque_odelamangadedrenadoenelcarterdeaceite.
Yeala Figura20.
3. Extraigaeltapbndedrenadoyvadeelaceiteenuncontenedorapropiado,
conunacapacidadnomenora64oz.
4. Inclineeltractorligeramenteendirecdbndeunredpienteadecuadopara
ayudaradrenarpercompleterodeelaceitedelmotor.
Antesdeindinarel motor oequipo paradrenarelaceite,droneel
combustibledeldep6sitohaciendofuncionar el motor hastaqueel
dep6sitodecombustibleest_ vado.
5. Realiceelserviciodelfiltrodeaceitecomeseindicaposteriormente
enestasecd6n.
Figura20
geemplaze del filtre de aceite
Estemotorestaequipadoconunfiltrodeaceitearosenquedebereemplazarse
cadavezqueserealizauncambiodeaceite,encadaestaci6nocada50horns.
ConsultelaFigura21.
Parareemplazarel filtro de aceite:
1. Dreneelaceitecomeseindk6precedentementeenestasecd6n.
2. Extraigaelfiltrodeaire.Desecheelfiltroviejodemaneraadecuada.
3. Lubriquelajuntadelfiltro nuevoconaceiteIimpio.
4. Coloqueygireelfiltro deaceitemanualmentehastaquelajuntaentreen
contactoconlasupefficiedeselladodelacubiertadelcarter,luegoajusteel
filtro deaceite,10-12Nm(88.5-106.2pulgada-Iibra),1/2-3/4degiro.
5. Agregueaceitecomoseindic6precedentemente.
6. Asegt_resedequelavarillademedici6nest_instalada.
7. Enciendayhagafuncionarel motor.Compruebesihayfugas.
91

8. Detengael motor.Espereunosminutosycontroleelniveldeaceite.Consulte
Controldelniveldeaceiteenlasecci6nMontajedelpresentemanual.
Filtro de aceite
J
Figura21
Procedimiento para agregar aceite
li@ORTANTE:Asegtiresedeinspecdonarel motorsobreunasuperfidenivelada
yconel motorapagado.
1. Limpiealrededordelatapayeltubodelavafillademedici6nconunatela
limpiaparaeliminarlosresiduos.VealaFigura22.
Figura22
2. Saquelavafillademedki6ndelniveldelaceiteylimpielaconunatela.
3. Viertaaceitedentrodeltubodelavafillademedid6n.Nollene
excesivamente.Conuncambiodefiltrodeaceitelacantidaddeaceitedealto
nivelparaestemotoresde1700ml(57.48onzasliquidas).
4. Coloquelavafillademedici6nygirelahastalaposid6nenquequedatrabada
antesdearrancarel motor.
5. Arranqueelmotor.D_jeloenmarchaduranteunossegundosy luego
apagueel motor.
6. Controleel niveldeaceite.ConsulteControldelniveldeaceiteenlasecd6n
Montajedelpresentemanual.
Mantenimiento delfiltro deaire
Losfiltrosdepapelnosepuedenlimpiarysedebenreemplazarcada100horas
defuncionamiento;conmayorfrecuenciasiseutilizanenlugaresdondeabunda
el polvo.
Nuncausegasolinaosolventesdepuntodeencendidobajoparalimpiarel
elementodelfUtrodeaire.Podriaproducirseunincendiooexplosi6n.
Nouseairepresurizadonidisoiventeparalimpiarel¢artuchopurificador
deaire.
Sinoseinstalancorrectamentelosfiltros olascubiertas,lasexplosiones
[del carburadorpuedencausarlesionesgravesola muerte. Nointente
[haterarrancarelmotor cuandonoest_ncolocados.
IMPORTANTE:Nuncaopereel motorsinelfiltrodeaire.Resultakiendesgaste
r_ipidodelmotor.
1. Desenrosquelostornillosdeorejetasyquitelacubiertadelfiltro deaire.
VealaFigura23.
f
Tornillo de
orejetas
Tapa del filtro
deai
/
Figura23
92

2.
f
3.
Extraigaelfiltrodeaire.Veala Figura24.
/'i
/// i
........Y
J
Figura24
Retireelpreflltrodeespumadealrededordelfiltrodeairedepapel.Veala
Figura25.Reemplaceelelementodepapelsiest_sudoodafiado.Limpieel
elementodeespumaoreempl_celosJest_dafiado.
Figura25;
4. Afindelimpiarelelementodeespuma,I_velocondetergenteliquidosuave
yagua.Apdeteuopdmaelelementodeespumaparaenjuagarlasudedad
yelagua.NoIoretuerza;siIohate,podriadafiaro rasgarel elementode
espuma.Permitaquesesequebienantesdeusarlo.NOlubdqueelelemento
deespuma.
5. Sujeteelfiltrodeairenuevoconel elementodeespuma,paraIocualdebe
alinearel orificiodelfiltro deaireconelcolectordeadmisi6n.YealaFigura26.
admisi6n
Figura26
Sujetelacubiertadelfiltrodeairecomprobandoquequedenalineadas
lasnervaduraspl_sticasdelacubiertaconlosdispositivospl_sticosdela
cubiertadelfiltro deaire.YealaFig.27.Girelostornillosdeorejetasenel
sentidodelasagujasdelrelojhastaquequedenajustados.Controlesihay
problemasdealineaci6n.
Tapa del filtro
deaire
Dispositivo
Cubierta
Mantenimientodebujia
Figura27
NOpruebelachispasinoest_la buj[adeencendido.NOd_arranqueal motorsino
est_labuj[adeencendido.
Paraasegurarsedequeelmotorfundonebien,labuj[adebetenerunaseparaci6n
correctay debeestarlibrededep6sitos.
1. Retirelafundadebuj[ayutiliceunaIlaveparabuj[asparaextraerlabuj[a.Vea
laFigura28.
93

Siel motor haestadofuncionando, elsilendadorestar_muy caEente.
Tengacuidadoparanotocarelsilendador.
Funda de bujia j
Figura28
Inspeccionevisualmentelabujia.Eliminela bujiasipresentamuchodesgaste,
osielaislanteest_agrietadooastillado.Limpielabujiaconuncepillode
alambresisevaareutilizar.
Midalaseparaci6ndebujiaconuncalibrador.Corrijadesetnecesariotorden-
doelelectrodolateral.Yeala Figura29.Laseparaci6ndebeestablecersepara
quequedeentre0.024-0.031pulg.
f Electrodo
Figura29
4. Verifiquequelaarandeladelabujiaest_enbuenascondidonesyenrosquela
bujiahadaadentromanualmenteparaevitarelenrosquecruzado.
5. Unavezquelabujiaest_asentadaensulugar,ajusteconunaIlaveparabuj[a
paracomprimirlaarandela.
NOTA:Cuandoinstaleunabujianueva,apriete1/2devueltaunavezquela
bujiaseencuentracolocadaensulugarparacomprimirlaarandela.Cuando
vuelvaa colocarunabujiausada,apriete1/8- 1/4degirodespu(_sdequela
bujiaseasientaparacomprimirlaarandela.
IMPORTANTE:Labujiadebeestarfirmementeasegurada.Silabuj[anoest_
bienaseguradapuedecalentarsemuchoydaffarelmotor.
Mantenimientodelfiltro decombustible
la gasolinayelvapordegasolinasonsumamenteinflamablesy
Iexpiosivos.Elfuegoylasexpiosionespuedencausarquemadurasgraves
tambi_nlamuerte.
Mantengalagasolinaalejadadechispas,llamasexpuestas,llamaspiloto,
calor,yotrasfuentesdeignici6n.
Verifiquefrecuentementelaslineasdecombustible,eltanque,eltap6n,ylos
accesoriosbuscandorajadurasop6rdidas.Reemplacedesetnecesario.
Antesdereemplazarelfiltrodecombustible,dreneeldep6sitodecombustible
comoseindicaenParadrenarelcombustible.
Nodreneelcombustiblecuandoel motorest_caliente.Permitaqueelmotor
seenfriebien.Dreneelcombustibledentrodeunredpienteaprobadoyalaire
libre,lejosdecualquierllamaexpuesta.
Dreneunvolumendecombustiblegrandedesdeeldep6sito,desconectando
la I[neadecombustibledelfiltrodecombustibleenI[neaqueseencuentra
cercadelmotor.
Retirelalineadecombustibledelladoenlinea(ladoorientadoaldep6sito
decombustible)delfiltrodecombustible.
Losrepuestosdebenserlosmismosysedebeninstalarenlamismaposid6n
quelaspiezasoriginales.
Sisederramacombustible,esperehastaqueseevaporeantesdeencender
el motor.
Antesdereemplazarelfiltrodecombustible,dreneeldep6sitodecombusti-
ble.DeIocontrario,el combustiblepuedegotearycausarunincendio
ounaexplosi6n.
Paradrenarelcombustible:
Ubiqueelfiltrodecombustible,quepasadelladoizquierdodelmotor,entre
eltanquedecombustibleyelcarburador,ypuedeestarsujetoal motorcon
unatira deuni6n.Cortelatira,sila hay,luegosujetelaabrazaderaenlinea
delfiltro decombustibleconunpardepinzas,deslkelaabrazaderahada
arribapotlaI[neadecombustible.Saquelalineadecombustibledelfiltroy
coloqueelextremoabiertodela I[neaenunredpienteaprobadoparadrenar
elcombustible.
Paracambiarelfiltro decombustible:
2. UtilicepinzasparaapretarlaslengiJetasdelaotraabrazadera(elladofuera
delineadelfiltro decombustible),luegodeslicelaabrazaderaalej_ndoladel
filtro decombustible.Gireytiredelalineadecombustibledelfiltro.
YealaFigura30.
3. VerifiquequelasI[neasdecombustiblenotienenrajaduraso p_rdidas.
Reemplacedesetnecesario.
4. Reemplaceel filtrodecombustibleporunfiltro derecambiodeequipo
original.Llamea1-800-4-MY-HOME®paracomprarelfiltroderepuestodel
equipooriginal.
5. SujetelasI[neasdecombustibleconlasabrazaderas.
Elfiltro decombustiblenosepuedelimpiarysedebereemplazarcada100horasde
fundonamiento;conmayorfrecuendasiseutilizacongasolinavieja.
94

Filtro de
combustible
\
Leng_3eta
Linea de
Abrazadera
j/
%=
Figura30
I.impieelmotor
Sielmotorhaestadofundonando,d_jeloenfriardurantepotIomenosmediahora
antesdelimpiarlo.Retireperi6dicamentelasuciedadacumuladaenelmotor.
Limpielasaletasderefrigeraci6ndelmotorcada25horas.Limpieconuncepillo
oairecomprimido.
IMPORTANTE:Norodeel motorconaguaparalimpiarloporqueelaguapodr[acon-
taminarelcombustible.Conunamangueradejard[noequipodelavadoapresi6n
tambi_npuedeforzaraguadentrodelfiltro deaireolaaberturadelsilenciador.El
aguaenelfiltrodeaireembeber_elelementodepapel,yel aguaquepasaatrav_s
delelementoosilenciadorpuedeingresarenelcilindro,causandodaSo.
la acumulad6nderesiduosalrededordelsilendadorpodriaprodudrun
incendio.Inspecci6neloylimpieloantesdecadauso.
EXTRACCIONDELAPLMAFORMADECOETE
Para extraer la plataforma decorte, procedade la siguiente manera:
1. Coloquela palancadelatomadefuerza(PTO)(enganchedecuchilla)enla
posici6nOFF(desconectada)ypongaelfrenodemano.
2. Bajela plataformacolocandolapalancadeelevad6ndela plataforma
dentrodela muescainferiordelguardabarrosderecho.
3. ExtraigalacorreadealrededordelapoleadelaPTOdeltractor.
Yeala Figura31.
Figura31
Extraigaelpasadordechavetaconuni6ncurvaylaarandelaplanadel
conjuntodeelevaci6ndelaplataformaygu_rdeloparavolveracolocarlo
posteriormente.YealaFigura32.
Figura32
Evitelaslesionesporcompresi6n.AIextraerla correa,nocoloquenunca
losdedosen elresorteintermediooentrela correay unapolea.
95

5.
Extraigalospasadoresdechavetaconuni6ncurvaqueatinest_nsujetando
launidad,comoseindicaenlaFigura33.
.. J
Figura33
NOTA:Lospasadoresdechavetaconuni6ncurvasedebenvolveracolocarde
arribahaciaabajo.
6. Muevalapalancadeelevad6ndelaplataformadentrodelamuesca
superiordelguardabarrosderechoparalevantarlosbrazosdeelevad6ndela
plataformaysacarlosdelcamino.
7. Desconecteelcableadoenespiraldelinterruptordeseguridaddelaplataforma.
8. ExtraigaconcuidadoelcabledelaPTOdelaparteposteriordelaplataforma
decorteretirandoelpasadordechavetaconuni6ncurvaqueIosujeta.Retire
elresortedelsoportedepoleaIotadelaplataforma.VealaFigura34.
9.
Figura34
Deslicesuavementelaplataformadecorte(desdeel ladoizquierdo)hacia
afueradesdelaparteinferiordeltractor.
Cambiodelacorreadelaplataforma
J
NOTA:5epuedecambiarlacorreadelaplataformasindesinstalarlaplataformade
cortedeltractor;sinembargo,resultamuchom_sf_cilextraerprimerolaplatafor-
ma,cambiarlelacorreayluegovolverainstalarlaplataformadecorte.
Paracambiarlacorreadelaplataformadecorte,procedadelasiguientemanera:
I. Lom_sf_cilescambiar[acorreadelaplataformaextrayendoprimerola
plataformadecortecomoseindicapreviamenteenestasecci6n.Omitaeste
pasosidecidecambiarlacorreadelaplataformasinextraerlaplataformade
cortedelaunldad.DeIocontrario,extraigalaplataformadecorteahora.
2. Sivaacambiarlacorreadelaplataformaconlaplataformadecorteinstalada
enlaunidad,bajelaplataformadecortea laposici6ndecortem_sbaja.
3. Extraigalacorreadealrededordela poleadetransmisibndelaPTOdela
unidadcomoseindicaenla Figura31.Simplementedejerodarunladodela
correaparaquesalgadelapoleayluegodebeseguirsac_ndolatodoalrededor
delapoleahastaquesesueltadela polea.
4. Llevelacorreahaciaelfrentedelaunidad,jal_ndolaatrav(_syhadaafuerade
la m_nsuladelguardacorrea,comoseindicaenlaFigura31.
5. Extraigalacubiertadelacorreadelaplataforma,paraIocualdeber_retirarlos
trespernoshexagonalesquelasujetan.VealaFigura35.
Figura35
Extraigaelespaciadordelguardacorreaextrayendolospernoshexagonales
quelasujetan.VealaFigura36.
Perno hexagonal del guardacorrea
J
Figura36
Cambielacorrea,luegovuelvaainstalartodosloscomponentesqueextrajo
siguiendoelordeninverso,comenzandoporlapoleaIocayterminandoporla
cubiertadelacorrea.
96

8. Paselacorreadelaplataformaatrav(_sdelam_nsuladelguardacorreay
col6quelaalrededorysobrelapoleadetransmisi6ndelaPTO,comoseindica
enla Figura31.
NEUM_,TICOS
Nuncaexcedalapresi6nm_ximadeinfladoqueseindicaenloslateralesde
losneum_ticos.
Lapresibnoperativarecomendadaparalosneumaticoses:
• Aproximadamente10psiparalosneum_ticostraseros
• Aproximadamente14psiparalosneum_ticosdelanteros
IMPORTANTE"Consulteloslateralesdelasruedasparaconocerconexactitud
lapresi6nm_ximaenpsirecomendadaporelfabricante.Nolosinfleenexceso.
Unapresi6ndeneum_ticosdesparejapodriahacerquelaplataformanocorteel
cdspedparejo.
CUCHILLADECOETE
Apagueelmotor yextraigala IlavedecontactoantesderetirarlascuchiF
lasdetorte paraafllarlas oreemplazarlas.Protejasusmanosutiiizando
guantesreforzadoscuandosujetelascuchiiias.
Inspeccioneperi6dicamentelacuchiilay/oelhusilloenbuscade
rajadurasodafios,especialmentedespu_sdegoipearunobjetoextrafio.
Nooperelam_quinabasradespu_sdehaberreemplazadoloscomponen-
tesda_ados.
Pararetirarlacuchilla,hagaIosiguiente.
2.
3.
NOTA:Puederesultarm_sf_cilcambiarlacuchillaempezandoprimeropor
extraerla plataformadelaparteinferiordeltractor,(consultelasecci6n
Extracci6ndelaplataformadecorteenpartesanterioresdeestasecci6n);
luegovolteecondelicadezalaplataformaparadejaraldescubiertosuparte
inferior.Sinembargo,esposiblecambiarlacuchillasinsacarlaplataforma
deltractor.Siseintentacambiarlacuchillasinsacarlaplataformadeltractor,
primerosedebemoverlapalancadeelevaci6ndelaplataformahastasu
posici6ndecortem_selevada.
Extraigalaclavijadeabono,elcanaldelaplataformaoelcanaldela
embolsadora,sivieneequipado,dejandoalavistalaaberturadelcanal
delaplataforma.
Useunbloquedemaderaoun2x4,ins(_rtelodentrodelaaberturadela
plataformay hagagirarlacuchillahastaquelamaderahagacuffaentrela
aberturadelaplataformaylacuchilladecorte,comoseindicaenlaFigura37.
Extraigalatuercadebridahexagonalqueaseguralacuchillaalmontajedel
husilloyretirelacuchilla.Yeaelrecuadrodela Figura37.
NOTA:Elhusillodelaplataformatieneunaroscanormal.Paraaflojarlo,rote
latuercadeseguridadconbridaensentidocontrarioalasagujasdelreloj.
Figura37
Paraafilarlascuchillasdecortedeformaadecuada,extraigacantidades
igualesdemetaldeambosextremosdelascuchillasaIolargodelosbordes
cortantes,paraleloalbordedeca[dayaun_ngulode25°a 30°. Afilesiempre
cadabordedelascuchillasdecortedeformaparejaparamantenerun
equilibrioadecuadoentrelasmismas.YealaFigura38.
Sielhordedetortedelacuchillahasidoafiladopreviamenteosiexiste
unaseparad6ndemetal,reempiacelascuchiiiaspototrasnuevas.
Unacuchillarealequilibradacausaraexcesodevibraci6nypuededafiar
eltractory/ocausarlesionespersonales.
Pruebeelequilibr[odelacuchillausandouncompensadordecuchillas.
Afileelmetaldelladopesadohastaquequedebienequilibrada.
NOTA:Cuandoreemplacelacuchilla,asegtiresedeinstalarlaconel lado
marcado"Bottom"(inferior)(oconelladoqueposeeunntimerodepieza
estampado)mirandoalpisocuandolacortadoradec_spedest_enposici6n
deoperaci6n.
97

Utiliceunallavedetorsi6n paraajustarlatuercade bridahexagonaldel
husillodelacuchillaentre70y 90pies-libras.
AJUSTES
Nuncaintentehaterajustesmientraselmotorest_enmarcha,excepto
cuandoasiloespedficaelmanualdeloperador.
AJLISTI:I)ELASIENTO
Consulteenlasecd6nMontajedeestemanuallasinstrucdonesparaelajuste
delasiento.
AJUSTEDELFEENODEMANO
Nuncaintenteajustarlosfrenosconelmotorenmarcha.Desenganchesiempre
laPTO(palancadeenganchedecuchilla),muevalapalancadecambiosala
posid6nneutral,pareelmotoryretirelaIlave,paraevitarquealguienencienda
acddentalmenteel motor.
Nivelaci6ndela plataforma
NOTA:Controlelapresi6ndeneum_ticosdeltractorantesderealizarcualquiernive-
laci6ndelaplataforma.ConsulteNeum_ticosenlasecci6nServidoymantenimiento
deestemanualparaobtenerm_sinformad6nsobrelapresi6ndelosneum_ticos.
Nivelaci6n frontal-posterior
EsposJbleajustarlainclinaci6ndelaplataformadetorte. Elfrentedelaplataforma
debeestarentre0"(alras)y1/4"m_sbajoquelaparteposteriordelaplataforma.
Desetnecesario,realkeunajustedelasiguientemanera:
1. Coneltractorestadonadosobreunasuperficiefirmeynivelada,ubiquela
palancadeelevaci6ndelaplataformaenla posid6nmedia(3)yrotelacuchilla
demaneraquequedealineadaconel frenteylaparteposteriordeltractor.
2. Midaladistandadesdelapartedelanteradelapuntadelacuchillahasta
elpiso,ydesdelaparteposteriordelapuntadelacuchillahastaelpiso.La
primeramedki6ndebesetentre0"(alras)y 1/4"menorquelasegunda.
Determineladistandaaproximadanecesariaparaunajusteadecuadoy,deset
necesario,sigaconelpasosiguiente.
3. Ubiquelatuercadeseguridadconbridaenelextremofrontaldelavarilla
deelevad6ndelaPTO.YealaFigura39.
Aprietelatuercadeseguridadconbridaparalevantarla partedelantera
delaplataforma;
Aflojelatuercadeseguridadconbridaparabajarlapartedelantera
delaplataforma.
J
/ /
/ //
/ /
//
/
J
Sieltractornosedetieneporcompletocuandosepresionatotalmenteelpedalde
embrague-freno,osilasruedastraserasdeltractorpuedenrodarconelfrenode
manocolocado,elfrenonecesitaunajuste.Comuniqueseconel Centrodeservkiode
reparacionesm_scercanoparaquelehaganunservkioalosfrenos.
ParaubkarelCentrodeservido dereparadonesy piezasmascercano
oparaprogramarel servidode mantenimiento o reparad6n,comuniquese
altel_fono 1-800-4-MY-HOME_.
CAMBIODELACORREADETRANSMISION
NOTA:Paracambiarlacorreadetransmisi6ndeltractor,sedebenretirarvarios
componentesyserequierenherramientasespedales(esdecir,Ilavedeimpacto/aire).
ComuniqueseconelCentrodeservkiodereparacionesypiezasm_scercanoparaque
lehaganunservkioalacorreadetransmisi6n.
ParaubicarelCentrodeservkiodereparadonesypiezasm_scercano,Ilameal
(800)659-5917.
SILENCIAi)OR
Latemperaturadelsilenciadorydelas_reascercanasdelmotorpuedesuperarlos
150°F(65°C).Eviteelcontactoconestas_reas.
Inspeccioneperi6dkamenteelsilenciadoryreempl_celosiesnecesario.Los
repuestosdelsilendadordebensetlosmismosysedebeninstalarenlamisma
posid6nquelaspiezasoriginales.
LIMPIE ELMOTOR
Diariamenteoantesdecadauso,limpieelcdsped,lagrasaolosresiduosacumu-
ladosenelmotor.Mantengalimpioselvarillaje,losresortesy loscontroles.
Mantengael_reaquerodeaalsilenciadoryqueest_detr_sdelmismolibre
decualquierresiduocombustible.
Mantengaelmotorlimpioparapermitirelmovimientodeairealrededor
delmismo.
Laspiezasdelmotorsedebenmantenerlimpiaspararedudrelriesgode
sobrecalentamientoycombusti6ndelosresiduosacumulados.
Nouseaguaparalimpiarlaspiezasdelmotor.Elaguapuedecontaminar
elsistemadecombustible.Useuncepilloounpasoseco.
AJLISTEi)ELCAI_BLIRAI)OE
Elcarburadordeestemotornoesregulable.
Figura39
98

BATERIA
iADVERTENCIAProposid6n65deCalifornia!Losbornesdelabatefiay losaccesofios
afinescontienenplomoycompuestosdeplomo,sustandasquimlcasquesegunIo
estableddoporelEstadodeCaliforniacausanc_ncerydaffosenelsistemareproduc-
tivo.L_veselasmanosdespu(_sdeestarencontactoconestoscomponentes.
Siextraela batefia, desconecteprimeroel cableNEGATIVO(negro)desu
borney a continuad6n elcablePOSmVO(rojo).Cuandovue[vaainstalar
la bateria, conectesiempreprimeroelcablePosmvo (rojo)asuborne,
jya cont nuac 6ne cabeNEGATVO(negro).
Labatefiaest_selladaynonecesitamantenlmlento.Losnlvelesde_ddonose
puedencontrolar.
SiempremantengaIimpiosyIibresdeacumulad6ndeelementoscorrosivoslos
cablesylosbornesdelabatefia.
Despu_sdeIlmpiarlabatefiay losbornes,apllqueunacapadelgadade
vasellnaograsaaambosbornes.
Slempremantengaloscapuchonesdegomacolocadossobreelbornepositivo
parapreveniruncortodrcuito.
IMPORTANTE:Siquitalabatefiaporcuaiquierraz6n,desconectepfimeroelcable
NEGATIVO(negro)desuterminalyacontinuad6nelcablePOSITIVO(rojo).Cuando
vuelvaa[nstalarlabatefia,conectesiemprepfimeroelcablePOSITIVO(rojo)asu
borne,yacontinuad6nelcableNEGATIVO(negro).Aseguresequeloscablesest_n
conectadosalosbornescorrectos,yaques[loscambiasepodfia[nvertirlapolafidad
yprovocarundaffoalsistemaalternadordelmotor.
Limpieza de la bateria
LimpJelabatefiaretir_ndoladeltractorylav_ndolaconbicarbonatodesod[oy
solud6ndeagua.Siesnecesafio,raspelosbornesdelabatefiaconunceplllode
alambreparaquitarlosdep6sitos.Cubralosbornesyloscablesexpuestoscongrasa
ovasellnaparaprevenirlacorrosi6n.
4. Conecteelotroextremodelcablenegativoal bloquedelmotordeltractor,
alejadodelabatefia.Acopleaunapartesinpinturaparaasegurarsedeque
hayaunabuenaconexi6n.
Sila batefiaconcargaest_iinstaladaenelvehkulo(esdedrautom6vil,
cami6n)NOpongaen marchaelmotordelvehkulocuandoarranque su
tractor conconexionesenpuente.
5. Arranqueel tractor(segunlasinstruccionesdelasecci6nFuncionamiento
deestemanual).
6. Coloqueelfrenodemanodeltractorantesdesacarloscablesdeconexi6nen
puente,enordeninversodeconexi6n.
DURACI6N
AIcargarse,lasbatefiasemiten ungasquepuedecausarexplosiones.
Carguela batefiaenunfirea bienventiiaday mant_ngaJaalejadade una
llama expuestaopiloto,comolosde loscaientadoresde agua,calefacto-
resde ambiente, hornos,secadoresderopayotrosaparatos agas.
Cuandocarguelabatefiadesu tractor, utiliceunicarnenteuncargador
disefiadoparabatefiasdeplomo-ficidode 12V.Leaelmanual del
joperadordelcargadordela bateriaantesdecargarla batefiadesu
[tractor. Siempresigalas instruccionesytenga en cuentalasadvertencias.
Sisutractornosehautilizadoduranteunpefiododetiempoprolongado,carguela
batefiadelasiguientemanera:
1. Ajusteelcargadordebatefiaparaqueproduzcaunm_ximode10amperios.
Sisucargadordebatefiaesautom_tico,carguelabatefiahastaqueelcargador
indiquequesehacompletadolacarga.Sielcargadornoesautom_tico,cargue
duranteochohorascomom[nlmo.
Desperfectosde la bateria
Algunascausascomunesdefalladelabatefiason:
Activaci6ninicialincorrecta
Sobrecarga
Congelamiento
Cargalnsufidente
Corrosl6nenlasconexiones
EstasfallasNOest_ncubiertasporlagarantiadesutractor.
FUSIBLE
Enel mazodecablesdesutractorest_instaladounfusiblede15ampefios,
paraprotegerelsistemael(ktficodeltractordelosdaffoscausadosporexceso
deamperaje.
S[elsistemael_ctriconofunciona,oel motordesutractornoarranca,verifique
pfimeroqueelfusiblenosehayaquemado.Sepuedeencontrardebajodel
guardabarrosenellado[zquierdodelaunidad,enelmazodecablesjustoendma
delabatefia.
ARRANQUECONCABLESDEPUENTE
Huncaarranque unabatefiadafiada ocongeladaconconexionesen
puente.Aseguresedequelosvehkulosnosetoqueny losmotoresestzin
apagados.Nopermitaquelaspinzasdeloscablessetoquen.
Conecteelcablepositivo(+) albornepositivo(+) delabatefiadescargada
desutractor.
2. Conecteelotroextremodelcablealborneposltivo(+) delabatefiaconcarga.
3. Conecteelsegundocablenegativo(-) al borne(-) delabatefiacargada.
Paraelreemplazoutilicesiempreunfusibleconlamismacapacidadde
amperaje.
LUBFIICACION
Antesderealizartareasdelubricaci6n,reparaci6noinspecci6n,siempre
desconectela PTO(pa[ancadeenganchedecuchilla),muevala palanca
deeatablesala posici6nneutral,pongael freno demano, pareel motory
retirela Ilave,paraevitar quealguienenciendaaccidentalmenteel motor.
99

Puntosdepivoteyvarillaje
Lubdquetodoslospuntosdepivotedelsistemadeimpulsi6n,elfrenodemano
yelvadllajedeelevad6nalmenosunavezportemporadaconaceiteligero.
Ruedastraseras
Lasruedastraserassedebensacardelosejesunavezportemporada.Lubdquebien
losejesylasIlantasconunagrasamultiusosantesdereinstalarlos.
Ejesdelanteros
Cadaextremodelabarradepivotedelanteradeltractorpuedeestarequipado
conunaccesododeengrasado.Lubdqueconpistoladegrasacada25horasde
fundonamlentodeltractor.
Cremallera y pi_6n de direcd6n
Unavezportemporada,ocada25horasdefundonamlento,ser_necesar[olubdcar
elmecanismodecremalleraypiff6ndedirecd6nqueest_ublcadodebajodelfrente
delaunldad.Medianteelusodegrasaparaautom6vilesest_ndar,engraseelfrente
ylaparteposteriordelacremalleradedirecd6n,comoseindicaenlaFigura40.
©
Figura40
LiMPiEZADELMOTORYDELAPLATAFORMA
Sisederramacombustibleoaceitesobrelam_quina,debeI[mp[arsedeinmediato.
NOpermitaqueseacumulendesechosalrededordelasaletasderefrlgerad6ndel
motornienningunaotrapartedela m_quina.
IMPORTANTE:NOserecomiendaelusodeunalavadoradepresi6nparalimpiar
eltractor.Puededaffarloscomponentesel(ktrlcos,loshusillos,laspoleas,los
rodamientosoelmotor.
Sistema de lavado de plataforma
Laplataformadesutractorest_equipadaconunpuertodeaguasobresusuperfide
comopartedelsistemadelavadodelaplataforma.
Utiliceelsistemadelavadodeplataformaparalavarlaparteinferiordelaplataforma
e[mpedirlaacumulad6ndesustandascorrosivas.Realkelossiguientespasos
DESPUESDECADACORTEDEClaSPED:
1. Drivethetractortoa level,clearspotonyourlawn,nearenoughforyour
gardenhosetoreach.
Aseguresede quee[canaldedescargade[tractor NOESTEORiENTADO
ENLADiRECCI6Nenqueseencuentranlacasa,elgaraje,losvehkuios
estacionados,etc.
2. Desconectelatomadefuerza(enganchedecucHIla),pongaelfrenodemano
ypareelmotor.
3. Enrosqueelacopledemanguera(embaladoconelManualdelOperador
desutractor)enelextremodelamangueradejard[n.
4. Unaelacopledelamangueraal puertodeaguaqueseencuentraenla
superfidedelaplataforma.YealaFigura41.
J
Figura41
5. Abraelsuministrodeagua.
6. Mientrasest_sentadoenlaposki6ndeloperadordeltractor,vuelvaaarrancar
el motorycoloquelapalancadelreguladorenlaposici6nVELOCIDADRAPIDA
(FAST,representadoporunaliebre).
7. Muevalapotendadearranque(enganchedecucHIla)deltractora laposici6n
ON(encendido).
8. Permanezcaenlaposki6ndeloperadorconlaplataformadecorteengancha-
dadurantedosminutoscomominimo,permitiendoquelaparteinferiordela
plataformadecorteselaveafondo.
9. Muevalapotendadearranque(enganchedecuchilla)deltractora laposid6n
OFF(apagado).
10. Girela Ilavedeencendidoalaposid6nSTOP(parar)paraapagarelmotor
deltractor.
11. Desconecteel aguay retireelacopladordelamangueradesdeelpuertode
aguaqueseencuentraenlasuperfidedelaplataforma.
Despu(_sdelimpiar[aplataforma,regresealaposid6ndeloperadoryenganchela
PTO.Mantengalaplataformadecorteenfundonamientodurantedosminutospor
Iomenosparapermitirquesesequetotalmentelaparteinferiordelamisma.
100

Nuncaalrnacenetractordec_spedconcombustibleen eltanqueen unespaciocerradooen_.reasconpocaventilad6n,dondelosgasesdel
combustiblepuedanalcanzarel fuego,chispaso unaluzpilotocornolaquefienenalgunoshornos,calentadoresde agua,secadoresde ropa
oalgOnotrodispositivoa gas.
PREPARACION DEL MOTOR
IMPORTANTE:Elcombustiblequequedaen el tanquecuandohace
calorsedeteriorayocasionagravesproblernasdeencendido.
La noutilizaci6ndeun aditivodecombustibledeestabilizaci6no
totalrnenteenrnarchaelmotorhastaque sequedansincombustible
antesde sualrnacenarnientofueradeternporadapuederesultar
enda_osal carburadordel motor.Da_osposterioresnoestarian
cubiertospor lagaranfiadel fabricante.
Motoressealrnacenaentre30y 90diasdebensertratadosconun
estabilizadordegasolinay losrnotoresalrnacenadosrn_.sde90 dias
esnecesariodrenarel combustibleparaevitareldeterioroy lagorna
de laforrnaci6nenel sisternade combustibleoen laspartesesen-
cialesdel carburador.Si lagasolinaen el motorsedeterioradurante
elalrnacenarniento,puedesernecesariotenetelcarburador,yotros
cornponentesdelsisternadecombustible,la reparaci6no sustituci6n.
Paraevitarqueseforrnendep6sitosdegornaenel interiordel
carburadordel motorycausarun posiblernalfuncionarnientodel mo-
tor,el sisternadecombustibledebeservaciadocornpletarnente,o la
gasolinadebesertratadoconunestabilizadorparaevitarsudeterioro.
1. Si utilizaunestabilizadordecombustible:
a. Lealasinstruccionesy recornendacionesdelfabricantedel
producto.
b. Agreguela cantidadcorrectadeestabilizadorparala
capacidaddel sisternade combustiblea gasolinalirnpiay
nueva.
c. Lleneel dep6sitodecombustibleconcombustibletratado
yhagafuncionarel motor2-3rninutosparaestabilizarel
combustibledentrodelcarburador.
2. Cuandovacieel sisternadecombustible:
a. Nodreneel combustiblecuandoel motorest,.caliente.
Perrnitaqueel motorseenfriebien.Dreneel combustible
dentrode un recipienteaprobadoyal airelibre,lejosde
cualquierllamaexpuesta.
b. Dreneungranvolurnende combustibledesdeel dep6sito,
desconectandolaIfneade combustibledel filtrode combus-
tibleen lineaqueseencuentracercadel motor.
Lagasolinaessumamenteinflamabley puedesetexplosivaenciertas
condiciones.Vacielaantesdeaimacenarei equipoduranteperiodos
prolongados.DreneelcombustibleOnicarnentedentrodeun
recipienteaprobadoy al airelibre,lejosdecualquierllamaexpuesta.
Dejequeel motorseenfrie.Antesdedrenarel combustible,apague
cigarrillos,cigarros,pipasyotrasfuentesde cornbusti6n.Vaciela
gasolinaenuna.reabienventilada,lejosdecualquierfuentedellama
o chispas,incluidocuaiquierartefactoconluzpiloto.AImacenela
gasolinaenunrecipienteaprobado,en unlugarseguro.
Vuelvaa contectarla Ifneadecombustibleyhagafuncionar
el motorhastaquecorniencea fallar,useentoncesel
cebadorpararnantenerel motorenrnarchahastaagotar
todoel combustibledel carburador.
101
d. Vuelvaa desconectarla lineadecombustibleydrenela
gasolinarestanteenel sisterna.
La gasolinaes unasustancia t6xica. Elimine ia gasolina
adecuadamente.Comuniquesecon lasautoridadeslocales para
averiguarcua.iesson los metodosadecuados para eliminar la gasolina.
3. Extraigalabujiay viertauna(1)onzade aceiteparamotorpotel
orificiode labujiaenel cilindro.Hagagirarelmotorvariasveces
paradistribuirel aceite.Vuelvaa colocarla bujia.
4. Lirnpielos residuosdetodomotor,conprotecci6nparalosdedos,
y debajo,alrededory detr_.sdel silenciador.Retocarlapintura
da_ada,ylas_.reasotropelajequepuedenoxidarseconuna
peliculadelgadadeaceite.
5. Conservaren unlugarlirnpio,secoy bienventiladolejosde
cualquieraparatoque funcionaconunallamao luzpiloto,corno
unhomo,calentadorde aguao secadorade ropa.Tarnbi_nevitar
cualquier_.reaconun motorel_ctricoqueproduzcachispas,o
dondelasherrarnientasel_ctricassonoperados.
6. Siesposible,evitarlaszonasde almacenarnientoconalta
hurnedad,yaque prornuevelaoxidaci6ny lacorrosi6n.
7. Mantenerel nivelde motorde alrnacenarniento.Inclinaci6npuede
provocarfugasde aceiteo combustible.
EL DRENAJE DE LOS COMBUSTIBLES
1. Localiceel filtrodecombustible,que seencuentraen el lado
izquierdodel motor,ypuedeserconectadoal motorconuna
correade ernpate.
2. Cortarlacorreade la corbata,siest,.presente,entonceserner-
genteen la abrazaderaenlineaen elfiltrode combustibleconun
pardealicates,deslicelaabrazaderadela lineadecombustible.
3. QuitelaIfneade combustibleen la lineay lafugadecombustible
en un recipienteaprobado.
PREPARACION DE LA TRACTOR DE CI=SPED
1. Lirnpiey lubriquela tractorcornosedescribeen lasinstrucciones
de lubricaci6n.
2. Noutiliceunalavadoraa presi6nniunarnangueradejardinpara
lirnpiarsuunidad.
3. Alrnacenelatractoren unazonalirnpiay seca.Nola alrnacene
cercade rnaterialescorrosivoscornoporejernplofertilizantes.
ELIMINACION DE ALMACENAMIENTO
1. Revisesumotorcornosedescribeen la secci6nde laAsarnblea
de estemanual.
2. Siel combustibleruedrenadodurantelapreparaci6ndealrnace-
narniento,Ileneeltanquecongasolinafresca.Siustedrnantiene
uncontenedordegaso%apararepostar,asegQresede que
contienes61ocombustiblefresco.Lagasolinaseoxidaydeteriora
conel tiernpo,causandoproblernasdearranque.
3. Siel cilindrorue recubiertaconaceitedurantela preparaci6nde
alrnacenarniento,el motorde hurnoal arrancar.Estoesnormal.

Elmotornoarranca
Elmotorfuncionade manera
err_tica
1. Perilladepotenciade arranque(PTO)conectada.
2. Noest&colocadoelfreno demano.
3. Sehadesconectadoel cablede lasbujias.
4. Lapalancade controldel reguladornoest_en
la posici6nde arranquecorrecta.
5. Nose haactivadoelcebador
6. Eldep6sitodecombustibleest_vaciooel
combustiblesehaechadoaperder.
7. Lalineadelcombustibleest&bloqueada.
8. Lasbujiasnofuncionancorrectamente.
9. Motorahogado.
10. Fusiblefundido(s)
11. Interruptor de seguridad (s) no est,.
debidarnente enganchado.
1. Launidadest_funcionandoconel CEBADOR
activado.
2. Sehanaflojadoloscablesde labujia.
3. Lalineadelcombustibleest_tapadaoel
combustiblesehaechadoaperder.
4. Laventilaci6nenla tapadel combustibleest_
obstruida.
5. Aguaosuciedaden el sistemadelcombustible.
6. EIfiltrode aireest_ sucio.
1. Coloquela perillaenla posici6ndedesconexi6n(OFF).
2. Coloqueelfreno demano.
3. Conecteelcable alas bujias.
4. Muevala palancadelreguladora la posici6nFAST
(r@ido).
5. Tire elcontroldelCEBADORhaciaafuera.
6. Lleneel dep6sitocongasolinalimpiay nueva(de menos
de 30dias).
7. Limpielalineadecombustibley reemplaceelfiltrodecombustible.
8. Limpieo cambielasbujiasoajustela separaci6n.
9. Arranqueelmotorconelreguladorenposici6nFAST(r&pido).
10. Reemplaceelfusible(s)
11. Asegurarse de asiento est,. en la posici6n de func-
ionarniento adecuada, y / o de la cubierta canaleta,
tubo o clavija de abono instalado correctamente.
1. PresioneelcontroldelCEBADOR.
2,
3.
4,
5.
6,
Elmotorrecalienta 1. Elniveldeaceitedelmotorest_ bajo. 1.
2.
2. Flujodeairerestringido.
Elmotorvacilaa altas 1. Laseparaci6nde lasbujiasesmuypequeSa. 1.
revoluciones
Elmotorfuncionacondificultad 1. Bujiaatorada,averiadaoexcesode separaci6n. 1.
en ralenti 2. Elfiltrode aireest_ sucio. 2.
Demasiadavibraci6n 1. Cuchillade cortefloja o descentrada. 1.
2. CuchilladaSadaocurvada 2.
1. Lavelocidaddelmotoresdemasiadolenta. 1.
2. CespedhQmedo.
Lacortadorade cespedno
regresael recortedecesped
comoabono
Cortedesigual
3. Cespeddemasiadoalto.
Lacuchillade lacortadoranoest_afilada.
Laplataformanoest&correctamentenivelada.
Lacuchillade lacortadoranoest_afilada.
Presi6nde neum_ticosdesigual.
4,
1.
2.
3.
Conecteloscablesde la bujia.
Limpiela lineadecombustible;Ileneeltanquecon gaso-
linalimpiay nuevay reemplaceelfiltro decombustible.
Destapelaventilaci6noreemplacelatapasiest_da_ada.
Vacieel tanquede combustible.Lleneel tanquecon
gasolinalimpiay nueva.
Reemplaceelelementode papeldelfiltrode aireo limpie
el depuradordeespuma.
Lleneel c&rtercon laadecuadacantidady pesodeaceite.
Limpielos recortesdepastoy la suciedadacumulados
alrededorde lasaletasde refrigeraci6ndelmotory del
alojamientodelsoplador.
Retirelasbujiasy reajustelaseparaci6n
Reemplacelasbujias.Configurela separaci6nde la bujia.
Reemplaceelelementodelfiltro deairey/o limpieel
depurador.
Aprietelacuchillay el husillo.
Reemplacelacuchilla.
Coloqueel controldel reguladorenla posici6nFAST
(velocidadr@ida,representadapotuna liebre).
2. Norealiceabonocuandoel cespedest&hQmedo.
3. Corteunavezauna alturade corteelevaday luego
vuelvaacortarel cespedala alturadeseada,ohagauna
pasadade cortem_sangosta.
4. Afileocambie la cuchilla.
1. Realiceunajustede laplataformaladoa lado.
2. Afileocambie la cuchilla.
3. Verifiquela presi6nde loscuatroneum_ticos.
102

Busque el periodo de duraci6n de emisiones importantes yla informaci6n de clasificaci6n de aire en
la etiqueta de emisiones de su motor
Los motores cuyo cumpiimiento con los estAndares de emisi6n Tier 2 de laComisi6n de Recursos Ambientales de California (CARB)
est6 certificado deben exhibir la informaci6n relacionada con el periodo de duraci6n de ias emisiones y la clasificaci6n de aire. Sears
Brands Management Corporation ponen esta informaci6n a disposici6n del consumidor en nuestras etiquetas de emisiones.
Ei Periodo de Duraci6n de las Emisiones describe el nQmero de horas de tiempo real de funcionamiento para el cuai se certifica que
el motor cumpie con ias reglas de emisi6n, descontando el mantenimiento adecuado del mismo segQn las instrucciones de oper-
aci6n y mantenimiento. Se utilizan las siguientes categonas:
Moderado:Se certifica que el motor cumpie con las reglas de emisi6n durante 125 horas de tiempo real de funcionamiento del motor.
Inmediato:Se certifica que el motor cumpie con las reglas de emisi6n durante 250 horas de tiempo real de funcionamiento del motor.
Extendido:Se certifica que el motor cumpie con las reglas de emisi6n durante 500 horas de tiempo real de funcionamiento del motor.
Por ejemplo, una cortadora de c6sped tJpica que se empuja desde arras se usa entre 20 y 25 horas por aSo. Por Io tanto, el Periodo
de Duraci6n de Emisiones de un motor con una clasificaci6n intermedia sena equivaiente aentre 10 y 12 aSos.
Laciasificaci6n de aire es un nQmero calculado para describir el nivel relativo de emisiones para un grupo de motores en particular.
Cuanto menor sea la clasificaci6n de aire, mayor es la limpieza del motor. La informaci6n se presenta de forma grAfica en la etiqueta
de emisiones.
Despu_s del 1 de julio de 2000, busque el periodo de cumplimiento de las reglas de
emisiones en la etiqueta de cumplimiento de las reglas de emisiones del motor
Despu6s del 1 de julio de 2000 se certificarA que determinados motores Sears Brands Management Corporation cumplen
con los estAndares de emisiones de la fase 2 de la Agencia de Protecci6n Ambientai de los Estados Unidos (USEPA). Para
los motores certificados para la etapa 2, el periodo de cumplimiento con ias reglas de emisiones al cual se hace referencia
en la etiqueta de cumplimiento con las reglas de emisiones indica el nQmero de horas de funcionamiento para el cual se ha
demostrado que el motor cumple con los requerimientos federales de emisi6n.
Para los motores con desplazamiento inferior a 225 cc, Categoria C = 125 horas, B = 250 horas y A = 500 horas.
Para los motores con desplazamiento de 225 cc o mAs, Categoria C = 250 horas, B = 500 horas y A = 1000 horas.
El desplazamiento de los motores de la serie modelo 150112 es 249 cc.
La presente es una representaci6n gen_ricade laetiqueta de emisi6n que se encuentra generaimente en un
motor certificado.
FAMILYYBSXS.3192VA 274812
GDOC-100182Rev.A

(Estap_.ginaseaplicas61oenEE.UU.yCanada.).
SearsBrandsManagement Corporation, el Consejo de Recursos Ambientales de California (CARB)
y la Agencia de Protecci6n Ambiental de los Estados Unidos (EPA)
Declaraci6n de garantia del sistema de control de emisiones (derechos y obligaciones de la garanfia de defectos del propi=
etario)
LACOBERTURADE LAGARANTJADECONTROLDEEMISIONESES Y PARALOSMODELOSCERTIFICADOSDELANO1997YPOSTERIORES,
APLIOABLEALOSMOTORESCERTIFICADOSCOMPRADOSENCALIFOR- QUESECOMPRENY UTILICENENCUALQUIERPARTEDE LOSESTADOS
NIAEN1995Y POSTERIORMENTE,QUESE UTILIZANENCALIFORNIA, UNIDOS(Y APARTIRDEL1 DE ENERODE2001ENCANADA).
Declaraci6n de garanfia sobre defectos en el control de emisiones para California y los Estados Unidos
ElConsejode RecursosAmbientalesdeCalifornia(CARB),laEPA(Agencia
de Protecci6nAmbientaldelos EE.UU.)y Searstienenel gustodeexplicarla
garantiadelsistemadecontroldeemisionesparamotoresdela_o 2000y para
elfuturoconrelaci6na motorespeque_ostodoterreno(SORE).EnCalifornia,
los nuevosmotorespeque_ostodoterrenodebenestardise_ados,construidos
y equipadosparacumplirconlas rigurosasnormasanti-smogdelestado.En
el restodelos EstadosUnidos,losmotoresnuevostodoterrenodeencendido
porchispacertificadosparaela_o1997debencumplirest_ndaressimilares
establecidospot laEPA.Searsdebegarantizarel sistemadecontroldeemis-
ionesdesu motorparalosperiodosdetiempoenumeradosacontinuaci6n,
siemprequenohayaabuso,negligenciao mantenimientoindebidode su
motortodoterrenopeque_o.Susistemade controldeemisionespuedeincluir
piezastalescomoel carburador,el filtrodeaire,elsistemadeencendido,el
silenciadoryel conversorcatalitico.Tambienpuedeincluirconectoresyotras
unidadesrelacionadasconlasemisiones.Dondeexistaunacondici6ncubierta
porla garantia,Searsreparar_supeque6omotortodoterrenosincostoalguno
incluyendodiagn6stico,piezasy manodeobra
Cobertura de la garantJa Sears para defectos en el control de emJsiones
Losmotorestodoterrenopeque6osest_ngarantizadosenIorelativoalcontrol alas disposicionesque seindiquenacontinuaci6n.Si una partedesumotor
deemisionesparadefectosenpiezasduranteunperiododedosa_os,sujeto cubiertapot lagaranfiaesdefectuosa,Searsreparar_o sustituir_dichaparte.
Responsabilidades del propietario en relacibn con la garantia
Comopropietariodelmotortodoterrenopeque_o,Ud.esresponsabledela
realizaci6ndelmantenimientorequeridoquese incluyeenlas instrucciones
deoperaci6ny mantenimiento.Searsrecomiendaquese conserventodoslos
recibosrelativosal mantenimientodesu motortodoterrenopeque_o,pero
nopudedenegarlagarantiasimplementeporla faltade losmismos,oporsu
incumplimientodelmantenimientoprogramatic.Comopropietariodelmotor
peque_otodoterrenodebesaberque,sinembargo,Searslepuedenegar
lacoberturade lagarantiasi su motortodoterrenopeque6oouna piezadel
mismohanfalladodebidoaabuso,negligencia,mantenimientoindebidoo
a modificacionesnoaprobadas.Ud.esresponsabledepresentarsumotor
todoterrenopeque6oaundistribuidorde serviciosSearsautorizadotan pronto
comoaparezcaunproblema.Lasreparacionesdela garantiasinconfiicto
debencompletarseen unplazodetiemporazonable,nosuperiora30dias.Si
tienealgunapreguntarespectoa susderechosy responsabilidadesreferen-
tesala garantia,debecontactarconunrepresentantedeserviciosSearsal
1--800--469--4663.Lagarantiadeemisionesesunagarantiapordefectos.Los
defectossejuzgandeacuerdoconelfuncionamientonormalde unmotor.La
garantiano est_relacionadaconunapruebade emisionesenuso.
Disposiciones de la garantJa Sears para defectos en el control de emJsiones
Lassiguientessondisposicionesespecificasrelacionadasconla coberturade lagarantiaparadefectosenel controldeemisiones.Esuna_adidoa lagarantiade
motorSearsparamotoresnoreguladosqueseencuentraen lasinstruccionesdefuncionamientoy mantenimiento.
1. Piezascongarantia
Lacoberturadeesta garantiaseextiendeL]nicamentealas piezas
queaparecenacontinuaci6n(las partesde lossistemasdecontrolde
emisiones),siemprequedichaspiezasestuvieranyaenel motoren el
momentodesucompra.
a. Sistemademedici6ndecombustible
•Sistemadeenriquecimientoparaarranqueenfrio
•Carburadory partesinternas
• Bombade combustible
b. Sistemadeinducci6nde aire
• Filtrodeaire
•Colectordeadmisi6n
c. Sistemadeencendido
• Bujia(s)deencendido
•Sistemadeencendidomagneto
d. Sistemadelcatalizador
•Convertidorcatalitico
•Colectordeescape
•Sistemadeinyecci6nde aireov_lvulade impulsos
e. Elementosvariadosusadosenlossistemasanteriores
•Wlvulas devacio,sensiblesa temperatura,posici6ny tiempo
einterruptores
•Conectoresy montajes
2. AIcancedela cobertura
Searsgarantizaal poseedorinicialy a loscompradoressubsiguientes
quelas piezascongarantianotendr_ndefectosen materialesni mano
deobraque provoquenla falladelas mismasduranteun periodode
dosaSosa partirdela fechaen queel motorse entregaa uncomprador
particular.
3. Sincargo
Lareparaci6noreemplazodecualquierpartecongarantiaserealizar_
sin cargoalgunoparael poseedor,incluyendotareasdediagn6sticoque
permitandeterminarsi una partecongarantiaesdefectuosa,siempreque
dichodiagn6sticose realiceenundistribuidordeserviciosSearsautoriza-
do. Paraelserviciode lagarantiadeemisiones,contactealdistribuidorde
serviciosSearsautorizadom_scercanoincluidoen las"P_ginasamarillas"
en lascategorias"Motores,gasolina","Motoresdegasolina","Podadoras
de cesped",osimilares.
4. Reclamacionesyexclusionesala cobertura
Las reclamacionesde lagarantiadebenenviarsedeacuerdocon las
disposicionesdela politicadegarantiaparamotoresSears.Lacobertura
de lagarantiaexcluir_defectosen piezascongarantiaquenoscan partes
originalesSears,o abuso,negligenciao mantenimientoincorrecto,taly
comoseestableceen lapoliticadegarantiaparamotoresSears.Searsno
es responsablede lasfallasenpiezascongarantiaprovocadasporel uso
de partesa6adidas,que noscanoriginalesoquesehayanmodificado.
5. Mantenimiento
Cualquierpartecongarantiaque noesteprogramadaparaser reem-
plazadacomomantenimientorequerido,oque s61odebainspeccionarse
regularmentealefectode"inspeccioneoreemplacesegL]nsea necesario",
estar_garantizadacontradefectosduranteelperiodode la garantia.Todas
las piezasgarantizadasqueestenprogramadasparasureemplazopara
cumplirconlos requisitosdemantenimientoestar_ngarantizadass61o
porel periodoanterioral primerreemplazoprogramaticparadicha pieza.
Cualquierpiezade recambioqueseaequivalenteenfuncionamientoy
durabilidadpuedeusarsepararealizarmantenimientoo reparaciones.El
propietarioes responsablederealizartodoel mantenimientorequerido,tal
y comose defineenlas instruccionesdefuncionamientoy mantenimiento
Sears
6. Coberturaindirecta
Porla presente,lacoberturaseextiendeala falladecualquiercomponente
de motorprovocadapot lafallade unapiezacongarantiaque estetodavia
en periododegarantia.
Enlos EstadosUnidosy Canad_hayunalineadeatenci6nde24 horas,1-800-469--4GG3,quecuentacon unmenL]conmensajespre-grabadosque contienen
informaci6nparael mantenimientodemotores.

DECLARACIONFEDERALy/oDECALIFORNIASOBRE GARANTJAS EN EL CONTROL DE EIVIISIONES
SUS DERECHOS Y OBLIGACIONES EN CUANTO A LA GARANTJA
MTDConsumerGroupInc,laAgenciadeProtecci6nMedioambientaldelos EstadosUnidos(EPA),y paraaquellosproductoscertificadosparasuventaen el es-
tadode California,elDepartamentode los RecursosdelAire deCalifornia(CARB)secomplacenenexplicarla garanfiaquecubreal sistemade control(ECS)de
emisiones(evaporativasy/ode escape)de suequipoy motor(motordeequiposdeexteriores)deencendidopot chispaparatodoterreno,peque_o,deexteriores
dela_o2006y a_osposterioresEnCalifornia,losnuevosmotoresdeequiposdeexterioresdebenestardise_ados,construidosyequipadosparacumplircon las
estrictasnormasantipoluci6ndel Estado(enotrosestados,losequiposdela_o 1997y modelosposterioresdebenserestardise_ados,construidosy equipados
paracumplirconlas regulacionesdemotoresdeencendidoporchispaparatodoterrenopeque_osde laAgenciade Protecci6nMedioambientaldelos Estados
Unidos,(EPA).MTDConsumerGroupInc.debegarantizarelsistemadecontroldeemisiones(ECS)desu motordeequiposdeexteriorespotel periodode
tiempoindicadom_sabajo,siempreycuando noexistausoincorrecto,negligenciaomantenimientoinadecuadodedicho motor.
SuECSpuedeincluirpiezastalescomoel carburador,el sistemade inyecci6ndecombustible,elsistemadeencendido,el convertidorcatalitico,losdep6sitos
decombustible,laslineasdecombustible,lostaponesdecombustible,lasv_lvulas,contenedores,filtros, manguerasdevapor,abrazaderas,conectoresyotros
componentesafinesrelacionadosconlasemisiones.
Dondeexistaunacondici6ncubiertaporla garantia,MTDConsumerGroupInc.reparar_su motorde equiposde exterioressincostoalgunoincluyendoel
diagn6stico,las piezasy lamanodeobra.
COBERTURA DE LA GARANTJA DEL FABRICANTE:
Estesistemadecontroldeemisionessegarantizaporel t@minode dosaSos.Si algunapiezarelacionadacon lasemisionesdesu motorde equiposde
exterioresesdefectuosa,MTDCONSUMERGROUPINC.reparar_osustituir_dichapieza.
RESPONSABILIDADES DEL PROPIETARIO SEGUN LA GARANTJA:
Ensu car_cterdepropietariodelmotordeequiposdeexteriores,ustedesresponsabledel mantenimientorequeridoqueseespecificaenel manualdel propieta-
rio.MTDConsumerGroupIncle recomiendaque conservetodoslosrecibosquecubrenel mantenimientode sumotor,noobstanteIocualMTDConsumerGroup
Incnopodr_denegarel cumplimientode lagarantiaQnicamenteporlafaltade los recibos.
Comopropietariodel motordeequiposde exteriores,usteddebesaberqueMTDConsumerGroupInc.puededenegarlacoberturade lagarantiasisu motoro
unapiezadel mismofallandebidoauso incorrecto,negligencia,mantenimientoindebidoo amodificacionesnoaprobadas.
Ustedesresponsablede presentarsumotoral centrodedistribuci6noserviciotecnicodeMTDConsumerGroupInc.tan prontocomoaparezcael problema.Las
reparacionescubiertasporla garantiasedebenIlevara caboen unlapsorazonablequenoexcedade30 dias.Sitienealgunapreguntarespectode lacobertura
dela garantia,p6ngaseen contactoconel DepartamentodelServicioT@nicode MTDConsumerGroupInc.al telefono1-800-800-7310o pot correoelectr6nico
enhttp://support.mtdproducts.com
COBERTURA DE LA GARANTJA DE EMISIONES GENERALES:
MTDConsumerGroupIncgarantizaal compradorfinaly acadacompradorsubsiguienteque el motordeequiposde exteriores:est_ dise_ado,construidoy
equipadodemododecumplircontodaslas regulacionesaplicablesy quese encuentralibrededefectosdematerialesyde fabricaci6nquepudierencausarla
falladeuna piezagarantizadaidentica,entodoslosaspectosmaterialesala piezadescriptaenla solicitudde certificaci6ndeMTDConsumerGroupInc.
El periododegarantiacomienzaenla fechade entregadelmotoral compradorfinalo en lafechaenque la m_quinaseponeenfuncionamientopot primeravez.
El periododegarantiaesde dosaSos.
Sujetoaciertascondicionesyexclusionesqueseindicanacontinuaci6n,lagarantiadelas piezasrelacionadascon lasemisionesesla siguiente:
1. Cualquierpiezagarantizadaque noesteprogramadaparaserreemplazadacomopartedelmantenimientorequeridoen lasinstruccionesescritassuminis-
tradassegarantizaporel periododegarantiaarribamencionado.Sila piezafalladuranteel periododecoberturade lagarantia,la mismaser_reparada
oreemplazadaporMTDConsumerGroupInc.deacuerdoconel parrafo(4)acontinuaci6n.Cualquierpiezareparadao reemplazadasegQnlagaranfiase
garantizar_potel restodelperiodode garantia.
2. Cualquierpiezagarantizadaqueeste programadasolamenteparainspecci6nregularenlas instruccionesescritassuministradassegarantizapotel periodo
degarantiaarribamencionado.CualquierpiezareparadaoreemplazadasegQnla garantiasegarantizar_pot elrestodelperiodo.
3. Cualquierpiezagarantizadaqueeste programadaparareemplazosegQnel mantenimientorequeridode conformidadcon lasinstruccionesescritassuminis-
tradas,segarantizaporel periododetiempoanteriora laprimerafechade reemplazoprogramadaparaesapieza.Si lapiezafallaantesdelprimerreemplazo
programatic,lamismaser&reparadaoreemplazadapot MTDConsumerGroupInc.deacuerdoconelparrafo(4)acontinuaci6n.Cualquierpiezareparadao
reemplazadabajogarantiasegarantizar_potel restodelperiodoanterioral primerreemplazoprogramaticpuntualparaesapieza.
4. Lareparaci6noel reemplazodecualquierpiezagarantizadadeconformidadconlasdisposicionesde lagarantiaqueaquise estipulasedeben realizarenun
centrodegarantiasin costoalgunoparael propietario.
5. Noobstantelasdisposicionesqueaquiseestipulan,losservicioso reparacionesbajo garantiasesuministrar_nentodosnuestroscentrosdedistribuci6nbajo
franquiciademantenimientoparalos motoresoequiposencuesti6n.
6. El propietariodelmotorde equiposdeexterioresno deber_pagarel trabajodediagn6sticodirectamenteasociadocon unapiezagarantizadadefectuosaen
relaci6nconlas emisiones,siempreycuandodichotrabajode diagn6sticoserealiceen uncentrocubiertopot lagarantia.
7. MTDConsumerGroupInces responsablepotdaSoscausadosaotroscomponentesdemotoresoequiposderivadosde lafallabajo garantiadecualquier
piezagarantizada.

8.Durantelatotalidaddelperiododegarantiadelmotoryequipoparatodoterrenoarribamencionado,MTDConsumerGroupIncmantendr_unsuministro
depiezasbajogarantiasuficienteparasatisfacerlademandaesperadadetalespiezas.
9.Cualquierpiezadereemplazosepodr_usarparaelcumplimientodelmantenimientoolasreparacionesbajogarantiaysesuministrar_nsincargopara
elpropietario.Dichousonoreducir_lasobligacionesdegarantiadeMTDConsumerGroupInc.
10.Nosepodr_nusarpiezasadicionalesnimodificadasquenoestenexentasdeacuerdoconelDepartamentodelosRecursosdelAire(AirResourcesBoard).
Elusodecualquierpiezaadicionalomodificadanoexentaporelcompradorfinalser_causaldeinvalidezdelosreclamosbajogaranfia.MTDConsumer
GroupIncnotendr_responsabilidadpotlagarantiadefallasdepiezasgarantizadasquefuerencausadaspotelusodeunapiezaadicionalnoexenta
omodificada.
PIEZAS GARANTIZADAS:
Lareparaci6noel reemplazodecualquierpiezagarantizadaquede otto modopudieseestarcubiertaporlagarantiapodr_set excluidadetal coberturade
garantiasi MTDConsumerGroupIncdemuestraqueel motoresobjetodeusoincorrecto,negligenciao mantenimientoinadecuado,y quetal usoincorrecto,
negligenciaomantenimientoinadecuadofuecausa directade la necesidadde reparaci6noreemplazode dichapieza.NoobstanteIoantedicho,cualquierajuste
deuncomponenteconundispositivodelimitaci6nde ajusteinstaladoenf_bricay quefuncioneadecuadamente,podr_setcubiertopot lagarantia.Adem_s,
la coberturabajoestagarantiase extiendesoloapiezasqueestuvieronpresentesenel motory equipotodoterrenoadquiridos.
Est_ncubiertaslas siguientespiezascongaranfiaparaemisiones(decorresponder):
(1)Sistemademedici6nde combustible
• Sistemade mejoraparainicioenfrio (cebadosuave)
• Carburadory piezasinternas(osistemade inyecci6npotcombustible)
• Bombadecombustible
• Dep6sitodecombustible
(2)Sistemade inducci6ndeaire
• Purificadordeaire
• Colectordeadmisi6n
(3) Sistemadeencendido
• Bujia(s) deencendido
• Sistemade encendidopot magneto
(4)Sistemade encendido
• Convertidorcatalitico
,, SAI(v_lvulaReed)
(5)Componentesvariosutilizadosen el sistemaanterior
• Wlvulas e interruptoresdevacio,temperatura,posici6nsensiblesaltiempo
• Conectoresy montajes
(6) Controlevaporativo
• Manguerade combustible
• Abrazaderasde lamangueradecombustible
• Tap6ndelcombustibleatadopot correa
• Cajadecarbono
• Lineas de vapor
GDOC-100223

Felicitaciones por haber realizado una adquisici6n inteligente. El producto Craftsman® que ha
adquirido esta diseSado y fabricado para brindar muchos aSos de funcionamiento confiable. Pero
como todos los productos a veces puede requerir de reparaciones. Es en ese momento cuando el
disponer de un Acuerdo de protecci6n para reparaciones le puede ahorrar dinero y problemas.
A continuaci6nse detallanlos puntosincluidosen el Acuerdo:
[] Servicio experto prestadopor nuestros10,000especialistasen reparacionesprofesionales
[] Servicio ilirnitado sin cargo para las piezasy la manode obraentodas las reparacionescubiertas
[] Reernplazo del producto hasta 1500d61aressi no es posible repararel productocubierto
[] Descuento de 25% del precionormal delservicio y de las piezas relacionadascon el mismo que no estencubiertas
por elacuerdo;ademas,25% del precionormal de laverificaci6nde mantenimientopreventivo
[] Ayuda r_pida pot tel_fono - Io IlamamosResoluci6n RApida- el apoyotelef6nico de unChamusca al representante.
Pienseennosotroscomo el manual "de un dueSohablador."
Una vezadquiridoel Acuerdo,puede programarel serviciocon tan s61orealizaruna Ilamadatelef6nica. PuedeIlamaren
cualquier momentodeldia o de la nocheo programarunservicio en linea.
ElAcuerdode Protecci6nde Reparaci6nes unacompra sin riesgo.Si ustedanulapor alguna raz6nduranteel periodode
garantiade producto,proporcionaremosunreembolso Ileno.O, un reembolsoprorrateadoencualquier momentodespues
del periodode garantiade productoexpira,iAdquiera hoysu acuerdode protecci6nparareparaciones!
Se aplican determinadas limitaciones y exclusiones. Paraobtener informaciTnadicional y precios en los Estados
Unidos Ilame al 1-800-827-6655.
El *Coverage en Canad_ivaria en algunos articulos. Para detalles Ilenos la Ilamada Chamusca Canad_ien 1-800-
361-8885.
Servicio de instalaci6nde Sears
Sidesea solicitar la instalaci6nprofesionalde Searsde aparatosdomesticos,dispositivos paraabrir portones,calentado-
resde aguay otrosarticulos domesticosimportantes,en los EstadosUnidoso Canada flameal 1-800-4-MY-HOME®.

Riding Equipment
questions or problems?
Satisfaction with your purchase
is our number one concern!
To troubleshoot problems,
get answers to questions, order parts,
or schedule repair service for your
Riding Equipment, call the number below.
Para respuestas a preguntas o problemas,
y ordenar piezas o pedir servicio para la
reparacibn de su equipo, Ilame el nt_mero abajo.
1-800-659-5917
Craftsman Help Line
www.craftsman.com
TM
® Registered Trademark / Trademark of KCD IP, LLC in the United States, or Sears Brands, LLC in other countries
® Marca Registrada / TMMarca de Fabrica de KCD IP, LLC en Estados Unidos, o Sears Brands, LLC in otros paises
-
 1
1
-
 2
2
-
 3
3
-
 4
4
-
 5
5
-
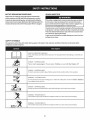 6
6
-
 7
7
-
 8
8
-
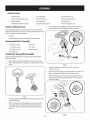 9
9
-
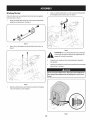 10
10
-
 11
11
-
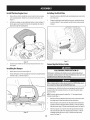 12
12
-
 13
13
-
 14
14
-
 15
15
-
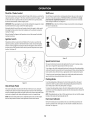 16
16
-
 17
17
-
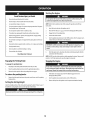 18
18
-
 19
19
-
 20
20
-
 21
21
-
 22
22
-
 23
23
-
 24
24
-
 25
25
-
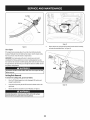 26
26
-
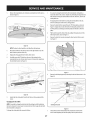 27
27
-
 28
28
-
 29
29
-
 30
30
-
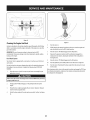 31
31
-
 32
32
-
 33
33
-
 34
34
-
 35
35
-
 36
36
-
 37
37
-
 38
38
-
 39
39
-
 40
40
-
 41
41
-
 42
42
-
 43
43
-
 44
44
-
 45
45
-
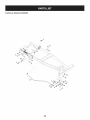 46
46
-
 47
47
-
 48
48
-
 49
49
-
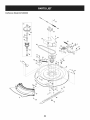 50
50
-
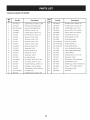 51
51
-
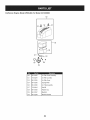 52
52
-
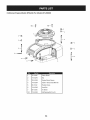 53
53
-
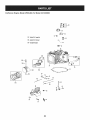 54
54
-
 55
55
-
 56
56
-
 57
57
-
 58
58
-
 59
59
-
 60
60
-
 61
61
-
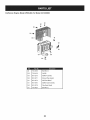 62
62
-
 63
63
-
 64
64
-
 65
65
-
 66
66
-
 67
67
-
 68
68
-
 69
69
-
 70
70
-
 71
71
-
 72
72
-
 73
73
-
 74
74
-
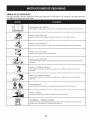 75
75
-
 76
76
-
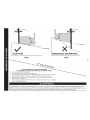 77
77
-
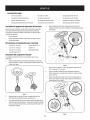 78
78
-
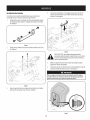 79
79
-
 80
80
-
 81
81
-
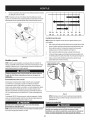 82
82
-
 83
83
-
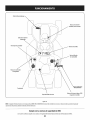 84
84
-
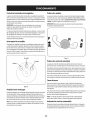 85
85
-
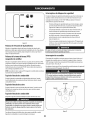 86
86
-
 87
87
-
 88
88
-
 89
89
-
 90
90
-
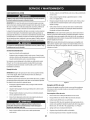 91
91
-
 92
92
-
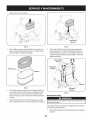 93
93
-
 94
94
-
 95
95
-
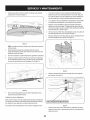 96
96
-
 97
97
-
 98
98
-
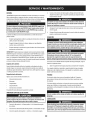 99
99
-
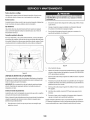 100
100
-
 101
101
-
 102
102
-
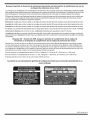 103
103
-
 104
104
-
 105
105
-
 106
106
-
 107
107
-
 108
108
-
 109
109
-
 110
110
-
 111
111
-
 112
112
-
 113
113
-
 114
114
-
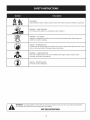 115
115
-
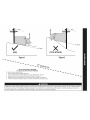 116
116
-
 117
117
-
 118
118
-
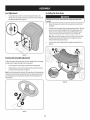 119
119
-
 120
120
-
 121
121
-
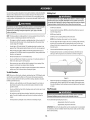 122
122
-
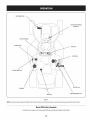 123
123
-
 124
124
-
 125
125
-
 126
126
-
 127
127
-
 128
128
-
 129
129
-
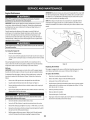 130
130
-
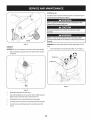 131
131
-
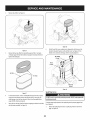 132
132
-
 133
133
-
 134
134
-
 135
135
-
 136
136
-
 137
137
-
 138
138
-
 139
139
-
 140
140
-
 141
141
-
 142
142
-
 143
143
-
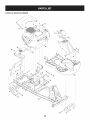 144
144
-
 145
145
-
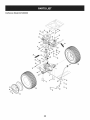 146
146
-
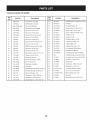 147
147
-
 148
148
-
 149
149
-
 150
150
-
 151
151
-
 152
152
-
 153
153
-
 154
154
-
 155
155
-
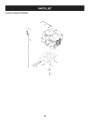 156
156
-
 157
157
-
 158
158
-
 159
159
-
 160
160
-
 161
161
-
 162
162
-
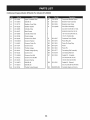 163
163
-
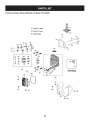 164
164
-
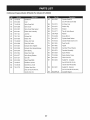 165
165
-
 166
166
-
 167
167
-
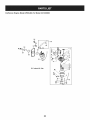 168
168
-
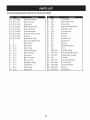 169
169
-
 170
170
-
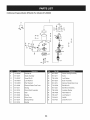 171
171
-
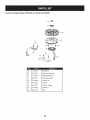 172
172
-
 173
173
-
 174
174
-
 175
175
-
 176
176
-
 177
177
-
 178
178
-
 179
179
-
 180
180
-
 181
181
-
 182
182
-
 183
183
-
 184
184
-
 185
185
-
 186
186
-
 187
187
-
 188
188
-
 189
189
-
 190
190
-
 191
191
-
 192
192
-
 193
193
-
 194
194
-
 195
195
-
 196
196
-
 197
197
-
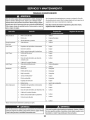 198
198
-
 199
199
-
 200
200
-
 201
201
-
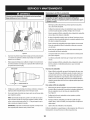 202
202
-
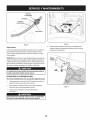 203
203
-
 204
204
-
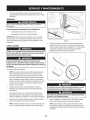 205
205
-
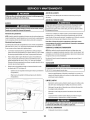 206
206
-
 207
207
-
 208
208
-
 209
209
-
 210
210
-
 211
211
-
 212
212
-
 213
213
-
 214
214
-
 215
215
-
 216
216


Craftsman 247.290000 Manual de usuario
- Categoría
- Cortadoras de césped
- Tipo
- Manual de usuario
en otros idiomas
- English: Craftsman 247.290000 User manual
Artículos relacionados
-
Craftsman 247.28902 Manual de usuario
-
-
-
-
-
-
-
MTD 247240690 El manual del propietario
-
MTD 247.240193 El manual del propietario