Craftsman 247776050 El manual del propietario
- Categoría
- Trituradoras de jardín
- Tipo
- El manual del propietario

Operator's Manual
I:Rl FI'SlVl N
1450 Series Engine
Chipper Shredder
Model No. 247.77605
Before using this equipment,
read this manual and follow
all safety rules and operating
instructions.
* SAFETY
* ASSEMBLY
* OPERATION
* MAINTENANCE
* PARTS LIST
* ESPANOL
Sears Brands Management Corporation, Hoffman Estates, iL 60179 U.S.A.
Visit our website: www.craftsman.com
FORMNO.769-07077A
04/23/2012

Warranty Statement .................................. Pac
Safe Operation Practices .......................... Pac
Safety Labels ............................................ Pac
Assembly .................................................. Pac
Operation .................................................. Pac
Service and Maintenance ......................... Pac
Off-Season Storage .................................. Pac
e2
e3
e7
e8
e12
e14
e18
Trouble Shooting ....................................... Page 19
Parts List ................................................... Page 20
Label Map ................................................. Page 33
Repair Protection Agreement ................... Page 36
Espa_ol ..................................................... Page 37
Service Numbers ...................................... Back Cover
CRAFTSMAN TWO YEAR FULL WARRANTY
FORTWOYEARSfromthedateofpurchase,thisproductiswarrantedagainstanydefectsinmaterialor workmanship.A defec-
tiveproductwillreceivefreerepairor replacementifrepairisunavailable.
Forwarrantycoveragedetailstoobtainfreerepairor replacement,visitthewebsite:www.craftsman.com
ThiswarrantycoversONLYdefectsinmaterialandworkmanship.WarrantycoveragedoesNOTinclude:
• Expendableitemsthatcanwearoutfromnormalusewithinthewarrantyperiod,suchastheblades, sparkplug,air
cleaner,flailscreenand catcherbag.
• Productdamageresultingfromuserattemptsatproductmodificationor repairorcausedbyproductaccessories.
• Repairsnecessarybecauseofaccidentor failuretooperateor maintaintheproductaccordingtoall suppliedinstruc-
tions.
• Preventivemaintenance,or repairsnecessarydueto improperfuelmixture,contaminatedorstalefuel.
Thiswarrantyisvoidif thisproductiseverusedwhileprovidingcommercialservicesor ifrentedtoanotherperson.
Thiswarrantygivesyouspecificlegalrights,andyoumayalsohaveotherrightswhichvaryfromstatetostate.
SearsBrands ManagementCorporation, Hoffman Estates,IL60179
EngineSeries: 1450
EngineOilType: SAE30
EngineOilCapacity: 28ounces
Fuel: UnleadedGasoline
SparkPlug: Champion®RC-12YC
SparkPlugGap: .030"
Model Number.................................................................
Serial Number.................................................................
Dateof Purchase.............................................................
Recordthemodelnumber,serialnumber
anddateof purchaseabove
©SearsBrands,LLC 2

Thissymbolpointsoutimportantsafetyinstructionswhich,if not
followed,couldendangerthepersonalsafetyand/orpropertyof
yourselfandothers.Readandfollowall instructionsin thismanual
beforeattemptingtooperatethismachine.Failuretocomplywith
theseinstructionsmayresultin personalinjury.Whenyouseethis
symbol,HEEDITSWARNING!
CALIFORNIA PROPOSITION 65
EngineExhaust,someof itsconstituents,andcertainvehicle
componentscontainoremitchemicalsknowntoStateofCalifornia
tocausecancerandbirthdefectsorotherreproductiveharm.
Thismachinewasbuilttobeoperatedaccordingtothesafeopera-
tionpracticesin thismanual.Aswithanytypeofpowerequipment,
carelessnessorerroronthepartoftheoperatorcan resultin
seriousinjury.Thismachineiscapableofamputatingfingers,hands,
toesandfeetandthrowingdebris.Failureto observethefollowing
safetyinstructionscouldresultin seriousinjuryordeath.
Your Responsibility--Restrict theuseofthispowermachineto
personswhoread,understandandfollowthewarningsand instruc-
tionsinthismanualandon themachine.
SAVETHESEINSTRUCTIONS!
TRAINING
• Read,understand,andfollowall instructionson themachineand
in themanual(s)beforeattemptingtoassembleandoperate.
Keepthis manualina safeplaceforfutureand regularreference
andfororderingreplacementparts.
• ReadtheOperator'sManualand followallwarningsand safety
instructions.Failuretodosocanresultin seriousinjurytothe
operatorand/orbystanders.
• Befamiliarwithall controlsandtheirproperoperation.Knowhow
tostopthemachineanddisengagethemquickly.
• Neverallowchildrenunder16yearsofagetooperatethis
machine.Children16andovershouldreadandunderstandthe
instructionsandsafeoperationpracticesin thismanualandon
themachineandbe trainedandsupervisedbyanadult.
• Neverallowadultstooperatethis machinewithoutproper
instruction.
• Keepbystanders,pets,andchildrenatleast75feetfromthe
machinewhileitisin operation.Stopmachineifanyoneenters
thearea.
• Neverrunanengineindoorsor ina poorlyventilatedarea.Engine
exhaustcontainscarbonmonoxide,anodorlessanddeadlygas.
• Donotputhandsandfeetnearrotatingpartsor inthefeeding
chambersanddischargeopening.Contactwiththerotating
impellercanamputatefingers,hands,andfeet.
• Neverattempttounclogeitherthefeedintakeordischarge
opening,removeor emptybag,or inspectand repairthemachine
whiletheengineisrunning.Shuttheengineoff andwaituntilall
movingpartshavecometoa completestop.Disconnectthespark
plugwireandgroundit againsttheengine.
PREPARATION
• Thoroughlyinspecttheareawheretheequipmentistobeused.
Removeall rocks,bottles,cans,or otherforeignobjectswhich
couldbepickedupor thrownandcausepersonalinjuryor
damageto themachine.
• Alwayswearsafetyglassesor safetygogglesduringoperation
andwhileperformingan adjustmentor repair,to protectyour
eyes.Thrownobjectswhichricochetcancauseseriousinjuryto
theeyes.
• Wearsturdy,rough-soledworkshoesandclose-fittingslacksand
shirts.Loosefittingclothesor jewelrycanbecaughtin movable
parts.Neveroperatethismachineinbarefeetorsandals.Wear
leatherworkgloveswhenfeedingmaterialinthechipperchute.
• Beforestarting,checkallboltsandscrewsforpropertightnessto
besurethemachineisinsafeworkingcondition.Also,visually
inspectmachineforanydamageatfrequentintervals.
• Maintainor replacesafetyandinstructionslabels,asnecessary.
3

SafeHandlingof Gasoline:
Toavoidpersonalinjuryor propertydamageuseextremecarein
handlinggasoline.Gasolineisextremelyflammableandthevaporsare
explosive.Seriouspersonalinjurycanoccurwhengasolineisspilled
onyourselfor yourclotheswhichcanignite.Washyourskinand
changeclothesimmediately.
• Useonlyan approvedgasolinecontainer.
• Neverfillcontainersinsidea vehicleor ona truckor trailerbed
witha plasticliner.Alwaysplacecontainersonthegroundaway
fromyourvehiclebeforefilling.
• Whenpractical,removegas-poweredequipmentfromthetruck
ortrailerand refuelitontheground.Ifthisisnotpossible,then
refuelsuchequipmenton a trailerwitha portablecontainer,rather
thanfroma gasolinedispensernozzle.
• Keepthenozzleincontactwiththerimofthefueltankor
containeropeningatalltimesuntilfuelingiscomplete.Donotuse
a nozzlelock-opendevice.
• Extinguishallcigarettes,cigars,pipesandothersourcesof
ignition.
• Neverfuelmachineindoors.
• Neverremovegascapor addfuelwhiletheengineishotor run-
ning.Allowenginetocoolatleasttwo minutesbeforerefueling.
• Neveroverfillfueltank.Filltankto nomorethan1/2inchbelow
bottomoffillernecktoallowspaceforfuelexpansion.
• Replacegasolinecapandtightensecurely.
• Ifgasolineisspilled,wipeitoff theengineandequipment.Move
unittoanotherarea.Wait5 minutesbeforestartingtheengine.
• Toreducefirehazards,keepmachinefreeofgrass,leaves,or
otherdebrisbuild-up.Cleanupoil orfuelspillageand removeany
fuelsoakeddebris.
• Neverstorethemachineorfuelcontainerinsidewherethereisan
openflame,sparkor pilotlightason awaterheater,spaceheater,
furnace,clothesdryerorothergasappliances.
OPERATION
• Donotputhandsandfeetnearrotatingpartsor in thefeeding
chambersanddischargeopening.Contactwiththerotating
impellercanamputatefingers,hands,andfeet.
• Beforestartingthemachine,makesurethechipperchute,feed
intake,andcuttingchamberare emptyandfreeofall debris.
• Thoroughlyinspectall materialtobe shreddedandremoveany
metal,rocks,bottles,cans,or otherforeignobjectswhichcould
causepersonalinjuryor damagetothemachine.
• Ifitbecomesnecessaryto pushmaterialthroughtheshredder
hopper,usea smalldiameterstick.Donotuseyourhandsor feet.
• Iftheimpellerstrikesa foreignobjector ifyourmachineshould
startmakinganunusualnoiseorvibration,immediatelyshut
theengineoff.Allowtheimpellertocometoa completestop.
Disconnectthesparkplugwire,grounditagainsttheengineand
performthefollowingsteps:
a. Inspectfordamage.
b. Repairor replaceanydamagedparts.
c. Checkforanyloosepartsandtightento assurecontinued
safeoperation.
• Donotallowanaccumulationof processedmaterialto buildupin
thedischargearea.Thiscanpreventproperdischargeandresult
inkickbackof materialthroughthefeedopening.
• Donotattempttoshredorchipmateriallargerthanspecified
on themachineor inthis manual.Personalinjuryor machine
damagecouldresult.
• Neverattempttounclogeitherthefeedintakeor discharge
openingwhiletheengineisrunning.Shuttheengineoff,waituntil
all movingpartshavestopped,disconnectthesparkplugwireand
grounditagainsttheenginebeforeclearingdebris.
• Neveroperatewithouttheshredderhopper,chipperchute,or
chutedeflectorproperlyattachedtothemachine.Neveremptyor
changedischargebagwhiletheengineisrunning.
• Keepallguards,deflectorsand safetydevicesin placeand
operatingproperly.
• Keepyourfaceandbodybackandtothesideofthechipper
chutewhilefeedingmaterialintothemachineto avoidaccidental
kickbackinjuries.
• Neveroperatethis machinewithoutgoodvisibilityorlight.
• Donotoperatethismachineona paved,gravelor non-level
surface.
• Donotoperatethismachinewhileundertheinfluenceof alcohol
or drugs.
• Mufflerandenginebecomehotandcancausea burn.Donot
touch.
• Neverpick uporcarrymachinewhiletheengineisrunning.
• Ifsituationsoccurwhichare notcoveredinthis manual,usecare
andgoodjudgement.Contact1-800-4-MY-HOMEforthelocation
ofthenearestSearsParts& RepairServiceCenter.
MAINTENANCE & STORAGE
• Nevertamperwith safetydevices.Checktheirproperoperation
regularly.
• Checkboltsandscrewsforpropertightnessatfrequentintervals
to keepthemachineinsafeworkingcondition.Also,visually
inspectmachineforanydamageandrepair,ifneeded.
• Beforecleaning,repairing,or inspecting,stoptheengineand
makecertaintheimpellerandall movingpartshavestopped.
Disconnectthesparkplugwireandgrounditagainsttheengine
to preventunintendedstarting.
• Donotchangetheenginegovernorsettingsoroverspeedthe
engine.Thegovernorcontrolsthemaximumsafeoperatingspeed
oftheengine.
4

• Maintainor replacesafetyandinstructionlabels,asnecessary.
Followthismanualforsafeloading,unloading,transporting,and
storageof thismachine.
Neverstorethemachineorfuelcontainerinsidewherethereisan
openflame,sparkorpilotlightsuchasa waterheater,furnace,
clothesdryer,etc.
Allowmachinetocoolatleast5 minutesbeforestoring.
• Alwaysrefertotheoperator'smanualforproperinstructionson
off-seasonstorage.
• Ifthefueltankhasto bedrained,do thisoutdoors.
• Observeproperdisposallawsand regulationsforgas,oil,etc.to
protecttheenvironment.
• AccordingtotheConsumerProductsSafetyCommission(CPSC)
andtheU.S.EnvironmentalProtectionAgency(EPA),thisproduct
hasan AverageUsefulLifeofseven(7)years,or 60hoursof
operation.AttheendoftheAverageUsefulLife havethemachine
inspectedannuallybyan authorizedservicedealertoensurethat
allmechanicalandsafetysystemsareworkingproperlyand not
wornexcessively.Failuretodo socanresultinaccidents,injuries
ordeath.
DO NOT MODIFY ENGINE
Toavoidseriousinjuryordeath,donotmodifyenginein anyway.
Tamperingwiththegovernorsettingcanleadto a runawayengineand
causeittooperateatunsafespeeds.Nevertamperwithfactorysetting
ofenginegovernor.
NOTICE REGARDING EMISSIONS
EngineswhicharecertifiedtocomplywithCaliforniaandfederal
EPAemissionregulationsforSORE(SmallOff RoadEquipment)are
certifiedtooperateon regularunleadedgasoline,and mayinclude
thefollowingemissioncontrolsystems:EngineModification(EM),
OxidizingCatalyst(CO),SecondaryAirInjection(SAI)and ThreeWay
Catalyst(TWO)if soequipped.
SPARK ARRESTOR
Thismachineis equippedwithan internalcombustionengineand
shouldnotbe usedonor nearanyunimprovedforest-covered,
brushcoveredor grass-coveredlandunlesstheengine'sexhaust
systemisequippedwitha sparkarrestormeetingapplicablelocalor
statelaws(ifany)
Ifa sparkarrestorisused,itshouldbe maintainedin effectiveworking
orderbytheoperator.IntheStateofCaliforniatheaboveis required
bylaw(Section4442oftheCaliforniaPublicResourcesCode).Other
statesmayhavesimilarlaws.Federallawsapplyonfederallands.
A sparkarrestorforthemufflerisavailablethroughyournearestSears
PartsandRepairServiceCenter.

SAFETY SYMBOLS
Thispagedepictsanddescribessafetysymbolsthatmayappearonthisproduct. Read,understand,andfollowall instructionson themachine
beforeattemptingtoassembleandoperate.
i
i
• ®
il
READ THE OPERATOR'S MANUAL(S)
Read, understand, and follow all instructions in the manual(s) before attempting to assemble and
operate
WARNING-- ROTATING BLADES
Keep hands out of inlet and discharge openings while machine is running. There are rotating blades
inside
BYSTANDERS
Keep bystanders, pets, and children at least 75 feet from the machine while it is in operation. Stop
machine if anyone enters the area.
WARNING-- THROWN DEBRIS
Never operate without the chute deflector properly attached to the machine.
EYEPROTECTION
Always wear safety glasses or safety goggles when operating this machine.
I_ ARNING: YourResponsibility--Restricttheuseofthis powermachineto personswhoread,understandandfollowthe
warningsand instructionsinthis manualandonthemachine.
J
SAVETHESEINSTRUCTIONS!
6

r
100/.LIIO-NV:IIO
"lVflNV_ S,UOIVU3dOQV3H"G
"S3OV_IJflS]3AVUONO9NIIV_J3dO
N3HMNOIIflVOVSIX]qsfl"S9]ONVIS181V]98VHOSIO
10381083A3N'S]IUflrNI SI03PgoNMOUHIQIOAV01 "_
"3NIHOV_ONIOIA83SUOONIOOO]ONfl
]UO_38O3ddOIS]AVHSlHPd9NIAOW11VlllNfl S]IQNVH
ONIH]8NIVW3UONV']NION]dOlS'88]A]1HOlnlo]9VON]SIO"8
"]lnHg ]gHVHOSIO9010Nfl01 1001lflO-NP]lO ]Sfl "Z
"l]]d ONVSONVH]lPlnd_P NVOH3onvuoHq]l]d_JIHIIM
IOVINO0"u39npONV_J3113dWI9NllVIOU_JOH_IVMVd]3H"L
7

IMPORTANT:Thisunitisshippedwithoutgasolineoroil intheengine.
Becertaintoserviceenginewithgasolineandoilasinstructedinthe
Operationsectionofthis manualbeforeoperatingyourmachine.
NOTE:Referenceto rightand lefthandsideoftheChipperShredder
isobservedfromtheoperatingposition.
OPENING CARTON
1. Cuteachcornerofthecartonverticallyfromtopto bottom.
2. Removeall looseparts.
3. Removeloosepackingmaterial.
REMOVING UNiT FROM CARTON
1. Liftunitfromthereartodetachitfromunderlyingcartonmaterial
androllunitoutofcarton.
2. Checkcartonthoroughlyforanyotherlooseparts.
LOOSE PARTS IN CARTON
• HopperAssembly
• Bag
• ChuteDeflector
• ChipperChute
• Tamper
• SafetyGlasses
• EngineOil
• Operator'sManual
ATTACHING THE HOPPER ASSEMBLY
1. A. Removesixhexnutsandwashersfromtheweldstudson the
impellerhousing.Donotremovesupportplate.SeeFigure1.
B. Placehopperassemblyintopositioninfrontofimpeller
housing,aligningholesinhopperassemblycollarwithweld
studs.
C. Slidehopperassemblyontoweldstudsand replacewashers
andhexnuts.Donottightencompletely.
2. A. Lifthopperassemblyup toimpellerbracketassembly.See
Figure2.
B.Slidethereleaserodoutslightlytohookthehopperbracket
ontothe rod.SeeFigure2.
C.Tightenthesixhexnutsthatsecurehopperassemblyto
impellerhousingandalsotightenthehexnutsthat secure
hopperbracketto hopperassembly.
f
Figure1
J
f
Figure2
8

ATTACHING THE CHUTE DEFLECTOR
1. A.Removethewingknobsfromeachsideofthelowerimpeller
housing.SeeFigure3.
ATTACHING THE CHIPPER CHUTE
1. A. Removethethreecuppedwashersand hexnutsfromweld
studsaroundtheopeningonthesideoftheimpellerhousing.
SeeFigure5.
.
f
Figure3
B.Removethehexlocknut,spacers,andhexboltfromthetopof
theimpellerhousing.
A.Alignthechutedeflectorin positiononthedischargeopening
andinserthexboltwithspacerthroughhingeonchute
deflector(spacersfit insideofhinges).SeeFigure4.
f
Figure5
B.Removethehexbolts,flatwashersandlocknutsfromthetwo
holesontheupperendofthe supportbrace.
A.Alignthechipperchuteovertheweldstuds,sothe slotinthe
bottomofthechuteisfacingdown.SeeFigure6.
i
i
i
/
/
/
/
/
/
/
/
/
/
/
/ /
i
/ i"
/ ,/
/ /s
/
/
/
/
/
/ ,
/ /
J
J
Figure4
Figure6
B.Placesecondspaceroverhexboltinsideotherhingeand
securewithhexlocknut.
C. Securebothsidesofchutedeflectorto impellerhousingusing
wingknobspreviouslyremoved.
B.Securechipperchutewiththethreecuppedwashers(cupped
sideagainstthechipperchute)andhexnutspreviously
removed.Donottightenthenutsatthistime.
9

.
Thechippershredderwasshippedwithoneendofthesupport
bracealreadysecuredtothelowerframe.Loosenbutdo not
removetheboltssecuringthebraceto theframe.
Figure7
A.Aligntheholesinthechutewiththeholesinthetopofthe
braceandattachbracetochipperchutewithhardware
previouslyremoved.Theflatwashersshouldbe placedunder
theboltheadsandagainsttheinsidesurfaceoftheplastic
chipperchute.Tightensecurely.SeeFigure7.
B.Tightentheboltssecuringthesupportbracetotheframe.
C.Tightenthethreenutsontheweldstudsholdingthechipper
chutetotheimpellerhousing.
ATTACHING THE BAG
f
Toattachthebag:
A. Placetheopeningofthebagcompletelyoverthechute
deflector.
B.Pullon thedrawstringuntilthebagistightaroundchute
deflectoropening.
C.Clipdrawstringbackon itself,tightagainstchutedeflectorto
secureintoposition.SeeFigure8.
Figure8
J
10

(large) HopperAssembly
ReleaseRod
(small) Chipper Chute
Tamper--=_
GasFill
@
Chute
Deflector
Figure9
Nowthatyouhavesetupyourchippershredderforoperation,get
aquaintedwithits controlsandfeatures.Theseare describedbelow
andillustratedon thispage.Thisknowledgewillallowyoutouseyour
newequipmenttoits fullestpotential.
CHIPPER CHUTE
Allowstwigsandsmallbranchesup to3" indiametertobefedintothe
impellerforchipping.SeeFigure9.
Theoperationof anychippershreddercan resultinforeignobjects
beingthrownintotheeyes,whichcandamageyoureyesseverely.
Alwayswearthesafetyglassesprovidedwiththisunitor eyeshields
beforechippingor shreddingandwhileperforminganyadjustments
or repairs.
TAMPER
HOPPER ASSEMBLY
Allowleavesandsmallbranchesupto 1/2diameterto befedintothe
impellerforchippingandshredding.Materialcanberakedintohopper
assemblybyloweringthehopperassembly.SeeFigure9.
RELEASE ROD
Thereleaserodislocatedon theimpellerbracketassemblyandit
isusedto releaseorlockthehopperwhenraisingor lowering.See
Figure9.
CHUTE DEFLECTOR
Chippedandshreddeddebrisisdischargedoutthechutedeflector.
Theunitmaybeoperatedwithorwithoutthecollectionbagattachedto
thechutedeflector.SeeFigure9.
Thisplugisinsertedintothechipperchuteto pushtwigsandsmall
branchestowardstheimpellerbladeswithoutendangeringyourhands.
TH ROTTLE CONTROL
Thislevercontrolstheenginespeedandstopfunction.Throughthree
separatepositionsontheleverfromleftto right,theoperationisas
follows:
Start/Run Slow/Idle Engine Off
CHOKE CONTROL
Thechokecontrolisusedtochokethecarburetorand assistinstarting
theengine.
Meets ANSI Safety Standards
CraftsmanYardVacuumsconformtothesafetystandardoftheAmericanNationalStandardsInstitute(ANSI).
11

GAS AND OIL FILL-UP
Oil (one bottle shipped with unit)
FirstTimeUse
1. Removeoil fillplug.
2. Withthechippershredderonlevelground,usea funneltoempty
entirecontentsofoil bottleprovidedintotheengine.
3. Replaceoil fillplugandtighten.
Subsequent Uses
Onlyusehighqualitydetergentoil ratedwithAPIserviceclassification
SF,SG,or SH.Selecttheoil'sSAEviscositygradeaccordingtothe
expectedoperatingtemperature.Followthechartbelow.
_older _ 32°F _Warmer'_
OilViscosity Chart
J
Alcoholblendedfuels(calledgasoholor usingethanolor methanol)
canattractmoisturewhichleadstoseparationand formationofacids
duringstorage.Acidicgascandamagethefuelsystemofanengine
whileinstorage.
Toavoidengineproblems,thefuelsystemshouldbeemptiedbefore
storagefor30daysorlonger.Drainthegastank,starttheengine
andletitrununtilthefuellinesandcarburetorare empty.Use
freshfuelnextseason.See STORAGEInstructionsforadditional
information.
Neveruseengineorcarburetorcleanerproductsinthefueltankor
permanentdamagemayoccur.
NOTE:Checkthefuellevelperiodicallytoavoidrunningoutofgaso-
linewhileoperatingthechippershredder.Iftheunitrunsoutofgasas
itischipping,itmaybe necessarytounclogthedischargeareabefore
itcanbe restarted.RefertoSERVICEANDMAINTENANCEsection.
Althoughmulti-viscosityoils(5W30,10W30,etc.)improvestarting
incoldweather,theywillresultinincreasedoil consumptionwhen
usedabove32°E Checkyourengineoillevelmorefrequentlytoavoid
possibleenginedamagefromrunninglowon oil.
1. Checktheoil levelbyremovingtheoilfillplugand lookinginto
theoil fillhole.Oil shouldbevisibleup tothethreadsof theoil fill
plug,almosttothepointofoverflowing.Fillifnecessary.Capac-
ity isapproximately28 oz.Overfillingcancausea hazardous
situation,be suretowipeup anyspilledor excessoil.
2. Replaceoil fillplugandtighten.
3. Keepoil levelatFULL.Runningtheenginewithtoolittleoil can
resultinpermanentenginedamage.
Gasoline
Useextremecarewhenhandlinggasoline.Gasolineisextremely
flammableandthevaporsareexplosive.Neverfuelmachineindoors
orwhiletheengineishotor running.Extinguishcigarettes,cigars,
pipes,andothersourcesof ignition.
1. Removefuelcapfromthefueltank.
2. Makesurethecontainerfromwhichyouwillpourthegasolineis
cleanandfreefromrustor foreignparticles.Neverusegasoline
thatmaybestalefromlongperiodsofstorageinitscontainer.
Gasolinethathasbeensittingforanyperiodlongerthanfour
weeksshouldbeconsideredstale.
3. Fillfueltankwithclean,fresh,unleadedregulargasolineonly.Do
notusegasolinecontainingMETHANOL.Replacefuelcap.
TO START ENGINE
1. Attachsparkplugwireand rubberboottosparkplug.
2. Filltankto nomorethan1/2inchbelowbottomoffillerneckto
providespaceforfuelexpansion.
3. Turnthefuelshut-offvalvetotheONposition.
4. MovethechokeleverontheenginetoCHOKEI'_1 position.(A
warmenginemaynotrequirechoking.)See Figure10.
5. MovethrottlecontroltoSTART/RUN(Rabbit)_ position.See
Figure10.
6. Standingbehindtheunit,graspstarterhandleand pullropeout
untilyoufeela drag.
f
Figure10
J
12

NOTE:Youwillheara noiseastheenginefindsthestartof the
compressioncycle.Thenoiseiscausedbythechippingandshredding
flails,andyouwillhearit untiltheengineimpellerreachesfullspeed.
7. Pulltheropewitha rapid,continuous,fullarmstroke.Keepa firm
griponthestarterhandle.Lettheroperewindslowly.
8. Repeat,if necessary,untilenginestarts.Whenenginestarts,
movechokecontrolgraduallytowardtheRUNIJtIposition..
9. If enginefalters,movechokecontrolbacktowardtheCHOKE
I'o,I positionand repeatsteps5 though8.
10. ALWAYSkeepthethrottlecontrolin theSTART/RUNposition
whenoperatingthechippershredder.
TO STOP ENGINE
1. Movethrottlecontrollevertoslow(turtle)'_ position.
Wheneverpossible,graduallyreduceenginespeedbefore
stoppingengine.
2. MovethrottlecontrollevertoSTOPI or OFFposition.
3. Turnthefuelshut-offvalvetotheOFFposition.
4. Disconnectsparkplugwireandgrounditagainsttheengineto
preventaccidentalstartingwhiletheequipmentisunattended.
SHREDDING
Yardwastesuchas leavesandpineneedlescanbe placedin the
hopperforshredding.Aftermaterialhasbeenprocessedbythe shred-
derbladeandflails,itwillbeforcedoutofthechutedeflector,and,if
attached,intoadebriscollectionbag.
Observethefollowingguidelineswhenshreddingyarddebris:
• Neverattempttoshredmaterialotherthannormalyarddebris
(leaves,twigs,pinecones,etc.).
• Avoidshreddingfibrousplantssuchastomatovines,palmfronds,
etc.,untiltheyare thoroughlydriedout. Freshvinesdo notshred
wellandtendtowrapthemselvesaroundtheimpellerandflails.
• Placereasonableamountsofdebrisintothehopperata time.Do
notoverloadthehopper.
• Allowthematerialin thehopperto bedrawnintothebladesand
shreddedbeforeaddingadditionaldebristothehopper.Failureto
duesomayresultin acloggedhopper,cloggedchutedeflectoror
a stalledengine.
CHIPPING
Branchesupto3"in diametercanbefedintothechipperchute.
Observethefollowingguidelineswhenchippingbranches:
• Keepbothhandsfirmlyonthebranchasyoufeeditintothe
chipperchute.
• Neverfeedmorethanonebranchintothechipperchuteata time.
• Neverfeedanythingotherthanbranches(orwood)intothe
chipperchute.
• Applyintermittentpressure(force,inshortpulses)whilefeeding
larger(3-inchdiameter)branchesintothechipperchute,toavoid
boggingor stallingtheengine.
IMPORTANT:Neverfeedbrancheswitha diametergreaterthan
three(3)inchesintothechipperchute.Doingsocanresultin serious
damageto yourunit'schipperblades,flailsor impeller.
NOTE:Forbestperformance,alwaysoperatetheunitwith sharp
chipperblades.If a noticeablelossin performanceisencountered
whilechippingbranches,thechipperbladesshouldbe replaced.
LOWERING THE HOPPER ASSEMBLY
1. Withonehandgraspthehandleatthetopofthehopperassem-
blyandlift slightly.
2. Withtheotherhandpulloutonthereleaserodandlowerthe
hopperassemblytotheground.
TO EMPTY BAG
1. Un-clipdrawstringandloosenbagfromchutedeflectoropening.
2. Emptybagandreattachtothedischargechuteopening.Pullon
thedrawstringuntilthebagistightaroundthechuteopeningand
clipthedrawstringtightagainstthechutedeflector.
IMPORTANT:Theflailscreenislocatedinsidethehousingin the
dischargearea.Iftheflailscreenbecomesclogged,removeand
cleanas instructedintheServiceand Maintenancesection.Forbest
performance,itisalsoimportanttokeepthechipperbladessharp.
13

MAINTENANCE SCHEDULE
Beforeperforminganytypeofmaintenance/service,disengageall
controlsandstoptheengine.Waituntilallmovingpartshavecometo
acompletestop.Disconnectsparkplugwireandgrounditagainstthe
enginetopreventunintendedstarting.Alwayswearsafetyglassesduring
operationorwhileperforminganyadjustmentsor repairs.
Followthemaintenanceschedulegivenbelow.Thischartdescribes
serviceguidelinesonly.UsetheServiceLogcolumntokeeptrackof
completedmaintenancetasks.Tolocatethe nearest SearsService
Centeror toscheduleservice,simplycontactSearsat
1-800-4-MY-HOME®.
EachUse
1st5 - 8 hours
25 hours
Annuallyor 50hours
Annuallyor 100hours
BeforeStorage 1. Fuelsystem
Underheavyloador inhightemperatures
.
2.
3.
1.
1.
2.
3.
1.
2.
1.
Engineoillevel
Looseormissinghardware
Unitandengine.
Engineoil
Engineoill-
Aircleaner
Controllinkagesand pivots
Engineoil
Muffler
Sparkplug
1. Check
2. Tightenor replace
3. Clean
1. Change
1. Change
2. Replace
3. Lubewithlightoil
1. Change
2. Inspect
1. Clean,checkand resetgap,or
replacesparkplug.
1. Runengineuntilit stopsfromlackof
fueloradda gasolineadditivetothe
gasin thetank.
Alwaysstopengineanddisconnectsparkplugwirebeforeperforming
Ianymaintenanceoradjustments.Alwayswearsafetyglassesduring
_operationor whileperforminganyadjustmentsor repairs.
GENERAL RECOMMENDATIONS
• Alwaysobserveallsafetyrulesfoundonproductlabelsandin
thisoperator'smanualwhenperforminganymaintenance.Safety
rulescanbefoundonthe productlabelsandin thisOperator's
Manualbeginningon page3.
• Thewarrantyon thischippershredderdoesnotcoveritemsthat
havebeensubjectedtooperatorabuseor negligence.Toreceive
fullvaluefromwarranty,operatormustmaintaintheequipmentas
instructedhere.
• Someadjustmentswillhavetobe madeperiodicallytomaintain
yourunitproperly.
• Periodicallycheckall fastenersand makesurethesearetight.
ENGINE MAINTENANCE
Checking the Spark Plug
Cleansparkplugandresettheelectrodegapto0.030"atleastoncea
season;replaceevery100hoursofoperation.
f
Electrode
Porcelain
,L
.030 (.76 mm) gap
Figure 11
• Cleanareaaroundthesparkplugbase.Donotsandblastspark
plug.Sparkplugshouldbecleanedbyscrapingor wirebrushing
andwashingwitha commercialsolvent.
Removeandinspectthesparkplug.Checkgaptomakesureitis
setat .030".SeeFigure11.
Replacethesparkplugif electrodesare pitted,burned,or the
porcelainiscracked.
14

Servicing the Air Cleaner
Donotusepressurizedairor solventstocleantheaircleaner
cartridge.
Theair cleanerpreventsdamagingdirt, dust,etc.,fromenteringthe
carburetorand beingforcedintotheengineandisimportanttoengine
lifeandperformance.Neverruntheenginewithoutan aircleaner
completelyassembled.
Replacetheaircleanerevery25 hoursofoperation.
1. Loosenscrewsthatholdtheairfiltercover.
2. Opencoverandremoveair filter.See Figure12.
f
Cover
Air Filter
\
y
Figure12
3. Discardold airfilter.
4. installnewairfilter.
5. Closethecoverandtightenscrews.
NOTE:Ifthefilteristornordamagedin anyway,replaceit.
Check Engine Oil
1. Makesureengineislevelandtheareaaroundoil fillcapisclean.
2. Removeoilfillcap.
3. Oilshouldbe nearthetopoftheoil fillcapthreads,almostto the
pointofoverflowing
Change Engine Oil
* Onlyusehighqualitydetergentoil ratedwithAPIservice
classificationSF,SG,orSH.Selecttheoil'sSAEviscositygrade
accordingtotheexpectedoperatingtemperature.Refertoopera-
tionsectionforviscositychart.
. Changeengineoil afterthefirstfivetoeighthoursofoperation,
andeveryfifty hoursoreveryseasonthereafter.Changeoil every
twentyfivehourswhenoperatingengineunderheavyloadorin
hightemperatures.
To Drain Oil
1. Runtheengineto warmtheoil.
2. WithengineOFFbutstillwarm,disconnectthe sparkplugwire
and keepitawayfromsparkplug.
3. Removeoil draincaplocatedatthebaseoftheengine,anddrain
oil intoan appropriatereceptacle.SeeFigure13.
Oil Drain
End Cap _"
J
Figure13
e
Usedoil isa hazardouswasteproduct.Disposeofusedoil properly.
IDonotdiscardwithhouseholdwaste.Checkwithyourlocalauthori-
_tiesorSearsServiceCenterforsafedisposal/recyclingfacilities.
4. Whenengineisdrainedofall oil,replaceandtightentheoil drain
cap.
5. Withtheenginelevel,refillwith approximately28oz. offreshoil.
Filltheoil upintothethreadsoftheoilfill plug,almosttothepoint
ofoverflowing.
6. Replacetheoilfill plugandwipeupanyoil thatmayhavespilled
or overflowed.
7. Replacesparkplugwirebeforestarting.
15

Service IVluffler
Temperatureof mufflerandnearbyareasmayexceed150°F(65°C).
Avoidtheseareas.
• Inspectmufflerevery50 hours,andreplaceif necessary.
Replacementpartsforthemufflermustbethe sameandinstalled
inthe samepositionastheoriginalparts.
Clean Engine
Dailyor beforeeveryuse,cleangrass,chaffor accumulated
debrisfromengine.Keeplinkage,spring,andcontrolsclean.
Keepareaaroundandbehindmufflerfreeofanycombustible
debris.
• Keepingenginecleanallowsairmovementaroundengine.
• Enginepartsshouldbe keptcleanto reducetheriskofoverheat-
ingandignitionofaccumulateddebris.
Donotusewatertocleanengineparts.Watercouldcontaminatefuel
system.Usea brushor drycloth.
Carburetor Adjustment
Thecarburetoronthis engineisnotadjustable.
Engine Speed
LUBRICATION
Donot,attempttoaltertheenginespeedbytamperingwiththe
enginesgovernorlinkage.Doingsocouldresultin seriouspersonal
Iinjuryanddamagetotheengine.TheengineRPMhasbeensetat
thefactory.
• HopperAssembly- Lubricatethepivotpointson thehopper
assemblywithlightoiloncea season.
• DischargeChute-Lubricatethepivotpointsonthedischarge
chutewithlightoiloncea season.
• ReleaseRod-Lubricatethereleaserodand springwith lightoil
oncea season.
CLEAN EQUIPMENT
• Cleanthechippershredderthoroughlyaftereachuse.
• Washbagperiodicallywithwater.Allowtodrythoroughlyin
shade.
• Iftheflailscreenbecomesclogged,removeandcleanas
instructedbelow.
NOTE:Cleaningwitha forcefulsprayofwaterisnotrecommendedas
itcouldcontaminatethefuelsystem.
REMOVING THE FLAIL SCREEN
Beforeperforminganytypeofmaintenanceonthemachine waitfor
all partsto stopmovinganddisconnectthesparkplugwire. Failure
tofollowthis instructioncouldresultinpersonalinjuryor property
damage.
Ifthedischargeareabecomesclogged,removetheflailscreenand
cleanareaasfollows:
Stoptheengine.Makecertainthechippershredderhascometo
a completestop.
Disconnectsparkplugwirefromsparkplugandgroundagainst
theengine.
A. Removethebagandtwowingknobsoneachsideofthechute
deflector.SeeFigure14.
.
3.
f
/
s /
s'
/ /
/
//
/
j
Figure14
B.Liftthechutedeflectoruptokeepitoutoftheway.
C.Removethetwo hairpinclipsfromeachclevispinwhich
extendthroughthehousingand removepins.
D.Removetheshredderscreenfrominsidethehousingand
cleanthescreenbyscrapingorwashingwithwater.SeeFig.14.
4. Reinstallthescreen,makingcertaintoreassembletheflailscreen
withthecurvesidedown.
5. Reattachthechutedeflectorwiththehardwarepreviouslyremoved
andconnectthebagto unit.
SHARPENING OR REPLACING CHIPPER
BLADES
1. Disconnectthesparkplugwireandgroundagainsttheengine.
2. Removetheflailscreenasinstructedinthe previoussection.
3. Removethechipperchutebyremovingthreehexnutsand
washers.
4. Removethechipperchutesupportbracefromtheframeby
16

removingthehexbolts.
5. Rotateimpellerassemblybyhanduntilyoulocateone oftwo
chipperbladesin thechipperchuteopening.
6. Removethebladebyremovingtheinternalhexscrews,lock
washers,andhexnutswhichsecureittothe impeller.Retainthe
/
/
Figure15
hardware.SeeFigure15.
NOTE:Usea3/16"hexkey(Allen)wrenchon theoutsideoftheblade
anda 1/2"box(or socket)wrenchontheinsideoftheimpeller.Hold
theAllenwrenchstationaryand rotatethebox(or socket)wrenchto
loosenthenut.
7. Installa replacementblade(PartNo.742-0544)withthehardware
removedearlieror sharpenand replaceexistingblade.
IMPORTANT:Whensharpeningtheblade,protecthandsbyusing
gloves.Followtheoriginalangleofgrindandmakesuretoremovean
equalamountfromeachblade.
8. Toreplacetheotherblade,rotatetheimpellertoexposethe
secondbladeand repeatthestepsabove.
NOTE: Makecertainbladesare reassembledwiththesharpedge
facingthesamedirectionaswhenremoved.Torquehardwareto250
- 300in.Ibs.
Theimpeller'schipperbladesandshredderbladearesharp.Wear
leatherworkglovesto protectyourhands.
SHARPENING OR REPLACING THE
SHREDDER BLADE
1. Stoptheengineandmakecertainthatallmovingpartshave
cometoa completestop.
2. Disconnectthesparkplugwireandgroundagainsttheengine.
3. Lowerthehopperassemblyandplacea blockundertheflailhousing.
4. Removethesix hexlocknutsandflatwashersfromtheweld
studsontheflailhousing.Retainthehardware.
17
5. Carefullyseparatethehopperassemblyfromtheimpelleras-
semblyandremovetheshredderplate.Theshredderplatecanbe
identifiedbyreferringtoitem29 in thepartslist onpage20& 21.
NOTE:Whenreassemblingtheshredderplate,makecertainthe
embossedtabfacesinwardtowardstheimpeller.
6. Removethetwowingknobsthatsecurethechuteddlector and
raisethechute.
7. Inserta 1/2"or 3/4"diameterpipethroughtheshredderscreen
intotheimpellertokeepitfromturningor removetheflailscreen
and inserta pieceofwoodintothechuteopening.
8. A. Removethetwointernalhexscrews,lockwashers,and hex
locknutswhichsecuretheshredderbladetotheimpeller.
B.Removethehexbolt,lockwasher,andflatwasherto
completelyfreeshredderblade.SeeFigure16.
f
Weld
FlailHousing
Figure16
9. Installa replacementblade(PartNo.742-0544)with thehardware
removedearlierorsharpenand replaceexistingblade.
IMPORTANT:Whenreassemblingtheshredderblade,tightencenter
bolttobetween550and700in.-Ibs,andthetwooutsideboltsto
between250and350in.-Ibs.
NOTE:Usea 3/16"hexkey(Allen)wrenchontheoutsideofthe
shredderbladeanda 1/2"box(or socket)wrenchon theinsideofthe
shredderblade.HoldtheAllenwrenchstationaryand rotatethebox
(orsocket)wrenchtoloosenthenut. Usecautionwhenremovingthe
bladetoavoidcontactingtheweldstudson housing.
IMPORTANT:Whensharpeningtheblade,followtheoriginalangle
ofgrindasa guide.It isextremelyimportantthateachcuttingedge
receivesan equalamountofgrindingtopreventan unbalancedblade.
An unbalancedbladewillcauseexcessivevibrationwhenrotatingat
highspeedsandmaycausedamagetotheunit.Thebladecanbe
testedbybalancingiton ascrewdriverornail.Removemetalfromthe
heavysideuntilitisbalancedevenly.

Neverstorechippershredderwithfuelintankindoorsorinpoorly
ventilatedareaswherefuelfumesmayreachanopenflame,spark,
orpilotlightasonafurnace,waterheater,clothesdryer,orgas
appliance.
PREPARING THE ENGINE
Forenginesstoredover30 days:
1. Topreventgumfromforminginfuelsystemor oncarburetor
parts,runengineuntilit stopsfromlackof fuelor adda gasoline
additivetothegasinthetank.Ifyouusea gasadditive,runthe
engineforseveralminutestocirculatetheadditivethroughthe
carburetor--afterwhichtheengineandfuelcanbestoredup to
six months.
2. Whileengineis stillwarm,changetheoil.SeeChangeEngineOil
in SERVICEANDMAINTENANCEsection.
3. Removesparkplugand pourapproximately1oz. (30ml)ofclean
engineoil intothecylinder.Pulltherecoilstarterseveraltimesto
distributetheoil,andreinstallthe sparkplug.
4. Cleanengineofsurfacedebris.
PREPARING THE CHIPPER SHREDDER
* Whenstoringthechippershredderinan unventilatedor metal
storageshed,careshouldbetakento rustproofthenon-painted
surfaces.Usinga lightoil orsilicone,coattheequipment,
especiallyanysprings,bearings,andcables.
, Removealldirt fromexteriorofengineandequipment.
, Followlubricationrecommendations.
o Storeequipmentin a clean,dryarea.Donotstorenextto
corrosivematerials,suchasfertilizer.Donotstoreinan area
whereequipmentispresentthatmayusea pilotlightor hasa
componentthatcancreatea spark.
18

Beforeperforminganytyped maintenance/service,disengageall
controlsandstoptheengine.Waituntilallmovingpartshavecometo
acompletestop.Disconnectsparkplugwireandgrounditagainstthe
enginetopreventunintendedstarting.Alwayswearsafetyglassesduring
operationorwhileperforminganyadjustmentsor repairs.
Enginefailstostart
Enginerunserratically
1. Throttlelevernotincorrectstartingposition
2. ChokenotintheCHOKEposition
3. Sparkplugwiredisconnected
4. Faultysparkplug
5. Fueltankemptyor stalefuel
6. Cannotpullrecoilcord
7. Engineflooded
1. UnitrunningonCHOKE
2. Sparkplugwireloose
3. Stalefuel
4. Waterordirtinfuel system
5. Dirtyair cleaner
6. LowengineRPM
7. Carburetoroutofadjustment
1. Engineoillevellow
2. Airflowrestricted
Engineoverheats
Enginehesitatesat highRPMs 1. Sparkpluggap settooclose
Engineidlespoorly 1. Fouledsparkplug
2. Dirtyair cleaner
Excessivevibration 1. Loosepartsor damagedimpeller
Unitdoesnotdischarge 1. Chuteddlector clogged
Rateofdischargeslows
considerablyorcompositionof
dischargedmaterialchanges
2. Foreignobjectlodgedin impeller
3. LowengineRPM
1. LowengineRPM
2. Chipperbladedull
1. Movethrottleleverto START/RUNposition.
2. MoveCHOKEtotheCHOKEposition.
3. Connectwiretosparkplug.
4. Clean,adjustgap,or replace.
5. Filltankwithclean,freshgasoline.
6. Obstructionlodgedin impeller.Disconnectspark
plugwireandremovelodgedobject.
7. Waita fewminutesto restart.
1. MovechokelevertotheRUNposition.
2. Connectandtightensparkplugwire.
3. Filltankwithfreshgasoline.
4. Refillwithfreshfuel.
5. Cleanor replaceair cleanerfilter.
6. Alwaysrunengineatfullthrottle.
7. ContactyourSearsParts& RepairCenter.
1. Fillenginewith properamountandtype ofoil.
2. Cleandebrisfromaroundtheengine'scoolingfins
and blowerhousing.
1. Removesparkplugandadjustgap.
1. Replacesparkplugandadjustgap.
2. Replaceair cleanercartridge.
1. Stopengineimmediatelyanddisconnectsparkplug
wire.ContactyourSearsParts& RepairCenter.
1. Stopengineimmediatelyanddisconnectspark
plugwire.Cleanflailscreenandinsided discharge
opening.
2. Stopengineanddisconnectsparkplugwire.
Removelodgedobject.
3. Alwaysrunengineatfullthrottle.
1. Alwaysrunengineatfullthrottle.
2. Replaceor sharpenchipperbladeor contactyour
SearsParts& RepairCenter.
NEED MORE HELP?
Find tMs and a[[ your other product rnanuats online.
Get answers from our team of home experts.
Get a personal}zeal rnaintenance p[an for your home,
Find information and tools to help with home projects.
b_te_ght te ye_ by $¢alts
19

Craftsman Chipper Shredder -- Model No. 247.77605
/
/ ;/
/ /
_ ....
/
; /
2O

Craftsman Chipper Shredder B IViodel No. 247.77605
936-0217 LockWasher,3/8 710-3008
2. 914-0149B CotterPin 23. 736-0247
3. 720-0170 WingKnob5/16-18 24. 942-0571
4. 681-0094A-4044 ChuteDeflectorAssembly 25. 710-1254
5. 911-0835 ClevisPin 26. 681-0004A-4044
6. 781-0457-0637 ShredderScreen 27. 710-0825
7. 926-0211 U-Nut5/16-18 28. 781-0515-0637
8. 950-0793 Spacer 29. 781-0574-0637
9. 912-3027 HexLockNut,1/4-20 30. 681-0104-4044
10. 712-3004A HexLockNut5/16-18 31. 932-0306A
11. 936-0119 LockWasher5/16 32. 936-0117
12. 681-04116 innerImpellerHousingAssembly 33. 914-0104
13. 710-3025 HexCapScrew5/16-18x.625 34. 936-0264
14. 710-0157 HexCapScrew5/16-24x .75 35. 710-0376
15. 942-0544B ChipperBlade 36. 748-0453
16. 710-1054 HexCapScrew5/16-24x 1.0 37. 731-1707A
17. 681-04095 ImpellerAssembly 38. 912-0429
18. 912-0411 HexLockNut5/16-24 39. 731-1710A
19. 712-0266A Nut,JamLock,3/8-16 40. 681-0123-4044
20. 719-04308 FlailBlade 41. 711-1128
21. 738-04286A ShoulderPin,.5x 2.625
HexCapScrew5/16-18x .75
FiatWasher3/8 x 1.25
ShredderBlade
HexCapScrew3/8-24x2.25
OuterimpellerHousingAssembly
HexCapScrew1/4-20x3.75
FrontSupportBracket
ShredderPlate
RearHopperBracketAssembly
CompressionSpring1.75
FlatWasher
CotterPin
FlatWasher.330IDx.630OD
HexCapScrew5/16-18x 1.0
Spacer,.375IDx2.50LG
HopperAssembly
HexLockNut5/16-18
HopperCollar
FrontHopperBracketAssembly
LockRod
21

Craftsman Chipper Shredder B IViodel No. 247.77605
22

Craftsman Chipper Shredder B IViodel No. 247.77605
728-0175 PopRivet
2 753-05094 ChipperShredderChute 17
3 735-0249A ChuteFlap 18
4 781-0633 ChuteFlapStrip 19
5 681-04119-4044 ChipperChuteAssembly 20
6 710-0751 HexCapScrew1/4-20x.620 21
7 712-04064 HexLockNut1/4-20 22
8 710-0809 HexCapScrew1/4-20x 1.25 23
9 736-0173 FlatWasher.28IDx .74OD 24
10 736-0242 BellWasher.340IDx .872OD 25
11 912-3010 HexNut5/16-18 26
12 749-1004-4044 SupportBrace
13 712-3004A HexLockNut5/16-18
14 710-3180 HexCapScrew5/16-18x 1.75
15 936-0170 BellWasher5/16x 1.0
950-0786 Spacer
738-0813 AxleAssembly
737-0298 Pipe,Oil Drain
934-04009 WheelComplete,10.0x 4.0Gray
726-0214 PushCap
681-0183B-4044 Frame
936-0451 Washer,.320IDx.93OD
710-0502A Screw,3/8-16x 1.250
723-0400 SafetyGlasses(NotShown)
964-04024 ChipperBagAss'y(Not Shown)
737-0132 Oil DrainEndCap
27 731-1617 Tamper
28 20T212-O835-F1 ReplacementEngine
29 710-0106 HexScrew,1/4-20x 1.25
23

Briggs & Stratton 20T212=0835=F1 For Chipper Shredder IViodel No. 247.77605
48s,oRTB,OOK E1058OPERATORSMANU_,] 1330_EP_I_M_NU_,i
307 (_
306
12
552
718A
998 _
1427 _"_
46
<_::_.............(_
45 _,/--
278 _
505 _;_
404
614 ,,.......
_-_%
616 ii
LY
24 ._:,
146
o
741%
22
24

Briggs & Stratton 20T212=0835-F1 For Chipper Shredder Model No. 247.77605
45
1026
L 0
,/ C- - Z _Z)
} ixi_ ¸,
_ ..........i36
f 868 .... i883 \
635
337
1022
914
25

Briggs & Stratton 20T212=0835=F1 For Chipper Shredder IViodel No. 247.77605
11
633 @_
98
..................... i
51A(
108
130
95
@
117_j
105
127°
1127
.....122......
118 @
51A(
163
53
180 ;
957
190
601 _!
24O
958
26

Briggs & Stratton 20T212=0835=F1 For Chipper Shredder IViodel No. 247.77605
%
1070
1005
455
%
1070 332
1036 EMISSIONS LABEL
3O4
78
37A
37
305
597 _ 58
456
689
1210
59
• 60 "
1211
592
65A
27

Briggs & Stratton 20T212=0835=F1 For Chipper Shredder Model No. 247.77605
271
190 @_
668
621
843 """_-J'
1230 _'
281
663 %
2O9
613
883
635 ___
356
832
836 _
M
ii
_J
28

Briggs & Stratton 20T212-0835=F1 For Chipper Shredder Model No. 247.77605
968
161
445 ;f i" '\_ ti i_s\ <_
121 CARBURETOR OVERHAUL KIT
51A
127 O
137
163
633 _
8O4
703
1425
358 ENGINE GASKET SET
2O
12
883
1068
1095 VALVE GASKET SET
51A
7 _ / ,\
,X
883
29

Briggs & Stratton 20T212=0835=F1 For Chipper Shredder IViodel No. 247.77605
1
2
3
5
7
794849
698340
391086s
794870
694872
CylinderAssembly
Kit-Bushing/Seal(MagnetoSide)
Seal-Oil(MagnetoSide)
Head-Cylinder
Gasket-CylinderHead
11 696796 Tube-Breather
12 694953 Gasket-Crankcase
13 794829 Screw(CylinderHead)
15 691686 Plug-OilDrain
16 794874 Crankshaft
18 791965 Cover-Crankcase
19 698340 Kit-Bushing/Seal(PTOSide)
20 391086s Seal-Oil(PTOSide)
21 281658s Cap-OilFill
22 794825 Screw(CrankcaseCover/Sump)
23 794814 Flywheel
24 222698s Key-Flywheel
25 792117 PistonAssembly(Standard)
792144 PistonAssembly(.020"Oversize)
26 793561 RingSet(Standard)
792073 RingSet(.020"Oversize)
27 690975 Lock-PistonPin
28 696581 Pin-Piston
29 694691 Rod-Connecting
30 694692 Dipper-ConnectingRod
32 690976 Screw(ConnectingRod)
33 697576 Valve-Exhaust
34 792200 Valve-Intake
35 694865 Spring-Valve(intake)
36 694865 Spring-Valve(Exhaust)
37 795715 Guard-Flywheel
37A 699047 Guard-Flywheel
42 499586 Keeper-Valve
45 690977 Tappet-Valve
46 795697 Camshaft
48 N/A ShortBlock(NoShortBlockAvailable
atthisprinting)
51 694874 Gasket-intake
51A 694875 Gasket-intake
53 794830 Stud(Carburetor)
55 695288 Housing-RewindStarter
30
58
59
60
65
65A
95
97
98
693389
805957
490652
699228
690837
690718
796334
695408
Rope-Starter
Insert-Grip
Grip-StarterRope
Screw(RewindStarter)(Mx6.35mm)
Screw(RewindStarter)(10-32x.27)
Screw(ThrottleValve)
Shaft-Throttle
Kit-idleSpeed
104 694918 Pin-FloatHinge
105 696136 Valve-FloatNeedle
108 696143 Valve-Choke
117 796080 Jet-Main(Standard)
118 796128 Jet-Main(HighAltitude)
121 796137 Kit-CarburetorOverhaul
122 694876 Spacer-Carburetor
125 796321 Carburetor
127 690727 Plug-Welch
130 696139 Valve-Throttle
133 694914 Float-Carburetor
135 698780 Tube-FuelTransfer
137 698781 Gasket-FloatBowl
141 696145 Kit-ChokeShaft
146 690979 Key-Timing
161 795742 Base-AirCleaner
163 692277 Gasket-AirCleaner
180 795705 Tank-Fuel
187 791871 Line-Fuel(Formed)
187A 795046 Line-Fuel(Formed)
187B 791834 Line-Fuel(Formed)
188 699479 Screw(ControlBracket)
190 795047 Screw(FuelTank)
192 690083 Adjuster-RockerArm
209 694867 Spring-Governor(Red)
211 695307 Spring-GovernedIdle
219 693578 Gear-Governor
220 691724 Washer(GovernorGear)
222 795739 Bracket-Control
227 694864 Lever-GovernorControl
240 394358s Filter-Fuel
271 695381 Lever-Control
278 798196 Washer(GovernorControlLever)

Briggs & Stratton 20T212=0835=F1
281 695294 Panel-Control
300 794949 Muffler
304 795733 Housing-Blower
305 699480 Screw(BlowerHousing)
306 697240 Shield-Cylinder
307 794822 Screw(CylinderShield)
332 794824 Nut(Flywheel)
333 492341 Armature-Magneto
334 699477 Screw(MagnetoArmature)
337 491055s Plug-Spark
356 699340 Wire-Stop
For Chipper Shredder Model No. 247.77605
358 795201 GasketSet-Engine
404 795759 Washer(GovernorCrank)
410 695382 Link-Control
415 691363 Plug(Cylinder)
445 491588s Filter-AirCleanerCartridge
455 794867 Cup-Flywheel
456 692299 Plate-PawlFriction
459 281505s PawI-Ratchet
504 695383 WasherSet-Friction
505 793515 Nut(GovernorControlLever)
529 791822 Grommet
552 694674 Bushing-GovernorCrank
561 694255 Nut(ControlLever)
562 798197 Bolt(GovernorControlLever)
592 690800 Nut(RewindStarter)
597 691696 Screw(PawlFrictionPlate)
601 791850 Clamp-Hose(Green)
601A 795230 Clamp-Hose
621 692310 Switch-Stop
632 695917 Spring/Link-MechanicalGovernor
608 695287 Starter-Rewind
613 794846 Screw(Muffler)(M6x.18.27mm)
613A 794844 Screw(Muffler)(M8x.21.67mm)
614 691620 Pin-Cotter
616 795758 Crank-Governor
621 692310 Switch-Stop
632 796324 Spring/Link-MechanicalGovernor
633 690998 Seal-Choke/ThrottleShaft (Throttle
Shaft)(ChokeShaft)
635 691909 Boot-SparkPlug
654
663
668
689
7O3
718
718A
741
794824 Nut(Carburetor)(Serrated)
699492 Screw(ControlPanel)
694257 Spacer(ControlBracket)
691855 Spring-Friction
795222 Clip
690959 Pin-Locating(Cylinder)
695178 Pin-Locating(CylinderHead)
691288 Gear-Timing
742 692564 Retainer-ERing
746 694679 Gear-Idler
773 694258 Retainer(ControlBracket)
798 697890 Screw(RockerCover)
• 804 795223 Canister-Carbon(EVAP)
825 795226 Hose-Air
832 793903 Guard-Muffler
836 699234 Screw(MufflerGuard)
843 695588 Sleeve-Lever
851 692424 Terminal-SparkPlug
868 690968 Seal-Valve
883 794818 Gasket-Exhaust
914 794827 Screw(RockerCover)
957 795221 Cap-Fuel
958 698180 Valve-FuelShutOff
968 794785 Cover-AirCleaner
975 698783 Bowl-Float
998 792928 Pipe-Oil
1005 794815 Fan-Flywheel
1022 690971 Gasket-RockerCover
1023 697691 Cover-Rocker
1026 695177 Rod-Push
1029 690972 Arm-Rocker
1036 Label-Emissions(Availablefroma
Briggs& StrattonAuthorizedDealer)
1054 280275 Tie-Cable
1058 277040TRI Operator'sManual
1070 794821 Screw(FlywheelFan)
1095 795200 GasketSet-Valve
1100 791959 Pivot-RockerArm
1127 695407 Screw(FloatBowl)
1210 498144 Pulley/SpringAssembly(Pulley)
1211 498144 Pulley/SpringAssembly(Spring)
31

Briggs & Stratton 20T212=0835=F1 For Chipper Shredder IViodel No. 247.77605
1230
1427
699847 Stud(ControlBracket)
695757 Cap-Pipe
EngineGasketSet KeyNo.358
CarburetorOverhaulKit KeyNo.121
ValveGasketSet KeyNo.1095
• Includedin EngineGasketSet,KeyNumber358
0 Includedin CarburetorOverhaulKit, KeyNumber121
+ IncludedinValveGasketSet, KeyNumber1095
32

Craftsman Chipper Shredder Model No. 247.77605
777333113 777333200 777332036
®ROTATING CUTTING BLADES. KEEP HANDS AND
FEET OUT OF OPENING WHILE MACHINE mS
RUNNING.
=DO NOT OPERATE THiS MACHINE UNLESS THE
CHUTE DEFLECTOR HAS BEEN PROPERLY
iNSTALLED ANDJS SECURED WiTH THE HAND
KNOBS.
777S30185
Operatien Of This Equipment May Create
Sparks That Can Start Fires Around Dry
Vegetation. A Spark Arrestor May Be
Required. The Operator Should Contact
Local Fire Agencies For Laws Or ReguJa=
ionsTo Fire Prevention Requirements.
777X43688
.................DOHOT...................
USEE85 ORFUEL ......
CONTAiNiNGMORE
THAN10% ETHANOL
777S30181
ROTATING CUTTING BLADES.
KEEP HANDS AND FEET OUT
OF OPENINGS WHILE MACHINE
iS RUNNING.
777S32282
DONOTOPERATETHIS MACHINE
UNLESSTHECHUTEDEFLECTOR
777D12676
TO AVOID SERIOUS iNJURY:
• Read the operator's manuaJ(s) before starting and
using unit.
• Keep ag shieJds and guards in place and secureJy
attached.
• Keep hands, feet, face, cJothing and Jong hair out of
Shredder Hopper, Chipper Chute and Discharge
Chute whge the engine is running. Rotating cutting
bJades inside these openings wiJJcause serious
personal injury if contacted. Material being processed
may bounce back from inJetopenings or be thrown
from the discharge chute. Long hair or Jeoseclothing
may be puJJedor sucked into the inlet openings.
• Do not pJacebranches over 1/2 inch diameter into
the Jarge Shredder Hopper. Branches over 1/2 inch in
diameter sheuJd be pJaeed in the SmaJJChipper
Chute.
• if the chipped shredder jams or becomes clogged,
immediateJy shut off the engine and wait for ail
moving parts to come to a complete stop before
cJearing.
• Do not instaJJ,remove, adjust, or service the
discharge screen or any other part whiJe the engine
is running. Blade contact can occur.
$32O36 AC
777332037
TO AVOID SERIOUS iNJURY:
DO not operate on uneven ground where unit is
unstabJe. Do net operate on pavement, gravel or
other hard surfaces since objects can ricochet
and cause injury.
To avoid a fire hazard, keep Jeaves, grass, and other
combustible materiaJs away from hot engine and
muffler.
• Keep children and ethers away from area of
operation,
, Wear approved safety glasses, gloves and ear
protection.
33

(Thispageapplicableinthe U.S.A.and Canadaonly.)
Sears Brands Management Corporation (Sears), the California Air Resources Board (CARD)
and the United States Environmental Protection Agency (U.S. EPA)
Emission Control System Warranty Statement (Owner's Defect Warranty Rights and Obligations)
EMISSIONCONTROLWARRANTYCOVERAGEISAPPLICABLETOCERTI-
FIEDENGINESPURCHASEDINCALIFORNIAIN1995ANDTHEREAF-
TER,WHICHARE USEDINCALIFORNIA,ANDTOCERTIFIEDMODEL
California and United States Emission
TheCaliforniaAirResourcesBoard(CARD),U.S.EPAand Searsarepleased
toexplainthe EmissionControlSystemWarrantyonyourmodelyear2000and
latersmalloff-roadengine(SORE).InCalifornia,newsmalloff-roadengines
mustbedesigned,builtand equippedto meettheState'sstringentanti-smog
standards.Elsewherein theUnitedStates,newnon-road,spark-ignition
enginescertifiedformodelyear1997andlatermustmeetsimilarstandardsset
forthbythe U.S.EPA.Searsmustwarranttheemissioncontrolsystemonyour
YEAR1997ANDLATERENGINESWHICHAREPURCHASEDANDUSED
ELSEWHEREINTHEUNITEDSTATES(ANDAFTERJANUARY1,2001 IN
CANADA).
Control Defects Warranty Statement
enginefortheperiodsoftime listedbelow,providedtherehasbeennoabuse,
neglector impropermaintenanceofyoursmalloff-roadengine.Youremis-
sioncontrolsystemincludespartssuchasthecarburetor,aircleaner,ignition
system,mufflerand catalyticconverter.Alsoincludedmaybeconnectorsand
otheremissionrelatedassemblies.Wherea warrantableconditionexists,Sears
will repairyoursmalloff-roadengineatnocostto youincludingdiagnosis,parts
andlabor.
Sears Emission Control Defects Warranty Coverage
Smalloff-roadenginesarewarrantedrelativeto emissioncontrolpartsdefects
foraperiodofoneyear,subjecttoprovisionssetforthbelow.Ifanycovered
Owner's Warranty
Asthe smalloff-roadengineowner,youareresponsiblefor theperformanceof
therequiredmaintenancelistedin yourOperatingand MaintenanceInstruc-
tions.Searsrecommendsthatyouretainallyourreceiptscoveringmaintenance
onyoursmalloff-roadengine,butSearscannotdenywarrantysolelyfor the
lackofreceiptsorfor yourfailuretoensuretheperformanceof allscheduled
maintenance.Asthe smalloff-roadengineowner,youshouldhoweverbe
awarethatSearsmaydenyyouwarrantycoverageifyoursmalloff-roadengine
ora parthasfaileddueto abuse,neglect,impropermaintenanceor unap-
parton yourengineis defective,the partwillbe repairedorreplacedbySears.
Responsibilities
provedmodifications.Youareresponsibleforpresentingyoursmalloff-road
engineto anAuthorizedSearsServiceDealeras soonasaproblemexists.The
undisputedwarrantyrepairsshouldbecompletedinareasonableamountof
time,notto exceed30days.Ifyouhaveanyquestionsregardingyourwarranty
rightsand responsibilities,youshouldcontactaSearsServiceRepresentative
at 1-800-469-4663.Theemissionwarrantyisa defectswarranty.Defectsare
judgedonnormalengineperformance.Thewarrantyis notrelatedtoan in-use
emissiontest.
Sears Emission Control Defects Warranty Provisions
ThefollowingarespecificprovisionsrelativetoyourEmissionControlDefectsWarrantyCoverage.ItisinadditiontotheSearsenginewarrantyfornon-regulated
enginesfoundin theOperatingand MaintenanceInstructions.
1. WarrantedParts
Coverageunderthiswarrantyextendsonlytothe partslistedbelow(the
emissioncontrolsystemsparts)tothe extentthesepartswerepresenton
theenginepurchased.
a. FuelMeteringSystem
• Coldstartenrichmentsystem
• Carburetorand internalparts
• FuelPump
b. AirlnductionSystem
• Aircleaner
• Intakemanifold
c. IgnitionSystem
• Sparkplug(s)
• Magnetoignitionsystem
d. CatalystSystem
• Catalyticconverter
• Exhaustmanifold
• Air injectionsystemor pulsevalve
e. MiscellaneousItemsUsedin AboveSystems
• Vacuum,temperature,position,timesensitivevalves
andswitches
• Connectorsandassemblies
2. LengthofCoverage
Searswarrantstothe initialownerandeachsubsequentpurchaserthat
theWarrantedPartsshallbefreefromdefectsin materialsandworkman-
shipwhichcausedthefailureofthe WarrantedPartsfora periodofone
yearfromthe datethe engineis deliveredtoa retailpurchaser.
3. NoCharge
Repairor replacementof anyWarrantedPartwill beperformedat no
chargetothe owner,includingdiagnosticlaborwhichleadstothe
determinationthataWarrantedPartisdefective,ifthe diagnosticworkis
performedatanAuthorizedSearsServiceDealer.Foremissionswarranty
servicecontactyournearestAuthorizedSearsServiceDealeraslistedin
the "YellowPages"under"Engines,Gasoline,""GasolineEngines,""Lawn
Mowers,"orsimilarcategory.
4. Claimsand CoverageExclusions
Warrantyclaimsshall befiledinaccordancewiththe provisionsofthe
SearsEngineWarrantyPolicy.Warrantycoverageshall beexcludedfor
failuresof WarrantedPartswhicharenotoriginalSearspartsor because
ofabuse,neglector impropermaintenanceas setforth inthe Sears
EngineWarrantyPolicy.Searsisnotliableto coverfailuresof Warranted
Partscausedby theuseof add-on,non-original,or modifiedparts.
5. Maintenance
AnyWarrantedPartwhichis notscheduledforreplacementas required
maintenanceor whichis scheduledonlyforregularinspectiontothe effect
of"repairor replaceasnecessary"shallbe warrantedastodefectsfor the
warrantyperiod.AnyWarrantedPartwhichisscheduledfor replacement
asrequiredmaintenanceshallbewarrantedas todefectsonlyforthe
periodoftime uptothe firstscheduledreplacementfor thatpart.Any
replacementpartthatisequivalentin performanceand durabilitymay
beusedin the performanceofanymaintenanceor repairs.Theowneris
responsibleforthe performanceof all requiredmaintenance,asdefinedin
the SearsOperatingand MaintenanceInstructions.
6. ConsequentialCoverage
Coveragehereundershallextendtothefailureofanyenginecomponents
causedbythe failureofanyWarrantedPartstillunderwarranty.
Inthe USAandCanada,a 24hourhotline,1-800-469-4663,hasa menuofpre-recordedmessagesofferingyouenginemaintenanceinformation.
GDOC-100188Rev.B
34

Look For Relevant Emissions Durability Period and
Air index information On Your Engine Emissions Label
Engines that are certified to meet the California Air Resources Board (CARB) Tier 2 Emission Standards must
display information regarding the Emissions Durability Period and the Air Index. Sears Brands Management
Corporation makes this information available to the consumer on our emission labels.
The Emissions Durability Period describes the number of hours of actual running time for which the engine is
certified to be emissions compliant, assuming proper maintenance in accordance with the Operating & Mainte-
nance Instructions. The following categories are used:
Moderate: Engine is certified to be emission compliant for 125 hours of actual engine running time.
Intermediate: Engine is certified to be emission compliant for 250 hours of actual engine running time.
Extended: Engine is certified to be emission compliant for 500 hours of actual engine running time.
For example, a typical walk-behind lawn mower is used 20 to 25 hours per year. Therefore, the Emissions
Durability Period of an engine with an intermediate rating would equate to 10 to 12 years.
The Air index is a calculated number describing the relative level of emissions for a specific engine family. The
lower the Air Index, the cleaner the engine. This information is displayed in graphical form on the emissions label.
After July 1,2000, Look For Emissions Compliance Period
On Engine Emissions Compliance Label
After July 1, 2000 certain Sears Brands Management Corporation engines will be certified to meet the United
States Environmental Protection Agency (USEPA) Phase 2 emission standards. For Phase 2 certified engines, the
Emissions Compliance Period referred to on the Emissions Compliance label indicates the number of operating
hours for which the engine has been shown to meet Federal emission requirements.
For engines less than 225 cc displacement, Category C = 125 hours, B = 250 hours and A = 500 hours.
For engines of 225 cc or more, Category C = 250 hours, B = 500 hours and A = 1000 hours.
This isa generic representation of the emission label typically found on a certified engine.
FAMILYYBSXS.3192VA 274812
GDOC-100182Rev.B
35

Congratulations on making a smart purchase. Your new Craftsman® product is designed and
manufactured for years of dependable operation. But like all products, it may require repair
from time to time. That's when having a Repair Protection Agreement can save you money and
aggravation.
Here's what the Repair Protection Agreement* includes:
[] Expert service by our 10,000 professional repair specialists
[] Unlimited service and no charge for parts and labor on all covered repairs
[] Product replacement up to $1500 if your covered product can't be fixed
[] Discount of 25% from regular price of service and related installed parts not covered by the
agreement; also, 25% off regular price of preventive maintenance check
[] Fast help by phone - we call it Rapid Resolution - phone support from a Sears representative.
Think of us as a "talking owner's manual."
Once you purchase the Repair Protection Agreement, a simple phone call is all that it takes for you
to schedule service. You can call anytime day or night, or schedule a service appointment online.
The Repair Protection Agreement is a risk-free purchase. If you cancel for any reason during the
product warranty period, we will provide a full refund. Or, a prorated refund anytime after the
product warranty period expires. Purchase your Repair Protection Agreement today!
Some limitations and exclusions apply. For prices and additional information in the U.S.A.
call 1=800=827=6655.
*Coverage in Canada varies on some items. For full details call Sears Canada at 1=800=361=
6665.
Sears Installation Service
For Sears professional installation of home appliances, garage door openers, water heaters, and
other major home items, inthe U.S.A. or Canada call 1=800=4=MY=HOME®.
36

Declaraci6n de garantia ....................... Pagina 37
Practicas operacion seguras ............... Pagina 38
Montaje ................................................ Pagina 42
Operacion ............................................ Pagina 46
Servicio y Mantenimiento .................... Pagina 48
Almacenamiento fuera de temporada .... Pagina 52
Solucion de problemas ...................... Pagina 53
Etiquetas de seguridad ....................... Pagina 7
Lista de piezas ..................................... Pagina 20
Acuerdo de Proteccion Para
Reparaciones ....................................... Pagina 59
Labels .................................................. Pagina 33
NOmero de servicio ..................... Cubierta posterior
ARTESANODE DOSAI/OS DEGARANTIA
PORDOSANOSSapartirdelafechadecompra,esteproductoestagarantizadocontracualquierdefectodematerialo manode
obra.Unproductodefectuosorecibir&la reparacbno lasustitucbnsila reparacbnnoestAdisponible.
Paraobtenerinformaci6ndetalladacoberturade lagarantiaparaobtenerla reparacbno sustitucbngratuita,visiteel sitioweb:www.
craftsman.com
EstagarantiacubrelosdefectosSOLOde rnaterialesyfabricacbn.Lagarantianoinduye:
ElementosreutilizaNesquepuedengastarseporel usonormaldentrodel periododegarantia,talescomolascuchillas,
bujias,filtrodeaire,pantalladedesgranadoy unabolsa.
Productoda_osresultantesde losintentosdelusuariodemodificaci6ndelproducto,reparaci6no causadospor
accesoriosdeproductos.
• Reparacionesnecesariasdebidoalaccidenteo porno operaro mantenerel productosegOnlasinstruccionesprovistas.
El mantenimientopreventivoo reparacionesnecesariasdebidoa unamezclaincorrectade combustible,combustible
contaminadoo pasado.
Estagarantiaes inv_Jidasiesteproductoseutilizaal mismotiempola prestaci6nde servicioscomercialeso sisealquilaa otra
persona.
Estagarantiale otorgaderechoslegalesespecificos,y ustedtambi_npuedetenerotrosderechosquevariande estadoaestado.
SearsBrands ManagementCorporation, Hoffman Estates, IL60179
Serie: 1450
Tipodeaceitedelmotor: SAE30
Capacidadde aceitedel motor: 28onzas
Elcombustible: GasolinasinPIomo
Bujias: Champion®RC-12YC
Separaci6ndelasbujias: .030"
NSrnerode modelo ..........................................................
N_mero de serie..............................................................
Fechade compra .............................................................
Registrearribael nOmerodel modelo,el nOmerode serieyla fecha
de compra
©SearsBrands,LLC 37

Lapresenciade estesirnboloindicaquesetratadeinstrucciones
irnportantesde seguridadque sedebenrespetarparaevitar
poneren peligrosuseguridadpersonaly/o materialyla deotras
personas.Leay sigatodaslasinstruccionesde estemanualantes
deponeren funcionarnientoestarn_.quina.Sino respetaestas
instruccionespodriaprovocarlesionespersonales.Cuandoveaeste
sirnbolo,ipresteatenci6na laadvertencia!
Estarn_.quinarueconstruidaparaseroperadade acuerdocon
lasreglasdeseguridadcontenidaseneste manual.AIigualque
concualquiertipode equipornotorizado,undescuidoo errorpor
partedel operadorpuedeproducirlesionesgraves.Estarn_.quina
escapazde arnputarrnanosypiesy dearrojarobjetoscongran
fuerza.Denorespetarlasinstruccionesde seguridadsiguientesse
puedenproducirlesionesgraveso larnuerte.
PROPOSICION 65 DE CALIFORNIA
Elescapedel motorde esteproducto,algunosdesuscornponentes
y algunoscornponentesdelvehiculocontieneno liberansustancias
quirnicasqueelestadode Californiaconsideraque puedenproducir
c_.ncer,defectosdenacirnientouotrosproblernasreproductivos.
Su responsabilidad--Restrinja el usodeestarn_.quina
rnotorizadaalas personasque lean,cornprendany respetenlas
advertenciase instruccionesqueaparecenen estemanualyen la
rn_.quina.
iGUARDEESTASINSTRUCCIONES!
CAPACITACiON
• Lea,entienday curnplatodaslasinstruccionesincluidasen
la rnAquinayen losrnanualesantesde rnontarlayutilizarla.
Guardeestemanualenun lugarseguroparaconsultasfuturasy
regulares,asicornoparasolicitarrepuestos.
• Leael ManualdelOperadory sigatodaslasadvertenciase
instruccionesdeseguridad.El fracasode hacerasi puedecausar
la heridaseriaal operadory/o personaspresentes.
• Farniliaricesecontodosloscontrolesysuoperaci6nadecuada.
Sepac6rnodetenerla rn_.quinayc6rnodesengranarloscontroles
r_.pidarnente.
• Noperrnitanuncaque losnifos rnenoresde 16afrosutilicen
estarn_.quina.Losnifosde 16afrosy rn_.srnayoresdeben
leerycornprenderlasinstruccionesde operaci6nylasreglas
de seguridadcontenidasen estemanual,ytarnbi_ndebenser
capacitadosy estarsupervisadosporunode lospadres.
• Nuncaperrnitaquelosaduitosoperenestarn_.quinasinrecibir
antesla instrucci6napropiada.
• Mantengaa lostranseQntes,ayudantes,rnascotasy nifos al
rnenosa 75piesde la rn_.quinarnientrasest,.operando.Detenga
la rn_.quinasialguienentraenla zona.
• Nuncaenciendaun motorenespacioscerradoso enunazona
conpocaventilaci6n.Elescapedel motorcontienernon6xidode
carbono,un gasinodoroy letal.
• Nopongalasrnanoso lospiescercadelaspiezasrotatoriaso
en lasc_.rnarasdealirnentaci6nnien laaberturade descarga.El
contactoconel motorrotatoriopuedeproducirla arnputaci6nde
dedos,rnanoso pies.
• Nuncatratededestapar[atornade alirnentaci6no la aberturade
descarga,nitratede sacaro vaciarla bolsade laaspiradora,ni
de revisary repararlarn_.quinarnientrasel motorest,.enrnarcha.
Apagueel motory esperehastaquetodaslaspiezasrn6vilesse
hayandetenidoporcornpleto.Desconecteel cablede la bujiay
p6ngalodernaneraque hagarnasacontrael motor.
PREPARATIVOS
* Inspeccionerninuciosarnenteel _.readondeutilizar_,el equipo.
Retiretodaslaspiedras,botellas,latasu otrosobjetosextrafos
que puedanserlevantadoso arrojadoscausandolesiones
personaleso dafos a larn_.quina.
, Paraprotegerselosojosutilicesiernpreanteojoso antiparras
de seguridadrnientrasoperala rn_.quinao rnientrasla ajusta
o repara.Losobjetosarrojadosquerebotanpuedenlesionar
gravernentelavista.
, Utilicezapatosde trabajoresistentes,desuelafuerte,asicorno
pantalonesycarnisasajustados.Lasprendassueltaso las
alhajaspuedenquedaratrapadasen laspiezasrn6viles.Nunca
utilicela rn_.quinadescaizoo consandalias.Utiiiceguantesde
trabajodecuerocuandoalirnentematerialporelcanaldela
cortadora.
, Antesde encenderla rn_.quinacontrolequetodoslospernosy
tornillosest_nbienajustadosparacornprobarquela rn_.quinase
encuentraen condicionessegurasdeoperaci6n.Adern_.s,realice
una inspecci6nvisualde la rn_.quinaaintervalosfrecuentespara
controlarsila rnisrnaest,.dafada.
, Mantengao reernplacelasetiquetasdeseguridade instrucciones
segQnseanecesario.
38

Manejoseguro de la gasolina
Paraevitarlesionespersonaleso daSosrnaterialesseasurnarnente
cuidadosoal rnanipularla gasolina.Lagasolinaesaltarnenteinflarno
ableysusvaporespuedencausarexplosiones.Se puedelesionar
gravernentesiderrarnagasolinasobreustedo sobrela ropayaquese
puedeencender.L_veselapiely c&rnbiesede ropadeinrnediato.
• Utilices61orecipientesparagasolinaautorizados.
• NuncaIleneloscontenedoresenelinteriordeun vehiculo
o carni6nocajadecarnionetaconrecubrirnientospl&sticos.
Coloquesiernprelosrecipientesenel pisoy lejosdelvehiculo
antesde Ilenarlos.
• Retireelequipoa gasolinadelcarni6no rernolqueyII_neloen
el piso.Si estonoesposible,entoncesIlenedichoequipoenun
rernolqueconun recipienteport&til,en vezdedesdeun dispen-
sadordegasolina.
• Mantengala boquillade Ilenadoencontactoconel bordedela
entradadeltanquedegasolinao contenedorentodornornento
hastaqueest_Ileno.Noutiliceundispositivoparaabrir/cerrarla
boquilla.
• Apaguetodosloscigarrillos,cigarros,pipasyotrasfuentesde
cornbusti6n.
• Nuncacarguecornbustibben la rn&quinaen unespaciocerrado.
• Nuncasaquelatapadelgasni agreguecombustiblernientrasel
motorest&calienteo enrnarcha.Dejequeel motorseenfriepor
Iornenosdosrninutosantesdevolvera cargarcombustible.
• Nuncarecargueel tanquede combustible.Lleneel tanqueno
rn&sde 1/2pulgadapordebajode la basedelcuellodelfiltro
paradejarespacioparala dilatacbndelcornbustibb.
• Vuebaa colocarlatapade lagasolinay aj_steb bien.
• Lirnpielagasolinaderrarnadasobreelmotory elequipo.Trasbde
la rn&quinaa otrazona.Espere5rninutosantesdeencenderel
motor.
• Nuncaalrnacenelarn&quinao elrecipientede combustibleen
unespaciocerradodondehayafuego,chispaso luzpiloto(por
ejernplo,hornos,calentadoresdeagua,calefactores,secadores
de ropa,etc.)
• Parareducirel riesgodeincendiornantengalarn_.quinalirnpia
depasto,hojasyde acurnulaci6nde otrosdesechos.Lirnpielos
derrarnesdeaceiteo combustibley saquetodoslosdesechos
ernbebidosconcombustible.
OPERACION
• Nopongalasrnanoso lospiescercadelaspiezasrotatoriaso
enlasc_.rnarasdealirnentaci6nni en laaberturade descarga.El
contactoconel motorrotatoriopuedeproducirla arnputaci6nde
dedos,rnanoso pies.
• Antesdeencenderlarn_.quinacornpruebequeel canaldela
cortadora,latornade alirnentaci6ny lac_.rnarade corteest_.n
vacbs ysindesechos.
• Inspeccionerninuciosarnentetodoel materialquedeseatriturar
ysaquelosobjetosrnet_.licos,piedras,botellas,latasuotros
objetosextraSosquepuedenocasionarlesionesodaSarla
rn_.quina.
• Siesnecesarioernpujarel materialporlatolvade latrituradora
useunpalode di_.rnetropequeSo.Noutilicelasrnanosni los
pies.
• Siel motorgolpeaunobjetoextraSoo sila rn_.quinaernpieza
a producirunsonidopococornQno unavibraci6n,apagueel
motordeinrnediato.Dejequeel motorsedetengaporcornpleto.
Desconecteel cablede la bujia,p6ngalodernaneraque haga
rnasacontrael motory sigaestospasos:
a. Inspeccionela rn_.quinaparaversiest,.daSada.
b. Repareo reernplacelaspiezasdaSadas.
c. ControlesihaypiezasflojasyajQstelasparaasegurarquela
rn_.quinafuncionede rnaneraseguray continua.
• Noperrnitaqueseacurnulematerialprocesadoen lazonade
descarga.El rnisrnopuedeobstaculizarla descargaadecuada
y provocarel retornodel materiala travesde laaberturade
alirnentaci6n.
• Nointentetriturarni picarmaterialdemayortarnaSoal espe-
cificadoen larn_.quinaoenestemanual.Sepodrianproducir
lesioneso daSos.
• Nuncatratede destaparla tornade alirnentaci6no laabertura
de descargarnientrasel motorest,.en rnarcha.Apagueel motor
y esperehastaquetodaslaspiezasque sernuevensehayan
detenidopor cornpleto,desconecteel cablede labujiay p6ngalo
de rnaneraquehagarnasacontraelmotorantesde sacarlos
escornbros.
• Nuncaoperela rn_.quinasinque latolvadela trituradora,el canal
de lacortadorao el canaldeflectorest_ncorrectarnenteconecta-
dosa la rn_.quina.Nuncavacienicarnbielabolsade descarga
rnientrasel motorest,.en rnarcha.
• Mantengatodoslosprotectores,desviadoresy dispositivosde
seguridadensu lugaryen buenascondiciones.
• Mientrasalirnentamaterialdentrode la rn_.quinarnantengasu
rostroysucuerpodetr_.syhaciaun costadodelcanalde la
cortadoraparaevitarlesionesporretrocesosaccidentales.
• Nuncaopereestarn_.quinasinbuenavisibilidado ilurninaci6n.
• Noopereestarn_.quinaen superficiescongrava.
• Noopereestarn_.quinaestandobajolosefectosdelalcoholo de
drogas.
• Elsilenciadoryel motorsecalientany puedenproducirquerna-
duras.Nolostoque.
• Nuncalevanteo transportela rn_.quinacuandoel motorest,.
encendido.
• Sisepresentansituacionesquenoest_.nprevistaseneste
manualseacuidadosoy useel sentidocornQn.Marquepara
contactareldepartarnentodeatenci6nalclienteyobtenerel
nornbredesudistribuidorrn_.scercano.
39

MANTENIMIENTO Y ALMACENAMIENTO
• Nuncarnanipulelosdispositivosde seguridadde rnanera
irnprudente.Controleperi6dicarnentequefuncionende forrna
adecuada.
• Controlefrecuenternentequetodoslospernosytornillosest_n
bienajustadosparacornprobarquela rn_.quinaseencuentraen
condicionessegurasdefuncionarniento.Adern_.s,realiceuna
inspecci6nvisualde larn_.quinaparacontrolarsi larnisrnaest,.
da_adayrep_.reladesernecesario.
• Antesdelirnpiar,repararo inspeccionarla rn_.quina,detengael
motorycornpruebequeel rnisrnoyquetodaslaspiezasrn6viles
sehallandetenido.Desconecteel cablede labujiay p6ngalo
de rnaneraquehagarnasacontrael motorparaevitarquese
enciendade rnaneraaccidental.
• Nocarnbielaconfiguraci6ndel reguladordel motorni acelere
dernasiadoel rnisrno.El reguladorcontrolalavelocidadrn_.xirna
segurade operaci6ndelmotor.
• Mantengao reernplacelasetiquetasde seguridade instrucciones
segQnseanecesario.
• Sigalasinstruccionesde estemanualparacargar,descargar,
transportary alrnacenardernaneraseguraestarn_.quina.
• Nuncaalrnacenelarn_.quinao el recipientedecombustibleenun
espaciocerradodondehayafuego,chispaso luzpilotocornopor
ejernplo,calentadoresdeagua,hornos,secadoresde ropa,etc.
• Dejequela rn_.quinaseenfriepotIornenos5 rninutosantesde
guardarla.
• Consultesiernpreel manualdel operadorparaconocerlas
instruccionesadecuadasparael alrnacenarnientofuerade
ternporada.
• Seg_nla Cornisi6ndeSeguridadde Productosparael Consu-
rnidorde losEstadosUnidos(CPSC)y laAgenciade Proteccidn
Arnbientalde losEstadosUnidos(EPA),esteproductotieneuna
vidaOtilmediade siete(7)a_os,6 60horasde funcionarniento.
AI finalizarla vidaOtilmedia,adquieraunarn_.quinanuevao
hagainspeccionaranualrnente_staporundistribuidorde servicio
autorizadoparacerciorarsede quetodoslossisternasrnec_.nicos
yde seguridadfuncionancorrectarnenteyno tienenexcesivo
desgaste.Si noIohace,puedenproducirseaccidentes,lesiones
o rnuerte
• Sidebevaciarel tanquedecombustible,h_.galoal airelibre.
• Respetelasnorrnasreferentesa ladisposici6ncorrectay las
reglarnentacionessobregas,combustible,etc.paraprotegerel
medicarnbiente.
NO MODIFIQUE EL MOTOR
Paraevitarlesionesgraveso larnuerte,nornodifiqueel motorbajo
ningunacircunstancia.Si carnbialaconfiguracidndel reguladorel
motorpuededescontrolarseyoperara velocidadesinseguras.Nunca
carnbiela configuracidndef_.bricadel reguladordelmotor.
AVISO REFERIDO A EMISIONES
Losrnotoresqueest&ncertificadosycurnplenconlasregulaciones
de ernisionesfederalesEPAyde CaliforniaparaSORE(Equipos
peque_ostodoterreno)est_.ncertificadosparaoperarcongasolina
cornOnsinplornoy puedenincluirlossiguientessisternasde control
de ernisiones:Modificacidnde motor(EM)ycatalizadorde tresvias
(TWO)siest_.nequipadosde esarnanera.
GUARDACHISPAS
Estarn_.quinaest,.equipadaconunmotordecornbusti6ninternay
nodebeserutilizadaen ocercade unterrenoagrestecubiertopor
bosque,rnalezaso hierbaexceptosielsisternadeescapedelmotor
est,.equipadoconunarnortiguadorde chispasquecurnplaconlas
leyeslocaleso estatalescorrespondientes,encasode habedas.
Si seutilizaunarnortiguadorde chispasel operadorIodebernantener
en condicionesde usoadecuadas.Enel Estadode Californialas
rnedidasanteriorrnenternencionadassonexigidasporIcy(Arficulo
4442del C6digode RecursosPt_blicosdeCalifornia).Esposible
queexistanleyessirnilaresenotrosestados.Lasleyesfederalesse
aplicanenterritoriosfederales.
Puedeconseguirelarnortiguadordechispasparael silenciadora
travesdesudistribuidorautorizadode rnotoreso poni_ndoseen
contactoconel departarnentodeservicios,RO.Box361131Cleve-
land,Ohio44136-0019.
4O

SilVIBOLOS DE SEGURIDAD
Estap&ginarepresentay describelaseguridadlossimbolosquepuedenpareceren esteproducto.Lea,comprenda,y sigatodasinstrucciones
enla m_.quinaantesprocurarparareuniry operar.
LEA EL MANUAL(S) DEL OPERADOR
Lea, comprenda, y siga todas instrucciones en el manual (manuales) antes procurar para
reunir y operar
ADVERTENCIA-- GIRANDO HOJAS
Mantenga manos fuera de aperturas de cala y descarga mientras m_iquina corre. Alli giran
hojas adentro
ESPECTADORES
Mantenga a espectadores, los animales favoritos, y los niffos por Io menos 75 pies de la
m_iquina mientras est,1 en la operaci6n. Pare m_iquina si cualquiera entra el _irea.
ADVERTENClA-- ESCOMBROS TIRADOS
Nunca operar sin el deflector de tobog_in conect6 apropiadamente a la m_iquina.
PROTECClON DE OJO
Siempre Ileve gafas de seguridad o gafas de seguridad al operar esta m_iquina.
41

IMPORTANTE:Estaunidadseentregasingasolinao aceiteenel
motor.AsegQresedeservMoconmotordegasolinay aceitesegQn
lasinstrucdonesen la operad6nde estemanualantesde operarsu
rn_.quina.
NOTA:Referenciaa la derechay laizquierdadela TrituradoraChip-
perseobservadesdelaposici6nde funcionarniento.
APERTURA DE LA CAJA DE CARTON
1. Cortecadaunade lasesquinasde la cajaverticalrnente,de la
partesuperiora la base.
2. Saquetodaslaspiezassueltas.
3. Quiteel materialdeempaquesuelto.
COIVIO SACAR LA UNIDAD DE LA CAJA
1. Elevelaunidaddesdela parteposteriorparasepararladel
materialde la cajaquequededebajo,yhagarodarla unidad
fuerade lacaja.
2. Verifiquecuidadosarnentesi enla cajaquedaalgunapartesuelta.
/
.......
Figura1
PIEZAS SUELTAS DENTRO DE LA CAJA
• Montajede tolva
• Bolsa
• Canaldeflector
• Pis6n
• Anteojosde seguridad
• Canaldela cortadora
• Aceitedemotor
• Manualde Operador
INSTALACION DE LA TOLVA IVIONTAJE
1. A.Saqueseistuercashexagonalesy arandelasde losesp_.r
ragosde la soldadurade lacajadelmotor.Nosaquela placa
de sost_n.Veala Figura1.
B.Coloqueel rnontajedela tolvaen posici6ndelantede lacaja
del motor,alineandolosagujerosdel rnontajedelarcde la
tolvaconlosesp_.rragosde lasoldadura.
C. Desliceel rnontajede latolvasobrelosesp_.rragosde la
soldadurayvuelvaa colocarlasarandelasylastuercas
hexagonales.Nolasajustepor cornpleto.
2. A. Levanteelrnontajede latolvahastael rnontajedelsoportede
motor.Wase lafigura2.
B. Deslicelavarillade liberaci6nhaciaafueralevernentepara
engancharel soportede tolvaen la varilla.Veaia Figura2.
C.Ajustelasseistuercashexagonalesqueunenel rnontajede la
tolvaa lacajadelmotory ajustetarnbi_nlasarandelas
hexagonalesqueunenel soportedela tolvaal rnontajedela
rnisrna.
J
Figura2
42

COLOCACl6N DEL CANAL DEFLECTOR r'
.
A.Saquelasperillasa mariposade loscostadosde la caja
inferiordelmotor.
B.Saquela tuercade seguridadhexagonal,losseparadoresyel
bul6nhexagonalde lapartesuperiordela cajadel motor.Vea
la Figura313.
A. Pongaen Ifneaelcanaldeflectoren suposici6nenla abertura
de descargae inserteel bul6nhexagonalconel separadora
travesde la bisagradel canaldeflector(losseparadoresvan
dentrodelasbisagras).Veala Figura314.
B.Coloqueel segundoseparadorsobreelbul6nhexagonal
dentrode laotrabisagray ajOsteloconlatuercadeseguridad
hexagonal.
C.Ajusteamboscostadosdel canaldeflectora a lacajadel
motorutiNzandolasperiNasamariposaque habfasacado
anteriormente.
COLOCACl6N DEL CANAL
DE LA CORTADORA
A. Saquelastresarandelascurvasylastuercashexagonales
delosesp_.rragosdela soldaduraqueest_.nalrededorde la
aberturaenel costadode lacajadelmotor.Veala Figura5.
B.Saquelosbuloneshexagonales,lasarandelasplanasy las
tuercasde seguridadde losdosagujerosdelextremo
superiordela trabade sosten.
........................................
Figura4
i
i
/ • i
,/
Figura5
43

2, f
,
A,Pongaen Ifneael canalde lacortadoraporencimade los
esp_.rragosde la soldadurade maneraquela ranuraen
la basedel canalmirehaciaabajo,
B.Ajusteelcanaldela cortadoracontresarandelascurvas
(conel ladocurvocontrael canalde la cortadora)yconlas
tuercashexagonalesquehabfasacadoanteriormente,No
ajustelastuercasen estemomento.Veala Figura6.
Lacortadoratrituradorafueenviadaconun extremode la
trabadesost@nyaunidoalbastidorinferior.Aflojeperono
saquelosbulonesque unenla trabaal basfidor,
A,Pongaen Ifnealosagujerosdelcanalconlosagujerosdela
partesuperiorde latrabay unala mismaal canalde la
cortadoraconloselementosde ferreterfapreviamente
retirados,Lasarandelaslianasdeberiansercolocadas
bajolascabezasdecerrojoy contrala superfMeinteriordel
pl&sficochippertolva.Ajustebien.Veala Figura7.
B.Ajustelosbulonesqueunenlatrabade sost@nal bastidor.
C,Ajustelastrestuercasde losesp_.rragosde la soldaduraque
sostienenel canalde lacortadoraa la cajadelmotor,
COLOCAClON DE LA BOLSA
1. Paraadosarla bolsa:
A.Coloquela aberturade labolsacompletamentesobreel
canaldeflector.
B.Tirede latirade extracci6nhastaque labolsaquede
ajustadaalrededorde laaberturadelcanaldeflector.
C.Vuelvaa sujetarlatirade extracci6nsobresi misma,
apri@telacontrael canaldeflectorparaque quedefirmeen su
lugar.Veala Figura8.
Ahoraqueyahaajustadosucortadoratrituradoraparasufunciona-
miento,familiariceseconsuscontrolesycaracterfsticas.Estosse
describeny seilustranen estap_.gina.Esteconocimientole permitir_.
utilizarsunuevoequipoa sum_.ximacapacidad.
/ /
7 /
i /
/
/ /
/
/
/ /
/ /
/
J
/
/
/ /
Figura6
/ /
/
/
/
Figura7
J
Figura8
44

Montaje de latolva
Varilla de liberaci6n
Llenadode aceite
Llenadode combustible
Canalde
cortadora
Pis6n
Deflector
del canal
Figura9
CANAL DE LA CORTADORA
Permitequelas ramaspeque_asde hasta3"dedi_.metroingresenal
motorparaserpicadas.Veala Figura9.
MONTAJE DE LA TOLVA
Permitaque lashojasy lasramaspeque_asde hasta1/2dedi_metro
ingresenal motorparaserpicadasytrituradas.Bajandoel montaje
dela tolvasepuederastrillarmateriale introducirlodentrodel mismo.
Veala Figura9.
VARILLA DE LIBERACION
Lavarillade liberaci6nest,. ubicadaenel montajedel soportedel
motory seusaparaliberaro trabarlatolvaal momentode subiro
bajar.Veala Figura9.
DEFLECTOR DEL CANAL
Losdesechoscortadosy trituradossedescarganfueradeldeflector
delcanal.Launidadpuedeseroperadacono sinla bolsade recolec-
ci6nadosadaal deflectordelcanal.Veala Figura9.
PIS6N
Esteenchufeesinsertadoenla tolvachipperparaempujarramitasy
peque_asramashacialasI_.minasde aspasinponeren peligrosus
manos.
AIoperarunacortadoratrituradorapuedeserqueobjetosextra_os
seanarrojadosa losojosIocualpuededa_arlosgravemente.Utilice
siemprelosanteojosde seguridadprovistosconestaunidado
protectoresparaojosantesde picaro triturar el materialo mientras
[rea zaajusteso reparacones.
CONTROL DEL ESTRANGULADOR
Estapalancacontrolala velocidaddel motoryla funci6ndedetenci6n.
Mediantetresposicionesindependientesde la palanca,de izquierdaa
derecha,la operaci6nse realizadela siguienteforma:
CONTROL DE OBTURACION
Elcontroldeobturaci6nseutiNzaparacebarel carburadory ayudara
queel motorarranque.
Arranque/
funcionamiento
lento / Motor apagado
marcha lenta
Cumple con los estandares de seguridad de ANSI
LasaspiradorasparapatiosdeCraftsmancumplenconlosestAndaresdeseguridaddelinstitutoestadounidensedeestAndaresnacionales(ANSI).
45

LLENADO DE GASOLINA Y ACEITE
Aceite (se env(a una botella junto con la unidad)
Primeruso
1. Quitartap6ndeIlenadode aceite.
2. Conlatrituradoraa niveldel suelo,el usodeun embudopara
vaciartodoel contenidode la botellade aceiteestablecidasen el
motor.
3. Sustituirtap6nde Ilenadode aceitey apriete.
Usosposteriores
Usesolamenteunaceitedetergentede altacalidadcuyaclasificaci6n
de servicioAPIseaSF,SGo SH.Seleccioneelgradodeviscosidad
SAEdel aceitesegQnla temperaturade operaci6nesperada.Cumpla
latablaqueaparecea continuaci6n.
_s frio -'_ 32°
Tabladeviscosidad delaceite
MAscaliente
AunquelosaceitesdeviscosidadmQltiple(5W30,10W30,etc.)
mejoranel encendidocuandoelclimaestAfrio,losmismosincremen-
tanel consumode aceitecuandoseusana m_sde32°ECompruebe
el niveldeaceiteconmayorfrecuenciaparaevitarda_osdebidoa que
el motortrabajeconun niveldeaceitebajo.
1. Comprobarel nivelde aceitequitandoel tap6nde Ilenadode
aceitey mirarhaciael orificiode Ilenadode aceite.Deaceite
debeservisiblea laparteinferiordeltapdnde Ilenadodeaceite
hilos.Lleneel rondode lostemastap6ndeIlenadodeaceite,
sifueranecesario.Lacapacidadesde aproximadamente28oz
Llenadoexcesivohar_queel motoral humoprofusamentey se
traducir_en el rendimientodel motorpobres.
2. Sustituirtapdnde Ilenadode aceitey apriete.
3. Mantengael nivelde aceiteen la marcaFULL.Siponeel motor
en marchaconmuypocoaceitelepuedecausarda_osperman-
entes.
Tengaextremocuidadocuandomanipulegasolina.Lagasolinaes
altamenteinflamabley susvaporespuedencausarexplosiones.
Nuncacarguecombustibleen lam_quinaen unespaciocerrado
o cuandoel motorestacalienteoen march&Apaguecigarrillos,
cigarros,pipasyotrasfuentesdecombustidn.
GASOLINA
1. Saquela tapadelcombustibledeldep6sitodel mismo.
2. Verifiquequeel recipientedelquevaa verterlagasolinaest_
limpioy librede6xidoo deobjetosextra_os.Nousenunca
gasolinaquepuedaestarviejaporhaberestadoalmacenadaen su
recipienteporlargosperiodos.Lagasolinaquehaestadoestacio-
nadapotunperiodosuperioracuatrosemanasdebeconsiderarse
vieja.
3. Lleneeltanquede combustibles61ocongasolinanormalsin
plomo,limpiay fresca.NousegasolinaquecontengaMETANOL.
Vuelvaa colocarlatapade combustibleensulugar.
Loscombustiblesconmezclade alcohol(queseIlarnangasohol,
o queutilizanetanolo metanol)puedenatraerhumedad,Ioque
conducea la separaci6nyformaci6nde _cidosduranteel almace-
namiento.Elgasaddico puededa_arel sistemade combustibledel
motormientraslam_q_uinaest_almacenada.
Paraevitarproblemasconel motor,sedebevaciarel sistemade
combustibleantesdealmacenarla m_quinadurante30dfaso m_.s.
Vade eltanquede nafta,enciendael motoryd_jelofuncionarhasta
quelaslineasdecombustibleyel carburadorest_nvados.La
siguientetemporadausecombustiblefresco.ConsultelasInstruc-
clonesde ALMACENAMIENTOsideseainformaci6nadicional.
Nousenuncaproductosde limpiezaparamotoresocarburadores
enel dep6sitodecombustible,sepuedenocasionarda_osperma-
nentes.
NOTA:Verifiqueperi6dicamenteel nivelde combustibleparaevitar
quedarsesingasolinamientrasest&operandolacortadoratrituradora.
Si la unidadsequedasincombustiblemientrasestatriturando,puede
resultarnecesariodestaparel &teade descargaantesdepodervolver
a encenderla.Consultela secci6nSERVlCIOY MANTENIMIENTO.
PARA ENCENDER EL MOTOR
1. Conecteel cablede labujiay la mangade gomaa lamisma.
2. Lleneeltanqueno m&sde 1/2pulgadapordebajode la basedel
cuellodel filtroparadejarespacioparaladilataci6ndelcombus-
tible.Vealafigura10.
f
C
Figura10
46

3. Girelav_.lvulade cierredecombustiblea la posici6nEN.
4. Muevaelcontroldelobturadorhaciael controldel regulador!'o,I
paraobturarel carburadordelmotor.(Siel motorest,.tibio
la obturaci6npuedeno sernecesaria).
5. Muevalapalancadecontroldel estranguladora la posici6n ,_
START/RUN(encendido/ funcionarniento,representadopor
unaliebre).Veala figura10.
6. Situadodetr&sde la unidad,tomela rnanijadelarrancadorytire
dela cuerdahastaquesientauntir6n.
NOTA:Escuchar_.unsonidocuandoalcanceelcornienzodelciclode
cornpresi6n.Estesonidoescausadoporel descebadoylostopesque
sonpartedelrnecanisrnodela trituradorayes de esperarhastaqueel
motoralcancela rn_.xirnavelocidad.
7. Tirede lacuerdadernanerar_.pidaycontinua.Aprietebienla
rnanijadelarrancador.Dejequelacuerdaseenrosque
lentarnente.
8. Repitaestepaso,de sernecesario,hastaqueseenciendael
motor.Cuandoseenciendeel motorrnuevaelcontrolde
obturacidngradualrnentelejosdel controldelestrangulador.
9. Siel motorfalla,rnuevaelcontroldel obturadorhaciaatr_.s,en
direccidnal controldelestrangulador,y repitalospasos5 a8.
10. MantengaSIEMPREelcontroldelestranguladorenposicidn
START/RUN(encendido/funcionarniento)rnientrasoperela
cortadoratrituradora._lJ
PARA DETENER EL MOTOR
1. El reguladorde movirnientocontrolala palancaparareducirla
rnarcha(tortuga)_ de laposici6n.Siernpreque posible,
gradualrnentereduzcala velocidadde motorantesde pararel
motor.
2. Muevalaspalancasdecontroldel reguladora laposici6n
STOP(detencidn)uOFF(apagado).
3. Girelav_.lvulade cierredecombustiblea la posicidnOFR
4. Desconecteel cabledela bujfaytierracontrael motorparaevitar
el arranqueaccidentalrnientrasel equipoest,.desatendido.
TRITURACION
Eldesechoqueseacurnulaen lospatioscornoporejernplolashojas
ylasagujasde lospinospuedesercolocadoenla tolvaparatriturarlo.
Despu_sdeprocesarel materialconlacuchillade latrituradoray
dedesgranar,esernpujadofueradel deflectordelcanaly,si est,.
instalada,haciael interiordela bolsade recolecci6nde desechos.
Respetelassiguientespautascuandotrituredesechosquese
acurnulanen lospatios:
• $61outilicela rn_.quinaparatriturarel materialqueseencuentra
enun pationormal(hojas,rarnas,picasde lospinos,etc.).
• Evitarlatrituracidnlasplantasfibrosas,cornolasvidesde
tornate,hojasde palrna,etc,hastaqueest_ncornpletarnente
secos.Frescasvisasnotriturebienytiendena envolverseen
todoel irnpulsory flails.
• Coloquecantidadesrazonablesde desechosen latolvaporvez.
Nosobrecarguelatolva.
Perrnitaqueel materialque seencuentraen latolvaseaatrafdo
hastalascuchillasytrituradoantesde agregarrn_.sdesechos
dentrode larnisrna.Deno hacerlosepuedetaparla tolva,el
deflectordel canalo detenerel motor.
CORTE
Sepuedeperrnitirel ingresode rarnasdehasta3"de di_.rnetroenel
canalde la cortadora.Respetelassiguientespautasparael cortede
lasrarnas:
• Mantengaarnbasrnanosfirrnernenteen la rarnaa rnedidaque la
colocadentrodel canaldela cortadora.
• Noponganuncarn_.sdeunararnadentrodelcanaldelacortadorapor
vez.
• Enelcanalde lacortadoras61osepuedecolocarrarnas(de
rnadera).
• Apliquepresi6ninterrnitente(fuerza,en irnpulsoscortos)cuando
coloquerarnasrn_.slargas(de3 pulgadasdedi_.rnetro)dentro
del canaldela cortadoraparaevitarinundaro ahogarel motor.
IMPORTANTE:Nuncacoloquerarnasconundi_.rnetrosuperiora tres
(3)pulgadasdentrodelcanalde lacortadora.Dehacerlosepueden
daSargravernentelascuchillasde corte,eldesgranadoo el motorde
launidad.
NOTA:Pararnejoresresultados,operesiernprela unidadcon
cuchillasde corteafiladas.Si seproduceunareducci6napreciable
en el rendirnientornientrassecortanrarnas,sedebereernplazarlas
cuchillasde la cortadora.
C6MO BAJAR EL MONTAJE DE LA TOLVA
1. Conunarnanotomela rnanijaqueseencuentraenla parte
superiordel rnontajede la tolvay lev_.ntelalevernente.
2. Conlaotrarnanotirehaciaafuerade lavarillade liberaci6ny
bajeel rnontajede la tolvahastael piso.
C6MO DESCARGAR LA BOLSA
1. Sueltela cuerdade extracci6nyaflojela bolsade laaberturadel
canaldeflector.
2. Vacfela bolsayvuelvaa colocarlaenla aberturadelcanalde
descarga.Tiredela cuerdahastaquela bolsaest_ajustada
alrededordela aberturadelcanaly sujetela cuerdaapret_.ndola
contraelcanaldeflector.
IMPORTANTE:Lapantalladedesgranadoest,. ubicadadentrodela
cajaenla zonadedescarga.Si setapala pantallade desgranado,
s_.quelayIfrnpielacornoseindicaen lasecci6nServicioy Man-
tenirniento.Paraobtenerel rnejorresultadotarnbi_nesirnportante
rnantenerafiladala cuchilladela cortadora.
47

LISTA DE iVlANTENIIVllENTO
Antesde realizarcualquiertipodel rnantenirniento/servicio,suelte
todoslosrnandosypareel motor.Esperehastaquetodaslaspartes
de rnovirnientohayanvenidoa unaparadacornpleta.Desconecteel
alarnbredebujiay b_.selocontraelmotorparaprevenirel cornienzo
involuntario.SiernpreIlevepuestoscristalesinastillablesdurantela
operaci6no realizandocualquierajusteo reparaciones.
CadaUso
los 5- 8 horas
25 horas
Anualrnenteo 50 horas
Anualrnenteo 100horas
Antesde Alrnacenaje
1. Niveldel aceitede motor
2. Hardwaresueltooausente
3. Unidadymotor
1. Elaceitede motor
1. Elaceitede rnotort
2. Filtrode aire
3. Encadenarnientosde control
ypivotes
1. Elaceitede motor
2. Elsilenciador
1. Bujia
1. Sisternadecombustible
Bajocargapesadao enternperaturasaltas
Sigalalistade rnantenirnientodadaabajo.Estacartadescribepautas
de servicios61o.Usela colurnnade Troncode Servicioparaguardar
la pistade tareasdernantenirnientocornpletadas.Localizarel rn_.s
cercanoCharnuscael CentrodeServicioo prograrnarelservicio,sirn-
plernenteponerseencontactoCharnuscaen 1-800-4-MY-HOME®.
•" O
1. Cornprobar
2. Aprieteo sustituir
3. Lirnpio
1. Carnbio
1. Carnbio
2. Sustituyen
3. Lubricaci6nconpetr61eoligero
1. Carnbio
2. Inspeccionar
1. Clean,checkand resetgap,or
replacesparkplug.
1. Elmotordirigidohastaqueestose
parea faltadelcombustibleoaSada
un aditivodegasolinaal gasenel
tanque.
Siernpredetengael motorydesconecteelcabledela bujiaantes
de hacercualquiertipodemantenirnientooajustes.Utilicesiernpre
pnteojos de seguridaddurantela operaci6no rnientrasajustao
[reparaesteequipo.
RECOMENDACIONES GENERALES
• Alwaysobserveallsafetyrulesfoundonproductlabelsandin
thisoperator'smanualwhenperforminganymaintenance.Safety
rulescanbefoundonthe productlabelsandin thisOperator's
Manualbeginningon page36.
• Lagarantiadeestacortadoratrituradoranocubreelernentosque
banestadosujetosal rnalusoo negligenciadel operador.Para
recibirel reernbolsototalde lagarantia,el operadordeber_,dar
rnantenirnientoalequipotalycornoseindicaenestemanual.
• Algunosajustesdebenserrealizadosperi6dicarnenteparael
mantenirnientoadecuadodela unidad.
• Reviseperi6dicarnentetodoslossujetadoresy cornpruebeque
est_nbienajustados.
iVlANTENIlVlIENTO DE MOTOR
Servicio A La Bujia
Lirnpielabujiayajusteelespacioa 0.030"al rnenosunavezpor
estaci6n;sustituyacada100horasde laoperaci6n.
f
2
1,
2.
3.
\
3
Espaciode0,030pulg(0,76mm)
Electrodo
Porcelana
Figura11
J
• Arealirnpiaalrededorde labasede bujia.Nolije labujfa.Se
debenlirnpiarlasbujfasrnedianteraspadootalladoconcepillo
de alarnbrey lavadoconunsolventecornercial.
• Quitee inspeccionelabujfa.Cornpruebeel huecoparaasegu-
rarsequees puestoen .030".Veala Figura11.
• Sustituyalabujiasi loselectrodossonpicados,quernados,o la
porcelanaesrajada.
48

Servicio Del Filtro De Aire f
Nouseakepresurizadoo solventesparalimpiarelcartuchode filtro
de aire,
Elfiltrode aireevitael ingresoal carburadorde suciedad,polvo,etc,
perjudicialesy evitaque losmismosseanintroducidosdentrodelmo-
tor.Adem_.s,dichofiltroesimportanteparalavidaQtilyel rendimiento
delmotor.Noponganuncaen funcionamientoel motorsinhaber
montadototalmenteel filtrodeake.
Sustituyenel filtrode airecada25horasde laoperaci6n.
1. Sueltetornillosquesosfienenla tapadefiltrode aire.
2, Latapaabiertay quitaFiltrodeaire,Veala Figura12,
3. DesecheelviejoFiltrode aire.
4. InstaleelnuevoFiltrode ake.
5. Qerre latapay aprietetornillos.
NOTA:Siel filtroestArotoo darado,cAmbielo,
Compruebe El Aceite Del Motor
1. Compruebeel petr61eoantesdecadauso. Detengael motory
esperevariosminutosantesde verificarel niveldeaceite.Conel
motorubicadoen sueloparejo,el aceitedebeestaren la marca
FULL(lleno)dela varilladelniveldeaceite.
2. Saquela varilladel niveldeaceiteylimpielimpioconlatel&
3. Sustituyayaprietela varillade aceite.Quitey compruebeelnivel
delaceite.Elniveldeberiaestaren laserialLLENA.
4. Deset necesario,arada el petr61eodespacio-nuevocontrol.No
sobrellenar.
5. Limpielavarilladeaceitelimpia,sustituyayapretar.Quitey
compruebeelniveldel aceite.Elniveldelaceitedeberiaestaren
la lineaLLENAenla varillade aceite.
Nohagaoverfil.Elsobrellenoconel petr61eopuedehacerqueel
motornocomience,o confuerzacomienzo.Si sobrela seral LLENA
en la varillade aceite,dreneel petr61eoparareducirel niveldel
aceitea la seral LLENAen la varillade aceite.
Cambio Del Aceite Del Motor
• Usesolamenteun aceitedetergentede altacalidadcuya
clasificaci6nde servicioAPIseaSF,SGo SH.Seleccioneel
gradode viscosidadSAEdel aceitesegQnlatemperaturade
operaci6nesperada.Consultelasecci6ndeoperaci6nparavetla
tablade viscosidad.
• Cambieelpetr61eode motordespu6sdelascincoa ocho
primerashorasde laoperaci6n,y cadacincuentahoraso
cadatemporadaa partirdeentonces.Cambieel petr61eocada
veinticincohorascuandomotordeoperacionesbajolacarga
pesadao entemperaturasaltas.
C6mo Vaciar El Aceite
1. Vacieel combustibledeltanquehaciendofuncionarel motor
hastaqueel tanquedecombustibleest6vacio.
Filtrode aire
La )a
Figura12
2. Conel motorLEJOSperotodaviacalientan,desconectanla bujia
Ioalambranyguardanlejosde labujia.
3. Quiteel enchufededesag(JedelaceitecuadradoIocalizadoenla
basedel motor,ydreneel petr61eoen un recept_.culoapropiado.
Veala Figura13en lap_.gina15.
4. Sustituyay aprieteel enchufededesagQedel aceite.
5. Cuandoelmotoresdrenadodetodoel petr61eo,nivelde motor
de lugar.Recambioconaproximadamente28onz.de petr61eo
fresco.LI6nesea lalineaLLENAen lavarilladeaceite.No
El petr61eousadoes undesechoarriesgado.Elimineel petr61eo
usadocorrectamente.Nodesecheconla basurade la casa.
Compruebeconsusautoridadeslocaleso Chamuscael Centrode
Servicioparainstalacionesdedisposici6n/reciclajeseguras.
sobrellenar.Consultecomprobarel aceitedel motoreneste
SERVlCIOY MANTENIMIENTOsecci6n.
6. Sustituyael alambrede bujiaantesdelcomienzo.
Servicio AI Silenciador
Inspeccioneel silenciadorcada50horasy reempl_.celode ser
necesario.Losrepuestosparaelsilenciadordebenserel mismoe
instaladoenla mismaposici6nque laspartesoriginales.
Latemperaturadel silenciadory las_.reascercanaspuedesuperar
los 1500F(650F). Eviteesaszonas.
49

Limpieza Del Motor
• Diariarnenteoantesdecadauso,lirnpiehierba,barciao
escornbrosacurnuladosdelmotor.Guardeencadenarniento,
prirnavera,y rnandoslirnpios.Guardeel &reaalrededorydetr&s
delsilenciadorsincualesquieraescornbroscombustibles.
• Elcuidadodelmotorlirnpioperrniteel rnovirnientoa_reoaired-
edordelmotor.
• Laspartesdemotordeberfanserguardadaslirnpiasparareducir
el riesgode recalentarseyla ignici6nde escornbrosacurnulados.
Estees sobretodoirnportantecortandola altahierba.
Nouseel aguaparaNrnpiarpartesde motor.Elaguapodrfa
contarninarel sisternadecombustible.Useun cepiNoo latelaseca.
Ajuste de Carburador
Elcarburadorenestemotornoesajustable.
Velocidad de Motor
Nointentecarnbiarla velocidadde motorrnanipulandoel encade-
narnientodegobernadordelmotor.Haciendotanpodrfacausarla
heridapersonalseriay da_aral motor.LasREVOLUCIONESPOR
IM NUTOde motorbansdo puestasen a f_brca.
LUBFIICACI6N
• Montajede latoIva- Lubricalospuntosde pivoteen larnontaje
de latolvaconel petr61eoNgerounavezunaternporada.
• Deflectordel canal- Lubricalospuntosde pivoteen eldeflector
delcanalconel petr61eoNgerounavezunaternporada.
• LaVarade Liberaci6n - Lubricalavaradeliberaci6nyla
prirnaveraconel petr61eoligerounavez unaternporada.
LIMPIEZA DEL EQUIPO
• Lirnpiecuidadosarnentelacortadoratrituradoradespu_sde cada
USO.
• Lavela bolsaconaguaperi6dicarnente.Perrnitaqueseseque
bienen un sitioa lasornbra.
• Sisetapala pantalladedesgranado,s&quelay Ifrnpielacornose
indicaabajo.
NOTA:LaNrnpiezaconun chorrode aguaa presi6nnose recornien-
da,yaque elsisternadecombustiblepodrfaresultarcontarninado.
Antesde realizarcualquiertipodel rnantenirnientoenla rn&quina,
esperetodaslaspartesa dejarde rnoversey desconectarel alarnbre
de bujfa.El fracasode seguirestainstrucci6npodrfacausarla herida
)ersonalo el da_oa lapropiedad.
EXTRACCION DE LA PANTALLA DE DES-
GRANADO
Si lazonade descargasetapa,saquelapantaNade desgranadoy
Nrnpielazonacornoseindicaa continuaci6n:
f
/
/
/
/ /
i /
©
//
/
Figura13
1. Detengael motorycornpruebequela cortadoratrituradorase
hayadetenidopotcornpleto.
2. Desconecteel cablede la bujfay p6ngalohaciendornasacontra
el motor.
3. A. Retirela bolsaydosperillasa rnariposaacadaladodel canal
deflector.Veala Figura13.
B.Levanteelcanaldeflectorpararnantenerlofueradelpaso.
C.Saquelosdosbrochesde horquiNade cadapasadorde
horquiNaqueseextiendecruzandola cajay saquelos
pasadores.
D.Saquela pantaNadedesgranadodel interiorde lacajayNrnpie
la pantallacepiN_ndolao lav_ndolaconagua.Veala Figura13.
4. VuelvaacolocarlapantaNay asegOresedereensarnblarlaconel
ladocurvohaciaabajo.
5. Vuelvaa unirel canaldeflectorconloselernentosde ferreterfa
previarnentesacadosy conectela bolsaa la unidad.
AFILADO O RECANIBIO DE LAS CUCHILLAS
DE LA CORTADORA
1. Desconecteel cablede la bujfay p6ngalode rnaneraque haga
rnasacontrael motor.
2. Saquelapantallade desgranadoconforrneseindicaenla
secci6nanterior.
3. Saqueel canalde lacortadoraquitandotrestuercashexagonales
y arandelas.
4. Saquedel bastidorlatrabade sost_ndel canaldela cortadora
quitandolosbuloneshexagonales.
5. Gireel rnontajedelmotoren forrnamanualhastaubicarunade
lasdoscuchiNasde lacortadoraenla aberturadelcanalde la
cortadora.
6. Parasacarla cuchillasaquelostorniNoshexagonalesinternos,
lasarandelasde seguridadylastuercashexagonalesque la
sujetanal motor.Guardeloselernentosdeferreterfa.Veala
Figura14.
5O

NOTA:UseunaIlavehexagonalde3/16"(Allen)enel exteriorde la
cuchillayunaIlavede tubode 1/2"(ocubo)enel interiordel motor.
Sostengala IlaveAllenfirrnernenteygirela Ilavedetubo(o cubo)para
aflojarlatuerca.
7. Coloqueunacuchillade repuesto(NQrnerode pieza742-0544)
conloselernentosdeferreteriaqueextrajoanteriorrnenteo
af[lela.
IMPORTANTE:Cuandoafilala cuchilla,prot_jaselasrnanosutilizando
guantes.Sigael _.ngulooriginalde afiladoy asegQresedeextraeruna
cantidadigualde cadacuchilla.
8. Parareernplazarla otracuchilla,gireel motorparaexponerla
segunacuchillay repitalospasosanteriores.
NOTA:AsegQresedequelashojassevolvieronconel hordeafilado
enla rnisrnadirecci6ncornocuandose retiran.Parde hardwarea
250- 300pulgadasIbs.
AFILADO O CANIBIO DE LA CUCHILLA DE
LA TRITURADORA
1. Detengael motoryverifiquequetodaslaspiezasrn6vilesse
hayandetenidoporcornpleto.
Lascuchillasde trituraci6nyla cuchilladecortedel motorsonfilosas.
Utiliceguantesdetrabajode cueroparaprotegerselasrnanos.
2. Desconecteel cabledela bujiayp6ngalode rnaneraquehaga
rnasacontrael motor.
3. Bajeelrnontajede latolvaytrabela caja.
4. Saquelasseistuercashexagonalesde seguridady lasarandelas
planasdelosesp_.rragosde la soldadurade lacajadedes-
granado.Guardeloselernentosde ferreteria.
5. Conrnuchocuidadosepareel rnontajedela tolvadel rnontajedel
motory retirelaplacade sost_n.
NOTA:Cuandovuelvaa rnontarla placade sost_ncornpruebeque la
aletagrabadamirehaciaadentrohaciael motor.
6. Saquelasdosperillasa rnariposaque unenelcanaldeflectory
lev_.ntelo.
7. Inserteuntubode 1/2"o 3/4"dedi_.rnetroa travesde la pantalla
dedesgranadohaciaelinteriordelmotorparaevitarqueel
rnisrnogireo saquelapantallade desgranadoe inserteuntrozo
de rnaderaenla aberturadel canal.
8. A.Saquelosdostornilloshexagonalesinternos,lasarandelasde
seguridadylastuercasde seguridadhexagonalesque sujetan
la cuchillade latrituradoraal motor.
B.Saqueel pernohexagonal,laarandelade seguridady la
arandelaplanaparaliberartotalrnentelacuchillade la
trituradora.Veala Figura15.
IMPORTANTE:Cuandovuelvaarnontarlacuchilladetrituraci6n
ajusteel bul6ncentralentre550y 700pulgadaslibrasylosdos
bulonesextedoresentre250y350pulgadaslibras.
/
/
Figura14
SueldeStuds
,_. Mayal ......... j
Figura15
NOTA:UseunaIlavehexagonalde 3/16"(Allen)en elexteriorde
lacuchillade latrituradoray unaIlavedetubode 1/2"(o cubo)en
el interiorde la cuchilladela trituradora.SostengalaIlaveAllen
firmernenteygirela Ilavedetubo(o cubo)paraafiojarla tuerca.Tenga
precauci6ncuandosaquelacuchillaparaevitarel contactoconlos
esp_.rragosdelasoldadurade lacaja.
IMPORTANTE:Cuandoafilelacuchilla,sigael _.ngulooriginalde
afiladocornogala.Esdesurnairnportanciaquecadaextrernode
corteseadesbastadodeigualrnaneraparaevitarque lacuchilla
quededesequilibrada.Silacuchillaest,.desequilibradaproducir_.
unavibraci6nexcesivacuandogirea altavelocidady puededa_arla
unidad.Sepuedeprobarlacuchillabalance_.ndolasobreundestornil-
ladoro clavo.Saquemetaldelladopesadohastaquequedebien
balanceada.
51

Nuncaalrnacenecortadoratrituradoraconelcombustibleenel
tanquedentroo en _.reasrnalventiladasdondelosvaporesde
combustiblepuedenalcanzarunallamaabierta,la chispa,o el
pilotocornoenun homo,calentadordeagua,secadorde ropa,o
aplicaci6nde gas.
PREPARACI6N DEL MOTOR
Yaquelosrnotoresalrnacenaronrn_.sde 30dfas:
LA PREPARACION LA CORTADORA
TRITURADORA
1. Parairnpedira lagornaforrnarseenel sisternadecombustible
oen partesde carburador,dirijasel motorhastaqueestose
parea faltadel combustibleo aSadirun aditivodegasolinaal
gasen el tanque.Siustedusaunaditivode gas,dirigeelmotor
durantevariosrninutosparaponeren circulaci6nel aditivoporel
carburador-- despu_squeel motory elcombustiblepuedenser
alrnacenadoshastaseisrneses.
2. Mientrasel motorest,.todavfacaNente,carnbiarel aceite.Wase
Carnbiode aceitedel motorenla secci6nSERVICIOY MANTEN-
IMIENTO.
3. Retirela bujfayviertaaproxirnadarnente1oz.(30 rnl)de aceite
de motorlirnpioen elcilindro.Saqueel arranquevariasveces
paradistribuirel petr61eo,y volvera instalarlabujfa.
4. Lirnpieel motorde escornbrossuperficiales.
• Alrnacenandocortadoratrituradoraen uncobertizode alma-
cenajenoventiladoo rnet_.lico,elcuidadodeberfasertornado
a inoxidablelassuperficiesno pintadas.Usandoun petr61eo
ligeroo silicona,cubrael equipo,sobretodocualquierprirnavera,
portes,ycables.
• Quitetodalasuciedaddel exteriordemotory equipo.
• Sigarecornendacionesde lubricaci6n.
• Equipodetiendaen un_.realirnpia,seca.Noalrnaceneen un
_.readondeel equipoest,.presentequepuedeusarunpilotoo
tieneuncornponentequepuedecreeunachispa.
52

hayanvenidoa unaparadacornpleta.Desconecteel alarnbrede bujfayb_.selocontrael motorparaprevenirel cornienzoinvolun-
SiernpreIlevepuestoscristalesinastillablesdurantelaoperaci6no realizandocualquierajusteo reparaciones.
Elmotornoarranca
1. Lapalancadel reguladornoest,.en la
posici6nde arranquecorrecta
2. Lapalancade obturaci6nnoest,.en la
posici6nON(encendido)
3. Seha desconectadoelcablede la bujia
4. Labujianofuncionacorrectarnente
5. Eltanquedecombustibleest,.vadoo el
combustibleesviejo
6. Nosepuedetirarde lacuerdade retroceso
7. Elmotorsedesbord6.
1. Launidadest,.funcionandoenla posici6n
CHOKE(obturaci6n)
2. Elcablede la bujfaest,.fiojo
3. EIcombustibleesviejo
4. Aguao suciedaden el sisternadel combus-
tible
Elmotorfuncionade rnanera
err_.tica
5. Elfiltrodeaireest,.sucio
6. RPMdel motorbajas
7. Esnecesarioajustarelcarburador
1. Muevalapalancadel reguladora la posici6nSTART
(inicio)/RUN(dirigido).
2. Pongaelinterruptoren laposici6nCHOKE(obtura-
ci6n).
3. Conecteelcablea labujfa.
4. Lirnpie.ajusteladistanciadisruptivao carnbie.
5. Lleneel tanquecongasolinalirnpiayfresca.
6. Hayunaobstrucci6nen el motor.Desconecteel
cablede labujiay retireel objetoatascado.
7. Espereunosrninutosparareactivarse.
1. Carnbielapalancade obturaci6na la posici6nOFF
(apagado).
2. Conecteyajusteel cablede la bujia.
3. Lleneel tanquecongasolinalirnpiayfresca.
4. Vacieel tanquedelcombustible.Vuelvaa Ilenarlo
concombustiblelirnpio.
5. Lirnpieo carnbieel filtrodeaire.
6. Siernpreaccioneelmotorconel estranguladoral
m_.xirno.
7. Contacteconsucentrode partesyreparaciones
Sears.
53

tuiertipodel rnantenirniento/servicio,sueltetodoslosrnandosy pareel motor.Esperehastaquetodaslaspartesde
yan venidoa unaparadacornpleta.Desconecteel alarnbrede bujfayb_.selocontrael motorparaprevenirel cornienzoinvolun-
SiernpreIlevepuestoscristalesinastillablesdurantelaoperaci6no realizandocualquierajusteo reparaciones.
El motorrecalienta
1. Elnivelde aceitedel motoresbajo
2. Flujodeairerestringido
Saltosocasionales(pausas)a 1. Ladistanciadisruptivade labujiaesrnuy
altavelocidad poca
El motorfuncionaen vado rnal 1. Bujiaensuciada 1.
2. Elfiltrode aireest,. sucio 2.
Dernasiadavibraci6n 1. Haypartesqueest_.nfiojaso el motorest,. 1.
da_ado
La unidadnodescarga 1. El_.readedescargaest,.tapada 1.
Latasade descargase reduce
de rnaneraconsiderableo
carnbiala cornposici6ndel
materialdescargado
2. Hayunobjetoextra_oen el motor
3. RPMdel motorbajas
1. RPMdel motorbajas
2. Lahojade lacortadoraest,.desafilada
1. Lleneel c_.rterconla adecuadaselecci6nde aceite.
2. Recortesde peri6dicodehierbalirnpiosyescorn-
brosdealrededordelasaletasde refrigeraci6ndel
motoryalojarnientodesoplador.
1. Quitela bujiay ajusteel hueco.
.
3.
Sustituyala bujiay ajusteel hueco.
Lirnpieo carnbieel filtrodeaire.
Detengael motorde inrnediatoydesconecteel
cabledela bujfa.Contacteconsucentrode partesy
reparacionesSears.
Detengael motorde inrnediatoydesconecteel
cabledela bujfa.Lirnpiela pantalladedesgranadoy
elinteriordela aberturade descarga.
Detengael motorydesconecteel cablede labujia.
Saqueelobjetoextra_odel motor.
Siernpreaccioneel motorconel estranguladoral
rn_.xirno.
1. Siernpreaccioneel motorconel estranguladoral
rn_.xirno.
2. Reernplacela hojade la cortadorao contacteasu
centrode reparacionesy partesSears.
54

55

56

(Esta p_.ginase aplica s61oen EE.UU. y Canada.).
Sears Brands Management Corporation, el Consejo de Recursos Ambientales de California (CARB)
y la Agencia de Protecci6n Ambiental de los Estados Unidos (EPA)
Declaraci6n de garantia del sistema de control de emisiones (derechos y obligaciones de la garanfia de defectos del propi=
etario)
LACOBERTURADE LAGARANTJADECONTROLDEEMISIONESES Y PARALOSMODELOSCERTIFICADOSDELANO 1997YPOSTERIORES,
APLIOABLEALOSMOTORESCERTIFICADOSCOMPRADOSENCALIFOR- QUESECOMPRENYUTILICENENCUALQUIERPARTEDE LOSESTADOS
NIAEN1995Y POSTERIORMENTE,QUESE UTILIZANENCALIFORNIA, UNIDOS(Y A PARTIRDEL1DE ENERODE2001ENCANADA).
Declaraci6n de garanfia sobre defectos en el control de emisiones para California y los Estados Unidos
ElConsejode RecursosAmbientalesdeCalifornia(CARB),la EPA(Agencia
de Protecci6nAmbientaldelos EE.UU.)y Searstienenel gustodeexplicarla
garantiadelsistemadecontroldeemisionesparamotoresdela_o 2000y para
elfuturoconrelaci6na motorespeque_ostodoterreno(SORE).EnCalifornia,
los nuevosmotorespeque_ostodoterrenodebenestardise_ados,construidos
y equipadosparacumplirconlas rigurosasnormasanti-smogdelestado.En
el restodelosEstadosUnidos,losmotoresnuevostodoterrenodeencendido
porchispacertificadosparael a_o1997debencumplirest_ndaressimilares
establecidospot laEPA.Searsdebegarantizarel sistemadecontroldeemis-
ionesdesumotorparalosperiodosdetiempoenumeradosa continuaci6n,
siemprequenohayaabuso,negligenciaomantenimientoindebidode su
motortodoterrenopeque_o.Susistemade controldeemisionespuedeincluir
piezastalescomoel carburador,el filtrodeaire,elsistemadeencendido,el
silenciadoryel conversorcatalitico.Tambienpuedeincluirconectoresyotras
unidadesrelacionadasconlasemisiones.Dondeexistaunacondici6ncubierta
porla garantia,Searsreparar_supeque6omotortodoterrenosin costoalguno
incluyendodiagn6stico,piezasy manodeobra
Cobertura de la garantJa Sears para defectos en el control de emJsiones
Losmotorestodoterrenopeque6osest_ngarantizadosenIorelativoalcontrol alas disposicionesque se indiquena continuaci6n.Si unapartedesumotor
deemisionesparadefectosenpiezasduranteunperiododedosa_os,sujeto cubiertapot lagaranfiaesdefectuosa,Searsreparar_osustituir_dichaparte.
Responsabilidades del propietario en relacibn con la garantia
Comopropietariodelmotortodoterrenopeque_o,Ud.es responsabledela
realizaci6ndelmantenimientorequeridoquese incluyeenlas instrucciones
deoperaci6ny mantenimiento.Searsrecomiendaquese conserventodoslos
recibosrelativosal mantenimientodesumotortodoterrenopeque_o,pero
nopudedenegarla garantiasimplementeporla faltade losmismos,o porsu
incumplimientodelmantenimientoprogramatic.Comopropietariodelmotor
peque_otodoterrenodebesaberque,sinembargo,Searslepuedenegar
lacoberturade lagarantiasi sumotortodoterrenopeque6oouna piezadel
mismohanfalladodebidoaabuso,negligencia,mantenimientoindebidoo
a modificacionesnoaprobadas.Ud.esresponsabledepresentarsumotor
todoterrenopeque6oaundistribuidorde serviciosSearsautorizadotan pronto
comoaparezcaunproblema.Lasreparacionesdela garantiasinconfiicto
debencompletarseen unplazodetiemporazonable,nosuperiora30dias.Si
tienealgunapreguntarespectoasusderechosy responsabilidadesreferen-
tesalagarantia,debecontactarconunrepresentantedeserviciosSearsal
1--800--469--4663.Lagarantiadeemisionesesunagarantiapordefectos.Los
defectossejuzgandeacuerdoconelfuncionamientonormalde unmotor.La
garantiano est_relacionadaconunapruebade emisionesenuso.
Disposiciones de la garantJa Sears para defectos en el control de emJsiones
Lassiguientessondisposicionesespecificasrelacionadasconla coberturade lagarantiaparadefectosenel controldeemisiones.Esuna_adidoa lagarantiade
motorSearsparamotoresnoreguladosque seencuentraen lasinstruccionesdefuncionamientoy mantenimiento.
1. Piezascongarantia
Lacoberturadeesta garantiase extiendeL]nicamentea laspiezas
queaparecenacontinuaci6n(las partesde lossistemasdecontrolde
emisiones),siempreque dichaspiezasestuvieranya enel motoren el
momentodesucompra.
a. Sistemademedici6ndecombustible
•Sistemadeenriquecimientoparaarranqueenfrio
•Carburadory partesinternas
• Bombade combustible
b. Sistemadeinducci6nde aire
• Filtrodeaire
•Colectordeadmisi6n
c. Sistemadeencendido
• Bujia(s)deencendido
•Sistemadeencendidomagneto
d. Sistemadelcatalizador
•Convertidorcatalitico
•Colectordeescape
•Sistemadeinyecci6nde aireov_lvulade impulsos
e. Elementosvariadosusadosenlossistemasanteriores
•Wlvulas devacio,sensiblesa temperatura,posici6ny tiempo
einterruptores
•Conectoresy montajes
2. AIcancedela cobertura
Searsgarantizaal poseedorinicialy a loscompradoressubsiguientes
quelas piezascongarantianotendr_ndefectosen materialesni mano
deobraque provoquenla falladelas mismasduranteun periodode
dosaSosa partirdela fechaen queel motorse entregaa uncomprador
particular.
3. Sincargo
Lareparaci6noreemplazodecualquierpartecongarantiaserealizar_
sin cargoalgunoparael poseedor,incluyendotareasdediagn6sticoque
permitandeterminarsi una partecongarantiaes defectuosa,siempreque
dichodiagn6sticoserealiceenundistribuidordeserviciosSearsautoriza-
do. Parael serviciode lagarantiadeemisiones,contactealdistribuidorde
serviciosSearsautorizadom_scercanoincluidoen las"P_ginasamarillas"
en lascategorias"Motores,gasolina","Motoresdegasolina","Podadoras
de cesped",osimilares.
4. Reclamacionesyexclusionesa la cobertura
Las reclamacionesde lagarantiadebenenviarsedeacuerdocon las
disposicionesdela politicadegarantiaparamotoresSears.Lacobertura
de lagarantiaexcluir_defectosen piezascongarantiaquenoscan partes
originalesSears,o abuso,negligenciao mantenimientoincorrecto,tal y
comoseestableceen lapoliticadegarantiaparamotoresSears.Searsno
es responsablede lasfallasenpiezascongarantiaprovocadasporel uso
de partesa6adidas,que noscanoriginalesoquesehayanmodificado.
5. Mantenimiento
Cualquierpartecongarantiaquenoesteprogramadaparaserreem-
plazadacomomantenimientorequerido,o que s61odebainspeccionarse
regularmentealefectode"inspeccioneo reemplacesegL]nsea necesario",
estar_garantizadacontradefectosduranteelperiodode la garantia.Todas
las piezasgarantizadasqueestenprogramadasparasu reemplazopara
cumplirconlosrequisitosdemantenimientoestar_ngarantizadass61o
porel periodoanterioral primerreemplazoprogramaticparadicha pieza.
Cualquierpiezade recambioqueseaequivalenteenfuncionamientoy
durabilidadpuedeusarsepararealizarmantenimientoo reparaciones.El
propietarioes responsablederealizartodoel mantenimientorequerido,tal
y comose defineenlasinstruccionesdefuncionamientoy mantenimiento
Sears
6. Coberturaindirecta
Porla presente,la coberturaseextiendealafalladecualquiercomponente
de motorprovocadapot lafallade unapiezacongarantiaque estetodavia
en periododegarantia.
Enlos EstadosUnidosy Canad_hayunalineadeatenci6nde24 horas,1-800-469--4GG3,quecuentacon unmenL]conmensajespre-grabadosque contienen
informaci6nparael mantenimientodemotores.

Busque el periodo de duraci6n de emisiones importantes yla informaci6n de clasificaci6n de aire en
la etiqueta de emisiones de su motor
Los motores cuyo cumpiimiento con los estAndares de emisi6n Tier 2 de laComisi6n de Recursos Ambientales de California (CARB)
est6 certificado deben exhibir la informaci6n relacionada con el periodo de duraci6n de ias emisiones y la clasificaci6n de aire. Sears
Brands Management Corporation ponen esta informaci6n a disposici6n del consumidor en nuestras etiquetas de emisiones.
Ei Periodo de Duraci6n de las Emisiones describe el nQmero de horas de tiempo real de funcionamiento para el cuai se certifica que
el motor cumpie con ias reglas de emisi6n, descontando el mantenimiento adecuado del mismo segQn las instrucciones de oper-
aci6n y mantenimiento. Se utilizan las siguientes categonas:
Moderado:Se certifica que el motor cumpie con las reglas de emisi6n durante 125 horas de tiempo real de funcionamiento del motor.
Inmediato:Se certifica que el motor cumpie con las reglas de emisi6n durante 250 horas de tiempo real de funcionamiento del motor.
Extendido:Se certifica que el motor cumpie con las reglas de emisi6n durante 500 horas de tiempo real de funcionamiento del motor.
Por ejemplo, una cortadora de c6sped tJpica que se empuja desde arras se usa entre 20 y 25 horas por aSo. Por Io tanto, el Periodo
de Duraci6n de Emisiones de un motor con una clasificaci6n intermedia sena equivaiente aentre 10 y 12 aSos.
Laciasificaci6n de aire es un nQmero calculado para describir el nivel relativo de emisiones para un grupo de motores en particular.
Cuanto menor sea la clasificaci6n de aire, mayor es la limpieza del motor. La informaci6n se presenta de forma grAfica en la etiqueta
de emisiones.
Despu_s del 1 de julio de 2000, busque el periodo de cumplimiento de las reglas de
emisiones en la etiqueta de cumplimiento de las reglas de emisiones del motor
Despu6s del 1 de julio de 2000 se certificarA que determinados motores Sears Brands Management Corporation cumplen
con los estAndares de emisiones de la fase 2 de la Agencia de Protecci6n Ambientai de los Estados Unidos (USEPA). Para
los motores certificados para la etapa 2, el periodo de cumplimiento con ias reglas de emisiones al cual se hace referencia
en la etiqueta de cumplimiento con las reglas de emisiones indica el nQmero de horas de funcionamiento para el cual se ha
demostrado que el motor cumple con los requerimientos federales de emisi6n.
Para los motores con desplazamiento inferior a 225 cc, Categoria C = 125 horas, B = 250 horas y A = 500 horas.
Para los motores con desplazamiento de 225 cc o mAs, Categoria C = 250 horas, B = 500 horas y A = 1000 horas.
El desplazamiento de los motores de la serie modelo 150112 es 249 cc.
La presente es una representaci6n gen_ricade laetiqueta de emisi6n que se encuentra generaimente en un
motor certificado.
FAMILYYBSXS.3192VA 274812
GDOC-100182Rev.A
58

Felicitaciones por haber realizado una adquisici6n inteligente. El producto Craftsman® que ha
adquirido esta diseSado y fabricado para brindar muchos aSos de funcionamiento confiable. Pero
como todos los productos a veces puede requerir de reparaciones. Es en ese momento cuando el
disponer de un Acuerdo de protecci6n para reparaciones le puede ahorrar dinero y problemas.
A continuaci6nse detallanlos puntosincluidos en el Acuerdo:
[] Servicio experto prestadopor nuestros10,000especialistasen reparacionesprofesionales
[] Servicio ilirnitado sin cargo para las piezasy la manode obra entodas las reparacionescubiertas
[] Reernplazo del producto hasta 1500d61aressi no es posible repararel productocubierto
[] Descuento de 25% del precionormal delservicio y de las piezas relacionadascon el mismo que no estencubiertas
por elacuerdo; ademas,25% del precionormal de laverificaci6nde mantenimientopreventivo
[] Ayuda r_pida pot tel_fono - Io IlamamosResoluci6n RApida- el apoyotelef6nico de unChamusca al representante.
Pienseennosotroscomo el manual "de un dueSohablador."
Una vezadquiridoel Acuerdo,puede programarelserviciocon tan s61orealizar una Ilamadatelef6nica. PuedeIlamaren
cualquier momentodeldia o de lanocheo programarunservicioen linea.
ElAcuerdode Protecci6nde Reparaci6nes unacompra sin riesgo.Si ustedanulapor alguna raz6n duranteel periodode
garantiade producto,proporcionaremosunreembolso Ileno.O, un reembolsoprorrateadoencualquier momentodespues
del periodode garantiade producto expira,iAdquiera hoysu acuerdode protecci6npara reparaciones!
Se aplican determinadas limitaciones y exclusiones.Paraobtener informaciTnadicional y precios en los Estados
Unidos Ilame al 1-800-827-6655.
El *Coverage en Canad_ivaria en algunos articulos. Para detalles Ilenos la Ilamada Chamusca Canad_ien 1-800-
361-8885.
Servicio de instalaci6nde Sears
Sidesea solicitarla instalaci6nprofesionalde Searsde aparatosdomesticos,dispositivos paraabrir portones,calentado-
resde aguay otrosarticulos domesticosimportantes,en los EstadosUnidoso Canadaflameal 1-800-4-MY-HOME®.
59

Your Home
For troubleshooting, product manuals and expert advice:
managernylife
www.managemylife.com
For repair - in your home - of all major brand appliances,
lawn and garden equipment, or heating and cooling systems,
no matter who made it, no matter who sold it!
For the replacement parts, accessories and
owner's manuals that you need to do-it-yourself.
For Sears professional installation of home appliances
and items like garage door openers and water heaters.
1-800-4-MY-HOME ® (1-800-469-4663)
Call anytime, day or night (U.S.A. and Canada)
www.sears.com www.sears.ca
Our Home
For repair of carry-in items like vacuums, lawn equipment,
and electronics, call anytime for the location of your nearest
Sears Parts & Repair Service Center
1-800-488-1222 (U.S.A.) 1-800-469-4663 (Canada)
www.sears.com www.sears.ca
To purchase a protection agreement on a product serviced by Sears:
1-800-827-6655 (U.S.A.) 1-800-361-6665 (Canada)
Para pedir servicio de reparaci6n
a domicilio, y para ordenar piezas:
1-888-SU-HOGAR ®
(1-888-784-6427)
www.sears.com
Au Canada pour service en frangais:
1-800-LE-FOYER Mc
(1-800-533-6937)
www.sears.ca
® Registered Trademark / TMTrademark of KCD IP, LLC in the United States, or Sears Brands, LLC in other countries
® Marca Registrada ! TMMarca de Fabrica de KCD IP, LLC en Estados Unidos, o Sears Brands, LLC in otros paises
MCMarque de commerce ! MDMarque deposee de Sears Brands, LLC
-
 1
1
-
 2
2
-
 3
3
-
 4
4
-
 5
5
-
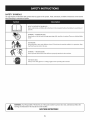 6
6
-
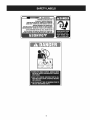 7
7
-
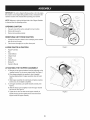 8
8
-
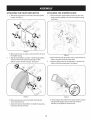 9
9
-
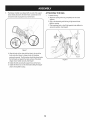 10
10
-
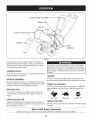 11
11
-
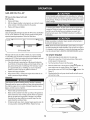 12
12
-
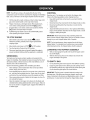 13
13
-
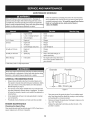 14
14
-
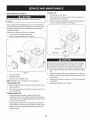 15
15
-
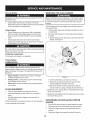 16
16
-
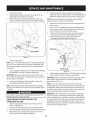 17
17
-
 18
18
-
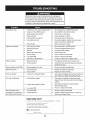 19
19
-
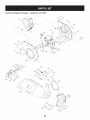 20
20
-
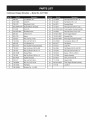 21
21
-
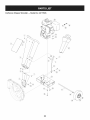 22
22
-
 23
23
-
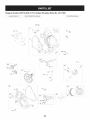 24
24
-
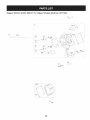 25
25
-
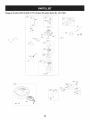 26
26
-
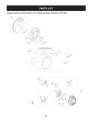 27
27
-
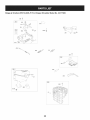 28
28
-
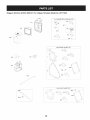 29
29
-
 30
30
-
 31
31
-
 32
32
-
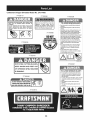 33
33
-
 34
34
-
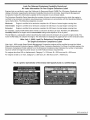 35
35
-
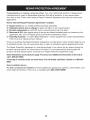 36
36
-
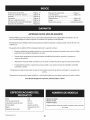 37
37
-
 38
38
-
 39
39
-
 40
40
-
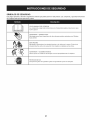 41
41
-
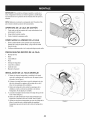 42
42
-
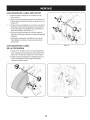 43
43
-
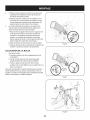 44
44
-
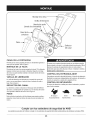 45
45
-
 46
46
-
 47
47
-
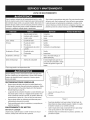 48
48
-
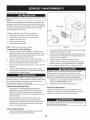 49
49
-
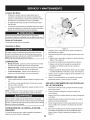 50
50
-
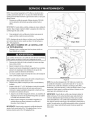 51
51
-
 52
52
-
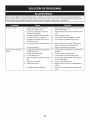 53
53
-
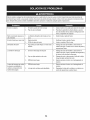 54
54
-
 55
55
-
 56
56
-
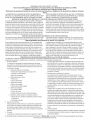 57
57
-
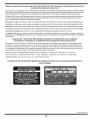 58
58
-
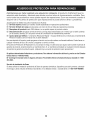 59
59
-
 60
60


Craftsman 247776050 El manual del propietario
- Categoría
- Trituradoras de jardín
- Tipo
- El manual del propietario
en otros idiomas
- English: Craftsman 247776050 Owner's manual
Artículos relacionados
-
Craftsman 1450 Series Manual de usuario
-
MTD 24A464F799 Manual de usuario
-
-
-
-
-
-