Craftsman 247770130 El manual del propietario
- Tipo
- El manual del propietario

Operator's Manual
CRRF[SM ®
675 Series Engine
POWER PROPELLED YARD VACUUM
Model No. 247.77013
CAUTION: Before using
this product, read this
manual and follow all
safety rules and operating
instructions.
o SAFETY
o ASSEMBLY
o OPERATION
o MAINTENANCE
o PARTS LIST
o ESPANOL
Sears Brands Management Corporation, Hoffman Estates, IL 60179, U.S.A.
Visit our web site: www.craftsman.com
FORMNO.769-05107B
4/6/2011

WarrantyStatement..................................Page2
SafeOperation Practices .......................... Page 3
Safety Labels ............................................ Page 7
Assembly .................................................. Page 8
Operation .................................................. Page 12
Service and Maintenance ......................... Page 16
Off-Season Storage .................................. Page 22
Trouble Shooting ....................................... Page 23
Parts List ................................................... Page 24
Repair Protection Agreement ................... Page 38
Espa_ol ..................................................... Page 39
Service Numbers ...................................... Back Cover
CRAFTSMAN TWO YEAR FULL WARRANTY
FORTWOYEAR(S)fromthedateof purchase,thisproductiswarrantedagainstanydefectsinmaterialorworkmanship.A defectiveproductwill
receivefreerepairorreplacementif repairisunavailable.
Forwarrantycoveragedetailsto obtainfreerepairor replacement,visitthewebsite:www.craftsman.com
ThiswarrantycoversONLYdefectsin materialandworkmanship.WarrantycoveragedoesNOTinclude:
• Expendableitemsthatcanwearoutfromnormalusewithinthewarrantyperiod,suchastheblades, sparkplug,aircleaner,flail
screenandcatcherbag.
• Productdamageresultingfromuserattemptsatproductmodificationor repairor causedbyproductaccessories.
• Repairsnecessarybecauseofaccidentor failuretooperateormaintaintheproductaccordingtoall suppliedinstructions.
• Preventivemaintenance,orrepairsnecessarydueto improperfuelmixture,contaminatedor stalefuel.
Thiswarrantyisvoidifthis productiseverusedwhileprovidingcommercialservicesorif rentedtoanotherperson.
Thiswarrantygivesyouspecificlegal rights,andyoumayalsohaveotherrightswhichvaryfromstateto state.
Sears Brands Management Corporation, Hoffman Estates, IL 60179
EngineSeries: 675
EngineOilType: SAE30
EngineOilCapacity: 18ounces
FuelCapacity: 1 1/2Quarts
SparkPlug: Champion®RJ19LM
SparkPlugGap: .020"
Model Number.................................................................
Serial Number .................................................................
Dateof Purchase.............................................................
Recordthemodelnumber,serialnumber
anddateof purchaseabove
©SearsBrands,LLC 2

Thissymbolpointsoutimportantsafetyinstructionswhich,if not
followed,couldendangerthepersonalsafetyand/orpropertyof
yourselfandothers.Readandfollowall instructionsin thismanual
beforeattemptingtooperatethismachine.Failuretocomplywith
theseinstructionsmayresultin personalinjury.Whenyouseethis
symbol,HEEDITSWARNING!
CALIFORNIA PROPOSITION 65
EngineExhaust,someof itsconstituents,andcertainvehicle
componentscontainoremitchemicalsknowntoStateofCalifornia
tocausecancerandbirthdefectsorotherreproductiveharm.
Thismachinewasbuilttobeoperatedaccordingtothesafeopera-
tionpracticesin thismanual.Aswithanytypeofpowerequipment,
carelessnessorerroronthepartoftheoperatorcan resultin
seriousinjury.Thismachineiscapableofamputatingfingers,hands,
toesandfeetandthrowingdebris.Failureto observethefollowing
safetyinstructionscouldresultin seriousinjuryordeath.
Your Responsibility--Restricttheuseofthispowermachineto
personswhoread,understandandfollowthewarningsand instruc-
tionsin thismanualandon themachine.
SAVETHESEINSTRUCTIONS!
TRAINING
• Read,understand,andfollowallinstructionson themachineand
in themanualbeforeattemptingtoassembleandoperate.Keep
thismanualina safeplaceforfutureandregularreferenceandfor
orderingreplacementparts.
• ReadtheOperator'sManualand followallwarningsand safety
instructions.Failuretodosocanresultin seriousinjurytothe
operatorand/orbystanders.Forquestionscall, 1-800-4MY-
HOME.
• Befamiliarwithall controlsandtheirproperoperation.Knowhow
tostopthemachineanddisengagethemquickly.
• Neverallowchildrenunder16yearsofagetooperatethis
machine.Children16andovershouldreadandunderstandthe
instructionsandsafeoperationpracticesin thismanualandon
themachineandbe trainedandsupervisedbyanadult.
• Neverallowadultstooperatethis machinewithoutproper
instruction.
• Keepbystanders,pets,andchildrenatleast75feetfromthe
machinewhileitisin operation.Stopmachineifanyoneenters
thearea.
• Neverrunanengineindoorsor ina poorlyventilatedarea.Engine
exhaustcontainscarbonmonoxide,anodorlessanddeadlygas.
• Donotputhandsandfeetnearrotatingpartsor inthefeeding
chambersanddischargeopening.Contactwiththerotating
impellercanamputatefingers,hands,andfeet.
• Neverattempttounclogeitherthefeedintakeordischarge
opening,removeor emptybag,or inspectand repairthemachine
whiletheengineisrunning.Shuttheengineoff andwaituntilall
movingpartshavecometoa completestop.Disconnectthespark
plugwireandgroundit againsttheengine.
PREPARATION
• Thoroughlyinspecttheareawheretheequipmentistobeused.
Removeall rocks,bottles,cans,or otherforeignobjectswhich
couldbepickedupor thrownandcausepersonalinjuryor
damageto themachine.
• Alwayswearsafetyglassesor safetygogglesduringoperation
andwhileperformingan adjustmentor repair,to protectyour
eyes.Thrownobjectswhichricochetcancauseseriousinjuryto
theeyes.
• Wearsturdy,rough-soledworkshoesandclose-fittingslacksand
shirts.Loosefittingclothesor jewelrycanbecaughtin movable
parts.Neveroperatethismachineinbarefeetorsandals.Wear
leatherworkgloveswhenfeedingmaterialinthechipperchute.
• Beforestarting,checkallboltsandscrewsforpropertightnessto
besurethemachineisinsafeworkingcondition.Also,visually
inspectmachineforanydamageatfrequentintervals.
• Maintainor replacesafetyandinstructionslabels,asnecessary.
3

SafeHandlingof Gasoline:
Toavoidpersonalinjuryor propertydamageuseextremecarein
handlinggasoline.Gasolineisextremelyflammableandthevaporsare
explosive.Seriouspersonalinjurycanoccurwhengasolineisspilled
onyourselfor yourclotheswhichcanignite.Washyourskinand
changeclothesimmediately.
• Useonlyan approvedgasolinecontainer.
• Neverfillcontainersinsidea vehicleor ona truckor trailerbed
witha plasticliner.Alwaysplacecontainersonthegroundaway
fromyourvehiclebeforefilling.
• Whenpractical,removegas-poweredequipmentfromthetruck
ortrailerand refuelitontheground.Ifthisisnotpossible,then
refuelsuchequipmenton a trailerwitha portablecontainer,rather
thanfroma gasolinedispensernozzle.
• Keepthenozzleincontactwiththerimofthefueltankor
containeropeningatalltimesuntilfuelingiscomplete.Donotuse
a nozzlelock-opendevice.
• Extinguishallcigarettes,cigars,pipesandothersourcesof
ignition.
• Neverfuelmachineindoors.
• Neverremovegascapor addfuelwhiletheengineishotor run-
ning.Allowenginetocoolatleasttwo minutesbeforerefueling.
• Neveroverfillfueltank.Filltankto nomorethan1/2inchbelow
bottomoffillernecktoallowspaceforfuelexpansion.
• Replacegasolinecapandtightensecurely.
• Ifgasolineisspilled,wipeitoff theengineandequipment.Move
unittoanotherarea.Wait5 minutesbeforestartingtheengine.
• Toreducefirehazards,keepmachinefreeofgrass,leaves,or
otherdebrisbuild-up.Cleanupoil orfuelspillageand removeany
fuelsoakeddebris.
• Neverstorethemachineorfuelcontainerinsidewherethereisan
openflame,sparkor pilotlightason awaterheater,spaceheater,
furnace,clothesdryerorothergasappliances.
OPERATION
• Donotputhandsandfeetnearrotatingpartsor in thefeeding
chambersanddischargeopening.Contactwiththerotating
impellercanamputatefingers,hands,andfeet.
• Beforestartingthemachine,makesurethechipperchute,feed
intake,andcuttingchamberare emptyandfreeofall debris.
• Thoroughlyinspectall materialtobe shreddedandremoveany
metal,rocks,bottles,cans,or otherforeignobjectswhichcould
causepersonalinjuryor damagetothemachine.
• Iftheimpellerstrikesa foreignobjector ifyourmachineshould
startmakinganunusualnoiseorvibration,immediatelyshut
theengineoff.Allowtheimpellertocometoacompletestop.
Disconnectthesparkplugwire,grounditagainsttheengineand
performthefollowingsteps:
a. Inspectfordamage.
b. Repairor replaceanydamagedparts.
c. Checkforanyloosepartsandtightento assurecontinued
safeoperation.
• Donotallowanaccumulationof processedmaterialto buildupin
thedischargearea.Thiscanpreventproperdischargeandresult
inkickbackof materialthroughthefeedopening.
• Donotattempttoshredorchipmateriallargerthanspecified
on themachineor inthis manual.Personalinjuryormachine
damagecouldresult.
• Neverattempttounclogeitherthefeedintakeor discharge
openingwhiletheengineisrunning.Shuttheengineoff,waituntil
all movingpartshavestopped,disconnectthesparkplugwireand
grounditagainsttheenginebeforeclearingdebris.
• Neveroperatewithoutvacuumbaganddischargechuteproperly
attachedtothe machine.Neveremptyor changevacuumbag
whiletheengineisrunning.Vacuumbagmustbe keptclosedat
all timesduringoperation.
• Neveroperatewithouteithertheinletnozzleor optionalhose
attachment(ifapplicable)properlyattachedtothemachine.
Neverattempttoattachor changeeitherattachmentwhilethe
engineisrunning.
• Keepallguards,deflectorsand safetydevicesin placeand
operatingproperly.
• Keepyourfaceandbodybackandtothesideofthechipper
chutewhilefeedingmaterialintothemachineto avoidaccidental
kickbackinjuries.
• Neveroperatethis machinewithoutgoodvisibilityorlight.Always
be sureofyourfootingand keepa firmholdon thehandles.
• Donotoperatethismachineona paved,gravelor non-level
surface.
• Donotoperatethismachinewhileundertheinfluenceof alcohol
or drugs.
• Mufflerandenginebecomehotandcancausea burn.Donot
touch.
• Neverpick uporcarrymachinewhiletheengineisrunning.
• Ifsituationsoccurwhichare notcoveredinthis manual,usecare
andgoodjudgement.ContactCustomerSupportforassistance
andthenameofthenearestservicedealer.
4

MAINTENANCE & STORAGE
• Nevertamperwithsafetydevices.Checktheirproperoperation
regularly.
• Checkboltsand screwsforpropertightnessatfrequentintervals
tokeepthemachinein safeworkingcondition.Also,visually
inspectmachineforanydamageand repair,ifneeded.
Beforecleaning,repairing,or inspecting,stoptheengineand
makecertaintheimpellerand allmovingpartshavestopped.
Disconnectthesparkplugwireandgrounditagainsttheengine
topreventunintendedstarting.
Donotchangetheenginegovernorsettingsor overspeedthe
engine.Thegovernorcontrolsthe maximumsafeoperatingspeed
oftheengine.
Maintainor replacesafetyandinstructionlabels,asnecessary.
Followthismanualforsafeloading,unloading,transporting,and
storageof thismachine.
Neverstorethemachineorfuelcontainerinsidewherethereisan
openflame,sparkorpilotlightsuchasa waterheater,furnace,
clothesdryer,etc.
Allowmachinetocoolatleast5 minutesbeforestoring.
• Alwaysrefertotheoperator'smanualforproperinstructionson
off-seasonstorage.
• If thefueltankhasto bedrained,do thisoutdoors.
• Observeproperdisposallawsand regulationsforgas,oil,etc.to
protecttheenvironment.
• AccordingtotheConsumerProductsSafetyCommission(CPSC)
andtheU.S.EnvironmentalProtectionAgency(EPA),thisproduct
hasan Average UsefulLifeofseven(7)years,or 60hoursof
operation.AttheendoftheAverageUsefulLifehavethemachine
inspectedannuallybyan authorizedservicedealertoensurethat
allmechanicalandsafetysystemsareworkingproperlyand not
wornexcessively.Failuretodo socanresultinaccidents,injuries
ordeath.
DO NOT MODIFY ENGINE
Toavoidseriousinjuryordeath,donotmodifyenginein anyway.
Tamperingwiththegovernorsettingcanleadto a runawayengineand
causeittooperateatunsafespeeds.Nevertamperwithfactorysetting
ofenginegovernor.
NOTICE REGARDING EMISSIONS
EngineswhicharecertifiedtocomplywithCaliforniaandfederal
EPAemissionregulationsforSORE(SmallOff RoadEquipment)are
certifiedtooperateon regularunleadedgasoline,and mayinclude
thefollowingemissioncontrolsystems:EngineModification(EM),
OxidizingCatalyst(OC),SecondaryAirInjection(SAI)and ThreeWay
Catalyst(TWO)if soequipped.
SPARK ARRESTOR
Thismachineis equippedwithan internalcombustionengineand
shouldnotbe usedonor nearanyunimprovedforest-covered,
brushcoveredor grass-coveredlandunlesstheengine'sexhaust
systemisequippedwitha sparkarrestormeetingapplicablelocalor
statelaws(ifany).
Ifa sparkarrestorisused,itshouldbe maintainedin effectiveworking
orderbytheoperator.IntheStateofCaliforniatheaboveis required
bylaw(Section4442oftheCaliforniaPublicResourcesCode).Other
statesmayhavesimilarlaws.Federallawsapplyonfederallands.
A sparkarrestorforthemufflerisavailablethroughyournearestSears
PartsandRepairServiceCenter.

SAFETY SYMBOLS
Thispagedepictsanddescribessafetysymbolsthatmayappearonthisproduct. Read,understand,andfollowall instructionson themachine
beforeattemptingtoassembleandoperate.
i
i
• ®
® •
llm
il
READ THE OPERATOR'S MANUAL(S)
Read, understand, and follow all instructions in the manual(s) before attempting to assemble and
operate
WARNING-- ROTATING BLADES
Keep hands out of inlet and discharge openings while machine is running. There are rotating blades
inside
BYSTANDARDS
Keep bystanders, pets, and children at least 75 feet from the machine while it is in operation. Stop
machine if anyone enters the area.
BYSTANDARDS
Keep bystanders, pets, and children at least 75 feet from the machine while it is in operation. Stop
machine if anyone enters the area.
WARNING-- THROWN OBJECTS
This machine may pick up and throw and objects which can ricochet.
EYEPROTECTION
Always wear safety glasses or safety goggles when operating this machine.
WARNING-- GASOLINE ISFLAMMABLE
Allow the engine to cool at least two minutes before refueling.
WARNING-- CARBON MONOXIDE
Never run an engine indoors or in a poorly ventilated area. Engine exhaust contains carbon
monoxide, an odorless and deadly gas.
6

Operation Of This Equipment May Create
Sparks That Can Start Fires Around Dry
Vegetation. A Spark Arrestor May Be
Required. The Operator Should Contact
Local Fire Agencies For Laws Or Regula=
tions To Fire Prevention Requirements.
STOP
Keep hands out of inlets
while engine is running.
Rotating blades are
inside.
FRONT WHEEL / VACUUM NOZZLE
HEmGHT ADJUSTER
For use in
grass to
pickup
_eaves and
debris
To pick up
wet material
pine cones_
acorns Or
materia_ on
pavement.
TO AVOID SERIOUSINJU RY
R EAD OPERA TO R'S MANU AL.
KEEP HANDS OUT OF INLET AND DISCHARGE OPENINGS WHILE MACHINE
IS RUNNING . ROTATING BLADES ARE INSIDE .
TURN ENGINE OFF AND ALLOW IMPELLER TOCOME TOCOMPLETE STOP
BEFORE REM OVlNG BAG.
DO NOT ATTEMPT TO CLEAR A CLOG OR JAM WITH THE ENGINE RUNNING .
DO NOT OPERATE UNIT WITHOUT BAG OR OPTIONA L BLOWER CHUTE IN
PLACE.
DO NOT STAND ORWALK IN FRONT OF BLOWER CHUTE OR AIM ITAT BYSTANDERS.
OBJECTS THROWN OUT OF DISCHARGE CAN CA USE PERSONAL INJU RY.
DO NOT OPERATEWHEN CHILDREN OR OTHERS ARE AROUND .
WEAR APPRO VED SAFE TY GLASSES.
7

IMPORTANT:Thisunitisshippedwithoutgasolineoroil intheengine.
Becertaintoserviceenginewithgasolineandoilasinstructedinthe
Operationsectionofthis manualbeforeoperatingyourmachine.
NOTE:Referenceto rightand lefthandsideoftheYardVacuumis
observedfromtheoperatingpositionlookingforwardtothefrontof the
machine.
OPENING CARTON
1. Cuteachcornerofthecartonverticallyfromtopto bottom.
2. Removeall looseparts.
3. Removeloosepackingmaterial.
REMOVING UNIT FROM CARTON
1. Liftunitfromthereartodetachitfromunderlyingcartonmaterial
androllunitoutofcarton.
2. Checkcartonthoroughlyforanyotherlooseparts.
NOTE:Makesurenottocrimpcableswhileremovingloosepartsor
theentireunitfromthecarton.
LOOSE PARTS IN CARTON
(See Figure 1)
* Upperand LowerHandle
. HoseAssembly
* SafetyGlasses
. EngineOil(Maybelocatedinbag)
* Bag
. BlowerChute
* Operator'sManual
f
Safety Glasses
Operator'sManual
Bottle of EngineOil
Figure1
\
Hose
Assembly
BlowerChute
J
8

ATTACHING THE HANDLE
1. Removethehairpinclipsfromthehandlebracketsand removethe
carriagescrewsandwingnutsfromthelowerhandle.
a. Placethebottomholesinlowerhandleoverthepinson the
handlebracketsand securewith hairpinclips.SeeFigure2.
b. insertcarriagescrewsthroughupperholeinlowerhandlefrom
theinsideandsecurewithwingnuts.SeeFigure2.
2. a. Unfoldtheupperhandleuntilitalignswithlowerhandle.Make
suretheropeguideisontherightsideofupperhandle.See
Figure3.
IMPORTANT:Makesurethecablesareroutedoutsidethelower
handle.Also,donotcrimpthecableswhileliftingupthehandles.
.
.
b. Securethetwo handlesbytighteningthehandleknobs(carriage
boltsmustbeseatedproperlyintothehandle).See Figure3.
Pullthetwo cabletiesattachedtothecablestightapproximately
8 inchesfromeachcableendandplacethecablesintothecable
guide.
Loosenthewingnutthatsecurestheropeguidetothe rightsideof
upperhandle.
a. Pullthestarterropeoutoftheengineslowly.SeeFigure4.
b. Slipthestarterropeintotheropeguide.Tightenthewingnut.
SeeFigure4.
Figure2
Figure3
J
9
Figure4
J

f
Figure5
_, ATTACHING THE HOSE ASSEMBLY
1. a. Slidehoseadapterof hoseassemblyintothebaseadapter
locatedon theleftfrontoftheYardVacuum.SeeFigure5.
b. Pullspringloadedpinoutonthebaseandalignpinwiththefirst
hole(closesttotheendofthetube)inthehoseadapter.
c. Releasethepintolockthehosein place.
2. a. Snapthehosehandlefirstintotheupperhosehandlebracket
andthenintothelowerhosehandlebracket.
b. Layhosetubingincurvedendofhandlenexttochipperchute.
SeeFigure6.
ATTACHING THE BAG
Graspbaghandlewithonehandandslidelockingrodonmounting
bracketwith otherhandtowardengine.Usetheendofmounting
bracketas leveragewhenslidingthelockingrod.
a. Slipbagovertherimofthedischargeopeningandrelease
lockingrodtosecurebagin place.SeeFigure7.
b. Snapbagclipto thetopofthelowerhandle.
c. Placethelowerstrapson thebagoverthetopof lowerhandle,
hookingthemon thestuds.SeeFigure7.
NOTE:Thebag/chuteswitchbuttonattachedtothemountingbracket
mustbefullydepressedbythetipof fronttabon baghandlewhen
securingthebagorenginewillnotstart.
Figure6
Figure7
10

ATTACHING THE BLOWER CHUTE f
NOTE:Thebagmustberemovedbeforeinstallingtheblowerchute.
1. a. Graspblowerchutewithone handandslidelockingrodon
mountingbracketwithotherhandtowardengine.Usetheendof
mountingbracketas leveragewhenslidingthelockingrod.See
Figure8.
b. Slipblowerchuteoverrimof dischargeopeningandrelease
lockingrodto securechutein place,asin Figure8.
c. Raisethenozzleheighttothehighestsettingwhenusingthe
blowerchute.Refertonozzleheightadjustmentbelow.
NOTE:Thebag/chuteswitchbuttonattachedtothemountingbracket
mustbefullydepressedbythetipoffronttabontheblowerchuteor
enginewillnotstart.
Alwaysstopengineanddisconnectsparkplugwirebeforeperforming
anymaintenanceoradjustments.Alwayswearsafetyglassesduring
operationor whileperforminganyadjustmentsor repairs.
NOZZLE HEIGHT ADJUSTMENT
Thenozzlecanbeadjustedtoanyfive positions,rangingfrom5/8"
to4-1/8"groundclearance.Thenozzleheighthastobeadjusted
accordingtoyardconditions.
1. Depressnozzleheightadjustmentlevertowardswheel.See
Figure9.
2. Movetheheightadjustmentleverforwardor backwardtoadjust
thenozzleupwardsordownwards.Makesurebothleversarein
thesameposition.
3. Releaselevertowardsdeck.
NOTE:Ingeneral,raisethenozzleheighttovacuuma thicklayerof
leavesortooperatewiththeblowerchute.Lowerthenozzleheightfor
smoothersurfaces.
f
\\
Figure8
J
Figure9
J
11

f
Drive Control
Speed Thr( Control Choke Control
Starter
Lower
Hose
Bracket
HoseAssembl'
Hose
Blower Chipper
Chute Chute
Bag
Bag Handle
Oil Fill
GasolineFill
)ark PlugWire
Nozzle/Hose
Lever
Nozzle
Nowthat youhavesetup youryardvacuumforoperation,get
acquaintedwith itscontrolsandfeatures.Thesearedescribedbelow
andillustratedon thispage.Thisknowledgewillallowyoutouseyour
newequipmenttoits fullestpotential.
Theoperationofanyyardvacuumcanresultinforeignobjectsbeing
thrownintotheeyes,whichcandamageyoureyesseverely.Always
Iwearthesafetyglassesprovidedwiththisunitoreyeshieldswhile
[operatingor performinganyadjustmentsor repairson it.
NozzleHeig
Adjustment Lever
Figure10
iMPORTANT:Movethespeedcontrolonlywhentheengineisrunning.
Changingthespeedcontrolsettingwiththeengineoffcandamagethe
yardvacuum.
CHIPPER CHUTE
Allowstwigsandsmallbranchesupto 1-1/2"in diametertobe fedinto
theimpellerforchipping.SeeFigure10.
DRIVE CONTROL
Locatedon theundersideofthe upperhandle,thedrivecontrolisused
toengage/disengagewheels.Fullysqueezethedrivecontrolagainst
theupperhandletoengagethewheels;releasetodisengage.(DO
NOTslipclutch).
SPEED CONTROL
Locatedon theleftsideoftheupperhandle,thespeedcontrolis used
toselecttheforwardspeedoftheyardvacuum.
NOZZLE HEIGHT ADJUSTMENT LEVER
Usedtoadjustthenozzlegroundclearancerangingapproximately
from5/8"to 4-1/8".See Figure10.
NOZZLE
Yardwastesuchasleavesorpineneedlescanbevacuumedup
throughthenozzlefor shredding.
HOSE ASSEMBLY
Usedasanalternativeto thenozzletovacuumyardwastesuchas
leavesor pineneedlesin hardto reachplaces.SeeFigure10.
NOZZLE/HOSE VAC LEVER
Thenozzle/hosevachandleislocatedon topofthenozzle.Useit to
switchvacuumsuctionbetweenthenozzleandthehoseassembly.
HOSE HANDLE
Usedtoguidehoseassemblywhenvacuuming.
Meets ANSI Safety Standards
CraftsmanYardVacuumsconformto thesafetystandardoftheAmericanNationalStandardsinstitute(ANSi).
12

BAG HANDLE
Usedtograspbaginorderto assistinattaching,removing,and
emptyingbag.SeeFigure10.
BAG
Collectsshreddedmaterialfedthroughthechipperchuteorvacuumed
throughthenozzleor hose.
BLOWER CHUTE
Whenattachedtounit,theblowerchuteisusedtodischargeyard
wastesuchasleaves,pineneedle,or smalltwigsacrossyard.
THROTTLE CONTROL
Thethrottlecontrolstheenginespeedandstopfunction.Through
threeseparatepositionson theleverfromleftto right,theoperationis
asfollows:
Althoughmulti-viscosityoils(5W30,10W30,etc.)improvestarting
incoldweather,theywillresultin increasedoilconsumptionwhen
usedabove32°ECheckyourengineoillevelmorefrequentlytoavoid
possibleenginedamagefromrunninglowonoil.
1. Checktheoillevelmakingcertainnotto rubthedipstickalongthe
insidewallsoftheoilfilltube.Thiswouldresultin afalsedipstick
reading.RefilltoFULLmarkondipstick,ifnecessary.Capacity
isapproximately18oz.Overfillingwillcausetheenginetosmoke
profuselyandwillresultin poorengineperformance.
2. Replaceoil filldipstickandtighten.
3. Keepoillevelat FULL.Runningtheenginewithtoolittleoil can
resultin permanentenginedamage.
Useextremecarewhenhandlinggasoline.Gasolineisextremely
flammableand thevaporsare explosive.Neverfuelmachineindoors
or whiletheengineishotor running.Extinguishcigarettes,cigars,
pipes,andothersourcesofignition.
Start/Run Slow/Idle EngineOff
CHOKE CONTROL
Thechokecontrolisusedtochokethecarburetorandassistinstarting
theengine.
STARTER HANDLE
Usedto starttheengine.
GAS AND OiL FILL-UP
Oil (one bottle shipped with unit)
First TimeUse
1. Removeoilfilldipstick.
2. WiththeYardVacuumon levelground,usea funnelto empty
entirecontentsofoil bottleprovidedintotheengine.
3. Replaceoilfilldipstickandtighten.
Subsequent Uses
Onlyusehighqualitydetergentoil ratedwithAPIserviceclassification
SF,SG,or SH.Selecttheoil'sSAEviscositygradeaccordingto the
expectedoperatingtemperature.Followthechartbelow:
/_Colder_ 32°F _Warme_
0il Viscosity Chart
J
Gasoline
1. Removefuelcapfromthefueltank.
2. Makesurethecontainerfromwhichyouwillpourthegasolineis
cleanandfreefromrustorforeignparticles.Neverusegasoline
thatmaybe stalefromlongperiodsof storageinitscontainer.
Gasolinethathasbeensittingforanyperiodlongerthanfour
weeksshouldbeconsideredstale.
3. Fillfueltankwithclean,fresh,unleadedregulargasolineonly
toapproximately1-1/2inchesbelowtopof necktoallowforfuel
expansion.DonotusegasolinecontainingMETHANOL.Replace
fuelcap.
Useofalcoholblendedfuels(calledgasoholor usingethanolor
methanol)canattractmoisturewhichleadstoseparationandforma-
tionofacidsduringstorage.Acidicgascandamagethefuelsystem
of anenginewhilein storage.
Toavoidengineproblems,thefuelsystemshouldbeemptiedbefore
storagefor30 daysorlonger.Drainthegastank,starttheengine
andletitrununtilthefuellinesandcarburetorareempty.Usefresh
Ifuelnextseason.SeeSTORAGEInstructionsforadditionalinforma-
_tion.
mayoccur.
NOTE:Checkthefuellevelperiodicallytoavoidrunningoutofgaso-
linewhileoperatingtheYardVacuum.Iftheunitrunsoutofgasasit
ischipping,it maybe necessarytounclogthedischargeareabeforeit
canbe restarted.RefertoSERVICEANDMAINTENANCEsection.
13

TopView
iiii_ FrontTab i i
BagYC_hutei/
SwitchWire /
/
/
Figure11
ChokeControl
Figure12
f
;/
Whenmovingthrottlecontrollever,becarefulofheatedsurfacesand
sharpedgeson mufflerguard.
TO START ENGINE
1. Attachsparkplugwireandrubberbootto sparkplug.
2. Thebag/chuteswitchbuttonmustbefullydepressedbythetip
offronttabon baghandleor blowerchuteforenginetostart.See
Figure11.
3. Makesurebag/chuteswitchwireisconnectedtoengineand
groundedtomountingbracket.SeeFigure11.
4. Gastankshouldbe filled3/4tofull beforestarting.
5. Movethrottlecontrolto START/RUN(Rabbit) position.See
Figure12. _lf
6. Movethechokecontrol towardthe throttle
controltochokethe I",1eng ne'scarburetor(Awarmengine
maynotrequirechoking.)SeeFigure12.
7. Standingbehindtheunit,graspstarterhandleandpull ropeout
untilyoufeeladrag.
8. Pulltheropewitha rapid,continuous,fullarmstroke.Keepafirm
gripon thestarterhandle.Letthe roperewindslowly.
9. Repeat,ifnecessary,untilenginestarts.Whenenginestarts,
movechokecontrolgraduallyawayfromthethrottlecontrol.
10. Ifenginefalters,movechokecontrolbacktowardthethrottle
controland repeatsteps7 through9.
11. ALWAYSkeepthethrottlecontrolinthe START/RUNposition
whenoperatingtheYardVacuum.
TO STOP ENGINE
1. Movethrottlecontrolleverto slow(turtle)_ position.
Wheneverpossible,graduallyreduceenginespeedbefore
stoppingengine.
2. Movethrottlecontrolleverto STOP or OFFposition.
3. Disconnectsparkplugwireand groundit toprevent
accidentalstartingwhiletheequipmentisunattended.
TO EMPTY BAG
1. Unhookbagstrapsfromthe lowerhandle.
2. Unsnapbagclipfromthetopoflowerhandle.See Figure13.
3. Graspbaghandlewithonehandandpulllock rodonmounting
bracketwith otherhandtowardengineto release.
4. Liftbagoffbackof unit.
5. Twistthetwobuttonsonthebackofthebagto unlockandempty
contents.SeeFigure14.Holdbaghandleandbagclipwhile
emptyingthecontents.
6. Compressbagopeningandfoldinnerflapoveropening.
7. Foldouterflapoverinnerflapandinsertbuttonsonthebag
throughmetaloutlets.SeeFigure14.
8. Twistthebuttonsto lockbag.Placebagbackontounitas
instructedintheASSEMBLYsection.
Figure13

TO REMOVE BLOWER CHUTE
1. Graspblowerchutewithone handandpull lockrodonmounting
bracketwithotherhandtowardengineto release.Referto Figure
8 intheASSEMBLYsection.
2. Removeblowerchutefromovertherimofthedischargeopening.
USING THE NOZZLE VACUUM
1. Placenozzle/hosevacleverinthetoppositionon thenozzleto
vacuumthroughnozzle.SeeFigure15.
2. Thespringloadedpinmustbein thefirsthole(closesttotheend
ofthetube)ofthehoseadaptertooperatethe nozzlevac.
3. Placebothhandsontopoftheupperhandleandfullyliftthedrive
controlagainsttheupperhandletopropeltheunitoveryard.
4. Usethespeedcontrolto chooseeitherthe highor lowspeed.The
speedcontrolmaybemovedeitherwhiletheunitis propellingor
beforeengagingthewheels.
Inner
Flap
OuterFla[:
Figure14
IMPORTANT:Movethespeedcontrolonlywhentheengineis running.
Changingthespeedcontrolsettingwiththeengineoff candamagethe
yardvacuum.
Yardwastesuchas leavesandpineneedlescanbevacuumedup
throughthenozzleforshredding.Aftermaterialhasbeenshredded
bytheflailbladesontheimpellerassembly,itwillbedischarged
intocatcherbagorthroughblowerchute.Donotattempttoshredor
chipanymaterialotherthanvegetationfoundin a normalyard(i.e.
branches,leaves,twigs,etc.)Avoidfibrousplantssuchastomato
vinesor palmfrondsuntiltheyare thoroughlydriedout. Materialssuch
asstalksor heavybranchesupto 1-1/2"indiametermaybe fedinto
thechipperchute.
Vac Lever
specifiedonthemachineorin thismanual.Personalinjuryor
to themachinecouldresult.
IMPORTANT:Theflailscreenis locatedinsidethehousinginthe
dischargearea.iftheflailscreenbecomesclogged,removeandclean
asinstructedin theSERVICE&MAINTENANCEsection.Forbest
performance,itis alsoimportanttokeepthechipperbladesharp.
Donotatanytimemakeanyadjustmentswithoutfirststopping
engineanddisconnectingsparkplugwire.
USING THE HOSE ASSEMBLY
1. Placenozzle/hosevacleverinthebottompositionon thenozzle
toredirectvacuumtothehoseassembly.SeeFigure16.
2. Thespringloadedpinmustbein thesecondholeofthehose
adaptertooperatethehoseassembly.
3. Unhookthehosefromupperhandlebracketandgraspthehose
handletoguidewhilevacuumingyardwastesuchas leavesor
pineneedlesin hardto reachplaces.
Figure15
15
F
Figure16

MAINTENANCE SCHEDULE
Beforeperforminganytypeofmaintenance/service,disengageall
controlsandstoptheengine.Waituntilallmovingpartshavecometo
acompletestop.Disconnectsparkplugwireandgroundittoprevent
unintendedstarting.Alwayswearsafetyglassesduringoperationorwhile
performinganyadjustmentsorrepairs.
Followthemaintenanceschedulegivenbelow.Thischartdescribes
serviceguidelinesonly.UsetheServiceLogcolumntokeeptrackof
completedmaintenancetasks.Tolocate the nearest SearsService
Centeror to scheduleservice,simplycontactSearsat
1-800-4-MY-HOME®.
EachUse
1st5 - 8 hours
25 hours
50 hours
Annuallyor 100hours
BeforeStorage 1. Fuelsystem
Underheavyloador inhightemperatures
1. Engineoil level
2. Looseor missinghardware
3. Unitandengine.
1. Engineoil
1. Engineoilt
2. Aircleaner
3. Controllinkagesandpivots
1. Engineoil
1. Sparkplug
= =
1. Check
2. Tightenor replace
3. Clean
1. Change
1. Change
2. Cleanor replace
3. Lubewithlightoil
1. Change
1. Cleanandadjustgap,orelse
replacewithnewplug.
1. Runengineuntilit stopsfromlackof
fuelor adda gasolineadditiveto the
gasin thetank.
Alwaysstopengineanddisconnectsparkplugwirebeforeperforming
Ianymaintenanceoradjustments.Alwayswearsafetyglassesduring
[operationor whileperforminganyadjustmentsor repairs.
GENERAL RECOMMENDATIONS
• Alwaysobservesafetyruleswhenperforming
anymaintenance.
• Thewarrantyon thisyardvacuumdoesnotcoveritemsthat have
beensubjectedtooperatorabuseor negligence.Toreceivefull
valuefromwarranty,operatormustmaintaintheequipmentas
instructedhere.
• Someadjustmentswillhavetobe madeperiodicallytomaintain
yourunitproperly.
• Periodicallycheckall fastenersand makesurethesearetight.
ENGINE MAINTENANCE
Checking the Spark Plug
Cleansparkplugandresettheelectrodegapto0.020"atleastoncea
season;replaceevery100hoursofoperation.
• Cleanareaaroundthesparkplugbase.Donotsandblastspark
plug.Sparkplugshouldbecleanedbyscrapingorwirebrushing
andwashingwitha commercialsolvent.
/f Electrode Porcelain
.020inch(.51ram)gap
Figure17
J
Removeandinspectthesparkplug.Checkgaptomakesureitis
setat .020".SeeFigure17.
• Replacethesparkplugif electrodesare pitted,burned,or the
porcelainiscracked.
16

Servicing the Air Cleaner
Donotusepressurizedairor solventstocleantheaircleaner
cartridge.
Theair cleanerpreventsdamagingdirt, dust,etc.,fromenteringthe
carburetorand beingforcedintotheengineandisimportanttoengine
lifeandperformance.Theair cleanerconsistsofa pleatedfilter.Never
runtheenginewithoutan aircleanercompletelyassembled.
Cleanor replacetheair cleanerevery25hoursofoperation.
1. Loosenscrewandtilt plastichousingcoveron sideofengine
down.SeeFigure18.
2. Removeairfilterfromplastichousingcoverandreplacewith
cleanor newfilter.
3. insertcover'stabsintoslotsin bottomofbase.
4. Tiltcoverupintoplaceandtightenscrew.
NOTE:Ifthefilteristornordamagedin anyway,replaceit.
Checking Engine Oil
1. Stopengineandwaitseveralminutesbeforecheckingoil level.
Withengineonlevelground,theoil mustbeto FULLmarkon
dipstick.
2. Removeoilfilldipstickandwipecleanwithcloth.
3. Replaceandtightendipstick.Removeandcheckoil level.Level
shouldbeatFULLmark.
4. If needed,addoil slowly- recheck.Donotoverfill.
5. Wipedipstickclean,replaceandtighten.Removeandcheckoil
level.Oil levelshouldbe atFULLlineondipstick.
Donotoverfil.Overfillingwithoil maycausetheenginetonotstart,or
hardstarting.If overtheFULLmarkon thedipstick,drainoilto reduce
oil leveltoFULLmarkondipstick.
f
x \
\
©
Figure18
J
Usedoil isa hazardouswasteproduct.Disposeofusedoil properly.
IDonotdiscardwithhouseholdwaste.Checkwithyourlocalauthori-
_tiesorSearsServiceCenterforsafedisposal/recyclingfacilities.
5. Whenengineisdrainedofall oil,placeenginelevel.Refillwith
approximately18oz.offreshoil.Fillto FULLlineondipstick.Do
notoverfill.RefertoGasAnd Oil Fill-Up in OPERATIONsection.
6. Replaceoil filldipstickandtighten.
7. Replacesparkplugwirebeforestarting.
Temperatureofmufflerandnearbyareasmayexceed150°F(65°C).
Avoidtheseareas.
Changing Engine Oil
• Onlyusehighqualitydetergentoil ratedwithAPIservice
classificationSF,SG,orSH.Selecttheoil'sSAEviscositygrade
accordingtotheexpectedoperatingtemperature.RefertoOpera-
tionsectionforviscositychart.
• Changeengineoil afterthefirstfivetoeighthoursofoperation,
andeveryfifty hoursoreveryseasonthereafter.Changeoil every
twentyfivehourswhenoperatingengineunderheavyloadorin
hightemperatures.
To Drain Oil
1. Drainthefuelfromthetankbyrunningtheengineuntilthefuel
tankisempty.
2. Disconnectsparkplugwireandkeepitawayfromsparkplug.
3. WithengineOFFbutstillwarmremoveoil filldipstick.
4. Tipuniton itsside(sparkplugsideup)todrainthroughtheoilfill
tubeintoappropriatereceptacle.
Servicing Muffler
• inspectmufflerperiodically,andreplaceif necessary.Replace-
mentpartsforthemufflermustbe thesameandinstalledinthe
samepositionastheoriginalparts,otherwisefirecanoccur.
Cleaning Engine
• Dailyorbeforeeveryuse,cleangrass,chafforaccumulated
debrisfromengine.Keeplinkage,spring,andcontrolsclean.
Keepareaaroundand behindmufflerfreeofanycombustible
debris.
• Keepingenginecleanallowsair movementaroundengine.
• Enginepartsshouldbekeptcleanto reducetheriskofover-
heatingandignitionofaccumulateddebris.Thisisespecially
importantifcuttingtallgrass.
Donotusewatertocleanengineparts.Watercouldcontaminatefuel
system.Usea brushor drycloth.
17

Carburetor Adjustment f ..../ _,
Thecarburetoronthis engineisnotuseradjustable.ContactSears /
Parts& Repairforadjustment,
Engine Speed
Donot,attempttoaltertheenginespeedbytamperingwiththe
enginesgovernorlinkage.Doingsocouldresultin seriouspersonal
Iinjuryanddamagetotheengine.TheengineRPMhasbeensetat
thefactory.
LUBRICATION
• Wheels- Placea fewdropsofSAE30 oilon eachshoulderscrew
oncea season.
• Nozzleheight adjustment levers- Lubricatenozzleheight
adjustmentleverswith lightoil.
• Locking Rod-Lubricatethelock rodandcompressionsprings
whichattachtothemountingbracket.
• Nozzle/HoseVacLever: Lubricatethenozzle/hosevacleveron
topof thenozzleoncea seasonwithlightoil.
/
Figure19
CLEANING EQUIPMENT
Cleanundersideof theyardvacuumoncea seasontopreventbuild-up
ofdebris.Followstepsbelowforthisjob.
1. Disconnectandgroundsparkplugwire.Emptythefueltankby
runningengineuntiltankisdry.
2. Tiptheyardvacuumsothatitrestson itsside,keepingthe
mufflersidedown.Holdyardvacuumfirmly.
3. Scrapeandcleantheundersideofthedeckandnozzlewitha
suitabletool.Donotspraywithwater.
IMPORTANT:Donotusea pressurewasherorgardenhosetoclean
yourunit.Thesemaycausedamagetobearings,ortheengine.The
useofwaterwillresultin shortenedlifeandreduceserviceability.
4. Puttheyardvacuumbackon itswheelson theground.
CLEANING THE FLAIL SCREEN
Ifthedischargeareabecomesclogged,removetheflailscreenand
cleanareaasfollows:
1. Stoptheengine.Makecertainthechipper/shreddervacuumhas
cometoa completestop.
2. Beforeuncloggingthedischargechute,disconnect andground
the spark plugwire.
3. Removethevacuumbagor blowerchutefromthe unitas
instructedin theOPERATIONsectiontoobtainaccesstoflail
screen.
4. Removethethreeselftappingscrewssecuringthebeltcover,and
removebeltcover.SeeFigure19.
5. Removeselftappingscrewon rightsideof unitthatattachesto
theflail screen.SeeFigure20.
f
/
Figure20
J
18

6. Removehexscrewontopofrearhousingnearmountingbracket
andtheflangelocknutthatsecuresflailscreen.SeeFigure20.
7. Removeandcleanthescreenbyscrapingorwashingwithwater.
SeeFigure21.
8. Reinstallthescreen.
Beforeperforminganytypeof maintenanceon themachine,waitfor
all partstostopmovinganddisconnectandgroundthesparkplug
wire. Failuretofollowthisinstructioncouldresultin personalinjuryor
propertydamage.
DRIVE CONTROL CABLE ADJUSTMENT
Adjustthedrivecontrolcableif theyardvacuumdoesnotselfpropel
withthedrivecontrolengaged,orif theunithesitateswhiletheengine
maintainsthesamespeedafterapproximately20 hoursofuse.
Tomovethez-fittingofthedrivecontrolcablefromitsfactoryset
positioninthefrontholeofthedrivecontroltotherearhole,proceed
asfollows:
1. Pushtherightsideof thecontroloutofthe rightholeintheupper
handle.SeeFigure22A.
2. Pivotcontroldowntowardsthelowerhandle.
3. Pivotstraightupto removeitfromtheleftholein theupper
handle.SeeFigure22A.
4. Thereisnowsufficientslackinthedrivecontrolcableto graspthe
z-fittingwithyourhandandmoveitfromthefrontholetothe rear
holeofthedrivecontrol.SeeFigure22B.
IMPORTANT:Makesureto insertthez-fittingintothe rearholeas
itwasinsertedinthefronthole,thatis fromtheoutside ofthedrive
control.
5. Youmaynowcarefullyreinstallthedrivecontrolbyperformingthe
previousstepsintheoppositeorderandmannerof removal.
IMPORTANT:Onceassembledand priorto restarting,makesurethat
thecableisproperlyadjusted.Withthedrivecontroldisengaged,the
unitshouldfreelypullin reverse.
f
\
J
Figure21
\
19
Figure22

SHARPENING OR REPLACING CHIPPER
BLADE
NOTE:Beforetippingtheunit,emptythefueltankbyrunningengine
untiltankisdry,andemptytheoil reservoirasdescribedinToDrain
Oil.
1. Disconnectand groundthesparkplugwire.
2. Removebagassemblyor blowerchute.
3. Removethethreehexcapscrewsholdingthechipperchuteto
theupperhousing.SeeFigure23.
4. Removethefronthubcaps,flangelocknuts,frontwheels,and
wavewashersthatattachtothepivotarmassemblies.SeeFigure
24.
5. Removethe shoulderscrews,thrustwashers,andbellwashers
thatgothroughthepivotarmstothefrontsupportbrace.Thefront
supportbraceandlocknutcanberemovedatthistimeaswell.
6. Removethefourscrewson theupperhousingthat securethe
nozzlecover.SeeFigure25.
f
Figure23
x /
..........................Front support Braceand Lock Nui,
PivotArm Assembl'
J
BellWasher
Thrust Washer
Shoulder Screw
Wave
Washer
Lock Nut
HubCa[ Wheel
J
Figure24
f
2O
Figure25
J

7. Carefullytilt andsupporttheunituptoprovideaccessunderneath
tothenozzlemountinghardwareandimpeller.Removethethree
shoulderboltssecuringtheblackplasticlowerflailhousingtothe
lowerhousing.Referto Figure26.
8. Tilttopofblackplasticlowerflailhousingtowardtheengineto
remove.
9. Usinga 3/16"allenwrench,removetheflat headcapscrewsthat
holdthechipperbladetotheimpeller.Thesescrewsareacces-
siblethroughtheopeningcreatedwhenthechipperchutewas
removedearlier.SeeFigure27.
10. Thenutsontheflat headcapscrewscanbereachedfrom
underneathusinga 1/2-inchsocket,universal,andextension.
SeeFigure28.
11. Replaceorsharpenchipperblade.Thebladecanbe sharpened
witha fileor ona grindingwheel.
Thechipperbladeis sharp.Whensharpeningblade,wearleather
workglovestoprotectyourhandsandfollowtheoriginalangleof
grind.
12. Reassemblebyperformingthepreviousstepsin theopposite
orderand mannerofremoval.
NOTE:Tightenbladescrewsto210- 250in-lbs.Makecertainchipper
bladeis reassembledwiththesharpedgefacingupward.
Black
Nozzle
\
f
ShoulderScrews
Figure26
C
Flat Head Ca Screws
Chipper Blade
Figure27
J
Impeller
21
Figure28
J

Neverstoreyardvacuumwithfuelintankindoorsor inpoorly
ventilatedareaswherefuelfumesmayreachanopenflame,spark,
or pilotlightasona furnace,waterheater,clothesdryer,or gas
appliance.
PREPARING THE ENGINE
Forenginesstoredover30 days:
1. Topreventgumfromforminginfuelsystemor oncarburetor
parts,runengineuntilit stopsfromlackof fuelor adda gasoline
additivetothegasinthetank.Ifyouusea gasadditive,runthe
engineforseveralminutestocirculatetheadditivethroughthe
carburetor--afterwhichtheengineandfuelcanbestoredup to
six months.
2. Whileengineis stillwarm,changetheoil.
3. Removesparkplugand pourapproximately1oz. (30rnl)ofclean
engineoil intothecylinder.Pulltherecoilstarterseveraltimesto
distributetheoil,andreinstallthe sparkplug.
4. Cleanengineofsurfacedebris.
PREPARING THE YARD VACUUM
• Whenstoringtheyardvacuumin an unventilatedor metalstorage
shed,careshouldbetakento rustproofthenon-paintedsurfaces.
Usinga lightoil orsilicone,coattheequipment,especiallyany
springs,bearings,andcables.
• Removealldirt fromexteriorofengineandequipment.
• Followlubricationrecommendations.
• Storeequipmentin a clean,dryarea.Donotstorein anarea
whereequipmentispresentthatmayusea pilotlightor hasa
componentthatcancreatea spark.
22

Enginefailstostart
Enginerunserratically
1. Throttlelevernotincorrectstartingposition
2. ChokecontrolnotinCHOKEposition
3. Sparkplugwiredisconnected
4. Faultysparkplug
5. Fueltank emptyorstalefuel
6. Cannotpullrecoilcord
7. Safetyswitchnotdepressed
Engineoverheats
Enginehesitatesathigh RPMs 1. Sparkpluggap settooclose
Engineidlespoorly 1. Fouledsparkplug
2. Dirtyair cleaner
Excessivevibration 1. Loosepartsor damagedimpeller
Unitdoesnotdischarge 1. Dischargeareaclogged
Rated dischargeslows
considerablyor compositionof
dischargedmaterialchanges
Unitfailstopropelitselforslips
whendrivecontrolisengaged
8. Safetyswitchwireisnotconnectedto
engineor notproperlygrounded
1. Unitrunningon CHOKE
2. Sparkplugwireloose
3. Stalefuel
4. Wateror dirtin fuelsystem
5. Dirtyair cleaner
6. LowengineRPM
7. Carburetoroutofadjustment
1. Engineoil levellow
2. Air flowrestricted
2. Foreignobjectlodgedin impeller
3. LowengineRPM
4. Vacuumbagisfull
1. LowengineRPM
2. Chipperbladedull
1. Drivecontrolcableoutofadjustment
2. Drivebeltwornordamaged
1. Movethrottleleverto START/RUNposition.
2. MovechokecontroltoCHOKEposition.
3. Connectwiretosparkplug.
4. Clean,adjustgap,orreplace.
5. Filltankwithclean,freshgasoline.
6. Obstructionlodgedin impeller.Disconnectspark
plugwireandremovelodgedobject.
7. Safetyswitchmustbedepressedbythefronttabon
thebag handlewhensecuringthebag.
8. Connectsafetyswitchwireto engineconnectorand
groundto mountingbracket.
1. Movechokecontrolto RUNposition.
2. Connectandtightensparkplugwire.
3. Filltankwithfreshgasoline.
4. Drainfuel. Refillwithfreshfuel.
5. Cleanor replaceair cleanerfilter.
6. Alwaysrunengineatfullthrottle.
7. ContactyourSearsParts& RepairCenter.
1. Fillenginewith properamountandtype ofoil.
2. Cleangrassclippingsanddebrisfromaroundthe
engine'scoolingfinsandblowerhousing.
1. Removesparkplugandadjustgap.
1. Replacesparkplugandadjustgap.
2. Replaceair cleanercartridge.
1. Stopengineimmediatelyanddisconnectsparkplug
wire.ContactyourSearsParts& RepairCenter.
1. Stopengineimmediatelyanddisconnectsparkplug
wire.Cleanflailscreenandinsideofdischargeopen-
ing.
2. Stopengineanddisconnectsparkplugwire.Remove
lodgedobject.
3. Alwaysrunengineatfullthrottle.
4. Emptybag.
1. Alwaysrunengineatfullthrottle.
2. Replacechipperbladeor contactyourSearsParts&
RepairCenter.
1. Followadjustmentprocedurein Service& Mainte-
nancesection.
2. ContactyourSearsParts& RepairCenter.
Find this and all your other product manuals online.
Get answers from our team of home experts.
Get a personalized maintenance plan for your home.
Find information and tools to heLpwith home projects.
23

Craftsman 675 Series Yard Vacuum Model 247.77013
14
39
64
\
2
/
24
28
25
®
A
32
35
37
"67
_'61
59
_56
57
24

Craftsman 675 Series Yard Vacuum Model 247.77013
Ref.No. PartNo. Description
1. 731-07001 HubCap
2. 749-04163-0637 UpperHandle
3. 720-0279 Knob
4. 710-1205 EyeBolt
5. 781-1056-0637 UpperHandleBracket
6. 710-0726 HexCapScrew5/16-12x.750
7. 720-04072A HandleKnob5/16-18
8. 710-1174 CarriageBolt
9. 731-04911 NozzleHandleClip
10. 749-04165-0637 LowerHandle
11. 711-1293 Studs
12. 710-0703 CarriageScrew1/4-20x.75
13. 912-0397 WingNut1/4-20
14. 710-1611B TT Screw,5/16-18x .750
15. 710-05073 Screw,1/4-20x .500
16. 912-0442 CapLockNut,1/4-20
17. 710-0751 HexCapScrew1/4-20x.620
18. 681-0195 HoseBaseAdapterAssembly
(Incl.Ref.#19-21)
19. 916-0104 ERing.500Dia
20. 932-3035 CompressionSpring
21. 711-1571 ClevisPin
22. 936-3020 FiatWasher.271IDx.630OD
23. 781-04266-4044 UpperFlailHousing
24. 746-04156 DriveControlCable
25. 731-1820 CableGuide
26. 681-04088-4044 ChipperChuteAssembly
27. 746-04155 SpeedControlCable
28. 710-1122 HexScrew,1/4-20x2.50
29. 981-0156A-4044 HandleBracketAss'yRH
981-0155A-4044 HandleBrktAss'yLH(NotShown)
30. 712-04064 FlangeLockNut,1/4-20
31. 748-0457 Spacer
32. 731-2478 HoseNozzle
33. 710-3288 HexCapScrew1/4-20x 2.625
34. 723-0295 AdjustmentClamp
35. 749-1270A NozzleHandle
36. 764-0648A VacuumHose
37. 720-0369 HandlePlug
38. 731-2292 HoseAdapter
39. 747-04305A DriveControl
40. 725-0157 CableTie
Ref.No. PartNo. Description
41. 918-04460 TransmissionAssembly
42. 981-04027 IdlerAssembly(Incl.Ref.#74-80)
43. 710-1650 ShoulderScrew,#12-24x .30x .46
44. 710-1220 Screw,#12-16x .750
45. 911-04245 ImpellerHub
46. 915-0221 DowelPin
47. 781-04082-0637 FrontWheelSupportBrace
48. 781-04081-0637 RearWheelSupportBrace
49. 914-0104 CotterPin
50. 916-0104 E-Ring
51. 936-3004 FiatWasher,.406x .875x.105
52. 936-0232 WaveWasher.531IDx.781OD
53. 738-1015 ShoulderScrew3/8-16
54. 934-2042A RearWheel
55. 716-0865 SnapRing
56. 741-04242 HeightAdjustmentBearing
57. 687-02342 PivotArmAssembly
58. 720-0426 HeightAdjustmentKnob
59. 732-1026 SpringLever
60. 736-0741 BellWasher.760IDx.25OD
61. 738-1172 ShoulderScrew,.750x.500
62. 987-02051 HeightLeverAssembly
(Incl.Ref.#58-59)
63. 734-2004B FrontWheel
64. 710-1652 Screw,1/4-20x .625
65. 712-04065 FlangeLockNut,3/8-16
66. 731-04879 BeltCover
67. 936-0314 ThrustWasher.375IDx.70OD
68. 731-04643 WheelCover
69. 732-04217 ExtensionSpring,.375x2.95
70. 936-0369 FiatWasher,.5081Dxl.0OODx.020
71. 738-0930 ShoulderScrew,.560x.165
72. 741-04108 DriveAxleBushing
73. 781-04078-0637 TransmissionMountingBracket
74. 710-0597 Screw,1/4-20x 1.00
75. 717-1762 SpurGear- RH
717-1761 SpurGear- LH(NotShown)
76. 941-0124 BallBearing
77. 750-1050 FlangeSpacer,.260x.659x.517
78. 954-0369 Belt,3/8x 32.5
79. 781-04077-0637 IdlerBracket
80. 782-7598 BeltKeeper
25

Craftsman 675 Series Yard Vacuum Model 247.77013
27/
49
@/
45
28/
2
o
48
A
21.. i
22 24
16
25
26

Craftsman 675 Series Yard Vacuum iVlodel 247.77013
Ref.No. PartNo. Description
1. 664-0094 BagAssembly
2. 681-0154-0637 ScreenAssembly
3. 710-1054 HexScrew5/16-24x 1.0
4. 981-0490 ChipperBlade
5. 781-0735 PinClip
6. 719-0329 Flail
7. 715-0166 SpiralPin
8. 711-1401 ClevisPin
9. 912-0411 LockNut,5/16-24
10. 936-0119 LockWasher,5/16
11. 981-0152 ImpellerAssembly
(Incl.Ref.#3 - 10)
12. 781-0721B-4044 LowerFlailHousing
13. 712-04063 FlangeLockNut5/16-18
14. 710-0607 Screw,5/16-18x.500
15. 747-04297 HingePin
16. 981-04031 Nozzle
17. 781-1064 BaseAdapterDoor
18. 732-1156 TorsionSpring
19. 926-0106 CapSpeedNut1/4
20. 711-1551 PivotRod
21. 731-04967 NozzleDoorLever
22. 710-1256 HexScrew,#8-18x 1.25
23. 750-1294 ShoulderSpacer
24. 732-3118 ExtensionSpring
25. 732-1151A NozzleDoorTorsionSpring
26. 731-2294A NozzleDoor
Ref.No. PartNo. Description
27. 664-04039 Bag
28. 631-0083 ChuteAssembly
29. 736-0247 FiatWasher.375IDx 1.25OD
30. 936-0217 LockWasher3/8
31. 710-1273 HexCapScrew,3/8-24x2.75
32. 631-04118 EngineSpacerAssembly
33. 710-1008 Screw,3/8-16x 1.875
34. 925-1700 SwitchCover
35. 925-3166 SafetySwitch
36. 931-1613 SafetySwitchCover
37. 910-0224 HexWasherScrew#10-16x.50
38. 629-0920A WireHarness
39. 914-0104 CotterPin
40. 732-0962 CompressionSpring
41. 781-0778A-0637 MountingBracket
42. 747-1153 LockRod
43. 710-3195 HexCapScrew5/16-18x4.5
44. 710-3025 HexCapScrew5/16-18x.625
45. 710-1220 Screw,#12-16x.750
46. 710-0351 Screw#10- 16x.500
47. 736-0607 ExternalbWasher5/16
48. 726-0139 SpeedNut
49. 710-0726 HexindexScrew,5/16-12x.750
50. 710-1650 ShoulderScrew,#12-24x .30x .46
51. 0EM-290-012 BlowerChute
-- 723-0400 SafetyGlasses(NotShown)
27

Craftsman 675 Series Engine Model No. 126T02
ForYard Vacuum Model 247.77013
j1019 LABEL KI'_
5O
383_'_
7(
635
287
718_
1330 REPAIR MANUAL ]
i1058 OWNER'S MANUA_
306
505@
28

Craftsman 675 Series Engine Model No. 126T02
For Yard Vacuum Model 247.77013
425
445
443_
843
81
613
977 CARBURETOR
GASKET SET
163_137_
7_ 633A @
633G
61 276_
365
121 CARBURETOR OVERHAUL KiT
633A@
163_
lo4%_
276 127
968
836 _ _;_ _._/
621_
966_ 159
._ 29_
970
615
404
616__
633_
692 |
633A @
104
137(
276
276
163 _
127<3
130
95
633
0
617
29

Craftsman 675 Series Engine Model No. 126T02
ForYard Vacuum Model 247.77013
3_ 20
358 ENGINE GASKET SET
__329 REPLACEMENT ENGINE 1
921 '_\
%
78
930
I
601
1036 EMiSSiONS LABEL I
!
1005
m
45o
60
689 O
3O

Craftsman 675 Series Engine Model No. 126T02
For Yard Vacuum iVlodel 247.77013
D = " O
697322 CylinderAssembly
2. 399269 Kit-Bushing/Seal
3. 299819t Seal-Oil(MagnetoSide)
4. 493279 Sump-Engine
5. 691160 Head-Cylinder
7. 692249t Gasket-CylinderHead
8. 695250 BreatherAssembly
9. 699472 Gasket-Breather
10. 691125 Screw(BreatherAssembly)
11. 691260 Tube-Breather
12. 692232t Gasket-Crankcase
13. 690912 Screw(CylinderHead)
15. 691680 Plug-OilDrain
16. 694478 Crankshaft
20. 399781t Seal-Oil(PTOSide)
22. 691092 Screw(EngineSump)
23. 692315 Flywheel
24. 222698 Key-Flywheel
25. 697339 PistonAssembly(Standard)
697341 PistonAssembly(.020"Oversize)
26. 499425 RingSet-Piston(Standard)
499427 RingSet-Piston(.020"Oversize)
27. 691866 Lock-PistonPin
28. 499423 Pin-Piston
29. 499424 Rod-Connecting
32. 691664 Screw(ConnectingRod)
32A. 695759 Screw(ConnectingRod)
33. 262651 Valve-Exhaust
34. 262652 Valve-Intake
D = O Q
691270 Spring-Valve(Intake)
36. 691270 Spring-Valve(Exhaust)
37. 694086 Guard-Flywheel
40. 692194 Retainer-Valve
43. 691997 Slinger-Governor/Oil
45. 690548 Tappet-Valve
46. 691449 Camshaft
48. 498828 ShortBlock
50. 497465 Manifold-Intake
51. 272199t Gasket-Intake
54. 691650 Screw(IntakeManifold)
55. 691421 Housing-RewindStarter
58. 697316 Rope-Starter(Cutto RequiredLength)
60. 281434 Grip-StarterRope
65. 690837 Screw(RewindStarter)
78. 691108 Screw(FlywheelGuard)
81. 691740 Lock-MufflerScrew
95. 691636 Screw(ThrottleValve)
97. 493267 Shaft-Throttle
104. 691242tt Pin-FloatHinge
108. 691182 Valve-Choke
109. 498593 Shaft-Choke
117. 498978 Jet-Main(Standard)
121. 498260 Kit-CarburetorOverhaul
125. 499059 Carburetor
127. 694468tt Plug-Welch
130. 691203 Valve-Throttle
133. 398187 Float-Carburetor
134. 398188tt Valve-Needle/Seat
31

Craftsman 675 Series Engine Model No. 126T02
ForYard Vacuum Model 247.77013
D = O
693981tt* Gasket-FloatBowl
146. 690979 Key-Timing
159. 691753 Bracket-AirCleanerPrimer
163. 272653t*tt Gasket-AirCleaner
187. 691050 Line-Fuel(Cutto RequiredLength)
188. 693399 Screw(ControlBracket)
190. 690940 Screw(FuelTank)
202. 691829 Link-MechanicalGovernor
209. 691291 Spring-Governor
222. 692150 Bracket-Control
227. 690783 ControlLever-Governor
276. 271716tt* SealingWasher
287. 690940 Screw(DipstickTube)
300. 692038 Muffler
304. 493294 Housing-Blower
305. 691108 Screw(BlowerHousing)
306. 690450 Shield-Cylinder
307. 690345 Screw(CylinderShield)
324. 695161 Cup/ScreenAssembly
332. 690662 Nut(Flywheel)
333. 802574 Armature-Magneto
334. 691061 Screw(ArmatureMagneto)
337. 802592 Plug-Spark
347. 691396 Switch-Rocker
Ref.No. PartNo. Description
356. 496381 Wire-Stop
358. 497316 EngineGasketSet
D = O
19069 FlywheelPuller
365. 692524 Screw(Carburetor)
383. 89838 Wrench-SparkPlug
404. 690272 Washer(GovernorCrank)
425. 690670 Screw(AirCleanerCover)
443. 692523 Screw(AirCleanerPrimerBase)
445. 491588 Filter-AirCleanerCartridge
456. 692299 Plate-PawlFriction
459. 281505 PawI-Ratchet
497. 690664 Screw(Stopswitch)
505. 691251 Nut(GovernorControlLever)
523. 495264 Dipstick
524. 692296t Seal-DipstickTube
525. 495265 Tube-Dipstick
529. 691923 Grommet
562. 92613 Bolt(GovernorControlLever)
564. 698589 Screw(ControlCover)
584. 697734 Cover-BreatherPassage
585. 691879t Gasket-BreatherPassage
592. 690800 Nut(RewindStarter)
597. 691696 Screw(PawlFrictionPlate)
601. 95162 Clamp-Hose
604. 698588 Cover-Control
608. 497680 Starter-Rewind
613. 691340 Screw(Muffler)
615. 690340 Retainer-GovernorShaft
616. 698801 Crank-Governor
32

Craftsman 675 Series Engine Model No. 126T02
For Yard Vacuum iVlodel 247.77013
270344t*tt
621. 692310
62Z 692872
633. 691321ff*
633A. 693867ff*
D = I! It
Seal-ORing(IntakeManifold)
Switch-Stop
Bracket-Stopswitch
Seal-Choke/ThrottleShaft
Seal-Choke/ThrottleShaft
635. 66538 Boot-Spark Plug
668. 493823 Spacer
670. 692294 SpacepFueITank
Ref.No. PartNo. Description
684. 690345 Screw(BreatherPassageCover)
689. 691855 Spring-Friction
692. 690579 Spring-Detent
718. 690959 Pin-Locating
741. 790345 Gear-Timing
832. 499034 Guard-Muffler
836. 690664 Screw(MufflerGuard)
842. 6910311- Seal-ORing(DipstickTube)
843. 691884 Sleeve-Lever
847. 692017 Assembly-Dipstick/Tube
851. 493880 Terminal-SparkPlug
868. 697338 Seal-Valve
869. 691155 Seat-Valve(intake)
870. 690380 Seat-Valve(Exhaust)
m = I! O
262001 Bushing-Guide(Exhaust)
63709 Bushing-Guide(Intake)
921. 698587 Cover-BlowerHousing
930. 691919 Guard-Rewind
957. 397974 Cap-FuelTank
966. 496116 Base-AirCleanerPrimer
968. 692298 Cover-AirCleaner
969. 690700 Screw(BlowerHousingCover)
970. 691669 Screw(AirCleanerPrimerBracket)
972. 699374 Tank-Fuel
975. 493640 Bowl-Float
976. 694395 Primer-Carburetor
977. 498261 Set-CarburetorGasket
1005. 691346 Fan-Flywheel
1019. 494256 Kit-Label
1036. 697457 Label-Emission
1058. MS5244 Owner'sManual
1059. 692311 Kit-Screw/Washer
1210. 498144 Assembly-Pulley/Spring(Pulley)
1211. 498144 Assembly-Pulley/Spring(Spring)
1329. 123K02- ReplacementEngine
0240-E1
1330. 272147 RepairManual
tlncluded in EngineGasketSet,Key.No.358
ttlncluded inCarburetorOverhaulKit, Key.No.121
*includedin CarburetorGasketSet,Key.No.977
33

Craftsman 675 Series Yard Vacuum Model 247.77013
777S30270 777S33200
= KEEP HANDS OUT OF D|SCHARGE OPEN|NO=
= DO NOT STAND OR WALK iN FRONT OF
DISCHARGE OPENING OR AiM iT AT
BYSTANDERS= OBJECTS THROWN OUT OF
CHUTE CAN CAUSE PERSONAL iNJURY=
• KEEP CHILDREN AND OTHERS AWAY= $30270
777S33123
Keep hands out of inlets
while engine is running,
Rotating blades are
inside.
FRONT WHEEL / VACUUM NOZZLE
HEIGHT ADJUSTER
LOW
To pick up
wet material,
pine cones,
acorns or
I materiaJ on
Jpavement,
777122428
I Operation Of This Equipment May Create
Sparks That Can Start Fires Around Dry
Vegetation, A Spark Arrestor May Be
Required. The Operator Should Contact
Local Fire Agencies For Laws Or Regula=
t_ion Requ'_ements.
777S32432
777X43688
..................DO ............................
USEE85 ORFUEL..............
CONTAiNiNGMORE
THAN10% ETHAHOL
TO AVOID SERIOUS iNJURY
• READ OPERATOR'S MANUAL.
• KEEP HANDS OUT OF iNLET AND DISCHARGE OPENINGS WHILE MACHINE iS
RUNNING. ROTATING BLADES ARE iNSiDE.
• TURN ENGINE OFF AND ALLOW iMPELLER TO COME TO COMPLETE STOP
BEFORE REMOVING BAG.
• DO NOT ATTEMPT TO CLEAR A CLOG OR JAM WiTH THE ENGINE RUNNING.
" DO NOT OPERATE UNiTWiTHOUT BAG OR OPTIONAL BLOWER CHUTE iN PLACE.
• DO NOT STAND OR WALK IN FRONT OF BLOWER CHUTE OR AiM iT AT BYSTANDERS.
OBJECTS THROWN OUT OF DISCHARGE CAN CAUSE PERSONAL iNJURY.
• DO NOT OPERATE WHEN CHILDREN OR OTHERS ARE AROUND.
• WEAR APPROVED SAFETY GLASSES.
$32432 AC
777i22415
777122416
777Dl1373
777120916
777Dl1379
777Dl1374
34

35

(Thispageapplicableinthe U.S.A.and Canadaonly.)
Sears Brands Management Corporation (Sears), the California Air Resources Board (CARD)
and the United States Environmental Protection Agency (U.S. EPA)
Emission Control System Warranty Statement (Owner's Defect Warranty Rights and Obligations)
EMISSIONCONTROLWARRANTYCOVERAGEISAPPLICABLETOCERTI-
FIEDENGINESPURCHASEDINCALIFORNIAIN1995ANDTHEREAF-
TER,WHICHARE USEDINCALIFORNIA,ANDTOCERTIFIEDMODEL
California and United States Emission
TheCaliforniaAirResourcesBoard(CARD),U.S.EPAandSearsarepleased
toexplainthe EmissionControlSystemWarrantyonyourmodelyear2000and
latersmalloff-roadengine(SORE).InCalifornia,newsmalloff-roadengines
mustbedesigned,builtandequippedto meettheState'sstringentanti-smog
standards.Elsewherein theUnitedStates,newnon-road,spark-ignition
enginescertifiedformodelyear1997andlatermustmeetsimilarstandardsset
forthbythe U.S.EPA.Searsmustwarranttheemissioncontrolsystemonyour
YEAR1997ANDLATERENGINESWHICHAREPURCHASEDANDUSED
ELSEWHEREINTHEUNITEDSTATES(ANDAFTERJANUARY1,2001 IN
CANADA).
Control Defects Warranty Statement
enginefortheperiodsoftime listedbelow,providedtherehasbeennoabuse,
neglector impropermaintenanceofyoursmalloff-roadengine.Youremis-
sioncontrolsystemincludespartssuchasthecarburetor,aircleaner,ignition
system,mufflerandcatalyticconverter.Alsoincludedmaybeconnectorsand
otheremissionrelatedassemblies.Whereawarrantableconditionexists,Sears
will repairyoursmalloff-roadengineatnocostto youincludingdiagnosis,parts
andlabor.
Sears Emission Control Defects Warranty Coverage
Smalloff-roadenginesarewarrantedrelativeto emissioncontrolpartsdefects
fora periodofoneyear,subjecttoprovisionssetforthbelow.Ifanycovered
Owner's Warranty
Asthe smalloff-roadengineowner,youareresponsiblefor theperformanceof
therequiredmaintenancelistedin yourOperatingand MaintenanceInstruc-
tions.Searsrecommendsthatyouretainallyourreceiptscoveringmaintenance
onyoursmalloff-roadengine,butSearscannotdenywarrantysolelyfor the
lackofreceiptsorforyourfailuretoensuretheperformanceof allscheduled
maintenance.As thesmalloff-roadengineowner,youshouldhoweverbe
awarethat Searsmaydenyyouwarrantycoverageifyoursmalloff-roadengine
ora parthasfaileddueto abuse,neglect,impropermaintenanceor unap-
parton yourengineis defective,the partwillbe repairedorreplacedbySears.
Responsibilities
provedmodifications.Youareresponsibleforpresentingyoursmalloff-road
engineto anAuthorizedSearsServiceDealerassoonas aproblemexists.The
undisputedwarrantyrepairsshouldbecompletedinareasonableamountof
time,notto exceed30days.Ifyouhaveanyquestionsregardingyourwarranty
rightsandresponsibilities,youshouldcontacta SearsServiceRepresentative
at 1-800-469-4663.Theemissionwarrantyisa defectswarranty.Defectsare
judgedonnormalengineperformance.Thewarrantyis notrelatedtoan in-use
emissiontest.
Sears Emission Control Defects Warranty Provisions
ThefollowingarespecificprovisionsrelativetoyourEmissionControlDefectsWarrantyCoverage.ItisinadditiontotheSearsenginewarrantyfornon-regulated
enginesfoundin theOperatingand MaintenanceInstructions.
1. WarrantedParts
Coverageunderthiswarrantyextendsonlytothepartslistedbelow(the
emissioncontrolsystemsparts)tothe extentthesepartswerepresenton
theenginepurchased.
a. FuelMeteringSystem
• Coldstartenrichmentsystem
• Carburetorand internalparts
• FuelPump
b. AirlnductionSystem
• Aircleaner
• Intakemanifold
c. IgnitionSystem
• Sparkplug(s)
• Magnetoignitionsystem
d. CatalystSystem
• Catalyticconverter
• Exhaustmanifold
• Air injectionsystemorpulsevalve
e. MiscellaneousItemsUsedin AboveSystems
• Vacuum,temperature,position,timesensitivevalves
andswitches
• Connectorsandassemblies
2. LengthofCoverage
Searswarrantstothe initialownerand eachsubsequentpurchaserthat
theWarrantedPartsshallbefreefromdefectsin materialsandworkman-
shipwhichcausedthefailureofthe WarrantedPartsfor aperiodofone
yearfromthe datethe engineis deliveredtoa retailpurchaser.
3. NoCharge
Repairor replacementof anyWarrantedPartwill beperformedat no
chargetothe owner,includingdiagnosticlaborwhichleadstothe
determinationthata WarrantedPartisdefective,ifthe diagnosticworkis
performedatanAuthorizedSearsServiceDealer.Foremissionswarranty
servicecontactyournearestAuthorizedSearsServiceDealeraslistedin
the "YellowPages"under"Engines,Gasoline,""GasolineEngines,""Lawn
Mowers,"orsimilarcategory.
4. Claimsand CoverageExclusions
Warrantyclaimsshallbefiledin accordancewiththe provisionsofthe
SearsEngineWarrantyPolicy.Warrantycoverageshall beexcludedfor
failuresof WarrantedPartswhicharenotoriginalSearspartsor because
ofabuse,neglector impropermaintenanceas setforth inthe Sears
EngineWarrantyPolicy.Searsisnotliableto coverfailuresof Warranted
Partscausedbytheuseof add-on,non-original,or modifiedparts.
5. Maintenance
AnyWarrantedPartwhichis notscheduledfor replacementas required
maintenanceor whichis scheduledonlyfor regularinspectiontothe effect
of"repairor replaceasnecessary"shallbe warrantedastodefectsfor the
warrantyperiod.AnyWarrantedPartwhichisscheduledfor replacement
asrequiredmaintenanceshallbewarrantedastodefectsonlyforthe
periodoftime uptothe firstscheduledreplacementfor that part.Any
replacementpartthatisequivalentin performanceanddurabilitymay
beusedinthe performanceofanymaintenanceor repairs.Theowneris
responsibleforthe performanceof all requiredmaintenance,as definedin
the SearsOperatingand MaintenanceInstructions.
6. ConsequentialCoverage
Coveragehereundershallextendtothefailureofanyenginecomponents
causedbythefailureofanyWarrantedPartstillunderwarranty.
Inthe USAandCanada,a 24hourhotline,1-800-469-4663,hasa menuofpre-recordedmessagesofferingyouenginemaintenanceinformation.
GDOC-100188Rev.B
36

Look For Relevant Emissions Durability Period and
Air index information On Your Engine Emissions Label
Engines that are certified to meet the California Air Resources Board (CARB) Tier 2 Emission Standards must
display information regarding the Emissions Durability Period and the Air Index. Sears Brands Management
Corporation makes this information available to the consumer on our emission labels.
The Emissions Durability Period describes the number of hours of actual running time for which the engine is
certified to be emissions compliant, assuming proper maintenance in accordance with the Operating & Mainte-
nance Instructions. The following categories are used:
Moderate: Engine is certified to be emission compliant for 125 hours of actual engine running time.
Intermediate: Engine is certified to be emission compliant for 250 hours of actual engine running time.
Extended: Engine is certified to be emission compliant for 500 hours of actual engine running time.
For example, a typical walk-behind lawn mower is used 20 to 25 hours per year. Therefore, the Emissions
Durability Period of an engine with an intermediate rating would equate to 10 to 12 years.
The Air index is a calculated number describing the relative level of emissions for a specific engine family. The
lower the Air Index, the cleaner the engine. This information is displayed in graphical form on the emissions label.
After July 1,2000, Look For Emissions Compliance Period
On Engine Emissions Compliance Label
After July 1, 2000 certain Sears Brands Management Corporation engines will be certified to meet the United
States Environmental Protection Agency (USEPA) Phase 2 emission standards. For Phase 2 certified engines, the
Emissions Compliance Period referred to on the Emissions Compliance label indicates the number of operating
hours for which the engine has been shown to meet Federal emission requirements.
For engines less than 225 cc displacement, Category C = 125 hours, B = 250 hours and A = 500 hours.
For engines of 225 cc or more, Category C = 250 hours, B = 500 hours and A = 1000 hours.
This isa generic representation of the emission label typically found on a certified engine.
FAMILYYBSXS.3192VA 274812
GDOC-100182Rev.B
37

Congratulations on making a smart purchase. Your new Craftsman® product is designed and
manufactured for years of dependable operation. But like all products, it may require repair
from time to time. That's when having a Repair Protection Agreement can save you money and
aggravation.
Here's what the Repair Protection Agreement* includes:
[] Expert service by our 10,000 professional repair specialists
[] Unlimited service and no charge for parts and labor on all covered repairs
[] Product replacement up to $1500 if your covered product can't be fixed
[] Discount of 25% from regular price of service and related installed parts not covered by the
agreement; also, 25% off regular price of preventive maintenance check
[] Fast help by phone - we call it Rapid Resolution - phone support from a Sears representative.
Think of us as a "talking owner's manual."
Once you purchase the Repair Protection Agreement, a simple phone call is all that it takes for you
to schedule service. You can call anytime day or night, or schedule a service appointment online.
The Repair Protection Agreement is a risk-free purchase. If you cancel for any reason during the
product warranty period, we will provide a full refund. Or, a prorated refund anytime after the
product warranty period expires. Purchase your Repair Protection Agreement today!
Some limitations and exclusions apply. For prices and additional information in the U.S.A.
call 1=800=827=6655.
*Coverage in Canada varies on some items. For full details call Sears Canada at 1=800=361=
6665.
Sears Installation Service
For Sears professional installation of home appliances, garage door openers, water heaters, and
other major home items, inthe U.S.A. or Canada call 1=800=4=MY=HOME®.
38

Declaraci6n de garantia ....................... Pagina 39
Practicas operacion seguras ............... Pagina 40
Montaje ................................................ Pagina 44
Operacion ............................................ Pagina 48
Servicio y Mantenimiento .................... Pagina 52
Almacenamiento fuera de temporada .... Pagina 58
Solucion de problemas ...................... Pagina 59
Etiquetas de seguridad ....................... Pagina 7
Lista de piezas ........................................ Pagina 24
Acuerdo de Proteccion Para
Reparaciones ....................................... Pagina 63
NOmero de servicio ..................... Cubierta posterior
ARTESANODE DOSANOS DEGARANTJA
PORDOSANOS(S)apartirdelafechadecompra,esteproductoest&garantizadocontracualquierdefectodematerialo manode obra.Un
productodefectuosorecibir&la reparaci6no la sustituci6nsila reparaci6nnoestAdisponible.
Paraobtenerinformaci6ndetalladacoberturade lagaranfiaparaobtenerla reparaci6no sustituci6ngratuita,visiteel sitioweb:www.craftsman.com
EstagarantiacubrelosdefectosSOLOde materialesyfabricaci6n.Lagarantianoincluye:
• Elementosreutilizablesquepuedengastarseporel usonormaldentrodel periododegarantia,talescomolascuchillas,bujias,filtrode
aire,pantallade desgranadoyunabolsa.
• ProductodaSosresultantesde losintentosdelusuariodemodificaci6ndelproducto,reparaci6no causadosporaccesoriosde
productos.
• Reparacionesnecesariasdebidoal accidenteo por nooperaro mantenerel productosegQnlasinstruccionesprovistas.
• El mantenimientopreventivoo reparacionesnecesariasdebidoa unamezclaincorrectade combustible,combustiblecontaminadoo
pasado.
Estagaranfiaes inv&lidasiesteproductose utilizaal mismotiempola prestaci6nde servicioscomercialeso si sealquilaaotrapersona.
Estagarantialeotorgaderechoslegalesespecificos,y ustedtambi_npuedetenerotrosderechosquevariandeestadoa estado.
Sears Brands Management Corporation, Hoffman Estates, IL 60179
Serie: 675
Tipodeaceitedelmotor: SAE30
Capacidadde aceitedel motor: 18onzas
Capacidadde combustible: 1 1/22 cuartos
Bujias: Champion@RJ19LM
Separaci6ndelasbujias: .020"
NSmerode modelo ..........................................................
N_mero de serie..............................................................
Fechade compra .............................................................
Registrearribael nQmerodel modelo,el nQmerode serieyla fecha
de compra
©SearsBrands,LLC 39

Lapresenciade estesirnboloindicaque setratade instrucciones
irnportantesde seguridadquesedebenrespetarparaevitar
ponerenpeligrosu seguridadpersonaly/o materialy lade otras
personas.Leay sigatodaslasinstruccionesdeestemanualantes
de poneren funcionarnientoestarn_.quina.Si no respetaestas
instruccionespodriaprovocarlesionespersonales.Cuandoveaeste
sirnbolo,ipresteatenci6na la advertencia!
PROPOSICION 65 DE CALIFORNIA
Elescapedel motorde esteproducto,algunosde suscornponentes
y algunoscornponentesdelvehiculocontieneno liberansustancias
quirnicasqueelestadode Californiaconsideraque puedenproducir
c_.ncer,defectosde nacirnientouotrosproblernasreproductivos.
Estarn_.quinarueconstruidaparaseroperadadeacuerdocon
lasreglasde seguridadcontenidasenestemanual.AIigualque
concualquiertipodeequipornotorizado,undescuidoo errorpor
partedeloperadorpuedeproducirlesionesgraves.Estarn_.quina
escapazde arnputarrnanosy piesy dearrojarobjetoscongran
fuerza.Denorespetarlasinstruccionesde seguridadsiguientesse
puedenproducirlesionesgraveso la rnuerte.
Su responsabilidad--Restrinja el usode estarn_.quina
rnotorizadaalas personasque lean,cornprendany respetenlas
advertenciase instruccionesqueaparecenenestemanualyen la
rn_.quina.
iGUARI)E ESTASINSTRUCCIONES!
CAPACITACION
• Lea,entienday curnplatodaslasinstruccionesincluidasen
la rnAquinayen losrnanualesantesde rnontarlayutilizarla.
Guardeestemanualenun lugarseguroparaconsultasfuturasy
regulares,asicornoparasolicitarrepuestos.
• Leael ManualdelOperadory sigatodaslasadvertenciase
instruccionesdeseguridad.El fracasode hacerasi puedecausar
la heridaseriaal operadory/o personaspresentes.ParaIlarnada
de preguntas,1-800-659-5917.
• Farniliaricesecontodosloscontrolesysuoperaci6nadecuada.
Sepac6rnodetenerla rn_.quinayc6rnodesengranarloscontroles
r_.pidarnente.
• Noperrnitanuncaque losniffosrnenoresde 16afrosutilicen
estarn_.quina.Losniffosde 16afrosy rn_.srnayoresdeben
leerycornprenderlasinstruccionesde operaci6nylasreglas
de seguridadcontenidasen estemanual,ytarnbi_ndebenser
capacitadosy estarsupervisadosporunode lospadres.
• Nuncaperrnitaquelosadultosoperenestarn_.quinasinrecibir
antesla instrucci6napropiada.
• Mantengaa lostranseQntes,ayudantes,rnascotasy niffosal
rnenosa 75piesde la rn_.quinarnientrasest,.operando.Detenga
la rn_.quinasialguienentraenla zona.
• Nuncaenciendaun motorenespacioscerradoso enunazona
conpocaventilaci6n.Elescapedel motorcontienernon6xidode
carbono,un gasinodoroy letal.
• Nopongalasrnanoso lospiescercadelaspiezasrotatoriaso
en lasc_.rnarasde alirnentaci6nnien laaberturade descarga.El
contactoconel motorrotatoriopuedeproducirla arnputaci6nde
dedos,rnanoso pies.
• Nuncatratededestapar[atornade alirnentaci6no la aberturade
descarga,nitratede sacaro vaciarla bolsade laaspiradora,ni
de revisary repararlarn_.quinarnientrasel motorest,.enrnarcha.
Apagueel motoryesperehastaquetodaslaspiezasrn6vilesse
hayandetenidoporcornpleto.Desconecteel cablede labujiay
p6ngalode rnaneraquehagarnasacontrael motor.
PREPARATIVOS
• Inspeccionerninuciosarnenteel_.readondeutilizar_,el equipo.
Retiretodaslaspiedras,botellas,latasu otrosobjetosextra_os
que puedanserlevantadoso arrojadoscausandolesiones
personaleso da_osa larn_.quina.
• Paraprotegerselosojosutilicesiernpreanteojoso antiparras
de seguridadrnientrasoperala rn_.quinao rnientrasla ajusta
o repara.Losobjetosarrojadosquerebotanpuedenlesionar
gravernentelavista.
• Utilicezapatosde trabajoresistentes,desuelafuerte,asicorno
pantalonesycarnisasajustados.Lasprendassueltaso las
alhajaspuedenquedaratrapadasen laspiezasrn6viles.Nunca
utilicela rn_.quinadescalzoo consandalias.Utiliceguantesde
trabajodecuerocuandoalirnentematerialporelcanaldela
cortadora.
• Antesde encenderla rn_.quinacontrolequetodoslospernosy
tornillosest_nbienajustadosparacornprobarquela rn_.quinase
encuentraen condicionessegurasdeoperaci6n.Adern_.s,realice
una inspecci6nvisualde la rn_.quinaa intervalosfrecuentespara
controlarsila rnisrnaest,.da_ada.
• Mantengao reernplacelasetiquetasdeseguridade instrucciones
segQnseanecesario.
Manejosegurodelagasolina
Paraevitarlesionespersonaleso da_osrnaterialesseasurnarnente
cuidadosoal rnanipularlagasolina.Lagasolinaesaltarnenteinfiarn-
abley susvaporespuedencausarexplosiones.Sepuedelesionar
gravernentesiderrarnagasolinasobreustedo sobrela ropayaquese
puedeencender.L_.vesela pielyc_.rnbiesede ropade inrnediato.
• Utilices61orecipientesparagasolinaautorizados.
4O

• NuncaIleneloscontenedoresen elinteriordeun vehiculo
o carni6nocajadecarnionetaconrecubrirnientospl_.sticos.
Coloquesiernprelosrecipientesenel pisoy lejosdelvehiculo
antesde Ilenarlos.
Retireel equipoa gasolinadelcarni6no rernolqueyII_neloen
el piso.Si estonoesposible,entoncesIlenedichoequipoenun
rernolqueconun recipienteport_.til,en vezdedesdeun dispen-
sadordegasolina.
Mantengala boquillade llenadoencontactoconel hordedela
entradadeltanquedegasolinao contenedorentodornornento
hastaqueest_Ileno.Noutiliceundispositivoparaabrir/cerrarla
boquilla.
Apaguetodosloscigarrillos,cigarros,pipasyotrasfuentesde
cornbusti6n.
Nuncacarguecombustibleen la rn_.quinaen unespaciocerrado.
Nuncasaquelatapadelgasni agreguecombustiblernientrasel
motorest,.calienteo enrnarcha.Dejequeel motorseenfriepor
Iornenosdosrninutosantesdevolvera cargarcombustible.
Nuncarecargueel tanquede combustible.Lleneel tanqueno
rn_.sde 1/2pulgadapordebajode la basedelcuellodelfiltro
paradejarespacioparala dilataci6ndelcombustible.
• Vuelvaa colocarla tapade lagasolinay ajOstelabien.
• Lirnpielagasolinaderrarnadasobreelmotory elequipo.Traslade
la rn_.quinaa otrazona.Espere5rninutosantesdeencenderel
motor.
• Nuncaalrnacenela rn_.quinao el recipientede combustibleen
unespaciocerradodondehayafuego,chispaso luzpiloto(por
ejernplo,hornos,calentadoresdeagua,calefactores,secadores
de ropa,etc.)
• Parareducirel riesgodeincendiornantengalarn_.quinalirnpia
depasto,hojasyde acurnulaci6nde otrosdesechos.Lirnpielos
derrarnesdeaceiteo combustibley saquetodoslosdesechos
ernbebidosconcombustible.
OPERACION
• Nopongalasrnanoso lospiescercadelaspiezasrotatoriaso
enlasc_.rnarasdealirnentaci6nni en laaberturade descarga.El
contactoconel motorrotatoriopuedeproducirla arnputaci6nde
dedos,rnanoso pies.
• Antesdeencenderlarn_.quinacornpruebequeel canaldela
cortadora,latornade alirnentaci6ny lac_.rnarade corteest_.n
vadas ysindesechos.
• Inspeccionerninuciosarnentetodoel materialquedeseatriturar
ysaquelosobjetosrnet_Jicos,piedras,botellas,latasuotros
objetosextra_osquepuedenocasionarlesionesoda_arla
rn_.quina.
Sielmotorgolpeaunobjetoextra_oo sila rn_.quinaernpiezaa pro-
ducirunsonidopococornOnounavibraci6n,apagueelmotorde
inrnediato.Dejequeelmotorsedetengaporcornpleto.Desconecte
el cablede labujia,p6ngalode rnaneraquehagarnasacontrael
motorysigaestospasos:
a. Inspeccionela rn_.quinaparaversiest,.da_ada.
b. Repareo reernplacelaspiezasda_adas.
c. ControlesihaypiezasflojasyajQstelasparaasegurarquela
rn_.quinafuncionede rnaneraseguray continua.
• Noperrnitaqueseacurnulematerialprocesadoen lazonade
descarga.El rnisrnopuedeobstaculizarla descargaadecuada
y provocarel retornodel materiala travesde laaberturade
alirnentaci6n.
• Nointentetriturarni picarmaterialdemayortarna_oal espe-
cificadoen larn_.quinao enestemanual.Sepodrianproducir
lesioneso da_os.
• Nuncatratede destaparla tornade alirnentaci6no laabertura
de descargarnientrasel motorest,.en rnarcha.Apagueel motor
y esperehastaquetodaslaspiezasque sernuevensehayan
detenidopor cornpleto,desconecteel cablede labujfay p6ngalo
de rnaneraquehagarnasacontraelmotorantesde sacarlos
escombros.
• Nuncaoperela rn_.quinasinque labolsade laaspiradorayel
canalde descargaest_nconectadosa larn_.quinacornocorre-
sponde.Nuncavade ni carnbiela bolsade la aspiradorarnientras
el motorest,.en rnarcha.Elextrernoconcierrede labolsade la
aspiradoradebequedarcerradotodoel tiernpornientrasla opera.
• Nuncaoperela rn_.quinasiel picode ingresoo la uni6nopcional
parala rnangueranoest_.nconectadosa la rn_.quinaadecu-
adarnente.Nuncaintenteconectarocarnbiarningunadeestas
unionesrnientrasel motorest,.en rnarcha.
• Mantengatodoslosprotectores,desviadoresy dispositivosde
seguridadensu lugaryen buenascondiciones.
• Mientrasalirnentamaterialdentrode la rn_.quinarnantengasu
rostroysucuerpodetr_.syhaciaun costadodelcanalde la
cortadoraparaevitarlesionesporretrocesosaccidentales.
• Nuncaopereestarn_.quinasinbuenavisibilidado ilurninaci6n.
Siernpredebeestarsegurode queest,.bienafirrnadoysostenga
bienlasrnanijas.
• Noopereestarn_.quinaen superficiescongrava.
• Noopereestarn_.quinaestandobajolosefectosdelalcoholo de
drogas.
• Elsilenciadoryel motorsecalientany puedenproducirquerna-
duras.Nolostoque.
• Nuncalevanteo transportela rn_.quinacuandoel motorest,.
encendido.
Sisepresentansituacionesquenoest_.nprevistaseneste
manualseacuidadosoy useel sentidocornQn.Marquepara
contactareldepartarnentodeatenci6nalclienteyobtenerel
nornbredesudistribuidorrn_.scercano.
41

MANTENIMIENTO Y ALMACENAMIENTO
• Nuncarnanipulelosdispositivosde seguridadde rnanera
irnprudente.Controleperi6dicarnentequefuncionende forrna
adecuada.
• Controlefrecuenternentequetodoslospernosytornillosest_n
bienajustadosparacornprobarquela rn_.quinaseencuentraen
condicionessegurasdefuncionarniento.Adern_.s,realiceuna
inspecci6nvisualde larn_.quinaparacontrolarsi larnisrnaest,.
da_adayrep_.reladesernecesario.
• Antesde lirnpiar,repararo inspeccionarla rn_.quina,detengael
motorycornpruebequeel rnisrnoyquetodaslaspiezasrn6viles
sehallandetenido.Desconecteel cablede labujiay p6ngalo
de rnaneraquehagarnasacontrael motorparaevitarquese
enciendade rnaneraaccidental.
• Nocarnbielaconfiguraci6ndel reguladordel motorni acelere
dernasiadoel rnisrno.El reguladorcontrolalavelocidadrn_.xirna
segurade operaci6ndelmotor.
• Mantengao reernplacelasetiquetasde seguridade instrucciones
segQnseanecesario.
• Sigalasinstruccionesde estemanualparacargar,descargar,
transportary alrnacenardernaneraseguraestarn_.quina.
• Nuncaalrnacenela rn_.quinao el recipientedecombustibleenun
espaciocerradodondehayafuego,chispaso luzpilotocornopor
ejernplo,calentadoresdeagua,hornos,secadoresde ropa,etc.
• Dejequela rn_.quinaseenfriepotIornenos5 rninutosantesde
guardarla.
• Consultesiernpreel manualdel operadorparaconocerlas
instruccionesadecuadasparael alrnacenarnientofuerade
ternporada.
• Seg_nla Cornisi6ndeSeguridadde Productosparael Consu-
rnidorde losEstadosUnidos(CPSC)y laAgenciade Proteccidn
Arnbientalde losEstadosUnidos(EPA),esteproductotieneuna
vidaOtilmediade siete(7)a_os,6 60horasde funcionarniento.
AI finalizarla vidaOtilmedia,adquieraunarn_.quinanuevao
hagainspeccionaranualrnente_staporundistribuidorde servicio
autorizadoparacerciorarsede quetodoslossisternasrnec_.nicos
yde seguridadfuncionancorrectarnenteyno tienenexcesivo
desgaste.Si noIohace,puedenproducirseaccidentes,lesiones
o rnuerte
• Sidebevaciarel tanquedecombustible,h_.galoal airelibre.
• Respetelasnorrnasreferentesa ladisposici6ncorrectay las
reglarnentacionessobregas,combustible,etc.paraprotegerel
medicarnbiente.
NO MODIFIQUE EL MOTOR
Paraevitarlesionesgraveso larnuerte,nornodifiqueel motorbajo
ningunacircunstancia.Si carnbialaconfiguracidndel reguladorel
motorpuededescontrolarseyoperara velocidadesinseguras.Nunca
carnbiela configuracidndef_.bricadel reguladordelmotor.
AVISO REFERIDO A EMISIONES
Losrnotoresqueest&ncertificadosycurnplenconlasregulaciones
de ernisionesfederalesEPAydeCaliforniaparaSORE(Equipos
peque_ostodoterreno)est_.ncertificadosparaoperarcongasolina
cornOnsinplornoy puedenincluirlossiguientessisternasde control
de ernisiones:Modificacidnde motor(EM)ycatalizadorde tresvias
(TWO)siest_.nequipadosde esarnanera.
GUARDACHISPAS
Estarn&quinaest,.equipadaconunmotorde cornbusti6ninternay
nodebeserutilizadaen o cercade unterrenoagrestecubiertopor
bosque,rnalezaso hierbaexceptosiel sisternade escapedelmotor
est,.equipadoconunarnortiguadorde chispasque curnplaconlas
leyeslocaleso estatalescorrespondientes,encasode habedas.
Si seutilizaunarnortiguadorde chispasel operadorIodebernantener
en condicionesde usoadecuadas.Enel Estadode Californialas
rnedidasanteriorrnenternencionadassonexigidasporIcy(Arficulo
4442del Cddigode RecursosPOblicosde California).Esposible
queexistanleyessirnilaresenotrosestados.Lasleyesfederalesse
aplicanenterritoriosfederales.
Puedeconseguirelarnortiguadordechispasparael silenciadora
travesdesudistribuidorautorizadode rnotoreso poni_ndoseen
contactoconel departarnentodeservicios.
42

SilVIBOLOSDE SEGURIDAD
Estap&ginarepresentay describelaseguridadlossimbolosquepuedenpareceren esteproducto.Lea,comprenda,y sigatodasinstrucciones
enla m_quinaantesprocurarparareuniry operar.
O O
I-ml
llm
LEA EL MANUAL(S) DEL OPERADOR
Lea, comprenda, y siga todas instrucciones en el manual (manuales) antes procurar para
reunir y operar
ADVERTENCIA-- GIRANDO HOJAS
Mantenga manos fuera de aperturas de cala y descarga mientras m_fiquina corre. Alli giran
hojas adentro
ESPECTADORES
Mantenga a espectadores, los animales favoritos, y los ni_os pot Io menos 75 pies de la
m_iquina mientras est,1 en la operaci6n. Pare m_iquina si cualquiera entra el _irea. eet from
the machine while it is in operation. Stop machine if anyone enters the area.
ADVERTENCIA-- OBJETOS TIRADOS
Esta m_iquina puede recoger y poder tirar y los objetos que pueden rebotar.
PROTECCION DE OJO
Siempre Ileve gafas de seguridad o gafas de seguridad al operar esta m_fiquina.
ADVERTENCIA-- GASOLINA ESINFLAMABLE
Allow the engine to cool at least two minutes before refueling.
ADVERTENCIA-- MONOXIDO DE CARBONO
Nunca corra un motor dentro ni en un _irea mal ventilada. El escape del motor contiene
mon6xido de carbono, un gas inodoro y mortal.
43

IMPORTANTE:Estaunidadseenviasingasolinaniaceiteenel mo-
tor.Antesdeoperarlam_.quinacargueel motorcongasolinay aceite
comoseindicaen la secci6nde Operaci6nen estemanual.
NOTA:Lasreferenciasa losladosderechoe izquierdodela aspira-
doraparapatiossehacenobservandola m_.quinadesdela posici6n
deoperaci6n.
APERTURA DE LA CAJA DE CARTON
1. Cortecadaunade lasesquinasde la cajaverticalmente,de la
partesuperiora la base.
2. Saquetodaslaspiezassueltas.
3. Quiteel materialdeempaquesuelto.
COIVlO SACAR LA UNIDAD DE LA CAJA
1. Elevelaunidaddesdela parteposteriorparasepararladel
materialde la cajaquequededebajo,yhagarodarla unidad
fuerade lacaja.
2. Verifiquecuidadosamentesi enla cajaquedaalgunapartesuelta.
NOTA:AsegQresede nodoblarloscablesmientrasextraede lacaja
laspartessueltaso todala unidad.
PIEZAS SUELTAS DENTRO DE LA CAJA
(Yea la figura 1)
• Manijasuperiore inferior
• Montajede la manguera
• Bolsa
• Canaldesoplado
• Anteojosde seguridad
• Aceiteparamotor(puedeestarenel interiorde la bolsa)
• Manualdeloperador
f
Control de la transmisi6n
Soporte parala manijade
la manguerasuperior
Tuerca
mariposa /7'
Perilla manual
j Manijasuperio_r
Guia de I Control de
cuerda velocidad
Guiadel
cable
Soportepara la manija de la
manguerainferiort
Manija
Tornillo
carro
Tuercade
mariposa
Bolsa
\
Montaje de la
manguera
Botellade aceite paramotor Canalde soplado
Manualdel operador d_ _
__ Anteojos de segurida
Figura 1
44

MONTAJE DE LA MANIJA
1. Saquelosbrochesdehorquillade lossoportesde larnanija,y
saquelostornillosdelcarroylastuercasdernariposadelarnanija
inferior.
a. SitOelosagujerosinferioresde larnanijainferiorsobre
lospernosde lossoportesde larnanija,yasegOreloscon
brochesdehorquilla.Vealafigura2.
b. Insertelostornillosdelcarrodesdeel ladodeafueraa trav_s
delagujerosuperiorde larnanijainferiory asegOreloscon
tuercasde rnariposa.Veala figura2.
2. a. Desplieguelarnanijasuperiorhastaquequedealineadacon
la rnanijainferior.AsegQresequela guiade lacuerdaest_
situadaa laderechade la rnanijasuperior.Veala figura3.
[MPORTANTE:AsegQresedeenrutarloscablesfuerade larnanija
inferior.Asirnisrno,no prenseloscablesrnientraslevantalasrnanijas.
.
.
b. Parasujetar[asdosrnanijasajustelasperiiiasde [arnanija
(lospernosdel carrodebenestarcolocadosde forrna
adecuadaen[arnanija).Vea[afigura3.
Tirede lasdosunionesdelcableunidasa loscables,ajuste
aproxirnadarnente8 pulgadasdecadaextrernode cable,y ubique
loscablesen suguia.
Aflojela tuercade rnariposaquesostienela guiade lacuerd
contrael ladoderechode la rnanijasuperior.
a. Tirelentarnentede la cuerdade arranqueparasacarladel
motor.Vealafigura4.
b. Deslicela cuerdadearranqueen la guia.Ajustela tuercaa
rnariposa.Vealafigura4.
Guiadela
cuerda
45
Figura 4
J

/
i' !i ee el \\\
Figura5
f
INSTALACI6N DEL iVIONTAJE DE LA
iVlANGUERA
1. a. Desliceeladaptadorpararnangueradel rnontajede la rnisrna
haciael interiordeladaptadorbaseubicadoa la izquierday al
frentedela aspiradoraparapatios.Veala figura5.
b.Tiredelpernocon resortedel ladoexteriorde la base,yponga
el pernoen Nneaconel primeragujero(elrn_.scercanoal
extrernodel tubo)deladaptadorpararnanguera.
c. Suelteelpernoparaajustarlarnangueraensulugar.
2. a. Prirnero,unaa presi6nla rnanijade larnangueraconel soporte
parala rnanijade la rnanguerasuperior,ydespu6sconel
soportede la rnanguerainferior.
b. SitQeel ca_ode la rnangueraa finalcurvode mangoal canalde
lacortadora.Vealafigura6.
iViONTAJE DE LA BOLSA
Sostengalarnanijadela bolsaconunarnanoydeslicela variNade
seguridaddel soportede rnontajehaciaelmotorconla otrarnano.
Useel extrernodelsoportede rnontajecornopalancacuando
deslicelavarillade seguridad.
a. Deslicela bolsapotencirnadel bordedela aberturade
descargaysueltelavariNade seguridadparaajustarla bolsa
en sulugar.Vealafigura7.
b. Unael brochede labolsaa presi6nconla partesuperiorde la
rnanijainferior.
c. Coloquelastirasinferioresde la bolsaporencirnade laparte
superiordela rnanijainferior,enganch_.ndolasen lospernos.
Vealafigura7.
NOTA:El bot6ninterruptorde bolsa/ canal,unidoa la rn6nsulade
rnontaje,debequedarpresionadototalrnenteporla puntadela aleta
delanterasituadaenla rnanijadela bolsacuandoajustedichabolsa,
o el motorno arrancar_..
Figura6
J
Figura7
46

INSTALAR EL CANAL DE SOPLADO f
NOTA:hayquerefirarla bolsaantesdeinstalarel canalde soplado.
1. a. Tomeelcanalde sopladoconunarnanoydeslicela varillade
seguridaddel soportede rnontajehaciael motorconlaotra
rnano.Useelextrernodelsoportede rnontajecornopalanca
cuandodeslicelavarillade seguridad.Vealafigura8.
b. Desliceel canalde sopladoporencirnadel hordede laabertura
dedescarga,y sueltelavarillade seguridadparaajustarel
canalen sulugar.
c. Aurnentela alturadel picoal rrn_.xirnocuandoutiliceelcanalde
soplado.Consultelasinstruccionesparaajustarlaalturadel
picoen la siguientesecci6n.
NOTA:Elbot6ninterruptorde bolsa/ canalunidoa la rn_nsulade
rnontajedebequedarpresionadototalrnenteporla puntade laaleta
delanterasituadaen el canaldesoplado,oel motornoarrancar&
Siernpredetengael motorydesconecteelcabledela bujiaantes
dehacercualquiertipode mantenirnientoo ajustes.Utilicesiernpre
anteojosde seguridaddurantelaoperaci6no rnientrasajustao
reparaesteequip&
/
Figura8
J
AJUSTE DE LA ALTURA DEL PICO
Puedeajustarel picoen seisposicionesquevariandesde5/8"a
4-1/8"dedistanciadel suelo.Debeajustarla alturadelpicosegOnlas
condicionesdel patio.
1. Oprirnala palancade ajustede laalturadel picohaciala rueda.
Veala figura9.
2. Muevalapalancadeajustede alturahaciadelanteo haciaatr_.s,
paramoverel picoarribao abajo.AsegOresede quearnbas
palancasest_.nenla misrnaposici6n.
3. Liberela palancahaciala cubierta.
NOTA:en general,levantelaalturadel picoparaaspirarunacapa
gruesade hojaso parausarelcanalde soplado.Bajelaalturadel
picoparasuperficiesrn_.slisas.
f
Figure9
J
47

f
de latransmisi6n Controldel Control de
Control develocidad estrangulador obturaci6n
Manija del
arrancador
Soporte parala
manija de la
manguera inferior
Montaje de la
manguera
Manija de
manguera
Canalde Canaldel_
soplado cortadora
Bolsa
ijade la bolsa
Llenadode aceite
Llenado de
dela
la
delpico /
manguera de la
aspiradora
Palancadeajuste
de laaltura del
pico
Ahoraqueyahaajustadosuaspiradoraparapatiosparala operaci6n,
famiNarfceseconsuscontrolesycaracterfsticas.Estossedescriben
yseilustranenesta p_.gina.Esteconocimientole permitir_,utilizarsu
nuevoequipoa sum_.ximacapacidad.
Ai operarunacortadoratrituradorapuedeserqueobjetosextra£os
seanarrojadosa losojosIocualpuededa_arlosgravemente.Utilice
siemprelosanteojosde seguridadprovistosconesta unidado
protectoresparaojosmientrasoperaymientrasrealizaajusteso
reparaciones.
lJ
Figura10
CONTROL DE LA TRANSIVIISION
Ubicadosobrela partedeabajodela manijasuperior,elcontroldela
transmisi6nseutilizaparaengranar/ desengranarlasruedas.Apriete
pot completoel controlde latransmisi6ncontralamanijasuperior
paraengranarlasruedas,y su_lteloparadesengranarlas.(NOsuelte
el embrague).
CANAL DE LA CORTADORA
Permiteque lasramaspequeSasde hasta1-1/2"de di&metroingresen
al motorparapicarlas.Yeala figura9.
IMPORTANTE: Mueva el control de velocidad s61ocuando el motor
est_ en marcha. Si cambia el ajuste dei control de velocidad con el
motor apagado, su aspiradora para patios puede resultar daSada.
PALANCA
Losdesechosqueseacumulanenlospatioscomoporejemplolashojas
o lasagujasdelospinossepuedenaspirarconel picoparapicarlos.
CONTROL DE VELOCIDAD
Situadoen laparteizquierdade la manijaizquierda,el controlde
velocidadseutilizaparaseleccionarlavelocidadde avancedela
aspiradoraparapatios.
BOLSA
Juntael materialtrituradoqueingres6a travesdel canalde picadoo
querueaspiradoa travesdel picoo de la manguera.
iVlANIJA DE LA BOLSA
Seutilzaparatomarlabolsaparacolocarla,sacarlayvaciarla.Vealafigura10.
Cumple con los estandares de seguridad de ANSI
LasaspiradorasparapatiosdeCraftsmancumplenconlosest&ndaresdeseguridaddelinstitutoestadounidensedeest&ndaresnacionales(ANSI).
48

CANAL DE SOPLADO
CuandoseIounealaunidadelcanaldesopladoseutilizaparasoplaro
esparcirpotlospatioslosdesechosqueseacurnulanenlosrnisrnoscorno
potejernplolashojas,lasagujasdelospinoso lasrarnaspeque_as.
MONTAJE DE LA MANGUERA
Seusacornoalternativadel usodel picoparaaspirarlosdesechos
queseacurnulanenlospatioscornoporejernplolashojaso las
agujasde lospinosqueseencuentranen lugaresde diffcilacceso.
Veala figura10.
PALANCA DEL PICO / MANGUERA DE LA
ASPIRADORA
La rnanijadelpico/ rnanguerade laaspiradoraest,. situadaen
la partesuperiordelpico.Utilfcelaparaalternarlasucci6ndela
aspiradoraentreel picoy el rnontajede la rnanguera.
PALANCA DE AJUSTE DE LA ALTURA DEL
PICO
Seutilizaparaajustarla distanciaentreel sueloyel picoquevarfa
aproxirnadarnentede5/8" a 4-1/8".Vealafigura10.
CONTROL DEL ESTRANGULADOR
Estapalancacontroialavelocidaddelmotory lafunci6nde detenci6n.
Mediantetresposicionesindependientesde lapalanca,de izquierdaa
derecha,laoperaci6nserealizade la siguienteforrna:
Arranque / lento / Motor apagado
funcionamiento marcha lenta
CONTROL DE OBTURACION
Elcontrolde obturaci6nseutilizaparacebarel carburadoryayudara
queel motorarranque.
MANIJA DEL ARRANCADOR
Seutilizaparaencenderel motor.
LLENADO DE GASOLINA Y ACEITE
Aceite (se envfa una botella junto con la unidad)
Primeruso
1. Saquela varilladel niveldeaceite.
2. Conla aspiradoraparapatiosal niveidel suelo,utiliceunernbudo
paravaciardentrodelmotortodoel contenidode la boteNade
aceitesurninistradaconla unidad.
3. Vuelvaa colocarla varillade Nenadodeaceitey ajOstela.
Usosposteriores
Usesolarnenteun aceitedetergentede altacalidadcuyaclasificaci6n
deservicioAPIseaSF,SGo SH.Seleccioneel gradodeviscosidad
SAEdel aceitesegOnla ternperaturade operaci6nesperada.Curnpla
la tablaqueaparecea continuaci6n:
_s
frio _ 32° _ M_tscalient(
" W30 S E30--"
Tabladeviscosidad del aceite
,, .y
Aunquelosaceitesde viscosidadrnWtipie(5W30,10W30,etc.)
rnejoranel encendidocuandoel clirnaest,.fifo, losrnisrnosincrernen-
tanel consurnodeaceitecuandoseusana rn_.sde32°ECornpruebe
el nivelde aceiteconmayorfrecuenciaparaevitarda_osdebidoa que
el motortrabajeconunniveldeaceitebajo.
1. Cornpruebeel niveldeaceiteasegur_.ndoseque lavarilladel
niveldeaceitenoroceconlasparedesinterioresdeltubode
Ilenadode aceite.Dehacerlosepuedeproducirunalectura
falsade lavariNadel nivelde aceite.Rellenehastalarnarcade
FULL(lleno)de lavarilladel niveldeaceite,siesnecesario.La
capacidadesde aproxirnadarnente18oz. ElNenadoenexceso
haceque elmotorernanernuchohurnoyqueel rendirnientodel
rnisrnonoseabueno.
2. Vuelvaa colocarlavarillade Ilenadode aceiteyajQstela.
3. Mantengael nivelde aceiteen larnarcaFULL.Si poneel motor
en rnarchaconrnuypocoaceitele puedecausarda_osperrna-
nentes.
Tengaextrernocuidadocuandornanipulegasolina.Lagasolinaes
altarnenteinfiarnabley susvaporespuedencausarexplosiones.
Nuncacarguecombustibleenla rn_.quinaenunespaciocerrado
o cuandoel motorest,.calienteo en rnarcha.ApaguecigarriNos,
cigarros,pipasy otrasfuentesde cornbusti6n.
GASOLINA
1. Saquelatapadel combustibledel dep6sitodel rnisrno.
2. Verifiquequeelrecipientedelquevaa verterlagasolinaest_
lirnpioylibrede6xidoodeobjetosextra_os.Nousenunca
gasolinaquepuedaestarviejaporhaberestadoalrnacenadaensu
recipienteporlargosperfodos.Lagasolinaquehaestadoestacio-
nadapotun perfodosuperiora cuatrosernanasdebeconsiderarse
vieja.
3. Lleneel tanquede combustibles61ocongasolinanormalsin
piorno,lirnpiayfresca.NousegasolinaquecontengaMETANOL
Vuelvaa colocarlatapadecombustibleensulugar.
Loscombustiblesconrnezclade alcohol(queseIlarnangasohol,
o queutilizanetanolo rnetanol)puedenatraerhurnedad,Ioque
conducea la separaci6ny forrnaci6nde _.cidosduranteel alrnace-
narniento.Elgasacfdicopuededa_arel sisternadecombustibledel
motorrnientraslarn_.cj_uinaest,.alrnacenada.
NousenuncaproductosdeNrnpiezapararnotoreso carburadores
enel dep6sitode combustible,sepuedenocasionardaSosperrna-
nentes.
49

f
VistaSuperior
Cable/d{ ptor
de JaBols_/Canal ..........
i /
f
J
Figura11
Control del estrangulador
Control de obturaci6n
Figura12
Figura13
Paraevitarproblemasconel motor,sedebevaciarel sistemade
combustibleantesdealmacenaria m_.quinadurante30dfaso m_.s.
Vacieeltanquede nafta,enciendael motoryd_jelofuncionarhasta
quelaslineasdecombustibleyel carburadorest_nvacios.La
siguientetemporadausecombustiblefresco.ConsultelasInstruc-
clonesde ALMACENAMIENTOsideseainformaci6nadicional.
NOTA:Verifiqueperi6dicamenteel nivelde combustibleparaevitar
quedarsesingasoiinamientrasest,.operandolaaspiradorapara
patios.Si launidadsequedasincombustiblemientrasest,.triturando,
puederesultarnecesariodestaparel _.reade descargaantesde poder
volvera encenderla.Consultela secci6nSERVlCIOY MANTEN-
IMIENTO.
Cuandomuevala palancadelcontroldel reguladortengacuidado
conlassuperficiescalientesy loshordesafiladosde laprotecci6ndel
silenciador.
PARA ENCENDER EL MOTOR
1. Conecteel cablede la bujiay la mangade gomaa lamisma.
2. Elbot6ndelinterruptordebolsa/canaldebequedarpresionado
totalmenteporlapuntadelaaletadelanterasituadaenlamaniadela
bolsaoenelcanaldesoplado,yaqueencasocontrarioelmotorno
arrancar&Vealafigura11.
3. Compruebequeel cabledelinterruptorde labolsa/ canalest_
conectadoal motoryqueest_conectadoa tierramediantela
m_nsulade montaje.Vealafigura11.
4. EltanquedecombustibledebeIlenarsea3/4deltotalantesde
arrancar.
5. Muevala palancade controldelestranguladora la posici6n
START/RUN(encendido/ funcionamiento,representadoporuna
liebre).Vealafigura12.
6. Muevael controldelobturadorl'e'! haciael controldel regulador
paraobturarel carburadordel motor.(Siel motorest,.tibiola
obturaci6npuedenosernecesaria).
7. Situadodetr_.sde launidad,tomela manijadel arrancadorytire
"_ de lacuerdahastaquesientauntir6n.Vealafigura12.
8. Tirede iacuerdademanerar_.pidaycontinua.Aprietebienla
manijadelarrancador.Dejequelacuerdaseenrosquelentamente.
9. Repitaestepaso,desetnecesario,hastaqueseenciendael mo-
tor.Cuandoseenciendeel motormuevael controldeobturaci6n
gradualmentelejosdel controldelestrangulador.
10. Si el motorfalla,muevael controldelobturadorhaciaatr_.s,en
direcci6nal controldelestrangulador,y repitalospasos1a 9.
11. MantengaSiEMPREel controldelestrangula,,doren posici6n
START/RUN(encendido/ funcionamiento)_ mientras
operelaaspiradoraparapatios.
,J
PARA DETENER EL MOTOR
1. Elreguladorde movimientocontrolalapalancaparareducir_
la marcha(tortuga)dela posici6n.Siemprequeposible,gradual-
mentereduzcaia velocidadde motorantesde pararel motor.
2. Muevalaspalancasde controldel reguladora laposici6n
STOP(detenci6n)u OFF(apagado).
50

3. Desconecteel cabledela bujiade labujiaycol6queloa rnasa f
contrael motorparaevitarqueseenciendaaccidentalrnente
rnientrasnoseest,.prestandoatenci6nalequipo.
DESCARGA DE LA BOLSA
1. Desenganchelastirasde labolsade la rnanijainferior.
2. Suelteel brochede labolsaa presi6nde la partesuperiorde la
rnanijainferior.Veala figura13.
3. Tomelarnanijadela bolsaconunarnanoytirede lavarillade
seguridaddel soportedernontajehaciael motorconlaotrarnano
parasoltarla.
4. Elevela bolsafuerade la parteposteriorde la unidad.
5. Girelosdosbotonesdela parteposteriorde la bolsaparaabrida
yvaciarel contenido.Sostengala rnanijayel brochedela bolsa
rnientrasvaciael contenido.
6. Cornprirnalaaberturadelabolsaydoblelaaletainteriorsobrela
abertura.
7. Doblela aletaexteriorsobrelaaletainteriore insertelosbotones
dela bolsaa travesde lassalidasrnet_.licas.
8. Girelosbotonesparacerrarla bolsa.Ubiquelabolsade nuevo
enla unidadcornoseindicaenla Secci6ndeAsarnblea.
EXTRACCION DEL CANAL DE SOPLADO
1. Tomeel canalde sopladoconunarnanoytirede lavarillade
seguridaddel soportedernontajehaciael motorconlaotrarnano
parasoltado.Consultelafigura8 en laSecci6nde Asarnblea.
2. Saqueelcanaldesopladoporencirnadelhordedelaaberturade
descarga.
Palancade la
aspiradora
Figura14
USO DEL PICO DE LA ASPIRADORA
1. Coloquelapalancadelpico/ rnangueradelaaspiradoraenlaposici6n
superiordelpicoparaaspiraratravesdelrnisrno.Yealafigura14.
2. Elpernoconresortedebeestarenel primerorificio(el rn_.s
cercanoalfinaldeltubo)del adaptadorde larnanguerapara
operarel picode la rnisrna.
3. Conarnbasrnanossituadasenla partesuperiorde larnanija
superior,elevecornpletarnenteel controlde transrnisi6ncontrala
rnanijasuperiorparairnpulsarla unidadporel patio.
4. Utiliceelcontroldevelocidadparaelegirvelocidadaltao baja.
Elcontrolde velocidadpuedernoversernientrasla unidadse
irnpulsaoantesdeengranarlasruedas.
IMPORTANTE:Muevaelcontrolde velocidads61ocuandoel motor
est_enrnarcha.Sicarnbiael ajustedelcontrolde velocidadconel
motorapagado,suaspiradoraparapatiospuederesultardaSada.
Eldesechoqueseacurnulaen lospatioscornoporejernplolashojas
ylasagujasde lospinospuedenaspirarsea travesdel picopara
triturarlos.Despu_squehatrituradoel materialconlashojasde
desgranardel rnontajedel motor,el rnisrnoser_.descargadoa la bolsa
colectorao atrav_sdelcanalde soplado.$61outilicela rn_.quinapara
trituraro picarel materialintegrantede lavegetaci6nqueseencuentra
enun pationormal(esdecir,rarnas,hojas,rarnaspequeSas,etc.)
Evitelasplantasfibrosascornoporejernplolasde tornateso frondas
depalrnahastaque est_ntotalrnentesecas.Se puedenintroducir
rnaterialescornoporejernplotroncoso rarnaspesadasde hasta1
-1/2"de di_.rnetroenel canalde lacortadora.
Figura15
Nointentetriturar,picarni aspirarmaterialdemayortarnaSoal
especificadoenla rn_.quinaoen estemanual.Sepodrianproducir
lesioneso daSosa la rn_.quina.
IMPORTANTE:La pantalladedesgranadoest,.ubicadadentrode la
cajaen lazonade descarga.Sisetapalapantallade desgranado,
s_.quelaylirnpielacornoseindicaen la secci6nde rnantenirniento.
Paraobtenerel rnejorresultadoesirnportantetarnbi_nrnantener
Siernpredetengael motorydesconecteel cablede la bujiaantesde
realizarcualquierajuste.
USO DEL MONTAJE DE LA MANGUERA
1. Coloquela rnanijadel pico/ rnanguerade laaspiradoraenla
posici6nde la basedelpicoparavolvera dirigirla aspiraci6nal
rnontajede la rnanguera.Vealafigura15.
2. Paraoperarel ensarnbladode la rnanguera,el pernoconresorte
debeestarenel segundoagujerodeladaptadordela rnisrna.
3. Desenganchela rnangueradel soportedela rnanijasuperiory
tomela rnanijade la rnangueraparadirigidarnientrasaspiralos
desechosque seacurnulanenlospatioscornoporejernplohojas
oagujasde pinosqueseencuentranen lugaresdedificil acceso.
51

LISTA DE iVlANTENIIVllENTO
Antesde realizarcualquiertipodel rnantenirniento/servicio,suelte
todoslosrnandosypareel motor.Esperehastaquetodaslaspartes
de rnovirnientohayanvenidoa unaparadacornpleta.Desconecteel
alarnbredebujiay b_.selocontrael motorparaprevenirel cornienzo
involuntario.SiernpreIlevepuestoscristalesinastillablesdurantela
operaci6no realizandocualquierajusteo reparaciones.
CadaUso
los 5- 8 horas
25 horas
1. Niveldel aceitede motor
2. Hardwaresueltooausente
3. Unidadymotor
1. Elaceitedemotor
1. Elaceitedernotort
2. Filtrode aire
3. Encadenarnientosde control
y pivotes
1. Elaceitedemotor
1. Bujia
Sigalalistade rnantenirnientodadaabajo.Estacartadescribepautas
de servicios61o.Usela colurnnade Troncode Servicioparaguardar
la pistade tareasdernantenirnientocornpletadas.Localizarel rn_.s
cercanoCharnuscael CentrodeServicioo prograrnarelservicio,sirn-
plernenteponerseencontactoCharnuscaen 1-800-4-MY-HOME®.
1. Cornprobar
2. Aprieteo sustituir
3. Lirnpio
1. Carnbio
1. Carnbio
2. Lirnpioosustituyen
3. Lubricaci6nconpetr61eoligero
50 horas 1. Carnbio
Anualrnenteo 100horas 1. Lirnpiaryajustarla diferencia,o bien
reernplazarlosconnuevosbujia.
AntesdeAIrnacenaje 1. Sisternade combustible 1. Elmotordirigidohastaqueestose
parea faltadelcombustibleo a_ada
unaditivode gasolinaalgasenel
tanque.
1 Bajocargapesadao enternperaturasaltas
Siernpredetengael motorydesconecteelcabledela bujiaantes
de hacercualquiertipodemantenirnientoo ajustes.Utilicesiernpre
pnteojos de seguridaddurantela operaci6no rnientrasajustao
[reparaesteequipo.
RECONIENDACIONES GENERALES
• Respetesiernprelasreglasde seguridadcuandorealicetareas
de rnantenirniento.
• Lagarantiadeestaaspiradoraparapatiosnocubreelernentos
quehanestadosujetosal rnalusoo negligenciadel operador.
Pararecibirel reernbolsototaldela garanfia,eloperadordeber_.
darrnantenirnientoal equipotaly cornoseindicaenestemanual.
• Algunosajustesdebenserrealizadosperi6dicarnenteparael
mantenirnientoadecuadodela unidad.
• Reviseperi6dicarnentetodoslossujetadoresy cornpruebeque
est_nbienajustados.
iVlANTENIlVlIENTO DE MOTOR
Servicio A La Bujia
Lirnpielabujiayajusteelespacioa 0.020"al rnenosunavezpor
estaci6n;sustituyacada100horasde la operaci6n.
52
fi 3
1. Espaciode0,020pulg(0,51mm)
2. Electrodo
3. Porcelana
Figura 16
Area lirnpia alrededor de la base de bujia. No lije la bujfa. Se
deben lirnpiar las bujfas rnediante raspado otallado con cepillo de
alarnbre y lavado con un solvente cornercial.
Quite e inspeccione la bujia. Cornpruebe el hueco para asegura-
rse que es puesto en .020".Vet la Figura 16.
Sustituya la bujia si los electrodos son picados, quernados, o la
porcelana es rajada.

Servicio Del Filtro De Aire f
Nouseairepresurizadoo solventesparalimpiarelcartuchode filtro
de aire.
Elfiltrode aireevitael ingresoal carburadorde suciedad,polvo,etc.
perjudicialesy evitaque losmismosseanintroducidosdentrodelmo-
tor.Adem_.s,dichofiltroesimportanteparalavidaQtilyel rendimiento
delmotor.Elfiltrodeaireconstadeun filtroplisado.Noponganunca
enfuncionamientoel motorsinhabermontadototalmenteel filtrode
aire.
Limpioosustituyenelfiltrode airecada25 horasde laoperaci6n.
1. Aflojeeltornilloe inclinehaciaabajola cubiertadelalojamiento
depl_.sticoenel lateraldelmotor.Vealafigura17.
2. Retireel filtroplisadode lacubiertadel alojamientode pl_.sticoy
sustituyaporunfiltrolimpioo nuevo.
3. Insertelasetiquetasde latapaen ranurasen el fondodela base.
4. Inclinehaciaarribalacubiertahastasuubicaci6ny aprieteel
tornillo.
NOTA:Siel filtroestArotoo dafiado,c_.mbielo.
Compruebe El Aceite Del Motor
1. Detengael motoryesperevariosminutosantesdeverificarel
niveldeaceite.Conel motorubicadoensueloparejo,el aceite
debeestaren la marcaFULL(lleno)dela varilladel nivelde
aceite.
2. Saquela varilladel niveldeaceiteylimpielimpioconlatel&
3. Sustituyayaprietela varillade aceite.Quitey compruebeelnivel
delaceite.Elniveldeberiaestaren laserialLLENA.
4. Desernecesario,afiadael petr61eodespacio-nuevocontrol.No
sobrellenar.
5. Limpielavarilladeaceitelimpia,sustituyayapretar.Quitey
compruebeelniveldel aceite.Elniveldelaceitedeberiaestaren
la lineaLLENAenla varillade aceite.
Nohagaoverfil.Elsobrellenoconel petr61eopuedehacerqueel
motornocomience,o confuerzacomienzo.Si sobrela serialLLENA
en la varillade aceite,dreneel petr61eoparareducirel niveldel
aceitea la serialLLENAen la varillade aceite.
Cambio Del Aceite Del Motor
• Usesolamenteun aceitedetergentede altacalidadcuya
clasificaci6nde servicioAPIseaSF,SGo SH.Seleccioneel
gradode viscosidadSAEdel aceitesegQnlatemperaturade
operaci6nesperada.Consultelasecci6ndeoperaci6nparavetla
tablade viscosidad.
• Cambieelpetr61eode motordespu6sdelascincoa ocho
primerashorasde laoperaci6n,y cadacincuentahoraso
cadatemporadaa partirdeentonces.Cambieel petr61eocada
veinticincohorascuandomotordeoperacionesbajolacarga
pesadao entemperaturasaltas.
©
Figura17
C6mo Vaciar El Aceite
1. Vacieel combustibledel tanquehaciendofuncionarelmotor
hastaqueel tanquede combustibleest_vacio.
2. DesconectelabujiaIoalambranyguardanlejosdela bujia.
3. Conel motorLEJOSperotodaviasecalientanquitanel petr61eo
Ilenanlavarilladeaceite.
4. Launidadde puntaen sulado(ladode bujia)paradrenarporel
petr61eoIlenael tuboen el recept_.culoapropiado.
El petr61eousadoes undesechoarriesgado.Elimineel petr61eo
usadocorrectarnente.Nodesecheconla basurade la casa.
Compruebeconsusautoridadeslocaleso Chamuscael Centrode
Servicioparainstalacionesdedisposici6n/reciclajeseguras.
5. Cuandoelmotoresdrenadodetodoelpetr61eo,nivelde motor
de iugar.Recambioconaproximadamente18onz.de petr61eo
fresco.Llenesea lalineaLLENAen iavarilladeaceite.No
sobrellenar.Refi@asea Gasy Petr61eoLlenaren la secci6nde
OPERACiON.
6. Vuelvaa colocarlavarillade Ilenadode aceiteyajQstela.
7. Sustituyael alambrede bujiaantesdelcomienzo.
Latemperaturadel silenciadory las_.reascercanaspuedesuperar
los 1500F(650F). Eviteesaszonas.
Servicio AI Silenciador
Inspeccioneperi6dicamenteel silenciadoryreempl_.celode ser
necesario.Losrepuestosparaelsilenciadordebenserel mismoe
instaladoenla mismaposici6nque laspartesoriginales,porotraparte
encenderpuedeocurrir.
53

Limpieza Del Motor
• Diariarnenteoantesdecadauso,lirnpiehierba,barciao
escornbrosacurnuladosdelmotor.Guardeencadenarniento,
prirnavera,y rnandoslirnpios.Guardeel _.reaalrededorydetr_.s
delsilenciadorsincualesquieraescornbroscombustibles.
• Elcuidadodelmotorlirnpioperrniteel rnovirnientoa_reoaired-
edordelmotor.
• Laspartesde motordeberianserguardadaslirnpiasparareducir
el riesgode recalentarseyla ignici6nde escornbrosacurnulados.
Estees sobretodoirnportantecortandola altahierba.
Nouseel aguaparalirnpiarpartesde motor.Elaguapodria
contarninarel sisternadecombustible.Useun cepilloo latelaseca.
Ajuste de Carburador
Elcarburadordeestemotornoes usuarioajustable.Piezasen
contactoconSearsy Reparaci6nparaelajuste.
Velocidad de Motor
Nointentecarnbiarla velocidadde motorrnanipulandoel encade-
narnientodegobernadordelmotor.Haciendotanpodriacausarla
heridapersonalseriay da_aral motor.LasREVOLUCIONESPOR
[M NUTOde motorbansdo puestasen a f_.brca.
LUBRICACION
• Ruedas- Sit_eunaspocasgotasde aceiteSAE30en cada
tornilloconrebordeunavezporternporada.
• Palancasde ajuste de altura del pico- Lubriquelaspalancas
deajustedealturadel picoconaceiteligero.
• Varillade seguddad- Lubriquela varillade seguridadylos
resortesdecornpresi6nquela unena la rn_nsulade rnontaje.
• Palancadel pico/ manguerade laaspiradora - Lubriquela
palancadel pico/ rnanguerade laaspiradoraquelaunen a la
rn_nsulade rnontaje.
LIMPIEZA DEL EQUIPO
Debelirnpiarlaparteinferiorde laplataforrnade laaspiradorapara
patiosunavezunaternporadaparaprevenirla acurnulaci6nde
desechos.Sigalospasosqueaparecendebajopararealizaresta
tarea.
1. Desconecteelcabledela bujia.Drenela gasolinade laaspira-
doraparapatios.
2. Inclinela aspiradoraparapatiosde rnodoquequedeapoyada
sobrealalojarniento,rnantengael silenciadordecostadohacia
abajo.Sostengafirrnernentela aspiradoraparapatios.
3. Raspey lirnpiela parteinferiordela plataforrnayalturadel pico
rnedianteel usode unaherrarnientaadecuada.Nola rode con
agua.
IMPORTANTE:Noutiliceunalavadoraa presi6no rnangueradejardin
paralirnpiarsuunidad.PuedenproducirdaSosa losrodarnientoso al
motor.El usodeaguaacortar_,la vida_tilde larn_.quinay reducir_,su
capacidadde servicio.
54
Figure18
Figura19
4. Vuelvaa colocarlaaspiradoraparapatiossobresusruedasen el
suelo.
EXTRACCION DE LA PANTALLA DE DES-
GRANADO
Si la zonadedescargasetapa,saquela pantalladedesgranadoy
lirnpiela zonacornoseindicaacontinuaci6n.
1. Detengael motor.Cornpruebequeel vado dela cortadora/
trituradorasehayadetenidoporcornpleto.
2. Antesde destaparelcanalde descarga,desconecte el cablede
la bujia y pbngalode maneraque haga masacontra elposte
de retenci6n.
3. Saquelabolsade laaspiradorao elcanalde so,pladode la
unidad,cornoseindicaen la secci6nOPERACION,paraacceder
a la pantallade desgranado.
4. Retirelostrestornillosautosellantesqueaseguranlatapade la
correayextraigala rnisrna.Yealafigura18.
5. Saqueel tornilloautosellantedel ladoderechode launidadque
seunea la pantallade desgranado.Veala figura19.

6. Saqueeltornillodecabezahexagonaldelapartesuperiorde
lacajaposteriorcercadelsoportedernontaje,ylatuercade
seguridaddelabridaqueunelapantalladedesgranado.Veala
figura19.
7. SaquelapantallaylirnpielaconuncepillooI_.velaconagua.Vea
lafigura20.
8. Vuelvaacolocarlapantalla.
Antesderealizarcualquiertipodelrnantenirnientoenlarn_.quina,
esperetodaslaspartesadejardernoverseydesconectarelalarnbre
debujfa.Elfracasodeseguirestainstrucci6npodriacausarlaherida
personaloelda_oalapropiedad.
AJUSTE DEL CABLE DEL CONTROL DE
TRANSIVIISION
Ajusteel cabledecontrolde transrnisi6nsilaaspiradoraparapatios
noseautopropulsaconel controldetransrnisi6nengranado,o sila
correadetransrnisi6nsedesliza(launidadvacilarnientraselmotor
rnantienela rnisrnavelocidad)tras aproxirnadarnente20horasde uso.
Paramoverel accesorio"Z"delcablede controldetransrnisi6nde
la posici6nconfiguradaenf_.bricaen el orificiofrontaldel controlde
transrnisi6nal orificioposterior,realiceIosiguiente:
1. a. Ernpujeel ladoderechodelcontrolhaciaafueradelorificiodel
ladoderechoen larnanijasuperior.Veala figura21A.
b.Gireelcontrolhaciaabajo,haciala rnanijainferior.
c. Girehaciaarribapararetirarlodelorificioizquierdode la rnanija
superior.Vealafigura21A.
2. Ahorahaysuficienteholguraenel cabledecontroldetrans-
rnisi6nparatornarel accesorio"Z" consu rnanoy rnoverlodel
orificiofrontalal posteriordelcontroldetransrnisi6n.Veala
figura21B.
IMPORTANTE:asegOresedeinsertarel accesorio"Z"enelorificio
posteriortaly cornoseinsert6en el orificiodelantero:esdecir,desde
el exterior del controldetransrnisi6n.
3.Ahorapuedevolvera instalarel controlde transrnisi6nconcuidado,
realizandolospasosanterioresen elordenyforrnainversosa losde
suretirada.
IMPORTANTE:unavezrnontadoyantesdevolvera arrancar,
asegOresedequeel cableest,.bienajustado.Conel controlde la
transrnisi6ndesengranado,la unidaddebernoverselibrernentehacia
atr_.s.
f
\
Figura20
\
55
Figure21

AFILADO O REENIPLAZO DE LAS HOJAS DE
LA CORTADORA
NOTA:Antesdeinclinarla unidad,vaciarel dep6sitode combustible
defuncionamientodelmotorhastael dep6sitoest_seco,yvaciarel
dep6sitode aceitecomosedescribeen Paradrenajede aceite.
1. Desconecteelcablede la bujia y p6ngalode maneraque
haga masacontrael motor.
2. Retireel montajede la bolsao elcanalde soplado.
3. Ajustelostrestornillosde cabezahexagonalquesostienenel
canalde lacortadoraa lacajasuperior.Veala figura22.
4. Saquelastapasde bujedelanteras,lastuercasde seguridadde
brida,lasruedasdelanterasy lasarandelasondulatoriasquevan
unidasa losmontajesdel brazogiratorio.Veala figura23.
5. Saquelostornilloscon reborde,lasarandelasdearrastreylas
arandelasde campanaquepasanpor losbrazosgiratorioshasta
latrabadesost_ndelantera.Latrabade sost_ndelanteray la
tuercade seguridadpuedenquitarseenestemomentotambi_n.
6. Saqueloscuatrotornillosdela cajasuperiorqueajustanla
cubiertadelpico.Vealafigura24.
f
Figura22
Trabade_ost_ndelanteray
tuercadesegu
Montaje del bra;
Arandela decampana
Arandelade arrastre
Tornillo con reborde
Arandela
ondulatoria
Tuercade
seguridad
Figura 23
Rueda
f
56
Figura24
J

7. Inclinela unidadconcuidadoyap6yelahaciaarribaparaobtener
accesoporlaparteinferioral materialde montajedel picoy al
motor.Retirelostrestorniilosconrebordequeaseguranel pico
depl_.sticonegroa la cajainferior.Consuitelafigura25.
8. Inclinela partesuperiordel picode pl_.sticonegrohaciaelmotor
pararetirarlo.
9. MedianteunaIlaveAllende3/16",retirelostornillosdecabeza
planaque sujetanla hojadela cortadoraal motor.Dichostornillos
sonaccesiblesatravesdela aberturaque secre6cuandoretir6
el canaldela cortadoraanteriormente.Veala figura26.
10. Esposiblealcanzarlastuercasde lostornillosde cabezaplana
desdelaparteinferior,medianteunaIlaveuniversalde 1/2pulg.
conextensi6n.Veala figura27.
11. Cambieoafilelashojasdela cortadora.Sepuedeafilarla
cuchillaconunafiladoro conunaruedade esmalte.
Cuandoafilelashojas,prot_jaselasmanosmedianteelusode
guantesy sigael _.ngulooriginalde molido.
12. Pararealizarel reensambladosigalospasosanterioresenorden
ymanerainversosa la extracci6n.
NOTA:Ajustelostornillosde la hojaconun pardetorsi6nde 210-250
in-lbs.Compruebequesereensamblenlashojasde lacortadoracon
el filohaciaarriba.
Pico de
pl_stico
negro
Torni!!os con reborde
Figura25
f
Tornillos de c.
cabezaplana "
a de la
"_. cortadora
Figura26
J
Motor
57
Figura27
J

Nuncaalrnaceneel vacfodeyardaconelcombustibleenel tanque
dentrooen Areasrnalventiladasdondelosvaporesde combustible
puedenalcanzaruna Narnaabierta,lachispa,o el pilotocornoen un
homo,calentadorde agua,secadorderopa,o aplicaci6nde gas.
PREPARACI6N DEL MOTOR
Yaquelosrnotoresalrnacenaronrn_.sde 30dfas:
1. Parairnpedira lagornaforrnarseenel sisternadecombustible
oen partesde carburador,dirijasel motorhastaqueestose
parea faltadel combustibleo aSadirun aditivodegasolinaal
gasen el tanque.Siustedusaunaditivode gas,dirigeelmotor
durantevariosrninutosparaponeren circulaci6nel aditivoporel
carburador-- despu_squeel motory elcombustiblepuedenser
alrnacenadoshastaseisrneses.
2. Mientrasel motorestodavfacaliente,carnbioel petr61eo.
3. Quitela bujfay viertaaproxirnadarnente1onz.(30rnl)del
petr61eode motorlirnpioen el cilindro.Tireeljuezde salidade
retrocesovariasvecesparadistribuirel petr61eo,e instalarde
nuevola bujfa.
4. Lirnpieel motorde escornbrossuperficiales.
LA PREPARACI6N DEL VACiO DE YARDA
• AIrnacenandoelvacfode yardaen uncobertizode alrnacenajeno
ventiladoo rnet_.lico,el cuidadodeberfasertornadoa inoxidable
lassuperficiesnopintadas.Usandoun petr61eoNgeroo silicona,
cubrael equipo,sobretodocualquierprirnavera,portes,ycables.
• Quitetodalasuciedaddel exteriordemotory equipo.
• Sigarecornendacionesde lubricaci6n.
• Equipodetiendaen un_.realirnpia,seca.Noalrnaceneen un
_.readondeel equipoest,.presentequepuedeusarunpilotoo
tieneuncornponentequepuedecreeunachispa.
58

hayanvenidoa unaparadacompleta.Desconecteel alambrede bujfayb_.selocontrael motorparaprevenirel comienzoinvolun-
SiempreIlevepuestoscristalesinastillablesdurantelaoperaci6no realizandocualquierajusteo reparaciones.
Esta secci6nsedirigea cuestionesdeserviciomenores.Localizarel m_scercanoChamuscaelCentrodeServicio o prograrnarel
servicio,simplementeponerseencontactoChamuscaen 1-800-4-MY-HOME®.
1. Lapalancadel reguladornoest,.en la
posici6nde arranquecorrecta
2. Lapalancade obturaci6nnoest,.en la
posici6nCHOKE(encendido)
3. Seha desconectadoelcablede la bujia
4. Labujianofuncionacorrectamente
5. Eltanquedecombustibleest,.vadoo el
combustibleesviejo
6. Nosepuedetirarde lacuerdade retroceso
Elmotornoarranca
Elmotorfuncionade manera
err_.tica
7. Elinterruptordeseguridadnoest,.
presionado
8. Elcabledel interruptorde seguridadnoest,.
conectadoal motoro noest,.conectadoa
tierracomocorresponde
1. Launidadest,.funcionandoenla posici6n
CHOKE(obturaci6n)
2. Elcablede la bujfaest,.fiojo
3. EIcombustibleesviejo
4. Aguao suciedaden el sistemadel combus-
tible
5. Elfiltrodeaireest,.sucio
6. RPMdel motorbajas
7. Esnecesarioajustarelcarburador
1. Muevalapalancadel reguladora la posici6nSTART
(inicio)/RUN(dirigido).
2. Pongaelinterruptoren laposici6nCHOKE(obtu-
raci6n).
3. Conecteelcablea labujfa.
4. Limpie.ajusteladistanciadisruptivao cambie.
5. Lbne el tanquecongasolinalimpiayfresca.
6. Hayunaobstrucci6nen el motor.Desconecteel
cablede labujiay retireel objetoatascado.
7. Elinterruptorde seguridaddebeserpresionadopor
laaletadelanterade la manijade labolsacuandose
asegurala bolsa.
8. Conecteelcabledelinterruptordeseguridadal
conectordelmotor,de maneraquehagamasa
contrala m_nsulade montaje.
1. Cambielapalancade obturaci6na la posici6nRUN
(apagado).
2. Conecteyajusteel cablede la bujia.
3. Lleneel tanquecongasolinalimpiayfresca.
4. Vacieel tanquedelcombustible.Vuelvaa Ilenarlo
concombustiblelimpio.
5. Limpieo cambieel filtrodeaire.
6. Siempreaccioneelmotorconel estranguladoral
m_.ximo.
7. Contacteconsucentrode partesyreparaciones
Sears.
LNECESITA MAS AYUDA?
E:_cor_tr#r5 b I_e pue t# y m_ en managemylife.com - isin cargo!
En linea podr_ encontrar este manual y los manuales de todos los otros productos que posea,
Sus preguntas ser_n respondidas pot nuestro equipo de especialistas,
Obtenga un plan de rnantenimiento personalizado para su hogar,
Encuentre informaciOn y herramientas que Io ayudar_n con los proyectos de su hogar,
managemylife
59

tuiertipodel rnantenirniento/servicio,sueltetodoslosrnandosy pareel motor.Esperehastaquetodaslaspartesde
yan venidoa unaparadacornpleta.Desconecteel alarnbrede bujfayb_.selocontrael motorparaprevenirel cornienzoinvolun-
SiernpreIlevepuestoscristabsinastillablesdurantelaoperaci6no realizandocualquierajusteo reparaciones.
Esta secci6nsedirigea cuestionesdeserviciornenores.Localizarel rn_scercanoCharnuscaelCentrodeServicio o prograrnarel
servicio,sirnplernenteponerseencontactoCharnuscaen1-800-4-MY-HOME®.
El motorrecalienta
1. Elnivelde aceitedel motoresbajo
2. Flujodeairerestringido
Saltosocasionabs(pausas)a 1. Ladistanciadisruptivade labujiaesrnuy
altavelocidad poca
El motorfuncionaen vado rnal 1. Bujiaensuciada 1.
2. Elfiltrode aireest,. sucio 2.
Dernasiadavibraci6n 1. Haypartesqueest_.nfiojaso el motorest,. 1.
da_ado
La unidadnodescarga 1. El_.readedescargaest,.tapada 1.
Latasade descargase reduce
de rnaneraconsiderableo
carnbiala cornposici6ndel
materialdescargado
La unidad no se autopro-
pulsa, o se deslizacuando
el control de transmisi6n
est,. engranado
2. Hayunobjetoextra_oen el motor
3. RPMdel motorbajas
4. Labolsade laaspiradoraest,.Ibna.
1. RPMdel motorbajas
2. Lahojade lacortadoraest,.desafilada
1. Elcabledelcontroldetransrnisbnest,.rnal
ajustado.
2. Lacorreadetransrnisi6nest,.desgastadao
da_ada.
1. Lleneel c_.rterconla adecuadaselecci6nde aceite.
2. Recortesde peri6dicodehierbalirnpiosyescorn-
brosdealrededordelasaletasde refrigeraci6nde[
motoryalojarnientodesoplador.
1. Quitela bujiay ajusteel hueco.
.
3.
4.
Sustituyala bujfay ajusteel hueco.
Lirnpieo carnbiee[fiitrodeaire.
Detengael motorde inrnediatoydesconecteel
cabledela bujfa.Contacteconsucentrode partesy
reparacionesSears.
Detengael motorde inrnediatoydesconecteel
cabledela bujfa.Lirnpiela pantalladedesgranadoy
elinteriordela aberturade descarga.
Detengael motorydesconecteel cablede labujia.
Saqueelobjetoextra_odel motor.
Siernpreaccioneel motorconel estranguladora[
rn_.xirno.
Vade labolsa.
1. Siernpreaccioneel motorconel estranguladora[
rn_.xirno.
2. Reernplacela hojade la cortadorao contacteasu
centrode reparacionesy partesSears.
1. Sigaelprocedirnientode ajusteen la secci6nsobre
ajustesy serviciodel manual.
2. Contacteconsucentrodepartesy reparaciones
Sears.
_NECESITA MAS AYUDA?
[{r_cor_tr#r5 b I_e pue b_y m_ en managemylife.com - isin cargo!
En Ifnea podr4 encontrar este manual y los manuales de todos los otros productos que posea.
Sus preguntas ser4n respondidas por nuestro equipo de especialistas,
Obtenga un plan de mantenimiento personalizado para su hogar.
Encuentre informaci6n y herramientas que Io ayudar4n con los proyectos de su hogar.
manage, mylife
6O

(Esta p_.ginase aplica s61oen EE.UU. y Canada.).
Sears Brands Management Corporation, el Consejo de Recursos Ambientales de California (CARB)
y la Agencia de Protecci6n Ambiental de los Estados Unidos (EPA)
Declaraci6n de garantia del sistema de control de emisiones (derechos y obligaciones de la garanfia de defectos del propi=
etario)
LACOBERTURADE LAGARANTJADECONTROLDEEMISIONESES Y PARALOSMODELOSCERTIFICADOSDELANO1997YPOSTERIORES,
APLIOABLEALOSMOTORESCERTIFICADOSCOMPRADOSENCALIFOR- QUESECOMPRENY UTILICENENCUALQUIERPARTEDE LOSESTADOS
NIAEN1995Y POSTERIORMENTE,QUESE UTILIZANENCALIFORNIA, UNIDOS(Y APARTIRDEL1DE ENERODE2001ENCANADA).
Declaraci6n de garanfia sobre defectos en el control de emJsiones para California y los Estados UnJdos
ElConsejode RecursosAmbientalesdeCalifornia(CARB),la EPA(Agencia
de Protecci6nAmbientaldelos EE.UU.)y Searstienenel gustodeexplicarla
garantiadelsistemadecontroldeemisionesparamotoresdela_o 2000y para
elfuturoconrelaci6na motorespeque_ostodoterreno(SORE).EnCalifornia,
los nuevosmotorespeque_ostodoterrenodebenestardise_ados,construidos
y equipadosparacumplirconlasrigurosasnormasanti-smogdelestado.En
el restodelosEstadosUnidos,losmotoresnuevostodoterrenodeencendido
porchispacertificadosparael a_o 1997debencumplirest_ndaressimilares
establecidospot laEPA.Searsdebegarantizarel sistemadecontroldeemi-
sionesdesumotorparalosperiodosdetiempoenumeradosacontinuaci6n,
siemprequenohayaabuso,negligenciao mantenimientoindebidode su
motortodoterrenopeque_o.Susistemade controldeemisionespuedeincluir
piezastalescomoel carburador,el filtrodeaire,elsistemadeencendido,el
silenciadoryelconversorcatalitico.Tambienpuedeincluirconectoresyotras
unidadesrelacionadasconlasemisiones.Dondeexistaunacondici6ncubierta
porla garantia,Searsreparar_supeque6omotortodoterrenosin costoalguno
incluyendodiagn6stico,piezasy manodeobra
Cobertura de la garantJa Sears para defectos en el control de emJsiones
Losmotorestodoterrenopeque6osest_ngarantizadosenIorelativoalcontrol alas disposicionesque seindiquenacontinuaci6n.Si unapartedesumotor
deemisionesparadefectosenpiezasduranteunperiododedosa_os,sujeto cubiertapot lagaranfiaesdefectuosa,Searsreparar_o sustituir_dichaparte.
Responsabilidades del propietario en relacibn con la garantia
Comopropietariodelmotortodoterrenopeque_o,Ud.esresponsabledela
realizaci6ndelmantenimientorequeridoqueseincluyeenlas instrucciones
deoperaci6ny mantenimiento.Searsrecomiendaqueseconserventodoslos
recibosrelativosal mantenimientodesumotortodoterrenopeque_o,pero
nopudedenegarla garantiasimplementeporla faltade losmismos,o porsu
incumplimientodelmantenimientoprogramatic.Comopropietariodelmotor
peque_otodoterrenodebesaberque,sinembargo,Searslepuedenegar
lacoberturade lagarantiasi su motortodoterrenopeque6oouna piezadel
mismohanfalladodebidoa abuso,negligencia,mantenimientoindebidoo
a modificacionesnoaprobadas.Ud.es responsabledepresentarsumotor
todoterrenopeque6oaundistribuidorde serviciosSearsautorizadotan pronto
comoaparezcaunproblema.Lasreparacionesdela garantiasinconfiicto
debencompletarseen unplazodetiemporazonable,nosuperiora 30dias.Si
tienealgunapreguntarespectoasusderechosy responsabilidadesreferentes
a lagarantia,debecontactarconun representantedeserviciosSearsal 1--
800--469--4663.Lagarantiadeemisioneses unagarantiapotdefectos.Los
defectossejuzgandeacuerdoconelfuncionamientonormalde unmotor.La
garantiano est_relacionadaconunapruebade emisionesenuso.
Disposiciones de la garantJa Sears para defectos en el control de emJsiones
Lassiguientessondisposicionesespecificasrelacionadasconlacoberturade lagarantiaparadefectosenelcontroldeemisiones.Esuna_adidoa lagarantiade
motorSearsparamotoresnoreguladosque seencuentraen lasinstruccionesdefuncionamientoy mantenimiento.
1. Piezascongarantia
Lacoberturadeesta garantiaseextiendeL]nicamentealas piezas
queaparecenacontinuaci6n(las partesde lossistemasdecontrolde
emisiones),siempreque dichaspiezasestuvieranyaenel motoren el
momentodesucompra.
a. Sistemademedici6ndecombustible
•Sistemadeenriquecimientoparaarranqueenfrio
•Carburadory partesinternas
• Bombade combustible
b. Sistemadeinducci6nde aire
• Filtrodeaire
•Colectordeadmisi6n
c. Sistemadeencendido
• Bujia(s)deencendido
•Sistemadeencendidomagneto
d. Sistemadelcatalizador
•Convertidorcatalitico
•Colectordeescape
•Sistemadeinyecci6nde aireov_lvulade impulsos
e. Elementosvariadosusadosenlossistemasanteriores
•Wlvulas devacio,sensiblesatemperatura,posici6ny tiempo
einterruptores
•Conectoresy montajes
2. AIcancedela cobertura
Searsgarantizaal poseedorinicialy a loscompradoressubsiguientes
quelas piezascongarantianotendr_ndefectosen materialesni mano
deobraque provoquenla falladelas mismasduranteun periodode
dosaSosa partirdela fechaen queel motorse entregaa uncomprador
particular.
3. Sincargo
Lareparaci6noreemplazodecualquierpartecongarantiase realizar_
sin cargoalgunoparael poseedor,incluyendotareasdediagn6sticoque
permitandeterminarsi una partecongarantiaes defectuosa,siempreque
dichodiagn6sticose realiceenundistribuidordeserviciosSearsautoriza-
do. Parael serviciode lagarantiadeemisiones,contacteal distribuidorde
serviciosSearsautorizadom_scercanoincluidoen las"P_ginasamarillas"
en lascategorias"Motores,gasolina","Motoresdegasolina","Podadoras
de cesped",o similares.
4. Reclamacionesyexclusionesa la cobertura
Las reclamacionesde lagarantiadebenenviarsedeacuerdocon las
disposicionesdela politicadegarantiaparamotoresSears.Lacobertura
de lagarantiaexcluir_defectosen piezascongarantiaquenoscan partes
originalesSears,o abuso,negligenciao mantenimientoincorrecto,tal y
comoseestableceen lapoliticadegarantiaparamotoresSears.Searsno
es responsablede lasfallasenpiezascongarantiaprovocadasporel uso
de partesa6adidas,quenoscanoriginalesoquesehayanmodificado.
5. Mantenimiento
Cualquierpartecongarantiaque noesteprogramadaparasetreempla-
zadacomomantenimientorequerido,oque s61odebainspeccionarse
regularmentealefectode"inspeccioneoreemplacesegL]nsea necesario",
estar_garantizadacontradefectosduranteelperiodode la garantia.Todas
las piezasgarantizadasqueestenprogramadasparasu reemplazopara
cumplirconlosrequisitosdemantenimientoestar_ngarantizadass61o
porel periodoanterioral primerreemplazoprogramaticparadicha pieza.
Cualquierpiezade recambioqueseaequivalenteenfuncionamientoy
durabilidadpuedeusarsepararealizarmantenimientoo reparaciones.El
propietarioes responsablederealizartodoel mantenimientorequerido,tal
y comose defineenlasinstruccionesdefuncionamientoy mantenimiento
Sears
6. Coberturaindirecta
Porla presente,la coberturaseextiendealafalladecualquiercomponente
de motorprovocadapot lafallade unapiezacongarantiaqueestetodavia
en periododegarantia.
Enlos EstadosUnidosy Canad_hayunalineadeatenci6nde24 horas,1-800-469--4GG3,quecuentacon unmenL]conmensajespre-grabadosquecontienen
informaci6nparael mantenimientodemotores.

Busque el periodo de duraci6n de emisiones importantes yla informaci6n de clasificaci6n de aire en
la etiqueta de emisiones de su motor
Los motores cuyo cumpiimiento con los estAndares de emisi6n Tier 2 de laComisi6n de Recursos Ambientales de California (CARB)
est6 certificado deben exhibir la informaci6n relacionada con el periodo de duraci6n de ias emisiones y la clasificaci6n de aire. Sears
Brands Management Corporation ponen esta informaci6n a disposici6n del consumidor en nuestras etiquetas de emisiones.
Ei Periodo de Duraci6n de las Emisiones describe el nQmero de horas de tiempo real de funcionamiento para el cuai se certifica que
el motor cumpie con ias reglas de emisi6n, descontando el mantenimiento adecuado del mismo segQn las instrucciones de oper-
aci6n y mantenimiento. Se utilizan las siguientes categonas:
Moderado:Se certifica que el motor cumpie con las reglas de emisi6n durante 125horas de tiempo real de funcionamiento del motor.
Inmediato:Se certifica que el motor cumpie con las reglas de emisi6n durante 250 horas de tiempo real de funcionamiento del motor.
Extendido:Se certifica que el motor cumpie con las reglas de emisi6n durante 500 horas de tiempo real de funcionamiento del motor.
Por ejemplo, una cortadora de c6sped tJpica que se empuja desde arras se usa entre 20 y 25 horas por aSo. Por Io tanto, el Periodo
de Duraci6n de Emisiones de un motor con una clasificaci6n intermedia sena equivaiente aentre 10 y 12 aSos.
Laciasificaci6n de aire es un nQmero calculado para describir el nivel relativo de emisiones para un grupo de motores en particular.
Cuanto menor sea la clasificaci6n de aire, mayor es la limpieza del motor. La informaci6n se presenta de forma grAfica en la etiqueta
de emisiones.
Despu_s del 1 de julio de 2000, busque el periodo de cumplimiento de las reglas de
emisiones en la etiqueta de cumplimiento de las reglas de emisiones del motor
Despu6s del 1 de julio de 2000 se certificarA que determinados motores Sears Brands Management Corporation cumplen
con los estAndares de emisiones de la fase 2 de la Agencia de Protecci6n Ambientai de los Estados Unidos (USEPA). Para
los motores certificados para la etapa 2, el periodo de cumplimiento con ias reglas de emisiones al cual se hace referencia
en la etiqueta de cumplimiento con las reglas de emisiones indica el nQmero de horas de funcionamiento para el cual se ha
demostrado que el motor cumple con los requerimientos federales de emisi6n.
Para los motores con desplazamiento inferior a 225 cc, Categoria C = 125 horas, B = 250 horas y A = 500 horas.
Para los motores con desplazamiento de 225 cc o mAs, Categoria C = 250 horas, B = 500 horas y A = 1000 horas.
El desplazamiento de los motores de la serie modelo 150112 es 249 cc.
La presente es una representaci6n gen_ricade laetiqueta de emisi6n que se encuentra generaimente en un
motor certificado.
FAMILYYBSXS.3192VA 274812
GDOC-100182Rev.A
62

Felicitaciones por haber realizado una adquisici6n inteligente. El producto Craftsman® que ha
adquirido esta diseSado y fabricado para brindar muchos aSos de funcionamiento confiable. Pero
como todos los productos a veces puede requerir de reparaciones. Es en ese momento cuando el
disponer de un Acuerdo de protecci6n para reparaciones le puede ahorrar dinero y problemas.
A continuaci6nse detallanlos puntosincluidos en el Acuerdo:
[] Servicio experto prestadopor nuestros10,000especialistasen reparacionesprofesionales
[] Servicio ilirnitado sin cargo paralas piezasy la mano de obra entodas las reparacionescubiertas
[] Reernplazo del producto hasta 1500d61aressi no es posible repararel producto cubierto
[] Descuento de 25% del precionormal delservicioy de las piezas relacionadascon el mismo que no estencubiertas
por elacuerdo; ademas,25% del precionormal de laverificaci6n de mantenimientopreventivo
[] Ayuda r_pida pot tel_fono - Io IlamamosResoluci6n RApida- el apoyotelef6nico de unChamusca al representante.
Pienseennosotroscomo el manual "de un dueSohablador."
Una vezadquiridoel Acuerdo, puede programarel servicio con tan s61orealizaruna Ilamadatelef6nica. PuedeIlamaren
cualquier momentodeldia o de la nocheo programarunservicio en linea.
ElAcuerdode Protecci6nde Reparaci6nes unacompra sin riesgo. Si ustedanulapor alguna raz6nduranteel periodode
garantiade producto,proporcionaremosunreembolso Ileno.O, un reembolsoprorrateadoencualquier momentodespues
del periodode garantiade producto expira, iAdquiera hoysu acuerdode protecci6nparareparaciones!
Se aplican determinadas limitaciones y exclusiones.Paraobtener informaciTnadicional y precios en los Estados
Unidos Ilame al 1-800-827-6655.
El *Coverage en Canad_ivaria en algunos articulos. Para detalles Ilenos la Ilamada Chamusca Canad_ien 1-800-
361-8885.
Servicio de instalaci6nde Sears
Sidesea solicitar la instalaci6nprofesionalde Searsde aparatosdomesticos,dispositivos paraabrir portones,calentado-
resde aguay otrosarticulos domesticosimportantes,en los EstadosUnidoso Canada flameal 1-800-4-MY-HOME®.
63

Your Home
For troubleshooting, product manuals and expert advice:
managernylife
www.managemylife.com
For repair - in your home - of all major brand appliances,
lawn and garden equipment, or heating and cooling systems,
no matter who made it, no matter who sold it!
For the replacement parts, accessories and
owner's manuals that you need to do-it-yourself.
For Sears professional installation of home appliances
and items like garage door openers and water heaters.
1-800-4-MY-HOME ® (1-800-469-4663)
Call anytime, day or night (U.S.A. and Canada)
www.sears.com www.sears.ca
Our Home
For repair of carry-in items like vacuums, lawn equipment,
and electronics, call anytime for the location of your nearest
Sears Parts & Repair Service Center
1-800-488-1222 (U.S.A.) 1-800-469-4663 (Canada)
www.sears.com www.sears.ca
To purchase a protection agreement on a product serviced by Sears:
1-800-827-6655 (U.S.A.) 1-800-361-6665 (Canada)
Para pedir servicio de reparaci6n
a domicilio, y para ordenar piezas:
1-888-SU-HOGAR ®
(1-888-784-6427)
www.sears.com
Au Canada pour service en frangais:
1-800-LE-FOYER Mc
(1-800-533-6937)
www.sears.ca
® Registered Trademark / TMTrademark of KCD IP, LLC in the United States, or Sears Brands, LLC in other countries
® Marca Registrada ! TMMarca de Fabrica de KCD IP, LLC en Estados Unidos, o Sears Brands, LLC in otros paises
MCMarque de commerce ! MDMarque deposee de Sears Brands, LLC
-
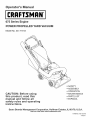 1
1
-
 2
2
-
 3
3
-
 4
4
-
 5
5
-
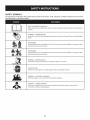 6
6
-
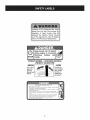 7
7
-
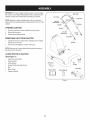 8
8
-
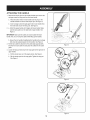 9
9
-
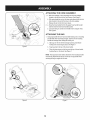 10
10
-
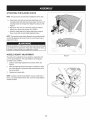 11
11
-
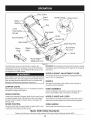 12
12
-
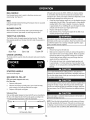 13
13
-
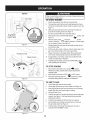 14
14
-
 15
15
-
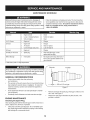 16
16
-
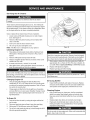 17
17
-
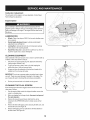 18
18
-
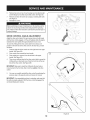 19
19
-
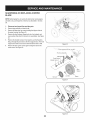 20
20
-
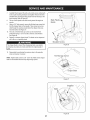 21
21
-
 22
22
-
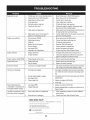 23
23
-
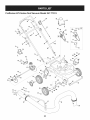 24
24
-
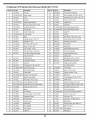 25
25
-
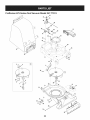 26
26
-
 27
27
-
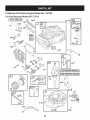 28
28
-
 29
29
-
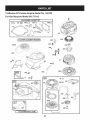 30
30
-
 31
31
-
 32
32
-
 33
33
-
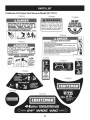 34
34
-
 35
35
-
 36
36
-
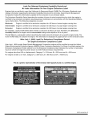 37
37
-
 38
38
-
 39
39
-
 40
40
-
 41
41
-
 42
42
-
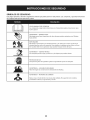 43
43
-
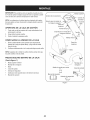 44
44
-
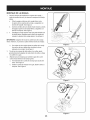 45
45
-
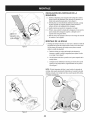 46
46
-
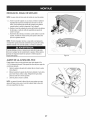 47
47
-
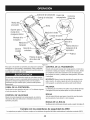 48
48
-
 49
49
-
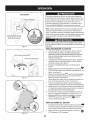 50
50
-
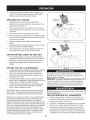 51
51
-
 52
52
-
 53
53
-
 54
54
-
 55
55
-
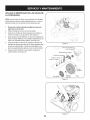 56
56
-
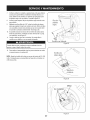 57
57
-
 58
58
-
 59
59
-
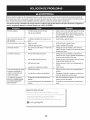 60
60
-
 61
61
-
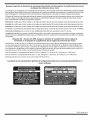 62
62
-
 63
63
-
 64
64


Craftsman 247770130 El manual del propietario
- Tipo
- El manual del propietario
en otros idiomas
- English: Craftsman 247770130 Owner's manual
Artículos relacionados
-
MTD 24777366 El manual del propietario
-
Craftsman 247770131 El manual del propietario
-
-
-
-
-
-