
hd outdoor wireless IP camera
VHS-010-OC

3
Contents
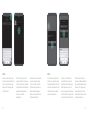
Introduction to the
Cave HD Outdoor IP Camera
UK Before pairing the Cave
camera with your Cave Smart
Hub please read the following.
Ensure the camera and Smart
Hub is within range of the mobile
device which you use to access
the Cave app.
You will need your router
username and password to
hand.
IMPORTANT: Only use the
supplied power cable with the
camera and a compatible power
source. Failure to do so may
invalidate your warranty.
FR Avant de coupler la caméra
Cave avec votre Cave Smart Hub,
veuillez lire ce qui suit.
Assurez-vous que la caméra
et le Smart Hub sont à portée
de l’appareil mobile que
vous utilisez pour accéder à
l’application Cave.
Vous aurez besoin du nom
d’utilisateur et du mot de passe
de votre routeur.
IMPORTANT: Utilisez
uniquement le câble
d’alimentation fourni avec
l’appareil photo et une source
d’alimentation compatible. Le
non-respect de cette consigne
peut invalider votre garantie.
ES Antes de emparejar la cámara
Cave con su Cave Smart Hub, lea
lo siguiente.
Asegúrese de que la cámara
y Smart Hub estén dentro del
alcance del dispositivo móvil que
usa para acceder a la aplicación
Cave.
Necesitará el nombre de usuario
y la contraseña de su enrutador
a mano.
IMPORTANTE: Utilice
únicamente el cable de
alimentación suministrado
con la cámara y una fuente de
alimentación compatible. El
no hacerlo puede invalidar su
garantía.
Visit our YouTube channel for Cave installation guides
https://www.youtube.com/VehoWorld
Introduction to the Cave HD Outdoor IP Camera 3
Installing the Cave camera 4
Pairing the Cave camera 6
Live view, recording and playback 14
Camera settings 16
Specications 17
Support & troubleshooting 18

4 5
UK We recommend the
installation is carried out by
aqualiedElectrician.Before
mounting the camera ensure
the mounting surface can
easily support the weight of the
camera.
FR Nous recommandons que
l’installation soit effectuée par
unélectricienqualié.Avantde
monter la caméra, assurez-vous
que la surface de montage peut
facilement supporter le poids de
la caméra.
ES Recomendamos que
la instalación la realice un
electricistacualicado.Antesde
montar la cámara, asegúrese
dequelasuperciedemontaje
pueda soportar fácilmente el
peso de la cámara.
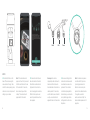
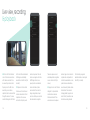
Installating the Cave camera
UK Before installation insert a
compatible microSD card, class
10 up to 128GB (not included).
Remove the two screws that
secure the bottom panel and
insert microSD card into the slot.
Secure the bottom panel in place
with the two screws.
FR Avant l’installation, insérez
une carte microSD compatible,
classe 10 jusqu’à 128GB (non
incluse). Retirez les deux vis qui
xentlepanneauinférieuret
insérez la carte microSD dans la
fente. Fixez le panneau inférieur
en place avec les deux vis.
ES Antes de la instalación inserte
una tarjeta microSD compatible,
clase 10 hasta 128GB (no
incluida). Quite los dos tornillos
que aseguran el panel inferior e
inserte la tarjeta microSD en la
ranura. Asegure el panel inferior
en su lugar con los dos tornillos.
up to 128GB
Reset LAN Power

67
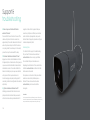
Pairing the Cave camera
STEP 1
UK Once installed and plugged
into a compatible power source,
the Cave camera LED (on the
front) will continuously flash
green to indicate it is in pairing
mode.
FR Une fois installée et branchée
sur une source d’alimentation
compatible, la LED de la caméra
Cave (à l’avant) clignotera en vert
en continu pour indiquer qu’elle
est en mode d’appairage.
ES Una vez instalada y
conectada a una fuente de
alimentación compatible, el
LED de la cámara Cave (en
la parte frontal) parpadeará
continuamente en verde para
indicar que está en modo de
emparejamiento.
STEP 2
UK Open the Cave app and press
the ‘Add Accessory’ button then
press ‘By scanning QR Code’.
FR Ouvrez l’application Cave et
appuyez sur le bouton «Ajouter
un accessoire», puis sur «En
scannant le code QR».
ES Abra la aplicación Cave
y presione el botón “Agregar
accesorio”, luego presione
“Escaneando el código QR”.

8 9
STEP 3
UK Scan the QR Code on the
base of the camera using the
scan window in the app. Take
note of the camera pairing name,
shownonscreen,nextopenwi-
settings on your device.
Note: If the camera does not
appearonthewi-listpressand
hold the reset button on the rear
of the camera for 10 seconds,
when released, you will hear
a ‘Beep’. The camera should
appear within 30 seconds.
FR Scannez le code QR sur la
base de la caméra à l’aide de
la fenêtre de numérisation de
l’application. Prenez note du
nom de couplage de la caméra,
afchéàl’écran,aprèsavoir
ouvertlesparamètreswi-sur
votre appareil.
Remarque: Si la caméra
n’apparaîtpasdanslalistewi-,
maintenez enfoncé le bouton
deréinitialisationàl’arrièredela
caméra pendant 10 secondes,
une fois relâché, vous entendrez
un «bip». La caméra devrait
apparaître dans les 30 secondes.
ES Escanee el código QR en
la base de la cámara usando
la ventana de escaneo en la
aplicación. Tome nota del
nombre de emparejamiento
de la cámara, que se muestra
en la pantalla, luego abra la
conguracióndewi-ensu
dispositivo.
Nota: Si la cámara no aparece
en la lista de Wi-Fi, presione
y mantenga presionado el
botón de reinicio en la parte
posterior de la cámara durante
10 segundos, cuando lo
suelte, escuchará un “Bip”. La
cámara debería aparecer en 30
segundos.
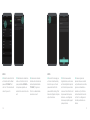
Reset LAN Power

10 11
STEP 4
UK Select the camera from the
wi-listandenterthedefault
password ‘01234567’ and
click ‘Join’. The camera should
connecttoyourwi-.
FR Sélectionnez la caméra dans
lalistewi-etentrezlemotde
passe par défaut «01234567»
et cliquez sur «Rejoindre». La
caméra doit se connecter à votre
wi-.
ES Seleccione la cámara de
lalistadewi-eintroduzcala
contraseña predeterminada
“01234567” y haga clic en
“Unirse”. La cámara debería
conectarseatuwi-.
STEP 5
UK Re-enter the Cave app your
wi-routershouldbealready
listed,enteryourwi-router
passwordandconrmthe
password before clicking ‘Start’.
Networkcongurationmaytake
up to a few minutes.
FR Entrez à nouveau dans
l’application Cave, votre routeur
wi-devraitdéjàêtrerépertorié,
entrez le mot de passe de votre
routeurwi-etconrmezlemot
de passe avant de cliquer sur
«Démarrer». Laconguration
du réseau peut prendre jusqu’à
quelques minutes.
ES Vuelva a ingresar a la
aplicación Cave, su enrutador
wi-yadeberíaestarenlalista,
ingrese la contraseña de su
enrutadorwi-yconrmela
contraseña antes de hacer clic
en“Iniciar”.Laconguración
de la red puede tardar unos
minutos.

12 13
STEP 6
UK Enter a name for your new
IP camera and click the tick icon
to save. The camera will now
appear in the Cave app under
‘Smart cameras’.
FR Entrez un nom pour votre
nouvelle caméra IP et cliquez sur
l’icône de coche pour enregistrer.
La caméra IP devrait maintenant
apparaître dans l’application
Cave sous «Caméras
intelligentes».
ES Introduzca un nombre para
su nueva cámara IP y haga
clic en el icono de marca de
vericaciónparaguardar.La
cámara IP debería aparecer
ahora en la aplicación Cave en
“Cámaras inteligentes”.
STEP 7
UK To view the camera for the
rsttime,youwillneedtoreset
the default password. Press ‘OK’
and enter a new password, once
conrmedthecamerawillbe
online and ready to view.
FR Pour voir la caméra pour
lapremièrefois,vousdevrez
réinitialiser le mot de passe par
défaut. Appuyez sur «OK» et
entrez un nouveau mot de passe,
unefoisconrmé,lacamérasera
en ligne et prête à être visionnée.
ES Para ver la cámara por
primera vez, deberá restablecer
la contraseña predeterminada.
Presione “OK” e ingrese una
nueva contraseña, una vez
conrmada,lacámaraestará
en línea y lista para ver.

14 15
Live view, recording
& playback
UK Click on the ‘Smart Camera’
icon on the home screen where
all IP cameras are listed. For a
live view of any camera’s click
the play icon on the left. In live
view mode, you can take a
snapshot, listen to audio and talk
through the camera. To review
recorded footage click the ‘Video’
link for a list of recorded events.
All footage is automatically
saved onto a microSD card (not
included).
FR Cliquez sur l’icône «Smart
Camera» sur l’écran d’accueil
où toutes les caméras IP sont
répertoriées. Pour une vue
en direct de n’importe quelle
caméra, cliquez sur l’icône de
lecture sur la gauche. En mode
d’afchageendirect,vous
pouvez prendre un instantané,
écouter de l’audio et parler
via la caméra. Pour revoir les
images enregistrées, cliquez
sur le lien «Vidéo» pour une liste
des événements enregistrés.
Toutes les séquences sont
automatiquement enregistrées
sur une carte microSD (non
incluse).
ES Haga clic en el icono “Cámara
inteligente” en la pantalla de
inicio donde se enumeran
todas las cámaras IP. Para
una vista en vivo de cualquier
cámara, haga clic en el ícono de
reproducción a la izquierda. En
el modo de visualización en vivo,
puede tomar una instantánea,
escuchar audio y hablar a través
de la cámara. Para revisar el
metraje grabado, haga clic en el
enlace “Video” para obtener una
lista de los eventos grabados.
Todo el metraje se guarda
automáticamente en una tarjeta
microSD (no incluida).

16 17
Camera settings
UK Change camera password /
Motion detection & recording /
Sync timezone / Record in HD or
SD / Horizontal and vertical flip
/Updatewi-settings/Format
SD card.
FR Changer le mot de passe
de la caméra / Détection et
enregistrement de mouvement /
Fuseau horaire de synchronisation /
Enregistrer en HD ou SD / Retourner
horizontalement et verticalement
/Mettreàjourlesparamètres
wi-/FormaterlacarteSD.
ES Cambiar la contraseña de la
cámara / Detección y grabación
de movimiento / Sincronizar
zona horaria / Grabar en HD o
SD / Volteo horizontal y vertical /
ActualizarconguracióndeWi-Fi
/ Formatear tarjeta SD.
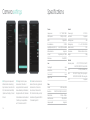
Specifications
Camera
Imagesensor 1/2.7”1080PCMOS
Effective pixels 1920(H) x 1080(V)
WDR Digital WDR
Noise Reduction 3D DNR
Day/Night control (IR-Cut) Auto (ICR)/Colour/B&W
Motion detection Supported
SD card Supported, up to 128GB
IR distance 30m (98.5ft)
Lens
Focal length 4mm
Max aperture F2.4
Focus control Fixed
Angle of view 114°
Video
Encode H.265mainprole
Resolution 1080P (1920x1080), VGA (640x352)
Video bitrates 32Kbps ~ 8Mbps
Video frame rate 30fps@1080P
Image snapshot Supported
General
Power supply DC 12V/1A
Hard reset Supported
Working power <5W
Workingtemp -10℃~+55/10%~90%RH
Water resistant IP65
Dimensions 188mm x 65mm x 60 mm
Weight 385g
Network
Network protocol HTTP, FTP, TCP/IP, UDP, SMTP,
DHCP, NTP, UPNP, RTSP, Onvif, DDNS
App iOS(9.0+),Android(5.0+)
Wi-Fi Wi-Fi (802.11b/g/n), 2.4G only, supports
WEP / WPA-PSK /WPA2-PSK encryption
P2P Supported

18
Support &
troubleshooting
UK How do you reset the Cave HD Outdoor
wireless IP Camera?
Press and hold the reset button on the rear of the
camera until you hear the reset success tone,
approximately 10 seconds. Release the button and
waituntilyouhearabeeptoconrmthecamera
is in pairing mode, this can take up to 30 seconds;
proceed to set up the camera after the beep.
FR Comment réinitialiser la Caméra IP Cave?
Appuyezsurleboutonderéinitialisationàl’arrière
de l’appareil photo et maintenez-le enfoncé jusqu’à
ce que vous entendiez la tonalité de réussite de la
réinitialisation, environ 10 secondes. Relâchez le
bouton et attendez jusqu’à ce que vous entendiez
unbippourconrmerquelacaméraesten
mode de couplage, cela peut prendre jusqu’à 30
secondes;procédezàlacongurationdelacaméra
aprèslebip.
ES ¿Cómo restableces la Cámara Cave IP?
Mantenga presionado el botón de reinicio en la
parte posterior de la cámara hasta que escuche
el tono de reinicio exitoso, aproximadamente 10
segundos. Suelte el botón y espere hasta que
escucheunpitidoparaconrmarquelacámara
está en modo de emparejamiento, esto puede
demorarhasta30segundos;procedaacongurar
la cámara después del pitido.
Contacting Veho
To contact Veho for support or troubleshooting
for your Cave IP Camera visit our website at
veho-world.com and use our pop-up chatbox.
Pour contacter Veho pour l’assistance ou le
dépannage de votre Caméra IP Cave, visitez notre
site Web à veho-world.com et utilisez notre boîte
de discussion contextuelle.
Para ponerse en contacto con Veho para obtener
asistencia o solución de problemas para su
Cámara IP Cave, visite nuestro sitio web en
veho-world.com y utilice nuestro chatbox
emergente.
DISCLAIMER:
Veho is not responsible for ensuring all footage is captured. Please ensure
the Cave HD Outdoor Wireless IP Camera is installed and positioned correctly,
and you are familiar with operating the camera and app before using.

This symbol, affixed to the product or its packaging, indicates that the product must not be processed as household waste. This product should
be correctly disposed of according to your local guidelines for electrical and battery operated products. Correct disposal of the battery will avoid
potential harm to the environment and human health. For further information regarding the recycling of this product, please contact your local
waste recycling centre.
EC DECLARATION OF CONFORMITY
Hereby, Veho UK LTD declares that the radio equipment type (VHS-010-OC) is in compliance
with Directive 2014/53/EU. The full text of the EU Declaration of Conformity
is available at https://veho-world.com/compliance/
Frequency band(s) - 2.4GHz
Maximum radio-frequency power - 19dBm
-
 1
1
-
 2
2
-
 3
3
-
 4
4
-
 5
5
-
 6
6
-
 7
7
-
 8
8
-
 9
9
-
 10
10
-
 11
11


en otros idiomas
- français: Veho VHS-010-OC Manuel utilisateur
- English: Veho VHS-010-OC User manual
