Hammerhead HDHD060 Manual de usuario
- Categoría
- Herramientas eléctricas
- Tipo
- Manual de usuario

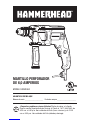
6.0 AMP HAMMER DRILL
MODEL HDHD060
ATTACH YOUR RECEIPT HERE
Serial Number _____________________ Purchase Date ______________________
Questions, problems, missing parts? Before returning to your retailer, call
our customer service department at 1-877-888-1880, 8:30 a.m. – 8:00 p.m.
EST (Monday – Friday) & 10:00 a.m. – 6:00 p.m. EST (Saturday and Sunday).

2 6.0 AMP HAMMER DRILL
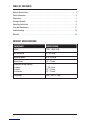
TABLE OF CONTENTS
Product Specifications ....................................................2
Safety Information .......................................................3
Preparation .............................................................7
Package Contents ........................................................8
Operating Instructions ....................................................9
Care and Maintenance ...................................................17
Troubleshooting ........................................................18
Warranty ..............................................................18
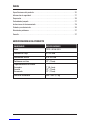
PRODUCT SPECIFICATIONS
COMPONENT SPECIFICATIONS
Motor 120V~, 60Hz, 6.0A
No-load speed 0-2,700 RPM
Hammer speed 0-43,200 BPM
Keyed chuck 1/2" (13 mm)
Maximum drilling capacity:
In wood
In metal
In concrete
1" (25.4 mm)
1/2" (13 mm)
1/2" (13 mm)
Tool weight 4 lbs. 14 oz. (2.2 kg)

6.0 AMP HAMMER DRILL 3
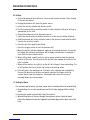
SAFETY INFORMATION
Please read and understand this entire manual before attempting to assemble or operate
this product. If you have any questions regarding the product, please call Hammerhead
customer service at 1-877-888-1880, 8:30 a.m. – 8:00 p.m. EST (Monday – Friday) &
10:00 a.m. – 6:00 p.m. EST (Saturday and Sunday).
WARNING
The operation of any power tool can result in foreign objects being thrown into your eyes,
which can result in severe eye damage. Before beginning power-tool operation, always
wear safety goggles or safety glasses with side shields and a full-face shield, when
needed. We recommend using a wide vision safety mask over eyeglasses or standard
safety glasses with shields. Always use eye protection marked to comply with ANSI Z87.1.
DANGER
People with electronic devices, such as pacemakers, should consult their physician(s)
before using this product. Operation of electrical equipment in close proximity to a heart
pacemaker could cause interference or failure of the pacemaker.
WARNING
Some dust created by power sanding, sawing, grinding, drilling and other construction
activities contains chemicals known to the state of California to cause cancer, birth defects
or other reproductive harm. Some examples of these chemicals are:
• Lead from lead-based paints.
• Crystalline silica from bricks and cement and other masonry products, and
• Arsenic and chromium from chemically-treated lumber.
Your risk from these exposures varies, depending on how often you do this type of work.
To reduce your exposure to these chemical: work in a well-ventilated area, and work with
approved safety equipment, such as those dust masks that are specially designed to filter
out microscopic particles.

4 6.0 AMP HAMMER DRILL
SAFETY INFORMATION
Know the Tool
To operate this tool, carefully read this manual and all labels affixed to the hammer drill
before using it. Keep this manual available for future reference.
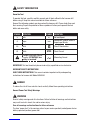
Some of the following symbols may be used on this hammer drill. Please study them and
their meaning. Proper interpretation of these symbols will allow you to operate the tool
better and more safely.
SYMBOL DEFINITION SYMBOL DEFINITION
VVolts n 0No-load Speed
AAmps /min Revolutions, Strokes, Beats or
Impacts per Minute
Hz Hertz Class II Construction
WWatts Direct Current
A danger, warning or caution.
It means ‘ATTENTION! Your
safety is involved.’
Alternating Current
IMPORTANT: This tool should only be serviced only by a qualified service technician.
IMPORANT SAFETY INSTRUCTIONS
SAVE THESE INSTRUCTIONS-This manual contains important safety and operating
instructions for hammer drill Model HDHD060.
DANGER
To reduce the risk of fire or electric shock, carefully follow these operating instructions
General Power Tool Safety Warnings
WARNING
Read all safety warnings and all instructions. Failure to follow all warnings and instructions
may result in electric shock, fire and/or serious injury.
Save all warnings and instructions for future reference
The term “power tool” in the warnings refers to your mains-operated (corded) power tool or
battery-operated (cordless) power tool.

6.0 AMP HAMMER DRILL 5
SAFETY INFORMATION
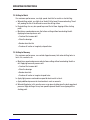
Work Area Safety
• Keep work area clean and well lit. Cluttered and dark areas invite accidents.
• Do not operate power tools in explosive atmospheres, such as in the presence of
flammable liquids, gases or dust. Power tools create sparks which may ignite the dust
or fumes.
• Keep children and bystanders away while operating a power tool. Distractions can
cause you to lose control.
Electrical safety
• Power tool plugs must match the outlet. Never modify the plug in any way. Do not
use any adapter plugs with earthed (grounded) power tools. Unmodified plugs and
matching outlets will reduce risk of electric shock.
• Avoid body contact with earthed or grounded surfaces, such as pipes, radiators,
ranges and refrigerators. There is an increased risk of electric shock if your body is
earthed or grounded.
• Do not expose power tools to rain or wet conditions. Water entering a power tool will
increase the risk of electric shock.
• Do not abuse the cord. Never use the cord for carrying, pulling or unplugging the
power tool. Keep cord away from heat, oil, sharp edges or moving parts. Damaged
or entangled cords increase the risk of electric shock.
• When operating a power tool outdoors, use an extension cord suitable for outdoor
use. Use of a cord suitable for outdoor use reduces the risk of electric shock.
• If operating a power tools in a damp location is unavoidable, use a ground-fault circuit
interrupter (GFCI) protected supply. Use of a GFCI reduces the risk of electric shock.
Personal Safety
• Stay alert, watch what you are doing and use common sense when operating a
power tool. Do not use a power tool while you are tired or under the influence of
drugs, alcohol or medication. A moment of inattention while operating power tools may
result in serious personal injury.
• Use personal protective equipment. Always wear eye protection. Protective
equipment such as dust mask, non-skid safety shoes, hard hat, or hearing protection
used for appropriate conditions will reduce personal injuries.
• Prevent unintentional starting. Ensure the switch is in the off-position before
connecting to power source and/or battery pack, picking up or carrying the tool.
Carrying power tools with your finger on the switch or energizing power tools that have
the switch on invites accidents.

6 6.0 AMP HAMMER DRILL
SAFETY INFORMATION
• Remove any adjusting key or wrench before turning the power tool on. A wrench or
a key left attached to a rotating part of the power tool may result in personal injury.
• Do not overreach. Keep proper footing and balance at all times. This enables better
control of the power tool in unexpected situations.
• Dress properly. Do not wear loose clothing or jewelry. Keep your hair, clothing and
gloves away from moving parts. Loose clothes, jewelry or long hair can be caught in
moving parts.
• If devices are provided for the connection of dust extraction and collection
facilities, ensure these are connected and properly used. Use of dust devices can
reduce dust related hazards.
Power Tool Use and Care
• Do not force the power tool. Use the correct power tool for your application. The
correct power tool will do the job better and more safely at the rate for which it was
designed.
• Do not use the power tool if the switch does not turn it on and off. Any power tool
that cannot be controlled with the switch is dangerous and must be repaired.
• Disconnect the plug from the power source and/or the battery pack from the
power tool before making any adjustments, changing accessories, or storing
power tools. Such preventive safety measures reduce the risk of starting the power tool
accidentally.
• Store idle power tools out of the reach of children and do not allow persons
unfamiliar with the power tool or these instructions to operate the power tool.
Power tools are dangerous in the hands of untrained users.
• Maintain power tools. Check for misalignment or binding of moving parts,
breakage of parts and any other condition that may affect the power tool's
operation. If damaged, have the power tool repaired before use. Many accidents are
caused by poorly maintained power tools.
• Keep cutting tools sharp and clean. Properly maintained cutting tools with sharp
cutting edges are less likely to bind and are easier to control.
• Use the power tool, accessories, tool bits, etc. in accordance with these
instructions, taking into account the working conditions and the work to be
performed. Use of the power tool for operations different from those intended could
result in a hazardous situation.
Service
• Have your power tool serviced by a qualified repair person using only identical
replacement parts. This will ensure that the safety of the power tool is maintained.

6.0 AMP HAMMER DRILL 7
SAFETY INFORMATION
Specific Safety Rules for Hammer Drill
• Hold power tool by insulated gripping surfaces, when performing an operation
where the cutting accessory may contact hidden wiring or its own cord. Cutting
accessory contacting a “live” wire may make exposed metal parts of the power tool
“live” and could give the operator an electric shock.
• Wear ear protectors when impact drilling. Exposure to noise can cause hearing loss.
• Use auxiliary handle(s), if supplied with the tool. Loss of control can cause personal
injury.
• Do not use the power tool with a damaged cord. Do not touch the damaged
cord and pull the plug from the outlet when the cord is damaged while working.
Damaged cords increase the risk of an electric shock.
• Secure the workpiece. A workpiece clamped with clamping devices or in a vice is held
more secure than by hand.
• Always wait until the power tool has come to a complete stop before placing it
down. The tool insert can jam and lead to loss of control over the power tool.
PREPARATION
Before attempting to use the hammer drill, familiarize yourself with all of its operating
features and safety requirements.

8 6.0 AMP HAMMER DRILL
PACKAGE CONTENTS
N
L
G
I
A
M
J
K
H
EF
B
C
D
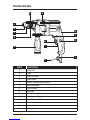
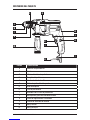
PARTS DESCRIPTION
AChuck jaws
BChuck
CChuck-key holes
DChuck sleeve
EHammer / drilling selection switch
FDepth-stop gauge
GLock-on button
HChuck key
IChuck-key strap
JVariable-speed trigger switch
KSpeed adjustment dial
LDirection-of-rotation lever
MAuxiliary handle
NPrimary handle

6.0 AMP HAMMER DRILL 9
OPERATING INSTRUCTIONS
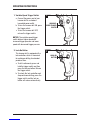
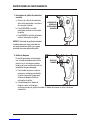
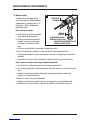
1. Variable-Speed Trigger Switch
a. Connect the power cord of your
hammer drill to a standard
household power outlet.
b. To turn the hammer drill ON, press
the trigger switch.
c. To turn the hammer drill OFF,
release the trigger switch.
NOTICE: The variable-speed trigger
switch delivers higher speed with
increased trigger pressure and lower
speed with decreased trigger pressure.
2. Lock-On Button
This hammer drill is equipped with a
lock-on button, which is convenient
for continuous drilling for extended
periods of time.
a. To drill continuously, press and
hold the trigger switch and then
press the lock-on button. Release
the trigger switch.
b. To unlock the lock-on button and
stop continuous drilling, press the
trigger switch and the lock-on
button will release automatically.
1
VARIABLE-
SPEED TRIGGER
SWITCH
2
LOCK-ON
BUTTON

10 6.0 AMP HAMMER DRILL
OPERATING INSTRUCTIONS
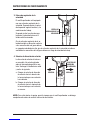
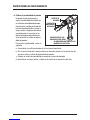
3. Speed Adjustment Dial
This hammer drill is equipped with a
speed adjustment dial; the required
speed may be adjusted according to
the material and the working condi-
tions.
The speed adjustment dial can be
adjusted even if the drill is running.
Turn the variable-speed adjustment
dial counterclockwise for a higher
speed range; turn the variable-speed
adjustment dial clockwise for a lower
speed range.
4. Direction-Of-Rotation Selector
The direction of bit rotation is revers-
ible and is controlled by a selector
located above the trigger switch. With
the drill held toward you:
a. Position the direction-of-rotation
selector to the right of the tool for
forward rotation.
b. Position the direction-of-rotation
selector to the left of the tool for
reverse rotation.
NOTICE: To prevent gear damage, always
allow the hammer drill to come to a complete stop before changing the direction of rotation.
3
SPEED
ADJUSTMENT DIAL
4
DIRECTION-
OF-ROTATION
SELECTOR
REVERSE FORWARD

6.0 AMP HAMMER DRILL 11
OPERATING INSTRUCTIONS
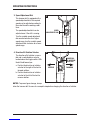
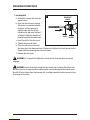
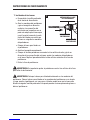
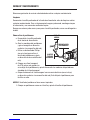
5. Auxiliary Handle
The tool must be supported with
the auxiliary handle, which can be
positioned and locked into any of
12 positions, 360° around the collar
mount.
To install the handle:
a. Unplug the hammer drill from the
power source.
b. Loosen the handle assembly
by turning the handle
counterclockwise.
c. Slide the handle assembly onto
the collar mount.
d. Rotate the handle assembly to the desired operating position, then push the handle
inward until it engages in the desired position.
e. Securely tighten the auxiliary handle by turning the handle clockwise.
To reposition the handle:
a. Unplug the hammer drill from the power source.
b. Rotate the lower portion of auxiliary handle counter-clockwise.
c. Push the handle forward until it disengages from the locking teeth in the collar
mount.
d. Move the handle to the desired position.
e. Push the handle inward until it engages in the desired position.
f. Securely tighten the auxiliary handle by rotating it clockwise.
5
AUXILIARY
HANDLE
LOCKING
TEETH
COUNTER-CLOCKWISE
CLOCKWISE

12 6.0 AMP HAMMER DRILL
OPERATING INSTRUCTIONS
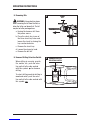
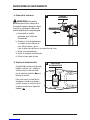
6. Depth-Stop Gauge
The drilling depth can be pre-set and/
or repeated by using the depth-stop
gauge.
Unplug the hammer drill from the
power source and install the auxiliary
handle and make sure that the ac-
cessory has been fully inserted onto
the locking teeth on the chuck before
setting the depth-stop gauge.
To adjust the depth:
a. Unplug the hammer drill from the
power source.
b. Rotate the lower portion of auxiliary handle counter-clockwise to loosen the depth-
stop gauge.
c. Slide depth-stop gauge to the desired position.
d. Securely tighten the auxiliary handle by rotating it clockwise.
6
DEPTH
-STOP
GAUGE
X
LOCKING
TEETH
COUNTER-CLOCKWISE
CLOCKWISE

6.0 AMP HAMMER DRILL 13
OPERATING INSTRUCTIONS
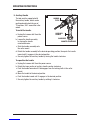
7. Installing Bits
a. Unplug the hammer drill from the
power source.
b. Open the chuck jaws by turning
the sleeve in a counterclockwise
direction, until the opening is
slightly larger than the bit you
intend to use, and raise the front
of the drill slightly to keep the bit
from falling out of the chuck jaws.
c. Insert the drill bit into the chuck.
d. Tighten the sleeve by hand.
e. Place the chuck key into one of
the three chuck key holes and turn it clockwise to tighten the chuck jaws on the bit.
Repeat with the remaining two chuck key holes.
f. Remove the chuck key.
WARNING: It is important to tighten the chuck with all three key holes to prevent
slippage.
WARNING: Insert the drill bit straight into the chuck jaws. Inserting the drill bit into
the chuck jaws at an angle and then tightening the chuck and using the drill could cause
the drill bit to be thrown from the hammer drill, resulting in possibly serious personal injury
or damage to the chuck.
7
CHUCK
SLEEVE
CHUCK
JAWS
CHUCK KEY
HOLES

14 6.0 AMP HAMMER DRILL
OPERATING INSTRUCTIONS
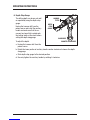
8. Removing Bits
WARNING: Use protective gloves
when removing the bit from the tool, or
allow the bit to cool down first. The bit
may be hot after prolonged use.
a. Unplug the hammer drill from
the power source.
b. Place the chuck key in one of
the three chuck key holes and
loosen the chuck by turning the
key counterclockwise.
c. Remove the chuck key.
d. Loosen the sleeve by hand.
e. Remove the drill bit.
9. Hammer/Drilling Selection Switch
When drilling in concrete, granite,
tile, marble, etc., push the selec-
tion switch to the side marked
with this symbol: for hammer
drilling.
To select drilling mode for drilling in
wood and metal, push the selec-
tion switch to the side marked with
this symbol: .
8CHUCK
KEY
9HAMMER/DRILLING
SELECTION SWITCH

6.0 AMP HAMMER DRILL 15
OPERATING INSTRUCTIONS
10. Drilling
a. Secure the material to be drilled in a vise or with clamps to keep it from turning
as the drill bit rotates.
b. Unplug the hammer drill from the power source.
c. Install the auxiliary handle and the correct bit.
d. Use the hammer/drilling selection switch to select hammer drilling or drilling as
appropriate for the task.
e. Connect the hammer drill to the power source.
f. Verify that the direction-of-rotation selector is at the correct setting (forward).
g. Hold the hammer drill firmly with one hand on the primary handle and the other
hand on the auxiliary handle.
h. Place the bit at the point to be drilled.
i. Press the trigger switch to start the hammer drill.
j. Move the drill bit into the workpiece, applying only enough pressure to keep the
bit cutting. Do not force the hammer drill or apply side pressure to elongate a
hole. Allow the tool to do the work.
k. When drilling hard, smooth surfaces, use a center punch to mark the desired
location of the hole. This will prevent the drill bit from slipping off-center as the
hole is started.
l. When drilling metals, use light oil on the drill bit to keep it from overheating. The
oil will prolong the life of the bit and increase the drilling action.
m. If the bit jams in the workpiece or if the drill stalls, stop the tool immediately.
Reverse the direction of rotation and gently squeeze the trigger switch to
remove the bit from the workpiece. Investigate and correct the cause of
jamming before you resume work.
11. Drilling In Wood
For maximum performance, use high-speed steel or brad-point bits for wood drilling.
a. Begin drilling at a very low speed to prevent the bit from slipping off the starting
point.
b. Increase the speed as the drill bit enters the material.
c. When drilling holes all the way through the workpiece, place a block of wood
behind the workpiece to prevent ragged or splintered edges on the back side of the
hole.

16 6.0 AMP HAMMER DRILL
OPERATING INSTRUCTIONS
12. Drilling In Metal
For maximum performance, use high-speed steel bits for metal or steel drilling.
a. When drilling metals, use light oil on the drill bit to keep it from overheating. The oil
will prolong the life of the bit and increase the drilling action.
b. Begin drilling at a very low speed to prevent the bit from slipping off the starting
point.
c. Maintain a speed and pressure that allows cutting without overheating the bit.
Applying too much pressure will:
• Overheat the hammer drill
• Wear the bearings
• Bend or burn the bits
• Produce off-center or irregularly-shaped holes
13. Drilling In Masonry
For maximum performance, use carbide-tipped masonry bits when drilling holes in
brick, tile, concrete, etc.
a. Maintain a speed and pressure which allows cutting without overheating the bit or
drill. Applying too much pressure will:
• Overheat the hammer drill
• Wear the bearings
• Bend or burn bits
• Produce off-center or irregular-shaped holes
b. Apply light pressure and medium speed for best results in brick.
c. Apply additional pressure for hard materials such as concrete.
d. When drilling holes in tile, practice on a scrap piece to determine the best speed and
pressure. Begin drilling at a very low speed to prevent the bit from slipping off the
starting point.

6.0 AMP HAMMER DRILL 17
CARE AND MAINTENANCE
All maintenance should only be carried out by an authorized service organization.
Cleaning
Before cleaning or performing any maintenance, unplug the hammer drill from the power
source. For safe and proper operation, always keep the tool and its ventilation slots clean.
Always use only a soft, dry cloth to clean your hammer drill; never use detergent or alcohol.
Removing The Chuck
a. Unplug the hammer drill from the
power source.
b. Open the chuck jaws by turning
the sleeve in a counter-clockwise
direction.
c. Use a Phillips screwdriver (not
included) to remove the chuck
screw by turning it in a clockwise
direction.
d. Insert a 5/16 in. or larger hex key
(not included) into the chuck and
securely tighten the chuck jaws
around the hex key.
e. Tap the hex key sharply with a mallet (not included) in a counter-clockwise direction.
This will loosen the chuck for easy removal.
NOTICE: The chuck screw has left-handed threads.
f. Attach a new chuck to the spindle and tighten the chuck screw.
HEX
WRENCH
MALLET
CHUCK
JAWS

18 6.0 AMP HAMMER DRILL
TROUBLESHOOTING
PROBLEM POSSIBLE CAUSE CORRECTIVE ACTION
The motor does not
start
The tool is not connected to a
power source
Connect the tool to a power
source
The bit cannot be
installed
1. The sleeve is not released
2. The bit does not fit the chuck
jaw
1. Release the sleeve
2. Use the appropriate bit
The motor is
overheating Cooling vents are obstructed
Clean and clear vents. Do
not cover with hand during
operation
3 YEAR LIMITED WARRANTY
This hammer drill is warranted to the original purchaser from the original purchase date for
two years, plus one additional year with product registration at www.hammerheadtools.com
(2+1), for a total three years subject to the warranty coverage described herein.
Please retain your receipt.
This hammer drill is warranted to the original user to be free from defects in material
and workmanship. If you believe that the hammer drill is defective at any time during the
specified warranty period, call HAMMERHEAD support at 1-877-888-1880 to speak with a
customer service agent. This warranty does not cover: (1) Part failure due to normal wear or
tool abuse (2) Any parts have been altered or modified by anyone other than an authorized
HAMMERHEAD personnel.
This warranty excludes bits, bulbs and accessories. This warranty gives you specific legal
rights, and you may also have other rights that vary from state.

MARTILLO PERFORADOR
DE 6,0 AMPERIOS
MODELO HDHD060
ADJUNTE SU RECIBO AQUÍ
Número de serie ___________________ Fecha de compra ____________________
¿Preguntas, problemas, piezas faltantes? Antes de volver a la tienda,
llame a nuestro Departamento de Servicio al Cliente al 1-877-888-1880, de
8:30 a.m. a 8:00 p.m. Hora estándar del Este (lunes a viernes) y de 10:00
a.m. a 6:00 p.m. Hora estándar del Este (sábado y domingo).

20 MARTILLO PERFORADOR DE 6,0 AMPERIOS
ÍNDICE
Especificaciones del producto. . . . . . . . . . . . . . . . . . . . . . . . . . . . . . . . . . . . . . . . . . . . . . 20
Información de seguridad .................................................21
Preparación ...........................................................26
Contenido del paquete ...................................................27
Instrucciones de funcionamiento ...........................................28
Cuidado y mantenimiento .................................................36
Solución de problemas ...................................................37
Garantía ..............................................................37
ESPECIFICACIONES DEL PRODUCTO
COMPONENTE ESPECIFICACIONES
Motor 120V~, 60Hz, 6,0A
Velocidad sin carga 0-2,700 RPM
Velocidad del martillo 0-43,200 GPM
Portabrocas con llave 1/2" (13mm)
Capacidad máxima de taladro:
En madera
En metal
En concreto
1" (25,4mm)
1/2" (13mm)
1/2" (13mm)
Peso de la herramienta 4 lbs. 14oz. (2,2kg)

MARTILLO PERFORADOR DE 6,0 AMPERIOS 21
INFORMACIÓN DE SEGURIDAD
Lea y comprenda completamente este manual antes de intentar ensamblar u operar
este producto. Si tiene preguntas sobre este producto, llame al Servicio al Cliente al
1-888-HAMMERHEAD (1-877-888-1880), de 8:30 a.m. a 8:00 p.m. Hora estándar del Este
(lunes a viernes) y de 10:00 a.m. a 6:00 p.m. Hora estándar del Este (sábado y domingo).
ADVERTENCIA
El uso de cualquier herramienta eléctrica puede tener como consecuencia que objetos
extraños salgan expedidos hacia los ojos, lo que puede provocar daños oculares graves.
Antes de comenzar a utilizar una herramienta eléctrica, póngase siempre gafas de
seguridad o lentes protectores con protección lateral y protección para rostro completo
si es necesario. Se recomienda utilizar una máscara ancha de seguridad de visión sobre
lentes o gafas de seguridad estándar con protectores. Use siempre lentes de protección
con marcas que indiquen que cumplen con la norma ANSI Z87.1.
PELIGRO
Las personas que poseen dispositivos electrónicos, como marcapasos, deben consultar
al médico antes de usar este producto. La utilización de equipos eléctricos cerca de un
marcapasos puede producir interferencias o fallas en el marcapasos.
ADVERTENCIA
Parte del polvo producto del lijado, aserrado, esmerilado, taladrado y otras actividades de
construcción, contiene sustancias químicas que el estado de California reconoce como
causantes de cáncer, malformaciones congénitas u otros daños reproductivos. Algunos
ejemplos de estas sustancias químicas son los siguientes:
• Plomo de pinturas a base de plomo.
• Sílice cristalina de ladrillos, cemento y de otros productos de mampostería.
• Arsénico y cromo de madera tratada químicamente.
El riesgo de estas exposiciones varía según la frecuencia con la que realice este tipo de
trabajo. Medidas para reducir la exposición a estas sustancias químicas: Trabaje en un
área bien ventilada y con el equipo de seguridad aprobado, como las mascarillas antipolvo
especialmente diseñadas para filtrar partículas microscópicas.

22 MARTILLO PERFORADOR DE 6,0 AMPERIOS
INFORMACIÓN DE SEGURIDAD
Conocimiento de la herramienta
Para operar esta herramienta, lea detenidamente este manual y todas las etiquetas adjuntas
al martillo perforador antes de usarlo. Mantenga este manual a mano para referencia futura.
Algunos de los siguientes símbolos pueden aparecer en este martillo perforador. Estúdielos
junto con sus significados. La interpretación correcta de estos símbolos le permitirá operar
mejor la herramienta y de manera más segura.
SÍMBOLO DEFINICIÓN SÍMBOLO DEFINICIÓN
VVoltios n 0Velocidad sin carga
AAmperios /min Revoluciones, golpes o
impactos por minuto
Hz Hercios Construcción clase II
WVatios Corriente continua
Peligro, advertencia o
precaución. Significa:
“¡ATENCIÓN! Su seguridad
está en juego”.
Corriente alterna
IMPORTANTE: Esta herramienta solo debe recibir mantenimiento de parte de un técnico de
servicio calificado.
INSTRUCCIONES IMPORTANTES DE SEGURIDAD
GUARDE ESTAS INSTRUCCIONES: este manual contiene instrucciones importantes de
seguridad y funcionamiento para el martillo perforador, Modelo HDHD060.
PELIGRO
Siga las instrucciones a continuación cuidadosamente para reducir el riesgo de incendio o
descargas eléctricas.
Advertencias generales de seguridad en el manejo de herramientas eléctricas

MARTILLO PERFORADOR DE 6,0 AMPERIOS 23
INFORMACIÓN DE SEGURIDAD
ADVERTENCIA
Lea todas las advertencias de seguridad e instrucciones. No seguir todas las instrucciones
que se indican a continuación podría resultar en descargas eléctricas, incendios o lesiones
personales graves.
Guarde todas las advertencias e instrucciones para referencia futura.
La denominación “herramienta eléctrica” que se menciona en las advertencias hace
referencia a la herramienta eléctrica conectada a la red de suministro eléctrico (con cable)
o a la herramienta eléctrica a batería (inalámbrica).
Seguridad del área de trabajo
• Mantenga el área de trabajo limpia y bien iluminada. Las áreas desordenadas y
oscuras invitan a los accidentes.
• No utilice herramientas eléctricas en ambientes en los que se puedan producir
explosiones, como en los que se encuentran líquidos, gases o polvos inflamables.
Las herramientas eléctricas crean chispas que pueden encender el polvo o los gases.
• Los niños y otras personas deben mantenerse alejados mientras se usa una herramienta
eléctrica. Las distracciones pueden hacer que pierda el control de la herramienta.
Seguridad eléctrica
• Los enchufes de las herramientas eléctricas deben coincidir con el tomacorriente.
Nunca modifique el enchufe de ningún modo. No use ningún adaptador de enchufe
con herramientas eléctricas con conexión a tierra (puesta a tierra). Los enchufes
sin modificar y los tomacorrientes adecuados reducirán el riesgo de descarga eléctrica.
• Evite el contacto corporal con las superficies con conexión a tierra, como tuberías,
radiadores, estufas y refrigeradores. El riesgo de descarga eléctrica aumenta si su
cuerpo está conectado a tierra o con puesta a tierra.
• No exponga las herramientas eléctricas a la lluvia ni a la humedad. Si entra agua en
una herramienta eléctrica, aumentará el riesgo de descarga eléctrica.
• No jale del cable. Nunca use el cable para transportar, jalar o desenchufar la
herramienta eléctrica. Mantenga el cable alejado del calor, el aceite, los bordes
filosos o las piezas móviles. Los cables dañados o enredados aumentan el riesgo de
descarga eléctrica.
• Al utilizar una herramienta eléctrica en exteriores, use una extensión eléctrica
para uso en exteriores. El uso de una extensión para uso en exteriores reduce el riesgo
de electrocución.

24 MARTILLO PERFORADOR DE 6,0 AMPERIOS
INFORMACIÓN DE SEGURIDAD
• Si no puede evitar operar una herramienta eléctrica en condiciones de humedad,
use un suministro protegido por un tomacorriente con interruptor de circuito de
falla de puesta a tierra (GFCI, por sus siglas en inglés). El uso de un GFCI reduce el
riesgo de descarga eléctrica.
Seguridad personal
• Manténgase atento, mire lo que está haciendo y aplique el sentido común cuando
utilice una herramienta eléctrica. No utilice una herramienta eléctrica si está
cansado o bajo la influencia de las drogas, el alcohol o algún medicamento. Un
momento de distracción mientras opera una herramienta eléctrica puede provocar
lesiones personales graves.
• Use el equipo de protección personal. Use siempre lentes de protección. El equipo
de protección, como mascarillas antipolvo, zapatos de seguridad antideslizantes, cascos
duros o protección auditiva, usado para las condiciones adecuadas, reducirá las lesiones
personales.
• Prevenga los arranques involuntarios. Asegúrese de que el interruptor esté
en la posición de apagado antes de conectar la herramienta a una fuente de
alimentación o a un paquete de baterías, de recogerla o transportarla. Transportar
herramientas eléctricas con el dedo en el interruptor o herramientas eléctricas
encendidas invita a los accidentes.
• Retire toda llave de tuercas o herramienta de ajuste antes de encender la
herramienta eléctrica. Si deja una llave de tuercas fijada a una pieza giratoria de la
herramienta eléctrica, se podrían producir lesiones personales.
• No trate de llegar más allá de donde alcance. Mantenga un apoyo de pies y un
equilibrio adecuados en todo momento. Esto le permitirá tener un mejor control de la
herramienta eléctrica en situaciones inesperadas.
• Utilice la ropa indicada. No use ropa holgada ni joyas. Mantenga su cabello, ropa y
guantes alejados de las piezas móviles. La ropa holgada, las joyas o el cabello largo
pueden quedar atascados en las piezas móviles.
• Si se proporcionan dispositivos para la conexión de aparatos de extracción
y recolección de polvo, asegúrese de que estén conectados y de que se usen
correctamente. El uso de dispositivos antipolvo puede reducir los peligros relativos al polvo.
Uso y cuidado de las herramientas eléctricas
• No fuerce la herramienta eléctrica. Use la herramienta eléctrica correcta para su
aplicación. La herramienta eléctrica correcta hará mejor el trabajo y de manera más
segura al ritmo para el que se diseñó.
• No use la herramienta eléctrica si el interruptor no la enciende o apaga. Cualquier
herramienta eléctrica que no se pueda controlar con el interruptor es peligrosa y se debe reparar.

MARTILLO PERFORADOR DE 6,0 AMPERIOS 25
INFORMACIÓN DE SEGURIDAD
• Desconecte el enchufe de la fuente de alimentación o del paquete de baterías de
la herramienta eléctrica antes de hacer cualquier ajuste, cambiar accesorios o
almacenar la herramienta eléctrica. Estas medidas preventivas de seguridad reducen
el riesgo de arrancar accidentalmente la herramienta eléctrica.
• Almacene las herramientas eléctricas inactivas fuera del alcance de los niños y
no permita que personas no familiarizadas con ellas o con las instrucciones de la
herramienta eléctrica las operen. Las herramientas eléctricas son peligrosas en las
manos de usuarios sin capacitación.
• Realice el mantenimiento de las herramientas eléctricas. Revíselas para controlar
que no estén desalineadas y que las piezas móviles no estén atascadas, que
las piezas no estén rotas y que no se presenten otras posibles causas de mal
funcionamiento de la herramienta eléctrica. Si está dañada, haga reparar la
herramienta eléctrica. Muchos accidentes se producen debido a herramientas
eléctricas con mantenimiento deficiente.
• Mantenga las herramientas de corte afiladas y limpias. Las herramientas de corte
que se mantienen a punto, con los bordes afilados, son menos propensas a atascarse y
más fáciles de controlar.
• Use la herramienta eléctrica, los accesorios, las brocas, etc., de acuerdo con estas
instrucciones y tenga en cuenta las condiciones de trabajo y el trabajo a realizar.
El uso de la herramienta eléctrica en operaciones que no son las previstas puede
producir una situación de peligro.
Mantenimiento
• Haga revisar la herramienta eléctrica por una persona calificada y use solo piezas
de repuesto idénticas. Esto asegurará que se mantenga la seguridad de la herramienta
eléctrica.
Reglas específicas de seguridad para el martillo perforador
• Sostenga la herramienta eléctrica por las superficies de agarre aisladas cuando
realice una operación en la que el accesorio de corte pueda entrar en contacto
con el cableado oculto o su propio cable. Si el accesorio de corte entra en contacto
con un cable con corriente, puede provocar que las piezas metálicas expuestas de la
herramienta eléctrica conduzcan corriente, lo que podría provocar una descarga eléctrica
al operador.
• Utilice protectores para los oídos cuando taladre a percusión. La exposición al ruido
puede causar pérdida de la audición.
• Use las manijas auxiliares en caso de que se proporcionen con la herramienta. La
pérdida de control puede causar lesiones personales.

26 MARTILLO PERFORADOR DE 6,0 AMPERIOS
INFORMACIÓN DE SEGURIDAD
• No use la herramienta eléctrica con un cable dañado. No toque el cable dañado
ni jale el enchufe de la toma de corriente cuando la herramienta esté en
funcionamiento. Si el cable está dañado, aumenta el riesgo de una descarga eléctrica.
• Asegure la pieza de trabajo. Una pieza sujetada con abrazaderas o con una prensa de
tornillo se mantiene más segura que con la mano.
• Siempre espere a que la herramienta eléctrica se detenga por completo antes
de colocarla hacia abajo. El accesorio insertado de la herramienta eléctrica puede
atorarse y hacerle perder el control de esta.
PREPARACIÓN
Antes de intentar usar el martillo perforador, familiarícese con todas sus características de
funcionamiento y requisitos de seguridad.

MARTILLO PERFORADOR DE 6,0 AMPERIOS 27
CONTENIDO DEL PAQUETE
N
L
G
I
A
M
J
K
H
EF
B
C
D
PIEZAS DESCRIPCIÓN
AMordazas del portabrocas
BPortabrocas
COrificios de la llave de portabrocas
DManguito del portabrocas
ESelector de taladro/martillo
FCalibre de profundidad de parada
GBotón de bloqueo
HLlave de portabrocas
IAbrazadera de la llave de portabrocas
JInterruptor de gatillo de velocidad variable
KEsfera de regulación de la velocidad
LPalanca de dirección de rotación
MManija auxiliar
NManija principal

28 MARTILLO PERFORADOR DE 6,0 AMPERIOS
INSTRUCCIONES DE FUNCIONAMIENTO
1. Interruptor de gatillo de velocidad
variable
a. Conecte el cable de alimentación
del martillo perforador a una toma
de corriente estándar.
b. Para ENCENDER el martillo
perforador, presione el interruptor
de gatillo.
c. Para APAGAR el martillo perforador,
suelte el interruptor de gatillo.
AVISO: El interruptor de gatillo de velocidad
variable proporciona mayor velocidad con
una mayor presión del gatillo y una menor
velocidad con menos presión del gatillo.
2. Botón de bloqueo
El martillo perforador está equipado
con un botón de bloqueo que resulta
práctico en el caso de que se deba
taladrar de forma continua durante un
período de tiempo prolongado.
a. Para taladrar de forma continua,
presione y mantenga presionado
el gatillo interruptor, luego pulse
el botón de bloqueo. Suelte el
interruptor de gatillo.
b. Para desbloquear el botón de
bloqueo y parar el taladrado
continuo, presione el gatillo interruptor. El botón de bloqueo se soltará de forma
automática.
1
INTERRUPTOR
DE GATILLO
DE VELOCIDAD
VARIABLE
2
BOTÓN DE
BLOQUEO

MARTILLO PERFORADOR DE 6,0 AMPERIOS 29
INSTRUCCIONES DE FUNCIONAMIENTO
3. Esfera de regulación de la
velocidad
El martillo perforador está equipado
con una esfera de regulación de la
velocidad. Se puede ajustar la veloci-
dad requerida según el material y las
condiciones de trabajo.
Se puede ajustar la esfera de regu-
lación de la velocidad incluso si el
taladro está funcionando.
Gire la esfera de regulación de la ve-
locidad variable en dirección contraria
a las manecillas del reloj para obtener
un rango de velocidad más alto; gire la esfera de regulación de la velocidad variable en
sentido de las manecillas del reloj para obtener un rango de velocidad más bajo.
4. Selector de dirección de rotación
La dirección de rotación de la broca
es reversible. Un selector ubicado
sobre el interruptor de gatillo la con-
trola. Sostenga el taladro hacia usted
y realice lo siguiente:
a. Coloque el selector de dirección
de rotación hacia la derecha de
la herramienta para una rotación
hacia delante.
b. Coloque el selector de dirección
de rotación hacia la izquierda de
la herramienta para una rotación
en reversa.
AVISO: Para evitar daños al equipo, permita siempre que el martillo perforador se detenga
completamente antes de cambiar la dirección de rotación.
3
ESFERA DE
REGULACIÓN DE LA
VELOCIDAD
4
SELECTOR DE
DIRECCIÓN
DE ROTACIÓN
REVERSA ADELANTE

30 MARTILLO PERFORADOR DE 6,0 AMPERIOS
INSTRUCCIONES DE FUNCIONAMIENTO
5. Manija auxiliar
Se debe utilizar el mango auxiliar
con la herramienta. Puede colocarlo
y bloquearlo en cualquiera de las 12
posiciones, a 360°, alrededor del
soporte del anillo.
Para instalar la manija:
a. Desenchufe el martillo perforador
de la fuente de alimentación.
b. Afloje el ensamble de la manija,
girando la manija en dirección
contraria a las manecillas del
reloj.
c. Deslice el ensamble de la manija por el soporte del anillo.
d. Gire el ensamble de la manija a la posición de funcionamiento deseada, a
continuación empuje la manija hacia dentro hasta que se enganche en la posición
deseada.
e. Apriete bien la manija auxiliar girándola en dirección de las manecillas del reloj.
Para colocar el mango en otro lugar, realice lo siguiente:
a. Desenchufe el martillo perforador de la fuente de alimentación.
b. Gire la parte inferior de la manija auxiliar en dirección contraria a las manecillas del
reloj.
c. Empuje la manija hacia delante hasta que se desenganche de los dientes de
bloqueo en el soporte del anillo.
d. Mueva la manija a la posición deseada.
e. Empuje la manija hacia dentro, hasta que se enganche en la posición deseada.
f. Apriete bien la manija auxiliar y rótela en dirección de las manecillas del reloj.
5
MANIJA
AUXILIAR
DIENTES DE
BLOQUEO
EN DIRECCIÓN CONTRARIA A LAS
MANECILLAS DEL RELOJ
EN DIRECCIÓN DE LAS
MANECILLAS DEL RELOJ

MARTILLO PERFORADOR DE 6,0 AMPERIOS 31
INSTRUCCIONES DE FUNCIONAMIENTO
6. Calibre de profundidad de parada
Se puede ajustar previamente o
repetir la profundidad del taladro con
el calibre de profundidad de parada.
Desenchufe el martillo perforador de
la fuente de alimentación e instale la
manija auxiliar. Asegúrese de colocar
completamente el accesorio en los
dientes de bloqueo del portabrocas
antes de ajustar el calibre de profun-
didad de parada.
Para ajustar la profundidad, realice lo
siguiente:
a. Desenchufe el martillo perforador de la fuente de alimentación.
b. Gire la parte inferior de la manija auxiliar en dirección contraria a las manecillas del
reloj para soltar el calibre de profundidad de parada.
c. Coloque el calibre de profundidad de parada en la posición deseada.
d. Apriete bien la manija auxiliar y rótela en dirección de las manecillas del reloj.
6
CALIBRE DE
PROFUNDIDAD
DE PARADA
X
DIENTES DE
BLOQUEO
EN DIRECCIÓN CONTRARIA A LAS
MANECILLAS DEL RELOJ
EN DIRECCIÓN DE LAS
MANECILLAS DEL RELOJ

32 MARTILLO PERFORADOR DE 6,0 AMPERIOS
INSTRUCCIONES DE FUNCIONAMIENTO
7. Instalación de las brocas
a. Desenchufe el martillo perforador
de la fuente de alimentación.
b. Abra las mordazas del portabrocas
y gire el manguito en dirección
contraria a las manecillas del
reloj hasta que la apertura sea un
poco más amplia que la broca que
usará. Levante levemente la parte
frontal del taladro para evitar que
la broca se caiga de las mordazas
del portabrocas.
c. Coloque la broca para taladro en
el portabrocas.
d. Apriete el manguito manualmente.
e. Coloque la llave de portabrocas en uno de los tres orificios de esta y gírela en
dirección de las manecillas del reloj para apretar las mordazas del portabrocas
en la broca. Repita el procedimiento en los dos orificios restantes de la llave de
portabrocas.
f. Retire la llave de portabrocas.
ADVERTENCIA: Es importante apretar el portabrocas con los tres orificios de la llave
para evitar el deslizamiento.
ADVERTENCIA: Coloque la broca para taladro directamente en las mordazas del
portabrocas. Colocar la broca para taladro en las mordazas del portabrocas en un ángulo
y, luego, apretar el portabrocas, así como usar el taladro, puede hacer que la broca para
taladro se caiga del martillo perforador. Esto puede provocar lesiones personales graves o
dañar el portabrocas.
7
MANGUITO DEL
PORTABROCAS
MORDAZAS DEL
PORTABROCAS
ORIFICIOS DE LA LLAVE
DE PORTABROCAS

MARTILLO PERFORADOR DE 6,0 AMPERIOS 33
INSTRUCCIONES DE FUNCIONAMIENTO
8. Cómo retirar las brocas
ADVERTENCIA: Use guantes
protectores para retirar la broca de la
herramienta o primero deje que la broca
se enfríe. Es posible que la broca esté
caliente después de un uso prolongado.
a. Desenchufe el martillo
perforador de la fuente de
alimentación.
b. Coloque la llave de portabrocas
en uno de los tres orificios de
esta, afloje la broca y gire la
llave en dirección contraria a las manecillas del reloj.
c. Retire la llave portabrocas.
d. Suelte el manguito manualmente.
e. Retire la broca para taladro.
9. Selector de taladro/martillo
Cuando taladre en concreto, granito,
baldosa, mármol, etc., empuje el
selector hacia el lado marcado
con el siguiente símbolo: para
taladrar a martillo.
Para seleccionar el modo de tal-
adrado para taladrar en madera
o metal, empuje el selector hacia
el lado marcado con el siguiente
símbolo: .
8LLAVE DE
PORTABROCAS
9SELECTOR DE
TALADRO/MARTILLO

34 MARTILLO PERFORADOR DE 6,0 AMPERIOS
INSTRUCCIONES DE FUNCIONAMIENTO
10. Cómo taladrar
a. Asegure el material que desea taladrar en una prensa de tornillo con abrazaderas
para evitar que este gire cuando la broca para taladro rota.
b. Desenchufe el martillo perforador de la fuente de alimentación.
c. Instale la manija auxiliar y la broca correcta.
d Utilice el selector de taladro/martillo para seleccionar si desea taladrar con el
martillo o el taladro, según lo que sea adecuado para la tarea.
e. Conecte el martillo perforador a la fuente de alimentación.
f. Revise si el selector de dirección de rotación está en el ajuste correcto (hacia
delante).
g. Sostenga el martillo perforador, coloque una mano en la manija principal y la otra
en la manija auxiliar.
h. Coloque la broca en el lugar donde desea taladrar.
i. Presione el interruptor de gatillo para arrancar el martillo perforador.
j. Coloque la broca para taladro en la pieza de trabajo y aplique solo la presión
necesaria para que la broca corte. No fuerce el martillo perforador ni aplique una
presión lateral para alargar un agujero. Deje que la herramienta realice el trabajo.
k. Cuando taladre en superficies lisas o duras, utilice un punzón para marcar la
ubicación deseada del agujero. Esto evitará que la broca para taladro se deslice
fuera del centro cuando se empiece a taladrar el agujero.
l. Cuando taladre en metales, utilice aceite ligero en la broca para taladro para evitar
que se sobrecaliente. El aceite prolongará la vida útil de la broca y aumentará la
acción de taladrado.
m. Si la broca se atasca en la pieza de trabajo o si el taladro se ahoga, pare la
herramienta de inmediato. Invierta la dirección de rotación y presione suavemente
el gatillo interruptor para retirar la broca de la pieza de trabajo. Examine y corrija la
causa de atascamiento antes de reanudar el trabajo.
11. Cómo taladrar en madera
Para obtener el máximo rendimiento, use brocas de punta perforadora o de acero de
alta velocidad para taladrar en madera.
a. Comience a taladrar a una velocidad muy baja para evitar que la broca se deslice
fuera del punto de inicio.
b. Aumente la velocidad a medida que la broca para taladro entra en el material.
c. Cuando taladre agujeros a lo largo de la pieza de trabajo, coloque un bloque de
madera detrás de esta para evitar que los bordes se tornen irregulares o se astillen
en la parte posterior del agujero.

MARTILLO PERFORADOR DE 6,0 AMPERIOS 35
INSTRUCCIONES DE FUNCIONAMIENTO
12. Cómo taladrar en metal
Para obtener el máximo rendimiento, use brocas de acero para metal, para taladrar
en acero.
a. Cuando taladre en metales, utilice aceite ligero en la broca para taladro para evitar
que se sobrecaliente. El aceite prolongará la vida útil de la broca y aumentará la
acción de taladrado.
b. Comience a taladrar a una muy baja velocidad para evitar que la broca se deslice
hacia afuera del punto de inicio.
c. Mantenga una velocidad y una presión que permitan cortar sin sobrecalentar la
broca. Aplicar demasiada presión producirá lo siguiente:
• El martillo perforador se sobrecalentará.
• Desgastará los cojinetes.
• Las brocas se torcerán o quemarán.
• Producirá agujeros descentrados o irregulares.
13. Cómo taladrar en mampostería
Para obtener un máximo rendimiento, utilice brocas con puntas de carburo para
mampostería cuando taladre agujeros en ladrillos, baldosas, concreto, etc.
a. Mantenga una velocidad y una presión que permitan cortar sin sobrecalentar la
broca o el taladro. Aplicar demasiada presión producirá lo siguiente:
• El martillo perforador se sobrecalentará.
• Desgastará los cojinetes.
• Las brocas se torcerán o quemarán.
• Producirá agujeros descentrados o irregulares.
b. Para obtener mejores resultados en ladrillos, ejerza una leve presión y taladre a una
velocidad media.
c. Ejerza más presión en materiales duros; por ejemplo, concreto.
d. Cuando taladre agujeros en una baldosa, practique en un fragmento para
determinar cuál es la mejor velocidad y presión. Comience a taladrar a una muy
baja velocidad para evitar que la broca se deslice hacia afuera del punto de inicio.

36 MARTILLO PERFORADOR DE 6,0 AMPERIOS
CUIDADO Y MANTENIMIENTO
Solo una organización de servicio autorizada debe realizar cualquier mantenimiento.
Limpieza
Desconecte el martillo perforador de la fuente de alimentación antes de limpiar o realizar
cualquier mantenimiento. Para un funcionamiento seguro y adecuado, mantenga siempre
la herramienta y sus ranuras de ventilación limpias.
Siempre use solo un paño suave y seco para el martillo perforador; nunca use detergente o
alcohol.
Cómo retirar el portabrocas
a. Desenchufe el martillo perforador
de la fuente de alimentación.
b. Abra las mordazas del portabrocas
y gire el manguito en dirección
contraria a las manecillas del reloj.
c. Utilice un destornillador Phillips
(no se incluye) para retirar el
tornillo del portabrocas y gírelo
en dirección de las manecillas del
reloj.
d. Coloque una llave hexagonal
de 5/16 pulg o más grande (no
se incluye) en el portabrocas y apriete firmemente las mordazas del portabrocas
alrededor de la llave hexagonal.
e. Golpee fuertemente la llave hexagonal con una maza de hierro (no se incluye)
en dirección contraria a las manecillas del reloj. Esto aflojará el portabrocas para
facilitar su retiro.
AVISO: El tornillo del portabrocas tiene roscas izquierdas.
f. Coloque un portabrocas nuevo en el husillo y apriete el tornillo del portabrocas.
LLAVE DE
TUERCAS
HEXAGONAL
MAZA DE
HIERRO
MORDAZAS DEL
PORTABROCAS

MARTILLO PERFORADOR DE 6,0 AMPERIOS 37
SOLUCIÓN DE PROBLEMAS
PROBLEMA CAUSA POSIBLE ACCIÓN CORRECTIVA
El motor no arranca
La herramienta no está
conectada a una fuente de
alimentación
Conecte la herramienta a
una fuente de alimentación
No se puede instalar la
broca
1. No liberó el maguito
2. La broca no coincide con la
mordaza del portabrocas
1. Libere el manguito
2. Use la broca correcta
El motor se
sobrecalienta
Las rejillas de ventilación están
obstruidas
Limpie y despeje las
ventilaciones. No cubra con
la mano durante la operación
GARANTÍA LIMITADA DE 3 AÑOS
El comprador original de este martillo perforador cuenta con una garantía de dos años
a partir de la fecha de compra original, más un año adicional si registra el producto en
www.hammerheadtool.com (2 + 1), lo que suma un total de tres años, sujeto a la cobertura
de la garantía que se describe en el presente documento.
Conserve su recibo.
Se garantiza al comprador original que este martillo perforador no posee defectos de
materiales ni de mano de obra. Si cree que el atornillador de impacto o el martillo automático
presenta algún defecto en cualquier momento durante el período de garantía especificado,
simplemente llame al Servicio de Ayuda al Cliente de HAMMERHEAD al 1-877-888-1880
para hablar con un agente de Servicio al Cliente. Esta garantía no cubre: (1) falla de las piezas
debido al desgaste normal o al maltrato de la herramienta; (2) cualquier pieza alterada o
modificada por alguien ajeno al personal autorizado de HAMMERHEAD.
Esta garantía excluye las brocas, las bombillas y los accesorios. Esta garantía le otorga
derechos legales específicos, pero podría tener también otros derechos que varían según
el estado.

-
 1
1
-
 2
2
-
 3
3
-
 4
4
-
 5
5
-
 6
6
-
 7
7
-
 8
8
-
 9
9
-
 10
10
-
 11
11
-
 12
12
-
 13
13
-
 14
14
-
 15
15
-
 16
16
-
 17
17
-
 18
18
-
 19
19
-
 20
20
-
 21
21
-
 22
22
-
 23
23
-
 24
24
-
 25
25
-
 26
26
-
 27
27
-
 28
28
-
 29
29
-
 30
30
-
 31
31
-
 32
32
-
 33
33
-
 34
34
-
 35
35
-
 36
36
-
 37
37
-
 38
38


Hammerhead HDHD060 Manual de usuario
- Categoría
- Herramientas eléctricas
- Tipo
- Manual de usuario
en otros idiomas
- English: Hammerhead HDHD060 User manual
Otros documentos
-
Genesis GHD1260 Manual de usuario
-
-
Craftsman 315269280 El manual del propietario
-
Ryobi D620H Manual de usuario
-
-
-
RIDGID R50111-R1006 Guía del usuario
-
-
-
Skil HD182001 El manual del propietario