
A0(78-80)E_BILING
130924A
MANUAL DE INSTRUCCIONES
INSTRUCTIONS MANUAL
DESHUMEDECEDOR /
DEHUMIDIFIER
MODELOS / MODELS:
EAD301DWD
EAD504DWD
EAD704DWD
Lea todas las instrucciones antes de utilizar
el aparato y guardelas para futuras referencias.
Read all instructions prior to using
appliance and keep this manual for future reference.

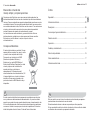
Índice
Bienvenido al mundo del
manejo simple y sin preocupaciones
01 electrolux bienvenido
indice electrolux 02
Consejos ambientales
El material del embalaje es reciclable. Procure
separar plásticos, espuma flex, papel y cartón
y enviarlos a las compañias de reciclaje.
De acuerdo con la directriz de la RAEE
(Residuos de Aparatos Eléctricos y
Electrónicos), en inglés WEEE (Waste of
Electrical and Electronic Equipment), se debe
colectar y disponer de los residuos de
aparatos eléctricos y electrónicos
separadamente. Si futuramente usted
necesita desechar este electrodoméstico, NO
lo haga echándolo con el resto de la basura
doméstica. Sírvase enviar el aparato a los
puntos de colecta de RAEE donde los haya
disponibles.
Entre en contacto con un técnico de mantenimiento autorizado para reparar o
ejecutar labores de mantenimiento en esta unidad.
El deshumedecedor de aire no devera ser operado por niños pequeños.
Si hay necesidad de sustituir el cable de alimentación, dicha sustitución deberá
ser llevada a cabo unicamente por personal autorizado.
Gracias por elegir Electrolux como marca para su deshumedecedor. Los
deshumedecedores Electrolux han sido concebidos bajo altísimos estándares
técnicos. Poseen características especiales desarrolladas para ofrecer aun más
comodidad al usuario. Para que usted pueda disfrutar todos los recursos de su
nuevo deshumedecedor de aire, Electrolux creó este manual. Con orientaciones
simples y prácticas usted conocerá sus funciones; además aprenderá la
manera de operar este aparato de modo adecuado y seguro.
Lea las instrucciones sobre instalación y operación antes de utilizar su
deshumedecedor y guárdelas en un lugar seguro para futuras consultas.
Electrolux una vez más fabrica lo mejor en lo que se refiere a
electrodomésticos.
En este manual usted hallará varias sugerencias importantes acerca de cómo
usar y mantener su deshumedecedor adecuadamente. Un poco de cuidado
preventivo por parte del usuario puede ahorrarle tiempo y dinero durante la vida
útil de su deshumedecedor. Usted encontrará muchas respuestas a problemas
comunes en la tabla de consejos para la solución de problemas. El leer antes
dicha tabla podría evitarle el llamar al Centro de Servicio Autorizado.
ESP
ESP
Seguridad ................................................................................................ 03
Información eléctrica ................................................................................ 05
Descripción .............................................................................................. 06
Como elegir el lugar de instalación............................................................ 07
Panel de control ....................................................................................... 08
Operación ................................................................................................ 10
Cuidado y mantenimiento ........................................................................ 14
Solución de problemas ............................................................................ 16
Otras características ................................................................................ 17
Informaciones técnicas ............................................................................ 35

03 electrolux seguridad
seguridad electrolux 04
Seguridad
Lea todas las instrucciones antes de
utilizar este deshumedecedor. Para
reducir el riesgo de incendio, choques
eléctricos, o daño a personas durante
el uso del deshumedecedor.
No exceda el rango de poder de
salida o de conexión del dispositivo.
De otra manera, puede provocar un
choque eléctrico o incendio por al
exceso de calor generado.
No opere o detenga la unidad
apagando o prendiendo el interruptor.
Puede causar un choque eléctrico o
incendio debido a la generación de
calor.
No inserte o remueva el enchufe con
las manos mojadas.
Puede causar un choque eléctrico.
No dañe o utilice un cable de energía
no especificado.
Puede causar un choque eléctrico o
incendio.
No modifique la longitud del enchufe o
comparta el toma corriente con otras
aplicaciones.
Puede causar un choque eléctrico o
incendio debido a la generación de
calor.
No coloque la unidad debajo de una
fuente de calor.
Las partes de plástico pueden
derretirse y ocasionar un incendio.
Desconecte la energía si siente
Sonidos u olores extraño o si
comienza a salir humo.
Puede ocasionar un incendio o
choque eléctrico.
Nunca debe intentar desarmar la
unidad o repararla usted mismo.
Puede causar errores en la máquina o
choque eléctrico.
Antes de limpiar la unidad, apáguela y
desconéctela.
Puede ocasionar choque eléctrico o
heridas.
No utilice la máquina cerca de gas o
combustibles inflamables, como
gasolina, bencina, tóner, etc.
Puede ocasionar una explosión o
incendio.
No beba o utilice el agua almacenada
en la unidad.
Contiene contaminantes y podría
enfermarlo.
No retire el contenedor de agua
mientras está operando.
Puede ocasionar que el contenedor se
vuelque sobre la unidad y causar un
choque eléctrico.
No utilice la unidad en espacios
pequeños.
Falta de ventilación puede ocasionar
sobrecalentamiento e incendio.
No coloque en áreas donde le puede
caer agua a la unidad.
Agua puede entrar en la unidad y
degradar el aislamiento. Puede
ocasionar un choque eléctrico o
incendio.
Coloque la unidad en un lugar del piso
nivelado y resistente.
Si la unidad se cae, el agua puede
derramarse y dañar sus pertenencias
o provocar choques eléctricos o
incendios.
No obstruya las ranuras de entrada o
salida con trapos o toallas.
La falta de flujo de aire puede
provocar un sobrecalentamiento e
incendio.
Se debe tener cuidado cuando use la
unidad en una habitación con las
siguientes personas:
Bebés, niños, ancianos, y personas no
sensibles a la humedad.
No utilizar en áreas donde se
manipulan químicos.
Esto ocasionará el deterioro de la
unidad debido a los productos
químicos y solventes disueltos en el
aire.
No se pare o siente sobre la unidad.
Puede lastimarse se cae de la unidad
o si la unidad cae sobre usted.
Nunca introduzca los dedos ni otros
objetos extraños en las rejillas o
aberturas. Tenga especial cuidado de
advertir a los niños de estos peligros.
Puede causar una choque eléctrico o
fallo del dispositivo.
Inserte siempre los filtros de forma
segura. Limpiar el filtro una vez cada
dos semanas.
La operación sin filtros puede
ocasionar fallas.
No coloque objetos pesados sobre el
cable enchufe y tenga cuidado que el
cable no esté comprimido.
Hay peligro de incendio o choque
eléctrico.
Si entra agua en la unidad, apáguela y
desconecte la energía, póngase en
contacto con un técnico calificado.
Puede causar una avería en el
dispositivo o un accidente.
No coloque floreros o recipiente con
agua en la parte superior de la unidad.
Agua puede derramarse en la unidad,
causando fallas en el aislamiento y
choques eléctricos o incendios.
ESP
ESP

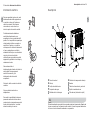
descripción electrolux 06
ESP
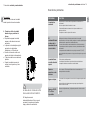
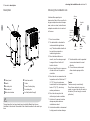
El deshumedecedor que usted ha comprado puede ser ligeramente diferente de
la que se muestra en las figuras de este manual, la forma en general deberá ser
la misma. Lea la información referente a su operación.
1
2
3
4
5
6
8
7
9
10
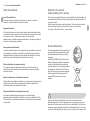
Panel de control
Manija
Rejilla de salida de aire
Recipiente de agua
Medidor del nivel de agua
Salida de la manguera de drenaje
Ruedas
Cable de alimentación y enchufe
Rejilla de entrada de aire
Filtro de aire (detras de la rejilla)
Descripción
1
2
3
4
5
6
7
8
9
10
Frente
Tras
05 electrolux información eléctrica
ESP
Para su seguridad y protección, este
deshumedecedor está equipado con
un enchufe a tierra de 3 puntas en
cable de corriente. Bajo ninguna
circunstancia, corte, remueva, o
desvie la punta a tierra del enchufe.
Su deshumedecedor deberá ser
enchufado directamente en un
receptáculo a tierra y polarizado de 3
puntas. Si el receptáculo de pared que
usted pretende utilizar no acepta un
enchufe de 3 puntas, o si usted no
está seguro si la salida está adecuada
a tierra o protegida por un fusible
retardador de tiempo o un cortador de
circuito, pida a un electricista
calificado para que instale una salida
apropriada y aplicable a los códigos y
ordenanzas locales.
Nunca desenchufe el
deshumedecedor tirando del cable de
electricidad. Siempre agarre el
enchufe firmemente y jale
directamente hacia fuera del
receptáculo.
No pinche, doble o anude el cable de
corriente.
No use cabels de extensión o
adaptadores.
Para evitar la posibilidad de lesiones
personales antes de instalar o hacer
mantenimiento, siempre desconecte la
fuente de alimentación a la unidad
antes de instalar y/o servicio.
Información eléctrica

07 electrolux como elegir el lugar de instalación
Como elegir el lugar de instalación
ESP
Un deshumidificador operando en el
sótano tendrá poco o ningún efecto
en el secado de un área adyacente de
almacenamiento cerrado, como un
armario, a menos que exista una
circulación de aire adecuada dentro y
fuera de la zona.
1. No use al aire libre.
2. Este deshumidificador está
diseñado solo para aplicaciones
residenciales de interior. No debe
utilizarse para aplicaciones
comerciales o industriales.
3. Coloque el deshumidificador en un
piso nivelado que sea lo
suficientemente resistente como
para soportar la unidad con un
recipiente lleno de agua.
4. Deje por lo menos 20 cm de
espacio libre alrededor de la
unidad para la buena circulación
de aire.
5. Coloque la unidad en un área
donde la temperatura no
descienda por debajo de 5 °C
(41°F). Las bobinas pueden ser
cubiertas de escarcha a
temperaturas inferiores a 5°C
(41°F), lo que puede reducir el
rendimiento.
6. Coloque la unidad lejos de la
secadora, calentador o radiador.
7. Utilice la unidad para evitar daños
por humedad en cualquier lugar
con libros o artículos de valor.
8. Utilice el deshumidificador en un
sótano para ayudar a prevenir
daños por humedad.
9. El deshumidificador debe utilizarse
en un área cerrada para más
eficacia.
10. Cierre todas las puertas, ventanas
y otras aberturas al exterior de la
habitación.
Ruedas
Las ruedas solo se mueven
lateralmente.
No fuerce las ruedas para moverlas
sobre la alfombra, o mueva la unidad
con agua en el recipiente. (La unidad
puede volcarse derramar el agua.)
Rejilla de salida
de aire
Rejilla de
ingreso de aire
20cm o
más
20cm o
más
20cm o
más
20cm o
más
40cm o
más
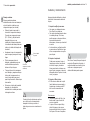
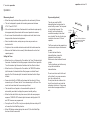
panel de control electrolux 08
ESP
Panel de control
1
2
3
4
Botón de ENCENDIDO
Presione para encender o apagar el deshumidificador.
Botón de MODO
Presione para seleccionar el modo de funcionamiento deseado de
deshumidificación, deshumidificación Continua y deshumidificación
Inteligente. Los modos de Secadora y deshumidificación Inteligente son
opcionales.
Botónes de Arriba/Abajo
Botones de Control de Configuración de Humedad
El nivel de humedad puede ajustarse dentro de un rango de 35% HR
(humedad relativa) a 85% de HR (humedad relativa) en incrementos de 5%.
Para aire más seco, presione el botón (-) y seleccione un valor porcentual
inferior (%). Para aire húmedo, presione el botón (+) y establezca un valor
por ciento más (%).
Botones de configuracion del Temporizador
Utilize los botones de Arriba/Abajo para establecer el inicio automático y el
tiempo de parada automática de 0.0 a 24.
Botón de Temporizador
Presione para iniciar el inicio automático y el tiempo de parada automatica
en conjunto con los botones de Arriba/Abajo.
123345 6
7 109 8 11
12
13

09 electrolux panel de control
operación electrolux 10
6
7
9
10
11
Botón de Turbo
Controla la velocidad del ventilador. Presione para seleccionar la velocidad
Alta o Normal del ventilador. Ajuste el control del ventilador a Alta para
máxima eliminación de humedad. Cuando la humedad se haya reducido y
se prefiere un funcionamiento silencioso, ajuste el control del ventilador a
Normal.
PANTALLA
Muestra el % de humedad establecido durante la configuración, luego
muestra el nivel real (5% de precisión) % de humedad del ambiente.
Códigos de error y códigos de protección:
AS- Error de sensor de Humedad--Desconecte la unidad y reconectela. Si el
error persiste, llame a servicio.
ES- Error de sensor de temperatura--Desconecte la unidad y reconectela. Si
el error persiste, llame a servicio.
P1- Unidad está descongelando - Permita un periodo de tiempo para
descongelar automáticamente. La protección se borrará después de que la
unidad se auto-descongele.
P2-Cubeta esta llena o la cubeta no esta en la posicion correcta—Vaciar la
cubeta y reposicionar correctamente.
E3- Mal funcionamiento de la unidad--Desconecte la unidad y reconectela.
Si el error persiste, llame a servicio.
Luz indicadora Recipiente lleno
Luz indicadora de Temporizador encendido/apagado
Luz indicadora de Turbo encendido
Luz indicadora del encendido
Luz indicadora de operaciones
Botón de Ionizador
Presione para activar el ionizador. Los aniones son automáticamente
generados por ionización. Los aniones desactivan los vapores químicos y
partículas de polvo en el aire. Presione nuevamente para detener la función.
Luz indicadora de Ionizador encendido
Todas las imágenes en el manual son solo para fines de explicación. La unidad
que compre puede ser ligeramente diferente pero las operaciones y funciones
son las mismas.
ESP
ESP
5
8
12
13
Operación
Cuando utilice la unidad
• La primera vez que utiliza el deshumidificador, operar la unidad
continuamente durante 24 horas.
• Esta unidad está diseñada para funcionar con un entorno de trabajo entre
los 5°C/41°F y 35°C/95°F.
• Si la unidad ha sido apagada y debe ser encendida de nuevo rápidamente,
permita aproximadamente tres minutos para el correcto funcionamiento
antes de encender.
• No conectar el deshumidificador a un tomacorriente múltiple que también
está siendo utilizado para otros dispositivos eléctricos.
• Seleccione una ubicación adecuada, asegúrese que tiene fácil acceso a un
tomacorriente.
• Conecte el dispositivo a un tomacorriente adecuado con salida de conexión
a tierra.
• Asegúrese que el recipiente de agua está bien colocado de lo contrario la
unidad no funcionará correctamente.
Configuracion del Temporizador
• Cuando la unidad este encendida, primero presione el boton del
Temporizador, se enciende la luz indicadora de Temporizador Apagado.
Indicacion que se ha iniciado el programa de Parada Automatica. Presione
nuevamente y se enciende la luz indicadora de Encendido. Indicacion que
se ha iniciado el Inicio Automatico.
• Cuando la unidad este apagada, primero presione el Botón del
Temporizador, se enciende la luz indicadora de Temporizador Encendido.
Indicacion que se ha iniciado el Inicio Automatico. Presione nuevamente y
se enciende la luz indicadora de Temporizador Apagado. Indicacion que se
ha iniciado la Parada Automatica.
• Presione y mantenga presionado el botón de Arriba/Abajo para cambiar
Tiempo Automatico en incrementos de 0.5 horas, hasta 10 horas, luego en
incrementos de 1 hora hasta 24 horas. El control hará una cuenta regresiva
del tiempo restante hasta el inicio.
• El tiempo seleccionado se registrará en 5 segundos y el sistema regresará
automáticamente para mostrar el ajuste de humedad anterior.
• Al ajustar los tiempos de Inicio Automático y Parada Automática, dentro de
la misma sequencia de programa, se encienden las luces de Temporizador
Encendido/Apagado identificando que los tiempos de Encendido y
Apagado han sido programados.
• Encender o Apagar la unidad en cualquier momento o ajustar el
Temporizador a 0.0 cancela la funcion de Inicio/Parada Automatica.
• Cuando la pantalla LED muestra el código de P2, también se cancelará la
función de Inicio/Parada Automatica.

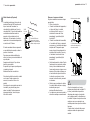
operación electrolux 12
Al quitar el recipiente, no toque
ninguna pieza dentro de la unidad. Si
lo hace, podría dañar el producto.
Asegúrese de empujar el recipiente
con cuidado cuando lo introduzca en
la unidad. Golpear el recipiente contra
cualquier cosa o no empujarlo con
cuidado puede hacer que la unidad no
funcione.
Cuando retire la cubeta, debe secar
cualquier residuo de agua sobre la
unidad.
1. Hale un poco la cubeta
2. Sujete ambos lados de la
cubeta de forma pareja y
retire de la unidad.
3. Deshagase del agua.
11 electrolux operación
Remover el agua recolectada
Hay dos maneras de remover el agua
recolectada.
1. Utilice el recipiente
• Cuando la unidad está apagada, si
el cubo está lleno, la unidad
emitirá un pitido 8 veces y el
indicador luminoso de Lleno
parpadeará, la pantalla digital
muestra P2.
• Cuando la unidad está encendida,
si la cubeta está llena, se apaga el
compresor y el ventilador se apaga
después de 30 segundos para
secar el agua del condensador, la
unidad emitirá un pitido 8 veces y
el indicador luminoso de Lleno
parpadeará, la pantalla digital
muestra P2.
• Retire lentamente la cubeta. Sujete
fuertemente las manijas de ambos
lados y hale cuidadosamente de
forma recta para que el agua no se
derrame. No coloque el tanque en
el suelo debido a que el fondo de
la cubeta no es plano; de otra
manera la cubeta caerá y causará
un derrame.
• Bote el agua y reubique la cubeta.
La cubeta debe estar en su lugar y
asentada para que el
deshumidificador funcione.
• La máquina se reiniciará cuando la
cubeta se reubique correctamente.
ESP
ESP
Modo Secadora (Opcional)
La unidad puede hacer la función de
deshumidificación MAX cuando está
bajo el modo de Secadora. La
velocidad del ventilador se fija en la
velocidad Alta. El nivel de humedad es
controlada automáticamente de
acuerdo a la humedad real de la
habitacion. Se terminará el modo de
operación de la secadora después de
un máximo de 10 horas.
El modo secadora debe ser operado
en una habitación cerrada, no abra la
puerta ni la ventana.
Para lograr una deshumidificación
eficaz, por favor, primero deshidrate la
ropa mojada.
Asegúrese de dirigir el flujo de aire
hacia la ropa mojada.
Es posible que la ropa mojada gruesa
y pesada no logre la
deshumidificación mas efectiva.
No cubra la salida de aire de la unidad
con la ropa. Puede causar calor
excesivo, incendio o fallos en la
unidad.
No coloque la ropa mojada encima de
la unidad y no permitir que gotee
sobre la unidad. Puede causar una
descarga eléctrica, línea de fuga o
falla de la unidad.
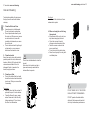
Ropa mojada
Permita 30-50cm de
distancia de los lados
superior e izquierdo de la
unidad a la ropa mojada.
.
30-50
Flujo de
aire
30-50 cm

Retire el tapón
de goma
Conecte la
manguera a la salida
del drenaje
13 electrolux operación
cuidado y mantenimiento electrolux 14
Drenaje continuo
El agua puede desecharse
automáticamente hacia un drenaje en
el piso fijando la unidad con una
manguera de agua (no incluida).
• Retire el tapón de goma de la
toma de la manguera de drenaje.
Conecte una manguera de agua
(ID = 13,5mm) y diríjala hacia el
desagüe del piso o a una
instalación de drenaje adecuada.
La instalación de drenaje debe ser
inferior a la salida del desagüe de
la unidad.
• Asegúrese de que la manguera de
agua es segura para que no haya
fugas.
• Dirija la manguera hacia el
desagüe, asegurándose que no
existan dobleces que harían
detener el flujo del agua.
• Coloque la boca de la manguera
en el desagüe y asegúrese de que
la boca de la manguera este a
nivel o hacia abajo para que el
agua fluya libremente. Nunca dejar
hacia arriba.
• Seleccione el ajuste de humedad
deseado y la velocidad del
ventilador de la unidad para iniciar
el desagüe continuo.
Cuando la función de drenaje continuo
no se utiliza, retire la manguera de
desagüe de la toma y conecte el
tapón de goma como se muestra en la
figura.
No utilice el lavavajillas para limpiar el
recipiente. Después de limpiarlo, el
recipiente debe ser colocado y bien
sujeto en su lugar para que el
deshumidificador pueda operar.
ESP
ESP
Cuidado y mantenimiento
Apague el deshumidificador y retire el
enchufe del tomacorriente antes de
limpiar.
1. Limpiar la rejilla y la carcasa
• Use agua y un detergente suave.
No utilice lejía o abrasivos.
• No vierta agua directamente sobre
la unidad principal. Si lo hace,
podría causar un choque eléctrico,
causa del aislamiento a
deteriorarse, o hacer que la unidad
se oxide.
• La toma de aire y rejillas de salida
se ensucian con facilidad, así que
utilice una aspiradora o un cepillo
para limpiar.
2. Limpiar el recipiente
Cada pocas semanas, limpie el
tanque para evitar el crecimiento
de moho, hongos y bacterias.
Llene parcialmente el tanque con
agua limpia y agregue un poco de
detergente suave. Agite en el cubo,
vacíe y enjuague.
3. Limpiar el filtro de aire
• El filtro de aire detrás de la rejilla
frontal debe ser inspeccionado y
limpiado por lo menos cada 30
días o más a menudo de ser
necesario.
Para remover:
• Sujete la lengüeta del filtro y tire
hacia arriba. Luego tire de ella
como se muestra.
• Limpie el filtro con agua tibia y
jabón. Enjuague y deje que se
seque antes de volver a colocarlo.
No limpie el filtro en el lavaplatos.

NO ENJUAGUE O PONGA EL FILTRO
EN EL LAVAPLATOS AUTOMÁTICO.
NO haga funcionar el
deshumidificador sin filtro ya que la
suciedad y las pelusas lo pueden
tapar y reducir el rendimiento.
15 electrolux cuidado y mantenimiento
solución de problemas electrolux 16
Solución de problemas
La unidad no
enciende
La unidad hace
un ruido fuerte al
operar
Agua en el piso
- Asegúrese que el enchufe está completamente conectado en el
tomacorriente.
- Revise la caja de fusible/circuito de la casa.
- El deshumidificador ha alcanzado el nivel pre establecido o el
recipiente está lleno.
- El recipiente no está en la posición correcta.
- El filtro de aire está bloqueado.
- La unidad está inclinada en lugar de vertical como debería ser.
- La superficie donde se encuentra no está nivelada.
- El conector de la manguera a la conexión de la manguera puede estar
suelto.
- Intentar utilizar el recipiente para recoger agua, pero el tapón de
vaciado ha sido removido.
El
deshumidificador
no absorbe la
humedad del aire
como debería
Aparece
escarcha en las
bobinas
Aparece E1, E2,
P1 o P2 en
la pantalla
- No dispone de tiempo suficiente para eliminar la humedad.
- Asegúrese de que no haya cortinas, persianas o muebles que bloqueen
la parte delantera o posterior del deshumidificador.
- El control de humedad no está establecido lo suficientemente bajo.
- Compruebe que todas las puertas, ventanas y otras aberturas estén
bien cerradas.
- La temperatura de la habitación es muy baja, menos de 5°C(41°F).
- Hay un calentador de queroseno o algo que emite vapor de agua en la
habitación.
- Esto es normal. Tel deshumidificador tiene la característica de
descongelamiento automático.
- Estos son códigos de error y códigos de protección. Vea la sección
página 09.
PROBLEMA SOLUCIÓN
ESP
ESP
Para insertar:
Inserte el filtro de aire en la unidad
desde la parte inferior hacia arriba.
4. Cuando no utilice la unidad
durante largos periodos de
tiempo
• Después de apagar la unidad,
espere un día antes de vaciar el
recipiente.
• Limpieza de la unidad principal, el
recipiente, el nebulizador
ultrasónico y el filtro de aire.
• Enrolle el exceso de cable en el
gancho del cable de alimentación.
• Cubra la unidad con una bolsa de
plástico.
• Guarde la unidad en posición
vertical en un lugar seco y bien
ventilado.

17 electrolux otras características
welcome electrolux 18
Environmental advice
The packaging material used is recyclable; we
recommend that you separate plastic, paper
and cardboard and give them to recycling
companies.
According to WEEE (Waste of Electrical and
Electronic Equipment) guidelines, waste from
electrical and electronic devices should be
collected separately. If you need to dispose of
this appliance in the future, do NOT throw it
away with the rest of your domestic garbage.
Instead, please take the appliance to the
nearest WEEE collection point, where
available.
Thank you for choosing Electrolux for your dehumidifier. Our air dehumidifier are
developed with high technical and quality standards, with features to offer you
even more comfort.
Read all instructions before using this appliance. This book contains valuable
information about operation, care and service. Keep it in a safe place.
You expect all this from Electrolux…and we deliver.
Welcome to the world of
simple handling and no worries.
Inside you will find many helpful hints on how to use and maintain your
dehumidifier properly. Just a little preventive care on your part can save you a
great deal of time and money over the life of your dehumidifier. You'll find many
answers to common problems in the chart of troubleshooting tips. If you review
our chart of Troubleshooting Tips first, you may not need to call for service at all.
ESP
ENG
Luz de Recipiente Lleno
Se ilumina cuando el recipiente está listo para ser vaciado, o cuando el
recipiente no está colocado en la posición correcta.
Apagado Automático
El interruptor de control del nivel del agua apaga el des humidificador cuando
el recipiente se llena o cuando se remueve el recipiente o cuando no se coloca
en la posición correcta. Cuando se alcanza el nivel de humedad
predeterminado, la unidad se apaga automáticamente. En algunos modelos, el
motor del ventilador seguira operando.
Descongelamiento Automático
Cuando se acumule escarcha en los serpentines del evaporador, el compresor
de se apagará y el ventilador continuará funcionando hasta que la escarcha
desaparezca.Durante la operación de descongelación automática, la unidad
puede hacer un ruido de refrigerante fluyendo, esto es normal.
Reinicio Automático (en algunos modelos)
Si la unidad se apaga inesperadamente debido a un corte de energía, se
reiniciará con la función anterior en forma automática cuando se reanude el
suministro eléctrico.
Espere 3 minutos antes de reanudar la operación
Después de que la unidad se ha detenido, no se puede reiniciar la operación en
los primeros 3 minutos. Esto es para proteger la unidad. La operación se
iniciará automáticamente después de 3 minutos.
Modo de deshumidificación inteligente (opcional)
En el modo de deshumidificación inteligente, la unidad controlará
automáticamente humedad de la habitación en un rango confortable de 45% ~
55% de acuerdo a la temperatura ambiente. La función de ajuste de humedad
no será válida.
Otras características

19 electrolux contents
security electrolux 20
Contents
Contact the authorised service technician for repair or maintenance of this unit.
The dehumidifier cannot be use by childrens.
If the power cord is to be replaced, replacement work shall be performed by
authorised personnel only.
Security.....................................................................................................20
Electrical information.................................................................................22
Description...............................................................................................23
Choosing the installation site..................................................................24
Control panel...........................................................................................25
Operation.................................................................................................27
Care and cleaning....................................................................................31
Troubleshooting........................................................................................33
Other features............................................................................................34
Technical information...............................................................................35
ENG
ENG
Security
Do not exceed the rating of the power
outlet or connection device.
Otherwise, it may cause electric shock
or fire due to excess heat generation.
Do not operate or stop the unit by
switching on or off the power.
It may cause electric shock or fire due
to heat generation.
Do not damage or use an unspecified
power cord.
It may cause electric shock or fire.
Do not modify power cord length or
share the outlet with other appliances.
It may cause electric shock or fire due
to heat generation.
Do not insert or pull out plug with wet
hands.
It may cause electric shock.
Do not place the unit near a heat
source.
Plastic parts may melt and cause a
fire.
Disconnect the power if strange
sounds, smell, or smoke comes from
it.
It may cause fire and electric shock.
You should never try to take apart or
repair the unit by yourself.
It may cause failure of machine or
electric shock.
Before cleaning, turn off the power
and unplug the unit.
It may cause electrical shock or injury.
Do not use the machine near
flammable gas or combustibles, such
as gasoline, benzene, thinner, etc.
It may cause an explosion or fire.
Do not drink or use the water drained
from the unit.
It contains contaminants and could
make you sick.
Do not take the water bucket out
during operation.
It may cause bucket full protect of the
unit and cause electric shock.
Do not use the unit in small spaces.
Lack of ventilation can cause
overheating and fire.
Do not put in places where water may
splash onto the unit.
Water may enter the unit and degrade
the insulation. It may cause an electric
shock or fire.
Place the unit on a level, sturdy
section of the floor.
If the unit falls over, it may cause
water to spill and damage belongings,
or cause electrical shock or fire.
Do not cover the intake or exhaust
openings with cloths or towels.
A lack of air flow can lead to
overheating and fire.
Care should be taken when using the
unit in a room with the following
persons:
Infants, children, elderly people, and
people not senstive to humidity.

21 electrolux security
electrical information electrolux 22
ENG
ENG
Read all instructions before using this
dehumidifier. To reduce the risk of fire,
electric shock, or injury to persons
when using your dehumidifier.
Do not use in areas where chemicals
are handled.
This will cause the unit deterioration
due to chemicals and solvents
dissolved in the air.
Never insert your finger or other
foreign objects into grills or openings.
Take special care to warn children of
these dangers.
It may cause electric shock or failure
of appliance.
Do not place heavy object on the
power cord and take care so that the
cord is not compressed.
There is danger of fire or electric
shock.
Do not climb up on or sit on the unit.
You may be injured if you fall or if the
unit falls over.
Always insert the filters securely.
Clean filter once every two weeks.
Operation without filters may cause
failure.
If water enters the unit, turn the unit
off and disconnect the power , contact
a qualified service technician.
It may cause failure of appliance or
accident.
Do not place flower vases or other
water container on top of the unit.
Water may spill inside the unit,
causing insulation failure and electrical
shock or fire.
For your safety and protection, this
dehumidifier is equipped with a three-
prong grounding plug on the power
cord. Do not, under any
circumstances, cut or remove the
round ground prong from the plug.
Your dehumidifier must be plugged
directly into a properly grounded and
polarized three-prong receptacle. If
the wall receptacle you intend to use
will not accept a three-prong plug, or
if you are not sure the outlet is
adequately grounded or protected by
a time delay fuse or circuit breaker,
have a qualified electrician install the
proper outlet according to the National
Electrical Code and appliance local
codes and ordinances.
Never unplug the dehumidifier by
pulling on the power cord. Always grip
the plug firmly and pull straight out
from the receptacle.
Do not pinch, bend, or knot the power
cord.
Do not use an extension cord or an
adapter plug.
To avoid the possibility of personal
injury, always disconnect the power
supply to the unit, before installing
and/or servicing.
Electrical information

Air outlet
grille
Air intake
grille
20cm or
more
20cm or
more
20cm or
more
20cm or
more
40cm or
more
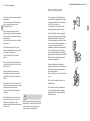
1
2
3
4
5
6
8
7
9
10
Control panel
Handle
Air outlet grille
Water bucket
Water level window
Drain hose outlet
Caster
Power Cord and plug
Air intake grille
Air filter (behind the grill)
1
2
3
4
5
6
7
8
9
10
Front
Rear
23 electrolux description
choosing the installation site electrolux 24
ENG
ENG
The appliance that you have bought may be slightly different from the one
illustrated in this manual. Please refer to the information related to the model you
have.
Description
Choosing the installation site
A dehumidifier operating in a
basement will have little or no effect in
drying an adjacent enclosed storage
area, such as a closet, unless there is
adequate circulation of air in and out
of the area.
1. Do not use outdoors.
2. This dehumidifer is intended for
indoor residential applications
only. This dehumidifier should not
be used for commercial or
industrial applications.
3. Place the dehumidifier on a
smooth, level floor strong enough
to support the unit with a full
bucket of water.
4. Allow at least 20cm of air space on
all sides of the unit for good air
circulation.
5. Place the unit in an area where the
temperature will not fall below 5°C
(41 °F). The coils can become
covered with frost at temperatures
below 5 °C(41 °F), which may
reduce performance.
6. Place the unit away from the
clothes dryer, heater or radiator.
7. Use the unit to prevent moisture
damage anywhere books or
valuables are stored.
8. Use the dehumidifier in a basement
to help prevent moisture damage.
9. The dehumidifier must be operated
in an enclosed area to be most
effective.
10. Close all doors, windows and
other outside openings to the
room.
Casters
Casters can only move laterally.
Do not force casters to move over
carpet, nor move the unit with water in
the bucket (The unit may tip over and
spill water.)

25 electrolux control panel
control panel electrolux 26
ENG
ENG
Control panel
1
2
3
4
POWER Pad
Press to turn the dehumidifier on and off.
MODE Pad
Press to select the desired operation mode from Dehumidifying, Dryer,
Continuous dehumidifying and Smart dehumidifying. Dryer and Smart
dehumidifying modes are optional.
Up/Down Pads
Humidity Set Control Pads
The humidity level can be set within a range of 35%RH(Relative Humidity) to
85%RH(Relative Humidity) in 5% increments. For drier air, press down the
pad and set to a lower percent value(%). For damper air, press the up pad
and set a higher percent value(%).
Timer Set Control Pads
Use the Up/Down pads to set the Auto start and Auto stop time from 0.0 to
24.
Timer Pad
Press to initiate the Auto start and Auto stop feature, in conjuction with the
up and down key pads.
5
8
9
10
11
Turbo Pad
Control the fan speed. Press to select either High or Normal fan speed. Set
the fan control to High for maximum moisture removal. When the humidity
has been reduced and quiet operation is preferred, set the fan control to
Normal.
DISPLAY
Shows the set % humidity level while setting, then shows the actual(+5%
accuracy) room % humidity level.
Error Codes and Protection Codes:
AS- Humidity sensor error--Unplug the unit and plug it back in. If error
repeats, call for service.
ES- Temperature sensor error-- Unplug the unit and plug it back in. If error
repeats, call for service.
P1- Unit is defrosting-- Allow the unit time to automatically defrost. The
protection will clear after the unit self defrosts.
P2- Bucket is full or bucket is not in right position-- Empty the bucket and
replace it in the right position.
E3- Unit malfunction-- Unplug the unit and plug it back in. If error repeats,
call for service.
Bucket full indicator light
Timer On/Off indicator light
Turbo on indicator light
Power on indicator light
Operations on indicator light
Ion function
Ionizer creates Anions, which deactivate the airborne chemical vapors and
dust particles, eliminates odor, smoke and creates fresher feeling.
Ion function on indicator light
All the pictures in the manual are for explanation purposes only. The actual
shape of the unit you purchased may be slightly different, but the operations
and functions are the same.
123345 6
7 109 8 11
6
7
12
13
12
13

27 electrolux operation
operation electrolux 28
ENG
ENG
Operation
When using the unit
• When first using the dehumidifier, operate the unit continuously 24 hours.
• This unit is designed to operate with a working environment between
5°C/41°F and 35°C/95°F.
• If the unit has been switched off and needs to be switched on again quickly,
allow approximately three minutes for the correct operation to resume.
• Do not connect the dehumidifier to a multiple socket outlet, which is also
being used for other electrical appliances.
• Select a suitable location, making sure you have easy access to an
electrical outlet.
• Plug the unit into a suitable electrical socket-outlet with earth connection.
• Make sure the Water bucket is correctly fitted otherwise the unit will not
operate properly.
Setting the Timer
• When the unit is on, first press the Timer button, the Timer Off indicator light
illuminates. It indicates the Auto Stop program is initiated. Press it again the
Time On indecator light illuminates.It indicates the Auto Start is initiated.
• When the unit is off, first press the Timer button, the TIMER ON indicator
light illuminates. It indicates the Auto Start program is initiated. Press it
again the Time Off indecator light illuminates.It indicates the Auto Stop is
initiated.
• Press or hold the UP or DOWN pad to change the Auto time by 0.5 hour
increments, up to 10 hours, then at 1 hour increments up to 24 hours. The
control will count down the time remaining until start.
• The selected time will register in 5 seconds and the system will
automatically revert back to display the previous humidity setting.
• When the Auto start & Auto stop times are set, within the same program
sequence, TIMER ON OFF indicator lights illuminate identifying both ON
and OFF times are now programmed.
• Turning the unit ON or OFF at any time or adjusting the timer setting to 0.0
will cancel the Auto Start/Stop function.
• When LED display window displays the code of P2, the Auto Start/Stop
function will also be cancelled.
Dryer mode (optional)
The unit can make the MAX
dehumidification function when it is
under the Dryer mode. The fan speed
is fixed at high fan speed. The
humidity level is automatically
controlled according to the actual
room humidity.The unit will quit dryer
mode after a maximum 10 hours'
operation.
The Dryer mode must be operated in a
close room,do not open the door and
window.
To make the best effective
dehumidification ,please first
dehydrate the wet clothes.
Make sure to direct airflow at the wet
clothes.
For thick and heavy wet clothes may
not get the best effective
dehumidification.
Do not cover the air outlet of the unit
with clothes. It may cause excessive
heat, fire or failure of unit.
Do not place the wet clothes on the
top of the unit and do not make the
water drop into the unit. It may cause
electric shock,creepage or failure of
unit.
W
et clothes
Allow 30-50cm of distance
on the top and right sides
of the unit to the wet
clothes
30-50 cm
Airflow
30-50 cm

1. Pull out the bucket a little
2. Hold both sides of the
bucket with even strenght,
and pull it out from the unit.
3. Pour the water out.
29 electrolux operation
operation electrolux 30
ENG
ENG
Removing the collected water
There are two ways to remove
collected water.
1. Use the bucket
• When the unit is off,if the bucket is
full,the unit will beep 8 times and
the Full indicator light will flash, the
digital display shows P2.
• When the unit is on,if the bucket is
full, the compressor turns off and
the fan turns off after 30 seconds
for drying the water of the
condenser, then the unit will beep
8 times and the Full indicator light
will flash, the digital display shows
P2.
• Slowly pull out the bucket. Grip the
left and right handles securely, and
carefully pull out straight so water
does not spill. Do not put the tank
on the floor because the bottom of
the bucket is uneven. Otherwise
the bucket will fall and cause the
water to spill.
• Throw away the water and replace
the bucket. The bucket must be in
place and securely seated for the
dehumidifier to operate.
• The machine will re-start when the
bucket is restored in its correct
position.
When you remove the bucket, do not
touch any parts inside of the unit.
Doing so may damage the product.
Be sure to push the bucket gently all
the way into the unit. Banging the
bucket against anything or failing to
push it in securely may cause the unit
not to operate.
When you remove the bucket,if there
is some water in the unit you must dry
it .
2. Continuous draining
Water can be automatically emptied
into a floor drain by attaching the unit
with a water hose (not included).
• Remove the rubber plug from the
back drain hose outlet. Attach a
water hose(ID=13.5mm) and lead it
to the floor drain or a suitable
drainage facility.The drainage
facility should be lower than the
drain outlet of the unit.
• Make sure the water hose is secure
so there are on leaks.
• Direct the hose toward the
drain,making sure that there are no
kinks that will stop the water
flowing.
• Place the end of the hose into the
drain and make sure the end of the
hose is level or down to let the
water flow smoothly.Do never let it
up.
• Select the desired humidity setting
and fan speed on the unit for
continuous draining to start.
When the continuous drain feature is
not being used, remove the drain
hose from the outlet and attach the
rubber plug as shown.
Remove the
rubber plug
Attach the hose to
the drain hose outlet

31 electrolux care and cleaning
care and cleaning electrolux 32
ENG
ENG
Do not use a dishwasher to clean the
bucket.
After clean, the bucket must be in
place and securely seated for the
dehumidifier to operate.
Care and cleaning
Turn the dehumidifier off and remove
the plug from the wall outlet before
cleaning.
1. Clean the Grille and Case
• Use water and a mild detergent.
Do not use bleach or abrasives.
• Do not splash water directly onto
the main unit. Doing so may cause
an electrical shock, cause the
insulation to deteriorate, or cause
the unit to rust.
• The air intake and outlet grilles get
soiled easily, so use a vacuum
attachment or brush to clean.
2. Clean the bucket
Every few weeks, clean the bucket to
prevent growth of mold, mildew and
bacteria. Partially fill the bucket with
clean water and add a little mild
detergent. Swish it around in the
bucket, empty and rinse.
3. Clean the air filter
• The air filter behind the front grille
should be checked and cleaned at
least every 30 days or more often
if necessary.
To remove:
• Grip the tab on the filter and pull it
upward, then pull it out as shown.
• Clean the filter with warm, soapy
water. Rinse and let the filter dry
before replacing it. Do not clean
the filter in a dishwasher.
To attach:
Insert the air filter into the unit from
underside to upside.
4. When not using the unit for long
time periods
• After turning off the unit, wait one
day before emptying the tank.
• Clean the main unit, bucket,
ultrasonic nebulizer and air filter.
• Twist the excess cord onto the
power cord hook.
• Cover the unit with a plastic bag.
• Store the unit upright in a dry, well-
ventilated place.
DO NOT RINSE OR PUT THE FILTER
IN AN AUTOMATIC DISHWASHER.
DO NOT operate the dehumidifier
without a filter because dirt and lint
will clog it and reduce performance.

33 electrolux troubleshooting
other features electrolux 34
ENG
ENG
Troubleshooting
Unit does not
start
The unit makes a
loud noise when
operating
Water on floor
- Make sure the dehumidifier s plug is pushed completely into the outlet.
- Check the house fuse/circuit breaker box.
- Dehumidifier has reached its preset level or bucket is full.
- Tank is not in the proper position.
- The air filter is clogged.
- The unit is tilted instead of upright as it should be.
- The floor surface is not level.
- Hose to connector or hose connection may be loose.
- Intend to use the bucket to collect water, but the back drain plug is
removed.
Dehumidifier
does not
dry the air as it
should
Frost appears on
the coils
E1, E2, P1 or P2
appear in the
display
- Do not allow enough time to remove the moisture.
- Make sure there are no curtains, blinds or furniture blocking the front or
back of the dehumidifier.
- The humidity control may not be set low enough.
- Check that all doors, windows and other openings are securely closed.
- Room temperature is too low, below 5 °C(41 °F).
- There is a kerosene heater or something giving off water vapor in the
room.
- This is normal. The dehumidifier has Auto defrost feature.
- These are error codes and protection codes. See the page 26.
PROBLEM SOLUTION
Bucket Full Light
Glows when the bucket is ready to be emptied, or when the bucket is removed
or not replaced in the proper position.
Auto Shut Off
The water level control switch shuts off the dehumidifier when the bucket is
full, or when the bucket is removed or not replaced in the proper position.
When the setting humidity is reached, the unit will be shut off automatically. For
some models,the fan motor will continue operating.
Auto Defrost
When frost builds up on the evaporator coils, the compressor will cycle off and
the fan will continue to run until the frost disappears. When Auto defrosting
operation,the unit may make a voice of refrigerant flowing,it is normal.
Auto-Restart (on some models)
If the unit breaks off unexpectedly due to the power cut, it will restart with the
previous function setting automatically when the power resumes.
Wait 3 minutes before resuming operation
After the unit has stopped, it can not be restart opertation in the first 3 minutes.
This is to protect the unit. Operation will automatically start after 3 minutes.
Smart dehumidifying mode(optional)
At smart dehumidifying mode, the unit will automatically control room humidity
in a comfortable range 45%~55% according to the room temperature. The
humidity setting function will be invalid.
Other features

ANOTACIONES / NOTES
35 electrolux informaciones técnicas/technical information
anotaciones/notes electrolux 36
Informaciones técnicas / Technical information
Modelo/Model EAD504DWD
Voltaje/Frecuencia / Voltage/Frequency
Peso / Weight
Dimensiones (AxHxP) / Dimensions (WxHxD)
Capacidad / Capacity
Potencia nominal / Rated power
Corriente nominal / Rated current
Refrigerante / Refrigerant
Protección de agua / Waterproof class
220 V / 60 Hz
11,5 kg
350 × 210 × 510 mm
20L/50 pinta (pints per day)
450 W
2,12 A
R134a / 120 g
IP20
ESPESP
ESP
ENG
ENG
Anotaciones / Notes
Modelo/Model EAD704DWD
Voltaje/Frecuencia / Voltage/Frequency
Peso / Weight
Dimensiones (AxHxP) / Dimensions (WxHxD)
Capacidad / Capacity
Potencia nominal / Rated power
Corriente nominal / Rated current
Refrigerante / Refrigerant
Protección de agua / Waterproof class
220 V / 60 Hz
15 kg
400 x 562 x 254 mm
30L/70 pinta (pints per day)
620 W
2,95 A
R134a / 180 g
IP20
EAD301DWD
220 V / 60 Hz
10,5 kg
350 × 210 × 510 mm
12L/25 pinta (pints per day)
385 W
1,82 A
R134a / 110 g
IP20

ANOTACIONES / NOTES
37 electrolux anotaciones/notes
anotaciones/notes electrolux 38
ESPESP
ESP
ENG
ENG
ANOTACIONES / NOTES
-
 1
1
-
 2
2
-
 3
3
-
 4
4
-
 5
5
-
 6
6
-
 7
7
-
 8
8
-
 9
9
-
 10
10
-
 11
11
-
 12
12
-
 13
13
-
 14
14
-
 15
15
-
 16
16
-
 17
17
-
 18
18
-
 19
19
-
 20
20


Electrolux EAD704DWD Manual de usuario
- Categoría
- Deshumidificadores
- Tipo
- Manual de usuario
en otros idiomas
- English: Electrolux EAD704DWD User manual
Otros documentos
-
Philips DE5205/10 Manual de usuario
-
Keystone KSTAD30B Manual de usuario
-
Keystone KSTAD70B Manual de usuario
-
BLACK+DECKER BDT30WTB Manual de usuario
-
-
LG UD701KOG1 El manual del propietario
-
Infiniton DHM-W20L El manual del propietario
-
LG UD701KOG3 El manual del propietario
-
commercial cool CCD25JW Manual de usuario
-
Soleus Air Dehumidifier GL-DEH-70P-2 Manual de usuario