Moser Li+Pro Instrucciones de operación
- Categoría
- Cortapelos
- Tipo
- Instrucciones de operación

IMPORTANT SAFEGUARDS
When using your clipper, basic precautions should always be followed: READ ALL
INSTRUCTIONS BEFORE USING
DANGER:
To reduce the risk of death or injury by electric shock:
1) Do not place or store appliance where it can fall or be pulled into a tub or sink.
Do not place in or drop into water or other liquid.
2) Except when charging, always unplug this appliance from the electrical outlet
when not in use.
3) Unplug the clipper or recharge stand from the cord before cleaning.
4) Do not reach for an appliance that has fallen into water. Unplug immediately.
5) Do not use while bathing or in a shower.
WARNING:
To reduce the risk of burns, fire, electric shock or injury to persons:
1) Do Not Crush, Disassemble, Heat above 100˚C (212˚F), or Incinerate the appli-
ance, due to Risk of Fire, Explosion, or Burns.
2) Close supervision is necessary when this appliance is used by, on, or near chil-
dren or disabled persons.
3) Use this appliance only for its intended use as described in this manual. Do not
use attachments not recommended by the manufacturer.
4) Do not use this appliance with a damaged or broken blades or broken attach-
ments, as facial injury may occur.
5) Never operate this appliance if it has a damaged cord or battery charger trans-
former, if it is not working properly, if it has been dropped or damaged, dropped
into water. Return the appliance to Wahl Clipper Corporation for examination and
repair.
6) Do not carry this appliance by supply cord or use cord as a handle.
7) Keep the cord away from heated surfaces.
8) Never drop or insert any object into any opening.
9) Do not place or leave the appliance where it is expected to be subject to damage
by an animal or exposed to weather.
10) Do not operate where aerosol (spray) products are being used or where oxygen
is being administered. Do not use clipper germicide cleaners containing phynyl
phenol.
11) Use only the charger supplied by the manufacturer to recharge.
12) Always attach plug to appliance first, then to outlet. To disconnect, turn all con-
trols to "off" then remove plug from outlet.
SAVE THESE INSTRUCTIONS
THIS CLIPPER WAS DESIGNED
FOR COMMERCIAL USE ONLY
GENERAL:
1) Only use hair clippers to cut human hair. Only use animal clippers to cut animal
hair and animal fur.
2) The appliance is safety insulated and radio screened. It meets the require ments
of EU Directive 2004/108/EC regarding electromagnetic compatibility and EC
Low Voltage Directive 2006/95/EC.
Lithium-Ion Battery Replacement, Clipper Disposal and Recycling:
· For battery replacement send the entire, intact clipper unit to:
Wahl Annex 3001 North Locust, P.O. Box 578, Sterling, IL 61081
· Do not attempt to remove the battery. Lithium-Ion batteries can explode, catch
fire, and/or cause burns if disassembled, damaged, or exposed to water or high
temperatures.
· If you choose not to replace the battery, the entire, intact clipper unit must be
disposed. Do not attempt to remove the battery for disposal. Lithium-Ion batteries
are subject to local disposal regulations. Many locations prohibit disposal in stan-
dard waste receptacles. Check your local laws and regulations.
· For recycling contact a government recycling agency, waste disposal service,
retailer, or visit online recycling sources, such as www.batteryrecycling.com or
www.rbrc.org.
1884-1591 · 09/2011
Operating Instructions
Cord/Cordless Hair Clipper
Instrucciones de uso
Máquina de corte de pelo con alimentación de red /
por batería
en
ENGLISH
Type 1884
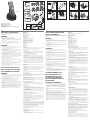
100 – 75%
24 – 10%
74 – 50% 49 – 25%
< 10%
B
A
C
E
F
G
D
C
J
I
K
L
M
R
Q
D
G
H
N
O P
en
es
7 8
1 2
3 4
5 6
b
a
b
a
1
a
b
b
a
5
green
red
green
red
green
orange
Description of parts
A Blade set
B On/off switch with LED display
C Battery power indicator
D Oil and cleaning indicator
E Appliance socket
F Charging stand
G Charging stand socket
H Cable compartment
I Attachment comb, cutting length 3 mm
J Attachment comb, cutting length 6 mm
K Attachment comb, cutting length 9 mm
L Attachment comb, cutting length 12 mm
M Attachment comb, cutting length 18 mm
N Attachment comb, cutting length 25 mm
O Oil for blade set
P Cleaning brush
Q Plug-in transformer
R Appliance plug
Mains operation
· Connect the appliance plug (R) on the plug-in transformer to the appliance socket (E)
(Fig. 1
ⓐ
).
· Connect the plug-in transformer to the mains power supply (Fig. 1
ⓑ
).
· Using the on/off switch, switch the appliance off after use (Fig. 2).
Charging the battery
· Connect the appliance plug (R) on the plug-in transformer to the charging stand
socket (G) (Fig 3
ⓐ
). The appliance can also be connected directly to the plug-in
transformer for charging. (Fig. 1
ⓐ
/
ⓑ
).
· Connect the plug-in transformer in to the socket (Fig 3
ⓑ
).
· Switch off the appliance using the on/off switch (Fig. 2).
· Place appliance on the charging stand or connect directly in to the plug-in trans-
former. (Fig. 1
ⓐ
/
ⓑ
).
· During the charging operation, the LED indicator on the on/off switch flashes green.
The charge status of the battery is displayed by the battery power indicator (C).
When the battery is fully charged, all segments on the capacity display (C) and the
LEDs on the on/off switch are lit continuously. After the device has been removed
from the charging stand, the display goes out after approx. 15 seconds. (power sav-
ing mode)
· Recommendation: To assure the precision of the capacity indicator (C), the battery
should not be recharged again until its power has been completely drained, i.e. until
it is ‘flat’.
· It will take no more than 45 minutes for the appliance to charge to full capacity.
Battery operation
· Switch on the appliance using the on/off switch and, after use, switch it off again
(Fig. 2).
· After the appliance is switched off, the display remains active for about 15 seconds.
(power-save mode)
· The appliance can also be used without the power supply for a maximum of 75 min-
utes if the battery is fully charged. This capacity is reached after approx. 5 - 10
charging cycles.
· Once the rechargeable battery is fully discharged, the appliance shuts off
automatically.
· Note: In case of insufficient maintenance of the blade set, the operating time can be
reduced considerably.
Cutting length adjustment
The cutting length adjustment integrated in the blade set (Fig. 4) has five settings to
determine the length of the hair from 0.7 mm to 3 mm Move the adjusting lever to the
required position and click it into place.
Cutting with attachment combs
The appliance can also be operated with attachment combs. To achieve the desired
cutting length, the cutting length adjustment lever has to be set to position 1 (Fig. 4a).
The following attachment combs are supplied with the appliance: 3 mm, 6 mm, 9 mm,
12 mm, 18 mm and 25 mm cutting length.
Attaching / removing the attachment comb
· Slide the attachment comb all the way on to the blade-set in the direction indicated
by the arrow. (Fig. 5
ⓐ
).
· The attachment comb can easily be removed by pushing it in the direction of the
arrow (Fig. 5
ⓑ
).
Cleaning and general care
· Never immerse the appliance in water.
· After every usage, remove the attachment comb and detach the blade set (Fig. 6
ⓐ
).
Use the cleaning brush to remove any cut hairs from the blade set and from the
housing opening. Press the cleaning lever to do this (Fig. 7). This makes it easy to
remove residual hairs from between the top blade and bottom blade with the clean-
ing brush (EASY CLEANING).
· The charging contacts on the appliance and charging stand must always be kept
clean.
· Only wipe the appliance with a soft or slightly damp cloth.
Never use solvents or scouring agents.
· The blade set may be cleaned with a hygienic spray order no. 3701 (8 oz.) or 3701-
400 (24 oz.).
Do not use any other cleaning agent.
· The blade set should be oiled frequently (daily) in order to maintain its good cutting
performance and thus ensure a long service life (Fig. 8). Only use blade set oil order
no. 03311 (4 oz.) or no. 3310(4 oz.).
· Blade set oil and hygienic spray are available from your dealer or our Service Center.
· The blade set should be replaced if the cutting performance is reduced after
extended use, despite regular cleaning and lubrication.
Oil and cleaning indicator
To ensure that your new hair cutting appliance enjoys a long service life, the appliance
needs to be cleaned and oiled on a regular basis (see section on cleaning and care).
To give you advance notice of an urgent need for maintenance care, your hair cutting
appliance has been equipped with an oil and cleaning indicator. Whenever the oil and
cleaning indicator (D) lights up, the blade set urgently needs to be serviced and oiled to
prevent premature wear to the appliance. Proceed as follows:
· Use the On/Off switch to switch the hair clipper off (Fig. 2).
· Remove the attachment comb and blade set and clean the housing opening and the
blade set with the cleaning brush. (Fig. 7).
· Oil the blade set (Fig. 8).
Changing the blade set
· Switch off using the on/off switch (Fig. 2).
· The blade set can be removed by sliding it away from the housing in the direction of
the arrow (Fig. 6
ⓐ
).
· To replace the blade set, position it with the hook in the slot on the housing and
press until it clicks into place (Fig. 6
ⓑ
).
INDICACIONES IMPORTANTES
PARA LA SEGURIDAD
Respete estas indicaciones de seguridad siempre que utilice máquinas de corte de
pelo: LEA DETENIDAMENTE TODAS LAS INSTRUCCIONES ANTES DE USAR EL
PRODUCTO
PELIGRO:
Para evitar el riesgo de electrocución:
1) Coloque y guarde siempre los aparatos eléctricos de modo que no puedan caer al
agua (p. ej., al lavabo). No ponga los aparatos eléctricos en contacto con el agua u
otros líquidos.
2) Desconecte el enchufe de red inmediatamente después de utilizar el aparato, salvo
cuando deba cargarse.
3) Antes de limpiar el aparato desconecte el enchufe de red.
4) No toque nunca un aparato eléctrico que esté mojado. Desconecte inmediatamente
el enchufe de red.
5) No utilice aparatos eléctricos en la bañera o la ducha.
ATENCIÓN:
Para evitar el riesgo de quemaduras, incendios, electrocución y lesiones:
1) No golpee, desmonte ni queme el aparato y no lo exponga a temperaturas superio-
res a 100˚C (212˚F) .
2) No deje que los niños y las personas con discapacidades utilicen el aparato sin
vigilancia. Vigile el aparato en todo momento cuando haya niños o personas con
discapacidades cerca del mismo.
3) Utilice el aparato únicamente de acuerdo con la finalidad descrita en las instruccio-
nes de uso. Deben utilizarse exclusivamente los accesorios recomendados por el
fabricante.
4) Para evitar lesiones en el rostro, no utilice el aparato con cabezales de corte o
peines dañados.
5) No utilice el aparato en caso de que no funcione debidamente, de que el cable o
la clavija estén dañados o de que se haya caído al agua. En tales casos, envíe
el aparato a nuestro Departamento de Atención al Cliente para su inspección y
reparación.
6) No sujete el aparato por el cable eléctrico ni utilice el cable como si fuera el mango.
7) Mantenga el cable alejado de superficies calientes.
8) No introduzca ni deje que caigan objetos extraños en las aberturas del aparato.
9) Para evitar daños mantenga el aparato alejado de animales y protegido de las
influencias meteorológicas.
10) No utilice el aparato al aire libre o en entornos en los que se usen aerosoles
(sprays) o en los que se haya liberado oxígeno. No utilice para la limpieza desin-
fectantes con fenilfenol.
11) Utilice sólo el cargador suministrado para cargar la batería.
12) Conecte siempre el cable primero al aparato y después a la toma de corriente.
Para apagar el aparato, ponga el interruptor en posición de desconexión (OFF) y a
continuación extraiga el enchufe de red de la toma de corriente.
CONSERVE SIEMPRE LAS
INSTRUCCIONES DE USO
ESTA MÁQUINA DE CORTE
DE PELO ESTÁ PREVISTA
EXCLUSIVAMENTE PARA USO
PROFESIONAL
INFORMACIÓN GENERAL:
1) Utilice la máquina de corte de pelo exclusivamente para cortar cabello en huma-
nos. Utilice la esquiladora exclusivamente para cortar el pelaje de animales.
2) El aparato está dotado de aislamiento de protección y sistema de eliminación de
parásitos. Cumple con las disposiciones de la directiva de la UE 2004/108/CE
sobre compatibilidad electromagnética y de la directiva 2006/95/CE sobre baja
tensión.
Cambio de la batería de iones de litio, eliminación y reciclaje de la máquina de
corte de pelo:
· Si precisa un cambio de batería, envíe el aparato completo a la dirección siguiente:
Wahl Annex 3001 North Locust, P.O. Box 578, Sterling, IL 61081
· No intente cambiar la batería por su cuenta. Las baterías de iones de litio pueden
explotar, inflamarse y/o provocar quemaduras si se desmontan, se dañan o si se
exponen a la acción de la humedad o de temperaturas altas.
· Si no desea cambiar la batería, debe eliminar el aparato completo. No intente retirar
la batería del aparato para desecharlo. Las baterías de iones de litio deben des-
echarse conforme a las disposiciones legales vigentes. Está prohibido desecharlas
con la basura doméstica. Infórmese con anterioridad sobre la normativa local a este
respecto.
· Para obtener información sobre el reciclaje del aparato puede acudir a las autorida-
des competentes, a la empresa de tratamiento de residuos que corresponda o a su
tienda habitual, o bien puede visitar las páginas www.batteryrecycling.com o www.
rbrc.org.
es
ESPAÑOL
Componentes
A Cabezal de corte
B Interruptor de conexión/desconexión con indicador LED
C Indicador de capacidad
D Indicador de lubricación y de limpieza
E Conexión del aparato
F Cargador
G Conexión del cargador
H Guardacables
I Peine, longitud de corte de 3 mm
J Peine, longitud de corte de 6 mm
K Peine, longitud de corte de 9 mm
L Peine, longitud de corte de 12 mm
M Peine, longitud de corte de 18 mm
N Peine, longitud de corte de 25 mm
O Aceite para el cabezal de corte
P Cepillo de limpieza
Q Fuente de alimentación conmutada
R Conector de alimentación
Funcionamiento con alimentación de red
· Conecte el conector de alimentación (R) de la fuente de alimentación conmutada
a la conexión (E) del aparato (fig. 1a).
· Conecte la fuente de alimentación conmutada a la toma de corriente (fig. 1b).
· Encienda y apague el aparato después de su uso con el interruptor de conexión/
desconexión (fig. 2).
Carga de la batería
· Conecte el conector (R) de la fuente de alimentación conmutada a la conexión (G)
del cargador (fig. 3
ⓐ
). El aparato también puede cargarse conectándolo directa-
mente a la fuente de alimentación conmutada. (Fig. 1
ⓐ
/
ⓑ
).
· Conecte la fuente de alimentación conmutada a la toma de corriente (fig. 3
ⓑ
).
· Apague el aparato con el interruptor de conexión/desconexión (fig. 2).
· Coloque el aparato en el cargador o conéctelo directamente con la fuente de ali-
mentación conmutada (fig. 1).
· Durante la carga el LED del interruptor de conexión/desconexión se ilumina en
verde y parpadea. El indicador de capacidad (C) informa del estado de carga de
la batería. Cuando la batería está completamente cargada permanecen encendi-
dos todos los segmentos del indicador de capacidad (C) y el LED del interruptor
de conexión/desconexión. Una vez retirado el aparato del cargador, el indicador
se apaga después de unos 15 segundos (modo de ahorro de energía).
· Recomendación: para garantizar la precisión del indicador de capacidad (C), el
aparato no se debería volver a cargar hasta que la batería se encuentre comple-
tamente descargada.
· El tiempo de carga para volver a alcanzar la plena capacidad es de hasta 45
minutos.
Funcionamiento con batería
· Encienda y apague el aparato después de su uso con el interruptor de conexión/
desconexión (fig. 2).
· Una vez desconectado el aparato, el indicador se apaga después de unos 15
segundos (modo de ahorro de energía).
· Con la batería completamente cargada, el aparato puede funcionar hasta 75
minutos sin necesidad de conectarlo a la red. Esta autonomía se consigue des-
pués de 5-10 ciclos de carga.
· Si la batería está descargada, el aparato se apaga automáticamente.
· Nota: Si el mantenimiento del cabezal de corte es insuficiente, es posible que la
autonomía se reduzca notablemente.
Ajuste de la longitud de corte
Mediante el ajuste de la longitud de corte integrado en el cabezal de corte puede
ajustarse la longitud de corte en 5 posiciones entre 0,7 mm y 3 mm (fig. 4). Para
ello, encaje la palanca en la posición deseada.
Corte con peine
El aparato se puede utilizar también con peines. Para conseguir la longitud de corte
indicada, el ajuste de la longitud de corte se debe poner en la posición 1 (fig. 4). El
producto incluye los siguientes peines: longitudes de corte de 3 mm, 6 mm, 9 mm,
12 mm, 18 mm y 25 mm.
Colocación y extracción del peine
· Deslice el peine sobre el cabezal de corte en el sentido de la flecha hasta el tope
(fig. 5
ⓐ
).
· El peine puede retirarse fácilmente empujándolo en el sentido de la flecha
(fig. 5
ⓑ
).
Limpieza y mantenimiento
· No sumerja el aparato en agua.
· Después de cada uso desmonte el peine y abra el cabezal de corte (fig. 6
ⓐ
).
Elimine los restos de pelo de la abertura de la carcasa y del cabezal de corte
con el cepillo de limpieza. Para hacerlo debe presionar la palanca de limpieza
(fig. 7). De este modo pueden eliminarse fácilmente los restos de pelo que hayan
quedado entre el peine de corte y la cuchilla con el cepillo de limpieza (EASY
CLEANING).
· Los contactos de carga del aparato y del cargador deben mantenerse siempre
limpios.
· Limpie el aparato únicamente con un paño suave y, en caso necesario, ligera-
mente humedecido. No utilice disolventes ni productos de limpieza abrasivos.
· El cabezal de corte puede limpiarse con el spray de limpieza de ref. 3701 (8 oz.)
o 3701-400 (24 oz.).
Utilice únicamente dicho producto de limpieza.
· Recomendamos lubricar el cabezal de corte con regularidad para garantizar una
óptima calidad de corte durante mucho tiempo (fig. 8). Utilice únicamente el aceite
especial para cabezales de corte ref. 03311 (4 oz.) o 3310 (4 oz.).
· Puede solicitar tanto el aceite para cabezales de corte como el spray de limpieza
a su proveedor habitual o a nuestro Departamento de Atención al Cliente.
· En el caso de que, a pesar de limpiar y lubricar el cabezal regularmente, su capa-
cidad de corte disminuya después de un uso prolongado, éste deberá cambiarse.
Indicador de lubricación y de limpieza
Para garantizar una larga vida útil de su máquina de corte de pelo nueva es nece-
sario limpiarla y engrasarla con regularidad (véase apartado Limpieza y manteni-
miento). Su máquina de corte de pelo ha sido dotada de un sistema indicador de
lubricación y de limpieza que le permite saber cuándo necesita un mantenimiento
o una limpieza con urgencia. Si el indicador de lubricación y de limpieza (D) se
ilumina, deberá limpiar y lubricar el cabezal de corte de inmediato para evitar el des-
gaste prematuro del aparato. Siga estas instrucciones:
· Apague el aparato con el interruptor de conexión/desconexión (fig. 2).
· Retire el peine y el cabezal y limpie con el cepillo al efecto la abertura de la car-
casa y el cabezal de corte. (fig. 7).
· Lubrique el cabezal de corte (fig. 8).
Cambio del cabezal de corte
· Apague el aparato con el interruptor de conexión/desconexión (fig. 2).
· Extraiga el cabezal de corte retirándolo de la carcasa en el sentido de la flecha
(fig. 6
ⓐ
).
· Para volver a utilizar el aparato, introduzca el cabezal en la carcasa con el gan-
cho en el alojamiento y presiónelo contra la carcasa hasta que encaje (fig. 6
ⓑ
).
La página se está cargando ...
Transcripción de documentos
1 A a a D N M L 3 8 1 P G C H 100 – 75% R 74 – 50% 1884-1591 · 09/2011 green 49 – 25% green green D 24 – 10% orange < 10% red red en ENGLISH IMPORTANT SAFEGUARDS When using your clipper, basic precautions should always be followed: READ ALL INSTRUCTIONS BEFORE USING DANGER: To reduce the risk of death or injury by electric shock: 1) Do not place or store appliance where it can fall or be pulled into a tub or sink. Do not place in or drop into water or other liquid. 2) Except when charging, always unplug this appliance from the electrical outlet when not in use. 3) Unplug the clipper or recharge stand from the cord before cleaning. 4) Do not reach for an appliance that has fallen into water. Unplug immediately. 5) Do not use while bathing or in a shower. WARNING: To reduce the risk of burns, fire, electric shock or injury to persons: 1) Do Not Crush, Disassemble, Heat above 100˚C (212˚F), or Incinerate the appliance, due to Risk of Fire, Explosion, or Burns. 2) Close supervision is necessary when this appliance is used by, on, or near children or disabled persons. 3) Use this appliance only for its intended use as described in this manual. Do not use attachments not recommended by the manufacturer. 4) Do not use this appliance with a damaged or broken blades or broken attachments, as facial injury may occur. 5) Never operate this appliance if it has a damaged cord or battery charger transformer, if it is not working properly, if it has been dropped or damaged, dropped into water. Return the appliance to Wahl Clipper Corporation for examination and repair. 6) Do not carry this appliance by supply cord or use cord as a handle. 7) Keep the cord away from heated surfaces. 8) Never drop or insert any object into any opening. 9) Do not place or leave the appliance where it is expected to be subject to damage by an animal or exposed to weather. 10) Do not operate where aerosol (spray) products are being used or where oxygen is being administered. Do not use clipper germicide cleaners containing phynyl phenol. 11) Use only the charger supplied by the manufacturer to recharge. 12) Always attach plug to appliance first, then to outlet. To disconnect, turn all controls to "off" then remove plug from outlet. SAVE THESE INSTRUCTIONS THIS CLIPPER WAS DESIGNED FOR COMMERCIAL USE ONLY GENERAL: 1) Only use hair clippers to cut human hair. Only use animal clippers to cut animal hair and animal fur. 2) The appliance is safety insulated and radio screened. It meets the requirements of EU Directive 2004/108/EC regarding electromagnetic compatibility and EC Low Voltage Directive 2006/95/EC. Lithium-Ion Battery Replacement, Clipper Disposal and Recycling: · For battery replacement send the entire, intact clipper unit to: Wahl Annex 3001 North Locust, P.O. Box 578, Sterling, IL 61081 · Do not attempt to remove the battery. Lithium-Ion batteries can explode, catch fire, and/or cause burns if disassembled, damaged, or exposed to water or high temperatures. · If you choose not to replace the battery, the entire, intact clipper unit must be disposed. Do not attempt to remove the battery for disposal. Lithium-Ion batteries are subject to local disposal regulations. Many locations prohibit disposal in standard waste receptacles. Check your local laws and regulations. · For recycling contact a government recycling agency, waste disposal service, retailer, or visit online recycling sources, such as www.batteryrecycling.com or www.rbrc.org. 5 a Q Instrucciones de uso Máquina de corte de pelo con alimentación de red / por batería 7 b G O es 4 E F Operating Instructions Cord/Cordless Hair Clipper b a K J I C en 6 b b B Type 1884 5 2 es ESPAÑOL Description of parts A Blade set B On/off switch with LED display C Battery power indicator D Oil and cleaning indicator E Appliance socket F Charging stand G Charging stand socket H Cable compartment I Attachment comb, cutting length 3 mm J Attachment comb, cutting length 6 mm K Attachment comb, cutting length 9 mm L Attachment comb, cutting length 12 mm M Attachment comb, cutting length 18 mm N Attachment comb, cutting length 25 mm O Oil for blade set P Cleaning brush Q Plug-in transformer R Appliance plug Mains operation · Connect the appliance plug (R) on the plug-in transformer to the appliance socket (E) (Fig. 1ⓐ). · Connect the plug-in transformer to the mains power supply (Fig. 1ⓑ). · Using the on/off switch, switch the appliance off after use (Fig. 2). Charging the battery · Connect the appliance plug (R) on the plug-in transformer to the charging stand socket (G) (Fig 3ⓐ). The appliance can also be connected directly to the plug-in transformer for charging. (Fig. 1ⓐ/ⓑ). · Connect the plug-in transformer in to the socket (Fig 3ⓑ). · Switch off the appliance using the on/off switch (Fig. 2). · Place appliance on the charging stand or connect directly in to the plug-in transformer. (Fig. 1ⓐ/ⓑ). · During the charging operation, the LED indicator on the on/off switch flashes green. The charge status of the battery is displayed by the battery power indicator (C). When the battery is fully charged, all segments on the capacity display (C) and the LEDs on the on/off switch are lit continuously. After the device has been removed from the charging stand, the display goes out after approx. 15 seconds. (power saving mode) · Recommendation: To assure the precision of the capacity indicator (C), the battery should not be recharged again until its power has been completely drained, i.e. until it is ‘flat’. · It will take no more than 45 minutes for the appliance to charge to full capacity. Battery operation · Switch on the appliance using the on/off switch and, after use, switch it off again (Fig. 2). · After the appliance is switched off, the display remains active for about 15 seconds. (power-save mode) · The appliance can also be used without the power supply for a maximum of 75 minutes if the battery is fully charged. This capacity is reached after approx. 5 - 10 charging cycles. · Once the rechargeable battery is fully discharged, the appliance shuts off automatically. · Note: In case of insufficient maintenance of the blade set, the operating time can be reduced considerably. Cutting length adjustment The cutting length adjustment integrated in the blade set (Fig. 4) has five settings to determine the length of the hair from 0.7 mm to 3 mm Move the adjusting lever to the required position and click it into place. Cutting with attachment combs The appliance can also be operated with attachment combs. To achieve the desired cutting length, the cutting length adjustment lever has to be set to position 1 (Fig. 4a). The following attachment combs are supplied with the appliance: 3 mm, 6 mm, 9 mm, 12 mm, 18 mm and 25 mm cutting length. Attaching / removing the attachment comb · Slide the attachment comb all the way on to the blade-set in the direction indicated by the arrow. (Fig. 5ⓐ). · The attachment comb can easily be removed by pushing it in the direction of the arrow (Fig. 5ⓑ). Cleaning and general care · Never immerse the appliance in water. · After every usage, remove the attachment comb and detach the blade set (Fig. 6ⓐ). Use the cleaning brush to remove any cut hairs from the blade set and from the housing opening. Press the cleaning lever to do this (Fig. 7). This makes it easy to remove residual hairs from between the top blade and bottom blade with the cleaning brush (EASY CLEANING). · The charging contacts on the appliance and charging stand must always be kept clean. · Only wipe the appliance with a soft or slightly damp cloth. Never use solvents or scouring agents. · The blade set may be cleaned with a hygienic spray order no. 3701 (8 oz.) or 3701400 (24 oz.). Do not use any other cleaning agent. · The blade set should be oiled frequently (daily) in order to maintain its good cutting performance and thus ensure a long service life (Fig. 8). Only use blade set oil order no. 03311 (4 oz.) or no. 3310(4 oz.). · Blade set oil and hygienic spray are available from your dealer or our Service Center. · The blade set should be replaced if the cutting performance is reduced after extended use, despite regular cleaning and lubrication. Oil and cleaning indicator To ensure that your new hair cutting appliance enjoys a long service life, the appliance needs to be cleaned and oiled on a regular basis (see section on cleaning and care). To give you advance notice of an urgent need for maintenance care, your hair cutting appliance has been equipped with an oil and cleaning indicator. Whenever the oil and cleaning indicator (D) lights up, the blade set urgently needs to be serviced and oiled to prevent premature wear to the appliance. Proceed as follows: · Use the On/Off switch to switch the hair clipper off (Fig. 2). · Remove the attachment comb and blade set and clean the housing opening and the blade set with the cleaning brush. (Fig. 7). · Oil the blade set (Fig. 8). Changing the blade set · Switch off using the on/off switch (Fig. 2). · The blade set can be removed by sliding it away from the housing in the direction of the arrow (Fig. 6ⓐ). · To replace the blade set, position it with the hook in the slot on the housing and press until it clicks into place (Fig. 6ⓑ). INDICACIONES IMPORTANTES PARA LA SEGURIDAD Respete estas indicaciones de seguridad siempre que utilice máquinas de corte de pelo: LEA DETENIDAMENTE TODAS LAS INSTRUCCIONES ANTES DE USAR EL PRODUCTO PELIGRO: Para evitar el riesgo de electrocución: 1) Coloque y guarde siempre los aparatos eléctricos de modo que no puedan caer al agua (p. ej., al lavabo). No ponga los aparatos eléctricos en contacto con el agua u otros líquidos. 2) Desconecte el enchufe de red inmediatamente después de utilizar el aparato, salvo cuando deba cargarse. 3) Antes de limpiar el aparato desconecte el enchufe de red. 4) No toque nunca un aparato eléctrico que esté mojado. Desconecte inmediatamente el enchufe de red. 5) No utilice aparatos eléctricos en la bañera o la ducha. ATENCIÓN: Para evitar el riesgo de quemaduras, incendios, electrocución y lesiones: 1) No golpee, desmonte ni queme el aparato y no lo exponga a temperaturas superiores a 100˚C (212˚F) . 2) No deje que los niños y las personas con discapacidades utilicen el aparato sin vigilancia. Vigile el aparato en todo momento cuando haya niños o personas con discapacidades cerca del mismo. 3) Utilice el aparato únicamente de acuerdo con la finalidad descrita en las instrucciones de uso. Deben utilizarse exclusivamente los accesorios recomendados por el fabricante. 4) Para evitar lesiones en el rostro, no utilice el aparato con cabezales de corte o peines dañados. 5) No utilice el aparato en caso de que no funcione debidamente, de que el cable o la clavija estén dañados o de que se haya caído al agua. En tales casos, envíe el aparato a nuestro Departamento de Atención al Cliente para su inspección y reparación. 6) No sujete el aparato por el cable eléctrico ni utilice el cable como si fuera el mango. 7) Mantenga el cable alejado de superficies calientes. 8) No introduzca ni deje que caigan objetos extraños en las aberturas del aparato. 9) Para evitar daños mantenga el aparato alejado de animales y protegido de las influencias meteorológicas. 10) No utilice el aparato al aire libre o en entornos en los que se usen aerosoles (sprays) o en los que se haya liberado oxígeno. No utilice para la limpieza desinfectantes con fenilfenol. 11) Utilice sólo el cargador suministrado para cargar la batería. 12) Conecte siempre el cable primero al aparato y después a la toma de corriente. Para apagar el aparato, ponga el interruptor en posición de desconexión (OFF) y a continuación extraiga el enchufe de red de la toma de corriente. CONSERVE SIEMPRE LAS INSTRUCCIONES DE USO ESTA MÁQUINA DE CORTE DE PELO ESTÁ PREVISTA EXCLUSIVAMENTE PARA USO PROFESIONAL INFORMACIÓN GENERAL: 1) Utilice la máquina de corte de pelo exclusivamente para cortar cabello en humanos. Utilice la esquiladora exclusivamente para cortar el pelaje de animales. 2) El aparato está dotado de aislamiento de protección y sistema de eliminación de parásitos. Cumple con las disposiciones de la directiva de la UE 2004/108/CE sobre compatibilidad electromagnética y de la directiva 2006/95/CE sobre baja tensión. Cambio de la batería de iones de litio, eliminación y reciclaje de la máquina de corte de pelo: · Si precisa un cambio de batería, envíe el aparato completo a la dirección siguiente: Wahl Annex 3001 North Locust, P.O. Box 578, Sterling, IL 61081 · No intente cambiar la batería por su cuenta. Las baterías de iones de litio pueden explotar, inflamarse y/o provocar quemaduras si se desmontan, se dañan o si se exponen a la acción de la humedad o de temperaturas altas. · Si no desea cambiar la batería, debe eliminar el aparato completo. No intente retirar la batería del aparato para desecharlo. Las baterías de iones de litio deben desecharse conforme a las disposiciones legales vigentes. Está prohibido desecharlas con la basura doméstica. Infórmese con anterioridad sobre la normativa local a este respecto. · Para obtener información sobre el reciclaje del aparato puede acudir a las autoridades competentes, a la empresa de tratamiento de residuos que corresponda o a su tienda habitual, o bien puede visitar las páginas www.batteryrecycling.com o www. rbrc.org. Componentes A Cabezal de corte B Interruptor de conexión/desconexión con indicador LED C Indicador de capacidad D Indicador de lubricación y de limpieza E Conexión del aparato F Cargador G Conexión del cargador H Guardacables I Peine, longitud de corte de 3 mm J Peine, longitud de corte de 6 mm K Peine, longitud de corte de 9 mm L Peine, longitud de corte de 12 mm M Peine, longitud de corte de 18 mm N Peine, longitud de corte de 25 mm O Aceite para el cabezal de corte P Cepillo de limpieza Q Fuente de alimentación conmutada R Conector de alimentación Funcionamiento con alimentación de red · Conecte el conector de alimentación (R) de la fuente de alimentación conmutada a la conexión (E) del aparato (fig. 1a). · Conecte la fuente de alimentación conmutada a la toma de corriente (fig. 1b). · Encienda y apague el aparato después de su uso con el interruptor de conexión/ desconexión (fig. 2). Carga de la batería · Conecte el conector (R) de la fuente de alimentación conmutada a la conexión (G) del cargador (fig. 3ⓐ). El aparato también puede cargarse conectándolo directamente a la fuente de alimentación conmutada. (Fig. 1ⓐ/ⓑ). · Conecte la fuente de alimentación conmutada a la toma de corriente (fig. 3ⓑ). · Apague el aparato con el interruptor de conexión/desconexión (fig. 2). · Coloque el aparato en el cargador o conéctelo directamente con la fuente de alimentación conmutada (fig. 1). · Durante la carga el LED del interruptor de conexión/desconexión se ilumina en verde y parpadea. El indicador de capacidad (C) informa del estado de carga de la batería. Cuando la batería está completamente cargada permanecen encendidos todos los segmentos del indicador de capacidad (C) y el LED del interruptor de conexión/desconexión. Una vez retirado el aparato del cargador, el indicador se apaga después de unos 15 segundos (modo de ahorro de energía). · Recomendación: para garantizar la precisión del indicador de capacidad (C), el aparato no se debería volver a cargar hasta que la batería se encuentre completamente descargada. · El tiempo de carga para volver a alcanzar la plena capacidad es de hasta 45 minutos. Funcionamiento con batería · Encienda y apague el aparato después de su uso con el interruptor de conexión/ desconexión (fig. 2). · Una vez desconectado el aparato, el indicador se apaga después de unos 15 segundos (modo de ahorro de energía). · Con la batería completamente cargada, el aparato puede funcionar hasta 75 minutos sin necesidad de conectarlo a la red. Esta autonomía se consigue después de 5-10 ciclos de carga. · Si la batería está descargada, el aparato se apaga automáticamente. · Nota: Si el mantenimiento del cabezal de corte es insuficiente, es posible que la autonomía se reduzca notablemente. Ajuste de la longitud de corte Mediante el ajuste de la longitud de corte integrado en el cabezal de corte puede ajustarse la longitud de corte en 5 posiciones entre 0,7 mm y 3 mm (fig. 4). Para ello, encaje la palanca en la posición deseada. Corte con peine El aparato se puede utilizar también con peines. Para conseguir la longitud de corte indicada, el ajuste de la longitud de corte se debe poner en la posición 1 (fig. 4). El producto incluye los siguientes peines: longitudes de corte de 3 mm, 6 mm, 9 mm, 12 mm, 18 mm y 25 mm. Colocación y extracción del peine · Deslice el peine sobre el cabezal de corte en el sentido de la flecha hasta el tope (fig. 5ⓐ). · El peine puede retirarse fácilmente empujándolo en el sentido de la flecha (fig. 5ⓑ). Limpieza y mantenimiento · No sumerja el aparato en agua. · Después de cada uso desmonte el peine y abra el cabezal de corte (fig. 6ⓐ). Elimine los restos de pelo de la abertura de la carcasa y del cabezal de corte con el cepillo de limpieza. Para hacerlo debe presionar la palanca de limpieza (fig. 7). De este modo pueden eliminarse fácilmente los restos de pelo que hayan quedado entre el peine de corte y la cuchilla con el cepillo de limpieza (EASY CLEANING). · Los contactos de carga del aparato y del cargador deben mantenerse siempre limpios. · Limpie el aparato únicamente con un paño suave y, en caso necesario, ligeramente humedecido. No utilice disolventes ni productos de limpieza abrasivos. · El cabezal de corte puede limpiarse con el spray de limpieza de ref. 3701 (8 oz.) o 3701-400 (24 oz.). Utilice únicamente dicho producto de limpieza. · Recomendamos lubricar el cabezal de corte con regularidad para garantizar una óptima calidad de corte durante mucho tiempo (fig. 8). Utilice únicamente el aceite especial para cabezales de corte ref. 03311 (4 oz.) o 3310 (4 oz.). · Puede solicitar tanto el aceite para cabezales de corte como el spray de limpieza a su proveedor habitual o a nuestro Departamento de Atención al Cliente. · En el caso de que, a pesar de limpiar y lubricar el cabezal regularmente, su capacidad de corte disminuya después de un uso prolongado, éste deberá cambiarse. Indicador de lubricación y de limpieza Para garantizar una larga vida útil de su máquina de corte de pelo nueva es necesario limpiarla y engrasarla con regularidad (véase apartado Limpieza y mantenimiento). Su máquina de corte de pelo ha sido dotada de un sistema indicador de lubricación y de limpieza que le permite saber cuándo necesita un mantenimiento o una limpieza con urgencia. Si el indicador de lubricación y de limpieza (D) se ilumina, deberá limpiar y lubricar el cabezal de corte de inmediato para evitar el desgaste prematuro del aparato. Siga estas instrucciones: · Apague el aparato con el interruptor de conexión/desconexión (fig. 2). · Retire el peine y el cabezal y limpie con el cepillo al efecto la abertura de la carcasa y el cabezal de corte. (fig. 7). · Lubrique el cabezal de corte (fig. 8). Cambio del cabezal de corte · Apague el aparato con el interruptor de conexión/desconexión (fig. 2). · Extraiga el cabezal de corte retirándolo de la carcasa en el sentido de la flecha (fig. 6ⓐ). · Para volver a utilizar el aparato, introduzca el cabezal en la carcasa con el gancho en el alojamiento y presiónelo contra la carcasa hasta que encaje (fig. 6ⓑ).-
 1
1
-
 2
2


Moser Li+Pro Instrucciones de operación
- Categoría
- Cortapelos
- Tipo
- Instrucciones de operación
En otros idiomas
- français: Moser Li+Pro Mode d'emploi
- English: Moser Li+Pro Operating instructions
- Deutsch: Moser Li+Pro Bedienungsanleitung
Documentos relacionados
-
Moser 1230 Original Operating Manual
-
Moser ChroMini Instrucciones de operación
-
-
-
-
-
-
-
-