APRILIA SCARABEO 100 4T - 2007 Manual de usuario
- Categoría
- Motocicletas
- Tipo
- Manual de usuario
Este manual también es adecuado para

use+maintenancebook
SCARABEO 50 I.E. - 100 4T
aprilia part# 8202290

2
uso y mantenimiento
Scarabeo 50 - Scarabeo 100 4T
© 2001 aprilia s.p.a. - Noale (VE)
Primera edición: Junio 2001
Nueva edición:
Producido e impreso por:
C.L.D. s.r.l. División manuales técnicos
via D. Alighieri, 37/A - 56012 Fornacette (Pisa)
Tel. +39 - (0)587 42 28 00
Fax +39 - (0)587 42 28 01
www.cld.it
E-mail: [email protected]
por parte de:
aprilia s.p.a.
via G. Galilei, 1 - 30033 Noale (VE) - Italy
Tel. +39 - (0)41 58 29 111
Fax +39 - (0)41 58 29 190
www.aprilia.com
MENSAJES DE SEGURIDAD INFORMACION
Los mensajes de aviso abajo descritos se
utilizan en todo el manual para indicar lo si-
guiente:
Símbolo de aviso relativo a la segu-
ridad.
Cuando este símbolo está presente en el
vehículo o en el manual, tenga cuidado
con los riesgos potenciales de lesiones.
La inobservancia de lo indicado en los
avisos precedidos por este símbolo pue-
de perjudicar la seguridad ¡de Usted, de
los demás y del vehículo!
Indica un riesgo potencial de lesiones
graves o muerte.
Indica un riesgo potencial de lesiones li-
geras o daños al vehículo.
IMPORTANTE El término “IMPOR-
TANTE” en el presente manual precede im-
portantes instrucciones o información.
Las operaciones precedidas por este
símbolo deben ser repetidas también
en el lado opuesto del vehículo.
De no resultar expresamente descrito, hay
que realizar la instalación de los grupos si-
guiendo en orden contrario las operaciones
que se han efectuado para el desmontaje.
Los términos “derecha” e “izquierda” se re-
fieren al piloto sentado sobre el vehículo en
la posición normal de conducción.
Las citaciones de conducción con pa-
sajero se refieren únicamente a los países
en los que está previsto.
En el texto y en las figuras los símbolos
seguidos por el símbolo del modelo (
-
100
) se refieren sólo al modelo indicado.
Antes de arrancar el motor, lea con cuida-
do este manual y en particular el capítulo
“CONDUCCION SEGURA”.
Su seguridad y la de los otros no depende
sólo de su prontitud de reflejos y agilidad,
sino también del conocimiento del vehícu-
lo, de su estado de buen funcionamiento y
del conocimiento de las reglas fundamen-
tales para una CONDUCCION SEGURA.
Por lo tanto, le aconsejamos que se fami-
liarice con el vehículo de manera que pue-
da moverse con habilidad y seguridad en-
tre el tráfico de la carretera.
PELIGRO
ATENCION
ADVERTENCIAS-PRECAUCIONES-
AVISOS GENERALES

3
uso y mantenimiento
Scarabeo 50 - Scarabeo 100 4T
IMPORTANTE Este manual debe con-
siderarse como parte integrante del vehícu-
lo y siempre debe acompañarlo incluso en
caso de reventa.
aprilia ha realizado este manual poniendo
el máximo cuidado en la exactitud y actuali-
dad de la información facilitada. Sin embar-
go, como los productos aprilia están suje-
tos a continuas mejoras de planeamiento,
puede producirse una ligera discrepancia
entre las características del vehículo que Ud.
posee y las que se describen en el presente
manual. Para cualquier aclaración sobre la
información contenida en el manual, diríja-
se a su Concesionario Oficial aprilia.
Para las operaciones de control y las repa-
raciones que no se describen explícitamen-
te en esta publicación, la compra de repues-
tos originales aprilia, de accesorios y de
otros productos, así como para el asesora-
miento específico, diríjase exclusivamente a
los Concesionarios Oficiales y Centros de
Asistencia aprilia, que garantizan un ser-
vicio esmerado y rápido.
Le damos las gracias por haber elegido
aprilia y le deseamos una conducción agra-
dable.
A todos los países se les reserva los dere-
chos de memorización electrónica, de repro-
ducción y de adaptación total y parcial, con
cualquier vehículo.
IMPORTANTE En algunos países la le-
gislación vigente exige el cumplimiento de
las normas anti-contaminación y anti-ruido
y la realización de controles periódicos.
El usuario que utiliza el vehículo en estos
países debe:
– dirigirse a un Concesionario Oficial
aprilia para la sustitución de tales com-
ponentes con otros homologados para ese
país;
– efectuar los controles periódicos solicita-
dos.
IMPORTANTE Al pedir los repuestos a
su Concesionario, especifique el código ci-
tado en la ETIQUETA CODIGO REPUES-
TOS.
Añada la sigla de identificación en el espa-
cio correspondiente reservado a continua-
ción, para recordarla en caso de pérdida o
desgaste de la etiqueta.
La etiqueta está pegada sobre la traviesa
izquierda del chasis; para la lectura saque
la tapa de inspección, véase pág. 65 (DES-
MONTAJE TAPA DE INSPECCIÓN).
En este manual las variantes están indica-
das por los siguientes símbolos:
modelo Inyección Electrónica
100
modelo 100 cm
3
versión encendido automático luces
(Automatic Switch-on Device)
opcional
versión con freno de tambor
versión catalítica
VERSIÓN:
Italia
Reino Unido
Austria
Portugal
Finlandia
Bélgica
Alemania
Francia
España
Grecia
Holanda
Suiza
Dinamarca
Japón
Singapur
Polonia
Israel
Corea del Sur
Chile
Bermudas
Estados Unidos
de América
Australia
Brasil
Nueva Zelanda
Canadá
Croacia
Eslovenia
República
del Suráfrica
Malasia

4
uso y mantenimiento
Scarabeo 50 - Scarabeo 100 4T
INDICE GENERAL
CONDUCCIÓN SEGURA ................................... 5
REGLAS FUNDAMENTALES DE
SEGURIDAD ................................................... 6
ROPA.............................................................. 9
ACCESORIOS............................................... 10
CARGA .......................................................... 10
UBICACIÓN ELEMENTOS
PRINCIPALES .......................................... 12
UBICACIÓN ELEMENTOS
PRINCIPALES
100
.......................................... 14
UBICACIÓN MANDOS / INSTRUMENTOS
E INDICADORES ............................................. 16
TABLAS INSTRUMENTOS E INDICADORES17
LUZ TESTIGO INJECTION CHECK ............. 18
MANDOS PRINCIPALES INDIVIDUALES 19
MANDOS EN EL LADO IZQUIERDO
DEL MANILLAR ............................................. 19
MANDOS EN EL LADO DERECHO
DEL MANILLAR ............................................. 20
MANDOS PRINCIPALES INDIVIDUALES
100
21
MANDOS EN EL LADO IZQUIERDO
DEL MANILLAR ............................................. 21
MANDOS EN EL LADO DERECHO
DEL MANILLAR ............................................. 22
INTERRUPTOR DE ENCENDIDO ................ 23
BLOQUEO DE LA DIRECCIÓN .................... 23
EQUIPO AUXILIAR .......................................... 24
DESBLOQUEO / BLOQUEO SILLÍN............ 24
GUANTERA PORTADOCUMENTOS ............ 24
GANCHO ANTIRROBO................................. 24
KIT HERRAMIENTAS ................................... 25
GANCHO PORTABOLSAS ........................... 25
COLOCACIÓN CASCO EN EL MALETERO
TRASERO ..................................................... 26
COMPONENTES PRINCIPALES ..................... 27
COMBUSTIBLE ............................................. 27
LUBRICANTES ............................................. 28
RELLENO ACEITE MOTOR .......................... 29
CONTROL NIVEL ACEITE
TRANSMISION
100
..................................... 30
SUSTITUCIÓN ACEITE MOTOR Y FILTRO . 30
LÍQUIDO FRENOS - recomendaciones ........ 31
FRENOS DE DISCO ..................................... 32
BATTERY HYDROGEN GAS
AND ELECTROLYTE
FRENO TRASERO DE TAMBOR.................. 33
NEUMÁTICOS............................................... 34
VERSIÓN ENCENDIDO AUTOMÁTICO
LUCES .................................................. 36
ESCAPE / SILENCIADOR DE ESCAPE ....... 36
NORMAS PARA EL USO ................................. 37
TABLA CONTROLES PRELIMINARES ........ 37
ARRANQUE .................................................. 38
SALIDA Y CONDUCCIÓN ............................. 41
RODAJE ........................................................ 44
PARADA ........................................................ 45
APARCAMIENTO .......................................... 45
COLOCACIÓN DEL VEHÍCULO SOBRE
EL CABALLETE CENTRAL........................... 46
SUGERENCIAS CONTRA LOS ROBOS ...... 46
MANTENIMIENTO............................................ 47
FICHA DE MANTENIMIENTO
PERIÓDICO .......................................... 48
FICHA DE MANTENIMIENTO
PERIÓDICO
100
.......................................... 51
DATOS DE IDENTIFICACIÓN ...................... 54
FILTRO AIRE ......................................... 55
FILTRO AIRE
100
......................................... 56
DESMONTAJE CAJA FILTRO
AIRE COMPLETA .................................. 57
DESMONTAJE CAJA FILTRO
AIRE COMPLETA
100
.................................. 57
RUEDA DELANTERA.................................... 58
RUEDA TRASERA ........................................ 60
COMPROBACIÓN DESGASTE
PASTILLAS.................................................... 61
COMPROBACIÓN DESGASTE
ZAPATAS
100
....................................... 62
INSPECCIÓN SUSPENSIÓN DELANTERA
Y TRASERA .................................................. 62
CONTROL DE LA DIRECCIÓN..................... 63
CONTROL EJE FULCRO MOTOR ............... 63
DESMONTAJE PINZA FRENO
TRASERO ............................................ 64
DESMONTAJE ESPEJOS
RETROVISORES .......................................... 64
DESMONTAJE CUBREMANILLAR
DELANTERO................................................. 65
DESMONTAJE TAPA DE INSPECCIÓN ....... 65
DESMONTAJE SILENCIADOR
DE ESCAPE .......................................... 66
DESMONTAJE SILENCIADOR
DE ESCAPE
100
.......................................... 67
DESMONTAJE PLATAFORMA
REPOSAPIÉS ............................................... 68
CONTROL CABALLETE ............................... 68
CONTROL INTERRUPTORES ..................... 69
AJUSTE DEL RALENTÍ................................. 69
AJUSTE MANDO ACELERADOR ................. 70
BUJÍA ............................................................ 71
BATERÍA ....................................................... 72
LARGA INACTIVIDAD DE LA BATERÍA ....... 73
CONTROL Y LIMPIEZA
TERMINALES Y BORNES ............................ 73
DESMONTAJE BATERÍA .............................. 74
CONTROL NIVEL ELECTROLITO BATERÍA 74
RECARGA BATERÍA ..................................... 75
INSTALACIÓN BATERÍA ............................... 75
SUSTITUCIÓN FUSIBLE .............................. 76
REGULACIÓN VERTICAL HAZ LUMINOSO 77
BOMBILLAS .................................................. 77
SUSTITUCIÓN BOMBILLAS FARO
DELANTERO................................................. 78
SUSTITUCIÓN BOMBILLAS INDICADORES
DE DIRECCIÓN DELANTEROS ................... 79
SUSTITUCIÓN BOMBILLA
FARO TRASERO .......................................... 79
SUSTITUCIÓN BOMBILLAS INDICADORES
DE DIRECCIÓN TRASEROS........................ 80
SUSTITUCIÓN BOMBILLA
LUZ MATRÍCULA (en los países donde
está previsto)
100
..................................
81
SUSTITUCIÓN BOMBILLAS
SALPICADERO ............................................. 81
TRANSPORTE ................................................. 82
VACIADO DEL COMBUSTIBLE
DEL DEPÓSITO ............................................ 83
LIMPIEZA ......................................................... 84
PERIODOS DE LARGA INACTIVIDAD ......... 85
DATOS TÉCNICOS .......................................... 86
TABLA LUBRICANTES ................................. 90
ESQUEMA ELÉCTRICO - Scarabeo .... 94
ESQUEMA ELÉCTRICO - Scarabeo
100
.... 96

conducción segura

6
uso y mantenimiento
Scarabeo 50 - Scarabeo 100 4T
La mayor parte de los accidentes se debe a
la inexperiencia del piloto.
NO preste NUNCA el vehículo a principian-
tes, y de todas formas, asegúrese de que el
piloto tenga todos los requisitos necesarios
para conducir.
REGLAS FUNDAMENTALES
DE SIGURIDAD
Para conducir el vehículo es necesario po-
seer todos los requisitos previstos por la ley
(carnet de conducir, edad mínima, idoneidad
psico-física, seguro, impuestos gubernativos,
matrícula, etc.).
Se aconseja que familiarice y que tome con-
fianza gradualmente con el vehículo, en zo-
nas de baja densidad de circulación y/o en
propiedades particulares.
La ingestión de algunas medicinas, alcohol
y sustancias estupefacientes o psicofár-
macos aumenta notablemente el riesgo de
accidentes.
Asegúrese de que sus condiciones psico-fí-
sicas resulten idóneas para conducir, y so-
bre todo tenga mucho cuidado con el can-
sancio físico y con la somnolencia.

7
uso y mantenimiento
Scarabeo 50 - Scarabeo 100 4T
Respete rigurosamente las señales y las
normas del tráfico rodado nacional y local.
Evite maniobras repentinas y peligrosas
para los demás y para sí mismo (por ejem-
plo: empinadas, inobservancia de los lími-
tes de velocidad, etc.), además, juzgue y
tome siempre en consideración las condi-
ciones del firme, de la visibilidad, etc.
No choque contra obstáculos que puedan
dañar el vehículo o llevar a la pérdida del
control del mismo.
No se quede en la zaga del vehículo que le
preceda para aumentar su velocidad.
Conduzca siempre con ambas manos sobre
el manillar y con los pies sobre el estribo (o
sobre los estribos del piloto) en la correcta
posición de conducción.
Evite levantarse de pie durante la conduc-
ción o estirarse.

8
uso y mantenimiento
Scarabeo 50 - Scarabeo 100 4T
El piloto nunca tiene que distraerse, o de-
jarse distraer o afectar por personas, obje-
tos, acciones (no tiene que fumar, comer,
beber, leer, etc.) durante la conducción del
vehículo.
Utilice combustible y lubricantes específicos
para el vehículo, del tipo señalado en la “TA-
BLA LUBRICANTES”; controle varias veces
que el vehículo mantenga los niveles pres-
critos de combustible, de aceite y de líquido
refrigerante.
Si el vehículo ha sufrido un accidente o bien
en caso de choques o caídas, fíjese que no
hayan sido dañadas las palancas de man-
do, los tubos, los cables, el sistema de fre-
nado y las partes vitales.
Eventualmente, dé el vehículo a un Conce-
sionario Oficial aprilia para que controle,
sobre todo, el bastidor, el manillar, las sus-
pensiones, los órganos de seguridad y los
dispositivos de los que el usuario no consi-
gue valorar su integridad.
Señale toda mala función para facilitar las
operaciones de los técnicos y/o mecánicos.
No se ponga jamás a conducir el vehículo si
el daño sufrido puede comprometer su se-
guridad.
No modifique jamás la posición, la inclina-
ción o el color de: matrícula, indicadores de
dirección, dispositivos de alumbrado y la
bocina.
Modificaciones del vehículo comportan la
anulación de la garantía.
Sólo para los vehículos hasta 50 cm
3
in-
cluidos
Se advierte que cualquier modificación del
aparato motor o de otros órganos para au-
mentar la velocidad o la potencia del ciclo-
motor está prohibida por la ley: aportar mo-
dificaciones que comporten un aumento de
la velocidad máxima del vehículo o bien un
aumento de la cilindrada del motor hace que
COOLER
OIL

9
uso y mantenimiento
Scarabeo 50 - Scarabeo 100 4T
Sólo para los vehículos de más de 50 cm
3
Cualquier modificación que se aporte al ve-
hículo y el cambio de piezas originales, pue-
den comprometer las prestaciones del mis-
mo y bajar, por lo tanto, el nivel de seguri-
dad o, incluso, volverlo ilegal.
Se aconseja respetar todas las disposicio-
nes legales y las normas nacionales y loca-
les en materia de equipamiento del vehícu-
lo.
De manera especial hay que evitar las mo-
dificaciones técnicas para aumentar las pres-
taciones o alterar las características origina-
les del vehículo.
Evite en absoluto las competiciones con
otros vehículos.
Evite la conducción fuera de la carretera.
ROPA
Antes de empezar a conducir, acuérdese de
ponerse y de abrocharse siempre y co-
rrectamente el casco. Asegúrese de que esté
homologado, íntegro, de su medida y que
tenga la visera limpia.
Lleve ropa protectiva, especialmente de co-
lores claros y/o reflectantes. De tal manera
puede hacerse visible a los demás conduc-
tores, reduciendo notablemente el riesgo de
accidentes; además estará más protegido en
caso de caída.
La ropa tiene que estar muy ajustada y ce-
rrada en las extremidades; los cordones, los
cinturones y las corbatas no deben colgar;
evite que éstos u otros objetos interfieran
durante la conducción, enredándose en ob-
jetos en movimiento o en otros órganos de
conducción.
A12
345
ONLY ORIGINALS
el ciclomotor pase a ser a todos los efectos
una motocicleta, con la consiguiente obliga-
ción para el propietario:
– de efectuar una nueva homologación;
– de la matrícula;
– del permiso de conducir.
Además, se advierte que tales modificacio-
nes determinan la caducidad del seguro ya
que las pólizas de seguros prohíben aportar
variaciones técnicas que comporten aumen-
to de prestaciones. Por lo anteriormente di-
cho, la violación de la prohibición de adulte-
ración está castigada por la ley con sancio-
nes (entre las cuales la confiscación del ve-
hículo) a las que se pueden añadir, según
los casos, las de la falta del casco y de la
matrícula, las de violación de las obligacio-
nes fiscales (impuesto de propiedad) y las
penales por eventual falta del permiso de
conducir.

10
uso y mantenimiento
Scarabeo 50 - Scarabeo 100 4T
No guarde en el bolsillo objetos que puedan
resultar peligrosos en caso de caída, por
ejemplo: objetos con punta como llaves,
bolígrafos, recipientes de cristal, etc. (las
mismas precauciones están dirigidas tam-
bién al eventual pasajero).
ACCESORIOS
El usuario es personalmente responsable de
la elección de instalación y del uso de acce-
sorios. Al instalar el accesorio se le recomien-
da que éste no vaya a cubrir los dispositivos
de señalización acústica y visual o que com-
prometa su funcionamiento, que no limite la
carrera de las suspensiones y el ángulo de
viraje, que no obstaculice la puesta en fun-
ción de los mandos y que no reduzca la al-
tura del suelo y el ángulo de inclinación en
la curva. Evite el uso de accesorios que pue-
dan obstaculizar el acceso a los mandos, en
cuanto pueden alargar los tiempos de reac-
ción en caso de urgencia.
Los carenados y los parabrisas de grandes
dimensiones, instalados en el vehículo, pue-
den dar lugar a fuerzas aerodinámicas que
pueden comprometer la estabilidad del ve-
hículo durante su carrera, sobre todo a ve-
locidad elevada.
Compruebe que el equipo esté fijado muy
firmemente al vehículo y que no resulte pe-
ligroso durante la conducción.
No añada ni modifique los dispositivos eléc-
tricos que superen la capacidad de carga del
vehículo, porque esto podría causar la pa-
rada repentina del mismo o una falta peli-
grosa de corriente necesaria para el funcio-
namiento de los dispositivos de señalización
acústica y visual. aprilia aconseja el uso
de accesorios originales (aprilia genuine
accessories).
CARGA
Sea prudente y moderado al cargar el equi-
paje. Es necesario que ponga el equipaje lo
más cerca posible del baricentro del vehícu-
lo y que distribuya de manera uniforme la
carga en ambos lados para reducir al míni-
mo cada tipo de desajuste. Compruebe, ade-
más, que la carga esté fijada firmemente al
vehículo, sobre todo durante viajes de largo
recorrido.

11
uso y mantenimiento
Scarabeo 50 - Scarabeo 100 4T
No sujete jamás objetos voluminosos, pe-
sados y/o peligrosos en el manillar, en los
guardabarros, y en las horquillas: esto cau-
saría una respuesta del vehículo más lenta
durante las curvas y comprometería, de ma-
nera inevitable, la manejabilidad del mismo.
No ponga a los lados del vehículo un equi-
paje demasiado voluminoso ya que podría
ir a chocar contra personas u obstáculos,
causando la pérdida de control del vehícu-
lo.
No transporte ningún tipo de equipaje que
no esté fijado firmemente al vehículo.
No transporte equipaje que sobresalga ex-
cesivamente del maletero o que cubra los
dispositivos de alumbrado y de señalización
acústica y visual.
No transporte animales o a niños sobre el
portadocumentos o sobre el maletero.
No supere el límite máximo de peso trans-
portable por cada maletero.
La sobrecarga del vehículo compromete la
estabilidad y la manejabilidad del mismo.
KG!

12
uso y mantenimiento
Scarabeo 50 - Scarabeo 100 4T
UBICACION ELEMENTOS PRINCIPALES
PIE DE LA ILUSTRACION
1) Claxon
2) Depósito líquido freno trasero
3) Guantera portadocumentos
4) Portafusibles
5) Batería
6) Estribo izquierdo pasajero
(países donde previsto)
7) Cerradura sillín
8) Portaequipajes
9) Caballete central
10) Filtro aire
11) Tapa de inspección
10
11
9
4
5
8
3
2
1
(
(
(
(
(
(
(
(
(
(
)
)
)
)
)
)
)
)
)
)
)
)
)
)
)
)
)
)
)
)
)
)
)
)
)
)
)
)
)
)
)
)
)
)
)
)
)
)
)
)
)
)
)
)
)
)
)
)
)
)
)
)
)
)
)
)
)
)
)
)
)
)
)
)
)
)
)
)
)
)
)
)
)
)
)
)
)
)
)
)
)
)
)))))))))))
6
7

13
uso y mantenimiento
Scarabeo 50 - Scarabeo 100 4T
PIE DE LA ILUSTRACION
1) Depósito aceite mezclador
2) Tapón depósito aceite mezclador
3) Tapón depósito combustible
4) Interruptor de encendido / seguro de dirección
5) Gancho portabolsos
6) Tapa número chasis
7) Depósito líquido freno delantero
8) Bujía
9) Depósito combustible
10)Estribo derecho pasajero
(países donde previsto)
11) Gancho antirrobo (para cable acorazado
“Body-Guard” aprilia
)
1
2
3
5
7
4
6
8
10
9
11

14
uso y mantenimiento
Scarabeo 50 - Scarabeo 100 4T
UBICACION ELEMENTOS PRINCIPALES
100
PIE DE LA ILUSTRACION
1) Claxon
2) Guantera portadocumentos
3) Portafusibles
4) Batería
5) Estribo izquierdo pasajero
6) Cerradura sillín
7) Portaequipajes
8) Caballete central
9) Pedal de arranque
10)Filtro aire
11) Tapa de inspección
1
apri
lia
2
3
4 6
10
8
9
5
11
7
100

15
uso y mantenimiento
Scarabeo 50 - Scarabeo 100 4T
PIE DE LA ILUSTRACION
1) Tapón depósito combustible
2) Interruptor de encendido / seguro de dirección
3) Gancho portabolsos
4) Tapa número chasis
5) Depósito líquido freno delantero
6) Bujía
7) Depósito combustible
8) Estribo derecho pasajero
9) Gancho antirrobo (para cable acorazado
“Body-Guard” aprilia
)
100
1
3
5
2
4
6
8
7
9

16
uso y mantenimiento
Scarabeo 50 - Scarabeo 100 4T
PIE DE LA ILUSTRACION
1) Mandos eléctricos en el lado izquierdo del manillar
2) Palanca freno trasero
3) Espejo retrovisor izquierdo
4) Instrumentos e indicadores
5) Espejo retrovisor derecho
6) Palanca freno delantero
7) Puño de gas
8) Mandos eléctricos en el lado derecho del manillar
9) Interruptor de encendido / seguro de dirección (
- - )
10)Velocímetro
11) Indicador nivel combustible ( )
12)Luz testigo indicadores de dirección (
) color verde
13)Luz testigo diagnóstico Injection Check (
) color rojo ( )
14)Luz testigo luz larga (
) color azul marino
15)Luz testigo reserva aceite mezclador (
) color rojo ( )
16)Luz testigo luces de cruce (
) color verde (
100
)
17)Cuentakilómetros
UBICACION MANDOS / INSTRUMENTOS E INDICADORES
1/2
4/4
0 0 00 00
0
40
30
30
20
50
60
20
10
10
R
mph km/h
40
50
70
80
90
aprilia
3
2
1
9
8
7
6
1/2
4/4
R
30
20
10
0
40
30
20
50
60
mph km/h
40
50
70
80
90
aprilia
4
11
12
10
0 00 0
17
15
14
13
10
00
Km
Km
1/2
4/4
0 0 00 00
0
40
30
30
20
50
60
20
10
10
R
mph km/h
40
50
70
80
90
aprilia
3
2
1
9
8
7
6
5
1/2
4/4
R
30
20
10
0
40
30
20
50
60
mph km/h
40
50
70
80
90
aprilia
4
11
12
10
0 00 0
17
16
14
10
00
Km
Km
100

17
uso y mantenimiento
Scarabeo 50 - Scarabeo 100 4T
TABLA INSTRUMENTOS E INDICADORES
Centellea cuando está en función la señal de viraje.
Luz testigo indicadores
de dirección(
)
Descripción
Función
Indicador nivel combustible (
)
Se enciende con el interruptor de encendido en posición “
“, una palanca del freno acciona-
da y el pulsador de arranque “ “ apretado, efectuando un control del correcto funcionamiento
de la bombilla.
Cuando no se produzca el encendido de la bombilla durante el arranque, efectúe la sustitución
de la misma.
Si la luz testigo se enciende y no se apaga después de haber
soltado el pulsador de arranque “
“, o bien se enciende du-
rante el funcionamiento normal, significa que el nivel del aceite mezclador está en re-
serva; en este caso efectúe el relleno del aceite mezclador, véase pág. 28 (ACEITE MEZ-
CLADOR).
Se enciende cuando la luz del faro delantero está en posición de luz de cruce.
Indica más o menos el nivel del combustible en el depósito.
Luz testigo luz larga
( )
Luz testigo luces de cruce (
)
Cuentakilómetros totalizador
Luz testigo reserva aceite
mezclador
( )
ATENCION
Indica el número total de kilómetros recorridos.
Se enciende cuando la luz del faro delantero está en posición de luz larga.
Indica la velocidad de conducción.
Velocímetro
Luz testigo diagnóstico
(Injection Check)
Se enciende cuando se coloca la llave en “ ” y se apaga una vez puesto en funcionamiento
el vehículo.
Si la luz testigo se enciende durante el funcionamiento de la
moto, el vehículo está averiado; diríjase a un concesionario
aprilia.
ATENCION

18
uso y mantenimiento
Scarabeo 50 - Scarabeo 100 4T
LUZ TESTIGO INJECTION CHECK
PRIORIDAD 1
La luz testigo centellea frecuentemente.
Si sucede esto, significa que se ha producido una avería po-
tencialmente grave. Aconsejamos que se dirija inmediatamen-
te a un Concesionario Oficial aprilia.
Si en este caso se arranca el vehículo, las funciones del mismo
pueden ser limitadas.
Detenga el vehículo y llévelo a un Concesionario Oficial aprilia.
PRIORIDAD 2
La luz testigo se enciende y permanece encendida un mínimo de
10 segundos.
Ésta es una indicación de error de funcionamiento momentá-
neo que no compromete la seguridad del vehículo. En este
caso es posible arrancar la moto. Es oportuno dirigirse lo an-
tes posible a un Concesionario Oficial aprilia.
ATENCION
ATENCION

19
uso y mantenimiento
Scarabeo 50 - Scarabeo 100 4T
MANDOS PRINCIPALES INDIVIDUALES
MANDOS EN EL LADO IZQUIERDO DEL MANILLAR
IMPORTANTE Los componentes eléctricos funcionan sólo si
el interruptor de encendido está en posición “
”.
IMPORTANTE La instalación de iluminación funciona solo con
el motor encendido.
1) DESVIADOR LUCES (
- ) (no presente )
Con el interruptor de las luces (
-
•
) en posición " ", si el
desviador luces se encuentra en posición "
", se acciona la
luz de cruce; en posición "
", se acciona la luz larga.
2) INTERRUPTOR INDICADORES DE DIRECCION (
)
Desplace el interruptor hacia la izquierda, para señalar la vuelta
a la izquierda; desplace el interruptor hacia la derecha, para
indicar la vuelta a la derecha.
Apriete el interruptor para desactivar el indicador de dirección.
3) PULSADOR BOCINA ( )
Al apretarlo se acciona la bocina.
1
2
3

20
uso y mantenimiento
Scarabeo 50 - Scarabeo 100 4T
MANDOS EN EL LADO DERECHO DEL MANILLAR
IMPORTANTE Los componentes eléctricos funcionan sólo si
el interruptor de encendido está en posición “
”.
IMPORTANTE La instalación de iluminación funciona solo con
el motor encendido.
1) INTERRUPTOR LUCES (
-
•
)
IMPORTANTE Antes de actuar sobre el interruptor luces
controle que el desviador luces (
- ) esté en posición “ ”.
Con el interruptor luces en posición “
•
”, las luces están apaga-
das; en posición “ “, están encendidas: la luz de posición tra-
sera, las luces del salpicadero instrumentos y la luz de cruce o
la luz larga. Mediante el desviador luces (
- ), es posible
accionar la luz de cruce o la luz larga.
1a) DESVIADOR LUCES (
- )
Con el desviador luces en posición “ ” están encendidas: la
luz de cruce, la luz de posición trasera y las luces del salpicade-
ro; en posición “
” están encendidas: la luz larga, la luz de
posición trasera y las luces salpicadero.
IMPORTANTE El apagado de las luces está subordinado al
apagado del motor.
2) PULSADOR DE ARRANQUE (
)
Presionando el pulsador de arranque y accionando simultánea-
mente una palanca freno (delantero o trasero), el motor de arran-
que hace girar el motor.
Para el procedimiento de arranque, véase pág. 38 (ARRANQUE).
1a
1
2

21
uso y mantenimiento
Scarabeo 50 - Scarabeo 100 4T
MANDOS PRINCIPALES INDIVIDUALES
100
MANDOS EN EL LADO IZQUIERDO DEL MANILLAR
IMPORTANTE Los componentes eléctricos funcionan sólo si el
interruptor de encendido está en posición “
”.
IMPORTANTE La instalación de iluminación funciona solo con el
motor encendido.
1) DESVIADOR LUCES (
- )
Con el interruptor de las luces (
- -
•
) en posición " ", si el
desviador luces se encuentra en posición "
", se acciona la luz de
cruce; en posición "
", se acciona la luz larga.
2) PULSADOR DESACTIVACIÓN INDICADORES
DE DIRECCIÓN (▲)
Con el interruptor indicadores de dirección (3) desplazado hacia la
derecha o hacia la izquierda, presionando el pulsador se desactiva
el funcionamiento de los indicadores de dirección.
3) INTERRUPTOR INDICADORES DE DIRECCION (
)
Desplace el interruptor hacia la izquierda, para señalar la vuelta a la
izquierda; desplace el interruptor hacia la derecha, para indicar la
vuelta a la derecha.
Apriete el interruptor (2) para desactivar el indicador de dirección.
4) PULSADOR BOCINA ( )
Al apretarlo se acciona la bocina.
100
1
2
3
4

22
uso y mantenimiento
Scarabeo 50 - Scarabeo 100 4T
MANDOS EN EL LADO DERECHO DEL MANILLAR
IMPORTANTE Los componentes eléctricos funcionan sólo si el
interruptor de encendido está en posición “
”.
IMPORTANTE La instalación de iluminación funciona solo con
el motor encendido.
1) INTERRUPTOR LUCES (
- -
•
)
IMPORTANTE Antes de actuar sobre el interruptor luces con-
trole que el desviador luces (
- ) esté en posición “ ”.
Con el interruptor luces en posición “
•
”, las luces están apaga-
das; en posición “
“, están encendidas las luces de posición y
la luz salpicadero; en posición “
” están encendidas las luces
de posición, la luz salpicadero instrumentos y la luz de cruce.
Mediante el desviador luces ( - ), es posible accionar la luz
larga.
2) PULSADOR DE ARRANQUE (
)
Presionando el pulsador de arranque y accionando simultánea-
mente una palanca freno (delantero o trasero), el motor de arran-
que hace girar el motor.
Para el procedimiento de arranque, véase pág. 38 (ARRANQUE).
100
1
2

23
uso y mantenimiento
Scarabeo 50 - Scarabeo 100 4T
INTERRUPTOR DE ENCENDIDO
El interruptor de encendido se encuentra en
el lado derecho, cerca del manguito de la
dirección.
IMPORTANTE La llave (1) acciona el
interruptor de encendido / seguro de direc-
ción, la guantera portadocumentos y la ce-
rradura del sillín.
Con el vehículo se entregan dos llaves (una
de reserva).
IMPORTANTE Guarde la llave de re-
serva en un lugar diferente del vehículo.
PELIGRO
SEGURO DE DIRECCION
No gire nunca la llave en posición “ ”
durante la marcha, porque se puede per-
der el control del vehículo.
FUNCIONAMIENTO
Para bloquear la dirección:
♦ Gire el manillar completamente hacia la
izquierda.
♦ Gire la llave (1) en posición “ ”, presió-
nela.
♦ Suelte la llave.
IMPORTANTE Gire la llave y el mani-
llar simultáneamente.
♦ Gire la llave (1) en sentido antihorario (ha-
cia la izquierda), luego gire despacio el
manillar hasta poner la llave (1) en “
”.
♦ Extraiga la llave.
Posición
Función
Extracción
Llave
Seguro de
dirección
La dirección
está
bloqueada.
No es posible
arrancar
el motor ni
encender
las luces.
Es posible
quitar la
llave.
No se puede
arrancar el
motor ni
accionar las
luces.
Es posible
quitar la
llave.
Se puede
arrancar el
motor y
accionar las
luces.
No es posi-
ble quitar la
llave.
1

24
uso y mantenimiento
Scarabeo 50 - Scarabeo 100 4T
EQUIPO AUXILIAR
DESBLOQUEO / BLOQUEO
SILLIN
Para desbloquear y levantar el sillín:
♦ Coloque el vehículo sobre el caballete cen-
tral en un terreno firme y llano.
♦ Introduzca la llave en la cerradura sillín (1).
♦ Gire la llave en sentido horario y levante
el sillín (2).
IMPORTANTE Antes de bajar y blo-
quear el sillín, controle que no haya olvida-
do la llave en el interior del sillín.
♦ Para bloquear el sillín, bájelo y haga pre-
sión sobre éste centralmente hasta oír el
resorte de la cerradura.
Antes de empezar a conducir, asegúre-
se de que el sillín esté bloqueado co-
rrectamente.
GUANTERA
PORTADOCUMENTOS
Para abrir la guantera portadocumentos:
♦ Coloque el vehículo sobre el caballete cen-
tral en un terreno firme y llano.
♦ Introduzca la llave de encendido en la ce-
rradura (3) y gírela en sentido horario.
Para el cierre:
♦ Introduzca la llave de encendido, gírela en
sentido horario empujándola, después gire
la llave en sentido contrario para bloquear.
♦ Saque la llave y compruebe que la
guantera esté cerrada.
No se exceda cargando la guantera por-
tadocumentos.
Máximo peso permitido: 1,5 Kg.
GANCHO ANTIRROBO
El gancho antirrobo (4) está situado en el
lado derecho del vehículo.
Para prevenir un eventual robo del vehícu-
lo, se aconseja sujetarlo con el cable aco-
razado “Body-Guard” aprilia
(5) que
se encuentra en los Concesionario Oficial
aprilia.
No utilice el gancho para levantar el ve-
hículo, ni para cualquier otro motivo, ya
que ha sido proyectado tan solo para
asegurar el vehículo una vez ha sido
aparcado.
PELIGRO
PELIGRO
PELIGRO
1
2
3
4
5

25
uso y mantenimiento
Scarabeo 50 - Scarabeo 100 4T
KIT HERRAMIENTAS
Para acceder al kit herramientas desbloquee
y levante el sillín, véase pág. 24 (DESBLO-
QUEO / BLOQUEO SILLÍN).
Las llaves están alojadas en la parte supe-
rior de la tapa sede batería.
El kit herramientas está compuesto por:
– n° 1 llave de tubo de 16 mm (1);
– n° 1 llave fija tipo DIN de 17 mm;
– n° 1 destornillador (2) con un extremo
cruciforme tipo PH tamaño 2 y con el otro
extremo con llave macho hexagonal de 4
mm.
GANCHO PORTABOLSOS
No cuelgue del gancho, bolsos o sobres
demasiados voluminosos, porque po-
drían perjudicar gravemente la maneja-
bilidad del vehículo o el movimiento de
los pies.
El gancho portabolsos (3) está situado de-
bajo del sillín en la parte delantera.
Máximo peso permitido: 1,5 kg.
PELIGRO
100
Las llaves están ubicadas en el alojamiento
situado en el plástico debajo del sillín.
El kit herramientas está compuesto por:
– n° 1 llave de tubo de 16 mm (1);
– n° 1 destornillador (2) con un extremo cru-
ciforme tipo PH tamaño 2 y con el otro
extremo con llave macho hexagonal de 4
mm.
– n° 1 O-ring de sellado para las dos herra-
mientas.
2
1
1
100
2
1

26
uso y mantenimiento
Scarabeo 50 - Scarabeo 100 4T
UBICACIÓN DEL CASCO EN EL
MALETERO TRASERO
Gracias al maletero trasero no es necesario
llevar consigo el casco cada vez que se
aparca el vehículo.
No conduzca con el maletero trasero
abierto. Podría comprometer las condi-
ciones de seguridad durante la conduc-
ción.
Para colocar el casco:
♦
Coloque el vehículo sobre el caballete
central, véase pág. 46 (COLOCACIÓN
DEL VEHÍCULO SOBRE EL CABALLE-
TE CENTRAL).
♦ Extraiga la llave del interruptor de encen-
PELIGRO
dido e introdúzcala en la cerradura (1) del
maletero trasero.
♦ Gire la llave en sentido contrario a las agu-
jas del reloj y abra el maletero trasero (2).
♦ Introduzca el casco (3) en el interior del
maletero trasero, colocándolo tal como
se indica en la figura y como se ilustra
en el adhesivo del maletero.
♦ Cierre el maletero trasero (2) hasta oír un
clic y extraiga la llave de la cerradura (1).
No deje la llave en la cerradura.
ATENCION
3
1
2
100

27
uso y mantenimiento
Scarabeo 50 - Scarabeo 100 4T
COMPONENTES PRINCIPALES
PELIGRO
COMBUSTIBLE
El combustible utilizado para la propul-
sión de los motores de explosión es muy
inflamable y puede volverse explosivo en
algunas condiciones.
Es oportuno reponer gasolina y realizar
las operaciones de mantenimiento en una
zona ventilada y con el motor apagado.
No fume durante la provisión de gasoli-
na y cerca de los vapores del combusti-
ble; de todas formas evite absolutamen-
te el contacto con llamas libres, chispas
y cualquier otra fuente que podría cau-
sar el encendido o la explosión.
Además, evite la salida del combustible
de la boca de llenado, ya que podría in-
cendiarse al llegar a contacto con las
superficies muy calientes del motor.
En caso de que se vertiera accidental-
mente algo de gasolina, controle que la
zona esté completamente seca, antes de
arrancar el vehículo.
La gasolina se dilata con el calor y bajo la
acción de los rayos solares. Por lo tanto
no llene nunca el depósito hasta el tope.
Una vez que se haya terminado la ope-
ración de provisión de gasolina, cierre
con cuidado el tapón.
Evite el contacto del combustible con la
piel, la inhalación de vapores, la inges-
tión y el trasiego de un recipiente a otro
por medio de un tubo.
NO ESPARZA EL COMBUSTIBLE EN EL
AMBIENTE.
MANTENGASE LEJOS DEL ALCANCE
DE LOS NIÑOS.
Utilice exclusivamente gasolina super (4
Stars
) DIN 51600, número de octanos
mínimo 98 (N.O.R.M.) y 88 (N.O.M.M.).
Utilice exclusivamente gasolina super sin
plomo según DIN 51 607, número de octa-
nos mínimo 95 (N.O.R.M.) y 85 (N.O.M.M.).
Para el abastecimiento de combustible:
♦
Levante el sillín, véase pág. 24 (DES-BLO-
QUEO/BLOQUEO SILLIN).
♦ Desenrosque y quite el tapón depósito (1).
CAPACIDAD DEPOSITO
(reserva incluida): 8 l
RESERVA DEPOSITO: 1 l .
No añada aditivos u otras sustancias al
combustible.
Si se utiliza un embudo u otro, asegúre-
se que esté perfectamente limpio.
♦ Efectúe el abastecimiento de combustible.
Una vez realizado el abastecimiento, co-
loque correctamente el tapón (1).
♦ Coloque el tapón (1).
ATENCION
PELIGRO
100
100
1
1

28
uso y mantenimiento
Scarabeo 50 - Scarabeo 100 4T
ACEITE MEZCLADOR
Rellene el depósito de aceite del mezclador
cada 2000 km (1250 mi).
El vehículo está provisto de una central que
a su vez gestiona una bomba electrónica
para el correcto aporte de aceite para la lu-
bricación del motor (véase pág. 90 TABLA
LUBRICANTES).
La entrada en reserva está indicada por el
encendido de la luz testigo reserva aceite
mezclador “
“ situada en el salpicadero,
véase pág. 16 y 17 (UBICACIÓN MANDOS
/ INSTRUMENTOS E INDICADORES).
La utilización del vehículo sin aceite mez-
clador causa graves daños al motor. En
el caso en que se agote el aceite conteni-
do en el depósito mezclador o si se des-
monta el tubo de aceite del mezclador,
es necesario dirigirse a un Concesiona-
rio Oficial aprilia para la realización de
la purga.
Esta operación es indispensable ya que
el funcionamiento del motor con aire en
la instalación del aceite mezclador podría
causar graves daños al motor.
PELIGRO
LUBRICANTES
El aceite puede dañar gravemente la piel
si es manejado durante mucho tiempo y
diariamente. Se aconseja que se lave las
manos con mucho cuidado tras haberlo
manejado.
En caso de intervenciones de manteni-
miento, se aconseja el uso de guantes
de látex.
MANTENGASE LEJOS DEL ALCANCE
DE LOS NIÑOS.
NO ESPARZA EL ACEITE EN EL AM-
BIENTE.
Opere con precaución.
No esparza el aceite!
Tenga cuidado con no ensuciar ningún
componente, la zona en que se opera y
aquella circunstante.
Limpie esmeradamente todo eventual
residuo de aceite.
En caso de pérdidas o malfunciona-
mientos, diríjase a un Concesionario Ofi-
cial aprilia.
Para la introducción del aceite mezclador
en el depósito:
♦
Levante el sillín, véase pág. 24 (DESBLO-
QUEO / BLOQUEO SILLÍN).
♦ Saque el tapón (1).
CAPACIDAD DEPÓSITO: 1,5 l
RESERVA DEPÓSITO: 0,6 l .
No añada aditivos u otras sustancias al
aceite.
Si se utiliza un embudo u otro, asegúre-
se que esté perfectamente limpio.
♦ Efectúe el relleno del aceite.
Una vez efectuado el relleno, coloque
correctamente el tapón (1).
♦ Coloque el tapón (1).
ATENCION
ATENCION
ATENCION
ATENCION
1

29
uso y mantenimiento
Scarabeo 50 - Scarabeo 100 4T
ACEITE MOTOR
100
En los motores 4T el aceite motor se utiliza
para engrasar los órganos de la distribución,
los cojinetes principales y el grupo térmico.
Una cantidad insuficiente de aceite pue-
de provocar graves daños al motor.
En todos los motores 4T la pérdida de las
características del aceite, así como un cier-
to consumo se deben considerar normales.
Los consumos pueden ser el resultado de
las condiciones de empleo (ej. conducien-
do siempre “a pleno gas” el consumo de
aceite aumenta). En función del consumo
total de aceite en el motor y de los consu-
mos medios medidos según los modos
estándar, se definen las frecuencias de sus-
titución previstas en el programa de mante-
nimiento.
Con el fin de prevenir cualquier inconve-
niente, se recomienda controlar el nivel
del aceite cada vez que se utiliza el vehí-
culo.
COMPROBACIÓN NIVEL ACEITE MOTOR
Compruebe el nivel del aceite del motor cada
2000 km (1250 mi).
♦ Coloque el vehículo sobre el caballete cen-
tral véase pág. 46 (COLOCACIÓN DEL
VEHÍCULO SOBRE EL CABALLETE
CENTRAL).
Cada vez que se utiliza el vehículo, con
el motor frío, se debe efectuar el control
del nivel del aceite motor, que debe estar
comprendido entre las muescas de MAX
y MIN de la ventanilla.
La referencia del nivel MAX indica una can-
tidad de aproximadamente 850 cc de aceite
en el motor.
PELIGRO
ATENCION
ATENCION
Si el control se efectúa después de haber
empleado el vehículo, es decir, con motor
caliente, la línea del nivel resultará más baja;
para efectuar un correcto control es nece-
sario apagar el motor y esperar unos 10
minutos para obtener un nivel correcto.
RELLENO ACEITE MOTOR
Efectúe el relleno del aceite motor cada 2000
km (1250 mi).
Los eventuales rellenos de aceite se de-
ben efectuar después del control del ni-
vel y en todo caso añadiendo aceite sin
superar nunca el nivel MAX.
Cada 2000 km (1250 mi) está previsto efec-
tuar, en un Concesionario Oficial aprilia,
un control y eventual relleno de aceite mo-
tor.
ATENCION

30
uso y mantenimiento
Scarabeo 50 - Scarabeo 100 4T
SUSTITUCIÓN ACEITE MOTOR
Y FILTRO
La sustitución del aceite y la limpieza del
filtro se deben efectuar cada 4000 km (2500
mi) en un Concesionario Oficial aprilia.
Vacíe el motor haciendo salir todo el aceite
por el tapón de vaciado (1).
Para facilitar la salida del aceite afloje el ta-
pón (2) y extraiga el filtro de red.
Después de haber limpiado el filtro de red y
haberlo montado y apretado el tapón (2), lle-
ne con aproximadamente 850 cc de aceite
por el tapón (3).
CONTROL NIVEL ACEITE
TRANSMISION
100
NO ESPARZA EL ACEITE EN EL AM-
BIENTE.
Lea con cuidado pág. 47 (MANTENI-
MIENTO).
Para el control del nivel del aceite transmi-
sión, hay que efectuar las siguientes ope-
raciones cada 4000 km (2500 mi) de reco-
rrido; cada 4000 km (2500 mi) de recorrido
o cada 12 meses (
):
♦ Recorra algunos kilómetros hasta alcan-
zar la temperatura normal de funciona-
miento y luego pare el motor.
♦ Coloque el vehículo sobre el caballete
central.
♦ Coloque un recipiente graduado con ca-
pacidad no inferior a 120 cm
3
, por debajo
del tapón de vaciado (1).
♦ Desenrosque el tapón de llenado (2) y el
tapón de vaciado aceite (1).
100
1
2
♦ Deje salir el aceite completamente del
cárter, mida la cantidad; si ésta resultara
inferior a los 100 cm
3
, restaure el nivel
añadiendo la cantidad que falta.
♦ Cierre el tapón de vaciado y provea al lle-
nado.
♦ Cierre el tapón de llenado (2).
Cierre con cuidado los tapones de llena-
do y de vaciado y controle que el aceite
no se salga. Controle periódicamente que
no haya pérdidas en correspondencia
con la junta de la tapa del cárter. No utili-
ce el vehículo con lubricación insuficien-
te o con lubrificantes contaminados o no
adecuados, porque aceleran el desgaste
de las partes en movimiento y pueden
crear daños irreparables.
Para el control y la sustitución diríjase a
un Concesionario Oficial aprilia.
ACEITE TRANSMISION
Es necesario que haga sustituir el aceite
transmisión tras los primeros 500 km (312
mi) y la primera vez después de 4000 km
(2500 mi) o cada 12 meses; sucesivamente
cada 8000 km (5000 mi) o cada 2 años.
Después de los primeros 1000 km (625 mi)
haga controlar el nivel del aceite transmi-
sión o cada 4 meses. Es necesario que haga
sustituir el aceite transmisión tras los prime-
ros 4000 km (2500 mi) o cada 12 meses.
Para el control y la sustitución diríjase a un
Concesionario Oficial aprilia.
ATENCION
100
1
3

31
uso y mantenimiento
Scarabeo 50 - Scarabeo 100 4T
LIQUIDO FRENOS -
recomendaciones
Variaciones imprevistas del juego o una
resistencia elástica sobre la palanca del
freno, se deben a defectos en el sistema
hidráulico.
Diríjase a un Concesionario Oficial
aprilia
si tiene dudas sobre el funciona-
miento perfecto del sistema de frenado,
y si no se encuentra en la posibilidad de
efectuar las operaciones normales de
control.
Ponga particular cuidado en que el dis-
co del freno y las juntas de fricción no
estén untados o engrasados, sobre todo
tras la realización de operaciones de
mantenimiento o control.
Controle que el tubo del freno no resulte
pellizcado o deteriorado.
MANTENGASE LEJOS DEL ALCANCE
DE LOS NIÑOS.
NO ESPARZA EL LÍQUIDO EN EL AM-
BIENTE.
PELIGRO
PELIGRO
Arranque el vehículo, déjelo girar algunos
minutos y apáguelo: después de unos 5
minutos controle el nivel y eventualmente
rellene sin superar nunca el nivel MAX.
Para los rellenos y la sustitución emplee
aceite nuevo, véase pág. 90 (TABLA
LUBRICANTES).
Hacer funcionar el motor con aceite in-
suficiente o con lubricantes no adecua-
dos, acelera el desgaste de las partes en
movimiento y puede dar lugar a graves
averías.
PELIGRO
2

32
uso y mantenimiento
Scarabeo 50 - Scarabeo 100 4T
PELIGRO
PELIGRO
FRENOS DE DISCO
Los frenos son los órganos que garanti-
zan mayormente la seguridad, por lo tan-
to hay que conservarlos siempre en per-
fecta eficacia y controlarlos antes de
cada viaje.
Un disco sucio ensucia las pastillas y por
consiguiente reduce la eficacia de frena-
do. Las pastillas sucias deben ser susti-
tuidas, mientras que el disco sucio debe
ser limpiado con un producto des-
engrasante de alta calidad.
El líquido frenos debe ser sustituido cada
dos años por un Concesionario Oficial
aprilia.
No dude en dirigirse a un Concesionario
Oficial aprilia en caso de dudas sobre
el perfecto funcionamiento de la instala-
ción de frenado y en el caso en que no
sea capaz de efectuar las normales ope-
raciones de control.
IMPORTANTE Para la versión con fre-
no de tambor trasero
, las siguientes in-
formaciones se refieren solo a la instalación
freno de disco delantero.
Gastándose las pastillas de fricción, el ni-
vel del líquido de los frenos en el depósito
disminuye para compensar automáticamen-
te el desgaste.
El depósito líquido frenos (1) está situado
cerca de la fijación palanca freno delante-
ro. Controle periódicamente el nivel del lí-
quido frenos en el depósito (1), y el desgas-
te de las pastillas, véase pág. 61 (COMPRO-
BACIÓN DESGASTE PASTILLAS).
No utilice el vehículo si hay una pérdida
de líquido en la instalación de frenado.
CONTROL
Para controlar el nivel:
♦ Coloque el vehículo sobre el caballete
central y un suelo firme y llano.
♦ Gire el manillar, de modo que el líquido
contenido en el depósito líquido frenos sea
paralelo a la referencia “MIN” presente
sobre el cristal (2).
MIN = nivel mínimo.
♦ Compruebe que el líquido contenido en el
depósito supere la referencia “MIN” in-
dicada en el cristal (2).
Si el líquido no llega por lo menos hasta la
referencia “MIN”:
El nivel del líquido disminuye progresi-
vamente con el desgaste de las pastillas.
♦ Compruebe el desgaste de las pastillas de
los frenos, véase pág. 61 (COMPRO-
BACION DESGASTE PASTILLAS) y del
disco.
Si las pastillas y/o el disco no deben ser sus-
tituidos:
♦ Diríjase a un Concesionario Oficial
aprilia que proveerá al relleno.
Controle la eficacia de frenado.
En caso de una carrera excesiva de la pa-
lanca freno o de una pérdida de eficacia
de la instalación de frenado, diríjase a un
Concesionario Oficial aprilia, ya que
podría ser necesario purgar el aire de la
instalación.
ATENCION
ATENCION

33
uso y mantenimiento
Scarabeo 50 - Scarabeo 100 4T
PELIGRO
FRENO TRASERO DE TAMBOR
100
Los frenos son los órganos que garanti-
zan mayormente la seguridad, por lo tan-
to hay que consérvalos en perfecta efi-
cacia; contrólelos antes de cada viaje.
No dude en dirigirse a un Concesionario
Oficial aprilia en caso de dudas sobre
el perfecto funcionamiento de la instala-
ción de frenado y en el caso en que no
sea capaz de efectuar las normales ope-
raciones de control.
REGULACIÓN FRENO
♦ Mida la distancia que cubre la palanca
antes de que el freno empiece su acción
de frenado. La carrera en vacío en el ex-
tremo de la palanca del freno debe ser de
aproximadamente 10 mm.
Para la regulación del juego:
♦ Actúe sobre el registro (1).
♦ Accione el freno repetidamente y controle
que la rueda gire libremente después de
haber soltado el freno.
♦ Controle la eficacia del frenado.
El completo enroscado del registro (1)
indica un desgaste de las zapatas; en tal
caso véase pág. 62 (COMPROBACIÓN
DESGASTE ZAPATAS).
IMPORTANTE El calentamiento de las
zapatas del freno, provocado por la acción
de frenado, puede modificar el juego entre
material de roce y tambor. Por este motivo
compruebe el juego incluso con zapatas a
temperatura de ejercicio.
♦ Efectúe una vuelta de prueba accionando
dos o tres veces el freno trasero.
Efectúe la comprobación con motor pa-
rado.
♦ Aparque el vehículo, véase pág. 45 (APAR-
CAMIENTO).
♦ Compruebe que la rueda gire libremente.
Si fuera necesario:
Con el motor caliente, preste atención
para no quemarse durante el desarrollo
de las operaciones sucesivas.
♦ Afloje el registro (1), comprobando que la
rueda gire libremente.
ATENCION
PELIGRO
PELIGRO
100
1

34
uso y mantenimiento
Scarabeo 50 - Scarabeo 100 4T
NEUMATICOS
Este vehículo está equipado con neumáti-
cos sin cámara.
Controle periódicamente la presión de
hinchado de los neumáticos a tempera-
tura ambiente, véase pág. 86 (DATOS
TECNICOS).
Si los neumáticos están calientes, la me-
dición no es correcta.
Mida la presión de hinchado sobre todo
antes y después de cada largo viaje.
Si la presión del hinchado es demasiado
alta, las irregularidades del terreno no lle-
gan a amortiguarse y se transmiten al
manillar, comprometiendo por lo tanto el
confort de marcha y reduciendo también
la adherencia a la carretera en curva.
Si, al revés, la presión del hinchado es
insuficiente, los flancos de los neumáti-
cos (1) trabajan excesivamente y podrían
producirse el deslizamiento de la goma
sobre la llanta, o su despegue, con con-
siguiente pérdida de control del vehícu-
lo.
En caso de frenazos abruptos, los neu-
máticos podrían salirse de las llantas.
En las curvas, además, el vehículo podría
perder adherencia.
Controle las condiciones de las superfi-
cies y del desgaste, porque una mala con-
dición de los neumáticos puede compro-
meter su adherencia a la carretera y la
maniobrabilidad del vehículo.
Algunas tipologías de neumáticos, ho-
mologados para este vehículo, están pro-
vistas de indicadores de desgaste.
Existen diferentes tipos de indicadores de
desgaste.
Pida información sobre las mo-
dalidades de comprobación desgaste a su
vendedor.
Compruebe visualmente el es-
tado de los neumáticos y, de estar des-
gastados, hágalos sustituir.
Haga sustituir el neumático si está des-
gastado o si un eventual pinchazo en la
zona de la banda de rodadura tiene di-
mensiones mayores que 5 mm.
Una vez reparado el neumático, haga rea-
lizar el equilibrado de las ruedas.
PELIGRO
PELIGRO PELIGRO
1

35
uso y mantenimiento
Scarabeo 50 - Scarabeo 100 4T
Los neumáticos se deben sustituir con
otros de tipo y modelo indicados por la
casa fabricante, véase pág. 86 (DATOS
TÉCNICOS); el uso de neumáticos dife-
rentes a los indicados influencia negati-
vamente la conducción del vehículo.
No instale neumáticos del tipo con cá-
mara en llantas para neumáticos tube-
less, y al revés.
Controle que las válvulas de hinchado (2)
estén siempre equipadas con taponcitos
para evitar un repentino deshinchamien-
to de los neumáticos.
Las operaciones de sustitución, de re-
paración, de mantenimiento y de equili-
brado son muy importantes, deben eje-
cutarse con equipos adecuados y con la
experiencia indispensable.
Por esta razón le aconsejamos diríjase
a un Concesionario Oficial aprilia o a
un servicio especializado para ejecutar
las operaciones anteriores.
Si los neumáticos son nuevos pueden
estar cubiertos de una substancia res-
baladiza, por lo tanto conduzca con cui-
dado durante los primeros kilómetros.
No engrase los neumáticos con un lí-
quido no adecuado. Si los neumáticos
son viejos, aunque no están desgasta-
dos del todo, pueden endurecerse y no
garantizar el agarre en carretera.
En este caso haga sustituir los neumá-
ticos.
PELIGRO PELIGRO
LIMITE MINIMO DE PROFUNDIDAD
BANDA DE RODADURA (3):
delantero y trasero ..........................1,5 mm
( 3 mm)
y en todo caso no inferior a lo prescrito por
la legislación vigente en el país donde se
utiliza el vehículo.
2
3

36
uso y mantenimiento
Scarabeo 50 - Scarabeo 100 4T
SILENCIADOR DE ESCAPE /
PARTE TERMINAL DE ESCAPE
Se prohíbe alterar el sistema de control
de los ruidos.
Se avisa al propietario del vehículo que la
ley puede prohibir lo siguiente:
– el desmontaje y todas las acciones, rea-
lizadas por quienquiera a fin de controlar
la emisión de ruidos antes de la venta o
entrega del vehículo al comprador final o
durante su utilización, que puedan hacer
inoperante cualquier dispositivo o ele-
mento constitutivo incorporado en un ve-
hículo nuevo, hecha excepción de las ope-
raciones de mantenimiento, reparación o
sustitución; y
– el empleo del vehículo tras haber des-
montado o hecho inoperante dicho dis-
positivo o elemento constitutivo.
Controle el silenciador de escape/parte ter-
minal de escape y los tubos de la parte ter-
minal, asegurándose de que no haya trazas
de herrumbre o agujeros y de que el sistema
de escape funcione correctamente.
En caso de que el ruido producido por el
sistema de escape aumente, diríjase de in-
mediato a un Concesionario Oficial
aprilia.
PELIGRO
VERSION ENCENDIDO
AUTOMATICO LUCES
El vehículo equipado con este dispositivo se
reconoce porque, al arranque del motor, las
luces entran en función automáticamente.
Por esta razón se sustituye el interruptor lu-
ces con un desviador luces “
- ”.
El apagado de las luces está subordinado al
apagado del motor.
♦ Antes del arranque controle que el des-
viador luces se encuentre en “
” (luz de
cruce delantera).

37
uso y mantenimiento
Scarabeo 50 - Scarabeo 100 4T
TABLA CONTROLES PRELIMINARES
Control
Pág.
Freno de disco
Controle el funcionamiento, el nivel del líquido y eventuales
pérdidas. Compruebe el desgaste de las pastillas. Si es ne-
cesario efectúe la restauración del nivel del líquido frenos.
31, 32, 61
Freno trasero de
tambor
100
Controle el funcionamiento, carrera en vacío y condiciones
de la palanca de mando. Regule el juego si no es correcto.
33, 62
Acelerador
Controle que funcione suavemente y que pueda abrirse
y cerrarse completamente en todas las posiciones de
la dirección. Ajuste y/o lubrique si es necesario.
70
Aceite mezclador
28
Ruedas /
neumáticos
Controle las condiciones de las superficies de los
neumáticos, la presión de hinchado, el desgaste y los
daños eventuales. Saque de los acanalados de la banda
de rodamiento eventuales cuerpos extraños encajados.
34
Palancas de los
frenos
Controle que funcionen suavemente.
Engrase las articulaciones si es necesario.
–
Dirección
Controle que la rotación sea homogénea, suave, sin jue-
gos o aflojamientos.
63
Caballete
Controle que funcione suavemente, y que la tensión
de los muelles vuelva a ponerlo en su posición normal.
Lubrique juntas y articulaciones si es necesario.
68
Elementos de
fijación
–
Depósito gasolina
Controle el nivel y reponga gasolina si es necesario.
Controle pérdidas eventuales u oclusiones del circuito.
27, 83
Luces, luces indicado-
ras, luz testigo inyec-
ción
, bocina y dis-
positivos eléctricos
Controle el funcionamiento correcto de los dispositivos.
Sustituya las bombillas o efectúe la reparación de la ave-
ría si fuera necesario.
72 – 81
NORMAS PARA EL USO
PELIGRO
Antes de salir, efectúe siempre un con-
trol preliminar del vehículo para una co-
rrecta y segura funcionalidad, véase TA-
BLA CONTROLES PRELIMINARES.
El hecho de no realizar las siguientes
operaciones puede causar graves lesio-
nes personales o daños graves al vehí-
culo.
No dude en dirigirse a un Concesionario
Oficial aprilia si no comprende el fun-
cionamiento de unos mandos o si nota o
sospecha la presencia de algunas ano-
malías en el funcionamiento.
El tiempo necesario para un control es
muy limitado, mientras que resulta no-
table la seguridad obtenida.
Detalle
Controle y/o rellene si fuera necesario.
Compruebe que los elementos de fijación no estén flo-
jos. Si acaso, ajústelos o apriételos.
Bomba inyección
18
Controle el funcionamiento correcto.
(
(
(
(
(
(
(
(
(
(
)
)
)
)
)
)
)
)
)
)
)
)
)
)
)
)
)
)
)
)
)
)
)
)
)
)
)
)
)
)
)
)
)
)
)
)
)
)
)
)
)
)
)
)
)
)
)
)
)
)
)
)
)
)
)
)
)
)
)
)
)
)
)
)
)
)
)
)
)
)
)
))
)))
))))))
)
)
)
)
)
)
)
)
)
)
)

38
uso y mantenimiento
Scarabeo 50 - Scarabeo 100 4T
PELIGRO
ARRANQUE
Los gases de escape contienen mo-
nóxido de carbono, sustancia extrema-
damente nociva si inhalada por el orga-
nismo.
Evite arrancar en los locales cerrados o
sin aire suficiente. La inobservancia de
esta advertencia podría causar una pér-
dida de los sentidos hasta llegar a la muer-
te por asfixia.
No suba al vehículo para arrancar.
ARRANQUE ELÉCTRICO
♦ Coloque el vehículo sobre el caballete cen-
tral en un terreno firme y llano.
♦ Asegúrese de que el interruptor luces (1)
esté en posición “
•
”.
♦ Asegúrese de que el desviador luces
(2) esté en posición “
”.
♦ Coloque en “ ” el interruptor de arranque
(3).
♦
Controle que la luz testigo “injection
Check” se apague (véase pág. 18 LUZ
TESTIGO INJECTION CHECK).
♦ Bloquee por lo menos una rueda, accio-
nando una palanca del freno (4). De no
realizar esto, no llega corriente al relé de
arranque, por lo que el motor de arranque
no gira.
IMPORTANTE Si el vehículo ha queda-
do inactivo durante mucho tiempo, realice
las operaciones de pág. 40 (ARRANQUE
TRAS LARGA INACTIVIDAD).
IMPORTANTE Para evitar un consumo
excesivo de la batería, no mantenga presio-
nado el pulsador de arranque “ ” durante
más de cinco segundos. Si en este intervalo
de tiempo el motor no se pone en marcha,
espere diez segundos y presione otra vez el
pulsador de arranque “
”.
Apriete el pulsador de arranque “
” (5) sin
acelerar, luego suéltelo al ponerse en mar-
cha el motor.
100
1
5
2
1
5
4
3

39
uso y mantenimiento
Scarabeo 50 - Scarabeo 100 4T
Apriete el pulsador de arranque “ ” (5),
abra ligeramente el puño del gas aproxima-
damente 1/8 (véase figura), luego suéltelo
al ponerse en marcha el motor.
Presionando el pulsador de arranque
“ “,
la luz testigo reserva aceite mez-
clador
“ “
se enciende.
Una vez arrancado el motor, soltando el
pulsador de arranque
“ “,
la luz testigo
reserva aceite mezclador
“ “
se debe
apagar; si permanece encendida, efectúe
el relleno del aceite mezclador, véase pág.
28 (ACEITE MEZCLADOR).
Si después del arranque se enciende
la luz testigo “Injection Check”, detenga
el vehículo y diríjase a un Concesionario
Oficial aprilia.
Evite presionar el pulsador de arranque
“ ” (5)
cuando el motor está encendi-
do, ya que se podría dañar el motor de
arranque.
ARRANQUE DE PEDAL (KICK START)
100
♦ Coloque el vehículo sobre el caballete
lateral en un terreno firme y llano.
♦ Sitúese en el lado izquierdo del vehículo.
♦ Asegúrese de que el interruptor luces (1)
esté en posición “
•
”.
♦ Asegúrese de que el desviador luces
(2) esté en posición “
”.
♦ Coloque en “ ” el interruptor de encen-
dido (3).
ATENCION
ATENCION
♦ Para evitar la pérdida de control del vehí-
culo al arranque, bloquee ambas ruedas,
accionando las palancas de los frenos (4).
♦ Gire hacia el exterior el pedal de arran-
que (6).
Evite presionar el pedal de arranque
cuando el motor está encendido.
♦ Actúe con el pie derecho sobre el pedal
de arranque (6), soltándolo inmediata-
mente. Repita, si necesario, la operación
hasta el arranque del motor.
♦ Haga regresar a su sitio el pedal de arran-
que (6).
6
100

40
uso y mantenimiento
Scarabeo 50 - Scarabeo 100 4T
ARRANQUE CON EL MOTOR INUNDADO
En caso de que no se realice correctamen-
te el procedimiento de arranque, o en caso
de un exceso de combustible en los tubos
de admisión, el motor podría resultar inun-
dado.
Para limpiar el motor inundado:
♦ Apriete el pulsador de arranque “ ” (5)
por algunos segundos (haciendo funcio-
nar el motor en vacío) con el puño de gas
(7) completamente girado (Pos. A).
ARRANQUE EN FRÍO
En caso de temperaturas ambiente bajas
(cerca o inferior a 0°C) podrían surgir algu-
nas dificultades durante el primer arranque.
En este caso:
♦ Apriete el pulsador de arranque “ ” (5) y
simultáneamente gire con moderación
(Pos. B) el puño de gas (7).
Si el motor se pone en marcha.
♦ Suelte el puño de gas (7).
♦ En caso de que el ralentí resulte inesta-
ble, actúe sobre el puño de gas (7) dán-
dole pequeñas y frecuentes vueltas.
Para salir, véase pág. 41 (SALIDA Y CON-
DUCCIÓN).
Si el motor no se pone en marcha.
Espere unos segundos y vuelva a realizar el
procedimiento de ARRANQUE EN FRÍO.
♦ Si es necesario, saque la bujía, véase pág.
71 (BUJIA) y controle que no sea húme-
da.
♦ Si la bujía es húmeda, límpiela y séquela.
Antes de volver a instalarla:
IMPORTANTE Coloque un paño limpio
sobre el cilindro cerca del alojamiento de la
bujía como protección de eventuales cho-
rros de aceite.
♦ Presione el pulsador de arranque “ ” (5)
y haga girar el motor de arranque por unos
cinco segundos, sin acelerar.
ARRANQUE
TRAS LARGA INACTIVIDAD
Si el vehículo ha quedado inactivo durante
mucho tiempo, es posible que el arranque
sea dificultoso debido a que el circuito de
alimentación combustible podría estar par-
cialmente vacío.
En este caso:
♦ Presione el pulsador de arranque “ ” (5)
por unos cinco segundos para permitir el
llenado del recipiente carburador.
100
5
5
7

41
uso y mantenimiento
Scarabeo 50 - Scarabeo 100 4T
SALIDA Y CONDUCCION
IMPORTANTE Antes de salir, lea con
mucho cuidado el capítulo “conducción se-
gura”, véase pág. 5 (CONDUCCIÓN SEGU-
RA).
Las citaciones para la conducción con
pasajero se refieren únicamente a los
países en los que está previsto.
Viajando sin pasajero, controle que los
estribos traseros estén cerrados.
Durante la conducción mantenga las
manos firmemente sobre el manillar y los
pies sobre el estribo.
NO CONDUZCA NUNCA EN POSICIONES
DIFERENTES.
En caso de conducción con pasajero, ins-
truya a la persona que se transporta de
manera que no haya problemas durante
las maniobras. Antes de ponerse en mar-
cha, asegúrese de que el caballete o los
caballetes hayan regresado perfectamen-
te a su posición.
Para ponerse en marcha:
♦ Suelte el puño de gas (pos. A), y bloquee
el freno trasero, luego baje el vehículo del
caballete.
♦ Suba al vehículo y, por motivos de esta-
bilidad, conserve por lo menos un pie apo-
yado en el suelo.
♦ Ajuste correctamente la posición de los
retrovisores.
Con el vehículo parado, familiarícese con
el uso de los retrovisores.
♦ Para ponerse en marcha, suelte la palan-
ca del freno y el vehículo empezará a
moverse.
No efectúe salidas repentinas con el mo-
tor frío. Para reducir la emisión de sus-
tancias contaminantes en el aire y el con-
sumo de combustible, se aconseja que
caliente el motor conduciendo a una ve-
locidad limitada durante los primeros ki-
lómetros de recorrido.
No acelere y decelere a menudo y conti-
nuamente porque inadvertidamente se
podría perder el control del vehículo.
PELIGRO
PELIGRO
PELIGRO
PELIGRO
ATENCION

42
uso y mantenimiento
Scarabeo 50 - Scarabeo 100 4T
PELIGROPELIGROPELIGRO
En caso de frenada, accione ambos fre-
nos para obtener una deceleración uni-
forme, dosificando la presión sobre los
órganos de frenado en forma apropiada.
Accionando sólo el freno delantero o sólo
el trasero, se reduce notablemente la fuer-
za de frenado, con el riesgo de bloquear
una rueda con consiguiente pérdida de
adherencia.
Si tiene que pararse en subida, decelere
completamente y utilice sólo los frenos
para mantener parado el vehículo.
La utilización del motor para mantener
parado el vehículo puede causar el so-
brecalentamiento del variador.
Durante la conducción con escasa visi-
bilidad, para aumentar la visibilidad de su
vehículo, encienda las luces de cruce
también de día; con el firme de la carre-
tera mojado o con poca adherencia (nie-
ve, hielo, barro, etc.), conduzca con velo-
cidad moderada, evitando frenazos re-
pentinos o maniobras que podrían cau-
sar la pérdida de adherencia y, como con-
secuencia, la caída.
Antes de iniciar una curva, reduzca la
velocidad o frene recorriendo la misma
con velocidad moderada y constante o
con ligera aceleración; evite frenar al lí-
mite: las posibilidades de deslizar re-
sultarían demasiado elevadas.
Utilizando continuamente los frenos en
los tramos en bajada, puede darse el re-
calentamiento de las juntas de fricción,
con sucesiva reducción de la eficacia de
los frenos.
Aproveche la compresión del motor uti-
lizando ambos frenos de manera inter-
mitente.
En los tramos en bajada no conduzca con
el motor apagado.

43
uso y mantenimiento
Scarabeo 50 - Scarabeo 100 4T
PELIGROPELIGROPELIGRO
Ponga cuidado en todo tipo de obstácu-
lo o variación de la geometría del firme
de la carretera.
Las carreteras estropeadas, los carriles,
los sumideros, las señales de indicación
pintadas en el firme de la carretera, las
chapas metálicas de las obras cuando
llueve se vuelven resbaladizos y, por lo
tanto, hay que adelantarlos muy pruden-
temente, conduciendo de manera suave
e inclinando el vehículo lo menos posi-
ble.
Si la luz testigo de reserva del aceite mez-
clador “ ” se enciende durante el nor-
mal funcionamiento del motor significa
que el nivel del aceite mezclador está en
reserva; en este caso efectúe el relleno
del aceite mezclador, véase pág. 28 (ACEI-
TE MEZCLADOR).
Señale siempre los cambios de vías o de
dirección por medio de los dispositivos
adecuados y con oportuno adelanto, evi-
tando maniobras repentinas y pe-
ligrosas. Desactive los dispositivos inme-
diatamente después del cambio de direc-
ción.
Mientras está adelantando o es adelan-
tado por otros vehículos, ponga el máxi-
mo cuidado.
En caso de lluvia, la nube de agua pro-
ducida por los grandes vehículos redu-
ce la visibilidad; el desplazamiento de
aire puede causar la pérdida de control
del vehículo.

44
uso y mantenimiento
Scarabeo 50 - Scarabeo 100 4T
RODAJE
Durante los primeros 500 km (312 mi) de
funcionamiento, realice los controles se-
ñalados en la columna “fin rodaje” de
la FICHA DE MANTENIMIENTO PERIODI-
CO, véase pág. 48-53 (FICHA DE MANTE-
NIMIENTO PERIODICO), para evitar daños
a los demás, a sí mismo y/o al vehículo.
El rodaje del motor es fundamental para
garantizar una larga duración y un correcto
funcionamiento. Recorra, si es posible, ca-
rreteras con muchas curvas y/o onduladas
para que el motor, las suspensiones y los
frenos puedan sufrir un rodaje más eficaz.
Para los primeros 500 km de recorrido (312
mi), aténgase a las siguientes normas:
♦ 0-100 km (0-62 mi)
Durante los primeros 100 km (62 mi), ac-
túe con cuidado sobre los frenos y evite
frenazos repentinos y prolongados. Todo
esto para permitir un ajuste correcto del
material de fricción de las pastillas sobre
los discos del freno.
♦ 0-300 km (0-187 mi)
No deje abierto el puño del acelerador a
más de la mitad para largos recorridos.
♦ 300-500 km (187-312 mi)
No deje abierto el puño del acelerador a
más de 3/4 para largos recorridos.
PELIGRO

45
uso y mantenimiento
Scarabeo 50 - Scarabeo 100 4T
PELIGRO PELIGRO
ATENCION
ATENCION
PARADA
Evite, si es posible, parar bruscamente
el vehículo, reducir de repente la veloci-
dad y frenar al límite.
♦ Suelte el puño de gas (Pos. A) y accione
gradualmente los frenos para parar el
movimiento del vehículo.
♦ Durante la parada momentánea, manten-
ga accionado por lo menos un freno.
APARCAMIENTO
Aparque el vehículo sobre suelo sólido y
llano para que no caiga.
No apoye el vehículo en los muros, ni lo
apoye tampoco por el suelo.
Asegúrese de que el vehículo y, sobre
todo, las partes muy calientes del mismo
no sean peligrosas para las personas y
para los niños.
No deje el vehículo sin vigilancia y con el
motor en marcha o con la llave intro-
ducida en el interruptor de encendido.
No debe sentarse sobre el vehículo cuan-
do está apoyado en el caballete.
♦ Pare el vehículo, véase al lado (PARADA).
Con el motor parado y con el interruptor
de encendido en posición “
” la batería
podría descargarse.
♦ Gire la llave (1) y ponga en “ ” el inte-
rruptor de encendido (2).
♦ Coloque el vehículo sobre el caballete,
véase pág. 46 (COLOCACION DEL VE-
HICULO SOBRE EL CABALLETE CEN-
TRAL).
Con el motor parado no hace falta cerrar
el grifo del combustible en cuanto está
equipado con un sistema automático de
cierre.
No deje la llave introducida en el inte-
rruptor de encendido.
♦ Bloquee la dirección, véase pág. 23 (SE-
GURO DE DIRECCION) y extraiga la lla-
ve (1).
2
1
ATENCION

46
uso y mantenimiento
Scarabeo 50 - Scarabeo 100 4T
Escriba en esta página sus datos y su nú-
mero de teléfono, para facilitar la identifica-
ción en caso de hallazgo después del robo.
APELLIDOS: ...............................................
NOMBRE: ......................................................
DIRECCION: ................................................
.....................................................................
N. TELEFONO: ...........................................
IMPORTANTE En muchos casos los
vehículos robados han sido identificados
gracias a los datos indicados en el manual
de uso/mantenimiento.
COLOCACION DEL VEHICULO
SOBRE EL CABALLETE CENTRAL
Lea con cuidado pág. 45 (APARCAMIEN-
TO).
CABALLETE CENTRAL
♦ Empuñe el semimanillar izquierdo y el asa
trasera (1).
♦ Empuje sobre la palanca del caballete (2).
Asegúrese de la estabilidad del vehícu-
lo.
ATENCION
SUGERENCIAS CONTRA LOS
ROBOS
No deje NUNCA la llave de encendido in-
troducida y utilice siempre el seguro de di-
rección.
Aparque el vehículo en un lugar seguro y, si
es posible, en un garaje o en un lugar vigila-
do.
Utilice, si es posible, un cable acorazado
“Body-Guard” aprilia
adecuado o un
dispositivo antirrobo adicional.
Compruebe que los documentos y la tasa de
circulación estén en orden.
(
(
(
(
(
(
(
(
(
(
)
)
)
)
)
)
)
)
)
)
)
)
)
)
)
)
)
)
)
)
)
)
)
)
)
)
)
)
)
)
)
)
)
)
)
)
)
)
)
)
)
)
)
)
)
)
)
)
)
)
)
)
)
)
)
)
)
)
)
)
)
)
)
)
)
)
)
)
)
)
)
)
)
)
)
)
)
)
)
)
)
)
)
)
)
)
)
)
)
)
)
)
)
1
2
(
(
(
(
(
(
(
(
(
(
(
(
(
(
(
(
(
(
(
(
(
(
(
(
(
(
(
(
(
(
(
(
(
(
(
(
(
(
(
(
(
(
(
(
(
(
(
(
(
(
(
(
(
(
(
(
(
(
(
(
(
(
(
(
(
(
(
(
(
(
((((
(
(((
(
(
(
(
(
(
(
(
(
(
(
(
(
(
(
(
(
(
(
(
(
(
(
(
(
(
(
(
(
(
(
(
(
(
(
(
(
(
(
(
(
(
(
(
(
(
(
(
(
(
(
(
(
(
1
2

47
uso y mantenimiento
Scarabeo 50 - Scarabeo 100 4T
MANTENIMIENTO
PELIGROPELIGRO
Peligro de incendio.
El combustible y otras sustancias infla-
mables no deben ser acercados a los
componentes eléctricos.
Antes de empezar cualquier tipo de in-
tervención de mantenimiento o de ins-
pección al vehículo, pare el motor y qui-
te la llave, espere a que el motor y el sis-
tema de escape se hayan enfriado, levan-
te el vehículo posiblemente por medio del
equipo adecuado, sobre una superficie
sólida y llana.
Antes de seguir adelante controle que el
lugar donde trabaja tenga un adecuado
cambio de aire.
Ponga cuidado sobre todo en las partes
aún calientes del motor y del sistema de
escape, para evitar quemaduras.
El vehículo está construido con partes
no comestibles. No muerda, no chupe,
no mastique ni trague ninguna parte del
mismo por ninguna razón.
De no resultar expresamente descrito,
hay que realizar la instalación de los gru-
pos siguiendo en orden contrario las ope-
raciones que se han efectuado para el
desmontaje.
En caso de intervenciones de manteni-
miento, se aconseja el uso de guantes
de látex.
ATENCION
Habitualmente las operaciones de manteni-
miento ordinario pueden ser realizadas por
el usuario; en algunos casos pueden reque-
rir un equipo específico y una preparación
técnica.
En caso de que se necesite asistencia o un
asesoramiento técnico, diríjase posiblemen-
te a un Concesionario Oficial aprilia que
garantizará un servicio detallado y rápido.
Se aconseja que pida al Concesionario
Oficial aprilia que le haga probar el vehí-
culo en la carretera tras una intervención de
reparación o de mantenimiento periódico.
Sin embargo, efectúe personalmente los
“Controles Preliminares” tras una interven-
ción de mantenimiento, véase pág. 37 (TA-
BLA CONTROLES PRELIMINARES).

48
uso y mantenimiento
Scarabeo 50 - Scarabeo 100 4T
FICHA DE MANTENIMIENTO
PERIODICO
INTERVENCIONES A REALIZAR POR EL
Concesionario Oficial aprilia (QUE PUE-
DEN EFECTUARSE POR EL USUARIO)
LEYENDA
1
= controle, limpie, ajuste, lubrique o sus-
tituya si es necesario;
2
= limpie;
3
= sustituya;
4
= ajuste.
IMPORTANTE Realice las operaciones
de mantenimiento más frecuentemente si se
utiliza el vehículo en zonas lluviosas, polvo-
rientas o sobre recorridos accidentados.
Interruptores luz stop
1
Componentes
Fin rodaje
[500 km
(312 mi)]
Cada 4000 km
(2500 mi)
o 12 meses
Cada 8000 km
(5000 mi)
o 24 meses
Batería - nivel electrólito
1 1
Bujía
1 3
Filtro aire
1 3
Instalación luces
1 1
Líquido frenos (control nivel)
1
Aceite mezclador cada 2000 km (1250 mi):
1
Ruedas neumáticos y presión
de hinchado
cada mes:
1
Desgaste pastillas freno delantero
y trasero
1
cada 2000 km (1250 mi):
1

49
uso y mantenimiento
Scarabeo 50 - Scarabeo 100 4T
Funcionamiento acelerador
1 1
INTERVENCIONES A REALIZAR POR EL
Concesionario Oficial aprilia
LEYENDA
1
= controle, limpie, ajuste, lubrique o sus-
tituya si es necesario;
2
= limpie;
3
= sustituya;
4
= ajuste.
IMPORTANTE Realice las operaciones
de mantenimiento más frecuentemente si se
utiliza el vehículo en zonas lluviosas, polvo-
rientas o sobre recorridos accidentados.
Discos freno
1 1
Amortiguador trasero
1
Cables transmisión y mandos
1 1
Correa de transmisión
3
Cojinetes columna dirección y juego
1 1
Cojinetes ruedas
1
Aros pistón cada 12000 km (7440 mi):
1
Funcionamiento general vehículo
1 1
Aceite transmisión
3
cada 4000 km cada 8000 km
(2500 mi) o 12 (5000 mi) o 2
meses:
1
años:
3
Instalaciones de frenado / discos freno
1 1
Instalación refrigeración cilindro cada 20000 km (12400 mi):
2
(limpieza exterior)
Líquido frenos cada 2 años:
3
Escape / silenciador de escape
1
Mezclador / funcionamiento acelerador
1 1
Pernos polea trasera cada 12000 km (7440 mi):
3
Polea delantera móvil fija cada 12000 km (7440 mi):
3
Componentes
Fin rodaje
[500 km
(312 mi)]
Cada 4000 km
(2500 mi)
o 12 meses
Cada 8000 km
(5000 mi)
o 24 meses

50
uso y mantenimiento
Scarabeo 50 - Scarabeo 100 4T
INTERVENCIONES A REALIZAR POR EL
Concesionario Oficial aprilia
LEYENDA
1
= controle, limpie, ajuste, lubrique o sus-
tituya si es necesario;
2
= limpie;
3
= sustituya;
4
= ajuste.
IMPORTANTE Realice las operaciones
de mantenimiento más frecuentemente si se
utiliza el vehículo en zonas lluviosas, polvo-
rientas o sobre recorridos accidentados.
(*) Las guías están integradas, no las susti-
tuya. Sustituya solamente los rodillos.
Tubos combustible cada 4000 km (2500 mi):
1
/ cada 2 años:
3
Limpieza inyector cada 8000 km (5000 mi):
2
Rodillos y guías válvulas delanteras (*)
3
Ruedas / neumáticos y presión
1 1
de hinchado
Apriete tornillos
1 1
Luz testigo reserva aceite mezclador
1 1
Tubería instalación de frenado cada 4000 km (2500 mi):
1
/ cada 4 años:
3
Tubería aceite mezclador
1 1
cada 2 años:
3
Desgaste embrague
1
Componentes
Fin rodaje
[500 km
(312 mi)]
Cada 4000 km
(2500 mi)
o 12 meses
Cada 8000 km
(5000 mi)
o 24 meses

51
uso y mantenimiento
Scarabeo 50 - Scarabeo 100 4T
Aceite buje
3 1 1
Bujía - Distancia electrodos
1
Control régimen ralentí / Carburación
4 4
Instalación luces y batería
1 1
Interruptores luz STOP
1
Líquido frenos (control nivel)
1 1
Aceite motor primera sustitución a 1000 km después del
rodaje y después cada 4000 km (2500 mi)
Desgaste pastillas freno delantero
1 1
Ruedas neumáticos y presión
de hinchado
1 1
Proyector
1
FICHA DE MANTENIMIENTO
PERIODICO
100
INTERVENCIONES A REALIZAR POR EL
Concesionario Oficial aprilia (QUE PUE-
DEN EFECTUARSE POR EL USUARIO)
LEYENDA
1
= controle, limpie, ajuste, lubrique o sus-
tituya si es necesario;
2
= limpie;
3
= sustituya;
4
= ajuste.
IMPORTANTE Realice las operaciones
de mantenimiento más frecuentemente si se
utiliza el vehículo en zonas lluviosas, polvo-
rientas o sobre recorridos accidentados.
Componentes
Fin rodaje
[1000 km
(625 mi)]
Cada 4000 km
(2500 mi)
o 12 meses
Cada 8000 km
(5000 mi)
o 24 meses

52
uso y mantenimiento
Scarabeo 50 - Scarabeo 100 4T
INTERVENCIONES A REALIZAR POR EL
Concesionario Oficial aprilia
100
LEYENDA
1
= controle, limpie, ajuste, lubrique o sus-
tituya si es necesario;
2
= limpie;
3
= sustituya;
4
= ajuste.
IMPORTANTE Realice las operaciones
de mantenimiento más frecuentemente si se
utiliza el vehículo en zonas lluviosas, polvo-
rientas o sobre recorridos accidentados.
Filtro aceite (de red)
2
Cable acelerador
4
(ajuste)
Correa de transmisión
1 1 1
Cojinetes columna dirección y
juego dirección
1 1
Cojinetes ruedas
1
Filtro aire cada 3000 km (1875 mi):
3
Juego válvulas
1
cada 24000 km (15000 mi):
1
Instalaciones de frenado
1 1
Prueba vehículo e instalación frenos
1 1
Instalación ventilación cilindro cada 24000 km (15000 mi):
1
Engrase leva freno
trasero
1
Aceite frenos cada 2 años:
3
Aceite motor
3 3
Aceite transmisión
3 1 3
Rodillos variador
1
Componentes
Fin rodaje
[1000 km
(625 mi)]
Cada 4000 km
(2500 mi)
o 12 meses
Cada 8000 km
(5000 mi)
o 24 meses

53
uso y mantenimiento
Scarabeo 50 - Scarabeo 100 4T
LEYENDA
1
= controle, limpie, ajuste, lubrique o sus-
tituya si es necesario;
2
= limpie;
3
= sustituya;
4
= ajuste.
IMPORTANTE Realice las operaciones
de mantenimiento más frecuentemente si se
utiliza el vehículo en zonas lluviosas, polvo-
rientas o sobre recorridos accidentados.
Ruedas neumáticos y presión
de hinchado
1 3
Purga líquido frenos
1
Apriete tuercas / bulones / tornillos
1 1
Suspensiones
1
Tubos combustible
1
cada 4 años:
3
Componentes
Fin rodaje
[1000 km
(625 mi)]
Cada 4000 km
(2500 mi)
o 12 meses
Cada 8000 km
(5000 mi)
o 24 meses

54
uso y mantenimiento
Scarabeo 50 - Scarabeo 100 4T
FICHA DE RECONOCIMIENTO
Resulta recomendable escribir los números
del bastidor y del motor en el espacio reser-
vado expresamente en este manual.
El número del bastidor puede utilizarse para
la compra de repuestos.
IMPORTANTE La alteración de los nú-
meros de identificación puede provocar gra-
ves sanciones penales y administrativas; en
particular, la alteración del número del bas-
tidor produce la anulación inmediata de la
garantía.
NUMERO MOTOR
El número de motor está troquelado cerca
del soporte inferior del amortiguador trase-
ro.
Motor nº __________________________
NUMERO BASTIDOR
El número del bastidor está troquelado en
el tubo central del bastidor.
Para leerlo es preciso desmontar la tapa (1).
Bastidor nº __________________________
1
100

55
uso y mantenimiento
Scarabeo 50 - Scarabeo 100 4T
FILTRO AIRE
Lea con cuidado pág. 47 (MANTENIMIEN-
TO).
El control del estado del filtro del aire se de-
berá efectuar mensualmente o cada 4000
km (2500 mi), esto dependerá de las condi-
ciones de utilización.
De utilizar el vehículo en carreteras polvo-
rientas o mojadas, las operaciones de lim-
pieza o sustitución tendrán que efectuarse
con mayor frecuencia.
IMPORTANTE Cuando el filtro resulta
obstruido saque el elemento filtrante (4) y
sustitúyalo.
DESMONTAJE
♦ Coloque el vehículo sobre el caballete
central en un terreno firme y llano, véase
pág. 46 (COLOCACION DEL VEHICULO
SOBRE EL CABALLETE CENTRAL).
♦ Saque la tapa de inspección, véase pág.
66 (DESMONTAJE TAPA DE INSPEC-
CIÓN).
♦ Extraiga del encaje de la tapa del filtro del
aire (1) el tubo de alimentación gasolina
(2) al inyector.
♦ Desenrosque y quite los siete tornillos (3).
1
2
3
3
3
3
4

56
uso y mantenimiento
Scarabeo 50 - Scarabeo 100 4T
FILTRO AIRE
100
Lea con cuidado pág. 47 (MANTENIMIEN-
TO).
La limpieza y el control del estado del filtro
del aire deberían ser realizados mensual-
mente o cada 3000 km (1875 mi), según las
condiciones de empleo.
De utilizar el vehículo en carreteras polvo-
rientas o mojadas, las operaciones de lim-
pieza o sustitución tendrán que efectuarse
con mayor frecuencia.
Hay que sacar el filtro aire del vehículo para
limpiarlo.
LIMPIEZA
No use gasolina o disolventes inflama-
bles para lavar el elemento filtrante, para
evitar el riesgo de incendios o ex-
plosiones.
♦ Lave el elemento filtrante (3) con disol-
ventes limpios, no inflamables ni con un
elevado punto de volatilidad y déjelo se-
car perfectamente.
♦ Aplique sobre toda la superficie un acei-
te para filtros.
PERICOLO
DESMONTAJE
♦ Coloque el vehículo sobre el caballete
central en un terreno firme y llano, véase
pág. 46 (COLOCACION DEL VEHICULO
SOBRE EL CABALLETE CENTRAL).
♦ Desenrosque y quite los seis tornillos (1).
♦ Extraiga la tapa del filtro del aire (2).
♦ Extraiga el elemento filtrante (3).
1
100
1
1
2
3
100

57
uso y mantenimiento
Scarabeo 50 - Scarabeo 100 4T
DESMONTAJE CAJA FILTRO
AIRE COMPLETA
100
Lea con cuidado pág. 47 (MANTENIMIEN-
TO).
♦ Coloque el vehículo sobre el caballete
central en un terreno firme y llano, véase
pág. 46 (COLOCACION DEL VEHICULO
SOBRE EL CABALLETE CENTRAL).
♦ Desenrosque y quite los dos tornillos (1)
manteniendo las tuercas de fijación situa-
das detrás.
♦ Desenrosque el tornillo de fijación salpi-
cadero con caja filtro (6).
♦ Mediante la utilización de una herramien-
ta adecuada extraiga la abrazadera (2) del
tubo aire (3).
♦ Extraiga el tubo manguito filtro aire-car-
burador (4) del filtro del aire (5), aflojando
la abrazadera de fijación.
♦
Saque la caja del filtro del aire completa
(5).
DESMONTAJE CAJA FILTRO
AIRE COMPLETA
Lea con cuidado pág. 47 (MANTENIMIEN-
TO).
Las operaciones para el desmontaje y
montaje de la caja filtro aire completa son
difíciles y complejas, es necesario diri-
girse a un Concesionario Oficial aprilia.
ATENCION
100
5
1
3
2
4
100
6
100

58
uso y mantenimiento
Scarabeo 50 - Scarabeo 100 4T
♦ Coloque el vehículo sobre el caballete cen-
tral en un terreno firme y llano.
IMPORTANTE Prepare un soporte con
base de apoyo 200 x 200 mm y altura ade-
cuada.
♦ Interponiendo un tejido esponjoso, coloque
el soporte debajo del vehículo de manera
que la rueda delantera tenga espacio sufi-
ciente para moverse libremente y para
evitar que el vehículo caiga.
Asegúrese de la estabilidad del vehículo.
♦ Coloque debajo del neumático una suje-
ción (1) para mantener la rueda en posi-
ción después de haberla soltado.
♦
Afloje el tornillo (2) de la morsa perno rueda.
♦ Desenrosque completamente el perno rue-
da (3).
Par de apriete perno rueda:
50 Nm (5 kgm).
♦ Sujete la rueda delantera y extraiga ma-
nualmente el perno rueda (3).
♦ Recupere la arandela (4).
No accione la palanca del freno delante-
ro después de haber sacado la rueda
puesto que los pistones de la pinza po-
drían salir de sus sedes, causando la pér-
dida del líquido frenos.
En este caso diríjase a un Concesionario
Oficial aprilia que efectuará la interven-
ción de mantenimiento.
♦ Mueva hacia delante la rueda delantera
hasta extraer el disco de la pinza freno (5).
♦ Extraiga completamente la rueda delante-
ra.
♦ Desconecte el reenvío cuentakilómetros
(6).
RUEDA DELANTERA
DESMONTAJE
Las operaciones para el desmontaje y
montaje de la rueda delantera pueden ser
difíciles y complejas para un operador
inexperto.
En caso de necesidad, diríjase a un Con-
cesionario Oficial aprilia.
En todo caso, si quiere efectuar tales
operaciones personalmente, aténgase a
las siguientes instrucciones.
Lea con cuidado pág. 47 (MANTENIMIEN-
TO).
Durante el desmontaje y el montaje pres-
te atención para no dañar las tuberías,
los discos y las pastillas de los frenos.
ATENCION
ATENCION
ATENCION
6
4
2
3
5
100
aprilia
1
1

59
uso y mantenimiento
Scarabeo 50 - Scarabeo 100 4T
MONTAJE
Lea con cuidado pág. 47 (MANTENIMIEN-
TO).
Durante el montaje preste atención para
no dañar la tubería, el disco y las pasti-
llas del freno.
Para el montaje de la rueda delantera, efec-
túe las siguientes operaciones:
♦ Extienda una capa de grasa lubricante por
toda la longitud del perno rueda (3), véase
pág. 90 (TABLA LUBRICANTES).
♦ Coloque la rueda entre las varillas de la
horquilla sobre el sujetador (1).
♦ Coloque la lengüeta (8) del reenvío cuen-
takilómetros (7) en su sede sobre el buje
rueda.
Peligro de lesiones. No introduzca los
dedos para alinear los orificios.
♦ Desplace la rueda hasta alinear el orificio
central a los orificios sobre la horquilla.
♦ Compruebe que los siguientes componen-
tes no estén sucios:
– neumático;
– rueda;
– disco freno.
Después del montaje, accione repetida-
mente la palanca freno delantero y con-
trole el correcto funcionamiento del sis-
tema de frenado.
Controle el centrado de la rueda.
Se aconseja hacer controlar los pares de
apriete, el centrado y el equilibrado en un
Concesionario Oficial aprilia, para evi-
tar inconvenientes que podrían causar se-
rios daños a usted y/o a los demás.
ATENCION
PELIGRO
♦
Introduzca la rueda entre las varillas inser-
tando con cuidado el disco en la pinza freno.
♦ Introduzca la arandela (4) entre el reenvío
cuentakilómetros (7) y la varilla derecha
horquilla.
♦ Introduzca completamente el perno rueda
(3) y apriételo manualmente.
♦ Apriete completamente el perno rueda (3).
Par de apriete perno rueda:
50 Nm (5 kgm).
♦ Con la palanca freno delantero acciona-
da, presione repetidamente sobre el ma-
nillar, haciendo penetrar la horquilla.
De esta manera se permitirá el asiento de
las varillas de la horquilla en modo apro-
piado.
♦ Apriete el tornillo (2) de la morsa perno
rueda.
Par de apriete tornillo morsa perno rue-
da: 12 Nm (1,2 kgm).
ATENCION
7
4
8
2
3

60
uso y mantenimiento
Scarabeo 50 - Scarabeo 100 4T
RUEDA TRASERA
DESMONTAJE
Las operaciones para el desmontaje y el
montaje de la rueda trasera pueden ser
difíciles y complejas para un operador
inexperto. En caso de necesidad, diríja-
se a un Concesionario Oficial aprilia.
En todo caso, si quiere efectuar tales
operaciones personalmente, aténgase a
las siguientes instrucciones.
Lea con cuidado pág. 47 (MANTENIMIEN-
TO).
Antes de efectuar las siguientes opera-
ciones, deje enfriar el motor y el silencia-
dor hasta que alcancen la temperatura
ambiente, para evitar posibles quemadu-
ras.
Durante el desmontaje y el montaje
preste atención para no dañar la tubería,
el disco y las pastillas del freno.
♦ Coloque el vehículo sobre el caballete cen-
tral en un terreno firme y llano.
♦ Saque el silenciador de escape, véase pág.
66 (DESMONTAJE SILENCIADOR DE
ESCAPE).
♦ Saque la tapa (1).
♦ Extraiga la rueda.
IMPORTANTE Utilice exclusivamente
Recambios Originales aprilia.
♦ Después del montaje compruebe que los
siguientes componentes no estén sucios:
– neumático,
– rueda
–
disco freno.
Después del montaje accione repetida-
mente la palanca del freno trasero y con-
trole el correcto funcionamiento del sis-
tema de frenado.
Controle el centrado de la rueda.
Se aconseja hacer controlar los pares de
apriete, el centrado y el equilibrado en un
Concesionario Oficial aprilia, para evitar
inconvenientes que podrían causar serios
daños a usted y/o a los demás.
ATENCION
IMPORTANTE Para desenroscar la
tuerca rueda (2) es necesario bloquear la
rotación de la rueda.
♦
Accione a fondo la palanca freno trasero (3),
interponiendo un trozo de cartón (4), colo-
que la abrazadera de plástico (5) para man-
tener accionada la palanca freno trasero.
♦ Desenrosque y quite la tuerca rueda (2),
recuperando la arandela.
IMPORTANTE Durante el montaje, sus-
tituya la tuerca rueda (de tipo especial) con
otra nueva.
Par de apriete tuerca rueda (2):
110 Nm (11 kgm).
♦ Suelte la palanca freno trasero.
♦
100
Afloje el guardafangos, véase pág. 57.
♦
100
Extraiga la rueda.
♦ Saque la pinza freno trasero, véase
pág. 64 (DESMONTAJE PINZA FRENO
TRASERO
).
ATENCION
100
1
2
1
2
4
5
3

61
uso y mantenimiento
Scarabeo 50 - Scarabeo 100 4T
COMPROBACION DESGASTE
PASTILLAS
Lea con cuidado pág. 31 (LIQUIDO FRE-
NOS - recomendaciones), pág. 32 (FRE-
NOS DE DISCO) y pág. 47 (MANTENI-
MIENTO).
Controle el desgaste de las pastillas del fre-
no después de los primerosi 500 km (312
mi), luego cada 2000 km (1250 mi).
El desgaste de las pastillas del freno de dis-
co depende del uso, del tipo de conducción
y de la carretera.
El desgaste es mayor con el uso en carrete-
ras sucias o mojadas.
Controle el desgaste de las pastillas de
los frenos sobre todo antes de cada via-
je.
Para realizar un control rápido del desgas-
te de las pastillas es preciso que:
♦ Coloque el vehículo sobre el caballete cen-
tral en un terreno firme y llano.
♦ Saque la tapa pinza freno (1).
♦ Realice un control visual entre el disco de
freno y las pastillas.
El consumo más allá del límite del mate-
rial de fricción pondría el soporte metá-
lico de la pastilla en contacto con el dis-
co, con consiguiente ruido metálico y
chispas en la pinza; de este modo se per-
judicarían la eficacia de frenado, la segu-
ridad y la integridad del disco.
♦ Si el espesor del material de fricción (in-
cluso de una sola pastilla) queda reduci-
do al valor aproximado de 1,5 mm, haga
sustituir ambas pastillas.
Para la sustitución, diríjase a un Conce-
sionario Oficial aprilia.
PELIGRO
PELIGRO
PELIGRO
1

62
uso y mantenimiento
Scarabeo 50 - Scarabeo 100 4T
COMPROBACIÓN DESGASTE
ZAPATAS
100
Lea con cuidado pág. 33 (FRENO TRA-
SERO DE TAMBOR
100
) y pág. 47
(MANTENIMIENTO).
Controle el desgaste de las zapatas del fre-
no trasero después de los primeros 1000 km
(625 mi), luego cada 4000 km (2500 mi).
INSPECCION SUSPENSION
DELANTERA Y TRASERA
Lea con cuidado pág. 47 (MANTENIMIEN-
TO).
Controle la sujeción de todos los órganos y
la funcionalidad de las articulaciones de la
suspensión delantera y trasera después de
los primeros 1000 km (625 mi) y luego cada
4000 km (2500 mi).
En caso de que se notaran anomalías en
el funcionamiento o se necesitara la in-
tervención de personal especializado,
diríjase a un Concesionario Oficial
aprilia.
ATENCION
100
♦ Saque la rueda trasera, véase pág. 60
(RUEDA TRASERA).
♦ Ahora es posible controlar el espesor del
material de roce, que no deberá ser infe-
rior a 1 mm.
En el caso en que se haya alcanzado el
espesor mínimo permitido, si se notan ano-
malías de funcionamiento o las piezas re-
sultan dañadas, diríjase a un Concesio-
nario Oficial aprilia, que efectuará la sus-
titución.
Para comprobar el estado de desgaste de
las zapatas del freno trasero:
1
100

63
uso y mantenimiento
Scarabeo 50 - Scarabeo 100 4T
♦ Interponiendo un tejido esponjoso, colo-
que el soporte por debajo del vehículo, de
manera que la rueda delantera tenga es-
pacio suficiente para moverse libremente
y para evitar que el vehículo caiga.
♦ Sacuda la horquilla en el sentido de mar-
cha.
IMPORTANTE Sacudiendo excesiva-
mente la horquilla se podría registrar el mo-
vimiento del caballete, mostrando un juego
no correcto. Repita algunas veces la opera-
ción anterior.
♦ Si el juego que se ha notado resulta evi-
dente, diríjase a un Concesionario Ofi-
cial aprilia que proveerá a restablecer las
condiciones óptimas de la dirección.
CONTROL DEL EJE FULCRO
MOTOR
Lea con cuidado pág. 47 (MANTENIMIEN-
TO).
Realice periódicamente el control del juego
presente entre los casquillos del perno mo-
tor y el perno motor.
Para efectuar este control es necesario:
♦ Coloque el vehículo sobre el caballete cen-
tral en un terreno firme y llano.
♦ Sacuda la rueda transversalmente al sen-
tido de marcha.
♦ En caso de juego, diríjase a un Conce-
sionario Oficial aprilia, que procederá
a restablecer las condiciones óptimas de
empleo.
ATENCION
100
aprilia
CONTROL DE LA DIRECCION
Lea con cuidado pág. 47 (MANTENIMIEN-
TO).
De vez en cuando se aconseja que se rea-
lice un control para comprobar la presencia
de juego en la dirección.
Para efectuar tal operación es necesario:
♦ Coloque el vehículo sobre el caballete cen-
tral en un terreno firme y llano.
IMPORTANTE Prepare un soporte con
base de apoyo 200 x 200 mm y altura ade-
cuada.
Asegúrese de la estabilidad del vehícu-
lo.

64
uso y mantenimiento
Scarabeo 50 - Scarabeo 100 4T
DESMONTAJE PINZA
FRENO TRASERO
Lea con cuidado pág. 47 (MANTENIMIEN-
TO).
Durante el desmontaje preste atención
para no dañar la tubería, el disco y las
pastillas del freno.
♦ Coloque el vehículo sobre el caballete cen-
tral en un terreno firme y llano.
♦ Desenrosque y quite los dos tornillos (1).
Par de apriete tornillos pinza freno (1):
27 Nm (2,7 kgm).
Durante el montaje de la pinza freno, sus-
tituya los tornillos (1) de fijación pinza con
dos tornillos nuevos del mismo tipo.
No accione la palanca del freno trasero
después de haber sacado la pinza freno,
ya que los pistones de la misma podrían
salir de sus sedes causando la pérdida
del líquido frenos.
En este caso diríjase a un Concesionario
Oficial aprilia, que efectuará una inter-
vención de mantenimiento.
♦ Extrayéndola con cuidado del disco freno,
saque la pinza freno (2).
Después del montaje, accione repetida-
mente la palanca del freno trasero y con-
trole el correcto funcionamiento del sis-
tema de frenado.
ATENCION
PELIGRO
ATENCION
PELIGRO
DESMONTAJE
RETROVISORES
Lea con cuidado pág. 47 (MANTENIMIEN-
TO).
♦ Coloque el vehículo sobre el caballete cen-
tral en un terreno firme y llano.
♦ Levante la funda de protección (3).
Aguante el retrovisor (4) para evitar que
caiga accidentalmente.
♦ Manteniendo bloqueado el tornillo (5), aflo-
je completamente la tuerca (6).
♦ Saque el espejo retrovisor (4).
ATENCION
2
1
4
3
6
5

65
uso y mantenimiento
Scarabeo 50 - Scarabeo 100 4T
DESMONTAJE
CUBREMANILLAR DELANTERO
Lea con cuidado pág. 47 (MANTENIMIEN-
TO).
♦ Coloque el vehículo sobre el caballete cen-
tral en un terreno firme y llano.
♦ Desenrosque y quite los dos tornillos (1)
indicados por las flechas.
♦ Desenrosque y quite los dos tornillos (2).
Trabaje con cuidado para no dañar la
sede (3) de la lengüeta de encaje (4).
♦ ★ Utilizando un destornillador de corte
pequeño, levante la lengüeta de encaje (4),
situada en el interior del cubremanillar
delantero (5).
♦ ★ Repita la operación también por la par-
te inferior del cubremanillar.
Maneje con cuidado los componentes de
plástico y los pintados; no los raye ni
dañe.
♦ Saque el cubremanillar delantero (5) pres-
tando atención para no romper la lengüe-
ta de encaje.
IMPORTANTE Durante el montaje com-
pruebe que las lengüetas de encaje estén
correctamente introducidas.
DESMONTAJE
TAPA DE INSPECCION
Lea con cuidado pág. 47 (MANTENIMIEN-
TO).
Maneje con cuidado los componentes
que están pintados; no los raye ni dañe.
♦ Coloque el vehículo sobre el caballete cen-
tral en un terreno firme y llano.
♦ ★ Destornille y quite el tornillo (6).
♦ Saque la tapa de inspección (7).
ATENCION
ATENCION
ATENCION
2
1
1
5
4
3
7
6

66
uso y mantenimiento
Scarabeo 50 - Scarabeo 100 4T
DESMONTAJE
SILENCIADOR DE ESCAPE
Lea con cuidado pág. 47 (MANTENIMIEN-
TO).
♦ Coloque el vehículo sobre el caballete cen-
tral en un terreno firme y llano.
Antes de efectuar las siguientes opera-
ciones deje enfriar el motor y el silencia-
dor de escape hasta que alcancen la tem-
peratura ambiente, para evitar posibles
quemaduras.
♦ Desenrosque y quite los dos tornillos (1)
de fijación del silenciador al motor.
Par de apriete tornillos (1):
25 Nm (2,5 kgm).
♦ Desenrosque y quite los tornillos (2).
Par de apriete tornillos (2):
12 Nm (1,2 kgm).
♦ Saque el silenciador de escape (3).
PELIGRO
IMPORTANTE Durante el montaje sus-
tituya la junta entre colector de escape y si-
lenciador con otra nueva.
1
3
2

67
uso y mantenimiento
Scarabeo 50 - Scarabeo 100 4T
DESMONTAJE
SILENCIADOR DE ESCAPE
100
Lea con cuidado pág. 47 (MANTENIMIEN-
TO).
♦ Coloque el vehículo sobre el caballete cen-
tral en un terreno firme y llano.
Antes de efectuar las siguientes opera-
ciones deje enfriar el motor y el silencia-
dor de escape hasta que alcancen la tem-
peratura ambiente, para evitar posibles
quemaduras.
♦ Saque la tapa de inspección, véase pág.
65 (DESMONTAJE TAPA DE INSPEC-
CIÓN).
♦ Desenrosque y quite los dos tornillos (1)
de fijación del silenciador al motor.
Par de apriete tornillos (1):
25 Nm (2,5 kgm).
♦ Desenrosque y quite las dos tuercas (2).
Par de apriete tuercas (2):
12 Nm (1,2 kgm).
♦ Saque el silenciador de escape (3).
PELIGRO
IMPORTANTE Durante el montaje sus-
tituya la junta entre colector de escape y si-
lenciador con otra nueva.
1
3
100
2
100

68
uso y mantenimiento
Scarabeo 50 - Scarabeo 100 4T
DESMONTAJE
PLATAFORMA REPOSAPIÉS
Lea con cuidado pág. 47 (MANTENIMIEN-
TO).
♦ Saque la tapa de inspección, véase pág.
65 (DESMONTAJE TAPA DE INSPEC-
CIÓN).
♦ ★ Desenrosque y quite los dos tornillos (1).
♦ ★ Desenrosque y quite los tres tornillos (2)
situados debajo de la plataforma reposa-
piés.
Trabaje con precaución.
No dañe las lengüetas y/o las sedes de
encaje.
♦ Levante moderadamente la parte trasera
de la plataforma reposapiés (3) y extrái-
gala de la base del escudo interno.
No fuerce el escudo inferior porque está
fijado al chasis mediante dos tornillos
delanteros.
IMPORTANTE Durante el montaje intro-
duzca primero las dos lengüetas centrales y
a continuación las laterales.
Para la introducción de los tres tornillos (2)
asegúrese visualmente de la alineación del
orificio reposapiés - sede tornillo.
ATENCION
ATENCION
100
1
2
2
1
1
2
1
3
CONTROL CABALLETE
Lea con cuidado pág. 47 (MANTENIMIEN-
TO).
El caballete (1) ha de girar libremente.
Realice los siguientes controles:
♦ Los muelles (2) no tienen que estar da-
ñados, desgastados, oxidados o afloja-
dos.
♦ El caballete ha de girar libremente, si aca-
so engrase la articulación, véase pág. 90
(TABLA LUBRICANTES).

69
uso y mantenimiento
Scarabeo 50 - Scarabeo 100 4T
CONTROL INTERRUPTORES
Lea con cuidado pág. 47 (MANTENIMIEN-
TO).
En el vehículo se encuentran dos interrup-
tores:
– interruptor luz stop sobre palanca mando
freno trasero (3).
– interruptor luz stop sobre palanca mando
freno delantero (4).
Para acceder a los interruptores:
♦ Saque el cubremanillar delantero, véase
pág. 65 (DESMONTAJE CUBREMANI-
LLAR DELANTERO).
Efectúe periódicamente los siguientes con-
troles:
♦ Controle que sobre el interruptor no exis-
tan depósitos de suciedad o fango; la es-
piga debe moverse sin interferencias, re-
gresando automáticamente a la posición
de salida.
♦ Controle que los cables estén conectados
correctamente.
AJUSTE DEL RALENTI
Lea con cuidado pág. 47 (MANTENIMIEN-
TO).
Ajuste el ralentí después de los primeros 500
km (312 mi) y cada vez que resulte irregu-
lar.
Para realizar esta operación:
♦ Recorra algunos kilómetros, hasta alcan-
zar la temperatura de funcionamiento nor-
mal, luego pare el motor.
♦
100
Desmonte la tapa de inspección, véa-
se pág. 65 (DESMONTAJE TAPA DE INS-
PECCION).
♦ Conecte un cuentarrevoluciones electró-
nico al cable de la bujía.
PELIGRO
Asegúrese, antes de efectuar la opera-
ción, que el local en el que se trabaja ten-
ga un adecuado recambio de aire.
♦ Ponga en marcha el motor.
El régimen de rotación mínimo del motor
tendrá que ser aproximadamente 1500 ±100
rpm. En este caso la rueda trasera no se
pone en rotación por el motor.
El régimen de rotación mínimo del motor
tendrá que ser aproximadamente 1800 ±100
rpm. En este caso la rueda trasera no se
pone en rotación por el motor.
100
100
4
3

70
uso y mantenimiento
Scarabeo 50 - Scarabeo 100 4T
Si es necesario:
♦ Intervenga sobre el botón esférico de re-
gistro (1) situado sobre el carburador.
ATORNILLANDO (en sentido horario) au-
menta el número de las revoluciones.
DESTORNILLANDO (en sentido antiho-
rario) disminuye el número de las revolu-
ciones.
♦ Actuando sobre el puño de gas, acelere y
decelere algunas veces para controlar el
funcionamiento correcto y si el ralentí que-
da estable.
IMPORTANTE No actúe sobre el torni-
llo de regulación aire para evitar variaciones
en la regulación de la carburación.
En caso de necesidad, diríjase a un Con-
cesionario Oficial aprilia.
AJUSTE
MANDO ACELERADOR
Lea con cuidado pág. 47 (MANTENIMIEN-
TO).
La carrera en vacío del puño de gas debe
ser de 2 - 3 mm, mensurables en el puño.
Para la regulación del juego:
♦ Coloque el vehículo sobre el caballete cen-
tral su di un terreno solido e in piano.
♦ Extraiga el elemento de protección (2).
♦ Afloje la tuerca (3).
♦ Actúe sobre el registro (4), situado en la
entrada del cable mando acelerador.
Tras el ajuste:
♦ Apriete la tuerca (3), bloqueando el regis-
tro (4) y coloque la funda de protección (2).
ATENCION
Al término del ajuste, compruebe que la
rotación del manillar no modifique el ra-
lentí del motor y que el puño de gas, una
vez suelto, regrese suave y automá-
ticamente a la posición de reposo.
PELIGRO
1
100
2
4
3

71
uso y mantenimiento
Scarabeo 50 - Scarabeo 100 4T
BUJIA
Lea con cuidado pág. 47 (MANTENIMIEN-
TO).
Controle la bujía tras los primeros 500 km (312
mi) y sustitúyala cada 4000 km (2500 mi).
Controle o sustituya la bujía cada 8000 km
(5000 mi).
Desmonte periódicamente la bujía, límpiela
de las incrustaciones de carbonilla y, si es
necesario, sustitúyala.
Para acceder a la bujía:
♦ Desmonte la tapa de inspección, véase
pág. 65 (DESMONTAJE TAPA DE INS-
PECCION).
Para el desmontaje y la limpieza:
♦ Desconecte la pipeta de la bujía (1).
♦
Limpie muy bien la base de la bujía, luego
destorníllela utilizando la llave que forma
100
ATENCION
parte del equipamiento base del kit herra-
mientas, y extráigala de su sede, teniendo
cuidado que polvo u otras sustancias no
entren en el interior del cilindro.
♦ Controle que sobre el electrodo y sobre la
porcelana central de la bujía no haya cos-
tras de carbonilla o signos de corrosión.
Eventualmente, limpie con los limpiadores
adecuados para bujías, con un alambre y/
o con un cepillo metálico.
♦
Sople muy fuerte con un chorro de aire para
evitar que residuos removidos entren en el
motor. Hay que sustituir la bujía si ésta pre-
senta hendiduras en el aislador, electrodos
oxidados o incrustaciones excesivas.
♦ Controle la distancia entre los electrodos
por medio de un calibre de espesor.
Ésta tiene que ser de 0,6 – 0,7 mm; si aca-
so ajústela curvando con cuidado el elec-
trodo de masa.
♦ Compruebe que la arandela esté en bue-
nas condiciones. Con la arandela instala-
da, atornille a mano la bujía para no dañar
la rosca.
♦ Apriete con la llave del kit herramientas del
equipamiento base, dándole 1/2 vuelta a
la bujía, para comprimir la arandela.
Par de apriete bujía:
20 Nm (2 kgm)
Hay que atornillar muy bien la bujía para
que el motor no se sobrecaliente,
dañándose gravemente. Utilice sólo bu-
jías del tipo aconsejado, véase pág. 86
(DATOS TECNICOS) para no perjudicar el
rendimiento y la duración del motor.
♦ Conecte la pipeta de la bujía (1).
♦
Mantenga la pipeta en la misma posi-
ción que tenia antes de ser extraída.
♦ Vuelva a instalar la tapa de inspección,
véase pág. 65 (DESMONTAJE TAPA DE
INSPECCION).
1
1
100

72
uso y mantenimiento
Scarabeo 50 - Scarabeo 100 4T
BATERIA
Lea con cuidado pág. 47 (MANTENIMIEN-
TO).
Peligro de incendio.
El combustible y otras sustancias infla-
mables no deben ser acercados a los
componentes eléctricos.
No invierta nunca la conexión de los ca-
bles de la batería.
Conecte y desconecte la batería con el
interruptor de encendido en posición
“
” porque, en caso contrario, unos
componentes podrían dañarse.
Conecte antes el cable positivo (+) y lue-
go el negativo (–).
Desconecte siguiendo el orden contrario.
La batería emana gases explosivos, por
lo tanto es conveniente mantener lejos
llamas, chispas, cigarrillos y cualquier
otra fuente de calor.
Durante la recarga o el uso, provea a una
ventilación adecuada del local, evite la
inhalación de gases emitidos durante la
recarga de la misma.
MANTENGASE LEJOS DEL ALCANCE DE
LOS NIÑOS.
Ponga cuidado en no inclinar demasia-
do el vehículo, para evitar salidas peli-
grosas del líquido de la batería.
El líquido de la batería es corrosivo.
No lo vierta ni lo esparza sobre todo so-
bre las partes de plástico.
IMPORTANTE En el caso en que sea
necesaria una intervención de asistencia o
una consulta técnica, diríjase a un Conce-
sionario Oficial aprilia, que garantizará un
servicio esmerado y rápido.
Controle tras los primeros 500 km (312 mi)
y sucesivamente cada 4000 km (2500 mi) ó
12 meses, el nivel del electrolito y el apreta-
miento de los bornes.
Controle tras los primeros 1000 km (625 mi)
y sucesivamente cada 4000 km (2500 mi) ó
12 meses, el nivel del electrolito y el apreta-
miento de los bornes.
El electrolito de la batería es tóxico, cáus-
tico y en contacto con la epidermis pue-
de causar quemaduras por contener áci-
do sulfúrico. Lleve ropa protectora, una
máscara para la cara y/o gafas de pro-
tección en el caso de mantenimiento.
Si algo del líquido electrolítico viniera a
contacto con la piel, lávese con abun-
dante agua fría.
De llegar a contacto con los ojos, lávese
con abundante agua durante quince mi-
nutos, luego diríjase enseguida a un of-
talmólogo.
De tragarlo accidentalmente, beba mu-
cha agua o leche, siga con leche de mag-
nesia o aceite vegetal, luego diríjase en-
seguida a un médico.
PELIGRO
ATENCION
PELIGRO
100

73
uso y mantenimiento
Scarabeo 50 - Scarabeo 100 4T
LARGA INACTIVIDÀD
DE LA BATERIA
En caso de que el vehículo quede inactivo
durante más de quince días, es necesario
recargar la batería para evitar su sulfatación,
véase pág. 75 (RECARGA BATERIA).
Es importante controlar la carga periódica-
mente (más o menos una vez cada mes)
durante el invierno o cuando el vehículo se
queda parado, para evitar que pueda de-
gradarse.
♦ Recárguela completamente, usando una
recarga normal, véase pág. 75 (RECAR-
GA BATERIA).
Si la batería queda en el vehículo, desco-
necte los cables de los terminales.
CONTROL Y LIMPIEZA
TERMINALES Y BORNES
Lea con cuidado pág. 72 (BATERIA).
♦ Acceda a la batería, véase pág. 74 (AC-
CESO A LA BATERÍA).
♦ Controle que los terminales (1) de los ca-
bles y los bornes (2) de la batería estén:
– en buenas condiciones (sin corrosión o
incrustaciones);
– cubiertos de grasa especial o vaselina.
Si fuera necesario:
♦
Asegúrese que el interruptor de encendi-
do esté en posición
“ ”.
♦ Desconecte antes el cable negativo (–) y
luego el positivo (rojo) (+).
♦ Cepille con una escobilla de alambre me-
tálico para eliminar todo residuo de corro-
sión.
♦ Vuelva a conectar antes el cable positivo
(rojo) (+) y luego el negativo (–).
♦ Recubra terminales y bornes con grasa
especial o vaselina.
♦ Coloque la batería, véase pág. 75 (INS-
TALACIÓN BATERÍA).

74
uso y mantenimiento
Scarabeo 50 - Scarabeo 100 4T
♦ Controle que el nivel del líquido esté com-
prendido entre las dos muescas “MIN” y
“MAX”, troqueladas sobre el lado de la ba-
tería.
Eventualmente:
♦ Desenrosque y quite los tapones de los ele-
mentos.
Para restaurar el nivel del electrolito uti-
lice exclusivamente agua destilada. No
supere la referencia “MAX”, ya que el ni-
vel aumenta durante la recarga.
♦ Restaure el nivel del líquido añadiendo
agua destilada.
Una vez ultimado el relleno coloque co-
rrectamente los tapones de los elementos.
♦ Coloque los tapones de los elementos.
DESMONTAJE BATERIA
Lea con cuidado pág. 72 (BATERIA).
ACCESO A LA BATERÍA
♦ Asegúrese que el interruptor de encendi-
do esté en posición “
”.
♦ Levante el sillín, véase pág. 24 (DESBLO-
QUEO / BLOQUEO SILLÍN).
♦ Saque la tapa batería (1).
La batería está inmovilizada con los ca-
bles eléctricos. Durante el desmontaje no
fuerce los cables.
DESMONTAJE COMPLETO
♦ Desconecte antes el cable negativo (-) y
luego el positivo (rojo) (+).
♦ Saque el tubo respiradero.
♦ Saque la batería de su alojamiento y coló-
quela sobre una superficie llana en un lu-
gar fresco y seco.
Una vez desmontada, hay que colocar la
batería en un lugar seguro y lejos del al-
cance de los niños.
CONTROL NIVEL
ELECTROLITO BATERIA
Lea con cuidado pág. 72 (BATERIA).
♦ Desmonte la batería, (véase DESMONTA-
JE BATERIA).
ATENCION
PELIGRO
ATENCION
ATENCION
MAX
MIN
1
100
1

75
uso y mantenimiento
Scarabeo 50 - Scarabeo 100 4T
♦ Conecte en este orden el cable positivo
(rojo) (+) y el negativo (
-).
♦ Recubra terminales y bornes con grasa
especial o vaselina.
Durante el montaje acompañe los cables
eléctricos y colóquelos en su posición
para evitar que sean aplastados.
El cable negativo (-) no debe sobreponer-
se a la fijación del positivo (+) sino que
se debe colocar al lado, entre la batería y
la caja.
♦ Empuje la batería hacia el interior de la caja
portabatería.
♦ Cierre la tapa batería (1).
♦ Baje el sillín, véase pág. 24 (DESBLO-
QUEO / BLOQUEO SILLÍN).
RECARGA BATERIA
Lea con cuidado pág. 72 (BATERIA).
♦ Desmonte la batería, véase pág. 74 (DE-
SMONTAJE BATERIA).
♦ Prepare un adecuado cargabaterías.
♦ Desenrosque y quite los tapones de los
elementos.
♦ Controle el nivel del electrolito bateria, véa-
se pág. 74 (CONTROL NIVEL ELECTRO-
LITO BATERIA).
♦ Conecte la batería a un cargabaterías.
IMPORTANTE Se aconseja una recar-
ga utilizando un amperaje de 1/10 de la ca-
pacidad de la batería misma.
♦ Encienda el cargabaterías.
♦ Tras haber realizado la recarga, vuelva a
controlar el nivel del electrolito y de re-
sultar necesario rellene con agua desti-
lada.
♦ Vuelva a instalar los tapones de los ele-
mentos.
Vuelva a instalar la batería sólo 5-10 mi-
nutos después de haberla desconectada
del cargador, ya que, durante un breve
periodo de tiempo, la batería sigue pro-
duciendo gas.
INSTALACION BATERIA
Lea con cuidado pág. 72 (BATERIA).
♦ Asegúrese que el interruptor de encendi-
do esté en posición “
”.
♦ Coloque la batería en su alojamiento.
♦ Conecte el tubo respiradero batería.
Conecte siempre el respiradero de la ba-
tería para evitar que los vapores del áci-
do sulfúrico, al salir del respiradero, pue-
dan corroer la instalación eléctrica, las
partes pintadas, las piezas de goma o las
juntas.
El tubo respiradero debe estar conecta-
do de manera que no sea posible aplas-
tarlo ya que en caso contrario puede cau-
sar un aumento de la presión interna de
la batería, con la posibilidad de dañarla.
ATENCION
ATENCION
ATENCION
100

76
uso y mantenimiento
Scarabeo 50 - Scarabeo 100 4T
SUSTITUCION FUSIBLE
Lea con cuidado pág. 47 (MANTENIMIEN-
TO).
No repare fusibles dañados.
No utilice nunca fusibles diferentes de los
indicados para no causar daños al siste-
ma eléctrico o incluso un incendio en
caso de cortocircuito.
IMPORTANTE Cuando el fusible se es-
tropea frecuentemente es posible que haya
un cortocircuito o una sobrecarga. En este
caso consulte un Concesionario Oficial
aprilia.
♦ Sustituya el fusible dañado con el fusible
de reserva (3) del equipo base o con uno
del mismo amperaje.
IMPORTANTE Si se utiliza un fusible de
reserva (3) proceda a introducir otro igual
en la sede correspondiente.
♦ Coloque la tapa de inspección, véase pág.
65 (DESMONTAJE TAPA DE INSPEC-
CIÓN).
COLOCACION FUSIBLES
Fusible 7,5 A de batería a:
todas las cargas eléctricas, excepto el cir-
cuito luces que está alimentado con corrien-
te alterna.
Si se da cuenta de que un componente eléc-
trico no funciona o funciona de manera no
correcta, o de que el motor no se pone en
marcha, es necesario que controle el fusible
(1).
Para el control:
♦ Coloque en “ ” el interruptor de encendi-
do, para evitar un corto circuito accidental.
♦ Acceda a la batería, desde donde es posi-
ble trabajar en los fusibles, véase pág. 74
(ACCESO A LA BATERÍA).
♦ Extraiga un fusible (1) a la vez y controle
si el filamento (2) está interrumpido.
♦ Antes de sustituir el fusible, busque, si es
posible, la causa que ha ocasionado la
avería.
ATENCION
3
1

77
uso y mantenimiento
Scarabeo 50 - Scarabeo 100 4T
REGULACION VERTICAL
HAZ LUMINOSO
IMPORTANTE En base a lo prescrito por
la legislación vigente en el país donde se
utiliza el vehículo, para el control de la orien-
tación del haz luminoso se deben adoptar
unos procedimientos específicos.
Para comprobar rápidamente la orientación
correcta del haz luminoso delantero, colo-
que el vehículo a diez metros de distancia
de una pared vertical, asegurándose de que
el suelo esté llano.
♦ Encienda la luz de cruce, siéntese sobre
el vehículo y compruebe que el haz lumi-
noso proyectado en la pared esté muy
poco por debajo de la recta horizontal del
proyector (unos 9/10 de la altura total).
Para regular el haz luminoso:
♦ Coloque el vehículo sobre el caballete cen-
tral en un terreno firme y llano.
♦ Actúe con un destornillador sobre el tor-
nillo correspondiente (1).
ATORNILLANDO (sentido horario) el haz
luminoso se levanta.
DESTORNILLANDO (en sentido antiho-
rario) el haz luminoso baja.
BOMBILLAS
Lea con cuidado pág.
48-53
(FICHA DE
MANTENIMIENTO PERIÓDICO).
Peligro de incendio.
El combustible y otras sustancias infla-
mables no deben ser acercados a los
componentes eléctricos.
Antes de sustituir una bombilla, ponga el
interruptor de encendido en la posición
“
” y espere unos minutos para permi-
tir la refrigeración de la misma.
Sustituya la bombilla utilizando guantes
limpios o utilizando un trapo limpio y
seco.
No deje huellas sobre la bombilla, ya que
podrían causar el sobrecalentamiento y,
por lo tanto, su ruptura.
Si toca la bombilla con las manos sin pro-
tección, límpiela con alcohol de eventua-
les huellas, para evitar que se funda.
NO FUERCE LOS CABLES ELECTRI-
COS.
PELIGRO
ATENCION
1

78
uso y mantenimiento
Scarabeo 50 - Scarabeo 100 4T
SUSTITUCION BOMBILLAS
FARO DELANTERO
Lea con cuidado pág. 77 (BOMBILLAS).
En el faro delantero están alojadas:
– una bombilla luz de cruce/luz larga (1);
– una bombilla luz de posición (2).
Para la sustitución:
♦ Saque el cubremanillar delantero, véase
pág. 65 (DESMONTAJE CUBREMANI-
LLAR DELANTERO).
BOMBILLAS DE POSICION
Para extraer el casquillo portalámparas,
no fuerce los cables eléctricos.
♦ Aguante el casquillo portalámparas de
posición (4), estírelo y desconéctelo de su
sede.
♦ Extraiga la bombilla (2) y sustitúyala con
otra del mismo tipo.
BOMBILLA
LUZ DE CRUCE / LUZ LARGA
♦ Gire en sentido antihorario el casquillo
portalámparas (3) y extráigalo de la sede.
♦ Presione moderadamente y gire en senti-
do antihorario la bombilla luz cruce / luz
larga (1), extraiga y sustitúyala con otra del
mismo tipo.
ATENCION
2
1

79
uso y mantenimiento
Scarabeo 50 - Scarabeo 100 4T
SUSTITUCION BOMBILLAS
INDICADORES DE DIRECCION
DELANTEROS
Lea con cuidado pág. 77 (BOMBILLAS).
♦ Coloque el vehículo sobre el caballete.
♦ Destornille y quite el tornillo (1).
IMPORTANTE Durante el desmontaje
de la pantalla de protección, trabaje con pre-
caución, para no romper el diente de aco-
plamiento.
♦ Saque la pantalla de protección (2).
♦ Saque el transparente de color amarillo
ámbar (3).
IMPORTANTE Durante el montaje co-
loque correctamente la pantalla de protec-
ción en su sede.
Apriete con precaución y moderadamente
el tornillo (1) para evitar dañar la tulipa.
♦ Presione moderadamente la bombilla (4) y
gírela en sentido antihorario.
♦ Extraiga la bombilla (4) de su sede.
IMPORTANTE Introduzca la bombilla en
el casquillo portalámparas haciendo coinci-
dir las dos espigas guía con las corres-
pondientes guías sobre el casquillo portalám-
paras.
♦ Instale correctamente otra bombilla del
mismo tipo.
IMPORTANTE Si el casquillo portalám-
paras (5) sale de su alojamiento, vuelva a
introducirlo correctamente, haciendo coinci-
dir la abertura de radios del casquillo porta-
lámparas con el alojamiento del tornillo.
SUSTITUCION BOMBILLAS
FARO TRASERO
Lea con cuidado pág. 77 (BOMBILLAS).
♦ Coloque el vehículo sobre el caballete.
♦ Destornille y quite el tornillo (6).
IMPORTANTE Durante el desmontaje
de la pantalla de protección, trabaje con cui-
dado, para no romper el diente de acopla-
miento.
♦ Desmonte la pantalla de protección (7).
♦ Presione moderadamente la bombilla y gí-
rela en sentido antihorario.
♦ Extraiga la bombilla de su sede.
IMPORTANTE Introduzca la bombilla en
el casquillo portalámparas haciendo coinci-
dir las dos espigas guía con las correspon-
dientes guías sobre el casquillo portalámpa-
ras.
♦ Instale correctamente una bombilla del
mismo tipo.
IMPORTANTE Durante el reensamblaje,
coloque correctamente la pantalla de protec-
ción en su sede.
Apriete con cuidado y moderadamente los
tornillos (6) para no dañar la pantalla de pro-
tección.
1
3
5
4
2
6
6
7

80
uso y mantenimiento
Scarabeo 50 - Scarabeo 100 4T
SUSTITUCION BOMBILLAS
INDICADORES DE DIRECCION
TRASEROS
Lea con cuidado pág. 77 (BOMBILLAS).
♦ Coloque el vehículo sobre el caballete.
♦ Desenrosque y quite los dos tornillos (1).
IMPORTANTE Durante el desmontaje
de la pantalla de protección, trabaje con pre-
caución para no romper el diente de aco-
plamiento.
♦ Saque la pantalla de protección (2).
IMPORTANTE Durante el montaje, co-
loque correctamente la pantalla de protec-
ción en su sede.
♦ Saque la pantalla de protección (3), girán-
dola hacia el exterior del vehículo.
♦ Presione moderadamente el transparente
de color amarillo ámbar (4), gírelo en sen-
tido antihorario y extráigalo.
IMPORTANTE Durante el desmontaje
de la pantalla de protección, trabaje con pre-
caución para no romper el diente de acopla-
miento.
♦ Presione moderadamente la bombilla (5) y
gírela en sentido antihorario.
♦ Extraiga la bombilla (5) de su sede.
IMPORTANTE Introduzca la bombilla en
el casquillo portalámparas haciendo coinci-
dir las dos espigas guía con las corres-
pondientes guías sobre el casquillo portalám-
paras.
♦ Instale correctamente otra bombilla del
mismo tipo.
IMPORTANTE Si el casquillo portalám-
paras (6) sale de su alojamiento, vuelva a
introducirlo correctamente, haciendo coinci-
dir la abertura de radios del casquillo porta-
lámparas con el alojamiento del tornillo.
1
1
2
6
5
4
3

81
uso y mantenimiento
Scarabeo 50 - Scarabeo 100 4T
SUSTITUCION BOMBILLAS
LUZ MATRÍCULA (en los países
donde está previsto)
100
Lea con cuidado pág. 77 (BOMBILLAS).
Para la sustitución:
♦ Desenrosque y quite el tornillo (1).
♦ Extraiga el portalámparas de goma (2).
♦ Extraiga la bombilla de su sede.
♦ Instale correctamente una nueva bombi-
lla, siguiendo el procedimiento inverso.
Para extraer el casquillo portalámparas,
no fuerce los cables eléctricos.
IMPORTANTE Durante el montaje ase-
gúrese de la correcta introducción del
portalámpara en su sede.
SUSTITUCIÓN
BOMBILLAS SALPICADERO
Lea con cuidado pág. 77 (BOMBILLAS).
En el salpicadero se encuentran:
– Las bombillas de las luces testigos.
– Las luces de iluminación salpicadero.
Para la sustitución:
♦ Saque el cubremanillar delantero, véase
pág. 65 (DESMONTAJE CUBREMANI-
LLAR DELANTERO).
ATENCION
100
1/2
4/4
R
30
20
10
0
40
30
20
50
60
mph km/h
40
50
70
80
90
aprilia
0 00 0
10
00
Km
1/2
4/4
R
30
20
10
0
40
30
20
50
60
mph km/h
40
50
70
80
90
aprilia
0 00 0
10
00
Km
2
1
100

82
uso y mantenimiento
Scarabeo 50 - Scarabeo 100 4T
BOMBILLAS LUCES TESTIGOS
IMPORTANTE Extraiga un portalámpa-
ras a la vez para evitar colocarlo incorrecta-
mente en fase de montaje.
♦ Extraiga el portalámparas afectado:
♦ Extraiga y sustituya la bombilla con otra
del mismo tipo.
Antes de transportar el vehículo es ne-
cesario vaciar con cuidado el depósito
combustible y el carburador, véase pág.
83 (EVACUACION DEL COMBUSTIBLE
DEL DEPOSITO), controlando que éstos
estén bien secos.
Durante el desplazamiento, el vehículo
debe conservar la posición vertical y es-
tar anclado firmemente, para evitar pér-
didas de combustible, aceite y líquido
refrigerante.
En caso de avería no remolque el vehí-
culo sino requiera la intervención de un
medio de socorro.
LUCES DE ILUMINACIÓN SALPICADERO
Extraiga un portalámpara a la vez para
evitar colocarlo incorrectamente en fase
de montaje.
♦ Extraiga el portalámparas de la parte del
salpicadero en la que se ha producido el
descenso luminoso:
(*) En algunas versiones esta bombilla pue-
de no estar presente.
♦ Extraiga y sustituya la bombilla con otra
del mismo tipo.
TRANSPORTE
Pos. Luz Testigo Colores
Indicadores de
direccion (
)
verde
Reserva aceite
mezclador (
)
rojo
Luz larga (
)
azul marino
Pos. Zona iluminada
5 Parte derecha superior
6 Parte izquierda superior (*)
7 Parte derecha inferior
PELIGRO
PELIGRO
ATENCION
Luz de cruce
(
)
100
verde
Luz Testigo Injection
Check
rojo
1
2
3
2
4
4

83
uso y mantenimiento
Scarabeo 50 - Scarabeo 100 4T
EVACUACION DEL
COMBUSTIBLE DEL DEPOSITO
Lea con cuidado pág. 27 (COMBUSTI-
BLE).
Peligro de incendio.
Espere a que el motor y el silenciador de
escape se hayan enfriado del todo.
Los vapores del combustible perjudican
la salud. Antes de seguir adelante con-
trole que el lugar donde trabaja tenga un
adecuado cambio de aire.
No inhale los vapores de combustible.
No fume ni utilice llamas libres.
NO ESPARZA EL COMBUSTIBLE EN EL
AMBIENTE.
♦ Coloque el vehículo sobre el caballete
central en un terreno firme y llano.
♦ Pare el motor y espere a que el vehículo
se haya enfriado.
♦ Prepare un recipiente, con capacidad su-
perior a la cantidad de combustible pre-
sente en el depósito, y colóquelo sobre el
suelo por el lado izquierdo del vehículo.
♦ Saque el tapón depósito combustible.
♦ Vacíe el depósito del combustible utili-
zando una bomba manual o un sistema
semejante.
Una vez finalizado el vaciado coloque
correctamente el tapón del depósito.
♦
Coloque el tapón depósito combustible.
Para vaciar del todo el carburador:
♦
Trabajando por el lado derecho del vehí-
culo, saque la abrazadera de manguera (4).
♦ Coloque el extremo libre del tubo (1) en
el interior de un recipiente.
♦ Abra el reposapiés izquierdo pasajero (2).
♦ Trabajando por el lado izquierdo del ve-
hículo, introduzca un destornillador entre
el reposapiés y el motor.
IMPORTANTE Durante el montaje sus-
tituya la abrazadera con otra nueva.
♦ Abra el escape del carburador aflojando
el tornillo de drenaje (3) situado debajo
de la cubeta.
En cuanto haya salido todo el combustible
contenido en el carburador:
♦ Atornille completamente el tornillo de pur-
ga (3).
Atornille con cuidado el tornillo de pur-
ga (3) para evitar pérdidas de combusti-
ble del carburador cuando reposta.
En caso de necesidad, diríjase a un Con-
cesionario Oficial aprilia.
PELIGRO
PELIGRO
PELIGRO
100
1
4

84
uso y mantenimiento
Scarabeo 50 - Scarabeo 100 4T
Limpie frecuentemente el vehículo si lo uti-
liza en zonas o en condiciones de:
♦ Contaminación atmosférica (ciudad y zo-
nas industriales).
♦ Salinidad y humedad en la atmósfera (zo-
nas de mar, clima caluroso y húmedo).
♦ Condiciones particulares del ambiente y
según las temporadas (el uso de sal, pro-
ductos químicos anticongelantes sobre
carreteras durante el invierno).
♦ Hay que poner mucho cuidado en que so-
bre la carrocería no queden residuos de
polvos industriales y contaminantes, man-
chas de alquitrán, insectos muertos, ex-
crementos de pájaros, etc.
♦ Evite aparcar el vehículo debajo de árbo-
les porque, en algunas temporadas, de los
árboles caen residuos, gomas, frutos u ho-
jas que contienen sustancias químicas que
dañan la pintura.
Después del lavado del vehículo la efi-
cacia de los frenos podría resultar com-
prometida temporalmente, por la pre-
sencia de agua en las superficies de fric-
ción del sistema de frenado.
Hay que prever largas distancias de fre-
nado para evitar accidentes. Accione va-
rias veces los frenos para restablecer las
condiciones normales.
Efectúe los controles preliminares, véa-
se pág. 37 (TABLA CONTROLES PRELI-
MINARES).
No dirija chorros de agua o de aire a pre-
sión elevada, o chorros de vapor sobre
las siguientes partes: cubos de las rue-
das, mandos colocados en el lado dere-
cho e izquierdo del manillar, cojinetes,
bombas de los frenos, instrumentos e
indicadores, escape de la parte terminal
de escape, vano portadocumentos/kit
herramientas, interruptor de encendido/
seguro de dirección, tapón combustible,
faros y conexiones eléctricas.
Para la limpieza de las partes de goma y
plástico y del sillín no utilice alcohol o
disolventes sino agua y jabón neutro.
No aplique ceras de protección al sillín,
para evitar deslizar sobre el mismo.
Para quitar la parte sucia y el barro de las
superficies pintadas, es necesario utilizar un
chorro de agua de presión baja, mojar las
partes sucias con cuidado, quitar barro y su-
ciedad con una esponja blanda para carro-
cería impregnada en mucha agua y champú
(2 – 4% partes de champú en agua).
Luego enjuague con mucha agua y seque
con piel gamuzada.
Para limpiar las partes exteriores del motor,
utilice detergente desgrasante, pinceles y
trapos.
Le recordamos que hay que restaurar el
brillo con ceras con silicona tras haber
lavado con cuidado el vehículo.
No realice el lavado a pleno sol, sobre
todo en verano, con la carrocería aún ca-
liente, en cuanto el champú secándose
antes del enjuague podría dañar el pinta-
do.
No utilice líquidos a temperatura superior
a 40°C para la limpieza de los componen-
tes de plástico del vehículo.
LIMPIEZA
PELIGRO
ATENCION
PELIGRO
ATENCION

85
uso y mantenimiento
Scarabeo 50 - Scarabeo 100 4T
PERIODOS DE LARGA
INACTIVIDÀD
Hay que adoptar algunas precauciones para
evitar las consecuencias por no haber utili-
zado el vehículo.
Además es necesario realizar las repara-
ciones y un control general antes del perío-
do de inactividad, para no olvidarse de rea-
lizarlas posteriormente.
Actúe de la siguiente manera:
♦
Vacíe completamente el depósito com-
bustible y el carburador, véase pág. 83
(EVACUACION DEL COMBUSTIBLE DEL
DEPOSITO).
♦
Saque la bujía, véase pág. 71 (BUJIA) y vier-
ta en el cilindro una cucharilla (5 - 10 cm
3
)
de aceite para motores de dos tiempos.
IMPORTANTE Coloque un paño limpio
sobre el cilindro cerca del alojamiento de la
bujía como protección de eventuales cho-
rros de aceite.
♦ Ponga en “ ” el interruptor de encendido
y presione por algunos segundos el pul-
sador de arranque motor “
” para distri-
buir el aceite de manera uniforme sobre
las superficies del cilindro.
♦ Saque el paño de protección.
♦ Vuelva a instalar la bujía.
♦ Saque la batería, véase pág. 74 (DES-
MONTAJE BATERIA).
♦ Lave y seque el vehículo, véase pág. 84
(LIMPIEZA).
♦
Aplique algo de cera sobre las superficies
pintadas.
♦ Hinche los neumáticos, véase pág. 34
(NEUMÁTICOS).
♦ Coloque el vehículo de manera que am-
bos neumáticos estén levantados del sue-
lo, utilizando un soporte adecuado.
♦ Coloque el vehículo en un local fresco, sin
humedad, al amparo de los rayos de sol y
donde las variaciones de temperatura re-
sulten mínimas.
♦ Introduzca y ligue una bolsa de plástico al
tubo terminal del silenciador de escape
para evitar que entre humedad en el silen-
ciador de escape.
♦ Cubra el vehículo evitando el uso de ma-
teriales plásticos o impermeables.
TRAS EL PERIODO DE INACTIVIDAD
♦ Descubra y limpie el vehículo, véase pág.
84 (LIMPIEZA).
♦ Controle el estado de carga de la bate-ría,
véase pág. 75 (RECARGA BATERIA) e
instálela, véase pág. 75 (INSTALACION
BATERIA).
♦ Controle el completo enroscado del torni-
llo de drenaje combustible (índice de cie-
rre del drenaje), véase pág. 83 (EVACUA-
CION DEL COMBUSTIBLE DEL DEPOSI-
TO).
♦ Reponga combustible en el depósito, véa-
se pág. 27 (COMBUSTIBLE).
♦ Efectúe los controles preliminares, véase
pág. 37 (TABLA CONTROLES PRELIMI-
NARES).
Recorra algunos kilómetros de prueba a
velocidad moderada y en una zona lejos
del tránsito.
PELIGRO

86
uso y mantenimiento
Scarabeo 50 - Scarabeo 100 4T
DATOS TECNICOS
MEDIDAS Longitud máx. ....................................................
1905 mm -
100
1905 mm
Anchura máx. (en las palancas frenos) .............
705 mm -
100
705 mm
Altura máxima (en los espejos retrovisores)......
1270 mm -
100
1270 mm
Altura hasta el sillín............................................
780 mm -
100
780 mm
Distancia entre los ejes......................................
1250 mm -
100
1245 mm
Altura libre mínima del suelo .............................
145 mm -
100
140 mm
Peso en vacío (en orden de marcha) ................
86 kg -
100
94 kg
MOTOR Modelo ...............................................................
2T -
100
4T
Tipo ....................................................................
ABAI -
100
4T2V
Número cilindros ................................................ Monocilíndrico horizontal
Cilindrada total ...................................................
49,38 cm
3
-
100
96,21 cm
3
Diámetro / carrera .............................................. 41,0 mm / 37,4 mm -
100
50 mm / 49 mm
Relación de compresión ....................................
10,5:1 -
100
10,5:1
Arranque ............................................................
elettrico -
100
elettrico + kick estárter
Embrague .......................................................... centrífugo
Cambio .............................................................. variador continuo automático
Cambio .............................................................. variador continuo automático ventilado
Refrigeración ..................................................... por aire forzado
TRANSMISION Variador ............................................................. continuo automático
Primaria ............................................................. por correa trapezoidal
Relaciones ......................................................... mínimo para cambio continuo:
2,90 -
100
2,63
máximo para cambio continuo:
0,75 -
100
0,76
Secundaria......................................................... por engranajes
CAPACIDAD Combustible (reserva incluida) .......................... 8
Reserva combustible ......................................... 1
Aceite transmisión .............................................
120 cm
3
-
100
100 cm
3
Aceite motor.......................................................
100
0,8 l
Aceite mezclador (incluida reserva)...................
1,5
Reserva aceite mezclador .................................
0,6
Asientos ............................................................. n° 1 (2 en los países donde está previsto el transporte del pasajero
)
Asientos ............................................................. n° 2
100
Máxima carga vehículo (piloto + equipaje) ........ 110 kg
(piloto + pasajero + equipaje) ............................ 185 kg (en los países donde está previsto el transporte del pasajero)

87
uso y mantenimiento
Scarabeo 50 - Scarabeo 100 4T
CARBURADOR Modelo:
– standard ..........................................................
100
KEIHIN CVK 20 - DELLORTO PHVD 22
Difusor ...............................................................
cuerpo de mariposa BING Ø 18 mm -
100
Ø 20 mm / Ø 22 mm
ALIMENTACION Combustible
100
........................................ gasolina super DIN 51 600 (4 Stars), mínimo octano 98
(N.O.R.M.) y 88 (N.O.M.M.)
BASTIDOR Tipo .................................................................... monoviga desdoblado de doble cuna
SUSPENSIONESDelantera ........................................................... horquilla telescópica con funcionamiento hidráulico
Carrera............................................................... 80 mm
Trasera............................................................... monoamortiguador hidráulico
Carrera rueda ....................................................
78 mm -
100
82 mm
FRENOS Delantera ........................................................... de disco Ø 220 mm con transmisión hidráulica
Trasera
....................................................... de disco Ø 190 mm con transmisión hidráulica
Trasera
100
....................................................... Ø 140 mm
RUEDAS Llantas ............................................................... de aleación
Delantera ........................................................... 1,60 x 16"
Trasera............................................................... 1,85 x 16"
NEUMATICOS Delantera ...........................................................
2,50 x16” 42J -
100
80 / 80 x 16”
SAVA MC 26 CAPRI 46M
REINF
Trasera...............................................................
2,75 x 16” 46J -
100
90 / 80 - 16”
SAVA MC 26 CAPRI 52 M
REINF
PRESION DE HINCHADO ESTANDARD
Delantera ........................................................... 190 kPa (1,9 bar)
Trasera............................................................... 220 kPa (2,2 bar)
PRESION DE HINCHADO CON PASAJERO (en los países en los que está previsto el transporte del pasajero)
Delantera ........................................................... 190 kPa (1,9 bar)
Trasera............................................................... 230 kPa (2,3 bar)

88
uso y mantenimiento
Scarabeo 50 - Scarabeo 100 4T
ENCENDIDO Tipo .................................................................... T.C.I. -
100
C.D.I.
Avance de encendido
................................. variable con 20° a 4000 rpm
Avance de encendido
100
................................. 17° a 7500 rpm
Bujia estándar ....................................................
NGK CPR 8E -
100
NGK BR8 HS
Distancia electrodos bujía.................................. 0,6 ± 0,05 mm
N° revoluciones del motor al régimen del ralentí 1900+o-50
INSTALACION
ELECTRICA Batería ............................................................... 12 V - 4 Ah (hermética
) - 12 V - 9 Ah
100
Fusible ............................................................... 7,5 A
Generador (de magneto permanente) ...............
12 V - 140 W /
100
13 V - 120 W
Bombillas luz de cruce/luz larga ........................ 12 V - 35 / 35 W
Bombilla luz de posición .................................... 12 V - 5 W (W 2,1 x 9,5 d)
Bombillas luz indicadores de dirección .............. 12 V - 10 W
Bombilla luz de posición/luz freno trasera ......... 12 V - 5/21 W
Bombilla luz matrícula........................................ 12 V - 5 W
Bombillas alumbrado salpicadero ...................... 12 V - 1,2 W
Luces indicadoras luz larga ............................... 12 V - 1,2 W
Luces indicadoras indicadores de dirección ...... 12 V - 3 W
Luz testigo reserva aceite mezclador ................ 12 V - 1,2 W
Luz testigo Injection Check ................................ 12 V - 2 W

89
uso y mantenimiento
Scarabeo 50 - Scarabeo 100 4T

90
uso y mantenimiento
Scarabeo 50 - Scarabeo 100 4T
TABLA LUBRICANTES
Aceite motor (aconsejado): SUPERBIKE 4, SAE 5W - 40.
En sustitución al aceite aconsejado pueden utilizarse aceites de marca con prestaciones conformes o superiores a las especificaciones
CCMC G-4, A.P.I. SG.
Para empleos particularmente gravosos o en climas calientes, se aconseja el aceite 5W50/10W50 sintético.
Aceite transmisión (aconsejado):
F.C., SAE 75W - 90 o GEAR SYNTH, SAE 75W - 90.
En sustitución al aceite aconsejado pueden utilizarse aceites de marca con prestaciones conformes o superiores a las especificaciones
A.P.I. GL-4.
Aceite mezclador (aconsejado):
GREEN HIT 2 o bien CITY 2T.
En sustitución al aceite aconsejado, pueden utilizarse aceites de marca con prestaciones conformes o superiores a las especificaciones
ISO-L-ETC++, A.P.I. TC ++.
Aceite horquilla (aconsejado): aceite para horquillas
F.A. 5W o F.A. 20W;
en sustitución
FORK 5W o FORK 20W.
En caso de que se quiera utilizar una conducta intermedia entre las ofrecidas por
F.A. 5W y por F.A. 20W o por FORK 5W
y por
FORK 20W, pueden mezclarse los productos según lo indicado a continuación:
SAE 10W =
F.A. 5W 67% del volumen + F.A. 20W 33% del volumen, o
FORK 5W 67% del volumen + FORK 20W 33% del volumen;
SAE 15W =
F.A. 5W 33% del volumen + F.A. 20W 67% del volumen, o
FORK 5W 33% del volumen + FORK 20W 67% del volumen.
Cojinetes y otros puntos de lubricación (aconsejado):
AUTOGREASE MP o GREASE 30.
En sustitución al producto aconsejado, utilice grasa de marca para cojinetes rodantes, campo de temperatura útil -30°C…+140°C, punto de
goteo 150°C…230°C, elevada protección antioxidante, buena resistencia al agua y a la oxidación.
Protección polos batería: Grasa neutra o vaselina.
Utilice sólo líquido frenos nuevo.
Líquido para frenos (aconsejado):
F.F., DOT 5 (Compatible DOT 4) o BRAKE 5.1, DOT 5 (Compatible DOT 4).
Utilice sólo anticongelante y antioxidante sin nitrito que garantice una protección por lo menos a los -35°C.
Líquido refrigerante del motor (aconsejado): ECOBLU - 40°C o COOL.
PELIGRO
PELIGRO
PELIGRO

91
uso y mantenimiento
Scarabeo 50 - Scarabeo 100 4T
PIDA SOLO REPUESTOS ORIGINALES
NOTAS

92
uso y mantenimiento
Scarabeo 50 - Scarabeo 100 4T
Importadores
Edificio America, Av. da de Arangòn 334 - 28022 - Madrid (E)
Tel. 0034-91-7460066 - Fax 0034-91-7460065
Lahana 12 N. Filadelphia 143 42 - Athens (GR)
Tel. 0030-10-2723553 - Fax 0030-10-2714748 - E-mail: [email protected]
via G. Galilei, 1 - 30033 Noale (VE) Italy - Tel. +39(0)41 5829111 - Fax +39(0)41 441054
Servizio Clienti aprilia +39(0)41 5786269 - E-mail: [email protected]
Z.A. Central Parc - 255 BLV Robert Ballanger
B.P. 77 93421 Villepinte (F) - Tel. 0033-1-49634747 - Fax 0033-1-49638750
Am Seestern 3 D-40547 Düsseldorf (D)
Tel. 0049-211-59018-00 - Fax 0049-211-5901819
Nikkelstraat 1 - 4823 AE Breda (NL)
Tel. 0031-76-5431640 - Fax 0031-76-5431649
Dunragit - Stranraer - Wigtownshire DG9 8PN - Scotland (UK)
Tel. 0044-1776-888670 - Fax 0044-1581-400661 - E-mail: [email protected]
109 Smoke Hill Lane Suite 190 - Woodstock, GA 30188 (USA)
Tel. 001-770-592-2261 - Fax 001-770-592-4878
Frankenburgerstrasse 19 - 4910 Ried im Innkreis (A)
Tel. 0043-7752-88077 - Fax 0043-7752-70684 - E-mail: [email protected]
Av. Da Republica 692 - 4450 Matosinhos (P)
Tel. 00351-229382450 - Fax 00351-229371305 - E-mail: [email protected]
P.o.B. 18 - 29250 Nakkila (SF)
Tel. 00358-2-5352500 - Fax 00358-2-5372793 - E-mail: [email protected]
Landegemstraat 4 - Industriegebied B-9031 Drongen-Baarle
Tel. 0032-9-2829410 - Fax 0032-9-2810012 - E-mail: [email protected]
Bernerstrasse Nord 202 - 8064 Zurich (CH)
Tel. 0041-1-4348686 - Fax 0041-1-4348606 - E-mail: [email protected]
Hammervej 32 - 7900 Nikobing Mors (DK)
Tel. 0045-97-722233 - Fax 0045-97-722143/33 - E-mail: [email protected]
ING-KART d.o.o. Samoborska cesta 258 - 10000 Zagreb (HR)
Tel. 00385-1-3498000 - Fax 00385-1-3499111 - E-mail: [email protected]

93
uso y mantenimiento
Scarabeo 50 - Scarabeo 100 4T
Importadores
MX
RP
RO
RU
VRC
Hold utca 23 H-1054 - Budapest (HU)
Tel. 0036-1-3329938 - Fax 0036-1-2693044 - E-mail: bertinus@elender.hu
MILLE MOTOR KFT.
HARO SKANDINAVIA A.S.
Shinyokohamameguro Bldg. 3-22-5, Shinyokohama Kouhoku-ku 222-0033 Yokohama-Shi Kanagawa (J)
Tel. 0081-454772632 - Fax 0081-454772605 - E-mail: [email protected]
1179 Serangoon Road - 328232 Singapore (SGP)
Tel. 0065-98287581 - E-mail: [email protected]
YeungSoo BLDG 302 206-25, Ohjang-dong, Chung-ku, Seoul (ROK)
Tel. 0082-2-22756130 - Fax 0082-2-22756132 - E-mail: [email protected]
8, Sheridan Close - NSW 2214 - Milperra - Sydney (AUS)
Tel. 0061-2-97722666 - Fax 0061-2-97742321 - E-mail: [email protected]
Old Pretoria Road - Wynberg - Johannesburg (RSA)
Tel. 0027-11-7868486 - Fax 0027-11-7868482 - E-mail: [email protected]
35, Manchester Street - P.o.B. 22416 - Christchurch (NZ)
Tel. 0064-3-3660129 - Fax 0064-3-3667580 - E-mail: [email protected]
Baragova 5 - 1113 Ljubljana (SLO)
Tel. 00386-1-5883 421 - Fax 00386-1-5883 465 - E-mail: ziga.martincic@avto-triglav.si
Kore Sehitleri Cad. No. 42 - 80300 - Zincirlikuyu - Istanbul (TR)
Tel. 0090-212-3360058 - Fax 0090-212-3360057 - E-mail: [email protected]
no. 1 Long Mile Road - Dublin 12 (IRL)
Tel. 00353-1-4566222 - Fax 00353-1-4756461 - E-mail: [email protected]
Bubenska 43 - 170 00 Praha 7 (CZ)
Tel. 0042-02-96547142 - Fax 0042-02-96547145 - E-mail: [email protected]
Kjørbekkdalen 6, 3735 Skien (N)
Tel. 0047-35506780 - Fax 0047-35506781 - E-mail: [email protected]
APRILIA DE MEXICO, SA. de CV.
San Jeromino, 64640, 552 Monterrey N.L. (MX)
Tel. 0052-8333-4493 - Fax 0052-8348-9398 - E-mail: [email protected]
APRILIA JAPAN CORP.
MOTOMAX MOTORLU ARACLAR SAN. VETIC. A.S.
CYCLENET PTE TLD
Bldg. 7294 cn Recto Highway - Pampanga (RP)
Tel. 00632-7524450 - Fax 00632-7505764 - E-mail: [email protected]
ULTRA BIKERS NETWORK INC.
Str. Depozitelor 41-43 Jud. Arges - Pitesti (RO)
Tel. 0040-248211004 - Fax 0040-248211004 - E-mail: [email protected]
RO GROUP INT.
Saldova 38 - 180 00 Praha 8 - Karlin
Ul. Sadovaya-Cernogriazskaia 13/3 - Mosca (RU)
Tel. 007-095-208 2557 - Fax 007-095-208 4838 - E-mail: [email protected]
Z.A.O. ITALMOTO
29 Hak Po Street - Mongkok Kowloon - Hong Kong (VRC)
Tel. 00852-23859229 - Fax 00852-23857920 - E-mail: [email protected]
AH LAM MOTORCYCLE CO. LTD.

94
uso y mantenimiento
Scarabeo 50 - Scarabeo 100 4T
ESQUEMA ELECTRICO - Scarabeo
Ar
Ar/Bi
Gr
V/R
L
B/N
G/R
V/R
B
Vi
V/G
R/N
M
V/G
V/G
R
R
N
Ar
7.5 A
V/R
R/N
10 A
R
R
R/N
R
5
3
B
G/R
1 2
Vi
V/R
R
B
G
Az
1
2
3
4
5
6
7
8
9
10
11
12
13
14
15
16
17
18
19
20
21
22
B
B
R/M
R/N
R/M
R/N
R/M
R/M
R/N
Bi/ViBi/Vi
V
Bi/R
G/R
M
V/R
Ro
G
Bi
Ro
M/G
Ar/N
Bi/G
B/G
M
G/R
N
G
Bi
V/R
Bi/R
V
Ro
M/G
Bi/G
B/G
Ar/N
R/N
N
N
V
B
Ar
Ar/Bi
VISTO DAL LATO CHE
SI CONNETTE AL REGOLATORE
BLU
VERDEARANCIO
ARANCIO BIANCO
G V
Ar
B
R/M
R/N
V/R
Bi
B
Gr/V
Bi
R
G
Gr
B
R
B/N
B/N
R
Bi
B
Gr
G
B
B
Bi
Az
R
V/R
B
Vi
Vi
Az
Az
B
+
-C
Ar
R/N
ON
V/R
Ar
OFF
LOCK
G/RG/R
V
G
V/RV/G
G
V
N
N
Az
V/G
G
B
R
Gr/V
B
V/R
B
Gr/V
M
B
B
B
Az
B
R
V/R
Vi
G
B
Bi
R
Gr/V
N
B
Bi
Gr/V
B
G
N
Bi
G
N
AzAz
B
Ro Ro
Ro
2
19
5
18
32
11
1
1
27
30
14
16
22
1
21
13
1
15
26
6 87 9104
12
34
1
1
3
20
P
17
25
23
24
31
1
36
37
38
40
41
43
39
35
1
29
1
28
1
1
1
33
1
1

95
uso y mantenimiento
Scarabeo 50 - Scarabeo 100 4T
LEYENDA ESQUEMA ELECTRICO - Scarabeo
1) Conectores múltiples
2) Centralita E.C.U.
3) Conexión serial
4) Sensor acelerador
5) Pick-up
6) Sensor temperatura
7) Bomba aceite
8) Inyector gasolina
9) Inyector aire
10) Bomba gasolina
11) Bobina A.T.
12) Bujia
13) Fusibles
14) Batería
15) Relé de arranque
16) Motor de arranque
17) Relé inyección
18) Regulador de tensión
19) Generador
20) Resistor
21) Interruptor stop trasero
22) Interruptor stop delantero
23) Indicador de dirección trasero izquierdo
24) Bombilla posición/stop (trasero)
25) Indicador de dirección trasero derecho
26) Interruptor nivel aceite
27) Diodo de control
28) Desviador luces derecho
29) Conmutador de llave
30) Intermitencia
31) Desviador luces izquierdo
32) Claxon
33) Sonda nivel gasolina
34) Luz testigo check inyección
35) Instrumento nivel gasolina
36) Luz testigo indicadores de dirección
37) Luz indicadora luz larga
38) Bombillas alumbrado salpicadero
39) Luz testigo nivel aceite
40) Salpicadero
41) Indicador de dirección delantero izquierdo
42) Bombilla luz de cruce/luz larga (35/35W)
43) Indicador de dirección delantero derecho
COLORES DE LOS CABLES
Ar naranja
Az azul claro
B azul marino
Bi blanco
G amarillo
Gr gris
M marrón
N negro
R rojo
V verde
Vi violeta
Ro rosado

96
uso y mantenimiento
Scarabeo 50 - Scarabeo 100 4T
ESQUEMA ELECTRICO - Scarabeo
100
G
Bi
N
B
B
B
N
N
G/R G/R
3
N
M
M
G/Bi
Gr
V/R
4312
G/Bi
Bi/R
B
M
4
5
B/N
V/R
G/Bi
Gr/V
V/R
Gr/V
Bi
N
G
B
NN
R
Bi
Az
B
G
V/R
R
B
Az
B
B
Az
N
B
V/R
R
Az
Bi
B
B
G
G
R
Bi
G/Bi
Bi
N
Bi/R
Gr/V
B
G
Gr
V/R
Gr/V
B
R
Az
LOCK
OFF
V/R
ON
V/R
Ar
R
V
G
B
V
N
12
V
B
R
R
7.5 A
R
B
Gr/V
M
V/G
V/R
R
V/G
V/R
GrGr
Ar
B
Bi/R
B
Ar
Bi/R
G/N G/N
N
Bi
G/N
N
G/N
B
Gr/V
V
GG
V
Az Az
B
G/R
B
Bi
R
B/NB/N
R
B
G
B
G
B
M
R
B
G
V/G
Az
V/G V/R
G
Az
V/G
R
B
C-
+
17
38
38
33
31
34
32
13
38
5
36
1
38
35
2
38
3
23
38
38
40 6
37
9
10
7
38
8
3838
38
12
15
38
16
14
25
26
29
30 27
19

97
uso y mantenimiento
Scarabeo 50 - Scarabeo 100 4T
LEYENDA ESQUEMA ELECTRICO - Scarabeo
100
1) Generador
2) Transductor
3) Bujia
5) Regulador de tensión
6) Batería
7) Motor de arranque
8) Relé de arranque
9) Interruptor stop delantero
10) Interruptor stop trasero
12) Lámpara luz matrícula
13) Sensor nivel combustible
14) Indicador de dirección trasero derecho
15) Bombilla posición/stop (trasero)
16) Indicador de dirección trasero izquierdo
17) Desviador luces derecho
18) Desviador luces izquierdo
19) Conmutador de llave
23) Salpicadero
25) Luz testigo luces de cruce
26) Bombillas alumbrado salpicadero
27) Instrumento nivel combustible
29) Luz indicadora luz larga
30) Luz testigo indicadores de dirección
31) Indicador de dirección delantero derecho
32) Indicador de dirección delantero izquierdo
33) Bombilla luz posición
34) Bombilla luz de cruce/luz larga (35/35W)
COLORES DE LOS CABLES
Ar naranja
Az azul claro
B azul marino
Bi blanco
G amarillo
Gr gris
M marrón
N negro
R rojo
V verde
Vi violeta
35) Claxon
36) Pick up
37) Fusible
38) Conectores múltiples
40) Starter automático

98
uso y mantenimiento
Scarabeo 50 - Scarabeo 100 4T
PIDA SOLO REPUESTOS ORIGINALES
NOTAS

99
uso y mantenimiento
Scarabeo 50 - Scarabeo 100 4T
PIDA SOLO REPUESTOS ORIGINALES
NOTAS

100
uso y mantenimiento
Scarabeo 50 - Scarabeo 100 4T
PIDA SOLO REPUESTOS ORIGINALES
NOTAS

101
uso y mantenimiento
Scarabeo 50 - Scarabeo 100 4T
PIDA SOLO REPUESTOS ORIGINALES
NOTAS

102
uso y mantenimiento
Scarabeo 50 - Scarabeo 100 4T
PIDA SOLO REPUESTOS ORIGINALES
NOTAS

103
uso y mantenimiento
Scarabeo 50 - Scarabeo 100 4T
PIDA SOLO REPUESTOS ORIGINALES
NOTAS

104
uso y mantenimiento
Scarabeo 50 - Scarabeo 100 4T
La Sociedad aprilia s.p.a. queda agradecida a sus Clientes por haber elegido
el vehículo y les recomienda:
– No esparzan aceite, combustible, sustancias y componentes contaminan-
tes en el ambiente.
– No mantengan el motor encendido si no es necesario.
– Eviten ruidos molestos.
– Respeten la naturaleza.

SCARABEO 50 I.E. - 100 4T
use+maintenancebook
aprilia part# 8202290

2
use and maintenance
Scarabeo 50 - Scarabeo 100 4T
© 2001 aprilia s.p.a. - Noale (VE)
First edition: June 2001
Reprint:
Produced and printed by:
C.L.D. s.r.l. Editing division
via D. Alighieri, 37/A - 56012 Fornacette (Pisa)
Tel. +39 - (0)587 42 28 00
Fax +39 - (0)587 42 28 01
www.cld.it
E-mail: [email protected]
On behalf of:
aprilia s.p.a.
via G. Galilei, 1 - 30033 Noale (VE) - Italy
Tel. +39 - (0)41 58 29 111
Fax +39 - (0)41 58 29 190
www.aprilia.com
SAFETY WARNINGS TECHNICAL
The following precautionary warnings are
used throughout this manual in order to con-
vey the following messages:
Safety warning. When you find this
symbol on the vehicle or in the
manual, be careful to the potential risk of
personal injury. Non-compliance with the
indications given in the messages pre-
ceded by this symbol may result in grave
risks for your and other people’s safety
and for the vehicle!
Indicates a potential hazard which may
result in serious injury or even death.
Indicates a potential hazard which may
result in minor personal injury or dam-
age to the vehicle.
NOTE The word “NOTE” in this manual
precedes important information or instruc-
tions.
The operations preceded by this sym-
bol must be repeated also on the op-
posite side of the vehicle.
If not expressly indicated otherwise, for the
reassembly of the units repeat the disassem-
bly operations in reverse order.
The terms “right” and “left” are referred to
the rider seated on the vehicle in the normal
riding position.
Any notes on the riding with passenger
are only referred to countries where this is
allowed.
The symbols
in the text and figures
preceded by the model symbol (
-
100
)
only refer to the mentioned model.
Before starting the engine, carefully read this
manual and in particular the section “SAFE
DRIVE”.
Your and other people’s safety depends not
only on your quickness of reflexes and on
your agility, but also on what you know about
the vehicle, on its efficiency and on your
knowledge of the basic information for “SAFE
DRIVE”. Therefore, get a thorough knowl-
edge of the vehicle, in such a way as to be
able to drive in the traffic safely.
WARNING
CAUTION
WARNINGS - PRECAUTIONS -
GENERAL ADVICE

3
use and maintenance
Scarabeo 50 - Scarabeo 100 4T
NOTE This manual must be considered as
an integral part of the vehicle and must al-
ways accompany it, even in case of resale.
aprilia has carried out this manual with the
maximum attention, in order to supply the
user with correct and updated information.
However, since aprilia constantly improves
the design of its products, there may be slight
discrepancies between the characteristics of
your vehicle and those described in this
manual. For any clarification concerning the
information contained in this manual, do not
hesitate to contact your aprilia Official
Dealer.
For control and repair operations not ex-
pressly described in this publication, for the
purchase of aprilia genuine spare parts, ac-
cessories and other products, as well as for
specific advice, contact exclusively aprilia
Official Dealers and Service Centers, which
guarantee prompt and accurate assistance.
Thank you for choosing aprilia. We wish
you a nice ride.
All rights as to electronic storage, reproduc-
tion and total or partial adaptation, with any
means, are reserved for all Countries.
NOTE Observance of the antipollution and
antinoise regulations as well as periodical
checks of the vehicle is necessary in some
countries, according to the laws in force. The
user of the vehicle in these countries must:
– contact an aprilia Official Dealer for the
replacement of the parts with other parts
type-approved in the relative country.
– Perform the periodical checks as neces-
sary.
NOTE When asking your Dealer for spare
parts, specify the spare parts code indicated
on the SPARE PARTS IDENTIFICATION
LABEL.
Write down the identification code in the
space here below, in order to remember it
also in case of loss or deterioration of the
label.
The identification label is found on the left-
hand tube of the frame; to be able to read it,
remove the inspection cover, see page 65
(REMOVING THE INSPECTION COVER).
In this manual the various versions are indi-
cated by the following symbols:
Electronic injection version
100
100 cm
3
model
automatic light switching version
(Automatic Switch-on Device)
optional
drum brake version
catalytic version
VERSION:
Italy
United Kingdom
Austria
Portugal
Finland
Belgium
Germany
France
Spain
Greece
Holland
Switzerland
Denmark
Japan
Singapore
Poland
Israel
South Korea
Malaysia
Chile
Bermuda
United States
of America
Australia
Brazil
New Zealand
Canada
Croatia
Slovenia
South Africa

4
use and maintenance
Scarabeo 50 - Scarabeo 100 4T
TABLE OF CONTENTS
SAFE DRIVE ...................................................... 5
BASIC SAFETY RULES .................................. 6
CLOTHING ..................................................... 9
ACCESSORIES............................................. 10
LOAD ............................................................. 10
ARRANGEMENT OF THE MAIN
ELEMENTS .............................................. 12
ARRANGEMENT OF THE MAIN
ELEMENTS
100
.............................................. 14
ARRANGEMENT OF THE CONTROLS /
INSTRUMENTS AND INDICATORS ................ 16
INSTRUMENTS AND INDICATORS TABLE . 17
INJECTION CHECK WARNING LIGHT ........ 18
MAIN INDIPENDENT CONTROLS .......... 19
CONTROLS ON THE LEFT SIDE
OF THE HANDLEBAR .................................. 19
CONTROLS ON THE RIGHT SIDE
OF THE HANDLEBAR .................................. 20
MAIN INDIPENDENT CONTROLS
100
.......... 21
CONTROLS ON THE LEFT SIDE
OF THE HANDLEBAR .................................. 21
CONTROLS ON THE RIGHT SIDE
OF THE HANDLEBAR .................................. 22
IGNITION SWITCH ....................................... 23
STEERING LOCK ......................................... 23
AUXILIARY EQUIPMENT ................................ 24
UNLOCKING / LOCKING THE SADDLE ...... 24
DOCUMENT HOLDER .................................. 24
ANTI-THEFT HOOK ...................................... 24
TOOL KIT ..................................................... 25
BAG HOOK ................................................... 25
POSITIONING THE HELMET IN THE
REAR TOP CASE......................................... 26
MAIN COMPONENTS ...................................... 27
FUEL ............................................................. 27
LUBRICANTS ................................................ 28
ENGINE OIL .................................................. 29
CHECKING TRANSMISSION OIL
LEVEL
100
................................................... 30
CHANGING ENGINE OIL AND FILTER ........ 30
BRAKE FLUID - recommendations ............... 31
BATTERY HYDROGEN GAS
AND ELECTROLYTE
DISC BRAKES .............................................. 32
REAR DRUM BRAKE.................................... 33
TYRES........................................................... 34
AUTOMATIC LIGHT SWITCHING
VERSION .............................................. 36
EXHAUST SILENCER................................... 36
INSTRUCTIONS FOR USE .............................. 37
PRELIMINARY CHECKING OPERATIONS .. 37
STARTING..................................................... 38
DEPARTURE AND DRIVE ............................ 41
RUNNING-IN ................................................. 44
STOPPING .................................................... 45
PARKING....................................................... 45
POSITIONING THE VEHICLE ON THE CENTRE
STAND........................................................... 46
SUGGESTIONS TO PREVENT THEFT ........ 46
MAINTENANCE ............................................... 47
REGULAR SERVICE INTERVALS
CHART .................................................. 48
REGULAR SERVICE INTERVALS
CHART
100
.................................................. 51
IDENTIFICATION DATA ................................ 54
AIR CLEANER ...................................... 55
AIR CLEANER
100
...................................... 56
REMOVING AIR CLEANER
BOX ASSEMBLY ................................... 57
REMOVING AIR CLEANER
BOX ASSEMBLY
100
................................... 57
FRONT WHEEL ............................................ 58
REAR WHEEL ............................................... 60
CHECKING THE BRAKE PAD WEAR .......... 61
CHECKING THE BRAKE SHOES
WEAR
100
........................................... 62
INSPECTING THE FRONT AND
REAR SUSPENSIONS.................................. 62
CHECKING THE STEERING ........................ 63
CHECKING THE ENGINE FULCRUM AXIS . 63
REMOVING
THE REAR BRAKE CALIPER ............. 64
REMOVING THE REAR-VIEW MIRRORS ... 64
REMOVING
THE LOWER HANDLEBAR COVER ............ 65
REMOVING THE INSPECTION COVER ...... 65
REMOVING THE EXHAUST
SILENCER ............................................ 66
REMOVING THE EXHAUST
SILENCER
100
............................................ 67
REMOVING THE FOOTBOARD ................... 68
CHECKING THE STAND .............................. 68
CHECKING THE SWITCHES ....................... 69
IDLING ADJUSTMENT.................................. 69
ADJUSTING THE ACCELERATOR
CONTROL ..................................................... 70
SPARK PLUG ................................................ 71
BATTERY ...................................................... 72
LONG INACTIVITY OF THE BATTERY ........ 73
CHECKING AND CLEANING
THE TERMINALS .......................................... 73
REMOVING THE BATTERY.......................... 74
CHECKING THE ELECTROLYTE LEVEL .... 74
RECHARGING THE BATTERY ..................... 75
INSTALLING THE BATTERY ........................ 75
CHANGING THE FUSES .............................. 76
ADJUSTING THE VERTICAL
HEADLIGHT BEAM ....................................... 77
BULBS ........................................................... 77
CHANGING THE HEADLIGHT BULBS......... 78
CHANGING THE FRONT DIRECTION
INDICATOR BULBS ...................................... 79
CHANGING THE REAR LIGHT BULB .......... 79
CHANGING THE REAR DIRECTION
INDICATOR BULBS ...................................... 80
CHANGING THE NUMBER PLATE BULB
(in the countries where required)
100
...
81
CHANGING THE DASHBOARD BULBS ...... 81
TRANSPORT ................................................... 82
DRAINING THE FUEL TANK ........................ 83
CLEANING ....................................................... 84
LONG PERIODS OF INACTIVITY ................ 85
TECHNICAL DATA ........................................... 86
LUBRICANT CHART ..................................... 90
WIRING DIAGRAM - Scarabeo ............. 94
WIRING DIAGRAM - Scarabeo
100
............. 96

safe drive

6
use and maintenance
Scarabeo 50 - Scarabeo 100 4T
Most road accidents are caused by the driv-
er’s lack of experience.
NEVER lend the vehicle to beginners and,
in any case, make sure that the driver has
all the requirements for driving.
BASIC SAFETY RULES
To drive the vehicle it is necessary to be in
possession of all the requirements prescribed
by law (driving licence, minimum age, psy-
chophysical ability, insurance, state taxes,
vehicle registration, number plate, etc.).
Gradually get to know the vehicle by driving
it first in areas with low traffic and/or private
areas.
The use of medicins, alcohol and drugs or
psychotropic substances notably increases
the risk of accidents.
Be sure that you are in good psychophysical
conditions and fit for driving and pay particu-
lar attention to physical weariness and drow-
siness.

7
use and maintenance
Scarabeo 50 - Scarabeo 100 4T
Rigorously observe all road signs and na-
tional and local road regulations.
Avoid abrupt movements that can be dan-
gerous for yourself and other people (for ex-
ample: rearing up on the back wheel, speed-
ing, etc.), and give due consideration to the
road surface, visibility, etc.
Avoid obstacles that could damage the ve-
hicle or make you lose control.
Avoid riding in the slipstream created by pre-
ceding vehicles in order to increase your
speed.
Always keep both hands on the handlebars
and both feet on the footboard (or on the foot-
rests), in the correct driving posture.
Avoid standing up or stretching your limbs
while driving.

8
use and maintenance
Scarabeo 50 - Scarabeo 100 4T
The driver should pay attention and avoid
distractions caused by people, things and
movements (never smoke, eat, drink, read,
etc.) while driving.
Use only the vehicle’s specific fuels and lu-
bricants indicated in the “LUBRICANT
CHART”, check all oil, fuel and coolant lev-
els regularly.
If the vehicle has been involved in an acci-
dent, make sure that no damage has oc-
curred to the control levers, pipes, wires,
braking system and vital parts.
If necessary, have the vehicle inspected by
an aprilia Official Dealer, who should care-
fully check the frame, handlebars, suspen-
sions, safety parts and all the devices that
you cannot check by yourself.
Always remember to report any malfunction
to the technicians to help them in their work.
Never use the vehicle when the amount of
damage it has suffered endangers your
safety.
Never change the position, inclination or col-
our of: number plate, direction indicators,
lights and horns.
Any modification of the vehicle will result in
the invalidity of the guarantee.
Only for vehicles up to 50 cm
3
included
Any modification of the engine or of other
members which is aimed at increasing the
speed or the power of the vehicle is prohib-
ited by the law; in fact, any modification re-
sulting in an increase of the maximum speed
or of the engine displacement would change
the scooter into a motorcycle, which implies
COOLER
OIL

9
use and maintenance
Scarabeo 50 - Scarabeo 100 4T
Only for vehicles over 50 cm
3
Any change made to the vehicle and removal
of original parts can compromise the vehi-
cle’s performance, thus affecting the safety
or making it illegal.
We suggest that the law and national and
local regulations as to the vehicle equipment
be always observed.
In particular, avoid making any technical
changes aimed at increasing the speed of
the vehicle or that may alter the original speci-
fications of the vehicle itself.
Never race with other vehicles.
Avoid off-road driving.
CLOTHING
Before starting, always wear a correctly fas-
tened crash helmet. Make sure that it is ho-
mologated, in good shape, of the right size
and that the visor is clean.
Wear protective clothing, preferably in light
and/or reflecting colours. In this way you will
make yourself more visible to the other driv-
ers, thus notably reducing the risk of being
knocked down, and you will be more pro-
tected in case of fall.
This clothing should be very tight-fitting and
fastened at the wrists and ankles.
Strings, belts and ties should not be hang-
ing loose; prevent these and other objects
from interfering with driving by getting en-
tangled with moving parts or driving mecha-
nisms.
A12
345
ONLY ORIGINALS
the following obligations for the owner:
– new homologation;
– new registration;
– driving license.
Further, said modifications cause the loss of
the insurance cover, since insurance poli-
cies expressly prohibit to make technical
changes aimed at increasing the vehicle
performance levels.
For the reasons stated above, the failure to
comply with the tampering prohibition is
punished by law with appropriate sanctions
(including the confiscation of the vehicle),
which, according to the case, can be com-
bined with the sanctions provided for not
using the crash helmet and/or the number
plate, for the violation of fiscal obligations
(ownership tax) and with penal sanctions
provided for using the vehicle without driv-
ing license.

10
use and maintenance
Scarabeo 50 - Scarabeo 100 4T
Do not keep objects that can be dangerous
in case of fall, for example pointed objects
like keys, pens, glass vials etc. in your pock-
ets (the same recommendations also apply
to passengers).
ACCESSORIES
The owner of the vehicle is responsible for
the choice, installation and use of any ac-
cessory.
Avoid installing accessories that cover horns
or lights or that could impair their functions,
limit the suspension stroke and the steering
angle, hamper the operation of the controls
and reduce the distance from the ground and
the angle of inclination in turns.
Avoid using accessories that hamper access
to the controls, since this can prolong reac-
tion times during an emergency.
Big fairings and windshields installed on the
vehicle may produce aerodynamic forces
that affect the stability of the vehicle, espe-
cially when riding at high speed.
Make sure that the equipment is well fas-
tened to the vehicle and not dangerous dur-
ing driving. Do not install electrical devices
and do not modify those already existing to
avoid electrical overloads, because the ve-
hicle could suddenly stop or there could be
a dangerous current shortage in the horn and
in the lights.
aprilia recommends the use of (aprilia
genuine accessories).
LOAD
Be careful and moderate when loading your
luggage. Keep any luggage loaded as close
as possible to the center of gravity of the
vehicle and distribute the load uniformly on
both sides, in order to reduce imbalance to
the minimum. Furthermore, make sure that
the load is firmly secured to the vehicle, es-
pecially during long trips.

11
use and maintenance
Scarabeo 50 - Scarabeo 100 4T
Avoid hanging bulky, heavy and/or danger-
ous objects on the handlebars, mudguards
and forks: the vehicle might respond more
slowly in turns and its manoeuvrability could
be unavoidably impaired.
Do not place bags that are too bulky on the
vehicle sides, because they could hit people
or obstacles, making you lose control of the
vehicle.
Do not carry any bag if it is not tightly se-
cured to the vehicle.
Do not carry bags which protrude too much
from the luggage-rack or which cover the
lights, horn or indicators.
Do not carry animals or children on the glove
compartment or on the luggage-rack.
Do not exceed the maximum load allowed
for each side-bag.
When the vehicle is overloaded, its stability
and its manoeuvrability can be compromised.
KG!

12
use and maintenance
Scarabeo 50 - Scarabeo 100 4T
ARRANGEMENT OF THE MAIN ELEMENTS
KEY
1) Horn
2) Rear brake reservoir
3) Document holder
4) Fuse carrier
5) Battery
6) Passenger left footrest
(in the countries where required)
7) Saddle lock
8) Luggage carrier
9) Centre stand
10) Air cleaner
11) Inspection cover
10
11
9
4
5
8
3
2
1
(
(
(
(
(
(
(
(
(
(
)
)
)
)
)
)
)
)
)
)
)
)
)
)
)
)
)
)
)
)
)
)
)
)
)
)
)
)
)
)
)
)
)
)
)
)
)
)
)
)
)
)
)
)
)
)
)
)
)
)
)
)
)
)
)
)
)
)
)
)
)
)
)
)
)
)
)
)
)
)
)
)
)
)
)
)
)
)
)
)
)
)
)))))))))))
6
7

13
use and maintenance
Scarabeo 50 - Scarabeo 100 4T
KEY
1) Mixer oil reservoir
2) Mixer oil reservoir plug
3) Filler cap
4) Ignition switch / steering lock
5) Bag hook
6) Frame number cover
7) Front brake reservoir
8) Spark plug
9) Fuel tank
10)Passenger right footrest
(in the countries where required)
11) Anti-theft hook (for the aprilia
“Body-Guard” armored cable
)
1
2
3
5
7
4
6
8
10
9
11

14
use and maintenance
Scarabeo 50 - Scarabeo 100 4T
ARRANGEMENT OF THE MAIN ELEMENTS
100
KEY
1) Horn
2) Document holder
3) Fuse carrier
4) Battery
5) Passenger left footrest
6) Saddle lock
7) Luggage carrier
8) Centre stand
9) Kick starter
10)Air cleaner
11) Inspection cover
1
apri
lia
2
3
4 6
10
8
9
5
11
7
100

15
use and maintenance
Scarabeo 50 - Scarabeo 100 4T
KEY
1) Filler cap
2) Ignition switch / steering lock
3) Bag hook
4) Frame number cover
5) Front brake reservoir
6) Spark plug
7) Fuel tank
8) Passenger right footrest
9) Anti-theft hook (for the aprilia
“Body-Guard” armored cable
)
100
1
3
5
2
4
6
8
7
9

16
use and maintenance
Scarabeo 50 - Scarabeo 100 4T
KEY
1) Electrical controls on the left side of the handlebar
2) Rear brake lever
3) Left-hand rearview mirror
4) Instruments and indicators
5) Right-hand rearview mirror
6) Front brake lever
7) Throttle grip
8) Electrical controls on the right side of the handlebar
9) Ignition switch / steering lock (
- - )
10)Speedometer
11) Fuel level indicator (
)
12)Green direction indicator warning light (
)
13)Red Diagnostic system warning light (injection check)
(
) ( )
14)Blue high beam warning light (
)
15)Mixer oil reserve warning light (
) red colour ( )
16)Green low beam warning light (
) (
100
)
17)Kilometres odometer
ARRANGEMENT OF THE CONTROLS / INSTRUMENTS AND INDICATORS
1/2
4/4
0 0 00 00
0
40
30
30
20
50
60
20
10
10
R
mph km/h
40
50
70
80
90
aprilia
3
2
1
9
8
7
6
1/2
4/4
R
30
20
10
0
40
30
20
50
60
mph km/h
40
50
70
80
90
aprilia
4
11
12
10
0 00 0
17
15
14
13
10
00
Km
Km
1/2
4/4
0 0 00 00
0
40
30
30
20
50
60
20
10
10
R
mph km/h
40
50
70
80
90
aprilia
3
2
1
9
8
7
6
5
1/2
4/4
R
30
20
10
0
40
30
20
50
60
mph km/h
40
50
70
80
90
aprilia
4
11
12
10
0 00 0
17
16
14
10
00
Km
Km
100

17
use and maintenance
Scarabeo 50 - Scarabeo 100 4T
INSTRUMENTS AND INDICATORS TABLE
It blinks when the direction indicator is on.
Direction indicator warning light ( )
Description
Function
Fuel level indicator (
)
It comes on when the ignition switch is in the
“ ”,
position, one brake lever is actuated and the
start button
“ “
is pressed, checking the bulb correct operation.
If the bulb does not come on during the starting phase, replace it.
If the warning light comes on but does not go off after releas-
ing the start button
“ ”,
or if it comes on while running the
vehicle, the oil level in the mixer is low; in this case top up the mixer oil as described on
page 28 (MIXER OIL).
It comes on when the headlight is in low beam position.
It indicates the approximate fuel level in the tank.
High beam warning light ( )
Low beam warning light (
)
Total kilometres odometer
Mixer oil reserve warning light
( )
CAUTION
It indicates the total number of kilometres covered.
It comes on when the headlight is in high beam position.
It indicates the driving speed.
Speedometer
Diagnostic system warning light
(injection check)
It comes on when the key is in the “ “ position and goes off after starting the vehicle.
If the warning light comes on while running the vehicle, this
denotes a malfunction. Contact your aprilia Dealer.
CAUTION

18
use and maintenance
Scarabeo 50 - Scarabeo 100 4T
INJECTION CHECK WARNING LIGHT
PRIORITY NO. 1
The warning light blinks rapidly.
If this happens, a potentially serious breakdown has occurred.
It is strongly recommended that you contact an aprilia Offi-
cial Dealer.
If the vehicle is started, its functionality may be limited.
Stop the vehicle and take it to an aprilia Official Dealer.
PRIORITY NO. 2
The warning light comes on and stays lit for at least 10 seconds.
This denotes a momentary malfunction that does not affect
the safety of the vehicle. The engine can be started. It is advis-
able to contact an aprilia Official Dealer as soon as possible.
CAUTION
CAUTION

19
use and maintenance
Scarabeo 50 - Scarabeo 100 4T
MAIN INDIPENDENT CONTROLS
CONTROLS ON THE LEFT SIDE OF THE
HANDLEBAR
NOTE The electrical parts work only when the ignition switch is in
position “
”.
NOTE The lighting system works only when the engine is run-
ning.
1) DIMMER SWITCH (
- ) (not provided )
When the light switch (
-
•
) is in position " ", if the dimmer
switch is in position "
", the low beam comes on; while if it is in
position "
", the high beam comes on.
2) DIRECTION INDICATOR SWITCH (
)
To indicate the turn to the left, move the switch to the left; to
indicate the turn to the right, move the switch to the right.
To turn off the direction indicator, press the switch.
3) HORN PUSH BUTTON (
)
The horn is activated when the “
“ push button is pressed.
1
2
3

20
use and maintenance
Scarabeo 50 - Scarabeo 100 4T
CONTROLS ON THE RIGHT SIDE OF THE
HANDLEBAR
NOTE The electrical parts work only when the ignition switch is in
position “
”.
NOTE The lighting system works only when the engine is run-
ning.
1) LIGHT SWITCH (
-
•
)
NOTE Before operating the light switch, make sure that the
dimmer switch (
- ) is in position “ ”.
When the light switch is in position “
•
”, the lights are off; in
position “
“, the parking lights, the dashboard light and the low
or high beam are on.
The low or high beam can be operated by means of the dimmer
switch (
- ).
1a) DIMMER SWITCH ( - )
When the dimmer switch is in position “ ”, the low beam, the
parking and the dashboard lights are on; when it is in position
“
”, the high beam, the parking and the dashboard lights are on.
NOTE The lights can be switched off only by stopping the en-
gine.
2) START PUSH BUTTON (
)
When the start push button is pressed and one of the brake
levers (front or rear) is activated at the same time, the starter
makes the engine run.
For the starting, see page 38 (STARTING).
1a
1
2

21
use and maintenance
Scarabeo 50 - Scarabeo 100 4T
MAIN INDIPENDENT CONTROLS
100
CONTROLS ON THE LEFT SIDE OF THE
HANDLEBAR
NOTE The electrical parts work only when the ignition switch is in
position “
”.
NOTE The lighting system works only when the engine is running.
1) DIMMER SWITCH (
- )
When the light switch (
- -
•
) is in position " ", if the dimmer
switch is in position "
", the low beam comes on; while if it is in
position "
", the high beam comes on.
2) DIRECTION INDICATORS DISABLING BUTTON (▲)
Move the direction indicator switch (3) to the right or to the left and
press the button to disable the direction indicators operation.
3) DIRECTION INDICATOR SWITCH ( )
To indicate the turn to the left, move the switch to the left; to indicate
the turn to the right, move the switch to the right.
To turn off the direction indicator, press the switch (2).
4) HORN PUSH BUTTON (
)
The horn is activated when the “
“ push button is pressed.
100
1
2
3
4

22
use and maintenance
Scarabeo 50 - Scarabeo 100 4T
CONTROLS ON THE RIGHT SIDE OF THE
HANDLEBAR
NOTE The electrical parts work only when the ignition switch is in
position “
”.
NOTE The lighting system works only when the engine is running.
1) LIGHT SWITCH ( - -
•
)
NOTE Before operating the light switch, make sure that the dim-
mer switch (
- ) is in position “ ”.
When the light switch is in position “
•
”, the lights are off; in posi-
tion “
“, the parking lights and the dashboard light are on; in
position “
“, the parking lights, the dashboard light and low beam
light are on.
The low or high beam can be operated by means of the dimmer
switch (
- ).
2) START PUSH BUTTON (
)
When the start push button is pressed and one of the brake le-
vers (front or rear) is activated at the same time, the starter makes
the engine run.
For the starting, see page 38 (STARTING).
100
1
2

23
use and maintenance
Scarabeo 50 - Scarabeo 100 4T
IGNITION SWITCH
The ignition switch is positioned on the right
side, near the steering column.
NOTE The key (1) operates the ignition/
steering lock switch, the tool kit compartment
lock and the saddle lock.
Two keys are supplied together with the ve-
hicle (one spare key).
NOTE Do not keep the spare key on the
vehicle.
WARNING
STEERING LOCK
Never turn the key to position “ ” in run-
ning conditions, in order to avoid losing
control of the vehicle.
OPERATION
To lock the steering:
♦ Turn the handlebar completely leftwards.
♦
Turn the key (1) to position “ ” and press it.
♦ Release the key.
NOTE Turn the key and steer the handle-
bar at the same time.
♦ Rotate the key (1) anticlockwise (left-
wards), steer the handlebar slowly until the
key (1) reaches position “
”.
♦ Extract the key.
Position
Function
Key
removal
Steering
lock
The steering
is locked. It is
neither pos-
sible to start
the engine,
nor to switch
on the lights.
It is possible
to remove
the key.
Neither the
engine, nor
the lights can
be switched
on.
It is possible
to remove
the key.
The engine
and the lights
can be
switched on.
It is not pos-
sible to re-
move the
key.
1

24
use and maintenance
Scarabeo 50 - Scarabeo 100 4T
AUXILIARY EQUIPMENT
UNLOCKING / LOCKING THE
SADDLE
To unlock and lift the saddle:
♦ Position the vehicle on the centre stand,
on a solid and level surface.
♦ Insert the key in the saddle lock (1).
♦ Turn the key clockwise and raise the sad-
dle (2).
NOTE Before lowering and locking the
saddle, make sure that you have not left the
key in the undersaddle.
♦
To lock the saddle, lower and press it at
the centre.
Before leaving, make sure that the sad-
dle is properly locked.
DOCUMENT HOLDER
To open the document holder:
♦ Position the vehicle on the centre stand on
a solid and level surface.
♦ Insert the ignition key in the lock (3) and
turn it in a clockwise direction.
To close the document holder:
♦ Insert the ignition key, turn it in a clockwise
direction while pushing it, then turn the key
in the opposite direction to lock the docu-
ment holder.
♦ Remove the key and check that the docu-
ment holder is closed.
Do not overload the document holder.
Maximum allowed weight: 1.5 kg.
ANTI-THEFT HOOK
The anti-theft hook (4) is positioned on the
right side of the vehicle.
To prevent the vehicle from being stolen, it
is advisable to secure it with the aprilia
“Body-Guard” armored cable
(5), avail-
able at any aprilia Official Dealer.
Do not use the hook to lift the vehicle or
for any purpose other than securing the
vehicle once it has been parked.
WARNING
WARNING
WARNING
1
2
3
4
5

25
use and maintenance
Scarabeo 50 - Scarabeo 100 4T
TOOL KIT
To gain access to the tool kit, unlock and lift
the saddle as described on page 24 (UN-
LOCKING / LOCKING THE SADDLE).
The wrenches are fixed in the upper part of
the battery compartment cover.
The tool kit is formed by:
– No. 1 16 mm socket wrench (1);
– No. 1 17 mm wrench of the DIN type;
– No. 1 screwdriver (2) with one cross end
of the PH type, size 2, and opposite end
with hexagonal male wrench of 4 mm.
BAG HOOK
Do not hang excessively bulky bags or
parcels to the hook, as this may seriously
compromise the manoeuvrability of the
vehicle or the movement of your feet.
The bag hook (3) is positioned on the front
part of the inner shield.
Max. allowed weight: 1.5 kg.
WARNING
100
The wrenches are located in the comparment
found in the undersaddle plastic part.
The tool kit is formed by:
– No.1 16 mm socket wrench (1);
– No. 1 screwdriver (2) with one cross end
of the PH type, size 2, and opposite end
with hexagonal male wrench of 4 mm.
– No. 1 O ring for the two tools.
1
2
1
1
100
2

26
use and maintenance
Scarabeo 50 - Scarabeo 100 4T
POSITIONING THE HELMET IN
THE REAR TOP CASE
Thanks to the rear top case, it is not neces-
sary to take away the helmet with you eve-
rytime you park the vehicle.
Never drive the vehicle with the rear top
case open as this may compromise
safety while riding.
To position the helment in the top case:
♦
Position the vehicle on the centre stand
as described on page 46 (POSITIONING
THE VEHICLE ON THE CENTRE
STAND)
.
♦ Remove the key from the ignition switch
and insert it in the lock (1) found on the
WARNING
rear top case.
♦ Turn the key anticlockwise and open the
rear top case (2).
♦ Put the helment (3) into the rear top case,
positioning it as shown in the figure and
on the label in the top case.
♦ Close the rear top case (2) until you hear
the click, remove the key from the lock (1).
Never leave the key in the lock.
CAUTION
3
1
2
100

27
use and maintenance
Scarabeo 50 - Scarabeo 100 4T
MAIN COMPONENTS
WARNING
FUEL
The fuel used for internal combustion
engines is extremely inflammable and in
particular conditions it can become ex-
plosive.
It is important to carry out the refuelling
and the maintenance operations in a well-
ventilated area, with the engine off.
Do not smoke while refuelling or near fuel
vapours, in any case avoid any contact
with naked flames, sparks and any other
heat source to prevent the fuel from
catching fire or from exploding.
Further, prevent fuel from flowing out of
the fuel filler, as it could catch fire when
getting in contact with the red-hot sur-
faces of the engine.
In case some fuel has accidentally been
spilt, make sure that the area is com-
pletely dry before starting the vehicle.
Since petrol expands under the heat of
the sun and due to the effects of sun ra-
diation, never fill the tank to the brim.
Screw the cap carefully after refuelling.
Avoid any contact of the fuel with the skin
and the inhalation of vapours; do not
swallow fuel or pour it from a receptacle
into another by means of a tube.
DO NOT DISPOSE OF FUEL IN THE EN-
VIRONMENT.
KEEP AWAY FROM CHILDREN.
Use only premium petrol (4 Stars
) DIN
51600 standard, min. O.N. 98 (N.O.R.M.)
and 88 (N.O.M.M.).
Use only unleaded petrol, in conformity with
the DIN 51607 standard, min. O.N. 95
(N.O.R.M.) and 85 (N.O.M.M.).
To refuel, proceed as follows:
♦
Lift the saddle, see page 24 (UNLOCK-
ING / LOCKING THE SADDLE).
♦ Unscrew and remove the fuel tank plug
(1).
FUEL TANK CAPACITY
(reserve included): 8 l
TANK RESERVE: 1 l .
Do not put additives or other substances
into the fuel.
If you use a funnel or other similar items,
make sure that they are perfectly clean.
♦ Refuel.
Make sure that the filler cap (1) is well
tightened.
♦ Put back the cap (1).
CAUTION
WARNING
100
100
1
1

28
use and maintenance
Scarabeo 50 - Scarabeo 100 4T
MIXER OIL
Top up with fresh oil every 2000 km (1250
mi).
The vehicle is provided with a power unit
controlling an electronic pump providing the
right amount of oil required for the engine
lubrication (see page 90 LUBRICANT
CHART).
The reserve is signaled by the mixer oil re-
serve warning light “
“ found on the dash-
board, see page16 and 17 (ARRANGE-
MENT OF THE CONTROLS / INSTRU-
MENTS AND INDICATORS).
The use of the vehicle without mixer oil
causes serious damages to the engine.
If you run out of oil in the mixer oil tank
or if the mixer oil pipe has been removed,
it is necessary to contact an aprilia Offi-
cial Dealer, who will provide for bleeding
the system.
This operation is indispensable, since the
operation of the engine with air in the
mixer oil system may cause serious dam-
ages to the engine itself.
WARNING
LUBRICANTS
Oil can cause serious damage to the skin
if handled every day and for long peri-
ods. Wash your hands carefully after us-
ing oil.
In case any maintenance operation has
to be carried out, it is advisable to use
latex gloves.
KEEP AWAY FROM CHILDREN.
DO NOT DISPOSE OF OIL IN THE ENVI-
RONMENT.
Proceed with care.
Do not spill the oil!
Take care not to smear any component,
the area in which you are working and
the surrounding area.
Carefully remove any trace of oil.
In case of leakages or malfunctions, con-
tact an aprilia Official Dealer.
To pour the oil in the reservoir:
♦
Lift the saddle, see page 24 (UNLOCKING
/ LOCKING THE SADDLE).
♦ Unscrew and remove the fuel tank plug (1).
MIXER OIL TANK CAPACITY: 1.5 l
TANK RESERVE: 0.6 l .
Do not put additives or other substances
into the oil.
If you use a funnel or other similar items,
make sure that they are perfectly clean.
♦ Fill with oil
Make sure that the filler cap (1) is well
tightened.
♦ Put back the cap (1).
CAUTION
CAUTION
CAUTION
CAUTION
1

29
use and maintenance
Scarabeo 50 - Scarabeo 100 4T
ENGINE OIL
100
In four-stroke engines oil is used to lubri-
cate the valve gear components, the crank-
shaft bearings and the power plant.
A lack of engine oil can cause serious
damage to the engine.
In all four-stroke engines, oil deterioration
and consumption are, to some extent, nor-
mal. Oil consumption partly depends on the
riding conditions (e.g. constantly riding at full
throttle increases oil consumption).
The oil renewal intervals shown in the main-
tenance schedule are based on the engine
oil capacity and on an oil consumption av-
erage calculated according to standard
methods.
To ensure proper engine operation, we
recommend checking the oil level every
time the vehicle is used.
CHECKING THE ENGINE OIL LEVEL
Check the engine oil level every 2000 km
(1250 mi).
♦
Position the vehicle on the centre stand as
described on page 46 (POSITIONING THE
VEHICLE ON THE CENTRE STAND)
.
Everytime the vehicle is used with the
engine cold, check the oil level that must
be between the MAX and MIN level marks.
The MAX level mark indicates an amount of
oil of about 850 cc.
WARNING
CAUTION
CAUTION
TOPPING UP THE ENGINE OIL
Top up with engine oil after 2000 km (1250
mi).
Top up with fresh oil after checking the
level. Never exceed the MAX level mark.
Have the oil checked and topped up at your
aprilia Official Dealer every 2000 km
(1250 mi).
CAUTION
If the oil level is checked after the vehicle
has been used, thus with engine hot, the
level may be lower; to check the oil correct
level, wait for at least 10 minutes after stop-
ping the engine.

30
use and maintenance
Scarabeo 50 - Scarabeo 100 4T
1
3
CHECKING THE
TRANSMISSION OIL LEVEL
100
DO NOT DISPOSE OF THE USED OIL IN
THE ENVIRONMENT.
Carefully read the instructions on page
47 (MAINTENANCE).
Check the transmission oil level every 4000
km (2500 mi); every 4000 km (2500 mi) or
every 12 months following the steps below
(
):
♦ Run the engine until it reaches normal
operating temperature. Stop the engine.
♦ Position the vehicle on the centre stand.
♦ Position a graduated container with capac-
ity not lower than 120 cm
3
, under the drain
plug (1).
♦ Unscrew the filler (2) and oil drain (1) plugs.
100
1
2
♦ Allow the oil to completely flow out of the
crankcase, measure the amount of oil; if it
is less than 100 cm
3
, restore the right level
by adding the lacking quantity.
♦ Tighten the drain plug and fill with oil.
♦ Tighten the filler plug (2).
Tighten the filler and drain plugs and
make sure that no oil leaks out. Periodi-
cally check out for leakages through the
crankcase cover seal.
Do not use the vehicle when lubrication
is insufficient or with polluted or wrong
lubricants as this may accelerate the
moving parts wear, resulting in irrepara-
ble damages.
Have the oil checked and changed at an
aprilia Official Dealer.
TRANSMISSION OIL
It is necessary to have the transmission oil
changed after the first 500 km (312 mi) and
the first time after 4000 km (2500 mi) or every
12 months; successively every 8000 km
(5000 mi) or every 2 years.
Check the transmission oil level after the first
1000 km (625 mi) or every 4 months. It is
necessary to have the transmission oil
changed after the first 4000 km (2500 mi) or
every 12 months.
To check the oil level and to change the oil,
contact an aprilia Official Dealer.
CAUTION
CHANGING THE ENGINE OIL
AND FILTER
Change the oil and clean the filter every 4000
km (2500 mi) at an aprilia Official Dealer.
Allow the oil to completely flow out of the
engine through the drain plug (1). To make
this operation easier, unloose plug (2) and
remove the net filter.
Clean the net filter, refit it and tighten plug
(2). Afterwards, fill with about 850 cc of oil
through plug (3).
100

31
use and maintenance
Scarabeo 50 - Scarabeo 100 4T
Start the engine, let it run for a few minutes
and then switch it off: after about 5 minutes,
check the level and top up, if necessary,
without exceeding the MAX level mark.
Always top up with fresh oil, see page 90
(LUBRICANT CHART).
Do not run the engine with an insufficient
amount of oil or wrong oil as this may
result in premature wear of the moving
parts and cause serious damages.
2
BRAKE FLUID - recommendations
Sudden resistance or clearance problems
on the brake lever may be due to trou-
bles in the hydraulic system.
For any doubt regarding the perfect func-
tioning of the braking system and in case
you are not able to carry out the usual
checking operations, contact your
aprilia Official Dealer.
WARNING
Pay special attention to the brake disc
and friction material, making sure that
they are neither dirty nor oily, especially
after maintenance operations or inspec-
tions.
Make sure that the brake pipe is neither
twisted nor worn out.
DO NOT DISPOSE OF THE FLUID IN THE
ENVIRONMENT.
KEEP AWAY FROM CHILDREN.
WARNING
WARNING

32
use and maintenance
Scarabeo 50 - Scarabeo 100 4T
WARNING
WARNING
DISC BRAKES
The brakes are the parts that most en-
sure your safety and for this reason they
must always be perfectly working; check
them before every trip.
A dirty disc soils the pads, with conse-
quent reduction of the braking efficiency.
Dirty pads must be replaced, while dirty
discs must be cleaned with a high-qual-
ity degreaser.
The brake fluid must be changed every
two years by an aprilia Official Dealer.
For any doubt regarding the perfect func-
tioning of the braking system and in case
you are not able to carry out the usual
checking operations, contact your
aprilia Official Dealer.
NOTE For versions with rear drum brake
, the following information are only re-
ferred to the front disc braking system.
When the friction pads wear out, the fluid
level decreases automatically in order to
compensate for the wear.
The brake fluid reservoir (1) is situated next
to the front brake lever connection. Periodi-
cally check the level in the brake fluid reser-
voir (1) and the pads wear, see page 61
(CHECKING THE BRAKE PAD WEAR).
Do not use the vehicle if the braking sys-
tem leaks fluid.
CHECKING
To check the brake fluid level
♦ Position the vehicle on the centre stand,
on a solid and level surface.
♦ Rotate the handlebar, so that the fluid con-
tained in the brake reservoir (1) is parallel
to the “MIN” mark stamped on the glass
gauge (2).
MIN = minimum level.
♦ Make sure that the fluid contained in the
reservoir exceeds the “MIN” mark stamped
on the glass gauge (2).
If the fluid does not reach at least the “MIN”
mark:
When the disc pads wear out, the level of
the fluid decreases progressively to com-
pensate for their wear.
♦ Check the brake pad wear, see page 61
(CHECKING THE BRAKE PAD WEAR).
If the pads and / or the disc do not need re-
placing:
♦ Contact an aprilia Official Dealer, who
will provide for topping up.
Check the braking efficiency.
In case of excessive stroke of the brake
lever or reduced efficiency of the braking
system, contact an aprilia Official Dealer,
since it may be necessary to bleed the
system.
CAUTION
CAUTION

33
use and maintenance
Scarabeo 50 - Scarabeo 100 4T
WARNING
REAR DRUM BRAKE
100
The brakes are the parts that most en-
sure your safety and for this reason they
must always be perfectly working; check
them before every trip.
For any doubt regarding the perfect func-
tioning of the braking system and in case
you are not able to carry out the usual
checking operations, contact your
aprilia Official Dealer.
ADJUSTING THE BRAKE
♦ Check the stroke of the lever before it starts
the braking action. The idle stroke at the
brake lever end must be around 10 mm.
To adjust the play:
♦ act on register (1).
♦ Actuate the brake repeatedly and check
that the wheel is turning freely after releas-
ing the brake.
♦ Check the braking efficiency.
If register (1) can be screwed completely,
the shoes may be worn out; in this case,
go to page 62 (CHECKING THE SHOES
WEAR).
NOTE The brake shoes heating, caused
by the braking action, may modify the play
between the friction material and the drum,
and for this reason we suggest the play be
checked also with shoes at operative tem-
perature.
♦ Perform a test drive by actuating the rear
brake two or three times.
Perform the check with the engine off.
♦ Park the vehicle, see page 45 (PARKING).
♦ Check that the wheel turns freely.
If necessary:
When the engine is hot, be careful not to
burn yourself while performing the follow-
ing operations.
♦ Unloose register (1), check that the wheel
turns freely.
CAUTION
WARNING
WARNING
100
1

34
use and maintenance
Scarabeo 50 - Scarabeo 100 4T
TYRES
This vehicle is equipped with tyres with air
tube.
Periodically check the tyre inflation pres-
sure at room temperature, see page 86
(TECHNICAL DATA).
If the tyres are hot, the measurement is
not correct. Carry out the measurement
especially before and after long rides.
If the inflation pressure is too high, the
ground unevenness cannot be dampened
and is therefore transmitted to the han-
dlebar, thus compromising the driving
comfort and reducing road holding dur-
ing turns.
If, on the contrary, the inflation pressure
is too low, the tyre sides (1) are under
greater stress and the tyre itself may slip
on the rim or it may become loose, with
consequent loss of control of the vehicle.
In case of sudden braking the tyres could
even get out of the rims. Further, the ve-
hicle could skid while turning.
Check the surface and the wear of the
tyres, since tyres in bad conditions can
impair both the grip and the controllabil-
ity of the vehicle.
Some types of tyres homologated for this
vehicle are provided with wear indicators.
There are several kinds of wear indica-
tors.
For more information on how to check the
wear, contact your Dealer.
Visually check if the tyres are worn and
in this case have them changed.
Change the tyre when it is worn out or in
case of puncture on the tread side, if the
puncture is larger than 5 mm.
After repairing a tyre, have the wheels bal-
anced.
WARNING
WARNING WARNING
1

35
use and maintenance
Scarabeo 50 - Scarabeo 100 4T
The tyres must be replaced with other
tyres of the type and model recommended
by the manufacturer, see page 86 (TECH-
NICAL DATA); the use of tyres different
from those prescribed may adversely af-
fect the manoeuvrability of the vehicle.
Do not install tyres with air tube on rims
for tubeless tyres and viceversa.
Make sure that the tyres always have their
valve sealing (2) caps on, to prevent them
from suddenly going flat.
Change, repair, maintenance and balanc-
ing operations are very important and
should be carried out by qualified techni-
cians with appropriate tools.
For this reason, it is advisable to have
the above mentioned operations carried
out by an aprilia Official Dealer or by a
qualified tyre repairer.
If the tyres are new, they may still be cov-
ered with a slippery film: drive carefully
for the first miles. Do not oil the tyres with
unsuitable fluids. If the tyres are old, even
if not completely worn out, they may be-
come hard and may not ensure good road
holding.
In this case, have the tyres changed.
WARNING WARNING
2
3
MINIMUM TREAD DEPTH LIMIT (3):
front and rear ..................................1.5 mm
(
3 mm)
However, the minimum tread depth must not
be less than the valuse prescribed by the
regulations in force in the country where the
vehicle is used.

36
use and maintenance
Scarabeo 50 - Scarabeo 100 4T
EXHAUST SILENCER
Tampering with the noise control system
is prohibited.
Owners are warned that the law may pro-
hibit:
– the removal or rendering inoperative by
any person, other than for purposes of
maintenance, repair or replacement, of any
device or element of design incorporated
into any new vehicle for the purpose of
noise control prior to its sale or delivery to
the ultimate purchaser or while it is in use;
and
– the use of the vehicle after such device or
element of design has been removed or
rendered inoperative by any person.
Check the exhaust silencer and the silencer
pipes, making sure that there are neither
signs of rust, nor holes and that the exhaust
system works effectively.
If the noise produced by the exhaust sys-
tem increases, immediately contact your
aprilia Official Dealer.
WARNING
AUTOMATIC LIGHT
SWITCHING VERSION
Vehicles equipped with this device are rec-
ognizable by the ligths switching on auto-
matically when the engine is started.
For this reason the light switch has been re-
placed with a dimmer switch “
- ”.
The lights can be switched off only by stop-
ping the engine.
♦ Before starting the vehicle, make sure that
the dimmer switch is in position “
” (front
low beam).

37
use and maintenance
Scarabeo 50 - Scarabeo 100 4T
PRELIMINARY CHECKING OPERATIONS
Check
Page
Disc brakes
Check the functioning, the fluid level and make sure there
are no leaks. Check the wear of the pads.
Top up, if necessary.
31, 32, 61
Rear drum brake
100
Check the functioning, the idle stroke and control lever
condition. Adjust the play, if necessary.
33, 62
Accelerator
Make sure that it works smoothly and that it is possible to
open and close it completely, in all steering positions.
If necessary, adjust and/or lubricate it.
70
Mixer oil
28
Wheel / tyres
Check the tyre surface, the inflation pressure, wear and
tear and any damage.
Remove any foreign matter that may be stuck in the tread
grooves.
34
Brake levers
Make sure that they work smoothly.
If necessary, lubricate the articulations.
–
Steering
Make sure that the steering rotates smoothly, without any
clearance or slackening.
63
Stand
Make sure that they work smoothly and that the spring
tension brings it back to its normal position. If necessary,
lubricate joints and hinges.
68
Fastening elements
–
Fuel tank
Check the fuel level and top up, if necessary.
Make sure there are no leaks or occlusions in the circuit.
27, 83
Lights, warning lights,
injection warning light
, horn and electric
devices
Check the proper functioning of all the devices.
Change the bulbs or intervene in case of failure.
72 – 81
INSTRUCTIONS FOR USE
WARNING
Before departure, always carry out a pre-
liminary checking of the vehicle, to make
sure that it functions correctly and safely,
see the following table PRELIMINARY
CHECKING OPERATIONS.
The non-performance of these checking
operations can cause severe personal
injuries or damages to the vehicle.
Do not hesitate to consult your aprilia
Official Dealer in case there is something
you do not understand about the func-
tioning of some controls or in case you
suspect or discover some irregularities.
It does not take long to carry out a check-
up and this operation ensures you much
more safety.
Component
Check and/or top up, if necessary.
Make sure that the fastening elements are not loose.
If necessary, adjust or tighten them.
Injection pump
18
Check operation.
(
(
(
(
(
(
(
(
(
(
)
)
)
)
)
)
)
)
)
)
)
)
)
)
)
)
)
)
)
)
)
)
)
)
)
)
)
)
)
)
)
)
)
)
)
)
)
)
)
)
)
)
)
)
)
)
)
)
)
)
)
)
)
)
)
)
)
)
)
)
)
)
)
)
)
)
)
)
)
)
)
))
)))
))))))
)
)
)
)
)
)
)
)
)
)
)

38
use and maintenance
Scarabeo 50 - Scarabeo 100 4T
WARNING
STARTING
Exhaust gases contain carbon monoxide,
which is extremely noxious if inhaled.
Avoid starting the vehicle in closed or
badly-ventilated rooms.
The non-observance of this warning may
cause loss of consciousness or even lead
to death by asphyxia.
Do not get on the vehicle for the starting.
ELECTRIC STARTING
♦ Position the vehicle on the centre stand,
on a solid and level surface.
♦ Make sure that the light switch (1) is in
position “
•
”.
♦ Make sure that the dimmer switch (2)
is in position “
”.
♦ Move the ignition switch (3) to position “ ”.
♦
Ensure that the “injection check” warn-
ing light goes out
(see page 18 INJECTION
CHECK WARNING LIGHT).
♦ Lock at least one wheel, by pulling a brake
lever (4). If this operation is not carried out,
the start relay receives no current and
therefore the engine does not start.
100
1
5
NOTE After a long period of inactivity, carry
out the operations described at page 40
(STARTING AFTER A LONG PERIOD OF
INACTIVITY).
NOTE To avoid the excessive wear of the
battery, do not keep the start push button
“
” pressed for more than five seconds. If
the engine does not start within this lapse of
time, wait ten seconds and press the start
push button “
” again.
Press the start push button “
” (5) without
accelerating, then release it as soon as the
engine starts.
2
1
5
4
3

39
use and maintenance
Scarabeo 50 - Scarabeo 100 4T
6
Press the start push button “ ” (5), rotate
the throttle twistgrip by 1/8 of its turn (see
figure), and then release it as soon as the
engine starts.
When the start push button “
” is
pressed, the mixer oil reserve warning
light “
” comes on.
With the engine in running condition,
when the start push button “
” is re-
leased, the mixer oil reserve warning light
“
” must go out; if this does not occur,
top up the mixer oil tank, see page 28
(MIXER OIL).
100
If the “injection check” warning light
comes on after the engine has started,
stop the vehicle and contact an aprilia
Official Dealer.
Avoid pressing the start push button “
”
(5) when the engine is running, since you
may damage the starter.
KICK START
100
♦ Position the vehicle on the centre stand,
on a solid and level surface.
♦ Move to the left side of the vehicle.
♦ Make sure that the light switch (1) is in
position “
•
”.
♦ Make sure that the dimmer switch (2)
is in position “
”.
♦ Move the ignition switch (3) to position
“
”.
CAUTION
CAUTION
♦ To avoid losing control of the vehicle dur-
ing the starting, lock both wheels by
putting on the brake levers (4).
♦ Rotate the kick starter outward (6).
Do not push down the kick starter with
the engine on.
♦ Push down the kick starter (6) with your
right foot, releasing it immediately.
If necessary, repeat the operation until the
engine starts.
♦ Let the kick starter go back to home posi-
tion (6).

40
use and maintenance
Scarabeo 50 - Scarabeo 100 4T
STARTING WITH FLOODED ENGINE
If the starting is not carried out properly or if
there is too much fuel in the intake ducts and
in the carburettor, the engine may get
flooded.
To clean a flooded engine:
♦ Press the start push button “ ” (5) for a
few seconds (letting the engine spin over)
with completely open throttle (7) (Pos. A).
STARTING WITH COLD ENGINE
When the room temperature is low (near or
below 0°C), it may be difficult to start the
engine at the first attempt.
In this case:
♦ Keep the start push button “ ” (5) pressed
and at the same time rotate the throttle grip
(7) moderately.
If the engine starts.
♦ Release the throttle grip (7).
♦ If the idling is unstable, twist the throttle
grip (7) slightly and frequently.
To leave, see page 41 (DEPARTURE AND
DRIVE).
If the engine does not start.
Wait a few seconds and repeat the START-
ING WITH COLD ENGINE procedure.
♦ If necessary, remove the spark plug, see
page 71 (SPARK PLUG) and make sure
that it is not wet.
♦ If the spark plug is wet, clean and dry it.
Before reinstalling it:
NOTE Put a clean cloth on the cylinder,
near the spark plug seat, in order to protect
it from oil sprays.
♦ Press the start push button “ ” (6) and
let the starter run for about five seconds,
without accelerating.
STARTING
AFTER A LONG PERIOD OF INACTIVITY
After a long period of inactivity, if the start is
not immediate, this may be due to the fact
that the fuel circuit is partially empty.
In this case:
♦ Press the start push button “ ” (5) for
about five seconds, in order to ensure the
filling of the float chamber.
100
5
5
7

41
use and maintenance
Scarabeo 50 - Scarabeo 100 4T
DEPARTURE AND DRIVE
NOTE Before departure, carefully read the
“safe drive” chapter, see page 5 (SAFE
DRIVE).
Any mention to the use of the vehicle with
passenger is to be intended as referred
only to the countries where this is al-
lowed.
If you drive without passenger, make sure
that the passenger footrests are folded.
While riding, keep your hands on the grips
and your feet on the footrests.
NEVER RIDE IN ANY POSITION OTHER
THAN THOSE INDICATED.
If you drive with a passenger, instruct
him/her so that he / she does not create
problems during manouvres.
Before leaving, make sure that the stand/
stands is / are completely up.
To leave:
♦ Release the throttle grip (Pos. A), put on
the rear brake, then move the vehicle
down the stand.
♦ Get on the vehicle, keeping at least one
foot on the ground in order not to lose bal-
ance.
♦ Adjust the inclination of the rear-view mir-
rors correctly.
With the vehicle at rest, try to get ac-
quainted with the use of the rear-view
mirrors.
♦ To leave, release the brake lever and the
vehicle will start moving.
Do not start off abruptly when the engine
is cold.
To reduce the emission of polluting sub-
stances and the consumption of fuel,
warm the engine up by proceeding at low
speed for the first miles.
Avoid opening and closing the throttle re-
peatedly and continuously, so that you
do not accidentally lose control of the
vehicle.
WARNING
WARNING
WARNING
WARNING
CAUTION

42
use and maintenance
Scarabeo 50 - Scarabeo 100 4T
WARNINGWARNINGWARNING
If you have to brake, close the throttle and
put on both brakes in order to obtain uni-
form deceleration, properly exerting pres-
sure on the braking parts.
By putting on the front brake only or the
rear brake only, you reduce the braking
force considerably, thus running the risk
of locking one wheel and consequently
losing grip.
If you stop uphill, decelerate completely
and use the brakes only to keep the vehi-
cle steady.
Using the engine to keep the vehicle sta-
tionary can overheat the clutch and the
variator.
When riding in conditions of poor visibil-
ity, switch on the high beam lights to im-
prove the visibility also in the daytime; in
case of wet road or scarce wheel grip
(snow, ice, mud, etc.), drive slowly, avoid-
ing sudden brakings or manoeuvres that
could make you lose grip and fall down.
Before beginning to turn, slow down or
brake driving at moderate and constant
speed or accelerating slightly; avoid
braking at the last moment: it would be
very easy to skid.
If the brakes are operated continuously
on downhill stretches, the friction mate-
rial may overheat, thus reducing the brak-
ing efficiency.
Exploit the engine compression by
putting on both brakes intermittently.
Never drive downhill with the engine off!

43
use and maintenance
Scarabeo 50 - Scarabeo 100 4T
WARNINGWARNINGWARNING
Pay the utmost attention to any obstacle
or variation of the road surface.
Uneven roads, rails, manhole covers, in-
dications painted on the road surface,
building site metal plates become rather
slippery by rain. For this reason all these
obstacles have to be carefully avoided,
driving smoothly and bending the vehi-
cle as little as possible.
If the mixer oil reserve warning light “
”
comes on during the normal functioning
of the engine, this means that the mixer
oil reserve is being used; in this case, top
up the mixer oil tank, see page 28 (MIXER
OIL).
Always use the direction indicators in
time when you intend to change lane or
direction, avoiding sharp and dangerous
movements.
Switch off the direction indicators as
soon as you have changed direction.
Be extremely careful when you overtake
other vehicles or are overtaken.
In case of rain, the water cloud created
by big vehicles reduces visibility; the air
shift may make you lose control of the
vehicle.

44
use and maintenance
Scarabeo 50 - Scarabeo 100 4T
RUNNING-IN
After the first 500 km (312 mi), carry out
the checking operations indicated in the
column “After running-in” of the REGU-
LAR SERVICE INTERVALS CHART, see
page 48 - 53, in order to avoid hurting
yourself or other people and/or damag-
ing the vehicle.
The running-in of the engine is primary to
ensure its correct functioning and its correct
functioning. If possible, drive on hilly roads
and/or roads with many bends, so that the
engine, the suspensions and the brakes un-
dergo a more effective running-in.
For the first 500 km (312 mi), keep to the
following indications:
♦ 0-100 km (0-62 mi)
During the first 100 km (62 mi) put on the
brakes with caution, avoiding sharp and
prolonged brakings. This ensures a cor-
rect bedding-in of the pads on the brake
disc.
♦ 0-300 km (0-187 mi)
Do not keep the throttle grip open more
than one half for long stretches.
♦ 300-500 km (187-312 mi)
Do not keep the throttle grip open more
than three-fourths for long stretches.
WARNING

45
use and maintenance
Scarabeo 50 - Scarabeo 100 4T
WARNING WARNING
CAUTION
CAUTION
CAUTION
STOPPING
If possible, avoid stopping abruptly, slow-
ing down suddenly and braking at the last
moment.
♦ Release the throttle grip (Pos. A) and
gradually put on the brakes to stop the
vehicle.
♦ In case of a brief stop, keep at least one
brake on.
PARKING
Park the vehicle on firm and flat ground,
to prevent it from falling down.
Neither lean the vehicle against walls, nor
lay it on the ground.
Make sure that the vehicle and especially
its red-hot parts do not represent a dan-
ger for persons and children.
Do not leave the vehicle unattended when
the engine is on or the key is inserted into
the ignition switch.
Do not sit on the vehicle when the stand
is down.
♦ Stop the vehicle, see beside (STOPPING).
With stopped engine and ignition switch
in position “
”, the battery may run
down.
♦ Rotate the key (1) and move the ignition
switch (2) to position “
”.
♦ Position the vehicle on the stand, see page
46 (POSITIONING THE VEHICLE ON THE
CENTRE STAND).
It is not necessary to close the fuel tap
when the engine is off, since it is equipped
with an automatic closing system.
Never leave the key in the ignition switch.
♦ Lock the steering, see page 23 (STEER-
ING LOCK) and extract the key (1).
2
1

46
use and maintenance
Scarabeo 50 - Scarabeo 100 4T
Write down your personal data and tel-
ephone number in the space provided in this
page, to facilitate the identification of the
owner in case of finding after theft.
SURNAME: ...............................................
NAME: .......................................................
ADDRESS: ................................................
...................................................................
TELEPHONE NO.: ....................................
NOTE Very often stolen vehicles are iden-
tified thanks to the data written on the use/
maintenance manual.
POSITIONING THE VEHICLE ON
THE CENTRE STAND
Carefully read page 45 (PARKING).
CENTRE STAND
♦ Grasp the left handgrip and the rear han-
dle (1).
♦ Push down the stand lever (2).
Make sure that the vehicle is stable.
CAUTION
SUGGESTIONS TO PREVENT
THEFT
NEVER leave the ignition key inserted and
always use the steering lock.
Park the vehicle in a safe place, possibly in a
garage or a protected place.
If possible, use the appropriate aprilia
“Body-Guard” armored cable , or an ad-
ditional anti-theft device.
Make sure that all documents are in order
and the road tax has been paid.
(
(
(
(
(
(
(
(
(
(
)
)
)
)
)
)
)
)
)
)
)
)
)
)
)
)
)
)
)
)
)
)
)
)
)
)
)
)
)
)
)
)
)
)
)
)
)
)
)
)
)
)
)
)
)
)
)
)
)
)
)
)
)
)
)
)
)
)
)
)
)
)
)
)
)
)
)
)
)
)
)
)
)
)
)
)
)
)
)
)
)
)
)
)
)
)
)
)
)
)
)
)
)
1
2
(
(
(
(
(
(
(
(
(
(
(
(
(
(
(
(
(
(
(
(
(
(
(
(
(
(
(
(
(
(
(
(
(
(
(
(
(
(
(
(
(
(
(
(
(
(
(
(
(
(
(
(
(
(
(
(
(
(
(
(
(
(
(
(
(
(
(
(
(
(
((((
(
(((
(
(
(
(
(
(
(
(
(
(
(
(
(
(
(
(
(
(
(
(
(
(
(
(
(
(
(
(
(
(
(
(
(
(
(
(
(
(
(
(
(
(
(
(
(
(
(
(
(
(
(
(
(
(
1
2

47
use and maintenance
Scarabeo 50 - Scarabeo 100 4T
MAINTENANCE
WARNINGWARNING
Risk of fire.
Keep fuel and other flammable sub-
stances away from the electrical compo-
nents.
Before beginning any maintenance opera-
tion or any inspection of the vehicle, stop
the engine, extract the key from the igni-
tion block, wait until the engine and the
exhaust system have cooled down and if
possible lift the vehicle by means of the
proper equipment, on firm and flat
ground.
Before proceeding, make sure that the
room in which you are working is prop-
erly ventilated.
Keep away from the red-hot parts of the
engine and of the exhaust system, in or-
der to avoid burns.
Do not hold mechanical pieces or other
parts of the vehicle with your mouth: the
components are not edible and some of
them are noxious or even toxic.
If not expressly indicated otherwise, for
the reassembly of the units repeat the dis-
assembly operations in reverse order.
In case any maintenance operation has
to be carried out, it is advisable to use
latex gloves.
CAUTION
Normally, the routine maintenance opera-
tions can be performed by the user; how-
ever, in some cases the use of specific tools
and technical expertise may be required.
If you need assistance or technical advice,
consult your aprilia Official Dealer, who
can ensure you prompt and accurate servic-
ing.
Ask your aprilia Official Dealer to test the
vehicle on the road after a repair or periodic
maintenance operation.
In any case, personally carry out the “Pre-
liminary checking operations” after any main-
tenance operation, see page 37 (PRELIMI-
NARY CHECKING OPERATIONS).

48
use and maintenance
Scarabeo 50 - Scarabeo 100 4T
REGULAR SERVICE INTERVALS
CHART
OPERATIONS TO BE CARRIED OUT BY
THE aprilia Official Dealer (WHICH CAN
BE CARRIED OUT EVEN BY THE USER)
KEY
1
= check and clean, adjust, lubricate or
change, if necessary;
2
= clean;
3
= change;
4
= adjust.
NOTE Carry out the maintenance opera-
tions more frequently if you use the vehicle
in rainy and dusty areas or on uneven
ground.
Stop light switches
1
Components
After running-in
[500 km
(312 mi)]
Every 4000 km
(2500 mi)
or 12 months
Every 8000 km
(5000 mi)
or 24 months
Battery / electrolyte level
1 1
Spark plug
1 3
Air cleaner
1 3
Light system
1 1
Brake fluid (check level)
1
Mixer oil every 2000 Km (1250 mi):
1
Wheels, tyres and inflating
pressures
every month:
1
Front and rear brake
pad wear
1
every 2000 Km (1250 mi):
1

49
use and maintenance
Scarabeo 50 - Scarabeo 100 4T
Accelerator operation
1 1
OPERATIONS TO BE CARRIED OUT BY
THE aprilia Official Dealer
KEY
1
= check and clean, adjust, lubricate or
change, if necessary;
2
= clean;
3
= change;
4
= adjust.
NOTE Carry out the maintenance opera-
tions more frequently if you use the vehicle
in rainy and dusty areas or on uneven
ground.
Brake discs
1 1
Rear shock absorber
1
Controls and transmission cables
1 1
Drive belt
3
Steering bearings and steering
1 1
Wheel bearings
1
Piston rings every 12000 Km (7440 mi):
1
General vehicle operation
1 1
Transmission oil
3
every 4000 km every 8000 km
(2500 mi) or 12 (5000 mi) or 2
months:
1
years:
3
Brake systems/discs
1 1
Cylinder cooling system
every 20000 km (12400 mi):
2
(outside cleaning)
Brake fluid every 2 years:
3
Silencer / exhaust
1
Mixer / accelerator operation
1 1
Rear pulley pins
every
12000 km (7440 mi):
3
Fixed movable front pulley
every
12000 km (7440 mi):
3
Components
After running-in
[500 km
(312 mi)]
Every 4000 km
(2500 mi)
or 12 months
Every 8000 km
(5000 mi)
or 24 months

50
use and maintenance
Scarabeo 50 - Scarabeo 100 4T
OPERATIONS TO BE CARRIED OUT BY
THE aprilia Official Dealer
KEY
1
= check and clean, adjust, lubricate or
change, if necessary;
2
= clean;
3
= change;
4
= adjust.
NOTE Carry out the maintenance opera-
tions more frequently if you use the vehicle
in rainy and dusty areas or on uneven
ground.
(*) The guides are integrated, do not replace
them. Only replace the rollers.
Fuel pipe every 4000 km (2500 mi):
1
/ every 2 years:
3
Injector cleaning every 8000 km (5000 mi):
2
Front variator needle rollers and
3
guides (*)
Wheels, tyres and inflating pressure
1 1
Tightening of nuts and bolts
1 1
Mixer oil reserve warning light
1 1
Braking system pipe every 4000 km (2500 mi):
1
/ every 4 years:
3
Mixer oil pipe
1 1
every 2 years:
3
Clutch wear
1
Components
After running-in
[500 km
(312 mi)]
Every 4000 km
(2500 mi)
or 12 months
Every 8000 km
(5000 mi)
or 24 months

51
use and maintenance
Scarabeo 50 - Scarabeo 100 4T
REGULAR SERVICE INTERVALS
CHART
100
OPERATIONS TO BE CARRIED OUT BY
THE aprilia Official Dealer (WHICH CAN
BE CARRIED OUT EVEN BY THE USER)
KEY
1
= check and clean, adjust, lubricate or
change, if necessary;
2
= clean;
3
= change;
4
= adjust.
NOTE Carry out the maintenance opera-
tions more frequently if you use the vehicle
in rainy and dusty areas or on uneven
ground.
Hub oil
3 1 1
Spark plug / electrolyte level
1
Carburettor / idling
4 4
Electric system and battery
1 1
STOP light switches
1
Brake fluid (check level)
1 1
Engine oil first change at 1000 km after running-in
and then every 4000 km (2500 mi)
Front brake pad wear
1 1
Wheels, tyres and inflating
pressures
1 1
Headlight
1
Components
After running-in
[1000 km
(625 mi)]
Every 4000 km
(2500 mi)
or 12 months
Every 8000 km
(5000 mi)
or 24 months

52
use and maintenance
Scarabeo 50 - Scarabeo 100 4T
OPERATIONS TO BE CARRIED OUT BY
THE aprilia Official Dealer
100
KEY
1
= check and clean, adjust, lubricate or
change, if necessary;
2
= clean;
3
= change;
4
= adjust.
NOTE Carry out the maintenance opera-
tions more frequently if you use the vehicle
in rainy and dusty areas or on uneven
ground.
Filter oil (net)
2
Accelerator cable
4
(Adjustment)
Steering bearings and
steering
1 1
Wheel bearings
1
Air cleaner every 3000 km (1875 mi):
3
Valve clearance
1
every 24000 km (15000 mi):
1
Brake systems
1 1
Vehicle and braking system test
1 1
Cylinder ventilation system every 24000 km (15000 mi):
1
Greasing rear brake
cam
1
Brakes oil every 2 years:
3
Engine oil
3 3
Transmission oil
3 1 3
Variator rollers
1
Drive belt
1 1 1
Components
After running-in
[1000 km
(625 mi)]
Every 4000 km
(2500 mi)
or 12 months
Every 8000 km
(5000 mi)
or 24 months

53
use and maintenance
Scarabeo 50 - Scarabeo 100 4T
KEY
1
= check and clean, adjust, lubricate or
change, if necessary;
2
= clean;
3
= change;
4
= adjust.
NOTE Carry out the maintenance opera-
tions more frequently if you use the vehicle
in rainy and dusty areas or on uneven
ground.
Wheels, tyres and inflating
pressures
1 3
Brake fluid bleeding
1
Tightening of nuts and bolts
1 1
Suspensions
1
Fuel pipes
1
every 4 years:
3
Components
After running-in
[1000 km
(625 mi)]
Every 4000 km
(2500 mi)
or 12 months
Every 8000 km
(5000 mi)
or 24 months

54
use and maintenance
Scarabeo 50 - Scarabeo 100 4T
IDENTIFICATION DATA
It is a good rule to write down the frame and
engine numbers in the space provided in this
manual.
The frame number can be used for the pur-
chase of spare parts.
NOTE Do not alter the identification num-
bers if you do not want to incur severe penal
and administrative sanctions. In particular,
the alteration of the frame number results in
the immediate invalidity of the guarantee.
ENGINE NUMBER
The engine number is stamped near the
lower support of the rear shock absorber.
Engine no. __________________________
FRAME NUMBER
The frame number is stamped on the cen-
tral tube of the frame. To be able to read it,
remove the cover (1).
Frame no. __________________________
1
100

55
use and maintenance
Scarabeo 50 - Scarabeo 100 4T
AIR CLEANER
Carefully read page 47 (MAINTENANCE).
Check the conditions of the air cleaner
monthly or every 4000 km (2500 mi), depend-
ing on the conditions in which the vehicle is
used.
If the vehicle is used on dusty or wet roads,
the cleaning operations and any replacement
should be carried out more frequently.
NOTE If the cleaner is clogged, remove
the filtering element (4) and replace it.
REMOVAL
♦ Position the vehicle on the centre stand,
on a solid and level surface see page 46
(POSITIONING THE VEHICLE ON THE
CENTRE STAND).
♦ Remove the inspection cover, see page
65 (REMOVING THE INSPECTION
COVER).
♦ Withdraw from the air cleaner cover (1)
the fuel to injector supply pipe (2).
♦ Unscrew and remove the seven screws
(3).
1
2
3
3
3
3
4

56
use and maintenance
Scarabeo 50 - Scarabeo 100 4T
AIR CLEANER
100
Carefully read page 47 (MAINTENANCE).
Check the conditions of the air cleaner and
clean it monthly or every 3000 km (1875 mi),
depending on the conditions in which the ve-
hicle is used.
If the vehicle is used on dusty or wet roads,
the cleaning operations and any replacement
should be carried out more frequently.
To clean the filtering element it is necessary
to remove it from the vehicle.
CLEANING
Do not use petrol or inflammable solvents
to wash the filtering element, in order to
avoid fires or explosions.
♦ Wash the filtering element (3) with clean,
non-inflammable solvents or solvents with
high volatility point, then let it dry thor-
oughly.
♦ Apply a filter oil on the whole surface.
WARNING
1
100
1
1
2
3
100
REMOVAL
♦ Position the vehicle on the centre stand,
on a solid and level surface, see page 46
(POSITIONING THE VEHICLE ON THE
CENTRE STAND).
♦ Unscrew and remove the six screws (1).
♦ Remove the air cleaner cover (2).
♦ Remove the filtering element (3).

57
use and maintenance
Scarabeo 50 - Scarabeo 100 4T
REMOVING AIR CLEANER BOX
ASSEMBLY
100
Carefully read page 47 (MAINTENANCE).
♦
Position the vehicle on the centre stand,
on a solid and level surface, see page 46
(POSITIONING THE VEHICLE ON THE
CENTRE STAND).
♦
Unscrew and remove the two screws (1)
keeping the relative stop nuts.
♦
Unloose the splash guard fixing screw with
filter box (6).
♦
Withdraw clamp (2) from the air tube (3)
using a suitable tool (3).
♦
Unloose the fixing clamp and remove the
air cleaner-carburettor tube (4) from the
air cleaner (5).
♦
Remove the air cleaner box assembly (5).
REMOVING AIR CLEANER BOX
ASSEMBLY
Carefully read page 47 (MAINTENANCE).
The disassembly and reassembly opera-
tions of the air cleaner box assembly are
difficult and complicated. Contact an
aprilia Official Dealer.
CAUTION
100
5
1
3
2
4
100
6
100

58
use and maintenance
Scarabeo 50 - Scarabeo 100 4T
♦ Position the vehicle on the centre stand,
on a solid and level surface.
NOTE Arrange for a support with a base
of 200x200mm and suitable height.
♦ Place the support under the vehicle and a
spongy cloth between them, so that the
front wheel can move freely and the vehi-
cle cannot fall down.
Make sure that the vehicle is stable.
♦ Put a suitable support (1) under the tyre to
hold the wheel in the right position, after
releasing it.
♦ Unloose screw (2) of the wheel pin clamp.
♦ Completely unscrew the wheel pin (3).
Wheel pin-nut driving torque:
50 Nm (5.0 kgm).
♦ Hold the front wheel and manually remove
the wheel pin (3).
♦ Keep the washer (4).
Do not actuate the front brake lever after
removing the wheel to prevent the caliper
pistons from falling out of their seats,
causing the brake fluid to leak out.
In this case, contact an aprilia Official
Dealer that will carry out the required
maintenance operations.
♦ Move the front wheel forward until the disc
can be removed from the brake caliper (5).
♦ Remove the front wheel.
♦ Disable the odometer transmission (6).
FRONT WHEEL
DISASSEMBLY
The disassembly and reassembly opera-
tions of the front wheel may result diffi-
cult and complicated for an unskilled
operator.
Contact an aprilia Official Dealer if nec-
essary.
If you wish to perform this operation per-
sonally, follow the steps below.
Carefully read page 47 (MAINTENANCE).
Upon disassembly and reassembly of the
wheel, be careful not to damage the pipe-
line, discs and brake pads.
CAUTION
CAUTION
CAUTION
6
4
2
3
5
100
aprilia
1
1

59
use and maintenance
Scarabeo 50 - Scarabeo 100 4T
REASSEMBLY
Carefully read page 47 (MAINTENANCE).
While reassembling the wheel, be careful
not to damage the brake pipe, the disc
and the pads.
To reassemble the front wheel, proceed as
follows:
♦ Smear a thin layer of grease on the whole
length of the wheel pin (3), see page 90
(LUBRICANT CHART).
♦ Position the wheel between the fork rods,
onto the support (1).
♦ Insert the tang (8) of the odometer trans-
mission (7) in the seat on the wheel hub.
Risk of personal injury. Do not use your
fingers to align the holes.
♦ Move the wheel to align the central hole
with the holes on the fork.
♦ Make sure that the following components
are not dirty:
– tyre;
– wheel;
– brake discs.
After reassembly, pull the front brake le-
ver repeatedly and check the correct func-
tioning of the braking system.
Check the wheel centering.
Have the driving torques, centering and
balancing of the wheel checked by your
aprilia Official Dealer, in order to avoid
accidents that may be harmful for you
and/or other people.
CAUTION
WARNING
♦ Insert the wheel between the rods. Insert
with care the disc in the brake caliper.
♦ Insert the washer (4) between the
odometer transmission (7) and the fork
right-hand rod.
♦ Fully insert the wheel pin (3) and tighten it
manually.
♦ Tighten the wheel pin (3).
Wheel pin nut driving torque:
50 Nm (5.0 kgm).
♦ Pull the front brake lever and repeatedly
push down the handlebar to allow the fork
to sink.
This allows the fork rods to bed properly.
♦ Tighten the screw (2) of the wheel pin
clamp.
Driving torque of the wheel pin clamp
screws: 12 Nm (1.2 kgm).
CAUTION
7
4
8
2
3

60
use and maintenance
Scarabeo 50 - Scarabeo 100 4T
REAR WHEEL
DISASSEMBLY
The disassembly and reassembly opera-
tions of the rear wheel may result diffi-
cult and complicated for an unskilled op-
erator. Contact an aprilia Official Dealer
if necessary.
If you wish to perform this operation per-
sonally, follow the steps below.
Carefully read page 47 (MAINTENANCE).
Before performing the following opera-
tions, allow the engine and silencer to
cool down to the ambient temperature in
order to avoid burns.
On disassembly and reassembly of
the wheel, be careful not to damage the
pipeline, disc and brake pads.
♦ Position the vehicle on the centre stand,
on a solid and level surface.
♦ Remove the silencer, see page 66 (RE-
MOVING THE EXHAUST SILENCER).
♦ Remove the cover (1).
♦ Withdraw the wheel.
NOTE Use aprilia Genuine Spare Parts
only.
♦ After reassembly, make sure that the fol-
lowing components are not dirty:
– tyre;
– wheel;
–
brake discs.
After reassembly, pull the rear brake le-
ver repeatedly and check the correct func-
tioning of the braking system. Check the
wheel centering.
Have the driving torques, centering and
balancing of the wheel checked by your
aprilia Official Dealer, in order to avoid
accidents that may be harmful for you and/
or other people.
CAUTION
NOTE To be able to unloose the wheel nut
(2) it is necessary to block the wheel.
♦
Completely pull the rear brake lever (3),
interposing a card (4), and keep it pulled
by means of a plastic clamp (5).
♦ Unscrew and remove the wheel nut (2) and
the washer.
NOTE Upon reassembly, change the wheel
nut (special type).
Wheel nut (2) driving torque:
110 Nm (11 kgm).
♦ Release the rear brake lever.
♦
100
Unloose the splash guard, see page
57.
♦
100
Withdraw the wheel.
♦ Remove the rear brake caliper, see
page 64 (REMOVING THE REAR BRAKE
CALIPERS
).
CAUTION
100
1
2
1
2
4
5
3

61
use and maintenance
Scarabeo 50 - Scarabeo 100 4T
CHECKING THE BRAKE PAD
WEAR
Carefully read page 31 (BRAKE FLUID -
recommendations), page 32 (DISC
BRAKES), page 47 (MAINTENANCE).
Check the brake pad wear after the first 500
km (312 mi) and successively every 2000
km (1250 mi).
The wear of the brake pads depends on the
use, on the kind of drive and on the road.
The wear will be greater when the vehicle is
driven on dirty or wet roads.
Check the wear of the brake pads espe-
cially before every trip.
To carry out a rapid checking of the wear of
the front pads, proceed as follows:
♦ Position the vehicle on the centre stand,
on a solid and level surface.
♦ Remove the brake caliper cover (1).
♦ Carry out a visual check between brake
disc and pads.
The excessive wear of the friction mate-
rial would cause the contact of the pad
metal support with the disc, with conse-
quent metallic noise and production of
sparks from the caliper; braking effi-
ciency, safety and soundness of the disc
would thus be negatively affected.
♦ If the thickness of the friction material (even
of one pad only) has reduced to about 1.5
mm, replace both pads.
Have the pads changed by your aprilia
Official Dealer.
WARNING
WARNING
WARNING
1

62
use and maintenance
Scarabeo 50 - Scarabeo 100 4T
CHECKING THE BRAKE SHOES
WEAR
100
Carefully read the instructions on page
33 (REAR DRUM BRAKE
100
) and
page 47 (MAINTENANCE).
Check the rear brake shoes wear after the
first 1000 km (625 mi) and then every 4000
km (2500 mi).
INSPECTING THE FRONT AND
REAR SUSPENSIONS
Carefully read page 47 (MAINTENANCE).
Check the tightening of all the parts and the
functioning of the front and rear suspension
articulated joints after the first 1000 km (625
mi), and then every 4000 km (2500 mi).
If you notice irregularities in the opera-
tion or if the help of a qualified techni-
cian is necessary, contact your aprilia
Official Dealer.
CAUTION
100
♦ Remove the rear wheel, see page 60
(REAR WHEEL).
♦ Now check the thickness of the friction ma-
terial, that should never be lower than 1mm.
If the thickness of the friction material has
reached the limit value, if you notice irregu-
larities in the operation or if the parts are
damaged, contact an aprilia Official
Dealer that will see to their replacement.
To check the rear brake shoes wear follow
the steps below:
1
100

63
use and maintenance
Scarabeo 50 - Scarabeo 100 4T
♦ Place the support under the vehicle and a
spongy cloth between them, so that the
front wheel can move freely and the vehi-
cle cannot fall down.
♦ Shake the fork in the direction of travel.
NOTE Do not shake the fork excesively,
otherwise you may take in consideration the
movement of the stand, thus observing an
incorrect slack.
Repeat the previous operation more than
once.
♦ If you find that there is a considerable slack,
contact your aprilia Official Dealer to re-
store the optimal steering conditions.
CHECKING
THE ENGINE FULCRUM AXIS
Carefully read page 47 (MAINTENANCE).
Periodically check the slack existing between
the engine pin bushes and the engine pin.
To carry out this operation, proceed as fol-
lows:
♦ Position the vehicle on the centre stand,
on a solid and level surface.
♦ Shake the wheel transversally with respect
to the riding direction.
♦ If you find that there is a considerable slack,
contact your aprilia Official Dealer, to re-
store the optimal operating conditions.
CAUTION
100
aprilia
CHECKING THE STEERING
Carefully read page 47 (MAINTENANCE).
Check the steering play every now and then.
To check the steering it is necessary to:
♦ Position the vehicle on the centre stand,
on a solid and level surface.
NOTE Arrange for a support with base of
200x200mm and of a suitable height.
Make sure that the vehicle is stable.

64
use and maintenance
Scarabeo 50 - Scarabeo 100 4T
REMOVING THE
REAR BRAKE CALIPER
Carefully read page 47 (MAINTENANCE).
When disassembling the brake caliper, be
careful not to damage the pipeline, disc
and brake pads.
♦ Position the vehicle on the centre stand on
a solid and level surface.
♦ Unloose and remove the two screws (1).
Tightening torque of brake caliper screws
(1): 27 Nm (2.7 kgm).
On reassembly of the brake caliper, re-
place the caliper fixing screws (1) with two
new screws of the same type.
Do not actuate the rear brake lever after
removing the brake caliper to prevent the
pistons from falling out of their seats,
causing the brake fluid to leak out.
In this case, contact an aprilia Official
Dealer that will carry out the required
maintenance operations.
♦ Carefully withdraw the brake caliper (2)
from the brake disc.
After reassembling, repeatedly actuate
the rear brake lever and check the brak-
ing system functioning.
CAUTION
WARNING
CAUTION
WARNING
REMOVING
THE REAR-VIEW MIRRORS
Carefully read page 47 (MAINTENANCE).
♦ Position the vehicle on the centre stand,
on a solid and level surface.
♦ Lift the protective case (3).
Hold the rear-view mirror (4), to prevent
it from accidentally falling down.
♦ Hold the screw (5) and unloose the nut (6)
completely.
♦ Remove the rear-view mirror (4).
CAUTION
2
1
4
3
6
5

65
use and maintenance
Scarabeo 50 - Scarabeo 100 4T
REMOVING THE LOWER
HANDLEBAR COVER
Carefully read page 47 (MAINTENANCE).
♦ Position the vehicle on the centre stand,
on a solid and level surface.
♦ Unscrew and remove the two screws (1)
shown by the arrows.
♦ Unscrew and remove the two screws (2).
Proceed with care to avoid damaging the
tang (4) seat (3).
♦ ★ Using a small screwdriver, lift the tang
(4) found inside the front handlebar cover
(5).
♦ ★ Repeat the above operation also on the
lower part of the handlebar cover.
Handle the plastic or painted components
with care and avoid scraping or damag-
ing them.
♦ Remove the front handlebar cover (5) tak-
ing care not to break the tangs.
NOTE On reassembly, check that the tangs
are fitted properly.
REMOVING
THE INSPECTION COVER
Carefully read page 47 (MAINTENANCE).
Handle the painted components with care
and avoid scraping or damaging them.
♦ Position the vehicle on the centre stand,
on a solid and level surface.
♦ ★ Unscrew and remove the screw (6).
♦ Remove the inspection cover (7).
CAUTION
CAUTION
CAUTION
2
1
1
5
4
3
7
6

66
use and maintenance
Scarabeo 50 - Scarabeo 100 4T
REMOVING
THE EXHAUST SILENCER
Carefully read page 47 (MAINTENANCE).
♦ Position the vehicle on the centre stand,
on a solid and level surface.
Before you go on with the following op-
erations, allow the engine and the silencer
to cool down to the ambient temperature
to avoid burns.
♦ Unloose and remove the two fixing screws
(1) from the engine silencer.
Screws (1) driving torque:
25 Nm (2.5 kgm).
♦ Unloose and remove screws (2).
Screws (2) driving torque:
12 Nm (1.2 kgm).
♦ Remove the exhaust silencer (3).
WARNING
NOTE On reassembly, replace the seal
between the exhaust manifold and the si-
lencer with a new one.
1
3
2

67
use and maintenance
Scarabeo 50 - Scarabeo 100 4T
REMOVING
THE EXHAUST SILENCER
100
Carefully read page 47 (MAINTENANCE).
♦ Position the vehicle on the centre stand,
on a solid and level surface.
Before you go on with the following op-
erations, allow the engine and the silencer
to cool down to the ambient temperature
to avoid burns.
♦ Remove the inspection cover, see page 65
(REMOVING THE INSPECTION COVER).
♦ Unloose and remove the two fixing screws
(1) from the engine silencer.
Screws (1) driving torque:
25 Nm (2.5 kgm).
♦ Unloose and remove the two nuts (2).
Nuts (2) driving torque:
12 Nm (1.2 kgm).
♦ Remove the exhaust silencer (3).
WARNING
NOTE On reassembly, replace the seal
between the exhaust manifold and the si-
lencer with a new one.
1
3
100
2
100

68
use and maintenance
Scarabeo 50 - Scarabeo 100 4T
REMOVING THE FOOTBOARD
Carefully read page 47 (MAINTENANCE).
♦ Remove the inspection cover, see page 65
(REMOVING THE INSPECTION COVER).
♦ ★ Unloose and remove the two screws (1).
♦ ★ Unloose and remove the three screws
(2) located under the footboard.
Proceed with care to avoid damaging the
tangs and/or relevant seats.
♦ Slightly lift the rear part of the footboard
(3) and withdraw it from the base of the
inner shield.
Do not force the lower shield as it is fixed
to the frame with only two front screws.
NOTE On reassembly, first insert the two
central tangs and then the side tangs. Be-
fore you insert the three screws (2), visually
check that the footrest - screw holes are
aligned.
CAUTION
CAUTION
100
1
2
2
1
1
2
1
3
CHECKING THE STAND
Carefully read page 47 (MAINTENANCE).
Make sure the stand (1) rotates freely.
Perform the following checks:
♦ The springs (2) must not be damaged,
worn, rusty or weak.
♦ The stand must rotate freely. If necessary,
grease the articulated joint, see page 90
(LUBRICANT CHART).

69
use and maintenance
Scarabeo 50 - Scarabeo 100 4T
CHECKING THE SWITCHES
Carefully read page 47 (MAINTENANCE).
The vehicle is provided with two switches:
– stoplight switch on the rear brake control
lever (3);
– stoplight switch on the front brake control
lever (4).
To reach the switches:
♦ Remove the lower handlebar cover, see
page 65 (REMOVING THE LOWER HAN-
DLEBAR COVER).
Periodically carry out the following checks:
♦ Make sure that there are no dirt or mud
deposits on the switch; the pin must be able
to move without interferences, returning au-
tomatically to its initial position.
♦ Make sure that the cables are connected
correctly.
IDLING ADJUSTMENT
Carefully read page 47 (MAINTENANCE).
Adjust the idling after the first 500 km (312
mi) and every time it is irregular.
To carry out this operation, proceed as fol-
lows:
♦ Drive for a few miles until the engine
reaches the normal running temperature,
then stop the engine.
♦
100
Remove the inspection cover, see
page 65 (REMOVING THE INSPECTION
COVER).
♦ Connect an electronic revolution counter
to the spark plug cable.
WARNING
Before proceeding, make sure that the
room in which you are working is prop-
erly ventilated.
♦ Start the engine.
The minimum speed of the engine (idling)
must be about 1500 ± 100 rpm; in this case
the engine does not make the rear wheel
rotate.
The minimum speed of the engine (idling)
must be about 1800 ± 100 rpm; in this case
the engine does not make the rear wheel
rotate.
100
100
4
3

70
use and maintenance
Scarabeo 50 - Scarabeo 100 4T
If necessary:
♦ Act on the adjusting screw (1) positioned
on the carburettor.
By SCREWING IT (clockwise), you increase
the engine rpm.
By UNSCREWING IT (anticlockwise), you
decrease the engine rpm.
♦ Twist the throttle grip, accelerating and de-
celerating a few times to make sure that it
functions correctly and to check if the idling
speed is constant.
NOTE Do not act on the air adjusting screw,
to avoid variations of the carburation setting.
If necessary, contact your aprilia Official
Dealer.
ADJUSTING
THE ACCELERATOR CONTROL
Carefully read page 47 (MAINTENANCE).
The ideal slack of the accelerator control
should be about 2-3 mm, that can be meas-
ured on the throttle grip.
To adjust the slack, proceed as follows:
♦ Position the vehicle on the centre stand,
on a solid and level surface.
♦ Remove the protection element (2).
♦ Loosen the nut (3).
♦ Act on the adjuster (4), positioned at the
beginning of the accelerator control cable.
After the adjustment:
♦ Tighten the nut (3), thus locking the adjuster
(4) and put back the protection element (2).
CAUTION
After the adjustment, make sure that the
rotation of the handlebar does not modify
the engine idling rpm and that the throt-
tle grip returns smoothly and automati-
cally to its original position after being
released.
WARNING
1
100
2
4
3

71
use and maintenance
Scarabeo 50 - Scarabeo 100 4T
SPARK PLUG
Carefully read page 47 (MAINTENANCE).
Check the spark plug after the first 500 km
(312 mi), and
change
every 4000 km (2500
mi).
Check or change the spark plug every 8000
km (5000 mi).
Periodically remove the spark plug and clean
it carefully, removing carbon deposits;
change it if necessary.
To gain access to the spark plug:
♦ Remove the inspection cover, see page 65
(REMOVING THE INSPECTION COVER).
To remove and clean the spark plug:
♦ Remove the spark plug cap (1).
♦
Remove all the dirt from the base of the
spark plug, then unscrew it with the span-
ner you will find in the tool kit and extract it
100
CAUTION
1
1
100
from its seat, taking care that neither dust
nor other substances enter the cylinder.
♦ Make sure that there are neither carbon
deposits, nor corrosion marks on the elec-
trode and on the central porcelain part; if
necessary, clean them with the special
cleaners for spark plugs, with an iron wire
and/ or a metal brush.
♦ Energetically blow some air, in order to pre-
vent the removed residues from getting into
the engine. If the spark plug has crackings
on the insulating material, corroded elec-
trodes or excessive deposits, it must be
changed.
♦ Check the spark plug gap with a thickness
gauge. The gap must be 0.5 - 0.6 mm; if
necessary adjust it, carefully bending the
earth electrode.
♦ Make sure that the washer is in good con-
ditions. With the washer on, screw the
spark plug by hand in order not to damage
the thread.
♦ Tighten the spark plug by means of the
spanner you will find in the tool kit, giving it
half a turn to compress the washer.
Spark plug driving torque:
20 Nm (2.0 kgm)
The spark plug must be well tightened,
otherwise the engine may overheat and
be seriously damaged.
Use the recommended type of spark plug
only, see page 86 (TECHNICAL DATA), in
order not to compromise the life and per-
formance of the engine.
♦ Connect the spark plug pipe (1).
♦
Keep the pipe in the same position as
before its disassembly.
♦ Refit the inspection cover, page 65 (RE-
MOVING THE INSPECTION COVER).

72
use and maintenance
Scarabeo 50 - Scarabeo 100 4T
BATTERY
Carefully read page 47 (MAINTENANCE).
Risk of fire.
Keep fuel and other flammable sub-
stances away from the electrical compo-
nents.
Never invert the connection of the battery
cables.
Connect and disconnect the battery with
the ignition switch in position “
”, oth-
erwise some components may be dam-
aged.
Connect first the positive cable (+) and
then the negative cable (–).
Disconnect following the reverse order.
The battery gives off explosive gases;
keep it away from flames, sparks, ciga-
rettes and any other source of heat.
During the recharging or the use, make
sure that the room is properly ventilated
and avoid inhaling the gases released
during the recharging.
KEEP AWAY FROM CHILDREN.
Do not incline the vehicle too much, in
order to avoid dangerous leaks of the
battery fluid.
The electrolyte is corrosive.
Do not pour or spill it, especially on the
plastic parts.
NOTE If servicing or technical advice is
required, contact an aprilia Official Dealer
that will certainly give you accurate and fast
assistance.
Check the electrolyte level and the terminals
tightening after the first 500 km (312 mi) and
then every 4000 km (2500 mi) or 12 months.
Check the electrolyte level and the terminals
tightening after the first 1000 km (625 mi)
and then every 4000 km (2500 mi) or 12
months.
The electrolyte in the battery is toxic and
caustic and if it gets in contact with the
skin it can cause burns, since it contains
sulphuric acid. Wear protection clothes,
a face mask and/or goggles during main-
tenance operations.
In case of contact with the skin, rinse with
plenty of water.
In case of contact with the eyes, rinse with
plenty of water for fifteen minutes, then
consult an oculist without delay.
If the electrolyte is accidentally swal-
lowed, drink a lot of water or milk, then
continue drinking milk of magnesia or
vegetable oil and consult a doctor with-
out delay.
WARNING
CAUTION
WARNING
100

73
use and maintenance
Scarabeo 50 - Scarabeo 100 4T
LONG INACTIVITY
OF THE BATTERY
If the vehicle remains unused for more than
fifteen days, it is necessary to recharge the
battery, in order to prevent its sulphation, see
page 75 (RECHARGING THE BATTERY).
It is important to check the charge periodi-
cally (about once a month), during the win-
ter or when the vehicle remains unused, in
order to prevent the deterioration of the bat-
tery.
♦ Recharge it completely with a normal
charge, see page 75 (RECHARGING THE
BATTERY).
If the battery remains on the vehicle, discon-
nect the cables from the terminals.
CHECKING AND CLEANING
THE TERMINALS
Carefully read page 72 (BATTERY).
♦ Gain access to the battery, see page 74
(ACCESS TO BATTERY).
♦ Make sure that the cable terminals (1) and
the battery terminals (2) are:
– in good conditions (and not corroded or
covered with deposits);
– covered with special grease or Vaseline.
If necessary:
♦
Make sure that the ignition switch is in po-
sition
“ ”.
♦ Disconnect first the negative (–) and then
the positive cable (red) (+).
♦ Brush with a wire brush to eliminate any
sign of corrosion.
♦ Reconnect first the positive (red) (+) and
then the negative cable (–).
♦ Cover the terminals with special grease or
Vaseline.
♦ Refit the battery, see page 75 (INSTALL-
ING THE BATTERY).

74
use and maintenance
Scarabeo 50 - Scarabeo 100 4T
♦ Make sure that the fluid level is included
between the two “MIN” and “MAX” notches
stamped on the battery side.
Otherwise:
♦ Unscrew and remove the element plugs.
Top up with distilled water only.
Do not exceed the “MAX” mark, since the
electrolyte level increases during the re-
charge.
♦ Top up by adding distilled water.
After topping up, put back the element
plugs in the correct position.
♦ Put back the element plugs.
REMOVING THE BATTERY
Carefully read page 72 (BATTERY).
ACCESS TO BATTERY
♦ Make sure that the ignition switch is in po-
sition “
”.
♦ Lift the saddle, see page 24 (UNLOCKING
/ LOCKING THE SADDLE).
♦ Remove the battery cover (1).
The battery is connected to the electrical
wires. Do not force the wires while remov-
ing the battery.
COMPLETE REMOVAL
♦ Disconnect first the negative (-) and then
the positive cable (red) (+).
♦ Detach the breather pipe.
♦ Remove the battery from its compartment
and put it on a flat surface, in a cool and
dry place.
Once it has been removed, the battery
must be stored in a safe place and kept
away from children.
CHECKING
THE ELECTROLYTE LEVEL
Carefully read page 72 (BATTERY).
♦ Remove the battery (see REMOVING THE
BATTERY).
CAUTION
WARNING
CAUTION
CAUTION
MAX
MIN
1
100
1

75
use and maintenance
Scarabeo 50 - Scarabeo 100 4T
♦ Connect, in order, the positive (red) (+) and
negative (
-) cable.
♦ Cover the terminals with special grease or
Vaseline.
Upon reassembly, put the electrical ca-
bles in the correct position taking care
not to squash them.
The negative cable (
-) must not be placed
upon the positive cable (+). Take care to
position it on the side, between the bat-
tery and the box.
♦ Push the battery into the battery holder
♦ Close the battery cover (1).
♦ Lower the saddle, see page 24 (UNLOCK-
ING / LOCKING THE SADDLE).
RECHARGING THE BATTERY
Carefully read page 72 (BATTERY).
♦ Remove the battery, see page 74 (REMOV-
ING THE BATTERY).
♦ Take a suitable battery charger.
♦ Unscrew and remove the element plugs.
♦
Check the electrolyte level, see page 74
(CHECKING THE ELECTROLYTE LEVEL).
♦ Connect the battery with a battery charger.
NOTE A recharge with an amperage equal
to 1/10 th of the battery capacity is recom-
mended.
♦ Switch on the battery charger.
♦ After the recharging operation, check the
electrolyte level again and if necessary top
up with distilled water.
♦ Tighten the element plugs.
Reassemble the battery only 5-10 minutes
after disconnecting the recharger, since
the battery continues to produce gas for
a short lapse of time.
INSTALLING THE BATTERY
Carefully read page 72 (BATTERY).
♦ Make sure that the ignition switch is in po-
sition “
”.
♦ Put the battery in its container.
♦ Connect the breather pipe.
Always connect the battery breather pipe,
to prevent the sulphuric acid vapours
from corroding the electric system,
painted parts, rubber elements or gaskets
when they exit the breather pipe itself.
The breather pipe must be connected in
such a way as not to be squashed, other-
wise it may cause a pressure increase
inside the battery, with the risk of damag-
ing it.
CAUTION
CAUTION
CAUTION
100

76
use and maintenance
Scarabeo 50 - Scarabeo 100 4T
CHANGING THE FUSES
Carefully read page 47 (MAINTENANCE).
Do not repair faulty fuses.
Never use fuses different from the rec-
ommended ones.
The use of unsuitable fuses may damage
the electric system or, in case of short
circuit, may even cause a fire.
NOTE If a fuse blows frequently, there prob-
ably is a short circuit or an overload in the
electric system.
In this case it is advisable to consult an
aprilia Official Dealer.
♦ Then replace the damaged fuse with a new
one having the same amperage.
NOTE If you use one of the spare fuses
(3), put a new fuse in the appropriate seat.
♦ Reposition the inspection cover, see page
65 (REMOVING THE INSPECTION
COVER).
LOCATION OF FUSES
7.5 A fuse (1) - From key switch to:
all electrical loads, other than the lights cir-
cuit that is powered with alternate current.
If an electric component does not work or
works irregularly, or if the engine fails to start,
it is necessary to check the fuses (1).
To carry out the checking:
♦ Turn the ignition switch to position “ ”, to
avoid any accidental short circuit.
♦ Gain access to the battery in order to work
on the fuses, see page 74 (ACCESS TO
BATTERY).
♦ Extract the fuses (1) one by one and check
if the filament (2) is broken.
♦ Before replacing a fuse, try to find out the
cause of the trouble, if possible.
CAUTION
3
1

77
use and maintenance
Scarabeo 50 - Scarabeo 100 4T
ADJUSTING THE VERTICAL
HEADLIGHT BEAM
NOTE To check the direction of the head-
light beam, specific procedures must be
adopted, in accordance with the regulations
in force in the country where the vehicle is
used.
To rapidly check the correct direction of the
beam, place the vehicle on flat ground, 10 m
away from a wall.
♦ Turn on the low beam, sit on the vehicle
and make sure that the beam projected on
the wall is slightly under the horizontal line
of the headlight (about 9/10th of the total
height).
To adjust the headlight beam:
♦ Position the vehicle on the centre stand,
on a solid and level surface.
♦ Act on the suitable screw (1) by means of
a screwdriver.
By TURNING IT CLOCKWISE, you set the
beam upwards.
By TURNING IT ANTICLOCKWISE, you
set the beam downwards.
BULBS
Carefully read pages 48-53 (REGULAR
SERVICE INTERVALS CHART).
Risk of fire.
Keep fuel and other flammable sub-
stances away from the electrical compo-
nents.
Before changing a bulb, position the ve-
hicle on the centre stand, move the igni-
tion switch to position “
” and wait a
few minutes, so that the bulb cools down.
Change the bulb wearing clean gloves or
using a clean and dry cloth.
Do not leave fingerprints on the bulb,
since these may cause its overheating
and consequent breakage.
If you touch the bulb with bare hands,
remove any fingerprint with alcohol, in
order to avoid any damage.
DO NOT FORCE THE ELECTRIC CABLES.
WARNING
CAUTION
1

78
use and maintenance
Scarabeo 50 - Scarabeo 100 4T
CHANGING
THE HEADLIGHT BULBS
Carefully read page 77 (BULBS).
The headlight houses:
– one low / high beam bulb (1);
– one parking light bulb (2).
To change them:
♦ Remove the front handlebar cover, see
page 65 (REMOVING THE FRONT HAN-
DLEBAR COVER).
PARKING LIGHT BULB
Do not pull the electrical wires when re-
moving the bulb socket.
♦ Get hold of the parking light bulb socket
(4), pull it and remove it from its seat.
♦ Withdraw the bulb (2) and replace it with
one of the same type.
LOW / HIGH BEAM BULB
♦ Turn the bulb socket anticlockwise (3) and
remove it from its seat.
♦ Gently press and turn anticlockwise the
low/high beam bulb (1), remove it and re-
place it with one of the same type.
CAUTION
2
1

79
use and maintenance
Scarabeo 50 - Scarabeo 100 4T
CHANGING THE FRONT
DIRECTION INDICATOR
BULBS
Carefully read page 77 (BULBS).
♦ Position the vehicle on the stand.
♦ Unscrew and remove the screw (1).
NOTE While removing the protection
screen, proceed carefully in order not to
break the cog.
♦ Remove the protection screen (2).
♦ Remove the amber yellow glass (3).
NOTE Upon reassembly, correctly position
the protection screen in its seat.
Tighten the screw (1) moderately and care-
fully, to avoid damaging the protection
screen.
♦ Press the bulb (4) slightly and rotate it an-
ticlockwise.
♦ Extract the bulb (4) from its seat.
NOTE Insert the bulb in the bulb socket,
making the two bulb pins coincide with the
relevant guides on the socket.
♦ Correctly install a new bulb of the same
type.
NOTE If the bulb socket (5) goes out of its
seat, insert it correctly, making the bulb socket
opening coincide with the screw seat.
CHANGING
THE REAR LIGHT BULB
Carefully read page 77 (BULBS).
♦ Position the vehicle on the stand.
♦ Unscrew and remove the two screws (6).
NOTE While removing the protection
screen, proceed carefully in order not to
break the cog.
♦ Remove the protection screen (7).
♦ Press the bulb slightly and rotate it anti-
clockwise.
♦ Remove the bulb from its seat.
NOTE Insert the bulb in the socket, mak-
ing the two bulb pins coincide with the rel-
evant guides on the socket.
♦ Correctly install a new bulb of the same
type.
NOTE Upon reassembly, correctly position
the protection screen in its seat.
Tighten the screws (6) moderately and care-
fully, to avoid damaging the protection
screen.
1
3
5
4
2
6
6
7

80
use and maintenance
Scarabeo 50 - Scarabeo 100 4T
CHANGING THE REAR
DIRECTION INDICATOR
BULBS
Carefully read page 77 (BULBS).
♦ Position the vehicle on the stand.
♦ Unscrew and remove the two screws (1).
NOTE While removing the protection
screen, proceed carefully in order not to
break the cog.
♦ Remove the protection screen (2).
NOTE Upon reassembly, correctly position
the protection screen in its seat.
♦ Remove the protection screen (3), by pull-
ing it to the vehicle external side.
♦ Gently press on the amber yellow glass (4),
turn it anticlockwise and remove it.
NOTE While removing the protection
screen, proceed carefully in order not to break
the cog.
♦ Press the bulb (5) slightly and rotate it an-
ticlockwise.
♦ Extract the bulb (5) from its seat.
NOTE Insert the bulb in the bulb socket,
making the two bulb pins coincide with the
relevant guides on the socket.
♦ Correctly install a new bulb of the same
type.
NOTE If the bulb socket (6) goes out of its
seat, insert it correctly, making the bulb
socket opening coincide with the screw seat.
1
1
2
6
5
4
3

81
use and maintenance
Scarabeo 50 - Scarabeo 100 4T
CHANGING THE NUMBER
PLATE BULB (in the countries
where required)
100
Carefully read page 77 (BULBS).
To change the bulb:
♦ Unscrew and remove the screw (1).
♦ Withdraw the rubber bulb socket (2).
♦ Remove the bulb from its seat.
♦ Correctly fit a new bulb following the same
operations in the reverse order.
CHANGING
THE DASHBOARD BULBS
Carefully read page 77 (BULBS).
The dashboard contains:
– the warning light bulbs;
– the dashboard lighting bulbs.
To change the bulbs:
♦ Remove the front handlebar cover, see
page 65 (REMOVING THE FRONT HAN-
DLEBAR COVER).
CAUTION
2
1
100
To extract the bulb socket, do not pull the
electric wires.
NOTE Upon reassembly, make sure the
bulb socket is properly inserted in its seat.
100
1/2
4/4
R
30
20
10
0
40
30
20
50
60
mph km/h
40
50
70
80
90
aprilia
0 00 0
10
00
Km
1/2
4/4
R
30
20
10
0
40
30
20
50
60
mph km/h
40
50
70
80
90
aprilia
0 00 0
10
00
Km

82
use and maintenance
Scarabeo 50 - Scarabeo 100 4T
WARNING LIGHT BULBS
NOTE Extract the bulb sockets one by one,
in such a way as to avoid positioning them
incorrectly during the reassembly.
♦ Extract the relative bulb socket:
♦ Extract the bulb and replace it with one of
the same type.
Before transporting the vehicle, it is nec-
essary to empty the fuel tank and the car-
burettor completely, see page 83 (DRAIN-
ING THE FUEL TANK) making sure that
both are completely dry.
During transport the vehicle must be kept
in vertical position and be firmly an-
chored, in order to avoid any leakage of
fuel, oil or coolant.
In case of failure, do not tow the vehicle,
but ask for assistance.
DASHBOARD LIGHTING BULBS
Extract the bulb sockets one by one, in
such a way as to avoid positioning them
incorrectly during the reassembly.
♦ Extract the bulb socket of the dashboard
part in which there has been a light de-
crease:
(*) This bulb may not be installed on some
versions.
♦ Extract the bulb and replace it with one of
the same type.
TRANSPORT
Pos. Warning light Colour
Direction
indicators (
)
green
2 stroke
oil reserve (
)
red
High beam (
)
blue
Pos. Lit part
5 Upper right part
6 Upper left part (*)
7 Lower right part
WARNING
WARNING
CAUTION
Low
beam (
)
100
green
Injection
check
red
1
2
3
2
4
4

83
use and maintenance
Scarabeo 50 - Scarabeo 100 4T
DRAINING THE FUEL TANK
Carefully read page 27 (FUEL).
Risk of fire.
Wait until the engine and the exhaust si-
lencer have completely cooled down.
Fuel vapours are noxious for your health.
Before proceeding, make sure that the
room in which you are working is prop-
erly ventilated.
Do not inhale fuel vapours.
Do not smoke, nor use free flames.
DO NOT DISPOSE OF FUEL IN THE ENVI-
RONMENT.
♦ Position the vehicle on the centre stand,
on a solid and level surface.
♦ Stop the engine and wait until it has cooled
down.
♦ Prepare a container with capacity exceed-
ing the fuel quantity present in the tank
and put it on the ground on the left side of
the vehicle.
♦ Remove the fillercap.
♦ Empty the fuel tank by means of a manual
pump or a similar system.
After draining the tank, put back the filler
cap in the correct position.
♦
Put back the filler cap.
To drain the carburettor completely, proceed
as follows:
♦ Remove the hose clamp (4) from the right-
hand side of the vehicle.
♦ Position the tube free end (1) inside a con-
tainer.
♦ Open the passenger left-hand footrest (2).
♦ Insert a screwdriver between the footrest
and engine operating on the left-hand side
of the vehicle.
NOTE On reassembly, always replace the
clamp with a new one.
♦ Open the carburettor outlet by loosening
the drain screw (3) positioned under the
float chamber.
When all the fuel has flowed out of the car-
burettor:
♦ Tighten the drain screw (3) completely.
Tighten the drain screw (3) with care, to
avoid fuel leakages from the carburettor
during the refuelling.
If necessary, contact an aprilia Official
Dealer.
WARNING
WARNING
WARNING
100
1
4

84
use and maintenance
Scarabeo 50 - Scarabeo 100 4T
Clean the vehicle frequently if it used in par-
ticular areas or conditions, such as:
♦ Polluted areas (cities and industrial areas).
♦ Areas characterized by an high percent-
age of salinity and humidity (sea areas, hot
and humid climates).
♦ Particular conditions (use of salt and anti-
ice chemical products on the roads during
the winter).
♦ Avoid leaving deposits of industrial and
polluting powders, tar spots, dead insects,
bird droppings, etc. on the body.
♦ Avoid parking the vehicle under trees, since
in some seasons residues, resins, fruits or
leaves fall down, which contain substances
that may damage the paint.
After the vehicle has been washed, its
braking functions could be temporarily
impaired because of the presence of wa-
ter on the grip surfaces. Calculate long
braking distances to avoid accidents.
Brake repeatedly to restore normal con-
ditions.
Carry out the preliminary checking opera-
tions, see page 37 (PRELIMINARY
CHECKING OPERATIONS).
Do not direct high-pressure water or air
jets or steam jets on to the following com-
ponents: wheel hubs, controls on the
right and left side of the handlebar, bear-
ings, brake pumps, instruments and in-
dicators, exhaust pipes, glove/tool kit
compartment, ignition switch/steering
lock, radiator wings, fuel cap, lights and
electric connections.
Do not use alcohol or solvents to clean
the rubber and plastic parts and the sad-
dle: use water and mild soap.
Do not apply protection waxes onto the
saddle, in order not to make it too slip-
pery.
To remove dirt and mud from the painted
surfaces use a low- pressure water jet, care-
fully wet the dirty parts, remove mud and filth
with a soft car sponge impregnated with a
lot of water and shampoo (2 – 4% parts of
shampoo in water).
Then rinse with plenty of water and dry with
chamois leather.
To clean the outer parts of the engine use a
degreaser, brushes and wipers.
To clean the lights, use a sponge soaked
with water and a neutral detergent, rub-
bing the surfaces delicately and rinsing
frequently with plenty of water.
Polish with silicone wax only after hav-
ing carefully washed the vehicle. Do not
wash the vehicle under the sun, especially
during the summer, when the body is still
warm, since if the shampoo dries before
being rinsed away, it can damage the
paint.
Do not use liquids at a temperature ex-
ceeding 40°C to clean the plastic compo-
nents of the vehicle.
CLEANING
WARNING
CAUTION
WARNING
CAUTION

85
use and maintenance
Scarabeo 50 - Scarabeo 100 4T
LONG PERIODS OF INACTIVITY
Precautions are needed to avoid the adverse
effects of prolonged inactivity.
Further, it is important to carry out the nec-
essary repairs and a general check up be-
fore the period of inactivity, since you could
forget to carry them out later.
Proceed as follows:
♦
Completely drain the tank and carburettor,
see page 83 (DRAINING THE FUEL
TANK).
♦
R
emove the spark plug, see page 71
(SPARK PLUG) and pour one teaspoon (5-
10 cm
3
) of oil for two-stroke engines in the
cylinder.
NOTE Put a clean cloth on the cylinder,
next to the spark plug seat, as a protection
against oil splashes.
♦ Turn the ignition switch to “ ” and press
the engine start button “
” for a few sec-
onds to distribute the oil evenly on the cyl-
inder surfaces.
♦ Remove the cloth.
♦ Refit the spark plug.
♦ Remove the battery, see page 74 (REMOV-
ING THE BATTERY).
♦ Wash and dry the vehicle, see page 84
(CLEANING).
♦
Polish the painted surfaces with wax.
♦ Inflate the tyres, see page 34 (TYRES).
♦ By means of a suitable support, position
the vehicle so that both tyres are raised
from the ground.
♦ Place the vehicle in an unheated, not-hu-
mid room, away from sunlight, with mini-
mum temperature variations.
♦ Position and tie a plastic bag on the final
pipe of the exhaust silencer, in order to pre-
vent moisture from getting into it.
♦ Cover the vehicle avoiding the use of plas-
tic or waterproof materials.
AFTER A PERIOD OF INACTIVITY
♦ Uncover and clean the vehicle, see page
84 (CLEANING).
♦ Check the charge of the battery, see page
75 (RECHARGING THE BATTERY) and
install it, see page 75 (INSTALLING THE
BATTERY).
♦ Check that the carburettor drain screw is
fully tightened (drainage closing index), see
page 83 (DRAINING THE FUEL TANK).
♦ Refuel, see page 27 (FUEL).
♦ Carry out the preliminary checking opera-
tions, see page 37 (PRELIMINARY
CHECKING OPERATIONS).
Have a test ride at moderate speed in a
low-traffic area.
WARNING

86
use and maintenance
Scarabeo 50 - Scarabeo 100 4T
TECHNICAL DATA
DIMENSIONS Max. length ........................................................
1905 mm -
100
1905 mm
Max. width (brake levers)...................................
705 mm -
100
705 mm
Max. height (rearview mirrors) ...........................
1270 mm -
100
1270 mm
Seat height.........................................................
780 mm -
100
780 mm
Wheel base ........................................................
1250 mm -
100
1245 mm
Minimum free height from ground ......................
145 mm -
100
140 mm
Empty weight (in running order).........................
86 kg -
100
94 kg
ENGINE Model .................................................................
2T -
100
4T
Type ...................................................................
ABAI -
100
4T2V
Number of cylinders ........................................... Horizontal single-cylinder
Total displacement .............................................
49.38 cm
3
-
100
96.21 cm
3
Bore / stroke ...................................................... 41.0 mm / 37,4 mm -
100
50 mm / 49 mm
Compression ratio..............................................
10.5:1 -
100
10.5:1
Starting ..............................................................
electric -
100
electric + kick starter
Clutch................................................................. centrifugal
Change gear ...................................................... automatic continuous variator
Change gear ...................................................... ventilated automatic continuous variator
Cooling............................................................... forced air
TRANSMISSION Variator .............................................................. automatic continuous
Primary .............................................................. V belt
Ratios................................................................. minimum for continuous change:
2.90 -
100
2.63
maximum for continuous change:
0.75 -
100
0.76
Secondary.......................................................... with gears
CAPACITY Fuel (reserve included) ...................................... 8
Fuel reserve ....................................................... 1
Transmission oil .................................................
120 cm
3
-
100
100 cm
3
Engine oil ...........................................................
100
0.8 l
Mixer oil (reserve included)................................
1.5
Mixer oil reserve ................................................
0.6
Seats.................................................................. n° 1 (2 in the countries where this is allowed)
Seats.................................................................. n° 2
100
Vehicle max. load (driver + luggage) ................. 110 kg
Vehicle max. load (driver + passenger + luggage)
185 kg (in the countries where this is allowed)

87
use and maintenance
Scarabeo 50 - Scarabeo 100 4T
CARBURETTOR Model:
– standard ..........................................................
100
KEIHIN CVK 20 - DELLORTO PHVD 22
Choke tube ........................................................
throttle body BING Ø 18 mm -
100
Ø 20 mm / Ø 22 mm
FUEL SUPPLY Fuel
100
..................................................... premium petrol DIN 51 600 (4 Stars), minimum octane number 98
(N.O.R.M.) and 88 (N.O.M.M.)
FRAME Type ................................................................... split single tube with double cradle
SUSPENSIONS Front................................................................... hydraulically operated telescopic fork
Stroke ................................................................ 80 mm
Rear ................................................................... hydraulic single-shock absorber
Stroke ................................................................
78 mm -
100
82 mm
BRAKES Front................................................................... disc brake, Ø220 mm with hydraulic transmission
Rear ............................................................ disc brake, Ø190 mm with hydraulic transmission
Rear
100
............................................................ Ø 140 mm
WHEEL Rims................................................................... alloy
Front................................................................... 1.60 x 16"
Rear ................................................................... 1.85 x 16"
TYRES Front...................................................................
2.50 x16” 42J -
100
80 / 80 x 16”
SAVA MC 26 CAPRI 46M
REINF
Rear ...................................................................
2.75 x 16” 46J -
100
90 / 80 - 16”
SAVA MC 26 CAPRI 52 M
REINF
STANDARD INFLATION PRESSURE
Front................................................................... 190 kPa (1.9 bar)
Rear ................................................................... 220 kPa (2.2 bar)
INFLATION PRESSURE WITH PASSENGER (in the countries where this is allowed)
Front................................................................... 190 kPa (1.9 bar)
Rear ................................................................... 230 kPa (2.3 bar)

88
use and maintenance
Scarabeo 50 - Scarabeo 100 4T
IGNITION Type ................................................................... T.C.I. -
100
C.D.I.
Spark advance
............................................ variable with 20° at 4000 rpm
Spark advance
100
............................................ 17° at 7500 rpm
Standard spark plug...........................................
NGK CPR 8E -
100
NGK BR8 HS
Spark plug gap................................................... 0.6 ± 0.05 mm
rpm at slow running ........................................... 1900+o-50
ELECTRIC
SYSTEM Battery ............................................................... 12 V - 4 Ah (sealed
) - 12 V - 9 Ah
100
Fuse ................................................................... 7.5 A
Generator (with permanent magnet)..................
12 V - 140 W /
100
13 V - 120 W
Low / high beam bulbs ....................................... 12 V - 35 / 35 W
Parking light bulb ............................................... 12 V - 5 W (W 2.1 x 9.5 d)
Direction indicators bulbs................................... 12 V - 10 W
Stop/tail light bulb .............................................. 12 V - 5/21 W
Number plate bulb ............................................. 12 V - 5 W
Dashboard lighting bulb ..................................... 12 V - 1.2 W
High beam warning lights .................................. 12 V - 1.2 W
Direction indicators warning lights ..................... 12 V - 3 W
Mixer oil reserve warning light ........................... 12 V - 1.2 W
Injection check warning light .............................. 12 V - 2 W

89
use and maintenance
Scarabeo 50 - Scarabeo 100 4T

90
use and maintenance
Scarabeo 50 - Scarabeo 100 4T
LUBRICANT CHART
Engine oil (recommended): SUPERBIKE 4, SAE 5W - 40.
As an alternative to the recommended oil, it is possible to use high-quality oils with characteristics in compliance with or superior to CCMC G-
4, A.P.I. SG. specifications.
In case of severe driving conditions or use of the vehicle in warm climates, it is recommended to use synthetic oil of the 5W50/
10W50 type.
Transmission oil (recommended):
F.C., SAE 75W - 90 or GEAR SYNTH, SAE 75W - 90.
As an alternative to the recommended oil, it is possible to use high-quality oils with characteristics in compliance with or superior to the A.P.I.
GL-4 specifications.
Mixer oil (recommended):
GREEN HIT 2 or CITY 2T.
As an alternative to the recommended oil, use high-quality oils with characteristics in compliance with or superior to the ISO-L-ETC++, A.P.I.
TC++ specifications.
Fork oil (recommended):
F.A. 5W or F.A. 20W fork oil;
an alternative FORK 5W or FORK 20W fork oil.
If you need an oil with intermediate characteristics in comparison with the F.A. 5W and F.A. 20W or FORK 5W and FORK
20W, these can be mixed as indicated below:
SAE 10W =
F.A. 5W 67% of the volume + F.A. 20W 33% of the volume, or
FORK 5W 67% of the volume + FORK 20W 33% of the volume;
SAE 15W = F.A. 5W 33% of the volume + F.A. 20W 67% of the volume, or
FORK 5W 33% of the volume + FORK 20W 67% of the volume.
Bearings and other lubrication points (recommended):
AUTOGREASE MP or GREASE 30.
As an alternative to the recommended product, use high-quality grease for rolling bearings, working temperature range -30°C.... +140°C,
dripping point 150°C... 230°C, high protection against corrosion, good resistance to water and oxidation.
Protection of the battery poles: neutral grease or vaseline.
Use new brake fluid only.
Brake fluid (recommended):
F.F., DOT 5 (DOT 4 compatible) or BRAKE 5.1, DOT 5 (DOT 4 compatible).
Use only antifreeze and anticorrosive without nitrite, ensuring protection at -35°C at least.
Engine coolant (recommended):
ECOBLU - 40°C or COOL.
WARNING
WARNING
WARNING

91
use and maintenance
Scarabeo 50 - Scarabeo 100 4T
ASK FOR GENUINE SPARE PARTS ONLY
NOTE

92
use and maintenance
Scarabeo 50 - Scarabeo 100 4T
Importers
Edificio America, Av. da de Arangòn 334 - 28022 - Madrid (E)
Tel. 0034-91-7460066 - Fax 0034-91-7460065
Lahana 12 N. Filadelphia 143 42 - Athens (GR)
Tel. 0030-10-2723553 - Fax 0030-10-2714748 - E-mail: [email protected]
via G. Galilei, 1 - 30033 Noale (VE) Italy - Tel. +39(0)41 5829111 - Fax +39(0)41 441054
Servizio Clienti aprilia +39(0)41 5786269 - E-mail: [email protected]
Z.A. Central Parc - 255 BLV Robert Ballanger
B.P. 77 93421 Villepinte (F) - Tel. 0033-1-49634747 - Fax 0033-1-49638750
Am Seestern 3 D-40547 Düsseldorf (D)
Tel. 0049-211-59018-00 - Fax 0049-211-5901819
Nikkelstraat 1 - 4823 AE Breda (NL)
Tel. 0031-76-5431640 - Fax 0031-76-5431649
Dunragit - Stranraer - Wigtownshire DG9 8PN - Scotland (UK)
Tel. 0044-1776-888670 - Fax 0044-1581-400661 - E-mail: [email protected]
109 Smoke Hill Lane Suite 190 - Woodstock, GA 30188 (USA)
Tel. 001-770-592-2261 - Fax 001-770-592-4878
Frankenburgerstrasse 19 - 4910 Ried im Innkreis (A)
Tel. 0043-7752-88077 - Fax 0043-7752-70684 - E-mail: [email protected]
Av. Da Republica 692 - 4450 Matosinhos (P)
Tel. 00351-229382450 - Fax 00351-229371305 - E-mail: [email protected]
P.o.B. 18 - 29250 Nakkila (SF)
Tel. 00358-2-5352500 - Fax 00358-2-5372793 - E-mail: [email protected]
Landegemstraat 4 - Industriegebied B-9031 Drongen-Baarle
Tel. 0032-9-2829410 - Fax 0032-9-2810012 - E-mail: [email protected]
Bernerstrasse Nord 202 - 8064 Zurich (CH)
Tel. 0041-1-4348686 - Fax 0041-1-4348606 - E-mail: [email protected]
Hammervej 32 - 7900 Nikobing Mors (DK)
Tel. 0045-97-722233 - Fax 0045-97-722143/33 - E-mail: [email protected]
ING-KART d.o.o. Samoborska cesta 258 - 10000 Zagreb (HR)
Tel. 00385-1-3498000 - Fax 00385-1-3499111 - E-mail: [email protected]

93
use and maintenance
Scarabeo 50 - Scarabeo 100 4T
Importers
MX
RP
RO
RU
VRC
Hold utca 23 H-1054 - Budapest (HU)
Tel. 0036-1-3329938 - Fax 0036-1-2693044 - E-mail: bertinus@elender.hu
MILLE MOTOR KFT.
HARO SKANDINAVIA A.S.
Shinyokohamameguro Bldg. 3-22-5, Shinyokohama Kouhoku-ku 222-0033 Yokohama-Shi Kanagawa (J)
Tel. 0081-454772632 - Fax 0081-454772605 - E-mail: [email protected]
1179 Serangoon Road - 328232 Singapore (SGP)
Tel. 0065-98287581 - E-mail: [email protected]
YeungSoo BLDG 302 206-25, Ohjang-dong, Chung-ku, Seoul (ROK)
Tel. 0082-2-22756130 - Fax 0082-2-22756132 - E-mail: [email protected]
8, Sheridan Close - NSW 2214 - Milperra - Sydney (AUS)
Tel. 0061-2-97722666 - Fax 0061-2-97742321 - E-mail: [email protected]
Old Pretoria Road - Wynberg - Johannesburg (RSA)
Tel. 0027-11-7868486 - Fax 0027-11-7868482 - E-mail: [email protected]
35, Manchester Street - P.o.B. 22416 - Christchurch (NZ)
Tel. 0064-3-3660129 - Fax 0064-3-3667580 - E-mail: [email protected]
Baragova 5 - 1113 Ljubljana (SLO)
Tel. 00386-1-5883 421 - Fax 00386-1-5883 465 - E-mail: ziga.martincic@avto-triglav.si
Kore Sehitleri Cad. No. 42 - 80300 - Zincirlikuyu - Istanbul (TR)
Tel. 0090-212-3360058 - Fax 0090-212-3360057 - E-mail: [email protected]
no. 1 Long Mile Road - Dublin 12 (IRL)
Tel. 00353-1-4566222 - Fax 00353-1-4756461 - E-mail: [email protected]
Bubenska 43 - 170 00 Praha 7 (CZ)
Tel. 0042-02-96547142 - Fax 0042-02-96547145 - E-mail: [email protected]
Kjørbekkdalen 6, 3735 Skien (N)
Tel. 0047-35506780 - Fax 0047-35506781 - E-mail: [email protected]
APRILIA DE MEXICO, SA. de CV.
San Jeromino, 64640, 552 Monterrey N.L. (MX)
Tel. 0052-8333-4493 - Fax 0052-8348-9398 - E-mail: [email protected]
APRILIA JAPAN CORP.
MOTOMAX MOTORLU ARACLAR SAN. VETIC. A.S.
CYCLENET PTE TLD
Bldg. 7294 cn Recto Highway - Pampanga (RP)
Tel. 00632-7524450 - Fax 00632-7505764 - E-mail: [email protected]
ULTRA BIKERS NETWORK INC.
Str. Depozitelor 41-43 Jud. Arges - Pitesti (RO)
Tel. 0040-248211004 - Fax 0040-248211004 - E-mail: [email protected]
RO GROUP INT.
Saldova 38 - 180 00 Praha 8 - Karlin
Ul. Sadovaya-Cernogriazskaia 13/3 - Mosca (RU)
Tel. 007-095-208 2557 - Fax 007-095-208 4838 - E-mail: [email protected]
Z.A.O. ITALMOTO
29 Hak Po Street - Mongkok Kowloon - Hong Kong (VRC)
Tel. 00852-23859229 - Fax 00852-23857920 - E-mail: [email protected]
AH LAM MOTORCYCLE CO. LTD.

94
use and maintenance
Scarabeo 50 - Scarabeo 100 4T
WIRING DIAGRAM - Scarabeo
Ar
Ar/Bi
Gr
V/R
L
B/N
G/R
V/R
B
Vi
V/G
R/N
M
V/G
V/G
R
R
N
Ar
7.5 A
V/R
R/N
10 A
R
R
R/N
R
5
3
B
G/R
1 2
Vi
V/R
R
B
G
Az
1
2
3
4
5
6
7
8
9
10
11
12
13
14
15
16
17
18
19
20
21
22
B
B
R/M
R/N
R/M
R/N
R/M
R/M
R/N
Bi/ViBi/Vi
V
Bi/R
G/R
M
V/R
Ro
G
Bi
Ro
M/G
Ar/N
Bi/G
B/G
M
G/R
N
G
Bi
V/R
Bi/R
V
Ro
M/G
Bi/G
B/G
Ar/N
R/N
N
N
V
B
Ar
Ar/Bi
VISTO DAL LATO CHE
SI CONNETTE AL REGOLATORE
BLU
VERDEARANCIO
ARANCIO BIANCO
G V
Ar
B
R/M
R/N
V/R
Bi
B
Gr/V
Bi
R
G
Gr
B
R
B/N
B/N
R
Bi
B
Gr
G
B
B
Bi
Az
R
V/R
B
Vi
Vi
Az
Az
B
+
-C
Ar
R/N
ON
V/R
Ar
OFF
LOCK
G/RG/R
V
G
V/RV/G
G
V
N
N
Az
V/G
G
B
R
Gr/V
B
V/R
B
Gr/V
M
B
B
B
Az
B
R
V/R
Vi
G
B
Bi
R
Gr/V
N
B
Bi
Gr/V
B
G
N
Bi
G
N
AzAz
B
Ro Ro
Ro
2
19
5
18
32
11
1
1
27
30
14
16
22
1
21
13
1
15
26
6 87 9104
12
34
1
1
3
20
P
17
25
23
24
31
1
36
37
38
40
41
43
39
35
1
29
1
28
1
1
1
33
1
1

95
use and maintenance
Scarabeo 50 - Scarabeo 100 4T
WIRING DIAGRAM KEY - Scarabeo
1) Multiple connectors
2) Electronic control unit (ECU)
3) Serial connection
4) Throttle sensor
5) Pick-up
6) Temperature sensor
7) Oil pump
8) Fuel injector
9) Air injector
10) Fuel pump
11) H.T. coil
12) Spark plug
13) Fuse
14) Battery
15) Start relay
16) Starter
17) Injection relay
18) Voltage regulator
19) Generator
20) Resistor
21) Front stoplight switch
22) Rear stoplight switch
23) Rear left direction indicator
24) Rear stoplight
25) Rear right direction indicator
26) Oil level switch
27) Control diode
28) RH switch
29) Key switch
30) Flashers
31) LH switch
32) Horn
33) Fuel level sensor
34) Injection check warning light
35) Fuel level instrument
36) Direction indicator warning light
37) High beam warning light
38) Dashboard light
39) Oil reserve warning light
40) Dashboard
41) Front left direction indicator
42) Low/high beam bulb (35/35W)
43) Front right direction indicator
CABLE COLOURS
Ar orange
Az light blue
B blue
Bi white
G yellow
Gr grey
M brown
N black
R red
V green
Vi violet
Ro pink

96
use and maintenance
Scarabeo 50 - Scarabeo 100 4T
WIRING DIAGRAM - Scarabeo
100
G
Bi
N
B
B
B
N
N
G/R G/R
3
N
M
M
G/Bi
Gr
V/R
4312
G/Bi
Bi/R
B
M
4
5
B/N
V/R
G/Bi
Gr/V
V/R
Gr/V
Bi
N
G
B
NN
R
Bi
Az
B
G
V/R
R
B
Az
B
B
Az
N
B
V/R
R
Az
Bi
B
B
G
G
R
Bi
G/Bi
Bi
N
Bi/R
Gr/V
B
G
Gr
V/R
Gr/V
B
R
Az
LOCK
OFF
V/R
ON
V/R
Ar
R
V
G
B
V
N
12
V
B
R
R
7.5 A
R
B
Gr/V
M
V/G
V/R
R
V/G
V/R
GrGr
Ar
B
Bi/R
B
Ar
Bi/R
G/N G/N
N
Bi
G/N
N
G/N
B
Gr/V
V
GG
V
Az Az
B
G/R
B
Bi
R
B/NB/N
R
B
G
B
G
B
M
R
B
G
V/G
Az
V/G V/R
G
Az
V/G
R
B
C-
+
17
38
38
33
31
34
32
13
38
5
36
1
38
35
2
38
3
23
38
38
40 6
37
9
10
7
38
8
3838
38
12
15
38
16
14
25
26
29
30 27
19

97
use and maintenance
Scarabeo 50 - Scarabeo 100 4T
WIRING DIAGRAM KEY - Scarabeo
100
1) Generator
2) Transducer
3) Spark plug
5) Voltage regulator
6) Battery
7) Starter
8) Start relay
9) Front stoplight switch
10) Rear stoplight switch
12) Number plate bulb
13) Fuel level sensor
14) Rear right direction indicator
15) Rear stoplight
16) Rear left direction indicator
17) RH switch
18) LH switch
19) Key switch
23) Dashboard
25) Low beam warning light
26) Dashboard light
27) Fuel level instrument
29) High beam warning light
30) Direction indicator warning light
31) Front right direction indicator
32) Front left direction indicator
33) Parking lights bulb
34) Low / high beam bulb (35/35W)
CABLE COLOURS
Ar orange
Az light blue
B blue
Bi white
G yellow
Gr grey
M brown
N black
R red
V green
Vi violet
35) Horn
36) Pick up
37) Fuse
38) Multiple connectors
40) Automatic starter

98
use and maintenance
Scarabeo 50 - Scarabeo 100 4T
ASK FOR GENUINE SPARE PARTS ONLY
NOTE

99
use and maintenance
Scarabeo 50 - Scarabeo 100 4T
ASK FOR GENUINE SPARE PARTS ONLY
NOTE

100
use and maintenance
Scarabeo 50 - Scarabeo 100 4T
ASK FOR GENUINE SPARE PARTS ONLY
NOTE

101
use and maintenance
Scarabeo 50 - Scarabeo 100 4T
ASK FOR GENUINE SPARE PARTS ONLY
NOTE

102
use and maintenance
Scarabeo 50 - Scarabeo 100 4T
ASK FOR GENUINE SPARE PARTS ONLY
NOTE

103
use and maintenance
Scarabeo 50 - Scarabeo 100 4T
ASK FOR GENUINE SPARE PARTS ONLY
NOTE

104
use and maintenance
Scarabeo 50 - Scarabeo 100 4T
aprilia s.p.a. wishes to thank its customers for the purchase of this vehicle.
- Do not dispose of oil, fuel, polluting substances and components in the
environment.
- Do not keep the engine running if it isn’t necessary.
- Avoid disturbing noises.
- Respect nature.
-
 1
1
-
 2
2
-
 3
3
-
 4
4
-
 5
5
-
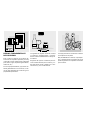 6
6
-
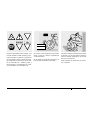 7
7
-
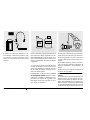 8
8
-
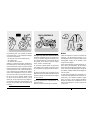 9
9
-
 10
10
-
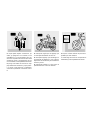 11
11
-
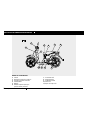 12
12
-
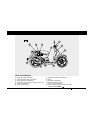 13
13
-
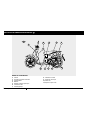 14
14
-
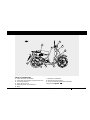 15
15
-
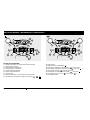 16
16
-
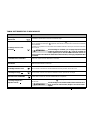 17
17
-
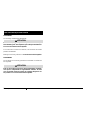 18
18
-
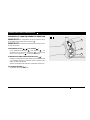 19
19
-
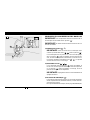 20
20
-
 21
21
-
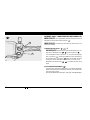 22
22
-
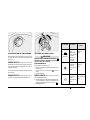 23
23
-
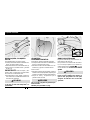 24
24
-
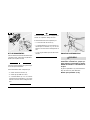 25
25
-
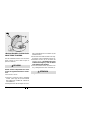 26
26
-
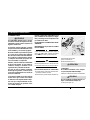 27
27
-
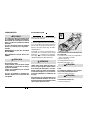 28
28
-
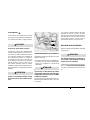 29
29
-
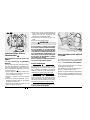 30
30
-
 31
31
-
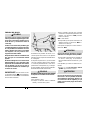 32
32
-
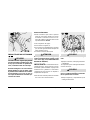 33
33
-
 34
34
-
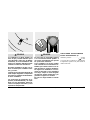 35
35
-
 36
36
-
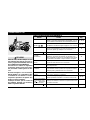 37
37
-
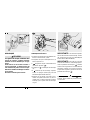 38
38
-
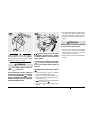 39
39
-
 40
40
-
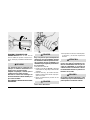 41
41
-
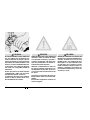 42
42
-
 43
43
-
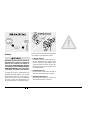 44
44
-
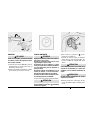 45
45
-
 46
46
-
 47
47
-
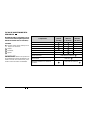 48
48
-
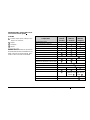 49
49
-
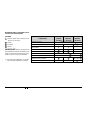 50
50
-
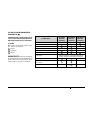 51
51
-
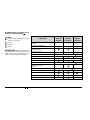 52
52
-
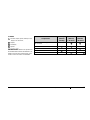 53
53
-
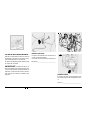 54
54
-
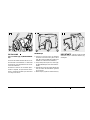 55
55
-
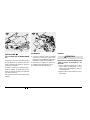 56
56
-
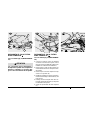 57
57
-
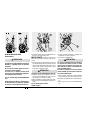 58
58
-
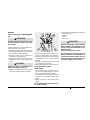 59
59
-
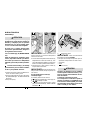 60
60
-
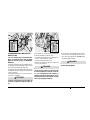 61
61
-
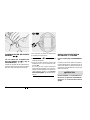 62
62
-
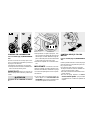 63
63
-
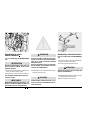 64
64
-
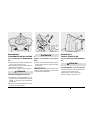 65
65
-
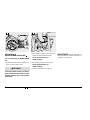 66
66
-
 67
67
-
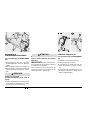 68
68
-
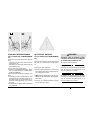 69
69
-
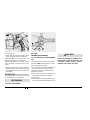 70
70
-
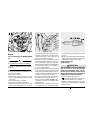 71
71
-
 72
72
-
 73
73
-
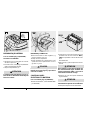 74
74
-
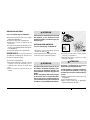 75
75
-
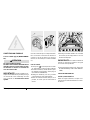 76
76
-
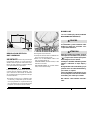 77
77
-
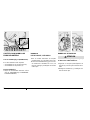 78
78
-
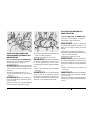 79
79
-
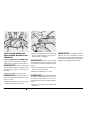 80
80
-
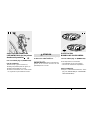 81
81
-
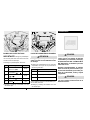 82
82
-
 83
83
-
 84
84
-
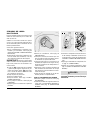 85
85
-
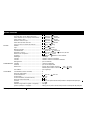 86
86
-
 87
87
-
 88
88
-
 89
89
-
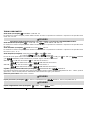 90
90
-
 91
91
-
 92
92
-
 93
93
-
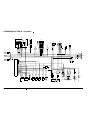 94
94
-
 95
95
-
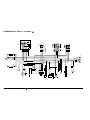 96
96
-
 97
97
-
 98
98
-
 99
99
-
 100
100
-
 101
101
-
 102
102
-
 103
103
-
 104
104
-
 105
105
-
 106
106
-
 107
107
-
 108
108
-
 109
109
-
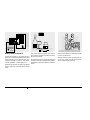 110
110
-
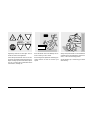 111
111
-
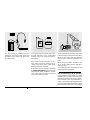 112
112
-
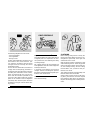 113
113
-
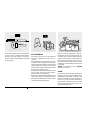 114
114
-
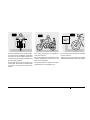 115
115
-
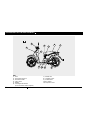 116
116
-
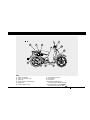 117
117
-
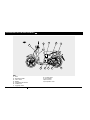 118
118
-
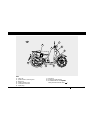 119
119
-
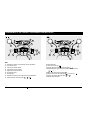 120
120
-
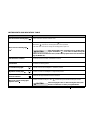 121
121
-
 122
122
-
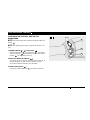 123
123
-
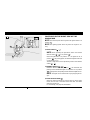 124
124
-
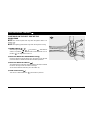 125
125
-
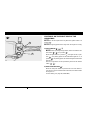 126
126
-
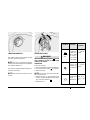 127
127
-
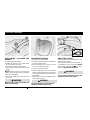 128
128
-
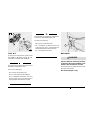 129
129
-
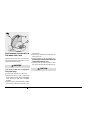 130
130
-
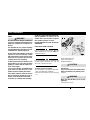 131
131
-
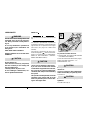 132
132
-
 133
133
-
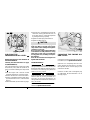 134
134
-
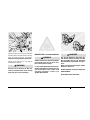 135
135
-
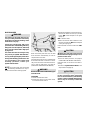 136
136
-
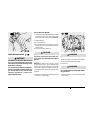 137
137
-
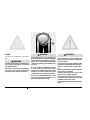 138
138
-
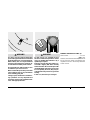 139
139
-
 140
140
-
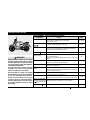 141
141
-
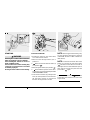 142
142
-
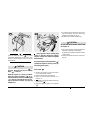 143
143
-
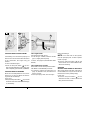 144
144
-
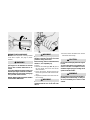 145
145
-
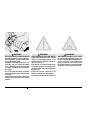 146
146
-
 147
147
-
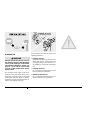 148
148
-
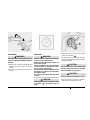 149
149
-
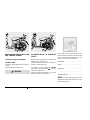 150
150
-
 151
151
-
 152
152
-
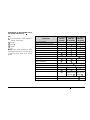 153
153
-
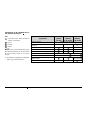 154
154
-
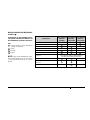 155
155
-
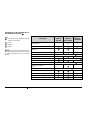 156
156
-
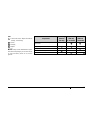 157
157
-
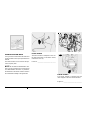 158
158
-
 159
159
-
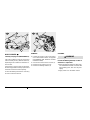 160
160
-
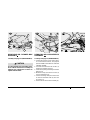 161
161
-
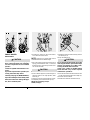 162
162
-
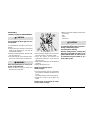 163
163
-
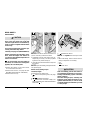 164
164
-
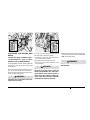 165
165
-
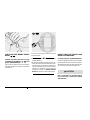 166
166
-
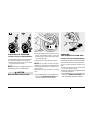 167
167
-
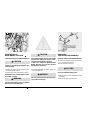 168
168
-
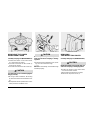 169
169
-
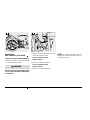 170
170
-
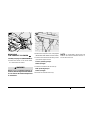 171
171
-
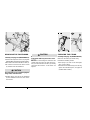 172
172
-
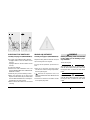 173
173
-
 174
174
-
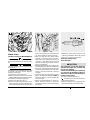 175
175
-
 176
176
-
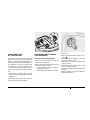 177
177
-
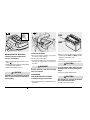 178
178
-
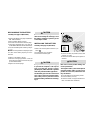 179
179
-
 180
180
-
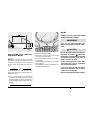 181
181
-
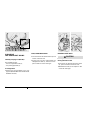 182
182
-
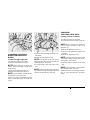 183
183
-
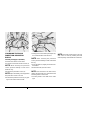 184
184
-
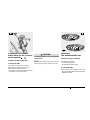 185
185
-
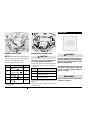 186
186
-
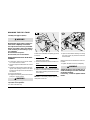 187
187
-
 188
188
-
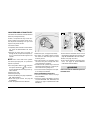 189
189
-
 190
190
-
 191
191
-
 192
192
-
 193
193
-
 194
194
-
 195
195
-
 196
196
-
 197
197
-
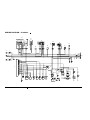 198
198
-
 199
199
-
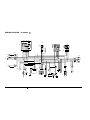 200
200
-
 201
201
-
 202
202
-
 203
203
-
 204
204
-
 205
205
-
 206
206
-
 207
207
-
 208
208


APRILIA SCARABEO 100 4T - 2007 Manual de usuario
- Categoría
- Motocicletas
- Tipo
- Manual de usuario
- Este manual también es adecuado para
en otros idiomas
Artículos relacionados
-
APRILIA SCARABEO 500 - 2002 Manual de usuario
-
APRILIA LEONARDO 150 Use And Maintenance Book
-
-
-
-
-
-
-
-