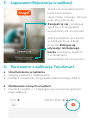
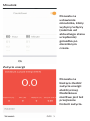
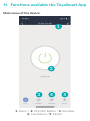
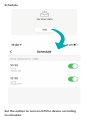
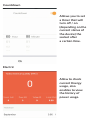
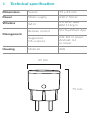
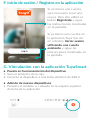
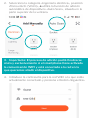
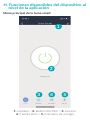
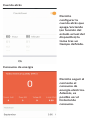
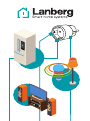
El Lanberg SM01-WP10 es un enchufe inteligente que te permite controlar tus dispositivos eléctricos desde cualquier lugar y en cualquier momento a través de la aplicación TuyaSmart. Con este dispositivo, puedes encender y apagar tus aparatos electrónicos de forma remota, establecer horarios y temporizadores para automatizar tu hogar, monitorizar el consumo de energía y mucho más. Además, es compatible con los asistentes de voz Amazon Alexa y Google Assistant, lo que te permite controlar tus dispositivos con comandos de voz.
El Lanberg SM01-WP10 es un enchufe inteligente que te permite controlar tus dispositivos eléctricos desde cualquier lugar y en cualquier momento a través de la aplicación TuyaSmart. Con este dispositivo, puedes encender y apagar tus aparatos electrónicos de forma remota, establecer horarios y temporizadores para automatizar tu hogar, monitorizar el consumo de energía y mucho más. Además, es compatible con los asistentes de voz Amazon Alexa y Google Assistant, lo que te permite controlar tus dispositivos con comandos de voz.


-
 1
1
-
 2
2
-
 3
3
-
 4
4
-
 5
5
-
 6
6
-
 7
7
-
 8
8
-
 9
9
-
 10
10
-
 11
11
-
 12
12
-
 13
13
-
 14
14
-
 15
15
-
 16
16
-
 17
17
-
 18
18
-
 19
19
-
 20
20
-
 21
21
-
 22
22
-
 23
23
-
 24
24
-
 25
25
-
 26
26
-
 27
27
-
 28
28
-
 29
29
-
 30
30
-
 31
31
-
 32
32
-
 33
33
-
 34
34
-
 35
35
-
 36
36
-
 37
37
-
 38
38
-
 39
39
-
 40
40


El Lanberg SM01-WP10 es un enchufe inteligente que te permite controlar tus dispositivos eléctricos desde cualquier lugar y en cualquier momento a través de la aplicación TuyaSmart. Con este dispositivo, puedes encender y apagar tus aparatos electrónicos de forma remota, establecer horarios y temporizadores para automatizar tu hogar, monitorizar el consumo de energía y mucho más. Además, es compatible con los asistentes de voz Amazon Alexa y Google Assistant, lo que te permite controlar tus dispositivos con comandos de voz.
En otros idiomas
- English: Lanberg SM01-WP10 User manual
- polski: Lanberg SM01-WP10 Instrukcja obsługi
Documentos relacionados
Otros documentos
-
PUR LINE 250m3-H WiFi Tuya APP Control Air Recuperator Wall Mounted Heat Recovery Unit Manual de usuario
-
Logicom STRIPPY 4 + 4USB El manual del propietario
-
Dimplex DVF1200 El manual del propietario
-
 Ksix BXBULB6011 Smart Bulb SmartLED Manual de usuario
-
media-tech MT6105 Manual de usuario
-
PNI IP649 Manual de usuario
-
Overmax OV-CAMSPOT 4.0 PTZ WHITE El manual del propietario
-
Argo APOLLO 10SC Manual de usuario
-
PNI Safe House HS008 wireless outdoor siren Manual de usuario
-
PNI HS650 Manual de usuario
