
D-RTK
V1.0
2017.06
Quick Start Guide
快速入门指南
快速入門指南
クイックスタートガイド
퀵스타트가이드
Kurzanleitung
Guía de inicio rápido
Guide de démarrage rapide
Guida di avvio rapido
Snelstartgids
Guia de início rápido
Краткое руководство пользователя

Important notes are indicated by this symbol.
重要注意事项说明符号。
重要備註說明符號。
この記号は、重要な注意事項を表します。
중요참고에는이기호가표시됩니다.
Wichtige Hinweise sind durch dieses Symbol gekennzeichnet.
Las notas importantes se indican con este símbolo.
Les remarques importantes sont indiquées par ce symbole.
Le note importanti sono contrassegnate da questo simbolo.
Belangrijke opmerkingen worden aangeduid met dit symbool.
As notas importantes são indicadas por este símbolo.
Важные примечания обозначаются этим символом.


2
© 2017 DJI All Rights Reserved.
EN
Disclaimer
Thank you for purchasing the D-RTK
TM
(hereinafter referred to as “product”). Read this disclaimer carefully
before using this product. By using this product, you hereby agree to this disclaimer and signify that
you have read it fully. Please install and use this product in strict accordance with this manual. SZ DJI
Technology Co., Ltd. and its aliated companies assume no liability for damage(s) or injuries incurred
directly or indirectly from using, installing or retting this product improperly, including but not limited to
using non-designated accessories.
DJI
TM
is a trademark of SZ DJI Technology Co., Ltd. (abbreviated as “DJI”) and its aliated companies.
Names of products, brands, etc., appearing in this manual are trademarks or registered trademarks
of their respective owner companies. This product and manual are copyrighted by DJI with all rights
reserved. No part of this product or manual shall be reproduced in any form without the prior written
consent of or authorization from DJI.
This disclaimer is produced in various languages. In the event of variance among dierent versions, the
Simplied Chinese version shall prevail when the product in question is purchased in Mainland China, and
the English version shall prevail when the product in question is purchased in any other region.
Warnings
1. Ensure all parts are connected correctly and OFFSET values are congured correctly in DJI Assistant 2
when using the D-RTK for the rst time.
2. DO NOT bend or fold the antenna cable excessively.
3. Be sure that the Ground System antenna is perfectly level when mounted.
4. Only operate in an open environment free from radio interference.
5. Ensure that the Air System and the Ground System antennas are unobstructed when used.
6. The two Air System antennas should be kept at the same height.
7. Make sure that the DATALINK PRO antennas DO NOT obstruct each other when used.
8. At least one A3 series GPS module is required.
9. Only use genuine DJI parts or parts certied by DJI. Unauthorized parts or parts from non-DJI-certied
manufacturers may cause the system to malfunction and compromise safety.
10. Ensure that the D-RTK and its components are free from contamination (e.g. water, oil, soil and sand).
11. Download the latest version of the user manual or software for any related DJI product that is required
when using this product.

© 2017 DJI All Rights Reserved.
3
EN
Introduction
The D-RTK is a GPS and barometer system specially designed to provide centimeter-level positioning accuracy
for the DJI A3 series ight controllers. Using dual antennas, its heading reference is more accurate than a normal
compass sensor, and it is able to withstand magnetic interference from metal structures.
Depending on the region of purchase, the D-RTK uses either GPS and BeiDou or GPS and GLONASS to
perform at the highest standards.
Overview
D-RTK Processor ×2 GNSS Antenna ×3 Antenna Cable ×3
Antenna Bracket
I
×1 Antenna Bracket
II
×2 Base Board ×1
DATALINK PRO Bracket ×1 Thumb Screw ×1 8-pin Cable ×1
4-pin CAN Cable ×1 Micro USB Cable ×1 Ground System Power Cable×1
Air System Power Cable
I
×1 Air System Power Cable
II
×1 Screw Others
M2.5 ×5
M3.0 ×8
Cup-head Full
Thread Screw
M3 & M3 Nut
Velcro
Double-sided
Tape
Hexagonal
L-wrench

4
© 2017 DJI All Rights Reserved.
EN
*Complimentary with purchase of both the DJI Matrice 600 and D-RTK.
Ground System Installation and Connection
The following uses the DJI A3 Flight Control System, DJI DATALINK PRO 900 and DJI Intelligent Flight
Battery to illustrate a typical installation and connection.
Installation
1. Mount the DATALINK PRO Bracket onto the Base Board with two M2.5×5 screws.
2. Mount the GNSS Antenna onto the Antenna Bracket
I
with three M3.0×8 screws, and then x the
Antenna Bracket
I
onto the Base Board.
3. Fix the D-RTK Processor onto the Base Board as the Ground System.
4. Fix the DATALINK PRO Base Station onto the DATALINK PRO Bracket.
5. Fix the battery in place with velcro and then x the Base Board onto an appropriate tripod*.
*Supports ordinary camera and camcorder tripods mounted with 1/4-20 screws.
Upper Expansion Plate×1 Bracket×4 Assistant Bracket×2 Antenna Bracket
III
×4
Antenna Clip×2 Screw
M2.5×5
M3.0×8
Matrice 600 Accessories*

© 2017 DJI All Rights Reserved.
5
EN
1/4"
3/8"
Thread Size
Connection
1. Connect the Ground System and the GNSS Antenna with an Antenna Cable.
2. Connect the Ground System and the DATALINK PRO Base Station with an 8-pin Cable.
3. Connect the Ground System to the battery with the Ground System Power Cable.

6
© 2017 DJI All Rights Reserved.
EN
Air System Installation and Connection
The following uses the Antenna Bracket
III
, DJI DATALINK PRO 900, DJI Matrice 600, D-RTK and DJI A3
Flight Control System to illustrate a typical installation and connection.
Installation
1. Mount the two GNSS Antennas to the Antenna Bracket
III
with four M3.0×6.5 screws.
2. Attach the D-RTK Processor (working as the Air System) and the DATALINK PRO Mobile Station to the
Upper Expansion Plate with double-sided tape.
• Use the Antenna Bracket
II
if using other types of aircraft and follow the requirements below:
a. Ensure that the two Antenna Brackets
II
form a straight line through the aircraft’s center of gravity,
and the distance between the two Antennas is greater than 25 cm (the farther apart, the better).
b. The two Antenna Brackets
II
should be equidistant from the aircraft’s center of gravity.
c. The two Air System antennas should be kept at the same height.
Connection
1. Using the Antenna Cables, connect the Ground System’s “ANT1” port to one Antenna as the Master
Antenna, and the “ANT2” port to the other Antenna as the Slave Antenna.
2. Attach the DATALINK PRO Mobile Station’s Antennas and tidy them with clips.
3. Connect the Air System CAN/UART port to the DATALINK PRO Mobile Station CAN/UART port with an
8-pin Cable.
4. Connect the Air System “CAN1” port to any CAN1 port on the A3 ight controller with a 4-pin CAN Cable.
5. Connect the Air System “POWER” port to the power port on the aircraft with an Air System Power Cable
I
.

© 2017 DJI All Rights Reserved.
7
EN
• Use the Air System Power Cable
II
if using the D-RTK with other types of aircraft.
• Connect the Ground System and the Air System one by one to the computer for rmware
upgrade. Power cycle the DATALINK PRO, Flight Control System and D-RTK after upgrading.
• Supports Windows 7 (or later) or Mac OS X 10.9 (or later).
Usage
Conguring Parameters Using DJI Assistant 2
IMPORTANT: The Ground System and Air System should be connected to the computer separately and
activated. Be sure to congure parameters with DJI Assistant 2 for rst time use.
1. Download DJI Assistant 2 from www.dji.com and install it on your computer.
2. Connect the Ground System to the computer with DJI Assistant 2 launched, and then go to Connected
Devices > D-RTK to congure the coordinates.
3. When conguring the Air System, ensure the A3 Flight Control System is connected. Connect the
Flight Control System to the computer with DJI Assistant 2 launched. Select the connected Flight
Control System from the Connected Devices page, and then go to DJI Devices > Air System Antenna
to congure antenna oset parameters.
Conguring the Air SystemConguring the Ground System

8
© 2017 DJI All Rights Reserved.
EN
• DO NOT power on the Air System before the Ground System’s Working Status LED turns solid green.
• Ensure the Air System and the Ground System’s antennas are unobstructed when used.
• Download the User Manual from www.dji.com to learn more.
• The DATALINK PRO Base Station and Mobile Station’s 4-position Switches should be toggled to
the UART_SW1 position if the D-RTK is only used with the DATALINK PRO, otherwise the D-RTK
will fail to receive data from the DATALINK PRO. If also using DJI Assistant 2 Ground Station,
the 4-position Switches should be toggled to the COMBO_SW4 position. Refer to the “DATALINK
PRO User Manual” for more details.
• Set the A3 Flight Control System to P mode or F mode.
• DO NOT move the Ground System during positioning.
• The Ground System’s position coordinates can be set in DJI Assistant 2.
Usage Procedures
Use the D-RTK in an open environment free from radio interference and follow the procedures below:
1. Power on the Ground System, and wait for the Working Status LED to turn solid green.
2. Power on the Air System, and wait for the Working Status LED to turn solid green.
3. The D-RTK is ready to work when the A3 Flight Control System’s Flight Status LED blinks green and
blue alternately.
Updating the Ground System’s Position
Each time it is used, the Ground System automatically detects the oset distance from its previous
position. If the oset distance is > 50 meters, the Ground System will update the new position coordinates
automatically. If the position has changed but the Ground System does not update automatically, you
will need to update manually. Press the Update Button and hold for 5 seconds until the Ground System
recalculates the position coordinates. The Working Status LED will blink green quickly if the position is
updated successfully (DJI GO will prompt you once the Ground System’s position is updated successfully).
Update Button

© 2017 DJI All Rights Reserved.
9
EN
Ground System
—
Solid White Ground System is initializing or not activated.
......
Blinking White Slowly Initialization failure.
—
Solid Red D-RTK not positioned.
......
Blinking Red Slowly Setting the Ground System’s position.
—
Solid Green Ground System’s position is set.
......
Blinking Green Quickly Ground System’s position is updated.
Air System
—
Solid White Air System is initializing or not activated.
......
Blinking White Slowly Initialization failure.
—
Solid Yellow Ground System not positioned but dierential data received.
—
Solid Red Ground System not positioned, dierential data not received.
......
Blinking Yellow Slowly Ground System positioned with single point, dierential data received.
......
Blinking Red Slowly
Ground System positioned with single point, but differential data not
received.
......
Blinking Purple Slowly D-RTK is executing oating-point mode.
......
Blinking Green Slowly D-RTK is executing calculation mode.
—
Solid Green D-RTK is executing xed mode.
Working Status LED

EN
Positioning Accuracy
Horizontal: 1 cm + 1 ppm
Vertical: 2 cm + 1 ppm
Orientation Accuracy
(0.2/R)°
R is the baseline distance (distance between the two Air
System antennas) in meters.
Root Mean Square (RMS) 0.03 m/s
Frequency Used
Global version: GPS L1&L2, GLONASS F1&F2
Asia-Pacic version: GPS L1&L2, BEIDOU B1&B2
Interface Type CAN, UART, USB
Input Voltage 3S to 12S (12 to 52 V)
Power Consumption 5.2 W
Current 0.45 A (@ 12 V)
D-RTK Processor Dimensions 112.3 mm×63 mm×18.6 mm
D-RTK Processor Weight 139.5 g
Operating Temperature
32° to 113°F (0° to 45°C)
Storage Temperature
-40° to 185°F (-40° to 85°C)
Specications
D-RTK
TM
is a trademark of DJI.
Copyright © 2017 DJI All Rights Reserved.
This content is subject to change.
Download the latest version from
www.dji.com/product/d-rtk

© 2017 DJI All Rights Reserved.
11
CHS
免责声明
感谢您购买 D-RTK
TM
。在使用之前,请仔细阅读本声明,一旦使用,即被视为对本声明全部内
容的认可和接受。请严格遵守手册、产品说明和相关的法律法规、政策、准则安装和使用该产
品。在使用产品过程中,用户承诺对自己的行为及因此而产生的所有后果负责。因用户不当使
用、安装、改装造成的任何损失,DJI 将不承担法律责任。
DJI
TM
是深圳市大疆创新科技有限公司及其关联公司的商标。本文出现的产品名称、品牌等,
均为其所属公司的商标或注册商标。本产品及手册为大疆创新版权所有。未经许可,不得以任
何形式复制翻印。
关于免责声明的最终解释权,归大疆创新所有。
产品使用注意事项
1. 初次使用时,请确保各个模块连线正确,并且在调参软件中正确设置主从天线偏移量。
2. 安装时请勿过度弯曲和折叠 D-RTK 天线馈线。
3. D-RTK 地面端天线的安装和摆放一定要保证与水平面相对水平。
4. 在开阔、不受无线电干扰的环境中使用 D-RTK。
5. 使用过程请确保 D-RTK 天空端和地面端的天线均不受遮挡。
6. D-RTK 天空端的两个天线高度必须保持一致。
7. 请勿遮挡所搭配使用的 DATALINK PRO 天线。
8. 至少需要与一个 A3 飞行控制系统的 GPS 一起使用。
9. 使用原厂配件或经过 DJI 认证的配件。使用非原厂配件有可能对系统的安全使用造成危险。
10. 部件内部没有进入任何异物(如:液体、油、沙土等)。
11. 使用过程中,如果需要用到 DJI 产品相关的用户手册和软件,请从 DJI 官方网站 www.dji.com
下载最新版本。

12
© 2017 DJI All Rights Reserved.
CHS
物品清单
D-RTK 处理器 ×2 GNSS 天线 ×3 天线馈线 ×3
天线支架
I
×1 天线支架
II
×2 安装底座 ×1
DATALINK PRO 支架 ×1 手拧螺丝 ×1 8 针线 ×1
4 针 CAN 线×1 Micro USB 线×1 地面端电源线 ×1
天空端电源线
I
×1 天空端电源线
II
×1 螺丝 其它
M2.5×5
M3.0×8
杯头全螺纹螺丝
M3& 螺母 M3
魔术贴
双面胶
L 型内六角扳手
简 介
D-RTK 专为 A3 系列飞行控制系统开发,与传统 GPS 和气压计定位方案相比,精度由米级提
升至厘米级。与指南针模块相比,其双天线测向技术不仅精度更高,而且提供强大的抗电磁干
扰能力,在高压线、金属建筑等强磁干扰的环境下保障可靠的飞行。D-RTK 在不同的区域提供
GPS+ 北斗或 GPS+GLONASS 组合模块,确保优秀的定位性能。

© 2017 DJI All Rights Reserved.
13
CHS
地面端安装连线
下面安装连线以 DJI A3 飞行控制系统,DJI DATALINK PRO 900 和 DJI 智能飞行电池为模型进
行示例。
安 装
1. 使用两颗 M2.5×5 螺丝将 DATALINK PRO 支架固定到底座上。
2. 使用三颗 M3.0×8 螺丝将 GNSS 天线固定到天线支架
I
的顶端,然后将天线支架
I
安装到底
座上。
3. 使用手拧螺丝将一个 D-RTK 处理器固定到底座上作为地面端。
4. 使用手拧螺丝固定 DATALINK PRO 基站到 DATALINK PRO 支架中。
5. 使用魔术贴固定电池,并根据螺纹规格将安装底座固定到合适的三角架上 *。
* 购买 DJI Matrice 600 和 D-RTK 两者时的赠品。
Matrice 600 配件 *
上扩展板 ×1 基座 ×4 加强杆 ×2 天线支架
III
×4
天线夹子 ×2 螺丝
M3.0×8
M3.0×6.5
* 支持普通相机和摄像机的 1/4-20 螺丝。

14
© 2017 DJI All Rights Reserved.
CHS
1/4"
3/8"
螺纹规格
连 线
1. 使用天线馈线连接 ANT1 端口至 GNSS 天线。
2. 使用 8 针线连接地面端 CAN/UART 端口到 DATALINK PRO 基站的 CAN/UART 端口。
3. 使用地面端电源线连接 POWER 口到电池。

© 2017 DJI All Rights Reserved.
15
CHS
天空端安装连线
下面安装连线以天线支架
III
,DJI DATALINK PRO 900,DJI Matrice 600 和 DJI A3 飞行控制
系统为模型进行示例。
安 装
1. 分别使用四颗 M3.0×6.5 螺丝将 GNSS 天线固定到天线支架
III
上。
2. 使用双面胶将一个 D-RTK 处理器(作为天空端)和 DATALINK PRO 移动端安装到飞行器的
上扩展架。
•
如果安装到其它飞行器,使用两个天线支架
II
,并且有以下要求:
a. 两个天线支架
II
和飞行器重心必须保持在一条直线上,且两个天线之间的距离不
能小于 25cm(尽可能大)。
b. 两个天线支架
II
必须关于飞行器重心成对称。
c. 两个天线的安装高度必须保持一致。
连 线
1. 分别使用天线馈线连接天空端的两个天线,其中 ANT1 端口连接的作为主天线,ANT2 端口
连接的作为从天线。
2. 安装 DATALINK PRO 移动端的天线,并用天线夹子固定好。
3. 使用 8 针线连接天空端 CAN/UART 端口到 DATALINK PRO 移动端 CAN/UART 端口。
4. 使用 4 针 CAN 线连接天空端 CAN1 口到 A3 主控器任一个 CAN1 接口。
5. 使用天空端电源线
I
连接 POWER 口到 DJI Matrice 600 上的电源接口。

16
© 2017 DJI All Rights Reserved.
CHS
•
如果使用其它飞行器,则可以使用天空端电源线
II
连接天空端到电源。
使用方法
使用调参软件设置参数
首次使用时必须使用 DJI Assistant 2 调参软件分别连接天空端和地面端先激活,并进行参数设置。
1. 从 DJI 官方网站 www.dji.com 下载调参软件安装包并按照提示进行安装,然后运行调参软件。
2. 连接地面端到电脑,进入 D-RTK 的页面,设置参考坐标。
3. 设置天空端时,必须连接 A3 飞行控制系统。连接飞行控制系统到电脑,进入所连接飞行控
制系统的页面,在 DJI 设备 -> 天线中设置天线偏移量。
•
可使用调参软件分别升级天空端和地面端, 升级完成后请务必给 A3 飞行控制系统
以及 D-RTK 重新上电。
•
调参软件需使用 Win7 及以上系统或 Mac OS X 10.9 及以上系统。
天空端参数设置连线地面端参数设置连线

© 2017 DJI All Rights Reserved.
17
CHS
使 用
请确保在开阔环境中使用 D-RTK,周围没有无线电信号干扰。按照以下步骤使用:
1. 开启地面端电源,等待工作状态指示灯绿灯常亮。
2. 开启天空端电源,等待工作状态指示灯绿灯常亮。
3. A3 飞行控制系统状态指示灯绿蓝交替闪,可正常工作。
刷新地面端位置
每次使用时,地面端将检测与上一次位置的偏移距离,一旦距离超过 50 米则自动刷新坐标。
如果地面端的位置较上一次发生变化,但并没有自动刷新坐标,则需要手动刷新。长按刷新按
键 5 秒,等待地面端重新计算坐标,一旦刷新成功,则工作状态指示灯将快闪绿灯进行提示(如
果使用 DJI GO App,则刷新坐标成功时,App 也会进行提示)。
•
必须等待地面端工作状态指示灯绿灯常亮之后才开启天空端电源。
•
使用过程确保 D-RTK 天空端和地面端的天线均不受遮挡。
•
请从 DJI 官方网站 www.dji.com 下载用户手册,了解更多详细内容。
•
仅 DATALINK PRO 与 D-RTK 一起使用时,DATALINK PRO 基站和移动端的开关
必须拨到 UART_SW1 位置,否则 D-RTK 无法接收 DATALINK PRO 数据。如有 DJI
Assistant 2 地面站一同连接 DATALINK PRO 时,DATALINK PRO 开关必须拨到
COMBO_SW4 位置。请阅读《DATALINK PRO 用户手册》,了解更多详细内容。
•
A3 飞行控制系统的控制模式必须为 P 模式或 F 模式。
•
定位过程中,切勿移动地面端。
•
使用 DJI Assistant 2,也可以设定地面端坐标。
刷新按键

18
© 2017 DJI All Rights Reserved.
CHS
地面端
—
白灯常亮 地面端正在初始化 / 地面端未激活
......
白灯慢闪 初始化失败
—
红灯常亮 D-RTK 未定位
......
红灯慢闪 正在设置地面端位置
—
绿灯常亮 地面端位置设置完成
......
绿灯快闪 地面端位置信息已刷新
天空端
—
白灯常亮 天空端正在初始化 / 天空端未激活
......
白灯慢闪 初始化失败
—
黄灯常亮 收到地面端差分数据,未定位
—
红灯常亮 未收到地面端差分数据,未定位
......
黄灯慢闪 收到地面端差分数据,单点定位
......
红灯慢闪 未收到差分数据,单点定位
......
紫灯慢闪 D-RTK 使用浮点方式进行解算
......
绿灯慢闪 D-RTK 使用推算方式进行解算
—
绿灯常亮 D-RTK 进行固定解算
工作状态指示灯

CHS
定位精度
水平:1 cm + 1 ppm
垂直:2 cm + 1 ppm
定向精度
(0.2/R)°
R 为天空端两根天线之间的距离,单位为米
测速精度(RMS) 0.03 m/s
使用频点
全球版:GPS L1&L2,GLONASS F1&F2
亚太版:GPS L1&L2,BEIDOU B1&B2
接口类型 CAN,UART,USB
功耗 5.2 W
电压要求 12-52 V(3S-12S)
电流 0.45 A(@12 V)
D-RTK 处理器尺寸 112.3 mm×63 mm×18.6 mm
D-RTK 处理器重量 139.5 g
工作环境温度 0℃至 45℃
储存环境温度 -40℃至 85℃
参 数
D-RTK
TM
是大疆创新的商标。
Copyright © 2017
大疆创新 版权所有
本指引如有更新,恕不另行通知。
您可以在 DJI 官方网站查询最新版本
www.dji.com/product/d-rtk

20
© 2017 DJI All Rights Reserved.
CHT
免責聲明
感謝您購買 D-RTK
TM
。使用之前,請仔細閱讀本聲明,一旦使用,即視為認同並接受本聲明全
部內容。安裝和使用本產品時,請嚴格遵守手冊、產品說明和相關的法律法規、政策及準則。
在使用產品過程中,使用者承諾對自己的行為及因此而產生的所有後果負責。因使用者不當使
用、安裝或改裝所造成的任何損失,DJI 概不承擔法律責任。
DJI
TM
是深圳市大疆創新科技有限公司及其附屬公司的商標。本文出現的產品名稱、品牌等,
均為其所屬公司的商標或註冊商標。本產品及手冊之版權為大疆創新所有。未經許可,不得以
任何形式複製翻印。
關於免責聲明的最終解釋權,歸大疆創新所有。
產品使用注意事項
1. 初次使用本產品時,請確保各個零件已正確連接,並且在 DJI Assistant 2 中正確設定主從天
線偏移量。
2. 安裝時請勿過度彎曲和折疊 D-RTK 天線纜線。
3. D-RTK 地面系統天線的安裝和擺放務必保持水平。
4. 在不受無線電干擾的開闊環境中使用 D-RTK。
5. 使用過程中,請確保 D-RTK 航空系統和地面系統的天線均未受遮蔽。
6. D-RTK 航空系統的兩個天線高度必須保持一致。
7. 請勿遮蔽所搭配使用的 DATALINK PRO 天線。
8. 至少需要搭配使用一個 A3 飛行控制系統的 GPS。
9. 使用原廠配件或經過 DJI 認證的配件。使用非原廠配件可能造成系統故障或造成危險。
10. 確定產品組件內無任何異物 ( 例如:液體、油、沙土等 )。
11. 使用過程中,如需參閱 DJI 產品相關的使用者手冊和軟體,請至 DJI 官方網站 www.dji.com
下載最新版本。

© 2017 DJI All Rights Reserved.
21
CHT
組件清單
D-RTK 處理器 ×2 GNSS 天線 ×3 天線纜線 ×3
天線支架
I
×1 天線支架
II
×2 底板 ×1
DATALINK PRO 支架 ×1 手轉螺絲 ×1 8 針腳纜線 ×1
4 針腳 CAN 纜線 ×1 Micro USB 纜線 ×1 地面系統電源線 ×1
航空系統電源線
I
×1 航空系統電源線
II
×1 螺絲 其它
M2.5 × 5
M3.0 × 8
圓頭全螺紋螺絲
M3 與 M3 螺帽
魔鬼氈
雙面膠帶
L 型六角扳手
簡介
D-RTK 專為 A3 系列飛行控制系統所開發,與傳統 GPS 和氣壓計定位方案相比,準確度由公
尺提升至公分。與指南針模組相比,其雙天線測向技術不僅準確度更高,而且提供強大的抗電
磁干擾能力,在高壓電纜、金屬結構等強磁干擾的環境下保障可靠的飛行。視購買區域而定,
D-RTK 使用 GPS + 北極星或 GPS + GLONASS 組合模組,確保優秀的定位性能。

22
© 2017 DJI All Rights Reserved.
CHT
地面系統安裝連線
下面安裝連線以 DJI A3 飛行控制系統、DJI DATALINK PRO 900 和 DJI 智慧飛行電池舉例說明。
安裝
1. 使用兩枚 M2.5×5 螺絲將 DATALINK PRO 支架固定到底板上。
2. 使用三枚 M3.0×8 螺絲將 GNSS 天線固定到天線支架
I
的頂端,然後將天線支架
I
安裝到
底板上。
3. 使用手轉螺絲將一個 D-RTK 處理器固定到底板上作為地面系統。
4. 使用手轉螺絲將 DATALINK PRO 基地台固定在 DATALINK PRO 支架上。
5. 使用魔鬼氈固定電池,並根據螺紋規格將安裝底板固定到合適的三角架上 *。
* 同時購買 DJI Matrice 600 和 D-RTK 即免費贈送。
Matrice 600 配件 *
上擴展板 ×1 基座 ×4 輔助支架 ×2 天線支架
III
×4
天線夾 ×2 螺絲
M2.5×5
M3.0×8
* 支援使用 1/4-20 螺絲固定的普通相機和攝錄影機。

© 2017 DJI All Rights Reserved.
23
CHT
1/4"
3/8"
螺紋規格
連線
1. 使用天線纜線連接 ANT1 連接埠與 GNSS 天線。
2. 使用 8 針腳纜線將地面系統 CAN/UART 連接埠連接到 DATALINK PRO 基地台的 CAN/UART
連接埠。
3. 使用地面系統電源線將地面系統連接到電池。

24
© 2017 DJI All Rights Reserved.
CHT
航空系統安裝連線
下面安裝連線以天線支架
III
、DJI DATALINK PRO 900、DJI Matrice 600 和 DJI A3 飛行控制系
統舉例說明。
安裝
1. 分別使用四枚 M3.0×6.5 螺絲將 GNSS 天線固定到天線支架
III
上。
2. 使用雙面膠帶將一個 D-RTK 處理器 ( 作為航空系統 ) 和 DATALINK PRO 行動台安裝到飛行
器的上擴展板。
•
如果安裝到其它飛行器,請使用兩個天線支架
II
,並遵守以下要求:
a. 兩個天線支架
II
和飛行器重心必須保持在一條直線上,且兩個天線之間的距離不
能小於 25 公分 ( 盡可能保持最遠距離 )。
b. 兩個天線支架
II
必須與飛行器重心保持等距離。
c. 兩個天線的安裝高度必須保持一致。
連線
1. 分別使用天線纜線連接航空系統的兩個天線,其中 ANT1 連接埠連接主天線,而 ANT2 連接
埠則連接從屬天線。
2. 安裝 DATALINK PRO 行動台的天線,並用天線夾固定好。
3. 使用 8 針腳纜線連接航空系統 CAN/UART 連接埠和 DATALINK PRO 行動台 CAN/UART 連接
埠。
4. 使用 4 針腳 CAN 纜線,將航空系統 CAN1 連接埠連接到 A3 飛行控制系統上的任一個
CAN1 連接埠。
5. 使用航空系
統電
源
線
I
,
將
「
電
源」
連
接埠
連
接到 DJI Matrice 600 上的
電
源
連
接埠。

© 2017 DJI All Rights Reserved.
25
CHT
•
如果使用其它飛行器,則可以使用航空系統電源線
II
連接航空系統到電源。
使用方法
使用 DJI Assistant 2 設定參數
首次使用時,必須分別將航空系統和地面系統連接至 DJI Assistant 2 並加以啟動,同時設定參數。
1. 從 DJI 官方網站 www.dji.com 下載 DJI Assistant 2 並進行安裝,然後啟動軟體。
2. 連接地面系統到電腦,進入 D-RTK 的頁面,設定參考座標。
3. 設定航空系統時,必須連接 A3 飛行控制系統。連接飛行控制系統到電腦,進入所連接飛行
控制系統的頁面,在「DJI 設備」>「天線」中設定天線偏移量。
•
可使用 DJI Assistant 2 分別升級航空系統和地面系統,升級完成後請務必重新啟動
A3 飛行控制系統以及 D-RTK。
•
DJI Assistant 2 需使用 Win7 及更新版本或 Mac OS X 10.9 及更新版本。
航空系統參數設定連線地面系統參數設定連線

26
© 2017 DJI All Rights Reserved.
CHT
使用
請確保在開闊環境中使用 D-RTK,且周圍沒有無線電訊號干擾。按照以下步驟使用:
1. 開啟地面系統電源,等待運作狀態指示燈恆亮綠燈。
2. 開啟航空系統電源,等待運作狀態指示燈恆亮綠燈。
3. A3 飛行控制系統狀態指示燈交替閃爍綠色和藍色,可正常運作。
更新地面系統位置
每次使用時,地面系統將檢測與上一次位置的偏移距離,一旦距離超過 50 公尺則自動更新座標。
如果地面系統的位置與上一次不同,但並沒有自動更新座標,則需要手動更新。長按更新按鈕
5 秒,等待地面系統重新計算座標,一旦更新成功,則運作狀態指示燈將快閃綠燈進行提示 ( 如
果使用 DJI GO 應用程式,則更新座標成功時,應用程式也會進行提示 )。
•
必須等待地面系統運作狀態指示燈恆亮綠燈之後才開啟航空系統電源。
•
使用過程中,請確保 D-RTK 航空系統和地面系統的天線均未受遮蔽。
•
請從 DJI 官方網站 www.dji.com 下載使用者手冊,瞭解更多詳細內容。
•
僅 DATALINK PRO 與 D-RTK 一起使用時,DATALINK PRO 基地台和行動台的開關
必須切換到 UART_SW1 位置,否則 D-RTK 無法接收 DATALINK PRO 資料。如有
DJI Assistant 2 地面站同時連接至 DATALINK PRO,DATALINK PRO 開關必須切換到
COMBO_SW4 位置。請參閱《DATALINK PRO 使用者手冊》,瞭解更多詳細內容。
•
A3 飛行控制系統的控制模式必須為 P 模式或 F 模式。
•
定位過程中,切勿移動地面系統。
•
也可以使用 DJI Assistant 2 設定地面系統座標。
更新按鈕

© 2017 DJI All Rights Reserved.
27
CHT
地面系統
—
恆亮白色 地面系統正在初始化 / 地面系統未啟動
......
緩慢閃爍白色 初始化失敗
紅
—
恆亮紅色 D-RTK 未定位
紅
......
緩慢閃爍紅色 正在設定地面系統位置
綠
—
恆亮綠色 地面系統位置設定完成
綠
......
快速閃爍綠色 地面系統位置資訊已更新
航空系統
—
恆亮白色 航空系統正在初始化 / 航空系統未啟動
......
緩慢閃爍白色 初始化失敗
黃
—
恆亮黃色 收到地面系統差異數據,未定位
紅
—
恆亮紅色 未收到地面系統差異數據,未定位
黃
......
緩慢閃爍黃色 收到地面系統差異數據,單點定位
紅
......
緩慢閃爍紅色 未收到差異數據,單點定位
......
緩慢閃爍紫色 D-RTK 使用浮點模式執行演算
綠
......
緩慢閃爍綠色 D-RTK 使用計算模式執行演算
綠
—
恆亮綠色 D-RTK 正在執行固定演算
運作狀態指示燈

CHT
定位精確度
水平:1 cm + 1 ppm
垂直:2 cm + 1 ppm
定向精確度
(0.2/R) °
R 為航空系統兩個天線之間的距離,單位為公尺
測速精確度 (RMS) 0.03 m/s
使用頻率
全球版:GPS L1&L2、GLONASS F1&F2
亞太版:GPS L1&L2、BEIDOU B1&B2
介面類型 CAN、UART、USB
功率消耗 5.2 W
輸入電壓 12-52 V (3S-12S)
電流 0.45 A (@12 V)
D-RTK 處理器尺寸 112.3 mm×63 mm×18.6 mm
D-RTK 處理器重量 139.5 g
操作溫度 0℃ 至 45℃
存放溫度 -40℃ 至 85℃
參數
D-RTK
TM
是
大疆創新
的
商標
。
Copyright © 2017
大疆創新 版權所有
內容可能時有變動。
您可至下列網址下載最新版本:
www.dji.com/product/d-rtk

© 2017 DJI All Rights Reserved.
29
JP
免責事項
この度は、D-RTK
TM
(以下、「本製品」といいます)をご購入いただきまして、誠にありがとうございます。本製品の使用前に、
この免責事項をよくお読みください。本製品を使用すると、この免責事項をすべて読み、これに同意したとみなされます。
本製品は、必ずこのマニュアルに従って取り付け、使用してください。SZ DJI Technology Co., Ltd. およびその関連会社
は、本製品が不適切な方法で使用、取り付けまたは修理されたこと(これには、指定以外のアクセサリを使用したことな
どが含まれますが、これに限定されません)により、直接または間接的な原因で生じた物的損害または人的被害につい
ていかなる責任も負いません。
DJI
TM
は、SZ DJI Technology Co., Ltd.(以下、「DJI」といいます)およびその関連会社の登録商標です。本マニュアルに記
載されている製品、ブランドなどの名称は、その所有者である各社の商標または登録商標です。本製品および本マニュ
アルは、不許複製・禁無断転載を原則とする DJI の著作物のため、DJI から書面による事前承認または許諾を得ることなく、
いかなる形であれ複製することは固く禁じられています。
この免責事項は複数の言語で提供されています。各言語版の内容に相違がある場合、中国本土にて購入された製品に
ついては中国語(簡体字)版の内容が優先され、他の地域にて購入された製品については英語版の内容が優先されます。
注意事項
1. D-RTK を初めて使用する場合は、必ずすべての部品を正しく接続し、DJI Assistant 2 にて OFFSET の値を正しく設定
してください。
2. アンテナケーブルを過度に折り曲げたり、折りたたんだりしないでください。
3. グラウンドシステムのアンテナは、取り付けたときに完全に水平になるようにしてください。
4. 操縦は無線干渉のないオープンな環境でのみ行ってください。
5. 使用の際にエアシステムおよびグラウンドシステムのアンテナが妨げられないことを確認してください。
6. エアシステム の 2 本のアンテナは、同じ高さに保たれていなければなりません。
7. 使用の際に DATALINK PRO のアンテナ同士が妨げ合わないことを確認してください。
8. A3 シリーズ GPS モジュールが少なくとも 1 個必要です。
9. DJI の純正部品または DJI が認定する部品のみお使いください。非正規の部品や DJI 認定メーカー以外が製造した
部品を使用すると、システムに不具合が発生し、安全性を損なうおそれがあります。
10. D-RTK およびその部品に異物(水、油、土、砂など)が付いていないことを確認してください。
11. この製品を使用する際は、必要な関連 DJI 製品すべてのユーザーマニュアルやソフトウェアの最新バージョンをダ
ウンロードしてください。

30
© 2017 DJI All Rights Reserved.
JP
はじめに
D-RTK は、センチメートル単位の精度の測位が可能となるよう特別に設計された、DJI A3 シリーズフライトコントロー
ラ用の GPS および気圧計システムです。デュアルアンテナを使用することで、通常のコンパスセンサーよりも高い精度
の機首方位を知ることができると同時に、金属製構造物からの磁気干渉にも耐えることができます。
D-RTK は、ご購入地域によって、GPS および BEIDOU、または GPS および GLONASS を利用することで、最高水準の性
能を発揮します。
概観
D-RTK プロセッサ 2 個 GNSS アンテナ 3 本 アンテナケーブル 3 本
アンテナブラケット I 1 個 アンテナブラケット II 2 個 ベースボード 1 枚
DATALINK PRO ブラケット 1 個 蝶ネジ 1 本 8 ピンケーブル 1 本
4 ピン CAN ケーブル 1 本 マイクロ USB ケーブル 1 本 グラウンドシステム電源ケーブル 1 本
エアシステム電源ケーブル I 1 本 エアシステム電源ケーブル II 1 本 ネジ その他
M2.5 × 5
M3.0 × 8
カップ頭
全ネジ
M3 および
M3 ナット
マジックテープ
両面テープ
L 型六角レンチ

© 2017 DJI All Rights Reserved.
31
JP
* DJI Matrice 600 および D-RTK の両方をご購入の場合、無料でご利用いただけます。
グラウンドシステムの取り付けおよび接続
以下では、DJI A3 フライトコントロールシステム、DJI DATALINK PRO 900、DJI インテリジェントフライトバッテリを使用した、
一般的な取り付けおよび接続について説明します。
取り付け
1. M2.5 × 5 のネジ 2 本を使用して、DATALINK PRO ブラケットをベースボードに取り付けます。
2. M3.0 × 8 のネジ 3 本を使用して、GNSS アンテナをアンテナブラケット I に取り付けます。次に、そのアンテナブラケッ
ト I をベースボードに取り付けます。
3. D-RTK プロセッサをベースボードに取り付けます。
4. DATALINK PRO ベースステーションを DATALINK PRO ブラケットに取り付けます。
5. バッテリをマジックテープで所定の位置に固定します。次に、ベースボードを適切な三脚
*
に取り付けます。
* 普通のカメラやビデオカメラ用の、1/4-20 のネジが付いた三脚を使用することができます。
上部拡張プレート 1 枚 ブラケット 4 個 補助ブラケット 2 個
アンテナブラケット III
4 個
アンテナクリップ 2 個 ネジ
M2.5 × 5
M3.0 × 8
Matrice 600 アクセサリ *

32
© 2017 DJI All Rights Reserved.
JP
1/4 インチ
3/8 インチ
ネジ山サイズ
接続
1. グラウンドシステムと GNSS アンテナを、アンテナ ケーブルで接続します。
2. グラウンドシステムと DATALINK PRO ベースステーションを、8 ピンケーブルで接続します。
3. グラウンドシステムとバッテリを、グラウンドシステム電源ケーブルで接続します。

© 2017 DJI All Rights Reserved.
33
JP
エアシステムの取り付けおよび接続
以下では、アンテナブラケット III、DJI DATALINK PRO 900、DJI Matrice 600、D-RTK、DJI A3 フライトコントロールシステ
ムを使用した、一般的な取り付けおよび接続について説明します。
取り付け
1. M3.0 × 6.5 のネジ 4 本を使用して、GNSS アンテナをアンテナブラケット III に取り付けます。
2. D-RTK プロセッサ(エアシステムとして動作)と DATALINK PRO モバイルステーションを、両面テープを使って上部
拡張プレ ートに取り付けます。
• 他のタイプの機体を使用する場合は、アンテナブラケット II を使用し、以下の要件に従ってください。
a. 2 つのアンテナブラケット II が機体の重心を通して一直線になるようにします。また、2 本のアンテナ間の
距離が 25 cm 以上(広ければ広いほど良い)になるようにします。
b. 2 つのアンテナブラケット II は、機体の重心から等距離になるようにしてください。
c. 2 本のエアシステムアンテナの高さが等しくなるようにしてください。
接続
1. アンテナケーブルを使用して、どちらか一方のアンテナをグラウンドシステムの「ANT1」ポートに接続してマスターア
ンテナとし、もう一方のアンテナを「ANT2」ポートに接続してスレーブアンテナとします。
2. DATALINK PRO モバイルステーションのアンテナを取り付け、クリップを使って整理します。
3. 8 ピンケーブルを使用して、エアシステムの CAN/UART ポートと DATALINK PRO モバイルステーションの CAN/
UART を接続します。
4. 4 ピン CAN ケーブルを使用して、エアシステムの「CAN1」ポートを A3 フライトコントローラの任意の CAN1 ポート
に接続します。
5. エアシステム電源ケーブル
I
を使用して、エアシステムの「POWER」ポートを機体の電源に接続します。

34
© 2017 DJI All Rights Reserved.
JP
• 他の種類の機体で D-RTK を使用する場合は、エアシステム電源ケーブル
II
を使用してください。
• ファームウェアの更新、グラウンドシステムとエアシステムを、それぞれ個別にコンピュータに接続して行って
ください。更新後は、DATALINK PRO、フライトコントロールシステム、D-RTK を再起動してください。
• Windows 7 以降、Mac OS X 10.9 以降をサポートしています。
使用方法
DJI Assistant 2 を使用したパラメータの設定
重要:グラウンドシステムとエアシステムを、それぞれ別のコンピュータに接続して作動させる必要があります。初回使
用時には必ず、DJI Assistant 2 でパラメータ設定を行ってください。
1. DJI Assistant 2 を www.dji.com からダウンロードし、コンピュータにインストールします。
2. グラウンドシステムをコンピュータに接続し、DJI Assistant 2 を起動します。次に、[Connected Devices] > [D-RTK]
と進み、座標を設定します。
3. エアシステムの設定を行う際には、A3 フライトコントロールシステムが確実に接続されていることを確認します。フ
ライトコントロールシステムをコンピュータに接続し、DJI Assistant 2 を起動します。[Connected Devices]ページか
ら、接続したフライトコントロールシステムを選択します。次に、[DJI Devices] > [Air System Antenna]と進み、アン
テナのオフセットパラメータを設定します。
エアシステムの設定グラウンドシステムの設定

© 2017 DJI All Rights Reserved.
35
JP
• グラウンドシステムの動作ステータス LED が緑色に点灯するまで、エアシステムの電源をオンにしないでくだ
さい。
• 使用の際にエアシステムおよびグラウンドシステムのアンテナが何ら妨げられないことを確認してください。
• www.dji.com からユーザーマニュアルをダウンロードして、詳細を確認してください。
• DATALINK PRO と共に使用しているのが D-RTK のみである場合、DATALINK PRO ベースステーションおよ
びモバイルステーションの 4 ポジションスイッチが UART_SW1 の位置になっていなければなりません。そう
でないと、D-RTK は DATALINK PRO からのデータを受信できません。DJI Assistant 2 Ground Station も使
用する場合は、4 ポジションスイッチが COMBO_SW4 の位置になっている必要があります。詳細については、
「DATALINK PRO ユーザーマニュアル」を参照してください。
• A3 フライトコントロールシステムを P モードまたは F モードに設定してください。
• 測位中にグラウンドシステムを一切動かさないでください。
• グラウンドシステムの位置座標は DJI Assistant 2 で設定できます。
使用手順
D-RTK は無線干渉のないオープンな環境で使用してください。また、使用に当たっては、以下の手順に従ってください。
1. グラウンドシステムの電源をオンにし、動作ステータス LED が緑色に点灯するまで待ちます。
2. エアシステムの電源をオンにし、動作ステータス LED が緑色に点灯するまで待ちます。
3. A3 フライトコントロールシステムのフライトステータス LED が緑と青の交互点滅になったら、D-RTK は動作準備完
了です。
グラウンドシステムの 位 置の 更 新
グラウンドシステムは、使用のたびに元の位置からのオフセット距離を自動的に検出します。オフセット距離が 50 m を
越える場合、グラウンドシステムは、新しい位置座標の更新を自動的に行います。位置が変更されたにも関わらず、グラ
ウンドシステムが自動的に更新を行わない場合は、手動で更新する必要があります。更新ボタンを押し、5 秒間保持すると、
グラウンドシステムが位置座標を再計算します。位置の更新が正常に完了すると動作ステータス LED が緑色で高速点
滅します(グラウンドシステムの位置が正常に更新されると、DJI GO が知らせます)。
更新ボタン

36
© 2017 DJI All Rights Reserved.
JP
グラウンドシステム
—
白色点灯 グラウンドシステムが初期化中、または作動していません。
......
白色の低速点滅 初期化に失敗しました。
—
赤色点灯 D-RTK の測位が完了していません。
......
赤色の低速点滅 グラウンドシステムの 位置を設 定しています。
—
緑色点灯 グラウンドシステムの位置が設定されました。
......
緑色の高速点滅 グラウンドシステムの位置が更新されました。
エアシステム
—
白色点灯 エアシステムが初期化中、または作動していません。
......
白色の低速点滅 初期化に失敗しました。
—
黄色点灯 グラウンドシステムの測位が完了していませんが、差分データを受信しました。
—
赤色点灯 グラウンドシステムの測位が完了していません。また、差分データを受信しません。
......
黄色の低速点滅 グラウンドシステムの 1 点測位が完了し、差分データを受信しました。
......
赤色の低速点滅 グラウンドシステムの 1 点測位が完了しましたが、差分データを受信しません。
......
紫色の低速点滅 D-RTK は浮動小数点モード実行中です。
......
緑色の低速点滅 D-RTK は計算モード実行中です。
—
緑色点灯 D-RTK は固定モード実行中です。
動作ステータス LED

JP
測位精度
水平:1 cm + 1 ppm
垂直:2 cm + 1 ppm
方向精度
(0.2/R)°
R はベースラインの距離(エアシステムアンテナ 2 本間の距離。
単 位:m )を 表 し ま す 。
二乗平均平方根(RMS) 0.03 m/ 秒
使用周波数
グローバルバージョン:GPS L1 および L2、GLONASS F1 および F2
アジア太平洋バージョン:GPS L1 および L2、BEIDOU B1 および B2
インターフェイスタイプ CAN、UART、USB
入力電圧 3 S ~ 12 S(12 ~ 52 V)
消費電力 5.2 W
電流 0.45 A(@ 12 V)
D-RTK プロセッサ寸法 112.3 mm x 63 mm x 18.6 mm
D-RTK プロセッサ重量 139.5 g
作動温度 0°~ 45°C
保管温度 -40°~ 85°C
仕様
D-RTK
TM
は DJI の商標です。
Copyright © 2017 DJI All Rights Reserved.
本内容は変更されることがあります。
最新版は下記よりダウンロードしてください
www.dji.com/product/d-rtk

38
© 2017 DJI All Rights Reserved.
KR
고지 사항
D-RTK
TM
를구매해주셔서감사합니다.(본장치는이후"제품"으로언급됩니다.)본제품을사용하기전에본문서의
고지사항을주의깊게읽어주십시오.본제품을사용하는것은이고지사항에동의하고모든내용을읽은것으로간
주됩니다.반드시본설명서에따라제품을설치하고사용하십시오.SZDJITechnologyCo.,Ltd.와해당자회사는지
정되지않은액세서리의사용을포함(단,이에국한되지않음)하여제품의부적절한사용,설치또는수리로인해직접
또는간접적으로발생하는손해및부상에대해어떠한책임도지지않습니다.
DJI
TM
는SZDJITechnologyCo.,Ltd.(약어로"DJI")와해당자회사의상표입니다.이설명서에표시된제품이름,브랜
드이름등은해당소유자의상표또는등록상표입니다.DJI는본제품과설명서의소유권과함께모든권한을보유합
니다.본제품또는설명서의어떤부분도DJI의서면허가또는동의없이어떤형식으로도재생산할수없습니다.
이고지사항은다양한언어로제공됩니다.서로다른버전간에차이점이있을경우,중국본토에서제품구매시중국
어간체버전이우선적으로적용되며기타지역에서제품구매시영어버전이우선적으로적용됩니다.
경고
1. D-RTK를처음사용할때DJIAssistant2에서모든부품이올바르게연결되었고오프셋값이올바르게설정되었는
지확인하십시오.
2. 안테나케이블을과도하게구부리거나접지마십시오.
3. 지상시스템안테나가장착된경우에완전히수평을이루고있는지확인하십시오.
4.무선간섭이없는열린공간에서만작동하십시오.
5. 항공시스템및지상시스템안테나를사용할때방해요소가없는지확인하십시오.
6.두항공시스템안테나는동일한높이로유지되어야합니다.
7. 둘이상의DATALINKPRO안테나를사용할때는서로방해하지않는지확인하십시오.
8.하나이상의A3시리즈GPS모듈이필요합니다.
9.DJI순정부품또는DJI에서인증한부품만을사용하십시오.인증되지않은부품또는DJI비공인제조업체의부품
을사용하면시스템오작동및안전성저하의원인이될수있습니다.
10.D-RTK및해당구성요소에이물질(예:물,기름,흙,모래등)이없는지확인하십시오.
11. 이제품을사용할때필요한관련DJI제품의최신사용설명서또는소프트웨어버전을다운로드하십시오.

© 2017 DJI All Rights Reserved.
39
KR
소개
D-RTK는DJIA3시리즈비행컨트롤러에센티미터수준의포지셔닝정확도를제공하기위해특별히설계된GPS및기압
계시스템입니다.이중안테나를사용하면방향지침이일반나침반센서보다더정확하며금속구조물의자기간섭도견
딜수있습니다.
D-RTK에는최고의성능을위해구매지역에따라GPS와BeiDou또는GPS와GLONASS가사용됩니다.
개요
D-RTK프로세서×2 GNSS안테나×3 안테나케이블×3
안테나브래킷
I
×1 안테나브래킷
II
×2 기본보드×1
DATALINK PRO
브래킷×1 나비나사×1
8
핀케이블×1
4핀CAN케이블×1 MicroUSB케이블×1 지상시스템전원케이블×1
항공시스템전원케이블
I
×1 항공시스템전원케이블
II
×1 나사 기타
M2.5×5
M3.0×8
컵헤드전체길이
나사
M3&M3너트
벨크로
양면테이프
육각L렌치

40
© 2017 DJI All Rights Reserved.
KR
*DJIMatrice600과D-RTK모두구매시무료
지상 시스템 설치 및 연결
아래에서는DJIA3비행컨트롤시스템,DJIDATALINKPRO900및DJI인텔리전트기체배터리를사용하여일반적
으로설치및연결하는방법에대해설명합니다.
설치
1.M2.5×5나사2개로DATALINKPRO브래킷을기본보드에장착합니다.
2.M3.0×8나사3개로GNSS안테나를안테나브래킷
I
에장착한다음안테나브래킷
I
을기본보드에고정합니다.
3.D-RTK프로세서를지상시스템의기본보드에고정합니다.
4.DATALINKPRO기지국을DATALINKPRO브래킷에고정합니다.
5.벨크로로배터리를제자리에고정시킨다음기본보드를적절한삼각대에고정합니다*.
*1/4-20나사로장착되는일반카메라및캠코더삼각대를지원합니다.
상부확장플레이트×1 브래킷×4 보조브래킷×2 안테나브래킷
III
×4
안테나클립×2 나사
M2.5 ×5
M3.0 ×8
Matrice600액세서리*

© 2017 DJI All Rights Reserved.
41
KR
1/4"
3/8"
나사산크기
연결
1.안테나케이블로지상시스템과GNSS안테나를연결합니다.
2.8핀케이블로지상시스템과DATALINKPRO기지국을연결합니다.
3.지상시스템전원케이블로지상시스템을배터리에연결합니다.

42
© 2017 DJI All Rights Reserved.
KR
항공 시스템 설치 및 연결
아래에서는안테나브래킷
III
,DJIDATALINKPRO900,DJIMatrice600,D-RTK및DJIA3비행컨트롤시스템을
사용하여일반적으로설치및연결하는방법에대해설명합니다.
설치
1.M3.0×6.5나사4개로GNSS안테나2개를안테나브래킷
III
에장착합니다.
2.양면테이프로D-RTK프로세서(항공시스템으로작동)와DATALINKPRO이동국을상부확장플레이트에부착합
니다.
•다른유형의기체를사용하고있는경우안테나브래킷
II
를사용하고다음요구사항을따릅니다.
a.안테나브래킷
II
2개가항공기의무게중심을통과하는직선형태를이루고안테나2개사이의거리가
25cm보다긴지확인합니다(멀리떨어져있는것이좋음).
b.안테나브래킷
II
2개는항공기의무게중심에서같은거리에있어야합니다.
c.두항공시스템안테나는동일한높이로유지되어야합니다.
연결
1. 안테나케이블을사용하여지상시스템의"ANT1"포트를하나의안테나(마스터안테나)에연결하고"ANT2"포트를
다른안테나(슬레이브안테나)에연결합니다.
2. DATALINKPRO이동국의안테나를부착하고클립으로정리합니다.
3. 8핀케이블로항공시스템CAN/UART포트를DATALINKPRO이동국CAN/UART포트에연결합니다.
4.4핀CAN케이블로항공시스템"CAN1"포트를A3비행컨트롤러의아무CAN1포트에연결합니다.
5. 항공시스템전원케이블
I
로항공시스템"POWER"포트를항공기전원포트에연결합니다.

© 2017 DJI All Rights Reserved.
43
KR
•D-RTK를다른유형의기체에사용하는경우항공시스템전원케이블
II
를사용하십시오.
•펌웨어업그레이드를위해지상시스템및항공시스템을컴퓨터에하나씩연결합니다.업그레이드후
DATALINKPRO,비행제어시스템및D-RTK를켭니다.
•Windows7(이상)또는MacOSX10.9(이상)를지원합니다.
사용
DJI Assistant 2를 사용하여 매개변수 설정
중요:지상시스템및항공시스템은별도의컴퓨터에연결하여활성화해야합니다.처음사용하는경우DJIAssistant
2로매개변수를구성해야합니다.
1. www.dji.com
에서DJIAssistant2를다운로드하여컴퓨터에설치합니다.
2.지상시스템을DJIAssistant2가실행중인컴퓨터에연결한다음ConnectedDevices>D-RTK로이동하여좌표
를구성합니다.
3.항공시스템을구성할때A3비행컨트롤시스템이연결되어있는지확인합니다.비행컨트롤시스템을DJI
Assistant2가실행중인컴퓨터에연결합니다.ConnectedDevices페이지에서연결된비행컨트롤시스템을선택
한다음DJIDevices>AirSystemAntenna로이동하여안테나오프셋매개변수를구성합니다.
항공시스템구성지상시스템구성

44
© 2017 DJI All Rights Reserved.
KR
•지상시스템의작동상태LED가녹색으로일정하게유지되기전에는항공시스템의전원을켜지마십시오.
•항공시스템및지상시스템안테나를사용할때방해요소가없는지확인하십시오.
•자세한내용은www.dji.com
에서사용설명서를다운로드하여참조하십시오.
•D-RTK가DATALINKPRO에만사용되는경우DATALINKPRO기지국및이동국의4단스위치를UART_
SW1위치로전환해야합니다.그렇지않으면D-RTK가DATALINKPRO에서데이터를수신하지못할수있
습니다.DJIAssistant2지상기지국도사용하는경우4단스위치를COMBO_SW4위치로전환해야합니다.자
세한내용은"DATALINKPRO사용설명서"를참조하십시오.
•A3비행컨트롤시스템을P모드또는F모드로설정하십시오.
•포지셔닝중에지상시스템을이동하지마십시오.
•지상시스템의위치좌표는DJIAssistant2에서설정할수있습니다.
사용 절차
D-RTK를무선간섭이없는열린공간에서사용하고아래의절차를따르십시오.
1.지상시스템의전원을켜고작동상태LED가녹색으로일정하게유지될때까지기다립니다.
2.항공시스템의전원을켜고작동상태LED가녹색으로일정하게유지될때까지기다립니다.
3.A3비행컨트롤시스템의비행상태LED가녹색과파란색으로교대로깜박이면D-RTK의작동준비가된것입니다.
지상 시스템의 위치 업데이트
매번사용할때마다지상시스템은이전의위치에서오프셋거리를자동으로감지합니다.오프셋거리가50미터를초
과하는경우지상시스템은새로운위치좌표를자동으로업데이트합니다.위치는변경되었으나지상시스템이자동으
로업데이트하지않는경우수동으로업데이트해야합니다.지상시스템이위치좌표를다시계산할때까지업데이트
버튼을5초동안길게누릅니다.위치가성공적으로업데이트되면작동상태LED가녹색으로빠르게깜박입니다.지상
시스템의위치가성공적으로업데이트되면DJIGO에메시지가표시됩니다.
업데이트버튼

© 2017 DJI All Rights Reserved.
45
KR
지상시스템
—
흰색유지 지상시스템이초기화중이거나활성화되지않았습니다.
......
흰색느리게점멸 초기화에실패했습니다.
—
빨간색유지 D-RTK가포지셔닝되지않았습니다.
......
빨간색느리게점멸 지상시스템의위치를설정중입니다.
—
녹색유지 지상시스템의위치가설정되었습니다.
......
녹색으로빠르게점멸 지상시스템의위치가업데이트되었습니다.
항공시스템
—
흰색유지 항공시스템이초기화중이거나활성화되지않았습니다.
......
흰색느리게점멸 초기화에실패했습니다.
—
노란색유지 지상시스템이포지셔닝되지않았으나차등데이터가수신되었습니다.
—
빨간색유지 지상시스템이포지셔닝되지않았으며차등데이터가수신되지않았습니다.
......
노란색느리게점멸 지상시스템이단일점에포지셔닝되었으며차등데이터가수신되었습니다.
......
빨간색느리게점멸 지상시스템이단일점에포지셔닝되었으나차등데이터가수신되지않았습니다.
......
보라색느리게점멸 D-RTK가부동소수점모드를실행중입니다.
......
녹색으로느리게점멸 D-RTK가계산모드를실행중입니다.
—
녹색유지 D-RTK가고정모드를실행중입니다.
작동 상태 LED

KR
포지셔닝정확도
수평:1cm+1ppm
수직:2cm+1ppm
방향정확도
(0.2/R)°
R은미터로측정한기준선거리(항공시스템안테나2개사이의
거리)입니다.
제곱평균(RMS) 0.03m/s
사용주파수
글로벌버전:GPSL1&L2,GLONASSF1&F2
아시아태평양버전:GPSL1&L2,BEIDOUB1&B2
인터페이스유형 CAN,UART,USB
입력전압 3S~12S(12~52V)
전력소비 5.2W
전류 0.45A(@12V)
D-RTK프로세서치수 112.3mm×63mm×18.6mm
D-RTK프로세서중량 139.5g
작동온도 32°~113°F(0°~45°C)
보관온도 -40°~185°F(-40°~85°C)
사양
D-RTK
TM
은DJI 의상표입니다 .
Copyright©2017DJIAllRightsReserved.
간편 사용 안내는 사전 고지 없이 변경될 수 있습니다.
자세한 내용은 사용 설명서를 다운로드하십시오
www.dji.com/product/d-rtk

© 2017 DJI All Rights Reserved.
47
DE
Haftungsausschluss
Vielen Dank, dass Sie das System D-RTK
TM
gekauft haben (es wird im Folgenden als „Produkt“
bezeichnet). Lesen Sie sich diesen Haftungsausschluss aufmerksam durch, bevor Sie dieses Produkt
verwenden. Durch die Verwendung dieses Produkts erklären Sie sich mit diesem Haftungsausschluss
einverstanden und bestätigen, dass Sie ihn vollständig gelesen haben. Bitte montieren und verwenden
Sie dieses Produkt unter strikter Einhaltung der vorliegenden Bedienungsanleitung. Die SZ DJI
Technology Co., Ltd. und seine verbundenen Unternehmen übernehmen keine Haftung für Schäden oder
Verletzungen, die direkt oder indirekt aus unsachgemäßer Nutzung, Montage oder Neumontage dieses
Produkts entstehen, einschließlich, der Verwendung von nicht vorgesehenem Zubehör.
DJI
TM
ist ein Warenzeichen von SZ DJI Technology Co., Ltd. (kurz: „DJI“) und seiner verbundenen
Unternehmen. Namen von Produkten, Marken, usw., die in dieser Bedienungsanleitung enthalten
sind, sind Warenzeichen oder eingetragene Warenzeichen der jeweiligen Besitzer. Dieses Produkt und
die Bedienungsanleitung sind urheberrechtlich geschütztes Eigentum von DJI und alle Rechte sind
vorbehalten. Kein Teil dieses Produkts oder der Bedienungsanleitung darf in irgendeiner Form ohne
vorherige schriftliche Zustimmung oder Genehmigung von DJI reproduziert werden.
Dieser Haftungsausschluss wird in verschiedenen Sprachen erstellt. Im Fall von Abweichungen zwischen
den verschiedenen Versionen ist die im vereinfachten Chinesisch verfasste Version maßgeblich, wenn
das jeweilige Produkt in Festlandchina erworben wurde, bzw. die englische Version, wenn das jeweilige
Produkt in anderen Regionen erworben wurde.
Warnhinweise
1. Stellen Sie vor der erstmaligen Verwendung des D-RTK sicher, dass sämtliche Teile ordnungsgemäß
angeschlossen und OFFSET-Werte in DJI Assistant 2 richtig konguriert sind.
2. Biegen Sie das Antennenkabel NICHT übermäßig, und knicken Sie es NICHT.
3. Achten Sie darauf, dass die Antenne des Bodensystems nach der Montage absolut waagerecht
ausgerichtet ist.
4. Betreiben Sie das Produkt ausschließlich im Freien in einer Umgebung, in der keine Funkstörsignale auftreten.
5. Stellen Sie sicher, dass die Antennen von Flugsystem und Bodensystem während der Verwendung
nicht verdeckt sind.
6. Die beiden Antennen des Flugsystems sollten auf gleicher Höhe montiert werden.
7. Stellen Sie sicher, dass die DATALINK PRO-Antennen einander während der Verwendung NICHT verdecken.
8. Es ist mindestens ein GPS-Modul der Serie A3 erforderlich.
9. Nur DJI-Originalteile oder Teile mit DJI-Freigabe verwenden! Nicht freigegebene Teile oder Teile von
Fremdherstellern können Systemstörungen verursachen und die Betriebssicherheit des Produkts
beeinträchtigen.
10. Stellen Sie sicher, dass das D-RTK und seine Bauteile keine Verunreinigungen aufweisen (z. B.
Wasser, Öl, Erde, Sand).
11. Laden Sie die neueste Version der Bedienungsanleitung oder der Software von DJI-Produkten
herunter, die für die Verwendung dieses Produkts erforderlich sind.

48
© 2017 DJI All Rights Reserved.
DE
Einleitung
Das D-RTK ist ein GPS- und Barometer-System, das auf eine zentimetergenaue Positioniergenauigkeit
des Flugcontrollers der Serie DJI A3 ausgelegt ist. Dank der Verwendung von zwei Antennen ist
die Referenz der Flugrichtung genauer als die eines normalen Kompasssensors, außerdem ist es
unempndlich gegenüber magnetischen Interferenzen durch Metallkonstruktionen.
Je nachdem, in welcher Region es gekauft wurde, kommt im D-RTK entweder GPS mit BeiDou oder GPS
mit GLONASS zum Einsatz, um die bestmögliche Leistung zu erzielen.
Übersicht
D-RTK-Prozessor ×2 GNSS-Antenne ×3 Antennenkabel ×3
Antennenhalterung
I
×1 Antennenhalterung
II
×2 Grundplatte ×1
DATALINK PRO-Halterung ×1 Rändelschraube ×1 8-poliges Kabel ×1
4-poliges CAN-Kabel ×1 Micro-USB-Kabel ×1 Bodensystem-Stromkabel ×1
Flugsystem-Stromkabel
I
×1 Flugsystem-Stromkabel
II
×1 Schraube Sonstiges
M2,5 ×5
M3,0 ×8
Rundkopfschraube
mit Vollgewinde
M3 und M3-Mutter
Klettband
Doppelseitiges
Klebeband
L-förmiger
Inbusschlüssel

© 2017 DJI All Rights Reserved.
49
DE
*Kostenlos beiliegend bei Kauf eines DJI Matrice 600 oder D-RTK.
Installation und Anschluss des Bodensystems
Zur Darstellung von Installation und Anschluss werden im Folgenden der Flugcontroller DJI A3, DJI DATALINK
PRO 900 sowie die DJI Intelligent Flight Battery verwendet.
Installation
1. Befestigen Sie die DATALINK PRO-Halterung mithilfe der beiden Schrauben (M2,5 × 5) an der Grundplatte.
2. Montieren Sie die GNSS-Antenne mithilfe der drei Schrauben (M3,0 × 8) an der Antennenhalterung
I
,
und xieren Sie anschließend die Antennenhalterung
I
auf der Grundplatte.
3. Befestigen Sie den D-RTK-Prozessor als Bodensystem auf der Grundplatte.
4. Befestigen Sie die DATALINK PRO-Basisstation auf der DATALINK PRO-Halterung.
5. Fixieren Sie den Akku mithilfe des Klettbands, und befestigen Sie anschließend die Grundplatte auf
einem geeigneten Stativ*.
*Unterstützt gängige Kamera- und Camcorder-Stative mit Befestigung durch 1/4-20-Schrauben.
Obere Erweiterungsplatte ×1 Halterung × 4 Halterung für
Assistant ×2
Antennenhalterung
III
×4
Antennenclip ×2 Schraube
M2,5 ×5
M3,0 ×8
Zubehör für Matrice 600*

50
© 2017 DJI All Rights Reserved.
DE
1/4"
3/8"
Gewindegröße
Anschließen
1. Schließen Sie das Bodensystem und die GNSS-Antenne mit einem Antennenkabel an.
2. Schließen Sie das Bodensystem und die DATALINK PRO-Basisstation mit einem 8-poligen Kabel an.
3. Schließen Sie das Bodensystem mithilfe des Bodensystem-Stromkabels an den Akku an.

© 2017 DJI All Rights Reserved.
51
DE
Installation und Anschluss des Flugsystems
Zur Darstellung von Installation und Anschluss werden im Folgenden die Antennenhalterung
III
, DJI DATA-
LINK PRO 900, DJI Matrice 600, D-RTK und der Flugcontroller DJI A3 verwendet.
Installation
1. Befestigen Sie die beiden GNSS-Antennen mithilfe der vier Schrauben (M3,0 × 6,5) an der
Antennenhalterung
III
.
2. Bringen Sie den D-RTK-Prozessor (der als Flugsystem fungiert) und die mobile DATALINK PRO-Station
mit doppelseitigem Klebeband an der oberen Erweiterungsplatte an.
• Verwenden Sie die Antennenhalterung
II
, wenn Sie andere Fluggeräte einsetzen, und beachten
Sie dazu die nachstehenden Anforderungen:
a. Stellen Sie sicher, dass die beiden Antennenhalterungen
II
eine gerade Linie durch den
Schwerpunkt des Fluggeräts bilden und dass der Abstand zwischen den beiden Antennen
größer als 25 cm ist (je größer, desto besser).
b. Die beiden Antennenhalterungen
II
sollten denselben Abstand zum Schwerpunkt des
Fluggeräts haben.
c. Die beiden Antennen des Flugsystems sollten auf gleicher Höhe montiert werden.
Anschließen
1. Verbinden Sie den Anschluss „ANT1“ des Bodensystems mithilfe der Antennenkabel mit einer Antenne
als Master-Antenne und den Anschluss „ANT2“ mit der anderen Antenne als Slave-Antenne.
2. Befestigen Sie die Antennen der mobilen DATALINK PRO-Station, und sichern Sie sie mit Clips.
3. Verbinden Sie den CAN/UART-Anschluss des Flugsystems mit dem CAN/UART-Anschluss der mobilen
DATALINK PRO-Station mithilfe eines 8-poligen Kabels.
4. Verbinden Sie den Anschluss „CAN1“ des Flugsystems mit einem beliebigen CAN1-Anschluss am
Flugcontroller A3 mithilfe eines 4-poligen CAN-Kabels
5. Verbinden Sie den Anschluss „POWER“ des Flugsystems mithilfe eines Flugsystem-Stromkabels
I
mit
dem Stromanschluss des Fluggeräts.

52
© 2017 DJI All Rights Reserved.
DE
• Verwenden Sie das Flugsystem-Stromkabel
II
, wenn Sie das D-RTK mit anderen Fluggeräten einsetzen.
• Schließen Sie das Bodensystem und das Flugsystem nacheinander an den Computer an, um
ein Upgrade der Firmware vorzunehmen. Schalten Sie DATALINK PRO, Flugcontroller und D-RTK
nach dem Upgrade aus und wieder ein.
• Unterstützt Windows 7 (oder höher) und Mac OS X 10.9 (oder höher).
Verwendung
Parameter mit DJI Assistant 2 kongurieren
WICHTIG: Das Bodensystem und das Flugsystem sollten separat mit dem Computer verbunden und
aktiviert werden. Stellen Sie sicher, dass die Parameter mit DJI Assistant 2 für die erstmalige Verwendung
konguriert werden.
1. Laden Sie DJI Assistant 2 von www.dji.com herunter, und installieren Sie das Programm auf Ihrem Computer.
2. Schließen Sie das Bodensystem nach Aufrufen von DJI Assistant 2 an den Computer an, und wechseln
Sie anschließend zu Angeschlossene Geräte > D-RTK, um die Koordinaten zu kongurieren.
3. Stellen Sie bei der Konguration des Flugsystems sicher, dass der Flugcontroller A3 angeschlossen ist.
Schließen Sie den Flugcontroller bei aufgerufenem DJI Assistant 2 an den Computer an. Wählen Sie
auf der Seite Angeschlossene Geräte den angeschlossenen Flugcontroller, und wechseln Sie zu DJI-
Geräte > Flugsystemantenne, um die Oset-Parameter der Antenne zu kongurieren.
Flugsystem kongurierenBodensystem kongurieren

© 2017 DJI All Rights Reserved.
53
DE
• Schalten Sie das Flugsystem ERST ein, wenn die Status-LED des Systems permanent grün leuchtet.
• Stellen Sie sicher, dass die Antennen von Flugsystem und Bodensystem während der Verwen-
dung nicht verdeckt sind.
• Laden Sie die Bedienungsanleitung von www.dji.com herunter, um weitere Informationen zu
erhalten.
• Die 4-Positionsschalter der DATALINK PRO-Basisstation und der mobilen DATALINK PRO-
Station sollten in die Position UART_SW1 geschaltet werden, wenn das D-RTK ausschließlich mit
DATALINK PRO verwendet wird, da das D-RTK anderenfalls keine Daten über DATALINK PRO
empfängt. Bei gleichzeitiger Verwendung der DJI Assistant 2 Bodenstation sollten die 4-Positi-
onsschalter in die Position COMBO_SW4 geschaltet werden. Genauere Informationen nden Sie
in der „DATALINK PRO-Bedienungsanleitung“.
• Aktivieren Sie den Modus P oder dem Modus F des Flugcontrollers A3.
• Bewegen Sie das Bodensystem während der Positionierung NICHT.
• Die Koordinaten der Position des Bodensystems können in DJI Assistant 2 eingegeben werden.
Das Produkt verwenden
Verwenden Sie das D-RTK im Freien in einer Umgebung ohne Funkstörsignale, und beachten Sie die
nachstehenden Verwendungshinweise:
1. Schalten Sie das Bodensystem ein, und warten Sie, bis die Status-LED permanent grün leuchtet.
2. Schalten Sie das Flugsystem ein, und warten Sie, bis die Status-LED permanent grün leuchtet.
3. Das D-RTK ist betriebsbereit, sobald die Flugstatus-LED am Flugcontroller A3 abwechselnd grün und
blau leuchtet.
Position des Bodensystems aktualisieren
Das Bodensystem erkennt bei jedem Einschalten automatisch den Abstand zu seiner vorherigen
Position. Ist der Abstand > 50 Meter, aktualisiert das Bodensystem die Koordinaten der neuen Position
automatisch. Aktualisiert sich das Bodensystem bei geänderter Position nicht automatisch, müssen
Sie es manuell aktualisieren. Halten Sie die Aktualisierungstaste 5 Sekunden lang gedrückt, bis das
Bodensystem die Koordinaten seiner Position neu berechnet. Die Status-LED blinkt schnell grün,
wenn die Position erfolgreich aktualisiert wird (DJI GO zeigt eine Meldung an, sobald die Position des
Bodensystems erfolgreich aktualisiert wurde).
Aktualisierungstaste

54
© 2017 DJI All Rights Reserved.
DE
Bodensystem
—
Leuchtet permanent weiß Bodensystem initialisiert sich oder ist nicht aktiviert.
......
Blinkt langsam weiß Initialisierung fehgeschlagen.
—
Leuchtet permanent rot D-RTK nicht positioniert.
......
Blinkt langsam rot Position des Bodensystems wird eingestellt.
—
Leuchtet permanent grün Position des Bodensystems ist eingestellt.
......
Blinkt schnell grün Position des Bodensystems ist aktualisiert.
Flugsystem
—
Leuchtet permanent weiß Flugsystem initialisiert sich oder ist nicht aktiviert.
......
Blinkt langsam weiß Initialisierung fehgeschlagen.
—
Leuchtet permanent gelb
Bodensystem ist nicht positioniert, Dierenzdaten werden jedoch
empfangen.
—
Leuchtet permanent rot
Bodensystem ist nicht positioniert, es werden keine Dierenzdaten
empfangen.
......
Blinkt langsam gelb
Bodensystem ist mit einem Punkt positioniert, Dierenzdaten
werden empfangen.
......
Blinkt langsam rot
Bodensystem ist mit einem Punkt positioniert, es werden jedoch
keine Dierenzdaten empfangen.
......
Blinkt langsam violett D-RTK wird in einem Gleitkommamodus betrieben.
......
Blinkt langsam grün D-RTK wird in einem Berechnungsmodus betrieben.
—
Leuchtet permanent grün D-RTK wird in einem festen Modus betrieben.
Status-LED

DE
Positioniergenauigkeit
Horizontal: 1 cm + 1 ppm
Vertikal: 2 cm + 1 ppm
Ausrichtungsgenauigkeit
(0,2/R)°
R ist der Grundlinienabstand (Abstand zwischen zwei
Flugsystemantennen) in Metern.
Effektivwert (RMS) 0,03 m/s
Verwendete Frequenz
Globale Version: GPS L1&L2, GLONASS F1&F2
Version für Asien-Pazik-Raum: GPS L1&L2, BEIDOU B1&B2
Schnittstellentyp CAN, UART, USB
Eingangsspannung 3S bis 12S (12 bis 52 V)
Leistungsaufnahme 5,2 W
Strom 0,45 A (bei 12 V)
Abmessungen des
D-RTK-Prozessors
112,3 mm×63 mm×18,6 mm
Gewicht des D-RTK-Prozessors 139,5 g
Betriebstemperatur
0 bis 45 °C (32 bis 113 °F)
Lagertemperatur
-40 bis 85 °C (-40 bis 185 °F)
Technische Daten
D-RTK
TM
ist eine Marke von DJI.
Copyright © 2017 DJI Alle Rechte vorbehalten.
Änderungen vorbehalten.
Die aktuelle Fassung nden Sie auf
www.dji.com/product/d-rtk

56
© 2017 DJI All Rights Reserved.
ES
Renuncia de responsabilidad
Gracias por adquirir el D-RTK
TM
(en lo sucesivo denominado el "producto"). Lea esta renuncia de
responsabilidad detenidamente antes de usar este producto. Al utilizar este producto, maniesta su
conformidad con esta cláusula de renuncia de responsabilidad y conrma que la ha leído completamente.
Instale y utilice este producto siguiendo estrictamente las instrucciones de este manual. SZ DJI
Technology Co., Ltd. y sus empresas liales no asumen ninguna responsabilidad por daños o lesiones
causados directa o indirectamente por un uso, instalación o montaje deciente del producto, sin incluir el
uso de accesorios no designados.
DJI
TM
es una marca comercial de SZ DJI Technology Co., Ltd. (abreviado como "DJI") y sus liales. Los
nombres de productos, marcas, etc., que aparecen en este manual son marcas comerciales o marcas
comerciales registradas de sus respectivas empresas propietarias. Este producto y el manual están
protegidos por los derechos de autor de DJI con todos los derechos reservados. Ni la totalidad ni parte de
este manual o producto deberá ser reproducida en forma alguna sin el consentimiento previo por escrito o
la autorización de DJI.
Esta renuncia se proporciona en diversos idiomas. En el caso de que haya diferencias entre las distintas
versiones, prevalecerá la versión en chino simplicado si el producto en cuestión se ha comprado en
China continental. La versión inglesa prevalecerá si el producto en cuestión se ha adquirido en cualquier
otra región.
Advertencias
1. Antes de usar el D-RTK por primera vez, asegúrese de que todas las piezas estén conectadas
correctamente y que los valores de OFFSET se hayan congurado correctamente en DJI Assistant 2.
2. NO doble ni pliegue excesivamente el cable de la antena.
3. Asegúrese de que la antena de Ground System queda perfectamente alineada una vez montada.
4. Utilice el sistema únicamente en espacios abiertos sin interferencias de radio.
5. Asegúrese de que las antenas del Air System y el Ground System están libres de obstáculos al usarlas.
6. Las dos antenas del Air System deben mantenerse a la misma altura.
7. Asegúrese de que las antenas del DATALINK PRO no se obstaculizan mutuamente al usarlas.
8. Se requiere al menos un módulo de GPS de la serie A3.
9. Utilice solo piezas originales de DJI o certicadas por DJI. Las piezas no autorizadas o piezas de
fabricantes no certicados por DJI pueden causar un mal funcionamiento del sistema y comprometer
la seguridad.
10. Asegúrese de que el D-RTK y sus componentes no están contaminados (p.ej., con agua, aceite,
tierra o arena).
11. Descargue la última versión del manual de usuario o software de cualquier producto DJI relacionado
que necesite al usar este producto.

© 2017 DJI All Rights Reserved.
57
ES
Introducción
El D-RTK es un sistema de GPS y barómetro diseñado especialmente para proporcionar precisión de
posicionamiento del orden de centímetros para los controladores de vuelo DJI de la serie A3. Mediante el
uso de dos antenas, la referencia de rumbo es más precisa que la de un sensor de brújula normal y no se
ve afectada por interferencias magnéticas causadas por estructuras metálicas.
En función de la región donde se haya comprado, el D-RTK emplea GPS y BeiDou o GPS y GLONASS
para un rendimiento insuperable.
Descripción general
Procesador D-RTK ×2 Antena GNSS ×3 Cable de antena ×3
Soporte de antena
I
×1 Soporte de antena
II
×2 Placa base ×1
Soporte DATALINK PRO ×1 Tornillo de apriete manual ×1 Cable de 8 pines ×1
Cable CAN de 4 pines ×1 Cable MicroUSB ×1
Cable de alimentación de
Ground System ×1
Cable de alimentación de Air
System
I
×1
Cable de alimentación de Air
System
II
×1
Tornillos Otros
M2.5 ×5
M3.0 ×8
Tornillo de cabeza
cóncava de rosca
completa
M3 y tuerca M3
Velcro
Cinta
adhesiva de
doble cara
Llave allen

58
© 2017 DJI All Rights Reserved.
ES
*Incluidos con la compra conjunta del DJI Matrice 600 y el D-RTK.
Instalación y conexión de Ground System
A continuación, se usa como ejemplo el sistema de control de vuelo DJI A3, el DJI DATALINK PRO 900 y
la Batería de Vuelo Inteligente DJI para ilustrar una instalación y conexión típicas.
Instalación
1. Monte el soporte del DATALINK PRO sobre la placa base con dos tornillos M2.5 × 5.
2. Monte la antena GNSS sobre el soporte de la antena
I
con tres tornillos M3.0 × 8, y je el soporte de la
antena
I
a la placa base.
3. Fije el procesador D-RTK a la placa base así como el Ground System.
4. Fije la estación base DATALINK PRO al soporte DATALINK PRO.
5. Fije la batería en su sitio con el velcro y luego monte la placa base sobre un trípode adecuado*.
*Admite trípodes de videocámara y cámara normales de montaje con tornillo de 1/4-20.
Placa de expansión supe-
rior ×1
Soporte ×4 Soporte de
asistencia ×2
Soporte de antena
III
×4
Clip de la antena ×2 Tornillos
M2.5 ×5
M3.0 ×8
Accesorios para el Matrice 600*

© 2017 DJI All Rights Reserved.
59
ES
1/4"
3/8"
Tamaño de rosca
Conexión
1. Conecte el Ground System y la antena GNSS mediante un cable de antena.
2. Conecte el Ground System y la estación base DATALINK PRO mediante un cable de 8 pines.
3. Conecte el Ground System a la batería mediante el cable de alimentación del Ground System.

60
© 2017 DJI All Rights Reserved.
ES
Instalación y conexión de Air System
A continuación, se usa como ejemplo el soporte de antena
III
, el DJI DATALINK PRO 900, el DJI Matrice
600, el D-RTK y el sistema de control de vuelo DJI A3 para ilustrar una instalación y conexión típicas.
Instalación
1. Monte las dos antenas GNSS en el soporte de antena
III
con cuatro tornillos M3.0 × 6,5.
2. Utilizando cinta de doble cara, je el procesador D-RTK (funcionando como Air System) y la estación
móvil DATALINK PRO a la placa de expansión superior.
• Si usa otros tipos de aeronave, utilice el soporte de antena
II
y siga los requisitos siguientes:
a. Asegúrese de que los dos soportes de antena
II
forman una línea recta a través del centro de
gravedad y que la distancia entre ambas antenas es de más de 25 cm (cuanto más alejadas,
mejor).
b. Los dos soportes de antena
II
deben estar equidistantes del centro de gravedad de la aeronave.
c. Las dos antenas del Air System deben mantenerse a la misma altura.
Conexión
1. Utilizando los cables de antena, conecte el puerto “ANT1” del Ground System a una antena como
antena maestra (Master), y el puerto “ANT2” a la otra antena como antena esclava (Slave).
2. Conecte las antenas de la estación móvil DATALINK PRO y fíjelas con abrazaderas.
3. Conecte el puerto CAN/UART del Air System al puerto CAN/UART de la estación móvil DATALINK
PRO con un cable de 8 pines.
4. Conecte el puerto “CAN1” del Air System a cualquier puerto CAN1 del controlador de vuelo A3
mediante un cable CAN de 4 pines.
5. Conecte el puerto “POWER” del Air System al puerto de alimentación de la aeronave mediante un
cable de alimentación de Air System
I
.

© 2017 DJI All Rights Reserved.
61
ES
• Utilice el cable de alimentación del Air System
II
si va a usar el D-RTK con otros tipos de aeronave.
• Conecte el Ground System y el Air System uno a uno al ordenador para efectuar la actualización
de rmware. Apague y vuelva a encender el DATALINK PRO, el sistema de control de vuelo y el
D-RTK después de la actualización.
• Compatible con Windows 7 (o posterior) o Mac OS X 10.9 (o posterior).
Uso
Conguración de los parámetros con DJI Assistant 2
IMPORTANTE: El Ground System y el Air System deben estar conectados al ordenador por separado y
activados. Asegúrese de congurar los parámetros con DJI Assistant 2 antes de usarlo por primera vez.
1. Descargue DJI Assistant 2 de www.dji.com e instálelo en el ordenador.
2. Conecte el Ground System al ordenador con DJI Assistant 2 iniciado, y vaya a Connected Devices >
D-RTK para congurar las coordenadas.
3. Al congurar el Air System, asegúrese de que el sistema de control de vuelo A3 está conectado.
Conecte el sistema de control de vuelo al ordenador con DJI Assistant 2 iniciado. En la página
Connected Devices, seleccione el sistema de control de vuelo conectado y a continuación vaya a DJI
Devices > Air System Antenna para congurar los parámetros de desviación de la antena.
Conguración del Air SystemConguración del Ground System

62
© 2017 DJI All Rights Reserved.
ES
• NO encienda el Air System antes de que la luz del LED de estado de funcionamiento del
Ground System se quede ja en verde.
• Asegúrese de que las antenas del Air System y el Ground System están libres de obstáculos al
usarlas.
• Descargue el manual del usuario en www.dji.com para obtener más información.
• Los interruptores de 4 posiciones de la estación base y la estación móvil DATALINK PRO deben
colocarse en la posición UART_SW1 si el D-RTK se utiliza sólo con el DATALINK PRO; de lo
contrario, el D-RTK no podrá recibir datos del DATALINK PRO. Si también utiliza la estación base de
DJI Assistant 2, los interruptores de 4 posiciones se deben colocar en la posición COMBO_SW4.
Consulte el “Manual del usuario de DATALINK PRO” para obtener más información.
• Sitúe el sistema de control de vuelo A3 en modo P o modo F.
• NO mueva el Ground System durante el posicionamiento.
• Las coordenadas de posición del Ground System se pueden establecer en DJI Assistant 2.
Procedimientos de uso
Use el D-RTK en un entorno libre de interferencias de radio y siga estos procedimientos:
1. Encienda el Ground System y espere a que el LED de estado de funcionamiento muestre una luz verde
ja.
2. Encienda el Air System y espere a que el LED de estado de funcionamiento muestre una luz verde ja.
3. El D-RTK estará listo para funcionar cuando el LED de estado de vuelo del sistema de control de vuelo
A3 parpadee alternativamente en verde y azul.
Actualización de la posición del Ground System
Cada vez que se usa, el Ground System detecta automáticamente la distancia de desviación respecto
de su posición anterior. Si la distancia de desviación es > 50 metros, el Ground System actualizará las
nuevas coordenadas de posición automáticamente. Si la posición ha cambiado pero el Ground System
no se actualiza automáticamente, el usuario deberá efectuar la actualización manualmente. Mantenga
pulsado el botón de actualización durante 5 segundos hasta que el Ground System vuelva a calcular
las coordenadas de posición. El LED de estado de funcionamiento parpadeará en verde rápidamente
si la posición se actualiza correctamente (cuando la posición del Ground System se actualice
satisfactoriamente, DJI GO lo conrmará mediante un mensaje).
Botón de actualización

© 2017 DJI All Rights Reserved.
63
ES
Ground System
—
Blanco jo El Ground System se está inicializando o no está activado.
......
Parpadeo lento en
blanco
Fallo de inicialización.
—
Rojo jo D-RTK no posicionado.
......
Parpadeo lento en rojo La posición del Ground System se está estableciendo.
—
Verde jo Posición del Ground System establecida.
......
Parpadeo rápido en
verde
Posición del Ground System actualizada.
Air System
—
Blanco jo El Air System se está inicializando o no está activado.
......
Parpadeo lento en
blanco
Fallo de inicialización.
—
Amarillo jo Ground System no posicionado, pero datos diferenciales recibidos.
—
Rojo jo Ground System no posicionado, datos diferenciales no recibidos.
......
Parpadeo lento en
amarillo
Ground System posicionado con un punto, datos diferenciales recibidos.
......
Parpadeo lento en rojo
Ground System posicionado con un punto pero datos diferenciales
no recibidos.
......
Parpadeo lento en
púrpura
D-RTK está ejecutando modo en vuelo estático.
......
Parpadeo lento en
verde
D-RTK está ejecutando modo de cálculo.
—
Verde jo D-RTK está ejecutando modo jo.
LED de estado de funcionamiento

ES
Precisión de posicionamiento
Horizontal: 1 cm + 1 ppm
Vertical: 2 cm + 1 ppm
Precisión de la orientación
(0,2/R)°
R es la distancia de línea base (distancia entre ambas antenas
del Air System) en metros.
Media cuadrática (RMS) 0,03 m/s
Frecuencia empleada
Versión global: GPS L1&L2, GLONASS F1&F2
Versión Asia-Pacíco: GPS L1&L2, BEIDOU B1&B2
Tipo de interfaz CAN, UART, USB
Voltaje de entrada 3S a 12S (12 a 52 V)
Potencia consumida 5,2 W
Corriente 0,45 A (a 12 V)
Procesador D-RTK 112,3 mm x 63 mm x 18,6 mm
Peso del procesador D-RTK 139,5 g
Temperatura de funcionamiento
De 32° a 45°C (de 0° a 113°F)
Temperatura de almacenamiento
De -40° a 85°C (de -40° a 185°F)
Especicaciones
D-RTK
TM
es una marca comercial de DJI.
Copyright © 2017 DJI Todos los Derechos Reservados.
Este contenido está sujeto a cambios.
Descarga la última versión de
www.dji.com/product/d-rtk

© 2017 DJI All Rights Reserved.
65
FR
Clause d'exclusion de responsabilité
Merci d'avoir acheté le D-RTK
TM
(ci-après dénommé le « produit »). Lisez attentivement la présente
clause d'exclusion de responsabilité avant d'utiliser ce produit. En utilisant ce produit, vous acceptez
la présente clause d'exclusion de responsabilité et conrmez l'avoir lue dans son intégralité. Installez et
utilisez ce produit conformément au présent manuel. SZ DJI Technology Co., Ltd. et ses sociétés aliées
déclinent toute responsabilité en cas de dommage ou de blessure causé(e) directement ou indirectement
par l'utilisation, l'installation ou le remontage incorrect(e) de ce produit, y compris mais sans s'y limiter,
l'utilisation d'accessoires non autorisés.
DJI
TM
est une marque commerciale de SZ DJI Technology Co., Ltd. (abrégée en « DJI ») et de ses sociétés
aliées. Les noms de produits, de marques, etc., apparaissant dans le présent manuel sont des marques
commerciales ou des marques déposées de leurs détendeurs respectifs. Ce produit et le présent manuel
sont la propriété de DJI, tous droits réservés. Aucune partie de ce produit ou du présent manuel ne peut
être reproduite sous quelque forme que ce soit sans l'autorisation ou le consentement écrit préalable de
DJI.
La présente clause d'exclusion de responsabilité est traduite dans plusieurs langues. En cas de
divergence entre les diérentes versions, la version chinoise prévaudra si le produit concerné a été acheté
en Chine continentale et la version anglaise prévaudra si le produit concerné a été acheté dans toute
autre région.
Avertissements
1. Lorsque vous utilisez le D-RTK pour la première fois, vériez que tous les éléments sont bien connectés
et que les valeurs OFFSET sont congurées correctement dans DJI Assistant 2.
2. Ne pliez PAS et ne recourbez PAS le câble des antennes de manière excessive.
3. Veillez à ce que l'antenne du système au sol soit parfaitement à la verticale.
4. Utilisez uniquement le produit dans un environnement dégagé exempt d’interférences radio.
5. Faites en sorte qu'aucun obstacle ne gêne les antennes du système aérien et du système au sol.
6. Les deux antennes du système aérien doivent toujours être à la même hauteur.
7. Assurez-vous que les antennes du DATALINK PRO ne se gênent PAS mutuellement lors de l’utilisation.
8. Au moins un module GPS de la gamme A3 est nécessaire.
9. N'utilisez que des pièces ocielles DJI ou certiées par DJI. Les pièces non autorisées ou les pièces
de fabricants non agréés par DJI sont susceptibles d'entraîner un dysfonctionnement du système et de
compromettre la sécurité.
10. Veillez à ce que le D-RTK et ses composants soient protégés de toute contamination (par exemple :
eau, huile, terre ou sable).
11. Téléchargez la dernière version du manuel de l'utilisateur ou du logiciel pour tout produit DJI associé
requis lorsque vous utilisez ce produit.

66
© 2017 DJI All Rights Reserved.
FR
Introduction
Le D-RTK est un système GPS doté d'un baromètre. Il est spécialement conçu pour orir une précision
centimétrique aux contrôleurs de vol A3 de DJI. Avec ses deux antennes, son point de référence est
plus précis qu'un capteur de compas et il présente l'avantage de ne pas être sensible aux interférences
magnétiques des ouvrages métalliques.
Selon la région d'achat, le D-RTK utilise une navigation GPS et BeiDou ou une navigation GPS et
GLONASS an d'orir le positionnement le plus ecace qui soit.
Vue d'ensemble
Processeur D-RTK ×2 Antenne GNSS ×3 Câble d'antenne ×3
Support d'antenne
I
×1 Support d'antenne
II
×2 Carte ×1
Support pour
DATALINK PRO ×1
Vis à serrage manuel ×1
Câble à 8 broches ×1
Câble CAN à 4 broches ×1 Câble Micro-USB ×1
Câble d'alimentation du système
au sol ×1
Câble d'alimentation
I
du
système aérien ×1
Câble d'alimentation
II
du
système aérien ×1
Vis Autres
M2,5 ×5
M3 ×8
Vis à tête ronde
Vis letée
M3 et écrou M3
Bande Velcro
Bande adhésive
double face
Clé hexagonale

© 2017 DJI All Rights Reserved.
67
FR
*Fournis pour l'achat d'un Matrice 600 et d'un D-RTK de DJI.
Installation et connexion du système au sol
La procédure suivante explique comment réaliser l'installation et la connexion du produit en utilisant à titre
d'exemple le système de contrôle de vol A3, le DATALINK PRO 900 et l'Intelligent Flight Battery de DJI.
Installation
1. Installez le support du DATALINK PRO sur la carte à l'aide de deux vis M2,5 × 5 mm.
2. Installez l'antenne GNSS sur le support d'antenne
I
à l'aide de trois vis M3 × 8 mm, puis xez le
support d'antenne
I
sur la carte.
3. Fixez le processeur D-RTK sur la carte en tant que système au sol.
4. Fixez la station de base DATALINK PRO sur son support.
5. Fixez la batterie à son emplacement à l'aide de la bande Velcro, puis installez la carte sur un trépied
adapté*.
* Carte compatible avec les trépieds classiques destinés aux appareils photo et caméscopes (vis de
6,3 mm ou 1/4 de pouce et 20 lets au pouce).
Plaque d'extension
supérieure ×1
Support ×4 Support pour système
Assistant ×2
Support d'antenne
III
×4
Clip d'antenne ×2 Vis
M2,5 ×5
M3 ×8
Accessoires pour Matrice 600*

68
© 2017 DJI All Rights Reserved.
FR
6,3 mm (1/4 po)
9,5 mm (3/8 po)
Diamètre
Connexion
1. Connectez le système au sol et l'antenne GNSS à l'aide d'un câble d'antenne.
2. Connectez le système au sol et la station de base DATALINK PRO à l'aide du câble à 8 broches.
3. Connectez le système au sol et la batterie à l'aide du câble d'alimentation de celui-ci.

© 2017 DJI All Rights Reserved.
69
FR
Installation et connexion du système aérien
La procédure suivante explique comment réaliser l'installation et la connexion du produit en utilisant à titre
d'exemple le support d'antenne
III
, le DATALINK PRO 900, le Matrice 600, le D-RTK et le système de
contrôle de vol A3 de DJI.
Installation
1. Installez les deux antennes GNSS sur le support d'antenne
III
à l'aide de quatre vis M3 × 6,5 mm.
2. Fixez le processeur D-RTK (en tant que système aérien) et la station mobile DATALINK PRO à la plaque
d'extension supérieure à l'aide de la bande adhésive double face.
• Si vous possédez un autre type d'appareil, utilisez le support d'antenne
II
et respectez les
recommandations suivantes :
a. Les deux supports d'antenne
II
doivent être diamétralement opposés par rapport au centre
de gravité et les antennes doivent être séparées d'au moins 25 cm.
b. Les deux supports d'antenne II doivent être placés à égale distance du centre de gravité de
l'appareil.
c. Les deux antennes du système aérien doivent être à la même hauteur.
Connexion
1. À l'aide des câbles d'antenne, reliez le port ANT1 du système au sol à l'antenne principale et le
port ANT2 à l'antenne secondaire.
2. Installez les antennes de la station mobile DATALINK PRO et xez-les avec les clips.
3. À l'aide du câble à 8 broches, reliez le port CAN/UART du système aérien au port CAN/UART de la
station mobile DATALINK PRO.
4. À l'aide du câble CAN à 4 broches, reliez le port CAN1 du système aérien à n'importe quel port CAN1
du contrôleur de vol A3.
5. À l'aide du câble d'alimentation
I
du système aérien, reliez le port POWER du système aérien au port
d'alimentation de l'appareil.

70
© 2017 DJI All Rights Reserved.
FR
• Si vous utilisez le D-RTK avec un autre type d'appareil, eectuez les connexions avec le câble
d'alimentation
II
du système aérien.
• Connectez le système au sol et le système aérien à l'ordinateur, l'un après l'autre, pour la mise à
niveau du micrologiciel. Éteignez et rallumez le DATALINK PRO, le système de contrôle de vol et
le D-RTK après la mise à niveau.
• Compatible avec Windows 7 (ou versions ultérieures) et Mac OS X 10.9 (ou versions ultérieures).
Utilisation
Conguration des paramètres avec DJI Assistant 2
IMPORTANT : le système au sol et le système aérien doivent être connectés à l'ordinateur séparément et
activés. Veillez à congurer les paramètres avec DJI Assistant 2 avant la première utilisation.
1. Téléchargez DJI Assistant 2 sur www.dji.com, puis installez-le sur votre ordinateur.
2. Connectez le système au sol à l'ordinateur sur lequel DJI Assistant 2 est lancé, puis sélectionnez Connected
Devices > D-RTK an de dénir les coordonnées.
3. Lorsque vous congurez le système aérien, le système de contrôle de vol A3 doit être connecté.
Connectez-le à l'ordinateur sur lequel DJI Assistant 2 est lancé. Sélectionnez le système de contrôle de
vol sur la page Connected Devices, puis accédez à DJI Devices > Air System Antenna pour congurer
les paramètres de décalage de l'antenne.
Conguration du système aérienConguration du système au sol

© 2017 DJI All Rights Reserved.
71
FR
• Ne mettez PAS le système aérien en marche tant que le voyant d'état de fonctionnement du
système au sol n'est PAS vert.
• Faites en sorte qu'aucun obstacle ne gêne les antennes du système aérien et du système au sol.
• Téléchargez le manuel de l'utilisateur sur www.dji.com pour en savoir plus.
• Si vous utilisez le D-RTK uniquement avec le DATALINK PRO, les commutateurs à 4 positions de la
station de base et de la station mobile DATALINK PRO doivent être mis sur la position UART_SW1.
À défaut, le D-RTK ne pourra pas recevoir les données transmises par le DATALINK PRO. Si
vous utilisez également la station au sol DJI Assistant 2, le commutateur à 4 positions doit être
mis sur la position COMBO_SW4. Pour plus d'informations, consultez le manuel de l'utilisateur
du DATALINK PRO.
• Congurez le système de contrôle de vol A3 sur le mode P ou F.
• Ne déplacez PAS le système au sol pendant le calcul de la position.
• Les coordonnées du système au sol peuvent être dénies dans DJI Assistant 2.
Mode d'emploi
Utilisez le D-RTK dans un environnement dégagé, exempt d'interférences radio, et respectez la procédure
suivante :
1. Mettez en marche le système au sol et attendez que le voyant d'état de fonctionnement devienne vert.
2. Mettez en marche le système aérien et attendez que le voyant d'état de fonctionnement devienne vert.
3. Le D-RTK est prêt dès que les voyants d'état de vol du système de contrôle de vol A3 clignotent
alternativement en vert et bleu.
Mise à jour de la position du système au sol
Chaque fois que vous l'utilisez, le système au sol détecte automatiquement la distance qui le sépare de
sa précédente position. Si cette distance est supérieure à 50 mètres, les coordonnées sont automatique-
ment mises à jour. Si la position a changé, mais que le système au sol ne procède pas automatiquement
à la mise à jour, vous devez eectuer cette opération manuellement. Appuyez sur le bouton Update
pendant 5 secondes jusqu'à ce que le système au sol recalcule les coordonnées de la position. Le voyant
d'état de fonctionnement clignote rapidement en vert quand la mise à jour de la position est terminée
(l'application DJI GO vous l'indique également par un message).
Bouton Update

72
© 2017 DJI All Rights Reserved.
FR
Système au sol
—
Blanc xe Le système au sol est en cours d'initialisation ou n'est pas activé.
......
Clignote lentement en
blanc
L'initialisation a échoué.
—
Rouge xe Le D-RTK n'est pas positionné.
......
Clignote lentement en
rouge
La position du système au sol est en cours de conguration.
—
Vert xe La position du système au sol est congurée.
......
Clignote rapidement en
vert
La position du système au sol est mise à jour.
Système aérien
—
Blanc xe Le système aérien est en cours d'initialisation ou n'est pas activé.
......
Clignote lentement en
blanc
L'initialisation a échoué.
—
Jaune xe
Le Système aérien n'est pas positionné, mais des données
diérentielles ont été reçues.
—
Rouge xe
Le système au sol n'est pas positionné et aucune donnée diérentielle
n'a été reçue.
......
Clignote lentement en
jaune
Le système au sol est positionné avec un seul point et des données
diérentielles ont été reçues.
......
Clignote lentement en
rouge
Le système au sol est positionné avec un seul point, mais aucune
donnée diérentielle n'a été reçue.
......
Clignote lentement en
violet
Le D-RTK est en mode ottant.
......
Clignote lentement en
vert
Le D-RTK est en mode de calcul.
—
Vert xe Le D-RTK est en mode xe.
Voyant d'état de fonctionnement

FR
Précision de positionnement
Horizontale : 1 cm + 1 ppm
Verticale : 2 cm + 1 ppm
Précision de l'orientation
(0,2/R)°
R est la distance de base (distance entre les deux antennes du
système aérien) en mètres
Moyenne quadratique 0,03 m/s
Fréquence utilisée
Version internationale : L1 et L2 (GPS), F1 et F2 (GLONASS)
Version Asie-Pacique : L1 et L2 (GPS), B1 et B2 (BEIDOU)
Type d'interface CAN, UART, USB
Tension d'entrée 12 à 52 V (3S à 12S)
Consommation électrique 5,2 W
Courant 0,45 A en 12 V
Dimensions du processeur D-RTK 112,3 mm × 63 mm × 18,6 mm
Poids du processeur D-RTK 139,5 g
Température de fonctionnement
32 à 113 °F (0 à 45 °C)
Température de stockage
-40 à 185 °F (-40 à 85 °C)
Caractéristiques techniques
D-RTK
TM
est une marque commerciale de DJI.
Copyright © 2017 DJI Tous droits réservés.
Contenu sujet à modications.
Téléchargez la dernière version à l'adresse
www.dji.com/product/d-rtk

74
© 2017 DJI All Rights Reserved.
IT
Limitazioni di responsabilità
Grazie per aver acquistato D-RTK
TM
(di seguito indicato come "prodotto"). Leggere attentamente le
presenti limitazioni di responsabilità prima di utilizzare questo prodotto. Utilizzando il prodotto, l'utente
accetta le presenti limitazioni di responsabilità e dichiara di averle lette per intero. Si prega di installare e
usare questo prodotto attenendosi strettamente a questo manuale utente. SZ DJI Technology Co., Ltd.
e le sue società aliate declinano ogni responsabilità per danni o lesioni direttamente o indirettamente
imputabili all'utilizzo, all'installazione o alla riparazione impropri del prodotto, ivi compreso, ma non
limitatamente a, l'uso di accessori non destinati ad esso.
DJI
TM
è un marchio di SZ DJI Technology Co., Ltd. (abbreviato come "DJI") e sue società aliate. I nomi di
prodotti, marchi, ecc. che compaiono nel presente manuale sono marchi registrati delle rispettive società
proprietarie. Il presente prodotto e il relativo manuale sono protetti da copyright di proprietà di DJI. Tutti i
diritti riservati. Nessuna parte di questo prodotto o del relativo manuale potrà essere riprodotta in qualsiasi
forma senza previo consenso o autorizzazione scritto/a da parte di DJI.
Le presenti limitazioni di responsabilità sono fornite in varie lingue. In caso di diormità tra le diverse
versioni, prevarrà la versione in cinese semplicato qualora il prodotto in questione venga acquistato sul
territorio della Cina continentale e la versione in inglese qualora il prodotto venga acquistato in qualunque
altra regione.
Avvertimenti
1. Vericare che tutti i componenti siano collegati e che i valori di OFFSET siano impostati correttamente
in DJI Assistant 2 quando si utilizza D-RTTK per la prima volta.
2. NON ettere o piegare eccessivamente il cavo dell'antenna.
3. Assicurarsi che l'antenna del sistema di collegamento a massa sia perfettamente a livello quando montata.
4. Utilizzare il sistema esclusivamente all’aperto, in un ambiente libero da interferenze radio.
5. Assicurarsi che le antenne del sistema aereo e del sistema terrestre non siano ostruite quando utilizzate.
6. Le due antenne del sistema aereo dovrebbero essere mantenute alla stessa altezza.
7. Assicurarsi che le antenne DATALINK PRO non si ostacolino a vicenda quando utilizzate.
8. È richiesto almeno un modulo GPS serie A3.
9. Utilizzare solo componenti originali DJI o certicati da DJI. I componenti non autorizzati o i pezzi prove-
nienti da costruttori sprovvisti di certicazione DJI possono causare il malfunzionamento del sistema e
comprometterne la sicurezza.
10. Assicurarsi che D-RTK e i relativi componenti siano privi di qualsiasi contaminazione (ad es. acqua,
olio, terra e sabbia).
11. Scaricare la versione più recente del manuale utente o del software per qualsiasi prodotto DJI
correlato, necessario per l'utilizzo di questo prodotto.

© 2017 DJI All Rights Reserved.
75
IT
Introduzione
Il D-RTK è un sistema a GPS e barometro appositamente progettato per fornire una precisione di
posizionamento al livello del centimetro per i controllori di volo DJI serie A3. Con l'uso di doppie antenne,
il riferimento direzionale è più preciso di quello fornito da un normale sensore a bussola ed è in grado di
resistere alle interferenze magnetiche causate da strutture metalliche.
In funzione della regione di acquisto, il D-RTK utilizza il GPS e il BeiDou o il GPS e il GLONASS per ottenere
prestazioni del più alto livello.
Panoramica
2 processori D-RTK 3 antenne GNSS 3 cavi per antenna
1 staffa per antenna
I
2 staffe per antenna
II
1 piastra di base
1 staffa per DATALINK PRO 1 vite con testa ad alette 1 cavo a 8 pin
1 cavo CAN a 4 pin 1 cavo micro-USB
1 cavo di alimentazione per sistema
terrestre
1 cavo di alimentazione per
sistema aereo
I
1 cavo di alimentazione per
sistema aereo
II
Vite Altro
M2.5 ×5
M3.0 ×8
Testa a tazza piena
Vite lettata
M3 e dado M3
Velcro
Nastro
biadesivo
Chiave
esagonale a L

76
© 2017 DJI All Rights Reserved.
IT
*Gratuito con l'acquisto di DJI Matrice 600 e D-RTK.
Installazione e collegamento del sistema terrestre
Qui si utilizzano il sistema di controllo di volo DJI A3, il DJI DATALINK PRO 900 e la batteria di volo intelli-
gente DJI per illustrare una tipica procedura di installazione e collegamento.
Installazione
1. Montare la staa per DATALINK PRO sulla piastra di base con due viti M2.5 x 5.
2. Montare l'antenna GNSS sulla staa per antenna
I
con tre viti M3.0 × 8, quindi ssare la staa per anten-
na
I
sulla piastra di base.
3. Fissare il processore del D-RTK sulla piastra di base come sistema terrestre.
4. Fissare la stazione base del DATALINK PRO sulla staa per DATALINK PRO.
5. Fissare in sede la batteria con velcro, quindi ssare la piastra di base su un apposito cavalletto*.
*Sostiene una normale fotocamera e i treppiedi per videocamera montati con viti 1/4-20.
1 piastra di espansione
superiore
4 staffe 2 staffe per Assistant 4 staffe per antenna
III
2 clip per antenna Vite
M2.5 ×5
M3.0 ×8
Accessori Matrice 600*

© 2017 DJI All Rights Reserved.
77
IT
1/4"
3/8"
Dimensioni della lettatura
Collegamento
1. Collegare il sistema terrestre e l'antenna GNSS con un cavo per antenna.
2. Collegare il sistema terrestre e la stazione base del DATALINK PRO con un cavo a 8 pin.
3. Collegare il sistema terrestre alla batteria con il cavo di alimentazione del sistema terrestre.

78
© 2017 DJI All Rights Reserved.
IT
Installazione e collegamento del sistema aereo
Qui si utilizzano la staa per antenna
III
, il DJI DATALINK, il PRO 900, il DJI Matrice 600, il D-RTK e il
sistema di controllo di volo DJI A3 per una tipica procedura di installazione e collegamento.
Installazione
1. Montare le due antenne GNSS sulla staa per antenna
III
con quattro viti M3.0 × 6.5.
2. Collegare il processore del D-RTK (funziona come sistema aereo) e la stazione mobile del DATALINK
PRO alla piastra di espansione superiore con del nastro biadesivo.
• Utilizzare la staa per antenna
II
in caso di utilizzo di altri tipi di aeromobili e rispettare i requisiti
seguenti:
a. Vericare che le due stae per antenna
II
formino una linea retta passante per il centro di gravità del
velivolo e che la distanza tra le due antenne sia maggiore di 25 cm (più sono distanti meglio è).
b. Le due stae per antenna
II
dovrebbero essere equidistanti dal centro di gravità del velivolo.
c. Le due antenne del sistema aereo dovrebbero essere mantenute alla stessa altezza.
Collegamento
1. Utilizzando i cavi per antenna, collegare la porta "ANT1" del sistema terrestre a un'antenna come
antenna master, e la porta "ANT2" all'altra antenna come antenna slave.
2. Collegare le antenne della stazione mobile del DATALINK PRO e ssare i cavi mediante delle clip.
3. Collegare la porta CAN/UART del sistema aereo alla porta CAN/UART della stazione mobile del
DATALINK PRO con un cavo a 8 pin.
4. Collegare la porta "CAN1" del sistema aereo a qualsiasi porta CAN1 del controllore di volo A3 con un
cavo CAN a 4 pin.
5. Collegare la porta "POWER" del sistema aereo alla porta di alimentazione del velivolo con un cavo di
alimentazione
I
del sistema aereo.

© 2017 DJI All Rights Reserved.
79
IT
• Usare il cavo di alimentazione
II
del sistema aereo se si utilizza il D-RTK con altri tipi di aeromobile.
• Collegare il sistema terrestre e il sistema aereo uno ad uno al computer per l'aggiornamento del
rmware. Dopo l'aggiornamento, eseguire un ciclo di funzionamento del DATALINK PRO, del
sistema di controllo di volo e del D-RTK.
• Supporta Windows 7 (o successivi) o Mac OS X 10.9 (o successivi).
Uso
Congurazione dei parametri con DJI Assistant 2
IMPORTANTE: il sistema terrestre e il sistema aereo devono essere collegati separatamente al computer e
attivati. Assicurarsi di congurare i parametri con DJI Assistant 2 quando vengono utilizzati per la prima volta.
1. Scaricare DJI Assistant 2 dal sito Web www.dji.com e installarlo sul computer.
2. Collegare il sistema terrestre al computer dopo aver lanciato il DJI Assistant 2, quindi, per congurare le
coordinate, andare su Dispositivi collegati > D-RTK.
3. Quando si congura il sistema aereo, assicurarsi che il sistema di controllo di volo A3 sia collegato.
Collegare il sistema di controllo di volo al computer dopo aver lanciato il DJI Assistant 2. Selezionare il
collegamento del sistema di controllo di volo dalla pagina Dispositivi collegati, quindi, per congurare i
parametri di oset dell'antenna, andare su Dispositivi DJI > Antenna del sistema aereo.
Congurazione del sistema aereoCongurazione del sistema terrestre

80
© 2017 DJI All Rights Reserved.
IT
• Non accendere il sistema aereo prima che il LED di stato operativo del sistema terrestre diventi
verde sso.
• Assicurarsi che le antenne del sistema aereo e del sistema terrestre non siano ostruite quando
utilizzate.
• Per saperne di più, scaricare il Manuale utente da www.dji.com.
• I commutatori a 4 posizioni della stazione base e della stazione mobile devono essere portati
sulla posizione UART_SW1 se il D-RTK viene usato solo con il DATALINK PRO, altrimenti il D-RTK
non riesce a ricevere dati dal DATALINK PRO. Se si utilizzano anche la stazione di terra DJI Assistant
2, i commutatori a 4 posizioni devono essere portati sulla posizione COMBO_SW4. Per ulteriori
dettagli, Fare riferimento al "Manuale utente DATALINK PRO".
• Impostare il sistema di controllo di volo A3 in modalità P o in modalità F.
• Non spostare il sistema terrestre durante la fase di posizionamento.
• Le coordinate di posizione del sistema terrestre possono essere impostate con DJI Assistant 2.
Procedure di utilizzo
Utilizzare il D-RTK all'aperto dove non ci siano interferenze radio e seguire le procedure riportate di seguito:
1. Accendere il sistema terrestre e attendere che il LED di stato operativo diventi verde sso.
2. Accendere il sistema aereo e attendere che il LED di stato operativo diventi verde sso.
3. Il D-RTK è operativo quando il LED di stato di volo del sistema di controllo di volo A3 lampeggia di colore
verde e blu in modo alternato.
Aggiornamento della posizione del sistema terrestre
Ogni volta che viene utilizzato, il sistema terrestre rileva automaticamente la distanza di scostamento
dalla sua posizione precedente. Se la distanza di scostamento è > 50 metri, il sistema terrestre aggiorna
automaticamente le nuove coordinate di posizione. Se la posizione è cambiata ma il sistema terrestre non
si aggiorna automaticamente, è necessario aggiornarlo manualmente. Premere il pulsante Aggiorna e te-
nerlo premuto per 5 secondi no a quando il sistema terrestre non ricalcola le coordinate della posizione.
Il LED di stato operativo lampeggia rapidamente di colore verde se la posizione viene aggiornata corretta-
mente (DJI GO avverte una volta che la posizione del sistema terrestre è aggiornata correttamente).
Pulsante Aggiorna

© 2017 DJI All Rights Reserved.
81
IT
Sistema terrestre
—
Bianco sso Il sistema terrestre è in fase di inizializzazione o non è attivato.
......
Bianco lampeggiante
lentamente
Errore d'inizializzazione.
—
Rosso sso D-RTK non posizionato.
......
Rosso lampeggiante
lentamente
Impostazione della posizione del sistema terrestre.
—
Verde sso La posizione del sistema terrestre è impostata.
......
Verde lampeggiante
rapidamente
La posizione del sistema terrestre è aggiornata.
Sistema d'aria
—
Bianco sso Il sistema d’aria è in fase di inizializzazione o non è attivato.
......
Bianco lampeggiante
lentamente
Errore d'inizializzazione.
—
Giallo sso Sistema terrestre non posizionato, ma dati dierenziali ricevuti.
—
Rosso sso Sistema terrestre non posizionato, dati dierenziali non ricevuti.
......
Giallo lampeggiante
lentamente
Sistema terrestre posizionato con un singolo punto, dati dierenziali
ricevuti.
......
Rosso lampeggiante
lentamente
Sistema terrestre posizionato con un singolo punto, ma dati
dierenziali non ricevuti.
......
Viola lampeggiante
lentamente
D-RTK è in esecuzione in modalità ottante.
......
Verde lampeggiante
lentamente
D-RTK è in esecuzione in modalità di calcolo.
—
Verde sso D-RTK è in esecuzione in modalità ssa.
LED dello stato di funzionamento

IT
Precisione di posizionamento
Orizzontale: 1 cm + 1 ppm
Verticale: 2 cm + 1 ppm
Precisione di orientamento
(0,2/R)°
R è la distanza della linea di base (distanza fra due antenne del
sistema aereo) in metri.
Radice quadrata della media dei
quadrati (RMS)
0,03 m/s
Frequenza utilizzata
Versione globale: GPS L1&L2, GLONASS F1&F2
Versione Asia-Pacico: GPS L1&L2, BEIDOU B1&B2
Tipo d'interfaccia CAN, UART, USB
Tensione d'ingresso 3S a 12S (12 a 52 V)
Consumo energetico 5,2 W
Attuale 0,45 A (a 12 V)
Dimensioni del processore D-RTK 112,3 mm × 63 mm × 18,6 mm
Peso del processore D-RTK 139,5 g
Temperatura di esercizio
Da 0 °C a 45 °C (da 32 °F a 113 °F)
Temperatura di stoccaggio
Da -40 °C a 85 °C (da -40 °F a 185 °F)
Caratteristiche tecniche
D-RTK
TM
è un marchio di DJI.
Copyright © 2017 DJI Tutti i diritti riservati.
Il contenuto del documento potrebbe cambiare.
Scaricare l'ultima versione dal sito
www.dji.com/product/d-rtk

© 2017 DJI All Rights Reserved.
83
NL
Disclaimer
Dank u voor uw aankoop van de D-RTK
TM
(hierna 'product' genoemd). Lees deze disclaimer zorgvuldig
door voordat u dit product gaat gebruiken. Door dit product te gebruiken, geeft u aan dat u instemt
met deze disclaimer en geeft u aan dat u deze hebt gelezen. Installeer en gebruik dit product in
overeenstemming met deze handleiding. SZ DJI Technology Co., Ltd. en haar dochterondernemingen
aanvaarden geen enkele aansprakelijkheid voor schade(s) of blessures die direct of indirect voortvloeien
uit het onjuiste gebruik, de onjuiste installatie of montage van dit product, met inbegrip van maar niet
beperkt tot het gebruik van niet-aangewezen accessoires.
DJI is een handelsmerk van SZ DJI Technology Co., Ltd. (afgekort als 'DJI') en haar dochterondernemingen.
Namen van producten, merken, enz., in deze handleiding zijn handelsmerken of gedeponeerde
handelsmerken van hun respectieve eigenaren. Het copyright voor dit product en deze handleiding rust
bij DJI met alle rechten voorbehouden. Geen enkel onderdeel van dit product of handboek mag worden
gereproduceerd in welke vorm dan ook zonder voorafgaande schriftelijke toestemming van DJI.
Deze disclaimer is geproduceerd in verschillende talen. In geval van tegenspraak tussen verschillende
versies heeft de Chinese versie voorrang indien het product in kwestie is gekocht op het vasteland
van China en heeft de Engelstalige versie voorrang indien het product in kwestie in een andere regio is
gekocht.
Waarschuwingen
1. Zorg ervoor dat alle onderdelen correct zijn aangesloten en de OFFSET-waarden correct zijn
gecongureerd in DJI Assistant 2 wanneer u de D-RTK voor de eerste keer gebruikt.
2. Buig of vouw de antennekabel NIET overmatig.
3. Zorg dat de antenne van het grondsysteem helemaal rechtop staat als deze is gemonteerd.
4. Alleen gebruiken in een open omgeving zonder radiostoringen.
5. Zorg dat de antennes van het luchtsysteem en het grondsysteem tijdens gebruik vrij zijn van
belemmeringen.
6. De twee antennes van het luchtsysteem moeten op gelijke hoogte worden bevestigd.
7. Zorg dat de DATALINK PRO-antennes elkaar NIET hinderen tijdens gebruik.
8. Ten minste één A3-serie GPS-module vereist.
9. Gebruik uitsluitend originele DJI-onderdelen of onderdelen die zijn gecerticeerd door DJI. Niet-
goedgekeurde onderdelen of onderdelen van fabrikanten die niet door DJI zijn gecerticeerd, kunnen
leiden tot storingen in het systeem en de veiligheid kan in het gedrang komen.
10. Zorg ervoor dat de D-RTK en de onderdelen vrij zijn van vuil (bijv. water, olie, aarde en zand).
11. Download de nieuwste versie van de gebruikershandleiding of software voor aanverwante DJI-
producten die u nodig hebt voor gebruik van dit product.

84
© 2017 DJI All Rights Reserved.
NL
Inleiding
De D-RTK is een GPS- en barometersysteem dat speciaal is ontworpen om op de centimeter nauwkeurig
te kunnen navigeren met de A3-serie vluchtcontrollers van DJI. Door gebruik te maken van twee antennes
is de koersreferentie van de D-RTK nauwkeuriger dan een normale kompassensor. Het systeem is ook
bestand tegen magnetische storingen van metalen constructies.
Afhankelijk van de regio van aankoop, maakt de D-RTK gebruik van GPS en BeiDou of van GPS en
GLONASS. Dit stelt het systeem in staat op het allerhoogste niveau te presteren.
Overzicht
D-RTK-processor x2 GNSS-antenne x3 Antennekabel x3
Antennesteun
I
x1 Antennesteun
II
x2 Grondplaat x1
DATALINK PRO-steun x1 Stelknop x1 8-pins kabel x1
4-pins CAN-kabel x1 Micro-USB-kabel x1 Voedingskabel grondsysteem x1
Voedingskabel luchtsysteem
I
x1 Voedingskabel luchtsysteem
II
x1 Schroef Overig
M2.5x5
M3.0x8
Bolkopschroef
met volledige
schroefdraad
M3 en M3-moer
Klittenband
Dubbelzijdig
tape
Inbussleutel

© 2017 DJI All Rights Reserved.
85
NL
*Gratis bij aankoop van zowel de DJI Matrix 600 als de D-RTK.
Installeren en aansluiten grondsysteem
In dit gedeelte worden het DJI A3 Flight Control System, de DJI DATALINK PRO 900 en de DJI Intelligent
Flight Battery gebruikt om een typische installatie en verbinding weer te geven.
Installatie
1. Monteer de DATALINK PRO-steun met twee M2.5x5-schroeven op de grondplaat.
2. Monteer de GNSS-antenne met drie M3.0x8-schroeven op antennesteun
I
en bevestig vervolgens
antennesteun
I
op de grondplaat.
3. Bevestig de D-RTK-processor voor het grondsysteem op de grondplaat.
4. Bevestig het DATALINK PRO-basisstation op de DATALINK PRO-steun.
5. Bevestig de accu op zijn plaats met klittenband en bevestig vervolgens de grondplaat op een passend
statief*.
*Ondersteunt conventionele camera- en camcorderstatieven met 1/4"-20-schroeven.
Bovenste uitbreidingsplaat x1 Steun x4 Hulpsteun x2 Antennesteun
III
x4
Antenneclip x2 Schroef
M2.5x5
M3.0x8
Accessoires Matrice 600*

86
© 2017 DJI All Rights Reserved.
NL
1/4"
3/8"
Maat schroefdraad
Aansluiten
1. Sluit het grondsysteem aan op de GNSS-antenne met een antennekabel.
2. Sluit het grondsysteem aan op het DATALINK PRO-basisstation met een 8-pins kabel.
3. Sluit het grondsysteem met de voedingskabel voor het grondsysteem aan op de accu.

© 2017 DJI All Rights Reserved.
87
NL
Installeren en aansluiten luchtsysteem
In dit gedeelte worden de antennebeugel
III
, de DJI DATALINK PRO 900, de DJI Matrice 600, de D-RTK
en het DJI A3 Flight Control System gebruikt om een typische installatie en verbinding weer te geven.
Installatie
1. Monteer de twee GNSS-antennes op de antennebeugel
III
met vier M3.0x6.5-schroeven.
2. Bevestig de D-RTK-processor voor het luchtsysteem en het DATALINK PRO-mobiele station op de
bovenste uitbreidingsplaat met dubbelzijdig tape.
• Gebruik de antennesteun
II
indien andere soorten luchtvaartuigen worden gebruikt en volg de
onderstaande vereisten:
a. Zorg dat de twee antennesteunen
II
een rechte lijn vormen door het zwaartepunt van het
luchtvaartuig en dat de afstand tussen de twee antennes groter is dan 25 cm (hoe verder uit
elkaar, hoe beter).
b. De twee antennesteunen II moeten zich op gelijke afstand van het zwaartepunt van het
luchtvaartuig bevinden.
C. De twee antennes van het luchtsysteem moeten zich op gelijke hoogte bevinden.
Aansluiten
1. Verbind met een antennekabel de ANT1-poort van het grondsysteem met een antenne, dit wordt de
master-antenne. Verbind met een tweede antennekabel de ANT2-poort met de andere antenne, dit
wordt de slave-antenne.
2. Bevestig de antennes van het DATALINK PRO-mobiele station en werk de draden weg met klemmetjes.
3. Verbind met een 8-pins kabel de CAN/UART-poort van het luchtsysteem met de CAN/UART-poort van
het DATALINK PRO-mobiele station.
4. Verbind met een 4-pins CAN-kabel de CAN1-poort van het luchtsysteem met de CAN1-poort van de
A3-vluchtcontroller.
5. Verbind met voedingskabel
I
van het luchtsysteem de POWER-poort van het luchtsysteem en de
power-port van het luchtvaartuig.

88
© 2017 DJI All Rights Reserved.
NL
• Gebruik voedingskabel
II
van het luchtsysteem als u de D-RTK met andere typen luchtvaartuigen
gebruikt.
• Sluit het grondsysteem en het luchtsysteem één voor één aan op de computer om de rmware
te upgraden. Zet de DATALINK PRO, het Flight Control System en de D-RTK na het upgraden
uit en weer aan.
• Ondersteunt Windows 7 (of nieuwer) of Mac OS X 10.9 (of nieuwer).
Gebruik
Instellen van parameters met DJI Assistant 2
BELANGRIJK: Het grondsysteem en het luchtsysteem moeten afzonderlijk op de computer worden aangeslo-
ten en worden geactiveerd. Zorg dat parameters worden ingesteld met DJI Assistant 2 voor het eerste gebruik.
1. Download DJI Assistant 2 van www.dji.com en installeer het op uw computer.
2. Sluit het grondsysteem aan op de computer terwijl DJI Assistant 2 is geopend en ga naar Aangesloten
apparaten > D-RTK om de coördinaten in te stellen.
3. Zorg dat het A3 Flight Control System is aangesloten wanneer u het luchtsysteem congureert.
Sluit het Flight Control System aan op de computer terwijl DJI Assistant 2 is geopend. Selecteer het
aangesloten Flight Control System op de pagina Connected Devices en ga naar DJI-apparaten >
Antenne luchtsysteem om de oset-parameters van de antenne in te stellen.
Het luchtsysteem congurerenHet grondsysteem congureren

© 2017 DJI All Rights Reserved.
89
NL
• Zet het luchtsysteem NIET aan voordat de Working Status-LED continu groen brandt.
• Zorg dat de antennes van het luchtsysteem en het grondsysteem tijdens gebruik vrij zijn van
belemmeringen.
• Download de gebruikershandleiding van www.dji.com voor meer informatie.
• De vierstandenschakelaar van het DATALINK PRO-basisstation en -mobiele station moeten in
de stand UART_SW1 staan als de D-RTK alleen wordt gebruikt met de DATALINK PRO, omdat
de D-RTK anders geen gegevens kan ontvangen van de DATALINK PRO. Als er ook gebruik
wordt gemaakt van het DJI Assistant 2-grondstation, moet de vierstandenschakelaar in de
stand COMBO_SW4 staan. Raadpleeg de DATALINK PRO-gebruikershandleiding voor meer
informatie.
• Zet het A3 Flight Control System in de P- of F-modus.
• Beweeg het grondsysteem NIET tijdens het bepalen van de positie.
• De positiecoördinaten van het grondsysteem kunnen worden ingesteld in DJI Assistant 2.
Gebruiksprocedures
Gebruik de D-RTK in een open omgeving zonder radiostoringen en volg de onderstaande procedures:
1. Zet het grondsysteem aan en wacht tot de Working Status-LED continu groen brandt.
2. Zet het luchtsysteem aan en wacht tot de Working Status-LED continu groen brandt.
3. De D-RTK is klaar voor gebruik wanneer de Flight Status-LED van het A3 Flight Control System afwis-
selend groen en blauw knippert.
De positie van het grondsysteem bijwerken
Iedere keer dat het grondsysteem wordt gebruikt, detecteert het automatisch de oset-afstand ten
opzicht van de vorige positie. Als de oset-afstand groter is dan 50 meter, zal het grondsysteem
de coördinaten van de nieuwe positie automatisch bijwerken. Als de positie is veranderd maar het
grondsysteem niet automatisch wordt bijgewerkt, dient u dit handmatig te doen. Druk op de knop Update
en houd deze 5 seconden vast, totdat het grondsysteem de coördinaten herberekent. De Working
Status-LED zal snel groen knipperen als de positie met succes is bijgewerkt (DJI GO geeft een melding
als de positie van het grondsysteem succesvol is bijgewerkt).
Knop Update

90
© 2017 DJI All Rights Reserved.
NL
Grondsysteem
—
Continu wit Grondsysteem wordt geïnitialiseerd of is niet geactiveerd.
......
Langzaam wit
knipperend
Initialisatie mislukt.
—
Continu rood Positie D-RTK niet bepaald.
......
Langzaam rood
knipperend
Positie grondsysteem wordt ingesteld.
—
Continu groen Positie grondsysteem is ingesteld.
......
Snel groen knipperend Positie grondsysteem is bijgewerkt.
Luchtsysteem
—
Continu wit Luchtsysteem wordt geïnitialiseerd of is niet geactiveerd.
......
Langzaam wit
knipperend
Initialisatie mislukt.
—
Continu geel Positie grondsysteem niet bepaald, dierentiaalgegevens ontvangen.
—
Continu rood
Positie grondsysteem niet bepaald, dierentiaalgegevens niet
ontvangen.
......
Langzaam geel
knipperend
Positie grondsysteem bepaald met één punt, dierentiaalgegevens
ontvangen.
......
Langzaam rood
knipperend
Positie grondsysteem bepaald met één punt, dierentiaalgegevens
niet ontvangen.
......
Langzaam paars
knipperend
D-RTK werkt in de modus variabel punt.
......
Langzaam groen
knipperend
D-RTK voert de berekeningsmodus uit.
—
Continu groen D-RTK werkt in de modus vast punt.
Working Status-LED

NL
Nauwkeurigheid positionering
Horizontaal: 1 cm + 1 ppm
Verticaal: 2 cm + 1 ppm
Nauwkeurigheid oriëntatie
(0.2/R)°
R is de lengte van de basislijn (afstand tussen de twee
antennes van het luchtsysteem) in meters.
Kwadratisch gemiddelde (RMS) 0,03 m/s
Gebruikte frequentie
Versie wereldwijd: GPS L1 en L2, GLONASS F1 en F2
Versie Azië-Stille Oceaan: GPS L1 en L2, BEIDOU B1 en B2
Type interface CAN, UART, USB
Ingangsspanning 3S tot 12S (12 tot 52 V)
Stroomverbruik 5,2 W
Stroomsterkte 0,45 A (bij 12 V)
Afmetingen D-RTK-processor 112,3 mm×63 mm×18,6 mm
Gewicht D-RTK-processor 139,5 g
Bedrijfstemperatuur
0 tot 45 °C (32 tot 113 °F)
Opbergtemperatuur
-40 tot 85 °C (-40 tot 185 °F)
Specicaties
D-RTK
TM
is een handelsmerk van DJI.
Copyright © 2017 DJI Alle rechten voorbehouden.
Deze inhoud is aan verandering onderhevig.
Download de nieuwste versie op
www.dji.com/product/d-rtk

92
© 2017 DJI All Rights Reserved.
PT
Exoneração de responsabilidade
Agradecemos a aquisição do D-RTK
TM
(a seguir designado de "produto"). Leia atentamente a presente
exoneração de responsabilidade antes de utilizar este produto. Ao utilizar este produto, aceita a presente
exoneração de responsabilidade e conrma que leu o documento na íntegra. Instale e utilize este produto
respeitando rigorosamente este manual. A SZ DJI Technology Co., Ltd. e respetivas empresas aliadas
não assumem qualquer responsabilidade relativa a dano(s) ou ferimentos direta ou indiretamente resul-
tantes da utilização, instalação ou reequipamento deste produto de modo inadequado, incluindo, entre
outros, a utilização de acessórios não designados.
DJI
TM
é uma marca comercial da SZ DJI Technology Co., Ltd. (abreviada como "DJI") e das respetivas
empresas aliadas. Todos os nomes de produtos, marcas, etc. incluídos no presente manual são marcas
comerciais ou marcas comerciais registadas das respetivas empresas detentoras. Este produto e manual
estão protegidos por direitos de autor pela DJI, com todos os direitos reservados. Nenhuma parte deste
produto ou manual deverá ser reproduzida, seja de que forma for, sem o consentimento ou autorização
prévios, por escrito, da DJI.
Esta exoneração de responsabilidade está disponível em diversos idiomas. Em caso de discrepâncias
entre as diferentes versões, a versão em chinês simplicado prevalece quando o produto em questão
for adquirido na China continental, e a versão em inglês prevalece quando o produto em questão for
adquirido em qualquer outra região.
Avisos
1. Certique-se de que todas as peças estão corretamente ligadas e que os valores de DESVIO estão
corretamente congurados no DJI Assistant 2 quando utilizar o D-RTK pela primeira vez.
2. NÃO dobre demasiado o cabo da antena.
3. Certique-se de que a antena do Ground System está perfeitamente nivelada quando é montada.
4. Utilize apenas em ambiente aberto, sem interferências de rádio.
5. Certique-se de que as antenas do Air System e do Ground System estão desobstruídas quando são
utilizadas.
6. As duas antenas do Air System devem ser mantidas à mesma altura.
7. Certique-se de que as antenas DATALINK PRO NÃO se obstruem umas às outras quando são utiliza-
das.
8. É necessário pelo menos um módulo GPS da série A3.
9. Utilize apenas peças genuínas da DJI ou peças certicadas pela DJI. Peças não autorizadas ou peças
de fabricantes não certicados pela DJI podem causar falhas no sistema e comprometer a segurança.
10. Certique-se de que o D-RTK e os seus componentes não estão contaminados (por ex., água, óleo,
terra e areia).
11. Transra a versão mais recente do manual do utilizador ou do software de qualquer produto DJI
relacionado que seja necessário para a utilização deste produto.

© 2017 DJI All Rights Reserved.
93
PT
Introdução
O D-RTK é um sistema de barómetro e GPS especialmente concebido para proporcionar aos controladores
de voo da série A3 da DJI uma precisão de posicionamento ao centímetro. Utilizando antenas duplas, a sua
referência de rumo é mais precisa do que um sensor de bússola normal e tem capacidade para resistir a
interferências magnéticas de estruturas de metal.
Dependendo da região onde é adquirido, o D-RTK utiliza GPS e BeiDou ou GPS e GLONASS para
cumprir os mais elevados padrões de qualidade.
Visão geral
Processador do D-RTK×2 Antena de GNSS×3 Cabo de antena×3
Suporte de antena
I
×1 Suporte de antena
II
×2 Placa de base×1
Suporte de DATALINK PRO×1 Parafuso manual×1 Cabo de 8 pinos×1
Cabo CAN de 4 pinos ×1 Cabo micro USB×1
Cabo de alimentação do Ground
System×1
Cabo de alimentação do Air
System
I
×1
Cabo de alimentação do Air
System
II
×1
Parafuso Outros
M2.5 ×5
M3.0 ×8
Parafuso
sextavado com
rosca completa
Porca M3 e M3
Velcro
Fita adesiva de
dupla face
Chave em L
hexagonal

94
© 2017 DJI All Rights Reserved.
PT
*Grátis na compra do DJI Matrice 600 e do D-RTK.
Instalação e ligação do Ground System
O exemplo seguinte utiliza o Flight Control System DJI A3, o DJI DATALINK PRO 900 e a DJI Intelligent
Flight Battery para ilustrar uma instalação e ligação típicas.
Instalação
1. Monte o suporte Datalink PRO à placa de base com dois parafusos M2.5 × 5.
2. Monte a antena de GNSS no suporte de antena
I
com três parafusos M3.0 × 8 e, em seguida, xe o
suporte de antena
I
à placa base.
3. Fixe o processador do D-RTK à placa de base como o Ground System.
4. Fixe a estação de base do DATALINK PRO ao suporte do DATALINK PRO.
5. Fixe a bateria com velcro e, em seguida, xe a placa de base ao tripé adequado*.
*Suporta tripés de câmaras e câmaras de vídeo convencionais montados com parafusos de 1/4-20.
Placa de expansão
superior ×1
Suporte ×4 Suporte auxiliar ×2 Suporte de antena
III
×4
Grampo de antena ×2 Parafuso
M2.5 ×5
M3.0 ×8
Acessórios do Matrice 600*

© 2017 DJI All Rights Reserved.
95
PT
1/4"
3/8"
Tamanho da rosca
Ligação
1. Ligue o Ground System e a antena GNSS com um cabo de antena.
2. Ligue o Ground System e a estação de base do DATALINK PRO com um cabo de 8 pinos.
3. Ligue o Ground System à bateria com cabo de alimentação do Ground System.

96
© 2017 DJI All Rights Reserved.
PT
Instalação e ligação do Air System
O exemplo seguinte utiliza o suporte de antena
III
, o DJI DATALINK PRO 900, o DJI Matrice 600, o D-RTK
e o Flight Control System DJI A3 para ilustrar uma instalação e ligação típicas.
Instalação
1. Fixe as duas antenas GNSS ao suporte de antena
III
com quatro parafusos M3.0 × 6.5.
2. Fixe o processador do D-RTK (funcionando como o Air System) e a estação móvel do DATALINK PRO
à placa de expansão superior com ta adesiva de dupla face.
• Utilize o suporte de antena
II
se utilizar outros tipos de aeronave e siga os seguintes requisitos:
a. Certique-se de que os dois suportes de antena
II
formam uma linha reta desde o centro de
gravidade da aeronave e que a distância entre as duas antenas é superior a 25 cm (quanto
mais afastadas, melhor).
b. Os dois suportes de antena
II
devem estar equidistantes do centro de gravidade da aeronave.
c. As duas antenas do Air System devem ser mantidas à mesma altura.
Ligação
1. Com os cabos de antena, ligue a porta "ANT1" do Ground System e uma antena como a antena
principal e a porta "ANT2" a outra antena como a antena secundária.
2. Ligue as antenas da estação móvel do DATALINK PRO e aperte-as com grampos.
3. Ligue a porta CAN/UART do Air System à porta CAN/UART da estação móvel do DATALINK PRO com
um cabo de 8 pinos.
4. Ligue a porta "CAN1" do Air System a qualquer porta CAN1 do controlador de voo A3 com um cabo
CAN de 4 pinos.
5. Ligue a porta "POWER" do Air System à porta de alimentação da aeronave com um cabo de
alimentação do Air System
I
.

© 2017 DJI All Rights Reserved.
97
PT
• Utilize o cabo de alimentação do Air System
II
se utilizar o D-RTK com outros tipos de aeronave.
• Ligue o Ground System e o Air System, um de cada vez, ao computador para atualização do
rmware. Após a atualização, reinicie o DATALINK PRO, o Flight Control System e o D-RTK.
• Suporta Windows 7 (ou posterior) ou Mac OS X 10.9 (ou posterior).
Utilização
Parâmetros de utilização com o DJI Assistant 2
IMPORTANTE: O Ground System e Air System devem ser ligados ao computador e ativados separadamente.
Certique-se de que congura os parâmetros com o DJI Assistant 2 para a primeira utilização.
1. Transra o DJI Assistant 2 de www.dji.com e instale-o no seu computador.
2. Ligue o Ground System ao computador com o DJI Assistant 2 iniciado e, em seguida, aceda a
"Connected Devices" > D-RTK para congurar as coordenadas.
3. Ao congurar o Air System, certique-se de que o Flight Control System A3 está ligado. Ligue o Flight
Control System ao computador com o DJI Assistant 2 iniciado. Selecione o Flight Control System
ligado a partir da página "Connected Devices" e, em seguida, aceda a "DJI Devices" > "Air System
Antenna" para congurar os parâmetros de desvio da antena.
Congurar o Air SystemCongurar o Ground System

98
© 2017 DJI All Rights Reserved.
PT
• NÃO ligue o Air System antes de o LED de estado de funcionamento do Ground System car
aceso a verde.
• Certique-se de que as antenas do Air System e do Ground System não estão obstruídas
quando são utilizadas.
• Transra o manual do utilizador a partir de www.dji.com para saber mais.
• A estação de base do DATALINK PRO e os interruptores de 4 posições da estação móvel
devem estar na posição UART_SW1 se o D-RTK for utilizado apenas com o DATALINK PRO,
caso contrário o D-RTK não receberá os dados do DATALINK PRO. Se também utilizar a
estação do solo DJI Assistant 2, os interruptores de 4 posições devem estar na posição
COMBO_SW4. Consulte o "Manual do utilizador DATALINK PRO" para obter mais informações.
• Dena o Flight Control System A3 no modo P ou no modo F.
• NÃO desloque o Ground System durante o posicionamento.
• As coordenadas da posição do Ground System podem ser denidas no DJI Assistant 2.
Procedimentos de utilização
Utilize o D-RTK em ambiente aberto sem interferências de rádio e siga os procedimentos descritos abaixo:
1. Ligue o Ground System e aguarde até que o LED de estado de funcionamento que aceso a verde.
2. Ligue o Air System e aguarde até que o LED de estado de funcionamento que aceso a verde.
3. O D-RTK está pronto a funcionar quando o LED de estado de voo do Flight Control System A3 pisca
alternadamente a verde e azul.
Atualizar a posição do Ground System
De cada vez que é utilizado, o Ground System deteta automaticamente a distância de desvio da sua
posição anterior. Se a distância de desvio for > 50 metros, o Ground System atualizará automaticamente
as coordenadas da nova posição. Caso a posição seja mudada mas o Ground System não atualizar
automaticamente, será necessário atualizar manualmente. Mantenha o botão "Update" premido durante
5 segundos até que o Ground System recalcule as coordenadas da posição. O LED de estado de
funcionamento pisca rapidamente a verde se a posição for atualizada com sucesso (a DJI GO envia-lhe
um lembrete quando a posição do Ground System é atualizada com sucesso).
.
Botão "Update"

© 2017 DJI All Rights Reserved.
99
PT
Ground System
—
Luz branca
continuamente acesa
O Ground System está a iniciar ou não está ativado.
......
Luz branca intermitente
lenta
Falha ao iniciar.
—
Luz vermelha
continuamente acesa
O D-RTK não está posicionado.
......
Intermitente lento a
vermelho
Denir a posição do Ground System
—
Luz verde
continuamente acesa
A posição do Ground System está denida.
......
Luz verde intermitente
rápida
A posição do Ground System está atualizada.
Air System
—
Luz branca
continuamente acesa
O Air System está a iniciar ou não está ativado.
......
Luz branca intermitente
lenta
Falha ao iniciar.
—
Luz amarela
continuamente acesa
O Ground System não está posicionado mas os dados de diferencial
são recebidos.
—
Luz vermelha
continuamente acesa
O Ground System não está posicionado, os dados de diferencial não
são recebidos.
......
Luz vermelha
intermitente lenta
O Ground System está posicionado com um único ponto, os dados
de diferencial são recebidos.
......
Intermitente lento a
vermelho
O Ground System está posicionado com um único ponto, os dados
de diferencial não são recebidos.
......
Luz roxa intermitente
lenta
O D-RTK está a executar o modo de ponto utuante.
......
Luz verde intermitente
lenta
O D-RTK está a executar o modo de cálculo.
—
Luz verde
continuamente acesa
O D-RTK está a executar o modo xo.
LED de estado de funcionamento

PT
Precisão de posicionamento
Horizontal: 1 cm + 1 ppm
Vertical: 2 cm + 1 ppm
Precisão de orientação
(0,2/R)°
R é a distância da linha de base (distância entre as duas
sistemas do Air System) em metros.
Média quadrática (RMS) 0,03 m/s
Frequência utilizada
Versão global: GPS L1&L2, GLONASS F1&F2
Versão Ásia-Pacíco: GPS L1&L2, BEIDOU B1&B2
Tipo de interface CAN, UART, USB
Tensão de entrada 12 a 52 V
Consumo de energia 5,2 W
Corrente 0,45 A (a 12 V)
Dimensões do processador do
D-RTK
112,3 mm × 63 mm × 18,6 mm
Peso do processador do D-RTK 139,5 g
Temperatura de funcionamento
0 °C a 45 °C (32 °F a 113 °F)
Temperatura de armazenamento
-40 °C a 85 °C (-40 °F a 185 °F)
Especicações
D-RTK
TM
é uma marca comercial da DJI.
Copyright © 2017 DJI Todos os direitos reservados.
Este conteúdo está sujeito a alteração.
Faça download da versão mais recente em
www.dji.com/product/d-rtk

© 2017 DJI All Rights Reserved.
101
RU
Отказ от ответственности
Благодарим вас за приобретение D-RTK
TM
(в дальнейшем «Продукт»). Прочитайте этот отказ от ответст-
венности перед использованием продукта. Используя данный продукт, вы выражаете согласие с этим
отказом от ответственности и подтверждаете, что прочитали его полностью. Установка и эксплуатация этого
продукта должна осуществляться в строгом соответствии с данным руководством. SZ DJI Technology Co.,
Ltd. и дочерние компании не несут никакой ответственности за ущерб или травмы, понесенные напрямую
или косвенно из-за использования, установки или некорректной установки данного продукта, включая, но не
ограничиваясь использованием не предназначенных для устройства аксессуаров.
DJI
TM
— это товарный знак компании SZ DJI Technology Co., Ltd. (сокращенно "DJI") и дочерних компаний.
Названия продуктов, торговых марок и т.д., содержащихся в данном руководстве являются товарными
знаками или зарегистрированными товарными знаками соответствующих владельцев компаний. Этот продукт
и руководство DJI охраняются авторским правом. Все права защищены. Никакая часть данного продукта или
руководства не может быть воспроизведена в любой форме без предварительного письменного согласия или
разрешения DJI.
Этот отказ от ответственности доступен на нескольких языках. Если версии данного документа различают-
ся, версия на китайском языке будет иметь преимущественную силу, если данный продукт был приобретен
в материковой части Китая. Версия на английском языке имеет преимущественную силу, если продукт был
приобретен в любом другом регионе.
Предупреждения
1. При первом использовании D-RTK убедитесь, что все модули подсоединены правильно, а в DJI Assistant 2
настроены верные значения смещения.
2. Избегайте чрезмерного сгибания кабеля антенны.
3. Убедитесь, что антенна наземной станции установлена ровно.
4. Используйте устройство только на открытой местности, свободной от помех.
5. Убедитесь, что антенны воздушной и наземной систем беспрепятственно работают при использовании
устройства.
6. Две антенны воздушной системы должны находиться на одинаковой высоте.
7. Убедитесь, что антенны DATALINK PRO НЕ препятствуют работе друг друга при использовании устройства.
8. Необходим как минимум один модуль GPS серии A3.
9. Используйте только оригинальные или сертифицированные DJI компоненты. Компоненты сторонних и
не сертифицированных компанией DJI производителей могут вызвать неисправности системы и создать
угрозу безопасности.
10. Убедитесь, что на D-RTK и его компонентах отсутствуют загрязнения (например, вода, масло, почва и песок).
11. Загрузите последнюю версию руководства пользователя или программного обеспечения для любых
связанных с DJI продуктов, необходимых при использовании данного продукта.

102
© 2017 DJI All Rights Reserved.
RU
Введение
D-RTK — это система, оснащенная GPS и барометром. Она была специально разработана для пультов управления
DJI серии A3 и обеспечивает точность позиционирования с погрешностью до сантиметра. Благодаря использова-
нию двух антенн курсовертикаль устройства обладает большей точностью по сравнению с обычным компасным
датчиком и может выдерживать магнитные помехи, исходящие от металлических конструкций.
В зависимости от того, в каком регионе была совершена покупка, D-RTK использует GPS и BeiDou или GPS
и GLONASS для обеспечения максимальной производительности.
Обзор
Процессор D-RTK ×2
Антенна GNSS (глобальной навига-
ционной спутниковой системы) ×3
Кабель антенны ×3
Кронштейн для антенны
I ×1
Кронштейн для антенны
II ×2 Основная плата ×1
Кронштейн для DATALINK PRO ×1 Винт с накатанной головкой ×1 8-контактный кабель ×1
4-контактный кабель CAN ×1 Кабель Micro USB ×1 Кабель питания наземной системы ×1
Кабель питания
воздушной
системы I ×1
Кабель питания
воздушной
системы II ×1
Винт Другие
M2.5 ×5
M3.0 ×8
С полукруглой
головкой
Винт с резьбой
M3 и гайка M3
Липучка
Двусторонняя
клейкая лента
Шестиугольный
Г-образный
гаечный ключ

© 2017 DJI All Rights Reserved.
103
RU
*Предлагается при покупке DJI Matrice 600 и D-RTK.
Установка и подключение наземной системы
В качестве примера стандартной установки описывается процесс подключения системы управления полетом
DJI A3, DJI DATALINK PRO 900 и аккумулятора DJI Intelligent Flight.
Установка
1. Установите кронштейн для DATALINK PRO на основную плату с помощью двух винтов M2.5 × 5.
2. Установите антенну GNSS (глобальной навигационной спутниковой системы) на кронштейн для антенны
I
с
помощью трех винтов M3.0 × 8, а затем закрепите кронштейн для антенны
I
на основной плате.
3. Закрепите процессор D-RTK на основной плате, так же, как на наземной системе.
4. Зафиксируйте базовую станцию DATALINK PRO на кронштейне DATALINK PRO.
5. Зафиксируйте аккумулятор с помощью липучки, а затем закрепите основную плату на подходящем штативе.*
*Используется с обычной камерой и штативами видеокамер, устанавливаемыми с помощью винтов размером от
1/4 дюйма до 20 дюймов.
Верхний модуль расширения ×1 Кронштейн ×4
Вспомогательный
кронштейн ×2
Кронштейн для антенны III×4
Зажим антенны ×2 Винт
M2.5 ×5
M3.0 ×8
Аксессуары Matrice 600*

104
© 2017 DJI All Rights Reserved.
RU
1/4"
Размер резьбы 3/8»
Подключение
1. Соедините наземную систему и антенну GNSS с помощью кабеля антенны.
2. Соедините наземную систему и базовую станцию DATALINK PRO с помощью 8-контактного кабеля.
3. Подключите наземную систему к аккумулятору с помощью кабеля питания наземной системы.

© 2017 DJI All Rights Reserved.
105
RU
Установка и подключение воздушной системы
В качестве примера стандартной установки описывается процесс соединения кронштейна для атенны III, DJI
DATALINK PRO 900, DJI MATRICE 600, D-TRK и системы управления полетом DJI A3.
Установка
1. Установите две антенны GNSS на кронштейн для антенны
III
с помощью винтов M3.0 × 6.5
2. С помощью двусторонней клейкой ленты прикрепите процессор D-RTK (работающий как воздушная систе-
ма) и мобильную станцию DATALINK PRO к верхнему модулю расширения.
• При работе с другими типами летательных аппаратов используйте кронштейн для антенны
II
и
соблюдайте нижеуказанные требования:
а. Убедитесь, что два кронштейна для антенн
II
образуют прямую линию, проходящую через центр
тяжести летательного аппарата, и находятся более чем в 25 см друг от друга (чем дальше, тем
лучше).
б. Два кронштейна для антенн II должны находиться на одинаковом расстоянии от центра тяжести
летательного аппарата.
в. Две антенны воздушной системы должны находиться на одной высоте.
Подключение
1. С помощью кабелей антенн подключите порт "ANT1" наземной системы к одной антенне (она будет основной)
и порт "ANT2" к другой антенне (она будет вспомогательной).
2. Прикрепите антенны мобильной станции DATALINK PRO и закрепите их с помощью зажимов.
3. Подключите порт CAN/UART воздушной системы к порту CAN/UART мобильной станции DATALINK PRO с
помощью 8-контактного кабеля.
4. Подключите порт “CAN1” воздушной системы к любому порту CAN1 на пульте управления A3 с помощью
4-контактного кабеля CAN.
5. Подключите порт “POWER” воздушной системы к порту питания летательного аппарата с помощью кабеля
питания воздушной системы
I
.

106
© 2017 DJI All Rights Reserved.
RU
• Для подключения D-RTK к другим типам летательных аппаратов используйте кабель питания
воздушной системы
II
.
• По очереди подключите наземную и воздушную системы к компьютеру для обновления прошивки.
После обновления выключите и снова включите DATALINK PRO, систему управления полетом и
D-RTK.
• Поддерживает Windows 7 (или более поздняя версия) или Mac OS X 10.9 (или более поздняя версия).
Использование
Настройка параметров с помощью DJI Assistant 2
ВАЖНО: Наземная и воздушная станции должны быть по отдельности подключены к компьютеру и
активированы. Перед первым использованием настройте параметры с помощью DJI Assistant 2.
1. Загрузите ПО DJI Assistant 2 с www.dji.com и установите его на ваш компьютер.
2. Запустите на компьютере программу DJI Assistant 2, подключите к нему наземную систему и выберите
Connected Devices > D-RTK, чтобы настроить координаты.
3. При настройке воздушной системы убедитесь, что система управления полетом A3 подключена. Запустите
на компьютере программу DJI Assistant 2 и подключите к нему систему управления полетом. Выберите
подключенную систему управления полетом на странице Connected Devices, а затем перейдите в
DJI Devices > Air System Antenna, для настройки угла смещения антенны.
Настройка воздушной системы
Настройка наземной системы

© 2017 DJI All Rights Reserved.
107
RU
• НЕ включайте воздушную систему, пока светодиодный индикатор рабочего состояния наземной
системы не начнет светиться зеленым.
• Убедитесь, что антенны воздушной и наземной систем могут работать беспрепятственно.
• Дополнительную информацию ищите в руководстве пользователя, которое можно скачать на
сайте www.dji.com.
• 4-позиционные переключатели базовой и мобильной станций DATALINK PRO должны быть
переведены в положение "UART_SW1", если с D-RTK используется только DATALINK PRO, в
противном случае D-RTK не сможет получать необходимые данные от DATALINK PRO. Если
используется также и наземная станция DJI Assistant 2, 4-позиционные переключатели необходимо
перевести в положение "COMBO_SW4". Чтобы получить более подробную информацию,
ознакомьтесь с руководством пользователя DATALINK PRO.
• Переведите систему управления полетом A3 в режим P или режим F.
• НЕ перемещайте наземную систему во время позиционирования.
• Координаты положения наземной системы можно настроить с помощью DJI Assistant 2.
Условия эксплуатации
Используйте D-RTK на открытой местности, свободной от помех, и соблюдайте следующие инструкции:
1. Включите наземную систему и подождите, пока светодиодный индикатор рабочего состояния начнет
светиться зеленым.
2. Включите воздушную систему и подождите, пока светодиодный индикатор рабочего состояния не начнет
светиться зеленым.
3. Когда D-RTK будет готов к эксплуатации, светодиодные индикаторы состояния полета системы управле-
ния полетом A3 будут попеременно мигать зеленым и синим.
Обновление положения наземной системы
При каждом использовании наземная система автоматически определяет расстояние смещения от
предыдущего положения. Если расстояние смещения > 50 м, наземная система автоматически обновит
координаты положения. Если положение изменилось, а наземная система не обновила данные автоматически,
необходимо выполнить процедуру обновления вручную. Нажмите кнопку "Update" и удерживайте ее в течение
5 секунд, чтобы наземная система определила новые координаты положения. Если изменить положение
удалось, светодиодный индикатор рабочего состояния будет быстро мигать зеленым.
Кнопка "Update"

108
© 2017 DJI All Rights Reserved.
RU
Наземная система
—
Белый индикатор горит
непрерывно
Наземная система выключена или выполняется инициализация.
......
Белый индикатор
медленно мигает
Сбой инициализации.
—
Красный индикатор
горит непрерывно
Не выполнено позиционирование D-RTK.
......
Красный индикатор
медленно мигает
Задается положение наземной системы.
—
Зеленый индикатор
горит непрерывно
Положение наземной системы задано.
......
Зеленый индикатор
быстро мигает
Положение наземной системы обновлено.
Воздушная система
—
Белый индикатор горит
непрерывно
Воздушная система выключена или выполняется инициализация.
......
Белый индикатор
медленно мигает
Сбой инициализации.
—
Желтый индикатор
горит непрерывно
Позиционирование наземной системы не выполнено, но
дифференциальные данные получены.
—
Красный индикатор
горит непрерывно
Позиционирование наземной системы не выполнено,
дифференциальные данные не получены.
......
Желтый индикатор
медленно мигает
Выполнено позиционирование наземной системы с одной точкой,
дифференциальные данные получены.
......
Красный индикатор
медленно мигает
Выполнено позиционирование наземной системы с одной точкой, но
дифференциальные данные не получены.
......
Фиолетовый индикатор
медленно мигает
D-RTK работает в режиме плавающей точки.
......
Зеленый индикатор
медленно мигает
D-RTK работает в режиме вычисления.
—
Зеленый индикатор
горит непрерывно
D-RTK работает в фиксированном режиме.
Расшифровка значений цвета светодиодных индикаторов

RU
Точность позиционирования
По горизонтали: 1 см + 1 ч./мд or частей на миллион
По вертикали: 2 см + 1 ч./мд or частей на миллион
Точность ориентации
(0,2/R)°
R — это базовое расстояние (расстояние между двумя антеннами
воздушной системы). Оно измеряется в метрах.
Среднеквадратичное значение (RMS) 0,03 м/с
Используемая частота
На международной версии: GPS L1&L2, GLONASS F1&F2
На версии для стран азиатско-тихоокеанского региона: GPS L1&L2,
BEIDOU B1&B2
Тип интерфейса CAN, UART, USB
Напряжение на входе: от 3 до 12 См (от 12 до 52 В)
Потребляемая мощность 5,2 В
Сила тока 0,45 A (при 12 В)
Размеры процессора D-RTK 112,3 мм × 63 мм × 18,6 мм
Вес процессора D-RTK 139,5 г
Диапазон рабочих температур От 0 до +45 °C (от 32 до 113 °F)
Диапазон температур хранения От -40 до +85 °C (от -40 до 185 °F)
Технические характеристики
D-RTK
TM
является товарным знаком компании DJI.
Copyright © 2017 DJI Все права защищены.
Содержание руководства может измениться.
Последняя версия доступна на сайте
www.dji.com/product/d-rtk

110
©
2017 DJI All Rights Reserved.
Compliance Information
FCC Compliance Notice
This device complies with Part 15 of the FCC Rules. Operation is subject to the following two conditions: (1)
This device may not cause harmful interference, and (2) This device must accept any interference received,
including interference that may cause undesired operation.
Any changes or modications not expressly approved by the party responsible for compliance could void
the user’s authority to operate the equipment.
This equipment has been tested and found to comply with the limits for a Class B digital device, pursuant
to part 15 of the FCC Rules. These limits are designed to provide reasonable protection against harmful
interference in a residential installation. This equipment generates, uses and can radiate radio frequency
energy and, if not installed and used in accordance with the instructions, may cause harmful interference
to radio communications. However, there is no guarantee that interference will not occur in a particular
installation. If this equipment does cause harmful interference to radio or television reception, which can be
determined by turning the equipment off and on, the user is encouraged to try to correct the interference by
one or more of the following measures:
—Reorient or relocate the receiving antenna.
—Increase the separation between the equipment and receiver.
—Connect the equipment into an outlet on a circuit different from that to which the receiver is connected.
—Consult the dealer or an experienced radio/TV technician for help.
EU Compliance Statement: SZ DJI TECHNOLOGY CO., LTD. hereby declares that this device is in
compliance with the essential requirements and other relevant provisions of the Directive 2014/53/EU.
A copy of the EU Declaration of Conformity is available online at www.dji.com/euro-compliance
EU contact address: DJI GmbH, Industriestrasse. 12, 97618, Niederlauer, Germany
Declaración de cumplimiento UE: SZ DJI TECHNOLOGY CO., LTD. por la presente declara que este
dispositivo cumple los requisitos básicos y el resto de provisiones relevantes de la Directiva 2014/53/EU.
Hay disponible online una copia de la Declaración de conformidad UE en www.dji.com/euro-compliance
Dirección de contacto de la UE: DJI GmbH, Industriestrasse. 12, 97618, Niederlauer, Germany
EU-verklaring van overeenstemming: SZ DJI TECHNOLOGY CO., LTD. verklaart hierbij dat dit apparaat
voldoet aan de essentiële vereisten en andere relevante bepalingen van Richtlijn 2014/53/EU.
De EU-verklaring van overeenstemming is online beschikbaar op www.dji.com/euro-compliance
Contactadres EU: DJI GmbH, Industriestrasse. 12, 97618, Niederlauer, Germany
Declaração de conformidade da UE: A SZ DJI TECHNOLOGY CO., LTD. declara, através deste documento,

que este dispositivo está em conformidade com os requisitos essenciais e outras disposições relevantes da
Diretiva 2014/53/EU.
Existe uma cópia da Declaração de conformidade da UE disponível online em www.dji.com/euro-
compliance
Endereço de contacto na UE: DJI GmbH, Industriestrasse. 12, 97618, Niederlauer, Germany
Dichiarazione di conformità UE: SZ DJI TECHNOLOGY CO., LTD. dichiara che il presente dispositivo è
conforme ai requisiti essenziali e alle altre disposizioni rilevanti della direttiva 2014/53/EU.
Una copia della dichiarazione di conformità UE è disponibile online all'indirizzo Web www.dji.com/euro-
compliance
Indirizzo di contatto UE: DJI GmbH, Industriestrasse. 12, 97618, Niederlauer, Germany
Déclaration de conformité UE : Par la présente, SZ DJI TECHNOLOGY CO., LTD déclare que cet appareil
est conforme aux principales exigences et autres clauses pertinentes de la directive européenne 2014/53/
EU.
Une copie de la déclaration de conformité UE est disponible sur le site www.dji.com/euro-compliance
Adresse de contact pour l'UE : DJI GmbH, Industriestrasse. 12, 97618, Niederlauer, Germany
EU-Compliance: Hiermit erklärt SZ DJI TECHNOLOGY CO., LTD., dass dieses Gerät den wesentlichen
Anforderungen und anderen einschlägigen Bestimmungen der EU-Richtlinie 2014/53/EU entspricht.
Eine Kopie der EU-Konformitätserklärung nden Sie online auf www.dji.com/euro-compliance.
Kontaktadresse innerhalb der EU: DJI GmbH, Industriestrasse. 12, 97618, Niederlauer, Germany
CAUTION: RISK OF EXPLOSION IF BATTERY IS REPLACED BY AN INCORRECT TYPE. DISPOSE OF
USED BATTERIES ACCORDING TO THE INSTRUCTIONS
Environmentally friendly disposal
Old electrical appliances must not be disposed of together with the residual waste, but have to be
disposed of separately. The disposal at the communal collecting point via private persons is for
free. The owner of old appliances is responsible to bring the appliances to these collecting points
or to similar collection points. With this little personal effort, you contribute to recycle valuable raw
materials and the treatment of toxic substances.

Manufactured by:
14th oor, West Wing, Skyworth Semiconductor Design Building NO.18 Gaoxin South 4th Ave,
Nanshan District, Shenzhen, Guangdong, China
制 造 商:深圳市大疆创新科技有限公司
地址:深圳市南山区高新南四道 18 号创维半导体设计大厦西座 14 层
服务热线:400-700-0303

Printed in China.
www.dji.com/support
DJI Support
DJI 技术支持
DJI 技術支援
DJI サポート
DJI지원
DJI Support
Asistencia técnica de DJI
Assistance DJI
Assistenza DJI
DJI-ondersteuning
Suporte DJI
Техническая поддержка DJI
If you have any questions about this document,
please contact DJI by sending a message to
.
如果您对说明书有任何疑问或建议,请通过以下电子邮
箱联系我们:
。
-
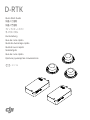 1
1
-
 2
2
-
 3
3
-
 4
4
-
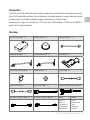 5
5
-
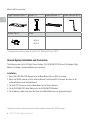 6
6
-
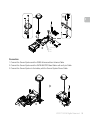 7
7
-
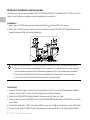 8
8
-
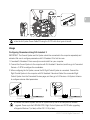 9
9
-
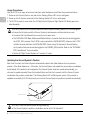 10
10
-
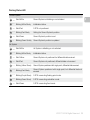 11
11
-
 12
12
-
 13
13
-
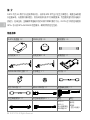 14
14
-
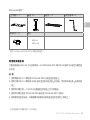 15
15
-
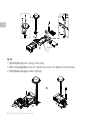 16
16
-
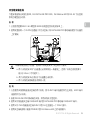 17
17
-
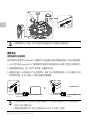 18
18
-
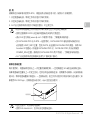 19
19
-
 20
20
-
 21
21
-
 22
22
-
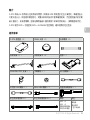 23
23
-
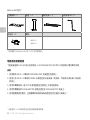 24
24
-
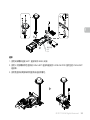 25
25
-
 26
26
-
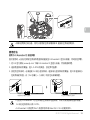 27
27
-
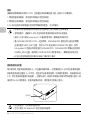 28
28
-
 29
29
-
 30
30
-
 31
31
-
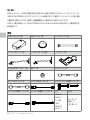 32
32
-
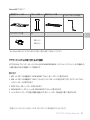 33
33
-
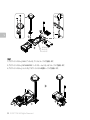 34
34
-
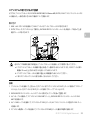 35
35
-
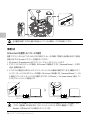 36
36
-
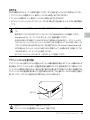 37
37
-
 38
38
-
 39
39
-
 40
40
-
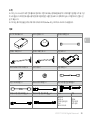 41
41
-
 42
42
-
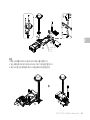 43
43
-
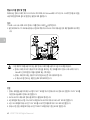 44
44
-
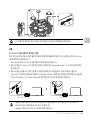 45
45
-
 46
46
-
 47
47
-
 48
48
-
 49
49
-
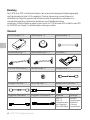 50
50
-
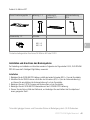 51
51
-
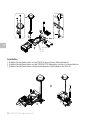 52
52
-
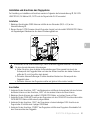 53
53
-
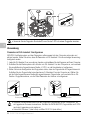 54
54
-
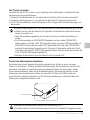 55
55
-
 56
56
-
 57
57
-
 58
58
-
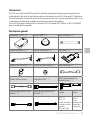 59
59
-
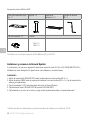 60
60
-
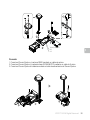 61
61
-
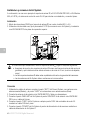 62
62
-
 63
63
-
 64
64
-
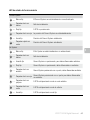 65
65
-
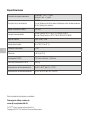 66
66
-
 67
67
-
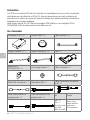 68
68
-
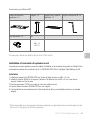 69
69
-
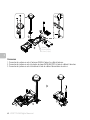 70
70
-
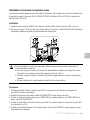 71
71
-
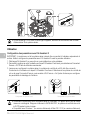 72
72
-
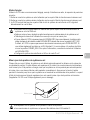 73
73
-
 74
74
-
 75
75
-
 76
76
-
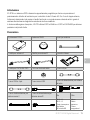 77
77
-
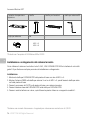 78
78
-
 79
79
-
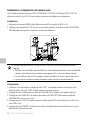 80
80
-
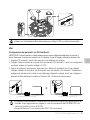 81
81
-
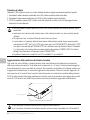 82
82
-
 83
83
-
 84
84
-
 85
85
-
 86
86
-
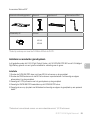 87
87
-
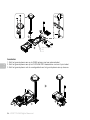 88
88
-
 89
89
-
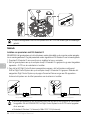 90
90
-
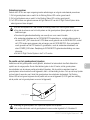 91
91
-
 92
92
-
 93
93
-
 94
94
-
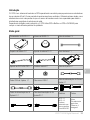 95
95
-
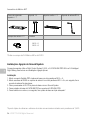 96
96
-
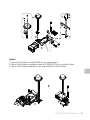 97
97
-
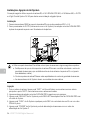 98
98
-
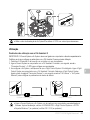 99
99
-
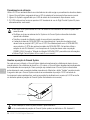 100
100
-
 101
101
-
 102
102
-
 103
103
-
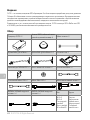 104
104
-
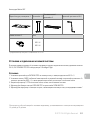 105
105
-
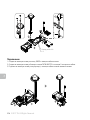 106
106
-
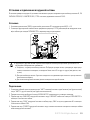 107
107
-
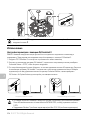 108
108
-
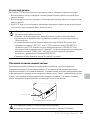 109
109
-
 110
110
-
 111
111
-
 112
112
-
 113
113
-
 114
114
-
 115
115


dji D-RTK Guía de inicio rápido
- Tipo
- Guía de inicio rápido
- Este manual también es adecuado para
en otros idiomas
- français: dji D-RTK Guide de démarrage rapide
- italiano: dji D-RTK Guida Rapida
- Deutsch: dji D-RTK Schnellstartanleitung
- português: dji D-RTK Guia rápido
- 日本語: dji D-RTK クイックスタートガイド
Artículos relacionados
-
dji MATRICE 300 RTK Información del Producto
-
dji Assistant 2 Guía de inicio rápido
-
-
dji Mavic 3 Enterprise Guía del usuario
-
dji Datalink 3 Guía de inicio rápido
-
dji Assistant 2 For Phantom Guía de inicio rápido
-
-
dji Assistant 2 For Phantom Guía de inicio rápido
-
-