Toshiba 27D46 Guía del usuario
- Categoría
- Televisores LCD
- Tipo
- Guía del usuario
Este manual también es adecuado para

27D46
32D46
2006
Appendix
Using the TV’s
Features
Setting up
your TV
Using the
Remote Control
Connecting
your TV
Welcome to
Toshiba
Important
Safeguards
J3W41121A(E)_COVER 14/03/2006, 3:28 PM1

2
Child Safety
It Makes A Difference
Where Your TV Stands
Congratulations on your purchase! As you enjoy
your new TV, keep these safety tips in mind:
The Issue
If you are like most consumers, you have a TV in your home.
Many homes, in fact, have more than one TV.
The home theater entertainment experience is a growing
trend, and larger TVs are popular purchases; however, they
are not always supported on the proper TV stands.
Sometimes TVs are improperly secured or inappropriately
situated on dressers, bookcases, shelves, desks, audio
speakers, chests, or carts. As a result, TVs may fall over,
causing unnecessary injury.
Toshiba Cares!
The consumer electronics industry
is committed to making home
entertainment enjoyable and safe.
The Consumer Electronics
Association formed the Home
Entertainment Support Safety
Committee, comprised of TV and
consumer electronics furniture
manufacturers, to advocate
children’s safety and educate
consumers and their families about
television safety.
Tune Into Safety
One size does NOT fit all! Use appropriate
furniture large enough to support the weight of your
TV (and other electronic components.)
Use appropriate angle braces, straps, and anchors to secure
your furniture to the wall (but never screw anything directly
into the TV.)
Carefully read and understand the other enclosed
instructions for proper use of this product.
Do not allow children to climb on or play with furniture
and TVs.
Avoid placing any item on top of your TV (such as a VCR,
remote control, or toy) that a curious child may reach for.
Remember that children can become excited while watching
a program and can potentially push or pull a TV over.
Share our safety message about this hidden hazard of
the
home with your family and friends. Thank you!
Safety Precautions
WARNING
TO REDUCE THE RISK OF FIRE OR ELECTRIC SHOCK,
DO NOT EXPOSE THIS APPLIANCE TO RAIN OR
MOISTURE.
Dear Customer,
Thank you for purchasing this Toshiba TV. This manual will
help you use the many exciting features of your new TV.
Before operating the TV, please read this manual
completely, and keep it nearby for future reference.
NOTE TO CATV INSTALLERS
This is a reminder to call the CATV system installer’s
attention to Article 820-40 of the NEC, which provides
guidelines for proper grounding and, in particular, specifies
that the cable ground shall be connected to the grounding
system of the building, as close to the point of cable entry
as practical. For additional antenna grounding information,
see items 25 and 26 on page 4.
The lightning symbol in the triangle tells you that the
voltage inside this product may be strong enough to
cause an electric shock. DO NOT TRY TO SERVICE
THIS PRODUCT YOURSELF.
The exclamation mark in the triangle tells you that
important operating and maintenance instructions
follow this symbol.
WARNING: TO REDUCE THE RISK OF ELECTRIC
SHOCK, DO NOT REMOVE COVER (OR BACK.)
NOUSER-SER VICEABLE PARTS INSIDE. REFER
SERVICING TO QUALIFIED SERVICE PERSONNEL.
0303
2
2500 Wilson Blvd.
Arlington, VA 22201 U.S.A.
Tel. 703-907-7600 Fax 703-907-7690
www.CE.org
CEA is the Sponsor, Producer and
Manager of the International CES
®
NOTICE OF POSSIBLE ADVERSE EFFECTS
ON TV PICTURE DISPLAY
If a fixed (non-moving) pattern or image remains on the TV screen
for extended periods of time, the image can become permanently
ingrained in the cathode ray tube(s) of the TV and cause subtle but
permanent ghost images. This type of damage is NOT COVERED
BY YOUR WARRANTY. (See item 33 on page 4 for details.)
Important
Safeguards
CAUTION
TO PREVENT ELECTRIC SHOCK DO NOT USE THIS
POLARIZED PLUG WITH AN EXTENSION CORD,
RECEPTACLE OR OTHER OUTLET UNLESS THE
BLADES CAN BE FULLY INSERTED TO PREVENT
BLADE EXPOSURE.
J3W41121A(E)_P02-06 14/03/2006, 3:28 PM2

3
Appendix
Using the TV’s
Features
Setting up
your TV
Using the
Remote Control
Connecting
your TV
Welcome to
Toshiba
Important
Safeguards
Installation, Care, and Service
Installation
Follow these recommendations and precautions and heed all
warnings when installing your TV:
16) Never modify this equipment. Changes or modifications
may void: a) the warranty, and b) the user’s authority to
operate this equipment under the rules of the Federal
Communications Commission.
17) DANGER: RISK OF SERIOUS PERSONAL
INJURY, DEATH, OR EQUIPMENT
DAMAGE! Never place the TV on
an unstable cart, stand, or table. The TV
may fall, causing serious personal injury,
death, or serious damage to the TV.
18) Never place or store the TV in direct
sunlight; hot, humid areas; areas
subject to excessive dust or vibration;
or locations with temperatures at or
below 41°F (5°C.)
19) Always place the TV on the floor
or a sturdy, level, stable surface that
can support the weight of the unit.
20) Never place items such as vases,
aquariums, or candles on top of the TV.
21) Never block or cover the slots or
openings in the TV cabinet back,
bottom, and sides. Never place
the TV:
• on a bed, sofa, rug, or similar
surface;
• too close to drapes, curtains,
or walls; or
• in a confined space such as a
bookcase, built-in cabinet, or any
other place with poor ventilation.
The slots and openings are provided
to protect the TV from overheating
and to help maintain reliable
operation of the TV.
22) Never allow anything to rest on or roll over the power
cord, and never place the TV where the power cord is
subject to wear or abuse.
23) Never overload wall outlets and
extension cords.
Important Safety Instructions
1) Read these instructions.
2) Keep these instructions.
3) Heed all warnings.
4) Follow all instructions.
5) Do not use this apparatus near
water.
6) Clean only with a dry cloth.
7) Do not block any ventilation
openings. Install in accordance with
the manufacturer’s instructions.
8) Do not install near any heat
sources such as radiators,
heat registers, stoves, or other
apparatus (including amplifiers)
that produce heat.
9) Do not defeat the safety purpose of the polarized or
grounding type plug. A polarized plug has two blades
with one wider than the other. A grounding type plug has
two blades and a third grounding
prong. The wide blade or the third
prong are provided for your safety.
If the provided plug does not fit into
your outlet, consult an electrician
for replacement of the obsolete outlet.
10) Protect the power cord from being
walked on or pinched, particularly at
plugs, convenience receptacles, and
the point where it exits the apparatus.
11) Only use attachments/accessories specified by the
manufacturer.
12) Use only with the cart, stand, tripod,
bracket, or table specified by the
manufacturer, or sold with the
apparatus. When a cart is used, use
caution when moving the cart/apparatus
combination to avoid injury from tip-over.
13) Unplug this apparatus during
lightning storms or when
unused for long periods
of time.
14) Refer all servicing to qualified service personnel.
Servicing is required when the apparatus has been
damaged in any way, such as power supply
cord or plug is damaged, liquid has
been spilled or objects have fallen into
the apparatus, the apparatus has been
exposed to rain or moisture, does not
operate normally, or has been dropped.
15) CAUTION: To reduce the risk of electric shock, do
not use the polarized plug with an extension cord,
receptacle, or other outlet unless the blades can
be inserted completely to prevent blade exposure.
Wide plug
QUALIFIED
SERVICE
TECHNICIAN
0303
3
Important
Safeguards
J3W41121A(E)_P02-06 14/03/2006, 3:29 PM3

4
24) Always operate this equipment from
a 120 V AC, 60 Hz power source only.
25) Always make sure the antenna system is properly
grounded to provide adequate protection against voltage
surges and built-up static charges (see Section 810 of the
National Electric Code.)
26) DANGER: RISK OF SERIOUS PERSONAL
INJURY OR DEATH!
• Use extreme care to make sure you are never in
a position where your body (or any item you are in contact
with, such as a ladder or screwdriver) can accidentally
touch overhead power lines. Never locate the antenna
near overhead power lines or other electrical circuits.
• Never attempt to install any of the following during
lightning activity:
a) an antenna system; or b) cables, wires, or any home
theater component connected to an antenna or phone
system.
Care
For better performance and safer operation of your TOSHIBA
TV, follow these recommendations and precautions:
27) Always sit approximately 10–25 feet away from the TV and
as directly in front of it as possible. The picture can appear
dull if you sit too far to the left or right of the TV, or if
sunlight or room lights reflect on the screen. Turn the TV
off to check for reflections on the screen, and then remove
the source of reflections while viewing the TV.
28) Always unplug the TV before
cleaning. Never use liquid or
aerosol cleaners.
29) WARNING: RISK OF ELECTRIC SHOCK!
Never spill liquids or push objects of any kind
into the TV cabinet slots.
Ground clamp
Antenna discharge unit
(NEC Section 810-20)
Grounding conductors
(NEC Section 810-21)
Power service grounding
electrode system (NEC Art 250 Part H)
Ground clamps
Antenna lead-in wire
Electric service equipment
QUALIFIED
SERVICE
TECHNICIAN
30) [This item applies to projection TVs only.] If the air
temperature rises suddenly (for example, when the TV is
first delivered), condensation may form on the lenses. This
can make the picture appear distorted or the color appear
faded. If this happens, turn off the TV for 6 to 7 hours to
allow the condensation to evaporate.
31) For added protection of your TV from lightning and power
surges, always unplug the power cord and disconnect the
antenna from the TV if you leave the TV unattended or
unused for long periods of time.
32) During normal use, the TV may make
occasional snapping or popping
sounds. This is normal, especially
when the unit is being turned on or
off. If these sounds become frequent
or continuous, unplug the power cord
and contact a Toshiba Authorized Service Center.
33) Possible Adverse Effects on TV Picture Display:
If a
fixed (non-moving) pattern or image remains on the TV
screen for extended periods of time, the image can become
permanently ingrained in the cathode ray tube(s) of the TV
and cause subtle but permanent ghost images. This type
of damage is NOT COVERED BY YOUR WARRANTY.
Never leave the TV on for extended periods of time while it
is displaying the following images or formats:
• Fixed Images, including but not limited to PIP/POP
windows, closed captions, video game patterns, TV
station logos, stock tickers, and websites.
• Special Formats
that do not use the entire screen, including
but not limited to widescreen or letterbox format media viewed
on a 4:3 aspect ratio display (with gray or black bars at the top
and bottom of the screen); or 4:3 aspect ratio format media
viewed on a widescreen/16:9 aspect ratio display (with gray or
black bars on the left and right sides of the screen.)
Service
34) WARNING: RISK OF ELECTRIC
SHOCK! Never attempt to service the
TV yourself. Opening and
removing the covers may expose
you to dangerous voltage or other
hazards. Refer all servicing to a
Toshiba Authorized Service Center.
35) If you have the TV serviced:
• Ask the service technician to use only replacement parts
specified by the manufacturer.
• Upon completion of service, ask
the service technician to perform
routine safety checks to determine
that the TV is in safe operating
condition.
36) When the TV reaches the end of its useful life, ask a
qualified service technician to properly dispose of the TV.
Improper disposal may result in a picture tube implosion
and possible personal injury.
0303
4
Important
Safeguards
J3W41121A(E)_P02-06 14/03/2006, 3:29 PM4

5
Appendix
Using the TV’s
Features
Setting up
your TV
Using the
Remote Control
Connecting
your TV
Welcome to
Toshiba
Important
Safeguards
Important Safeguards ............................................................................................................. 2-4
Welcome to Toshiba ................................................................................................................... 6
Exploring your new TV ......................................................................................................................................... 6
Selecting a location for the TV.............................................................................................................................. 6
Connecting your TV ................................................................................................................... 7
Connecting a VCR................................................................................................................................................ 7
Connecting a cable converter box or Antenna ..................................................................................................... 8
Connecting a DVD player/satellite receiver and a VCR ....................................................................................... 9
Connecting a DVD player with ColorStream
®
(component video) and a VCR ................................................... 10
Connecting a DTV receiver / set-top box with ColorStream
®
(component video) and a VCR ............................ 11
Connecting a camcorder .................................................................................................................................... 12
Connecting an audio system .............................................................................................................................. 13
Connecting an AV amplifier with built-in digital surround .................................................................................... 13
Using the remote control......................................................................................................... 14
Preparing the remote control for use .................................................................................................................. 14
Installing the remote control batteries ................................................................................................................ 14
Using the remote control to operate your other devices..................................................................................... 14
Programming the remote control to operate your other devices ........................................................................ 15
Device code tables ............................................................................................................................................. 16
Learning about the remote control ..................................................................................................................... 18
Setting up your TV ................................................................................................................... 19
Starting setup ..................................................................................................................................................... 19
Changing the on-screen display language ......................................................................................................... 19
Adding channels to the TV’s memory ................................................................................................................. 20
Using the TV’s features ........................................................................................................... 21
Adjusting the channel settings ............................................................................................................................ 21
Using the LOCKS menu ..................................................................................................................................... 22
Selecting a password ................................................................................................................................. 22
Using the V-Chip (parental control) feature................................................................................................ 23
Locking channels ....................................................................................................................................... 24
Locking the video inputs ............................................................................................................................ 25
Setting the GameTimer
TM
........................................................................................................................... 25
Using the front panel lock feature .............................................................................................................. 26
Labeling channels .............................................................................................................................................. 26
Selecting the video input source ........................................................................................................................ 27
Setting the clock ................................................................................................................................................. 27
Setting the ON/OFF timer ................................................................................................................................... 27
Viewing the wide-screen picture formats ............................................................................................................ 28
Adjusting the picture ........................................................................................................................................... 30
Adjusting the picture quality ....................................................................................................................... 30
Resetting your picture adjustments............................................................................................................ 30
Setting the sleep timer ........................................................................................................................................ 30
Using the closed caption feature ........................................................................................................................ 31
Using the CC advanced feature ......................................................................................................................... 31
Adjusting the sound ............................................................................................................................................ 32
Muting the sound ....................................................................................................................................... 32
Selecting stereo/SAP broadcasts .............................................................................................................. 32
Adjusting the sound quality ........................................................................................................................ 32
Selecting the audio languages ................................................................................................................... 33
Selecting the digital output format .............................................................................................................. 33
Using the StableSound
®
feature ................................................................................................................ 33
Using the surround sound feature.............................................................................................................. 34
Resetting your audio adjustments.............................................................................................................. 34
Checking the digital signal strength.................................................................................................................... 34
Displaying TV status information on-screen ....................................................................................................... 34
Auto power off .................................................................................................................................................... 35
Understanding the Power Return feature ........................................................................................................... 35
Appendix ................................................................................................................................... 35
Troubleshooting .................................................................................................................................................. 35
Specifications ..................................................................................................................................................... 36
Limited United States Warranty .......................................................................................................................... 37
Important
Safeguards
J3W41121A(E)_P02-06 14/03/2006, 3:30 PM5

6
Welcome to Toshiba
Congratulations! You have purchased one of the finest color TVs on the
market. The goal of this manual is to guide you through setting up and
operating your Toshiba TV as quickly as possible.
You may need to purchase other audio or video cables to connect your
equipment. See “Connecting your TV” on page 7 for more information.
Please read all the safety and operating instructions carefully before
you begin.
Exploring your new TV
You can operate your TV by using the buttons on the front panel or the
remote control. The front and back panels provide all the inputs you will
need to connect other equipment to your TV.
The STARTING SETUP feature appears
the first time you turn on the TV. See page
19 for details.
Welcome to
Toshiba
Notes:
• To open the menu system, you can either
press MENU on the remote control or
simultaneously press both VOLUME
buttons (
▲
and
▼
) on the front panel.
• When a menu is open, to select the desired
setting, you can use either the arrow
buttons on the remote control or the
CHANNEL
▲
/
▼
and VOLUME
▲
/
▼
buttons on the front panel.
Selecting a location for the TV
• Place the TV on the floor or on a sturdy platform in a location where
light does not directly hit the screen.
• Place the TV far enough from the walls to allow proper ventilation.
Inadequate ventilation may cause overheating, which may damage
the TV.
TV back panel
TV front panel
POWER
Remote sensor
Power indicator
Channel ▲/▼
Volume
▲/▼
Audio(L/R)/Video In
POWER
Remote sensor
Power indicator
Channel ▲/▼
Volume
▲/▼
Audio(L/R)/Video In
27D46
32D46
J3W41121A(E)_P02-06 14/03/2006, 3:30 PM6

7
Appendix
Using the TV’s
Features
Setting up
your TV
Using the
Remote Control
Connecting
your TV
Welcome to
Toshiba
Important
Safeguards
IN
OUT
VIDEO
IN from ANT
CH 3
CH 4
OUT to TV
AUDIO
LR
You will need:
• two coaxial cables
• one set of standard A/V cables
Note:
If using a mono VCR, connect L/Mono to VCR
Audio OUT using only one audio cable. For
better picture quality, if your VCR has S-video,
you can use an S-video cable instead of the
standard video cable. Do not connect both an
S-video cable and a standard video cable at
the same time or the picture performance will
be unacceptable.
Connecting a VCR
This connection allows you to watch local channels and video programs,
play or record on the VCR while watching TV, and record from one
channel while watching another channel.
Cable Lead-in
from cable box
or antenna
TV
Stereo VCR
The unauthorized recording, use, distri-
bution or revision of television programs,
videotapes, DVDs, and other materials is
prohibited under the Copyright Laws of
the United States and other countries,
and may subject you to civil and criminal
liability.
Connecting
your TV
NOTICE: RISK OF
EQUIPMENT DAMAGE!
Do not plug in any power cords
until you have finished connecting
all equipment.
Connecting your TV
• A coaxial cable is the standard cable that comes in from your
antenna or cable converter box. Coaxial cables use “F” connectors.
• Standard A/V (audio/video) cables are usually color coded accord-
ing to use: yellow for video and red and white for audio. The red
audio cable is for the stereo right channel, and the white audio
cable is for the stereo left (or mono) channel. If you look at the rear
panel of the TV, you will see that the terminals are color coded in
the same manner as the cables.
• S-video cables provide better picture performance than standard
video cables. S-video cables can only be used with S-video
compatible components.
• Component video cables provide better picture performance than
S-video cables. Component video cables can only be used with
component video compatible components.
• Digital audio coaxial cable is for use with digital audio equipment
that has digital audio output (see page 13.)
ANTENNA
Coaxial Cable
AUDIO
Cables
VIDEO
Cable
S-Video
Cable
Component video
Cables
DIGITAL AUDID
Coaxial Cable
J3W41121A(E)_P07-13 14/03/2006, 3:30 PM7

8
Connecting a cable converter box or Antenna
This television has an extended tuning range and can tune most cable
channels without using a cable company supplied converter box. Some
cable companies offer “premium pay channels” in which the signal is
scrambled. Descrambling these signals for normal viewing requires the
use of a descrambler device, which is generally provided by the cable
company.
Option 1 : For Subscribers to Basic Cable TV Service
For basic cable service not requiring a Converter/Descrambler box,
connect the incoming 75 ohm Coaxial Cable directly to the Antenna
Jack on the back of the television.
Option 2 : For Subscribers to Scrambled Cable TV Service
If you subscribe to a cable service that requires the use of a Converter/
Descrambler box, connect the incoming cable to the Converter/
Descrambler box and connect the output of the box to the Antenna
Jack on the back of the television. Follow the connections shown
below. Set the television to the output of the Converter/Descrambler
box (usually channel 3 or 4) and use the Converter/Descrambler box to
select channels.
Option 3 : For Subscribers to Unscrambled Basic Cable
with Scrambled Premium Channels
If you subscribe to a cable service in which basic cable channels are
unscrambled and premium channels require the use of a Converter/
Descrambler box, you may wish to use a two-set signal splitter (some-
times called a “two-set coupler”) and an A/B Switch box from the cable
installer or an electronics supply store. Follow the connections shown
below. With the switch in the “B” position, you can directly tune any
nonscrambled channels on your TV. With the switch in the “A” position,
tune your TV to the output of the Converter/Descrambler box (usually
channel 3 or 4) and use the box to tune scrambled channels.
Note:
When you use a converter box with your TV,
there may be features that you cannot
program using the remote control, such as
labeling channels, blocking channels, and
programming your favorite channels.
From Cable
A
B
TV
Option 1:
Option 2:
Option 3:
Connecting
your TV
Converter/Descrambler
Converter/Descrambler;
Splitter A / B Switch
J3W41121A(E)_P07-13 14/03/2006, 3:31 PM8

9
Appendix
Using the TV’s
Features
Setting up
your TV
Using the
Remote Control
Connecting
your TV
Welcome to
Toshiba
Important
Safeguards
Connecting a DVD player/satellite receiver
and a VCR
This connection allows you to watch DVD/satellite, VCR, or TV
programs. You can record from the satellite receiver and TV, as well as
record one TV channel while watching another channel.
You will need:
• three coaxial cables
• two sets of standard A/V cables
Note:
If using a mono VCR, connect L/Mono to VCR
Audio OUT using only one audio cable. For
better picture quality, if your VCR has S-video,
you can use an S-video cable instead of the
standard video cable. Do not connect both an
S-video cable and a standard video cable at
the same time or the picture performance will
be unacceptable.
Satellite IN
OUT
VIDEO AUDIO
LR
OUT to TV
IN
OUT
VIDEO AUDIO
LR
IN from ANT
CH 3
CH 4
OUT to TV
DVD player / Satellite Receiver
TV
Stereo VCR
From satellite
The unauthorized recording, use, distri-
bution or revision of television programs,
videotapes, DVDs, and other materials is
prohibited under the Copyright Laws of
the United States and other countries,
and may subject you to civil and criminal
liability.
Connecting
your TV
J3W41121A(E)_P07-13 14/03/2006, 3:31 PM9

10
You will need:
• two coaxial cables
• one set of standard A/V cables
• one set of component video cables
• one pair of standard audio cables
Connecting a DVD player with ColorStream
®
(component video) and a VCR
This connection allows you to watch DVD, VCR, or TV programs and
record TV programs. You can record from one source while watching a
program from another source. Your TV is capable of using ColorStream
(component video.) Connecting your TV to a component video compat-
ible DVD player, such as a Toshiba DVD player with ColorStream
®
, can
greatly enhance picture quality and performance.
IN
OUT
VIDEO
IN from ANT
CH 3
CH 4
OUT to TV
AUDIO
LR
OUT
AUDIO
OUT
VIDEO
COMPONENT VIDEO
Y
L
R
S-VIDEO
DVD player with Component video
TV
Stereo VCR
From antenna
Note:
The ColorStream inputs on this TV are for use
with devices that output 480i interlaced
signals ONLY. This TV will not accept or
display 480p or 720p progressive scan
signals or 1080i interlaced high-definition
signals. If you connect a high-definition set-
top receiver, 480p progressive scan DVD
player, or other similar device to the TV’s
ColorStream inputs, YOU MUST SWITCH
THE DEVICE’S OUTPUT TO 480i
INTERLACED MODE FIRST. Failure to do
this will display “Colorstream” on a black
screen.
The unauthorized recording, use, distri-
bution or revision of television programs,
videotapes, DVDs, and other materials is
prohibited under the Copyright Laws of
the United States and other countries,
and may subject you to civil and criminal
liability.
Connecting
your TV
J3W41121A(E)_P07-13 14/03/2006, 3:31 PM10

11
Appendix
Using the TV’s
Features
Setting up
your TV
Using the
Remote Control
Connecting
your TV
Welcome to
Toshiba
Important
Safeguards
AUDIO
OUT
Y
L
R
S-VIDEO VIDEO
OUT
COMPONENT VIDEO
IN
OUT
VIDEO
IN from ANT
CH 3
CH 4
OUT to TV
AUDIO
LR
Stereo VCR
TV
DTV Receiver
with Component video
From DTV
Antenna
From Antenna
You will need:
• three coaxial cables
• two sets of standard A/V cables
• one set of standard audio cables
• one set of component video cables
Note:
You can connect the component video cables
to either set of ColorStream jacks on the TV.
If your DTV receiver does not have compo-
nent video, use the S-video and standard
audio connections instead. Do not connect
both an S-video and a standard video cable
at the same time or the picture performance
will be unacceptable.
The unauthorized recording, use,
distribution, or revision of television
programs, videotapes, DVDs, and other
materials is prohibited under the
Copyright Laws of the United States and
other countries, and may subject you to
civil and criminal liability.
Connecting
your TV
Connecting a DTV receiver / set-top box with
ColorStream
®
(component video) and a VCR
This connection allows you to watch DTV (digital TV), VCR, and TV
programs, and record DTV and TV programs.
Your TV has ColorStream
®
(component video) inputs. Connecting your
TV to a DTV receiver with component video can greatly enhance
picture quality and realism.
J3W41121A(E)_P07-13 14/03/2006, 3:32 PM11

12
Connecting
your TV
Connecting a camcorder
This connection allows you to watch videos recorded on a camcorder.
You will need:
• one S-video cable or standard video cable
• one pair of standard audio cables
Note:
For better picture quality, if your camcorder
has S-video, you can use an S-video cable
(plus the standard audio cables) instead of a
standard video cable.
Do not connect both a standard video cable
and an S-video cable at the same time or the
picture performance will be unacceptable.
VIDEO
AUDIO
L
R
OUT
S-VIDEO
S-VHS Camcorder
Back panel of TV
VHS Camcorder
Front Panel of TV
VIDEO
AUDIO
L
R
OUT
S-VIDEO
J3W41121A(E)_P07-13 14/03/2006, 3:32 PM12

13
Appendix
Using the TV’s
Features
Setting up
your TV
Using the
Remote Control
Connecting
your TV
Welcome to
Toshiba
Important
Safeguards
Connecting
your TV
You will need:
• one coaxial digital cable
• Six sets of speaker cables
Digital Audio
Coaxial
IN
AV Amplifier with built-in digital surround
Center Speaker
Front
Speaker
(Left)
Front
Speaker
(Right)
Subwoofer
Surround Speaker
(Left)
Surround
Speaker (Right)
TV
TV
The COAXIAL DIGITAL AUDIO OUT jack outputs digital audio only during digital broadcasts with digital audio. To hear analog
broadcast audio, you also must connect analog audio cables from the L/R ANALOG AUDIO jacks to the receiver’s inputs.
Consult the owner’s manual for your receiver to determine the best way to switch between the analog and digital signals.
Connecting an audio system
This connection allows you to use an audio amplifier with built-in
digital surround and external speakers.
Connecting an AV amplifier with built-in digital surround
You will need:
• one set of standard audio cables
LINE IN
LR
Back panel of TV
Amplifier
Note:
For additional information, please refer to your
amplifier owner’s manual.
J3W41121A(E)_P07-13 14/03/2006, 3:32 PM13

14
Using the remote control
Preparing the remote control for use
With the remote control, you can operate your TV, most cable TV
converters/satellite receivers, VCRs, and DVD players together, even if
they are different brands. In addition to operating the TV, the remote
control can operate most cable TV converters, satellite receivers,
VCRs, and DVD players, regardless of their brand. The remote control
is pre-programmed to operate most Toshiba satellite receivers, VCRs,
and DVD players. To control a non-Toshiba device (or a Toshiba device
that the remote control is not pre-programmed to operate), you must
first program the remote control. See “Programming the remote control
to operate your other devices” on the next page.
Installing the remote control batteries
To install the batteries:
1. Open the battery cover on the back of the remote control.
2. Install two “AAA” size batteries. Match the + and – signs on the
batteries to the signs on the battery compartment.
3. Close the battery cover on the remote control until the lock snaps.
Using the remote control to operate your other devices
To control a cable TV
converter/satellite
receiver:
Program the remote
control to recognize the
brand of your cable TV
converter/satellite receiver
(see “Programming the
remote control to operate
your other devices” on
page 15.) The buttons
shown at right will control
the cable TV converter/
satellite receiver.
Press “CBL/SAT” first.
Power
CH RTN
(Channel Return)
Channel
Numbers
Input (TV)
Pic Size (TV)
Channel 34
Volume +/- (TV)
TV/VCR
Using the
Remote Control
Power
CH RTN
(Channel Return)
Channel
Numbers
Input (TV)
Pic Size (TV)
Channel 34
Volume +/- (TV)
VCR controls
Mute (TV)
CBL/SAT
VCR
Note:
The TV remote control may not operate your
VCR, DVD player, or cable TV converter.
Refer to the owner's manual supplied with
your other devices to see which features may
be available. Additionally, the remote control
for this TV may not support certain features
available on the original remote controls for
your other devices, in which case it is
suggested that you use the original remote
control for the applicable device.
Caution:
• Never throw batteries into a fire.
Notes:
•
Be sure to use AAA size batteries.
•
Dispose of batteries in a designated disposal area.
•
Batteries should always be disposed of with the
environment in mind. Always dispose of batteries in
accordance with applicable laws and regulations.
•
If the remote control does not operate correctly,
or if the operating range becomes reduced,
replace batteries with new ones.
•
When necessary to replace batteries in the
remote control, always replace both batteries
with new ones. Never mix battery types or use
new and used batteries in combination.
•
Always remove the batteries from the remote control
if they are dead or if the remote control is not to be
used for an extended period of time. This will
prevent battery acid from leaking into the battery
compartment.
To control a VCR:
Program the remote
control to recognize
the brand of your VCR
(see “Programming the
remote control to
operate your other
devices” on page 15.)
The buttons shown at
right will then control
the VCR.
Press “VCR” first.
J3W41121A(E)_P14-21 14/03/2006, 3:33 PM14

15
Appendix
Using the TV’s
Features
Setting up
your TV
Using the
Remote Control
Connecting
your TV
Welcome to
Toshiba
Important
Safeguards
Programming the remote control to operate
your other devices
This remote control is pre-programmed to operate most Toshiba
satellite receivers, VCRs, and DVD players. To control a non-Toshiba
device (or a Toshiba device that the remote control is not pre-programmed
to operate), you must follow the steps below to program your remote control.
1. Refer to the code tables (on pages 16 and 17) to find the
corresponding code for your device.
If more than one code is listed, try each one separately until you
find the one that works.
2. If you are programming the remote control to operate your:
• Cable TV converter/satellite receiver: Press “CBL/SAT.”
• VCR: Press “VCR.”
• DVD player: Press “DVD.”
3. While holding down RECALL, press the Channel Number buttons
to enter the three-digit code for your device within 10 seconds.
Note:If you do not enter the code within 10 seconds from step 3,
or if you enter the wrong code, this operation is canceled.
4. Point the remote control at the cable TV converter/satellite
receiver, VCR or DVD player, and press POWER to test the code.
• If the device responds, you entered the correct code.
•
If the device does not respond, repeat steps 1–4 using another code.
5. Press “TV” to control the TV.
For future reference, write down the codes you used:
Cable TV converter/satellite receiver code _____________________
VCR code ______________________________________________
DVD player code _________________________________________
Notes:
• When shipped from the factory, the remote
control is set to operate your TV.
• Each time you replace the batteries, you
must reprogram the remote control.
• Some newer VCRs are capable of working
on either of two remote codes. These VCRs
have a switch labeled “VCR1/VCR2.”
If your VCR has this kind of switch and
does not respond to any of the codes for
your VCR, set the switch to the other
position (VCR1 or VCR2) and reprogram
the remote control.
Recall
Channel
Numbers
Program the remote
control to recognize the
brand of your DVD
player (see
“Program
ming the
remote control
to
operate your other
devices” below.) The
buttons shown at right
will then control the
DVD player.
Press “DVD” first.
Power
Number
buttons
DVD Skip/Search
/
DVD
Recall
TOP Menu
ENTER
DVD MENU
Pic Size (TV)
Mute (TV)
Input (TV)
Volume +/- (TV)
DVD controls
To control a DVD player:
▲▼
▼
▼
Using the
Remote Control
DVD Clear
TV
VCR
DVD
CBL/SAT
J3W41121A(E)_P14-21 14/03/2006, 3:33 PM15

16
Brand Code Brand Code
Device code tables
[For CBL/SAT Mode]
CABLE Box
Brand Code
ABC
Archer
Cableview
Century
Citizen
Contec
Diamond
Eagle
GE
Gemini
General Instruments
Hamlin
Hitachi
Jasco
061, 062, 063, 082,
084, 087, 091, 092,
096, 098
065, 092, 097, 099
064, 094
092
090, 092, 097
083, 085, 086, 088,
093, 098
093
091
061, 062
069, 070, 094
062, 089, 096
093
062, 095, 096
097
Jerrold
Magnavox
Memorex
Multi Canal
Novavision
Panasonic
Philco
Philips
Pioneer
Proscan
Radio Shack
RCA
Realistic
Recoton
Samsung
062, 069, 071, 082,
086, 089, 091, 096
072, 096
091, 092, 104
090
101
081, 083, 085
087
066, 067, 068, 070,
072, 073, 074, 075,
091, 092
076, 077
061, 062
092, 097, 099
064, 081
065
102
077, 090
Scientific Atlanta
Sears
Signature
Signature 2000
Sprucer
Starcom
Stargate
Sylvania
TeleView
Texscan
Tocom
U. S. Electronics
United Cable
Universal
Wards
063, 078, 079, 080,
088, 098, 101, 105
095
062
096
081, 085
069, 082, 087, 096,
103, 104
069, 090
095, 100
090
100
071, 084, 085
087, 096, 098
082
065, 092, 097, 099,
102, 103
096
Brand Code Brand Code
[For VCR Mode]
VCR
Brand Code
Admiral
Aiko
Aiwa
Akai
Audiovox
Bell & Howell
Broksonic
Calix
Carver
CCE
Citizen
Colortyme
Craig
Curtis Mathes
Daewoo
Daytron
Denon
Dimensia
Electrohome
Emerson
Fisher
049
019
018
003, 004, 037, 038,
039, 058, 069
010
007, 068
008, 017
010
026
019
009, 010, 011, 012,
013, 014, 015, 019,
057, 073
005
009, 010, 016, 061,
065, 079
001, 005, 009, 012,
014, 040, 048, 053,
056, 057
011, 013, 015, 017,
018, 019, 057, 078
078
063
001, 048
010, 020, 065
003, 008, 010, 011,
017, 018, 020, 028,
039, 054, 057, 062,
065, 068, 072
007, 016, 021, 022,
023, 057, 064, 068,
070, 071, 079
Fuji
Funai
Garrard
GE
Go Video
Goldstar
Gradiente
Harman Kardon
Hitachi
JBL
JC Penney
Jensen
JVC
Kenwood
Kodak
LG
Lloyds
Logik
LXI
Magnasonic
Magnavox
004, 041
018, 073
018
001, 002, 009, 040,
042, 048, 056
056, 059, 061, 081
005, 010, 014, 054,
056, 065, 067
018, 065
005
024, 025, 035, 037,
042, 063, 070, 080
076
005, 006, 007, 008,
009, 010, 023, 024,
025, 026, 035, 056,
061, 063, 065
024, 025, 037
005, 006, 007, 014,
037, 043, 062, 063,
068, 082
005, 006, 007, 012,
014, 037, 043, 053,
068, 071
010
010
053, 073, 079
061
010
061, 065, 078
026, 027, 034, 044,
057, 061, 072
Marantz
Memorex
MGA
MGN
Minolta
Mitsubishi
Montgomery Ward
Motorola
MTC
Multitech
NEC
Nikko
Noblex
Optimus
Optonica
Orion
Panasonic
Pentax
Pentex Research
Philco
Philips
Pioneer
005, 006, 007, 012,
014, 026, 053, 067
007, 009, 010, 016,
018, 034, 049, 063,
065, 066, 068, 075,
079
020, 028, 039
056
024, 025, 035, 063
020, 024, 025, 028,
039, 043, 065
049
049
009, 046, 061
009, 012, 018
005, 006, 007, 012,
014, 037, 043, 053,
054, 067, 070
010
009
010, 049, 065
031
054, 057, 062, 065,
068, 072
036, 045, 046, 057,
061, 072, 079
012, 024, 025, 035,
042, 053, 063
014
026, 027, 063
026, 031, 044, 057
006, 024, 043, 055
Brand Code Brand Code
Satellite
Brand Code
Alphastar
Chaparral
DISH Network
Drake
Echostar
Express Vu
Fujitsu
GE
General Instruments
Hitachi
Hughes
038, 059
034
057
020, 040, 044, 046,
050, 053
018, 041, 051
057
027
008, 009, 013
010, 011, 012, 022,
023, 031, 049
033
033
Hughes Network
Systems
Intersat
Janeil
JVC
Kenwood
Magnavox
Optimus
Pansat
Primestar
Proscan
Radio Shack
RCA
019
048
027
017, 057
029
060
058
036, 052
015, 042
008, 009, 013
022, 023, 030
008, 009, 013, 016
Realistic
Samsung
Sony
Star Choice
Star Trak
STS
Toshiba
Uniden
Zenith
030
059
014, 055
057
025, 026, 037, 054
024
000, 001, 002, 003,
004, 005, 006, 007,
020, 031, 056
021, 028, 030, 032,
035, 039, 043, 045,
047, 058
027
Using the
Remote Control
J3W41121A(E)_P14-21 14/03/2006, 3:33 PM16

17
Appendix
Using the TV’s
Features
Setting up
your TV
Using the
Remote Control
Connecting
your TV
Welcome to
Toshiba
Important
Safeguards
Brand Code Brand Code
VCR (Continued)
Brand Code
Portland
Proscan
Proton
Quasar
Radio Shack
Radio Shack/
Realistic
Radix
RCA
Realistic
Ricoh
Runco
Samsung
Sansui
012, 013, 015
001, 002, 048
061
045
010, 031, 065
007, 009, 010, 016,
018, 020, 021, 022,
031, 049
010
001, 002, 003, 009,
024, 025, 029, 035,
040, 042, 045, 048,
055, 056, 063, 071,
083
007, 009, 010, 011,
016, 018, 020, 021,
022, 031, 049, 051,
056, 060, 065, 075,
079
047
034
009, 011, 038, 056,
073, 084
006, 037, 043, 061
007, 009, 016, 054,
064, 068, 071, 075,
079, 085
008, 011, 017, 028,
030, 057, 065, 072
007, 010, 016, 021,
022, 023, 024, 025,
035, 053, 057, 063,
064, 065, 068, 071,
075, 079
013, 020, 031, 049,
051, 060, 066
004, 025, 032, 061
049
075
047, 061
004, 032, 033, 041,
052, 058, 070, 074,
076, 077, 080
035
018, 026, 027, 028,
044, 072
018, 051, 053, 073,
079
007
Sanyo
Scott
Sears
Sharp
Shintom
Signature
Signature 2000
Singer
Sony
STS
Sylvania
Symphonic
Tandy
Tashiko
Tatung
Teac
Technics
Teknika
Toshiba
Totevision
Unitec
Unitech
Vector Research
Video Concepts
Wards
White Westinghouse
XR-1000
Yamaha
Zenith
010
037
018, 029, 037
036
010, 018, 065
000, 011, 021, 023,
024, 028, 030, 039,
057, 074, 078, 079
009, 010, 065
073
009
005, 006, 011, 012,
053
005, 006, 011, 012,
039, 053
009, 010, 011, 016,
018, 020, 024, 025,
031, 035, 049, 051,
056, 057, 060, 065,
066, 079
073
018
005, 006, 007, 014,
037, 053
004, 032, 034, 041,
047, 069, 086
Brand CodeCode Brand Code
TV/VCR Combo
Brand
Action
GE
Goldstar
Panasonic
078
059, 062
065
065
078
065
079
074
Precision
Quasar
Realistic
Sony
Toshiba
Zenith
Totevision
057
065
009, 010, 065
Brand Code Brand Code
Portable DVD
Brand Code
Aiwa
Audiovox
093
094, 095
024, 096, 099Panasonic RCA 098
Brand Code Brand Code
HTIB
Brand Code
Lasonic 083 084Panasonic Venturer 085
Brand Code Brand Code
[For DVD Mode]
DVD
Brand Code
Aiwa
Apex
BOSE
Broksonic
Clarion
Classic
Daewoo
Denon
Emerson
Fisher
Funai
GE
Go Video
GPX
Hitachi
JVC
006, 015
016, 017
097
018
019
020
021
022, 023, 024, 025
026, 027
028
027
001, 029, 030
087
031
005, 032, 033, 034,
035
003, 007, 036, 042,
088
037
008, 009
004, 038
039
040
026
041
043
044
058
010, 045, 046, 047,
048, 049, 050
004, 051
052, 053, 054, 055
001, 056
057, 058
001, 002, 059, 089
Kenwood
Konka
Magnavox
Memorex
Mintek
NAD
Nakamichi
Norcent
Onkyo
Oritron
Panasonic
Philips
Pioneer
Proscan
Qwestar
RCA
Sampo
Samsung
Sansui
Sanyo
Sharp
Sherwood
Sony
Sylvania
Teac
Technics
Techwood
Toshiba
Yamaha
Zenith
060
061, 062, 086, 090
073
063, 091
064, 067
074
011, 012, 065, 066,
068, 069, 070
027
071
072
075
000, 013, 076, 077,
078
079, 080, 081
014, 082, 092
DVD Code
Brand VCR Code DVD Code
[For VCR and DVD Mode]
DVD/VCR Combo
Brand VCR Code
Go Video
JVC
RCA
081
082
083
Samsung
Sanyo
Zenith
087
088
089
084
085
086
090
091
092
Using the
Remote Control
J3W41121A(E)_P14-21 14/03/2006, 3:33 PM17

18
TV/VIDEO selects the video input source (page 25)
RECALL displays status information on-screen (page 23)
CHANNEL NUMBERS allow direct access to channels (page 20)
CH
33
33
3 /
44
44
4 cycles through programmed channels (page 20)
TV selects TV mode
CBL/SAT selects CBL/SAT mode (page 14)
SLEEP programs the TV to turn off at a set time (page 30)
POWER turns the TV on and off
MUTE turns off the sound (page 24)
CH RTN (Channel Return) returns to the last viewed channel
(page 21)
VOL +/- adjusts the volume level
VCR selects VCR mode (page 14)
DVD selects DVD mode (page 15)
PIC SIZE cycles through the three picture sizes—4:3, 16:9, ZOOM.
(page 28)
FAV ▲ /▼ (Favorite Channels) cycles through the channels you
programmed as favorite channels (page 21)
MENU/ENTER accesses the menu system; also sets menu
selections (page 19)
EXIT closes on-screen menus (page 19)
DVD MENU accesses the DVD menu
PAUSE pauses a videotape/DVD
SKIP/SEARCH skips DVD chapter
REW rewinds a videotape/DVD
TOP MENU accesses the DVD TOP menu
REC starts recording a videotape
PLAY plays a videotape/DVD
STOP stops a videotape/DVD
FF fast forwards a videotape/DVD
TV/VCR toggles between TV and VCR modes when viewing
while recording
CLEAR clears input data in DVD mode
Learning about the remote control
Channel
Numbers
Menu/Enter
Recall
FAV ▲▼
(Favorite Channels)
Mute
Stop
Sleep
TV/Video
DVD Menu
Picture Size
CBL/SAT
Exit
Enter
Using the
Remote Control
Channel 3 /4
FF
Volume +/-
VCR
DVD
TV
Pause
Skip/Search
4¢
Rew
TOP Menu
Rec
Clear
TV/VCR
POWER
Play
CH RTN
(Channel Return)
J3W41121A(E)_P14-21 14/03/2006, 3:34 PM18

19
Appendix
Using the TV’s
Features
Setting up
your TV
Using the
Remote Control
Connecting
your TV
Welcome to
Toshiba
Important
Safeguards
Setting up your TV
After you have installed the batteries and programmed the remote
control, you need to set some preferences on the TV using the menu
system. You can access the menu system with the buttons on the
remote control.
• When you make a menu selection, your changes occur
immediately. You do not have to press MENU or EXIT to save your
changes.
• After 15 seconds, the menu screen will automatically close if you
do not make a selection. Your changes will still be saved.
• When you are finished programming the menus, press EXIT.
Starting setup
The STARTING SETUP feature appears the first time you turn on the
TV, and helps you select the menu language, specify the TV/CABLE
setting, and program channels automatically.
IMPORTANT: You must connect an antenna or cable TV system
first. See “Connecting your TV” on pages 7-13 for details.
1. Press POWER to turn on the TV.
The STARTING SETUP function
begins and the language setup
menu appears on the screen. Press
▲ or ▼ to select your desired
language, then press ENTER.
2. Press ▲ or ▼ to select TV or
CABLE, then press ENTER.
3. Press ▲ or ▼ to select START, and then press ENTER, which
starts the AUTO SETUP.
Note:
To cancel the setup and return to the regular TV screen, press
▲
or
▼
to select CANCEL and press ENTER.
4. When the AUTO SETUP is complete, the regular TV screen
appears.
Note:
• AUTO SETUP of channels may take 15–30 minutes to complete,
depending on your regional cable service.
• To cancel the AUTO SETUP and return to the regular TV screen,
press EXIT.
Changing the on-screen display language
You can choose from three different languages (English, French, and
Spanish) for the on-screen displays of adjustment menus and
messages.
To select a language:
1. Press MENU, then press
or
until the SETUP menu appears.
2. Press ▲ or ▼ to highlight
LANGUAGE.
3. Press
or to highlight your desired language.
Menu/Enter
Exit
SETUP
LANGUAGE
CLOCK SET
TV / CABLE
CH PROGRAM
ADD / ERASE
ENGLISH
CABLE
:SELECT :ADJUST
:SELECT :ADJUST
ENGLISH
CABLE
POWER
:SELECT ENTER : SET
LANGUAGE / LANGUE / IDIOMA
ENGLISH
FRANÇAIS
ESPAÑOL
Setting up
your TV
J3W41121A(E)_P14-21 14/03/2006, 3:34 PM19

20
Adding channels to the TV’s memory
When you press Channel ▲ / ▼ on the TV or CH 3 / 4 on the remote
control, your TV will stop only on the channels you have programmed
into the TV's channel memory. Follow the steps below to program
channels into the channel memory.
Programming channels automatically
Your TV can automatically detect all active channels and store them in
its memory. After the TV has stored the channels in its memory auto-
matically, you can add or erase channels manually.
To add channels automatically:
1. Press MENU, then press
or to display the SETUP menu.
2. Press ▲ or ▼ until the TV/CABLE
selection is highlighted.
3. Press or to highlight either
TV or CABLE, depending on
which you use.
If you use an antenna, choose TV.
If you use cable, choose CABLE.
4. Press ▼ until the CH PROGRAM selection is highlighted.
5.
Press or to start channel programming. The TV will automatically
cycle through all the TV or Cable channels (depending on which you
selected), and store all active channels in the channel memory.
While the TV is cycling through the channels, the message
“PROGRAMMING NOW-PLEASE WAIT” appears.
6.
When channel programming is complete, the message “COMPLETED”
appears.
7. Press CH 3 or 4 to view the programmed channels.
Adding and erasing channels manually
After you have programmed the channels automatically, you can add
or erase specific channels manually.
To add or erase channels manually:
1. Press MENU, then press
or to display the SETUP menu.
2. Press ▲ or ▼ until the ADD/ERASE selection is highlighted.
3. Press
or to display the ADD/
ERASE menu.
4. Press ▲ or ▼ to select ADD/ERASE,
then press
.
5. Select the desired channel to be
memorized or deleted using ▲ or ▼.
Press
or to select either ADD or
ERASE.
6. Repeat step 5 for other channels you want to add or erase, then
press ENTER.
7. Press EXIT to return to the normal screen.
To erase all channels from the channel memory:
Press ▲ or ▼ to select CLEAR ALL in step 4 above, then press ENTER.
All channels are erased from the channel memory. (You can still use the
Channel Numbers on the remote control to tune a channel.)
Changing channels
To change to the next programmed channel:
Press Channel ▲ / ▼ on the TV or CH 3 / 4 on the remote control.
To change to a specific analog channel:
Press the Channel Number buttons (0-9) on the remote control.
For example, to select channel 125, press 1, 2, 5.
To change to a specific digital channel:
Press the first 3 digits, then press 100, followed by the remaining 3 digits.
For example, to select channel 015-001, press 0, 1, 5, 100, 0, 0, 1.
Menu
Channel 34
SETUP
LANGUAGE
CLOCK SET
TV / CABLE
CH PROGRAM
ADD / ERASE
ENGLISH
CABLE
:SELECT :ADJUST
SETUP
LANGUAGE
CLOCK SET
TV / CABLE
CH PROGRAM
ADD / ERASE
ENGLISH
TV / CABLE
:SELECT :ADJUST
Setting up
your TV
Channel
Numbers
Note:
If the desired channel is not stored in the
channel memory, add the channel manually
(see “Adding and erasing channels manually,”
below).
Exit
Note:
Digital cable channels may be represented by
channel numbers that include a “dash” (e.g.,
85–002). These digital channel numbers may
not match the numbers in the channel line-up
provided by your cable company. This is not a
malfunction.
J3W41121A(E)_P14-21 14/03/2006, 3:35 PM20

21
Appendix
Using the TV’s
Features
Setting up
your TV
Using the
Remote Control
Connecting
your TV
Welcome to
Toshiba
Important
Safeguards
Using the TV’s features
Adjusting the channel settings
Switching between two channels
You can switch between two channels without entering an actual
channel number each time.
To switch between two channels:
1. Select the first channel you want to view.
2. Select a second channel using the Channel Number buttons (0-9,
100.)
3. Press CH RTN. The previous channel will be displayed.
Each time you press CH RTN, the TV will switch back and forth
between the two channels.
Programming your favorite channels
You can preset up to 12 of your favorite channels using the Favorite
Channel Programming feature. Because this feature scans through
only your favorite channels, it allows you to skip other channels you
do not normally watch.
You can still use Channel 3 / 4 to scan through all the channels you
programmed in the TV’s memory or the Channel Numbers to directly
tune a channel.
To program your favorite channels:
1. Select a channel you want to program as a favorite channel.
2. Press MENU, then press
or to display the OPTION menu.
3. Press ▲ or ▼ to highlight FAVORITE CH.
4. Press or to display the
FAVORITE CH menu. SET/CLEAR
will be highlighted.
5. Press
or to highlight SET and
press ENTER.
6. Press EXIT to return to normal
viewing.
7. Repeat steps 1-6 for up to 12
channels.
To select your favorite channels:
Press the FAV ▲ ▼ buttons on the remote control to select your
favorite channels.
The FAV ▲ ▼ buttons will not work until you have programmed
your favorite channels.
To clear your favorite channels:
1. Select a channel you want to clear.
2. Press MENU, then press
or to display the OPTION menu.
3. Press ▲ or ▼ to highlight FAVORITE CH.
4. Press or to display the FAVORITE CH menu. SET/CLEAR will
be highlighted.
5. Press
or to highlight CLEAR.
6. Press ENTER until “0” replaces the
channel number you want to erase.
7. Press EXIT to return to normal
viewing.
8. Repeat steps 1-6 for the other
channels.
Channel
Numbers
CH RTN
OPTION
ON/OFF TIMER
FAVORITE CH
CH LABEL
OFF
:SELECT :ADJUST
Channel 34
FAVORITE CH:CH 2
SET / CLEAR TV CABLE
000
000
000
000
OPTION MENU
ENTER:SET EXIT:END
:SELECT :ADJUST
Using the TV’s
Features
FAV ▲ ▼
Exit
Menu/
Enter
FAVORITE CH:CH 2
SET / CLEAR TV CABLE
002 0 0
000
000
000
OPTION MENU
ENTER:CLEAR EXIT:END
:SELECT :ADJUST
Note:
To return to the OPTION menu from the
FAVORITE CH menu, press
▲
or
▼
to
highlight OPTION MENU, then press
or
.
J3W41121A(E)_P14-21 14/03/2006, 3:35 PM21

22
Using the LOCKS menu
Note: The V-Chip feature is available for the U.S. V-Chip system
only. The Canadian V-Chip system is not supported.
You can prevent others from viewing certain programs or channels by
blocking them using the V-Chip feature.
Selecting a password
Before you can use the V-Chip feature to block programs and
channels, you must select a password. The password you select
prevents others from changing the rating limits you set.
To select your password and access the LOCKS menu:
1. Press MENU, then press
or to highlight the LOCKS menu.
2. Press ▲ or ▼ to display the password entering mode.
3. Use the Channel Number buttons (0-9) to enter your password.
If you are accessing the LOCKS menu for the first time, select a
four-digit number to be your password. Press ENTER.
4. Enter the password again to confirm it, and then press ENTER.
The LOCKS menu appears.
5. You may now set up the LOCKS menu. See “Using the V-Chip
(parental control) feature” (page 23), “Locking channels” (page 24),
“Locking the video inputs” (page 25), “Setting the GameTimer
TM
”
(page 25), and “Using the front panel lock feature” (page 26.)
To change your password:
1. Press MENU, then press
or to display the LOCKS menu.
2. Press ▲ or ▼ to display the password entering mode.
3. Use the Channel Number buttons (0-9) to enter your password.
Press ENTER. The LOCKS menu appears.
4. Press ▲ or ▼ to highlight NEW PASSWORD and press
or to
display the NEW PASSWORD menu.
5. Use the Channel Number buttons (0-9) to enter a new code.
Press ENTER.
6. Enter the password again to confirm it, and then press ENTER.
7. Press EXIT to return to normal viewing.
LOCKS
NEW PASSWORD
[0-9]:SELECT ENTER : SET
EXIT :END
Menu/
Enter
Exit
LOCKS
NEW PASSWORD
----
[0-9]:SELECT ENTER: SET
EXIT :END
LOCKS
CONFIRM PASSWORD
[0-9]:SELECT ENTER: SET
EXIT :END
Using the TV’s
Features
Channel
Numbers
J3W41121A(E)_P22-30 14/03/2006, 3:36 PM22

23
Appendix
Using the TV’s
Features
Setting up
your TV
Using the
Remote Control
Connecting
your TV
Welcome to
Toshiba
Important
Safeguards
Using the V-Chip (parental control) feature
The Motion Picture Association of America (MPAA) uses a rating
system to qualify motion picture content. Television broadcasters also
employ a rating system to qualify the content of television programs.
The TV and MOVIE ratings work with the V-Chip feature and allow you
to block programs according to the rating limits you set.
To use the V-Chip to block programs by rating:
1. Press MENU, then press
or to display the LOCKS menu.
2.Press ▲ or ▼ to display the password entering mode.
3.Use the Channel Number buttons (0-9) to enter your password.
Press ENTER. The LOCKS menu appears.
4.Press ▲ or ▼ to highlight V-CHIP.
• Press
or to highlight ON to
enable V-Chip program blocking
by rating.
•
Press
or
to highlight OFF to
disable
V-Chip program blocking
by rating.
5.Press ▲ or ▼ to highlight V-CHIP
SET. Then, press
or to display
the V-CHIP SET menu.
6.
Press ▲ or ▼ to highlight TV RATING.
Then, press or to display the
desired rating.
OFF : TV RATING is not set
TV-Y : All children
TV-Y7 : 7 years old and above
TV-G : General audience
TV-PG : Parental guidance
TV-14 : 14 years old and above
TV-MA : 17 years old and above
• When you select TV-Y7, TV-PG, TV-14, or TV-MA, press
RECALL to explain the rating. Press ▲ or ▼ to select the desired
rating you want. Press
or to select the setting ON or OFF.
7.Press ▲ or ▼ to highlight MOVIE RATING. Then, press
or to
display the RATING SET menu. Press ▲ or ▼ to select the
desired rating, then press
or to select ON or OFF.
G:All ages
PG : Parental guidance
PG-13 :
Parental guidance less than
13 years old
R:
Under 17 years old Parental
guidance suggested
NC17 : 17 years old and above
X:Adult only
When you try to view a program with a ratings block, a message will
appear listing the program’s ratings. The program can still be viewed if
you press MUTE and then enter your password to temporarily bypass
the block.
Notes:
• If you forget your password, press RECALL
four times within five seconds while the TV
is in password entering mode. This allows
you to reset your password.
• You can use V-CHIP SET (DTV) function
when the digital broadcasting with a new
rating system is received on the TV.
Recall
Menu/
Enter
Exit
Channel
Numbers
Using the TV’s
Features
Mute
LOCKS
V-CHIP
V-CHIP SET
V-CHIP SET (DTV)
:SELECT :ADJUST
ON / OFF
LOCKS
V-CHIP
V-CHIP SET
V-CHIP SET (DTV)
:SELECT :ADJUST
ON
V-CHIP SET
TV RATING
MOVIE RATING
:SELECT :ADJUST
OFF
OFF / TV-Y / TV-Y7 / TV-G
TV-PG / TV-14 / TV-MA
RATING SET
G
ON /OFF
PG :
:
ON
PG-13 :
:
ON
R ON
NC-17 :
:
ON
X ON
:SELECT :ADJUST
J3W41121A(E)_P22-30 15/03/2006, 11:18 AM23

24
Locking channels
With the CH LOCK feature, you can lock specific channels. You will not
be able to tune locked channels unless you clear the setting. You can
choose to lock up to 12 TV channels and 12 cable channels.
To lock channels:
1. Tune the TV to the channel you want to lock.
2. Press MENU, then press
or to display the LOCKS menu.
3. Press ▲ or ▼ to display the password entering mode.
4. Use the Channel Number buttons (0-9) to enter your password,
then press ENTER. The LOCKS
menu appears.
5. Press ▲ or ▼ to highlight CH
LOCK and press
or to display
the CH LOCK menu.
6.
Press or to select the following:
• SET: to set the channel as one to
be locked. Then press ENTER.
• CLEAR: to clear all channels from
the list of locked channels. Then
press ENTER.
7. Repeat steps 1 through 6 to lock
other channels. When you are
finished locking channels, press
EXIT to return to normal viewing.
If you try to tune a locked channel, the TV will not display it, but will
display the nearest unlocked channel.
Notes:
• After programming CH LOCK, change
channels before turning off the television.
• To return to the LOCKS menu from the
CH LOCK menu, press
▲
or
▼
to highlight
LOCKS MENU, then press
or .
Menu/
Enter
Exit
Channel
Numbers
LOCKS
LOCK
CH LOCK
VIDEO LOCK
GAME TIMER
FRONT PANEL LOCK
NEW PASSWORD
:SELECT :ADJUST
OFF
OFF
OFF
CH LOCK :CH 2
SET / CLEAR TV CABLE
00 0
00 0
00 0
00 0
LOCKS MENU
ENTER:SET EXIT:END
:SELECT :ADJUST
To unlock channels:
1. Press MENU, then press
or to display the LOCKS menu.
2. Press ▲ or ▼ to display the password entering mode.
3. Use the Channel Number buttons (0-9) to enter your password,
then press ENTER. The LOCKS menu appears.
4. Press ▲ or ▼ to highlight CH LOCK and press
or to display
the CH LOCK menu.
5. Press or to highlight CLEAR and clear all channels from the
list of locked channels. Press ENTER.
6. Press EXIT to return to normal viewing.
Using the TV’s
Features
Channel 34
J3W41121A(E)_P22-30 14/03/2006, 3:36 PM24

25
Appendix
Using the TV’s
Features
Setting up
your TV
Using the
Remote Control
Connecting
your TV
Welcome to
Toshiba
Important
Safeguards
Locking the video inputs
With the VIDEO LOCK feature, you can lock out the input sources
(VIDEO1, VIDEO2, ColorStream and channels 3 and 4.)
You will not be able to select the input sources with the TV/VIDEO
button or Channel Number buttons unless you unlock the video inputs.
To set up the video lock:
1. Press MENU, then press
or to display the LOCKS menu.
2. Press ▲ or ▼ to display the password entering mode.
3. Use the Channel Number buttons (0-9) to enter your password,
then press ENTER. The LOCKS menu appears.
4. Press ▲ or ▼ to highlight VIDEO LOCK.
5. Press
or to select:
• OFF: Unlocks all video input sources.
•
VIDEO: Locks VIDEO1, VIDEO2,
ColorStream
.
• VIDEO +: Locks VIDEO1,
VIDEO2, ColorStream, channel 3,
and channel 4. This option should
be used if you use the antenna
terminal to play a video tape.
6. Press EXIT to return to normal
viewing.
To unlock the video inputs:
Select OFF in step 5, above.
Setting the GameTimer
TM
With the
GameTimer
TM
feature, you can automatically activate the
VIDEO LOCK feature (VIDEO setting)
to set a time limit for playing a
video game (30, 60, 90, or 120 minutes.)
To set up the GameTimer:
1. Press MENU, then press
or to display the LOCKS menu.
2. Press ▲ or ▼ to display the password entering mode.
3. Use the Channel Number buttons (0-9) to enter your password,
then press ENTER. The LOCKS menu appears.
4. Press ▲ or ▼ to highlight GAME TIMER.
5. Press
or to select a time limit (30 minutes, 60 minutes, 90
minutes, 120 minutes, or OFF.)
6. Press EXIT to return to normal viewing. After the GameTimer is
programmed, the display will appear briefly every ten minutes to
remind you that the GameTimer
is
operating.
When the programmed time is
reached, the TV will change
channels automatically and enter
VIDEO LOCK mode.
Note:
After programming VIDEO LOCK, change
channels or press the TV/VIDEO key before
turning off the television.
Menu/
Enter
Exit
Channel
Numbers
LOCKS
LOCK
CH LOCK
VIDEO LOCK
GAME TIMER
FRONT PANEL LOCK
NEW PASSWORD
:SELECT :ADJUST
OFF
OFF
OFF
OFF / VIDEO / VIDEO+
LOCKS
LOCK
CH LOCK
VIDEO LOCK
GAME TIMER
FRONT PANEL LOCK
NEW PASSWORD
:SELECT :ADJUST
OFF
OFF
OFF
OFF / 30 / 60 / 90 / 120
TV/Video
Note:
Interactive video games that involve shooting
a gun type of joy-stick at an on-screen target
may not work on this TV.
Using the TV’s
Features
To deactivate the GameTimer and unlock the VIDEO LOCK:
Set the VIDEO LOCK to OFF (see “Locking the video inputs” above.)
J3W41121A(E)_P22-30 14/03/2006, 3:37 PM25

26
SPACE
—
+
—
Using the front panel lock feature
You can lock the front panel buttons to prevent your settings from being
changed accidentally (by children, for example.) When the front panel
lock is in ON, all control buttons on the TV front panel (except POWER)
do not operate.
To lock the front panel:
1. Press MENU, then press
or to display the LOCKS menu.
2. Press ▲ or ▼ to display the password entering mode.
3. Use the Channel Number buttons (0-9) to enter your password,
then press ENTER. The LOCKS menu appears.
4. Press ▲ or ▼ to highlight FRONT
PANEL LOCK and press
or to
highlight ON.
5.
Press EXIT to return to normal viewing.
If a button on the front panel is
pressed, the message “NOT
AVAILABLE” appears.
To unlock the front panel:
Press and hold the VOL ▼ button on the TV front panel for about 10
seconds until the message “FRONT PANEL LOCK: OFF” appears
on-screen.
To unlock the front panel using the menus:
Select OFF in step 4, above.
Labeling channels
Channel labels appear above the on-screen channel number display
each time you turn on the TV, select a channel, or press the RECALL
button. You can choose any four characters to create a channel label.
To create channel labels:
1. Select a channel you want to label.
2. Press MENU, then press
or
until the OPTION menu appears.
3. Press ▲ or ▼
to highlight CH
LABEL.
4. Press
or to display the CH
LABEL menu. SET/CLEAR will be
highlighted.
5. Press
or to highlight SET.
6. Press ENTER to highlight LABEL.
7. Repeatedly press or until the
character you want appears. Press
ENTER.
Note:
The character will change as follows:
8. Repeat step 7 to enter the rest of the
characters.
If you would like a blank space in the
label name, you must choose an
empty space from the list of characters; otherwise, a dash will
appear in that space.
9. Repeat steps 1-8 for other channels. You can assign a label to
each channel.
10. Press EXIT to return to normal viewing.
Menu/
Enter
Exit
OPTION
ON/OFF TIMER
FAVORITE CH
CH LABEL
OFF
:SELECT :ADJUST
CH LABEL :CH 25
SET / CLEAR
LABEL
– – – –
OPTION MENU
ENTER:SET EXIT:END
:SELECT :ADJUST
CH LABEL :CH 25
SET
LABEL
– – – –
OPTION MENU
EXIT:END
:ADJUST ENTER:SET
To erase channel labels:
1. Tune the TV to the channel whose label
you want to erase.
2. Press MENU, then press
or until the
OPTION menu appears.
3. Press ▲ or ▼ to highlight CH LABEL.
4. Press
or to display the CH LABEL
menu. SET/CLEAR will be highlighted.
5. Press
or to highlight CLEAR.
6. Press ENTER.
7.
Repeat steps 1-6 to erase other channel labels.
LOCKS
LOCK
CH LOCK
VIDEO LOCK
GAME TIMER
FRONT PANEL LOCK
NEW PASSWORD
:SELECT :ADJUST
OFF
OFF
ON / OFF
Channel
Numbers
Using the TV’s
Features
Channel 34
Note:
To return to the OPTION menu from the CH
LABEL menu, press
▲
or
▼
to highlight
OPTION MENU, then press
or
.
Recall
TV front panel (27D46)
Buttons that can be blocked
TV front panel
(27D46)
VOL ▼
J3W41121A(E)_P22-30 14/03/2006, 3:37 PM26

27
Appendix
Using the TV’s
Features
Setting up
your TV
Using the
Remote Control
Connecting
your TV
Welcome to
Toshiba
Important
Safeguards
Selecting the video input source
Press TV/VIDEO to view a signal from another device connected to
your TV, such as a VCR or DVD player. You can select ANT, VIDEO 1,
VIDEO 2, or ColorStream, depending on which input jacks you used to
connect your devices (see “Connecting your TV” on page 7.)
Pressing TV/VIDEO on the remote
control displays the current signal
source (press TV/VIDEO again or
0-3 to change)
Note:
When ColorStream is selected, the video
OUT jack does not output a signal. To receive
a video OUT signal, you must use a standard
video or S-video connection instead.
/0-3:SELECT
SOURCE SELECTION
0. ANT
1. VIDEO1
2. VIDEO2
3. ColorStream
Using the TV’s
Features
Notes:
• After a power failure or disconnection of the
power, the ON/OFF timer settings will be lost.
• To return to the OPTION menu from the
ON/OFF TIMER menu, press
▲
or
▼
to
highlight OPTION MENU, then press
or
.
Setting the clock
You must set the clock before you can program the ON/OFF timer.
To set the clock: (Example: “8:30 AM” March, 25 (SAT), 2006)
1. Press MENU, then press or to
display the SETUP menu.
2. Press ▲ or ▼
to highlight CLOCK
SET, then press
.
3. Press
or to set the MONTH,
then press ▼.
4. Set the DAY, YEAR and TIME as in
step 3.
After setting the clock, the date and
time function starts automatically.
5. Press EXIT to return to the normal
screen.
Note:
After a power failure or disconnection of the
power, the clock settings will be lost.
Menu/
Enter
Exit
SETUP
LANGUAGE
CLOCK SET
TV / CABLE
CH PROGRAM
ADD / ERASE
ENGLISH
CABLE
:SELECT :ADJUST
ON/OFF TIMER
ON TIMER
6:00AM
OFF TIMER
12:00AM
OPTION MENU
CH 3
CLEAR
CLEAR
:SELECT :ADJUST
EXIT:END
CLOCK SET
MONTH
DAY
YEAR
TIME
1
1 (SUN)
2006
12:00AM
:SELECT :ADJUST
ENTER:SET EXIT:END
ON/OFF TIMER
ON TIMER
6:30AM
OFF TIMER
12:00AM
OPTION MENU
CH 4
:ADJUST ENTER:SET
EXIT:END
ONCE DAILY CLEAR
CLEAR
Setting the ON/OFF timer
This feature allows you to program the TV to turn on or off
automatically at a set time. If you program the ON TIMER to “DAILY,”
the TV will turn on every day at the same time to the same channel
until you clear the ON TIMER.
To set the ON timer: (Example: Turning on the TV to channel 12
at 6:30 AM, DAILY)
1. Set the clock, if you have not already done so (see above.)
2. Press MENU, and then press
or to display the OPTION menu.
3. Press ▲ or ▼ to highlight ON/OFF TIMER.
4. Press or to highlight SET, then press ENTER. The ON/OFF
TIMER menu appears.
5. Press ▲ or ▼ to highlight ON TIMER,
then press
to highlight the hour
position.
6. Press ▲ or ▼ to set the desired hour,
then press
.
7. Set the desired minutes and channel,
as in step 6.
8. Press
or to select ONCE or
DAILY, then press ENTER.
9. Press EXIT to return to normal
viewing.
To set the OFF timer:
Select OFF TIMER in step 5, above.
To cancel the ON/OFF timers:
Select CLEAR in step 8, above.
Press EXIT to return to normal viewing.
TV/Video
J3W41121A(E)_P22-30 14/03/2006, 3:37 PM27

28
Using the TV’s
Features
Pic Size
Viewing the wide-screen picture formats
You can view 480i format programs in a variety of picture sizes—4:3,
16:9, ZOOM.
The way the image displays in any of the picture sizes will vary depending
on the format of the program you are viewing. Select the picture size
that displays the current program the way that looks best to you.
To select the picture size:
Repeatedly press PIC SIZE on the remote control to cycle among the
three picture sizes, as described below.
Available picture sizes for the various input sources
: available / ✕ : not available
4:3
16:9
ZOOM
4:3 picture size
• If receiving a 4:3 format (analog or digital) program, selecting 4:3
PIC SIZE will typically display the image in its original formatted
proportion.
• If receiving a 16:9 format (digital) program, selecting 4:3 PIC SIZE
will typically display the image stretched taller (squeezed.)
ZOOM16:9
4:3 format program (analog)
or external input
✕
✕
✕
Picture size
4:3
4:3 format program (digital)
16:9 (squeezed) format
program (digital)
Input source
J3W41121A(E)_P22-30 14/03/2006, 3:38 PM28

29
Appendix
Using the TV’s
Features
Setting up
your TV
Using the
Remote Control
Connecting
your TV
Welcome to
Toshiba
Important
Safeguards
Using these functions to change the picture
size (i.e., changing the height/width ratio)
for any purpose other than your private
viewing may be prohibited under the
Copyright Laws of the United States and
other countries, and may subject you to civil
and criminal liability.
NOTICE OF POSSIBLE ADVERSE
EFFECTS ON TV PICTURE DISPLAY
Avoid displaying stationary images on your
TV screen for extended periods of time.
Fixed (non-moving) patterns or images
(including but not limited to PIP/POP
windows, closed captions, video game
patterns, TV station logos, stock tickers,
websites, and special formats that do not use
the entire screen) can become permanently
ingrained in the cathode ray tube(s) of the TV
and cause subtle but permanent ghost
images. This type of damage is NOT
COVERED BY YOUR WARRANTY.
Using the TV’s
Features
16:9 picture size
• If receiving a 4:3 format digital program, the 16:9 PIC SIZE is not
available.
• If receiving a 4:3 format analog program, selecting 16:9 PIC SIZE
will typically display the image stretched wider with bars at the top
and bottom.
ZOOM picture size (for 16:9 format programs)
• If receiving a 4:3 format (analog or digital) program, the ZOOM PIC
SIZE is not available.
• If receiving a 16:9 format (digital) program, selecting ZOOM PIC
SIZE will typically enlarge the image, retaining the original formatted
proportion, but with the sides edges hidden.
• If receiving a 16:9 format (digital) program, selecting 16:9 PIC SIZE
will typically display the image in its original formatted proportion
with bars at the top and bottom.
J3W41121A(E)_P22-30 14/03/2006, 3:38 PM29

30
Selection Pressing
BRIGHTNESS darker lighter
CONTRAST lower higher
COLOR paler deeper
TINT reddish greenish
SHARPNESS softer sharper
Adjusting the picture
Adjusting the picture quality
You can adjust the picture quality to your personal preferences,
including the brightness, contrast, color, tint, and sharpness. The
qualities you choose will be stored automatically in the PICTURE
menu’s MEMORY mode so you can recall them at any time.
To adjust the picture quality:
1. Press MENU, then press
or to display the PICTURE menu.
2. Press ▲ or ▼ until the item you want to adjust is highlighted.
3. Press or to adjust the level.
4. Press EXIT to return to normal viewing.
Exit
Menu
Resetting your picture adjustments
The RESET function returns your picture quality adjustments to the
following factory settings:
To reset your picture adjustments:
1. Press MENU, then press
or to display the PICTURE menu.
2. Press ▲ or ▼ to highlight RESET, and then press
.
Setting the sleep timer
You can use the sleep timer to automatically turn off the TV at a set time.
To set the sleep timer:
Repeatedly press SLEEP on the remote control to set the length of
time until the TV turns off. The clock will increase 10 minutes for each
press of the SLEEP button (0h00m, 0h10m, ...1h50m, 2h00m.) After
the sleep timer is programmed, the display will appear briefly every
ten minutes to remind you that the sleep timer is operating.
To confirm the sleep timer setting:
Press SLEEP one time. The remaining time will be momentarily displayed.
To cancel the sleep timer:
Repeatedly press SLEEP until the display turns to 0h00m.
Brightness ............ center (25)
Contrast .................. max (50)
Color .................... center (25)
PICTURE
BRIGHTNESS
CONTRAST
COLOR
TINT
SHARPNESS
RESET
:SELECT :ADJUST
25
50
25
0
25
PICTURE
BRIGHTNESS
CONTRAST
COLOR
TINT
SHARPNESS
RESET
:SELECT :ADJUST
25
50
25
0
25
Using the TV’s
Features
Sleep
Tint ......................... center (0)
Sharpness............ center (25)
J3W41121A(E)_P22-30 14/03/2006, 3:38 PM30

31
Appendix
Using the TV’s
Features
Setting up
your TV
Using the
Remote Control
Connecting
your TV
Welcome to
Toshiba
Important
Safeguards
Using the TV’s
Features
Using the closed caption feature
The Closed Caption feature has two options:
• Captions—An on-screen display of the dialogue, narration, and
sound effects of programs and videos that are closed-captioned
(usually identified in your local TV listings as “CC”).
• Text—An on-screen display of information not related to the program,
such as weather or stock data (if available in your viewing area).
To view captions or text:
1. Tune the TV to the desired program.
2. Press MENU, and then press
or to display the SETUP menu.
3. Press ▲ or ▼ to highlight CLOSED CAPTION.
4. Press
or to select the desired Closed Caption mode, as
follows:
• To view captions, select C1 or C2 (C1 displays translation of
the primary language in your area).
Note: If the program or video you selected is not closed
captioned, no captions will display on-screen.
• To view text, select T1 or T2.
Note: If text is not available in your viewing area, a black
rectangle may appear on-screen. If this happens, set the
Closed Caption feature to OFF.
SETUP
CLOSED CAPTION
CC ADVANCED
SIGNAL METER
:SELECT :ADJUST
OFF
C1 / C2 / T1 / T2 / OFF
MENU/
ENTER
Using the CC advanced feature
This feature is designed to customize digital captions only.
1. Tune the TV to the desired program.
2. Press MENU, and then press or to display the SETUP
menu.
3. Press ▲ or ▼ to highlight CC ADVANCED, then press
.
4.
Press
▲ or ▼
to select the desired item to adjust, then press or .
5. Press ▲ or ▼ to select the desired setting, then press ENTER.
You can select from among the following items and parameters.
TEXT SIZE: AUTO, SMALL, STANDARD, LARGE
TEXT TYPE: AUTO, DEFAULT, MONO W. SERIF, PROP. W.
SERIF, MONO W/O SERIF, PROP. W/O SERIF,
CASUAL, CURSIVE, SMALL CAPITALS
TEXT COLOR: AUTO, BLACK, WHITE, RED, GREEN, BLUE,
YELLOW, MAGENTA, CYAN
TEXT EDGE:
AUTO, NONE, RAISED, DEPRESSED, UNIFORM,
LEFT DROP SHADOW, RIGHT DROP SHADOW
BACKGROUND COLOR: AUTO, BLACK, WHITE, RED, GREEN,
BLUE, YELLOW, MAGENTA, CYAN
6. Press EXIT to return to the normal viewing.
Note:
When a digital signal is received, you can choose from CS1, CS2,
CS3, CS4, CS5, CS6, C1, C2, C3, C4, T1, T2, T3, T4, and OFF.
NOTICE OF POSSIBLE ADVERSE
EFFECTS ON TV PICTURE DISPLAY
Avoid displaying stationary images on your
TV screen for extended periods of time.
Fixed (non-moving) patterns or images
(including but not limited to PIP/POP
windows, closed captions, video game
patterns, TV station logos, stock tickers,
websites, and special formats that do not use
the entire screen) can become permanently
ingrained in the cathode ray tube(s) of the TV
and cause subtle but permanent ghost
images. This type of damage is NOT
COVERED BY YOUR WARRANTY.
EXIT
Notes:
• A closed caption signal may not be decoded
in the following situations:
- when a video tape has been dubbed
- when the signal reception is weak
- when the signal reception is non-standard
• Do not set the Closed Caption “Text Color”
and “Background Color” as the same color
or you will not be able to see the text.
To turn off the Closed Caption feature:
Highlight OFF in step 4, above.
J3W41121A(E)_P31-Back 14/03/2006, 3:39 PM31

32
Using the TV’s
Features
Adjusting the sound quality
You can change the sound quality of your TV by adjusting the bass,
treble, and balance.
To adjust the sound quality:
1. Press MENU, then press
or to display the AUDIO menu.
2. Press ▲ or ▼ to highlight the item you want to adjust.
3. Press or to adjust the level.
•
makes the sound quality weaker or increases the balance in
the left channel, depending on the item selected.
• makes the sound quality stronger or increases the balance in
the right channel, depending on the item selected.
AUDIO
MTS
BASS
TREBLE
BALANCE
AUDIO LANGUAGE
DIGITAL OUTPUT
STEREO
:SELECT :ADJUST
25
25
0
PCM
To listen to a second audio program (SAP):
1. Press MENU, then press or to display the AUDIO menu.
2. Press ▲ or ▼ to highlight MTS.
3. Press or to highlight SAP. The TV speakers will output the
second audio program instead of normal audio.
4. Press EXIT to return to normal viewing.
Adjusting the sound
Muting the sound
Press MUTE to temporarily turn off the sound. While the sound is off,
the screen will display the word MUTE in the lower right-hand corner.
To restore the sound, either press MUTE again or press VOL+/–.
Selecting stereo/SAP broadcasts
The multi-channel TV sound (MTS) feature provides high-fidelity stereo
sound. MTS also can transmit a second audio program (SAP) containing
a second language or other audio information (when available.)
Note: The MTS feature is not available in VIDEO mode.
When the TV receives a stereo or SAP broadcast, the word
“STEREO” or “SAP” displays on-screen every time you turn on
the TV, change the channel, or press RECALL.
To listen to stereo sound:
1. Press MENU, then press or to display the AUDIO menu.
2. Press ▲ or ▼ to highlight MTS.
3. Press or to highlight STR (stereo.)
Note:
• In general, you can leave your TV in stereo mode because the
TV automatically outputs the type of sound being broadcast
(stereo or mono.)
•
If the stereo sound is noisy, select MONO to reduce the noise.
4. Press EXIT to return to normal viewing.
Mute
Exit
Recall
Menu
AUDIO
MTS
BASS
TREBLE
BALANCE
AUDIO LANGUAGE
DIGITAL OUTPUT
STR / SAP / MONO
:SELECT :ADJUST
25
25
0
PCM
Note:
A second audio program (SAP) can be heard
only on those TV stations that offer it.
For example, a station might broadcast music
as a second audio program. If you have SAP
on, you will see the current program on the
screen but hear music instead of the
program’s normal audio.
However, if you have SAP on, and the station
you are watching is not currently
broadcasting a second audio program, the
station’s normal audio will be output;
however, occasionally there is no sound at all
in SAP mode. If this happens, set the MTS
feature to STEREO mode.
Volume +/–
J3W41121A(E)_P31-Back 14/03/2006, 3:39 PM32

33
Appendix
Using the TV’s
Features
Setting up
your TV
Using the
Remote Control
Connecting
your TV
Welcome to
Toshiba
Important
Safeguards
Using the StableSound
®
feature
The StableSound
feature limits the highest volume level to prevent
extreme changes in volume when the signal source is changed.
To turn on the StableSound
®
feature:
1. Press MENU, then press
or to display the AUDIO menu.
2. Press ▲ or ▼ to highlight STABLE SOUND.
3. Press or to highlight ON.
4. Press EXIT to return to normal viewing.
To turn off the StableSound
®
feature:
Highlight OFF in step 3 above.
Menu
AUDIO
STABLE SOUND
SURROUND
RESET
:SELECT :ADJUST
ON / OFF
OFF
Selecting the audio languages
When two or more audio languages are included in a digital signal, you
can select one of the audio languages.
To select the audio language:
1. Press MENU, then press or to display the AUDIO menu.
2. Press ▲ or ▼ to highlight AUDIO LANGUAGE, then press
.
3. Press ▲ or ▼ to select the desired language, then press ENTER.
4. Press EXIT to return to normal viewing.
Selecting the digital output format
You can choose the format of the digital audio output signal.
To select the digital output format:
1.
Press MENU, then press
or to display the AUDIO menu.
2. Press ▲ or ▼ to highlight DIGITAL OUTPUT.
3.
Press
or
to highlight PCM or DOLBY DIGITAL.
4.
Press
EXIT to return to normal viewing.
AUDIO
MTS
BASS
TREBLE
BALANCE
AUDIO LANGUAGE
DIGITAL OUTPUT
STEREO
:SELECT :ADJUST
25
25
0
PCM
AUDIO
MTS
BASS
TREBLE
BALANCE
AUDIO LANGUAGE
DIGITAL OUTPUT
STEREO
:SELECT :ADJUST
25
25
0
PCM
PCM /DOLBY DIGITAL
Exit
Using the TV’s
Features
* Manufactured under license from Dolby Laboratories. Dolby and the double-D symbol are trademarks of Dolby Laboratories.
J3W41121A(E)_P31-Back 14/03/2006, 3:39 PM33

34
STEREO
SAP
TV-PG L V
ON TIMER 12:00AM
OFF TIMER 12:00PM
SLEEP TIMER 2h00m
ANT
ABCD
CABLE
4:3
CLOCK 12:00AM SUN
007
Using the TV’s
Features
Checking the digital signal strength
You can check the strength of the digital signal by viewing the digital
signal meter.
To view the digital signal meter:
1. Press MENU, then press
or
to display the SETUP menu.
2. Press ▲ or ▼ to highlight SIGNAL
METER.
3. Press
or to check the digital
signal strength.
4. Press EXIT to return to the normal screen.
Displaying TV status information on-screen
Press RECALL to display the following information on-screen:
• Clock
• Channel number or VIDEO
mode selected
• Channel label (if set)
• Stereo or SAP (second audio
program) audio status
• Content rating
• On timer, Off timer, Sleep timer
(if set)
• Picture size
Recall
Menu
Resetting your audio adjustments
The RESET function returns your audio adjustments to the following
factory settings:
MTS ................. STR
Bass ................. center (25)
Treble ............... center (25)
Balance ............ center (0)
To reset your audio adjustments:
1. Press MENU, then press
or to
display the AUDIO menu.
2. Press ▲ or ▼ to highlight RESET,
and then press
.
Digital output ..................... PCM
Stable sound ..................... OFF
Surround ........................... OFF
:SELECT :ADJUST
AUDIO
STABLE SOUND
SURROUND
RESET
OFF
OFF
Using the surround sound feature
The surround sound feature expands the audio listening field wider and
deeper to create exceptional sound quality from the TV’s speakers.
The feature uses stereo signals from a TV broadcast or video input.
To turn on the surround sound feature:
1. Select the STEREO mode, if available (see “Selecting stereo/SAP
broadcasts” on page 32.)
2. Press MENU, then press
or to
display the AUDIO menu.
3. Press ▲ or ▼ to highlight
SURROUND.
4. Press
or to highlight ON.
To turn off the surround sound feature:
Highlight OFF in step 4 above.
In general, you can leave your TV in surround mode because it will
automatically output the type of sound being broadcast (surround
stereo or monaural).
SIGNAL METER
CHANNEL (DIGITAL)
1-001
80
AUDIO
STABLE SOUND
SURROUND
RESET
:SELECT :ADJUST
OFF
ON / OFF
Exit
Notes:
• The SIGNAL METER feature is not
available for analog channels.
• After approximately 240 seconds, the
SIGNAL METER screen will return to
normal TV-operation automatically.
• When you select a vacant channel, the
signal meter may react.
J3W41121A(E)_P31-Back 14/03/2006, 3:40 PM34

35
Appendix
Using the TV’s
Features
Setting up
your TV
Using the
Remote Control
Connecting
your TV
Welcome to
Toshiba
Important
Safeguards
Appendix
Appendix
Troubleshooting
Before calling a service technician, please check the following table for a possible cause of the symptom and some solutions.
Symptom Solution
Black box on screen
• Select OFF in the Closed Caption menu to turn off the Closed Caption Text mode.
• If you connected a high-definition receiver, 480p progressive scan DVD player, or
other similar device to this TV, you must switch the device’s output to 480i interlaced
mode first. Failure to do this will display the word “ColorStream” on a black screen.
TV will not turn on
• Make sure the power cord is plugged in, then press POWER.
• The remote control batteries may be dead. Replace the batteries.
No picture, no sound
• Check the antenna/cable connections.
No sound, picture OK
• The sound may be muted. Press VOLUME.
• The station may have broadcast difficulties. Try another
channel.
• The MTS feature may be in SAP mode. Select STR or MONO in the MTS menu.
Poor sound, picture OK
• The station may have broadcast difficulties. Try another channel.
• The MTS feature may be in SAP mode. Select STR or MONO in the MTS menu.
Poor picture, sound OK
• Check the antenna connections.
• The station may have broadcast difficulties. Try another channel.
• Adjust the PICTURE menu.
Poor reception of broadcast channels
• The station may have broadcast difficulties. Try another channel.
• Check the antenna connections.
• If you are using a video input, make sure the TV/VIDEO button is set correctly.
Cannot receive above channel 13
• Make sure the TV/CABLE feature in the SETUP menu is set to “CABLE.”
Unable to select a certain channel
• The channel may be blocked by the V-Chip feature or CH LOCK feature, or erased
with the add/erase feature.
Cannot access signal input sources (Video1
, • Check the VIDEO LOCK feature.
Video2 and ColorStream and/or Channels 3 and 4
Multiple images
• The station may have broadcast difficulties. Try another channel.
• Use a highly directional outdoor antenna.
Poor color or no color
• The station may have broadcast difficulties. Try another channel.
• Adjust the TINT and/or COLOR in the PICTURE menu.
• If you change the direction of the TV while it is turned on, the picture could suffer
from color shading. If so, turn off the TV and allow it to cool for several hours before
turning it on again.
No stereo or SAP sound from a
• Make sure the MTS feature (in the AUDIO menu) is set properly.
known MTS broadcast
The V-Chip password does not work
• Change or reset your password.
(U.S. V-Chip system only)
The remote control does not operate
• Make sure the TV • CBL/SAT • VCR • DVD mode is set properly on the remote
control.
• Remove all obstructions between the remote control and the TV.
• The remote control batteries may be dead. Replace the batteries.
The front panel buttons do not operate
• Check the FRONT PANEL LOCK feature.
Digital broadcasting screen problem
• Check the digital signal strength.
Closed Caption box appears with no text
• Make sure the Closed Caption “Text Color” and “Background Color” are not set to
the same color (see page 31).
Auto power off
The TV will automatically turn off after approximately 15 minutes if it is tuned to a vacant channel or a station that completes
its
broadcast for the day and stops broadcasting on that channel. This feature does not work in VIDEO mode.
Understanding the Power Return feature
If the power is cut off while you are viewing the TV and the power is resupplied, the Power Return feature will turn the TV
on automatically.
If the power is going to be off for a long time or you are going to be away from the TV for a long time, unplug the power cord
from the wall outlet to prevent the TV from turning on in your absence.
J3W41121A(E)_P31-Back 14/03/2006, 3:40 PM35

36
Appendix
Specifications
• This model complies with the specifications below.
• Design and specifications are subject to change without notice.
• This model may not be compatible with features and/or specifications that may be added in the future.
Picture Tube 27 in. (676.0 mm) diagonal
(Screen size is approximate.)
Television system NTSC standard, ATSC standard (8VSB), QAM
Channel coverage VHF: 2–13
UHF: 14–69
Cable TV: 4A, A-5–A-1, A-I,
J–W, W
+
1–W
+
84
Power source 120V AC, 60 Hz
Power consumption 130 W
Audio power 2.5 W + 2.5 W
Speaker type 2 x 3-1/2 in. (50.8 x 88.9 mm) x 2 pcs.
Video/Audio terminals S-VIDEO INPUT
Y-INPUT: 1V (p-p), 75 ohm, negative sync.
C-INPUT: 0.286V (p-p) (burst signal), 75 ohm
VIDEO/AUDIO INPUT
VIDEO: 1V (p-p), 75 ohm, negative sync.
AUDIO: 150 mV (rms) (30% modulation equivalent, 47k ohm)
ColorStream
®
(component video) INPUT
Y: 1V (p-p), 75 ohm
PR: 0.7V (p-p), 75 ohm
PB: 0.7V (p-p), 75 ohm
AUDIO OUTPUT
150 mV (rms) (30% modulation equivalent, 47k ohm)
DIGITAL AUDIO OUTPUT
AUDIO: 0.5V (p-p), 75 ohm
Dimensions Width: 29-1/8 in. (740 mm)
Height: 22-1/2 in. (571.5 mm)
Depth: 19-3/8 in. (491.5 mm)
Weight 81.6 lbs. (37.0 kg)
Supplied accessories Remote control with two size “AAA” batteries
27D46
32D46
32 in. (800.1 mm) diagonal
(Screen size is approximate.)
135W
1-13/16 x 3-7/8 in. (45.7 x 99.1 mm) x 2 pcs.
Width: 29-9/16 in. (751 mm)
Height: 25-15/16 in. (658.5 mm)
Depth: 21-3/4 in. (552 mm)
114.7 lbs. (52.0 kg)
J3W41121A(E)_P31-Back 14/03/2006, 3:40 PM36

37
Appendix
Using the TV’s
Features
Setting up
your TV
Using the
Remote Control
Connecting
your TV
Welcome to
Toshiba
Important
Safeguards
Appendix
Limited United States Warranty
for Non-FST PURE
®
CRT-based TVs 27 Inch and Larger
Toshiba America Consumer Products, L.L.C. (“TACP”) makes the following
limited warranties to original consumers in the United States. THESE LIMITED
WARRANTIES EXTEND TO THE ORIGINAL CONSUMER PURCHASER OR
ANY PERSON RECEIVING THIS TELEVISION AS A GIFT FROM THE
ORIGINAL CONSUMER PURCHASER AND TO NO OTHER PURCHASER
OR TRANSFEREE.
TELEVISIONS PURCHASED IN THE U.S.A. AND USED ANYWHERE
OUTSIDE OF THE U.S.A., INCLUDING, WITHOUT LIMITATION, CANADA
AND MEXICO, ARE NOT COVERED BY THESE WARRANTIES.
TELEVISIONS PURCHASED ANYWHERE OUTSIDE OF THE U.S.A.,
INCLUDING, WITHOUT LIMITATION, CANADA AND MEXICO, AND USED
IN THE U.S.A., ARE NOT COVERED BY THESE WARRANTIES.
Limited Ninety (90) Day Warranty on Labor
TACP warrants this television and its parts against defects in materials or
workmanship for a period of ninety (90) days after the date of original retail
purchase. DURING THIS PERIOD, TACP WILL, AT TACP’S OPTION, REPAIR
OR REPLACE A DEFECTIVE PART WITH A NEW OR REFURBISHED PART
WITHOUT CHARGE TO YOU FOR PARTS OR LABOR. During this period,
TACP Authorized Service Station personnel will come to your home when
warranty service is required. Depending on the type of repair required, the
service will either be performed in your home or the television will be taken to
a TACP Authorized Service Station for repair and returned to your home at no
cost to you.
Limited One (1) Year Warranty on Parts
TACP further warrants the parts in this television against defects in materials
or workmanship for a period of one (1) year after the date of original retail
purchase. DURING THIS PERIOD, TACP WILL, AT TACP’S OPTION, REPAIR
OR REPLACE A DEFECTIVE PART WITH A NEW OR REFURBISHED PART
WITHOUT CHARGE TO YOU FOR THE PART, PROVIDED THAT IF A
DEFECTIVE PART IS REPAIRED OR REPLACED AFTER NINETY (90) DAYS
AFTER THE DATE OF ORIGINAL RETAIL PURCHASE, YOU MUST PAY ALL
LABOR CHARGES IN CONNECTION WITH THE REPAIR OR
REPLACEMENT THEREOF. After the date that is ninety (90) days after the
date of original retail purchase, you may request in-home service at your
expense, or you may deliver the entire television to a TACP Authorized Service
Station. If you elect to deliver the entire television to a TACP Authorized Service
Station, you must pay for all transportation and insurance charges for the
television to and from the TACP Authorized Service Station.
Limited Two (2) Year Warranty on Picture Tube
TACP further warrants the picture tube in this television against defects in
materials or workmanship for a period of two (2) years after the date of original
retail purchase. DURING THIS PERIOD, TACP WILL, AT TACP’S OPTION,
REPAIR OR REPLACE A DEFECTIVE PICTURE TUBE WITH A NEW OR
REFURBISHED PICTURE TUBE WITHOUT CHARGE TO YOU, PROVIDED
THAT IF A DEFECTIVE PICTURE TUBE IS REPAIRED OR REPLACED
AFTER ONE (1) YEAR AFTER THE DATE OF ORIGINAL RETAIL
PURCHASE, YOU MUST PAY FOR ALL LABOR CHARGES IN CONNECTION
WITH THE REPAIR OR REPLACEMENT THEREOF. After the date that is
ninety (90) days after the date of original retail purchase, you may request in-
home service at your expense, or you may deliver the entire television to a
TACP Authorized Service Station. If you elect to deliver the entire television to
a TACP Authorized Service Station, you must pay for all transportation and
insurance charges for the television to and from the TACP Authorized Service
Station.
Rental Units
The warranty for television rental units begins on the date of the first rental or
thirty (30) days after the date of shipment to the rental firm, whichever comes
first.
Limited Warranty for Commercial Units
TACP warrants televisions that are sold and used for commercial purposes as
follows: all parts are warranted against defects in materials or workmanship
for a period of ninety (90) days after the date of original retail purchase.
DURING THIS PERIOD, TACP WILL, AT TACP’S OPTION, REPAIR OR
REPLACE A DEFECTIVE PART WITH A NEW OR REFURBISHED PART
WITHOUT CHARGE TO YOU.
Owner’s Manual and Product Registration Card
Read this owner’s manual thoroughly before operating this television.
Complete and mail the enclosed product registration card or register your
television online at www.tacp.toshiba.com/service as soon as possible.
By registering your television you will enable TACP to bring you new products
specifically designed to meet your needs and help us to contact you in the
unlikely event a safety notification is required under the U.S. Consumer
Product Safety Act. Failure to complete and return the product registration
card does not diminish your warranty rights.
Your Responsibility
THE ABOVE WARRANTIES ARE SUBJECT TO THE FOLLOWING
CONDITIONS:
(1) You must retain your original bill of sale or provide other proof of
purchase.
(2) All warranty servicing of this television must be performed by an
Authorized TACP Service Station.
(3) The warranties from TACP are effective only if this television is
purchased and operated in the Continental U.S.A. or Puerto Rico.
(4) Labor service charges for set installation, setup, adjustment of
customer controls, and installation or repair of antenna systems are
not covered by this warranty. Reception problems caused by
inadequate antenna systems, misaligned satellite dishes, cable
television distribution, VCRs, DVD players/recorders, personal
computer level IEEE-1394 devices, and any other connected signal
source device are your responsibility.
How to Obtain Warranty Service
If, after following all of the operating instructions in this manual and reviewing
the section entitled “Troubleshooting,” you find that service is needed:
(1) To find the nearest TACP Authorized Service Station, visit TACP’s
website at www.tacp.toshiba.com/service or contact TACP’s
Consumer Solution Center toll free at 1-800-631-3811.
(2) You must present your original bill of sale or other proof of purchase
to the TACP Authorized Service Station.
ALL WARRANTIES IMPLIED BY THE LAW OF ANY STATE OF THE U.S.A.,
INCLUDING THE IMPLIED WARRANTIES OF MERCHANTABILITY AND
FITNESS FOR A PARTICULAR PURPOSE, ARE EXPRESSLY LIMITED
TO THE DURATION OF THE LIMITED WARRANTIES SET FORTH ABOVE.
WITH THE EXCEPTION OF ANY WARRANTIES IMPLIED BY THE LAW
OF ANY STATE OF THE U.S.A. AS HEREBY LIMITED, THE FOREGOING
WARRANTY IS EXCLUSIVE AND IN LIEU OF ALL OTHER WARRANTIES,
GUARANTEES, AGREEMENTS, AND SIMILAR OBLIGATIONS OF TACP
WITH RESPECT TO THE REPAIR OR REPLACEMENT OF ANY PARTS. IN
NO EVENT SHALL TACP BE LIABLE FOR CONSEQUENTIAL OR
INCIDENTAL DAMAGES (INCLUDING, BUT NOT LIMITED TO, LOST
PROFITS, BUSINESS INTERRUPTION, OR MODIFICATION OR ERASURE
OF RECORDED DATA CAUSED BY USE, MISUSE OR INABILITY TO USE
THIS TELEVISION).
No person, agent, distributor, dealer, or company is authorized to change,
modify, or extend the terms of these warranties in any manner whatsoever.
The time within which an action must be commenced to enforce any obligation
of TACP arising under the warranty or under any statute or law of the United
States or any state thereof is hereby limited to ninety (90) days from the date
you discover, or should have discovered, the defect. This limitation does not
apply to implied warranties arising under the law of any state of the U.S.A.
THIS WARRANTY GIVES YOU SPECIFIC LEGAL RIGHTS AND YOU MAY
ALSO HAVE OTHER RIGHTS WHICH MAY VARY FROM STATE TO STATE
IN THE U.S.A. SOME STATES OF THE U.S.A. DO NOT ALLOW
LIMITATIONS ON THE DURATION OF AN IMPLIED WARRANTY, WHEN
AN ACTION MAY BE BROUGHT, OR THE EXCLUSION OR LIMITATION
OF INCIDENTAL OR CONSEQUENTIAL DAMAGES. THEREFORE, THE
ABOVE PROVISIONS MAY NOT APPLY TO YOU UNDER SUCH
CIRCUMSTANCES.
For additional information, visit TACP's website:
www.tacp.toshiba.com
J3W41121A(E)_P31-Back 14/03/2006, 3:41 PM37

National Service Division
ColorStream, TheaterView, and StableSound are registered trademarks of
Toshiba America Consumer Products, L.L.C.
GameTimer is a trademark of Toshiba America Consumer Products, L.L.C.
PRINTED IN THAILAND
J3W41121A(E)_P31-Back 14/03/2006, 3:41 PM38

27D46
32D46
J3W41121A SH 06/04
N
Todos los derechos reservados
2006
Información
importante sobre
seguridad
Conectando su
TV
Configurando su
TV
Usando las
funciones de la
TV
Apéndice
Usando el control
remoto
Bienvenido a
Toshiba
J3W41121A(S)_COVER 14/03/2006, 3:41 PM1

2
2
Información
importante sobre
seguridad
Seguridad infantil
El lugar en que se coloca el televisor es
muy importante
¡Felicitaciones por su compra!
Tenga en mente estos consejos de
seguridad mientras disfruta de su
televisor:
El problema
Si usted es como la mayoría de las personas, usted tiene un televisor
en su hogar. Es más, muchos hogares tienen más de un televisor.
La posibilidad de disfrutar la experiencia del teatro en casa
es una tendencia en aumento y los televisores grandes están
muy de moda; el problema es que no siempre se colocan
sobre una base adecuada.
A veces los aparatos no están bien asegurados o se sitúan de
manera poco adecuada sobre tocadores, libreros, estantes,
escritorios, altavoces, arcones o carritos. Como resultado,
el televisor se puede caer y causar lesiones innecesarias.
¡Toshiba se preocupa!
La industria de los aparatos electro-
domésticos se ha impuesto el compromiso
de hacer que el entretenimiento en el
hogar sea agradable y sin riesgos.
La Asociación de Aparatos
Electrónicos de consumo formó la
Comisión de Seguridad para el
Apoyo del Entretenimiento en el
Hogar (la cual comprende a
fabricantes de televisores y muebles
para aparatos electrónicos de
consumo) con la finalidad de velar
por la seguridad infantil y educar al
consumidor y a su familia acerca de
la seguridad del TV.
Sintonice la seguridad
¡Aquí NO corresponde el concepto de
unitalla! Use un mueble adecuado de tamaño
suficiente para soportar el peso de su televisor ( y
otros componentes electrónicos).
Use soportes de ángulo, abrazaderas y anclajes apropiados
para asegurar el mueble a la pared (pero nunca atornille
ninguna cosa directamente en el televisor).
Lea atentamente las instrucciones adjuntas hasta entenderlas
para que pueda utilizar este producto de la manera adecuada.
No permita que los niños se trepen sobre los muebles y los
televisores y no permita que jueguen con ellos.
No ponga cosas encima del televisor (la videocasetera, el
control remoto o los juguetes) que un niño curioso pueda
querer alcanzar.
Tenga presente que los niños se pueden emocionar mucho
cuando están viendo un programa y pueden empujar el
televisor o volcárselo encima.
Difunda entre sus familiares y amigos nuestro mensaje de
seguridad acerca de este peligro oculto en el hogar. ¡Gracias!
AVISO A LOS INSTALADORES DE TELEVISIÓN
POR CABLE (CABLE TV, CATV)
Este es un recordatorio para los instaladores de sistemas de
CATV sobre el Artículo 820-40 de la NEC, que dispone pautas
para la conexión a tierra correcta y especifica en particular
que el cable de tierra se debe conectar al sistema de
conexión a tierra del edificio, lo más cerca posible del punto
de entrada del cable. Consulte los puntos 25 y 26 en la página
4, para obtener información adicional sobre la conexión a
tierra de la antena.
2500 Wilson Blvd.
Arlington, VA 22201 U.S.A.
Tel. 703-907-7600 Fax 703-907-7690
www.CE.org
CEA es el patrocinador, productor y
administrador de la CES
®
Internacional.
0303
CUIDADO: Para prevenir descargas eléctricas,
no usar este enchufe polarizado con un cable
de extensión, receptáculo u otro tomacorriente
a menos que las clavijas puedan insertarse
para prevenir su exposicón.
Estimado cliente:
Le agradecemos que haya comprado este televisor
TOSHIBA. Este manual le ayudará a utilizar las numerosas
e interesantes funciones de su nuevo televisor.
Antes de hacer funcionar el televisor, lea este
manual en su totalidad y consérvelo en un lugar
conveniente para consultarlo en el futuro.
Precauciones de seguridad
ADVERTENCIA
PARA REDUCIR EL RIESGO DE INCENDIO O
DESCARGA ELÉCTRICA, NO EXPONGA ESTE
APARATO A LA LLUVIA O A LA HUMEDAD.
ADVERTENCIA: PARA REDUCIR EL RIESGO DE
DESCARGA ELƒCTRICA, NO RETIRE LA CUBIERTA
(NI LA PARTE POSTERIOR). NO HAY NINGòN
COMPONENTE EN EL INTERIOR QUE EL USUARIO
PUEDA REPARAR. ENCARGUE TODAS LAS
REPARACIONES A UN TƒCNICO CALIFICADO.
AVISO DE POSIBLES EFECTOS ADVERSOS
EN EL TUBO DE IMAGEN DEL TELEVISOR
Si una imagen fija (que no se mueve) permanece en la
pantalla del televisor por mucho tiempo, puede quedar
grabada en forma definitiva en el tubo de imagen.
Este tipo de daño NO ESTÁ CUBIERTO POR SU
GARANTÍA. Vea el apartado 33 en la página 4.
El símbolo de rayo en un triángulo indica que el voltaje
en el interior de este producto puede causar descargas
eléctricas. NO INTENTE REPARAR ESTE PRODUCTO
USTED MISMO.
El símbolo de exclamación en un triángulo indica que
el texto que sigue contiene instrucciones importantes
de mantenimiento y funcionamiento.
ADVERTENCIA
RIESGO DE DESCARGA ELÉCTRICA
NO ABRIR
J3W41121A(S)_P02-06 14/03/2006, 3:42 PM2

3
Bienvenido a
Toshiba
Conectando su
TV
Configurando su
TV
Usando las
funciones de la
TV
Apéndice
Usando el control
remoto
Información
importante sobre
seguridad
3
Instrucciones de seguridad importantes
1) Lea estas instrucciones.
2) Conserve estas instrucciones.
3) Preste atención a todas las
advertencias.
4) Siga todas las instrucciones.
5) No use este aparato cerca del agua.
6) Lí mpielo únicamente con un paño seco.
7) No bloquee las rejillas de ventilación.
Instale el aparato de acuerdo con las
instrucciones del fabricante.
8) No instale el aparato cerca de fuentes
de calor tales como radiadores, salidas
de calefacció n, cocinas y otros aparatos
(incluidos los amplificadores) que
producen calor.
9) No anule el diseño de seguridad del enchufe polarizado o
con conexión a tierra. Los enchufes polarizados tienen dos
clavijas, una de las cuales es más ancha que la otra. Los
enchufes con conexión a tierra tienen dos
clavijas planas y una redonda que sirve de
conexión a tierra. La clavija ancha y la
tercera clavija son para su seguridad.
Si el enchufe del aparato no entra en el
enchufe de la pared, consulte a un técnico electricista para que
cambie el enchufe de pared obsoleto.
10) Proteja el cordón eléctrico para que
no lo pisen ni lo aprieten, en particular
cerca del enchufe, en el enchufe en
sí y en el punto en que sale del aparato.
11)
Use únicamente los accesorios especificados por el fabricante.
12) Use únicamente el carrito, base, trípode,
soporte o mesa que especifique el
fabricante o que se venda con el aparato.
Si usa un carrito, proceda con precaución al
mover la combinación carrito/aparato para
evitar que se le caiga encima y lo lesione.
13) Desconecte el aparato durante las
tormentas eléctricas o cuando no
lo vaya a utilizar por períodos de
tiempo prolongados.
14) Encargue todas las reparaciones y servicio a
personal calificado. El aparato debe ser enviado
a un técnico calificado si se deja caer, si
funciona anormalmente o si sufre daños
tales como roturas del cordón de alimentación
o del enchufe, derrame de líquidos o caída de
objetos en el interior o exposición a la lluvia o a la humedad.
15)
CUIDADO: Para prevenir descargas eléctricas, no usar
este enchufe polarizado con un cable de extensión,
receptáculo u otro tomacorriente a menos que las clavijas
puedan insertarse para prevenir su exposicón.
Instalación, cuidado y servicio
Instalación
Siga estas recomendaciones y precauciones y tenga en mente todas
las advertencias cuando instale su televisor:
16) No modifique este equipo. Los cambios o modificaciones
pueden anular: a) la garantía y b) la autoridad del usuario para
operar este equipo bajo las reglas de la Comisión Federal de
Comunicaciones (Federal Communications Commission, FCC).
17) PELIGRO: ¡RIESGO DE LESIÓN GRAVE,
MUERTE O DAÑO AL EQUIPO!
Nunca coloque el televisor sobre
un carrito, base o mesa inestables. Puede
caerse y causar lesiones graves, muerte o
daño considerable al televisor.
18) Nunca sitúe ni guarde el televisor a la
luz directa del sol; en lugares cálidos o
húmedos; en lugares expuestos al polvo
o la vibración excesivos o en lugares con
temperaturas de 5 °C (41 °F) o menos.
19) Coloque siempre el televisor en el piso
sobre una superficie resistente, nivelada
y estable que sea capaz de soportar
el peso de la unidad.
20) Nunca coloque objetos tales como
floreros, acuarios o velas encima del
televisor.
21) Nunca bloquee ni cubra las rejillas o aberturas de las partes
posterior, inferior y laterales de la caja del televisor. Nunca
coloque el televisor:
• sobre una cama, sillón, alfombra
o superficie similar;
• demasiado cerca de cortinas,
persianas, paredes o
• en un lugar encerrado, como por
ejemplo un librero, un estante
empotrado u otros lugares que
no tengan buena ventilación.
Las rejillas y aberturas tienen la
finalidad de proteger el aparato contra
el sobrecalentamiento y de conservarlo
en un buen estado de funcionamiento.
22) No apoye o haga rodar objetos sobre el cordón eléctrico, ni
coloque el televisor donde el cordón se pueda desgastar o
quedar expuesto a maltrato.
23) Nunca sobrecargue los enchufes de
pared ni las extensiones.
Clavija ancha
Información
importante sobre
seguridad
0303
J3W41121A(S)_P02-06 14/03/2006, 3:42 PM3

4
4
30) [Esta instrucción aplica sólo a los televisores proyectores.]
Si la temperatura del aire aumenta repentinamente (por ejemplo,
cuando le entregan el televisor), se puede formar condensación en
las lentes. Esto puede hacer que la imagen se vea distorsionada o
que el color parezca apagado. Si esto ocurre, apague el televisor y
no lo vuelva a encender durante 6 ó 7 horas para que la humedad
se evapore.
31) Con el fin de protegerlo contra las subidas de voltaje y los
rayos, desconecte el televisor y la antena si no los va a usar
por períodos prolongados.
32) Durante el uso normal es posible que el
televisor haga ruidos de vez en cuando.
Esto es normal, especialmente en el
momento de encenderlo y apagarlo.
Si los ruidos se vuelven frecuentes
o continuos, desconecte el televisor
y comuníquese con un centro de servicio
autorizado de TOSHIBA.
33) Posibles efectos adversos sobre el tubo de imagen del
televisor: Si una imagen fija (que no se mueve) permanece en la
pantalla del televisor por mucho tiempo, puede quedar grabada en
forma definitiva en el tubo de imagen y dejar una imagen fantasma
tenue pero permanente en la pantalla. Este tipo de daño NO
ESTÁ CUBIERTO POR SU GARANTÍA. Nunca deje el televisor
encendido por períodos prolongados cuando esté mostrando los
siguientes formatos o imágenes:
• Imágenes fijas, tales como ventanas PIP/POP, cintas de datos
bursátiles, patrones de juegos de video, logotipos de estaciones
de TV, subtítulos ocultos y sitios Web.
• Formatos especiales que no utilizan la pantalla completa. Por
ejemplo, ver un programa en formato 16:9 en una pantalla normal
4:3 (barras grises en la parte superior e inferior de la pantalla); o
ver un programa en formato normal 4:3 en una pantalla ancha de
formato 16:9 (barras grises sobre los costados izquierdo y
derecho de la pantalla).
Servicio
34) ADVERTENCIA: ¡RIESGO DE DESCARGA
ELÉCTRICA! Nunca trate de
reparar el televisor usted
mismo. Abrir o quitar las tapas puede
exponerlo a voltajes peligrosos u otros
riesgos. Encargue las reparaciones a
un centro de servicio autorizado de TOSHIBA.
35) Si le reparan el televisor:
• Pídale al técnico que utilice únicamente repuestos especificados
por el fabricante.
• Una vez concluída la reparación,
pídale al técnico que haga las
comprobaciones de seguridad
de rutina para determinar que
el televisor funciona sin peligro.
36) Cuando el televisor llegue al fin de su vida útil, pídale a un técnico
de servicio calificado que lo deseche de manera adecuada.
Desecharlo de manera incorrecta puede causar implosión del tubo
de imagen y posibles lesiones personales.
24)
Conecte este equipo únicamente a una
fuente de alimentación de 120 V CA,
60 Hz.
25) Verifique siempre que el sistema de la antena esté conectado a
tierra correctamente para proteger adecuadamente el aparato
contra las subidas de voltaje y las cargas de energía estática
acumulada (consulte la Sección 810 del Código Eléctrico Nacional).
26) PELIGRO: ¡RIESGO DE LESIÓN GRAVE O MUERTE!
• Proceda con extremada cautela para asegurarse de
que nunca se encuentre en una posición en la cual su
cuerpo (o cualquier objeto con el que tenga contacto, como por
ejemplo una escalera o un destornillador) pueda tocar
accidentalmente los cables aéreos de alta tensión. Nunca sitúe la
antena cerca de los cables aéreos de alta tensión u otros circuitos
eléctricos.
• Nunca intente instalar lo siguiente durante tormentas eléctricas:
a) sistema de antena, b) cables o componentes de teatro en casa
conectados a la antena o al sistema de teléfonos.
Cuidado
Siga estas recomendaciones y observe estas precauciones para lograr
el mejor rendimiento y un funcionamiento seguro de su televisor
TOSHIBA:
27) Siéntese siempre a una distancia entre 3 y 7.5 metros (10 a 25 pies)
del televisor y, de ser posible, directamente enfrente. Si se sienta
demasiado a la izquierda o a la derecha, o si la luz solar o de las
lámparas de la habitación se refleja en la pantalla, la imagen puede
parecer pálida. Apague el televisor para comprobar si se ven
reflejos en la pantalla, luego elimine la fuente del reflejo mientras
ve televisor.
28) Desconecte siempre el televisor
antes de limpiarlo. Nunca utilice
limpiadores líquidos o limpiadores
en aerosol.
29) ¡ADVERTENCIA: RIESGO DE DESCARGA
ELÉCTRICA! Nunca derrame líquidos ni introduzca
objetos en las ranuras de la caja del televisor.
Información
importante sobre
seguridad
Abrazadera de
conexión a tierra
Unidad de descarga de la antena
(Sección 810-20 del NEC)
Conductores de conexión a tierra
(Sección 810-21 del NEC)
Sistema de electrodos de conexión a tierra
del servicio de suministro eléctrico
(Artículo 250, Parte H del NEC)
Abrazaderas de
conexión a tierra
Acometida de antena
Equipo del servicio de
suministro eléctrico
0303
J3W41121A(S)_P02-06 14/03/2006, 3:43 PM4

5
Bienvenido a
Toshiba
Conectando su
TV
Configurando su
TV
Usando las
funciones de la
TV
Apéndice
Usando el control
remoto
Información
importante sobre
seguridad
Información
importante sobre
seguridad
Información importante sobre seguridad ....................................................................................................................2 - 4
Bienvenido a Toshiba .......................................................................................................................................................... 6
Explorando su nueva TV .................................................................................................................................................6
Seleccionando un lugar para la TV ................................................................................................................................. 6
Conectando su TV ................................................................................................................................................................
7
Conectando una videograbadora ....................................................................................................................................7
Conectando una caja convertidora para cable TV .......................................................................................................... 8
Conectando un reproductor de DVD/receptor satelital y una videograbadora................................................................ 9
Conectando un reproductor de DVD con ColorStream
®
(video de componente) y una videograbadora...................... 10
Conectando un receptor de DTV o caja de conexión con un video de componente ColorStream
®
y una videograbadora ... 11
Conectando una videocámara ......................................................................................................................................12
Conectando un sistema de audio.................................................................................................................................. 13
Conectando un amplificador AV con sonido surround digital incorporado .................................................................... 13
Usando el control remoto..................................................................................................................................................
14
Preparando el control remoto para su uso .................................................................................................................... 14
Instalando las baterías del control remoto .................................................................................................................... 14
Usando el control remoto para operar otros aparatos .................................................................................................. 14
Programando el control remoto para operar otros aparatos ......................................................................................... 15
Tablas de código del convertidor de cable/receptor satelital, videograbadora y reproductor de DVD .......................... 16
Aprendiendo sobre el control remoto ............................................................................................................................ 18
Configurando su televisor.................................................................................................................................................
19
Empezando configuración.............................................................................................................................................19
Cambiando el idioma de despliegue en la pantalla....................................................................................................... 19
Agregando canales a la memoria del televisor ............................................................................................................. 20
Usando las funciones del televisor ..................................................................................................................................
21
Ajustando la configuración de los canales ....................................................................................................................21
Usando el menú de BLOQUEAR ..................................................................................................................................22
Seleccionando una Contraseña ............................................................................................................................22
La función del V-Chip (control paterno) ................................................................................................................. 23
Bloqueando los canales ........................................................................................................................................24
Bloqueando la entrada de video ........................................................................................................................... 25
Configurando el GameTimer™ (Tiempo de juego) ...............................................................................................25
Usando la función de bloqueo del panel frontal ....................................................................................................26
Creando las etiquetas de los canales ........................................................................................................................... 26
Seleccionando la fuente de entrada de video ............................................................................................................... 27
Configurando el reloj .....................................................................................................................................................27
Configurando el cronómetro de ENCENDIDO/APAGADO ............................................................................................ 27
Viendo los formatos de imágenes de pantalla amplia................................................................................................... 28
Ajustando la imagen...................................................................................................................................................... 30
Ajustando la calidad de la imagen ........................................................................................................................ 30
Restableciendo sus ajustes de la imagen .............................................................................................................30
Configurando el sleep timer (cronómetro de apagado automático) ..............................................................................30
Usando la función de subtítulos .................................................................................................................................... 31
Usando la función de subtítulos avanzados ..................................................................................................................31
Ajustando el sonido .......................................................................................................................................................32
Enmudeciendo el sonido ....................................................................................................................................... 32
Seleccionando las estaciones en estéreo/SAP.....................................................................................................32
Ajustando la calidad del sonido.............................................................................................................................32
Selección del idioma del audio ..............................................................................................................................33
Seleccionando el formato de salida digital ............................................................................................................ 33
Usando la función de sonido StableSound
®
.......................................................................................................... 33
Usando la función de sonido Surround ................................................................................................................. 34
Restableciendo sus ajustes de audio ............................................................................................................................34
Cómo comprobar la potencia de la señal digital ........................................................................................................... 34
Desplegando la información en pantalla ....................................................................................................................... 34
Apagado automático ..................................................................................................................................................... 35
Entendiendo la función de Retorno de Energía ............................................................................................................35
Apéndice .............................................................................................................................................................................
35
Solución de problemas..................................................................................................................................................35
Especificaciones ...........................................................................................................................................................36
Garantía limitada en los Estados Unidos .....................................................................................................................37
J3W41121A(S)_P02-06 14/03/2006, 3:43 PM5

6
La función EMPEZANDO CONFIGURACION
aparecerá la primera vez que encienda el
televisor. Vea la página 19 para obtener
detalles.
Bienvenido a
Toshiba
Bienvenido a Toshiba
¡Felicitaciones! Usted ha comprado uno de los televisores a color más
finos del mercado. La meta de este manual es guiarlo completamente
para preparar y a operar su televisor tan rápidamente como sea
posible.
Usted tal vez necesite comprar otros cables de audio o video para
conectar su equipo. Vea “Conectando su TV” en la página 7 para más
información.
Por favor lea cuidadosamente todas las instrucciones operativas y de
seguridad antes de empezar.
Explorando su nueva TV
Usted podrá operar su televisor al usar los botones en el panel frontal
o el control remoto. Los paneles frontal y trasero proporcionan todas
las entradas que necesitará para conectar otro equipo a su televisor.
Notas:
• Para abrir el sistema de menú, puede
presionar MENU en el mando a distancia o
apretar simultáneamente los botones de
VOLUMEN (
▲
y
▼
) en el panel delantero.
• Cuando un menú está abierto, para
seleccionar el ajuste deseado, puede usar
los botones de flecha sobre el mando a
distancia o los botones
▲
/
▼
de CANAL y
VOLUMEN en el panel delantero.
Interruptor
Sensor de control remoto
Indicador EN CENDIDO
Conectores de entrada
de Audio (I/D)/Video
Seleccionando un lugar para la TV
• Coloque el televisor en el piso o en una plataforma robusta en un
lugar donde la luz no pegue directamente en la pantalla.
• Coloque el televisor lo bastante lejos de las paredes para permitir
la ventilación apropiada. La ventilación inadecuada podría causar
sobrecalentamiento que podrá dañar el podría.
Panel delantero de la TV
Panel trasero de la TV
Selectores de
canal en ▲/▼
Comandos de
volumen ▲/▼
27D46
32D46
Interruptor
Sensor de control remoto
Indicador EN CENDIDO
Conectores de entrada
de Audio (I/D)/Video
Selectores de
canal en ▲/▼
Comandos de
volumen ▲/▼
J3W41121A(S)_P02-06 14/03/2006, 3:44 PM6

7
Bienvenido a
Toshiba
Conectando su
TV
Configurando su
TV
Usando las
funciones de la
TV
Apéndice
Usando el control
remoto
Información
importante sobre
seguridad
IN
OUT
VIDEO
IN from ANT
CH 3
CH 4
OUT to TV
AUDIO
LR
TV
Conectando su
TV
AVISO: ¡RIESGO DE DAÑO
EN EL EQUIPO!
No conecte ningún cable de
corriente hasta que haya
terminado de conectar todo su
equipo.
Conectando una videograbadora
Esta conexión le permite ver los canales locales y programas de video,
reproducir o grabar en la videograbadora mientras ve la televisión, y
grabar de un canal mientras ve otro canal.
Conectando su TV
• Un cable coaxial es un cable normal que entra de su antena o de
la caja convertidora de cable TV. Los cables coaxiales usan
conectores “F”.
• Los cables normales de A/V (audio/video) usualmente están
codificados con colores según su uso: amarillo para video, rojo y
blanco para audio. El cable rojo de audio es para el canal
estereofónico derecho, y el cable blanco de audio es para el canal
estereofónico (o monofónico) izquierdo. Si observa el panel
trasero televisor, verá que las terminales están codificadas con
colores de la misma manera que los cables.
• Los cables de S-video proporcionan un mejor desempeño de la
imagen. Sólo pueden usarse los cables de S-video con los
componentes compatibles de S-video.
• Los cables de video de componentes y proporcionan el mejor
desempeño de la imagen. Los cables de video de componentes
sólo podrán usarse con componentes que sean compatibles con
el video de componentes.
• El cable de Interfaz para digital audio coaxial es para usarse con
equipos de video que tengan salida digital audio (vea la página 13).
Usted necesitará lo siguiente:
• Dos cables coaxiales
• Un juego de cables normales de A/V
Nota:
Si usa una videograbadora monofónica,
conecte L/Mono a Audio OUT de la
videograbadora usando sólo un cable de
audio. Para obtener una mejor calidad en la
imagen, si su videograbadora tiene S-video,
podrá usar un cable de S-video en lugar del
cable normal de video. No conecte un cable
normal de video y un cable de S-video
simultáneamente o la calidad de la imagen no
será buena.
Entrada del cable de la caja
para cable TV o la antena
Videograbadora
estereofónica
La grabación no autorizada, el uso, la
distribución o la revisión de los
programas televisivos, videos, DVD y
otros materiales se prohíben bajo las
Leyes de Copyright de los Estados
Unidos y otros países, y podrían estar
sujetos a la responsabilidad civil y penal.
ANTENA
Cable coaxial
Cables
AUDIO
Cable
VIDEO
Cable
S-Video
Cables video
componente
Cable Digital
Audio Coaxial
J3W41121A(S)_P07-13 14/03/2006, 3:44 PM7

8
A
B
Convertidor/Descodificador
Convertidor/Descodificador
Divisor Interruptor A / B
TV
Opción 1:
Opción 2:
Opción 3:
Conectando una caja convertidora para cable TV
Este televisor puede sintonizar la mayoría de los canales por cable sin
necesidad de recurrir al convertidor suministrado por los canales de cable.
Algunas compañías de cable ofrecen “canales pagados exclusivos” en los
cuales la señal esta codificada. La descodificación de esas señales para
la obtención de una señal normal requiere el uso de un descondificador
que es generalmente provisto por la compañía de cable.
Para los Abonados a un Servicio de TV por Cable “BÁSICO”
Para un servicio de cable básico que no requiera convertidor/
descodificador, conecte el cable coaxial Cable TV de 75 ohmios
directamente a la entrada de antena en la parte trasera del televisor.
Para los Abonados a un Servicio de TV por Cable “CODIFICADO”
Si Ud. está suscrito a un servicio de cable que requiere el uso de un
convertidor/descodificador conecte el cable de bajada de antena al
convertidor/descodificador y conecte la salida de éste a la entrada de
antena en la parte trasera del televisor. Siga la conexión como se
muestra en la figura. Sintonice el televisor en el canal de salida del
convertidor/descodificador (usualmente canal 3 ó 4) y utilice el
convertidor/descodificador para la selección de canales.
Para los Abonados a un Servicio de Cable BÁSICO con Canales
Especiales Codificados
Si Ud. está suscrito a un servicio de cable en el cual los canales
básicos son comunes y los canales especiales necesitan un
convertidor/descodificador, puede utilizar un divisor de señal (a veces
llamado “acoplador”) y una caja de interruptor A/B. Siga el cableado
como se muestra en la figura. Con el interruptor en la posición “B”, Ud.
puede sintonizar directamente cualquier canal común en su televisor.
Con el interruptor en la posición “A” puede sintonizar su TV con la
salida del sintonizador/codificador y usarlo para sintonizar canales
codificados (usualmente canal 3 ó 4).
Nota:
Cuando use una caja convertidora con su
televisor, podría haber funciones que no
pueda programar al usar el control remoto,
como etiquetar los canales, bloquear los
canales y programar sus canales favoritos.
Conectando su
TV
Del servicio de cable
J3W41121A(S)_P07-13 14/03/2006, 3:45 PM8

9
Bienvenido a
Toshiba
Conectando su
TV
Configurando su
TV
Usando las
funciones de la
TV
Apéndice
Usando el control
remoto
Información
importante sobre
seguridad
Satellite IN
OUT
VIDEO AUDIO
LR
OUT to TV
IN
OUT
VIDEO AUDIO
LR
IN from ANT
CH 3
CH 4
OUT to TV
TV
Conectando un reproductor de DVD/receptor
satelital y una videograbadora
Esta conexión le permite ver DVD o canales satelitales, videocintas o
programas de televisión. Podrá grabar del receptor satelital y la
televisión, así como grabar un canal de televisión mientras esté viendo
otro canal.
Usted necesitará lo siguiente:
• Tres cables coaxiales
• Dos juegos de cables normales de A/V
Nota:
Si usa una videograbadora monofónica,
conecte L/Mono a Audio OUT de la
videograbadora usando sólo un cable de
audio. Para obtener una mejor calidad en la
imagen, si su videograbadora tiene S-video,
podrá usar un cable de S-video en lugar del
cable normal de video. No conecte un cable
normal de video y un cable de S-video
simultáneamente o la calidad de la imagen no
será buena.
La grabación no autorizada, el uso, la
distribución o la revisión de los
programas televisivos, videos, DVD y
otros materiales se prohíben bajo las
Leyes de Copyright de los Estados
Unidos y otros países, y podrían estar
sujetos a la responsabilidad civil y penal.
Reproductor de DVD/Receptor satelital
Videograbadora
estereofónica
Al satelite
Conectando su
TV
J3W41121A(S)_P07-13 14/03/2006, 3:45 PM9

10
IN
OUT
VIDEO
IN from ANT
CH 3
CH 4
OUT to TV
AUDIO
LR
OUT
AUDIO
OUT
VIDEO
COMPONENT VIDEO
Y
L
R
S-VIDEO
TV
Usted necesitará lo siguiente:
• Dos cables coaxiales
• Un juego de cables normales de A/V
• Un juego de cables composante de video
• Un par de cables normales de audio
Conectando un reproductor de DVD con
ColorStream
®
(video de componente) y una
videograbadora
Esta conexión le permite ver DVD, videocintas o programas de
televisor y grabar programas de televisión. Podrá grabar de una fuente
mientras vea un programa de otra fuente. Su televisor es capaz de
usar ColorStream (un componente de video). Al conectar su televisor a
un reproductor de DVD compatible con el video de componentes, tal
como un reproductor de DVD Toshiba con ColorStream
®
, podrá realzar
la calidad de la imagen y el desempeño.
La grabación no autorizada, el uso, la
distribución o la revisión de los
programas televisivos, videos, DVD y
otros materiales se prohíben bajo las
Leyes de Copyright de los Estados
Unidos y otros países, y podrían estar
sujetos a la responsabilidad civil y penal.
Reproductor de DVD con composante de video
A la antena
Videograbadora
estereofónica
Conectando su
TV
Nota:
Las entradas del ColorStream en esta
televisión son para usarse con dispositivos
que SÓLO tengan una señal entrelazada de
480i como salida. Esta televisión no aceptará
o desplegará señales de barrido progresivo
de 480p o 720p o señales entrelazadas de
alta definición de 1080i. Si conecta un
receptor de conexión de alta definición, un
reproductor de barrido progresivo de 480p u
otro dispositivo similar a las entradas
ColorStream de televisión, DEBERÁ
PRIMERO CAMBIAR LA SALIDA DEL
DISPOSITIVO AL MODO ENTRELAZADO
DE 480i. La falla en hacer esto, causará que
se despliegue una imagen pobre o no se
despliegue ninguna imagen.
J3W41121A(S)_P07-13 14/03/2006, 3:45 PM10

11
Bienvenido a
Toshiba
Conectando su
TV
Configurando su
TV
Usando las
funciones de la
TV
Apéndice
Usando el control
remoto
Información
importante sobre
seguridad
AUDIO
OUT
Y
L
R
S-VIDEO VIDEO
OUT
COMPONENT VIDEO
IN
OUT
VIDEO
IN from ANT
CH 3
CH 4
OUT to TV
AUDIO
LR
Nota:
Podrá conectar los cables de video de
componente a cualquier juego de conectores
ColorStream en el televisor. Si su receptor de
DTV no tiene video de componente, use en
lugar de eso, conexiones de S-video y
conexiones normales de audio. No conecte
un cable S-video y un cable normal de video
normal al mismo tiempo o la imagen será
inaceptable.
TV
Receptor de DTV
con composante de video
De antena
de DTV
Usted necesitará lo siguiente:
• Tres cables coaxiales
• Dos juegos de cables normales de A/V
• Un par de cables normales de audio
• Un par de caldes composante de video
Conectando su
TV
La grabación no autorizada, el uso, la
distribución o la revisión de los
programas televisivos, videos, DVD y
otros materiales se prohíben bajo las
Leyes de Copyright de los Estados
Unidos y otros países, y podrían estar
sujetos a la responsabilidad civil y penal.
Videograbadora
estereofónica
De antena
Conectando un receptor de DTV o caja de
conexión con un video de componente
ColorStream
®
y una videograbadora
Esta conexión le permite mirar DTV (Televisor Digital), la
videograbadora, los programas de televisión y grabar los programas de
DTV y TV. Su televisor tiene entradas para video de componente
ColorStream
®
. Conectar su televisor a un receptor de DTV con un
video de componente podrá mejorar enormemente la calidad de la
imagen y el realismo.
J3W41121A(S)_P07-13 14/03/2006, 3:46 PM11

12
VIDEO
AUDIO
L
R
OUT
S-VIDEO
Panel trasero de la TV
Conectando su
TV
Conectando una videocámara
Esta conexión le permite ver los materiales de videos grabados en una
videocámara.
Usted necesitará lo siguiente:
•
Un cable de S-Video o cable normal de video
• Un par de cables normales de audio
Nota:
Para obtener una mejor calidad en la imagen,
si su videocámara tiene S-video, podrá usar
un cable S-video (más los cables normales de
audio) en lugar de un cable normal de video.
No conecte un cable normal de video y un
cable de S-video simultáneamente o la
imagen será inaceptable.
Videocámara S-VHS
VIDEO
AUDIO
L
R
OUT
S-VIDEO
Videocámara VHS
Panel delantero
de la TV
J3W41121A(S)_P07-13 14/03/2006, 3:46 PM12

13
Bienvenido a
Toshiba
Conectando su
TV
Configurando su
TV
Usando las
funciones de la
TV
Apéndice
Usando el control
remoto
Información
importante sobre
seguridad
Digital Audio
Coaxial
IN
LINE IN
LR
Usted necesitará lo siguiente:
• Un cable digital coaxial
• Seis par de cables altavoz
Altavoce central
Altavoce
frontal
(Izquierda)
Altavoz de
graves
Alavoce Surround
(Izquierda)
TV
TV
Las salidas de audio coaxial digital (COAXIAL DIGITAL AUDIO OUT) sólo para las emisiones digitales con sonido de
difusión digital. Para escuchar un sonido de difusión análogo, enchufe los conectores de audio izquierdo y derecho (L/R) en
las entradas del receptor. Consulte el manual del usuario para determinar la mejor forma de elegir entre las señales
análogas o digitales para su receptor.
Conectando un sistema de audio
Esta conexión le permite usar un amplificador de audio con sonido
surround digital incorporado y altavoces externos.
Conectando un amplificador AV con sonido surround digital incorporado
Usted necesitará lo siguiente:
• Un par de cables normales de audio
Panel trasero de la TV
Amplificador
Conectando su
TV
Amplificador AV con sonido
surround digital incorporado
Altavoce
frontal
(Derecha)
Alavoce Surround
(Derecha)
Nota:
Para información adicional, consulte el
manual del usuario del amplificador.
J3W41121A(S)_P07-13 14/03/2006, 3:46 PM13

14
Usando el control remoto
Preparando el control remoto para su uso
Con el control remoto, podrá operar su televisor, la mayoría de los
modelos de videograbadoras y reproductores de DVD, y convertidores de
cable TV en conjunto, aun cuando sean de marcas diferentes. Además
del funcionamiento de la TV, el mando a distancia puede manejar la
mayoría de los convertidores de TV por cable, receptores de satélite,
grabadores de vídeo, y lectores de DVD, independientemente de su
marca. El mando a distancia es preprogramado para manejar la mayoría
de los receptores de satélite, grabadores de vídeo, y lectores de DVD de
Toshiba. Para controlar un dispositivo de no Toshiba (o un dispositivo de
Toshiba cuyo mando a distancia no haya sido preprogramado para
manejar), usted debe programar primero el mando a distancia. Consulte
“Programando el mando a distancia para manejar sus otros dispositivos”,
en la siguiente página.
Instalando las baterías del control remoto
Para instalar las baterías:
1. Abra la tapa de baterías en la parte de atrás del control remoto.
2. Instale dos baterías de tamaño “AAA”. Haga corresponder los
signos de + y - en las baterías con los signos del compartimiento
de baterías.
3. Cierre la tapa de la batería en el control remoto hasta que el cierre
haga un chasquido.
Encendido
CH RTN (Retorno
de canal)
Números
de canal
Entrada (TV)
Tamaño imagen (TV)
Canal 34
Volumen +/- (TV)
TV/VCR
Encendido
CH RTN (Retorno
de canal)
Números
de canal
Entrada (TV)
Tamaño imagen (TV)
Canal 34
Volumen +/- (TV)
Controles de la VCR
Silencio (TV)
CBL/SAT
VCR
Usando el control
remoto
Para controlar a una
videograbadora:
Programe el control
remoto para que
reconozca la marca de
su videograbadora (vea
“Programando el control
remoto para operar
otros aparatos” en la
página 15). Los botones
mostrados a la derecha
controlarán luego la
videograbadora.
Presione primero el
botón de “VCR”.
Usando el control remoto para operar otros aparatos
Nota:
El control remoto del televisor prodría no operar
su videograbadora, reproductor de DVD o
convertidor de cable TV. Refiérase al manual
del propietario proporcionado con el equipo
respectivo para ver qué funciones podrían estar
disponibles. Adicionalmente, el control remoto
para este televisor prodría no desempenar
ciertas funciones disponibles en los controles
remotos originales para tal equipo adicional, en
cuyo caso, se sugiere que use el control remoto
original para el aparato respectivo.
Precaución:
• Nunca eche baterías a un fuego.
Notas:
•
Asegúrese de usar baterías tipo AAA.
•
Deseche las baterías en un área designada
para este tipo de desecho.
•
Las baterías siempre deben desecharse
teniendo en cuenta el medio ambiente.
Siempre deseche las baterías de acuerdo a
las normas y regulaciones pertinentes.
•
Si el control remoto no funciona
correctamente, o si el rango de operación se
reduce, reemplace las baterías por nuevas.
•
Cuando sea necesario cambiar las baterías
en el control remoto, siempre reemplace
ambas por nuevas. Nunca combine diferentes
tipos de batería, ni nuevas con usadas.
•
Si las baterías no tienen carga o si dejará de
usar el control remoto por un tiempo
prolongado, sáquelas. Eso evitará la fuga de
ácido al compartimiento de las baterías.
Para controlar a un
convertidor de cable TV/
receptor satelital:
Programe el control
remoto para que
reconozca la marca de
su convertidor/receptor
satelital (vea
“Programando el control
remoto para operar otros
aparatos” en la página
15). Los botones
mostrados a la derecha
controlarán el convertidor
de cable TV/receptor
satelital. Presione primero
el botón de “CBL/SAT”.
J3W41121A(S)_P14-21 14/03/2006, 3:47 PM14

15
Bienvenido a
Toshiba
Conectando su
TV
Configurando su
TV
Usando las
funciones de la
TV
Apéndice
Usando el control
remoto
Información
importante sobre
seguridad
Info estado
Números
de canal
Encendido
Botones de
números
Saltar/buscar en
DVD /
DVD
Invo estado
Menú TOP
Ingresar
Menú DVD
Tamaño imagen (TV)
Silencio (TV)
Entrada (TV)
Volumen +/- (TV)
Controles de DVD
▲▼
▼
▼
Despejar
TV
VCR
DVD
CBL/SAT
Usando el control
remoto
Para controlar a un
reproductor de DVD:
Programe el control
remoto para que
reconozca la marca de
su reproductor de DVD
(vea “Programando el
control remoto para
operar otros aparatos”
debajo). Los botones
mostrados a la derecha
controlarán luego el
reproductor de DVD.
Presione primero el
botón de “DVD”.
Programando el control remoto para operar
otros aparatos
Este control remoto está preprogramado para operar receptores
satelitales, videograbadoras y reproductores de DVD Toshiba. Para
controlar receptores satelitales, videograbadoras, reproductores de
DVD, o convertidores de cable TV diferentes a los modelos de
Toshiba, usted deberá seguir los pasos de abajo para programar su
control remoto.
1. Refiérase a las tablas de códigos (en las páginas 16 y 17) para
encontrar el código correspondiente para su marca. Si se lista
más de un código, pruebe cada uno separadamente hasta que
encuentre aquel que trabaje.
2. Si está programando el control remoto para operar lo siguiente:
• Convertidor de Cable TV/Receptor Satelital: Presione “CBL/
SAT.”
• Videograbadora: Presione “VCR.”
• Reproductor de DVD: Presione “DVD.”
3. Mientras retiene RECALL, presione los botones de números para
los canales e ingrese el código de tres dígitos para la marca de su
Convertidor de Cable TV/Receptor Satelital, Videograbadora o
Reproductor de DVD.
4. Apunte el control remoto al Convertidor de Cable TV/Receptor
Satelital, Videograbadora o Reproductor de DVD, y presione
POWER para probar el código.
• Si el Convertidor de Cable TV/Receptor Satelital,
Videograbadora o Reproductor de DVD responde, ingresó el
código correcto.
• Si el Convertidor de Cable TV/Receptor Satelital,
Videograbadora o Reproductor de DVD no responde, repita los
pasos del 1 al 4 usando otro código.
5. Presione “TV” para controlar el televisor.
Para futura referencia, apunte los códigos que usó:
El código del convertidor de cable/receptor satelital_______________
El código de la videograbadora_______________________________
El código del reproductor de DVD_____________________________
Notas:
• Cuando se envía de la fábrica, el control
remoto se configura para que opere su
televisor.
• Si no ingresa el código dentro de 10
segundos del paso 3 o si ingresa un código
que no esté listado debajo, esta operación se
cancelará.
• Cada vez que reemplace las baterías, deberá
reprogramar el control remoto.
• Algunas videograbadoras más nuevas son
capaces de trabajar en cualquiera de los dos
códigos del control remoto. Estas
videograbadoras tienen un interruptor
etiquetado “VCR1/VCR2”.
Si su videograbadora tiene este tipo de
interruptor y no responde a ninguno de los
códigos para su videograbadora, fije el
interruptor a la otra posición (VCR1 o VCR2)
y reprograme el control remoto.
J3W41121A(S)_P14-21 14/03/2006, 3:47 PM15

16
Marca Código Marca Código
Tablas de código del convertidor de cable/receptor satelital,
videograbadora y reproductor de DVD
[Para el modo de CBL/SAT]
CABLE Box
Marca Código
ABC
Archer
Cableview
Century
Citizen
Contec
Diamond
Eagle
GE
Gemini
General Instruments
Hamlin
Hitachi
Jasco
061, 062, 063, 082,
084, 087, 091, 092,
096, 098
065, 092, 097, 099
064, 094
092
090, 092, 097
083, 085, 086, 088,
093, 098
093
091
061, 062
069, 070, 094
062, 089, 096
093
062, 095, 096
097
Jerrold
Magnavox
Memorex
Multi Canal
Novavision
Panasonic
Philco
Philips
Pioneer
Proscan
Radio Shack
RCA
Realistic
Recoton
Samsung
062, 069, 071, 082,
086, 089, 091, 096
072, 096
091, 092, 104
090
101
081, 083, 085
087
066, 067, 068, 070,
072, 073, 074, 075,
091, 092
076, 077
061, 062
092, 097, 099
064, 081
065
102
077, 090
Scientific Atlanta
Sears
Signature
Signature 2000
Sprucer
Starcom
Stargate
Sylvania
TeleView
Texscan
Tocom
U. S. Electronics
United Cable
Universal
Wards
063, 078, 079, 080,
088, 098, 101, 105
095
062
096
081, 085
069, 082, 087, 096,
103, 104
069, 090
095, 100
090
100
071, 084, 085
087, 096, 098
082
065, 092, 097, 099,
102, 103
096
Marca Código Marca Código
[Para el modo de VCR]
Videograbadora
Marca Código
Admiral
Aiko
Aiwa
Akai
Audiovox
Bell & Howell
Broksonic
Calix
Carver
CCE
Citizen
Colortyme
Craig
Curtis Mathes
Daewoo
Daytron
Denon
Dimensia
Electrohome
Emerson
Fisher
049
019
018
003, 004, 037, 038,
039, 058, 069
010
007, 068
008, 017
010
026
019
009, 010, 011, 012,
013, 014, 015, 019,
057, 073
005
009, 010, 016, 061,
065, 079
001, 005, 009, 012,
014, 040, 048, 053,
056, 057
011, 013, 015, 017,
018, 019, 057, 078
078
063
001, 048
010, 020, 065
003, 008, 010, 011,
017, 018, 020, 028,
039, 054, 057, 062,
065, 068, 072
007, 016, 021, 022,
023, 057, 064, 068,
070, 071, 079
Fuji
Funai
Garrard
GE
Go Video
Goldstar
Gradiente
Harman Kardon
Hitachi
JBL
JC Penney
Jensen
JVC
Kenwood
Kodak
LG
Lloyds
Logik
LXI
Magnasonic
Magnavox
004, 041
018, 073
018
001, 002, 009, 040,
042, 048, 056
056, 059, 061, 081
005, 010, 014, 054,
056, 065, 067
018, 065
005
024, 025, 035, 037,
042, 063, 070, 080
076
005, 006, 007, 008,
009, 010, 023, 024,
025, 026, 035, 056,
061, 063, 065
024, 025, 037
005, 006, 007, 014,
037, 043, 062, 063,
068, 082
005, 006, 007, 012,
014, 037, 043, 053,
068, 071
010
010
053, 073, 079
061
010
061, 065, 078
026, 027, 034, 044,
057, 061, 072
Marantz
Memorex
MGA
MGN
Minolta
Mitsubishi
Montgomery Ward
Motorola
MTC
Multitech
NEC
Nikko
Noblex
Optimus
Optonica
Orion
Panasonic
Pentax
Pentex Research
Philco
Philips
Pioneer
005, 006, 007, 012,
014, 026, 053, 067
007, 009, 010, 016,
018, 034, 049, 063,
065, 066, 068, 075,
079
020, 028, 039
056
024, 025, 035, 063
020, 024, 025, 028,
039, 043, 065
049
049
009, 046, 061
009, 012, 018
005, 006, 007, 012,
014, 037, 043, 053,
054, 067, 070
010
009
010, 049, 065
031
054, 057, 062, 065,
068, 072
036, 045, 046, 057,
061, 072, 079
012, 024, 025, 035,
042, 053, 063
014
026, 027, 063
026, 031, 044, 057
006, 024, 043, 055
Marca Código Marca Código
Satelite
Marca Código
Alphastar
Chaparral
DISH Network
Drake
Echostar
Express Vu
Fujitsu
GE
General Instruments
Hitachi
Hughes
038, 059
034
057
020, 040, 044, 046,
050, 053
018, 041, 051
057
027
008, 009, 013
010, 011, 012, 022,
023, 031, 049
033
033
Hughes Network
Systems
Intersat
Janeil
JVC
Kenwood
Magnavox
Optimus
Pansat
Primestar
Proscan
Radio Shack
RCA
019
048
027
017, 057
029
060
058
036, 052
015, 042
008, 009, 013
022, 023, 030
008, 009, 013, 016
Realistic
Samsung
Sony
Star Choice
Star Trak
STS
Toshiba
Uniden
Zenith
030
059
014, 055
057
025, 026, 037, 054
024
000, 001, 002, 003,
004, 005, 006, 007,
020, 031, 056
021, 028, 030, 032,
035, 039, 043, 045,
047, 058
027
Usando el control
remoto
J3W41121A(S)_P14-21 14/03/2006, 3:48 PM16

17
Bienvenido a
Toshiba
Conectando su
TV
Configurando su
TV
Usando las
funciones de la
TV
Apéndice
Usando el control
remoto
Información
importante sobre
seguridad
Marca Código Marca Código
Videograbadora (Continuacion)
Marca Código
Portland
Proscan
Proton
Quasar
Radio Shack
Radio Shack/
Realistic
Radix
RCA
Realistic
Ricoh
Runco
Samsung
Sansui
012, 013, 015
001, 002, 048
061
045
010, 031, 065
007, 009, 010, 016,
018, 020, 021, 022,
031, 049
010
001, 002, 003, 009,
024, 025, 029, 035,
040, 042, 045, 048,
055, 056, 063, 071,
083
007, 009, 010, 011,
016, 018, 020, 021,
022, 031, 049, 051,
056, 060, 065, 075,
079
047
034
009, 011, 038, 056,
073, 084
006, 037, 043, 061
007, 009, 016, 054,
064, 068, 071, 075,
079, 085
008, 011, 017, 028,
030, 057, 065, 072
007, 010, 016, 021,
022, 023, 024, 025,
035, 053, 057, 063,
064, 065, 068, 071,
075, 079
013, 020, 031, 049,
051, 060, 066
004, 025, 032, 061
049
075
047, 061
004, 032, 033, 041,
052, 058, 070, 074,
076, 077, 080
035
018, 026, 027, 028,
044, 072
018, 051, 053, 073,
079
007
Sanyo
Scott
Sears
Sharp
Shintom
Signature
Signature 2000
Singer
Sony
STS
Sylvania
Symphonic
Tandy
Tashiko
Tatung
Teac
Technics
Teknika
Toshiba
Totevision
Unitec
Unitech
Vector Research
Video Concepts
Wards
White Westinghouse
XR-1000
Yamaha
Zenith
010
037
018, 029, 037
036
010, 018, 065
000, 011, 021, 023,
024, 028, 030, 039,
057, 074, 078, 079
009, 010, 065
073
009
005, 006, 011, 012,
053
005, 006, 011, 012,
039, 053
009, 010, 011, 016,
018, 020, 024, 025,
031, 035, 049, 051,
056, 057, 060, 065,
066, 079
073
018
005, 006, 007, 014,
037, 053
004, 032, 034, 041,
047, 069, 086
Marca CódigoCódigo Marca Código
Conjunto de TV con videograbadora
Marca
Action
GE
Goldstar
Panasonic
078
059, 062
065
065
078
065
079
074
Precision
Quasar
Realistic
Sony
Toshiba
Zenith
Totevision
057
065
009, 010, 065
Marca Código Marca Código
DVD portátil
Marca Código
Aiwa
Audiovox
093
094, 095
024, 096, 099Panasonic RCA 098
Marca Código Marca Código
HTIB
Marca Código
Lasonic 083 084Panasonic Venturer 085
Marca Código Marca Código
[Para el modo de DVD]
DVD
Marca Código
Aiwa
Apex
BOSE
Broksonic
Clarion
Classic
Daewoo
Denon
Emerson
Fisher
Funai
GE
Go Video
GPX
Hitachi
JVC
006, 015
016, 017
097
018
019
020
021
022, 023, 024, 025
026, 027
028
027
001, 029, 030
087
031
005, 032, 033, 034,
035
003, 007, 036, 042,
088
037
008, 009
004, 038
039
040
026
041
043
044
058
010, 045, 046, 047,
048, 049, 050
004, 051
052, 053, 054, 055
001, 056
057, 058
001, 002, 059, 089
Kenwood
Konka
Magnavox
Memorex
Mintek
NAD
Nakamichi
Norcent
Onkyo
Oritron
Panasonic
Philips
Pioneer
Proscan
Qwestar
RCA
Sampo
Samsung
Sansui
Sanyo
Sharp
Sherwood
Sony
Sylvania
Teac
Technics
Techwood
Toshiba
Yamaha
Zenith
060
061, 062, 086, 090
073
063, 091
064, 067
074
011, 012, 065, 066,
068, 069, 070
027
071
072
075
000, 013, 076, 077,
078
079, 080, 081
014, 082, 092
Código de DVD
Marca Código de VCR Código de DVD
[Para el modo de VCR y DVD]
Conjunto de DVD/VCR
Marca Código de VCR
Go Video
JVC
RCA
081
082
083
Samsung
Sanyo
Zenith
087
088
089
084
085
086
090
091
092
Usando el control
remoto
J3W41121A(S)_P14-21 14/03/2006, 3:48 PM17

18
Números de canal
Menú/Intro
Info estado
FAV ▲▼
(Canales favoritos)
Silencio
Detener
Dormir
TV/Video
Menú DVD
Tamaño imagen
CBL/SAT
Salir
Intro
Canal 3 / 4
Adelantar
Volumen +/-
VCR
DVD
TV
Pausa
Saltar/Buscar
4¢
Regresar
Menú TOP
Grabar
Limpiar
TV/VCR
Encendido
Reproducir
Usando el control
remoto
Aprendiendo sobre el control remoto
TV/VIDEO selecciona la fuente de entrada del video (página 25)
RECALL
despliega la información del estado en la pantalla (página 23)
CHANNEL NUMBERS
permite el acceso directo a los canales (página 20)
CH
33
33
3 /
44
44
4 hace los ciclos a través de los canales programados
(página 20)
TV selecciona el modo de televisor
CBL/SAT selecciona el modo de videograbadora (página 14)
SLEEP programa el televisor para que se apague en una hora
establecida (página 30)
POWER enciende y apaga el televisor
MUTE apaga el sonido (página 24)
CH RTN (Channel Return) regresa al último canal visto (página 21)
VOL + / – ajusta el nivel del volumen
VCR selecciona el modo de CABLE (página 14)
DVD selecciona el modo de DVD (página 15)
PIC SIZE hace los ciclos por tres tamaños de la imagen–4:3, 16:9, ZOOM
(página 28)
FAV ▲/ ▼ (Favorite Channels) hace ciclos a través de los canales
favoritos (página 21)
MENU/ENTER permite el acceso a los menús de programación, y fija
la información programada del menú (página 19)
EXIT cierra los menús en pantalla (página 19)
DVD MENU accede al menú de DVD
PAUSE pone en pausa una videocinta o DVD
SKIP/SEARCH
controla los saltos en el capítulo del DVD
REW rebobina una videocinta o DVD
TOP MENU accede al menú de DVD TOP
REC comienza la grabación de una videocinta
PLAY reproduce una videocinta o DVD
STOP detiene una videocinta o DVD
FF avanza una videocinta o DVD
TV/VCR cambia entre los modos de televisor y videograbadora
cuando se vean mientras se esté grabando
CLEAR limpia los datos de entrada en el modo de DVD
CH RTN
(Channel Return)
J3W41121A(S)_P14-21 14/03/2006, 3:48 PM18

19
Bienvenido a
Toshiba
Conectando su
TV
Configurando su
TV
Usando las
funciones de la
TV
Apéndice
Usando el control
remoto
Información
importante sobre
seguridad
SETUP
LANGUAGE
CLOCK SET
TV / CABLE
CH PROGRAM
ADD / ERASE
ENGLISH
CABLE
:SELECT :ADJUST
:SELECT :ADJUST
ENGLISH
CABLE
:SELECT ENTER : SET
LANGUAGE / LANGUE / IDIOMA
ENGLISH
FRANÇAIS
ESPAÑOL
Cambiando el idioma de despliegue en la
pantalla
Podrá escoger en la pantalla tres idiomas diferentes (inglés, francés,
español) para el despliegue en pantalla de los menús de ajuste y los
mensajes.
Para seleccionar un idioma haga lo siguiente:
1. Presione MENU, luego presione
o para desplegar el menú de
SETUP.
2. Presione ▲ o ▼ para resaltar
LANGUAGE.
3. Presione o resalte su idioma deseado.
Configurando su televisor
Después que haya instalado las baterías y haya programado el control remoto,
necesitará establecer algunas preferencias en el televisor que usa el sistema
de menú. Podrá acceder al sistema de menú con los botones en el control
remoto.
• Cuando haga una selección del menú, sus cambios ocurrirán
inmediatamente. No tendrá que presionar MENU o EXIT para ver sus
cambios.
• Después de 15 segundos, la pantalla del menú se cerrará
automáticamente si no hace una selección. Sus cambios todavía se
guardarán.
• Cuando haya terminado de programar los menús, presione EXIT.
Empezando configuración
La función de EMPEZANDO CONFIGURACION aparecerá la primera vez que
encienda el televisor, y le ayudará a seleccionar el idioma del menú,
especificar la configuración de TV/CABLE, y programar los canales
automáticamente.
IMPORTANTE: Debe primero conectar un sistema de antena o cable TV.
Vea “Conectando su TV” en las páginas 7
a 13 para obtener detalles.
1. Presione POWER y encienda el
televisor. La función STARTING SETUP
comenzará y aparecerá el menú de
configuración del idioma en la pantalla.
Presione ▲ o ▼ para seleccionar su
idioma deseado, presione ENTER.
2. Presione ▲ o ▼ para seleccionar TV o CABLE, luego presione ENTER.
3. Presione ▲ o ▼ para seleccionar COMIENZO (START), y luego pulse
ENTER, que comienza el INSTALACIÓN AUTOMÁTICA (AUTO SETUP).
Nota:
Para cancelar la instalación y volver a la pantalla de TV normal, presione
▲
o
▼
para seleccionar CANCELAR (CANCEL) y luego ENTER.
4. Cuando la INSTALACIÓN AUTOMÁTICA esté completa, aparecerá la
pantalla de TV normal.
Nota:
· La INSTALACIÓN AUTOMÁTICA de canales puede tomar entre 15 y 30
minutos, para completarse, dependiendo de su servicio de cable
regional.
· Para cancelar la INSTALACIÓN AUTOMÁTICA y volver a la pantalla de
TV normal, presione SALIR (EXIT).
Menu/Enter
Exit
Power
Configurando su
TV
J3W41121A(S)_P14-21 14/03/2006, 3:49 PM19

20
SETUP
LANGUAGE
CLOCK SET
TV / CABLE
CH PROGRAM
ADD / ERASE
ENGLISH
CABLE
:SELECT :ADJUST
SETUP
LANGUAGE
CLOCK SET
TV / CABLE
CH PROGRAM
ADD / ERASE
ENGLISH
TV / CABLE
:SELECT :ADJUST
Agregando canales a la memoria del televisor
Cuando presione Channel
▲ / ▼
en la TV o CH
3 / 4
en el control remoto,
su televisor sólo se detendrá en los canales que usted haya guardado en la
memoria del canal de canales del televisor. Siga los pasos de abajo para
programar los canales en la memoria.
Programando los canales automáticamente
Su televisor podrá detectar automáticamente todos los canales activos y
podrá guardarlos en su memoria. Después que el televisor haya guardado
automáticamente los canales en su memoria, podrá agregar o borrar
canales específicos manualmente.
Para agregar los canales automáticamente:
1.
Presione MENU, luego presione o para desplegar el menú de SETUP.
2. Presione ▲ o ▼ hasta que la
selección de TV/CABLE se resalte.
3. Presione
o para resaltar ya sea
TV o CABLE, dependiendo de lo que
use. Si usa una antena, escoja TV.
Si usa cable, escoja CABLE.
4. Presione ▼ para seleccionar CH
PROGRAM.
5. Presione
o para iniciar la programación del canal. El televisor
automáticamente hará ciclos a través de todos los canales de
televisión o cable (dependiendo de lo que haya seleccionado), y
guardará todos los canales activos en la memoria de canales. Mientras
el televisor esté haciendo ciclos a través de los canales, aparecerá el
mensaje “PROGRAMMING NOW PLEASE WAIT”.
6. Cuando la programación de canales se haya completado, aparecerá el
mensaje “COMPLETED”.
7. Presione CH 3 o 4 para ver los canales programados.
Agregando y borrando los canales manualmente
Después que haya programado los canales automáticamente, podrá agregar
o borrar los canales específicos manualmente.
Para agregar o borrar los canales manualmente, haga lo siguiente:
1.
Presione MENU, y luego presione
o
despliegue el menú de SETUP.
2. Presione ▲ o ▼ para resaltar ADD/ERASE.
3. Presione
o despliegue el menú
de ADD/ERASE.
4. Presione ▲ o ▼ seleccione ADD/
ERASE, luego presione
.
5. Seleccione los canales deseados a
agregar o borrar mediante ▲ o ▼.
Presione
o para seleccionar
ADD (agregar) o ERASE (borrar).
6. Repita el paso 5 para añadir o eliminar más canales y, a continuación,
presione ENTER.
7. Presione EXIT para regresar a la vista normal.
Para borrar todo canal de la memoria del canal:
Presione ▲ o ▼ para seleccionar CLEAR ALL del paso 4 de arriba, luego
presione ENTER. Todo canal es borrado de la memoria del canal. (Puede
seguir utilizando los números de canales en el mando a distancia para
sintonizar un canal.)
Cambiando los canales
Para cambiar al siguiente canal programado, haga lo siguiente:
Presione Channel ▼ o ▲ en el televisor o CH 3 o 4 en el control remoto.
Para cambiar a un canal analógico específico:
Presione los botones de Channel Number (Del 0 al 9) en el
control remoto.
Por ejemplo, para seleccionar el canal 125, presione 1, 2, 5.
Para cambiar a un canal digital específico:
Presione los primeros 3 dígitos, luego presione 100, seguido por el
quedándose 3 dígitos.
Por
ejemplo, para seleccionar el canal 015-001, presione 0, 1, 5,
100, 0, 0, 1.
Menu
CH 34
Configurando su
TV
Números de
canal
Exit
Nota:
Si el canal deseado no es almacenado en la
memoria de canales, agregue los canales de
manera manual (consute “Agregando y
borrando los canales manualmente”, más
abajo).
Nota:
Los canales digitales de su servicio de
televisión por cable pudieran estar
representados por números de canal que
incluyen un “guión” (ejemplo, 85–002). Estos
números de canales digitales pudieran no
concordar con los números de canales
proveídos por su servicio local de televisión
por cable. Esto no indica falla alguna.
J3W41121A(S)_P14-21 14/03/2006, 3:49 PM20

21
Bienvenido a
Toshiba
Conectando su
TV
Configurando su
TV
Usando las
funciones de la
TV
Apéndice
Usando el control
remoto
Información
importante sobre
seguridad
OPTION
ON/OFF TIMER
FAVORITE CH
CH LABEL
OFF
:SELECT :ADJUST
FAVORITE CH:CH 2
SET / CLEAR TV CABLE
000
000
000
000
OPTION MENU
ENTER:SET EXIT:END
:SELECT :ADJUST
Números de
canal
CH RTN
Exit
FAV
CH 34
Usando las
funciones de la
TV
Menu/
Enter
Usando las funciones del televisor
Ajustando la configuración de los canales
Cambiando entre dos canales
Podrá cambiar entre dos canales sin ingresar un número de canal actual
cada vez.
Para cambiar entre dos canales:
1. Seleccione el primer canal que desee ver.
2. Seleccione un segundo canal usando los botones de Channel Number
(Del 0 al 9, 100).
3. Presione CH RTN. El canal anterior se desplegará.
Cada vez que presione CH RTN, el televisor cambiará alternadamente
entre los dos canales.
Programando sus canales favoritos
Usted puede prefijar hasta 12 de sus canales favoritos al usar la función de
programación del canal favorito. Debido a que esta función explora sólo a
través de sus canales favoritos, le permitirá saltar a otros canales que
normalmente no ve.
Podrá usar todavía Channel 3 / 4 para explorar a través de todos los que
haya programado en la memoria del televisor o los números de canales
para sintonizar directamente un canal.
Para programar sus canales favoritos:
1. Seleccione un canal que desee programar como un canal favorito.
2. Presione MENU, luego presione
o para desplegar el menú de
OPTION.
3. Presione ▲ o ▼ para resaltar FAVORITE CH.
4. Presione
o para desplegar el
menú de FAVORITE CH. SET/
CLEAR se resaltará.
5. Presione
o para resaltar SET y
presione ENTER.
6. Presione EXIT para cerrar la
pantalla.
7. Repita los pasos del 1 al 6 para los
otros 12 canales.
Para seleccionar sus canales
favoritos:
Presione los botones FAV ▲▼ en el control remoto para seleccionar
sus canales favoritos.
Los botones FAV ▲▼ no trabajarán hasta que haya programado sus
canales favoritos.
Para eliminar sus canales favoritos:
1. Seleccione un canal que desee eliminar.
2. Presione MENU, luego presione
o para desplegar el menú de
OPTION.
3. Presione ▲ o ▼ para resaltar FAVORITE CH.
4. Presione
o para desplegar el menú de FAVORITE CH.
SET/CLEAR se resaltará.
5. Presione
o para resaltar CLEAR.
6. Presione ENTER hasta que un “0”
reemplace el número de canal que
desee borrar.
7. Presione EXIT para regresar a la
vista normal.
8. Repita los pasos del 1 al 6 para los
otros canales.
Nota:
Para volver del menú FAVORITE CH al menú
OPTION, presione
▲
o
▼
para resaltar menú
OPTION, luego presione
o .
FAVORITE CH:CH 2
SET / CLEAR TV CABLE
002 0 0
000
000
000
OPTION MENU
ENTER:CLEAR EXIT:END
:SELECT :ADJUST
J3W41121A(S)_P14-21 14/03/2006, 3:50 PM21

22
LOCKS
NEW PASSWORD
[0-9]:SELECT ENTER : SET
EXIT :END
LOCKS
NEW PASSWORD
----
[0-9]:SELECT ENTER: SET
EXIT :END
LOCKS
CONFIRM PASSWORD
[0-9]:SELECT ENTER: SET
EXIT :END
Usando el menú de BLOQUEAR
Nota:
La función Chip V sólo está disponible para el sistema Chip
V
para los EE.UU. EI sistema V-Chip canadiense no es respaldado.
Podrá prevenir a otros que vean ciertos programas o canales
bloqueándolos al usar la función de Chip V.
Seleccionando una Contraseña
Antes de que pueda usar la función de Chip V para bloquear los
programas y canales, deberá seleccionar una contraseña. La
contraseña que seleccione impedirá a otros que cambien los límites de
clasificación que usted estableció.
Para seleccionar su contraseña y acceder al menú de LOCKS haga lo
siguiente:
1. Presione MENU, luego presione o para resaltar el menú de
LOCKS.
2. Presione ▲ o ▼ para desplegar el modo de entrada de la
contraseña.
3. Use los botones de números para los canales (del 0 al 9) para
ingresar su contraseña. Si está accediendo al menú de LOCKS
por primera vez, seleccione un número de cuatro dígitos para que
sea su contraseña. Presione ENTER.
4. Ingrese la contraseña de nuevo para confirmarla y luego presione
ENTER. El menú de LOCKS aparecerá.
5.
Podrá configurar ahora el menú de LOCKS. Vea “La función del V-Chip
(control paterno)” (página 23), “Bloqueando los canales” (página
24), “Bloqueando la entrada de video” (página 25), “Configurando
el GameTimer
TM
(página 25) o “Usando la función de bloqueo del
panel frontal” (página 26).
Para cambiar su contraseña:
1. Presione MENU, luego presione o para desplegar el menú de
LOCKS.
2. Presione ▲ o ▼ para desplegar el modo de entrada de la
contraseña.
3. Use los botones de números para los canales (del 0 al 9) para
ingresar su contraseña. Presione ENTER. El menú de LOCKS
aparecerá.
4. Presione ▲ o ▼ para resaltar NEW PASSWORD y presione
o
para desplegar el menú de NEW PASSWORD.
5. Use los botones de números para los canales (del 0 al 9) para
ingresar un nuevo código. Presione ENTER.
6. Ingrese la contraseña de nuevo para confirmarla, y luego presione
ENTER.
7. Presione EXIT para regresar a la vista normal.
Menu/
Enter
Exit
Números de
canal
Usando las
funciones de la
TV
J3W41121A(S)_P22-30 14/03/2006, 3:51 PM22

23
Bienvenido a
Toshiba
Conectando su
TV
Configurando su
TV
Usando las
funciones de la
TV
Apéndice
Usando el control
remoto
Información
importante sobre
seguridad
Usando las
funciones de la
TV
La función del V-Chip (control paterno)
La Asociación de Películas de América (MPAA - Motion Picture
Association of America) usa un sistema de clasificación para calificar el
contenido de la película. Las estaciones de televisión también emplean
un sistema de clasificación para calificar el contenido de los programas
televisivos. Las clasificaciones de MPAA, Youth TV y el televisor
trabajan con la función del Chip V y le permiten bloquear los programas
según los límites de clasificación que usted establezca.
Para usar Chip V para bloquear los programas por clasificación
haga lo siguiente:
1. Presione MENU, luego presione
o
para desplegar el menú de LOCKS.
2. Presione
▲
o
▼
para desplegar el modo de entrada de la contraseña.
3. Use los botones de números para los canales (del 0 al 9) para ingresar su
contraseña. Presione ENTER. El menú de LOCKS aparecerá.
4. Presione
▲
o
▼
para resaltar V-CHIP.
• Presione
o
para resaltar ON para
habilitar el bloqueo del programa con
Chip V por clasificación.
•
Presione o para resaltar OFF para
desactivar el bloqueo del programa
con Chip V por clasificación.
5. Presione
▲
o
▼
para resaltar V-CHIP SET.
Luego, presione
o
para desplegar el
menú de V-CHIP SET.
6.
Presione ▲ o ▼ para resaltar
TV RATING
.
Luego, presione
o
para desplegar la
clasificación deseada.
OFF :
TV RATING no está ijado
TV-Y : Todos los niños
TV-Y7 : 7 años de edad y más arriba
TV-G : Público general
TV-PG : Guía paterna
TV-14 :
14 años de edad y más arriba
TV-MA :
17 años de edad y más arriba
• Cuando seleccione TV-Y7, TV-PG,
TV-14 o TV-MA, presione RECALL para explicar la clasificación.
Presione
▲
o
▼
para seleccionar la clasificación deseada.
Presione
o
para seleccionar la configuración ON o OFF.
7. Presione
▲
o
▼
para resaltar MOVIE RATING. Luego presione
o
para desplegar el menú de RATING SET. Presione
▲
o
▼
para
seleccionar clasificatión deseada, luego presione
o
para seleccionar
ON o OFF
G:Todas las edades
PG : Guía paterna
PG-13 : Se sugiere guía paterna
menos de 13 años de edad
R:Se sugiere guía paterna
cuando se tenga menos de
17 años de edad
NC17 : 17 años de edad y más arriba
X:Sólo adultos
Cuando trate de ver un programa con un bloqueo de clasificación,
aparecerá un mensaje que lista las clasificaciones del programa.
El programa todavía podrá verse si presiona MUTE y luego ingrese su
contraseña para desviar el bloqueo temporalmente.
Notas:
• Si se olvida de su contraseña, presione
RECALL cuatro veces dentro de cinco
segundos mientras el televisor esté en el
modo de ingresar la contraseña. Esto le
permitirá restablecer su contraseña.
• Cuando recepciona en su TV una emisión
digital con un nuevo sistema de evaluación,
puede emplear la función FIJAR V-CHIP
(DTV).
Recall
Menu/Enter
Exit
Números de
canal
Mute
LOCKS
V-CHIP
V-CHIP SET
V-CHIP SET (DTV)
:SELECT :ADJUST
ON / OFF
LOCKS
V-CHIP
V-CHIP SET
V-CHIP SET (DTV)
:SELECT :ADJUST
ON
V-CHIP SET
TV RATING
MOVIE RATING
:SELECT :ADJUST
OFF
OFF / TV-Y / TV-Y7 / TV-G
TV-PG / TV-14 / TV-MA
RATING SET
G
ON /OFF
PG :
:
ON
PG-13 :
:
ON
R ON
NC-17 :
:
ON
X ON
:SELECT :ADJUST
J3W41121A(S)_P22-30 15/03/2006, 11:17 AM23

24
LOCKS
LOCK
CH LOCK
VIDEO LOCK
GAME TIMER
FRONT PANEL LOCK
NEW PASSWORD
:SELECT :ADJUST
OFF
OFF
OFF
CH LOCK :CH 2
SET / CLEAR TV CABLE
00 0
00 0
00 0
00 0
LOCKS MENU
ENTER:SET EXIT:END
:SELECT :ADJUST
Bloqueando los canales
Con la función CH LOCK, puede bloquear el acceso a ciertos canales.
No podrá sintonizar los canales bloqueados a no ser que borre el ajuste.
Puede bloquear hasta 12 canales de TV y 12 canales de TV por cable.
Para bloquear los canales:
1. Seleccione un canal que desee bloquear.
2. Presione MENU, luego presione o para desplegar el menú de
LOCKS.
3. Presione ▲ o ▼ para desplegar el
modo de entrada de la contraseña.
4. Use los botones de Channel
Number (del 0 al 9) para ingresar su
contraseña, luego presione ENTER.
Aparecerá el menú de LOCKS.
5. Presione ▲ o ▼ para resaltar CH
LOCK y presione o para
desplegar el menú de CH LOCK.
6. Presione o para seleccionar lo
siguiente:
• SET - para fijar el canal como uno
para bloquearse. Luego presione
ENTER.
• CLEAR- para limpiar todos los canales
de la lista de los canales bloqueados.
Luego presione ENTER.
7. Repita los pasos del 1 al 6 para bloquear los otros canales.
Cuando termine de bloquear los canales, presione EXIT para
regresar a la vista normal.
Si intenta sintonizar un canal bloqueado, el televisor no lo desplegará,
pero desplegará el canal no bloqueado más cercano.
Para desbloquear los canales:
1. Presione MENU, luego presione o para desplegar el menú de
LOCKS.
2. Presione ▲ o ▼ para desplegar el modo de entrada de la
contraseña.
3. Use los botones de números para los canales (del 0 al 9) para
ingresar su contraseña, luego presione ENTER. El menú de
LOCKS aparecerá.
4. Presione ▲ o ▼ para resaltar CH LOCK y presione o para
desplegar el menú de CH LOCK.
5. Presione o para resaltar CLEAR y limpie todos los canales de
la lista de los canales bloqueados. Presione ENTER.
6. Presione EXIT para regresar a vista normal.
Menu/
Enter
Exit
Números de
canales
Usando las
funciones de la
TV
CH 34
Notas:
• Después de programar CH LOCK, cambie
los canales antes de apagar el televisor.
• Para volver del menú CH LOCK al menú
LOCKS, presione
o para resaltar menú
LOCKS, luego presione
o .
J3W41121A(S)_P22-30 14/03/2006, 3:52 PM24

25
Bienvenido a
Toshiba
Conectando su
TV
Configurando su
TV
Usando las
funciones de la
TV
Apéndice
Usando el control
remoto
Información
importante sobre
seguridad
LOCKS
LOCK
CH LOCK
VIDEO LOCK
GAME TIMER
FRONT PANEL LOCK
NEW PASSWORD
:SELECT :ADJUST
OFF
OFF
OFF
OFF / VIDEO / VIDEO+
LOCKS
LOCK
CH LOCK
VIDEO LOCK
GAME TIMER
FRONT PANEL LOCK
NEW PASSWORD
:SELECT :ADJUST
OFF
OFF
OFF
OFF / 30 / 60 / 90 / 120
Bloqueando la entrada de video
Con la función de VIDEO LOCK, podrá bloquear las fuentes de
entrada (VIDEO1, VIDEO2, ColorStream y los canales 3 y 4).
No podrá seleccionar las fuentes de entrada con el botón de TV/
VIDEO o los botones de Channel a menos que limpie la configuración.
Para configurar el bloqueo de video haga lo siguiente:
1. Presione MENU, luego presione
o
para desplegar el menú de
LOCKS.
2. Presione ▲ o ▼ para desplegar el modo de entrada de la
contraseña.
3. Use los botones de Channel Number (del 0 al 9) para ingresar su
contraseña, luego presione ENTER. Aparecerá el menú de
LOCKS.
4. Presione ▲ o ▼ para resaltar VIDEO LOCK.
5. Presione
o
para seleccionar lo
siguiente:
• OFF: Desbloquea todas las
fuentes de entrada de video.
• VIDEO: Bloquea VIDEO1,
VIDEO2 y ColorStream.
• VIDEO +: Bloquea VIDEO1,
VIDEO2, ColorStream, canal 3 y canal 4. Esta opción deberá
usarse si usa la terminal de la antena para reproducir una
videocinta.
6. Presione EXIT para regresar a la vista normal.
Para desbloquear las entradas de video:
Seleccione OFF del paso 5 de arriba.
Configurando el GameTimer
TM
(Tiempo de juego)
Con la función de GameTimer
TM
, podrá automáticamente activar la
función de VIDEO LOCK (configuración de VIDEO) para fijar un límite
de tiempo para reproducir un juego de televisión (30, 60, 90 ó 120
minutos).
Para configurar el cronómetro del juego, haga lo siguiente:
1. Presione MENU, luego presione
o
para desplegar el menú de
LOCKS.
2. Presione ▲ o ▼ para desplegar el modo de entrada de
contraseña.
3. Use los botones de Channel Number (del 0 al 9) para ingresar su
contraseña, luego presione
ENTER. Aparecerá el menú de
LOCKS.
4. Presione ▲ o ▼ para resaltar
GAME TIMER.
5. Presione
o
para seleccionar un
límite de tiempo (30 minutos, 60
minutos, 90 minutos, 120 minutos u OFF).
6. Presione EXIT para regresar a la vista normal. Después que se
programe GameTimer, el despliegue aparecerá brevemente cada
diez minutos para recordarle que el GameTimer está operando.
Cuando el tiempo programado se alcance, la televisión cambiará
automáticamente de canal y entrará al modo de bloqueo de video.
Para desactivar GameTimer y desbloquear el VIDEO LOCK:
Fije VIDEO LOCK a OFF (vea “Bloqueando la entrada de video”
citado anteriormente).
Nota:
Después de programar VIDEO LOCK,
cambie los canales o active la tecla de TV/
VIDEO antes de apagar el televisor.
Menu/
Enter
Exit
Números de
canales
TV/Video
Notas:
• Es posible que los juegos interactivos de
video que involucren disparos con una
palanca de juegos tipo pistola a un objetivo
en pantalla tal vez no funcion en este televisor.
Usando las
funciones de la
TV
J3W41121A(S)_P22-30 14/03/2006, 3:52 PM25

26
OPTION
ON/OFF TIMER
FAVORITE CH
CH LABEL
OFF
:SELECT :ADJUST
CH LABEL :CH 25
SET / CLEAR
LABEL
– – – –
OPTION MENU
ENTER:SET EXIT:END
:SELECT :ADJUST
CH LABEL :CH 25
SET
LABEL
– – – –
OPTION MENU
EXIT:END
:ADJUST ENTER:SET
LOCKS
LOCK
CH LOCK
VIDEO LOCK
GAME TIMER
FRONT PANEL LOCK
NEW PASSWORD
:SELECT :ADJUST
OFF
OFF
ON / OFF
Nota:
Para volver del menú CH LABEL al menú
OPTION, presione
▲
o
▼
para resaltar menú
OPTION, luego presione
o .
SPACE
—
+
—
Usando la función de bloqueo del panel frontal
Podrá bloquear los botones del panel frontal para prevenir que sus
configuraciones sean cambiadas accidentalmente (por los niños, por
ejemplo). Cuando el bloqueo del panel frontal esté en ON, todos los
botones de control en el panel frontal del televisor (excepto POWER) no
operarán.
Para bloquear el panel frontal:
1. Presione MENU, luego presione
o para desplegar el menú de
LOCKS.
2. Presione ▲ o ▼ para desplegar el modo de entrada de la contraseña.
3. Use los botones de números para los canales (del 0 al 9) para
ingresar su contraseña, luego
presione ENTER. El menú de LOCKS
aparecerá.
4. Presione ▲ o ▼ para resaltar FRONT
PANEL LOCK y presione
o para
resaltar ON.
5. Presione EXIT para regresar a la
vista normal.
Si se presiona un botón en el panel frontal, aparecerá el mensaje
“NOT AVAILABLE”.
Para desbloquear el panel frontal:
Presione y retenga el botón VOL ▼ en el panel frontal del televisor
durante aproximadamente 10 segundos hasta que aparezca el mensaje
“FRONT PANEL LOCK: OFF” en pantalla.
También podrá desbloquear el panel frontal al usar los menús:
Seleccione OFF del paso 4 de arriba.
Creando las etiquetas de los canales
Las etiquetas del canal aparecen sobre el despliegue del número del
canal cada vez que encienda el televisor, seleccione un canal, o
presione el botón de Recall. Podrá escoger cualquiera de los cuatro
caracteres para identificar un canal.
Para crear las etiquetas del canal,
haga lo siguiente:
1.
Seleccione un canal que desee etiquetar.
2. Presione MENU, luego presione
o hasta que el menú de OPTION
aparezca.
3.
Presione ▲ o ▼ para resaltar CH LA-
BEL.
4. Presione o para desplegar el
menú de
CH LABEL
. SET/CLEAR
se resaltará.
5. Presione
o para resaltar SET.
6.
Presione ENTER para resaltar LABEL.
7.
Presione o para ingresar un
caracter en el primer espacio.
Presione el botón repetidamente hasta
que el caracter que desee aparezca
en la pantalla. Presione ENTER.
Nota:
El caracter cambiará como se
muestra debajo.
8. Repita el paso 7 para ingresar el resto de los caracteres.
Si usted deseara un espacio en blanco en el nombre de la
etiqueta, deberá escoger un espacio vacío de la lista de
caracteres; de otra manera, un guión aparecerá en ese espacio.
9. Repita los pasos del 1 al 8 para otros canales. Podrá asignar una
etiqueta a cada canal.
10. Presione EXIT para regresar a la vista normal.
Menu/
Enter
Exit
Para borrar las etiquetas del canal, haga lo
siguiente:
1. Seleccione un canal con una etiqueta.
2. Presione MENU, luego presione
o
hasta que aparezca el menú de OPTION.
3. Presione
▲ o ▼
para resaltar CH
LABEL.
4. Presione
o para desplegar el menú
de CH LABEL. SET/CLEAR se resaltará.
5. Presione
o para resaltar CLEAR.
6. Presione ENTER.
7. Repita los pasos del 1 al 6 para borrar
otras etiquetas del canal.
Números de
canales
Usando las
funciones de la
TV
CH 34
Recall
Panel frontal del televisor (27D46)
Botones que se pueden bloquear
Panel frontal
del televisor
(27D46)
VOL ▼
J3W41121A(S)_P22-30 14/03/2006, 3:53 PM26

27
Bienvenido a
Toshiba
Conectando su
TV
Configurando su
TV
Usando las
funciones de la
TV
Apéndice
Usando el control
remoto
Información
importante sobre
seguridad
/0-3:SELECT
SOURCE SELECTION
0. ANT
1. VIDEO1
2. VIDEO2
3. ColorStream
SETUP
LANGUAGE
CLOCK SET
TV / CABLE
CH PROGRAM
ADD / ERASE
ENGLISH
CABLE
:SELECT :ADJUST
ON/OFF TIMER
ON TIMER
6:00AM
OFF TIMER
12:00AM
OPTION MENU
CH 3
CLEAR
CLEAR
:SELECT :ADJUST
EXIT:END
CLOCK SET
MONTH
DAY
YEAR
TIME
1
1 (SUN)
2006
12:00AM
:SELECT :ADJUST
ENTER:SET EXIT:END
ON/OFF TIMER
ON TIMER
6:30AM
OFF TIMER
12:00AM
OPTION MENU
CH 4
:ADJUST ENTER:SET
EXIT:END
ONCE DAILY CLEAR
CLEAR
Seleccionando la fuente de entrada de video
Presione TV/VIDEO para ver una señal de otro dispositivo conectado a su
televisor, como una videograbadora o reproductor de DVD. Podrá
seleccionar ANT, VIDEO 1, VIDEO 2 o ColorStream dependiendo qué
conectores de entrada usó para conectar sus dispositivos (vea “Conectando
su TV” en la página 7).
Al presionar TV/VIDEO en el control
remoto, se desplegará la fuente de
señal actual (presione TV/VIDEO de
nuevo o del 0 al 3 para cambiar)
Nota:
Después de un fallo en la alimentación de
energía o de la desconexión, se perderán los
ajustes de hora.
Notas:
• Si se interrumpe o falla el suministro de
energía eléctrica, se perderá el ajuste del
cronómetro.
• Para volver del menú ON/OFF TIMER al
menú OPTION, presione
▲
o
▼
para resaltar
menú OPTION, luego presione
o
.
Configurando el reloj
Deberá ajustar el reloj antes de que pueda programar el cronómetro de
ON/OFF TIMER.
Para ajustar el reloj: (Ejemplo: “8:30 AM”,
Sábado 25 de marzo de 2006)
1.
Presione MENU, luego presione o
para desplegar el menú de SETUP.
2. Presione ▲ o ▼ para resaltar
CLOCK SET, luego presione .
3. Presione
o para ajustar la
hora, luego presione .
4. Fije el DÍA, el AÑO y la HORA
como en el paso 3.
Después de programar la hora, la
fecha y el tiempo comienzan a
funcionar automáticamente.
5. Presione EXIT para regresar a la vista normal.
Configurando el cronómetro de ENCENDIDO/APAGADO
Esta función le permite a usted programar el televisor para que se
encienda automáticamente en una hora fijada. Si programa ON TIMER
a “DAILY”, el televisor se encenderá todos los días a la misma hora y en
el mismo canal hasta que elimine ON TIMER.
Para ajustar el cronómetro de encendido: (Ejemplo: Encender el
televisor en el canal 12 a las 6:30 AM, DIARIAMENTE)
1. Ajuste el reloj, si no lo ha hecho todavía (vea arriba).
2. Presione MENU, luego presione
o para desplegar el menú
de OPTION.
3. Presione ▲ o ▼ para resaltar ON/
OFF TIMER.
4. Presione
o para resaltar SET,
luego presione ENTER.
Aparecerá el menú de ON/OFF TIMER.
5. Presione ▲ o ▼ para resaltar ON
TIMER y presione
para resaltar la
posición de las horas.
6. Presione ▲ o ▼ para ajustar la hora
deseada, luego presione
.
7. Ajuste los minutos y el canal como
se hizo en el paso 6.
8. Presione
o para seleccionar
ONCE o DAILY, luego presione
ENTER.
9. Presione EXIT para regresar a la vista normal.
Para ajustar el cronómetro (de apagado automático):
Seleccione OFF TIMER del paso 5 de arriba.
Para cancelar el cronómetro (de encendido automático),
haga lo siguiente:
Seleccione CLEAR del paso 8 de arriba.
Presione EXIT para regresar a la vista normal.
Nota:
Si se interrumpe la fuente de energía para el
televisor (por ejemplo, el cable de corriente
está desconectado u ocurre una falla en la
energía), necesitará volver a ajustar el reloj.
Menu/
Enter
Exit
Usando las
funciones de la
TV
TV/Video
J3W41121A(S)_P22-30 14/03/2006, 3:53 PM27

28
Viendo los formatos de imágenes de pantalla
amplia
Podrá ver programas en formato de 480i en una variedad de
tamaños—4:3, 16:9, y ZOOM.
La manera en que se despliegue la imagen en cualquiera de los
tamaños de la imagen variará, dependiendo del formato del programa
que esté viendo. Seleccione el tamaño de la imagen que despliega el
programa actual de la manera que le parezca mejor a usted.
Para seleccionar el tamaño de la imagen:
Presione PIC SIZE en el control remoto para seleccionar el tamaño de
la imagen deseado, lo hace los ciclos por tres tamaños de la imagen
cuando descrito abajo.
Pic Size
Tamaños de imágenes disponibles para las distintas fuentes de entrada.
: válido / ✕ : inválido
4:3
16:9
ZOOM
Tamaño 4:3 de la imagen
• Si recibe un programa de formato 4:3 (análogo/digital),
seleccionando 4:3 PIC SIZE la imagen se verá en la proporción
formateada originalmente.
• Si recibe un programa de formato 16:9 (digital), seleccionando 4:3
PIC SIZE, la imagen se verá estirada en su altura (comprimida).
Usando las
funciones de la
TV
ZOOM16:9
Programa de formato 4:3
(análogo) o entrada externos
✕
✕
✕
Tamaño de la imagen
4:3
Programa de formato 4:3
(digital)
Programa (digital) de formato
16:9 (comprimida)
Fuente de entrada
J3W41121A(S)_P22-30 14/03/2006, 3:54 PM28

29
Bienvenido a
Toshiba
Conectando su
TV
Configurando su
TV
Usando las
funciones de la
TV
Apéndice
Usando el control
remoto
Información
importante sobre
seguridad
Usando las
funciones de la
TV
Usar estas funciones para cambiar el
tamaño de la imagen (es decir, cambiar
la proporción de la altura / anchura) para
cualquier otro propósito diferente a su
observación privada podría prohibirse
bajo las Leyes de Copyright de los
Estados Unidos y otros países, y usted
podría estar sujeto a responsabilidad civil
y penal.
AVISO DE POSIBLES EFECTOS
ADVERSOS EN EL TUBO DE
IMÁGENES DEL TELEVISOR
Evite desplegar imágenes estacionarias
en su televisor durante períodos
extendidos de tiempo. Las imágenes fijas
(que no se mueven) tales como las
barras negras o grises en los formatos de
imágenes de pantalla amplia, los
patrones de juegos de video, los
logotipos de las estaciones de televisión y
los subtítulos ocultos pueden quedar
marcadas permanentemente en el tubo
de imágenes. Este tipo de daño NO SE
CUBRE POR SU GARANTÍA.
Tamaño 16:9 de la imagen
• Si recibe un programa de formato 4:3 (digital), la función 16:9 PIC
SIZE no estará disponible.
• Si recibe un programa de formato 4:3 (análogo), seleccionando 16:9
PIC SIZE, la imagen se verá estirada a lo ancho con barras en las
partes superior e inferior.
Tamaño ZOOM de la imagen (para programas con formato 16:9)
• Si recibe un programa de formato 4:3 (análogo o digital), la función
ZOOM PIC SIZE no estará disponible.
• Si recibe un programa de formato 16:9 (digital), seleccionando
ZOOM PIC SIZE, la imagen se estirará manteniendo su proporción
formateada originalmente, pero los costados de la imagen quedarán
ocultos.
• Si recibe un programa de formato 16:9 (digital), seleccionando 16:9
PIC SIZE, la imagen se verá en su proporción formateada
originalmente con barras en las partes superior e inferior.
J3W41121A(S)_P22-30 14/03/2006, 3:54 PM29

30
PICTURE
BRIGHTNESS
CONTRAST
COLOR
TINT
SHARPNESS
RESET
:SELECT :ADJUST
25
50
25
0
25
PICTURE
BRIGHTNESS
CONTRAST
COLOR
TINT
SHARPNESS
RESET
:SELECT :ADJUST
25
50
25
0
25
Ajustando la imagen
Ajustando la calidad de la imagen
Podrá ajustar la calidad de la imagen a sus preferencias personales,
incluyendo el CONTRAST (contraste), BRIGHTNESS (brillo), COLOR
(color), TINT (tinte) y SHARPNESS (nitidez). Las calidades que escoja se
guardarán automáticamente en la memoria de su televisor para que pueda
hacerlos volver en cualquier momento.
Para ajustar la calidad de la imagen:
1. Presione MENU, luego presione
o para desplegar el menú de
PICTURE.
2. Presione ▲ o ▼ hasta que el elemento que desee ajustar se ajuste.
3. Presione
o para ajustar el nivel.
4. Presione EXIT para regresar a la vista normal.
Usando las
funciones de la
TV
Restableciendo sus ajustes de la imagen
La función RESET devuelve los ajustes de calidad de la imagen a las
siguientes configuraciones de fábrica:
Para restablecer sus ajustes de la imagen:
1.
Presione MENU, luego presione o para desplegar el menú de PICTURE.
2. Presione ▲ o ▼ para resaltar RESET, y luego presione .
BRIGHTNESS ..... centro (25)
CONTRAST ............ max (50)
COLOR ................ centro (25)
Configurando el sleep timer (cronómetro de
apagado automático)
Podrá configurar el televisor para que se apague automáticamente.
Para ajustar el cronómetro de apagado automatico (sleep timer):
Presione repetidamente SLEEP en el control remoto para fijar la
duración de tiempo hasta que el televisor se apague. El reloj hará
una cuenta regresiva de 10 minutos por cada presión del botón SLEEP
(0h00m, 0h10m,...1h50m, 2h00m.) Después de programar el tiempo
de dormir, el despliegue aparecerá brevemente cada diez minutos
para recordarle que el cronómetro de dormir está operando.
Para confirmar la configuración del cronómetro de apagado
automatico (sleep timer), haga lo siguiente:
Presione SLEEP una vez. El tiempo restante se desplegará
momentáneamente.
Para cancelar el cronómetro de apagado automatico (sleep timer),
haga lo siguiente:
Presione repetidamente SLEEP hasta que el despliegue cambie a
0h00m.
TINT ....................... centro (0)
SHARPNESS....... centro (25)
Selección Presionar
BRIGHTNESS más oscuro más claro
CONTRAST más bajo más alto
COLOR más pálido más profundo
TINT rojizo verdoso
SHARPNESS más suave más nítido
Exit
Menu
Sleep
J3W41121A(S)_P22-30 14/03/2006, 3:54 PM30

31
Bienvenido a
Toshiba
Conectando su
TV
Configurando su
TV
Usando las
funciones de la
TV
Apéndice
Usando el control
remoto
Información
importante sobre
seguridad
SETUP
CLOSED CAPTION
CC ADVANCED
SIGNAL METER
:SELECT :ADJUST
OFF
C1 / C2 / T1 / T2 / OFF
Usando la functión de subtítulos avanzados
Esta función está diseñada para personalizar únicamente el teletexto
digital.
1. Sintonice la televisor al programa deseado.
2. Presione MENU, y luego presione
o despliegue el menú de
SETUP.
3. Presione ▲ o ▼ para resaltar CC ADVANCED, luego presione .
4. Presione ▲ o ▼ seleccione los artículos deseados para ajustar,
luego presione o .
5. Presione ▲ o ▼ seleccione la colocación deseada, luego
presione ENTER.
Puede seleccionar los siguientes elementos y opciones de configuración.
TEXT SIZE: AUTO, SMALL, STANDARD, LARGE
TEXT TYPE: AUTO, DEFAULT, MONO W. SERIF, PROP. W.
SERIF, MONO W/O SERIF, PROP. W/O SERIF,
CASUAL, CURSIVE, SMALL CAPITALS
TEXT COLOR: AUTO, BLACK, WHITE, RED, GREEN, BLUE,
YELLOW, MAGENTA, CYAN
TEXT EDGE:
AUTO, NONE, RAISED, DEPRESSED, UNIFORM,
LEFT DROP SHADOW, RIGHT DROP SHADOW
BACKGROUND COLOR: AUTO, BLACK, WHITE, RED, GREEN,
BLUE, YELLOW, MAGENTA, CYAN
6. Presione EXIT para regresar a la vista normal.
Usando la función de subtítulos
La función Closed Caption tiene dos opciones:
•
Desplegar subtítulos en la pantalla de diálogo, narración y efectos de
sonido de los programas y videos que tengan subtítulos
(normalmente identificados en su lista de televisión local como “CC”):
• Desplegar texto en la pantalla de información no relacionada al
programa, como el clima o los datos de la bolsa (si está disponible
en su área de vista).
Para ver subtítulos o texto:
1. Sintonice el televisor en el programa deseado.
2. Presione MENU, y luego presione
o para desplegar el menú
de SETUP.
3. Presione ▲ o ▼ para resaltar CLOSED CAPTION.
4. Presione
o
para seleccionar el modo deseado de Subtítulos,
como sigue:
• Para ver subtítulos, seleccione C1 o C2 (C1 despliega la traducción
del idioma primario en su área).
Nota: Si el programa o video que haya seleccionado no tiene
subtítulos, no se desplegarán subtítulos en la pantalla.
• Para ver texto, seleccione T1 o T2.
Nota: Si el texto no está disponible en su área de vista, aparecerá
un rectángulo negro en la pantalla. Si esto pasa, fije la función
de Subtítulos a OFF.
Usando las
funciones de la
TV
Nota:
Cuándo una señal digital se recibe, usted puede escoger de CS1,
CS2, CS3, CS4, CS5, CS6, C1, C2, C3, C4, T1, T2, T3, T4, y OFF.
Menu/
Enter
Exit
Notas:
•
Usando la función de subtítulos no podrá
decodificarse
en las situaciones siguientes:
- Cuando una videocinta se haya doblado.
- Cuando la recepción de la señal esté débil.
- Cuando la recepción de la señal no sea
normal.
• No configure el color de texto “Text Color”
para “Closed Caption” del mismo color que
el color de fondo “Background Color” ya que
esto hará que el texto no sea visible.
AVISO DE POSIBLES EFECTOS
ADVERSOS EN EL TUBO DE
IMÁGENES DEL TELEVISOR
Evite desplegar imágenes estacionarias
en su televisor durante períodos
extendidos de tiempo. Las imágenes fijas
(que no se mueven) tales como las barras
negras o grises en los formatos de
imágenes de pantalla amplia, los
patrones de juegos de video, los logotipos
de las estaciones de televisión y los
subtítulos ocultos pueden quedar
marcadas permanentemente en el tubo
de imágenes. Este tipo de daño NO SE
CUBRE POR SU GARANTÍA.
Para apagar la función de subtítulos:
Marque OFF en el paso 4, arriba.
J3W41121A(S)_P31-Back 14/03/2006, 3:55 PM31

32
AUDIO
MTS
BASS
TREBLE
BALANCE
AUDIO LANGUAGE
DIGITAL OUTPUT
STEREO
:SELECT :ADJUST
25
25
0
PCM
AUDIO
MTS
BASS
TREBLE
BALANCE
AUDIO LANGUAGE
DIGITAL OUTPUT
STR / SAP / MONO
:SELECT :ADJUST
25
25
0
PCM
Ajustando la calidad del sonido
Podrá cambiar la calidad del sonido de su televisor al ajustar el grave,
el agudo y el balance.
Para ajustar la calidad del sonido, haga lo siguiente:
1. Presione MENU, luego presione
o para desplegar el menú de
AUDIO.
2. Presione ▲ o ▼ para resaltar el elemento que desee ajustar.
3. Presione
o para ajustar el nivel.
•
hace que la calidad del sonido sea más débil o que
disminuya el balance en el canal derecho, dependiendo del
elemento seleccionado.
•
hace que la calidad del sonido sea más fuerte o que
disminuya el balance en el canal izquierdo, dependiendo del
elemento seleccionado.
Para escuchar el Segundo Programa de Audio
(SAP - Second Audio Program):
1.
Presione MENU, luego presione
o
para desplegar el menú de AUDIO.
2. Presione ▲ o ▼ para resaltar MTS.
3. Presione o para resaltar SAP. Los altavoces de el televisor
producirán el segundo programa de audio en lugar del audio normal.
4. Presione EXIT para regresar a la vista normal.
Ajustando el sonido
Enmudeciendo el sonido
Presione MUTE para apagar el sonido temporalmente. Mientras que el
sonido esté apagado, la pantalla desplegará la palabra MUTE en la
esquina inferior derecha. Para restaurar el sonido, presione MUTE o
presione VOL+/–.
Seleccionando las estaciones en estéreo/SAP
El sonido multicanal de televisión (MTS - Multi-channel TV)
proporciona sonido estereofónico de alta fidelidad. MTS también podrá
transmitir un segundo programa de audio (SAP - Second Audio
Program) conteniendo un segundo idioma u otra información de audio.
Nota: La función MTS no está disponible en el modo de VIDEO.
Cuando el televisor reciba una transmisión en estéreo o SAP, la
palabra STEREO o SAP aparecerá en la pantalla cada vez que
se encienda el televisor, se cambie el canal o se presione el
botón de RECALL.
Para escuchar sonido estereofónico:
1. Presione MENU, luego presione
o
para desplegar el menú de
AUDIO.
2. Presione ▲ o ▼ para resaltar MTS.
3. Presione
o
para resaltar STR (estéreo).
Notas:
• En general, podrá dejar su televisor en el modo estéreo porque el
televisor producirá automáticamente el tipo de que se transmite
(estéreo o mono).
• Si el sonido estereofónico es ruidoso, seleccione MONO para
reducir el ruido.
4. Presione EXIT para regresar a la vista normal.
Nota:
Un segundo programa de audio (SAP) sólo
podrá escucharse en aquellas estaciones de
televisión que lo ofrezcan.
Por ejemplo, una estación podría transmitir
música como segundo programa de audio. Si
tiene el modo de SAP activado, verá el
programa actual en la pantalla pero
escuchará música en lugar del programa
normal de audio.
Sin embargo, si tiene el modo de SAP
activado, y la estación que está mirando no
está transmitiendo actualmente un segundo
programa audio, escuchará el audio normal
de la estación; pero ocasionalmente no hay
ningún sonido en el modo de SAP. Si esto
pasa, fije la función de MTS al modo de
STEREO.
Mute
Exit
Recall
Menu
Usando las
funciones de la
TV
Volume +/–
J3W41121A(S)_P31-Back 14/03/2006, 3:56 PM32

33
Bienvenido a
Toshiba
Conectando su
TV
Configurando su
TV
Usando las
funciones de la
TV
Apéndice
Usando el control
remoto
Información
importante sobre
seguridad
AUDIO
STABLE SOUND
SURROUND
RESET
:SELECT :ADJUST
ON / OFF
OFF
AUDIO
MTS
BASS
TREBLE
BALANCE
AUDIO LANGUAGE
DIGITAL OUTPUT
STEREO
:SELECT :ADJUST
25
25
0
PCM
AUDIO
MTS
BASS
TREBLE
BALANCE
AUDIO LANGUAGE
DIGITAL OUTPUT
STEREO
:SELECT :ADJUST
25
25
0
PCM
PCM /DOLBY DIGITAL
Usando la función de sonido StableSound
®
La función de StableSound limita el nivel más alto del volumen para prevenir
cambios extremos en el volumen cuando se cambie la fuente de señal.
Para encender la función de StableSound
®
, haga lo siguiente:
1. Presione MENU, luego presione o hasta que aparezca el
menú de AUDIO.
2. Presione ▼ o ▲ para resaltar STABLE SOUND.
3. Presione
o para resaltar ON.
4. Presione EXIT para regresar a la vista normal.
Para apagar la función de StableSound
®
haga lo siguiente:
Resalte OFF del paso 3 de arriba.
Selección del idioma del audio
Si una señal digital incluye dos o más idiomas de audio, puede
seleccionar cuál desea escuchar.
Para selección del idioma del audio:
1.
Presione MENU, luego presione o despliegue el menú de AUDIO.
2. Presione ▲ o ▼ para resaltar AUDIO LANGUAGE, luego
presione
.
3. Presione ▲ o ▼ para seleccionar el idioma deseada, luego
presione ENTER.
4. Presione EXIT para regresar a la vista normal.
Seleccionando el formato de salida digital
Puede elegir el formato de la señal de salida de audio digital.
Para seleccionar el formato salida digital:
1.
Presione MENU, luego presione o despliegue el menú de AUDIO.
2. Presione
▲ o ▼
para resaltar DIGITAL OUTPUT.
3. Presione
▲ o ▼
para resaltar PCM o DOLBY DIGITAL.
4. Presione EXIT para regresar a la vista normal.
Usando las
funciones de la
TV
* Fabricado bajo licencia de Dolby Laboratories. Dolby y el símbolo de la doble D son marcas registradas por Dolby
Laboratories.
Menu
Exit
J3W41121A(S)_P31-Back 14/03/2006, 3:56 PM33

34
STEREO
SAP
TV-PG L V
ON TIMER 12:00AM
OFF TIMER 12:00PM
SLEEP TIMER 2h00m
ANT
ABCD
CABLE
4:3
CLOCK 12:00AM SUN
007
:SELECT :ADJUST
AUDIO
STABLE SOUND
SURROUND
RESET
OFF
OFF
SIGNAL METER
CHANNEL (DIGITAL)
1-001
80
AUDIO
STABLE SOUND
SURROUND
RESET
:SELECT :ADJUST
OFF
ON / OFF
Cómo comprobar la potencia de la señal digital
Puede comprobar el ancho de la señal digital, mirando el contador
digital.
Para ver el indicador de señal digital:
1.
Presione MENU, luego presione o despliegue el menú de SETUP.
2. Presione ▼ o ▲ para resaltar SIGNAL METER.
3. Presione
o
verificar la potencia
de la señal digital.
4. Presione EXIT para regresar a la
vista normal.
Desplegando la información en pantalla
Presione RECALL para desplegar la siguiente información en la pantalla:
• Reloj
• Modo de número de canal o VIDEO
seleccionado
• Etiqueta del canal (si está prefijado)
• Estado de audio Estéreo o Segundo
Programa de Audio (SAP - second
audio program)
• Clasificación del contenido
• Cronómetro de Encendido, Cronómetro de Apagado, Sleep Timer
(si está programado)
• Tamaño de la imagen
Digital output ..................... PCM
Stable sound ..................... OFF
Surround ........................... OFF
Usando la función de sonido Surround
La función de sonido surround expande el campo de escucha de audio
de forma más amplia y profunda para crear la calidad excepcional de
sonido de las bocinas de la televisión. La función usa señales
estereofónicas de una transmisión de televisión o una entrada de video.
Para encender la función de sonido surround:
1. Seleccione el modo STEREO, si está disponible (vea
“Seleccionando las estaciones en estéreo/SAP” en la página 32.)
2. Presione MENU, y luego presione
o hasta que el menú de
AUDIO aparezca.
3. Presione ▼ o ▲ para resaltar
SURROUND.
4. Presione
o para resaltar ON.
Para apagar la función de sonido surround, haga lo siguiente:
Resalte OFF del paso 4 de arriba.
En general, podrá dejar su televisión en el modo surround porque
producirá automáticamente el tipo de sonido que se está transmitiendo
(surround estéreo o monofónico).
Recall
Menu
Exit
Usando las
funciones de la
TV
Restableciendo sus ajustes de audio
La función de RESET devolverá los ajustes de audio a las
configuraciones de fábrica siguientes:
MTS......................... STR
Bass ........................ Centro (25)
Treble ...................... Centro (25)
Balance ................... Centro (0)
Para restablecer sus ajustes de
audio:
1.
Presione MENU, luego presione o
para desplegar el menú de AUDIO.
2. Presione ▼ o ▲ para resaltar
RESET, y luego presione
.
Notas:
• La función del indicador de señal no está
disponible en el caso de los canales
analógicos.
• Después de 240 segundos, la pantalla
SIGNAL METER (Indicador de señal)
vuelve automáticamente al modo de TV
normal.
• Cuando seleccione un canal disponible, el
contador de señal debera de reaccionar.
J3W41121A(S)_P31-Back 14/03/2006, 3:57 PM34

35
Bienvenido a
Toshiba
Conectando su
TV
Configurando su
TV
Usando las
funciones de la
TV
Apéndice
Usando el control
remoto
Información
importante sobre
seguridad
Apéndice
Solución de problemas
Antes de llamar a un técnico de servicio, por favor verifique la tabla por una posible causa del problema y algunas soluciones.
Problema Solución
Retángulo negro en la pantalla
• Seleccione OFF en el menú de subtítulos (Closed Caption) para apagar el modo de
texto.
• Si usted conectó un receptor de alta definición, un lector de DVD 480p, u otro
dispositivo similar a esta TV, debe cambiar primero la salida del dispositivo al modo
entrelazado 480i. En caso contrario, se verá la palabra “ColorStream” sobre una
pantalla negra.
La TV no enciende
• Asegúrese que el cable de corriente esté conectado, luego presione POWER.
• Las baterías del control remoto podrían estar descargadas. Reemplace las baterías.
Sin imagen, sin sonido
• Revise las conexiones de la antena o cable.
Sin sonido, imagen bien
• El sonido puede enmudecerse. Presione VOLUME.
• La estación podría tener dificultades de transmisión. Pruebe otro canal.
• La función de MTS podría estar en el modo de SAP. Presione el botón de MTS en el
control remoto hasta que el modo de STEREO (o MONO) esté activo.
Sonido pobre, imagen bien
• La estación podría tener dificultades de transmisión. Pruebe otro canal.
• La función de MTS podría estar en el modo de SAP. Presione el botón de MTS en el
control remoto hasta que esté activo el modo STEREO (o MONO).
Imagen pobre, sonido bien
• Verifique las conexiones de la antena.
• La estación podría tener dificultades de transmisión. Pruebe otro canal.
• Ajuste el menú de PICTURE.
Recepción pobre de los canales de
• La estación podría tener dificultades de transmisión. Pruebe otro canal.
transmisión
• Verifique las conexiones de la antena.
• Si está usando una videograbadora, asegúrese que el botón de TV/VIDEO esté
configurado correctamente.
No puede recibir por arriba del canal 13
• Asegúrese que la función de TV/CABLE en el menú de SETUP esté fijada al modo
de CABLE.
Incapaz de seleccionar cierto canal
• El canal podría bloquearse por la función V-Chip o la función de CH LOCK, o
borrarse con la función de Add/erase.
No puede acceder a las fuentes de entrada de
• Verifique la función de VIDEO LOCK.
la señal
(Video1, Video2 y ColorStream y/o Canales 3 y 4)
Imágenes múltiples
• La estación podría tener dificultades de transmisión. Pruebe otro canal.
• Use una antena altamente direccional para exteriores.
Color pobre o sin color
• La estación podría tener dificultades de transmisión. Pruebe otro canal.
• Ajuste la opción TINT y/o COLOR en el menú de PICTURE.
• Si cambia la dirección de la televisión mientras esté encendida, la imagen podría
sufrir un oscurecimiento del color. En ese caso, apague la televisión y permítale que
se enfríe durante varias horas antes de encenderla de nuevo.
Sin sonido estéreo o SAP de
• Asegúrese que la función de MTS esté configurada apropiadamente una estación
de MTS conocida
(menú de AUDIO).
La contraseña de PIN del Chip V no trabaja
• Cambie o restablezca su contraseña.
(Sólo para los sistemas Chip V de EE.UU.)
El control remoto no opera
• Asegúrese que el modo de TV·CBL/SAT·VCR·DVD esté configurado apropiadamente
en el control remoto.
• Remueva todas las obstrucciones entre el control remoto y el televisor.
• Las baterías del control remoto podrían estar descargadas. Reemplace las baterías.
Los botones del panel delantero no operan
• Verifique la función de FRONT PANEL LOCK.
Problema digital de pantalla de transmission
• Verifique la potencia de la señal digital.
El área de “Closed Caption” parece no tener texto
• Verifique que el color de texto “Text Color” para “Closed Caption” y el color de fondo
“Background Color” no estén configurados con el mismo color (vea la página 31).
Apagado automático
El televisor se apagará automáticamente después de aproximadamente 15 minutos si se sintoniza en un canal libre o una
estación que termine su transmisión por el día y deje de transmitir en ese canal. Esta función no trabaja en el modo de VIDEO.
Entendiendo la función de Retorno de Energía
Si la energía se interrumpe mientras esté viendo la televisión y la energía se vuelve a reabastecer, la función de Power
Return encenderá el televisor automáticamente.
Si la energía se va a apagar durante bastante tiempo o si usted va a estar durante bastante tiempo fuera de la casa,
desenchufe el cable de corriente del tomacorriente de la pared para impedir que el televisor se encienda en su ausencia.
Apéndice
J3W41121A(S)_P31-Back 14/03/2006, 3:57 PM35

36
Apéndice
Tubo de imagen 27 pulgadas (676,0 mm) diagonalmente
(El tamaño de pantalla es aproximado.)
Sistema NTSC standard, ATSC standard (8VSB), QAM
Cabertura de canales VHF: 2 a 13
UHF: 14 a 69
Cable TV: 4A, A-5 a A-1, A-I,
J–W, W
+
1 a W
+
84
Alimentación 120V CA, 60 Hz
Consumo 130 W
Potencìa de audio 2,5 W + 2,5 W
Tipo de los altavoces
2 x 3-1/2 pulgadas (50,8 x 88,9 mm) x 2 pcs.
Teminales de Video/Audio ENTRADA S-VIDEO
ENTRADA-Y: 1V (p-p), 75 ohmios, sincronización negativa.
ENTRADA-C: 0,286V (p-p) (señal de la ráfaga), 75 ohmios
ENTRADA VIDEO/AUDIO
VIDEO: 1V (p-p), 75 ohmios, sincronización negativa.
AUDIO: 150 mV (rms) (30% modulación equivalente, 47k ohmios)
ENTRADA ColorStream
®
(video de componente)
Y : 1V (p-p), 75 ohmios
PR: 0,7V (p-p), 75 ohmios
PB: 0,7V (p-p), 75 ohmios
SALIDA AUDIO
150 MV (rms) (30% modulación equivalente, 47k ohm)
SALIDA DIGITAL AUDIO
AUDIO: 0,5 V (p-p), 75 ohmios
Dimensiones Ancho: 29-1/8 pulgadas (740 mm)
Alto: 22-1/2 pulgadas (571,5 mm)
Fondo: 19-3/8 pulgadas (491,5 mm)
Peso 81,6 lbs. (37,0 kg)
Accesorios incluidos Control remoto con dos pilas “AAA”
Especificaciones
• Este modelo cumple con las especificaciones de abajo.
• El diseño y la especificación están sujetos a cambios sin aviso.
•
Este modelo podría no ser compatible con las funciones y/o especificaciones que puedan agregarse en el futuro.
27D46
32D46
32 pulgadas (800,1 mm) diagonalmente
(El tamaño de pantalla es aproximado.)
135 W
1-13/16 x 3-7/8 pulgadas (45,7 x 99,1 mm) x 2 pcs.
Ancho: 29-9/16 pulgadas (751 mm)
Alto: 25-15/16 pulgadas (658,5 mm)
Fondo: 21-3/4 pulgadas (552 mm)
114,7 lbs. (52,0 kg)
J3W41121A(S)_P31-Back 14/03/2006, 3:57 PM36

37
Bienvenido a
Toshiba
Conectando su
TV
Configurando su
TV
Usando las
funciones de la
TV
Apéndice
Usando el control
remoto
Información
importante sobre
seguridad
Apéndice
Garantía limitada en los Estados Unidos
Para televisores tipo CRT, no FST PURE
®
, de 27 pulgadas y más grandes
Toshiba America Consumer Products, L.L.C. (“TACP”) ofrece las siguientes
garantías limitadas al consumidor original de estos televisores en los Estados
Unidos. ESTAS GARANTÍAS LIMITADAS SE EXTIENDEN AL COMPRADOR/
CONSUMIDOR ORIGINAL DE ESTE TELEVISOR, O A CUALQUIER OTRA
PERSONA QUE LO RECIBA COMO REGALO DEL COMPRADOR/
CONSUMIDOR ORIGINAL, Y NO A NINGÚN OTRO COMPRADOR O
CONSUMIDOR.
LOS TELEVISORES COMPRADOS EN LOS ESTADOS UNIDOS Y USADOS
EN CUALQUIER LUGAR FUERA DE LOS ESTADOS UNIDOS, INCLUYENDO
PERO SIN LIMITARSE AL CANADÁ Y MÉXICO, NO ESTÁN AMPARADOS POR
ESTAS GARANTÍAS.
LOS TELEVISORES COMPRADOS EN CUALQUIER LUGAR FUERA DE LOS
ESTADOS UNIDOS, INCLUYENDO PERO SIN LIMITARSE AL CANADÁ Y
MÉXICO, Y USADOS EN LOS ESTADOS UNIDOS, NO ESTÁN AMPARADOS
POR ESTAS GARANTÍAS.
Garantía limitada de noventa (90) días en la mano de obra
TACP garantiza este televisor y sus piezas contra defectos en los materiales o
en la elaboración, por un período de noventa (90) días contados a partir de la
fecha de la compra original al por menor. DURANTE ESTE PERÍODO DE
TIEMPO, TACP TENDRÁ LA OPCIÓN DE REPARAR O REEMPLAZAR
CUALQUIER PIEZA QUE RESULTE DEFECTUOSA POR PIEZAS NUEVAS O
RECONSTRUÍDAS, SIN CARGO ALGUNO PARA USTED POR LAS PIEZAS NI
POR LA MANO DE OBRA. Cuando sea necesario prestar servicio de garantía
durante este período de tiempo, empleados de un Centro de Servicio autorizado
por TACP vendrán a su casa, y, según el tipo de reparación necesaria, ellos
prestarán ese servicio en su casa o se llevarán el televisor al Centro de Servicio,
devolviéndoselo después sin cargo alguno para usted.
Garantía limitada de un (1) año en las piezas
TACP garantiza las piezas de este televisor contra defectos en los materiales o
en la elaboración, por un período de un (1) año contado a partir de la fecha de la
compra original al por menor. DURANTE ESTE PERÍODO DE TIEMPO, TACP
TENDRÁ LA OPCIÓN DE REPARAR O REEMPLAZAR CUALQUIER PIEZA
QUE RESULTE DEFECTUOSA POR PIEZAS NUEVAS O RECONSTRUÍDAS,
SIN CARGO ALGUNO PARA USTED POR LAS PIEZAS, EXCEPTO QUE SI SE
REPARA O SE REEMPLAZA ALGUNA PIEZA DEFECTUOSA DESPUÉS DE
NOVENTA (90) DÍAS PASADA LA FECHA DE COMPRA ORIGINAL AL POR
MENOR, TODOS LOS CARGOS POR CONCEPTO DE MANO DE OBRA
RELACIONADOS CON ESA REPARACIÓN O REEMPLAZO LE
CORRESPONDERÁN A USTED. Después de noventa (90) días pasada la fecha
de compra original al por menor, usted podrá, por su propia cuenta, solicitar
servicio en su casa o enviar el televisor completo a un Centro de Servicio
autorizado por TACP. Si opta por enviar el televisor completo al Centro de
Servicio, usted deberá cubrir todos los gastos de transporte y seguro del
televisor hasta y desde dicho Centro de Servicio.
Garantía limitada de dos (2) años en el tubo-pantalla
TACP garantiza el tubo-pantalla de este televisor contra defectos en los
materiales o en la elaboración, por un período de dos (2) años contados a partir
de la fecha de compra original al por menor. DURANTE ESTE PERÍODO DE
TIEMPO, TACP TENDRÁ LA OPCIÓN DE REPARAR O REEMPLAZAR UN
TUBO-PANTALLA QUE HUBIERE RESULTADO DEFECTUOSO POR UN
TUBO-PANTALLA NUEVO O RECONSTRUÍDO, SIN CARGO ALGUNO PARA
USTED, EXCEPTO QUE SI REPARA O REEMPLAZA UN TUBO-PANTALLA
DESPUÉS DE UN (1) AÑO PASADA LA FECHA DE COMPRA ORIGINAL AL
POR MENOR, TODOS LOS GASTOS POR CONCEPTO DE MANO DE OBRA
RELACIONADOS CON ESA REPARACIÓN O REEMPLAZO LE
CORRESPONDERÁN A USTED. Después de noventa (90) días pasada la fecha
de compra original al por menor, usted podrá solicitar servicio en su casa, por su
propia cuenta, o enviar el televisor completo a un Centro de Servicio autorizado
por TACP. Si opta por enviar el televisor completo al Centro de Servicio, usted
deberá cubrir todos los gastos de transporte y seguro del televisor hasta y desde
dicho Centro de Servicio.
Televisores de alquiler
La garantía para los televisores de alquiler comienza a partir de la fecha del
primer alquiler, o treinta (30) días después de la fecha en que ese televisor es
enviado a la empresa que los alquila, lo que suceda primero.
Garantía limitada para televisores comerciales
TACP garantiza los televisores que se venden y utilizan para propósitos
comerciales, de la manera siguiente: Todas las piezas están garantizadas contra
defectos en los materiales o en la elaboración por un período de noventa (90)
días, contados a partir de la fecha de compra original al por menor. DURANTE
ESTE PERÍODO DE TIEMPO, TACP TENDRÁ LA OPCIÓN DE REPARAR O
REEMPLAZAR CUALQUIER PIEZA QUE RESULTE DEFECTUOSA POR UNA
PIEZA NUEVA O RECONSTRUIDA, SIN CARGO ALGUNO PARA USTED.
Manual del propietario y tarjeta de registro del producto
Lea el manual del propietario en su totalidad antes de usar este televisor.
Llene y devuelva por correo la tarjeta de registro del producto adjunta al presente, o registre
su televisor lo más pronto posible en línea en www.tacp.toshiba.com/service. Al registrar
su televisor, TACP podrá ofrecerle nuevos productos específicamente diseñados para
satisfacer sus necesidades, y permitirá que podamos contactarlo en el caso improbable que
fuere necesario enviarle alguna notificación de seguridad conforme al Acta de Seguridad de
Productos del Consumidor de Estados Unidos. Sus derechos de garantía no disminuyen si
usted no llena ni devuelve dicha tarjeta de registro del producto.
Sus responsabilidades
LAS GARANTÍAS ANTERIORMENTE MENCIONADAS ESTÁN SUJETAS A LAS
SIGUIENTES CONDICIONES:
(1) Usted deberá conservar su comprobante de compra o proporcionar alguna otra
prueba de la compra.
(2) Todos los servicios de garantía relacionados con este televisor deberán ser
realizados por Centros de Servicio autorizados por TACP.
(3) Las garantías de TACP son válidas solamente si este televisor se compra y se usa
dentro del territorio continental de los Estados Unidos o en Puerto Rico.
(4) Estas garantías no se extienden al servicio de mano de obra para instalar y colocar
el televisor o ajustar los controles del cliente, ni por la instalación o reparación de
sistemas de antena. Usted es responsable por cualquier problema en la recepción
causado por un sistema inadecuado de antena, antenas satelitales mal alineadas, la
distribución de televisión por cable, videograbadoras (VCRs), grabador / reproductor
DVD, dispositivos IEEE-1394 de computadoras personales, y cualquier otro
dispositivo conectado a la fuente de la señal.
(5) Las garantías sólo se extienden a defectos en los materiales o en la elaboración,
conforme se limitan anteriormente, y no a ningún producto o a piezas que usted
haya perdido o descartado; ni por daños al televisor o a sus piezas ocasionados por
incendios, un uso inadecuado, accidentes, fuerza mayor (tales como relámpagos o
fluctuaciones de la energía eléctrica), instalación inadecuada, mantenimiento
inadecuado, uso en violación de las instrucciones proporcionadas por TACP, mal
funcionamiento debido al uso de este producto simultáneamente con el equipo
conectado; a unidades que hayan sido modificadas o a las cuales se les haya
quitado, alterado o borrado el número de serie, o cuando éste se encuentre ilegible.
Cómo obtener servicios de garantía
Si después de seguir todas las instrucciones de funcionamiento incluidas en este manual y
de verificar la sección de solución de problemas titulada “Localización de fallas”, usted
estima todavía que necesita servicio:
(1) Para encontrar el Centro más cercano de Servicio Autorizado por TACP, visite el sitio
Web de TACP en www.tacp.toshiba.com/service, o póngase en contacto con el
Centro de Soluciones para el Consumidor de TACP, llamando gratis al 1-800-631-
3811.
(2) Usted deberá presentar su contrato de venta original o cualquier otra prueba de
compra, al Centro de Servicio autorizado por TACP.
TODAS LAS GARANTÍAS IMPLÍCITAS EN LAS LEYES DE CUALQUIER ESTADO DE LOS
ESTADOS UNIDOS, INCLUSO LAS GARANTÍAS IMPLÍCITAS DE COMERCIALIZACIÓN E
IDONEIDAD PARA UN FIN EN PARTICULAR, SE LIMITAN EXPRESAMENTE A LA
DURACIÓN DE LAS GARANTÍAS LIMITADAS INDICADAS ANTERIORMENTE. CON
EXCEPCIÓN DE CUALESQUIERA GARANTÍAS IMPLÍCITAS EN LAS LEYES DE
CUALQUIER ESTADO DE LOS EE.UU., CONFORME SE LIMITAN POR EL PRESENTE, LA
GARANTÍA ANTERIORMENTE MENCIONADA ES EXCLUSIVA Y EN LUGAR DE TODA
OTRA GARANTÍA, ACUERDOS Y OBLIGACIONES SIMILARES DE TACP CON
RESPECTO A LA REPARACIÓN O EL REEMPLAZO DE CUALQUIER PIEZA. EN NINGÚN
MOMENTO TACP SE RESPONSABILIZARÁ POR DAÑOS INCIDENTALES O INDIRECTOS
(INCLUYENDO PERO SIN LIMITARSE AL LUCRO CESANTE, INTERRUPCIÓN POR EL
CESE DE NEGOCIOS, MODIFICACIONES O ELIMINACIONES DE DATOS GRABADOS
CAUSADOS POR EL USO, EL MAL USO O INEPTITUD EN EL MANEJO DE ESTE
TELEVISOR).
Ninguna persona, agente, distribuidor, comerciante o compañía está autorizada a cambiar,
modificar o prorrogar los términos de esta garantía en forma alguna. El período de tiempo
dentro del cual se pueda entablar una demanda para hacer cumplir alguna obligación de
TACP que surja bajo esta garantía o bajo las leyes de los Estados Unidos o de cualquiera de
sus estados, se limita por este medio a noventa (90) días contados a partir de la fecha en
que usted tenga conocimiento del defecto, o en la que se debería haber tenido conocimiento
del mismo. Esta limitación no se extiende a las garantías implícitas que surjan conforme a
las leyes de cualquier estado de los Estados Unidos.
ESTA GARANTÍA LE PROPORCIONA DERECHOS LEGALES ESPECÍFICOS, Y PUDIERA
SER QUE USTED TENGA OTROS DERECHOS LOS CUALES PUEDEN VARIAR DE UN
ESTADO A OTRO EN LOS EE.UU. ALGUNOS ESTADOS DE LOS EE.UU. NO PERMITEN
LIMITACIONES EN CUANTO A LA DURACIÓN DE UNA GARANTÍA IMPLÍCITA, NI DE
CUÁNDO PUEDE ENTABLARSE UNA DEMANDA, NI DE LA EXCLUSIÓN O LIMITACIÓN
POR DAÑOS INCIDENTALES O INDIRECTOS. POR LO TANTO, PUDIERA SER QUE LAS
LIMITACIONES O EXCLUSIONES QUE PRECEDEN NO LE CORRESPONDAN A USTED
BAJO ESAS CIRCUNSTANCIAS.
Para más información, visite el sitio en la red de TACP:
www.toshiba.com/tacp.
J3W41121A(S)_P31-Back 14/03/2006, 3:57 PM37

National Service Division
ColorStream
®
, TheaterView y StableSound
®
son marcas registradas de
Toshiba America Consumer Products, L.L.C.
GameTimer es una marca comercial de Toshiba America Consumer
Products, L.L.C.
IMPRESO EN TAILANDIA
J3W41121A(S)_P31-Back 14/03/2006, 3:58 PM38
-
 1
1
-
 2
2
-
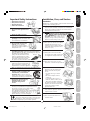 3
3
-
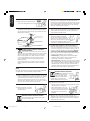 4
4
-
 5
5
-
 6
6
-
 7
7
-
 8
8
-
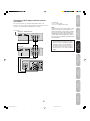 9
9
-
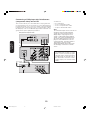 10
10
-
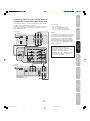 11
11
-
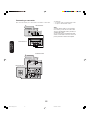 12
12
-
 13
13
-
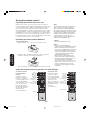 14
14
-
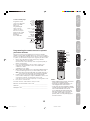 15
15
-
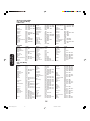 16
16
-
 17
17
-
 18
18
-
 19
19
-
 20
20
-
 21
21
-
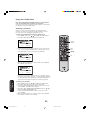 22
22
-
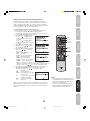 23
23
-
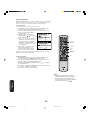 24
24
-
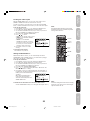 25
25
-
 26
26
-
 27
27
-
 28
28
-
 29
29
-
 30
30
-
 31
31
-
 32
32
-
 33
33
-
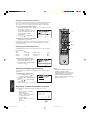 34
34
-
 35
35
-
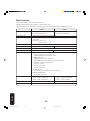 36
36
-
 37
37
-
 38
38
-
 39
39
-
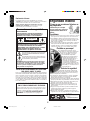 40
40
-
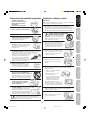 41
41
-
 42
42
-
 43
43
-
 44
44
-
 45
45
-
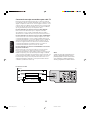 46
46
-
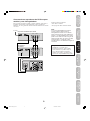 47
47
-
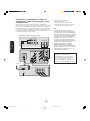 48
48
-
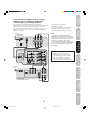 49
49
-
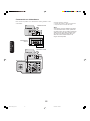 50
50
-
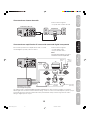 51
51
-
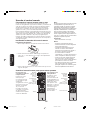 52
52
-
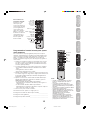 53
53
-
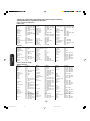 54
54
-
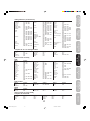 55
55
-
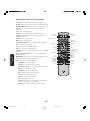 56
56
-
 57
57
-
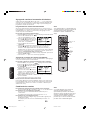 58
58
-
 59
59
-
 60
60
-
 61
61
-
 62
62
-
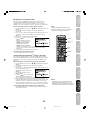 63
63
-
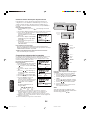 64
64
-
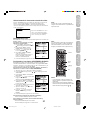 65
65
-
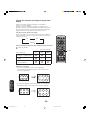 66
66
-
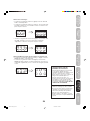 67
67
-
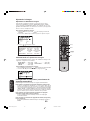 68
68
-
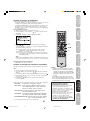 69
69
-
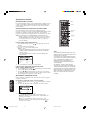 70
70
-
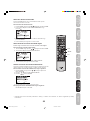 71
71
-
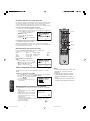 72
72
-
 73
73
-
 74
74
-
 75
75
-
 76
76


Toshiba 27D46 Guía del usuario
- Categoría
- Televisores LCD
- Tipo
- Guía del usuario
- Este manual también es adecuado para
en otros idiomas
- English: Toshiba 27D46 User guide
Artículos relacionados
-
Toshiba 24AF46 Manual de usuario
-
-
-
-
-
-
-
-
-
Otros documentos
-
Sony TV VCR Combo Manual de usuario
-
Aiwa RM-P300WAU Instrucciones de operación
-
-
-
Apex Digital Apex DT250 Manual de usuario
-
-
-
Dish Network DTVPAL Manual de usuario