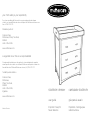
mothercare Stockholm Dresser Guía del usuario
- Tipo
- Guía del usuario

your child's safety is your responsibility
If you have a problem with this product or require replacement parts, please
contact your nearest Mothercare store or telephone the Mothercare customer care
line on 08453 30 40 30
Alternatively write to:
Customer Care,
Mothercare, Cherry Tree Road,
Watford
Herts. WD24 6SH
www.mothercare.com
la seguridad de su niño es su responsabilidad
Si surgiera algún problema con este producto o si necesita piezas de recambio,
sirvase ponerse en contacto con el almacén Mothercare más próximo o llamar a la
línea de Atención al Cliente de Mothercare número (+44) 1923 210 210
También puede escribir a:
Customer Care,
Mothercare,
Cherry Tree Road,
Watford
Herts. WD24 6SH,
Inglaterra
www.mothercare.com
Made in Slovenia
stockholm dresser cambiador stockholm
guía para el usuariouser guide
Importante. Retenga para
referencia futura
Important. Keep for
future reference

2
important notes notas importantes
1
Please take a few minutes to read this user guide.
Lay the parts out on the floor and compare to the PARTS CHECKLIST (below). Do not discard
any packaging until you are sure that you have all the parts.
This product, when used with the changer tray, has been designed to conform to the Safety
Standard BS EN 12221-1:2000
A Mothercare changing mat is recommended for use with this dresser chest, with maximum
dimensions of 76cm x 50cm (29
Por favor, tómese unos minutos en leer esta guía de usuario.
Desembale cuidadosamente su producto en el suelo y familiaricese con las piezas,
comparándolas con el catálogo de piezas que sigue. No tire el embalaje hasta que esté seguro
de que tiene todas las piezas.
Este cambiador, cuando utilizado con la bandeja de cambiador, cumple con la norma de
seguridad BS EN 12221-1:2000
Se recomende utilizar un cojín cambiador Mothercare de tamaño máximo 76cm x 50cm, puesto
equitativamente entre las 4 barandas superiores.
½ x 19½ in.) Place the mat evenly between the 4 top barriers.
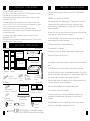
parts checklist catálogo de piezas
7
2
3 Drawer fronts
3 Frontales de cajón
3 Left sides
3 Lados izqo
3 Backs / 3 Fondos
3 Drawer bottoms
3 Bases de cajón
YOU WILL NEED a cross head (‘phillips’) screwdriver
SE VA A NECESITAR un destornillador de tipo "phillips"
3 Right sides
3 Lados dcho
6 Short screw bolts
6 Pernos como tornillos cortos
the dresser
el cambiador
the drawers
los cajones
12 Cams
12 Levas
12 Cam pins
12 Chavetas
This Dresser is not to be used for children over 12 months old or 9Kg, whichever
comes first.
WARNING! Do not leave the child unattended.
All Assembly fittings should be tightened properly. Screws and bolts should not be
loose because a child can squeeze parts of the body, or clothing (e.g. strings,
necklaces, ribbons for babies dummies etc.) could get caught. There would be a
danger of strangulation.
Be aware of the risk of open fire and other sources of strong heat, such as electric bar
fires, gas fires, etc. in the near vicinity of the changing unit.
An older child climbing on the dresser while a child is on the changing surface is
extremely dangerous and must be discouraged.
The Dresser must be used on a level and stable surface.
Once assembled, do not dismantle.
Keep away from trailing cords, drapes or flexes, and away from electric sockets.
Never move the Dresser with the child on it.
Este Cambiador no es para niños de más de 12 meses de edad o de más de 9Kg de
pesor.
¡AVISO! No deje nunca a su niño sin supervisión en la superficie del Cambiador.
Es preciso que todos los accesorios de montaje sean bien apretados. Con tornillos y
pernos que se han aflojado, pueda presionar el niño, partes del cuerpo, también ropa
(p.ej. cuerdas, collares, cintas para chupetes) puedan engancharse.
Es preciso disuadir el subir en el cambiador por un niño más grande mientras que un
niño esté en la superficie, porque es tan peligroso.
Es preciso utilizar el Cambiador sobre una superficie plana y estable.
Una vez montado, no desmonte el Cambiador.
Las fuentes de calor fuerte, p.ej chimeneas, estufas a gas o eléctricas en las
proximidades del Cambiador pueden ser peligrosas si se colocan cerca del
Cambiador.
Manténgalo alejado de cordones y cables eléctricos sueltos, cortinas y enchufes.
No mueva nunca el Cambiador mientras esté el niño en ello.
safety notes medidas de seguridad
5
Right side
Lateral dcho
Left Side
Lateral izqo
2 Back boards
2 entrepaños para
el fondo
1 Plinth
1 Plinto
8 Handles
8 Tiradores
1 Top
1 Parte superior
1 Back brace
1 Abrazadera trasera
1 Joining Strip
1 Ensambladura
trasera
1 Allen key
1 Llave Allen
4 Screw bolts
4 Pernos como tornillos
16 Handle bolts
16 Pernos para tiradores
4 Bolts
4 Pernos
1 Changing tray
1 Bandeja de cambiador

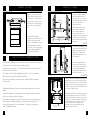
Using 4 screw bolts , attach the
back brace and plinth to both
ends, as shown. Take care that
the dowels fully enter the lower of
each pair of holes before
tightening the bolts.
Fije la abrazadera trasera y el
plinto a los dos extremos, tal
como se indica, utilizando 4
pernos como tornillos. Ten
cuidado de que las clavijas entrén
enteramente en el agujero más
bajo de cada par antes de apretar
los pernos.
1
the back brace and plinth
la abrazadera y el plinto
assembly montaje
3
6
3
Slide the 2 back boards down the
grooves near the rear edge of the
sides and into the groove in the
back brace. The joining strip
simply slides between them, in a
central position.
.
Pase los 2 antrepaños por las
ranuras cerca del borde trasero
de los extremos y hasta la ranura
en el borde de la abrazadera.
Deslize la ensambladura trasera
entre ellos, centralmente.
2
the back
el fondo
Before you use the changing tray,
fit the handles (in the same way as
for the drawers). Simply place the
tray evenly on the top of the chest.
Please be sure to read the safety
notes section of this guide before
use.
Antes de utilizar la bandeja
cambiador, sujete los tiradores (en
la misma manera que para los
cajones). Muy facilmente, se baje
la bandeja equitativamente sobre
la cómoda. Se lo ruega que véase
Vd. las medidas de seguridad en
esta guía antes del empleo.
11
the changing tray
la bandeja cambiador
assembly montaje
3
care of your product cuidado del producto
Periodically check all fittings to ensure none have come loose, and that there is no risk of
clothing or parts of the body becoming snagged or trapped.
If any part is missing or broken, do not use the dresser until the correct spare part has
been obtained from Mothercare.
Your dresser can be cleaned by wiping with a damp cloth. Do not use abrasives,
bleach, alcohol or ammonia based household polishes.
Take care when handling or moving the dresser. Careless handling can damage
wooden furniture.
Compruebe periódicamente todos los accesorios para asegurarse que no se hayan
aflojado.
No utilice el cambiador con cualquiera pieza rota o perdida, ni hasta que ha podido
sustituirla con la pieza correcta de Mothercare.
Puede limpiar su cambiador con un paño húmedo y secarla con un paño suave seco.
Nunca la limpie con limpiadores abrasivos ni a base de amoníaco, lejia o alcohol.
Tenga cuidado al manejar o mover el cambiador. Un manejo sin cuidado puede
dañar los muebles de madera.
4
Grooves
Ranuras
Plinth
Plinto
Back brace
Abrazadera
Back board
Entrepaño
Joining strip
Ensambladura
Back board
Entrepaño
Lower the top onto the assembly. ensuring that the
back boards enter the groove near the back edge,
and that it sits evenly on the sides. Secure with the
4 bolts through the bolt holes in the battens on the
underside of the top, and into the threaded inserts in
the side rails. Tighten the bolts.
Baje la parte superior hasta el montaje, asegurando
que los entrepaños del fondo entrén en la ranura
cerca de su borde trasero, y que se pare de modo
uniforme en los extremos. Apriete los 4 pernos por
los agujeros para pernos en las latas en la cara
inferior de la superficie, y hasta las tuercas
insertadas en los rascones superiores de los
extremos. Apriete los pernos.
3
the top
el superficie
Bolt holes
Agujeros
para pernos
Threaded
inserts
Tuercas
insertadas
Groove for back boards
Ranura para el fondo
Sides
Extremos

4 5
Use a screwdriver to thread the 4
cam pins into the holes in the
back of the drawer front. Tighten.
Utilizando un destornillador, fije los
4 chavejas en la superficie trasera
del frontal de cajón. Apriete.
4
the drawer front
el frente de cajón
assembly montaje
3
Insert the cams into the holes at
the front edge of each drawer
side, ensuring that the arrows are
pointing to the front.
Introduzca las levas en los
agujeros cerca del borde delantero
de los laterales de cajón,
asegurando que las flechas
indican el frontal.
5
the drawer sides
los laterales de cajón
Fit the holes in the front edges of
the sides over the cam pins, so
that the pins enter the cams. Note
that the grooves in the sides must
be facing inwards and must align
with those in the drawer front.
Using a screwdriver, turn the
cams clockwise, as far as you
can, in order to lock the joint.
Introduzca las chavejas montadas
en el frontal en los agujeros de los
bordes delanteros de los laterales,
hasta que entran en las levas.
Nótase que las ranuras en los
laterales deben mirar hacia el
interior del cajón, y también deben
alinear co la ranura en el frontal.
Con un destornillador, apriete las
levas en la dirección de las agujas
del reloj, para que se cierre la
juntura.
3
attach the sides
fije los laterales
6
front
frontal
arrow
flecha
Slide the drawer bottom into the
grooves in the drawer sides until it
sits completely in the groove in the
drawer front.
Introduzca la base de cajón en las
ranuras de los laterales, hasta que
se siente completamente en la
ranura del frontal.
7
the drawer bottom
la base de cajón
assembly montaje
3
8
the drawer back
el fondo del cajón
Attach the handles, using the
handle bolts through the holes in
the drawer front. Do not
overtighten.
Sujete los tiradores al frontal del
cajón, utilizando los pernos para
tiradores, por los dos agujeros en
ello y un destornillador. No se
aprieta demasiado.
3
the handles
los tiradores
9
Fit the drawer back as shown,
allowing the 2 dowels in each end
to enter the corresponding holes in
the drawer sides. Ensure that the
drawer bottom slots into the groove
on the drawer back. Secure with 2
short bolts, using the Allen key
provided.
Fije el fondo de cajón tal como se
indica, dejando entrar las clavijas
en su borde en los agujeros
correspondientes de los laterales, y
la base entrar en su ranura.
Asegure con los dos pernos cortos
y la llave Allen provecho.
Hook the two wheels on each side of the back
of the drawer over the wheels of the runners
attached to the dresser sides. The drawer
should glide in and out smoothly.
Enganche las dos ruedas en cada lado del
fondo del cajón por encima de las ruedas en los
patines encontrados en cada lado de los
extremos del cambiador. El cajón debe
deslizarse lisamente.
10
fit the drawers
introduzca los cajones
-
 1
1
-
 2
2
-
 3
3
-
 4
4


mothercare Stockholm Dresser Guía del usuario
- Tipo
- Guía del usuario
En otros idiomas
Documentos relacionados
-
mothercare Provencal Dresser Guía del usuario
-
-
-
-
-
-
-
-
-