Samsung HW-J6000 Manual de usuario

Tipo
Manual de usuario
Curved Soundbar
Imagine the possibilities
Thank you for purchasing this Samsung product.
To receive more complete service, please register your product at
www.samsung.com/register
User manual
HW-J6000
HW-J6001
2
GETTING STARTED
FEATURES
GETTING STARTED
Samsung Remote App
Control your Soundbar in the palm of your hand with the
Samsung Audio Remote App*. This convenient app is a
control hub for basic controls like power, volume, and
media controls, as well as custom settings like equalizer
setting.
Surround Sound Expansion
The Surround Sound Expansion feature adds depth and
spaciousness to your listening experience.
TV SoundConnect
Connect your TV and Soundbar easily through Bluetooth
with TV Sound Connect. The absence of trailing wires
between the Soundbar and TV allows you to showcase
the slim and sleek design of both systems, while
maintaining a clean look in your living environment. Easily
control the Soundbar and TV from a single TV remote.
HDMI
HDMI transmits video and audio signals simultaneously,
and provides a clearer picture.
The unit is also equipped with the ARC function which
lets you listen to sound from your TV through the
Soundbar via an HDMI cable. This function is only
available if you connect the unit to an ARC compliant TV.
USB Host Support
You can connect and play music files from external USB
storage devices such as MP3 players, USB flash
memory, etc. using the Soundbar's USB HOST function.
Bluetooth Function
You can connect a Bluetooth device to the Soundbar
and enjoy music with high quality stereo sound, all
without wires!
LICENSES
Manufactured under license from Dolby Laboratories.
Dolby and the double-D symbol are trademarks of Dolby
Laboratories.
For DTS patents, see http://patents.dts.com.
Manufactured under license from DTS Licensing Limited.
DTS, the Symbol, & DTS and the Symbol together are
registered trademarks, and DTS 2.0 Channel is a
trademark of DTS, Inc. © DTS, Inc. All Rights Reserved.
The terms HDMI and HDMI High-Definition Multimedia
Interface, and the HDMI Logo are trademarks or
registered trademarks of HDMI Licensing LLC in the
United States and other countries.
3
ENG
GETTING STARTED
SAFETY INFORMATION
SAFETY WARNINGS
TO REDUCE THE RISK OF ELECTRIC SHOCK, DO NOT REMOVE THE COVER (OR BACK).
NO USER-SERVICEABLE PARTS ARE INSIDE. REFER SERVICING TO QUALIFIED SERVICE PERSONNEL.
CAUTION
RISK OF ELECTRIC SHOCK
DO NOT OPEN
This symbol indicates “dangerous voltage”
inside the product that presents a risk of electric
shock or personal injury.
This symbol indicates important instructions
accompanying the product.
WARNING : To reduce the risk of fire or electric shock, do not expose this appliance to rain or moisture.
CAUTION : TO PREVENT ELECTRIC SHOCK, MATCH WIDE BLADE OF PLUG TO WIDE SLOT, FULLY INSERT.
This apparatus shall always be connected to a AC outlet with a protective grounding connection.
To disconnect the apparatus from the mains, the plug must be pulled out from the mains socket, therefore the
mains plug shall be readily operable.
CAUTION
Do not expose this apparatus to dripping or splashing. Do not put objects filled with liquids, such as vases on the
apparatus.
To turn this apparatus off completely, you must pull the power plug out of the wall socket. Consequently, the power
plug must be easily and readily accessible at all times.
4
GETTING STARTED
PRECAUTIONS
99.1mm 99.1mm
68.6
mm
99.1mm
Ensure that the AC power supply in your house complies with the power requirements listed on the identification
sticker located on the back of your product. Install your product horizontally, on a suitable base (furniture), with enough
space around it for ventilation (7~10 cm). Make sure the ventilation slots are not covered. Do not place the unit on
amplifiers or other equipment which may become hot. This unit is designed for continuous use. To fully turn off the
unit, disconnect the AC plug from the wall outlet. Unplug the unit if you intend to leave it unused for a long period of
time.
During thunderstorms, disconnect the AC plug from the
wall outlet. Voltage peaks due to lightning could damage
the unit.
Protect the product from moisture (i.e. vases), and
excess heat (e.g. a fireplace) or equipment creating
strong magnetic or electric fields. Disconnect the power
cable from the AC supply if the unit malfunctions. Your
product is not intended for industrial use. It is for
personal use only. Condensation may occur if your
product has been stored in cold temperatures. If
transporting the unit during the winter, wait approximately
2 hours until the unit has reached room temperature
before using.
Do not expose the unit to direct sunlight or other heat
sources. This could lead to overheating and cause the
unit to malfunction.
The batteries used with this product contain chemicals
that are harmful to the environment. Do not dispose of
batteries in the general household trash. Do not dispose
of batteries in a fire. Do not short circuit, disassemble, or
overheat the batteries. There is a danger of explosion if
the battery is incorrectly replaced. Replace only with the
same or equivalent type.
D
uri
ng
thu
nde
rstorms
dis
connect t
he
AC
plu
WARNING, DO NOT INGEST BATTERY, CHEMICAL BURN HAZARD, The remote control supplied with
this product contains a coin/button cell battery. If the coin/button cell battery is swallowed, it can cause
severe internal burns in just 2 hours and can lead to death. Keep new and used batteries away from
children. If the battery compartment does not close securely, stop using the product and keep it away
from children. If you think batteries might have been swallowed or placed inside any part of the body, seek immediate
medical attention.
5
ENG
GETTING STARTED
Figures and illustrations in this User Manual are
provided for reference only and may differ from
actual product appearance.
CONTENTS
2 GETTING STARTED
2 Features
3 Safety Information
6 What’s Included
7 DESCRIPTIONS
7 Top / Front Panel
8 Rear / Bottom Panel
9 Remote Control
11 INSTALLATION
11 Installing the Soundbar
11 Installing the Wall Mount
14 Attaching the Soundbar to your TV's Stand
14 Installing Soundbar to Free-Standing
15 CONNECTIONS
15 Connecting the Subwoofer
17 Connecting to a TV
17 Connections with TV Using HDMI (Digital)
Cable
17 Connections with TV Using Optical (Digital)
Cable
18 TV SoundConnect
20 Connections with External Device
20 HDMI Cable
20 Optical or AUX Cable
21 USB
23 FUNCTIONS
23 Input Mode
24 Bluetooth
27 Software Update
28 TROUBLESHOOTING
28 Troubleshooting
29 APPENDIX
29 Specifications
6
GETTING STARTED
WHAT’S INCLUDED
BEFORE READING THE USER’S MANUAL
Note the following terms before reading the user manual.
+ Icons used in this manual
Icon Term Definition
Caution
Indicates a situation where a function does not operate or settings may be canceled.
Note
Indicates tips or instructions on the page that help you operate a function.
Check for the supplied accessories shown below.
Remote Control /
Lithium Battery
(3V : CR2032)
Power Cord : 2EA DC Adapter HDMI Cable
USB Cable
User Manual Holder-Fix Mount : 2EA Bracket-Wall : 2EA
[ZW
Wall Mount Guide
The appearance of the accessories may differ slightly from the illustrations above.
Use the dedicated USB cable to connect external USB devices to the unit.
7
ENG
DESCRIPTIONS
TOP / FRONT PANEL
(Power) Button
Turns the power on and off.
VOL. - / +
Controls the volume level.
The numeric value of the volume level
appears in the front panel display.
Display
Displays the current mode.
(Source) Button
Selects the D.IN, AUX, HDMI, BT, TV, or
USB input.
While the unit is powered on, pressing
the
(Source) button for more than
3 seconds sets the button to act as
the
( Mute) button. To cancel the
( Mute) button setup, press the
(Source) button for more than 3
seconds again.
When you plug in the AC cord, the power key will work in 4 to 6 seconds.
When you turn on this unit, there will be a 4 to 5 second delay before it produces sound.
If you want to enjoy the sound only from the Soundbar, you must turn off the TV's speakers in the Audio
Setup menu of your TV. Refer to the owner's manual supplied with your TV.
DESCRIPTIONS
8
DESCRIPTIONS
REAR / BOTTOM PANEL
DC 14V
AUX IN
OPTICAL IN
HDMI IN
HDMI OUT
(TV-ARC)
5V 0.5A
DC14V
5V 0.5A
DC 14V
(Power Supply In)
Connect the DC power adaptor to the
power supply jack, and then connect the
AC power adaptor plug to a wall outlet.
(USB Port)
Connect USB devices here to play
files on the devices.
OPTICAL IN (D.IN)
Connect to the digital
(optical) output of an
external device.
HDMI OUT (TV-ARC)
Outputs digital video and
audio signals simultaneously
using an HDMI cable.
HDMI IN
Inputs digital video and audio
signals simultaneously using an
HDMI cable. Use when connecting
a supported external device.
AUX IN
Connect to the Analog output of an external
device.
LABEL
When disconnecting the power cable of the AC power adaptor from a wall outlet, pull the plug.
Do not pull the cable.
Do not connect this unit or other components to an AC outlet until all connections between components
are complete.
9
ENG
DESCRIPTIONS
REMOTE CONTROL
AUTO POWER
Press the
AUTO POWER
button to turn the Anynet+ function on or off.
(Default : Auto Power Link OFF, ON - ANYNET+ / OFF - POWER LINK or OFF
- ANYNET+ / ON - POWER LINK). The Anynet+ function lets you control the
Soundbar with the remote from an Anynet+ compatible Samsung TV. The
Soundbar must be connected to the TV via an HDMI cable.
* Auto Power Link
Synchronizes the Soundbar to a connected Optical source via the Optical
jack so it turns on automatically when you turn on your TV.
(See page 18)
Repeat
Press to set the Repeat function during music playback from a USB device.
OFF - REPEAT : Cancels Repeat Playback.
TRACK - REPEAT : Repeatedly play a track.
ALL - REPEAT : Repeatedly play all tracks.
RANDOM - REPEAT : Plays tracks in random order.
(A track that has already been played may be played again.)
Mute
You can turn the volume down to 0 with the push of a button.
Press again to restore the sound to the previous volume level.
SOURCE
Press to select a source connected to the Soundbar.
Skip Forward
If there is more than one file on the device you are playing, and you press
the $ button, the next file is selected.
SOUND CONTROL
Press to select TREBLE, BASS, or AUDIO SYNC. Then, use the
#
,
$
buttons to adjust the Treble, Bass volume from -6 to +6.
Press and hold the SOUND CONTROL button for about 5 seconds to adjust
the sound for each frequency band. 150Hz, 300Hz, 600Hz, 1.2KHz, 2.5KHz,
5KHz, 10KHz and SW are selectable and each can be adjusted to a setting
between -6 and +6.
If the Soundbar is connected to a digital TV and the video appears out of sync
with the audio, press the SOUND CONTROL button to sync the audio with the
video. Use the
#
,
$
buttons to set the audio delay between
0 ms and 300 ms. In USB mode, TV mode, and BT mode, the Audio Sync
function may not available.
Soundbar is a Samsung proprietary name.
Operate the TV using the TV's remote control.
10
DESCRIPTIONS
Bluetooth POWER
Press the Bluetooth POWER button on the remote to turn the Bluetooth
POWER On function on and off.
See pages 19 and 25 for details.
WOOFER
Press the WOOFER button. Then, use the
#
,
$
buttons to adjust the
Subwoofer volume from -12, -6 to +6.
SOUND
Surr.Sound adds depth and spaciousness to the sound. Pressing the
SOUND button repeatedly cycles through the Surr.Sound settings :
ON - SURROUND SOUND, OFF - SURROUND SOUND
Volume
Adjusts the volume level of the unit.
Power
Turns the Soundbar on and off.
SOUND EFFECT
You can select from 6 different sound modes - STANDARD (Original
Sound), MUSIC, VOICE, SPORTS, CINEMA, and NIGHT MODE
- depending on the content you want to listen to.
Select the STANDARD mode if you want to enjoy the original sound.
Play / Pause
Press the
&
button to pause a file temporarily.
Press the
&
button again to play the selected file.
Skip Back
If there is more than one file on the device you are playing, and you press
the
#
button, the previous file is selected.
INSTALLING THE BATTERY IN THE REMOTE CONTROL
1. Use a suitable coin to turn the
remote control's battery cover
counterclockwise to remove it
as shown in the figure above.
2. Insert a 3V lithium battery. Keep the
positive (+) pole facing up when inserting
the battery. Put the battery cover on and
align the '
' marks side by side as shown
in the figure above.
3. Use a suitable coin to
turn the remote control
battery cover clockwise
as far as it will go to fix it
in place.
11
ENG
INSTALLATION
INSTALLING THE SOUNDBAR
INSTALLING THE WALL MOUNT
+ Installation Precautions
Install on a vertical wall only.
For the installation, avoid a location with high temperature or humidity, or a wall that cannot sustain the weight of
the set.
Check the strength of the wall. If the wall is not strong enough to support the unit, reinforce the wall or install the
unit on a different wall that can support the unit's weight.
Purchase and use the fixing screws or anchors appropriate for the kind of wall you have (plaster board, iron board,
wood, etc.). If possible, fix the support screws into wall studs.
Purchase wall mounting screws according to the type and thickness of the wall you will mount the Soundbar on.
- Diameter : M5
- Length: L 35 mm or longer recommended.
Connect cables from the unit to external devices before you install it on the wall.
Make sure the unit is turned off and unplugged before you install it. Otherwise, it may cause an electric shock.
5 cm or more
1. Place the installation guide against the wall surface.
The installation guide must be level.
If the TV is mounted on the wall, install the Soundbar at least 5 cm below the TV.
INSTALLATION
12
INSTALLATION
Center Line
Center Line
2. Mark the location where the screws will go through on the wall, and then remove the installation guide. Next, drill
holes for the screws using an appropriately sized drill bit.
3. Fasten the Bracket-Wall (2ea) and screws to the marked locations.
4. Lift up the product after inserting the Bracket-Wall as shown.
13
ENG
INSTALLATION
DC 14V
AUX IN
OPTICAL IN
HDMI IN
HDMI OUT
(TV-ARC)
5V 0.5A
5. Insert and fasten Holder-Fix Mount into each hole on the product’s bottom side. The product is fixed to the
Bracket-Wall.
Do not hang onto the installed unit and avoid striking or dropping the unit.
Secure the unit firmly to the wall so that it does not fall off. If the unit falls off, it may cause an injury or
damage the product.
When the unit is installed on a wall, please make sure that children do not pull any of the connecting
cables, as it may cause it to fall.
For the optimal performance of a wall mount installation, install the speaker system at least 5 cm below the
TV, if the TV is mounted on the wall.
For your safety, if you do not mount the unit on the wall, install it on a secure, flat surface where it is unlikely
to fall.
14
INSTALLATION
ATTACHING THE SOUNDBAR TO YOUR TV'S STAND
You can attach the Soundbar to your TV's stand if you have a Samsung TV that has a stand that is compatible with this
Soundbar.
This Soundbar is compatible with model JU6700, JU6500 and JU7500, 48 inch, 55 inch and 65 inch,
JU6610 - 48 inch and 55 inch, 2015 Samsung curved TVs. Please visit the home page of Samsung
Electronics (www.Samsung.com) to see a detailed list of the compatible models.
This Soundbar cannot be installed to a non-compatible TV, in either form of TV mount or TV stand.
1. Align the Soundbar’s center with the center of the base of the TV, and then carefully push it onto the stand as far
as it will go, as shown in the illustration. Be careful not to unbalance the TV.
INSTALLING SOUNDBAR TO FREE-STANDING
1. Center the Soundbar on the flat area in front of the TV.
Install it on a level and firm surface.
15
ENG
CONNECTIONS
Do not connect the power cord of this product or your TV to a wall outlet until all connections between
components are complete.
Before moving or installing this product, be sure to turn off the power and disconnect the power cord.
CONNECTING THE SUBWOOFER
CONNECTING TO THE SUBWOOFER AUTOMATICALLY
The main unit and subwoofer should link (connect wirelessly) automatically when the main unit and subwoofer are
turned on.
If it is completely connected, the blue LED in the subwoofer stops blinking.
CONNECTING TO THE SUBWOOFER MANUALLY
The Subwoofer's linking ID is preset at the factory and the main unit and subwoofer should link (connect wirelessly)
automatically when the main unit and subwoofer are turned on. If the Link indicator does not light when the main unit
and subwoofer are turned on, please set the ID by following the procedure below.
POWER
1. Plug the power cords of the main unit and subwoofer into an AC wall outlet.
2. Press the ID SET button on the back of the subwoofer with a small, pointed object for 5 seconds.
The STANDBY indicator is turned off and the LINK indicator (Blue LED) blinks quickly.
3. While the main unit is powered off (in STANDBY mode), press and hold the
(Mute) on the remote control for 5
seconds.
4. The ID SET message appears on the Soundbar's display.
5. To finalize the link, turn the main unit’s power on while the subwoofer’s Blue LED blinks.
The main unit and the subwoofer should now be linked (connected).
The Link indicator (Blue LED) on the subwoofer should be on.
If the Link indicator is not solid blue, the linking process has failed. Turn off the main unit and start again from
Step 2.
You can enjoy better sound from the wireless subwoofer by selecting a Sound Effect.
(See page 10)
CONNECTIONS
16
CONNECTIONS
Before moving or installing the product, be sure to turn off the power and disconnect the power cord.
If the main unit is powered off, the wireless subwoofer will be in standby mode and the STANDBY LED on
the upper side will come on after the Link indicator (Blue LED) blinks for 30 seconds.
If you use a device that uses the same frequency (2.4GHz) as the Soundbar near the Soundbar,
interference may cause some sound interruption.
The transmission distance of the wireless signal between the main unit and subwoofer is about 10 meters,
but may vary depending on your operating environment. If a steel-concrete or metallic wall is between the
main unit and the wireless subwoofer, the system may not operate at all, because the wireless signal
cannot penetrate metal.
If the main unit doesn't make a wireless connection, follow steps 1-5 on the previous page to re-set the
connection between the main unit and wireless subwoofer.
The wireless receiving antenna is built into the wireless subwoofer. Keep the unit away from water and
moisture.
For optimal listening performance, make sure that the area around the wireless subwoofer location is clear
of any obstructions.
17
ENG
CONNECTIONS
CONNECTING TO A TV
CONNECTIONS WITH TV USING HDMI (DIGITAL) CABLE
DC 14V
AUX IN
OPTICAL IN
HDMI IN
HDMI OUT
(TV-ARC)
5V 0.5A
HDMI IN
HDMI OUT
(TV-ARC)
HDMI OUT
(TV-ARC)
HDMI Cable
1. Connect an HDMI cable from the HDMI OUT (TV-ARC) jack on the back of the product to the HDMI IN jack on
your TV.
2. Press the
(Source) button on the top panel of Soundbar or the SOURCE button on remote control to select
the D.IN mode.
HDMI is an interface that enables the digital transmission of video and audio data with just a single
connector.
If the TV provides an ARC port, connect the HDMI cable to the HDMI IN (ARC) port.
We recommend you use a coreless HDMI cable if possible. If you use a cored HDMI cable, use one whose
diameter is less than 14 mm.
Anynet+ must be turned on.
This function is not available if the HDMI cable does not support ARC.
CONNECTIONS WITH TV USING OPTICAL (DIGITAL) CABLE
DC 14V
AUX IN
OPTICAL IN
HDMI IN
HDMI OUT
(TV-ARC)
5V 0.5A
OPTICAL IN
OPTICAL OUT
Optical Cable
(not supplied)
1. Connect OPTICAL IN (Audio) on the Soundbar to the OPTICAL OUT jack of the TV.
2. Press the (Source) button on the top panel of Soundbar or the SOURCE button on remote control to select
the D.IN mode.
18
CONNECTIONS
+ Auto Power Link
If you have connected the main unit to a TV with a digital optical cable, set the Auto Power function ON to have
the Soundbar turn on automatically when you turn the TV on.
AUTO POWER LINK Display
ON
OFF - ANYNET+ / ON - POWER LINK
OFF
ON - ANYNET+ / OFF - POWER LINK
1. Connect the Soundbar and
a TV
with an Optical cable (not supplied).
2. Press the
(Source) button on the main unit’s top panel or the SOURCE button on the remote control to
select the
D.IN
mode.
3. Press the AUTO POWER button on the remote control to toggle the Auto Power Link function on and off.
Depending on the connected device, Auto Power Link may not function.
TV SOUNDCONNECT
You can enjoy TV sound through your Soundbar when it is connected to a Samsung TV that supports the TV
SoundConnect function.
Connect
1. Turn on the TV and Soundbar.
Turn on the menu of the TV.
Move to Speaker Settings on "Sound" tab.
Set the "Add New Device" menu to "On".
2. Press the (Source) button on the main unit’s top panel or the SOURCE button on the remote control to
select the TV mode.
3. On the TV, a message asking whether to enable the TV SoundConnect function appears.
4. Select <Yes> to finish connecting the TV and Soundbar using the TV's remote control.
19
ENG
CONNECTIONS
Switching the Soundbar’s mode from TV to another mode automatically terminates TV SoundConnect.
To connect the Soundbar to another TV, the existing connection must be terminated.
Terminate the connection to the existing TV, and then press the
&
button on the remote control for 5
seconds to connect to another TV.
The TV SoundConnect (SoundShare) function is supported by some Samsung TVs released from 2012 on.
Check whether your TV supports the TV SoundConnect (SoundShare) function before you begin. (For
further information, refer to the TV’s user manual.).
If your Samsung TV was released before 2014, check the SoundShare setting menu.
If the distance between the TV and Soundbar exceeds 10 meters, the connection may not be stable or the
audio may stutter. If this occurs, relocate the TV or Soundbar so that they are within operational range, and
then re-establish the TV SoundConnect connection.
TV SoundConnect Operational Ranges:
- Recommended pairing range: within 2 meters.
- Recommended operational range: within 10 meters.
The Play/Pause, Next, and Prev buttons on the Soundbar or Soundbar's remote do not control the TV.
+ Using the Bluetooth POWER On function
The Bluetooth POWER On function is available after you have successfully connected the Soundbar to a Bluetooth
compatible TV using TV SoundConnect. When the Bluetooth POWER On function is ON, turning the connected TV on
or off will turn the Soundbar's power on and off as well.
1. Connect the TV to your Soundbar using the TV SoundConnect function.
2. Press the Bluetooth POWER button on the Soundbar remote. ON - BLUETOOTH POWER appears on the
Soundbar's display.
ON - BLUETOOTH POWER : The Soundbar turns on and off when you turn the TV on or off.
OFF - BLUETOOTH POWER : The Soundbar only turns off when you turn the TV off.
This function is supported by some Samsung TVs released from 2013 on.
20
CONNECTIONS
CONNECTIONS WITH EXTERNAL
DEVICE
HDMI CABLE
HDMI is the standard digital interface for connecting to TVs, projectors, DVD players, Blu-ray players, set top boxes,
and more.
HDMI prevents any degradation to the signal due to conversion to analog and maintains the video and audio
quality of the original digital source.
Digital Devices
DC 14V
AUX IN
OPTICAL IN
HDMI IN
HDMI OUT
(TV-ARC)
5V 0.5A
HDMI OUT HDMI IN
HDMI IN
HDMI Cable
1. Connect an HDMI cable from the HDMI IN jack on the back of the product to the HDMI OUT jack on your digital
device.
2. Press the
(Source) button on the top panel of Soundbar or the SOURCE button on remote control to select
the HDMI mode.
OPTICAL OR AUX CABLE
This unit comes equipped with one optical in digital jack and one audio analog in jack, giving you two ways to
connect it to an External Devices.
AUX IN
AUX OUT
OPTICAL IN
OPTICAL OUT
BD / DVD player /
Set-top box /
Game console
Optical Cable
(not supplied)
Audio Cable
(not supplied)
21
ENG
CONNECTIONS
+ AUX Cable
1. Connect AUX IN (Audio) on the main unit to the AUDIO OUT jack of the Source Device.
2. Press the (Source) button on the top panel of Soundbar or the SOURCE button on remote control to select
the AUX mode.
+ Optical Cable
1. Connect OPTICAL IN (Audio) on the main unit to the OPTICAL OUT jack of the Source Device.
2. Press the (Source) button on the top panel of Soundbar or the SOURCE button on remote control to select
the D.IN mode.
USB
You can play music files located on USB storage devices through the Soundbar.
DC 14V
AUX IN
OPTICAL IN
HDMI IN
HDMI OUT
(TV-ARC)
5V 0.5A
5V 0.5A
Display
USB port
1. Connect the USB device to the USB port on the back of the product.
2. Press the (Source) button on the main unit’s top panel or the SOURCE button on the remote control to
select the USB mode.
3. USB appears on the display screen.
The Soundbar connection to the USB device is complete.
The Soundbar automatically turns off (Auto Power Off) if no USB device has been connected for more than 25
minutes.
+ Before you connect a USB device
Be aware of the following:
If the file name of a file or folder on a USB device exceeds 10 characters, it is not displayed on the Soundbar's
display.
This product may not be compatible with certain types of USB storage media.
The Soundbar supports the FAT16 and FAT32 file systems.
- The NTFS file system is not supported.
Connect USB devices directly to the USB port of the product. Otherwise, you may encounter a USB compatibility
problem.
Do not connect multiple storage devices to the product via a multi-card reader. It may not operate properly.
22
CONNECTIONS
Digital camera PTP protocols are not supported.
Do not remove the USB device while it is
transferring files.
DRM-protected music files (MP3, WMA) from commercial web sites cannot be played.
External HDDs are not supported.
Mobile phone devices are not supported.
File Format Type Compatibility list:
Extension Codec Sampling Rate Bitrate
*.mp3
MPEG 1 Layer2 16KHz ~ 48KHz 80kbps~320kbps
MPEG 1 Layer3 16KHz ~ 48KHz 80kbps~320kbps
MPEG 2 Layer3 16KHz ~ 48KHz 80kbps~320kbps
MPEG 2.5 Layer3 16KHz ~ 48KHz 80kbps~320kbps
*.wma
Wave_Format_MSAudio1 16KHz ~ 48KHz 56kbps~128kbps
Wave_Format_MSAudio2 16KHz ~ 48KHz 56kbps~128kbps
*.aac
AAC 16KHz ~ 96KHz 48kbps~320kbps
AAC-LC 16KHz ~ 96KHz
128kbps~192kbps
5.1ch 320kbps
HE-AAC 24KHz ~ 96KHz
48kbps~64kbps
5.1ch 160kbps
*.wav
- 16KHz ~ 48KHz up to 3000kbps
*.ogg
OGG 1.1.0 16KHz ~ 48KHz 50kbps~500kbps
*.flac
FLAC 1.1.0, FLAC 1.2.1 16KHz ~ 96KHz up to 3000kbps
If there are too many folders and files stored in the USB device, reading may take some time.
23
ENG
FUNCTIONS
INPUT MODE
Press the (Source) button on the main unit’s
top
p
anel or the
SOURCE button on the remote control to select
the mode you want.
Input mode Display
Optical Digital input
ARC (HDMI OUT) input
D.IN
AUX input
AUX
HDMI input
HDMI
BLUETOOTH mode
BT
TV SoundConnect
TV
USB mode
USB
AUTO POWER DOWN FUNCTION
The unit turns off automatically in the following situations.
D.IN / HDMI / BT / TV / USB / ARC Mode
- If there is no audio signal for 25 minutes.
AUX Mode
- If the AUX cable is disconnected for 25 minutes.
- If there is no KEY input for 8 hours when the AUX cable is connected. (Auto Power Down function can be
turned off only in that case.)
To turn off Auto Power Down function, while in AUX mode, press and hold the
&
button for 5 seconds.
ON - AUTO POWER DOWN / OFF - AUTO POWER DOWN appears on the display.
FUNCTIONS
24
FUNCTIONS
BLUETOOTH
You can connect a Bluetooth device to the Soundbar and enjoy music with high quality stereo sound, all without wires!
TO CONNECT THE SOUNDBAR TO A BLUETOOTH DEVICE
Check if the Bluetooth device supports the Bluetooth compliant stereo headset function.
Bluetooth device
Connect
1. Press the (Source) button on the main unit’s top panel or the
SOURCE button on the remote control to
select the BT mode.
You will see BT READY on the front display of the Soundbar.
2. Select the Bluetooth menu on the Bluetooth device you want to connect. (Refer to the Bluetooth device's user
manual.)
3. Select "[Samsung] Soundbar J-Series" from the list.
When the Soundbar is connected to the Bluetooth device, it will display [Bluetooth device name]
BT on
the front display.
The device name can only be displayed in English. An underline " _ " will be displayed if the name is not in
English.
If the Bluetooth device has failed to pair with the Soundbar, delete the previous "[Samsung] Soundbar
J-Series" found by the Bluetooth device and have it search for the Soundbar again.
4. Play music on the connected device.
You can listen to the music playing on the connected Bluetooth device over the Soundbar.
In BT mode, the Play / Pause / Next / Prev functions are not available. However, these functions are available
in Bluetooth devices supporting AVRCP.
25
ENG
FUNCTIONS
If asked for PIN code when connecting a Bluetooth device, enter <0000>.
Only one Bluetooth device can be paired at a time.
The Bluetooth connection will be terminated when you turn the Soundbar off.
The Soundbar may not perform Bluetooth search or connection correctly under the following
circumstances:
- If there is a strong electrical field around the Soundbar.
- If several Bluetooth devices are simultaneously paired with the Soundbar.
- If the Bluetooth device is turned off, not in place, or malfunctions.
- Note that such devices as microwave ovens, wireless LAN adaptors, fluorescent lights, and gas stoves
use the same frequency range as the Bluetooth device, which can cause electric interference.
The Soundbar supports SBC data (44.1kHz, 48kHz).
Connect only to a Bluetooth device that supports the A2DP (AV) function.
You cannot connect the Soundbar to a Bluetooth device that supports only the HF (Hands Free) function.
Once you have paired the Soundbar to a Bluetooth device, selecting "[Samsung] Soundbar J-Series"
from the device's scanned devices list will automatically change the Soundbar to BT mode.
Available only if the Soundbar is listed among the Bluetooth device’s paired devices. (The Bluetooth device
and the Soundbar must have been previously paired at least once.)
Soundbar will appear in the Bluetooth device’s searched devices list only when the Soundbar is displaying
BT READY.
In the TV SoundConnect mode, the Soundbar cannot be paired to another Bluetooth device.
BLUETOOTH POWER ON (BLUETOOTH POWER)
When the Bluetooth POWER On function is on and the Soundbar is turned off, if a previously paired Bluetooth device
tries to pair with the Soundbar, the Soundbar turns on automatically.
1. Press the Bluetooth POWER on the remote while the Soundbar is turned on.
2. ON - BLUETOOTH POWER appears on the Soundbar's display.
TO DISCONNECT THE BLUETOOTH DEVICE FROM THE
SOUNDBAR
You can disconnect the Bluetooth device from the Soundbar. For instructions, see the Bluetooth device's user manual.
The Soundbar will be disconnected.
When the Soundbar is disconnected from the Bluetooth device, the Soundbar will display
BT DISCONNECTED on the front display.
TO DISCONNECT THE SOUNDBAR FROM THE BLUETOOTH
DEVICE
Press the SOURCE button on the remote control or the (Source) button on the product's
top
panel to switch
from BT to another mode or turn off the Soundbar.
The connected Bluetooth device will wait a certain amount of time for a response from the Soundbar before
terminating the connection. (Disconnection time may differ, depending on the Bluetooth device)
26
FUNCTIONS
In Bluetooth connection mode, the Bluetooth connection will be lost if the distance between the Soundbar
and the Bluetooth device exceeds 10 meters.
The Soundbar automatically turns off after 25 minutes in the Ready state.
+ More About Bluetooth
Bluetooth is a technology that enables Bluetooth-compliant devices to interconnect easily with each other using a
short wireless connection.
A Bluetooth device may cause noise or malfunction, depending on usage, when:
- A part of your body is in contact with the receiving/transmitting system of the Bluetooth device or the
Soundbar.
- It is subject to electrical variation from obstructions caused by a wall, corner, or office partition.
- It is exposed to electrical interference from same frequency-band devices including medical equipment,
microwave ovens, and wireless LANs.
Pair the Soundbar with the Bluetooth device while they are close together.
The further the distance between the Soundbar and Bluetooth device, the worse the quality is.
If the distance exceeds the Bluetooth operational range, the connection is lost.
In poor reception areas, the Bluetooth connection may not work properly.
The Bluetooth connection only works when it is close to the unit. The connection will be automatically cut off if the
Bluetooth device is out of range. Even within range, the sound quality may be degraded by obstacles such as
walls or doors.
This wireless device may cause electric interference during its operation.
USING SAMSUNG AUDIO REMOTE APP
+ Install Samsung Audio Remote App
To control the product with your Smart Device and the Samsung Audio Remote app, download the Samsung Audio
Remote App through Google Play store.
ANDROID APP ON
Market search : Samsung Audio Remote
+ Accessing the Samsung Audio Remote App
After you install the Samsung Audio Remote app, follow the instructions in the app.
The APP function only supports mobile phone Android devices running Android OS 3.0 or later.
27
ENG
FUNCTIONS
SOFTWARE UPDATE
DC 14V
AUX IN
OPTICAL IN
HDMI IN
HDMI OUT
(TV-ARC)
5V 0.5A
5V 0.5A
Samsung may offer updates for the Soundbar's system firmware in the future.
If an update is offered, you can update the firmware by connecting a USB device with the firmware update stored on it
to the USB port on your Soundbar.
Note that if there are multiple update files, you must load them onto the USB device singly and use them to update the
firmware one file at a time.
Please visit samsung.com or contact the Samsung call center to receive more information about downloading updates
files.
Insert a USB device containing the firmware update into the USB port on the main unit.
Updating firmware may not work properly if audio files supported by the Soundbar are stored in the USB
storage device.
Do not disconnect the power or remove the USB device while updates are being applied. The main unit will
turn off automatically after completing the firmware update.
After the update, all settings are reset to their factory default settings. We recommend you write down your
settings so that you can easily reset them after the update. Note that updating firmware resets the
subwoofer connection too.
If connection to the subwoofer is not re-established automatically after the update, refer to page 15.
If the firmware fails to update, we recommend formatting the USB device in FAT16 and trying again.
Once the software update is completed, turn off the product and then press and hold the (
&
) button on
the remote control for more than 5 seconds. “INIT” appears on the display and the unit is powered off. The
upgrade is complete.
Do not format the USB device in the NTFS format. The Soundbar does not support the NTFS file system.
Depending on the manufacturer, some USB devices may not be supported.
28
TROUBLESHOOTING
TROUBLESHOOTING
Before requesting service, please check the following.
The unit will not turn on.
Is the power cord plugged into the outlet? Connect the power plug to the outlet.
A function does not work when the button is pressed.
Is there static electricity in the air? Disconnect the power plug and connect it again.
Sound is not produced.
Is the Mute function on?
Is the volume set to minimum?
Press the
( Mute) button to cancel the function.
Adjust the Volume.
The remote control does not work.
Are the batteries drained?
Is the distance between the remote control and main
unit too far?
Replace with new batteries.
Move closer to the unit.
The TV SoundConnect (TV pairing) failed.
Does your TV support TV SoundConnect?
Is your TV firmware the latest version?
Does an error occur when connecting?
Reset the TV mode and connect again.
TV SoundConnect is supported by some Samsung
TVs released from 2012 on. Check your TV to see if it
supports TV SoundConnect.
Update your TV with the latest firmware.
Contact the Samsung call center.
Press and hold the
&
button for 5 seconds to reset
the TV SoundConnect connection.
The red LED on the subwoofer blinks and the subwoofer is not producing sound.
Your subwoofer may not be connected to the
main body of the product.
Try to connect your subwoofer again.
(See Page 15)
The subwoofer drones and vibrates noticeably.
Try to adjust the vibration of your subwoofer.
Press the WOOFER button on your remote control to
adjust its value (between -12, -6 to +6.).
TROUBLESHOOTING
29
ENG
APPENDIX
SPECIFICATIONS
Model name
HW-J6000 / HW-J6001
GENERAL
USB
5V / 0.5A
Weight
Main Unit
2.7 kg
Subwoofer
(PS-WJ6000 / PS-WJ6001)
6.8 kg
Dimensions
(W x H x D)
Main Unit
1078 x 47.5 x 129 mm
Subwoofer
(PS-WJ6000 / PS-WJ6001)
452 x 335 x 154 mm
Operating Temperature Range
+5°C to +35°C
Operating Humidity Range
10 % to 75 %
AMPLIFIER
Rated Output
Power
Main Unit
22W/CH x 6, 4ohm, THD=10%, 1KHz
Subwoofer
(PS-WJ6000 / PS-WJ6001)
168W, 3ohm, THD=10%, 100Hz
S/N Ratio (Analog Input)
65 dB
Separation (1kHz)
65 dB
* S/N ratio, distortion, separation, and usable sensitivity are based on measurements using AES (Audio Engineering
Society) guidelines.
* Nominal specification
- Samsung Electronics Co., Ltd reserves the right to change the specifications without notice.
- Weight and dimensions are approximate.
- For the power supply and Power Consumption, refer to the label attached to the product.
a Open Source License Notice
- To send inquiries and requests regarding open sources, contact Samsung via Email
APPENDIX
Curved Soundbar
Imagine las posibilidades
Gracias por adquirir este producto Samsung.
Para recibir un servicio más completo, registre su producto en
www.samsung.com/register
Manual del usuario
HW-J6000
HW-J6001
Para evitar cualquier avería o daños, lea detalladamente este manual de instrucciones antes de
conectar y utilizar este aparato. Conserve el manual para referencia futura. (Sólo México)
2
INTRODUCCIÓN
CARACTERÍSTICAS
Samsung Remote App
Controle su Soundbar con la palma de la mano con la
Samsung Audio Remote App*. Esta práctica app es un
mando de control para funciones básicas como
encendido, volumen, controles de medios, así como
ajustes personalizados como ajuste del ecualizador.
Surround Sound Expansion
La función Surround Sound Expansion añade
profundidad y sensación de espacio a su experiencia
auditiva.
TV SoundConnect
Conecte su TV y la Soundbar fácilmente a través de
Bluetooth con TV SoundConnect. La ausencia de liosos
cables entre la Soundbar y el TV permite hacer gala del
diseño compacto y elegante de ambos sistemas al
mismo tiempo que da un muestra un aspecto despejado
a su espacio doméstico. Control sencillo de la Soundbar
y el TV desde un solo mando a distancia del TV.
HDMI
HDMI transmite simultáneamente señales de audio y de
video y proporciona una imagen más clara.
La unidad también está equipada con la función ARC
que le permite escuchar sonido del TV a través de la
Soundbar mediante un cable HDMI. Esta función sólo
está disponible si conecta la unidad a un televisor
compatible con ARC.
Soporte de USB Host
Puede conectar y reproducir archivos desde dispositivos
de almacenamiento externo USB como reproductores
MP3, memoria flash USB, etc. utilizando la función USB
HOST de Soundbar.
Función Bluetooth
Se puede utilizar para conectar el dispositivo Bluetooth al
Soundbar para poder disfrutar de la música con un
sonido estéreo de gran calidad, sin necesidad de cables.
LICENCIA
Fabricado con licencia de Dolby Laboratories. Dolby y el
símbolo de la doble D marcas comerciales de Dolby
Laboratories.
Para patentes de DTS, consulte http://patents.dts.com.
Fabricado con licencia de DTS Licensing Limited. DTS, el
símbolo, & DTS y el símbolo juntos son marcas
comerciales registradas y DTS 2.0 Channel es una
marca comercial de DTS, Inc. © DTS, Inc. Todos los
derechos reservados.
Los términos HDMI, HDMI High-Definition Multimedia
Interface y el logotipo de HDMI son marcas comerciales
o marcas registradas de HDMI Licensing LLC en
Estados Unidos y en otros países.
introducción
3
SPA
INTRODUCCIÓN
INFORMACIÓN DE SEGURIDAD
ADVERTENCIAS DE SEGURIDAD
PARA REDUCIR EL PELIGRO DE DESCARGA ELÉCTRICA, NO RETIRE LA TAPA (NI LA PARTE TRASERA).
NO CONTIENE ELEMENTOS QUE DEBA REEMPLAZAR EL USUARIO. EN CASO DE AVERÍA, SOLICITE LA AYUDA
DE PERSONAL ESPECIALIZADO.
PRECAUCIÓN
RIESGO DE ELECTROCUCION.
NO ABRIR.
Este símbolo indica que existe un voltaje
peligroso dentro de esta unidad que puede
producir una descarga eléctrica.
Este símbolo indica que existen instrucciones
importantes de funcionamiento y mantenimiento
en la documentación que se suministra con
esta unidad.
ADVERTENCIA : Para reducir el riesgo de incendio o de descarga eléctrica, no exponga este aparato a la lluvia ni a
lahumedad.
PRECAUCIÓN : PARA EVITAR DESCARGAS ELÉCTRICAS, INTRODUZCA TOTALMENTE EL ENCHUFE.
Este aparato deberá conectarse siempre a una toma de alimentación principal con una conexión a tierra de
protección.
Para desconectar el aparato de la fuente de alimentación, el enchufe deberá ser desconectado de la toma principal,
lo que significa que deberá disponer de fácil acceso al enchufe principal.
PRECAUCIÓN
No debe exponer este aparato a gotas ni salpicaduras de agua. No coloque en el aparato objetos con líquido,
como jarrones.
Para apagar completamente este aparato, debe desconectar su enchufe de la toma de corriente. Por tanto, el
enchufe debe estar accesible en todo momento.
4
INTRODUCCIÓN
PRECAUCIONES
99.1mm 99.1mm
68.6
mm
99.1mm
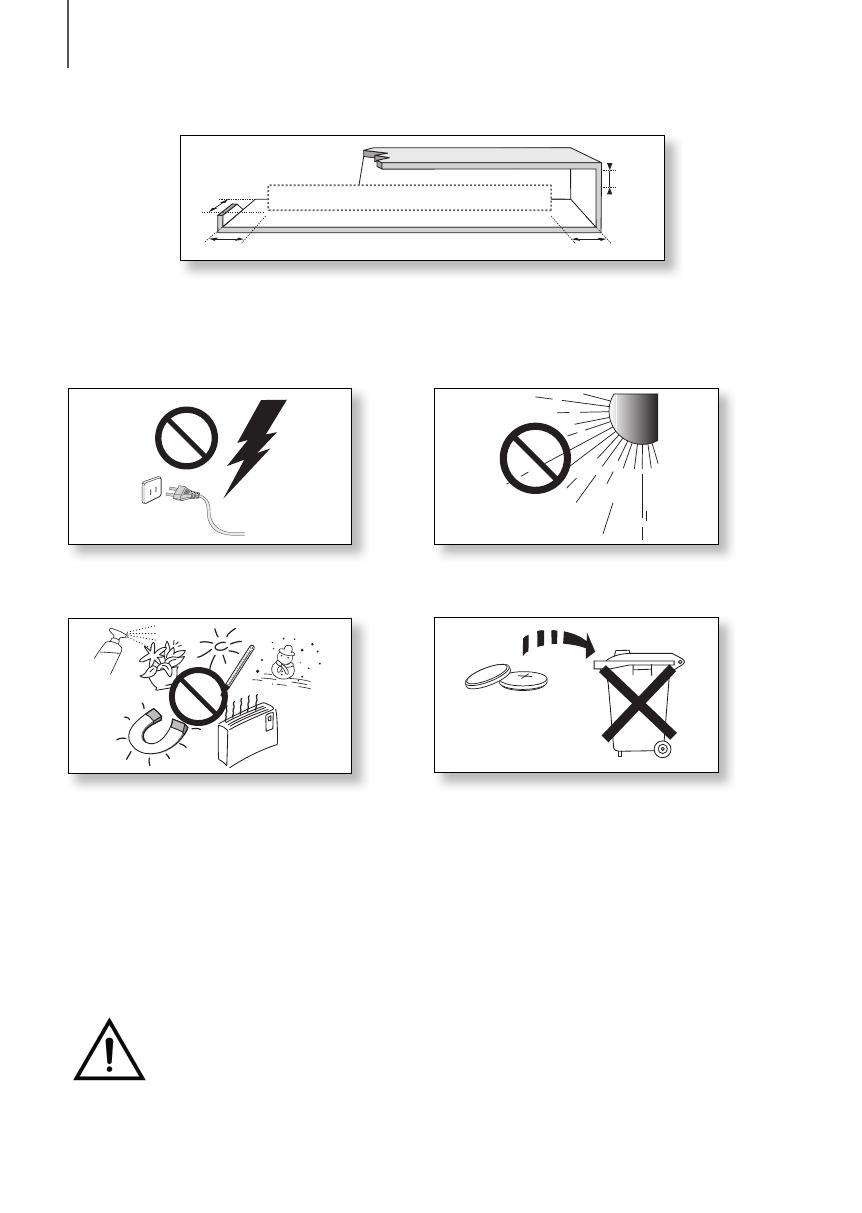
Asegúrese de que la toma de CA de su casa cumpla con los requisitos indicados en la pegatina de identificación
de la parte posterior del producto. Instale el producto horizontalmente, sobre una base adecuada (mueble), con
espacio suficiente a su alrededor para ventilación 7~10 cm. Asegúrese de que los orificios de ventilación no
queden tapados. No coloque la unidad sobre amplificadores o cualquier otro equipo que pueda generar calor.
Esta unidad se ha diseñado para utilizarse de forma continua. Para apagar completamente la unidad, desconecte
el enchufe de CA de la toma de corriente. Desenchufe la unidad si no va utilizarla durante un tiempo prolongado.
Durante tormentas, desconecte el enchufe principal de
CA de la toma de corriente. Los picos de tensión
debidos a rayos podrían dañar la unidad.
Proteja el reproductor contra la humedad por ejemplo,
jarrones) y calor excesivo (p. ej.: chimeneas) o equipos
que creen campos magnéticos o eléctricos potentes.
Desconecte el cable de alimentación de la fuente de CA
si la unidad no funciona correctamente. El producto no
ha sido creado para uso industrial. Este producto es sólo
para uso personal. Es posible que se produzca
condensación en el producto o en el disco en
situaciones de temperaturas bajas. Si tiene que
transportar el producto durante el invierno, espere 2
horas aproximadamente antes de usarlo hasta que la
unidad haya alcanzado la temperatura de la sala.
No exponga la unidad a la luz directa del sol ni a otras
fuentes de calor. Podrían sobrecalentarla y provocar una
avería en la unidad.
Las pilas utilizadas en este producto contienen
productos químicos que son peligrosos para el medio
ambiente. No tire las pilas con el resto de la basura
doméstica. No deseche las pilas en el fuego. No
cortocircuite, desmonte ni sobrecaliente las baterías. Si
las pilas se reemplazan de manera incorrecta existe
peligro de explosión. Reemplácelas únicamente por el
mismo tipo o un tipo equivalente.
ADVERTENCIA, NO INGERIR LA PILA, PELIGRO DE QUEMADURAS QUÍMICAS,
[Suministradas con el mando a distancia] Este producto contiene una pila de botón.
Si se ingiere la pila de botón, puede causar serias quemaduras internas en solo 2 horas y puede
provocar la muerte. Mantenga las pilas nuevas y las usadas lejos del alcance de los niños. Si el
compartimento de la pila no se cierre con seguridad, deje de utilizar el producto y aléjelo del alcance de los niños. Si
cree que existe la posibilidad de que las pilas hayan sigo ingeridas o se hayan introducido en algún órgano corporal,
busque atención médica inmediata.
5
SPA
INTRODUCCIÓN
ÍNDICE
2 INTRODUCCIÓN
2 Características
3 Información de seguridad
6 Componentes
7 DESCRIPCIÓN
7 Panel Superior/Frontal
8 Panel Posterior/Inferior
9 Mando a distancia
11 INSTALACIÓN
11 Instalación de la Soundbar
11 Precauciones en la instalación
14 Acoplamiento de la Soundbar en la base del
TV
14 Instalación de la Soundbar de forma
independiente
15 CONEXIONES
15 Conexión del subwoofer
17 Conexión a un TV
17 Conexiones con el TV utilizando un cable
HDMI (Digital)
17 Conexiones con el TV utilizando un cable
óptico (Digital)
18 TV SoundConnect
20 Conexiones con el dispositivo externo
20 Cable HDMI
20 Cable Óptico o AUX
21 USB
23 FUNCIONES
23 Modo De Entrada
24 Bluetooth
27 Actualización de Software
28 SOLUCIÓN DE PROBLEMAS
28 Solución de problemas
29 APÉNDICE
29 Especificaciones
Las figuras e ilustraciones de este Manual del
usuario se facilitan sólo como referencia y pueden
diferir del aspecto real del producto.
6
INTRODUCCIÓN
COMPONENTES
ANTES DE LEER EL MANUAL DEL USUARIO
Tenga en cuenta lo siguiente antes de leer el manual del usuario.
+ Iconos que se utilizarán en el manual
Icono Término Definición
Precaución
Indica una situación en la que la función no está operativa o pueden cancelarse los
ajustes.
Nota
Esto implica sugerencias o instrucciones en la página que ayudan a utilizar cada función.
Compruebe los accesorios suministrados que se incluyen a continuación.
Mando a distancia /
Pila de litio (3V : CR2032)
Cable de Alimentación : 2 Adaptador de CC Cable HDMI
Cable USB Manual del usuario
Fijación de soporte para
pared : 2
Soporte de pared : 2
[ZW
Guía de montaje en pared
El aspecto de los accesorios puede diferir ligeramente de las ilustraciones anteriores.
Utilice el cable USB dedicado para conectar los dispositivos USB externos a la unidad.
7
SPA
DESCRIPCIÓN
PANEL SUPERIOR/FRONTAL
Botón (Alimentación)
Enciende y apaga la unidad Soundbar.
VOL. - / +
Controla el nivel del volumen.
Aparece valor numérico del nivel de
volumen en la pantalla del panel frontal.
Pantalla
Muestra el modo actual.
Botón (Fuente)
Selecciona la entrada D.IN, AUX, HDMI,
BT, TV, USB.
Con la unidad encendida, si presiona
el botón
(Fuente) por más de 3
segundos el botón se define para que
actúe como el botón
(Silencio).
Para cancelar la configuración del
botón
(Silencio) presione de
nuevo el botón
(Fuente) por más
de 3 segundos.
Cuando enchufe el cable de CA, la tecla de alimentación funcionará transcurridos entre 4 y 6 segundos.
Cuando encienda la unidad, pasarán entre 4 y 5 segundos antes de poder reproducir sonido.
Para disfrutar del sonido sólo desde Soundbar, debe apagar los altavoces del TV en el menú Audio Setup
del TV. Consulte el manual del TV que se facilita con el TV.
descripción
8
DESCRIPCIÓN
PANEL POSTERIOR/INFERIOR
DC 14V
AUX IN
OPTICAL IN
HDMI IN
HDMI OUT
(TV-ARC)
5V 0.5A
DC14V
5V 0.5A
DC 14V
(Entr. Alim. Eléctrica)
Conecte el adaptador de alimentación de
CC a la toma de alimentación y, a
continuación, enchufe el adaptador de
alimentación de CA a la toma de corriente.
(Puerto USB)
Conecte aquí los dispositivos USB
para reproducir los archivos de los
dispositivos.
OPTICAL IN (D.IN)
Se conecta a la salida
digital (óptico) de un
dispositivo externo.
HDMI OUT (TV-ARC)
Genera la salida
simultáneamente de señales
digitales de video y audio
utilizando un cable HDMI.
HDMI IN
Introduce simultáneamente señales
digitales de video y audio utilizando
un cable HDMI. Utilícelo al conectar
un dispositivo externo compatible.
AUX IN
Se conecta a la salida analógica de un
dispositivo externo.
ETIQUETA
Al desconectar el cable de alimentación del adaptador de alimentación de CA, sujete el enchufe.
No tire del cable.
No conecte esta unidad u otros componentes a la toma de CA hasta haber realizado todas las conexiones
entre componentes.
9
SPA
DESCRIPCIÓN
MANDO A DISTANCIA
AUTO POWER
Presione el botón AUTO POWER para activar o desactivar la función Anynet+.
(Por defecto : Auto Power Link OFF, ON - ANYNET+ / OFF - POWER LINK u
OFF - ANYNET+ / ON - POWER LINK).
La función Anynet+ permite controlar
la Soundbar con el mando a distancia desde un TV Samsung compatible con
Anynet+. La Soundbar debe conectarse al TV a través de un cable HDMI.
* Auto Power Link
Sincroniza la Soundbar a la fuente óptica conectada a través de la toma
óptica para que se encienda automáticamente al encender el TV.
(Consulte la página 18)
Repetir
Puede definir la función Repetir durante la reproducción de música desde un
dispositivos USB.
OFF - REPEAT : Cancela la repetición de reproducción.
TRACK - REPEAT : Reproduce de forma repetida una pista.
ALL - REPEAT : Reproduce todas las pistas de forma repetida.
RANDOM - REPEAT : Reproduce las pistas en forma aleatoria.
(Una pista ya reproducida puede reproducirse de nuevo.)
Silencio
Puede bajar el volumen a 0 con la pulsación de un botón. Se pulsa de nuevo
para recuperar el sonido con el nivel de volumen anterior.
SOURCE
Se presiona para seleccionar una fuente conectada a la Soundbar.
Salto adelante
Cuando hay dos o más archivos en el dispositivo que está reproduciendo y
presiona el botón $, se selecciona el archivo siguiente.
SOUND CONTROL
Se presiona para seleccionar TREBLE, BASS o AUDIO SYNC.
A continuación, utilice los botones
#
,
$
para ajustar el volumen de agudos o
graves de -6 a +6.
Mantenga presionado el botón SOUND CONTROL por unos 5 segundos para
ajustar el sonido de cada banda de frecuencia. Es posible seleccionar y definir
150 Hz, 300 Hz, 600 Hz, 1,2 KHz, 2,5 KHz, 5 KHz, 10 KHz y SW con un ajuste
entre -6 y +6.
Si la Soundbar está conectada a un TV digital y el video aparece desincronizado
con el audio, presione los botones SOUND CONTROL para sincronizar el
audio con el video. Utilice los botones #,$ para definir la demora de audio
entre 0 ms y 300 ms. En modo USB, modo TV y modo BT, es posible que la
función de sincronización de audio no esté operativa.
La Soundbar es una denominación común de Samsung.
Controle el TV utilizando el mando a distancia del TV.
10
DESCRIPCIÓN
Bluetooth POWER
Presione el botón Bluetooth POWER del mando a distancia para activar y
desactivar la función de encendido mediante Bluetooth POWER On.
Consulte de la página 19 a la 25 para más detalles.
WOOFER
Presione el botón WOOFER. A continuación, utilice los botones
#
,
$
para
ajustar el volumen del Subwoofer entre -12, -6 y +6.
SOUND
Surr.Sound añade profundidad y sensación de espacio al sonido. Si se presiona
el botón
SOUND de forma repetida, se pasa cíclicamente por los ajustes
de Surr.Sound: ON - SURROUND SOUND, OFF - SURROUND SOUND
Volumen
Ajusta el nivel de volumen de la unidad.
Alimentación
Enciende y apaga la unidad Soundbar.
SOUND EFFECT
Puede seleccionar entre 6 modos de sonido diferentes:
STANDARD (Sonido Original), MUSIC, VOICE, SPORTS, CINEMA y
NIGHT MODE según el tipo de fuentes que desee disfrutar.
Seleccione el modo STANDARD si desea disfrutar del sonido original.
Reproducir/Pausa
Presione el botón & para detener temporalmente la reproducción del
archivo. Presione de nuevo el botón & para reproducir el archivo
seleccionado.
Salto atrás
Cuando hay dos o más archivos en el dispositivo que está reproduciendo y
presiona el botón #, se selecciona el archivo anterior.
INSTALACIÓN DE LAS PILAS EN EL MANDO A DISTANCIA
1. Utilice una moneda adecuada
para girar la tapa de la pila del
mando a distancia hacia la
izquierda para extraerla como
se muestra en la figura.
2. Inserte una pila de litio de 3V.
Mantenga el polo positivo (+) hacia
arriba al insertar la pila. Coloque la
tapa de la pila y alinee las marcas
'●' como se muestra en la figura.
3. Utilice una moneda adecuada
para girar la tapa de la pila del
mando a distancia a la
derecha lo máximo posible
hasta colocarla en su sitio.
11
SPA
INSTALACIÓN
INSTALACIÓN DE LA SOUNDBAR
INSTALACIÓN DEL SOPORTE DE PARED
+ Precauciones en la instalación
Se instala sólo en una pared.
En la instalación, evite lugares con altas temperaturas o humedad o paredes que no soporten el peso del equipo.
Compruebe la solidez de la pared. Si la pared no es lo suficientemente sólida para soportar la unidad, refuerce la
pared o instale la unidad en otra pared que pueda soportar su peso.
Compre y utilice los tornillos de fijación o los tacos apropiados para el tipo de pared (pladur, hierro, madera, etc.).
Si es posible, fije los tornillos del soporte con tacos.
Compre los tornillos de montaje en pared según el tipo y el grosor de la pared en la que va a montar la Soundbar.
- Diámetro : M5
- Longitud: se recomienda L 35 mm o superior.
Conecte los cables desde la unidad a los dispositivos externos antes de instalarlo en la pared.
Asegúrese de que esté apagado y desenchufado antes de instalarlo. De lo contrario, podría provocar una
descarga eléctrica.
5 cm o más
1. Coloque la guía de instalación contra la superficie de la pared.
La guía de instalación debe estar nivelada.
Si el TV está montado en la pared, instale la Soundbar al menos 5 cm por debajo del TV.
INSTALACIÓN
12
INSTALACIÓN
Center Line
Center Line
2. Marque los puntos en los que se colocarán los tornillos en la pared utilizando un lápiz y retire la guía de instalación.
A continuación, haga los orificios para los tornillos utilizando una broca del tamaño adecuado.
3. Fije los Soporte de pared (2) y los tornillos en los puntos indicados.
4. Levante el producto después de insertar el Soporte de pared como se muestra.
13
SPA
INSTALACIÓN
DC 14V
AUX IN
OPTICAL IN
HDMI IN
HDMI OUT
(TV-ARC)
5V 0.5A
5. Inserte y apriete el Fijación de soporte para pared en cada orificio de la parte inferior del producto. El producto
se acopla al Soporte de pared.
No cuelgue nada de la unidad instalada y evite cualquier impacto o caída de la unidad.
Fije bien la unidad a la pared para que no se caiga. Si la unidad se cae, puede provocar lesiones
personales o daños en el producto.
Una vez instalada la unidad en la pared, evite que los niños tiren de los cables de conexión.
Para un rendimiento óptimo de la instalación del soporte de pared, instale el sistema de bocinas al menos
5 cm debajo del TV, si el TV está montado en la pared.
Por su seguridad, si no monta la unidad en la pared, instálela en una superficie nivelada segura para evitar
caídas.
14
INSTALACIÓN
ACOPLAMIENTO DE LA SOUNDBAR EN LA BASE DEL TV
Puede acoplar la Soundbar en la base del TV si tiene un TV Samsung con una base compatible con esta Soundbar.
Esta Soundbar es compatible con los TV curvos de Samsung, modelos JU6700, JU6500 y JU7500, de
48, 55 y 65 pulgadas, y el modelo JU6610 de 48 y 55 pulgadas de 2015. Visite la página de inicio de
Samsung Electronics (www.Samsung.com) para ver la lista detallada de los modelos compatibles.
Esta Soundbar no se puede instalar en un TV no compatible, ya sea en forma de soporte de TV o base de
TV.
1. Alinee el centro de la Barra de sonido con el centro de la base del TV e insértela con mucho cuidado en la base
todo lo posible, como se muestra en la ilustración. Tenga cuidado de no desequilibrar el TV.
INSTALACIÓN DE LA SOUNDBAR DE FORMA
INDEPENDIENTE
1. Centre la Barra de sonido en la zona plana situada frente al TV.
Instálelo en una superficie plana.
15
SPA
CONEXIONES
No conecte el cable de alimentación de este producto del TV a la toma de corriente hasta realizar todas las
conexiones entre componentes.
Antes de trasladar o instalar este producto, asegúrese de apagar y desconectar el cable de alimentación.
CONEXIÓN DEL SUBWOOFER
CONEXIÓN AUTOMÁTICA AL SUBWOOFER
La unidad principal y el subwoofer deben vincularse (conectarse de forma inalámbrica) automáticamente cuando se
encienda la unidad principal y el subwoofer.
Si está completamente conectado, el LED azul del subwoofer deja de parpadear.
CONEXIÓN MANUAL AL SUBWOOFER
El ID de enlace del Subwoofer viene predefinido de fábrica y la unidad principal y el subwoofer deben conectarse
automáticamente (conexión inalámbrica) cuando la unidad principal y el subwoofer están encendidos. Si el indicador de
Link no se enciende al encender la unidad principal y el subwoofer, defina el ID siguiendo el siguiente proceso.
POWER
1. Enchufe los cables de alimentación de la unidad principal y del subwoofer a la toma de CA.
2. Presione el botón ID SET de la parte trasera del subwoofer con un objeto punzante pequeño durante 5 segundos.
El indicador STANDBY se apaga y el indicador LINK (LED azul) parpadea de forma rápida.
3. Con la unidad apagada (en modo ESPERA), mantenga presionado el botón
(Silencio)
del mando a distancia
por 5 segundos.
4. Aparece el mensaje ID SET en la pantalla de la Soundbar.
5. Para finalizar la conexión, encienda la unidad principal mientras parpadea el LED azul del subwoofer.
Ahora deben estar vinculados la unidad principal y el subwoofer (conectados).
El indicador de enlace (LED azul) del subwoofer debería aparecer iluminado.
Si el indicador Link se ilumina en azul de forma constante, se ha producido un error en el proceso de vinculación.
Apague de nuevo la unidad principal y empiece de nuevo a partir del paso 2.
Puede disfrutar de un mejor sonido en el subwoofer inalámbrico seleccionando el efecto de sonido. (Consulte
la página 10)
conexiones
16
CONEXIONES
Antes de trasladar o instalar el producto, asegúrese de apagar y desconectar el cable de alimentación.
Si está apagada la unidad principal, el subwoofer estará en modo de espera y se encenderá el LED de
STANDBY de la parte superior después de que el indicador Link (LED azul) parpadee durante 30
segundos.
Si utiliza un dispositivo que use la misma frecuencia (2,4 GHz) que la Soundbar cerca de la Soundbar, es
posible que se produzcan interferencias y la interrupción del sonido.
La distancia de transmisión de la señal inalámbrica entre la unidad principal y el subwoofer es de 10 m
pero puede variar según el entorno de funcionamiento.
Si entre la unidad principal y el subwoofer inalámbrico se encuentra una pared de acero-hormigón o una
pared metálica, es posible que el sistema no funcione en absoluto, porque la señal inalámbrica no puede
traspasar el metal.
Si la unidad principal no realiza la conexión inalámbrica, siga los pasos del 1 al 5 de la página anterior para
restablecer la conexión entre la unidad principal y el subwoofer inalámbrico.
La antena de recepción inalámbrica está incorporada en el subwoofer inalámbrico. Mantenga la unidad
alejada del agua y de la humedad.
Para un rendimiento óptimo de la audición, asegúrese de que el área situada alrededor de la localización
del subwoofer inalámbrico no tenga ninguna obstrucción.
17
SPA
CONEXIONES
CONEXIÓN A UN TV
CONEXIONES CON EL TV UTILIZANDO UN CABLE HDMI
(DIGITAL)
DC 14V
AUX IN
OPTICAL IN
HDMI IN
HDMI OUT
(TV-ARC)
5V 0.5A
HDMI IN
HDMI OUT
(TV-ARC)
HDMI OUT
(TV-ARC)
Cable de HDMI
1. Conecte un cable HDMI desde la toma HDMI OUT (TV-ARC) de la parte trasera del producto a la toma HDMI IN
del TV.
2. Presione el botón
(Fuente) del panel superior de la unidad principal o el botón SOURCE del mando a
distancia para seleccionar el modo D.IN.
HDMI es una interfaz que permite la transmisión digital de datos de video y audio con un conector único.
Si el TV proporciona un puerto ARC, conecte el cable HDMI al puerto HDMI IN (ARC).
Se recomienda utilizar un cable HDMI inalámbrico si fuera posible. Si se utiliza un cable HDMI con núcleo,
utilice uno cuyo diámetro sea inferior a 14 mm.
Anynet+ debe estar activado.
La función no está disponible si el cable HDMI no admite ARC.
CONEXIONES CON EL TV UTILIZANDO UN CABLE ÓPTICO
(DIGITAL)
DC 14V
AUX IN
OPTICAL IN
HDMI IN
HDMI OUT
(TV-ARC)
5V 0.5A
OPTICAL IN
OPTICAL OUT
Cable Óptico
(no suministrado)
1. Conecte OPTICAL IN (Audio) de la Soundbar a la toma OPTICAL OUT del TV.
2. Presione el botón (Fuente) del panel superior de la unidad principal o el botón SOURCE del mando a
distancia para seleccionar el modo D.IN.
18
CONEXIONES
+ Auto Power Link
Si ha conectado la unidad principal a un TV con un cable óptico digital, active la función de encendido
automático para que la Barra de sonido se encienda automáticamente cuando se encienda el TV.
AUTO POWER LINK Pantalla
ACT
OFF - ANYNET+ / ON - POWER LINK
DES
ON - ANYNET+ / OFF - POWER LINK
1. Conecte la Soundbar y un TV con un cable óptico. (no suministrado)
2. Presione el botón
(Fuente) del panel superior de la unidad principal o el botón SOURCE del mando a
distancia para seleccionar el modo
D.IN
.
3. Presione el botón AUTO POWER del mando a distancia para activar y desactivar la función Auto Power
Link.
Según el dispositivo conectado, es posible que Auto Power Link no funcione.
TV SOUNDCONNECT
Puede disfrutar del sonido del TV a través de la Soundbar conectada a un TV Samsung compatible con la función
TV SoundConnect.
Conectar
1. Encienda el TV y la Soundbar.
Abra el menú del TV.
Vaya a los ajustes de los altavoces en la ficha "Sonido".
Establezca el menú "Añadir nuevo dispositivo" en "Act".
2. Presione el botón (Fuente) del panel superior de la unidad principal o el botón SOURCE del mando a
distancia para seleccionar el modo TV.
3. En el TV, aparece un mensaje preguntando si activar la función TV SoundConnect.
4. Seleccione <> para terminar de conectar el TV y la Soundbar con el mando a distancia del TV.
19
SPA
CONEXIONES
El cambio del modo de Soundbar del TV a otro, termina automáticamente TV SoundConnect.
Para conectar a otro TV distinto al conectado, debe terminarse la conexión existente.
Termine la conexión al TV existente y presione el botón
&
del mando a distancia por 5 segundos para
conectar a otro TV.
La función TV SoundConnect (SoundShare) es compatible con algunos TV Samsung comercializados a
partir de 2012. Compruebe si el TV es compatible con la función TV SoundConnect (SoundShare) antes
de empezar. (Para obtener información adicional, consulte el manual de usuario del TV.)
Si su TV Samsung se comercializó antes de 2014, compruebe el menú de ajustes de SoundShare.
Si la distancia entre el TV y la Soundbar supera los 10 m, es posible que la conexión no sea estable o el
sonido se interrumpa. Si sucede esto, reubique el TV o la Soundbar de forma que se encuentre dentro del
campo de funcionamiento y restablezca la conexión de TV SoundConnect.
Disatancia de funcionamiento de TV SoundConnect:
- Campo de emparejamiento recomendado: no más de 2 m
- Alcance de funcionamiento recomendado: no más de 10 m
Los botones Reproducir/Pausa, Siguiente y Anterior de la Barra de sonido o el mando a distancia de la
Barra de sonido no controlan el TV.
+ Utilización de la función de Bluetooth POWER On
La función Bluetooth POWER On está disponible después de haber conectado correctamente la Soundbar a un TV
compatible con Bluetooth utilizando TV SoundConnect. Cuando esté activada la función Bluetooth POWER On,
encender o apagar el TV conectado, encenderá y apagará también la Soundbar.
1. Conecte el TV a la Soundbar utilizando la función TV SoundConnect.
2. Presione los botones Bluetooth POWER de la Soundbar y del mando a distancia. ON - BLUETOOTH POWER
aparece en la pantalla de la Soundbar.
ON - BLUETOOTH POWER : La Soundbar se enciende y se apaga cuando se enciende o se apaga el TV.
OFF - BLUETOOTH POWER : La Soundbar solo se apaga cuando se apaga el TV.
Esta función solo es compatible con algunos TVs Samsung comercializados a partir de 2013.
20
CONEXIONES
CONEXIONES CON EL DISPOSITIVO
EXTERNO
CABLE HDMI
HDMI es una interfaz digital estándar para conectar a dispositivos como un TV, un proyector, un reproductor de DVD,
un reproductor Blu-ray, un descodificador, etc.
Debido a que HDMI transmite la señal digital con la máxima calidad, puede disfrutar de video y audio superior, con la
misma calidad que en la fuente digital original.
Dispositivos
Digitales
DC 14V
AUX IN
OPTICAL IN
HDMI IN
HDMI OUT
(TV-ARC)
5V 0.5A
HDMI OUT HDMI IN
HDMI IN
Cable de HDMI
1. Conecte un cable HDMI desde la toma HDMI IN de la parte trasera del producto a la toma HDMI OUT de los
dispositivos digitales.
2. Presione el botón
(Fuente) del panel superior de la unidad principal o el botón SOURCE del mando a
distancia para seleccionar el modo HDMI.
CABLE ÓPTICO O AUX
Esta unidad viene equipada con una toma digital de entrada óptica y una toma de entrada analógica de audio,
de esta manera tiene dos formas de conectarlo a un dispositivo externo.
AUX IN
AUX OUT
OPTICAL IN
OPTICAL OUT
Reproductor de
BD/ DVD/
Descodificador/
Consola de
juegos
Cable Óptico
(no suministrado)
Cable de Audio
(no suministrado)
21
SPA
CONEXIONES
+ Cable AUX
1. Conecte AUX IN (Audio) de la unidad principal a la toma AUDIO OUT del dispositivo de la fuente.
2. Presione el botón (Fuente) del panel superior de la unidad principal o el botón SOURCE del mando a
distancia para seleccionar el modo AUX.
+ Cable Óptico
1. Conecte OPTICAL IN (Audio) de la unidad principal a la toma OPTICAL OUT del dispositivo de la fuente.
2. Presione el botón (Fuente) del panel superior de la unidad principal o el botón SOURCE del mando a
distancia para seleccionar el modo D.IN.
USB
Puede reproducir archivos de música ubicados en dispositivos de almacenamiento USB a través de la Soundbar.
DC 14V
AUX IN
OPTICAL IN
HDMI IN
HDMI OUT
(TV-ARC)
5V 0.5A
5V 0.5A
Pantalla
Puerto USB
1. Conecte el dispositivo USB al puerto USB del producto.
2. Presione el botón
(Fuente) del panel superior de la unidad principal o el botón SOURCE del mando a
distancia para seleccionar el modo USB.
3. USB aparece en pantalla.
La conexión de la Soundbar al dispositivo USB se completa.
Se apaga automáticamente (Auto Power Off) si no se ha conectado ningún dispositivo USB en un espacio de
más de 25 minutos.
+ Antes de conectar un dispositivo USB
Tenga en cuenta lo siguiente:
Si el nombre de un archivo o una carpeta en un dispositivo USB supera los 10 caracteres, no aparece en la
pantalla de la Soundbar.
Es posible que este producto no sea compatible con ciertos tipos de soportes de almacenamiento USB.
Se admiten los sistemas de archivos FAT16 y FAT32.
- No se admite el sistema de archivos NTFS.
Conecte el dispositivo USB directamente al puerto USB de este producto. De lo contrario, es posible que detecte
un problema de compatibilidad de USB.
No conecte varios dispositivos de almacenamiento al producto a través del lector de varias tarjetas. Puede que no
funcione correctamente.
22
CONEXIONES
No se admiten los protocolos PTP de cámaras digitales.
No retire el dispositivo USB mientras se transfieren los archivos.
No se podrán reproducir los archivos de música con protección DRM (MP3, WMA) de un sitio web comercial.
No se admiten HDD externos.
No se admiten los dispositivos de teléfonos móviles.
Lista de compatibilidad
Extensión Códec
Velocidad de
muestreo
Velocidad en bits
*.mp3
MPEG 1 Layer2 16KHz ~ 48KHz 80 ~ 320 kbps
MPEG 1 Layer3 16KHz ~ 48KHz 80 ~ 320 kbps
MPEG 2 Layer3 16KHz ~ 48KHz 80 ~ 320 kbps
MPEG 2.5 Layer3 16KHz ~ 48KHz 80 ~ 320 kbps
*.wma
Wave_Format_MSAudio1 16KHz ~ 48KHz 56 ~ 128 kbps
Wave_Format_MSAudio2 16KHz ~ 48KHz 56 ~ 128 kbps
*.aac
AAC 16KHz ~ 96KHz 48 ~ 320 kbps
AAC-LC 16KHz ~ 96KHz
128 ~ 192 kbps
5,1 canales 320 kbps
HE-AAC 24KHz ~ 96KHz
48 ~ 64 kbps
5,1 canales 160 kbps
*.wav
- 16KHz ~ 48KHz hasta 3000 kbps
*.ogg
OGG 1.1.0 16KHz ~ 48KHz 50 ~ 500 kbps
*.flac
FLAC 1.1.0, FLAC 1.2.1 16KHz ~ 96KHz hasta 3000 kbps
Si hay demasiadas carpetas y archivos almacenados en el dispositivo USB, la lectura puede llevar tiempo.
23
SPA
FUNCIONES
MODO DE ENTRADA
Presione el botón (Fuente) del panel superior de la unidad principal o el botón SOURCE del mando a distancia
para seleccionar el modo que desee.
Modo de entrada Pantalla
Entrada digital óptica
Entrada ARC (HDMI OUT)
D.IN
Entrada AUX
AUX
Entrada HDMI
HDMI
Modo BLUETOOTH
BT
TV SoundConnect
TV
Modo USB
USB
FUNCIÓN AUTO POWER DOWN
La unidad se apaga automáticamente en los siguientes casos:
Modo D.IN/HDMI/BT/TV/USB/ARC
- Si no hay señal de audio en un espacio de 25 minutos.
Modo AUX
- Si el cable AUX no se conecta antes de 25 minutos.
- Si no se ingresa la CLAVE durante 8 horas con el cable AUX conectado. (La función Auto Power Down puede
desactivarse únicamente en ese caso. )
Para desactivar la función Auto Power Down, en modo AUX, mantenga presionado el botón & durante 5 segundos.
Aparece en pantalla ON - AUTO POWER DOWN / OFF - AUTO POWER DOWN.
funciones
24
FUNCIONES
BLUETOOTH
Se puede utilizar para conectar el dispositivo Bluetooth al Soundbar para poder disfrutar de la música con un sonido
estéreo de gran calidad, sin necesidad de cables.
PARA CONECTAR SOUNDBAR A UN DISPOSITIVO BLUETOOTH
Compruebe si el dispositivo Bluetooth admite la función de audífonos estéreo compatibles con Bluetooth Space.
Dispositivo Bluetooth
Conectar
1. Presione el botón (Fuente) del panel superior de la unidad principal o el botón SOURCE del mando a
distancia para seleccionar el modo BT.
Verá BT READY en la pantalla frontal de la Soundbar.
2. Seleccione el menú de Bluetooth o el dispositivo Bluetooth que desea conectar. (Consulte el manual del usuario
del dispositivo Bluetooth.)
3. Seleccione "[Samsung] Soundbar J-Series" en la lista de resultados de la búsqueda.
Cuando el producto esté conectado al dispositivo Bluetooth, mostrará [Nombre dispositivo Bluetooth] BT
en la pantalla frontal.
El nombre del dispositibo no puede mostrar caracteres especiales. Aparecerá un signo de subrayado " _ " si el
nombre tiene caracteres especiales.
Si el dispositivo Bluetooth no se empareja con Soundbar, borre el "[Samsung] Soundbar J-Series"
anteriormente encontrado por el dispositivo Bluetooth y realice una búsqueda de Soundbar de nuevo.
4. Reproduzca música en el dispositivo conectado.
Puede escuchar la música que se esté reproduciendo en el dispositivo Bluetooth conectado desde el sistema
Soundbar.
El modo BT, las funciones Reproducir/Pausa/Siguiente/Anterior no están disponibles. No obstante, estas
funciones están disponibles en dispositivos Bluetooth compatibles con AVRCP.
25
SPA
FUNCIONES
Si se solicita un código PIN al conectar un dispositivo Bluetooth, ingrese <0000>.
Sólo es posible emparejar un dispositivo Bluetooth al mismo tiempo.
La conexión Bluetooth terminará cuando se apague la Soundbar.
Es posible que la Soundbar no pueda realizar correctamente una búsqueda o una conexión mediante
Bluetooth en las siguientes circunstancias:
- Si hay un campo eléctrico potente alrededor de Soundbar.
- Si varios dispositivos Bluetooth están simultáneamente emparejados con Soundbar.
- Si el dispositivo Bluetooth está desactivado, no está en su sitio o sufre una avería.
- Tenga en cuenta que dispositivos como hornos microondas, adaptadores de LAN inalámbrica, luces
fluorescentes y hornos de gas utilizan el mismo rango de frecuencias que el dispositivo Bluetooth,
pueden causar interferencias eléctricas.
La Soundbar admite datos SBC (44,1 kHz, 48 kHz).
Conecte sólo a un dispositivo Bluetooth que admita la función A2DP (AV).
No puede conectar la Soundbar a un dispositivo Bluetooth que admita solo la función HF (manos libres).
Una vez que haya emparejado la Barra de sonido a un dispositivo Bluetooth, si selecciona "[Samsung]
Soundbar J-Series" en la lista de dispositivos explorados, cambiará automáticamente la Barra de sonido
al modo BT.
Solo disponible si la Soundbar aparece en la lista de dispositivos emparejados del dispositivo Bluetooth.
(El dispositivo Bluetooth y la Soundbar deben emparejarse previamente al menos una vez.)
La Soundbar aparecerá en la lista de dispositivos buscados del dispositivo Bluetooth solo cuando la
Soundbar muestre BT READY.
En el modo TV SoundConnect, la Soundbar no se puede emparejar con otro dispositivo Bluetooth.
BLUETOOTH POWER ON (BLUETOOTH POWER)
Cuando esté activada la función de encendido mediante Bluetooth Power y la Soundbar este apagada, si un
dispositivo Bluetooth previamente emparejado intenta emparejarse con la Soundbar, la Soundbar se enciende
automáticamente.
1. Presione Bluetooth POWER en el mando a distancia con la Soundbar encendida.
2. Aparece ON - BLUETOOTH POWER en la pantalla de la Soundbar.
PARA DESCONECTAR EL DISPOSITIVO BLUETOOTH DE
SOUNDBAR
Puede desconectar el dispositivo Bluetooth de Soundbar. Para obtener instrucciones, consulte el manual del usuario
del dispositivo Bluetooth.
Soundbar se desconectará.
Cuando se desconecte Soundbar del dispositivo Bluetooth, Soundbar mostrará BT DISCONNECTED en la
pantalla frontal.
PARA DESCONECTAR SOUNDBAR DEL DISPOSITIVO
BLUETOOTH
Presione el botón SOURCE del mando a distacnia o el botón (Fuente) del panel superior del producto para
cambiar desde BT a otro modo o apagar la Soundbar.
El dispositivo Bluetooth conectado esperará una respuesta de Soundbar durante cierto tiempo antes de terminar
la conexión. (El tiempo dedesconexión puede diferir dependiendo del dispositivo Bluetooth.)
26
FUNCIONES
En el modo de conexión Bluetooth, la conexión Bluetooth se perderá si la distancia entre Soundbar y el
dispositivo Bluetooth supera los 10 m.
Soundbar se apaga automáticamente después de 25 minutos en modo Listo.
+ Información adicional sobre Bluetooth
Bluetooth es una tecnología que permite que los dispositivos externos compatibles con Bluetooth puedan fácilmente
interconectarse entre sí utilizando una conexión inalámbrica corta.
Un dispositivo Bluetooth puede causar ruidos o un funcionamiento defectuoso, dependiendo del uso, cuando:
- Una parte del cuerpo está en contacto con el sistema de recepción/transmisión del dispositivo Bluetooth o de
Soundbar.
- Exista variación eléctrica por obstrucciones causadas por una pared, un rincón o paneles de división de la
oficina.
- Esté expuesto a interferencias eléctricas de dispositivos con la misma banda de frecuencia incluido equipo
médico, hornos microondas y LAN inalámbrica.
Empareje Soundbar con el dispositivo Bluetooth a una distancia corta.
Cuando mayor sea la distancia entre Soundbar y el dispositivo Bluetooth, peor será la calidad.
Si la distancia sobrepasa el alcance de funcionamiento de Bluetooth, se pierde la conexión.
En áreas con sensibilidad/recepción pobre es posible que la conexión Bluetooth no funcione correctamente.
La conexión Bluetooth sólo funciona cuando está cerca del equipo. La conexión se corta automáticamente si la
distancia es superior a la indicada. Incluso dentro de esta distancia, es posible que la calidad del sonido se
degrade debido a obstáculos como muros o puertas.
El dispositivo inalámbrico puede causar interferencias eléctricas durante su funcionamiento.
UTILIZACIÓN DE LA APP SAMSUNG AUDIO REMOTE
+ Instalación de la AppSamsung Audio Remote
Para controlar el producto con el dispositivo inteligente mediante la App Samsung Audio Remote, descargue la App
Samsung Audio Remote a través de la tienda Google Play.
ANDROID APP ON
Búsqueda en Market : Samsung Audio Remote
+ Acceso a la App Samsung Audio Remote
Después de instalar la App Samsung Audio Remote, siga las instrucciones de la App.
La función APP solo es compatible con dispositivos telefónicos Android que ejecuten Android OS 3.0 o
posterior.
27
SPA
FUNCIONES
ACTUALIZACIÓN DE SOFTWARE
DC 14V
AUX IN
OPTICAL IN
HDMI IN
HDMI OUT
(TV-ARC)
5V 0.5A
5V 0.5A
Samsung puede ofrecer en el futuro actualizaciones para el firmware del sistema de la Soundbar.
Si existe una actualización, puede actualizar el firmware conectando un dispositivo USB con la actualización de
firmware al puerto USB de la Soundbar.
Tenga en cuenta que si hay varios archivos de actualización, debe cargarlos en el dispositivo USB por separado y
usarlos para actualizar el firmware de uno en uno.
Visite Samsung.com o póngase en contacto con el centro de atención al cliente de Samsung para recibir información
sobre la descarga de archivos de actualizaciones.
Inserte en el puerto USB de la unidad principal un dispositivo USB que contenga la actualización del
firmware.
Es posible que la actualización del firmware no se realice debidamente si los archivos de audio compatibles
con la Soundbar se almacenan en el dispositivo de almacenamiento USB.
No desconecte el equipo ni retire el dispositivo USB mientras se estén realizando las actualizaciones. La
unidad principal se apagará automáticamente tras completar la actualización del firmware.
Tras la actualización, todos los ajustes se reinician con sus ajustes por defecto de fábrica. Recomendamos
tomar nota de los ajustes para poder reinicializarlos tras la actualización. Tenga en cuenta que al actualizar
el firmware se reinicia también la conexión del subwoofer. Si no se establece automáticamente la conexión
al subwoofer tras la actualización, consulte la página 15.
Si no se actualiza el firmware, se recomienda formatear el dispositivo USB en FAT16 e intentarlo de nuevo.
Una vez completada la actualización del software, encienda el producto y, a continuación, mantenga
presionado el botón (
&
) del mando a distancia por 5 segundos. Aparece "INIT" en pantalla y la unidad
se apaga. La actualización queda completada.
No formatee la unidad USB con el formato NTFS. La Soundbar no es compatible con el sistema de
archivos NTFS.
Dependiendo del fabricante, es posible que no se admitan algunos dispositivos de almacenamiento USB.
28
SOLUCIÓN DE PROBLEMAS
Antes de solicitar servicio técnico, compruebe lo siguiente.
La unidad no se encenderá.
¿Está enchufado el cable de alimentación en la toma
de corriente?
Conecte el enchufe de alimentación en la toma de
corriente.
Una función no está operativa cuando se pulsa el botón.
¿Existe electricidad estática en el ambiente? Desconecte la toma de alimentación y conéctela de
nuevo.
No se produce sonido.
¿Está la función de silencio activada?
¿Tiene el volumen al mínimo?
Presione el botón
(Silencio) para cancelar la
función.
Ajuste el volumen.
El mando a distancia no funciona.
¿Se han agotado las pilas?
¿Está el mando a distancia situado a demasiada
distancia con respecto a la unidad principal?
Cambie las pilas.
Acérquelo más a la unidad principal.
Fallo en TV SoundConnect (emparejamiento del TV).
¿Es su TV compatible con TV SoundConnect?
¿Tiene la última versión del firmware del TV?
¿Se produce un error al conectar?
Reinicie el Modo TV y conecte de nuevo.
TV SoundConnect es compatible con algunos TVs
Samsung comercializados a partir de 2012.
Compruebe el TV para ver si es compatible con
TV SoundConnect.
Actualice el TV con la versión más reciente.
Póngase en contacto con el Centro de atención
telefónica de Samsung.
Mantenga presionado el botón & por 5 segundos
para reiniciar la conexión de TV SoundConnect.
El LED rojo del subwoofer parpadea y el subwoofer no genera sonido.
Es posible que el subwoofer no esté conectado al
cuerpo principal del producto.
Intente conectar de nuevo el subwoofer.
(Consulte la página 15)
El subwoofer zumba y vibra de forma notable.
Intente ajustar las vibraciones del subwoofer. Presione el botón
WOOFER
del mando a distancia
para ajustar su valor (entre -12, -6 y +6).
solución de problemas
29
SPA
APÉNDICE
ESPECIFICACIONES
Nombre del
modelo
HW-J6000 / HW-J6001
GENERALES
USB
5V/0,5A
Peso
Unidad Principal
2,7 kg
Subwoofer
(PS-WJ6000 / PS-WJ6001)
6,8 kg
Dimensiones
(Al x An x Pr)
Unidad Principal
1078 x 47,5 x 129 mm
Subwoofer
(PS-WJ6000 / PS-WJ6001)
452 x 335 x 154 mm
Rango de temperatura de servicio
+5 °C a +35 °C
Rango de humedad de servicio
10 % a 75 %
AMPLIFICADOR
Potencia
nominal de
salida
Unidad Principal
22W/CH x 6, 4 OHM, THD=10%, 1KHz
Subwoofer
(PS-WJ6000 / PS-WJ6001)
168W, 3 OHM, THD=10%, 100Hz
Índice S/N (entrada analógica)
65 dB
Separation (1kHz)
65 dB
* El índice S/N, la distorsión, la separación y la sensibilidad utilizable se basan en la medición utilizando las
instrucciones de AES (Audio Engineering Society).
* Especificación nominal
- Samsung Electronics Co., Ltd se reserva el derecho a cambiar las especificaciones sin previo aviso.
- Los pesos y dimensiones son aproximados.
- Para la fuente de alimentación y el consumo de energía, consulte la etiqueta pegada en el producto.
a Aviso sobre licencia de código abierto
- Para enviar consultas sobre fuentes abiertas, póngase en contacto con Samsung a través del correo
electrónico ([email protected]).
apéndice
AH68-02833E-00
AH68-02833E-00
©2015 Samsung Electronics Co.,Ltd. All rights reserved
Contact SAMSUNG WORLD WIDE
If you have any questions or comments relating to Samsung products, please contact the SAMSUNG
customer care center.
© 2015 Samsung Electronics Co., Ltd. Reservados todos los derechos.
Contacte con SAMSUNG WORLD WIDE
Si tiene alguna pregunta o comentario acerca de productos Samsung, por favor contacte con el servicio de
atención al cliente de SAMSUNG.
Area Contact Center
Web Site
`
Latin America
MEXICO 01-800-SAMSUNG (726-7864) www.samsung.com/mx/support
BRAZIL
0800-124-421 (Demais cidades e regiões)
4004-0000 (Capitais e grandes centros)
www.samsung.com/br/support
COSTA RICA
0-800-507-7267
00-800-1-SAMSUNG (726-7864)
www.samsung.com/latin/support (Spanish)
www.samsung.com/latin_en/support (English)
DOMINICAN
REPUBLIC
1-800-751-2676
ECUADOR
1-800-10-7267
1-800-SAMSUNG (72-6786)
EL SALVADOR
800-6225
800-0726-7864
GUATEMALA
1-800-299-0013
1-800-299-0033
HONDURAS
800-2791-9267
800-2791-9111
JAMAICA
1-800-234-7267
1-800-SAMSUNG (726-7864)
www.samsung.com/latin_en/support (English)
NICARAGUA 001-800-5077267
www.samsung.com/latin/support (Spanish)
www.samsung.com/latin_en/support (English)
PANAMA
800-7267
800-0101
PUERTO RICO 1-800-682-3180
TRINIDAD & TOBAGO 1-800-SAMSUNG (726-7864)
VENEZUELA 0-800-SAMSUNG (726-7864) www.samsung.com/ve/support
COLOMBIA
Bogotá 600 12 72
Gratis desde cualquier parte del país 01 8000 112 112 ó
desde su celular #SAM(726)
www.samsung.com/co/support
CHILE 800-SAMSUNG (726-7864)
www.samsung.com/cl/support
BOLIVIA 800-10-7260
PERU 0800-777-08 www.samsung.com/pe/support
ARGENTINE 0800-555-SAMSUNG (0800-555-7267) www.samsung.com/ar/support
URUGUAY 000-405-437-33
www.samsung.com/latin/support (Spanish)
www.samsung.com/latin_en/support (English)
PARAGUAY 009-800-542-0001
  • Page 1 1
  • Page 2 2
  • Page 3 3
  • Page 4 4
  • Page 5 5
  • Page 6 6
  • Page 7 7
  • Page 8 8
  • Page 9 9
  • Page 10 10
  • Page 11 11
  • Page 12 12
  • Page 13 13
  • Page 14 14
  • Page 15 15
  • Page 16 16
  • Page 17 17
  • Page 18 18
  • Page 19 19
  • Page 20 20
  • Page 21 21
  • Page 22 22
  • Page 23 23
  • Page 24 24
  • Page 25 25
  • Page 26 26
  • Page 27 27
  • Page 28 28
  • Page 29 29
  • Page 30 30
  • Page 31 31
  • Page 32 32
  • Page 33 33
  • Page 34 34
  • Page 35 35
  • Page 36 36
  • Page 37 37
  • Page 38 38
  • Page 39 39
  • Page 40 40
  • Page 41 41
  • Page 42 42
  • Page 43 43
  • Page 44 44
  • Page 45 45
  • Page 46 46
  • Page 47 47
  • Page 48 48
  • Page 49 49
  • Page 50 50
  • Page 51 51
  • Page 52 52
  • Page 53 53
  • Page 54 54
  • Page 55 55
  • Page 56 56
  • Page 57 57
  • Page 58 58
  • Page 59 59

Samsung HW-J6000 Manual de usuario

Tipo
Manual de usuario

En otros idiomas