Samsung DV456ETHDSU/AA-00 El manual del propietario
- Categoría
- Secadoras de ropa eléctricas
- Tipo
- El manual del propietario

Imagine the possibilities
Thank you foJ"puJ'chasing this Samsung p_'oduct.

1. Extra Large Capacity
Ultra drying capabilities are at your fingertip!! Now you cars dry extra-large loads. Our ultra -
large 7.3cu.ft capacity dryers circulate more air through your clothes, drying them faster, for a
wrinkle-free result.
2. Steam Cycle
This cycle sprays a small amount of water into the dryer drum after several minutes of
tumbling with heat. It reduces bad odors from clothing that are difficult to remove when
washing with water, and also reduces wrinkles.
3. Sanitize Cycle
This cycle sanitizes garments by infusing high temperature heat deep into the fabric during
the drying cycle and eliminating 99.9% of certain bacteria.Use this cycle for clothing,
bedding, towels, or other items needing sanitization.
4. Various Drying Cycles & Fuzzy Logic Algorithm
Simply turn the Jog Dial to select one of the 11 automatic drying cycles, including normal,
heavy duty, and bedding, or let the Fuzzy Logic Control measure the degree of dampness
and automatically set the drying time. Precision drying has never beers easier than with
Samsung.
5. Time Saving
Our cycles are designed with you in mind. All our dryers are designed to dry your clothes in
less time.., just 42 minutes! Giving you time for more important things in life.
6. Energy Saving
Samsung dryers are super energy efficient. You cars dry up to 3.09 pounds of laundry with
1kWh. Also, both the large capacity and Fuzzy Logic Control save energy by automatically
drying your clothes the most efficient way.
2 Features

7. Easy Reversible Door
The direction of our reversible door can be changed easily.
8. 4-way Vent (electric model only)
You can install the exhaust vent in the following four (4) positions: back, either side or bottom.
9. Smart Care
This function diagnoses problems by itself.
You don't need to call a service engineer or try to find the user manual whenever the product
has a problem, as Smart appliances let you know how to deal with the problem through your
smart phone.
Features 3

C
Congratulations on your new Samsung Dryer. This manual contains valuable
information on the installation, use, and care of your appliance. Please take the
time to read this manual to take full advantage of your dryer's many benefits and
features.
WHAT YOU NEED TO KNOW ABOUT SAFETY INSTRUCTIONS
Warnings and Important Safety Instructions in this manual do not cover all possible conditions and
situations that may occur. It is your responsibility to use common sense, caution, and care when installing,
maintaining, or operating your dryer.
Always contact your manufacturer about problems or conditions you do not understand.
IMPORTANT SAFETY SYMBOLS AND PRECAUTIONS
What the icons and signs in this user manual mean:
ik
WARNING
Hazards or unsafe practices that may result in severe personal injury
or death.
Follow the information in this manual to minimize the risk of fire or
explosion or to prevent property damage, personal injury, or death.
Do not store or use gasoline or other flammable vapors and liquids near
this or any other appliance.
,/_ Hazards or unsafe practices that may result in minor personal injury or
CAUTION property damage.
Do NOT attempt.
Do NOT disassemble.
[_ Do NOT touch.
Follow directions explicitly.
Unplug the power plug from the wall socket.
Make sure the machine is grounded to prevent electric shock.
Call the service center for help.
Note
These warning icons are here to prevent injury to you and others.
Please follow them explicitly.
After reading this section, keep it in a safe place for future reference.
_Read all instructions before the
using appliance.
SAVE THESE INSTRUCTIONS
4 safety instructions

A
WARNING
WARNING: To reduce the risk of fire, electric shock, or injury to persons when using your
appliance, follow basic precautions, including the following:
1. Read all instructions before using this appliance.
2. Do not dry articles that have been previously cleaned in, washed in, soaked in,
or spotted with gasoline, dry-cleaning solvents, or other flammable or explosive
substances, as they give off vapors that could ignite or explode.
3. Do not use the dryer to dry clothes which have traces of any flammable substance,
such as vegetable oil, cooking oil, machine oil, flammable chemicals, thinner, etc., or
anything containing wax or chemicals, such as mops and cleaning cloths. Flammable
substances may cause the fabric to catch fire by itself.
4. Do not store or use gasoline or other flammable vapors and liquids near this or any
other appliance.
5. Do not allow children to play on or in the appliance. Close supervision of children is
necessary when the appliance is used near children.
6. Before the appliance is removed from service or discarded, remove the door to the
drying compartment.
7. Do not reach into the appliance if the drum is moving.
8. Do not install or store this appliance where it will be exposed to the weather.
9. Do not tamper with controls.
10. Do not repair or replace any part of the appliance or attempt any servicing unless
specifically recommended in the user-maintenance instructions or in published user-
repair instructions that you understand and have the skills to carry out.
11. Do not use fabric softeners or products to eliminate static unless recommended by the
manufacturer of the fabric softener or product.
12. Clean the lint screen before or after each load.
13. Do not use heat to dry articles containing foam rubber or similarly textured rubber-like
materials.
14. Keep area around the exhaust opening and adjacent surrounding areas free from the
accumulation of lint, dust, and dirt.
15. The interior of the appliance and exhaust duct should be cleaned periodically by
qualified service personnel.
16. Do not place items exposed to cooking oils in your dryer. Items contaminated with
cooking oils may contribute to a chemical reaction that could cause a load to catch fire.
17. This appliance must be grounded. See "Electrical requirements" and "Grounding" in
installing your dryer section.
18. Do not allow children to play on or in the appliance. Closr supervision of children is
necessary when the appliance is used near children.
19. Do not insert your hand under the dryer
- This may result in injury
20. Take care that children's fingers are not caught in the door when closing it.
- This may result in injury.
SAVE THESE INSTRUCTIONS
safety instructions 5

C
WARNING --R k of Fire
,, Clothes dryer installationmust be performed by a qualified installer.
Install the clothes dryer according to the manufacturer's instructions and local codes.
,, Do not install a clothes dryer with flexible plastic venting materials. If flexible metal
(foil type) duct is installed, it must be of a specific type identified by the appliance
manufacturer as suitable for use with clothes dryers. Flexible venting materials are
known to collapse, be easily crushed, and trap lint. These conditions will obstruct
clothes dryer airflow and increase the risk of fire.
To reduce the risk of severe injury or death, follow all installation instructions.
/k
WARNING
To reduce the risk of fire or explosion:
,, Do not dry items that have been previously cleaned, washed, soaked, or spotted with
gasoline, dry cleaning solvents, or other flammable or explosive substances. They
emit vapors that could ignite or explode. Any material that has been in contact with a
cleaning solvent or flammable liquids or solids should not be placed in the dryer until all
traces of these flammable liquids or solids and their fumes have been removed.
There are many highly flammable items used inhomes, such as acetone, denatured
alcohol, gasoline, kerosene, some liquid household cleaners, some spot removers,
turpentine, waxes, and wax removers
Items containing foam rubber (may be labeled latex foam) or similarly textured rubber-
like materials must not be dried on a heat setting. Heated foam rubber materials can,
under certain circumstances, produce fire by spontaneous combustion.
Z_ What to do if you smell gas:
WARNING
Do not try to light any appliance.
,, Do not turn on the appliance.
,, Do not touch any electrical switch.
Do not use any phone in your building.
Clear the room, building or area of all occupants.
Immediately call your gas supplier from a neighbor's phone. Follow the gas supplier's
instructions.
,, If you cannot reach your gas supplier, call the fire department.
,, Installation and service must be performed by a qualified installer, service agency, or the
gas supplier.
,_ Gas Appliances:
WARNING
WARNING: This product contains chemicals known to the State of California to cause
cancer and reproductive toxicity.
Gas appliances can cause low-level exposure to Proposition 65 listed substances,
including but not limited to, benzene, carbon monoxide, formaldehyde and soot,
substances resulting from the incomplete combustion of natural gas or LP fuels.
SAVE THESE INSTRUCTIONS
6 safety instructions

Do not allow children or pets to play on, in, or in front of the appliance. Close supervision is
necessary when the appliance is used near children and pets.
Before discarding or removing your dryer from service, remove the door to the drying
compartment to prevent children or animals from becoming trapped inside.
Do not reach into the appliance when the drum is moving.
Do not install or store this appliance where it will be exposed to the weather.
Do not tamper with controls.
Do not repair, replace, or attempt to service any part of the appliance unless specifically
instructed to in the user-repair instructions and you have the understanding and skills to
carry out the procedure.
Do not use fabric softeners or products to eliminate static unless the softener or product is
recommended for dryer use by the manufacturer of the fabric softener or product.
Clean the lint screen before or after each load.
@
,6,
WARNING
WARNING
Keep the area around the exhaust opening and surrounding areas free from lint, dust, and dirt.
The interior of the dryer and exhaust duct should be cleaned periodically by qualified service
personnel.
This appliance must be properly grounded. Never plug the power cord into a receptacle
that is not grounded adequately or not in accordance with local and national codes. See
installation instructions for information about grounding this appliance.
Do not sit on top of the dryer.
Ensure pockets are free from small, irregularly shaped hard objects, foreign material, etc. ie.
coins, knives, pins, etc. These objects could damage your dryer.
Do not wash clothing with large buckles, buttons, or other heavy metal or solid objects.
Gas leaks may occur in your system, resulting in a dangerous situation.
Gas leaks may not be detected by smell alone.
Gas suppliers recommend you purchase and install a UL-approved gas detector.
Install and use inaccordance with the manufacturer's instructions.
Do not place items in your dryer that have been spotted or soaked with vegetable oil or cooking
oil. Even after being washed, these items may contain significant amounts of these oils.
Residual oil on clothing can ignite spontaneoulsy. The potential for spontaneous
combustion increases when items containing vegetable oil or cooking oil are exposed to
heat. Heat sources such as your dryer can warm these items, allowing an oxidation reaction
in the oil to occur. Oxidation creates heat. Ifthis heat cannot escape, the items can become
hot enough to catch fire. Piling, stacking, or storing these kinds of items may prevent heat
from escaping and can create a fire hazard.
All washed and unwashed fabrics that contain vegetable oil or cooking oil can be
dangerous. Washing these items in hot water with extra detergent will reduce, but not
eliminate, the hazard. Always use the Cool Down cycle for these items to reduce their
temperature. Never remove these items from the dryer hot or interrupt the drying cycle until
the items have run through the Cool Down cycle. Never pile or stack these items when they
are hot.
SAVE THESE iNSTRUCTiONS
safety instructions 7

ont nt
INSTALLING YOUR DRYER
OPERATING INSTRUCTIONS, TIPS
/
OPERATING iNSTRUCTiONS, TiPS
OPERATING iNSTRUCTiONS, TiPS
CARE AND CLEANING
SPECIAL LAUNDRY TiPS
9 Unpacking your dryer
9 Basic requirments
10 Ducting requirements
11 important to installer
11 Location considerations
11 Alcove or closet installation
12 Mobile home installation
12 Exhausting
13 Gas requirements
13 Commonwealth of Massachusetts
installation instructions
14 Electrical requirements
14 Grounding
15 Electrical connections
16 installation - General procedure
19 Connecting the inlet Hose
19 Final installation checklist
20 Dryer Exhaust Tips
21 Door Reversal
23 Overview of the control panel
26 Child lock
26 Drum Light
26 Signal
27 My Cycle
27 Smart Care
28 Clean the lint filter
28 Load the dryer properly
28 Getting started
29 Control Panel
29 Tumbler
29 Powder Coated Tumbler
29 Dryer Exterior
29 Dryer Exhaust System
30 Special laundry tips
TROUBLESHOOTING
i
31 Check these points if your dryer.,.
32 information codes
APPENDIX 33 Fabric care chart
34 Protecting the environment
34 Declaration of conformity
34 Specifications
35 Cycle chart
8 Contents

UNPACKING YOUR DRYER
Unpack your Dryer and inspect it for shipping damage. Make sure you have received all of the items
shown below. Ifyour Dryer was damaged during shipping, or you do not have all of the items, contact
1-800-SAMSUNG (726-7864).
To prevent personal injury or strain, wear protective gloves whenever lifting or carrying the dryer.
_ Packing materials can be dangerous to children. Keep all packing material (plastic bags, polystyrene,
....... etc.) well out of childrens' reach
//_Do not move the product while holding the front part of the top cover of the dryer.
....... - This may cause the cover to be separated and result in injury.
Control panel
Top Cover
[ BACK ]
Filter
I Frame Front
Door
Duct Exhaust
_olsneeded .................................................
Pliers Cutting knife Pipe wrench (gas only)
Nut drivers
Level PhiUipsScrewdriver Duct tape Wrench
Parts supplied
Rubber washer "Y'- Connector Hose water Short inlet hose
BASIC REQUIRMENTS
Make sure you have everything necessary for proper installation
A GROUNDED ELECTRICAL OUTLET is required. See Electrical Requirements.
A POWER CORD for electric dryers (except in Canada).
GAS LINES (ifinstalling a gas drye0. The gas lines must meet national and local codes.
EXHAUST SYSTEM - must be rigid metal or flexible stiff-walled metal exhaust ducting.
instal ing your dryer ._9

na VOLArdryer
J J
DUCTING REQUIREMENTS
Use a 4-inch (10.2 cm) diameter rigid aluminum or rigid galvanized steel duct.
Do not use a smaller duct.
Ducts larger than 4 inches (10.2 cm)in diameter can cause increased lint accumulation.
Lint accumulation should be cleaned regularly.
If a flexible metal duct must be used, use the type with a stiff sheet metal wall. Do not use a flexible duct
with a thin foil wall. Serious blockage can result if the flexible metal duct is bent too sharply.
Never install any type of flexible duct in walls, ceilings, or other concealed spaces.
Keep the exhaust duct as straight and short as possible.
Secure joints with duct tape. Do not use screws.
Plastic flexible duct can kink, sag, be punctured, reduce airflow, extend drying times, and affect dryer
operation.
Exhaust systems longer than recommended can extend drying times, affect machine operation, and
may collect lint.
The exhaust duct should end with an exhaust hood with a swing-out damper to prevent back drafts and
the entry of wildlife. Never use an exhaust hood with a magnetic damper.
The hood should have at least 12 inches (30.5 era) of clearance between the bottom of the hood and
the ground or other obstruction. The hood opening should point down.
Never install a screen over the exhaust outlet.
To avoid lint buildup, do not exhaust the dryer directly into a window well. Do not exhaust under a house
or porch.
If exhaust ductwork must run through an unheated area, the duct should be insulated and slope slightly
down towards the exhaust hood to reduce condensation and lint buildup.
Inspect and clean the interior of the exhaust system at least once a year. Unplug the power cord before
cleaning.
Check frequently to be sure the exhaust hood damper opens and closes freely.
Check once per month, and clean at least one time per year. Note: Ifclothes are not getting dry, then
check ducting for obstructions.
Do not exhaust dryer into any wall, ceiling, crawl space, or concealed space of a building, gas vent, or
any other common duct or chimney. This could create a fire hazard from lint expelled by the dryer.
Weather Hood Type
Recommended I use only for short.run installation
4" (10.2 cm) 2.5" (6.4 cm)
N01of 90° elbows Rigid MetalliCFlexible* I Rigid ' Metallic Flexible*
80 ft. (24.4 m) 41 ft. (12.4 m) 74 ft. (22.6 m) 33 ft. (10.1 m)
68 ft. (20.7 m) 37 ft. (11.2 m) 62 ft. (18.9 m) 29 ft. (8.8 m)
57 ft. (17.4 m) 33 ft. (10.1 m) 51 ft. (15.5 m) 25 ft. (7.6 m)
47 ft. (14.3 m) 29 ft. (8.8 m) 41 ft. (12.5 m) 21 ft. (6.5 m)
Do not use non-metallic flexible duct.
10 installing your dryer

If the new dryer is being installed into an existing exhaust system, you must
make sure:
The exhaust system meets all local, state, and national codes.
That a flexible plastic duct is not used.
To Inspect and clean all lint buildup from inside the existing duct.
The duct is not kinked or crushed.
The exhaust hood damper opens and closes freely.
The static pressure in any exhaust system must not exceed 0.83 inches of water column, or be
less than 0.
This can be measured with the dryer running with a manometer at the point where the exhaust
duct connects to the dryer. A no-heat setting should be used. The dryer tumbler should be
empty and the lint filter clean.
IMPORTANT TO INSTALLER
Please read the following instructions carefully before installing the dryer. These instructions should be kept
for future reference.
Z_ Remove the door from all discarded appliances to avoid the danger of a child suffocating.
WARNING
LOCATION CONSIDERATIONS
Locate the dryer where there is enough space at the front for loading the dryer, and enough space behind
for the exhaust system. This dryer is factory-ready for rear exhaust. To exhaust out the bottom or the right
or the left (electric model only), use the accessory exhaust kit (sold separately). Instructions are included
with the kit. It's important to make sure the room has enough fresh air. The dryer must be located where
there is no air-flow obstruction.
On gas dryers, adequate clearance as noted on the data plate must be maintained to ensure adequate air
for combustion and proper dryer operation.
Do not install or store the dryer in an area where it will be exposed to water and/or weather. Keep the dryer
area clear of combustible materials, casoline, and other flammable vapors and liquids. A dryer produces
combustible lint. The area around the dryer should be kept lint free.
ALCOVE OR CLOSET INSTALLATION
z_You must exhaust the dryer to the outside to reduce the risk of fire when you install the dryer in alcove
WARN,NGor closet.
No other fuel-burning appliance should be installed in the same closet as the dryer.
WARNING: To reduce the risk of fi re, you must exhaust the dryer to the outdoors.
See Exhaust information section.
Minimum clearances between the dryer and adjacent walls or other surfaces are:
2" in front, 17" on top, 1" on either side, and 5" in the back.
The closet front must have two unobstructed air openings for a combined minimum total area of 72 in2
with 3" minimum clearance on the top and bottom. A Iouvered door with equivalent space clearance is
acceptable.
instalin9 your dryer 11

na VoLArdryer
J J
MOBILE HOME INSTALLATION
The installation of the dryer in mobile homes must conform to the Manufactured Home Construction and
Safety Standard Title 24 CFR, Part 3280 {formerly the Federal Standard for Mobile Home Construction and
Safety, Title 24, HUD (Part 280), 1975} for the United States) or CSA Standards Z240 (for Canada).
When installing a dryer in a mobile home, you must make provisions for anchoring the dryer to the floor.
Locate the dryer in an area that has adequate fresh air.
A minimum of 72 in2(465 cm 2)of unobstructed space is required.
Call 1-800-SAMSUNG(726-7864) for information on purchasing the Floor Anchoring Kit as an accessory.
All mobile home installations must be exhausted to the outside with the exhaust duct termination securely
fastened to the mobile home structure, using materials that will not support combustion.
The exhaust duct may not terminate underneath the mobile home.
See Exhausting section for more information.
EXHAUSTING
The dryer shall not be exhausted into a chimney, a wall, a ceiling, an attic, a crawl space, or a concealed
space of a building.
Exhausting the dryer to the outside will prevent large amount of lint and moisture from being blown into the
room.
In
®
®
o
®
®
®
the United States:
All dryers must be exhausted to the outside.
The required exhaust duct is 4 inches (10.2 cm) in diameter.
Use only those foil-type flexible ducts, if any, specifically identified for use with the appliance
by the manufacturer and that comply with the Outline for Clothes Dryer Transition Duct,
Subject 2158A shall be used.
See "Ducting Requirements" in installing your dryer section for the maximum duct length and
number of bends shall be used.
The total length of flexible metal duct shall not exceed 2.4 m.
Do not assemble the duct with screws or other fastening means that extend into the duct
and catch lint
In
®
®
®
®
®
Canada:
All dryer must be exhausted to the outside.
The exhaust duct should be 4 inches(10.2 cm ) in diameter.
Use only those foil-type flexible ducts, if any, specifically indentified for use with the appliance
by the manufacturer shall be used.
See "Ducting Requirements" in installing your dryer section for the maximum duct length and
number of bends.
The total length of flexible metal duct shall not exceed 2.4 m.
Do not assemble the duct with screws or other fastening means that extend into the duct
and catch lint
Outside the U.S. and Canada:
• Refer to the local codes.
A
WARNING
You must exhaust the dryer to the outside to reduce the risk of fire when you install the
dryer in an alcove or closet.
NEVER USE A PLASTIC OR NON-METAL FLEXIBLE DUCT.
If your existing ductwork is plastic, non-metal, or combustible, replace it with metal.
Use only a metal exhaust duct that is non-flammable to ensure containment of exhaust air,
heat, and lint.
12 installing your dryer

GAS REQUIREMENTS
Use only natural or LP (liquid propane) gases.
THE INSTALLATION MUST CONFORM WITH LOCAL CODES, OR IN THE ABSENCE OF LOCAL
CODES, WITH THE NATIONAL FUEL GAS CODE ANSVZ223.1, LATEST REVISION (FOR THE UNITED
STATES), OR WITH THE CAN/CGA-B149 INSTALLATION CODES (FOR CANADA).
Gas dryers are equipped with a burner vent for use with natural gas. Ifyou plan to use your dryer with LP
(liquid propane) gas, it must be converted for safe and proper performance by a qualified service technician.
A 1/2" (1.27 era) gas supply line is recommended and must be reduced to connect to the 3/8" (1 cm) gas
line on your dryer. The National Fuel Gas Code requires that an accessible, approved manual gas shut-off
valve be installed within 6" of your dryer.
Gas dryers installed in residential garages must be raised 18 inches (46 cm) above the floor.
Additionally, a 1/8" (0.3 era) N.P.T. (National Pipe Thread) plugged tapping, accessible for test gauge
connection, must be installed immediately upstream of your dryer's gas supply connection.
Your dryer must be disconnected from the gas supply pipe system during any pressure testing of the
system.
DO NOT reuse old flexible metal gas lines. Flexible gas lines must be design certified by the American Gas
Association (CGA in Canada).
* ny pipe joint compound used must be resistant to the action of any liquefied petroleum gas.
As a courtesy, most local gas utilities will inspect a gas appliance installation.
GAS IGNITION - Your dryer uses an automatic ignition system to ignite the burner.
There is no constant burning pilot.
COMMONWEALTH OF MASSACHUSETTS INSTALLATION
INSTRUCTIONS
Your dryer must be installed by a licensed plumber or gas fitter. A "T" handle manual gas valve must be
installed in the gas supply line to your dryer. If a flexible gas connector is used to install your dryer, the
connector can be no longer than 3' (36").
Z_* Gas leaks may occur in your system, creating a dangerous situation.
....... * Gas leaks may not be detected by smell alone.
Gas suppliers recommend you purchase and install a UL-approved gas detector.
Install and use in accordance with the manufacturer's instructions.
instaling your dryer 13

na VOLArdryer
J J
ELECTRICAL REQUIREMENTS
The Wiring diagram is located on the plate below the control panel or frame back.
Z_, Improperly connecting the equipment grounding conductor can result in a risk of electric shock.
....... Check with a qualified electrician or serviceman if you are in doubt as to whether your dryer is
properly grounded. Do not modify the plug provided with your dryer - if it doesn't fit the outlet,
have a proper outlet installed by a qualified electrician.
• To prevent unnecessary risk of fire, electrical shock, or personal injury, all wiring and grounding
must be done in accordance with local codes, or in the absence of local codes, with the National
Electrical Code, ANSI/NFPA No. 70-Latest Revision (for the U.S.) or the Canadian Electrical Code
CSA C22.1 - Latest Revisions and local codes and ordinances. It is your responsibility to provide
adequate electrical services for your dryer.
• All gas installations must be done in accordance with the national FuelCode ANSI/Z2231 - Latest
Revision (for the U.S.) or CAN/CGA - B149 Installation Codes - Latest Revision (for Canada) and
local codes and ordinances.
GROUNDING
This dryer must be grounded. In the event of malfunction or breakdown, the ground will reduce the risk of
electrical shock by providing a path of least resistance for the electrical current.
Gas models
WARNING
WARNING
Your dryer has a cord with an equipment-grounding conductor and a grounding plug.
The plug must be plugged into an appropriate outlet that is properly installed and grounded in
accordance with all local codes and ordinances.
Do not modify the plug provided with your dryer - if it doesn't fit the outlet, have a proper outlet
installed by a qualified electrician.
Never connect the ground wire to plastic plumbing lines, gas lines, or hot water pipes.
Electric models
Your dryer has an optional cord with an equipment-grounding conductor and a grounding plug,
This cord is sold separately.
The plug must be plugged into an appropriate outlet that is properly installed and grounded in
accordance with all local codes and ordinances.
Do not modify the plug provided with your dryer - if it doesn't fit the outlet, have a proper outlet
installed by a qualified electrician.
Ifa power cord is not used and the electric dryer is to be permanently wired, the dryer must
be connected to a permanently grounded metal wiring system, or an equipment grounding
conductor must be run with the circuit conductors and connected to the equipment grounding
terminal or lead on the dryer.
14 installing your dryer

ELECTRICAL CONNECTIONS
Before operating or testing, follow all grounding instructions in the Grounding section.
An individual branch (or separate) circuit serving only your dryer is recommended. DO NOT USE AN
EXTENSION CORD.
/k
WARNING
Gas models- U,S, and Canada
A 120 volt, 60 Hz AC approved electrical service, with a 15-ampere fuse or circuit breaker is
required.
Electric models - U,S, only
Most U.S. dryers require a 120 / 240 volt, 60 Hz AC approved electrical service. Some require
120 / 208 volt, 60 Hz approved electrical service. The electric service requirements can be found
on the data label located behind the door. A 30-ampere fuse or circuit breaker on both sides of
the line is required.
If a power cord is used, the cord should be plugged into a 30-ampere receptacle.
The power cord is NOT provided with U.S. electric model dryers.
Risk of Electric Shock
When local codes allow, the dryer electrical supply may be connected by means of a new power
supply cord kit, marked for use with a dryer, that is U.L. listed and rated at a minimum of120/240
volts, 30-ampere with three No. 10 copper wire conductors terminated with closed loop
terminals, open-end spade lugs with turned up ends, or with tinned leads.
Do not reuse a power supply cord from an old dryer. The power cord electric supply wiring
must be supported at the dryer cabinet by a suitable UL-listed strain relief.
,, Grounding through the neutral conductor is prohibited for (1) new branch-circuit installations,
(2) mobile homes, (3) recreational vehicles, and (4) areas where local codes prohibit
grounding through the neutral conductor. (Use a 4-prong plug for a 4 wire receptacle, NEMA
type 14-30R.)
Electric models - Canada Only
A 120 / 240 volt, 60 Hz AC approved electrical service fused through a 30-ampere fuse or
circuit breaker on both sides of the line is required.
All Canadian models are shipped with the power cord attached. The power cord should be
plugged into a 30-ampere receptacle.
It is not to convert in Canada to 208 volts.
permissible
a
dryer
instaling your dryer 15

n ta nq VOLArdrvor
J J
INSTALLATION - GENERAL PROCEDURE
For proper installation, we recommend that you hire a qualified installer.
Read these instructions completely before you begin the installation.
To install the dryer, follow these steps:
1. Move your dryer to an appropriate location for installation. Consider installing the dryer and washer side-
by-side so you have easy access to both appliances.
To move the dryer easily, lay two of the carton cushion-tops on the floor. Tip your dryer on its side so it
lies across both cushion-tops. Push the dryer so that it is near its final location. Set your dryer upright.
Leave enough room around the dryer so you can attach the duct work, power cord, etc.
2.
3.
Ifyou need to change the direction of the door, go to Door Reversal on page 21. When done, return to
Step 3 below.
Review the Exhausting section before installing the exhaust system. Install the duct work from your
dryer to the exhaust hood. The crimped end of the duct sections must point away from your dryer. DO
NOT use sheet metal screws when assembling ducting. These joints should be taped. Never use plastic
flexible exhaust material.
A tip for tight installations: Attach a section of the exhaust system to your dryer before putting it in
place. Use duct tape to secure this section to your dryer, but do not cover the ventilation slots at the
back of the dryer cabinet.
4.
5.
Ifyou have an electric model, skip to Step 6. Ifyou have a gas model, go to the next step.
Review the Gas Requirements section, then follow the lettered steps below.
a. Remove the pipe thread protective cap.
b. Apply pipe joint compound or about 1 1/2 wraps of Teflon tape over all threaded connections.
The pipe joint compound must be resistant to the action of liquefied petroleum
any gas.
c. Connect the gas supply to your dryer. An additional fitting is required to connect the 3/4" (1.9 cm)
female thread end of a flexible connector to the 3/8" (1 cm) male threaded end on the dryer.
d. Securely tighten the gas line fitting over the threads.
e. Turn on the gas supply. Check all gas connections for leaks using a soap solution. If bubbles
appear, tighten the connections and recheck. DO NOT use an open flame to check for gas leaks.
f. Go to Step 6 on the next page
16 installing your dryer

6.
7.
8.
Review the Electrical Requirements section, then follow the 3 Wire system connection instructions (Step
7) or 4 Wire system instructions (Step 8) below.
Three Wire system instructions:
A. External ground connector
B. Neutral grounding wire (green/yellow)
O. Center silver-colored terminal block screw
D. Neutral wire (white or center wire)
E. 3_,,(1.9 cm) UL-listed strain relief
1. Loosen or remove the center terminal block screw. E
2. Connect the neutral wire (white or center wire) of the power
cord to the center, silver-colored terminal screw of the
terminal block. Tighten screw.
3. Connect the other wires to outer terminal block screws. Tighten screws.
4. Tighten the strain relief screws.
5. Insert the tab of the terminal block cover into your Dryer's rear panel slot.
Secure the cover with a hold-down screw.
WARNING
Ifconverting from a 4-wire electrical system to a 3-wire, you must connect the ground strap
to the terminal block support to ground the dryer frame to the neutral conductor.
Four
A,
B.
O.
D.
E.
F.
[_ e recommend using Ring terminals. Ifyou use Strap terminals, please ensure you install
them perfectly.
Wire System instructions:
External ground connector
Green or bare copper wire of power cord
3_,,(1.9 cm) UL-listed strain relief
Center silver-colored terminal block screw
Neutral Grounding wire (green/yellow)
Neutral wire (white or center wire)
1. Remove the External ground connector screw.
2. Connect the ground wire (green or unwrapped) of the
power cord to the external ground connector screw. If you
want to connect B (Green or bare copper wire of power
cord) to the Neutral Post without connecting it to A (cabinet
ground), call a service technician.
3. Loosen or remove the center terminal block screw.
4. Connect the neutral wire (white or center wire) of the power cord and the appliance ground
wire (green with yellow stripes) under the central screw of the terminal block.
5. Connect the other wires to the outer terminal block screws. Tighten screws.
6. Tighten the strain relief screws.
7. Insert the tab of the terminal block cover into your Dryer's rear panel slot.
Secure the cover with a hold-down screw.
We recommend using Ring terminals. Ifyou use Strap terminals, please ensure you install
them perfectly.
instaling your dryer 17

na VOLArdryer
J J
U.S. MODELS:
Z_ Risk Of Electric Shock
WARNING
9_
All U.S.models are designed for a 3-WIRE SYSTEM CONNECTION. The dryer frame is grounded to
the neutral conductor at the terminal block. A 4-WIRE SYSTEM CONNECTION is required for new or
remodeled construction, mobile homes, or if local codes do not permit grounding through neutral. If
you use the 4-wire system, you cannot ground the dryer frame to the neutral conductor at the terminal
block.
Remove the terminal block cover plate. Insert the power cord with a UL-listed strain relief through the
hole provided in the cabinet near the terminal block.
A strain relief must be used. Do not loosen the nuts already installed on the terminal block. Be sure
they are tight. Use a 3/8" (lcm) deep well socket.
To ensure that the dryer provides optimal drying performance, it must
be level. To level the dryer, follow the lettered steps below:
a. Using a level, check if the dryer is level side to side and then front
to back.
b. If the dryer is not level, adjust the leveling feet on the bottom of
the dryer until the dryer is level side to side and back to front.
Turning the feet clockwise retracts the feet. Turning the feet
clockwise loosens and extends them.
Level
If you have a dryer and washer
®
To set the dryer to the same height as the washer, fully
retract the leveling feet by turning them counterclockwise,
then loosen the feet by turning them clockwise. Once
the dryer is the same height as the washer, follow the
directions above to level the dryer.
Leveling feet
Adjust the leveling feet only as much as necessary to level the dryer. Extending the leveling
feet more than necessary can cause the dryer to vibrate.
10. Make sure all gas connections (on gas models) and exhaust, and electrical connections are complete.
Plug in your dryer, and then check its operation by using the checklist on the next page.
11. For GAS MODELS ONLY
The burner may not ignite initially due to air in the gas line. Allowing your dryer to operate on a heat
setting will purge the line. If the gas does not ignite within 5 minutes, turn your dryer off and wait 5
minutes. Be sure the gas supply to your dryer has been turned on. To confirm gas ignition, check the
exhaust for heat.
18 installing your dryer

CONNECTING THE INLET HOSE
METHOD1
The dryer must be connected to the cold water faucet using the new inlet hoses. Do not use old hoses.
1. If space permits, attach the brass female end of the "Y" connector to the cold water faucet.
2. Turn the cold water faucet off.
3. Attach the straight end of long hose to "Y' connector.
4. Using pliers, tighten the coupling with an additional two-thirds turn.
Do not overtighten, as it may damage the coupling. _L /
5. Attach angled end of long hoses to fill the valve at the
bottom of the dryer's rear frame. Screw on coupling byhand
until it is seated on fillvalve connector.
6. Using pliers, tighten the coupling with an additional two-thirds turn.
Do not overtighten, as it may damage the coupling.
7. Check that the water faucets are on.
8. Check for leaks around "Y" connector, faucets and hoses.
METHOD2
The dryer must be connected to the cold water faucet using the new inlet hoses. Do not use old hoses.
1. If "Y" connector cannot be attached directly to the cold water
faucet, the short hose must be used.
2. Turn the cold water faucet off.
3. Attach short inlet hose to cold water faucet.
Screw on coupling by hand until it is seated on the faucet.
4. Using pliers, tighten the coupling with an additional
two-thirds turn.
Do not overtighten, as it may damage the coupling.
5. Attach 'Y" connector to brass male end of small hose.
Screw on coupling by hand until it is seated on connector.
6. Using pliers, tighten the coupling with an additional two-thirds turn.
_Do not overtighten, as it may damage the coupling.
7. Attach angled end of long hoses to the fillvalve at the bottom of the dryer rear frame. Screw on
coupling by hand until it is seated on fillvalve connector.
8. Using pliers, tighten the coupling with an additional two-thirds turn.
Do not overtighten, as it may damage the coupling.
9. Check that the water faucets are on.
10. Check for leaks around "Y" connector, faucets and hoses.
FINAL INSTALLATION OH ECKLIST
[] The dryer is plugged into an electrical outlet and grounded properly.
[] The exhaust ductwork is hooked up and the joints are taped.
[] You have used rigid or stiff-walled flexible metal duct material, not plastic flexible duct.
[] The dryer is level and is sitting firmly on the floor.
[] For gas models: The gas is turned on and there are no gas leaks.
[] Start your dryer to confirm that it runs, heats, and shuts off.
instaling your dryer 19

na VoLArdryer
J J
DRYER EXHAUST TIPS
/_ Plastic or non-metal flexible duct presents a potential fire hazard.
WARNING
1. Make sure your dryer is installed properly so it exhausts air
easily.
2, Use 4" diameter rigid metal duct. Tape all joints, including at
the dryer.
Never use lint-trapping screws.
3, Keep ducts as straight as possible.
4.
Clean all old ducts before installing your new dryer.
Be sure the vent flap opens and closes freely.
Inspect and clean the exhaust system annually.
i
Don't let a poor exhaust system slow drying by:
1. Restricting your dryer with a poor exhaust system. 1
2. Using a plastic, thin foil, or non-metal flexible duct.
3, Using unnecessarily long ducts that have many
elbows.
4, Using crushed or clogged venting or ducts.
20 installing your dryer

DOOR REVERSAL
Ifyou want to reverse the direction of the door, it is recommended calling a
qualified service technician.
1, Unplug the power cord.
2. Remove the four hinge screws from the door
3o Remove the door by lifting it
4. Remove the two screws from the holder-lever, and then remove
the cover-holder.
5o Assemble the holder-lever on the opposite side using the screws
that were removed from the holder-lever-in Step 4.
6, Assemble the cover-holder on the opposite side.
7. Remove the two cover-hinges.
8. Assemble the two cover-hinges
on the opposite side.
Use a flat head screwdriver(-)
to remove the cover-holder's
cover-hinge.
N. J
9, Remove the 14 screws.
_Two screw (L)are longer than the other screws.
instaling your dryer 21

na VoLArdryer
J J
10, Remove the holder-glass.
11, Exchange the positions of:
: The cover-hinge and handle door
:The holder-hinge and guider-
holder glass
_ Refer to the illustrations on the
right to aid you in the assembly
process.
12, Remove the cover-hole (P).
13, Assemble the holder glass and then fasten the 14 screws
that you removed in step 9.
14, Attach the cover-hole.
A spare cover hole is in the assy manual.
15, Install the door on the frame-front and then fasten the
4 screws that you removed in step 2.
_ heck the positions of the screws you installed in the hinge
door.
22 installing your dryer

/_To reduce the risk of fire, electric shock, or injury to persons, read the IMPORTANT SAFETY
...... _NSTRUCTIONS before operating this appliance•
OVERVIEW OF THE CONTROL PANEL
Heav Normal Sanitize
Manualm
Perm
m Sensor
Wrinkle Away
SteamCyclesl
* Press & fold 3sec for Extra FLf_]C iOnS I .............. Power
@@@S[]@
-- _ :ii:._ :ii:'
Drying C_ling Wdnkle
Prevent
• Very Dry • High
• More Dry • Medium
• Normal Dry • Low
• Damp Dry • Extra Low
: i ........i ..........i
® do@@@
• 40rnin. [Wrinkle Prevent
• 30rain. i
• 20rain. IMixed LoadB
*s.,art Care
@
i
@e®
operatng nstructons, tips 23

iiii i!!i!!i!!i!!ii!ii!i!!ii!i i i! iii !!! i! ! i !!ii !i !i i i iiiiiiiiiiiii ii i! ! ! ! i i ii iiiiiiiiiiiiiiiiiiiiiiiiiiiiiiiiiiiiiiiiiiiiiiiii i i! i!
The display window shows the estimated time remaining in the cycle after
you have pressed the Start/Pause button. The estimated time remaining may
fluctuates as the cycle progresses.
The Drying light will illuminate and remain lit until the cycle is complete.
When your dryer is in the cool-down phase, the Cooling light will illuminate. When
your dryer is in the wrinkle prevent phase, the Wrinkle Prevent light will illuminate.
When the cycle is complete, "End" will appear in the display panel until you push
the Start/Pause button or the Power button. Ifyour dryer is paused during a
cycle, the indicator lights will blink until you press the Start/Pause button.
To select the dry level in the Normal, Heavy Duty, or other Sensor Dry cycles,
press the Dry Level button. An indicator light will illuminate next to the dryness
level you selected.
Press the button repeatedly to scroll through the settings. Larger or bulkier
loads may require the Very Dry or More Dry setting for complete dryness.
Damp Dry is designed to partially dry items. Use for items that lay flat or hang
to dry.
To select the temperature for the load, press the Temp button. An indicator
light will illuminate next to the temperature you selected. Press the button
repeatedly to scroll through the settings.
High - For sturdy cottons or those labeled Tumble Dry.
Medium - For permanent press, synthetics, lightweight cottons, or items
labeled Tumble Dry Medium.
Low - For heat sensitive items labeled Tumble Dry Low or Tumble Dry Warm.
Extra Low - Provides the lowest heated drying temperature possible.
When using Manual Dry cycles, you can adjust the drying time by pressing the
time selection button.
During the Sensory Dry cycle, the time light indicator is off because exact
drying times are determined by fluctuating humidity levels.
Therefore, the actual drying time may differ from the displayed time.
Adjust Time - You can add or subtract time from the automatically set times
in the Wrinkle Away cycle and the Manual Dry cycles (Time Dry, Quick Dry, or
refresh cycles.)
To add or subtract time from the cycle, press the Adjust Time arrow pad up or
down until the desired time is displayed.
Wrinkle Prevent - Wrinkle Prevent provides approximately 180 minutes
of intermittent tumbling in unheated air at the end of the cycle to reduce
wrinkling. Press the Wrinkle Prevent button to activate this feature.
The indicator light above the pad will illuminate when you select Wrinkle Prevent.
The load is dry and you can remove it at any time during the Wrinkle Prevent cycle.
Mixed Load Bell - The mixed load bell that notifi es you when the average
dry level in a load is damp dry (80 % dried). This lets you take garments that
you don't want fully dried or that dry quickly out of the dryer early while letting
others continue to dry. You can select this function in all Sensor Dry cycles
except Sanitize. The dry level selections are limited to Normal Dry, More Dry,
and Very Dry.
Smart Care - Use this function to check if the Dryer is out of order using your
smart phone when the Dryer malfunctions. This function is set if you press and
hold the Mixed Load Bell key for 3 seconds.
Press to pause and restart programs.
24 operatng nstructions, tps

Choose your favorite cycle including, temp, dry level. (See page 27 for detail.)
Press once to turn your dryer on, Press again to turn it off. Ifyou turn
your dryer on and do not touch any buttons for 10 minutes, the power
automatically turns off.
lf you insert laundry into your dryer while it is extremely tangled immediately after your washer has
finished a wash or spin cycle, it may degrade the drying efficiency or cause the door to open. We
recommend that you disentangle your laundry appropriately before inserting it.
Each indicator on the graphic display means:
My Cycle On / Off
Signal On/Off
Child Lock On/Off
Drum Light On/Off
Filter Check
Steam
operatng nstructons, tips 25

CHILD LOCK
Prevents children from playing with your dryer.
Setting/Releasing
Ifyou want to set or release the Child Lock, press the Temp. and Time buttons simultaneously
for 3 seconds.
Child Lock Details
You can turn Child Lock on while your dryer is running.
Once you turn Child Lock on, no button, except for the Power button, will respond until you
turn off the Child Lock function.
The Child Lock indicator will be lit.
If you have not turnd off Child Lock, and then turned the dryer off and on, the Child Lock
function will still be on. To turn off Child Lock, follow the instructions above.
When other buttons, except for the Power button, do not respond, check the Child Lock
indicator. If Child Lock is on, follow the instructions above to turn Child Lock off.
DRUM
Lights the
LIGHT
dryer drum while the dryer is running.
Turning On and Off
Press and hold the Wrinkle Prevent button for 3 seconds or more.
You can turn the Drum Light on and off while your dryer is running and when it is
stopped. If you do not turn the Drum Light off 5 minutes after turning it on, the Drum Light
automatically turns off.
SIGNAL
When the cycle is complete, a chime will sound.
When you press and hold both the Dry Level and Temp buttons simultaneously for 3 seconds or more, the
chime will sound intermittently.
Adjust the volume of the chime or turn it off by pressing the Signal button.
Press the Signal button repeatedly to scroll through the choices.
26 operatng nstructions, tps

MY CYCLE
Allows you to activate your custom dry (Cycle, Dry Level, Temp) with one button convenience.
Press the My Cycle button to load and use the saved My Cycle options. The "My Cycle" light will indicate
activation. Also, the chosen course and option lights will flicker.
You can set options as follows in the My Cycle mode.
1,
2,
3,
4,
Press the Power button.
Select cycle using the Cycle Selector.
After cycle selection, set each option (Dry Level, Temp)
You can then store the selected cycle and options by pressing and holding the My Cycle button for
longer than 3 seconds in My Cycle mode. The cycle and options you select will be displayed the next
time you choose the My Cycle function.
You can change the My Cycle settings by repeating the same process above.
The last used setting will be displayed the next time you choose the My Cycle function.
If you press My Cycle and release it within 3 seconds, the previously saved course and options appear.
If you press and hold My Cycle for 3 second or longer, the currently set course and options are saved
and the LED blinks for 3 seconds.
SMART CARE
This function enables you to check the status of the dryer using a smartphone.
1. To enable the Smart Care function, press the power button to turn the dryer on and then press and hold
the Mixed Load Bell button for 3 seconds. If you press a button other than the Mixed Load Bell button
after turning the dryer on, you will not be able to activate the Smart Care function.
,, The error code history is deleted after using the function.
2, Ifthe Smart Care function is activated, the Smart Care indicator is lit on the display.
3o Run the Smart Care app on your smart phone.
,, The Smart Care function is optimized with Galaxy S, Galaxy $2, iPhone 4 and iPhone 4S.
4o Focus the smart phone's camera on the display panel of the Dryer.
5o Ifthe smart phone's camera is focused on the display panel of the Dryer, the panel and error message is
automatically recognized and the error type and countermeasures are displayed on the smart phone.
6o Ifthe smartphone fails to recognize the error code more than twice, please enter the error code
displayed on the display panel of the dryer manually into the Smart Care app.
Downloading the Smart Care app
Download the Samsung Laundry App into your mobile phone from the Android market or Apple
App store. (Search word ' Samsung Smart Washer/Dryer)
Precautions when using Smart Care
Iflight from a light bulb, fluorescent bulb, or lamp is reflected on the display panel of the dryer, the
smartphone may not be able to recognize the panel or error mesage easily.
Ifyou hold the smartphone at too large an angle relative to the front of the display panel, it may not
be able to recognize the error code. For best results, hold the smartphone so that the front of the
panel and the smartphone are parallel or nearly parallel.
operatng nstructons, tips 27

CLEAN THE LINT FILTER
• After each load.
,, To shorten drying time.
,, To operate more energy efficiently.
_Do not dryer without the lint filter in place.
operate your
Frame Front
Fimter
Door
LOAD THE DRYER PROPERLY
,, Place only one washload in your dryer at a time.
In mixed loads, heavy and lightweight fabrics will dry differently. This may result in lightweight fabrics
being dry while heavy fabrics remain damp at the end of a drying cycle.
Add one or more additional similar items to your dryer when you are drying only one or two items. This
improves the tumbling action and drying efficiency.
,, Overloading restricts tumbling action, resulting in uneven drying as well as excessive wrinkling of some
fabrics.
GETTING STARTED
1. Load your dryer loosely- DO NOT overload.
2. Close the door.
3, Select the appropriate cycle and options for the load (see pages 23, 24, 25).
4, Press the Start/Pause button.
5, The dryer indicator light will illuminate.
6, The estimated cycle time will appear in the display.
The time may fluctuate as humidity levels fluctuate in the dryer.
®
®
When the cycle is complete, "End" will appear in the display.
Pressing Power cancels the cycle and stops your dryer.
The Drying, Cooling, and Wrinkle Prevent indicator lights will illuminate during those portions of the
cycle.
ADo not place anything on top of your dryer while it is running.
WARNING
28 operatng nstructions, tps

CONTROL PANEL
Clean with a soft, damp cloth. Do not use abrasive substances.
Do not spray cleaners directly on the panel.
The control panel finish may be damaged by some laundry pre-treatment soil and stain remover products.
Apply such products away from your dryer and wipe up any spills or overspray immediately.
TUMBLER
Remove any stains from the tumbler caused by crayon, ink, fabric dye (from new items such as towels or
jeans) and so on with an all-purpose cleaner.
Tumble old towels or rags to remove any remaining stain or cleaning substance.
Once these steps are followed, stains may still be visible, but should not transfer to subsequent loads.
POWDER COATED TUMBLER
To clean the powder coated tumbler, use a damp cloth with a mild, non-abrasive cleaner suitable easily
marred surfaces.
Remove cleaner residue and dry with a clean cloth.
DRYER EXTERIOR
Clean with a soft, damp cloth. Do not use abrasive substances.
Protect the surface from sharp objects.
Do not place any heavy or sharp objects or a detergent box on the dryer. They can scratch or damage the
top cover of the dryer. Keep these items in the separately purchased pedestal or in a separate storage box.
The entire dryer has a high-gloss finish. Avoid scratching or damaging the surface when using the dryer.
DRYER EXHAUST SYSTEM
Inspect and clean the dryer exhaust system yearly to maintain optimum performance.
The outside exhaust hood should be cleaned more frequently to ensure proper operation.
care and ceanng 29

I J I
Special laundry tips
Please follow the care label or manufacturer's instructions for drying special
items. If care label instructions are not available, use the following information as
a guide,
Bedspreads & Comforters
®
®
®
®
Blankets
®
Curtains & Draperies
®
Cloth Diapers
Down-filled Items (jackets,
sleeping bags, comforters,
etc.)
Pillows
®
®
®
Plastics (shower curtains,
outdoor furniture covers,
etc.)
Follow the care label instructions or dry using the Bedding cycle.
Make sure the item is thoroughly dry before using or storing.
May require repositioning to ensure even drying.
Use the Normal cycle and dry only one blanket at a time for best
tumbling action.
Make sure the item is thoroughly dry before using or storing.
Use the Perm Press cycle and medium temperature to help minimize
wrinkling.
Dry these in small loads for best results and remove as soon as
possible.
Use the Normal cycle and the High temperature settings for soft,
fluffy diapers.
Use the Normal cycle and medium temperature setting.
Adding a couple of dry towels shortens drying time and absorbs
moisture.
Use the Normal cycle.
Add a couple of dry towels and a pair of clean sneakers to help the
tumbling action and to fluff the items.
DO NOT dry kapok or foam pillows in the dryer.
Use the Time Dry cycle and the Low or Extra Low temperature
settings depending on the care label instructions.
THINGS TO AVOID PUTTING IN THE DRYER :
Fiberglass items (curtains, draperies, etc.).
Woolens, unless recommended on the label.
Vegetable or cooking oil-soaked items.
Foam Rubber (rug backs, stuffed toys, shoulder pads, etc.)
30 special laundry tips

tro Abe hoot ncj
CHECK THESE POINTS IF YOUR DRYER...
Doesn't run.
Doesn't heat.
Doesn't dry,
Is noisy.
Dries unevenly.
Has an odoc
®
,, Make sure the door is latched shut.
,, Be sure the power cord is plugged into a live electrical outlet.
• Check your home's circuit breakers or fuses.
• Press the Start/Pause button again if the door is opened during the
cycle.
• Check your home's circuit breakers or fuses.
• Select a heat setting other than refresh.
• On a gas dryer, check that the gas supply is on.
• Clean the lint filter and exhaust duct.
• Dryer may have moved into the cool-down phase of the cycle.
• Check all of the above, plus...
• Be sure the exhaust hood outside the home can open and close
freely.
• Check the exhaust system for lint buildup. Ducting should be
inspected and cleaned annually.
• Use a 4" rigid metal exhaust duct.
• Do not overload. 1wash load = 1 dryer load.
• Sort heavy items from lightweight items.
• Large, bulky items like blankets or comforters may require
repositioning to ensure even drying.
• Check that the washer is draining properly to extract adequate water
from the load.
• Load may be too small to tumble properly. Add a few towels.
• Check the load for objects such as coins, loose buttons, nails, etc.
Remove promptly.
• It is normal to hear the dryer gas valve or heating element cycle on
and off during the drying cycle.
• Be sure the dryer is leveled properly as outlined in the installation
instruction.
• It is normal for the dryer to hum due to the high velocity of air moving
through the dryer drum and exhaust system.
• Seams, pockets, and other similarly heavy areas may not be
completely dry when the rest of the load has reached the selected
dryness level. This is normal. Select the Very Dry setting if desired.
• If one heavy item is dried with a lightweight load, such as one towel
with sheets, it is possible that the heavy item will not be completely
dry when the rest of the load has reached the selected dryness level.
Sort heavy items from lightweight items for best drying results.
• Household odors from paint, varnish, strong cleaners, etc. may enter
the dryer with the surrounding room air. This is normal as the dryer
draws the air from the room, heats it, pulls it through the tumbler, and
exhausts it outside.
When these odors linger in the air, ventilate the room completely
before using the dryer.
troubleshooting 31

Shuts off before load is dry
Lint on clothes
Garments still wdnkled after
Wdnkle Away
Odors remain in clothing
after refresh.
iNFORMATiON CODES
Information codes may be displayed to help you understand what is occurring with your Dryer better.
The dryer load is too small. Add more items or a few towels and
restart the cycle.
The dryer load is too large. Remove some items and restart the dryer.
Make sure the lint filter is cleaned before every load. With some loads
that produce high amounts of lint, it may be necessary to clean the
filter during the cycle.
Some fabrics are lint producers (for example, a fuzzy white cotton
towel) and they should be dried separately from clothes that are lint
trappers (for example, a pair of black linen pants).
Divide larger loads into smaller loads for drying
Check pockets thoroughly before washing and drying clothes.
Small loads of 1 to 4 items work best.
Load fewer garments. Load similar-type garments.
Fabrics containing strong odors should be washed in a normal cycle.
tE Clogged Lint Screen Clean the screen or vent.
Vent is restricted Ifthe problem continues, call for service.
Invalid heating Temp when the dryer Call for service.
is running
dE Running the dryer with door open Close the door and then restart.
Ifthe problem continues, call for service.
Door is not closing properly Call for service.
dF
bE2
FE ...........
Unit detects a button is being
pressed for over 30secs or button is
stuck
Invalid power source Frequency
Make sure a button is NOT being pressed
continuously. Try restarting the cycle.
Ifthe problem continues, call for service.
Try restarting the cycle.
Ifthe problem continues, call for service.
Electronic Control Problem Call for service.
(Communication Error)
Electronic Control Problem Call for service.
....... (Over Voltage Error)
For any codes not listed above, call 1-800-726-7864 (1-800-SAMSUNG)

appendx
FABRIC CARE CHART
The following symbols provide garment care directions. The Clothing care labels include symbols for
washing, bleaching, drying and ironing, or dry cleaning when necessary. The use of symbols ensures
consistency among garment manufacturers of domestic and imported items. Follow care label directions to
maximize garment life and reduce laundering problems.
Normal Line Dry/Hang to Dry
Permanent Press /
Wrinkle Resistant/ [] Drip Dry
Wrinkle Control
Gentle/Delicates Dry Flat
HandWash
High
o,, Hot Medium
oo Warm Low
• Cold
O Any Heat O
No Heat/Air
Any Bleach (when
needed)
Only Non-Chlorine
(color-safe)
Bleach (when needed)
Tumble Dry Cycle
High
Medium
OIP_JPermanentPress/
Wrinkle Resistant/
Wrinkle Control
Gentle/Delioates
Low
[]
x
_iii[] _
i i
X
Do Not Wash
Do Not Wring
Do Not Bleach
Do Not Tumble Dry
No Steam (added to
iron)
Do Not Iron
Dry Clean
Do Not Dry Clean
Line Dry/Hang to Dry
Drip Dry
Dry Flat
** The dot symbols represent appropriate wash water temperatures for various items. The temperature range
for Hot is 105° - 125 °F / 41o_ 52 °C, for Warm 85° - 105 °F / 29° - 41 °C and for Cold 60° - 85 °F /
16 o_ 29 °C. (Wash water temperature must be a minimum of 60° F/16° C for detergent activation and
effective cleaning.)
append x 33

appondx
PROTECTING THE ENVIRONMENT
This appliance is manufactured from recyclable materials. If you decide to dispose of this appliance, please
observe local waste disposal regulations. Cut off the power cord so that the appliance cannot be connected
to a power source. Remove the door so that animals and small children cannot get trapped inside the
appliance.
DECLARATION OF CONFORMITY
This appliance complies with UL2158.
SPECIFICATIONS
DIMENSIONS
WEIGHT
5300 W (Elec.)
HEATER RATING
22000 BTU/hr (Gas)
Div inches (cm) Div Inches (cm)
A. Height 43.86" (111.4) C. Depth with door open 90° 49.80" (126.5)
B. Wdth 27" (68.6) D. Depth 29.96" (76.1)
127.8 Ib (58 kg)

CYCLE CHART
Heavy Duty
Bedding
Cottons, Work clothes, Linen, Mixed Loads
Sensor Dry
Underwear, Blouses, Lingerie
Bedding, Curtains, Children' clolhing
Heavy Fabrics such as jean, corduroys,
heavy work clothes
Shirts, Synthetic Fabdcs, Knits, Wrinkle--free
cottons, Permanent
Bulky items such as blankets, Sheets,
Comforters, Pillows
Sanitize
Towels
Manual Dry
Time Dry
Steam Cyc es
Wrinkle Away
Bath towels and similar items
Small loads
Any load
Shirts, Ti'ouser, Comforter, Pillows
Shirts, Ti'ouser, Blouses
(o : factory setting, : selectable)
©
©
©
Normal dry
Normal dry
Normal dry
Normal dry
Normal dry
Very dry (No change)
Normal dry
Normal
i
Perm Press
i
Sensor Dry Bedding
i
I Delicates
Towels
i
Quick Dry
Manual Dry
-rime Dry
i
Refresh
Steam Cycles
Wrinkle Away
®
®
®
®
®
®
® @
® @
® @ @ @ @
®
® @
®
®
®
®
®
®
®
®
®
®
®
Load Size Recommendations
@
©
Large load : Fillthe drum to about ,_ full. Do not add items over this level as they need to tumble
freely.
Medium load : Fill the drum to about 1/afull.
Small load : Fillthe drum with 3-5 items, not more than 1Afull.
* For best results, follow the load size recommendations for each dry cycle.
append x 35

SAMSUNG DRYER
LiMiTED WARRANTY TO ORiGiNAL PURCHASER
This SAMSUNG brand product, as supplied and distributed by SAMSUNG ELECTRONICS AMERICA, INC.
(SAMSUNG) and delivered new, in the original carton to the original consumer purchaser, is warranted by
SAMSUNG against manufacturing defects in materials and workmanship for a limited warranty period of:
One (1)Year All Parts and Labor
Two (2) Years Control Board Parts (Part Only)
This limited warranty begins on the original date of purchase, and is valid only on products purchased and
used in the United States.
To receive warranty service, the purchaser must contact SAMSUNG for problem determination and service
procedures.
Warranty service can only be performed by a SAMSUNG authorized service center.
The original dated bill of sale must be presented upon request as proof of purchase to SAMSUNG or
SAMSUNG's authorized service center.
SAMSUNG will provide in-home service during the warranty period at no charge, subject to availability
within the contiguous United States.
In-home service is not available in all areas.
To receive in-home service, product must be unobstructed and accessible to the service agent.
If service is not available, SAMSUNG may elect to provide transportation of the product to and from an
authorized service center.
SAMSUNG will repair, replace, or refund this product at our option and at no charge as stipulated herein,
with new or reconditioned parts or products if found to be defective during the limited warranty period
specified above.
All replaced parts and products become the property of SAMSUNG and must be returned to SAMSUNG.
Replacement parts and products assume the remaining original warranty, or ninety (90) days, whichever is
longer.
This limited warranty covers manufacturing defects in materials and workmanship encountered in normal,
noncommercial use of this product and shall not apply to the following: damage that occurs in shipment;
delivery and installation; applications and uses for which this product was not intended; altered product or
serial numbers; cosmetic damage or exterior finish; accidents, abuse, neglect, fire, water, lightning, or other
acts of nature or God; use of products, equipment, systems, utilities, services, parts, supplies, accessories,
applications, installations, repairs, external wiring or connectors not supplied or authorized by SAMSUNG
that damage this product or result in service problems; incorrect electrical line voltage, fluctuations and
surges; customer adjustments and failure to follow operating instructions, maintenance and environmental
instructions that are covered and prescribed in the instruction book; product removal and reinstallation;
problems caused by pest infestations.
This limited warranty does not cover problems resulting from incorrect electric current, voltage or supply,
light bulbs, house fuses, house wiring, cost of a service call for instructions, or fixing installation errors.
SAMSUNG does not warrant uninterrupted or error-free operation of the product.

EXCEPTASSETFORTHHEREIN,THEREARENOWARRANTIESONTHISPRODUCTEITHEREXPRESS
ORIMPLIED,ANDSAMSUNGDISCLAIMSALLWARRANTIESINCLUDING,BUTNOTLIMITEDTO,ANY
IMPLIEDWARRANTIESOFMERCHANTABILITY,INFRINGEMENTORFITNESSFORAPARTICULAR
PURPOSE.
NOWARRANTYORGUARANTEEGIVENBYANYPERSON,FIRM,ORCORPORATIONWITHRESPECT
TOTHISPRODUCTSHALLBEBINDINGONSAMSUNG.
SAMSUNGSHALLNOTBELIABLEFORLOSSOFREVENUEORPROFITS,FAILURETOREALIZE
SAVINGSOROTHERBENEFITS,ORANYOTHERSPECIAL,INCIDENTALORCONSEQUENTIAL
DAMAGESCAUSEDBYTHEUSE,MISUSE,ORINABILITYTOUSETHISPRODUCT,REGARDLESSOF
THELEGALTHEORYONWHICHTHECLAIMISBASED,ANDEVENIFSAMSUNGHASBEENADVISED
OFTHEPOSSIBILITYOFSUCHDAMAGES.
NORSHALLRECOVERYOFANYKINDAGAINSTSAMSUNGBEGREATERINAMOUNTTHANTHE
PURCHASEPRICEOFTHEPRODUCTSOLDBYSAMSUNGANDCAUSINGTHEALLEGEDDAMAGE.
WITHOUTLIMITINGTHEFOREGOING,PURCHASERASSUMESALLRISKANDLIABILITYFORLOSS,
DAMAGE,ORINJURYTOPURCHASERANDPURCHASER'SPROPERTYANDTOOTHERSANDTHEIR
PROPERTYARISINGOUTOFTHEUSE,MISUSE,ORINABILITYTOUSETHISPRODUCT.
THISLIMITEDWARRANTYSHALLNOTEXTENDTOANYONEOTHERTHANTHEORIGINAL
PURCHASEROFTHISPRODUCT,ISNONTRANSFERABLEANDSTATESYOUREXCLUSIVEREMEDY.
Somestatesdonotallowlimitationsonhowlonganimpliedwarrantylasts,ortheexclusionorlimitation
ofincidentalorconsequentialdamages,sotheabovelimitationsorexclusionsmaynotapplytoyou.This
warrantygivesyouspecificrights,andyoumayalsohaveotherrights,whichvaryfromstatetostate.
To obtain warranty service, please contact SAMSUNG at:
Samsung Electronics America, inc.
85 Challenger Road Ridgefield Park, NJ 07660
1-800-SAMSUNG (726-7864)
www.samsung.com/us/support
Visits by a Service Engineer to explain functions, maintenance or installation
is not covered by warranty.
Please contact your Samsung call agent for help with any of these issues.
warranty 37

SAMSUNG DRYER
LiMiTED WARRANTY TO ORiGiNAL PURCHASER
This SAMSUNG brand product, as supplied and distributed by SAMSUNG ELECTRONICS CANADA, INC.
(SAMSUNG) and delivered new, in the original carton to the original consumer purchaser, is warranted by
SAMSUNG against manufacturing defects in materials and workmanship for a limited warranty period of:
One (1)year part and labor
This limited warranty begins on the original date of purchase, and is valid only on products purchased and
used in the Canada.
To receive warranty service, the purchaser must contact SAMSUNG for problem determination and service
procedures.
Warranty service can only be performed by a SAMSUNG authorized service center.
The original dated bill of sale must be presented upon request as proof of purchase to SAMSUNG or
SAMSUNG's authorized service center.
SAMSUNG will provide in-home service during the warranty period at no charge, subject to availability
within the Canada.
In-home service is not available in all areas.
To receive in-home service, product must be unobstructed and accessible to the service agent.
If service is not available, SAMSUNG may elect to provide transportation of the product to and from an
authorized service center.
SAMSUNG will repair, replace, or refund this product at our option and at no charge as stipulated herein,
with new or reconditioned parts or products if found to be defective during the limited warranty period
specified above.
All replaced parts and products become the property of SAMSUNG and must be returned to SAMSUNG.
Replacement parts and products assume the remaining original warranty, or ninety (90) days, whichever is
longer.
This limited warranty covers manufacturing defects in materials and workmanship encountered in normal,
noncommercial use of this product and shall not apply to the following: damage that occurs in shipment;
delivery and installation; applications and uses for which this product was not intended; altered product or
serial numbers; cosmetic damage or exterior finish; accidents, abuse, neglect, fire, water, lightning, or other
acts of nature or God; use of products, equipment, systems, utilities, services, parts, supplies, accessories,
applications, installations, repairs, external wiring or connectors not supplied or authorized by SAMSUNG
that damage this product or result in service problems; incorrect electrical line voltage, fluctuations and
surges; customer adjustments and failure to follow operating instructions, maintenance and environmental
instructions that are covered and prescribed in the instruction book; product removal and reinstallation;
problems caused by pest infestations.
This limited warranty does not cover problems resulting from incorrect electric current, voltage or supply,
light bulbs, house fuses, house wiring, cost of a service call for instructions, or fixing installation errors.
SAMSUNG does not warrant uninterrupted or error-free operation of the product.

EXCEPTASSETFORTHHEREIN,THEREARENOWARRANTIESONTHISPRODUCTEITHEREXPRESS
ORIMPLIED,ANDSAMSUNGDISCLAIMSALLWARRANTIESINCLUDING,BUTNOTLIMITEDTO,ANY
IMPLIEDWARRANTIESOFMERCHANTABILITY,INFRINGEMENTORFITNESSFORAPARTICULAR
PURPOSE.
NOWARRANTYORGUARANTEEGIVENBYANYPERSON,FIRM,ORCORPORATIONWITHRESPECT
TOTHISPRODUCTSHALLBEBINDINGONSAMSUNG.
SAMSUNGSHALLNOTBELIABLEFORLOSSOFREVENUEORPROFITS,FAILURETOREALIZE
SAVINGSOROTHERBENEFITS,ORANYOTHERSPECIAL,INCIDENTALORCONSEQUENTIAL
DAMAGESCAUSEDBYTHEUSE,MISUSE,ORINABILITYTOUSETHISPRODUCT,REGARDLESSOF
THELEGALTHEORYONWHICHTHECLAIMISBASED,ANDEVENIFSAMSUNGHASBEENADVISED
OFTHEPOSSIBILITYOFSUCHDAMAGES.
NORSHALLRECOVERYOFANYKINDAGAINSTSAMSUNGBEGREATERINAMOUNTTHANTHE
PURCHASEPRICEOFTHEPRODUCTSOLDBYSAMSUNGANDCAUSINGTHEALLEGEDDAMAGE.
WITHOUTLIMITINGTHEFOREGOING,PURCHASERASSUMESALLRISKANDLIABILITYFORLOSS,
DAMAGE,ORINJURYTOPURCHASERANDPURCHASER'SPROPERTYANDTOOTHERSANDTHEIR
PROPERTYARISINGOUTOFTHEUSE,MISUSE,ORINABILITYTOUSETHISPRODUCT.
THISLIMITEDWARRANTYSHALLNOTEXTENDTOANYONEOTHERTHANTHEORIGINAL
PURCHASEROFTHISPRODUCT,ISNONTRANSFERABLEANDSTATESYOUREXCLUSIVEREMEDY.
Someprovincesdonotallowlimitationsonhowlonganimpliedwarrantylasts,ortheexclusionorlimitation
ofincidentalorconsequentialdamages,sotheabovelimitationsorexclusionsmaynotapplytoyou.
Thiswarrantygivesyouspecificrights,andyoumayalsohaveotherrights,whichvaryfromprovinceto
province.
To obtain warranty service, please contact SAMSUNG at:
Samsung Electronics Canada inc. 2050 Derry Road West, Mississauga, Ontario L5N 0B9 Canada.
1-800-SAMSUNG (726-7864)
www.samsung.com/ca/support (English)
www.samsung.com/ca fr/support (French)
FAX : 1-866-436-4617
Visits by a Service Engineer to explain functions, maintenance or installation
is not covered by warranty.
Please contact your Samsung call agent for help with any of these issues.
warranty 39

QUESTIONS OR COMMENTS?
Scan this with your smartphone
Scan the QR code* or visit
www.samsung.com/spsn
to view our heLpfuL
How-to Videos and Live Shows
*Requires reader to be knstalled on your smartphone
U.S.A 1-800-SAMSUNG (726-7864) www.samsung.com/us/support
www.samsung.com/ca/support (English)
CANADA 1-800-SAMSUNG (726-7864) www.samsung.com/ca_fr/support (French)
MEXICO 01-800-SAMSUNG (726-7864) www.samsung.com/mx/support
Code No. DC68-03170C-04_EN
Visits by a Service Engineer to explain functions, maintenance or
installation is not covered by warranty.
Please contact your Samsung call agent for help with any of these issues.

Set,dora a
manual
gas eec ca
del usuario
Imagine las posibilidades
GracJaspor adquirir este p_'oducto Samsung.

J I
1. Capacidad extra grande
iLas capacidades de secado ultra al alcance de la mane! Ahora puede secar cargas extra
grandes. Nuestras secadoras ultra grandes con 7,3 pies cObicos de capacidad, hacen
circular ma.s aire entre su ropa, secb.ndola m_tsr_tpido, para obtener un resultado sin arrugas.
2. Vapor Oiclo
Este ciclo roc(a una pequefla cantidad de agua en el tambor de la secadora despu_s de
varies minutes de secado con calor. Reduce los males olores de la ropa que son diffciles de
sacar al lavar con agua, tambi_n reduce las arrugas.
3. Ciclo Sanitize (desinfecci6n)
Este ciclo desinfecta las prendas impregnando la tela con calor a alta temperatura durante el
cicIo de secado y eliminando el 99,9% de ciertas bacterias. Utilice este ciclo para ropa, ropa
de cama, toallas u otras prendas que necesiten desinfeccion.
4. Diversos ciclos de secado y programa Fuzzy Logic
Simplemente gire el selector ta.ctilpara seleccionar uno de los 11 ciclos de secado
autom_ttico de lasecadora, incluidos normal, servicio pesado y ropa de cama, o deje que el
control Fuzzy Logic mida el grade de humedad y determine autom&.ticamente el tiempo de
secado. La precision en el secado nunca fue m_ts sencilla que con Samsung.
5. Ahorro de tiempo
Los delos est_tn diseflados pensando en usted. Todas nuestras secadoras est&.ndisefladas
para secar su ropa en menos tiempo.., is01oen 42 minutes! As( le queda tiempo para las
cosas m&.simportantes de la vida.
6. Ahorro de energia
Las secadoras Samsung son sQper eficientes en el consume de energ(a. Puede secar hasta
3,09 Ib (1,40 kg) de ropa con 1 kWh. Adema.s, tanto la gran capacidad come el control Fuzzy
Logic ahorran energ(a secando autom_tticamente sus prendas de la manera m_ts eficiente.

7. Puerta f4cilmente reversible
La direccion de la puerta reversible puede modificarse f&.cilmente.
8. Ventilaci6n de 4 direcciones (modelo el6ctrico solamente)
Puede instalar la ventilaci6n del drenaje en las siguientes cuatro (4) posieiones: atr_ts, en
cualquiera de los laterales o en la parte inferior.
9. Smart Care
Esta funci6n diagnostiea problemas por sf sola.
No ser&.neeesario que se comunique con un ingeniero del servicio t_enieo, ni que
busque el manual del usuario cuando suda algOn problema con el produeto, ya que los
eleetrodom_stieos inteligentes le permiten saber como tratar el problema a trav_s de su
tel_fono inteligente.

Felicitaciones por la compra de la nueva secadora Samsung. Este manual
contiene informaci6n importante acerca de la instalaci6n, el uso y el cuidado del
electrodomestico. Lea detenidamente estas instrucciones a fin de aprovechar al
m_ximo los mOltiples beneficios y funciones de la secadora.
LO QUE NECESITA SABER SOBRE LAS INSTRUCCIONES DE SEGURIDAD
Las advertencias y las instrucciones de seguridad importantes de este manual no cubren todas las posibles
condiciones y situaciones que pueden ocurrir. Es su responsabilidad actuar con sentido comLin, precaucion
y cuidado cuando instale, realice el mantenimiento o ponga en funcionamiento la secadora.
Comun(quese siempre con el fabricante si surgen problemas o situaciones que usted no comprende.
SIMBOLOS Y PRECAUCIONES DE SEGURIDAD IMPORTANTES
Los fconos y las se_ales incluidas en este manual del usuario
significan Io siguiente:
ADVERTENCIA
Peligroso prb.cticasinsegurasque puedencausar lesiones fisicas graves o la
muerte.
Siga lainformaciOncontenida en este manualpara minimizarel riesgode
incendio oexplosion o para evitardanos materiales,lesionesfisicaso la muerte.
No almaceneni utilicegasolinauotros vaporeso Ifquidosinflamablescerca de
este o cualquierotto aparatoel@trico.
//_ Peligros o pr&.cticas inseguras que pueden causar lesiones fisicas
PRECAUCION leves o da_os materiales.
NO intente hacer nada.
NO desarme.
NO toque.
Siga las instrucciones completamente.
Desenchufe el cable de alimentacion el_ctrica del tomacorriente de
Dared.
AsegOrese de que la m&.quina tenga buena conexion a tierra para evitar
descargas el_ctricas.
Llame al centro de servicio t_cnico para obtener asistencia.
Nota
Estos iconos de advertencia estan aqui para evitar que usted u otras personas sufran
da_os.
Siga las instrucciones completamente.
Despu_s de leer esta secci6n, guardela en un lugar seguro para consultas futuras.
_Lea todas las instrucciones antes de usar el electrodom_stico.
GUARDE ESTAS INSTRUCCIONES
4 instruccones de seguridad

/_ ADVERTENCIA: Para reducir el riesgo de incendio, descargas el_ctricas o lesiones fisicas
......... cuando usa este electrodom_stico, siga las instrucciones de seguridad bb.sicas que figuran
a continuacion:
1. Lea todas las instrucciones antes de usar este electrodom_stico.
2. No seque prendas que han sido previamente limpiadas, lavadas, remojadas o
salpicadas con gasolina, solventes de limpieza en seco u otras sustancias inflamables o
explosivas, ya que emiten vapores que pueden prenderse fuego o explotar.
3. No utilice la secadora para secar ropa que tenga restos de sustancias inflamables,
como aceites vegetales, de coccion o de m&.quina, productos qu(micos inflamables,
disolventes, etc., o que contengan cera o productos qu(micos, como trapeadores y
panos de limpieza. Las sustancias inflamables pueden ocasionar que la tela se prenda
fuego.
4. No almacene ni utilice gasolina u otros vapores o I(quidos inflamables cerca de este o
cualquier otro aparato el_ctrico.
5. No permita que los ninos jueguen sobre la lavadora o dentro de ella. Se requiere de
supervision cuando el electrodom_stico es utilizado cerca de los ninos.
6. Antes de descartar el electrodom_stico o de retirarlo de servicio, extraiga la puerta del
compartimiento de secado.
7. No introduzca la mano en el electrodom_stico si el tambor est&.en movimiento.
8. No instale o guarde este electrodom_stico donde quede expuesto a factores clim&.ticos.
9. No modifique los controles.
10. No repare, reemplace ni intente realizar el mantenimiento de cualquier pieza del
electrodom_stico salvo que est_ recomendado espec(ficamente en las instrucciones
de mantenimiento del usuario o en las instrucciones de reparacion para el usuario
publicadas y que, a su juicio, usted tenga la habilidad para Ilevarlas a cabo.
11. No use suavizante para ropa o productos para evitar la esta.tica salvo que el fabricante
del suavizante para ropa o del producto Io recomiende.
12. Limpie el filtro para pelusas antes o despu_s de cada carga.
13. No aplique calor para secar prendas que contengan goma espuma o materiales
semejantes a la goma con textura similar.
14. Mantenga el a.reaalrededor de lasalida del drenaje y las a.reasadyacentes libres de la
acumulacion de pelusa, polvo y suciedad.
15. El personal t_cnico calificado debe efectuar una limpieza periodica del interior del
electrodom_stico y del conducto de drenaje.
16. No coloque elementos expuestos a aceites de cocina en la secadora. Los elementos
contaminados con aceites de cocina pueden contribuir a que se produzca una reaccion
qu(mica que ocasione queen la carga de ropa se prenda fuego.
17. Este electrodom_stico debe conectarse a tierra. Consulte "Requisitos el_ctricos" y
"Conexion a tierra" en la seccion Instalacion de la secadora.
18. No permita que los ninos jueguen sobre el electrodom_stico ni en su interior. Se
requiere de supervision cuando el electrodom_stico es utilizado cerca de los ninos.
19. No introduzca las manos bajo la secadora.
- Se puede causar lesiones.
20. AI cerrar la puerta tenga cuidado de no atrapar los dedos de los ninos.
- Puede causarles lesiones.
GUARDE ESTAS INSTRUCCIONES
instruccones de seguridad 5

ADVERTEN A- Riesgode incendio
,, La instalacion de la secadora de ropa debe estar a cargo de un instaladorcalificado.
,, Instale la secadora de ropa seg0n las instrucciones del fabricante y los codigos locales.
,, No instale una secadora de ropa con materiales para ventilacion de pl&.stico flexible. Si se
instala un conducto de metal flexible (tipo la.mina meta.lica), debe ser de un tipo especffico
identificado por el fabricante del electrodomestico como adecuado para utilizar con
secadoras de ropa. Los materiales para ventilacion flexibles suelen hundirse, aplastarse
f&.cilmente y atrapar pelusa. Estas condiciones obstruir&.n el flujo de aire de la secadora de
ropa y aumentara.n el riesgo de incendio.
,, Para reducir el riesgo de lesiones graves o muerte, siga todas las instrucciones de
instalacion.
A Para reducir el riesgo de incendio o explosion:
...........,, No seque prendas que hayan sido previamente limpiadas, lavadas, remojadas o
salpicadas con gasolina, solventes de limpieza en seco u otras sustancias inflamables
o explosivas. Emiten vapores que se pueden prender fuego o explotar. No debe
colocarse en la secadora ning0n material que haya estado en contacto con un solvente
de limpieza o Ifquidos o s01idos inflamables hasta que se haya eliminado todo vestigio
de tales Ifquidos o s01idos inflamables y sus vapores.
Existen muchos artfculos altamente inflamables en los hogares, tales como acetona,
alcohol desnaturalizado, gasolina, kerosene, algunos limpiadores Ifquidos de uso
dom_stico, algunos quitamanchas, aguarr&.s, ceras y removedores de cera.
,, No se deben secar artfculos que contengan goma espuma (puede estar catalogada
como espuma de I&.tex)o matedales semejantes a la goma y con textura similar en
la opcion de secado con calor. Los materiales de goma espuma que reciben calor
pueden, en ciertas circunstancias, provocar incendios por combustion espont&.nea.
Z_ Qu_ hacer si percibe o]or a gas:
i
ADVERTENOIA
,, No intente encender ningQn electrodom_stico.
,, No encienda el electrodom_stico.
,, No toque ningOn interruptor el_ctrico.
,, No utilice ningOn tel_fono de su edificio.
,, Haga que todos los ocupantes se retiren del cuarto, edificio o &.rea.
,, Comunfquese inmediatamente con el proveedor de gas desde el tel_fono de un vecino.
Siga las instrucciones del proveedor de gas.
,, Si no se puede comunicar con el proveedor de gas, Ilame al departamento de
bomberos.
,, La instalacion y el servicio t_cnico deber&.n estar a cargo de un instalador calificado, una
agencia de reparaciones o el proveedor de gas.
_ Aparatos a gas:
ADVERTENCIA
ADVERTENCIA: Este producto contiene qufmicos que se sabe en el estado de
California que causan ca.ncer y toxicidad reproductiva.
Los Aparatos a gas pueden causar exposicion de bajo nivel alas sustancias
enumeradas en la Propuesta 65, incluyendo pero sin limitarse a, benceno, monoxido de
carbono, formaldehfdo yhollfn, sustancias que resultan de lacombustion incompleta de
gas natural ocombustibles PL.
GUARDE ESTAS iNSTRUCCIONES
6 instruccones de seguridad

de lalista,incluidosbenceno, formaldeh[do,monOxidode carbono y holl[ncausadapor la posible
combustion incompletade gas naturalo combustibles PL LaexposiciOna estas sustanciaspuede
minimizarseaunmb.spermitiendoque la secadoraventileapropiadamente haciael exterior.
No permitaque los ninos o las mascotasjueguen sobreel electrodomestico, dentro de 61ofrente a
61.Serequierede supervisioncuando elelectrodomestico esutilizado cercade ninosy mascotas.
Antes de desechar lasecadora ode retirarlade servicio,quite la puerta delcompartimiento de
secado paraevitarque los ninosy las mascotasquedenatrapados dentrode lasecadora.
No introduzca la manoen el electrodomestico cuando eltambor este en movimiento.
No instaleo guarde esteelectrodomestico donde quede expuestoafactores climb.ticos.
No modifique los controles.
No repare nireemplaceni intenterealizarel mantenimientode ningunapiezadel electrodomestico
salvoqueeste indicado espec[ficamenteen las instruccionesde reparaciOnpara el usuarioy que
comprenday tenga la habilidadpara Ilevaracabo el procedimiento.
No utilice suavizantede ropa o productos para eliminarla estb.ticaa menosque el suavizanteo
producto este recomendado para uso con la secadora pot elfabricante del mismo.
Limpieelfiltro parapelusasanteso despues de cada carga.
Mantengaelb.reaalrededorde la salidadel drenajey las b.reascircundantes libresde pelusa, polvoy
suciedad.
@
Elpersonaltecnico calificado debeefectuar unalimpieza periOdicadel interiorde lasecadoray del
conducto de drenaje.
Esteelectrodomesticodebe conectarse atierra correctamente. Nuncaenchufeel cable de
alimentaciOna un receptb.culoque no esteconectado atierra correctamente niguardeconformidad
con loscOdigoslocalesy nacionales.Consultelas instruccionesde instalaciOnparaobtener
informaciOnsobre cOmoconectar este electrodomestico a tierra.
No se siente encima de la secadora.
Z_ Aseguresede que los bolsillosno contenganobjetos pequenos,sOlidosy de forma irregular,material
.......... extrano,etc., pot ejemplo: monedas, cuchillos, alfileres,etc.. Talesobjetos podr[an danarla secadora.
No laveropa quecontenga hebillasgrandes,botones uotros objetos de metal pesado o sOlido.
_Se pueden producir perdidas gas en su quegenerenuna peligrosa.
de sistema situaciOn
ADVEmENOIA
Lasperdidas de gas pueden noset detectadas Onicamentepot el olor.
Losproveedoresde gas recomiendanque compre e instaleun detector de gas aprobado pot UL
Instaley use de acuerdo con las instruccionesdelfabricante.
No coloque prendas en la secadoraque hayansido salpicadas o remojadascon aceitevegetal
oaceite de cocina. Inclusodespues del lavado,estas prendaspueden contener unacantidad
importantede dichos aceites.
Elaceite residualen las prendaspuede prendersefuego enforma espontb.nea.La posibilidadde
combustion espontb.neaaumenta cuando las prendas quecontienen aceitevegetalo aceitede
cocina son expuestasal calor.Lasfuentes de calor,tales como la secadora, puedencalentar estas
prendasy permitirque se produzca laoxidaciOndelaceite a modo de reacciOn.LaoxidaciOngenera
calor.Si dicho calor no tiene formasalir,las prendas puedencalentarse Iosuficientecomo para
prendersefuego. Amontonar, apilaroguardar estetipo de prendas puede impedir que el calorsalga y
puede generarun peligrode incendio.
Todas las prendaslimpiasy suciasque contengan aceite vegetalo aceite de cocina pueden resultar
peligrosas.Lavardichas prendasen agua calientecon unadosisadicionalde detergentereducirb,el
peligro,aunque no Ioeliminarb..Siempreuse el ciclo Cool Down (Enfriamiento)paraestas prendas
con elfin de reducirla temperatura.Nunca retireestas prendas cuando lasecadora seencuentre
calienteni interrumpael ciclo de secado hastaque las prendas hayanpasado pot el ciclo Cool Down
(Enfriamiento).Nunca amontoneo apile estas prendascuandoesten calientes.
GUARDE ESTAS INSTRUCCIONES
[nstruccones de segur[dad 7

eontendo
INSTALACION DE LA SECADORA
MANUAL DE INSTRUCCIONES,
SUGERENCIAS
MANUAL DE INSTRUCCIONES,
SUGERENCIAS
MANUAL DE INSTRUCCIONES,
SUGERENCIAS
9 Desembalaje de la secadora
9 Requisitos basicos
10 Requisitos para el tendido de conductos
11 Importante para el instalador
11 Consideraciones acerca de la ubicacion
11 Instalacion del electrodomestico en un gabinete o
en un hueco
12 Instalacion en casas rodantes
12 Drenaje
13 Requisitos en cuanto al gas
13 Instrucciones de instalacion de la comunidad de
Massachusetts
14 Requisitos electricos
14 Conexion a tierra
15 Conexiones electricas
16 Instalacion - procedimiento general
19 Conexion la manguera de entrada
19 Lista de verificacion final de la instalacion
20 Sugerencias acerca del drenaje de la secadora
21 Inversion de la puerta
23 Descripcion general del panel de control
26 Seguro para ni_os
26 Luz del tambor
26 SePal
27 Mi ciclo
27 Smart care
28 Limpie el filtro para pelusas
28 Cargue la secadora de manera adecuada
28 Como comenzar
CUIDADO Y LIMPIEZA
SUGERENCIAS PARA PRENDAS
ESPECIALES
i
GUIA DE SOLU¢ION DE PROBLEMAS
APENDICE
8 conten do
29 Panel de control
29 Tambor
29 Tambor acabado con pintura en polvo
29 Exterior de la secadora
29 Sistema de drenaje de la secadora
30 Sugerencias para prendas especiales
31 Controle estos puntos si su secadora...
32 Codigos de informacion
33 Tabla de indicaciones sobre la tela
34 Proteccion del medio ambiente
34 Declaracion de conformidad
34 Especificaciones
35 Tabla de ciclos

/
DESEMBALAJE DE LA SECADORA
Desembalelasecadora e inspecciOnelapara controlar que no se hayanproducido danos durante eltransporte.
Compruebe que hayarecibido todos los elementosque se muestranacontinuaciOn.Si la secadora sufri6danos
durante eltransporte, osi falta algunelemento,comuniquese con el 1-800-SAMSUNG(726-7864).
Paraevitarlesionesfisicas otirones, use guantesprotectores cadavezque levanteotransporte la secadora.
A Los materialesde embalajepueden set peligrosos paralos ninos. Mantengatodos los materialesde embalaje
....."-'_,, (bolsasde pla.stico,poliestireno,etc.) lejosdelalcancede los ninos.
Z_No muevael producto sujeta.ndolopot la parte frontal de la cubierta superior de lasecadora.
........oo- Lacubierta se podria separary causarle lesionespersonales.
Panel de control
superior
Puerta
[ PARTE POSTERIOR ]
Filtro Conducto de
--I Marco delantero drenaje
Herramientas necesarias
L[ave ing[esa para
Pinzas CUter
tuberias_sblo de _Las_
L[ave de tuercas
Nivel Destorni[lador Phillips Cinta para conductos L[ave ing[esa
Partes surninistradas
Manguera corta de
Goma Conector "Y" Manguera del agua entrada
REQUISITOS BASICOS
Aseguresede tenet todo IonecesariopararealizarunainstalaciOnadecuada
• Se requiereun TOMACORRIENTECON CONEXIONA TIERRA.ConsultelasecciOnRequisitoselectricos.
UnCABLE DEALIMENTACIONpara las secadoraselectricas(exceptoen Canada.).
TUBER[ASDEGAS (sise instalauna secadoraa gas).Lastuberiasde gasdeben cumplircon los cOdigoslocalesy
nacionales.
ElSISTEMADEDRENAJE-debe consistir en unconducto de drenajede metalrigidoo flexiblecon un
recubrimientode metal resistente.
insta[ac6n de a secadora 9

REQUISITOS PARA EL TENDIDO DE CONDUCTOS
* Utiliceun conducto de acero galvanizadorigidoo de aluminiorigido,de 4pulgadas (10,2cm) de dia.metro.
* No utilice unconducto de menortamano.
* Los conductos de ma.sde 4 pulgadas (10,2 cm) de dia.metropuedencausar unamayor acumulaciOnde pelusa.
PeriOdicamente,debe retirarla pelusaacumulada.
* Si espreciso utilizarun conducto de metalflexible, utiliceel tipo que vienecon un recubrimientode metalresistente.
No utilice unconducto flexiblecon un recubrimientodelgado. Se puede producir unaobstrucciOnimportantesi se
dobla elconducto flexibleen forma demasiado marcada.
* Nunca instaleningun tipo de conducto flexibleen paredes, techos u otros espaciosque quedenocultos.
* Haga queel conducto de drenajese mantengaIoma.srecto y corto posible.
* Asegure las unionescon cinta paraconductos. Noutilicetomillos.
* Los conductos flexiblesde pla.sticose pueden enroscar,combat, pinchar, pueden reducir el flujode aire,prolongar
eltiempo de secado y afectar el funcionamientode la secadora.
* Los sistemasde drenajede mayor Iongitudquela recomendada pueden prolongarel tiempo de secado, afectar el
funcionamiento del equipo y acumular pelusa.
* Elconducto de drenajedebefinalizaren unatapa del drenajecon un reguladorde tiro que gire haciaafuerapara
evitarel reflujode airey elingreso de insectoso plantas. Nunca utiliceunatapa de drenajecon un reguladorde tiro
magnetico.
* Latapa debe tenet 12 pulgadas(30,5 cm) de espacio librecomo mfnimo entre la parte inferiorde latapa y elsuelo
uotra obstrucciOn.Laabertura de la tapa debe apuntar haciaabajo.
* Nunca instaleun filtro sobre la salidadel drenaje.
* Paraevitarla acumulaciOnde pelusa,no permitaque lasecadora drenedirectamente enel hueco de unaventana.
No permita quedrenedebajo de lacasa o de unagalerfa.
* Si la redde conductos del drenajedebe pasar pot una.reaque no recibecalor,sedebe aislarel conducto y se
Iodebe colocar levementeendeclive hacia latapa de drenajepara reducirla condensaciOny laacumulaciOnde
pelusa.
* Inspeccioney limpieel interiordel sistemade drenajepot Iomenos unavezpot ano. Desenchufeel cable de
alimentaciOnantesde limpiar.
* Controle con frecuenciapara asegurarsede que el reguladorde tiro de latapa de drenajeseabra y secierre sin
inconvenientes.
* Controle una vez pot mes y limpieal menos unavezal ano. Nota: Si las prendasno se secan,verifiqueque los
conductos no estenobstruidos.
* No haga que la secadora drenehacia ningunapared,techo, sOtanode pequenaalturao espacio oculto de un
edificio, Ifneade descargade gaseso cualquierotto conducto comon ochimenea. Esto podrfagenerarun peligro
de incendiocomo consecuenciade la pelusaexpulsadapot la secadora.
N°codos de 900
3
No utilice un conducto flexible de un material que no sea el metal.
Tipo de tapa impermeable
I
Recomendado Ut[[ices6lo para Una[nsta[aci6n de corte
I a[cance
4" (10,2 cm) 2,5" (6,4 cm)
Rigido. Met_tlicoflexible* I Rigido Met_tlicoflexible*
2,438,40 cm. (24,4 m) 1,249,68 cm. (12,4 m) 2,255,82 cm. (22,6m) 1,005,84 cm. (10,1 m)
2,072,64 cm. (20,7 m) 1,127,76 cm. (11,2 m) 1,889,76 cm. (18,9m) 883,92 cm. (8,8m)
1,737,36 cm. (17,4 m) 1,005,84 cm. (10,1 m) 1,554,48 cm. (15,5m) 762,00 cm. (7,6m)
1,432,56 cm. (14,3 m) 883,92 cm. (8,8m) 1,249,68 cm. (12,5 m) 640,08 cm. (6,5m)
10 instalacOn de la secadora

Si la nueva secadora se esta instalando dentro de un sistema de drenaje
existente, debe asegurarse de que:
el sistema de drenaje cumpla con todos los codigos locales, estaduales y nacionales;
no se utilice un conducto flexible de pla.stico;
se controle y limpie toda la pelusa acumulada del interior del conducto existente;
Compruebe que el conducto no est_ enroscado o aplastado;
el regulador de tiro de la tapa de drenaje se abra y se cierre sin inconvenientes.
La presion esta.tica de cualquier sistema de drenaje no debe superar las 0,83 pulgadas de la
columna de agua niset inferior a O.
Esto se puede medir cuando la secadora esta. en funcionamiento con un manometro en el punto
donde el conducto de drenaje se conecta a la secadora. Se debe utilizar la opcion sin calor. El
tambor de la secadora debe estar vacb y el filtro para pelusas limpio.
IMPORTANTE PARA EL INSTALADOR
Lea las siguientes instrucciones con detenimiento antes de instalar la secadora. Estas instrucciones se
deben conservar para consultas futuras.
Z_ Retire la puertade todos los electrodomesticosdesechados paraevitarel peligro de queun nine seasfixie.
ADVERTENCIA
CONSIDERACIONES ACERCA DE LA UBICACi(:)N
Ubique la secadora donde haya suficiente espacio adelante para cargarla y suficiente espacio atrb.spara
el sistema de drenaje. Esta secadora viene preparada de fb.brica para el drenaje posterior. Para que drene
per la parte inferiore hacia la derecha o la izquierda (medelo electrico solamente), utilice el kit de drenaje
accesorio (de venta per separado). El kit viene acompa_ado de instrucciones. Esimportante asegurarse de
queen la habitaci6n circule suficiente aire fresco. Lasecadora debe estar ubicada donde el aire pueda fluir sin
incenvenientes.
Paralas secadoras a gas, se debe mantener el espacio libre suficiente tal come figura en la placa de informaci6n
para garantizar que haya aire suficiente para la combusti6n y el funcionamiento adecuado de la secadora.
No instale ni guarde la secadora en un b.readonde quede expuesta al agua y/o a los factores climb.ticos.
Mantenga el b.reade la secadora libre de materiales combustibles, gasolina y otros vapores y I(quidos inflamables.
Unasecadora produce pelusa combustible. No debe haber pelusas en el b.reacircundante de la secadora.
INSTALACi0N DEL ELECTRODOMI_STICO EN UN GABINETE O EN
UN HUECO
/_ Debe colocar en la secadora un drenaje con salida hacia el exterior para reducir el riesgo de incendio
.........._ cuando instala la secadora en un gabinete o en un hueco.
,, No se debe instalar ningun otto electrodomestico que queme combustible en el mismo gabinete de la
secadora.
,, ADVERTENCIA: Parareducir el riesgo de incendio, debe colocarse en la secadora un drenaje con salida
hacia el exterior.
Consulte la secci6n Drenaje afin de obtener mb.sinformaci6n.
,, Los espacios libres m(nimos entre lasecadora y las paredes adyacentes u otras superficies deben tenet las
siguientes dimensiones:
2" (5,08 cm) en el frente, 17" (43,18 cm) en la parte superior, 1" (2,54 cm) a ambes lades y 5" (12,7 cm) en la
parte posterior.
,, Elfrente del gabinete debe contar con dos aberturas sin obstrucciones para que ingrese el aire, para ocupar
un b.reatotal combinada minima de 72 pulg2(183 cm2), con 3" (7,62 cm) de abertura minima en la parte
superior yen la parte inferior. Se acepta una puerta tipo persiana con un espacio libre equivalente.
instalacOn de a secadora 11

INSTALACi0N EN CASAS RODANTES
LainstalaciOnde la secadoraencasasrodantesdebe cumplircon laNormade ConstrucciOny Seguridadde Casas
Fabricadas,Titulo24 CFR,Parte3280 [denominadaanteriormenteNormaFederalparala Construcciony laSeguridadde
CasasRodantes,Titulo24, HUD (Parte280), 1975] (paralos EstadosUnidos)olas NormasCSAZ240 (paraCanad_t).
Cuandoseinstalauna secadoraen una casarodante, debetenet la precauciOnde asegurarla secadoraal piso.
Ubiquela secadoraen un&ea en laque circulesuficienteairefresco.
Serequiereunespaciominimode 72 pulg2(465cm2)sinobstrucciones.
Llameal 1-800-SAMSUNG(726-7864)paraobtener m_tsinformaciOnacercade la compradel kitde anclajeal pisocomo
accesorio.
Todas lasinstalacionesen casasrodantesdebentenet un drenajecon salidahaciaelexteriory laterminaciondel
conductode drenajedebe estarfirmementeaseguradaa laestructurade lacasa rodantemediantematerialesqueno
resulteninflamables.
Elconducto dedrenajeno puedeterminardebajode lacasa rodante.
Consultela secciOnDrenajeafin deobtener m_tsinformaciOn.
DRENAJE
La secadora no debe drenarse hacia una chimenea, pared, techo, altillo, sotano de pequena altura o
espacio oculto de un edificio.
Si la secadora tiene un drenaje con salida hacia el exterior se evitardt que ingrese una gran cantidad de
pelusa y humedad a la habitacion.
En los Estados Unidos:
* Todaslassecadorasdebentenerundrenajeconsalidahaciaelexterior.
* Elconductodedrenajerequeridotiene4pulgadas(10,2cm)dedi_tmetro.
* UtilicesOlolosconductosflexiblestipo laminametalica,silos hubiera,identificadosespecificamentepara
su utilizacioncon elelectrodomesticoperel fabricantey quecumplanconel Esquemaparaconductosde
transiciondesecadorade ropa,Tema2158A.
* Consulte"Requisitesparael tendidodeconductos"enla seccionInstalacionde lasecadoraparaconocerla
Iongitudm$ximadelconductoy el n0merode codos.
* LaIongitudtotaldelconductoflexiblemetaliconodebesuperarlos2,4 m.
* Nofie el conductocontomillosuotrosmediosdesujecionqueseextiendandentrodelconductoy atrapen
pehsa.
En CanadA:
* Todaslassecadorasdebentenerundrenajeconsalidahaciaelexterior.
* Elconductodedrenajedebetener4 pulgadas(10,2cm)dedi_tmetro.
* UtilicesOloaquellosconductosflexiblestipo I_tminamedtlica,silos hubiera,especificamenteidentificadosper
el fabricanteparasu usecon elelectrodomestico.
* Consulte"Requisitesparael tendidodeconductos"enla seccionInstalacionde lasecadoraparaconocerla
Iongitudm$ximadelconductoy el n0merode codos.
* LaIongitudtotaldelconductoflexiblemetaliconodebesuperarlos2,4 m.
* Nofie el conductocontomillosuotrosmediosdesujecionqueseextiendandentrodelconductoy atrapen
pehsa.
Fuera de los EE.UU. y CanadA:
,, Remftase a los codigos locales.
/_ Debecolocarenla secadoraun drenajeconsalidahaciael exteriorparareducirel riesgodeincendio
....."'_TE,,Acuandoinstalalasecadoraenun gabineteoen unhueco.
NUNCAUTILICEUNCONDUCTOFLEXIBLEDEPLASTICOO DEUNMATERIALQUENOSEAELMETAL.
Sisu redde conductosexistenteesde pl_tstico,deun materialquenoseael metalo es inflamable,
reemplacelaporunaque seademetal.
UtiliceL]nicamenteunconductodedrenajedemetalque noseainflamableparaasegurarlacontenciondel
aireexpulsado,elcalory la pelusa.
12 instalacOn de la secadora

REQUISITOS EN CUANTO AL GAS
Utilice Qnicamente gas natural o gas LP (gas licuado de propano).
LA INSTALACION DEBE REALIZARSE EN CONFORMIDAD CON LOS CODIGOS LOCALES, O EN
AUSENCIA DE ELLOS, CON EL CODIGO NACIONAL PARA GAS Y COMBUSTIBLES ANSI/Z223.1, LA
REVlSl0N MAS RECIENTE (PARA LOS ESTADOS UNIDOS), O CON LOS CODIGOS DE INSTALACION
CAN/CGA-B149 (PARA CANADa,).
Lassecadorasa gas estb.nequipadascon un orificiopara el quemador de modo que puedanset utilizadascon gas
natural.Si tienepensado utilizarsusecadoracon gas LP (gaslicuadode propano),deberb,efectuarsela conversion
para Iograrunfuncionamiento adecuado y seguro,tarea que deberb,estar a cargo de untecnico calificado.
Se recomiendausarun conducto de suministrode gasde 1/2" (1,27cm) y el mismodebe reducirse parala conexi0n
con elconducto de gas de 3/8" (1cm) de susecadora. ElC0digo NacionalparaGasy Combustiblesexigeque se
instale unavb.lvulamanual de cierredel gas, aprobada y de fb.cilacceso, dentro de los 6" de distanciade lasecadora.
Las secadoras a gas instaladas en garajes residenciales deben estar elevadas a 18 pulgadas (46 cm) del piso.
Ademb.s,inmediatamentecontra la corrientede laconexi0n delsuministrode gas de lasecadora, sedebe instalaruna
conexi0n roscada macho N.RT.(Roscanacionalparatubos) de 1/8" (0,3cm),accesiblepara laconexi0ndel medidor
de prueba.
Su secadoradebe estar desconectada delsistemade suministrode gas durante las pruebasde presi0ndel sistema.
NO vuelvaa utilizarel viejoconducto de gas en metalflexible.Eldiseno delconducto de gasflexibledebe estar
certificado pot laAsociaci0nAmericana delGas (CGAen Canadb.).
®
Todo compuesto de union de tuber(as utilizado debe set resistente a la accion del gas licuado de
petroleo.
A modo de cortes(a, la mayor(a de las empresas locales de gas inspeccionardtn la instalacion del
artefacto a gas.
ENCENDIDO DEL GAS: la secadora utiliza un sistema de encendido automdttico para encender el
quemador.
No existe un piloto que permanezca constantemente encendido.
INSTRUCCIONES DE INSTALACi0N DE LA COMUNIDAD DE
MAS SAC HUSETTS
La instalacion de la secadora deber_t estar a cargo de un plomero o un gasista matriculado. Se deber_t
instalar una vdtlvulade gas manual con una manija en forma de "T" en el conducto de suministro de gas de
la secadora. Si se utiliza un conector de gas flexible para instalar la secadora, el conector debe tenet una
Iongitud ma.ximade 3' (36").
Z_,, Se pueden producir p_rdidas de gas en su sistema que ocasionen una situacion peligrosa.
..........• Las p_rdidas de gas pueden no set detectadas Linicamente pot el clot.
Los proveedores de gas recomiendan que compre e instale un detector de gas aprobado pot UL.
,, Instale y use de acuerdo con las instrucciones del fabricante.
instalacOn de a secadora 13

REQUISITOS ELi CTRICOS
EIdiagrama del cableado se encuentra en la placa debajo del panel de control o en la parte posterior
del armazon.
ADVERTENCIA
La conexion inadecuada del conductor de conexion a tierra del equipo puede generar una
descarga el_ctrica.
Consulte a un electricista o t_cnico calificado si le surgen dudas acerca de si la conexion a tierra
de su secadora es correcta. No modifique el enchufe provisto con la secadora; si no entra en el
tomacorriente, solicite a un electricista calificado que instale el tomacorriente adecuado.
Para evitar el riesgo de incendio innecesario, descarga el_ctrica o lesiones ffsicas, todo el cableado
y la conexion a tierra deben realizarse en conformidad con los codigos locales, o en ausencia
de ellos, con el Codigo El_ctrico Nacional, ANSI/NFPA Nro. 70, la revision ma.s reciente (para los
EE.UU.) o el Codigo El_ctrico Canadiense CSA C22.1, las revisiones m_tsrecientes y los codigos
y ordenanzas locales. Es su responsabilidad proveer los servicios el_ctricos adecuados para su
secadora.
Todas las instalaciones de gas deber&.n realizarse en conformidad con el Codigo Nacional para
Combustibles ANSI/Z2231, la revision ma.sreciente (para los EE.UU.)o con los Codigos de
Instalacion CAN/CGA - B149, la revision m_tsreciente (para Canadb.)y los codigos y ordenanzas
locales.
CONEXION A TIERRA
Esta secadora debe conectarse a tierra. En caso de que el electrodom_stico funcione mal o se
descomponga, la conexion a tierra reducir&,el riesgo de descarga el_ctrica al ofrecer una vfa de menos
resistencia a la corriente el_ctrica.
ADVERTENCIA
ADVERTENCIA
Modelos a gas
Su secadora tiene un cable con un conductor de conexion a tierra del equipo y un enchufe de
conexion a tierra.
El enchufe debe conectarse a un tomacorriente adecuado que este correctamente instalado y
conectado a tierra en conformidad con todos los codigos y ordenanzas locales.
No modifique el enchufe provisto con la secadora; si no entra en el tomacorriente, solicite a un
electricista calificado que instale el tomacorriente adecuado.
Nunca conecte el cable a tierra alas tuberfas de pl_tstico, las tuberfas de gas o alas canerfas de
agua caliente.
Modelos el_ctricos
La secadora tiene un cable opcional con un conductor de conexion a tierra del equipo y un
enchufe de conexion a tierra. Este cable se vende pot separado.
El enchufe debe conectarse a un tomacorriente adecuado que este correctamente instalado y
conectado a tierra en conformidad con todos los codigos y ordenanzas locales.
No modifique el enchufe provisto con la secadora; si no entra en el tomacorriente, solicite a un
electricista calificado que instale el tomacorriente adecuado.
Si no se utiliza un cable de alimentacion y la secadora el_ctrica debe estar permanentemente
conectada, se la debe conectar a un sistema de cableado de metal con conexion a tierra
permanente, o se debe conectar un conductor con conexion a tierra del equipo a los
conductores del circuito y a la terminal con conexion a tierra del equipo o al cable de la
secadora.
14 instalac On de la secadora

CONEXIONES ELi CTRICAS
Antes de poner al electrodom_stico en funcionamiento o realizar pruebas, siga las instrucciones de
conexi6n a tierra de la secci6n Conexi6n a tierra.
Se recomienda que se destine un circuito derivado individual (o separado) s61o para la secadora. NO
UTILICE UN CABLE PROLONGADOR.
ADVEmENCIA
Modelos a gas - EE.UU. y Canad_
Se requiere un servicio el_ctrico aprobado de CA de 120 voltios, 60 Hz, con un fusible o
disyuntor de 15 A.
Modelos el_ctricos - $61o EE.UU.
La mayor parte de las secadoras estadounidenses requieren un servicio el_ctrico aprobado
de CA de 120 / 240 voltios, 60 Hz. Algunas requieren un servicio el_ctrico aprobado de 120 /
208 voltios, 60 Hz. Los requisitos del servicio el_ctrico pueden encontrarse en la etiqueta con
informaci6n ubicada detra.sde la puerta. Se requiere un fusible o disyuntor de 30 A a ambos
lados del conducto.
,, Si se utiliza un cable de alimentaci6n, el cable debe enchufarse a un tomacorriente de 30 A.
NO se provee el cable de alimentaci6n con los modelos el_ctricos de secadoras
estadounidenses.
RIESGO DE DESCARGA ELECTRICA:
Si Io permiten los c6digos locales, el suministro el_ctrico de la secadora puede conectarse pot
medio de un nuevo kit de cables de alimentaci6n el_ctrica, rotulado para que se Io utilice con la
secadora, es decir que cuente con certificaci6n U.L. y categorizado en un m(nimo de 120/240
voltios, 30 A con tres conductores de cobre N.° 10 que finalicen en terminales de bucle cerrado,
pernos de pala de tipo abierto con extremos rebatidos o con conductores de estano.
,, No vuelva a utilizar un cable de alimentaci6n el_ctrica de una secadora vieja. El cable de
alimentaci6n electrica debe asegurarse en el gabinete de la secadora con una protecci6n
contra los tirones adecuada con certificaci6n UL.
La conexi6n a tierra a trav_s del conductor neutro esta. prohibida para (1) instalaciones
nuevas con circuito derivado, (2)casas rodantes, (3)veh(culos de recreo y (4)&.teasen las
que los c6digos locales proh(ban la conexi6n a tierra a trav_s de un conductor neutro. (Utilice
un enchufe de 4 pines para un tomacorriente de 4 ranuras tipo NEMA 14-30%.
Modelos el_ctricos- $61o Canad_
Se requiere un servicio el_ctrico aprobado de CA de 120 240 voltios, 60 Hz, equipado con
un fusible o disyuntor de 30 A a ambos lados del conducto.
,, Todos los modelos canadienses se env(an con el cable de alimentaci6n adjunto. El cable de
alimentaci6n debe conectarse a un tomacorriente de 30 A.
_En Canadb. no est&.permitido convertir una secadora a 208 voltios.
instalac6n de a secadora 15

INSTALACION - PROCEDIMIENTO GENERAL
Para realizar una instalaci6n adecuada, recomendamos contratar a un instalador calificado.
Lea estas instrucciones en su totalidad antes de iniciar la instalacion.
Para instalar la secadora, siga estos pasos:
1. Mueva la secadora al lugar adecuado para la instalacion. Considere instalar la secadora y la lavadora
una al laclo de la otra para tener facil acceso a ambos electrodom_sticos.
[_ ara mover la secadora con facilidad, coloque dos de las protecciones superiores de carton en
el piso. Incline la secadora hacia uno de los laterales, de modo tal que quede atravesando ambas
protecciones. Empuje la secadora de modo que quede cerca de su ubicacion definitiva. Coloque la
secadora en posicion vertical. Deje suficiente espacio alrededor de la secadora para poder conectar
los conductos, cable de alimentacion, etc.
2.
3.
Si necesita cambiar la direcci0n de la puerta, consulte InversiOn de la puerta en la pb.gina 21. Cuando
termine, vuelva al Paso 3 a continuacion.
Consulte la seccion Drenaje antes de instalar el sistema de drenaje. Instale la red de conductos desde
la secadora hasta la tapa de drenaje. El extremo con reborde de las secciones del conducto deben
apuntar hacia afuera de la secadora. NO utilice tomillos con recubrimiento de metal cuando realice el
montaje de los conductos. Se les debe colocar cinta alas uniones. Nunca utilice material de pl&.stico
flexible para el drenaje.
Una sugerencia para que las instalaciones queden bien ajustadas: conecte una seccion del sistema de
drenaje a la secadora antes de colocarla en su lugar. Utilice cinta para conductos para asegurar esta
seccion a la secadora, pero no cubra las aberturas de ventilacion ubicadas en la parte oosterior del
gabinete de la secadora.
4.
5.
Si tiene un modelo el_ctrico, vaya al Paso 6. Si tiene un modelo a gas, vaya al paso siguiente.
Consulte la seccion Requisitos en cuanto al gas, luego siga los pasos indicados que figuran a
continuacion.
a. Retire la cubierta protectora de la rosca para tubos.
b. Aplique compuesto de union de tuber[as o 1 1/2 vueltas aproximadamente de cinta de Teflon en
todas las conexiones roscadas.
El compuesto de union de tubeffas utilizado debe ser resistente a la accion del gas licuado
de petr01eo.
c. Conecte el suministro de gas a la secadora. Se requiere un accesorio adicional para conectar el
extremo de la rosca hembra de 3/4" (1,9 cm) de un conector flexible al extremo de la rosca macho
de 3/8" (1 cm) de la secadora.
d. Ajuste firmemente el accesorio de la tubeffa de gas sobre las roscas.
e. Abra el suministro de gas. Controle todas las conexiones de gas para detectar si presentan
p_rdidas usando una solucion jabonosa. Si aparecen burbujas, ajuste las conexiones y vuelva a
controlar. NO use lallama abierta para verificar si hay p_rdidas de gas.
f. Vaya al Paso 6 en la pb.gina siguiente
16 [nstalac On de la secadora

6,
7,
8,
Consulte la seccion Requisitos Electricos, luego siga las instrucciones para conexion de sistemas de 3
cables (Paso 7) o las instrucciones para el sistema de 4 cables (Paso 8) a continuacion.
Instrucciones para el sistema de tres cables:
A, Conector a tierra externo
B, Cable a tierra neutro (verde/amarillo)
O, Tornillo central de color plateado del bloque de terminales
D, Cable neutro (cable blanco o central)
E, Proteccion contra los tirones con certificacion UL de 3/4" (1,9 cm)
1o Afloje o retire el tornillo central del bloque de terminales.
2, Conecte el cable neutro (cable blanco o central) del cable
de alimentacion a la terminal de tornillo central de color
plateado del bloque de terminales. Ajuste el tornillo.
3, Conecte los dem&,scables a los tornillos externos del bloque de terminales. Ajuste los
tornillos.
4, Ajuste los tornillos con dispositivo de alivio de tension.
5, Inserte la leng0eta de la cubierta del bloque de terminales en la ranura del panel posterior de
la secadora.
Asegure la cubierta con un tornillo de sujecion.
Si realiza la conversion del sistema el_ctrico de 4 cables a 3 cables, debe conectar la cinta
......... de conexion a tierra al soporte del bloque de terminales para conectar a tierra el armazon de
la secadora al conductor neutro.
Recomendamos usar terminales de anillo. Si utiliza terminales de correa, aseg0rese de
instalarlos perfectamente.
Instrucciones para el sistema de cuatro cables:
A, Conector a tierra externo
B, Cable verde o de cobre desnudo del cable de alimentaci6n
O, Protecci6n contra los tirones con certificaci6n UL de 3/4" (1,9 cm)
D, Tornillo central de color plateado del bloque de terminales
E, Cable a tierra neutro (verde/amarillo)
F, Cable neutro (cable blanco o central)
1, Retire el tornillo del conector a tierra externo.
2, Conecte el cable a tierra (verde o sin cubierta) del cable
de alimentaci6n al tornillo del conector a tierra externo. Si
desea conectar B (cable de cobre verde o desnudo del
cable de alimentaci6n) al terminal neutro sin conectarlo en
A (conexi6n a tierra del gabinete), Ilame al servicio t_cnico.
3, Afloje o retire el tornillo central del bloque de terminales.
4, Conecte el cable neutro (cable blanco o central) del cable de alimentaci6n y el cable a tierra
del electrodom_stico (verde con franjas amarillas) debajo del tornillo central del bloque de
terminales.
5, Conecte los dem&,scables a los tornillos externos del bloque de terminales. Ajuste los
tornillos.
6, Ajuste los tornillos con dispositivo de alivio de tensi6n.
7, Inserte la leng0eta de la cubierta del bloque de terminales en la ranura del panel posterior de
la secadora.
Asegure la cubierta con un tornillo de sujeci6n.
Recomendamos usar terminales de anillo. Si utiliza terminales de correa, aseg0rese de
instalarlos perfectamente.
instalac6n de a secadora 17

MODELOS ESTADOUNIDENSES:
RIESGO DE DESCARGA ELECTRICA
ADVER_C_
Todos los modelos estadounidenses esta.n disenados para una CONEXI©N DE SISTEMAS DE 3
CABLES. El armazon de la secadora est&.conectado a tierra al conductor neutro del bloque de
terminales. Se requiere una CONEXI©N DE SISTEMAS DE 4 CABLES para las construcciones nuevas
o remodeladas, las casas rodantes o si los codigos locales no permiten la conexion a tierra a trav_s
del neutro. Si utiliza un sistema de 4 cables, no puede conectar a tierra el armazon de lasecadora al
conductor neutro del bloque de terminales.
Retire la tapa del bloque de terminales. Inserte el cable de alimentacion con una proteccion contra los
tirones con certificacion UL a trav_s del orificio provisto en el gabinete cerca del bloque de terminales.
Se debe utilizar un dispositivo de alivio de tension. No afloje las tuercas ya instaladas en el bloque de
terminales. AsegOrese de que est_n ajustadas. Utilice un tomacorriente para huecos profundos de
3/8" (1 cm).
9, La secadora debe estar nivelada para garantizar un secado optimo.
Para nivelar la secadora, siga los pasos que figuran a continuacion: Nivel
a, Con un nivel, compruebe si la secadora est&.nivelada de lado a
lado y de adelante hacia atr&.s.
b, Si la secadora no est&.nivelada, ajuste las patas niveladoras de
la parte inferior de la base de la secadora hasta que la secadora
est_ nivelada de lado a lado y de adelante hacia atr&.s. Hacer girar
las patas en el sentido de las agujas del reloj las retrae. Hacer
girar las patas en el sentido contrario al de las agujas de reloj las
afloja y extiende.
Si dispone de una secadora y una lavadora
®
Para colocar la secadora a la misma altura que la lavadora,
retraiga completamente las patas niveladoras gir&.ndolas
en sentido contrario alas agujas del reloj, luego afloje las
patas gir&.ndolas en el sentido de las agujas del reloj. Una
vez que la secadora est&.a la misma altura que la lavadora,
siga las instrucciones precedentes para nivelar la secadora. Patas niveladoras
Betraercompletamente Luegoaflojar J
Ajuste las patas niveladoras s01o Io necesario para nivelar la secadora. Extender las patas
niveladoras m&.sde Io necesario puede hacer que la secadora vibre.
10, AsegOrese de que todas las conexiones de gas (en los modelos a gas), y las conexiones el_ctricas y del
drenaje est_n completas. Enchufe la secadora y luego controle su funcionamiento utilizando la lista de
verificacion que figura en la pb.gina siguiente.
11, Para MODELOS A GAS UNICAMENTE
Es posible que al principio el quemador no se encienda debido a la presencia de aire en el conducto de
gas. Permitir que la secadora funcione con la opcion de calor purgar&,el conducto. Si en el lapso de 5
minutos el gas no se enciende, apague la secadora y espere 5 minutos. AsegOrese de que el suministro
de gas hacia su secadora est_ abierto. Para confirmar que el gas est&.encendido, controle que se
sienta calor en el drenaje.
18 instalac on de la secadora

/
CONEXION LA MANGUERA DE ENTRADA
MI_TODO 1
La secadora debe estar conectada a la canilla de agua frfa mediante la manguera de entrada. No use
mangueras viejas.
1. Si el espacio Io permite, coloque el extremo hembra de bronce en el conector "Y" a la canilla de agua
frfa.
2. Cierre la canilla de agua frfa.
3. Coloque el extremo recto de la manguera larga en el conector "Y'" ,_J,. /
4. Con la pinza, ajuste la union con una vuelta adicional de dos
tercios.
_No ajuste en exceso ya que puede danar la union.
5. Coloque el extremo angular de la manguera larga en la vdtlvula de
Ilenado en la parte inferior del marco trasero de la secadora. Atornille
la union a mano hasta que est_ sujeta en el conector de la v_tlvula de Ilenado.
6. Con la pinza, ajuste la union con una vuelta adicional de dos tercios.
No ajuste en exceso ya que puede danar la union.
7. Verifique que las canillas de agua est_n abiertas.
8. Verifique que no haya p_rdidas alrededor del conector "Y" canillas y mangueras.
METODO2
La secadora debe estar conectada a la canilla de agua frfa mediante la manguera de entrada. No use
mangueras viejas.
1. Si no se puede colocar el conector "Y" directamente a la canilla de agua if(a, se debe usar la manguera
corta.
2. Cierre la canilla de agua frfa.
3. Coloque la manguera de entrada corta a la canilla de agua fr(a.
Atornille la union a mano hasta que est_ sujeta en la canilla.
4. Con la pinza, ajuste la union con una vuelta adicional de dos tercios.
No ajuste en exceso ya que puede danar la union Man ueracorta
de entrada
5. Coloque el conector "Y" al extremo macho de bronce de la
manguera pequena. Atornille la union a mano hasta que est_ _ conector"Y"
sujeta en el conector.
6. Con la pinza, ajuste la union con una vuelta adicional Mangueradel\\
agua
de dos tercios.
No ajuste en exceso ya que puede danar la union.
7. Coloque el extremo angular de la manguera larga en la vdtlvula de Ilenado en la parte inferior del marco
trasero de la secadora. Atornille la union a mano hasta que est_ sujeta en el conector de lavdtlvula de
Ilenado.
8. Con la pinza, ajuste la union con una vuelta adicional de dos tercios.
No ajuste en exceso ya que puede
danar la union.
9. Verifique que las canillas de agua est_n abiertas.
10. Verifique que no haya p_rdidas alrededor del conector "Y" canillas y mangueras.
LiSTA DE VERIFICACION FINAL DE LA INSTALACION
[] La secadora estdtenchufada a un tomacorriente y estdtconectada a tierra correctamente.
[] Los conductos de drenaje estdtn conectados y se ha colocado cinta a las uniones.
[] Usted uso conducto rfgido o flexible con un recubrimiento de metal resistente, no conducto flexible de
pla.stico.
[] La secadora esternivelada y apoyada firmemente sobre el piso.
[] Para modelos a gas: El gas estdtabierto y no hay p_rdidas de gas.
[] Encienda la secadora para confirmar que funciona, calienta y se apaga.
instalacon de a secadora 19

SUGERENCIAS ACERCA DEL DRENAJE DE LA SECADORA
z_Un eonducto flexible de pl_tstico o de un material que no sea el metal presenta un potential
...........riesgo de incendio.
1.
2.
AsegOrese de que su secadora est_ instalada
correctamente para que extraiga el aire f_tcilmente.
Utilice un conducto de metal ffgido, de 4" de diametro.
Coloque cinta en todas las uniones, incluso en la secadora.
Nunca use tornillos que atrapen pelusa.
3. Mantenga los conductos Io m_ts recto posible.
4.
[ J
Limpie todos los viejos conductos antes de instalar la nueva
secadora.
AsegQrese de que la ventilacion se abra y se cierre sin
inconvenientes.
Inspeccione y limpie el sistema de drenaje todos los anos.
i
No permita que un sistema de drenaje defectuoso demore el secado:
1. restringiendo a la secadora con un sistema de 1
drenaje defectuoso.
2. al utilizar un conducto flexible de pl_tstico, con un
recubrimiento delgado o de un material que no es
el metal.
3. al utilizar conductos innecesariamente largos que
tienen muchos codos. 3
4. al utilizar conductos o ventilaciones aplastados u
obstruidos.
20 instalac6n de la secadora

INVERSi6N DE LA PUERTA
Si desea invertir el sentido on que so abre la puerta, so recomienda Ilamar a un
t_cnico de servicio calificado.
1. Desconecte elcable de alimentaciOn.
2. Retire los cuatro tornillos de la bisagra de la puerta.
3. Retire la puerta levant_tndola.
4. Retire los dos tornillos de la placa de apoyo y luego retire la placa
de apoyo de la cubierta.
5. Monte la placa de apoyo del lado opuesto utilizando los tornillos
retirados de la placa de apoyo en el paso 4.
6. Monte la placa de apoyo de la cubierta del lado opuesto.
sF ............... _t
,<-- ;z;_;-; -
c_
7. Retire las dos bisagras de la
cubierta.
8. Monte las dos bisagras de la
cubierta del lado opuesto.
Use un destornillador piano
(-) para retirar la bisagra de la
cubierta de la placa de apoyo de
la cubierta.
f ....................... 4
./
9. Retire los 14 tornillos.
Hay dos tornillos (L)de mayor Iongitud que los
otros tornillos.
instalacon de a secadora 21

10, Retire el vidrio de lapuerta.
11, Intercambie la posicion de:
: La bisagra de la cubierta y la manija
de la puerta
: La bisagra de apoyo y la gufa del
vidrio de la puerta
_ Remftase alas ilustraciones de la
derecha para que le sirvan de gufa
en el proceso de ensamble.
12. Retire la cubierta del orificio (P).
13, Monte el vidrio de la puerta y luego ajuste los 14
tornillos que retiro en el paso 9.
14. Coloque la cubierta del orificio.
Se incluye una cubierta de repuesto para el
orificio en el manual de montaje.
o
_ ,,,IP
15, Instale la puerta en el marco frontal y luego apriete los
4 tornillos que retiro en el paso 2.
_ ompruebe la posicion de los tornillos que instalo en la la
bisagra de la puerta.
22 instalacOn de la secadora

do nctruooono¢,
I
A Pare reducir el riesgo de incendio, descarga el_ctrica o lesiones personales, lea las INSTRUCCIONES
Ao_,A DE SEGURIDAD IMPORTANTES antes de poner en funcionamiento el aparato.
DESCRIPCION GENERAL DEL PANEL DE CONTROL
Heav Normal Sanitize
Manualm
Perm
I Sensor
Wrinkle Away
Steam Cycles[]
@ @
* Press a Hol I 3s_ f'ar Extra FLmCtio_IS I .............. Power
_-7
cyi s
i
i
!
@@@
Pareseleccionarunciclo,gireel discoSelectordecicloshasteIlegaralciclodeseado.
Laluzdelindicadorjuntoal hombredelciclose iluminar&LosciclosNormal,HeavyDuty
(Serviciopesado),PermPress(Planchapermanente),Bedding(Ropede came),Delicates
(Prendasdelicadas),Sanitize(Desinfeccion)yTowels(-I-callas)son ciclosSensorDry(Secado
con sensor).
LaopcionSensorDry(Secadocon sensor)detectaautomaticamentelahumedadenla carga
y apagalasecadoracuandolacargaalcanzael niveldesecadoque ustedseleccionocon el
bot6nDryLevelSelection(Seleccionde nivelde secado)(veracontinuaci6n).
Normal:utiliceestecicloparesecarcargasde algodon,ropeinteriory lino.
HeavyDuty(Potenciaextra):utiliceestecicloparesecarlastelasresistentes,talescomolos
jeans,elcorderoyy la ropedetrabajoconcalora altatemperature.
PermPress (Pianchapermanente):secaautom_tticamenteprendasde algod6nsin arrugas,
tambientelassinteticas,tejidosy telasquerequierenplanchadopermanente.
Bedding(Ropede came) - pareprendasvoluminosas,comofrazadas,sabanasy edredones.
Delicates(Delicada):esteciclofue diseffadoparesecarprendassensiblesal calorabaja
temperaturede secado.
Towels(Toallas)- Paresecartoallasde baffoy prendassimilares.
Sanitize(Desinfecci6n)- Desinfectalas prendasimpregnandolatelacon calora alta
::: temperatureduranteel ciclodesecado.Utiliceestecicloparemantenersu ropedecamey
::: cortinaslimpiaspot medicde ladesinfecciOn.
::: Time Dry(Secadocon temporizador) : esteciclole permiteseleccionareltiempodelciclo
::: deseadoen minutos.
GireeldiscoSelectorde ciclosaTimeDry(Secadocon temporizador)yacontinuacion
presionelaflechahaciaarribadeAdjustTime(Ajustartiempo)paredeterminereltiempode
::: secado.Presionelaflecharepetidamenteparedesplazarseporlasopcionesdetiempo.
::: Quick Dry(Secado rb.pido)- ofreeeuneiclode secadoen30 minutos.
::: Refresh(Refrescar)- Useparesuavizarlasarrugasy reducirlos oloresencargasde unoa
cuatroelementos.Enesteciclo,se rociauna pequeffacantidadde agueenel tambordela
secadoradespuesde variosminutosde secadocon calor.
WrinkleAway (Antiarrugas):Reducelasarrugasenlas ropessecasqueRansidodejadas
::: en elarmarioduranteuntiempomediantelaaplicaci6nde unprocedimientoavanzadode
::: liheraciondearrugasatravesde cuidadooptimizadode vapor.Reducelasarrugasenhaste
::: tres elementosporvez.
,,, Puedecambiarel tiempodesecadomedianteel botondeAdjustTime.
manual de nstruccones, sugerencias 23

tFU©©ONOS,
- Puedeaumentaro disminuireltiempodeltitle, peronopuedeseleccionaruntiempo inferior
queeltiempominimodesecadoautomaticopre-establecido(20minutos).
Lapantalladigitalmuestraeltiemporestantedelciclo calculadodespuesdepresionarelboton
Start/Pause(Inicio/Pausa).Eltiemporestantecalculadopuedefluctuara medidaqueavanceel
ciclo.
Seiluminarala luzdeDrying(Secar)y se mantendrailuminadahastaquesehayacumplidoel
ciclo,
Cuandola secadoraesteenla fasedeenfriamiento,se iluminaralaluzde Oooling(Refrescar).
Cuandola secadoraesteenla fasedeprevencionde arrugas,se iluminaralaluz laWrinkle
Prevent(Prevencionde arrugas).
Cuandoel ciclohayafinalizado,aparecerala palabra"End"(Fin)en lapantallahastaque
presioneel botOnStart/Pause(Inicio/Pausa)o elbotOnPower(Encendido).Si susecadora
sedetieneduranteunciclo, laslucesdelindicadorparpadearanhastaquepresioneel boton
Start/Pause(Inicio/Pausa).
Paraseleccionarelnivelde secadoenlos ciclosNormal,HeavyDuty (Serviciopesado),uotros
:::::::::::::::::::::::::::::::: ciclosSensorDry(Secadoconsensor),presioneelbotch DryLevel(Niveldesecado).Se
iluminarauna luzenelindicadorjuntoal niveldesecadoqueselecciono.
Presioneel botdnrepetidamenteparadesplazarseporlasopciones.Lascargasm_tsgrandeso
................. masvoluminosasposiblementerequieranlaopcionVeryDry(Muyseco)o MoreDry(Masseco)
paraqueel secadoseacompleto.
LaopcionDampDry(Centrifugadoparcial)fueconcebidaparasecarlasprendasparcialmente.
Utilicelaparalasprendasque debansecarseen posicionhorizontalo colgarse.
Paraseleccionarlatemperaturaparalacarga,presioneelbot6nTemp(Temperatura).Se
iluminarauna luzenelindicadorjuntoalatemperaturaqueseleccion&Presioneelboton
repetidamenteparadesplazarseperlasopciones.
High(Alto): paralosalgodonesresistenteso aquelloscon elrotuloTumbleDry (Secaren
secadora).
Medium (Medic):paratelasque requierenplanchadopermanente,telassinteticas,algodones
livianosuotrasprendasconel rotuloTumbleDryMedium(Secarensecadoraatemperatura
medic).
Low (Bajo):paraprendassensiblesal calorcon elrotuloTumbleDryLow(Secarensecadoraa
temperaturabaja)oTumbleDryWarm(Secarensecadoraatemperaturacalida).
Extra Low(Extra Bajo)- ofreceunaopcionde secadocon calorala menortemperatura
posible.
Cuandousalos ciclosManualDry(Secadomanual),puedeajustareltiempo desecado
presionandoel botOndeseleccbndetiempo.
DuranteelcicloSensorDry(Secadoconsensor),el indicadorde tiemposeencuentraapagado
porqueeltiempodeseeadose determinasegL_lnel niveldehumedadfluctuante.
PerIotanto,eltiempode secadorealpuedeserdistintodelquese muestraenpantalla,
Adjust Time (AjustartJempo)- puedeagregarorestartiempoalostiemposconfigurados
automaticamenteen losciclosWrinkleAway(Desarrugar)y ManualDry(Secadomanual)
(ciclosTimeDry(Secadocon temporizador),Quick Dry(Secador@ido)o Refresh(Secadoa
temperaturaambiente)).
Paraagregaro restartiempoalciclo, presionelateclaAdjustTime(Ajustartiempo)conla flecha
haciaarribao haciaabajohastaque aparezcaeltiempodeseado.
WrinklePrevent(Prevenci6nde arrugas):ofreceaproximadamente180minutosde secado
intermitentecon airefrescoalfinaldelcicloparareducirlaformacionde arrugas.Presioneel
botonWrinklePrevent(Prevenciondearrugas)paraactivardichafuncion.
Laluzdelindicadorarribade lateclase iluminaracuandoseleccioneWrinklePrevent
(Prevencionde arrugas).
24 manual de nstruccones, sugerencias

__________________________________________________________________________________________
iiiiiiiiiiiiiiiiiiiiiiiiiiiiiiiiiiiiiiiiiiiiiiiiiiiiiiiiiiiiiiiiiiiiiiiiiiiiiiiiiiiiiiiiiiiiiiiiiiiiiiiiiiiiiiiiiiiiiiiiiiiiiiiiiiiiiiiiiiiiiiiiiiiiiiiiiiiiiiiiiiiiiiiiii
iiiiiiiiiiiiiiiiiiiiiiiiiiiiiiiiiiiiiiiiiiiiiiiiiiiiiiiiiiiiiiiiiiiiiiiiiiiiiiiiiiiiiiiiiiiiiiiiiiiiiiiiiiiiiiiiiiiiiiiiiiiiiiiiiiiiiiiiiiiiiiiiiiiiiiiiiiiiiiiiiiiiiiiiii
iiiiiiiiiiiiiiiiiiiiiiiiiiiiiiiiiiiiiiiiiiiiiiiiiiiiiiiiiiiiiiiiiiiiiiiiiiiiiiiiiiiiiiiiiii!i!i!i!i!i!i!i!i!i!i!i!i!i!i!i!i!i!i!i!i!i!i!i!i!i!i!i!i!i!i!i!i!i!i!i!i!i!i!i!
iiiiiiiiiiiiiiiiiiiiiiiiiiiiiiiiiiiiiiiiiiiiiiiiiiiiiiiiiiiiiiiiiiiiiiiiiiiiiiiiiiiiiiiiiiiiiiiiiiiiiiiiiiiiiiiiiiiiiiiiiiiiiiiiiiiiiiiiiiiiiiiiiiiiiiiiiiiiiiiiiiiiiiiiii
iiiiiiiiiiiiiiiiiiiiiiiiiiiiiiiiiiiiiiiiiiiiiiiiiiiiiiiiiiiiiiiiiiiiiiiiiiiiiiiiiiiiiiiiiiiiiiiiiiiiiiiiiiiiiiiiiiiiiiiiiiiiiiiiiiiiiiiiiiiiiiiiiiiiiiiiiiiiiiiiiiiiiiiiii
Lacargaesta.secay puederetirarlaencualquiermomentodurantoelcicloWrinklePrevent
(Prevenci6ndearrugas).
MixedLoad Bell(Timbrede carga mixta) - esunaalarmaque lenotificacuandoelnivol
de secadopromediodeunacargaescontrifugadoparcial(80%seco),Lopermiteretirarlas
prendasqueno deseaquose sequencompletamenteoque deseaquose sequenfueradela
secadoramientrasdejaquo otrasprendassigansoca.ndose.
Puedeseleccionarestafunci6nentodoslosciclosde SensorDry(Secadoconsonso0,excepto
Sanitize(Desinfecci6n),Lasseleccionesdelniveldesecadoselimitana NormalDry(Secado
normal),MoreDry(Ma.ssoco)y VeryDry(Muyseco),
Smart Care(Cuidado inteligente)- Utiliceostafunci6nparaverificarelfuncionamientode la
secadoramediantesuteldono intoligentecuandoobservaalg_lnproblemacon lasecadora.
Estafunci6nse configurasi mantienepresionadoelbot6n MixedLoadBell(Timbredecarga
mixta)duranto3 segundos.
Presi6neloparadetenery reiniciarlos programas,
Presi6nelounavezparaonconderlasecadoray presi6nelonuevamentoparaapagarla.
Si enciendesusecadoray notoca ning0nbot6ndurante10minutos,soapagara
automa.ticamente,
Si coloca la ropa en la secadora cuando est&.muy enredada inmediatamente despu_s del cicIo
de lavado o centrifugado, se puede reducir la eficacia del secado o causar que se abra la puerta.
Recomendamos desenredar la ropa antes de colocarla en la secadora.
Cada indicador de la pantalla gr&.ficasignifica:
My Cycle (Mi ciclo) Activado/Desactivado
Signal (SePal)Activado/Desactivado
Child Lock (Seguro para ni_os) Activado/Desactivado
Drum Light (Luz del tambor) Activado/Desactivado
Filter Check (Control del filtro)
Steam (Vapor)
manual de nstruccones, sugerencias 25

tFU©©ONOS,
SEGURO PARA NINOS
Evita que los ninos jueguen con la secadora.
Configuraci6n/Liberaci6n
Si desea configurar o liberar esta funcion, presione simult@_eamente los botones Temp. y Time
(Tiempo) durante 3 segundos.
Detalles del Seguro para ni_os
Puede activar el Seguro para ninos mientras su seeadora est&.en funcionamiento.
Una vez que active el Seguro para ninos, no responder&, ningOn boron, exeepto el boron
Power (Encendido), hasta que desactive dieha funcion.
Se iluminar&,el indieador de Seguro para ninos.
Si no desactivo el Seguro para ninos, y luego apago y encendio la seeadora, la funcion
Seguro para ninos continuar&, activada. Para desactivar el Seguro para ninos, siga las
instrucciones detalladas a continuacion.
_ uando otros botones, salvo el boton Power (Encendido), no respondan, verifique
el indicador de Seguro para ninos. Si el Seguro para ninos estdtactivado, siga las
instrucciones precedentes para desactivarlo.
LUZ DEL TAMBOR
Enciende el tambor de la secadora mientras se realiza el secado.
Encendido y apagado
Mantenga presionado el boton Wrinkle Prevent (Prevencion de arrugas) durante 3 segundos o
ma.s.
Puede encender y apagar la luz del tambor cuando la secadora est&.funcionando y cuando
se detiene. Si no apaga la luz del tambor 5 minutos despu_s de encenderla, la luz del
tambor se apaga autom&.tieamente.
SENAL
Cuando el ciclo haya finalizado, se escuchardt una senal sonora.
Si mantiene presionados los botones Dry Level (Nivel de secado) y Temp (Temperatura) simult_tneamente
durante 3 segundos o mdts, la senal sonora sonardt en forma intermitente.
Ajuste el volumen de la senal sonora o apb.guela presionando el boton Signal (Senal).
Presione el boton Signal (Senal) repetidamente para desplazarse por las opciones.
26 manual de nstruccones, sugerencias

MI CICLO
Le permite activar su ciclo de secado personalizado (ciclo, nivel de secado, temperatura) con la practicidad
de presionar un solo boton.
Presione el boton My Cycle (Mi ciclo} para cargar y utilizar las opciones guardadas en My Cycle (Mi Ciclo).
La luz de "Mi ciclo" indicar&,que est&.activo. Las luces de la opcion y del programa elegidos tambi@n
parpadeara.n.
Puede configurar las opciones en el modo Mi Ciclo de lasiguiente manera:
1. Presione el botOn Power (Encendido}.
2, Seleccione el ciclo utilizando el Cycle Selector (Selector de ciclos).
3. Despu@sde seleccionar el ciclo, establezca cada opci6n (nivel de secado, temperatura).
4o Puede guardar el ciclo y las opciones seleccionados manteniendo presionado el bot6n My Cycle
(Mi ciclo) durante ma.s de 3 segundos en el modo My Cycle (Mi ciclo). El ciclo y las opciones que
seleccione aparecera.n la pr6xima vez que elija la funci6n My Cycle (Mi ciclo).
_ uede cambiar la configuraci6n de My Cycle (Mi Ciclo repitiendo el proceso descrito ma.s arriba.
La pr6xima vez que elija la funci6n My Cycle (Mi ciclo) aparecera, la Liltima configuraci6n usada.
Si presiona el bot6n My Cycle (Mi Ciclo} y Io suelta dentro de 3 segundos, el programa y las
opciones guardados anteriormente aparecer&.n. Si mantiene presionado el bot6n My Cycle (Mi Ciclo}
durante 3 segundos o m&.s,las opciones y el programa configurados actualmente se guardar&.n y el
LED parpadear&, durante 3 segundos.
SMART CARE
Esta funcion permite comprobar el estado de lasecadora con un tel@fonointeligente.
1. Para activar la funcion Smart Care, presione el boton Power (Encendido) para poner en funcionamiento
la secadora y luego mantenga presionado el boton Mixed Load Bell (Timbre de carga mixta) durante
3 segundos. Si presiona un boton distinto al boton Mixed Load Bell (Timbre de carga mixta) despu@sde
encender la secadora, ya no podra, activar la funcion Smart Care.
El historial de los codigos de error se borra luego de usar la funcion.
2. Si la funcion Smart Care est&.activada, se enciende el indicador de Smart Care en la pantalla.
3. Ejecute la aplicacion Smart Care en su tel@fonointeligente.
La funcion Smart Care est&.optimizada con Galaxy S, Galaxy $2, iPhone 4 e iPhone 4S.
4. Enfoque la cb.mara del tel@fono inteligente hacia el panel de la pantalla de la secadora.
5. Si enfoca la cb.mara del tel@fonointeligente al panel de la pantalla de la secadora, el panel y el mensaje
de error se reconocen automa.ticamente y el tipo de error y la solucion se muestran automa.ticamente en
el tel@fono inteligente.
6. Si el tel@fonointeligente no reconoce el codigo de error m&.sde dos veces, ingrese en forma manual el
codigo de error indicado en el panel de la pantalla de la secadora en la aplicacion Smart Care.
_ Descarga de la aplicacion Smart Care
Descargue la Samsung Laundry App en su tel@fonocelular desde Android Market o Apple App
store. (Buscar palabra: Lavadora/secadora inteligente Samsung)
_ Precauciones de uso de Smart Care
Si la luz de un fluorescente o una I&.mparase refleja en el panel de la pantalla de la secadora, es
posible que el tel@fonointeligente no reconozca f&.cilmente el panel o el mensaje de error.
Si sostiene el tel@fonointeligente en un &.ngulo demasiado abierto respecto al frontal del panel de la
pantalla, es posible que no se reconozca el codigo de error. Para obtener los mejores resultados,
sostenga el tel@fono inteligente en una posicion paralela o casi paralela respecto al frontal del panel.
manual de nstruccones, sugerencias 27

tFU©©ONQS,
UMPIE EL FILTRO PARA PELUSAS
Despu_s de cada carga.
,, Para reducir el tiempo de secado.
,, Para hacer uso de la energ(a con mayor eficacia.
No haga funcionar la secadora sin el filtro para pelusas
colocado.
Marco
delantero Puerta
CARGUE LA SECADORA DE MANERA ADECUADA
Coloque s01o una carga de ropa en la secadora por vez.
,, En cargas mixtas, las telas pesadas y livianas se secan en forma diferente. Esto puede ocasionar que
las telas livianas est_n secas mientras que las telas pesadas queden hOmedas al final del ciclo de
secado.
,, Agregue una o mdts prendas similares adicionales a la secadora cuando estdtsecando s01ouna o dos
prendas. Esto mejora el funcionamiento de la secadora y la eficacia del secado.
Sobrecargar la secadora limita su funcionamiento y ocasiona un secado desparejo as[ como la
formacion excesiva de arrugas en algunas telas.
COMO COMENZAR
1. Cargue la secadora sin apretar. NO la sobrecargue.
2, Cierre la puerta.
3, Seleccione el ciclo y las opciones adecuadas para la carga (consulte las pb,ginas 23, 24, 25).
4, Presione el boton Inicio/Pausa.
5, Se iluminardtla luz del indicador de la secadora.
6, El tiempo del ciclo calculado aparecerdt en la pantalla.
El tiempo puede fluctuar debido a que los niveles de humedad fluctLian en la secadora.
®
®
Cuando haya finalizado el ciclo, la palabra "End" (Fin) aparecera, en la pantalla.
Si presiona Power (Encendido), se cancelara, el ciclo y lasecadora se detendra,.
Los indicadores de Drying (Secando), Cooling (Enfriando) y Wrinkle Prevent (Prevencion de arrugas)
se iluminardtn durante tales fases del ciclo.
Z_No coloque ningOn objeto en la parte superior de la secadora cuando estb,en funcionar'niento
ADVERTENCIA
28 manual de nstruccones, sugerencias

PANEL DE CONTROL
Limpie con un pano suave y h0medo. No utilice sustancias abrasivas.
No rode el panel directamente con limpiadores en aerosol.
El acabado del panel de control puede danarse a causa de algunos productos removedores de suciedad y
manchas de tratamiento previo al lavado.
Aplique dichos productos lejos de la secadora y limpie el Ifquido derramado o el rocb inmediatamente.
TAMBOR
Elimine todas las manchas del tambor causadaspor crayon, tinta o tintura de la tela (proveniente de
artfculos nuevos, tales como toallas o jeans) etc, con un limpiador com0n.
Posteriormente, seque las toallas o prendas viejas para eliminar restos de manchas o solucion de limpieza.
Una vez que se hayan seguido estos pasos, es posible que las manchas a0n sean visibles, pero no se
transferir&.nalas cargas subsiguientes.
TAMBOR ACABADO CON PINTURA EN POLVO
Para limpiar el tambor acabado con pintura en polvo, use un pano humedecido con un limpiador suave, no
abrasivo, adecuado para superficies que se deterioran f&.cilmente.
Elimine los residuos del limpiador y seque con un pano limpio.
EXTERIOR DE LA SECADORA
Limpie con un pano suave y h0medo. No utilice sustancias abrasivas.
Proteja la superficie de objetos afilados.
No coloque objetos pesados ni afilados ni tampoco el paquete de detergente sobre la secadora. Pueden
rayar o danar la cubierta superior de la secadora. Mantenga estos art(culos sobre el pedestal o en una caja
de almacenaje, que puede adquirir por separado. Toda la secadora tiene un acabado brillante. Evite rayar o
danar la superficie cuando use la secadora.
SiSTEMA DE DRENAJE DE LA SECADORA
Inspeccione y limpie el sistema de drenaje de la secadora anualmente para mantener un rendimiento
optimo.
La tapa de drenaje exterior debe limpiarse con m&.sffecuencia para garantizar un funcionamiento
adecuado.
cuidado y mpeza 29

DFon
Sugerencias para prendas especiaies
Siga las instrucciones del fabricante o de la etiqueta de indicaciones para secar
prendas especiaies. Si no se dispone de etiquetas con indicaciones, use ia
siguiente informaciOn como gufa.
Cubrecamas y edredones
Ropa de cama
Cortinas y paffos de tela
Paffaies de teia
Prendas con relleno de
plumas (chaquetas, bolsas
de dormir, edredones, etc.)
Siga las instrucciones de la etiqueta con indicaciones o seque
usando el ciclo Bedding (ropa de cama).
AsegOrese de que la prenda est_ completamente seca antes de
usarla o guardarla.
Tal vez deba volver a colocarla para garantizar un secado uniforme.
Utilice el ciclo Normal y seque de a una sola frazada pot vez para
Iograr un mejor funcionamiento de la secadora.
AsegOrese de que la prenda est_ completamente seca antes de
usarla o guardarla.
Utilice el ciclo Perm Press (Plancha permanente) y la temperatura
Medium (Medio) para reducir la formaci0n de arrugas.
Seque estos art(culos en tandas pequenas para obtener mejores
resultados y ret(relos Ioantes posible.
Utilice el ciclo Normal y la temperatura High (Alto) para panales
suaves y mullidos.
Utilice el ciclo Normal y la opcion de temperatura Medium (Medio).
Agregar toallas secas acorta el tiempo de secado y absorbe la
humedad.
®
®
®
®
®
®
®
®
®
®
®
®
®
®
Almohadas Utilice el ciclo Normal.
Agregue un par de toallas secas y un par de zapatillas limpias para
mejorar el funcionamiento de la secadora y secar los artfculos.
NO seque almohadas de capoc o de goma espuma en la secadora.
Plasticos (cortinas de baffo, Usel el ciclo de Time Dry y las configuraciones de temperatura Low o
cubiertas de muebies para Extra Low conforme alas instrucciones de la etiqueta de cuidados.
exteriores, etc.)
ARTICULOS QUE SE DEBE EVITAR PONER EN LA SECADORA:
Elementos de fibra de vidrio (cortinas, cortinas, etc.).
De lana, a menos que se reeomiende en la etiqueta.
Verduras o elementos impregnados de aceite de vegetal o para cocinar.
Goma, espuma (mochilas, juguetes rellenos, hombreras, etc.)
30 sugerencias para prendas especales

CONTROLE ESTOS PUNTOS S[ SU SECADORA...
No funciona.
No calienta,
No seca,
Hace ruido.
No seca de manera uniforme.
* Aseguresede que la puertaeste cerrada con traba.
* Aseguresede que el cable de alimentaci6nesteenchufado aun
tomacorrienteque funcione.
* Controle los disyuntoreso fusiblesde su casa.
* Presioneel botOnStart/Pause(Inicio/Pausa)nuevamentesi la puertase abre
durante el ciclo.
* Controle los disyuntoreso fusiblesde su casa.
* Seleccione unaopciOnde secado con calor distinta de refresh(Secadoa
temperaturaambiente).
* En una secadoraa gas, verifiqueque el suministrode gas esteabierto.
* Limpieel filtro atrapapelusasy elconducto de drenaje.
* La secadora puedehabersedesplazadoa lafase de enfriamientodel ciclo.
* Verifiquetodos losftemanterioresy, adema.s._
* Aseguresede que latapa de drenaje haciael exteriorde la casa sepueda
abrir y cerrarsin inconvenientes.
* Verifiqueque el sistemade drenajeno presente obstrucciones. Los
conductos deben inspeccionarsey limpiarsetodos los anos.
* Utiliceun conducto de drenajede metalrfgido,de 4".
* No lasobrecargue. 1carga de lavado= 1 carga de secado.
* Separelos artfculos pesados de los artfculos livianos.
* Es posible que seanecesariovolvera colocar los artfculosgrandes y
voluminosos,como lasfrazadaso los edredones,para garantizarun secado
uniforme.
* Verifiqueque lalavadoraeste drenandoen forma correcta paraextraerel
aguade la cargaadecuadamente.
* Es posible que lacarga sea demasiadopequena como parasecarse
correctamente.Agregue algunastoallas.
* Verifiquesien lacarga hay objetostales como monedas, botonesflojos,
clavos, etc. Retfrelosde inmediato.
* Es normalescucharel ruido de la va.lvulade gas de lasecadorao que el ciclo
del dispositivo de calorseenciendeo seapaga duranteel ciclo de secado.
* Aseguresede que la secadoraeste correctamenteniveladatal como se
describe en las instruccionesde instalaci6n.
* Es normalque lasecadora emitaun zumbido debido aalta velocidaddel aire
que se mueve pot el tambor de lasecadoray elsistemade drenaje.
* Es posible que las costuras, los bolsillosy otras&eas resistentessimilares
no se sequen pot completo cuando el restode lacarga ha Ilegadoal nivelde
secado seleccionado. Estoes normal.Seleccionela opciOnVery Dry (Super
secado)si Iodesea.
* Si seseca un artfculo pesado con unacarga liviana,pot ejemplouna toalla
con sa.banas,es posibleque el artfculo pesado no seseque completamente
cuando el restode la carga ha alcanzadoel nivelde secado seleccionado.
Separelos artfculospesados de los artfculos livianospara obtener mejores
resultados.
gua de so[ucon de prob emas 31

Tiene olor.
Se apaga antes de que la
carga est6 seca
Pelusa en las prendas
* Losolores delhogar,ya seaque provengande lapintura,el barniz,los
limpiadorespotentes,etc., pueden ingresaren lasecadora con el aire
delambiente. Esto esnormalpuesto que lasecadora extraeel aire de la
habitacbn, Iocalientay Io hacecircular pot eltambor y Ioexpulsaatraves
deldrenajehacia el exterior.
* Cuando estosolores permanecenen el aire,ventile bien la habitacbn antes
de usarla secadora.
* Lacarga de lasecadora esdemasiado pequena.Agregue mb.sprendaso
algunastoallasy reinicieel ciclo.
Lacarga de lasecadora esdemasiado grande. Retirealgunas prendasy
vuelva poneren funcionamientola secadora.
Limpieelfiltro parapelusasantesde cada carga. Con algunascargas que
producengrandes cantidadesde pelusa, quizb,sea necesariolimpiarelfiltro
duranteel ciclo.
Algunastelas producen pelusa(pot ejemplo, unatoalla de algodOnblanco
con mucho pelo)y deben secarsepot separadode lasprendas queatrapan
pelusa(potejemplo, un parde pantalonesde linonegro)
Dividalas cargas grandesen cargas mb.spequenas parael secado
Revisebien losbolsillosantesde lavary secar las prendas.
Funcionamejor con cargas pequenas de 1a4 prendas.
Carguemenos prendas. Cargue prendasde tipo similar.
o
o
Prendas arrugadas despu_s *
del ciclo Wrinkle Away
(Desarrugar).
Quedan olores en la ropa * Lastelasque contienenoloresfuertes deben lavarseen un ciclo normal.
despu_s de refresh (Secado a
temperatura ambiente).
CODIGOS DE INFORMACiON
Pueden aparecer c0digos de informaci0n para ayudarle a comprender mejor qu_ ocurre con la secadora.
tE Filtroparapehsasobstruido Limpieelfiltroo elconducto deventilacion.
Laventilacionestaobstruida Si elproblemacontinL_n,Ilamealserviciotecnico.
Temperaturade calentamientonovalida Comunfquesecon elserviciotecnico.
cuandolasecadoraesta enfuncionamiento
Lasecadorafuncionacon lapuertaabierta Cierrelapuertay hego reinicie.
Si elproblemacontinL_n,Ilamealserviciotecnico.
Lapuertanoesta biencerrada Comunfquesecon elserviciotecnico.
Launidaddetectaun bot6nqueseha AsegOresedeque NO hayabotonespresionados
presionadom_tsde 30 segundoso queesta constantemente.Pruebereiniciarel ciclo.
trabado. Si elproblemacontinL_n,Ilamealserviciotecnico.
Frecuenciade fuentede alimentacionnovalida Pruebereiniciarelciclo.
Si elproblemacontinL_n,Ilamealserviciotecnico.
Comunfquesecon elserviciotecnico.
dF
bE2
8 FE e xxx
8 AE e xxx
Problemacon elcontrolelectr6nico
(Fallade comunicaci6n)
Problemacon elcontrolelectr6nico
(Fallade sobrevoltaje)
Comunfquesecon elserviciotecnico.
Para los c0digos que no figuran mas arriba, Ilame al 1-800-726-7864 (1-800-SAMSUNG).
32_ gua de soIuc 6n de problemas

apend ae
TABLA DE INDICACIONES SOBRE LA TELA
Los siguientes s(mbolos ofrecen indicaciones acerca del cuidado de las prendas. La etiqueta de
indicaciones de la prenda incluye dmbolos para lavado, blanqueado, secado y planchado, o limpieza a
seco cuando sea necesaria. El uso de dmbolos garantiza la consistencia entre los fabricantes textiles de
art(culos nacionales e importados. Siga las indicaciones de la etiqueta para prolongar la vida Litilde la
prenda y reducir los problemas del lavado.
Normal Secar colgado/tender No lavar
Plancha permanente /
m Antiarrugas / Control de [] Colgar para que escurra No retorcer
arrugas
Prendas suaves / Secar en posicion _
No
blanqueador
usar
delicadas horizontal
!!!
S_i8
Alto
• • e Caliente Medic
®
oe Tibia/Tibia Bajo
o Frfa
n
Cualquier blanqueador
(cuando sea necesario)
$61o blanqueador sin
cloro (con protecci6n
para ropa de color)
(cuando sea necesaria)
Ciclo de secado en
secadora
Cualquier calor
sincalor/aire
Nosecaren secadora
Sinvapor (agregadoa la
plancha)
Noplanchar
0 Limpiar en seco
No limpiar en seeo
i_; Alto
Medic
to---1 Plancha permanente /
Antiarrugas / Control de
arrugas
PrendassuavesJ
m delieadas
Bajo
i i
X
X
Secar colgado/tender
Colgar para que escurra
Secar en posicion
horizontal
** Los simbolos con punto representan las temperaturas del agua del lavado apropiadas para diversas
prendas. El tango de temperatura para Caliente es de 41° a 52 °C (de 105° a 125 °F), para Tibia es de 29° a
41 °C (de 85° a 105 °F)y para Friaes de 16° a 29 °C
(de 60° a 85 °F). (La temperatura del agua del lavado debe alcanzar un minimo de 16 °C (60 °F) para que se
active el detergente y se Iogre un lavado eficaz).
apendice 33

apend ce
PROTECCi0N DEL MEDIO AMBIENTE
Este electrodom_stico se fabrica con materiales reciclables. Si decide desechar este electrodom_stico, siga
la normativa local relacionada con la eliminaci0n de desechos. Corte el cable de alimentaci0n para que el
electrodom_stico no pueda conectarse a una fuente de alimentaci0n. Quite la puerta para que los animales
y los ninos pequenos no puedan quedar atrapados dentro del electrodom_stico.
DECLARACi0N DE CONFORMIDAD
Este electrodom_stico cumple con la norma UL2158.
ESPECIFiCACIONES
DIMENSIONES A. Altura
B. Ancho
PESO
POTENCIA DEL
CALENTADOR
Pulgadas (cm,)Div ..... Pulgadas (cmi)
C. Profundidad con
43,86" (111,4) la puerta abierta a 90° 49,80" (126,5)
27" (68,6) D. Profundidad 29,96" (76,1)
127,8 Ib (58 kg)
5300 W (Elec.)
22000 BTU/h (Gas)

TABLA DE CICLOS
(®' configurado en f&.brica, ® ' seleccionable)
Normal
Plancha permanent®
Seeado con
sensor Ropa de cama
Delicada
Desinfeccbn
Secado rapido
;_ecaQo
manual Secado con
temporizador
Refrescar
Vapor Ciclo
Antiarrugas
AIgod6n, ropa de trabajo, ropa de cama,
carga mezclada
lblas resistent®s, tales corno jeans, corderoy
y ropa de trabajo pesado
Camisas, telas sinteticas, tejidos, prendas
de algod6n sin arrugas y telas que requieren
planchado permanente
Prendas voluminosas, tales como fr_adas,
sg.banas, ®dr®dories y almohadas
Ropa interior, blusas, lencerfa
Ropa de cama, cortinas, prendas para nihos (sin cambios)
Normal dry
Tballas de baflo y prendas similares (Secado normal)
Carga pequefla
Cualquier carga
Camisas, Pantabn, Edred6n, Almohadas
Camisas, Pantabn, blusas
©
©
©
Normal dry
Normal dry
Normal dry
Normal dry
Normal dry
Very dry (Muy seco)
iiiiiiiiiiiiiiiiiiiiiiiiiiiiiiiiiiiiiiiiiiiiiiiiiiiiiiiiiiiiiiiiiiiiiiiiiiiiiiiiiiiiiiiiiiiiiiiiiiiiiiiiiiiiiiiiiiiiiiiiiiiiiiiiiiiiiiiiiiiiiiiiiiiiii_________i________________________________________________________________________________________________________________________________________________________________________________________________________________________________iiii!!iiiiiiiiiiiiiiiiiiii!iiiii!!!i!i!i!!i!!i!i!i_i!!i!!i!!!iiiiiiiiiiilili_iiiii!!i!!iii!ii!ii!ilililif!if!if!iii_iiiiiiiiiiii_illi!!!!!!i!!!i!i!ii!iiiiiiiiiiiiiiiiiiiiiiiii!ilili!!!i!i!i!!i!!i!i!i_i!!i!!i!!!iiiiiiiiiiilili_iiiii!!i!!iii!ii!ii!i_i_! ii_ii_ii_i_!!_i!i!ii!_iii_!i_iiiiiiii!ii!!i!iiii_iiiiii!iiiiiiiiiiiiiilili_iiiiiiiiiiii_iiiiiiiiiiiiliiiif!:!!!iii_ii_ii_iiiii_i!_i!_i!_!;i_iiiiiiiilii;iiill!f!i!ili;iiiiiiiiiii;_;!!;!!;!!!iiiiiiiiiiiiil_iiiiii!i!!iiiiiiiiiiiiiii_ii!ii!ii!iiiiiiiiiiiiiiiiii!iiiiiili_;_iii_i_i_i_i_i_i_i_i_iiiii_iiiiii!iii__ii_iii!i!ii_ii_iiiilliiiiiiiiiiiiiii_i_illi!!!!__!i_i!iiiiiiiiiiiiiii!i!i!ilili_i!i!!ii_
!_!_!_!_!_!_!_!_!_!_!_!_!_!_!_!_!_!_!_!_!_!_!_!_!_!_!_!_!_!_!_!_!_!_!_!_!_!_!_!_!_!_!_!_!_!_!_!_!_!_!_!_!_!_!_!_!_!_!_!_!_!_!_!_!_!_!_!_!_!_!_!_!_!_!_!_!_!_!_!_!_!_!_!_!_!_!_!_!_!_!_!_!_!_!_!_!_!_!_!_!_!_!_!_!_!_!_!_!_!_!_!_!_!_!_!_!_!_!_!_!_!_!_!_!_!_!_!_!_!_!_!_!_!_!_!_!_!_!_!_!_!_!_!_!_!_!_!_!_!_!_!_!_!_!_!_!_!_!_!_!_!_!_!_!_!_!_!_!_!_!_!_!_!_!_!_'i#iii!!!!ii:#:i!i!i!iii!_iii!iii!!!!ii:#:i!i!i!iii!_iii!iii!!!!ii:#:i!i!i!iii!_iii!iii!!!!ii:!;i___;______:_____:_________________:__:________________:_________________________:__:________________:_________________________:__:________________:______________________:_____________:__:________________:_________________________:__:________________:_________________________:__:_______________:_________________________:__:________________:_________________________:__:________________:_________________________:__:_____________iilii_iiilliliiiiiiiiiii'_iiiiiiilii_iiilliliiiiiiiiiii'_iiiiiiilii_iiilliliiiiiiiiiii'_iiiiiiilii_iiilliliiiiiiiii'i!i!i!i!i!i!i!i!i!i!i!i!i_!i!_i_i_i_iiiiiiiiiiiiiiiiiiiill
Normal • ®
Potencia extra ®
Plancha permanent® ®
Secad 0 con I decama ®
sensor
®
I Desinfecci6n ®
I
Toallas ® ®
I
seead0 ' Seoado rg.pido ®
manual Secado con ® ® ® ® ®
temporizador
®
Vapor Ciclo
Antiarrugas ® ®
®
®
®
®
®
®
®
®
®
®
®
Recomendaciones sobre el tamaSo de la carga
Carga media :Llene Y_del tambor.
©
Carga grand® :Llene r_4del tambor. No agregue prendas por encima de este nivel para que puedan
dar vueltas con libertad.
Carga pequeSa : Coloque 3 a 5 prendas y no Ilene mas de _Adel tambor.
* Paraobtener los mejoresresultados,sigalas recomendacionessobreel tamaflo de lacarga paracada ciclo de secado.
apendice 35

\ /
SECADORA SAMSUNG
GARANT[A LIMITADA PARA EL COMPRADOR ORiGiNAL
El presente producto de la marca SAMSUNG, tal como Io provee y distribuye SAMSUNG ELECTRONICS
AMERICA, INC. (SAMSUNG) y Io entrega nuevo, en su embalaje de carton original al comprador o
consumidor original, est&.garantizado por SAMSUNG contra defectos de fabricacion de los materiales y la
mano de obra durante el perfodo limitado de la garantfa de:
un (1) ano para todas las piezas y la mano de obra
Dos (2) anos para las piezas del panel de control (Solo piezas)
La presente garantfa limitada comienza en la fecha original de compra yes v&.lidaunicamente para
productos comprados y usados en los Estados Unidos.
Para recibir el servicio t_cnico de la garantfa, el comprador debe comunicarse con SAMSUNG con el fin de
que se determine el problema y los procedimientos del servicio.
El servicio t_cnico de la garantfa s01o puede ser prestado por un centro de servicio t_cnico autorizado de
SAMSUNG.
Se debe presentar la factura de compra original como prueba de compra a SAMSUNG o al servicio t_cnico
autorizado de SAMSUNG.
SAMSUNG prestara, servicio t_cnico a domicilio durante el perfodo de la garantfa sin costo, sujeto a la
disponibilidad dentro de los Estados Unidos contiguos.
El servicio t_cnico a domicilio no est&.disponible en todas las &.reas.
Para recibir el servicio t_cnico a domicilio, el producto no debe presentar obstrucciones y debe ser
accesible para el agente del servicio t_cnico.
Si el servicio t_cnico no esta. disponible, SAMSUNG puede optar por transportar el producto hasta y desde
el servicio t_cnico autorizado.
SAMSUNG reparara., reemplazara, el producto u ofrecera, un reembolso a su criterio y sin cargo adicional,
tal como se establece en la presente garantfa, con piezas o productos nuevos o reacondicionados si se
comprueba que es defectuoso durante el perfodo limitado de la garantfa especificado anteriormente.
Todas las piezas y los productos reemplazados pasan a ser propiedad de SAMSUNG y deben ser
devueltos a SAMSUNG.
Las piezas y los productos reemplazados asumen la garantfa original que resta, o noventa (90) dfas, el
perfodo que sea el ma.s prolongado.
La presente garantfa limitada cubre defectos de fabricacion de los materiales y la mano de obra
encontrados durante el uso normal y dom_stico de este producto y no sera.va.lida para Io siguiente:
danos que ocurran durante el envfo; entrega e instalacion; aplicaciones y usos para los cuales el presente
producto no fue destinado; nOmeros de serie o producto alterados; dano cosm_tico o acabado exterior;
accidentes, abuso, descuido, incendio, inundacion, cafda de rayos, u otros casos fortuitos o de fuerza
mayor; uso de productos, equipo, sistemas, utilidades, servicios, piezas, suministros, accesorios,
aplicaciones, instalaciones, reparaciones, cableado externo o conectores no provistos ni autorizados por
SAMSUNG que danen este producto o que acarreen problemas en el servicio; voltaje de la Ifneael_ctrica
incorrecto, fluctuaciones y sobretension; ajustes del cliente e incumplimiento de Io establecido en el manual
de instrucciones, instrucciones de mantenimiento y ambientales que est&.ncubiertas y recomendadas en el
manual de instrucciones; traslado y reinstalacion del producto; problemas causados por plagas.
La presente garantfa limitada no cubre problemas derivados de la corriente, elvoltaje o el suministro
el_ctrico incorrectos, las bombillas de luz, los fusibles de lacasa, el cableado de la casa, el costo del
servicio t_cnico para recibir instrucciones o corregir errores en la instalacion.
SAMSUNG no garantiza el funcionamiento ininterrumpido o sin errores del producto.

SALVOLOESTABLECIDOENLAPRESENTEGARANT[A,NOEXISTENGARANT[ASSOBREEL
PRESENTEPRODUCTO,YASEANEXPRESASOTACITAS,YSAMSUNGDESCONOCETODASLAS
GARANT[ASQUEINCLUYEN,AUNQUENOENCARACTERTAXATIVO,CUALQUIERGARANT[A
T_,CITADEQUEELPRODUCTOSEENCUENTRAENCONDICIONESAPTASPARALAVENTA,DE
DEFRAUDACIONDEDERECHOSODEQUEELPRODUCTOSEADECUAALOSFINESESPEC[FICOS
PARALOSCUALESSEADQUIERE.
NINGONAVALOGARANT[AOTORGADOSPORPERSONA,COMPAKII'AOCORPORACIONALGUNA
CONRESPECTOALPRESENTEPRODUCTOREVESTIRACARACTERVlNCULANTEPARASAMSUNG.
SAMSUNGNOSERARESPONSABLEPORPCRDIDADEINGRESOSOLUCROCESANTE,
IMPOSIBILIDADDEGENERARAHORROSUOBTENEROTROSBENEFICIOS,OCUALQUIERDAI_O
DERIVADODECIRCUNSTANCIASESPECIALES,DANOIMPREVlSTOODERIVADOCAUSADO
PORELUSO,USOINCORRECTO,OINCAPACIDADPARAUSARELPRESENTEPRODUCTO,
INDEPENDIENTEMENTEDELATEOR[ALEGALENQUESEFUNDEELRECLAMOYAUNCUANDOSE
LEHAYANOTIFICADOASAMSUNGDELAPOSIBILIDADDETALESDANOS.
NINGUNRESARCIMIENTODENINGUNA[NDOLECONTRASAMSUNGSUPERARAELMONTODE
COMPRADELPRODUCTOVENDIDOPORSAMSUNGYCAUSANTEDELPRESUNTODAI_O.
SINLIMITARLOPRECEDENTE,ELCOMPRADORASUMETODOELRIESGOYLARESPONSABILIDAD
PORPCRDIDA,DANOOLESIONALCOMPRADORYALOSBIENESDELCOMPRADORYATERCEROS
YASUSBIENESDERIVADOSDELUSO,USOINCORRECTOOINCAPACIDADPARAUSAREL
PRESENTEPRODUCTO.
LAPRESENTEGARANT[ALIMITADANOSEEXTENDERAANINGUNAPERSONADISTINTADEL
COMPRADORORIGINALDELPRESENTEPRODUCTO,ESINTRANSFERIBLEYESTABLECESU
EXCLUSIVAREPARACION.
AlgunosEstadosnopermitenlimitacionesencuantoalplazodeunagarant(aimpl(cita,olaexclusiono
limitaciondedanosimprevistosoderivados,porIotantolaslimitacionesoexclusionesantedichaspueden
noaplicarseensucaso.Estagarant(aleotorgaderechosespec(ficos,yadem&.spuedetenerotros
derechosquevar(ansegOnelEstadoenelqueseencuentre.
Para recibir un servicio t_cnico de garantia, comuniquese con SAMSUNG a:
Samsung Electronics America, inc.
85 Challenger Road Ridgefield Park, NJ 07660
1=800=SAMSU NG(726=7864)
www.samsung.com/us/support
Las visitas de un Ingeniero de reparaciones para explicar funciones, el
mantenimiento o la instalacion no est&.ncubiertas por lagarant(a.
Contacte con su agente de Samsung para que Io ayude con cualquiera de
estos problemas.
garant[a 37

/
SECADORA SAMSUNG
GARANTIA LIMITADA PARA EL COMPRADOR ORiGiNAL
El presente producto de la marca SAMSUNG, tal como Io provee y distribuye SAMSUNG ELECTRONICS
CANADA, INC. (SAMSUNG) y Io entrega nuevo, en su embalaje de carton original al comprador o
consumidor original, est&.garantizado pot SAMSUNG contra defectos de fabricacion de los materiales y la
mano de obra durante el perfodo limitado de la garantfa de:
Un (1) ano para las piezas y la mano de obra
La presente garant(a limitada comienza en la fecha original de compra y es v&.lidaunicamente para
productos comprados y usados en Canada..
Para recibir el servicio t_cnico de la garant(a, el comprador debe comunicarse con SAMSUNG con el fin de
que se determine el problema y los procedimientos del servicio.
El servicio t_cnico de la garantfa s01o puede ser prestado por un centro de servicio t_cnico autorizado de
SAMSUNG.
Se debe presentar la factura de compra original como prueba de compra a SAMSUNG o al servicio t_cnico
autorizado de SAMSUNG.
SAMSUNG prestarb, servicio tecnico a domicilio durante el per(odo de la garant(a sin costo, sujeto a la
disponibilidad dentro de Canadb..
El servicio t_cnico a domicilio no est&.disponible en todas las &.reas.
Para recibir el servicio t_cnico a domicilio, el producto no debe presentar obstrucciones y debe set
accesible para el agente del servicio t_cnico.
Si el servicio t_cnico no esta. disponible, SAMSUNG puede optar por transportar el producto hasta y desde
el servicio t_cnico autorizado.
SAMSUNG repararb., reemplazarb, el producto u ofrecerb, un reembolso a su criterio y sin cargo adicional,
tal como se establece en la presente garant(a, con piezas o productos nuevos o reacondicionados si se
comprueba que es defectuoso durante el per[odo limitado de la garant[a especificado anteriormente.
Todas las piezas y los productos reemplazados pasan a ser propiedad de SAMSUNG y deben ser
devueltos a SAMSUNG.
Las piezas y los productos reemplazados asumen la garant(a original que testa, o noventa (90) d(as, el
per[odo que sea el ma.s prolongado.
La presente garant(a limitada cubre defectos de fabricacion de los materiales y la mano de obra
encontrados durante el uso normal y dom_stico de este producto y no sera.va.lida para Io siguiente:
danos que ocurran durante el env(o; entrega e instalacion; aplicaciones y usos para los cuales el presente
producto no fue destinado; nOmeros de serie o producto alterados; dano cosm_tico o acabado exterior;
accidentes, abuso, descuido, incendio, inundacion, ca(da de rayos, u otros casos fortuitos o de fuerza
mayor; uso de productos, equipo, sistemas, utilidades, servicios, piezas, suministros, accesorios,
aplicaciones, instalaciones, reparaciones, cableado externo o conectores no provistos ni autorizados por
SAMSUNG que danen este producto o que acarreen problemas en el servicio; voltaje de la I(neael_ctrica
incorrecto, fluctuaciones y sobretension; ajustes del cliente e incumplimiento de Io establecido en el manual
de instrucciones, instrucciones de mantenimiento y ambientales que est&.ncubiertas y recomendadas en el
manual de instrucciones; traslado y reinstalacion del producto; problemas causados por plagas.
La presente garant(a limitada no cubre problemas derivados de la corriente, el voltaje o el suministro
el_ctrico incorrectos, las bombillas de luz, los fusibles de lacasa, el cableado de la casa, el costo del
servicio t_cnico para recibir instrucciones o corregir errores en la instalacion.
SAMSUNG no garantiza el funcionamiento ininterrumpido o sin errores del producto.

SALVOLOESTABLECIDOENLAPRESENTEGARANT[A,NOEXISTENGARANT[ASSOBREEL
PRESENTEPRODUCTO,YASEANEXPRESASOTACITAS,YSAMSUNGDESCONOCETODASLAS
GARANT[ASQUEINCLUYEN,AUNQUENOENCARACTERTAXATIVO,CUALQUIERGARANT[A
T_,CITADEQUEELPRODUCTOSEENCUENTRAENCONDICIONESAPTASPARALAVENTA,DE
DEFRAUDACIONDEDERECHOSODEQUEELPRODUCTOSEADECUAALOSFINESESPEC[FICOS
PARALOSCUALESSEADQUIERE.
NINGONAVALOGARANT[AOTORGADOSPORPERSONA,COMPAKII'AOCORPORACIONALGUNA
CONRESPECTOALPRESENTEPRODUCTOREVESTIRACARACTERVlNCULANTEPARASAMSUNG.
SAMSUNGNOSERARESPONSABLEPORPCRDIDADEINGRESOSOLUCROCESANTE,
IMPOSIBILIDADDEGENERARAHORROSUOBTENEROTROSBENEFICIOS,OCUALQUIERDAIqO
DERIVADODECIRCUNSTANCIASESPECIALES,DANOIMPREVlSTOODERIVADOCAUSADO
PORELUSO,USOINCORRECTO,OINCAPACIDADPARAUSARELPRESENTEPRODUCTO,
INDEPENDIENTEMENTEDELATEOR[ALEGALENQUESEFUNDEELRECLAMOYAUNCUANDOSE
LEHAYANOTIFICADOASAMSUNGDELAPOSIBILIDADDETALESDANOS.
NINGUNRESARCIMIENTODENINGUNA[NDOLECONTRASAMSUNGSUPERARAELMONTODE
COMPRADELPRODUCTOVENDIDOPORSAMSUNGYCAUSANTEDELPRESUNTODAIqO.
SINLIMITARLOPRECEDENTE,ELCOMPRADORASUMETODOELRIESGOYLARESPONSABILIDAD
PORPCRDIDA,DANOOLESIONALCOMPRADORYALOSBIENESDELCOMPRADORYATERCEROS
YASUSBIENESDERIVADOSDELUSO,USOINCORRECTOOINCAPACIDADPARAUSAREL
PRESENTEPRODUCTO.
LAPRESENTEGARANT[ALIMITADANOSEEXTENDERAANINGUNAPERSONADISTINTADEL
COMPRADORORIGINALDELPRESENTEPRODUCTO,ESINTRANSFERIBLEYESTABLECESU
EXCLUSIVAREPARACION.
Algunasprovinciasnopermitenlimitacionesencuantoalplazodeunagarant(aimpl(cita,olaexclusiono
limitaciondedanosimprevistosoderivados,porIoquelaslimitacionesoexclusionesantedichaspueden
noaplicarseensucaso.Estagarant(aleotorgaderechosespec(ficos,yadem&.spuedetenerotros
derechosquevar(ansegOnlaprovinciaenlaqueseencuentre.
Para recibir un servicio t_cnico de garantia, comuniquese con SAMSUNG a:
Samsung Electronics Canada inc. 2050 Derry Road West, Mississauga, Ontario L5N 0B9 Canada.
1-800-SAMSUNG (726-7864)
www.samsung.com/ca/support (English)
www.samsung.com/ca fr/support (French)
FAX : 1-866-436-4617
Las visitas de un Ingeniero de reparaciones para explicar funciones, el
mantenimiento o la instalacion no est&.ncubiertas por lagarant(a.
Contacte con su agente de Samsung para que Io ayude con cualquiera de
estos problemas.
garant[a 39

sTiENE PREGUNTAS O COMENTARiOS?
U.S.A 1-800-SAMSUNG (726-7864) www.samsung.com/us/support
CANADA 1-800-SAMSUNG (726-7864) www.samsung.com/ca/support (English)
www.samsung.com/ca fr/support (French)
MEXICO 01-800-SAMSUNG (726-7864) www.samsung.com/mx/support
N.° de codigo: DC68-03170C-04_MES
Las visitas de un Ingeniero de reparaciones para explicar funciones, el
mantenimiento o la instalaci0n no est&.ncubiertas pot la garant(a.
Contacte con su agente de Samsung para que Io ayude con cualquiera de
estos problemas.
-
 1
1
-
 2
2
-
 3
3
-
 4
4
-
 5
5
-
 6
6
-
 7
7
-
 8
8
-
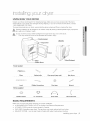 9
9
-
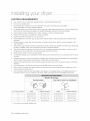 10
10
-
 11
11
-
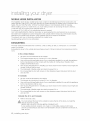 12
12
-
 13
13
-
 14
14
-
 15
15
-
 16
16
-
 17
17
-
 18
18
-
 19
19
-
 20
20
-
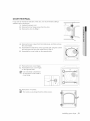 21
21
-
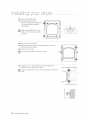 22
22
-
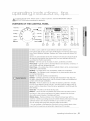 23
23
-
 24
24
-
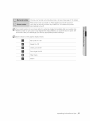 25
25
-
 26
26
-
 27
27
-
 28
28
-
 29
29
-
 30
30
-
 31
31
-
 32
32
-
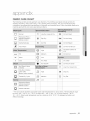 33
33
-
 34
34
-
 35
35
-
 36
36
-
 37
37
-
 38
38
-
 39
39
-
 40
40
-
 41
41
-
 42
42
-
 43
43
-
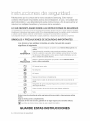 44
44
-
 45
45
-
 46
46
-
 47
47
-
 48
48
-
 49
49
-
 50
50
-
 51
51
-
 52
52
-
 53
53
-
 54
54
-
 55
55
-
 56
56
-
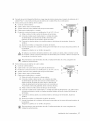 57
57
-
 58
58
-
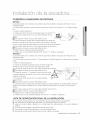 59
59
-
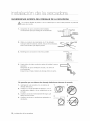 60
60
-
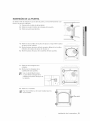 61
61
-
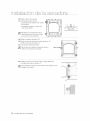 62
62
-
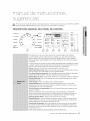 63
63
-
 64
64
-
 65
65
-
 66
66
-
 67
67
-
 68
68
-
 69
69
-
 70
70
-
 71
71
-
 72
72
-
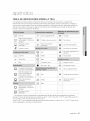 73
73
-
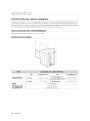 74
74
-
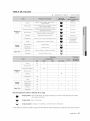 75
75
-
 76
76
-
 77
77
-
 78
78
-
 79
79
-
 80
80


Samsung DV456ETHDSU/AA-00 El manual del propietario
- Categoría
- Secadoras de ropa eléctricas
- Tipo
- El manual del propietario