
IT
DE
KO
ES
FR
EN
SH2
Owner’s Manual
Mode d’emploi
Manual de instrucciones
Bedienungsanleitung
Manuale di istruzioni
툲튪찋튢
Before using the instrument, be sure to read “PRECAUTIONS” on pages 7-8.
Avant d’utiliser cet instrument, lisez attentivement la section « PRÉCAUTIONS D’USAGE » aux pages 7-8.
Antes de utilizar el instrumento, lea la sección “PRECAUCIONES”, en las páginas 7-8.
Achten Sie darauf, vor Einsatz dieses Instruments die „VORSICHTSMASSNAHMEN“ auf Seiten 7-8 durchzulesen.
Prima di utilizzare lo strumento, assicurarsi di leggere la sezione “PRECAUZIONI”, alle pagine 7 - 8.
훋뾶쬂툲뾶흖ˊ훎툲삳푳푢

2
SH2 Owner’s Manual
For the instrument
SPECIAL MESSAGE SECTION
This product utilizes batteries or an external power supply
(adapter). DO NOT connect this product to any power supply or
adapter other than one described in the manual, on the name
plate, or specifically recommended by Yamaha.
WARNING: Do not place this product in a position where
anyone could walk on, trip over, or roll anything over power or
connecting cords of any kind. The use of an extension cord is
not recommended! If you must use an extension cord, the mini-
mum wire size for a 25’ cord (or less) is 18 AWG. NOTE: The
smaller the AWG number, the larger the current handling capac-
ity. For longer extension cords, consult a local electrician.
This product should be used only with the components supplied
or; a cart, rack, or stand that is recommended by Yamaha. If a
cart, etc., is used, please observe all safety markings and
instructions that accompany the accessory product.
SPECIFICATIONS SUBJECT TO CHANGE:
The information contained in this manual is believed to be cor-
rect at the time of printing. However, Yamaha reserves the right
to change or modify any of the specifications without notice or
obligation to update existing units.
This product, either alone or in combination with an amplifier and
headphones or speaker/s, may be capable of producing sound
levels that could cause permanent hearing loss. DO NOT oper-
ate for long periods of time at a high volume level or at a level
that is uncomfortable. If you experience any hearing loss or ring-
ing in the ears, you should consult an audiologist.
IMPORTANT: The louder the sound, the shorter the time period
before damage occurs.
Some Yamaha products may have benches and / or accessory
mounting fixtures that are either supplied with the product or as
optional accessories. Some of these items are designed to be
dealer assembled or installed. Please make sure that benches
are stable and any optional fixtures (where applicable) are well
secured BEFORE using.
Benches supplied by Yamaha are designed for seating only. No
other uses are recommended.
NOTICE:
Service charges incurred due to a lack of knowledge relating to
how a function or effect works (when the unit is operating as
designed) are not covered by the manufacturer’s warranty, and
are therefore the owners responsibility. Please study this manual
carefully and consult your dealer before requesting service.
ENVIRONMENTAL ISSUES:
Yamaha strives to produce products that are both user safe and
environmentally friendly. We sincerely believe that our products
and the production methods used to produce them, meet these
goals. In keeping with both the letter and the spirit of the law, we
want you to be aware of the following:
Battery Notice:
This product MAY contain a small non-rechargeable battery
which (if applicable) is soldered in place. The average life span
of this type of battery is approximately five years. When replace-
ment becomes necessary, contact a qualified service represen-
tative to perform the replacement.
This product may also use “household” type batteries. Some of
these may be rechargeable. Make sure that the battery being
charged is a rechargeable type and that the charger is intended
for the battery being charged.
When installing batteries, never mix old batteries with new ones,
and never mix different types of batteries. Batteries MUST be
installed correctly. Mismatches or incorrect installation may
result in overheating and battery case rupture.
Warning:
Do not attempt to disassemble, or incinerate any battery. Keep
all batteries away from children. Dispose of used batteries
promptly and as regulated by the laws in your area. Note: Check
with any retailer of household type batteries in your area for bat-
tery disposal information.
Disposal Notice:
Should this product become damaged beyond repair, or for
some reason its useful life is considered to be at an end, please
observe all local, state, and federal regulations that relate to the
disposal of products that contain lead, batteries, plastics, etc. If
your dealer is unable to assist you, please contact Yamaha
directly.
NAME PLATE LOCATION:
The name plate is located on the bottom of the product. The
model number, power requirements, etc., are located on this
plate. The serial number is located behind the control unit. You
should record the model number, serial number, and the date of
purchase in the spaces provided below and retain this manual
as a permanent record of your purchase.
Model
Serial No.
Purchase Date
PLEASE KEEP THIS MANUAL
92-BP (bottom_silent)

3
SH2 Owner’s Manual
For the instrument
* This applies only to products distributed by YAMAHA CORPORATION OF AMERICA.
COMPLIANCE INFORMATION STATEMENT(DECLARATION OF CONFORMITY PROCEDURE)
Responsible Party: Yamaha Corporation of America
Address: 6600 Orangethorpe Ave., Buena Park, Calif. 90620
Telephone: 714-522-9011
Type of Equipment: Silent Piano
Model Name: C1XSH2, C2XSH2, C3XSH2, C5XSH2, C6XSH2, C7XSH2,
GC1MSH2, GC2SH2, S3XSH2, S5XSH2, S6XSH2, S7XSH2,
U1SH2, U3SH2, YUS1SH2, YUS3SH2, YUS5SH2
This device complies with Part 15 of the FCC Rules.
Operation is subject to the following two conditions:
1) this device may not cause harmful interference, and
2) this device must accept any interference received including interference that may cause undesired operation.
See user manual instructions if interference to radio reception is suspected.
(FCC DoC)
1. IMPORTANT NOTICE: DO NOT MODIFY THIS UNIT!
This product, when installed as indicated in the instructions
contained in this manual, meets FCC requirements. Modifica-
tions not expressly approved by Yamaha may void your
authority, granted by the FCC, to use the product.
2. IMPORTANT: When connecting this product to accessories
and/or another product use only high quality shielded cables.
Cable/s supplied with this product MUST be used. Follow all
installation instructions. Failure to follow instructions could
void your FCC authorization to use this product in the USA.
3. NOTE: This product has been tested and found to comply
with the requirements listed in FCC Regulations, Part 15 for
Class “B” digital devices. Compliance with these require-
ments provides a reasonable level of assurance that your
use of this product in a residential environment will not result
in harmful interference with other electronic devices. This
equipment generates/uses radio frequencies and, if not
installed and used according to the instructions found in the
users manual, may cause interference harmful to the opera-
tion of other electronic devices. Compliance with FCC regula-
tions does not guarantee that interference will not occur in all
installations. If this product is found to be the source of inter-
ference, which can be determined by turning the unit “OFF”
and “ON”, please try to eliminate the problem by using one of
the following measures:
Relocate either this product or the device that is being
affected by the interference.
Utilize power outlets that are on different branch (circuit
breaker or fuse) circuits or install AC line filter/s.
In the case of radio or TV interference, relocate/reorient the
antenna. If the antenna lead-in is 300 ohm ribbon lead,
change the lead-in to co-axial type cable.
If these corrective measures do not produce satisfactory
results, please contact the local retailer authorized to distrib-
ute this type of product. If you can not locate the appropriate
retailer, please contact Yamaha Corporation of America,
Electronic Service Division, 6600 Orangethorpe Ave, Buena
Park, CA90620
The above statements apply ONLY to those products distrib-
uted by Yamaha Corporation of America or its subsidiaries.
* This applies only to products distributed by YAMAHA CORPORATION OF AMERICA. (class B)
FCC INFORMATION (U.S.A.)
For the AC adaptor and the instrument

4
SH2 Owner’s Manual
The model number, power requirements, etc., are located on the
name plate, which is at the bottom of the control unit. The serial num-
ber is located behind the control unit. You should note this serial num-
ber in the space provided below and retain this manual as a
permanent record of your purchase to aid identification in the event of
theft.
Model No.
Serial No.
(bottom_en_silent)
The name plate is located on the bottom of the unit.
La plaque signalétique de ce produit se trouve dans le bas de l'unité.
La placa del nombre se encuentra en la parte inferior de la unidad.
Das Namensschild befindet sich an der Unterseite des Produkts.
La targhetta del nome si trova sul fondo dell'unità.
명판은 제품 밑면에 부착되어 있습니다 .
Le numéro de modèle de l'appareil, ses besoins en alimentation ainsi
que d'autres informations le concernant figurent sur sa plaque
signalétique, qui se trouve en bas de l'unité de commande. Le numéro
de série est indiqué à l’arrière de l’unité de commande. Notez ce
numéro de série dans l'espace fourni ci-dessous et conservez le
présent manuel comme preuve permanente de votre achat afin de
faciliter l'identification du produit en cas de vol.
N° de modèle
N° de série
(bottom_fr_silent)
El número de modelo, los requisitos de alimentación, etc. se
encuentran en la placa de denominación, que está en la parte inferior
de la unidad de control. El número de serie se encuentra detrás de la
unidad de control. Debe anotar este número de serie en el espacio
que se proporciona a continuación y conservar este manual como un
registro permanente de su compra para facilitar la identificación en
caso de robo.
Nº de modelo
Nº de serie
(bottom_es_silent)
Modellnummer, Leistungsbedarf usw. sind auf dem Namensschild
aufgeführt, das sich an der Unterseite der Steuereinheit befindet. Die
Seriennummer befindet sich an der Rückseite der Steuereinheit. Für
den Fall eines Diebstahls sollten Sie diese Seriennummer im unten
vorgesehenen Feld eintragen und diese Anleitung als dauerhaften
Kaufnachweis aufbewahren.
Modell Nr.
Seriennr.
(bottom_de_silent)
Il numero del modello, i requisiti di alimentazione, ecc… si trovano
sulla piastrina posizionata nella parte inferiore dell'unità di controllo. Il
numero di serie si trova dietro l'unità di controllo. Si consiglia di
riportare il numero di serie nell'apposito spazio di seguito e di
conservare questo manuale come prova di acquisto permanente, al
fine di consentire l'identificazione in caso di furto.
Numero del modello
Numero di serie
(bottom_it_silent)
본 제품의 모델 번호 , 전원 규격 등은 기기 밑면에 있는
명판에서 확인할 수 있습니다 . 일련 번호는 기기 후면에
있습니다 . 도난 시 확인할 수 있도록 일련 번호를 아래 공란에
기입하고 본 사용설명서를 구매 기록으로 영구 보관해야
합니다 .
모델 번호
일련 번호
(bottom_ko_silent)

5
SH2 Owner’s Manual
English
Table of Contents
PRECAUTIONS...........................................................7
NOTICE ........................................................................9
About the Manuals ....................................................10
Included Accessories .................................................10
Features........................................................................11
Chapter 1 Getting Started ................... 12
Part names and functions .........................................12
Turning the power on/off .........................................15
Using headphones......................................................16
Chapter 2 Playing with the Silent Piano™
Function.............................. 17
Using the Silent Piano™ function .............................17
Selecting Voices..........................................................18
Chapter 3 Playing Back and Recording
Songs................................... 20
Playing back Songs.....................................................20
Recording your performance ...................................24
Handling User Song files...........................................27
Chapter 4 Using Convenient Functions
(UTILITY) .......................... 30
Enhancing the sound with Reverb...........................30
Using the metronome................................................32
Customizing with the various Function parameters
(Function settings).....................................................34
Chapter 5 Connecting to Other Devices
............................................. 45
Connecting USB devices...........................................45
Connecting to external audio devices ..................... 47
Connecting to external MIDI devices.....................49
Connecting to a computer/smart device ................50
Chapter 6 Using Other Functions....... 54
Backup data and initialization..................................54
Setting the Character Code for file names..............55
Chapter 7 Appendix ............................ 56
Message List................................................................56
Troubleshooting.........................................................58
Voice List.....................................................................60
Song List......................................................................62
Playback sequence of Song files in a USB flash drive
......................................................................................64
Specifications..............................................................65
Index ............................................................................67
SH2
Owner’s Manual

6
SH2 Owner’s Manual
(weee_eu_en_02)
Information for users on collection and disposal of old equipment:
This symbol on the products, packaging, and/or accompanying documents means that used electrical and electronic products should
not be mixed with general household waste.
For proper treatment, recovery and recycling of old products, please take them to applicable collection points, in accordance with your
national legislation.
By disposing of these products correctly, you will help to save valuable resources and prevent any potential negative effects on human
health and the environment which could otherwise arise from inappropriate waste handling.
For more information about collection and recycling of old products, please contact your local municipality, your waste disposal service
or the point of sale where you purchased the items.
For business users in the European Union:
If you wish to discard electrical and electronic equipment, please contact your dealer or supplier for further information.
Information on Disposal in other Countries outside the European Union:
This symbol is only valid in the European Union. If you wish to discard these items, please contact your local authorities or dealer and
ask for the correct method of disposal.
For the AC adaptor
This device complies with Part 15 of the FCC Rules. Operation is subject to the following two conditions:
(1) this device may not cause harmful interference, and (2) this device must accept any interference received, including interference
that may cause undesired operation.
(can_b_02)
CAN ICES-3 (B)/NMB-3(B)
Explanation of Graphical Symbols
The lightning flash with arrowhead symbol within
an equilateral triangle is intended to alert the user
to the presence of uninsulated “dangerous voltage”
within the product’s enclosure that may be of
sufficient magnitude to constitute a risk of electric
shock to persons.
The exclamation point within an equilateral
triangle is intended to alert the user to the presence
of important operating and maintenance
(servicing) instructions in the literature
accompanying the product.
IMPORTANT SAFETY INSTRUCTIONS
1 Read these instructions.
2 Keep these instructions.
3 Heed all warnings.
4 Follow all instructions.
5 Do not use this apparatus near water.
6 Clean only with dry cloth.
7 Do not block any ventilation openings. Install in
accordance with the manufacturer’s instructions.
8 Do not install near any heat sources such as radiators,
heat registers, stoves, or other apparatus (including
amplifiers) that produce heat.
9 Do not defeat the safety purpose of the polarized or
grounding-type plug. A polarized plug has two blades
with one wider than the other. A grounding type plug has
two blades and a third grounding prong. The wide blade
or the third prong are provided for your safety. If the
provided plug does not fit into your outlet, consult an
electrician for replacement of the obsolete outlet.
10 Protect the power cord from being walked on or pinched
particularly at plugs, convenience receptacles, and the
point where they exit from the apparatus.
11 Only use attachments/accessories specified by the
manufacturer.
12 Use only with the cart, stand,
tripod, bracket, or table
specified by the manufacturer,
or sold with the apparatus.
When a cart is used, use caution
when moving the cart/apparatus
combination to avoid injury from
tip-over.
13 Unplug this apparatus during lightning storms or when
unused for long periods of time.
14 Refer all servicing to qualified service personnel.
Servicing is required when the apparatus has been
damaged in any way, such as power-supply cord or plug
is damaged, liquid has been spilled or objects have
fallen into the apparatus, the apparatus has been
exposed to rain or moisture, does not operate normally,
or has been dropped.
(UL60065_03)
CAUTION: TO REDUCE THE RISK OF
ELECTRIC SHOCK, DO NOT REMOVE
COVER (OR BACK). NO USER-SERVICEABLE
PARTS INSIDE. REFER SERVICING TO
QUALIFIED SERVICE PERSONNEL.
CAUTION
RISK OF ELECTRIC SHOCK
DO NOT OPEN
WARNING
TO REDUCE THE RISK OF FIRE OR ELECTRIC SHOCK, DO NOT EXPOSE THIS APPARATUS TO RAIN OR MOISTURE.

7
SH2 Owner’s Manual
English
PRECAUTIONS
PLEASE READ CAREFULLY BEFORE PROCEEDING
Please keep this manual in a safe and handy place for future reference.
WARNING
• This AC adaptor is designed for use with only Yamaha electronic
devices. Do not use for any other purpose.
• Indoor use only. Do not use in any wet environments.
CAUTION
• When setting up, make sure that the AC outlet is easily accessible. If
some trouble or malfunction occurs, immediately turn off the power
switch of the instrument and disconnect the AC adaptor from the
outlet. When the AC adaptor is connected to the AC outlet, keep in
mind that electricity is flowing at the minimum level, even if the
power switch is turned off. When you are not using the instrument
for a long time, make sure to unplug the power cord from the wall
AC outlet.
WARNING
Always follow the basic precautions listed below to avoid the possibility of serious injury or even death from electrical
shock, short-circuiting, damages, fire or other hazards. These precautions include, but are not limited to, the following:
• Do not place the power cord near heat sources such as heaters or
radiators. Also, do not excessively bend or otherwise damage the
cord, or place heavy objects on it.
• Only use the voltage specified as correct for the instrument. The
required voltage is printed on the name plate of the instrument.
• Use the specified adaptor (page 66) only. Using the wrong adaptor
can result in damage to the instrument or overheating.
• Check the electric plug periodically and remove any dirt or dust
which may have accumulated on it.
• Unplug the power cord from the AC outlet when cleaning the
instrument.
• This instrument contains no user-serviceable parts. Do not open the
instrument or attempt to disassemble or modify the internal
components in any way. If it should appear to be malfunctioning,
discontinue use immediately and have it inspected by qualified
Yamaha service personnel.
• Radio waves may affect electro-medical devices.
- Do not use this product near medical devices or inside areas in
which the use of radio waves is restricted.
- Do not use this product within 15cm (6 in.) of persons with a heart
pacemaker implant.
• Do not expose the instrument to rain, use it near water or in damp or
wet conditions, or place on it any containers (such as vases, bottles
or glasses) containing liquids which might spill into any openings.
If any liquid such as water seeps into the instrument, turn off the
power immediately and unplug the power cord from the AC outlet.
Then have the instrument inspected by qualified Yamaha service
personnel.
• Never insert or remove an electric plug with wet hands.
• Do not put burning items, such as candles, on the unit.
A burning item may fall over and cause a fire.
• When one of the following problems occur, immediately turn off the
power switch and disconnect the electric plug from the outlet. Then
have the device inspected by Yamaha service personnel.
- The power cord or plug becomes frayed or damaged.
- It emits unusual smells or smoke.
- Some object has been dropped into the instrument.
- There is a sudden loss of sound during use of the instrument.
For the AC adaptor
For the instrument
Power supply/AC adaptor
Do not open
Location
Water warning
Fire warning
If you notice any abnormality
DMI-5 1/2

8
SH2 Owner’s Manual
CAUTION
Always follow the basic precautions listed below to avoid the possibility of physical injury to you or others, or damage
to the instrument or other property. These precautions include, but are not limited to, the following:
• Do not connect the instrument to an electrical outlet using a
multiple-connector. Doing so can result in lower sound quality, or
possibly cause overheating in the outlet.
• When removing the electric plug from the instrument or an outlet,
always hold the plug itself and not the cord. Pulling by the cord can
damage it.
• Remove the electric plug from the outlet when the instrument is not
to be used for extended periods of time, or during electrical storms.
• Do not place the instrument in an unstable position where it might
accidentally fall over.
• Before moving the instrument, remove all connected cables, to
prevent damage to the cables or injury to anyone who might trip
over them.
• When moving the instrument, be careful to avoid catching your
hands or feet on the instrument.
• Move the instrument slowly with extra care to keep the instrument
from falling over, or bumping against the surroundings. We
recommend that you consult a qualified carrier to transport or move
the instrument.
• When setting up the product, make sure that the AC outlet you are
using is easily accessible. If some trouble or malfunction occurs,
immediately turn off the power switch and disconnect the plug from
the outlet. Even when the power switch is turned off, electricity is
still flowing to the product at the minimum level. When you are not
using the product for a long time, make sure to unplug the power
cord from the wall AC outlet.
• Before connecting the instrument to other electronic components,
turn off the power for all components. Before turning the power on
or off for all components, set all volume levels to minimum.
• Be sure to set the volumes of all components at their minimum
levels and gradually raise the volume controls while playing the
instrument to set the desired listening level.
• Do not insert a finger or hand in any gaps on the fallboard or
instrument. Also take care that the fallboard does not pinch your
finger.
• Never insert or drop paper, metallic, or other objects into the gaps or
opening on the main unit, fallboard, or keyboard. This could cause
physical injury to you or others, damage to the instrument or other
property, or operational failure.
• Do not rest your weight on, or place heavy objects on the
instrument, and do not use excessive force on the buttons, switches
or connectors.
• Do not use the instrument/device or headphones for a long period of
time at a high or uncomfortable volume level, since this can cause
permanent hearing loss. If you experience any hearing loss or
ringing in the ears, consult a physician.
• Close the fallboard when the instrument is not in use. Hold the
fallboard with both hands when opening or closing it. Be careful to
avoid catching fingers (yours or others) between the fallboard and
the main unit.
• Do not go near the instrument during an earthquake. Strong shaking
during an earthquake could cause the instrument to move or tip
over, resulting in damage to the instrument or its parts, and possibly
causing injury.
Always turn the power off when the instrument is not in use.
Even when the [ ] (Standby/On) switch is in standby status (power lamp is off), electricity is still flowing to the instrument at the minimum level.
When you are not using the instrument for a long time, make sure you unplug the power cord from the wall AC outlet.
Power supply/AC adaptor
Location
Connections
Handling caution
Yamaha cannot be held responsible for damage caused by improper use or modifications to the instrument, or data that is lost or destroyed.
DMI-5 2/2

9
SH2 Owner’s Manual
English
NOTICE
To avoid the possibility of malfunction/ damage to
the product, damage to data, or damage to other
property, follow the notices below.
Handling
• Do not connect this product to public Wi-Fi and/or
Internet directly. Only connect this product to the
Internet through a router with strong password-
protections. Consult your router manufacturer for
information on security best practices.
• Do not use the instrument in the vicinity of a TV, radio,
stereo equipment, mobile phone, or other electric
devices. Otherwise, the instrument, TV, or radio may
generate noise. When you use the instrument along with
a smart device, such as an iPhone, iPad, etc., we
recommend that you set that device’s “Airplane Mode” to
on and then the Wi-Fi/Bluetooth setting to on in order
to avoid noise caused by communication.
• Do not expose the instrument to excessive dust or
vibrations, or extreme cold or heat (such as in direct
sunlight, near a heater, or in a car during the day) to
prevent the possibility of panel disfiguration, damage to
the internal components or unstable operation.
• Do not place vinyl, plastic or rubber objects on the
instrument, since this might discolor the panel or
keyboard.
• Bumping the surface of the instrument with metal,
porcelain, or other hard objects can cause the finish to
crack or peel. Use caution.
• Do not drag the instrument when moving it. Doing so
may damage the floor.
Maintenance
• When cleaning the instrument, use a soft and dry cloth.
Do not use paint thinners, solvents, alcohol, cleaning
fluids, or chemical-impregnated wiping cloths.
• Gently remove dust and dirt with a soft cloth. Do not
wipe too hard since small particles of dirt can scratch the
instrument’s finish.
• During extreme changes in temperature or humidity,
condensation may occur and water may collect on the
surface of the instrument. If water is left, the wooden
parts may absorb the water and be damaged. Make sure
to wipe any water off immediately with a soft cloth.
Saving data
• The MIDI Song recorded to this instrument (page 20)
are retained when the power is turned off. However, the
saved data may be lost due to some failure, an operation
mistake, etc. Save your important data onto an external
device such as a computer (page 50).
• To protect against data loss through USB flash drive
damage, we recommend that you save your important
data onto spare USB flash drive or an external device
such as a computer as backup data.
Information
About copyrights
• Copying of the commercially available musical data
including but not limited to MIDI data and/or audio
data is strictly prohibited except for your personal use.
• This product incorporates and bundles contents in
which Yamaha owns copyrights or with respect to which
Yamaha has license to use others' copyrights. Due to
copyright laws and other relevant laws, you are NOT
allowed to distribute media in which these contents are
saved or recorded and remain virtually the same or very
similar to those in the product.
* The contents described above include a computer
program, Accompaniment Style data, MIDI data,
WAVE data, voice recording data, a score, score data,
etc.
* You are allowed to distribute medium in which your
performance or music production using these contents
is recorded, and the permission of Yamaha
Corporation is not required in such cases.
About functions/data bundled with
the instrument
• Some of the preset songs have been edited for length or
arrangement, and may not be exactly the same as the
original.
About this manual
• The illustrations as shown in this manual are for
instructional purposes only, and may appear somewhat
different from those on your instrument.
• Windows is a registered trademark of Microsoft®
Corporation in the United States and other countries.
• iPhone, iPad and iPod touch are trademarks of Apple
Inc., registered in the U.S. and other countries.
• The Bluetooth® word mark and logos are registered
trademarks owned by Bluetooth SIG, Inc. and any use of
such marks by Yamaha Corporation is under license.
• The company names and product names in this manual
are the trademarks or registered trademarks of their
respective companies.
About Bluetooth communications
• The 2.4 GHz band used by Bluetooth compatible devices
is a radio band shared by many types of equipment.
While Bluetooth compatible devices use a technology
minimizing the influence of other components using the
same radio band, such influence may reduce the speed
or distance of communications and in some cases
interrupt communications.
• The speed of signal transfer and the distance at which
communication is possible differs according to the
distance between the communicating devices, the
presence of obstacles, radio wave conditions and the
type of equipment.
• Yamaha does not guarantee all wireless connections
between this unit and devices compatible with Bluetooth
function.

10
SH2 Owner’s Manual
Thank you for choosing the Yamaha Silent Piano™. This instrument is equipped with the same keyboard
mechanisms as an acoustic piano. However, you can play with the sound muted, and use various functions not
available on an acoustic piano, such as changing Voices or recording your performance. This manual mainly
explains these functions as a Silent Piano. In order to make the most of the performance potential and features
of the instrument, please read the manuals thoroughly, and keep them in a handy place for later reference.
About the Manuals
This instrument has the following documents and instructional materials.
Included Documents
Owner’s Manual (this book)
This manual mainly describes how to use
the particular functions for the Silent
Piano™ which can be used when the power
is turned on. For information on handling
as an acoustic piano, refer to the separate
manual for the piano.
Online Materials (downloadable
from the website)
iPhone/iPad Connection Manual
(only in English, French, German
and Spanish)
Explains how to connect the instrument to
smart devices, such as an iPhone, iPad, etc.
Computer-related Operations
Includes instructions on connecting this
instrument to a computer, and operations
related to transferring data.
MIDI Reference
Contains MIDI related information.
To obtain these manuals, access the Yamaha Downloads, enter the model name for searching the desired files.
Included Accessories
• Owner’s Manual (this book) x 1
•AC adaptor* x 1
•Power cord* x 1
•Headphones x 1
•Headphone hanger x 1
• Attachment screws for headphone hanger x 2
•
“50 Classical Music Masterpieces” music book
x 1
*May not be included depending on your area. Check with your Yamaha dealer.
Yamaha Downloads
http://download.yamaha.com/

11
SH2 Owner’s Manual
English
Features
• Silencing System enables you play in any situation, at any time you want
Yamaha’s innovative silencing system brings you superior performance, yet with virtually complete silence.
Enjoy your performance just as if you were playing an acoustic piano—but without the need to worry about
bothering people around you.
• Non-contact sensors for maximum expressiveness
The non-contact optical sensors faithfully detect subtle movement of the keys without affecting the touch of
the keys. They catch keystroke information precisely, enabling you to perform with rich nuance and
extraordinarily subtle expression.
• Elegant, integrated design
The control unit has been given a graceful design that unobtrusively blends with the piano itself. Moreover, the
simple controllers allow you to operate the instrument easily.
• Realistic ambience of the Voices enhances your performance
This instrument puts the sound of 20 luxurious, authentic Voices at your fingertips. These include Yamaha’s
flagship CFX piano—which delivers dynamic sound, from a brilliant high-range to powerful bass—and the
Bösendorfer* Imperial, a world-class piano renowned for its subtle and warm sound. The instrument also
features advanced technologies such as Binaural Sampling. Listening with headphones to a piano Voice
enhanced through these methods gives the impression of being thoroughly immersed in the sound, as if it was
actually emanating from the piano.
Altogether, it delivers real sound faithful to that of an actual acoustic piano, such as the quick attack and the
graceful resonance of a sustained piano tone, as well as how the sound responds to your playing strength, and
the resonance effect when the damper pedal is pressed.
* Bösendorfer is a subsidiary company of Yamaha.
• Playback and recording functions for aid in learning and practice
You can record your performance to this instrument and a USB flash drive, and improve your performance by
listening back to the recording. This instrument also features a Bluetooth audio function, which allows you to
play along on this instrument with audio from a Bluetooth-equipped device, and even record the audio as an
audio Song.
Smart Device App “Smart Pianist”
The smart device app “Smart Pianist” (available as a free download) enables you to use the functions such
as selecting Voices, controlling the metronome intuitively with the visualized interface, or display the score
on your smart device.
For information about this app, access the following web page:
https://www.yamaha.com/kbdapps/
The connection wizard of the Smart Pianist helps you to connect this unit to your smart device properly. To
start connection wizard, tap [ ] (Menu) located upper left on the Smart Pianist screen to open the menu,
then tap “Instrument” followed by “Start Connection Wizard.”

12
Chapter
SH2 Owner’s Manual
1 Getting Started
Part names and functions
Piano
DC IN jack
For connecting the supplied AC adaptor
(page 15).
Silencing lever
Activates the Silent Piano™ function.
Pedals
Soft pedal
Reduces the volume and slightly changes the
timbre of the notes. The notes played before
this pedal is pressed are not affected.
Silencing pedal (for models not equipped
with a sostenuto pedal)
Activates the Silent Piano™ function by pressing
and sliding to the left.
Sostenuto pedal (for models equipped with a
sostenuto pedal)
Sustains the notes that are being played at that
time even after you release the keys.
Subsequently played notes are not affected.
Damper pedal
Sustains notes even after you release the keys.
When the Silent Piano™ function is enabled and
a piano Voice is selected, pressing this pedal
reproduces the complicated interaction of both
strings and soundboard resonance by the VRM
technology (page 40), and makes the sound
more like a real acoustic piano.
The damper pedal features an expressive half-
pedal function, and allows you to set the degree
to which pressing the damper pedal applies the
half-pedal effect (page 39) when using the
Silent Piano™ function.
1
1
2
Control unit
(page 13)
(on the rear of
the piano)
Control unit
(page 13)
Upright Piano Grand Piano
(for models
equipped with a
sostenuto pedal)
1
2
1 2 3
1 2 3
Upright Piano Grand Piano
1
2
3

13
English
SH2 Owner’s Manual
Control unit
[PHONES] jacks
For connecting a pair of headphones with
stereo mini plug (page 16). Up to two
headphones can be connected.
USB [TO DEVICE] terminal
For connecting a USB flash drive or an optional
USB wireless LAN adaptor (page 45).
[Aco.] lamp (only for grand pianos)
When the lamp is lit, the sound is produced by
using the acoustic piano mechanics (page 17).
[] (Standby/On) switch
For turning the power on or setting to standby
(page 15).
Mode button
Each time you press this button, the mode
changes in the following order, and the lamp of
the selected mode lights up in orange.
• VOICE mode
For controlling the Voice (page 18).
•SONG mode
For recording your performance or playing
back preset Songs, recorded Songs, etc.
(page 20).
•UTILITY mode
For setting various convenient functions, such
as the metronome (page 30).
Button 1, Button 2, Button 3
Depending on the selected mode, different
functions are assigned and can be controlled by
pressing each button.
(Bluetooth) lamp
Lights up when the Bluetooth function is on
(page52). It lights up in blue when the
instrument is connected with a Bluetooth-
equipped device, and it lights up in white when
no Bluetooth-equipped device is connected
and while in the UTILITY mode.
Display
Indicates various setting values, such as Voice
number, Song number and other parameter
values.
15
1716
18
13 14
1 2 3
4
5 6
8
9
7
11
10
12
Front panel
Bottom panel
These buttons (and switch) are
pressed upward from the bottom.
(only for grand pianos)
(only for grand pianos)
1
2
3
4
5
6
7
8
9
10

14
SH2 Owner’s Manual
[VOICE/VALUE] control
Rotating this allows you to select desired Voices
or adjust the setting values. Depending on
particular functions, you may need to press this
to control the function.
[VOLUME] control
For adjusting the volume of the entire sound
output via the [PHONES] jack, AUX OUT
jacks, USB [TO HOST] terminal or Bluetooth.
(Only grand pianos) Pressing the control can
activate or deactivate the Silent Piano™
function (page 17).
AUX OUT [R]/[L/L+R] jacks
For connecting an external audio device and
output the sound of this unit to the device
(page 47).
MIDI [IN]/[OUT] terminals
For connecting an external MIDI device
(page 49).
[DC IN 16V] jack
(Upright piano) For connecting the power
cord. This is connected to the DC IN jack on
the rear of the piano when the instrument is
shipped.
(Grand piano) For connecting the supplied AC
adaptor (page 15).
[SENSOR] jack/ [MD/AMP] jack
(For qualified Yamaha personnel only.) These
connect to the sensor and to the internal unit.
The plugs are already connected when the
instrument is shipped.
[AUX IN] jack
For connecting an audio device such as a
portable music player and input the sound to
this unit (page 48).
USB [TO HOST] jack
For connecting to a computer or a smart device
(page 50).
11
12
13
14
15
16
17
18
Display
Indicates various values such as Song number
and Parameter value.
This display also indicates various messages
with the three characters. For details, refer to
page 56.
Song number Parameter value

15
English
SH2 Owner’s Manual
Turning the power on/off
CAUTION
Even when the instrument is turned off, electricity is still flowing to the instrument at the minimum level. When you
are not using the instrument for a long time or during electrical storms, make sure you unplug the AC power plug
from the wall AC outlet.
1
Connect the plugs of the AC adaptor in the order shown in the illustration.
Make sure to loop the power cord through the metal hook attached to the rear (for upright pianos) or
the bottom (for grand pianos) of the piano.
WARNING
Use the specified adaptor (page 66) only. Use of other adaptors may result in irreparable damage to both the
adaptor and the instrument.
CAUTION
When setting up the product, make sure that the AC outlet you are using is easily accessible. If some trouble
or malfunction occurs, immediately turn the power off and disconnect the plug from the outlet.
NOTE
When disconnecting the AC adaptor, first turn the power off, and then follow the order shown above in reverse.
2
Press the [] (Standby/On) switch to turn the
power on.
The [ ] (Standby/On) lamp lights up.
To turn the power off, press the switch again.
NOTE
The sound will not be properly output if a key was pressed when the power was turned on. Do not touch any keys
when turning the power on.
1-2
1-1
1-4
1-2
1-1
1-3
1-3
1-4
Upright piano
Grand piano
DC IN jack
Hook is located on
the rear of the piano.
AC
adaptor
Power cord
AC plug
AC outlet
[DC IN 16V] jack
AC outlet
AC plug
Power cord
AC
adaptor
Hooks are located on the
bottom of the piano,
behind the control unit.
The shape of the plug and outlet differ depending on your locale.

16
SH2 Owner’s Manual
Using headphones
Connect a pair of headphones to the [PHONES] jack. Since this
instrument is equipped with two [PHONES] jacks, you can connect
two pairs of headphones. If you are using only one pair, insert the
plug into either of these jacks.
Even when listening through headphones, you can enjoy
exceptionally realistic, natural sound by Yamaha’s advanced
technologies, Binaural Sampling and Stereophonic Optimizer. For
details, refer to page 19.
CAUTION
• Do not use the headphones for a long period of time at a high or
uncomfortable volume level, since this can cause permanent hearing
loss.
• Be careful not to catch your foot on the headphone cord.
NOTICE
Do not pull the cord of the headphones or apply excessive force on the plug. This can damage the headphones and
result in sound degradation.
Attaching the headphone hanger
Attach the headphone hanger to the bottom of the control unit with
the supplied two screws.
NOTICE
Do not hang anything other than the headphones on the hanger.
Otherwise, the instrument or the hanger may be damaged.
Auto Power Off function
To prevent unnecessary power consumption, this unit features an Auto Power Off function that
automatically turns the power off if the instrument is not operated for 30 minutes.
NOTICE
When the instrument is communicating with other devices or the Songs are played back, the power will not be
turned off automatically. Make sure to turn off the power by pressing the [] (Standby/On) switch when the
instrument is not in use.
Disabling Auto Power Off
Turn the power on while holding down the
lowest key (A-1). “PoF” appears on the display
and the unit starts up with the Auto Power Off
function disabled.
To turn the Auto Power Off function on or off
while the power is on, refer to page 43.
Lowest key (A-1)
Phone plug
(stereo mini)
Phillips-head (+) screwdriver

17
Chapter
English
SH2 Owner’s Manual
2 Playing with the Silent Piano™
Function
This instrument can be played both as a normal acoustic piano, and also as a Silent Piano™. Enabling the Silent
Piano™ function lets you take advantage of a variety of powerful functions—such as playing preset Voices built
into unit and recording your performances. Try out the Silent Piano™ function and explore the possibilities.
Using the Silent Piano™ function
1
Plug the headphones into the [PHONES] jack (page 16).
2
Rotate the [VOLUME] control to the far-left
position to set the volume to minimum.
3
Press the [] (Standby/On) switch to turn the power on.
4
Activate the Silent Piano™ function by one of the following operations.
These operations prevent the hammers from actually striking the strings.
(For upright pianos equipped with a sostenuto pedal)
• Pull the silencing lever towards you until you
hear a click and feel the mechanism catch.
(For upright pianos not equipped with a sostenuto pedal)
• Press the center pedal and slide it to the left.
(For grand pianos)
• Make sure that the [Aco.] lamp is
turned off.
If the lamp is lit, press the [VOLUME] control
to turn it off.
NOTE
For grand pianos, the Silent Piano™ function is activated (the [Aco.] lamp is off) automatically, when the power of the
unit is turned on. If you want to play an acoustic piano, turn the [Aco.] lamp on by pressing the [VOLUME] control.
Off

18
SH2 Owner’s Manual
Selecting Voices
When the Silent Piano™ function is enabled, you can select and play the various built-in preset Voices from the
keyboard. By default, the CFX Grand is always selected when the power is turned on. For the available Voices,
refer to the “Voice List” on page 19.
NOTE
• To hear and experience the characteristics of the Voices, listen to the Demo Songs for each Voice (page 20).
• You can change various settings such as sound effect, Touch Sensitivity, tuning, etc. in the Function Settings (page 34).
• Changing the Voice while pressing the keyboard may cause a sudden large change in the volume.
5
While playing the keyboard, adjust the volume level by rotating the [VOLUME]
control.
Rotating to the right increases the volume, while rotating to the left decreases it.
NOTE
The physical sound of the keyboard mechanism remains even when the Silent Piano™ function is active.
1
Press the Mode button several times
until the [VOICE] lamp lights up in
orange.
The currently selected Voice number is shown
on the display.
2
Use the [VOICE/VALUE] control or
one of Buttons 1 – 3 to select the
desired Voice.
The selected Voice can be confirmed by the
lamp and the display.
• [VOICE/VALUE] control
Rotating the control one by one switches the Voice to the next or previous one in the order of the Voice
List. Pressing this control instantly selects the CFX Grand (PF1) Voice.
• Button 1 [CFX]
Pressing this button selects the CFX Grand (PF1) Voice.
• Button 2 [Bösendorfer]
Pressing this button selects the Bösendorfer Imperial (PF2) Voice.
• Button 3 [Others]
Pressing this button selects the first Voice in each category (PF3, EP1, HS1, Or1, Pd1, Ly1) in order.
While the power is on, the Voice selected by Button 3 [Others] is retained. Pressing Button 3 [Others]
can calls up the last selected Voice instantly. When the power is turned off, the Voice for Button 3
resets to the Upright Piano (PF3) Voice.
Lights up in orange
Current Voice
number
The lamp of the selected button lights up in orange.
Press one of these buttons.

19
English
SH2 Owner’s Manual
Voi ce L ist
NOTE
For details on each Voice, refer to page 60.
Reproducing a natural sound distance sensation (even when using
headphones)—Binaural Sampling and Stereophonic Optimizer
This instrument features two advanced technologies that allow you to enjoy exceptionally realistic, natural
sound, even though listening on headphones. These functions can be turned on or off as desired (page 40).
Binaural Sampling (CFX Grand Voice only)
Binaural Sampling is a method that uses two special microphones set at the ear position of a performer and
records the sound from a piano as it would actually be heard. Listening to the sound with this effect through
headphones gives the impression of being immersed in the sound, as if it was actually emanating from the
piano. When the CFX Grand Voice is selected, binaural sampled sound is produced.
Stereophonic Optimizer (Piano Voices other than CFX Grand)
Stereophonic Optimizer is an effect which reproduces the natural sound distance, like with the sound of
Binaural Sampling, even though you are listening to it on headphones. When one of the Piano Voices other
than CFX Grand (page 60) is selected, the Stereophonic Optimizer is enabled.
Button Display Voice Name Button Display Voice Name
1 Binaural CFX Grand 3 Celesta
CFX Grand
2 Bösendorfer Imperial Organ Principal
3 Upright Piano Organ Tutti
Pop Grand Jazz Organ
Ballad Grand Strings
Stage E.Piano Choir
DX E.Piano Synth Pad
Vintage E.Piano Piano + Strings
Harpsichord 8' Piano + Pad
Harpsichord 8'+4' Piano + DX E.Piano

20
Chapter
SH2 Owner’s Manual
3
Playing Back and Recording Songs
The preset songs, your recorded performances, and commercially available songs are referred to as “Songs” in
this manual. This instrument can play or record MIDI Songs and Audio Songs.
Available Song format
Playing back Songs
Songs that can be played (Song Category)
* The Song categories for USB flash drive are shown only when the USB flash drive is connected.
** The External Song categories are shown only when the data exist.
For information about the playback sequence of Song files in the USB flash drive, refer to page 64.
Songs Data formats Extension
MIDI
Songs
In a MIDI song, the information of your keyboard
performance (such as keystroke and velocity) is
recorded. This is not a recording of the actual sound.
Based on the performance information, the tone
generator outputs the sound.
A MIDI Song uses a small amount of data capacity in
comparison to an Audio song, and allows you to
easily change aspects of the sound, such as Voices
used, etc.
SMF format 0
Standard MIDI File format 0 for
playback and recording. MIDI songs
recorded with this unit are saved in
this format.
SMF format 1
Standard MIDI File format 1 for
playback only.
.MID
Audio
Songs
An Audio Song is a recording of the performed sound
itself.
This data is recorded in the same way as that used in
recording cassette tapes, or with voice recorders, etc.
This data can be played with a portable music player,
etc., allowing you to easily let other people hear your
performance.
WAV
Audio file format commonly used by
computers. This instrument can play
44.1kHz/16bit stereo WAV files. Audio
Songs recorded on this instrument
are saved in this format.
.WAV
Song Category Song Number Description
Voice Demo Song (MIDI) d.01 – d.20
Demo Songs which effectively demonstrates each
Voice (page 62) on this unit.
Preset Song (MIDI) P.01 – P.50
50 classical piano preset Songs (page 62) stored to
this unit. These Songs correspond to the score in the
music book “50 Classical Music Masterpieces,”
included with this unit.
USB flash
drive*
User Song
(Audio)
A.00 – A.99
Audio Songs which have been recorded with this unit
and saved to a USB flash drive (page 24).
External Song
(Audio)**
C.00 – C.99,
100 – 399
External Audio Songs, commercially available or which
have been recorded on a computer, etc. and saved to a
USB flash drive.
User Song
(MIDI)
S.00 – S.99
MIDI Songs which have been recorded with this unit
and saved to a USB flash drive (page 24).
External Song
(MIDI)**
F.00 – F.99,
100 – 399
External MIDI Songs, commercially available or which
have been recorded on a computer, etc. and saved to a
USB flash drive.
Internal
memory
User Song
(MIDI)
U.01 – U.10
MIDI Songs which have been recorded to internal
memory of this unit (page 24).
External Song
(MIDI)**
L.01 – L.99
External MIDI Songs (commercially available or which
have been recorded on a computer, etc.) transferred
from a computer to this unit.

21
English
SH2 Owner’s Manual
NOTE
• Songs recorded by this instrument are called “User Songs” while Songs created in other ways or on other devices are
called “External Songs.” When you record a Song to a USB flash drive, a “USER FILES” folder is created automatically and
the resulting User Song will be saved in this folder. Songs in the “USER FILES” folder are handled as User Songs while
Songs in a location other than the “USER FILES” folder are handled as External Songs.
• You can also play back the music software for Disklavier purchased from the “Yamaha MusicSoft” website. For further
information, refer to the following website:
Yamaha MusicSoft: http://www.yamahamusicsoft.com/
1
(Only when you play the Song in a USB flash drive)
Connect the USB flash drive to the USB [TO DEVICE] terminal at the front of the
control unit.
Before using the USB flash drive, be sure to read “Connecting USB devices” on page 45.
2
Press the Mode button several times
until the [SONG] lamp lights up in
orange.
3
Press Button 1 [Select] several times
to select the Song category (page 20).
NOTE
The category (L.) for External Songs in internal
memory cannot be selected by this operation above.
First, select the category (U.) for the User Songs in
the internal memory, then go on to step 4. It is shown between the Song “U.10” and “U.rd.”
4
Rotate the [VOICE/VALUE] control
to select the desired Song.
When you call up one of the following
displays, all Songs in the category are played
back continuously until you stop playback. When you call up others, the selected Song is played back
and playback stops automatically when the end of the Song is reached.
• *rd (Random Playback)................ Continuously plays back all Songs in the selected category in
random order.
• *AL (All-repeat Playback)............ Continuously plays back all Songs in the selected category in
number order.
The asterisk (*) indicates one of the Song categories. For example, selecting “P.rd” can play all Preset Songs in
random order.
NOTE
• Pressing the [VOICE/VALUE] control can select the first Song in the selected Song category.
• Continuous playback is not available for Demo Songs.
• When “U.rd” or “U.AL” is selected, External Songs in the internal memory are also played back as well as User
Songs.
Lights up in orange

22
SH2 Owner’s Manual
Operations during playback
Playback continues even when you change the mode during playing the Song. Only when the instrument is in
the SONG mode, the following operations are available.
•Pause
During playback, press Button 3 [ / ] (Play/Pause) to pause playback. The display will also pause and the
[ /] (Play/Pause) lamp flashes will flash. Pressing the button again resumes Song playback from the
current position.
•Stop
During playback, press Button 1 [Select] to stop playback. When the end of the current Song is reached,
playback stops automatically.
When the Song is played back next time by pressing Button 3 [ /] (Play/Pause), it starts from the
beginning.
• Rewind/Fast forward
During playback or pausing, rotate the [VOICE/VALUE] control. Rotate the control to the left to rewind,
rotate it to the right to fast forward.
MIDI Songs are moved one measure back or forward, while Audio Songs are moved one second.
NOTE
Rewind and fast forward operations are not available for Demo Songs.
• Returning to the Song Top
During playback, press the [VOICE/VALUE] control to jump to the top of the Song.
NOTE
During playback of a Demo Song, this operation selects the Demo Song “d.01.”
5
Press Button 3 [ /] (Play/Pause) to start playback.
The [ /] (Play/Pause) lamp lights up and the current position (measure number or elapsed time) will
appear in the display.
The dot at the lower right of the display will flash at the MIDI Song tempo (or the metronome tempo
when playing back an Audio Song).
For operations during playback, see the next section.
NOTE
The current position is not displayed when playing back Demo Songs.
MIDI Song Audio Song
Current measure
number
Elapsed time
sec.
min. (In case of
10 minutes or more,
only the lowest digit
is shown).
Button 1 [Select] Button 3 [ /] (Play/Pause)
[VOICE/VALUE] control

23
English
SH2 Owner’s Manual
• Adjusting the Playback Tempo
You can change the tempo of MIDI Song or the speed of Audio Song during playback. It can
be adjusted in the same operation as the metronome tempo. For details, refer to page 32.
MIDI Songs: The tempo can be adjusted from 5 to 500 beats per minutes. It can also be
adjusted while the Song is paused. When the Song stops, it reset to the default setting.
Audio Songs: Compared to an original speed of 100%, it can be adjusted over the range of
75% – 125%. The setting value is maintained until another Song is selected.
NOTE
• For MIDI Songs having tempo changes in the middle of the Song, changing the tempo alters entire tempo relatively. For
example, in a Song that is set to a tempo of 100 at the start and changes midway during the Song to 120, changing the
starting tempo to 110 (10% faster) will result in a midway tempo of 132 (10% faster).
• When the MIDI Song tempo is changed, the metronome tempo is also changed to the same tempo. The Audio Song
speed does not affect the metronome tempo.
• While the Audio Song is paused and the metronome is played back, this operation changes only the metronome tempo
and the Audio Song speed is not changed.
Tem po
Speed (%)

24
SH2 Owner’s Manual
Recording your performance
You can record your performance on this instrument as a MIDI Song (SMF format 0) or an Audio Song (WAV
format). Up to 10 MIDI Songs can be saved (at 500KB/Song max.) to internal memory and up to 100 to a USB
flash drive. Up to 100 Audio Songs can be saved (at 80 minutes/Song max.) to a USB flash drive.
When the Song is recorded to a USB flash drive, a MIDI Song will be named “USERSONG**.MID” (**: 00 –99)
and an Audio Song will be named “AUDIOSONG**.WAV”, and saved to the “USER FILES” folder.
NOTE
You cannot start recording during Song playback. Make sure to stop playback beforehand.
1
(Only when you record a Song to a USB flash drive)
Connect a USB flash drive to the USB [TO DEVICE] terminal at the front of the
control unit.
Before using the USB flash drive, be sure to read “Connecting USB devices” on page 45.
2
Make necessary settings such as selecting a Voice (page 18).
3
Press the Mode button several times
until the [SONG] lamp lights up in
orange.
4
Press Button 1 [Select] to select the
recording format (Song category).
• For MIDI recording to internal memory.................. U. (U.01 – U.10)
• For MIDI recording to a USB flash drive ................. S. (S.00 – S.99)
• For Audio recording to a USB flash drive................. A. (A.00 – A.99)
Lights up in orange

25
English
SH2 Owner’s Manual
5
Rotate the [VOICE/VALUE] control
to select the Song number for
recording.
• When the selected Song contains already-recorded data:
You can confirm it by checking the display.
NOTICE
When the selected Song contains data, keep in mind that recording new data will erase the existing data.
If you want to play along with the metronome sound, turn the metronome on here.
NOTE
The metronome sound will not be recorded.
6
Press Button 2 [Rec] to put recording
in standby.
The [Rec] lamp lights in red, and the [ / ]
(Play/Pause) lamp flashes in orange.
NOTE
• To cancel recording standby status, press Button 2 [Rec] again.
• When an “EnP” or “FUL” message appears on the display, the memory capacity of the internal memory or the USB
flash drive is nearly full. We recommend that you first remove any unnecessary User Songs (page 28) to ensure
sufficient memory capacity. If “Enp” appears, you can start recording, but your performance data may not be
correctly saved or recording may stop automatically. If “FUL” appears, you cannot start recording.
7
Play the keyboard to start recording.
When you wish to record an empty section at the start of the Song, press Button 3 [ / ] (Play/Pause)
to start recording.
The [ /] lamp turns to be lit, and the current position (measure number or elapsed time) is shown on
the display while recording.
NOTICE
If “FUL” appears on the display while or after recording, it indicates the internal memory or USB flash drive
capacity becomes full and all or the part of the data will not be saved. We recommend that you first delete any
unnecessary User Songs (page 28) to ensure sufficient memory capacity.
NOTE
In case of Audio recording, the audio input from external device such as a computer or smart device (via the [AUX IN]
jack, USB [TO HOST] terminal, wireless LAN, or Bluetooth) can also be recorded. For connection with these devices,
refer to page 47.
When Song contains data: When Song does not contain data:
Three dots light up. Only the left-most dot lights up.
Measure number
Elapsed time (Min./Sec.)
Min.: Indicates minutes. In case of 10 minutes or more,
only the lowest digit is shown.
Sec.: Indicates seconds.
MIDI recording
Audio recording
or

26
SH2 Owner’s Manual
NOTICE
While dashes appear on the display in succession, never turn off the power. Doing so may corrupt the data or
damage the internal memory or USB flash drive.
NOTE
• If you stop recording without playing the keyboard, the selected Song data is deleted for MIDI recording, while a blank
(silent) Song is saved for Audio recording.
• The recorded User Song in the internal memory can be copied to a USB flash drive (page 27).
8
When your performance is finished,
press Button 2 [Rec] or Button 3
[ /] (Play/Pause) to stop
recording
Dashes appear on the display in succession,
indicating that the recorded data is being
saved. After the data is saved, an “End” message appears, and the recorded Song number will appear.
Pressing Button 3 [ /] (Play/Pause) plays back the recorded Song.
or

27
English
SH2 Owner’s Manual
Handling User Song files
You can copy the User Song saved in the internal memory to a USB flash drive. Also, you can delete the User
Songs in the internal memory or a USB flash drive.
NOTE
• Before using the USB flash drive, be sure to read “Connecting USB devices” on page 45.
• While a Song is being recorded, played back or paused, you cannot start these operations. Make sure to stop the Song
beforehand.
Copying User Songs in the internal memory to a USB flash drive
You can copy the User Song in the internal memory to the connected USB flash drive. We recommend to copy
your important Song to the USB flash drive. The copied Song is saved as SMF format 0 to the “USER FILES”
folder in the USB flash drive, and the file is automatically named as “USERSONG**.MID” (**: numerals).
NOTE
Demo Songs and Preset Songs cannot be copied.
1
Connect a USB flash drive to the USB [TO DEVICE] terminal at the front of the
control unit.
2
Press the Mode button several times
until the [SONG] lamp lights up in
orange.
3
Press Button 1 [Select] to select the
Song category “U.” (User Song).
4
Rotate the [VOICE/VALUE] control
to select the Song number (U.01 –
U.10) to copy.
5
Press the Mode button several times
until the [UTILITY] lamp lights up
in orange.
6
Press Button 3 [Func.] to enter the
Function Settings.
Lights up in orange
Lights up in orange

28
SH2 Owner’s Manual
NOTICE
While dashes appear on the display in succession, never turn off the power. Doing so may corrupt the data or
damage the internal memory or USB flash drive.
Deleting User Songs
You can delete the User Songs saved in the internal memory or the USB flash drive.
NOTE
The Songs other than the User Songs cannot be deleted.
7
Rotate the [VOICE/VALUE] control
to select “F7.1.”
8
Press Button 3 [Func.] to call up
“SAv” in the display.
The smallest MIDI Song number which has no
data in the USB flash drive is automatically
selected as the copy destination and the
number is shown in the display.
NOTE
• To cancel the copying operation, press any button other than Button 3 while the Song number is shown.
• If there is no empty MIDI Song number in the USB flash drive, “FUL” appears on the display and the copying
operation cannot be completed. Delete any unnecessary User Songs (page 28), then execute the copy operation
again.
9
Press Button 3 [Func.] again to start
copying.
Dashes appears in succession on the display,
indicating that the copy operation is in
progress. When the operation is completed,
“End” appears on the display.
1
Connect a USB flash drive to the USB [TO DEVICE] terminal at the front of the
control unit.
2
Press the Mode button several times
until the [SONG] lamp lights up in
orange.

29
English
SH2 Owner’s Manual
NOTICE
While dashes appear on the display in succession, never turn off the power. Doing so may corrupt the data or
damage the internal memory or USB flash drive.
3
Press Button 1 [Select] to select the
category of the Song to be deleted.
• U. (U.01 – U.10).................User Songs in internal memory (MIDI)
• S. (S.00 – S.99) ...................User Songs in a USB flash drive (MIDI)
• A. (A.00 – A.99).................User Songs in a USB flash drive (Audio)
4
Rotate the [VOICE/VALUE] control
to select the Song number to delete.
5
Press the Mode button several times
until the [UTILITY] lamp lights up
in orange.
6
Press Button 3 [Func.] to enter the
Function Settings.
7
Rotate the [VOICE/VALUE] control
to select “F7.2.”
8
Press Button 3 [Func.] to call up
“dEL” in the display.
After that, “n y” appears on the display.
NOTE
To cancel the copying operation, press any button
other than Button 3 [Func.] while “n y” is shown.
9
Press Button 3 [Func.] again to start
deleting.
Dashes appears in succession on the display,
indicating that the delete operation is in
progress. When the operation is completed,
“End” appears on the display.

30
Chapter
SH2 Owner’s Manual
4 Using Convenient Functions
(UTILITY)
This section include the operations in the UTILITY mode. The UTILITY mode allows you to apply the Reverb
effect, use the metronome, and use other various convenient functions.
Enhancing the sound with Reverb
An actual piano sounds differently depending on the size of the room, or the material of the building in which
it is played. The reverberation is the major reason for this difference. Using the Reverb effect and simulating
the reverberation in a concert hall, etc. gives you the feeling of the being at a live performance.
Although selecting a Voice will call up the optimum Reverb type and depth for the selected Voice, you can
change these settings as desired.
1
Press the Mode button several times
until the [UTILITY] lamp lights up
in orange.
2
Press Button 2 [Reverb].
The current Reverb depth appears on the
display.
3
Make the desired settings as follows.
• Adjusting the Reverb depth
Rotate the [VOICE/VALUE] control to
adjust the depth in the range of 1 – 20.
Pressing the [VOICE/VALUE] control can
restore the default setting of the selected
Voic e.
• Turning off the Reverb
While the Reverb depth is shown in the
display, press Button 2 [Reverb]. “OFF”
appears on the display and the Reverb effect
for the keyboard performance is turned off.
NOTE
You can also turn off the Reverb effect by setting the Reverb type to “OFF” (page 31). In this case, Reverb is not
applied to Song playback, nor to the keyboard performance.
Lights up in orange

31
English
SH2 Owner’s Manual
Reverb Type List
NOTE
• The Reverb settings are reset to the default values automatically when the power is turned off.
• When an external Song (page 20) is played back, or when the MIDI data is received (from a computer, etc.; page 50),
dashes may appear on the display. This indicates that the data uses a Reverb type which is not available on this unit.
• Selecting a Reverb type
3-1 Hold down Button 2 [Reverb] for three
seconds to show the current Reverb type
on the display.
3-2 Rotate the [VOICE/VALUE] control to
select a Reverb type. Pressing the
[VOICE/VALUE] control can restore the default setting of the selected Voice.
For the list of the available types, refer to “Reverb Type List” bellow.
3-3 Press Button 2 [Reverb] again or wait for a while without performing any operation to return to the
Reverb depth display.
Reverb Type Description
Off No effect is applied.
Recital Hall Simulates clear reverberation in a mid-sized hall suitable for piano recital.
Concert Hall Simulates brilliant reverberation in a large hall for public orchestra performances.
Chamber Simulates the elegant reverberation in a small room suitable for chamber music.
Cathedral Simulates the solemn reverberation in a high-ceiling stone-made cathedral.
Club Simulates the lively reverberation in a jazz club or a small bar.
Plate Simulates the bright sound of vintage reverb equipment used in recording studios.
Hold down for three seconds.

32
SH2 Owner’s Manual
Using the metronome
The unit features a built-in metronome that helps you to practice and play with accurate tempo.
NOTE
• When a MIDI Song (page 20) is played back, the metronome plays according to the Song tempo and time signature.
• The metronome tempo and beat restore to the default settings when the power is turned off.
• The metronome volume can be adjusted via Button 3 [Func.] in the UTILITY mode (page 38).
Turning on/off the metronome
Adjusting the Tempo
1
Press the Mode button several times
until the [UTILITY] lamp lights up
in orange.
2
Press Button 1 [Metronome] to turn
on the metronome.
The current tempo appears on the display.
While the metronome sounds, a dot at the
lower right of the display flashes at the current
tempo. Even when another Mode is selected,
the dot keeps flashing while the metronome is playing.
NOTE
When Button 2 [Reverb] or 3 [Func.] is selected in the UTILITY mode, you need to press Button 1 [Metronome] to
switch the function before operating step 2 above.
3
To stop the metronome, press Button 1 [Metronome] once again.
1
Press Button 1 [Metronome] in the UTILITY mode to call up the current tempo on
the display.
2
Rotate the [VOICE/VALUE] control
to adjust the tempo.
The metronome tempo can be set from 5 to
500 beats per minute. Pressing the [VOICE/
VALUE] control restores the default setting (120).
NOTE
When an Audio Song is being played back, this operation changes the playback speed (page 23). The metronome
tempo does not change.
Lights up in orange

33
English
SH2 Owner’s Manual
Selecting the time signature (Beat)
1
Press Button 1 [Metronome] in the UTILITY mode.
2
Hold down Button 1 [Metronome]
for three seconds to call up the beat
setting value on the display.
3
Rotate the [VOICE/VALUE] control
to select the beat.
The beat can be selected from 0 and 2 – 6. For
values other than 0, the first beat is accented
with a bell sound to signal the start of a
measure.
Pressing the [VOICE/VALUE] control can restore the default setting (0; no 1st beat accent).
Pressing Button 1 [Metronome] displays the tempo value.
NOTE
One beat is equal to a quarter note on this unit. When playing a song written in non- quarter-note units, change the
setting accordingly (for example, when playing a song in 3/2 time, set Beat to 6).
Hold down for three seconds.

34
SH2 Owner’s Manual
Customizing with the various Function parameters
(Function settings)
In the Function settings, you can tune the instrument, adjust the metronome volume, and make a wide range of
other convenient settings to customize your piano to suit your performance.
Function List
Function parameter values indicated by “*” are maintained even when the power is turned off.
Function Function No. Page
Brilliance* F1.1 page 36
Touch Touch Sensitivity* F2.1 page 36
Fixed Velocity F2.2 page 36
Keyboard Transpose F3.1 page 36
Master Tune* F3.2 page 37
Scale Tune Scale Type (Temperament) F3.3 page 37
Base Note F3.4 page 38
Metronome Volume* F4.1 page 38
Song MIDI Song/Keyboard Volume Balance* F4.2 page 38
MIDI Song Transpose F4.3 page 39
Audio Song Volume* F4.4 page 39
Sound Half Pedal Point* F5.1 page 39
Binaural On/Off* F5.2 page 40
VRM On/Off* F5.3 page 40
Damper Resonance Depth F5.4 page 41
String Resonance Depth F5.5 page 41
Aliquot Resonance Depth F5.6 page 41
Body Resonance Depth F5.7 page 42
Key-off Sample Volume F5.8 page 42
MIDI MIDI Transmit Channel* F6.1 page 42
Local Control On/Off F6.2 page 42
File Control Copying User Songs F7.1 page 43
Deleting User Songs F7.2 page 43
Formatting a USB flash drive F7.3 page 43
Auto Power Off F8.1 page 43
AUX IN Noise Gate* F8.2 page 43
Version F8.3 page 44
Audio Loop Back* F8.4 page 44
Bluetooth Bluetooth On/Off* F8.5 page 44
Pairing* F8.6 page 44

35
English
SH2 Owner’s Manual
Basic Function-parameter operations
To exit from the Function Settings, select another mode.
1
Press the Mode button several times
until the [UTILITY] lamp lights up
in orange.
2
Press Button 3 [Func.] to enter the
Function Settings.
3
Rotate the [VOICE/VALUE] control
to select the desired Function
number.
4
Press Button 3 [Func.] to display the
parameter value.
5
Rotate the [VOICE/VALUE] control
to change the parameter value.
To continue to set other Functions, repeat the
operation from step 2 above.
Lights up in orange

36
SH2 Owner’s Manual
Brilliance
Adjusts the timbre brilliance of the entire keyboard sound from mellow to bright.
Touch S en sitiv ity
Determines how the sound responds to your playing strength.
NOTE
When “OFF” (Fixed) is selected, the velocity can be set in F2.2 (Fixed Velocity).
Fixed Velocity
Determines the velocity with which the sound responds when Touch Sensitivity is set to “OFF” (Fixed).
Keyboard Transpose
Shifts the pitch of the entire keyboard up or down in semitone intervals to facilitate playing in difficult key
signatures, and to let you easily match the pitch of the keyboard to the range of a singer or other instruments.
For example, if you set this parameter to “5,” playing key C produces pitch F. In this way, you can play the F
major song as if it were in C major.
Setting range
-2 (Mellow) – 0 (Normal) – +2 (Bright)
Default setting
0 (Normal)
Setting range
-2 (Soft) Produces relatively high volume even with light playing strength.
-1 (Soft/Medium) Produces high volume with moderate playing strength.
0 (Medium) Standard Touch Sensitivity.
1 (Medium/Hard) Requires moderately strong playing for high volume.
2 (Hard) Requires strong playing to produce high volume.
OFF (Fixed) No touch response. The volume level will be the same regardless of
how hard you play the keys.
Default setting
0 (Medium)
Setting range
1 – 127
Default setting
64
Setting range
-12 – 0 – +12
Default setting
0

37
English
SH2 Owner’s Manual
NOTE
Your keyboard performance data will be transmitted with the transposed note numbers while MIDI note numbers received from
an external MIDI device or computer will not be affected by the Transpose setting.
Master Tune
Fine tunes the pitch of the entire instrument in 0.2 Hz steps. This lets you accurately match the keyboard pitch
to that of other instruments or music on a portable music player.
NOTE
The hundreds digit is omitted for the value shown in the display (e.g., “40.2” stands for 440.2 Hz).
Scale Type (Temperament)
Modern acoustic pianos are tuned almost exclusively in equal temperaments. Likewise, this unit employs equal
temperament, but you can select one of various scales for playing in custom tunings for specific historical
periods or music genres.
Setting range
A3 = 414.8 Hz – 466.8 Hz
Default setting
A3 = 440.0 Hz
Setting range
1 (Equal) The pitch range of each octave is divided equally into twelve parts,
with each half-step evenly spaced in pitch. This is the most commonly
used tuning in music today.
2 (Pure Major) These tunings preserve the pure mathematical intervals of each scale,
especially for triad chords (root, third, fifth). You can hear this best in
actual vocal harmonies — such as choirs and a cappella singing.
3 (Pure Minor)
4 (Pythagorean) This scale was devised by the famous Greek philosopher and is
created from a series of perfect fifths, which are collapsed into a single
octave. The 3rd in this tuning are slightly unstable, but the 4th and 5th
are beautiful and suitable for some leads.
5 (Mean-Tone) This scale was created as an improvement on the Pythagorean scale,
by making the major third interval more “in tune.” It was especially
popular from the 16th century to the 18th century. Handel, among
others, used this scale.
6 (Werckmeister)
This composite scale combines the Werckmeister and Kirnberger
systems, which were themselves improvements on the mean-tone and
Pythagorean scales. The main feature of this scale is that each key
has its own unique character. The scale was used extensively during
the time of Bach and Beethoven, and even now it is often used when
performing period music on the harpsichord.
7 (Kirnberger)
Default setting
1 (Equal)

38
SH2 Owner’s Manual
Base Note
Determines the base note for the Scale selected above. When the base note is changed, the pitch of the
keyboard is transposed, yet maintains the original pitch relationship between the notes. This setting is
necessary when Scale Tune is set to something other than “Equal Temperament.”
NOTE
In the display, the note is followed by a high bar if sharp, and the note is followed by a low bar if flat.
Metronome Volume
Adjusts the metronome volume.
MIDI Song/Keyboard Volume Balance
Adjusts the volume balance between the keyboard performance and the MIDI Song playback. The higher the
value, the Song playback volume decreases, the lower the value, the keyboard performance volume decreases.
To adjust the balance with Audio Song, adjust the Audio Song volume in F4.4 (page 39).
NOTE
Some PianoSoft Songs have their own volume balance settings. These settings take priority to the balance setting here.
Setting range
C, C#, D, Eb, E, F, F#, G, Ab, A, Bb, B
Default setting
C
Setting range
1 – 20
Default setting
15
Setting range
-64 – 0 – +64
Default setting
0
C
#
E
b

39
English
SH2 Owner’s Manual
Song Transpose
Shifts the pitch of the MIDI Song or Audio Song up or down in semitone intervals. For example, if you set this
parameter to “5,” the note of key C is played back in pitch F. In this way, the F major song is played back as if it
were in C major.
NOTE
• MIDI note numbers received from an external MIDI device or computer will not be affected by the Transpose setting.
• Applying transpose to an Audio Song may change its tonal characteristics.
Audio Song Volume
Adjusts the volume of Audio Song playback.
Half Pedal Point
You can sets the degree to which pressing the damper pedal applies the half-pedal effect. The larger the value,
the wider the half-pedal range. Larger values give you greater leeway in controlling the half-pedal effect.
Setting range
-12 – 0 – +12
Default setting
0
Setting range
1 – 20
Default setting
16
Setting range
-2 – 0 – +4
Default setting
0
Half-pedal function
This function allows the sustain length to vary depending on how far the pedal is pressed. The farther you
press the pedal, the more the sound sustains. For example, if you press the damper pedal and all notes you
are playing sound a bit murky and loud with too much sustain, you can release the pedal half way to
subdue the sustain (murkiness).

40
SH2 Owner’s Manual
Binaural On/Off
Turns the Binaural function on or off. When this function is on, the sound from this instrument changes to the
sound of Binaural Sampling or the sound enhanced with the Stereophonic Optimizer (page 19), allowing you
to enjoy more realistic sound even when listening with headphones.
VRM On/Off
Turns the VRM effect (see below) on/off. When set to on, the VRM effect is applied only to piano Voices (PF.1
– PF.5). Damper Resonance, String Resonance and Aliquot Resonance produced by VRM can be adjusted
separately in F5.4 – F5.7.
Setting range
On, OFF
Default setting
On
Since the sound of Binaural Sampling and the sound enhanced with the Stereophonic Optimizer are
optimized for listening with headphones, we recommend that you set this function to “OFF” in the
following situation.
You should turn these functions off when:
• Playing the sound of this instrument with an external powered speaker system or a mixer, while
monitoring the sound output from this instrument on connected headphones.
• Making an Audio Recording (page 24) and then playing the recorded Audio Song through speakers. (If
you want to play the Audio Song recorded on this instrument through speakers, make sure to turn these
functions off before using Audio Recording.)
NOTE
Before connecting an external audio device, be sure to read “Connecting to external audio devices” (page 47).
Setting range
On, OFF
Default setting
On
VRM (Virtual Resonance Modeling) technology
On an actual acoustic piano, if you press the damper pedal and play a key, not only does the string of the
pressed key vibrate, it also causes other strings and the soundboard to vibrate, with each influencing the
rest, creating a rich and brilliant resonance that sustains and spreads. The VRM (Virtual Resonance
Modeling) technology featured in this unit reproduces the complicated interaction of both string and
soundboard resonance faithfully using a virtual musical instrument (physical modeling), and makes the
sound more like a real acoustic piano. Since instantaneous resonance is made at the moment according to
the state of the keyboard or pedal, you can vary the sound expressively by changing the timing of your
pressing the keys, and the timing and depth of your pressing the pedal.

41
English
SH2 Owner’s Manual
Damper Resonance Depth
Determines the depth of the resonance effect produced by VRM which is applied when the damper pedal is
pressed. This parameter is effective only when VRM is on (page 40) and one of the piano Voice is selected.
String Resonance Depth
Determines the depth of the string resonance effect produced by VRM which is applied when a note on the
keyboard is pressed. This parameter is effective only when VRM is on (page 40) and one of the piano Voice is
selected.
Aliquot Resonance Depth
Determines the depth of the Aliquot resonance effect produced by VRM which is applied when you release
your hands from the keyboard. This parameter is effective only when VRM is on (page 40) and one of the
piano Voice is selected.
Setting range
0 – 10
Default setting
5
Setting range
0 – 10
Default setting
5
Setting range
0 – 10
Default setting
5
What is Aliquot?
Aliquot is a stringing method for pianos that uses extra, un-struck strings in the upper octaves to enhance
the tone. These strings sympathetically vibrate with other strings in an acoustic piano, resonating with
overtones, and adding richness, brilliance and complex color to the sound. Since they do not have a
damper, they will continue sounding even after you release your hands from the keyboard.

42
SH2 Owner’s Manual
Body Resonance Depth
Determines the depth of the Body resonance effect which simulates the resonance of the piano itself, i.e.
soundboard, the sides, the frame and so on. This parameter is effective only when VRM is on (page 40) and
one of the piano Voice is selected.
Key-off Sampling Volume
Determines the volume of the key-off sampling sound (simulated the subtle sound that occurs when you
release a key) which is available for some Voices. For Voices to which this effect is applied, refer to the Voice
List (page 60).
MIDI Transmit Channel
Determines the MIDI channel with which the MIDI data of the keyboard performance will be transmitted to
the external MIDI devices. When this parameter is set to “OFF,” MIDI data is not transmitted.
Local Control
Determines whether the sound played on the keyboard is produced from the tone generator of this instrument
or not.
Setting range
0 – 10
Default setting
5
Setting range
0 – 10
Default setting
5
Setting range
1 – 16, OFF
Default setting
1
Setting range
On The keyboard performance data is transmitted to the internal tone
generator of this instrument and it produces the sound.
OFF The keyboard performance data is not transmitted to the internal tone
generator of this instrument. This means that even if you play the
keyboard, this instrument will produce no sound. Instead, the keyboard
data can be transmitted via MIDI to a connected external MIDI device,
which can produce the sound.
Default setting
On

43
English
SH2 Owner’s Manual
Copying User Songs
Copies the User Songs saved in the internal memory to the connected USB flash drive. For details, refer to
“Copying User Songs in the internal memory to a USB flash drive” on page 27.
Deleting User Songs
Delete the User Songs in the internal memory or the connected USB flash drive. For details, refer to “Deleting
User Songs” on page 28.
Formatting a USB Flash Drive
Formats or initialize the USB flash drive connected to the USB [TO DEVICE] terminal. For details, refer to
“Formatting a USB flash drive” on page 46.
NOTICE
Executing the Format operation will delete all data saved in the USB flash drive. Save important data to a computer
or another storage device.
Auto Power Off
Disables or enables the Auto Power Off function (page 16).
NOTICE
When the instrument is communicating with other devices or the Songs are played back, the power will not be
turned off automatically. Make sure to turn off the power by pressing the [ ] (Standby/On) switch when the
instrument is not in use.
AUX IN Noise Gate
The AUX IN Noise Gate function conveniently cuts unwanted noise from the sound input via the [AUX IN]
jack. By default, this is set to on, however, this may result in necessary sounds also being cut, such as the soft
decay sound of a piano. To avoid this, set this function to off.
Setting range
On Enables the Auto Power Off function. The power is automatically
turned off if the instrument is not operated for approximately
30 minutes.
OFF Disables the Auto Power Off function. Turn off the power by pressing
the [ ] (Standby/On) switch.
Default setting
On
Setting range
On, OFF
Default setting
On

44
SH2 Owner’s Manual
Versi on
The firmware version of this unit is shown in the display.
Example: version 1.00
Audio Loop Back
Determines whether audio sound input from the connected computer or smart device (via the USB Audio
Interface function, wireless connection or Bluetooth Audio function; page 50) is output to a computer or a
smart device or not, along with the performance played on the instrument. To output the audio input sound,
set Audio Loop Back to “On.”
For example, if you want to record the audio input sound as well as the sound played on the instrument to a
computer or the smart device, set this to “On.” If you intend to record only the sound played on the instrument
to a computer or smart device, set this to “OFF.”
NOTICE
If you are using a DAW (digital audio workstation) application with this instrument, set the Audio Loop Back to off.
Otherwise, a loud sound may occur, depending on the settings of the computer or the application software.
NOTE
• The playback sound of an Audio Song on this instrument is also output to a computer or smart device when this is set to
“On,” while the sound is not output when this is set to “OFF.”
• With Audio Recording on this instrument, the audio input sound from the connected computer or smart device is recorded
when this is set to “On,” while the sound is not recorded when this is set to “OFF.”
Bluetooth On/Off
Turns on or off the Bluetooth function. For details, refer to “Turning the Bluetooth function on/off ” on
page 53.
Pairing
Register the Bluetooth-equipped device on this instrument. While “F8.6” is shown in the display, press
Button 3 [Func.] to enable the Pairing mode on the instrument. After that, make settings on the Bluetooth
equipped-device. For detailed instructions, refer to step 3 in “Pairing with Bluetooth-equipped devices” on
page 52.
Setting range
On, OFF
Default setting
On

45
Chapter
English
SH2 Owner’s Manual
5 Connecting to Other Devices
CAUTION
Before connecting the instrument to other electronic components, turn off the power to all the components. Also,
before turning any components on or off, set all volume levels to minimum (0). Otherwise, damage to the
components, electrical shock, or even permanent hearing loss may occur.
Connecting USB devices
You can connect a USB flash drive or a USB wireless LAN adaptor (sold separately) to the USB [TO DEVICE]
terminal. You can record your performance to the USB flash drive (page 24), or you can connect the
instrument to a smart device via wireless LAN (page 51).
Precautions when using the USB [TO
DEVICE] terminal
This instrument features a built-in USB [TO DEVICE]
terminal. When connecting a USB device to the
terminal, be sure to handle the USB device with care.
Follow the important precautions below.
NOTE
For more information about the handling of USB devices, refer to
the owner’s manual of the USB device.
Compatible USB devices
•USB flash drive
•USB hub
• USB wireless LAN adaptor (UD-WL01; may not be
available depending on your area)
Other USB devices such as a USB hub, computer
keyboard or mouse cannot be used.
The instrument does not necessarily support all
commercially available USB devices. Yamaha cannot
guarantee operation of USB devices that you purchase.
Before purchasing a USB device for use with this
instrument, please visit the following web page:
http://download.yamaha.com/
Although USB devices 2.0 to 3.0 can be used on this
instrument, the amount of time for saving to or loading
from the USB device may differ depending on the type
of data or the status of the instrument. USB 1.1 devices
cannot be used on this instrument.
NOTICE
The rating of the USB [TO DEVICE] terminal is a maximum
of 5V/500mA. Do not connect USB devices having a rating
above this, since this can cause damage to the instrument
itself.
Connecting a USB device
When connecting a USB
device to the USB [TO
DEVICE] terminal, make
sure that the connector on
the device is appropriate
and that it is connected in
the proper direction.
NOTICE
• Avoid connecting or disconnecting the USB device
during playback/recording, or when accessing the USB
device. Failure to observe this may result in “freezing” of
the operation of the instrument or corruption of the USB
device and the data.
• When connecting then disconnecting the USB device
(and vice versa), make sure to wait a few seconds
between the two operations.
NOTE
• If you intend to connect two or three devices at the same time
to a terminal, you should use a bus-powered USB hub. Only
one USB hub can be used. If an error message appears while
using the USB hub, disconnect the hub from the instrument,
then turn on the power of the instrument and re-connect the
USB hub.
• Do not use an extension cable when connecting a USB device.
Using USB Flash Drives
By connecting the instrument to a USB flash drive, you
can save data you’ve recorded to the connected device,
as well as read data from the connected USB flash drive.
Number of USB flash drives that can be used
Only one USB flash drive can be connected to the USB
[TO DEVICE] terminal. (If necessary, use a USB hub.
The number of USB flash drives that can be used
simultaneously with musical instruments even when a
USB hub is used is only one.)
Formatting a USB flash drive
You should format the USB flash drive only with this
instrument (page 46). A USB flash drive formatted on
another device may not operate properly.
NOTICE
The format operation overwrites any previously existing
data. Make sure that the USB flash drive you are formatting
does not contain important data.
To protect your data (write-protect)
To prevent important data from being inadvertently
erased, apply the write-protect provided with each USB
flash drive. If you are saving data to the USB flash
drive, make sure to disable write-protect.
Turning off the instrument
When turning off the instrument, make sure that the
instrument is NOT accessing the USB flash drive by
playback/recording. Failure to do so may corrupt the
USB flash drive and the data.

46
SH2 Owner’s Manual
Formatting a USB flash drive
Formats or initialize the USB flash drive connected to this instrument. When a “UnF” appear on the display,
indicating that the USB flash drive has not been formatted, format the drive.
NOTICE
Executing the Format operation will delete all data saved in the USB flash drive. Save important data to a computer
or another storage device.
NOTICE
While dashes appear in succession on the display, never turn off the power or disconnect the USB flash drive. Doing
so may corrupt the data on the USB flash drive, and the Format operation will not be executed properly.
1
Connect the USB flash drive to the USB [TO DEVICE] terminal.
2
Press the Mode button several times
until the [UTILITY] lamp lights up
in orange.
3
Press Button 3 [Func.] to enter the
Function Settings.
4
Rotate the [VOICE/VALUE] control
to select the function number “F7.3.”
5
Press Button 3 [Func.] to call up
“For” (Format) in the display.
“n y” will appear subsequently.
NOTE
While “n y” is shown in the display, you can cancel
the Format operation by pressing a button other than
Button 3 [Func.].
6
When “n y” appears, press Button 3
[Func.] to execute the Format
operation.
Dashes appear in succession on the display,
indicating that Formatting is in progress.
When the operation is completed, “End”
appears on the display
Lights up in orange

47
English
SH2 Owner’s Manual
Connecting to external audio devices
By connecting the AUX OUT jacks or the [AUX IN] jack to other audio devices, the keyboard performance on
this instrument can be output to the external device, or the audio sound played on the external device can be
input to this instrument.
NOTE
Use audio cables and adaptor plugs having no (zero) resistance.
Connecting to the AUX OUT [R]/[L/L+R] jacks
The AUX OUT [R]/[L/L+R] jacks are the standard phone jacks.
When connected to an audio recorder (such as a mini stereo system or IC recorder):
You can record performances played using the Silent Piano™ function.
When connected to powered speakers or a stereo system:
You can listen to performances played using the Silent Piano™ function on the speaker. The signal output from
this jack is the same sound as that heard when listening through headphones.
NOTICE
To avoid damage to the devices, first turn on the power to the instrument, then to the external device. When turning
off the power, first turn off the power to the external device, then to the instrument.
NOTE
• You can use the [VOLUME] control on this unit to adjust the output volume from the AUX OUT jacks.
• Use only the AUX OUT [L/L+R] jack for connection with a mono device.
• We recommend that you turn the Binaural (or Stereophonic Optimizer) function off when you monitor the sound output from
this instrument on connected headphones (pages 19 and 40).
Control unit bottom panel
AUX OUT
Stereo phone plug
(standard)
Audio cable
Audio recorder (mini stereo
system, IC recorder, etc.)
Powered speakers
Stereo system
or
Audio signal

48
SH2 Owner’s Manual
Example of using the [AUX IN] jack
The [AUX IN] jack is a stereo mini jack.
By connecting the [AUX IN] jack to other sound modules or playback devices (such as portable music players),
you can use the Silent Piano™ function together with the sound received from the connected devices.
You can use the [VOLUME] control on this unit to simultaneously adjust the volume of its electronic sound
and the sound received through its [AUX IN] jack. To set a proper balance of the levels, adjust the output
volume on the connected device.
NOTICE
Do not route the output from the AUX OUT jacks to the AUX IN jack. If you make this connection, the signal input at
the [AUX IN] jack is output from the AUX OUT jacks. These connections could result in a feedback loop that will
make normal performance impossible, and may even damage the equipment.
NOTE
By default, this instrument uses a convenient Noise Gate effect to cut unwanted noise from the sound input via the [AUX IN]
jack. However, this may result in necessary sounds also being cut, such as the soft decay sound of a piano. To avoid this, set
the Noise Gate to off (page 43).
Control unit bottom panel
[AUX IN]
stereo mini jack
Audio cable
Other sound modules
Portable music player, etc.
or
Audio signal

49
English
SH2 Owner’s Manual
Connecting to external MIDI devices
By connecting a MIDI device, you can control the external MIDI device from this unit or vice versa. Use the
MIDI terminals and standard MIDI cables to connect external MIDI devices (keyboard, synthesizer,
sequencer, etc.).
NOTE
• Demo Song data and Preset Song data cannot be transmitted.
• Since MIDI data that can be transmitted or received varies depending on the type of MIDI device, check the “MIDI
Reference” on the website to find out what MIDI data and commands your devices can transmit or receive.
Connecting to the MIDI [OUT] jack
When connected to another MIDI device:
You can reproduce the Silent Piano™ performances using sound modules such as synthesizers and other MIDI
devices.
Connecting to the MIDI [IN] jack
When connected to a sequencer:
You can use the sound module of this unit to reproduce performance data received from connected devices.
Control unit bottom panel
MIDI [OUT]
Other MIDI device
MIDI cable
Performance data
Control unit bottom panel
MIDI [IN]
Sequencer
MIDI cable
Performance data

50
SH2 Owner’s Manual
Connecting to a computer/smart device
Connecting this instrument to a computer or a smart device expands the possibility.
Connection example
For details on connecting to a computer or transferring the MIDI Song to the computer, refer to the
“Computer-related Operations” on the website (page 10).
NOTICE
• Do not connect this product to public Wi-Fi and/or Internet directly. Only connect this product to the Internet
through a router with strong password-protections. Consult your router manufacturer for information on security
best practices.
• Use an AB type USB cable of less than 3 meters. USB 3.0 cables cannot be used.
• If you are using a DAW (digital audio workstation) application with this instrument, set the Audio Loop Back
(page 44) to off. Otherwise, a loud sound may occur, depending on the settings of the computer or the application
software.
• Do not place your computer or smart device in an unstable position. Doing so may cause the device to fall and
result in damage.
NOTE
• When using a USB cable to connect the instrument to your computer or smart device, make the connection directly without
passing through a USB hub.
• For information on setting up your sequence software, refer to the owner’s manual of the relevant software.
• When transmitting or receiving audio signals by using the computer operated by Windows, the Yamaha Steinberg USB
Driver should be installed to the computer. For details, refer to the “Computer-related Operations” on the website.
• Before using the USB [TO DEVICE] terminal, be sure to read “Connecting USB devices” on page 45.
• When you use the instrument along with an application on your smart device, we recommend that you set your device to
not emit radio waves (for example, by setting “Airplane Mode” to on).
• The instrument will begin transmission a short time after the computer or smart device is connected.
What you can do by connecting to a computer/smart device:
• Transmitting and receiving audio data (USB Audio Interface function, page 51)
• Using a smart device app (page 51)
• Listening to the audio data in the smart device through this instrument (Bluetooth Audio function,
page 52)
• Transmitting and receiving MIDI data
• Saving the Song recorded on this instrument to the computer
NOTE
For details on transmitting/receiving MIDI data or saving the Song to a computer, refer to the “Computer-related
Operations” on the website.
USB [TO DEVICE]
terminal
Computer
USB cable
USB terminal
USB [TO HOST]
terminal
USB wireless
LAN adaptor
Wireless LAN
Smart device

51
English
SH2 Owner’s Manual
Transmitting/receiving audio data (USB Audio Interface function)
By connecting a computer or a smart device to the USB [TO HOST] terminal via a USB cable, digital audio
data can be transmitted/received, giving you the following advantages:
• Playing back audio data with high sound quality
This gives you direct, clear sound in which the sound quality has less noise and deterioration than that
from the [AUX IN] jack.
• Recording performance on the instrument as audio data by using a recording
software or a music production software
The recorded audio data can be played back on the computer or smart device.
NOTE
• The volume of the audio sound input can be adjusted from a computer or smart device.
• You can set whether audio sound input from the connected computer or smart device is output to a computer or smart
device or not, along with the performance played on the instrument. For details, refer to “Audio Loop Back” on page 44.
Using a smart device app
By using the compatible smart device app, you can take advantage of convenient functions and get more
enjoyment out of this instrument. Especially, “Smart Pianist” (available as a free download) enables you to
conveniently control the various functions of this instrument from the smart device. For information about the
compatible apps and smart devices, access the web page of the respective apps on the following page:
http://www.yamaha.com/kbdapps/
This section explains how to connect a smart device by using the separately sold USB wireless LAN adaptor
UD-WL01. For connections with other methods, refer to the “iPhone/iPad Connection Manual” on the
website.
Connection with the USB wireless LAN adaptor (UD-WL01*)
*UD-WL01 (sold separately) may not be available depending on your area.
There are two types of connections with the USB wireless LAN adaptor (UD-WL01) described below.
• Connecting by the Access Point mode
The Access Point mode allows you to directly connect the
USB wireless LAN adaptor and a smart device, without
the need for using an access point. You can use this mode
when there is not any access point available for connection
to the instrument, or when it is unnecessary to connect to
another network while a smart device is connected to the
instrument.
Access point
An “access point” refers to a device which acts as a base
station when data is transmitted/received via a USB
wireless LAN adaptor. Some access points are combined
with router or modem functions.
NOTE
When you change the Infrastructure mode (see the right
column) to the Access Point mode, initialize the instrument
(page 54).
• Connecting by the Infrastructure mode
(automatic setup by WPS)
The Infrastructure mode uses an access point for data
communication between a USB wireless LAN adaptor and
a network. You can use this mode when you connect to
another network while a smart device is connected to the
instrument.
NOTE
Once you connect by the Infrastructure mode, you can
connect to a network automatically without executing steps
2 and 3.
1
Initialize the instrument
(if necessary; see page 54).
2
Connect the UD-WL01 to the USB [TO
DEVICE] terminal.
3
Connect a smart device to the
instrument (as an access point).
1
Connect the UD-WL01 to the USB [TO
DEVICE] terminal.
2
Hold down the WPS button on the UD-
WL01 for three seconds.
The message as follows appears
on the display, indicating the
instrument is in standby for the
connection.
3
Press the WPS button on your access
point within two minutes after step 2.

52
SH2 Owner’s Manual
Listening to audio data from a smart device through this instrument
(Bluetooth Audio function)
This instrument is equipped with Bluetooth functionality. You can input the sound of the audio data saved in a
Bluetooth-equipped device, such as a smart phone, to this instrument and listen to it through the built-in
speaker of the instrument.
*Bluetooth
Bluetooth is a technology for wireless communication between devices within an area of about 10 meters (33 ft.) employing
the 2.4 GHz frequency band. In this manual, “Bluetooth-equipped device” means a device that can transmit the audio data
saved in it to the instrument using the Bluetooth function via wireless communication; for example, smart phone, digital audio
player, etc. For proper operation, the device must be compatible with A2DP (Advanced Audio Distribution Profile).
Pairing with Bluetooth-equipped devices
If you wish to connect your Bluetooth-equipped device to the instrument via Bluetooth, the device needs to be
paired with the instrument first. Once the Bluetooth-equipped device has been paired with this instrument,
there is no need to perform pairing again.
Pairing
“Pairing” means to register Bluetooth-equipped devices on this instrument, and establish the mutual recognition for wireless
communication between the two.
NOTE
• Only one Bluetooth-equipped device can be connected to this instrument at a time (although up to 8 devices can be paired
to this instrument). When pairing with the 9th Bluetooth-equipped device has succeeded, pairing data for the device with
the oldest connection date will be deleted.
• Paring can also be operated in the Function “F8.6” (page 44).
Before using the Bluetooth function, be sure to read “About Bluetooth communications” on page 9.
1
Press the Mode button several times
until the [UTILITY] lamp lights up
in orange.
NOTE
• When the Bluetooth function of this instrument is
set to off ( Bluetooth lamp is off), paring cannot
be established when executing the paring operation. Make sure to set the Bluetooth function to on (page 53), and
then start pairing.
• When no Bluetooth-equipped device is connected, the (Bluetooth) lamp lights up in white in the UTILITY mode,
and turns off in other modes.
2
Hold down Button 3 [Func.] for three
seconds.
The instrument will enter into Pairing mode.
At the same time the (Bluetooth) lamp will
flash and a “bt” message will appear on the
display.
NOTE
To cancel the pairing, press Button 3 [Func.] while “bt” is shown in the display.
3
On your Bluetooth-equipped device, set the Bluetooth function to on and select
“YAMAHA_SH2_TA2” from the connection list.
For details, refer to the Bluetooth-equipped device owner’s manual.
After pairing is completed, the (Bluetooth) lamp will light up in blue and the “bt” message will
disappear.
NOTE
• Make sure to complete the settings on the Bluetooth-equipped device within 5 minutes. After 5 minutes elapses, the
Pairing mode ends automatically and the (Bluetooth) lamp turns off.
• If you are required to enter a passkey, enter the numerals “0000.”
Lights up in orange
Hold down for three seconds.

53
English
SH2 Owner’s Manual
Turning the Bluetooth function on/off
By default, the Bluetooth function will be set to on right after turning the instrument’s power on. However, you
can set the function to off when you want to disconnect the connection between the instrument and the
Bluetooth-equipped device, or when you want to try to connect the device to the instrument again, etc.
To exit from the Function Settings, select another mode.
4
Play back audio data on your Bluetooth-equipped device to confirm that the built-
in speakers of this unit can output the audio sound.
When you turn on this unit the next time, the last connected Bluetooth-equipped device will be
connected to this instrument automatically, if the Bluetooth function of the device and the instrument is
set to on. If it is not connected automatically, select the model name of the instrument from the
connections list on the device.
NOTE
You can adjust the volume of the sound input via Bluetooth by the [VOLUME] control on this instrument. To adjust the
volume balance between your keyboard performance and the input sound via Bluetooth, adjust the volume on the
Bluetooth-equipped device.
1
Press the Mode button several times
until the [UTILITY] lamp lights up
in orange.
2
Press Button 3 [Func.] to enter the
Function Settings.
3
Rotate the [VOICE/VALUE] control
to select the Function number “F8.5.”
4
Press Button 3 [Func.] to display the
parameter value.
5
Rotate the [VOICE/VALUE] control
to select “On” or “OFF.”

54
Chapter
SH2 Owner’s Manual
6 Using Other Functions
Backup data and initialization
The following settings, referred to as Backup data, are automatically saved to the internal memory of this unit.
The Backup data and the User Song and External Song data will be maintained even if the power is turned off.
• Brilliance..........................................................................................page 36
• Touch Sensitivity ............................................................................page 36
• Master Tune ....................................................................................page 37
• Metronome Volume.......................................................................page 38
• MIDI Song/Keyboard Volume Balance.......................................page 38
• Audio Song Volume .......................................................................page 39
• Half Pedal Point..............................................................................page 39
• Binaural on/off................................................................................page 40
• VRM on/off ....................................................................................page 40
• MIDI Transmit Channel................................................................page 42
• AUX IN Noise Gate on/off............................................................page 43
• Audio Loop Back on/off ................................................................page 44
• Auto Power Off on/off ...................................................................page 43
• Bluetooth function on/off .............................................................page 44
• Bluetooth Pairing information .....................................................page 44
• Character Code...............................................................................page 55
Initializing the instrument (Clearing the Backup data)
While holding down the C7 key, turn on the power by pressing the [] (Standby/On) switch. “CLr” appears on
the display and the Backup data (with the exception of “Character Code” and “Bluetooth Paring information”)
will be initialized. Note that User Songs and External Songs are not erased.
NOTICE
While “CLr” is shown in the display, never turn off the power. Doing so may delete the User Song and External Song
data, or corrupt the Backup data.
NOTE
If this instrument somehow becomes disabled or malfunctions, turn off the power to the instrument, then perform the
initialization procedure.
C7: Highest key

55
English
SH2 Owner’s Manual
Setting the Character Code for file names
If the Song cannot be called up, you may need to select the appropriate Character Code which is compatible
with the file/folder name from the following two settings.
To set to International
While holding down Button 2, turn on the power by pressing the [ ] (Standby/On) switch.
International is selected, and “Int” appears on the display.
To set to Japanese
While holding down the Mode button and Button 2, turn on the power by pressing the [] (Standby/On)
switch.
Japanese is selected, and “JA” appears on the display.
NOTE
The setting here is maintained even when the power is turned off.
Setting range
Int (International) For playing back Songs with names using western European
characters (including umlaut or diacritic marks).
JA (Japanese) For playing back Songs with names using Japanese characters and
alphabets (excluding umlaut or diacritic marks).
Default setting
Int

56
Chapter
SH2 Owner’s Manual
7 Appendix
Message List
Message Descriptions
The instrument is standing by for Bluetooth pairing. While this message is shown, you cannot operate
the instrument.
Displayed while the instrument is initialized. Do not turn the power off while this message is shown.
Displayed when Musicsoft Downloader is used on the connected computer, or when an app such as
Smart Pianist is used on the connected smart device such as an iPhone and iPad. While this message
is shown, you cannot operate the instrument.
Displayed when the Character Code setting (page 55) is not appropriate for the file name of the Song
which you are selecting. Change the Character Code setting.
Displayed when the data format is not compatible with this instrument, or the data has some other
problems. This Song cannot be selected.
Displayed when no USB flash drive can be found, or a problem has occurred in the USB flash drive.
Disconnect and connect the device again, then execute the operation. If this message appears
repeatedly even when there aren’t any other likely problems, the USB flash drive may be damaged.
The Song you have selected cannot be copied or deleted on this instrument. Copy or delete these
types of Songs on a computer.
The memory or the number of the files in the copy destination USB flash drive is full. Remove any
unnecessary files in the USB flash drive.
Indicates that the USB flash drive is protected.
Displayed when the memory of the USB flash drive becomes full, or the number of files and folders
exceeds the system limit.
Displayed when Audio Song playback or recording has failed. If you are using a USB flash drive to
which data has already been stored or deleted a number of times, first make sure that the device does
not contain important data, then format it (page 46) and connect to the instrument again.
A malfunction has occurred in the instrument. Contact your nearest Yamaha dealer or authorized
distributor.
A malfunction has occurred in the instrument. Contact your nearest Yamaha dealer or authorized
distributor.
Displayed when the current operation is completed.
The memory of the instrument or the USB flash drive is running out. We recommend that you remove
any unnecessary User Songs (page 28) to ensure sufficient memory capacity before start recording.
The operation could not be completed because the instrument’s internal memory or the USB flash
drive is nearly full. If this message is shown while recording, your performance data may not be
correctly saved.
Confirms whether each operation is executed or not.
Displayed when you try to overwrite or delete a protected Song or read-only file.
Displayed when an unformatted USB flash drive is connected. First make sure that the device does not
contain important data, then format it (page 46).
Communication with the USB flash drive has been shut down because of overcurrent to the USB flash
drive. Disconnect the USB flash drive from the [USB TO DEVICE] terminal, then turn on the power of
the instrument again.

57
English
SH2 Owner’s Manual
* When an operation (such as saving or data transfer) is in progress, the display shows a sequence of flashing dashes.
* Press any button to exit from these message displays.
Communication with the USB flash drive has failed. Remove the USB flash drive and make the
connection again. If the message appears even when the USB flash drive is connected properly, the
USB flash drive may be damaged.
This USB flash drive is not supported on this instrument, or too many USB flash drives may have been
connected. Refer to “Connecting USB devices” (page 45) for information on the USB flash drive
connection.
The instrument is in Access Point mode and standing by for connection to an access point by WPS
(page 51). While this message is shown, you cannot operate the instrument.
A malfunction occurred in the instrument while it was standing by for connection to an access point by
WPS (page 51). Reconnect the UD-WL01 (sold separately) to the instrument and try to connect to the
access point by WPS again.
Message Descriptions

58
SH2 Owner’s Manual
Troubleshooting
If you have problems with the unit, here are a few troubleshooting tips. If you cannot solve the problem easily
yourself, consult your Yamaha piano dealer. DO NOT attempt to repair the piano or the AC adaptor yourself.
Problem Cause Solution
The power does not turn on. The AC adaptor may not be plugged in
correctly.
Insert the AC adaptor firmly into the
[DCIN 16V] jack and AC outlet (page 15).
The power is automatically turned
off.
This is normal and due to the Auto Power
Off function.
If necessary, disable the Auto Power Off
function (pages 16 and 43).
The overall volume is low, or no
sound is heard.
The [VOLUME] control may be turned to
the far left position.
Adjust the volume to an optimal level
(page 17).
Local Control is set to off. Make sure that Local Control (page 42) is
on.
The acoustic piano emits sound
when playing with the Silent
Piano™ function active.
Playing with extreme force may result in
sound being emitted from the acoustic
piano.
Moderate the strength of your playing.
The balance or volume varies
between the included
headphones and the
commercially available
headphones.
Headphone properties differ depending
on their type, so different headphones
may have different balance or volume
characteristics.
Use the same type of headphones for
optimum performance.
A rattling sound from the piano
body can be heard when playing
with the Silent Piano™ function.
This is not a fault. It is the sound of the acoustic piano’s keystroke.
When playing a rapid series of
notes with the Silent Piano™
function, a sound louder than
expected (considering playing
strength) occurs.
This is not a fault. The structure of the Silent Piano™ causes this to occur in some
cases.
Sound is not output properly or
evenly.
Since the keyboard was pressed when
the power is turned on, the keyboard
position is detected incorrectly.
Turn off the power and turn it on again to
reset the function. Do not touch any keys
when turning the power on.
No Reverb effect is applied to the
sound.
The Reverb depth may be set to
minimum.
Increase the Reverb Depth to apply an
appropriate amount of Reverb (page 30).
The sound lingers excessively. The Reverb depth or the Damper
Resonance effect depth may be set to an
excessive level.
Set these parameters to an appropriate
level (pages 30 and 41).
Noise is heard from the
headphones or speakers.
The noise may be due to interference
caused by the use of a mobile phone in
close proximity to the instrument.
Turn the mobile phone off, or use it away
from the instrument.
The headphones or speakers may not be
connected correctly.
Connect the headphones or speakers to
the corresponding jacks firmly (pages 16
and 47).
Noise can be heard when you use the
instrument along with the application on
your smart device, such as an iPhone and
iPad.
When you use the instrument along with a
smart device, we recommend that you set
“Airplane Mode” to on and then the Wi-Fi/
Bluetooth setting to on in order to avoid
noise caused by communication.
The pitch of this instrument is
different from that of other
instruments.
The pitch is different depending on the
instrument.
You can adjust the pitch of this instrument
to match that of other instruments
(page 37).

59
English
SH2 Owner’s Manual
*The message list (page 56) is also provided for your reference.
The Bluetooth-equipped device
cannot be paired with nor
connected to this instrument.
The Bluetooth function of this instrument
is off.
Make sure that the Bluetooth function is
turned on (page 53).
The Bluetooth-equipped device is not
paired with this instrument.
The device and this instrument need to be
paired to each other via Bluetooth
(page 52).
The Bluetooth function of the Bluetooth-
equipped device is not activated.
Make sure that the function is activated.
This instrument and the Bluetooth-
equipped device are too far apart.
Use the device in close proximity to this
instrument.
There is a device (microwave oven,
wireless LAN device, etc.) that outputs
signals in the 2.4 GHz frequency band
nearby.
Move the instrument away from any
devices that might be emitting radio-
frequency signals.
Sound input via Bluetooth is
interrupted.
The output volume of the Bluetooth-
equipped device connected to this
instrument is too low, resulting in the
sound being cut off via the Noise Gate
after it is input to this instrument.
Increase the output volume of the device.
The volume level reproduced via this
instrument can be adjusted by using the
[VOLUME] control.
Sound input to the [AUX IN] jacks
is interrupted.
The output volume of the external device
connected to this instrument is too low,
resulting in the sound being cut off via the
Noise Gate after it is input to this
instrument.
Increase the output volume of the external
device. The volume level reproduced via
this instrument can be adjusted by using
the [VOLUME] control.
Set the Noise Gate to off (page 43).
Problem Cause Solution

60
SH2 Owner’s Manual
Voice L ist
The cells marked by “” indicate the available characteristics (which are explained below) for the Voice.
• Stereo Sampling: Stereo sampling is used for the Voice.
• Touch Sensitivity: The volume responds to your playing strength.
• Key-off Sampling: The key-off sound (the subtle sound that occurs when you release a key) is sampled for
the Voice.
• VRM: Simulated string resonance sound with physical modeling when the damper pedal is pressed or keys
are pressed. This can be turned on or off. For details, refer to page 40.
Display Voice N ame Description
Stereo
Sam-
pling
Touch
Sensi-
tivity
Key-off
Sam-
pling
VRM
Piano
Binaural CFX
Grand
Yamaha’s CFX concert grand piano sound
sampled by Binaural Sampling, the method
optimized for headphone use. Listening this
through headphones gives the impression of
being immersed in the sound, as if it was
actually emanating from the piano. This is
available when the Binaural setting is turned on
(page 40).
CFX Grand Yamaha’s CFX concert grand piano sound with
a wide dynamic range for maximum expressive
control. Suitable for playing in any music genre
and style. This is available when the Binaural
setting is turned off (page 40).
Bösendorfer
Imperial
The famed sound of the Vienna-made
Bösendorfer Imperial concert grand piano. Its
spacious sound evokes the size of the
instrument, and is ideal for expressing
tenderness in compositions.
Upright Piano The sound sampled from an upright piano, the
Yamaha SU7. Enjoy the unique tonal character
and a lighter, more casual feel.
–
Pop Grand A slightly brighter piano sound. Good for popular
styles.
Ballad Grand Grand piano sound with a soft and warm tone.
Good for playing ballads.
E. Piano
Stage E.Piano The sound of an electric piano using hammer-
struck metallic “tines.” A soft tone results when
played lightly, and an aggressive tone when
played hard.
– –
DX E.Piano An electronic piano sound produced by an FM
synthesizer. The tone will change as you vary
your playing touch. Ideal for popular music.
– – –
Vintage E.Piano A different type of electric piano sound than
Stage E. piano. Widely used in rock and popular
music.
– –

61
English
SH2 Owner’s Manual
Harpsichord
Harpsichord 8' The sound of an instrument frequently used in
baroque music. Variations in playing touch will
not affect the volume, and a characteristic sound
will be heard when you release the key.
– –
Harpsichord
8'+4'
A harpsichord with an added upper octave.
Produces a more brilliant sound.
– –
Celesta The sound of a celesta (a percussion instrument
in which hammers strike tuned metal bars).This
instrument is well-known for its appearance in
“Dance of the Sugarplum Fairies” from
Tchaikovsky’s “Nutcracker Suite.”
– –
Organ
Organ Principal This Voice features the combination of pipes
(8'+4'+2') of a principal (brass instrument) organ.
It is suitable for Baroque church music.
– – –
Organ Tutti This Voice features a full coupler of a pipe organ,
famous for the sound used in Toccata and Fugue
by Bach.
– – –
Jazz Organ The sound of a “tonewheel” type electric organ.
Sampled with a Rotary SP effect, its rotation
speed is slow. Often heard in jazz and rock
idioms.
– – – –
Pad
Strings Stereo-sampled, large-scale strings ensemble
with realistic reverb. Try combining this Voice
with piano in the Dual mode.
– –
Choir A large, spacious choir Voice. Perfect for
creating rich harmonies in slow pieces.
– –
Synth Pad A warm, mellow, and spacious synth sound.
Ideal for sustained parts in the background of an
ensemble.
– – –
Layer
Piano + Strings Combination of piano and strings ensemble
Voices, giving you a richly textured sound as if
you were playing the piano with orchestral
accompaniment.
–
Piano + Pad Combination of piano and Synth Pad Voices. –
Piano
+ DX E.Piano
Combination of piano and DX E. Piano Voices. –
Display Voice Name Description
Stereo
Sam-
pling
Touch
Sensi-
tivity
Key-off
Sam-
pling
VRM

62
SH2 Owner’s Manual
Song List
Voice Demo Songs
Preset Songs (50 Classical Music Masterpieces)
No. Voice Name Song Name Composer
d.01
CFX Grand
Widmung S.566 R.253 F. Liszt / R. Schumann
Binaural CFX Grand
d.02
Bösendorfer Imperial Mädchens Wunsch (6 Chants polonaise S.480 R.145) F. Liszt / F. F. Chopin
d.03
Upright Piano Italienisches Konzert, BWV 971 1st mov. J. S. Bach
d.04
Pop Grand Original —
d.05
Ballad Grand Original —
d.06
Stage E.Piano Original —
d.07
DX E.Piano Original —
d.08
Vintage E.Piano Original —
d.09
Harpsichord 8'
Concerto a cembalo obbligato, 2 violini, viola e continuo
No.7, BWV 1058
J. S. Bach
d.10
Harpsichord 8'+4' Gigue, Französische Suiten No.5, BWV 816 J. S. Bach
d.11
Celesta Danse de la Fée Dragée P. I. Tchaikovsky
d.12
Organ Principal Herr Christ, der ein'ge Gottes-Sohn, BWV 601 J. S. Bach
d.13
Organ Tutti Original —
d.14
Jazz Organ Original —
d.15
Strings Original —
d.16
Choir Original —
d.17
Synth Pad Original —
d.18
Piano + Strings Original —
d.19
Piano + Pad Original —
d.20
Piano + DX E.Piano Original —
No. Song Name Composer
Arrangements
P.0 1
Canon D dur J. Pachelbel
P.0 2
Air On the G Strings J. S. Bach
P.0 3
Jesus, Joy of Man’s Desiring J. S. Bach
P.0 4
Twinkle, Twinkle, Little Star Traditional
P.0 5
Piano Sonate op.31-2 “Tempest” 3rd mov. L. v. Beethoven
P.0 6
Ode to Joy L. v. Beethoven
P.0 7
Wiegenlied op.98-2 F. P. Schubert
P.0 8
Grande Valse Brillante F. F. Chopin
P.0 9
Polonaise op.53 “Héroïque” F. F. Chopin
P.1 0
La Campanella F. Liszt
P.11
Salut d’amour op.12 E. Elgar
P.1 2
From the New World A. Dvořák
P.1 3
Sicilienne G. U. Fauré
P.1 4
Clair de lune C. A. Debussy
P.1 5
Jupiter (The Planets) G. Holst

63
English
SH2 Owner’s Manual
Duets
P. 1 6
Menuett (Eine kleine Nachtmusik K.525) W. A. Mozart
P. 1 7
Menuett G dur L. v. Beethoven
P. 1 8
Marcia alla Turca L. v. Beethoven
P. 1 9
Piano Concerto No.1 op.11 2nd mov. F. F. Chopin
P. 2 0
The Nutcracker Medley P. I. Tchaikovsky
Original Compositions
P. 2 1
Prelude (Wohltemperierte Klavier I No.1) J. S. Bach
P. 2 2
Menuett G dur BWV Anh.114 J. S. Bach
P. 2 3
Piano Sonate No.15 K.545 1st mov. W. A. Mozart
P. 2 4
Turkish March W. A. Mozart
P. 2 5
Piano Sonate op.13 “Pathétique” 2nd mov. L. v. Beethoven
P. 2 6
Für Elise L. v. Beethoven
P. 2 7
Piano Sonate op.27-2 “Mondschein” 1st mov. L. v. Beethoven
P. 2 8
Impromptu op.90-2 F. P. Schubert
P. 2 9
Frühlingslied op.62-6 J. L. F. Mendelssohn
P. 3 0
Fantaisie-Impromptu F. F. Chopin
P. 3 1
Etude op.10-3 “Chanson de l’adieu” F. F. Chopin
P. 3 2
Etude op.10-12 “Revolutionary” F. F. Chopin
P. 3 3
Valse op.64-1 “Petit chien” F. F. Chopin
P. 3 4
Nocturne op.9-2 F. F. Chopin
P. 3 5
Nocturne KK4a-16/BI 49 [Posth.] F. F. Chopin
P. 3 6
Träumerei R. Schumann
P. 3 7
Barcarolle P. I. Tchaikovsky
P. 3 8
La prière d'une Vierge T. Badarzewska
P. 3 9
Liebesträume No.3 F. Liszt
P. 4 0
Blumenlied G. Lange
P. 4 1
Humoresque A. Dvořák
P. 4 2
Arietta E. H. Grieg
P. 4 3
Tango (España) I. Albéniz
P. 4 4
The Entertainer S. Joplin
P. 4 5
Maple Leaf Rag S. Joplin
P. 4 6
La Fille aux Cheveux de Lin C. A. Debussy
P. 4 7
Arabesque No.1 C. A. Debussy
P. 4 8
Cakewalk C. A. Debussy
P. 4 9
Je te veux E. Satie
P. 5 0
Gymnopédies No.1 E. Satie
No. Song Name Composer

64
SH2 Owner’s Manual
Playback sequence of Song files in a USB flash drive
The illustration below shows the playback sequence of Song files stored on the USB flash drive.
Playback sequence of User Songs
User Songs are named as follows, and saved in the USER FILES folder.
The “**” section indicates the Song number. Songs are played back in order of the number in the “**” section.
• USERSONG**.MID (MIDI Song)
•USERAUDIO**.WAV (Audio Song)
Playback sequence of External Songs
NOTE
This unit cannot recognize Song files saved in a folder lower than the third level. If you manage Song files in a USB flash drive
with a computer, make sure to save them to the first, second or third level folder.
Priority Folder/File
1 Root folder Songs are played back first in numeric order, and then in alphabetical
order.
2 General folders
BBB.mid
AAA.mid
AAA.mid
BBB.mid
AAA.mid
BBB.mid
AAA.mid
AAA.mid
AAA.mid
USB flash drive
First level Second level Third level Fourth level
Cannot be played.
General folders
Can be played.
Root folder
USER FILES
Folder A
Folder B Sub Folder B
Sub Folder A Sub Folder A Sub Folder A

65
English
SH2 Owner’s Manual
Specifications
Upright Piano Grand Piano
Control
Interface
Keyboard Touch Response Hard, Medium/Hard, Medium, Soft/Medium, Soft, Fixed
Pedal Damper, Silencing/Sostenuto
*1
,
Soft
Damper, Sostenuto
*1
, Soft
Sensor
System
Key Sensors Non-contact continuous detection optical sensor
Hammer Sensors
–
Non-contact 2-point
optical fiber sensor
Damper Pedal Continuous detection sensor
Sostenuto Pedal On/Off detection sensor
Soft Pedal On/Off detection sensor
Silencing
System
Mechanism Hammer shank stopper operated
by silencing pedal/silencing
lever
*1
Hammer shank stopper operated
by motor drive
Action – Quick Escape mechanism
Voices Tone
Generation
Piano Sound Yamaha CFX, Bösendorfer Imperial
Binaural Sampling Yes (CFX Grand Voice only)
Piano Effect VRM Ye s
Key-off Samples Ye s
Smooth Release Ye s
Polyphony (max.) 256
Preset Number of Voices 20
Voices for Song Playback 480 XG Voices + 12 Drum/SFX Kits
Effects Types Reverb Ye s
Brilliance Ye s
Stereophonic Optimizer Ye s
Songs (MIDI) Preset Number of Preset Songs 20 Voice Demo Songs, 50 Classics
Recording Number of Songs 10
Data Capacity approx. 500 KB/Song
Format Playback SMF (Format 0, Format 1)
Recording SMF (Format 0)
Recording/
Playback
(Audio)
Recording Time (max.) 80 minutes/Song
Format Playback WAV (44.1 kHz, 16 bit, stereo)
Recording WAV (44.1 kHz, 16 bit, stereo)
Functions Overall
Controls
Metronome Ye s
Tempo Range 5 – 500
Transpose -12 – 0 – +12
Tuning 414.8 – 440.0 – 466.8 Hz
(approx. 0.2 Hz increments)
USB Audio Interface 44.1 kHz, 16 bit, stereo
Bluetooth Bluetooth version 4.1
Supported profile A2DP
Compatible codec SBC
Wireless output Bluetooth class 2
Maximum
communication distance
approx. 10 m (33 ft)
Range of transmit
frequency
2,402 – 2,480 MHz
Maximum RF output
Power
4 dBm

66
SH2 Owner’s Manual
*1 For models equipped with a sostenuto pedal.
The contents of this manual apply to the latest specifications as of the publishing date. To obtain the latest manual, access the
Yamaha website then download the manual file. Since specifications, equipment or separately sold accessories may not be
the same in every locale, please check with your Yamaha dealer.
Storage and
Connectivity
Storage Internal Memory approx. 1.3 MB
External Drives USB flash drive
Connectivity DC IN 16 V
Headphones Stereo mini jack (x2)
MIDI IN/OUT
AUX IN Stereo mini jack
AUX OUT [L/L+R] [R] (Standard phone jack)
USB TO DEVICE Ye s
USB TO HOST Ye s
Power Supply AC Adaptor PA-300C (or an equivalent recommended by Yamaha)
Power Consumption 12W (When using PA-300C AC adaptor)
Auto Power Off Ye s
Weight
(excluding the weight of the piano body)
4 kg (8 lb, 13 oz) 9 kg (19 lb, 13 oz)
Included Accessories AC adaptor*, power cord*, headphones, headphone hanger,
attachment screws for headphone hanger,
“50 Classical Music Masterpieces” music book, Owner’s Manual
*May not be included depending on your area. Check with your Yamaha dealer.
Separately Sold Accessories
(May not be available depending on your area.)
USB wireless LAN adaptor (UD-WL01),
wireless MIDI adaptor (UD-BT01/MD-BT01)
Upright Piano Grand Piano

67
SH2 Owner’s Manual
English
Index
A
Access Point mode ..................... 51
Accessories .................................. 10
Aliquot Resonance ..................... 41
All-repeat playback .................... 21
Audio Loop Back ........................ 44
Audio recording ......................... 24
Audio Song .................................. 20
Auto Power Off .................... 16, 43
[AUX IN] jack ............................ 48
AUX IN Noise Gate ................... 43
AUX OUT jacks ......................... 47
B
Backup data ................................. 54
Base note ...................................... 38
Beat ............................................... 33
Binaural ....................................... 40
Binaural Sampling ...................... 19
Bluetooth ..................................... 53
Bluetooth Audio ......................... 52
Body Resonance ......................... 42
Brilliance ...................................... 36
C
Character Code ........................... 55
Computer .................................... 50
Computer-related Operations .. 10
Continuous playback ................. 21
Control unit ................................ 13
Copy (User Song) ....................... 27
D
Damper Resonance .................... 41
Delete (User Song) ..................... 28
Demo Song ............................ 20, 62
Display ......................................... 14
E
External Song .............................. 20
F
Fast forward ................................ 22
Fixed velocity .............................. 36
Format (USB flash drive) .......... 46
Function settings ........................ 34
H
Half Pedal .................................... 39
Headphone hanger ..................... 16
Headphones ................................ 16
I
Included Accessories ..................10
Infrastructure mode ...................51
Initialization ................................54
K
Keyboard transpose ....................36
Key-off Sampling ........................42
L
Local Control ...............................42
M
Master Tune ................................37
Message List .................................56
Metronome ..................................32
MIDI jacks ...................................49
MIDI recording ...........................24
MIDI Song ...................................20
MIDI transmit channel ..............42
N
Noise Gate ...................................43
P
Pairing ....................................44, 52
Pause .............................................22
Pedal .............................................12
Playback .......................................20
Playback sequence (Song) .........64
Power ............................................15
Preset Song ............................20, 62
R
Random playback .......................21
Recording .....................................24
Reverb ...........................................30
Rewind .........................................22
S
Scale type ......................................37
Silencing lever .......................12, 17
Silent Piano function ..................17
Smart device ................................50
Smart Pianist ...............................11
Song (playback sequence) ..........64
Song Category .............................20
Song List .......................................62
SONG mode ..........................13, 20
Song transpose ............................39
Specifications ...............................65
Stereophonic Optimizer ............19
Stop ...............................................22
String Resonance ........................41
T
Temperament ............................. 37
Tempo (metronome) ................. 32
Tempo (Song) ............................. 23
Time signature ............................ 33
Touch Sensitivity (Touch
Responce) .................................... 36
Transpose (keyboard) ................ 36
Transpose (Song) ....................... 39
Troubleshooting ......................... 58
Tuning ......................................... 37
U
USB Audio Interface .................. 51
USB device .................................. 45
USB flash drive ........................... 45
USB [TO DEVICE] terminal .... 45
USB wireless LAN ...................... 51
User Song .............................. 20, 27
UTILITY mode ..................... 13, 30
V
Version ........................................ 44
Voice ............................................ 18
Voice Demo Song ................ 20, 62
Voice List ............................... 19, 60
VOICE mode ........................ 13, 18
Volume (Audio Song) ............... 39
Volume (master volume) .......... 18
Volume (metronome) ............... 38
Volume (MIDI Song) ................ 38
VRM (Virtual Resonance
Modeling) .................................... 40

68
SH2 Owner’s Manual
MEMO

69
SH2 Owner’s Manual
For U.S.A.
For CANADA
For U.S.A. and CANADA
This transmitter must not be co-located or operated in conjunction with any other antenna or transmitter.
This device complies with Industry Canada licence-exempt RSS standard(s). Operation is subject to the following two
conditions: (1) this device may not cause interference, and (2) this device must accept any interference, including
interference that may cause undesired operation of the device.
Le présent appareil est conforme aux CNR d’Industrie Canada applicables aux appareils radio exempts de licence.
L’exploitation est autorisée aux deux conditions suivantes : (1) l’appareil ne doit pas produire de brouillage, et (2)
l’utilisateur de l’appareil doit accepter tout brouillage radioélectrique subi, même si le brouillage est susceptible d’en
compromettre le fonctionnement.
This equipment complies with FCC/IC radiation exposure limits set forth for an uncontrolled environment and meets the
FCC radio frequency (RF) Exposure Guidelines and RSS-102 of the IC radio frequency (RF) Exposure rules. This
equipment has very low levels of RF energy that are deemed to comply without testing of specific absorption rate (SAR).
Cet équipement est conforme aux limites d’exposition aux rayonnements énoncées pour un environnement non contrôlé
et respecte les règles les radioélectriques (RF) de la FCC lignes directrices d’exposition et d’exposition aux fréquences
radioélectriques (RF) CNR-102 de l’IC. Cet équipement émet une énergie RF très faible qui est considérée conforme
sans évaluation du débit d’absorption spécifique (DAS).

70
SH2 Owner’s Manual
For EU countries
BG Bulgarian
ОПРОСТЕНА ЕС ДЕКЛАРАЦИЯ ЗА СЪОТВЕТСТВИЕ
С настоящото Yamaha Music Europe GmbH декларира, че този тип
радиосъоръжение [SH2] е в съответствие с Директива 2014/53/ЕС.
Цялостният текст на ЕС декларацията за съответствие може да се
намери на следния интернет адрес:
https://europe.yamaha.com/en/support/compliance/doc.html
ES Spanish
DECLARACIÓN UE DE CONFORMIDAD SIMPLIFICADA
Por la presente, Yamaha Music Europe GmbH declara que el tipo de equipo
radioeléctrico [SH2] es conforme con la Directiva 2014/53/UE. El texto com-
pleto de la declaración UE de conformidad está disponible en la dirección
Internet siguiente:
https://europe.yamaha.com/en/support/compliance/doc.html
CS Czech
ZJEDNODUŠENÉ EU PROHLÁŠENÍ O SHODĚ
Tímto Yamaha Music Europe GmbH prohlašuje, že typ rádiového zařízení
[SH2] je v souladu se směrnicí 2014/53/EU. Úplné znění EU prohlášení o
shodě je k dispozici na této internetové adrese:
https://europe.yamaha.com/en/support/compliance/doc.html
DA Danish
FORENKLET EU-OVERENSSTEMMELSESERKLÆRING
Hermed erklærer Yamaha Music Europe GmbH, at radioudstyrstypen [SH2]
er i overensstemmelse med direktiv 2014/53/EU. EU-overensstemmelseser-
klæringens fulde tekst kan findes på følgende internetadresse:
https://europe.yamaha.com/en/support/compliance/doc.html
DE German
VEREINFACHTE EU-KONFORMITÄTSERKLÄRUNG
Hiermit erklärt Yamaha Music Europe GmbH, dass der Funkanlagentyp [SH2]
der Richtlinie 2014/53/EU entspricht. Der vollständige Text der EU-
Konformitätserklärung ist unter der folgenden Internetadresse verfügbar:
https://europe.yamaha.com/en/support/compliance/doc.html
ET Estonian
LIHTSUSTATUD ELI VASTAVUSDEKLARATSIOON
Käesolevaga deklareerib Yamaha Music Europe GmbH, et käesolev raadio-
seadme tüüp [SH2] vastab direktiivi 2014/53/EL nõuetele. ELi vastavusdekla-
ratsiooni täielik tekst on kättesaadav järgmisel internetiaadressil:
https://europe.yamaha.com/en/support/compliance/doc.html
EL Greek
ΑΠΛΟΥΣΤΕΥΜΕΝΗ ΔΗΛΩΣΗ ΣΥΜΜΟΡΦΩΣΗΣ ΕΕ
Με την παρούσα ο/η Yamaha Music Europe GmbH, δηλώνει ότι ο ραδιοεξο-
πλισμός [SH2] πληροί την οδηγία 2014/53/ΕΕ. Το πλήρες κείμενο της δήλω-
σης συμμόρφωσης ΕΕ διατίθεται στην ακόλουθη ιστοσελίδα στο διαδίκτυο:
https://europe.yamaha.com/en/support/compliance/doc.html
EN English
SIMPLIFIED EU DECLARATION OF CONFORMITY
Hereby, Yamaha Music Europe GmbH declares that the radio equipment type
[SH2] is in compliance with Directive 2014/53/EU. The full text of the EU dec-
laration of conformity is available at the following internet address:
https://europe.yamaha.com/en/support/compliance/doc.html
FR French
DECLARATION UE DE CONFORMITE SIMPLIFIEE
Le soussigné, Yamaha Music Europe GmbH, déclare que l'équipement
radioélectrique du type [SH2] est conforme à la directive 2014/53/UE. Le texte
complet de la déclaration UE de conformité est disponible à l'adresse internet
suivante:
https://europe.yamaha.com/en/support/compliance/doc.html
HR Croatian
POJEDNOSTAVLJENA EU IZJAVA O SUKLADNOSTI
Yamaha Music Europe GmbH ovime izjavljuje da je radijska oprema tipa
[SH2] u skladu s Direktivom 2014/53/EU. Cjeloviti tekst EU izjave o
sukladnosti dostupan je na sljedećoj internetskoj adresi:
https://europe.yamaha.com/en/support/compliance/doc.html
IT Italian
DICHIARAZIONE DI CONFORMITÀ UE SEMPLIFICATA
Il fabbricante, Yamaha Music Europe GmbH, dichiara che il tipo di apparec-
chiatura radio [SH2] è conforme alla direttiva 2014/53/UE. Il testo completo
della dichiarazione di conformità UE è disponibile al seguente indirizzo Inter-
net:
https://europe.yamaha.com/en/support/compliance/doc.html
LV Latvian
VIENKĀRŠOTA ES ATBILSTĪBAS DEKLARĀCIJA
Ar šo Yamaha Music Europe GmbH deklarē, ka radioiekārta [SH2] atbilst
Direktīvai 2014/53/ES. Pilns ES atbilstības deklarācijas teksts ir pieejams
šādā interneta vietnē:
https://europe.yamaha.com/en/support/compliance/doc.html
LT Lithuanian
SUPAPRASTINTA ES ATITIKTIES DEKLARACIJA
Aš, Yamaha Music Europe GmbH, patvirtinu, kad radijo įrenginių tipas [SH2]
atitinka Direktyvą 2014/53/ES. Visas ES atitikties deklaracijos tekstas
prieinamas šiuo interneto adresu:
https://europe.yamaha.com/en/support/compliance/doc.html
HU Hungarian
EGYSZERŰSÍTETT EU-MEGFELELŐSÉGI NYILATKOZAT
Yamaha Music Europe GmbH igazolja, hogy a [SH2] típusú rádióberendezés
megfelel a 2014/53/EU irányelvnek. Az EU-megfelelőségi nyilatkozat teljes
szövege elérhető a következő internetes címen:
https://europe.yamaha.com/en/support/compliance/doc.html
NL Dutch
VEREENVOUDIGDE EU-CONFORMITEITSVERKLARING
Hierbij verklaar ik, Yamaha Music Europe GmbH, dat het type radioapparatuur
[SH2] conform is met Richtlijn 2014/53/EU. De volledige tekst van de EU-con-
formiteitsverklaring kan worden geraadpleegd op het volgende internetadres:
https://europe.yamaha.com/en/support/compliance/doc.html
PL Polish
UPROSZCZONA DEKLARACJA ZGODNOŚCI UE
Yamaha Music Europe GmbH niniejszym oświadcza, że typ urządzenia radio-
wego [SH2] jest zgodny z dyrektywą 2014/53/UE. Pełny tekst deklaracji zgod-
ności UE jest dostępny pod następującym adresem internetowym:
https://europe.yamaha.com/en/support/compliance/doc.html
PT Portuguese
DECLARAÇÃO UE DE CONFORMIDADE SIMPLIFICADA
O(a) abaixo assinado(a) Yamaha Music Europe GmbH declara que o pre-
sente tipo de equipamento de rádio [SH2] está em conformidade com a Dire-
tiva 2014/53/UE. O texto integral da declaração de conformidade está
disponível no seguinte endereço de Internet:
https://europe.yamaha.com/en/support/compliance/doc.html
RO Romanian
DECLARAȚIA UE DE CONFORMITATE SIMPLIFICATĂ
Prin prezenta, Yamaha Music Europe GmbH declară că tipul de echipamente
radio [SH2] este în conformitate cu Directiva 2014/53/UE. Textul integral al
declarației UE de conformitate este disponibil la următoarea adresă internet:
https://europe.yamaha.com/en/support/compliance/doc.html
SK Slovak
ZJEDNODUŠENÉ EÚ VYHLÁSENIE O ZHODE
Yamaha Music Europe GmbH týmto vyhlasuje, že rádiové zariadenie typu
[SH2] je v súlade so smernicou 2014/53/EÚ. Úplné EÚ vyhlásenie o zhode je
k dispozícii na tejto internetovej adrese:
https://europe.yamaha.com/en/support/compliance/doc.html
SL Slovenian
POENOSTAVLJENA IZJAVA EU O SKLADNOSTI
Yamaha Music Europe GmbH potrjuje, da je tip radijske opreme [SH2]
skladen z Direktivo 2014/53/EU. Celotno besedilo izjave EU o skladnosti je na
voljo na naslednjem spletnem naslovu:
https://europe.yamaha.com/en/support/compliance/doc.html
FI Finnish
YKSINKERTAISTETTU EU-VAATIMUSTENMUKAISUUSVAKUUTUS
Yamaha Music Europe GmbH vakuuttaa, että radiolaitetyyppi [SH2] on
direktiivin 2014/53/EU mukainen. EU-vaatimustenmukaisuusvakuutuksen
täysimittainen teksti on saatavilla seuraavassa internetosoitteessa:
https://europe.yamaha.com/en/support/compliance/doc.html
SV Swedish
FÖRENKLAD EU-FÖRSÄKRAN OM ÖVERENSSTÄMMELSE
Härmed försäkrar Yamaha Music Europe GmbH att denna typ av radioutrust-
ning [SH2] överensstämmer med direktiv 2014/53/EU. Den fullständiga texten
till EU-försäkran om överensstämmelse finns på följande webbadress:
https://europe.yamaha.com/en/support/compliance/doc.html
TR Turkey
BASİTLEŞTİRİLMİŞ AVRUPA BİRLİĞİ UYGUNLUK BİLDİRİMİ
İşbu belge ile, Yamaha Music Europe GmbH, radyo cihaz tipinin [SH2],
Direktif 2014/53/AB'ye uygunluğunu beyan eder. AB uyumu beyanının tam
metni aşağıdaki internet adresinden edinilebilir:
https://europe.yamaha.com/en/support/compliance/doc.html
Yamaha Music Europe GmbH
Siemensstr. 22-34 25462 Rellingen, Germany
Tel: +49-4101-303-0


72
SH2 Owner’s Manual
Manual Development Group
© 2018 Yamaha Corporation
Published 10/2019 MW-B0
YJ843B0
10-1, Naka-ku, Hamamatsu, 430-8650 JAPAN
-
 1
1
-
 2
2
-
 3
3
-
 4
4
-
 5
5
-
 6
6
-
 7
7
-
 8
8
-
 9
9
-
 10
10
-
 11
11
-
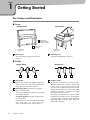 12
12
-
 13
13
-
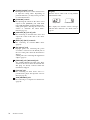 14
14
-
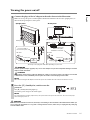 15
15
-
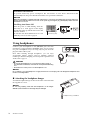 16
16
-
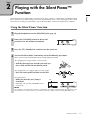 17
17
-
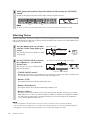 18
18
-
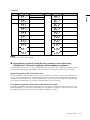 19
19
-
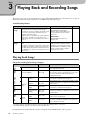 20
20
-
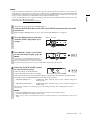 21
21
-
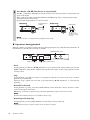 22
22
-
 23
23
-
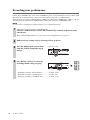 24
24
-
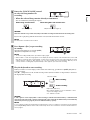 25
25
-
 26
26
-
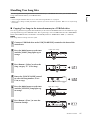 27
27
-
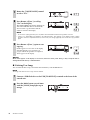 28
28
-
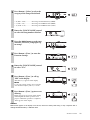 29
29
-
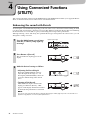 30
30
-
 31
31
-
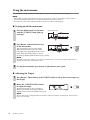 32
32
-
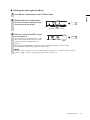 33
33
-
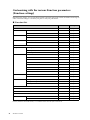 34
34
-
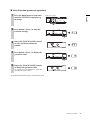 35
35
-
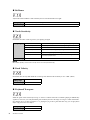 36
36
-
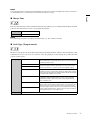 37
37
-
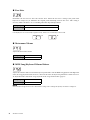 38
38
-
 39
39
-
 40
40
-
 41
41
-
 42
42
-
 43
43
-
 44
44
-
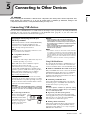 45
45
-
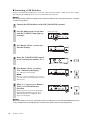 46
46
-
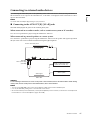 47
47
-
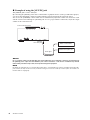 48
48
-
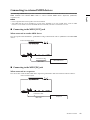 49
49
-
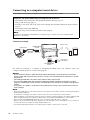 50
50
-
 51
51
-
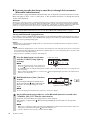 52
52
-
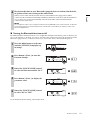 53
53
-
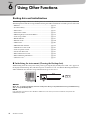 54
54
-
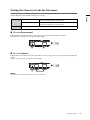 55
55
-
 56
56
-
 57
57
-
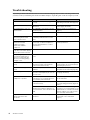 58
58
-
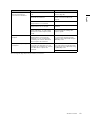 59
59
-
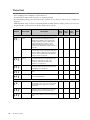 60
60
-
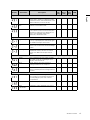 61
61
-
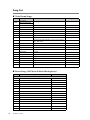 62
62
-
 63
63
-
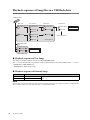 64
64
-
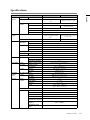 65
65
-
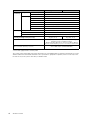 66
66
-
 67
67
-
 68
68
-
 69
69
-
 70
70
-
 71
71
-
 72
72


En otros idiomas
- français: Yamaha SH2 Le manuel du propriétaire
- italiano: Yamaha SH2 Manuale del proprietario
- English: Yamaha SH2 Owner's manual
- Deutsch: Yamaha SH2 Bedienungsanleitung
- русский: Yamaha SH2 Инструкция по применению
- Nederlands: Yamaha SH2 de handleiding
- português: Yamaha SH2 Manual do proprietário
- dansk: Yamaha SH2 Brugervejledning
- polski: Yamaha SH2 Instrukcja obsługi
- čeština: Yamaha SH2 Návod k obsluze
- svenska: Yamaha SH2 Bruksanvisning
- Türkçe: Yamaha SH2 El kitabı
- suomi: Yamaha SH2 Omistajan opas
- română: Yamaha SH2 Manualul proprietarului
Documentos relacionados
-
Yamaha P-515 El manual del propietario
-
Yamaha NX-B55 El manual del propietario
-
-
-
Yamaha SC2 El manual del propietario
-
-
-
Yamaha CLP-725 Guía del usuario
-
-