Bella 14440 El manual del propietario
- Categoría
- Pequeños electrodomésticos de cocina
- Tipo
- El manual del propietario
Este manual también es adecuado para

12 CUP PROGRAMMABLE
COFFEE MAKER
CAFETERA DIGITAL
PARA 12 TAZAS
Instruction Manual
Manual de instrucciones
Register your product and get support at:
Para registrar y obtener asistencia de su producto ir:
www.bellahousewares.com
SO-312565_14438_BELLA_12 cup CM Progra._Shopko_iM_R5.indd 1 2015-07-14 8:29 AM

SO-312565_14438_BELLA_12 cup CM Progra._Shopko_iM_R5.indd 2 2015-07-14 8:29 AM

Table of Contents
Important safeguards ........................................................................................................................................2
Additional important safeguards .....................................................................................................................3
Notes on the Plug ...............................................................................................................................................4
Notes on the Cord...............................................................................................................................................4
Plasticizer Warning ............................................................................................................................................. 4
Electric Power......................................................................................................................................................4
Carafe Safety Precautions .................................................................................................................................4
Coffee Yield ......................................................................................................................................................... 4
Getting To Know Your Coffee Maker ............................................................................................................... 5
Before Using for the First Time ........................................................................................................................5
Setting the CURRENT Time ...............................................................................................................................6
Brewing coffee .................................................................................................................................................... 6
Making coffee immediately ........................................................................................................................... 6
Setting the PROGRAM (Future Brew) Time ................................................................................................. 6
Setting the BOLD function ............................................................................................................................. 7
Pause and Serve ............................................................................................................................................. 7
Brewing a Second Pot of Coffee ...................................................................................................................7
Hints for Great Tasting Coffee .......................................................................................................................... 7
User Maintenance Instructions .......................................................................................................................8
Cleaning and Maintenance ................................................................................................................................8
Descaling ............................................................................................................................................................. 8
Storing Instructions ............................................................................................................................................8
Warranty ..............................................................................................................................................................9
Índice
Medidas de seguridad importantes ............................................................................................................... 10
Otras medidas de seguridad importantes ............................................................................................... 11-12
Notas sobre el enchufe .................................................................................................................................... 12
Notas sobre el cable ......................................................................................................................................... 12
Advertencia sobre los plasticantes .............................................................................................................. 12
Corriente eléctrica ............................................................................................................................................ 12
Precauciones de seguridad de la garrafa ...................................................................................................... 12
Rendimiento del café .......................................................................................................................................13
Descripción de la cafetera ............................................................................................................................... 13
Antes de utilizar por primera vez ................................................................................................................... 14
Ajuste de la hora ACTUAL ............................................................................................................................... 14
PREPARACIÓN DE CAFÉ .................................................................................................................................. 14
Para hacer café inmediatamente ................................................................................................................ 14
Ajuste de la hora de PROGRAMACIÓN (Preparación futura) .................................................................. 15
Café de aroma intenso.................................................................................................................................. 15
Función Detener y Servir ............................................................................................................................. 15
Para preparar una segunda jarra de café .................................................................................................. 16
Consejos para lograr un café sumamente delicioso ................................................................................... 16
Instrucciones de mantenimiento para el usuario ........................................................................................ 16
Limpieza y mantenimiento ............................................................................................................................. 16
Descalcicación ............................................................................................................................................... 17
Instrucciones de almacenamiento .................................................................................................................17
Garantía..............................................................................................................................................................18
SO-312565_14438_BELLA_12 cup CM Progra._Shopko_iM_R5.indd 1 2015-07-14 8:29 AM

2
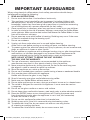
IMPORTANT SAFEGUARDS
When using electrical coffee makers, basic safety precautions should always
befollowed including the following:
1. READ ALL INSTRUCTIONS.
2. Do not touch hot surface. Use handles or knobs only.
3. This appliance is not intended for use by persons (including children) with
reducedphysical, sensory or mental capabilities, or lack of experience and
knowledge, unless they have been given supervision or instruction concerning
useof the appliance by a person responsible for their safety.
4. Close supervision is necessary when any appliance is used by or near children.
5. In order to minimize the risk of property damage, never place the Coffee Maker
under cabinets. Make sure the area several feet above the Coffee Maker is clear
from all furniture or cabinetry.
6. Do not open top cover while coffee is brewing. Scalding may occur if the cover
islifted or removed during the brewing cycle.
7. Do not use outdoors.
8. Unplug unit from outlet when not in use and before cleaning.
Allow unit to cool before putting on or taking off parts, and before cleaning.
9. To protect against re, electrical shock and injury to persons, do not immerse cord,
plugs, or appliance in water or other liquids.
10. Do not operate any appliance with a damaged cord or plug, or after the appliance
malfunctions, or has been damaged in any manner. Return appliance to the
nearest authorized service facility for examination, repair or adjustment.
NOTE: DO NOT ATTEMPT TO REPAIR THE UNIT YOURSELF.
THIS WILL VOID THEWARRANTY.
11. The use of accessory attachments not recommended by the appliance
manufacturer may result in re, electric shock or injury to persons.
12. Never move the appliance by pulling the cord. Do not let the cord hang over
theedge of a table or counter or touch hot surfaces.
13. Stand the appliance on a table or at surface.
14. Do not use a cracked glass carafe or a carafe having a loose or weakened handle.
15. Only use the glass carafe with this appliance.
Handle with care as the glass is veryfragile.
16. Snap lid securely onto glass carafe before serving coffee.
17. Never use your Coffee Maker without water in it.
18. Do not place appliance on or near a hot gas or electric burner or in a heated oven.
19. The carafe is designed for use with this appliance. It must never be used on
arange top.
20. Do not set hot glass carafe on a wet or cold surface.
21. Do not clean glass carafe with cleaners, steel wool pads, or other abrasive material
22. Press the ON/OFF button to turn the appliance off. Unplug the power cord
fromtheelectrical outlet when the appliance is not in use, left unattended,
or when thecarafe is empty.
23. Do not use this appliance for other than its intended use.
24. Scalding may occur if the lid is removed during the brewing cycles.
25. To reduce the risk of re, do not mount unit over or near any portion
of a heating or cooking appliance.
26. To reduce the risk of electric shock, do not mount over a sink.
SO-312565_14438_BELLA_12 cup CM Progra._Shopko_iM_R5.indd 2 2015-07-14 8:29 AM

3
27. To reduce the risk of re, do not store anything directly on top of the appliance
surface when the appliance is in operation.
28. To reduce the risk of Fire or Electric Shock, do not remove bottom cover.
No user serviceable parts inside. Repair should be done by authorized
servicepersonnel only.
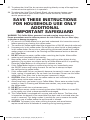
SAVE THESE INSTRUCTIONS
FOR HOUSEHOLD USE ONLY
ADDITIONAL
IMPORTANT SAFEGUARD
WARNING: This Coffee Maker generates heat and escaping steam during use.
Properprecautions must be taken to prevent the risk of burns, res, or other injury
topersons or damage to property.
1. All users of this Coffee Maker must read and understand this instruction manual
before operating or cleaning this coffee maker.
2. The cord to this coffee maker should be plugged into a 120V AC electrical outlet only.
3. Use water only in this coffee maker! Do not put any other liquids or food products
inthis coffee maker. Do not mix or add anything to the water placed in this coffee
maker, except as instructed in the Cleaning and Maintenance section to descale
theCoffee Maker.
4. DO NOT attempt to move a coffee maker containing hot liquids. Allow coffee
maker to cool completely before moving.
5. Keep coffee maker at least 4 inches away from walls or other objects during
operation. Do not place any objects on top of Coffee Maker while it is operating.
Place the Coffee Maker on a surface that is resistant to heat.
6. If this Coffee Maker begins to malfunction during use, immediately press
theON/OFF button and unplug the cord. Do not use or attempt to repair
themalfunctioning coffee maker.
7. If this coffee maker falls or accidentally becomes immersed in water or any other
liquid, unplug it immediately. Do not reach into the water! Do not use this coffee
maker after it has fallen into or has become immersed in water.
8. CAUTION: Allow 15 minutes for the coffee maker to cool sufciently before
addingwater to the water reservoir.
9. Always use fresh, cool water in your Coffee Maker. Warm water or other liquids,
except as listed in Cleaning and Maintenance section, may cause damage to
thecoffee maker.
10. DO NOT put carafe into a microwave oven.
11. DO NOT leave empty carafe on warming plate when Coffee Maker is turned ON,
asthe carafe may crack or become otherwise damaged.
12. This Coffee Maker is equipped with a pause and serve feature. The ow valve
islocated on the bottom of the removable lter basin and is activated when the
carafe is removed. This design makes it possible for you to remove the carafe
andpour a cup of coffee before the entire carafe is brewed.
13. CAUTION: To prevent injury when utilizing the pause and serve feature,
replacecarafe within 30 seconds of removing during brewing process.
SO-312565_14438_BELLA_12 cup CM Progra._Shopko_iM_R5.indd 3 2015-07-14 8:29 AM

4
Notes on the Plug
This appliance has a polarized plug (one blade is wider than the other).
To reduce the risk of electric shock, this plug will t in a polarized outlet only oneway.
If the plug does not t fully into the outlet, reverse the plug. If it still does not t,
contact a qualied electrician. Do not modify the plug in any way.
Notes on the Cord
The provided short power-supply cord (or detachable power-supply cord) should
beused to reduce the risk resulting from becoming entangled in or tripping over
alonger cord. Do not use an extension cord with this product.
Plasticizer Warning
CAUTION: To prevent Plasticizers from migrating to the nish of the counter top
ortable top or other furniture, place NON-PLASTIC coasters or place mats between
theappliance and the nish of the counter top or table top. Failure to do so may
causethe nish to darken; permanent blemishes may occur or stains can appear.
Electric Power
If the electrical circuit is overloaded with other appliances, your appliance
may not operate properly. It should be operated on a separate electrical circuit
fromother appliances.
Carafe Safety Precautions
1. Do not use a cracked carafe having a loose or weakened handle.
2. This carafe is designed to be used only on the warming plate of this Coffee Maker.
Do not use in a conventional oven.
3. To avoid breakage, handle carafe with care. Avoid impact. Glass will break as
aresult of impact. Use care when lling with water to avoid hitting faucet.
4. Do not place hot carafe on cool or wet surface. Allow to cool before washing
oradding liquids.
5. Do not set empty carafe on a hot heating surface. Do not clean with steel wool
pads, abrasive cleanser, or any other materials that may scratch.
6. Do not bump, scratch, or boil dry.
7. Discard carafe if it is cracked, scratched, or heated while empty for an extended
period of time.
Coffee Yield
12-Cup Coffee Maker: 12 (5-oz) cups.
NOTE: A 5-oz cup is the American industry standard and is used by most coffee
makermanufacturers.
NOTE: The amount of brewed coffee will always be less than the amount of water
placed into the water reservoir; as much as 10% may be absorbed by coffee grounds
and steam loss.
WARNING: TO REDUCE THE RISK OF FIRE OR ELECTRIC SHOCK, DO NOT REMOVE
THE BOTTOM COVER. NO USER-SERVICEABLE PARTS INSIDE. REPAIR SHOULD BE
DONE BY AUTHORIZED SERVICE PERSONNEL ONLY.
SO-312565_14438_BELLA_12 cup CM Progra._Shopko_iM_R5.indd 4 2015-07-14 8:29 AM

5
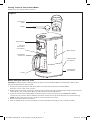
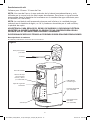
Getting To Know Your Coffee Maker
Product may vary slightly from illustration
4
Polarized Plug
(not shown)
Figure 1
Permanent
Filter
Scoop
Control Panel
Detachable
Carafe Lid
Carafe
Pause &
Serve Valve
(not shown)
Cord Storage
(not shown)
Water Gauge
Before Using for the First Time
CAUTION: To protect against electrical shock, do not immerse the Coffee Maker or allow power cord to come
intocontact with water or other liquids.
1. Remove all packing material and labels from the inside and outside of the Coffee Maker.
Place the unit on a at, clean surface.
2. Before preparing coffee, thoroughly clean the glass carafe with lid, removable lter holder and permanent
coffee lter in hot, sudsy water. Rinse and dry. Replace disassembled parts.
3. Clean the inside of the Coffee Maker by brewing 2 full carafes of tap water (see BREWING COFFEE
sectionfor instructions). Do not add the permanent coffee lter or ground coffee for this initial cleaning.
NOTE: At the end of the rst cycle, allow 15 minutes for the unit to cool.
4. Brew a second carafe of fresh water.
5. Wait an additional 15 minutes to allow the unit to cool before brewing your rst carafe of coffee.
Note: keep illustration
callouts aligned
SO-312565_14438_BELLA_12 cup CM Progra._Shopko_iM_R5.indd 5 2015-07-14 8:29 AM

6
Setting the CURRENT Time
NOTE: You do not need to set the CURRENT time if you are not using the PROGRAM (future brew) feature.
1. Plug the Coffee Maker into a 120V AC electrical wall outlet. The LCD display will illuminate blue.
NOTE: By default, 12:00 AM will be displayed, and will be ashing.
2. Press the HOUR button to increase the hour. Once the desired hour is displayed, press the MIN button to
increase minutes until the CURRENT time is displayed. Press and hold HOUR or MIN to toggle quickly.
NOTE: Pay attention to the AM and PM setting.
NOTE: The blue backlit LCD display will advance to sleep mode within 15 seconds if no buttons are pressed.
The CURRENT time can be changed at any time by simply repeating Step #2.
IMPORTANT: If you unplug and replug the Coffee Maker it will reset to the default time.
BREWING COFFEE
Making Coffee Immediately
NOTE: The amount of brewed coffee will always be less than the amount of water placed into the water reservoir;
as much as 10% is absorbed by coffee grounds and lter.
1. Lift to open the Coffee Maker lid. Fill carafe with cold tap water and pour into water reservoir at the back
of the unit. The water level can easily be seen from the viewing window on the side of the unit.
NOTE: Ensure water does not exceed the 12 cup line.
2. Place empty carafe on the warming plate.
3. Place the permanent lter in the removable lter holder. Measure 1 level tablespoon or 1 scoop with
theprovided scooper cup, of drip or regular grind coffee for each cup of coffee desired. For stronger
ormilder coffee, adjust amount of coffee to suit your taste.
4. Lower the lter holder down into the housing. Close the lid.
5. Plug the power cord into 120V/60HZ power supply outlet and press the ON/OFF button once; the light
around the ON/OFF button will be illuminated (blue). The appliance will begin working.
NOTE: You can take out the carafe, pour and serve at any time. The appliance will stop dripping
automatically, but the time cannot exceed 30 seconds.
NOTE: To cancel the brew cycle at any time, press the ON/OFF button.
WARNING: Do not open water reservoir lid when the coffee maker is operating.
6. When the brew cycle is complete 3 audible beeps will be heard and the Coffee Maker will advance
toKEEPWARM function and the TIME SINCE BREW icon
will appear on the LCD display.
7. The light around the ON/OFF button will remain illuminated and the clock will begin to count
up to 2 hours indicating the time since brew.
NOTE: As safety is concerned, be sure to cover the lid of carafe when pouring.
NOTE: To keep the coffee warm, return the carafe to the warming plate after pouring the coffee.
Thecoffee can be kept warm for up to 2 hours.
NOTE: To check the current time press the PROG/BOLD button. The TIME SINCE BREW icon
will
disappear and the current time will appear for 5 seconds. Once the 5 seconds is reached, the time since
brew and the TIME SINCE BREW icon
will reappear.
8. After 2 hours the appliance (and carafe warming plate) will turn off automatically and will beep 3 times.
The TIME SINCE BREW icon will disappear and the light around the ON/OFF button will turn off.
Thecurrent time will reappear on the LCD display
NOTE: Unplug the power cord from the electrical outlet when the appliance is not in use, left unattended,
or when the carafe is empty.
Setting the PROGRAM (Future Brew) Time
Coffee Maker can be programmed to begin brewing up to 24 hours in the future.
1. Press the PROG/BOLD button until the word “PROG” appears on the LCD display.
NOTE: By default, 12:00 AM will be displayed, and will be ashing. The blue backlit LCD display will
advance to sleep mode and the “PROG” icon will disappear within 15 seconds if no buttons are pressed.
2. Press the HOUR button to increase the hour. Once the desired hour is displayed, press the MIN button.
Press and hold HOUR or MIN to toggle quickly.
3. When the future auto PROGRAM time is displayed, press the PROG/BOLD button. An audible beep
conrms the selection and “PROG” appears in the display. The ring around the PROG/BOLD button
willilluminate blue.
NOTE: Pay attention to the AM and PM setting.
NOTE: Make sure the coffee maker is ready to brew by repeating steps 1-5 of the MAKING COFFEE
IMMEDIATELY section
SO-312565_14438_BELLA_12 cup CM Progra._Shopko_iM_R5.indd 6 2015-07-14 8:29 AM

7
4. When the preset time is reached, the light around the ON/OFF button will illuminate blue and brewing will
begin as indicating above under the MAKING COFFEE IMMEDIATELY steps 6-9. The light around the
PROG/BOLD button will turn off.
IMPORTANT: To cancel the PROGRAM (future brew) start time, press the PROG/BOLD button, the PROG
icon will disappear from the LCD display and the light around the PROG/BOLD button will turn off.
5. To change the preset start time, simply press the PROG button until “PROG” appears in the display.
6. Following steps 1-3 as described above, adjust future brew time.
NOTE: To recall the future start PROGRAM time, press the PROG/BOLD button twice. If the future brew
time is ok as is displayed, press the PROG/BOLD button twice again until “PROG” appears in the display.
Tips: to preset the previous future brew, simply press the PROG/BOLD button, the LCD will display PROG
and the light around the PROG/BOLD button will illuminate blue. The coffee maker is ready for future brew.
Setting the BOLD function
The Bold setting adjusts the brewing cycle of a full pot of coffee, allowing more time for the coffee to “steep”
toextract further oils and avor from the coffee bean. This results in a bolder tasting pot of coffee
1. Press and hold the PROG/BOLD button until the word BOLD appears on the screen.
2. To remove the BOLD function, simply press and hold the PROG/BOLD button until the BOLD
functiondisappears.
Pause and Serve
Using the pause and serve feature: If you wish to serve a cup of coffee before the brew cycle is completed,
simplyremove carafe from the warming plate. Dripping will automatically cease. Return the carafe onto the
warming plate; dripping will resume.
CAUTION: To prevent injury when utilizing pause and serve feature, replace carafe within 30 seconds after
removing during the brewing process.
1. After approximately 2 cups of coffee have been brewed, the carafe may be slowly removed and the coffee
will stop dripping.
2. The ow valve is located on the bottom of the lter holder and is activated when the carafe is removed.
This design makes it possible for you to remove the carafe and pour a cup of coffee before the entire
carafe is brewed.
IMPORTANT: When replacing the lter holder, the ow valve must be properly inserted into the front hole
of the machine, so that it can be seen as it sits on the top of the carafe lid.
3. When using this feature, make sure that the carafe is replaced under the lter holder within 30 seconds
toprevent overow.
Brewing a Second Pot of Coffee
To brew another pot of coffee, press the ON/OFF button to turn the coffee maker off. Wait 15 minutes to allow
theheating element to cool. Remove and dispose of the used coffee grounds; then rinse the carafe and lter
basket with water and repeat the brewing procedure detailed in the “BREWING COFFEE” section.
NOTE: If you do not allow the appliance to cool completely before reuse, water in the water reservoir may
overheat, causing steam to be released. This could result in burns and/or other personal injury.
Hints for Great Tasting Coffee
• A clean Coffee Maker is essential for making great tasting coffee. Regular cleaning, as described in
theCleaning & Maintenance Instructions and Descaling sections of this Instruction Manual is
highlyrecommended.
• Always use fresh, cold water in your Coffee Maker.
• Finer grinds, such as drip coffee, promote fuller extraction and provide rich, full-bodied coffee.
Regulargrind will require slightly more coffee per cup to provide the strength of a ner grind.
• Store coffee in a cool, dry place.
• For optimum coffee avor, buy whole beans and grind them nely just before brewing.
• Do not re-use coffee grounds since this will greatly impair coffee avor.
• Reheating coffee is not recommended. Coffee is at its peak avor immediately after brewing.
• Small oil droplets on the surface of brewed, black coffee is due to the extraction of oil from
the coffee grounds. Oiliness may occur more frequently if heavily roasted coffees are used.
Over extraction may also cause oiliness, indicating a need to clean your Coffee Maker.
SO-312565_14438_BELLA_12 cup CM Progra._Shopko_iM_R5.indd 7 2015-07-14 8:29 AM

8
User Maintenance Instructions
This appliance requires little maintenance. It contains no user-serviceable parts. Any servicing requiring
disassembly other than cleaning must be performed by a qualied appliance repair technician.
Cleaning and Maintenance
CAUTION: Be sure to unplug this appliance before cleaning. To protect against electrical shock, do not immerse
cord, plug or unit in water or other liquid. After each use, always make sure plug is rst removed from wall outlet.
1. Clean lter basket, lter, carafe and carafe lid after each use in hot, sudsy water.
2. Wipe the appliance’s exterior surface with a soft, damp cloth to remove stains.
3. Water droplets may build up in the area above the lter and drip onto the appliance base during brewing.
To control the dripping, wipe off the area with a clean, dry cloth after each use of the product.
4. Use a damp cloth to gently wipe the warming plate. Never use an abrasive cleaner to clean it.
Descaling
Special cleaning of your Coffee Maker is recommended at least once a month, depending on frequency of use
and quality of water used in the unit. If water in your area is especially hard, the following cleaning procedure
should be performed every 2 weeks, since minerals in water can detract from the avor of the coffee and possibly
lengthen brew time.
1. Fill carafe with 1 part white vinegar to 3 parts cold water. Pour water and vinegar solution into the
waterreservoir.
2. Brew the vinegar solution until the carafe is half full.
NOTE: During cleaning, more steam will occur than during normal coffee brewing.
3. Press the ON/OFF button to turn the Coffee Maker OFF. When liquid stops dripping from lter holder into
the carafe, remove the carafe and allow liquid to cool for 15 minutes. When cooled, lift lid and pour liquid
back into the water reservoir.
4. Close the lid. Return carafe to the warming plate.
5. BREW THE VINEGAR SOLUTION again, allowing all the cleaning solution to empty into the carafe. After
dripping has stopped, discard contents of the carafe.
6. Allow Coffee Maker to cool for 15 minutes, rinse by brewing a carafe full of cold water. Insert the clean
permanent coffee lter into the removable lter holder before brewing.
7. Repeat until no yellow liquid comes out and until no vinegar odor is left.
8. At end of brew cycle, press the ON/OFF button to turn the Coffee Maker OFF. Discard water in the carafe.
Wash carafe, permanent coffee lter, and removable lter holder in hot sudsy water. Dry parts thoroughly.
NOTE: carafe, permanent coffee lter, and removable lter holder are top-rack dishwasher safe. The carafe
lid is removable for easy cleaning.
9. When Coffee Maker has cooled, wipe exterior with a dry cloth.
Storing Instructions
1. Unplug unit and allow to cool.
2. Store Coffee Maker in its box or in a cool, dry place.
3. Never store unit while it is still plugged in.
SO-312565_14438_BELLA_12 cup CM Progra._Shopko_iM_R5.indd 8 2015-07-14 8:29 AM

9
Limited TWO-YEAR Warranty
SENSIO Inc. hereby warrants that for a period of TWO YEARS from the date
of purchase, this product will be free from mechanical defects in material and
workmanship, and for 90 days in respect to non-mechanical parts. At its sole
discretion, SENSIO Inc. will either repair or replace the product found to be defective,
or issue a refund on the product during the warranty period.
The warranty is only valid for the original retail purchaser from the date of initial retail
purchase and is not transferable. Keep the original sales receipt, as proof of purchase is
required to obtain warranty validation. Retail stores selling this product do not have the
right to alter, modify, or in any way revise the terms and conditions of the warranty.
EXCLUSIONS:
The warranty does not cover normal wear of parts or damage resulting from any of the
following: negligent use of the product, use of improper voltage or current, improper
routine maintenance, use contrary to the operating instructions, disassembly, repair,
or alteration by anyone other than qualied SENSIO Inc. personnel. Also, the warranty
does not cover Acts of God such as re, oods, hurricanes, or tornadoes.
SENSIO Inc. shall not be liable for any incidental or consequential damages caused
by the breach of any express or implied warranty. Apart from the extent prohibited
by applicable law, any implied warranty of merchantability or tness for a particular
purpose is limited in time to the duration of the warranty. Some states, provinces or
jurisdictions do not allow the exclusion or limitation of incidental or consequential
damages, or limitations on how long an implied warranty lasts, and therefore, the
above exclusions or limitations may not apply to you. The warranty covers specic
legal rights which may vary by state, province and/or jurisdiction.
HOW TO OBTAIN WARRANTY SERVICE:
You must contact Customer Service at our toll-free number: 1-866-832-4843.
A Customer Service Representative will attempt to resolve warranty issues over the
phone. If the Customer Service Representative is unable to resolve the problem, you will
be provided with a case number and asked to return the product to SENSIO Inc. Attach
a tag to the product that includes: your name, address, daytime contact telephone
number, case number, and description of the problem. Also, include a copy of the
original sales receipt. Carefully package the tagged product with the sales receipt,
and send it (with shipping and insurance prepaid) to SENSIO Inc.’s address. SENSIO
Inc. shall bear no responsibility or liability for the returned product while in transit to
SENSIO Inc.’s Customer Service Center.
SO-312565_14438_BELLA_12 cup CM Progra._Shopko_iM_R5.indd 9 2015-07-14 8:29 AM

10
MEDIDAS DE SEGURIDAD
IMPORTANTES
Al utilizar cafeteras eléctricas, siempre deben cumplirse las precauciones de seguridad
básicas, incluidas las siguientes:
1. LEA TODAS LAS INSTRUCCIONES.
2. No toque la supercie caliente. Utilice solamente las asas o perillas.
3. Este electrodoméstico no debe ser utilizado por personas (incluidos niños) con
capacidades físicas, sensoriales o mentales reducidas, o con falta de experiencia y
conocimientos, a menos que una persona responsable de su seguridad les haya
brindado supervisión o instrucciones sobre el uso de los electrodomésticos.
4. Es necesario que haya una supervisión estricta cuando el electrodoméstico sea
utilizado por niños o cerca de ellos.
5. A n de minimizar el riesgo de daños materiales, nunca coloque la cafetera debajo
de los armarios Asegúrese de que el área de varios pies (metros) por encima de la
cafetera esté libre de todos los muebles o armarios.
6. No abra la cubierta superior mientras está preparando café. Si la tapa se levanta o
se retira durante el ciclo de preparación, esto puede ocasionar quemaduras.
7. No utilice este aparato en exteriores.
8. Desenchufe la unidad del tomacorriente cuando no la utilice y antes de limpiarla.
Deje que la unidad se enfríe antes de colocar o retirar piezas, y antes de limpiarla.
9. Para protegerse del riesgo de incendio, descarga eléctrica y lesiones físicas, no
sumerja el cable, el enchufe ni el electrodoméstico en agua ni en ningún otro líquido.
10. No utilice ningún electrodoméstico que tenga un cable o enchufe dañado, que
muestre un funcionamiento defectuoso o que se haya dañado de cualquier manera.
Devuelva el electrodoméstico al centro de servicio técnico autorizado más cercano
para su revisión, reparación o ajuste.
NOTA: NO INTENTE REPARAR LA UNIDAD USTED MISMO. ESTO ANULARÁ
LAGARANTÍA.
11. El uso de accesorios no recomendados por el fabricante del electrodoméstico
puede provocar incendios, descargas eléctricas o lesiones físicas.
12. Nunca mueva el electrodoméstico jalando del cable. No permita que el cable cuelgue
del borde de la mesa o encimera ni que entre en contacto con supercies calientes.
13. Coloque el electrodoméstico sobre una mesa o supercie plana.
14. No utilice una garrafa de vidrio resquebrajada o una garrafa con el asa oja o rota.
15. Utilice solo la garrafa de vidrio con este electrodoméstico. Manipule con cuidado
dado que el vidrio es muy frágil.
16. Coloque la tapa rmemente en la garrafa de vidrio antes de servir el café.
17. Nunca utilice la cafetera sin agua en ella.
18. No coloque el electrodoméstico sobre un quemador a gas o eléctrico, o cerca de
este, ni dentro de un horno caliente.
19. La garrafa está diseñada para usarse con este electrodoméstico. Nunca debe
usarse sobre quemadores.
20. No coloque la garrafa de vidrio caliente sobre una supercie mojada o fría.
21. No limpie la garrafa de vidrio con limpiadores, esponjillas de lana de acero u otros
materiales abrasivos.
22. Presione el botón ON/OFF (Inicio/ apagar) para apagar el electrodoméstico.
Desconecte el cable eléctrico del tomacorriente cuando no utilice el
electrodoméstico, lo deje sin supervisión o la garrafa esté vacía.
SO-312565_14438_BELLA_12 cup CM Progra._Shopko_iM_R5.indd 10 2015-07-14 8:29 AM

11
23. No le dé al electrodoméstico otro uso que no sea el indicado.
24. Si la tapa se retira durante los ciclos de preparación, esto puede ocasionar quemaduras.
25. Para reducir el riesgo de incendio, no coloque la unidad sobre ninguna parte de un
electrodoméstico de calefacción o para cocinar, o cerca de estos.
26. Para reducir el riesgo de descarga eléctrica, no instale el aparato sobre un lavabo.
27. Para reducir el riesgo de incendio, no almacene nada directamente encima de la
supercie del electrodoméstico durante su funcionamiento.
28. Para reducir el riesgo de incendio o descarga eléctrica, no retire la cubierta inferior.
El aparato no contiene piezas en su interior que el usuario pueda reparar
Solamente el personal de servicio técnico autorizado podrá realizar reparaciones.
GUARDE ESTAS INSTRUCCIONES
SOLO PARA USO DOMÉSTICO
OTRAS MEDIDAS DE
SEGURIDAD IMPORTANTES
ADVERTENCIA: Esta cafetera genera calor y libera vapor mientras está en
funcionamiento. Se deben tomar las medidas de precaución adecuadas para evitar el
riesgo de quemaduras, incendios u otros tipos de lesiones físicas o daños materiales.
1. Todos los usuarios de esta cafetera deben leer y comprender este manual de
instrucciones antes de poner en funcionamiento o limpiar la cafetera .
2. El cable de esta cafetera solo debe enchufarse en un tomacorriente de 120 V CA.
3. ¡Utilice solamente agua en esta cafetera! No coloque otros líquidos ni alimentos en
esta cafetera . No mezcle ni agregue nada al agua que se coloca en esta cafetera,
excepto según se indica en las Instrucciones del ciclo de Limpieza y Mantenimiento
para quitar el sarro de la cafetera .
4. NO intente mover la cafetera con líquido caliente en su interior. Déjela enfriar por
completo antes de moverla.
5. Mantenga la cafetera, por lo menos, a 4 pulgadas (10 centímetros) de distancia de
paredes u otros objetos mientras está en funcionamiento. No coloque ningún objeto
sobre la cafetera mientras esté en funcionamiento. Coloque la cafetera sobre una
supercie resistente al calor.
6. Si la cafetera empieza a funcionar mal durante su uso, presione el botón ON/OFF
(Inicio/ apago) de inmediato y desenchufe el cable. No utilice ni intente reparar la
cafetera si funciona mal.
7. Si la cafetera se cae o accidentalmente se sumerge en agua u otro líquido, desenchúfela
de inmediato. ¡No introduzca la mano en el agua! No utilice esta cafetera después de
que esta se haya caído o se haya sumergido en agua.
8. PRECAUCIÓN: Deje que la cafetera se enfríe lo suciente durante 15 minutos antes de
agregar agua en el depósito.
9. Siempre use agua fría y potable en su cafetera el agua u otros líquidos calientes,
excepto aquellos enumerados en la sección de limpieza, pueden causar daños en la
cafetera.
10. NO coloque la garrafa en el horno microondas.
11. NO deje la garrafa vacía sobre la placa de calentamiento mientras la cafetera está en
posición ON (Encendido), dado que la garrafa puede resquebrajarse o dañarse de
algún otro modo.
SO-312565_14438_BELLA_12 cup CM Progra._Shopko_iM_R5.indd 11 2015-07-14 8:29 AM

12
12. Esta cafetera cuenta con la función de pausa y server. La válvula de ujo se encuentra
ubicada en la base del recipiente del ltro desmontable y se activa cuando se retira la
garrafa. Este diseño hace posible que pueda retirar la garrafa y servir una taza de café
antes de que se haya completado la preparación.
13. PRECAUCIÓN: Para evitar lesiones al utilizar la función de pausa y servir, vuelva a
colocar la garrafa dentro de los 30 segundos luego de retirarla durante el proceso
de preparación.
Notas sobre el enchufe
Este electrodoméstico cuenta con un enchufe polarizado (una pata es más ancha que
laotra). Para reducir el riesgo de descarga eléctrica, este enchufe encaja de una sola
manera en un tomacorriente polarizado. Si el enchufe no encaja bien en el
tomacorriente, delo vuelta. Si aun así no encaja, comuníquese con un electricista
calicado. No realice ningún tipo de modicación al enchufe.
Notas sobre el cable
Se debe usar el cable de alimentación corto provisto (o un cable de alimentación
desmontable) para reducir el riesgo de enredarse o tropezarse con un cable más largo.
No utilice un prolongador con este producto.
Advertencia sobre los plasticantes
PRECAUCIÓN: A n de evitar que los plasticantes se adhieran al acabado de la
encimera, la mesa u otro mueble, coloque un posafuentes o salvamanteles que NO
SEA DE PLÁSTICO entre el electrodoméstico y el acabado de la supercie de la
encimera o mesa. Si no se hace esto, es posible que el acabado se oscurezca, se
formen marcas permanentes o aparezcan manchas.
Corriente eléctrica
Si el circuito eléctrico está sobrecargado con otros artefactos, es posible que el
electrodoméstico no funcione correctamente. El electrodoméstico debe funcionar en
uncircuito eléctrico separado de otros artefactos.
Precauciones de seguridad de la garrafa
1. No use una garrafa resquebrajada, con el asa oja o rota
2. Esta garrafa está diseñada para usarse únicamente sobre la placa de calentamiento
de esta cafetera. No la use en un horno convencional.
3. Para evitar que se rompa, manipule la garrafa con cuidado. Evite los impactos.
Elvidrio se romperá si sufre impactos. Sea cuidadoso al llenarla con agua para
evitar que golpee contra el grifo.
4. No coloque la garrafa caliente sobre supercies frías o mojadas. Déjela enfriar
antes de lavarla o agregar líquidos.
5. No coloque la garrafa vacía sobre supercies de calentamiento calientes. No la
limpie con esponjillas de lana de acero, limpiadores abrasivos o cualquier otro
material que pudiera rayarla
6. No la golpee, raye o hierva sin agua.
7. Deseche la garrafa si esta está resquebrajada, rayada o si se ha calentado mientras
estaba vacía durante un largo período.
SO-312565_14438_BELLA_12 cup CM Progra._Shopko_iM_R5.indd 12 2015-07-14 8:29 AM

13
Rendimiento del café
Cafetera para 12 tazas: 12 tazas de 5 oz
NOTA: Una taza de 5 oz es la taza estándar de la industria estadounidense y es la
utilizada por la mayoría de los fabricantes de cafeteras. Para llenar su jarro favorito
extragrande, llene el depósito de la cafetera con la cantidad de agua suciente para
3o4 tazas (15 a 20 onzas).
NOTA: La cantidad de café preparado siempre será inferior a la cantidad de agua
colocada en el depósito de agua; un 10 % puede ser absorbido por el café molido y
lapérdida de vapor.
ADVERTENCIA: PARA REDUCIR EL RIESGO DE INCENDIO O DESCARGA ELÉCTRICA,
NO RETIRE LA CUBIERTA INFERIOR. EL PRODUCTO NO CONTIENE PIEZAS EN SU
INTERIOR QUE EL USUARIO PUEDA REPARAR. SOLAMENTE
EL PERSONAL DE SERVICIO TÉCNICO AUTORIZADO PODRÁ REALIZAR REPARACIONES.
Descripción de la cafetera
El producto puede diferir levemente de la ilustraciones.
4
Enchufe polarizado
(no mostrada)
Figura 1
Filtro permanente
para café
Cuchara
Panel de control
Tapa de la garrafa
removible
Garrafa
Válvula de ujo
con funciones
Pausar y Servir
(no mostrada)
Compartimiento
del cable
(no mostrada)
Indicador de
nivel de agua
Note: keep illustration
callouts aligned
SO-312565_14438_BELLA_12 cup CM Progra._Shopko_iM_R5.indd 13 2015-07-14 8:29 AM

14
Antes de utilizar por primera vez
PRECAUCIÓN: Para protegerse contra una descarga eléctrica, no sumerja la cafetera ni permita que el cable
eléctrico entre en contacto con agua u otros líquidos.
1. Quite todos los materiales de empaque y las etiquetas del interior y exterior de la cafetera. Coloque la
unidad sobre una supercie plana y limpia.
2. Antes de preparar el café, limpie minuciosamente la garrafa de vidrio con tapa, el soporte de ltro desmontable y
el ltro permanente para café con agua caliente y jabón. Enjuague y seque las piezas. Vuelva a colocar las piezas
desarmadas (consulte las Instrucciones de Limpieza y Mantenimiento para obtener una descripción completa).
3. Prepare 2 garrafas llenas de agua de grifo para limpiar el interior de la cafetera (consulte las Instrucciones
“PREPARACIÓN DE CAFÉ”). No agregue el ltro permanente para café ni café molido para esta limpieza inicial.
NOTA: Al nalizar el primer ciclo, deje enfriar la unidad durante 15 minutos.
4. Prepare una segunda garrafa de agua fresca.
5. Antes de elaborar su primera garrafa de café, espere 15 minutos más para permitir que la unidad se enfríe.
Ajuste de la hora ACTUAL
NOTA: No es necesario ajustar la hora ACTUAL si no está usando la función de programación (preparación futura).
1. Enchufe la cafetera en un tomacorriente de pared de 120 V CA. La pantalla LCD se iluminará en color azul.
NOTA: Por defecto, la pantalla mostrará 12:00 AM y parpadeará.
2. Presione el botón HOUR (Hora) para incrementar la hora. Una vez que la pantalla muestra la hora deseada,
presione el botón MIN (Minuto) para incrementar los minutos cuando se muestra la hora ACTUAL. Mantenga
presionado el botón HOUR (Hora) o MIN (Minuto) para alternar rápidamente.
NOTA: Preste atención a la conguración AM y PM.
NOTA: La pantalla LCD con fondo iluminado en azul ingresará al modo de suspensión dentro de los
15segundos si no se presiona ningún botón.
La hora actual se puede cambiar en cualquier momento simplemente repitiendo la etapa 2.
IMPORTANTE: Si desenchufa y vuelve a enchufar la cafetera, se restablecerá la hora por defecto.
PREPARACIÓN DE CAFÉ
Para hacer café inmediatamente
NOTA: La cantidad de café elaborado siempre será inferior a la cantidad de agua que se colocó en el depósito de
agua, ya que los granos de café molidos y el ltro absorben un 10 %.
1. Levante la tapa de la cafetera para abrirla. Llene la garrafa con agua de grifo fría y vierta el agua en el depósito que
está en la parte trasera de la unidad. El nivel de agua se puede ver fácilmente por ventana en el lado de la unidad.
NOTA: Asegúrese que el agua no exceda la línea de 12 tazas.
2. Coloque la garrafa vacía en la placa de calentamiento.
3. Coloque el ltro permanente en el soporte de ltro desmontable. Calcule 2 cucharadas soperas rasas, o
1medida con el cucharón suministrado, de café de ltro o triturado común para cada taza de café deseada.
Para obtener un café más fuerte o más suave, regule la cantidad de café para que se adapte a su gusto.
4. Baje el soporte de ltro dentro de la carcasa. Cierre la tapa.
5. Enchufe el cable de alimentación en una toma de corriente de 120 V/60 HZ. Presione el botón ON/OFF (Inicio/
apago). La luz alrededor del botón ON / OFF se iluminará (azul) y la cafetera iniciará el ciclo de elaboración
NOTA: Usted puede sacar la jarra, verter y servir en cualquier momento. El aparato dejará de gotear
automáticamente, pero el tiempo de servir no debe exceder de los 30 segundos.
NOTA: Para interrumpir el proceso de elaboración en cualquier momento, presione el botón ON/OFF
(Inicio/ apago).
AVERTENCIA: No abra la tapa del depósito de agua cuando la cafetera está en funcionamiento.
6. Una vez nalizado el ciclo de elaboración, el aparato emitirá 3 pitidos e ingresará al modo keep-warm (Mantener
caliente). El icono TIEMPO TRASNCURIDO DESDE LA ELABORACION
aparecerá en la pantalla LCD.
7. La luz alrededor del botón ON/OFF (Inicio/ apago) permanecerá iluminada y el reloj empezará a contar
hasta 2 horas que indican el tiempo transcurrido desde la elaboración.
NOTA: A medida de seguridad, asegúrese de cubrir la tapa de la jarra cuando se vierte el café.
NOTA: Para mantener el café caliente, devolver la jarra en la placa de calentamiento después de verter el
café. El café se mantendrá caliente durante un máximo de 2 horas.
NOTA: Para comprobar la hora ACTUAL, presione el botón PROG/BOLD. El icono TIEMPO TRASNCURIDO
DESDE LA ELABORACION Show the TSB icon desaparecerá y aparecerá la hora ACTUALl durante
5segundos. Una vez los 5 segundos alcanzados, el icono TIEMPO TRASNCURIDO DESDE LA
ELABORACION
y el tiempo transcurrido reaparecerán.
SO-312565_14438_BELLA_12 cup CM Progra._Shopko_iM_R5.indd 14 2015-07-14 8:29 AM

15
8. Después de 2 horas, el aparato (y la placa de calentamiento) se apagará automáticamente e emitirá
3pitidos. El icono TIEMPO TRASNCURIDO DESDE LA ELABORACION
desaparecerá y la luz alrededor
del botón ON/OFF (Inicio/ apago) se apagara. La hora ACTUAL reaparecerá en la pantalla.
NOTA: Desenchufe el cordón de corriente de la toma de corriente eléctrica cuando el aparato no está en
funcionamiento, cuando este sin supervisión o cuando la jarra está vacía.
Ajuste de la hora de PROGRAMACIÓN (Preparación futura)
La cafetera puede programarse para comenzar a preparar café hasta 24 horas más adelante
1. Presione el botón PROG/BOLD (Programar) hasta que la palabra “PROG” (Programar) aparezca en la
pantalla LCD
NOTA: Por defecto, la pantalla mostrará 12:00 AM y parpadeará. La pantalla LCD con fondo iluminado en
azul ingresará al modo de suspensión dentro de los 15 segundos si no se presiona ningún botón.
2. Presione el botón HOUR (Hora) para incrementar la hora. Una vez que la pantalla muestra la hora deseada,
presione el botón MINUTE (Minuto). Mantenga presionado el botón HOUR (Hora) o MIN (Minuto) para
alternar rápidamente.
3. Cuando se muestra la hora de la programación automática,), presione el botón PROG/BOLD (Programar).
Una señal sonora conrmará la selección y “PROG” (Programar) aparecerá en la pantalla. La luz alrededor
del botón PROG/BOLD se iluminará (azul).
NOTA: Preste atención a la conguración AM y PM
NOTA: Asegúrese de que la cafetera esté jada para preparar café repitiendo las etapas 1-5 de la sección
Para hacer café inmediatamente.
4. Una vez alcanzada la hora preestablecida, “PROG” (Programar) desaparecerá; el botón ON/OFF (Inicio/
apago) se iluminará y la preparación comenzará como indicado anteriormente en las etapas 6-9 de la
sección Para hacer café inmediatamente. La luz alrededor del botón PROG/BOLD se apagara.
IMPORTANTE: Para cancelar la hora de inicio de la función PROGRAMAR (preparación futura), presione el
botón PROG/BOLD (Programar); el ícono PROGRAM (Programar) se apagará.
5. Para cambiar la hora de inicio preestablecida, simplemente presione el botón PROG (Programar) hasta que
“PROG” (Programar) aparezca en la pantalla.
6. Siguiendo las etapas 1-3 descritas anteriormente, ajuste la hora de preparación futura
NOTA: Para recordar la hora de programación de inicio futuro, presione el botón PROG (Programar). Si la
hora de preparación futura está bien, presione el botón PROG (Programar) dos veces nuevamente hasta
que “PROGRAM” (Programar) aparezca en la pantalla
Consejo: Para preestablecer la preparación futura, simplemente presione el botón PROG (Programar)
hasta que “PROG” (Programar) aparezca en la pantalla. La luz alrededor del botón PROG/BOLD se
iluminará (azul) y la cafetera estará lista para la preparación futura.
Café de aroma intenso
Se ajusta la intensidad de la preparación de una garrafa llena de café para dejar más tiempo al café de macerar y
así extraer más aceites y sabor de los granos de café. De este modo obtendrá una garrafa de café más cargado.
1. Mantenga presionado el botón PROG / BOLD hasta que aparezca la palabra BOLD (aroma intenso) en la pantalla.
2. Para quitar la función de BOLD (aroma intenso), simplemente presione y mantenga presionado el botón PROG /
BOLD hasta que la palabra BOLD desaparezca.
Función Detener y Servir
Usando la función Detener y Servir: Si desea servir una taza de café antes que el ciclo de elaboración haya
nalizado, simplemente retire la garrafa de la placa de calentamiento. El goteo se interrumpirá automáticamente.
Vuelva a colocar la garrafa sobre la placa de calentamiento y el goteo se reiniciará.
PRECAUCIÓN: Para evitar lesiones al utilizar la función Detener y Servir, vuelva a colocar la garrafa dentro de los
30 segundos después de retirarla durante el proceso de elaboración.
1. Luego de haber elaborado aproximadamente 2 tazas de café, puede quitar la garrafa lentamente y el café
dejará de gotear.
2. La válvula de ujo se encuentra en la parte inferior del soporte de ltro y se activa cuando extrae la
garrafa. El diseño le posibilita extraer la garrafa y verter una taza de café antes de elaborar todo el café
que contiene la garrafa.
IMPORTANTE: Cuando vuelva a colocar el soporte de ltro, la válvula de ujo debe introducirse de modo
adecuado en el oricio delantero de la máquina. De este modo, puede observar que el soporte se asiente
en la parte superior de la tapa de la garrafa.
3. Cuando use esta función, procure volver a colocar la garrafa se vuelva debajo del soporte de ltro dentro
de los 30 segundos, para evitar un desborde.
SO-312565_14438_BELLA_12 cup CM Progra._Shopko_iM_R5.indd 15 2015-07-14 8:29 AM

16
Para preparar una segunda jarra de café
Para preparar otra jarra de café, presione el botón ON/OFF (Inicio/ apago) para apagar la cafetera. Espere quince
minutos para que se enfríe el elemento calefactor. Saque y deseche el café molido gastado; luego enjuague la
jarra y la canastilla del ltro y repita el procedimiento para la preparación de café detallado en la sección
“PREPARACIÓN DE CAFÉ”.
ADVERTENCIA: Si no deja que el aparato se enfríe completamente antes de reutilizarlo, el agua dentro de su depósito
puede sobrecalentarse y causar la emisión de vapor. Esto podría causar quemadura y/o lesiones personales.
Consejos para lograr un café sumamente delicioso
1. Para lograr un café sumamente delicioso es crucial que la cafetera esté limpia. Se recomienda
fervientemente realizar una limpieza periódica, según describen las Instrucciones de Limpieza y
mantenimiento y la sección de Descalcicación de este Manual de instrucciones.
2. Siempre use agua fresca y fría en su cafetera.
3. La molienda más na, como el café de ltro y el café de goteo automático, contribuye a una extracción
más completa y brinda un café más rico y concentrado. La molienda común requerirá un poco más de café
por taza para obtener la intensidad de una molienda más na.
4. Guarde el café en un lugar fresco y seco.
5. Para que el café tenga un sabor óptimo, compre granos enteros y tritúrelos en pedacitos justo antes de
comenzar la elaboración.
6. No vuelva a usar los granos de café molidos, ya que aplacará signicativamente el sabor del café.
7. No se recomienda recalentar el café. El sabor del café alcanza su punto ideal inmediatamente luego de
laelaboración.
8. Las gotitas de aceite que aparecen en la supercie del café negro elaborado se deben a la extracción de
aceite de los granos de café molidos. La oleosidad puede ocurrir más frecuentemente si se usan granos
decafé muy tostados. La extracción en exceso también puede generar oleosidad, lo que indica que debe
limpiar la cafetera.
Instrucciones de mantenimiento para el usuario
Este aparato requiere de poco mantenimiento. No contiene piezas que el usuario pueda reparar. Cualquier
servicio en el que la unidad deba desarmarse, con la excepción de la limpieza, debe realizarlo un técnico de
reparación de aparatos eléctricos calicado.
Limpieza y mantenimiento
PRECAUCIÓN: No olvide desenchufar el aparato antes de la limpieza. Para protegerse de electrocución, no
sumerja el cordón, el enchufe o la unidad en agua u otro líquido. Después de cada uso, asegúrese primero que
elenchufe se haya quitado de la toma de corriente de la pared.
1. Limpie la canastilla del ltro, el ltro, la jarra y la tapa de la jarra después de cada uso en agua caliente jabonosa.
2. Pase un paño suave húmedo por la supercie exterior para quitar manchas.
3. Puede haber acumulación de gotas de agua en el área arriba del ltro y que puede caer sobre la base del
aparato durante la preparación de café. Para controlar el goteo, pase un paño seco y limpio por el área
después de cada uso del pr oducto.
4. Use un paño húmedo para limpiar suavemente la placa caliente. Nunca use un limpiador abrasivo para limpiarla.
SO-312565_14438_BELLA_12 cup CM Progra._Shopko_iM_R5.indd 16 2015-07-14 8:29 AM

17
Descalcicación
Se recomienda hacer una limpieza especial a su cafetera al menos una vez al mes, de acuerdo con la frecuencia
de uso y la calidad de agua que se usa en la unidad. Si el agua de su zona es especialmente dura, debe realizar el
siguiente procedimiento de limpieza cada 2 semanas, ya que los minerales presentes en el agua pueden aplacar
el sabor del café y, probablemente, extender el tiempo de elaboración.
1. Llene la garrafa con 1 medida de vinagre blanco por 3 medidas de agua fría. Vierta la solución de agua y
vinagre en el depósito de agua
2. Prepare la solución de vinagre hasta que la garrafa esté medio llena.
NOTA: Durante la limpieza, saldrá más vapor que durante el ciclo de elaboración de café normal.
3. Presione el botón ON/OFF (Inicio/ apago) para apagar la cafetera. Cuando el líquido deje de gotear del
soporte de ltro a la garrafa, quite la garrafa y deje que el líquido se enfríe durante 15 minutos.
Una vez que el líquido se enfríe, levanté la garrafa y vierta el líquido nuevamente en el depósito de agua.
4. Cierre la tapa. Vuelva a colocar la garrafa en la placa de calentamiento.
5. PREPARE LA SOLUCIÓN DE VINAGRE nuevamente, y permita que la solución de limpieza en su totalidad
caiga dentro la garrafa. Al nalizar el goteo, deseche el contenido de la garrafa.
6. Deje que la cafetera se enfríe durante 15 minutos y prepare una garrafa llena de agua fría para enjuagar la
cafetera. Introduzca el ltro permanente para café limpio en el soporte de ltro desmontable antes de
comenzar la elaboración.
7. Repita hasta que no salga más líquido amarillo y hasta que no quede olor a vinagre
8. Al nalizar el ciclo de elaboración, presione el botón ON/OFF (Inicio/ apago) para apagar la cafetera.
Deseche el agua de la garrafa. Lave la garrafa, el ltro permanente para café y el soporte de ltro
desmontable con agua caliente y jabón. Seque las piezas completamente.
9. Cuando la cafetera se haya enfriado, limpie el exterior con un paño seco.
Instrucciones de almacenamiento
1. Desenchufe la unidad y deje que se enfríe.
2. Guarde la cafetera en su caja o en un lugar fresco y seco.
3. Nunca almacene la unidad si está caliente o enchufada.
SO-312565_14438_BELLA_12 cup CM Progra._Shopko_iM_R5.indd 17 2015-07-14 8:29 AM

18
Garantía limitada de DOS AÑOS
Mediante la presente, SENSIO Inc. garantiza que, durante el plazo de DOS AÑOS a
partir de la fecha de compra, este producto no presentará defectos mecánicos en el
material ni en la mano de obra, y durante 90 días, no los presentará en las piezas no
mecánicas. A su entera discreción, SENSIO Inc. reparará o reemplazará el producto
que resulte defectuoso, o emitirá un reembolso por el producto durante el plazo de
garantía.
Esta garantía es válida únicamente para el comprador minorista original a partir de la
fecha de compra minorista inicial y no es transferible. Conserve el recibo de compra
original, ya que se exige una prueba de compra para obtener la validación de la
garantía. Las tiendas minoristas no tienen derecho a alterar, modicar ni corregir de
ninguna manera los términos y condiciones de la garantía.
EXCLUSIONES:
La garantía no cubre el desgaste normal de las piezas ni el daño ocasionado por
cualquiera de las siguientes causas: uso negligente del producto, uso de un voltaje
o corriente incorrectos, mantenimiento de rutina inadecuado, uso contrario al de
las instrucciones de funcionamiento, desarmado, reparación o alteración a cargo de
personas que no sean miembros del personal calicado de SENSIO Inc. Asimismo, la
garantía no cubre actos de la naturaleza, como incendios, inundaciones, huracanes o
tornados.
SENSIO Inc. no asumirá responsabilidad por daños incidentales o resultantes
ocasionados por la violación de cualquier garantía expresa o implícita. Salvo en
la medida en que lo prohíban las leyes aplicables, cualquier garantía implícita de
comerciabilidad o aptitud para un propósito particular se limita temporalmente a la
duración de la garantía. Algunos estados, provincias o jurisdicciones no permiten la
exclusión ni la limitación de daños incidentales o resultantes, o limitaciones sobre
la duración de una garantía implícita y, por lo tanto, es posible que las exclusiones o
limitaciones mencionadas no le correspondan. La garantía cubre derechos legales
especícos que pueden variar de un estado, una provincia o una jurisdicción a otros.
CÓMO OBTENER EL SERVICIO DE GARANTÍA:
Debe comunicarse con el Servicio de atención al cliente a nuestro número telefónico
gratuito: 1-866-832-4843. Un representante del Servicio de atención al cliente intentará
resolver los problemas referidos a la garantía por teléfono. Si este no puede resolver
el problema, le proporcionarán un número de caso y le solicitarán que devuelva el
producto a SENSIO Inc. Adhiera una etiqueta al producto que incluya: su nombre,
dirección, número telefónico de contacto durante el día, número de caso y descripción
del problema. Además, incluya una copia del recibo de compra original. Envuelva
cuidadosamente el producto etiquetado con el recibo de compra, y envíelo (con el
envío y el seguro prepagados) a la dirección de SENSIO Inc. SENSIO Inc. no asumirá
obligación ni responsabilidad alguna por el producto devuelto que esté en el trayecto
hacia el Centro de servicio al cliente de SENSIO Inc.
SO-312565_14438_BELLA_12 cup CM Progra._Shopko_iM_R5.indd 18 2015-07-14 8:29 AM

19
SO-312565_14438_BELLA_12 cup CM Progra._Shopko_iM_R5.indd 19 2015-07-14 8:29 AM

20
SO-312565_14438_BELLA_12 cup CM Progra._Shopko_iM_R5.indd 20 2015-07-14 8:29 AM

21
SO-312565_14438_BELLA_12 cup CM Progra._Shopko_iM_R5.indd 21 2015-07-14 8:29 AM

For customer service questions or comments
Dudas o comentarios contactar el departamento de servicio al cliente
1-866-832-4843
www.sensioinc.com
BELLA is a registered trademark of Sensio Inc., Montréal, Canada H3B 3X9.
All rights reserved.
BELLA es una marca registrada de Sensio Inc., Montréal, Canada H3B 3X9.
Todos los derechos reservados.
BellaLife
BellaLife
bellahouse
w
ares.com
BellaLifestyle
BellaLifestyle
SO_312565
SO-312565_14438_BELLA_12 cup CM Progra._Shopko_iM_R5.indd 22 2015-07-14 8:29 AM
-
 1
1
-
 2
2
-
 3
3
-
 4
4
-
 5
5
-
 6
6
-
 7
7
-
 8
8
-
 9
9
-
 10
10
-
 11
11
-
 12
12
-
 13
13
-
 14
14
-
 15
15
-
 16
16
-
 17
17
-
 18
18
-
 19
19
-
 20
20
-
 21
21
-
 22
22
-
 23
23
-
 24
24


Bella 14440 El manual del propietario
- Categoría
- Pequeños electrodomésticos de cocina
- Tipo
- El manual del propietario
- Este manual también es adecuado para
en otros idiomas
- English: Bella 14440 Owner's manual
Artículos relacionados
-
Bella 12 Cup programmable coffee maker Manual de usuario
-
Bella Ultimate Elite Collection 12-Cup Programmable Coffee Maker El manual del propietario
-
-
-
-
-
-
-
Bella Linea Collection 12 Cup Programmable Coffee Maker El manual del propietario
-
Otros documentos
-
Professional Series CAFETERA PS77651 Manual de usuario
-
Sytech SYDC127P El manual del propietario
-
 brim SIZE-WISE SW20 Manual de usuario
-
Becken maquina de cafe com filtro BDCM 2179 El manual del propietario
-
Hamilton Beach 49947 Manual de usuario
-
Aroma ACM-640D El manual del propietario
-
-
 Continental Electric CE23671 Manual de usuario
-
Farberware 103744 Guía del usuario
-
Insignia NS-CM10PK6 Manual de usuario

