Kobalt KSB 2280-06 Manual de usuario
- Categoría
- Herramientas eléctricas
- Tipo
- Manual de usuario
Este manual también es adecuado para

1
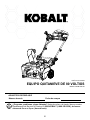
80 V SNOW THROWER
ITEM #1076663
MODEL #KSB 5080-06
Español p. 21
Questions, problems, missing parts? Before returning to your retailer, call our customer
service department at 1-888-3KOBALT (1-888-356-2258), 8 a.m. - 8 p.m., EST,
Monday - Friday.
ATTACH YOUR RECEIPT HERE
Purchase Date
PH18360
Serial Number


2
TABLE OF CONTENTS
PRODUCT SPECIFICATIONS
Product Specications ................................................................................................. 2
Package Contents ....................................................................................................... 3
Hardware Contents ...................................................................................................... 4
Symbols ..................................................................................................................... 5
Safety Information ...................................................................................................... 7
Preparation ................................................................................................................ 9
Assembly Instructions .............................................................................................. 10
Operating Instructions ............................................................................................. 13
Care and Maintenance.............................................................................................. 16
Troubleshooting ........................................................................................................ 18
Warranty ................................................................................................................. 19
Replacement Parts List ............................................................................................. 20
SPECIFICATIONS
Battery type 80 V Lithium-ion
No-load speed 1,800 / 1,950 RPM
Working width 22 in.
Intake height 12 in.
Wheels 8 in.
Discharge distance Up to 30 ft.
Weight (without battery) 57.9 lbs.
The recommended ambient temperature range:
Item Temperature
Snow Thrower Storage Temperature Range -4 ˚F (-20 ˚C) ~ 158 ˚F (70 ˚C)
Snow Thrower Operation Temperature Range 1.4 ˚F (-17 ˚C) ~ 104 ˚F (40 ˚C)
Battery Charging Temperature Range 39 ˚F (4 °C) ~ 104 ˚F (40 ˚C)
Charger Operation Temperature Range 39˚F (4°C) ~ 113 ˚F (45 ˚C)

3
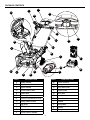
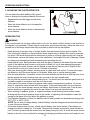
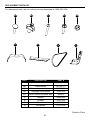
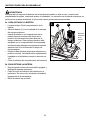
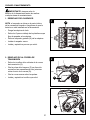
PART DESCRIPTION
A Middle handle
B Quick-release lever
C Upper handle
D Chute-rotation box
E Switch box
F Discharge chute
G Battery compartment cover
H Safety switch button
I Bail lever
J LED lights
K Light switch
L Chute-rotation handle
PACKAGE CONTENTS
PART DESCRIPTION
M Chute deector
N Scraper
O Drive belt cover
P Auger pulley
Q Drive Belt
R Impeller
S Speed switch
T Wheels
U Skid plates
V Battery
W Charger
D
F
M
A
V
W
B
T
U
N
R
O
J
C
E
I
K
L
P
Q
H
S
G

4
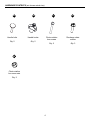
HARDWARE CONTENTS (not shown actual size)
AA
Discharge chute
screws
Qty. 3
BB
Handle bolts
Qty. 2
CC
DD
Handle knobs
Qty. 2
Chute-rotation
box screws
Qty. 2
Chute-rotation
box screw nuts
Qty. 2
EE

5
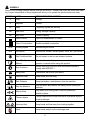
SYMBOLS
Some of the following symbols may be used on this product. Please study them and learn their mean-
ing. Proper interpretation of these symbols will allow you to operate the product better and safer.
SYMBOLS NAME DESIGNATION/EXPLANATION
V Volts Voltage
A Amperes Current
Hz Hertz Frequency (cycles per second)
Wh Watt Hour Energy Storage Capacity
Ah Amp Hour Current Capacity
Direct Current Type or a characteristic of current
Class II Construction Double-insulated construction
RPM Rotating Speed Revolutions per minute
/min Per Minute Revolutions, strokes, surface speed, orbits
,
etc., per minute
Wet Conditions Alert Do not expose to rain or use in damp locations.
Read The Operator’s
Manual
To reduce the risk of injury, user must read and understand
operator’s manual before using this product.
Eye Protection
Always wear eye protection with side shields marked to
comply with ANSI Z87.1.
Safety Alert Precautions that involve your safety.
Hand and Feet Keep hands and feet away.
Safe Distance Keep bystanders a safe distance from the machine.
Stop the Machine
Stop the motor and remove the battery before leaving the
machine.
Moving Parts
Stay away from moving parts. Keep all guards and
shields in place.
Thrown objects
Thrown objects can ricochet and result in personal injury or
property damage.
Hand and feet Keep hands and feet away from rotating impeller.
Hand Keep hands away from the discharge area.

6
The following signal words and meanings are intended to explain the levels of risk associated
with this product.
WARNING
• To avoid serious personal injury, do not attempt to use this product until you have read this Owner's
Manual thoroughly and understand it completely. If you do not understand the warnings and
instructions in this Owner's Manual, do not use this product.
Call 1-888-356-2258 for assistance.
The operation of any power tool can result in foreign objects being thrown into your eyes, which
can result in severe eye damage. Before operating a power tool, always wear safety goggles,
safety glasses with side shields, or a full face shield when needed. We recommend a Wide
Vision Safety Mask for use over eyeglasses or standard safety glasses with side shields. Always
use eye protection that is marked to comply with ANSI Z87.1.
•
SYMBOL SIGNAL MEANING
DANGER
Indicates an imminently hazardous situation, which, if not
avoided, will result in death or serious injury.
WARNING
Indicates a potentially hazardous situation, which, if not
avoided, could result in death or serious injury.
CAUTION
Indicates a potentially hazardous situation, which, if not
avoided, may result in minor or moderate injury.
CAUTION
(Without Safety Alert Symbol) Indicates a situation that may
result in property damage.
SYMBOLS

7
WARNING
SAFETY INFORMATION
Read and understand all instructions before using this product. Failure to follow all instructions listed
below may result in electric shock, re, and/or serious personal injury.
The term “power tool” in all of the warnings listed below refers to your mains-operated (corded) power
tool or battery-operated (cordless) power tool.
• Walk. Do not run.
• Verify that the power tool is not in contact with anything before turning it on.
• Stay away from impeller openings at all times. Keep face, hands, and feet away from concealed,
moving, or rotating parts.
• Be attentive when using the power tool. Stay alert for holes in the terrain and other hidden hazards
or trafc.
• Move up and down slopes when clearing snow. Do not go across a slope. Use caution when
changing direction. Do not use this power tool to clear snow from steep slopes.
• Do not operate the power tool if the guards, plates, and other safety protective devices are not in
place.
• Do not operate the power tool near glass enclosures, automobiles, trucks, window wells, drop-offs,
etc., without properly adjusting the angle of the snow discharge. Keep children and pets away from
the work area.
• Do not operate the power tool at high speeds on slippery surfaces. Look behind when backing up
and exercise caution.
• Wear safety glasses or goggles that meet ANSI Z87.1 standards.
• Use the power tool in daylight or in good articial light. Ensure lights are on if using in low light
conditions.
• To avoid accidental start-ups, remain in the starting position when turning the power tool on. The
operator and the power tool must be in a stable position during start-up. See the section titled
Starting/Stopping Instructions.
• Use this power tool only for the purposes it was designed.
• Hold the power tool with both hands while it is in use. Keep a rm grip on the handles.
• If the impeller does not rotate freely due to ice, thaw the power tool thoroughly before attempting to
use it.
• Keep the impeller clear of debris.
• Do not attempt to clear the impeller while the motor is running.
• After striking a foreign object, turn the power tool off and remove the battery pack, then inspect it for
damage. Repair any damage before restarting and using the power tool.
• If the power tool starts to vibrate abnormally, stop the power tool immediately and attempt to
determine the cause. Vibration is generally an indication of danger.
• Stop the motor and remove the battery pack whenever the operator is not in the operating position,
before unclogging the impeller, and before making any repairs, adjustments, or inspections.
• Do not use on graveled surface unless the power tool is adjusted for such a surface in accordance
with the operator’s manual.
• Keep Children Away – All visitors should be kept a safe distance from work area.
• Dress Properly – Do not wear loose clothing or jewelry. They can be caught in moving parts.
• Wear rubber boots when operating the power tool. Do not operate the equipment when barefoot or
wearing open sandals. Always wear substantial footwear.

8
SAFETY INFORMATION
• Operation of the power tool in the hand-held position is unsafe, except in accordance with the
special instructions for such use provided in the operator’s manual.
• Keep guards in place and in working order.
• Don’t Force Power Tool – It will perform better and safer at the rate for which it was designed.
• Don’t Overreach – Keep proper footing and balance at all times.
• If the power tool strikes a foreign object, follow these steps:
i) Stop the power tool. Release the switch.
ii) Inspect for damage.
iii) Repair any damage before restarting and operating the power tool.
• Store Idle Power Tool Indoors – When not in use, power tools should be stored indoors in a dry,
locked-up place out of reach of children.
• Maintain Power Tools With Care – Follow instructions for lubricating and changing accessories.
• Allow the power tool to run for a few minutes after clearing snow in order to prevent moving parts
from freezing.
• Only use identical replacement parts and accessories for this power tool. The use of nonidentical
parts or accessories could lead to serious injury to the user or damage the power tool, and will void
the warranty.
• Do not pick up the power tool while it is running. The power tool is designed to travel along the
ground.
• Never allow children to operate a power tool. Keep the area of operation clear of all persons,
particularly small children, and pets.
• Thoroughly inspect the area where the equipment is to be used and remove all stones, sticks,
wires, bones, and other foreign objects.
• Stop the blade(s) when crossing gravel drives, walks, or roads.
• For use only with Kobalt KB 580-06 battery and KRC 30-06 charger.
• Read the operating and service instruction manual carefully. Be thoroughly familiar with the controls
and the proper use of the equipment.
• Prevent unintentional starting. Ensure the switch is in the off-position before connecting to battery
pack, picking up or carrying the appliance. Carrying the appliance with your nger on the switch or
energizing appliance that have the switch on invites accidents.
• Disconnect the battery pack from the appliance before making any adjustments, changing
accessories, or storing appliance. Such preventive safety measures reduce the risk of starting the
appliance accidentally.
• Recharge only with the charger specied by the manufacturer. A charger that is suitable for one
type of battery pack may create a risk of re when used with another battery pack.
• Use appliances only with specically designated battery packs. Use of any other battery packs may
create a risk of injury and re.
• When battery pack is not in use, keep it away from other metal objects, like paper clips, coins, keys,
nails, screws or other small metal objects, that can make a connection from one terminal to another.
Shorting the battery terminals together may cause burns or a re.
• Under abusive conditions, liquid may be ejected from the battery; avoid contact. If contact
accidentally occurs, ush with water. If liquid contacts eyes, additionally seek medical help. Liquid
ejected from the battery may cause irritation or burns.
• Do not use a battery pack or appliance that is damaged or modied. Damaged or modied batteries
may exhibit unpredictable behavior resulting in re explosion or risk of injury.
• Do not expose a battery pack or appliance to re or excessive temperature. Exposure to re or
temperature above 265°F may cause explosion.

9
SAFETY INFORMATION
GENERAL SAFETY RULES
• Verify that the power tool is secure while transporting.
• Store the power tool in a dry area that will prevent unauthorized use or damage. Keep out of the
reach of children.
• Keep handles dry, clean, and free of debris. Clean the power tool after each use. Refer to the
Maintenance Section in this manual for more information.
• If the labels on the power tool become defaced or start to lift off, contact customer service
at 1-888-356-2258.
• Keep these instructions in a safe place for future reference. Refer to them often and use them to
instruct other users. Anyone who uses this power tool must read these instructions carefully.
• Maintain the power tool with care. Follow the instructions for lubricating and changing accessories.
PREPARATION
Before beginning assembly of product, make sure all parts are present. Compare parts with package
contents list and hardware contents list. If any part is missing or damaged, do not attempt to assem-
ble the product.
Estimated Assembly Time: 10 minutes
• Follow all charging instructions and do not charge the battery pack or appliance outside of the
temperature range specied in the instructions. Charging improperly or at temperatures outside of
the specied range may damage the battery and increase the risk of re.
• Have servicing performed by a qualied repair person using only identical replacement parts. This
will ensure that the safety of the product is maintained.
• Do not modify or attempt to repair the appliance or the battery pack (as applicable) except as
indicated in the instructions for use and care.

10
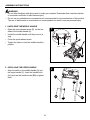
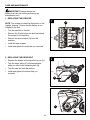
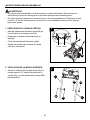
• Open the quick-release levers (B) on the two
sides of the middle handle (A).
• Unfold the middle handle until they come to a
stop.
• Close the quick-release levers.
• Tighten the knobs to hold the middle handle in
position.
• Align the holes on the middle handle (A) and
the upper handle (C). Insert the handle bolts
(AA) and use the handle knobs (BB) to tighten
them.
WARNING
• Do not allow familiarity with this product to make you careless. Remember that a careless fraction
of a second is sufcient to inict serious injury.
• Do not use any attachments or accessories not recommended by the manufacturer of this product.
The use of attachments or accessories not recommended can result in serious personal injury.
1. UNFOLDING THE MIDDLE HANDLE
2. INSTALLING THE UPPER HANDLE
ASSEMBLY INSTRUCTIONS
1
2
A
B
C
A
AA
BB
BB
AA
Knob Knob

11
ASSEMBLY INSTRUCTIONS
3
4
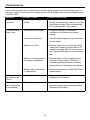
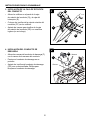
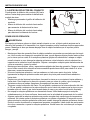
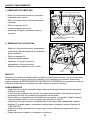
3. INSTALLING THE CHUTE-ROTATION BOX
• Align the holes in the panel of the
chute-rotation box (D) and the switch box (E).
• Put the chute-rotation box screws (CC) through
the holes.
• Tighten the chute-rotation box screw nuts (EE)
with a wrench (not included).
4. INSTALLING THE DISCHARGE CHUTE
• Align the grooves of the discharge chute (F)
with the slot on the chute housing.
• Push the discharge chute into position.
• Tighten the discharge chute screws (DD) with a
Phillips head screw driver to lock the discharge
chute.
CC
EE
Groove
F
DD
Slot
D
E

12
ASSEMBLY INSTRUCTIONS
M
N
O
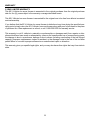
5a. TO INSTALL BATTERY PACK
• Open the battery compartment cover (G).
• Align the battery (V) with the cavity in the snow
thrower housing.
• Insert the battery into the right battery compartment
when standing in the operating position to start the
snow thrower. This snow thrower is equipped with
a battery storage compartment to store an extra
battery pack to extend your runtime.
• Slide the battery down to lock it into position. The
battery is fully inserted into the snow thrower when
you hear an audible “click”.
• Close the battery compartment cover.
5b. TO REMOVE BATTERY PACK
• Release your grip on the bail lever to stop the
snow thrower.
• Press the battery release button in the snow
thrower housing. This will cause the battery to
raise out of the tool slightly.
• Remove battery pack from the snow thrower.
WARNING
Always remove battery from your tool when you are assembling parts, making adjustments, cleaning,
or when not in use. Removing battery will prevent accidental starting that could cause serious
personal injury.
5
G
V
Battery
release
button

13
OPERATING INSTRUCTIONS
1a. POWERING ON
Solution 1:
1. Press and hold the safety switch button (H).
2. Pull the bail lever (I) upward to the handle to start the snow thrower and then release the button.
Solution 2:
1. Pull the bail lever (I) upward to the handle and hold it.
2. Press the safety switch button (H) to start the snow thrower and release the button.
1b. POWERING OFF
• Release the bail lever (I).
1
1
2
2
1
Solution 1 Solution 2
CAUTION
Do not attempt to override the operation of the safety switch button or bar lever.
WARNING
• The operation of any snow thrower can result in foreign objects being thrown into the eyes, which
can cause severe eye damage. Always wear safety glasses while operating the snow thrower and
while performing any adjustments or repairs.
• Keep bystanders a safe distance from the machine.
• INSPECT THE CLEARING AREA. Remove all stones, sticks, wire, bones, and other debris that
might be thrown by the rotating impeller.
Battery capacity indicator
Lights Capacity
4 Green Lights The battery is at full capacity
3 Green Lights The battery is at 75% capacity
2 Green Lights The battery is at 50% capacity
1 Green Light
The battery is at 25% capacity and
requires charging soon
Lights go out
The battery is under 25% capacity
and requires charging immediately
Battery capacity
indicator
H
I

14
OPERATING INSTRUCTIONS
2. LED LIGHTS
• To turn on the LED lights (J) for night time
snow removal, press the light switch (K).
• To turn off the LED lights, press the light switch
again.
• Press the speed switch (S) towards the rabbit
symbol for higher impeller speed and discharge
distance in heavy conditions.
• Press the speed switch (S) towards the turtle
system to decrease the impeller speed for
greater runtime in light conditions.
2
4. ADJUSTING THE DISCHARGE CHUTE
You can adjust the discharge chute (F) 180° to
change the snow direction.
• Push the chute-rotation handle (L) forward to
move the discharge chute to the left.
• Pull the chute-rotation handle (L) rearward to
move the discharge chute to the right.
3. SPEED SWITCH
4
F
L
J
K
S

15
OPERATING INSTRUCTIONS
OPERATING TIPS
WARNING
If the snow thrower hits a foreign object while it is in use, the object could be thrown in the direction of
the operator or a bystander. Thrown objects could cause serious personal injury. Keep the area to be
cleared free of all foreign objects that may be picked up and thrown by the impeller.
• Keep the area of operation free of foreign objects that can become thrown by the impeller. Per-
form a thorough inspection of the area since some objects may be hidden from view by surround-
ing snow. lf the snow thrower hits an obstruction or picks up a foreign object during use, stop the
snow thrower, remove the battery, remove the obstruction, and inspect the unit for damage. Repair
or replace any damaged part before restarting and operating the unit.
• Keep children, pets, and bystanders away from the area of operation. Be aware that the normal
noise of the machine when turned on may make it difcult for you to hear approaching people.
• When moving the snow thrower, use the wheels on one side as the pivot point. Slightly tilt the
snow thrower on this pivot point to move it forward or backward.
• Start your clearing path outward, throwing snow in a back and forth motion. To clear in the oppo-
site direction, pivot the snow thrower on its wheels. Make sure to overlap clearing paths.
• Note the wind direction. If possible, move in the same direction as the wind so that the snow is not
thrown against the wind (and thus back onto you and on the just cleared path).
• Do not push the snow thrower with excessive force. You should push the machine gently and at a
consistent speed in accordance with the unit's throw rate.
• Some parts of the snow thrower may freeze under extreme temperature conditions. Do not at-
tempt to operate the snow thrower with frozen parts. If the parts freeze while the snow thrower
is in use, stop the snow thrower, remove the battery, and inspect for frozen parts. Free all parts
before restarting or operating the snow thrower. Never force controls that are frozen.
• When working on pebbles, gravel, or unpaved surfaces, avoid throwing loose surface materi-
al along with the snow by pushing down on the handle, or adjusting the skid plates to raise the
scraper at the base of the unit above the pebbles or gravel.
• Cold Weather Operation: Lithium Ion batteries can be safely used from temperatures ranging from
39°F (4°C) to 104°F (40°C).
NOTE: Do not store or charge battery outside. Battery must be charged and stored indoors prior
to use of the snow thrower.
• If the snow thrower does not start, initially remove battery from snow thrower. Place battery on
charger and allow to charge for 10 minutes. Remove from charger and install in snow thrower for
use. The start-up issue may be caused from the battery being too cold. To avoid this issue, ensure
battery is stored in a dry cool place for storage and charging and leave indoors until ready for use.
5. ADJUSTING THE CHUTE DEFLECTOR
You can adjust the chute deector (M) up and
down to change the throwing distance of the snow.
• Squeeze and hold the trigger on the chute
deector.
• Move the chute deector up to increase the
snow distance.
• Move the chute deector down to decrease the
snow distance.
5
M
Trigger

16
CARE AND MAINTENANCE
1
2
IMPORTANT: Always remove the
battery from the tool before performing any
maintenance on it.
1. REPLACING THE SCRAPER
NOTE: The scraper is located at the bottom of the
impeller housing. Ensure that the battery is not
installed in the tool.
• Turn the machine to its side.
• Remove the 5 bolts below the deck that attach
the scraper to the machine.
• Remove the worn scraper (N) from the
machine.
• Install the new scraper.
• Install and tighten the bolts that you removed.
2. REPLACING THE DRIVE BELT
• Remove the screws on the drive belt cover (O).
• Turn the auger pulley (P) counterclockwise
while you remove the remaining belt (Q).
• Turn the new belt onto the pulleys.
• Install and tighten the screws that you
removed.
N
Bolt
Screw
O
P
Q

17
CARE AND MAINTENANCE
3. REPLACING THE IMPELLER
• Remove the 4 sets of nuts and bolts on the
middle steel plate.
• Remove the 4 sets of nuts and bolts on each
side.
• Remove the impellers (R).
• Install the new impellers.
• Tigthen the 8 sets of nuts and bolts that you
removed.
4. REPLACING THE SKID PLATES
• Loosen the 2 sets of bolts, spacers and nuts
that attach the skid plates to the snow thrower
housing.
• Remove the skid plates (U).
• Install the new skid plates.
• Tigthen the 2 sets of bolts, spacers and nuts
that you removed.
• Do the same operation on the other side.
3
4
R
4 sets of bolts and nuts
on each side (total of 8 sets)
Nut
Bolt
Spacer
4 sets of nuts and bolts on the
middle steel plate
SERVICE
Servicing requires extreme care and knowledge and should be performed only by a qualied service
technician. For service, it is suggested you return the product to your nearest AUTHORIZED
SERVICE CENTER for repair. When servicing, use only identical replacement parts.
STORAGE
• Run the snow thrower for a few minutes in order to melt any snow that may be left on the snow
thrower.
• Wipe the snow thrower off with a dry cloth before storage. This will help prevent ice building up on
the unit and parts freezing.
• Remove the battery and store it in a cool dry location, if possible. Charge the battery every six-
months when not in use in order to increase its life.
• Inspect the snow thrower thoroughly for worn, loose, or damaged parts. If any parts must be re-
paired or replaced, contact 1-888-356-2258.
• Store the snow thrower in a clean, dry place. Cover it in order to provide added protection.
• Always store battery and charger indoors.
U
U

18
TROUBLESHOOTING
PROBLEM POSSIBLE CAUSE CORRECTIVE ACTION
The handle is not
in position.
1. The bolts are not properly
seated.
1. Make sure the bolts are correctly installed
through the handle bars. Check to see if the
hand knobs are tight. Refer to Assembling
the Handles section in this manual.
The snow thrower
doesn't start.
1. The battery is not charged.
2. The switch is defective.
3. Battery is too cold.
4. Battery is not fully seated in
the battery compartment.
5. Battery may require service
or replacement.
1. Charge the battery by following the
procedures in the battery and charger
manual.
2. Have the switch replaced by an authorized
service center.
3. Remove battery from snow thrower. Bring
battery and charger into warm area for 15
minutes on charge. After 15 mins, remove
from charger and install in snow thrower for
use.
4. Remove battery, check compartment for
debris and foreign objects. Remove if
necessary and replace battery, ensuring
battery clicks into the battery compartment.
5. Call customer service at 1-888-356-2258 or
replace battery.
The motor is on, but
the impeller does
not turn.
1. The belt is damaged. 1. Replace the belt (see the section entitled
Replacing the Drive Belt).
The snow thrower
leaves a thin layer
of snow behind.
1. The scraper is worn. 1. Inspect the scraper for wear or damage. Re-
place the scraper (see the section entitled
Replacing the Scraper).
If you still have questions or an unresolved issue after going through this troubleshooting guide, or
just want to speak to a Kobalt product expert, please call our Kobalt customer service department at
1-888-356-2258.

19
WARRANTY
5-YEAR LIMITED WARRANTY
This 80 V Lithiuim-Ion snow thrower is warranted to the original purchaser from the original purchase
date for ve (5) years subject to the warranty coverage described herein.
This 80 V Lithiuim-Ion snow thrower is warranted for the original user to be free from defects in material
and workmanship.
If you believe that the 80 V Lithiuim-Ion snow thrower is defective at any time during the specied war-
ranty period, simply return the 80 V Lithiuim-Ion snow thrower along with proof of purchase to the place
of purchase for a free replacement or refund, or call 1-888-356-2258 for warranty service.
This warranty is void if: defects in materials or workmanship or damages result from repairs or alter-
ations which have been made or attempted by others or the unauthorized use of nonconforming parts;
the damage is due to normal wear, damage is due to abuse (including overloading of the tool beyond
capacity), improper maintenance, neglect or accident; or the damage is due to the use of the tool after
partial failure or use with improper accessories or unauthorized repair or alteration.
This warranty gives you specic legal rights, and you may also have other rights that vary from state to
state.

20
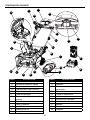
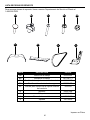
REPLACEMENT PARTS LIST
PART DESCRIPTION PART #
AA Handle bolts 322022607
BB Handle knobs 34113877-1
CC Chute-rotation box screws 322012607
DD Discharge chute screws 322071495
EE Chute-rotation box screw nuts 3220439
R Impeller 342051495
N Scraper 341271495
Q Drive belt 342011495
U Skid plates 333111495
Printed in China
For replacement parts, call our customer service department at 1-888-356-2258.
R
N
Q U
AA
BB
CC
DD
EE

21
EQUIPO QUITANIEVE DE 80 VOLTIOS
ARTÍCULO #1076663
MODELO #KSB 5080-06
¿Preguntas, problemas, piezas faltantes? Antes de volver a la tienda, llame a nuestro
Departamento de Servicio al Cliente al 1-888-3KOBALT (1-888-356-2258), de lunes a
viernes de 8 a.m. a 8 p.m. (hora del este).
ADJUNTE SU RECIBO AQUÍ
Fecha de compra
Número de serie

22
ÍNDICE
ESPECIFICACIONES DEL PRODUCTO
Especicaciones del producto ����������������������������������������������������������������������������������� 22
Contenido del paquete ���������������������������������������������������������������������������������������������� 23
Aditamentos ��������������������������������������������������������������������������������������������������������������� 24
Símbolos ������������������������������������������������������������������������������������������������������������������� 25
Información de seguridad ������������������������������������������������������������������������������������������ 27
Preparación �������������������������������������������������������������������������������������������������������������� 29
Instrucciones para el ensamblaje ������������������������������������������������������������������������������ 30
Instrucciones de uso ������������������������������������������������������������������������������������������������� 33
Cuidado y mantenimiento ������������������������������������������������������������������������������������������ 37
Detección de problemas �������������������������������������������������������������������������������������������� 39
Garantía ������������������������������������������������������������������������������������������������������������������� 40
Lista de piezas de repuesto ���������������������������������������������������������������������������������������� 41
ESPECIFICACIONES
Tipo de batería Iones de litio de 80 voltios
Velocidad sin carga 1800/1950 RPM
Ancho de trabajo 55,88 cm
Altura de entrada 30,48 cm
Ruedas 20,32 cm
Distancia de descarga Hasta 9,14 m
Peso (sin batería) 26,3 kg
EL RANGO DE TEMPERATURA AMBIENTE RECOMENDADO:
Artículo Temperatura
Rango de temperatura de almacenamiento del
equipo quitanieve
-20 °C (-4 °F) a 70 °C (158 °F)
Rango de temperatura de funcionamiento del
equipo quitanieve
-17 °C (1�4 °F) a 40 °C (104 °F)
Rango de temperatura de carga de la batería 4 °C (39 °F) a 40 °C (104 °F)
Rango de temperatura de funcionamiento del
cargador
4 °C (39 °F) a 45 °C (113 °F)

23
PIEZA DESCRIPCIÓN
A Manija central
B Palanca de liberación rápida
C Manija superior
D Caja de rotación del conducto
E Caja del interruptor
F Canal de descarga
G Cubierta del compartimiento de
baterías
H Botón del interruptor de seguridad
I Libere la palanca
J Luz LED
K Interruptor de luz
L Manija de rotación del conducto
CONTENIDO DEL PAQUETE
PIEZA DESCRIPCIÓN
M Deector del canal
N Raspador
O Cubierta de la correa de
transmisión
P Polea de la barrena
Q Correa de transmisión
R Impulsor
S Interruptor de velocidad
T Ruedas
U Zapatas
V Batería
W Cargador
D
F
M
A
V
W
B
T
U
N
R
O
J
C
E
I
K
L
P
Q
H
S
G

24
ADITAMIENTOS (no se muestran en el tamaño real)
AA
Tornillos del conducto
de descarga
Cantidad: 3
BB
Pernos de la manija
Cantidad: 2
CC
DD
Perillas de la manija
Cantidad: 2
Tornillos de la caja de
rotación del conducto
Cantidad: 2
Tuercas para tornillos
de la caja de rotación
del conducto
Cantidad: 2
EE

25
SÍMBOLOS
Algunos de los siguientes símbolos pueden ser usados en este producto� Obsérvelos y aprenda su
signicado. La interpretación correcta de estos símbolos permite una operación mejor y más segura.
SÍMBOLOS NOMBRE DESIGNACIÓN/EXPLICACIÓN
V Voltios Voltaje
A Amperios Corriente
Hz Hercios Frecuencia (ciclos por segundo)
Wh Vatio hora Capacidad de almacenaje de energía
Ah Amperio hora Capacidad de corriente
Corriente continua Tipo o característica de corriente
Fabricación Clase II Fabricación con doble aislamiento
RPM Velocidad giratoria Revoluciones por minuto
/min Por minuto
Revoluciones, pasadas, velocidad de supercie, órbitas, etc.
por minuto
Alerta de condiciones
de humedad
No exponga la unidad a la lluvia ni la use en lugares húmedos�
Lea el manual del
operador
Para reducir el riesgo de lesiones, el usuario debe leer
y comprender el manual del usuario antes de usar este
producto�
Protección ocular
Siempre use lentes con protección lateral que cumplan con
la norma ANSI Z87�1�
Alerta de seguridad Precauciones para su seguridad�
Mano y pie Mantenga las manos y los pies alejados�
Distancia segura
Mantenga a los espectadores a una distancia segura de la
máquina�
Detener la máquina
Detenga el motor y quite la batería antes de dejar la
máquina�
Piezas móviles
Manténgase alejado de las piezas móviles� Mantenga todas
las guardas y protecciones en su lugar�
Objetos lanzados
Los objetos lanzados por el producto pueden rebotar y
ocasionar lesiones o daños materiales�
Mano y pie Mantenga las manos y los pies lejos del impulsor giratorio�
Mano Mantenga las manos alejadas del área de descarga�

26
Las siguientes palabras de señalizacion y sus signicados tienen el objeto de explicar los niveles
de riesgo relaciondos con este producto�
ADVERTENCIA
Cualquier producto en funcionamiento puede lanzar objetos hacia los ojos, lo cual puede causar
serios daños a los mismos� Antes de iniciar la operación de herramientas de corriente, siempre
utilice gafas de seguridad, gafas de seguridad con protección lateral, y en la medida en que
sea necesario, un protector para toda la cara� Se recomienda una máscara de seguridad de
visión amplia sobre los lentes o las gafas de seguridad estándar con protección lateral� Siempre
póngase protección ocular con la marca de cumplimiento de la norma ANSI Z87�1�
•
SÍMBOLO SEÑAL SIGNIFICADO
PELIGRO
Indica una situación de peligro inminente que, si no es preveni-
da, causará la muerte o lesiones severas�
ADVERTENCIA
Indica una situación de peligro potencial que, si no es preveni-
da, podría causar la muerte o lesiones severas�
PRECAUCIÓN
Indica una situación de peligro potencial que, si no es preveni-
da, puede causar lesiones menores o moderadas�
PRECAUCIÓN
(Sin el símbolo de alerta de seguridad) Indica una situación
que puede causar daños materiales�
SÍMBOLOS
• Para evitar lesiones corporales serias, no intente utilizar este producto sin haber leído y comprendi-
do totalmente el manual del operador� Si no comprende los avisos de advertencia y las instrucciones
del manual del operador, no utilice este producto� Llame al Departamento de Atención al Consumidor
1-888-356-2258 y le brindaremos asistencia�

27
ADVERTENCIA
INFORMACIÓN DE SEGURIDAD
Lea y asegúrese de comprender todas las instrucciones antes de usar este producto� Si no se siguen
todas las instrucciones mencionadas a continuación, pudieran producirse descargas eléctricas,
incendios y/o lesiones severas�
El término “herramienta eléctrica” empleado en todos los avisos de advertencia enumerados abajo se
reere a las herramientas eléctricas de cordón (alámbricas) y de baterías (inalámbricas).
• Camine� No corra�
• Verique que la herramienta eléctrica no entre en contacto con nada antes de encenderla.
• Manténgase alejado de las aberturas del impulsor en todo momento� Mantenga la cara, las manos
y los pies lejos de las piezas ocultas, móviles o giratorias�
• Preste atención cuando use la herramienta eléctrica� Esté alerta a los huecos en el terreno y a
otros peligros ocultos o el tráco.
• Suba y baje las pendientes cuando quite nieve� No lo haga de forma trasversal� Tenga cuidado
cuando cambie de dirección� No use esta herramienta eléctrica para quitar nieve de pendientes
pronunciadas�
• No use la herramienta eléctrica a menos que las protecciones, las placas y otros dispositivos de
seguridad estén en su lugar�
• No use la herramienta eléctrica cerca de estructuras exteriores de vidrio, automóviles, camiones,
pozos profundos, caídas, etc�, sin ajustar adecuadamente el ángulo de la descarga de nieve�
Mantenga a niños y mascotas alejados del área de trabajo�
• No use la herramienta eléctrica a alta velocidad en supercies resbaladizas. Mire hacia atrás
cuando se desplace marcha atrás y tenga cuidado�
• Utilice gafas o gafas de seguridad que cumplan con las normas ANSI Z87�1�
• Use la herramienta eléctrica con luz de día o una buena luz articial. Asegúrese de que las luces
estén encendidas si utiliza el producto en condiciones de poca iluminación�
• Para evitar arranques accidentales, permanezca en la posición de arranque cuando encienda la
herramienta eléctrica� El operador y la herramienta eléctrica deben estar en una posición estable
durante el arranque� Consulte la sección titulada Instrucciones de arranque/detención�
• Use esta herramienta eléctrica solo para los nes de su diseño.
• Sostenga la herramienta eléctrica con ambas manos mientras esté funcionando� Sujete las manijas
con rmeza.
• Si el impulsor no gira con facilidad por el hielo, descongele bien la herramienta eléctrica antes de
intentar usarla�
• Mantenga el impulsor libre de desechos�
• No intente limpiar el impulsor con el motor en funcionamiento�
• Después de golpear un objeto extraño, apague la herramienta eléctrica y retire el paquete de
baterías� Luego, revise si se dañó� Repare cualquier daño antes de volver a encender y usar la
herramienta eléctrica�
• Si la herramienta eléctrica comienza a vibrar de manera anormal, deténgala e intente buscar la
causa de inmediato� Por lo general, la vibración es indicadora de un peligro�
• Detenga el motor y retire el paquete de baterías cuando el operador no esté usando la herramienta,
antes de eliminar obstrucciones del impulsor y antes de llevar a cabo reparaciones, ajustes o
inspecciones�
• No utilice la herramienta eléctrica en supercies con gravilla a menos que esté ajustada para dicha
supercie de acuerdo con el manual del operador.

28
INFORMACIÓN DE SEGURIDAD
• Mantenga a los niños alejados: todas las visitas deben mantenerse a una distancia segura del área
de trabajo�
• Use ropa adecuada: no use ropa holgada ni joyas� Pueden quedar atrapadas en las piezas
móviles�
• Use botas de goma cuando utilice la herramienta eléctrica� No use el equipo si está descalzo o
está usando sandalias abiertas� Siempre use un calzado resistente�
• El funcionamiento de la herramienta eléctrica en la posición de mano no es seguro, excepto de
acuerdo con las instrucciones de uso para dicha posición en el manual del operador�
• Mantenga las protecciones en su lugar y en buenas condiciones de funcionamiento�
• No fuerce la herramienta eléctrica: esta realizará un trabajo más seguro y de mejor calidad si se
usa al ritmo para el que fue diseñada�
• No se extienda demasiado; mantenga los pies rmes y en buen equilibrio en todo momento.
• Si la unidad golpea un objeto extraño:
i) Apague el motor�
ii) Inspeccione la máquina para vericar que no esté dañada.
iii) Repare los posibles daños antes de volver a encender y operar la máquina�
• Almacene la herramienta eléctrica en un lugar cerrado: cuando no esté en uso, debe almacenarla
en un espacio interior, seco y cerrado, fuera del alcance de los niños�
• Realice un mantenimiento adecuado de las herramientas eléctricas� Siga las instrucciones para
lubricar y reemplazar accesorios�
• Deje la herramienta eléctrica en funcionamiento durante algunos minutos después de quitar la
nieve para evitar que las piezas móviles se congelen�
• Use solo piezas y accesorios de repuesto idénticos para esta herramienta eléctrica� El uso de
piezas o accesorios que no sean idénticos podría provocar lesiones graves al usuario o daños a la
herramienta eléctrica, y anulará la garantía�
• No levante la herramienta eléctrica mientras está funcionando� La herramienta eléctrica está
diseñada para desplazarse sobre el piso�
• Nunca permita que los niños utilicen una herramienta eléctrica� Mantenga el área de operación
libre de cualquier persona, en especial niños pequeños y mascotas�
• Inspeccione minuciosamente el área donde se utilizará la herramienta y retire todas las piedras, las
varillas, los cables, los huesos y cualquier otro objeto extraño que encuentre�
• Detenga las cuchillas cuando cruce entradas, caminos o carreteras con gravilla�
• Use solo con la batería Kobalt KB 580-06 y el cargador KRC 30-06�
• Lea cuidadosamente el manual de instrucciones de funcionamiento y servicio� Familiarícese por
completo con los controles y el uso adecuado de este equipo�
• Evite un arranque accidental� Asegúrese de que el interruptor esté en la posición de apagado
antes de conectar la herramienta al paquete de baterías, o antes de levantarla o transportarla�
Transportar el electrodoméstico con el dedo en el interruptor o enchufar electrodomésticos con el
interruptor encendido aumenta las posibilidades de accidentes�
• Desconecte el paquete de baterías del electrodoméstico antes de realizar cualquier ajuste, cambiar
accesorios o almacenarlo� Este tipo de medidas de seguridad preventivas reduce el riesgo de
arranques accidentales del electrodoméstico�
• Recargue solo con el cargador especicado por el fabricante. Un cargador adecuado para un tipo
de paquete de baterías puede crear un riesgo de incendio cuando se usa con otro paquete de
baterías�
• Use electrodomésticos solo con paquetes de baterías designados especícamente. El uso de
cualquier otro paquete de baterías puede crear un riesgo de lesión e incendio�

29
INFORMACIÓN DE SEGURIDAD
NORMAS GENERALES DE SEGURIDAD
• Verique que la herramienta eléctrica esté segura durante el traslado.
• Almacene la herramienta eléctrica en un lugar seco para evitar el uso no autorizado o daños�
Manténgala alejada del alcance de los niños�
• Mantenga las manijas secas, limpias y libres de desechos� Limpie la herramienta eléctrica después
de cada uso� Para obtener más información, consulte la sección de Mantenimiento de este manual�
• Si las etiquetas en la herramienta eléctrica se deterioran o comienzan a levantarse, póngase en
contacto con el Servicio al Cliente al 1-888-356-2258�
• Guarde estas instrucciones en un lugar seguro para referencia futura� Consúltelas periódicamente
y úselas para instruir a otros usuarios� Cualquier persona que use esta herramienta eléctrica debe
leer con atención estas instrucciones�
• Realice un mantenimiento adecuado de la herramienta eléctrica� Siga las instrucciones para
lubricar y reemplazar accesorios�
PREPARACIÓN
Antes de empezar a ensamblar del producto, asegúrese de tener todas las piezas� Compare las
piezas con la lista del contenido del paquete y la lista de aditamentos� Si hay piezas faltantes o daña-
das, no intente ensamblar el producto�
Tiempo aproximado de ensamblaje: 10 minutos
• Cuando el paquete de baterías no está en uso, aléjelo de objetos metálicos, como sujetapapeles,
monedas, llaves, clavos, tornillos u otros objetos metálicos pequeños que pudieran crear una
conexión entre los terminales� Es posible que conectar los terminales de la batería entre sí
produzca quemaduras o un incendio�
• En condiciones de maltrato, es posible que salga líquido de la batería� Evite el contacto� Si se
produce un contacto accidental, enjuague con agua� Si el líquido entra en contacto con los ojos,
solicite atención médica adicional� El líquido que sale de la batería puede provocar irritación o
quemaduras�
• No use un paquete de baterías o electrodoméstico que esté dañado o modicado. Las baterías
dañadas o modicadas pueden mostrar una conducta impredecible que podría provocar incendios,
explosiones o riesgo de lesiones�
• No exponga un paquete de baterías o electrodoméstico al fuego o una temperatura excesiva� La
exposición al fuego o temperaturas superiores a 129,4 °C (265 °F) puede causar una explosión�
• Siga todas las instrucciones de carga y no cargue el paquete de baterías o el electrodoméstico
fuera del rango de temperatura especicado en las instrucciones. La carga incorrecta o a
temperaturas fuera del rango especicado puede dañar la batería y aumentar el riesgo de incendio.
• Haga reparar el producto solo por una persona de reparación calicada que utilice solo piezas de
repuesto idénticas� Esto mantendrá la seguridad del producto�
• No modique ni intente reparar el electrodoméstico ni el paquete de baterías (según corresponda)
excepto como se indique en las instrucciones para uso y cuidado�

30
• Abra las palancas de liberación rápida (B) en
los dos lados de la manija central (A)�
• Despliegue la manija central hasta que se
detenga�
• Cierre las palancas de liberación rápida�
• Apriete las perillas para sostener la manija
central en su posición�
• Alinee los oricios de la manija central (A) y la
manija superior (C)� Inserte los pernos de la
manija (AA) y use las perillas de la manija (BB)
para apretarlos�
ADVERTENCIA
• No permita que la familiaridad con este producto lo vuelva descuidado� Recuerde que un
descuido de una fracción de segundo es suciente para provocar lesiones graves.
• No utilice ningún acoplamiento o accesorio que no sea recomendado por el fabricante de este
producto� El uso de acoplamientos o accesorios no recomendados puede producir lesiones
personales graves�
1. DESPLIEGUE DE LA MANIJA CENTRAL
2. INSTALACIÓN DE LA MANIJA SUPERIOR
INSTRUCCIONES PARA EL ENSAMBLAJE
1
A
B
Perilla Perilla
2
C
A
AA
BB
BB
AA

31
INSTRUCCIONES PARA EL ENSAMBLAJE
3
4
3. INSTALACIÓN DE LA CAJA DE ROTACIÓN
DEL CONDUCTO
• Alinee los oricios en el panel de la caja
de rotación del conducto (D) y la caja del
interruptor (E)�
• Coloque los tornillos de la caja de rotación del
conducto (CC) en los oricios.
• Apriete las tuercas para tornillos de la caja
de rotación del conducto (EE) con una llave
inglesa (no se incluye)�
4. INSTALACIÓN DEL CONDUCTO DE
DESCARGA
• Alinee las ranuras del conducto de descarga (F)
con la ranura de la carcasa del conducto�
• Presione el conducto de descarga en su
posición�
• Apriete los tornillos del conducto de descarga
(DD) con un destornillador Phillips para
bloquear el conducto de descarga�
CC
EE
Muesca
F
DD
Ranura
D
E

32
INSTRUCCIONES PARA EL ENSAMBLAJE
M
N
O
5a. PARA INSTALAR LA BATERÍA
• Levante la tape (G) del compartimiento de la
batería�
• Alinee la batería (V) con la cavidad de la carcasa
del equipo quitanieve�
• Inserte la batería en el compartimiento de la
batería derecho mientras está de pie en la
posición de funcionamiento para arrancar el
equipo quitanieve� Este equipo quitanieve está
equipado con un compartimiento de almacenaje
de baterías para albergar un paquete de baterías
adicional con el n de extender el tiempo de
funcionamiento�
• Deslice la batería hacia abajo para trabarla en su
posición correcta� La batería está completamente
insertada en el quitanieve cuando se escucha un
“clic”�
• Cierre la cubierta del compartimiento de la batería�
5b. PARA RETIRAR LA BATERÍA
• Deje de apretar la barra de encendido/ apagado y
detenga la máquina quitanieve�
• Pulse el botón de liberación de la batería en el
quitanieve� De este modo, la batería sobresaldrá
ligeramente de la herramienta�
• Retire la batería del producto�
ADVERTENCIA
Siempre retire el paquete de baterías de la herramienta cuando no esté en uso o cuando esté
ensamblando las piezas, realizando ajustes o limpiándolo� La extracción de la batería evitará que se
produzca un arranque accidental, lo que podría causar graves lesiones personales�
5
G
V
Botón de
liberación
de la
batería

33
INSTRUCCIONES DE USO
1a. ENCENDIDO
Solución 1:
1� Mantenga presionado el botón del interruptor de seguridad (H)�
2� Jale la palanca de agarre (I) hacia arriba de la manija para arrancar el equipo quitanieve y luego
suelte el botón�
Solución 2:
1� Jale la palanca de agarre (I) hacia debajo de la manija y sosténgala�
2� Presione el botón del interruptor de seguridad (H) para arrancar el equipo quitanieve y suelte el
botón�
1b. APAGADO
• Libere la palanca (I)�
1
1
2
2
1
Solución 1 Solución 2
PRECAUCIÓN
No intente anular el funcionamiento del botón del interruptor de seguridad y la palanca de barra�
ADVERTENCIA
• Un equipo quitanieve en funcionamiento puede arrojar objetos extraños a los ojos del operador y,
de esta manera, causar graves daños oculares� Siempre use gafas de seguridad cuando use el
equipo quitanieve y realice ajustes o reparaciones�
• Mantenga a los espectadores a una distancia segura de la máquina�
• INSPECCIONE EL ÁREA QUE DESEA DESPEJAR� Retire piedras, palos, cables, huesos y otros
desechos que el impulsor giratorio podría arrojar�
Indicador de capacidad de la batería
Luces Capacidad
4 luces verdes
La batería está con su máxima
capacidad
3 luces verdes
La batería está en el 75% de su
capacidad
2 luces verdes
La batería está en el 50% de su
capacidad
1 luz verde
La batería está en el 25% de su
capacidad y requiere cambiarse
pronto
Luces
apagadas
La batería está bajo el 25% de su
capacidad y requiere cambiarse
inmediatamente
Indicador de capacidad de
la batería
H
I

34
INSTRUCCIONES DE USO
2. LUCES LED
• Para encender las luces LED (J) para quitar
nieve de noche, presione el interruptor de luz
(K)�
• Para apagar las luces LED, presione el
interruptor de luz nuevamente�
• Presione el interruptor de velocidad (S) hacia
el símbolo del conejo para mayor velocidad del
impulsor y distancia de descarga en condiciones
intensas�
• Presione el interruptor de velocidad (S) hacia el
símbolo de tortuga para reducir la velocidad del
impulsor con el n de tener un mayor tiempo de
funcionamiento en condiciones ligeras
2
4. AJUSTE DEL CONDUCTO DE DESCARGA
Puede ajustar el conducto de descarga (F) 180°
para cambiar la dirección de la nieve�
• Empuje la manija de rotación del conducto
(L) hacia delante para girar el conducto de
descarga hacia la izquierda�
• Jale la manija de rotación del conducto (L)
hacia atrás para girar el conducto de descarga
hacia la derecha�
3. INTERRUPTOR DE VELOCIDAD
4
F
L
J
K
S

35
INSTRUCCIONES DE USO
CONSEJOS DE OPERACIÓN
ADVERTENCIA
Si el equipo quitanieve golpea un objeto extraño durante su uso, el objeto podría arrojarse en la
dirección del operador o un transeúnte� Los objetos lanzados podrían ocasionar lesiones personales
graves� Mantenga el área que desea despejar libre de objetos extraños que el impulsor podría
recoger y arrojar�
• Mantenga el área de operación libre de objetos extraños que puedan ser arrojados por las impul-
sor� Lleve a cabo una inspección completa del área, ya que algunos objetos pueden estar ocultos
por la nieve que los rodea� Si la máquina quitanieve golpea una obstrucción o atrapa un objeto
extraño durante su uso, detenga la máquina quitanieve, retire la batería, retire la obstrucción e
inspeccione la unidad en busca de daños� Repare o reemplace cualquier parte dañada antes de
volver a encender y operar la unidad�
• Mantenga a las mascotas, niños y espectadores alejados del área de operación� Tenga en cuenta
que el ruido normal de la máquina al estar encendida puede hacer difícil para usted el oír a las
personas o mascotas acercarse�
• Al mover la máquina quitanieve, use las ruedas en un lado como punto de pivote� Incline
ligeramente la máquina quitanieve sobre este punto de pivote para moverla hacia adelante o
hacia atrás�
• Empiece su ruta de limpieza hacia afuera, lanzando la nieve en un movimiento hacia adelante y
hacia atrás� Para limpiar en la dirección opuesta, pase por sobre el cordón y gire la máquina
quitanieve sobre sus ruedas� Asegúrese de superponer las rutas de limpieza�
• Tenga en cuenta la dirección del viento� De ser posible, muévase en la misma dirección del vien-
to� De ser posible, muévase en la misma dirección que el viento de manera que la nieve no sea
lanzada contra el viento (y por tanto lanzada hacia su cara y por sobre la ruta recién limpiada)�
• No empuje la máquina quitanieve con demasiada fuerza� Usted debe empujar la máquina
cuidadosamente y de forma uniforme, de acuerdo con la velocidad de lanzamiento de la unidad�
• Algunas partes de la máquina quitanieve se pueden congelar bajo condiciones de temperatura
extremas� No intente operar la máquina quitanieve con partes congeladas� Si las partes se con-
gelan mientras la máquina quitanieve está siendo usada, detenga la máquina quitanieve, desen-
chufe el condón de extensión e inspeccione las partes congeladas� Libere todas las partes antes
de volver a encender u operar la máquina quitanieve� Nunca fuerce los controles que se hayan
congelado�
5. AJUSTE DEL DEFLECTOR DEL CONDUCTO
Puede ajustar el deector del conducto (M) hacia
arriba o hacia abajo para cambiar la distancia de
soplado de nieve�
• Mantenga presionado el gatillo del deector del
conducto�
• Mueva el deector del conducto hacia arriba
para aumentar la distancia de la nieve�
• Mueva el deector del conducto hacia abajo
para disminuir la distancia de la nieve�
5
M
Gatillo

36
INSTRUCCIONES DE USO
• Cuando trabaje sobre guijarros, gravilla o supercies no pavimentadas, evite arrojar materiales
sueltos de la supercie junto con la nieve presionando la manija hacia abajo o ajustando las zapa-
tas para elevar el raspador en la base de la unidad por sobre los guijarros o la gravilla�
• Funcionamiento en climas fríos: Las baterías de iones de litio se pueden usar de manera segura
en temperaturas que varían entre 4 °C (39 °F) y 40 °C (104 °F)�
NOTA: no almacene ni cargue las baterías en el exterior� Las baterías deben cargarse y almace-
narse en un lugar cerrado antes de usar el equipo quitanieve�
• Si la máquina no empieza, retire la batería� Coloque la batería en el cargador y deje cargar por
10 minutos para permitir que la batería se entibie� Luego retire de el cargador para usar con la
quitanieve� El problema de arranque puede deberse a que la batería está demasiado fría� Para
evitar este problema, asegúrese de guardar la batería en un lugar fresco y seco, así como de
cargarla y dejarla en el interior hasta que esté lista para usarla�

37
CUIDADO Y MANTENIMIENTO
1
2
IMPORTANTE: siempre retire la
batería de la herramienta antes de realizar
cualquier tarea de mantenimiento�
1. REEMPLAZO DEL RASPADOR
NOTA: el raspador se ubica en la parte inferior
de la carcasa del impulsor� Asegúrese de que la
batería no esté instalada en la herramienta�
• Ponga la máquina de lado�
• Retire los 5 pernos debajo de la plataforma que
jan el raspador a la máquina.
• Retire el raspador gastado (N) de la máquina�
• Instale el raspador nuevo�
• Instale y apriete los pernos que retiró�
2. REMPLAZO DE LA CORREA DE
TRANSMISIÓN
• Retire los tornillos de la cubierta de la correa
de transmisión (O)�
• Gire la polea de la barrena (P) en dirección
contraria a las manecillas del reloj mientras
retira el resto de la correa (Q)�
• Gire la correa nueva sobre las poleas�
• Instale y apriete los tornillos que retiró�
N
Perno
Tornillo
O
P
Q

38
CUIDADO Y MANTENIMIENTO
3. REEMPLAZO DEL IMPULSOR
• Retire los 4 conjuntos de tuercas y pernos en
la placa de acero central�
• Retire los 4 conjuntos de tuercas y pernos de
cada lado�
• Retire los impulsores (R)�
• Instale los impulsores nuevos�
• Apriete los 8 conjuntos de tuercas y pernos
que retiró�
4. REEMPLAZO DE LAS ZAPATAS
• Aoje los 2 conjuntos de pernos, espaciadores
y tuercas que jan las zapatas a la carcasa del
equipo quitanieve�
• Retire las zapatas (U)�
• Instale las zapatas nuevas�
• Apriete los 2 conjuntos de pernos,
espaciadores y tuercas que retiró�
• Repita la misma operación en el otro lado�
3
4
R
4 juegos de pernos y tuercas en cada
lado (total de 8 juegos)
Tuerca
Perno
Espaciador
4 conjuntos de tuercas y pernos
en la placa de acero central
SERVICIO
El servicio de la producto requiere extremo cuidado y conocimientos técnicos, por lo cual solo debe
ser efectuado por un técnico de servicio calicado. Si no comprende los avisos de advertencia y
sugerimos llevarla al ESTABLECIMIENTO DE SERVICIO AUTORIZADO de su preferencia para que
la reparen� Al dar servicio a la unidad, solo utilice piezas de repuesto idénticas�
ALMACENAMIENTO
• Haga funcionar el equipo quitanieve durante algunos minutos para derretir la nieve que pueda
quedar en el producto�
• Limpie el equipo quitanieve con un paño seco antes de almacenarlo� Esto ayudará a evitar la
acumulación de hielo en la unidad y la congelación de las piezas�
• Retire la batería y almacénela en una ubicación fresca y seca, si es posible� Cambie la batería
cada seis meses cuando no use el producto para aumentar su vida útil�
• Inspeccione el equipo quitanieve completamente en busca de piezas desgastadas, sueltas o
dañadas� Si se debe reparar o reemplazar cualquier pieza, póngase en contacto llamando al
1-888-356-2258�
• Almacene el equipo quitanieve en un lugar limpio y seco� Cúbralo para proporcionar mayor
protección�
• Siempre almacene la batería y el cargador en interiores�
U
U

39
SOLUCIÓN DE PROBLEMAS
PROBLEMA CAUSA POSIBLE ACCIÓN CORRECTIVA
La manija no está
en su posición�
1� Los pernos de soporte no
están apropiadamente
asentados�
1� Asegúrese de que los pernos están
correctamente instalados en los mangos�
Compruebe que las perillas manuales están
bien ajustadas� Consulte la sección de
ensamblaje de las manijas en este manual
El equipo quitanieve
no arranca�
1� La batería no está cargada�
2� El interruptor de control
está dañado�
3� La batería está demasiado
fria�
4� La batería no está
completamente insertada en
la carcasa�
5� Es posible que la batería
necesite repararse o
reemplazarse�
1� Cargue la batería siguiendo los
procedimientos que se describen en el
manual de la batería y el cargador�
2� Recurra a un centro de servicio autorizado
para reemplazar el interruptor�
3� Retire la batería del equipo quitanieve�
Lleve la batería y el cargador a un área
cálida para 15 minutos de carga� Luego de
15 minutos, retírela del cargador e instálela
en el equipo quitanieve para usarlo�
4. Retire la batería, verique el compartimiento
en busca de desechos y objetos
extraños� Retire y reemplace la batería
si es necesario, asegurándose de que
la batería nueva haga clic y calce en el
compartimiento de la batería�
5� Llame al Servicio al Cliente al
1-888-356-2258 o reemplace la batería�
El motor está
encendido, pero el
impulsor no gira�
1� La correa está dañada� 1� Remplace la correa (vea la sección titulada
Cómo inspeccionar o remplazar la correa de
impulsión)�
La máquina quita-
nieve deja una capa
delgada de nieve�
1� El raspador está desgastado� 1� Compruebe que la rasqueta no está
desgastada ni presenta daños� Reemplace
el raspador (vea la sección titulada Cómo
reemplazar el raspador)�
Si continua teniendo dudas o algún otro asunto sin resolver tras haber consultado esta guía de reso-
lución de problemas o simplemente desea hablar con un experto en productos Kobalt, llame al servi-
cio de atención al cliente de Kobalt al 1-888-356-2258�

40
GARANTÍA
GARANTÍA DE REPARACIÓN DE 5 AÑOS
Este equipo quitanieve de iones de litio de 80 voltios está garantizado para el comprador original desde
la fecha de compra original durante cinco (5) años y está sujeto a la cobertura de garantía que aquí se
describe�
Este equipo quitanieve de iones de litio de 80 voltios tiene una garantía para el usuario original contra
defectos en los materiales y la mano de obra�
Si cree que el equipo quitanieve de iones de litio de 80 voltios presenta fallas en cualquier momen-
to durante el período de garantía especicado, simplemente devuélvalo, junto con un comprobante
de compra, al lugar donde lo compró para obtener un reemplazo o reembolso sin cargo, o llame al
1-888-356-2258 para obtener el servicio de garantía�
Esta garantía es nula si: los defectos en los materiales o la mano de obra o los daños han sido cau-
sados por reparaciones o modicaciones hechas o que se hayan intentado hacer por parte de terceros
o el uso no autorizado de piezas incompatibles; el daño es debido al desgaste normal; el daño es
debido al abuso (lo que incluye la sobrecarga de la herramienta por encima de su capacidad), man-
tenimiento inadecuado, negligencia o accidente; o el daño es debido al uso de la herramienta después
de una falla parcial, el uso con accesorios inadecuados o reparaciones o alteraciones no autorizadas�
Esta garantía le concede derechos legales especícos y usted pudiera tener además otros derechos
que varían de un estado a otro�

41
LISTA DE PIEZAS DE REPUESTO
PIEZA DESCRIPCIÓN PIEZA #
AA Pernos de la manija 322022607
BB Perillas de la manija 34113877-1
CC Tornillos de la caja de rotación del conducto 322012607
DD Tornillos del conducto de descarga 322071495
EE Tuercas para tornillos de la caja de rotación
del conducto
3220439
R Impulsor 342051495
N Rasqueta 341271495
Q Correa de transmisión 342011495
U Zapatas 333111495
Impreso en China
Para encargar piezas de repuesto, llame a nuestro Departamento de Servicio al Cliente al
1-888-356-2258�
R
N
Q U
AA
BB
CC
DD
EE


-
 1
1
-
 2
2
-
 3
3
-
 4
4
-
 5
5
-
 6
6
-
 7
7
-
 8
8
-
 9
9
-
 10
10
-
 11
11
-
 12
12
-
 13
13
-
 14
14
-
 15
15
-
 16
16
-
 17
17
-
 18
18
-
 19
19
-
 20
20
-
 21
21
-
 22
22
-
 23
23
-
 24
24
-
 25
25
-
 26
26
-
 27
27
-
 28
28
-
 29
29
-
 30
30
-
 31
31
-
 32
32
-
 33
33
-
 34
34
-
 35
35
-
 36
36
-
 37
37
-
 38
38
-
 39
39
-
 40
40
-
 41
41
-
 42
42
-
 43
43
-
 44
44


Kobalt KSB 2280-06 Manual de usuario
- Categoría
- Herramientas eléctricas
- Tipo
- Manual de usuario
- Este manual también es adecuado para
En otros idiomas
- English: Kobalt KSB 2280-06 User manual
Documentos relacionados
Otros documentos
-
Greenworks Pro SNC406 Manual de usuario
-
 GreenWorks Commercial GN 220 El manual del propietario
-
Craftsman 26011 El manual del propietario
-
-
-
Greenworks 40V Snow Thrower El manual del propietario
-
 EarthWise SN74014 El manual del propietario
-
-
-

