
THANK YOU
We appreciate the trust and confidence you have placed in Defiant through the purchase of this motion security light.
We strive to continually create quality products designed to enhance your home. Visit us online to see our full line of
products available for your home improvement needs. Thank you for choosing Defiant!
Item #1002638550
Model #DFI-0452-WH
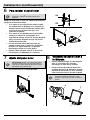
USE AND CARE GUIDE
MOTION SOLAR SECURITY LIGHT
Questions, problems, missing parts? Before returning to the store,
call Defiant Customer Service
8 a.m. - 7 p.m., EST, Monday-Friday, 9 a.m. – 6 p.m., EST, Saturday
1-866-308-3976
HOMEDEPOT.COM

2
Table of Contents
Table of Contents ..................................2
Safety Information .................................2
Warranty .................................................2
Pre-Installation ......................................3
Installation .............................................6
Operation ............................................... 9
Maintenance ........................................ 12
Care and Cleaning .............................. 12
Troubleshooting .................................. 12
Safety Information
PRECAUTIONS
Please read and understand this entire manual
before attempting to assemble, install, or operate
this light fixture.
□ This light fixture should be installed
outdoors to a wall or eave.
□ The light fixture should be mounted
approximately 8 ft. (2.4 m) above the
ground.
□ Do not cut the solar panel wire. Discontinue
use if the wire becomes frayed or broken.
□ Do not immerse components in liquid.
□ Do not use any other charging device other
than the single solar charging panel
provided with this light. Doing so may
result in injury or damage to the light and
voids any warranty.
□ Position the cord so that it is securely
fastened and will not result in a hazard
(such as tripping).
□ The maximum extension cord length to use
with this product is 60 ft.
A 30 ft. extension cord is available for this
product at HOMEDEPOT.COM.
WARNING: To prevent possible SERIOUS INJURY
or DEATH, never allow small children near batteries.
If a battery is swallowed, immediately notify a
doctor.
WARNING: DO NOT DISPOSE OF BATTERIES IN
FIRE. BATTERIES MAY EXPLODE OR LEAK.
NOTICE: When replacing batteries, recycle used batteries or
dispose of them in accordance with local regulations.
Warranty
1-YEAR LIMITED WARRANTY
WHAT IS COVERED
This product is guaranteed to be free of factory defective parts and workmanship for a period of 1 year from date of
purchase. Purchase receipt is required for all warranty claims.
WHAT IS NOT COVERED
This guarantee does not include repair service, adjustment and calibration due to misuse, abuse or negligence.
Unauthorized service or modification of the product or of any furnished component will void this warranty in its
entirety. This warranty does not include reimbursement for inconvenience, installation, setup time, loss of use,
unauthorized service, or return shipping charges. This warranty is not extended to other equipment and components
that a customer uses in conjunction with this product.
No service parts available for this product.
Contact the Customer Service Team at 1-866-308-3976 or visit www.HomeDepot.com.

3 HOMEDEPOT.COM
Please contact 1-866-308-3976 for further assistance.
Pre-Installation
PLANNING INSTALLATION
Before installing the light fixture, ensure that all parts are present. Compare parts with the Hardware Included and
Package Contents sections. If any part is missing or damaged, do not attempt to assemble, install, or operate this
light fixture.
Estimated installation time: 30 minutes
PRODUCT DESCRIPTION
This light operates from a battery charged from a solar panel. If the Lithium Ion battery voltage runs down to 3.6V,
the light will automatically switch to ECO mode and dim down to reserve battery for a longer run time. When the
solar panel has recharged the Lithium battery and voltage above 3.7V, the light will automatically switch back to
AUTO mode, and normal brightness.
INITIAL BATTERY CHARGE
IMPORTANT: Clouds, rain, snow, and other weather conditions may not allow the solar panel to completely recharge the battery. Other
obstructions such as buildings or trees may block the sun as well.
When installing the solar panel, make sure it is aimed as described below with a minimum amount of obstructions. Please mount the panel facing
toward the southern sky. An extended solar panel cord is available at Homedepot.com.
□ PRIOR TO USE, the battery will require 2 to 3 days of full, direct sunlight to completely charge with the switch in
the OFF position. Connect the solar panel cord plug with the connector extending from the bottom of the light
housing. If possible, aim the solar panel toward the South and tilt it approximately 50° from horizontal. If the
solar panel cannot be aimed toward the South, then tilt the panel approximately 30°. Another option is to add an
extension cord (excluded in the package) available at Homedepot.com.
□ Actual operating time will vary depending upon how frequently the light is turned on by the motion sensor.
□ Solar lighting is not designed to equal standard 120V lighting. The amount of light output is reduced to allow the
sun time to fully recharge the battery between lighting cycles.
□ Solar collection is only effective in direct sunlight. Every hour the light is on requires a minimum of 6 hours of
sunlight charging.
MOUNTING LOCATION
The most important thing to remember for the operation of your solar powered motion sensing light is that it works
from the power received from direct sunlight. The more direct sunlight the solar panel receives in a day, the longer
the light will operate.
SOLAR LIGHT FIXTURE
The main unit contains the LEDs, a motion sensor, and a rechargeable Lithium battery. When deciding where to
mount this unit, keep in mind that the motion sensor that activates the light has a “field of vision” of 50 ft. (15 m) in
front of the light and about 180° detection angle at a surrounding air temperature of 77°F (25°C).
SOLAR PANEL
The solar panel converts the sun’s energy into electricity, thus charging the battery stored in the solar light fixture.
The solar panel requires direct sunlight falling onto the face of the solar panel for as long as possible over the course
of the day.
When choosing the location for the solar panel, make sure it is aimed toward the South and is tilted to a suitable
angle to allow as much direct sunlight to fall upon it as possible. Make sure there is a minimum amount of
obstructions between the solar panel and the sun.
Also, make sure your solar panel location is not too far away from the solar light fixture for the wires to reach and
connect.

4
Pre-Installation (continued)
SPECIFICATIONS
Range Up to 50 ft. (15 m) (Varies with surrounding temperature)
Sensing angle Up to 180°
Lumens Solar Power: 500 LM
Power requirements Solar panel and rechargeable Lithium Batteries
Operating modes Off and Auto
Time delay 1 minute to 5 minutes
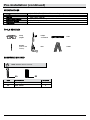
TOOLS REQUIRED
Safety
goggles
Phillips
screwdriver
Level
Drill bits
(3/32 in. and
7/32 in.)
Drill
Ladder
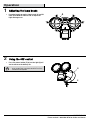
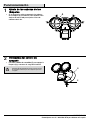
HARDWARE INCLUDED
NOTE: Hardware shown to actual size.
AA BB
Part Description Quantity
AA Mounting screw 5
BB Wall anchor 5

5 HOMEDEPOT.COM
Please contact 1-866-308-3976 for further assistance.
Pre-Installation (continued)
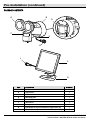
PACKAGE CONTENTS
Part Description Quantity
A Lamp head 2
B Light fixture 1
C Motion sensor 1
D Mounting plate 1
E Power button 1
F Solar panel 1
G Solar panel cradle 1
H Extendable cord (preassembled to Light fixture (B)) 1
I Extendable cord (preassembled from Solar panel (F)) 1
A
B
H
C
E
D
I
F
G

6
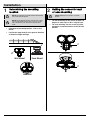
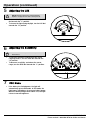
Installation
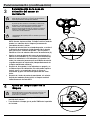
1
Determining the mounting
location
2
Setting the sensor for wall
or eave mounting
NOTE: The light fixture should be mounted approximately
8 ft. (2.4 m) above the ground.
NOTE: Ensure the fixture and the solar panel are located
close enough together for the cord to reach. You can also
add on an extension cord. Ensure the solar panel faces
South.
□ Determine the mounting location - wall or eave
mount.
□ Position the lamp head (A) in the general direction
of the desired light coverage.
NOTE: Adjust the sensor angle to a coverage
desired.
□ For wall mounting, tilt the sensor (C) down 10
degrees to cover up to a 50 ft. range in front.
□ For eave mounting, turn the sensor (C) either
clockwise or counterclockwise to the desired
position.
Wall Mount
A
Incorrect
Eave Mount
C
C

7 HOMEDEPOT.COM
Please contact 1-866-308-3976 for further assistance.
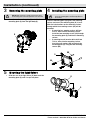
Installation (continued)
3
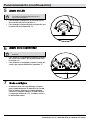
Removing the mounting plate
4
Installing the mounting plate
NOTE: Make sure there is enough vertical space above
the mounting plate to allow the light fixture to be mounted.
□ Press the wall mounting plate (D) and slide the
mounting plate (D) from the light body (B).
NOTE: Make sure there is enough vertical space
above the mounting plate to allow the light fixture to
be mounted.
Place the mounting plate (D) against the mounting
surface and ensure the mounting plate (D) is level.
Mark the hole locations on the mounting surface,
through which the mounting screws (AA) will be
threaded.
□ If mounting to a wooden surface, drill two
3/32 in. holes into the mounting surface.
Install the two mounting screws (AA) through
the mounting plate (D) and into the mounting
surface.
□ If mounting to wall board or brick, drill two
7/32 in. holes into the mounting surface.
Insert the wall anchors (BB) and attach the
mounting plate (D) using the two mounting
screws (AA).
5
Mounting the light fixture
□ Slide the rear of the light fixture (B) down onto the
mounting plate (D) until it snaps into place.
D
B
D
A
A
BB
D
B

8
Installation (continued)
6
Mounting the solar panel
RECOMMENDED: Caulk around the base and on top of
the screw heads after installation.
Place the solar panel (F) against the mounting surface and
mark the mounting holes.
□ If mounting to a wooden surface, drill three 3/32 in.
holes into the mounting surface. Install the three
mounting screws (AA) through the solar panel
cradle (G) and into the mounting surface.
□ If mounting to wall board or brick, drill three 7/32 in.
holes into the mounting surface. Insert the wall
anchors (BB) and attach the solar panel cradle (G)
using the three mounting screws (AA).
□ Once the solar panel cradle (G) has been installed,
position the solor panel (F) above it, adjusting the
direction and angle of the panel to its desired
position to receive optimal sunlight.
□ Slide the base of the solar panel (F) into the cradle
(G). It will snap and lock in position.
7
Adjusting the solar panel
8
Connecting the solar panel
to the light fixture
IMPORTANT: The solar panel (F) must receive as much
direct sunlight over the course of the day as possible. Keep
in mind that shadows may block the sunlight from reaching
the solar panel (F) during the day.
□ Rotate the solar panel (F) to the desired angle.
□ Carefully connect the solar panel (F) cable to
the light fixture (B). Screw the caps on the
plugs firmly.
□ Wrap any excess solar panel cable around the
cradle (G) located on the rear of the solar
panel (F). Leave enough loose cable to form a
drip loop.
IMPORTANT: Push the switch to the OFF position
and allow the battery to charge with 2 to 3 days of
full sunshine before testing.
G
F
G
BB
AA
F
F
G
B

9 HOMEDEPOT.COM
Please contact 1-866-308-3976 for further assistance.
Operation
1
Adjusting the lamp heads
□ If needed, gently grasp the lamp heads (A) and tilt
them up or down or side-to-side to adjust the
light coverage area.
2
Using the OFF control
□ Press the power button (E) to turn the light (B) off
and to conserve the battery life.
NOTE: Pushing the button in turns the light (B) ON (AUTO
mode). Pushing again so that the power button is out and
extended turns the light OFF.
A
B
E

10
Operation (continued)
3
Determining the motion
sensor detection zone
NOTE: The motion sensor (C) is adjustable. It has a
sensing angle of 180° and a range of approximately 50 ft.
depending on the surrounding temperature.
NOTE: When you turn ON the light (B), it will begin a 3
minute test mode. The photocell and motion detection will
be deactivated. After the first minute, motion detection will
be activated, but the photocell will remain deactivated.
After 3 minutes, the unit will set to AUTO mode, and both
photocells and motion detection will be enabled.
NOTE: The motion sensor (C) will need to completely
warm up (60 seconds) before beginning the setup process.
□ Push the switch button to the AUTO position. For the
first minute, the light is in test mode. The lamp heads
will stay on for 1 minute.
□ After the initial minute in test mode, motion detection
will be activated. You will have 2 minutes to perform a
“walk test”, which will help in identifying the coverage
area of the motion sensor (C).
□ Walk in an arc across the front of the motion sensor
(C), and watch the indicator light (1). If the motion
sensor (C) detects movement, the indicator light (1)
will flash green, and the lamp heads will stay on for 30
seconds after the detection (regardless of any further
motion.)
□ After 30 seconds, the indicator light will turn OFF and
reset for another detection. This cycle can be repeated
up to 4 times, and it is recommended that the motion
sensor (C) be adjusted for optimal detection during
these cycles.
□
A
fter 4 motion test cycles, or 2 minutes after the initial
test mode, the light will automatically switch to AUTO
mode.
4
Adjusting the light timer
NOTE: The TIME dial controls the amount of time the light
(B) will stay on full brightness after motion has been
detected. The timer is adjustable from 1 minute to 5 minutes.
□ To increase the time, turn the TIME dial towards the
5 minute position.
□ To decrease the time, turn the TIME dial towards the
1 minute position.
C
1

11 HOMEDEPOT.COM
Please contact 1-866-308-3976 for further assistance.
Operation (continued)
5
Adjusting the LUX
NOTE: Adjust the setting of the environmental light
brightness to trigger the auto dusk-to-dawn photocell.
□ To turn on the light in a very dark area, turn the LUX
dial towards the "L" position.
□ To turn on the light during daylight, turn the LUX dial
towards the "H" position.
6
Adjusting the Sensitivity
NOTE: The SENS dial adjusts the sensitivity of the
motion sensor.
□ To increase sensitivity, and increase the sensor
range up to 50 ft., turn the SENS dial towards the
"H" position.
□ To decrease sensitivity, and reduce the sensor
range, turn the SENS dial towards the "L" position.
7
ECO Mode
□ If the battery has limited power, the light will
automatically go into ECO mode. In ECO mode, the
light lowers in brightness to conserve battery power.
When the battery charges back above 3.7V, the light
returns to normal brightness.

12
Maintenance
BATTERY REPLACEMENT
□ When the pre-installed, rechargeable Lithium battery has reached the end of its useful life, it can be easily
replaced. Disconnect the light from the solar panel, and unmount from its position, placing the light on a sturdy
surface. Unscrew and remove the back panel to access the battery. Remove the battery from its cradle, and
disconnect the plug that attaches it to the light circuit board. Connect the new battery at the plug, and place the
battery back in its cradle position. Replace the rear cover, screwing it securely into position. Remount the light,
connect the solar panel, and follow the installation instructions. Please properly dispose of the depleted Lithium
battery.
Care and Cleaning
□ To prolong the original appearance, clean the light fixture with clear water and a soft, damp cloth only.
□ Periodically clean the solar panel with a soft cloth and warm water. Do not hose spray. Keep the panel clear of
snow and leaves. Make sure trees and other objects do not block sunlight from the panel.
□ Do not use paints, solvents, or other chemicals on this light fixture. They could cause a premature deterioration
of the finish. This is not a defect in the finish and will not be covered by the warranty.
□ Do not spray the light fixture with a hose or power washer.
□ If not to be used for several weeks, turn the unit OFF. Store it with the panel connected and where the panel can
gather sunlight.
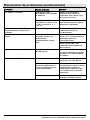
Troubleshooting
Problem Possible Issue Solution
The light will not turn ON.
The power button is OFF.
Turn on the light.
The battery has run down. Recharge the battery in the
sunlight.
The extension cord between
the solar panel and light fixture
is longer than 60 ft.
Connect to a shorter extension
cord, or reposition the solar panel
closer to light fixture.
The battery is dead. Replace with a new rechargeable
Lithium battery.
The solar panel is not
positioned correctly.
Adjust the panel angle to face
southward for sufficient and direct
sunlight.
The solar panel location is not
optimal.
The solar panel must face South
and have clear exposure to the
sun. If the panel cord is not long
enough, an extension is available
at Homedepot.com.
The motion sensor position is
not optimal.
Adjust the SENS dial between
"Low-Medium-High" accordingly.

13 HOMEDEPOT.COM
Please contact 1-866-308-3976 for further assistance.
Troubleshooting (continued)
Problem
Possible Issue
Solution
The light will not turn ON.
Other surrounding light
sources are triggering the
photocell.
Adjust the LUX setting to
compensate for other light sources
such as street lamps and house
lights.
Surrounding air temperature
is greater than 122°F (50°C)
or less than -4°F (-20°C).
The light will operate normally
within the specified temperature
range.
The green indicator light continues to
flash but the light does not turn ON.
There is a program error. Disconnect the battery and
reconnect to perform a reset.
The light appears dimmer than normal. The rechargeable Lithium ion
battery is low and the unit
switches to ECO mode
automatically.
When the battery is charged back
to 3.7V, the light will quit ECO
mode and return to normal
brightness.
Adjust the TIME dial to a smaller
amount of time to help save
battery.
The light turns ON during the day. The light is mounted in a dark
location.
Adjust the LUX dial towards "L".
If still malfunctioning, relocate the
light to a location away from
shadows.
The light appears to "strobe" or flash. The battery is low. Turn OFF the light and charge the
battery by direct sunlight.
Check if any surrounding light
source illuminates or reflects
ambient light towards the
motion sensor.
Remove surrounding light sources
that affect the motion sensor, or
relocate the light to ensure no light
reflects onto the motion sensor.
There is a program error. Turn OFF the light for 10 seconds.
Turn ON thereafter.

Questions, problems, missing parts?
Before returning to the store, call Defiant Customer Service
8 a.m. – 7 p.m., EST, Monday-Friday, 9 a.m. – 6 p.m., EST, Saturday
1-866-308-3976
HOMEDEPOT.COM
Retain this manual for future use.

GRACIAS
Agradecemos la confianza que ha depositado en Defiant a través de la compra de esta lámpara de seguridad con
detección de movimiento. Nos esforzamos continuamente para crear productos de calidad diseñados para mejorar
su hogar. Visítenos en línea para ver nuestra línea completa de productos disponibles para sus necesidades de
mejoramiento del hogar. ¡Gracias por elegir a Defiant!
Artículo n.º 1002638550
Modelo n.º DFI-0452-WH
GUÍA DE USO Y CUIDADO
LÁMPARA SOLAR DE SEGURIDAD
DETECTORA DE MOVIMIENTO
¿Tiene preguntas o problemas, o le faltan piezas? Antes de devolver a la tienda,
llame al Servicio de Atención al Cliente de Defiant
Lunes a viernes de 8:00 a.m. - 7:00 p.m., EST, y los sábados de 9:00 a.m. - 6:00 p.m., EST.
1-866-308-3976
HOMEDEPOT.COM

2
Índice
Índice ......................................................2
Información de seguridad ....................2
Garantía ..................................................2
Antes de la instalación ..........................3
Instalación ..............................................6
Funcionamiento ..................................... 9
Mantenimiento .................................... 12
Cuidado y limpieza .............................. 12
Resolución de problemas .................. 12
Información de seguridad
PRECAUCIONES
Lea y entienda este manual por completo antes de
intentar ensamblar, operar o instalar esta lámpara.
□ La lámpara debe instalarse en exteriores en
una pared o alero.
□ La lámpara debe instalarse
aproximadamente a 8 pies (2.4 m) por
encima del suelo.
□ No corte el cable del panel solar. Suspenda
el uso si el cable se deshilacha o se rompe.
□ No sumerja los componentes en líquido.
□ No utilice ningún otro dispositivo de carga
que no sea el panel de carga solar único
provisto para esta lámpara. De lo contrario,
puede causar lesiones o daños a la
lámpara y anulará cualquier garantía.
□ Coloque el cable de manera que esté bien
sujeto y no cause peligros (tal como
tropezar con él).
□ La longitud máxima del cable de extensión
para usar con este producto es de 60 pies.
Hay un cable de extensión de 30 pies
disponible para este producto en
HOMEDEPOT.COM.
ADVERTENCIA: Para evitar posibles LESIONES
GRAVES o la MUERTE, no permita que los niños
pequeños se acerquen a las baterías. Si se ingiere
una batería, notifique inmediatamente a un médico.
ADVERTENCIA: NO DESECHE LAS BATERÍAS
QUEMÁNDOLAS. LAS BATERÍAS PUEDEN EXPLOTAR O
TENER FUGAS.
AVISO: Cuando reemplace las baterías, recicle las baterías
usadas o deséchelas de acuerdo con los reglamentos locales.
Garantía
GARANTÍA LIMITADA POR 1 AÑO
QUÉ ES LO QUE CUBRE
Este producto está garantizado contra piezas defectuosas de fábrica y mano de obra por un período de 1 año a partir
de la fecha de compra. El recibo de compra es necesario para todos los reclamos de garantía.
QUÉ ES LO QUE NO CUBRE
Esta garantía no incluye servicio de reparación, ajuste y calibración debido al mal uso, abuso o negligencia. El
servicio no autorizado o la modificación del producto o de cualquier componente proporcionado anularán esta
garantía en su totalidad. Esta garantía no incluye reembolso por inconveniencias, instalación, tiempo de
preparación, pérdida de uso, servicio no autorizado o gastos de envío de devolución. Esta garantía no se extiende a
otros equipos y componentes que el cliente utilice junto con este producto.
No hay piezas de repuesto disponibles para este producto.
Comuníquese con el equipo de Atención al Cliente al 1-866-308-3976 o visite www.HomeDepot.com.

3 HOMEDEPOT.COM
Comuníquese con el 1-866-308-3976 para obtener más ayuda.
Antes de la instalación
PLANIFICACIÓN DE LA INSTALACIÓN
Antes de instalar la lámpara, asegúrese de que todas las piezas estén presentes. Verifique las piezas con las
secciones de Herraje incluido y Contenido del paquete. Si alguna pieza falta o está dañada, no intente montar,
instalar o utilizar esta lámpara.
Tiempo estimado de instalación: 30 minutos
DESCRIPCIÓN DEL PRODUCTO
Esta luz funciona con una batería que se carga a partir de un panel solar. Si la tensión de la batería de iones de litio
baja hasta 3.6 V, la luz cambiará automáticamente al modo ECO y se atenuará para ahorrar batería y alcanzar un
tiempo de funcionamiento más largo. Cuando el panel solar haya recargado la batería de litio y el voltaje esté por
encima de 3.7 V, la luz cambiará automáticamente al modo AUTO y la luminosidad normal.
CARGA INICIAL DE LA BATERÍA
IMPORTANTE: Las nubes, lluvia, nieve y otras condiciones meteorológicas pueden impedir que el panel solar recargue completamente a la
batería. Otras obstrucciones tales como edificios o árboles pueden bloquear al sol también.
Al instalar el panel solar, asegúrese de que esté orientado como se describe a continuación con una cantidad mínima de obstrucciones. Monte el
panel orientado al sol hacia el sur. En Homedepot.com hay disponible una extensión del cable del panel solar.
□ ANTES DE SU USO, la batería requerirá de 2 a 3 días de luz solar directa y plena para cargarse completamente
con el interruptor en la posición de apagado. Conecte el enchufe del cable del panel solar con el conector que se
extiende desde la parte inferior de la carcasa de la lámpara. Si es posible, apunte el panel solar hacia el sur e
inclínelo aproximadamente 50° de la horizontal. Si el panel solar no se puede dirigir hacia el sur, incline el panel
aproximadamente 30°. Otra opción es agregar un cable de extensión (no incluido en el paquete) que se
encuentra disponible en Homedepot.com.
□ El tiempo de funcionamiento real variará dependiendo de la frecuencia con la que el sensor de movimiento
encienda la lámpara.
□ La iluminación solar no está diseñada para igualar la iluminación estándar de 120 V. La emisión de luz es
reducida para permitir que durante el horario diurno la batería se recargue completamente entre los ciclos de
iluminación.
□ La carga solar sólo es eficaz bajo la luz solar directa. Por cada hora que la lámpara esté encendida se requiere
un mínimo de 6 horas de carga a la luz del sol.
UBICACIÓN DE MONTAJE
El factor más importante a recordar para el funcionamiento de su lámpara solar detectora de movimiento es que
esta funciona con la energía recibida de la luz directa del sol. Cuanta más luz solar directa reciba el panel solar en
un día, mayor será la duración de la luz.
LÁMPARA SOLAR
La unidad principal contiene los LED, un sensor de movimiento y una batería de litio recargable. Al decidir dónde
montar esta unidad, tenga en cuenta que el sensor de movimiento que activa la lámpara tiene un “campo de visión”
de 50 pies (15 m) delante de la luz y un ángulo de detección de 180° a una temperatura del aire circundante de 25
°C (77 °F).
PANEL SOLAR
El panel solar convierte la energía del sol en electricidad, recargando así la batería que se encuentra en la lámpara
solar. El panel solar requiere que la luz solar directa caiga sobre la superficie del panel durante el mayor tiempo
posible a lo largo del día.
Al elegir la ubicación para el panel solar, asegúrese de que esté dirigido hacia el sur y de que esté inclinado a un
ángulo adecuado para permitir que la luz solar directa caiga sobre él tanto como sea posible. Asegúrese de que haya
una cantidad mínima de obstrucciones entre el panel solar y el sol.
Además, asegúrese de que la ubicación del panel solar no esté demasiado lejos de la lámpara solar para que los
cables alcancen y se puedan conectar.

4
Antes de la instalación (continuación)
ESPECIFICACIONES
Alcance Hasta 50 pies (15 m) (varía según la temperatura ambiente)
Ángulo de detección Hasta 180°
Lúmenes Energía solar: 500 LM
Requerimientos de alimentación Panel solar y baterías de litio recargables
Modos de funcionamiento Apagado y Automático
Tiempo de demora 1 a 5 minutos
HERRAMIENTAS REQUERIDAS
Lentes
protectores
Destornillador
Phillips
Nivel
Brocas
(3/32 pulg. y
7/32 pulg.)
Taladro
Escalera
HERRAJE INCLUIDO
NOTA: El herraje se muestra al tamaño real.
AA BB
Pieza Descripción Cantidad
AA Tornillo de montaje 5
BB Anclaje de pared 5

5 HOMEDEPOT.COM
Comuníquese con el 1-866-308-3976 para obtener más ayuda.
Antes de la instalación (continuación)
CONTENIDO DEL PAQUETE
Pieza Descripción Cantidad
A Cabeza de la lámpara 2
B Lámpara 1
C Sensor de movimiento 1
D Placa de montaje 1
E Botón de encendido 1
F Panel solar 1
G Base del panel solar 1
H Cable de extensión (preensamblado a la lámpara (B)) 1
I Cable de extensión (preensamblado al panel solar (F)) 1
A
B
H
C
E
D
I
F
G

6
Instalación
1
Determinación de la ubicación
de montaje
2
Ajuste del sensor para
montaje en la pared o el
alero
NOTA: La lámpara se debe montar aproximadamente a 8
pies (2.4 m) sobre el suelo.
NOTA: Asegúrese de que la lámpara y el panel solar estén
situados lo suficientemente cerca como para que el cable
alcance. También puede añadir un cable de extensión.
Asegúrese de que el panel solar esté orientado hacia el sur.
□ Determine la ubicación de montaje, ya sea en la
pared o el alero.
□ Coloque el cabezal de la lámpara (A) en la dirección
general de la cobertura deseada de la luz.
NOTA: Ajuste el ángulo del sensor a la cobertura
deseada.
□ Para el montaje en la pared, incline el sensor
(C) hacia abajo 10 grados para cubrir un rango
de hasta 50 pies al frente.
□ Para el montaje en el alero, gire el sensor (C)
hacia la derecha o hacia la izquierda hasta la
posición deseada.
C
C

7 HOMEDEPOT.COM
Comuníquese con el 1-866-308-3976 para obtener más ayuda.
Instalación (continuación)
3
Extracción de la placa de
montaje
4
Instalación de la placa de
montaje
NOTA: Asegúrese de que haya suficiente espacio vertical
por encima de la placa de montaje para permitir que la
lámpara se pueda montar.
□ Presione la placa de montaje de pared (D) y
deslice la placa de montaje (D) del cuerpo de
la lámpara (B).
NOTA: Asegúrese de que haya suficiente espacio
vertical por encima de la placa de montaje para
permitir que la lámpara se pueda montar.
Coloque la placa de montaje (D) contra la superficie
de montaje y asegúrese de que la placa de montaje
(D) esté nivelada. Marque los orificios en la
superficie de montaje, a través de los cuales se
enroscarán los tornillos de montaje (AA).
□ Si se monta en una superficie de madera,
taladre dos orificios de 3/32 pulgadas en la
superficie de montaje. Instale los dos tornillos
de montaje (AA) a través de la placa de
montaje (D) y en la superficie de montaje.
□ Si se monta en una pared de panel o de
ladrillos, taladre dos orificios de 7/32
pulgadas en la superficie de montaje. Inserte
los anclajes de pared (BB) y fije la placa de
montaje (D) con los dos tornillos de
montaje (AA).
5
Para montar la lámpara
□ Deslice la parte trasera de la lámpara (B) hacia abajo
sobre la placa de montaje (D) hasta que encaje en su
lugar.
D
B
D
A
A
BB
D
B

8
Instalación (continuación)
6
Para montar el panel solar
RECOMENDACIÓN: Enmasille alrededor de la base y
encima de las cabezas de los tornillos después de la
instalación.
Coloque el panel solar (F) contra la superficie de montaje y
marque los orificios de montaje.
□ Si se monta en una superficie de madera, taladre
tres orificios de 3/32 pulgadas en la superficie de
montaje. Instale los tres tornillos de montaje (AA) a
través de la base del panel solar (G) y en la
superficie de montaje.
□ Si se monta en una pared de panel o de ladrillos,
taladre tres orificios de 7/32 pulgadas en la
superficie de montaje. Inserte los anclajes de pared
(BB) y fije la base del panel solar (G) con los tres
tornillos de montaje (AA).
□ Una vez instalada la base del panel solar (G),
coloque el panel solar (F) sobre ella, ajustando la
dirección y el ángulo del panel a su posición
deseada para recibir la luz solar óptima.
□ Deslice la base del panel solar (F) en la base (G).
Este encajará y se bloqueará en su posición.
7
Ajuste del panel solar
8
Conexión del panel solar a
la lámpara
IMPORTANTE: El panel solar (F) debe recibir tanta luz
solar directa durante el día como sea posible. Tenga en
cuenta que las sombras pueden bloquear la luz solar que
llega al panel solar (F) durante el día.
□ Gire el panel solar (F) al ángulo deseado.
□ Conecte cuidadosamente el cable del panel
solar (F) a la lámpara (B). Enrosque
firmemente las tapas de los enchufes.
□ Enrolle el exceso de cable del panel solar
alrededor de la base (G) ubicada en la parte
posterior del panel solar (F). Deje suficiente
cable suelto para formar un bucle de goteo.
IMPORTANTE: Empuje el interruptor a la posición
de apagado y permita que la batería se cargue
durante 2 a 3 días de pleno sol antes de realizar las
pruebas.
G
F
G
BB
AA
F
F
B

9 HOMEDEPOT.COM
Comuníquese con el 1-866-308-3976 para obtener más ayuda.
Funcionamiento
1
Ajuste de las cabezas de las
lámparas
□ Si es necesario, sujete suavemente las cabezas
de la lámpara (A) e inclínelas hacia arriba o hacia
abajo o de lado a lado para ajustar el área de
cobertura de la luz.
2
Utilización del control de
apagado
□ Presione el botón de encendido (E) para apagar la
lámpara (B) y conservar la carga de la batería.
NOTA: Al presionar el botón hacia adentro se enciende
la lámpara (B) (modo AUTO). Presionar de nuevo el botón
de encendido de manera que este salga hace que la luz
se apague.
A
B
E

10
Funcionamiento (continuación)
3
Determinación de la zona de
detección del sensor de
movimiento
NOTA: El sensor de movimiento (C) es ajustable. Tiene un
ángulo de detección de 180° y un rango de aproximadamente
50 pies dependiendo de la temperatura ambiente.
NOTA: Cuando encienda la lámpara (B), esta iniciará un modo
de prueba que dura 3 minutos. La fotocélula y la detección de
movimiento se desactivarán. Después del primer minuto, se
activará la detección de movimiento, pero la fotocélula
permanecerá desactivada. Después de 3 minutos, la unidad se
pondrá en el modo AUTO, y se activarán tanto las fotocélulas
como la detección de movimiento.
NOTA: El sensor de movimiento (C) deberá calentarse
completamente (60 segundos) antes de comenzar el proceso de
configuración.
□ Presione el botón del interruptor para que pase a la posición
AUTO. Durante el primer minuto, la lámpara está en modo de
prueba. Los cabezales de las lámparas permanecerán
encendidos durante 1 minuto.
□ Después del minuto inicial en el modo de prueba, se activará
la detección de movimiento. Usted dispondrá de 2 minutos
para realizar una “caminata de prueba”, que le ayudará a
identificar el área de cobertura del sensor de movimiento (C).
□ Camine en arco por delante del sensor de movimiento (C) y
observe la luz indicadora (1). Si el sensor de movimiento (C)
detecta el movimiento, la luz indicadora (1) parpadeará en
verde y los cabezales permanecerán encendidos durante 30
segundos después de la detección (independientemente de
cualquier movimiento adicional).
□ Después de 30 segundos, la luz indicadora se apagará y se
restablecerá para otra detección. Este ciclo puede repetirse
hasta 4 veces, y se recomienda ajustar el sensor de
movimiento (C) para una detección óptima durante estos
ciclos.
□ Después de 4 ciclos de prueba de movimiento, o 2 minutos
después del modo de prueba inicial, la lámpara cambiará
automáticamente al modo AUTO.
4
Ajuste del temporizador de la
lámpara
NOTA: La perilla TIME controla la cantidad de tiempo que la
lámpara (B) permanecerá encendida a plena luz después de que
se haya detectado el movimiento. El temporizador se puede
ajustar entre 1 y 5 minutos.
□ Para aumentar el tiempo, gire la perilla TIME hacia la
posición de 5 minutos.
□ Para disminuir el tiempo, gire la perilla TIME hacia la posición
de 1 minuto.
C
1

11 HOMEDEPOT.COM
Comuníquese con el 1-866-308-3976 para obtener más ayuda.
Funcionamiento (continuación)
5
Ajuste de LUX
NOTA: Ajuste el valor de luminosidad de la luz ambiental
para activar la fotocélula automáticamente desde el
crepúsculo hasta el amanecer.
□ Para encender la lámpara en un área muy oscura,
gire la perilla LUX hacia la posición “L”.
□ Para encender la lámpara durante la luz del día, gire
la perilla LUX hacia la posición “H”.
6
Ajuste de la sensibilidad
NOTA: La perilla SENS ajusta la sensibilidad del sensor de
movimiento.
□ Para aumentar la sensibilidad y aumentar el alcance
del sensor hasta 50 pies, gire la perilla SENS hacia
la posición “H”.
□ Para disminuir la sensibilidad y reducir el rango del
sensor, gire la perilla SENS hacia la posición “L”.
7
Modo ecológico
□ Si la batería tiene una carga limitada, la lámpara
pasará automáticamente al modo ECO. En el modo
ECO, la lámpara disminuye su luminosidad para
conservar la carga de la batería. Cuando la batería
se cargue por encima de 3.7 V, la lámpara vuelve a
la luminosidad normal.

12
Mantenimiento
CAMBIO DE LA BATERÍA
□ Cuando la batería de litio recargable preinstalada llegue al final de su vida útil, esta puede reemplazarse
fácilmente. Desconecte la lámpara del panel solar, y desmóntela de su posición, colocando la lámpara sobre
una superficie resistente. Desenrosque y retire el panel posterior para acceder a la batería. Retire la batería de
su soporte y desconecte el enchufe que la conecta a la placa de circuito de la lámpara. Conecte la nueva batería
en el enchufe y vuelva a colocar la batería en su posición en el soporte. Vuelva a colocar la cubierta trasera,
atornillándola firmemente en su posición. Vuelva a montar la lámpara, conecte el panel solar y siga las
instrucciones de instalación. Deshágase de la manera apropiada de la batería de litio agotada.
Cuidado y limpieza
□ Para prolongar el aspecto original, limpie la lámpara con agua limpia y un paño suave y húmedo solamente.
□ Limpie periódicamente el panel solar con un paño suave y agua tibia. No lo rocíe con una manguera. Mantenga
el panel libre de nieve y hojas. Asegúrese de que los árboles y otros objetos no bloqueen la luz solar del panel.
□ No utilice pinturas, disolventes u otros químicos en esta lámpara. Pueden causar un deterioro prematuro del
acabado. Esto no es un defecto en el acabado y no será cubierto por la garantía.
□ No rocíe la lámpara con una manguera o una rociadora eléctrica a presión.
□ Apague la unidad si no se va a utilizar durante varias semanas. Guárdela con el panel conectado y donde el
panel pueda recibir la luz del sol.
Resolución de problemas
Problema Posible problema Solución
La lámpara no enciende. El botón de encendido está
apagado.
Encienda la lámpara.
La batería se ha agotado. Recargue la batería a la luz del sol.
La longitud del cable de
extensión entre el panel solar y
la lámpara es mayor de 60
pies.
Conecte a un cable de extensión
más corto o coloque el panel solar
más cerca de la lámpara.
La batería ya no carga. Reemplácela con una nueva
batería de litio recargable.
El panel solar no está
posicionado correctamente.
Ajuste el ángulo del panel hacia el
sur para obtener suficiente luz
solar directa.
La ubicación del panel solar no
es óptima.
El panel solar debe estar orientado
hacia el sur y tener una clara
exposición al sol. Si el cable del
panel no es lo suficientemente
largo, hay disponible extensiones
en Homedepot.com.
La posición del sensor de
movimiento no es óptima.
Ajuste la perilla SENS entre “Low-
Medium-High” según corresponda.

13 HOMEDEPOT.COM
Comuníquese con el 1-866-308-3976 para obtener más ayuda.
Resolución de problemas (continuación)
Problema
Posible problema
Solución
La lámpara no enciende.
Otras fuentes de luz
circundantes están activando
la fotocélula.
Ajuste el valor de LUX para
compensar otras fuentes de
iluminación, tales como las luces
de la calle y de la casa.
La temperatura del aire
circundante es superior a 122
°F (50 °C) o inferior a -4 °F
(-20 °C).
La lámpara funcionará
normalmente dentro del rango de
temperatura especificado.
La luz indicadora verde continúa
parpadeando pero la lámpara no se
enciende.
Hay un error de programa. Desconecte la batería y vuelva a
conectarla para hacer un
restablecimiento.
La luz aparece más atenuada de lo
normal.
La batería de iones de litio
recargable está baja y la
unidad cambia
automáticamente al modo
ECO.
Cuando la batería se cargue de
nuevo a 3.7 V, la lámpara dejará el
modo ECO y volverá a la
luminosidad normal.
Ajuste la perilla TIME a una
cantidad menor de tiempo para
ahorrar batería.
La lámpara se enciende durante el día. La lámpara está montada en
un lugar oscuro.
Ajuste la perilla LUX hacia “L”.
Si sigue funcionando mal, coloque
la lámpara en un lugar alejado de
las sombras.
La luz parece “destellar” o parpadear. La batería está baja. Apague la lámpara y cargue la
batería por la luz solar directa.
Compruebe si alguna fuente
de luz circundante ilumina o
refleja luz ambiental hacia el
sensor de movimiento.
Retire las fuentes de luz
circundantes que afectan al sensor
de movimiento o reubique la
lámpara para asegurarse de que
no se refleje luz en el sensor de
movimiento.
Hay un error de programa. Apague la lámpara durante 10
segundos. Enciéndala después.

¿Tiene preguntas o problemas, o le faltan piezas?
Antes de devolver a la tienda, llame a Atención al Cliente de Defiant
Lunes a viernes de 8:00 a.m. - 7:00 p.m., EST, y los sábados de 9:00 a.m. - 6:00 p.m., EST.
1-866-308-3976
HOMEDEPOT.COM
Guarde este manual para su uso futuro.
-
 1
1
-
 2
2
-
 3
3
-
 4
4
-
 5
5
-
 6
6
-
 7
7
-
 8
8
-
 9
9
-
 10
10
-
 11
11
-
 12
12
-
 13
13
-
 14
14
-
 15
15
-
 16
16
-
 17
17
-
 18
18
-
 19
19
-
 20
20
-
 21
21
-
 22
22
-
 23
23
-
 24
24
-
 25
25
-
 26
26
-
 27
27
-
 28
28


En otros idiomas
- English: Defiant DFI-0452-WH User guide
Documentos relacionados
-
Defiant DFI-7148-BK Instrucciones de operación
-
Defiant DFI-5851-BK Instrucciones de operación
-
Defiant DFI-7167-WH Manual de usuario
-
-
-
-
-
-
-
